
Best Horror Games On Itch.io – July 2026
Across a bounty of subgenres.![Haze Seas Accessories Tier List [Best Accessories to Equip]](/wp-content/uploads/2026/07/haze-seas-accessories-tier-list.jpg "Haze Seas Accessories Tier List [Best Accessories to Equip]")
Haze Seas Accessories Tier List [Best Accessories to Equip]
The accessories with the best stat buffs in Haze Seas.
![[Roblox] Evomon Shiny Hunting Guide – Including Prismatic and Pris Shinies!](/wp-content/uploads/2026/06/evomon-shiny-hunting-guide.jpg "[Roblox] Evomon Shiny Hunting Guide – Including Prismatic and Pris Shinies!")

Lost Tales: Forgotten Souls Walkthrough
Welcometo the Lost Tales: Forgotten Souls walkthrough on Gamezebo. Lost Tales: Forgotten Souls is a Hidden Object Adventure game created by Rexard Entertainment. Solve the mystery of Darkville village, release the souls of the captured children and save your daughter Maria! Gamezebo’s walkthrough will provide you with detailed images, tips, information, and hints on how to play your best game.


- Prefer Gamezebo on Google

Game Introduction – Lost Tales: Forgotten Souls
Welcometo the Lost Tales: Forgotten Souls walkthrough on Gamezebo. Lost Tales: Forgotten Souls is a Hidden Object Adventure game created by Rexard Entertainment. Solve the mystery of Darkville village, release the souls of the captured children and save your daughter Maria! Gamezebo’s walkthrough will provide you with detailed images, tips, information, and hints on how to play your best game.
General Tips
Difficulty Modes
- In Casual Mode interactive spots are indicated with glints of light, and hint and skip buttons recharge faster.
- In Expert Mode interactive spots are not indicated, and hint and skip buttons recharge more slowly.
Cursors
- Click on areas with a magnifying glass to zoom in for a closer look.
- A hand with a pointing finger shows items that can be moved or picked up.
- Gear icons appear over areas where you can (attempt to) use the inventory item you’re holding.
- The default arrow changes to a more ornamental, moving arrow in places where you can move on to the next screen.
Hidden Object Scenes
- Hidden objects scenes (HOS) are indicated by colored sparkles, in both casual and expert mode.
- Regular items in HOS are listed in white.
- Items listed in green require an extra action to find. These actions are indicated with the same cursor symbols as in the game: a pointing finger for items you can pick up to use or interact with directly, and gears when the item you’re holding is over an interactive spot.
Puzzles
- In both casual and expert modes puzzles can be skipped once the green skip button has charged.
- Some, but not all, puzzles can be reset by clicking on the green arrow button in the top right corner of the screen.
- This walkthrough provides puzzle solutions from the default starting positions, so if you’re stuck, you can reset the puzzle if possible and use the steps indicated in this walkthrough.
Journal and Menu
- Your game journal is in the bottom left of the screen.
- The journal keeps track of the storyline for you, but is rarely of actual use. Once or twice it will help you remember a code you found earlier.
- The menu button can take you to the main menu or the options.
- Under options you can change music and background sound volumes, change between full screen and windowed mode, and switch the custom cursor on and off.
Chapter 1: The Magic Book
- Talk to the little girl – your daughter Maria.
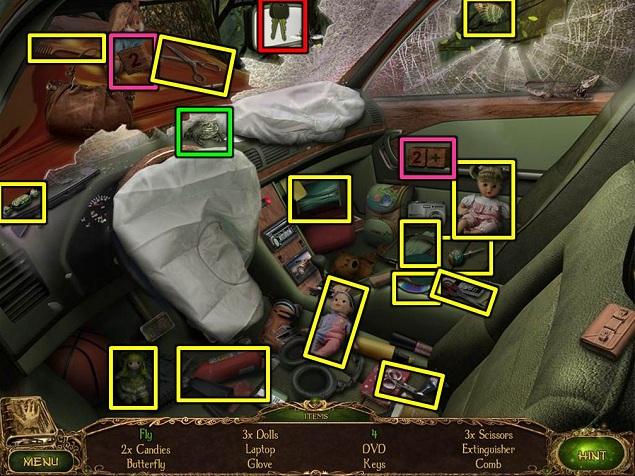
- Play the HOS inside the car.

- Put the #2 block next to the 2+ blocks to find the 4 (pink). Click on the frog to catch the fly (green).
- You receive the CAR KEYS (red).
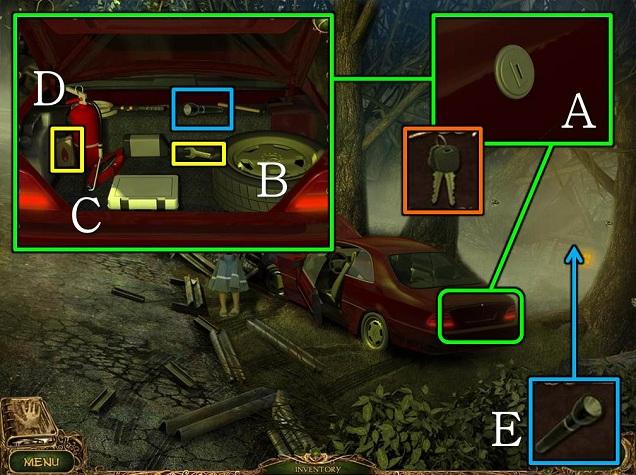
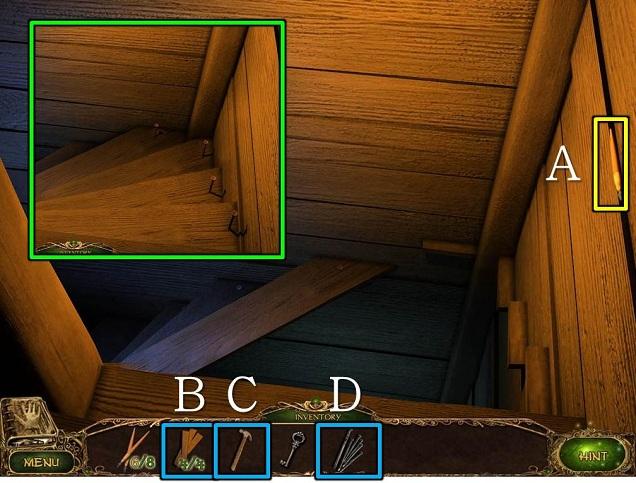
- Inspect the trunk of the car and open it with the CAR KEYS (A).
- Look inside the trunk.
- Move the spare wheel (B) to find the WRENCH.
- Move the jack (C) and the extinguisher (D) to find the LAMP OIL.
- Take the FLASH LIGHT.
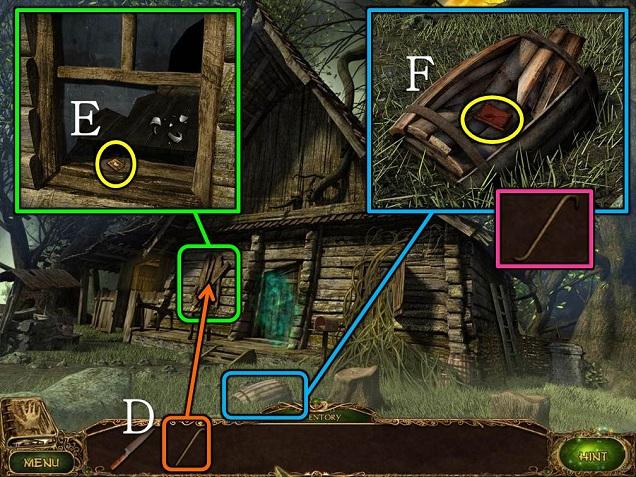
- Use the FLASH LIGHT on the house on the right (E).
- Talk to the old woman by the house.
- Enter the house.
- When back outside, click on the raven.
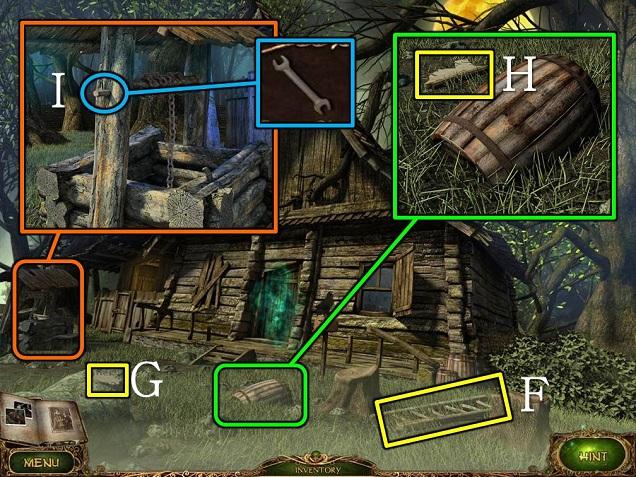
- Take the LADDER and the first piece of the PLAQUE (1/12).
- Zoom in on the barrel and take another piece of PLAQUE (2/12).
- Zoom in on the well.
- Use the WRENCH on the broken winch and click on it to raise the bucket.
- Play the HOS by the well.
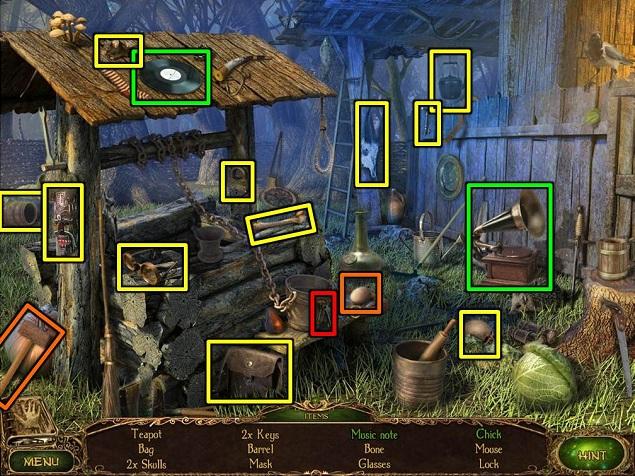
- Put the record on the old gramophone to get the music note (green). Use the hammer on the egg to get the chick (orange).
- You get a BUNCH OF KEYS (red).
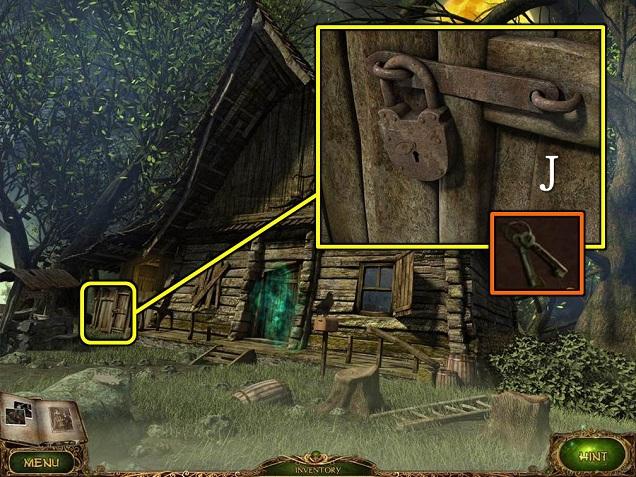
- Zoom in on the wooden door to the left of the house.
- Open the lock with the BUNCH OF KEYS (J).
- Go into the shed.
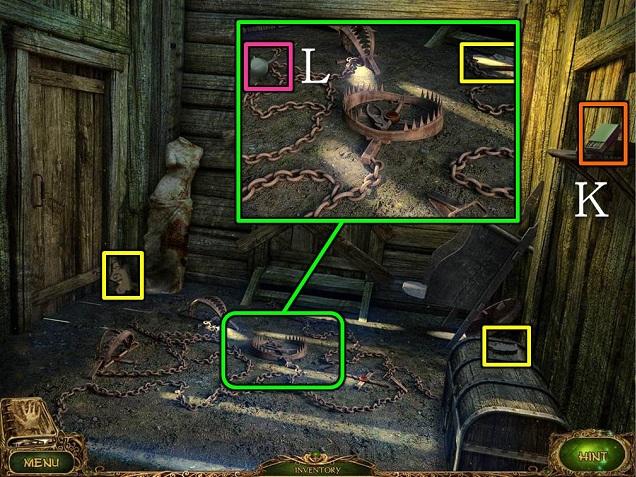
- Take two more pieces of the PLAQUE (3 and 4/12) and the MATCHES (K).
- Inspect the bear trap on the floor and take the FUNNEL (L) and more of the PLAQUE (5/12).
- Open the door to the left and go through it.
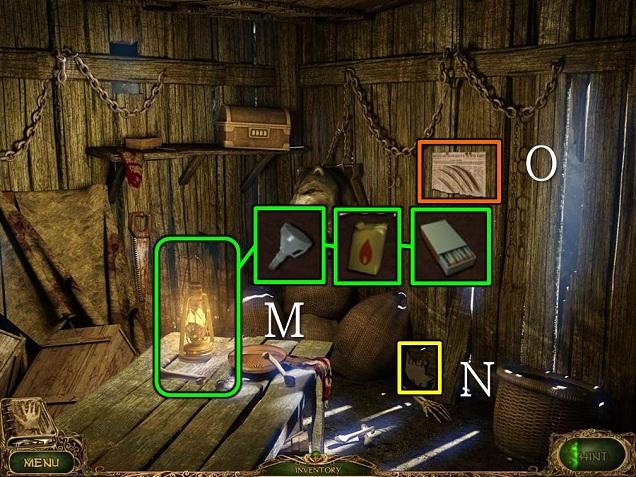
- Put the FUNNEL on the lamp, fill it with the LAMP OIL and light it with the MATCHES (M).
- Pick up another piece of the PLAQUE (6/12) (N).
- Read the newspaper clipping on the wall (O).
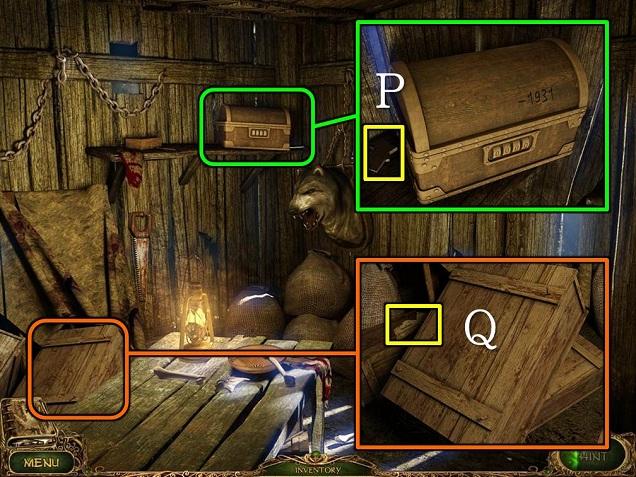
- By the locked box on the shelf is another piece of PLAQUE (7/12) (P).
- Another piece of the PLAQUE is by the crates on the floor (8/12) (Q).
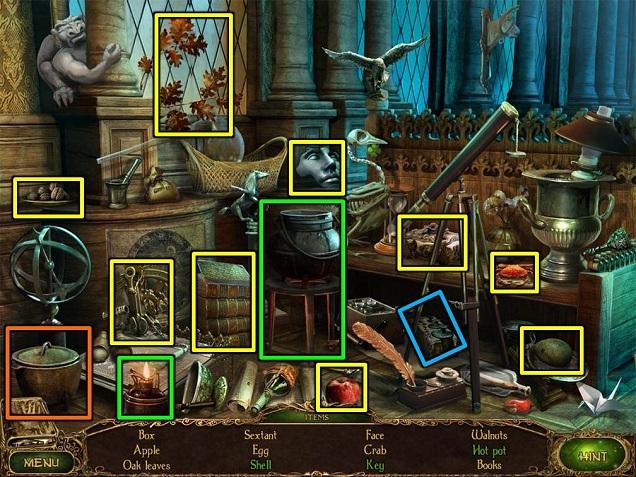
- Play the HOS.
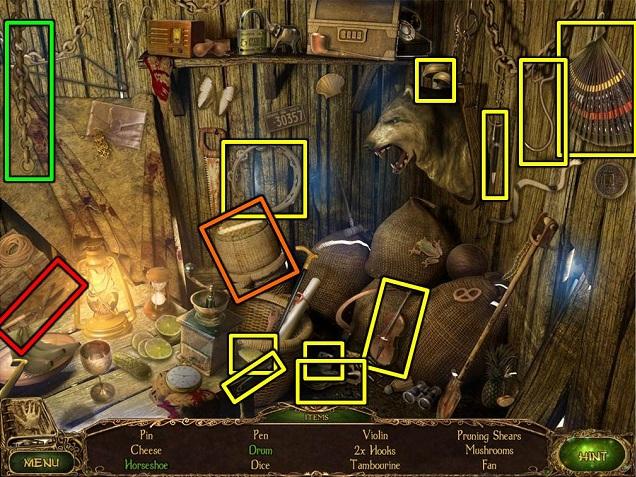
- Pull the chain (green) to find the horseshoe. Open the wicker basket (orange) to find the drum.
- You get some PRUNING SHEARS (red).
- Back out to the front of the house.
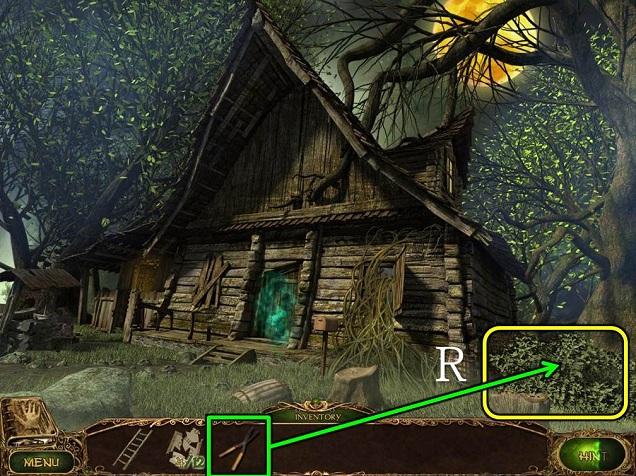
- Use the PRUNING SHEARS on the vines on the right three times (R).
- Go towards the gravestone on the right side of the house.
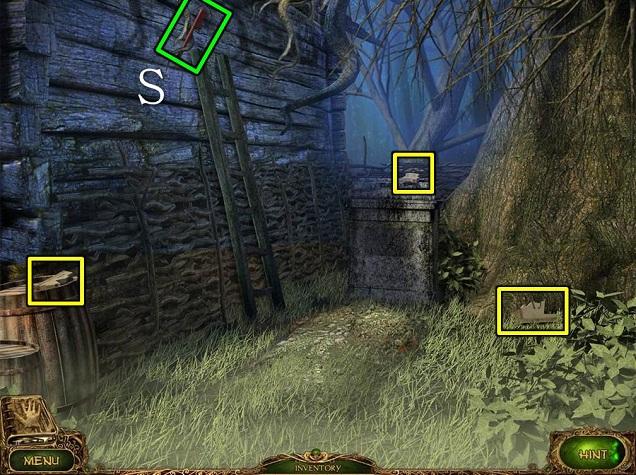
- Put the LADDER against the wall to take the MAILBOX FLAG (S).
- Take three more pieces of PLAQUE (9, 10 and 11/12).
- Back out to the front of the house.
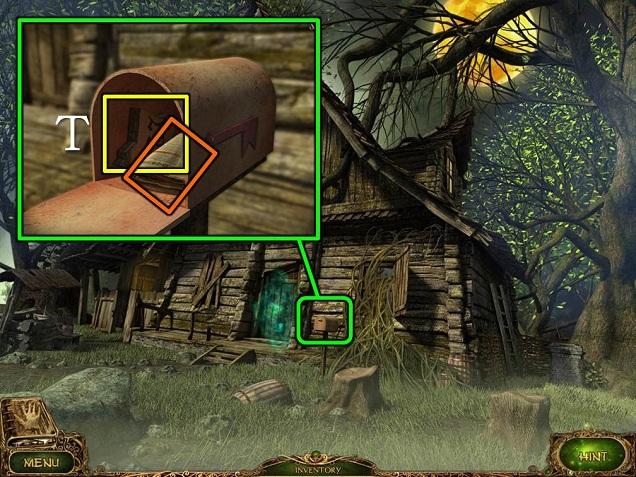
- Zoom in on the mailbox and put the MAILBOX FLAG on it.
- Click on the flag to open the mailbox.
- Inside the last piece of the PLAQUE (12/12) and another newspaper clipping (T).
- Go back to the grave to the right of the house.
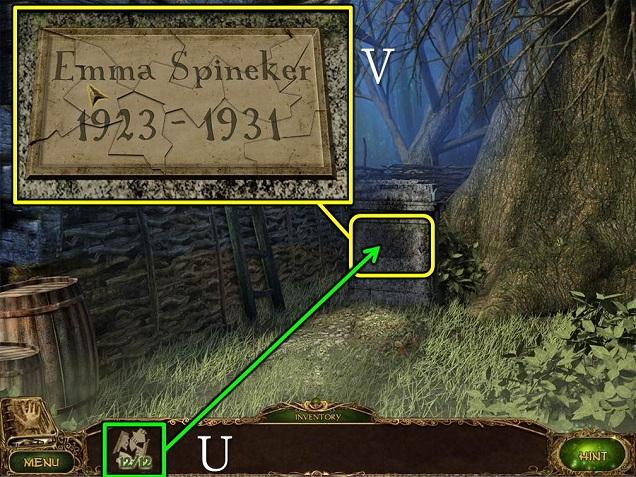
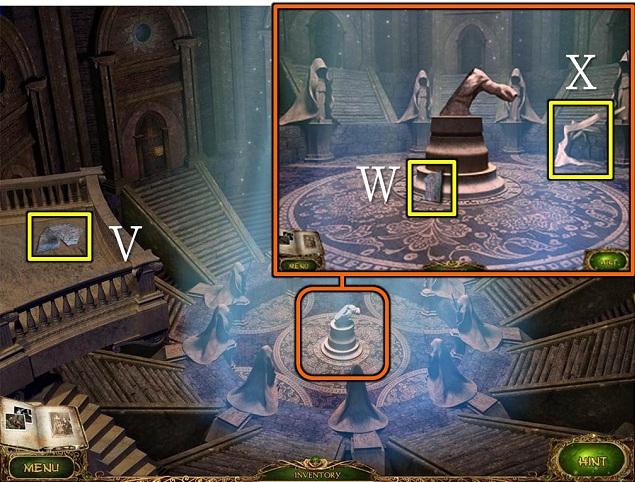
- Put the PLAQUE (12/12) on the stone (U).
- Do the jigsaw. Drag and drop pieces, and click to rotate. Pieces in the correct place stay fixed (V).
- Remember the dates.
- Go back to the shed and into the room on the left.
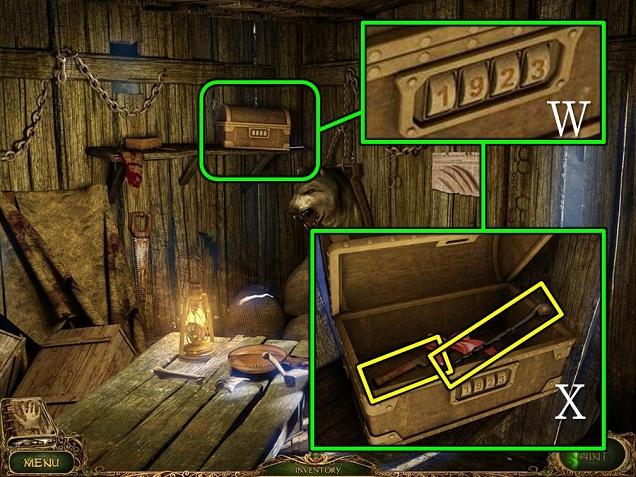
- Zoom in on the box on the shelf.
- Enter 1923 (W).
- Open the box and take the CANE and the KNIFE (X). The ribbon will just go into your journal.
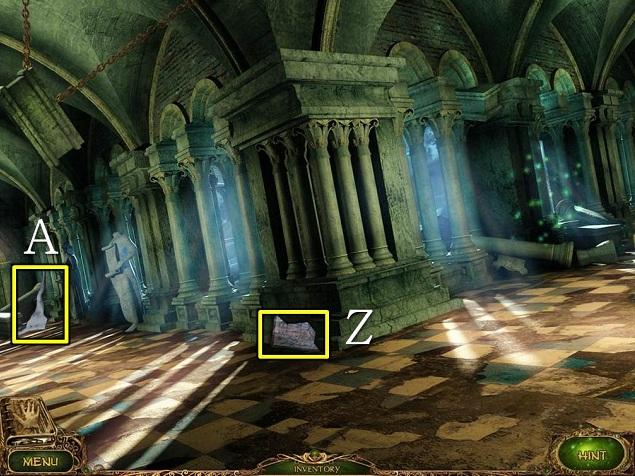
- Back out one screen to the bear traps.
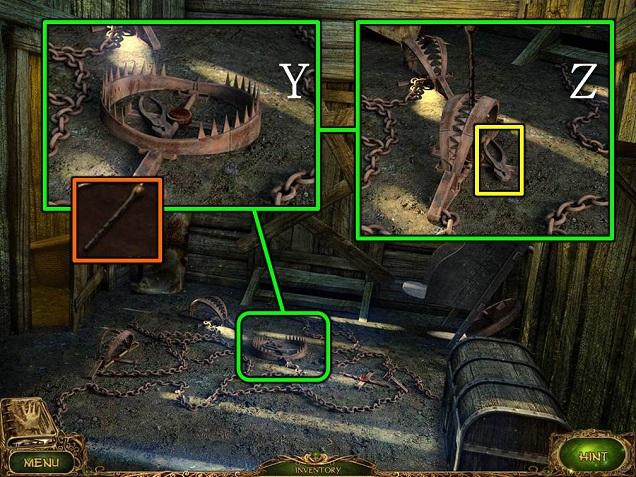
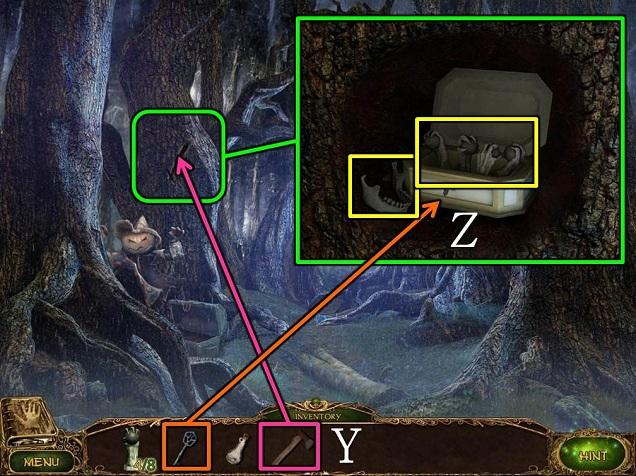
- Zoom in on the bear trap and disarm it with the CANE (Y).
- Take the PLIERS (Z).
- Go back into the room on the left.
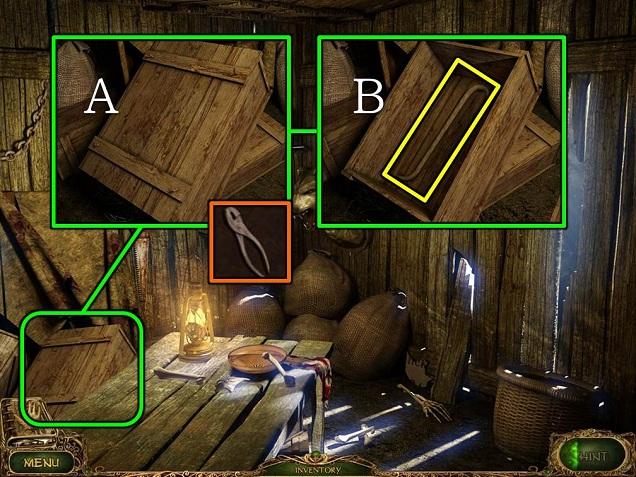
- Inspect the crates on the floor on the left, and take out the nails with the PLIERS (A).
- Open the crate and take the CROWBAR (B).
- Go back one screen.
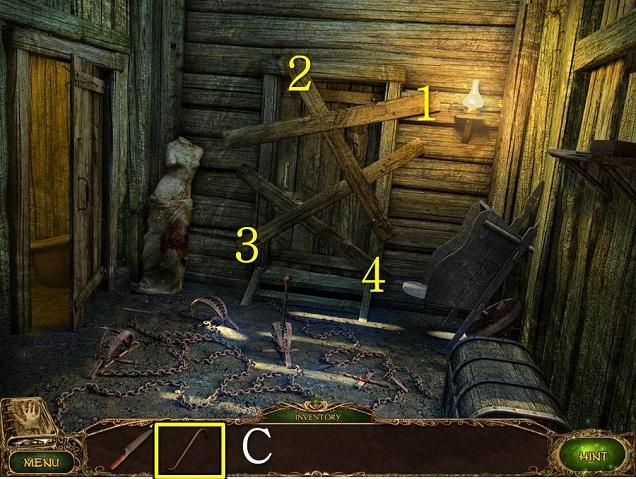
- Use the CROWBAR on the boards across the door (C). You need to remove them in order from top to bottom (1-4). Fortunately, only the next one to remove is indicated with the gears icon.
- Back out to the front of the house.
- Remove the boards across the window with the CROWBAR (D).
- Zoom in on the window and take the MOON TILE (E).
- Zoom in on the barrel and break it with the CROWBAR (twice).
- Take the BOOKCASE TILE (F).
- Go into the shed and zoom in on the door.
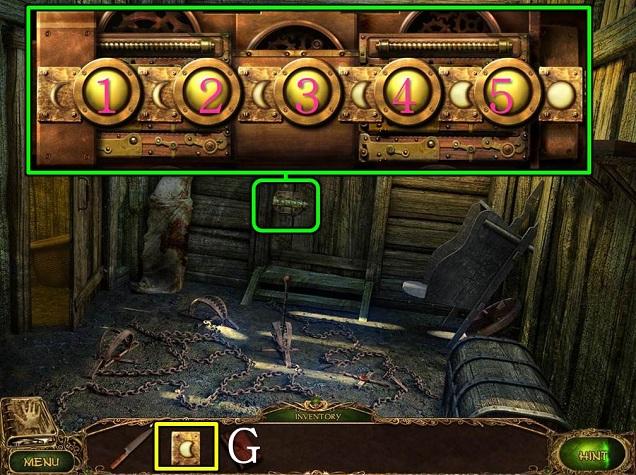
- Place the MOON TILE on the lock (G).
- Place the moon symbols in order from new to full moon by clicking on the yellow buttons to swap the pieces on either side. From the default position, click the buttons in the following order: 2, 1, 4, 3, 2, 5, 4.
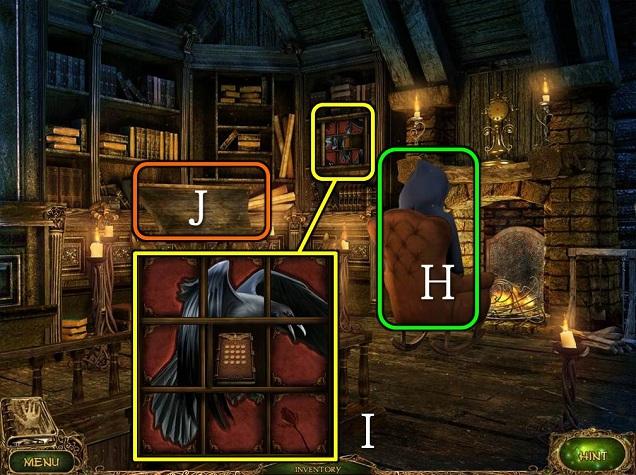
- Click on the creature by the fire and read his newspaper (H).
- Inspect the bookcase and put the BOOKCASE TILE on the puzzle.
- Swap and rotate pieces until you have the correct image (I). Most notably, the rose needs to be facing up.
- Take the MAGIC BOOK.
- Put the MAGIC BOOK on the reader (J).
- Play the HOS.
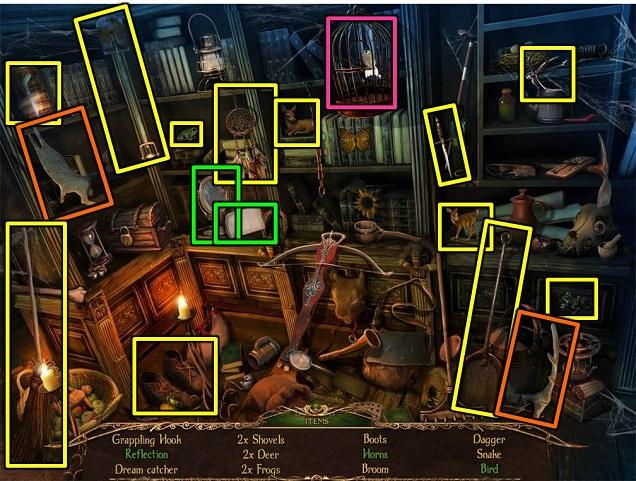
- Clean the mirror with the handkerchief (green) to get the reflection. Put the two horns together (orange), and open the cage to release the bird (pink).
- You get a SHOVEL.
- Back out to the front of the house and go to the gravestone.
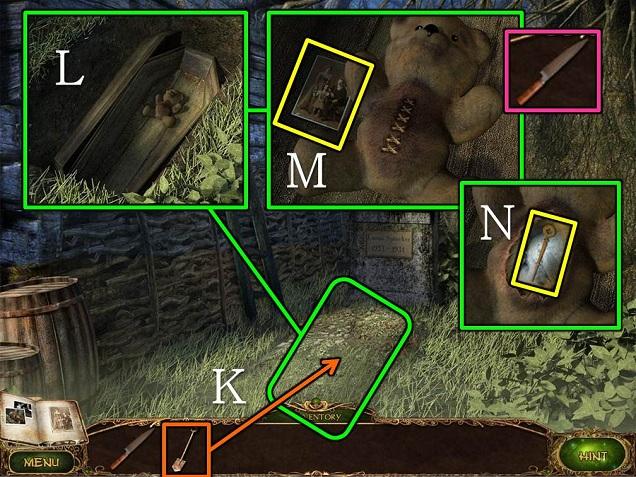
- Use the SHOVEL to dig up the grave (K).
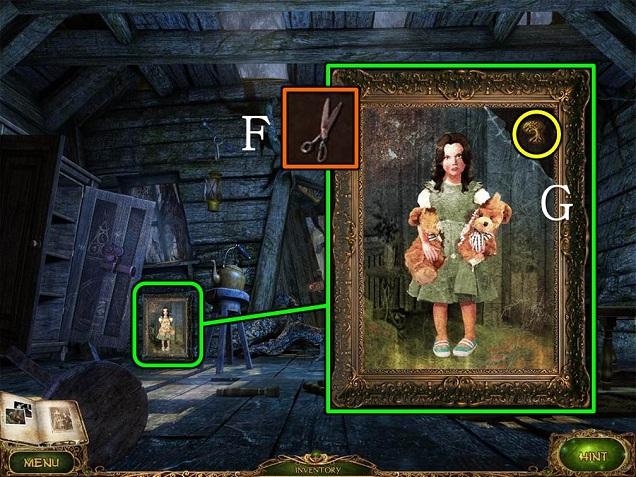
- Look inside the grave and open the coffin (L).
- Look at the picture beside the bear (M).
- Inspect the teddy bear and cut it open with the KNIFE.
- Click to open it further and take the CLOCK HAND (N).
- Go back to the shed and up the stairs.
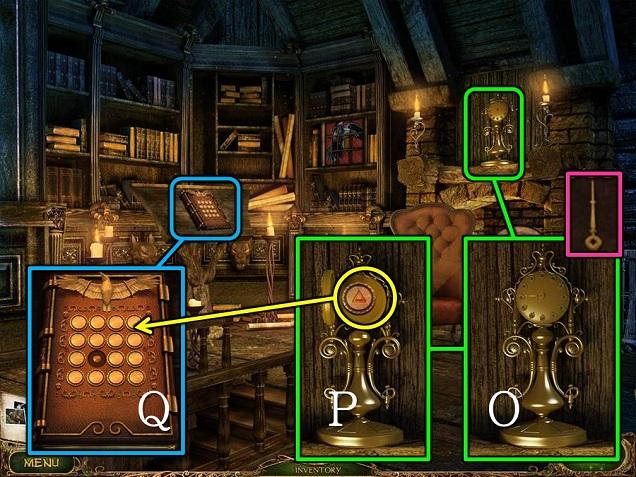
- Zoom in on the clock and place the CLOCK HAND on it (O).
- Take the BOOK SYMBOL (P).
- Zoom in on the magic book on the reader and put the BOOK SYMBOL in the empty slot (Q).
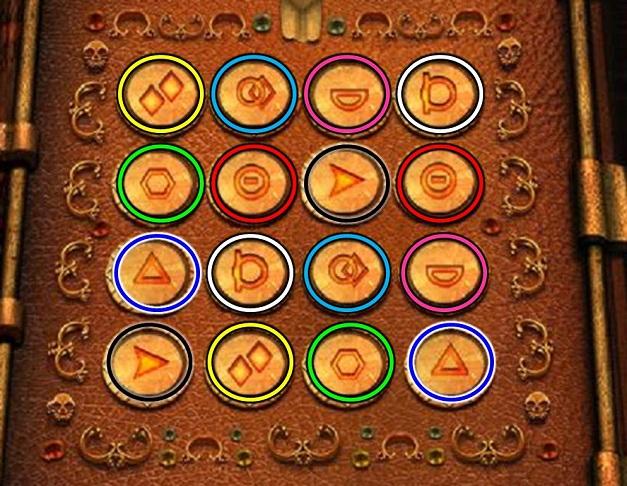
- Play the memory (match two) game to open the book.
Chapter 2: The Tree
- Play the HOS.
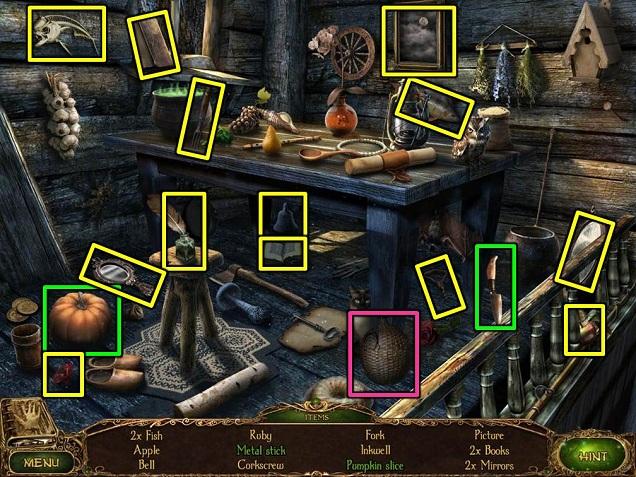
- Use the knife to slice the pumpkin (green). Move the bottle by the table to find the metal stick (pink).
- You get a LOCKPICK PART.
- Pick up the two WEIGHTS (1 and 2/8).
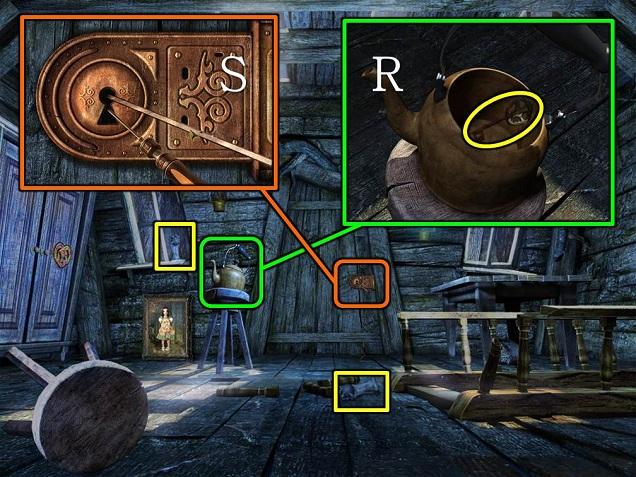
- Inspect the tea pot on the stool, take off the lid and take the KEY (R).
- Zoom in on the door and put the LOCKPICK PART in the lock.
- To pick the lock, hold down the mouse button briefly and listen to the sound. The quieter the sound, the closer to the correct position you are. When you hear a noise, release the pick quickly or it will break and you’ll have to try again. When you don’t hear a sound, hold the mouse button down until the lock opens. The screen shot shows the approximate position of the pick (S).
- Go through the door.
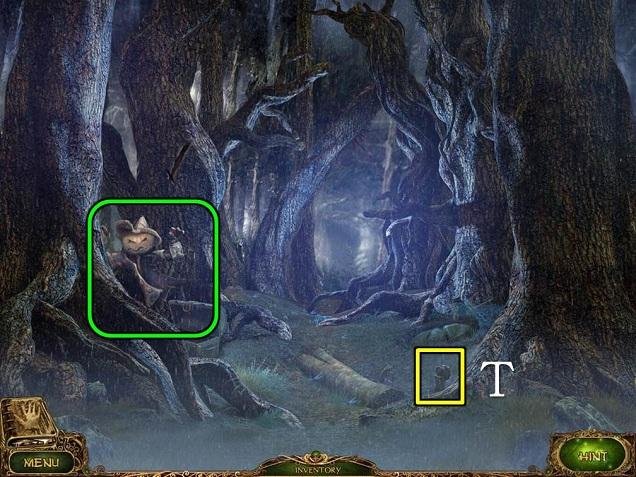
- After Emma is gone, pick up the WEIGHT (3/8) (T).
- Play the HOS by the scarecrow.
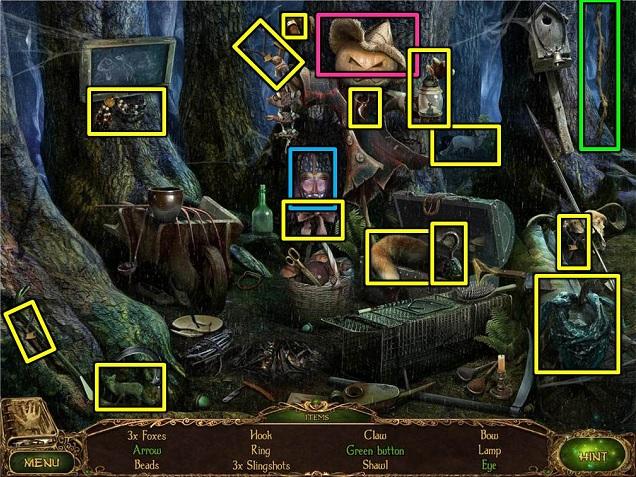
- Click on the mask to find the eye (blue). Pull the rope to shoot the arrow (pink). Remove the scarecrow’s hat to find the green button (green).
- You get a GREEN BUTTON.
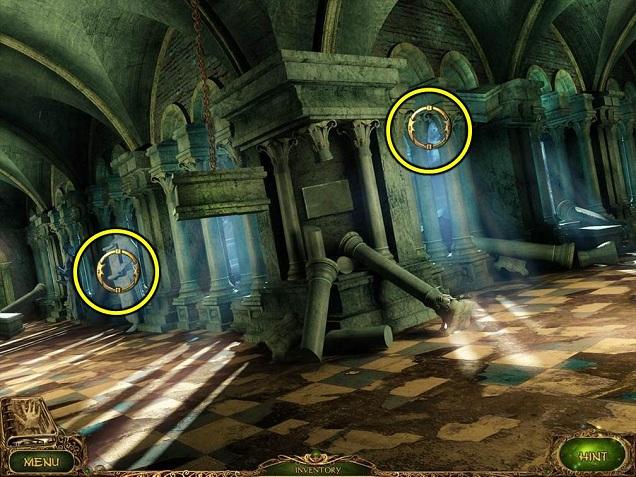
- Go back inside and inspect the cupboard on the left.

- Put the GREEN BUTTON on the lock to trigger the game.
- Use the arrows around the edges to rotate the three rings until the green buttons are in the position as shown on the carving on the left. One possible solution, from the default position, is to click the arrows in the following order: 5, 4, 6, 6, 3, 3, 5, 2, 2, 6 (U). This puzzle can’t be reset.
- Play the HOS inside the cupboard.
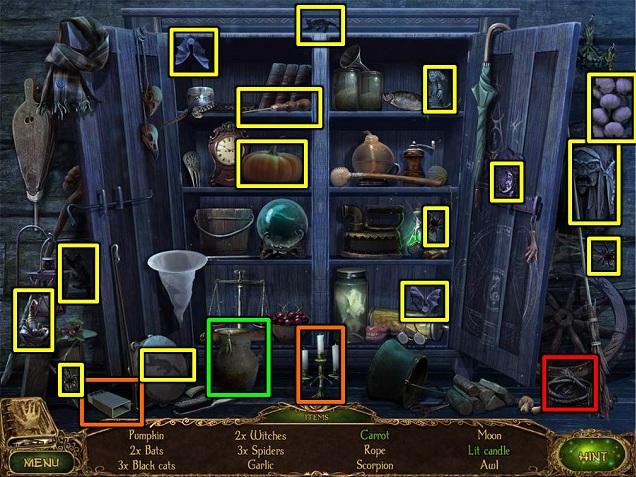
- Use the matches to light the candles (orange). The carrot is inside the clay pitcher (green).
- You get a ROPE (red).
- Go out through the door and on to the altar in the back.
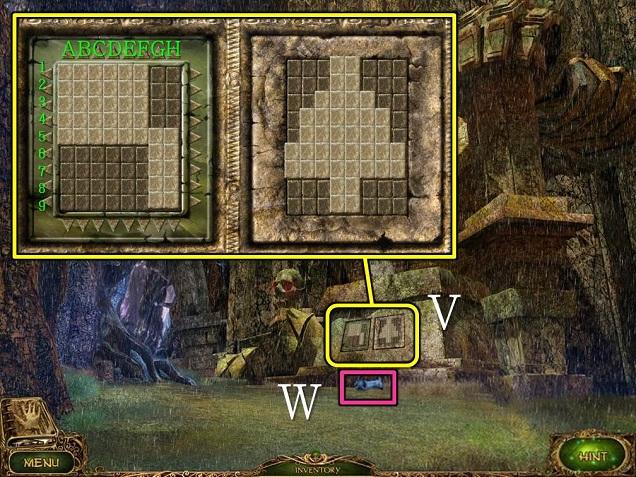
- Play the puzzle on the altar (V). You need to recreate the image on the right by clicking the little arrows around the frame on the left. One solution, from the default position, is:
- Columns A-F: 2 down
- Rows 8 and 9: 3 left
- Rows 3 and 4: 1 right
- Column A: 1 up
- Rows 3 and 4: 1 right
- Column A: 1 down
- Columns G and H: 2 up
- Rows 1 and 2: 3 left
- Row 3: 1 left
- Column G: 1 down
- Row 3: 1 right
- Column G: 1 down
- Column H: 2 down.
- Pick up the WEIGHT (4/8) that falls down (W).
- Go back one screen.
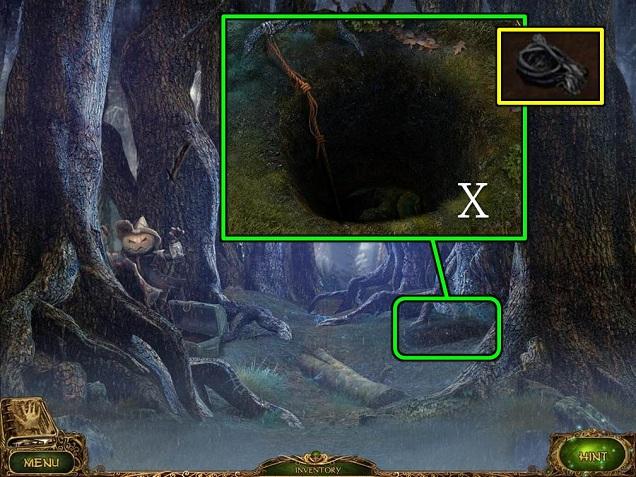
- The stone-covered hole on the right caves in.
- Zoom in on the hole and put the ROPE down it (X).
- Go down the hole.
- Talk to the tree creature.
- He will give you an EMPTY BOTTLE.
- Play the HOS by the stairs.
- The compass is in the book (green). The pearl is in the shell (orange).
- You get an axe.
- Climb back out through the hole (top left corner of the screen).
- Use the AXE on the tree above the scarecrow (Y).
- Look inside the hole.
- Use the KEY to open the box (Z).
- Take the four WEIGHTS (5-8/8).
- Take the STONE JAW.
- Go back down the hole.
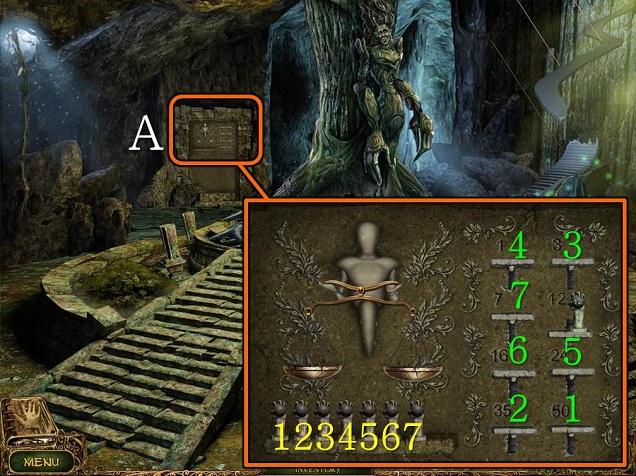
- Inspect the wall to the left of the tree (A).
- Place the WEIGHTS (8/8) on the puzzle to trigger.
- Use the scales to figure out which of the weights is the heaviest, all the way through to the lightest, and put them on the correct platforms. The #12 weight is already in place, so you can use that one as a reference.
- Go up through the hole and to the altar in the back.
- Go in.
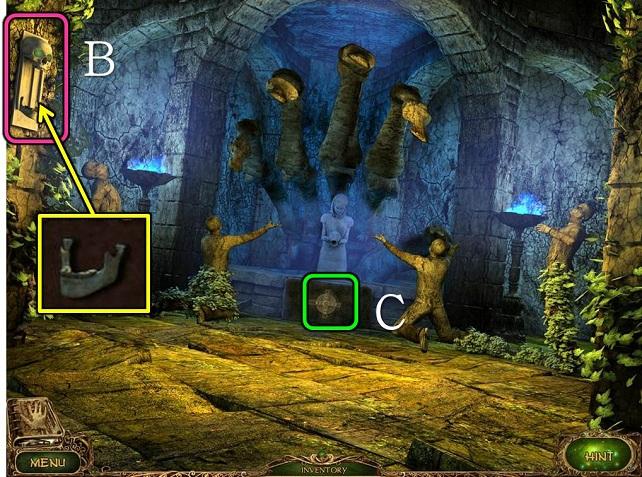
- Use the STONE JAW on the skull on the left (B).
- Click on the puzzle below the fountain (C).
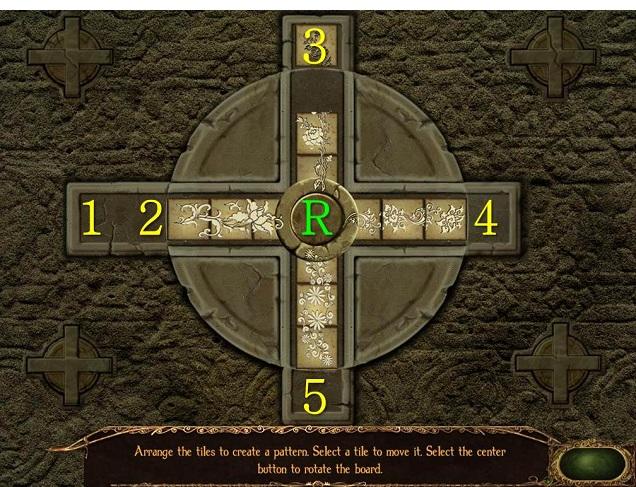
- You need to reorganize the 12 carved tiles so they form a series of patterns around the center. You can rotate the wheel by pushing the button in the center. Click on the outside tiles to move them into the empty spaces around the side. Click on the tiles in the outside spaces to move them back onto the wheel. Use the carvings around the center button as a clue which patterns go where. Correctly placed blocks light up white.
- From the default position, one of the solutions is as follows (R = rotate, 1-4 indicates either moving in or out of the empty slots around the edge):
- First pattern: 3, 4, R, 5, R, 1, R, 3, R, 3, R, R, R, 3, R, R, 2, R, 2.
- Second pattern: 3, R, 2, R, 3, R, 4, R, R, 2.
- Third and fourth patterns: 4, R, 5, 2, R, 3, R, R, 5, R, 5, R, R, 4, R, R, 2, R, 1, 3.
- Zoom in on the fountain.
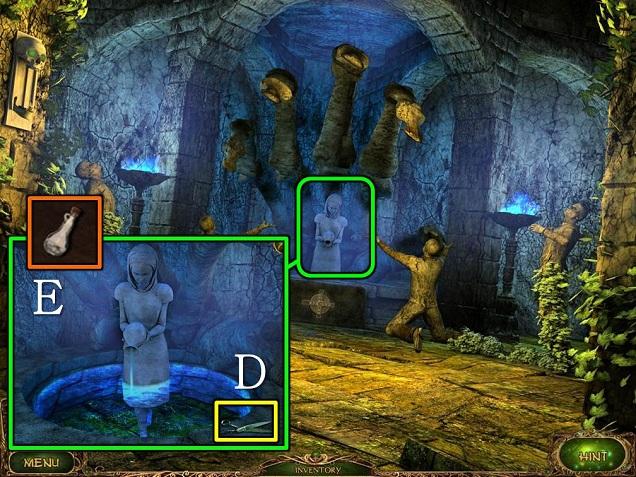
- Take the SCISSORS (D).
- Use the EMPTY BOTTLE on the water to get a BOTTLE WITH WATER (E).
- Back all the way out until you’re back in the room with the cupboard.
- Inspect the painting and use the SCISSORS to remove the corner (F).
- Take the TREE MEDALLION (G).
- Go through the door and down the hole.
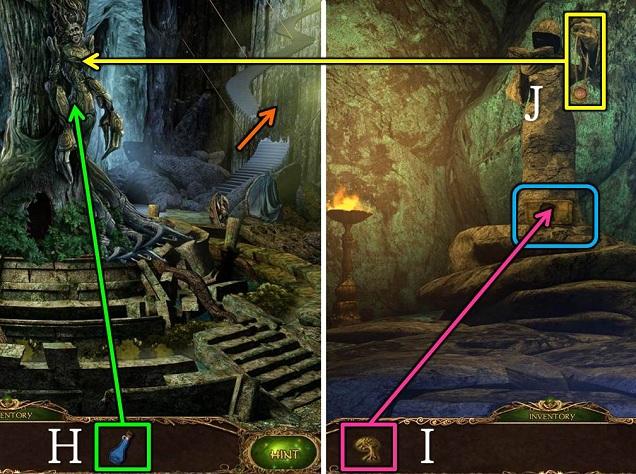
- Use the BOTTLE WITH WATER on the tree creature (H).
- You can now go up the stairs.
- Put the TREE MEDALLION on the statue (I).
- Pick up the AMULET.
- Go back to the tree and give him the AMULET (J).
- Put the AMULET on the magic book.
Chapter 3: The Minotaur
- Talk to the Minotaur.
- Play the HOS by the bench on the right.
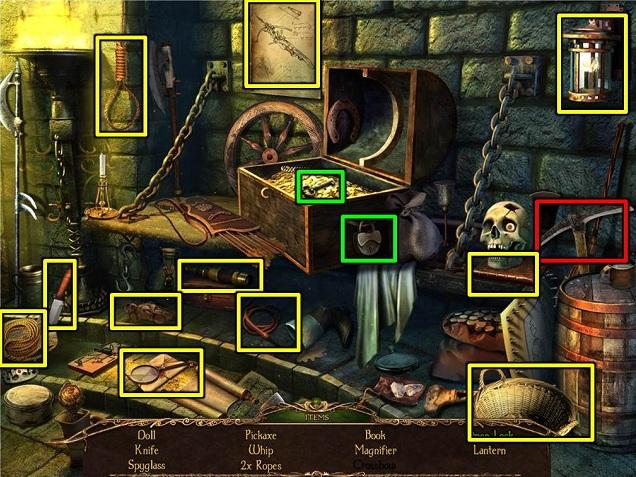
- Use the key to open the lock (green).
- You get a PICKAXE (red).

- Use the PICKAXE on the rubble on the left (K).
- Go through the door.
- Pick up the HAMMER (L).
- Go back to the Minotaur.
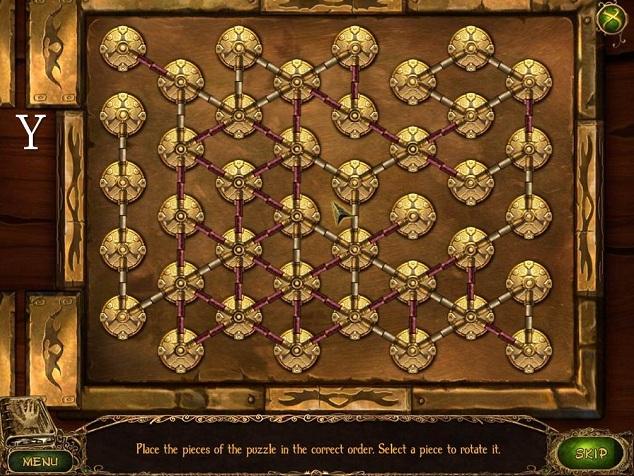
- Zoom in on the puzzle in the top left corner (M).
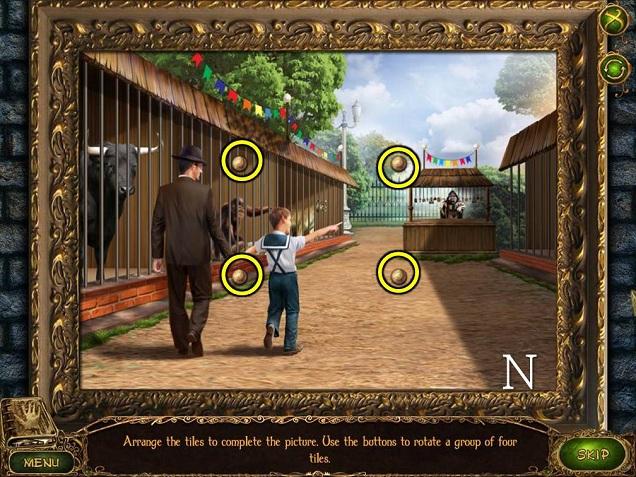
- Recreate the image by clicking on the yellow buttons to rotate the groups of four blocks (N). Unfortunately, this puzzle is random so I can’t give you a solution that will work for you.
- Go through the middle door.
- Play the HOS.
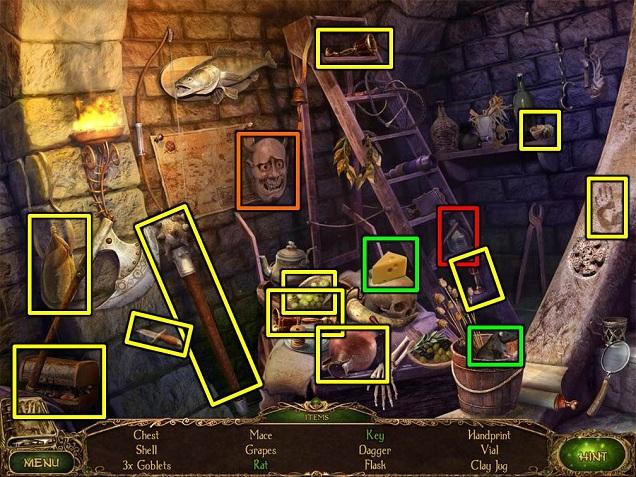
- Give the cheese to the rat (green). The key is behind the mask (orange).
- You get a VIAL (red).
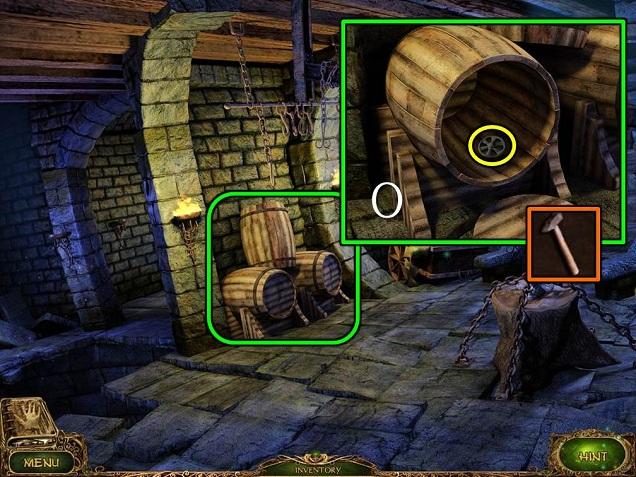
- Zoom in on the barrels (O).
- Open the barrel with the HAMMER.
- Take the VALVE.
- Back out to the Minotaur and go through the left door.
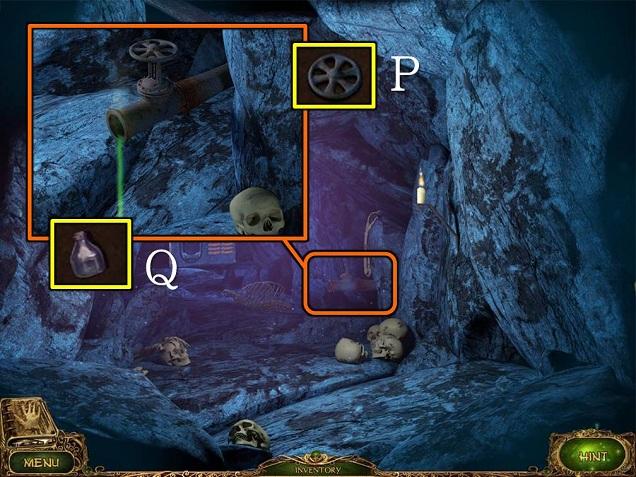
- Zoom in on the pipe.
- Put the VALVE on the pipe and click to turn it (P).
- Put the VIAL under the stream to get a VIAL WITH ACID (Q).
- Go back one room and go through the middle door.
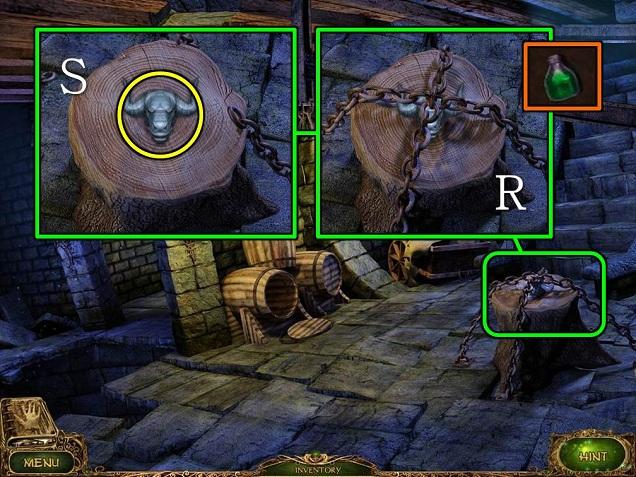
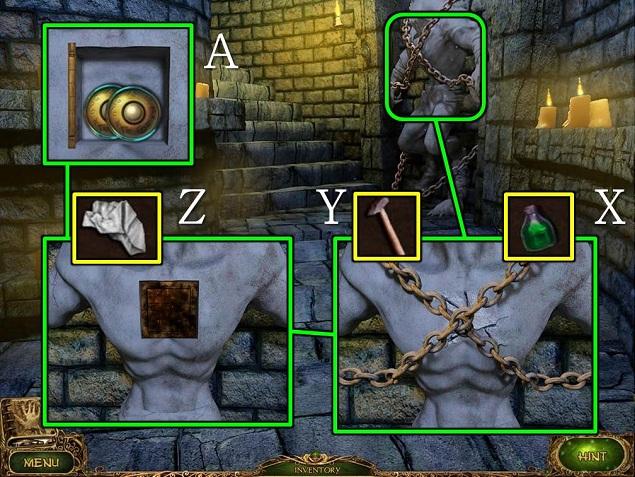
- Zoom in on the block and chains.
- Use the VIAL WITH ACID to melt the chains (R).
- Take the STONE MINOTAUR (S).
- Back out one screen.
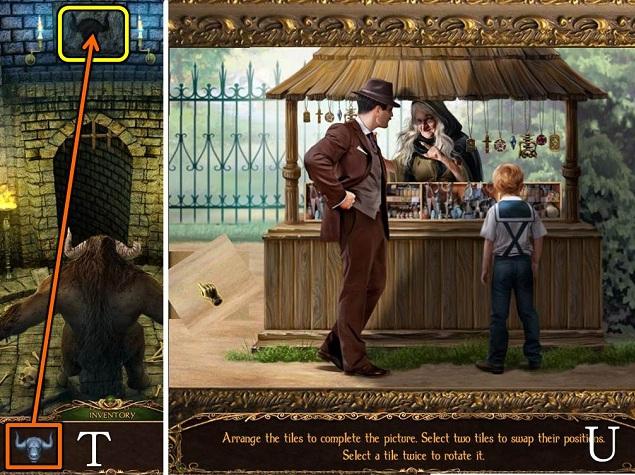
- Put the STONE MINOTAUR in the indentation above the middle door (T).
- Play the puzzle underneath (U). Select two tiles to swap them. Click a tile twice to rotate it. If you think you’ve completed the puzzle but the next stage isn’t triggered, check carefully if none of the tiles are upside down. Especially the ones in the bottom left are easy to get the wrong way up.
- Go through the door on the right.
- First go up the stairs.
- Play the HOS.
- Use the quill on the parchment to get the signature (green). The thermometer is behind the elephant head (orange). The pipe is really a flute, if you’re struggling to find it.
- You get a SAW (red).
- Go back to the Minotaur and through the left door.
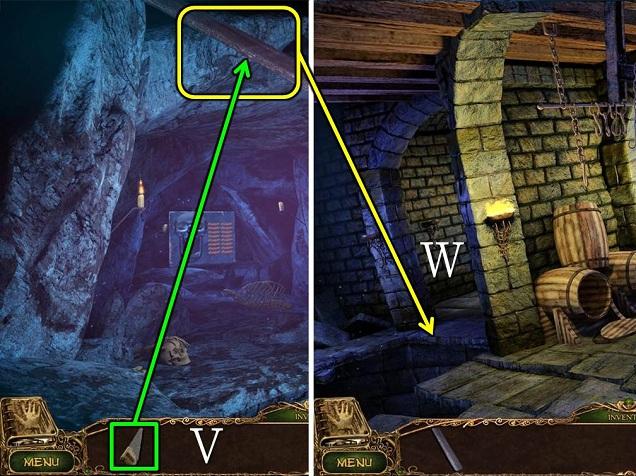
- Use the SAW on the beam hanging from the ceiling (V).
- You get a BOARD.
- Go through the middle door by the Minotaur.
- Put the BOARD over the gap on the left (W).
- Cross the board to the back room.
- Play the HOS.
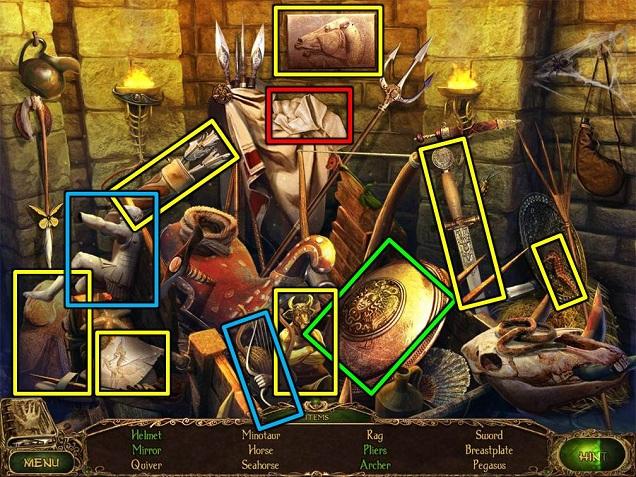
- The mirror, mask and pliers are behind the shield (green). Put the hand on the archer (blue).
- You get a RAG (red).
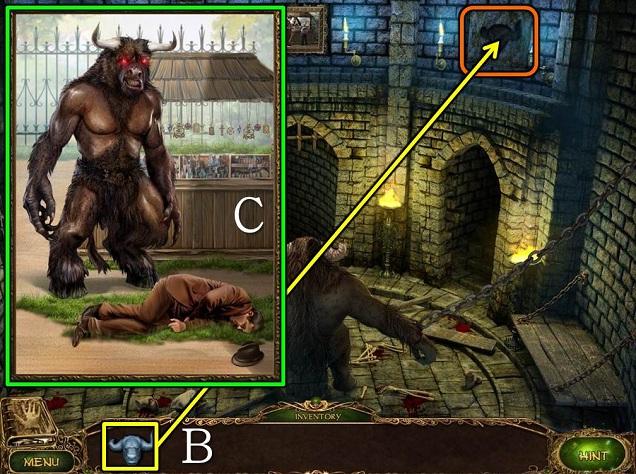
- Go back through the door on the right by the Minotaur.
- Zoom in on the statue and melt the chains with the VIAL WITH ACID (X).
- Break the statue with the HAMMER (Y).
- Clean the puzzle with the RAG (Z).
- Use the arrows around the sides to move the Minotaur heads into the slots. This puzzle is also random so I can’t give you a solution.
- Take the SKULL EYES (A).
- Go back to the left room
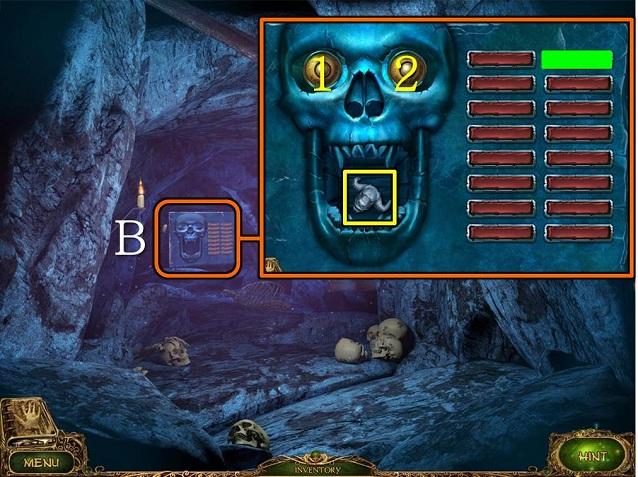
- Zoom in on the elevator in the back (B).
- Put the SKULL EYES on the skull.
- You need to move the elevator to the mouth of the skull so you can take the Minotaur head. The top right button needs to be green for the correct position. You move the elevator by clicking on the eyes. The left eye (1) moves the elevator 5 steps up, the right eye (2) moves the elevator 7 steps down. When there aren’t enough steps left at the top or bottom, the elevator will only move as many steps as it can.
- From the default position, click the left eye twice, and then alternate right and left until the top right button is green.
- Take the STONE MINOTAUR.
- Go back to the Minotaur and place the STONE MINOTAUR in the indentation above the right door.
- Complete the puzzle by clicking to rotate the tiles. Tiles only need to be rotated as they are all in the correct position.
- Put the AMULET on the book.
Chapter 4: The Beast
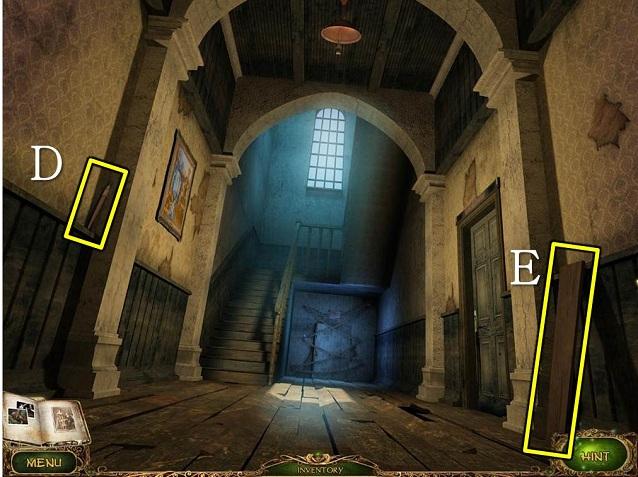
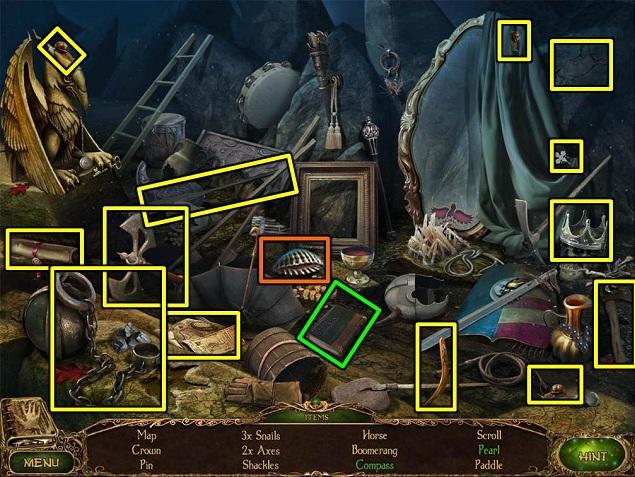
- Pick up one of the BRUSHES (1/8) (D) and the first of the BOARDS (1/4) (E).
- Go up the stairs and play the HOS.
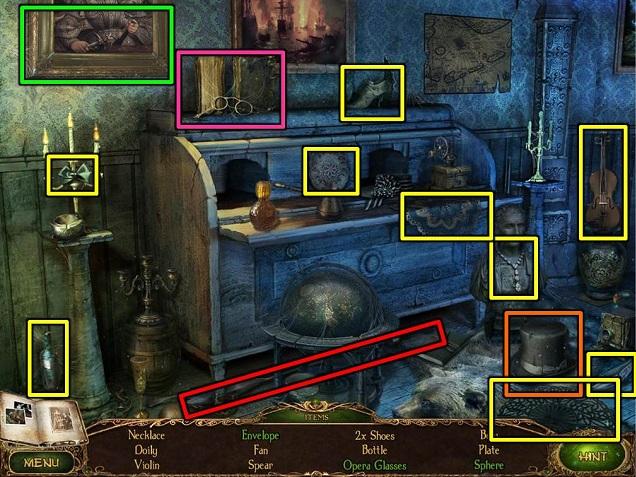
- The envelope is behind the painting (green). The opera glasses are under the top hat (orange). The sphere is behind the books (pink).
- You get a SPEAR (red).
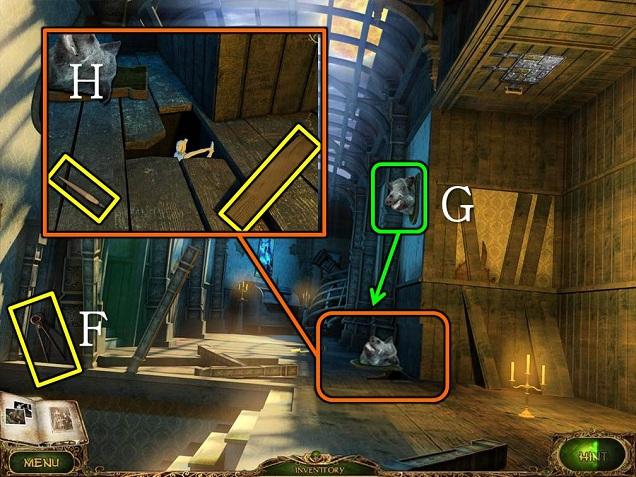
- On the landing, pick up the PLIERS (F).
- Click on the boar’s head (G) so it falls down.
- Zoom in on the head on the floor and pick up another one of the BRUSHES (2/8) and another one of the BOARDS (2/4) (H).
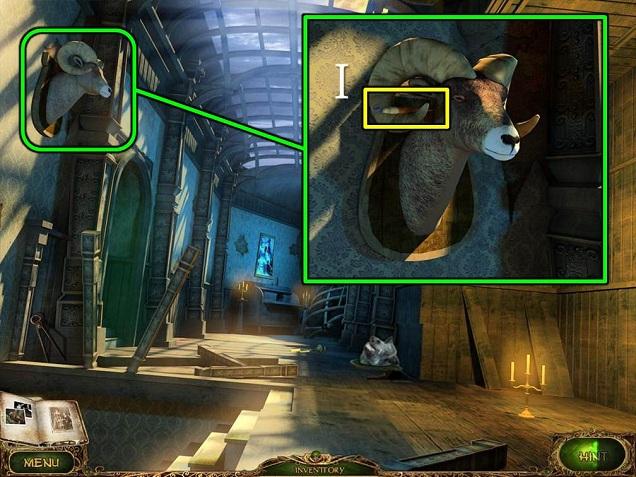
- Zoom in on the goat’s head and take another one of the BRUSHES (3/8) (I).
- Go through the door on the left.
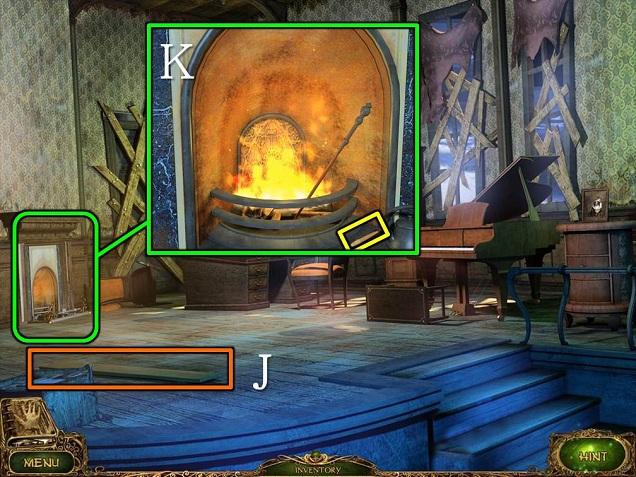
- Pick up the third of the BOARDS (3/4) (J).
- Zoom in on the fireplace.
- Pick up the next one of the BRUSHES (4/8) (K).
- Go back downstairs.
- Zoom in on the lamp above the stairs.
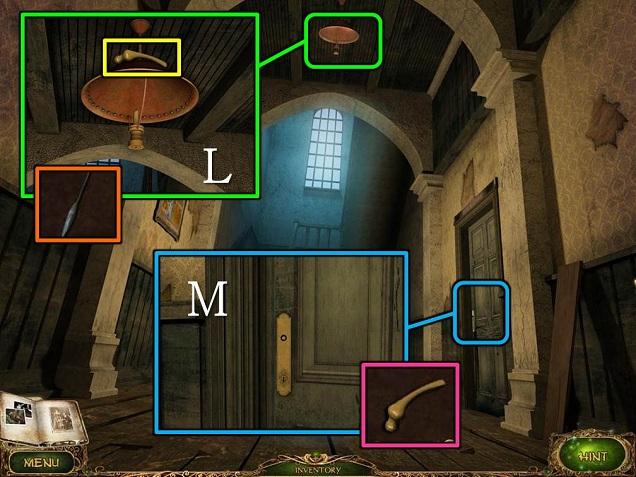
- Use the SPEAR to take the DOOR HANDLE (L).
- Zoom in on the door on the right and open it with the DOOR HANDLE (M).
- Go through the door.
- Play the HOS in the library.
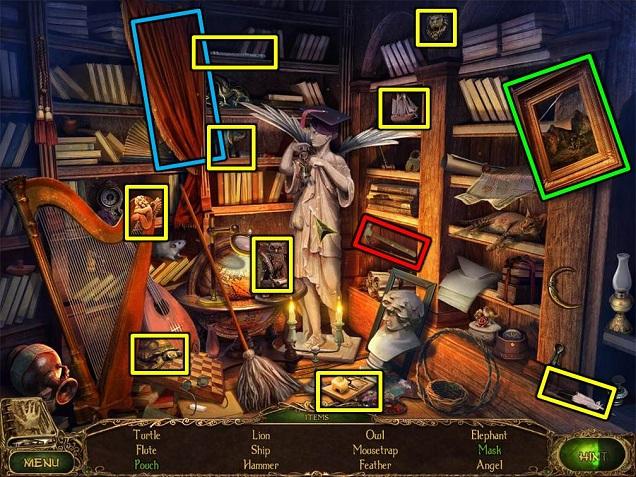
- The pouch is behind the picture frame (green). The mask is behind the curtain (blue).
- You get a HAMMER (red).
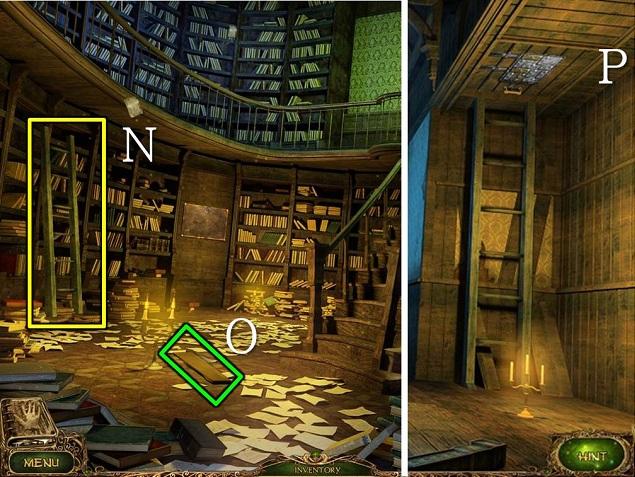
- Pick up the LADDER (N) and the last of the BOARDS (4/4) (O).
- Go back to the hallway and up the stairs.
- Put the LADDER under the trapdoor and zoom in on the puzzle (P).
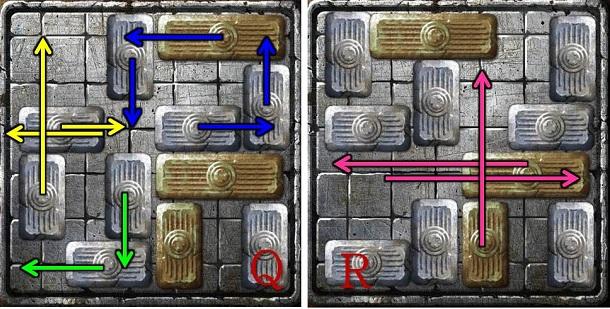
- Q: First follow the green arrows. Then follow the yellow arrows left, up, right. Then follow the blue arrows.
- R: Follow the pink arrows left, up, down.
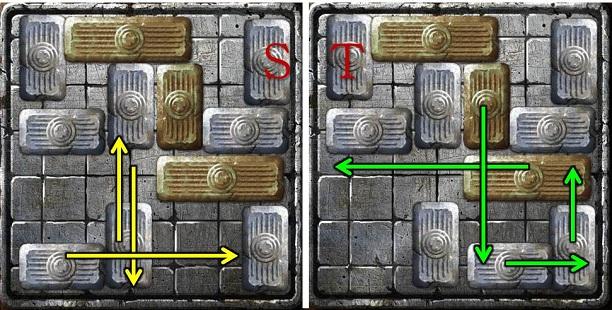
- S: Yellow up, right, down.
- T: Follow the green arrows.
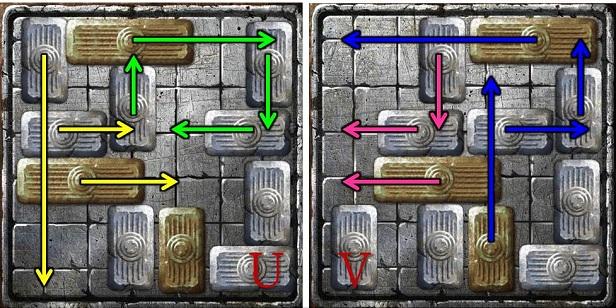
- U: First follow the green arrows, then the yellow ones.
- V: First follow the pink arrows, then the blue ones.
- Go up the ladder through the trapdoor.
- Play the HOS.
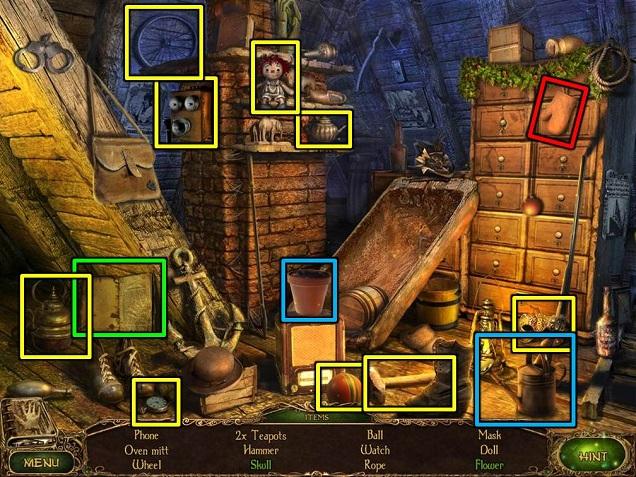
- The skull is behind the book (green). To get the flower you need to take the watering can and water the flower pot (blue).
- You get an OVEN MITT (red).
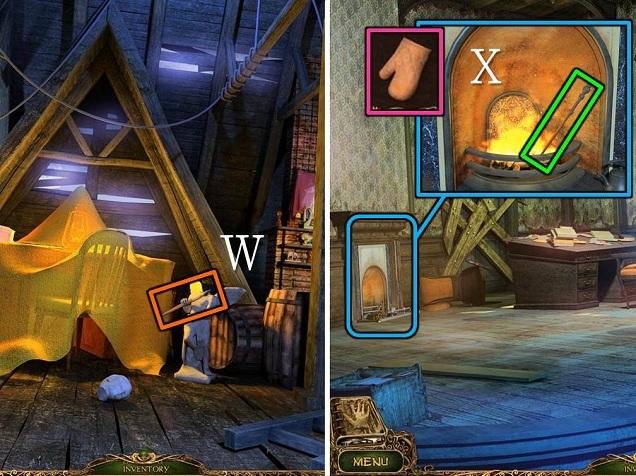
- Pick up the next of the BRUSHES (5/8) (W).
- Go down the ladder and into the room on the left.
- Zoom in on the fireplace.
- Take the POKER with the OVEN MITT (X).
- There is now a HOS by the desk.
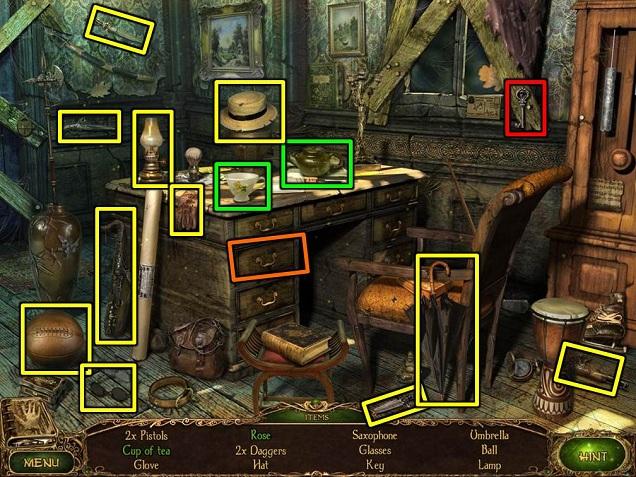
- Pour the tea in the cup (green) and open the second drawer on the left for the rose (orange).
- You get a KEY (red).
- Back out to the bottom of the stairs.

- Zoom in on the chained-up door.
- Take the next of the BRUSHES (6/8).
- Use the POKER on the mouse hole to get the NAILS (Y).
- Use the PLIERS to remove the chain on the door (Z).
- Go through the door.
- Pick up another one of the BRUSHES (7/8) (A).
- Put the BOARDS (4/4) down (B), put the NAILS on them (C) and fix them in place with the HAMMER (D – inset).
- Go down the stairs.
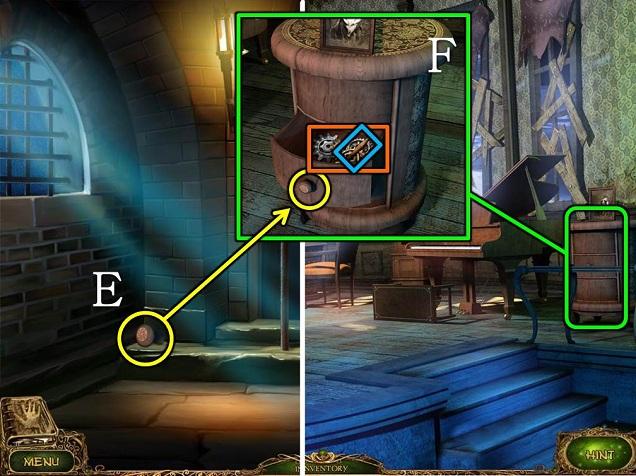
- Pick up the HANDLE (E).
- Go back up the stairs and into the room on the left.
- Zoom in on the drawer unit (F).
- Open the drawer with the HANDLE.
- Take the last of the BRUSHES (8/8) and the GEARS.
- Go down the stairs and into the library.
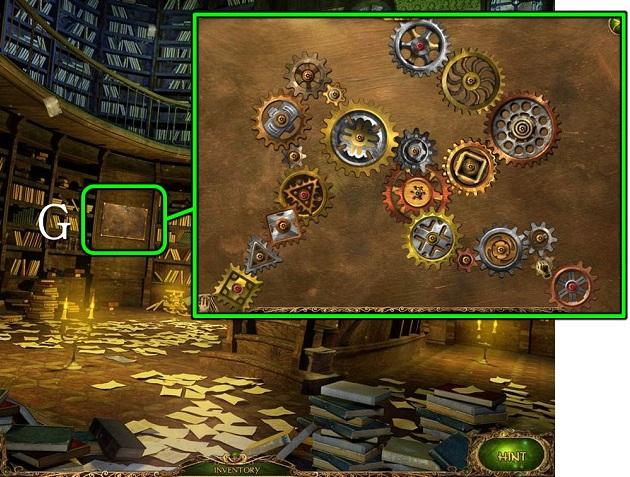
- Zoom in on the safe in the back (G).
- Put the gears on it to trigger a puzzle.
- You need to place all the gears on the pins to connect the ones already in place, so that they all spin. Unlike in other puzzles of this kind, sometimes gears overlap rather than just connect at the edges.
- Play the new HOS on the right side of the room.
- Put the burner under the pot (green). The shell is behind the pot on the left (orange). The key is under the box of weights (blue).
- You get a SAFE KEY.
- Back out to the hallway.
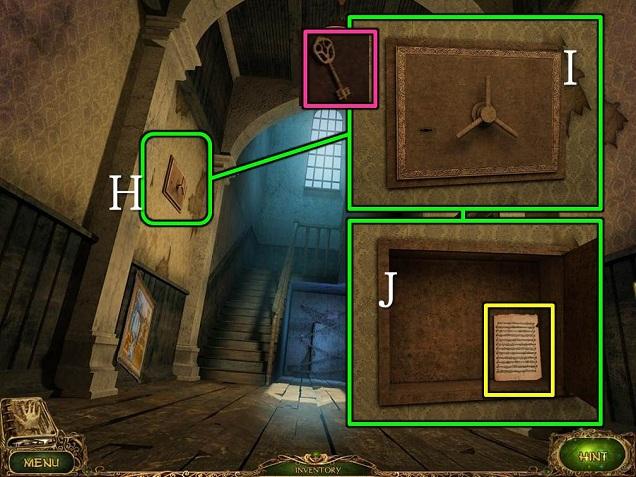
- Zoom in on the safe on the left wall (H).
- Open it with the SAFE KEY (I).
- Take the SHEET MUSIC (J).
- Go upstairs and into the room on the left.
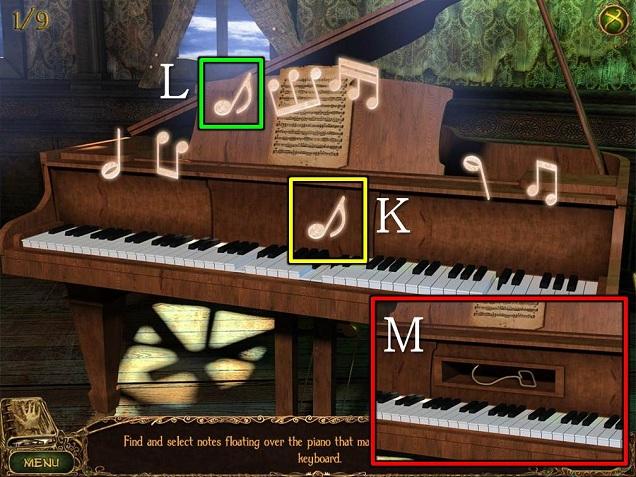
- Zoom in on the piano and place the SHEET MUSIC on the reader.
- The piano will play a series of notes, which will appear above the keyboard (K). You need to find identical notes and click on them before they disappear of screen (L). You have to be quite fast! There are 9 sets of notes to find.
- Take the HOOK from the compartment that opens (M).
- Back out to the landing.
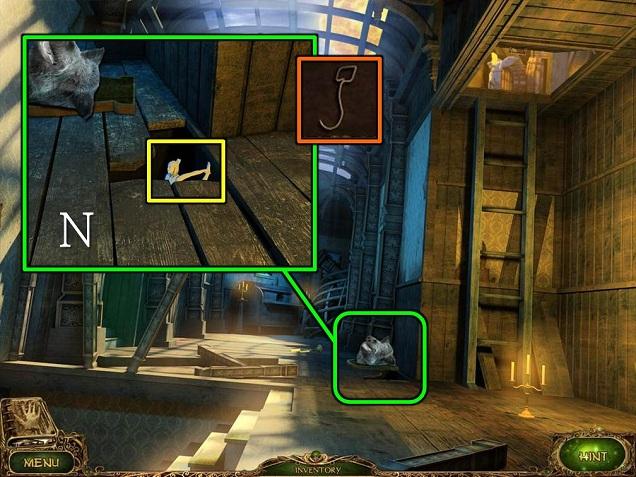
- Zoom in on the hole next to the boar’s head.
- Use the HOOK to take the BALLERINA (N).
- Go up the ladder.
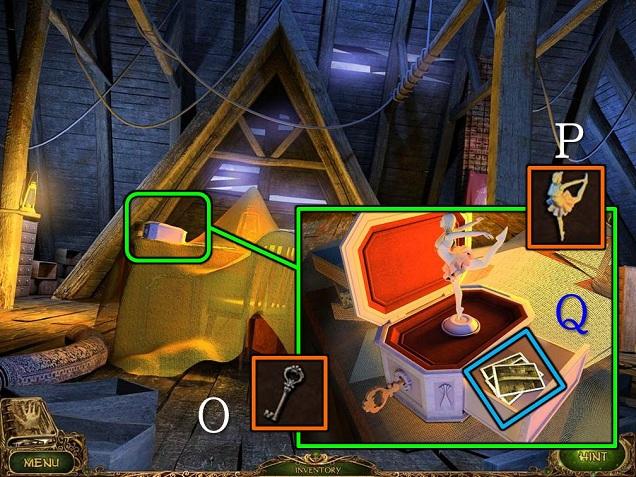
- Zoom in on the music box on the table.
- Open it with the KEY (O).
- Put the BALLERINA on the opened box (P).
- Take the PHOTOS (Q).
- Go back to the library downstairs.
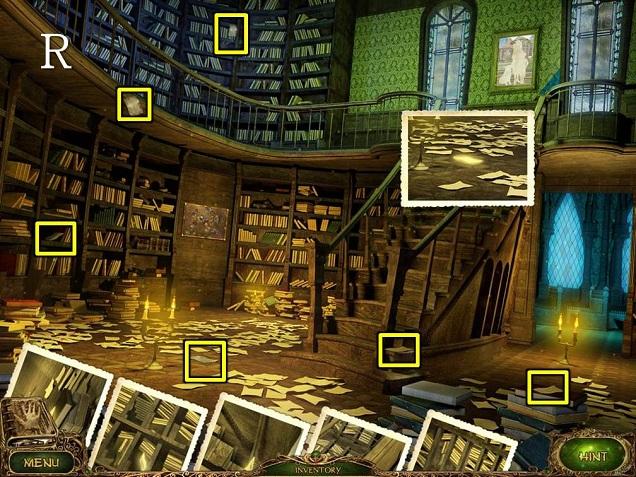
- Each of the photos shows a picture piece. Click on one of the photos to select it, then find the picture piece in the library as shown on the photo (R). You don’t need to have a photo selected to find the PICTURE PIECES (6/6).
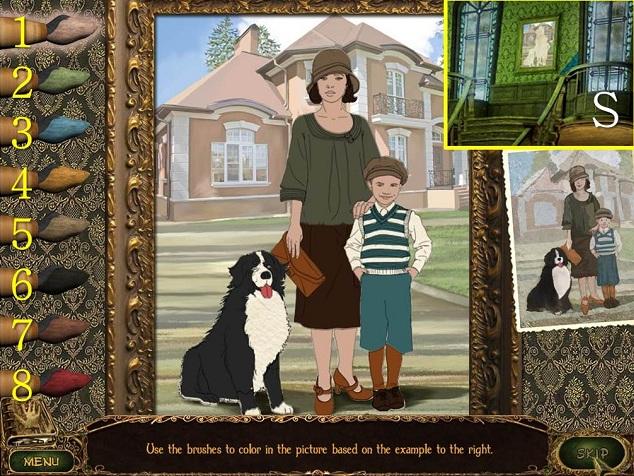
- Zoom in on the painting above the stairs (S).
- Put the BRUSHES (8/8) and PICTURE PIECES (6/6) on it.
- You need to paint the picture according to the photo.
- Paint #1: Mom’s face, both arms and legs; boy’s face and hands.
- Paint #2: Mom’s top.
- Paint #3: Boy’s clothes.
- Paint #4: Mom’s bag and shoes; boy’s socks.
- Paint #5: Mom’s hat; boy’s hat.
- Paint #6: Dog; mom’s hair.
- Paint #7: Mom’s skirt; boy’s shoes.
- Paint #8: Dog’s tongue.
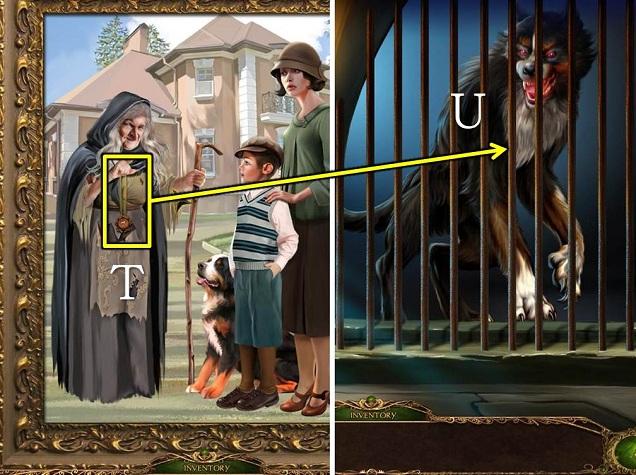
- Take the AMULET from Emma (T).
- Go down to the basement and give the AMULET to the beast (U).
- Put the AMULET on the book.
Chapter 5: The Statue
- Pick up the MIRROR FRAGMENT (1/7) (V).
- Zoom in on the broken statue and pick up another MIRROR FRAGMENT (2/7) (W) and a STATUE PART (1/5) (X).
- Zoom in on the door on the left for a puzzle (Y). You need to rotate all the wheels until all the pipes connect. They also need to connect to pipes of the same color. Wheels placed correctly stay fixed in place. For puzzles like this, it is generally easiest to start with the outside pieces, as they have fewer options.
- Go through the door.
- Pick up another MIRROR FRAGMENT (3/7) (Z) and STATUE PART (2/5) (A).
- Play the HOS.
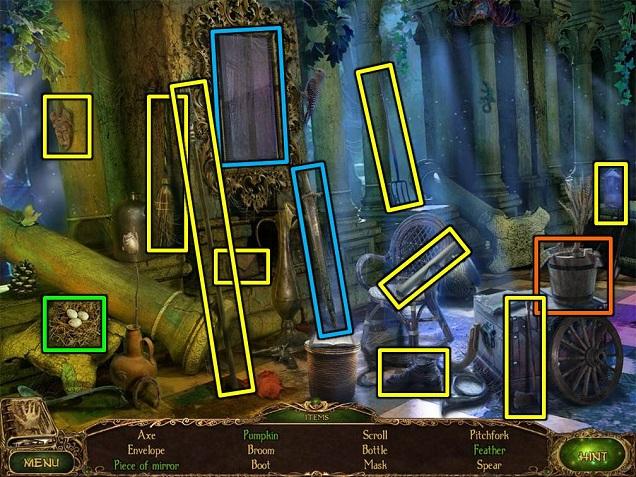
- The feather is under the nest (green). The pumpkin is behind the bucket (orange). Break the mirror with the sword for the piece of mirror (blue).
- You get another MIRROR FRAGMENT (4/7).
- Go back to the statue room.
- Go to the door on the right.
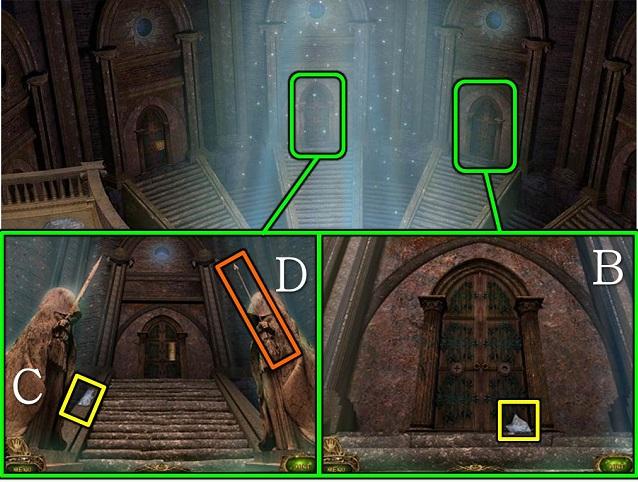
- Pick up the MIRROR FRAGMENT (5/7) (B).
- Go back to the main room and go to the middle door.
- Pick up the MIRROR FRAGMENT (6/7) (C) and take the BOW (1/3) from the statue on the right (D).
- Zoom in on the middle door.
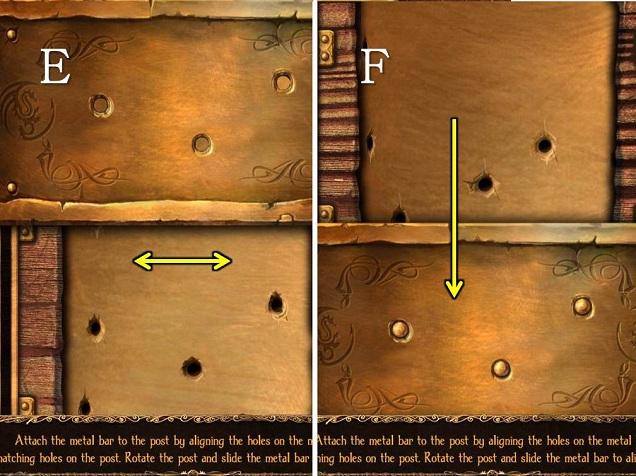
- To unlock the door, you need to rotate the column until you find a set of holes that match the holes in the bar (E). Then slide the metal bar up or down to align the holes (F).
- Go through the door.
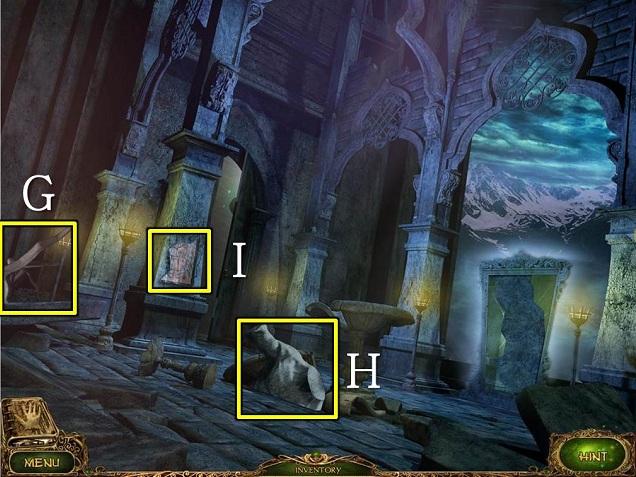
- Pick up two more STATUE PARTS (3 and 4/5) (G, H) and another MIRROR FRAGMENT (7/7) (I).
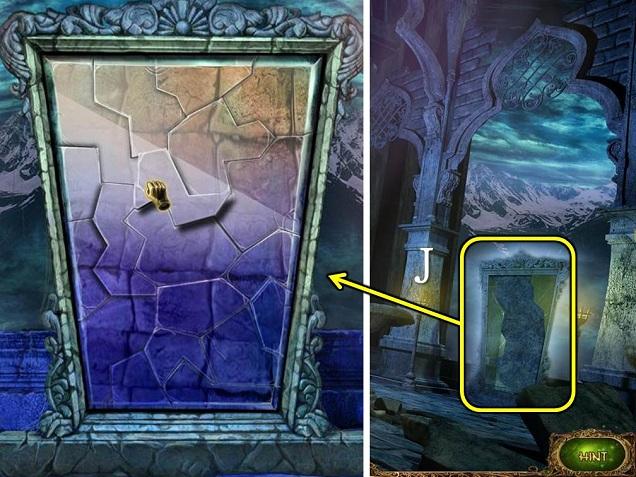
- Put the MIRROR FRAGMENTS (7/7) on the broken mirror (J) to trigger a jigsaw puzzle.
- Drag and drop pieces into their correct place to restore the mirror. Click on a piece to rotate it.
- Go through the mirror.
- Play the HOS.
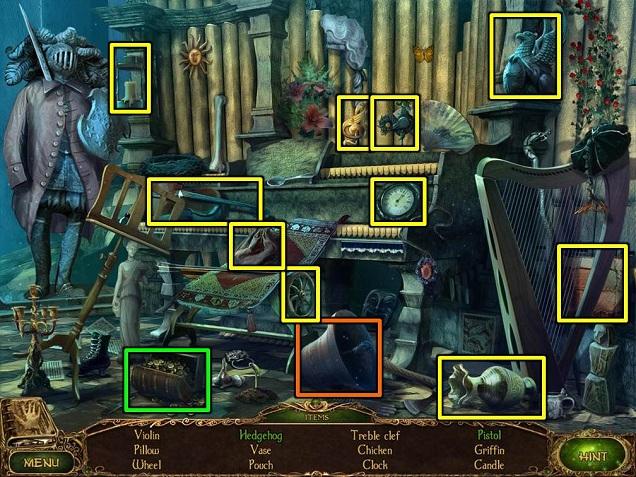
- Ring the bell to find the hedgehog (orange). The pistol is behind the money box (green).
- You get a PISTOL.
- Go back to the main room and off to the left.
- There’s a new HOS there.
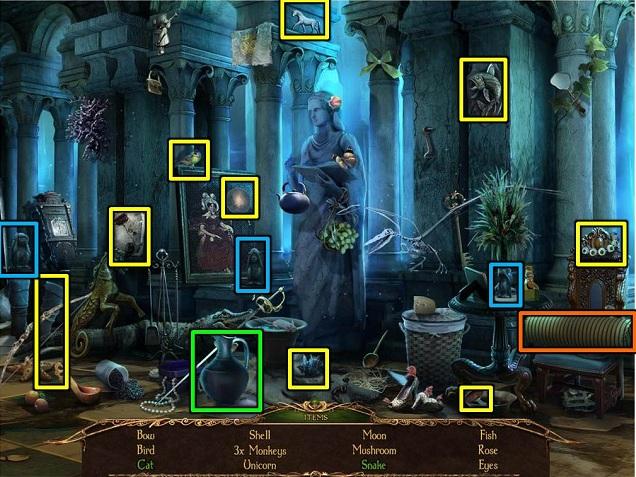
- The cat is behind the jug (green). The snake is behind the bedroll (orange).
- You get a BOW (2/3).
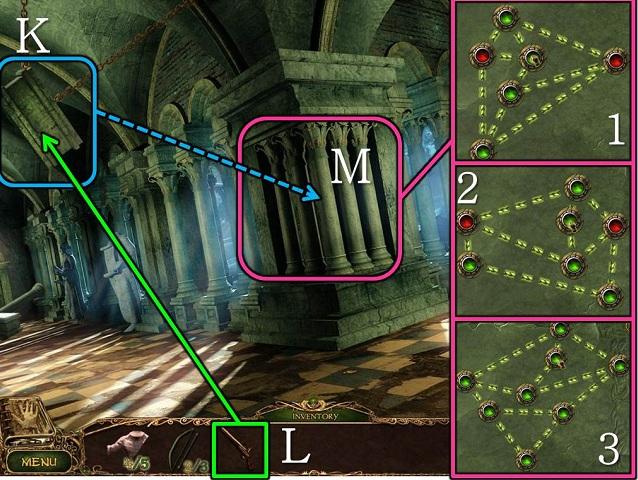
- Shoot down the coffin (K) with the PISTOL (L) – it will break the pillars (M).
- Click on the panel behind the pillars for a series of “untangle the ropes” puzzles. Red buttons are fixed in place.
- You receive the last piece of the BOW (3/3).
- Go back through the middle door and through the mirror.
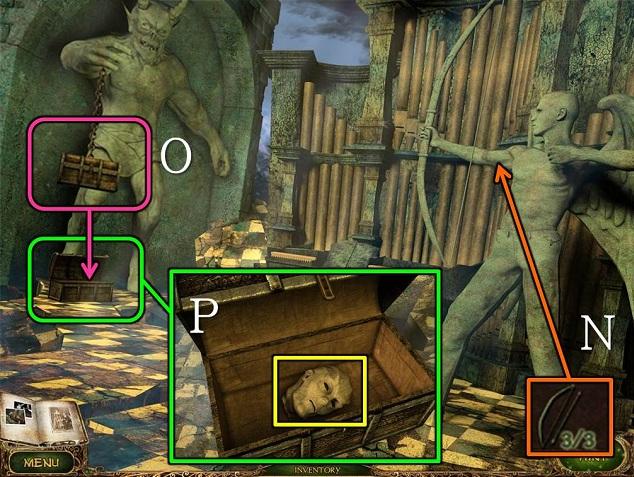
- Give the BOW (3/3) to the archer on the right (N). He will shoot down the hanging chest (O),
- Zoom in on the chest on the floor (P).
- Take the STATUE PART (5/5).
- Go back to the main room and zoom in on the statue.
- Return the STATUE PARTS (5/5) to the statue.
- He will give you a KEY.
- Go through the middle door.
- There will be a new HOS in the mirror room.
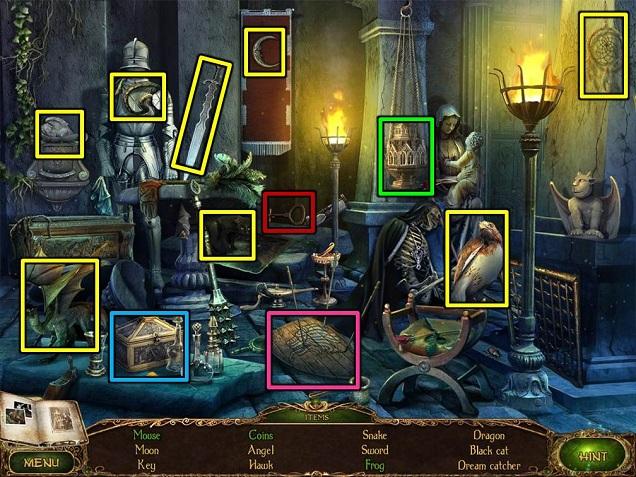
- The coins are under the shield (pink). The frog is behind the incense burner (green). The mouse is behind the jewelled chest (blue).
- You get a KEY (red).
- Go back to the main room and to the door on the right.
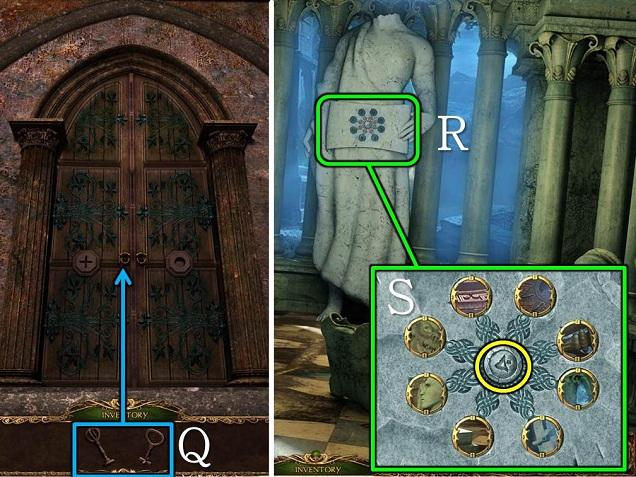
- Open it with the two KEYS (Q).
- Go through the door.
- Zoom in on the scroll the statue is holding (R).
- Click on the button in the middle to receive a series of tokens (S). You need to find the locations shown on the tokens and line them up.
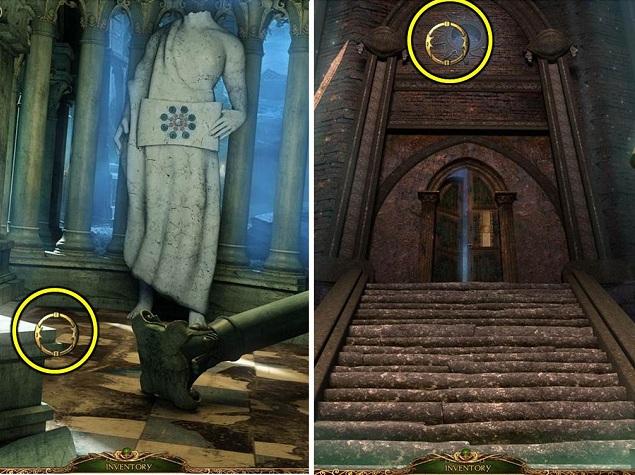

- When you’ve found all eight tokens, return to the room on the right.

- Put all tokens back in their correct places on the statue’s scroll (T).
- Take the AMULET.
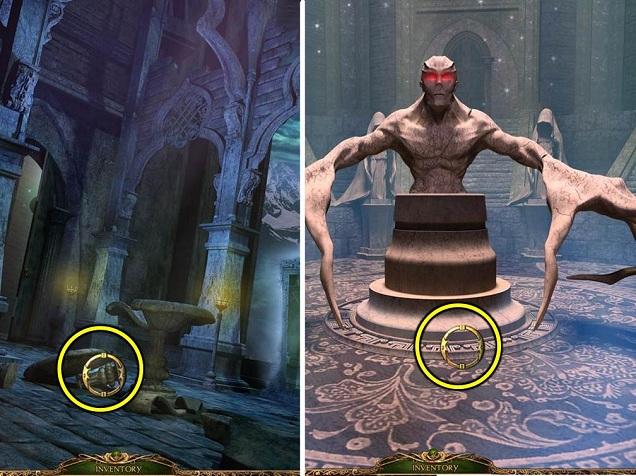
- Go back to the giant statue and give him the AMULET.
- Put the AMULET on the book.
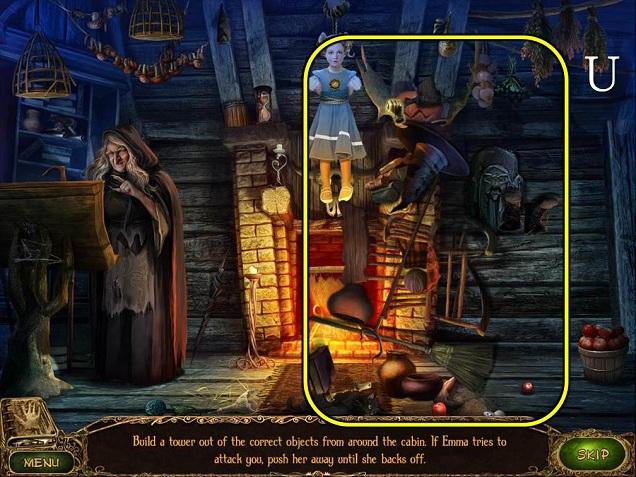
- For your final challenge, stack up all the loose pieces in the hut until Maria falls down (U). When Emma attacks, keep clicking on her until she backs off. There isn’t one true way of doing this. Just keep stacking until everything is piled up.
- Click on Maria to end the game.

More articles...
-
Best Horror Games On Itch.io – July 2026
Across a bounty of subgenres. -
Haze Seas Accessories Tier List [Best Accessories to Equip]
The accessories with the best stat buffs in Haze Seas.