![Digimon UP Tier List [Supports, Buddies, and Partners]](/wp-content/uploads/2026/07/digimon-up-tier-list.jpg "Digimon UP Tier List [Supports, Buddies, and Partners]")
Digimon UP Tier List [Supports, Buddies, and Partners]
These Digimon will get you UP the leaderboard.


![Haze Seas Boss Drops [Chances, Locations, and How to Spawn]](/wp-content/uploads/2026/07/haze-seas-boss-drops.jpg "Haze Seas Boss Drops [Chances, Locations, and How to Spawn]")

Welcome to Gamezebo's walkthrough for Lost Realms – The Curse of Babylon. ABOUT THIS WALKTHROUGH Items circled in red-yellow are the orange items on the list, or other key items for the game. Items circled in blue-yellow-white are the plain items on the list. Items circled in red-green are the yellow, 'foreign' items on the list. Up to chapter 3, items are the same in any game. From chapter 4 and on, a number of items are random, so only the key items will be circled. W…
a:1:i:0;a:2:s:13:”section_title”;s:45:”Lost Realms: The Curse of Babylon Walkthrough”;s:12:”section_body”;s:27146:”
Welcome to Gamezebo’s walkthrough for Lost Realms – The Curse of Babylon.
ABOUT THIS WALKTHROUGH
Items circled in red-yellow are the orange items on the list, or other key items for the game.
Items circled in blue-yellow-white are the plain items on the list.
Items circled in red-green are the yellow, ‘foreign’ items on the list.
Up to chapter 3, items are the same in any game. From chapter 4 and on, a number of items are random, so only the key items will be circled.
WALKTHROUGH
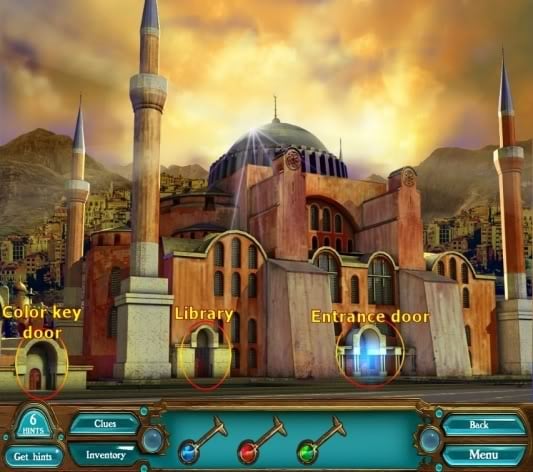
Chapter 1 – Hagia Sofia, Turkey
Click on the glowing door to enter Hagia Sofia.

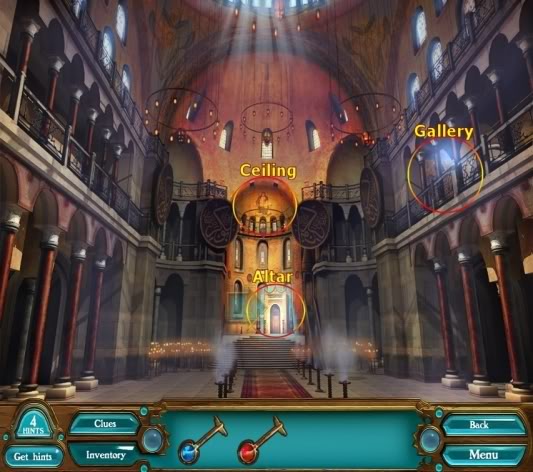
Inside, click on the altar to zoom in.
Find all the items on the list.
Follow the instructions on how to grab the robe, use it on the crate, and find the blue key.

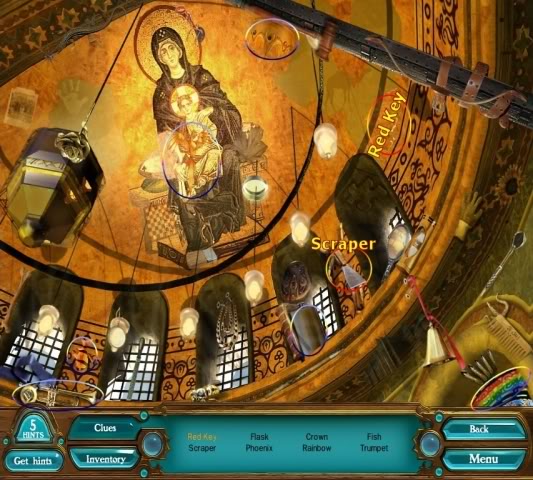
Go to the ceiling scene and find all the items on the list.
Take the scraper, and scrape the ceiling to find the red key.
Go to the gallery scene and find all the items on the list.
Take the scraper, and scrape the ceiling to find the red key.
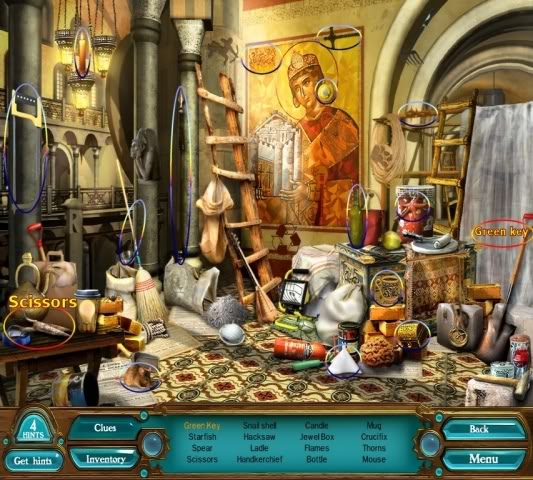
Enter the library, and click on the fuse box.
As this is a random puzzle, there is no one solution to it. The goal is to connect a certain number of connectors to the nuts, as indicated on them. If you’re having trouble you can also simply skip it.
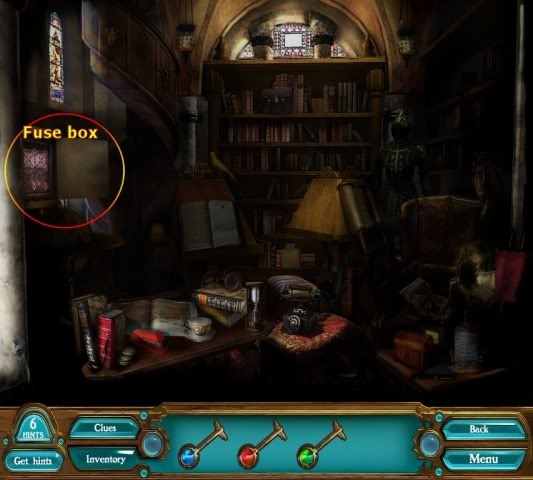
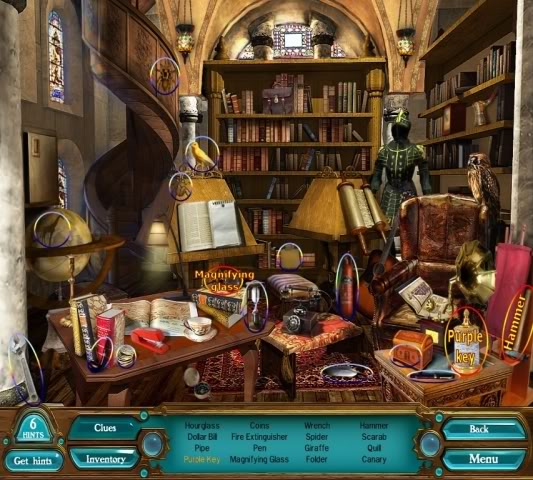
Now that the lights are on, find all the items on the list.
Find the magnifying glass, which will go to your tools.
Take the hammer and break the flask to find the purple key.
Go to the color key door, zoom in on the center wheel, and match the colored keys you gathered to the slots of the same color.
When the door opens, click on the left column of the altar to start a mini-game. The goal here is to jump over the other pegs, eliminating them by doing so, and end up in the green slot.
<VIDEO_17>
When the altar goes down, go behind it for a new hidden object scene.
Find all the items on the list.
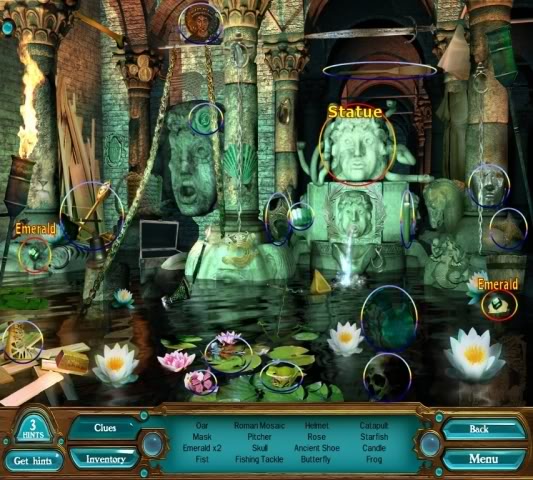
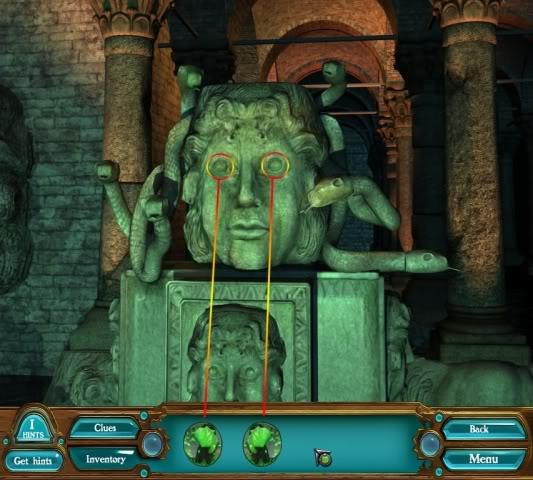
Take the two emeralds and zoom in on the head. Place the emeralds in its eye sockets to finish the chapter.
Chapter 2 – Istanbul Bazaar, Turkey
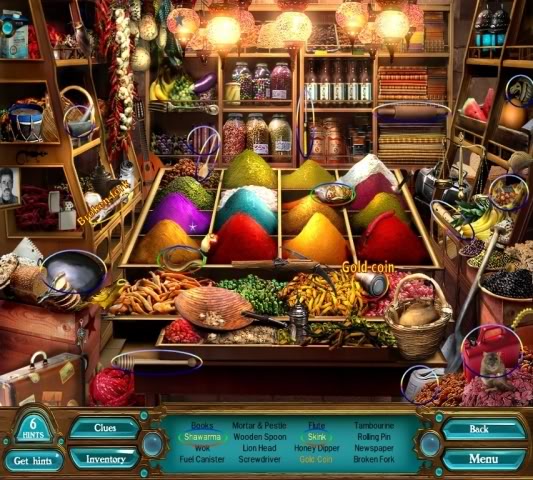
First, visit the spice stall.

Find all the items on the list.
Use the broken fork on the can to find the gold coin.
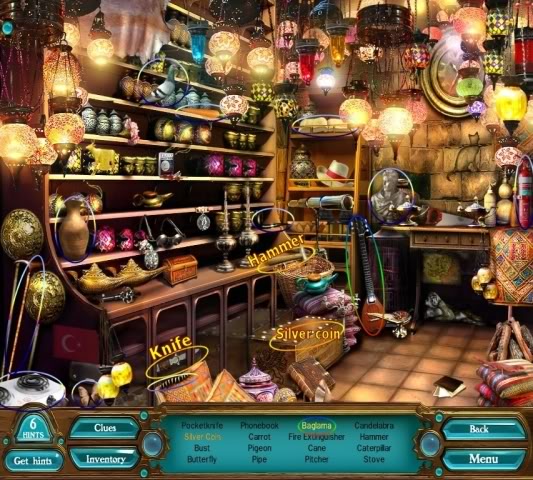
Visit the lamp stall.
Find all the items on the list.
Find the pocket knife.
Use the hammer on the chest to find the silver coin.
Now visit the cash register scene.
Find all the items on the list.
Use the zipper tab on the bag to find the bronze coin.
Now click on the register, and place the 3 coins in their corresponding slots.
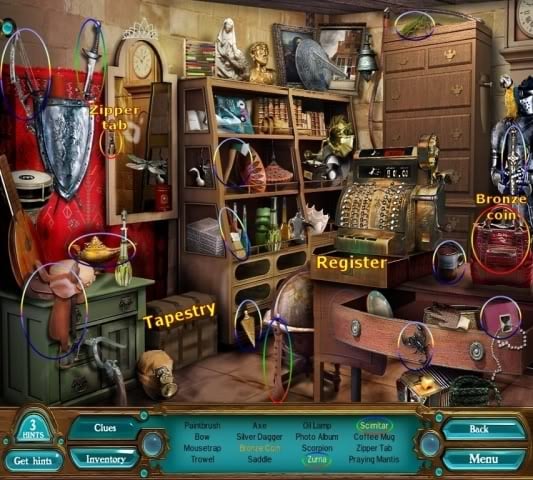
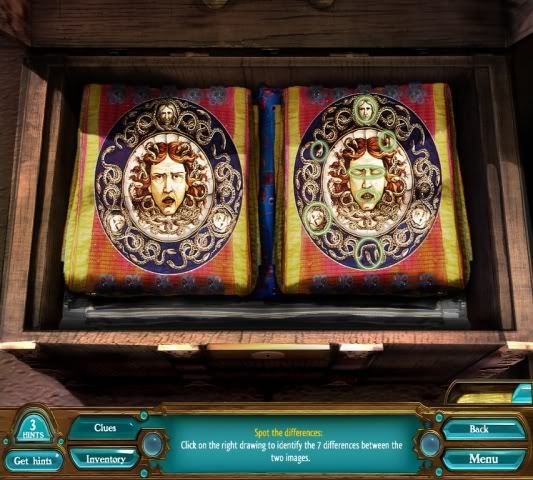
Click on the now-opened tapestry chest.
Find the 7 differences, and mark them on the right sample.
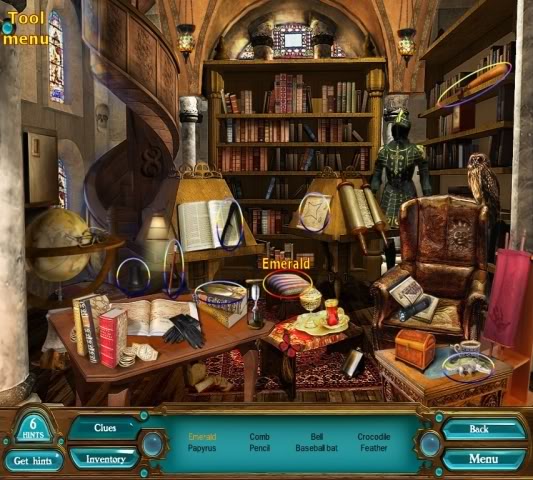
Chapter 3 – Hagia Sofia, Turkey
Enter the library again.

Find all the items on the list.
Click on the blue circle in the top left corner to open the tool menu, and use the pocket knife on the pillow to find the emerald.
Find the baseball bat.
Now go in through the main entrance, and pick the location in the top right.
Find all the items on the list.
Use the baseball bat from the tool menu to smash the mask and find the mirror.
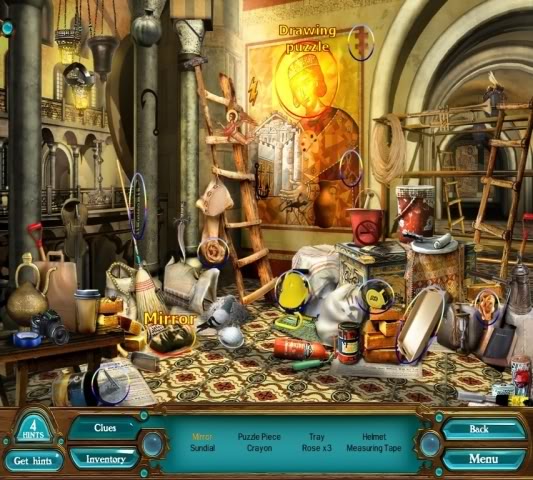
Click on the head of the painting to start a drawing puzzle.
Go to your inventory, and place the papyrus on the board on the right.
Now draw the star shape on the lightly shaded part of the mosaic in the top left, and pick up the valve handle that appears after you have done that.
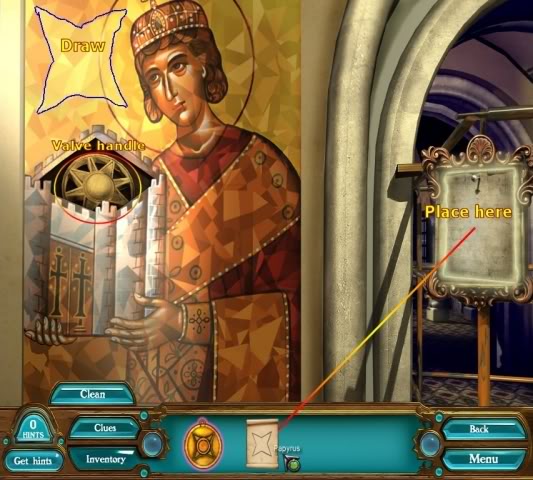
Go to the flooded room and place the valve handle in the holder above Medusa’s head to drain the room.
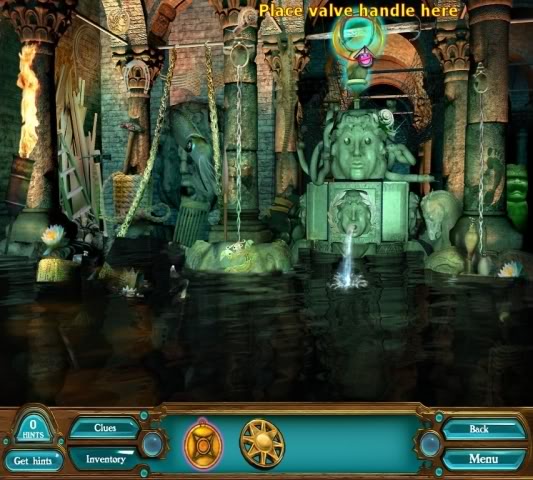
Find all the items on the list.
Use the pocket knife from the tool menu on the sack to find the scallop.
Click on the mosaic stone to start a slider puzzle.
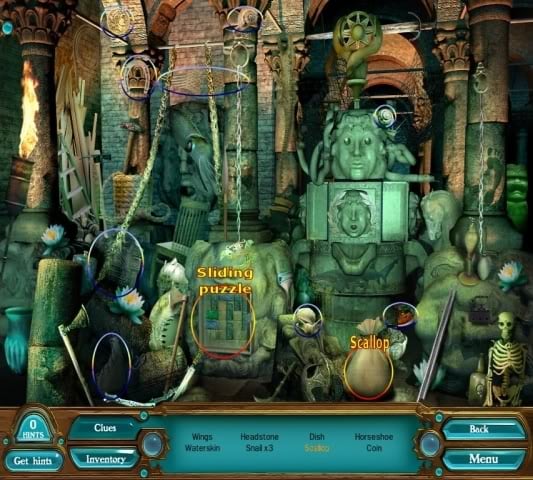
Slide the pieces around to enable the green piece to slide out of the box.
<VIDEO_34>
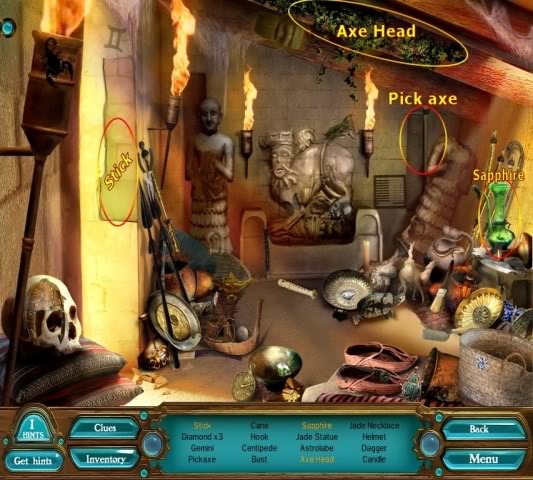
Chapter 4 – Untash Ziggurat, Dur
Combine both halves of the medallion in your inventory.
Enter the door in the middle.
Find all the items on the list.
Pick up the Pick axe, and use it on the wall to find the Stick.
Use the baseball bat-tool on the green vase to find the Sapphire.
Use the knife-tool on the vines to find the Axe Head.
Enter the door on the left.
Find all the items on the list.
Pick up the Palm Leaf, and use it on the pile of sand to find the Stone Rings.
Use the baseball bat-tool on the coconut to find the Gold Ring.
Use the knife-tool on the waterskin to find the Compass.

Enter the door on the right.
Find all the items on the list.
Pick up the Scimitar, and use it on the vines to find the Stick.
Use the baseball bat-tool on the barrel to find the Ibex.
Use the knife-tool on the bag to find the Quartz Stone.
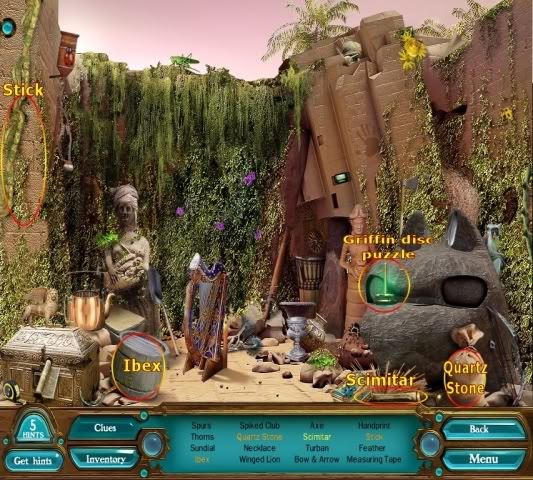
Start the Griffin Disc puzzle and move all discs to the right stick.
<VIDEO_38>
Take the weed spray that appears after finishing the puzzle and use it on the weeds on the back wall.
Find all the items on the list.
Use the baseball bat-tool on the statue head to find the Dagger.
Use the knife-tool on the doll to find the Diamond.

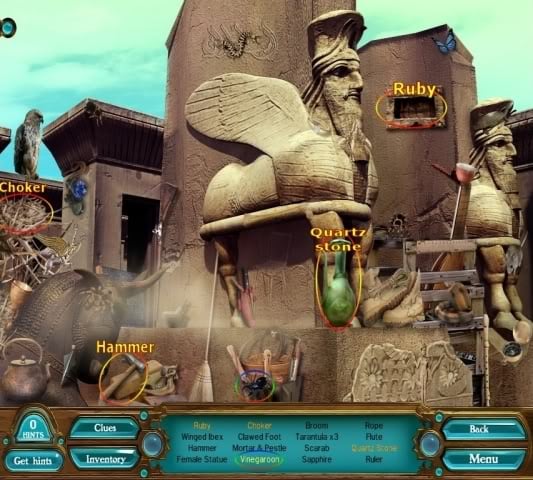
Chapter 5 – Persepolis, Persia
Go through the door in the middle.
Find all the items on the list.
Pick up the hammer and use it on the top right stone to find the Ruby.
Use the baseball bat-tool on the green vase to find the Quartz Stone.
Use the knife-tool on the nest to find the Choker.
Go through the door on the left.
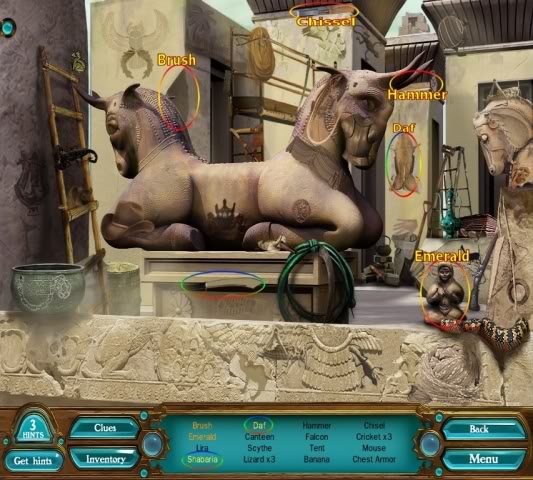
Find all the items on the list.
Pick up the chisel and the hammer, and use them (first the chisel, then the hammer) on the back wall to find the Brush.
Use the baseball bat-tool on the statue to find the Emerald.
Use the knife-tool on the wall to find the Daf.
Go through the door on the right.
Find all the items on the list.
Use the baseball bat-tool on the artifact to find the Necklace.
Use the knife-tool on the dirt in front of the casket to find the Crowbar.
Use the knife-tool on the drum to find the Shofar.
Click on the top of the casket to zoom in, use the crowbar and then use the brush.

Play Chinese checkers and remove enough marbles to fill up the meter on the right. Click on one marble and jump over another marble which is connected either vertically or horizontally. You don’t need to clear the entire board so just try and get as far as possible.
Find all the items on the list.
Use the baseball bat-tool on the statue to find the Sapphire.
Use the knife-tool on the dust in the top right corner to find the Bracelet.
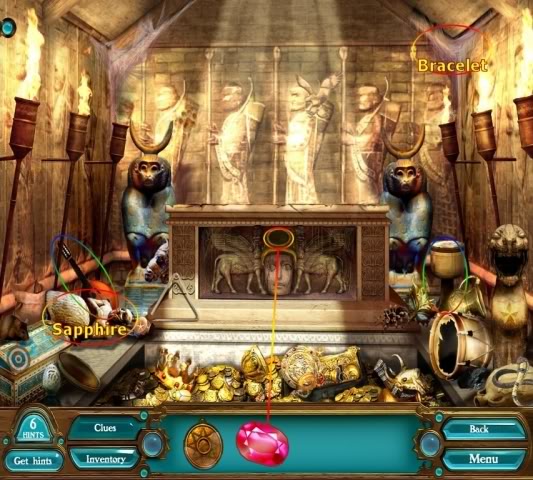
When all items have been found, the front of the casket will open.
Place the ruby from your inventory in the slot in the center of the casket.
Chapter 6 – Ishtar Gates, Kingdom of Babylon
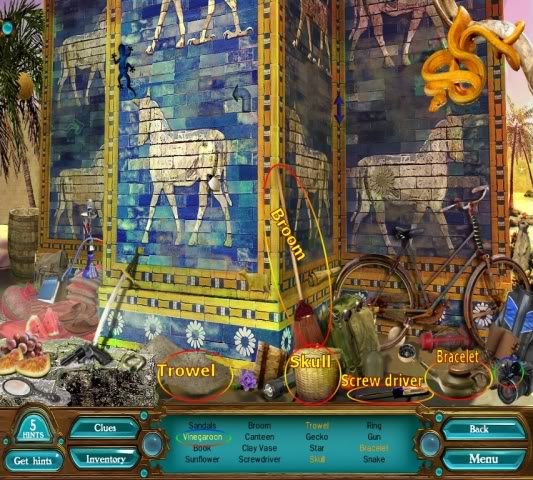
Click on the glowing golden symbols right of the gate.
Find all the items on the list.
Pick up the screwdriver.
Pick up the broom and use it on the pile of dust. When the dust has cleared, use the screwdriver on the loose tile under it to find the Trowel.
Use the baseball bat-tool on the oil lamp to find the Bracelet.
Use the knife-tool on the basket to find the Skull.
Click on the glowing golden symbols on the left side.
Pick up the scythe and use it on the tree branch to find the rag.
Use the baseball bat-tool on the crate to find the Red Necklace.
Use the knife-tool on the bushes to find the Key.
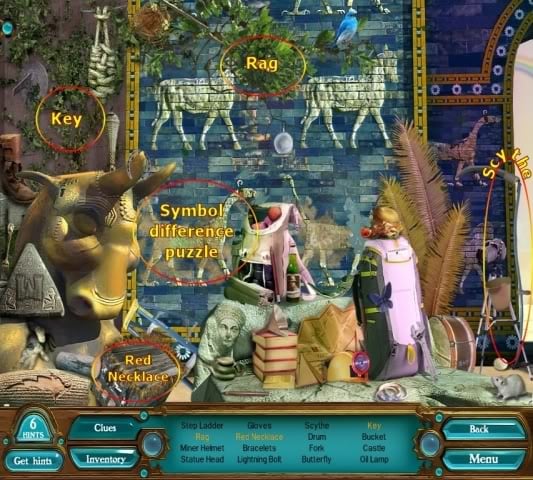
Click on the glowing symbol to start a spot-the-differences puzzle.
First use the trowel on the wall to scrape off the dirt, and then use the rag to clean it. Now spot the 7 differences on the symbol on the right.
When you solve the puzzle, the wall will open up and a slot will appear.
Put the medallion in the slot to start a movie scene.
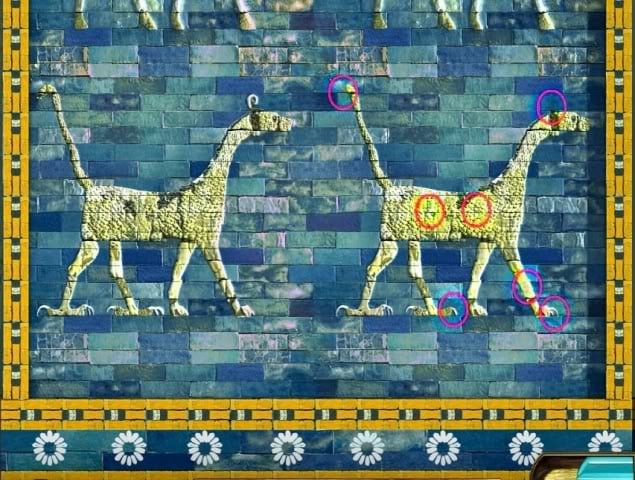
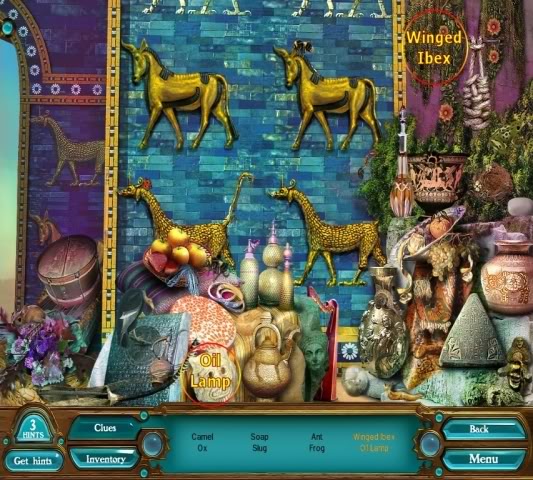
Click on the glowing golden symbols on the right side.
Find all the items on the list.
Use the baseball bat-tool on the cat figurine to find the Oil Lamp.
Use the knife-tool on the vines to find the Winged Ibex.
Chapter 7 – Central Plaza, Kingdom of Babylon
Go to the temple scene.
Find all the items on the list.
Use the baseball bat-tool on the vase to find the Tiara.
Use the knife-tool on the rug to find the Necklace.
Pick up the Old Hammer and use it on the gold chains to find the Temple Key.
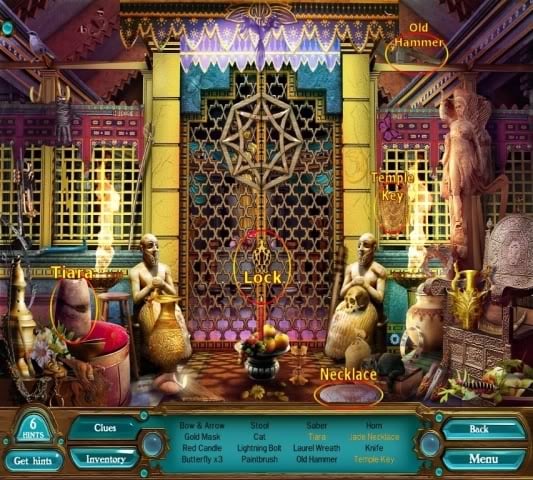
Use the Temple Key on the lock, and continue through to the next scene.
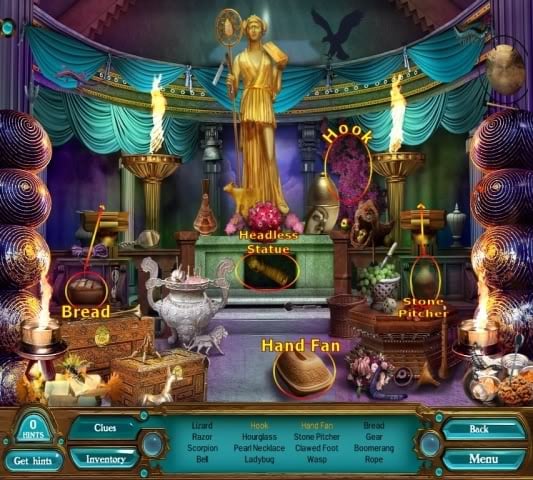
Find all the items on the list.
Use the baseball bat-tool on the stone pot to find the Hand Fan.
Use the knife-tool on the shrubs to find the Hook.
Pick up the Bread and Stone Pitcher and place them on the altars above them. Once you have found all of the items, the base of the statue will open and you will find the Headless Statue.
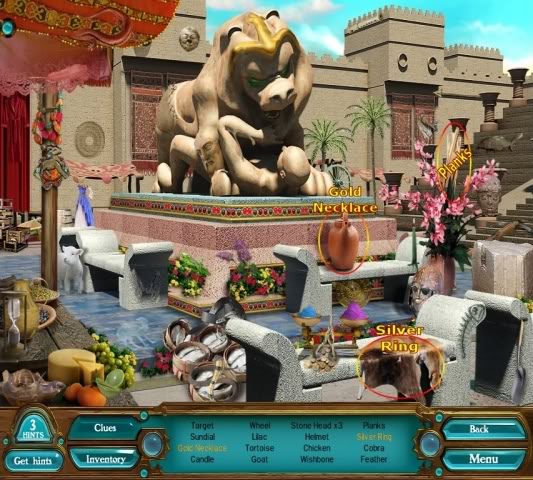
Go to the statue scene.
Find all the items on the list.
Use the baseball bat-tool on the pitcher to find the Gold Necklace.
Use the knife-tool on the animal skin to find the Silver Ring.
Go to the harbor scene.
Find all the items on the list.
Pick up the Chains and use them on the pile of fish to find the Broken Ship Wheel.
Use the baseball bat-tool on the coral to find the Bracelet.
Use the knife-tool on the pile of stuff in the center to find the Conch Shell.
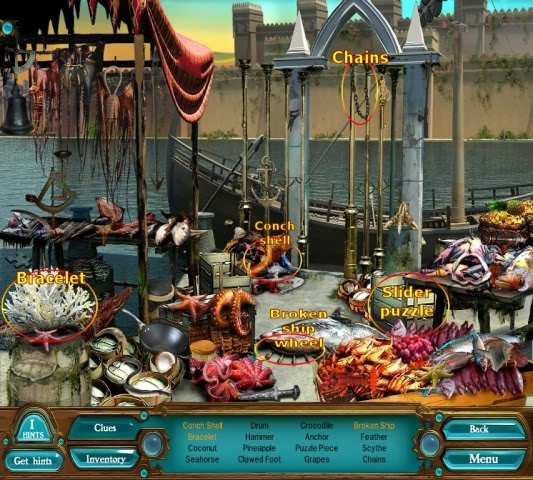
Click on the box to start a slider puzzle.
Your goal is to press the arrow buttons on the edges of the board in the correct order to slide the special items out of the box.
Solution for puzzle 1: right, up, left, down, right, up, right
Solution for puzzle 2: up, right, down, left, up, right, down, left, up, right, down, right
Solution for puzzle 3: down, left, up, right, up, left, down, right, up, left, down, right, up, right

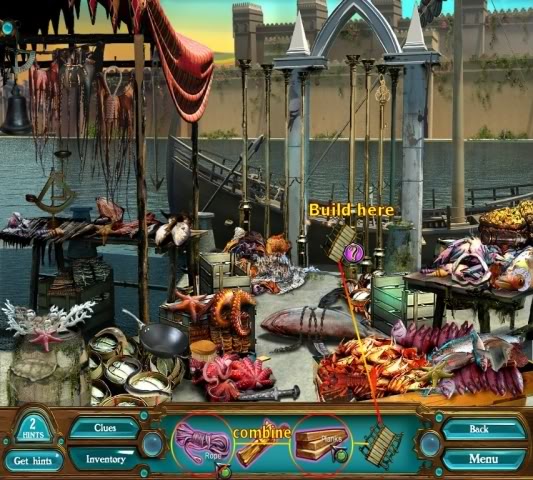
Combine the rope and planks in your inventory and place them in the scene to form a bridge to a boat.
Select the boat scene.
Find all the items on the list.
Use the baseball bat-tool on the pot to find the Ring.
Use the knife-tool on the fish nets to find the Oil Lamp.
Combine both parts of the Broken Ship Wheel in your inventory and place it in the scene.
Place the Crank from your inventory in the scene.
Place the Astrolabe from your inventory in the scene.

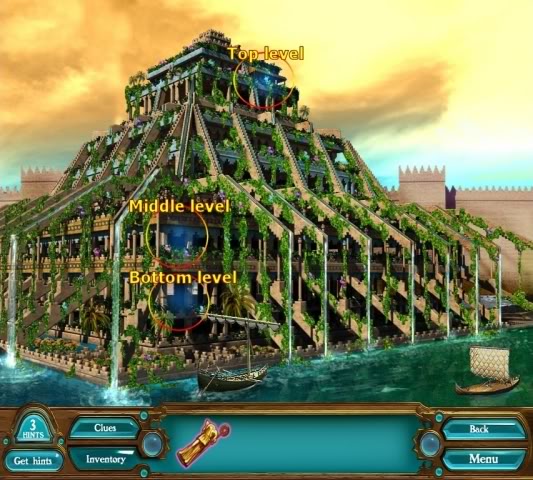
Chapter 8 – Hanging Gardens, Kingdom of Babylon
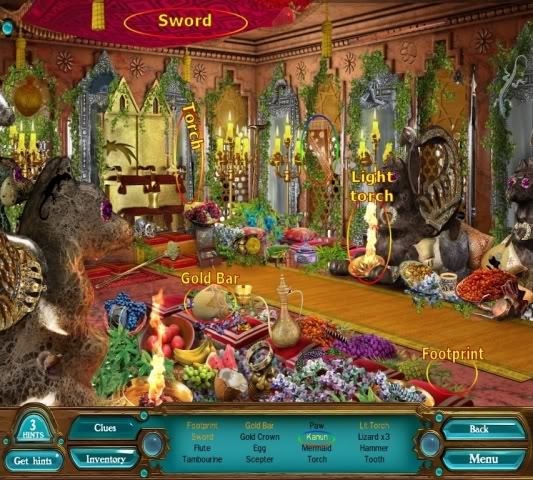
Select the bottom level scene.
Find all the items on the list.
Grab the Torch and use it on the fire in front of the statue.
Grab the lit torch and use it on the drapes to find the Sword.
Use the baseball bat-tool on the vase to find the Gold Bar.
Use the knife-tool on the lower-right ground to find the Footprint.
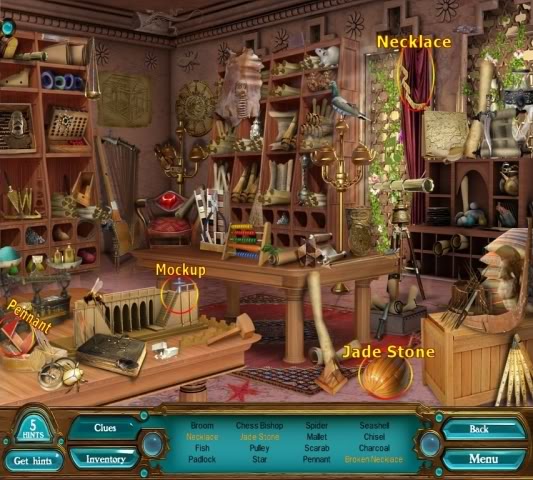
Select the middle level scene.
Find all the items on the list.
Pick up the Pennant and place it in the Mockup to find the Broken Necklace.
Use the baseball bat-tool on the artifact to find the Jade Stone.
Use the knife-tool on the drapes to find the Necklace.
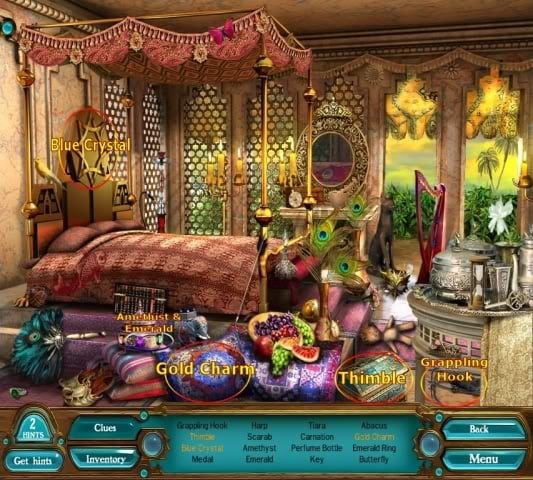
Select the top level scene.
Find all the items on the list.
Pick up the Grappling Hook and use it on the star plaque to knock it down onto the bed. Find the Blue Crystal on the back of the plaque.
Use the baseball bat-tool on the chest to find the Thimble.
Use the knife-tool on the blue pillow to find the Gold Charm.
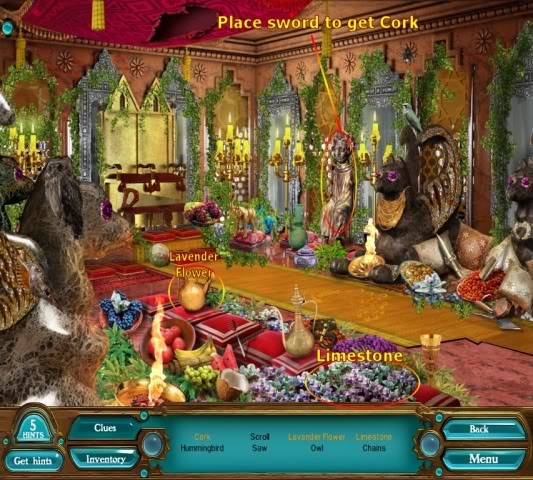
Return to the bottom level scene.
Find all the items on the list.
Place the Sword from your inventory in the hands of the statue to find the Cork.
Use the baseball bat-tool on the vase to find the Lavender Flower.
Use the knife-tool on the lavender to find the Limestone.
Go to the very top of the hanging gardens.
Find all the items on the list.
Use the baseball bat-tool on the pitcher to find the Silver Coin.
Use the knife-tool on the red cloth to find the Diamond.
Pick up the Gold Vase.
Place the Cork from your inventory in the statue’s mouth.
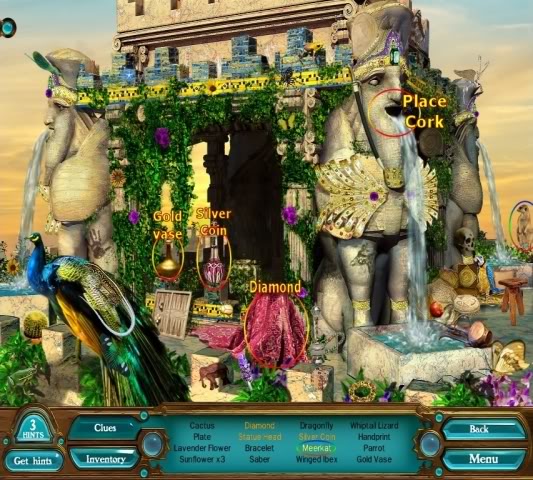
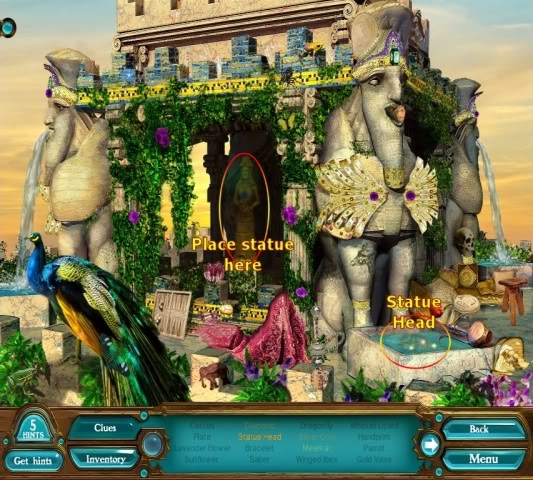
Use the Gold Vase on the water basin to get the Statue Head.
In your inventory, combine the Blue Crystal with the Broken Necklace to get the Statue’s Necklace.
In your inventory, combine the Headless Statue with the Statue Head to get the Statue.
In your inventory, combine Statue’s Necklace with the Statue to get the Ishtar Statue.
Place the Statue on the Altar and click on it for the final puzzle of the game.
The final puzzle is a game of Mastermind.
Your goal is to guess the correct code by getting clues for each of your guesses. After taking a guess press the "Check"-button to see how you did.
– A white square means you guessed the right symbol in the right position.
– A black square means you guessed the right symbol in the wrong position.
– A gold square means you got the symbol completely wrong.
If you guess the correct code within 8 tries you win the game. If you don’t guess it in time, you will start the mini-game over again.
If you are having too many problems solving the mini-game, you can skip it.

“;
