![Digimon UP Tier List [Supports, Buddies, and Partners]](/wp-content/uploads/2026/07/digimon-up-tier-list.jpg "Digimon UP Tier List [Supports, Buddies, and Partners]")
Digimon UP Tier List [Supports, Buddies, and Partners]
These Digimon will get you UP the leaderboard.

![Haze Seas Boss Drops [Chances, Locations, and How to Spawn]](/wp-content/uploads/2026/07/haze-seas-boss-drops.jpg "Haze Seas Boss Drops [Chances, Locations, and How to Spawn]")

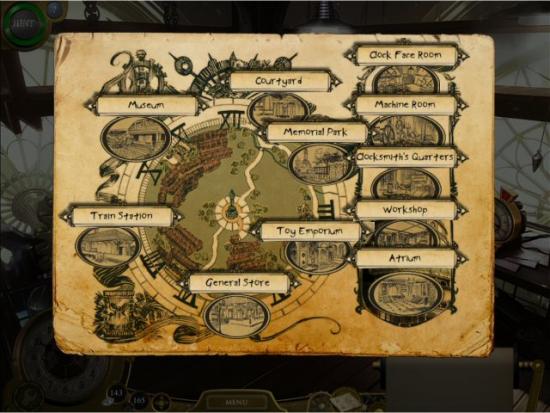
Welcome to the Lost in Time: The Clockwork Tower walkthrough on Gamezebo, written by Lynne Basinet. Lost in Time: The Clockwork Tower is an interactive, adventure, Hidden Object game played on PC, created by Sparkplug Games and Namco.. This walkthrough includes tips and tricks, helpful hints, and a strategy guide for how to complete Lost in Time: The Clockwork Tower.
Welcome to the Lost in Time: The Clockwork Tower walkthrough on Gamezebo, written by Lynne Basinet. Lost in Time: The Clockwork Tower is an interactive, adventure, Hidden Object game played on PC, created by Sparkplug Games and Namco. This walkthrough includes tips and tricks, helpful hints, and a strategy guide for how to complete Lost in Time: The Clockwork Tower.
Copyright Information
This walkthrough was created by Lynne Basinet, for Gamezebo.com, and is protected under US and International Copyright laws. Any unauthorized use, including re-publication, in whole or in part, without permission, is strictly prohibited.
Create your profile, adjust the Options, if desired, and then click on Play. Watch the opening movie.
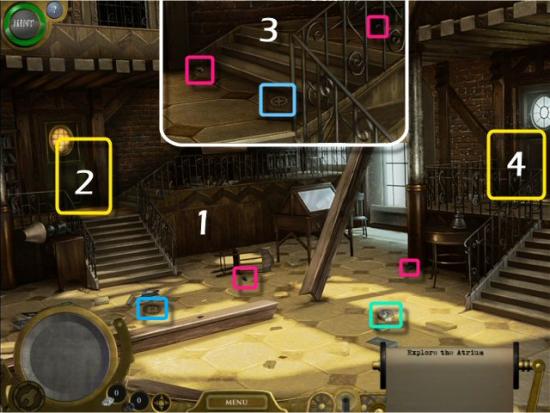
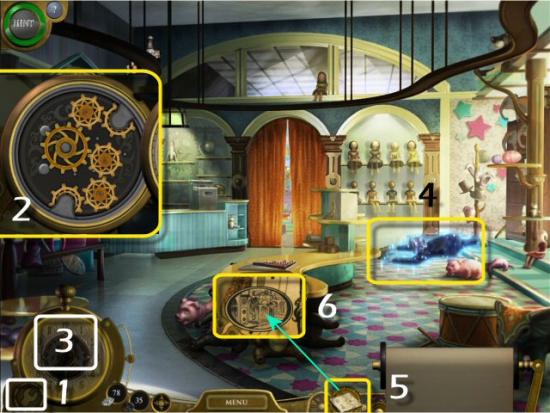
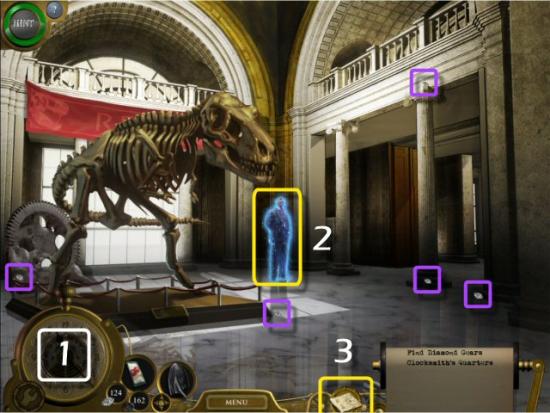
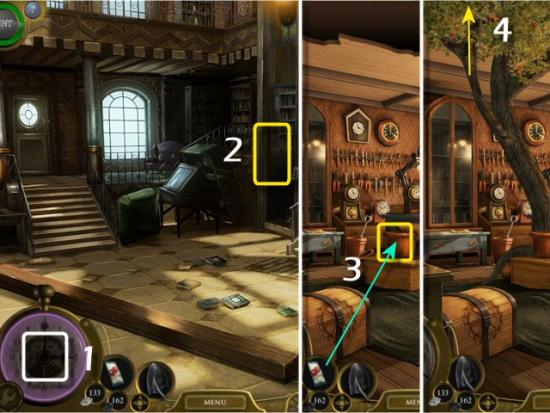
Collect the Pocket Watch, Copper Gear and Coal, in the Atrium (1) and then click on the Stair Landing to the Workshop (2). Collect the Copper Gear and Coal (3), return to the Atrium and then click on the Stair Landing to the Front Door (4).

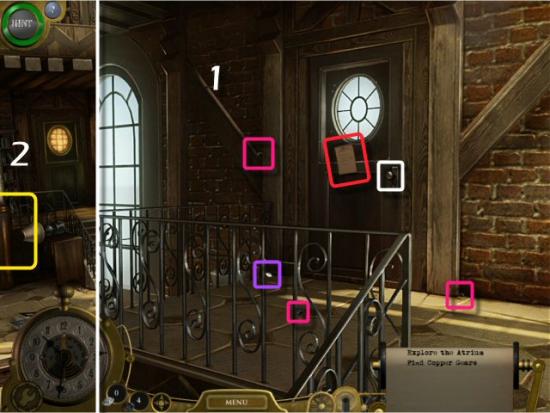
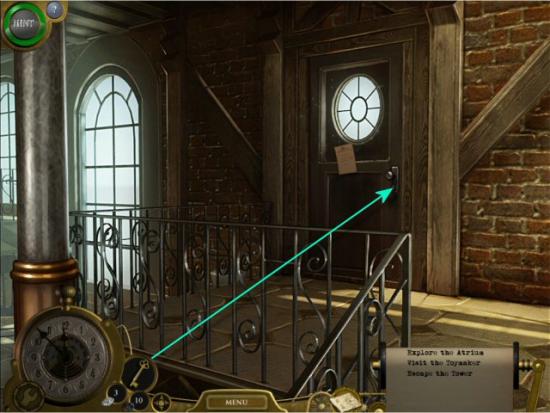
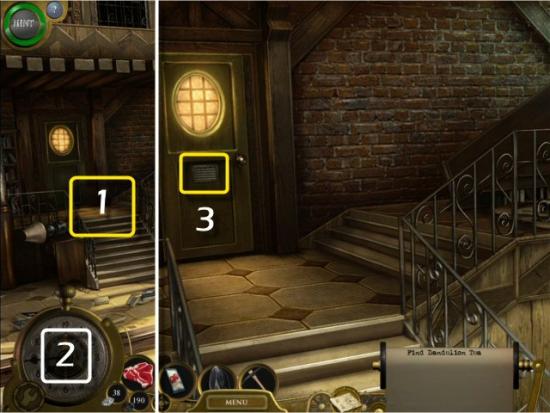
Collect the Diamond and Coal, click on the Note and then click on the Door Knob (1). Return to the Atrium and then click right to the Staircase (2).
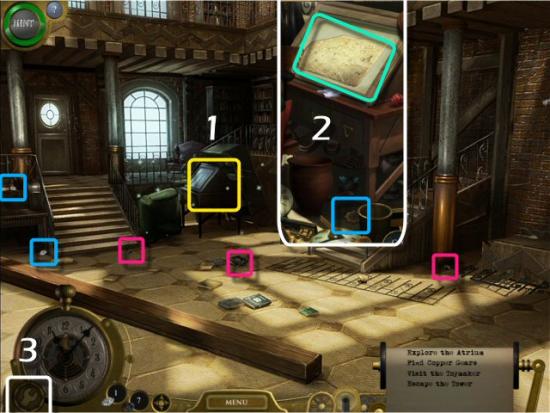
Collect the Diamonds and Coal and then click on the Drawing Table (1). Find all the items in the list. Key Items: Copper Gear, Map (2). When complete, click on the Watch Repair button to place the Gears (3).
Click on each Gear and place it in the Pocket Watch (1). Click on the blinking Pocket Watch (2), find the fluxing Key and then click on it, twice (3).
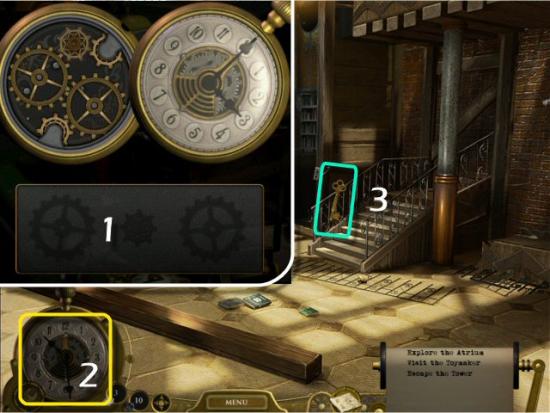
Return to the Atrium (click right), use the Key on the Front Door and then click on the Key.
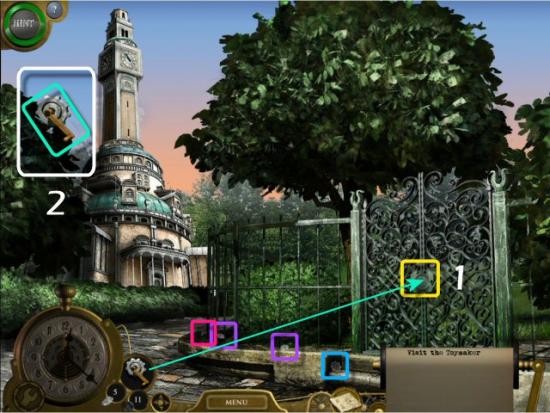
Collect the Diamonds, Coal and Silver Gear and then click on the Gate (1). Click on the Pocket Watch, find the fluxing Handle and then click on it, twice (2). Use the Handle on the Gate, click on it and then enter Memorial Park.
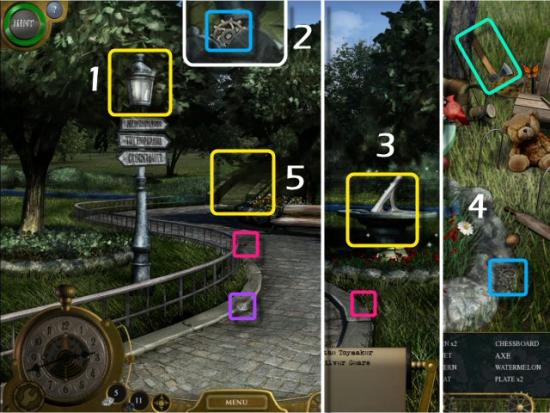
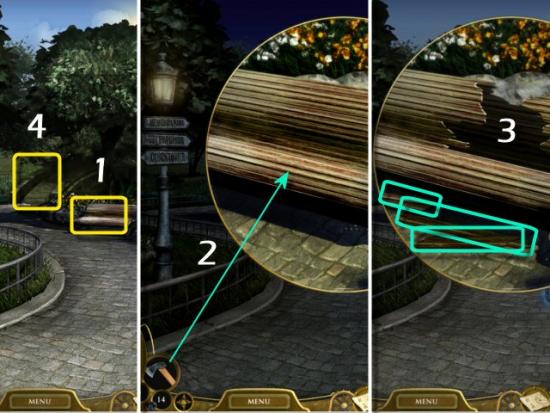
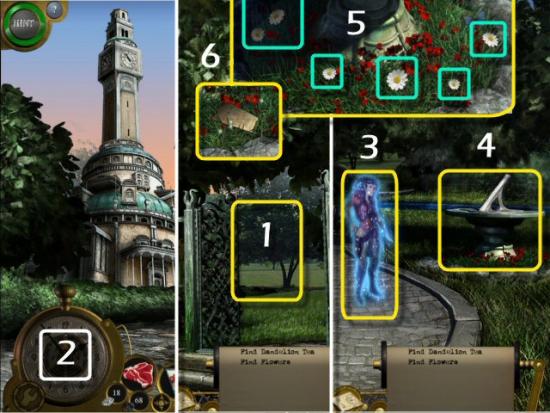
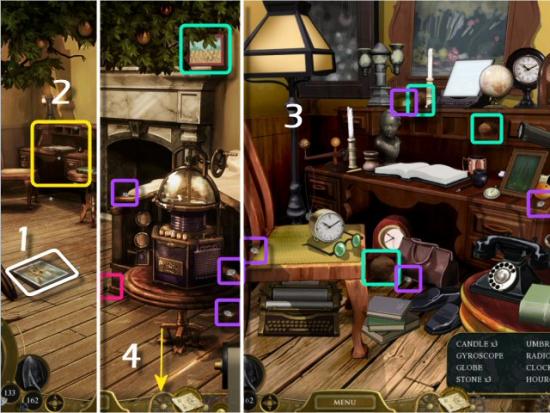
Collect the Diamond and Coal, click on the Sign (1), collect the Silver Gear (2) and then click on the Sundial (3). Find all the items in the list. Key Items: Axe, Silver Gear (4). Return to the Park, click on the Bridge (5) and then return to the Park.
Click on the Bench (1), use the Axe (2), collect 3 Boards (3) and then return to the Bridge (4).
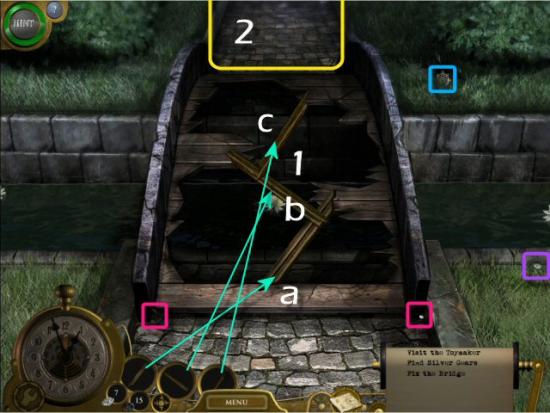
Use the Boards on the Bridge (1), in the order shown (a, b and c), collect the Silver Gear, Diamond and Coal and then cross the Bridge (2).
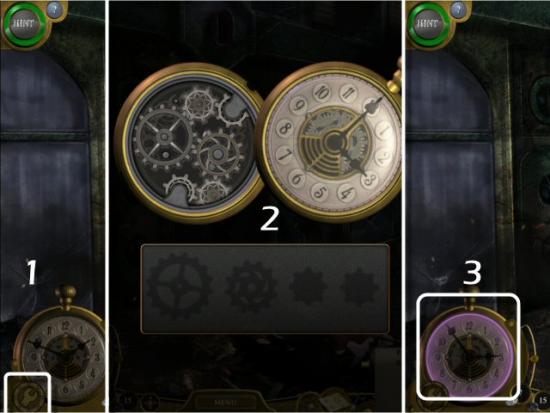
Click on the Watch Repair button (1), place the Gears (2) and then click on the blinking Pocket Watch (3).
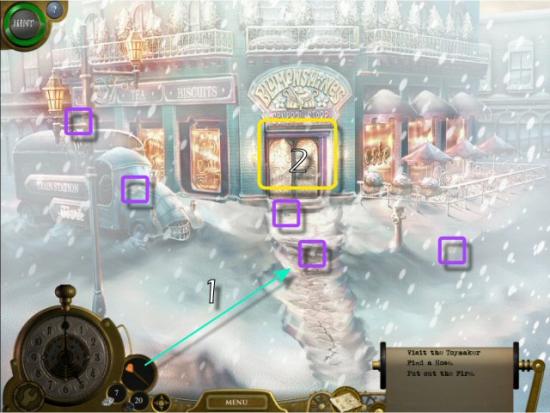
Click on the Smoke in the Window (1), click and drag the Arrow all the way to the Left (2) to Reverse Time, collect the Coal and Burning Board and then click right to the General Store (3).
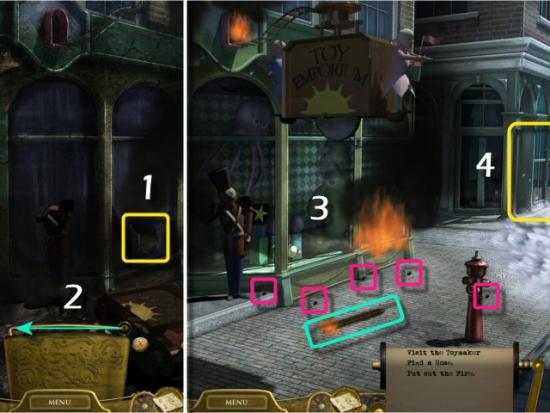
Use the Burning Board on the Path (1), collect the Diamonds and then enter the General Store (2).
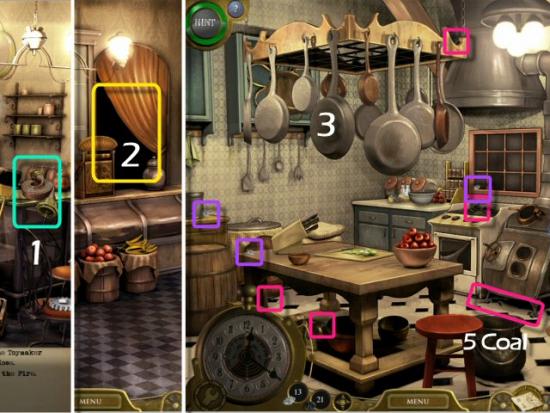
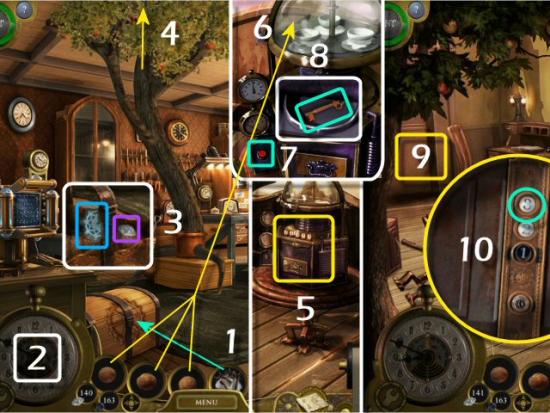
Click on the Hose to purchase it for 5 Diamonds (1), enter the Kitchen (2), collect the Diamonds and Coal (3) and then return to the Toy Store.
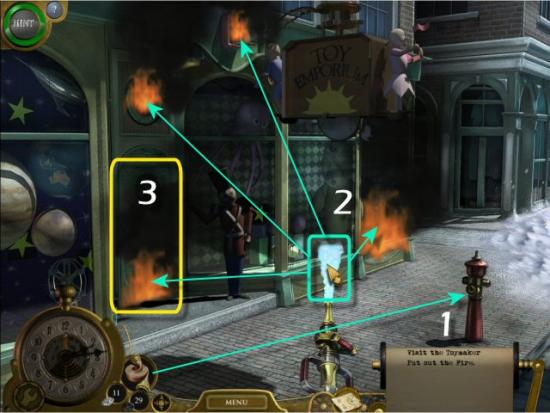
Use the Hose on the Hydrant (1) and then put out the Fires. Move your cursor left or right and then move your cursor up or down to direct the stream of water onto each Fire (2). When they’re out, enter the Toy Store (3).
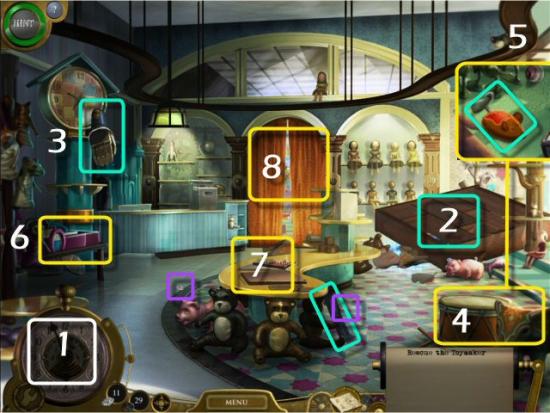
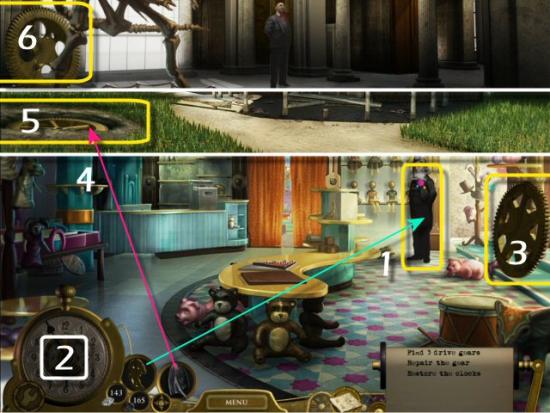
Click on the blinking Pocket Watch (1), click on the Bookshelf (2) and then click and drag the Arrow all the way to the Left, to Reverse Time. Click on the blinking Pocket Watch again, find the fluxing Otto’s Lower Arm (3) and then click on it, twice. Collect the Diamonds and Otto’s Left Leg and then click on the Toys (4).
Find all the items in the list. Key Items: Mouse (5 – located in the center of the scene). When complete, click on the Maze Game (6). When you complete the Maze Game, click on the Table (7). After you complete the Table area, enter the Back Room (8).
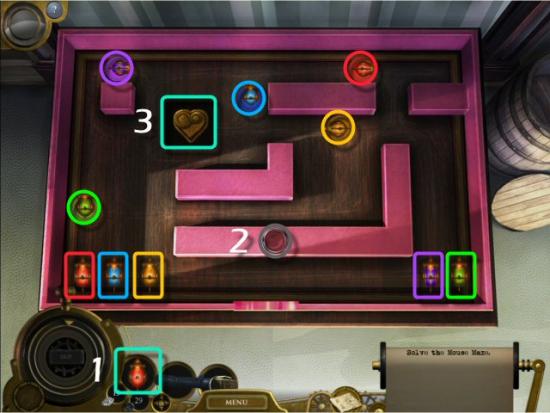
Maze Game
Click on the Red Mouse to place it on the board (1). The object is to move the 5 Mice onto their respectively colored Spots. Click on a Mouse to select it, move your cursor to the location you want it to go and then click to move the Mouse. The Mice will move in the direction chosen until they hit an obstacle or land on their own Spot. You may need to move some of the Mice to temporary locations in order to use them as obstacles for other Mice. Click on the Silver button to reset the game and start over (2). When complete, collect Otto’s Gearbox (3).
One solution is to click on the Mice in the following order:
Table
Click on the blinking Pocket Watch, find the fluxing Gold Gear and then click on it, twice (1). Collect the Diamonds and then click on the Jigsaw Game (2). When complete, click on the Peg Game (3).
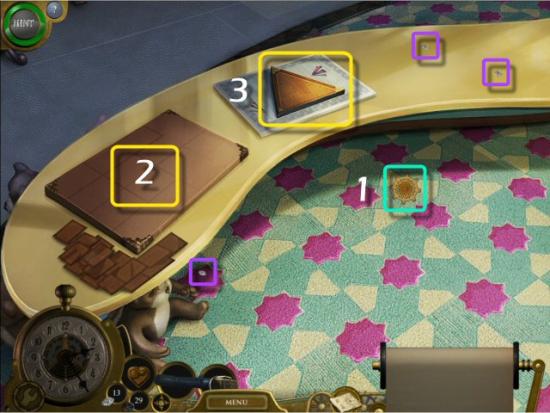
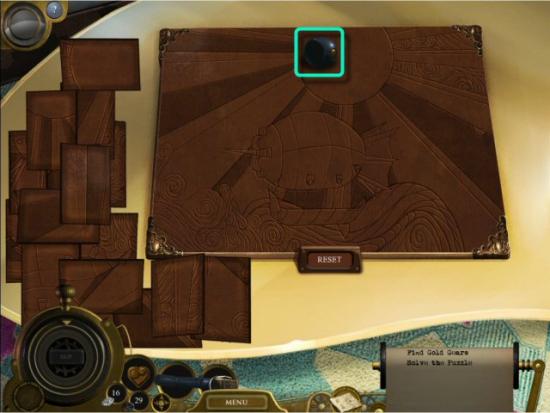
Jigsaw Game
Click and drag each piece to the Board and click on it to rotate it. You may rotate the pieces on or off the Board. Once placed in the correct position, the pieces will lock into place. Collect Otto’s Elbow, exit to the Table and then click on the Peg Game.
Peg Game
Remove the Pegs until you have no more moves. To remove a Peg, click on it and then click on an open Hole. You must jump over 1 Peg (you can’t jump over more than 1) to reach an open Hole. You can play this game 3 times and have 1, 2 and 3 Pegs Remaining to receive Achievements for completing each of them. Once you complete the first game solution, click the Reset button to play the remaining game solutions. When you’ve finished, collect Otto’s Right Leg, exit the Table and enter the Back Room.
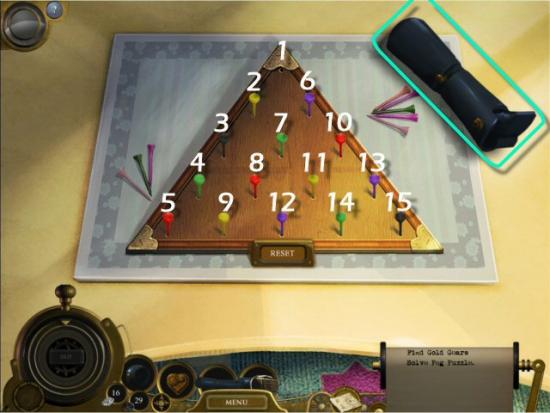
There are several solutions for each game, depending on where you begin and end. Here are 2 solutions for each of the games (read across, from left to right, in the first row and then repeat in the second row):
One Peg Remaining – Solution 1
3 to 1 | 10 to 3 | 9 to 7 | 14 to 9 | 5 to 12 | 15 to 10 | 6 to 13 |
12 to 10 | 4 to 2 | 1 to 3 | 13 to 6 | 3 to 10 | 6 to 13 |
One Peg Remaining – Solution 2
10 to 1 | 3 to 10 | 14 to 7 | 9 to 14 | 15 to 12 | 5 to 3 | 2 to 4 |
12 to 3 | 13 to 6 | 1 to 10 | 4 to 2 | 10 to 3 | 2 to 4 |
Two Pegs Remaining – Solution 1
3 to 1 | 12 to 3 | 15 to 12 | 9 to 14 | 4 to 2 | 1 to 3 | 6 to 8 |
10 to 12 | 14 to 4 | 9 to 7 | 3 to 10 | 13 to 6 |
Two Pegs Remaining – Solution 2
10 to 1 | 12 to 10 | 5 to 12 | 14 to 9 | 13 to 6 | 1 to 10 | 2 to 11 |
3 to 12 | 9 to 14 | 14 to 7 | 10 to 3 | 4 to 2 |
Three Pegs Remaining – Solution 1
3 to 1 | 11 to 2 | 9 to 7 | 5 to 3 | 14 to 9 | 6 to 8 | 9 to 7 |
13 to 6 | 1 to 10 | 2 to 11 | 10 to 12 |
Three Pegs Remaining – Solution 2
10 to 1 | 8 to 6 | 14 to 7 | 15 to 10 | 9 to 14 | 2 to 11 | 14 to 7 |
4 to 2 | 1 to 3 | 6 to 8 | 3 to 12 |
Back Room
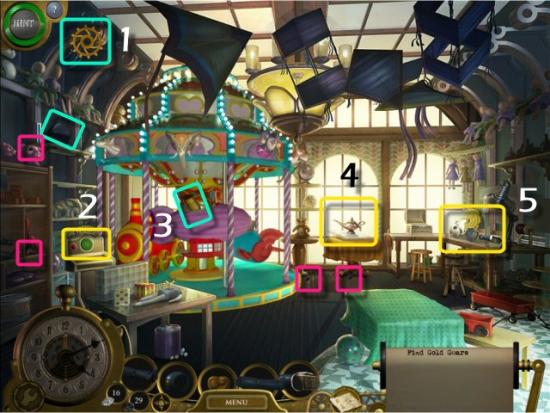
Click on the blinking Pocket Watch, find the fluxing Gold Gear and then click on it, twice (1). Click on the Green button to start the Carousel and then click on the Red button (2), to stop it, when the Purple Rocket has rotated to the front (3). Collect Otto’s Waist, Otto’s Spine and the Coal, and then click on Genie Lamp (4). When you complete that area, return and then click on the Work Bench (5).
Genie Lamp
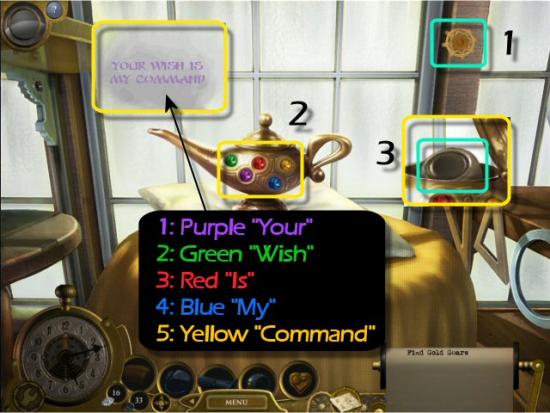
Click on the blinking Pocket Watch, find the fluxing Gold Gear and then click on it, twice (1). Click on each of the Gems in the Genie Lamp, as shown (2) and then collect Otto’s Eye (3). When complete return to the Back Room and click on the Work Bench.
Work Bench
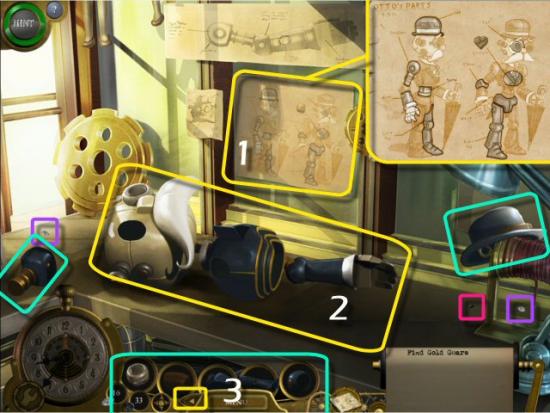
Collect the Diamonds, Coal, Otto’s Hat and Otto’s Upper Arm. Click on the Diagram (1) and repair Otto (2), using the Parts in your Inventory and placing them according to the Diagram. Use the Arrow (3), at the left or right side of the Menu button, to scroll through the Parts. You may place the Parts in any order you like.
Toymaker’s Card Game
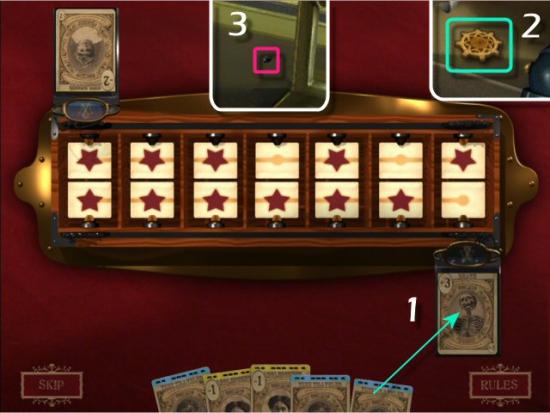
Otto offers to teach you a Card Game. The object is to fill up your side of the Board with 7 Blue Time Travel cards (those with a Red Star) first. You’ll collect 20 Diamonds for winning and you may play the game as many times as you like. You will collect 20 Diamonds each time you win (1).
Click on a card to place it. If you have no moves, you’ll be automatically dealt a new hand. You must land on a space by exact movement in order to claim a space on your side of the Board or remove the opponent’s claim on the opposite side. The game is completely random each time you play. When you’ve finished playing (you must win at least once), close the game and collect the Gold Gear (2). Note that after you close the game, or leave and return to the Work Bench, there may be a piece of Coal (3) to collect at the lower right of the screen, just to the left of the base of the Spool of Wire.
Return to the Toy Emporium, click on the Watch Repair button (1) and then place the Gears (2). You will now be able to use the Map to warp to any previously visited location. Click on the blinking Pocket Watch (3), click on the Toymaker (4), click on the Map (5) and then go to the General Store (6).
If you’ve collected at least 280 Diamonds (total cost to purchase the remaining items in the General Store), you can visit the General Store to make purchases before heading to the Atrium. If you chose not to play the Toymaker’s Card Game again, in order to collect more Diamonds, you’ll need to return here, later.
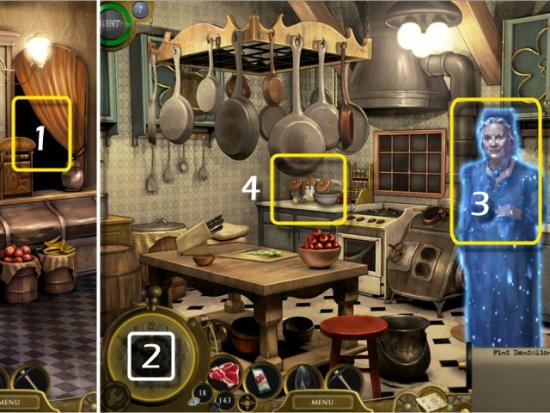
Kitchen
Enter the Kitchen (1), click on the blinking Pocket Watch (2), click on Eliza’s mom, Rosana (3) and then click on the Food Prep area (4).
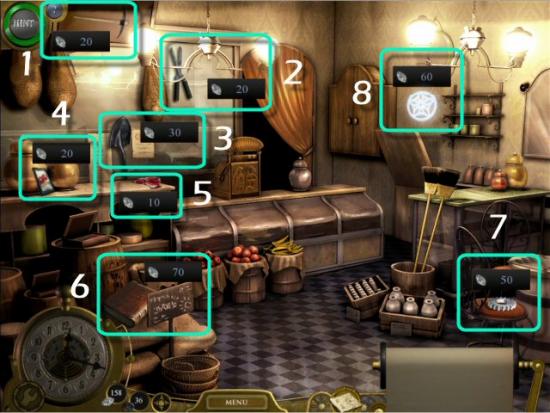
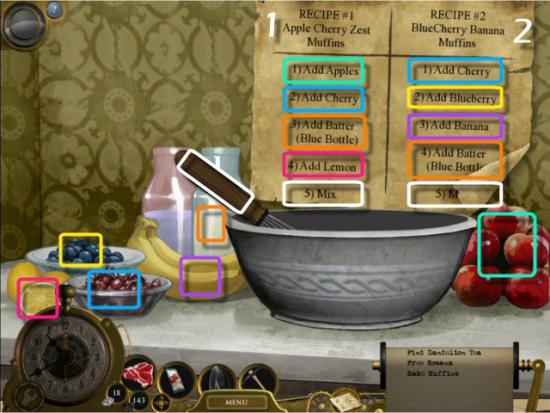
Food Prep
Prepare the Muffins according to the recipes. Begin with Recipe #1 and click on each ingredient to add it to the bowl and then click on the Whisk to mix it. Repeat for Recipe #2. When complete, return to the Train Station.
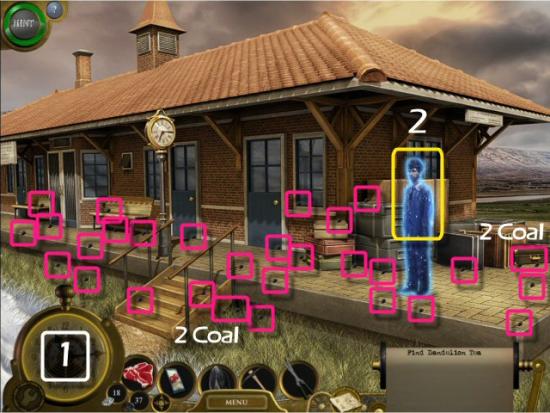
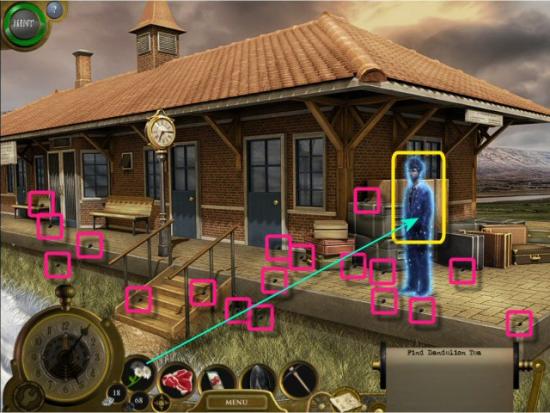
Exit to the outside of the General Store and then go left to the Train Station. Collect the Coal, click on the blinking Pocket Watch (1), click on Herbert (2) and then return to Memorial Park.
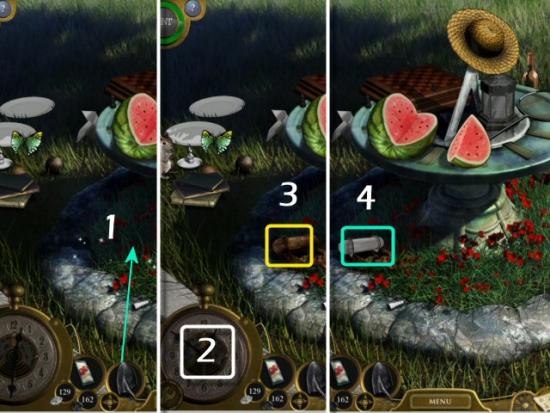
Enter the Park (1), click on the blinking Pocket Watch (2), click on Kaitlynn (3) and then click on the Sundial (4). Use the Clippers on the Flowers (5), collect the Train Tickets, use the Train Tickets on Kaitlynn and then return to the Train Station via the Map.
Collect the Coal and then use the Flowers on Herbert. You can exit and reenter the Train Station, as many times as you like, and collect more Coal, until you have 100 (you’ll find anywhere from 7 to 18 Coal each time), for the Achievement, or use the Map and return to the Atrium.
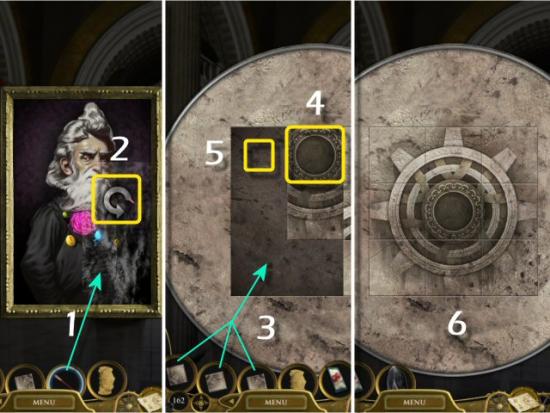
Click on the Work Shop Landing (1), click on the blinking Pocket Watch (2), find the fluxing Vent (3) and then click on it, once. Click on the blinking Pocket Watch and Vent, again.
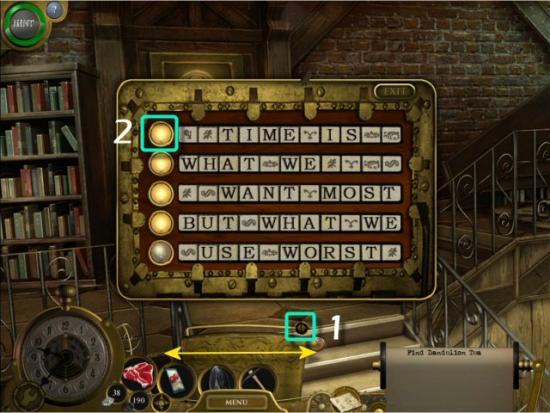
Click and drag the Arrow (1), on the Time Slider, left and right until each row of the code forms part of the Phrase. Click on the button at the left of each line (2) to lock it in place. Repeat for the other 4 lines of the Phrase. When complete, enter the Work Shop.
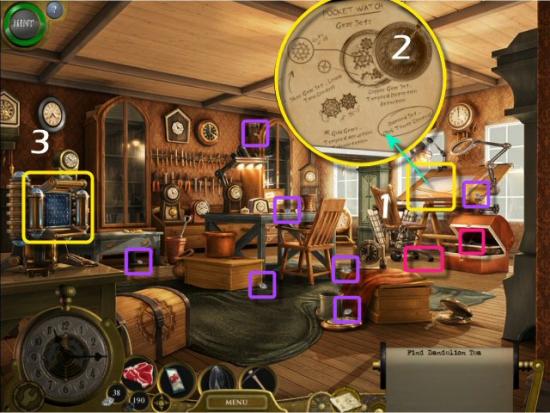
Collect the Diamonds and Coal, click on the Drafting Table (1) to view a Diagram (2) of the different Gear Sets and their functions and then click on the Coal Converter (3).
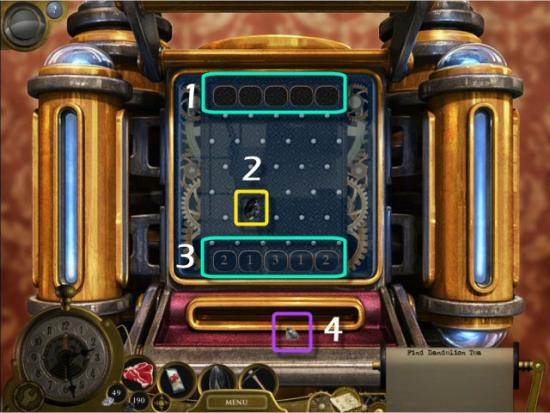
Use your Coal in the Pachinko style Converter, to exchange them for Diamonds. Click on one of the Slots at the top (1), the Coal (2) will drop to one of the Slots at the bottom (3) and you’ll receive 1, 2 or 3 Diamonds (4). Click on the Map and return to the Train Station.
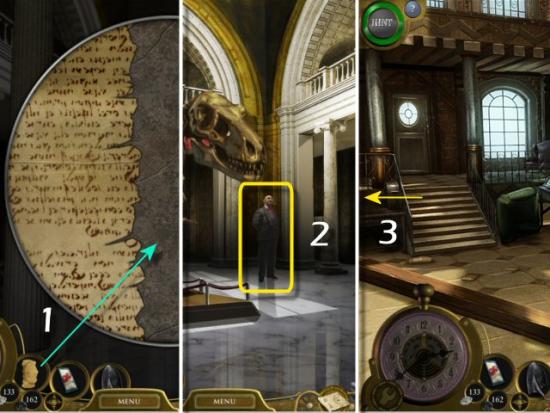
Enter the Train (1), collect the Diamonds and Coal, click on the Museum Door (2), click on the Mechanism (3) and then enter the Train (4 – click left), again.
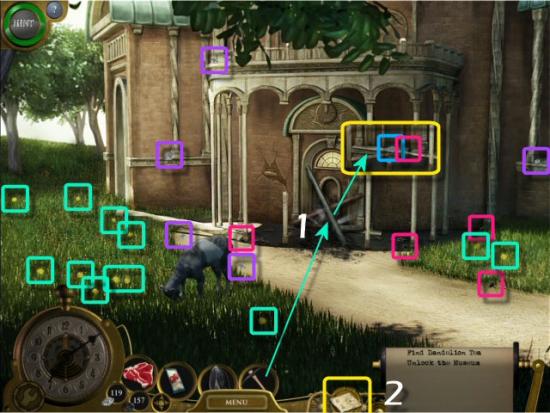
Use the Pickaxe on the Barricade (1), collect the Diamonds and Coal, the Dandelions (you only need 5) and the Diamond Gear. Click on the Map (2) and return to the General Store.
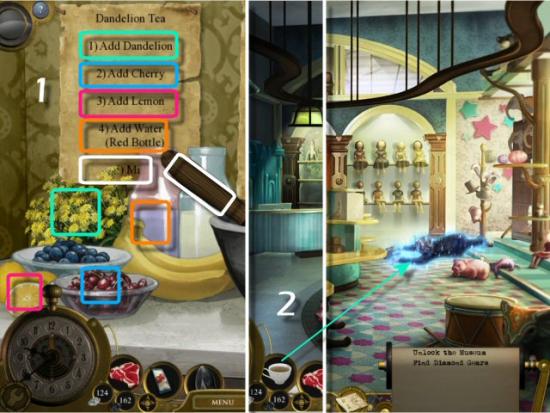
Enter the General Store, continue to the Kitchen and click on the Food Prep area. Prepare the Dandelion Tea according to the recipe. Click on each ingredient to add it to the bowl and then click on the Whisk to mix it (1). Click on the Map, return to the Toy Emporium and use the Dandelion Tea on the Toymaker (2).
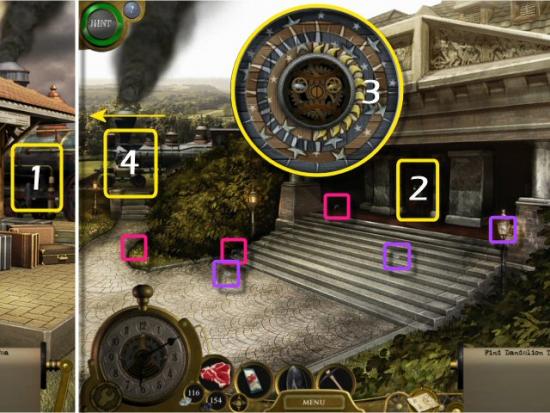
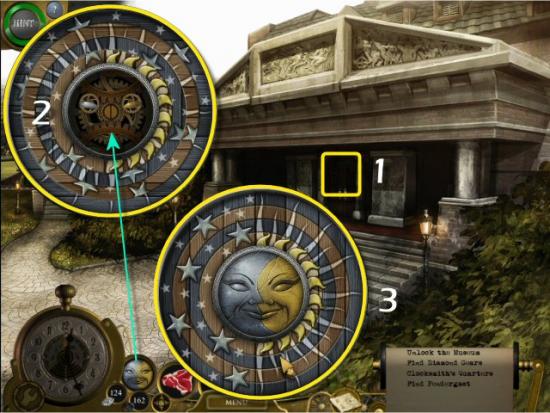
Click on the Map and return to the Museum. Click on the Door (1), use the Key in the Lock Mechanism (2) and then solve the Lock Puzzle (3). The puzzle always has the same solution; however, it starts with each ring in a different position each time you play. When complete, enter the Museum.
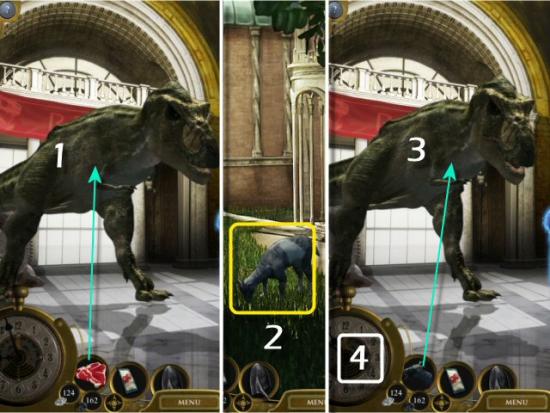
Use the Meat on the T-Rex (1), click on the Map and then return to the Courtyard. Collect the Goat (2 – click twice), return to the Museum and then use the Goat on the T-Rex (3). Click on the blinking Pocket Watch (4) and click and drag the Arrow on the Time Slider all the way to the left.
Collect the Diamonds, click on the blinking Pocket Watch (1), click on Mr. Pendergast (2), click on the Map (3) and then return to Memorial Park.
Enter the Park and click on the Sundial. Use the Shovel on the Grass (1), click on the blinking Pocket Watch (2), click on the Time Capsule (3), click and drag the Arrow to the left and collect the Town Charter (4). Click on the Map and return to the Museum.
Enter the Museum and then enter the Exhibit Hall (click right). Click on the blinking Pocket Watch (1), find the fluxing Diamond Gear and then click on it, twice (2). Find the Diamonds and then click on the Work Space (3). Find all the items in the list. Key Items: Paintbrush, 3 Relief Pieces (4). Click on the Painting (5). When complete, click on the Carving (6) and then click on the Town Charter Display Case (7).

Painting Puzzle
Click on the Paintbrush (1) and then trace the Arrows (2 – trace inside the arrows), in each of the sections, to fill in the Painting.
Carving Puzzle
Use the 3 Fragments on the Carving (3) and then slide the tiles around to reconfigure the Carving. Click on a Tile (4) and then click on the empty space (5) to move the tile. This puzzle always has the same solution (6); however, it starts with the pieces in different positions each time you play.
Town Charter Puzzle
Use the Fragment on the Town Charter (1) and then reconstruct it. Click on a section and then click on another to switch their places. Return to the Main Hall and click on Mr. Pendergast (2). Click on the Map, return to the Atrium and then click left to the Staircase (3).
Work Shop
Click on the blinking Pocket Watch (1), click on the Elevator (2) and then click and drag the Arrow all the way to the Left, to Reverse Time. Click on the Map and then return to the Workshop. Use the Packet of Seeds on the Pot (3), click on the blinking Pocket Watch, click on the Pot and then click and drag the Arrow all the way to the Right, to Speed Up Time. Enter the Clocksmith’s Quarters (4).
Clocksmith’s Quarters
Collect the Diamonds, Coal and Termites, click on the Picture (1) and then click on the Desk (2). Collect the Diamonds and find all the items in the list. Key Items: 3 Stones (3). Return to the Work Shop (4).
Work Shop
Use the Termites on the Chest (1), click on the blinking Pocket Watch (2), click on the Chest and then click and drag the Arrow all the way to the Right, to Speed Up Time. Collect the Diamond and Diamond Gear (3) and then return to the Clocksmith’s Quarters (4).
Clocksmith’s Quarters
Click on the Lockbox (5), use the Stones in the Cups (6), click on the Red Button (7) and collect the Key (8). Click on the Elevator (9) use the Key in the Lock and then click on “3” (10).
Machine Room
Click on the Stairs (1 – Tools and Parts), Collect the Diamonds and Coal and find all the items in the list. Key Items: Diamond Gear, 3 Levers (2). Click on the Watch Repair button (3), place the Gears (4) and then use the Levers on the Control Panel (5). Click 3 times on Lever “a,” once on Lever “b” and twice on Lever “c.” When complete, enter the Gear Platform (6).
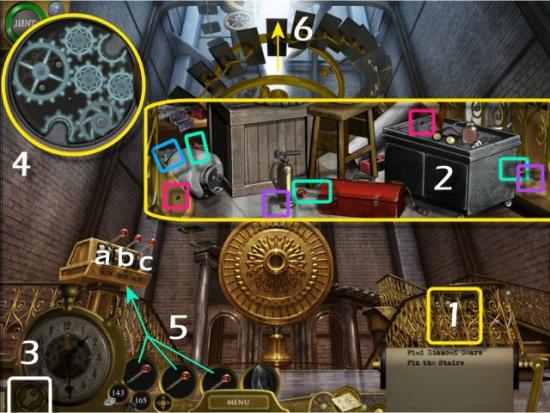
Gear Platform
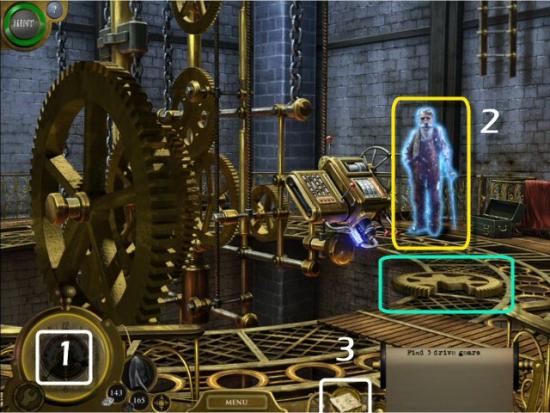
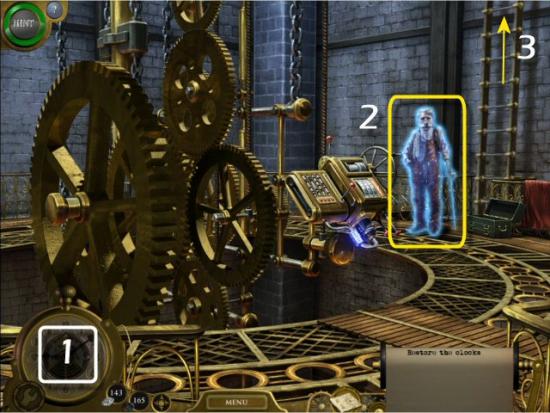
Collect the Broken Gear, click on the blinking Pocket Watch (1), click on the Clocksmith (2), click on the Map and then return to the Toy Emporium.
Use the Broken Gear on the Toymaker (1), click on the blinking Pocket Watch (2), click on the Gear (3), click on the Map and then return to the Courtyard.
Use the Shovel on the Ground (4), click on the blinking Pocket Watch, click on the Gear (5), click on the Map and then return to the Museum.
Enter the Museum, click on the blinking Pocket Watch, click on the Gear (6), click on the blinking Pocket Watch and Gear, again, click on the Map and then return to the Machine Room.
Enter the Gear Platform, click on the blinking Pocket Watch (1), click on the Clocksmith (2) and then enter the Clock Face Room (3).
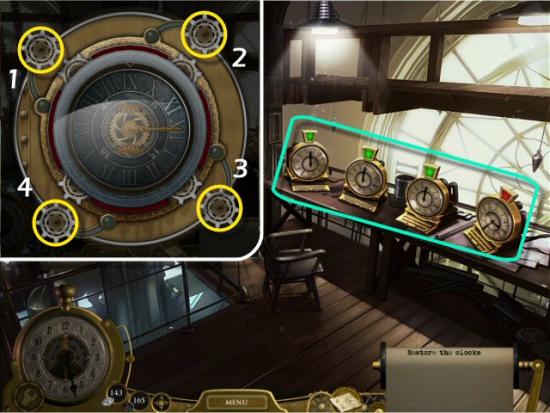
You must set each of the Clocks (yellow) to 12:00 O’clock. Click on any of the Clocks to begin. Click on one of the Gears (yellow) to engage it and then click on the center of the Clock to move the Minute Numbers, Minute Hand, Hour Numbers and Hour Hand.
The puzzles all begin in different configurations, so there isn’t one solution for any of the Clocks. One key is to set the Minute Numbers and Minute Hand first, by using Gear 1 and Gear 2, and then setting the Hour Numbers and the Hour Hand by using Gear 3 and Gear 4. Note that you can’t skip any of these puzzles to complete the game.
Watch the ending movie. Congratulations! You’ve completed Lost in Time: The Clockwork Tower. You may now go back and finish any Achievements you’d still like to collect.
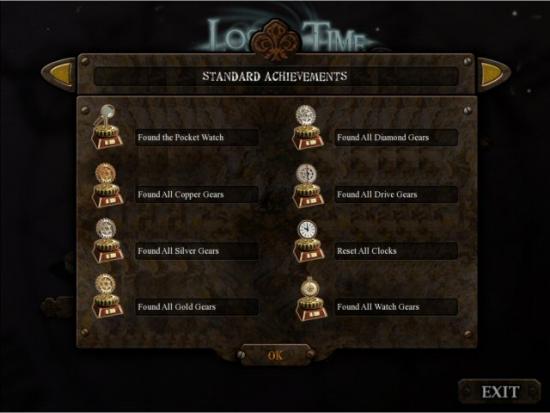
Standard Achievements
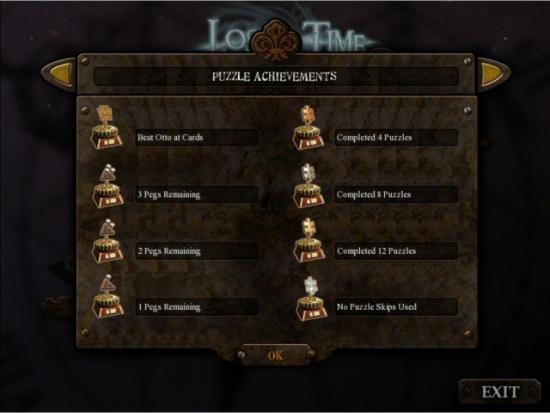
Puzzle Achievements
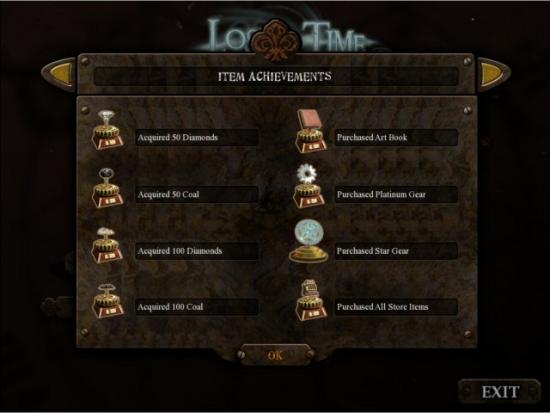
Item Achievements
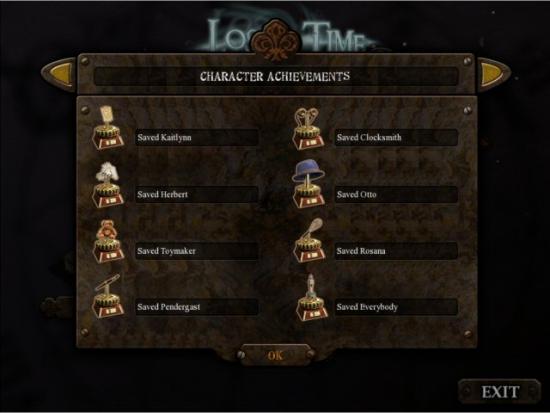
Character Achievements