
Best Horror Games On Itch.io – July 2026
Across a bounty of subgenres.![Haze Seas Accessories Tier List [Best Accessories to Equip]](/wp-content/uploads/2026/07/haze-seas-accessories-tier-list.jpg "Haze Seas Accessories Tier List [Best Accessories to Equip]")
Haze Seas Accessories Tier List [Best Accessories to Equip]
The accessories with the best stat buffs in Haze Seas.
![[Roblox] Evomon Shiny Hunting Guide – Including Prismatic and Pris Shinies!](/wp-content/uploads/2026/06/evomon-shiny-hunting-guide.jpg "[Roblox] Evomon Shiny Hunting Guide – Including Prismatic and Pris Shinies!")

Lost Chronicles: Fall of Caesar Walkthrough
Welcome to the Lost Chronicles: Fall of Caesar walkthrough on Gamezebo. Lost Chronicles: Fall of Caesar is a hidden object/adventure game played on the PC created by Vast Studios. This walkthrough includes tips and tricks, helpful hints, and a strategy guide to how to complete Lost Chronicles: Fall of Caesar.
Share this


- Prefer Gamezebo on Google

Lost Chronicles: Fall of Caesar – Game Introduction
Welcome to the Lost Chronicles: Fall of Caesar walkthrough on Gamezebo. Lost Chronicles: Fall of Caesar is a hidden object/adventure game played on the PC created by Vast Studios. This walkthrough includes tips and tricks, helpful hints, and a strategy guide to how to complete Lost Chronicles: Fall of Caesar.
How to Use this Walkthrough (Please read)
- This walkthrough is meant to be used as a guide to assist in solving mini-puzzles and acquiring all items in order to complete the game. You may explore locations in the order you wish, this walkthrough is written to take the most direct route to the game’s finish.
- Play the tutorial!!!! This walkthrough will assume you have as it explains the basic gameplay.
- Hidden object hunts have a list of items you must find. Screenshots will only highlight the inventory item you receive. The hint system can help you if you are stuck.
- Inventory objects are written in bold.
- The walkthrough will state, “Use the inventory item on the blah blah,” because it assumes you have the item. If you don’t have the item, on your keyboard, press CTRL+F (at the same time). In the text box, type the name of the item you are looking for and press ENTER. This will scan the page for the appearance of that word.
- Zooming in on areas opens small windows. Once you get the item or information you need, click anywhere on the screen to close it. The walkthrough will not include this instruction.
Gameplay and Tips
- This is a hidden object adventure game. You will move from location to location solving hidden object hunts, mini-puzzles and picking up items to use in order to proceed in the game.
- You will talk to characters as you move through the game. Click through all the dialogue options.
- Hover your mouse over every aspect of a scene and watch for your cursor to change.
- Magnifying glass cursor – Happens when hovering over an area that you can zoom in and investigate further.
- Hand cursor – When this happens, you can collect the item and add it to your inventory or you can interact with it.
- The inventory appears at the bottom of your screen. To use an inventory item, click on it and click on the area it needs to be used.
- Hidden object hunts provide a list of items to find. Click on the item to cross it off the list. Clicking Hint will highlight an item. To leave a hidden object hunt, click the Back button at the bottom right hand corner of your screen.
- Hint system – You have unlimited hints however it takes 40 seconds to recharge between uses.
- Mini-puzzles – Skip will complete the puzzle and move you forward. There seems to be no penalty. Some mini-puzzles have a Back button (bottom right of the screen) that will allow you to leave the puzzle.
- There is no timer or point system.
Starting the Game
- Play starts a new game (you’ll have to enter a profile name) or continues an existing game.
- Profiles allows you to choose, create or delete a player’s profile.
- Options allows you to adjust the sound and music volume. You can also change the full screen mode and the custom cursor.
- Quit exits the game.
Walkthrough – Chapter One
- When asked if you would like interactive tutorial messages, click Yes. The tutorial will explain the various cursors, how to talk to characters and how to investigate areas. Click on the sparkling area to start a hidden object hunt.

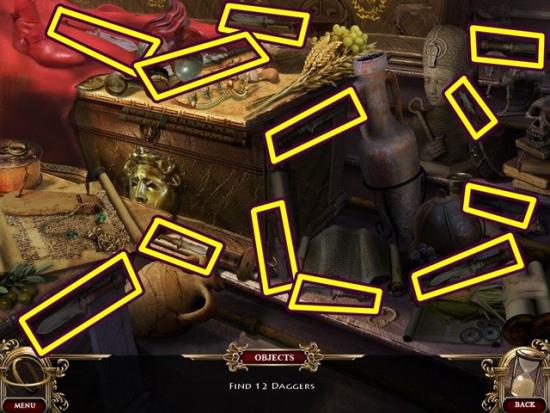
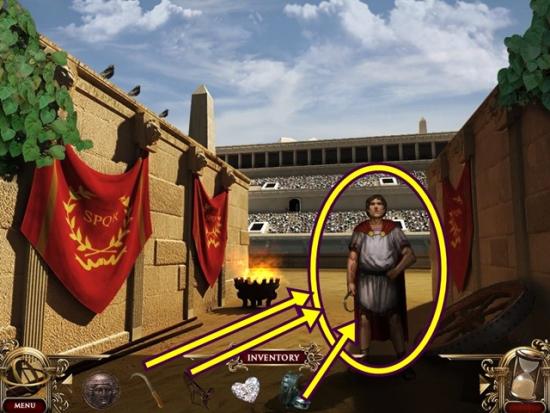
- Find the 12 daggers. Once you are finished, a mini-puzzle automatically starts. Click on the two identical daggers and place them in the sheathes.
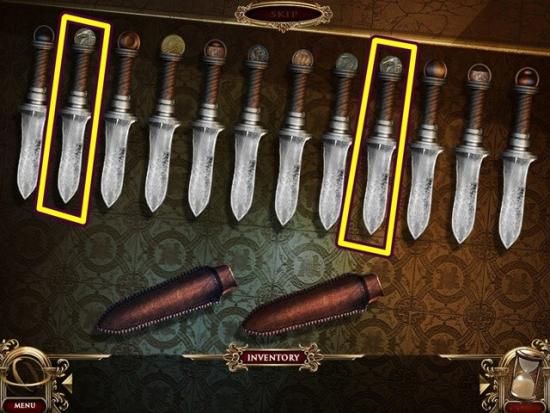
- The assassin’s daggers are added to your inventory. The tutorial then prompts you to leave the theatre of Pompey and enter the senate halls.
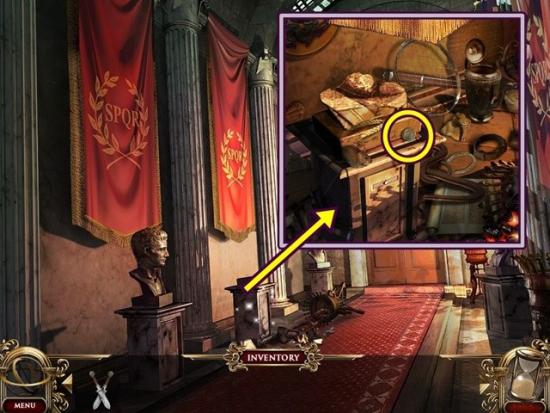
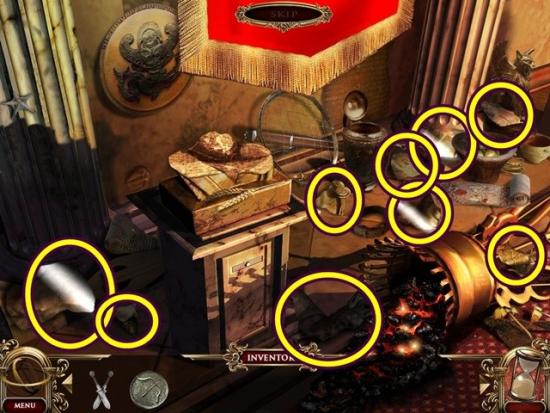
- Click on the sparkling area to start a hidden object hunt. Find all the items. A silver coin is added to your inventory. A mini-puzzle automatically starts.
- Find all the statue parts and then place them on the podium. It does not matter what order you place them, just pick any piece and click on the podium and it will be the right piece. Also, the pieces you need to find shimmer.
- Once you are finished, Marc Anthony bursts in. Click through the dialogue.
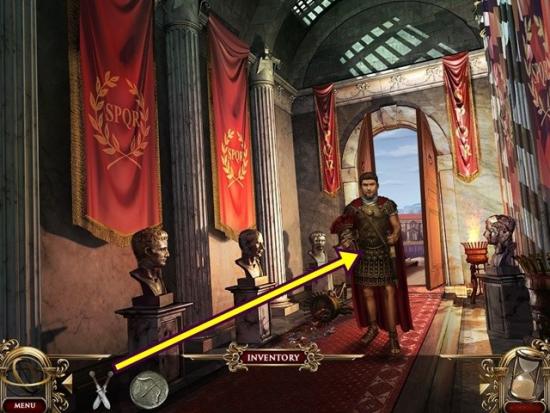
- Give him the assassin’s daggers.
- Click on the centre bust. Take the iron coin. Go back into the theatre of Pompey.
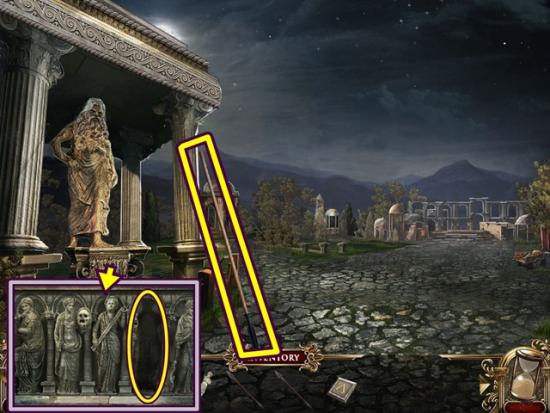
- Take the scrap of paper. Leave the theatre and go through the senate halls to the outer senate.
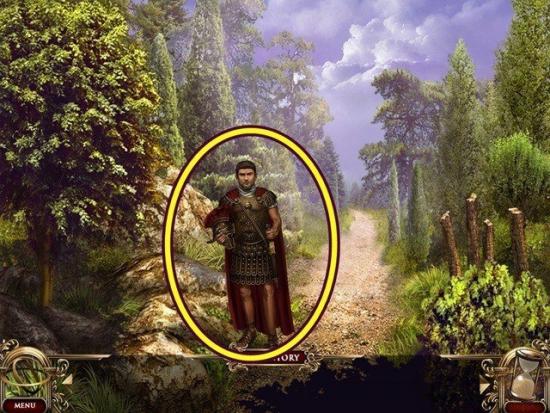
- Take the scrap of paper and bronze coin. Talk to the guard. Click through the dialogue.
- The tutorial then explains the compass/map. Click on the compass at the bottom left of your screen. It will show the tasks you must complete. Click on a flag for help with a task. The scenes that contain the items you need will be circled. Click off the map to close it.
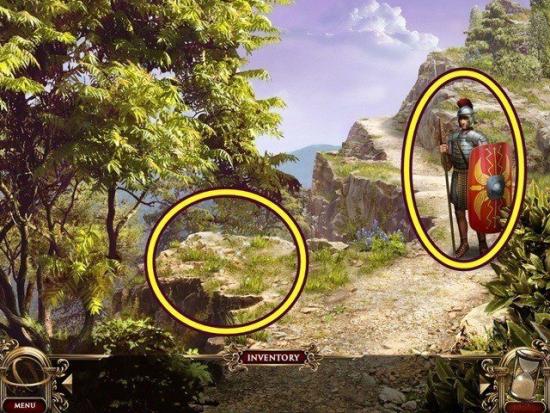
- Go west to the guard station.
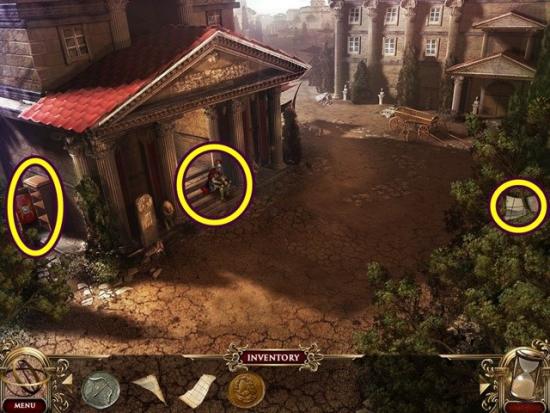
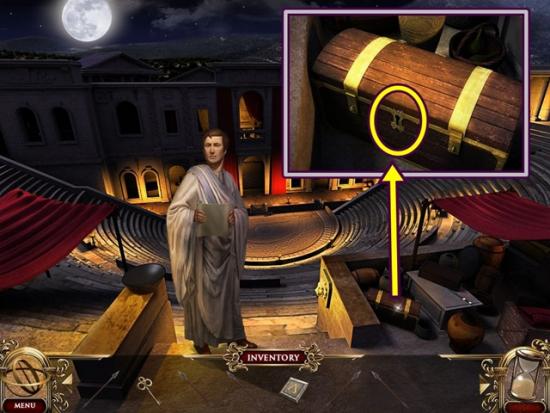
- Take the scrap of paper. Click on the chest against the side of the guard’s station. Take the shield. Talk to the guard. Click through the dialogue.
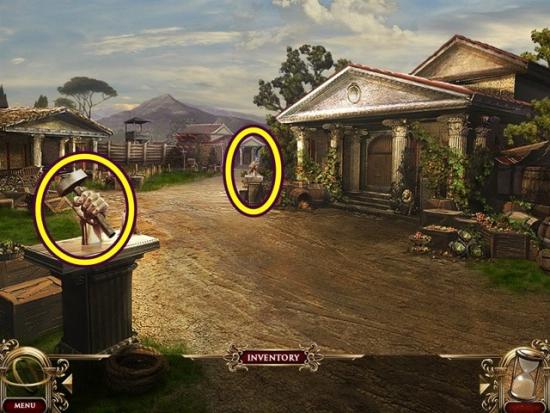
- Go up the path to the market.
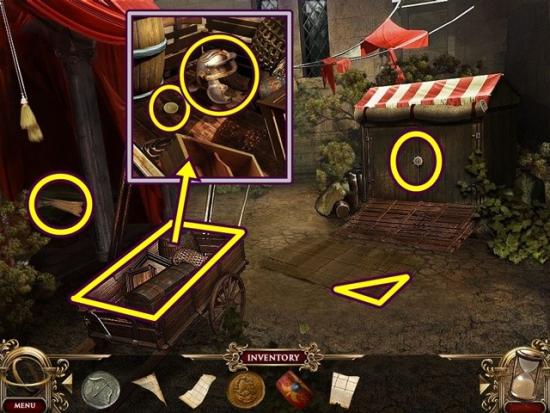
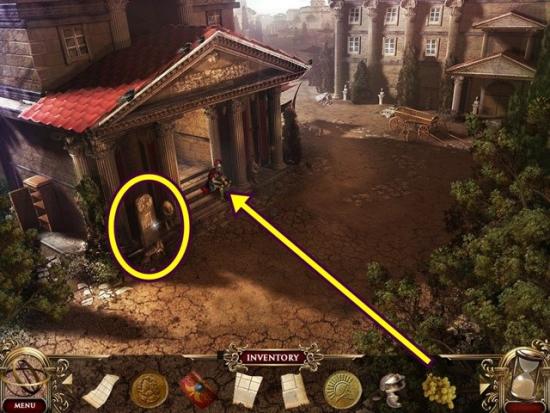
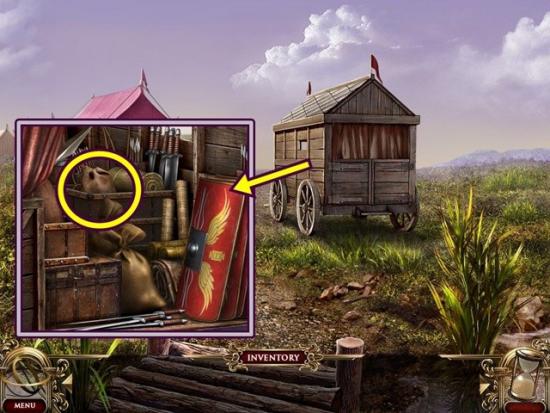
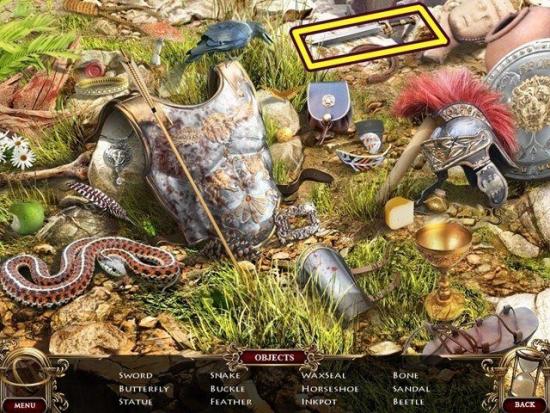
- Take the scrap of paper. Click on the cart. Move the items (click your mouse, it doesn’t matter where). Take the gold coin and the helmet. Click on the rug. Take the copper key. Click on the shed. Move all the pieces to expose the keyhole. Open the lock with the copper key. Click on the open shed to start a hidden object hunt.
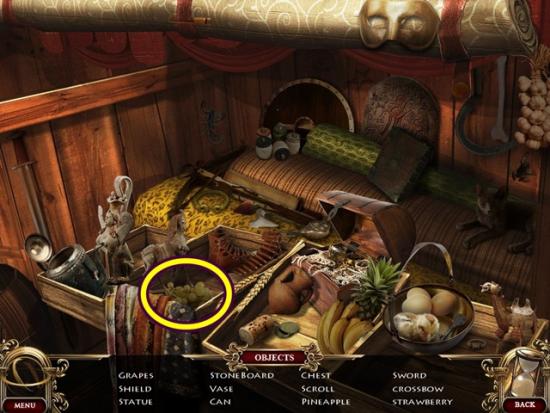
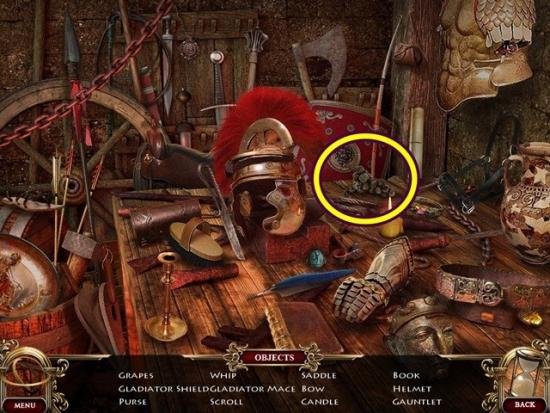
- Find all the items. Grapes are added to your inventory. Go south twice to the outer senate.
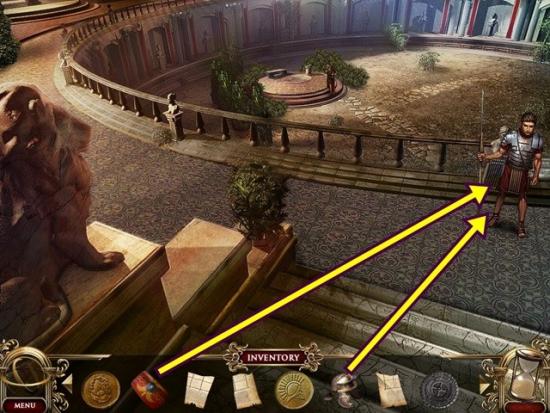
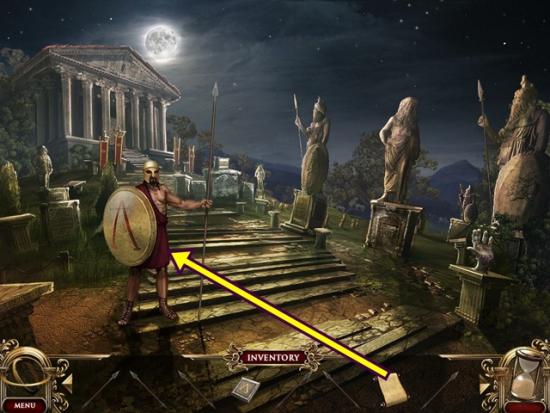
- Give the shield and helmet to the guard. He gives you a copper coin. Go west to the guard station.
- Give the grapes to the guard. Click through the dialogue. He gives you a scrap of paper. Click on the sign he mentions. Place all the scraps of paper on the sign (it doesn’t matter what order). Once they are all placed, take the completed paper (battle formations. Give the battle formations) to the guard. A mini-puzzle automatically starts.
- Note: You need five coins to play this mini-puzzle. Place all five coins from your inventory on the table (the coins are made of copper, gold, iron, bronze and silver).
- To solve this puzzle, place all your coins so each row and column has five different coins. Diagonal doesn’t count. To place a coin, select it and then click (on the grid) where you’d like to place it. When a piece is in the correct position, it does not lock, you can still move it.
- Note: If you are having difficulty placing a coin, it is NOT the game’s way of telling you the coin doesn’t go there. Just keep trying to drop the coin in the position.
- To start, concentrate on the rows with three coins already placed.
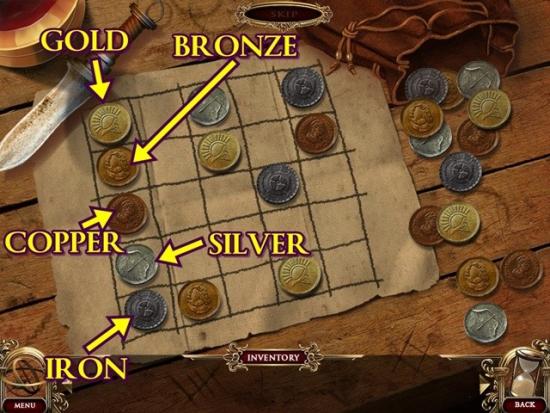
- The top row has three coins already in place, you only need place the bronze and copper coins. The bronze coin cannot go in the left position because there is already a bronze coin in that column so place the copper coin in the left position and the bronze coin in the right position.
- The second row then needs a silver and an iron coin. The iron coin cannot go in the right position because there is an iron coin in that column so the iron coin goes in the left position and the silver coin goes in the right position.
- The fourth column from the left now has four coins in place. Place the copper coin in the empty position (all other coins are in the column). From here, place the remaining coins.
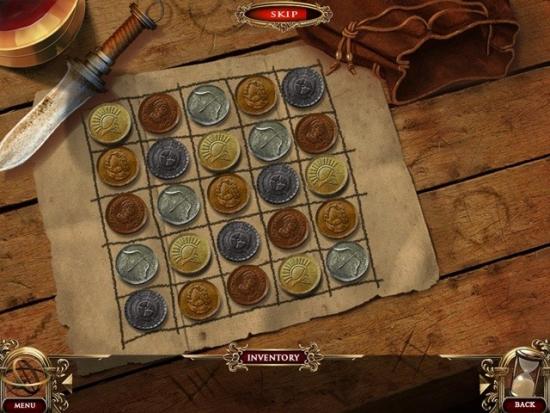
- Solution:
- The guard gives you marching orders. Return to the theatre of Pompey.
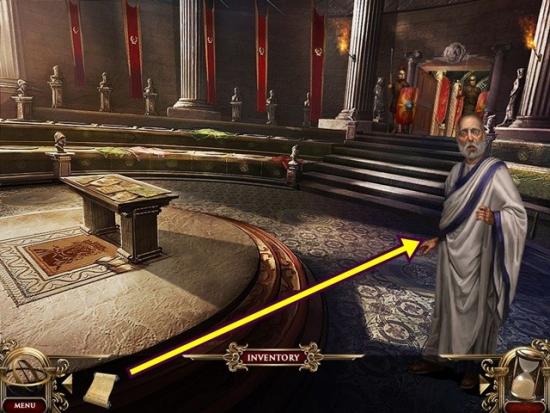
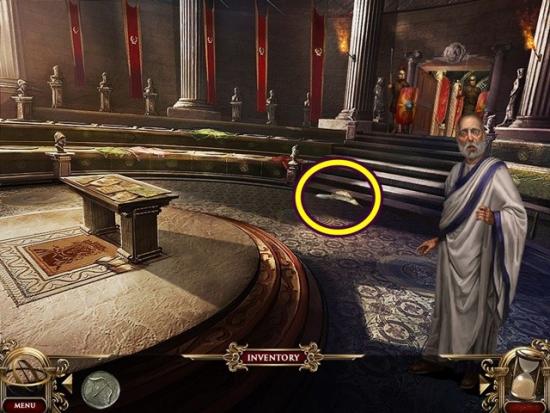
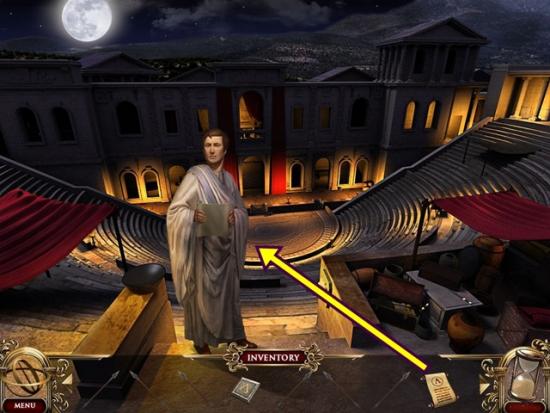
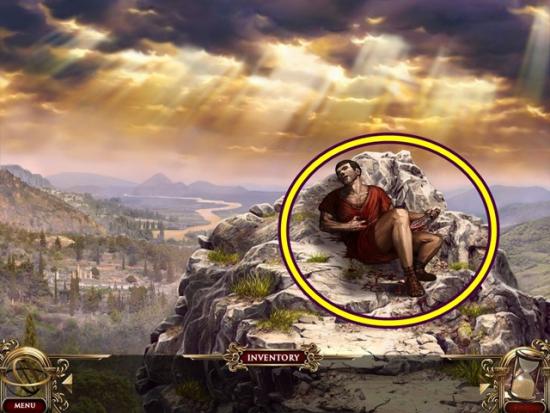
- Give the Senator the marching orders to sign. Go to the outer senate. Give the signed marching orders to the guard. Go down the stairs he was blocking into the assembly.
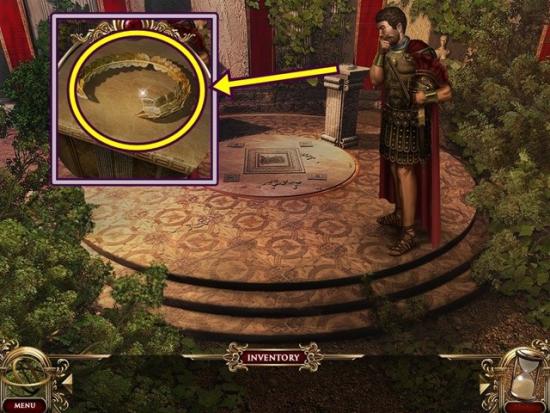
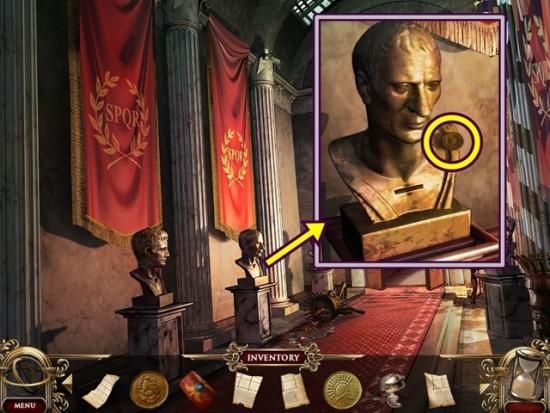
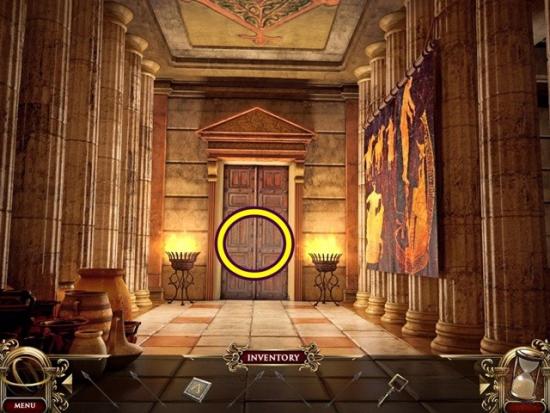
- Talk to Marc Anthony. Click through the dialogue. Click on the pillar behind him. Take the statue’s crown. Return to the senate halls.
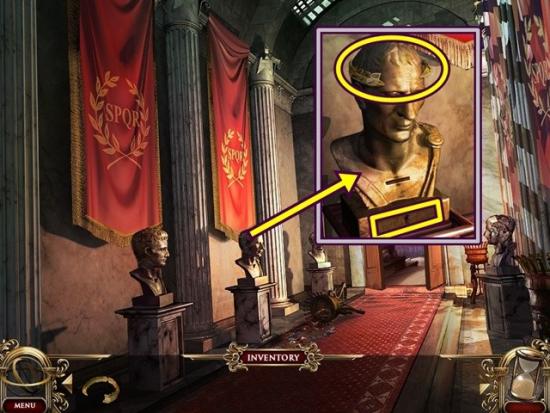
- Click on the centre bust. Place the statue’s crown atop its head. Click on the panel that opens. Take the dagger key. Place the dagger key in the slot on the bust’s neck. A mini-puzzle starts.
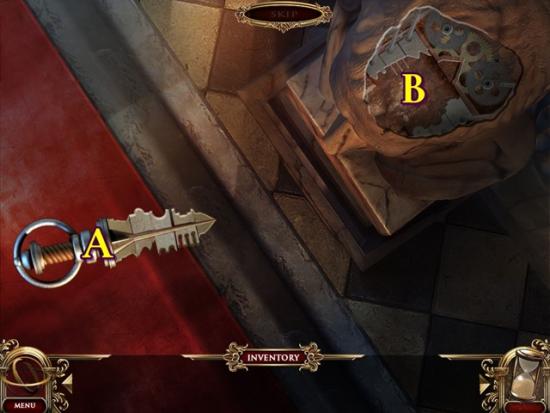
- To solve this puzzle, rearrange the pieces on the dagger key (A) so it matches the tumblers inside the lock (B). There are six pieces to arrange.
- To rearrange the pieces, select two to swap their positions. Pay attention when selecting pieces; a piece will highlight when your mouse is over it.
- Note the grooves on the lock tumblers. Position the dagger pieces appropriately.
- Solution:
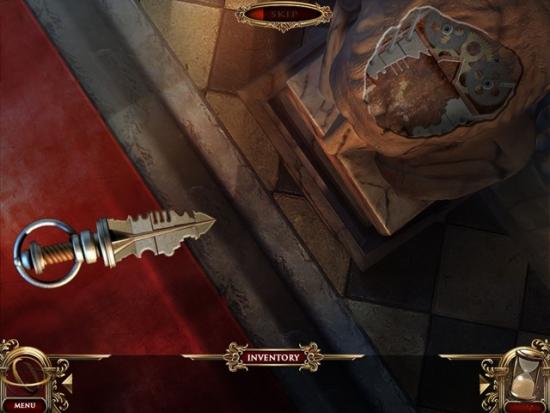
- Once the dagger key is correct, click on its handle and guide it to open the lock. Once it’s correct, a drawer will open. Take Caesar’s will. Return to Marc Anthony in the Assembly. Give Marc Anthony Caesar’s will.
Chapter Two
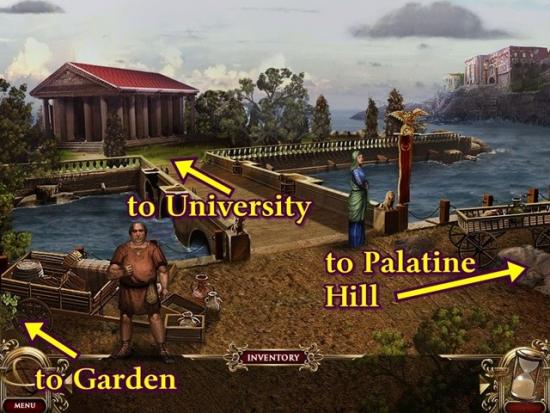
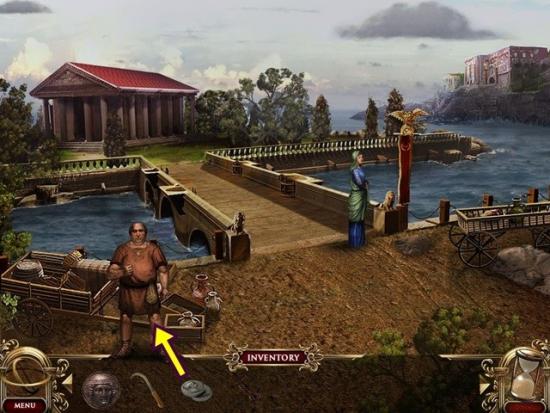
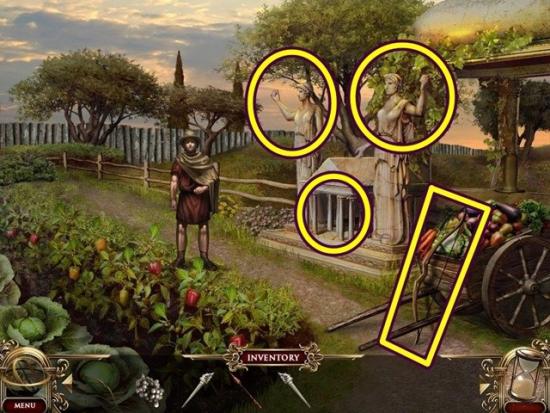
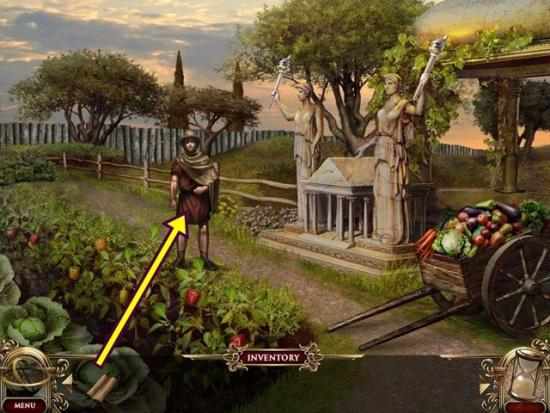
- Talk to the merchant. Click through the dialogue. Talk to the woman. Click through the dialogue. Go west to the garden.
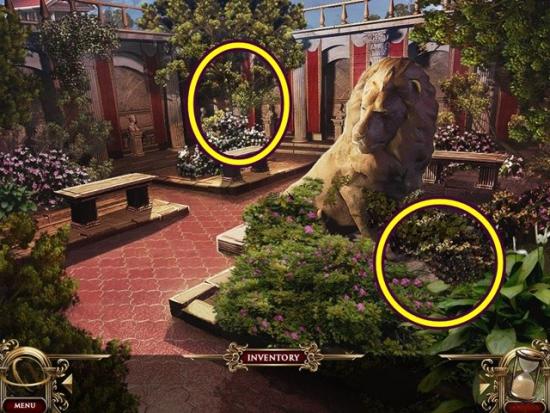
- Click three times on the leaves beside the stone lion. Take the basket that appears. Click on the northern corner.
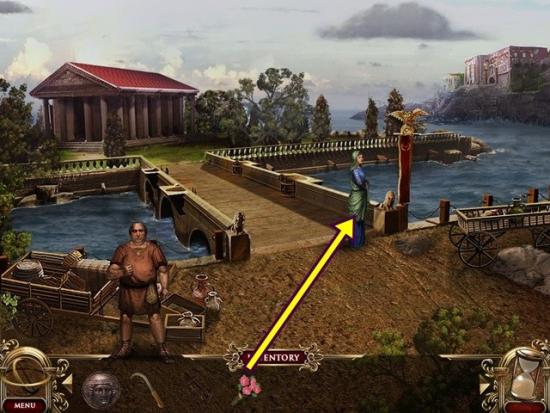
- Place the basket and click on the olives (about eight clicks) until the basket is full. The olives are added to your inventory. Leave the garden to return to the city street.
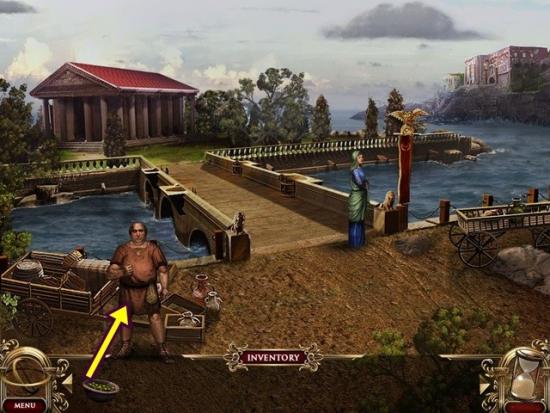
- Give the olives to the merchant. In return, he gives you an Hermes coin. Go across the bridge to the university.
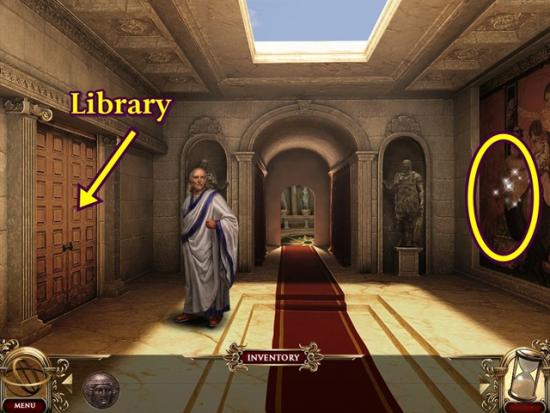
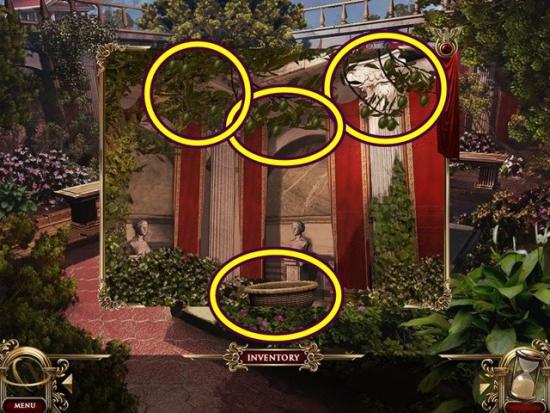
- Talk to Cicero. Click through the dialogue. He gives you a library key. Click on the wall hanging to start a hidden object hunt.
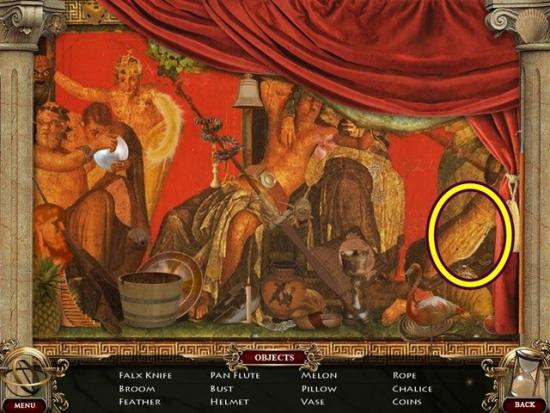
- Find all the items. A falx knife is added to your inventory.
- Click on the library door. Open the lock with the library key.
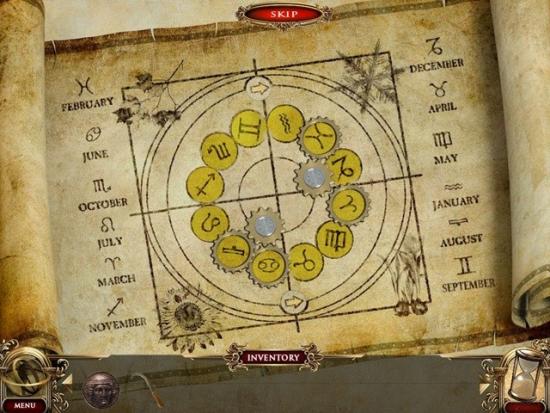
- Talk to the scholar. Click through the dialogue. A mini-puzzle automatically starts. Using the arrows and gears, position the zodiac signs so each zodiac sign is in its season’s area. For example, place the winter signs in the winter area, the summer signs in the summer area, etc. The zodiac signs do not need to be in order, they just need to be in their proper season.
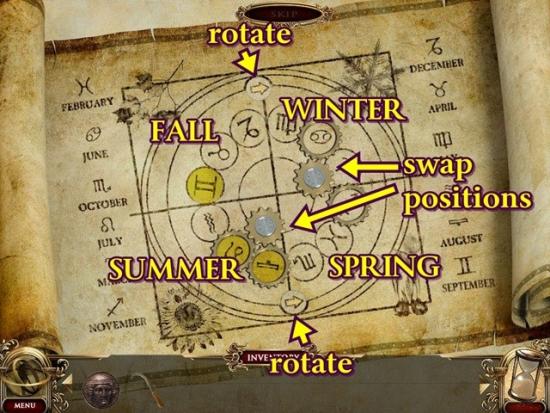
- Use the arrows to rotate the dial clockwise or counter-clockwise.
- Click a gear (left or right) to swap the positions of the two signs that appear in the ring’s gears.
- When a sign is in its proper area, it will turn yellow.
- To start, rotate the ring until the highest number of signs turn yellow (try for at least five signs to be yellow). As well, try to start from a position where you have at least two signs in a season that are yellow. Use this as your starting point.
- First fill one season, then the season beside it. Use the arrows and gears to arrange the signs. Again, they don’t have to be in order, just in their appropriate season.
- One possible solution:
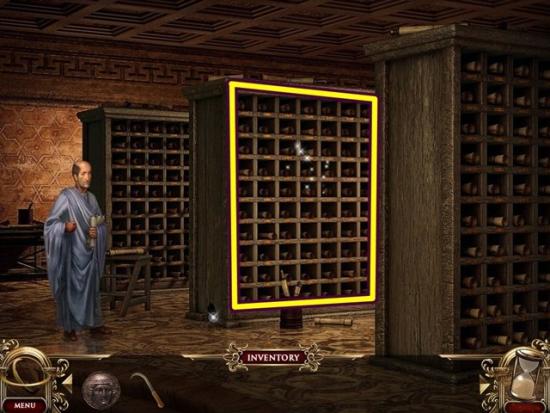
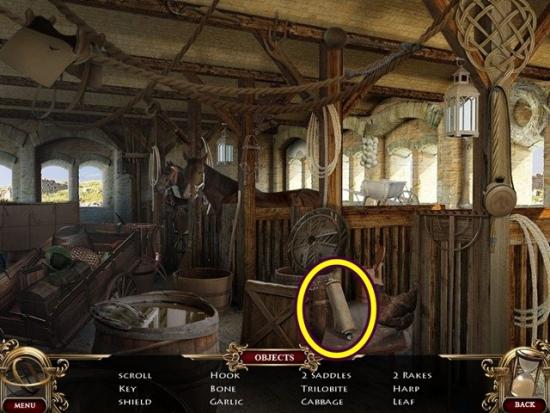
- The scholar gives you two pieces of silver. Click on the bookshelf to start a hidden object hunt.
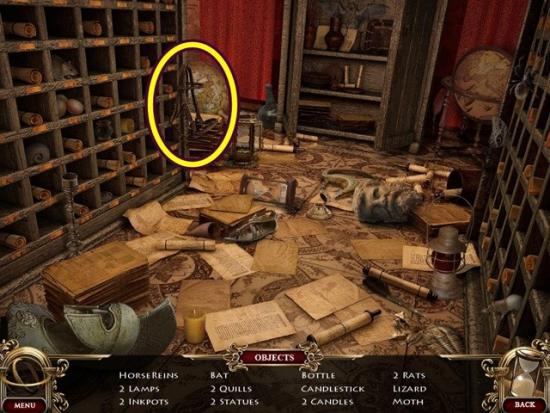
- Horse reins are added to your inventory. Return to the city street.
- Give the two pieces of silver to the merchant. In return, he gives you cheese. Return to the library.
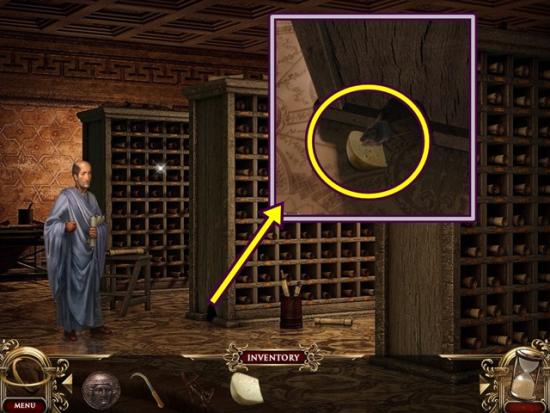
- Click on the mouse hole (bottom of middle bookshelf). Place the cheese in front of the hole to lure out the mouse. Take the mouse. Return to the garden.
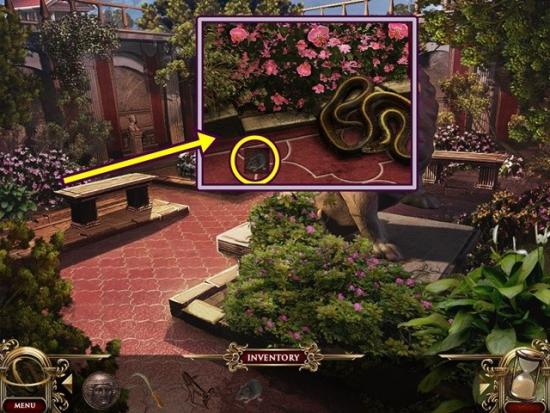
- Click on the flowers at the right of the scene. Distract the snake with the mouse. When the snake leaves, click on the flowers to take the beautiful flowers. Return to the city street.
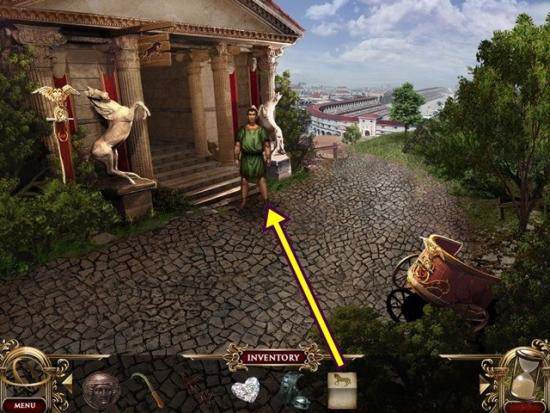
- Give the beautiful flowers to the woman. In return, she gives you a crystal heart. Go east to Palatine Hill.
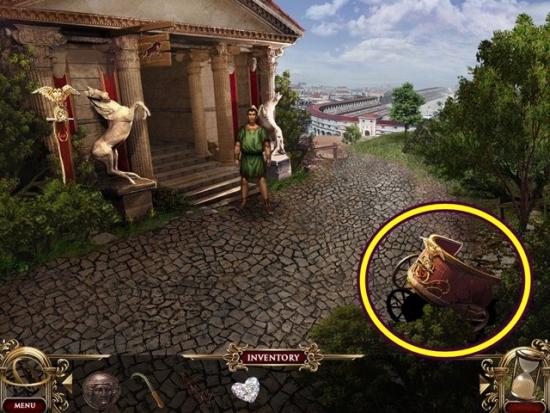
- Talk to the guard. Click through the dialogue. Click on the chariot. Click three times to remove the boards and then take the racing gear. Go up the path to circus maximus.
- Talk to the farmer/racer. Click through the dialogue. He then gives you the race registration form. Give him the racing gear, falx knife and horse reins. A mini-puzzle automatically starts.
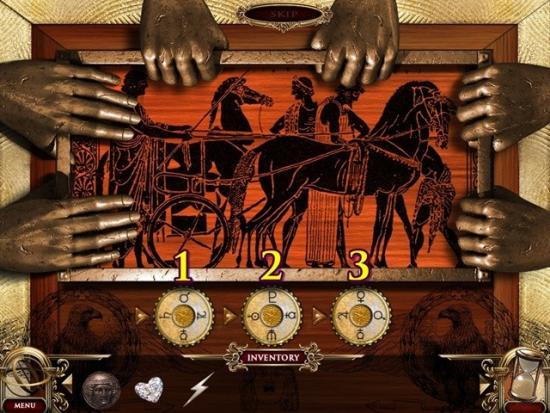
- The goal is to turn the dials so all three pairs of hands release the box. Turn dial #1 to turn it clockwise and dial #2 counter-clockwise. Turn dial #2 to turn dial #1 counter-clockwise, dial #2 clockwise and #3 counter-clockwise. Turn dial #3 to turn it clockwise and #2 counter-clockwise.
- Take note of the symbols on each dial and note which ones cause the hands to release. Continue turning the dials until the hands release the box. When the box opens, take the trident.
- Go south to Palatine Hill.
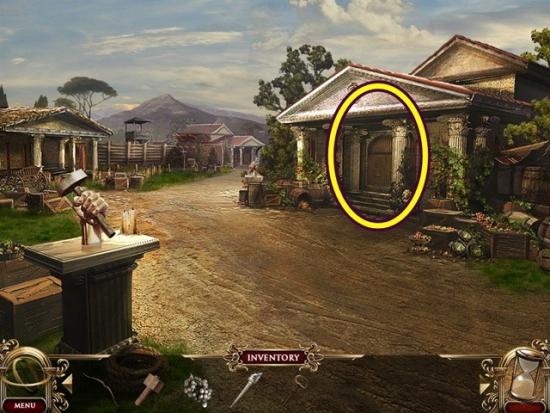
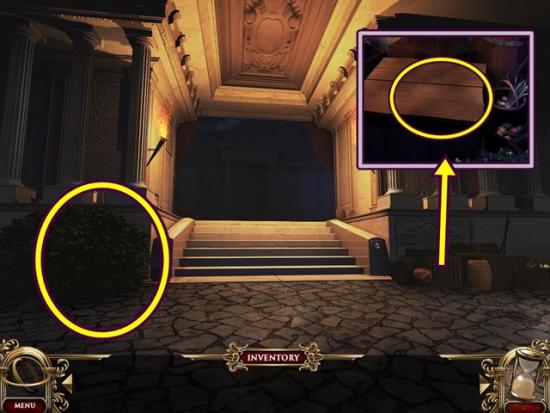
- Give the race registration to the guard. Click on the doorway to start a hidden object hunt.
- A text on Roman law is added to your inventory. Return to the university. Give the text on Roman law to Cicero. In return, he gives you the lightening bolt. Go into the Chamber of the Gods.
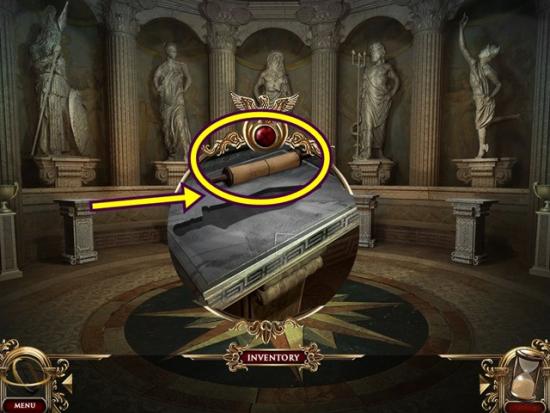
- Click on the pillar on the far left. Click on the scroll. It tells you to look at scroll 36 in the library. Return to the library.
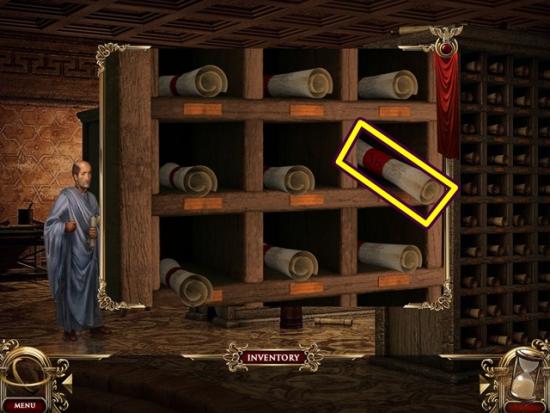
- Click on the bookshelf.
- Note: You need to have selected the scroll on the far left pillar in the Chamber of the Gods in order to start this puzzle.
- Select the scrolls until you find scroll 36. Click on scroll 36 again to start a mini-puzzle.
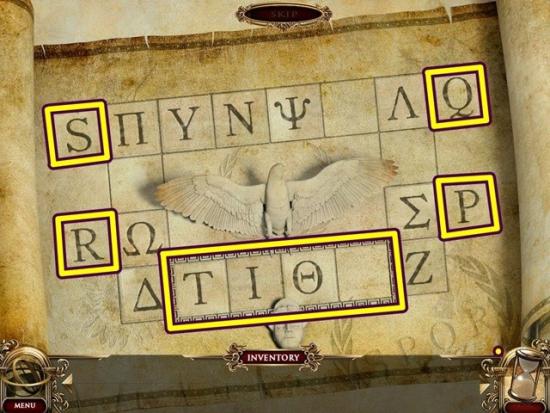
- Slide the lettered tiles around until you spell S-P-Q-R in the highlighted area. To move a tile, select it and click in one of the highlighted tiles to move it to that spot. You can only move a tile if it has an empty spot beside it. Tiles cannot jump over other tiles.
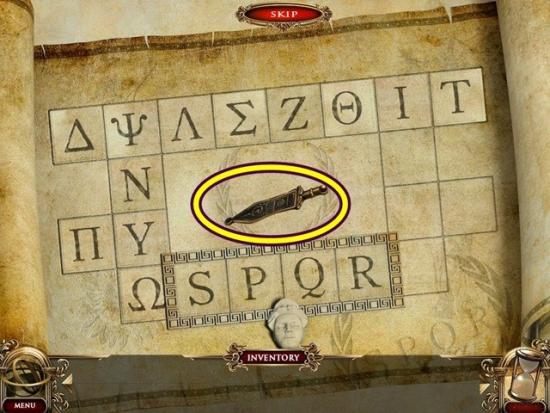
- Once you are finished, take the ornamental sword. Leave and go to the Chamber of the Gods.
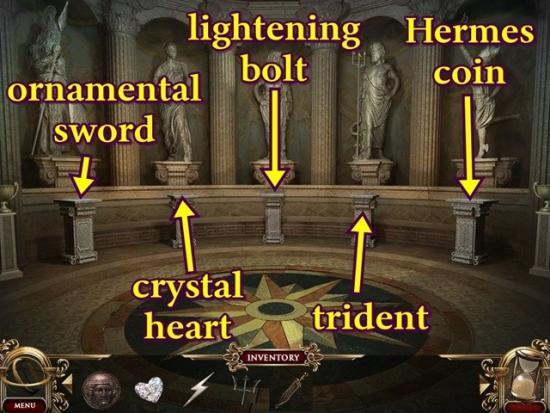
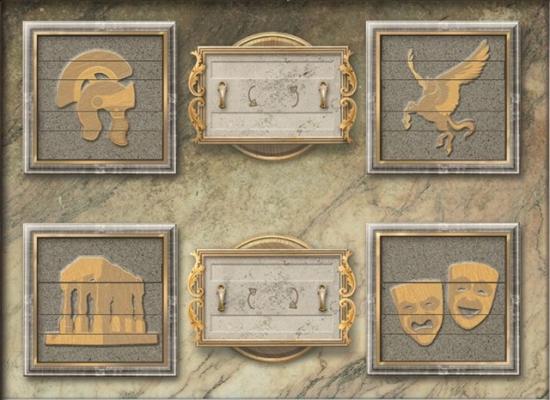
- Clicking on the pillars from left to right, place the ornamental sword, crystal heart, lightening bolt, trident and Hermes coin.
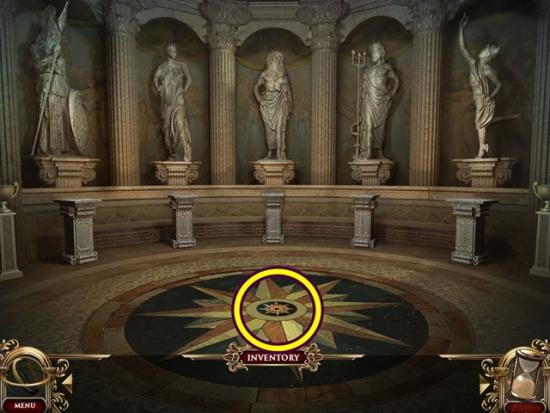
- Once the items are all placed, click on the newly uncovered slot on the floor. A mini-puzzle starts.
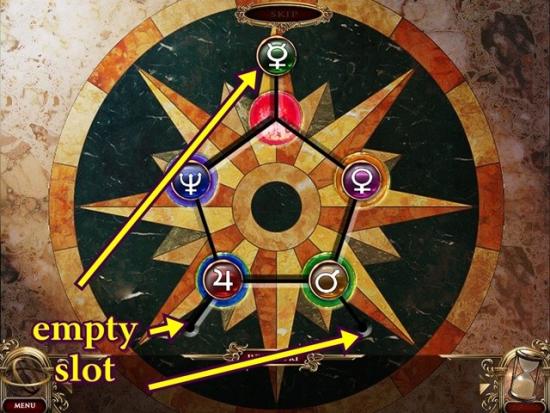
- Move the discs along the rails on the board so each disc is in its matching colour’s slot. To move a disc, select it and then move it to one of the highlighted slots. Start by positioning the blue, green or red disc as those colours’ slots have an empty slot above/below them (see screenshot above). The trick to solving this puzzle is taking advantage of the empty slots.
- I started by placing the blue disc. As well, when you place a disc that has an empty slot, move the disc into the empty slot so it’s easy to move the other discs around the board. For my game, I moved all the discs away from the blue slot, I then moved the blue disc into the empty slot below the blue slot.
- Continue until you’ve positioned all the discs. A secret passageway will open.
Chapter Three
- Click on the podium on the left and read the inscription. Click on the podium on the right (beside the building). Clear the leaves (about three clicks) and read the inscription.
- Go north to the north end.
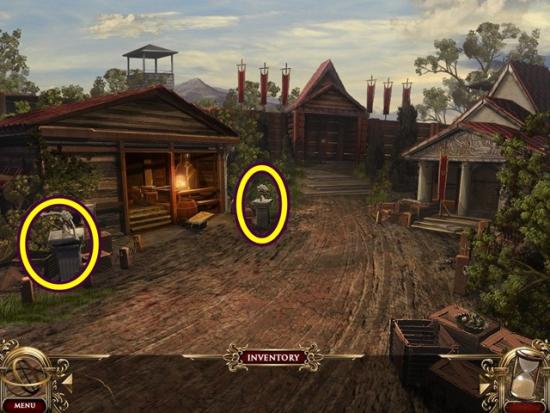
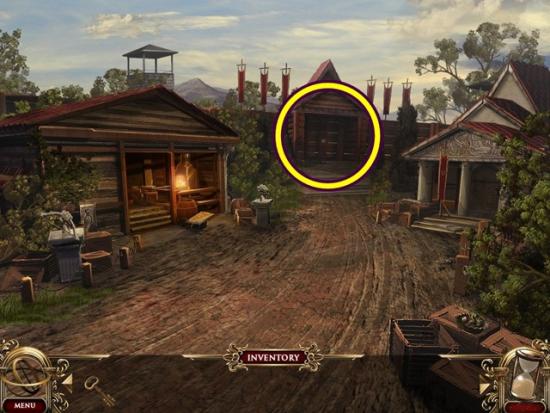
- Click on the two podiums and read the inscriptions. Enter the hunter’s lodge (right building).
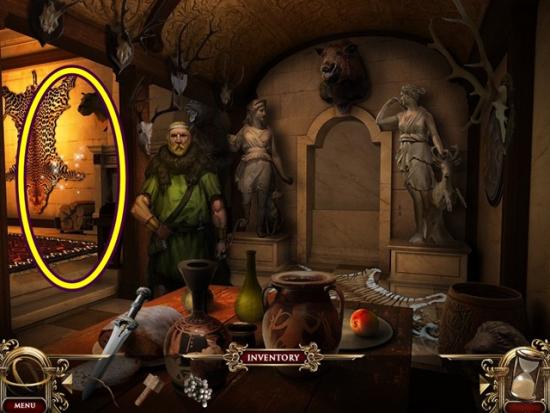
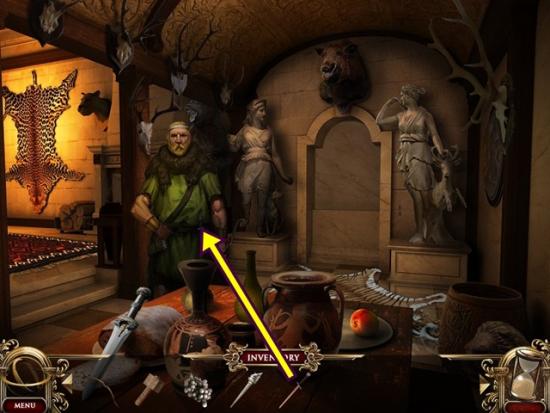
- Talk to the hunter. Click through the dialogue. He gives you a broken sword. Click on the area at the left to start a hidden object hunt.
- Demeter’s torch is added to your inventory. Leave the scene and enter the blacksmith’s forge (left building).
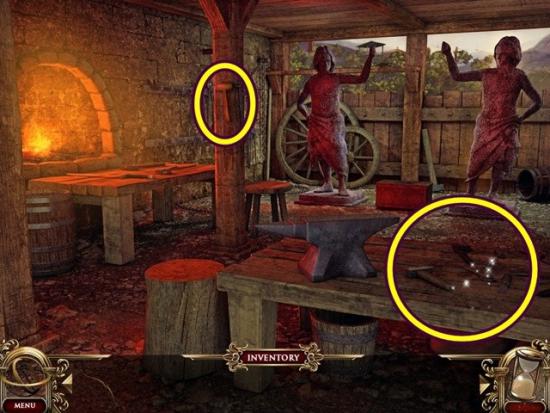
- Take the wooden mallet. Click on the fire.
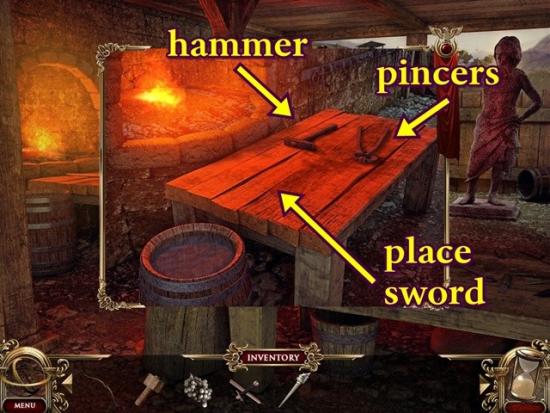
- Place the broken sword on the table. Use the pincers on a piece of the broken sword to place it in the fire. It will automatically come out of the fire. Then use the pincers on the other part of the sword to add it to the fire.
- Note: To get the pincers to take a piece of sword, place the point of the cursor over the sword piece, do not focus on the pincers.
- Once both pieces of sword have been placed in the fire, use the hammer on the sword. Then use the pincers again to take the sword and dunk it in water. Once you are finished, you will have the repaired sword.
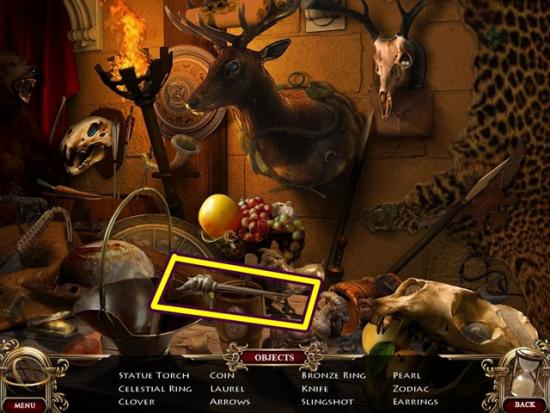
- Click on the table to start a hidden object hunt.
- Bacchus’ grapes are added to your inventory. Leave the scene and enter the hunting lodge.
- Give the repaired sword to the hunter. In return, he gives you the winery key. Go south two scenes to the south end.
- Click on the winery door. Use the winery key in the lock, then click to turn the key. Enter the winery.
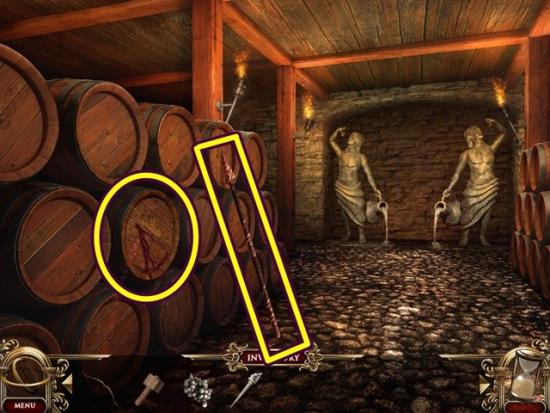
- Take Hephaestus’ spear. Click on the leaking barrel. Use the mallet to smash the barrel. Take Ceres’ torch. Leave the winery and go west to the farm.
- Talk the farmer. Click through the dialogue. Take Artemis’ bow.
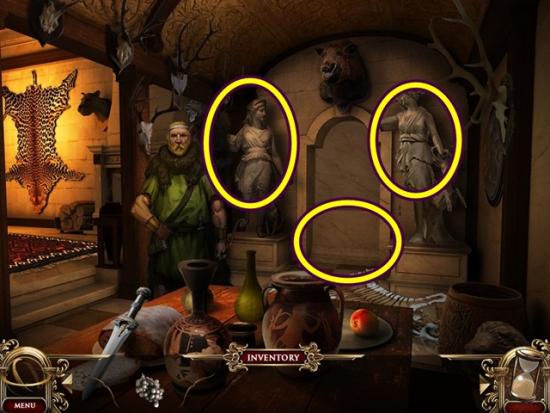
- On the two statues, place Ceres’ torch (left) and Demeter’s torch (right). Click on the area between the two statues to start a mini-puzzle.
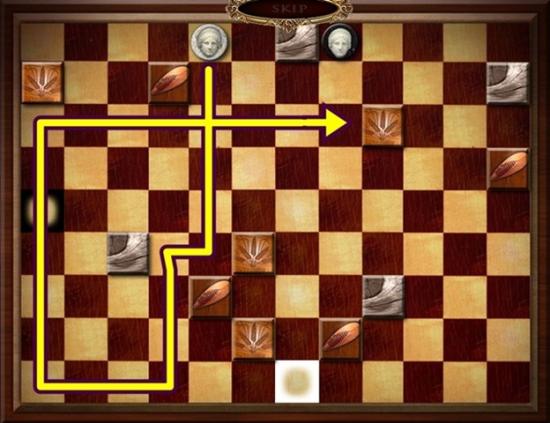
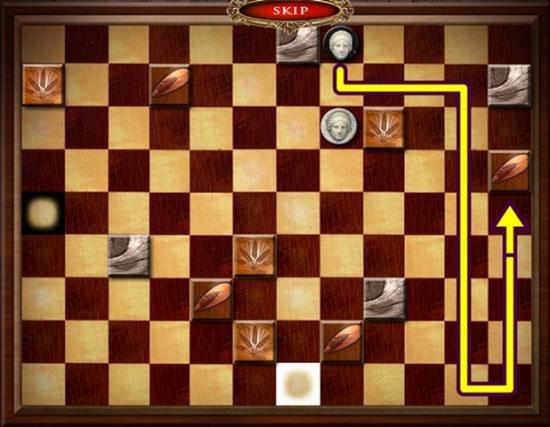
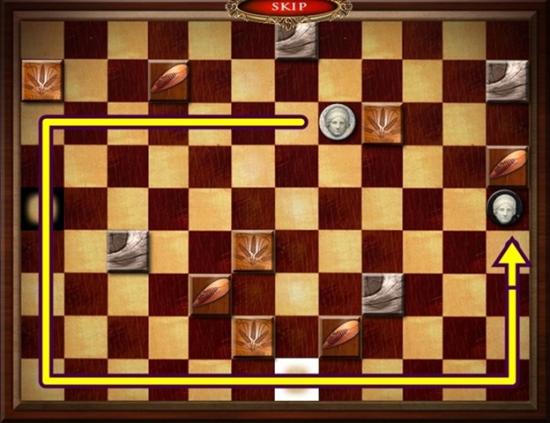
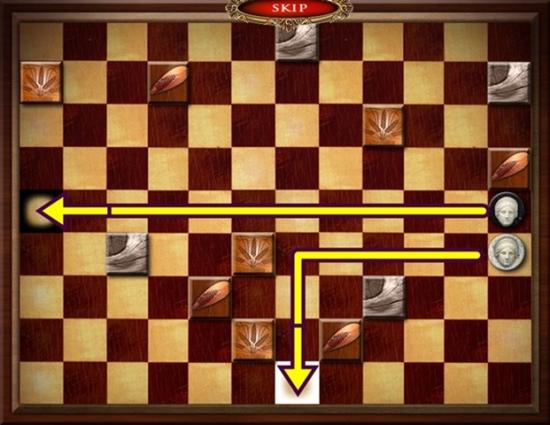
- Get the white coin into the white slot and the black coin into the black slot. To move a coin, click on it then select a direction. The coin will move until it hits an obstacle. Strategize before moving a coin as it helps to use one coin to guide the other into its slot.
- The coin has to “land” in its appropriate slot, it cannot pass over it.
- The screenshots below show one possible solution.
- Once you have completed the puzzle, you receive Vulcan’s spear. Go to the blacksmith’s forge.
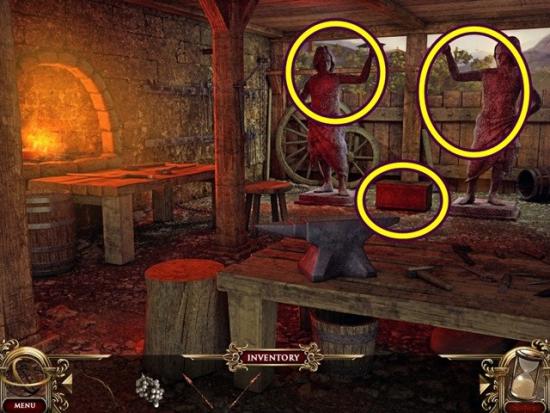
- On the two statues, place Vulcan’s spear (left) and Hephaestus’ spear (right). Click on the box in between the two statues to start a mini-puzzle.
- Clear a path for the bow to exit the box. To move an item, click and drag it.
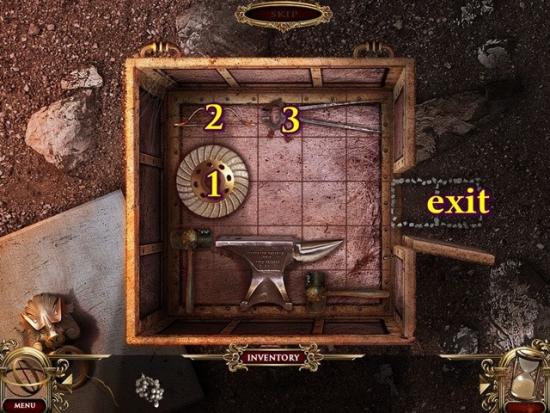
- To start, move the disc (1) all the way to the right, then move the bow (2) as far down as possible. Move the pincers (3) all the way to the left and move the disc (1) all the way up. Click and drag the bow (1) out of the box.
- Note: Drag the bow completely out of the box. If nothing happens, keep trying to drag the bow out of the box.
- Once you have completed the puzzle, you receive Diana’s bow. Go to the hunting lodge.
- On the two statues, place Artemis’ bow (left) and Diana’s bow (right). When the panel between the two statues opens, take Dionysus’ grapes. Go to the winery.

- On the two statues, place Dionysus’ grapes (left) and Bacchus’ grapes (right). Click the area between the two statues to start a mini-puzzle.
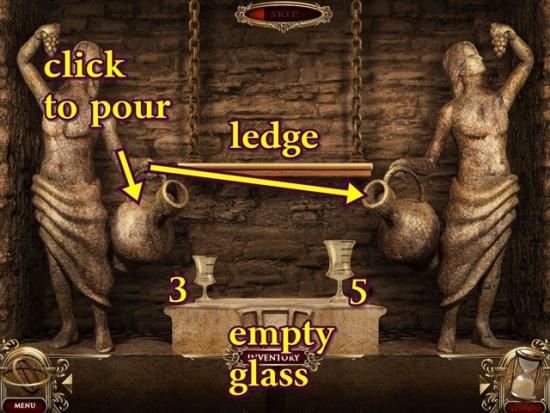
- Place four units of wine on the ledge. Only one cup can be used. Click on the pitcher beside either glass to fill it. The glass on the left can contain three units of wine, the glass on the right can contain 5 units. To empty a glass, pour the wine down the centre of the table.
- To solve, fill the large glass. Then use the large glass to fill the small glass (leaving two units in the large glass). Empty the small glass. Fill the small glass with the two units from the large glass. Fill the large glass. Pour the large glass into the small glass. This leaves four units in the large glass.
- Place the large glass with four units on the ledge. Once completed, take the Greek history scrolls that appear. Return to the farm.
- Give the Greek history scrolls to the farmer. In return, he gives you the fort key. Go to the north end.
- Click on the fort gate door. Insert the fort key in the lock, then click to turn it.
Chapter Four
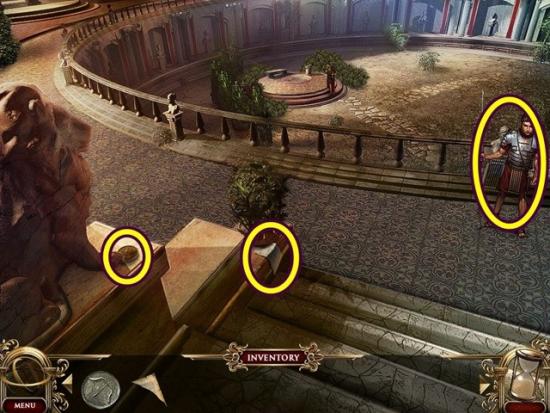
- Click on the debris on the right. Open the crate and take the sickle. Use the sickle to cut the bushes on the left. Take the Spartan spear. Go up the steps to the monument grounds.
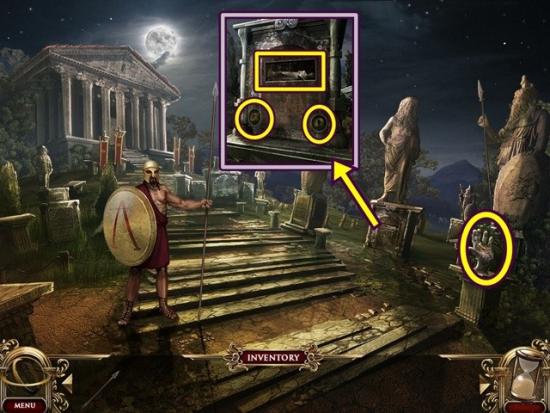
- Talk to the Spartan warrior. Click through the dialogue. Click on the hand statue. Take the small key. Click the base of the middle statue. Click on the two lit up buttons, then take the muse that appears. Go north to the central Acropolis.
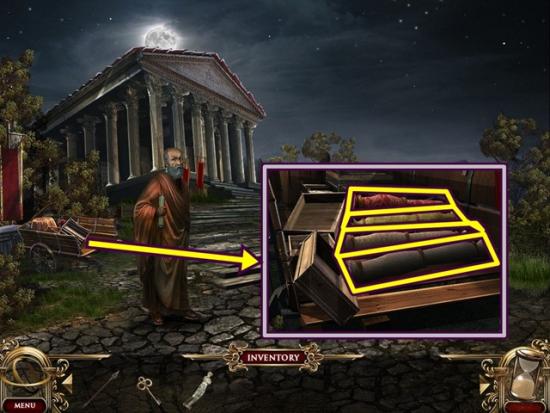
- Talk to the scholar. Click through the dialogue. Click to the cart behind him. Move the bolts of fabric (four) and take the Spartan spear. Go to the Parthenon.
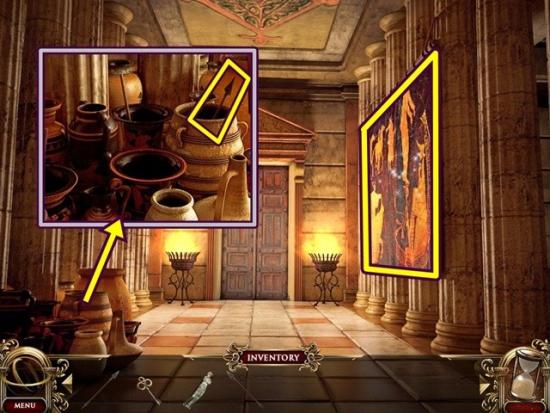
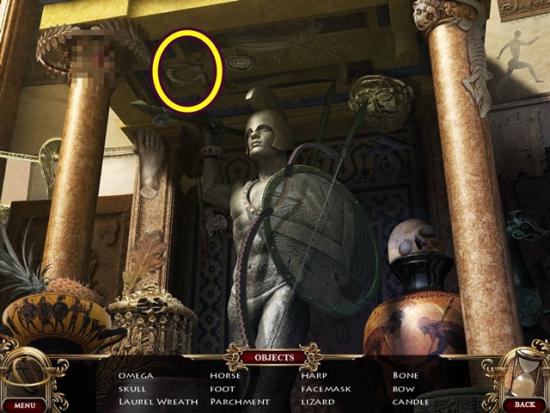
- Click on the pots (bottom left). Take the Spartan spear. Click on wall tapestry to start a hidden object hunt.
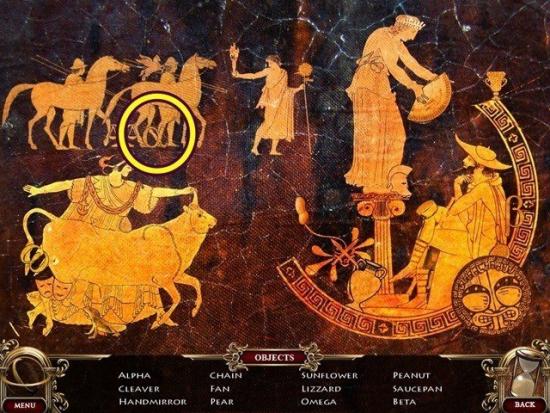
- An alpha emblem is added to your inventory. Leave and go to Zeus’ Polieus.
- Take the Spartan spear. Click on the base of the Zeus statue. Place the muse in the empty slot. Take the Spartan spear that appears. Go forward to the Theatre of Dionysus.
- Talk to the playwright. He gives you a blank scroll. Use the small key to unlock the chest. Take the Spartan spear. Return to the monument grounds.
- Give the blank scroll to the Spartan warrior. In return, he gives you a scroll with the Battle of Thermopylae. Return to the playwright.
- Give the playwright the scroll with the Battle of Thermopylae. In return, he gives you the Parthenon key. Return to the Parthenon.
- Click on the door. Unlock the door with the Parthenon key. Go into the inner Parthenon.
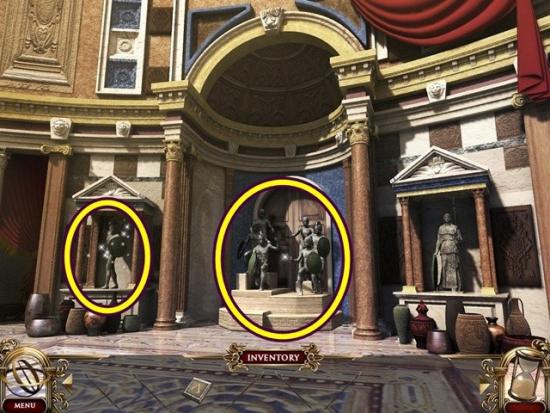
- Click on the left statue to start a hidden object hunt.
- An omega emblem is added to your inventory.
- Click on the statues in the middle. Give them all six Spartan spears. When the statues move, click on the doorway they were blocking to start a mini-puzzle.
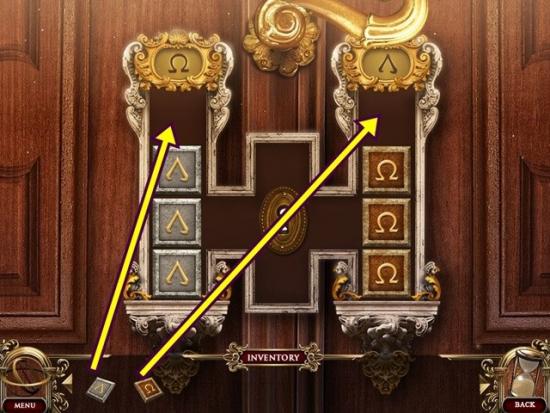
- Place the omega emblem and alpha emblem on the board. To solve this puzzle, move the alpha emblems to the right of the board under the alpha insignia and move the omega emblems to the left of the board under the omega insignia.
- Once completed, enter Athena’s chamber.
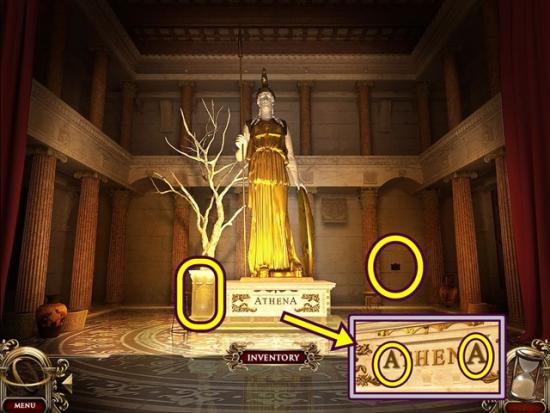
- Click on the statue of Athena’s base. Click on the two As and then take Athena’s key. Click on the base of the tree statue. Use Athena’s key in the lock. Take the owl emblem. Click on the plaque on the wall (right). Place the owl emblem. Click on it to start a mini-puzzle.
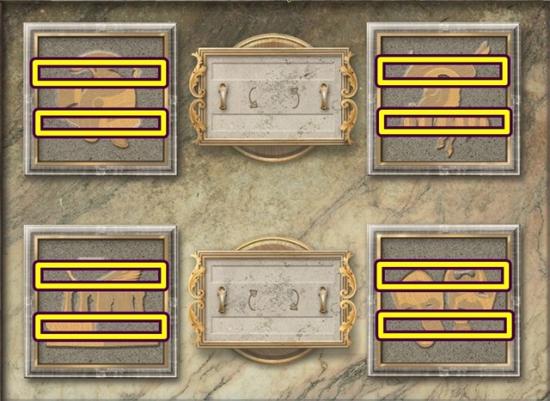
- To solve this puzzle, rearrange the tiles (highlighted in screenshot above) to complete the designs. Use the rectangular boxes in the middle to move the tiles.
- Use the screenshot above as an explanation as to how to solve this puzzle.
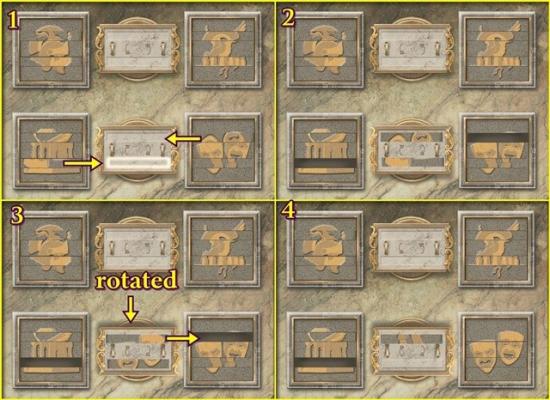
- Click on the tile you’d like to move (1). The box in the middle must be inline with the tile and when a rectangular slot highlights, click on it to move the selected tile into it (2). Then use the arrows to rotate the boxes (3), as well you can move the tiles from box to box. Before moving a tile into its proper position, you’ll have to move the tile that is already there (4). Move the title into its proper position (4).
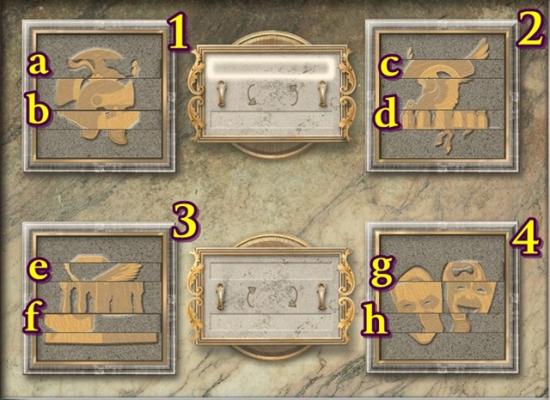
- Using the screenshot above as a guide, the images are numbered 1 to 4 and the tiles are a to h. Image 1 should contain tiles c and h. Image 2 should contain tiles e and a. Image 3 should contain tiles b and d. Image 4 should contain tiles f and g.
- Solution:
- Once completed, go through the doorway.
Chapter Five
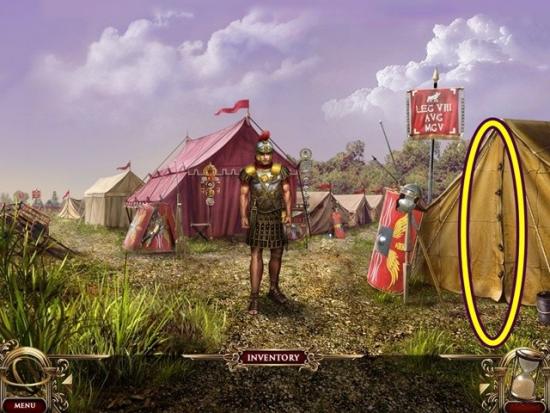
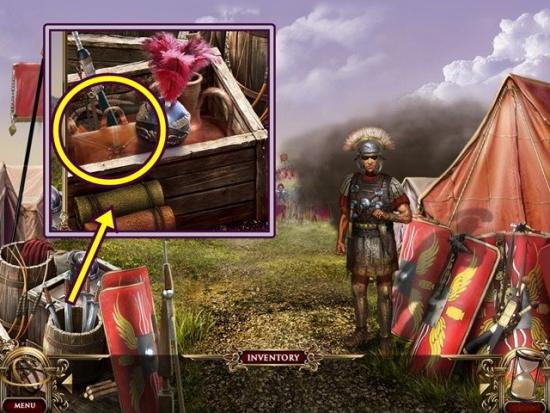
- Talk to Brutus. Click through the dialogue. Click on the tent. Click to undo all the fasteners. Once they are all undone, click inside the tent to start a hidden object hunt.
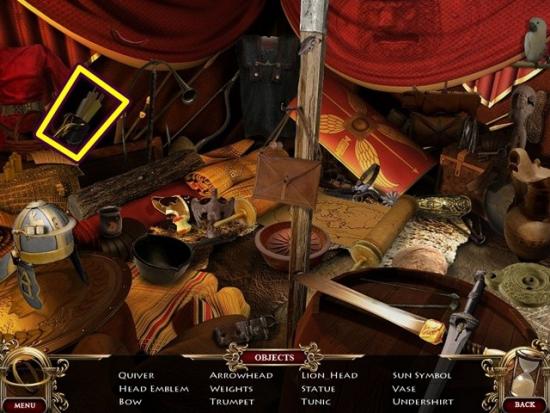
- Archer’s arrows are added to your inventory. Go east to the forest.
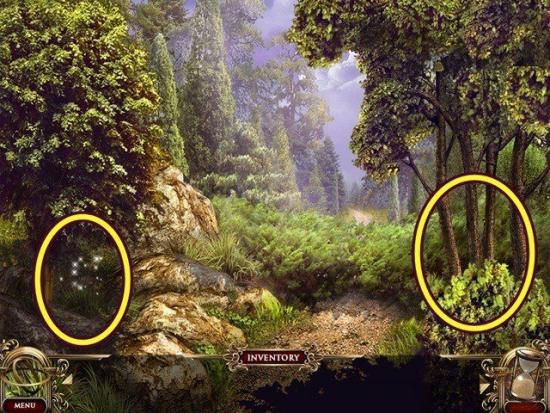
- Click on the trees on the left to start a hidden object hunt.
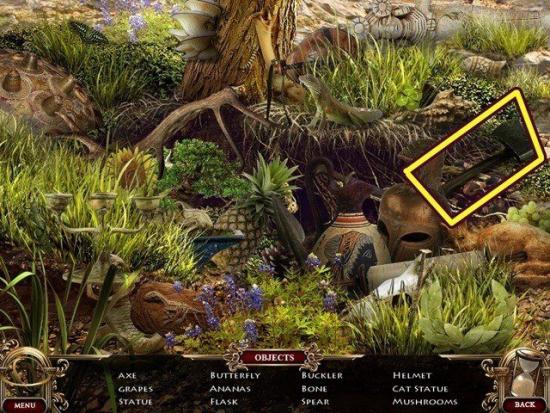
- An axe is added to your inventory. Click on the trees on the right. Use the axe to chop them down (all four trees). Take the lumber. Go south then north to the front lines.
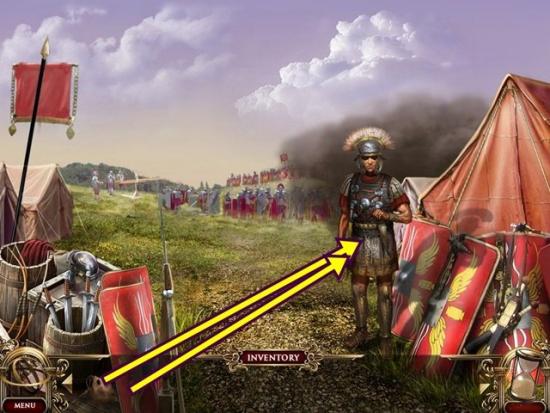
- Talk to the soldier. Click through the dialogue. Click on the supplies at the left of the scene. Move all the items, then take the rope. Go south twice to the marshlands.
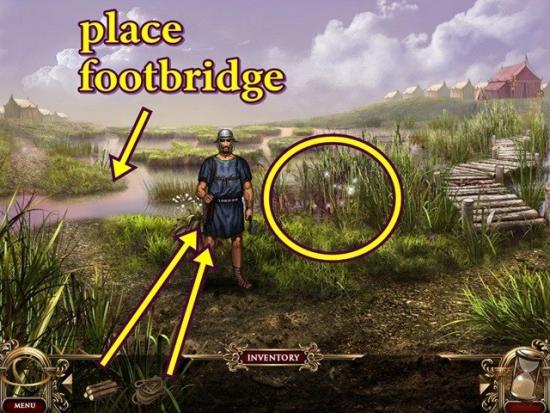
- Talk to the artisan. Click through the dialogue. Give him the rope and the lumber. In return, he gives you a footbridge. Click on the marsh area to start a hidden object hunt.
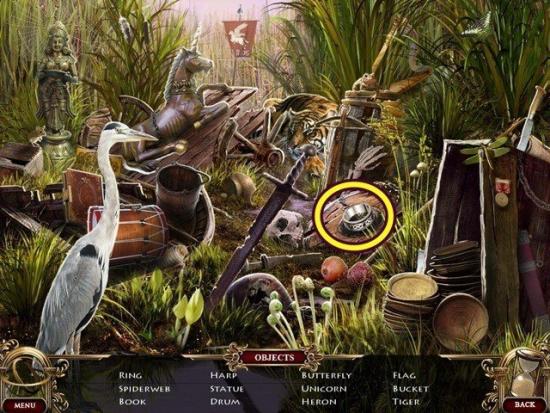
- Cassius’ ring is added to your inventory.
- Place the footbridge over the swamp. Go to the Great Plains.
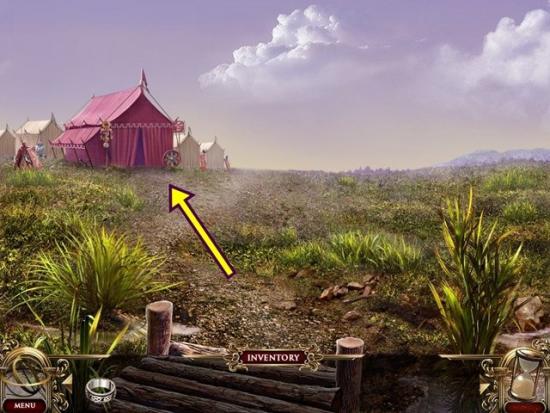
- Move forward to Cassius’ camp.
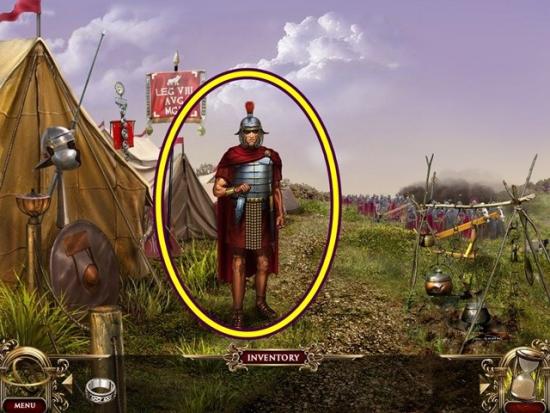
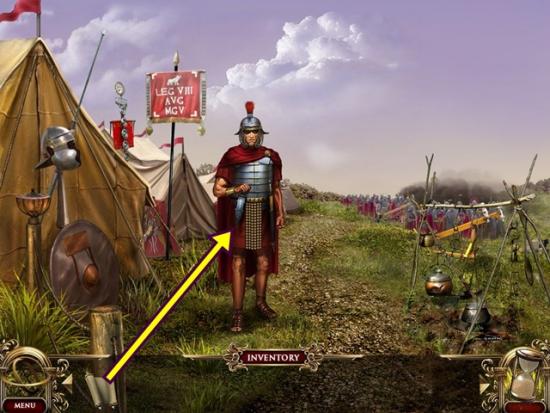
- Talk to the soldier. Click through the dialogue. Return to Brutus’ camp.
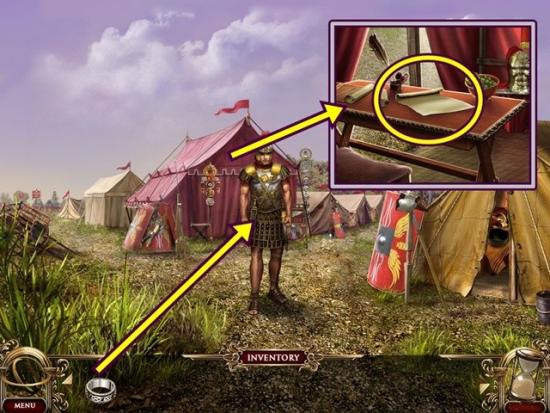
- Give Cassius’ ring to Brutus. When he leaves, click on the tent he was blocking. Take the strategic plan. Return to Cassius’ camp.
- Give the strategic plan to the soldier. Click through the dialogue. A mini-puzzle automatically starts.
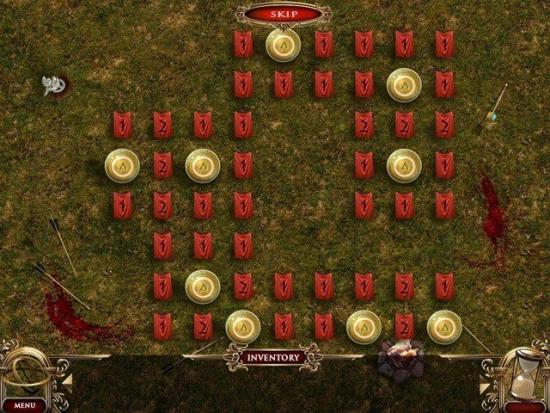
- This is a minesweeper puzzle. Click on a shield to start the puzzle. The flags all have a number indicating the unsafe flags that are nearby. A 1 means one unsafe shield is beside, above, below or diagonal from that flag. A 2 means two unsafe shields are beside, above, below or diagonal from that flag. Using logic, clear the board.
- Solution:
- Go south to the Great Plains.
- Once the cart finishes moving, click on it. Take the rations. Return to the front lines.
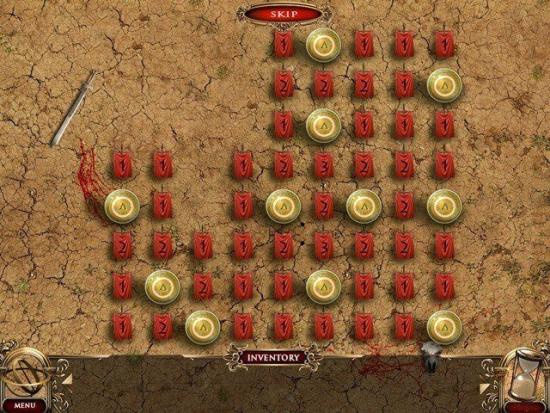
- Give the archer’s arrows and rations to the soldier. A mini-puzzle automatically starts. This is the exact same puzzle as the one before.
- Solution:
- Once you are completed, return to the forest.
- Talk to Cassius. Go north.
Chapter Six
- Click on the sparkling area to start a hidden object hunt.
- Achilles’ sword is added to your inventory. Use Achilles’ sword on the soldier blocking the path. Once he leaves, go north twice.
- Talk to Brutus. Click through the dialogue.
The end!

More articles...
-
Best Horror Games On Itch.io – July 2026
Across a bounty of subgenres. -
Haze Seas Accessories Tier List [Best Accessories to Equip]
The accessories with the best stat buffs in Haze Seas.