![Hololive Dreams Tier List [Best Cards]](/wp-content/uploads/2026/07/hololive-dreams-tier-list.jpg "Hololive Dreams Tier List [Best Cards]")
Hololive Dreams Tier List [Best Cards]
The best cards for the best performances.


![Iron Soul Dungeon Weapon Tier List [Best Weapons]](/wp-content/uploads/2026/07/iron-soul-dungeon-weapon-tier-list.jpg "Iron Soul Dungeon Weapon Tier List [Best Weapons]")

Welcome to Gamezebo's strategy guide for Little Folk of Faery. The guide is organized into five sections: MENUS (an explanation of the menu icons and what they do) VILLAGERS (a run-down of the different types of villagers) GENERAL TIPS WALKTHROUGH (a guide to completing all of the main quests and secondary quests in the game) COLLECTABLES (an explanation of the different collectables in the game and what bonuses they grant) To skip immediately to any part of the guide, type …
a:1:i:0;a:2:s:13:”section_title”;s:32:”Little Folk of Faery Walkthrough”;s:12:”section_body”;s:34834:”
Welcome to Gamezebo’s strategy guide for Little Folk of Faery.
The guide is organized into five sections:
To skip immediately to any part of the guide, type Ctrl+F on your keyboard and type in the keyword you’d like to search for – for example, type "Hermit Faery" to search the document for the Hermit Faery quest.
MENUS

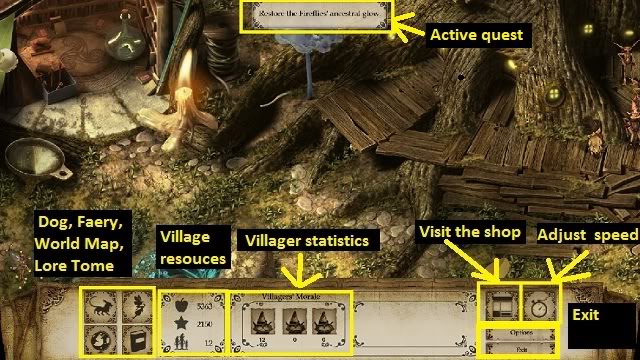
Active Quest
The part of the main quest that you’re working on will appear here.
Dog
Your dog, Ginger, is good at sniffing out collectibles. When you see the Dog icon blinking, click on it to be transported instantly to Ginger – usually there will be a collectible nearby.
Faery’s Advice
Click on the faery icon to receive valuable gameplay tips.
World Map
Click on the globe icon to see an overview of the entire map. Click anywhere on the map to travel to that location. Collectibles show up as specs of flickering light on the map. If you’re hunting for collectibles, a good strategy is to watch the world map for them to appear.
Tome of Lore
This book is divided into several sections:
Bestiary
When you meet a new creature in the game, its information gets recorded into the Bestiary. Visit the Bestiary to learn about each of them.
Quest Journal
This section keeps track of the quests you have discovered. It is divided into two pages: Main Quetss, and Secondary Quests. Not all secondary quests are mandatory to complete.
Tree of Knowledge
Here is where you go to spend the Enchantment Points you’ve accumulated. You can spend them in four areas:
Harvest: Increases the amount of food your villagers will harvest.
Movement: Increases your villagers’ movement speed and resistance to spirits.
Enchantment: Increases the amount of Enchantment points earned with each task.
Morale: Increases villagers’ ability to increase each other’s morale through chatting.
Collectables
Here you can see all of the special collectables you’ve found.
Village resources
This box tells you how many resources your village has.
The top symbol (Apple) = how much food you have gathered.
The middle symbol (Star) = how many Enchantment points you have to spend.
The bottom symbol (people) = how many villagers have returned to the village.
Villager statistics
These three icons show you the morale of your villagers; from left to right, it shows the number of Gleeful, Happy, and Sad villagers.
Click on this box to get more detailed descriptions of each villager in your tribe.
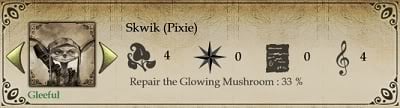
This box shows a picture of your villager, its name and type (i.e. Skwik, Pixie). Below the picture is hsi mood (either Gleeful, Happy or Sad). To the right are four symbols that show his skill level in each of the four categories (Nature, Exploration, Knowledge, and Music), and below that indicates the task he’s workign on at the moment, and what percentage of the task has been completed.
Visit the shop
Click on this icon to return to the antique shop when you unlock a new item that needs dusting off.
Adjust speed
Here you can adjust how quickly time goes by in the game.
Options and Exit
Click here for the Options menu, where you can adjust settings like volume and fullscreen.
Click on the Exit button to leave the game. Your progress will automatically be saved, but the game will continue to run even when you’ve shut it down.
VILLAGERS
There are four types of villagers, and each has a natural aptitude. It is possible to train villagers in other aptitudes as well, but it will take longer.
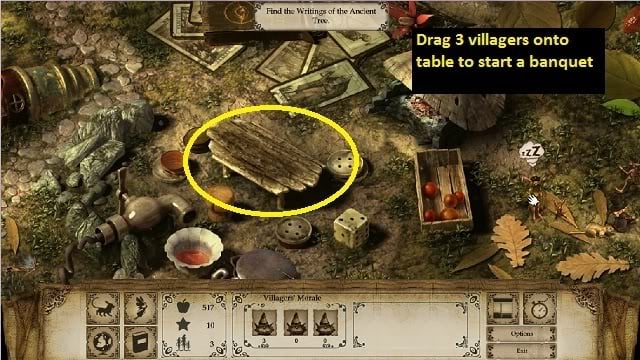
The three villagers you start with are random, and new villagers will appear in a random order each time you hold a banquet.
Dryad
Primary skill: Nature
Weak skill: Exploration
Gnome
Primary skill: Knowledge
Weak skill: Music
Leprechaun
Primary skill: Exploration
Weak skill: Nature
Pixie
Primary skill: Music
Weak skill: Knowledge
GENERAL TIPS
Controls
To scroll around the map, click the screen and drag it in the opposite direction you want to travel. For example, to scroll right, hold down the left mouse button and move the mouse left. This takes a bit of getting used to. You can also scroll by using the four arrow keys.
Time
Throwing a banquet
Mysterious Animal
WALKTHROUGH
Getting Started
If this is your first time playing the game, we recommend you go through the brief tutorial at the beginning to get your bearings.
You start off with three villagers: a Gnome, a Pixie, and a Dryad. The first thing you should do is complete The Hermit Faery quest, which will allow the villagers to access a food source. (See how to complete The Hermit Faery quest in the Main Quests section of this walkthrough below.)
The second thing you should do is locate the four learning nooks so you can begin training your villagers’ skills. (See how to complete the Learning Nooks quest in the Secondary Quests section of this walkthrough below.)
Dryads have a natural aptitude for Nature, so drag your Dryad over to the pile of fruit in the upper right of the map to start harvesting food for your village and improving the Dryad’s nature skill at the same time. The Gnome should learn Knowledge at the Library of Learning, and the Pixie should practice his musical skills at the Theatre of Inspiration.
As soon as you have enough food, throw your first banquet so you can acquire the fourth type of villager: The Leprechaun. Leprechauns have a natural aptitude for Exploration, so drag him onto the Telescope to practice this skill.
Note: If you opt to complete the tutorial, it will walk you through some of these early steps automatically.
MAIN QUESTS
History of the Fairy Realm
Decipher the Writings of the Ancient Tree
Click on the area in the screenshot above to decipher the ancient writings.
Drag a gnome onto the writings to decipher them.
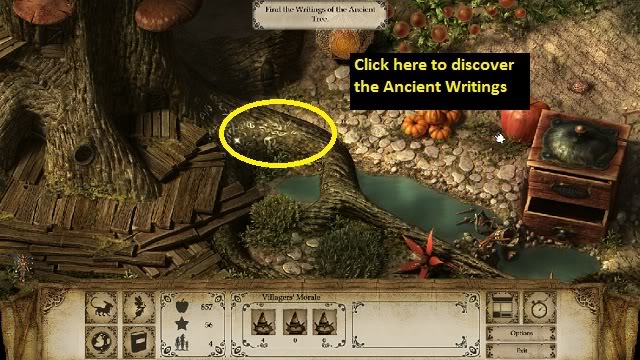
Restore the Stele of the Ancestral Ruins.
The Ancestral Ruins are the large circular ruins location in the upper left corner of the map. Click on them to "discover" them.
Drag a villager with Music skill onto the Wistful Spirit to distract it, then drag a villager with Exploration (+1) onto the ruins to clean them.
Decipher the Writings of the Ancestral Ruins.
Your musical villager might become sad at this point, so give him a morale boost by dragging him onto the food storage pile to get a bite to eat.
Next, drag a villager with Knowledge (+1) onto the same area to decipher the ruins. Don’t forget to keep distracting the Wistful Spirit with a musical villager.
QUEST COMPLETE
NEW QUEST EARNED: THE FIREFLIES
The Hermit Faery
Clear the entrance to the Hermit Feary’s house.
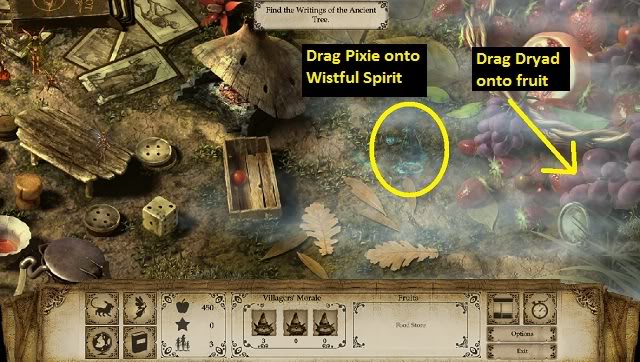
Start by finding the Fruit Basket so you can start harvesting food. Drag a Pixie onto the Wistful Spirit to distract it, then drag your Dryad onto the fruits to begin harvesting them.
Once you finish harvesting, the Wistful Spirit will disappear and the fog will lift, freeing the Hermit Faery. She drops a seed on the ground called the Hermit Faery’s Seed.
QUEST COMPLETE
NEW QUEST EARNED: ORCHARD SEEDS
Orchard Seeds
Produce the Swamp Flower Seed
This quest begins when you free the Hermit Faery and she drops the Hermit Faery’s Seed.
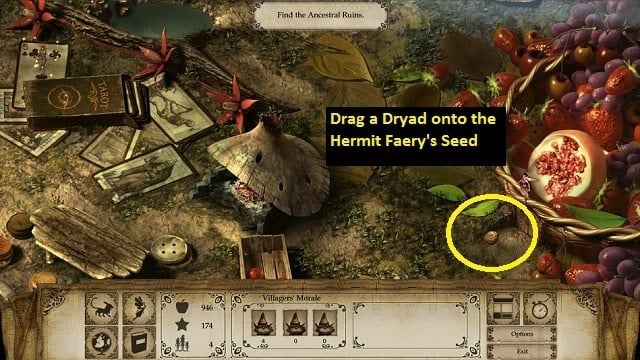
Drag a Dryad over to the Hermit Faery’s Seed to pick it up and take it to the orchard.
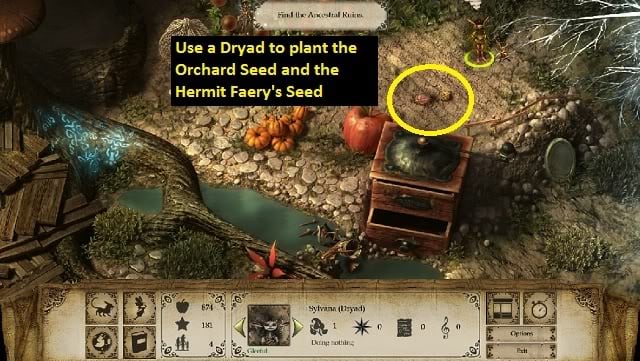
There are now two seeds sitting in the orchard: the Orchard Seed and the Hermit Faery’s Seed. Use a Dryad to plant both of them.
QUEST COMPLETE
NEW QUEST EARNED: THE SWAMP
The Swamp
Acquired by: Completing Orchard Seeds quest
Clean the Swamp
Drag up to 3 villagers with Nature (+2) onto Olianth, the creature in the swamp in the southeast corner of the map.
There are two Wistful Spirits in this area, so make sure you have to villagers with Music skill ready to distract them.
Fix the Water Source for the Blossoming Plain
Drag a villager with Knowledge (+1) onto the spout of the watering can. (Make sure to protect it from the Wistful Spirit with a Musical villager.) You can drag up to 3 villagers onto this task.
Plant the seed of the Orchard Shrub in the Swamp.
Drag a villager with Nature (+3) onto the swamp seed in the Orchard and the villager will carry it down into the swamp.
QUEST COMPLETE
You now have access to the Swamp Flowers to complete the GOLDEN SYRUP quest.
The Mirrors of the Faery World
Acquired by: Clicking on one of the mirrors.
Drag a villager with Exploration (+1) onto each of the first four mirrors to clean them.
Once the mirrors are clean, drag a villager with Knowledge (+1) onto the first four mirrors listed below to repair them.
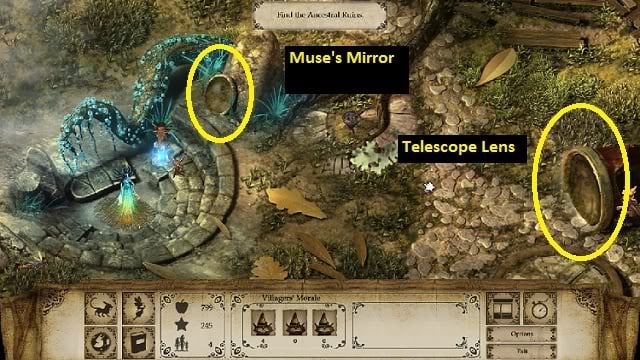
Clean and repair the Telescope Lens.
Clean and repair the Muse’s Mirror.
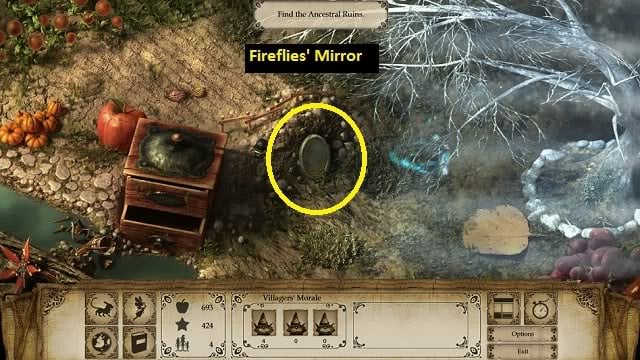
Clean and repair the Fireflies’ Mirror.
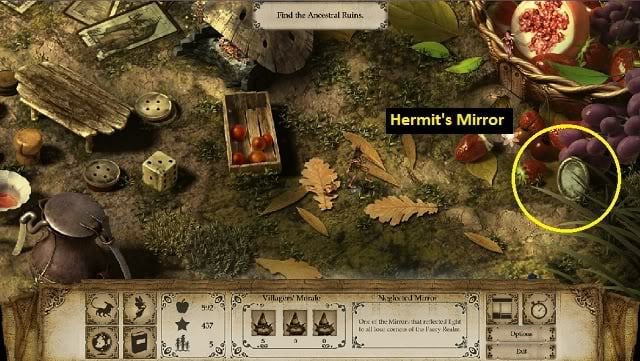
Clean and repair the Hermit’s Mirror.

Restore the Mirror of the Faery Circle.
Level 1 Movement is required to reach the Mirror of the Faery Circle.
Drag a villager with Exploration (+2) onto the mirror to clean it.
Drag a villager with Knowledge (+2) onto the mirror to repair it.
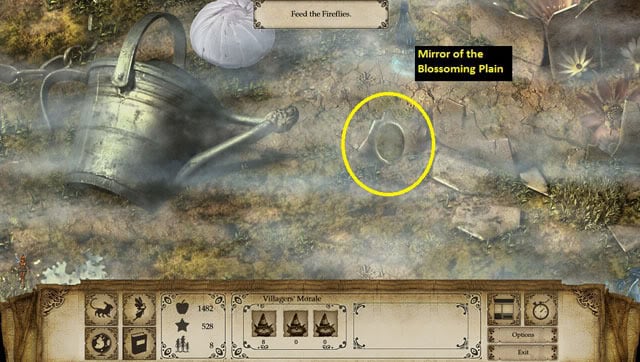
Clean and repair the Mirror of the Blossoming Plain.
Drag a villager with Exploration (+3) onto the mirror to clean it.
Drag a villager with Knowledge (+2) onto the mirror to repair it.
QUEST COMPLETE
The Faery Circle
Acquired by: Picking up your first Rune of Faery.
Collect all the Runes of Faeries
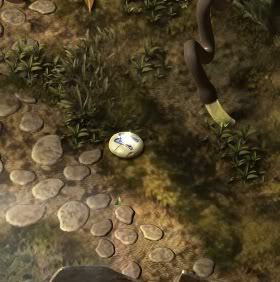
A Rune of Faery looks like a round stone with a glowing rune on top (see screenshot above).
The Melody of Legend
Acquired by: Drag a Pixie onto the Theatre of Inspiration for the first time.
Delight the Muse
Drag a Pixie onto the Theatre of Inspiration to talk to the Muse. A legendary instrument is hidden somewhere in the south-west of the realm.
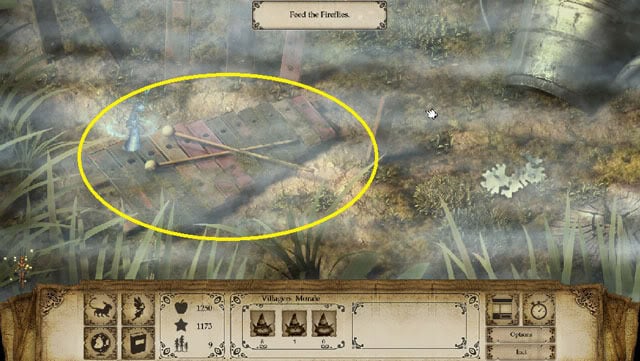
Clean the Xylophone
Locate the broken xylophone in the lower left corner of the map.
Drag two villagers with Exploration (+2) onto the broken xylophone. There’s a Wistful Spirit here, so make sure you have a Musical villager to distract it.
Study the Melody of Legend.
Drag two villagers with Music (+3) onto the xylophone to research it. (The Wistful Spirit will still be there.)
QUEST COMPLETE
The Fireflies
Acquired by: Completing HISTORY OF THE FAERY REALM
Give the Fireflies something to eat.
Locate the King of Fireflies, who you’ll see in the upper right corner of the screen.
Drag a villager with Nature (+1) onto the king to begin taking fruit to the king.
Give the Fireflies some Golden Syrup to eat.
First complete the Golden Syrup quest so you have food for the fireflies.
Drag at least two villager with Nature (+4) onto the king to feed him Golden Syrup. (You must have refined Golden Syrup in the still.) You can drag up to 4 villagers for this quest.
Make sure to distract the Wistful Spirit with a Musical villager.
Repair the Lamp of the Fireflies
Drag two villagers with Knowledge (+4) onto the lamp in the lower left corner of the screen (in the swamp). There is a Wistful Spirit here, so make sure you have a Musical villager to keep them at bay.
Lead the Fireflies back to their kingdom.
Drag two villager with Music (+4) onto the Firefly King. They will escort the king down to the Lamp in the lower right corner, then begin their work. You will need a third Musical villager to distract the Wistful Spirit in the area.
QUEST COMPLETE
Golden Syrup
Acquired by: Dragging a villager onto the Broken Still.
Repair the Still.
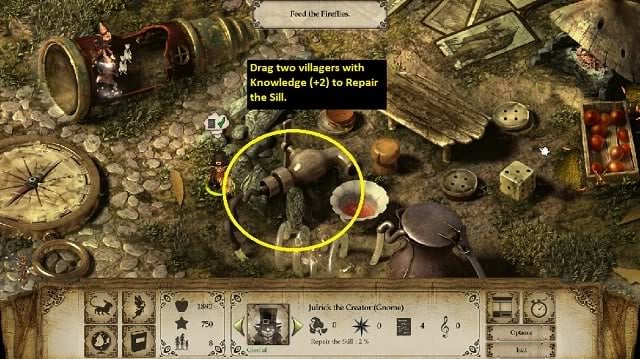
Drag two villagers with Knowledge (+2) onto the broken sill to repair it.
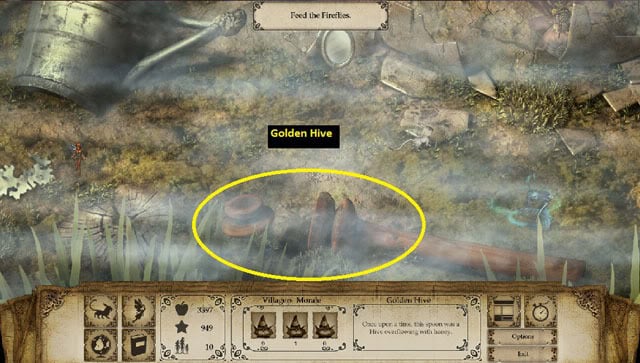
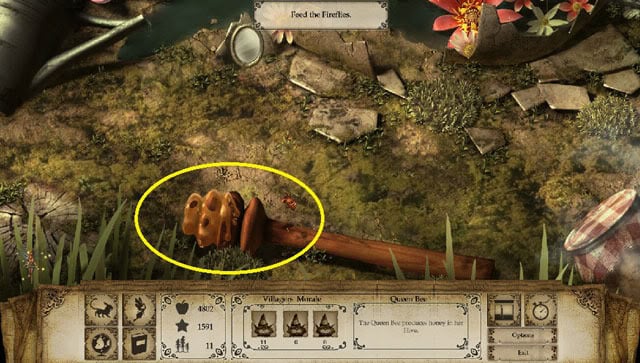
Repair the Honey Spoon
Drag two villagers with Knowledge (+3) onto the hive. Use a Musical villager to distract the Wistful Spirit.
Make the Queen of Flowers bloom
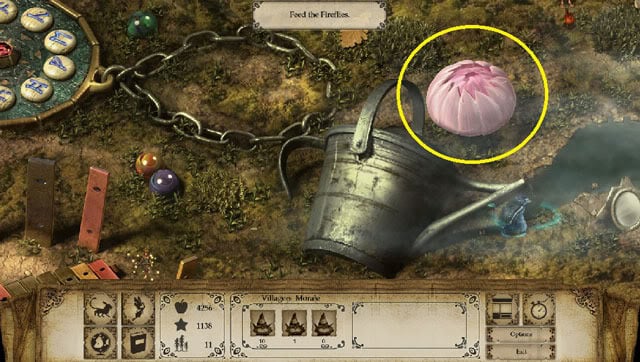
After you’ve repaired the water source as part of the Swamp quest, the large flower next to the watering can will turn pink. Drag a villager with Nature (+3) onto the flower, being sure to protect them from the Wistful Spirit with a Musical villager. You can drag up to three villagers onto the flower.
Take the Honey to the Still.
The Honey Spoon at the bottom of the screen is now dripping with honey. Drag at least two villagers with Nature (+2) on the honey to bring it back to the Still and make Golden Syrup. You can have at least five villagers on this task.
You must complete the Swamp quest to complete the last part of this quest.
Take Swamp Flowers to the Still.
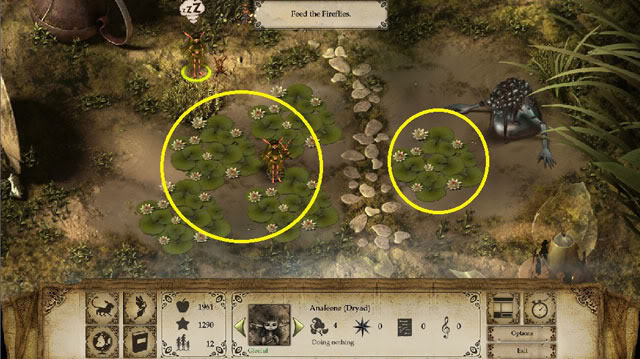
After you plant the Swamp Seed in the Swamp, Swamp Flowers will sprout.
Drag at least two villagers with Nature (+3) onto the Swamp Flowers to harvest them. You can drag up to four villagers onto the flowers.
Refine the Golden Syrup.
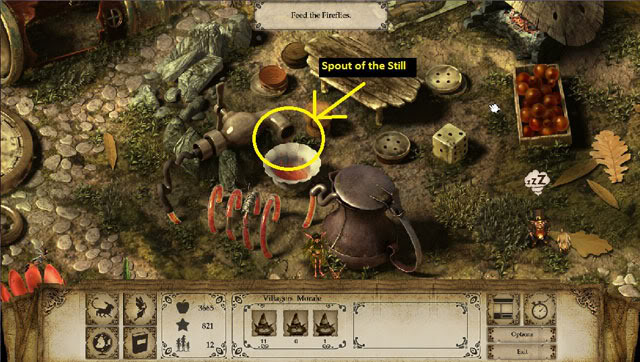
Drag at least two villagers with Knowledge (+3) onto the spout of the Still to refine the Golden Syrup. You can have up to 3 villagers on this task.
QUEST COMPLETE
SECONDARY QUESTS
Learning Nooks (Start Game With This Quest)
Find the Fruit Basket
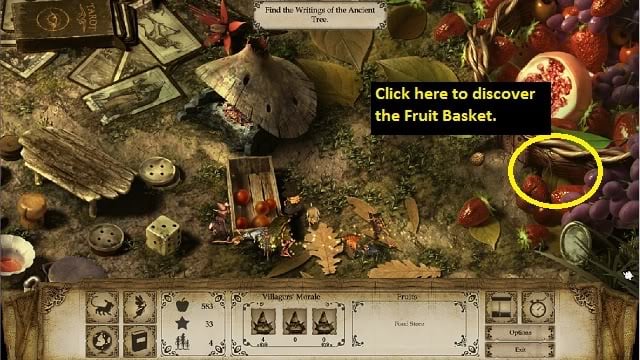
Click in the harvesting area below the Hermit Faery to discover the Fruit Basket.
Find the Telescope
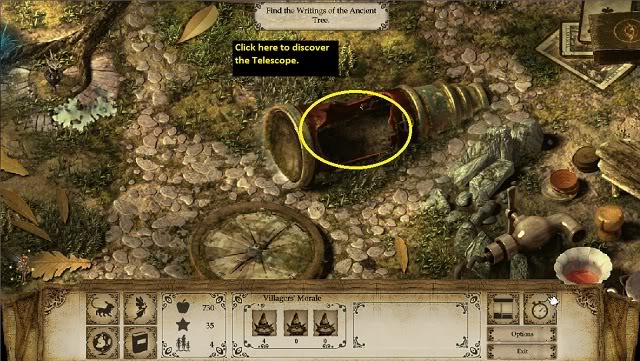
Find and click on the telescope in the screenshot above.
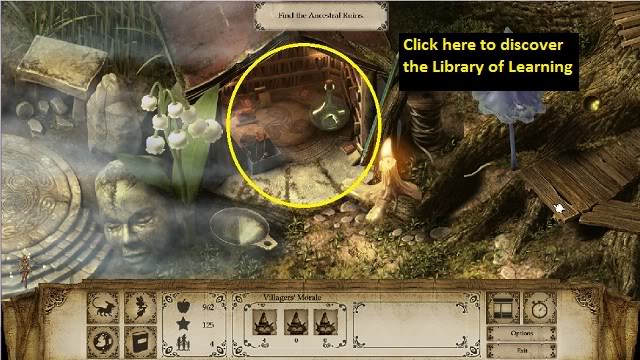
Find the Library of Learning
Find and click on the Library of Learning in the screenshot above.
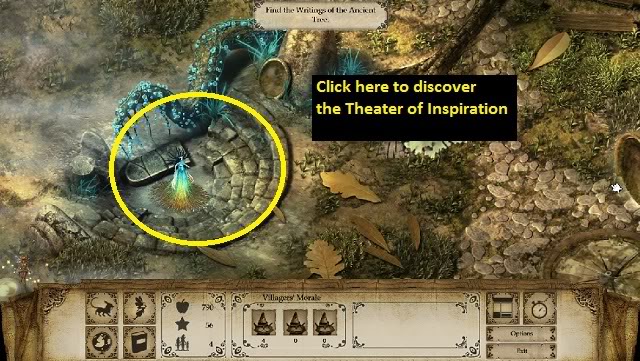
Find the Theatre of Inspiration
Find and click on the Theatre of Inspiration in the screenshot above. (Note: You may not find the Theatre until you actually click a Pixie onto it.)
QUEST COMPLETE: LEARNING NOOK
NEW QUEST EARNED: THE MELODY OF LEGEND
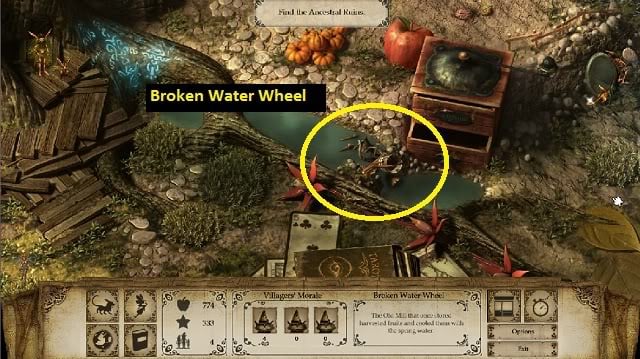
Old Mill
Acquired by: Click on the broken water wheel in the upper right.
Drag up to two villagers with Knowledge (+2) onto the water wheel to repair it.
QUEST COMPLETE
The Old Mill will increase your food storage capacity and allow villagers to eat directly from the Old Mill as well as the Fruit Basket.
Moonstones
Acquired by: Picking up your first Moonstone.
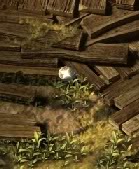
Pick up your first Moonstone to start this quest.
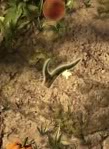
Ent Roots
Acquired by: Picking up your first Ent Root.
The Compass
Acquired by: Clicking on the compass to the lower left of the Telescope.
Drag a villager with Exploration (+1) onto the compass to clean it.
QUEST COMPLETE
Breaths of Sylphs
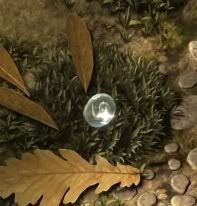
Acquired by: Picking up your first Breath of Sylph.
The Feary Crystal
Acquired by: Dragging a villager with Knowledge (+1) onto the dark crystal.
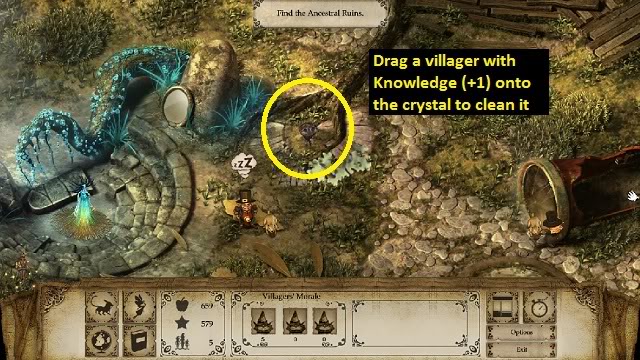
QUEST COMPLETE
Hand of Titan
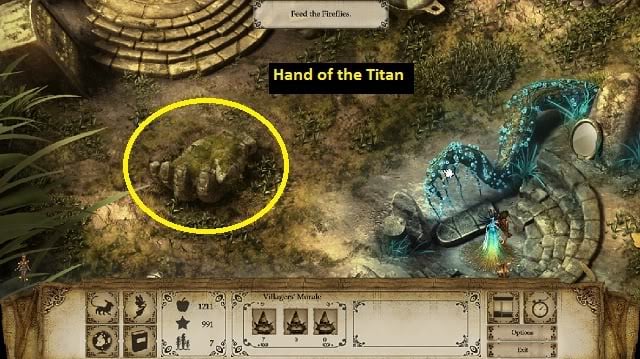
Acquired by: Clicking on the statue titan hand to the right of the Theatre of Inspiration.
Clean the Hand of the Titan.
Level 1 Movement is required for this quest.
Use two villagers with Exploration (+3) on the hand to clean it.
QUEST COMPLETE
Villagers
You start the game with this quest.
To finish this quest, you need to bring all 12 villagers back to the village.
Each time you throw a banquet, another villager will return to the village. You start the game with 3 villagers, so you’ll have to throw 8 banquets throughout the game to bring all of the villagers back.
Faery Lights
You’ll acquire this quest late in the game, after you’ve fed Golden Syrup to the firefly king.
Repair the Faery Light of the South, Centre and North.
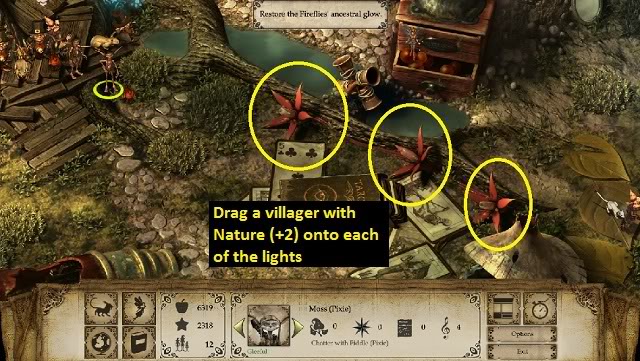
The lights of the south, centre and north are located just above the banquet area in the northeastern part of the map.
Drag villagers of Nature (+2) onto each of the three red faery lights to begin repairs.
QUEST COMPLETE
Glowing Mushroom
You’ll acquire this quest late in the game, after you’ve fed Golden Syrup to the firefly king.
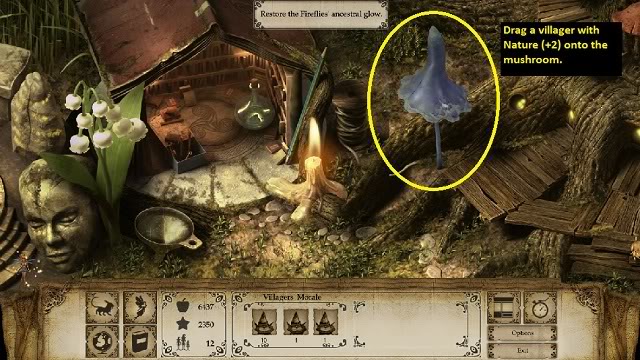
The mushroom is a large purple mushroom to the right of the Library of Learning in the upper left area of the map.
Repair the Glowing Mushroom.
Drag a villager with Nature (+2) onto the mushroom to begin repairs.
QUEST COMPLETE
COLLECTIONS
Moonstones (Secondary Quest)
Acquired by: Picking up your first Moonstone.
Pick up your first Moonstone to start this quest.
There are 10 of these to collect. When the collection is complete, your villagers’ morale will rise more quickly if they’re chatting to each other.
Ent Roots (Secondary Quest)
Acquired by: Picking up your first Ent Root.
There are 10 of these to collect. When the collection is complete, your villagers will harvest food more efficiently.
Breaths of Sylphs (Secondary Quest)
Acquired by: Picking up your first Breath of Sylph.
There are 10 of these to collect. When the collection is complete, your villagers will receive a permanent speed boost.
The Faery Circle (Main Quest)
Acquired by: Picking up your first Rune of Faery.
Collect all the Runes of Faeries
A Rune of Faery looks like a round stone with a glowing rune on top (see screenshot above).
There are 10 of these to collect. When the collection is complete, your villagers will earn more Enchantment points with each action performed.
“;
