- Wondering how to get Monopoly GO! free rolls? Well, you’ve come to the right place. In this guide, we provide you with a bunch of tips and tricks to get some free rolls for the hit new mobile game. We’ll …
Best Roblox Horror Games to Play Right Now – Updated Weekly
By Adele Wilson
Our Best Roblox Horror Games guide features the scariest and most creative experiences to play right now on the platform!The BEST Roblox Games of The Week – Games You Need To Play!
By Sho Roberts
Our feature shares our pick for the Best Roblox Games of the week! With our feature, we guarantee you'll find something new to play!All Grades in Type Soul – Each Race Explained
By Adele Wilson
Our All Grades in Type Soul guide lists every grade in the game for all races, including how to increase your grade quickly!
Laura Jones and the Secret Legacy of Nikola Tesla Tips Walkthrough
Check out our strategy guide for Laura Jones and the Secret Legacy of Nikola Tesla. GENERAL TIPS There are unlimited hints in the game. To use one, press the Hint button. You’ll have to wait a few minutes for it to recharge before you can use another hint. When you your cursor starts sparkling, it indicates an item that can be clicked on. You can skip some of the mini-games if you wish. You’ll get to play a hidden object game instead where you have to find random objects from a list. …
a:1:i:0;a:2:s:13:”section_title”;s:54:”Laura Jones and the Secret Legacy of Nikola Tesla Tips”;s:12:”section_body”;s:57422:”
Check out our strategy guide for Laura Jones and the Secret Legacy of Nikola Tesla.
GENERAL TIPS
- There are unlimited hints in the game. To use one, press the Hint button. You’ll have to wait a few minutes for it to recharge before you can use another hint.
- When you your cursor starts sparkling, it indicates an item that can be clicked on.
- You can skip some of the mini-games if you wish. You’ll get to play a hidden object game instead where you have to find random objects from a list.
- You can play the mini-games you’ve unlocked from any time by clicking on the “Mini-Games” tab in the main menu.
- You can go back and replay any stage in the game by accessing the table of contents.
- Your game is saved automatically after you complete a stage.
WALKTHROUGH
AT THE LAWYER’S OFFICE
Follow the tutorial, which tells you to pick up the pen and use it to sign the document.
ON THE TRAIN
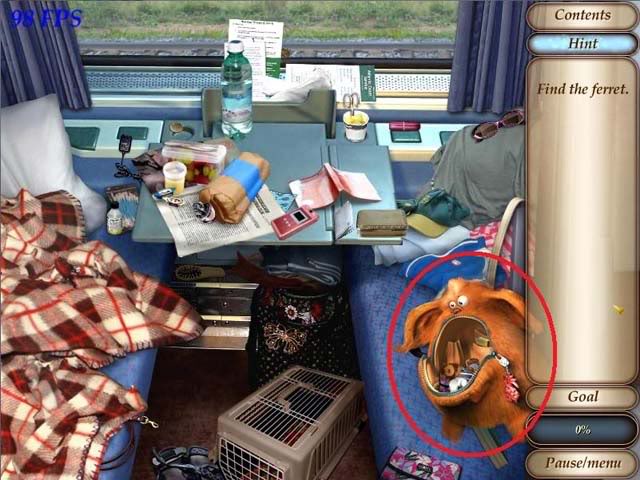
Stage 1: Find the ferret
1.Click on the orange knapsack to find the ferret hiding underneath it.

2. Click on the blanket on the left.
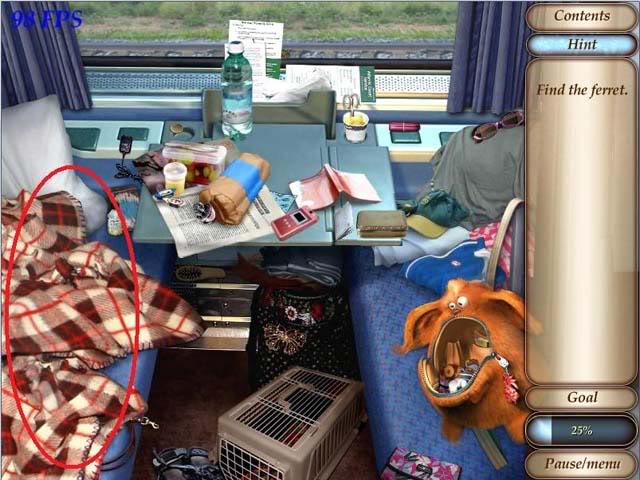
3. Click on the pet carrier on the floor.
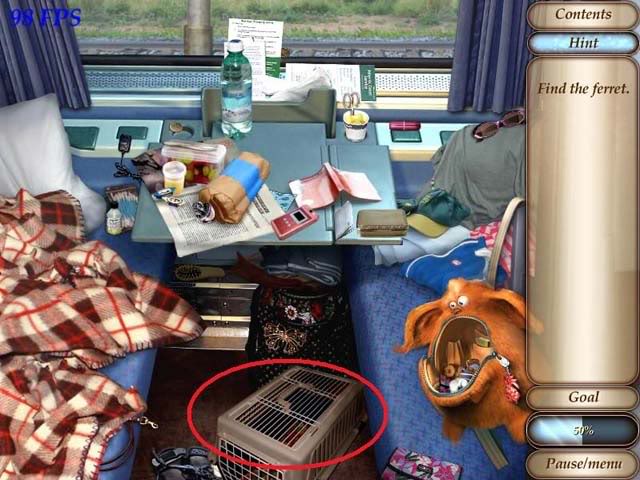
4. Click on the right curtain.
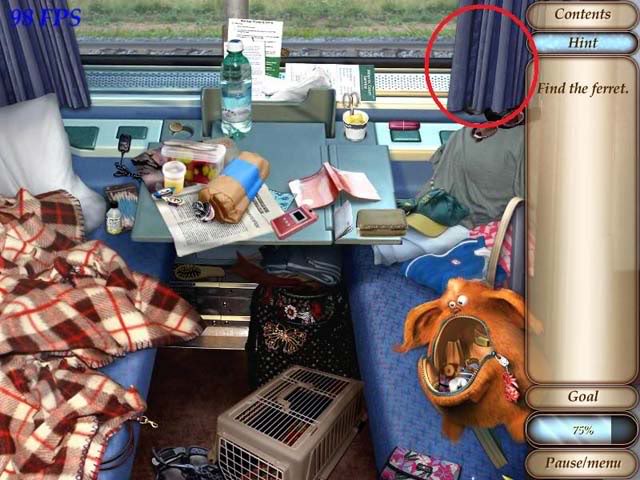
Stage 2: Mini-game: Put the globes in the right order
- In this mini-game you have to drag and drop the globes into the correct order so that it looks like the globe is spinning from right to left. Start with the globe that shows North and South America in the center, then arrange the pieces in order to show the globe moving from the Americas towards Europe and Africa, then to the Middle East and Asia, then Australia. The final globe should show North America coming back into the picture.
- See the screenshot below for the solution (click on it to enlarge).
![]()
Stage 3: Put the cell phone back together
Click on the following items and drag them into the blank area under where it says “Hints” in the menu to begin reassembling the phone:
- Pink cellphone body (broken) – found to the left of the pet carrier on the floor.
- Cellphone back – on top of the blanket near the ferret
- Battery – in the lower right corner under the orange backpack.
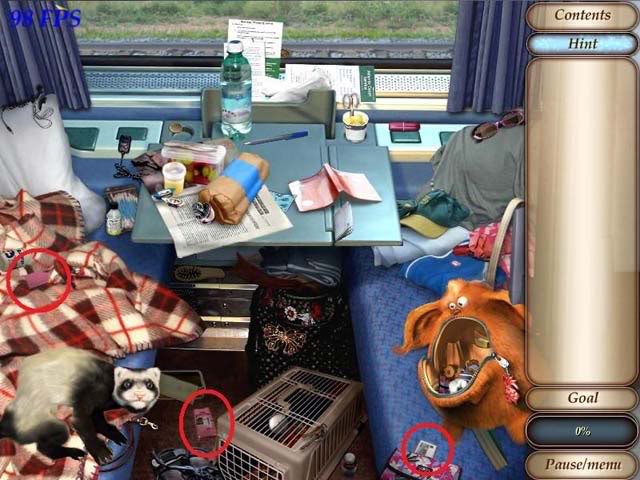
SIM Card – move the cursor to the tip of the blanket until it starts to shimmer, and click. A small screen will open up showing the SIM card wedged under the sideboard.
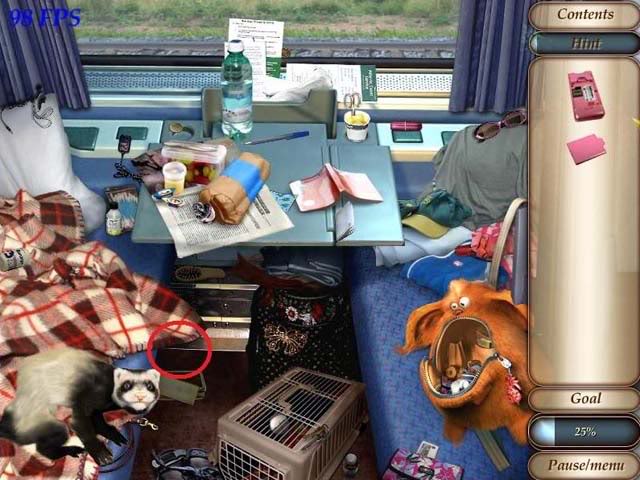
Click on the pen on the table to pick it up, then use it on the SIM card to pry it loose.
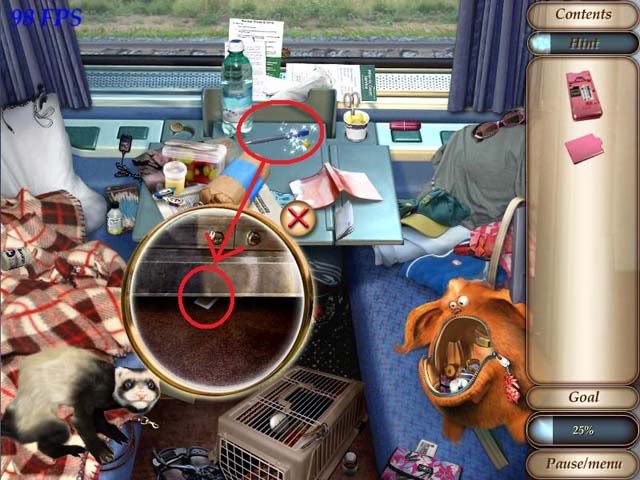
Once you’ve got all four parts, reassemble them the phone by clicking and dragging the parts onto it. Start with the SIM card, then the battery, then finally the back.
Stage 4: Find the items on the list
Find all the items in the scene.
THE LONG ROAD HOME
Stage 1: Call from the phone
Pick up the following items and drag them into your inventory:
- Boards – near the manhole in the middle of the road.
- Piece of duct tape – on the outside phone booth
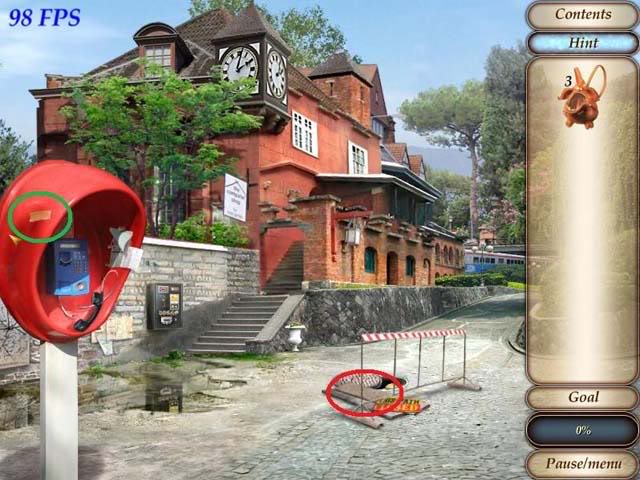
Place the boards on top of the puddle in front of the phone card machine
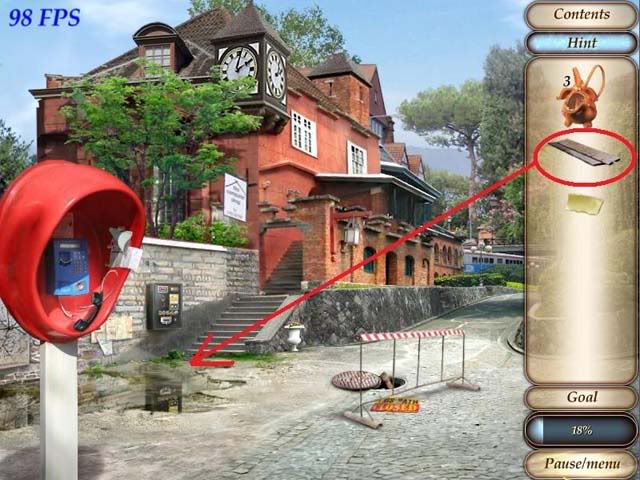
- Next, click on your bag to find three coins.
- Click on an item and hold down the mouse button to drag it out of the way (release the mouse button to drop the object.) Do this until you’ve uncovered three coins.
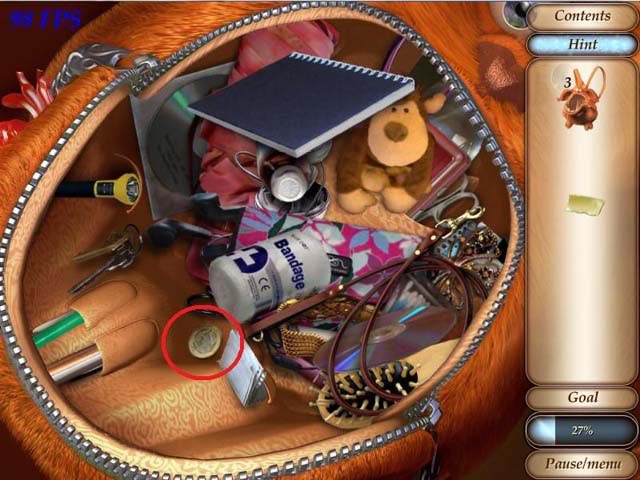
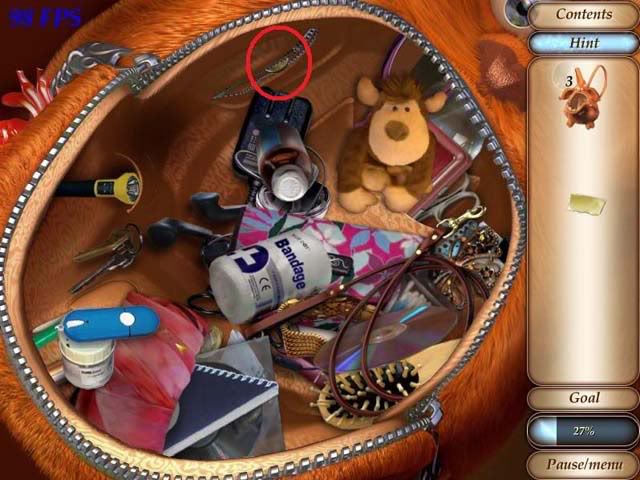
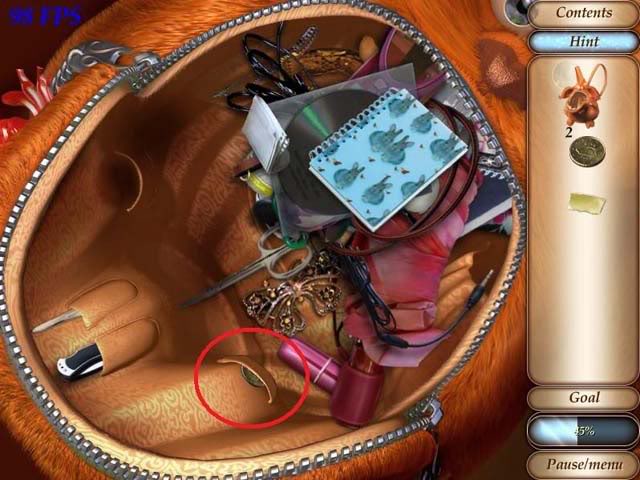
- Click on the coin machine for a close-up, then drag the three coins from the inventory into the coin slot. When you’re finished, press the yellow button and take the phone card that comes out of the slot.
- Now, turn your attention back to the red payphone. Take the duct tape and use it on the broken phone cord to repair it. Then use the phone card on the phone to make a call.
Stage 2: Center of town – Find my first aid supplies
- This is another puzzle where you have to move things around in Laura’s purse to discover the items on the list.
- The screenshot below shows the locations of the water, cotton swabs, scissors, bandage and iodine. I’ve moved everything out of the way so you can see exactly where to look.
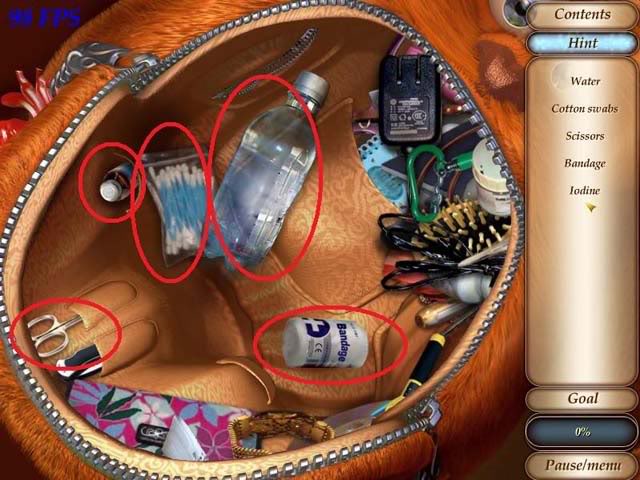
Next, use the items in the following order:
- Use the water on the man’s finger to clean it.
- Use the cotton swabs on the iodine, then use the iodine-dipped swab on the man’s finger to disinfect it.
- Use the scissors on the bandage to cut the correct length, then use the bandage on the finger.
Stage 3: Grandma’s House – Ring the bell on the gates
- Click on the gate, which zooms in on the doorbell. Click the doorbell (the round white circle with the black center) to ring it.
- Next, you’ll have to find the keys to open the gate.
- Start by clicking on the brick and the length of rope to pick them up. (Both are hidden in the foliage.)
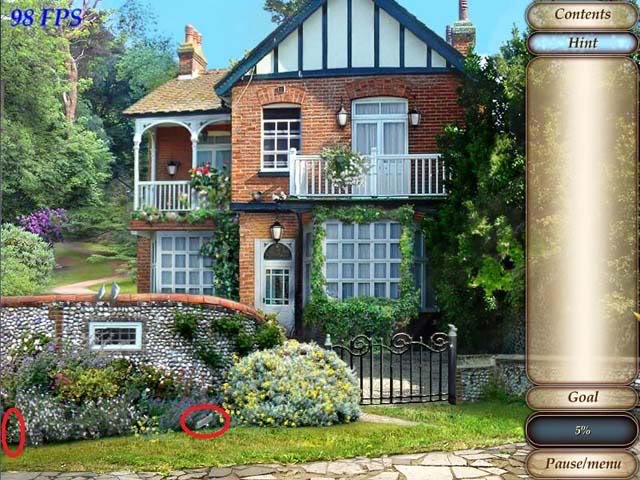
Then click on the small yellow flowers in the garden to zoom in. From the zoomed in scene, take the magnet and brick.
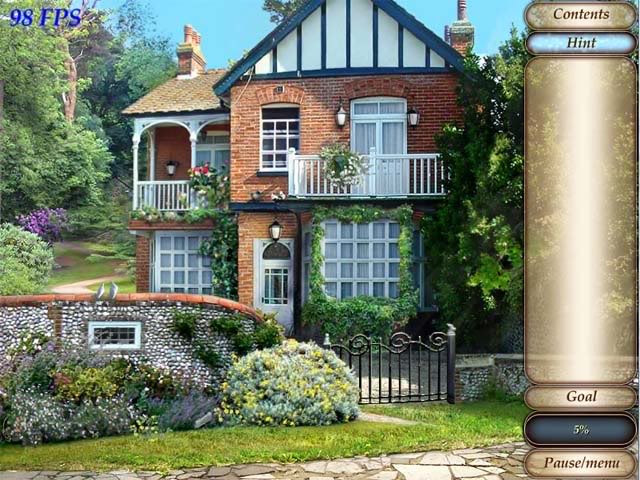
Place both bricks below the broken tree branch to the right of the grate, which will allow you to click on and take the broken tree branch.
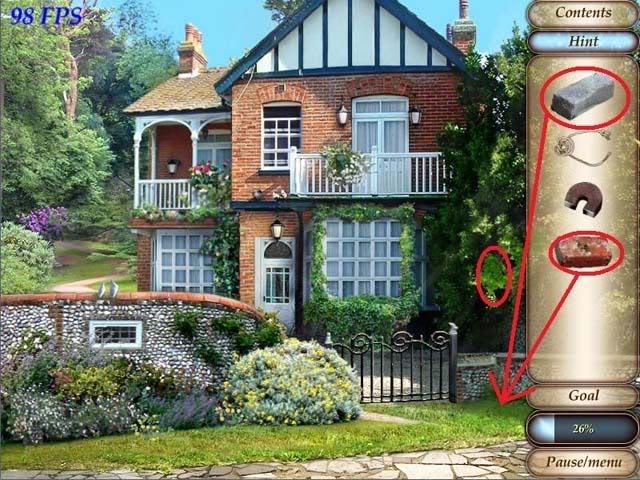
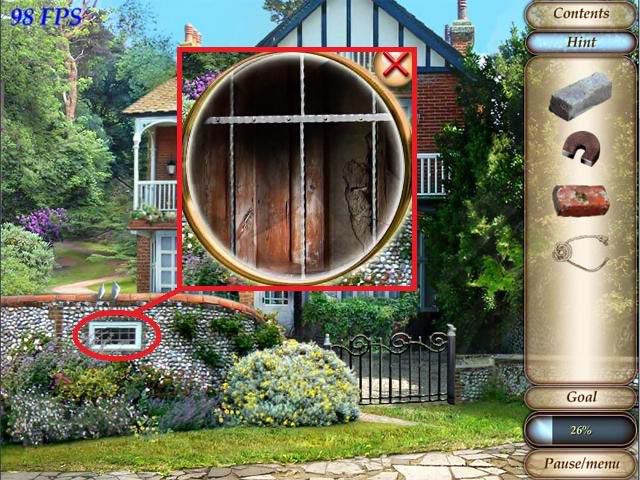
Next, click on the grate in the fence to zoom in. Click once on the grate and Laura will say she needs a flashlight.
Laura’s bag will appear in the inventory for you to click on. The flashlight is behind the cell phone.
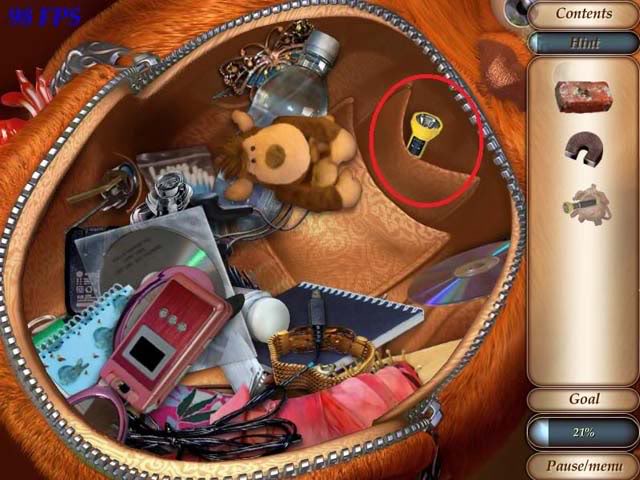
- Use the flashlight on the grate to reveal the set of keys.
- Try using the tree branch on the keys. Laura’s purse will appear in the inventory again for you to search through. This time, you’re trying to find her penknife.
- The penknife is in the upper pocket.
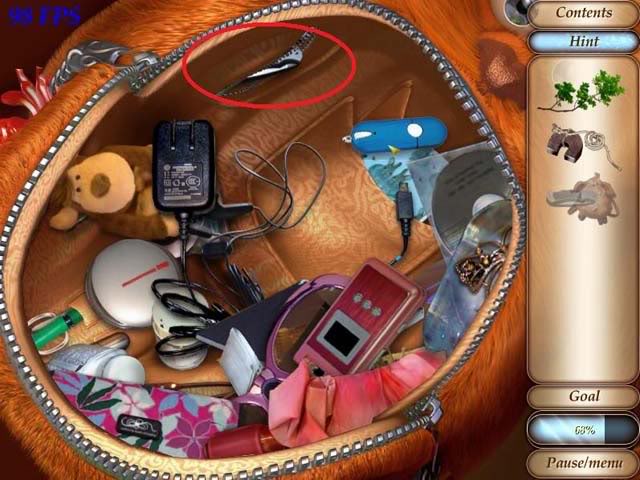
- Use the knife on the broken branch to get rid of the twigs, then used the stripped branch on the keys.
- After they’ve fallen, use the magnet on the rope to get “magnet on a rope,” then use the magnet on a rope on the keys to retrieve them.
- Click on the gate again and use the lower key on the lock to open the gate.
- Use the remaining key on the door to the house.
Stage 4 – Gramma’s House
Listen to the conversation between Laura and Gramma. (There’s nothing else to do in this stage.)
THE FIRST PART
Stage 1: The Souvenir Shop – Find all the mice
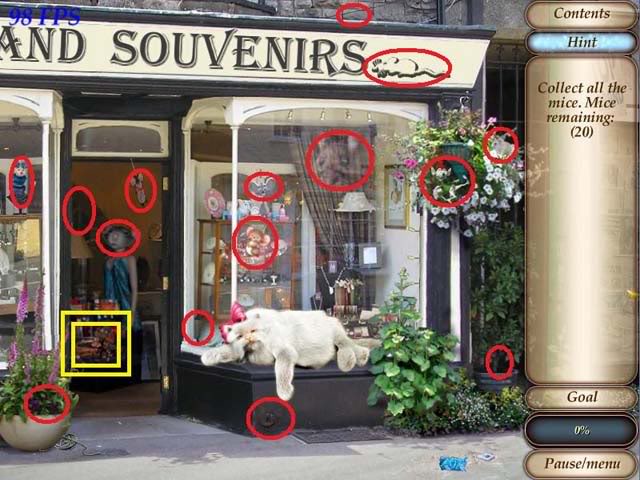
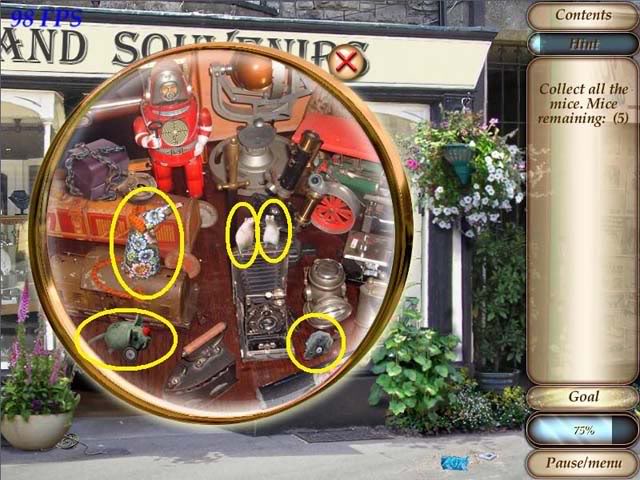
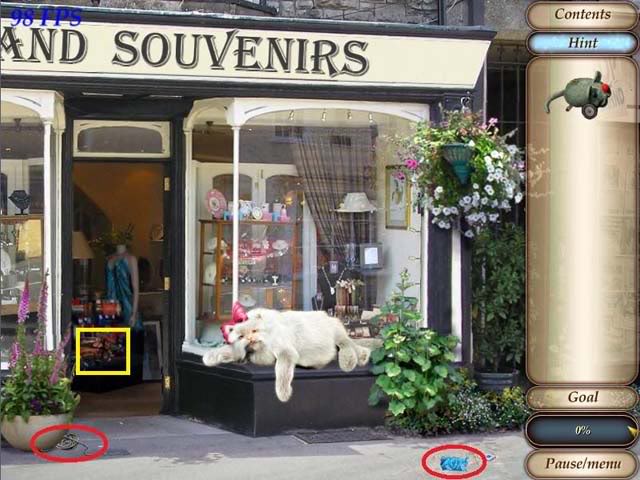
The goal here is to find 20 mice. Some of the mice pop in and out of view, so in those cases I’ve circled the spot where they’ll show up. The first 15 mice are circled in red in the screenshot below. Click on the yellow area in the screenshot to zoom in on a new area where you can click on the remaining 5 mice.
- Put together a mouse for the cat.
- Pick up the needle and paper, then click on the yellow area in the screenshot to zoom in.
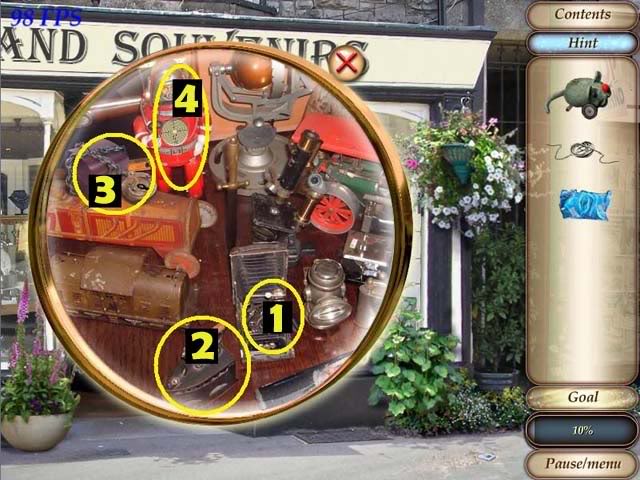
- 1. Click on the old-fashioned camera to take the screwdriver.
- 2. Click on the iron to move it out of the way and grab the key underneath.
- 3. Use the wind-up key on the locked box, and take the ball inside.
- 4. Use the ball on the robot.
Stage 2: Ball maze
Rotate the maze to either size to work the ball through the maze to the center. (Click on the maze and hold down the mouse button to drag it from side to side.)
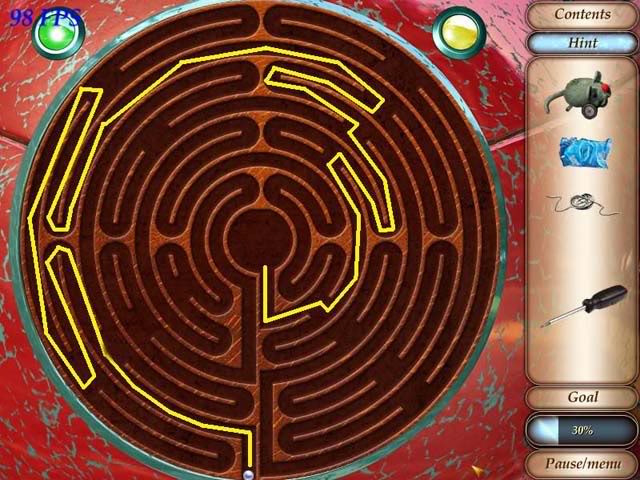
After you beat the maze, a key will appear in the robot’s hand for you to take.
- Finally, use the screwdriver on the black microscope to get a wheel.
- To assemble the cat toy, use the wheel on the mouse, then the key, then the string, then the paper.
- Use the finished cat toy on the cat.
Stage 3: Inside – Find Tesla’s invention part among the decorations
When you touch the amber bead necklace near the top of the screen, it will fall apart and scatter beads everywhere. Here’s where to find them all:
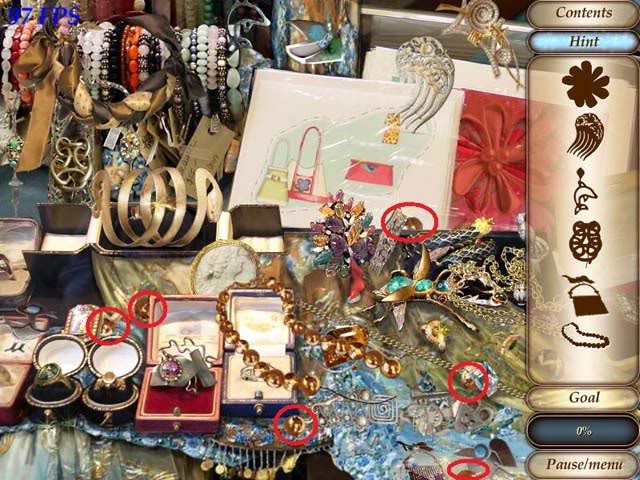
Clear the jewelery until you reach the last thing to click on: an old-fashioned broach. Click on that and you’ll see the invention part underneath it.
THE SECOND PART
Stage 1: Gramma’s Kitchen – Find all the porcelain figurines
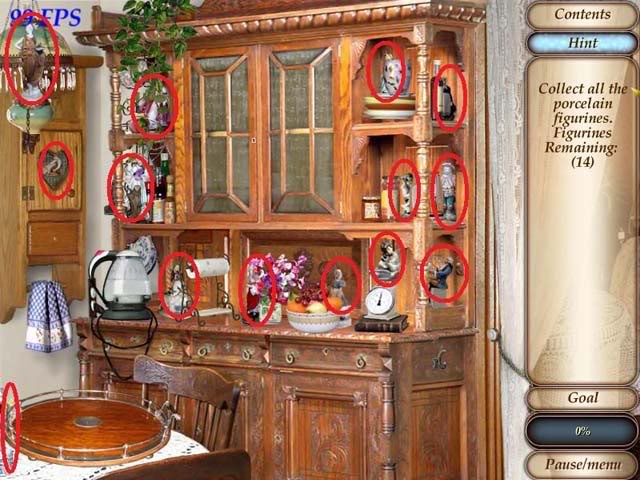
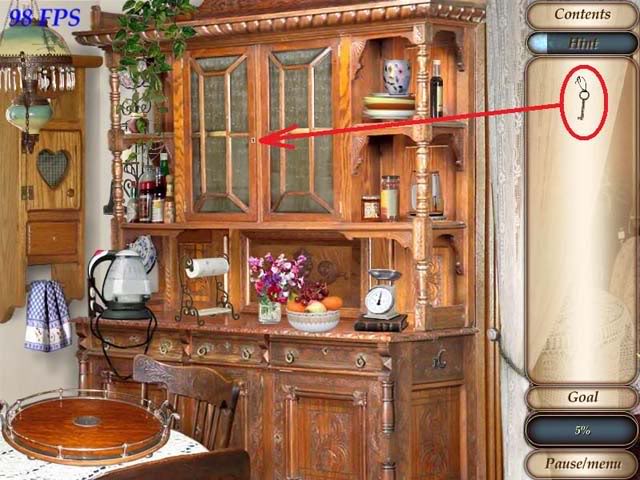
- Take the key from around the figurine’s neck.
- Use the key to unlock the kitchen cupboard.
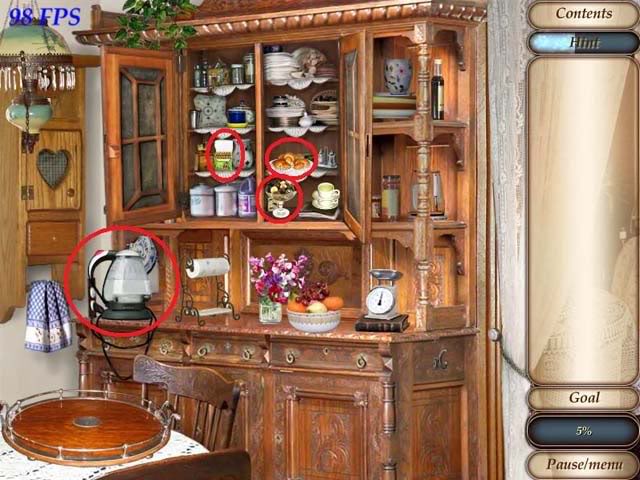
- Take the following from the open cupboard: two teabags (click on the teabag box twice), two cups (click on the cup twice), croissants and the bowl of candy.
- Also pick up the kettle on the counter.
- Use the kettle on each tea cup, then put a tea bag in each tea cup. Place the two full tea cups, croissants and bowl of candy on the tea tray in the lower left corner of the screen.
Stage 2: The Green Piglet Bar – String puzzle
- Click on the pieces of string to move them so that no string is crossing over top of another one. Strings that are still crossed will be red, and uncrossed strings will be blue. Try to turn all the strings blue.
- There are many solutions to this puzzle, but here are the one I came up with:
String puzzle #1:
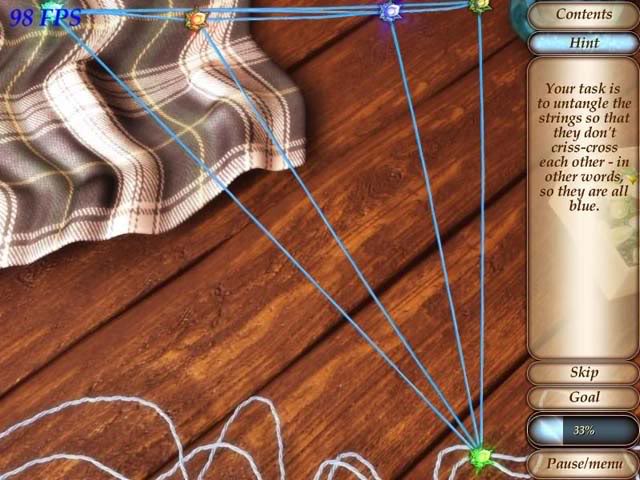
String puzzle #2:
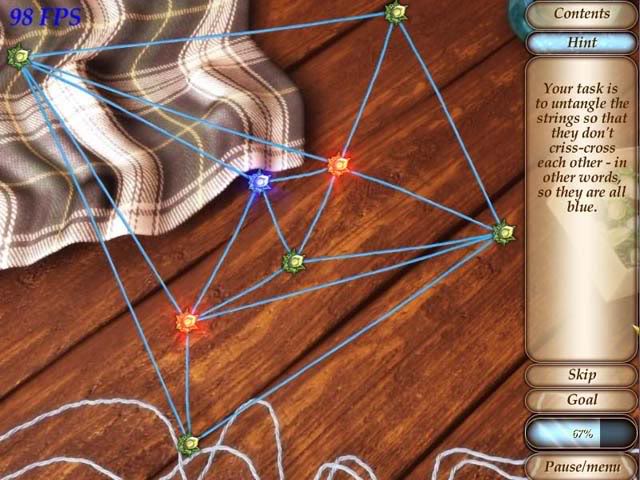
String puzzle #3:
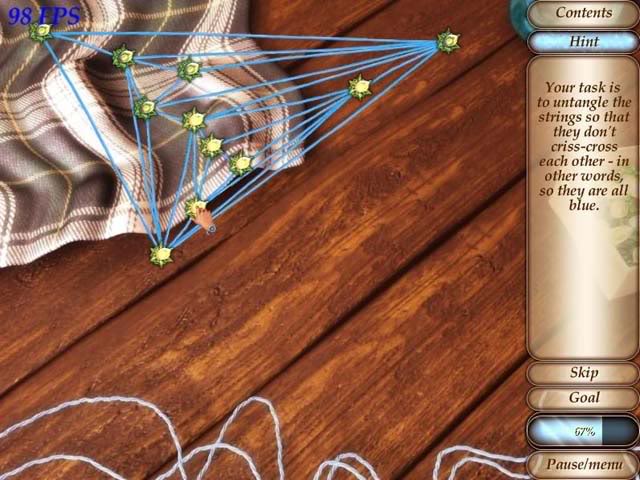
Stage 3: Form a bush into the shape of a pig
- Pick up the pruning shears, wire cutters, watering can, trowel and pot.
- Click on the plant pot holder to move it out of the way, then use the trowel to dig the patch of dirt to pick some up.
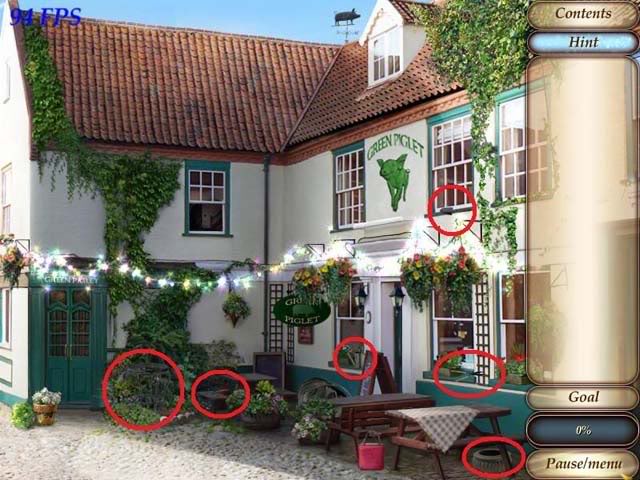
- Use the wire cutters on the coil of wire to cut some off.
- Use the shears on the plant to the right of all the hanging baskets to pick it up.
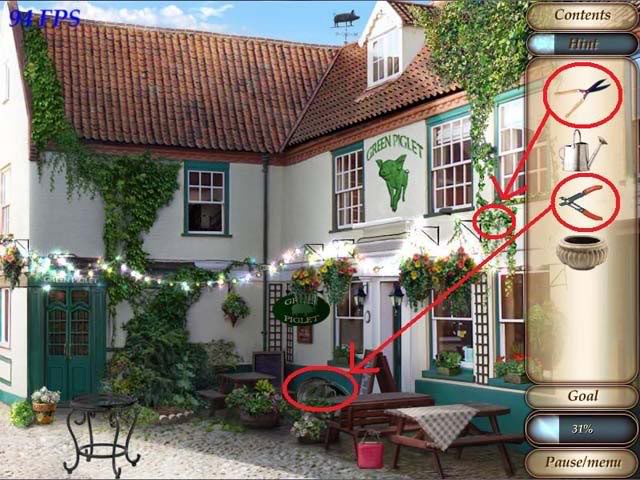
- In your inventory, put the dirt into the pot.
- Then, place the pot of dirt into the plant pot holder in the scene.
- Next, use the wire from your inventory on the pot. Then put the leaves on it. Finally, use the watering can on the whole thing.
Stage 4: Mini-game: Tesla’s machine.
The goal here is to collect all the crystals. When the rotating ball hits a crystal, it removes it from the board. Click the mouse button to switch which half of the machine rotates.
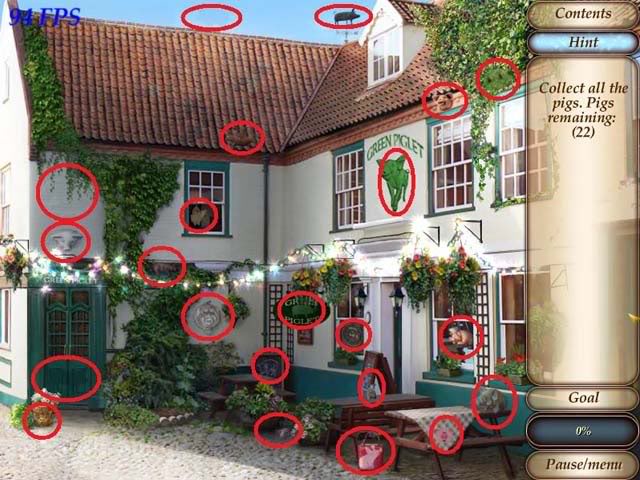
Stage 5: Collect all the pigs
Stage 6: Mini-game: Tesla’s machine, Round 2
Same as the first time….
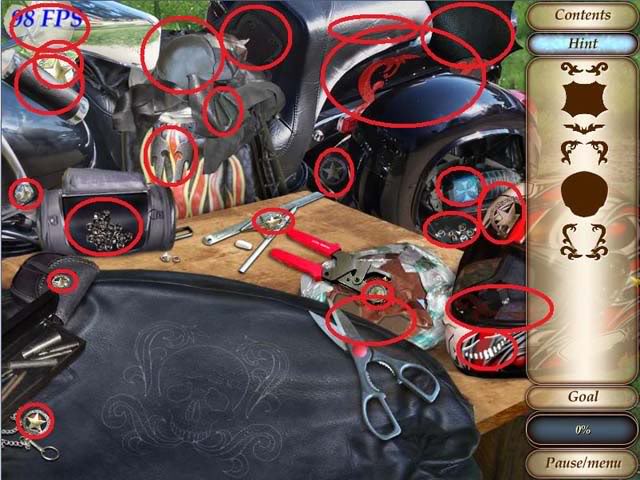
Stage 7: Make a pattern for Steve’s jacket
The locations to all thepieces are below. Keep in mind that some pieces won’t show up until you’ve found certain pieces to make more room on the list.
THE THIRD PART
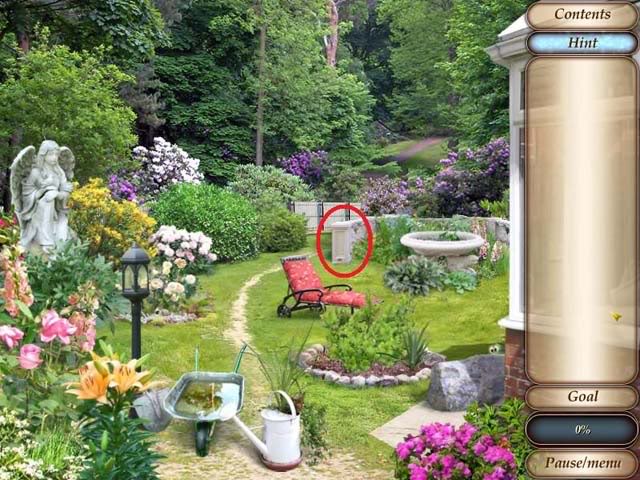
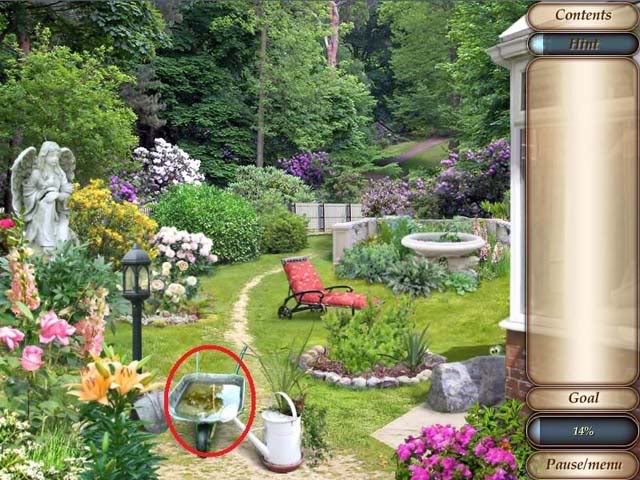
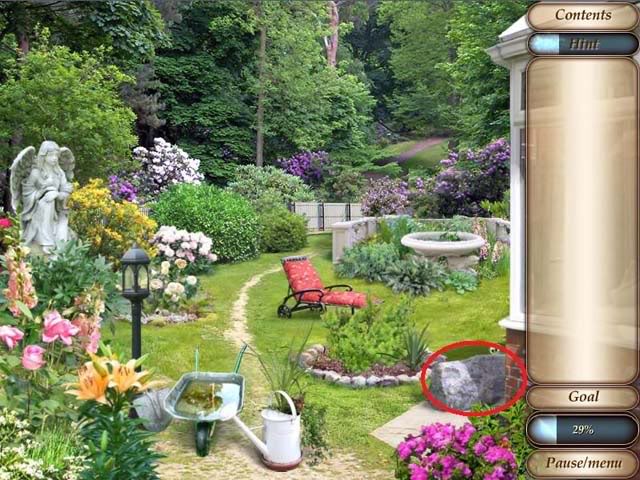
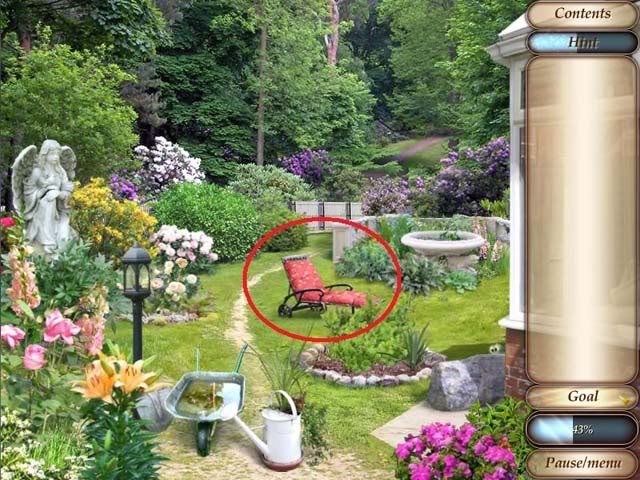
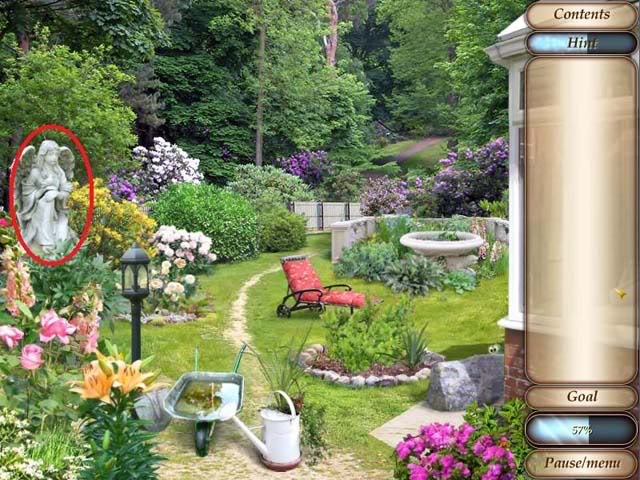
Stage 1: Gramma’s Garden – Find Ferris
Find the ferret again like you did on the train by clicking on objects to move them aside. This time you have to click on the ferret too when you find him.
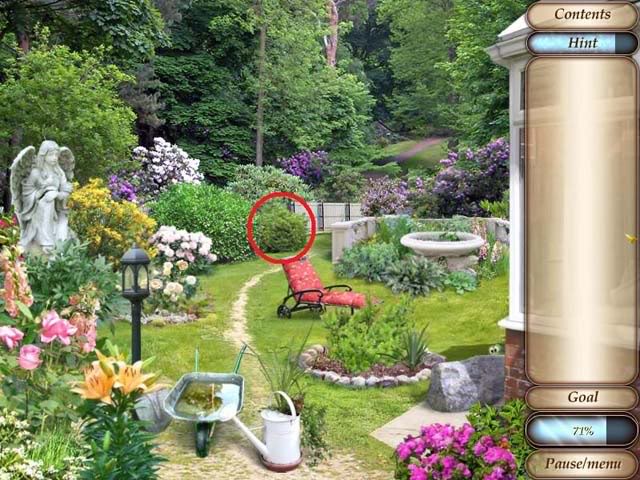
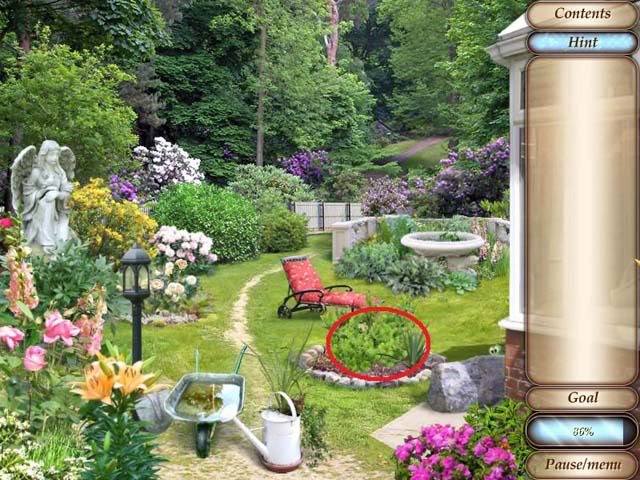
Stage 2: Collect the bugs and roaches
Yuck! Just about every bug in this level is crawling around, so simply click on everything that moves. Hover your mouse over the leaves to cause the butterflies to spread their wings – it makes them much easier to see.
Stage 3: The Amusement Park – Repair the fortune teller mechanism
- Pick up the gear, fortune teller’s hand, and 3 keys
- Click on the fortune teller’s stomach to open a secret compartment.
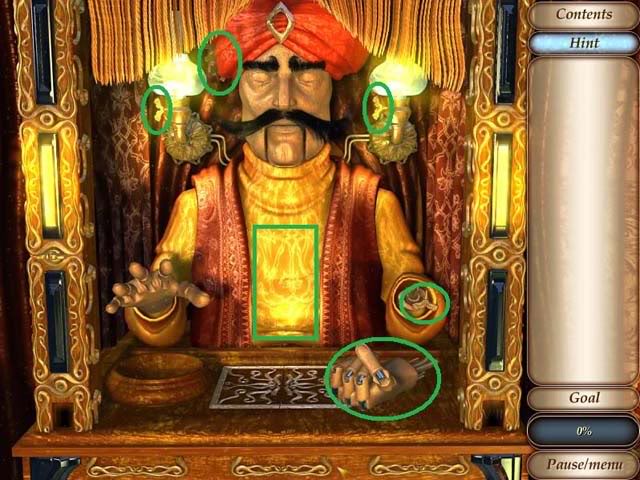
- Pick up the fourth key, which is located inside the stomach.
- Next, place the gear from your inventory inside the stomach.
- Place the hand on the fortune teller’s arm.
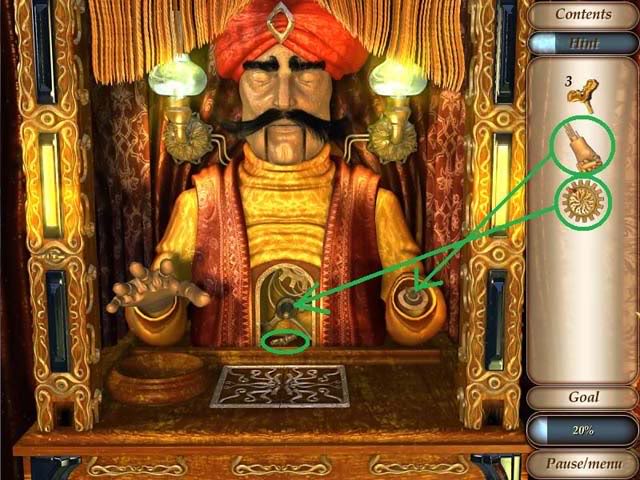
- Click on the gear and, keeping the mouse button held down, drag the mouse in a circle to rotate the gear. The hand will slowly begin to open.
- Once it’s opened all the way you’ll see a message saying “What’s that gleaming in his palm?”
- Take the sapphire out of his hand.
- Place the sapphire in the center of the fortune teller’s turban.
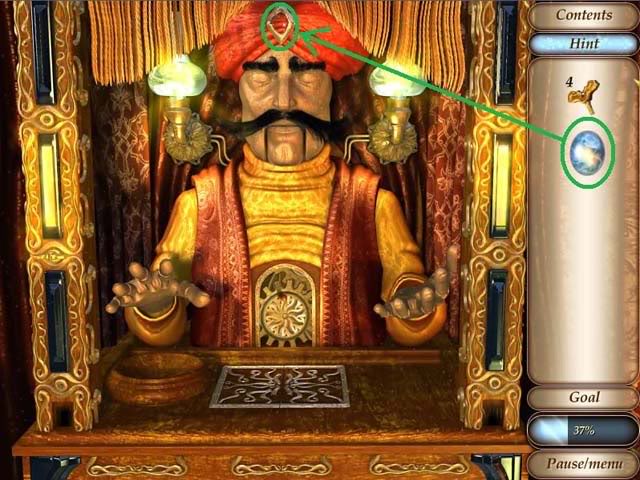
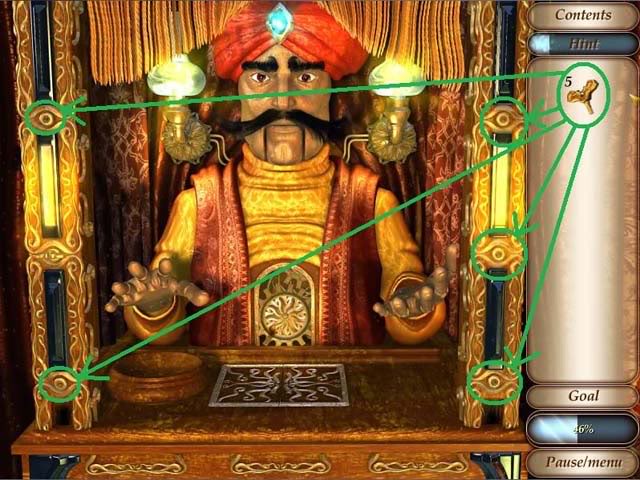
- Turn the gear again, and this time the fortune teller’s mouth will open. Take the fifth tesla key from his mouth.
- Drag each tesla key onto one of the keyholes on either side of the fortune teller as shown in the screenshot below.
Stage 4: The Fortune Teller
Now you have to turn the keys to light up all the lights along the left and right sides. First, take a look at the screenshot below, where I’ve numbered the keys 1 through 6.
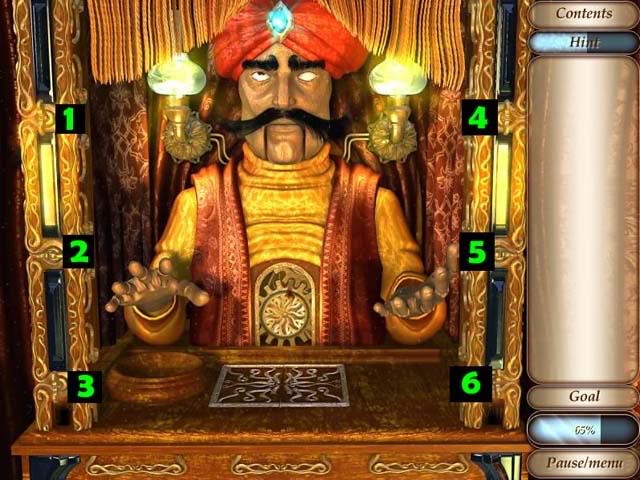
- Solution: Click key #5, then key #2. See, it wasn’t that hard!
- After all the lamps are lit, two Roman numerals will appear at the bottom of each column. Click on the Roman number on the left until it gets to “VII” and click on the right Roman numeral until it gets to “V.”
- Once you’ve done this, a compartment will open. Take the crystal ball from it, and place the ball in the indent below the fortune teller’s outstretched hand.
Guess the mystery words
Use the typewriter to guess the mystery words.
- The first word is ORACLE.
- The second word is PATH.
- The third word is FATE.
- The fourth word is ASTRONOMY.
THE FOURTH PART
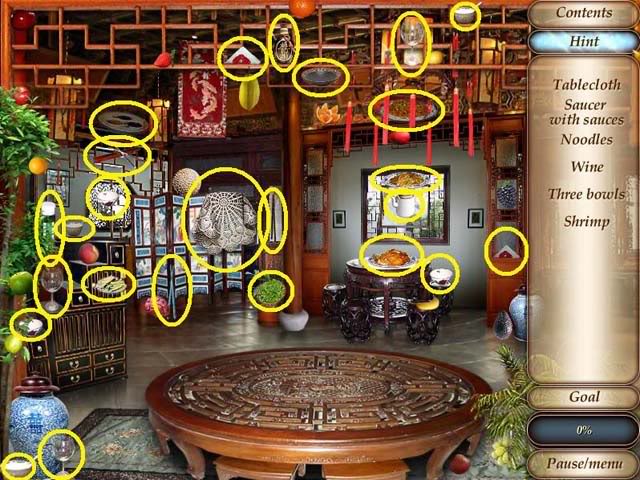
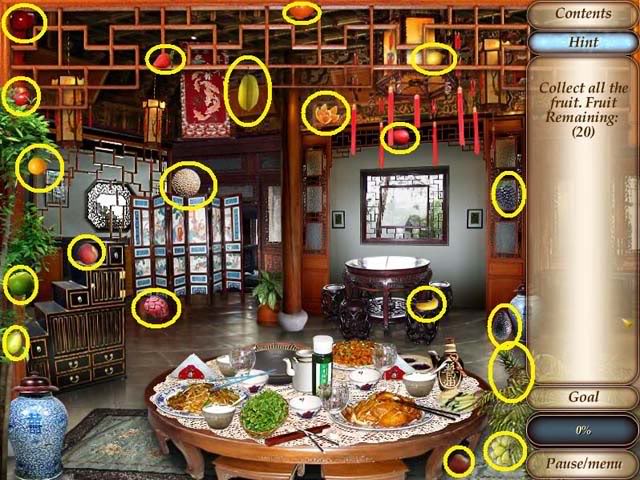
Stage 1: The Chinese Restaurant – Set the table
See the screenshot below for the location of all the items.
Collect all the fruit
Save the eggs
Use the mouse to move the basket back and forth along the bottom of the screen and catch the eggs as they fall. You have to catch 20 eggs to advance.
Repairing the chickens’ cages
- Click the basket at the bottom of the screen to move it out of the way, and take the lock that was behind it.
- Click the netting to take a piece.
- Take the piece of thick wire, the frame, the cage door
- Click the two cages to set them upright.
- Click the white cage to open the door. Click inside that cage to take a piece of rope.
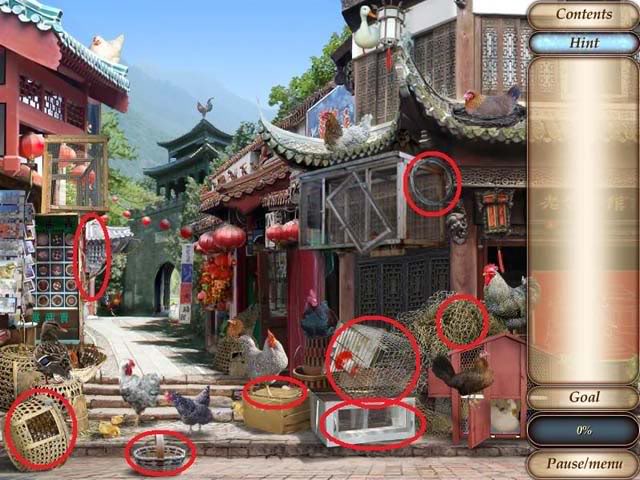
- In your inventory, click the wire onto the frame to get “net without mesh.” Click this onto the net to make a complete net.
- Put the cage door back on the wicker cage in the lower left corner.
- Use the rope on the large wire cage with the broken door in the center of the scene, then use the lock on the same cage.
- Now you’re ready to start catching chickens! Select your net from the inventory and click on a chicken to begin.
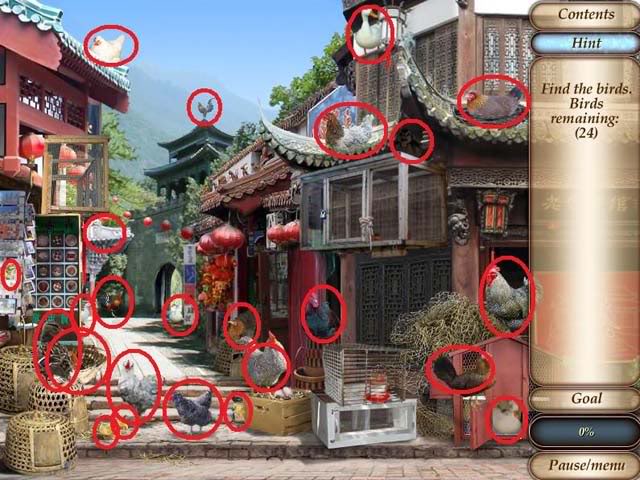
Find the chickens
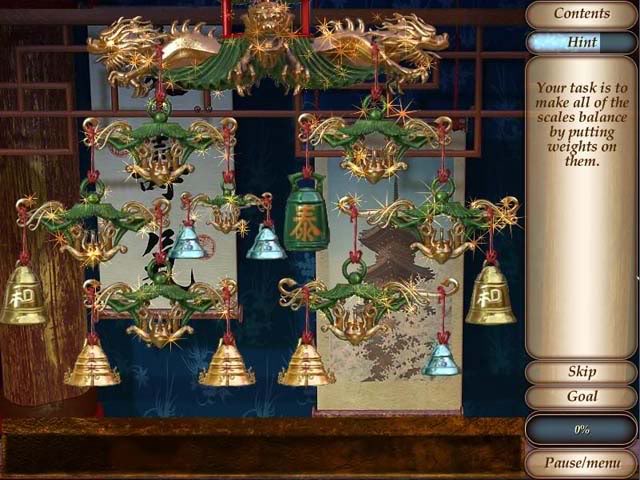
Balance the scales
THE ENEMY AND THE UNLIKELY FRIEND
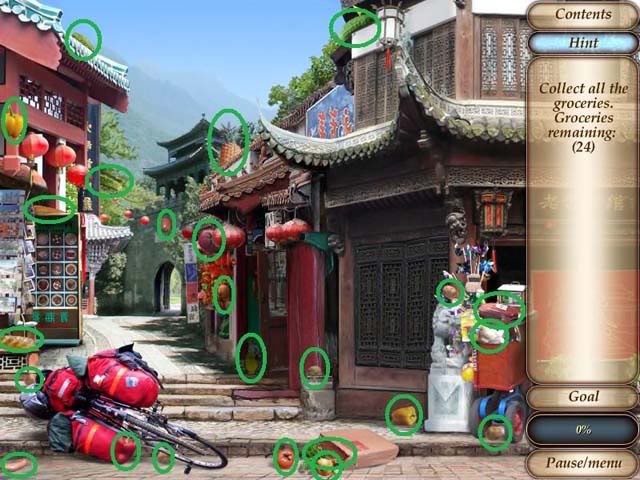
Stage 1: Collect the groceries
Stage 2: Chinese Park
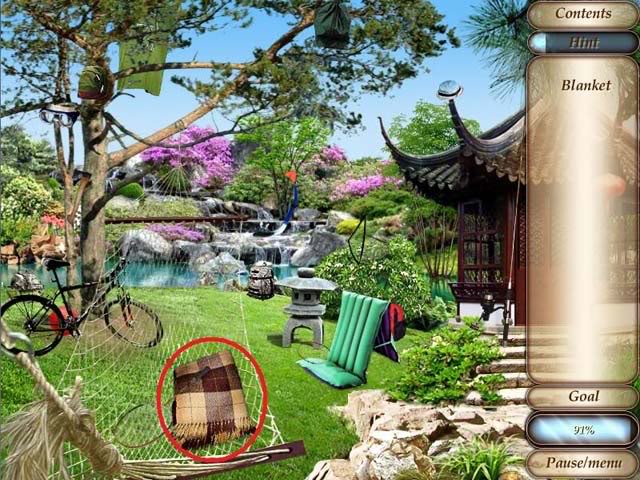
Help the hippy find his stuff. Once you’ve found everything on the list, click on the blanket in the middle of the hammock. The horn is underneath it.
THE FIFTH PART
Stage 1: Preparing the food
- When various symbols appear over the food, click on the right tool or ingredient and click it over the pot. The salt, pepper and oil are on the left counter, and the ladle and wooden spoon are on the right.
- Also keep an eye out on the stove’s temperature gauges. When they start to flash orange, click on them to adjust the temperature.
- When you’re done with a utensil or ingredient, right-click the mouse to instantly get rid of it, or just click on the next tool to switch them.
Stage 2: Look for the card
Click on the basket next to the chair. The pair of gloves is at the bottom of the basket (move the things out of the way until you see them.) Also take the red lamp string.
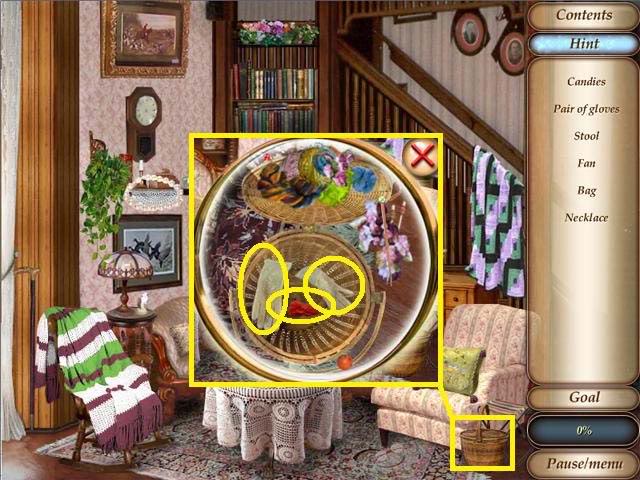
Take the necklace, fan, cane, binoculars, glasses, bag, and stool.
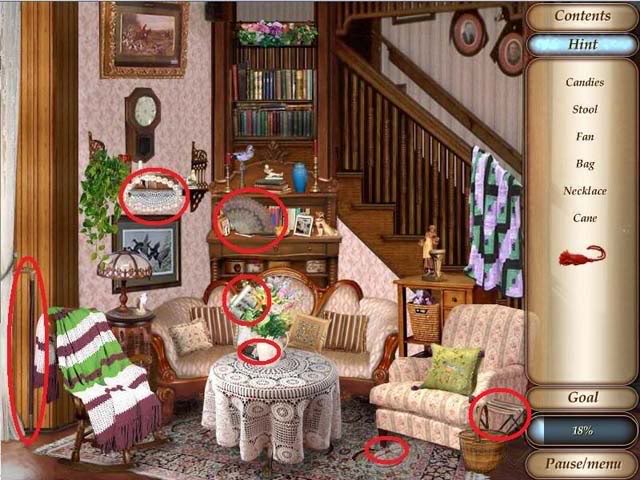
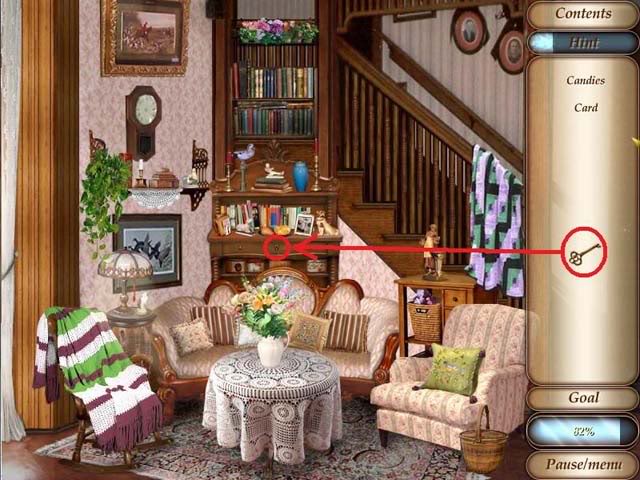
Use the cord on the lamp to light it, then click under the sofa for a closer look. In the zoomed-in window, take the key.
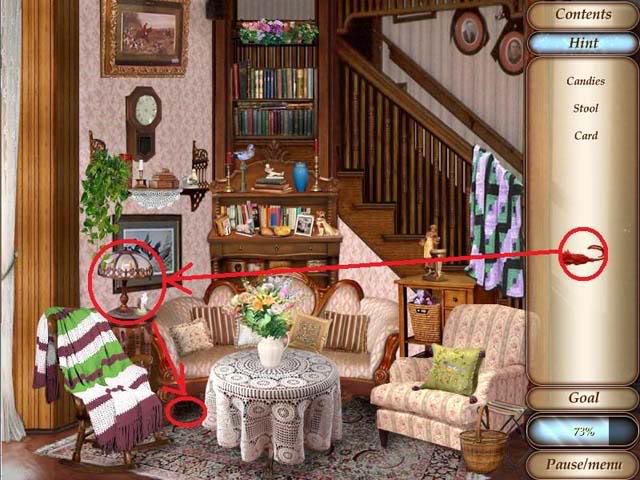
Use the key on the locked desk drawer, and take the card and candies inside.
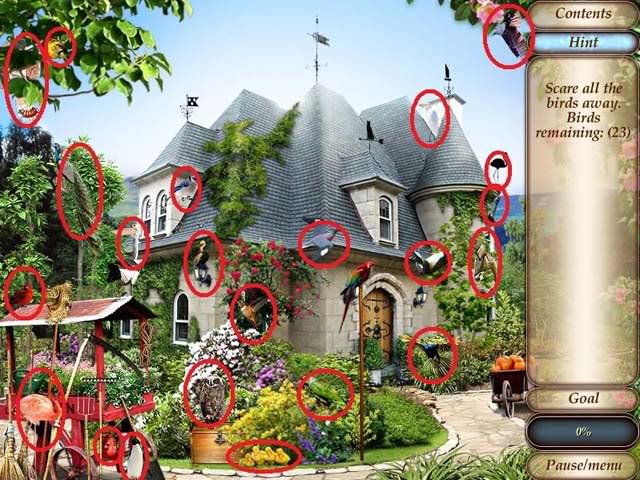
Stage 3: The Hotel – Scare away the birds
Stage 4: Make a scarecrow
Take a pumpkin, can of machine oil, pole, hat and rope
Click on the can for a zoom-in, then move the junk out of the way so you can take the small bolt.
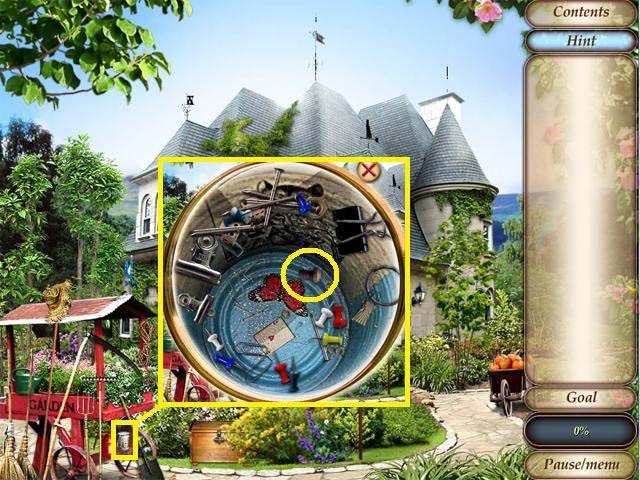
Click on the locked chest.
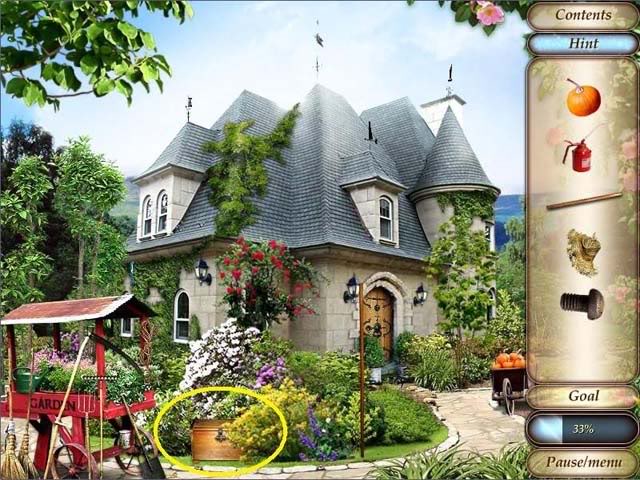
- Use the small bolt on the chest’s lock, then the machine oil. You can now click on the lock to open the chest. (Click on the bolt, then slide the lock to the right.) Click on the pile of clothes to take the shirt.
- Now it’s time to make the scarecrow.
- Click the items onto the pole in the following order: pumpkin, hat, pole, rope, shirt
Stage 5: Find all the mice
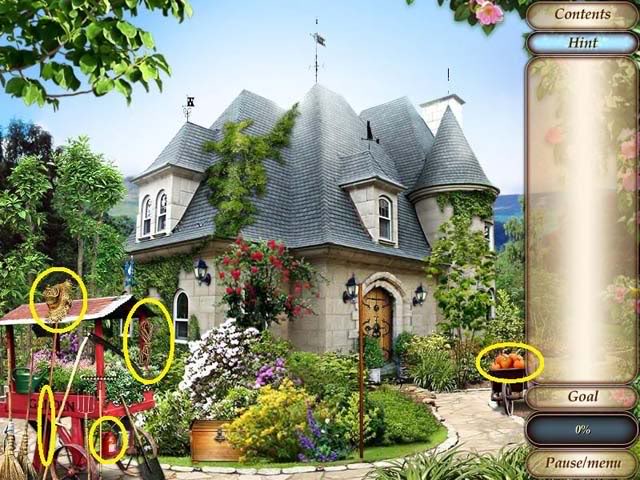
- Click on various objects in the scene to move them to reveal the mice that are hiding behind them.
- Stationary mice – these mice don’t move. Just click on them before the piece of furniture slides back into place). Objects with stationary mice behind them are circled in yellow.
- Moving mice – you have to click on them as they’re moving. If you miss, just click on the object again to repeat the sequence. Objects with moving mice are circled in red.
- Note: There are two mice hiding behind the statue in the lower right corner, so click after you’ve caught the first mouse, click on it a second time.
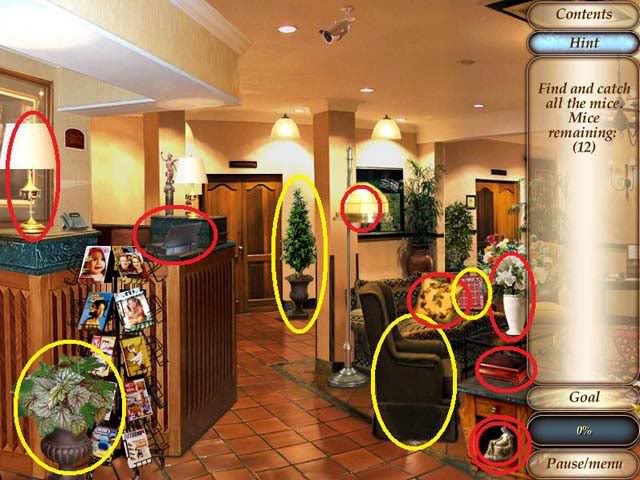
Stage 6: Mini-game: Catch the mice
This mini-game is straightforward: Click the mouse to make the top hat drop over top of the mice to catch them.
Stage 7: Find the weather vanes
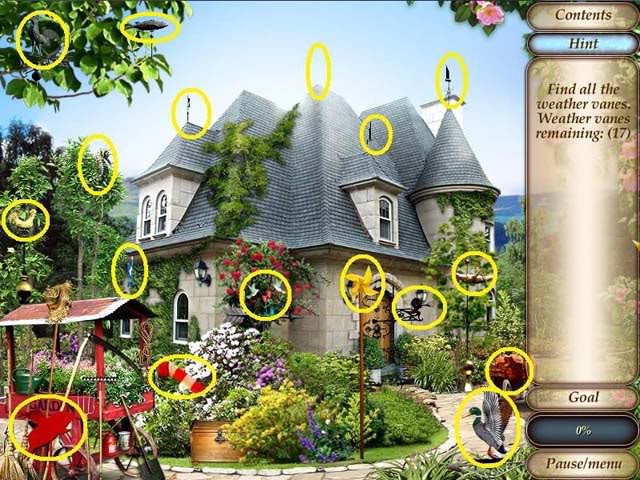
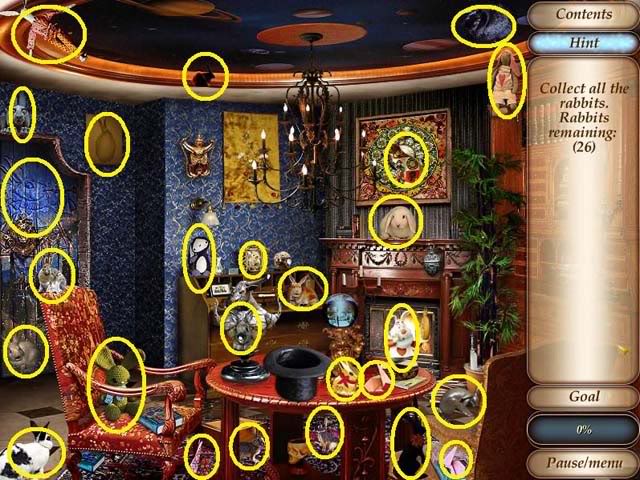
Stage 8: Illusionist’s Room – Find all the rabbits
Stage 9: Find the item’s hiding place
- The screenshot below shows you the locations of all the items you need to pick up in this room. You won’t be able to pick up everything right away because you can’t hold that much, so I’m going to tell you to pick up items in a specific order. Refer back to the screenshot below if you need to see where a specific item is.
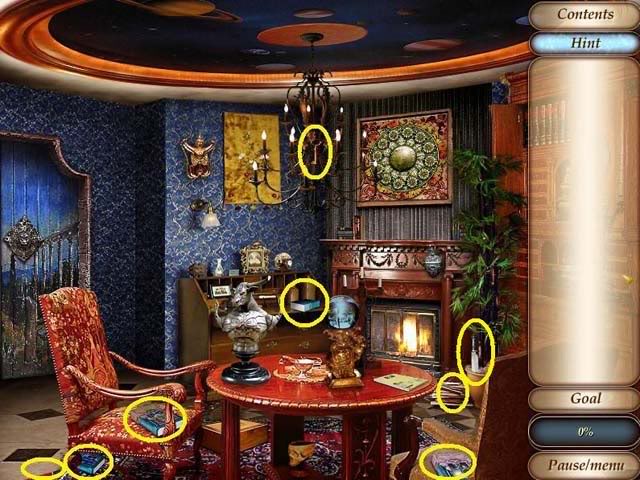
- Start by taking the pencil and immediately using it on the notepad that’s sitting on the table.
- Click on the notepad to zoom in, then use the pencil on the blank sheet of paper. (It might take a couple of tries for the click to “take.”) Take note of the pattern of symbols revealed on the piece of paper.
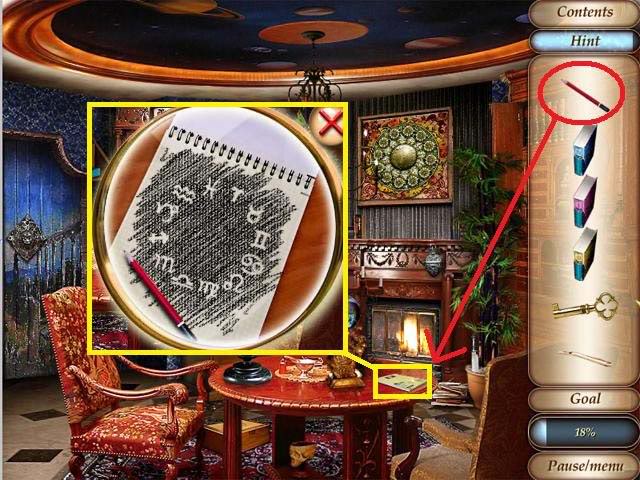
- Next, pick up the four heavy books.
- Click on the fireplace’s mantle to zoom in, then place the four books on the mantle. The books are numbered. Arrange them in the following order based on the Roman numerals on their spines, from left to right: I, II, III, IV. Take the horn from the compartment that opens.
- Click on the strange silver horned statue on the table to zoom in, then replace its missing horn. Take the little green stone that pops out of its chest.
- Next, take the key and knife from the room. (The key is blended in with the chandelier, and the knife is sticking out of the potted plant on the right.)
- Use the key to unlock the chest underneath the table, and zoom in.
- Use the knife to cut your way through, and pick up the door handle.
- Next, take the kindling from the pile in front of the fireplace.
- Click the kindling on the fireplace to get “burning kindling.”
- Use the burning kindling on the candelabra in front of the mantle to light the candles. You can now click on the glowing blue ball below the candelabra to zoom in.
- Your goal in the mini-game is to match the symbols in the three small circles along the bottom with the three symbols in the sphere. Click on a small circle to select it, then click on the larger circle (with the pink ball inside) to rotate that circle. Keep rotating the circles until the symbols inside match those in the screenshot below:
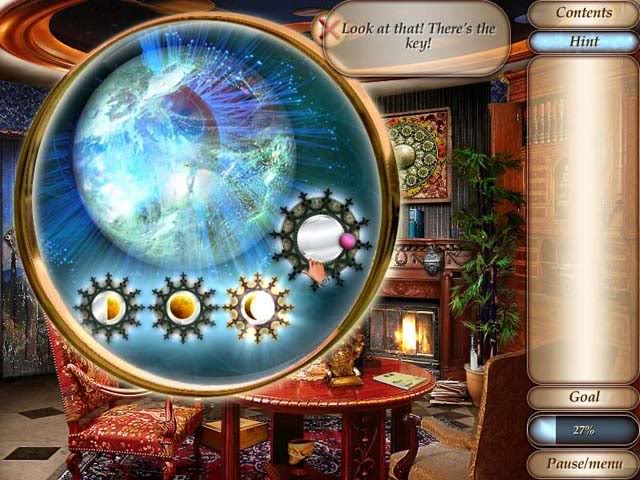
- Take the key that appears.
- Next, click on the large piece of framed stain glass art above the fireplace to zoom in. Arrange the symbols in the same order as the pattern in the notebook. To help you, click on the notebook to pull up the pattern again so you can have them both side by side. The screenshot below shows you how the symbols should be arranged. Simply click on two symbols to swap their positions.
- When you’ve done it correctly, the middle will pop open to reveal a lock.
- Use your remaining key, and take the red crystal that appears.
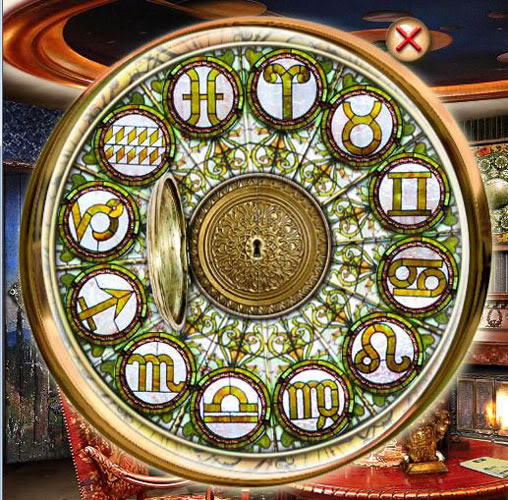
- Click on the strange symbol in the center of the door on the left hand side of the room to zoom in. You’ll notice that there’s a face in the center. Place the two crystals in each of its eye sockets, then use the door handle on the face.
Stage 10: Ball mini-game
Game #1:
Click the upper left arrow once.
Game #2:
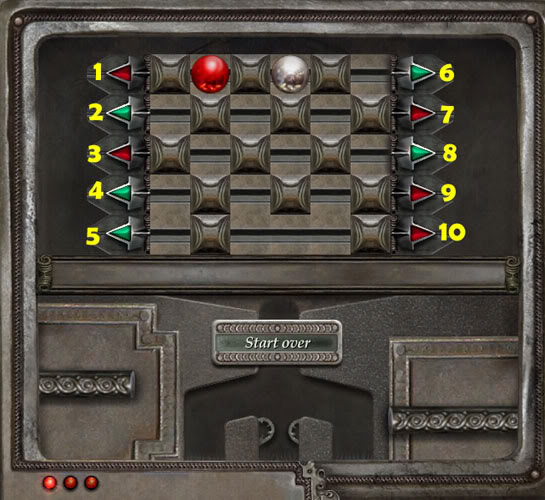
Refer to the screenshot, and click arrow #6 once, #5 once, and #8 once.
Game #3
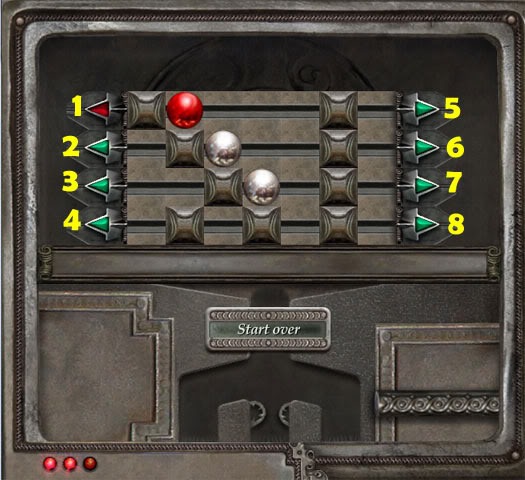
Refer to the screenshot, and click arrow #6 once, #5 once, #2 once, and #3 once.
THE MISSING KEEPER
Stage 1: Find all the flowers
Find all the flowers in the scene.
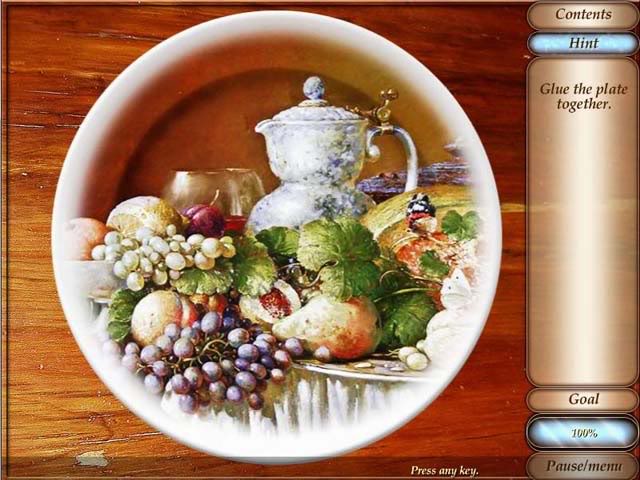
Stage 2: Assemble the broken plate
This is a simple jigsaw puzzle. Here’s what the plate looks like when it’s put back together:
Stage 3: Find things in the bar and put them back where they belong
Click on any out of place item that you see. They’ll automatically be put back into the scene where they belong.
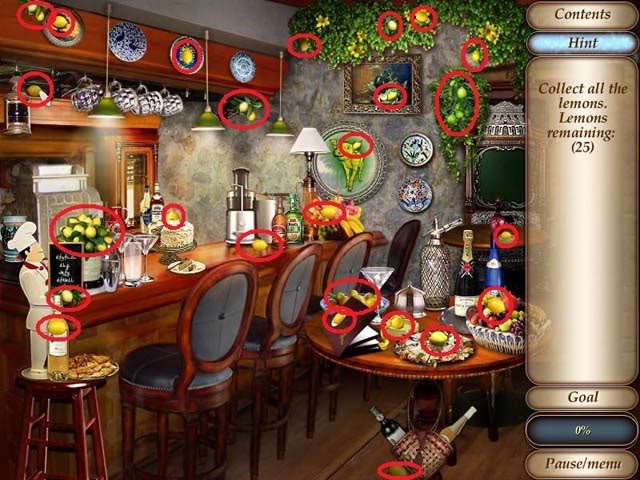
Stage 4: Collect lemons
Stage 5: Make lemon soda
- Pick up the sparkling water, sugar bowl, and glass.
- Click on the cash register to zoom in, and take the spoon and knife inside.
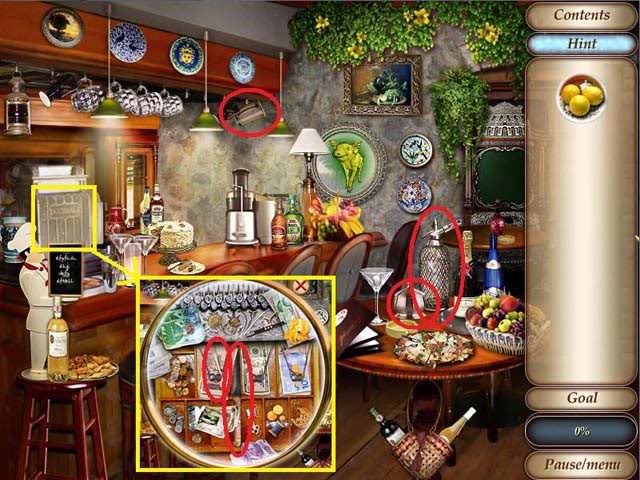
- In your inventory, use the knife on the lemons to slice them. Use the spoon on the sugar bowl to get a spoonful of sugar.
- Next, click the glass on the juicer on the counter.
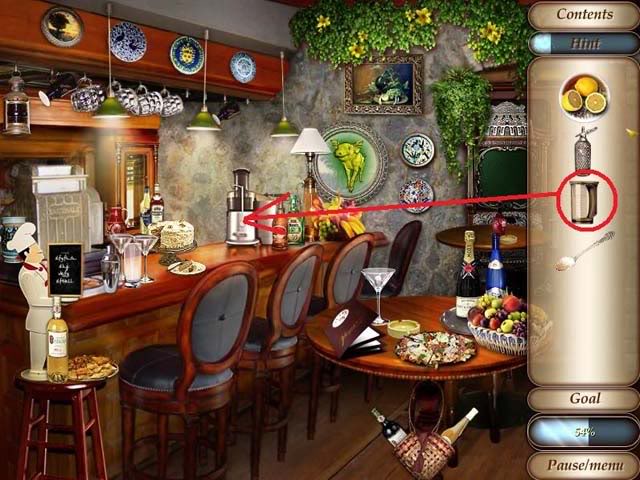
- Click the lemons on the juicer, then remove the glass of juice.
- Click the glass of juice on the martini glass on the table, then add the sparkling water, then the spoonful of sugar.
Stage 6: Mini-game: Central Square
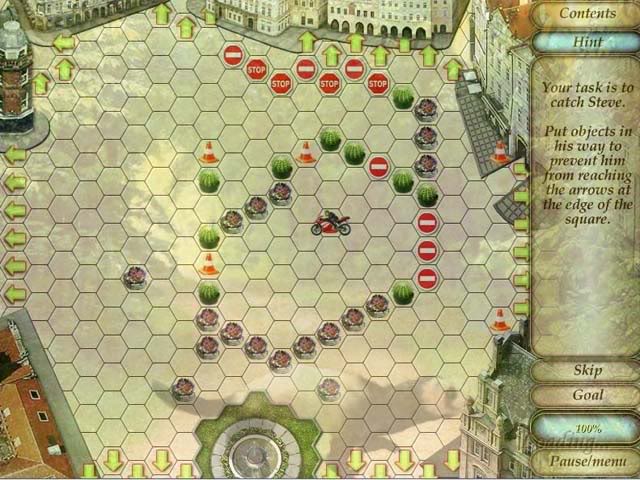
- Your goal here is to prevent Steve’s motorcycle from reaching the edge of the screen. Click on any of the empty spaces to put up a barrier. You win the game once you manage to block him in. A good strategy is to pay attention to the existing obstacles on the screen, and place your barriers so that you connect them. You’ll win the game once you manage to box Steve in.
Stage 7: Put Steve’s piercings back
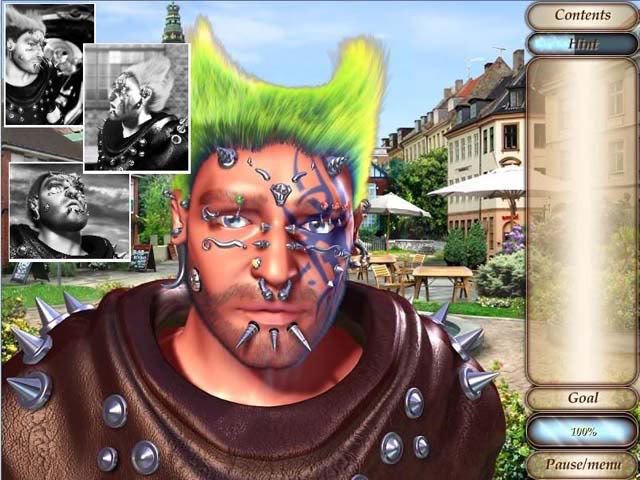
- Click on any of the three black and white photos for a close-up of Steve’s face. This will guide you on where to place the piercings.
- Here’s what he looks like when all the piercings are in:
THE SIXTH PART
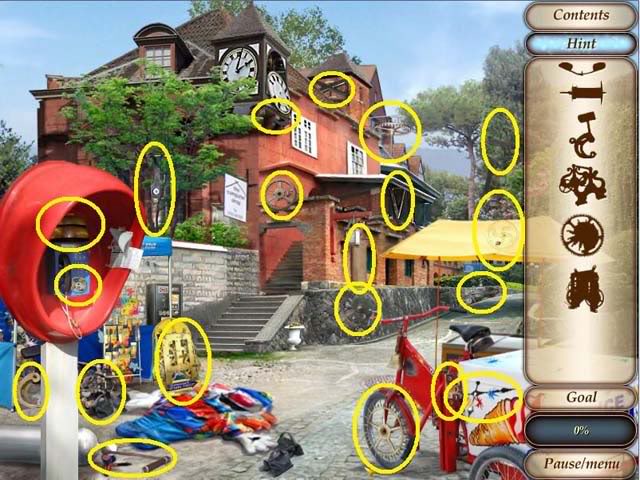
Stage 1: Find the clock parts
Stage 2: Repair the clock
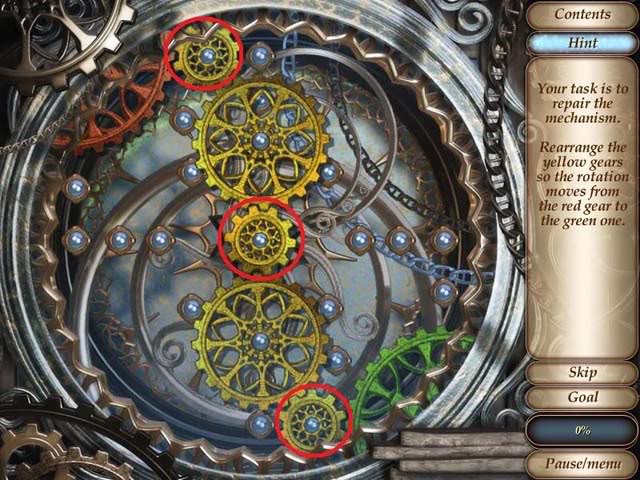
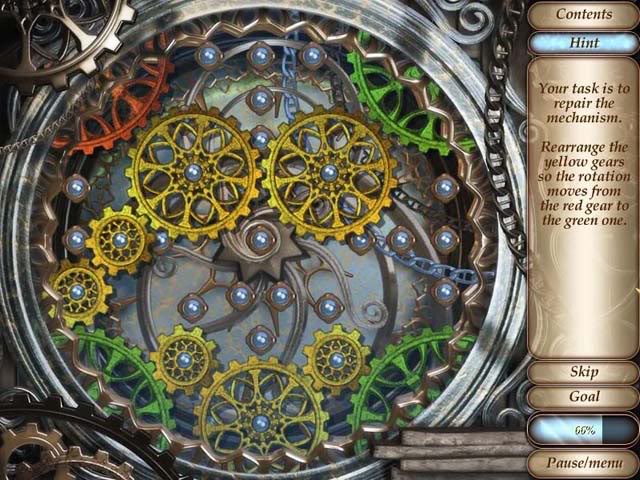
Arrange the small gears to connect the red and green gears at either end of the screen. See the screenshots below for where to place them.
Puzzle #1:
Puzzle #2:
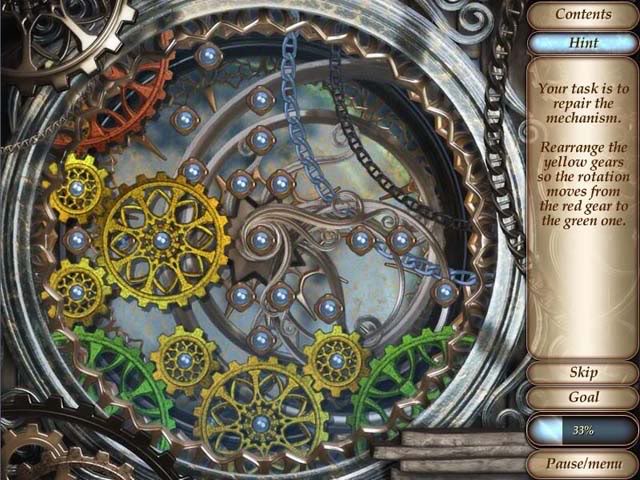
Puzzle #3
Stage 3: Repair the clown
Pick up the ball of string, duct tape, hose, and heavy goods. Click on the bag under the bicycle seat to zoom in, and take the wrench.
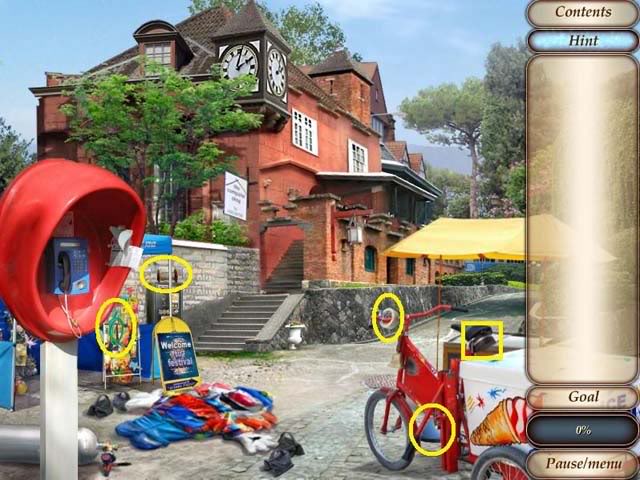
Use the duct tape on the clown, and attach the hose to the air canister lying nearby. Next, use the blue item labeled “goods” on the clown. Next, use the string on the clown to tie it to the weight. Finally, use the wrench on the air canister.
Stage 4: Tesla’s Box
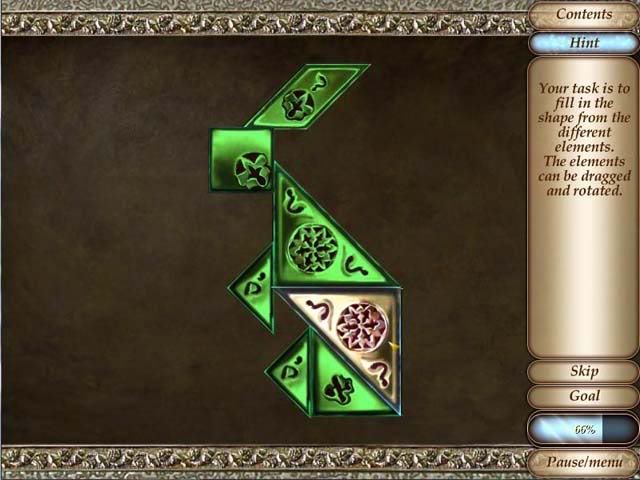
Complete three tangram puzzles to advance. Place the shapes so that they fit into the outline. When you hover your mouse over a piece, a red circle appears. Click on the red circle to rotate the piece.
Puzzle #1
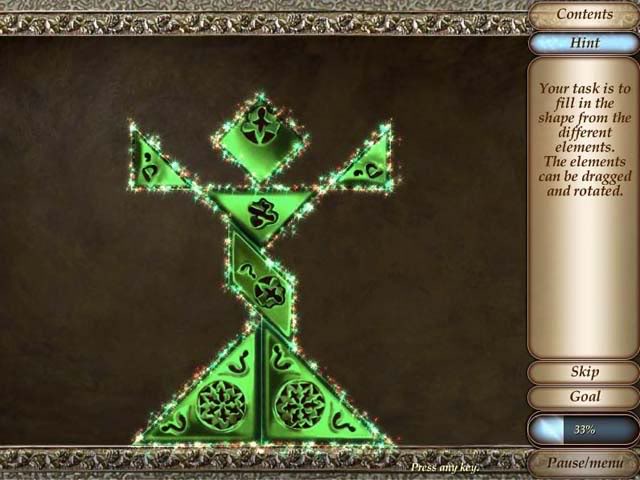
Puzzle #2
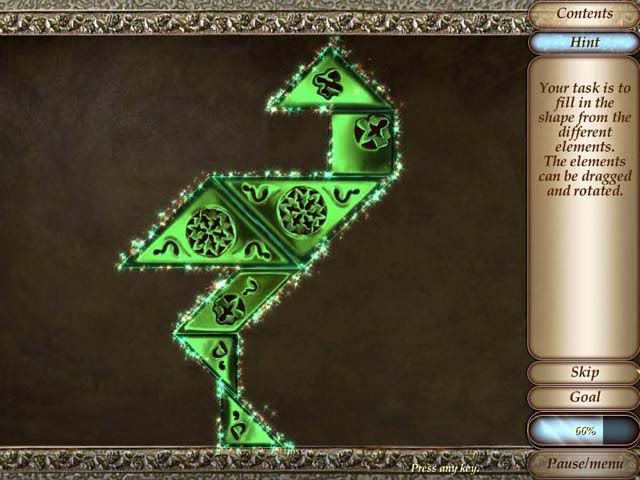
Puzzle #3
AT TESLA’S
Stage 1: At Gramma’s
Listen to the dialogue.
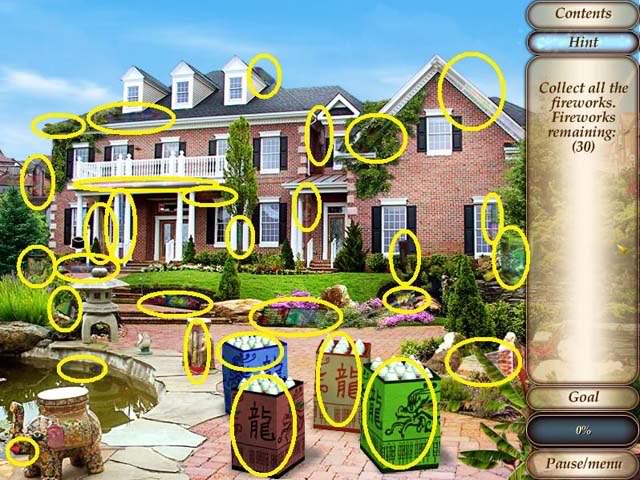
Stage 2: The Museum – Collect all the fireworks.
Stage 3: Light the fireworks
- Your goal here is to line up the fireworks in the correct order so that when lit they form a dragon in the sky.
- Use the dragon picture to the right of the fireworks as a reference.
- To light the fireworks, click on the torch and hold the mouse button down to drag it along the bottom of the line of fireworks.
- Start by arranging the fireworks in the pattern below:
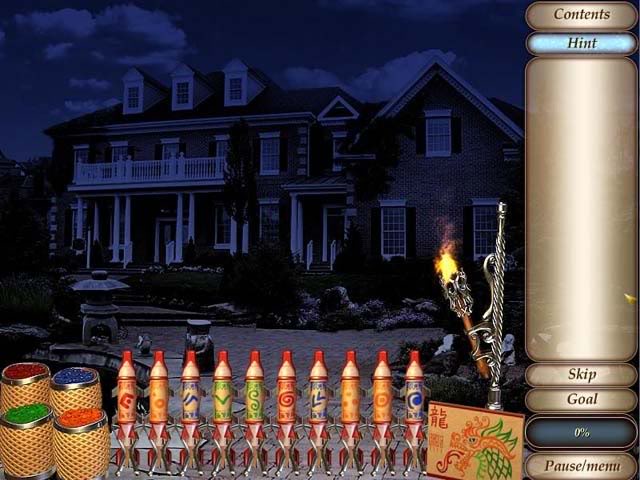
- This gives you the correct dragon pattern, but now you have to dye some of the fireworks the correct color.
- To dye a firework, click on the firework you wish to change the color of, and drag it onto one of the four dye sacks.
- The first two fireworks are already the correct color.
- Change firework #3 from blue to orange.
- Change firework #4 from green to blue.
- Change firework #5 from green to orange.
- Change firework #6 from red to orange.
- Change firework #7 from blue to green.
- Change firework #8 from orange to green.
- Change firework #9 from orange to green.
- And finally, change firework #10 from blue to orange.
The row of fireworks should look like the screenshot below:
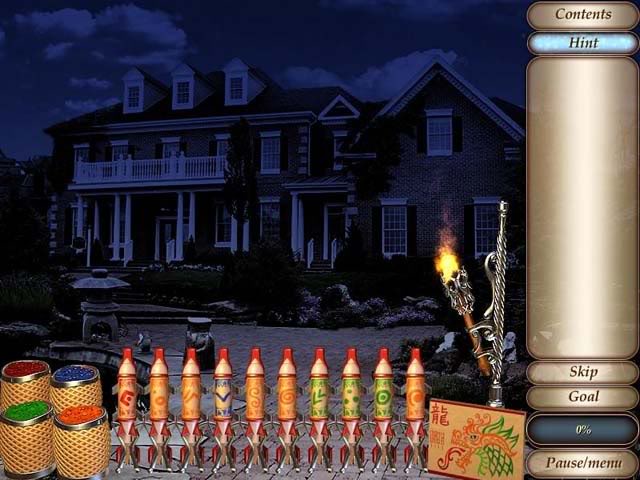
Light the fireworks with the torch to complete the puzzle.
Stage 4: Spot the differences
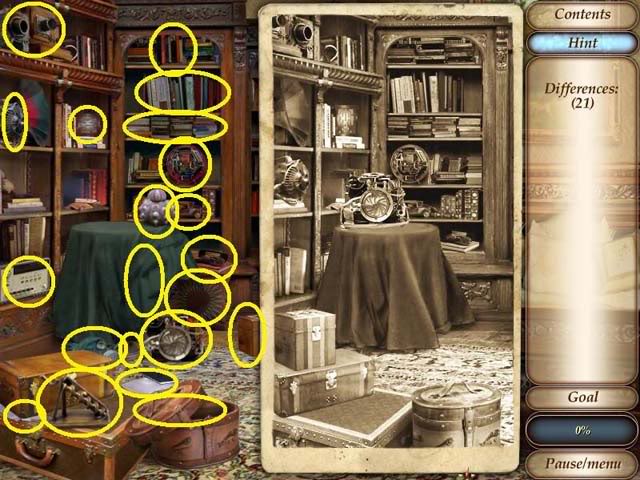
Stage 5: Tesla’s Last Riddle – Put out the lights
Puzzle #1
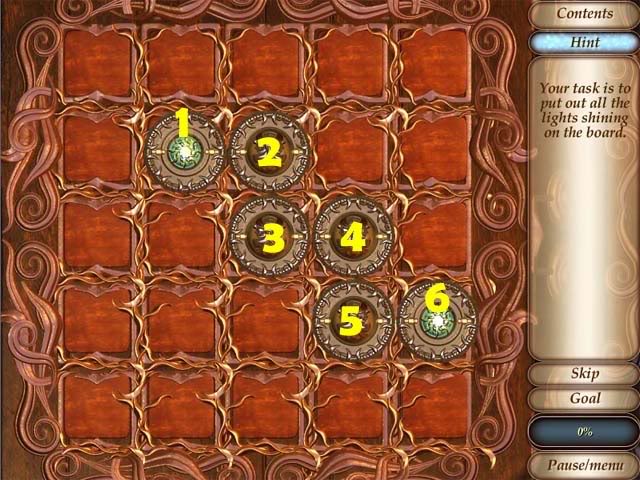
Based on the numberings in the screenshot above, click the lights in the following order: 6, 1, 2, 3, 4, 2
Puzzle #2
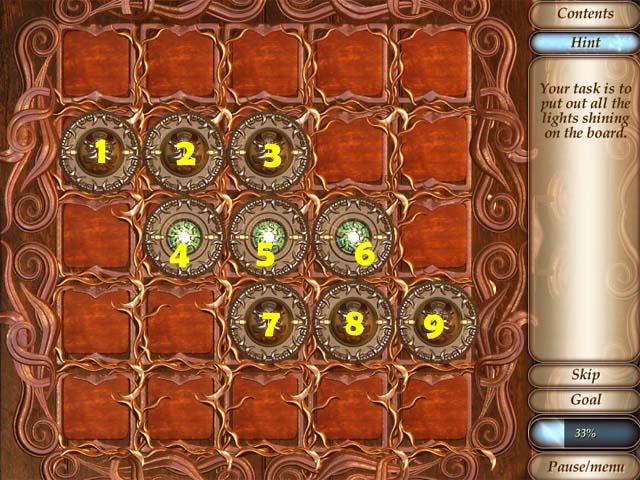
Based on the numberings in the screenshot above, click the lights in the following order: 6, 8, 6, 7, 3, 5, 1, 6, 8, 6, 9.
Puzzle #3
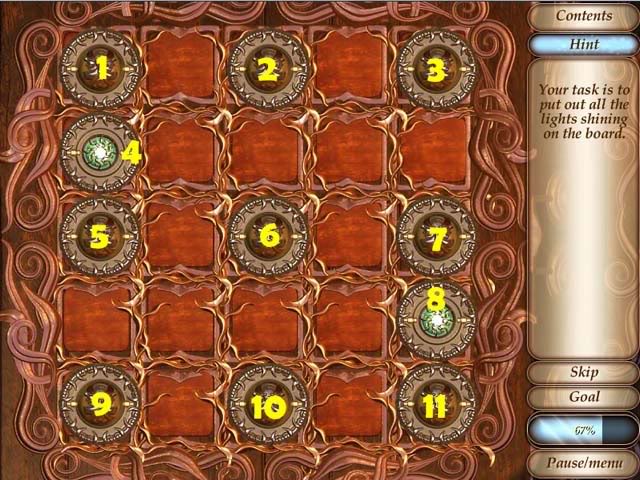
Based on the numberings in the screenshot above, click the lights in the following order: 4, 9, 10, 9, 6, 1, 3, 4.
THE SEARCH
Stage 1: Find the surveillance system
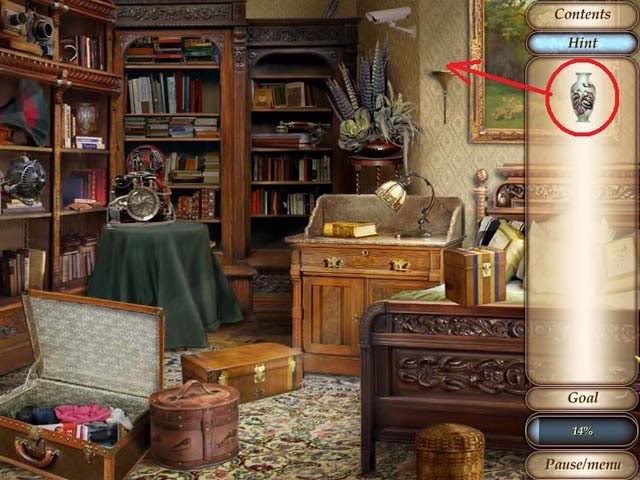
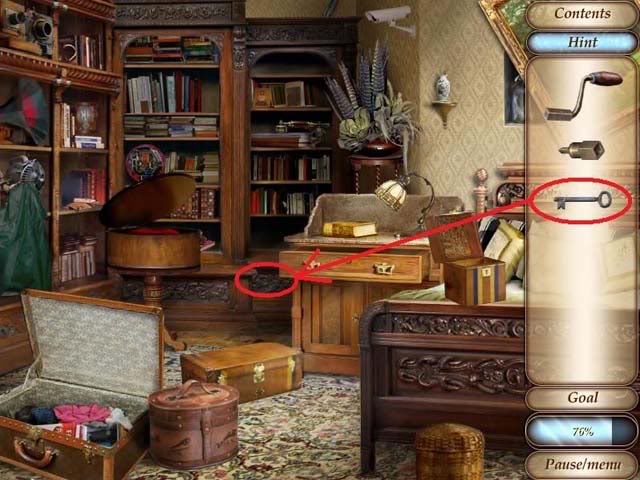
- In the lower left corner of the room is a stack of three trunks. Click on the top two to move them out of the way, which allows you to click on and open the bottom trunk. Take the pretty vase from inside the trunk.
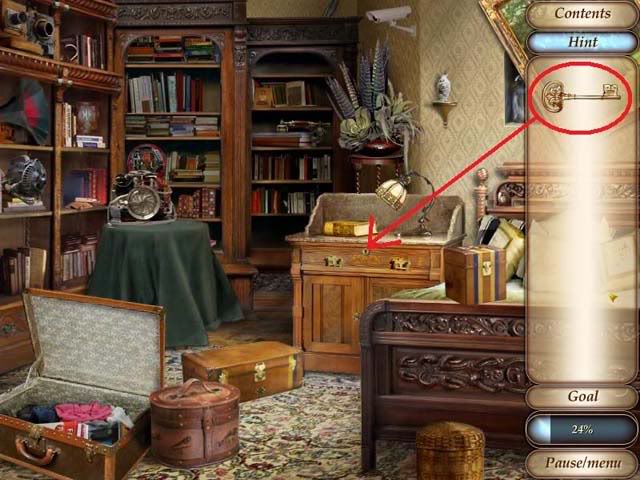
- Place the vase on the small shelf on the wall, which causes the painting to move aside and reveal a key. Take the key.
- Use the key on the locked desk to open the drawer. Take the handle from the drawer.
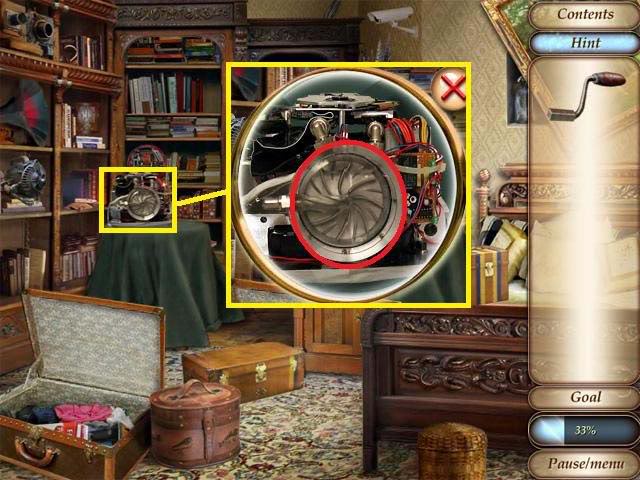
- Next, click on the contraption on top of the green table to zoom in. Click and hold the circular part in the middle of the machine, then rotate the mouse to open the compartment. Take the key that appears inside.
- Click on the green table cloth to remove it, then click on the table to zoom in. Click anywhere on the blank surface, then drag the mouse in circles to rotate the tabletop until a puzzle appears.
- Insert the numbers into the slots so that the equations are all equal to each other. (Note: The symbol in the upper right corner is a “+” sign, not a “x” sign.)
- See the screenshot below for the solution. Each equations should equal 3, so in other words, 1 + 2; 6 – 3; 7 – 4; and 8 – 5.
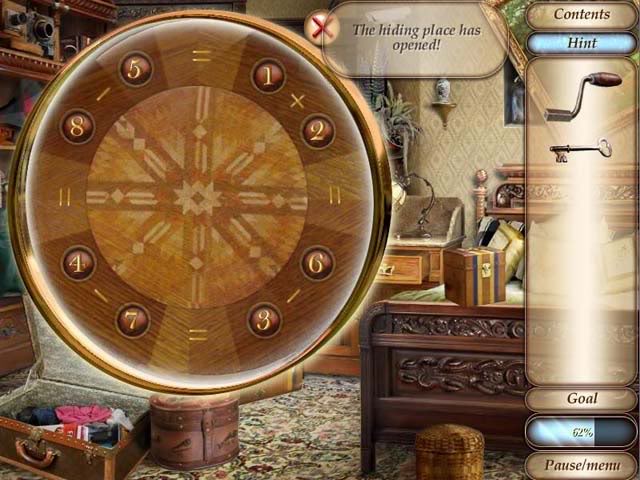
- Take the key from inside the table top after it opens.
- Use the gold key from your inventory on the striped box on the bed to open it, and take the connector inside.
- Click on the panel next to the desk to zoom in, and use the second key on the keyhole to unlock it. Use the switch on the small hole that opens up after you use the key. Finally, fit the handle into the hole.
- A new area of the room will be revealed. Click on the light switch to the right of the archway to flip on the light, and then click on the computer monitors on the desk.
- It turns out that you need an access code for the computer.
Stage 2: Find the access code.
Move the clutter out of the way and click on all the pieces of paper on and around the desk.
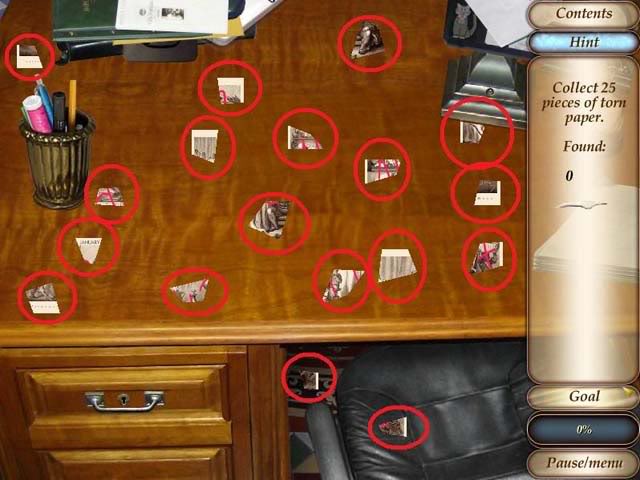
- Click on the pen holder to knock it over. Move the pens out of the way to reveal two more pieces of paper and a key that you can pick up.
- Use the key on the locked left-hand drawer, where you’ll find the last 5 pieces of paper.
Stage 3: Put together the pieces of paper
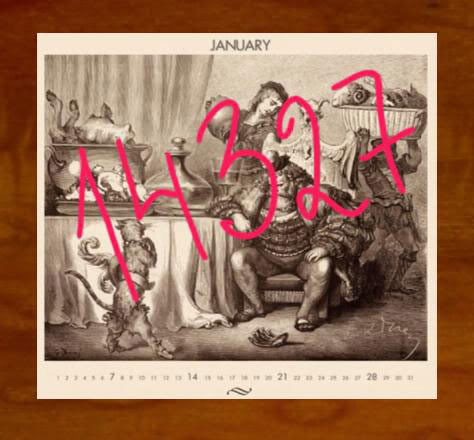
A jigsaw puzzle. Trying using the red squiggles on the photo as guides to help you put the pieces together faster.
Stage 4: Enter the code
Go back to the computer and enter the code you found on the piece of paper: 14327
TESLA’S SECRET MACHINE
Stage 1: Remove the balloons
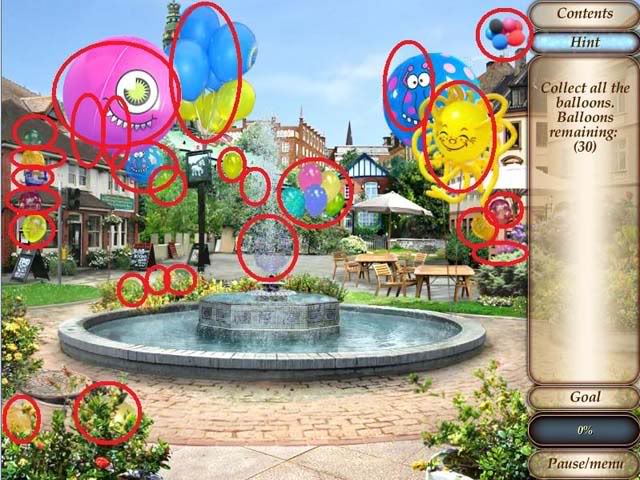
- Click on all the balloons to remove them from the scene.
- Note: When you click on the cluster of five balloons in the middle of the scene, they will float away and continue to float around the scene. Click on each of these balloons individually to get rid of them once and for all.
Stage 2: Fix the machine
The machine is divided into four archways. Clicking in each one will zoom in on a mini-game. Start by clicking on the pipes at the far left.
Pipe mini-game
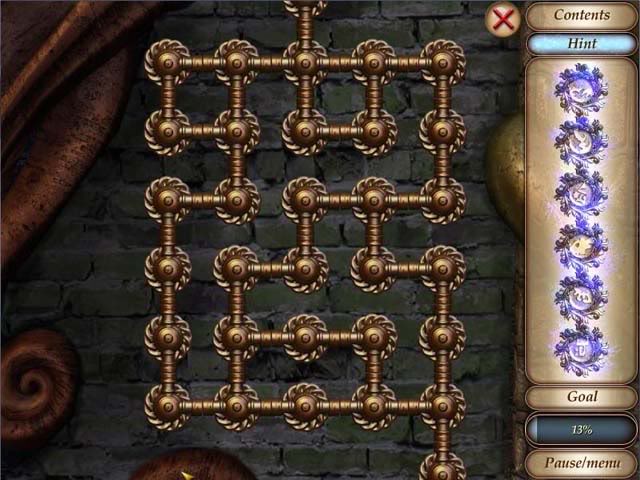
- Rotate the pipes to allow the water to travel from one side of the screen to the other. Make sure that no water is leaking out anywhere, meaning that each connection of the pipe must be connected to another.
- See the screenshot below for the solution.
Fountain mini-game
- Flip the platforms to change the direction of the water flow so that it hits the gear in the lower right.
- I’ve numbered each platform 1 through 6 in the screenshot below:
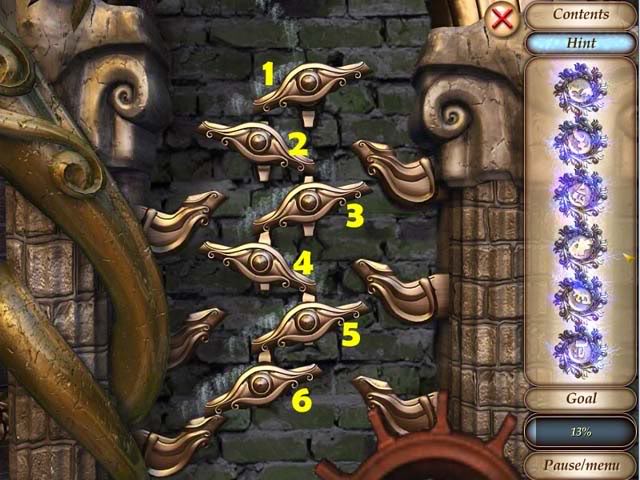
- Based on the numberings, click the fountains in the following order: 6, 1, 2, 5, 6, 4
Gears mini-game
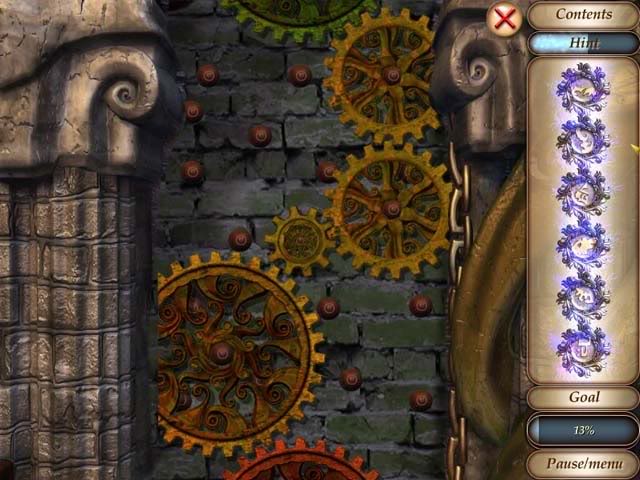
- To the right of the picture is a gears mini-game. Click on it to zoom in.
- Arrange the gears based on the screenshot below:
Picture mini-game
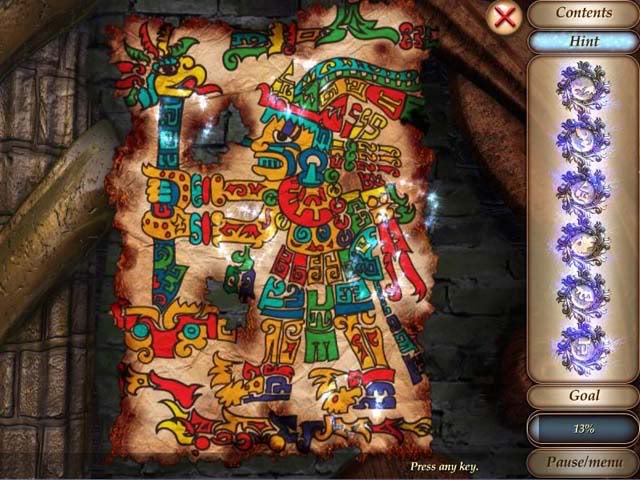
- Click on the right-most panel to zoom in on a jigsaw mini-game where you heve to reassemble a picture.
- The picture is quite complex, so I would suggest focusing on one color at a time (i.e. put together all the pieces that have turquoise in them together first, then green, and so on.)
- Use the screenshot below as a guide.
Placing the machine parts
- If you take a closer look at the picture you just assembled, you’ll see that there are 6 glowing spots on it. Pay attention to the symbol and color that is highlighted. The symbols correspond to the symbols in the six machine parts in your inventory, and the color indicates where you should place them in the main room. Match the symbol to the correct color based on the beam of light that’s shining down.
- In the screenshot below, I’ve circled each mechanical piece with the color that corresponds to where you should place it in the scene.
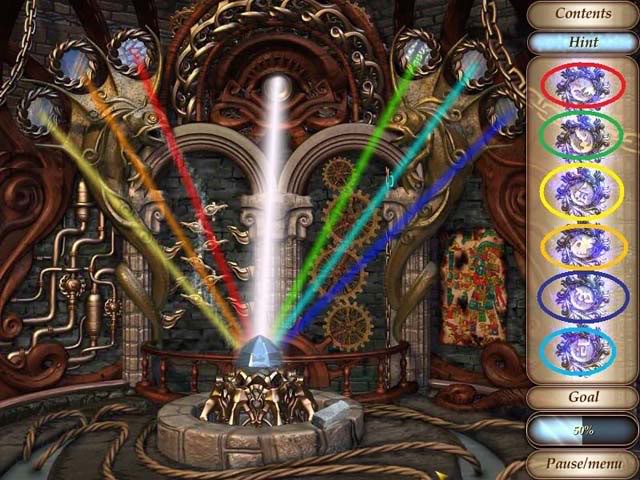
- In other words, the top piece (which we’ll call piece #1) goes in the third slot from the left (red). Piece #2 goes in the fourth slot from the left (green). Piece #3 goes in the left-most slot (yellow). Piece #4 goes in the second slot from the left (orange). Piece 35 goes in the last slot (dark blue). Piece #6 goes in the fifth slot from the left (turquoise).
- After a brief cutscene, use the brick to hit the man over the head.
Stage 3: Epilogue
Enjoy the final cutscene. Congratulations – you’ve just beaten the game!
“;
More articles...
Monopoly GO! Free Rolls – Links For Free Dice
By Glen Fox
Wondering how to get Monopoly GO! free rolls? Well, you’ve come to the right place. In this guide, we provide you with a bunch of tips and tricks to get some free rolls for the hit new mobile game. We’ll …Best Roblox Horror Games to Play Right Now – Updated Weekly
By Adele Wilson
Our Best Roblox Horror Games guide features the scariest and most creative experiences to play right now on the platform!The BEST Roblox Games of The Week – Games You Need To Play!
By Sho Roberts
Our feature shares our pick for the Best Roblox Games of the week! With our feature, we guarantee you'll find something new to play!All Grades in Type Soul – Each Race Explained
By Adele Wilson
Our All Grades in Type Soul guide lists every grade in the game for all races, including how to increase your grade quickly!


