
Best Horror Games On Itch.io – July 2026
Across a bounty of subgenres.
Grow A Garden 2 Base Price List
What's the most valuable crop?![Evomon Best Starter [Leafbun, Blazpup, or Bubble?]](/wp-content/uploads/2026/06/evomon-best-starter.jpg "Evomon Best Starter [Leafbun, Blazpup, or Bubble?]")
Evomon Best Starter [Leafbun, Blazpup, or Bubble?]
Grass-type, Fire-type, or Water-type?
![[Roblox] Evomon Shiny Hunting Guide – Including Prismatic and Pris Shinies!](/wp-content/uploads/2026/06/evomon-shiny-hunting-guide.jpg "[Roblox] Evomon Shiny Hunting Guide – Including Prismatic and Pris Shinies!")
Lake House: Children of Silence Walkthrough
Lake House: Children of Silence is a hidden object game from developer Big Fish Games. Gamezebo’s strategy guide will provide you with detailed images, tips, information, and hints on how to play your best game.
Share this


- Prefer Gamezebo on Google

Lake House: Children of Silence – Game Introduction
Lake House: Children of Silence is a hidden object game from developer Big Fish Games. Gamezebo’s strategy guide will provide you with detailed images, tips, information, and hints on how to play your best game.
General Tips
Difficulty Levels
- The game has two difficulty modes: Casual and Expert.
- On casual mode, the hint button takes 30 seconds to reload and interactive areas sparkle.
- On expert mode, the hint button takes two minutes to reload and interactive areas do not sparkle.
Cursors
- The cursor will change when it moves over interactive areas:
- Open hand: When an object can be picked up.
- Pointing finger: When an object cannot be picked up, but can be touched or interacted with.
- Magnifying glass: When a close-up view is available or an object can be examined in more detail.
- Item: When an item is selected from the inventory at the bottom of the playing area, the cursor will change to the image of the item.
- The cursor will not change when moving over listed objects in the hidden object scenes.
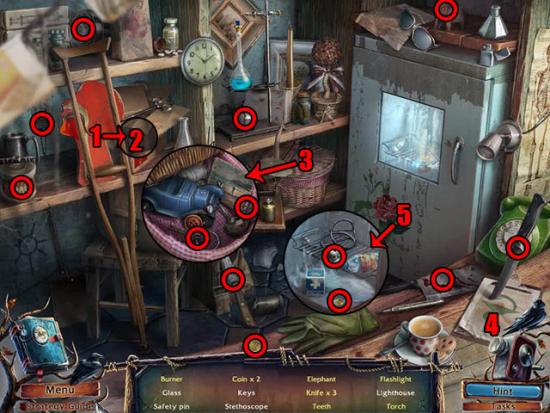
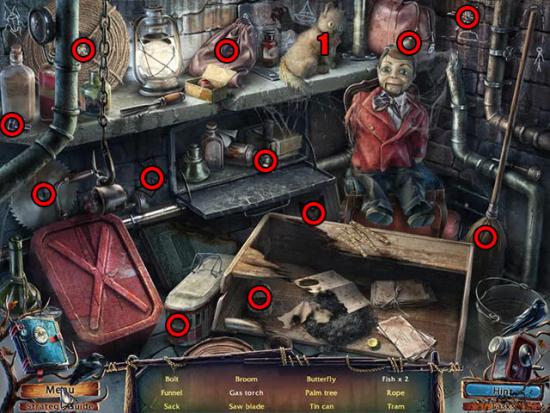
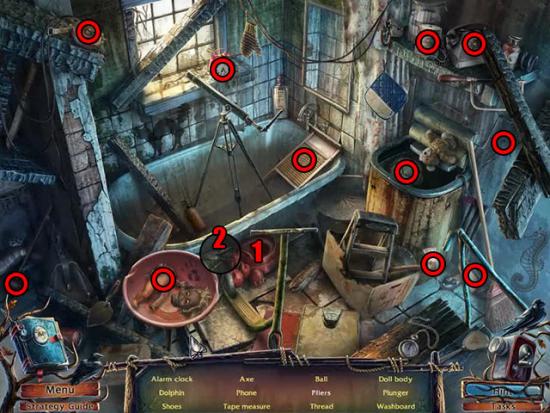
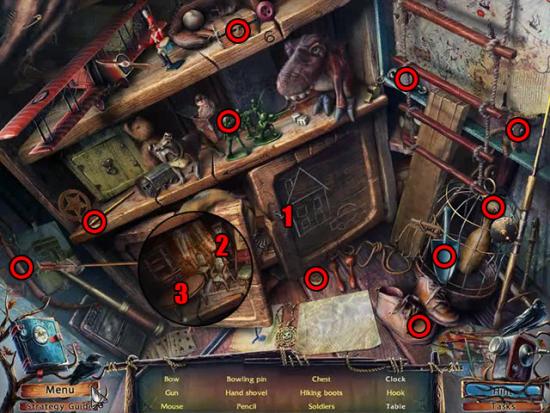
Hidden Object Scenes
- These scenes are found by selecting certain interactive areas in the game, represented by sparkling areas on casual mode.
- The aim is to find all of the objects on the list. Although most objects are in the open and can be found simply by clicking them, finding some objects requires two or more actions.
- On the images in this guide, objects which are in the open are identified with a red rectangle, while objects which require a series of actions are numbered.
- Clicking four times quickly causes the edges of the screen to turn blue and the mouse cursor to move slowly for three seconds.
Journal and Map
- The journal can be selected from the bottom-left corner of the playing area. It is updated as you plays through the game, and will show a description of all the important events that have happened so far.
- The map becomes available after you have opened the satchel in chapter 2. More areas becomes available on the map as you progress through the game. The red dot is placed in your current location. Areas which are green can be visited to complete important actions, while red areas have no actions that can currently be completed.
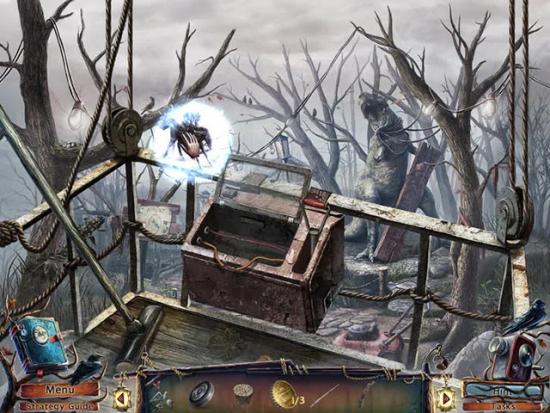
Chapter 1
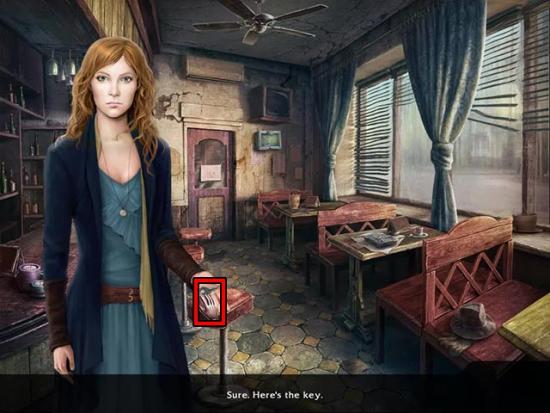
- Take the PHOTO ALBUM KEY from Ann’s hand:

- Examine the photo album on the table.
- Use the PHOTO ALBUM KEY on the lock.
- Turn the key twice to open the album.
- Examine the two burned photographs, the missing photograph on the right page and the newspaper.
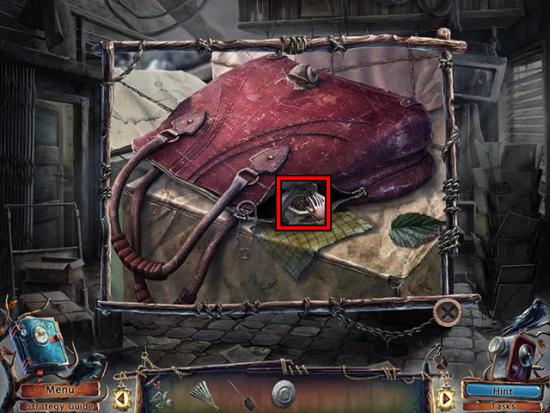
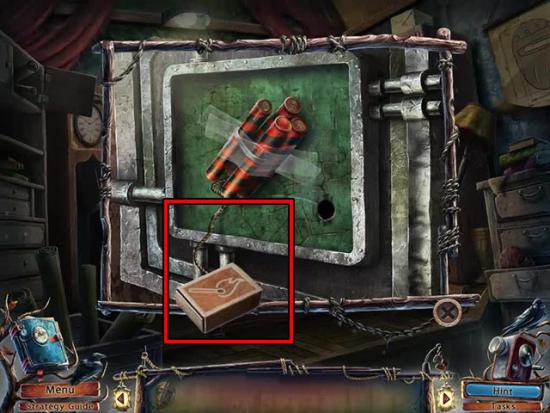
- Exit the view of the photo album and the barman will put a package on the table.
- Examine the package to see that it has a rope tied around it.
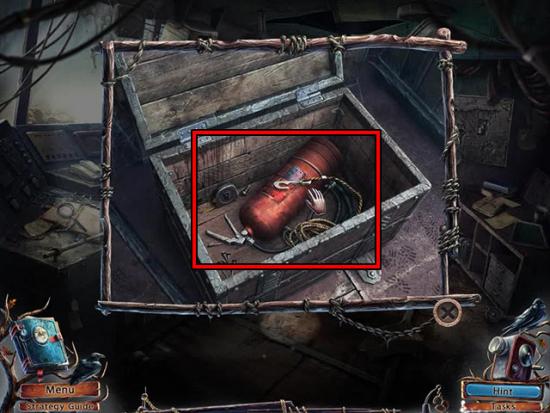
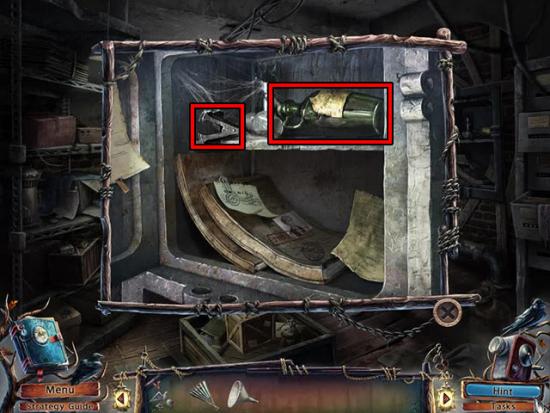
- Exit the view of the package and examine the box below the television:
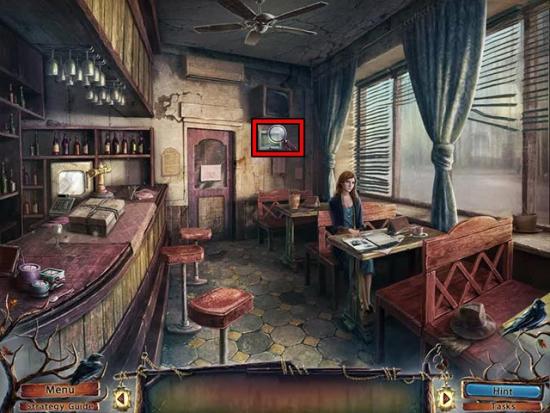
- Select the glass in front of the photograph to remove it.
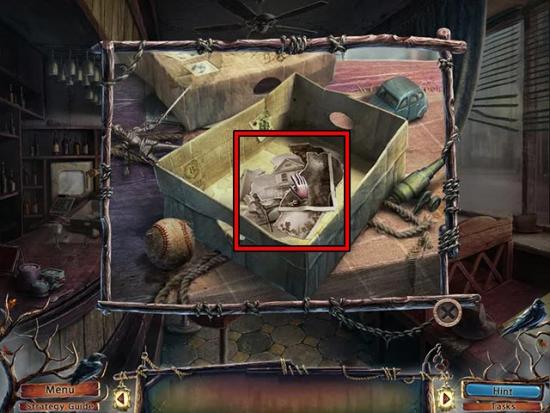
- Take the SCISSORS from the box.
- Examine the package and use the SCISSORS to cut the rope.
- Open the package.
- Move the four toys out of the way and take the TORN PHOTO:
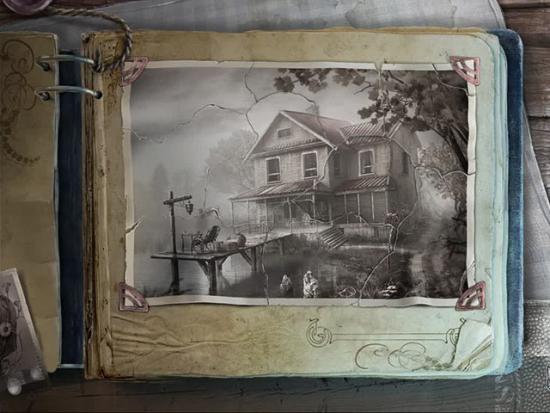
- Examine the photo album and use the TORN PHOTO on the right page.
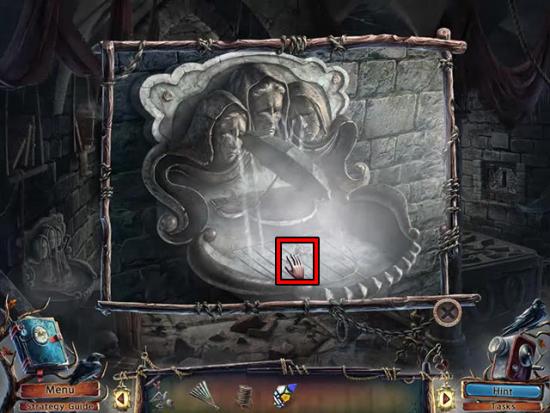
- Assemble the torn photograph to watch a cut-scene and receive the NOTE:
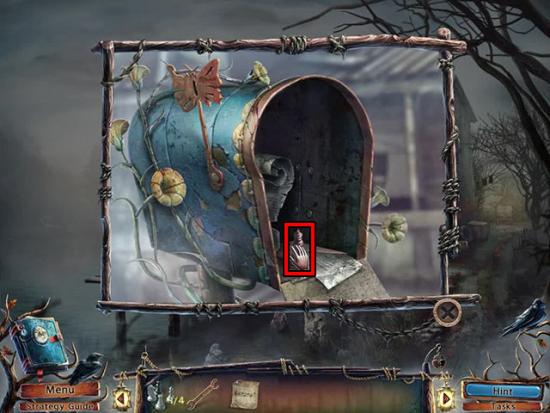
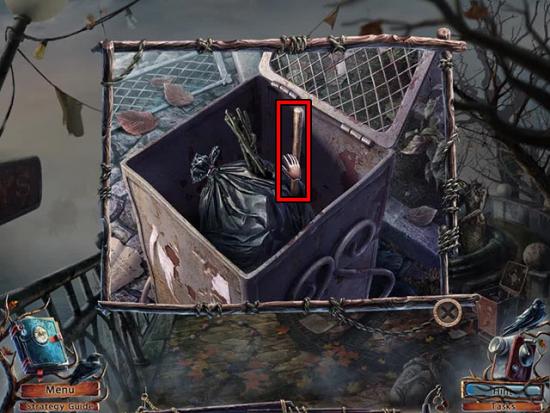
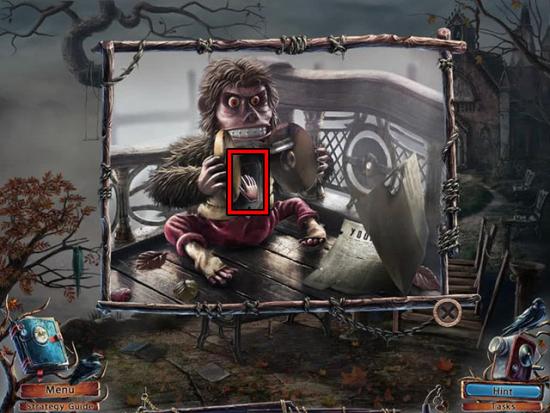
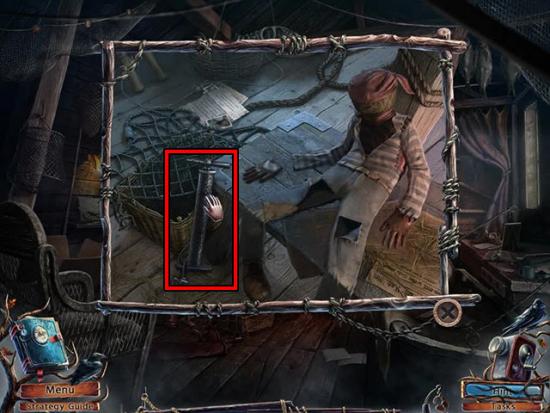
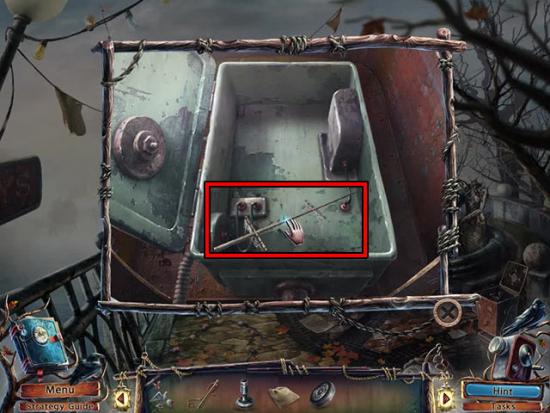
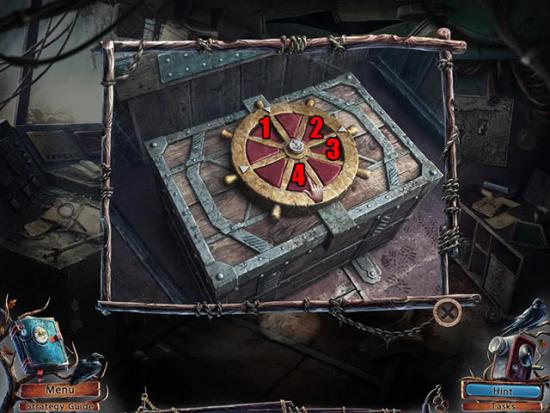
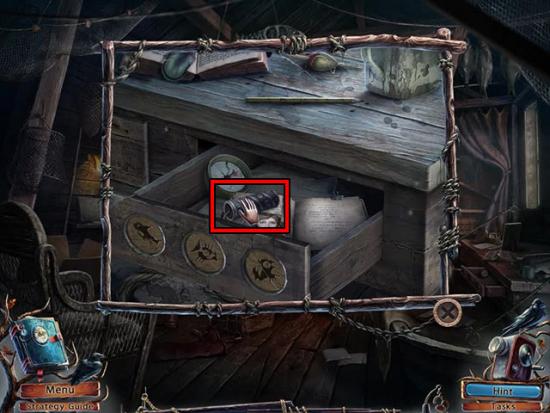
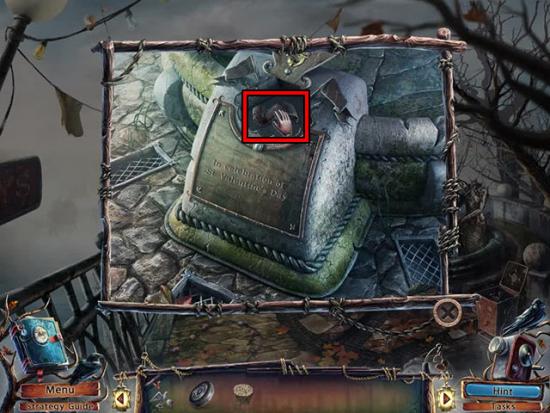
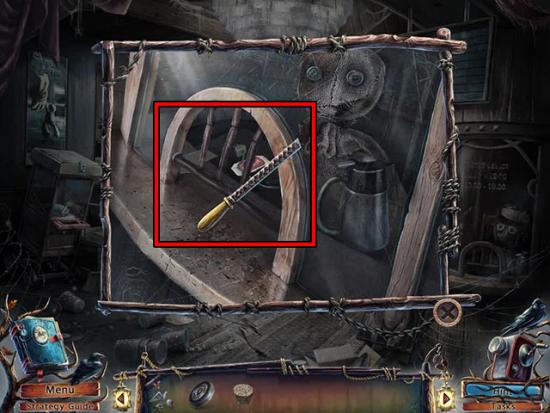
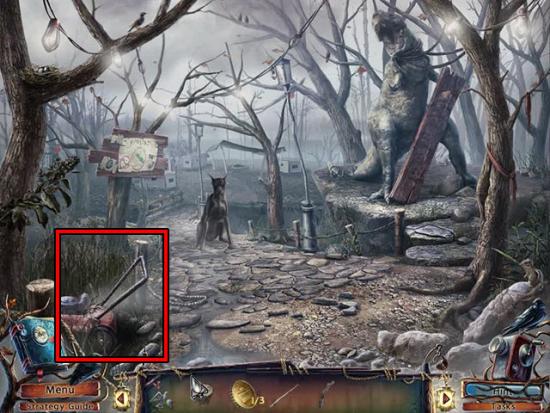
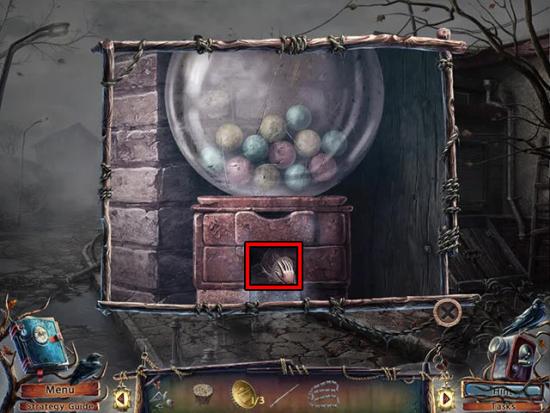
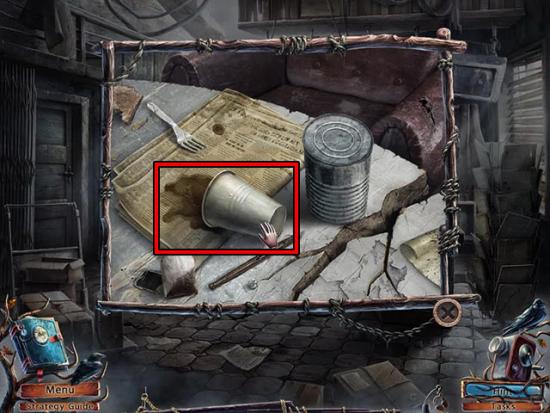
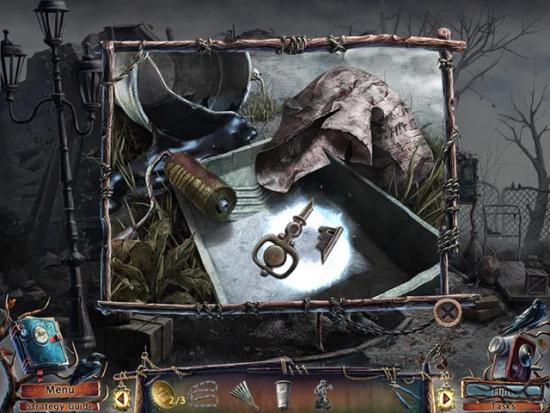
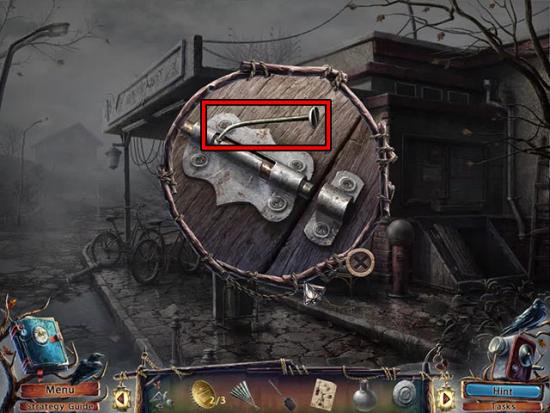
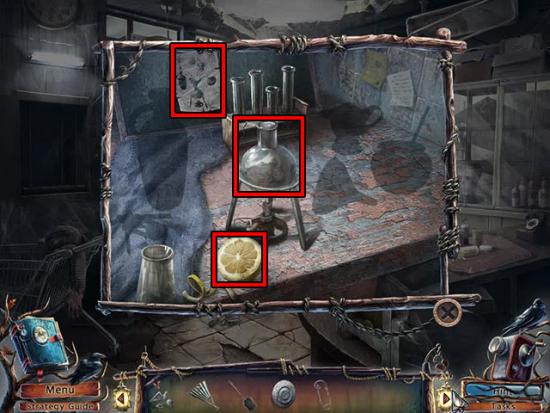
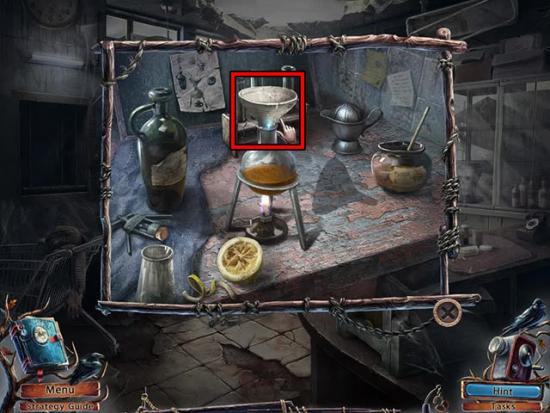
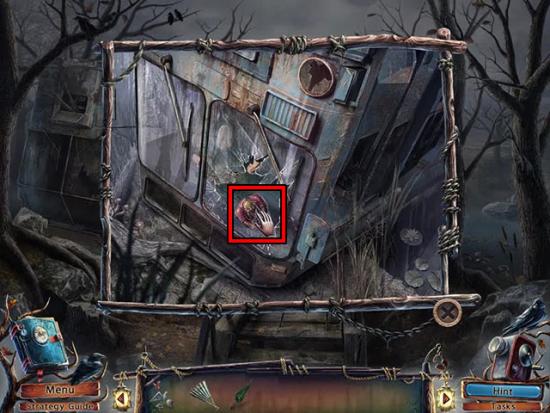
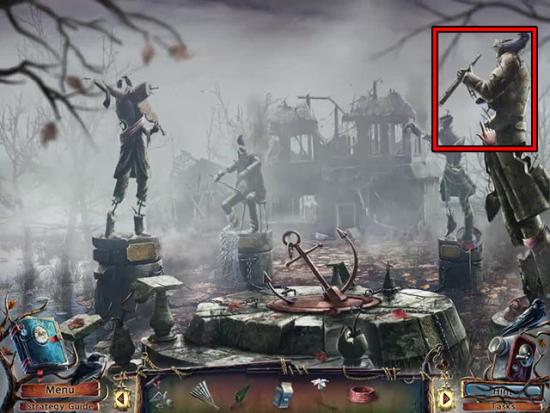
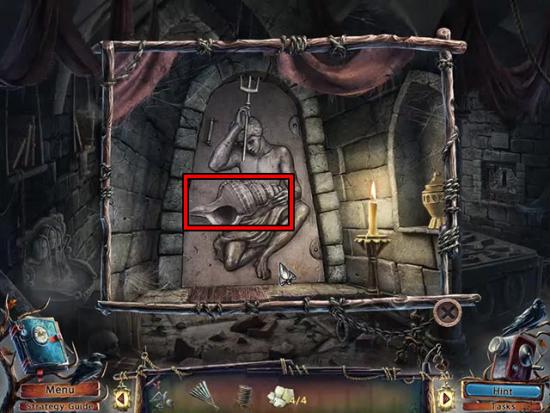
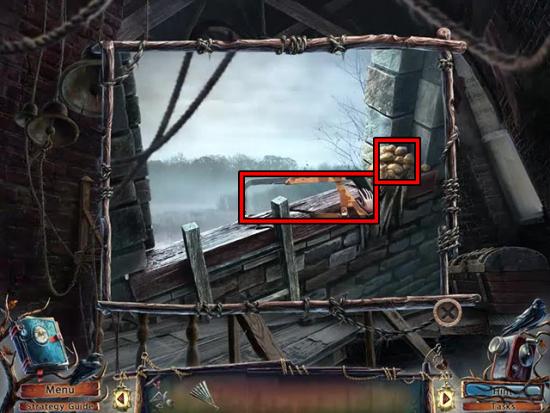
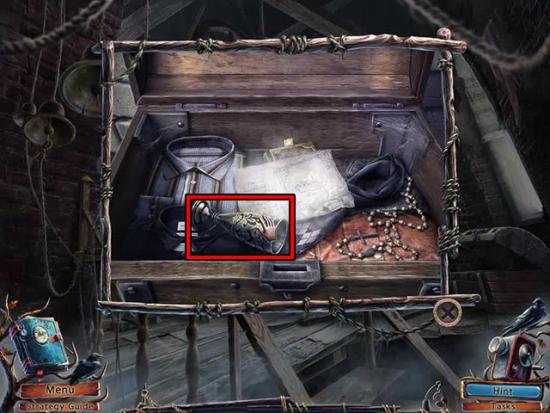
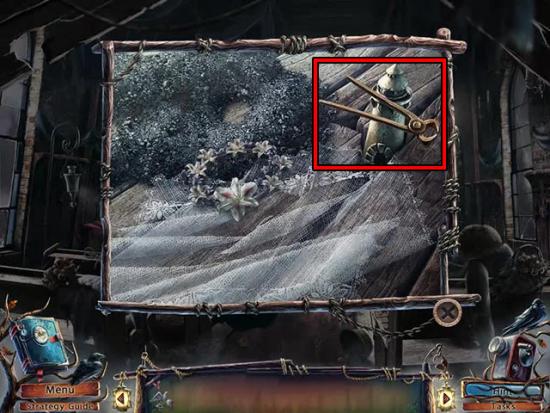
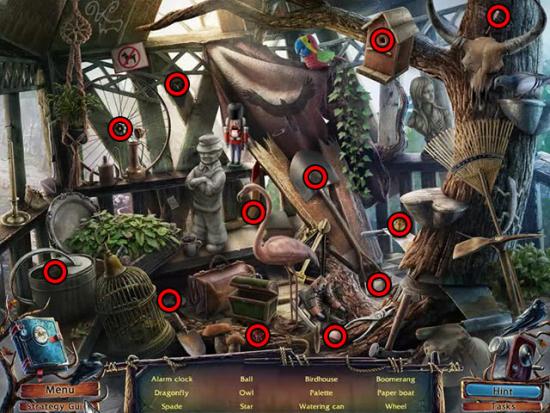
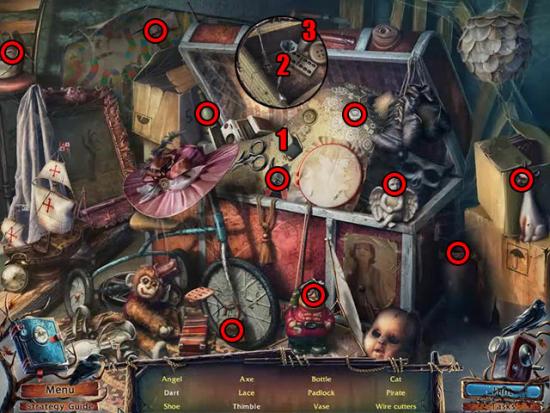
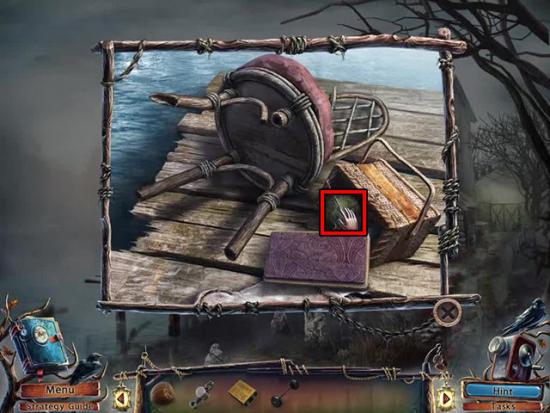
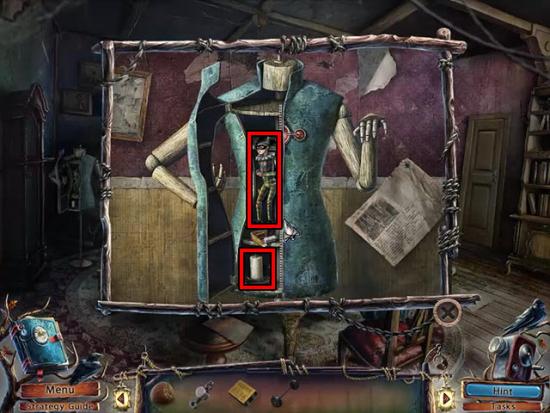
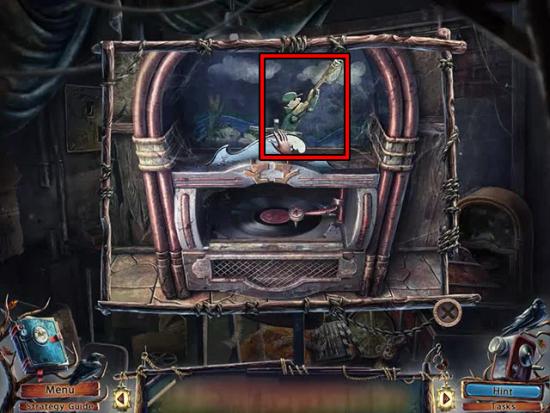
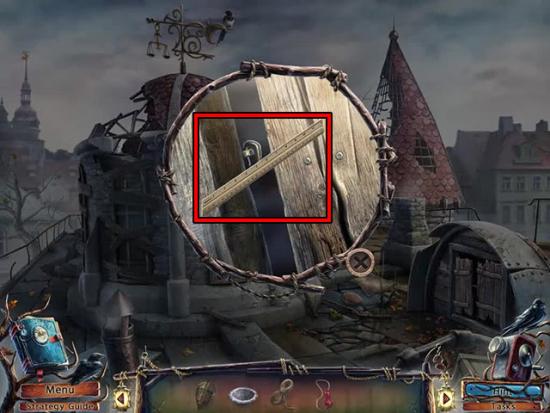
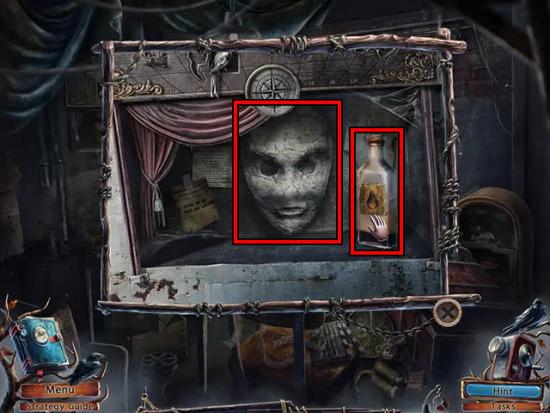
- Select the sparkling area behind the bar to launch a close-up scene:
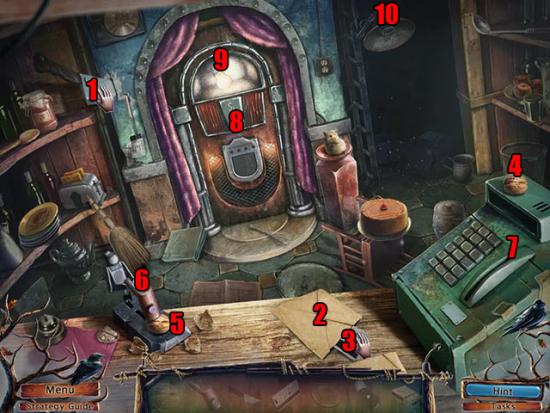
- Take the BUTCHER’S KNIFE (1) and use it on the envelope (2).
- Take the ACCESS CARD (3) from the envelope.
- Take the WALNUT (4) on top of the cash register.
- Use the WALNUT (5) on the nutcracker.
- Take the HAMMER (6) from the nutcracker.
- Use the ACCESS CARD on the cash register slot (7).
- Take the COIN from the cash register drawer.
- Use the COIN on the jukebox machine slot (8).
- Use the HAMMER on the glass of the jukebox.
- Take the LIGHT BULB (9).
- Use the LIGHT BULB on the lamp (10) to illuminate the matches.
- Take the MATCHES to complete the scene.
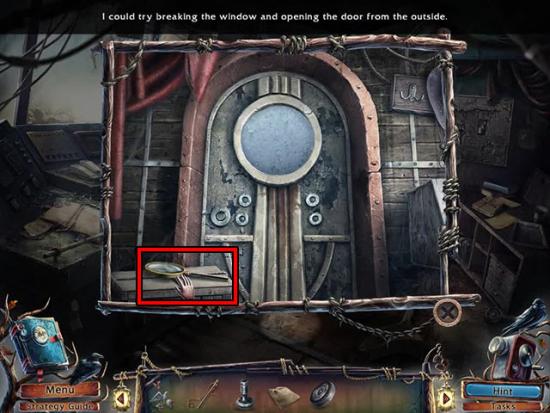
- Examine the candles on the bar:
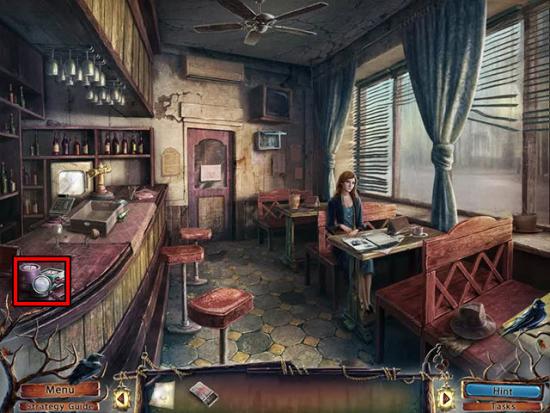
- Use the MATCHES on the candles to light them.
- Use the NOTE on the lit candles to read it.
- Exit the view of the note to watch a cut-scene.
Chapter 2
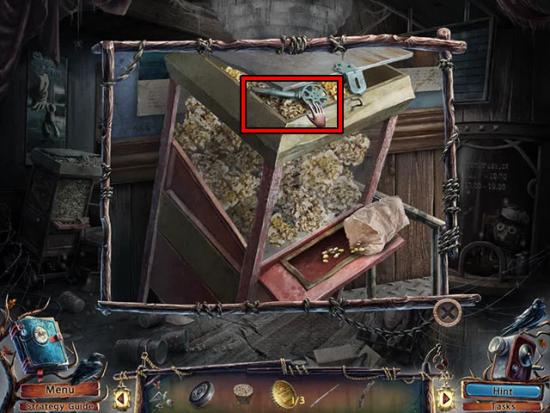
- Talk to Ann.
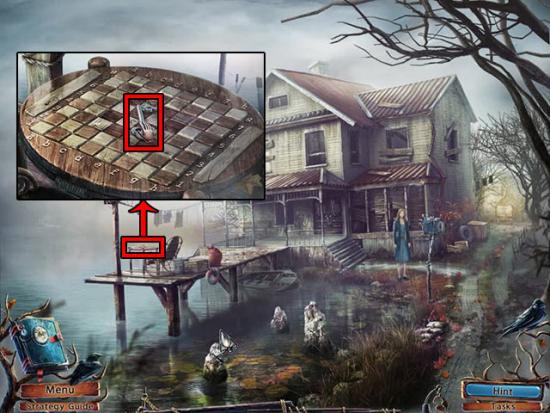
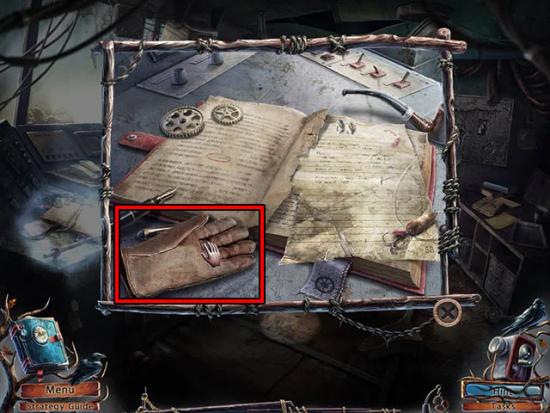
- Examine the chessboard and take the HOUSE KEY:
- Follow the path at the right side of the house.
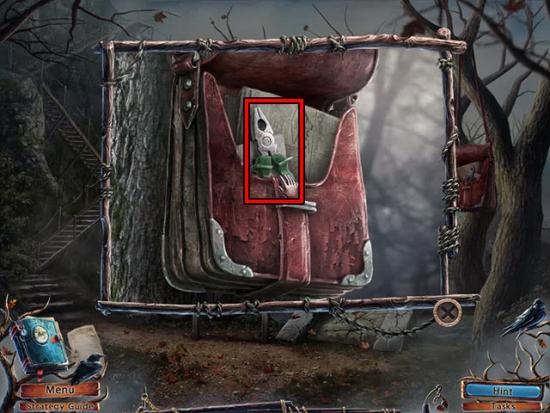
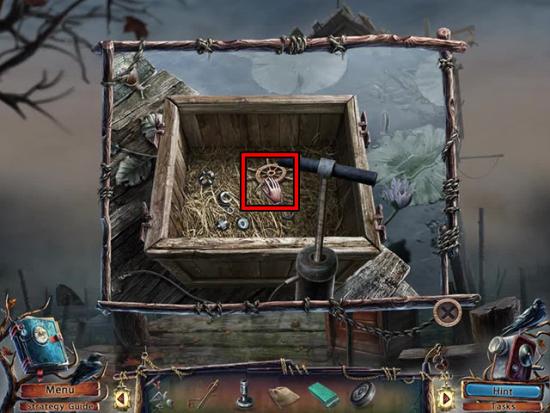
- Examine the satchel hanging from the tree branch.
- Open the satchel and examine the scroll to take the MAP of the city.
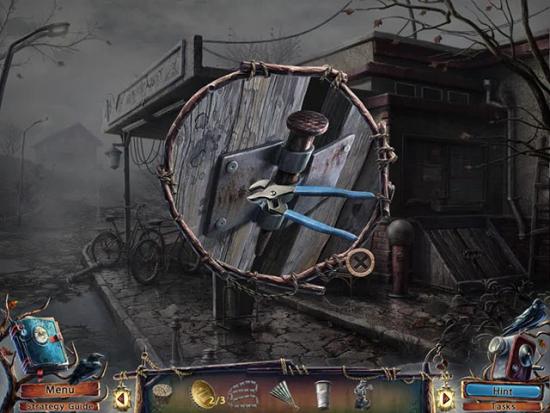
- Take the PLIERS:
- Examine the newspaper article.
- Examine the stairs and try to climb them to see the steam.
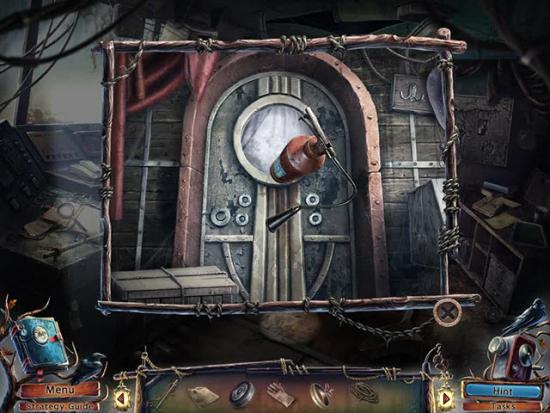
- Examine the gate to see the unusual lock.
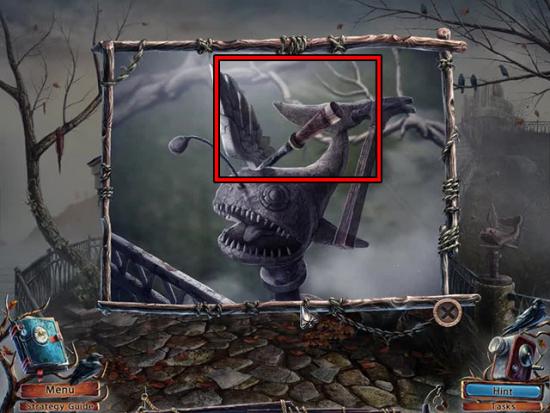
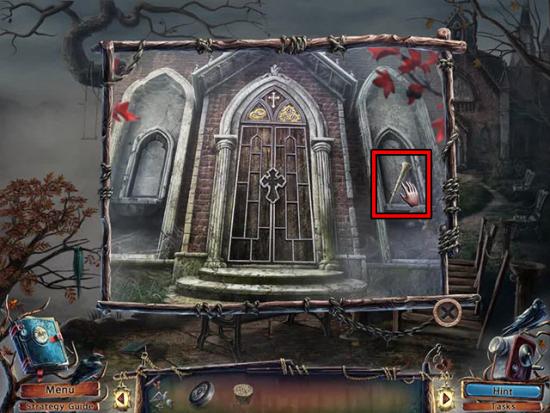
- In the close-up view, take the FEATHER DUSTER:
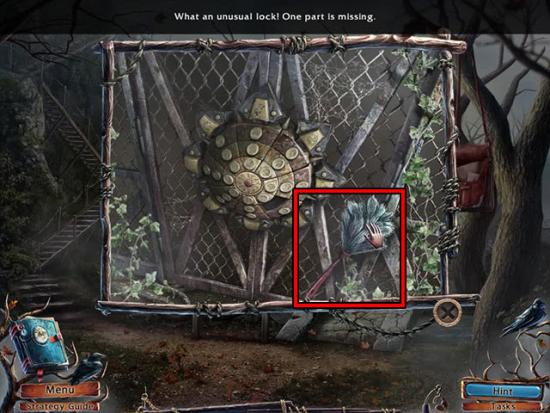
- Examine the bird on top of the sign.
- In the close-up view, select the slot to see that the bird is missing a wing.
- Move back to the path.
- Examine the front door of the house.
- Use the PLIERS on the lock to lift the cover.
- Use the HOUSE KEY on the keyhole.
- Turn the key twice to unlock the door.
- Enter the house.
- Examine the note on the small stool.
- Remove the cover from the table.
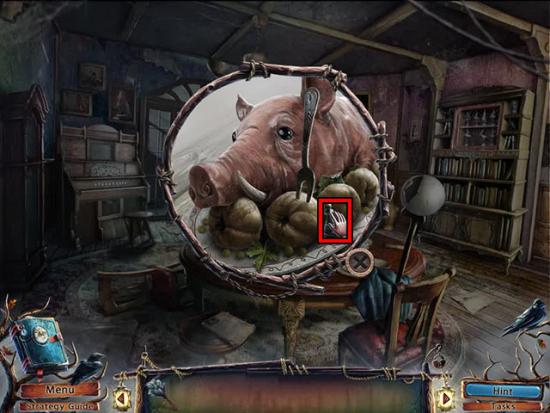
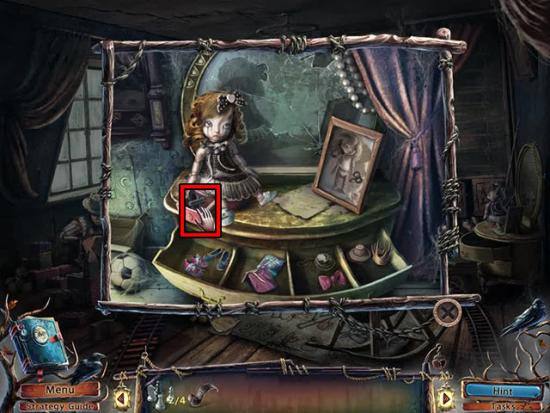
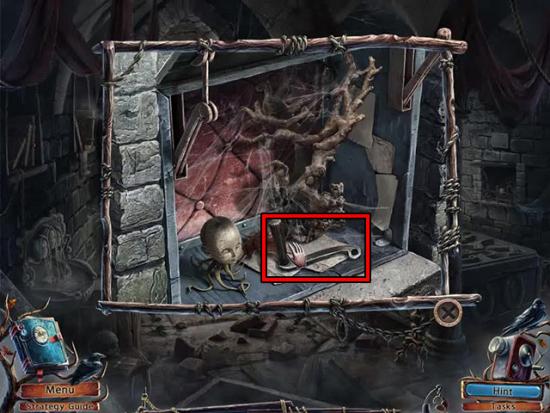
- Examine the pig.
- In the close-up view, take the CHESS PIECE (1 of 4):
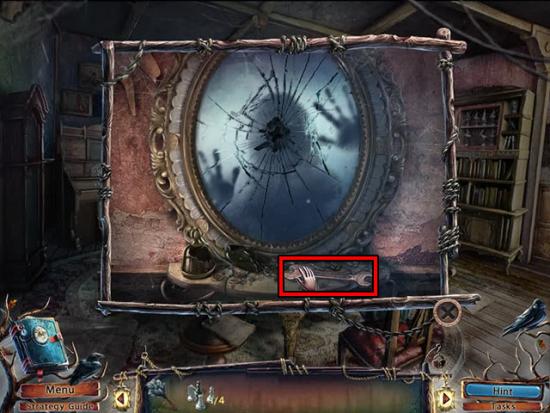
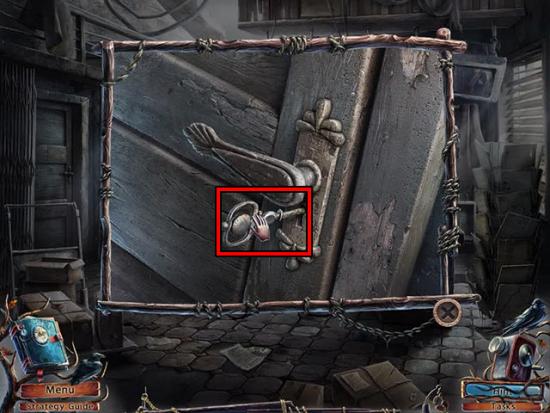
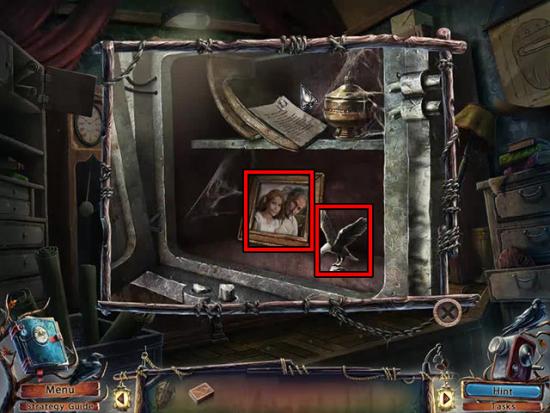
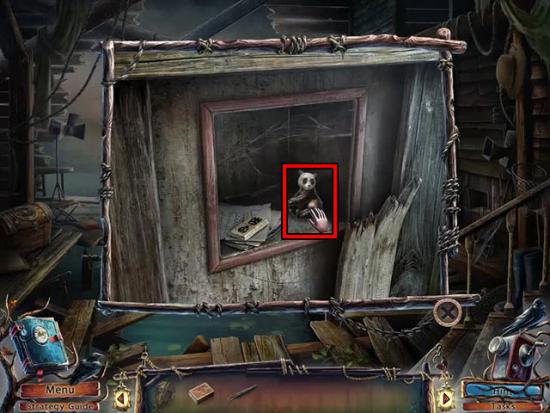
- Examine the mirror.
- In the close-up view, take the WRENCH:
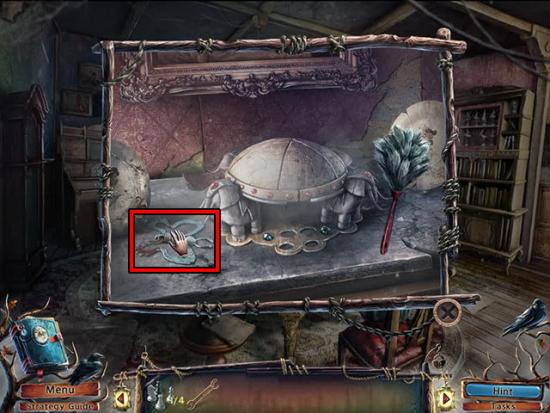
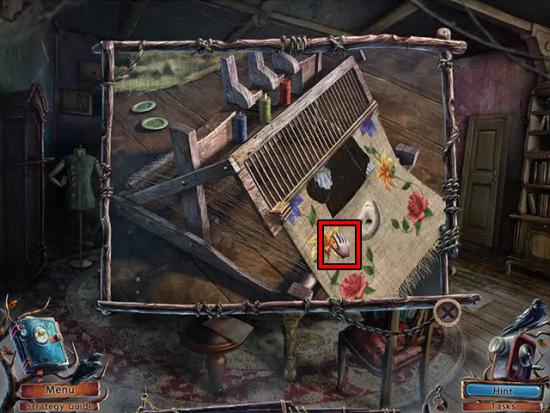
- Examine the fireplace.
- In the close-up view, use the feather duster on the cobwebs and take the BUTTERFLY:
- Exit the house.
- Examine the mailbox.
- In the close-up view, use the BUTTERFLY on the mailbox.
- Open the mailbox and take the SHEET MUSIC and the CHESS PIECE (2 of 4):
- Examine the note.
- Enter the house.
- Examine the piano and use the SHEET MUSIC on the holder.
- Play the notes shown on the sheet music:
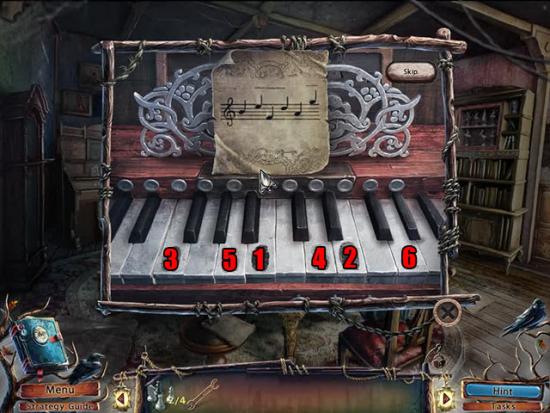
- After playing the correct notes, take the KEY TO CHILDREN’S ROOM.
- Examine the glass doors.
- In the close-up view, use the KEY TO CHILDREN’S ROOM on the bird-shaped slot.
- Enter the children’s room.
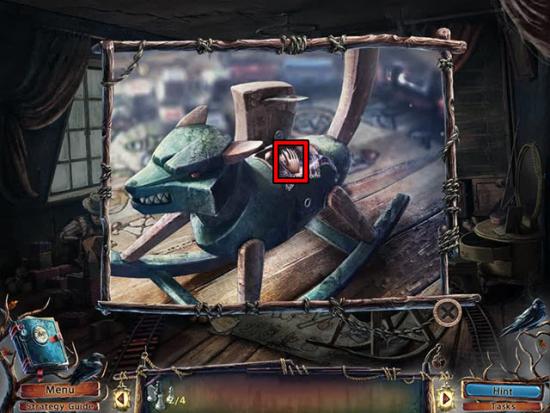
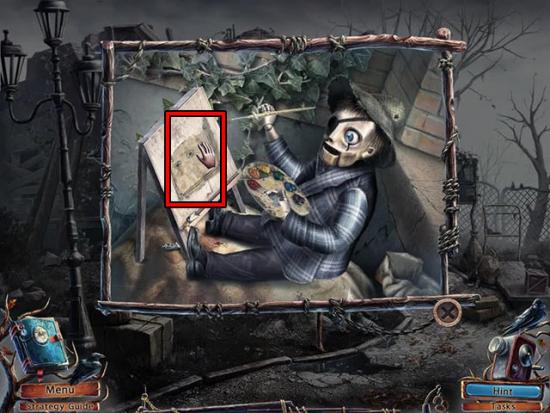
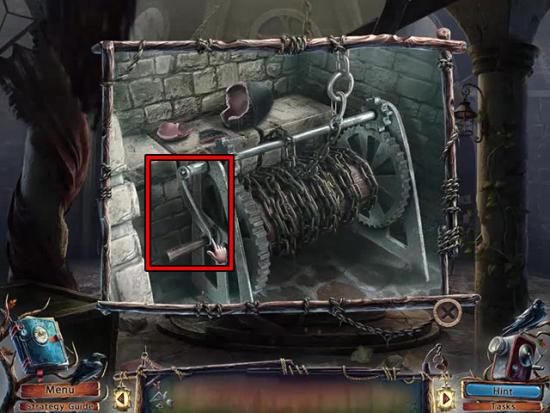
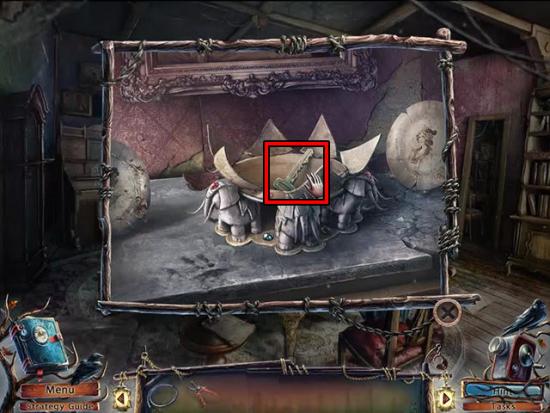
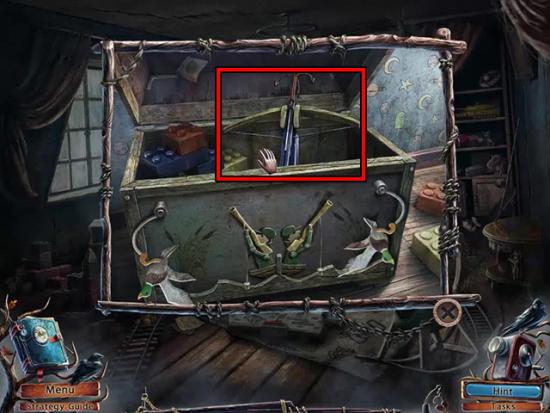
- Examine the rocking horse.
- In the close-up view, use the WRENCH on the seat and take the FILM STRIP:
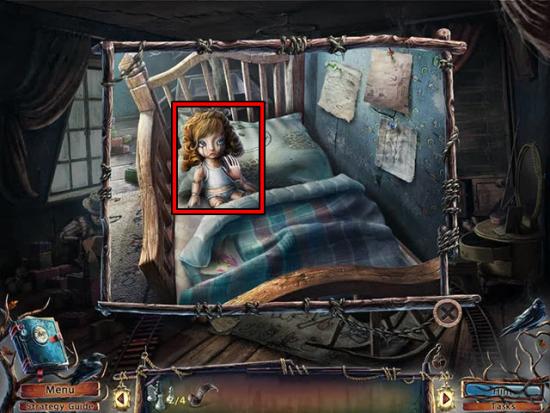
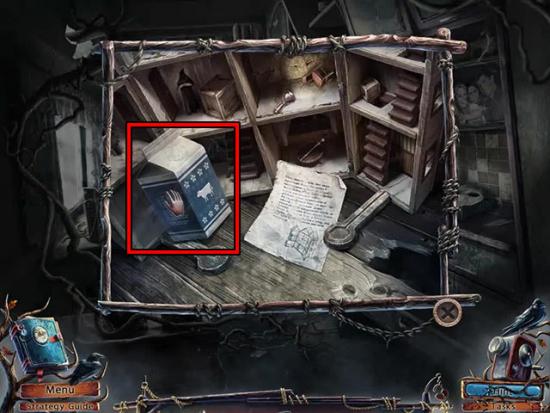
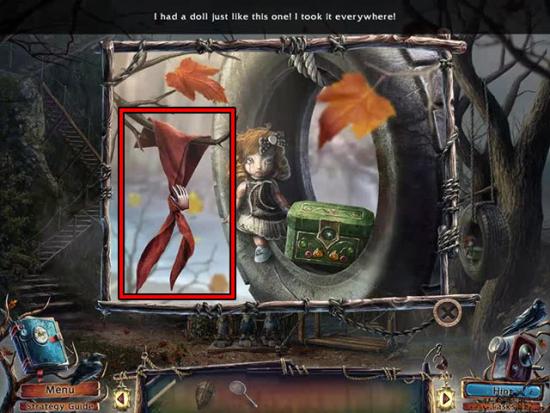
- Examine the bed and take the DOLL:
- Examine the dresser.
- In the close-up view, open the top drawer and use the DOLL on the stand.
- Examine the rocking horse and take the HANDKERCHIEF.
- Move back twice to exit the house.
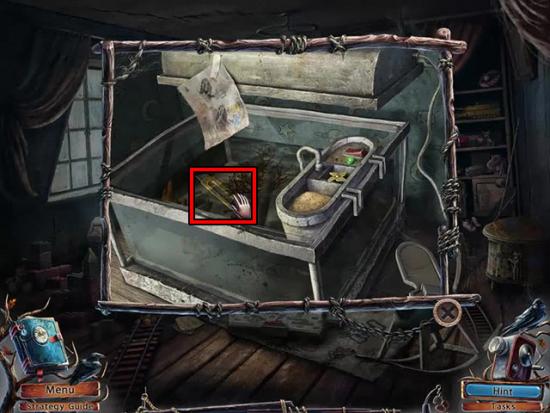
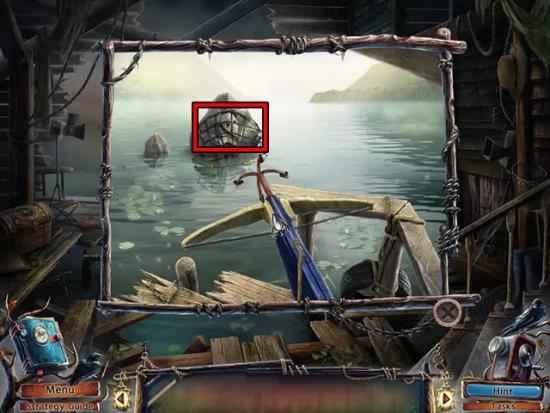
- Examine the lake.
- In the close-up view, use the HANDKERCHIEF on the lake to make the WET HANDKERCHIEF.
- Return to the children’s room and examine the mirror.
- In the close-up view, use the WET HANDKERCHIEF on the mirror to clean it.
- Dress the doll so that it matches the reflection in the mirror:
- Take the WIND-UP KEY from the drawer.
- Examine the toy train.
- In the close-up view, use the WIND-UP KEY on the front of the train.
- Wind the key and the train will move forward.
- Open the carriage and take TOMMY’S PENDANT and the SHOVEL.
- Move back twice to exit the house.
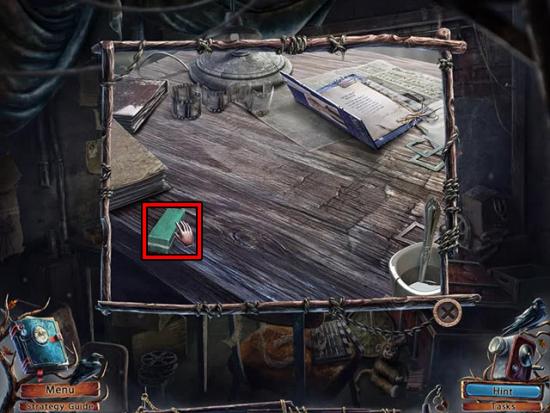
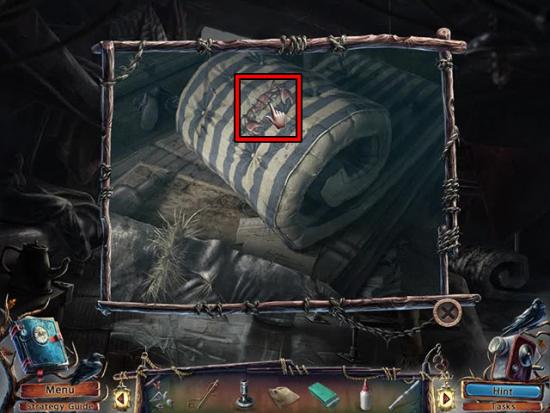
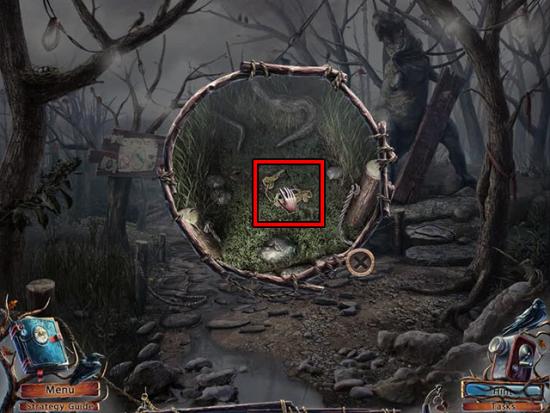
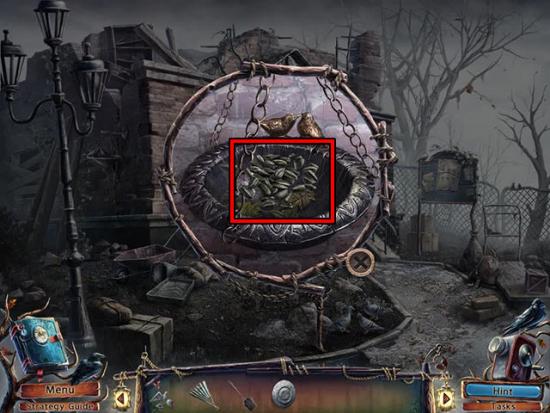
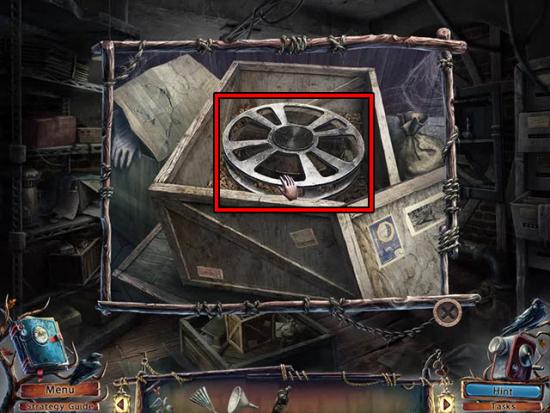
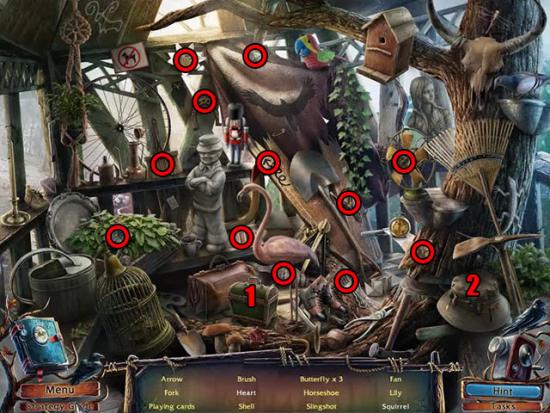
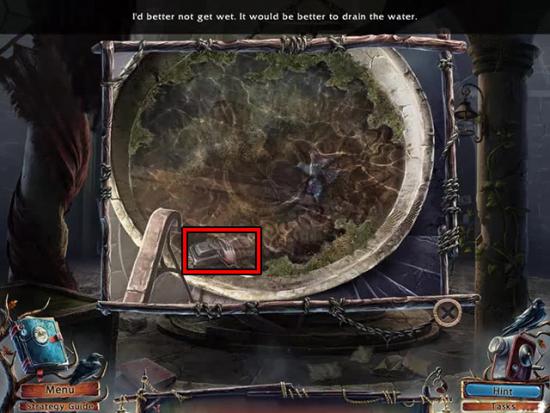
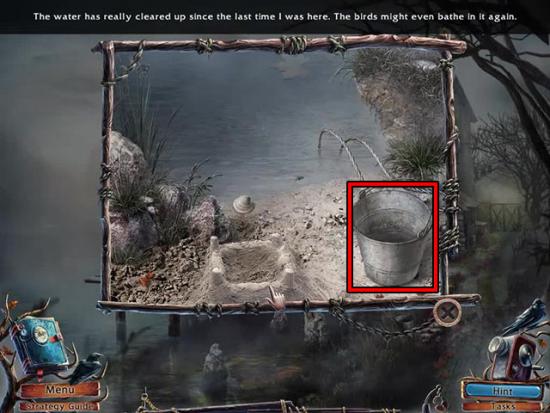
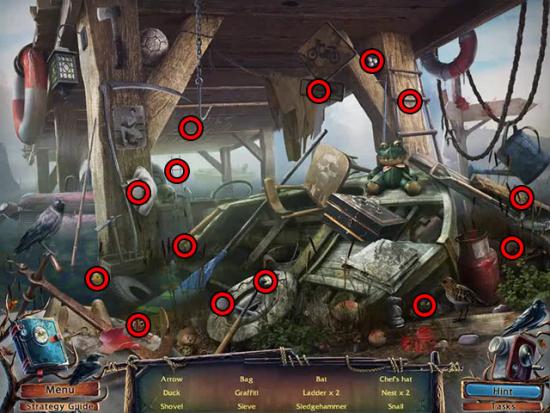
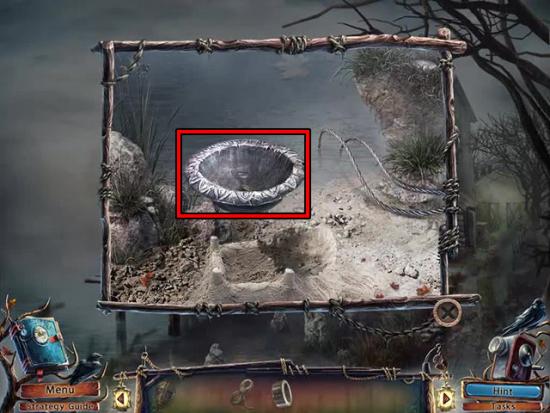
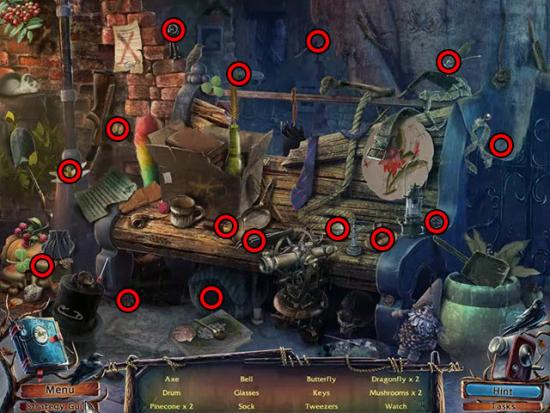
- Examine the water to enter a hidden object scene.
- Find all of the objects on the list:

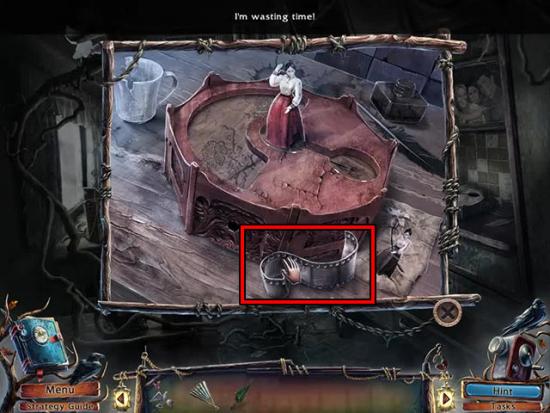
- After completing the scene, the EMPTY BUCKET and the CHESS PIECE (3 of 4) will be added to the inventory.
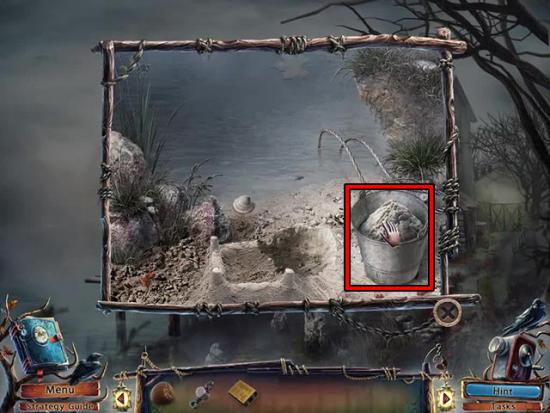
- Examine the water near the mailbox.
- Use the EMPTY BUCKET on the water.
- Use the SHOVEL on the clay.
- Take the BUCKET OF CLAY.
- Follow the path at the right side of the house.
- Examine the stairs.
- In the close-up view, use the BUCKET OF CLAY on the crack and then use the SHOVEL on the clay.
- Go up the stairs to the cliff.
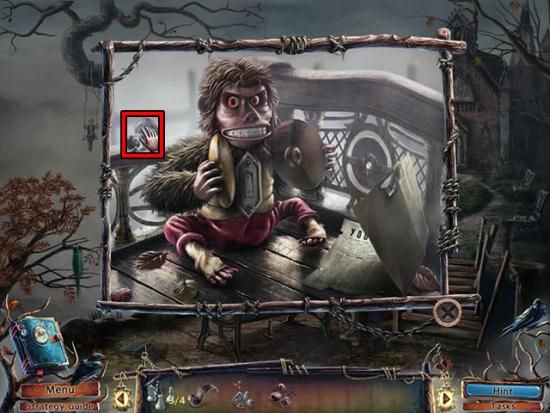
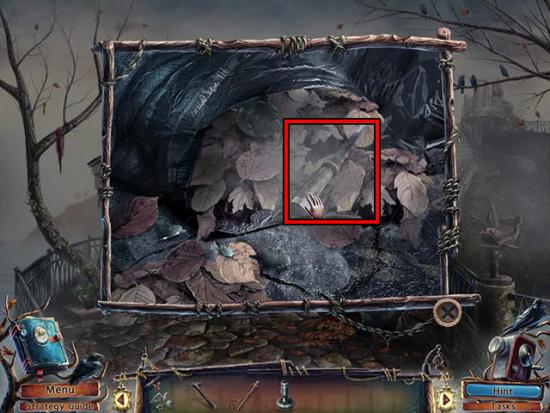
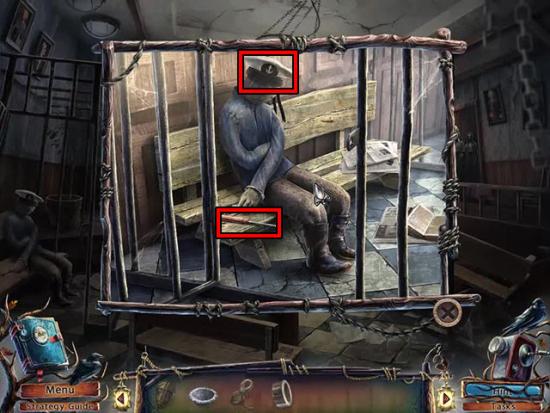
- Examine the tree and take the BERRIES:
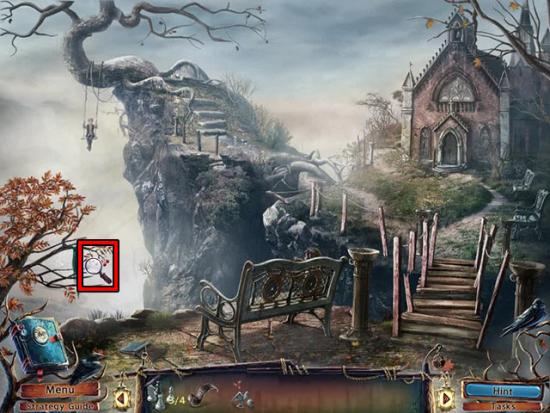
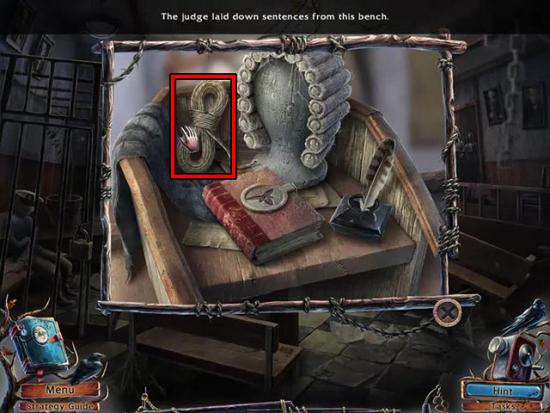
- Examine the bench.
- In the close-up view, take the CHESS PIECE (4/4):
- Examine the article about the chess tournament to add a note to the journal.
- Return to the front of the house and examine the chessboard.
- Use the chess pieces on the board and move them to the correct positions:
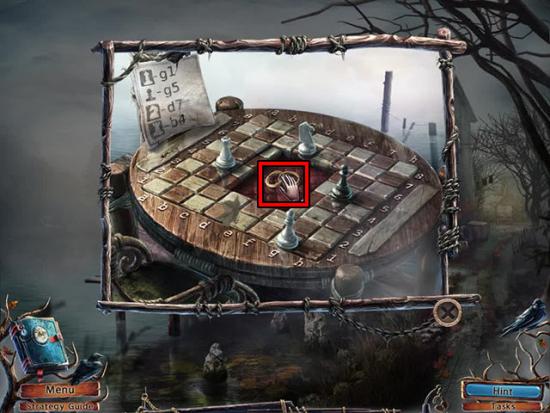
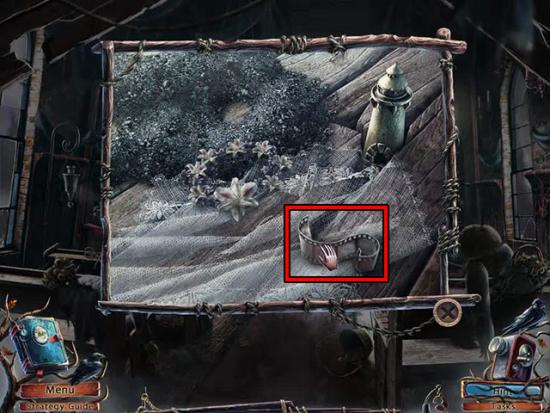
- Take the WEDDING RINGS.
- Return to the cliff and examine the church door.
- Examine the groom’s hand and use the WEDDING RINGS on it.
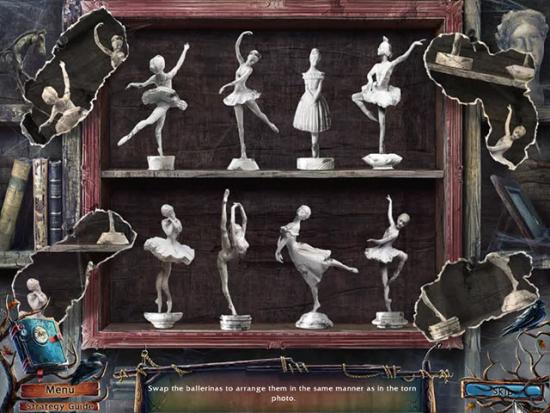
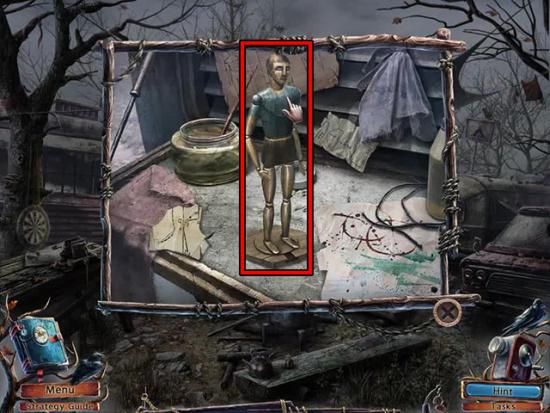
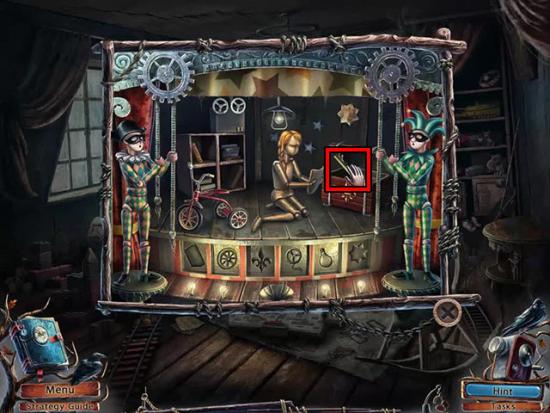
- Take the BALLERINA.
- Return to the hall of the house.
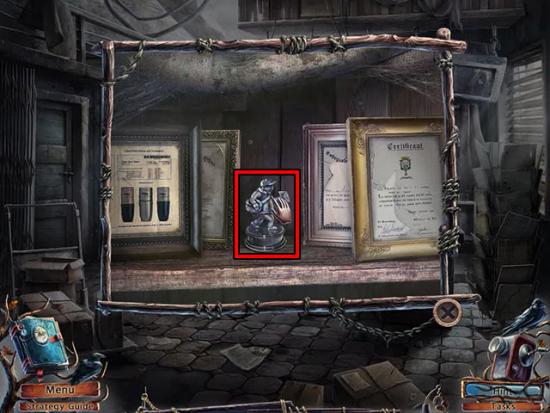
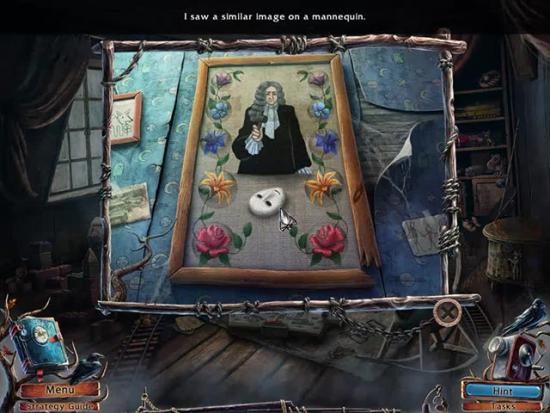
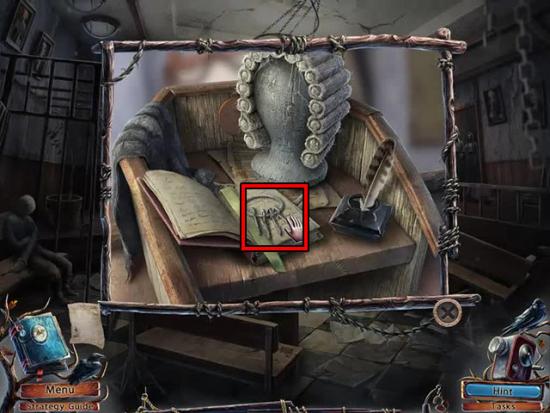
- Examine the bookcase.
- Use the BALLERINA on the bookcase.
- Arrange the ballerinas in the same manner as the torn photo:
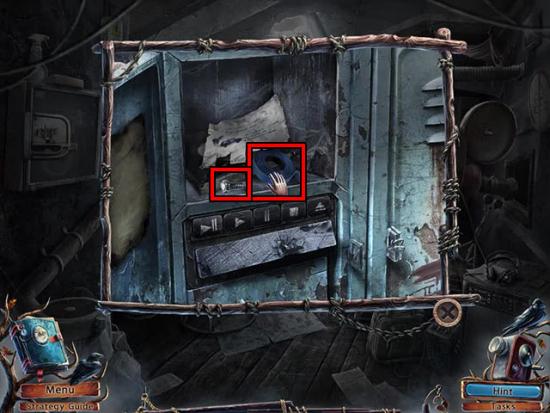
- Enter the back room.
- Examine the table.
- In the close-up view, take the film projector and use the film strip on the slot.
- After the cut-scene, exit the view of the camera to take the CHEST KEY.
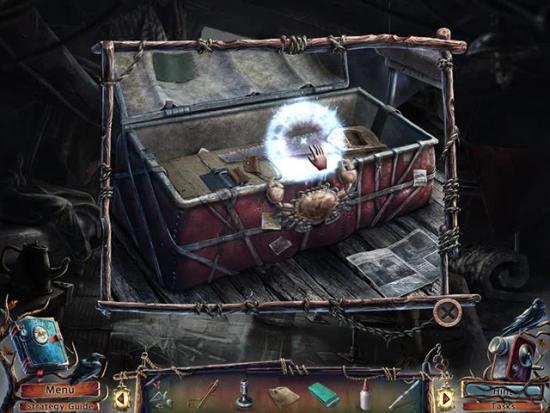
- Examine the chest and use the CHEST KEY on the lock.
- Turn the key twice to open the chest.
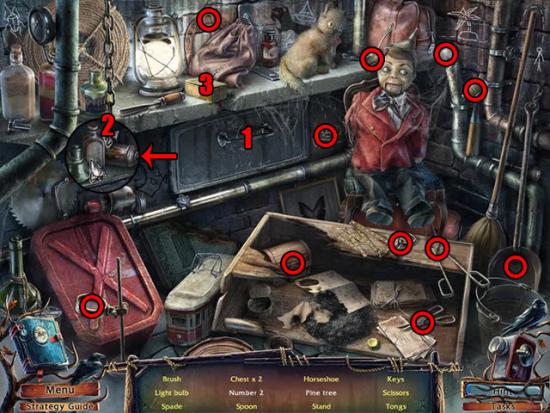
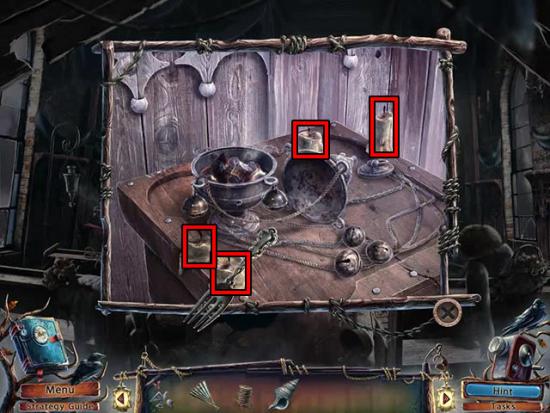
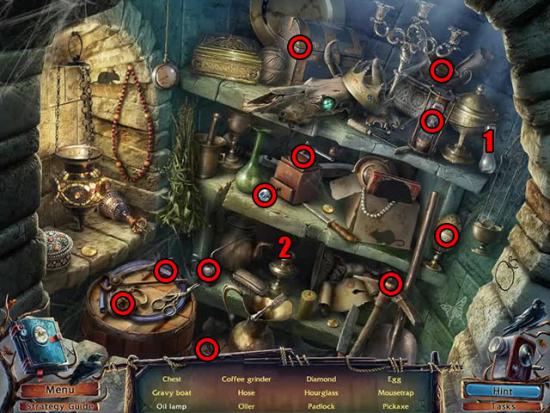
- Examine the chest to enter a hidden object scene. Find all of the objects on the list:
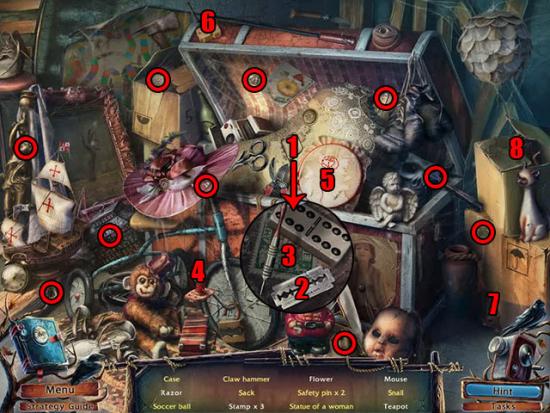
- After completing the scene, the CLAW HAMMER and RAZOR will be added to the inventory.
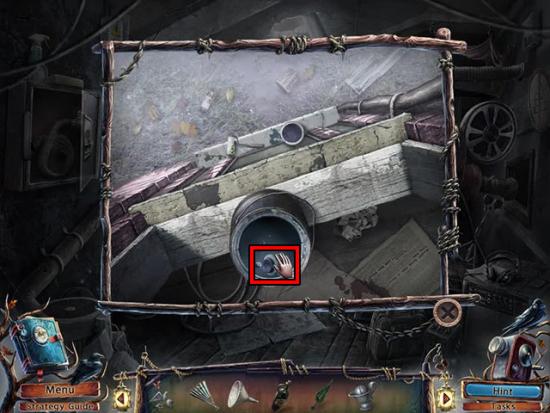
- Examine the pipe.
- In the close-up view, use the CLAW HAMMER on the pipe and then take the PIPE.
- Return to the children’s room and examine the tree.
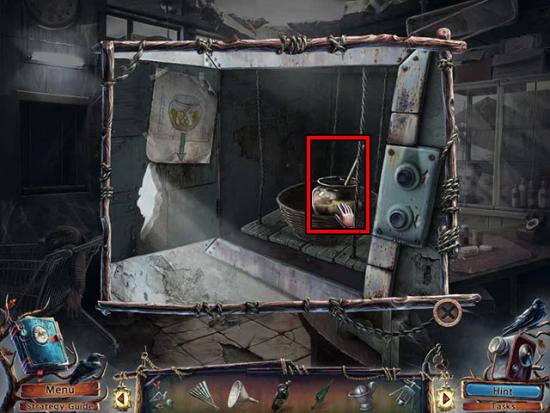
- In the close-up view, use the BERRIES on the iguana and then use the RAZOR on the branch twice to take the ORGAN GRINDER’S HAND.
- Examine the organ grinder and use the ORGAN GRINDER’S HAND on it.
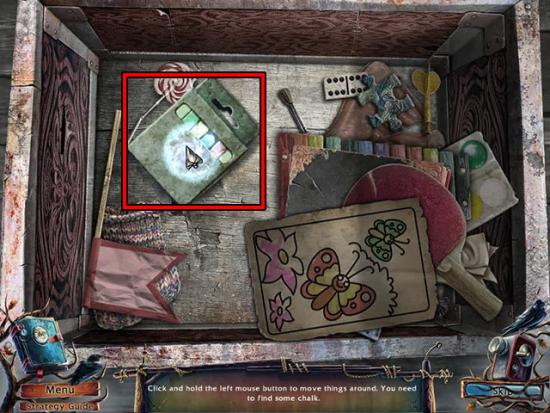
- Examine the box and move the objects by clicking and dragging them until the box of CHALK is revealed.
- Take the CHALK:
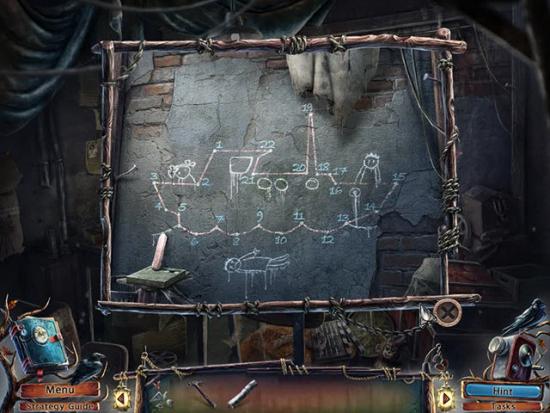
- Return to the film projector room and move the curtain by clicking it four times to reveal the chalk marks on the wall.
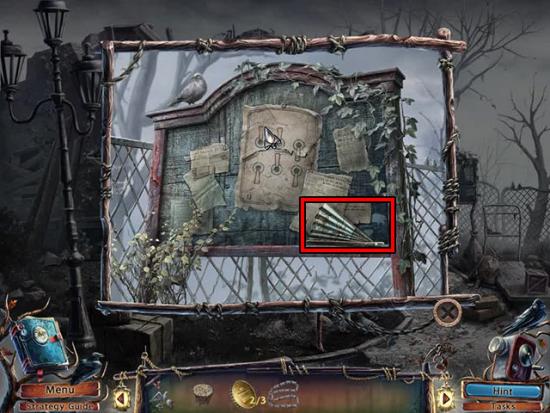
- Examine the wall.
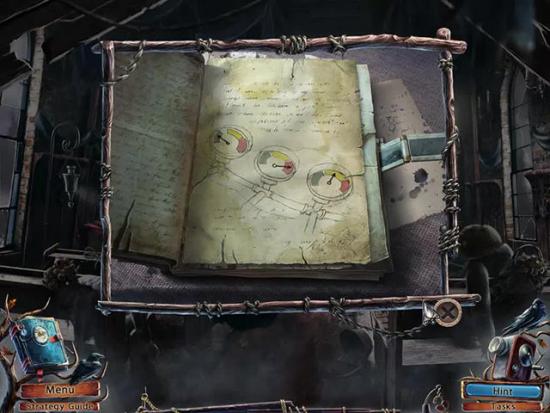
- In the close-up view, use the CHALK to connect the dots in the numbered order shown:
- Return to the children’s room and examine the lock at the right side of the room.
- Move the tiles to the correct positions that were shown after the chalk drawing was completed:
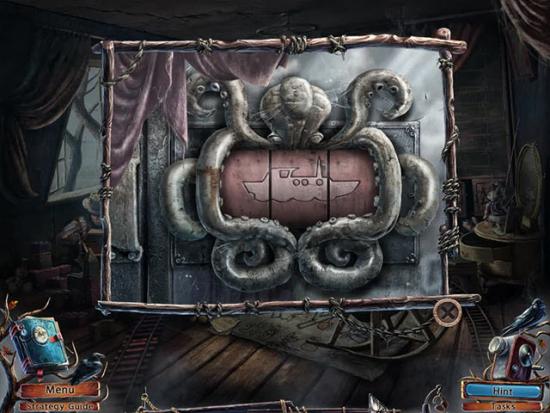
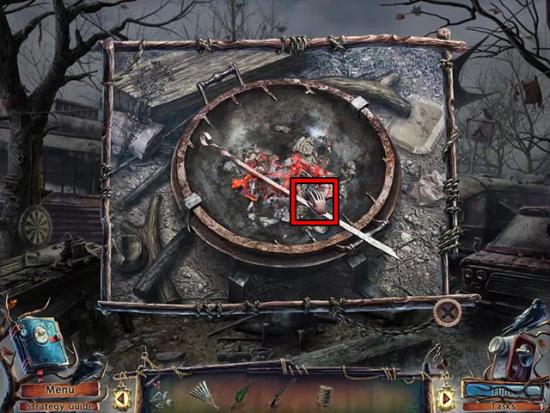
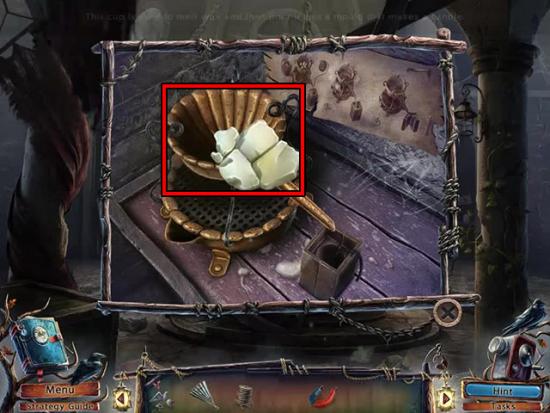
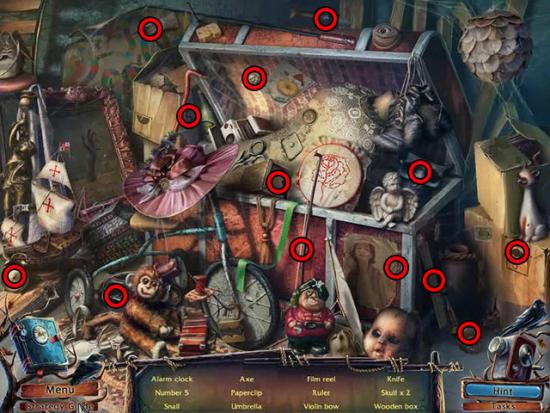
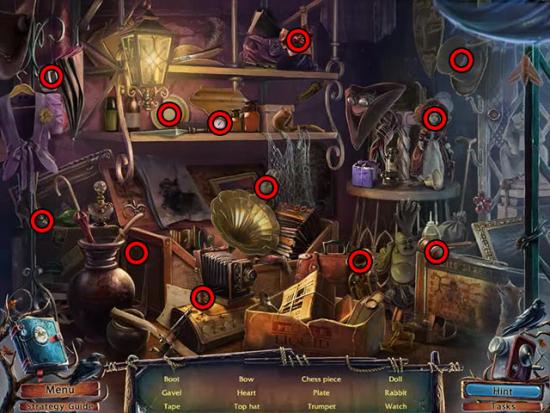
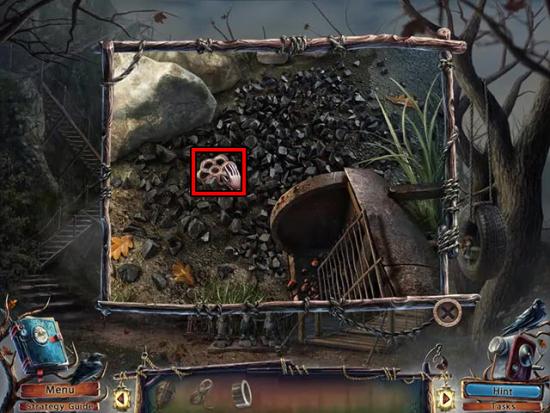
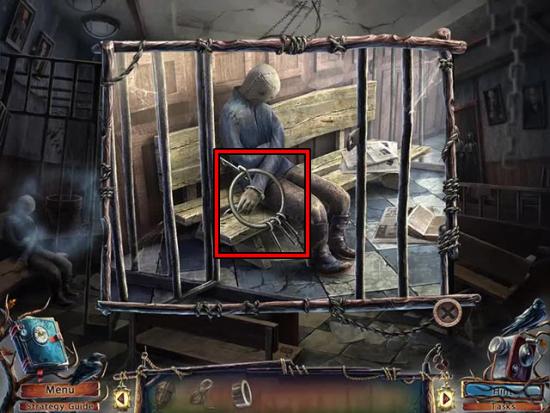
- Examine the door to enter a hidden object scene. Find all of the objects:
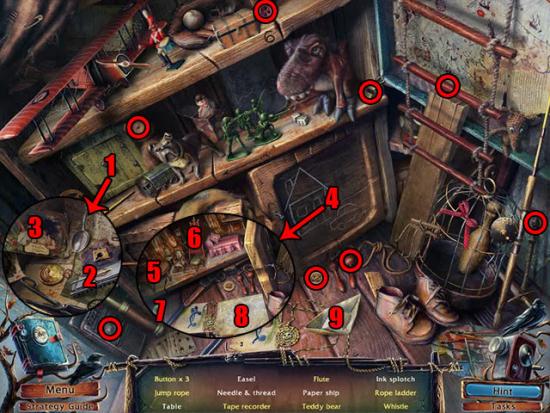
- After completing the scene, the ROPE LADDER and NEEDLE & THREAD will be added to the inventory.
- Exit the house and return to the cliff.
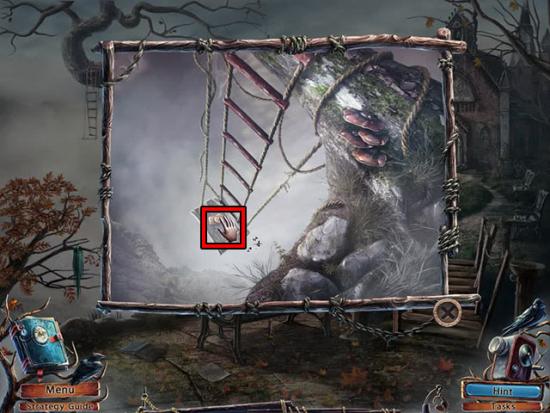
- Examine Tommy on the swing and give him the ROPE LADDER.
- Take the FILM STRIP.
- After the cut-scene, the STAMP will be added to the inventory.
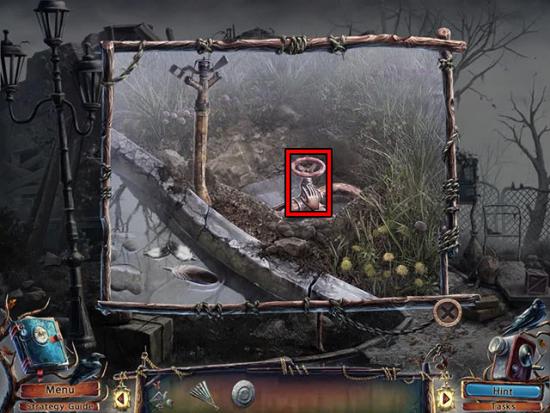
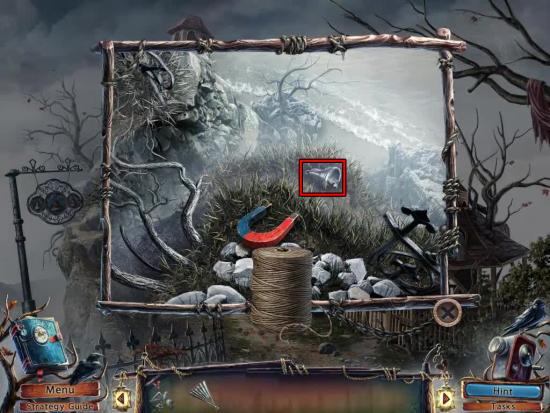
- Examine the swing and take the LOCK PART:
- Move back to the path.
- Examine the gate.
- Use the LOCK PART on the gate.
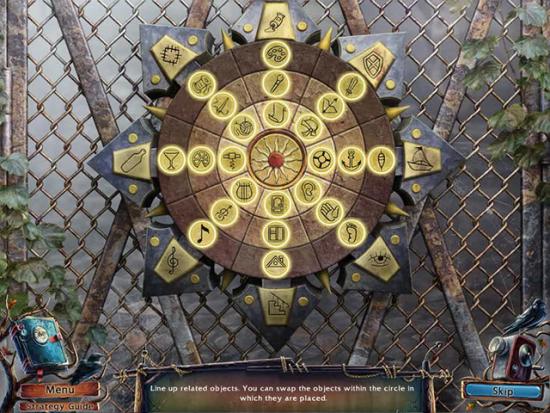
- Move the pieces to the correct positions:
- Enter the city to complete the second chapter.
Chapter 3
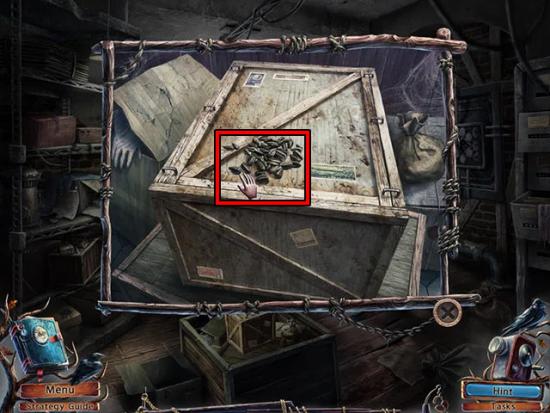
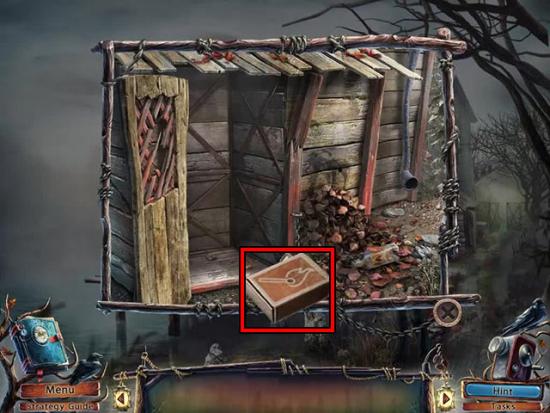
- Examine the box at the bottom-right corner of the area.
- Open the box and take the SHOVEL HANDLE:
- Move back and go upstairs to the cliff.
- Examine the bench.
- Use the PIPE on the monkey’s cymbals:
- Return to the lakeside walkway and move forward twice to the theatre.
- Examine the broom:
- Remove the broken handle.
- Use the SHOVEL HANDLE on the broken broom to take the BROOM.
- Move back to the souvenir shack.
- Examine the leaves and use the BROOM to sweep them twice.
- Take the CHISEL:
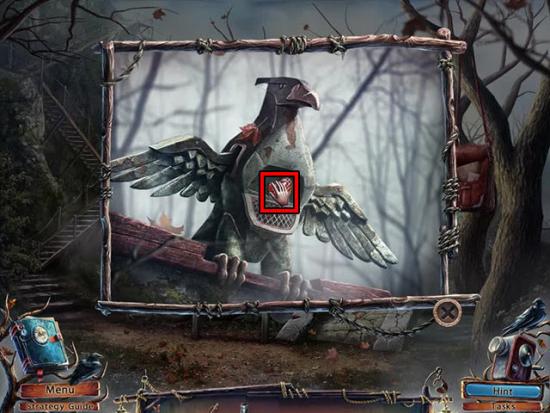
- Examine the fish.
- Use the CHISEL on the wing.
- Use the CLAW HAMMER on the chisel to take the WING:
- Move back twice to the path.
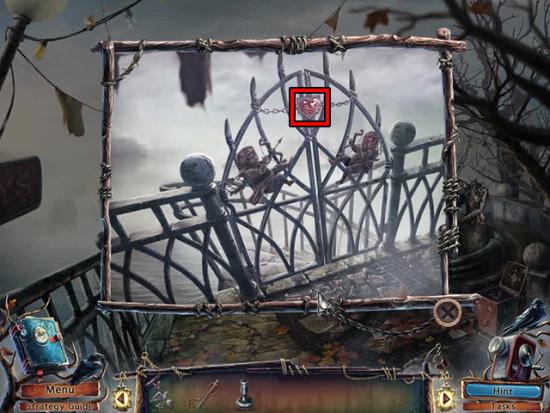
- Examine the bird and use the WING on it.
- Take the HEART:
- Go through the gate to the lakeside hallway to hear the phone ringing.
- Examine the phone and pick up the receiver.
- Examine the gate and put the HEART in the slot:
- Go through the gate to the embankment.
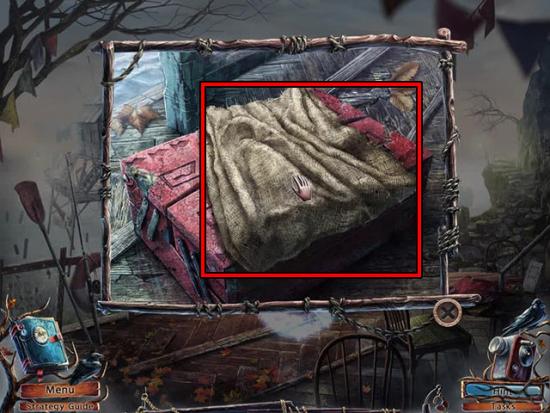
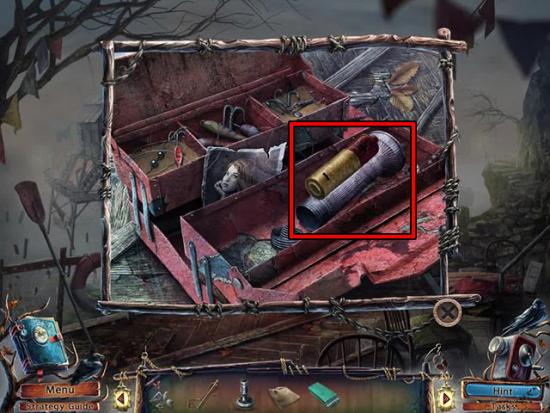
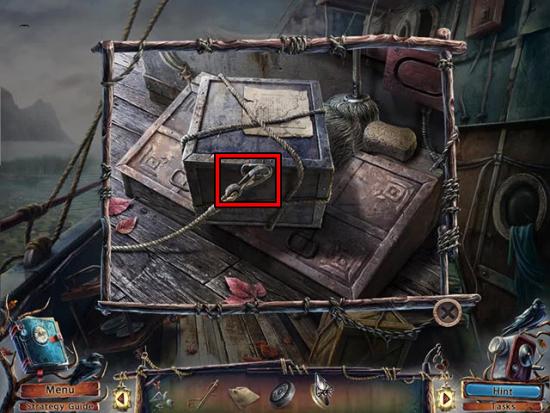
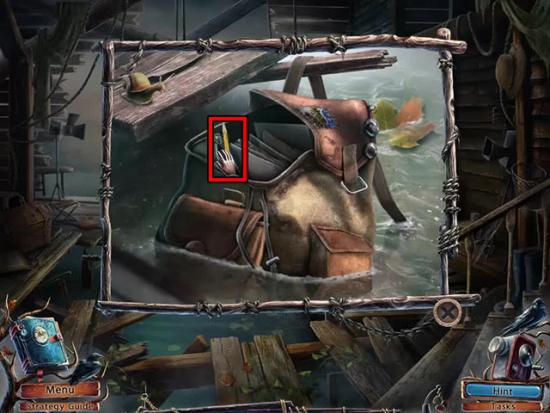
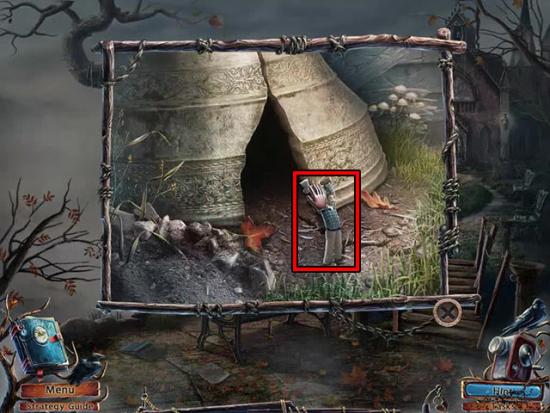
- Examine the tackle box and take the BURLAP SACK:
- Move to the dock to talk to the man.
- Examine the crate and take the PUTTY KNIFE:

- Travel to the lake house and enter the storage room.
- Examine the table and take the ERASER:
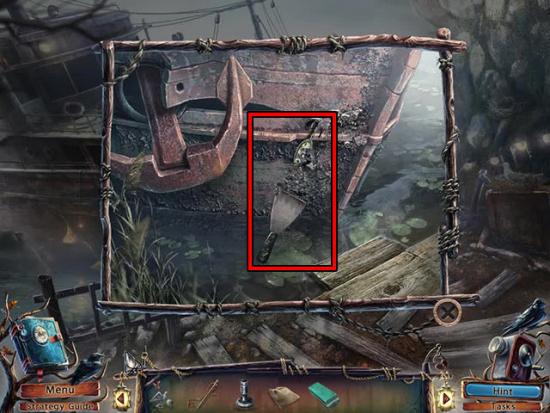
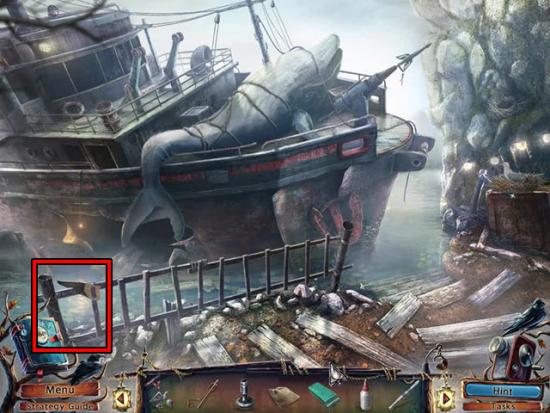
- Return to the embankment and move right to see the ship.
- Examine the ship and use the PUTTY KNIFE on the barnacles three times to take the FISHING HOOK:
- Move back to the embankment.
- Examine the fishing rod.
- Use the FISHING HOOK on the rod to take it.
- Move forward to the dock.
- Examine the water and use the FISHING ROD to take the shell:
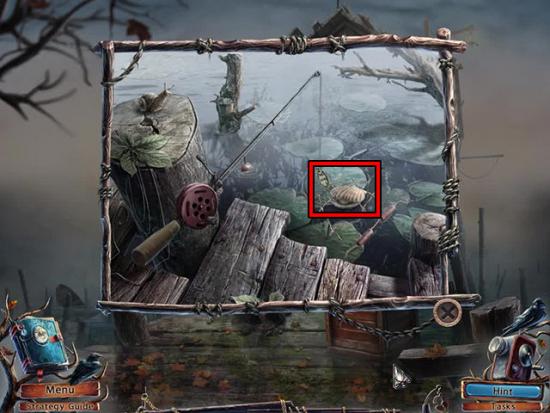
- Use the PUTTY KNIFE on the shell to take the PEARL.
- Examine the man and give him the PEARL.
- Take the TACKLE BOX KEY from his hand:
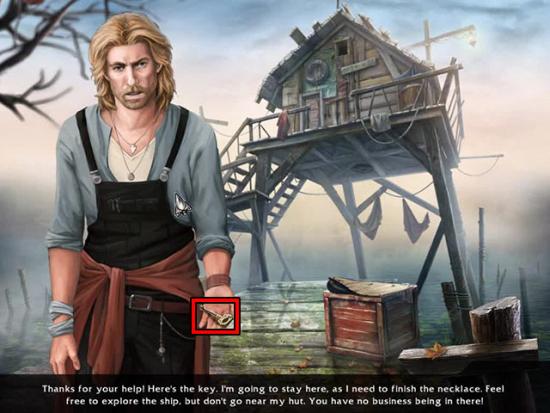
- Move back to the embankment.
- Examine the tackle box and use the TACKLE BOX KEY on it.
- Turn the key twice.
- Examine the photograph of Anna.
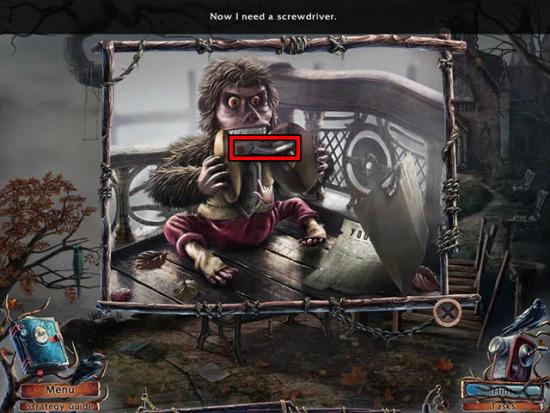
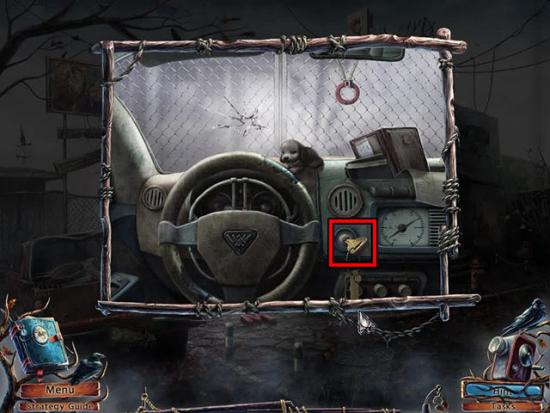
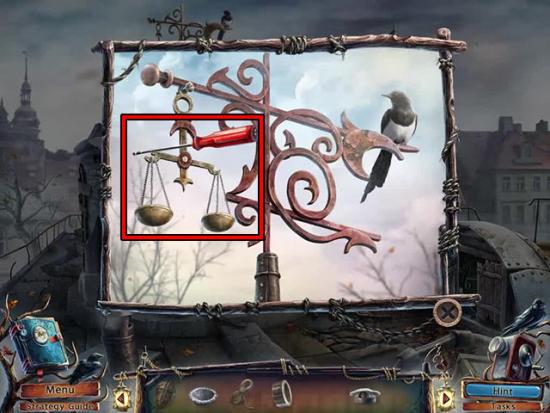
- Travel to the cliff and use the screwdriver on the monkey.
- Take the battery:
- Travel to the embankment.
- Examine the tackle box and use the battery on the flashlight:
- Move right to see the ship.
- Enter the ship.
Chapter 4
- Move the flashlight beam to the left side of the room and examine it to enter a hidden object scene.
- Find all of the hidden objects:
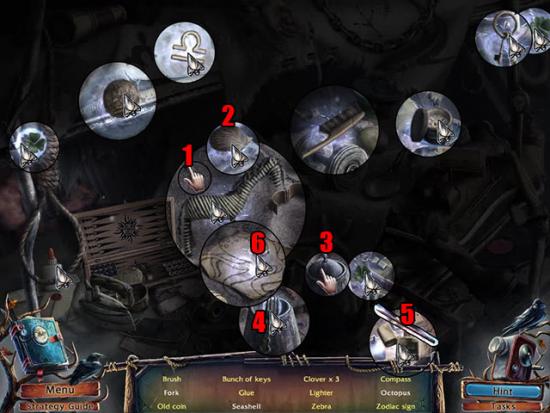
- After completing the scene, the LIGHTER and GLUE will be added to the inventory.
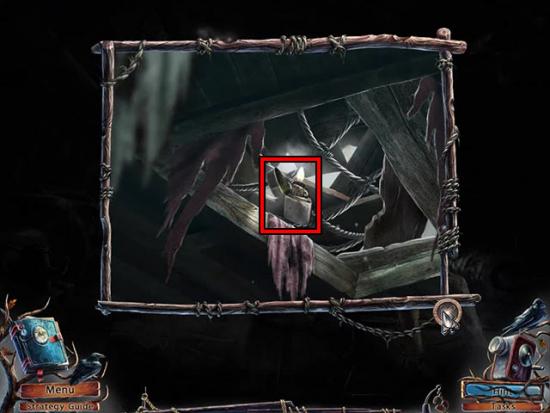
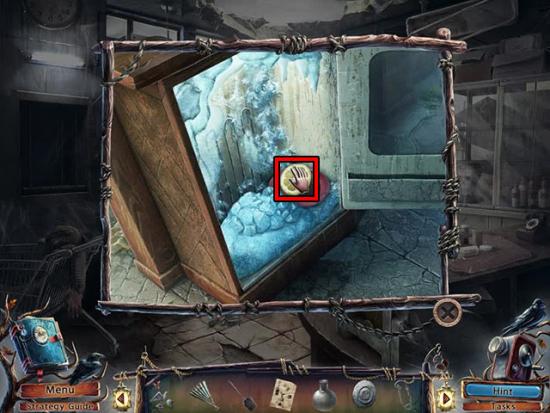
- Examine the hatch on the ceiling and use the LIGHTER on the rope:
- Select the boards twice to move them.
- Climb the ladder to arrive on the deck of the ship.
- Examine the trolley at the left side of the deck and remove the cover from the tray.
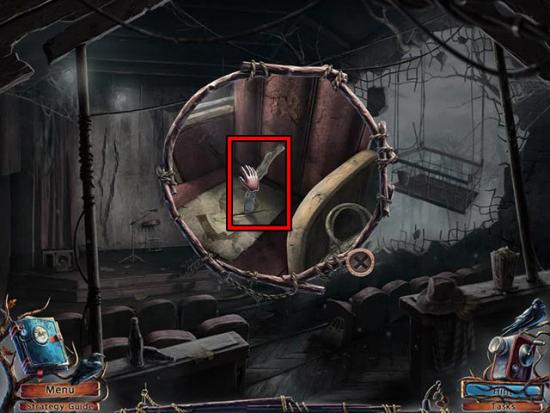
- Move the skeleton hand and take the SCALPEL:

- Move back to the hold.
- Examine the folded mattress and use the SCALPEL on it.
- Take the CRAB:
- Examine the chest and use the CRAB on the lock.
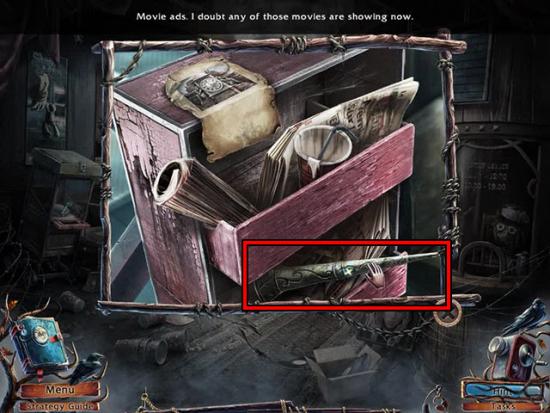
- Examine the newspaper clipping about the local fisherman.
- Select the handle to see that the belt rips.
- Take the HACKSAW:
- Exit the ship and use the HACKSAW on the fence to take the LADDER:
- Travel to the dock.
- Use the LADDER on the hut.
- Enter the fisherman’s hut.
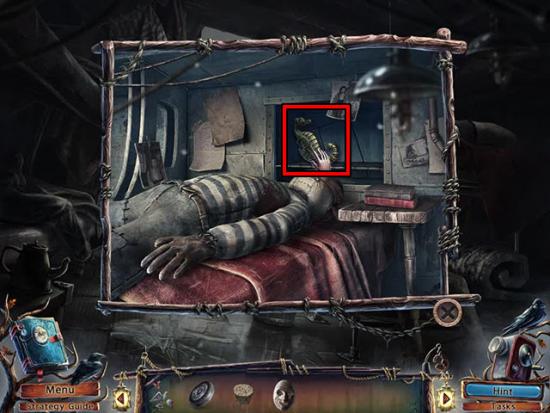
- Examine the hole in the wall and take the FILM STRIP:
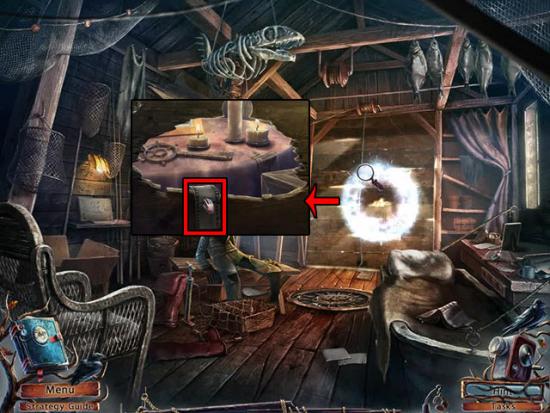
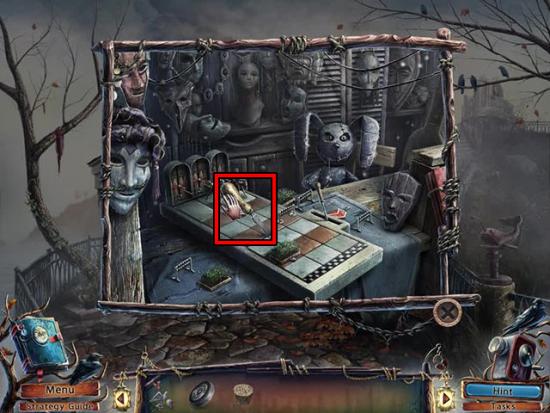
- Examine the table at the left side of the room.
- Use the SHIP BODY, GLUE and SCALPEL on the silhouettes:
- Examine the doll and take the PUMP:
- Exit the fisherman’s hut.
- Examine the crate and use the PUMP on the LAWN MOWER TIRE to take it.
- Take the SHIP’S WHEEL:
- Return to the fisherman’s hut.
- Examine the drawer.
- In the close-up view, examine the piece of paper.
- Click and hold the eraser on the pencil markings, then move it around until the numbers are revealed:
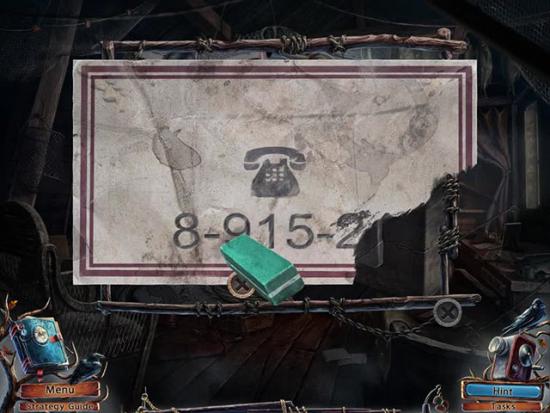
- Travel to the lakeside walkway and examine the phone.
- Use the phone number on the phone and then click and hold the correct numbers to dial the telephone number on the paper.
- Take the SHIP’S MAST:
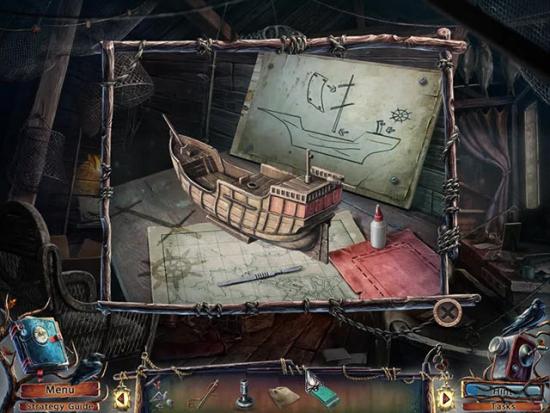
- Return to the fisherman’s hut and examine the table.
- Use the SHIP’S WHEEL and the MAST on the silhouettes.
- Use the GLUE on the mast hole and the wheel post.
- Put the MAST in the hole and the WHEEL on the post.
- Use the SCALPEL on the piece of paper.
- Take the paper and use it on the mast to complete the ship.
- Take the completed MODEL SHIP:

- Examine the panel and use the MODEL SHIP on the hole:

Chapter 5
- Travel to the ship’s deck and examine the door.
- Use the key on the keyhole.
- Turn the key twice to open the door.
- Enter the captain’s cabin.
- Examine the table and take the ANCHOR:

- Examine the figure in the chair and use the ANCHOR on the slot.
- After the small scene, take the MAGNIFYING GLASS:
- Exit the close-up view of the door.
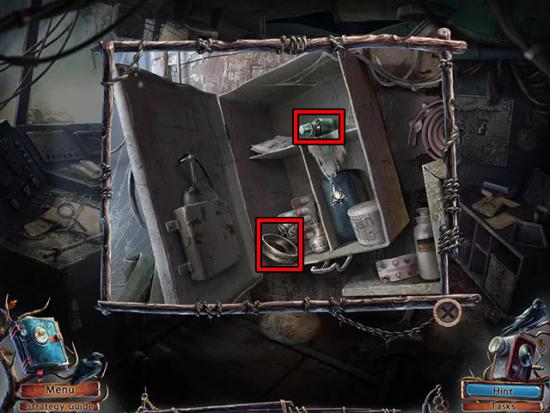
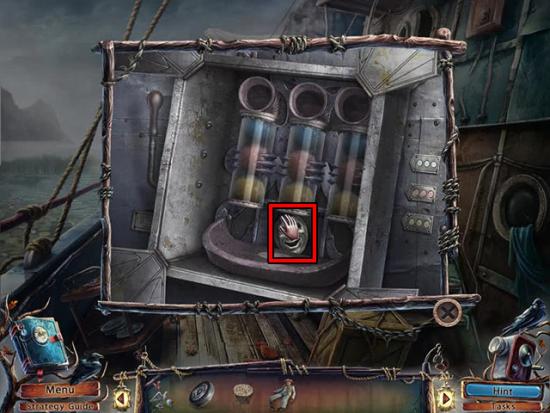
- Examine the control panel and take the GLOVE:
- Use the MAGNIFYING GLASS on the book to see a code.
- Examine the radio and set it to the correct frequency.
- Take the FIRST AID KIT KEY:

- Examine the first aid kit and unlock it using the FIRST AID KIT KEY.
- Take the RING KEY and the BRILLIANT GREEN:
- Examine the desk and use the BRILLIANT GREEN on the tray.
- Use the stamp on the tray to stamp the note.
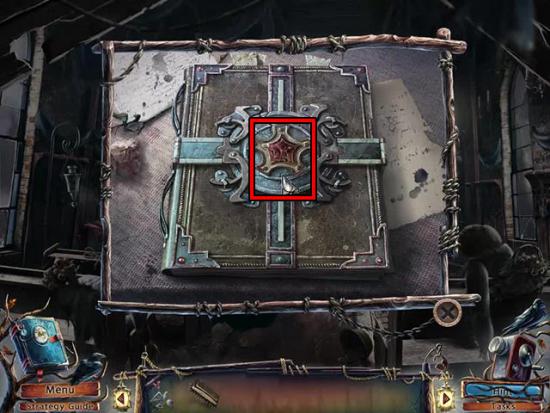
- Examine the chest and enter the correct code to open it:
- Select the newspaper article to move it.
- Take the ROPE and the FIRE EXTINGUISHER:
- Move back to view the door.
- Use the FIRE EXTINGUISHER on the window to break it:
- Use the GLOVE on the broken glass.
- Examine the window and select the handle to open the door.
Chapter 6
- Examine the crate and use the ROPE on the clip:
- Examine the cabinet and use the RING KEY on the keyhole:
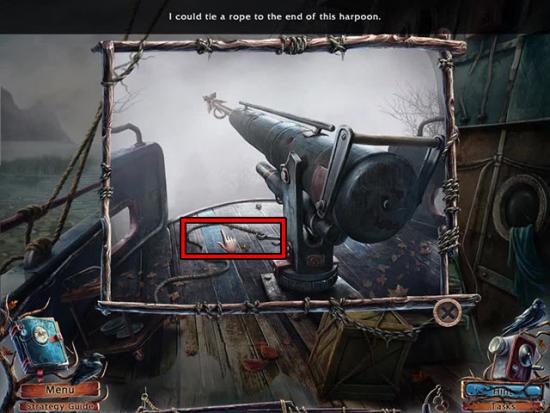
- Turn the key twice to open the cabinet.
- Exit the view of the mechanism.
- Examine the harpoon and select the rope to attach it to the harpoon:
- Examine the hidden object scene below the cabinet.
- Find all of the hidden objects:
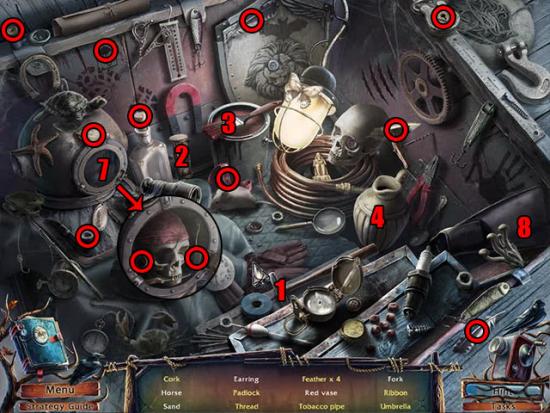
- After completing the scene, the RIBBON and CORK will be added to the inventory.
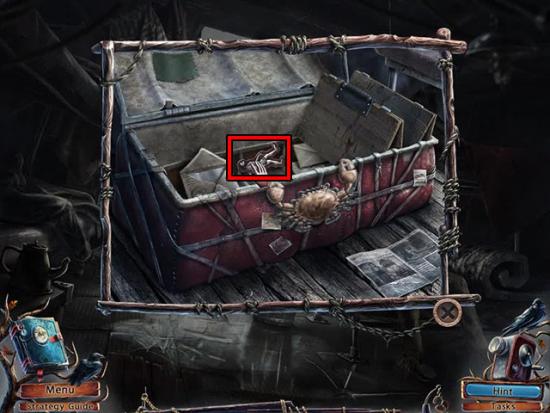
- Move back to the ship’s hold.
- Examine the chest.
- Examine the broken belt in the close-up view.
- Use the ribbon on the belt to fix it.
- Take the FIGURINE:
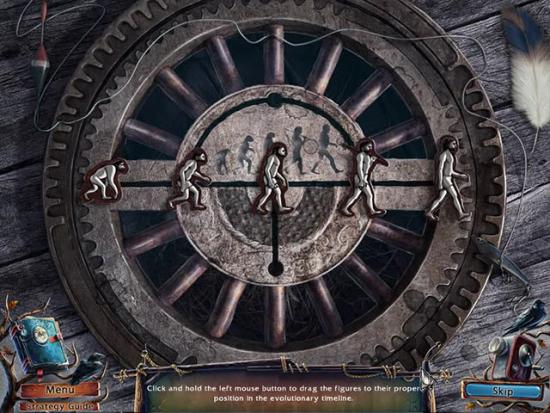
- Travel to the fisherman’s hut.
- Examine the gear on the floor and use the figurine on the gap.
- Drag the figures to the proper positions on the timeline:
- Use the burlap sack on the straw.
- Examine the desk and change the symbols to open the drawer.
- Take the FIRECRACKER:
- Examine the doll and use the STRAW and the NEEDLE & THREAD on it.
- Return to the area outside the ship and examine the seagull.
- Use the FIRECRACKER on the seagull.
- Take the JINGLE BELL from the nest:
l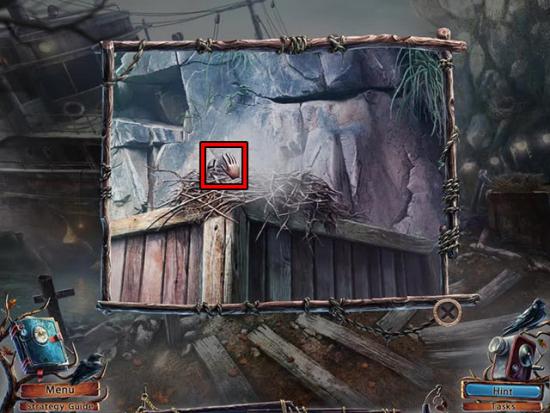
- Return to the ship’s deck and examine the cabinet.
- Use the JINGLE BELL on the mechanism.
- Rearrange the balls so that the top row contains blue balls, the middle row contains red balls and the bottom row contains yellow balls.
- Take the MASK:
- Move back to the ship’s hold.
- Examine the bed and use the STRAW DOLL on it to open the sliding door.
- Take the SEAHORSE:
- Travel to the lakeside walkway and examine the fountain.
- Use the SEAHORSE on the slot.
- Take the film strip:
- After the cut-scene, the flowers will be added to the inventory.
- Travel to the cliff and examine the door to the church.
- Examine the bride.
- Use the FLOWERS on the bride’s hands.
- Take the REED PIPE:
- Travel to the souvenir stand and examine the clock.
- Give the REED PIPE to the right figure.
- Move forward to the theatre entrance and examine the door.
- Use the MASK on the middle space.
- Enter the theatre lobby.
- Examine the drawers and take the REED PIPE:
- Exit the theatre and move back to the souvenir stand.
- Examine the souvenir stand and take the FILE:
- Return to the theatre lobby and examine the booth.
- Use the FILE on the bars:
- Take the TICKET.
- Examine the doors and use the TICKET on the slot:
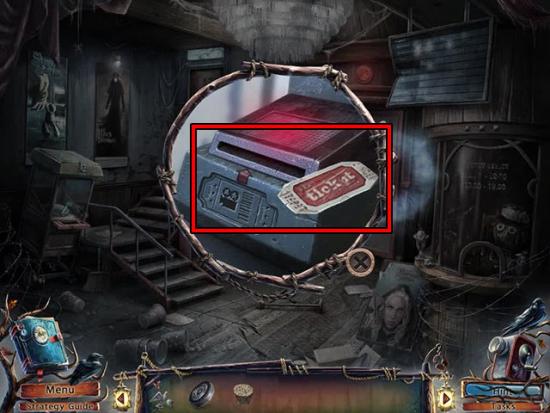
- Enter the theatre.
Chapter 7
- Examine the hidden object scene at the bottom-left corner of the room.
- Find all of the hidden objects:
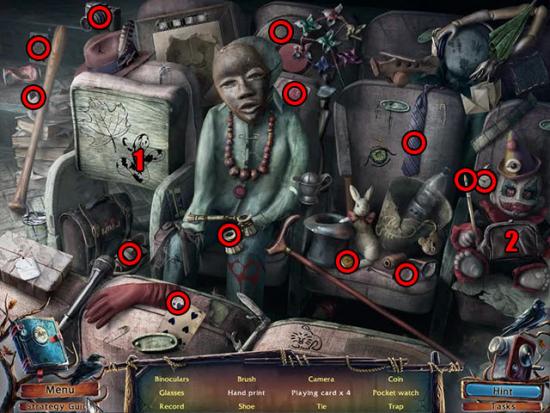
- After completing the scene, the COIN (1 of 3) and BRUSH will be added to the inventory.
- Examine the seats and take the PENKNIFE:
- Examine the scaffolding and use the PENKNIFE on the panel.
- Take the HORSE:
- Return to the souvenir stand and examine it.
- Use the HORSE on the track.
- Arrange the game pieces so that all horses cross the line at the same time:

- Take the popcorn:
- Return to the theatre lobby.
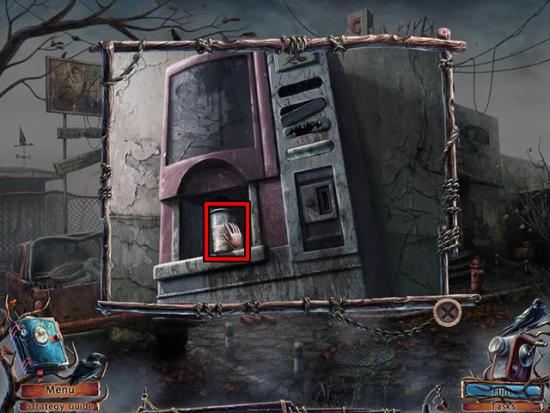
- Examine the popcorn machine and use the popcorn on the slot.
- Take the PROJECTION ROOM KEY:
- Examine the door at the top of the stairs and use the PROJECTION ROOM KEY on the slot.
- Turn the key twice to open the door.
- Enter the projection room.
- Examine the locker and open it.
- Take the DUCT TAPE and the BOLT:
- Return to the scaffolding in the theatre and use the duct tape on the panel:
- Pull the lever to lower the scaffolding.
- Move forward to the park.
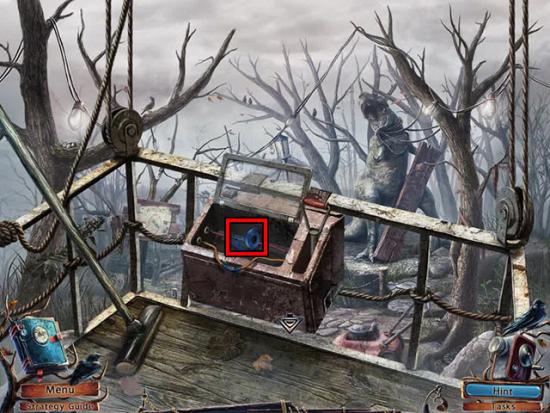
- Examine the sign.
- Use the PENKNIFE on the rope and take the FIREFIGHTER FIGURINE:
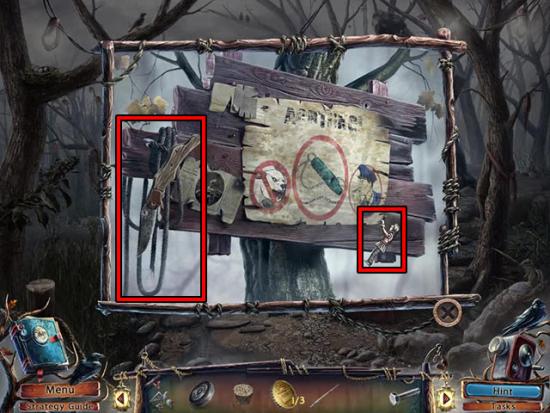
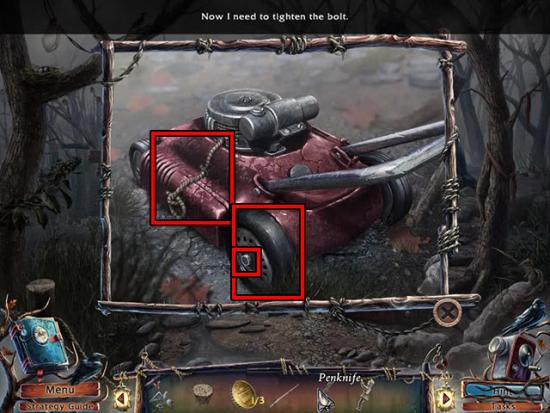
- Examine the lawnmower and use the ROPE, LAWNMOWER WHEEL and BOLT on it:
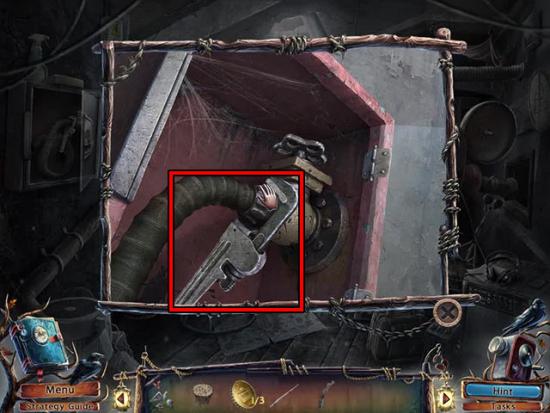
- Travel to the projection room and examine the cabinet.
- Use the FIREFIGHTER FIGURINE on the slot.
- Take the WRENCH:
- Return to the park and examine the lawnmower.
- Use the WRENCH on the bolt.
- Take the LAWNMOWER and use it on the long grass:
- Examine the grass and take the CAR KEY:
- Exit the theatre and examine the car.
- Use the CAR KEY in the keyhole:
- Turn the key to drive the car through the fence.
- Move forward and talk to the boy.
Chapter 8
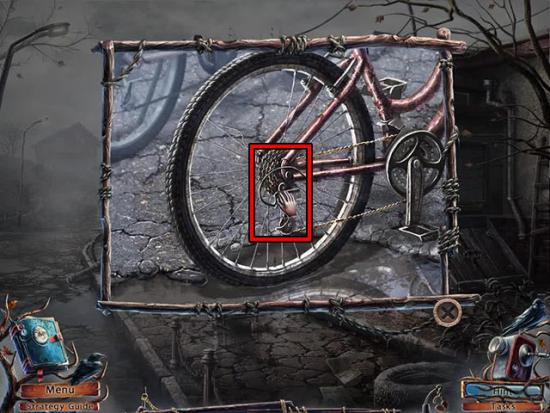
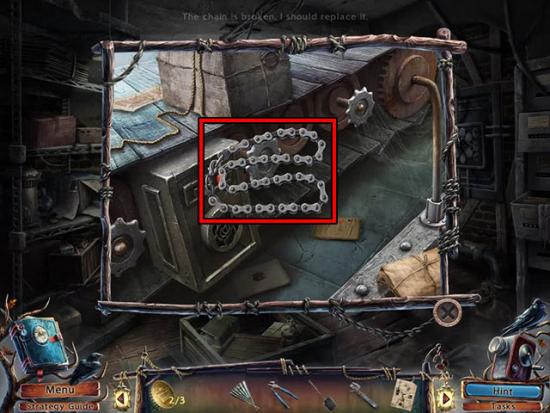
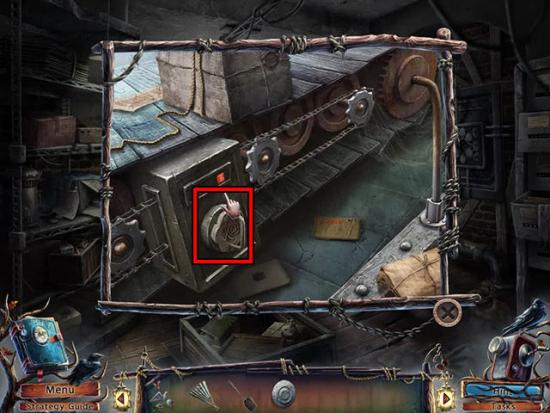
- Examine the bike and take the CHAIN:
- Examine the gumball machine and use the PENKNIFE to open the lid.
- Take the COIN (2 of 3):
- Move forward to the post office entrance and examine the doll.
- Use the BRUSH on the doll.
- Take the PART OF THE SCHEMATIC:
- Examine the door and open the cabinet to see the lock.
- Examine the noticeboard and use the PART OF THE SCHEMATIC on the top half to see the correct configuration for the switches.
- Take the FAN:
- Examine the door and move the switches to the correct positions:
- Enter the post office and talk to the boy.
- Examine the counter and take the EMPTY CUP:
- Examine the shelves behind the counter.
- Move the awards and take the TIN POSTMAN:
- Examine the left door and take the BROKEN KEY:
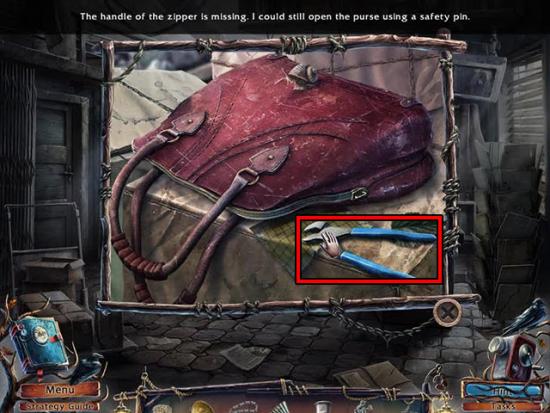
- Examine the purse and take the PLIERS:
- Exit the post office and examine the cement.
- Select the cement.
- Use the BROKEN KEY on the container to take the MOULD:
- Travel to the closed shop and examine the hatch.
- Use the PLIERS on the nail:
- Enter the basement and examine the area at the right side of the fan to enter a hidden object scene.
- Find all of the objects on the list:
- After completing the scene, the COAL SHOVEL and TONGS will be added to the inventory.
- Examine the coal and take the CAN OPENER:

- Use the COAL SHOVEL on the coal twice twice to fill the bucket.
- Take the COAL.
- Examine the tank and use the CORK on the small hole:
- Examine the furnace and open the grate.
- Use the COAL on the furnace.
- Use the FAN on the coal.
- Examine the bowl on the top of the furnace and use the TIN POSTMAN on it.
- Use the MOULD on the slot below the bowl.
- Use the TONGS on the bowl.
- Take the ARCHIVES KEY:

- Travel to the post office and examine the left door.
- Use the ARCHIVES KEY on the keyhole and turn the key twice.
- Enter the archives.
- Talk to the woman and take the PRESCRIPTION from her hand:
- Examine the conveyor belt at the back of the room.
- Select the old chain to remove it.
- Use the new CHAIN on the belt:
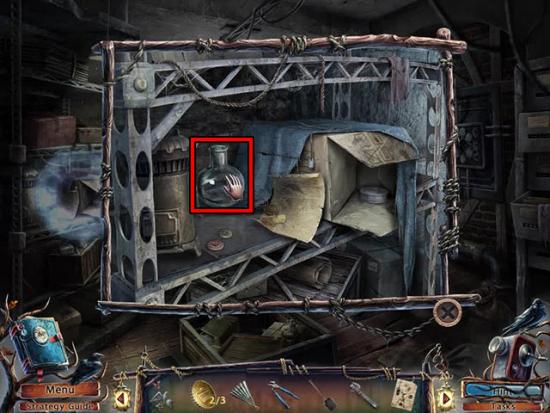
- Examine the shelves at the left side of the room and take the FLASK:
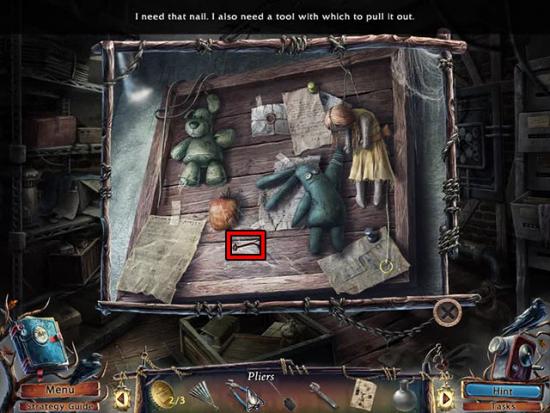
- Examine the noticeboard and use the PLIERS on the NAIL to take it:
- Move back to the post office lobby and examine the counter.
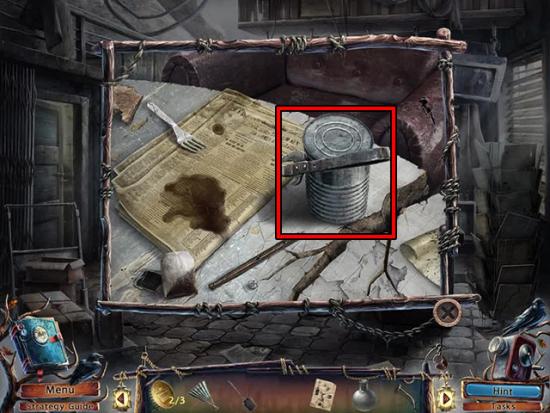
- Use the CAN OPENER on the tin to take the TIN LID:
- Travel to the shop and examine the door.
- Use the NAIL on the latch:
- Select the NAIL to open the door.
Chapter 9
- Enter the shop and examine the hidden object area behind the counter.
- Find all of the objects on the list:
- After completing the scene, the COIN (3 of 3) and SAFETY PIN will be added to the inventory.
- Travel to the theatre entrance and examine the drinks machine.
- Use the PAPER CUP on the drink slot.
- Use the three COINS on the coin slot.
- Press the button and then take the HOT WATER:
- Travel to the shop.
- Open the freezer and use the HOT WATER on the ice.
- Take the LEMON:
- Examine the table to see a Bunsen burner and silhouettes.
- Use the PRESCRIPTION, FLASK and the LEMON on the silhouettes:
- Travel to the post office and examine the red purse.
- Use the SAFETY PIN on the zip.
- Unzip the purse and take the ROSE:
- Enter the back room and examine the conveyor belt.
- Use the ROSE key on the slot:
- Turn the key to start the conveyor belt.
- Examine the crate and take the SEEDS:
- Travel to the post office entrance.
- Examine the bird bath and use the SEEDS on it:
- Examine the ground and use the shovel on it to reveal the valve.
- Take the VALVE:
- Travel to the basement of the shop and examine the planks at the right side of the fan to enter a hidden object scene.
- Find all of the objects on the list:
- After completing the scene, the FUNNEL and BURNER will be added to the inventory.
- Examine the tank and use the TIN LID on the hole.
- Select the BURNER and click and hold around the edges of the TIN LID until it is fully welded to the tank:
- Examine the pipe at the left side of the tank and use the VALVE on it.
- Select the VALVE to fill the tank with water.
- Take the bottle to receive the CAT:

- Enter the back room of the post office and examine the cabinet.
- Use the cat on the mechanism.
- Swap the cats and the pigeons.
- Take the SYRUP and STAPLE REMOVER:
- Examine the crate and use the STAPLE REMOVER on it.
- Remove the lid of the crate and take the FILM REEL:
- Travel to the projection room in the theatre and use the FILM REEL on the projector.
- Enter the auditorium and examine the left seats to enter a hidden object area.
- Find all of the objects on the list:

- After completing the scene, the UMBRELLA and JUICER will be added to the inventory.
- Return to the projection room and examine the window.
- Use the UMBRELLA on the paint pot and take the BUTTON:
- Examine the locker and press the correct buttons on the controls to take a film reel.
- After the scene, the CORKSCREW will be added to the inventory.
- Travel to the shop and examine the lift.
- Use the button on the hole.
- Press the button and take the HONEY:
- Examine the table and use the HONEY, FUNNEL, JUICER, SYRUP and CORKSCREW on the silhouettes.
- Use the FUNNEL on the flask.
- Use the LEMON on the juicer.
- Use the JUICER and HONEY on the funnel.
- Use the CORKSCREW on the bottle.
- Use the BOTTLE on the funnel.
- Select the Bunsen burner and then remove the funnel to take the ANTIDOTE:
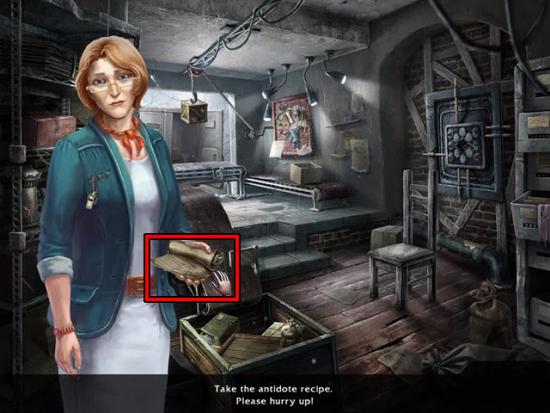
- Travel to the back room of the post office and give the ANTIDOTE to the woman.
- Take the WHISTLE from her hand:
- Travel to the park entrance and use the WHISTLE on the dog:
- Move forward to the trailers.
Chapter 10
- Examine the barbecue and take the FRYING PAN:
- Move forward to the broken bridge.
- Examine the window of the bus and use the FRYING PAN on the window.
- Take the PIRATE:
- Move back and examine the left trailer.
- Use the PIRATE on the middle barrel.
- Place the pirates on top of each other to reach the right rope:
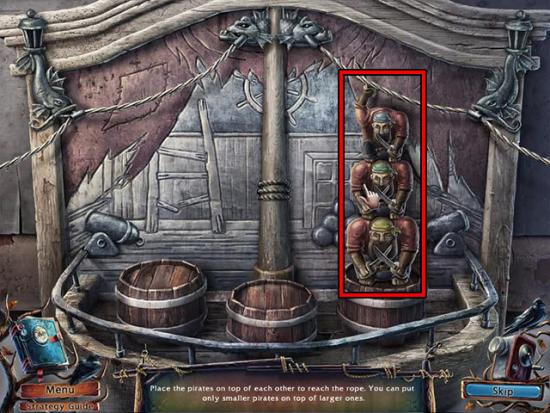
- Repeat this on the left rope to open the door to the trailer.
- Enter the trailer.
- Examine the desk and take the FILM STRIP:
- After the cut-scene, the SICKLE will be added to the inventory.
- Examine the doll house and take the CARTON OF MILK:
- Exit the trailer.
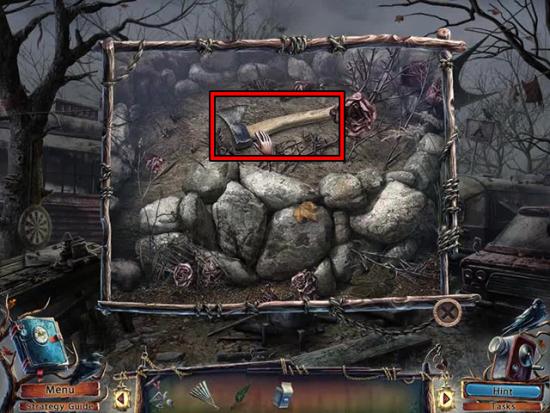
- Examine the bushes and use the SICKLE on them twice.
- Take the AXE:
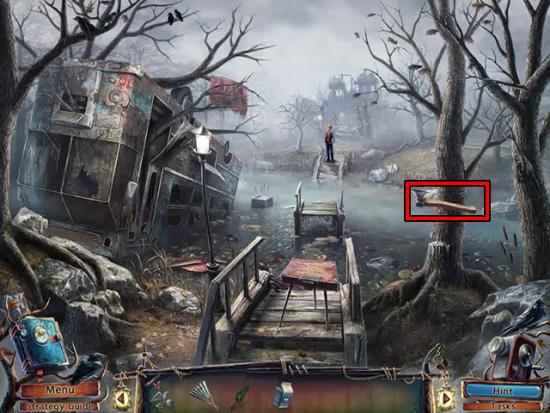
- Move forward to the broken bridge.
- Use the AXE on the tree:
- Cross over the bridge to talk to the boy and receive the SPYGLASS.
- Examine the area above the anchor to enter a hidden object scene.
- Find all of the objects on the list:
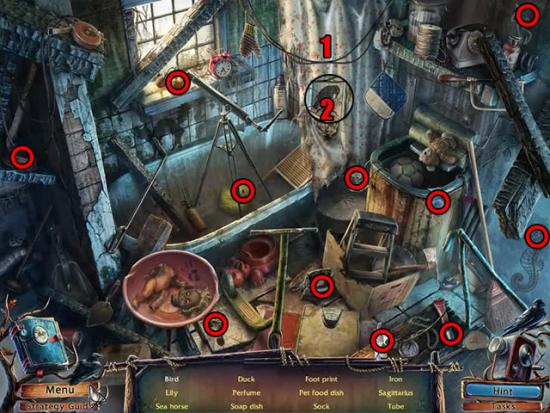
- After completing the scene, the LILY and PET FOOD DISH will be added to the inventory.
- Return to the trailer and examine the stand for the telescope.
- Use the SPYGLASS on the stand.
- Focus the image by rotating the dial:
Chapter 11
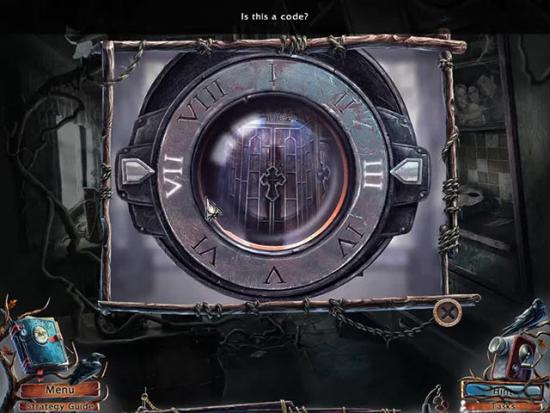
- Return to the broken bridge and examine the sketchbook.
- Enter the correct code to open the sketchbook.
- Take the flute:

- Move forward to the statues and give the FLUTE to the flute player:
- Return to the park entrance and examine the dinosaur to enter a hidden object scene.
- Find all of the objects on the list:
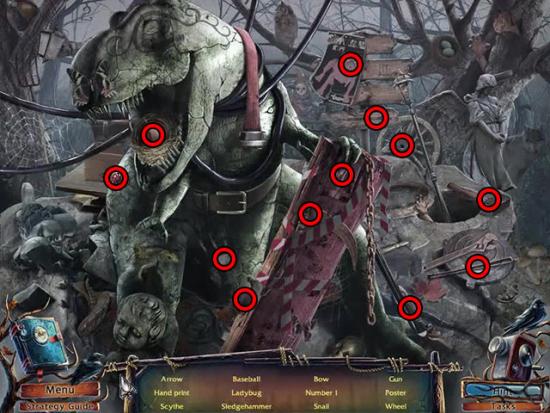
- After completing the scene, the VIOLIN BOW and GUN will be added to the inventory.
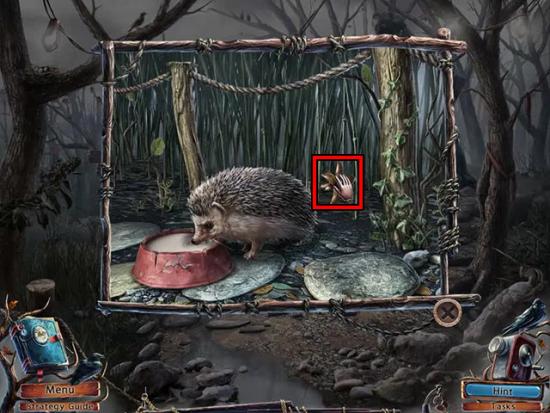
- Examine the grass to see a hedgehog.
- Use the CARTON OF MILK on the dish and then take the MUSIC BOX KEY:
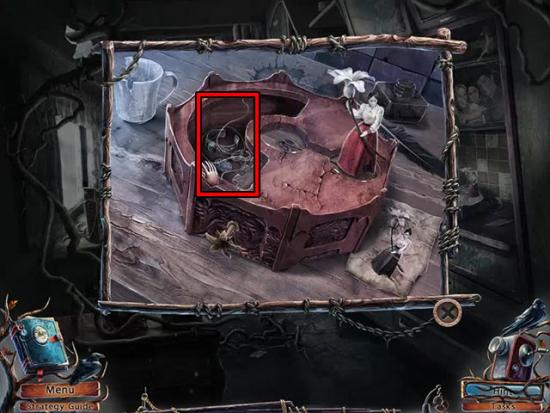
- Travel to the trailer and examine the music box.
- Use the MUSIC BOX KEY on the keyhole and give the LILY to the dancer.
- Turn the key to open the music box.
- Take the CELLO STRING:
- Exit the trailer and move forward to the broken bridge.
- Examine the cello and use the CELLO STRING on it to take the CELLO:
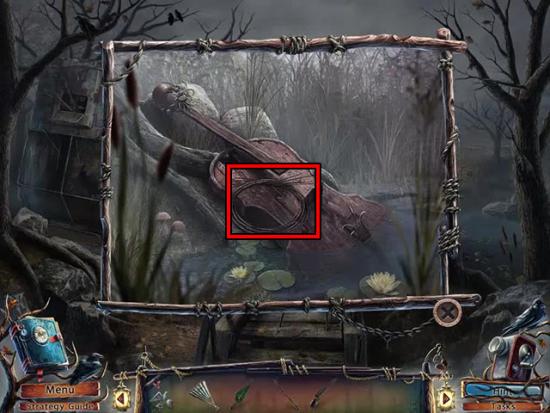
- Move forward to the statues and examine the building to enter a hidden object scene.
- Find all of the objects on the list:
- After completing the scene, the THREAD and TONGS will be added to the inventory.
- Move back twice to the trailer and examine the barbecue.
- Use the TONGS on the grill to remove it.
- Take the SPIT:
- Examine the vice and use the SPIT on it.
- Select the vice to move it.
- Take the TRIANGLE:

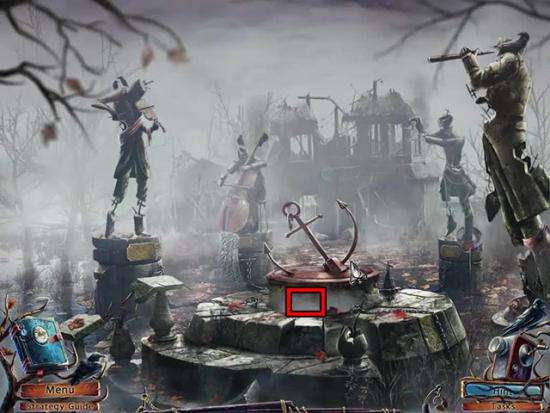
- Move forward twice to the statues.
- Use the VIOLIN BOW, CELLO and TRIANGLE on the statues.
- Examine the panel below the anchor and take the BROKEN FIGURINE:
- Move back twice to the trailers and examine the table.
- Use the BROKEN FIGURINE on the table.
- Assemble the doll on the stand.
- Take the brush from the varnish and use it on the figurine.
- Take the completed FISHERMAN FIGURINE:
- Enter the trailer and examine the doll house.
- Use the FISHERMAN FIGURINE on the doll house and guide him to the last room by giving the relevant items to the correct characters:
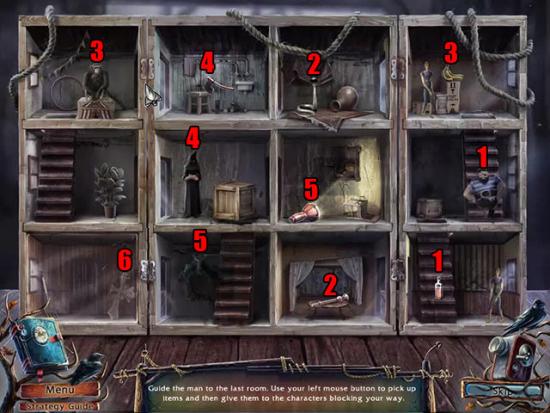
- After completing the mini-game, take the CRUCIFIX from the figurine.
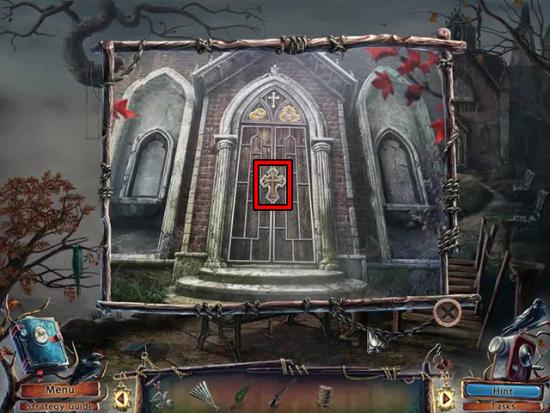
- Travel to the church and examine the door.
- Use the CRUCIFIX on the slot:
Chapter 12
- Enter the church and examine the floor.
- Take the FILM STRIP:
- After the scene, the STAINED GLASS FRAGMENT will be added to the inventory.
- Examine the chandelier and use the GUN on it. The chandelier will drop through the floor, creating a hole to the basement.
- Enter the basement and examine the water fountain.
- Use the UMBRELLA on the water and take the GATE KEY:
- Move up and examine the gate.
- Use the GATE KEY on the keyhole and turn the key twice.
- Move outside to the gazebo area.
- Examine the gazebo and use the STAINED GLASS FRAGMENT on the kite:
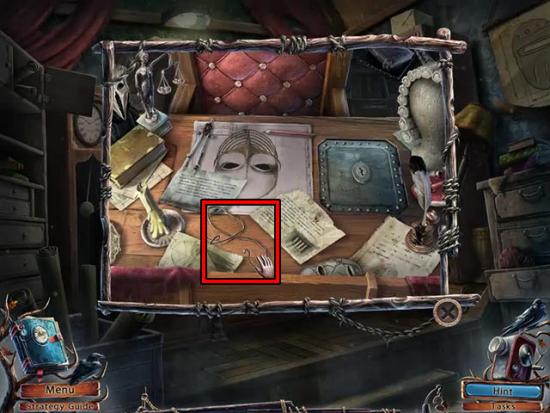
- Examine the gazebo again to enter a hidden object scene.
- Find all of the objects on the list:
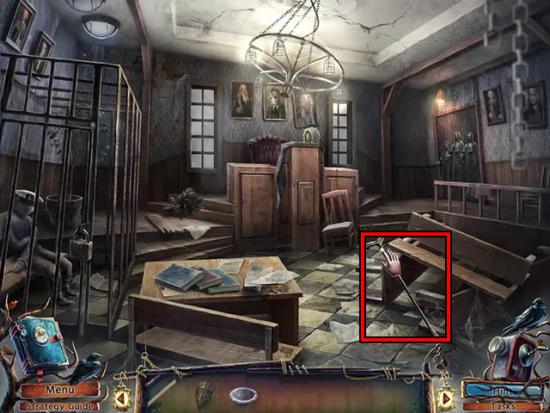
- After completing the scene, the SHELL and FORK will be added to the inventory.
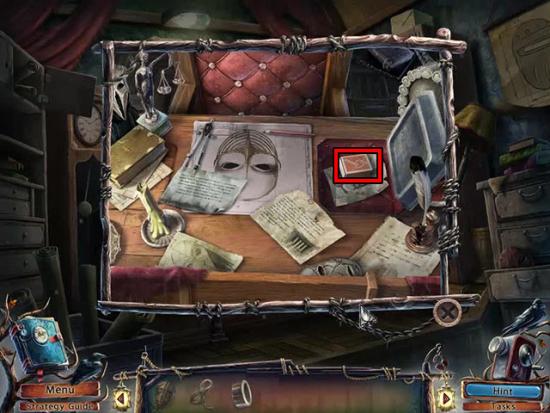
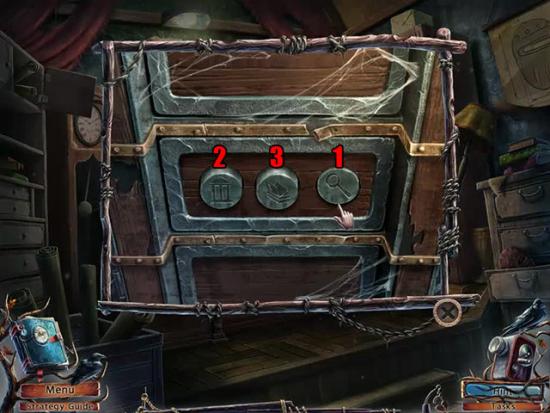
- Move back to the church and examine the incense burner.
- Use the FORK on the four candles to take the candle ends:
- Enter the basement and examine the hands holding the candles.
- Examine the locked door and use the SHELL on it:
- Enter the vat room and examine the stairs.
- Take the FILM STRIP:

- After the scene, the MAGNET will be added to the inventory.
- Examine the cup and use the four CANDLE ENDS on it:
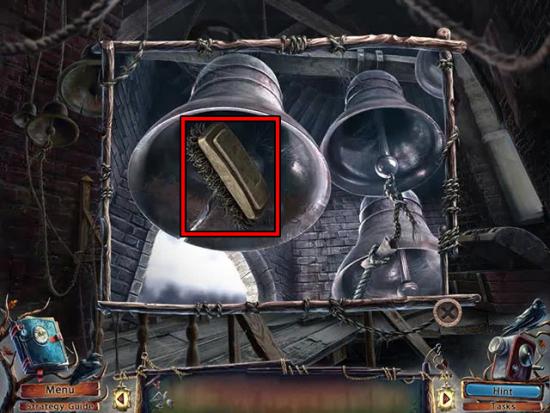
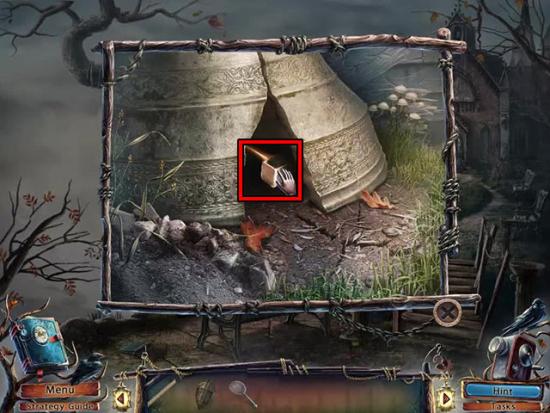
- Travel to the gazebo area and examine the cliff to see a bell.
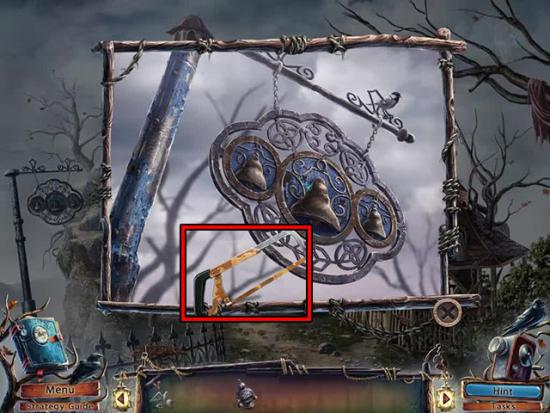
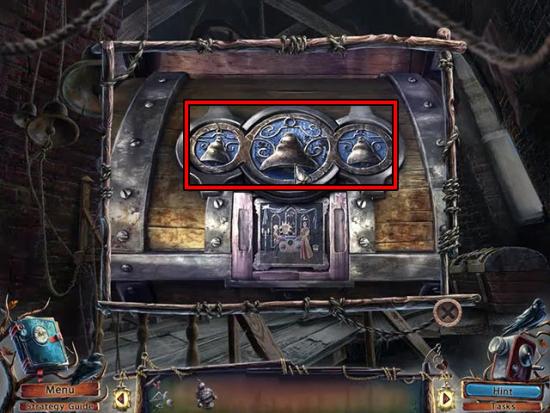
- Use the MAGNET on the bell and then use the THREAD on the magnet to take the HAND BELL:
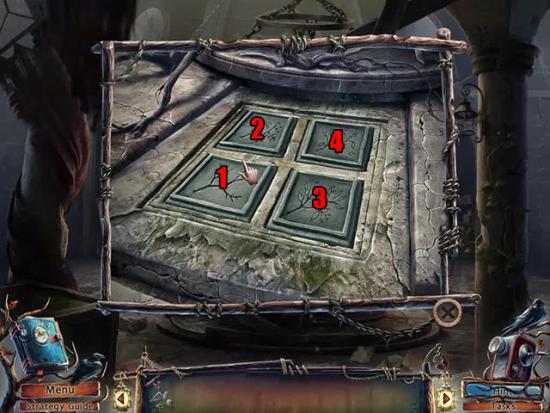
- Examine the door to the tower and use the HAND BELL on the chain.
- Raise or lower the bells to play the correct melody:
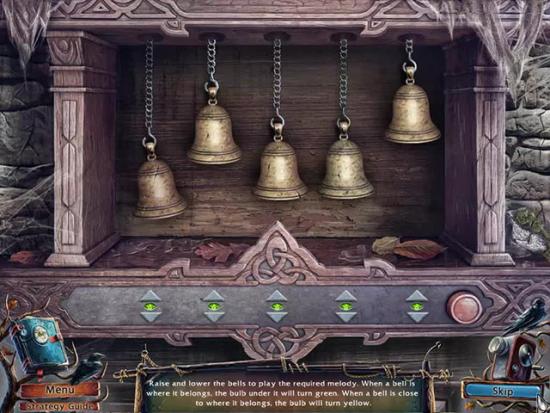
- Enter the tower.
Chapter 13
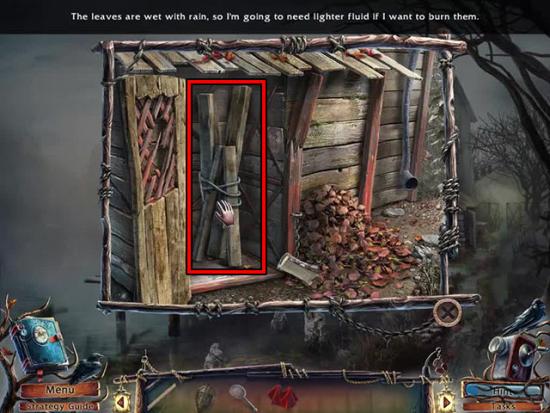
- Examine the window and take the HACKSAW and INCENSE:
- Return to the church and examine the incense bowl.
- Use the INCENSE on the censer and then use the FAN on the coals.
- Take the SMOKING CENSER:

- Exit the tower.
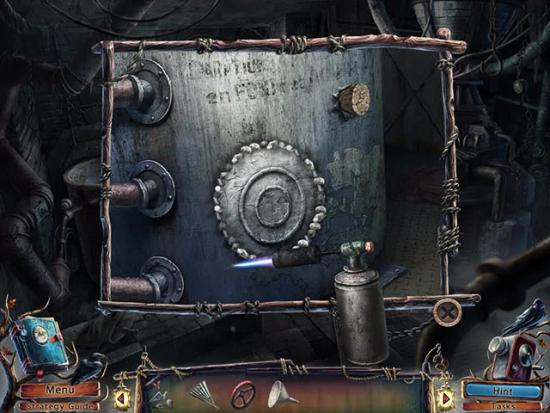
- Examine the bell sign and use the HACKSAW on it to take the COAT OF ARMS:
- Enter the tower and examine the chest.
- Use the COAT OF ARMS on the slot:
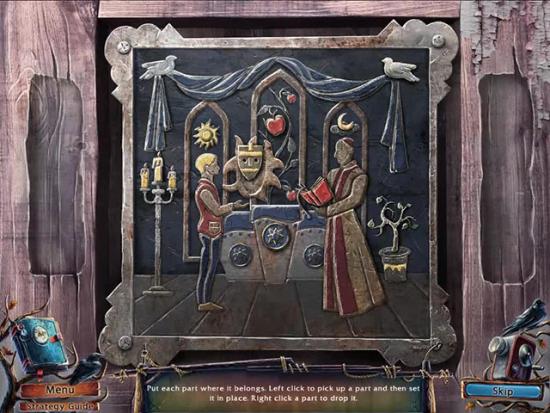
- In the mini-game, put each part where it belongs to open the chest:
- Use the SMOKING CENSER on the moths.
- Take the GOBLET:
- Examine the book to see a description about a secret room at the lake house.
- Take the CLASP:

- Travel to the church basement and examine the fountain.
- Use the GOBLET on the hot water:
- Travel to the vat room and examine the winch.
- Use the CLASP on the chain:
- Examine the right alcove and use the goblet with HOT WATER on the tray.
- Open the mould and take the CANDLE:
- Move back to the basement and examine the hands with the candles.
- Use the CANDLE on the empty hand:

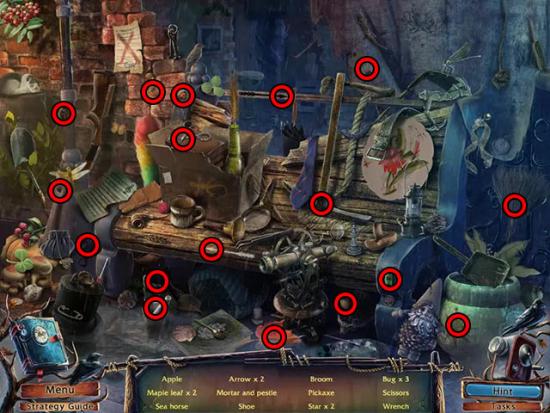
- Examine the newly opened doorway to enter a hidden object scene.
- Find all of the objects on the list:

- After completing the scene, the PLIERS will be added to the inventory.
- Go upstairs and examine the floor at the right side of the hole.
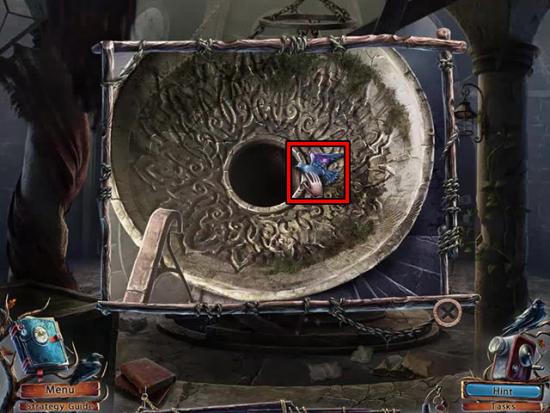
- Use the PLIERS on the lighthouse to take the LIGHTHOUSE:
- Examine the lighthouse slot at the right side of the room.
- Use the LIGHTHOUSE on the slot.
- Take the WINCH LEVER:
- Move forward to the vat room and examine the winch.
- Use the WINCH LEVER on the winch.
- Select the WINCH LEVER to open the vat:
- Examine the vat and take the SCRUB BRUSH:
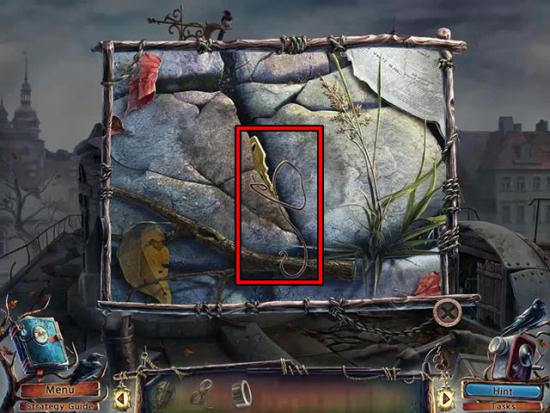
- Exit the tower and examine the gazebo to enter a hidden object scene.
- Find all of the objects on the list:
- After completing the scene, the STAR will be added to the inventory.
- Enter the church and examine the platform.
- Use the STAR on the book:
- Open the book to see that a page has been torn out.
- Enter the tower.
- Examine the bells and use the SCRUB BRUSH on them:
- Enter the vat room and examine the tiles below the left side of the vat.
- Press the tiles in the correct order to view the gauges:
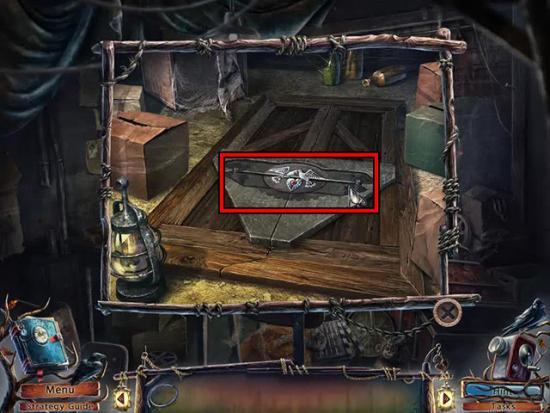
- Take the IRON BAR.
- Enter the church basement and examine the sarcophagus.
- Use the IRON BAR on the sarcophagus.
- Move the IRON BAR to open the sarcophagus.
- Move the cover and take the TORN PAGE and GAUGE POINTER:

- Go up to the church and examine the book on the altar.
- Use the TORN PAGE on the book to see the correct configuration for the gauges:
- Go downstairs to the basement and examine the shelf above the sarcophagus to enter a hidden object scene.
- Find all of the objects on the list:
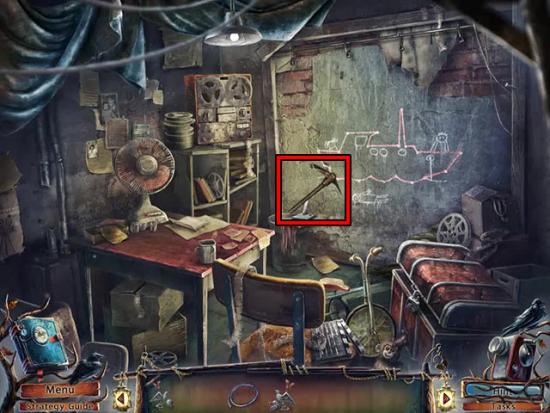
- After completing the scene, the PICKAXE and HOSE will be added to the inventory.
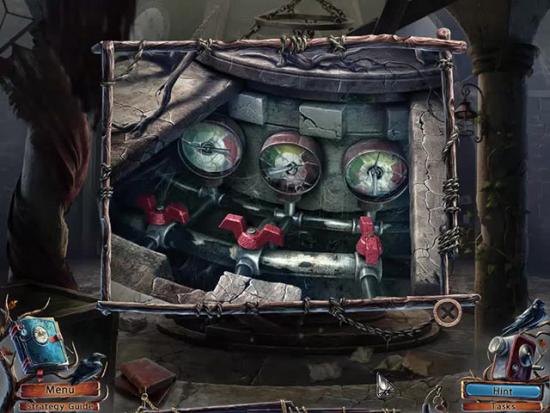
- Enter the vat room and examine the gauges.
- Use the GAUGE POINTER on the gauge.
- Turn the screws to set the gauges to the correct configuration:
- Examine the vat and take ANN’S PENDANT:
- Travel to the storage room in the lake house and use the PICKAXE on the wall:
- Examine the hole and move both boxes to reveal a lock.
- Use TOMMY’S PENDANT and ANN’S PENDANT on the lock:
Chapter 14
- Go downstairs to the lake house dock.
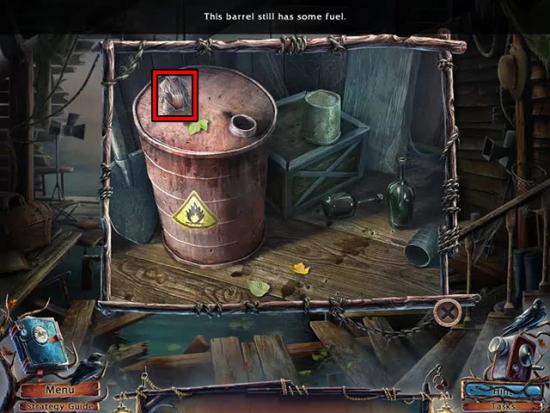
- After the cut-scene, examine the oil barrel and remove the cap.
- Take the ELEPHANT from the oil barrel:
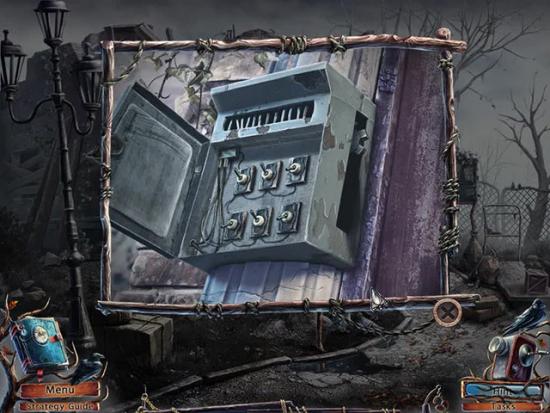
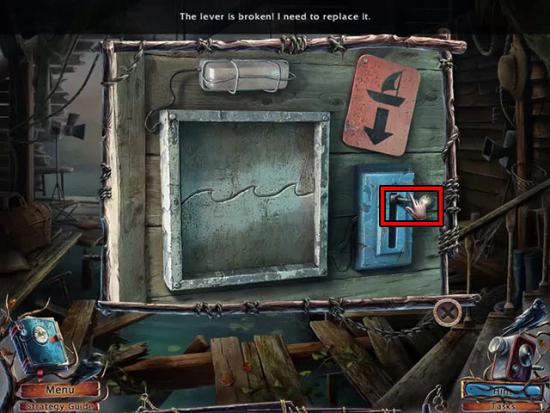
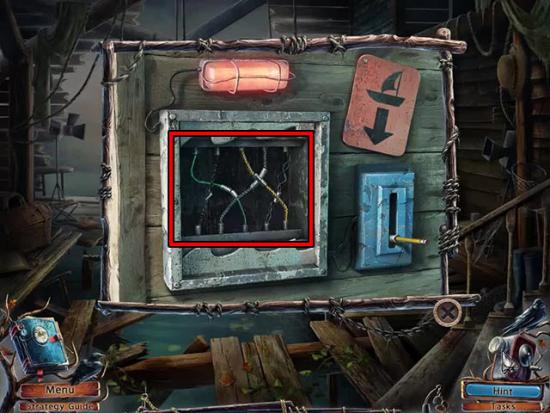
- Examine the circuit box and remove the broken lever:
- Move back to the storage room and examine the chest to enter a hidden object scene.
- Find all of the objects on the list:
- After completing the scene, the WIRE CUTTERS will be added to the inventory.
- Move back to the living room and examine the fireplace.
- Use the ELEPHANT on the slot for the figurine and take the BACKPACK KEY:
- Return to the lake house dock and examine the backpack.
- Use the BACKPACK KEY on the lock.
- Open the backpack and take the PENCIL:
- Examine the circuit box and use the PENCIL on the slot.
- Select the pencil to open the circuit box.
- Connect the wires to lower the boat:
- Examine the boat.
- Take the EMPTY GAS CAN and use the WIRE CUTTERS on the LIFESAVER to take it:

- Examine the oil barrel and use the EMPTY GAS CAN on it.
- Use the hose on the oil barrel to fill the gas can:
- Examine the boat and use the FULL GAS CAN on the fuel tank.
- Examine the water and throw the LIFESAVER to the man:
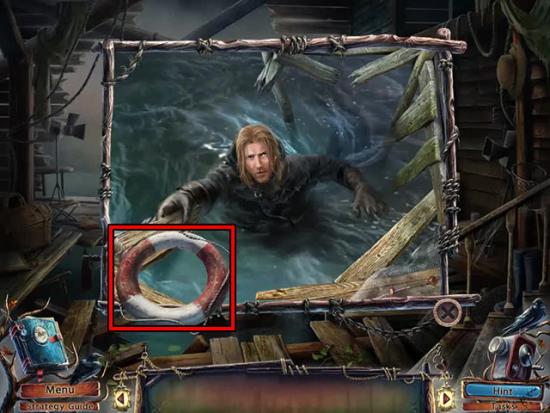
- You will receive the BOAT KEY for saving the man.
- Examine the boat and use the BOAT KEY on the keyhole to complete the game.
Bonus Chapter
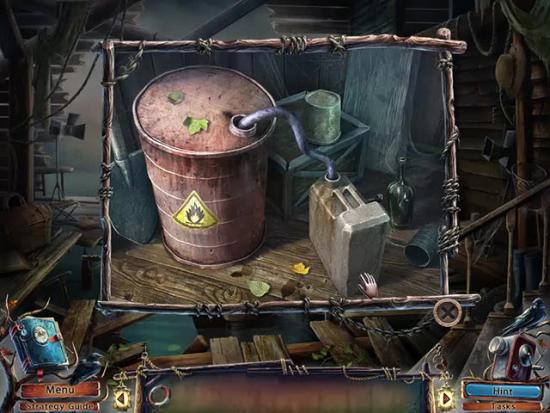
- Examine the dock and take the ACORN:
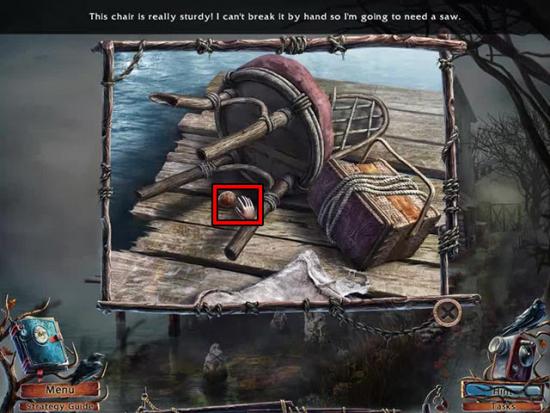
- Examine the window and take the SAW:
- Use the SAW on the chair at the end of the dock to take the CHAIR LEG.
- Examine the window and use the CHAIR LEG on it to hold the window open.
- Enter the living room of the lake house.
- Examine the mannequin body and take the BUCKET:
- Exit the house and examine the water.
- Use the BUCKET on the water to put it on the bank:
- Enter the lake house and go upstairs to the children’s room.
- Examine the shelves to enter a hidden object scene.
- Find all of the objects on the list:
- After completing the scene, the SCOOP and HOOK will be added to the inventory.
- Examine the glass case and open the compartment.
- Take the DEAD BATTERY and the WHEELS:

- Exit the house and examine the water.
- Use the SHOVEL on the sand to put some in the bucket.
- Take the BUCKET OF SAND:
- Return to the children’s room and examine the aquarium.
- Open the filter and use the BUCKET OF SAND on it.
- Press the button to drain the tank.
- Take the BOX KNIFE:
- Exit the house and examine the basket.
- Use the BOX KNIFE on the rope.
- Take the green THREAD:
- Enter the house and examine the loom.
- Use the THREAD on the reel.
- Select the thread to weave the tapestry.
- Take the TAPESTRY FRAGMENT:
- Go upstairs to the children’s room and examine the picture.
- Use the TAPESTRY FRAGMENT on the picture:
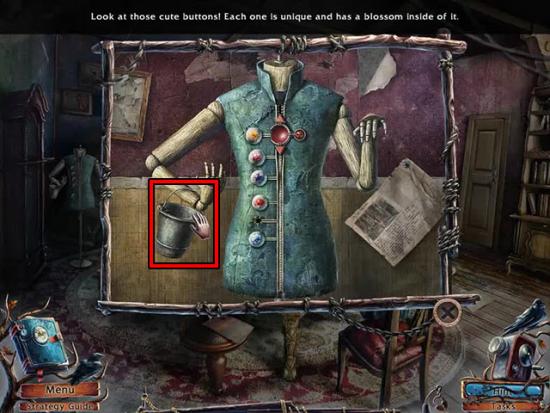
- Go downstairs and examine the mannequin.
- Click and drag the buttons to the correct positions:
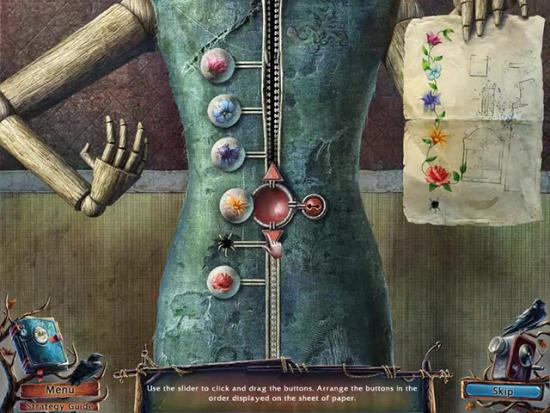
- Take the CANDLE and PERFORMER:
- Examine the fireplace and use the CANDLE on it.
- Examine the door and use the BURNING CANDLE on the wax:

- Return to the children’s room and examine the toy stage.
- Use the PERFORMER on the stage.
- Put the items in the correct places on the stage and then take the STOREROOM KEY:
- Go downstairs to the living room and examine the door.
- Use the STOREROOM KEY on the keyhole and turn the key to open the door.
- Enter the storage room and examine the chest to enter a hidden object scene.
- Find all of the objects on the list:
- After completing the scene, the WOODEN BOX and RULER will be added to the inventory.
- Go downstairs to the lake house dock.
- Examine the hamster hole.
- Use the WOODEN BOX on the floor and the ACORN on the box to make the trap:
- Select the box to take the HAMSTER.
- Examine the end of the dock and take the CAR BODY:
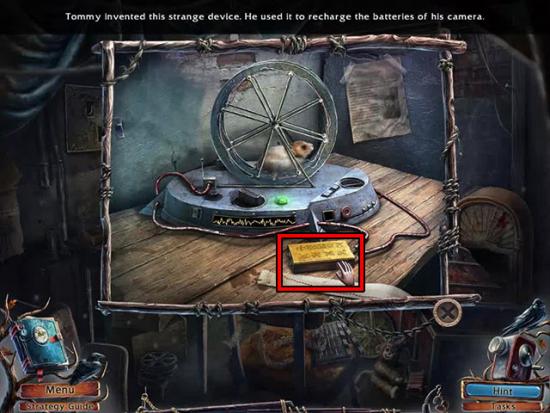
- Move back to the storage room and examine the hamster wheel.
- Use the HAMSTER on the hamster wheel and the DEAD BATTERY in front of the wheel.
- Take the CHARGED BATTERY:
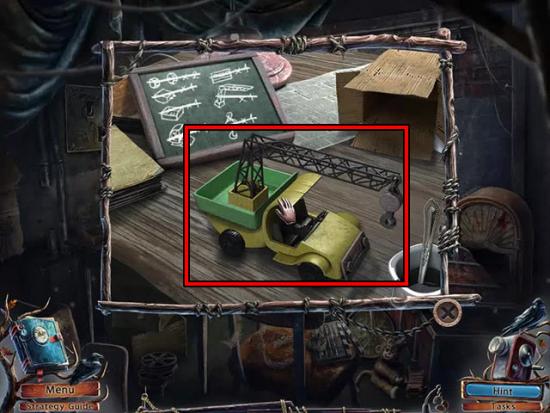
- Examine the table and use the HOOK, WHEELS and CAR BODY on it.
- Assemble the TRUCK and then take it:
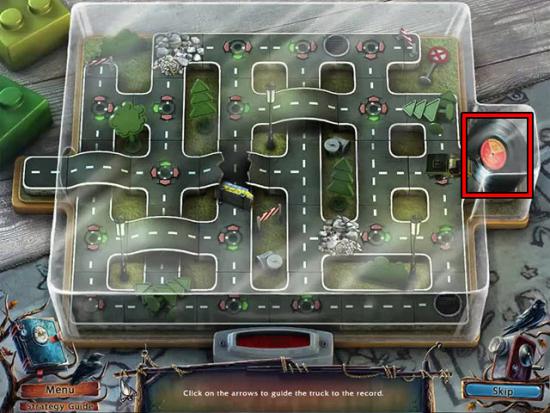
- Go upstairs to the children’s room and examine the car track.
- Use the CHARGED BATTERY on the slot.
- Use the TRUCK on the track.
- Change the arrows to guide the truck to the record:
- Return to the storage room and examine the record player.
- Use the RECORD on the record player.
- Take the HUNTER:
- Travel to the children’s room and examine the chest.
- Use the HUNTER on the silhouette to unlock the chest.
- Examine the newspaper and then take the CROSSBOW:
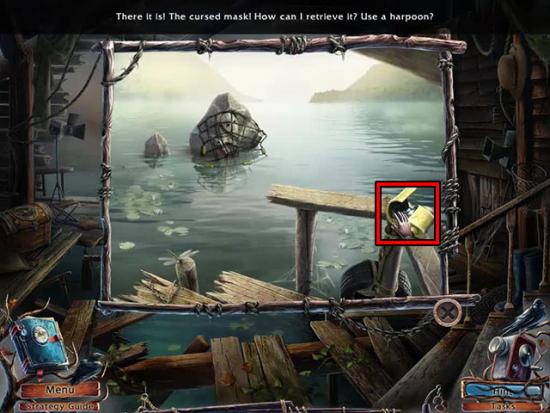
- Return to the lake house dock and examine the end of the dock to see the mask.
- Use the CROSSBOW on the mask to take the MASK and PLIERS:
- Exit the lake house and examine the water to enter a hidden object scene.
- Find all of the objects on the list:
- After completing the scene, the CHEF’S HAT and SIEVE will be added to the inventory.
- Examine the gate and use the PLIERS to cut the wire:

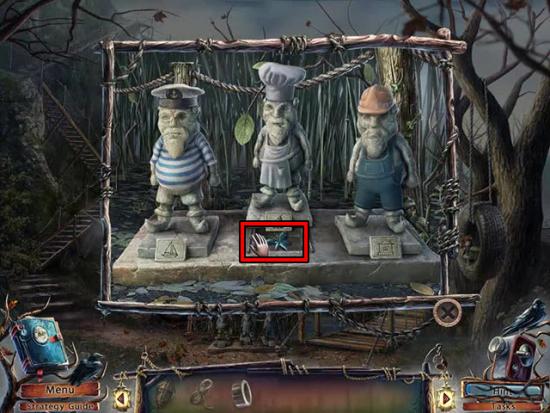
- Move forward to the path and examine the statues.
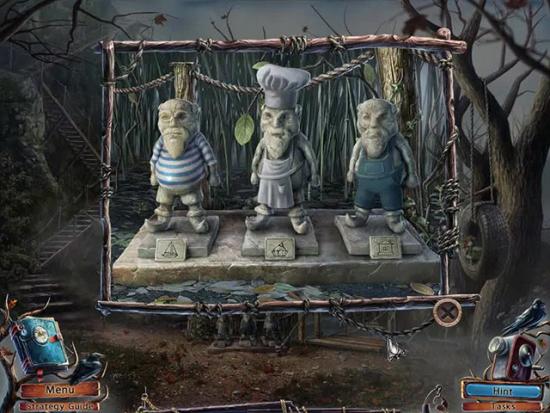
- Use the chef’s hat on the middle statue and change the clothes so that they suit the symbols below the character:
- Examine the box in the tree and take the HANDKERCHIEF:
- Go upstairs to the cliff and examine the bell.
- Take the WOODCUTTER FIGURINE:
- Move back and examine the shed.
- Use the WOODCUTTER FIGURINE on the log.
- Take the BOARDS:
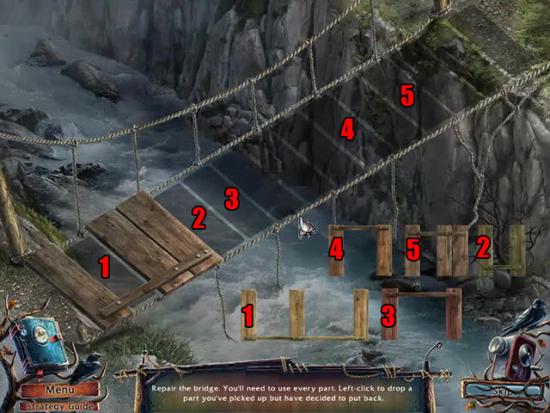
- Move forward to the path and use the BOARDS on the broken bridge.
- Place the wood in the correct positions to complete the bridge:
- Cross over the bridge to the lakeside walkway.
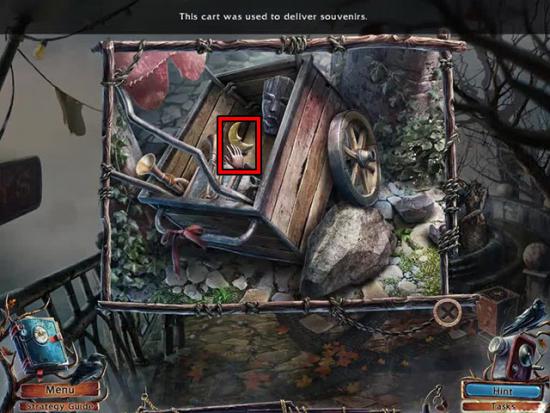
- Examine the cart and take the CRESCENT MOON:
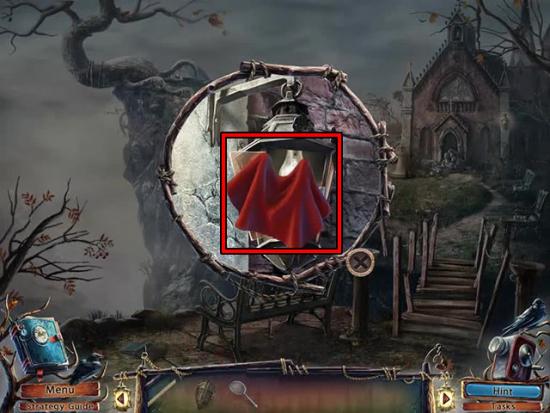
- Travel to the cliff and examine the lantern.
- Use the CRESCENT MOON on the light to open it.
- Use the HANDKERCHIEF on the LIGHT BULB to take it:
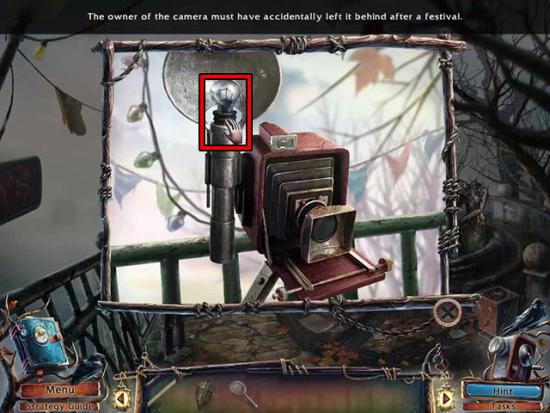
- Travel to the lakeside walkway and examine the camera.
- Use the LIGHT BULB on the flash of the camera.
- Take the FLASH:
- Return to the cliff and examine the bell.
- Use the FLASH on the bell and take the SLEDGEHAMMER:
- Travel to the lakeside walkway and examine the cart.
- Use the SLEDGEHAMMER on the stone stopping the cart from moving.
- Go through the archway to the town square.
- Examine the bench at the left side of the area to enter a hidden object scene.
- Find all of the objects on the list:
- After completing the scene, the MORTAR & PESTLE and PICKAXE will be added to the inventory.
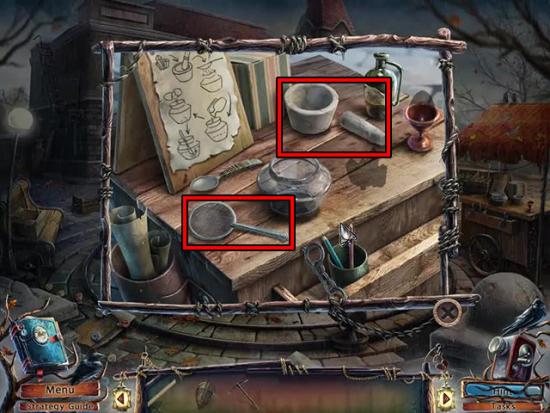
- Examine the stall and use the SIEVE and MORTAR & PESTLE on the silhouettes:
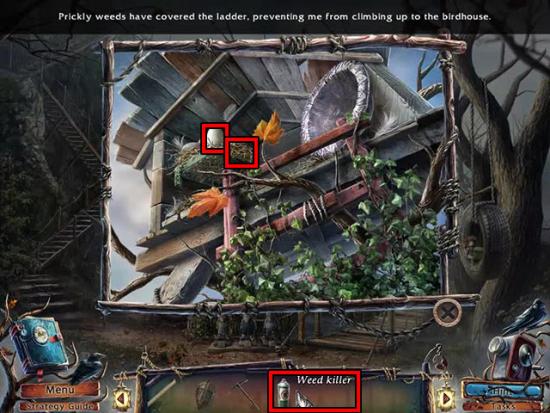
- Examine the stall with the green canopy and take the WEED KILLER:
- Move back twice to the path and examine the grass at the left side of the three statues.
- Use the WEED KILLER on the weeds and then take the EGG and the BIRD BATH:
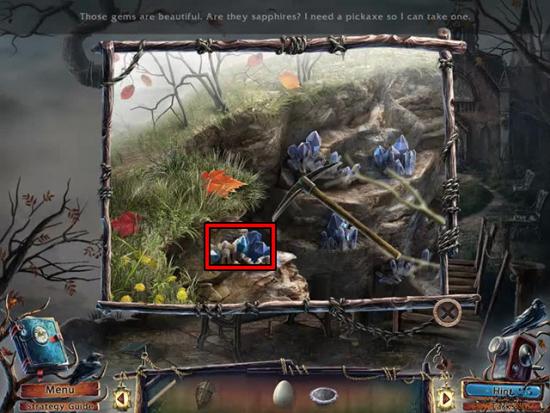
- Go upstairs to the cliff and examine the cliff.
- Use the PICKAXE on the BLUE GEM to take it:
- Return to the right stall in the town square and use the BLUE GEM and EGG on the silhouettes.
- Use the SIEVE on the bowl.
- Use the BLUE GEM on the mortar and use the pestle to grind it.
- Use the blue gem fragments on the sieve.
- Select the sieve to remove it.
- Use the egg on the edge of the bowl.
- Use the solvent on the bowl.
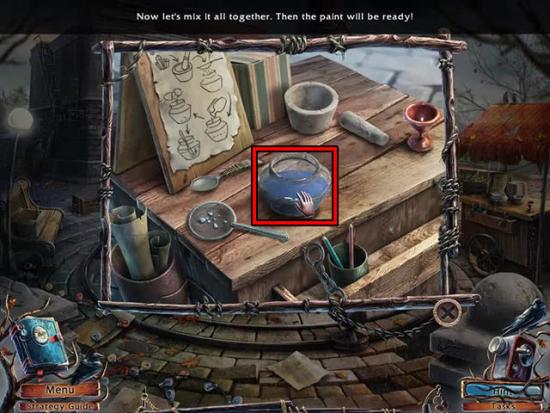
- Use the spoon on the bowl and then take the PAINT:
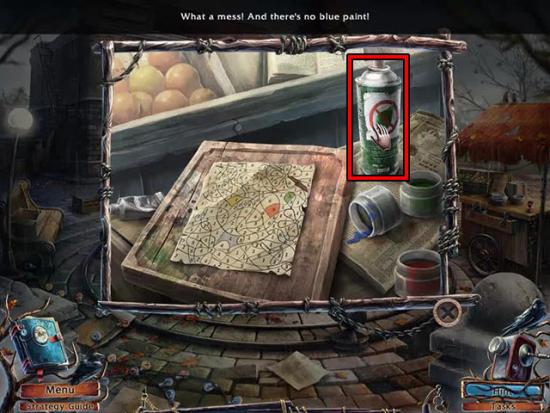
- Examine the stall with the green canopy and use the blue paint on the drawing.
- Select the paintbrush and then use the correct colours on the different sections of the drawing:

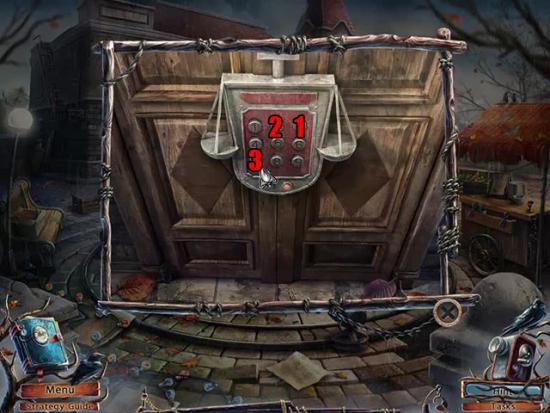
- Examine the door of the town hall and enter the correct code:
- Enter the town hall and take the CANE:
- Examine the bench and take the FUSE:
- Exit the town hall and examine the ladder.
- Use the CANE on the ladder to lower it:
- Go the roof and examine the weather vane.
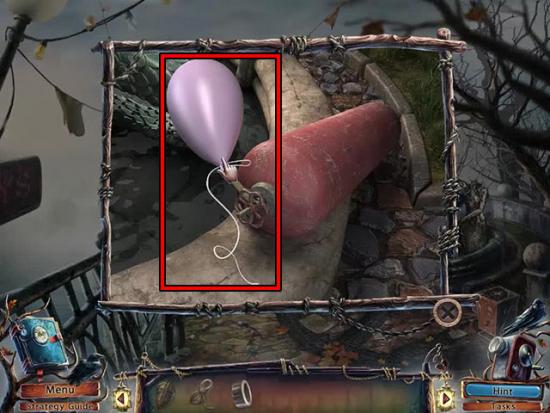
- Take the DEFLATED BALLOON:
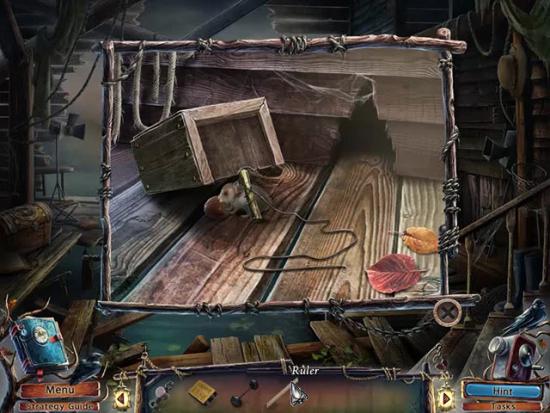
- Examine the window and use the RULER on the hook.
- Examine the window to enter a hidden object scene.
- Find all of the objects on the list:
- After completing the scene, the TAPE and HAMMER will be added to the inventory.
- Take the STONE:
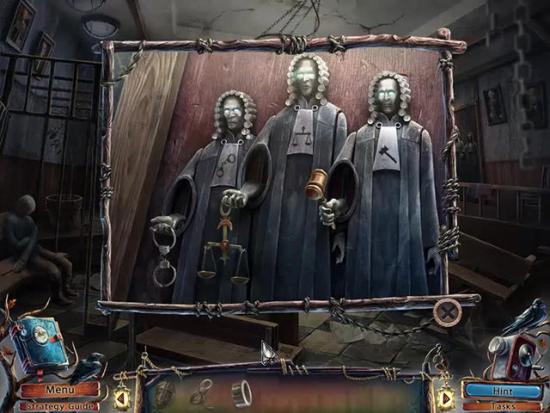
- Return to the town hall and examine the judges.
- Give the HAMMER to the right judge.
- Examine the jail cell and use the STONE on the lock.
- Take the SCREWDRIVER and the SAILOR’S CAP:
- Return to the roof of the town hall and examine the weather vane.
- Use the SCREWDRIVER on the SCALES to take them:
- Return to the town hall and give the SCALES to the middle judge.
- Move back three times to the path.
- Examine the dwarves and use the SAILOR’S CAP on the left dwarf.
- Move back to the lake and examine the water.
- Use the BIRD BATH on the water:
- Move forward to the path.
- Examine the coals.
- Use the BIRD BATH WITH WATER on the coals and take the VALVE:
- Move forward to the fountain and examine it.
- Use the DEFLATED BALLOON on the helium tank.
- Use the VALVE on the helium tank.
- Select the valve to inflate the balloon.
- Use the FUSE on the balloon and then take the BALLOON:
- Examine the clown and give him the BALLOON.
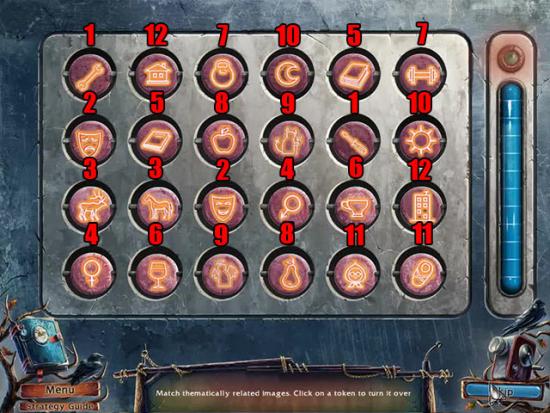
- Examine the clown again and match the themed images on the tokens:
- Take the SLINGSHOT.
- Travel to the cliff and examine the helmet in the tree.
- Use the SLINGSHOT on the helmet to take the CONSTRUCTION HELMET:

- Move back to the path and examine the dwarves.
- Use the CONSTRUCTION HELMET on the right dwarf and take the FLOWER:
- Return to the town hall and examine the judge’s stand.
- Use the FLOWER on the book cover.
- Examine the book and read the letter.
- Take the KEYS:
- Examine the jail cell and then examine the lock on the doll.
- Use the KEYS on the handcuffs to take them:
- Examine the judges and use the KEYS on the left judge:
- Enter the study and examine the desk.
- Take the WIRE:
- Travel to the roof and examine the tiles.
- Use the WIRE on the key to take the DESK KEY:
- Return to the study in the town hall and examine the desk.
- Use the DESK KEY in the lock and select the lock to open the desk safe:
- Take the MATCHES:
- Examine the piece of paper
- Examine the drawer and enter the code from the piece of paper:
- Examine the note and then take the DYNAMITE.
- Examine the wall safe.
- Use the DYNAMITE on the safe.
- Use the FUSE and the TAPE on the dynamite.
- Use the MATCHES on the fuse:
- Examine the wall safe.
- Take the FAMILY PHOTO and the EAGLE:
- Move back twice to the town square and examine the bench to enter a hidden object scene.
- Find all of the objects on the list:
- After completing the scene, the TWEEZERS will be added to the inventory.
- Return to the lake house and give the FAMILY PHOTO to the man.
- Enter the storage room and examine the chest to enter a hidden object scene.
- Find all of the objects on the list:

- After completing the scene, the CROWBAR will be added to the inventory.
- Go downstairs to the lake house dock and examine the wall.
- Use the CROWBAR on the wall and take the PANDA and DOMINO:
- Examine the chest and arrange the tokens correctly so that adjacent symbols match:
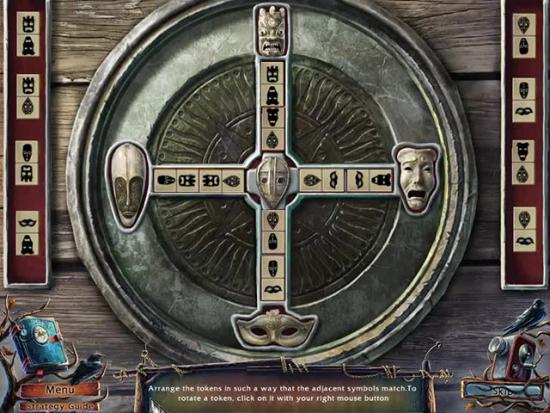
- After completing the mini-game, the PARROT will be added to the inventory.
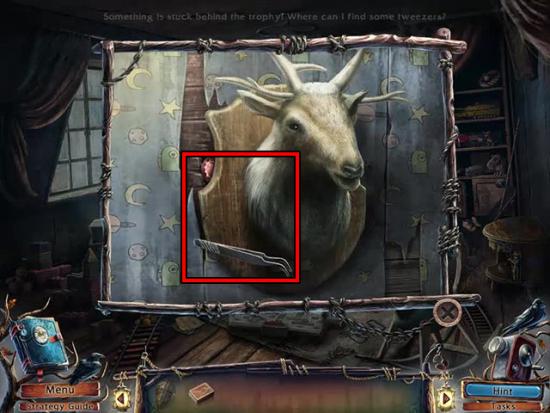
- Travel to the children’s room and examine the deer head.
- Use the TWEEZERS to take the GEM behind the trophy:
- Exit the lake house and move forward to the path.
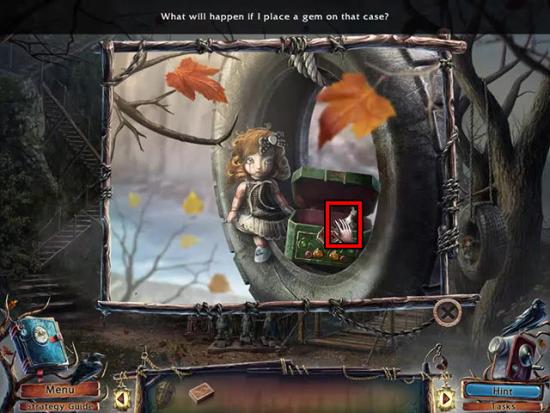
- Examine the doll and use the GEM on the box to open it.
- Take the KANGAROO:
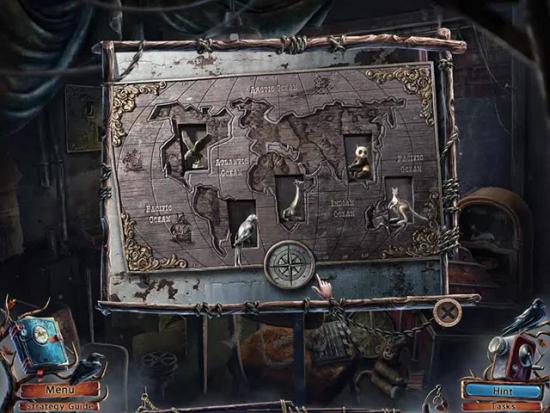
- Return to the storage room in the lake house and examine the map.
- Put the EAGLE, PANDA, PARROT and KANGAROO in the correct places on the map:
- Take the IGNITER FLUID and use the MASK on the mask holder:
- Exit the lake house and examine the shed.
- Use the IGNITER FLUID on the leaves.
- Use the MATCHES on the leaves to complete the bonus chapter:
Congratulations!
You have completed Gamezebo’s quick start guide for Lake House: Children of Silence. Be sure to check back often for game updates, staff and user reviews, user tips, forums comments and much more here at Gamezebo!

More articles...
-
Best Horror Games On Itch.io – July 2026
Across a bounty of subgenres. -
Grow A Garden 2 Base Price List
What's the most valuable crop? -
Evomon Best Starter [Leafbun, Blazpup, or Bubble?]
Grass-type, Fire-type, or Water-type?