
Grow A Garden 2 Base Price List
What's the most valuable crop?![Evomon Best Starter [Leafbun, Blazpup, or Bubble?]](/wp-content/uploads/2026/06/evomon-best-starter.jpg "Evomon Best Starter [Leafbun, Blazpup, or Bubble?]")
Evomon Best Starter [Leafbun, Blazpup, or Bubble?]
Grass-type, Fire-type, or Water-type?![Evomon Tier List [META and BEST Evomon]](/wp-content/uploads/2026/06/evomon-tier-list.jpg "Evomon Tier List [META and BEST Evomon]")
Evomon Tier List [META and BEST Evomon]
The Evomon dream team.
![[Roblox] Evomon Shiny Hunting Guide – Including Prismatic and Pris Shinies!](/wp-content/uploads/2026/06/evomon-shiny-hunting-guide.jpg "[Roblox] Evomon Shiny Hunting Guide – Including Prismatic and Pris Shinies!")
Kuros Walkthrough
Welcome to our walkthrough for Kuros. How to PlayFor a basic explanation of the gameplay of this game, press the HELP-button in the main menu for a detailed overview.Reading this walkthroughClick on the rounded rectangle around a base item, to make a list of item-outlines appear. Now drag every item marked and numbered on the screen, to the corresponding number on the list. If there are more then one base items in a screen, match the colors.TipIn every location, there is a chromatic lens to be …


- Prefer Gamezebo on Google

a:1:i:0;a:2:s:13:”section_title”;s:17:”Kuros Walkthrough”;s:12:”section_body”;s:36022:”
Welcome to our walkthrough for Kuros.
How to Play
For a basic explanation of the gameplay of this game, press the HELP-button in the main menu for a detailed overview.
Reading this walkthrough
Click on the rounded rectangle around a base item, to make a list of item-outlines appear. Now drag every item marked and numbered on the screen, to the corresponding number on the list. If there are more then one base items in a screen, match the colors.
Tip
In every location, there is a chromatic lens to be found; these act as your hints. Don’t forget to pick them up! If you did forget one, you can always return to that location.
Where am I?
As you wake up, confused of where you are and who you are, scroll over to one of the edges of the screen until an arrow appears. When the arrow appears, click to go to the map.
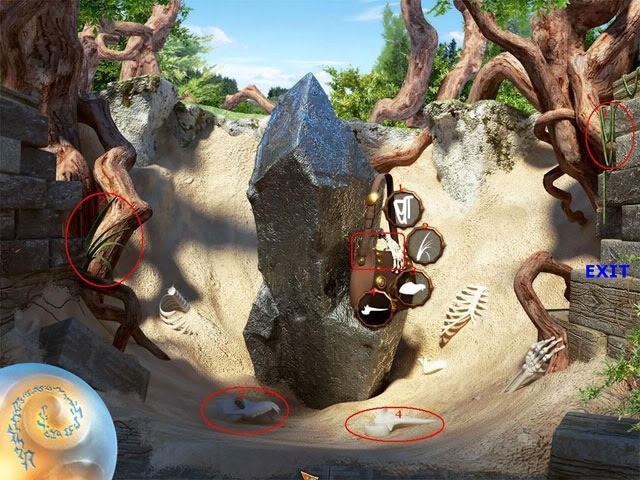
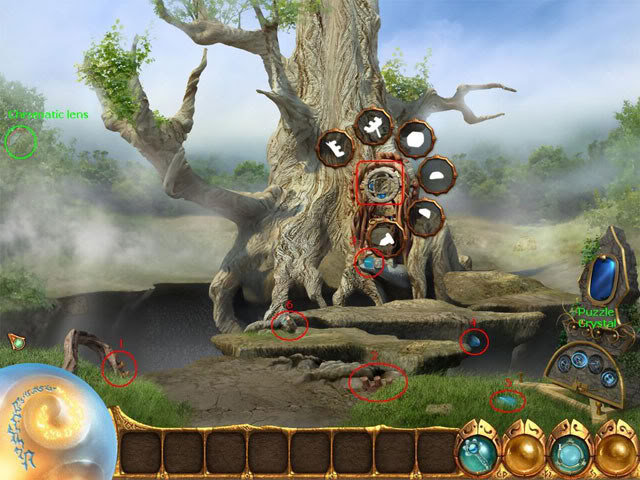
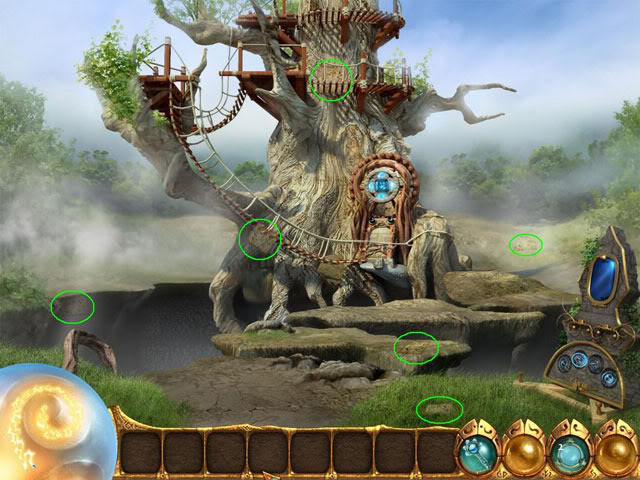
Wood Shrine
Collect the requested items, and then use them combined to fetch the bag.
Click on the right part of the screen to go to the gate area.

Wood Shrine – gate
Collect the 8 colored crystals, stack them in your inventory at the bottom of the screen (you can stack items of the same kind/color) and once you collected all, put them on the mechanism according to their colors.
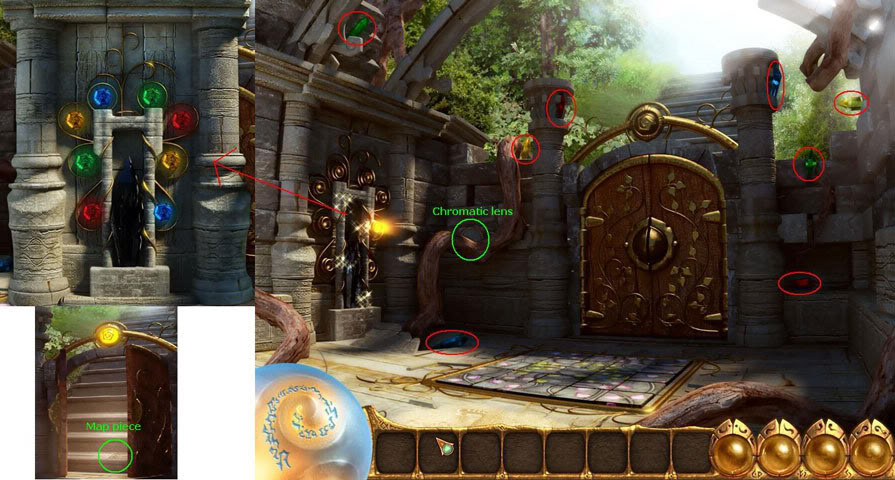
Don’t forget to pick up the Chromatic lens, left of the gate; this is a hint you can use.
Now click on the large glowing mosaic floor in front of the gate, and turn the pieces to return it back to normal. After the gate opens, on the bottom step, you will find the last map piece. Pick it up, and exit through the gate.
Sort the map pieces to put the map back together, and unlock your next location.
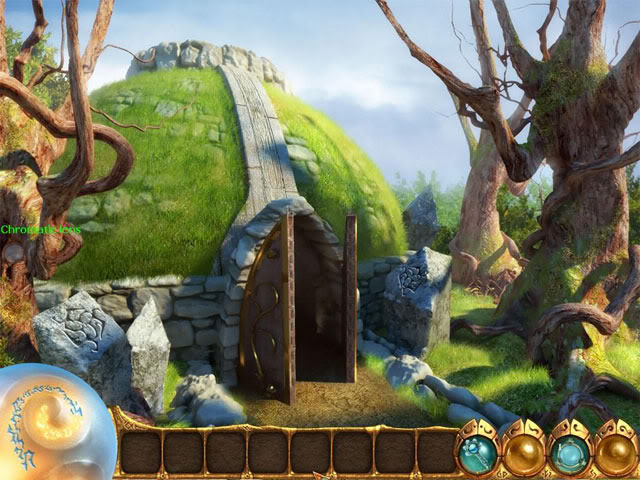
Ancient Barrow
After talking to a strange tree-creature, enter the barrow, only to find yourself locked in. Find pieces of the statue and put the statue back together to open the coffin. Some of the pieces of the statue can be confusing to place, but just try moving them around a bit, and don’t forget to build it from the bottom up.
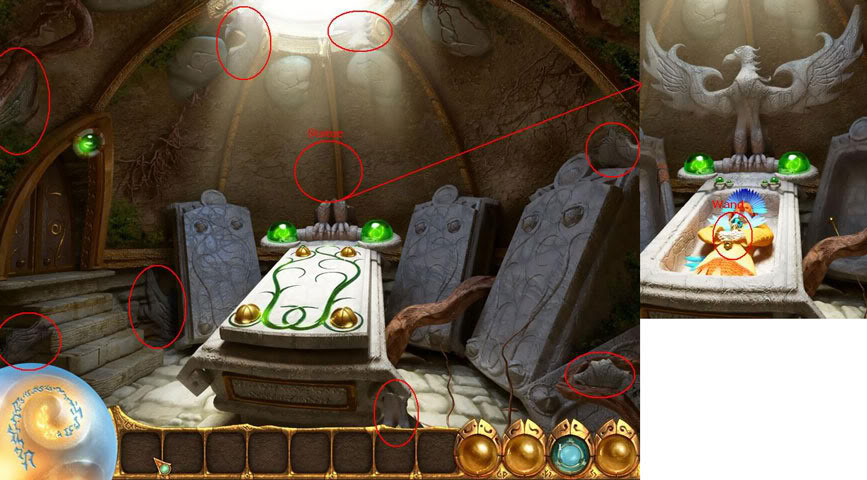
Ancient Barrow – inside
Once you’ve opened the coffin, click on the wand that is held by the priest, and find the 5 items related to it.
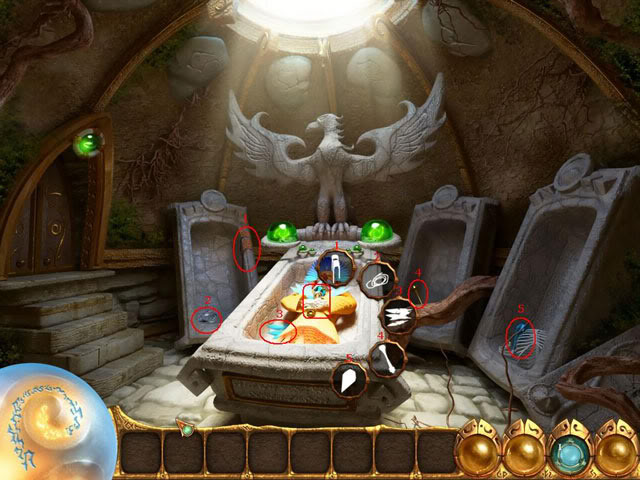
Now that you have the wand, click on the door on the left, and you will be taught how to use the wand to draw magical gestures. Simply draw the form of the gesture with your wand, it doesn’t matter where or how big you draw it. Once you’ve opened the door, go through.
The strange tree-creature will tell you this is not the wand he was looking for, but you can keep it. He also gives you the required map pieces. Click on the right side of the screen to return to the world map, and assemble the map for your next location. Don’t forget to pick up the chromatic lens.
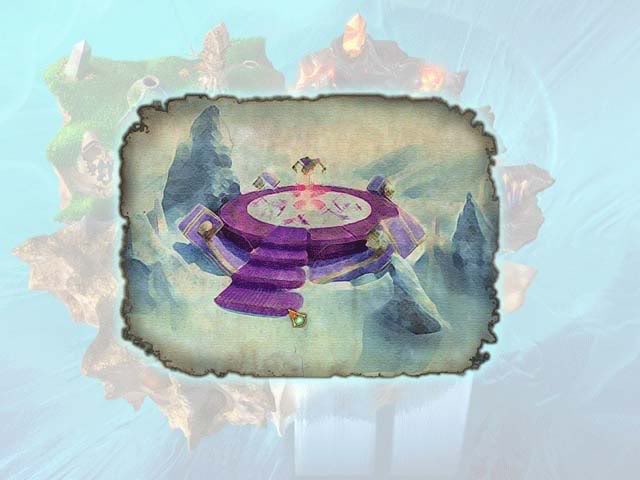
Oracle’s Hermitage
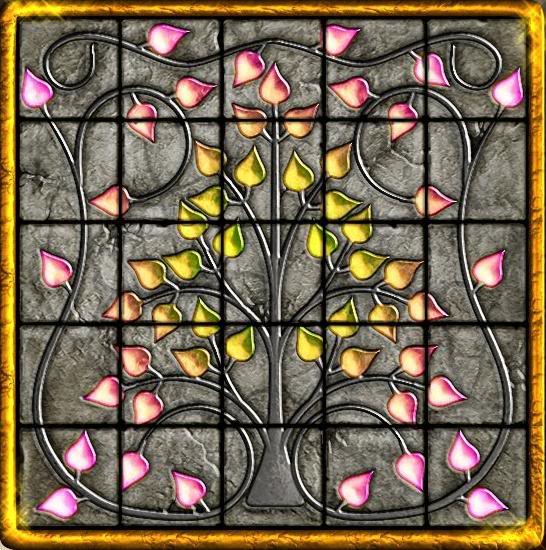
Click on the blue crystal sign on the right, to open a puzzle. Click neighbouring pieces to switch the pieces, and restore the picture to its original state. Solve 3 of these puzzles to restore the bridge.
TIP: work your way from right to left or left to right, one column at a time.
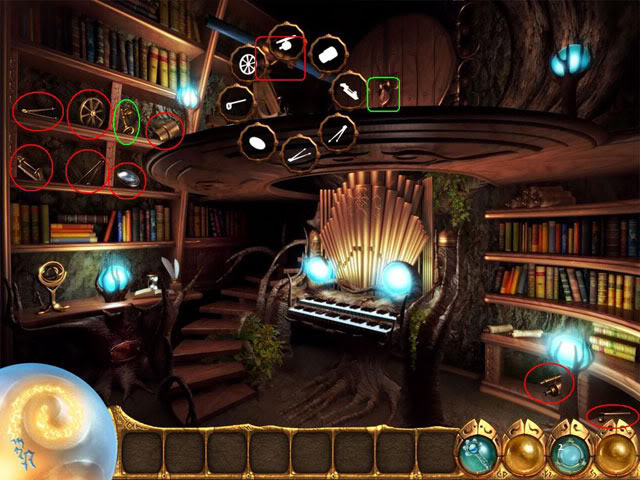
Now click on the base item above the door on the other side, and find the corresponding items.
Once you’ve completed the item, play a mini-game and guide the ball to the exit.
Play it 4 times to build a ladder-bridge up the tree.

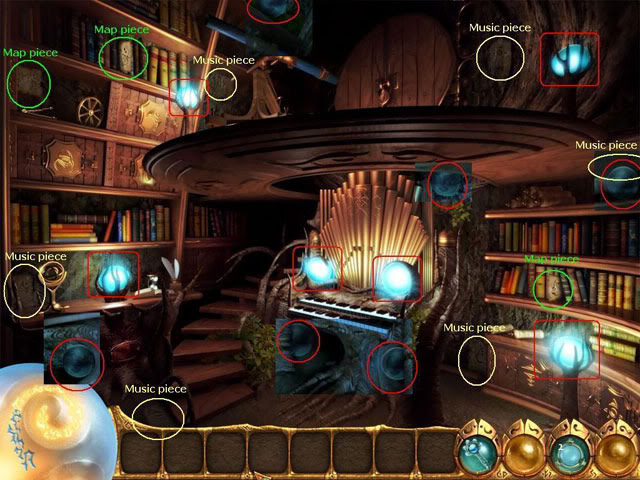
Once you’ve completed the bridge, click on the top of the screen to go up. Once up there, take out your wand to use it as a flash light. Look around the room to find 6 blue orbs, which you place on the 6 scorges, to light the room.
Now gather the 5 music pieces lying around, and click each of them on the organ. This will trigger a mini-game, where you need to press a key when one of the orbs falling down the columns crosses the bottom line. If you miss it, simply try again. Once you’ve played the 6 music pieces, a cupboard will open in the top left, where you will find a map piece, and one will open in the bottom right. Gather the other 2 map pieces as well.
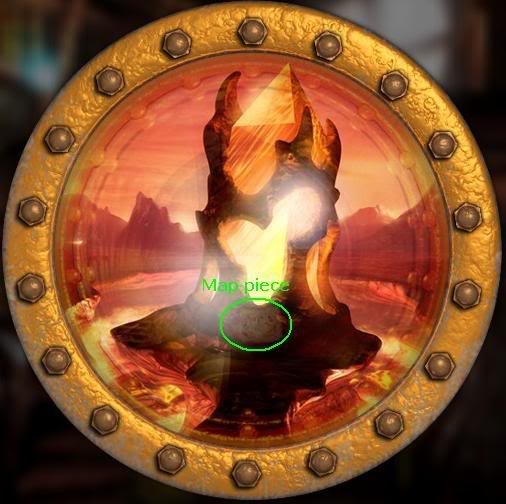
Now gather the parts of the telescope and repair the telescope. Grab the key and open the window-lock. Now click on the telescope to look through it, and grab a map piece.
Go back out and find the last map pieces, and click on the bottom of the screen to go back to the map screen, and reassemble the map.
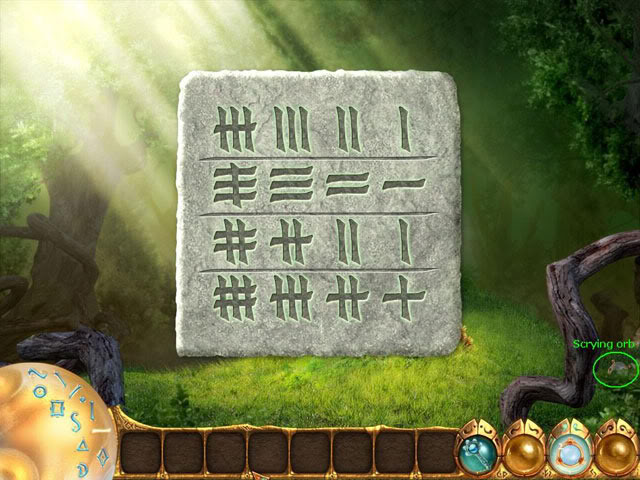
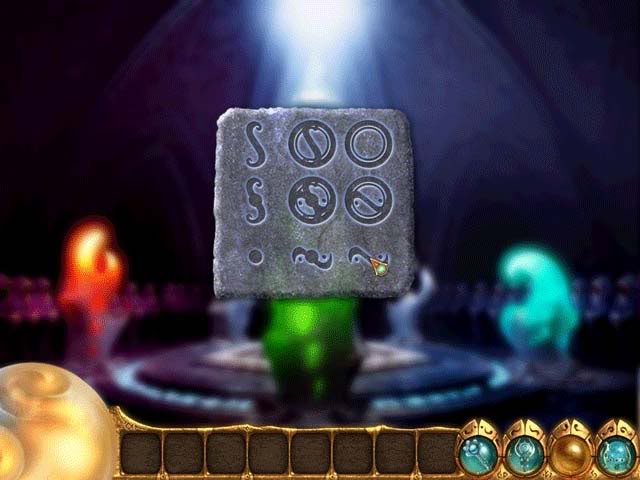
Wood Glyphstone
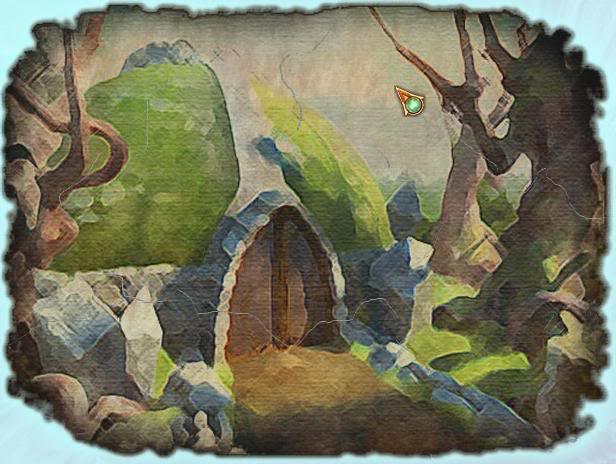
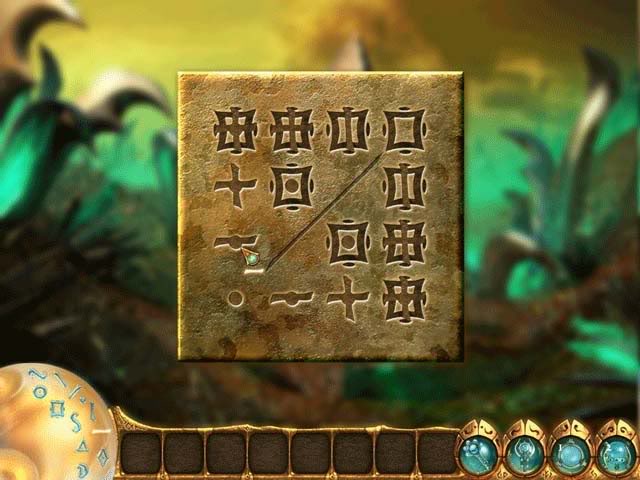
Go to the Wood Glyphstone and find the Scrying Orb on the bottom right of the screen.
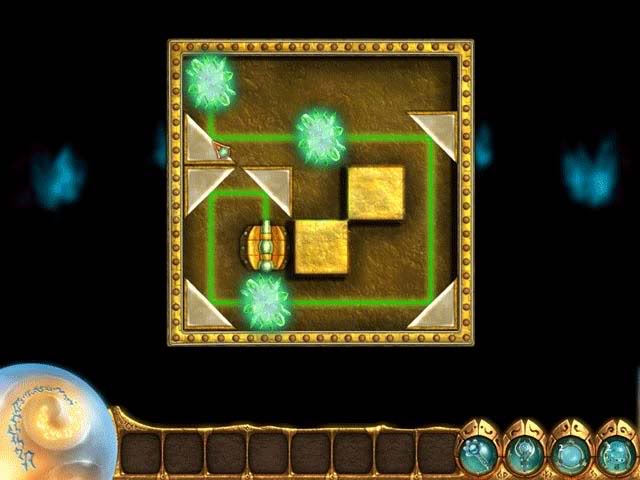
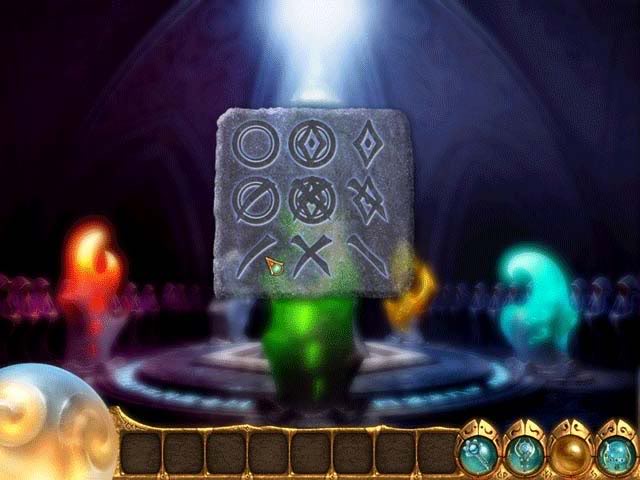
Now select the wand. Click on the glyphstone to remove the roots around it, and click once more to see your lightstone. In the bottom left part of the screen, in the large orb, you see several shapes. Use these to complete the signs on the stone.
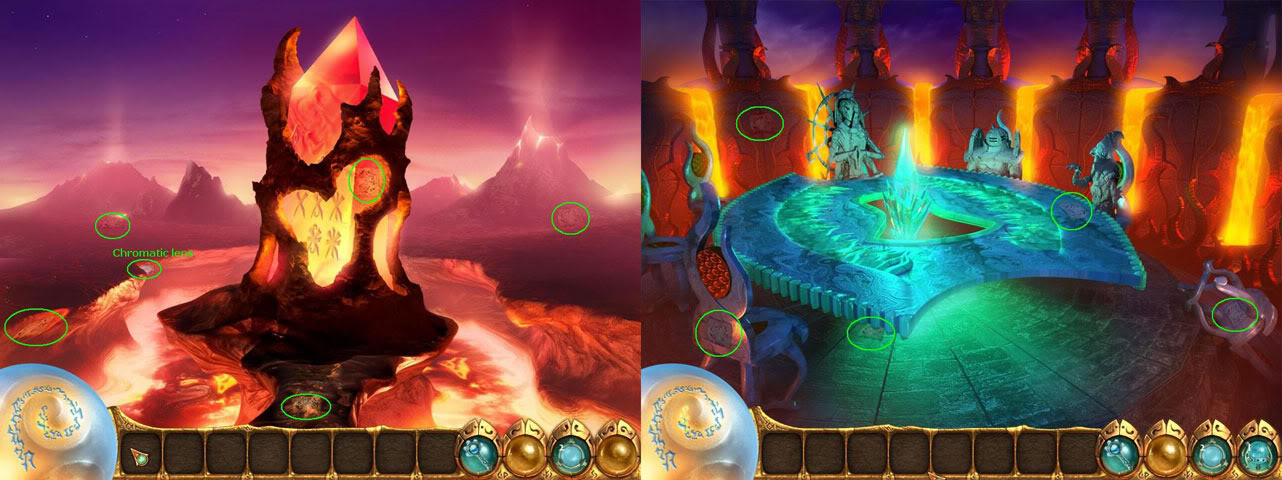
Fire Glyphstone
You will now be teleported to the Fire Glyphstone. Find 5 map pieces, and click on the right side of the screen, to leave to the map.
Hall of Brotherhoods
Go to the Hall of Brotherhoods, and after talking to the oracle, find the other 5 map pieces. Click in the middle of the screen to return to the map screen, and reassemble the map.
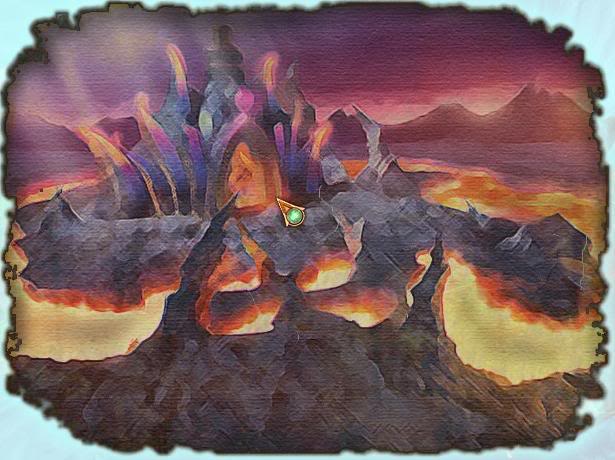
Hearth of Power
Grab the 4 hammers on this side of the lava, and use them to break down the 4 rock pilars, creating a save path to the other side. On the other side, find 6 more hammers (pink circles), and break down 6 rocks (pink cornered squares), and pick up the items found behind these rocks, and combine them on the front door.
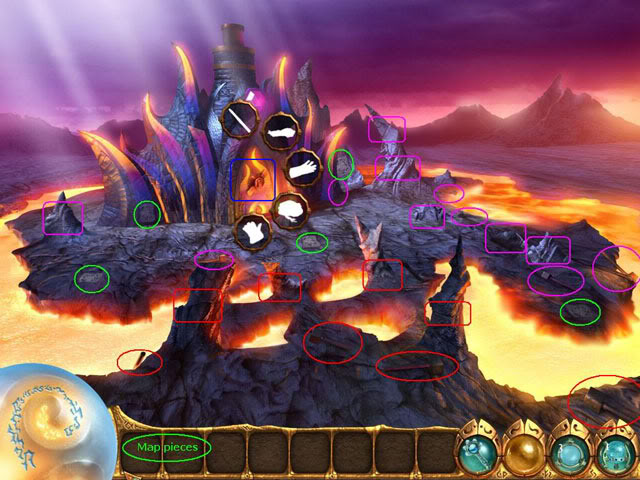
Click 4 times on the left side, 2 times on the right side, and 2 more times on the left side of the door to open the lock. Go through the door.
Hearth of Power -inside
Find 9 pieces of coal (marked blue) and put them in the furnace to heat it.
Now click on the top of the furnace with the wand, and trace the glyphs to repair it.
Find 7 metal-worker items (marked red) and combine them with the anvil.
Now click on the anvil, and in this mini-game, click on the brown spots to straighten out the metal and get the Orichalcum rod.
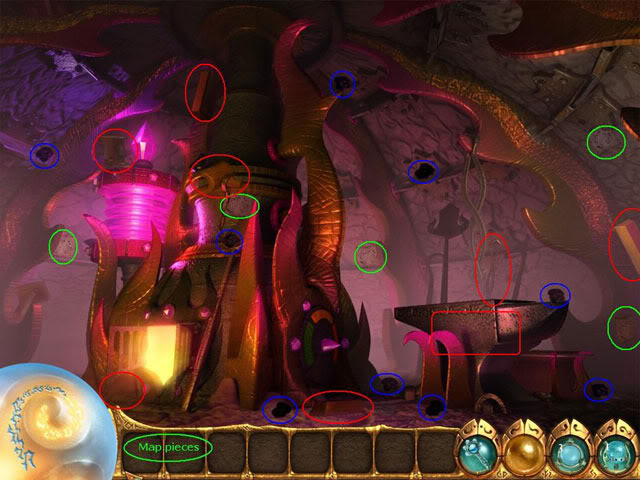
Click on the right side of the screen to go back out, and click on the bottom of the screen to reassemble the map.
Hall of Brotherhoods
Return to the Hall of Brotherhoods and talk to the oracle.
Ancient Barrows
Return to the Ancient Barrows and talk to Oakbeard.
He requests that you find him 10 Seeds of Renewal, 10 Firebloom Flowers, and 10 Kurosian Crystals. The Seed of Renewal are found in several of the Forest locations, while the Firebloom Flowers are found in several of the Fire locations. The crystals are found in both locations.


After you have found all the requested items, return to the Ancient Barrows, and return the items to Oakbeard. He will then give you items for the Oracle.
Hall of Brotherhoods
Return to the Hall of Brotherhoods and talk to the oracle.
Fire Glyphstone
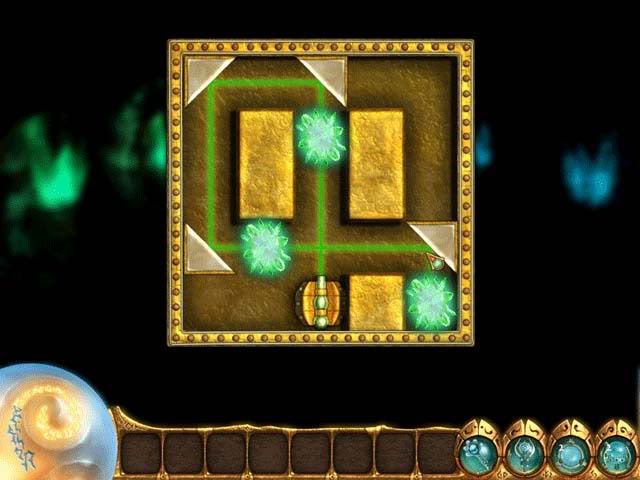
Go to the Fire Glyphstone and select the wand to remove the rocks around the glyphstone, and click once more to see your lightstone. In the bottom left part of the screen, in the large orb, you see several shapes. Use these to complete the signs on the stone.
Water Glyphstone
After finishing the fire glyphstone, you will be transported to the Water Glyphstone.
Collect 5 map pieces, and click on the left side of the screen to go to the map.
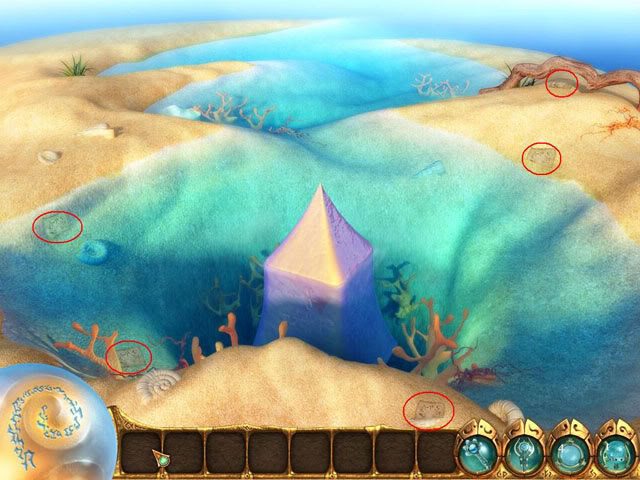
Frozen Obelisk
Go to the Frozen Obelisk, and collect the 3 map pieces that can be reached right away.

Now click on the strange machine in the background, and combine the requested items.
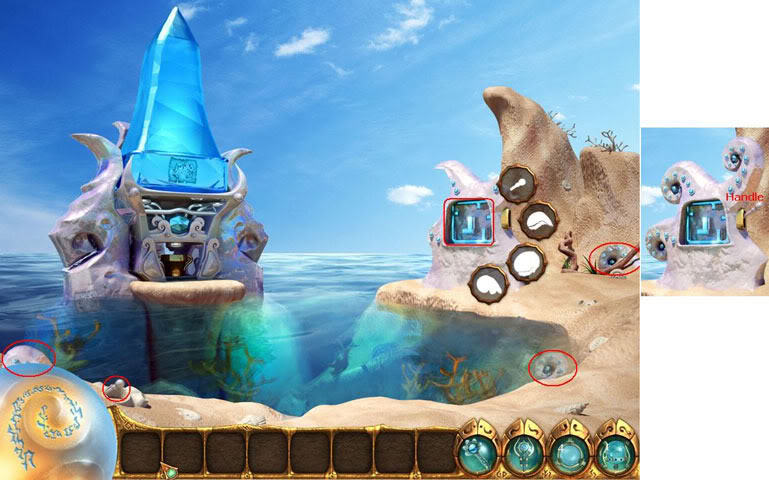
Once completed, click on the handle, to start another ball-guiding mini-game.
Play it 4 times to build a bridge to the tower.

Click on the map piece half in the water to get it. Now select the scepter, and click on the frozen map piece to break the ice and get it. Grab the bucket found under the obelisk, and fill it with water. Now put the bucket back, and there will form ice cubes in it. Click on it once more to open a puzzle, where you need to fit all pieces in the ice cube.
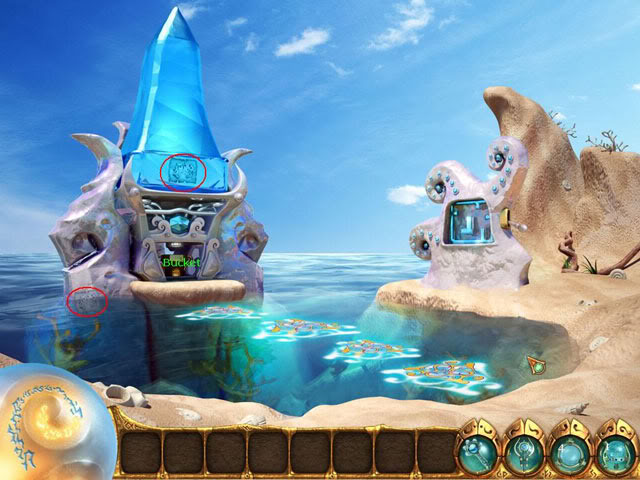
Return to the map screen, by clicking on the left side of the screen, and reassemble the map.
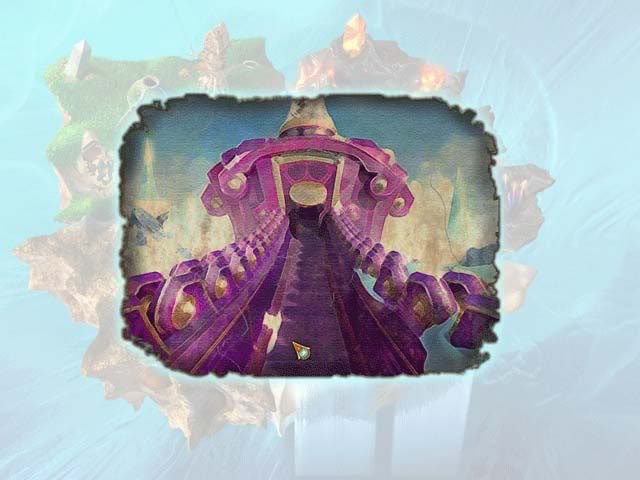
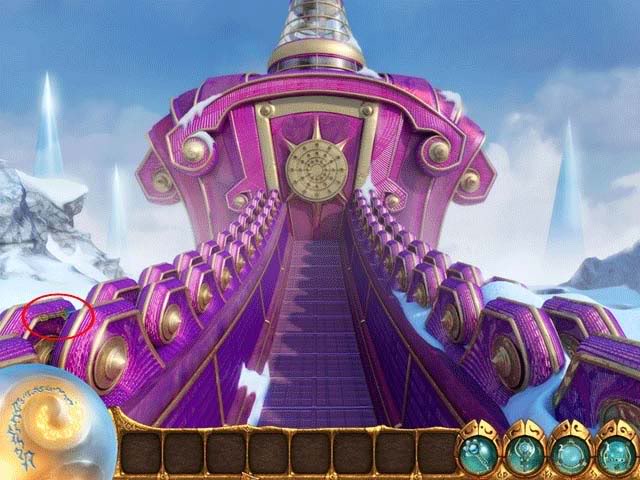
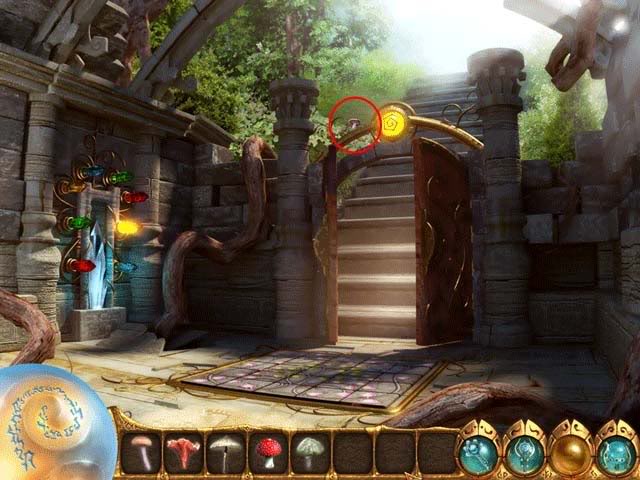
Farseer’s Tower -outside
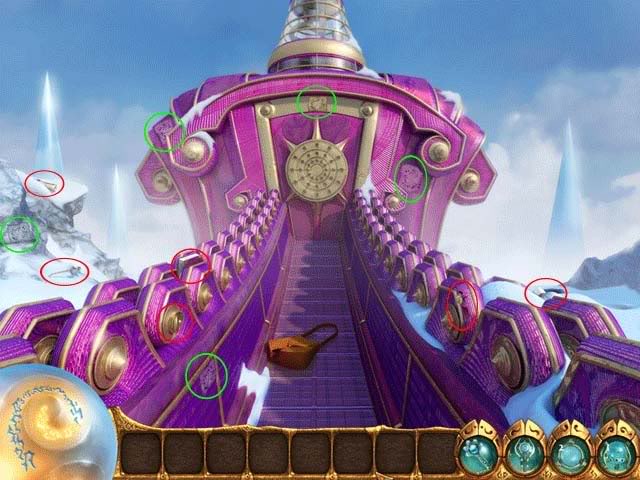
Go to the Farseer’s Tower, click on the giant wheel and collect 5 pieces of vine to repair the wheel.
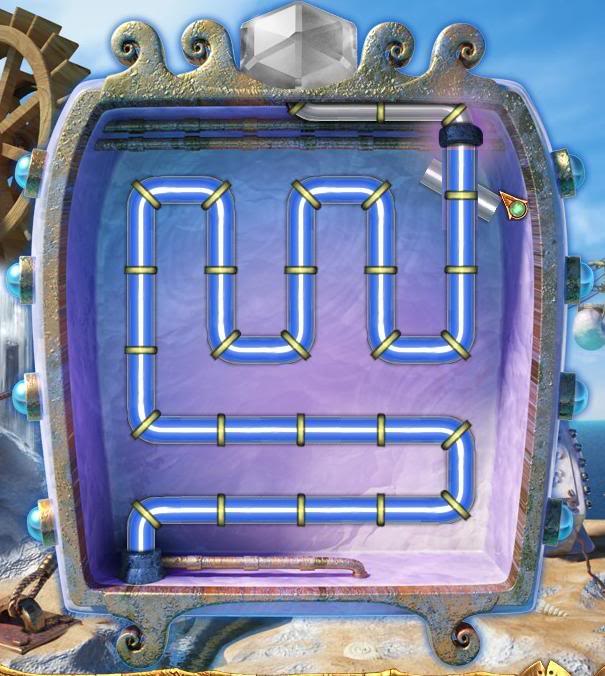
Now select the scepter, and click on the control panel to open it. Turn the pieces so that all connect correctly, and water flows from one end to the other.
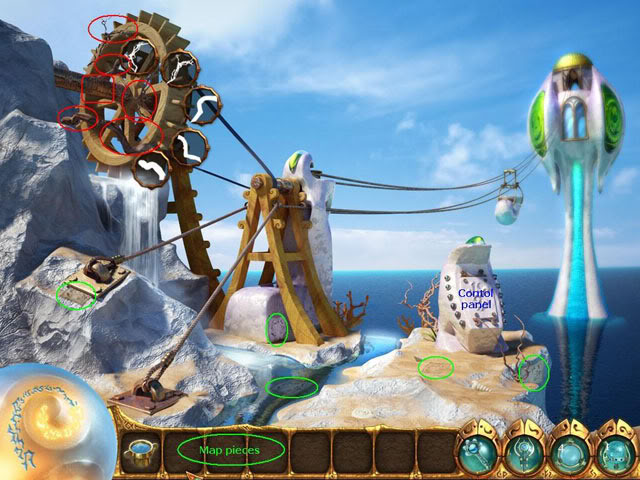
Once the control panel has been restored, the gondola will come down. Click on it to ride it up to the tower.
Farseer’s Tower
Talk to the farseer, and help him with his telescopes. Look through each of the telescopes, and combine one or more of the colored lenses to reveal a hidden glyph, and click on the glyph.
– For TELESCOPE 1, combine the blue and yellow lenses.
– For TELESCOPE 2, combine the blue, red and yellow lenses.
– For TELESCOPE 3, use only the red lens.
– For TELESCOPE 4, combine the blue and red lenses.
– For TELESCOPE 5, use only the blue lens.
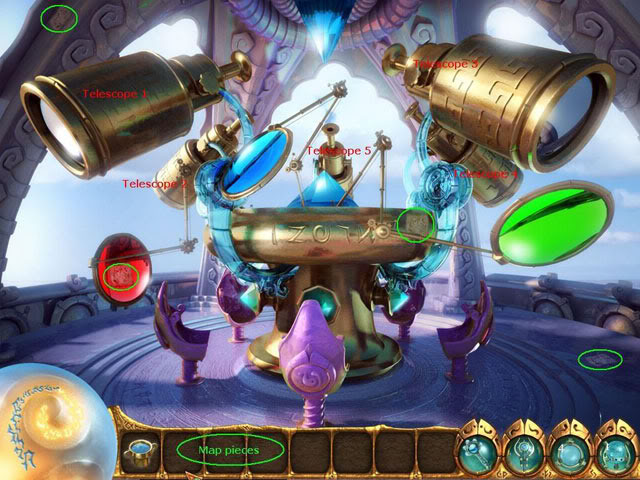
Once you have found the glyphs in the telescopes, they will appear in the tower. Use your staff to trace the 5 glyph symbols. It doesn’t matter where you draw them, nor in which order. If you can not clearly see the glowing glyph, look on the center panel of the telescopes, to see which glyphs you have traced (blue), and which ones not yet (grey).
Do this correctly, and the farseer will award you with another map piece.
Water Glyphstone
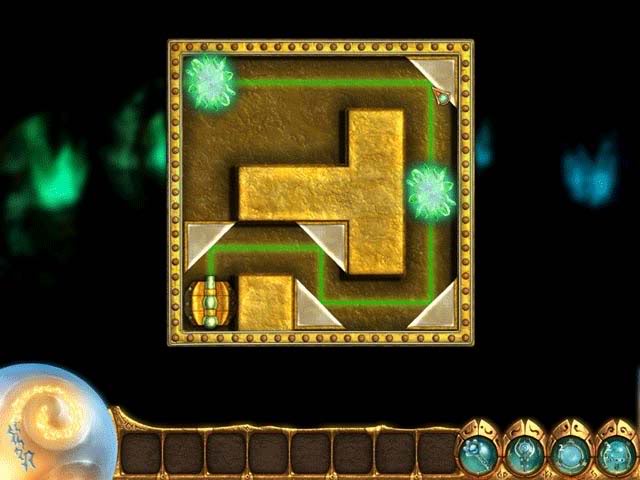
Make sure you have collected all the map pieces, and go to the Water Glyphstone. Select the wand and click on the Glyphstone to have it rise from the water, and click once more to see your lightstone. In the bottom left part of the screen, in the large orb, you see several shapes. Use these to complete the signs on the stone.
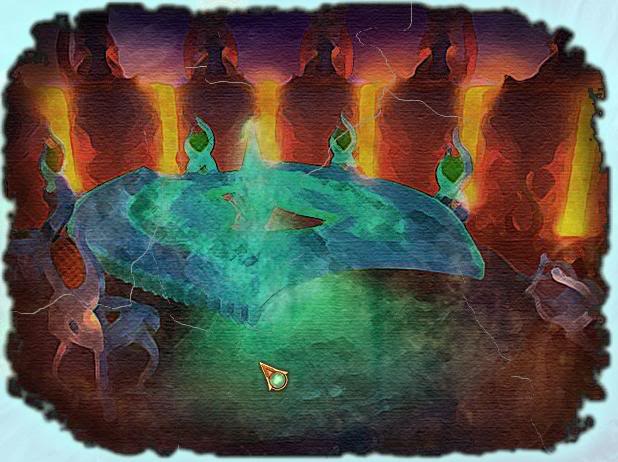
Obsidian Hold
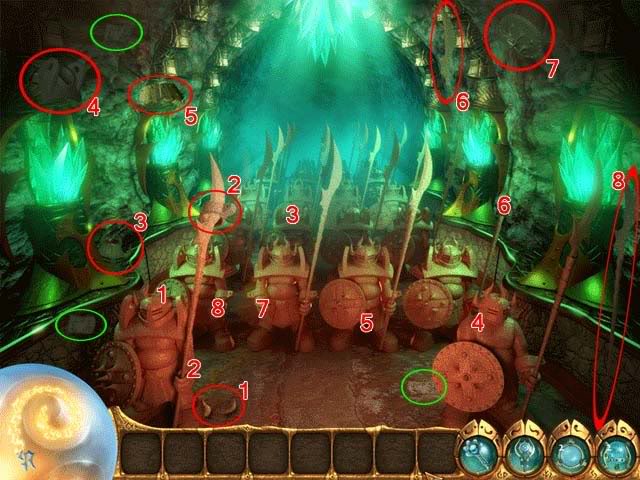
Before searching for more map fragments, you’ll need to restore the silver Lily field. Find and collect the statue pieces (circled in red) and assemble them according to the picture. Use the Sceptre on the Pile of Dirt to find an additional Scrying Orb. There are three map fragments in this area (circled in green).
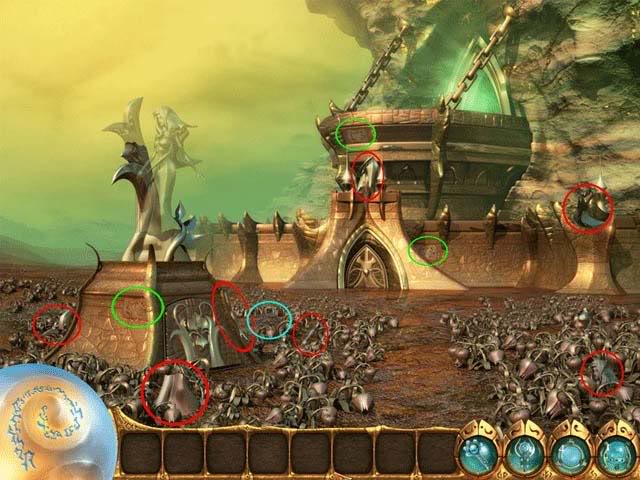
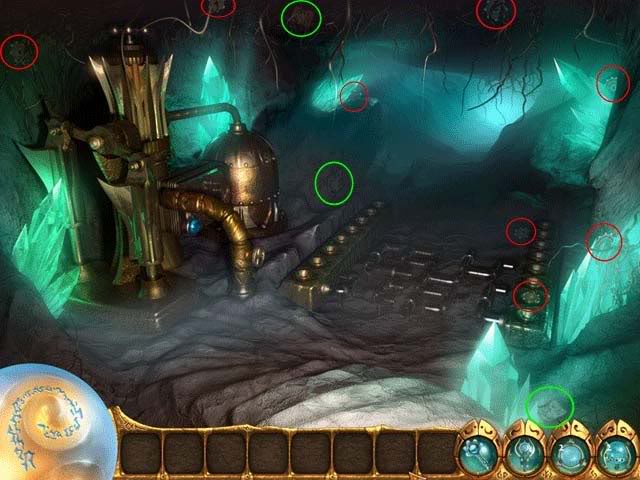
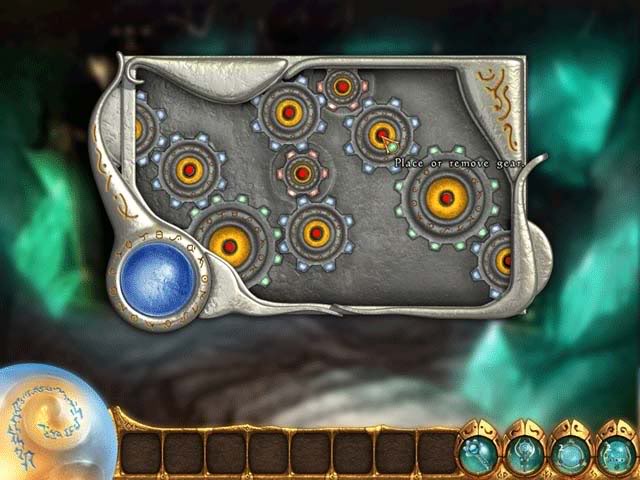
Once you’ve restored the statue, a secret area will open beneath the statue. Enter and recover 3 more map fragments. There are 8 cog gears you will need to find in here. When you find one, add it to your inventory below.
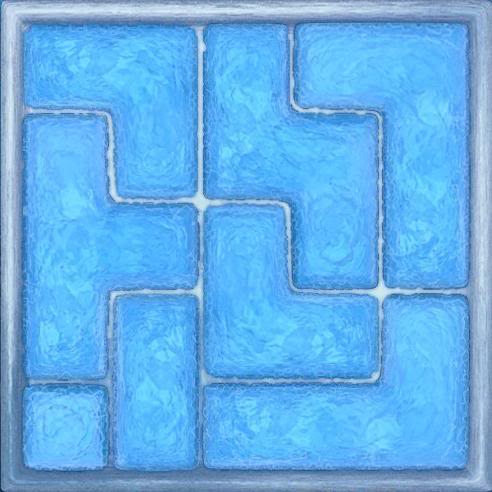
Once you’ve recovered all the gears, click on the irrigation machine. Assemble the gears in this fashion (red=small, blue=medium, green=large):
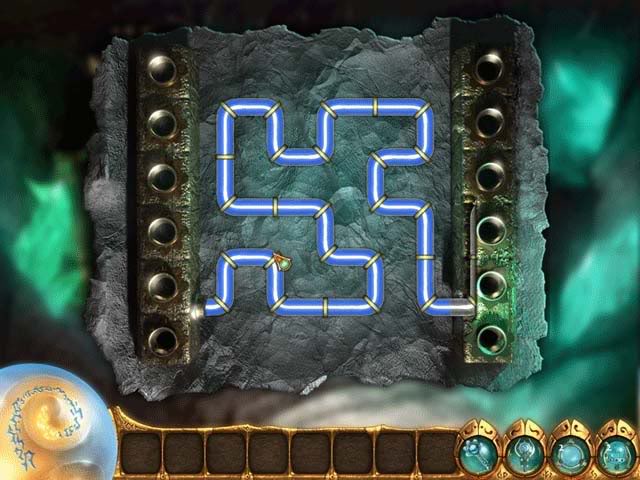
Next, click on the pipe system on the floor. Click on a pipe fragment to rotate it. The goal is to connect all of them to make the water flow. The final arrangement should look like this:
Return to the surface and click on the doors to the Obsidian Hold to talk to the Guardian. He’ll want proof of your restoring the lilies. Click on one on the right-hand side and give it to him to gain access to the hold.
Obsidian Hold -Inside-
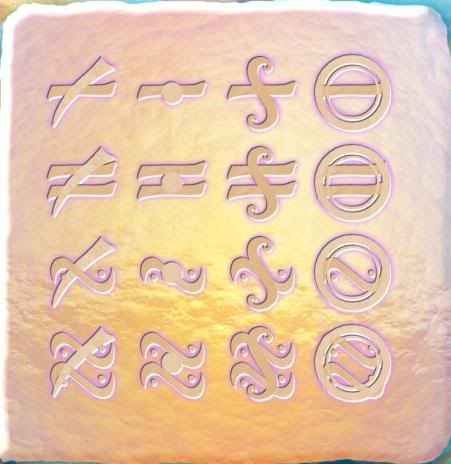
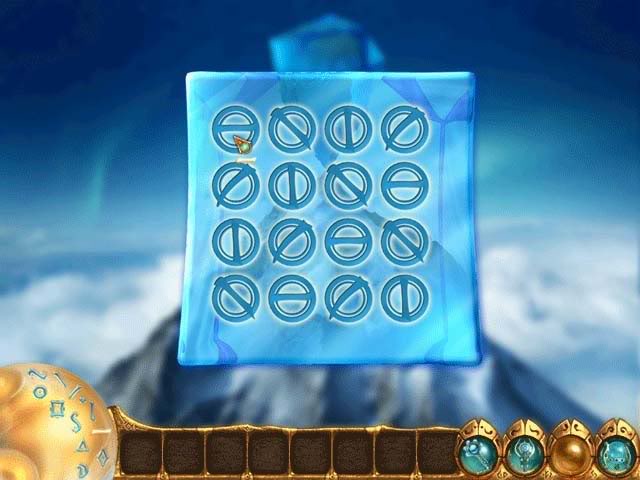
It’s dark inside. Click on the six crystals (ordering them left to right) and solve their puzzles to restore light. Here are the solutions (again going from left to right):

Once the area is lit, you’ll need to find the missing pieces belonging to the warriors and restore them. A circle with a number (i.e. 4) will match the number without a circle (i.e. 4) to show you where the object belongs. There are 3 more map fragments here.
Completing the task, go back outside to be rewarded with the final map fragment by the guardian. Assemble the map and return to the Metal Glyphstone.
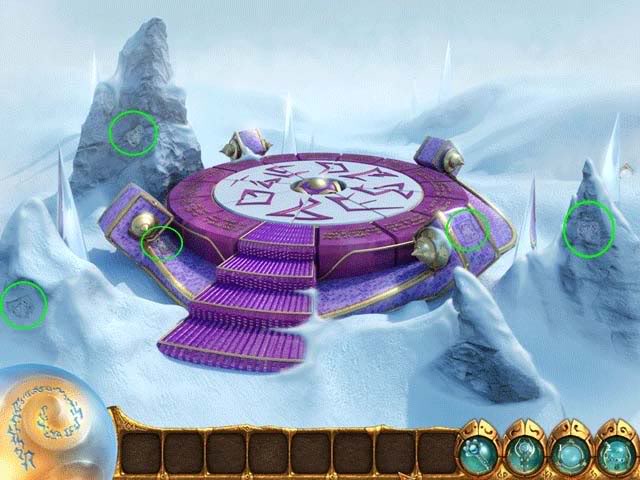
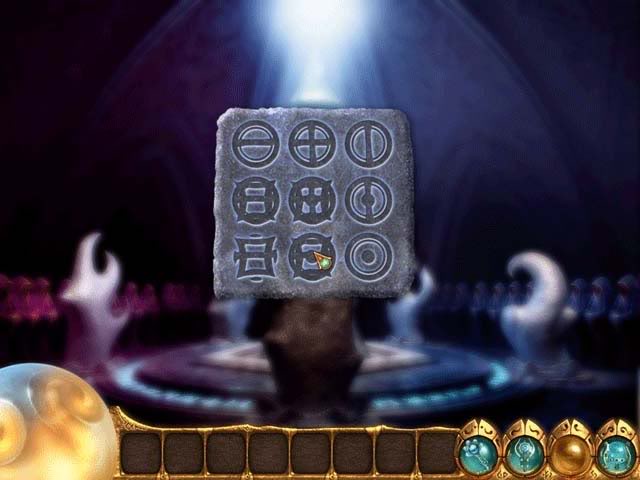
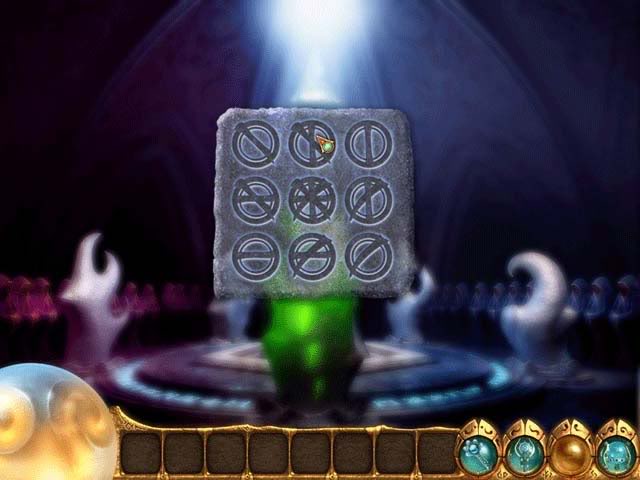
Metal Glyphstone
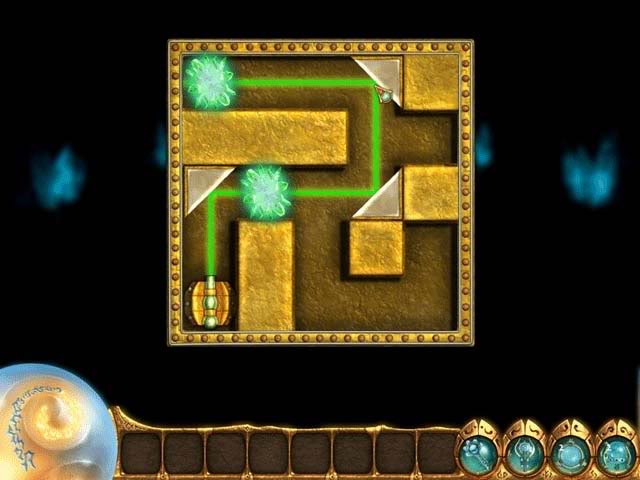
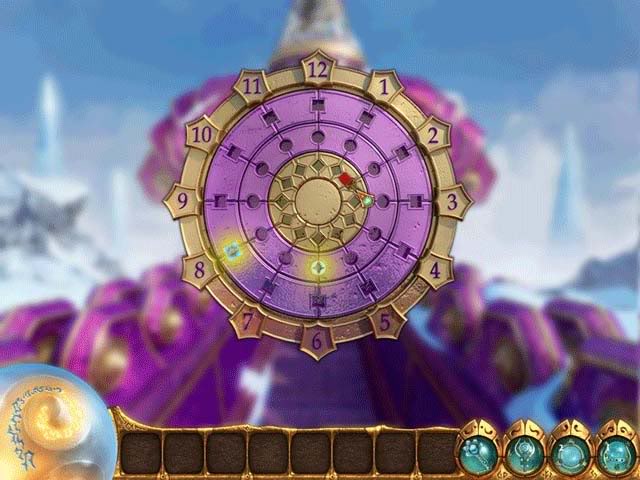
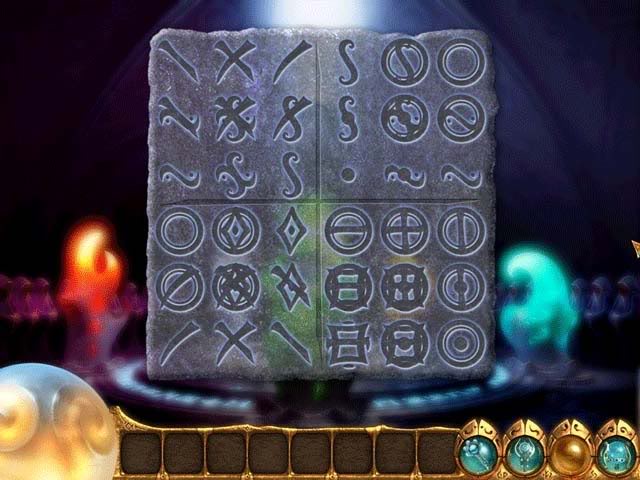
Back at the Glyphstone, use the Magic Wand to move away the rock. Complete the following pattern on the stone to activate it:
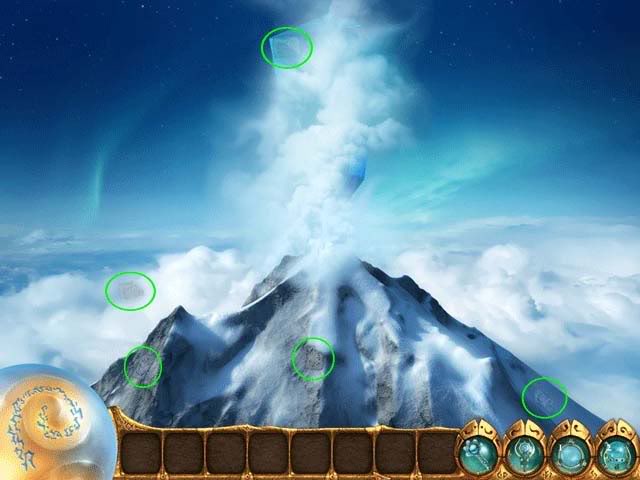
Aether Glyphstone
This will be the next location you are transported to. There are 5 map fragments to be found here before leaving the area:
Wheel of Time
Collect the final 5 map fragments, then click on the Wheel.
Switch tiles to make the wheel work again (you can only move tiles next to each other). The wheel should look like this:
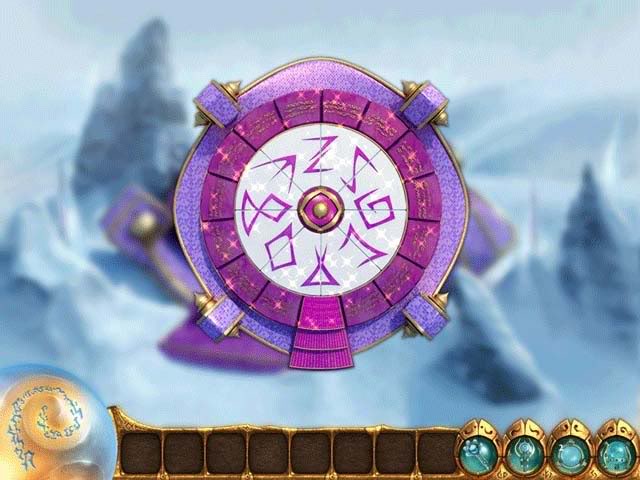
Next, click on the middle of the activated wheel. Find the 9 differences between the two pictures.
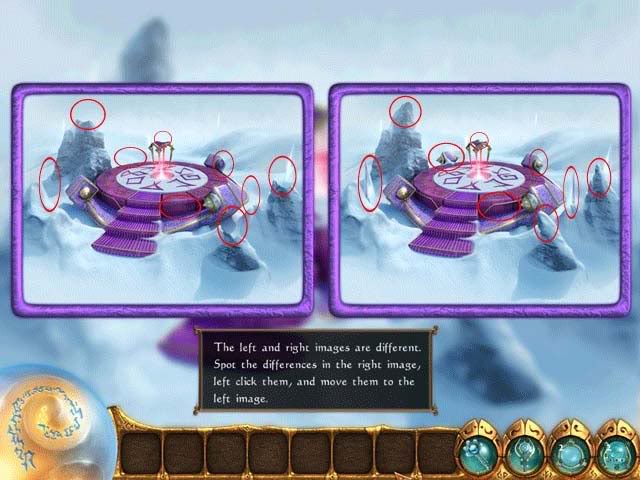
You will uncover a clue. Remember the time "08:30:10". Exit the area and assemble the map to reveal the next location.
Library of the Old Ones
Outside the library are 5 map fragments. You will encounter the Librarian, whose bag has ripped and whose belongings are now missing. Find her belongings and her key.
After finding the key, the Librarian will remember that the Guardian and the Farseer have the other two you’ll need. Revisit the Obsidian Hold and the Farseer’s Tower -inside-. Talk to both to recover the other two keys you will need, and return to the Library. Click on the door and place the keys in the following places:
- Blue- Outer Ring- 8
- Green- Middle Ring- 6
- Red- Inner Ring- 2
Library of the Old Ones -Inside-
Inside the Library, first collect the map fragments and the Pin Cards. There are 5 of each.
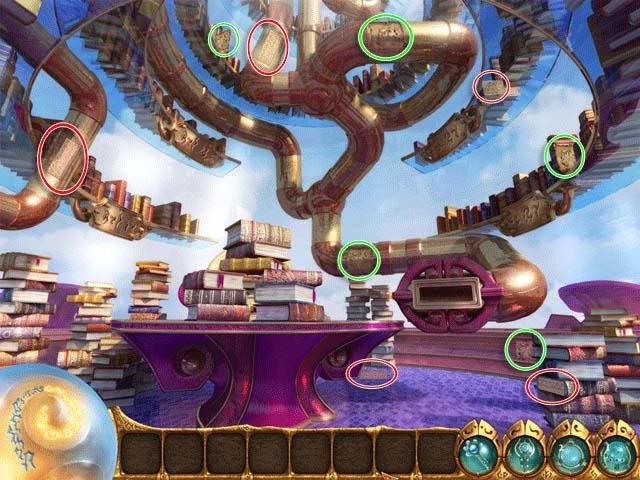
Next, you’ll need to organize the books on the table before you can use the Pin Machine. Organize the books in the following way (note, the shelves on which they are to be organized are marked by gold plaques):
- Grave Robbing for Fun and Profit by G – Non-fiction A-M
- Lord of the Glyphs by J.R. Token – Fiction A-M
- The Odyssey, Part 2: Revenge of the Kraken by Homer S.– Fiction N-Z
- How to be a Super Grandparent by Kamila Margaret– Non-Fiction A-M
- Navigating the Winds of Trade by Les Moore– Non-Fiction N-Z
- Pirate Talk for Beginners by R. Matey– Non-Fiction N-Z
- War and Peace and More War by Amos Cutter– Fiction N-Z
- Killer Cake Recipes by Jill Evans– Non-Fiction A-M
- Prophecies for Fun and Prophets by N. Damus– Non-Fiction N-Z
Afterwards, use the Pin Cards on the machine one by one. You’ll need to click the orange circular panels on the machine when the orbs reach the bottom square area. If you fail, you can always try again. After trying all 5 Pin Cards, the book you need will finally be revealed. Exit the Library and assemble the map to make the Accordant Acropolis appear.

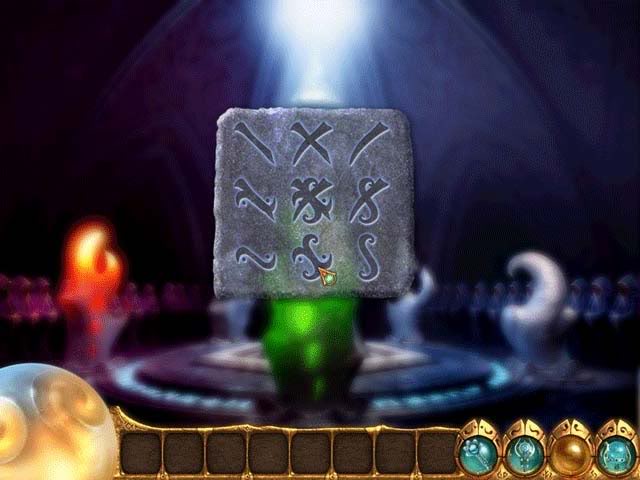
Aether Glyphstone
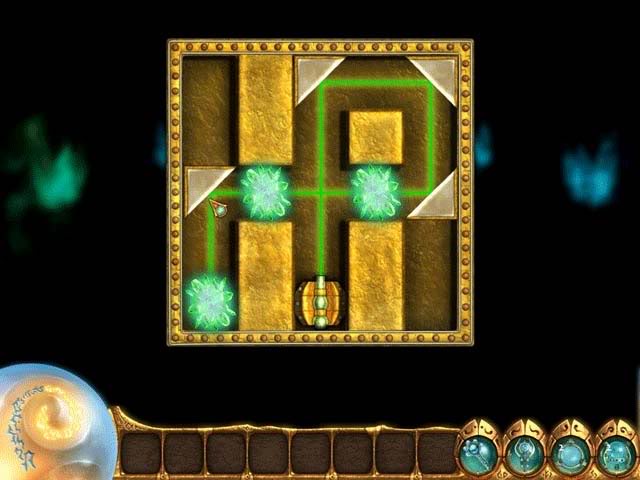
Use the Magic Wand to move the clouds away and assemble the glyphs in the correct pattern. It should look like this:
Accordant Acropolis
Inside you’ll confront Viktor, who’s attacking the Glyphstones and tearing apart the fabric of the universe. You will need to find 8 pieces for each of the various Glyphstones at the Acropolis to save Kuros. Time to retrace your steps!
Wood: Collect the Mushrooms
You’ll need to collect 8 mushrooms to restore the Wood Glyphstone. There are mushrooms scattered throughout the earth element’s locations:
Wood Glyphstone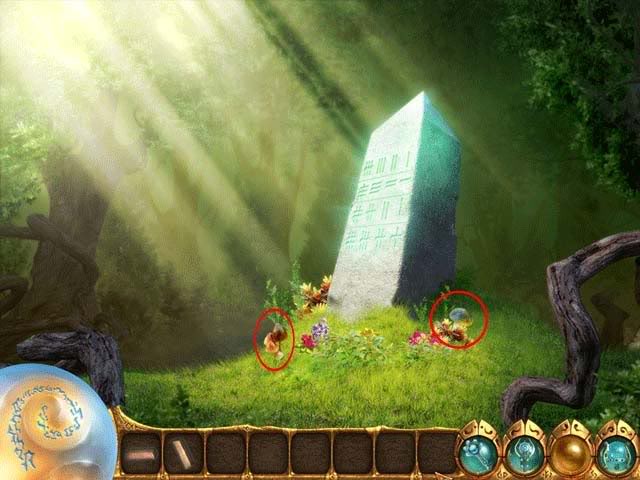
Ancient Barrow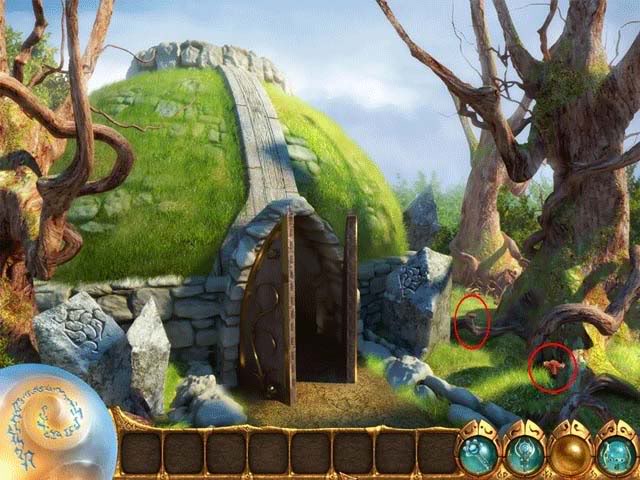
Wood Shrine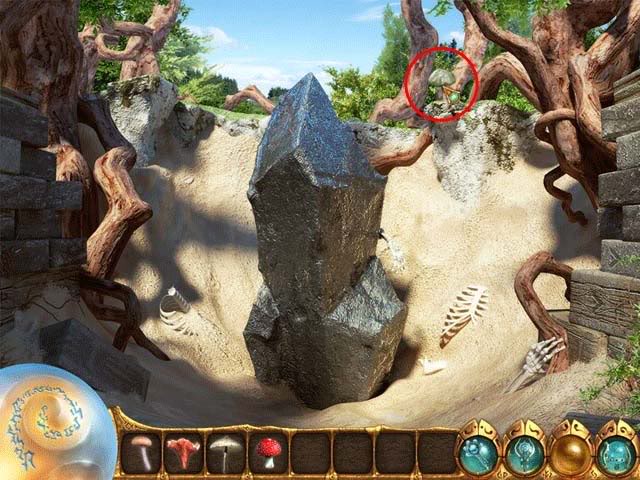
Oracle’s Hermitage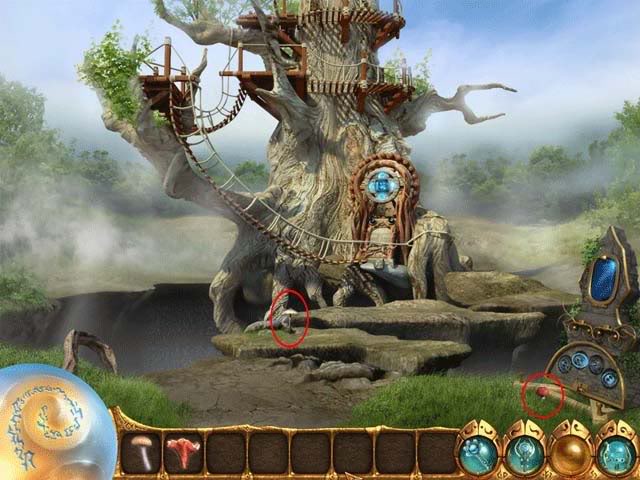
Return to the Accordant Acropolis and return all the mushrooms to their proper Glyphstone. Click on the Glyphstone again and complete the following glyph puzzle:
Fire: Collect the Carbon
You’ll need to collect 8 pieces of carbon to restore the Fire Glyphstone. There are pieces of carbon scattered throughout each of the fire element’s locations:
Fire Glyphstone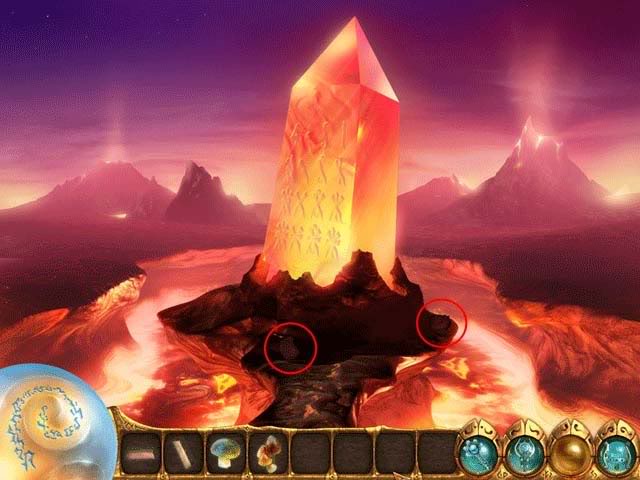
Hall of Brotherhoods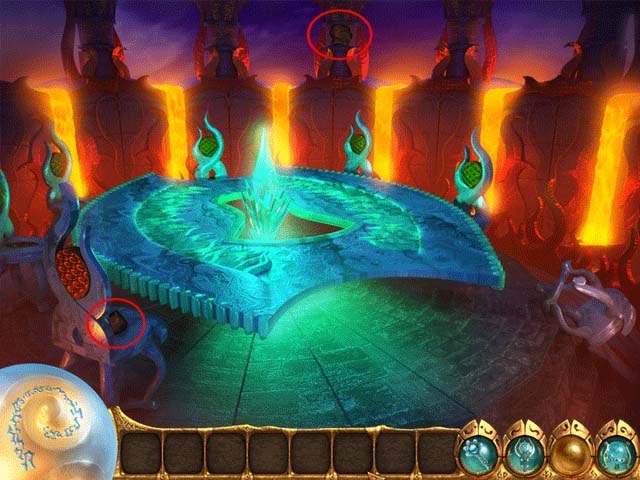
Hearth of Burning Power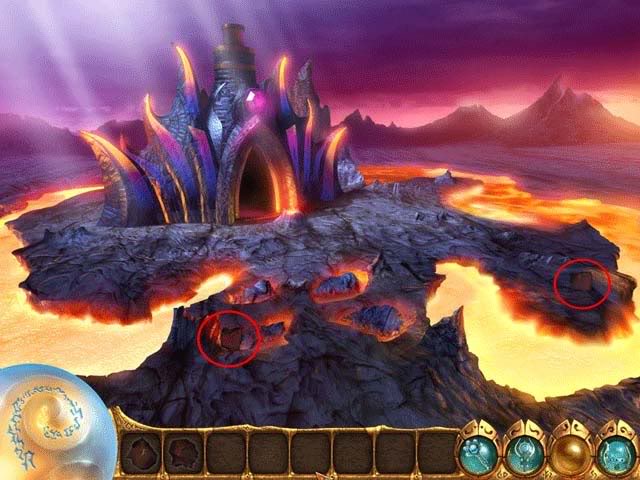
Hearth of Burning Power – Inside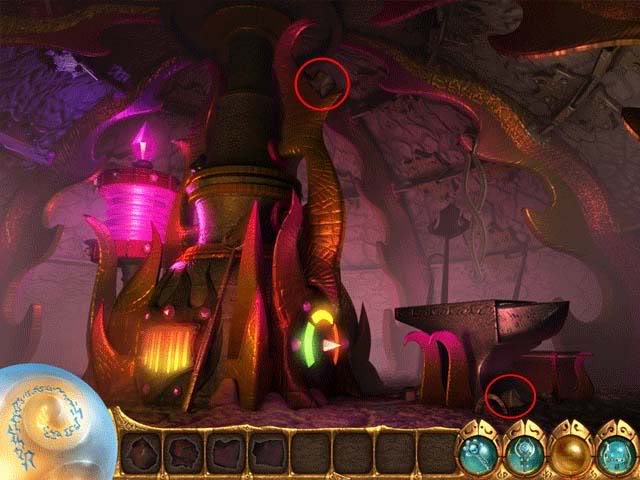
Return to the Accordant Acropolis and return all the carbon to their proper Glyphstone. Click on the Glyphstone again and complete the following glyph puzzle:
Water: Collect the Crystals
You’ll need to collect 8 crystals to restore the Water Glyphstone. There are crystals hidden throughout each of the water element’s locations: Click on the Glyphstone again and complete the following glyph puzzle:
Water Glyphstone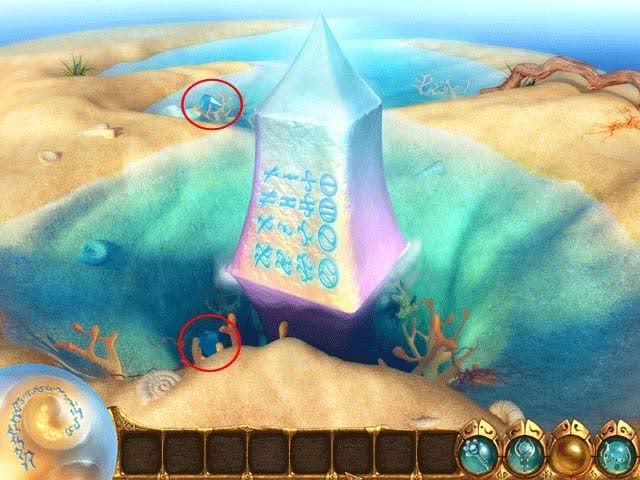
Frozen Obelisk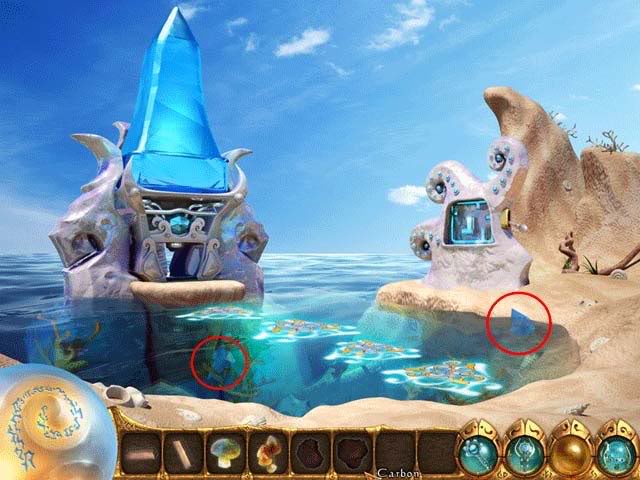
Farseer’s Tower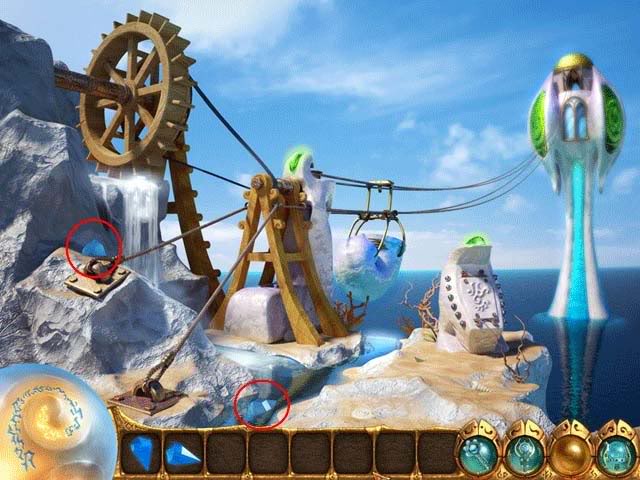
Farseer’s Tower -Inside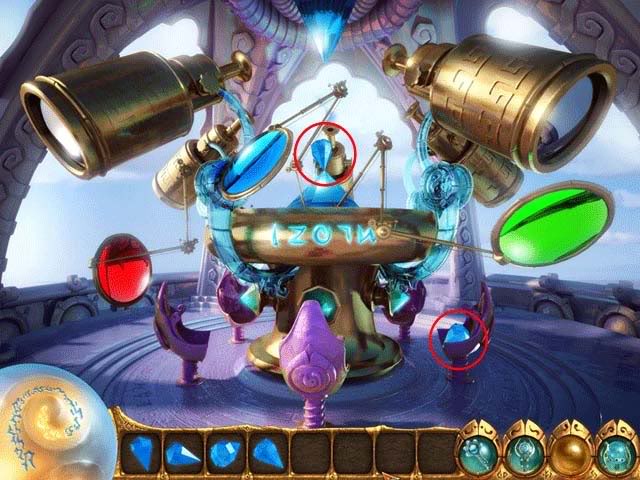
Return to the Accordant Acropolis and return all the crystals to their proper Glyphstone.
Metal: Collect the Bars
You’ll need to collect 8 bars to restore the Metal Glyphstone. There are bars hidden throughout each of the metal element’s locations:
Metal Glyphstone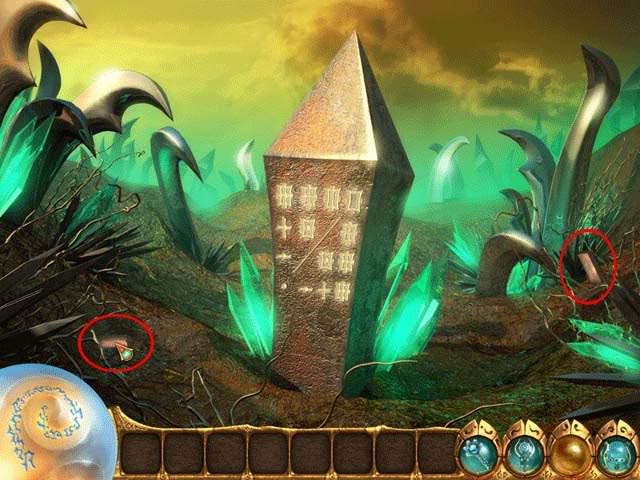
Obsidian Hold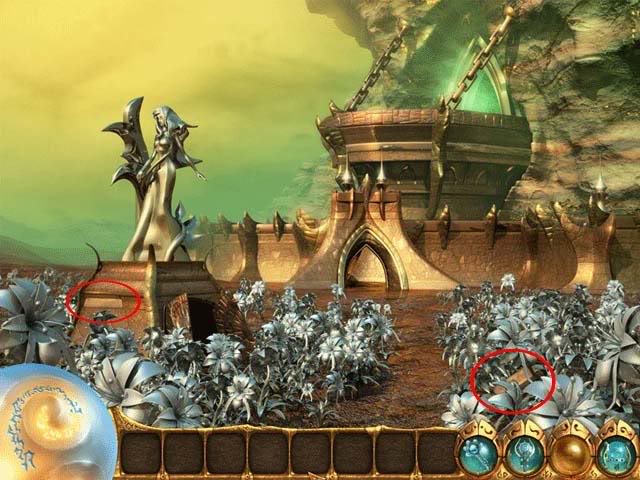
Obsidian Hold (Irrigation Room)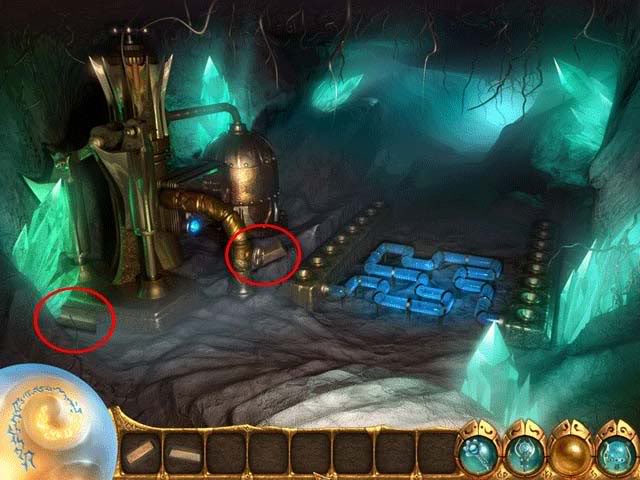
Obsidian Hold -Inside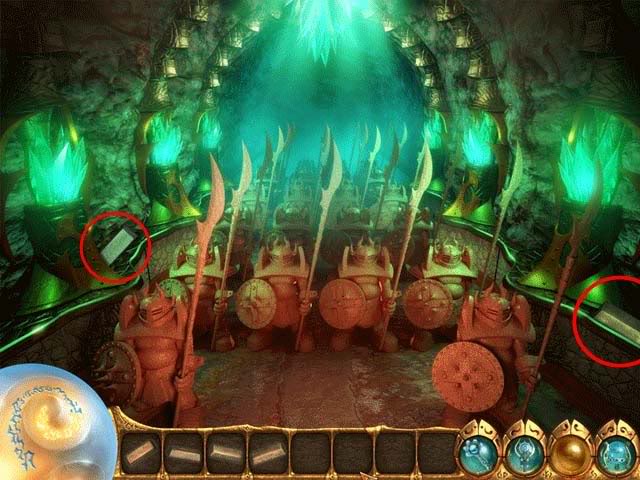
Return to the Accordant Acropolis and return all the bars to their proper Glyphstone. Click on the Glyphstone again and complete the following glyph puzzle:
Aether: Collect the Snowflakes
You’ll need to collect 8 snowflakes to restore the Aether Glyphstone. There are snowflakes scattered throughout the aether element’s locations:
Aether Glyphstone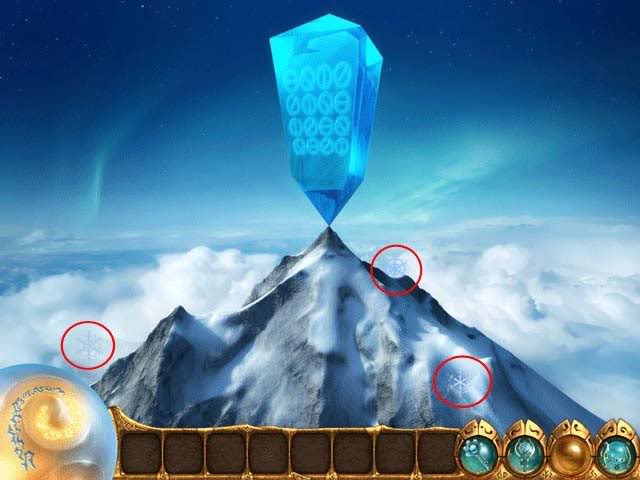
Wheel of Time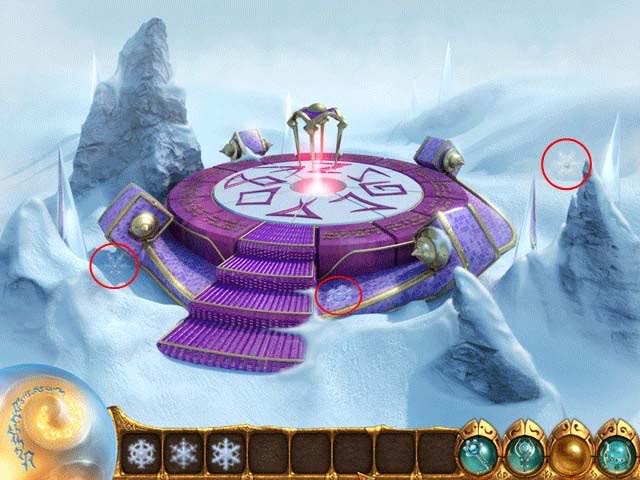
Library of the Old Ones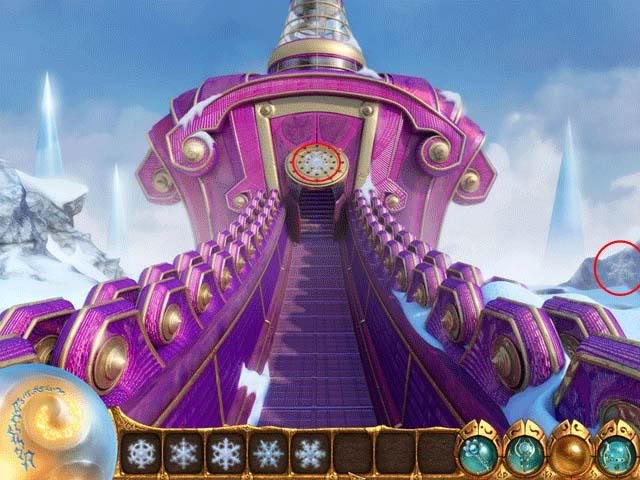
Return to the Accordant Acropolis and return all the snowflakes to their proper Glyphstone. Click on the Glyphstone again and complete the following glyph puzzle:
Accordant Acropolis
Once you’ve restored power to all the Glyphstones, click on the large stone in the middle and complete the following glyph puzzle:
The Glyphstones have been restored, and Kuros is saved! Sit back and enjoy your final ending movie scenes!
“;

More articles...
-
Grow A Garden 2 Base Price List
What's the most valuable crop? -
Evomon Best Starter [Leafbun, Blazpup, or Bubble?]
Grass-type, Fire-type, or Water-type? -
Evomon Tier List [META and BEST Evomon]
The Evomon dream team.