![Digimon UP Tier List [Supports, Buddies, and Partners]](/wp-content/uploads/2026/07/digimon-up-tier-list.jpg "Digimon UP Tier List [Supports, Buddies, and Partners]")
Digimon UP Tier List [Supports, Buddies, and Partners]
These Digimon will get you UP the leaderboard.


![Haze Seas Boss Drops [Chances, Locations, and How to Spawn]](/wp-content/uploads/2026/07/haze-seas-boss-drops.jpg "Haze Seas Boss Drops [Chances, Locations, and How to Spawn]")

Welcome to Gamezebo's strategy guide for Kellie Stanford: Turn of Fate. Navigation: -General Tips -Chapter 1: Kellie's Room -Chapter 2: Mike's Trailer -Chapter 3: Studio Storehouse -Chapter 4: Boss's Office -Chapter 5: Airline Office -Chapter 6: The Island -Chapter 7: The Bungalow -Chapter 8: Jungles -Chapter 9: The Yogi -Chapter 10: The Temple -Chapter 11: The Airplane -Chapter 12: Escape the Island -Chapter 13: Find Kellie's Father General Tips: Hi…
a:1:i:0;a:2:s:13:”section_title”;s:41:”Kellie Stanford: Turn of Fate Walkthrough”;s:12:”section_body”;s:35943:”
Welcome to Gamezebo’s strategy guide for Kellie Stanford: Turn of Fate.
Navigation:
-General Tips
-Chapter 1: Kellie’s Room
-Chapter 2: Mike’s Trailer
-Chapter 3: Studio Storehouse
-Chapter 4: Boss’s Office
-Chapter 5: Airline Office
-Chapter 6: The Island
-Chapter 7: The Bungalow
-Chapter 8: Jungles
-Chapter 9: The Yogi
-Chapter 10: The Temple
-Chapter 11: The Airplane
-Chapter 12: Escape the Island
-Chapter 13: Find Kellie’s Father
General Tips:
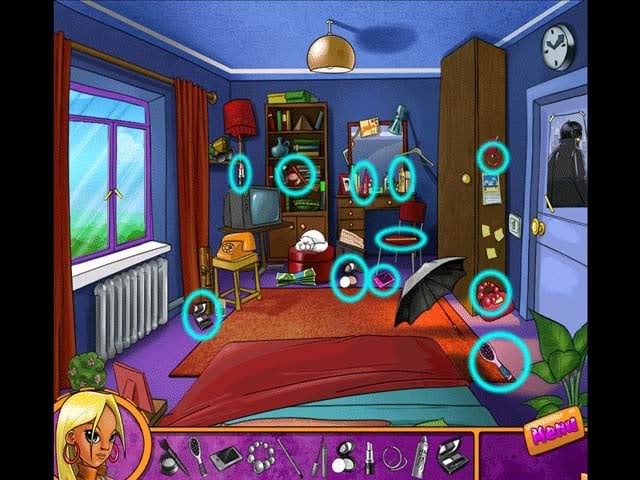
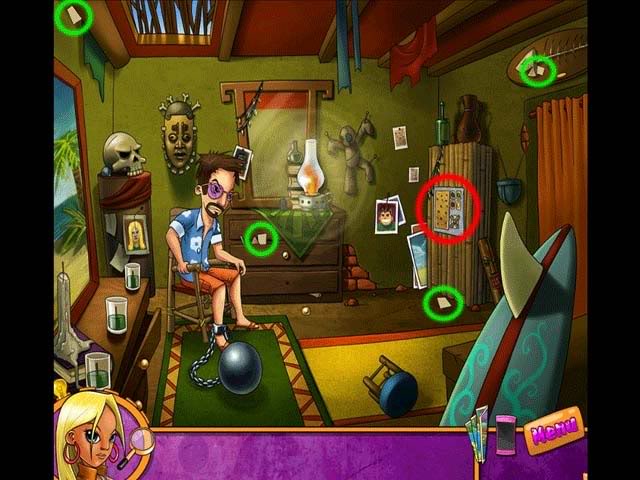
Chapter 1: Kellie’s Room
Kellie’s Room

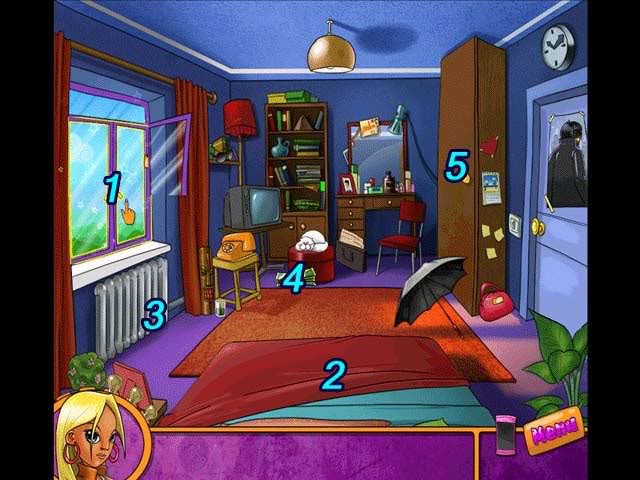
Escape Kellie’s Room
1.Click on the Window to open it
2.Click on the bedsheets (red)
3.Use the bedsheets on the heater to tie them up
4.Pick up the Map on the floor
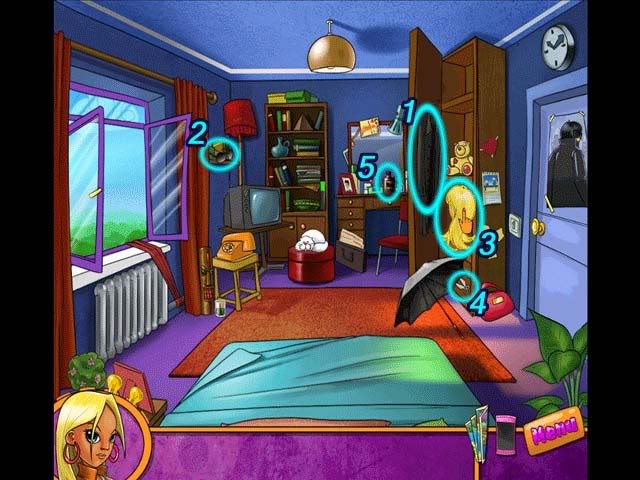
5.Open the closet on the right
1.Click on the Jacket to add it to your inventory
2.Click on the Glasses to add it to your inventory
3.Click the Wig to add it to your inventory
4.Click on the Scissors to add them to your inventory
5.Click on the Dye on the desk.
Escape the Flat
Chapter 2: Mike’s Trailer
Using the Magnifying Lens
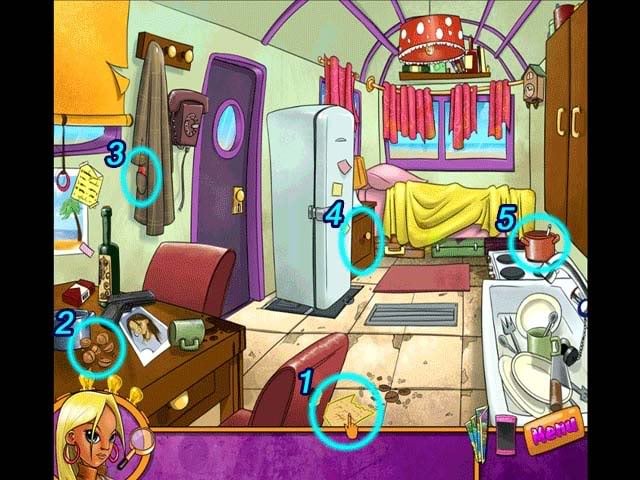
Inside Mike’s Trailer
1.Pick up the Note lying on the floor
2.Pick up the Nuts lying on the desk on the left.
3.Pick up the Multi-Pass card in the coat pocket
4.Click on the cupboard and pick up the Tape inside.
5.Click on the Pot and pick up the Key inside.
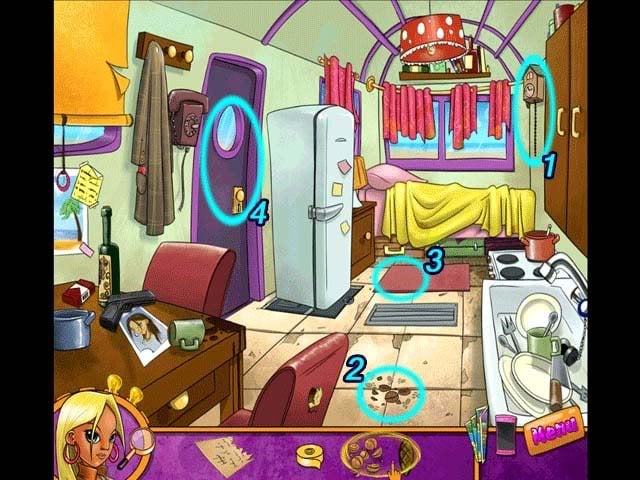
1.Use the Key on the Cuckoo Clock to make the Pinecone appear. Click on it to add it to your inventory.
2.Combine the Pinecone and Nuts in your inventory to crack them. Use the Nuts on the floor to make the Mouse appear.
3.Click on the Mouse’s hiding place underneath the carpet and click on the Tile to remove it. Pick up the other part of the Note to add it to your inventory.
4.Combine the Notes and the Tape in your inventory to read it, and then click on the door to exit.
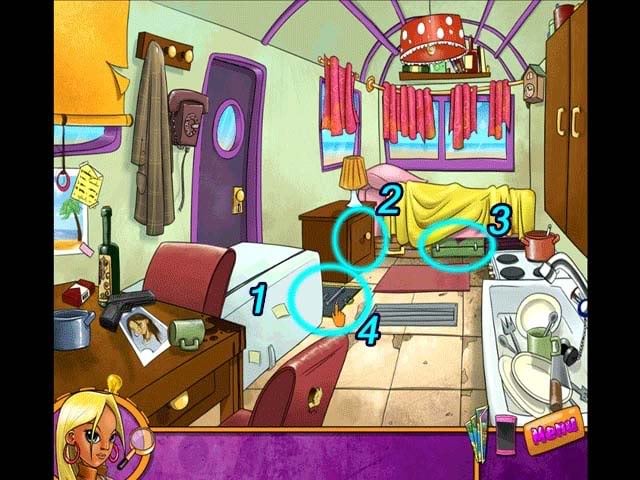
Escape the Trailer
1.Click on the refridgerator to knock it over and reveal and emergency hatch.
2.Click on the cupboard to open it and find the Chisel. Add it to your inventory.
3.Click on the green suitcase to reveal the keys. Click them to add them to your inventory.
4.Combine the Chisel and Keys in your inventory and use them on the hatch to enter a mini-game.
Open the Hatch

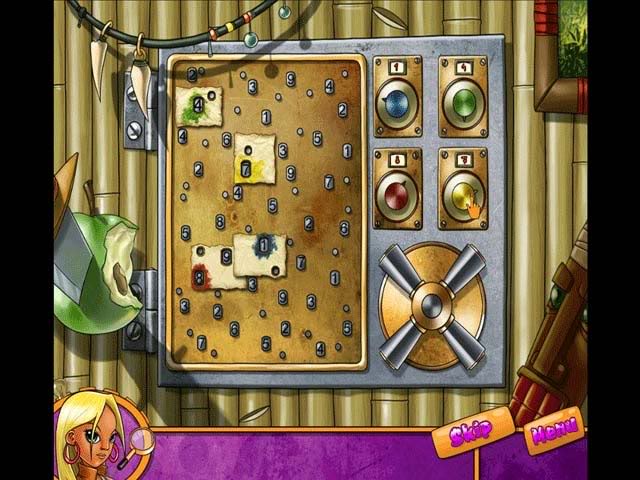
Chapter 3: Studio Storehouse
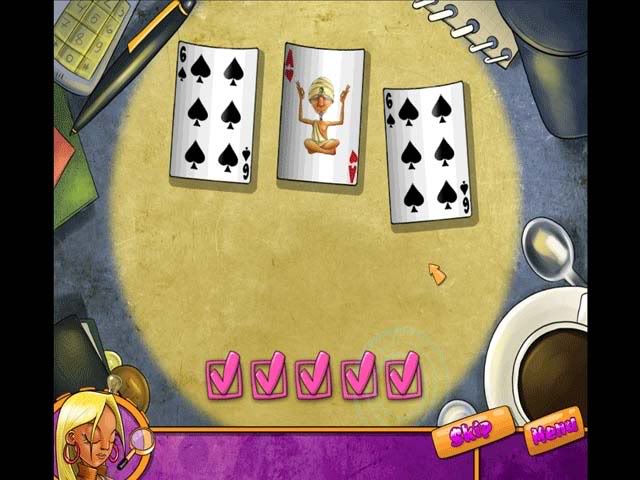
Card Game
Enter the Staffroom
1.Click on the Hammer to add it to your inventory.
2.Use the Hammer on the crate on the left to open it. Click on the board inside to enter a mini-game.
Drop-Dib Puzzle
Enter the Staffroom Part 2
1.Click on the tool box and pick up the Fuse and the Screwdriver.
2.Click on the fuse box. Use the 2 Fuses in your inventory on the empty space.
3.Click the light switch to turn on the lights.
4.Use the Hammer on the middle crate and pick up the Corkscrew inside.
5.Use the Corkscrew on the cork in the barrel to empty it of water. Click the barrel to move it out of the way of the door.
6.Pick up the Newspaper.
7.Use the Newspaper on the bottom of the door and use the Screwdriver on the lock to retrieve the key. Use the key on the door to enter the Staffroom.

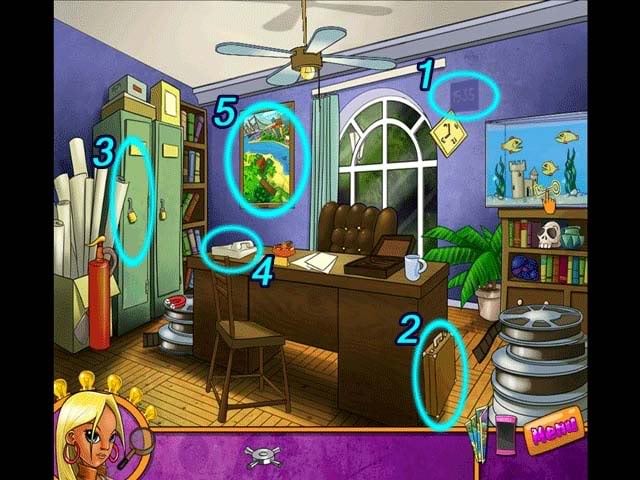
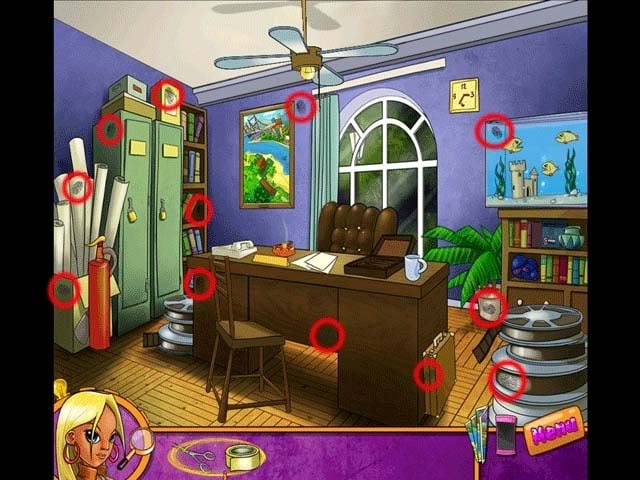
Chapter 4: Boss’s Office
Boss’s Office
1. Pick up the Magnet and add it to your inventory
2.Click on the box above the locker. Click on the Shoelaces to add them to your inventory.
3.Combine the Shoelaces and Magnet in your inventory. Use them on the Key inside the pirahna tank to add the Key to your inventory.
1.Click on the clock on the wall to move it and reveal a combination: 1535
2.Click on the Suitcase and input the combination 1535. Pick up the Crank inside and add it to your inventory.
3.Use the Key on the left locker. Pick up the Casette inside.
4.Use the Casette on the phone on the desk (this is mandatory before you can do step 5)
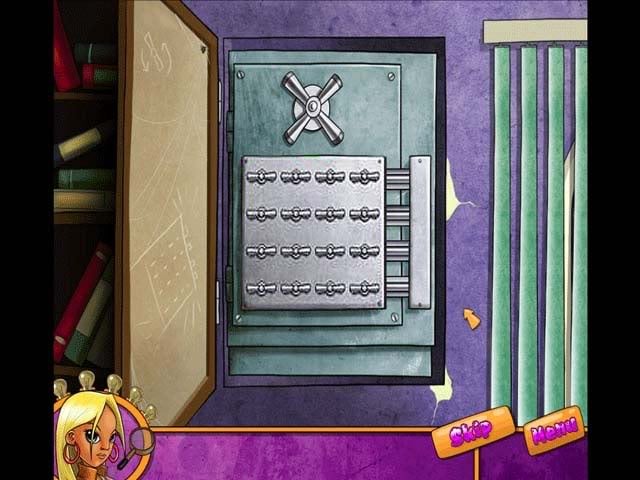
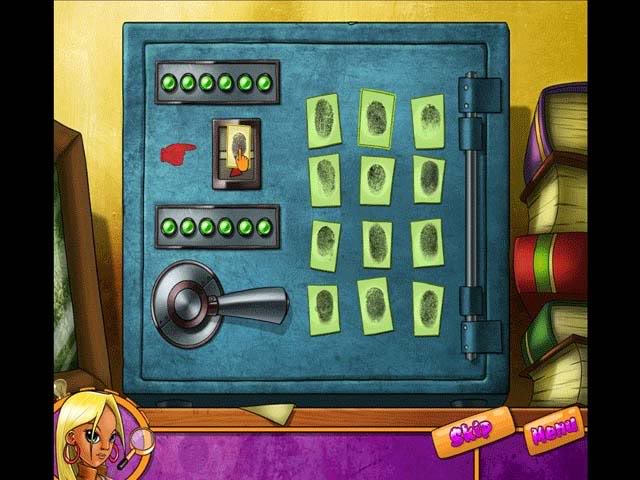
5.Click on the painting to reveal the Safe. Use the Crank on the Safe to enter a mini-game.
Open the Safe
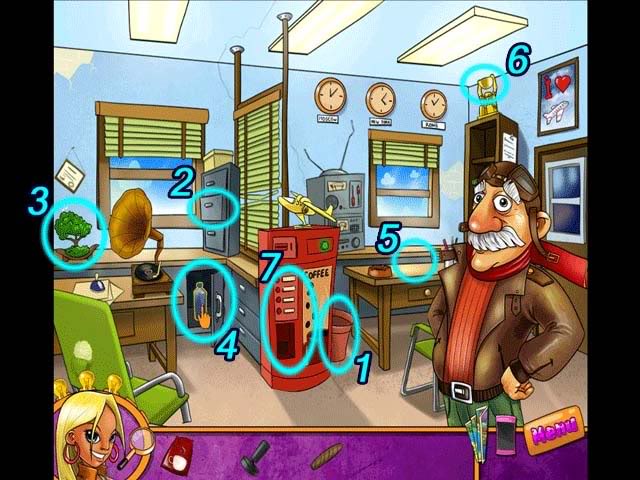
Chapter 5: Airline Office
Find the Pilot
1.Click on the desk bell to make the pilot appear and talk to him.
2.Click on the Coffee Machine to enter a mini-game
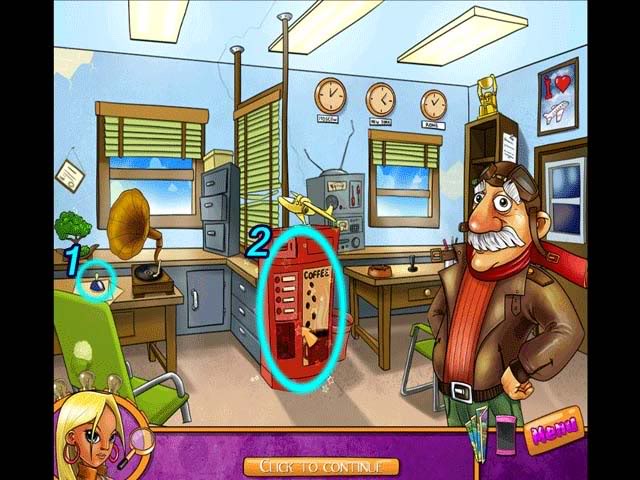
Fix the Coffee Machine
Coffee and a Cigar
1.Click on the trash bin to find the Cigar Casing and add it to your inventory.
2.Click the drawer to find Coffee beans and the Cigar. Add them to your inventory. Combine Cigar and Cigar casing and give it to the pilot.
3.Click on the banzai tree to reveal a key, and add it to your inventory.
4.Use the Key on the cabinet to unlock it and reveal a bottle of Water. Use it on the Coffee Machine.
5.Pick up the Masher sitting on the desk.
6.Pick up the Bowl in the idol’s hands. Combine Coffee beans, Masher, and the Bowl in your inventory to get coffee grounds.
7.Use the coffee grounds on the coffee machine to make coffee. Pick it up and give it to the pilot.
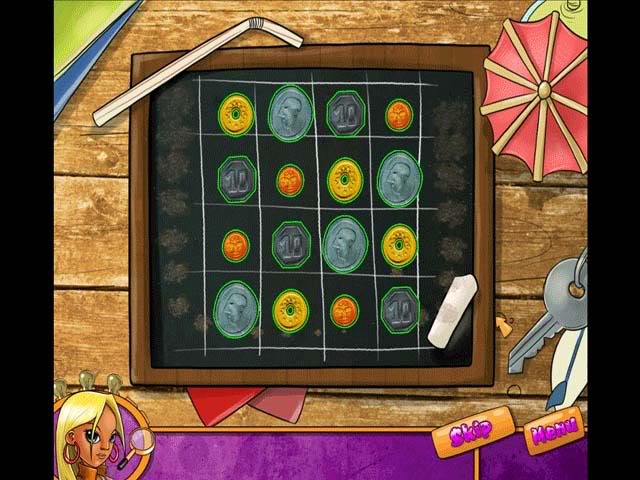
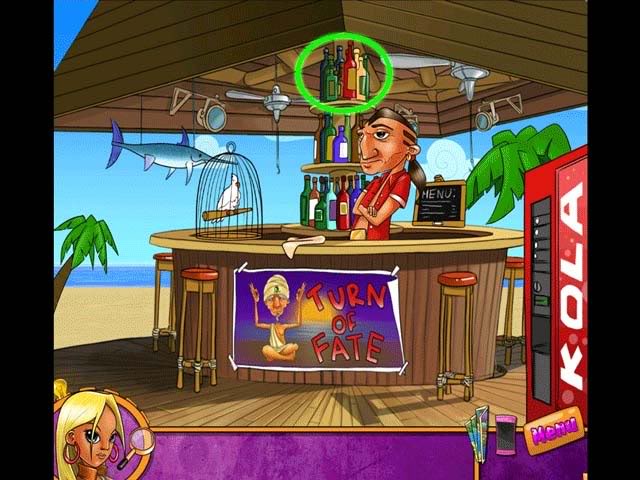
Chapter 6: The Island
Bar -Aloha-
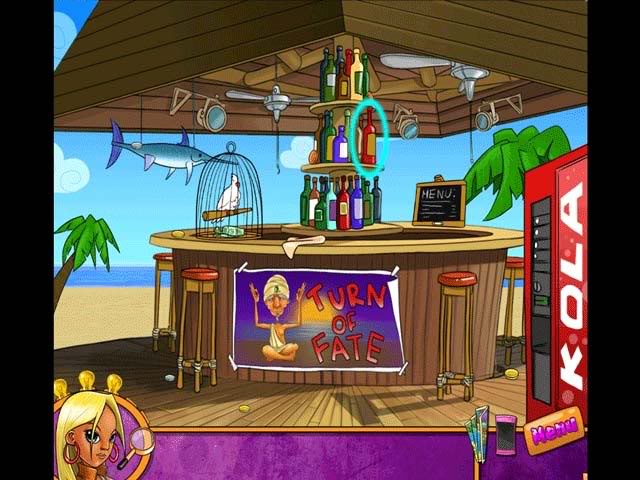


Coin Placement Challenge
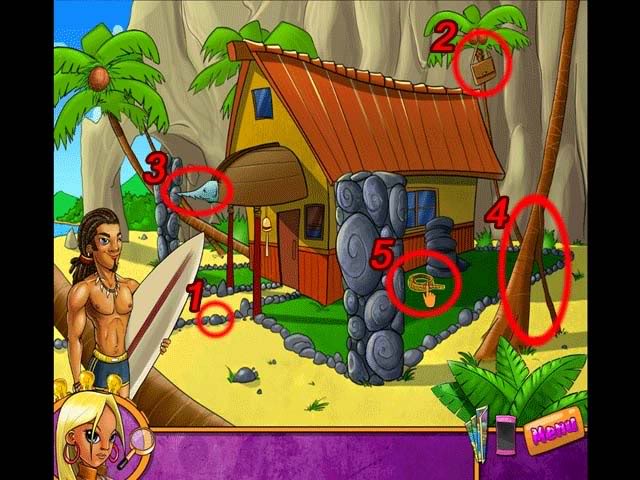
Chapter 7: The Bungalow
Talk to the Surfer
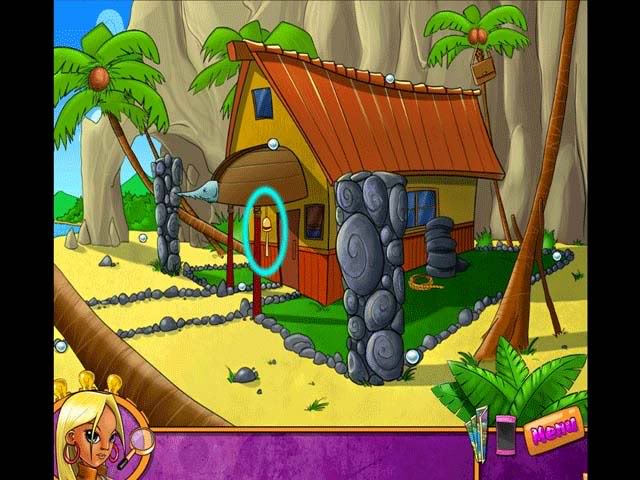
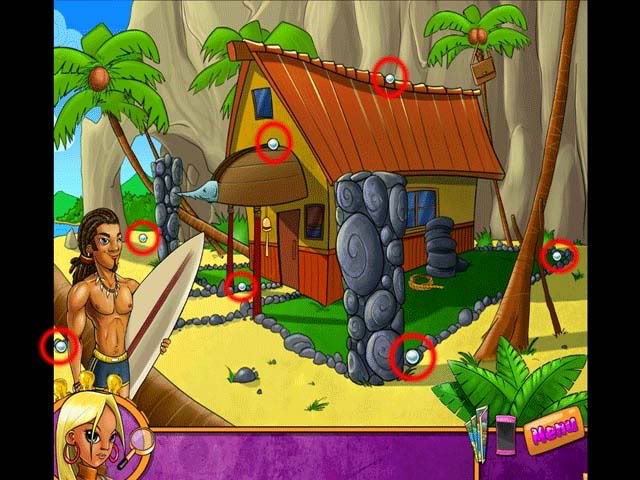
Assemble a Fishing Rod
1.Pick up the Rock
2.Use the Rock on the Bag to knock it down. Pick up the Hook from inside the Bag.
3.Pick up the Sawfish head and add it to your inventory.
4.Pick up the Stick to add it to your inventory. Combine the Sawfish and Stick to create a pole.
5.Pick up the Rope to add it to your inventory. Combine the Rope, Stick, and Hook to create a fishing pole.
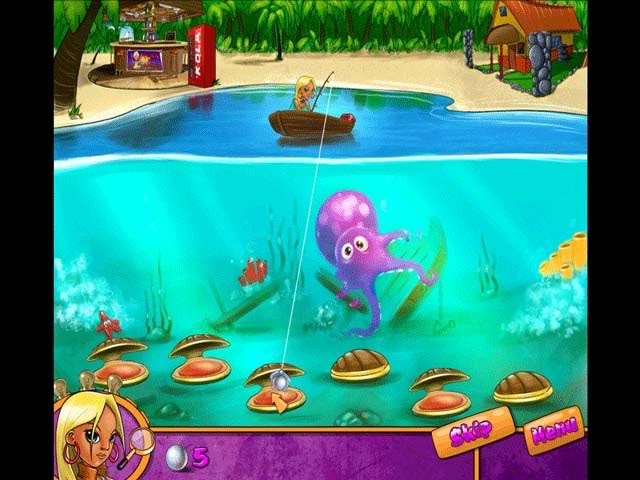
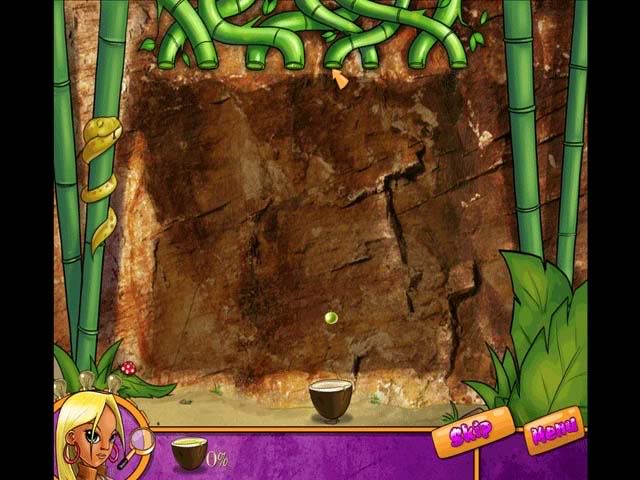
Fishing for Pearls
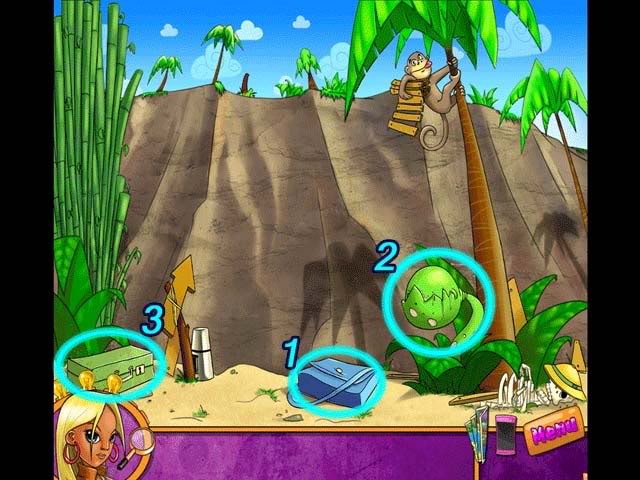
Chapter 8: Jungles
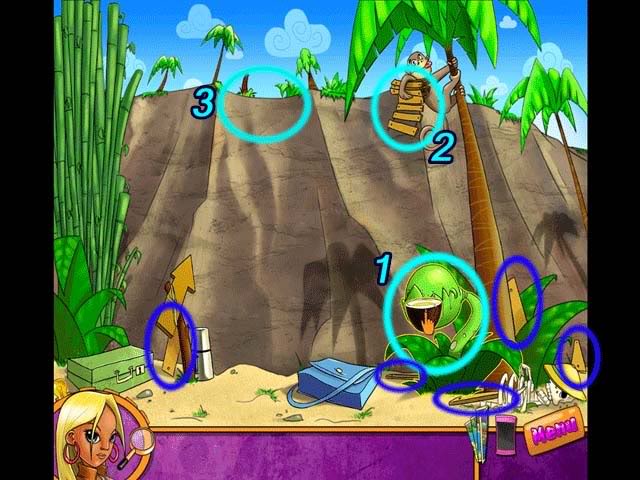
Cliffside
1.Click on the blue bag and pick up the Hamburger inside.
2.Feed/Use the Hamburger on the Giant Plant. It will eat it and spit out a Key. Click the Key to add it to your inventory.
3.Use the Key on the green briefcase to open it. Pick up the Fertilizer inside and use it on the Giant Plant.
Collect Coconut Milk
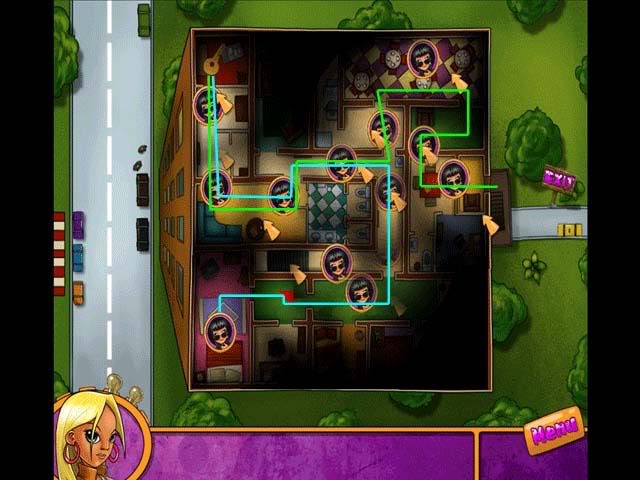
Get the Ladder to Climb the Mountain
1.Use the Coconut Milk on the Giant Plant.
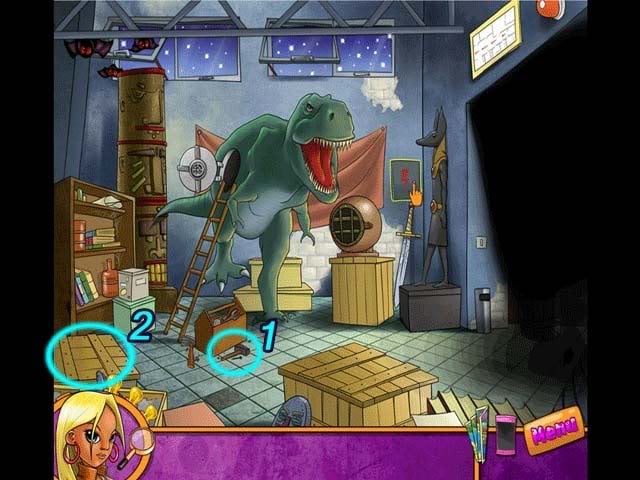
2.Pick up the Ladder the monkey drops, and collect the 5 missing pieces circled in dark blue.
3.Use the Ladder on the Cliffside, and use the 5 missing pieces on the Ladder. Click on it to climb up.
Chapter 9: The Yogi
Wake Up the Yogi

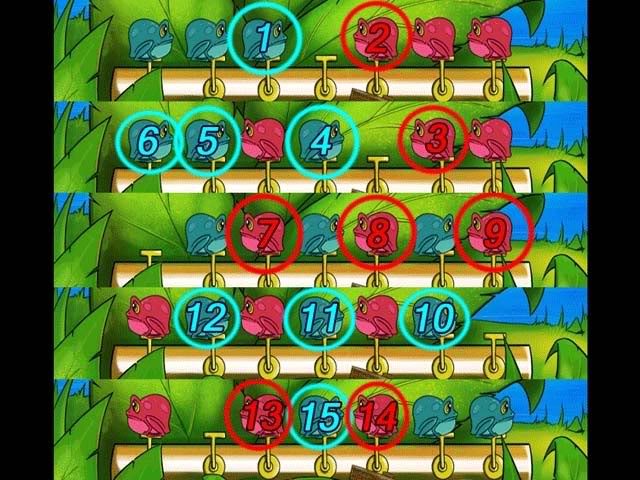
Leap Frog
Talk to the Yogi
1.Click on the area circled to reveal a Mouthpiece. Combine Mouthpiece with the Flute in your inventory.
2.Use the Flute on the Snake to make it fall asleep.
3.Pick up the Gong Hammer
4.Use the Gong Hammer on the Gong to wake up the Yogi.

Chapter 10: The Temple
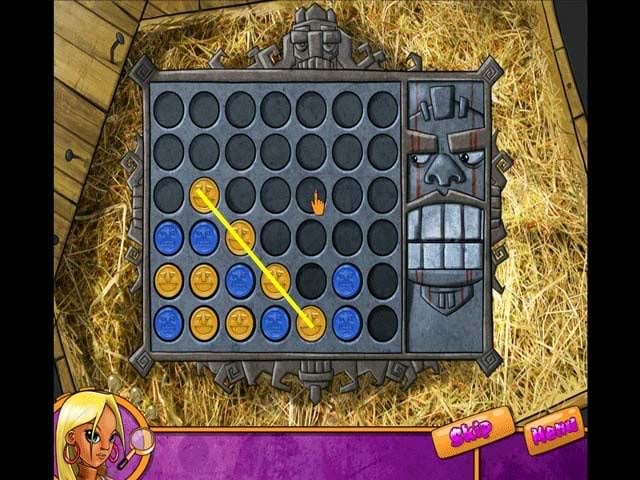
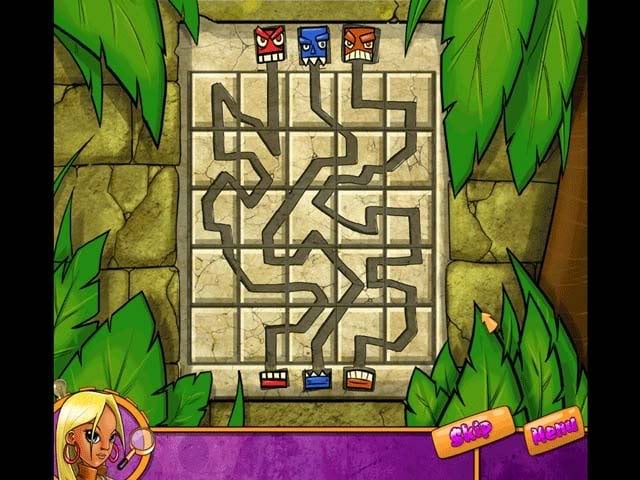
Tiki Maze
The Temple
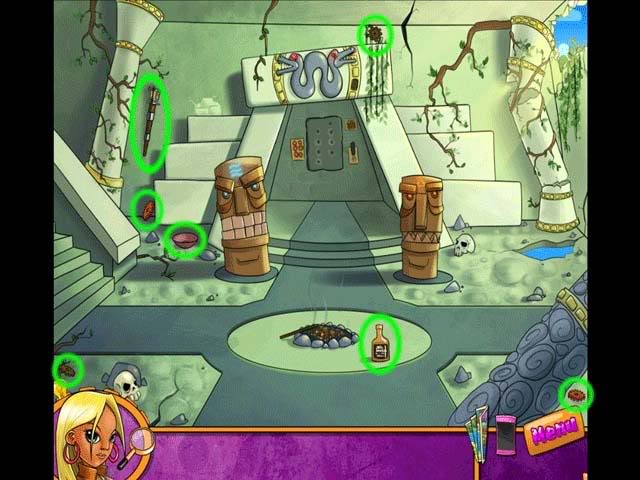
1.Combine the Oil and Torch in your inventory, then use it on the charcoal pit in the middle of the screen to light it.
2.Use the bowl on the area circled to gather water.
3.Use the water on the idol circled to reveal another gear. Add it to your inventory.
4.Use the torch on the idol circled to reveal another gear. Add it to your inventory.
5.Use the Gears on the panel to enter a mini-game.

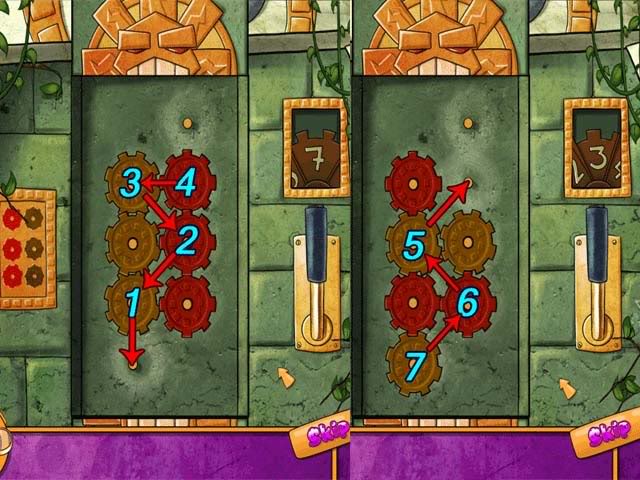
Arrange the Gears

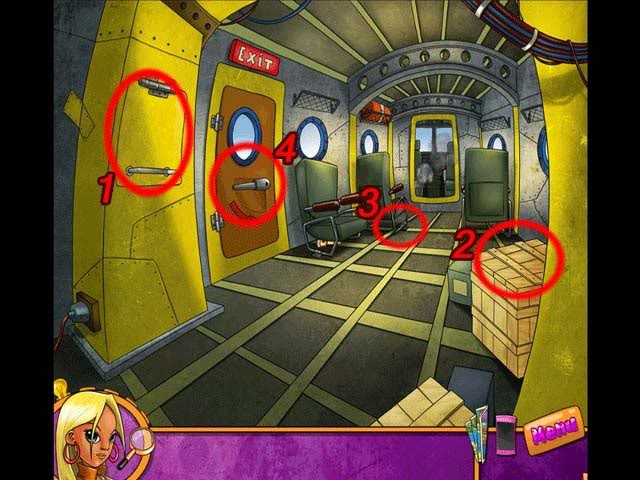
Chapter 11: The Airplane
Escape the Airplane
1.Open the yellow hatch and add Fire Extinguisher and Crowbar to your inventory.
2.Use the Crowbar on the crate and pick up the Wrench inside.
3.Use the Wrench to unscrew the Bolt holding down the chair.
4.Use the Bolt on the door handle, and then the Fire Extinguisher to move it. If the handle falls off, pick it up and put it back on the door. Click on the door to escape.
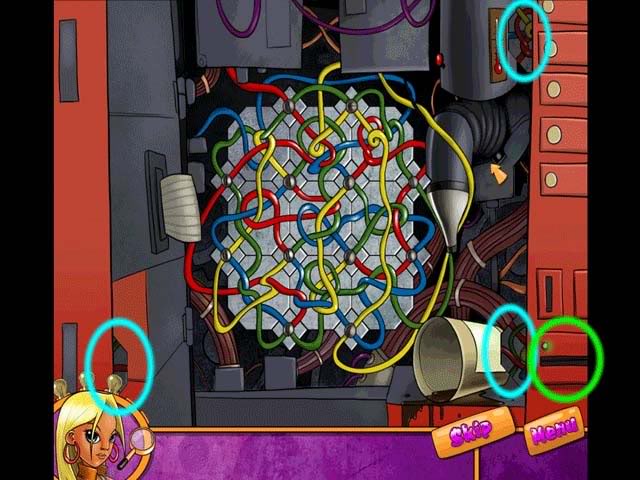
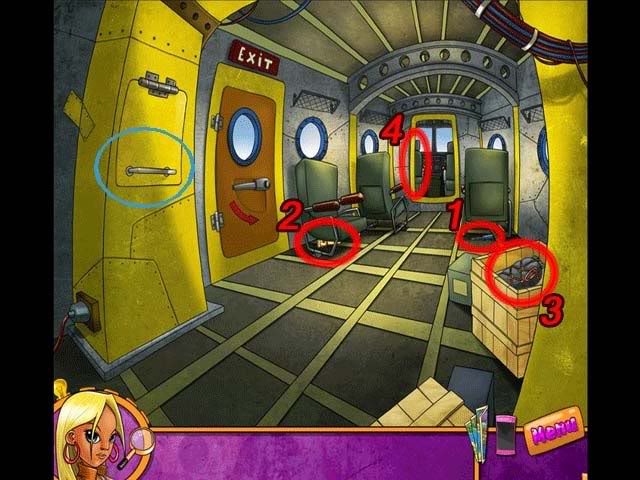
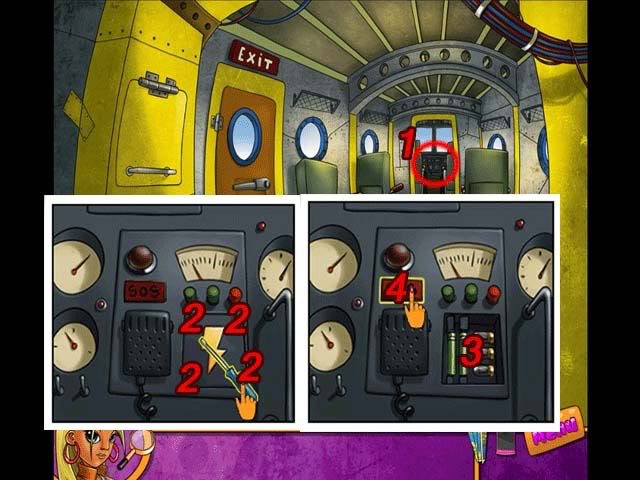
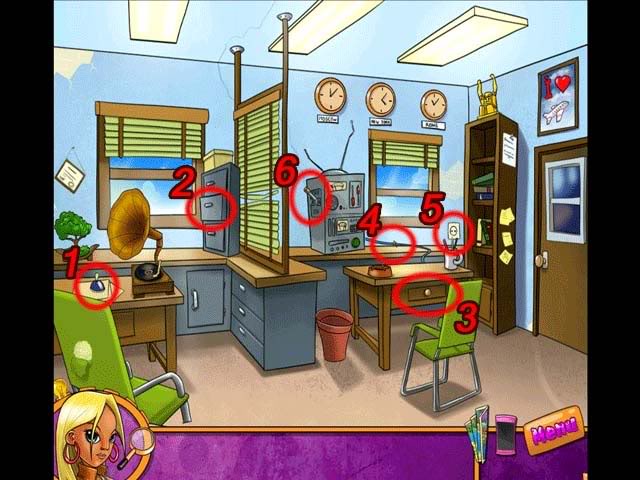
Restore the Radio
1.Pick up the Screwdriver to add it to your inventory.
2.Click on the Flashlight for a close-up, then click it again to empty the Batteries out. Pick up the Batteries and add them to your inventory.
3.Click on the liferaft to move it and reveal a Fuse. Add the Fuse to your inventory.
4.Click on the pilot’s seat to reveal another Fuse and add it to your inventory. The location of the third Fuse is circled in blue.
1.Click on the Radio in the cockpit
2.Use the Screwdriver to unscrew each of the screws on the panel and remove it.
3.Place the Batteries and the Fuses in the panel.
4.Press the SOS button.
Chapter 12: Escape the Island
Wake the Yogi
1.Pick up the Rock
2.Use the Rock on the Coconut to knock it down and jar up the snake.
3.Pick up the Gong Hammer.
4.Use the Gong Hammer on the Gong to wake up the Yogi.

Fill the Balloon Basket
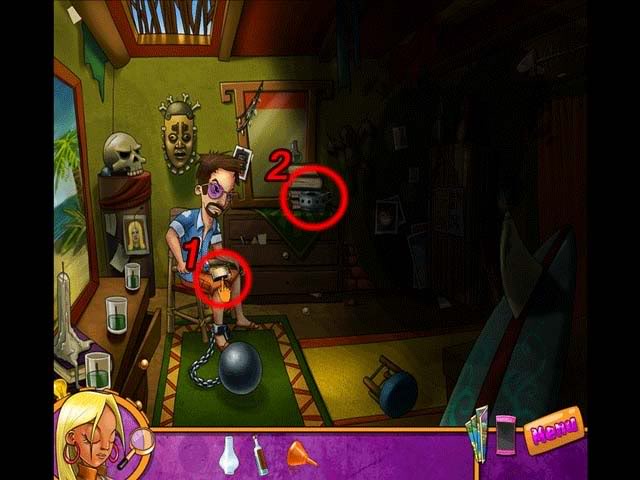
Rescue Mike
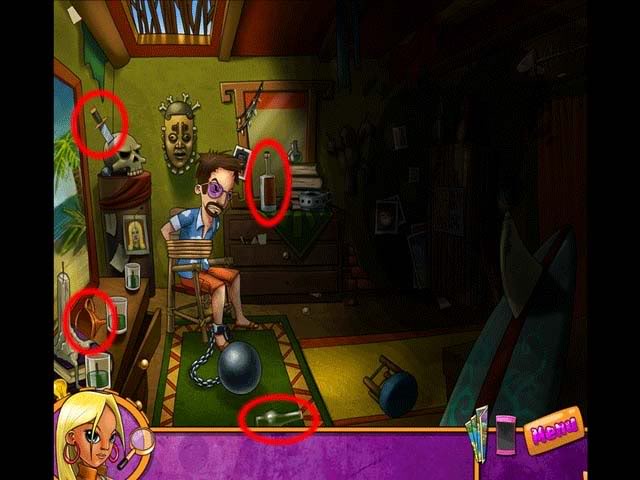
1.Use the Knife on Mike’s ropes to cut him free. Pick up the Matches that fall into his lap.
2.Use the following objects on the lamp in the following order: Funnel, Bottle, Glass Lamp, and Matches.
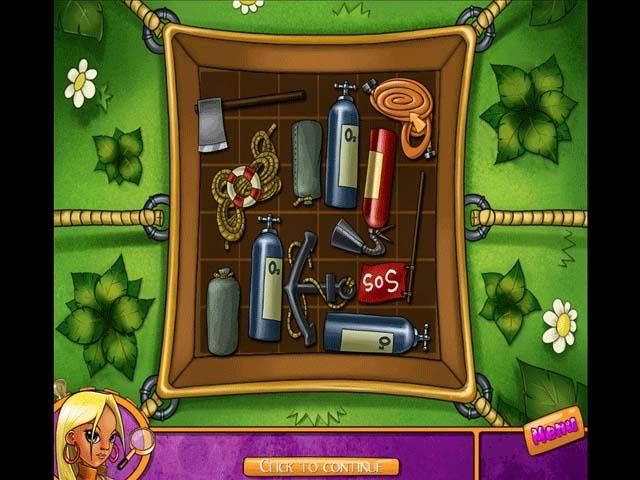
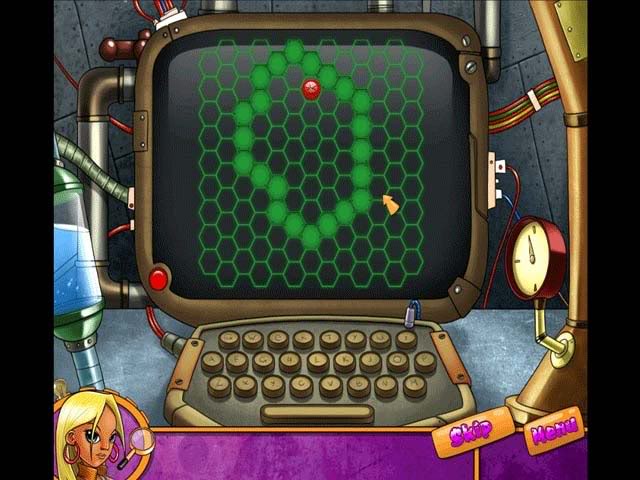
Find the Combination
Isolate the Virus
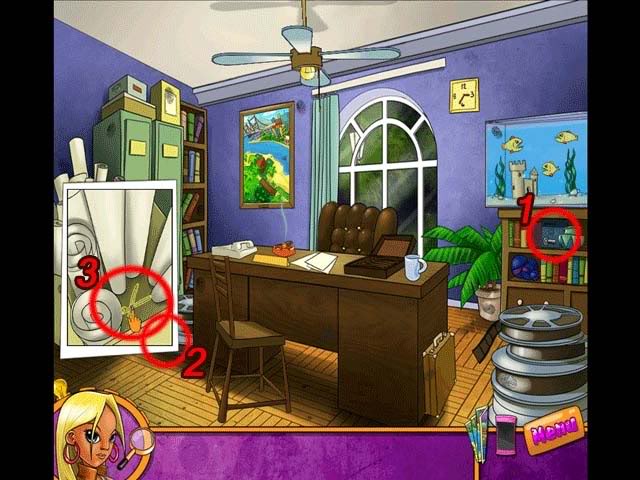
Chapter 13: Find Kellie’s Father
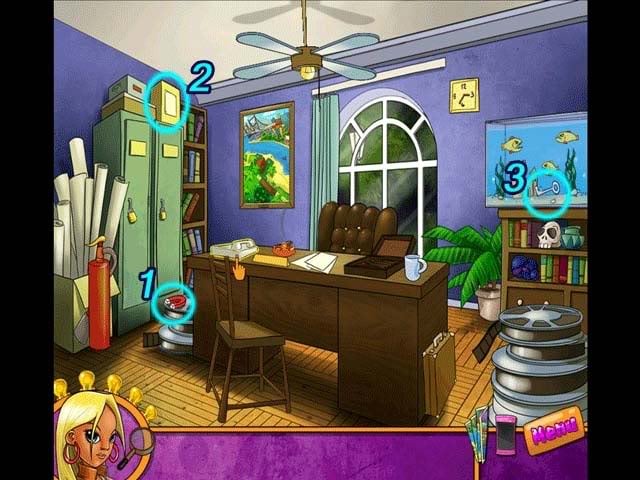
Boss’s Office
1.Click on the Skull to reveal a Safe
2.Pick up the Tape below the film reels.
3.Pick up the Scissors inside the box. Combine the Scissors and Tape in your inventory to be able to pick up Finger Prints.
Open the Safe
Airline Office
1.Click on the Desk Bell to talk to the pilot
2.Open the drawer and add Oilcan to your inventory.
3.Open the desk drawer and add Tape to your inventory.
4.Use the Tape on the cord to repair it.
5.Plug the end of the cord into the wall to restore power to the machine.
6.Use the Oilcan on the lever to make it work again. Click it to restore the machine back to working order, then click on the pilot.
Bar -Aloha-

Matching Tiles
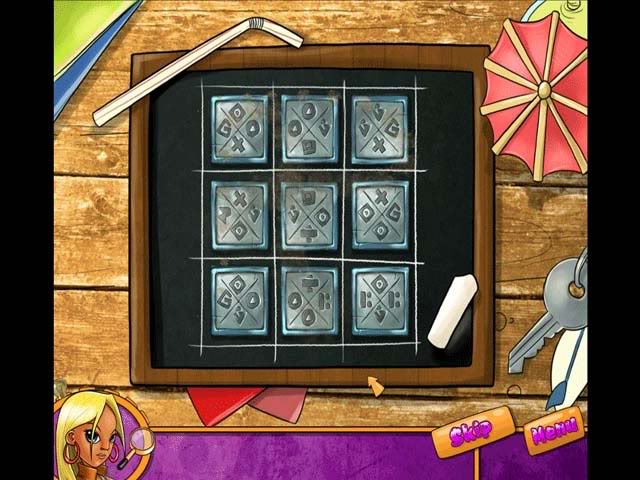
Convince the Bartender
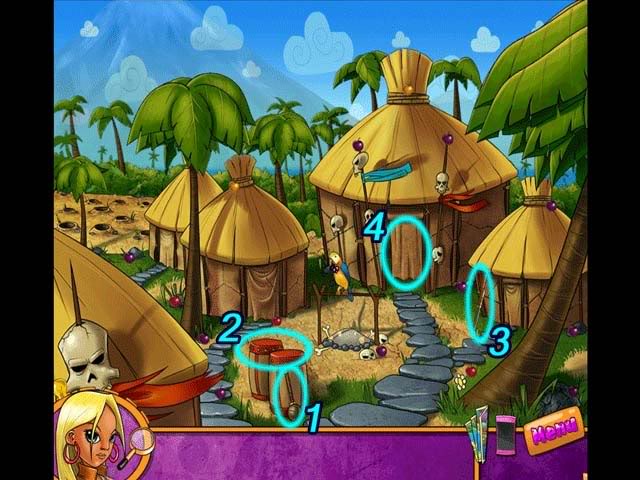
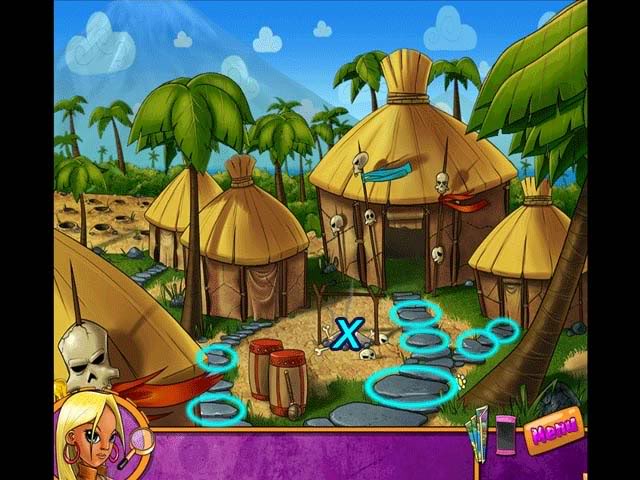
Village Maze

The Village
1.Pick up the Drumstick
2.Use the Drumstick on the Drums to talk to the Native
3.Pick up the Gun to add it to your inventory
4.Click on the pueblo opening to move the cloth door. Pick up the Bellows and add them to your inventory.
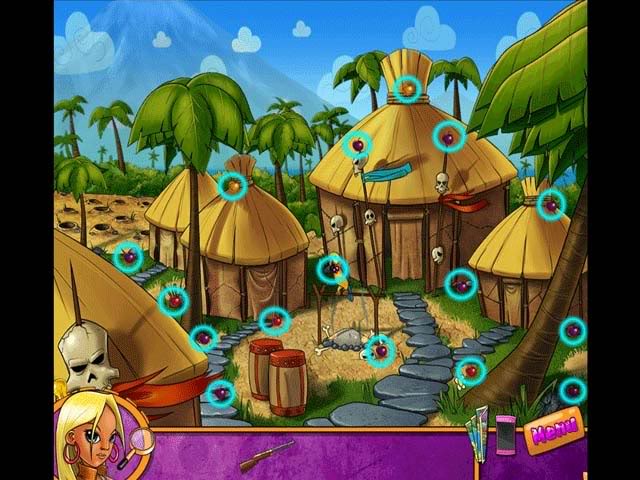
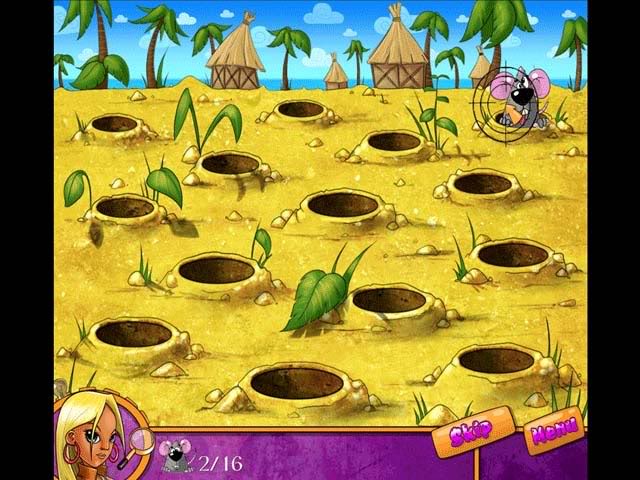
Shoot the Rats
Burn Kellie’s Father’s Things
Congratulations, you’ve completed the game!
“;
