
Grow A Garden 2 Base Price List
What's the most valuable crop?![Evomon Best Starter [Leafbun, Blazpup, or Bubble?]](/wp-content/uploads/2026/06/evomon-best-starter.jpg "Evomon Best Starter [Leafbun, Blazpup, or Bubble?]")
Evomon Best Starter [Leafbun, Blazpup, or Bubble?]
Grass-type, Fire-type, or Water-type?![Evomon Tier List [META and BEST Evomon]](/wp-content/uploads/2026/06/evomon-tier-list.jpg "Evomon Tier List [META and BEST Evomon]")
Evomon Tier List [META and BEST Evomon]
The Evomon dream team.
![[Roblox] Evomon Shiny Hunting Guide – Including Prismatic and Pris Shinies!](/wp-content/uploads/2026/06/evomon-shiny-hunting-guide.jpg "[Roblox] Evomon Shiny Hunting Guide – Including Prismatic and Pris Shinies!")
Kaptain Brawe: A Brawe New World Walkthrough
Welcome the Kaptain Brawe: A Brawe New World walkthrough on Gamezebo. Kaptain Brawe is an adventure game played on PC or Mac, created by Cateia Games. This walkthrough includes tips and tricks, helpful hints, and a strategy guide to how to complete Kaptain Brawe.


- Prefer Gamezebo on Google

Kaptain Brawe: A Brawe New World – Game Introduction
Welcome the Kaptain Brawe walkthrough on Gamezebo. Kaptain Brawe is an adventure game played on PC or Mac, created by Cateia Games. This walkthrough includes tips and tricks, helpful hints, and a strategy guide to how to complete Kaptain Brawe.
General Tips
In this point-and-click adventure game you need to solve quests by talking to people and interacting with objects.
Note on this walkthrough: numbers in the text always refer to numbers in the images below the text.
- You can play this game in casual or hardcore mode. In casual mode you can get hints to help you solve your quests by clicking on the quests in your quests journal (book icon, bottom left of your window). You can get several hints for each quest. Keep clicking on the hints list until no new hints appear.
- In hardcore mode, you will get the option to inspect or interact with an item when you click on it. In casual mode, clicking an object will immediately give you the information or action you need.
- Your inventory (bag icon, bottom left of your window) is a very useful place. Not only does it show all your current items, you can also get information on the items by placing them on the magnifying glass icon on the left hand side of the inventory. This may give you vital information about solving your quest.
- You can also combine items in your inventory to create new ones.
- To use inventory items on people or objects, open the inventory, select the item and then drag the item outside the inventory to close it and go back to the map. Then click on the object or person you want to use the item on.
- Each of your characters has their own inventory with items specific to their character.
- When talking to people, make sure you go through all the dialogue options as they may give you additional information or unlock new important quests.
- Characters you’ve already talked to may have new dialogue options when you’ve found new items or unlocked new quests.
- Similarly, sometimes an object you’ve already interacted with may give you new information when you click on them again.
- You can usually give characters objects they’ve requested by either talking to the character again or by selecting the object from your inventory and giving it to the character.
- The question mark icon in the bottom right of the screen will show you all exits and all clickable objects.
Inside the Spaceship
Get the Locators
- A Red Eagle spacecraft has crashed on Jama Spacea. Help Kaptain Brawe to find it and rescue the crew.
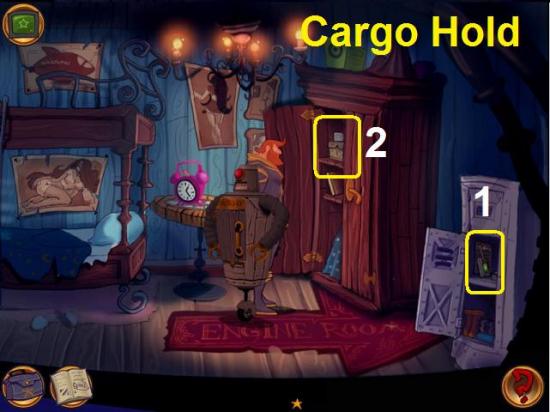
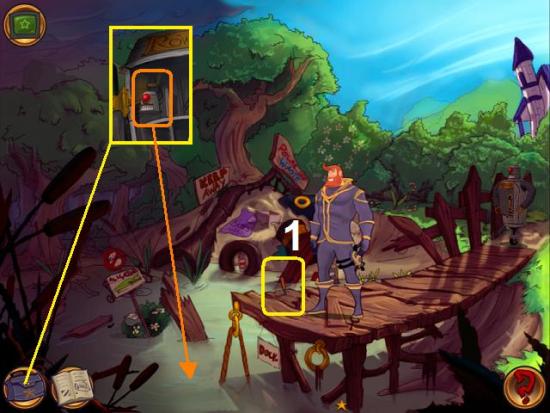
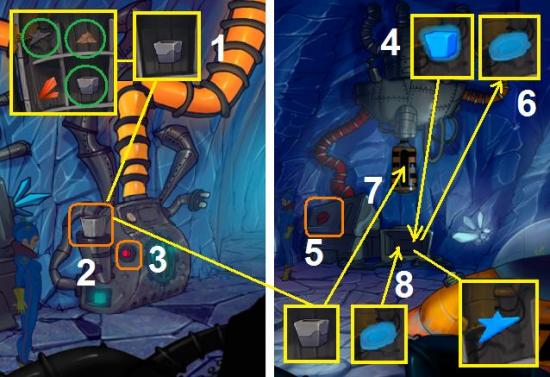
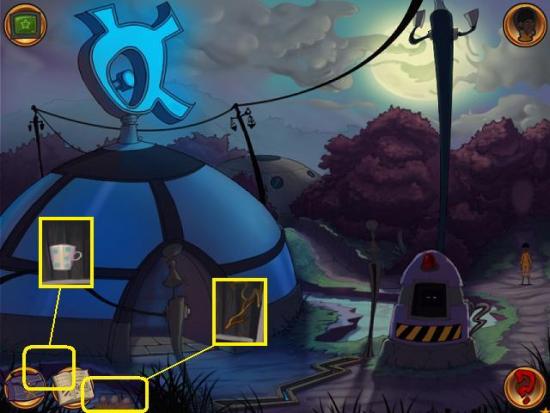
- Exit the cockpit left and go down the ladder to the cargo hold. The locators are in the locker in the cargo hold (1). One locator is missing its antenna.
- Get the silicone from the cupboard in the cargo hold (2).

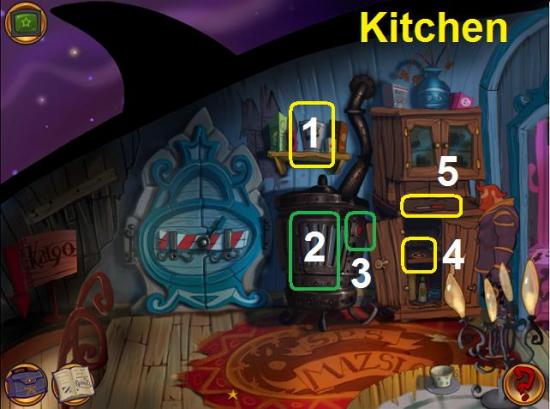
- Go back up the ladder to the kitchen and get the bucket from the shelf (1)
- In your inventory, put the silicone in the bucket.
- Open the oven door and put the bucket with silicone in the oven (2). Hit the power button (3). Take the melted silicone out.
- Open the cupboard in the kitchen and get the wire (4).
- Also get the potato peeler from the cupboard (5). You will need it later.
- In your inventory, put the wire in the melted silicone.
- Put the wire with silicone on the broken locator.
- Return the locators to Kralek in the cockpit.
Turn on Rowboat
- Get the manual from the cupboard in the cargo hold and inspect it in your inventory.
- The manual is in French and needs to be translated.
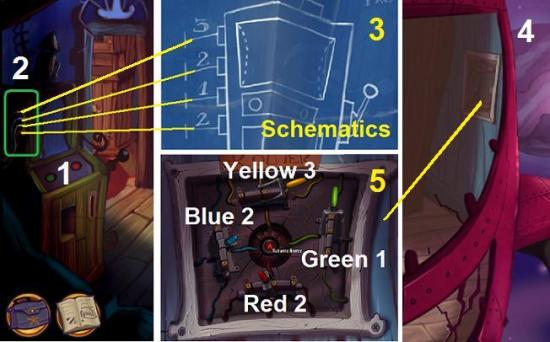
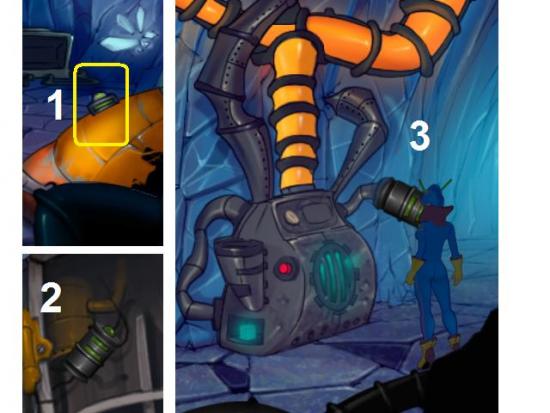
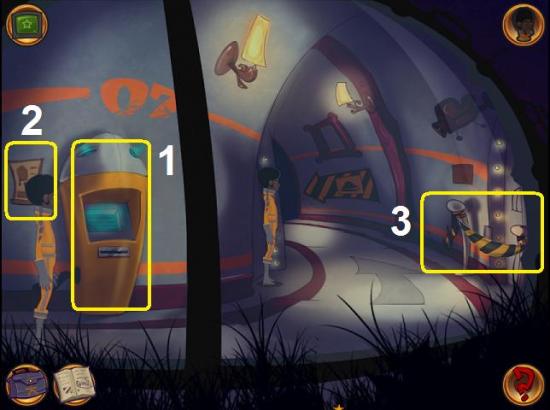
- Go back to the cockpit and inspect the translator (1). It doesn’t work.
- Talk to Kralek, he will tell you that the power supply needs to be re-routed. He gives you the schematics.
- Inspect the wires on the side of the translator (2) and remember the colors from top to bottom: yellow, blue, green, red.
- Inspect the schematics in your inventory and remember the numbers from top to bottom: 3, 2, 1, 2 (3). The numbers correspond with the colored wires.
- Go back to the cargo hold and go to the engine room on the right.
- Access the router on the right hand side of the screen (4).
- Position the switches according to the numbers and colors: Yellow on 3, blue on 2, green on 1 and red on 2 (5). Hit the red button in the middle.
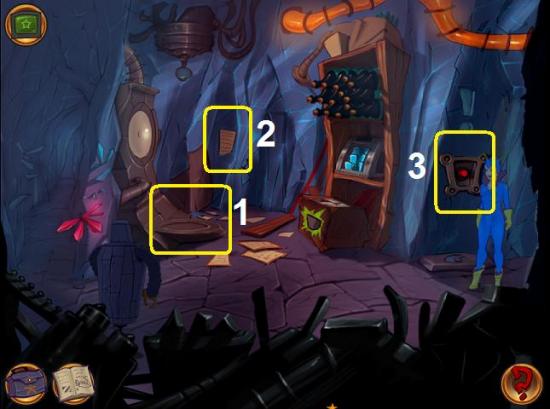
- Go back to the cockpit and inspect the translator again. It needs a disc.
- Ask Kralek about the disc. He left it “somewhere on the table”.
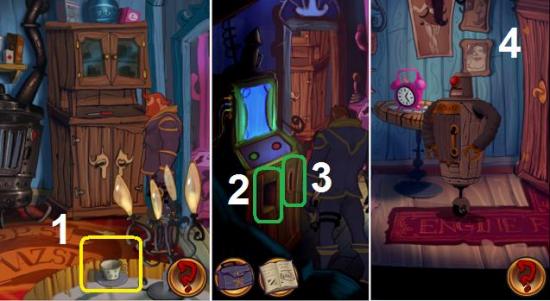
- Go back to the kitchen and inspect the teacup on the table twice (1). Second time it will give you a disc.
- Clean the disc with the hanky in your inventory.
- Now put the manual in the service hole on the translator (2), then place the cleaned disc in the slot (3).
- Pick up the translated manual and go back to Rowboat in the cargo hold (4) to activate him.
- Return to Kralek and tell him everything is set up.
Jama Space Motel
Talk to the Local Population
- Go to the motel and talk to the clerk. He mentions an old man in the park.
- Go east to the park and talk to the old man. He heard a plane crashing in the swamp.
- Go back to Kralek and talk to him to get your next quests.
Find the Boat
- From the crossroads, where Kralek is waiting, go west to the pier.
- Go into your inventory, select Rowboat and put him into the swamp.
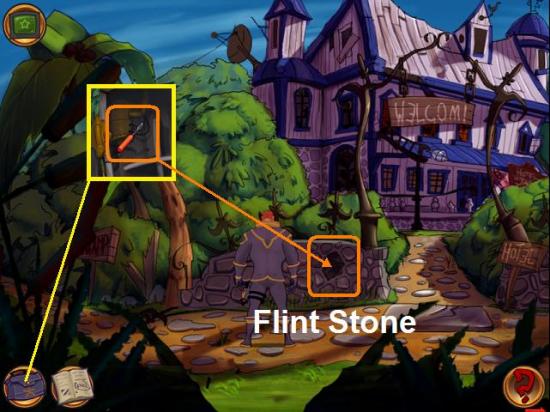
- Get the screwdriver from the left side of the pier (1).
- Go back to the crossroads and inspect the stone wall.
- Use the screwdriver on the flint stone in the stone wall.
- Go to the motel and interact with the wheel on the side of the vegetable stand.
- Use the sharpened screwdriver on the wheel.
- Take the wheel.
- Go back to the pier and put the wheel on Rowboat.
Find the Map
- Go back to the motel and talk to the clerk about the map. He needs you to find a dried, four leaved flower.
- Go east to the park and get a flower from the bush. It has 5 leaves, not 4. You might as well take two flowers right now as you will need another one later.

- Now go back to the spaceship (go east from the crossroads and then into the ship).
- Open the oven door, put the flower in and hit the power button. Take the dried flower out. (Also do this for the other flower for later).
- In your inventory, take the dried flower and put it on the glove icon to take one of the leaves off.
- Go back to the motel and talk to the clerk to give him the four leaved flower.
- Take the brochure.
- Talk to Kralek again if you like but this isn’t essential.
Find the Crashed Ship
Now you have the map and the boat you can enter the swamp. However, before you do, first go to the windmill west of the motel to get some items you will need later.
- Note the machines on the right, but go into the mill.
- Remove the sheet from the box by the door and get the piece of the plaque (1).
- Inspect the open box again and find a diary (2).
- Get the hammer from the wall on the left (3).
- Get the window cleaner from the shelf on the right (4).
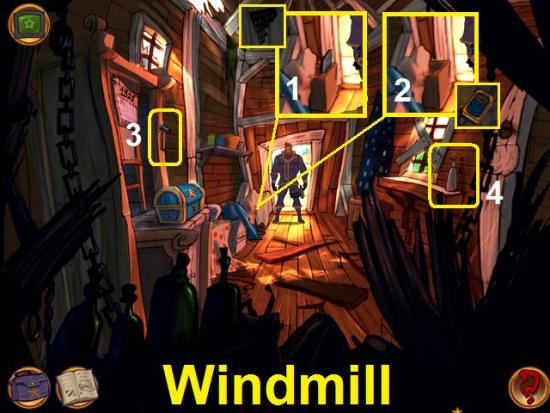
- Note the locked chest on the table and the calendar on the wall.
- Now go back to the pier, enter Rowboat and go to the dam.
Find the Previous Owner’s Grave
- Inspect the dam and the operating mechanism.
- Go back to the motel to talk to the clerk, who will tell you the key to unlock the barricade is in the grave of the previous owner of the hotel.
- Inspect the diary you found in the crate in the windmill. It was written by someone named Fuseman.
- Go to the park and talk to the old man. Get him to tell you his war story about the battle at Burnfield Canyone. He will tell you that his friend Grubby Larson’s nickname was Fuseman.
- Go back to the dam, and enter the cemetery.
- In your inventory, put the piece of the plaque into the bucket of melted silicone.
- Put the plaque with silicone onto the plaque next to the graves. You will get a list of names with codes that will tell you which grave is Grubby’s.
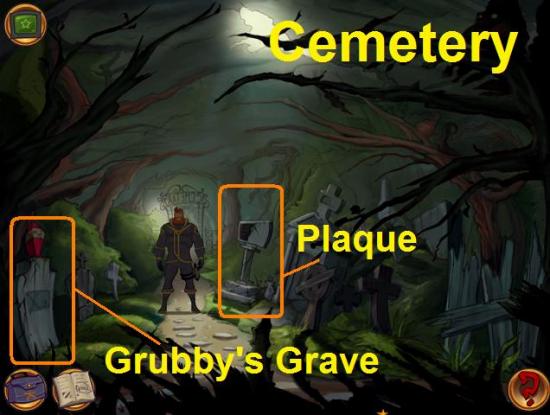
Get the Dam Key
- Once you’ve seen the name on the plaque, find Grubby’s grave. It’s the one on the far left.
- Interact with the grave, but you can’t dig it up with your hands.
- Go back to the old man in the park and give him the news. He’s not that interested but just asks you for some tobacco.
- If you haven’t already done this, get another flower from the bush in the park and dry it in the oven in the space ship.
- In your inventory, put the dried flower on the glove to rub it into tobacco.
- Give the “tobacco” to the old man, who suddenly feels so good that he drops his cane. Pick it up.
- In your inventory, use the potato peeler from the cupboard in the spaceship kitchen on the cane to sharpen the tip.
- Go back to the cemetery and stick the sharpened cane in the ground by Grubby’s grave.
- Hammer it down with your hammer from the windmill.
- Now go back to the dam and cross it.
- Go east into the clearing (inset). Watch the scene.
- Take the batteries from the crate on the right (1).
- Pick up the ashes and the strange device (2).
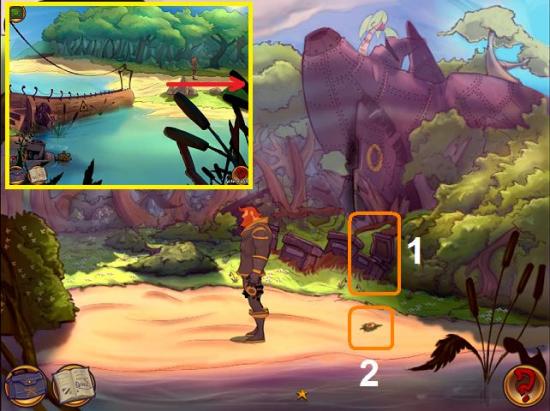
- Go back to Kralek with the strange device to complete the Find the Crashed Ship quest.
- Go back to the windmill and put the batteries on the Polar Ion Generator outside the mill to charge it.
- Go back to the dam and enter the cave.
- Put the charged battery on the power switch (1). Then hit the switch again to switch on the light. You should see the tip of the cane sticking through the ceiling (2).
- Hit the tip of the cane with your hammer. Make sure you hit the cane, not the grave.
- Take the key from the skeleton (3) to complete the quest.
Reach the Crash Site
Find the Fuses
- Exit the cave and try the key on the dam. It doesn’t work.
- Go back to the windmill and try the key on the locked chest inside. Make sure to interact with the lock, not the chest.
- Get the note and explosives from the chest.
- Inspect the note, which mentions a diary entry.
- Inspect the diary again to get a new page with a poem. Some of the words are smudged, but if you read the first verse carefully, you can probably guess what the last words should be (answer: A tree).
- The poem says to rub “me” (the tree) with some alcohol. The glass cleaner you found on the shelf in the windmill contains alcohol. So go to the big tree in the park and put the glass cleaner on its bark.
- Then the poem says to rub with a rug. Use the hanky on the bark to find a hatch.
- Inside the hatch is a number lock. “The answer lies within my birth” indicates that the combination is a date. Inspect the calendar on the wall in the windmill to get May 1st 1821.
- Enter 1, 5, 2, 1 into the lock and hit the red button.
- Access the safe and get the dry fuses.
- Put the fuses on the explosives in your inventory.
Raise the Dam
- Go back to the dam.
- Place the explosives with fuses on the dam (not on the mechanism).
- Go back to the crossroads and try the hammer on the flint stone in the wall. It won’t work (but you need to do it anyway).
- Now try the sharpened screwdriver on the flint stone (make sure to hit the flint and not the wall), then hit it with the hammer.
- Pick up the flint pieces.
- Go back to the pier and use the pieces of flint on the fuse. The dam will blow up.
- Enter the rowboat and sail to the crash site (you can only do this if you’ve shown the strange device to Kralek).
Get Rid of She
- At the crash site, interact with the crate.
- Open it with your screwdriver and inspect it.
- Watch the scene unfold.
- While She is trying to get her gun to work, throw the ashes of the vaporized man in her face.
- Then open the crate again to get the hostages and watch the scene.
Schminkell 7
You’ll get a long scene. Follow Agent Zero to the cargo hold when she asks you to. You’ll get another long scene. Try out switching between characters a couple of times.
Get Rid of Kralek and Adjust the Flight Path
- Talk to Agent Zero, a.k.a Luna, again to get the details of the mission.
- Switch to Luna and go to the cockpit.
- Talk to Kralek to ask him to show her the router (not the engine).
- Have Kaptain Brawe follow them and hit Kralek on the head with the hammer.
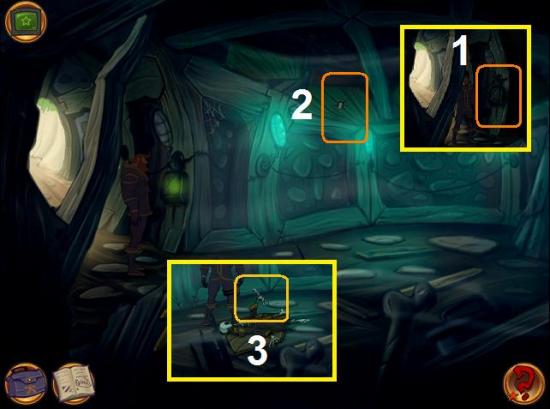
- Take Kaptain Brawe to the cockpit and inspect Kralek’s instruments (1). He doesn’t know the code.
- Inspect the space map on the wall (2) and click on Schminkell 7 to get the code.
- Access the instruments again and this time enter the correct code (7715-882).
- Get the Flight Pattern Calculation (3) and use it on Navig-O-Tron.
- Access the Navig-O-Tron again to adjust the flight path.
Escape the Cave
You have landed on Schminkell 7, Kaptain Brawe has been captured and Luna finds herself trapped in a cave with Rowboat.
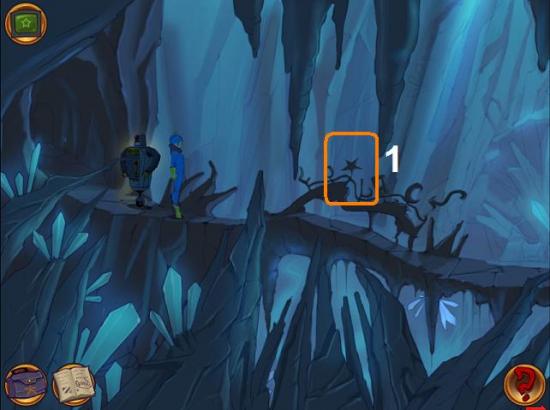
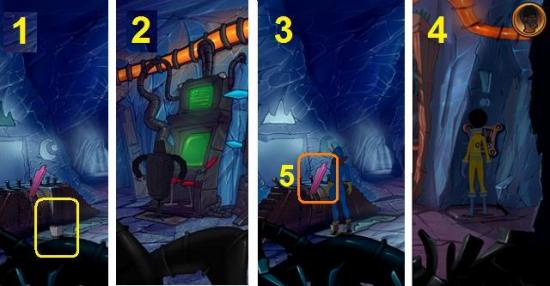
- Inspect the fence.
- Take the star shape from the fence (1).
- There is also a yellow crystal (behind Rowboat in the image) that you can take with your hammer, but you won’t actually need it.
- Go east, further into the cave.
- Inspect the DNA replicator and the power switch. You need to switch on the power to be able to use it.
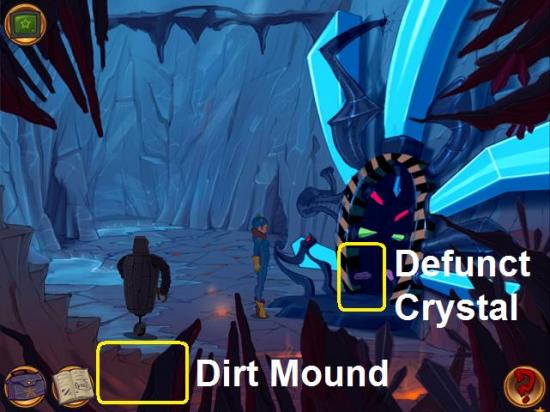
- At the bottom of the stairs to the entrance of the cave is a dirt mound. Click on it to get some moist clay.
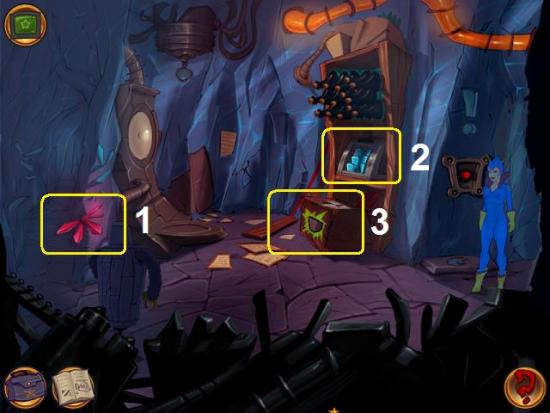
- Go into the left passage, to the storage room.
- Use the hammer on the red crystals (1).
- Get an ion cube (2) and a titanium box (3).
- Go east to the flying saucer room.
- Take the cork out of the exhaust pipe (1).
- Use the hammer on the blue crystal (2).
- Go east to the computer room.
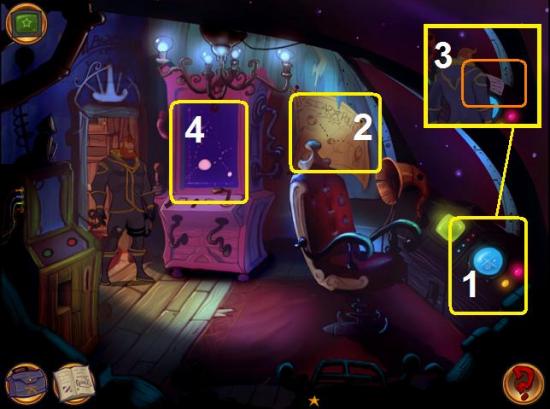
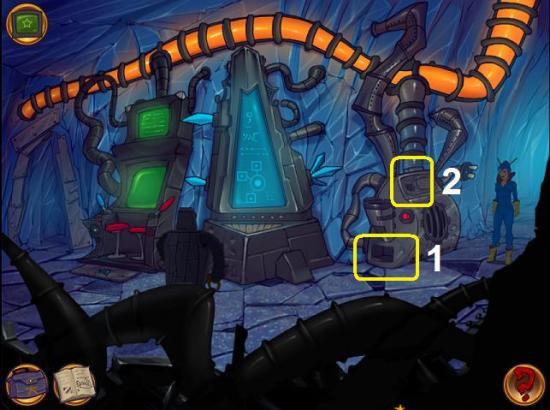
- Put the ion cube on the hatch of the heater (1).
- Put the cork in the button hole of the heater (2).
- Use the hammer on the cork in the button hole.
Replace the Computer Panel
- Interact with the computer screen in the flying saucer room to activate the quest.
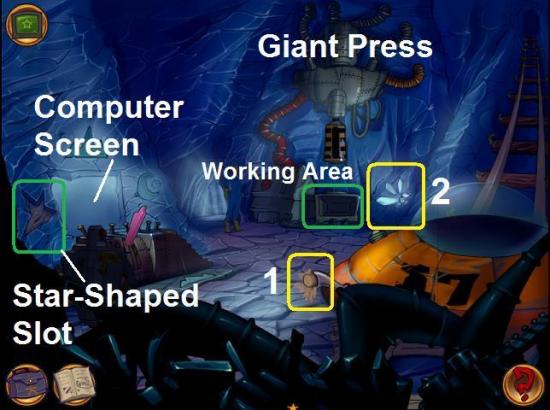
- You need to make an ion panel to fit the star-shaped slot to the left of the computer screen.
- Put the star shape you got from the fence at the cave entrance on the working area of the giant press and hit it with your hammer to break it.
- Put the moist clay from the dirt mound by the DNA replicator in a titanium box from the storage room. Add the broken stone to make a stone mold (1).
- Go back to the heater in the computer room and put the stone mold on the heater (2).
- Switch on the heater with the power button (3).
- Take the baked stone mold from the heater.
- Get another ion cube from the storage room and put it on the working area of the giant press (4). Hit the button on the press (5). You need to have activated the heater for the press to work. You’ll get an ion pancake (6).
- Now put the baked stone mold on the big press (the press itself, not the working area) (7) and put the ion pancake on the working area (8). Hit the button again.
- Put the star shaped ion in the slot by the computer screen.
Use the DNA Replicator
- Get another titanium box and more moist clay and put them together.
- Go to the Replicator and take out the defunct crystal (this can only be done after the heater has been activated).
- Put the crystal in the box with clay and bake it on the heater to make a crystal mould.
- Go back to the press and make sure the stone mold isn’t on it anymore.
- Put the blue crystal from the flying saucer room on the working area of the press and activate the press to turn it into dust.
- Do the same with the red crystal from the storage room.
- Put the red and blue dust in the crystal mold to make purple dust and bake it again on the heater.
- Put the purple crystal on the DNA replicator.
- Put the ashes on the DNA replicator and activate the replicator.
Escape the Cave – Continued
- After you’ve regenerated Danny, take Luna into the storage room.
- Get another titanium box and put it on the gravity displacer (1).
- Read the note on the wall (2) and then hit the red button (3).
- Get Rowboat from your inventory and put him on the gravity displacer to get him to pick up the 500-pound titanium box.
- Then go into your inventory again and this time put Rowboat himself on the displacer.
- Hit the button again.
- Go to the flying saucer room and put the 500-pound weight on the slab by the computer (1).
- Go to the computer room and put heavy Rowboat on the slab by the computer there (2).
- Go back to the flying saucer room and stand on the slab next to the weight (3).
- Now change to Danny.
- Take Danny into the storage room and have him step on the slab with the moon shape on it (4).
- Change to Luna and pull the lever (5) to open the doors.
- Take the fuel canister from the flying saucer (1).
- Put the canister (2) on the power outlet of the heater in the computer room to charge it (3).
- Place the charged canister on the flying saucer and click on the saucer to leave the cave.
Varion
Infiltrate the Complex
- You need to play with Danny as Luna isn’t supposed to be there and needs to remain hidden.
- Pick one of the fruits on the scary looking plant.
- Go north through the bushes and talk to the guards until they tell you that you need a S.C.A.D to get into the warehouse.
- Go west to “follow the path” and talk to the guard there. He wants to see your ID card. Danny has an ID card on him, so show that to the guard. Then admit that you’re a clone and the fence will go down.
- Make sure you talk to the guard until he tells you about the migraines.
- Go into the building.
- Try your ID card again on the ID pad by the elevator, but you will need a new one.
- Take the water sprayer from the plant. You will need it later.
Help Danny’s Clone
- Go east to the right corridor.
- Danny’s clone has a serious headache. Keep talking to him until you realize it’s a hangover.
- Go back to Luna and ask her about hangover cures. You need soap, egg and water in a cup and then boil it.
- Go back to the right corridor where the clone is and exit at the back to the landing dock. Get a branch off the withered bush on the right.
- Kaptain Brawe’s spaceship is there. Enter it.
- Get the teacup from the table.
- Open the cupboard and take out the liquid soap.
- Exit the spaceship and go back to the front of the building. In the bottom left corner, almost behind your quest book, is a nest with eggs. Use the withered branch on the nest and take an egg.
- Get your teacup from your inventory and put it on the swamp water beside the nest.
- Go back to the spaceship, put the egg and the soap in the teacup with swampy water and boil it in the oven.
- Bring the hangover cure to Danny’s clone. He will leave and give you his ID card.
Infiltrate the Complex – Continued
- Go to the computer in the right corridor (1) and print out the authorization papers.
- Look at the notice on the wall (2) to find out how to disguise Rowboat into a Kribb bot. You need a Kribb logo and some striped tape.
- Get the yellow and black construction tape from the door on the right (3).
- Go back to the elevator and now go to the left corridor.
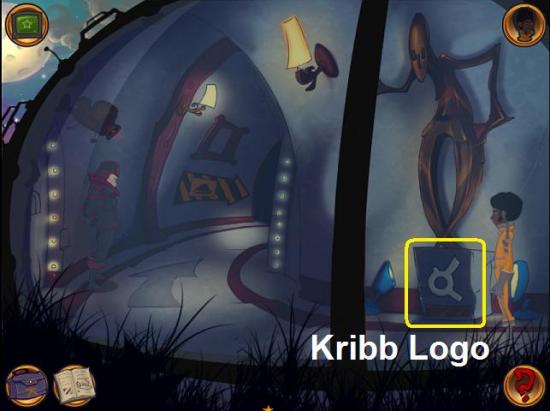
- Get the Kribb logo from the sculpture.
- Go back to the guard outside and give him the authorization papers. He will sign them after having looked at the clone ID card.
- Go back to Luna and Rowboat and put the construction tape and Kribb logo on Rowboat.
- Luna will get inside Rowboat.
- When you have the signed S.C.A.D. papers and Luna is inside the disguised Rowboat you can go back through the bushes to the warehouse and enter.
Rescue Captain Brawe
- First switch to Danny. Put the deadly pepper from the landing site in the water spray bottle from the elevator to make pepper spray.
- Give the pepper spray to Luna.
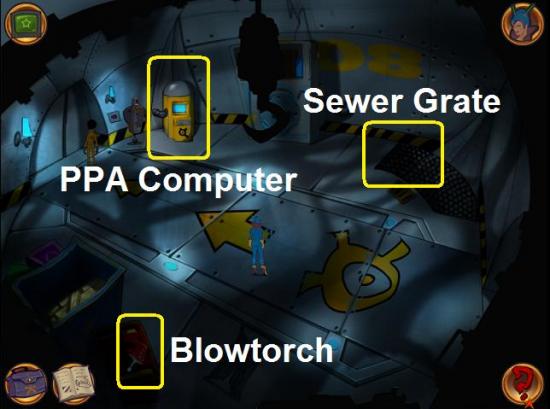
- Switch to Luna and have her explore the warehouse. There is an ion blowtorch in one of the containers.
- Use the blowtorch on the sewer grate in the top right corner.
- Open the grate and enter. Walk to the ladder at the other end of the passage. She can’t go up yet.
- Switch back to Danny and leave through the doors on the left.
- Go left twice to get to the left corridor.
- Talk to the guard to create a distraction.
- You will automatically be taken back to Luna. Have her climb the ladder.
- Inside the prison, give the pepper spray to Kaptain Brawe.
- Now switch to Kaptain Brawe and use the pepper spray on She.
- When you’re back with Luna, go back up the ladder again and search the body to find a key.
- Use the key on the cell door to complete the mission.
Destroy the DNA Replicator
Brawe:
- Switch to Kaptain Brawe and go down the pothole.
- Pick up the strange purple object.
- Go up the ladder into the loot warehouse and exit on the left to the right corridor.
- Go through the door the clone was previously guarding into the lab.
- Put the glowing object on the machine with the purple socket.
Luna:
- Switch to Luna, go down the pothole and back to the warehouse.
- Interact with the PPA computer, then go back to the prison to ask the scientists about the computer.
- Go back to the computer and answer the questions. You need to get a strong will report, so if you give flakey answers you will fail. One combination of answers that gets you a good report is: 2, 1, 1, 3, 2.
- Go back to prison and leave through the front door. You’ll arrive in the left corridor.
- Go through the door across the corridor and enter the strong will report into the slot of the machine.
Danny:
- Now switch to Danny. Take him to the PPA computer in the warehouse to get a pacifist report.
- Answers that will give you a pacifist report are: 3, 2, 1, 3, 3.
- Go to the elevator and open the door with the clone ID card.
- Enter the pacifist report into the machine and watch the events.
Get Rid of Kralek
- Back on Schminkell 7, Kralek is after the detonator that will blow up the DNA replicator. You need to get rid of him.
- Go into the left passage to the storage room.
- Take the detonator from your inventory and place it on the gravity displacer.
- When Kralek is stuck on the gravity displacer, go right twice to the computer room.
- Interact with the teleporter controls in the middle twice.
The End!

More articles...
-
Grow A Garden 2 Base Price List
What's the most valuable crop? -
Evomon Best Starter [Leafbun, Blazpup, or Bubble?]
Grass-type, Fire-type, or Water-type? -
Evomon Tier List [META and BEST Evomon]
The Evomon dream team.