- Wondering how to get Monopoly GO! free rolls? Well, you’ve come to the right place. In this guide, we provide you with a bunch of tips and tricks to get some free rolls for the hit new mobile game. We’ll …
Best Roblox Horror Games to Play Right Now – Updated Weekly
By Adele Wilson
Our Best Roblox Horror Games guide features the scariest and most creative experiences to play right now on the platform!The BEST Roblox Games of The Week – Games You Need To Play!
By Sho Roberts
Our feature shares our pick for the Best Roblox Games of the week! With our feature, we guarantee you'll find something new to play!All Grades in Type Soul – Each Race Explained
By Adele Wilson
Our All Grades in Type Soul guide lists every grade in the game for all races, including how to increase your grade quickly!
Journey to the Center of the Moon Walkthrough
Welcome to Gamezebo’s walkthrough for Journey to the Center of the Moon.
a:1:i:0;a:2:s:13:”section_title”;s:45:”Journey to the Center of the Moon Walkthrough”;s:12:”section_body”;s:38862:”
Welcome to Gamezebo’s walkthrough for Journey to the Center of the Moon.
CONTROLS
Hover your mouse over an object and click on it with the left mouse to interact with that object.
Right click anywhere to access your inventory.
Press F4 to quit the game without saving.
MAIN MENU
New Game – Start a new game.
Load Game – Load a previous game session.
Return to Game – Resume your current play session.
Credits – Watch the credits.
Options:
Rendering –
Hardware: Use this to get the most from your video card.
Software: Use this if your hardware can’t support the game.
Speed: Adjust the camera speed from slow to fast.
Subtitles: Turn off or on dialogue subtitles.
Object Information: Turn off hints and information about objects in the game
Volume: Move the slider up and down to
Quit – Exit the game.
WALKTHROUGH
Bold items are items you must pick up and examine
Italic items are places where you must use an item or interact with an item
Introduction:
The game begins with Michel Ardan awakening in a small capsule. You don’t know how you got here, but you should probably find out how you got here.
Examine the two people who are asleep on the benches. The one on the left is Barbicane, President of the Gun Club, and the one on the right is Nicholl, Barbicanes rival. Once you examined both the men, click on the newspaper hanging above Nicholl. Apparently all three men including you were loaded onto an artillery shell.
Next click on the Wrench, which is just to the left of the newspaper. It will fall, so pick it up. Right click to access your inventory, and move the wrench to the inventory area from the Transit Area. Click your wrench to equip it. Look at the port hole on the floor and use the wrench on the bolts. You’re in outer space!
Click on Barbicane to examine him, you will find out that he is dead, a bullet through the heart. Click the note he is holding in his hand, the wallet in his pocket, and take the Carriage Key that dropped on the floor. Use the key on the cabinet above your friend, and take the book of Ideograms on the left side. Hurry here, you are running out of oxygen, so time is limited. Take the Chlorate of Potash which is behind the book. Move to the other side of the capsule and examine the Bunsen burner on the right side above the flame. Take the lid off, then equip your Potash and pour it in the bowl. Click on the bowl to place it back above the flame, which will restore oxygen to the capsule.
Look down and see that there is a Can of Potassium and a Funnel, so pick them both up. In your inventory, click on the Funnel and the Can to combine them both to make a Can of Potassium with Funnel. Go back to the cabinet, pick up the Empty Pot, the Cartridges, a Closed Tin Can, a Long Strap, a Small Knife, Loaded Red Retrorockets, Spent Blue Retrorockets, Raffia, a Vine Plant, and lastly a Powder Barrel. Look at Barbicane again and take his hat. Using the small knife and Barbicanes hat, read Diana’s letter.
Next, take Nicholls Gun after examining him, then check his Wallet and face. After you’ve done this, check a port hole on the wall and all of a sudden you will lose gravity. Potassium starts floating around the shuttle, so use your Can of Potassium with Funnel to collect the droplets. Just move your mouse over the floating drops to collect them. A small cutscene will play after this.
If the oxygen levels start to drop and you start to suffocate, go to the burner and increase the flame to burn more Potash.
Go back to the Cabinet and look at the Wineglasses with the Casket. Take the empty glass on the left. Examine the rooster that you smuggled onboard, there is a burnt paper under the seat. Move the potash bowl off the flame and turn the flame down to its lowest level. Equip the paper and click the flame to examine it.
You should be on your way down to the moon now, so you have to ready your Retrorockets. In your inventory combine the Powder Barrel with the Wrench, or the Cartridges with the Small Knife to get Explosive Powder. Combine the Explosive Powder with the Spent Blue Retrorocket to get the Loaded Blue Retrorocket.
Next, equip the Red and Blue Retrorockets and insert them in the holes on the floor according to their colors. When you click on the button in the middle of the two rockets you have to lighten the load of the shuttle. Before you press it though, you should give a space funeral for Barbicane and Nicholl. Use the Raffia as string, so equip it and click on the cloth around both the men. Pick up each man, then go to the port hole on the floor and open it. With the men equipped send them off to space.
Use the wrench on both port hole bolts on each side of the shell, then climb the ladder. Turn around and open the porthole at the top of the vessel. Go back to the hole on the floor and equip items, then open the hole and throw them out. You will obtain these again later, so throw out everything that can be thrown out of the shuttle. Once all of that is done, hit the button to descend to the moon!
Once outside of the shell, you must explore the area. Take a few of the green Fruits of the Strangulica then go pick up the yellow Fruit of Mephita. Face the edge of the cliff and jump to the left edge. Click your mouse when the moving cursor is in the green zone to make your jump. On the other side of the pit there are two aggressive plants, so continue jumping around the area moving from clockwise from the shuttle.
From any point you can jump to the center mound on the island. Examine and pick up the shell item. Go to the ponds which have telescopes and pick up the Lunar Coins at the broken one, and Lunar Reeds at the one that works. Use your glass on the pond to get a Glass of Water. Use a coin on the good telescope to look through it to see a figure by a building, and after that you will learn two ideograms. Go down the path down the center of the two telescopes.
When you get down there, pick up the Yellow Fruit, Lunar Raffia, Dead Branch, and some Lunar Potting Soil (The soft dirt by the Raffia). Carry on down the tunnel and you’ll find an organ, and a stair to the right. Take it, and find the panel box. Open it by releasing the two handles. There is a small puzzle here, so click the levers in this order: Left twice, right twice, left once, then right once more. It will open a passage way back to the top. Go back up, then go to the top mound. Jump to the cliff which has two prongs pointing up. From there, jump to the cliff that is inset on the outer wall.
Once you land here, pick up the Lunar Coins, then catch a few floating blue fruits which appear when you examine the soil. After this, look at the ideograms on the containers. The ideograms on the right wall mean that the blue plant is aggressive towards the purple plant and can destroy it.
Look more right and hop to the next cliff. Here it shows that Purple is aggressive to the Yellow Plant. Hop to the next cliff which is behind you. Here is shows that the Yellow is aggressive to the Red Plant. Hope behind you once more to the last cliff to see that the Red is aggressive to the Green Plant. Go up the final time to see that the Green Plant is aggressive to the Blue Plant.
Here is how the order goes:
Blue -> Purple -> Yellow -> Red -> Green -> Blue
Look back into the crater and see all the plants together. There is some sort of mechanism on the ground, but we deal with that later. Go up the stairs and you will find an Alien! He is very nervous, so offer him some fruit, Yellow and Blue are the kind he likes, but you will have to cook it for him. Go down back to where the lava pool was in the cliff cove. Combine the Yellow and Blue fruits with the Pan to make a mixture, then place the pan on the lava and it will make Voracia-mephitia compote. Go back to the central area of the crater to get more soil, we will have to graft some plants to scare plants away.
Click on a fruit and the soil to produce a seed. Produce two seeds then combine them with a Raffia to make a Grafted Seedling. The combinations are as follows:
Yellow + Green
Blue + Yellow
Red + Blue
Green + Purple
Purple + Red
Once you have some combinations, the possible Yellow, Green, and Blue combinations, head to the plants that are scared by the other species. The groups that are scared by each color are as follows:
Yellow + Green = Red and Blue
Blue + Yellow = Purple and Red
Red + Blue = Green and Purple
Green + Purple = Blue and Yellow
Purple + Red = Yellow and Green
Go to the Red and Blue plant area. Use the Yellow and Green Seedlings to pass through unharmed. Collect all the possible items in the area, and when you obtain more fruit combine them with the proper combinations as listed above. Go through each area and collect all the items you can. When you come across an Alien, you have to keep them occupied with some fruit. The Aliens have two fruits on their shoulder, so you will have to mix what is aggressive towards each one. The mixtures are as follows:
Blue and Yellow Alien: Purple and Red Compote ~ Found at Purple and Red Plants
Blue and Red Alien: Purple and Green Compote ~ Found at Purple and Green Plants
Green and Purple Alien: Blue and Yellow Compote ~ Blue and Yellow Plants
You have to cook the fruit in your frying pan over the lava back at that cliff side, so collect the fruits you need and head over to cook some Compotes. When you have them, you have to use them on the Aliens to get past them. Go through each area and get all the items on the ground. Once you have everything from each area, go back to the area by the steps with the mechanical device on the cliff edge.

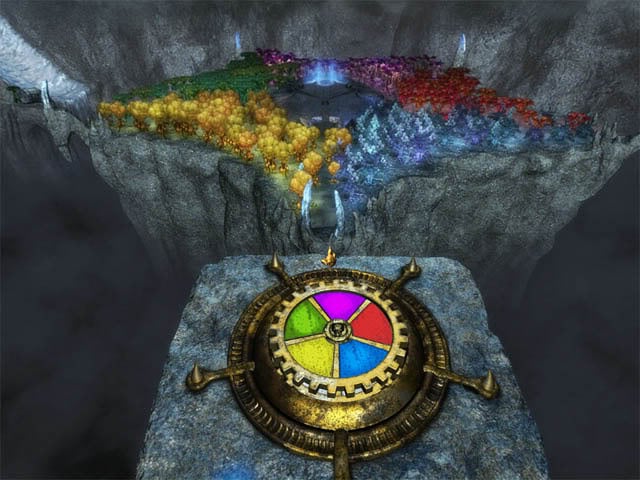
Press each color until they match with that colors correspond to the plants. Purple on top, Red, Blue, Yellow then Green in clockwise order, or as above. Take the colored gear, then reverse the order of the colors so it is Purple, Green, Yellow, Blue, then Red in clockwise order as shown:
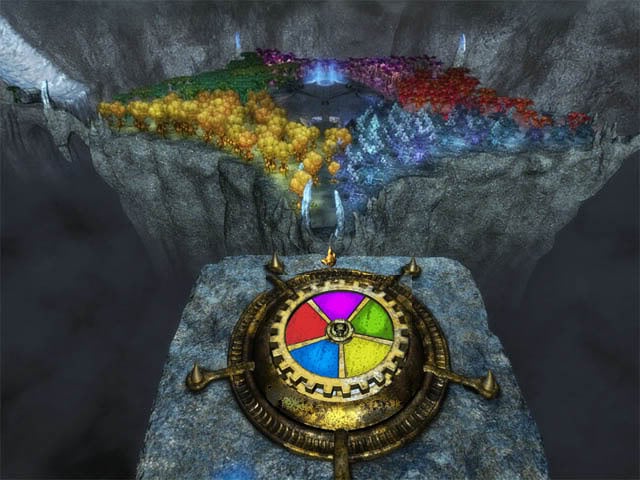
Take that gear as well. Go up the stairs behind you, then place the gear in the slot by the door, then turn the handle. Enter the next area.
You will now examine the ideograms on the wall, but you can’t open the gate. Go back down to the lava area and cook up some yellow and blue compote, then return to the ideograms past the gate. Eat it and your vision will turn green. Look at the ideograms and you will see these new symbols:
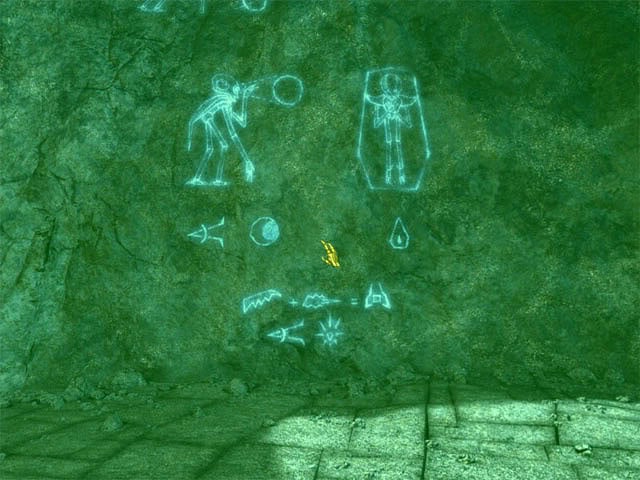
Go to the panel by the gate and click the symbols that you just discovered in any order. The gate will open, so go through that. If you want to remove the green vision drink a nice glass of water. Go to the end of the pathway, then use your can opener on the sarcophagus. It will break, but you can now get an Iron Bar, Selenite Key, lunar tool, and a leak proof globe.
Return to the entrance and use your Iron Bar on the Cracked Sarcophagus. Inside are human remains! Take the Gold Necklace, Damaged Flute, and the Mechanical Arm. You will want to leave now, so examine the panel by the door. Each piece of geometry has a number of points, the vertices or corners. The lights under each one mean that you have to add the number of points together, then click the piece of geometry that equals the total.
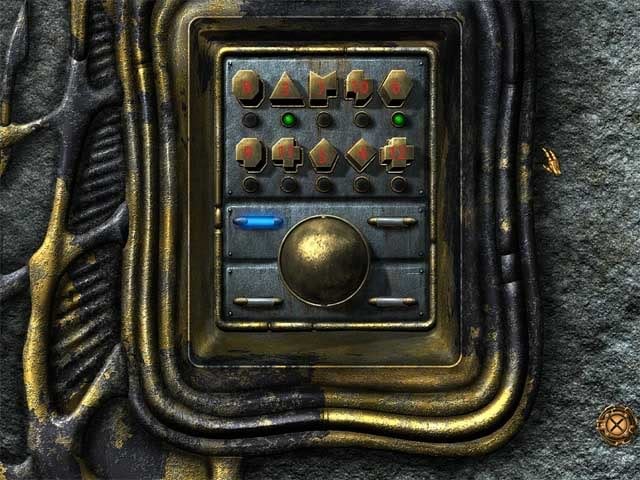
The ball will slowly open if you pressed the correct sequence. The puzzle is random, so you are going to have to add each number yourself and find the right piece. Good luck!
Once you have that done, head to the door at the right. Place the other gear in the slot then turn the handle. Enter the room and check the human picture on the wall. Enter the next room to your left. Pick up the ax and the Hopper. Go back to the hallway and press the call button for an elevator. Enter and use the Selenite Key on the top keyhole of the three, and you will be taken to an office after you press the button to the left of the key.
So you now have a new challenge, you have to prove to the Alien that you are smarter than it thinks you are, and with that you must return to the Earth. Your journal states the materials you will need to return to Earth, so we will follow that. Examine the board to the left of the desk, and the Alien will tell you that you need to know how to read Selenite and offers you the screen at his desk.
Press the button in front of the screen to activate it. A sequence of ideograms will go on the screen and you must press the correct option that says what it is. If you do not know them, write them down and draw the symbol for each one to remember them. You can find the ideogram book in your inventory. Once you complete the language test on the screen, you will be allowed to use the Language Harmonizer to the left. You must pass the test first.
The Harmonizer is another test; you will need sound for it. Press a button on the left and then press another on the right and try and match the sounds together. Once you have them all complete, you can ask for the key by pressing the button on the left of the desk. This is a random puzzle so listen carefully to the sounds.
Once you finish this your intelligence should be over 200 and you should have the Level 1 Key. You can sell objects to the Selenite if you wish, but be careful if you need an item, you will have to buy them back at a higher price from the Dispenser on the right. Sell your seeds and fruit, you will not need them anymore.
Go to the elevator and go to the second top floor. Go left to the exploding mushrooms and notice the bar on the floor. Examine your log book to learn how to count the Selenite way. Examine the panel box on the wall and add the numbers. A dot means 1, and a bar means 5. A square is 20. You must add the number off the floor, which us 6, to each column and carry over once it is past 20. Add 6 to the top right number, and if there is any carry over from the right add it to the left as you normally would normal math.
The puzzle is randomized, so you once again are going to have to figure this one out on your own. If there is nothing to carry over, make sure that the bottom left box is the same as the top left one, as you just carry that number down. When you solve the puzzle the panel will open, so turn the switch to open the door to your right.
Once you finish that puzzle go back to the elevator and go to the third floor. Go right to the food vats, and pick up the cogged cylinder and the shovel. You can mix fruit here to feed to Michel. The effects of cooked compotes are as follows:
Red and Blue = Purple vision.
Yellow and Blue = Green vision.
Green and Yellow = Makes Michel ‘feel splendid’.
Purple and Green = No comment.
All other combinations Michel will be unhappy with and won’t have any effect.
There isn’t much you can do here right now, so head down to the lowest level possible at the elevator. Once here you will find that there is a long rectangle divided into two parts, the left has 1 dot and the right has 2. You must add them to the panel box to open the next door.
Once again, the same rules of the math apply. 1 dot equals 1, a bar equals 5. Add two dots to the right, and one to the left, and carry over the right number if it passes 20. Remember to only carry over just 1 dot, not 2, so you will be adding 2 dots to the left panel. If the right column is 18, then make it stay as a box, if it is 19, then make it show just one dot. You shouldn’t have too many problems on this one. Flip the switch once you finish the puzzle then enter the room and examine freely.
Doing all of these tasks should have made your IQ go above 300. Return to the Office and ask for the 2nd key if it is above 300. Buy Yrshnouff gluance (glue), the Mechanical Hand, and the Mechanical Elbow.
Combine the Flute, Glue, and Reeds to repair the flute so you can speak Selenite. The flute will be automatically equipped, so now go back to the Selenites that you couldn’t talk to before to obtain knowledge. Go talk to the technician and talk to him through all the options. Be wary, it will cost you to learn everything. He feeds quite a bit off that tube, remember that.
Go to the food floor, the 3rd level from the top. Talk to Scurvy the Insomniac, and ask him for help to order the exiles to help move your shuttle. He will ask you some questions, they are very easy to answer. If they crack their cartilage, what do they do? Crack their cartilage. It’s all very easy, so just pick the right ones based on the question.
Once you finish that, it’s time to rig the food source for the Selenites. Combine the Green and Yellow fruit and cook it over the lava to make some compote. Dump that in the food vat to the left to make all the Selenites feel splendid. Go down a floor and obtain the Level 2 key from the Office Desk (Your IQ should be over 300 at this point).
Go back down to the 3rd floor to the food area, and go back to Scurvy. There is a key hole to the left, so use your Level 2 key on it and examine the bust. It will fall and break, so pick up the Broken Bust. Look at the bust in your inventory and you will hear that one part makes noise. Use the wrench on this part to obtain salt, and then use glue to reassemble it. If you do not have glue then buy some back at the Office. Once it is repaired put it back where it was to gain more IQ points.
Go down another floor to the Selenite that was busy working, and now he won’t notice you. Grab some Blue Ore, the Shovel, and use the Empty Can on the Azotic Acid. Open the cabinet on the wall and take the lobe, cogged cylinder, handle, belt, and ax.
Combine Azotic acid and Plugged Conch (The Blue Fruit) in inventory to get Belbaab conch that enables understanding all creatures. Get some more Azotic Acid. Once you have done that go back to the kitchen and turn the valve back to water so the Selenites return to normal.
We now have to return to the ship, so make sure before you go you have a Red Seedling in your inventory. When you get back to the ship the green plant is holding it, so scare it off with the Red Seedling. Go inside and talk to your pet rooster, and he will tell you how Barbicane and Nicholl died, which means you fulfilled your task the Supreme Selenite asked of you. Go to the Cliffside where the lava is and the soft soil around the crater.
Make blue fruit seedling. Combine that with the earth vine plant and raffia to make Voracia-grape hybrid. Plant the hybrid on fertile soil at the cliff cave to see a grape vine grow on the side of the cliff. Take lunar grape. Climb the vine to get up the cliff to the top.
When you go back to the office, there is an optional puzzle in the hall by the elevator. You can solve it by placing the hands and feet like so:
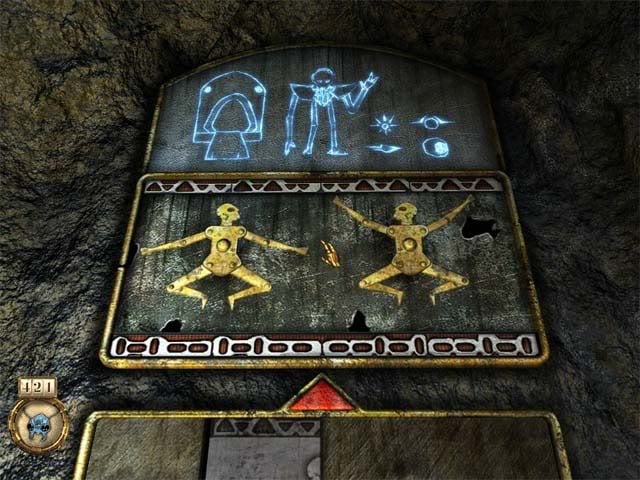
Pick up the Control Box when you complete it.
In your inventory, use the lunar tool on the broken mechanical arm to get a mechanical forearm, upper arm and corroded parts. Combine forearm, upper arm, and purchase a hand and elbow, then combine all of them to make mechanical arm.
Use your hand to catch an exploding mushroom at second floor. The easiest way is to place your cursor in the path of a dropping mushroom. Then combine the mushroom with the leak proof globe in inventory quickly to get mushroom spores. To make it easy, prepare a Green and Yellow compote and give it to Ardan character. This allows you to move faster to catch the mushrooms.
Once you have all that done, make a Red and Blue Compote. Eat it to make your vision turn purple, then go all the way back to the center island where the Organ structure was. Go up the stairs and examine the Purple Skull. Take note of the numbers, 1 and 8. You can drink water to clear your vision now if you want.
Go outside and look at the box with the red buttons. Press the water ideograms here:
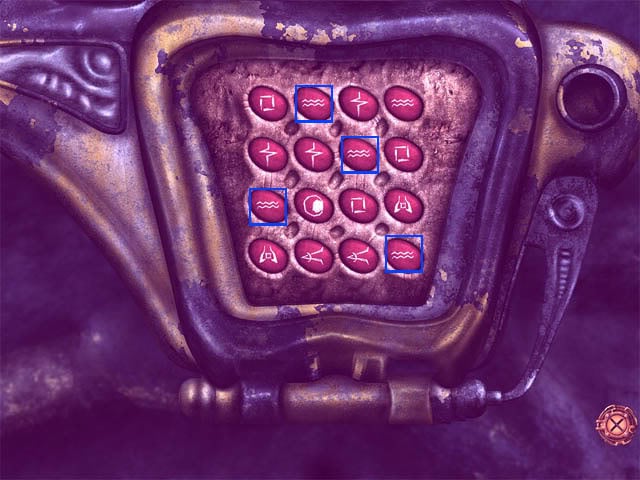
When you do it right, the panel opens and a lever is able to be turned. Turn it to the left. Do the same for the other side but turn the lever to the right. The ones you are supposed to press are as follows:
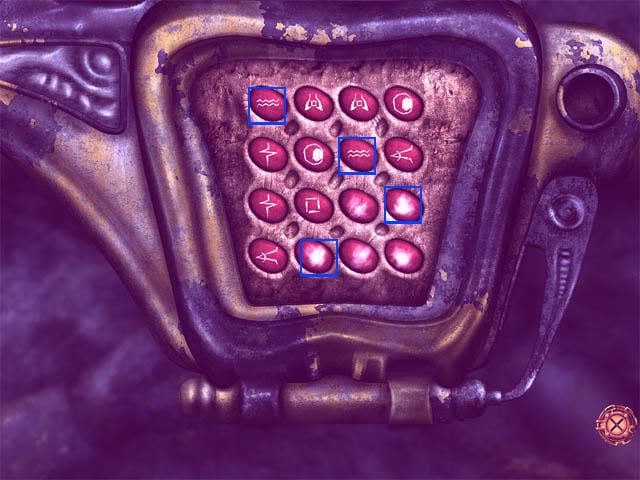
Once you have done that, interact with the 6 buttons on the left side of the area and press them in this order:
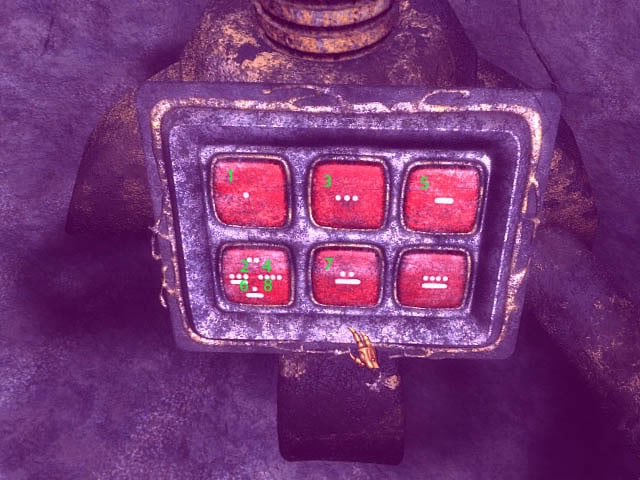
And on the right side of the area just raise it one level by pressing the top left button once. If done right Michel will say "What do you know?". Go back down to the Skull picture and obtain the salt that is there and take all you can.
Go back down to the elevator to the Laboratory, the 2nd last floor. Place the belt on the wheels, the shovel in the slot at the bottom, and a leak proof globe at the top of the machine. You need grease to make this thing work, so combine the following items (The chart on the sides illustrate what you need.
Combine Purple Fruit and a Red Fruit and put them in the pan. Heat it on some lava.
Place Compote mixture on bottom part of the Purifier.
When the vents won’t open, use the mechanical arm on vents that has red residue and click.
Take the Zubroo Concentrate. Add Viscous Secretion (Alien barf) to the Zubroo concentrate to make Zubdssik greasy amalgam.
Next we need to make another potion. Mix Green and Purple Seedlings together and graft them with some Raffia, then place that in the purifier to make Xulmi crystalline powder. Make sure you keep the vents open with the Mechanical Arm. Add Salt to the Xulmi powder to make the Xuldakir Star.
The next mixture we need Red and Purple Seedlings that are grafted, and place that in the purifier. Keep the vents open again to get Prultuuk’s crystalline powder. Mix that with the Exploded Spores in the glass to make Prulmis’ explosive mixture.
Go to the top level of the elevator, to the transmitter room. That is the room with the broken satellite dish. We need to fix this. Make a colored gear how we did it the last time, or buy one instead. Next, combine the colored gear, cogged cylinder, and the ax to make a Crushing Roller. Place the Crushing Roller in the slot on the left of the machine.
Place the Hopper in front of the Crushing Roller. Place the Funnel on the fuel line. Next pour the Azotic Acid in the Funnel. Now place the Handel on the right panel. Next place glue on the two open pipes. Lastly, use the Grease on the center bolt. Finally, put some Blue Ore in the Hopper. Pull the handle, and volia! She works! Collect some Lumen with the empty can.
Head back to the purifier once again, and put a Purple Fruit in. It will net you Brozkyzz concentrate, so mix that with a blue fruit and your new lumen to make Oxygenizing concentrate.
So, we are getting close to getting off this rock. We need to tip our shuttle off that edge so we can load it on the cannon, so lets get to it!
Go down to the lowest level possible using your Level 2 Key. Use the Xuldakir’s star on the pedestal in the center of the room, which will shrink you so you can enter the next room. From here, pull the lever to open the door. Next, go down the hall and take the Mechanical Hand and the Mechanical Elbow from the left insets, as well as the Broken Mirror and Painting, the Tunnel of Communication. Next examine the symbols on the pillar and they will be added to your log.
The next task is to make a concoction called the Essence of Klipsaggt. The steps to make it are in your log, and as follows:
– Place the empty can on the rock stand
– Turn the top right lever which will fill the tank with some purple liquid
– Press the button by the two arrows to fill your can with the liquid
– You need to empty the can now by turning the bottom left lever
– Fill it again by pressing the button
– Empty it once again using the bottom left lever
– Fill it again with the last of the liquid, which will be just one part
– Fill the tank on the right again
– Press the button in the center to fill the can, which will leave six parts in the right tank
– Turn the bottom left lever to empty the can
– Press the center button to fill the can again, which will leave two parts in the right tank
– Press the center button to fill the can with the remaining two parts
– Turn the top right lever to fill the tank
– Press the center button to fill the can which will leave seven parts in the right tank
– Turn the bottom left lever to empty your can again
– Press the center button to fill the can again, which will leave three parts in the right tank
– Turn the bottom left lever to empty your can again
– Press the center button to move the three parts from right tank to empty can
– Take your can with the Essence of Klipsaggt (3 Measures)
Once you have that, go back to the purifier. Make sure you have a purple fruit, if you do not go get one from the third floor. Make a Purple Seed from this by combining it with soil.
Place a Purple Seedling in the purifier and complete the mini-game again to get Klipsgaal’s Isotopes. You have to separate the Isotopes from the mix now, so use the machine on the left wall. Place the Klipsgaal’s Isotope on the scale. You will have 9 Isotopes, and you must find the lightest one.
– Place 4 on each side, then press the button in the middle
– Place two on each side now that don’t have X’s on them and press the button
– Place the remaining two on the scale, one per side, then press the button to find the lightest isotope.
Time to go back to the shuttle outside again, so head on over there.
Once at your ship we need to coat it in Lightening Paint. As instructed in your log book, mix the following ingredients:
Isolated Klipsgaal Isotope, the Blue Fruit, and the Essence of Klipsaggt (3 Measures), which will make Klipso’ Lightening Agent. Quickly spread this on the ship before it dries! If it does dry you can soften it again by using a flame, and luckily there is one in your ship. The last thing you have to do is get that rocket down into the pit, so use the Iron Bar on the rock that is holding the vessel up.
Go back to the elevator and go down to the second floor. Go left past the Exploding Mushrooms. Enter the room and close the door with the left lever, then open the right door with the right lever. Place the Prulmis’ Explosive Material on the ledge. Once again we are going to have to head all the way back to the island in the crater, to where the organ is. Get walking! When you leave the elevator you can take the Level 2 key with you.
When you are here, you need to get the water flowing for the organ, so turn the levers at each pond to fact the opposite way, inwards to the center of the island. Next, make the Air Turbine work by clicking on the ideogram that has the Air symbol on it down below. Once these two tasks are done, you can now play the organ. To make this easy, plug in the Level 2 key into the socket.
The next step is a puzzle, the exiles that are supposed to help you have two plants on their shoulders which correspond to the colors and sounds of the organ. (It is explained in your log book how to call them) There is a chart on the left to get you started (Blue Yellow, Green Purple, and Purple Red).
To make this easy the pipes will be numbered from left to right, starting at the left the first pipe is #1 and the last pipe on the right is #13, or, 1-13. Press the pipes in this order for each exile
Blue/Yellow Selenite:
- 5 10 – hear an answer
- 5 10 13 12 – hear an answer
- 5 10 13 12 12 – hear an answer
- 5 10 13 12 12 13 – hear an answer
- 5 10 13 12 12 13 10 – hear an answer
- 5 10 13 12 12 13 10 5 – the Exile comes
Green Purple Selenite:
- 8 3 – hear an answer
- 8 3 1 12 – hear an answer
- 8 3 1 12 12 – hear an answer
- 8 3 1 12 12 1 – hear an answer
- 8 3 1 12 12 1 3 – hear an answer
- 8 3 1 12 12 1 3 8 – the Exile comes
Purple Red Selenite:
- 3 6 – hear an answer
- 3 6 13 12 – hear an answer
- 3 6 13 12 12 – hear an answer
- 3 6 13 12 12 13 – hear an answer
- 3 6 13 12 12 13 6 – hear an answer
- 3 6 13 12 12 13 6 3 – the Exile comes
You will have to repeat the Blue/Yellow pattern twice to complete this puzzle. Once you finish the doors will stay open, so head on down. Head to the far end of the hall towards the Selemites. You can obtain Chlorine in a Glass Jar is you want at this point. Go to Scurvy and talk to him on the 3rd floor.
You need to protect the shell for launch, so enter it and look at the port hole that is not facing the Earth, the hole you entered from. Equip your Intact Protective Shield and place it on the window, and then use the bolts in your inventory along with the wrench to tighten it.
You need a bit more explosive power than just that Explosive Material on the shelf, so open your powder keg if you haven’t already done so with the Iron Bar or Wrench. Take the Retrorockets from their sockets and combine either one with the Powder. You will need to fill the other with Prulmis’s Explosive Mixture, so if you don’t have any go make some on the 5th floor (Red and Purple Grafted Seeds mixed with Exploded Spores).
We are going to need air for the journey home, so burn 2 Raffia on the flame inside the shuttle to make Potassium. You should have Borzludjak oxygenizing preparation in your inventory, but if you do not, obtain some Chlorine in the Glass Jar down the hall and mix it with the Potassium to get Chlorate of Potash.
The Supreme Selenite had asked us to return the items we took from the Necropolis, so head there and open the gate via the panel on the left. Go down the path and place the flowing items back in the sarcophagus: Iron Bar, Level 0 Selenite Key, Leak Proof Globe, and Lunar Tool.
When you try to return, you will have to redo the puzzle, however this time a light will be red instead of green, which means you must subtract the number of red corners from the green corners. The blue lights mean multiply the pieces together, and the yellow means divide that number. You can do this puzzle 3 times to get more IQ points.
Once you are done in the Necropolis, go back down to the office (Use the Level 2 key) to get there. Request the Level 3 key from the desk, you should have enough IQ (Over 750 or so). Before we get going on the shuttle, go to the top floor and examine the floor by the Gold men puzzle that we did earlier. Insert both Level 2 and Level 3 keys in the slots.
If you didn’t do this puzzle earlier you can do it now, arrange the mens arms and legs according to the silver diagram. Take the Control Box if you don’t already have it. Enter the room with the Satellite. Next, use some Glue on the Broken Mirror to get a Fixed Mirror. Place the Mirror on the stand, then put the Control Box behind it. Remember in the basement floor those symbols on the wall? It meant 7 for Light and 4 for Fire, so adjust the dials on the Control Box to have 7 for Light and 4 for Fire.
After you have contacted Earth you can request supplies. Ask for some Plants that you can accommodate to the Moon, and whatever other item you want. A can opener is a good choice. Return to the island in the crater and look for smoke signals before you jump down, as that is where the items landed. Obtain both items. Use the can opener on the Earth Supply Canister to get some plants. Your can opener will be broken, so use Yrshnouff gluance to fix it. Use it to open the cans. When you find the plants, you will find that the cotton that was sent mixed with the lunar plants. Pick some Lunar Cotton.
Combine the Tunnel of Communication Painting plus the Essence of Klipsaggt and Lunar Cotton to get a new painting, the Lumenplay in a grott. You will have to go fetch some more Klipsaggt.
Once everything is neat and in order, it’s time to get off this rock. Head down to the second floor and get to your rocket by shutting the door behind you. Insert the Level 3 key in the slot above the explosives, then return back a room. Press the Red Button to activate the timer and move it all the way to the right. Pull the lever on the side, then quickly re-enter the room with your shell, then press the lever on the wall. Hop in your shell and await lift off!
“;
More articles...
Monopoly GO! Free Rolls – Links For Free Dice
By Glen Fox
Wondering how to get Monopoly GO! free rolls? Well, you’ve come to the right place. In this guide, we provide you with a bunch of tips and tricks to get some free rolls for the hit new mobile game. We’ll …Best Roblox Horror Games to Play Right Now – Updated Weekly
By Adele Wilson
Our Best Roblox Horror Games guide features the scariest and most creative experiences to play right now on the platform!The BEST Roblox Games of The Week – Games You Need To Play!
By Sho Roberts
Our feature shares our pick for the Best Roblox Games of the week! With our feature, we guarantee you'll find something new to play!All Grades in Type Soul – Each Race Explained
By Adele Wilson
Our All Grades in Type Soul guide lists every grade in the game for all races, including how to increase your grade quickly!


