![Digimon UP Tier List [Supports, Buddies, and Partners]](/wp-content/uploads/2026/07/digimon-up-tier-list.jpg "Digimon UP Tier List [Supports, Buddies, and Partners]")
Digimon UP Tier List [Supports, Buddies, and Partners]
These Digimon will get you UP the leaderboard.

![Haze Seas Boss Drops [Chances, Locations, and How to Spawn]](/wp-content/uploads/2026/07/haze-seas-boss-drops.jpg "Haze Seas Boss Drops [Chances, Locations, and How to Spawn]")

Welcome to the Jodie Drake and the World in Peril walkthrough on Gamezebo. Jodie Drake and the World in Peril is an Hidden Object, Puzzle Game played on PC or Mac, created by Sleepwalker Games and available at Codeminion. This walkthrough includes tips and tricks, helpful hints, and a strategy guide for how to complete Jodie Drake and the World in Peril.
Welcome to the Jodie Drake and the World in Peril walkthrough on Gamezebo. Jodie Drake and the World in Peril is an Hidden Object, Puzzle Game played on PC or Mac, created by Sleepwalker Games and available at Codeminion. This walkthrough includes tips and tricks, helpful hints, and a strategy guide for how to complete Jodie Drake and the World in Peril.
Possible bugs in version 1.0.7
Click the Adventure Button, choose your difficulty level and watch the opening Comics (movies/cutscenes).
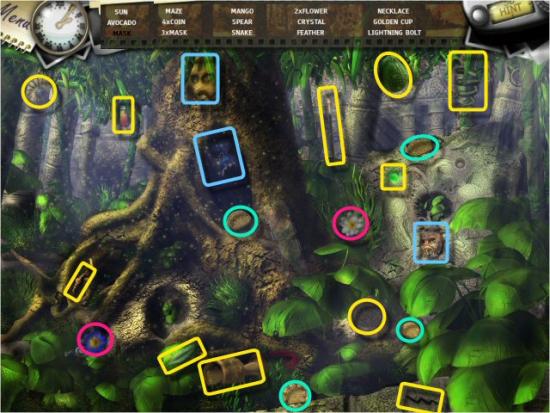
Level 1 – The Jungle
Find all the items in the list. Multiple Items: 4 Coins (green), 3 Masks (blue), 2 Flowers (pink).

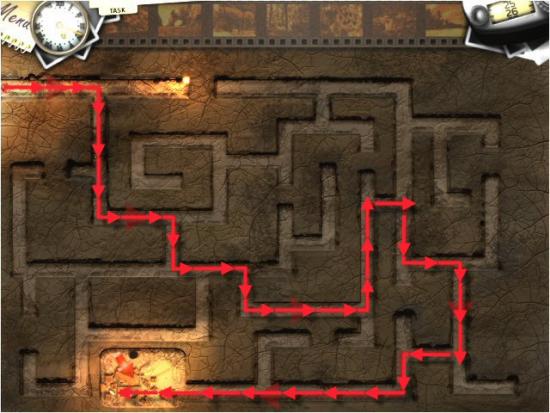
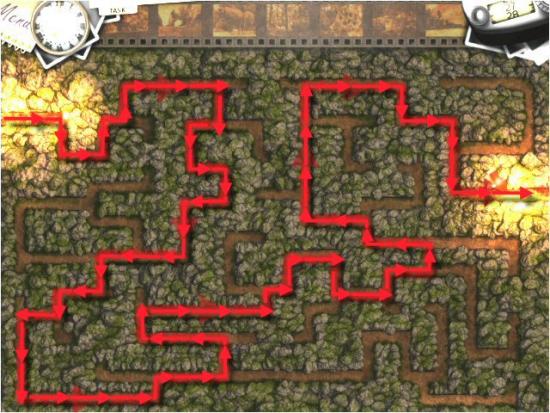
Level 2 – The Aztec Labyrinth
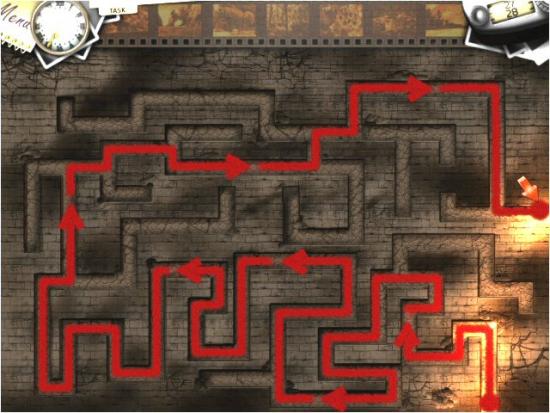
You must guide Jodie through the maze. Move your cursor along the path and Jodie will automatically follow it. The entire scene will be illuminated every 10 or 15 seconds. Use the Hint button to display the entire path. The maze is the same in both Relaxed and Challenge modes.
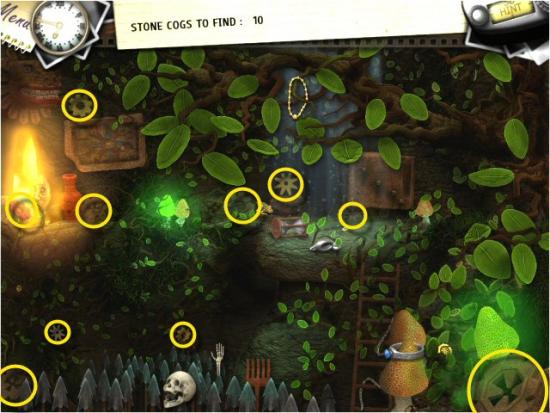
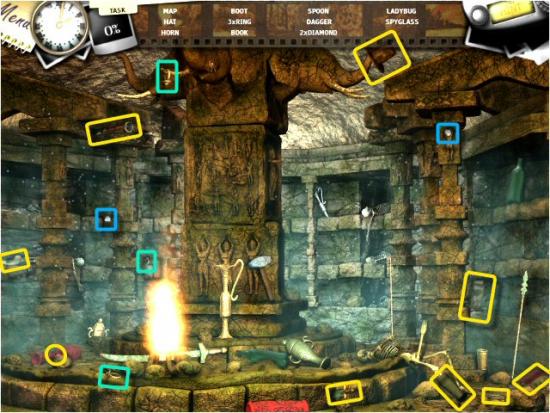
Level 3 – The Caverns
Find all the items in the list. Animated Item: Bat (dotted yellow).
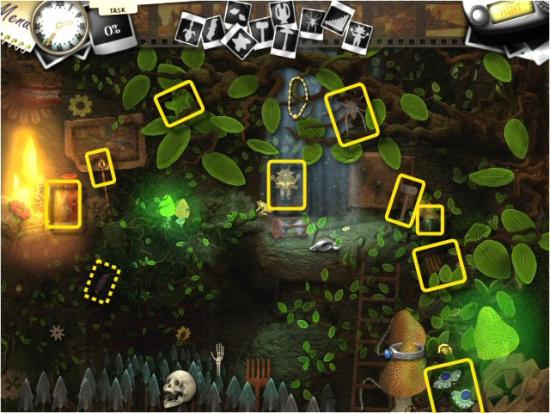
Find 10 Cogs.
Level 4 – The Work of Art
Find all the items in the list.
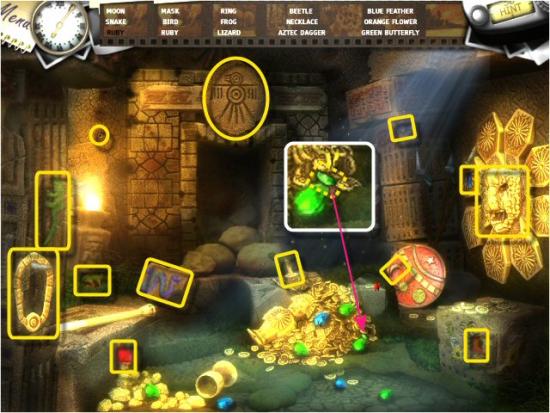
Level 5 – The Treasury
Find all the items in the list. Animated Item: Green Butterfly (dotted yellow).
Level 6 – The Ancient Gate
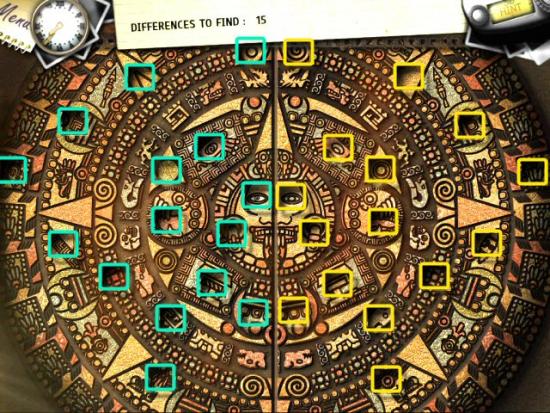
Find the 15 differences. When you click on one side of the image, a square section will be depressed on both sides.
Level 7 – The Cliff
Find all the items in the list. Animated Item: Eagle (dotted yellow).
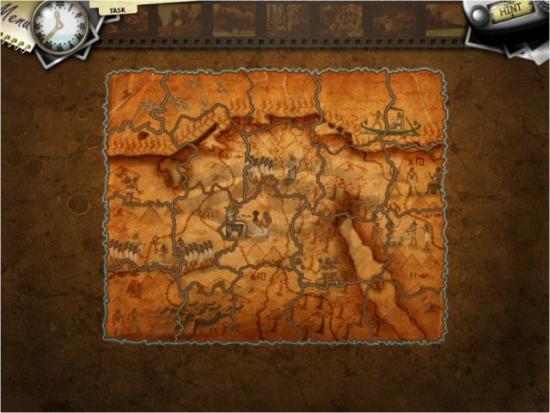
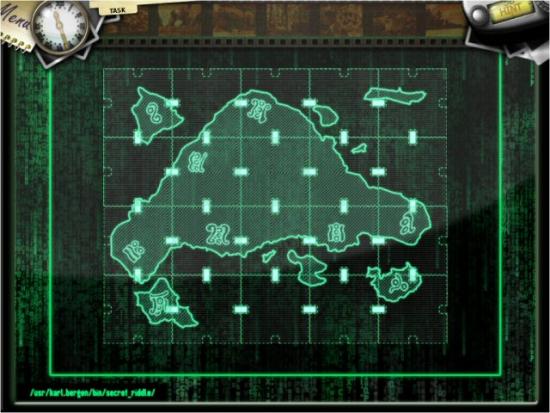
After the cutscene, you’ll return to the Map. You can choose one of three available locations: Greece, Egypt or India. China and Easter Island are locked. If you choose a different area than what’s shown in this guide, scroll down to the appropriate section.
Level 1 – The Mountain Path
Find all the items in the list.
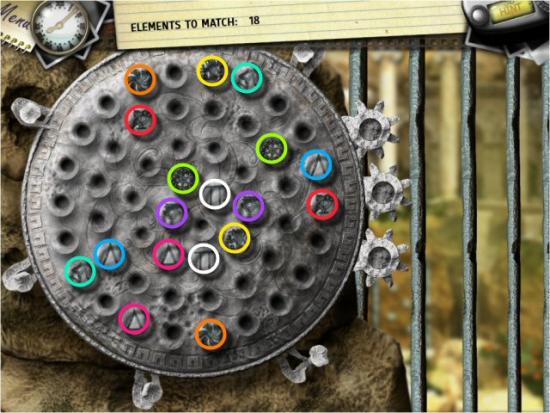
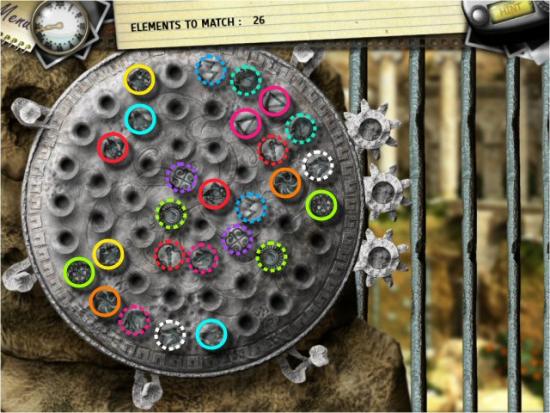
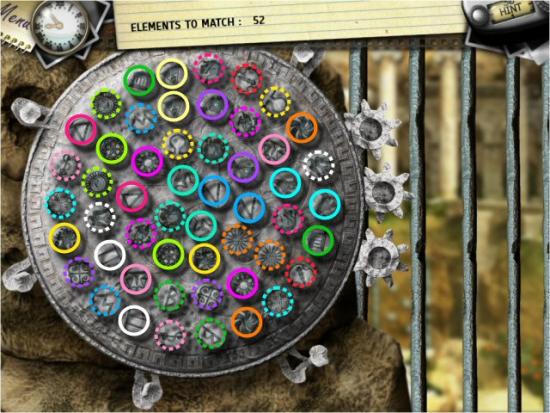
Level 2 – The Ancient Door Lock
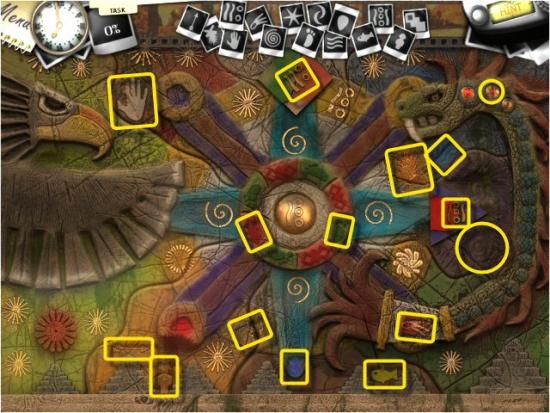
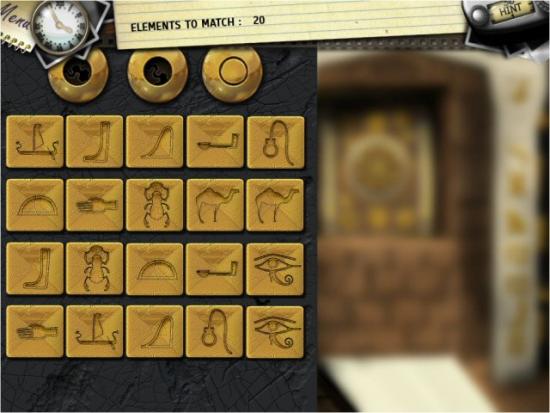
Find all the pairs to eliminate them. You’ll play 3 rounds of 9, 13 and 26 pairs (18, 26 and 52 elements). The pairs will always be the same, but they may be in different locations on the Wheel. There is no difference between Relaxed and Challenge modes.
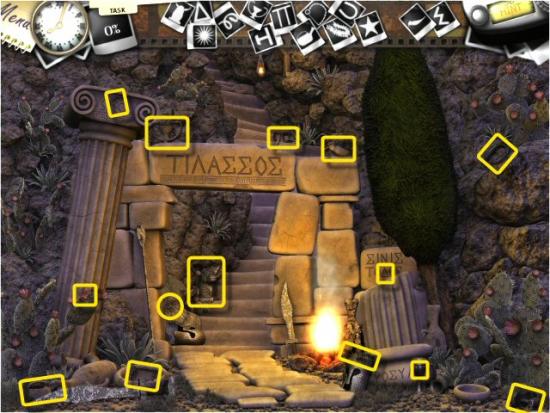
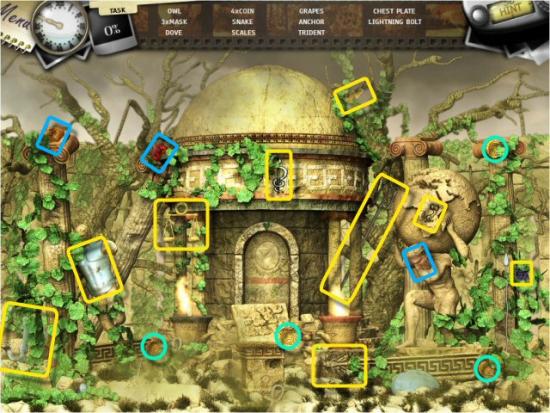
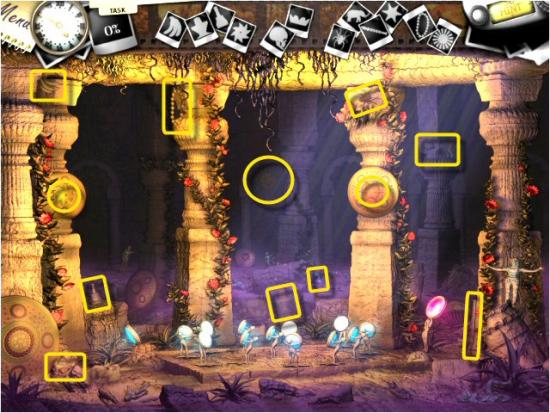
Level 3 – The Acropolis
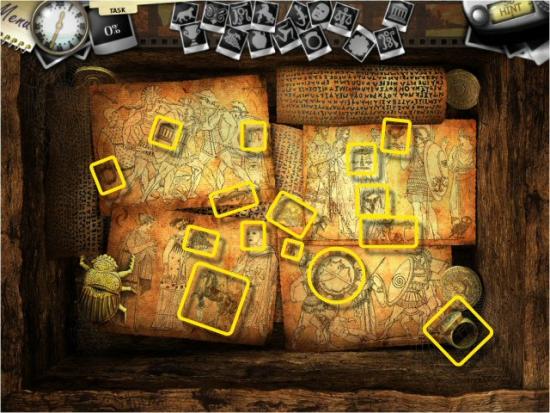
Find all the pieces of the 4 objects shown at the top.
Level 4 – The Atlas Shrine
Find all the items in the list. Multiple Items: 4 Coins (green), 3 Masks (blue).
Level 5 – The Broken Sculpture
Reconstruct the image. Click and drag a piece into position to reconstruct the image, jigsaw fashion. Once you position a piece next to one that fits, it will link and you can move the entire unit.

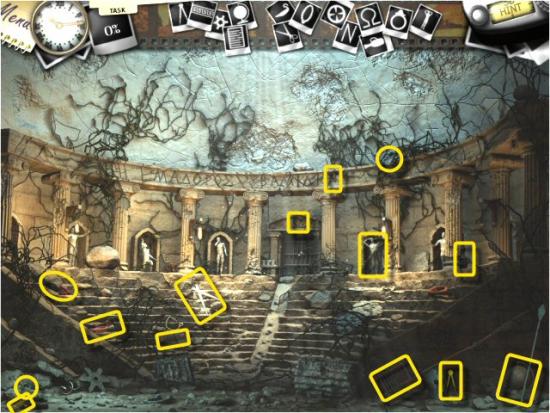
Level 6 – The Amphitheater
Find all the items in the list.
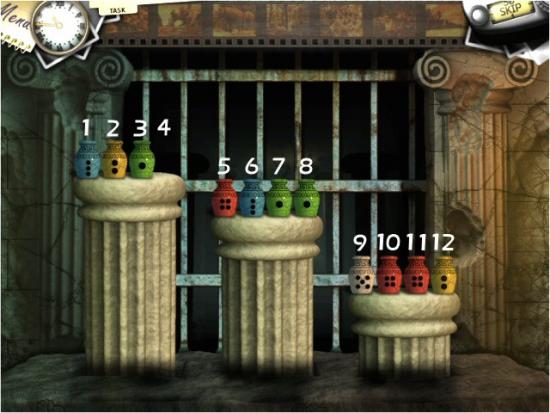
Level 7 – The Scales
Open the gate by balancing the 3 Scales. Click on a Weight and it will move to any Scale with an empty space. The total of all the Weights is 30, so each Scale must have 10. The solution is to click 9, 8, 2 and then 9. This puzzle is always the same in both Relaxed and Challenge modes.
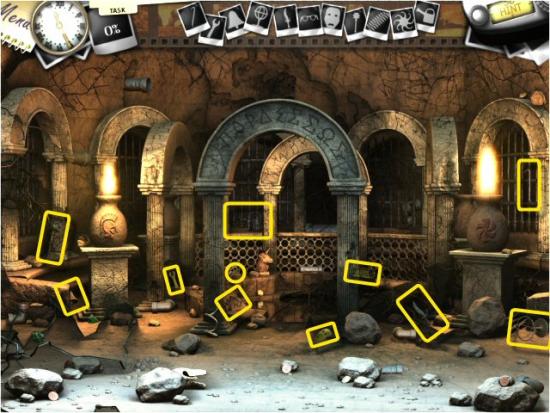
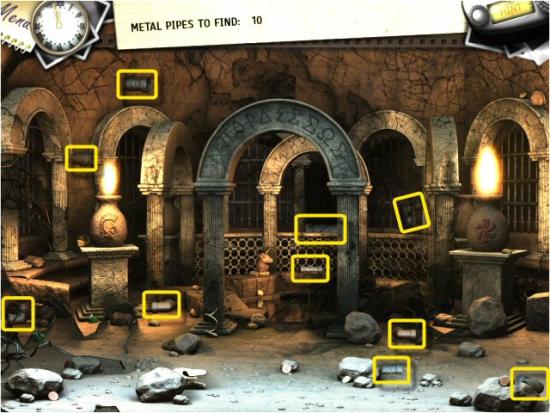
Level 8 – The Baths
Find all the items in the list.
Find 10 Metal Pipes.
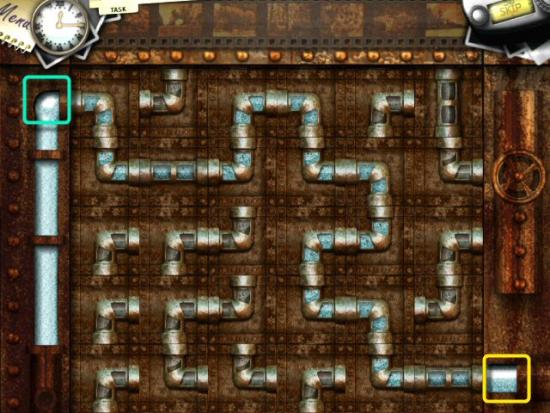
Level 9 – The Aqueduct
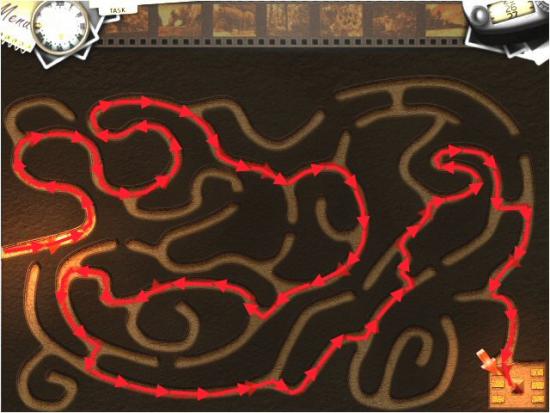
Arrange the Pipes so the water flows from the Intake (green), at the upper left, to the Outlet (yellow), at the lower right. Click on a section of Pipe and then click on another to switch their places. Note that you do not need to use every section of pipe and there is more than one solution. There is no difference between Relaxed and Challenge modes.
Level 10 – The Pool
Find 12 Keys.
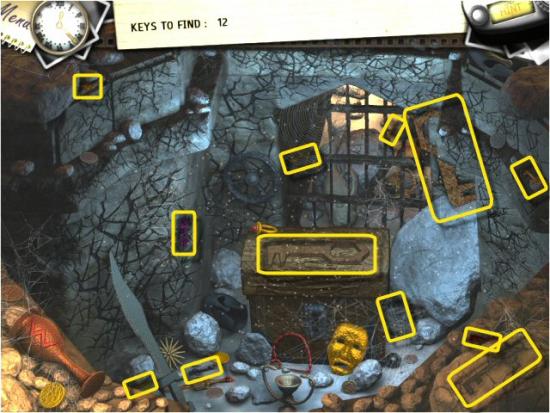
Level 11 – The Treasure Chest
Find all the items in the list.
Level 12 – The Minotaur’s Maze
You must guide Jodie through the maze. Move your cursor along the path and Jodie will automatically follow it. The entire scene will be illuminated every 10 or 15 seconds. Use the Hint button to display the entire path. The maze is the same in both Relaxed and Challenge modes.
After the cutscene, you’ll return to the Map. Choose the next open location.
Level 1 – The Oasis
Find all the items in the list. Multiple Items: 2 Rings (green).

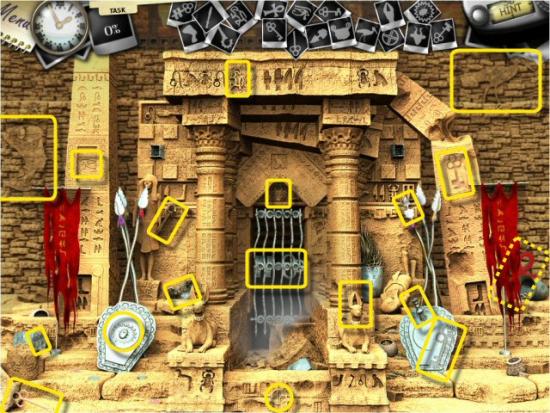
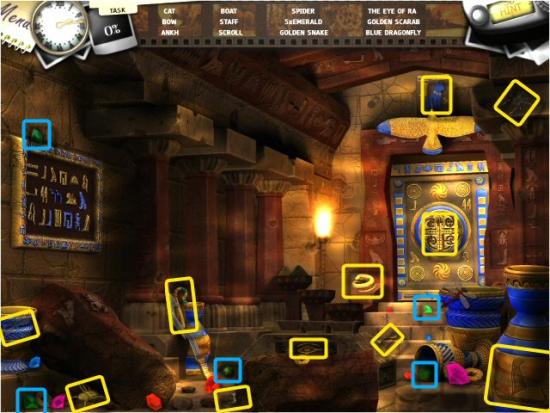
Level 2 – The Pyramid Entrance
Find all the items in the list. Animated Item: Ankh (banner hiding the Ankh is animated).
Level 3 – The Pyramid Corridors
You must guide Jodie through the maze. Move your cursor along the path and Jodie will automatically follow it. The entire scene will be illuminated every 10 or 15 seconds. Use the Hint button to display the entire path. The maze is the same in both Relaxed and Challenge modes.
Level 4 – The Tomb Gates
Find all the items in the list. Multiple Items: 5 Emeralds (blue).
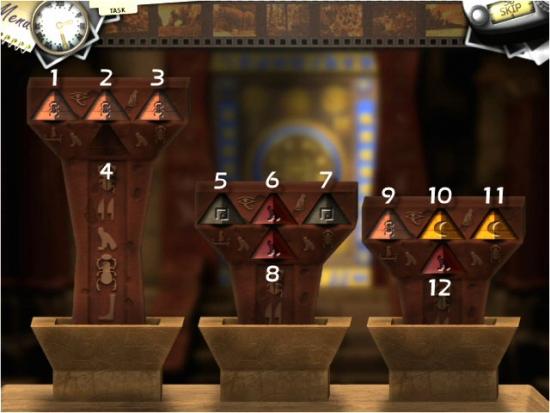
Level 5 – The Balance
Open the gate by balancing the 3 Scales. Click on a Weight and it will move to any Scale with an empty space. The amounts of each weight aren’t given, but there are only 4 different amounts, so it must be similar to the Scales you encountered in Greece. Moving a few of the weights around determined that Pink (scarab) = 1, Red (owl) = 2, Black (square spiral) = 4 and Yellow (crescent) = 6. The total of all the Weights is 30, so each Scale must have 10. The solution is to click 12, 3, 11 and then 8. This puzzle is always the same in both Relaxed and Challenge modes.
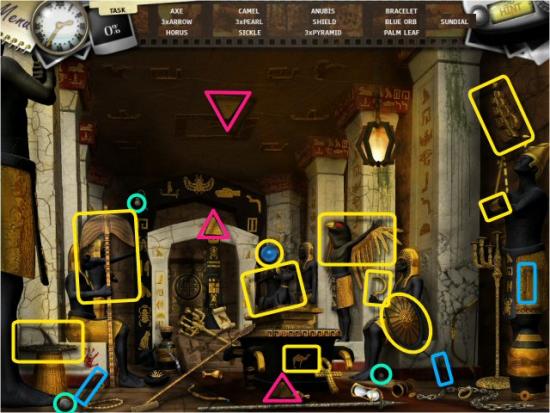
Level 6 – The Guardians
Find all the items in the list. Multiple Items: 3 Arrows (green), 3 Pearls (blue), 3 Pyramids (pink).
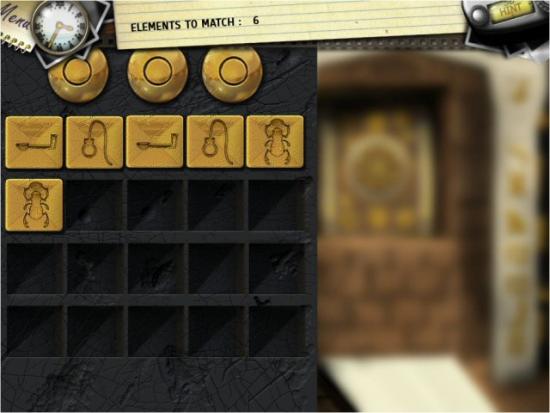
Level 7 – The Old Mechanism
Find all the pairs to eliminate them. You’ll play 3 rounds of 3, 5 and 10 pairs (6, 10 and 20 elements). The pairs may be different, or in different locations, on the Board. There is no difference in gameplay between Relaxed and Challenge modes.

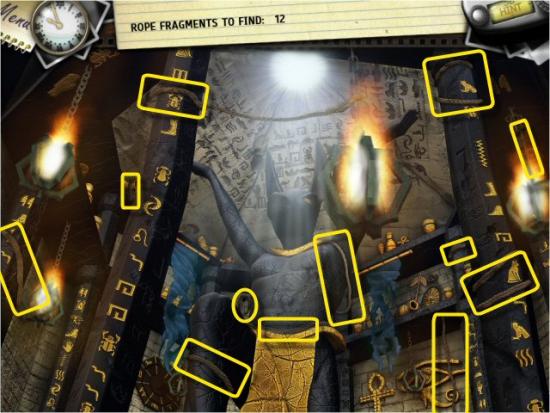
Level 8 – The Statue of Anubis
Find all the items in the list.
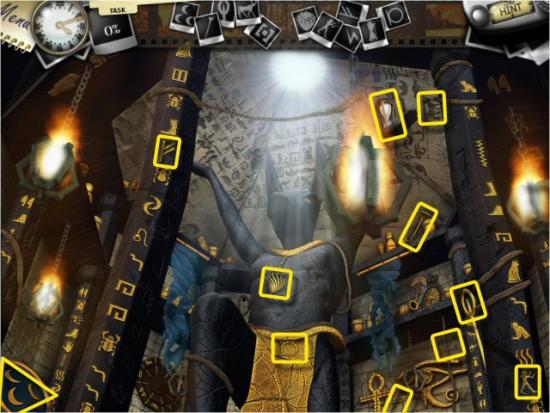
Find 12 Rope Fragments
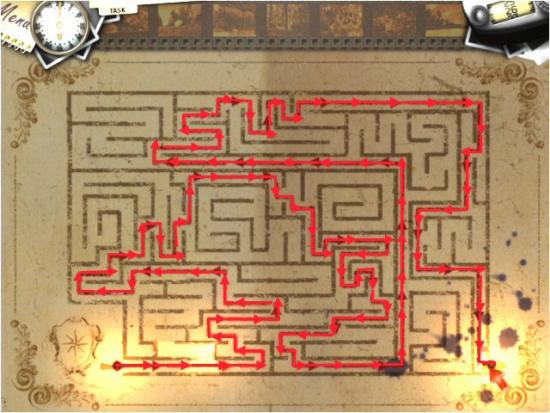
Level 9 – The Path of the Pharaohs
You must guide Jodie through the maze. Move your cursor along the path and Jodie will automatically follow it. The entire scene will be illuminated every 10 or 15 seconds. Use the Hint button to display the entire path. The maze is the same in both Relaxed and Challenge modes.
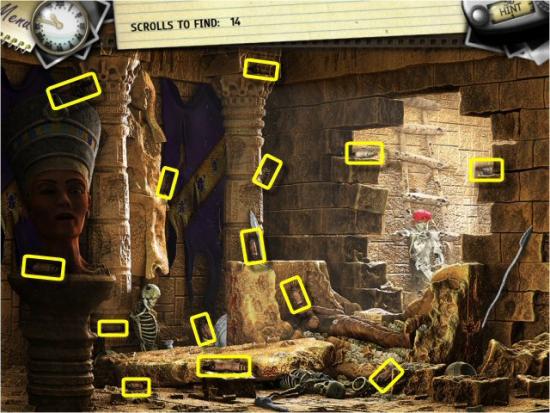
Level 10 – The Pharaoh’s Tomb
Find 14 Scrolls.
Level 11 – The Torn Papyrus
Reconstruct the image. Click and drag a piece into position to reconstruct the image, jigsaw fashion. Once you position a piece next to one that fits, it will link and you can move the entire unit.
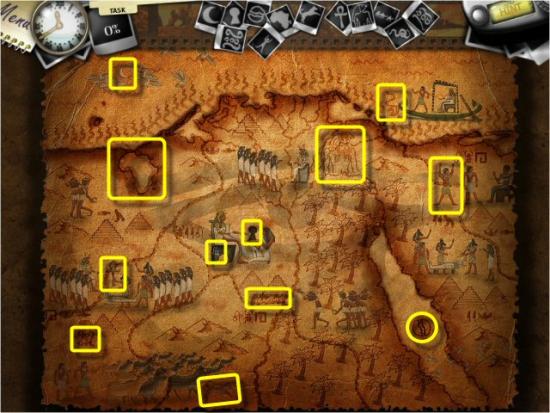
Level 12 – The Papyrus Map
Find all the items in the list.
After the cutscenes, you’ll return to the Map. Choose the final open location.
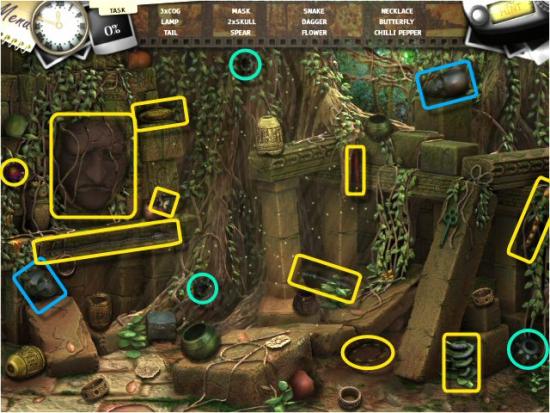
Level 1 – The Lost Temple
Find all the items in the list. Multiple Items: 3 Cogs (green), 2 Skulls (blue).
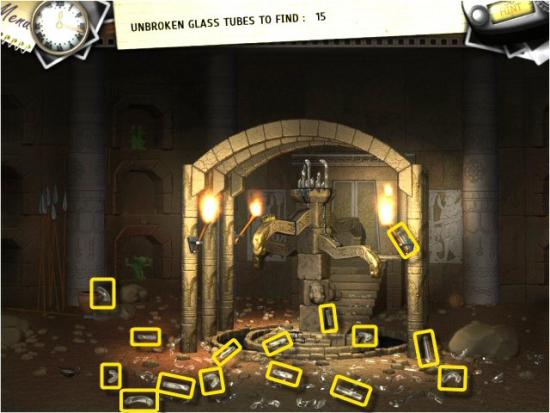
Level 2 – The Totem
Find all the items in the list. Multiple Items: 2 Coins (green), 2 Arm Bands (blue).
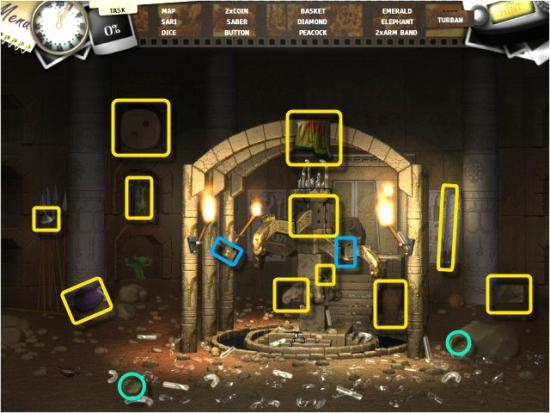
Find 15 Glass Tubes
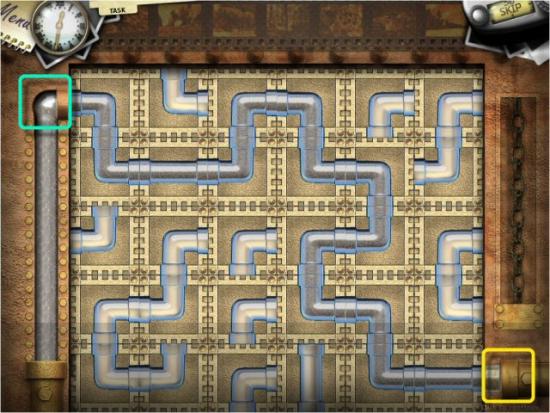
Level 3 – The Oil Machinery
Arrange the Pipes so the Oil flows from the Intake (green), at the upper left, to the Outlet (yellow) at the lower right. Click on a section of Pipe and then click on another to switch their places. Note that you do not need to use every section of Pipe and there is more than one solution. The solution shown is the same as the one used in Chapter 2 – Greece, Level 9 – The Aqueduct. There is no difference between Relaxed and Challenge modes.
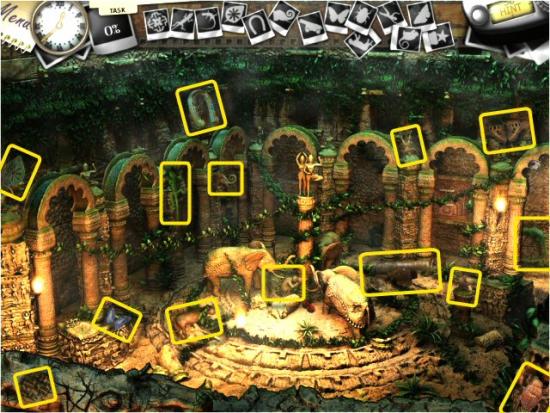
Level 4 – The Elephant Garden
Find all the items in the list.
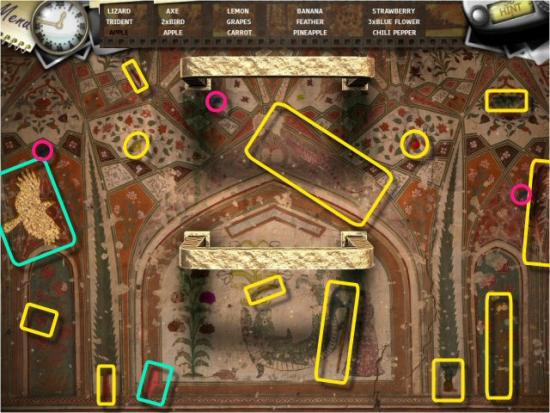
Level 5 – The Forgotten Fresco
Find all the items in the list. Multiple Items: 2 Birds (green), 3 Blue Flowers (pink).
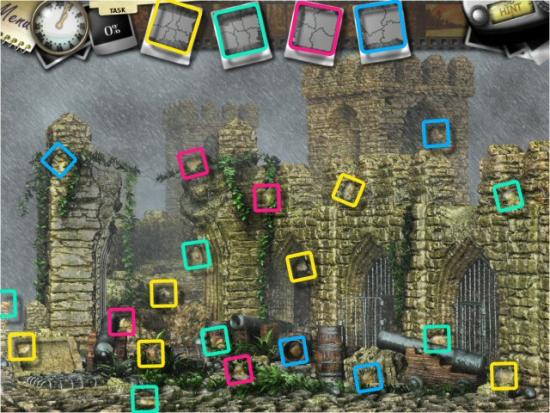
Level 6 – Tibet, The Abandoned Fort
Find all the pieces of the 4 objects shown at the top.
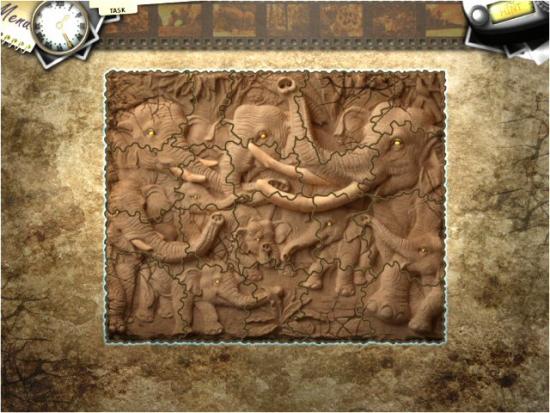
Level 7 – Tibet, The Ancient Puzzle
Reconstruct the image. Click and drag a piece into position to reconstruct the image, jigsaw fashion. Once you position a piece next to one that fits, it will link and you can move the entire unit.
Level 8 – Tibet, The Elephant Shrine
Find 11 Logs
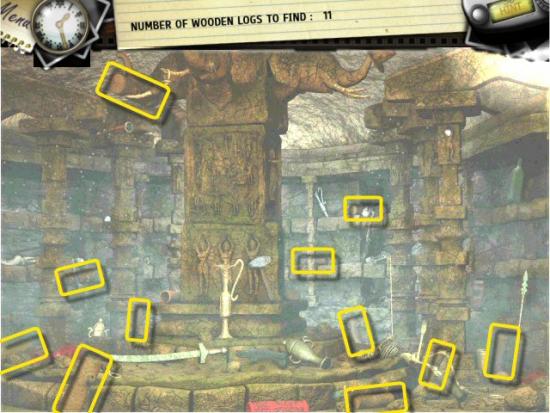
Find all the items in the list. Multiple Items: 3 Rings (green), 2 Diamonds (blue).
Level 9 – Tibet, The Dark Depths
You must guide Jodie through the maze. Move your cursor along the path and Jodie will automatically follow it. The entire scene will be illuminated every 10 or 15 seconds. Use the Hint button to display the entire path. The maze is the same in both Relaxed and Challenge modes.
Level 10 – Tibet, The Shrine Cellars
Find all the items in the list.
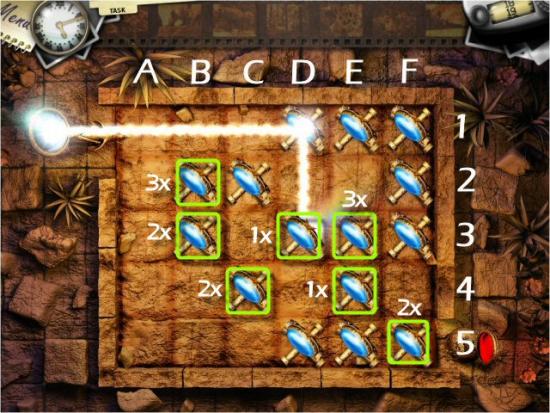
Level 11 – Tibet, The Light Puzzle
Direct the beam of light from the Source (green), at the upper left, to the Red Lens (yellow), at the lower right. Click on a Mirror to rotate it clockwise (you can’t right click). Note that you won’t use all the Mirrors and there may be more than one solution. There is no difference between Relaxed and Challenge modes.
Click B2 three times, B3 twice, C4 twice, D3 once, E3 three times, E4 once and F5 twice. The Mirrors you need to rotate are indicated in green.
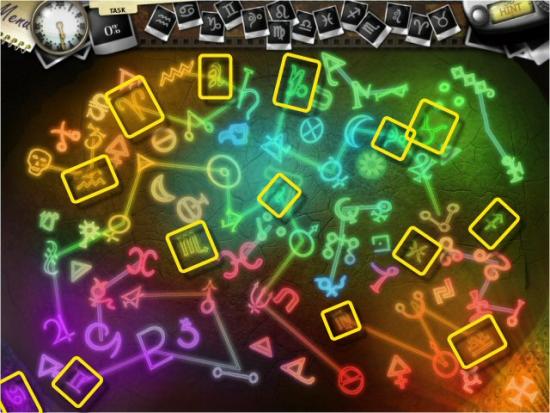
Level 12 – Tibet, The Star Map
Find all the items in the list.
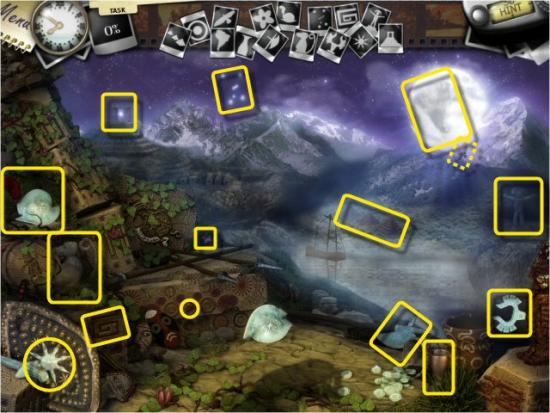
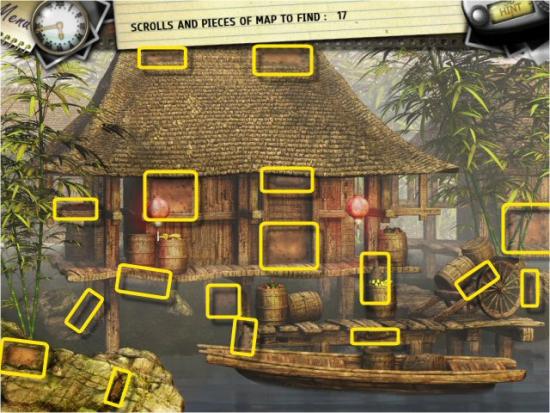
Level 1 – The Forgotten Boat Landing
Find 17 Scrolls and Pieces of Map. Note that there are 10 Scrolls and 7 Pieces of Map.
Level 2 – To The Temple
Reconstruct the image. Click and drag a piece into position to reconstruct the image, jigsaw fashion. Once you position a piece next to one that fits, it will link and you can move the entire unit.
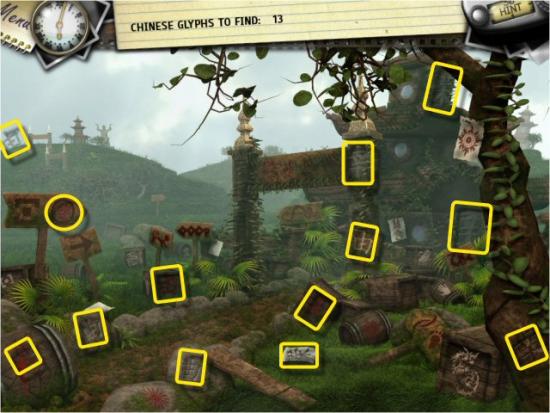
Level 3 – Journey Into The Unknown
Find 13 Chinese Glyphs
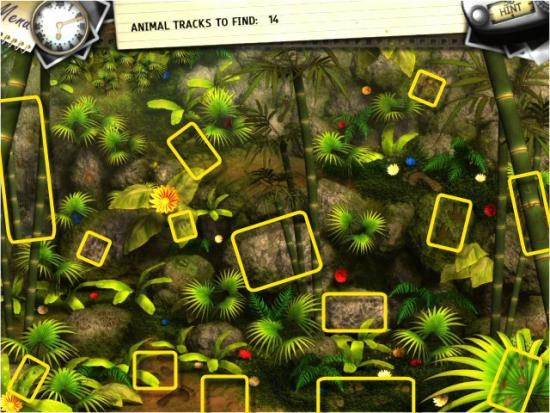
Level 4 – The Dense Jungle
Find 14 Animal Tracks
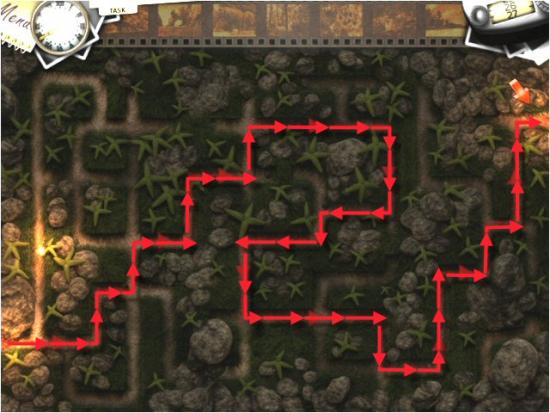
Level 5 – The Forgotten Path
You must guide Jodie through the maze. Move your cursor along the path and Jodie will automatically follow it. The entire scene will be illuminated every 10 or 15 seconds. Use the Hint button to display the entire path. The maze is the same in both Relaxed and Challenge modes.
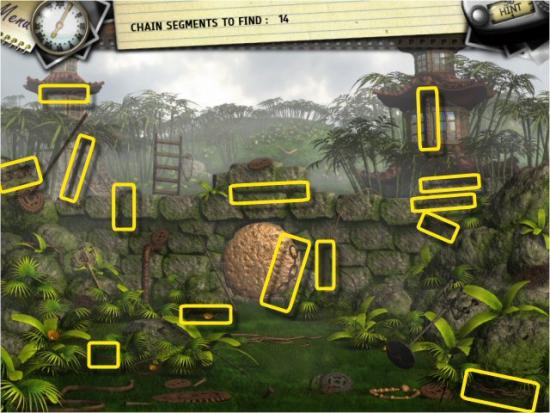
Level 6 – The Temple Courtyard
Find 14 Chain Segments
Level 7 – The Library
Find all the items in the list. Multiple Items: 3 Dominos (green).

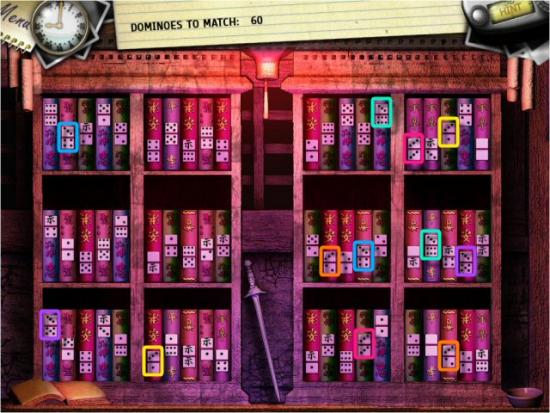
Level 8 – The Bookcase
Find all the pairs of Dominoes, to eliminate them. There is no difference in gameplay between Relaxed and Challenge modes, but the arrangements may be different for each player. There are 30 pairs and a good strategy may be to eliminate all the Dominoes with a 1 on the top or bottom, then 2, then 3, etc. Domino pairs with 3 on the top are shown in the screenshot, as an example.
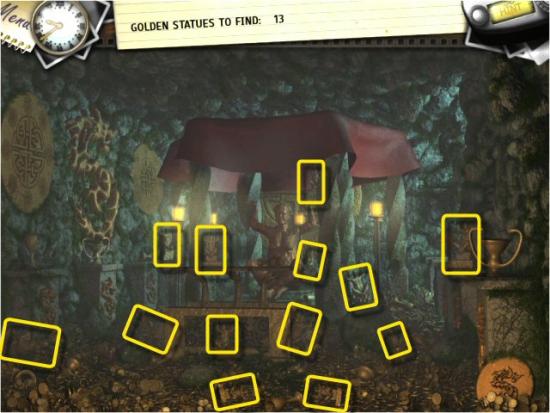
Level 9 – Ancient Caverns
Find 13 Golden Statues.
Level 10 – The Balance
Open the gate by balancing the 3 Scales. Click on a Weight and it will move to any Scale with an empty space. The amounts of each weight aren’t given, but there are only 4 different amounts, so it must be similar to the Scales you encountered in Greece. Moving a few of the weights around determined that the Small Statue = 1, the Medium Statue = 2, the Large Statue = 4 and the Jumbo Statue = 8. The total of all the Weights is 30, so each Scale must have 10. The solution is to click 3, 5, 10, 4, 12 and then 1. This puzzle is always the same in both Relaxed and Challenge modes.

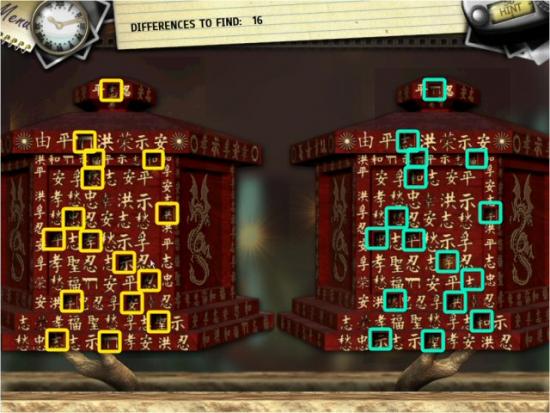
Level 11 – Jewelry Boxes
Find the 16 differences. When you click on one side of the image, a square section will be depressed on both sides.
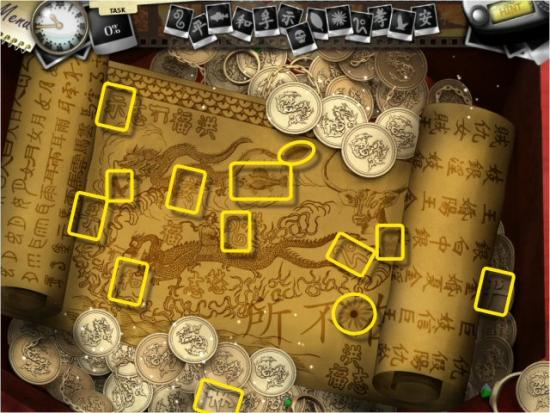
Level 12 – The Ancient Treasure
Find all the items in the list.
Level 1 – New York, Bergen’s Puzzle
Reconstruct the image. Click and drag a piece into position to reconstruct the image, jigsaw fashion. Once you position a piece next to one that matches, it will link and you can move the entire unit.
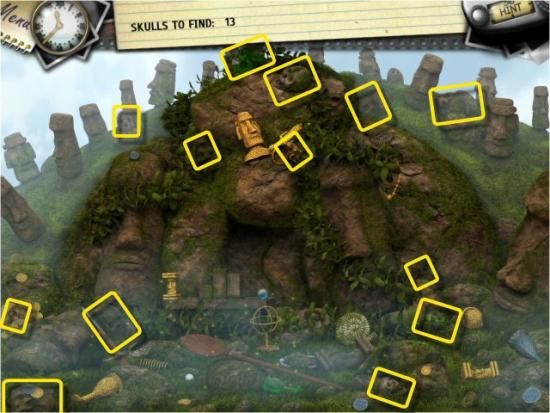
Level 2 – Ancient City, Entrance
Find 13 Skulls.
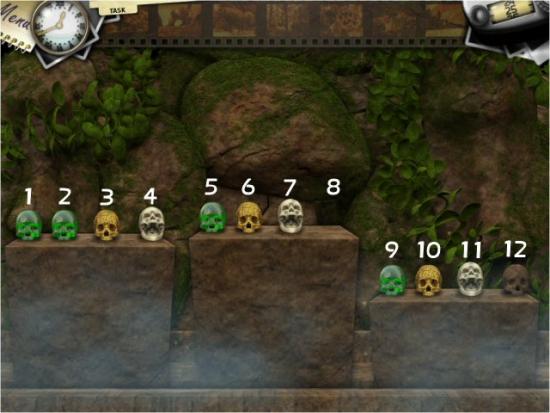
Level 3 – Ancient City, Harmony
Open the gate by balancing the 3 Scales. Click on a Weight and it will move to any Scale with an empty space. The amounts of each weight aren’t given, but there are only 4 different amounts, so it must be similar to the Scales you encountered in Greece. Moving a few of the weights around determined that the Green Skulls = 1, the Gold Skulls = 2, the White Skulls = 4 and the Brown Skull = 8. The total of all the Weights is 30, so each Scale must have 10. The solution for this puzzle is the same as Chapter 5, Level 10. Click 3, 5, 10, 4, 12 and then 1. This puzzle is always the same in both Relaxed and Challenge modes.
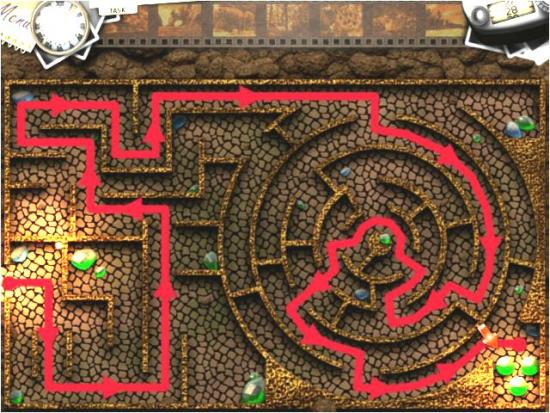
Level 4 – Ancient City, Corridors
You must guide Jodie through the maze. Move your cursor along the path and Jodie will automatically follow it. In this maze, there is no illumination. Use the Hint button to get the entire path displayed. The maze is the same in both Relaxed and Challenge modes.
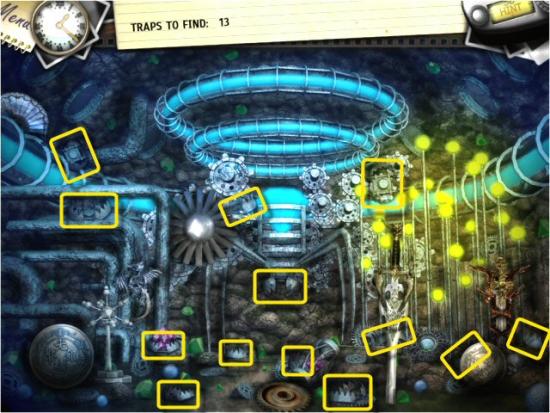
Level 5 – Ancient City, The Artifact
Find 13 Traps.
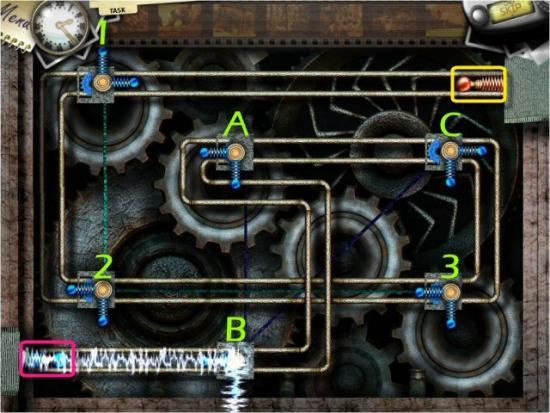
Level 6 – Ancient City, The Mechanism
Direct the Electricity from the Source Terminal (pink), at the lower left, to the End Terminal (yellow), at the upper right. Click on a Blue Terminal to rotate it clockwise (you can’t right click). Terminals are connected by green and blue wires and clicking on one affects one or more Terminals. The key to solving this puzzle is to recognize the parts of the puzzle (the numbered Terminals and lettered Terminals) are separate. Part I is 1, 2 and 3 – 1 is connected to 2, 2 is connected to 1 and 3, and 3 is connected to 2. Part II is A, B and C – A is connected to B, B is connected to A and C, and C is connected to B.
To solve Part I, click 3 once and then 1 once. To solve Part II, click C twice and then B three times. You can also do Part II first and then do Part I with the same result. The puzzle is the same in both Relaxed and Challenge modes.
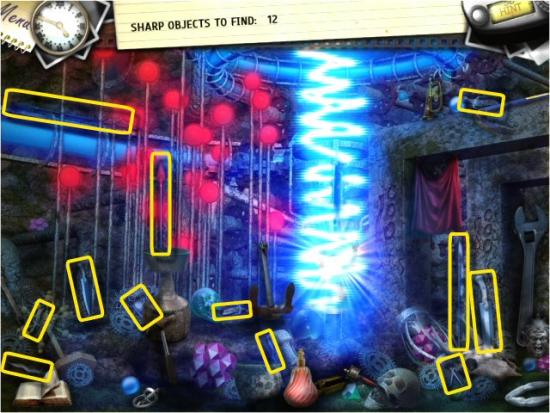
Level 7 – Ancient City, Rescued
Find 12 Sharp Objects.
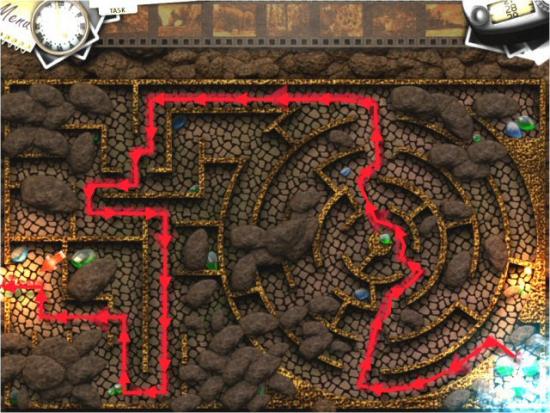
Level 8 – Ancient City, Escape
You must guide Jodie through the maze, as quickly as possible. If the growing Energy Wave (lower right) reaches you, you’ll have to restart the maze. Move your cursor along the path and Jodie will automatically follow it. In this maze, there is no illumination and you must move very quickly. Use the Hint button to get the entire path displayed. Please note that restarting the maze will not reset the Hint timer. If you need to look at the maze path again, you’ll have to let the Energy Wave reach you and restart the game until the Hint timer resets…this may take 2 or 3 tries.
Watch the ending Comics and Credits. Congratulations! You’ve completed Jodie Drake and the World in Peril.
