
Best Horror Games On Itch.io – July 2026
Across a bounty of subgenres.![Haze Seas Accessories Tier List [Best Accessories to Equip]](/wp-content/uploads/2026/07/haze-seas-accessories-tier-list.jpg "Haze Seas Accessories Tier List [Best Accessories to Equip]")
Haze Seas Accessories Tier List [Best Accessories to Equip]
The accessories with the best stat buffs in Haze Seas.
![[Roblox] Evomon Shiny Hunting Guide – Including Prismatic and Pris Shinies!](/wp-content/uploads/2026/06/evomon-shiny-hunting-guide.jpg "[Roblox] Evomon Shiny Hunting Guide – Including Prismatic and Pris Shinies!")

Joan Jade and the Gates of Xibalba Walkthrough
Welcome to Gamezebo’s strategy guide for Joan Jade and the Gates of Xibalba.


- Prefer Gamezebo on Google

a:1:i:0;a:2:s:13:”section_title”;s:46:”Joan Jade and the Gates of Xibalba Walkthrough”;s:12:”section_body”;s:62598:”
Welcome to Gamezebo’s strategy guide for Joan Jade and the Gates of Xibalba.
General Tips
Main Menu

- On your first play, you are required to enter a name.
- Options – You can adjust the volume for the music and sound. You can also change the cursor or play in full screen.
- Trophies – Displays a list of trophies to be achieved.
- Tip: Always review the trophies to be achieved. This will tell you what to work for and what needs to be done.
Game Play
- This game is a combination of hidden object hunts, collecting inventory items and solving puzzles.
- As you collect items, they are added to your inventory (bottom of screen). To use them, click on the item and then click on the active area on the screen. If that item does not work there, you will not lose the item. Either place it back in the inventory or right-click and it will automatically go back. If you use an inventory item and it disappears, do not worry, you no longer have any use for that item. Only the machete remains in your inventory the entire game.
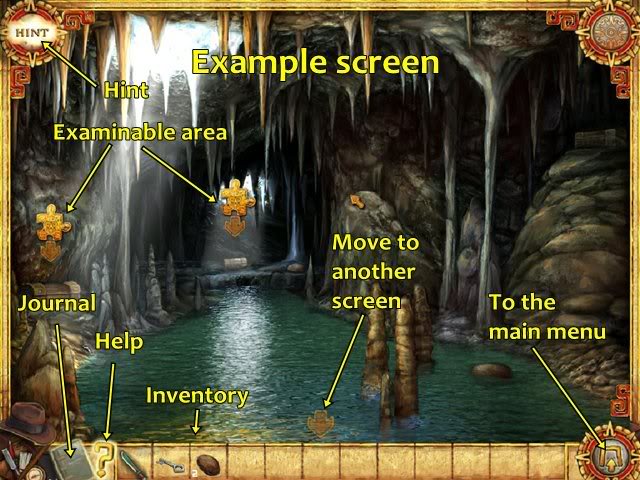
- Move your mouse slowly around the screen and descriptions will appear for many of the items in the scene. Clicking on them can either put them in your inventory or give you a clue that you need to use an inventory item in order to take or work the item.
- You have unlimited hints. It takes 60 seconds to regenerate.
- If you are unsure of your goal in a room, click the large question mark.
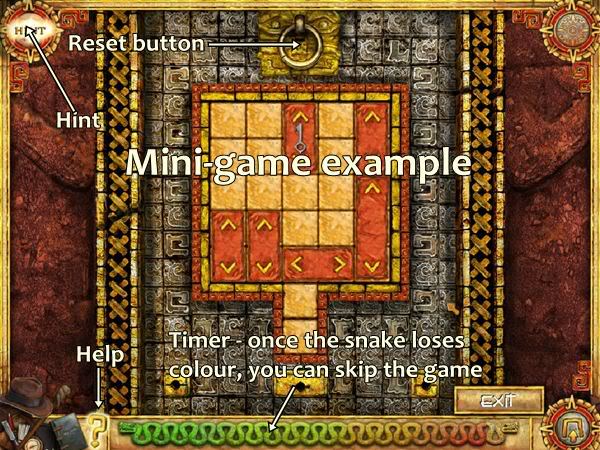
- You can skip mini-games once the colour has drained from the snake at the bottom of the screen.
Walkthrough
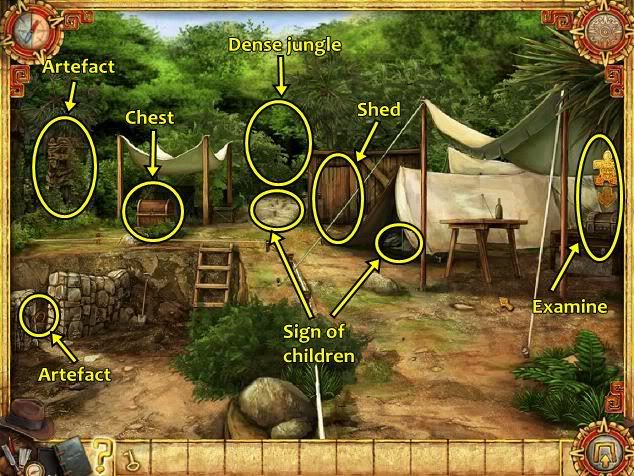
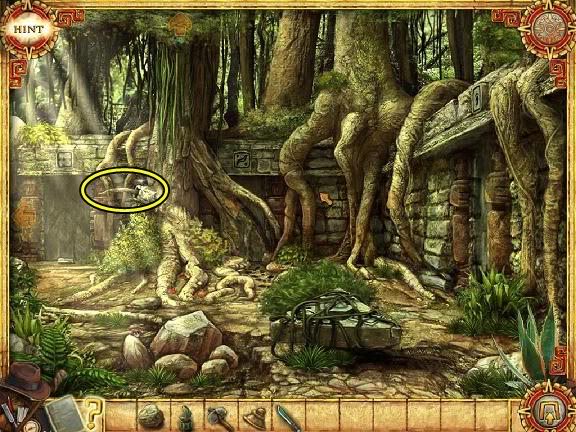
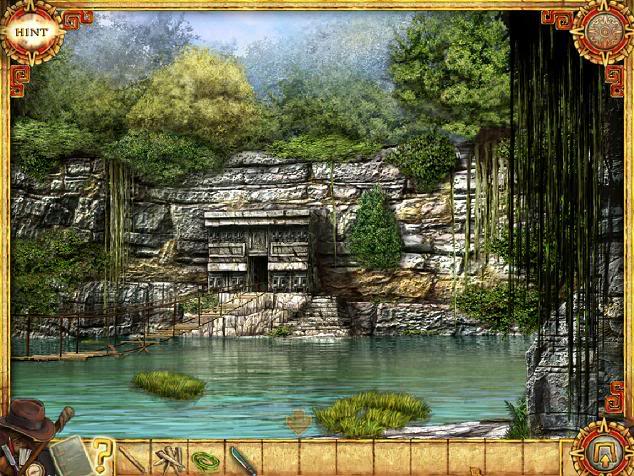
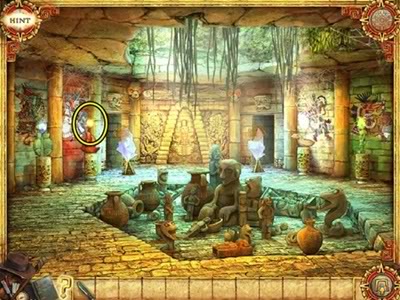
Excavation site
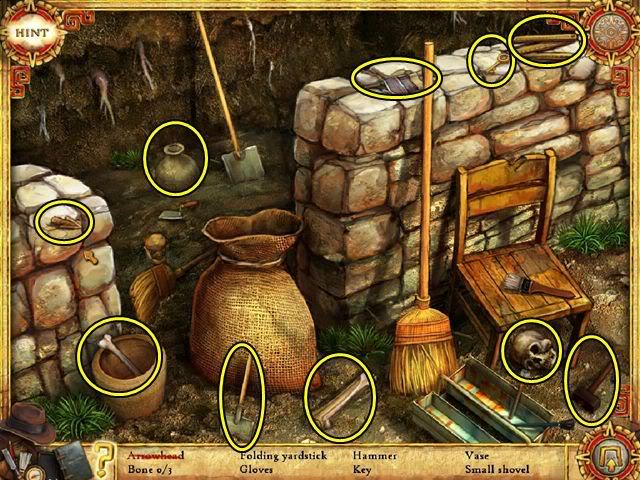
- After watching a cut scene, you find yourself in the jungle and need to find your kids. This goes into a mini-tutorial on how to play the game. You are instructed to click on the chest, only to find it locked. You are then instructed to check the excavation area for the key. A yellow arrow indicates where to click, click just below it until your mouse turns into a magnifying glass.
- This puts you into your first hidden object hunt. The list of objects to find appears at the bottom of the screen. The tutorial instructs you to click on the objects in the scene in order to cross them off the list.
- Hint: Click the Hint button for help. You can use one every 60 seconds.
- After finding all the items, you return to the first screen. You have received a chest key to your inventory.
- At the right-hand side of the screen, an arrow is pointing to a small chest. Hover your cursor above the chest and the word Examine appears. Click on the chest.
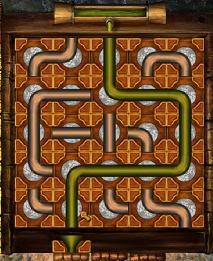
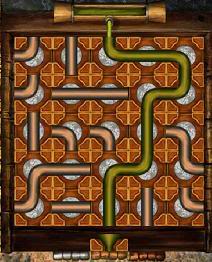
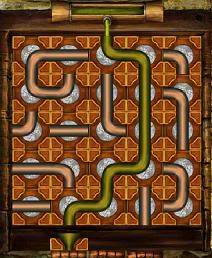
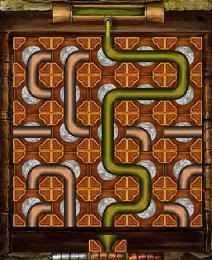
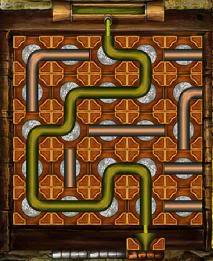
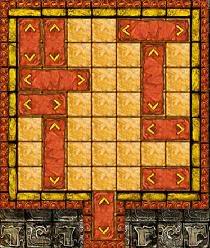
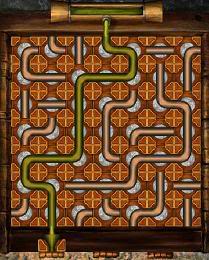
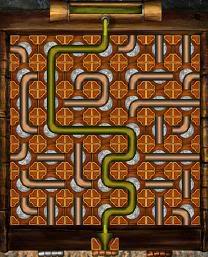
- You have to solve a mini-game. Arrange the pipes so the oil can drain out.
- Click on a pipe to rotate it 90 degrees.
- Click the oil container at the top of the puzzle to reset it.
- Click on the Question Mark for a reminder on the steps needed to solve the puzzle.
- To skip the mini-game, wait for the colour to drain from the snake however you will not earn a trophy.
- Tip: Start from the bottom and work your way to the top.
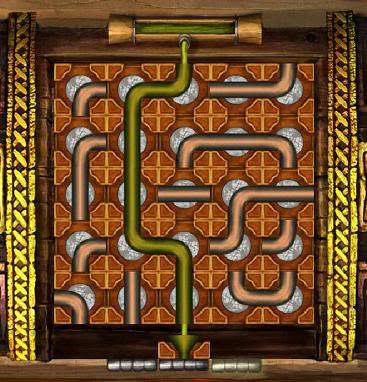
- A shed key has been added to your inventory.
- Move your mouse slowly around the screen and descriptions will appear for many of the items in the scene.
- From your inventory items, click on the chest key to carry it and then click on the chest. A machete has now been added to your inventory.
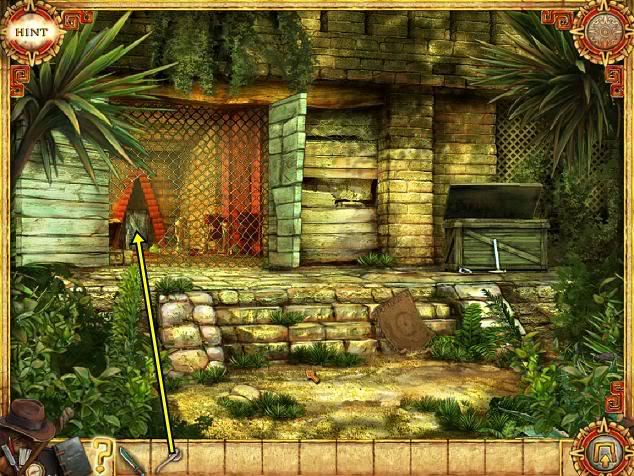
- Click inside the tent to find your children’s clothes.
- From your inventory items, click on the shed key to carry it and then click on the shed. You have received a torch.
- Click the statue (far left) in order to get an ancient artefact. You will collect these throughout the game.
- Click on the piece of ceramic pot and Joan will record it in her journal.
- Click on the footprints in front of the dense jungle. Your kids have been here.
- Click the dense jungle (middle of screen). You’re told you need something to help clear the dense jungle. Click on the machete to carry it and then click on the dense jungle. Right-click to put the machete back in your inventory. You have now cleared a path. Click on the red arrow to walk through the jungle.
Gate of the Temple
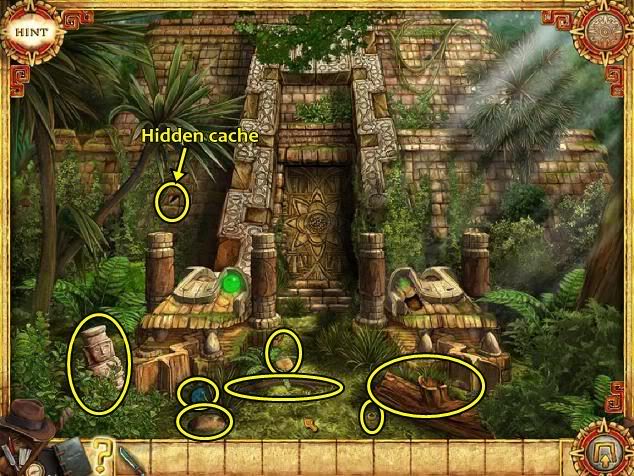
- Click the small ransacked statue (bottom left) to move it, then click the tooth to add it to your inventory.
- Click the blue crystal, scale, rock and stick to add it to your inventory.
- Click the ring (bottom of screen). This was your daughter’s ring and evidence she was here. All sightings of your children are automatically recorded in your journal.
- Click the log to move it. Click the orange crystal to add it to your inventory.
- On the temple wall (left), click on the hidden cache. You need something heavy to break it. From your inventory items, click on the rock and then click on the hidden cache. Use the stick to reach in and collect the white crystal.
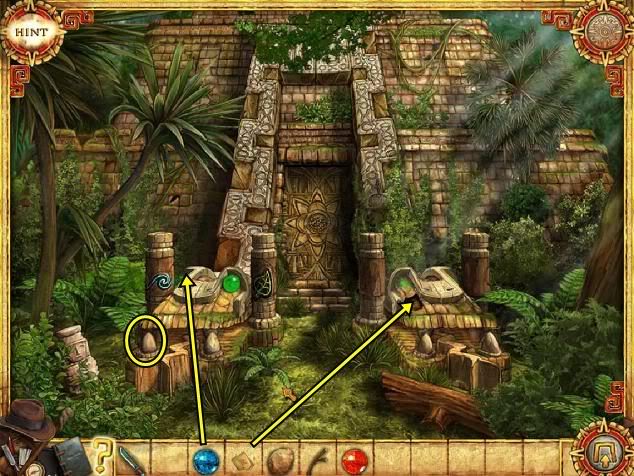
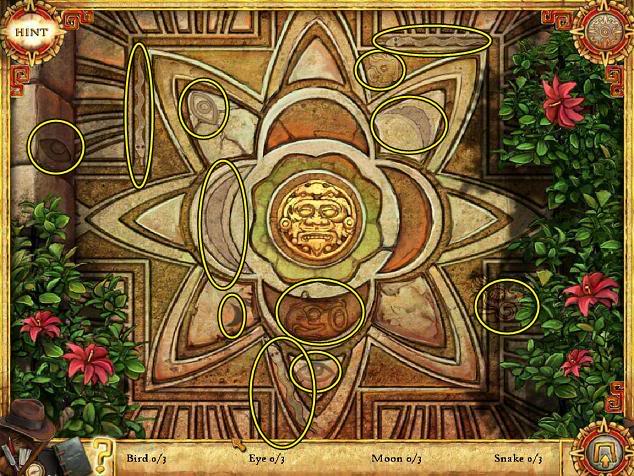
- Click the left snake statue. It’s missing a tooth. From your inventory, click on the tooth and place it on its mouth. Once placed, two symbols appear. Notice they are coloured. The crystals must match the colours. The snake statue is missing an eye. The symbol beside the eye is blue so click on the blue crystal and place it over its missing eye.
- Click on the snake statue on the right. It’s missing a scale. From your inventory, click on the scale and place it over the missing scale. Once placed, two symbols appear. From your inventory items, click on the orange crystal and the white crystal to place them over its missing eyes beside the appropriately coloured symbols.
- This activates the mosaic on the temple’s door.
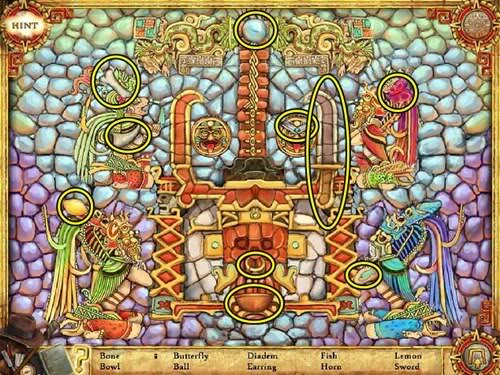
- Click on the door to start a hidden object hunt.
- Once you’ve completed the hidden object hunt, the temple door opens to reveal a mini-game.
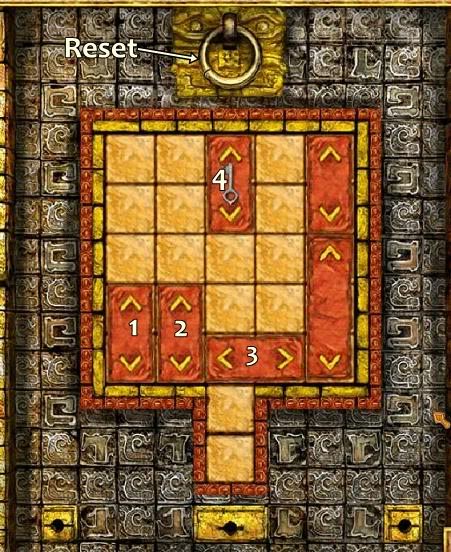
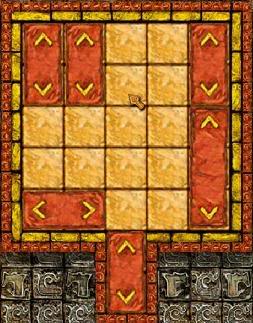
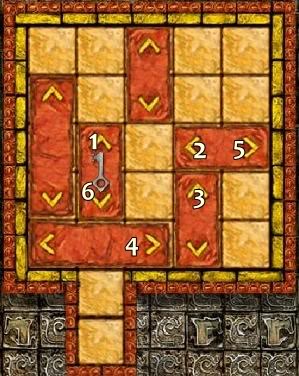
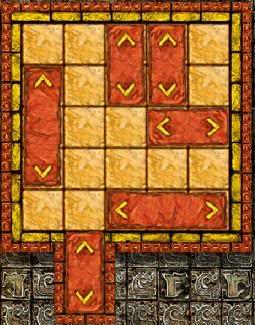
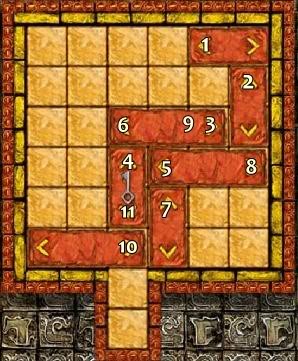
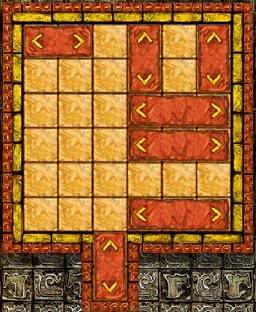
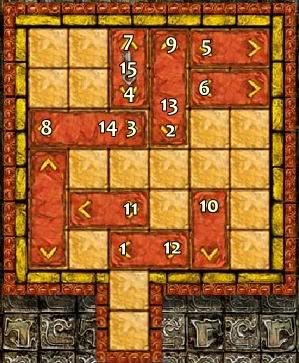
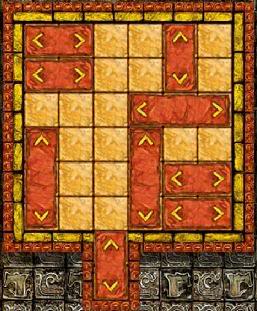
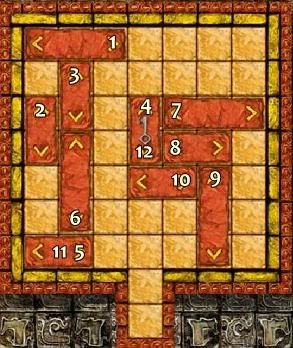
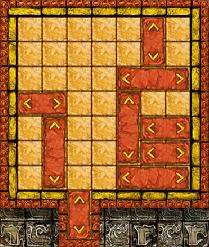
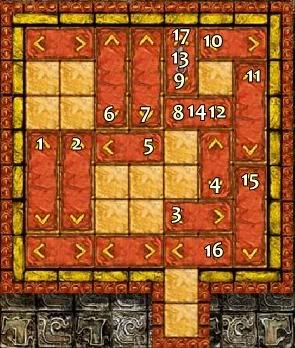
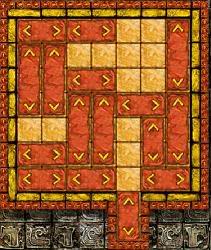
- You have to move the block with the key into the slot at the bottom to open the lock.
- Clicking on an arrow will move that block in that direction.
- Only obstacles will stop a block, you can’t control how many spaces a block moves.
- Enter the open temple door.
Cut scene.
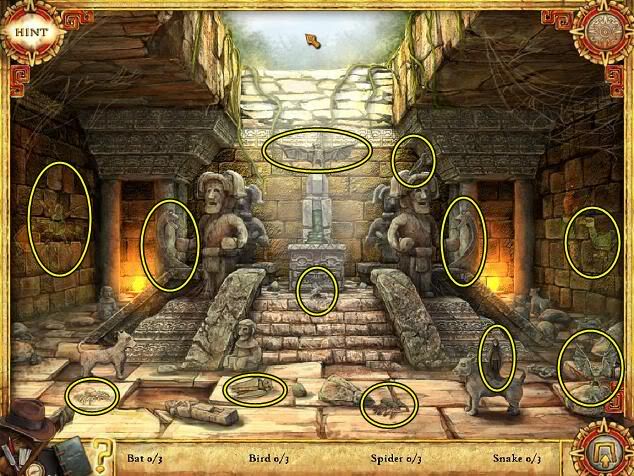
Inside the temple
- If you can’t see, you didn’t get the torch at the camp site. Go back to get to get the torch.
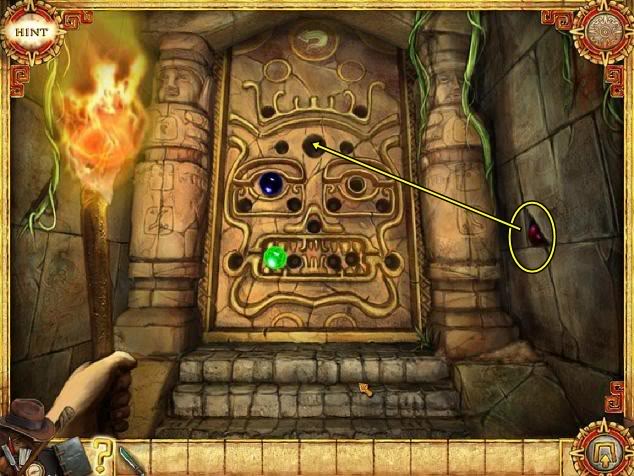
- The gate is locked. On the right side wall, click the big jewel to add it to your inventory. Place the big jewel in the empty slot at the top of the statue’s "face."
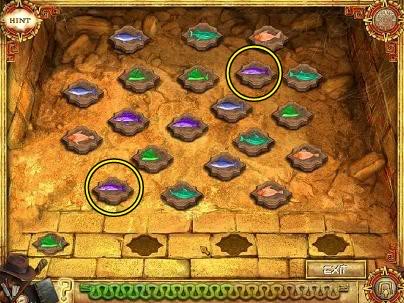
- Click the examinable area. This mini-game is a memory puzzle. You have to remember where each jewel was. It starts off easy and gets harder.
- Click the big red jewel to shake the other jewels loose.
- You can click the big red jewel to verify if they are in the right location.
- Once you’ve placed them, you have another puzzle with more jewels.
- The jewels are in a different location each time you play the game.
- Follow the arrow and go up the stairs.
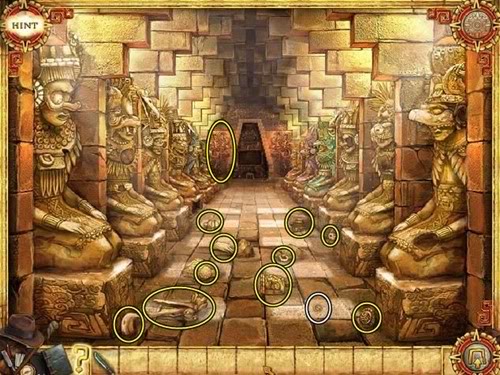
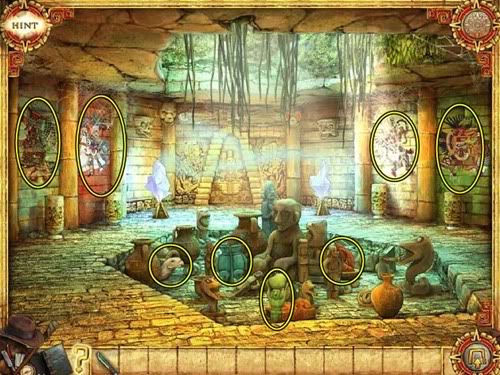
Temple chamber
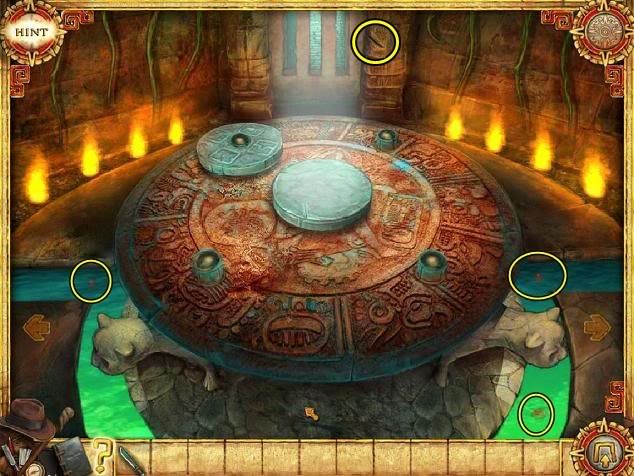
- You have to find the stone wheels to repair the machine to open the gate.
- Click the scratch on the back wall to find evidence of your children.
- Click the 3 rubies to add them to your inventory. Then click on a ruby and place it in a flame. Use the machete to take it out of the flame. Do this for the other two rubies. You now have three blackened rubies.
- Click the arrow pointing to the right to enter a tiny chamber.
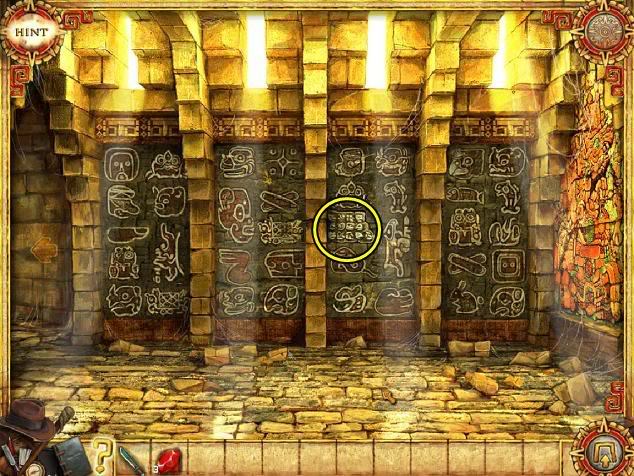
- There is a small cache on the wall you must figure out how to open. Click on the cubby to start a hidden object hunt.
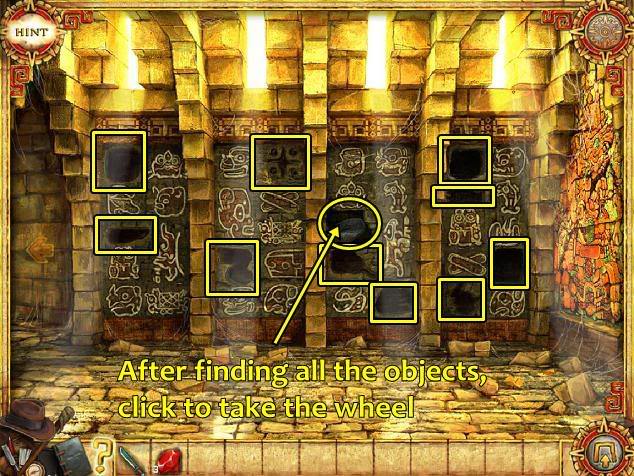
- The cubby then opens to reveal a wheel. Click it to add it to your inventory.
- Leave the room and go left, all the way over to the small chamber.
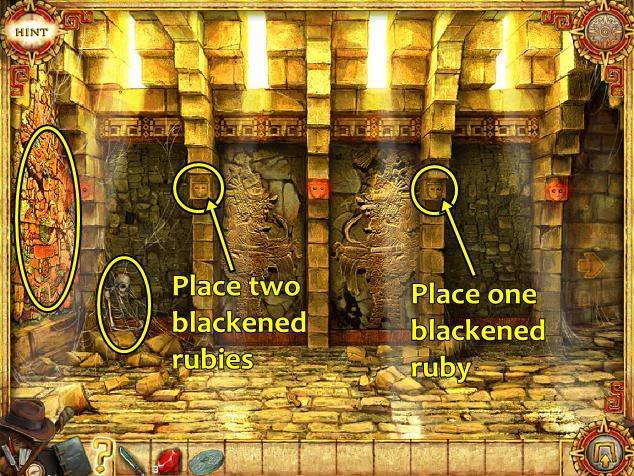
- Click on the skeleton and the carvings on the left wall to collect the artefacts.
- Place the three blackened rubies in the warriors faces (the one’s missing eyes).
- Two examinable areas have opened up.
- Click on the left examinable area. You have to solve several riddles. Click the letters to change them. The answers are: jaguar, crystal, stairs, and dagger. A wheel is added to your inventory.
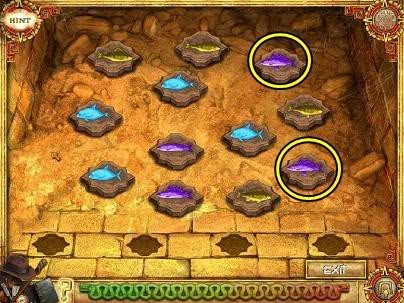
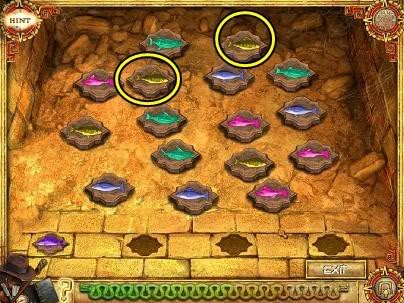
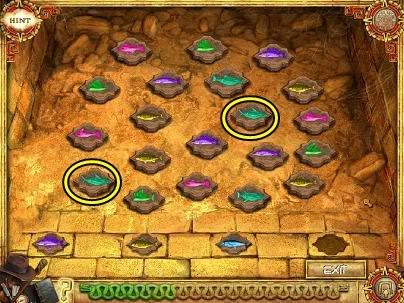
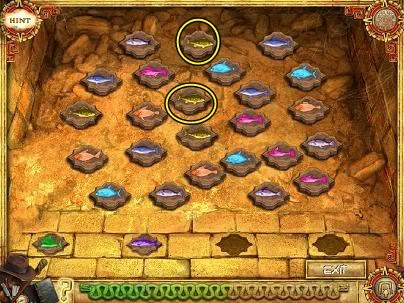
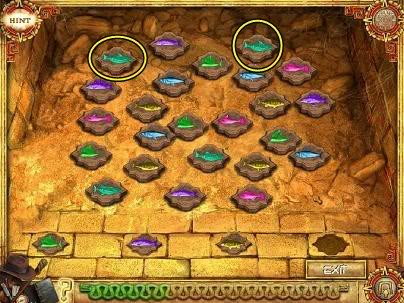
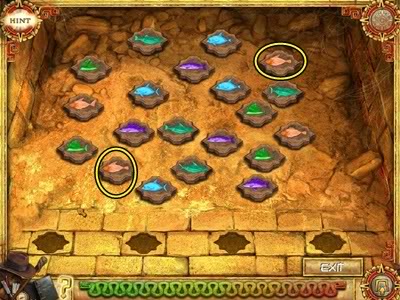
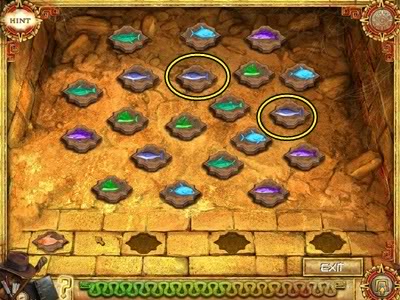
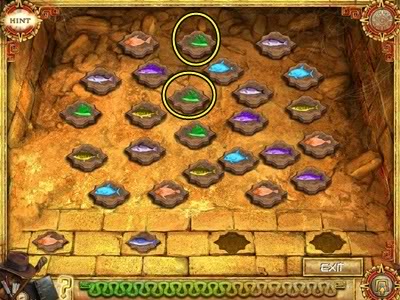
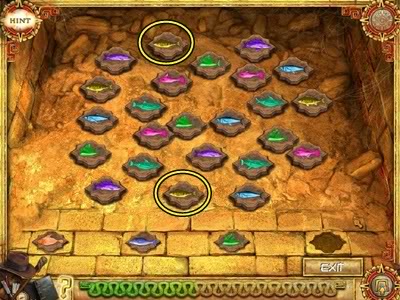
- Click on the right examinable area. In this mini-game, you have to find the identical fish. The first level is solved for you by the tutorial. You have to do this three more times.

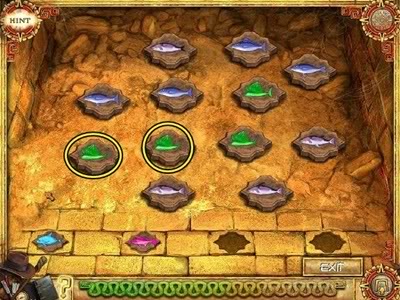
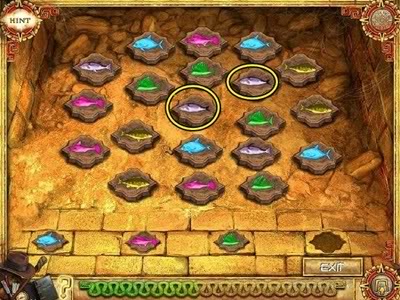
- Once completed, you receive the third wheel to complete the mechanism to open the gate. Return to the large chamber.
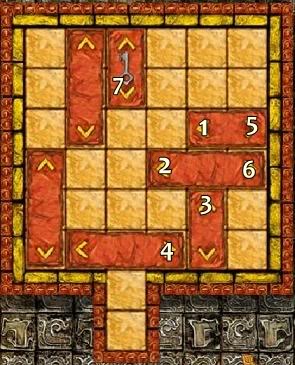
- Place the three wheels on the axis’. Click the centre area to complete a mini-game.
- You must match the wheels to the symbol in the centre.
- Moving one wheel will move another wheel so make note of how each is affected by one.
- Clicking the central wheel will start a new puzzle.
- The first puzzle is relatively easy but then a new wheel is added.
- Use trial and error until you line up the symbols.
- Go through the open gate.
Cut scene
Mayan town
Courtyard
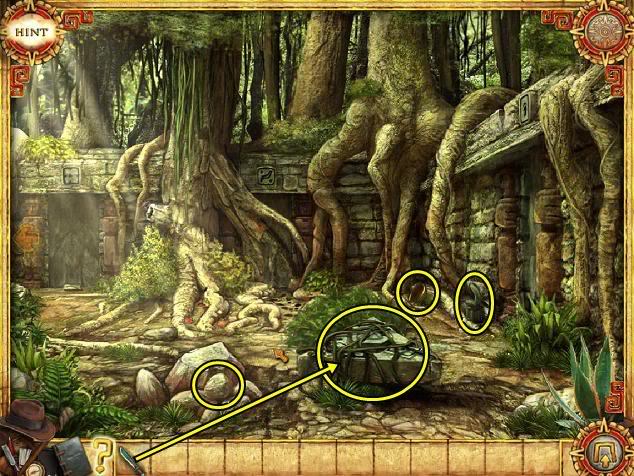
- You are now in an ancient Mayan courtyard. There is a table in the centre that is a mechanism for the exit but it’s covered in growth. Use the machete to clear the vines.
- Click to take a stone, statue fragment, and scale.
- Click the footprints to see that your children were there.
- Click to go to the area on the left (ball court).
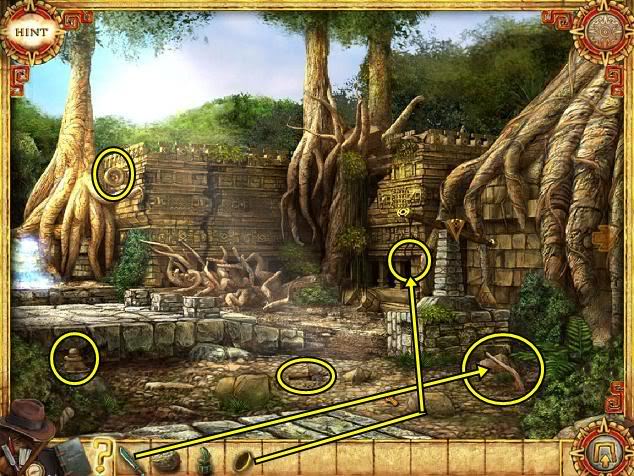
- There’s a triangular scale that needs fixing. From your inventory, click on the scale to carry it and then click on the scale. It is now fixed.
- Click to take the hammer and statue fragment.
- Click the hoop to add to your artefacts.
- Use the machete to cut the root. Right-click to put the machete back in your inventory.
- Put the rock on the scale. It’s too heavy. Take the hammer and keep clicking on the rock until it breaks and is the right weight for the scale (about five clicks). Click on the new rock (called hewn stone) to add it to your inventory.
- Return to the courtyard (right).
- Use the root on the hole in the tree.
- Go up the tree. This starts a hidden object hunt.
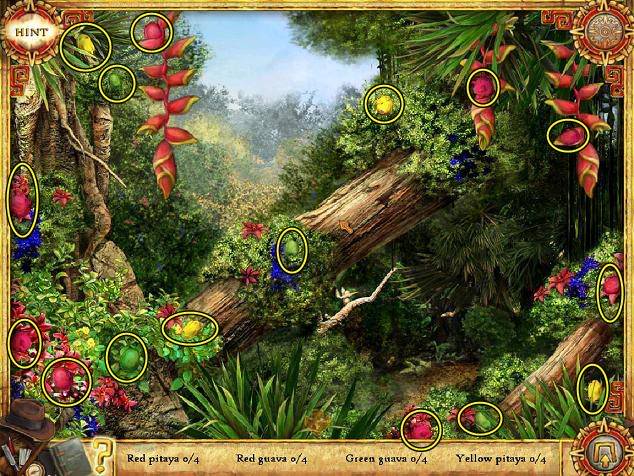
- Once you have the fruit, head down to the courtyard.

- From your inventory, click on the hewn stone and place it on the table. You now have three examinable areas (one is blocked).
- Click the examinable area on the far left (under the blue symbol). It is the matching fish mini-game again.

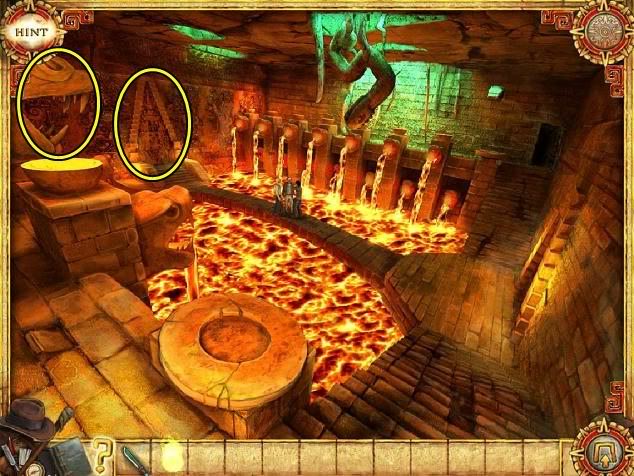
- Enter the door to the oratory.
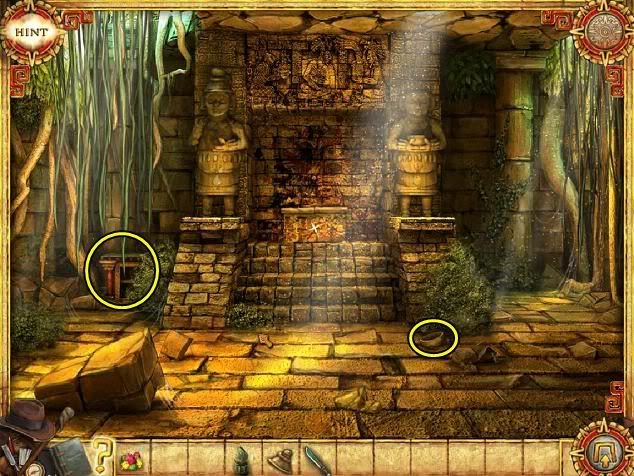
- Click to add the bowl to your inventory.
- Click the cabinet to take note of the artefact.
- Leave the oratory and go left to the ball court.

- Click the bowl on the running water to fill it with water. Return to the oratory.
- From your inventory, click on the green statue fragment and place it on the large statue on the left. Then add the bowl to it. For the statue on the right, place the yellowish statue fragment and the fruit.
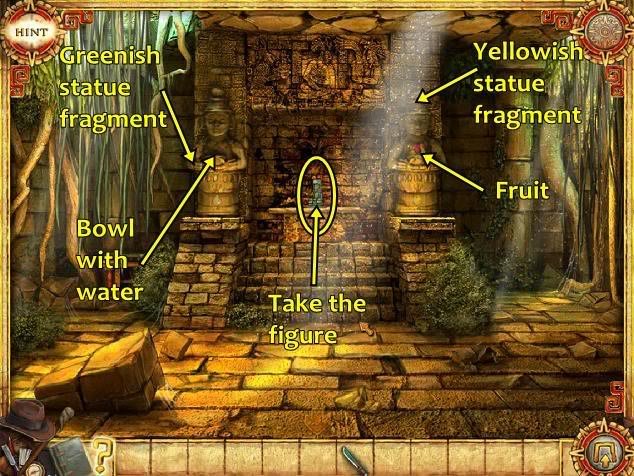
- Take the figure that appears on the pedestal.
- Leave the oratory and go back to the courtyard.
- Click the examinable area on the far right (under the green symbol) (the store). This is a match-2 mini-game. The instructions are clear. Click on the symbols to match them. Symbols repeat within the same level.
- Tip: I start on the far left and click the first tile, then the next. If they don’t match, I click the next two. Try to remember each symbol.
- Enter the store.
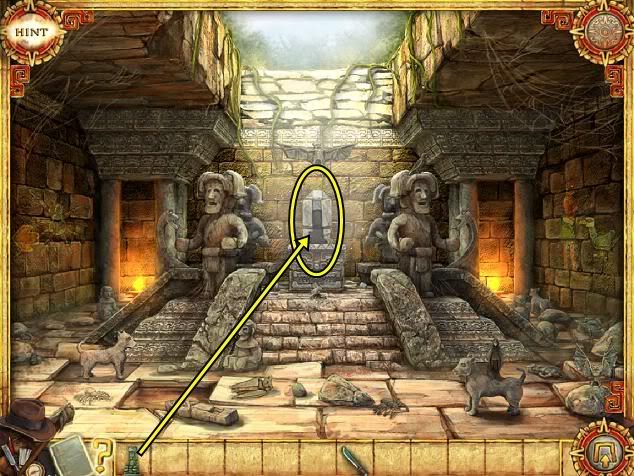
- Place the figure on the pedestal and a hidden object hunt starts.
- Take the axe that now appears above the pedestal.
- Return to the courtyard. Use the axe on the roots blocking the entrance below the red symbol (dungeon). This takes about four clicks.
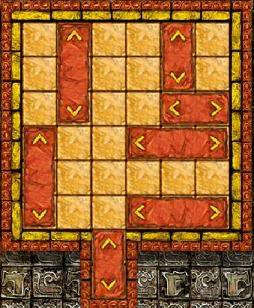
- Solve the key puzzle.
- Enter the dungeon.
Cut scene
- Click the statue on the right to add the artefact.
- Click the bowl on the statue to take the porcelain sauce pan.
- Use the machete on the spider web on the back wall. Right-click to put the machete back in your inventory.
- Click the silver faced mask on the far left once to reveal the stairs for one of the cubbies.
- Click the only examinable area possible. This is another riddle mini-game. The answers are: skeleton, feather, tongue, and bridge. You get a flask of oil.
- Use the oil on the silver faced mask on the far right. Click the masks until they all face upright. A chest appears from the statue on the right.
- To access the stairs closest to you, click on the far left and middle faces so they are upside down, but the far right is right side up. Solve the fish puzzles.

- Take the silver key.
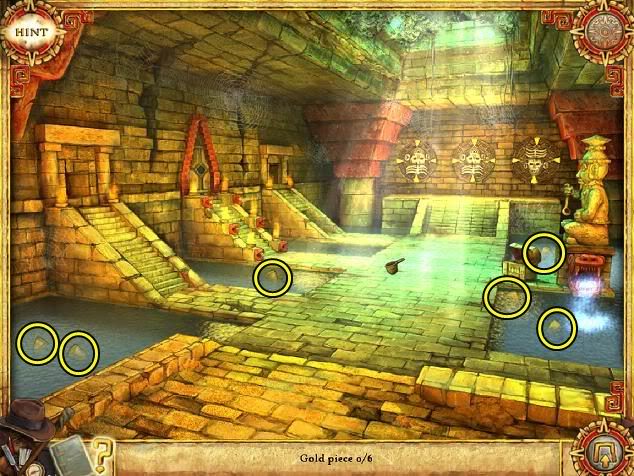
- Use the silver key on the chest. You receive a broken gold key. You must find the parts to fix it. You need the porcelain sauce pan (from the statue on the right) to gather the fragments of the key (6 pieces).
- Use the golden key to open the gate (middle). (You may need to rotate the silver faces to get the stairs leading to the gate.) Click to turn the golden key.
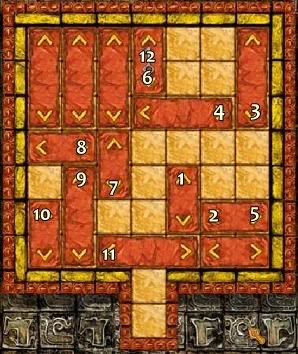
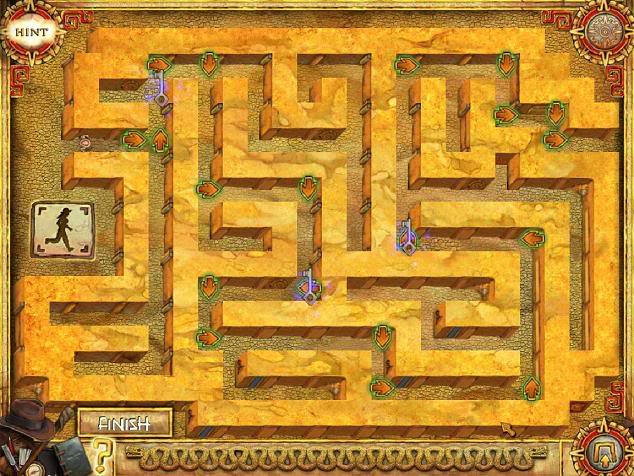
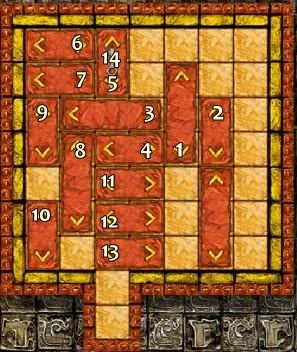
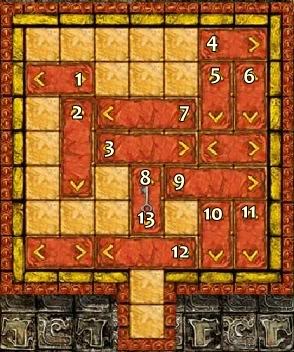
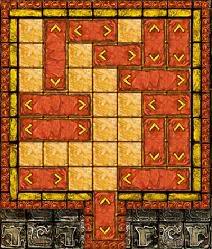
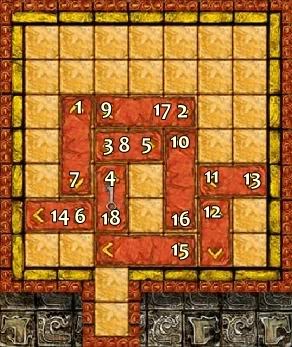
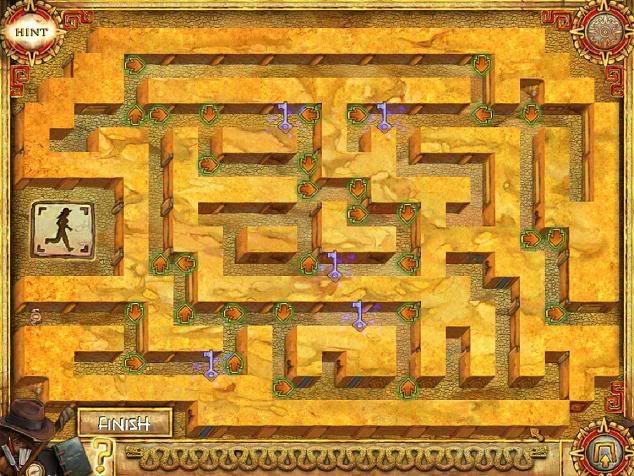
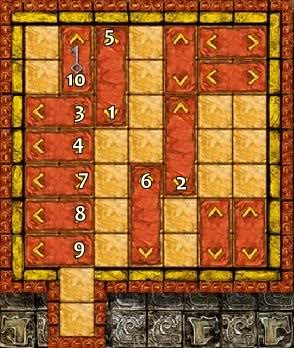
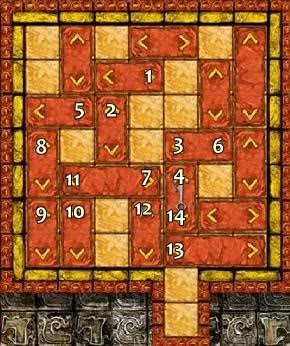
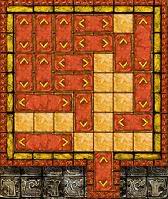
- Click on the examinable area. This mini-game is a maze. You have to guide Joan to each key and the exit.
- Use your mouse to add arrows for Joan to follow.
- Click to add an arrow and she will follow it.
- You have to add arrows at the end of corridors so she can follow.
- Click to add an arrow and then click on it again to rotate it.
- You can’t erase an arrow. If you’ve made a mistake, click the Joan symbol and let her run the maze. She’ll return to the beginning if she can’t solve it.
- You’re now in another room with a mechanism to solve. You need figurines to add to the empty slots.
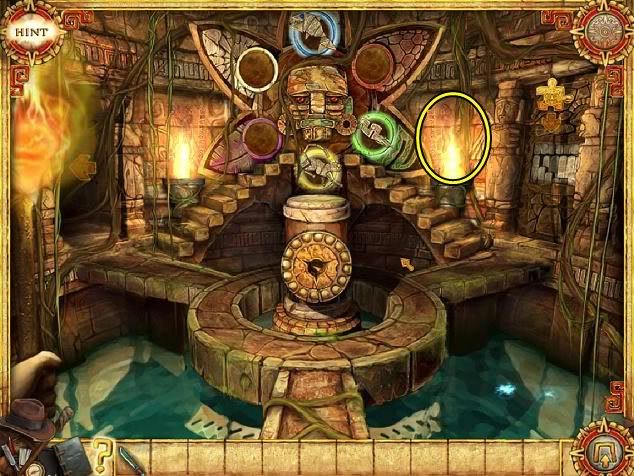
- Click the paintings on the back wall to add to your artefacts.
- Click the examinable area on the right. Another riddle mini-game. The answers are: statue, pyramid, jungle, and fruit.
- You receive a crank.
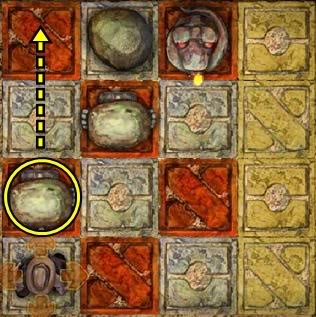
- Enter the cave (left) to trigger a hidden object hunt.
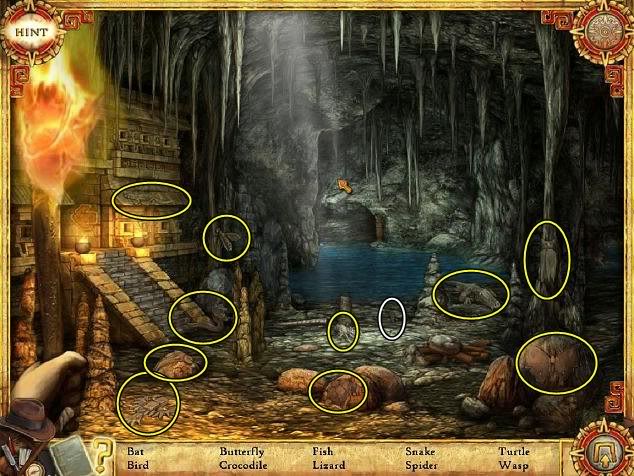
- Click the piece of Jim’s coat to record it (white circle).
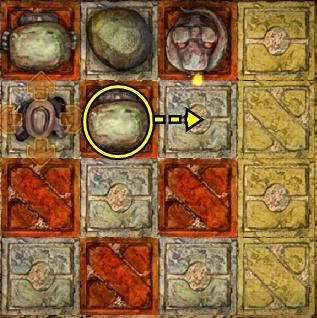
- You receive a bird, spider and turtle figurine. Return to the dungeon.
- Return to the dungeon and place the crank at the base of the mechanism. Click the crank top open the slots.
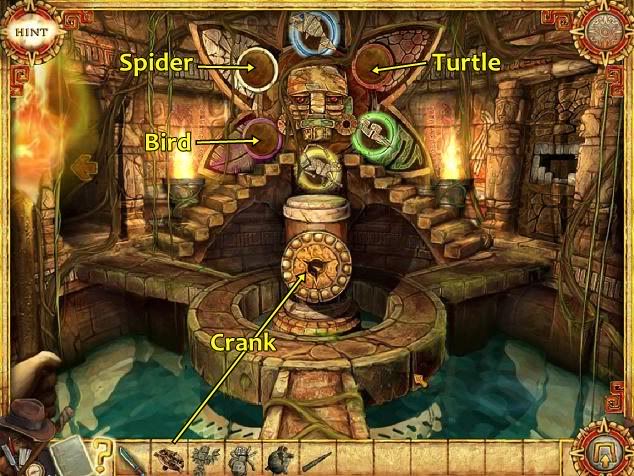
- Place the bird, spider and turtle figurines into the empty slots of the mechanism. The statue’s mouth opens to reveal a rope. Click to take the rope.
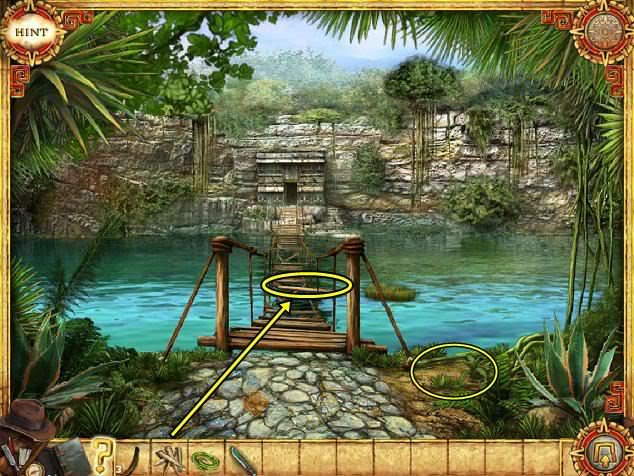
- Go to the cave.
- Click to take the stalactite and place it under the rock on top of the planks. Click the stalactite to move the rock.
- Click the rope on the planks to make a raft. Click the raft to place it in the water. You can now move to the tunnel.
Cut scene
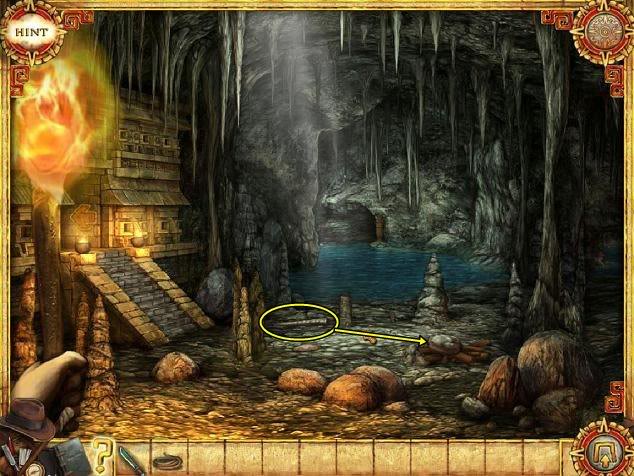
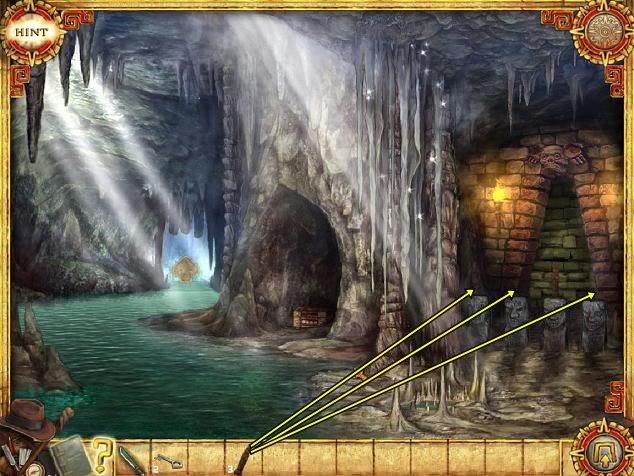
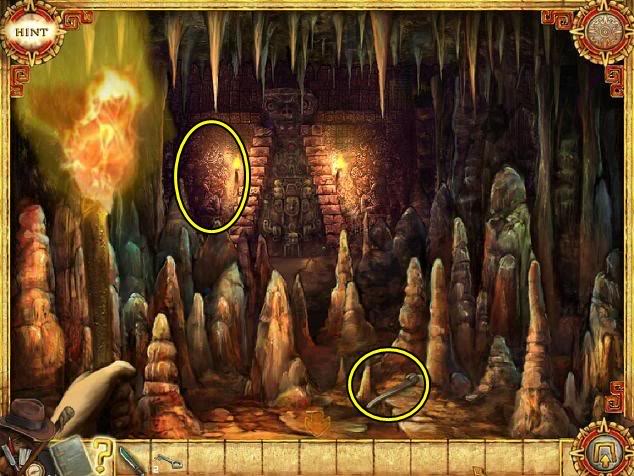
Sunken cave
- Click to take the key and the 2 stones.
- Click the carving to add it to your artefacts.
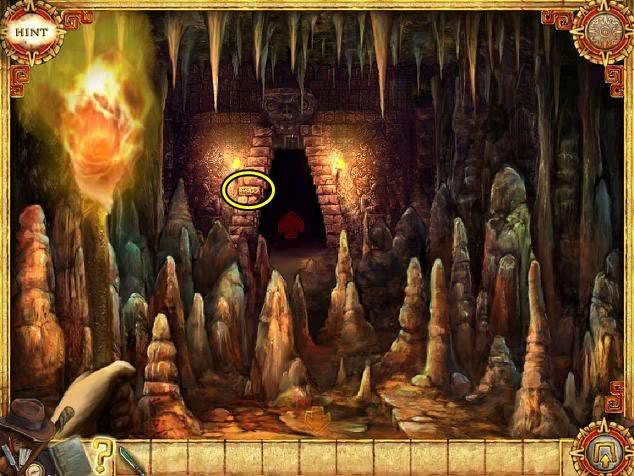
- Use the machete on the thin stalactites. The big ones in the back fall and you are immediately in a musical mini-game. A melody will play. Memorize the order played of the stalactites, then use your machete to repeat the sounds.
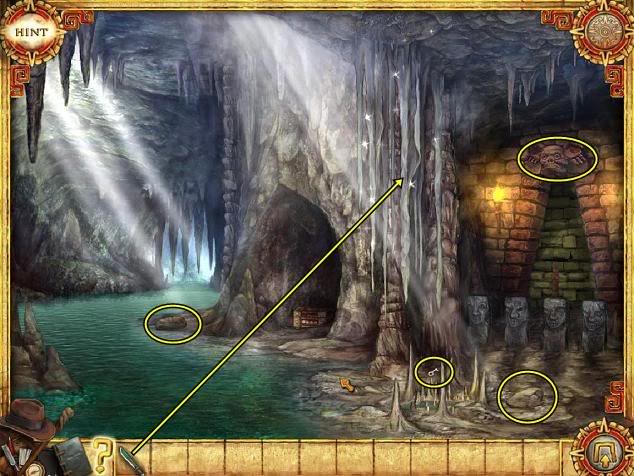
- Click to enter the deep cave.
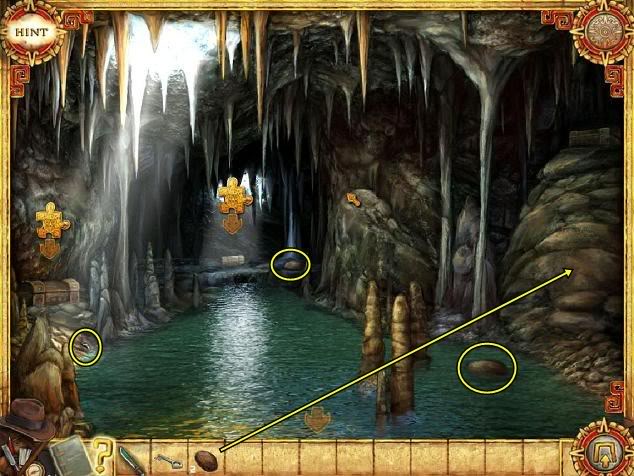
- Click to take the 2 stones and the key.
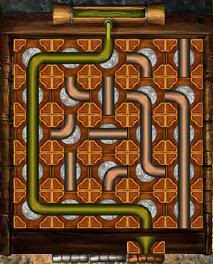
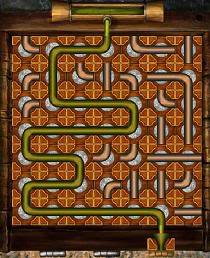
- By this point, you should have collected four stones. Place them on the hill in front of the chest you can’t reach (on the right) and solve the pipes mini-game to receive a statue.
- Click to examine the chest on the far left. Solve the match 2 mini-game and you receive another statue.
- Click to examine the middle chest and solve the key mini-game to receive another statue.
- Return to the sunken cave.
- Place the three statues on the pedestals.
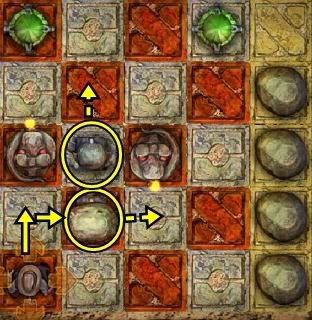
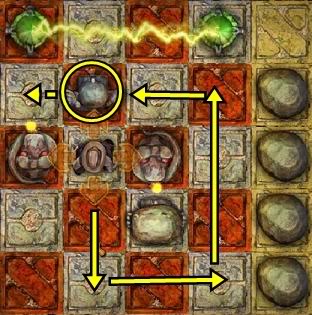
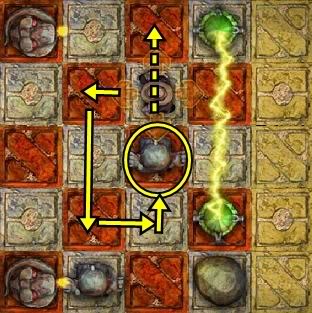
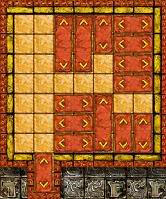
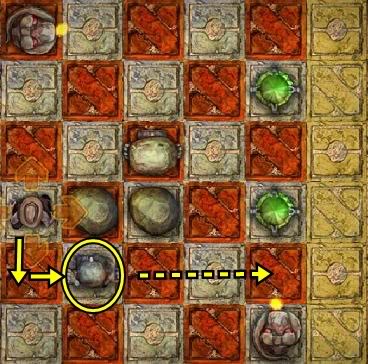
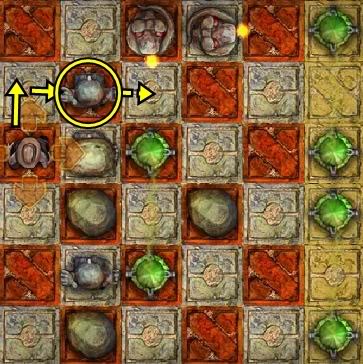
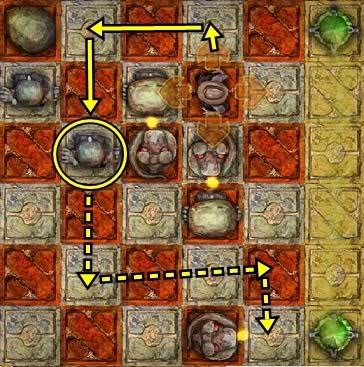
- Click the examinable area to start a trap mini-game.
- You have to move Joan around the squares and out to the other side.
- The first puzzle is a tutorial.
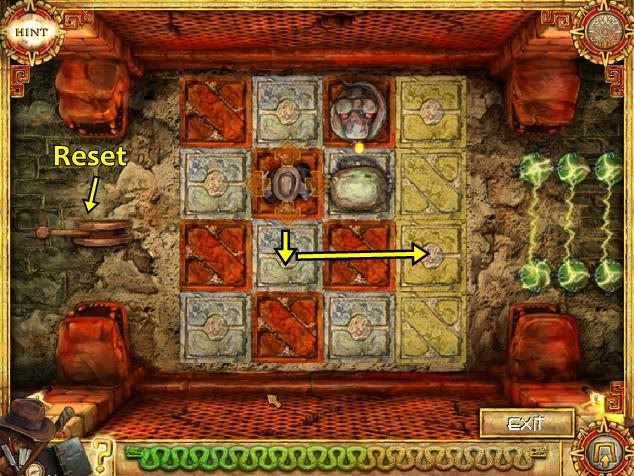
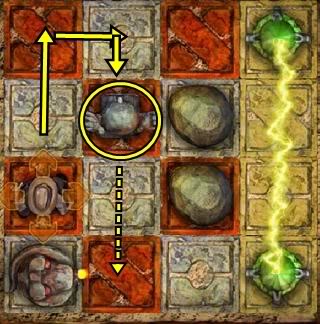
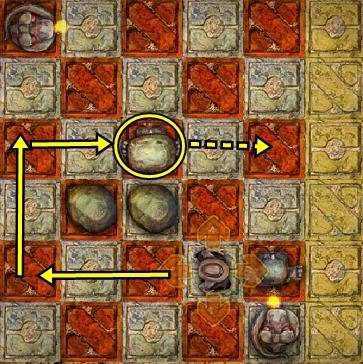
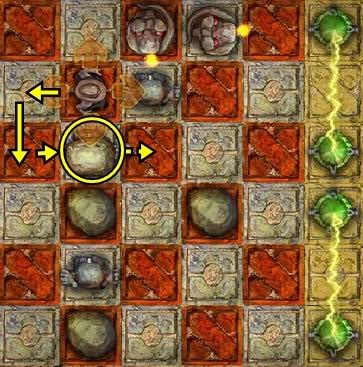
o For the second puzzle, push the statue in front of the dragon statue and it will explode the electro-crystal tiles. Guide Joan to the other side (without stepping in front of the fire spitting snake).
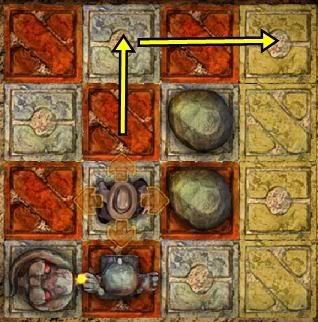
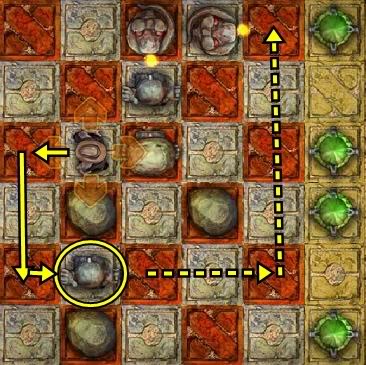
o For the third puzzle, move a rock in front of the snake and walk out.
- Enter the corridor.
- Take the crowbar.
- Click the paintings on the back wall to add to your artefacts.
- Go back to the sunken cave and use the crowbar on the chest to get a third key.
- Go back to the corridor.
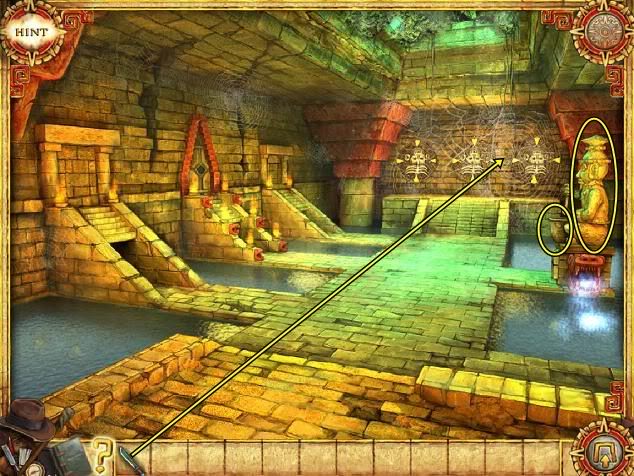
- Click the back gate to activate a hidden object hunt.

- You then receive some crystals. Use the crystals on the gate. Then one at a time, click the keys on the gate.
- Before going through the gate, click the inscription on the wall to find evidence of your children.
- Click to enter the gate.
Cut scene
Sacrificial pit
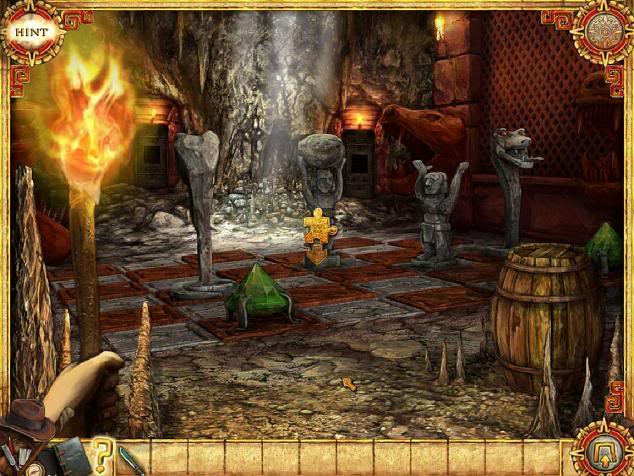
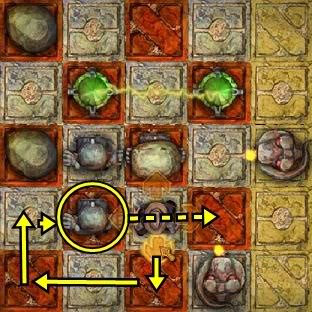
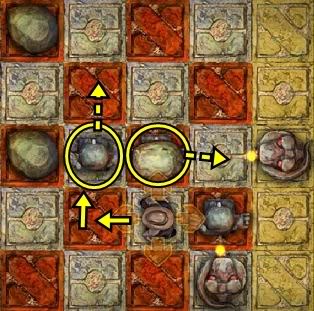
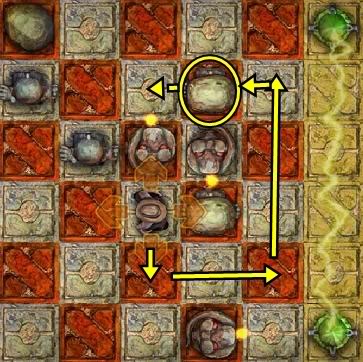
- Click the examinable area to solve another trap mini-game.
- Puzzle 1:
o Puzzle 2:
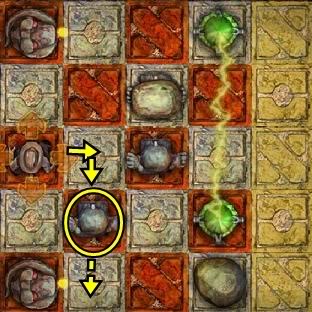

o Puzzle 3:


- Click on the broken stalactites to trigger a hidden object hunt.
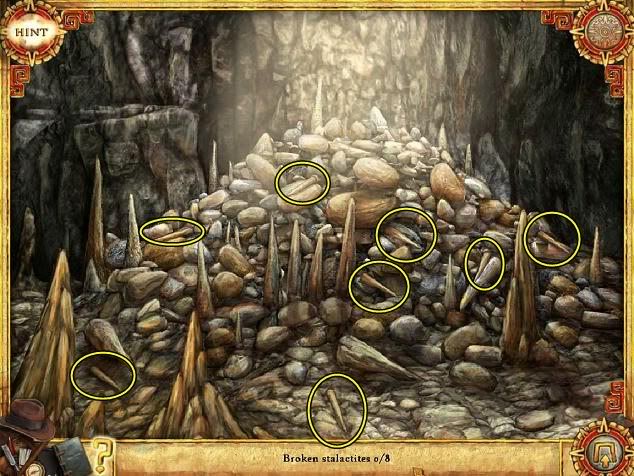
- You receive broken stalactites.
- You can now examine the two doors.
- Click the door on the right and solve the pipe mini-game.
- Enter the door to the sacred well. You should also have clicked the handprint, a clue to your children.
- Click to take the big rock.
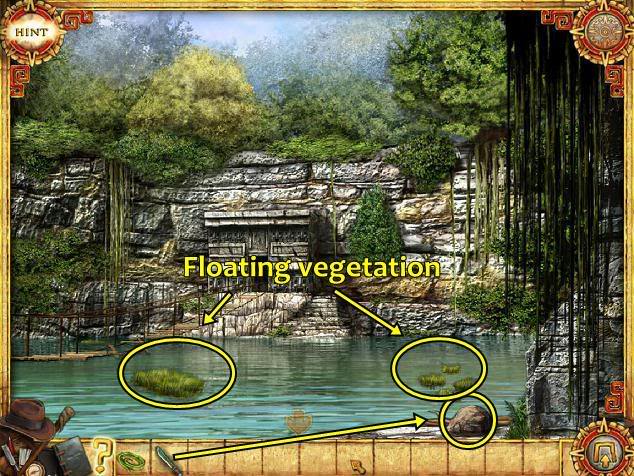
- Use the machete to take the big root. Right-click to return the machete to your inventory.
- Use the big root on the floating vegetation to start a hidden object hunt.
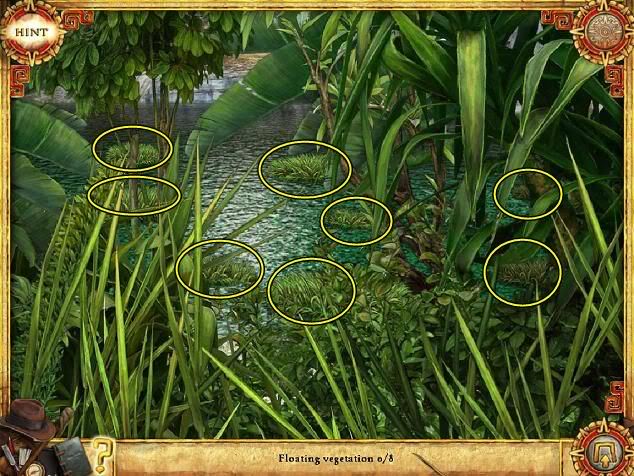
- You now have a raft.
- Return into the sacrificial pit area. Take the big rock in your inventory and use it on the barrel. Take the 3 planks.
- Click the door on the left to solve the key mini-game.
- Enter the door leading to the cliff.
- Use the machete on the thin roots to take them. Right-click to return the machete to your inventory.
- Place the 3 planks on the bridge. Take the big plank into your inventory.
- Leave and go back to the sacred well (right door).
- Take the broken stalactites from your inventory and place them on the raft, then use the thin roots and then the big plank. Click on the raft.
- The gate is now examinable. Click on it to solve another match-2 mini-game.
- Click to enter the gate.
Cut scene
Twelve Lords of Xibalba
- Click to take the button from Jim’s shirt.
- Click on all the statues on the right and the carvings on the back wall to add to your artefacts.
- Click to take the 10 statue fragments. Place them on the broken statues.
- Use logic (i.e., the hand goes where the missing hand is).
- Just click pieces on the statues. If they belong there, they’ll take.
- Once the statues are complete, they appear in colour.
- Click on the back gate to trigger a hidden object hunt.
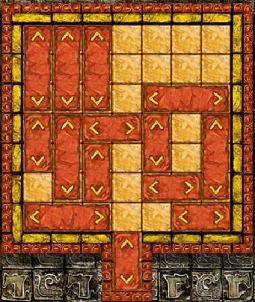
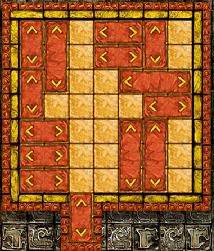
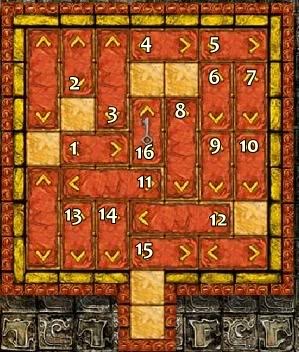
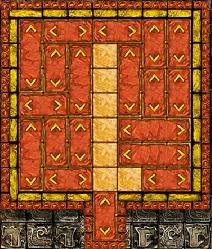
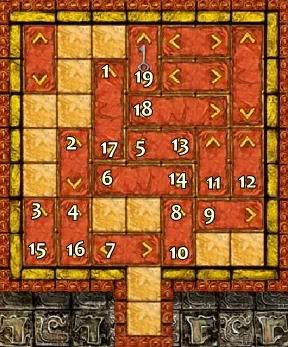
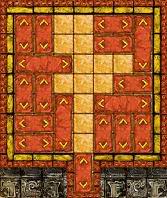
- Click on the examinable area to solve a maze mini-game.
- This one is harder because you have to double-back. Keep in mind that as Joan passes through an arrow, it disappears.
- You are now in the vestibule of Xibalba.
- Click on all four paintings on the wall to add to your artefacts.
- Click to take the human figure, the flame figure, the bird figure and the fish figure.
- In order from left to right, on the pedestals, place the fish, flame, bird and human figures. Essence appears above each statue.
- Click on the back gate. Joan can hear voices, probably the kidnappers. Two examinable areas open up.
- Click the one on the left to solve another fish mini-game.
- Enter the secret door.
Cut scene
- Joan sees the kidnappers.
- Click the huge portal on the left to add to your artefacts.
- Click on Quetzalcoatl’s statue to add to your artefacts.
- Leave and go back to the vestibule. Click the examinable area on the right to solve the key mini-game.
- Enter the door. You are on the other side of the kidnappers.
- Click on the examinable area (the table). Solve the rotating wheel mini-game.
- Go back to the vestibule and get the fire essence.
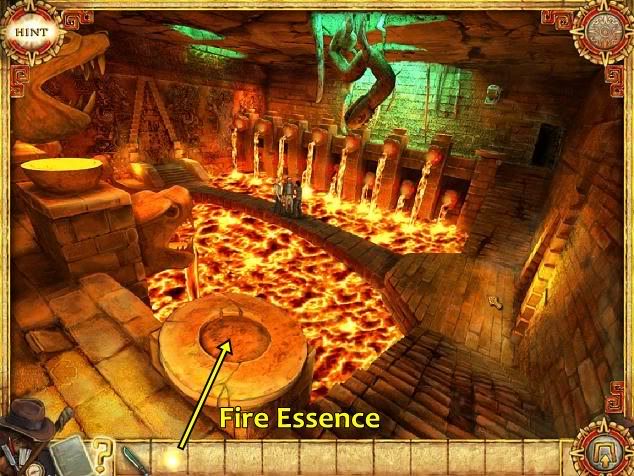
- Go to the left balcony and put the fire essence on the altar. The statue breaks and traps the kidnappers.
Cut scene
The kidnappers’ hideout
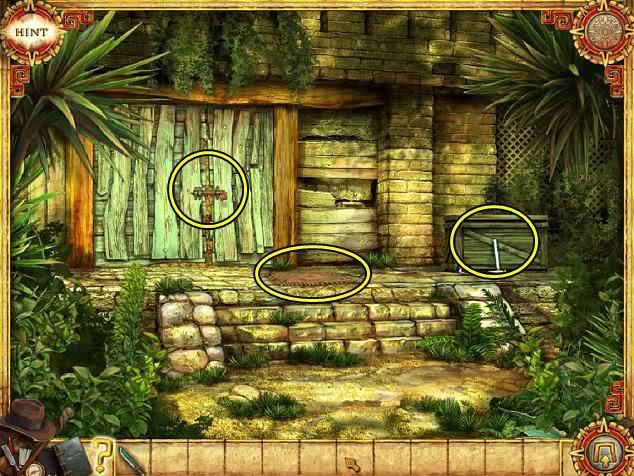
- Click on the toolbox to take the pincers.
- Click the doormat. Take the key.
- Use the key on the lock, then use the pincers on the fence. This opens up two examinable areas.
- Click on the examinable area on the left and solve the pipe mini-game to receive a door handle.
- Click on the other examinable area and solve the trap mini-game.

- Click the door handle on the opening. Click the door.
Your kids are free.
The end.
“;

More articles...
-
Best Horror Games On Itch.io – July 2026
Across a bounty of subgenres. -
Haze Seas Accessories Tier List [Best Accessories to Equip]
The accessories with the best stat buffs in Haze Seas.