- Wondering how to get Monopoly GO! free rolls? Well, you’ve come to the right place. In this guide, we provide you with a bunch of tips and tricks to get some free rolls for the hit new mobile game. We’ll …
Best Roblox Horror Games to Play Right Now – Updated Weekly
By Adele Wilson
Our Best Roblox Horror Games guide features the scariest and most creative experiences to play right now on the platform!The BEST Roblox Games of The Week – Games You Need To Play!
By Sho Roberts
Our feature shares our pick for the Best Roblox Games of the week! With our feature, we guarantee you'll find something new to play!Type Soul Clan Rarity Guide – All Legendary And Common Clans Listed!
By Nathan Ball
Wondering what your odds of rolling a particular Clan are? Wonder no more, with my handy Type Soul Clan Rarity guide.
Jewel Quest Mysteries 2: Trail of the Midnight Heart Walkthrough
Welcome to the Gamezebo Strategy Guide for Jewel Quest Mysteries 2: Trail of the Midnight Heart. This is the second in the Hidden Object/Jewel Board version of the series. This Strategy Guide is divided into two parts: General Tips (No Spoilers) Walkthrough General Tips For each level, you have to first do Hidden Object scenes in order to collect the pieces, called shards, of a broken jewel board. When you have all the pieces, you then solve the jewel board by m…
a:1:i:0;a:2:s:13:”section_title”;s:64:”Jewel Quest Mysteries 2: Trail of the Midnight Heart Walkthrough”;s:12:”section_body”;s:48046:”
Welcome to the Gamezebo Strategy Guide for Jewel Quest Mysteries 2: Trail of the Midnight Heart. This is the second in the Hidden Object/Jewel Board version of the series.
This Strategy Guide is divided into two parts:
General Tips (No Spoilers)
- For each level, you have to first do Hidden Object scenes in order to collect the pieces, called shards, of a broken jewel board. When you have all the pieces, you then solve the jewel board by making matches to turn all its squares gold.
- In the Hidden Object scenes you can collect objects from the Find List, jewels, and lion coins. The jewels are used to purchase upgrades later, and the lion coins are used to purchase "Specials," which can be used as hints.
- Most Hidden Object scenes have one or two Key Items. There are tools like a crowbar that can be used in later scenes to uncover jewel board shards. There are also Dragonflies, who also give you a jewel board shard.
- Objects can be any size, color, or time period.
- Locations repeat often, and the objects are always the same, but the Find List will differ. The lion coins and jewels may repeat or may be in a different place.
- The locations do not match the journal story. For example, while you are travelling on the Trans-Siberia railroad, you will have to search Papua, New Guinea. Just go with it
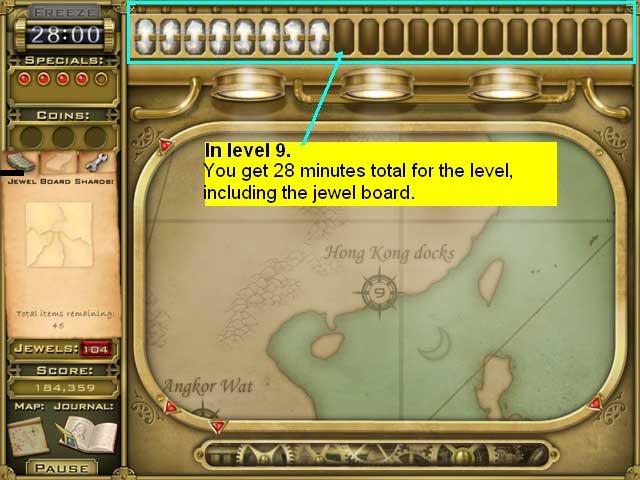
- The time you get is for the entire level-all Hidden Object scenes and the jewel board. Finishing faster gets you more bonus points.

- You can find lion coins in the Hidden Object scenes, or earn them by matching 3 or more coins on a jewel board.
Jewel Board Tips
- Jewel board play is the same as previous games in the series. Whenever you make a match of at least 3, the jewels are removed from the board and the squares underneath turn from grey to gold.
- It is usually fastest to work the jewel board from the bottom up. That way you benefit from accidental matches as new jewels fall onto the board.
- You can skip any jewel board without penalty, you just won’t earn as many bonus points.
- When you buy the upgrades that start the board with some squares already gold, those squares will start at the bottom. This means you can get some points even if you skip a jewel board altogether. It also helps take care of some of the hardest squares.
Upgrade Tips
- Unlike previous games in the series, you can now buy upgrades in between levels by spending jewels. Most of the upgrades give you more hints of one kind or another.
- Which upgrades you buy is a matter of taste. If you like the challenge of doing the jewel boards yourself, you may want to skip the upgrades that add gold squares to start a jewel board, as these reduce the challenge.
- Probably the most helpful upgrades are the ones that increase the number of specials you can have, as these hints can be used on the Hidden Object scenes or on the jewel boards.
- The glowing cursor that helps you find jewels will help you buy upgrades sooner.
- Once you have bought the cursor upgrade, the cursor will sparkle when you get near a jewel.
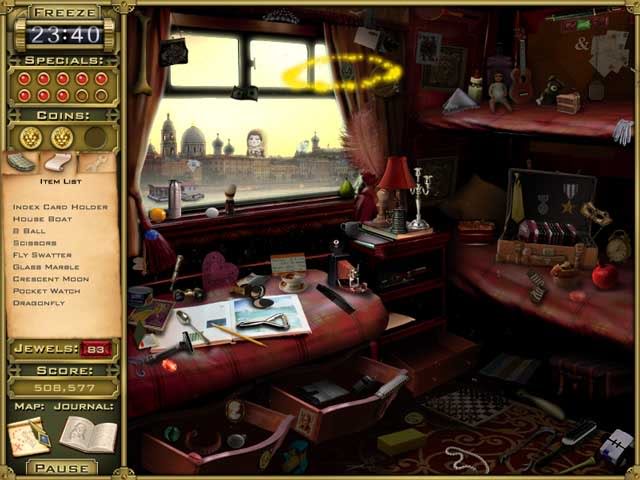
- Once you have bought the dragonfly upgrade, a dragonfly will occasionally fly across the screen and draw a gold circle around a lion coin you’ve missed.
Mini-game Tips
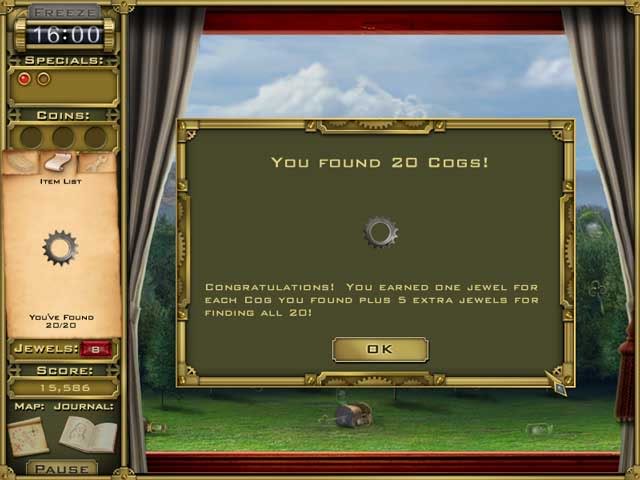
- Whenever you see a "transportation icon" on the map, like a train or a plane, you can play a bonus mini-game to earn more jewels. These are all the same type: you find up to 20 objects of the same kind, like 20 stars or 20 gears. The twist is that you are riding in the train or plane, so the scenery is moving past your window pretty quickly. You can play the game over and over until you feel you’ve gotten your best score. The objects are always in the same place. I usually got to 20 on the 3rd try.
- Objects in the mini-games may be any size or color, or be a shape in the clouds.
- If you get all 20 objects in the transportation mini-game, you get a bonus 5 jewels.
Specials Tips
- The "specials" are a row of red jewels on the top left of the screen. You start out with 3 slots, but you can get more slots as an upgrade.
- To use a special during a hidden object scene, click on one red dot and an object from the Find List will light up in the scene. You don’t get to select which object.
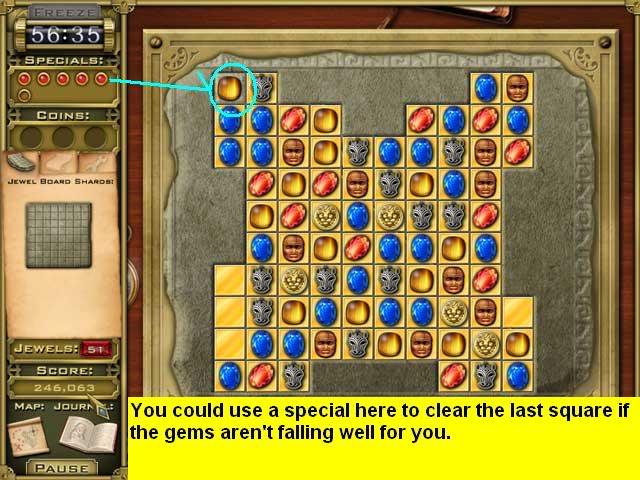
- To use a special during a jewel board, click on one red dot, and then click on any grey square on the board and it will turn gold. This is an easy way to finish a jewel board that has a square sticking out at the side or top.
- If you have filled all of the special slots, additional lion coins will turn into points instead of specials until you have an empty slot again.
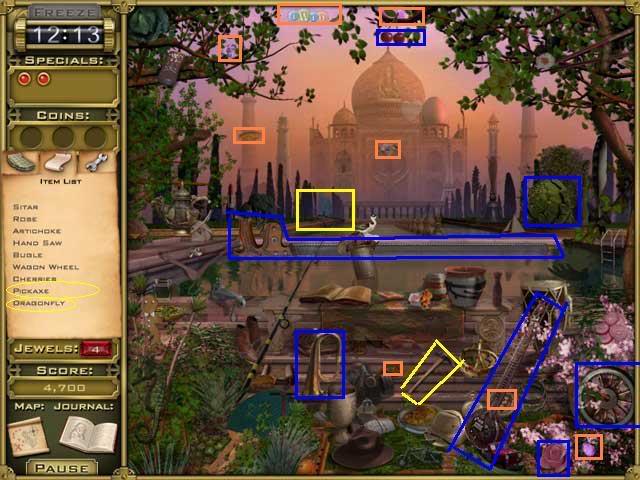
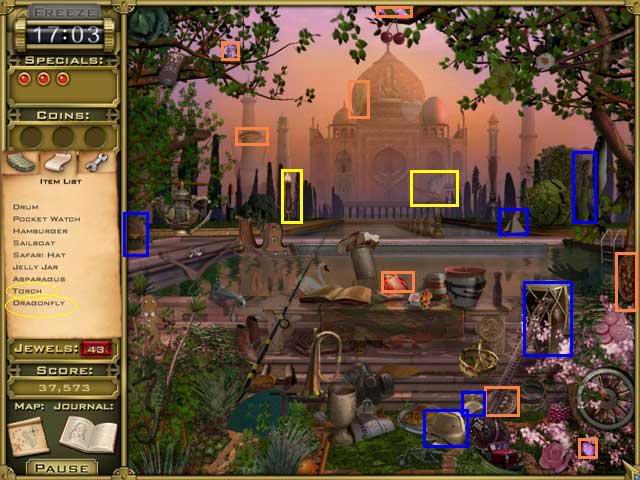
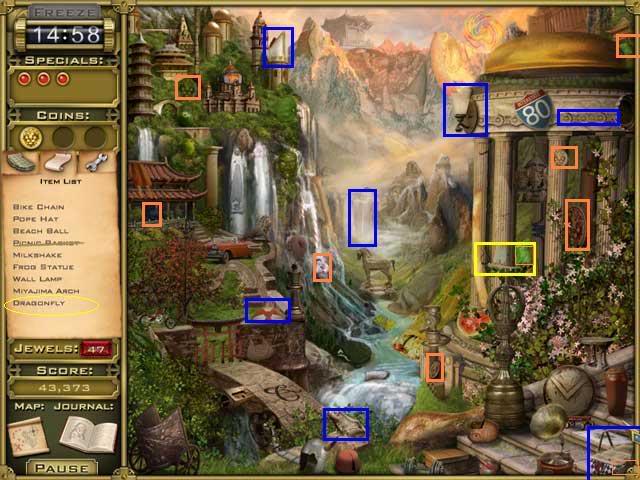
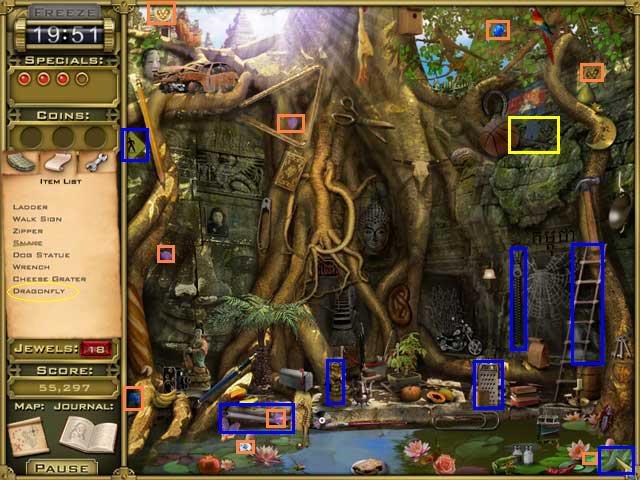
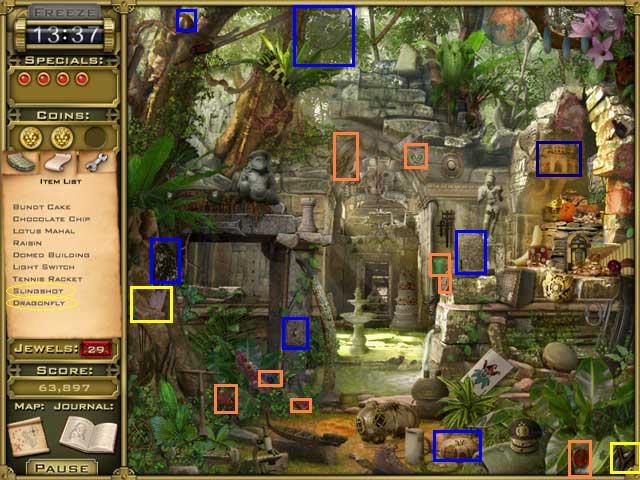
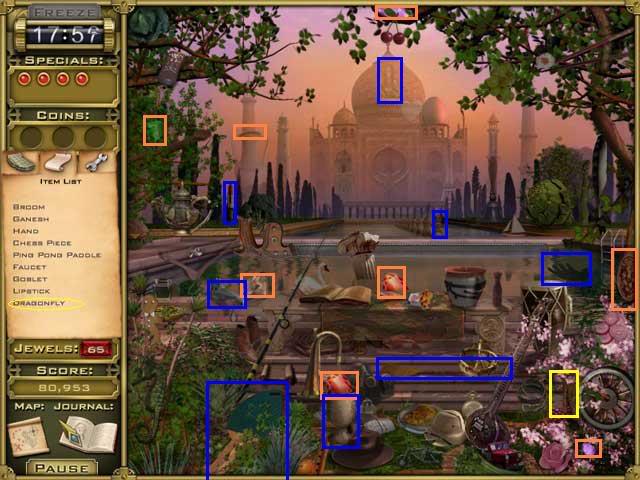
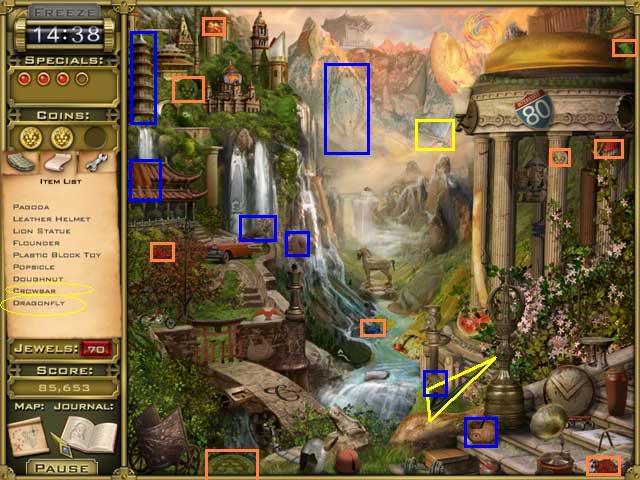
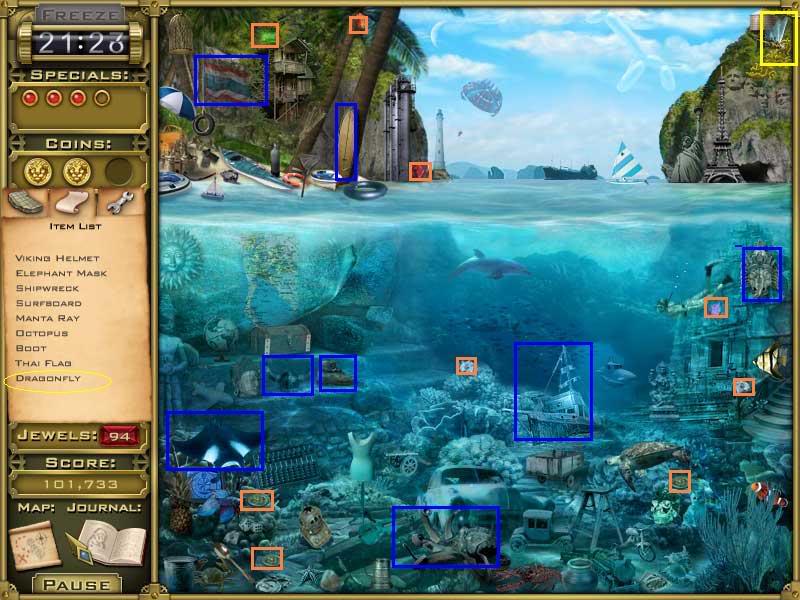
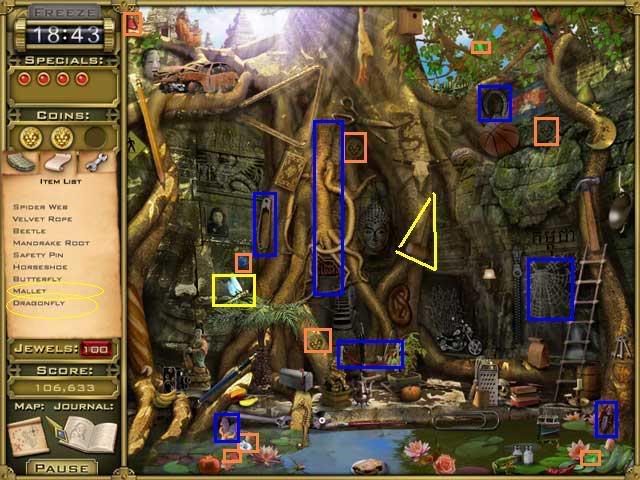
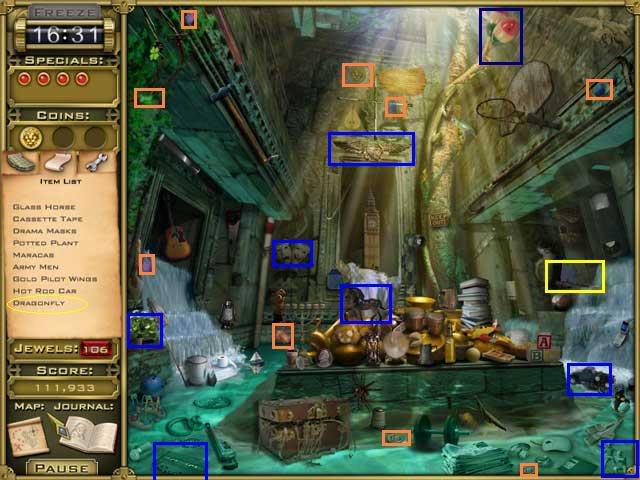
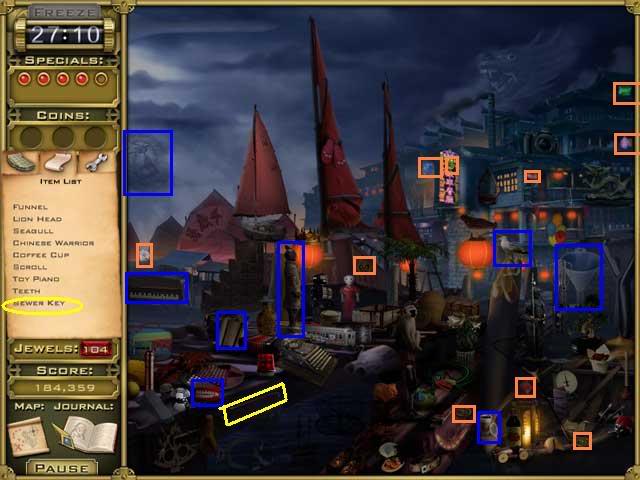
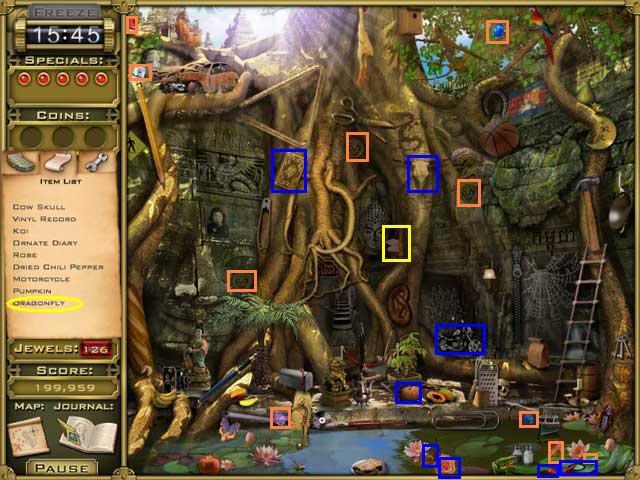
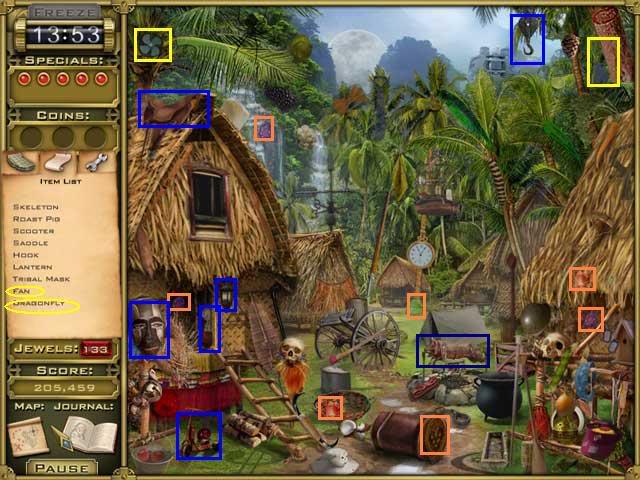
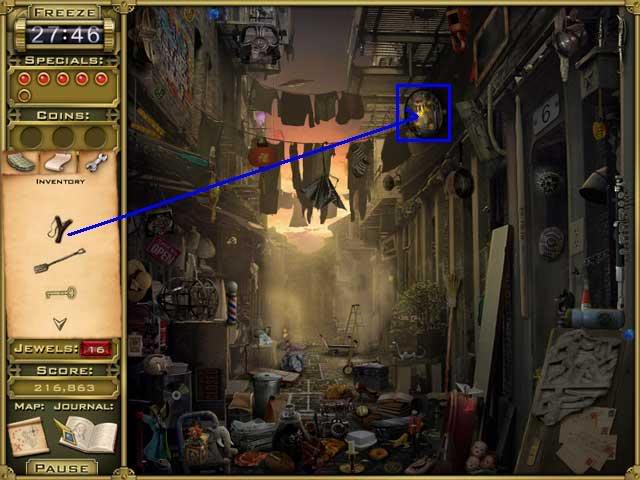
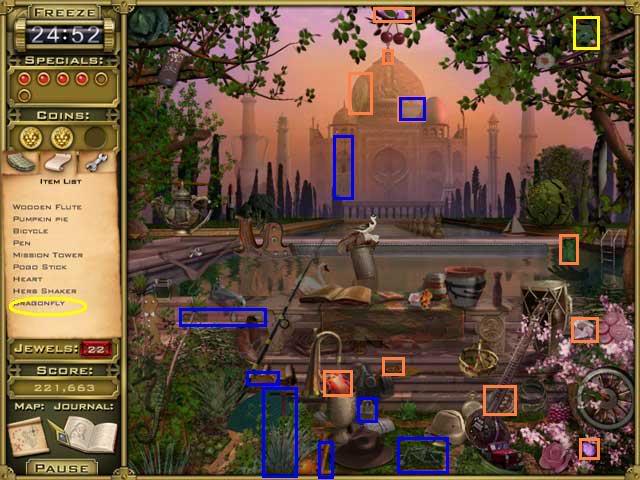
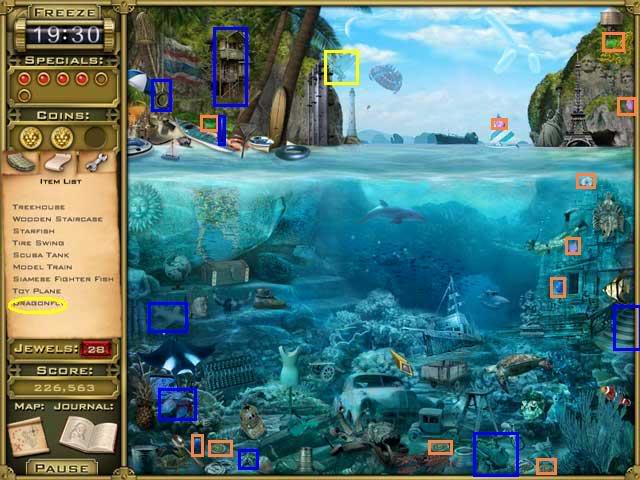
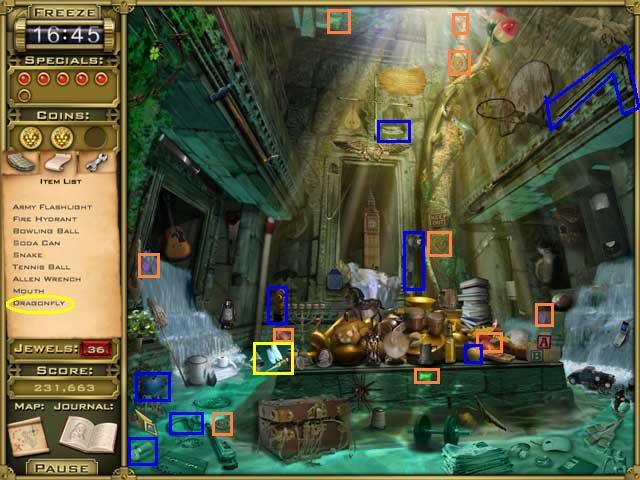
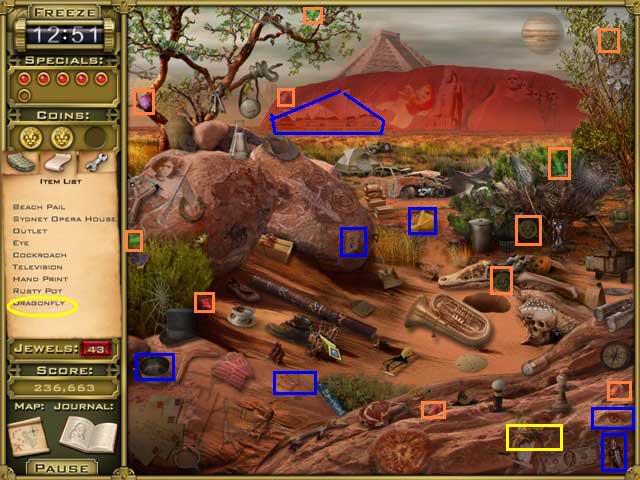
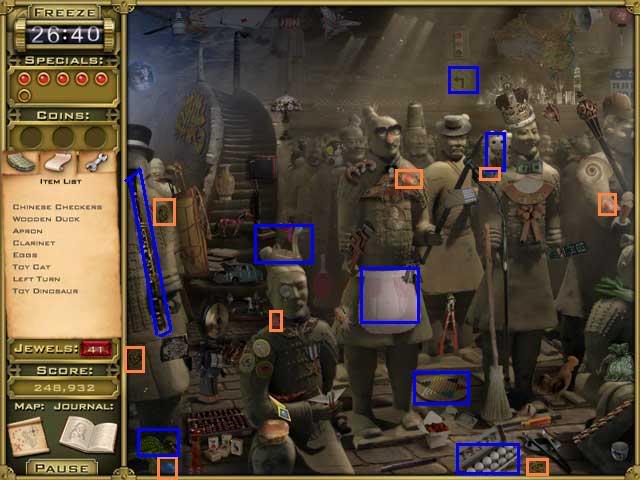
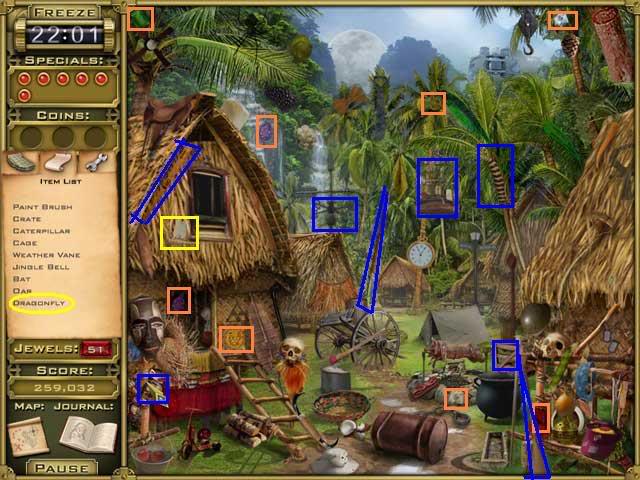
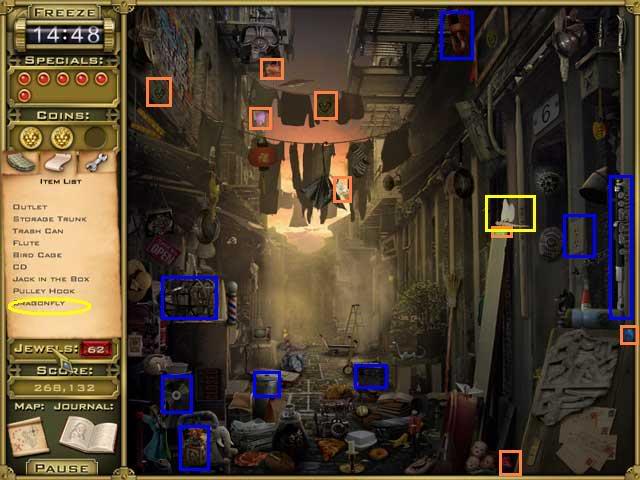
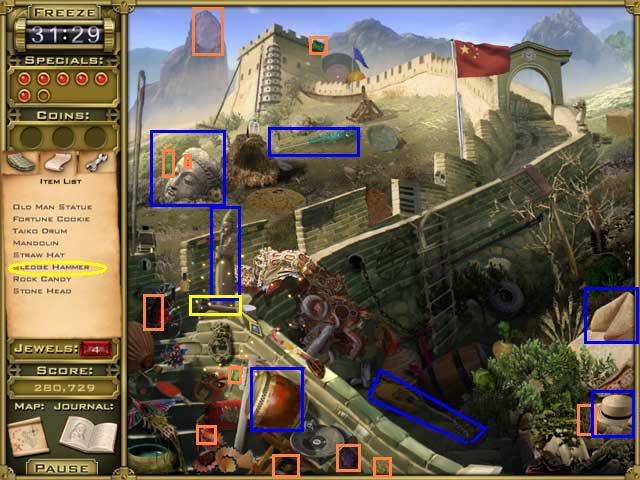
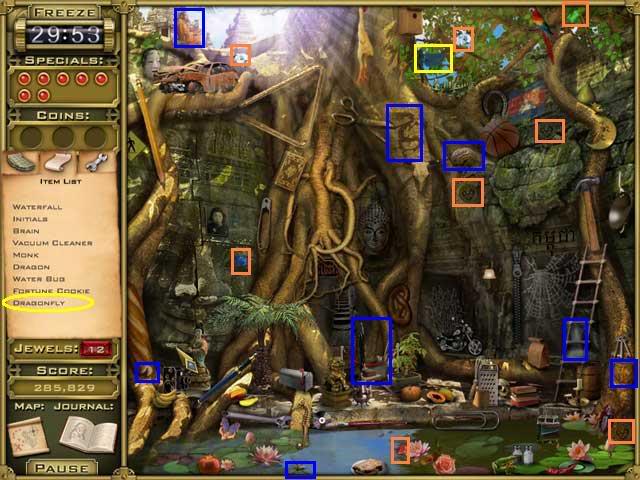
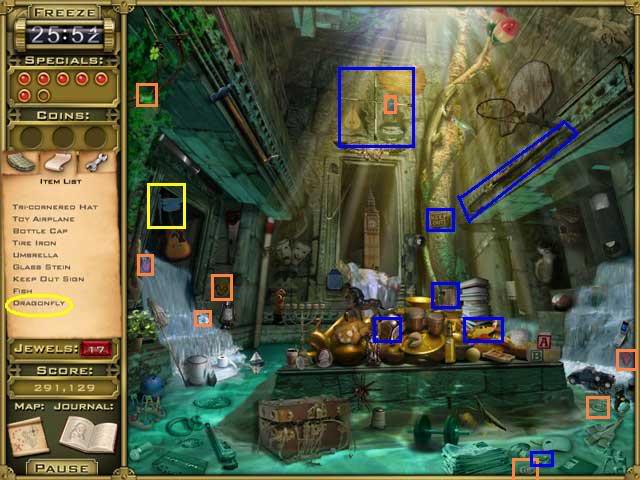
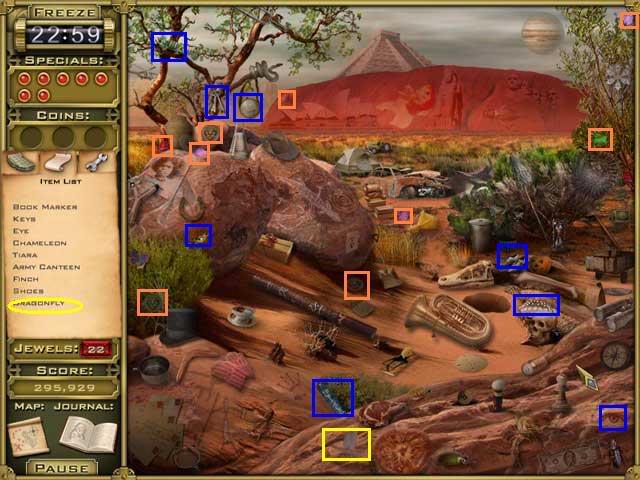
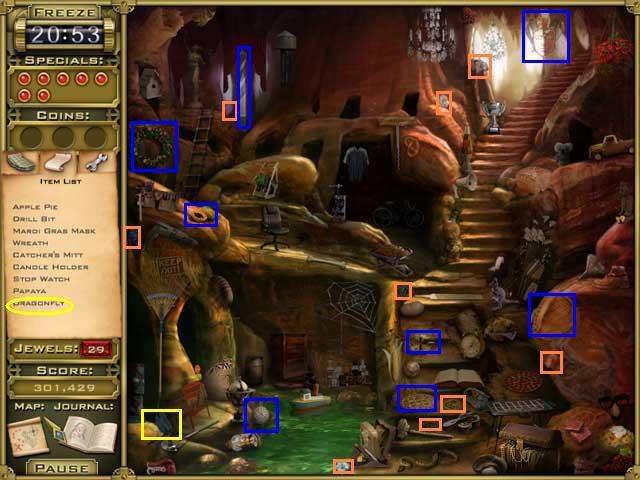
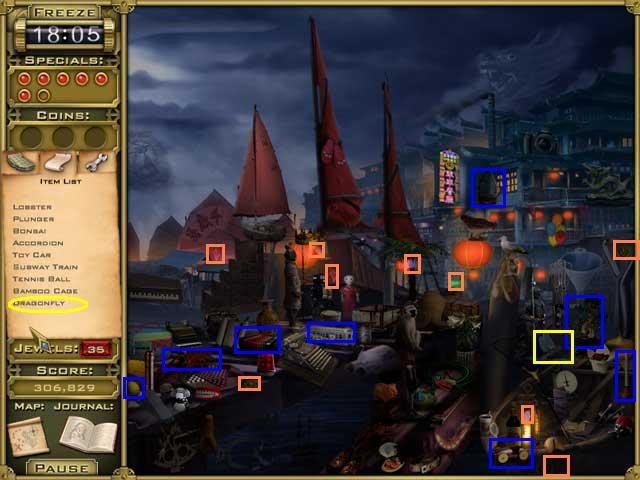
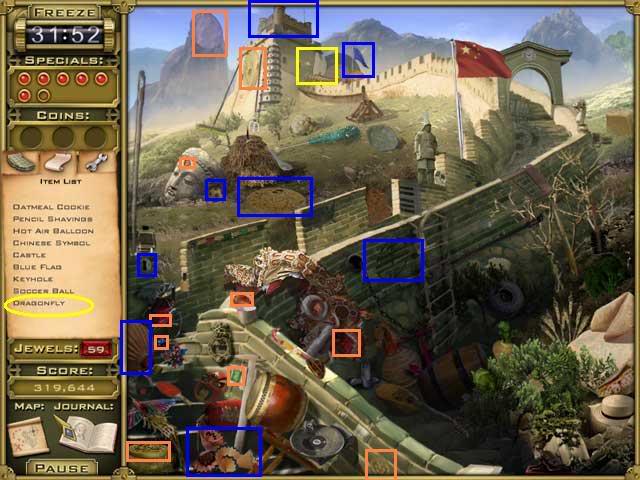
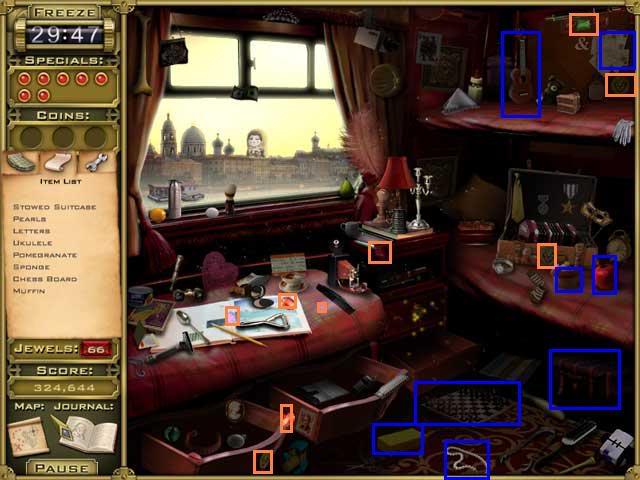
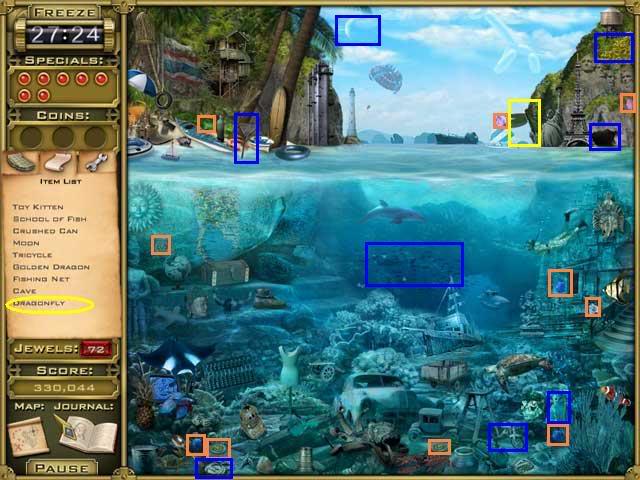
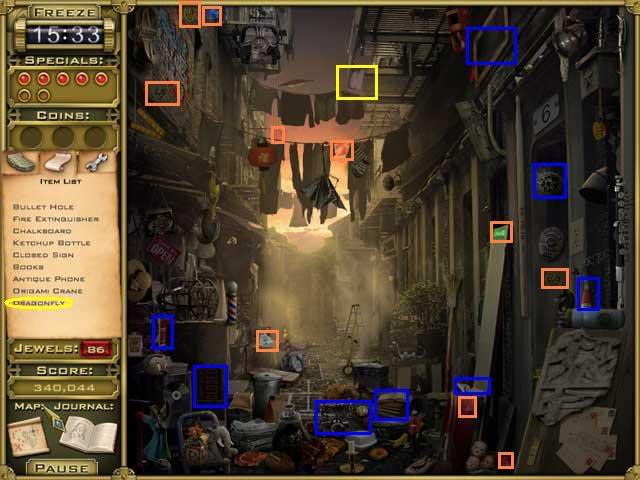
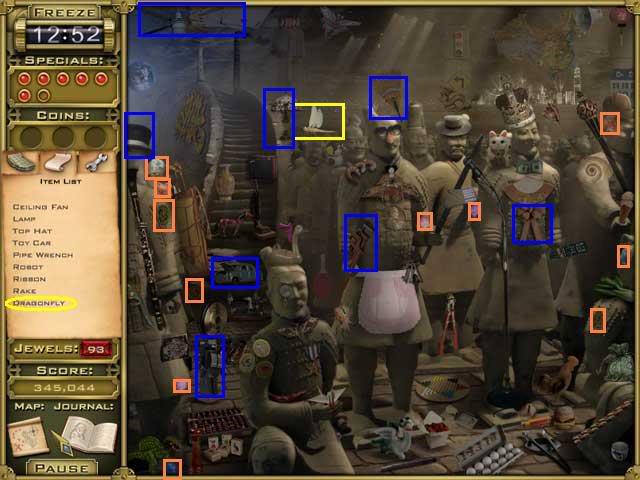
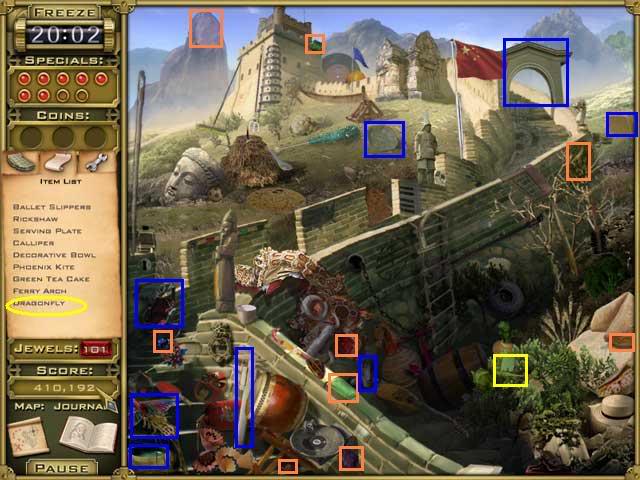
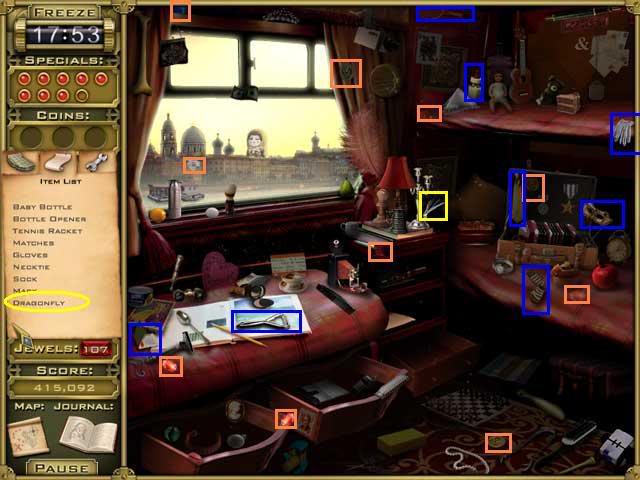
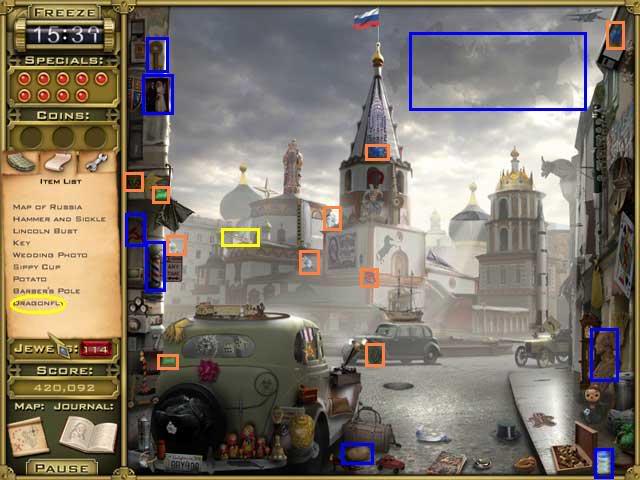
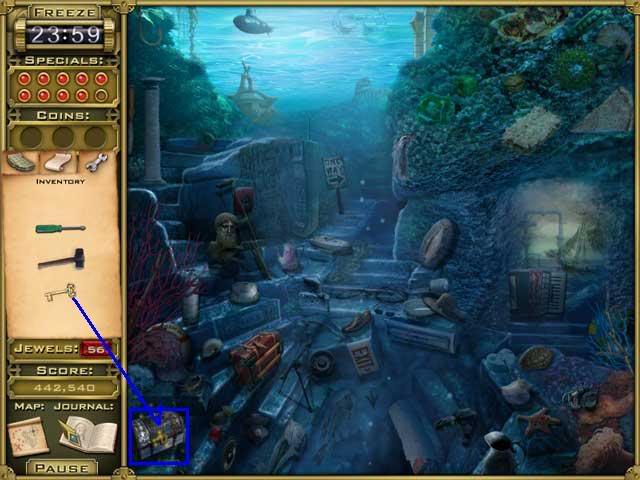
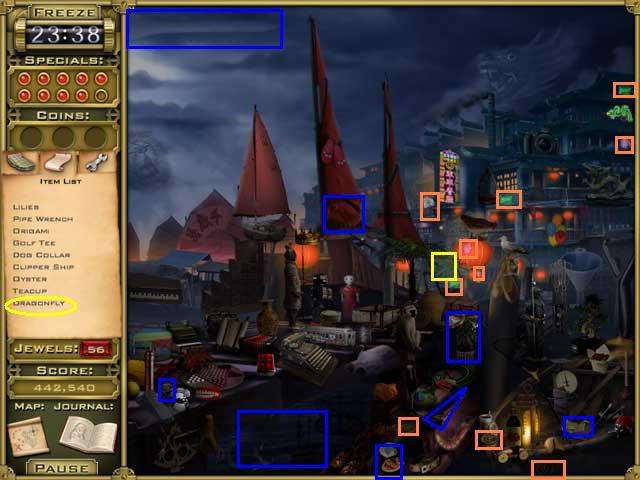
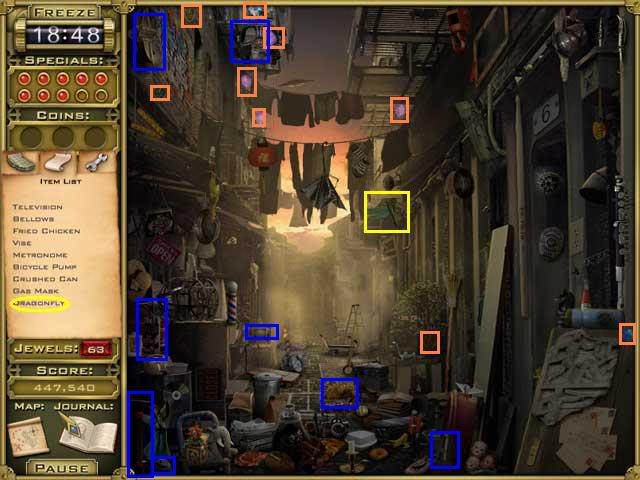
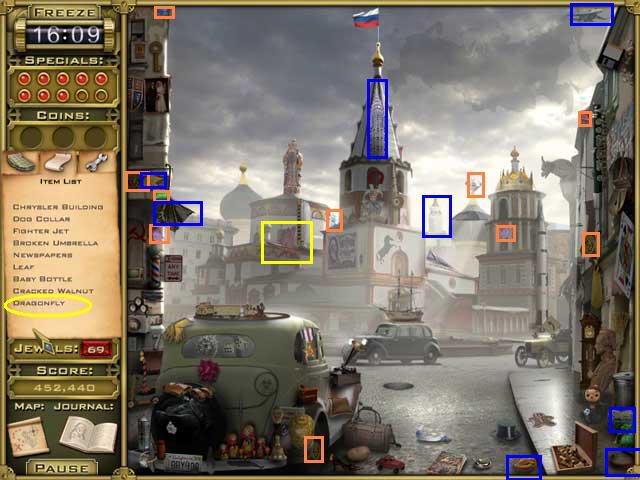
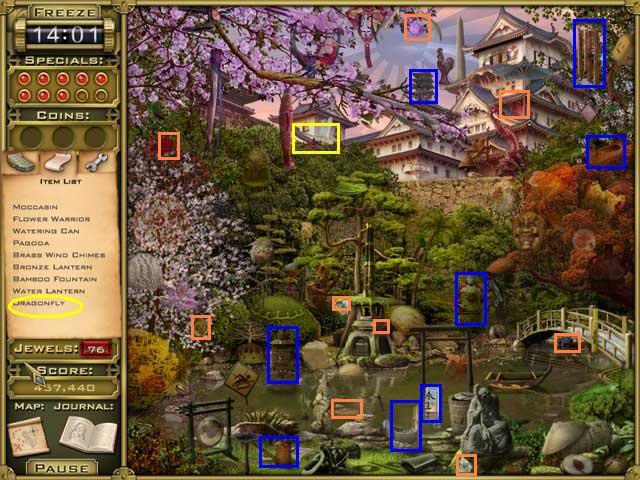
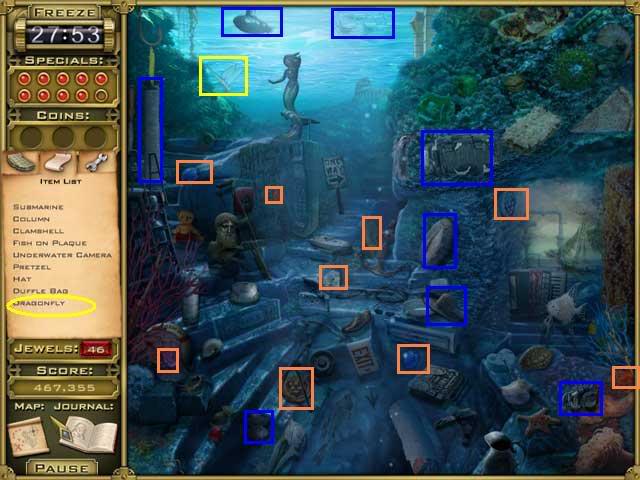
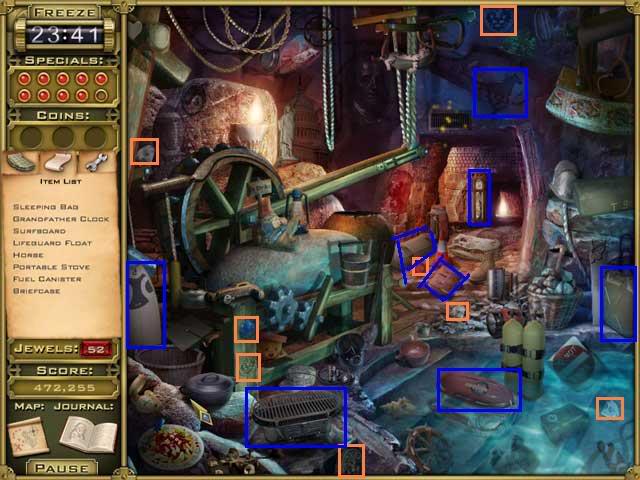
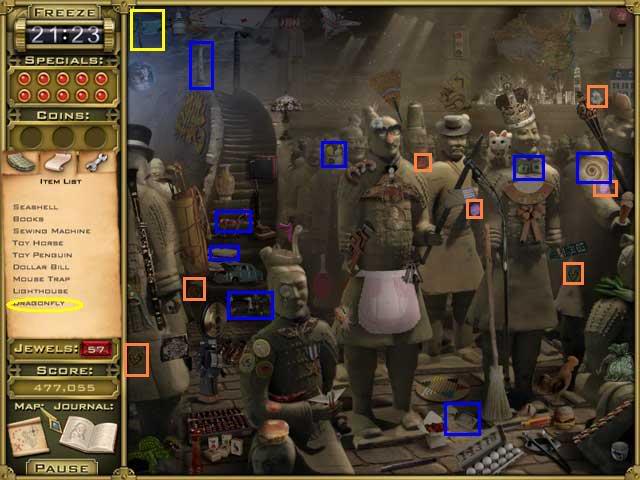
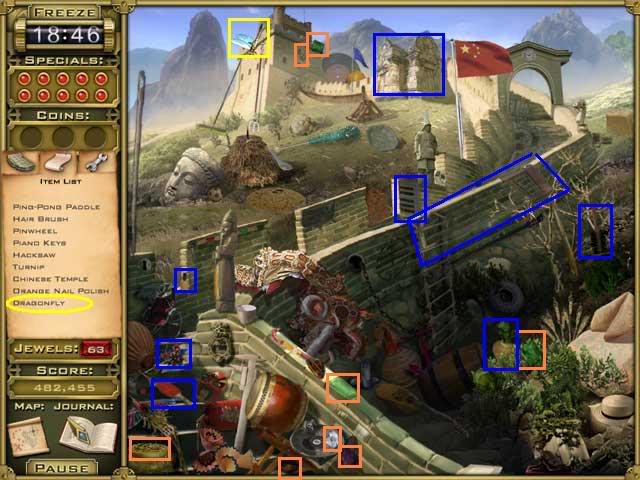
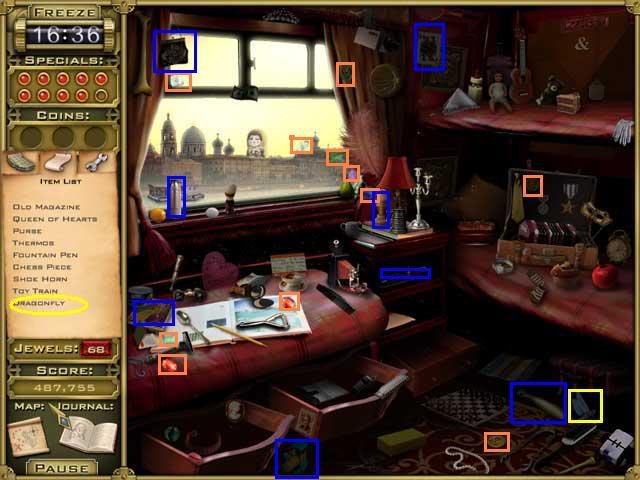
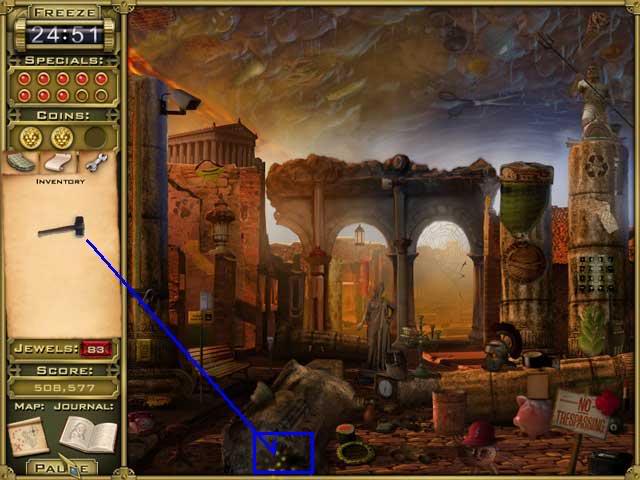
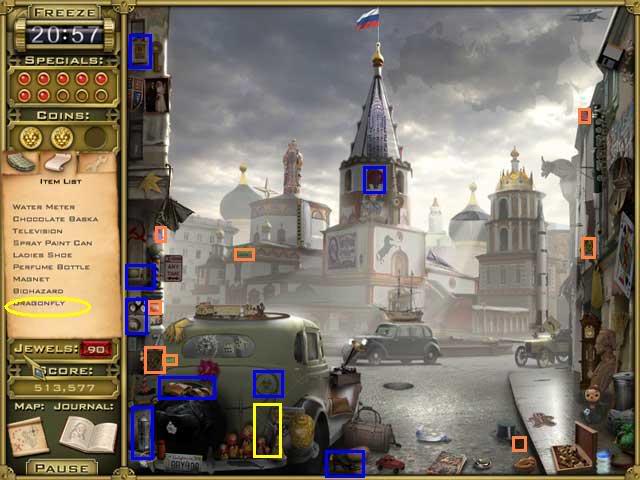
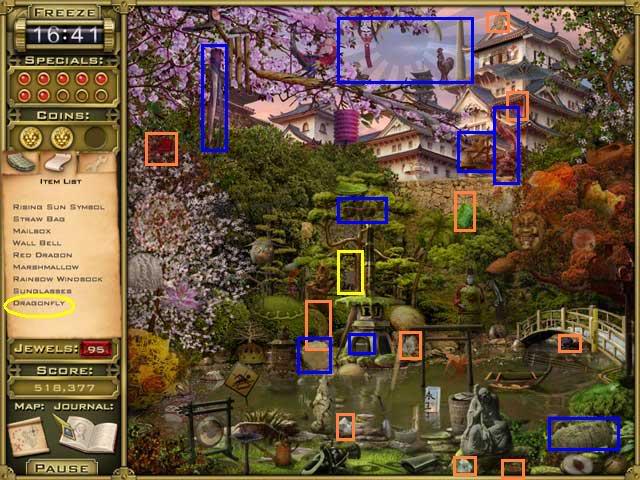
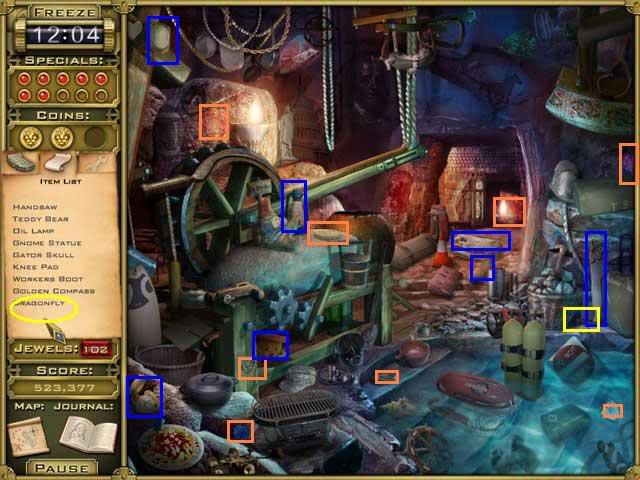
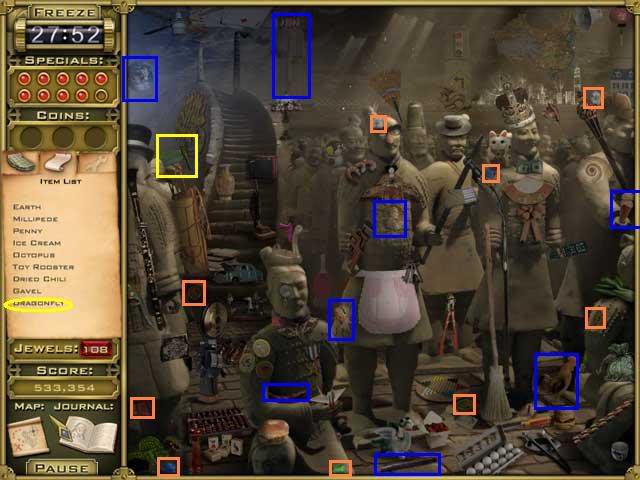
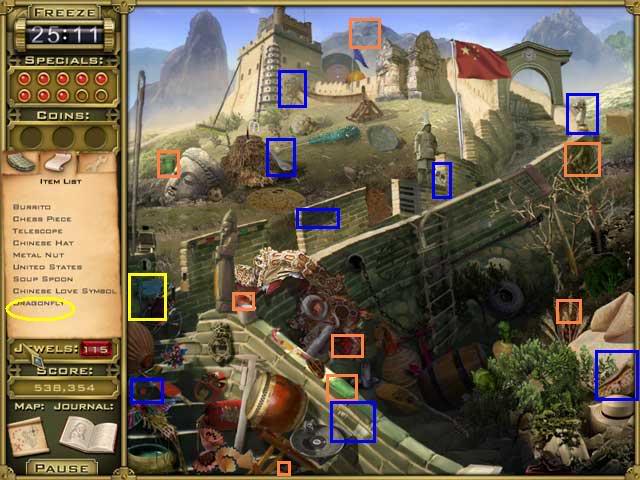
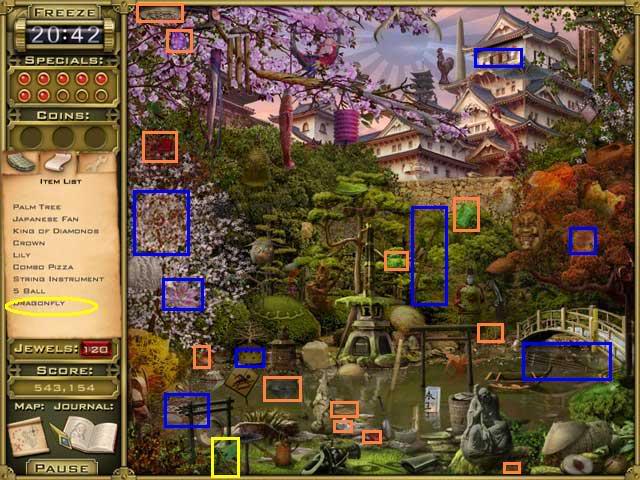
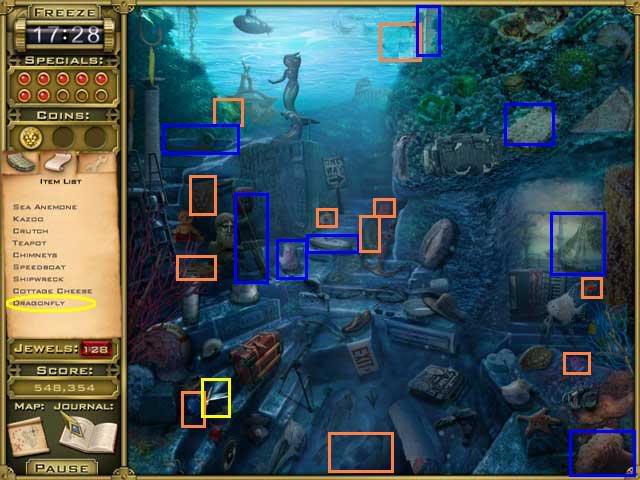
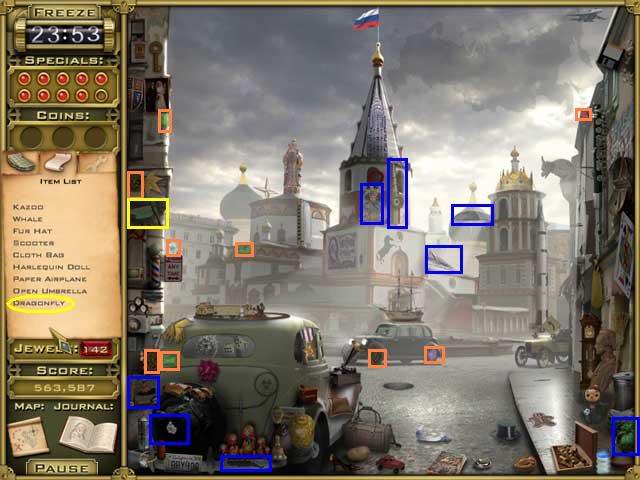
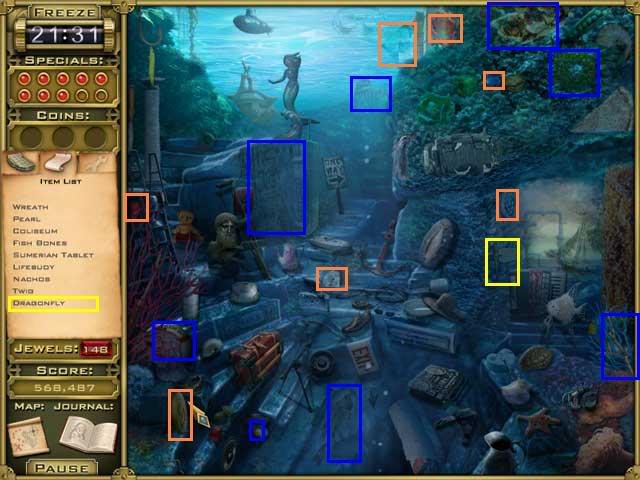
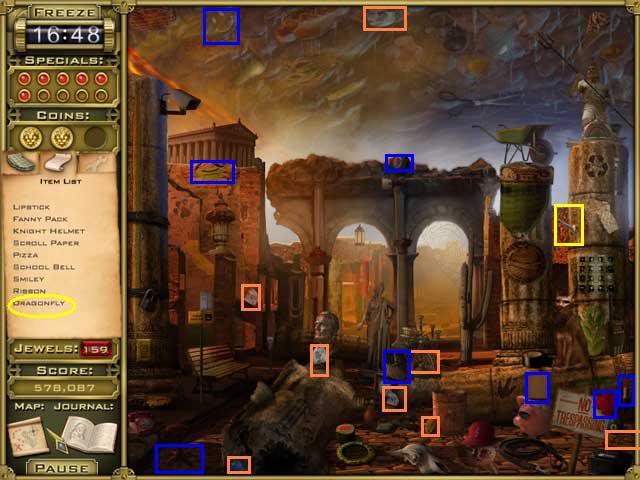
- These screenshots show the objects in each location.
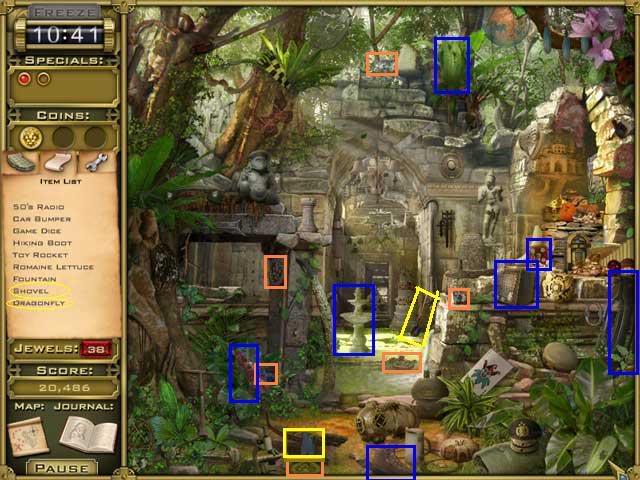
- Blue items are from the Find List.
- Yellow items are Key Objects. You will either get a tool to use later in the game or get a jewel board shard.
- Orange items are optional, like lion coins and jewels.
- Each level has several locations that you can do in any order, and the locations repeat from one level to another throughout the game. To make sure you’re at the same spot as the walkthrough, just count the number of crystals above the map on the right, then add 1. That will tell you what level you’re on. So if there are 3 crystals, you’re on level 4.
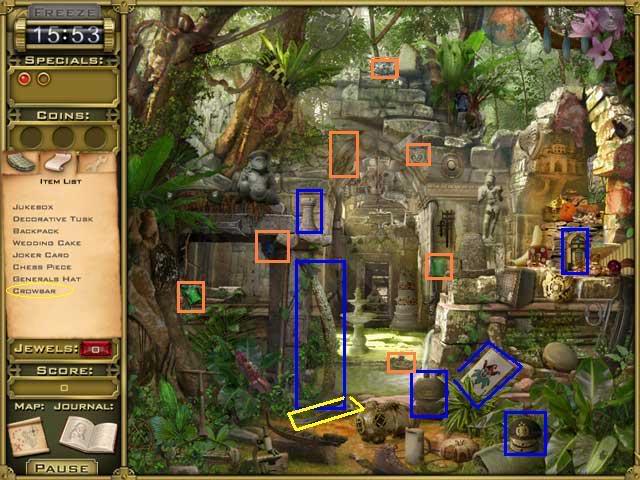
- Your Find List may differ from the ones shown. However, the key objects should always be in the same location.
Level 1
Taj Mahal Gardens
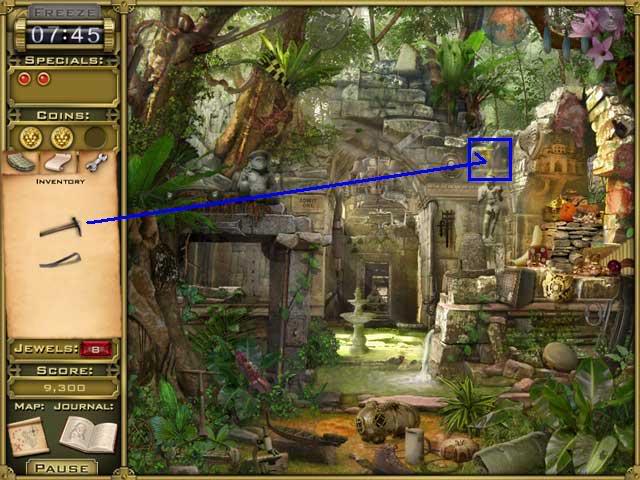
Monkey City Ruins

- Use the pickaxe on the crack in the stone in the upper right to reveal a jewel board shard. If you don’t have the pickaxe yet, you will get it in the Taj Mahal Gardens and then you can come back here.
Jewel board
Level 2
Shangri-La
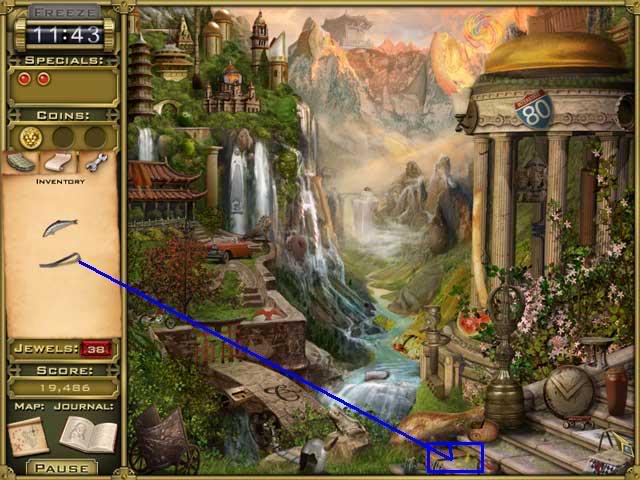
- The mist by the waterfall will thin at times and you can see more objects.
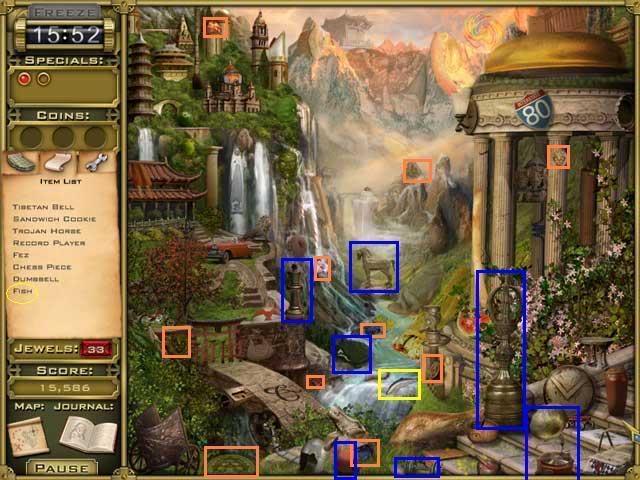
Use the crowbar on the crack on the lower stair to reveal a jewel board shard.
Monkey City Ruins
- You will return to many locations multiple times during the game. The main objects are all in the same places, but the Find List is different.
- The jewels and coins may be in the same spots or different ones.
Jewel Board
Level 3
Angkor Wat
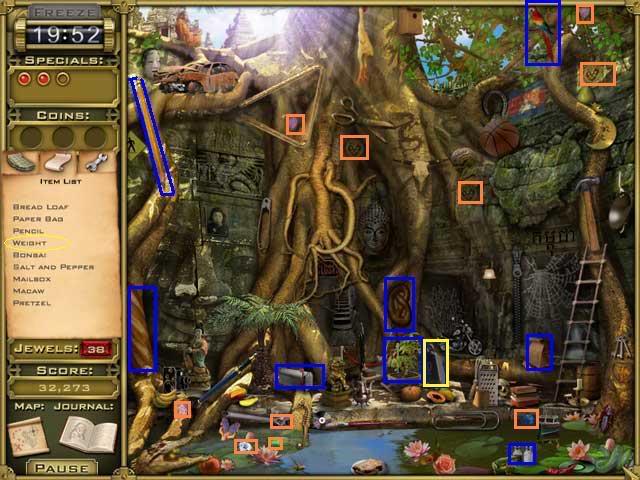
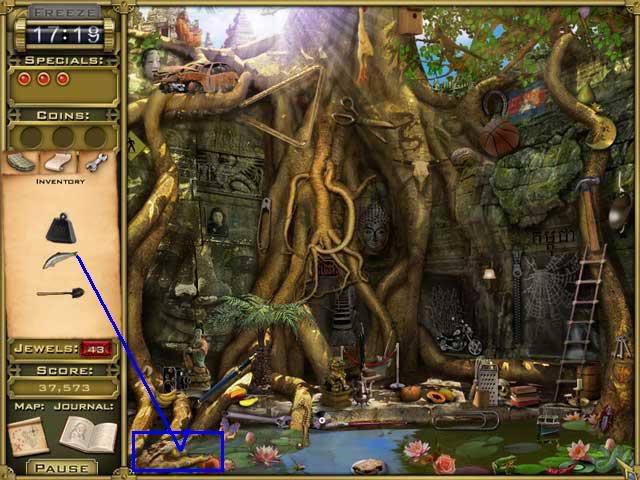
- Give the fish to the crocodile in the lower left corner to receive another jewel board shard.
Taj Mahal Gardens
Shangri-La
Jewel Board
Level 4
Angkor Wat
Angkor Wat Interior
- Begin by attaching the weight from inventory to the chain in the upper right. This will open the skylight.
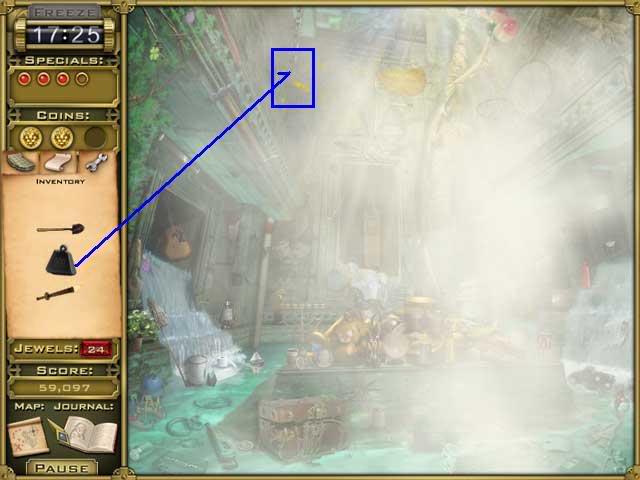
- Now move your cursor around the scene to clear the mist.
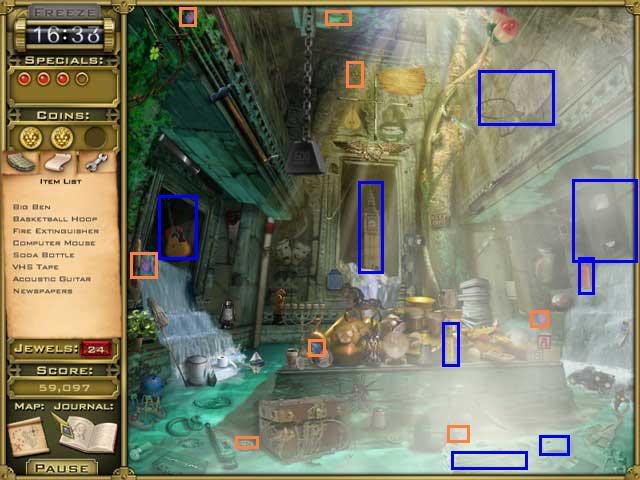
Monkey City Ruins
Jewel Board
Level 5
Phuket
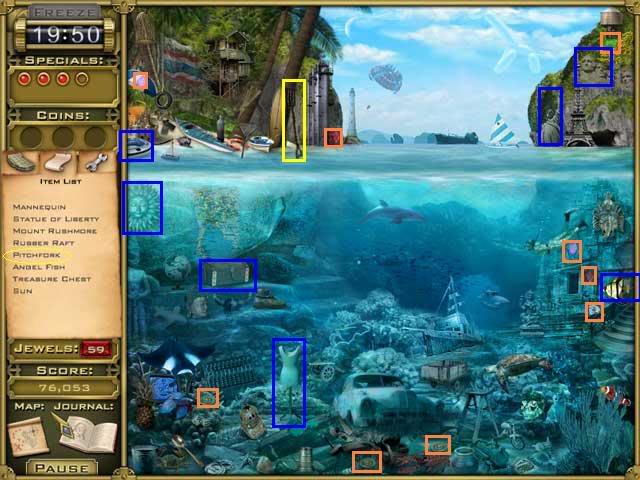
- Use the crowbar to open the car hood underwater in Phuket and receive another jewel board shard. You get the crowbar in Shangri-La, so if you don’t have it yet, you can come back here later.
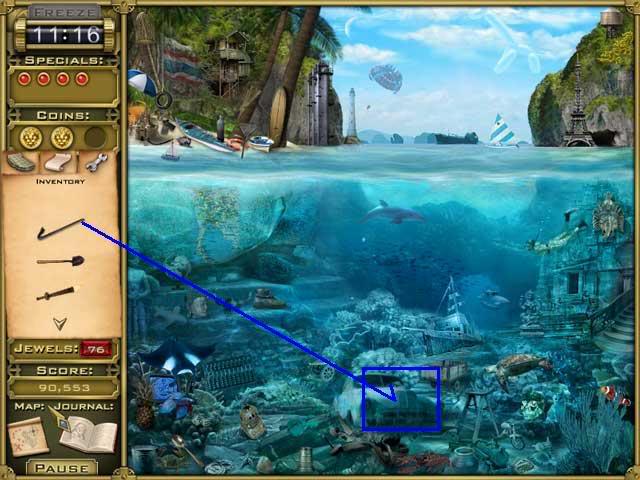
Taj Mahal Gardens
Shangri-La
Jewel Board
Level 6
Ayers Rock
- Use the shovel to dig where the yellow sparks are and you will receive another jewel board shard.
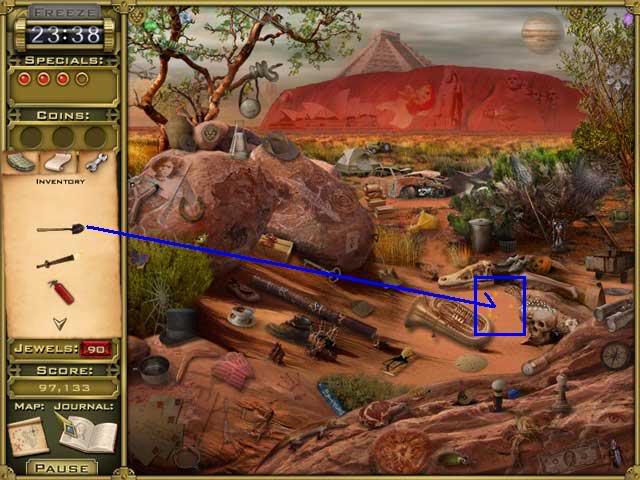
- Notice that form now on, whenever you visit Ayers Rock you’ll see the hole you dug. A nice touch.
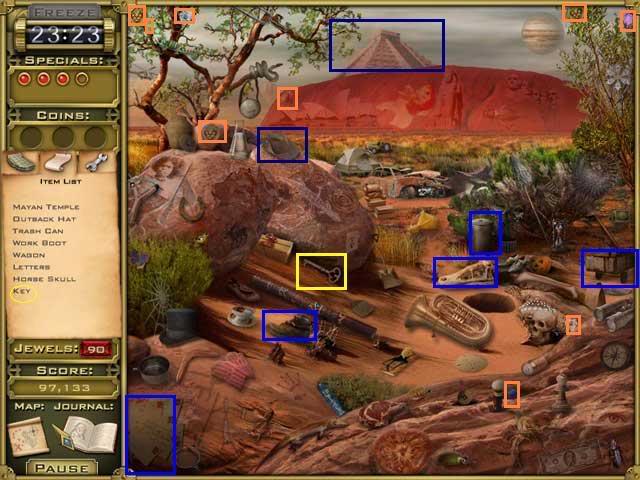
Phuket
Angkor Wat
Angkor Wat Interior
Jewel Board
Level 7
Ayers Rock Interior
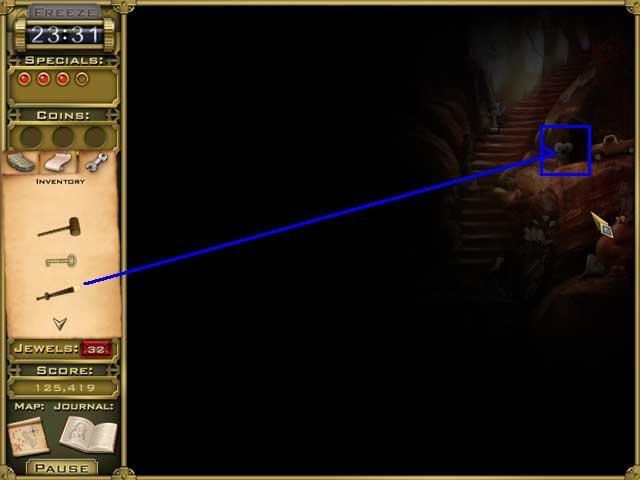
- Put the torch into the sparkle area on the right side of the scene. This will ight the cavern.
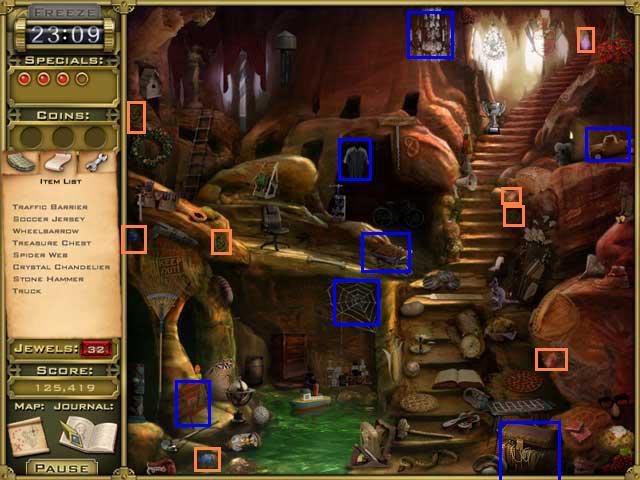
Monkey City Ruins
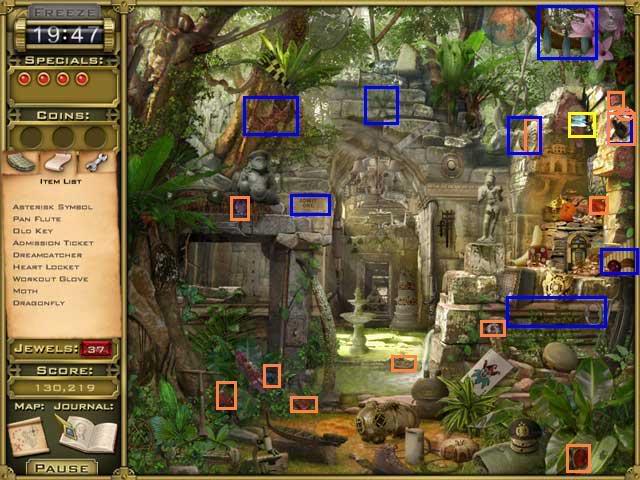
Taj Mahal Gardens
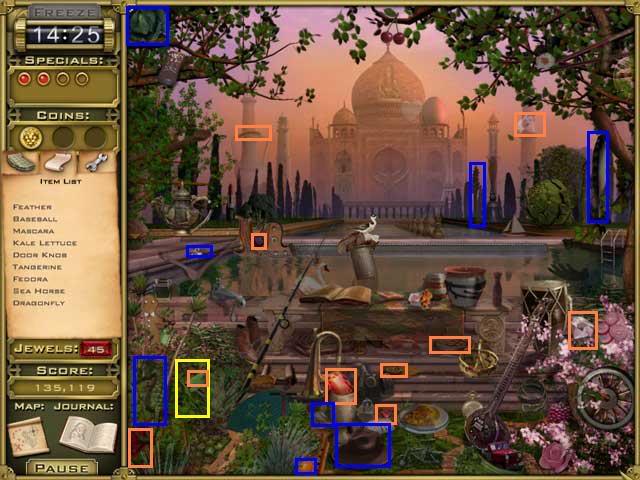
Shangri-La

Jewel Board
Level 8
Papua New Guinea
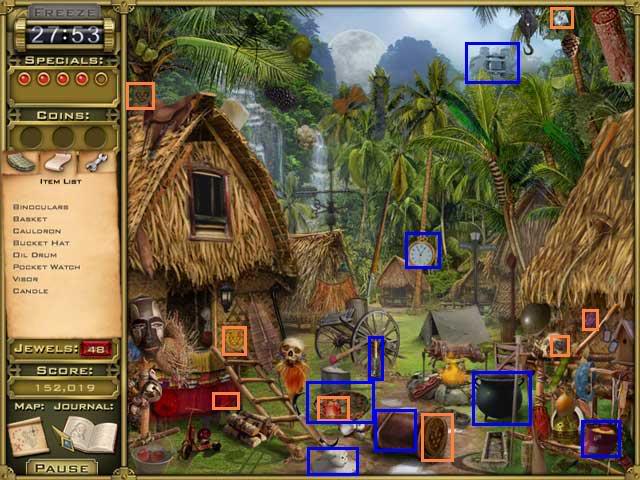
- Put out the fire with the fire extinguisher.
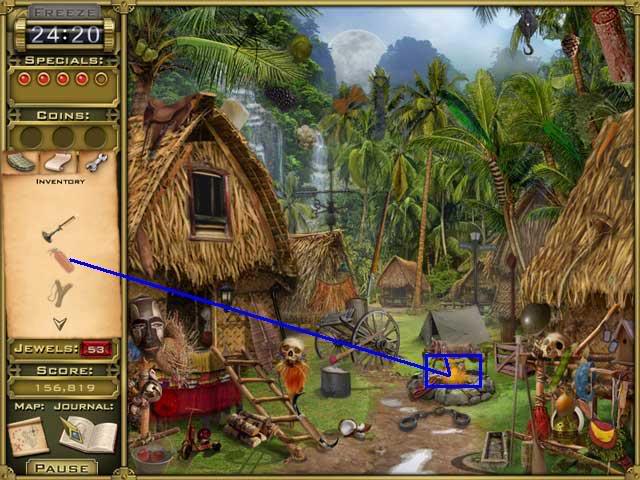
Angor Wat Interior
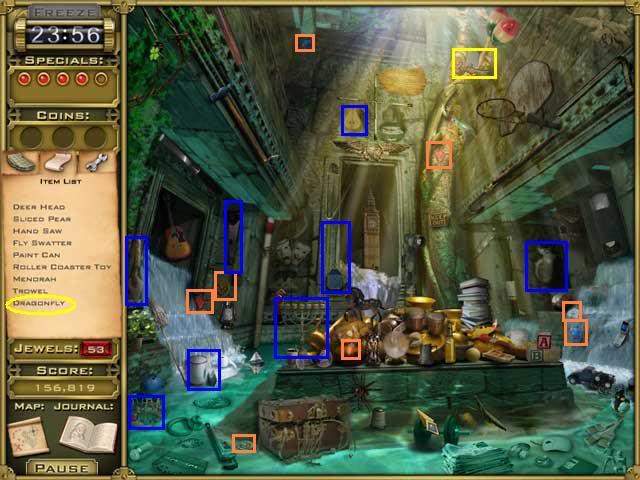
Phuket
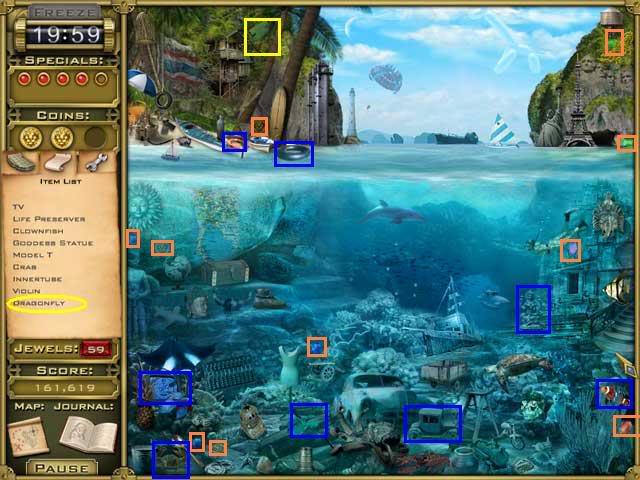
Ayers Rock
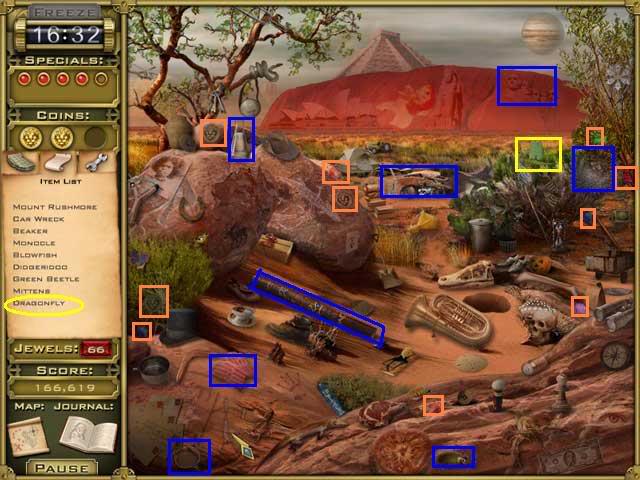
Ayers Rock Interior
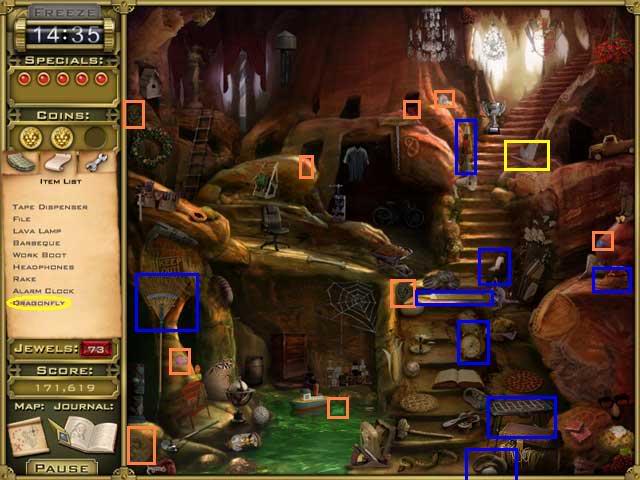
Jewel Board
Level 9
Boat mini-game
Hong Kong docks
- First use the candle from your inventory to light the lanterns.
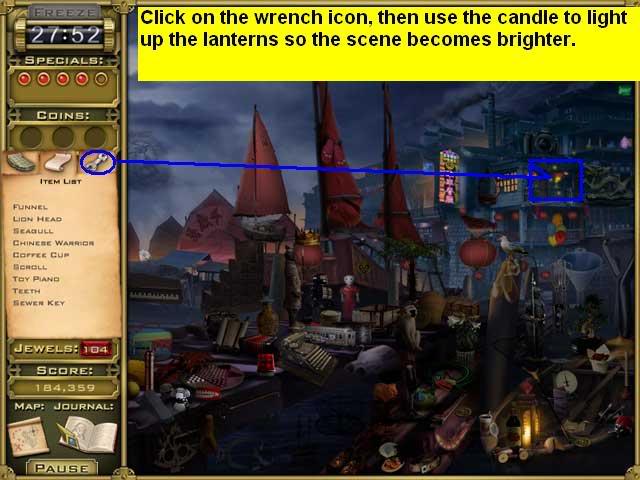
- That will brighten up the scene a little.
Monkey City Ruins
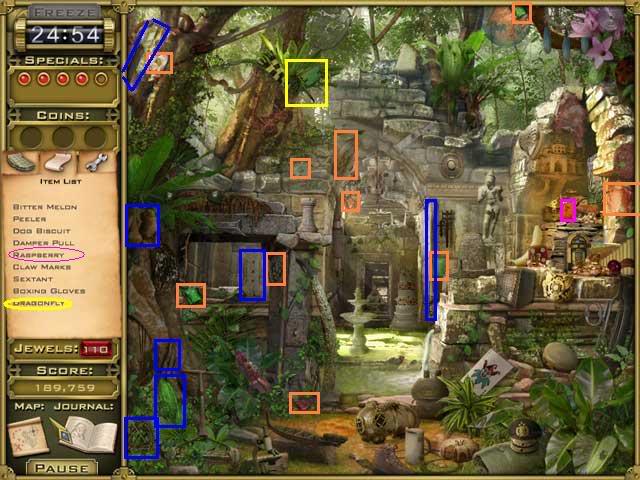
- The "raspberry" is orange. I’ve marked it on the screenshot in pink.
- The "damper pull" is a cast iron fireplace tool.
Shangri-La
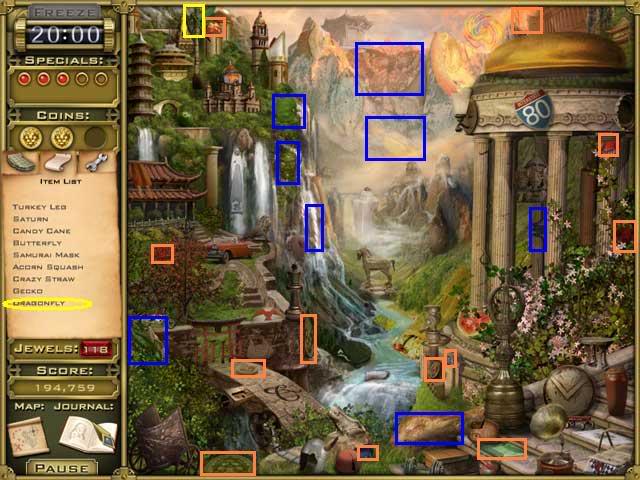
- Saturn is in the far back of the scene below the butterfly, but can be hard to see because of the mist.
Angkor Wat
Papua New Guinea
Jewel Board
Level 10
Airplane mini-game
Shanghai Back Alley

- The "blue angel" is an angel, not an airplane.
- Use the slingshot to break the item in the upper right to obtain a shard.
Taj Mahal Gardens
Phuket
Angkor Wat Interior
Ayers Rock
Jewel Board
Level 11
Train mini-game
Cavern of the Terra Cotta Warriors
- Move your cursor over the scene to clear the fog, then hit the gong with the mallet to find a jewelboard shard.
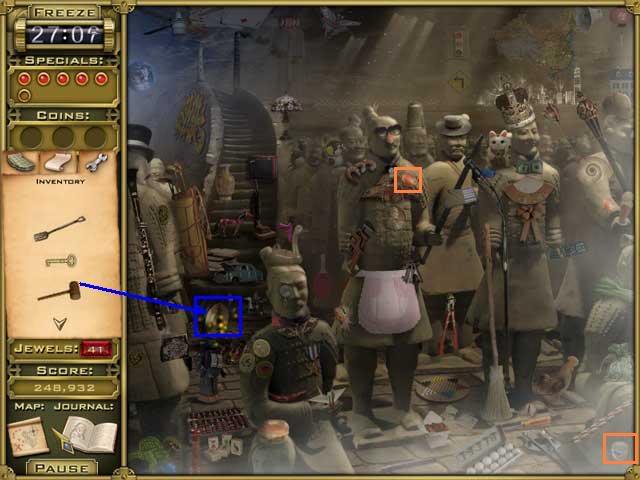
Ayers Rock Interior
Papua New Guinea
Hong Kong Docks
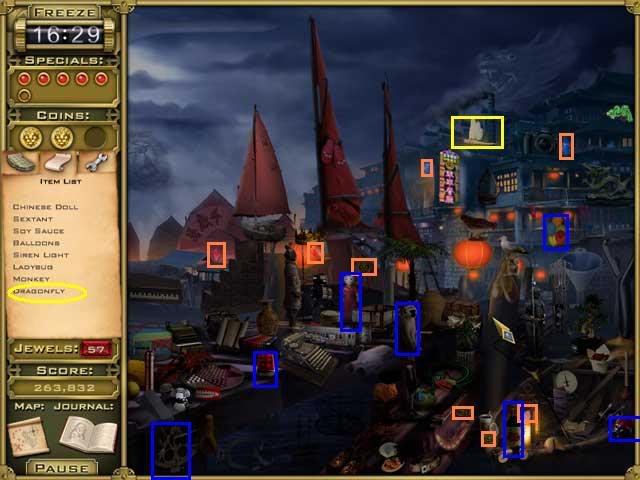
Shanghai Back Alley
Jewel board
Level 12
Great Wall of China
- Begin by using the pitchfork on the haystack to uncover a jewel shard.

Angkor Wat
Angkor Wat Interior
Ayers Rock
Ayers Rock Interior
Hong Kong Docks
Jewel board
Level 13
Train mini-game
Great Wall of China
Trans-Siberian Express
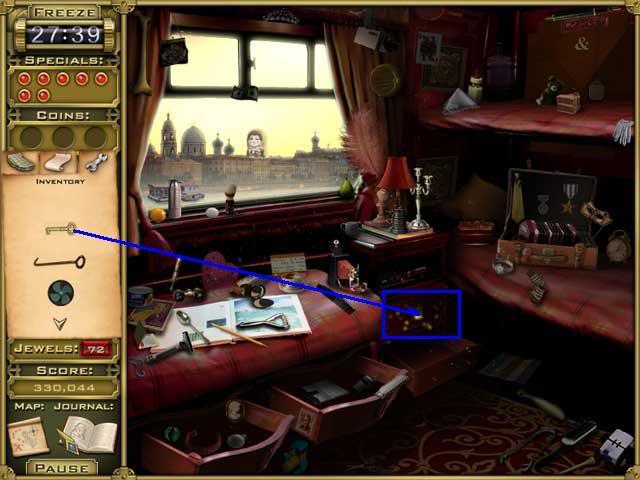
- Use the key from inventory to open the locked drawer and receive a jewel shard.
Phuket
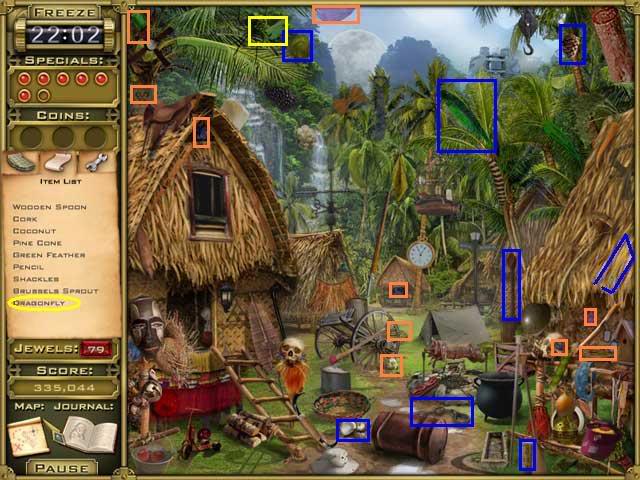
Papua New Guinea
- There are several coconuts in the scene. The only one that counts is the broken one just to the left of the oil drum at the lower front center of the scene.
Shanghai Back Alley
Cavern of the Terra Cotta Warriors
Jewel Board
Level 14
Train mini-game
Vladivostok
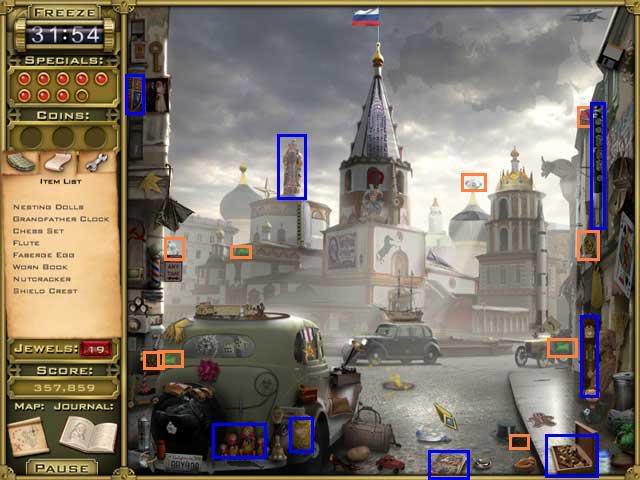
- Use the sewer key to open the manhole cover and get a jewelboard shard.
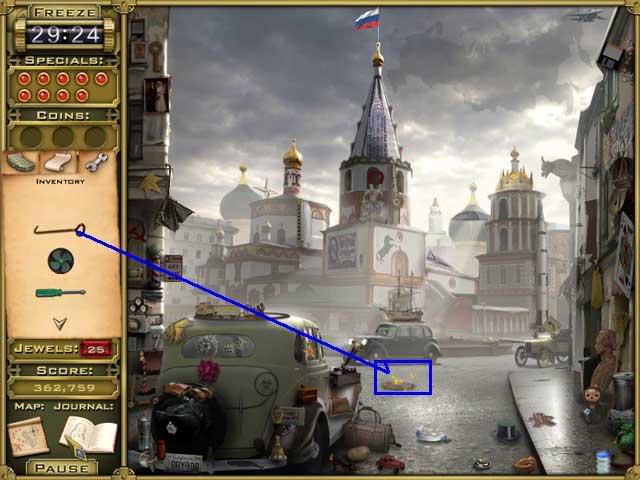
Ayers Rock
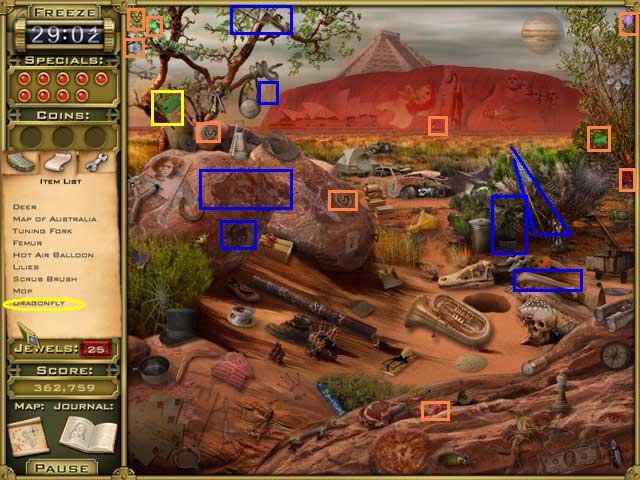
Interior of Ayers Rock
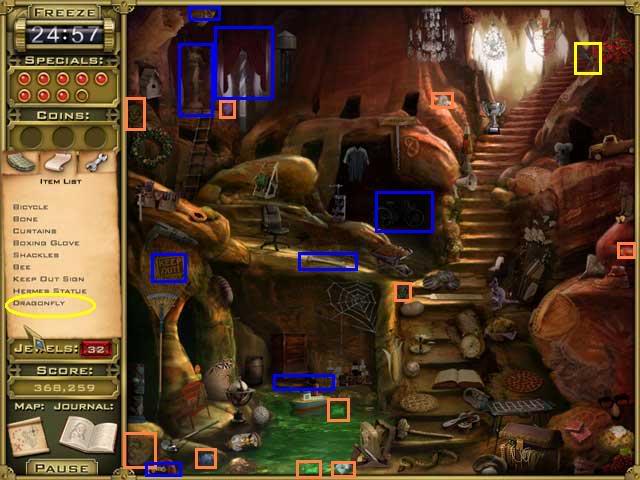
Trans-Siberian Express
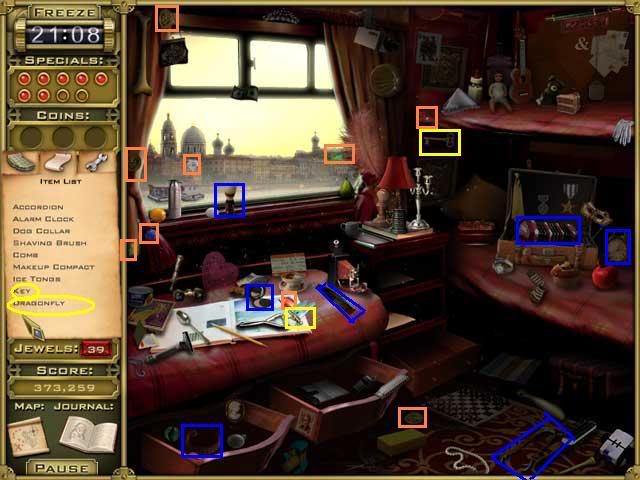
Papua New Guinea
- There is a "sun moon symbol" on the ground center right, but I found that it would only take when I clicked on the sun part.
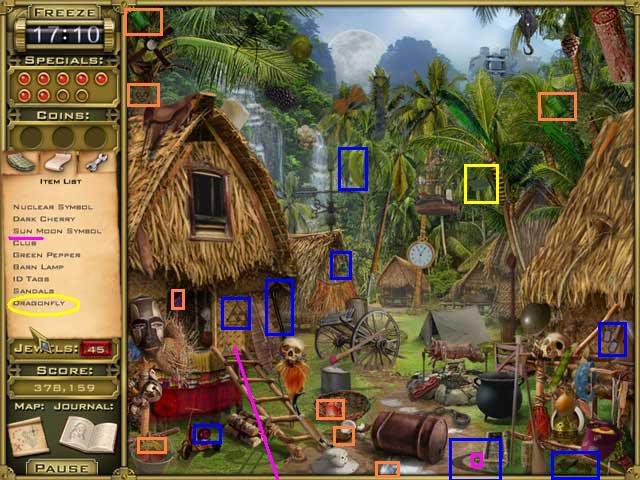
Hong Kong Docks
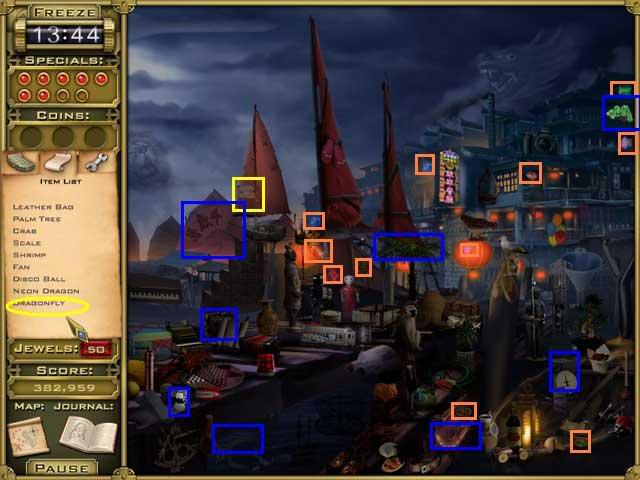
Jewel board
Level 15
Train mini-game
Himeji Castle
- The overall effect is great, but this was the first location that I felt didn’t fit a Hidden Object Game. There were over a dozen things that might have been jewels that weren’t, multiple kites, multiple tubs, etc.
- The only kite that counts is the one with a face that’s flying in the air, and it’s the least Japanese of any of them.
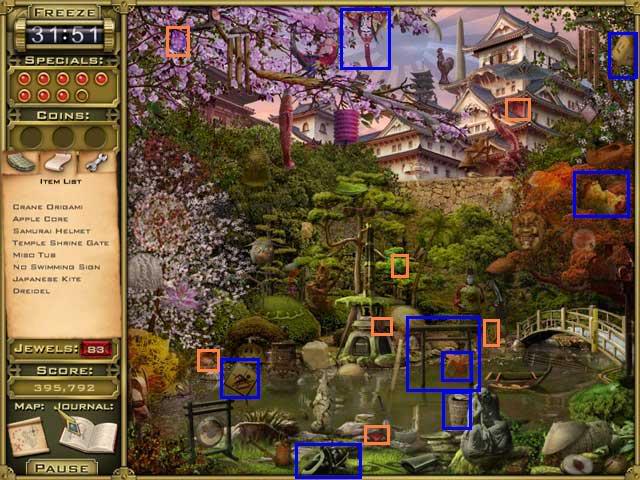
- Use the fan to blow the leaves off the bonsai tree in the lower right corner and receive a jewel board shard.
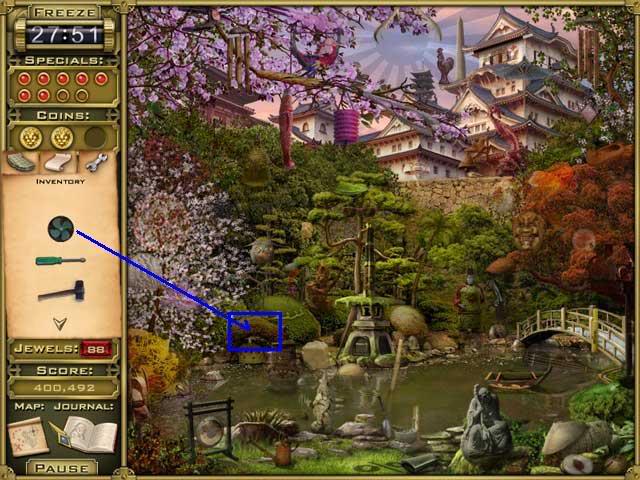
Cavern of the Terra Cotta Warrior
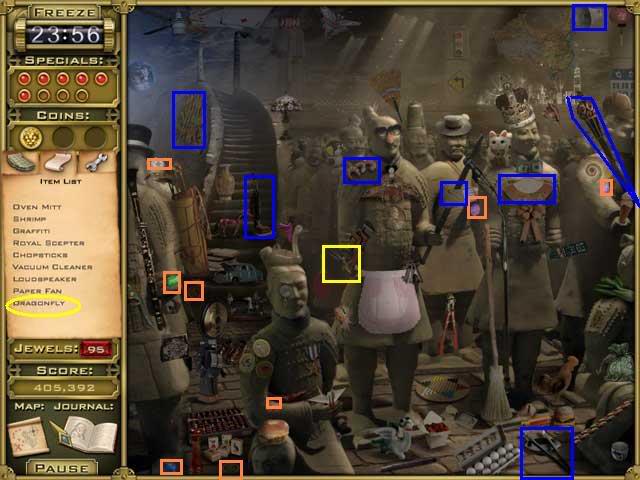
Great Wall of China
Trans-Siberian Railway
Vladivostok
Jewel Board
Level 16
Train mini-game
Underwater Pyramid City
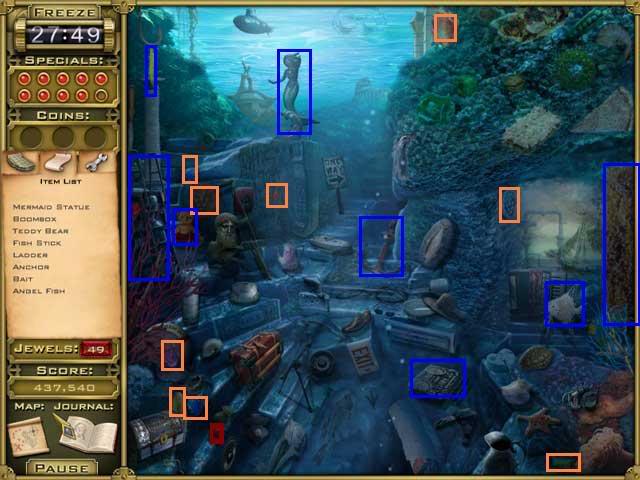
- Use the key on the chest to open it and receive another jewel board shard.
Hong Kong Docks
Shanghai Alley
Vladivostok
Himeji Castle
- The only pagoda that counts is the small black one near the center top.
- Many of the things that look like jewels aren’t. See the screenshot for all the real jewels.
Jewel board
Level 17
Underwater Pyramid City
Underwater Pyramid City Interior
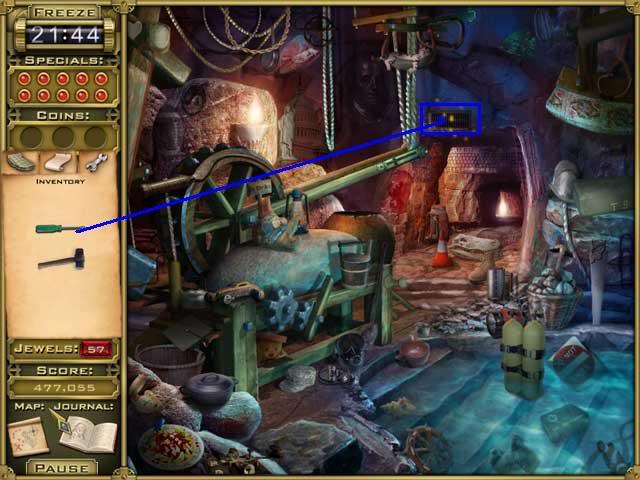
- Use the screwdriver on the vent to reveal another jewel board shard.
Cavern of the Terra Cotta Warriors
Great Wall of China
Trans Siberia Railroad
Jewel board
Level 18
Lost City of Lemuria
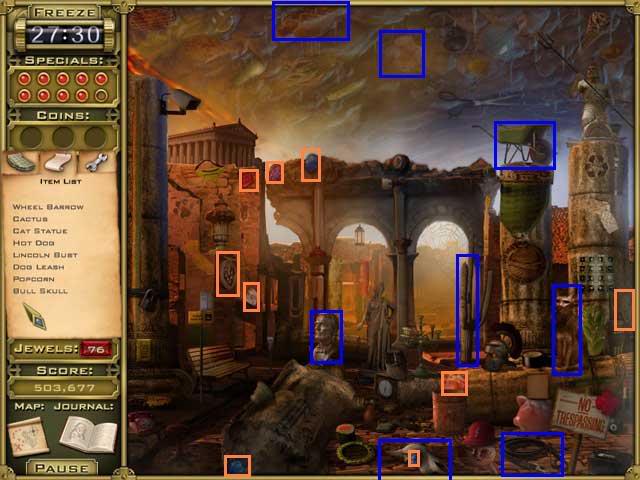
Trans Siberia Railroad

Vladivostok
Himeji Castle
Underwater Pyramid City Interior
Jewel board
Level 19
Cavern of the Terra Cotta Warriors
Great Wall of China
Himeji Castle
Underwater Pyramid City
Lost City of Lemuria
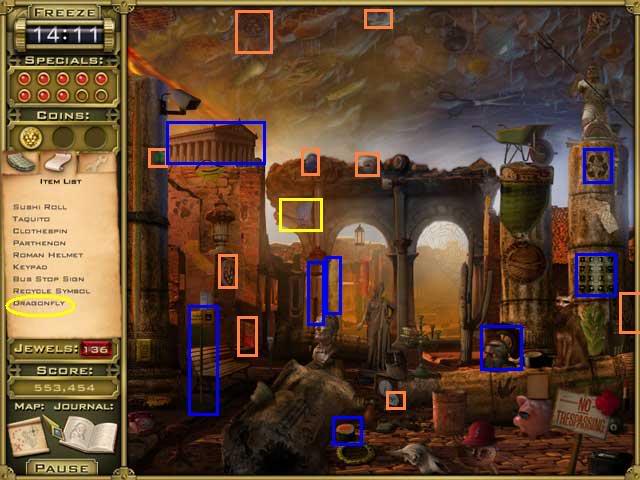
Level 20
Vladivostok
Underwater Pyramid City
- The only twig that counts is the one on the far right.
Underwater Pyramid City Interior
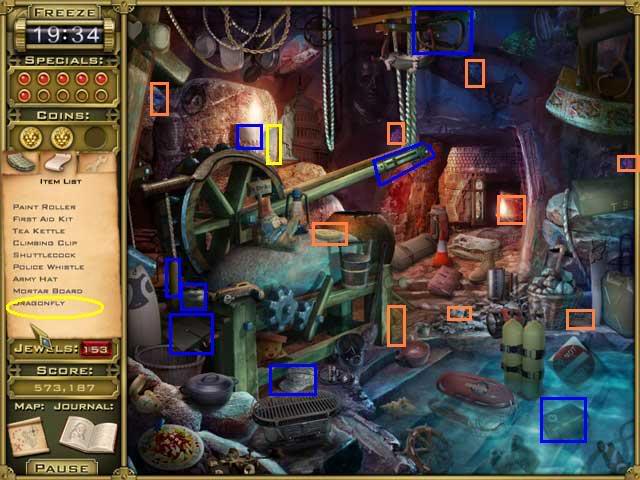
Lost City of Lemuria
- The pizza is on the ground underneath a stool on the lower right. Make sure you click on the pizza, not the stool, or it won’t count.
- The Knight’s helmet is like an upside bucket with an eyeslit in the center.
Jewel board
- Watch the ending movie. The voices are a little hard to understand, but basically Eva finds a map and Kin tells her it is the lost map of the ancients so they have a lot of new explorations ahead of them.
“;
More articles...
Monopoly GO! Free Rolls – Links For Free Dice
By Glen Fox
Wondering how to get Monopoly GO! free rolls? Well, you’ve come to the right place. In this guide, we provide you with a bunch of tips and tricks to get some free rolls for the hit new mobile game. We’ll …Best Roblox Horror Games to Play Right Now – Updated Weekly
By Adele Wilson
Our Best Roblox Horror Games guide features the scariest and most creative experiences to play right now on the platform!The BEST Roblox Games of The Week – Games You Need To Play!
By Sho Roberts
Our feature shares our pick for the Best Roblox Games of the week! With our feature, we guarantee you'll find something new to play!Type Soul Clan Rarity Guide – All Legendary And Common Clans Listed!
By Nathan Ball
Wondering what your odds of rolling a particular Clan are? Wonder no more, with my handy Type Soul Clan Rarity guide.


