![Digimon UP Tier List [Supports, Buddies, and Partners]](/wp-content/uploads/2026/07/digimon-up-tier-list.jpg "Digimon UP Tier List [Supports, Buddies, and Partners]")
Digimon UP Tier List [Supports, Buddies, and Partners]
These Digimon will get you UP the leaderboard.


![Haze Seas Boss Drops [Chances, Locations, and How to Spawn]](/wp-content/uploads/2026/07/haze-seas-boss-drops.jpg "Haze Seas Boss Drops [Chances, Locations, and How to Spawn]")

Welcome to the walkthrough for Jade Rousseau – The Secret Revelations: Fall of Sant’ Antonio on Gamezebo. Jade Rousseau – The Secret Revelations: Fall of Sant’ Antonio is a hidden object game for the PC created by Phenomedia and DECK13 Interactive. This walkthrough includes tips and tricks, helpful hints, and a strategy guide to complete Jade Rousseau – The Secret Revelations: Fall of Sant’ Antonio.
Welcome to the walkthrough for Jade Rousseau – The Secret Revelations: Fall of Sant’ Antonio on Gamezebo. Jade Rousseau – The Secret Revelations: Fall of Sant’ Antonio is a hidden object game for the PC created by Phenomedia and DECK13 Interactive. This walkthrough includes tips and tricks, helpful hints, and a strategy guide to complete Jade Rousseau – The Secret Revelations: Fall of Sant’ Antonio.
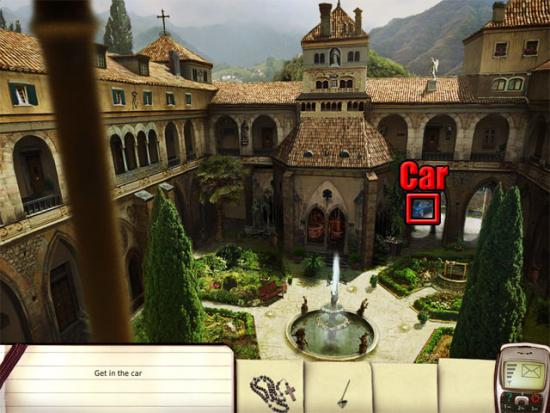
Car
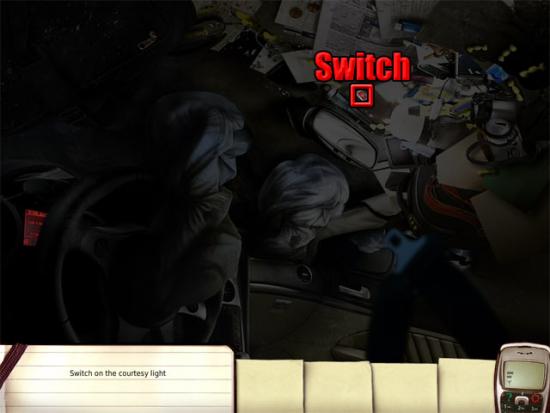
The game starts in the car. Select the switch:

Find all of the objects on the list:

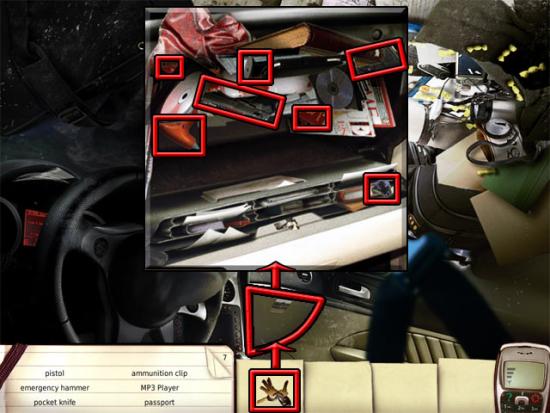
Use the key on the glove compartment. Find all of the objects on the list:
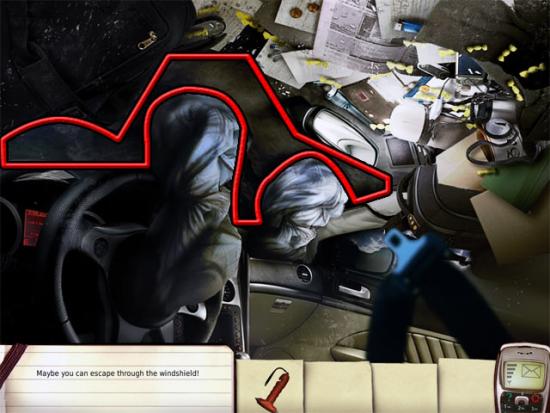
Use the emergency hammer on the car wind shield to exit the car:
Talk to David about any topics. After the conversation, Jade will travel to the village.
Village
Knock on the door to house number 20:
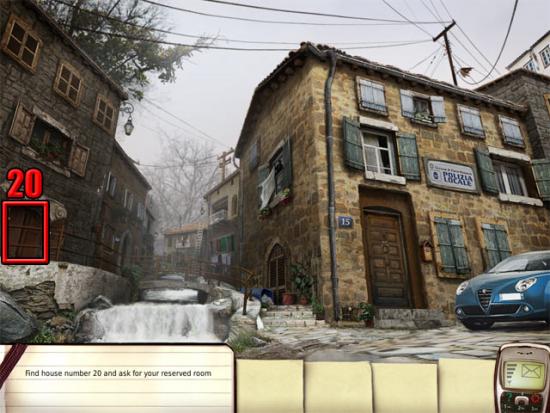
Talk to the woman inside and she will tell Jade that the room isn’t ready yet. Select the police station door to go inside.
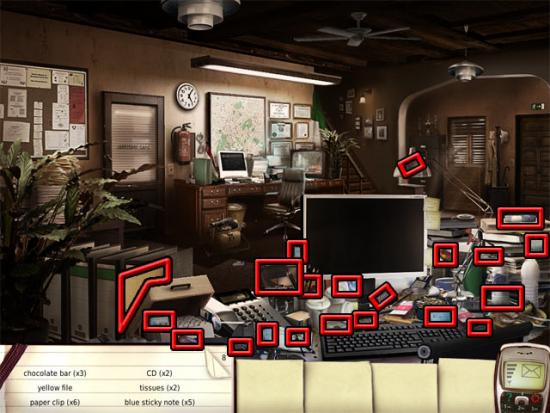
Police Station – First Visit
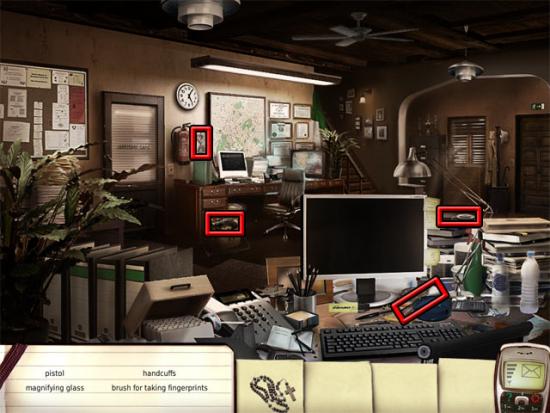
Select the door to the boss’s office to talk to him. After the conversation, find all of the objects on the list:
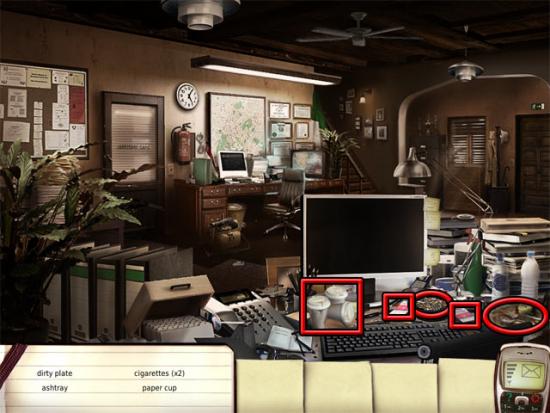
Find all of the objects on the next list:
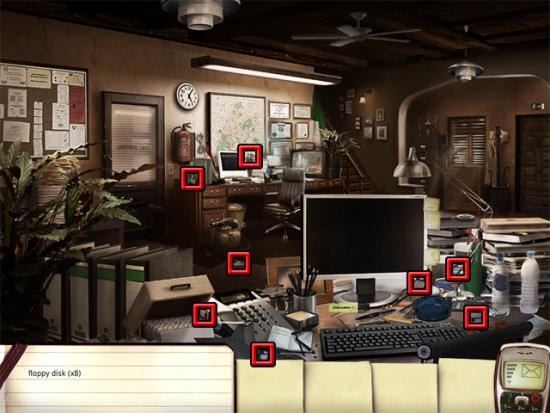
Find the eight floppy disks:
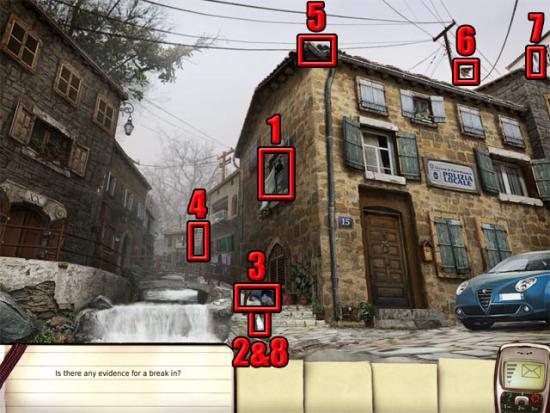
Select the door at the right side of the room to exit the police station. Talk to David and then examine the hotspots shown below in the following order:
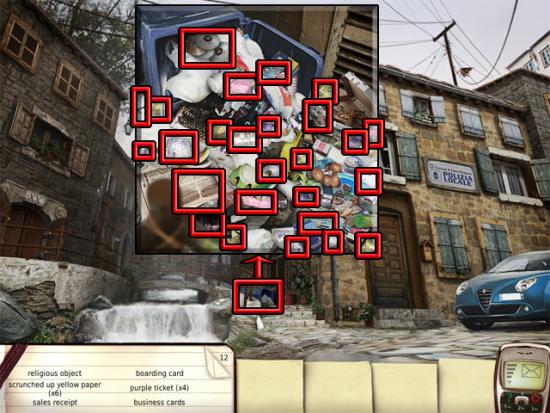
Enter the police station and select the office door to talk to the boss again. Exit the police station. Examine the garbage can and find all of the objects in the close-up view:
Enter the police station and examine the bulletin board at the left side of the room to view the notes that have been made so far. Select the check mark button above the phone to exit the view of the board. Find all of the objects on the list:
Exit the police station and select the blue car to talk to David. After the conversation, Jade will travel to the abbey.
Abbey – First Visit
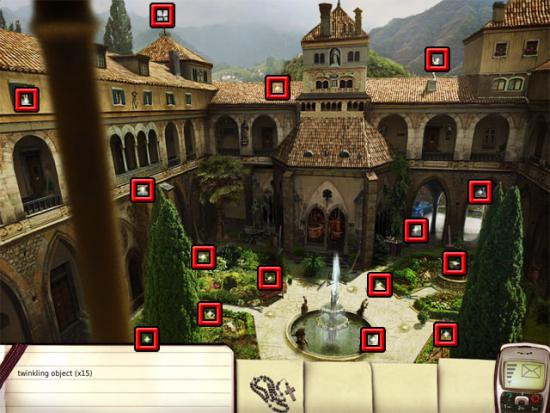
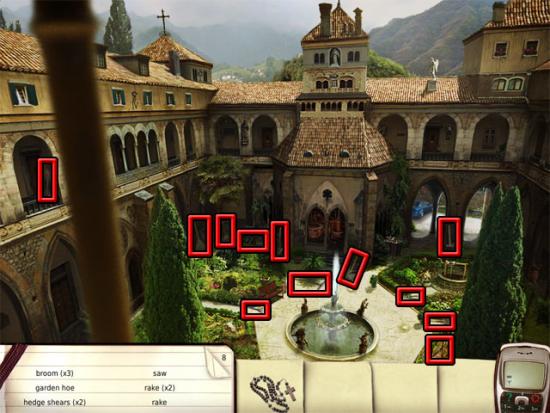
Talk to Gregorious about any topics after you arrive at the abbey. Find the fifteen twinkling objects:
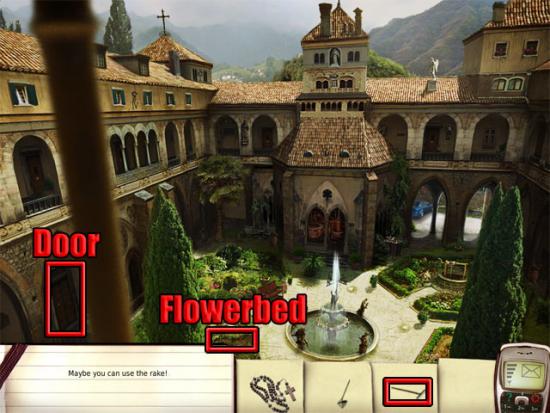
Jade notices that one of the flowerbeds has been disturbed. Find all of the objects on the list:
Use the rake on the flowerbed to find the key. Use the key on the library door:
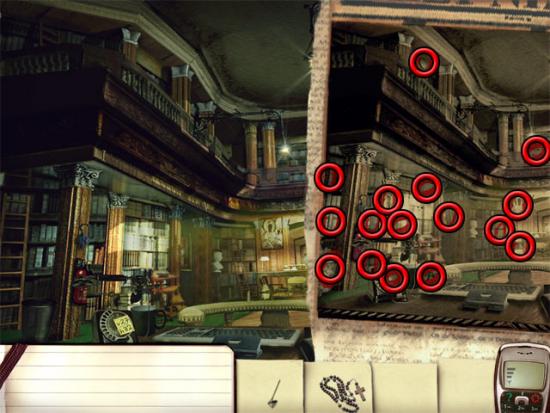
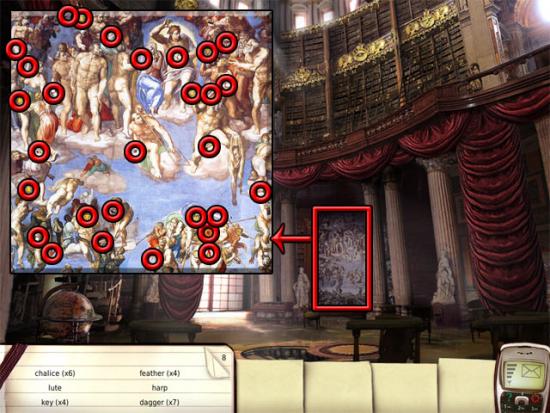
Use the key on the door at the left side of the area to enter the library. Find the sixteen differences between the library and the photograph:
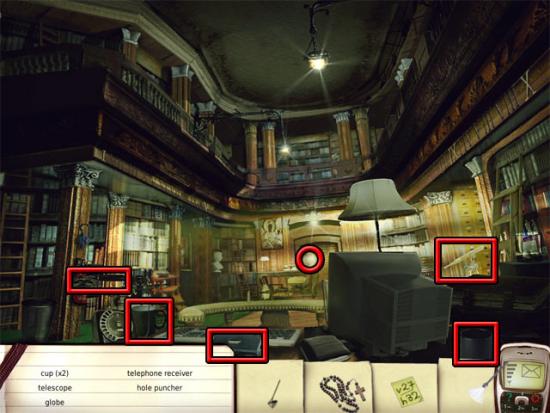
Use the fingerprint brush from the inventory on the objects shown below:
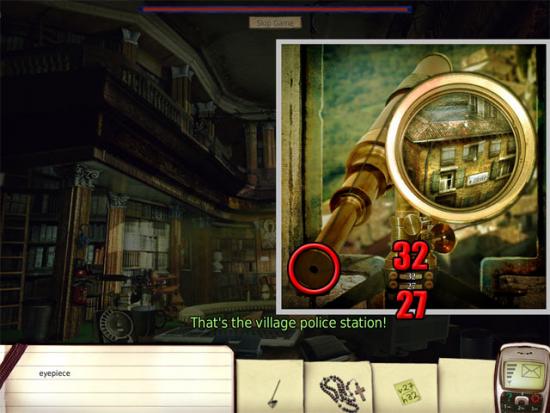
Examine the telescope at the right side of the room. Change the top number to 32 and the bottom number to 27, then examine the eyepiece to see the police station:
Select the eyepiece again to exit the view of the telescope. Examine the computer monitor and enter the password:
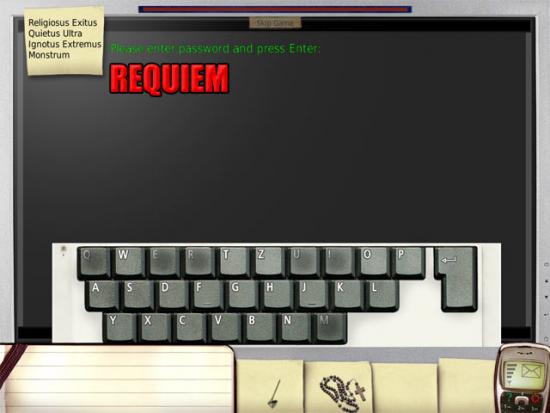
Press the enter key to see a file named the Secret Revelations. Press the check button to exit the view of the computer. After the conversation with Toni, select the door at the back of the room to exit the library and then select the car to return to the police station:
Police Station – Second Visit
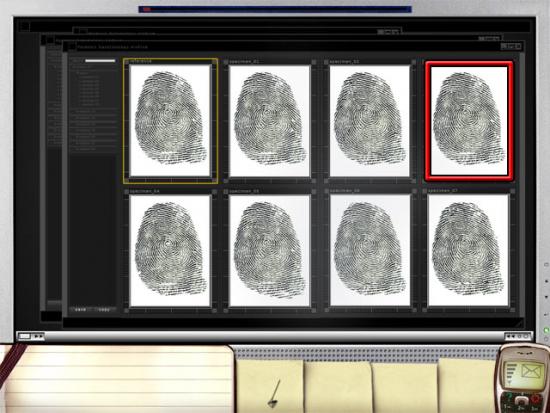
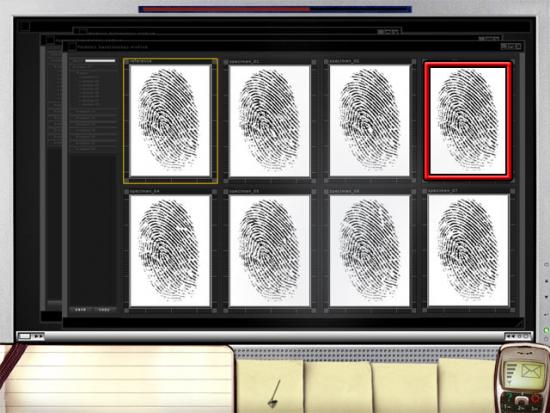
Select the bulletin board to add the latest evidence. Select the check mark button above the phone to exit the view of the board. Use the computer and select the matching fingerprints:
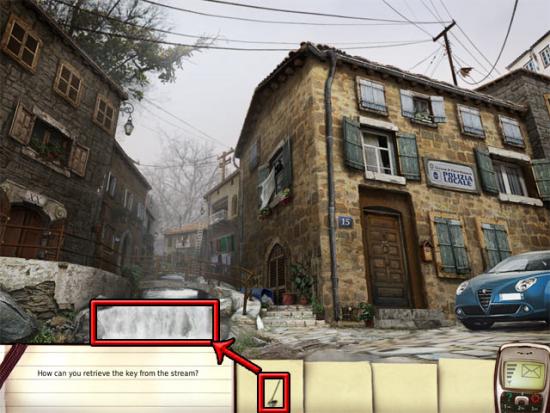
Select the stairs to travel to the interrogation room. Talk to Toni until he mentions the key. Select the right door to exit the police station. Use the net from the inventory on the stream to find the key:
Return to the police station and select the bulletin board to add the new piece of evidence. Exit the view of the board to talk to the boss.
Mine Shaft
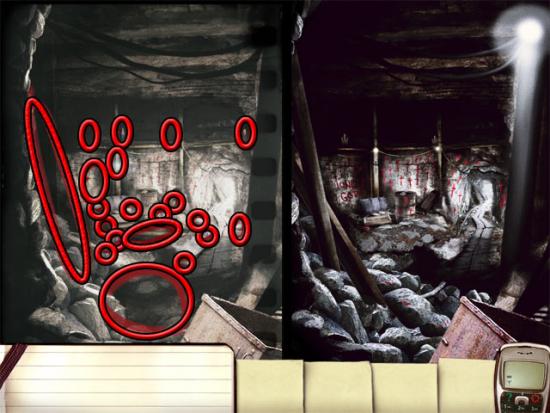
After the conversations with David and the boss, find the twenty differences on the photograph:
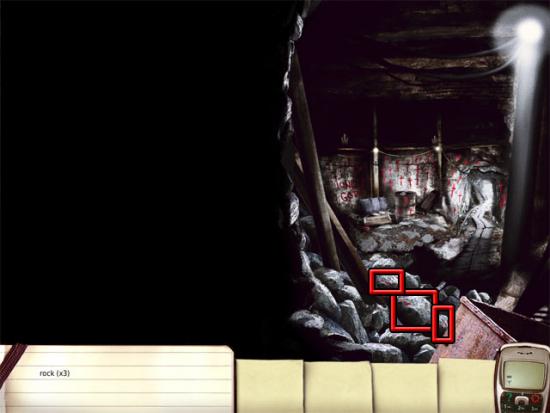
Select the three marked rocks:
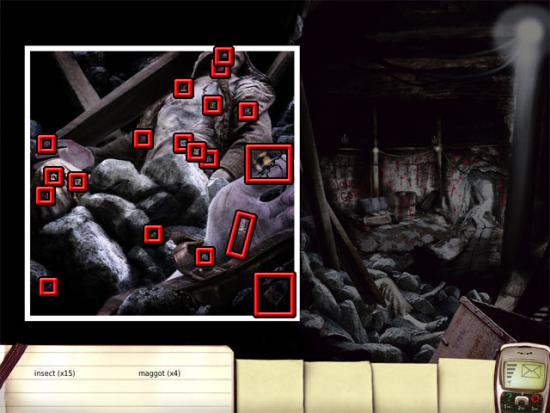
David mentions says that all of the bugs have to be found. Find the bugs:
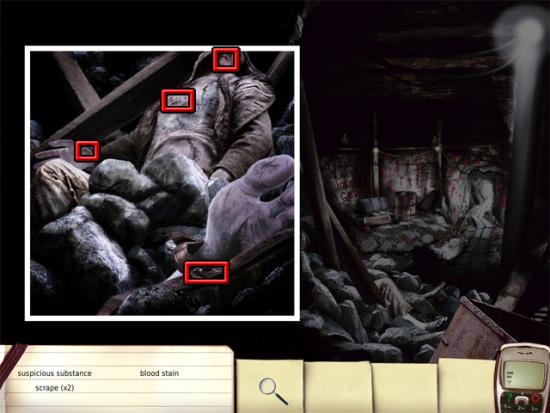
Use the magnifying glass from the inventory to find all of the objects on the list:
Select the tunnel to exit the mine.
Police Station – Third Visit
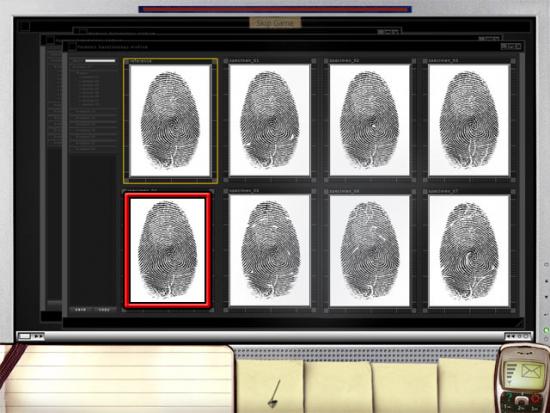
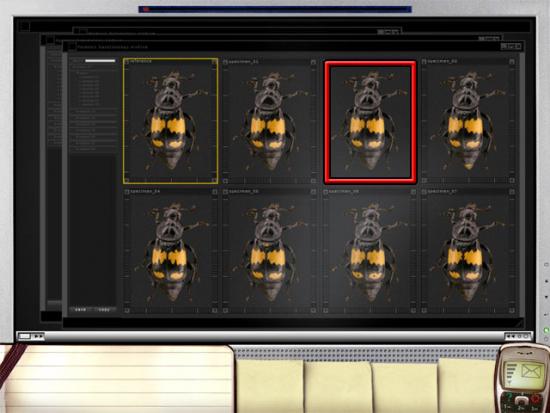
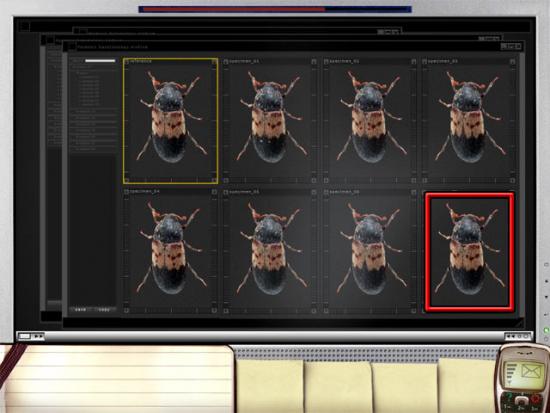
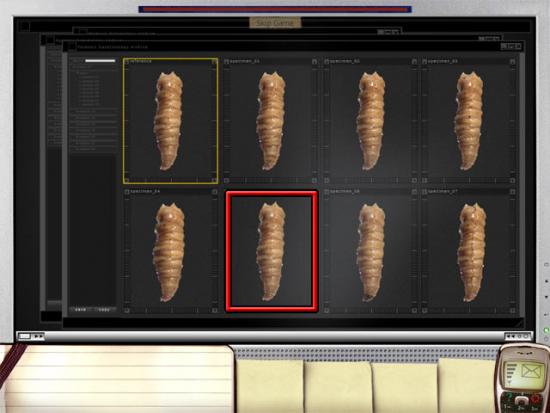
Use the computer and select the matching specimens:
Select the bulletin board to add the new pieces of evidence. Exit the view of the bulletin board. Open the right door to exit the police station.
Abbey – Second Visit
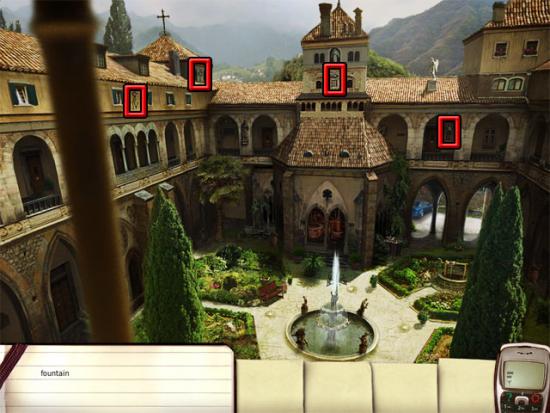
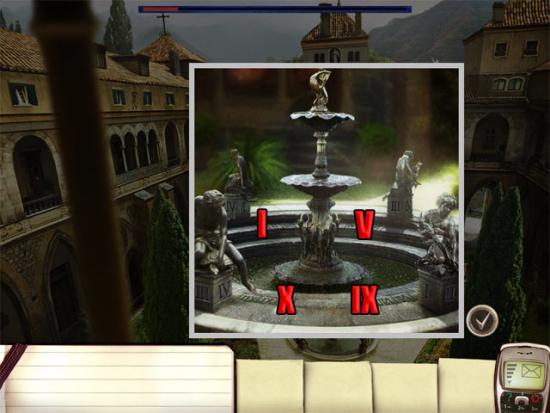
There are four Roman numerals on the walls that will help with the upcoming mini-game:
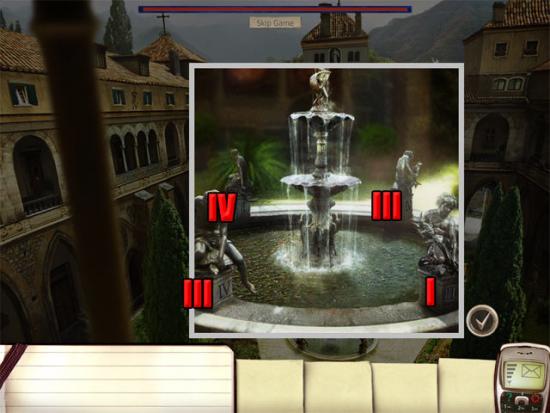
Select the fountain to play a mini-game where the aim is to turn the plinths to the ones shown on the wall:
The correct sequence of Roman numerals next needs to be pressed to drain the fountain. Enter the library to see that the numerals I, V, IX and X are highlighted. Exit the library and select the fountain. Press the Roman numerals shown below:
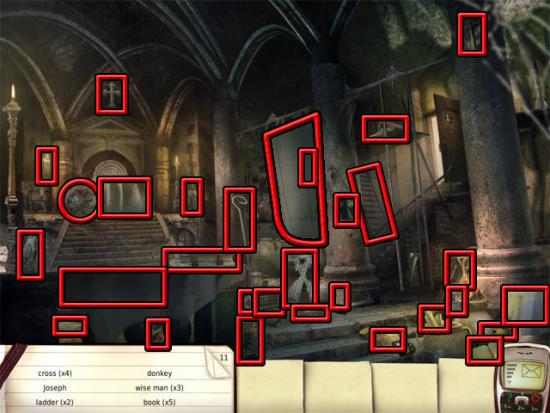
After completing the mini-game, select the fountain to enter the crypt. Find all of the objects on the list:
Examine the altar:
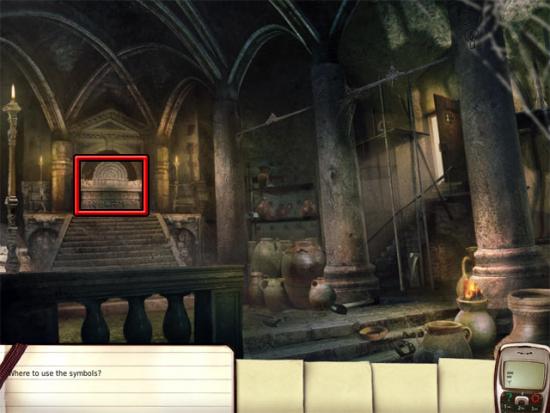
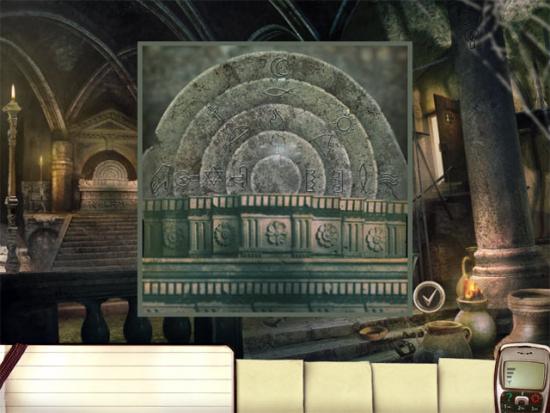
Examine the stone discs in the close-up view. Rotate the discs to the correct positions:
Find all of the objects on the list:
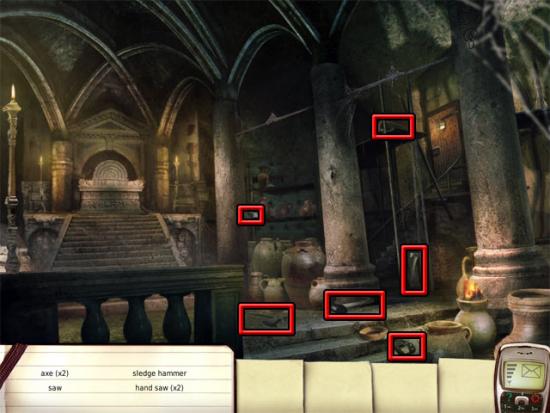
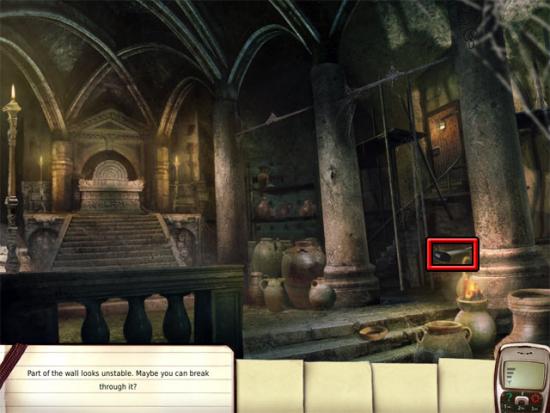
Use the hammer on the unstable part of the wall:
Find all of the objects on the list:
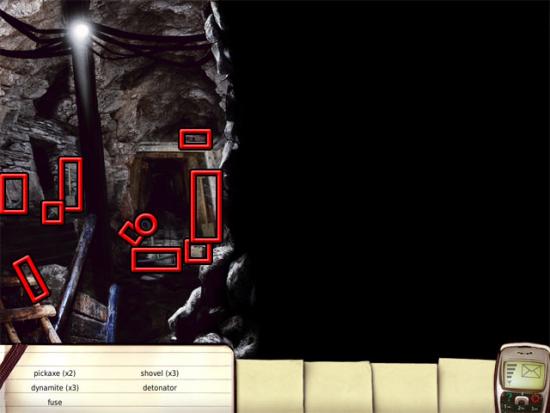
Use the dynamite on the right wall to enter the old mine. Select the tunnel to exit the mine and return to the police station.
Police Station – Fourth Visit
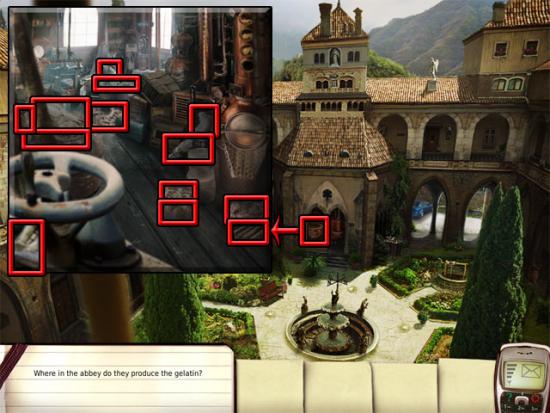
Exit the police station to return to the abbey. Select the cauldron and find the thirteen bones in the close-up view:
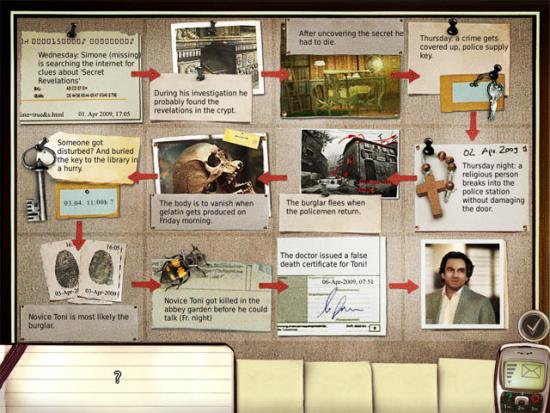
Select the car to return to the police station. Select the bulletin board to add the final pieces of evidence. Put the pieces of evidence in chronological order:
Airport
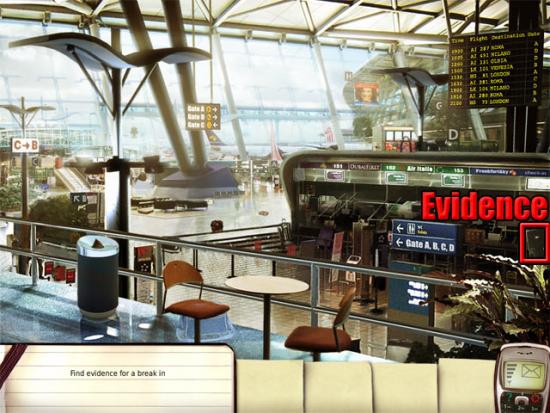
Find the evidence for the break-in:
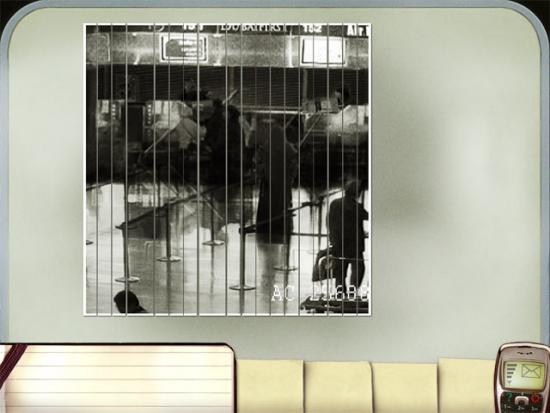
Put the strips of the picture in the correct order:
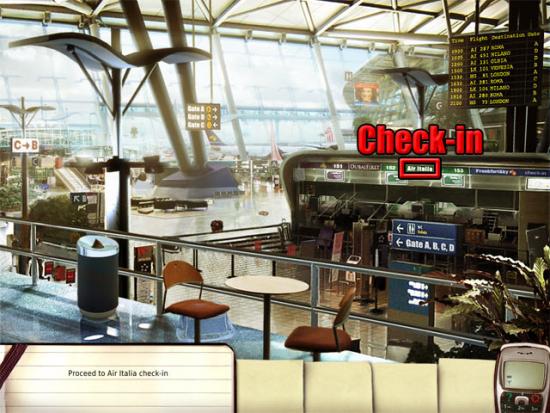
Select the check-in that the abbot visited:
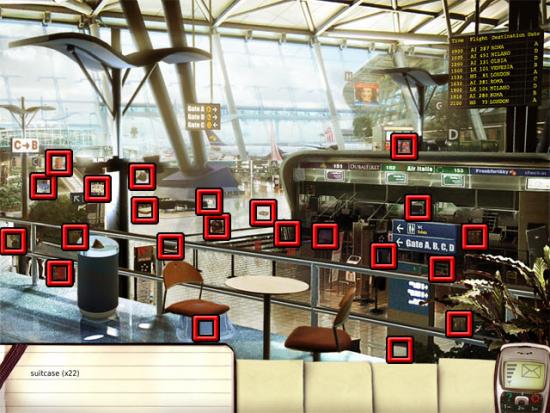
Find the twenty-two suitcases:
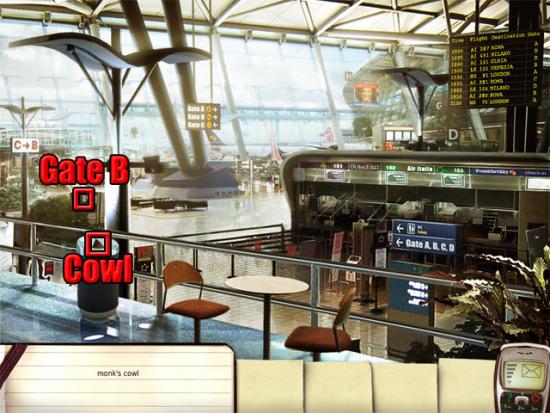
Select the Air Italia check-in again. Select the monk’s cowl and then select the sign for gate B:
Finish the conversation with David to fly to Rome.
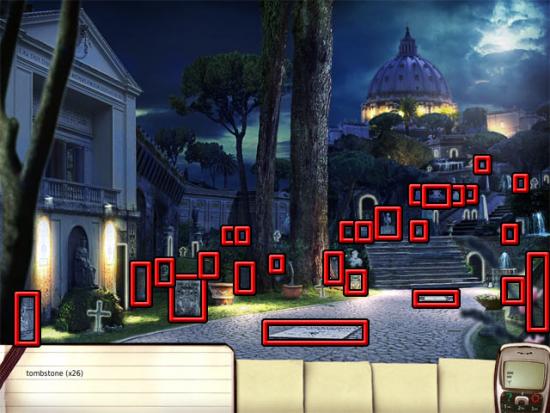
Cemetery
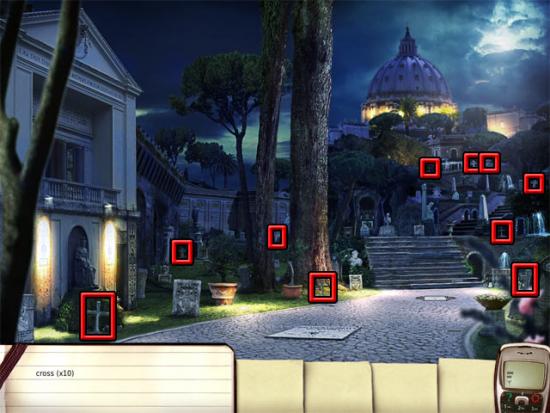
Find the ten crosses:
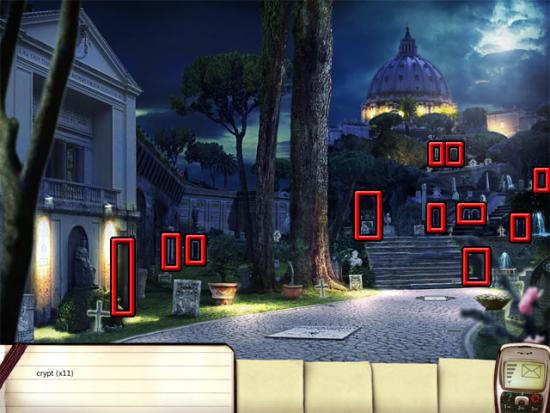
eleven crypts:
Find the twenty-six tombstones:
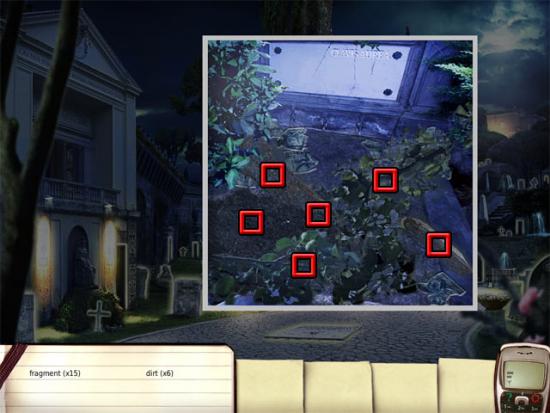
Click the following areas to remove the dirt:
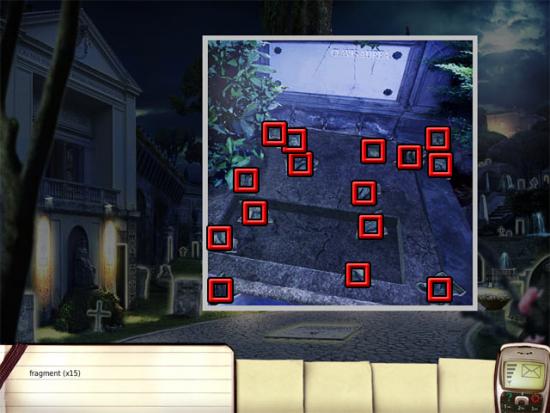
Find the fifteen fragments:
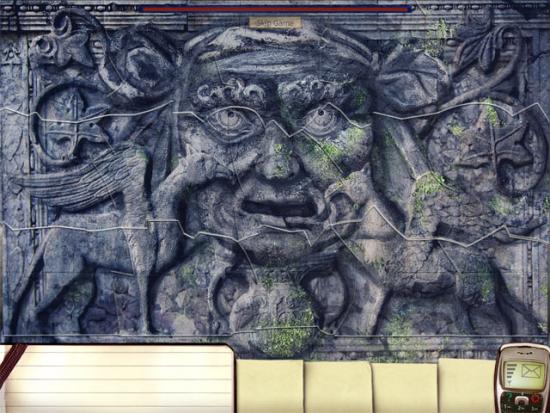
Rotate the puzzle pieces with the right mouse button and place them with the left mouse button. Pieces will lock into place when they have been placed correctly. The completed puzzle is shown below:
Tunnel
Find the ten stair fragments:
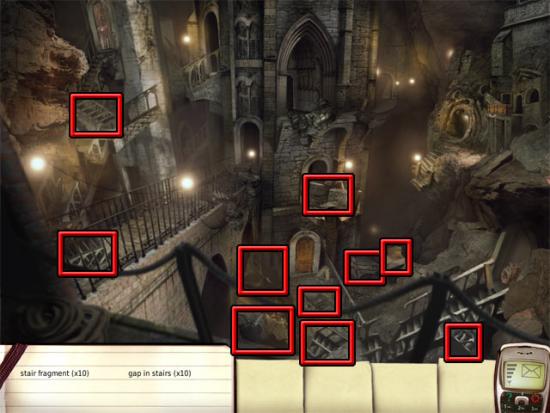
Use the stair fragments on the gaps in the stairs:

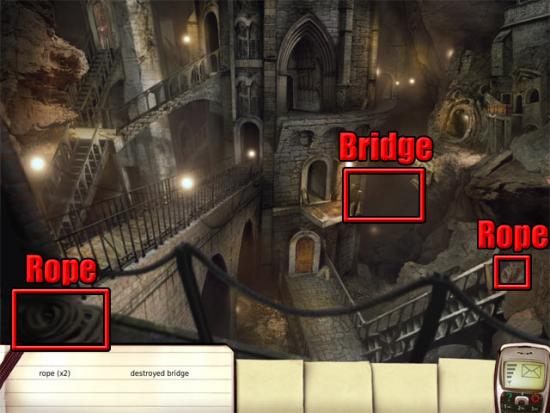
Find the ropes and use them on the bridge:
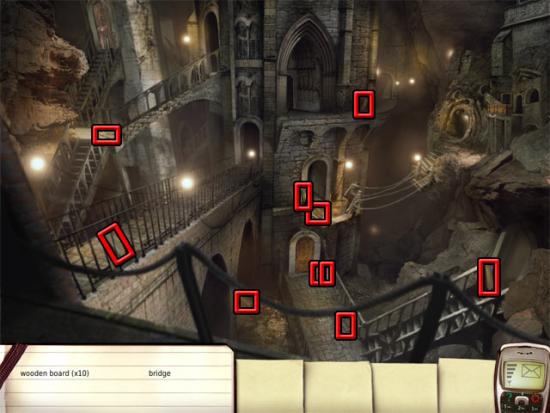
Find the ten boards and use them on the bridge:
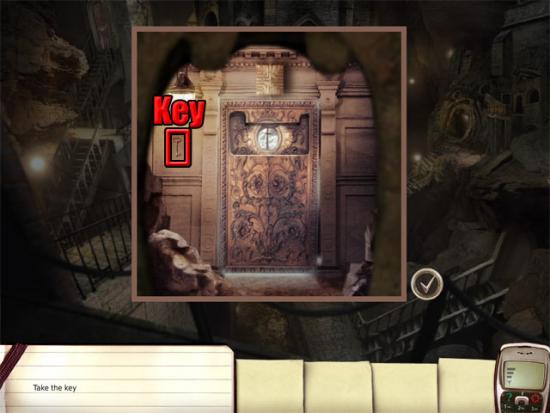
Select the doorway on the other side of the bridge. Take the key:
Select the check mark button to exit the view of the door. Make a note of the following doors in the area:
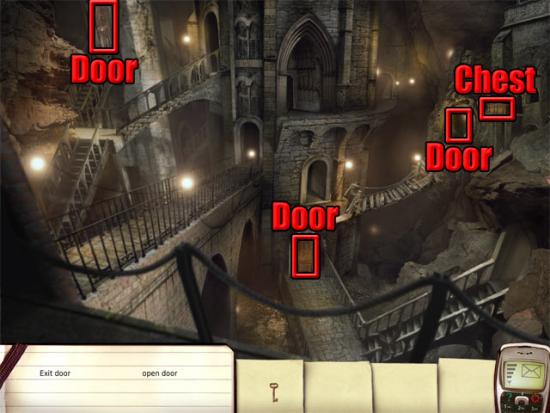
Use the key on the middle door and take the scroll from the doorway. Examine the right door and use the scroll on the cross on the door to reveal another key. Take the key from the right panel. Exit the view of the door and use the key on the chest. Take the eye from the chest, examine the right door and use the eye on the scroll on the door. Take the key from the top panel. Exit the view of the door and use the key on the left door at the top of the stairs. Take the cross from the doorway. Examine the right door and use the cross on the eye on the door to exit the tunnel.
Library
Examine the mural and find all of the objects on the list:
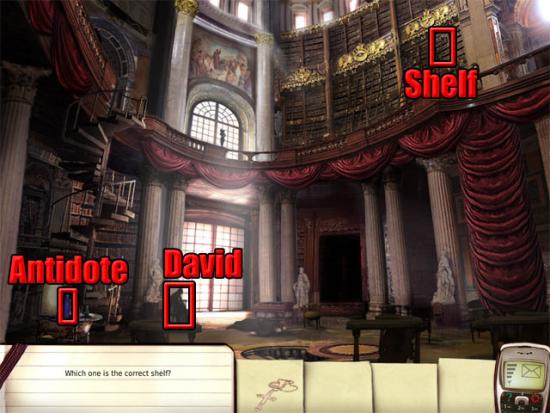
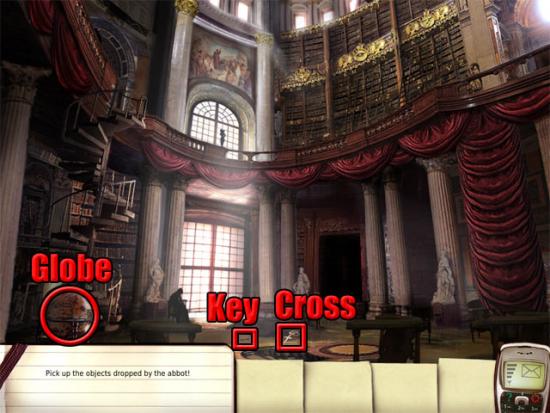
After the cutscene, take the cross and the key. Use the key on the globe:
Examine the shelf. Take the antidote and use it on David to complete the game: