- Wondering how to get Monopoly GO! free rolls? Well, you’ve come to the right place. In this guide, we provide you with a bunch of tips and tricks to get some free rolls for the hit new mobile game. We’ll …
Best Roblox Horror Games to Play Right Now – Updated Weekly
By Adele Wilson
Our Best Roblox Horror Games guide features the scariest and most creative experiences to play right now on the platform!The BEST Roblox Games of The Week – Games You Need To Play!
By Sho Roberts
Our feature shares our pick for the Best Roblox Games of the week! With our feature, we guarantee you'll find something new to play!All Grades in Type Soul – Each Race Explained
By Adele Wilson
Our All Grades in Type Soul guide lists every grade in the game for all races, including how to increase your grade quickly!
Inbetween Land Walkthrough
Inbetween Land is an interactive fragmented hidden object puzzle game created by Specialbit Studios. You will move from location to location solving fragmented hidden object hunts, mini-puzzles and picking up items to use in order to proceed in the game. Gamezebo’s strategy guide will provide you with detailed images, tips, information, and hints on how to play your best game.
Game Introduction – Inbetween Land
Inbetween Land is an interactive fragmented hidden object puzzle game created by Specialbit Studios. You will move from location to location solving fragmented hidden object hunts, mini-puzzles and picking up items to use in order to proceed in the game. Gamezebo’s strategy guide will provide you with detailed images, tips, information, and hints on how to play your best game.
General Tips
- This walkthrough is meant to be used as a guide to assist in solving mini-puzzles and acquiring all items in order to complete the game. You may explore locations in the order you wish, this walkthrough is written to take the most direct route to the game’s finish.
- Inventory objects will be written in CAPITALS and highlighted in yellow in the screenshots. The walkthrough will state, “Use the inventory item on the blah blah,” because it assumes you have the item. If you don’t have the item, on your keyboard, press CTRL+F (at the same time). In the text box, type the name of the item you are looking for and press ENTER. This will scan this page for the appearance of that word.
- Play the tutorial! It will explain gameplay elements. The tutorial is available in Casual and Normal mode only. An Achievement is earned by completing the tutorial.
- There are no sparkles, regardless of difficulty level!!! Move your cursor over every aspect of a scene and watch for it to change, it’s the only way to find everything
- Often you need to perform an action (i.e., place or collect an inventory item) in order for the game to progress. Before assuming the game has a glitch, go through your inventory and see if you can place any of your items anywhere or look for an item to pick up, switch to flip, etc.
- The Menu button at the top left of the screen gives access to the options screen and can bring you back to the main menu.
- Items collected throughout the game go into your inventory, located at the bottom of your screen.
- Closing a window – To close the zoom-in windows, click anywhere outside the window to close it. Tip: If you can zoom in on the area again, you likely haven’t found everything you needed to find.
- Click Back to leave a mini-puzzle. Leaving a mini-puzzle will reset it.
- An item in the inventory with a green plus sign beside it needs to be combined with another inventory item with a green plus sign.
Difficulty Modes
- There are three difficulty modes.
- Casual Mode has faster filling Hint and Skip meters and sparkles indicate all active areas. There is a tutorial.
- Normal Mode has slower filling Hint and Skip meters. There is a tutorial.
- Expert Mode has no Hint or Skip meter. There is no tutorial.
- You cannot change the difficulty setting during the game.
Cursors
- The default cursor looks like an arrow.
- An eye indicates you can inspect the area more closely.
- A grabbing hand indicates you can pick up an item to add to your inventory.
- Spinning gears indicate you can perform an action with an inventory item.
- A large pulsating arrow indicates you can move in that direction.
- Move your cursor over every aspect of a scene and watch for it to change, it’s the only way to find everything since there are no sparkles.
Fragmented Objects Scenes
- Fragmented object scenes provide an image of the fragmented objects to find.
- Once an item is assembled, you will hear a sound.
- Assembled items are used within the scene. This will reveals further pieces.
- The object fragments will be highlighted in yellow in the screenshots.
Notebook and Map
- Your notepad is located at the bottom left of the screen.
- The notepad records your progress and contains clues to solve puzzles. The notepad will sparkle when new clues have been added
Hint and Skip
- The Hint and Skips options are only available in the Casual and Normal modes.
- The Hint button is located at the bottom right of the screen. After using a hint, the meter will recharge.
- In fragmented hidden object scenes, click Hint, then click on an item at the bottom of the screen and that item will be highlighted. Click Hint, then click on an assembled item and it will show you where to use that item in the scene.
- Hints used during the adventure mode will tell you what to go next and/or where to go next.
- Skip allows you to skip mini-puzzles.
Achievements
- From the Main Menu screen, click on Achievements.
- Scroll through the list of Achievements to determine what you need to do.
- Most Achievements are earned by simply advancing through the game.
- Achievements you have to make an effort to earn are not using hints or skipping any mini-puzzle, watching all cutscenes and playing the tutorial.
- Achievements are awarded to the player’s profile. This means anyone who plays in Expert mode cannot earn all Achievements because they cannot play the Tutorial.
- The tutorial has you click the Hint and Skip buttons. It claims it will not affect your Achievements. If you click Skip Chapter on the tutorial captions, it doesn’t cancel the tutorial, just closes the caption. You will still get the Achievement for playing the tutorial.
First Crystal
- From the Main Menu screen, click Play.
- Select your difficulty (explained above).
- Watch the cutscene. There is an Achievement awarded for watching all the cutscenes; if you want to earn that Achievement, do not click Skip.

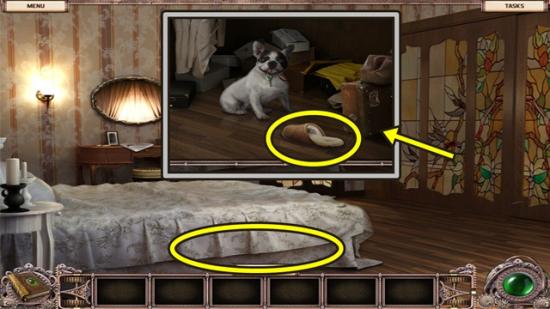
- Click on the closet.
- Click on the dog.
- Take the SLIPPER. Click anywhere outside the window to close it.
- Click on the bed.
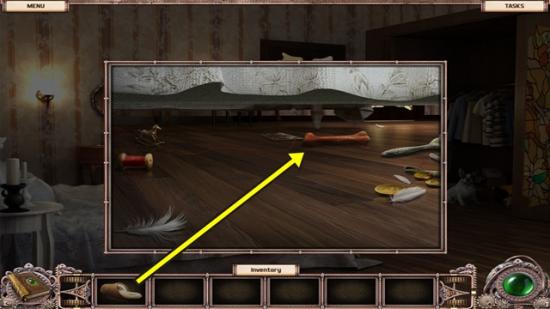
- Throw the SLIPPER at the bone.
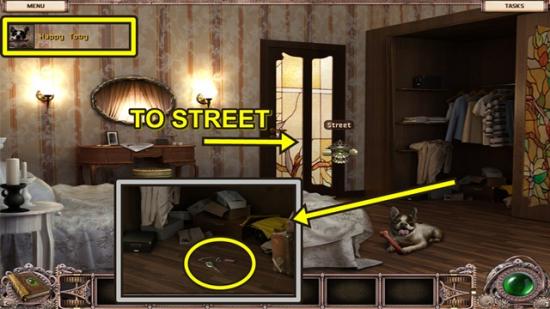
- You will earn the Happy Toby Achievement.
- Click on the closet again.
- Take the CAR KEY.
- Go through the door to the street.
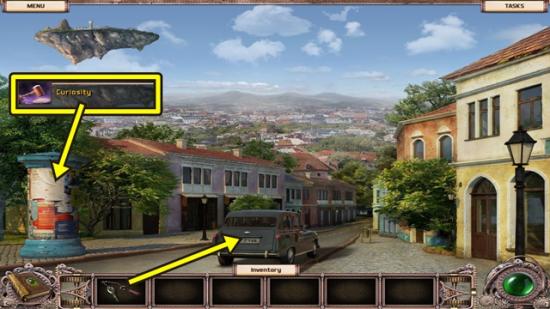
- Click on the spherical signpost.
- Click on the auction poster to earn the Curiosity Achievement.
- Click on the car. Insert the CAR KEY, then turn the key.
- Get in the car.
- Watch the cutscene.
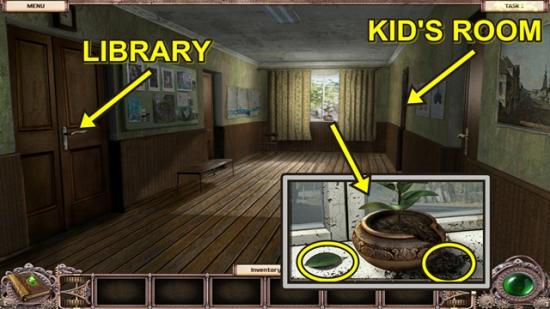
- Click on the window.
- Take the LEAF and SOIL.
- Open the door on the left and enter the library.
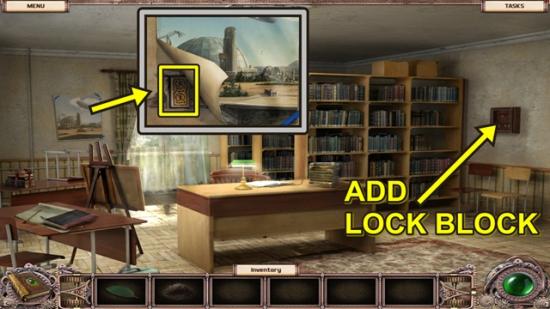
- Click on the poster.
- Tear away the poster and take the LOCK BLOCK.
- Click on the cabinet on the right wall.
- Add the LOCK BLOCK.
- A mini-puzzle starts.
- Rearrange the blocks to clear a path so the gold block can be slid out the bottom. Blocks can only move in the direction they are facing, i.e., vertical blocks can only be slid up and down and horizontal blocks can only be slid right and left.
- Use the screenshots below to solve the puzzle. To reset the puzzle, click Back, then re-enter the puzzle.
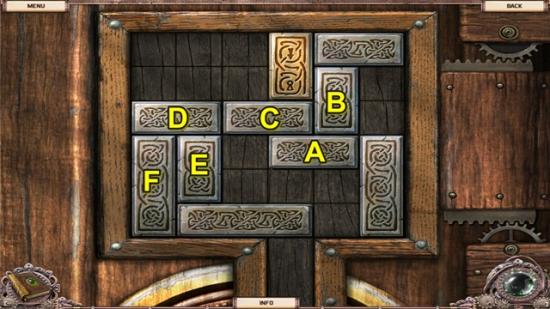
- Move block A to the left, move block B down, move blocks C and D to the right and move blocks E and F up.
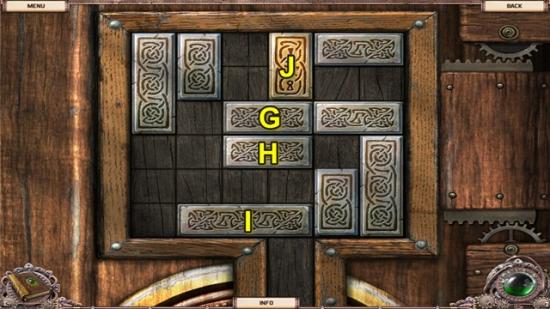
- Move blocks G, H and I to the left, then slide block J all the way down.
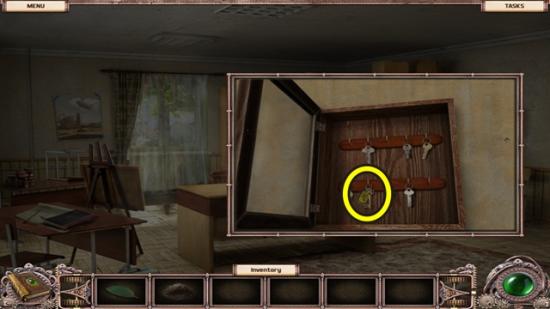
- Take MARY’S KEY.
- Go back into the corridor.
- Open the door on the right and enter the kid’s room.
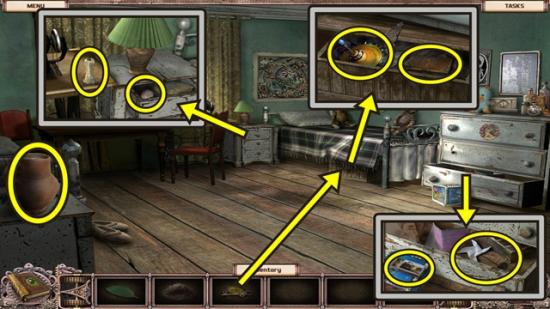
- Take the WATER JUG.
- Click on the nightstand. Take the CANDLE.
- Open the drawer and take the CHALK.
- Click on the open dresser drawer.
- Take the PINWHEEL and MATCHES.
- Click under the bed.
- Click on the chest under the bed.
- Unlock the chest with MARY’S KEY.
- Click on the open chest.
- Take the SPINNING TOP and notebook entry.
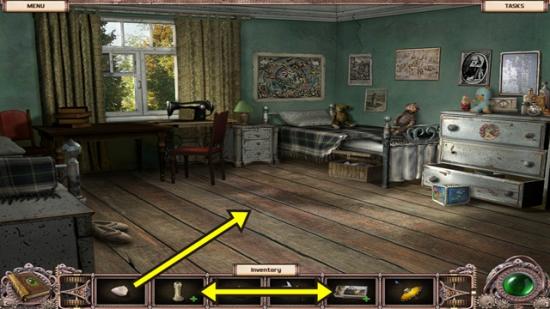
- From the inventory, combine the CANDLE and MATCHES to create the BURNING CANDLE.
- Use the CHALK to draw a diagram on the floor. The spinning gears cursor indicates the correct area to use the chalk.
- Click four times to complete the diagram.
- On the diagram, place the SPINNING TOP, BURNING CANDLE, LEAF, SOIL, WATER JUG and PINWHEEL. It doesn’t matter where you place the items, once you select an item from your inventory, hold the item over the diagram and click when you see the spinning gears cursor.
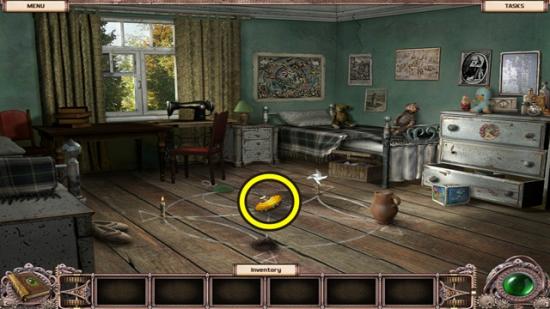
- Once all the items have been placed, click on the spinning top.
- Watch the cutscene.
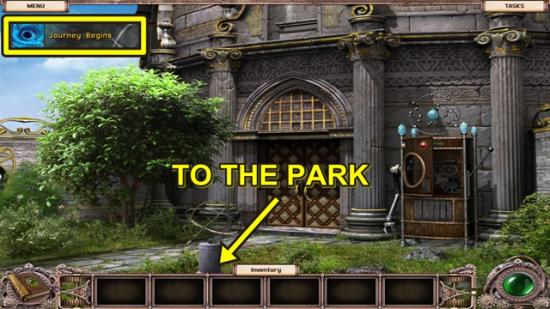
- You receive the Journey Achievement.
- Move down to the park.
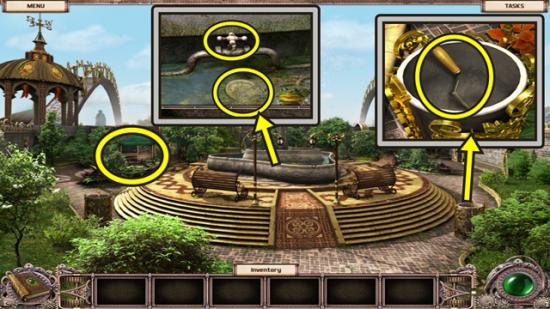
- Click on the urn to the right of the fountain.
- Take the HANDLE.
- Click on the fountain.
- Take the VALVE and COIN.
- Click on the gazebo on the left.
- Remove the cover.
- A mini-puzzle starts.
- Rotate the circles so all the red circle fragments are on the red background, the blue circle fragments are on the blue background and the yellow circle fragments are on the yellow background. Click on a circle piece to move that circle. Move the pieces from background to background using the centre circle. This puzzle is randomly generated and starts differently with each play, hence no step-by-step solution can be given.
- Solution:
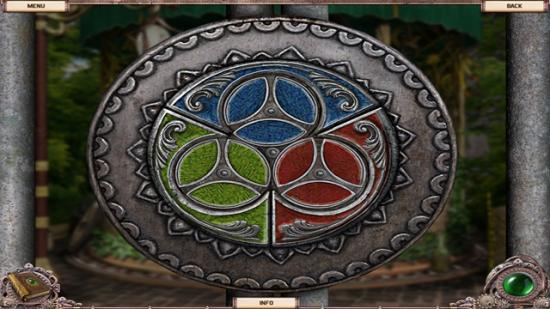
- A fragmented object hunt begins.
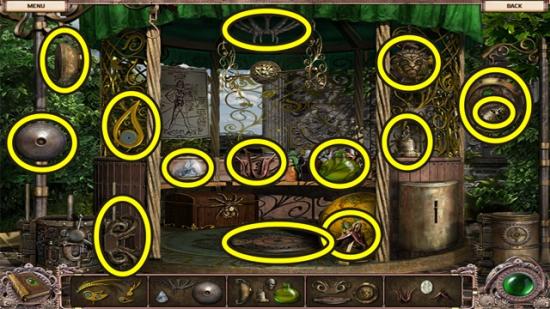
- Find all the object fragments shown in the images at the bottom of the screen. You will be able to complete the lid, acid and shield.
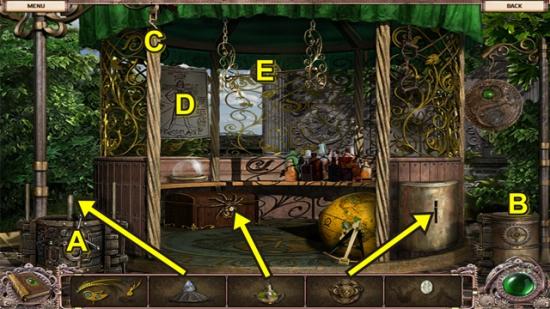
- Put the shield on the metal box to get the object fragment.
- Pour the acid on the locked chest and take the object fragment.
- Put the lid on the machine and turn the handle (A), then take the object fragment to complete the lantern (B).
- Hang the lantern on the hook (C), then click on the poster (D) and take the final object fragment to complete the clockwork bird.
- Put the clockwork bird on the perch (E).
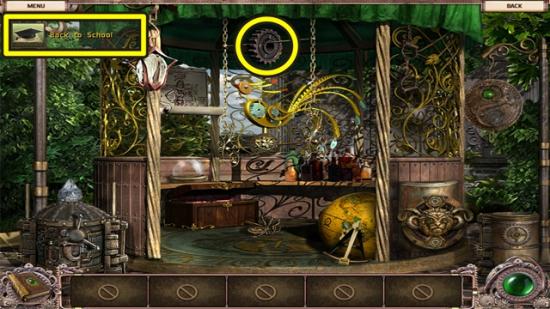
- If you played the tutorial, you will receive the Back to School Achievement.
- Take the GEAR.
- Move down to the temple entrance.
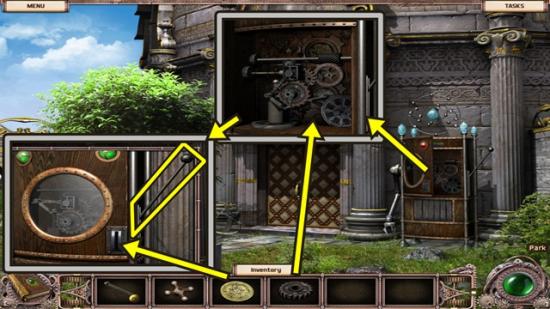
- Click on the ticket terminal.
- Add the GEAR.
- When the panel closes, put the COIN in the slot and pull the lever.
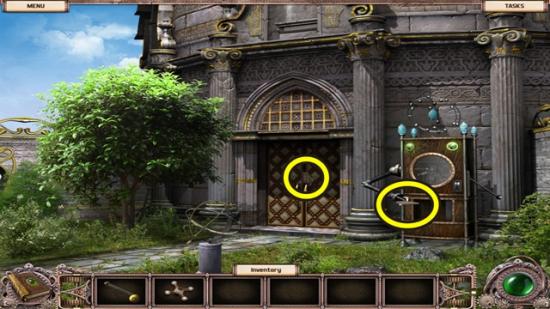
- Click on the ticket terminal’s mechanical hand and take the TICKET.
- Click on the door.
- Put the TICKET in the ticket reader.
- Go through the door into the temple hall.
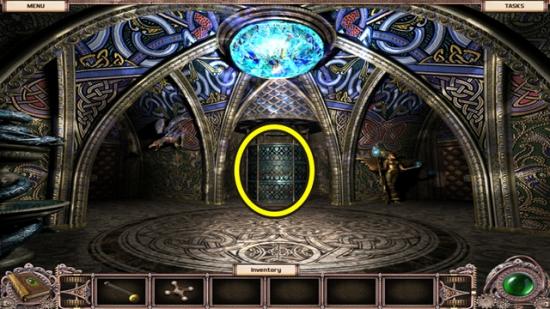
- Open the elevator door and get on the elevator.
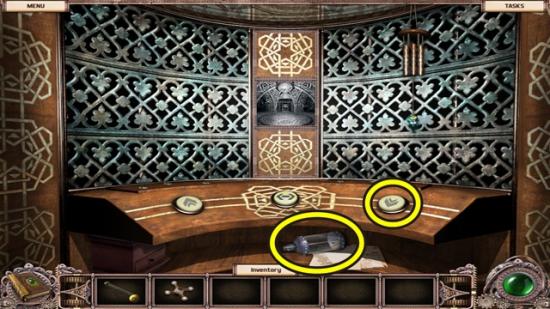
- Take the EMPTY CANISTER.
- Press the button on the right to go to the main hall.
- Move down to leave the elevator.
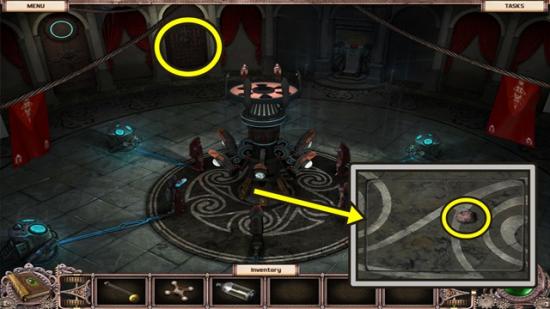
- Click on the machine in the centre of the room.
- Take the FLINT.
- Click on Mary. Click anywhere outside the window to close it.
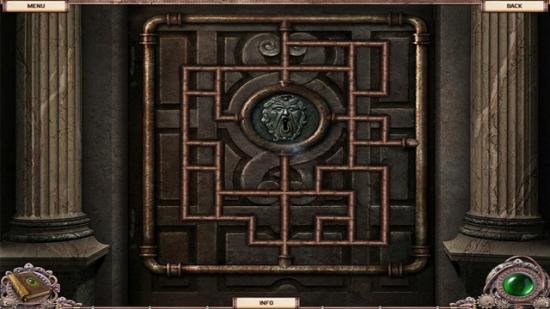
- Click on the right door.
- A mini-puzzle starts.
- Rotate the pipes to form a continuous circuit for the steam. Left-click to rotate the pipes clockwise and right-click to rotate the pipes counter-clockwise.
- Solution:
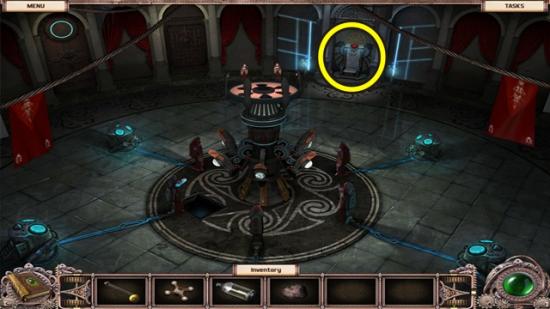
- Click on the throne to start a fragmented object hunt.
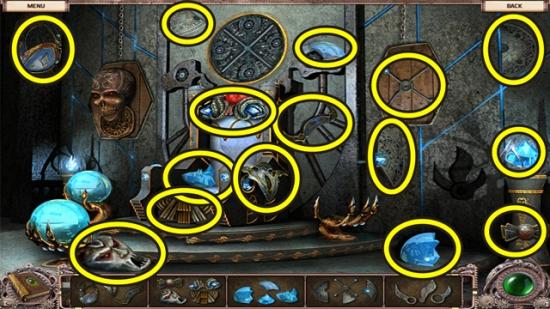
- Find all the object fragments shown in the images at the bottom of the screen. You will be able to complete the helmet, mask, sphere and shield.
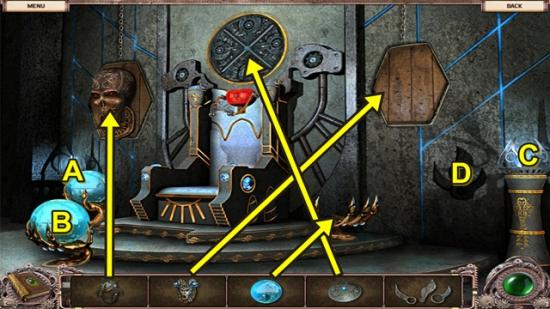
- Put the helmet on the skeleton mask and take the object fragment (A).
- Put the shield on the inset above the throne and take the object fragment (B).
- Put the mask on the inset to the right of the throne, then put the sphere on the pedestal, then take object fragment (C).
- Put the code key in the inset on the wall (D).
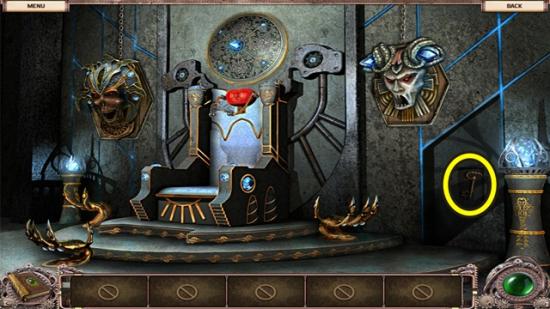
- Take the KEY.
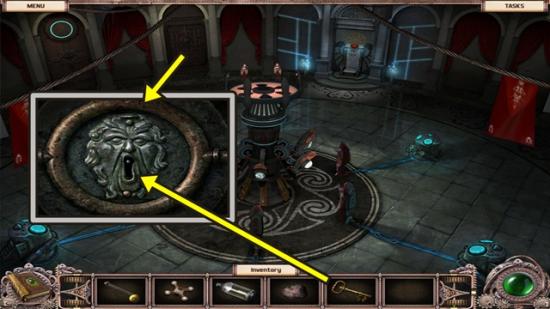
- Click on the right door. Insert the KEY.
- Enter the utility room.
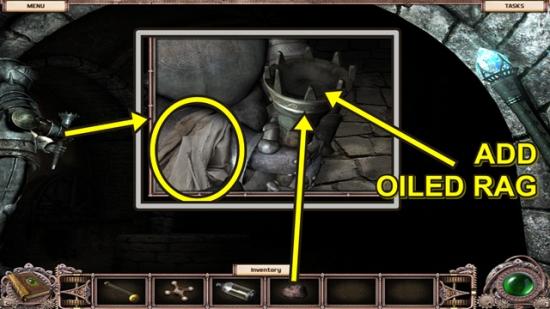
- Click on the suit of armour.
- Take the OILED RAG.
- Put the OILED RAG in the torch base, then use the FLINT to light the rag.
- Take the TORCH.
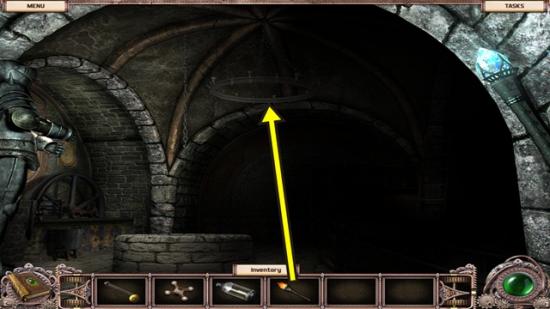
- Use the TORCH to light the chandelier.
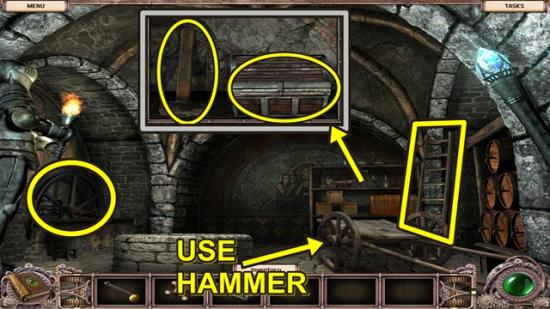
- Take the LADDER.
- Click on the back shelf.
- Take the HAMMER.
- Open the chest to get the ROD.
- Take the ROPE.
- Use the HAMMER to smash the cart, then take the WHEEL.
- Click on the steam engine to start a fragmented object hunt.
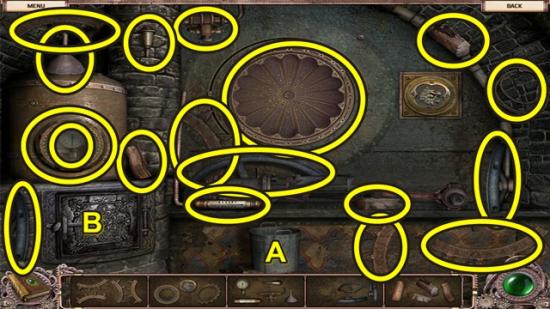
- Find all the object fragments shown in the images at the bottom of the screen. Move the bucket (A) to get an object fragment. Open the furnace (B) to get an object fragment. You will be able to complete the cog, lion shield, steam gauges, wheel and firewood.
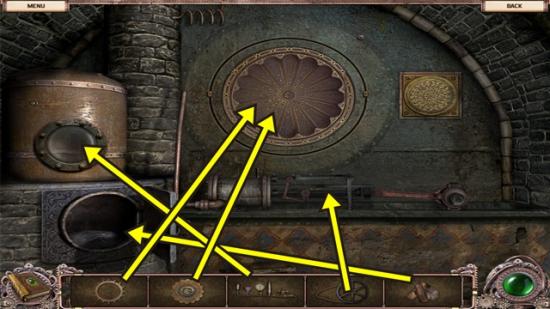
- Put the firewood in the furnace.
- Put the steam gauges on the tank.
- Put the cog and lion shield on the inset on the wall.
- Put the wheel on the steam engine.
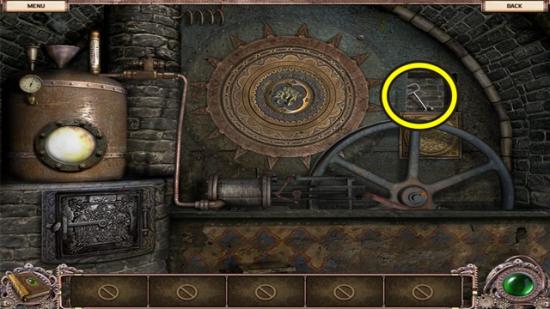
- Take the KEY.
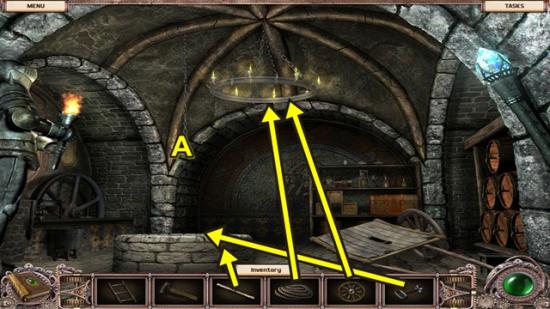
- Click on the well.
- Use the KEY to open the padlock.
- Remove the padlock and take the CHAIN. Click anywhere outside the window to close it.
- Click on the hook at the end of the chain (A).
- Add the CHAIN.
- Click on the well again.
- Add the ROD. Click anywhere outside the window to close it.
- Put the ROPE on the chandelier.
- Put the WHEEL on the end of the rope.
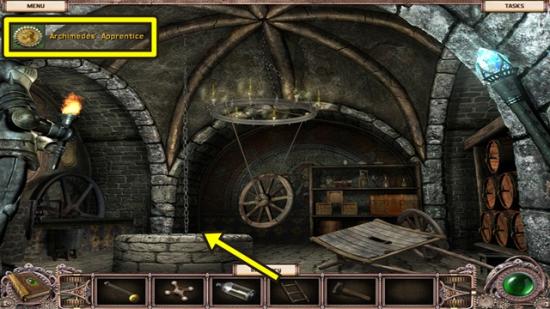
- You receive the Archimedes’ Apprentice Achievement.
- Click on the well.
- Add the LADDER.
- Climb down to the well bottom.
- Move forward, then move right.
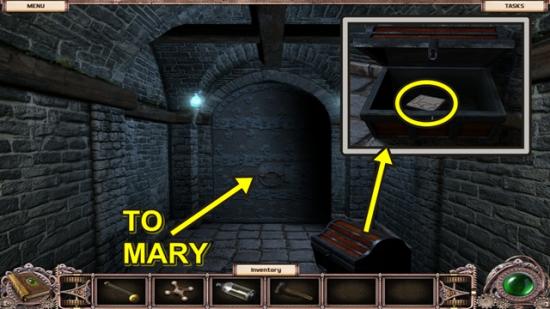
- Click on the chest.
- Open the chest and take the ENAMEL TILE.
- Move forward to Mary.
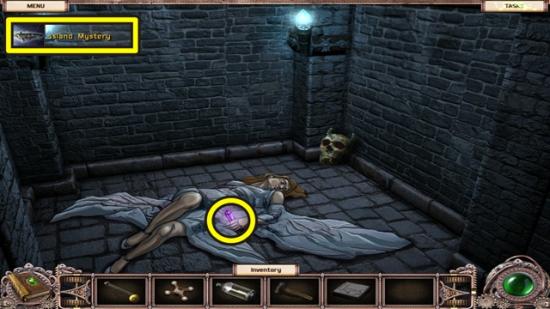
- Watch the cutscene.
- You receive the Island Mystery Achievement.
- Click on Mary’s hand.
- Take the VIOLET CRYSTAL.
Second Crystal
- Move down three scenes, then go up the ladder to the utility room, then move down into the main hall.
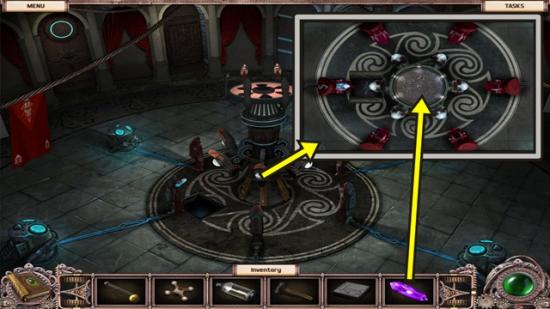
- Click on the machine.
- Add the VIOLET CRYSTAL. Click anywhere outside the window to close it.
- Move down to the elevator.
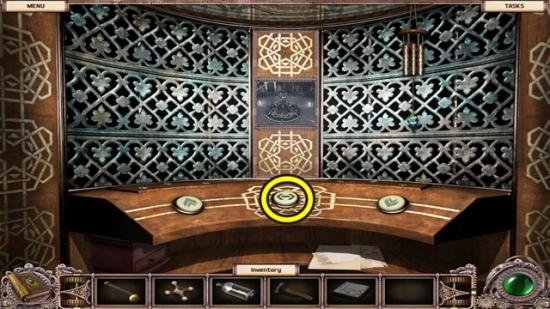
- Click on the middle button to return to the temple hall.
- When the elevator stops, move down to exit the elevator.
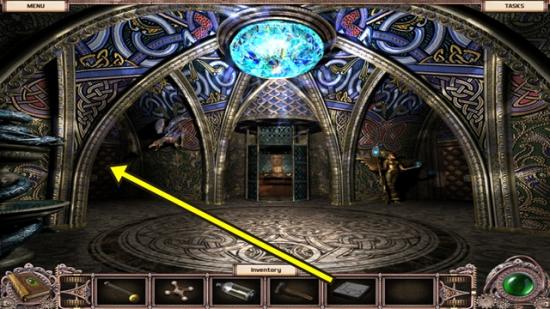
- Click on the door on the left.
- Add the ENAMEL TILE.
- A mini-puzzle starts.
- Rotate the tiles to recreate the image. Left-click to turn the tiles clockwise, right-click to turn the tiles counter-clockwise.
- Solution:
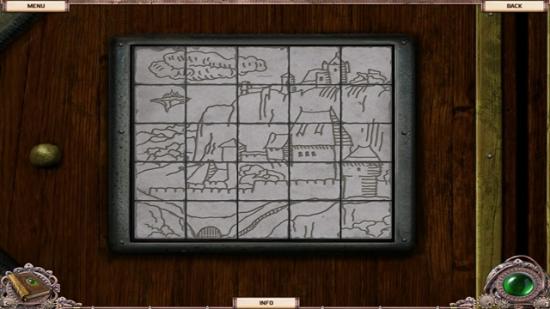
- Enter GargoylePark.
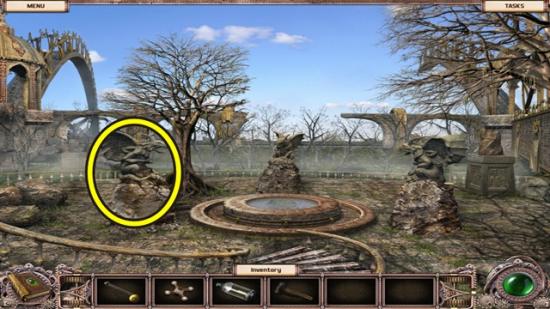
- Click on the left gargoyle.
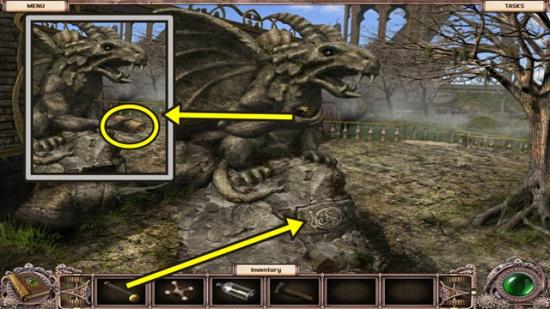
- Remove the plate from the statue.
- Add the HANDLE.
- Click on the scroll in the gargoyle’s hand.
- Click on the scroll to read it. Click anywhere outside the window to close it.
- Move down two scenes to the temple hall.
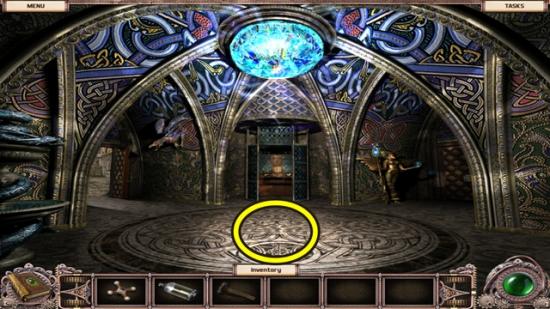
- Click on the secret floor.
- Remove the panel.
- Take the STONE DISK.
- Go left to the GargoylePark.
- Click on the fountain.
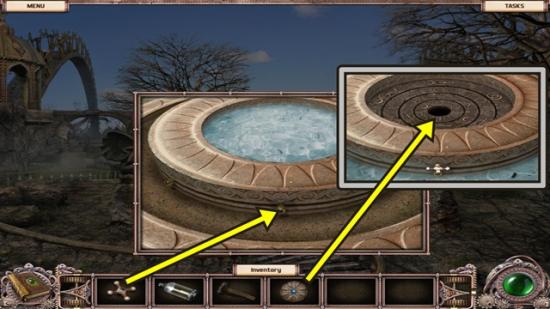
- Add the VALVE.
- When the water drains, add the STONE DISK to the centre.
- A mini-puzzle starts.
- Rotate the rings so the symbols recreate the larger symbols on the outer ring. Focus on one outer symbol at a time. Once you’ve recreated a large symbol, it will turn red. You can then move the inner rings and recreate another symbol. The symbol you’ve already recreated will remain red. Recreate all the larger symbols. Left-click to rotate the rings clockwise; right-click to rotate the rings counter-clockwise.
- The screenshot below has been modified to show the correct symbol combination for each larger symbol. This was done to avoid six separate screenshots.
- Solution:
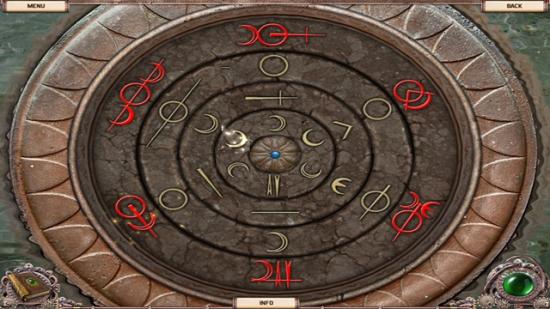
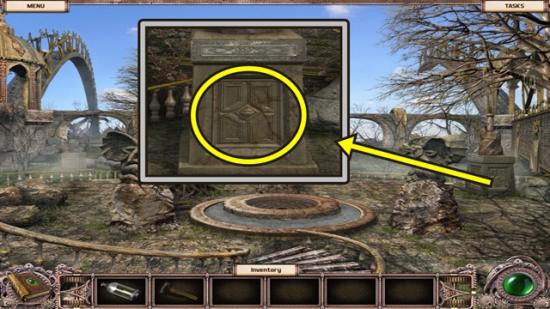
- When the obelisk appears, click on the statue base at the right.
- Move the panel.
- Take the GEAR WITH GEM.
- Return to the elevator (move down, then forward to the elevator).
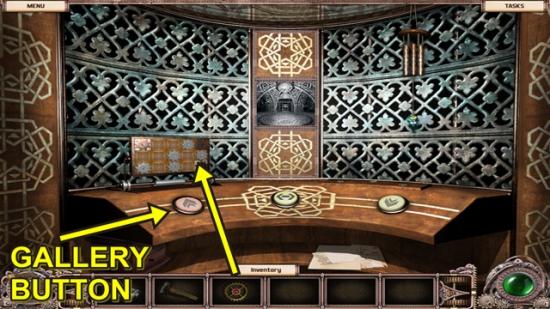
- Click on the gallery button on the left.
- Add the GEAR WITH GEM.
- A mini-puzzle starts.
- Rearrange the tiles and gears to create a continuous circuit. Note the steel tiles cannot be moved. This puzzle is randomly generated and starts differently with each play, hence no step-by-step solution can be given.
- Below are two possible solutions:
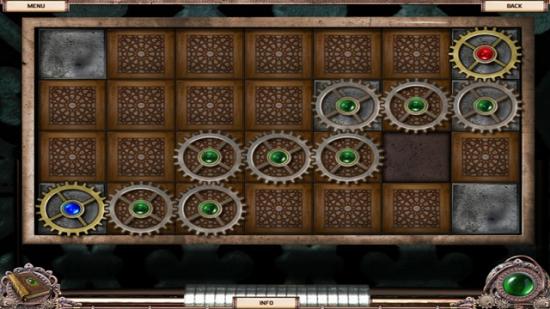
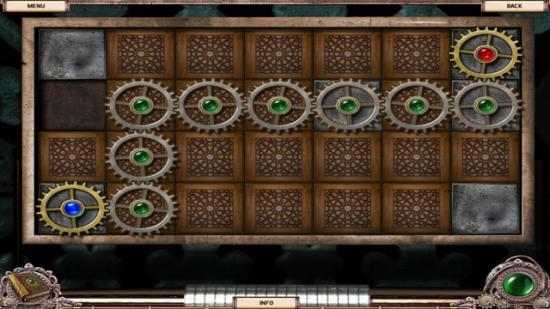
- Press the left gallery button.
- When the elevator stops, move down to exit the elevator.
- Watch the cutscene.
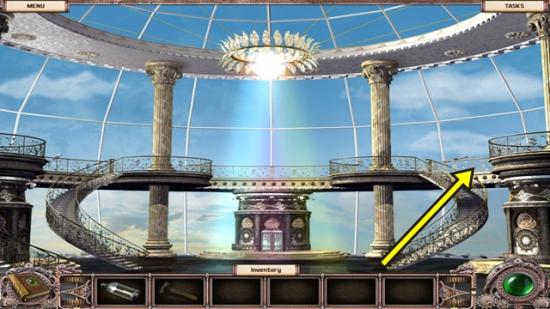
- Go up the right staircase.
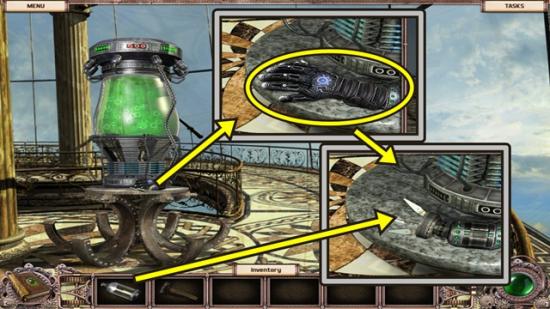
- Click on the fluorescent gas machine.
- Take the PROTECTIVE GLOVE.
- Put the EMPTY CANISTER where the protective glove was, then take the CANISTER WITH FLUORESCENT GAS.
- Move forward.
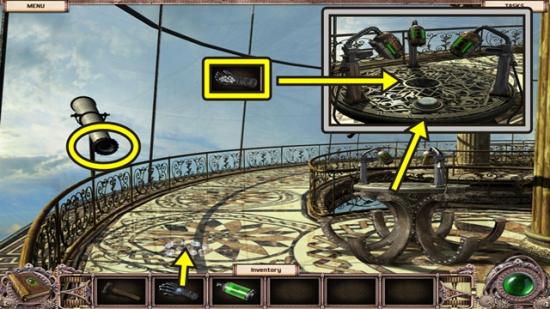
- Click on the telescope.
- After the lens breaks, click on the broken lens on the floor.
- Use the PROTECTIVE GLOVE to get the LENS FRAGMENTS.
- Click on the table.
- Add the LENS FRAGMENTS to the centre of the table.
- A mini-puzzle starts.
- Put the lens back together. Select a lens piece and if necessary, right-click to rotate the piece. Start with the border pieces (you can tell by the rounded, smooth edges). Select a border piece and move it where you think it should go. Hover the piece around. If it doesn’t snap into place, right-click to rotate the piece and move it where you think it should go. Continue until the piece snaps into place. When a piece is correctly placed, it will lock and cannot be moved.
- Solution:
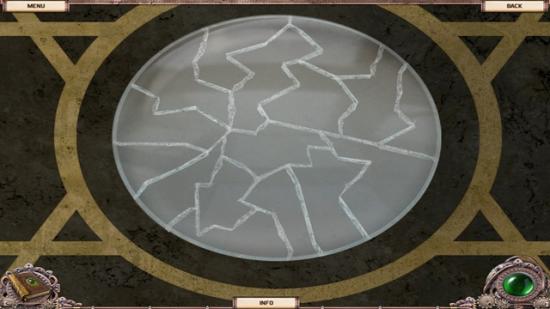
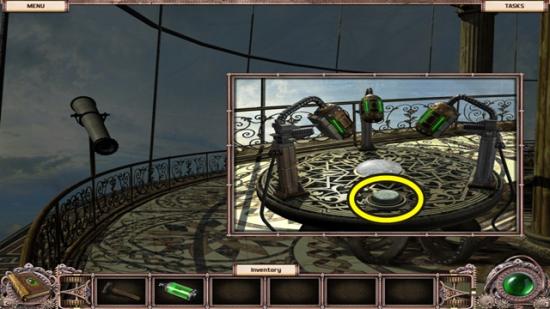
- Press the button on the table.
- Take the TELESCOPE LENS.
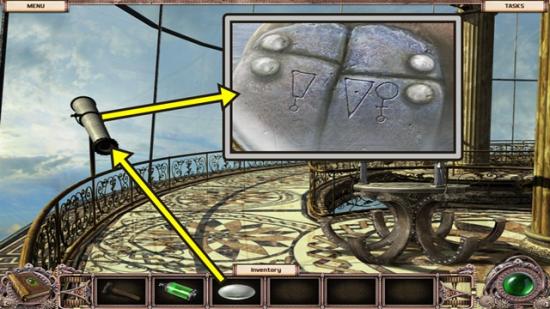
- Click on the telescope.
- Put the TELESCOPE LENS on the telescope.
- Look through the lens.
- Click on the lens.
- Take note of the three symbols on the robot’s shoulder.
- Move down two scenes, then move forward to the teleport.
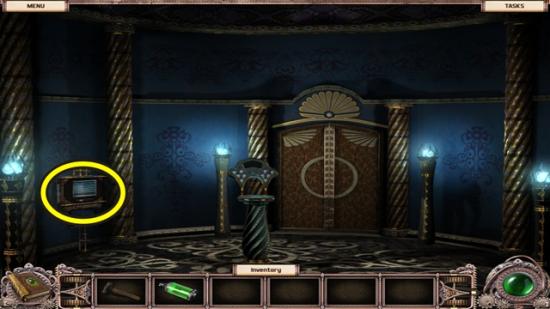
- Click on the monitor.
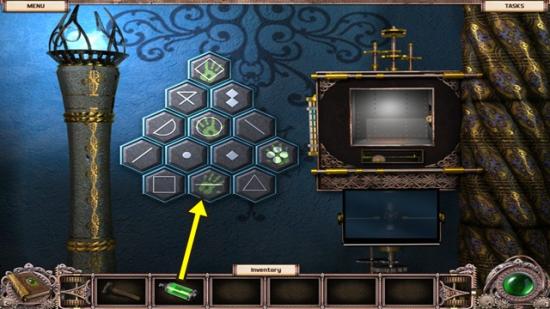
- Use the CANISTER WITH FLUORESCENT GAS on the symbols to make handprints appear.
- Press the symbols with handprints.
- When you are finished, take the CIRCUIT BOARD.
- Move down.
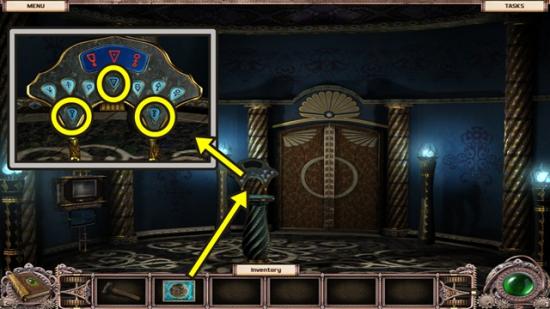
- Click on the panel in the middle of the room.
- Add the CIRCUIT BOARD.
- Press the symbols that you saw through the telescope (it doesn’t matter what order and you can only press the symbols you saw in the telescope).
- Move forward to the robot.
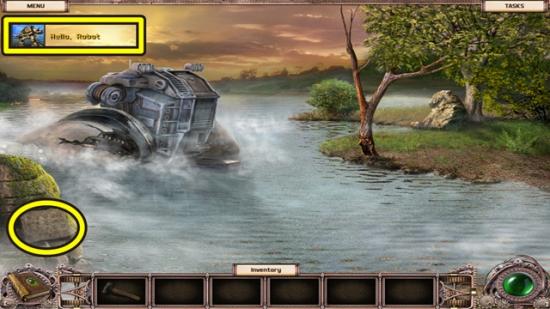
- You earn the Hello Robot Achievement.
- Click on the panel with symbols.
- A mini-puzzle starts. Watch the sequence and then click on the tiles in the same sequence. You must do this three times. This puzzle is randomly generated and starts differently with each play, hence no step-by-step solution can be given.
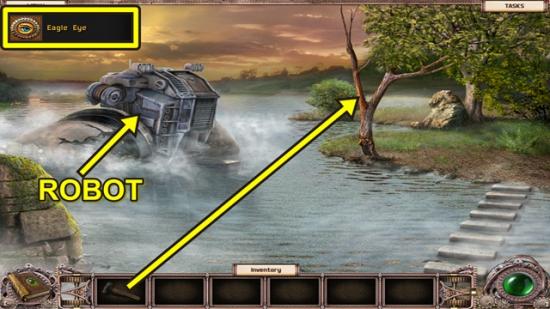
- When you are finished, you earn the Eagle Eye Achievement.
- Click on the tree.
- Use the HAMMER to knock down the branch.
- Move onto the robot.
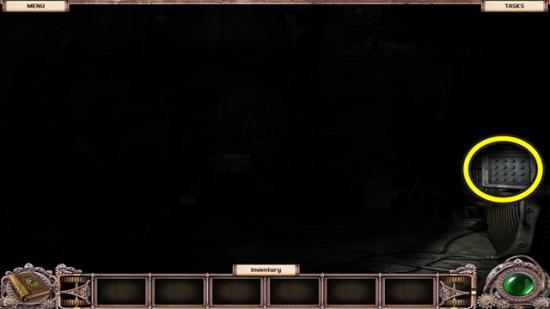
- Click on the panel.
- A mini-puzzle starts.
- Press the buttons to light up all the buttons. Pressing a button causes it to affect it and its surrounding buttons.
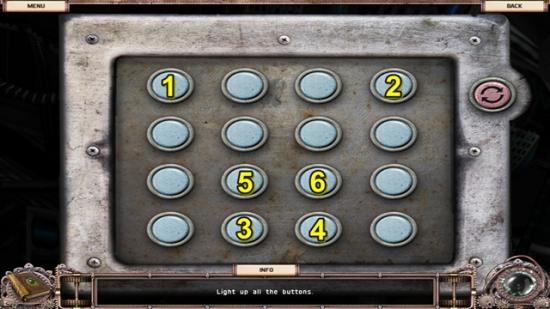
- Press the buttons in the order shown in the screenshot above. (Use the Reset button to turn off all the buttons, if necessary.)
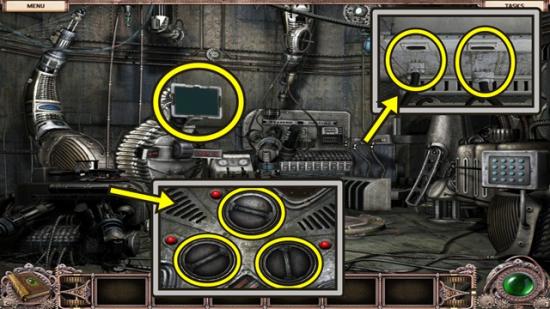
- Click on the cables.
- Plug in the cables.
- Click on the mechanism at left.
- Turn the dials.
- Click on the monitor.
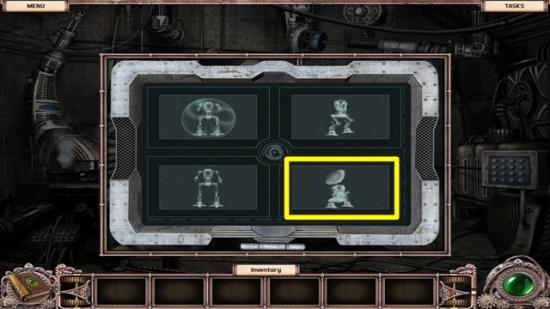
- Click on the search button (bottom right).
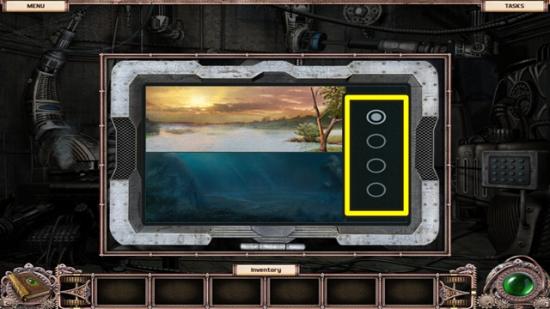
- Click on the buttons on the right four times until the yellow crystal appears.
- Click on the crystal (click on the screen).
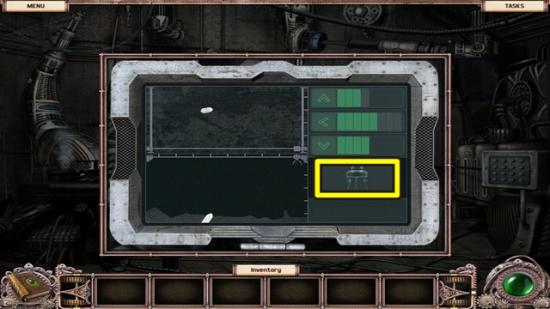
- Click on the directional arrows to get the claw to retrieve the crystal. Use the grid lines to determine how many times you need to click each arrow button.
- Press the up button three times, press the left button five times, then press the down button four times.
- Press the robot button.
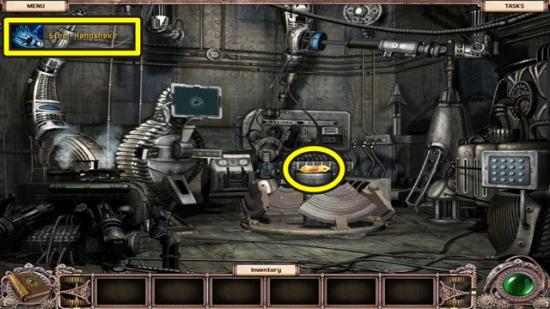
- You earn the Steel Handshake Achievement.
- Take the YELLOW CRYSTAL.
Third Crystal
- Move down.
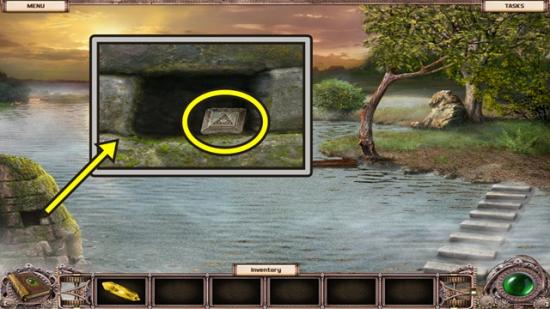
- Watch the cutscene.
- Click on the inset.
- Take the PIECE OF HALL DOOR.
- Move down three scenes to the elevator.
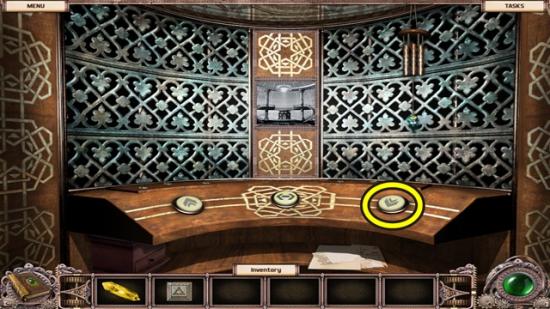
- Click on the right button to go to the main hall.
- Move down to the main hall.
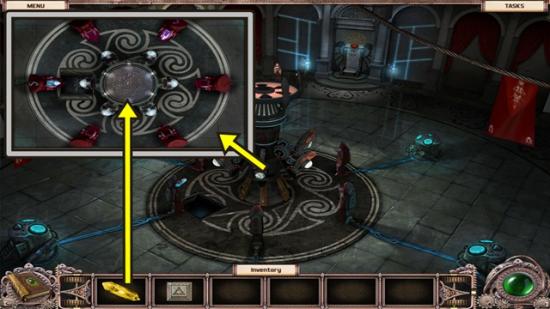
- Click on the machine.
- Add the YELLOW CRYSTAL. Click anywhere outside the window to close it.
- Move down to the elevator.
- Click on the middle button to return to the temple hall.
- When the elevator stops, move down to exit the elevator.
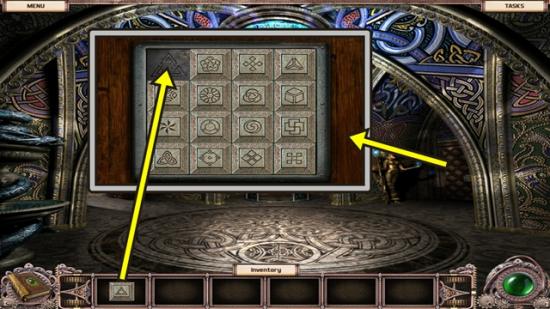
- Click on the door on the right.
- Add the PIECE OF HALL DOOR.
- A mini-puzzle starts.
- Slide the tiles so the outer tiles are adjacent to their symbols and the inner two columns’ tiles are on their matching symbol. This puzzle is randomly generated and starts differently with each play, hence no step-by-step solution can be given.
- Solution:
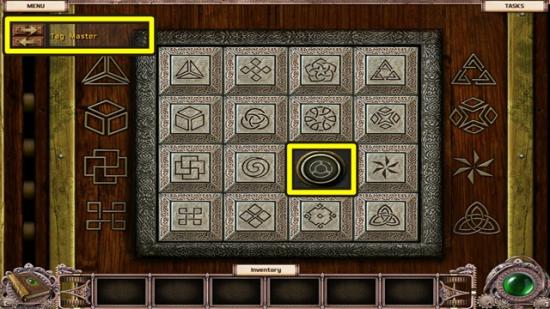
- You earn the Tag Master Achievement.
- Press the newly revealed button.
- Go through the door to the cliff.
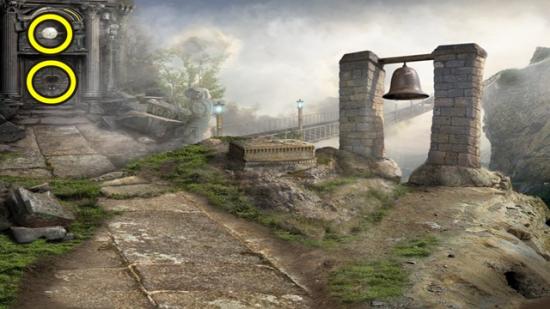
- Watch the cutscene.
- Click on the top of the door.
- Take the PRISM and the KEY.
- Click on the door.
- Insert the KEY.
- Enter the library hall.
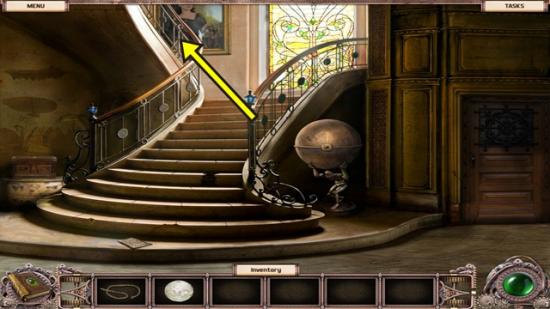
- Go upstairs to the hall.
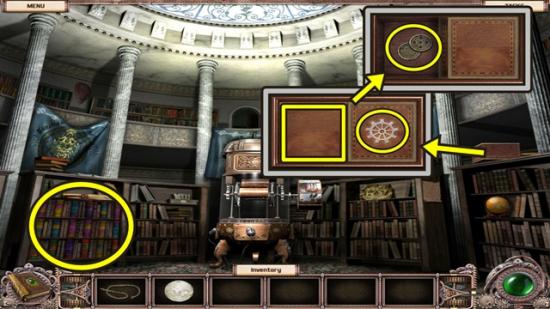
- Click on the chest atop the right shelf.
- Take the GLASS GEAR.
- Remove the left panel.
- Take the CHIPS.
- Click on the colourful bookshelf on the left.
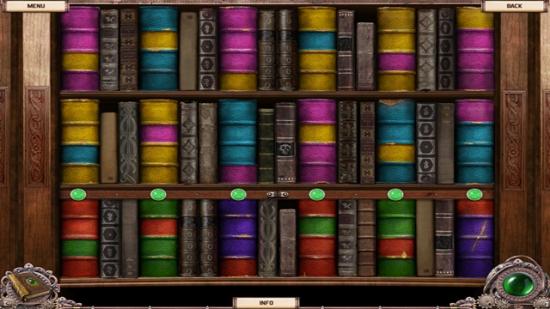
- A mini-puzzle starts.
- Rearrange the books on the top and middle shelf so their colours combine to form the colours of the book on the bottom shelf. When a book combination is correct, the red light will turn green. This puzzle is randomly generated and starts differently with each play, hence no step-by-step solution can be given.
- Purple and yellow makes orangey-red.
- Purple and light blue makes dark blue.
- Yellow and light blue makes green.
- Solution:
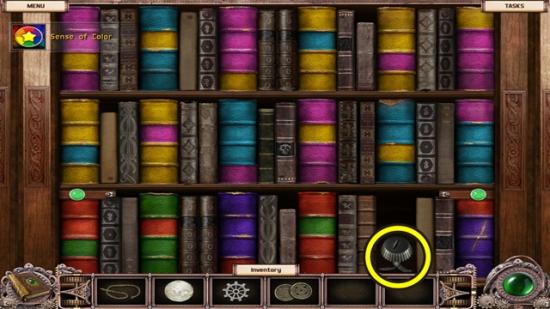
- You earn the Sense of Colour Achievement.
- Take the TRIPARTITE KEY.
- Move down to the library hall.
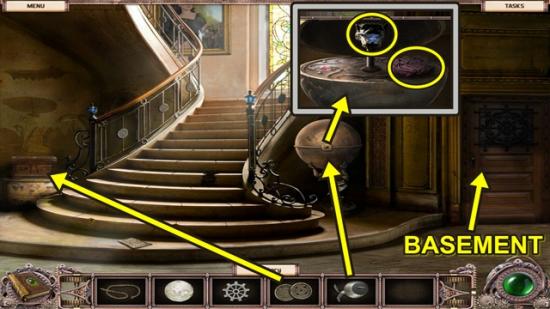
- Click on the sphere.
- Insert the TRIPARTITE KEY.
- Take the RAG.
- Push the handle down to open the basement door.
- Click on the chest on the left.
- Add the CHIPS.
- A mini-puzzle starts. Select the correct chip from the outer ring to place in the two empty slots. Determine the correct chip by looking at the patterns on the board.
- Solutions:
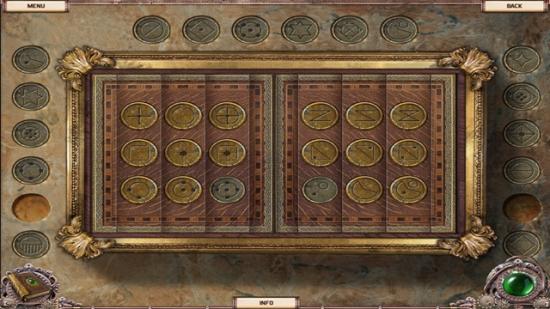
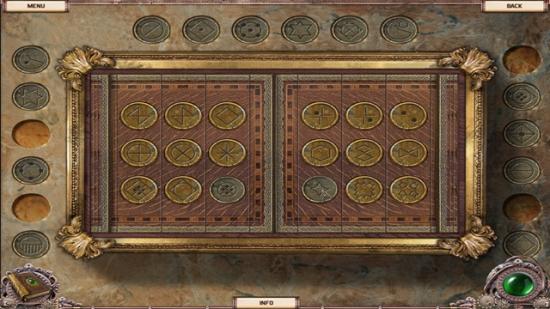
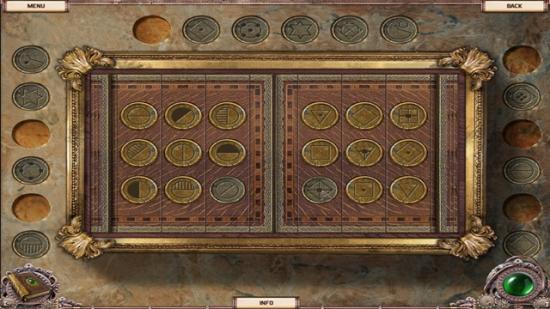
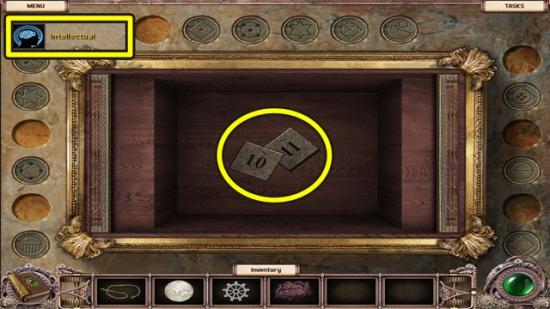
- You earn the Intellectual Achievement.
- Take the NUMBERED PLATES.
- Go down to the basement.
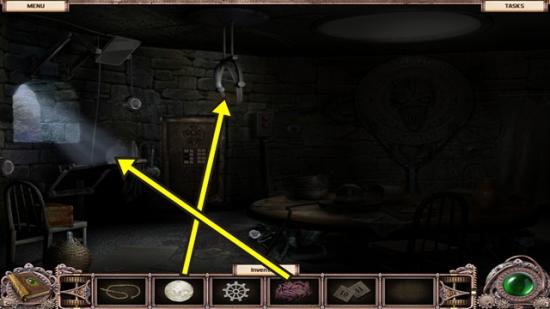
- Put the PRISM in the holder.
- Click on the dirty mirror.
- Clean the mirror with the RAG.
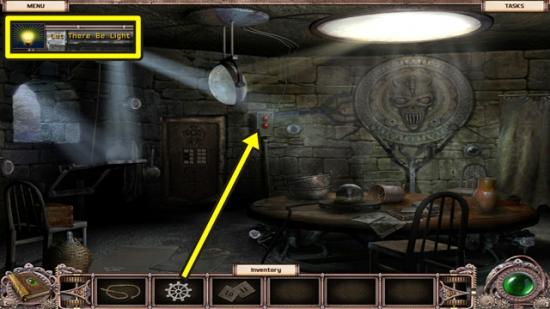
- You earn the Let There Be Light Achievement.
- Click on the panel with the red buttons.
- Remove the panel.
- Add the GLASS GEAR.
- A mini-puzzle starts.
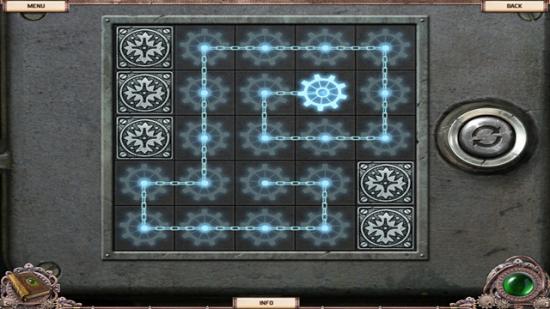
- Click on any tile on the board to place a gear. Then click on another tile in that row or column to move the gear. Continue until the gear has passed over every tile without crossing itsself.
- Solution:
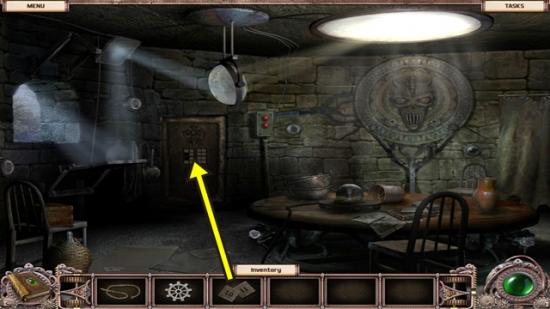
- Click on the door.
- Add the NUMBERED TILES.
- A mini-puzzle starts.
- Rearrange the tiles so the sum of each group of four tiles is 34. The numbers beside each group of tiles is the sum.
- Solution:
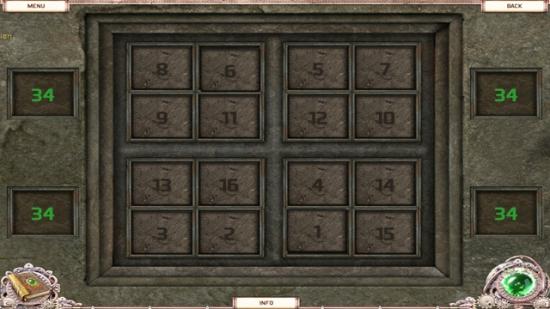
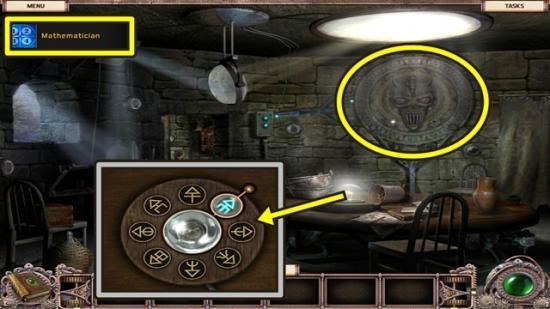
- You earn the Mathematician Achievement.
- Click on the table.
- Adjust the three lenses so they fit perfectly over a symbol (see inset in screenshot above).
- Click on the mask on the wall.
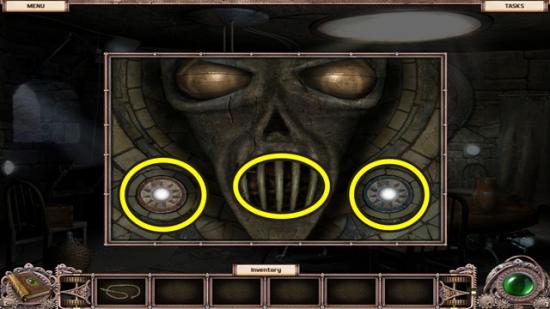
- Press the two buttons.
- When the button opens, take the MUSIC BOX PIECE.
- Go through the newly opened door to start a fragment object hunt.
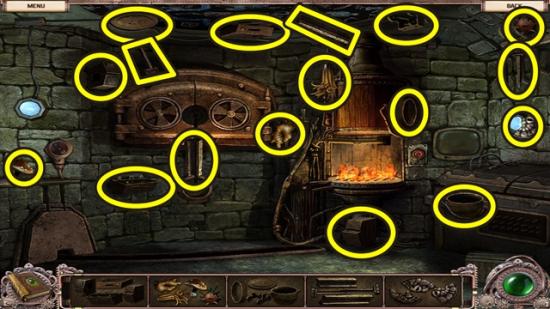
- Find all the object fragments shown in the images at the bottom of the screen. You will be able to complete the battery, food, pot and rail fragment.
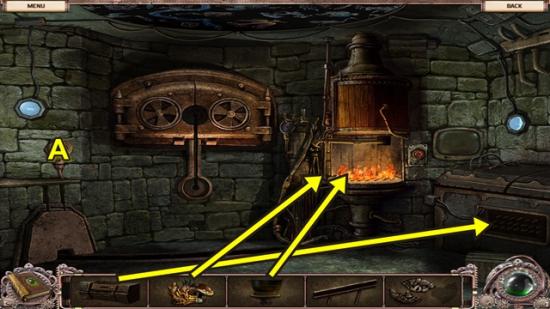
- Place the battery and take the object fragment.
- Put the pot in the fire, then add the food.
- Press the switch (A), then add the rail fragment.
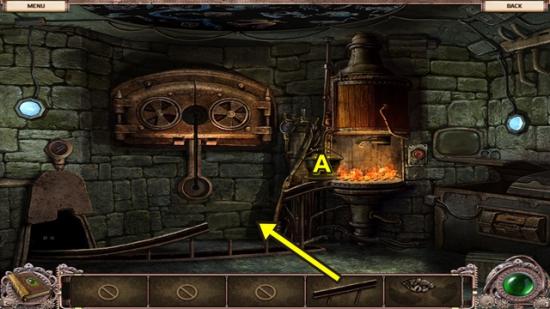
- Push the food down the rail track (A).
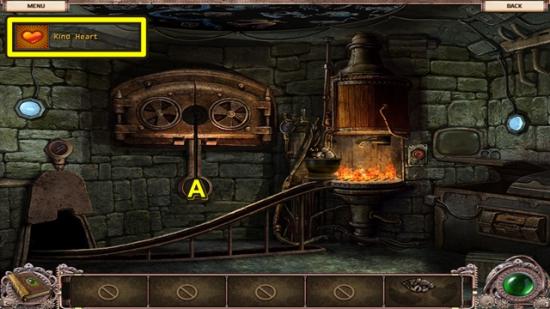
- You earn the Kind Heart Achievement.
- Take the object fragment that comes back up the rail track.
- Put the sun symbol in the slot.
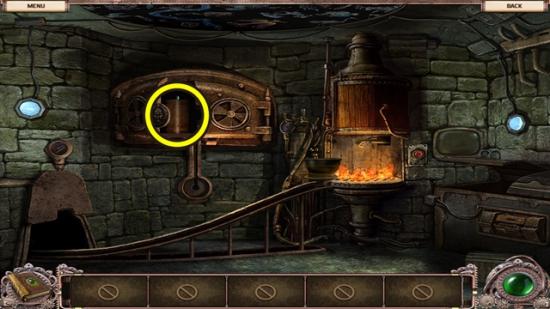
- Take the MUSICAL CYLINDER.
- Return to the library (move down, then go up the stairs).
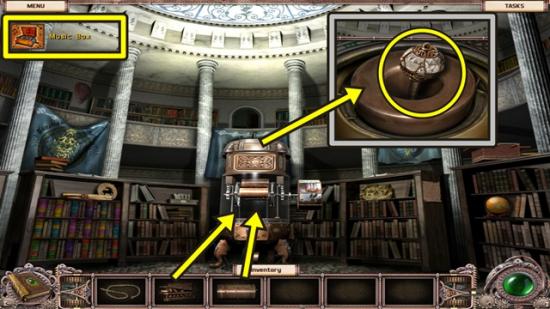
- Click on the music box.
- Add the MUSICAL CYLINDER and MUSIC BOX PIECE.
- You earn the Music Box Achievement.
- Click on the top of the music box.
- Take the BELL CLAPPER.
- Move down two scenes to the cliff, then go to the bridge.
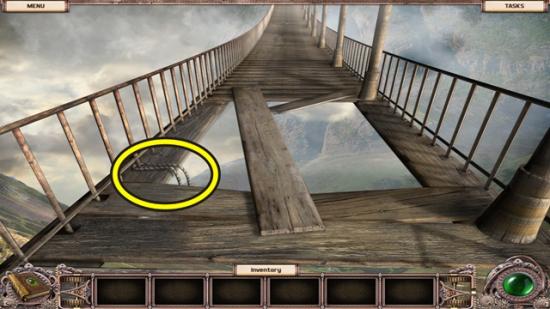
- Take the ROPE.
- Move down to the cliff.
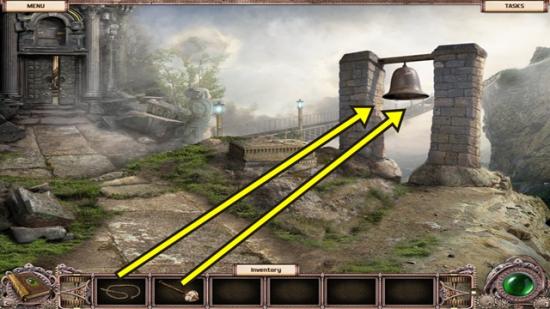
- Click on the bell.
- Add the BELL CLAPPER, then the ROPE.
- Pull the rope.
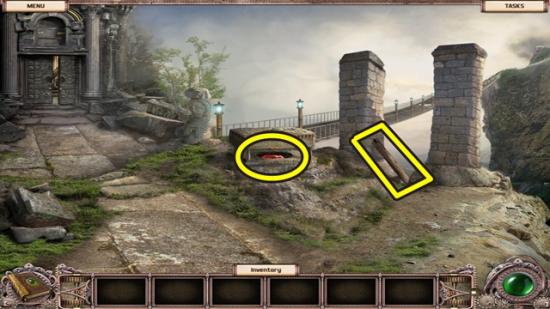
- Click on the board.
- Take the BOARD.
- Click on the stone box.
- Take the RED CRYSTAL.
Fourth Crystal
- Go to the bridge.
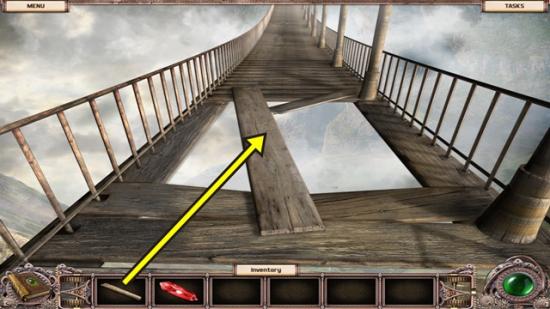
- Put the BOARD on the bridge.
- Cross the bridge to the lake.
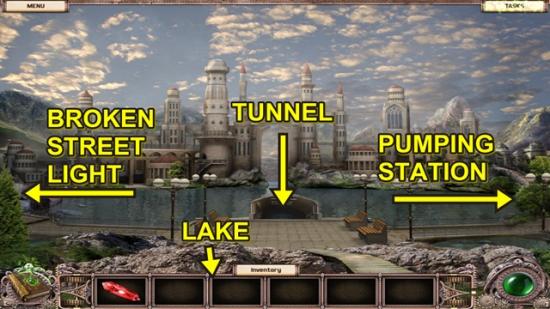
- Watch the cutscene.
- Move down to the lake.
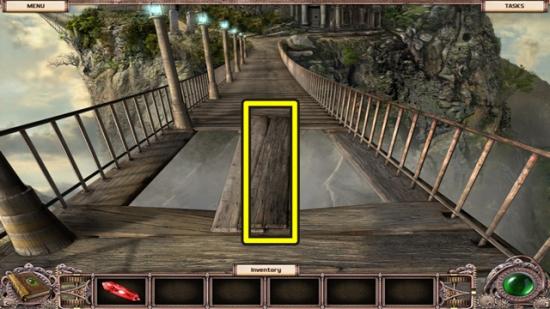
- Take the BOARD.
- Move forward, then go forward to the tunnel.
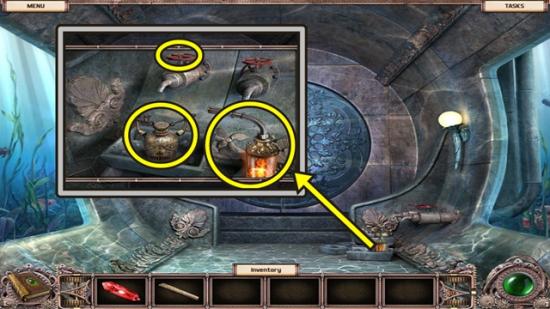
- Click on the taps.
- Take the WELDER.
- Turn on the left tap.
- Take the LAKEWATER.
- Move down and go left to the broken street light.
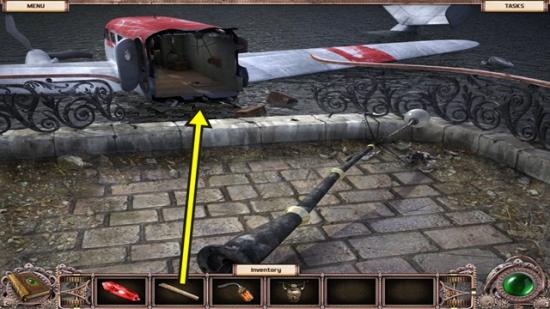
- Put the BOARD on the ledge.
- Go into the plane and continue forward to the cockpit.
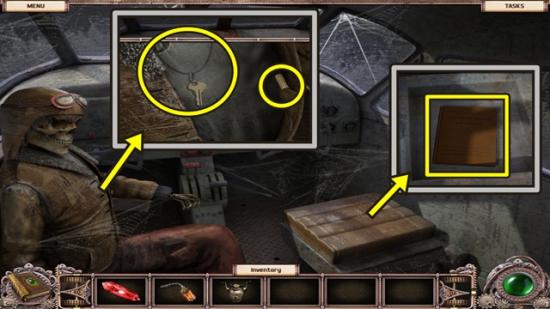
- Click on the seat.
- Remove the cover.
- Click on the aviator’s flight log book.
- Click on the map, then click on it again. Click anywhere outside the window to close it.
- Click on the skeleton.
- Take the PILOT’S KEY.
- Move the button side of the jacket.
- Take the map coordinates.
- Close the notebook.
- Move down into the body of the plane.
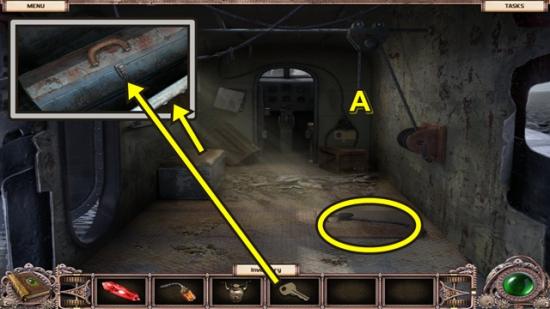
- Click on the seat.
- Unlock the toolbox with the PILOT’S KEY.
- Unfold the cloth, then take the WRENCH.
- Click on the floor hatch.
- Take the WINCH HOOK. Click anywhere outside the window to close it.
- Click on the cable (A).
- Add the WINCH HOOK.
- Use the WELDER to weld the two cables together.
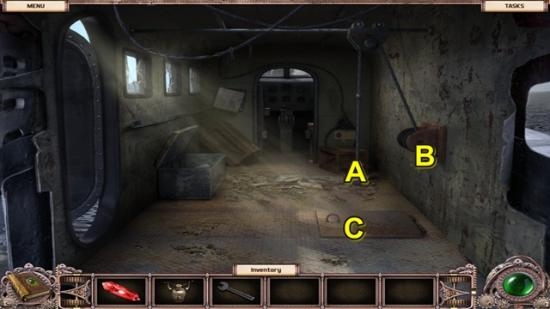
- Click on the hook (A) to attach it to the floor hatch.
- Turn the handle (B).
- Click on the newly revealed floor safe (C).
- Click on the safe again.
- A mini-puzzle starts.
- Click on the map on the left.
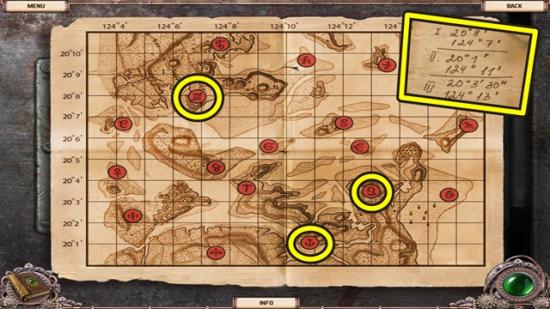
- Using the coordinates written on the note (top right), determine the three symbols.
- Click anywhere outside the map to move it.
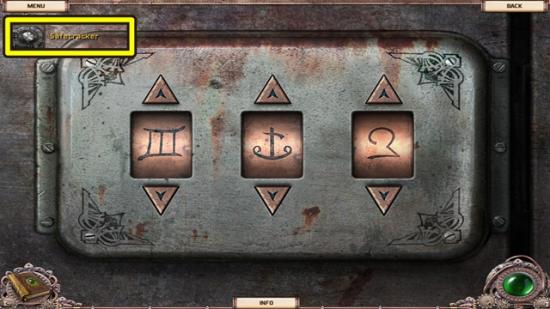
- To open the safe, use the arrows to locate the symbols you just found.
- You earn the Safecracker Achievement.
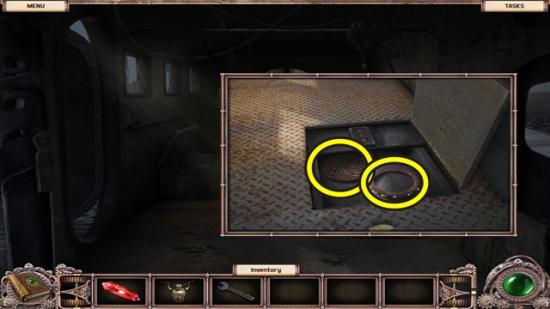
- Take the POWER SUPPLY and LOCK PIECE.
- Move down.
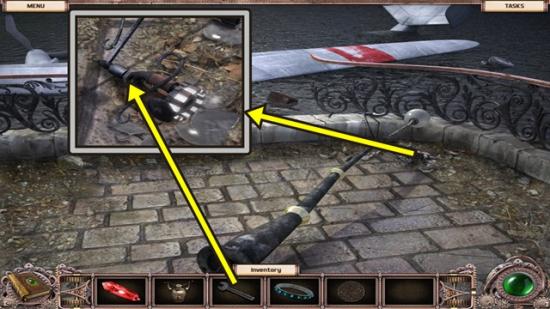
- Click on the broken street light.
- Use the WRENCH to take the MAGNETIC CORE.
- Move down and go right to the pumping station.
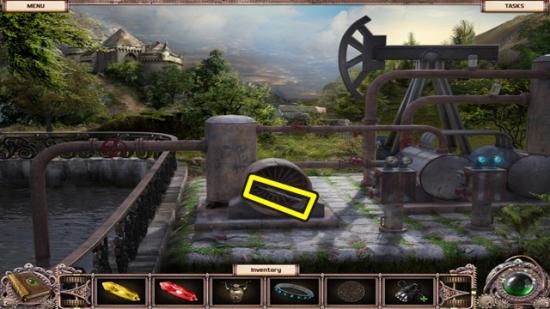
- Click on the fan.
- Take the METAL POLE. Click anywhere outside the window to close it.
- Return to the cockpit (move down, then left, go into the plane and move forward).
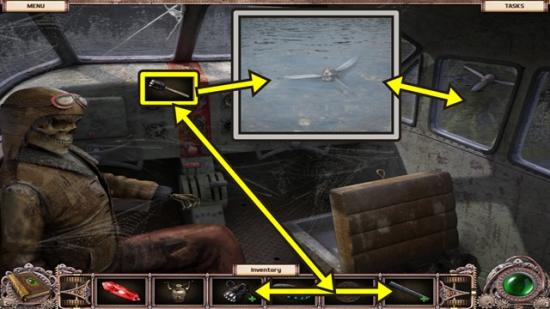
- Combine the MAGNETIC CORE and METAL POLE to make the TUBE WITH MAGNET.
- Click on the side window.
- Use the TUBE WITH MAGNET to break the window, then use it again to get the PROPELLER.
- Return to the pumping station (move down three scenes, then go right).
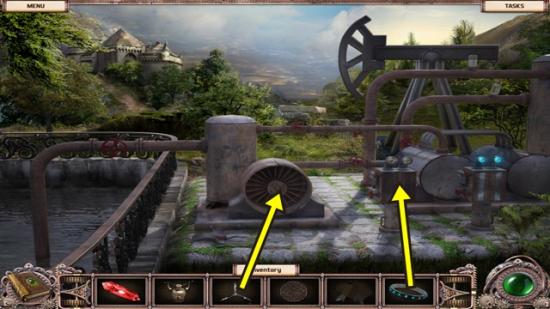
- Click on the fan.
- Add the PROPELLER.
- Click on the left panel.
- Remove the cover.
- Add the POWER SUPPLY.
- Return to the tunnel (move down, then forward).
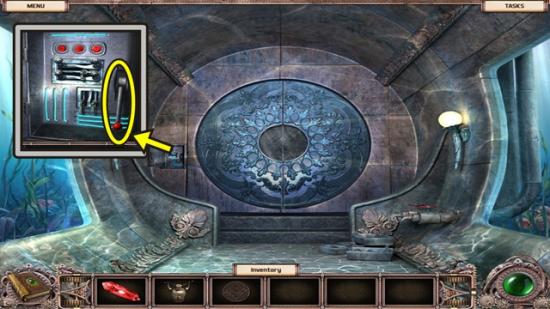
- Click on the panel beside the central doorway.
- Open the panel.
- Pull the lever.
- Go through the open door to the tower courtyard.
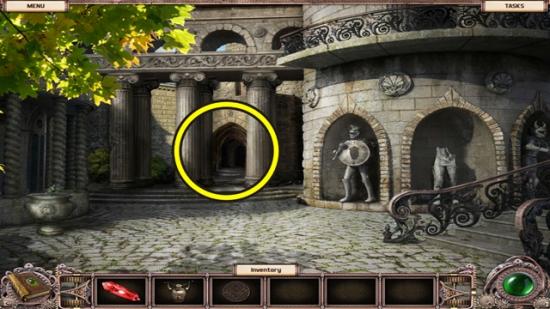
- Go to the generator room to start a fragmented object hunt.
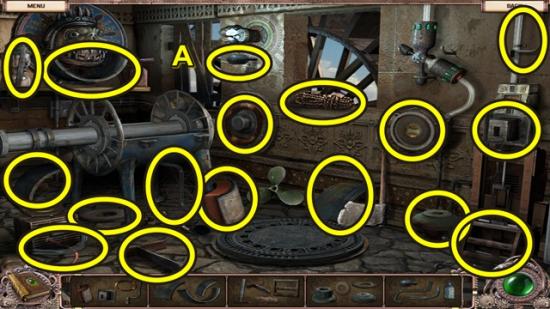
- Find all the object fragments shown in the images at the bottom of the screen. Move the boards (A) and take the object fragment. You will be able to complete the cover, tubes, coil and hoist.
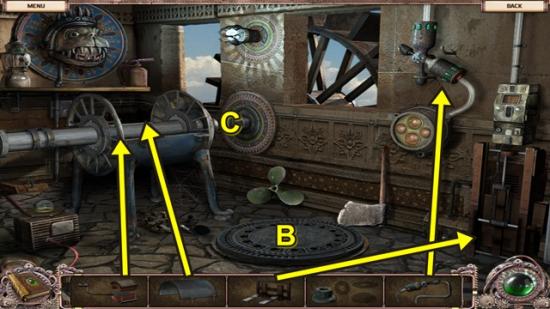
- Add the tubes to the upper part of the mechanism, then add the hoist to the lower part of the mechanism.
- Lift the hoist (by clicking on it) and take the object fragment (B).
- Put the coil on the generator, then add the cover.
- Place the clutch (C).
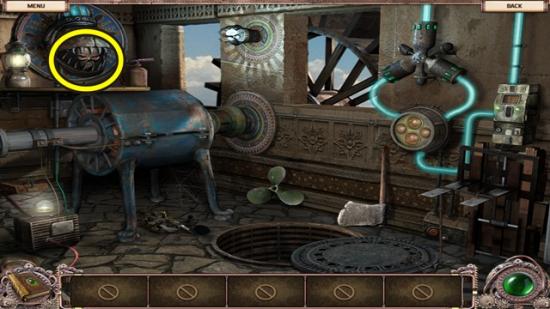
- Take the SKULL.
- Go up the stairs to the tower corridor.
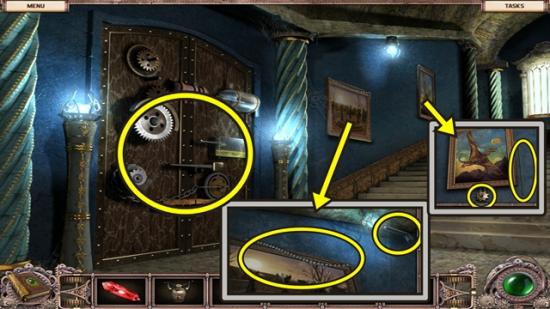
- Click on the painting.
- Take the TUBE and CHAIN.
- Click on the painting.
- Pull the chain and take the GEAR.
- Click on the door.
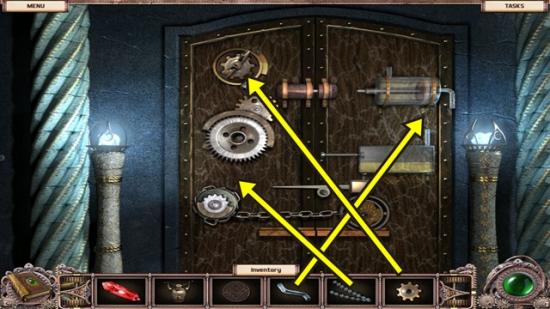
- Add the GEAR, TUBE and CHAIN.
- You earn the Mechanic Achievement.
- Enter the room.
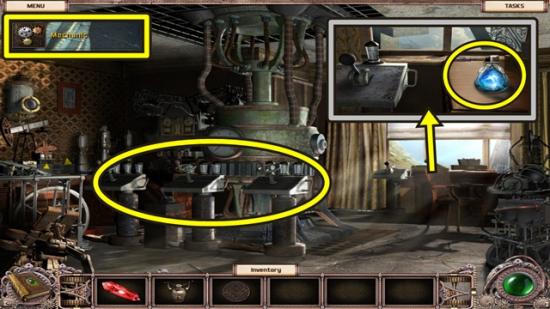
- Click on the desk.
- Take the LIGHTER. Click anywhere outside the window to close it.
- Click on the mechanism.
- A mini-puzzle starts.
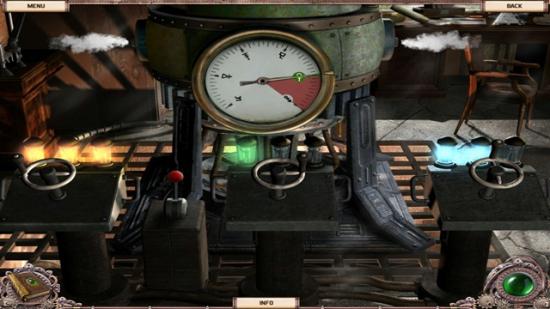
- Use the dials to move the lever into the green zone. The left dial moves the lever six marks, the middle dial moves the lever eight marks and the right dial moves the lever seven marks. The green zone is on the 40 mark.
- Turn the left dial three times, the middle dial once and the right dial twice.
- Solution:
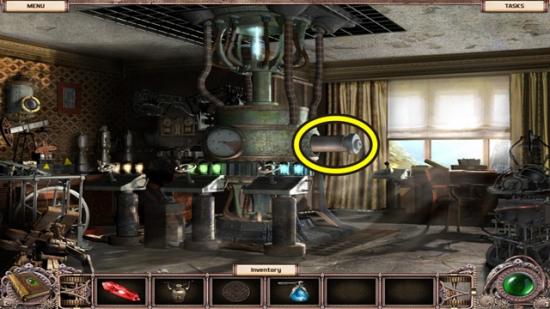
- Click on the cylinder that came out of the mechanism.
- Remove the cover and take the CROWN.
- Move down two scenes to the tower courtyard.
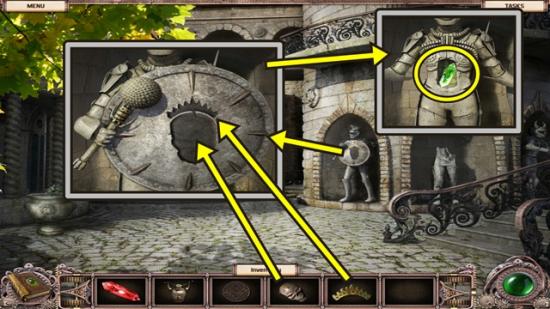
- Click on the statue.
- Add the SKULL and CROWN.
- Take the GREEN CRYSTAL.
Fifth Crystal
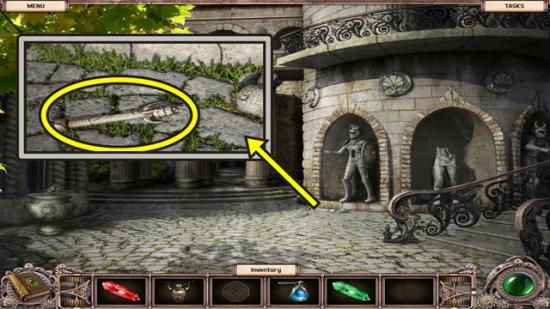
- Click on the ground in front of the statue.
- Take the SCEPTER.
- Go up the stairs and go through the door.
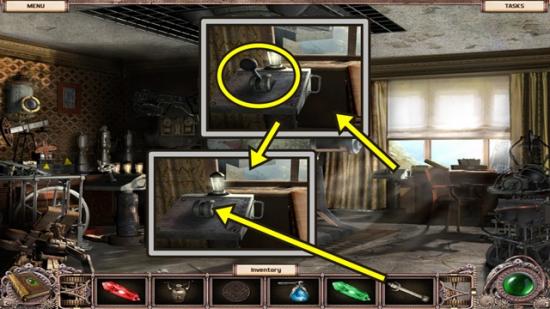
- Click on the desk.
- Pull the lever twice until it breaks.
- Add the SCEPTER.
- Pull the scepter to lower the bridge. Click anywhere outside the window to close it.
- Move down and move up the stairs.
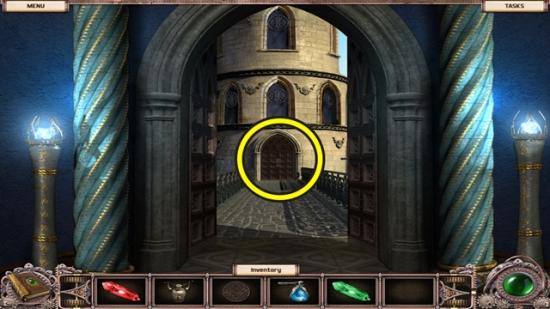
- Open the door.
- Open the door at the end of the bridge, then enter the laboratory.
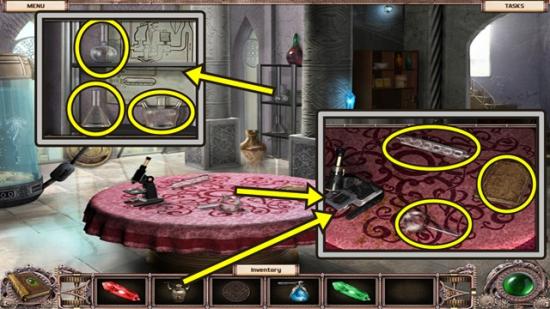
- Click on the glass shelf.
- Take the ROUND FLASK, CONICAL FLASK and TWO-HORNED FLASK.
- Click on the table.
- Take the ELONGATED FLASK and HORNED FLASK.
- Open the notebook and read the entry. Close the notebook.
- Click on the microscope.
- Put the LAKEWATER on the lens.
- A mini-puzzle starts.
- Collect the microbes according to the counter on the left. Click on the creatures as you see them float by.
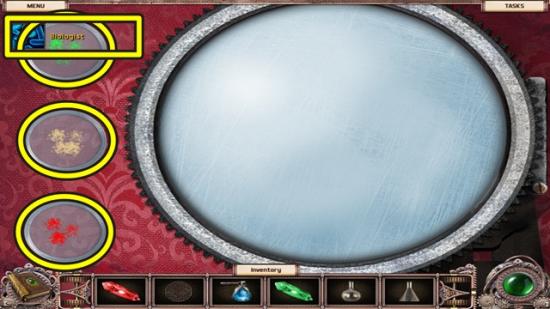
- You earn the Biologist Achievement.
- Take the EMERALD BACTERIA, AMBER BACTERIA and CRIMSON BACTERIA.
- Go to the upper floor.
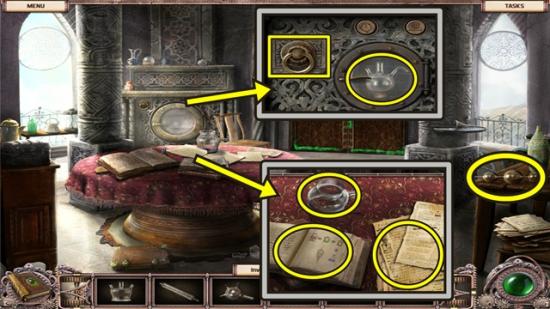
- Take the BUBBLE FLASK.
- Click on the oven.
- Take the EMPTY SCOOP.
- Open the oven door and take the SYMETRICAL FLASK.
- Click on the table.
- Take the CYLINDRICAL FLASK.
- Click on the book and note the instructions. Close the notebook.
- Move the papers (two clicks) and take the TWISTY FLASK.
- Move down four scenes to the tower courtyard.
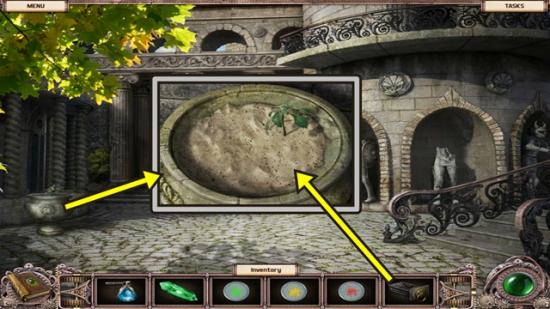
- Click on the urn.
- Use the EMPTY SCOOP to get the SCOOP OF SAND. Click anywhere outside the window to close it.
- Go back up to the upper floor.
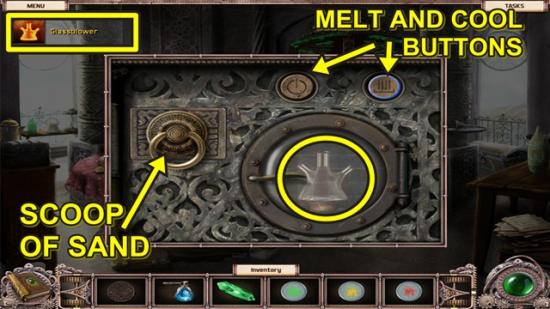
- Click on the oven.
- Insert the SCOOP OF SAND.
- Press the melt button.
- After the flask appears, press the cool button.
- Open the oven door and take the TRIANGULAR FLASK.
- You earn the Glassblower Achievement.
- Move down to the laboratory.
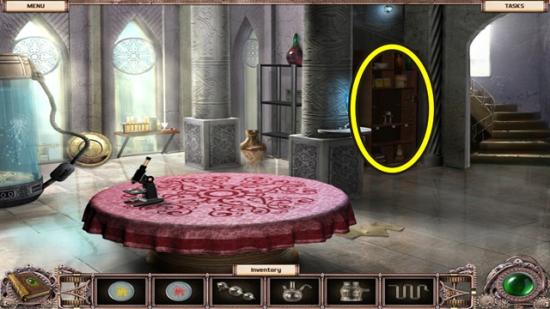
- Click on the wooden shelf.
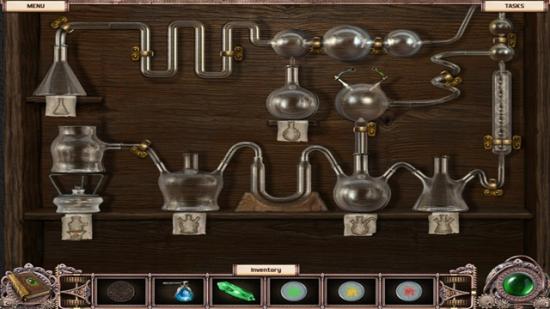
- Add all ten FLASKS.
- Move down and click on the jellyfish aquarium.
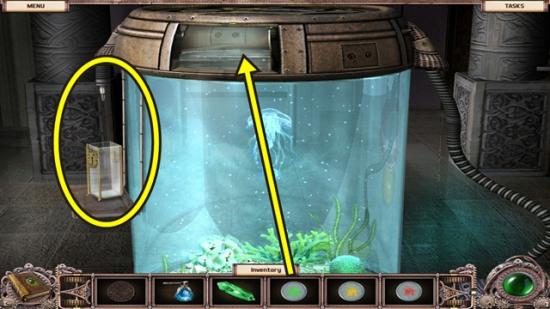
- Lift the panel at the top of the aquarium.
- Pour the EMERALD BACTERIA in the tank.
- After the vial fills, take the EMERALD VENOM.
- Move down.
- Click on the wooden bookshelf where you placed all the flasks.
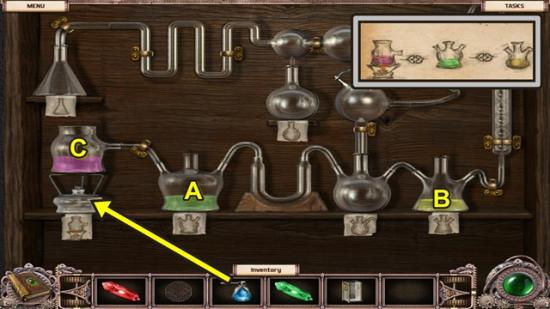
- Pour the EMERALD VENOM in the flask (A). Your notebook has a picture of the flask that requires the emerald venom.
- Move down and click on the aquarium.
- Put the EMPTY VIAL on the ledge where you took it originally.
- Pour the AMBER BACTERIA in the tank.
- After the vial fills, take the AMBER VENOM.
- Return to the wooden bookshelf with the flasks.
- Pour the AMBER VENOM in the flask (B). Your notebook has a picture of the flask that requires the amber venom.
- Move down and click on the aquarium.
- Put the EMPTY VIAL on the ledge where you took it originally.
- Pour the CRIMSON BACTERIA in the tank.
- After the vial fills, take the AMBER VENOM.
- Return to the wooden bookshelf with the flasks.
- Pour the CRIMSON VENOM in the flask (C). Your notebook has a picture of the flask that requires the crimson venom.
- Light the burner with the LIGHTER.
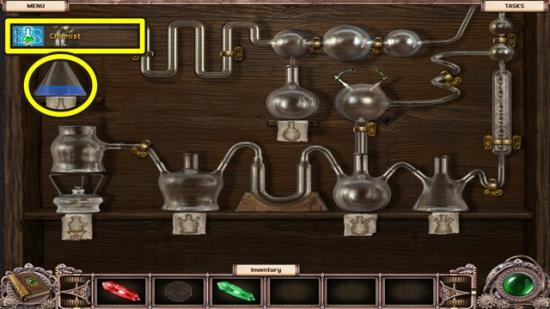
- Once the process is over, take the SOLVENT.
- You earn the Chemist Achievement.
- Move down and go up the stairs to the upper floor.
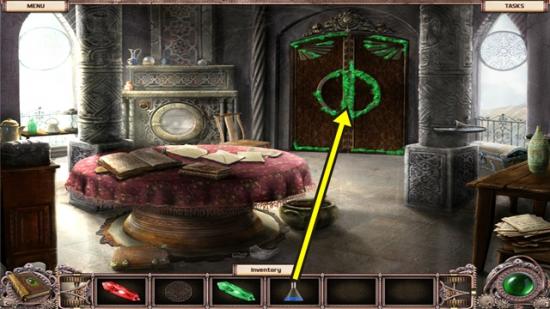
- Use the SOLVENT on the door.
- Go through the door.
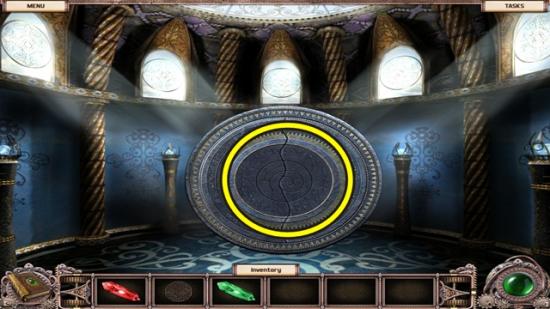
- Click on the ring.
- A mini-puzzle starts.
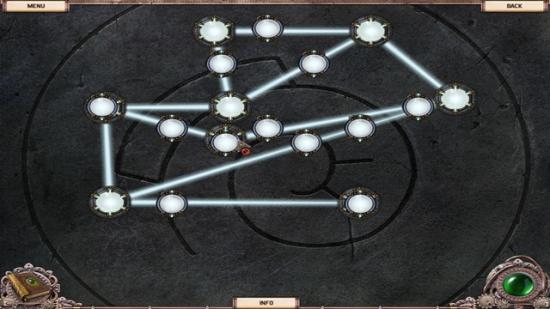
- Arrange the prisms so a light beam passes through all the lights.
- Solution:
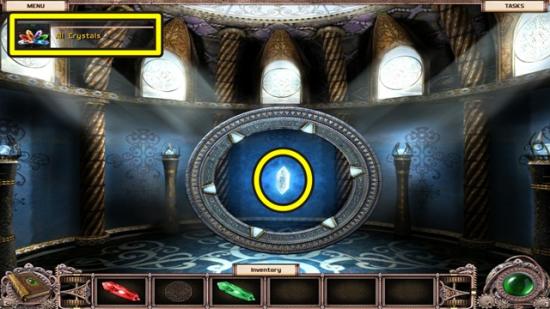
- Take the WHITE CRYSTAL.
- You earn the All Crystals Achievement.
- Go through the portal to the main hall.
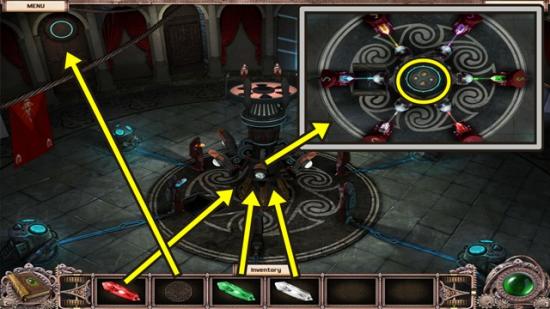
- Click on the machine.
- Add all the CRYSTALS in your inventory.
- Take the BATTERY.
- Click on the left door.
- Add the LOCK PIECE.
- Enter the tunnel.
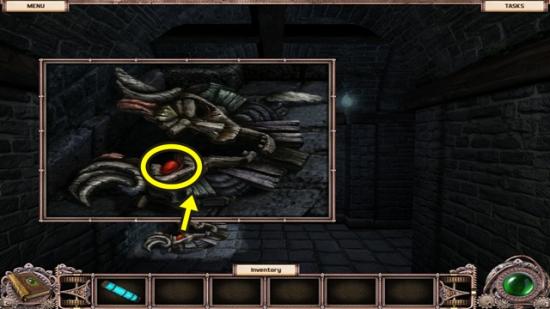
- Click on the broken mask.
- Take the MASK EYE.
- Go right and move forward.
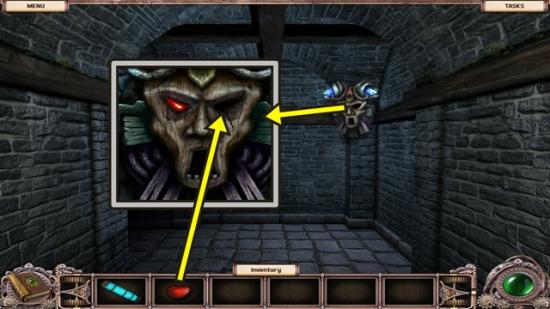
- Click on the mask.
- Add the MASK EYE.
- Take the CROSS-SHAPED PLATE from the mask’s mouth.
- Move left to the engine room.
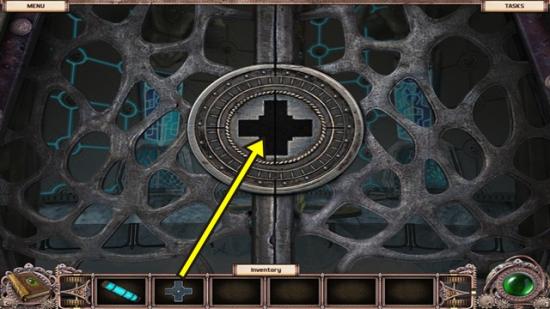
- Insert the CROSS-SHAPED PLATE.
- A mini-puzzle starts.
- Position all the plates into the grid so all pieces of the grid are covered.
- Solution:
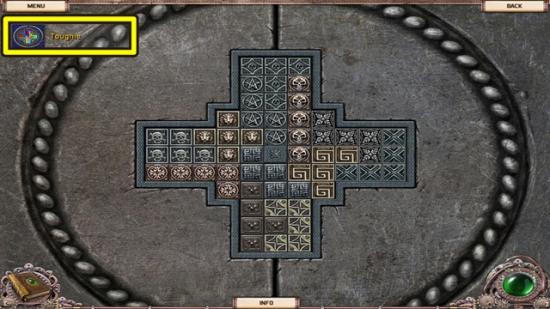
- You earn the Toughie Achievement.
- If you have not skipped any puzzles, you earn the Puzzle Solver Achievement.
- Move forward.
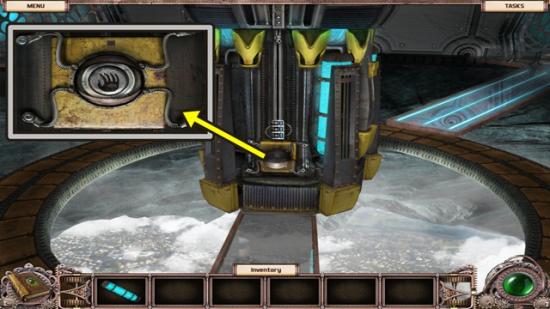
- Click on the mechanism.
- Lift the cover and press the button.
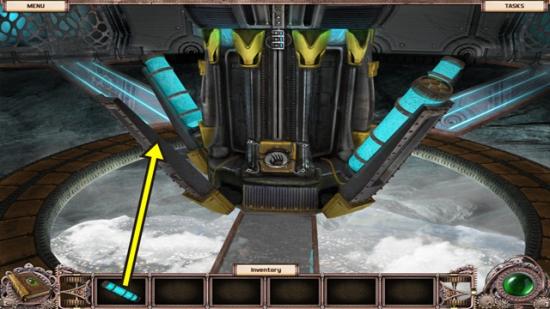
- Add the BATTERY.
- You earn the Ready to Go Achievement.
- Watch the cutscene.
- If you haven’t used the Hint button, you earn the Perfect Game Achievement.
- If you watched all the cutscenes without skipping, you earn the Story Time Achievement.
- If you earned all the other Achievements, you earn the Collector Achievement.
Congratulations! You have completed Gamezebo’s walkthrough for Inbetween Land. Be sure to check back often for game updates, staff and user reviews, user tips, forums comments and much more here at Gamezebo!
More articles...
Monopoly GO! Free Rolls – Links For Free Dice
By Glen Fox
Wondering how to get Monopoly GO! free rolls? Well, you’ve come to the right place. In this guide, we provide you with a bunch of tips and tricks to get some free rolls for the hit new mobile game. We’ll …Best Roblox Horror Games to Play Right Now – Updated Weekly
By Adele Wilson
Our Best Roblox Horror Games guide features the scariest and most creative experiences to play right now on the platform!The BEST Roblox Games of The Week – Games You Need To Play!
By Sho Roberts
Our feature shares our pick for the Best Roblox Games of the week! With our feature, we guarantee you'll find something new to play!All Grades in Type Soul – Each Race Explained
By Adele Wilson
Our All Grades in Type Soul guide lists every grade in the game for all races, including how to increase your grade quickly!


