![Digimon UP Tier List [Supports, Buddies, and Partners]](/wp-content/uploads/2026/07/digimon-up-tier-list.jpg "Digimon UP Tier List [Supports, Buddies, and Partners]")
Digimon UP Tier List [Supports, Buddies, and Partners]
These Digimon will get you UP the leaderboard.


![Haze Seas Boss Drops [Chances, Locations, and How to Spawn]](/wp-content/uploads/2026/07/haze-seas-boss-drops.jpg "Haze Seas Boss Drops [Chances, Locations, and How to Spawn]")

Welcome to the House of 1000 Doors: The Palm of Zoroaster walkthrough on Gamezebo. House of 1000 Doors: The Palm of Zoroaster is a hidden object game created by Alawar Games. This walkthrough includes tips and tricks, helpful hints, and a strategy guide on how to complete House of 1000 Doors: The Palm of Zoroaster.
Welcome to the House of 1000 Doors: The Palm of Zoroaster walkthrough on Gamezebo. House of 1000 Doors: The Palm of Zoroaster is a hidden object game created by Alawar Games. This walkthrough includes tips and tricks, helpful hints, and a strategy guide on how to complete House of 1000 Doors: The Palm of Zoroaster.
You can play this game in Casual or Expert mode. In Casual mode the hint button recharges after a minute and interactive areas are indicated with sparkles. In Expert mode the hint button recharges in two minutes and interactive areas are not indicated. Hidden Object Scenes (HOS) are indicated with sparkles in both modes
The cursor normally looks like a little gold arrow with a blue gem in it. The blue gem will start to rotate if you hover over an item that requires an action. Clicking on the item will give you a hint as to what action is required
A magnifying glass icon indicates you can inspect an object more closely
A hand icon means you can pick up an item. Usually the items you pick up will go into your inventory bar at the bottom of the screen but occasionally you will need to use the item straight away
Once you’ve crossed the water to the house in scene two you will find a very useful interactive map, which can be accessed in the bottom right of the screen. The map shows all areas that are accessible to you and allows you to instantly jump to another area without having to trudge through all the areas in between. Your current location is indicated with two little footprints. Unlike interactive maps in other games, this map only highlights the areas with objectives that you can currently complete. These areas will show up green on the map. So if you find an item that is required to complete an objective in a previous area, this area will instantly be highlighted on your map, saving you a lot of guesswork and toing and froing
Your journal will keep track of all the notes and newspapers you find and click on throughout the game. Refer to your journal for puzzle solutions that appeared on the notes and papers
The hint button only works in areas with objectives you can complete and in HOS
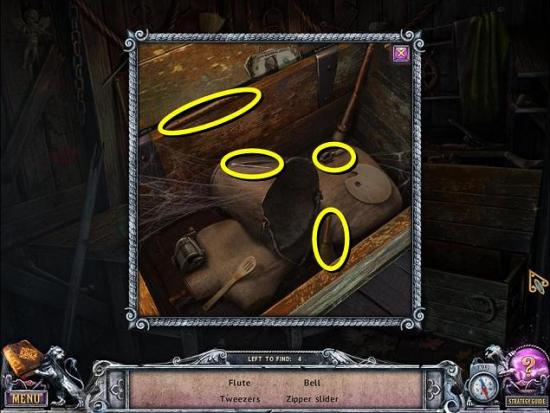
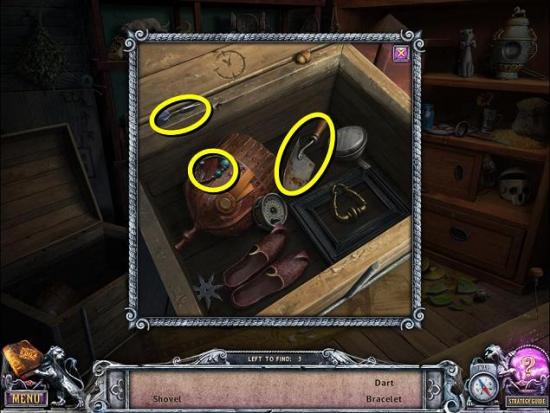
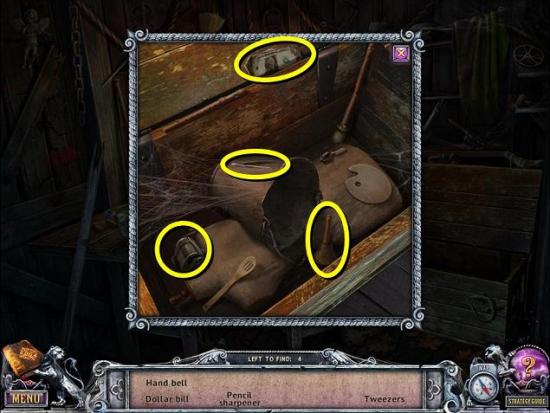
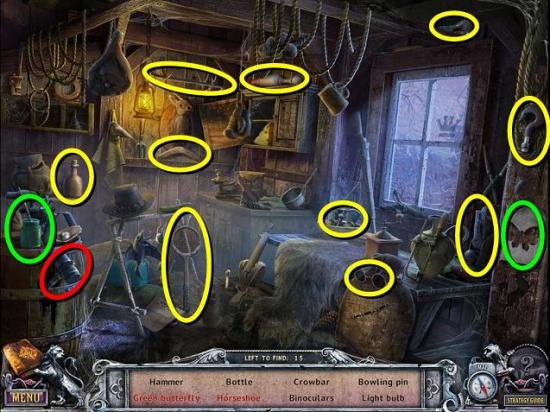
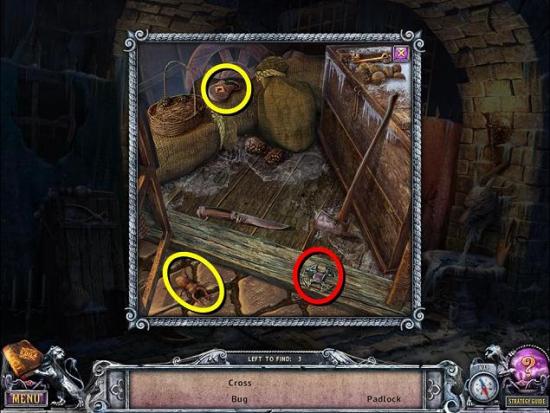
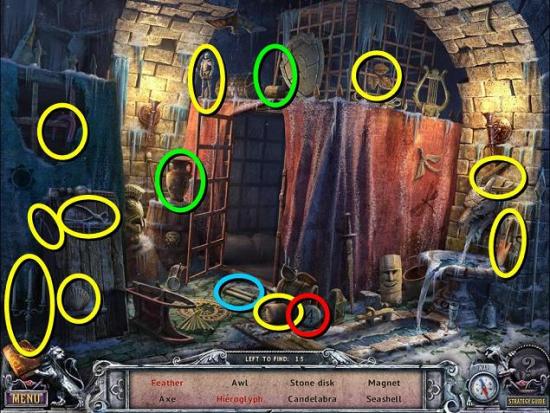
In the HOS some items are listed in red. These items require an extra step before you can take them, like using matches to light a lantern, or pulling down a curtain to reveal a hidden area. Most HOS also have places you can zoom in on, for example the inside of a chest, to find more items
Puzzles can be skipped when the skip button has filled up. You can reset puzzles by exiting and restarting the puzzle

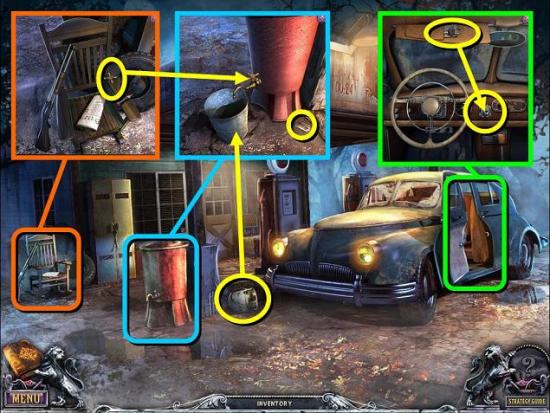
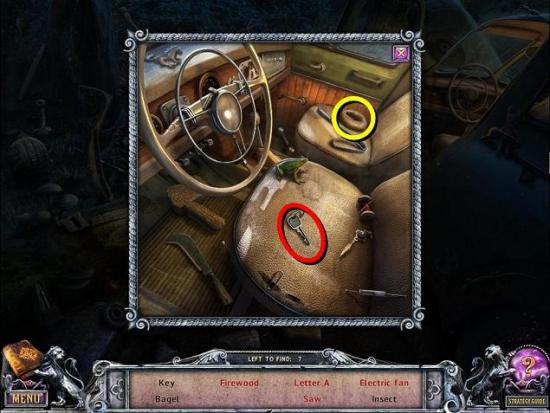
Zoom in on the car door
Pull down the sun visor to find the IGNITION KEY
Put the IGNITION KEY in the ignition
Close the window
Grab the BUCKET
Inspect the chair and take the VALVE HANDLE
Also read the newspaper
Zoom in on the water tank and take the RAZOR BLADE
Put the BUCKET under the tap
Place the VALVE HANDLE on the tap
Click on the tap to fill the bucket and take the BUCKET OF WATER
Inspect the locker and cut the rope with your RAZOR BLADE
Grab the SPONGE
Zoom in on the windscreen of the car
Use the BUCKET OF WATER on the windscreen and use the SPONGE to clean the screen
Go back into the car and turn the key in the ignition

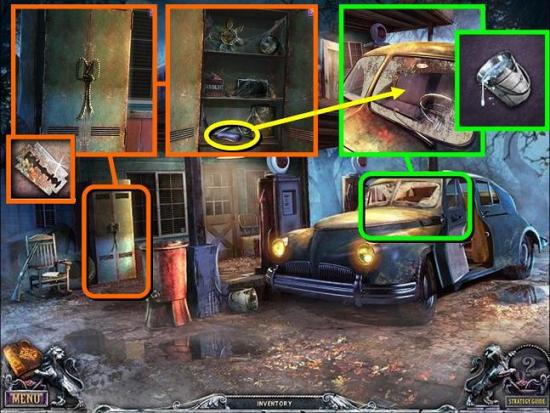
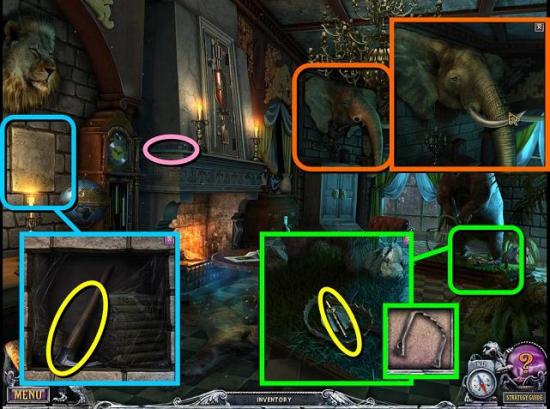
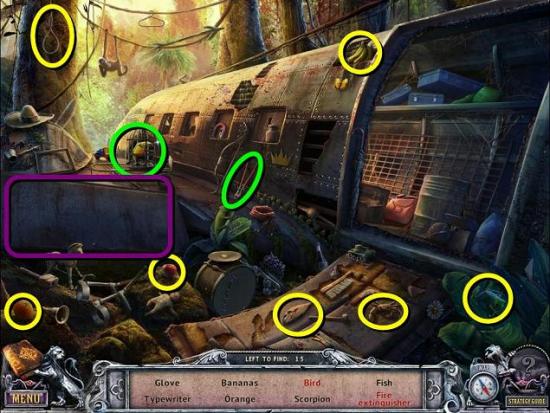
Click on the car for a HOS. Items in red need an extra action to complete. Use the axe on the chopping block to get firewood (blue). Put the fan blade on the fan (green). Put the saw blade on the saw handle (orange). The letter A is under the bark of the log (purple)
Inside the car (within the HOS) you can find more items. Get the TRUNK KEY (red) when you’re done
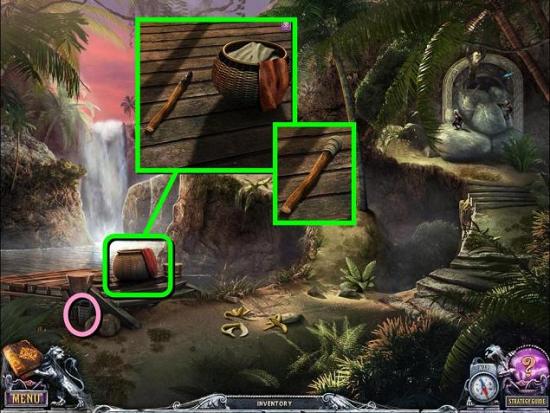
In this scene you can also find the first of the so-called “Beyond Objects”, which are objects that constantly morph between two different states (pink). There are 46 in the game, and these will all be marked pink in the screenshots. These may just be part of the Collector’s Edition of the game, but at this stage I can’t be sure. They are not required for completion of the game
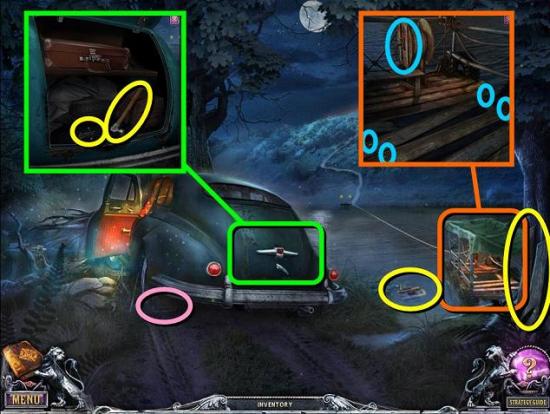
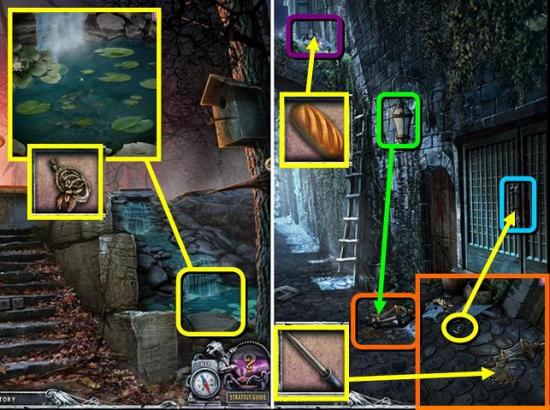
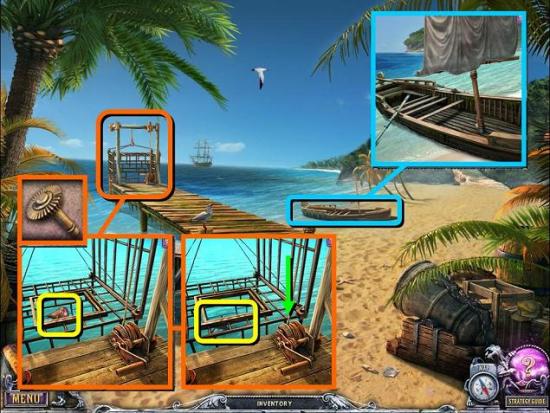
Grab the PLANKS and the CRANK from the water
Zoom in on the trunk of the car and open it with the TRUNK KEY
Take the HAMMER and the NAILS and watch the scene
Zoom in on the pontoon
Place the PLANKS and the NAILS and hammer the nails in place one by one with your HAMMER
Put the CRANK on the winch
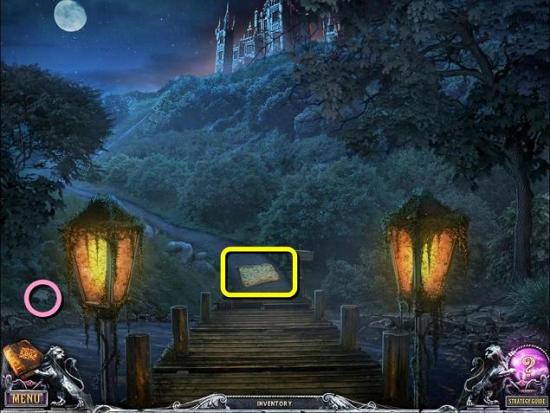
On the other shore, take the map, which will go in the bottom right of the screen. You can use this map to quickly jump to other locations
Find Beyond Object 2/46
Go up the path to the courtyard
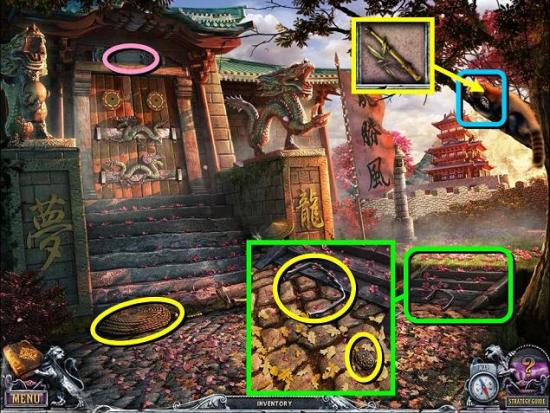
Grab the PRUNING SHEARS
Find Beyond Object 3/46
Zoom in on the container on the right, take the ELEPHANT TUSK and read the paper
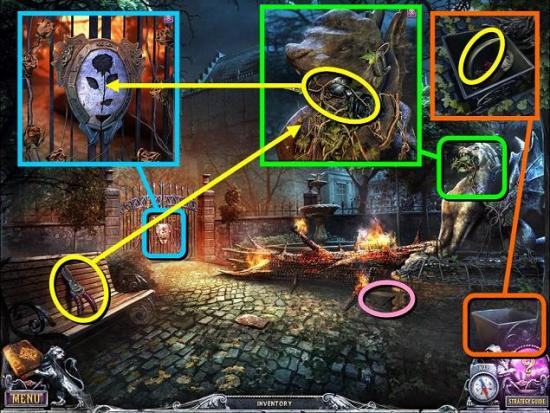
Zoom in on the statue of the griffin and use the PRUNING SHEARS to take the ROSE
Zoom in on the gate and place the ROSE in the lock
Go through the gate to the garden
Talk to the man on the bench (there are other things you can do here right now but I’ll mention them below)
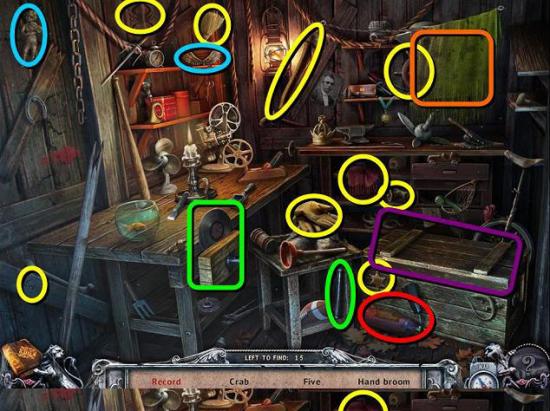
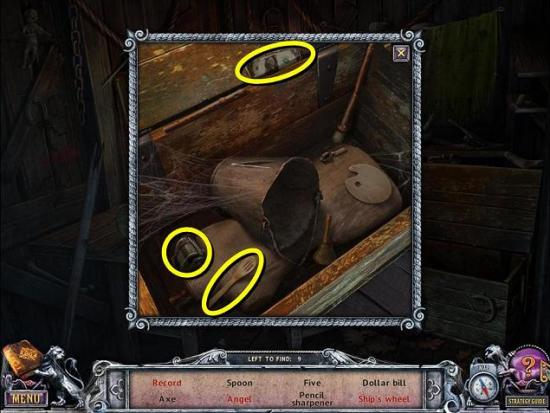
Open the shed door for a HOS. To get the record, use the vice handle on the vice (green). Put the wings on the angel (blue). Pull the curtain (orange) aside for the ship’s wheel. There are more items inside the chest (purple)
Get a FIRE EXTINGUISHER (red)
Back out to the courtyard
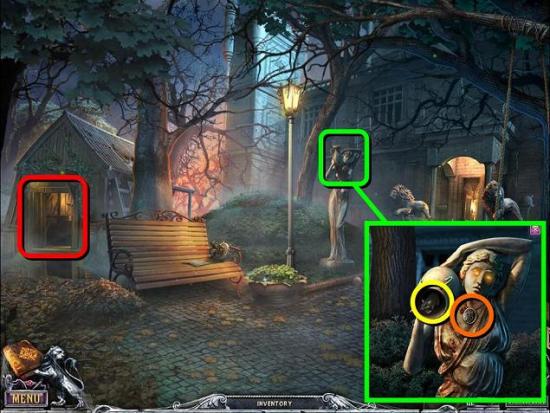
Use the FIRE EXTINGUISHER on the burning tree
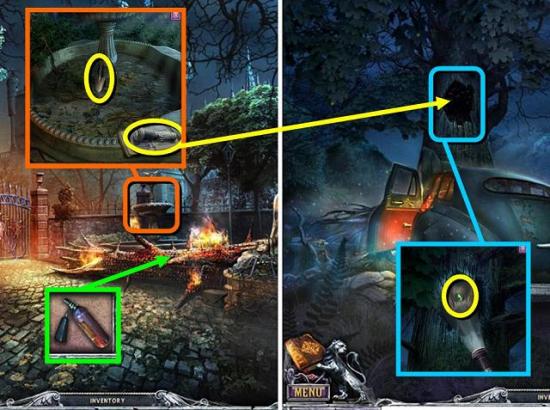
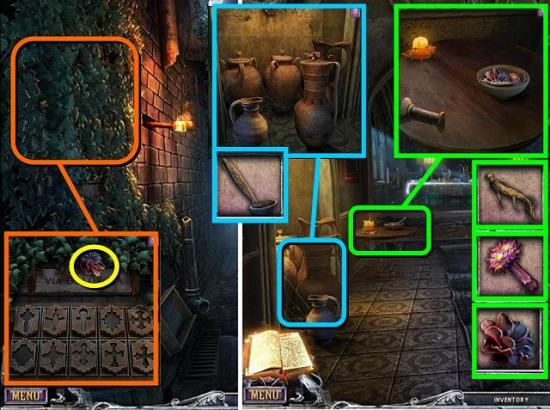
Inspect the fountain and take the SHOVEL and FLASHLIGHT. Also read the diary
Go back to the car on the seashore
Zoom in on the hole in the tree and use the FLASHLIGHT to look inside
Take the EYE
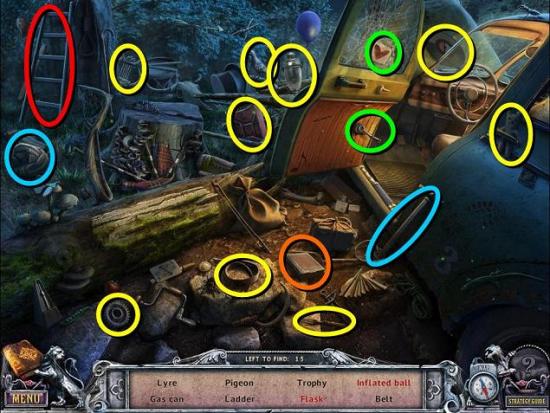
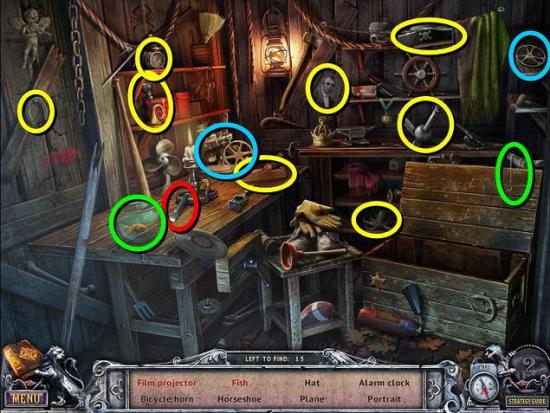
Play the new HOS by the car. Pump up the ball with the bicycle pump (blue). Turn the window handle to get the heart (green). The centipede is under the tree bark. The flask is inside the book (orange) and the dumbbell is inside the car. Get a LADDER (red) when you’re done
Go to the garden
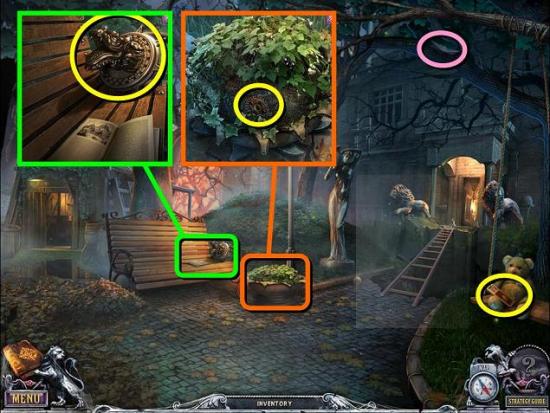
Take the MATCHES from the teddy bear
Find Beyond Object 4/46
The man has now left so zoom in on the bench and take the DRAGON HEAD
Zoom in on the planter and use your SHOVEL to dig
Find a GEAR
Place the LADDER across the gap and go through the door to the passage
Find Beyond Object 5/46
Pick up the CROWBAR
Go back to the courtyard
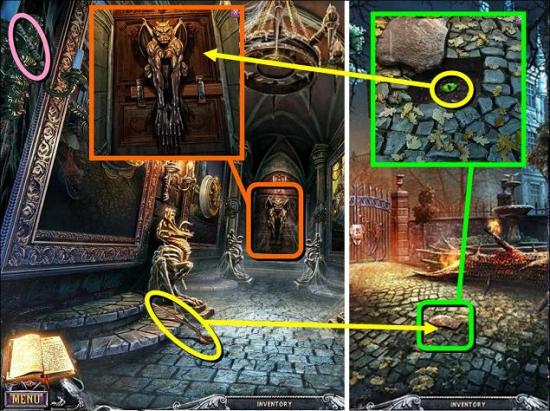
Inspect the loose stone on the ground and use the CROWBAR to move it
Take the second EYE
Go to the passage and zoom in on the gargoyle in the back
Give him the two EYES
Go through the door to the main hall
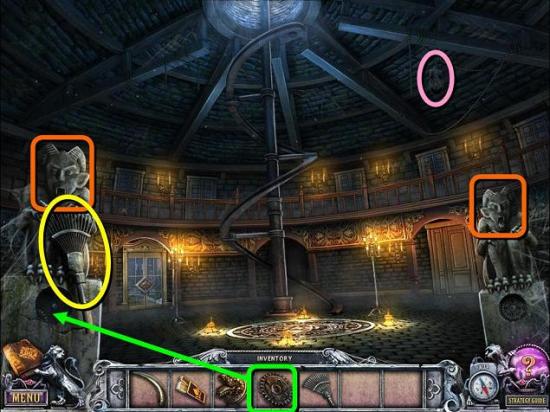
Take the RAKE and Beyond Object 6/46
Place the GEAR in the mechanism of the left statue
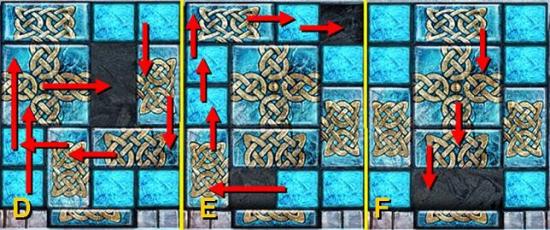
To raise the staircase, click the left statue twice and the right one once
Back out to the garden
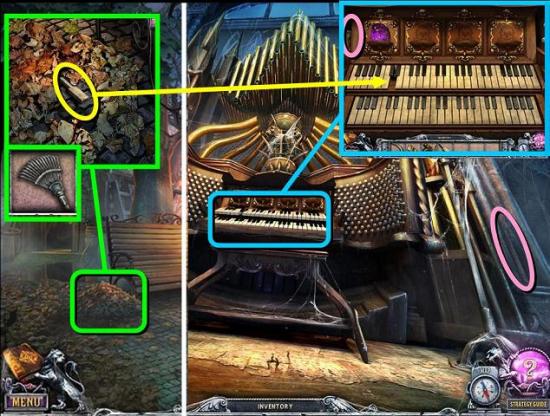
Zoom in on the pile of leaves and use the RAKE to move them
Take the ORGAN KEY
Go back to the main hall
Go up the stairs to the organ
Take Beyond Object 7/46
Zoom in on the keyboard and place the ORGAN KEY
Take the TIBET KEY and Beyond Object 8/46
Go back to the passage and zoom in on the first painting on the left
Open the lock with the TIBET KEY
Go through the painting to Tibet square
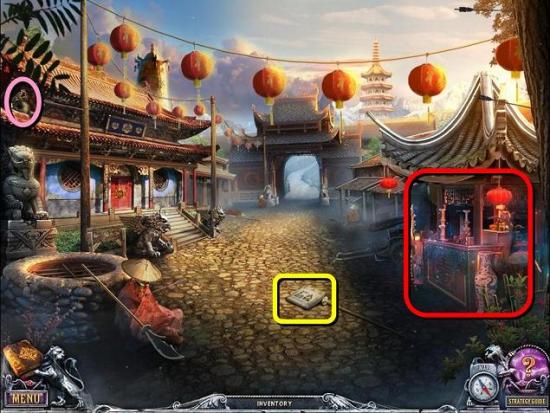
If you click on the ghost he just vanishes
Take Beyond Object 9/46
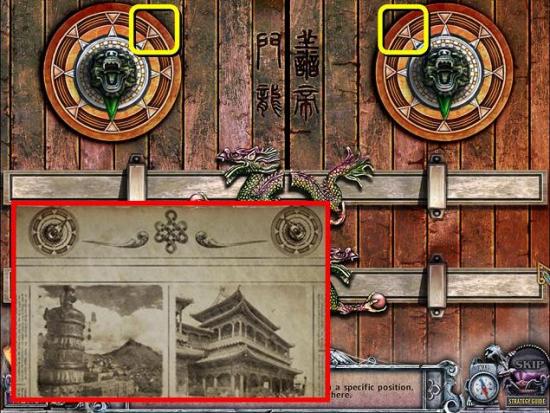
Make sure you read the newspaper on the ground as it shows a puzzle solution you will need later
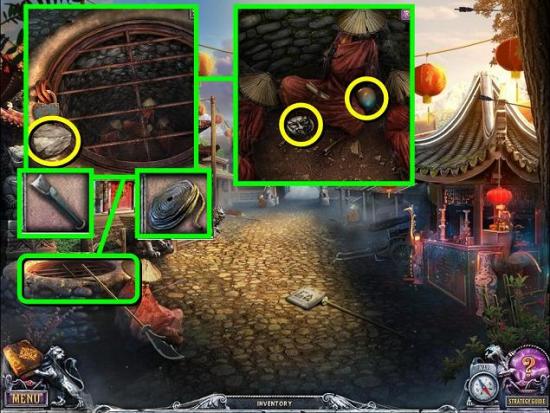
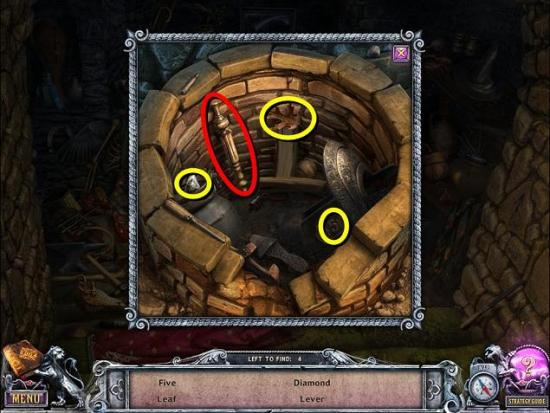
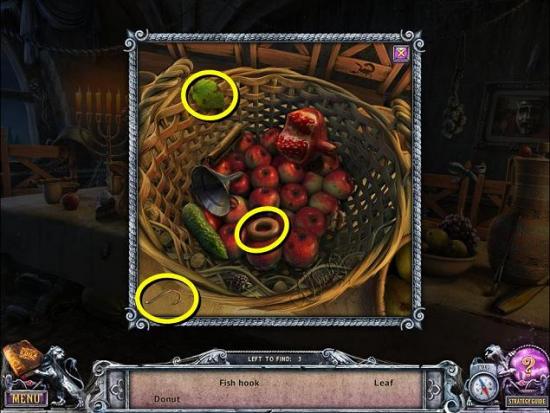
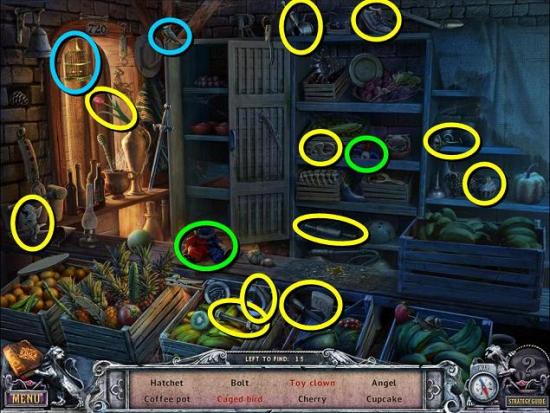
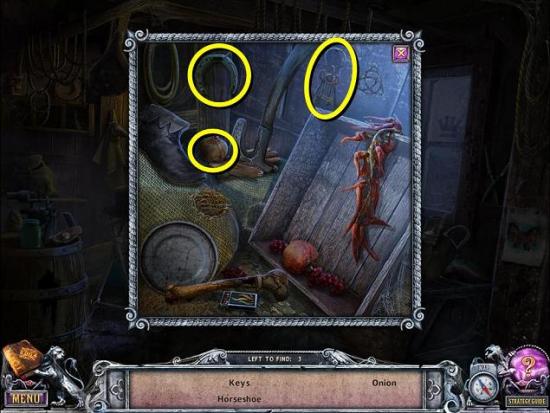
Play the HOS in the cart on the right
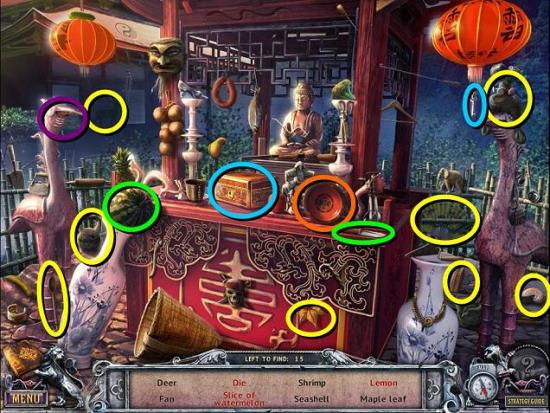
Move the red plate to find the lemon (orange). Use the knife by the red plate to cut the watermelon (green). Open the beak of the bird statue to find the die (purple). Use the key hanging from the right lantern on the locked box (blue) and look inside for more items
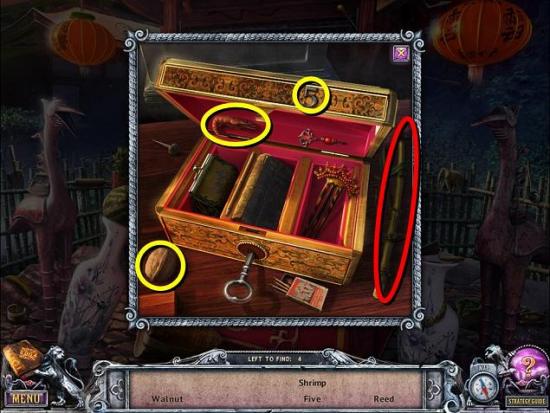
Get a REED (red)
Move on to the temple entrance
Take the ROPE and Beyond Object 10/46
Use the REED on the red panda in the tree and he will drop something
Zoom in on the low steps on the right for a TRAP PART and the LOCKET the panda dropped
Go back to the garden outside the house
Zoom in on the statue and give her the LOCKET
Take the MOUSE FIGURINE
Play the new HOS in the shed
Use the hook hanging from the unicycle on the fishbowl to get the fish (green). Put the film reel onto the projector (blue)
Get a CHISEL (red)
Go to Tibet square
Zoom in on the well. Put the chisel on the lock and then pick up the rock and hit the chisel with it
Put the ROPE down the well
Take the SPHERE and the STONE DISC and look at the scroll
Go to the main hall in the house
Zoom in on the floor and place the STONE DISC on the puzzle
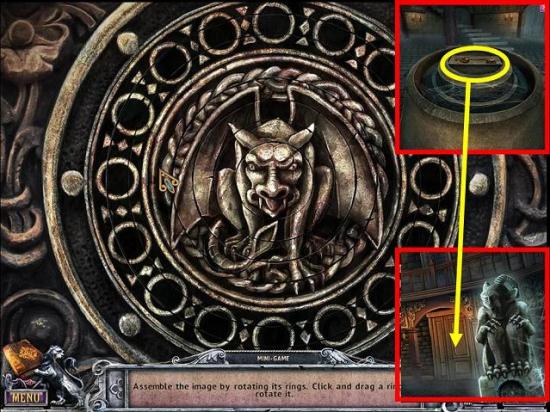
Recreate the image by rotating the rings. Match the outside two rings to the outside of the puzzle and the inner rings on the center piece
Inspect the pillar that appears and take the KEY
Zoom in on the door to the right and unlock it with the KEY
Click the handle to open
Go through the door to the trophy room
Play the HOS in the middle of the room
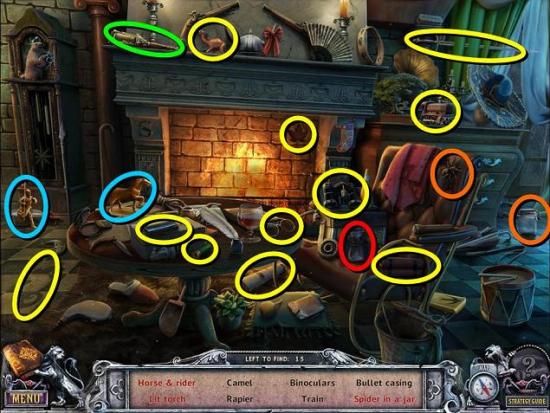
Get the little knight figurine and put it on his horse for horse and rider (blue). Get the torch from the mantelpiece (green) and light it in the fire. Pick up the jar and put the spider in it (orange). Get the POUCH (red) when you’re done
Take Beyond Object 11/46
Zoom in on the elephant and give him back his ELEPHANT TUSK
A hidden compartment is revealed above the desk. Inspect it to find a PICKAXE
Zoom in on the trap by the bear and place the TRAP PART on it
Take the CHIME
Go to Tibet square and zoom in on the pagoda on the left
Place the CHIME on the lock
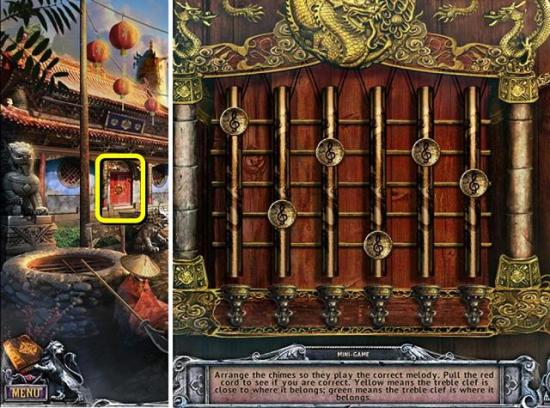
Pull the red cord on the right to play the chimes. The buttons with treble clefs on it will light up after the tune is played: green when they’re in the correct position, yellow when they’re close to the correct position and red when they’re completely wrong. Keep moving the clefs and pulling the cord until you have the right tune
Go into the pagoda, which is actually called a shofuso
Talk to the ghost of the monk
Take Beyond Object 12/46
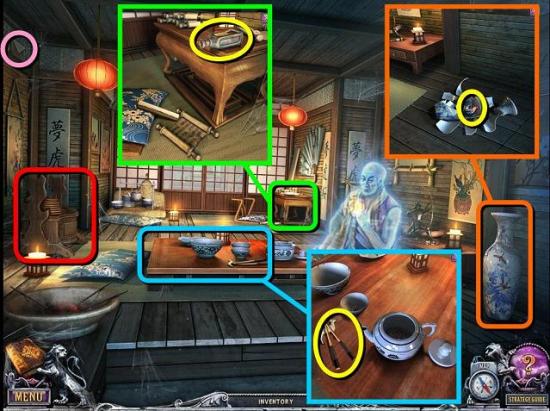
Inspect the vase, knock it over and take the ROOSTER FIGURINE
Zoom in on the table in the back, read the scroll and take the bottle of CLEANER
Zoom in on the table
Take the CHOPSTICKS and RAM FIGURINE
Zoom in on the bench on the left for a puzzle
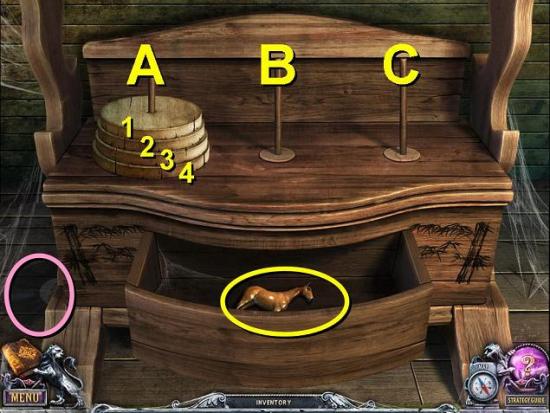
You need to move all the discs to the rod on the right. Discs can only be placed in empty spaces or on top of a bigger disc. Move them in the following order (with disc 1 being the smallest and disc 4 the largest):
Disc 1 to B
Disc 2 to C
Disc 1 to C
Disc 3 to B
Disc 1 to A
Disc 2 to B
Disc 1 to B
Disc 4 to C
Disc 1 to C
Disc 2 to A
Disc 1 to A
Disc 3 to C
Disc 1 to B
Disc 2 to C
Disc 1 to C
Take the HORSE FIGURINE from the drawer and take Beyond Object 13/46
Open the doors in the back and play the HOS
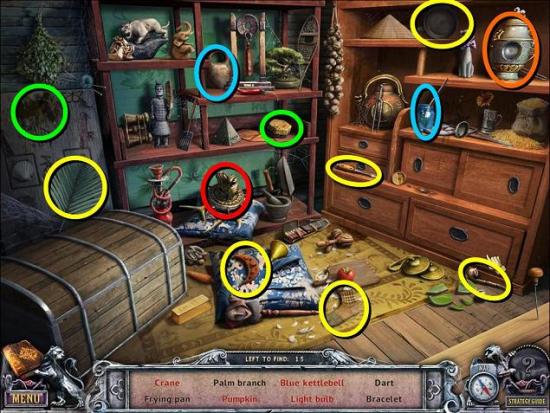
Use the sponge to wipe the dirt off the board and find the crane (green). Use the paint to paint the kettlebell blue (blue). Move the urn (orange) to find the pumpkins. The oven mitt is in the bottom right drawer. The screwdriver is behind the sliding panel. Open the chest for more items
Get the second DRAGON HEAD when you’re done
Back out to Tibet square and play the new HOS in the cart
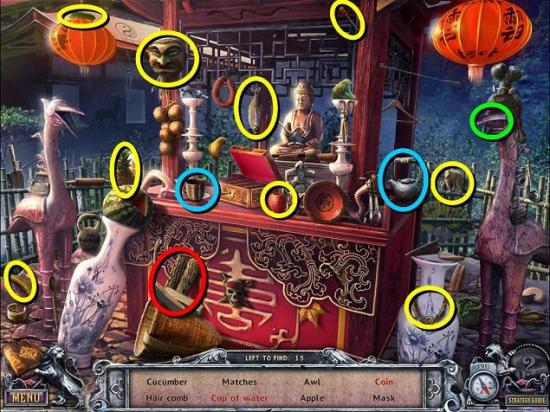
Use the kettle on the cup to pour a cup of water (blue). The coin is inside the beak of the crane on the right (green). There are objects inside the small chest

When you’re done you get FIREWOOD (red)
Go to the temple entrance
Give the SPHERE to the dragon statue on the right
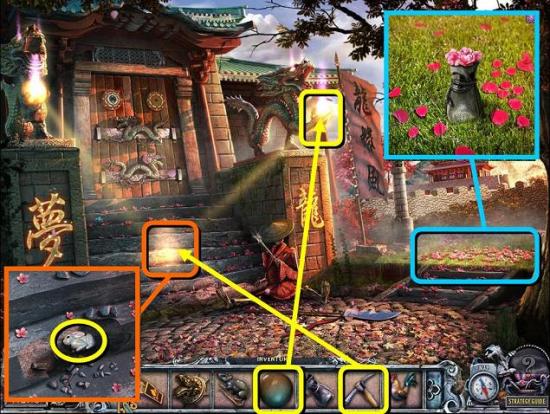
Use the PICKAXE on the spot where the light shines
Find a RABBIT FIGURINE
Zoom in on the grass under the tree
Use the POUCH to pick up some CHERRY TREE PETALS
Zoom in on the temple door
Place the two DRAGON HEADS
If you read the newspaper in Tibet square you will have the correct placement for the dragon heads in your journal. So rotate the heads to their correct places
Go to the temple passage
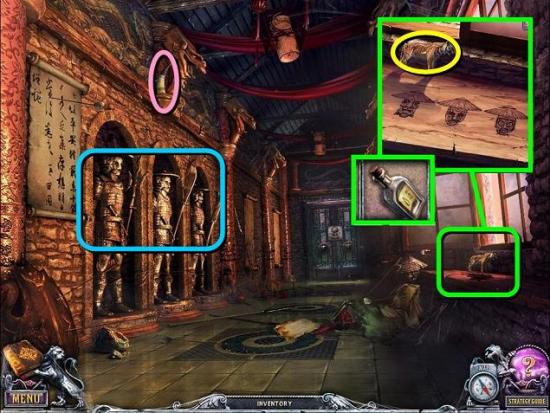
Take Beyond Object 14/46
Zoom in on the windowsill on the right and clean it with the CLEANER. Remember the faces (they’re also in your journal)
Take the TIGER FIGURINE
Zoom in on the three warrior statues
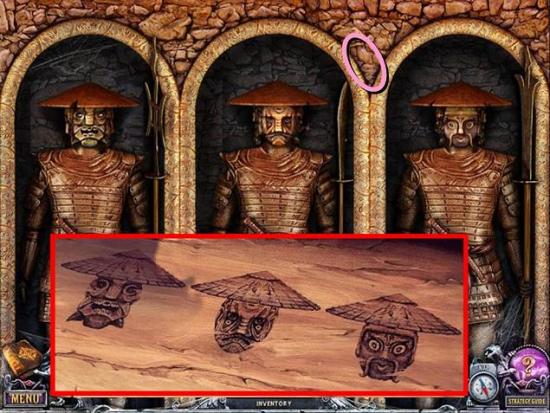
Turn their heads according to the faces you saw on the windowsill
Take the PUZZLE PIECE and Beyond Object 15/46 (sorry – I took the screengrab after I’d taken the object, but I’ve indicated the location in the image)
Zoom in on the door in the back and place the PUZZLE PIECE
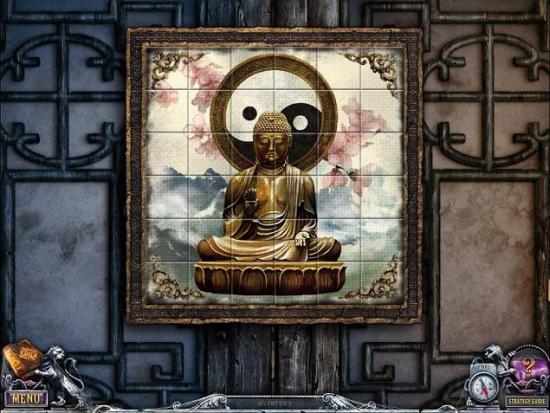
Recreate the image by swapping tiles around. Tiles will stay in place when they’re correct
Go through the door to the Hall of Buddha
Take the HAY
Go back to the shofuso
Zoom in on the fire place in the left back corner
Put the FIRE WOOD and HAY under the kettle and light it with your MATCHES
When the water boils, take the kettle with HOT WATER
Put the CHERRY TREE PETALS in the tea pot
Pour the HOT WATER on them, put the lid on and click on the pot to pour tea into the cup
Take the cup of TEA and give it to the monk
He will give you the GONG STICK
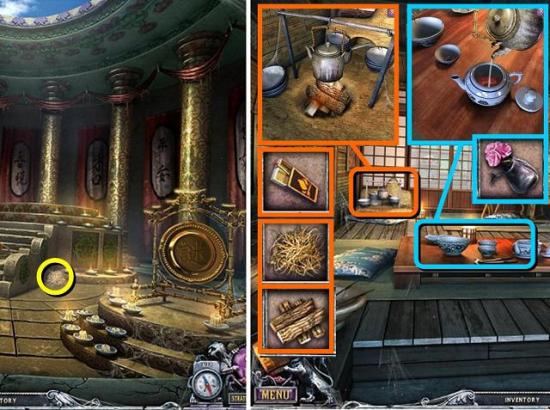
Play the new HOS in the back of the room
Use the sword to slice the tomato (blue). Give the bow to the cat behind the urn (green). The basket is in the right drawer, the tambourine in the left drawer.
There are more items in the chest
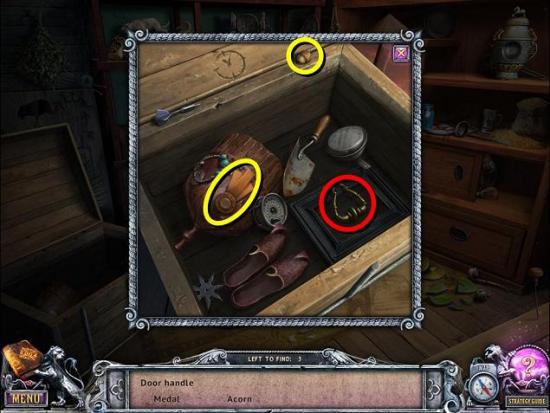
Get a DOOR HANDLE when you’re done (red)
Go to the trophy room in the house
Zoom in on the cupboard in the back and place the DOOR HANDLE
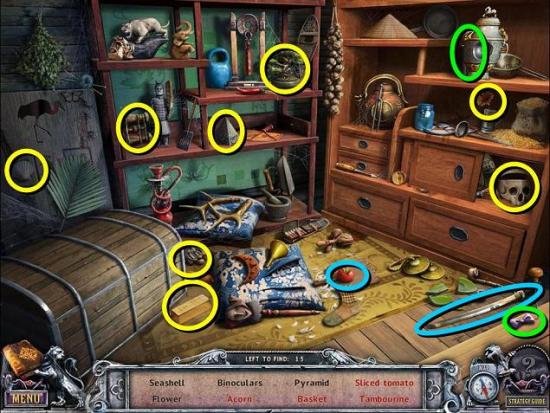
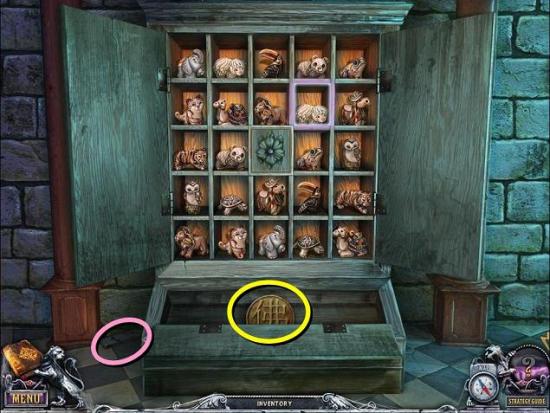
Play the classic memory game inside the cupboard – you need to find matching pairs of figurines
Take the HIEROGLYPH from the drawer and don’t forget to take Beyond Object 16/46
Go to the Hall of Buddha
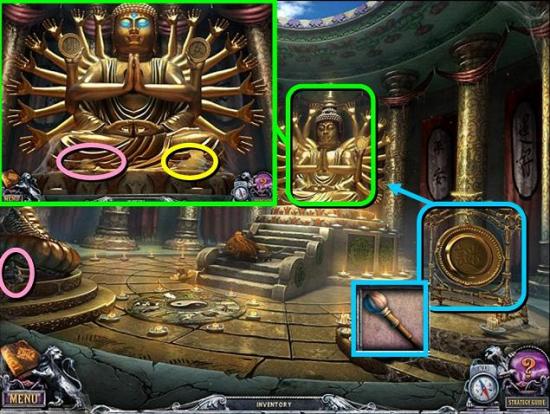
Take Beyond Object 17/46
Hit the gong with the GONG STICK
Zoom in on the statue that appears and take the AFRICA FIGURINE and Beyond Object 18/46
Go back to the trophy room and zoom in on the globe
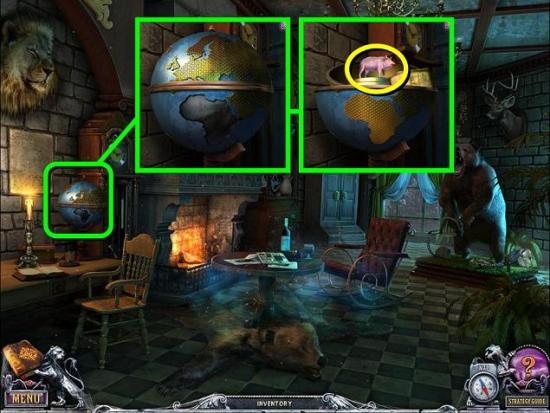
Place the AFRICA FIGURINE
Read the note and take the PIG FIGURINE inside the globe
Play the new HOS in the room
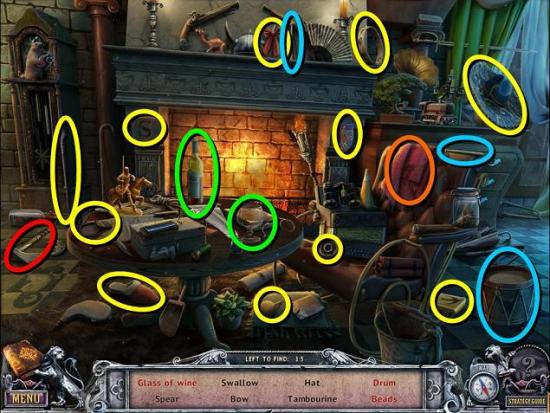
The beads are under the blanket (orange). Pour some wine from the bottle into the glass (green). Find the two drumsticks and put them on the drum. Get an AXE
Go to the Hall of Buddha and zoom in on the floor
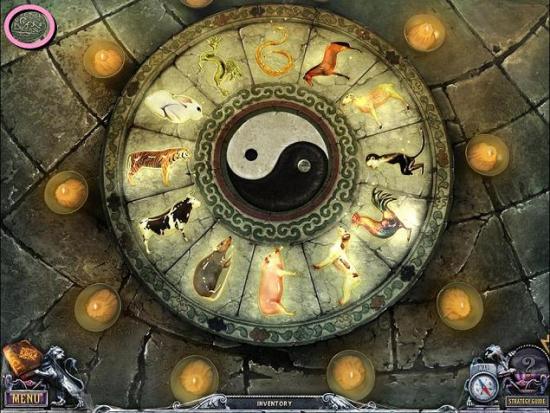
Place all FIGURINES (MOUSE, HORSE, TIGER, RAM, ROOSTER, PIG, RABBIT) in their correct places
Take the HIEROGLYPH and Beyond Object 19/46
Before you go and play the last puzzle of this chapter, go back through the Tibet area to see if you missed any Beyond Objects as you won’t be able to come back here
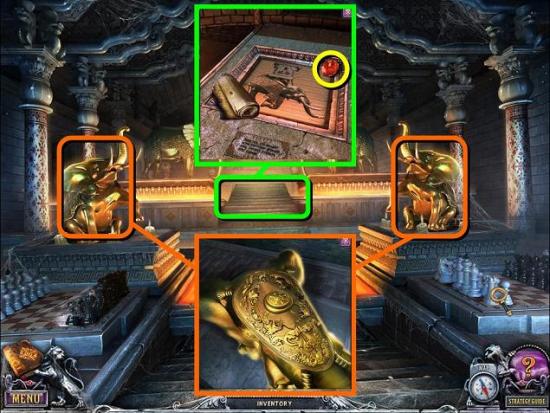
Zoom in on the statue and place the two HIEROGLYPHS in his hands
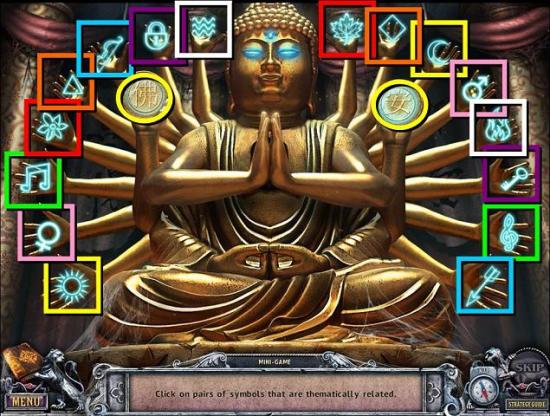
Click on pairs of symbols that are thematically matched
Take the SKULL
Go to the organ and zoom in
Place the SKULL on the second shelf and take the ELEPHANT KEY
Go to the passage
Click on the first painting on the right and open it with the ELEPHANT KEY
Go through the painting to the ruined city
Ignore the first map and go straight on to the hut
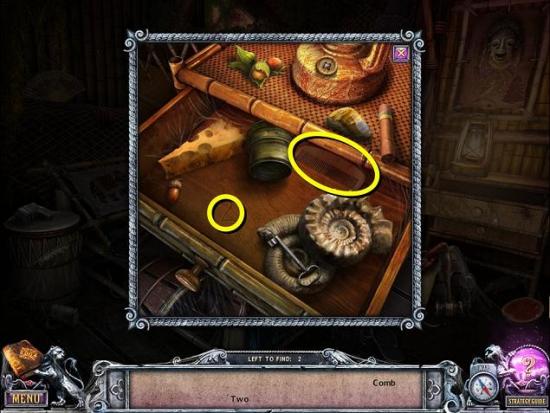
Open the door to the hut and play the HOS
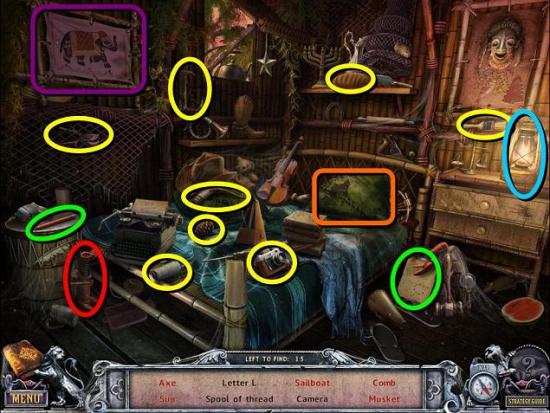
Use the pencil to draw a sun on the piece of paper (green). The axe is behind the painting of the elephant (purple). The musket is behind the pillow (orange). The sailboat is behind the lantern (blue). Open the drawer to find the last two items
Get a JACK (red) when you’re done
Go back to the ruined city
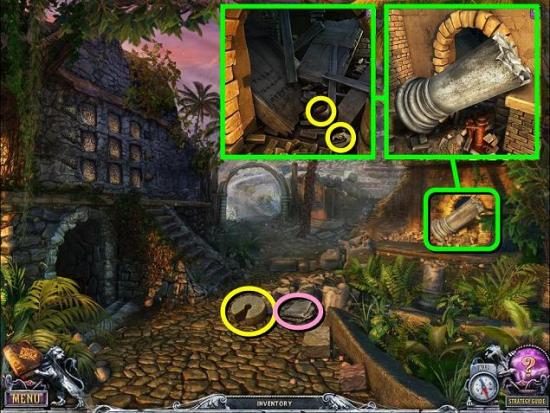
Take the WEIGHT and Beyond Object 20/46
Zoom in on the pillars on the right and use the JACK to move the fallen pillar
Take the FLOWER and the BOWL and read the note
Go to the main hall in the house
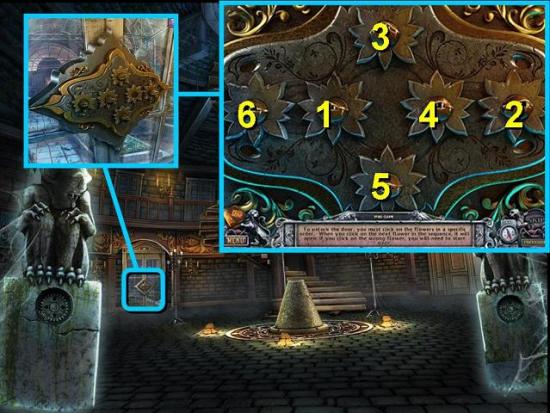
Zoom in on the door on the left and place the FLOWER on the lock
Find the correct order in which to click the flowers. If you get the order wrong you have to start over
Go through the door to the greenhouse
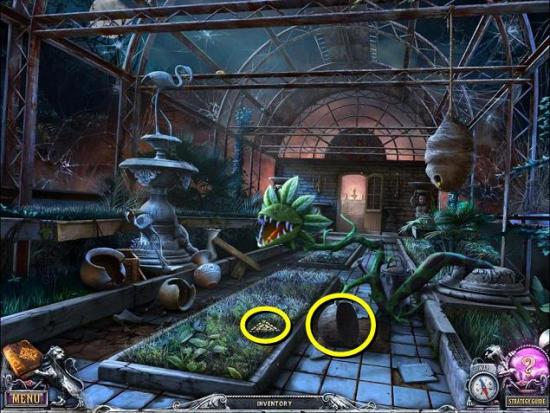
Take the BUTTON and the POT
Go to the ruined city
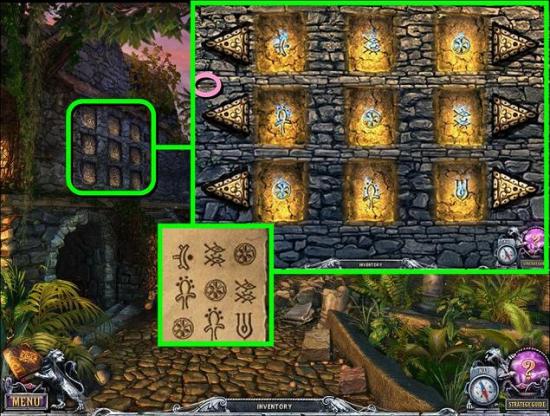
Zoom in on the squares in the left wall and place the missing BUTTON
Take Beyond Object 21/46
Use the arrow buttons to move the symbols. You need to put the symbols in the configuration as shown on the note you found behind the fallen pillar, which should be in your journal. Note that the symbols disappear when they’re between windows
Take the second WEIGHT and read the note
Go back to the hut and on to the bridge
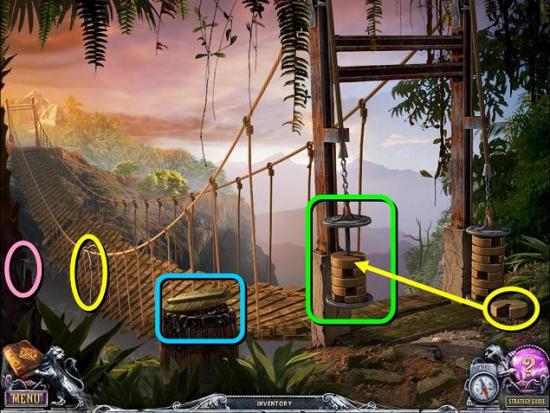
Pick up the third WEIGHT and Beyond Object 22/46
Take the lid off the barrel and take some of the RESIN
Put the three WEIGHTS on the left pulley
When the bridge is taut, take the GRAPPLING HOOK and go on to the waterfall
Take Beyond Object 23/46
Inspect the basket on the pier
Take the rag and put it on the stick to get a TORCH
Go to the hut
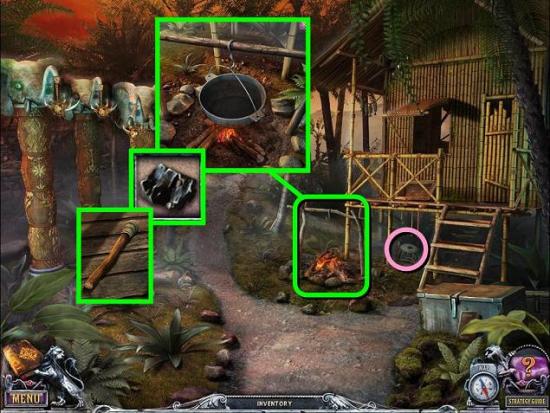
Take Beyond Object 24/46
Put the POT on the fire
Put the RESIN in the pot to melt it
Stick the TORCH in the melted resin and then put the TORCH WITH RESIN in the fire to get a LIT TORCH
Go to the ruined city and inspect the tunnel on the left
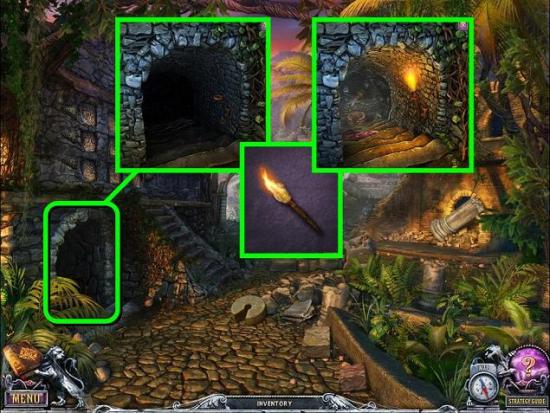
Put your LIT TORCH in the bracket on the wall
Play the HOS
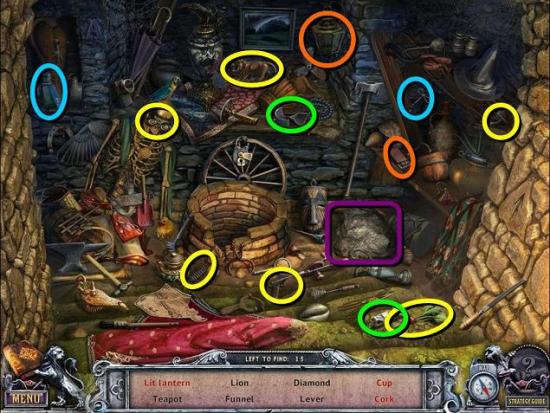
The teapot and funnel are behind the large rock (purple). Use the corkscrew on the bottle to get the cork (blue). Use the matches to light the lantern (orange). Use the glue to mend the broken cup (green). Look inside the well for more items
Get a LEVER (red)
Go to the waterfall
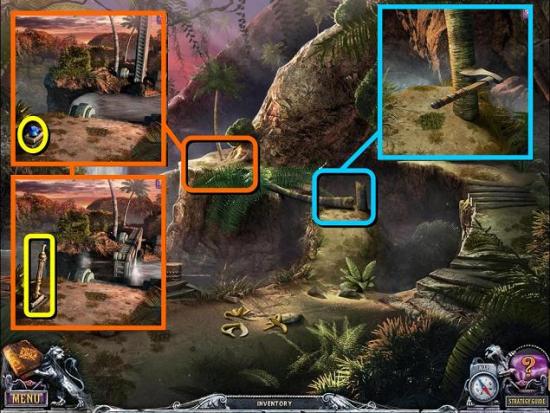
Zoom in on the palm tree and chop it down with your AXE
Move closer to the waterfall and take the BLUE GEM
Use the LEVER in the slot on the left where the gem was
Pull the lever and cross the waterfall to the treasury
Talk to the ghost
Take the GREEN GEM and Beyond Object 25/46
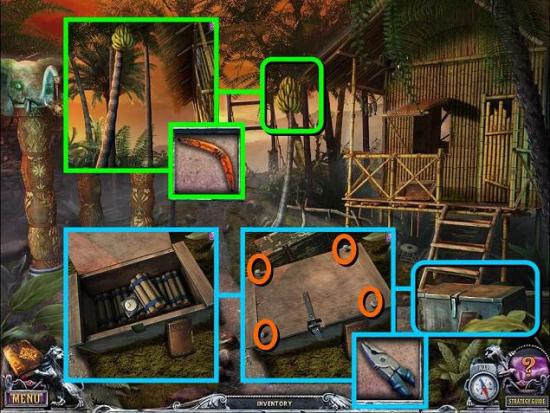
Go to the hut and play the new HOS

Find the three books and put them on the pile (blue). The violin and ship’s wheel may be under the cushion and the scales may be behind the lantern, depending on how you left the scene last time. There are more items in the drawer
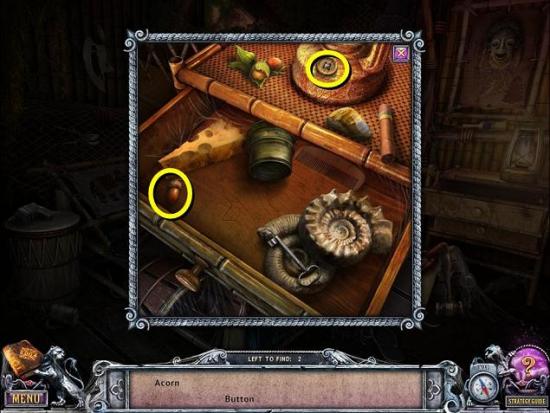
Get the FLYPAPER (red)
Go to the greenhouse
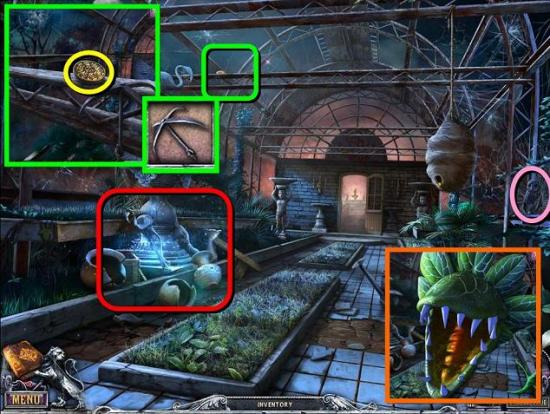
Zoom in on the flesh eating plant and feed it the FLYPAPER
Use the GRAPPLING HOOK on the beam
Zoom in on the beam and take COIN
Take Beyond Object 26/46
Play the HOS
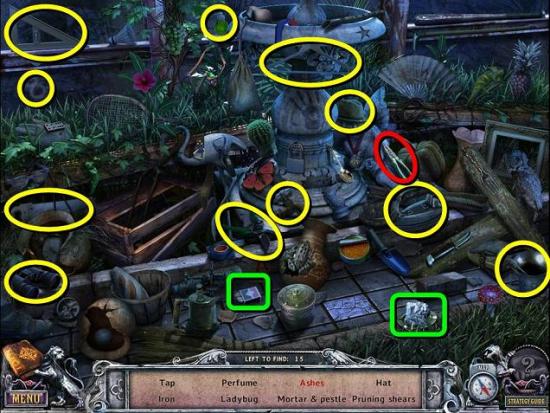
Use the matches to burn whatever is on the small plate and get the ashes (green). There are more objects inside the crate
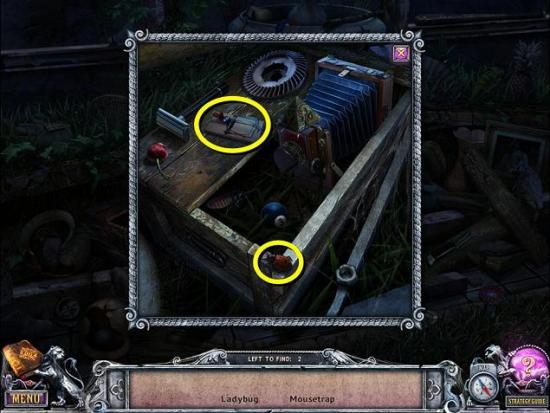
Get PLIERS (red)
Go through to the backyard
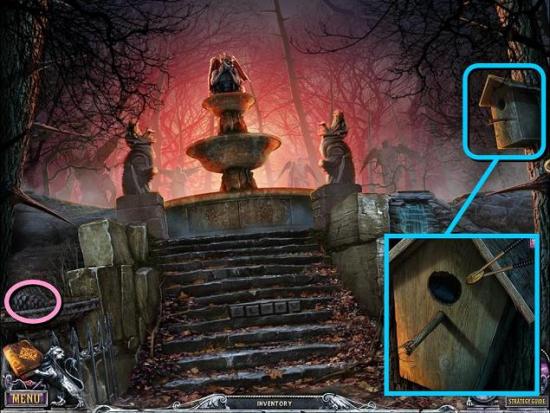
Take Beyond Object 27/46
Zoom in on the birdhouse and use the CHOPSTICKS to get the second COIN out
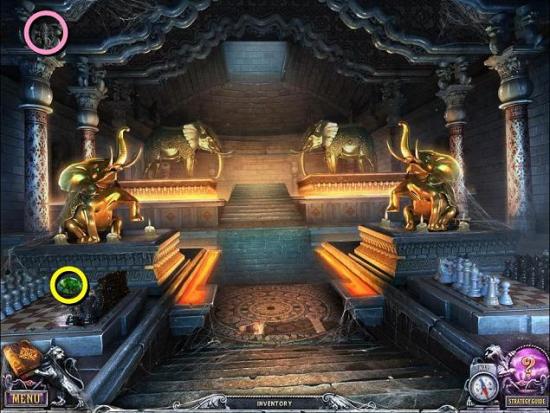
Go back to the treasury
Place the two COINS on the elephant statues on each side
Zoom in on the back of the room
Take the RED GEM and read the scroll
Go to the hut and zoom in on the totems on the left
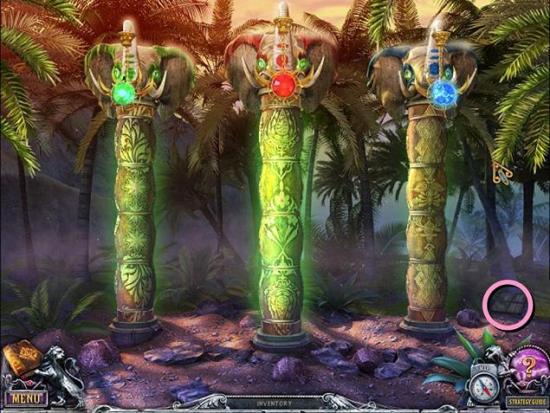
Take Beyond Object 28/46
Place the three GEMS on the totem with matching color
Rotate the discs on the totems to restore the carvings. Start with the bottom or top pieces to match them to the base or head
Take the BOOMERANG
Go back to the hut and zoom in on the chest
Read the diary and use the PLIERS to get the four nails out
Inside the chest is DYNAMITE
By the hut, zoom in on the BANANAS and use the BOOMERANG to take them down
Go to the waterfall
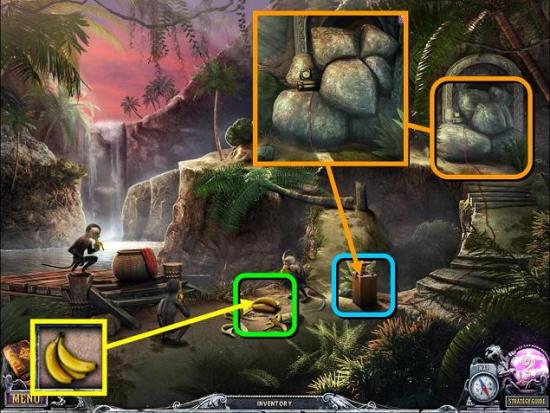
Put the BANANAS on the ground to distract the monkeys
Zoom in on the cave and place the DYNAMITE
Push down the detonator
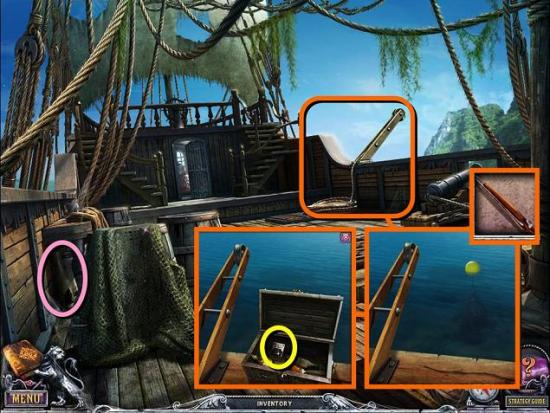
Go into the cave
Talk to the ghost
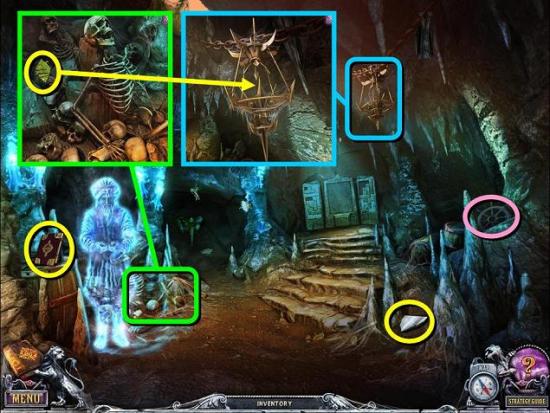
Pick up the MIRROR, the DICTIONARY and Beyond Object 29/46
Zoom in on the skeleton, take his GEM and read his scroll
Zoom in on the lantern and place the GEM in it
Go back to the ruined city and play the new HOS
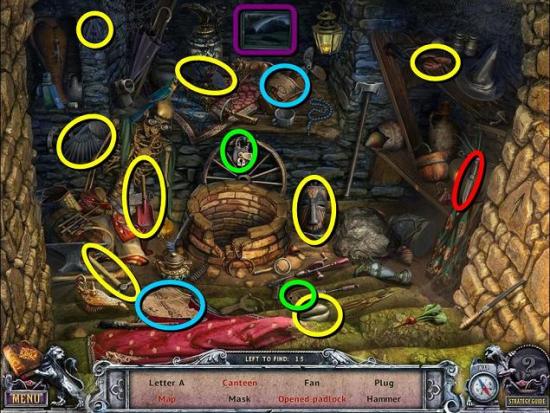
Tear down the painting in the back for the canteen (purple). Put the two pieces of map together (blue). Open the padlock with the key (green). There are more items down the well
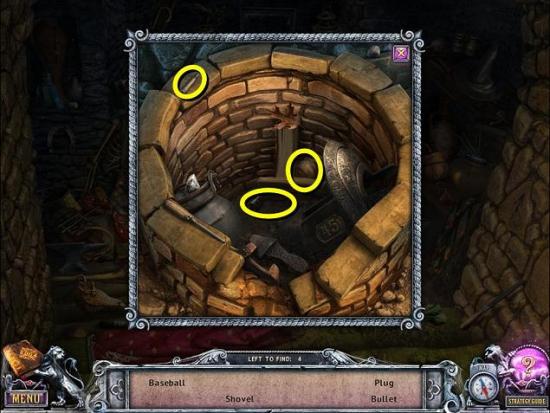
Get a KNIFE (red)
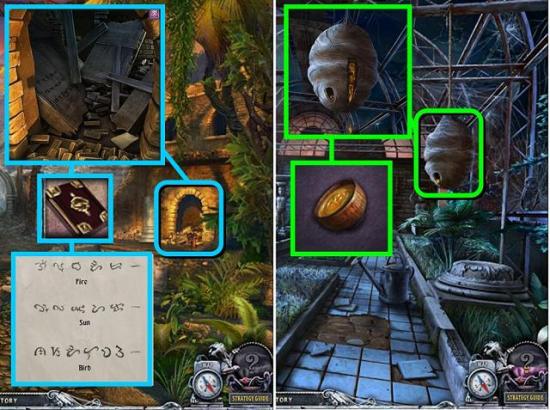
Zoom in on the area behind the pillars and use the DICTIONARY on the carved stone
Go to the greenhouse
Zoom in on the beehive and cut it with the KNIFE
Put the BOWL on the dripping honey to get a BOWL OF HONEY
Go to the backyard and zoom in on the stone steps
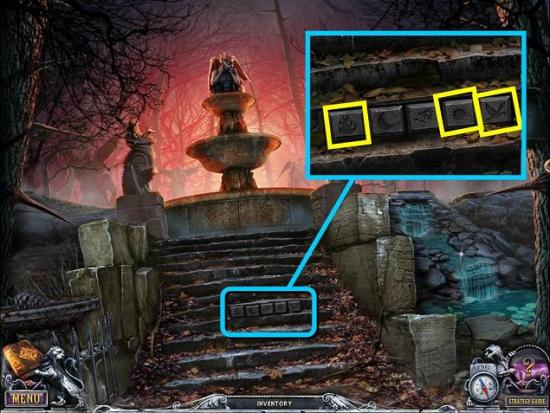
Click the tiles showing fire, the sun and a bird, as per the instructions you just deciphered from the stone tablet
Take the PUZZLE PIECE
Go back to the cave and play the puzzle in the back
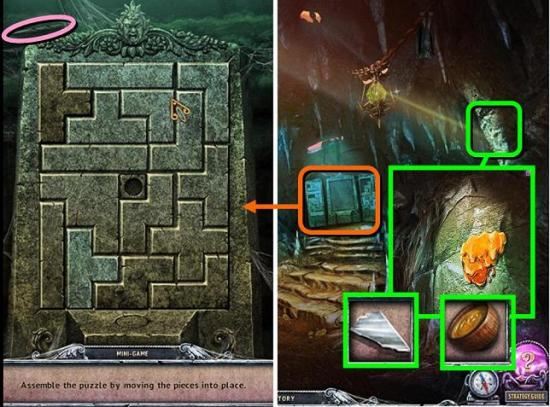
Place the PUZZLE PIECE in the middle and take Beyond Object 30/46
Take the KNIGHT chess piece
Zoom in on the wall on the right
Put some honey from the BOWL OF HONEY on the wall and then stick the MIRROR to it
Zoom in on the elephant in the back
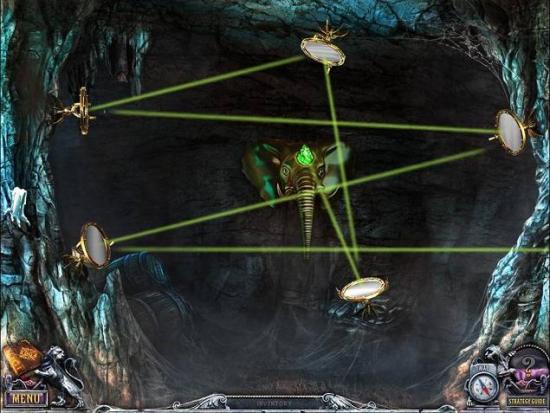
Rotate the mirrors until the light falls on the gem (it’s kinda cute when you hit the bat)
Take the BISHOP
Go to the treasury
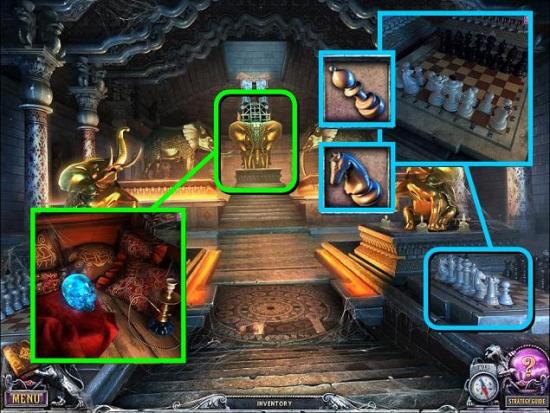
Zoom in on the chess set and place the KNIGHT and the BISHOP
At this point, make sure you found all the Beyond Objects in this chapter before continuing
When you’re ready, zoom in on the elephant at the back of the treasury and take the SKULL
Go to the organ and place the SKULL on the third shelf
Take the JERUSALEM KEY
Go to the passage and open the painting back left with the JERUSALEM KEY
Go through the painting to the Via Dolorosa
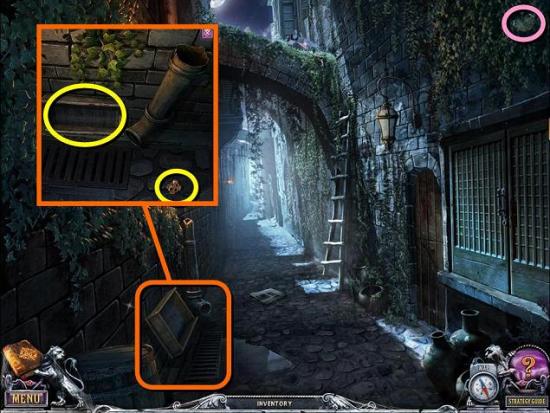
Take Beyond Object 31/46
Inspect the drainpipe on the left and take the SIEVE and the CROSS (1/10)
Go on to the town square
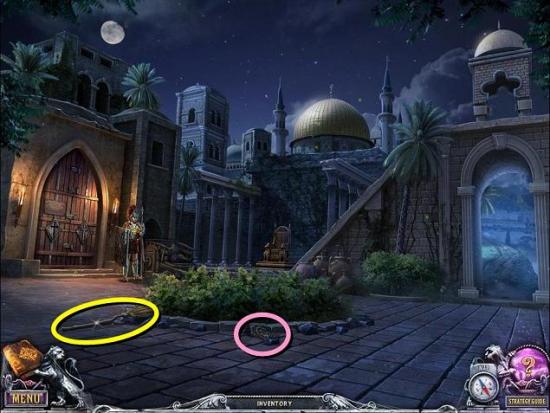
Click anywhere for a video
Take the BROOM and Beyond Object 32/46
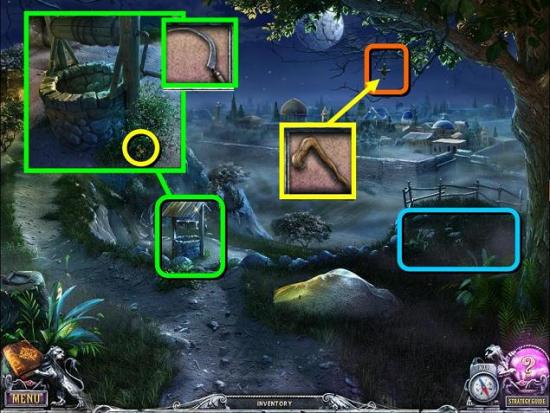
Go through the archway to the mountain passage
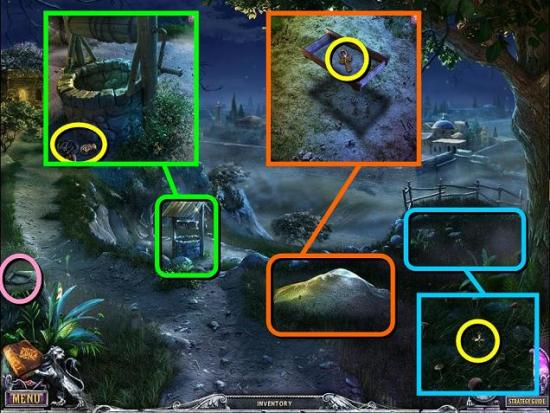
Take Beyond Object 33/46
Zoom in on the pile of sand and SIEVE it to find another CROSS (2/10)
Among the mushrooms in the grass under the tree is the third CROSS (3/10)
Inspect the well and take the MAGNET ON A ROPE and TAP
Go on to the house and click to talk to the ghost
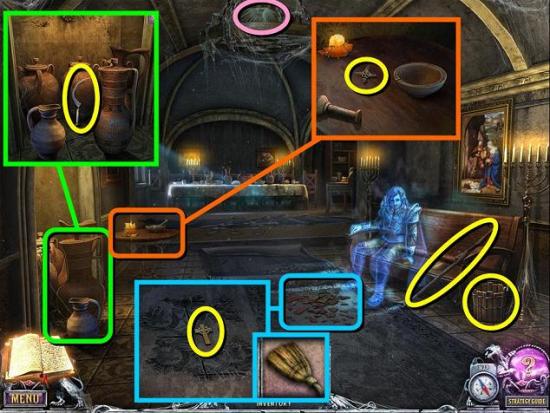
Take Beyond Object 34/46
Take the SHEPHERD’S STAFF and the BUCKET
Zoom in on the amphorae and take the SICKLE
Zoom in on the crockery shards on the floor and brush them away with your BROOM to find CROSS 4/10
On the little side table is CROSS 5/10
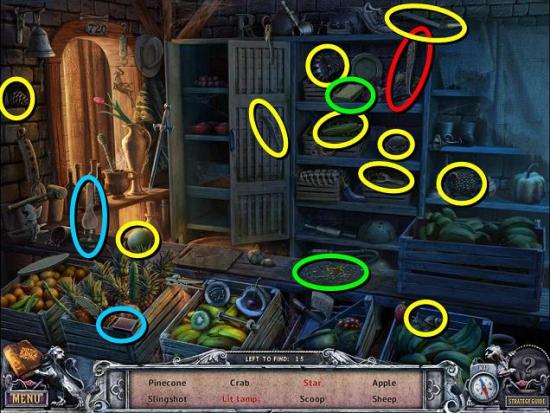
Play the HOS

The target is behind the painting (orange). Use the knife to slice the sausage (blue). There are more items in the basket
Get BREAD (red)
Go to the greenhouse for a new HOS
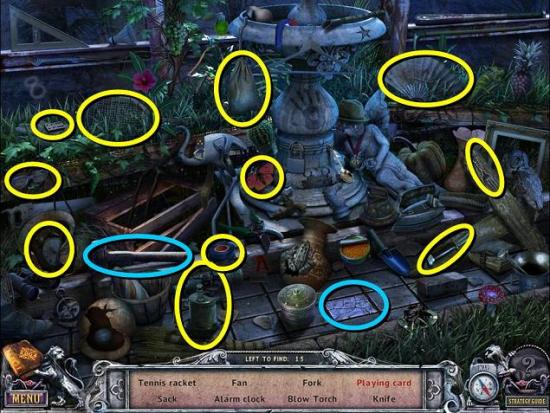
Pick up the hammer and smash the cracked floor tile to get the playing card (blue). There are more items in the crate
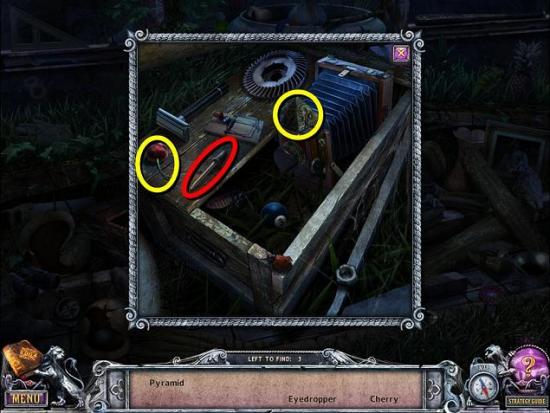
Get an EYEDROPPER (red)
Go on to the backyard
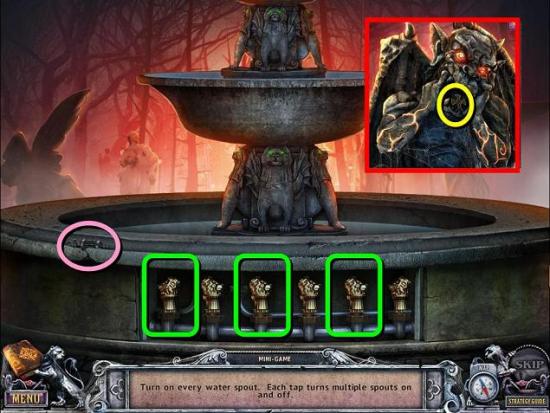
Zoom in on the fountain and take Beyond Object 35/46
Click to open the compartment and place the TAP
To turn on all the fountains, only turn taps 1, 3 and 5
The gargoyle will give you CROSS 6/10
Zoom in on the waterfall to the right of the stairs and use the MAGNET ON A ROPE to get an EAGLE
Go to Via Dolorosa and click on the lantern so it falls to the ground
Use the BREAD to lure the pigeons
Zoom in on the pigeons and take the KEY
In the same zoom, use the EYEDROPPER to take some of the lamp oil
Zoom in on the blinded windows on the right and use the EYEDROPPER WITH OIL to grease the lock
Open it with the KEY from the pigeons
Play the HOS
Put the head and body of the clown together (green). Pick up the cage and put the bird in it (blue). The HALF OF A SHIELD is inside the cupboard
Go to the trophy room
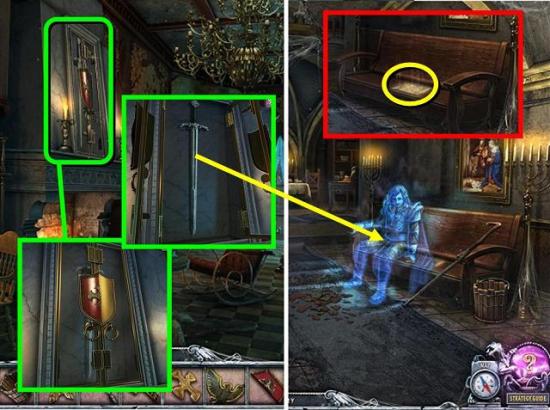
Zoom in on the mantelpiece and place the HALF OF A SHIELD next to the other half
Take the SWORD
Go to the house in Jerusalem and give the SWORD to the ghost
Look at the paper he leaves behind on the bench. It’s a recipe for a potion
Play the HOS
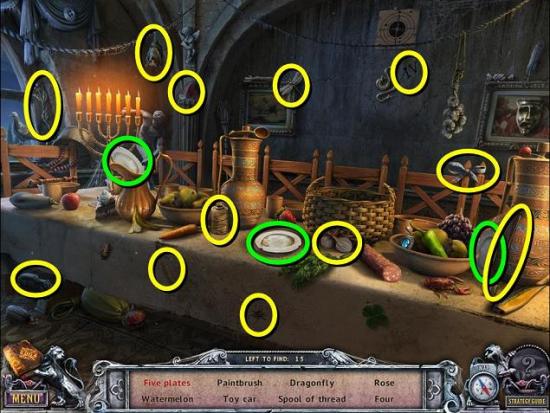
Find two plates and put them on the stack with the others (green). There are more objects in the basket
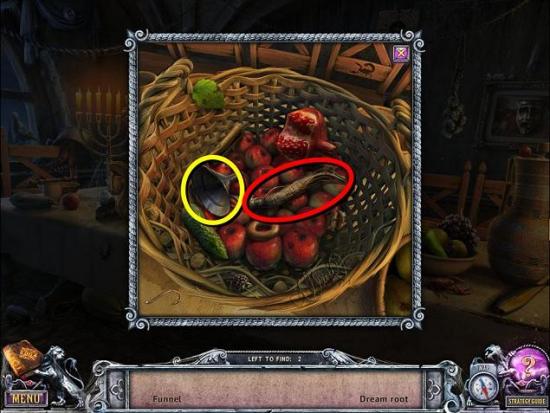
Get the DREAM ROOT (red)
Go to the mountain passage
Zoom in on the well and use the SICKLE to find CROSS 7/10
Use the SHEPERD’S STAFF on the tree to get CROSS 8/10
Zoom in on the mushrooms
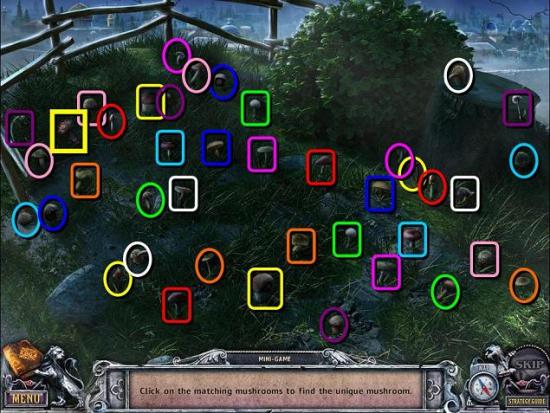
Find the matching pairs of mushrooms until one unique one is left. This is the MUSHROOM you need for the potion
There’s a new HOS in Via Dolorosa
The jam is behind the crate of bananas. The bow is behind the curtain. To find the star, pick up the sponge and clean the work surface (green). Pick up the matches to light the oil lamp (blue). Get a LADLE (red)
The OBLIVION FLOWER is in Via Dolorosa, on the wall with ivy on the left, above the panel where the crosses go. You need to move the ivy to find it
Go back to the house in Jerusalem
Zoom in on the side table and put the MUSHROOM, DREAM ROOT and OBLIVION FLOWER into the bowl
Pick up the pestle and mash up the ingredients
Take the DREAM POWDER
Zoom in on the amphorae and take the lid off the large one
Use the LADLE to put some wine into the smaller jug. Take the JUG OF WINE
Go to the wine puzzle in the back
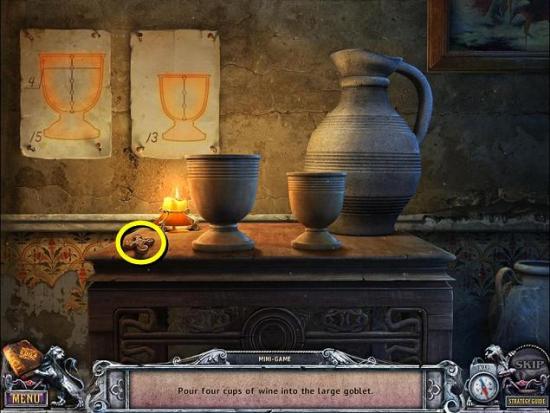
There is another CROSS (9/10) here
Place the JUG OF WINE
You need to somehow get exactly 4 units of wine in the large goblet:
Fill the large goblet from the jug (5/5)
Pour from the large goblet into the small goblet (2/5 and 3/3)
Empty the small goblet into the jug (2/5 and 0/3)
Pour the wine from the large goblet into the small one (0/5 and 2/3)
Fill the large goblet with wine from the jug (5/5 and 2/3)
Pour from the large into the small goblet (4/5 and 3/3)
Put the DREAM POWDER in the large goblet and take the GOBLET OF WINE
Go to the TOWN SQUARE
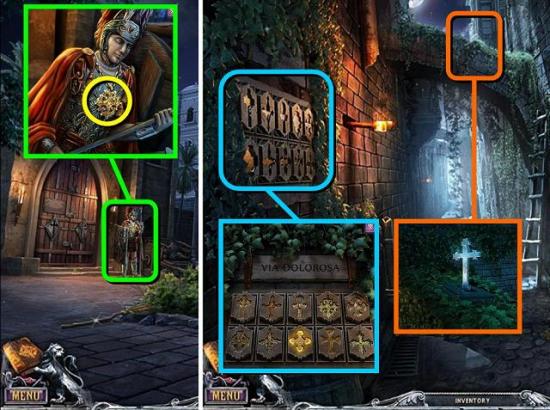
Give the GOBLET OF WINE to the guard
Zoom in on the guard and take cross 10/10
Back out to Via Dolorosa and zoom in on the vines on the wall on the left
Click several times to remove the vines, if you haven’t already done so
Place all 10 CROSSES
Go up to where the pigeons were and take the CROSS-SHAPED KEY
Go back to the town square
Zoom in on the door and place the CROSS-SHAPED KEY
Go into the descent to the temple
Take the SCYTHE, the CHAIN and Beyond Object 36/46
Go to the mountain passage and zoom in on the well
Put the CHAIN on the well, followed by the BUCKET
Turn the crank to lower and raise the bucket and take the BUCKET OF WATER
Go to Via Dolorosa and zoom in on the drainpipe
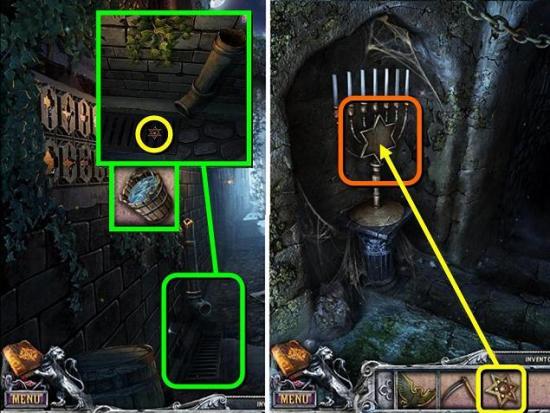
Pour the BUCKET OF WATER down the drainpipe and pick up the STAR OF DAVID
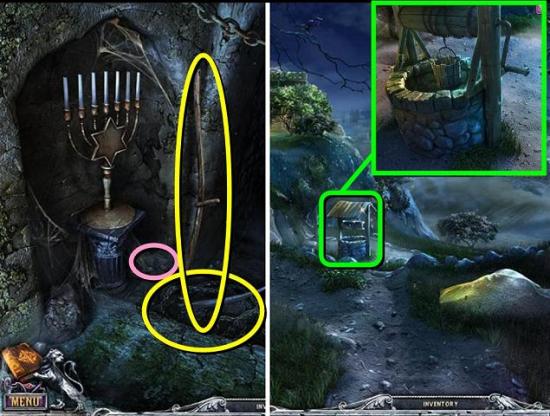
Go back to the descent to the temple and put the STAR OF DAVID on the Menorah
Go down to the temple
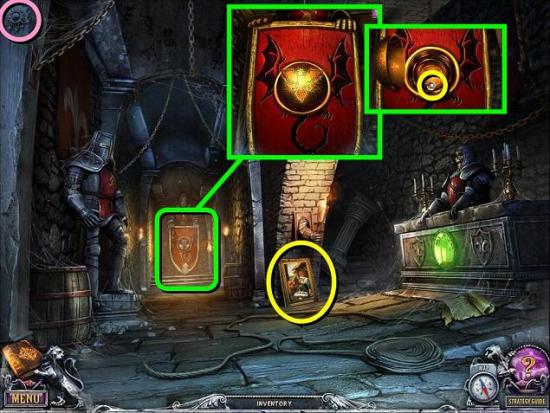
Take Beyond Object 37/46
Read the note and pick up the PAINTING
Zoom in on the knight in the back and put the EAGLE on his shield
Take the PEARL
Go to the house in Jerusalem
Put the PAINTING on the wall
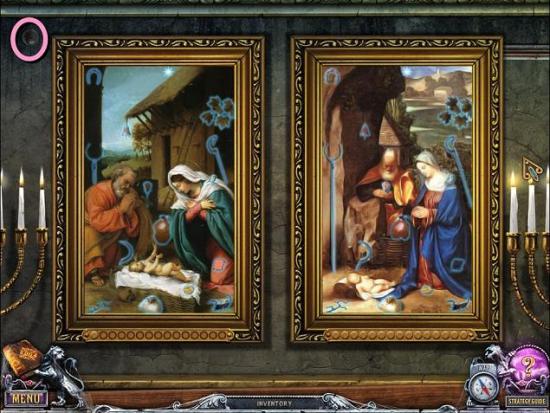
This puzzle is the opposite of a find the differences puzzle. You need to find the 15 items that are the same in both paintings. The dual arrows will help you with this. The dots at the bottom of the frames will show you how many you have left to find
Read the note and take the CROWN and Beyond Object 38/46
Go back to the temple
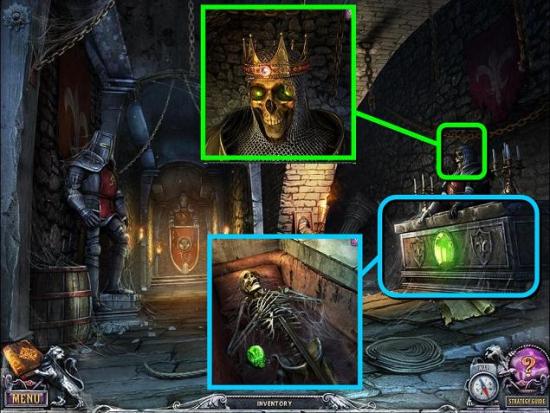
and give the CROWN to the skeleton of the king
Put the PEARL in the crown
Make sure you have all the Beyond Objects in this chapter and then zoom in on the sarcophagus and take the SKULL
Go back to the organ and place the SKULL on the last shelf
Take the MADAGASCAR KEY
Go to the passage and unlock the last painting with the MADAGASCAR KEY
Go through the painting to the jungle
First go straight on to the beach
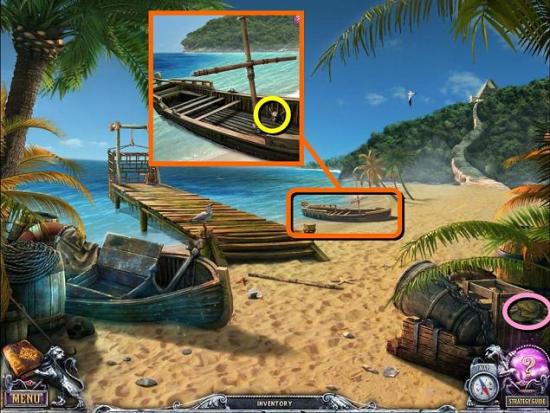
Take Beyond Object 39/46
Zoom in on the boat and take the PIRATE SKULL
Play the HOS
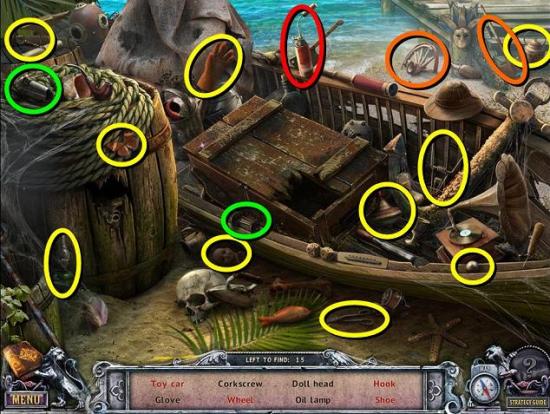
The shoe is under the burlap sack. Put the wheels on the toy car (green). Use the shovel to dig up the wheel (orange). The hook is in the crate. Get a BLOWTORCH (red)
Go on to the area near the pyramid
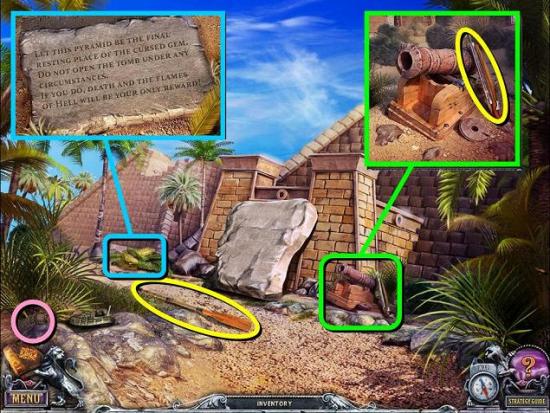
Take the OAR and Beyond Object 40/46
Zoom in on the cannon and take the HARPOON
Zoom in on the pile of palm fronts on the left and click to clear them away
Read the plaque
Go back to the jungle and go left to the plane crash
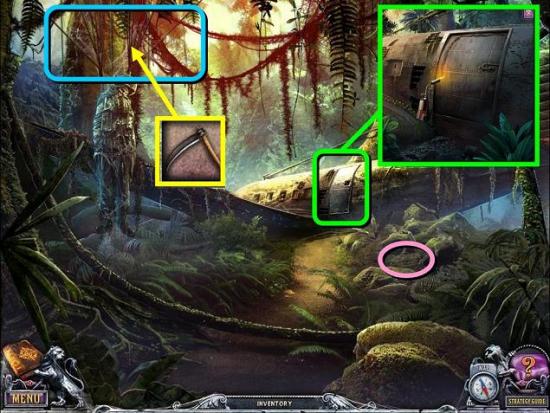
Take Beyond Object 41/46
Cut the poor pilot down with your SCYTHE
Take his PARACHUTE
Zoom in on the door of the plane and cut it with the BLOWTORCH
Turns out the plane is full of junk. No wonder it went down. Play the HOS
Use the wire cutter on the birdcage to release the bird (green). The elephant and fire extinguisher are behind the metal panel (purple). There are more items inside the plane
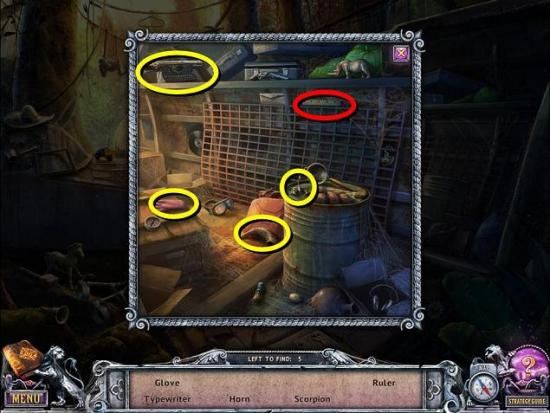
Get a RULER (red)
Go to the jungle
Take Beyond Object 42/46
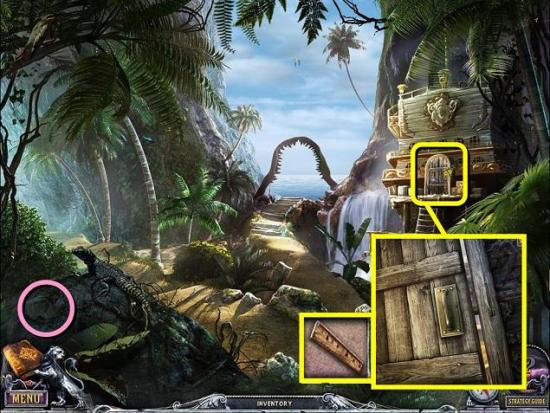
Zoom in on the building on the right and open the latch with the RULER
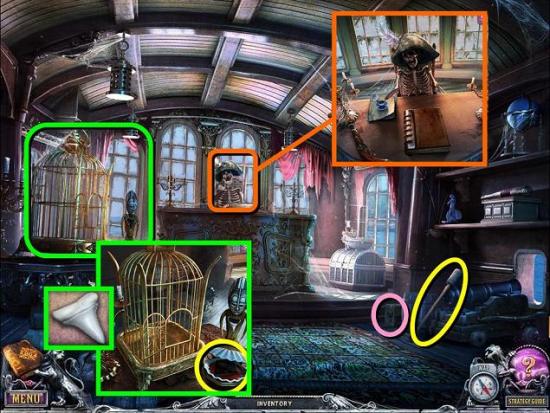
Go into the tavern
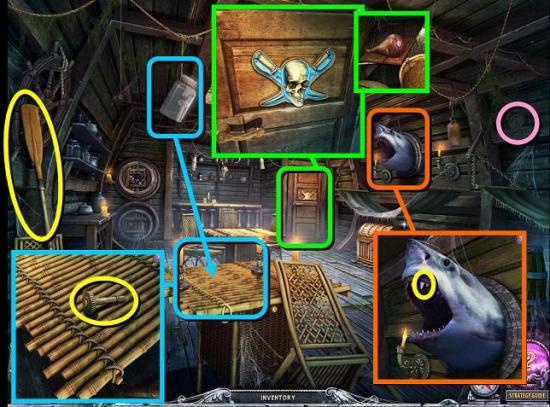
Take the second OAR and Beyond Object 43/46
Tip the jar hanging from the ceiling and pick up the GEAR that falls out
Zoom in on the shark head mounted on the wall and keep clicking his teeth until one TOOTH comes out
Zoom in on the door in the back, put the PIRATE SKULL on it and click the handle
Look inside the closet and take the MEAT
Go to the beach
Go to the cage at the end of the dock and put the GEAR on the wince
Turn the wince to lower the cage
Put the MEAT in the cage
When the shark is in the cage, click on the door to close it
Zoom in on the sailboat
Use the PARACHUTE as a sail and place the two OARS
Use the boat to sail to the pirate ship
Take Beyond Object 44/46
Zoom in on the coil of rope
Use the HARPOON to shoot at the buoy
Open the chest and take the PUZZLE PIECE
Go into the captain’s cabin
Take the RAMROD and Beyond Object 45/56
Zoom in on the captain and take his MUSKET and the FEATHER on his hat
Zoom in on the birdcage and place the TOOTH on the figurine
Take the second PUZZLE PIECE
Go back to the beach and play the new HOS
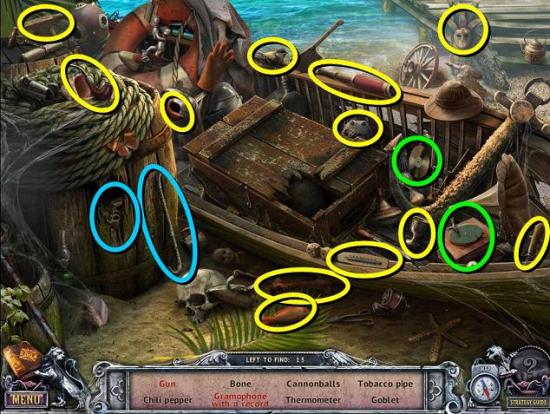
Put the record on the gramophone (green). Use the crowbar on the side of the barrel to find the gun. The CANNONBALLS are inside the crate
Go to the plane crash
Play the HOS
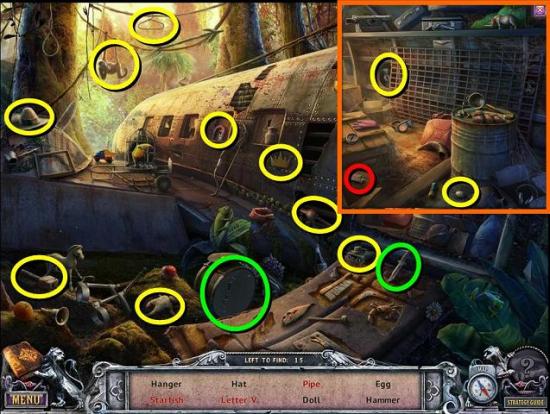
The starfish and letter V are behind the steel panel. Cut the drum with the knife (green) to find the pipe. There are more items inside (inset). Get the MATCHES (red)

Zoom in on the pilot and clean the stone next to him with the FEATHER
Take note of the symbols
Go to the tavern and zoom in on the chest
Shoot the lock with your MUSKET
Open the chest and take the CORKSCREW
Zoom in on the barrel and use the CORKSCREW to get the cork out
Take the GUNPOWDER
Go back to the pirate ship
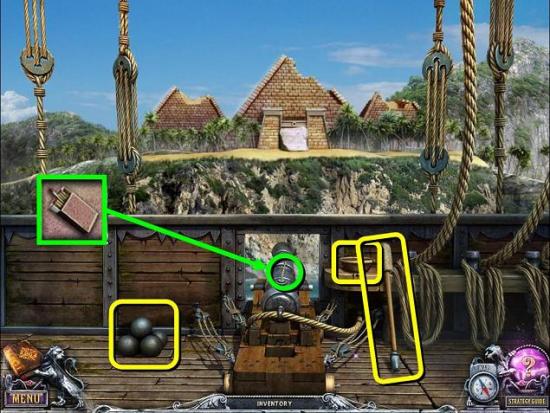
Zoom in on the cannon
Place the GUNPOWDER, CANNONBALLS and RAMROD
Light the fuse with the MATCHES
You can now enter the pyramid
Take the SABRE
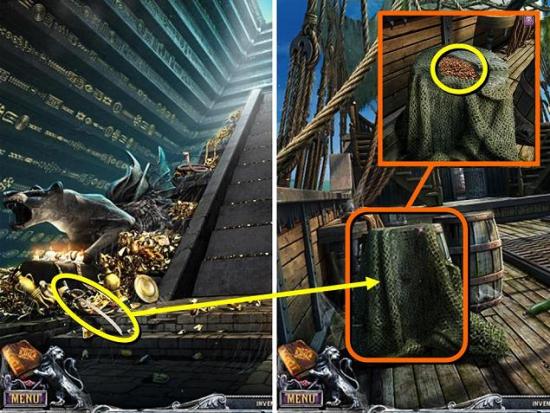
Go to the pirate ship and zoom in on the net
Cut the net with the SABRE
Take some of the ALMONDS
Go into the captain’s cabin
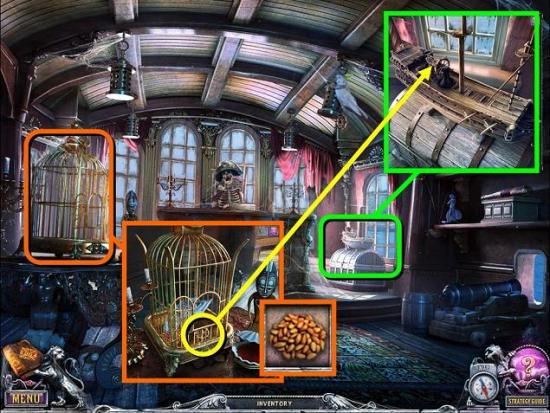
Zoom in on the birdcage and put your ALMONDS in it
Zoom back in on the cage when the bird is in it and take the SHIP’S WHEEL
Inspect the model ship on top of the chest and put the SHIP’S WHEEL on it
Take the LEVER
Go back into the pyramid
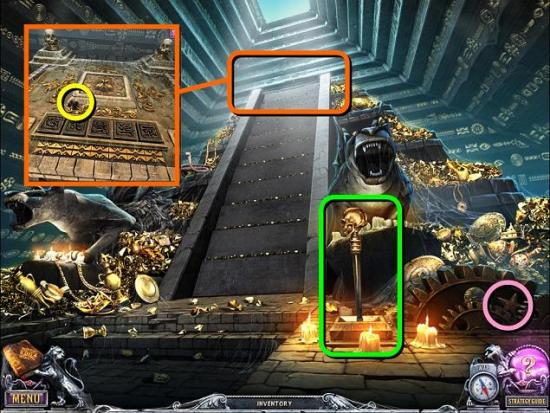
Take Beyond Object 46/46. Unfortunately, there doesn’t appear to be any kind of reward for finding all 46, other than the satisfaction of having done so
Place the LEVER in the hole by the gears and pull it
Zoom in on the top of the stairs and take the third PUZZLE PIECE
Go to the tavern
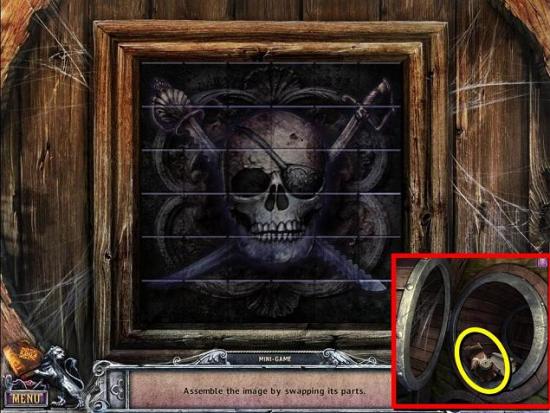
Zoom in on the puzzle in the back and place all three PUZZLE PIECES
Restore the image by swapping blocks
Inspect the porthole behind the puzzle and take the GLOVE
Go back to the top of the stairs in the pyramid
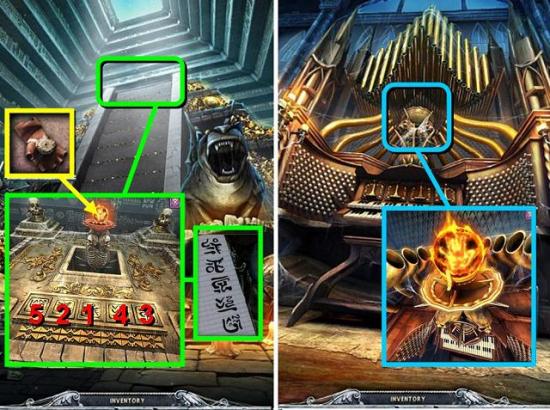
Click the five buttons with symbols in the order shown on the pilot’s pack
Use your GLOVE to take the FIREBALL
Go back to the organ
Zoom in on the bowl at the top of the organ and place the FIREBALL
The House of 1000 Doors
You’re given a KEY to start with
Inspect the painting on the right and take the KNIFE
Back out to the garden and talk to the girl
Cut the swing’s broken rope with the KNIFE
Open the shed for a HOS

The ship’s wheel is behind the curtain. Pick up the tongs to take the nails out of the horseshoe (green). There are more items in the chest
Get a BONE
Go through the passage to the main hall
Give the BONE to the dog
Go into the trophy room
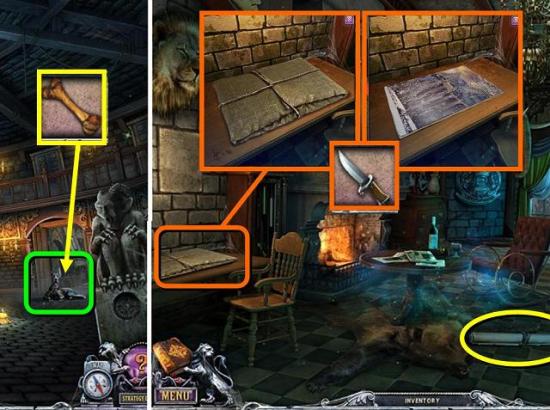
Zoom in on the desk and cut the ropes on the package with your KNIFE
Take the PAINTING
Pick up a second PAINTING from the floor
Play the HOS
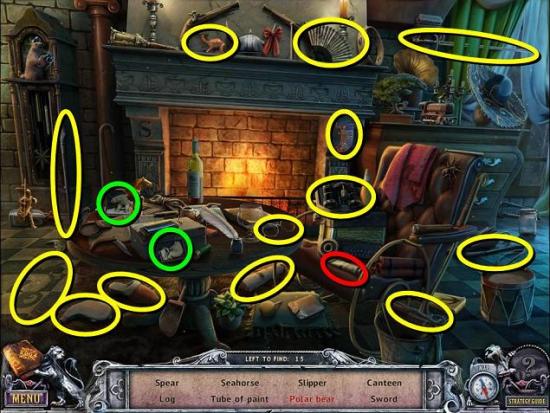
Put the two pieces of the picture together to find the polar bear (green). Get a TUBE OF PAINT (red)
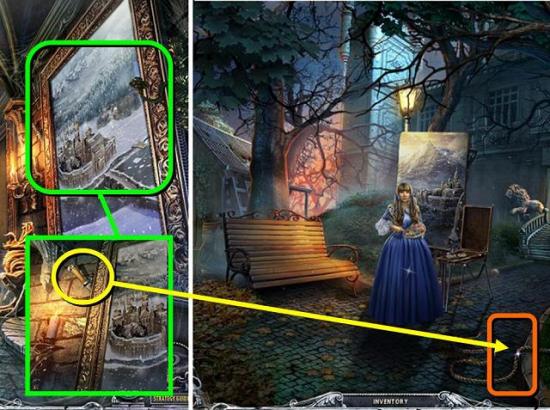
Go back to the garden
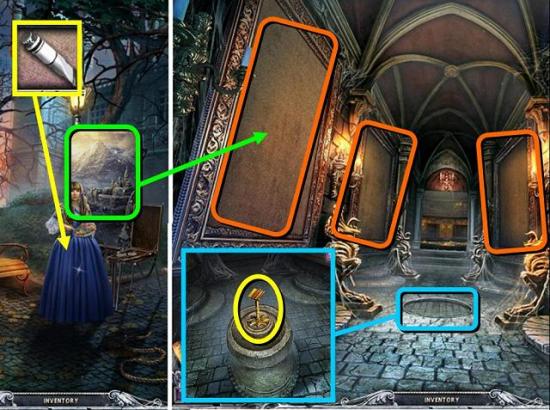
Give the TUBE OF PAINT to the girl
Wait a moment until she has finished painting and then take her PAINTING
Go into the passage and hang the three PAINTINGS in the empty frames
Go into the main hall
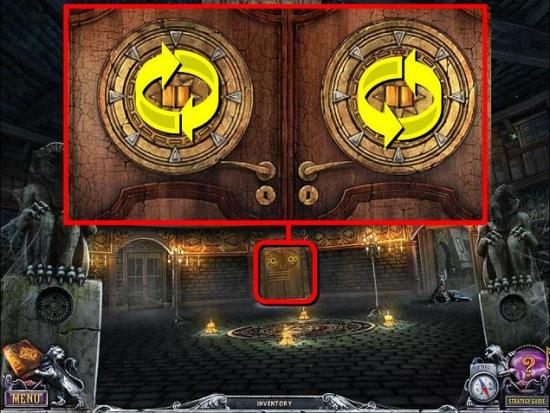
Zoom in on the door in the back
Put the two KEYS in the locks
To open the door, first fully rotate the right disc (8 clicks), then fully rotate the left disc plus one extra move (9 clicks)
Go into the library and talk to Gabriel
Zoom in on the globe
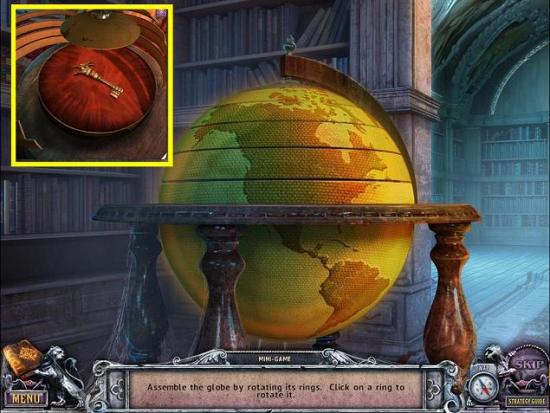
Rotate the rings to restore the globe
Inspect the globe again when it’s open and take the PORTAL KEY
Zoom in on the back of the room and open the portal with the PORTAL KEY
Go through the portal to the forest glade
The Snowy Lands

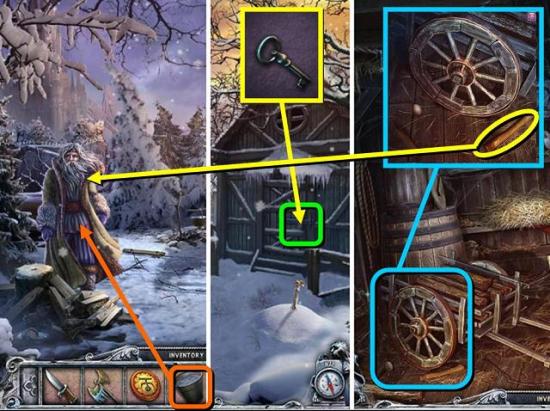
Talk to the lumberjack
Take the BUCKET, STONEPOLE AXE and BRUSHWOOD
Go on to the village

Zoom in on the broken bridge and take the SHIELD TOKEN (1/6)
Zoom in on the well
Put your ROPE and BUCKET on the well
Turn the crank to get a BUCKET OF WATER
Go back to the forest glade
Give the lumberjack the BUCKET OF WATER
He will give you the HEN COOP KEY
Go to the village and zoom in on the shed
Open the lock with the HEN COOP KEY
Go into the shed
Zoom in on the cart wheel and take the AXE HANDLE. Ignore the eggs for now
Back out to the lumberjack and give him the AXE HANDLE
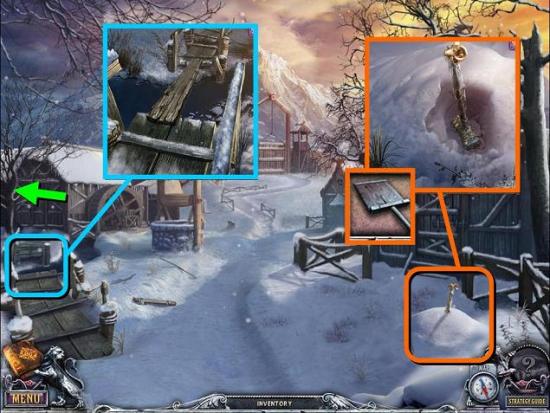
He will clear the way to the shed outside the castle, so go there
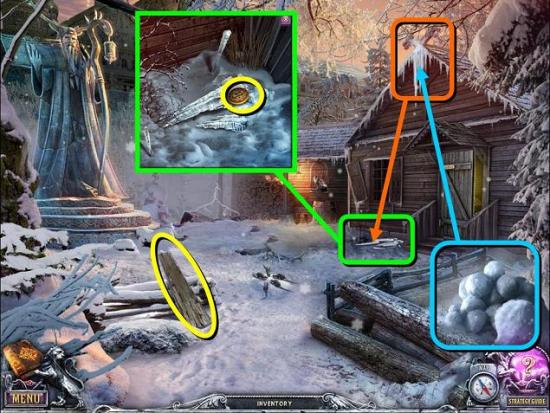
Take the PLANK
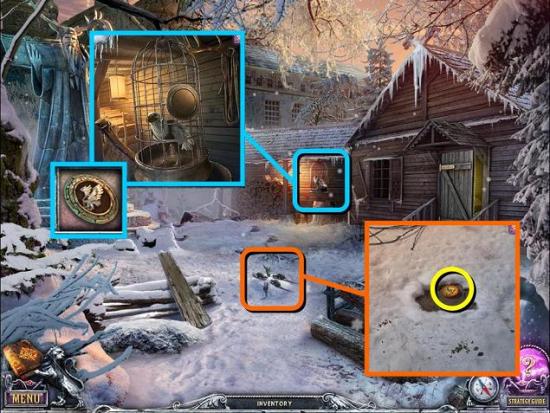
Pick up a snowball and throw it at the icicles hanging from the roof. Try a few times until the icicles fall down
Zoom in on the icicles on the ground and take the SHIELD TOKEN (2/6)
Open the door and play the HOS
Paint the butterfly green (green). Move the deer skin aside and zoom in under the table for more items
Get a HAMMER (red)
Go to the village and into the hen coop
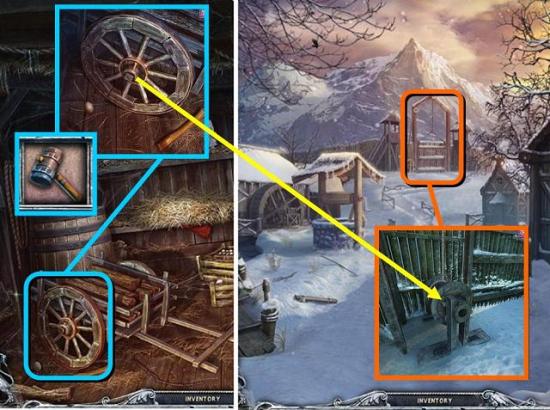
Zoom in on the cart wheel
Hit the pin with the HAMMER and take the WHEEL
Back out to the village and zoom in on the door in the back
Place the WHEEL on the mechanism
Click to turn it and open the gate
Go through the gate to the seashore
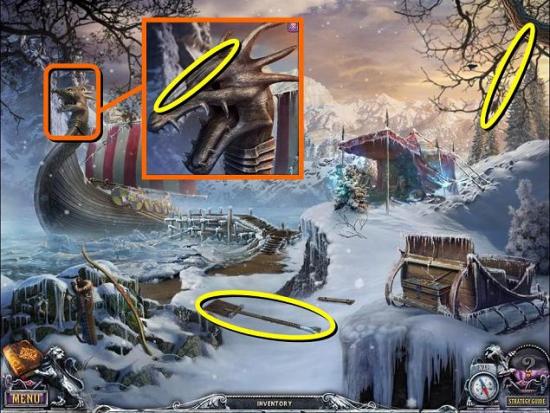
Grab the SHOVEL and the ARROW (1/3) from the tree
Zoom in on the figurehead of the ship and take the ARROW (2/3)
Play the HOS
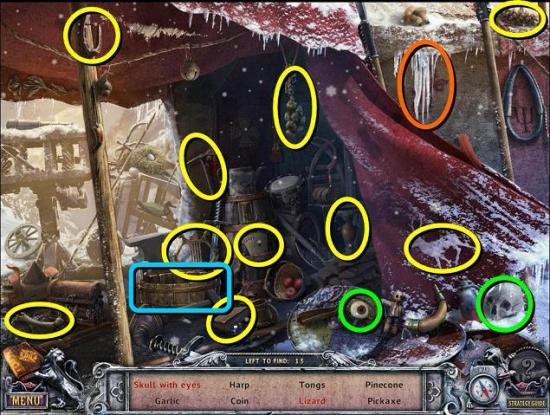
Break the icicles to find the lizard (orange). Put the eye in the skull (green). There are more items in the barrel (blue)
Get TONGS (red)
Go to the village
Zoom in on the pile of snow and use the SHOVEL to dig up the STONE HAMMER
Zoom in on the broken bridge
Put down the PLANK to fix the bridge
Move across the bridge to the watermill
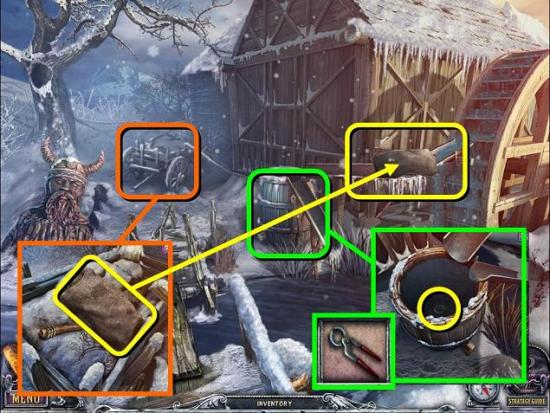
Zoom in on the cart and take the SACK
Put the SACK on the water shoot coming down from the mill to stop the flow
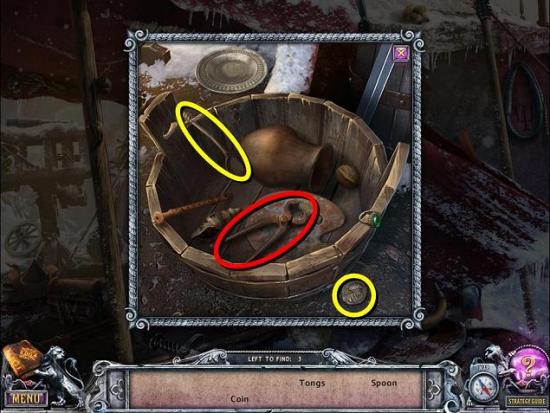
Zoom in on the barrel and take out the cork with the TONGS
When the water has drained, take the FALCON SYMBOL
Go to the shed outside the castle
Zoom in on the cage and put the FALCON SYMBOL on the lock to open it
The bird will scare away the mice
Zoom in on the snow where the mice were and move the snow until you find another SHIELD TOKEN (3/6)
Play the new HOS
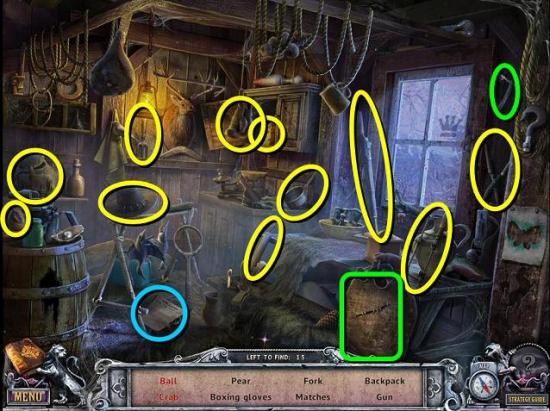
Cut the sack with the razor to find the ball (green). Move the paper to find the crab (blue). There are more items under the table
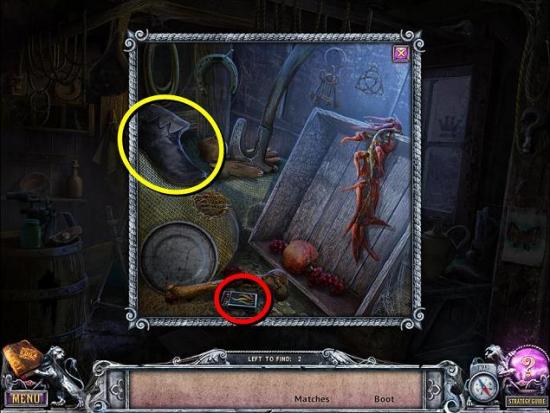
Get MATCHES (red)
Go to the forest glade
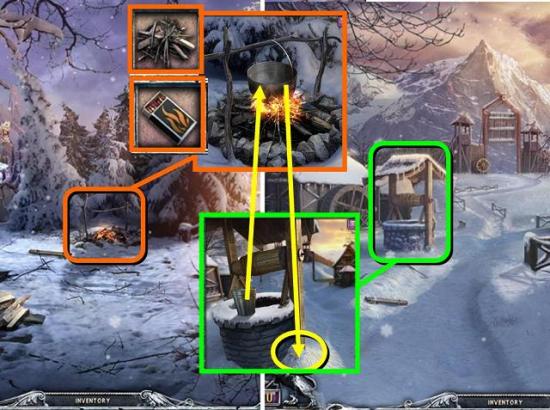
Zoom in on the fireplace and put the BRUSHWOOD under the pot
Go back to the well in the village and get another BUCKET OF WATER
Put the BUCKET OF WATER in the pot above the fire
Light the fire with your MATCHES
When the water is boiling, take the POT OF HOT WATER
Go to the village and zoom in on the well
Use the POT OF HOT WATER to melt the snow by the well
Take the PUZZLE PIECES
Go back to the seashore and play the new HOS
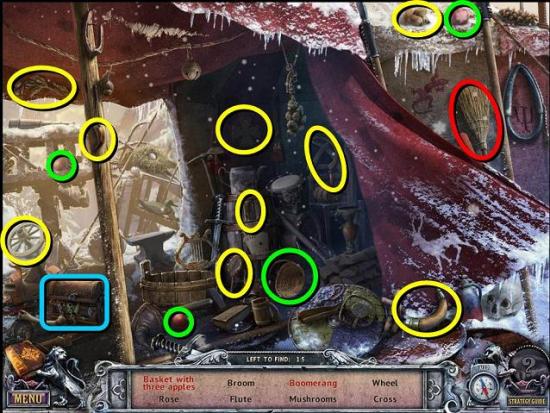
Find the three apples and put them in the basket (green). The boomerang is in the chest. There are more items in the barrel
Get the BROOM (red)
Zoom in on the puzzle chest
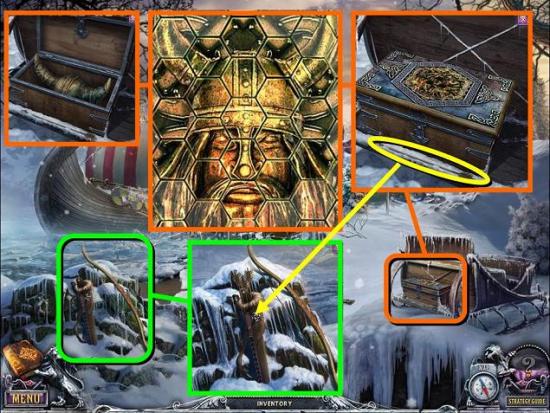
Put the PUZZLE PIECES on the chest
Rotate the pieces to restore the image
Take the STONE HELMET and the third ARROW (3/3)
Zoom in on the bow on the left and put the three ARROWS in the quiver
Pick up the BOW AND ARROWS
Go to the hen coop
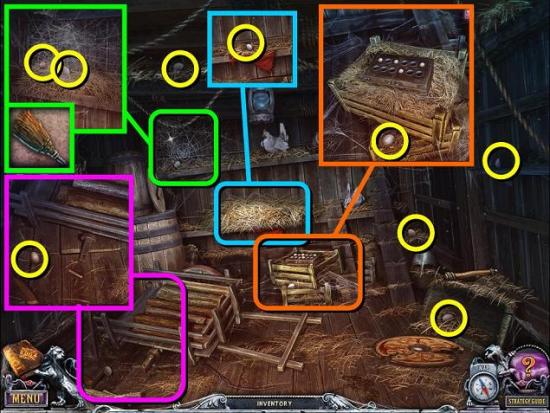
Collect all the eggs. Other than the eggs just lying around in the main scene, there’s an egg by the cartwheel, one under the hay where the red rag is, one by the egg carton on the crates and one behind cobwebs in the corner. You need to use the BROOM to get rid of the cobwebs. Also take the NUT
Put all the eggs in the carton (it’s more like a box than a carton, I guess)
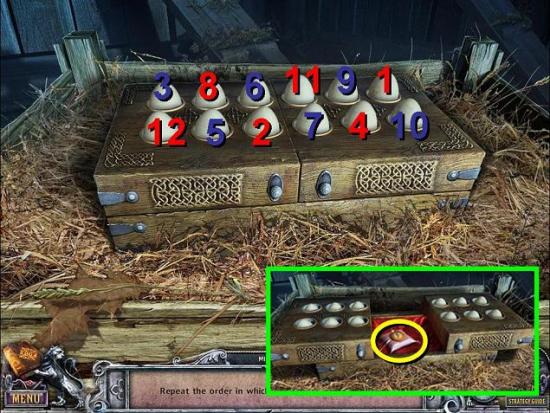
Repeat the order in which the eggs are pressed down. The sequence is always the same, but each round one more egg is added to the sequence
Get another SHIELD TOKEN (4/6)
Go the watermill
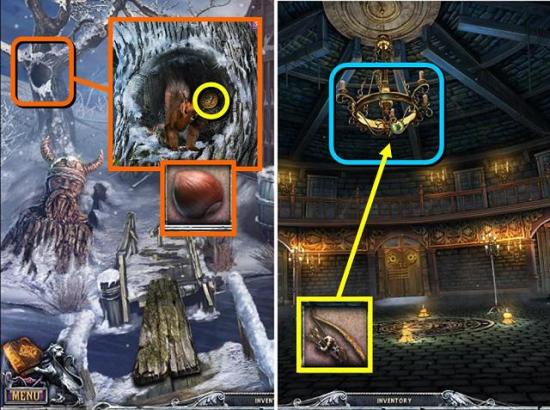
Zoom in on the hole in the tree
Give the NUT to the squirrel and take the SHIELD TOKEN (5/6)
Go back to the main hall in the mansion
Shoot at the chandelier and get a DEER TOKEN (wait, why did we have to find three arrows if we only need to use one?)
Go to the trophy room
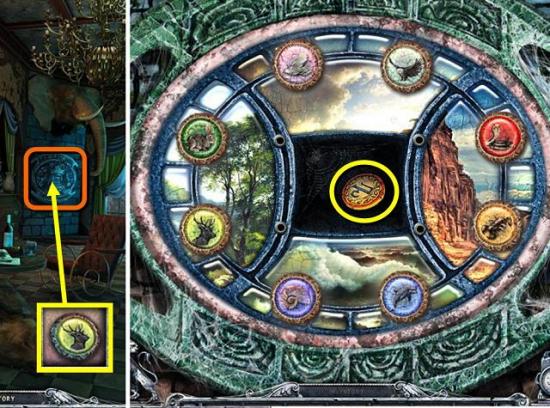
Zoom in on the puzzle on the back wall
Move the tokens around until the animals are all in their natural habitats (the area at the bottom actually shows crashing waves – initially I thought they were dark clouds). Note that the tokens can only move to adjacent empty spaces and can’t jump over each other, so it takes a bit of shuffling to get it done. I found the easiest way was to move the dolphin and shell to the bottom slots, then clearing a lot of space at the top by moving four of the others to the middle so you have a lot of manoeuvring space
Take the last SHIELD TOKEN (6/6)
Go to the library and talk to Gabriel again
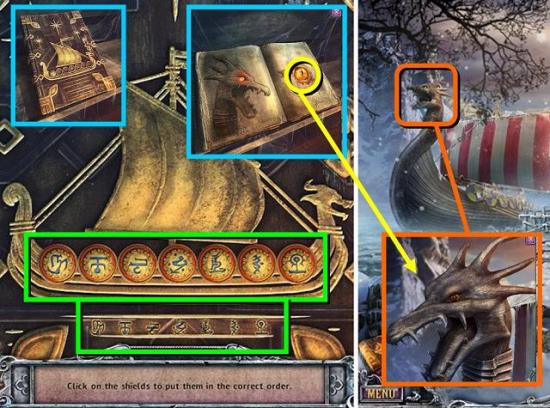
Zoom in on the book on the left and place the six SHIELD TOKENS
Move the tokens around until they are in the order shown below. Clicking on a token will swap the tokens on either side of it. Clicking on the tokens at the far left or right will simply swap it around with the one next to it
Zoom in on the book again once it’s open and take the DRAGON EYE
Go to the seashore
Zoom in on the figurehead on the bow and place the DRAGON EYE
The Island
Take the TORCH (shown in image further down)
Zoom in on the ladder to find that you need to find the six missing rungs, or ladder steps, as they call them
All the areas of the snowy lands on your map are lit up light a Christmas tree, so let’s go back to each of them one by one. Each area contains one of the LADDER STEPS
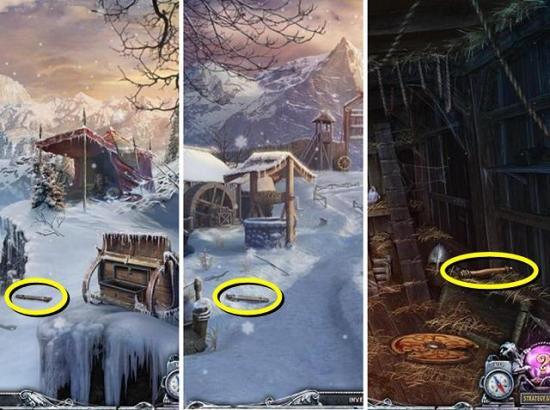
The above image shows the seashore, village and hen coop
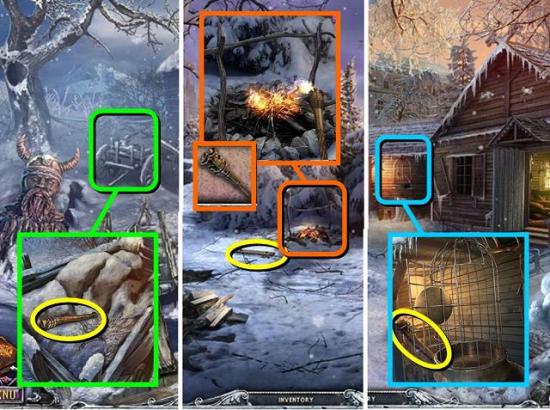
The above image shows the watermill, forest glade and shed outside the castle
When you’re in the forest glade, zoom in on the fire and light your TORCH
When you have all six ladder steps, go back to the island
Zoom in on the ladder and fix it with the six LADDER STEPS
Take the LADDER
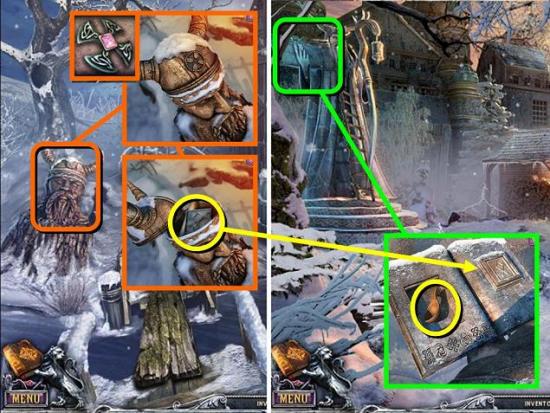
Go to the shed outside the castle
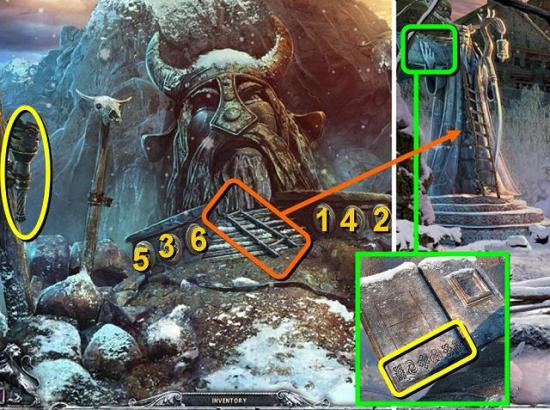
Put the LADDER up against the statue so you can take a look at the book he’s holding
Have a good look at the runes
Go back to the island and click on the runes in the order shown in the statue’s book
Go into the cave
Use the BURNING TORCH to light either one of the fire bowls
Have a look at the stone tablet
First go through the left tunnel to the hall with the well
Use the KNIFE to cut the curtain on the left and play the HOS
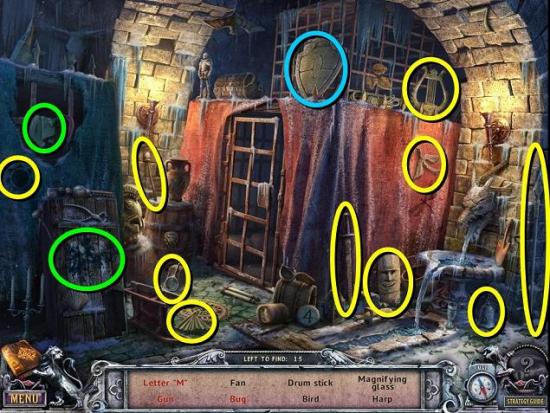
Take the rag and clean the wooden board with it to find the letter M (green). The gun is behind the shield (blue). There are more items inside the cell
You receive a CROSS (red)
Go back to the watermill
Zoom in on the wooden bust and put the CROSS on the helmet
Take the RUNE and read the scroll
Go to the shed outside the castle
Zoom in on the statue’s book again and place the RUNE on the right page
Take the LADLE
Go back to the hall with the well
Zoom in on the well
Use the LADLE to take some of the CURSED WATER
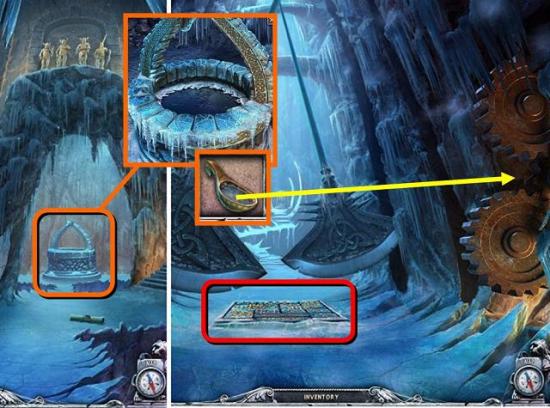
Now go to the hall with the axes on the right side of the cave
Freeze the cogs on the right with the CURSED WATER
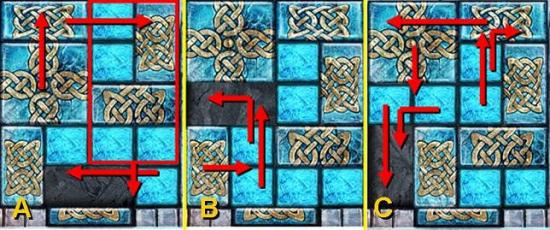
Zoom in on the puzzle on the floor
Restore the image by sliding the plates around
Take the STONE SHIELD
Go to the hall with the well and play the new HOS
Unroll the scroll on the floor to find the hieroglyph (blue). Break the vase with the hammer to find the feather (green). The nuts are inside the cell. Get a STONE DISC (red)
Zoom in on the four statues high up above the well
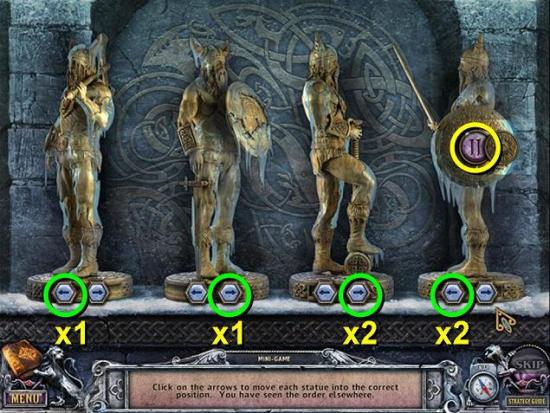
Give them (from left to right) the STONEPOLE AXE, STONE SHIELD, STONE HAMMER and STONE HELMET
Rotate the statues until they’re in the positions shown on the scroll from the stone bust by the watermill
Take the second STONE DISC
Go to the hall with the axes and zoom in on the door in the back
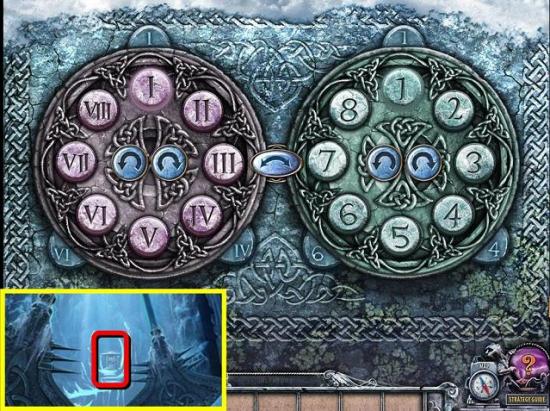
Put the two STONE DISCS on the puzzle
Move all the roman numerals to the disc on the left and the Arabic ones to the disc on the right. Arrange them as if on a clock with 8 hours. Focus on one disc at a time. After you’ve completed the first disc, use one spot on that disc to temporarily move aside a number on the other disc. Finally, put the last piece back on the first disc and rotate both discs until the 1 is at the top
Take the POLE AXE
Go back to the cave and zoom in on the ice in the back
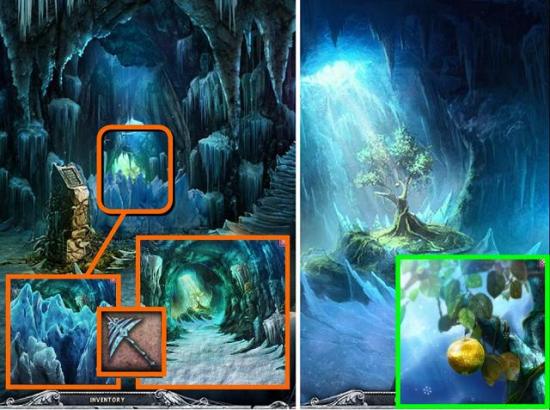
Use the POLE AXE to break the ice
Move through the new tunnel to the garden
Zoom in on the tree and take the GOLDEN APPLE
Return to the library and give the GOLDEN APPLE to Gabriel
House of 1000 Doors
1. Under car at seashore
2. In the grass to the left of the dock
3. By burning tree in courtyard
4. In tree on the right in the garden
5. Candelabra in top left corner of passage
6. Hanging from rope in main hall
7. To the right of the organ
8. On the left in the close up of the organ keyboard
Tibet
9. On the roof of the left pagoda in Tibet square
10. Above the door to the temple
11. On the mantelpiece in the trophy room
12. Top left corner of shofuso
13. Disc puzzle in shofuso
14. First gargoyle on the left in temple passage
15. With three warriors in temple passage
16. By dragon in Hall of Buddha
17. Next to chest with memory game in trophy room
18. On Buddha statue in Hall of Buddha
19. By figurines in Hall of Buddha
Ruined City
20. Next to the weight on the ground in the ruined city
21. On panel with symbols in ruined city
22. Under the hut
23. In palm tree left of the bridge
24. Next to pier by waterfall
25. Left pillar in treasury
26. Right wall of greenhouse after the plant has gone
27. Planter in backyard
28. To the right of blue elephant totem
29. In the cave, on the right
30. By block puzzle in cave
Jerusalem
31. Top right in Via Dolorosa
32. Town square, center
33. On tree stump in mountain passage
34. On chandelier in house in Jerusalem
35. Fountain in backyard (before you do the tap puzzle)
36. At the foot of the menorah in the descent to the temple in Jerusalem
37. Top left corner of temple in Jerusalem
38. By paintings in house in Jerusalem
Madagascar
39. On crates on the beach
40. Next to snake near the pyramid
41. Among tree roots by plane crash
42. By the lizard in the jungle
43. On right wall in tavern
44. To the left of the net on the pirate ship
45. Left of cannon in captain’s cabin
46. Between gears inside pyramid
