
Grow A Garden 2 Base Price List
What's the most valuable crop?![Evomon Best Starter [Leafbun, Blazpup, or Bubble?]](/wp-content/uploads/2026/06/evomon-best-starter.jpg "Evomon Best Starter [Leafbun, Blazpup, or Bubble?]")
Evomon Best Starter [Leafbun, Blazpup, or Bubble?]
Grass-type, Fire-type, or Water-type?![Evomon Tier List [META and BEST Evomon]](/wp-content/uploads/2026/06/evomon-tier-list.jpg "Evomon Tier List [META and BEST Evomon]")
Evomon Tier List [META and BEST Evomon]
The Evomon dream team.
![[Roblox] Evomon Shiny Hunting Guide – Including Prismatic and Pris Shinies!](/wp-content/uploads/2026/06/evomon-shiny-hunting-guide.jpg "[Roblox] Evomon Shiny Hunting Guide – Including Prismatic and Pris Shinies!")
Hotel Walkthrough
Welcome to the walkthrough for Hotel on Gamezebo. Hotel is a point and click adventure game for the PC by Cateia Games. This walkthrough includes tips and tricks, helpful hints, and a strategy guide to complete Hotel.


- Prefer Gamezebo on Google


Hotel – Game Introduction
Welcome to the walkthrough for Hotel on Gamezebo. Hotel is a point and click adventure game for the PC by Cateia Games. This walkthrough includes tips and tricks, helpful hints, and a strategy guide to complete Hotel.
General Information
- The default cursor is the white arrow. Move the mouse cursor around and the icon will change when it moves over a hotspot. The enter button or the Help button can be used to show all of these hotspots on the screen. The cursor will change to a yellow color when it passes over an area that can be walked to. The magnifying glass means that the object can be examined, the hand icon shows that there is an object that can be interacted with or added to the inventory, and the speech bubble icon shows that a conversation can be started with a character.
- The F1 key or the Help button at the bottom of the screen can be used to bring up a list of shortcut keys used in the game. Some helpful shortcuts to save time include pressing the space key to skip conversations and animations, and double clicking to instantly transport to locations that have already been visited without having to walk there. The space key can also be held down while Bridget is walking to make her move much faster.
- Conversations are frequently carried out with other characters in the game, and in most conversations you will have a list of topics to pick from. It is important to talk to all characters about every topic, as sometimes the only way of moving past a certain point in the game is to have talked with a character about a particular subject.
- The inventory displays a list of items that have been picked up in the game. Certain items can be double-clicked in order to zoom in or use them while they are in the inventory. While most items are used on other objects in the game window, some items are combined with another item in the inventory in order to make a new item.
- The collector’s edition of Hotel features a character biography for all of the characters in the game, an in-game strategy guide, six pieces of bonus artwork, four screensavers and six music tracks.
Walkthrough – Day 1
The game starts outside the castle. You have the option of following a tutorial, which will display help messages in the early stages of the game. Move the mouse cursor to the door and left click to start walking toward the castle entrance. Hold down the space bar key while Bridget is walking to move faster. After arriving at the castle entrance, right click to open the inventory and then double click the phone:

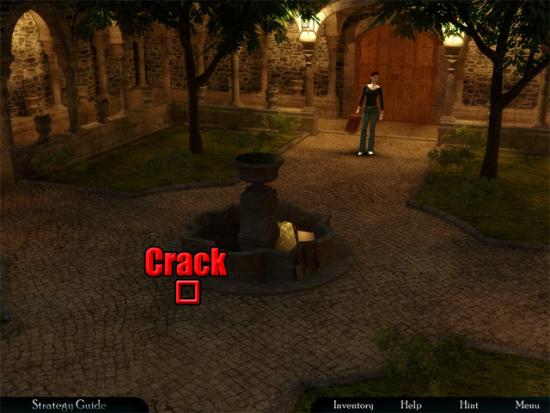
After a discussion with the chief inspector Sam McCloud, the butler will open the door to let Bridget into the castle courtyard. Approach the fountain the middle of the courtyard to hear detective Matisse and the butler talking about the keys to the basement. Approach the door at the other end of the courtyard and take the copper wire on the ledge:

Return to the fountain and use the copper wire on the cracked ground:
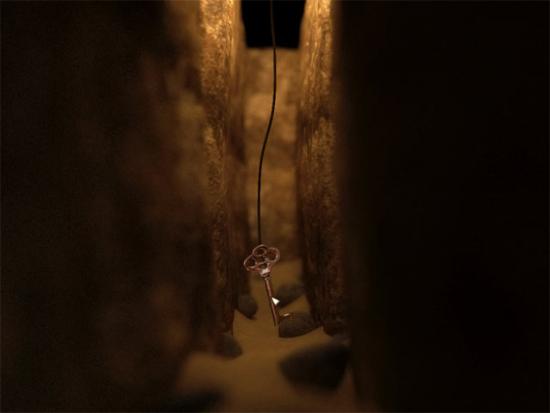
Move the wire to the key until it hooks into the hole. Move the cursor up to pull the key out of the hole without touching the sides:
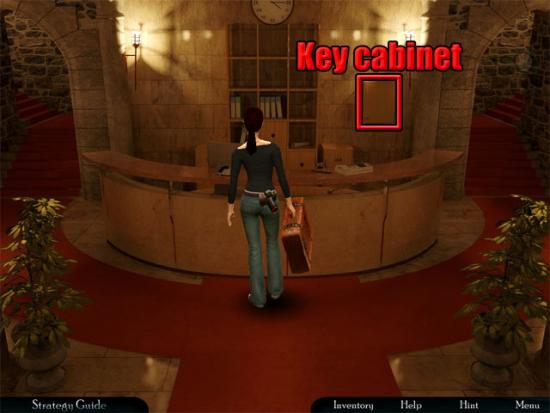
Approach the door and open it to enter the hotel. Approach the reception desk and talk to the butler about all topics to receive the hotel memento. Approach the key cabinet behind the desk:
Take the key to room 27:
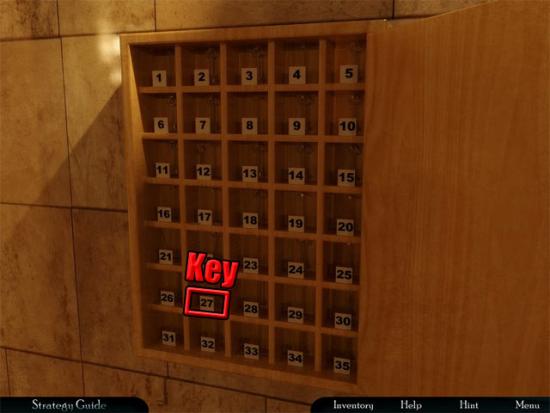
Move away from the keys. Climb up the stairs at the left side of the reception desk. Use the room key on the door to room 27 and then select the door to enter Bridget’s room. Use the suitcase from the inventory on the closet and the laptop on the desk:
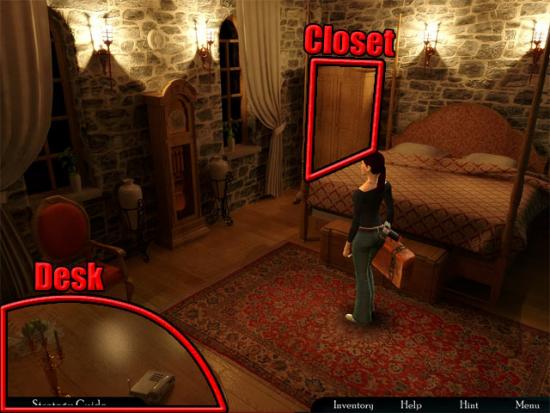
Exit the room and return to the reception area. Walk south away from the reception desk and approach the sofa at the left side of the hall. Take the box of matches on the fireplace shelf:
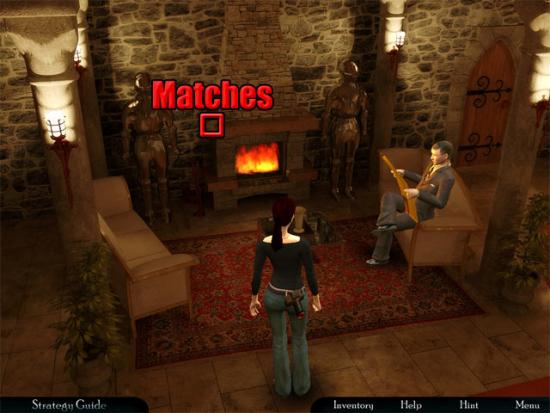
Talk to Matisse about all topics: He says that the fax machine is broken. Move away from the sofa and walk south to exit the hotel. Return to the fountain and select the gardening tools to take the axe:
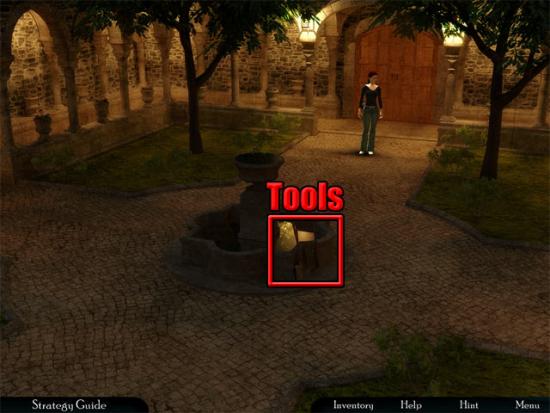
Return to the castle entrance and then exit the castle. Walk left to the bridge and select the cardboard boxes to take the fax paper rolls:
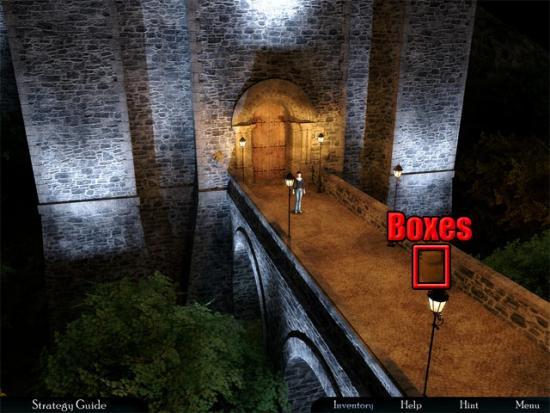
Return to the reception desk and use the fax paper rolls on the fax machine:
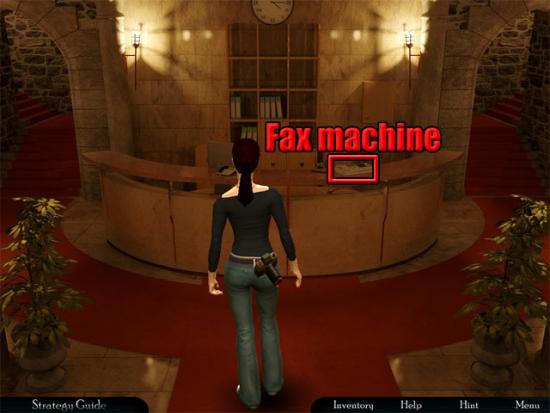
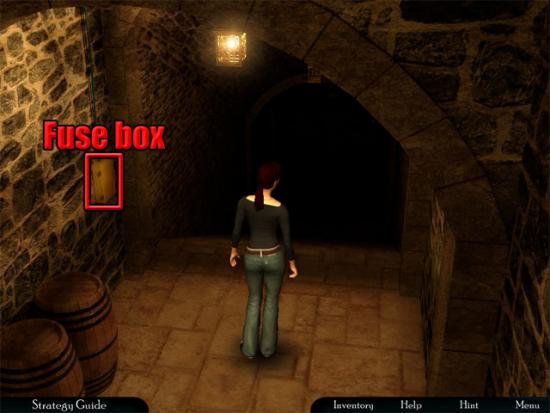
Take the fax from the machine and Bridget will also take a copy of the fax. Approach the sofa at the left side of the reception hall and talk to Matisse to give him the fax. Return to the reception desk and climb the right stairs. Go through the right doorway to enter the basement hall. Continue forward to the steps leading down to the basement. Open the fuse box on the left wall:
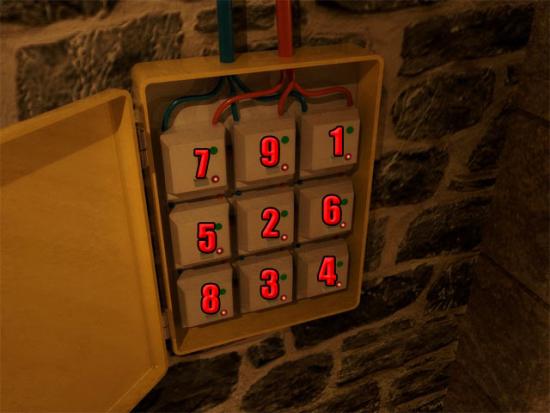
The aim is to select the switches to change all of the lights to green. Select the switches in the following order:
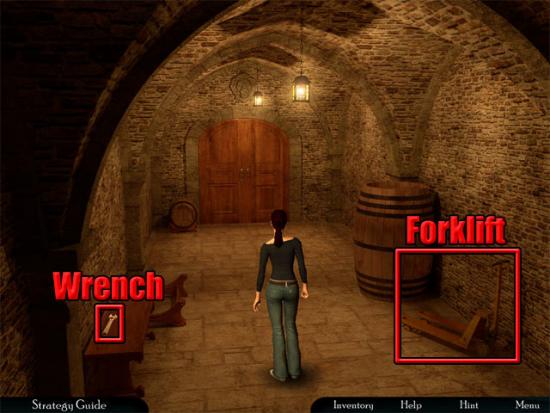
Approach the basement entrance and take the wrench and the forklift:
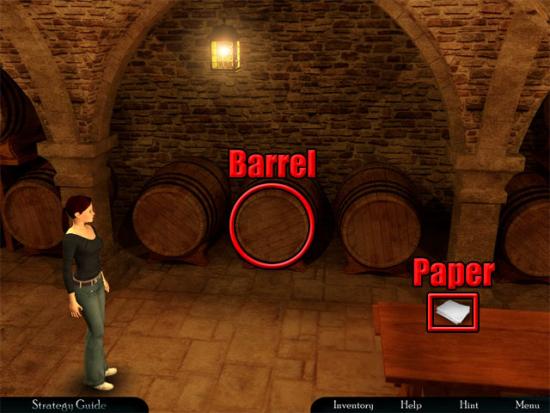
Use the basement key on the door to unlock it and then select the door to enter the basement. After the cutscene, approach the table. Take the bunch of paper from the table and use the axe on the middle barrel:
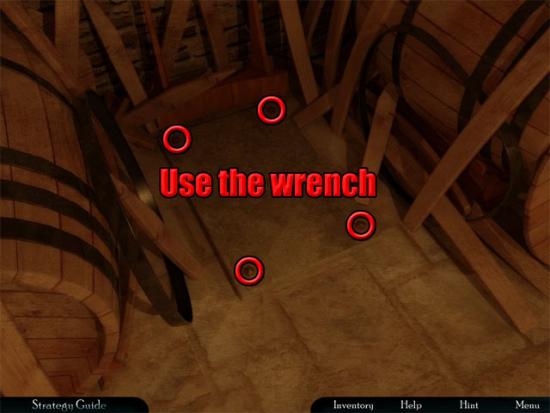
Approach the barrel spot and use the wrench on the four nuts:
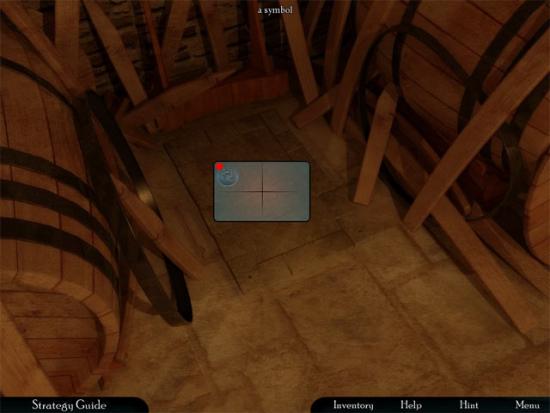
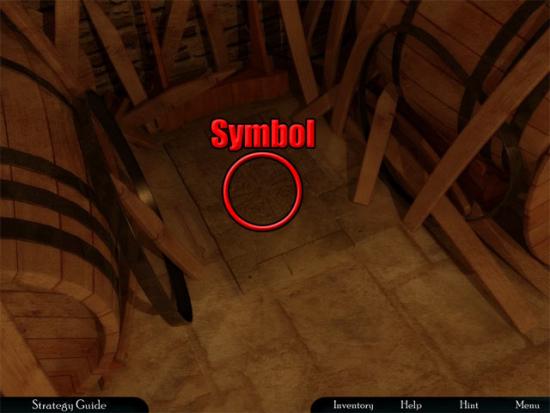
Use the forklift on the stone to reveal a symbol. Use the digital camera on the symbol:
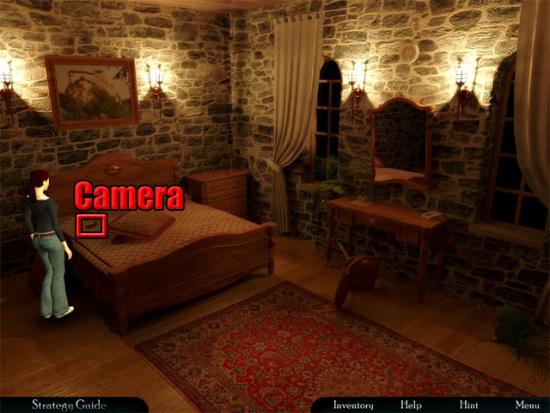
Return to Bridget’s room and use the photograph of the symbol on the laptop. Combine the matches with the plain paper in the inventory to set off the fire alarm. Exit Bridget’s room. Walk south in the hall and enter the room with the police tape in front of the door. Move the left pillow on the bed and take the digital camera:
Return to Bridget’s room and use the white digital camera on the laptop. After exiting the view of the photo, Mr. Greenleaf enters the room and talks with Bridget. In the dream, exit the room and follow the ghost through the halls to the statue to complete the first day.
Day 2
Select the candles behind the laptop to take one of them:
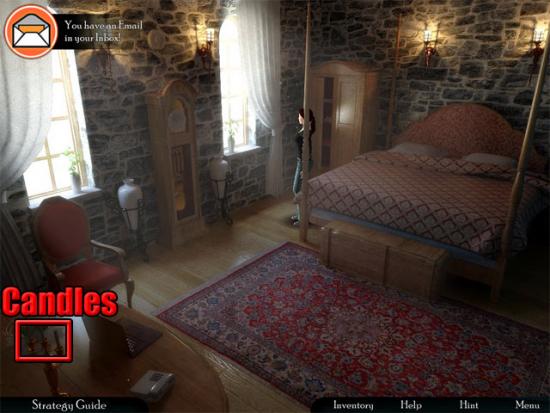
Use the laptop to read the e-mail from Xavi regarding the symbol. Return to the reception desk and take the paperclips:
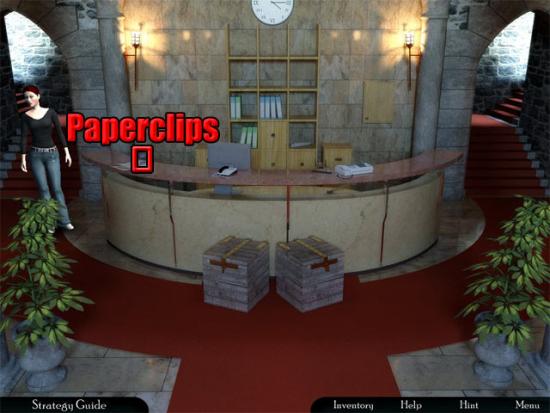
Approach the boxes in front of the reception desk and use the paperclip on the padlocks to open the boxes:
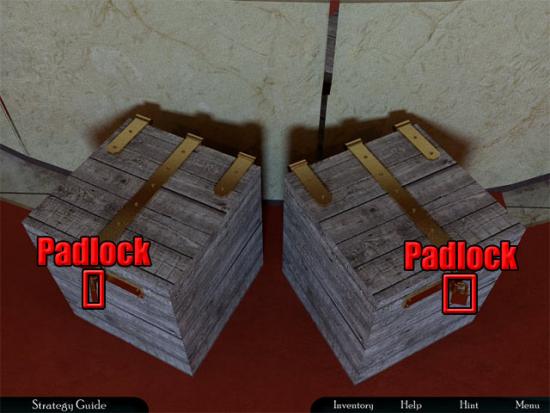
Use the digital camera on the stone tablet in one of the boxes. Walk south and exit the hotel. Take the ladder in the courtyard:
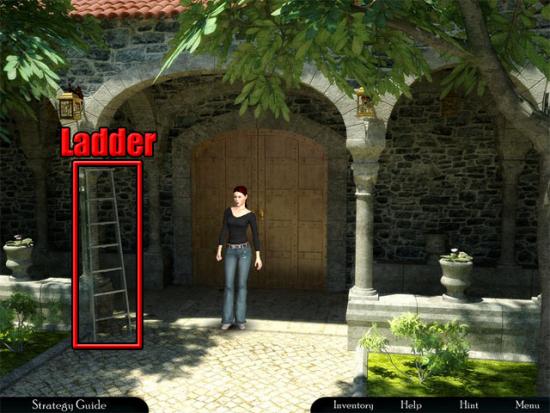
Enter the hotel and return to the basement. Approach the table and then walk right to the wine rack. Select the wine storage to take a bottle of wine. Return to the table and approach the barrel spot. Use the bottle of wine on the symbol:
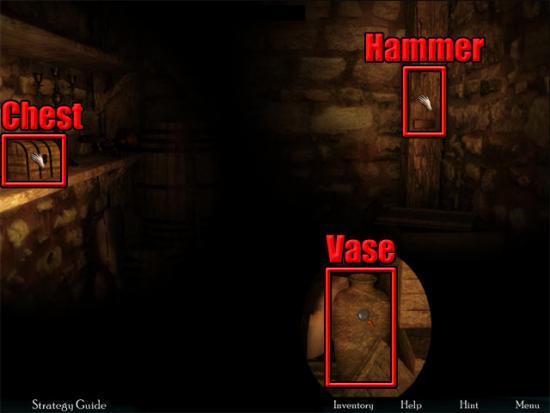
Use the ladder on the hole. Combine the matches with the candle in the inventory. Use the lit candle on the hole to climb down the ladder. Move the cursor to direct the light around the room. Take the hammer and the chest, and then use the hammer on the old vase:
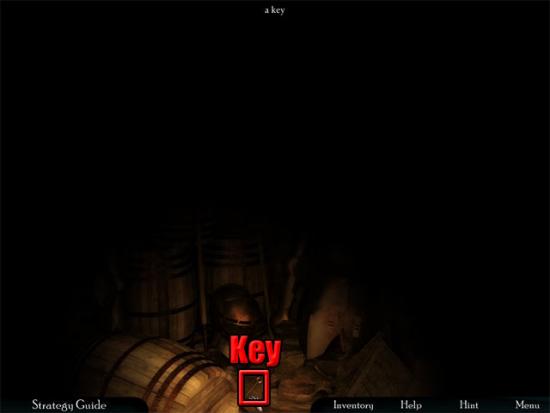
Take the key on the floor near the vase debris:
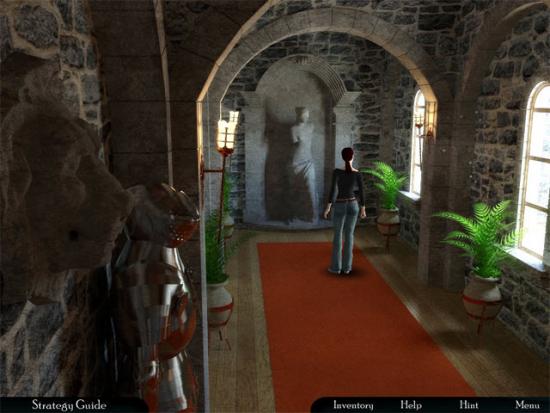
Combine the key with the chest in the inventory to find the blue crystal. Return to the hall outside Bridget’s room and walk north to the statue at the end of the hall:
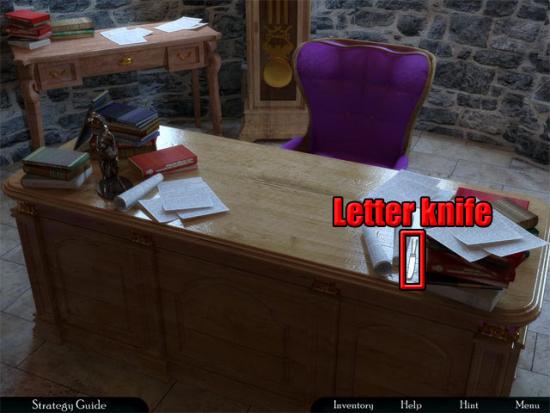
Approach the statue and use the blue crystal on one of the statue eye sockets. Return to Bridget’s room and use the tablet photo on the laptop. Return to the reception desk and the butler will now be waiting there. Talk to the butler about all topics: He says that Greenleaf wants to see Bridget in his office. Climb the right stairs and go through the middle doorway to enter the owner’s office. Talk to Mr. Greenleaf about all topics and he will leave. Approach the desk and take the letter knife:
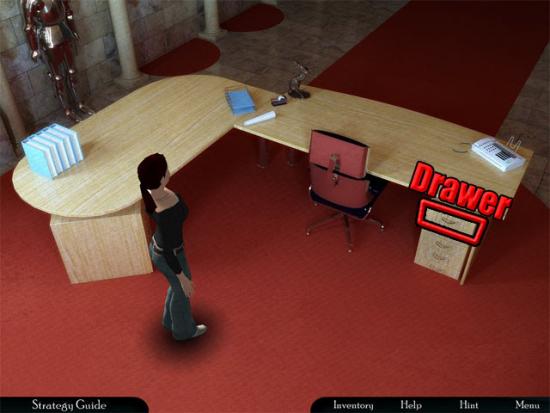
Step away from the desk and select the right door to enter the owner’s wife’s office. Approach the desk and use the letter knife on the desk drawer:
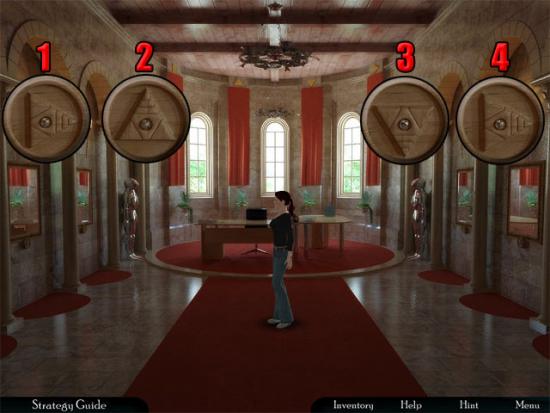
Take the marbles from the drawer. Step away from the desk. Examine the four mirrors in the room and use a marble in each triangle. Rotate the triangles below the four mirrors so that they are in the same positions as the triangles above the curtains. The correct positions are shown below:
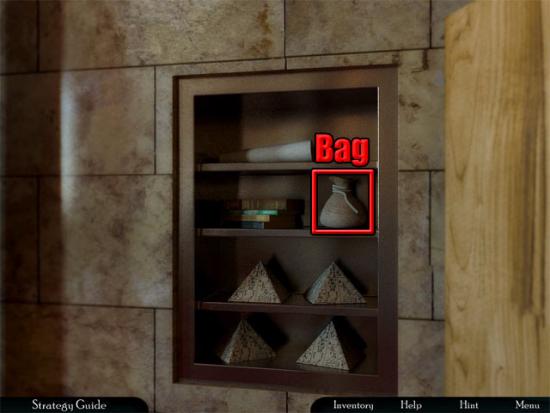
Approach the vault and take the bag:
Exit the office and return to the hall to talk to Matisse. Return to Bridget’s room and use the laptop to read the latest e-mail from Xavi. Close the e-mail and Sam will call to talk to Bridget about the case.
Day 3 – Hotel
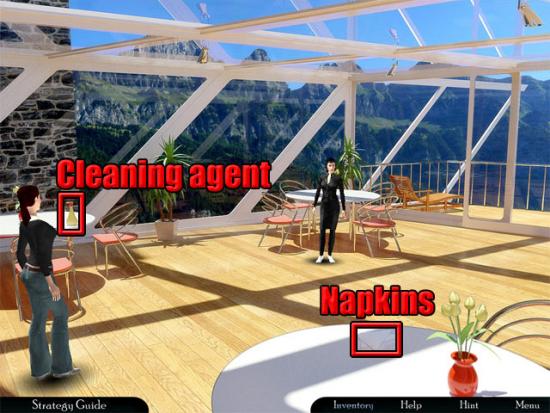
Exit Bridget’s room and return to the reception desk. Talk to the butler: He says that Mrs. Greenleaf is waiting for Bridget in the restaurant. Climb the right stairs and go through the left doorway to enter the restaurant. Take the cleaning agent and the napkins:
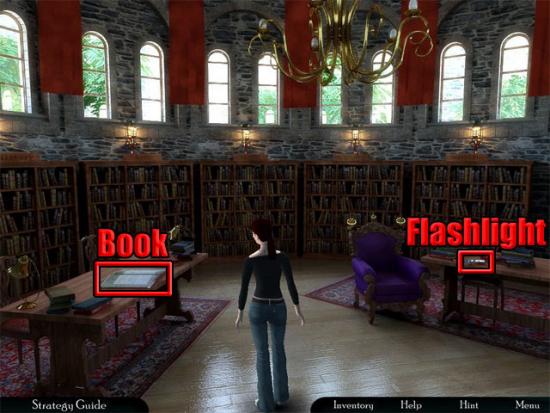
Talk to Mrs. Greenleaf about all topics. Return to the fountain in the courtyard and walk right to see Mrs. Greenleaf talking to her henchman in the library. Take the flashlight on the right table and examine the book on the left table:
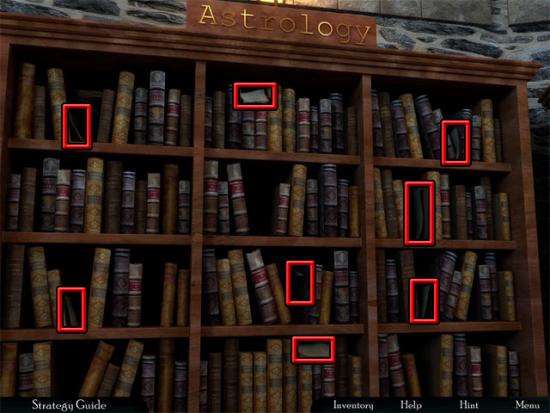
Approach the astrology bookshelf and take the eight pieces of parchment:
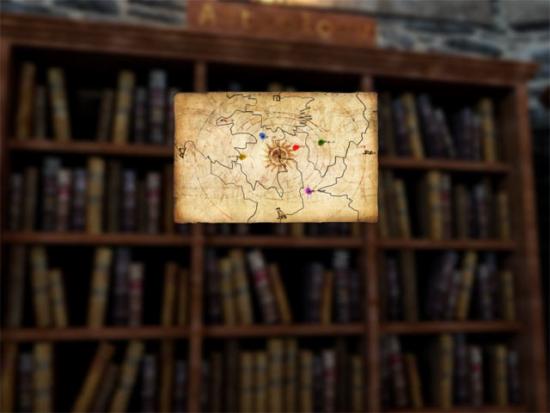
Exit the view of the bookshelf. Double click one of the parchment pieces in the inventory and then complete the jigsaw puzzle by rotating and placing the pieces on the outline:
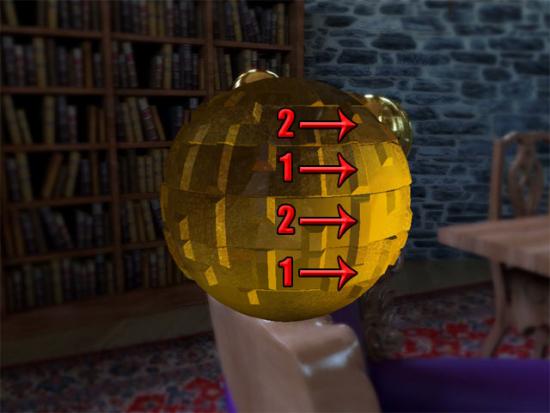
Approach the chair to see a yellow sphere. Rotate the four pieces of the yellow sphere to receive another blue crystal:
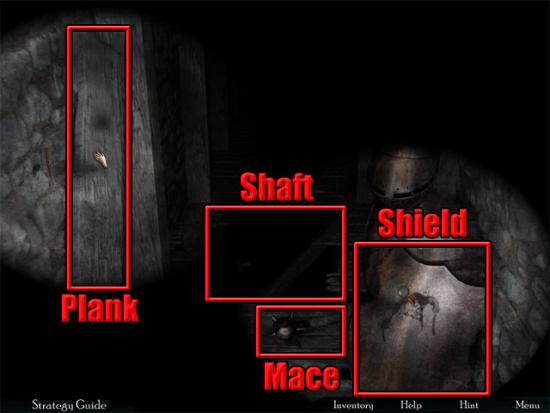
Return to the hall outside Bridget’s room and walk north to the statue. Use the second blue crystal on the eye socket to open a secret door. Go through the doorway to enter the dark hall. Combine the cleaning liquid with the cotton napkin in the inventory. Use the wet napkin on the knight’s shield and examine the inscription. Take the plank and the mace. Use the plank on the shaft:
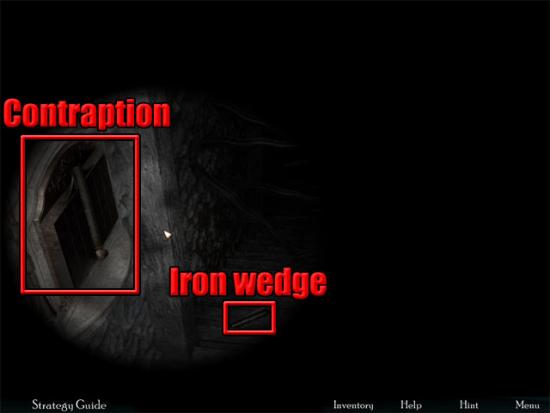
Proceed further into the hall and take the iron wedge on the floor. Approach the contraption on the left wall.
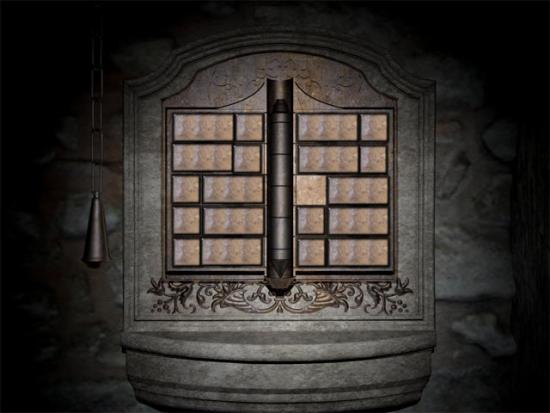
The aim in this mini-game is to move the blocks either horizontally or vertically so that the iron wedge moves it to bottom of the grid. The chain can be pulled to reset the puzzle. One way of completing the mini-game is shown below:
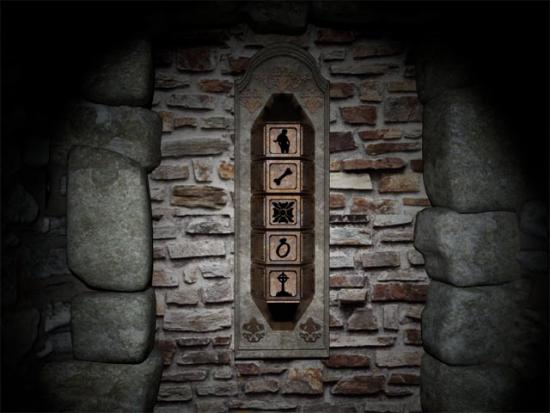
Proceed further into the tunnel and use the mace on the three planks. Approach the mechanism. Using the inscription on the shield as a reference, put the symbols in the correct order:
Enter the boiler room and take the crowbar and the welding torch:

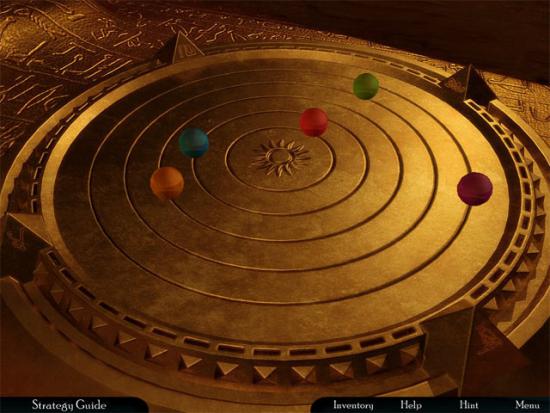
Use the welding torch on the chains on the box. Use the crowbar on the wooden box to open it. Approach the wooden box and use the bag on the plate. Using the astrology map from the inventory as a reference, place the spheres in the correct positions:
Use the digital camera on the mummy. Return to Bridget’s room and use the mummy photo on the laptop. Return to the reception desk and talk to the butler about all topics. Return to Bridget’s room and use the laptop to read the latest e-mail from Xavi. Close the e-mail and talk to Veronica about all topics. Return to the reception desk and talk to the butler: He mentions the location of the Templar cemetery. Exit the hotel and walk through the courtyard. Exit the castle, walk across the bridge and leave the castle area to travel to the abandoned village.
Day 3 – Village
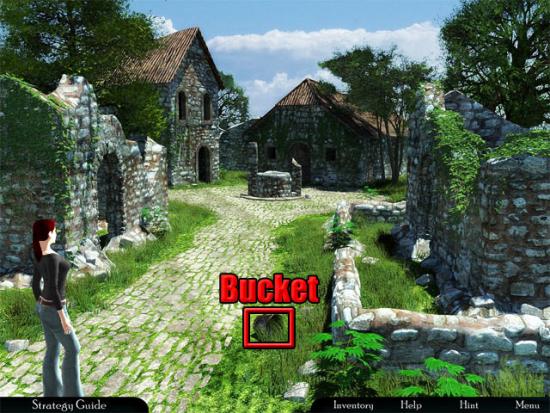
Take the bucket in the grass:
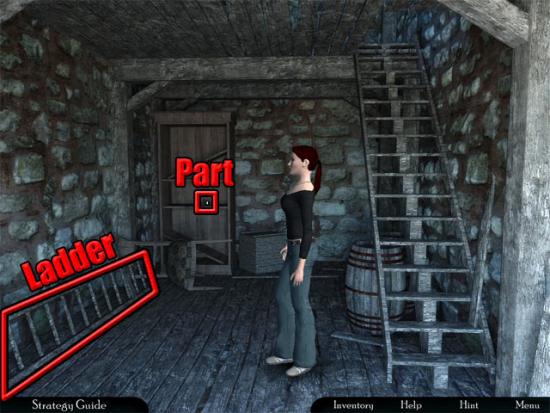
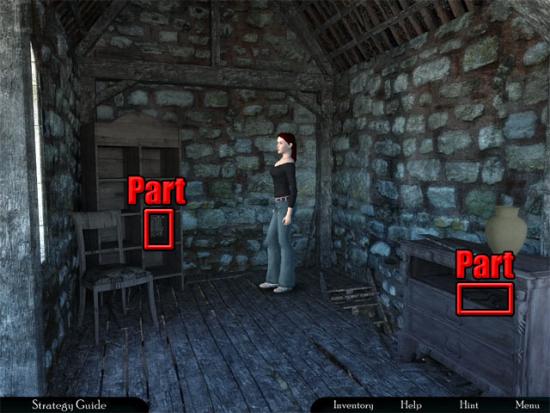
Approach the village well and enter the right abandoned house. Take the ladder and the stethoscope part:
Climb the stairs and take the two stethoscope parts:
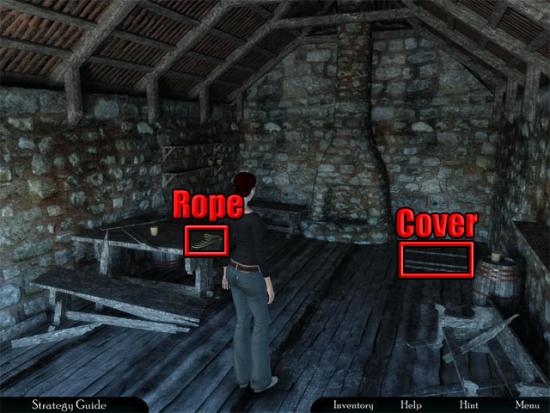
Go downstairs and exit the house. Enter the left abandoned house and take the rope. Open the wooden cover:
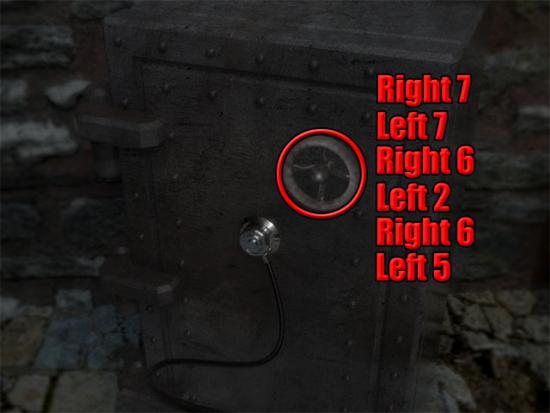
Go down to the basement. Combine the three stethoscope parts in the inventory and then use the completed stethoscope on the safe. Rotate the wheel in the direction and number of times shown below:
Take the compass from the safe. Climb back up the ladder and exit the house. Combine the bucket with the rope in the inventory and then use the bucket on the well to receive the bucket of water. Walk left along the path and keep following it to the graveyard entrance to see Theresa. Talk to Theresa about all topics. Take the first stone in the grass: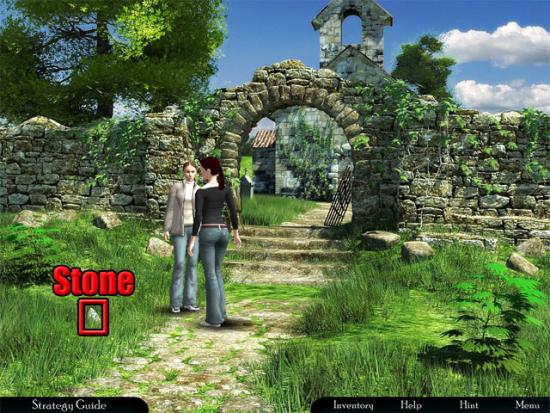
Enter the graveyard and take the second stone: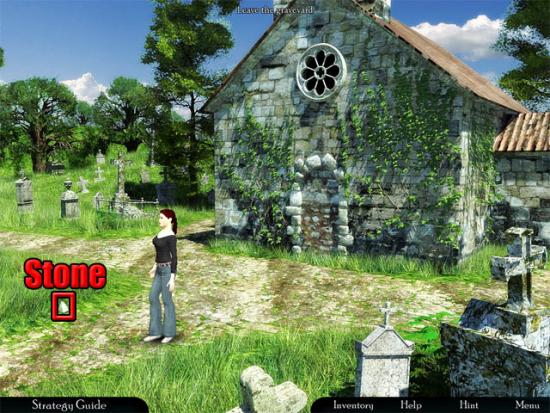
Walk left along the path and take the third stone: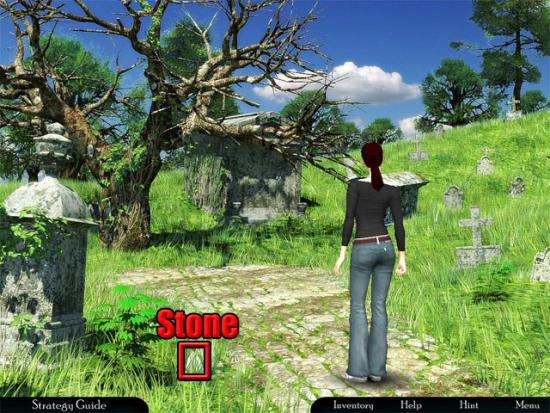
Walk back down the path and then go behind the church. Take the fourth stone and then use the ladder on the hole in the wall: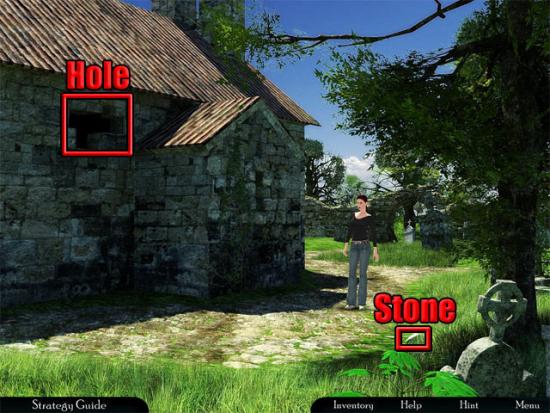
Climb up the ladder to enter the church. Take the fifth stone: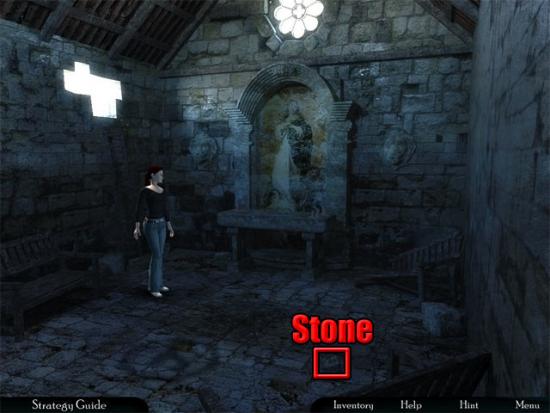
Approach the altar and use the matches on the candles. Put the five stones on the correct markings and then use the hotel memento on the middle of the altar: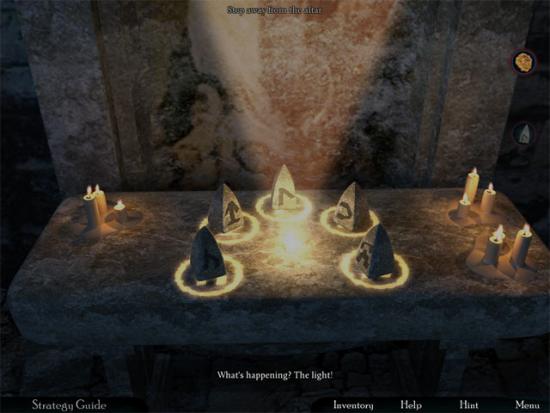
Rotate the light so that it shines on the symbol on the floor: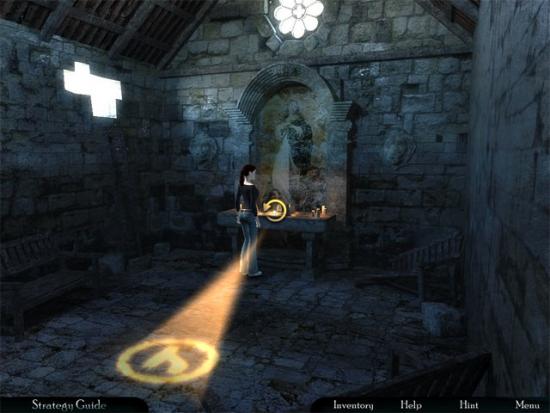
Keep aiming the light at the symbol and the floor will break after a few seconds. Go down the hole to enter the crypt. Approach the sarcophagus and use the bucket of water on the water tank. Rotate the nodes so that water flows from the top-left corner to the bottom-right corner of the square. One way of completing the mini-game is shown below: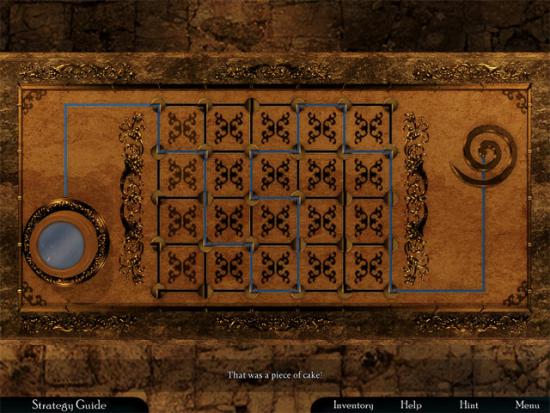
Touch the light to travel to Avalon. Talk to Arthur about all topics. Exit Avalon and return to the front of the church. Go left and talk to Veronica to travel to the underworld. Talk to Cleopatra about all topics. Proceed along the path and talk to Death. Exit the underworld and return to the crypt in the church. Touch the light to travel to Avalon. Talk to Arthur about the heart. Exit the church and talk to Veronica at the end of the path to return to the underworld. Walk along the path and talk to Death to play a mini-game. Guide the ball through the maze to reach the sun icon. You will need to time the movements as the blue tiles need to be covering the gaps. Follow the movements shown below: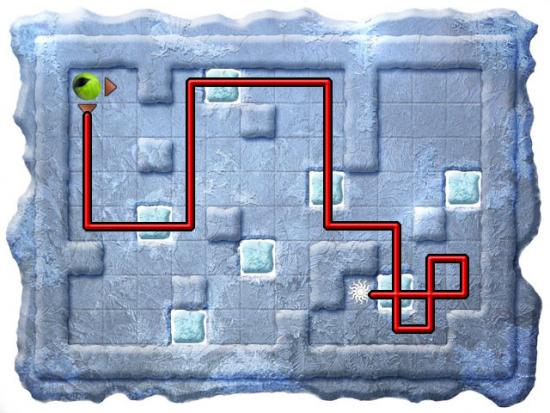
Cross over the bridge and talk to Mark: He says that he has lost a ring. Cross over the bridge and talk to Death. Return to Avalon. Talk to Arthur and he will allow Bridget to have the sword. Take the sword: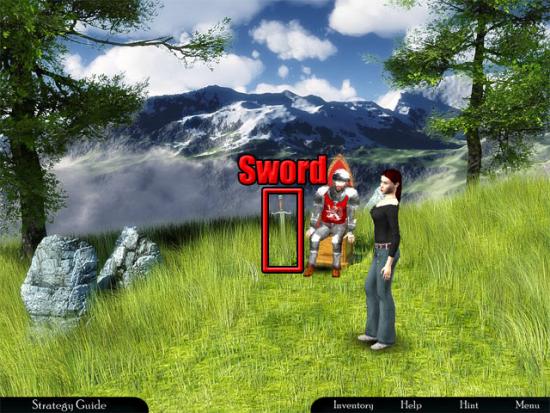
Return to Mark Antony in the underworld and continue left along the path to enter the labyrinth. Use the arrow keys and move through the maze to the ring: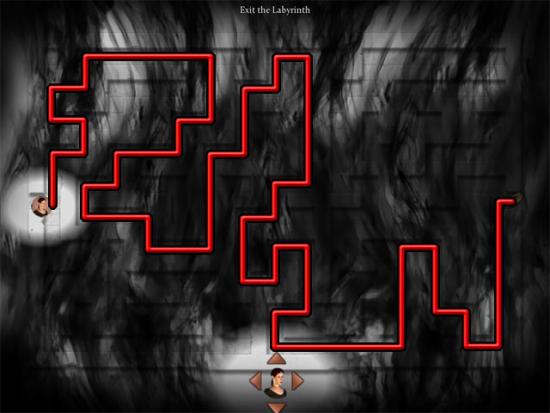
Walk right after completing the maze and talk to Mark Antony to take him to Cleopatra. Return to the graveyard entrance and talk to Theresa. Return to the village and use the rope on the well. Climb down the well. Approach the stone carvings on the wall and complete the mini-game by rotating and placing the tiles in the correct positions: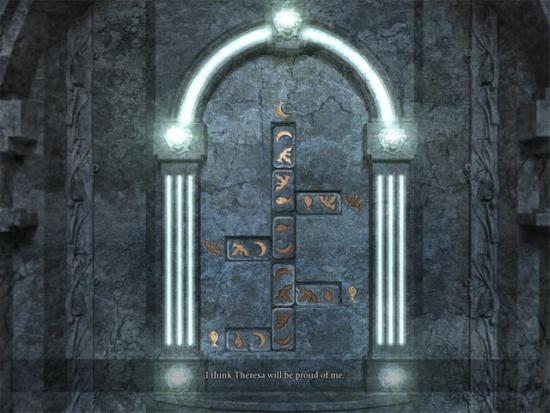
Climb up the rope and after the cutscene Bridget will return to the hotel.
Day 3 – Hotel
Approach the castle entrance. Use the rope on the left lamp pole: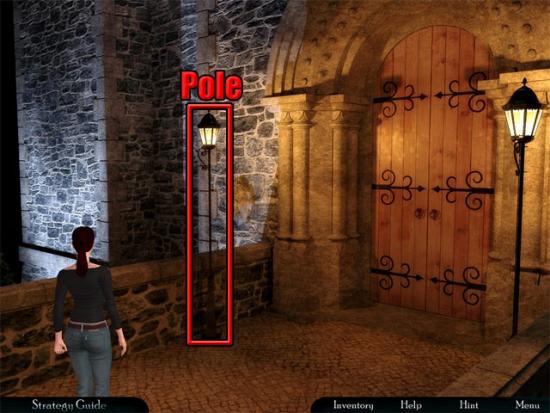
Climb below the bridge. Take the rusty saw and use it on the bars: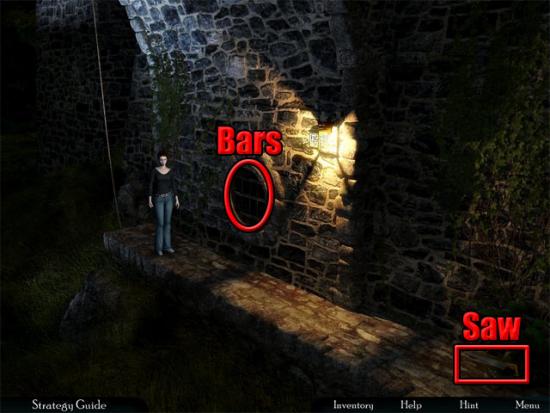
Crawl into the sewer tube. Approach the tube seal to play a mini-game where the aim is to rotate the wheels to form triangles. Rotate the bottom-left wheel four times and the top wheel four times. Next, switch between rotating the top wheel and the bottom-right until all three triangles have been formed. Select the ring in the middle of the triangle to complete the mini-game:
[hotel_61]
Enter the tube and approach the control panel on the wall. Slide the left and middle handles down. Press the button and the elevator will descend: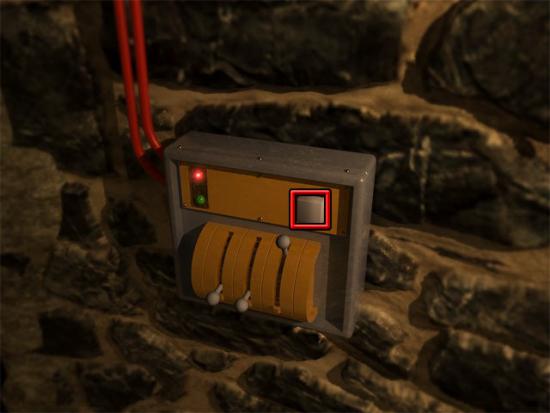
Step into the elevator to ascend to the office. Talk to Veronica. Return to the fountain in the castle courtyard and walk right to the library. Select the middle bookshelf to reveal a secret doorway: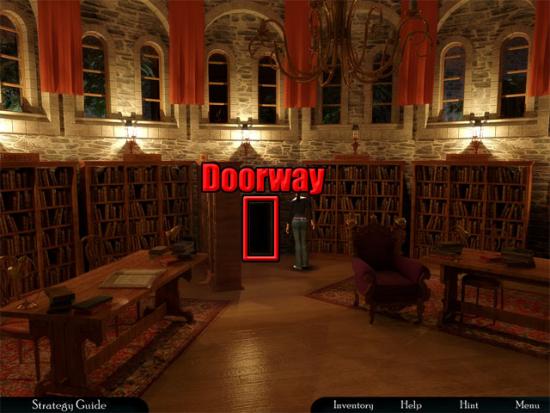
Go through the doorway and take the torch on the wall: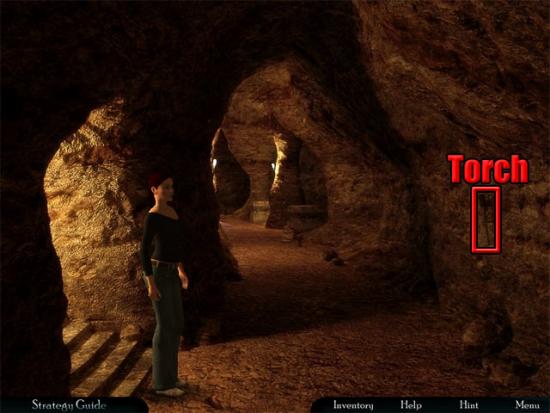
Walk forward through the tunnel to see the ritual. Return to the hall outside Briget’s room and follow the hall north to the boiler room. Examine the boiler gauges: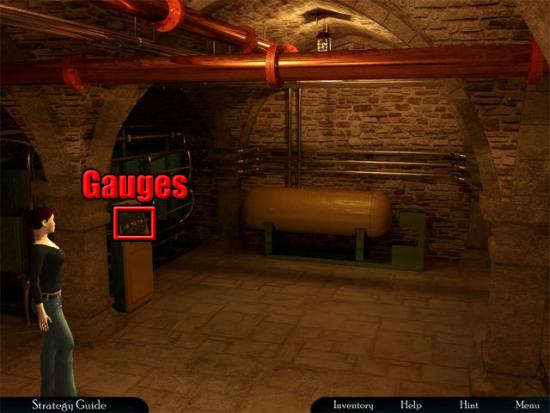
Press the top two switches (marked in blue), move the four levers (marked in red), and then rotate the three dials (marked in green):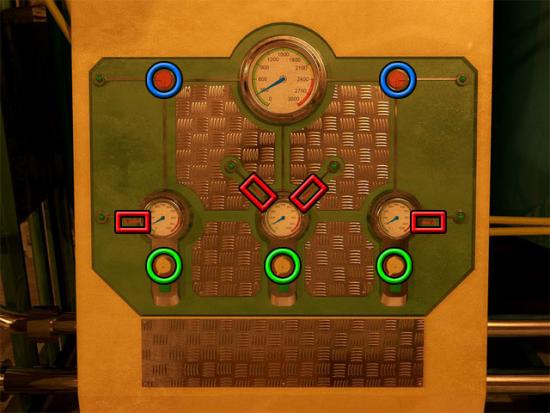
Return to the library and go through the secret doorway. Run back up the tunnel to return to the ritual room. Take the grail: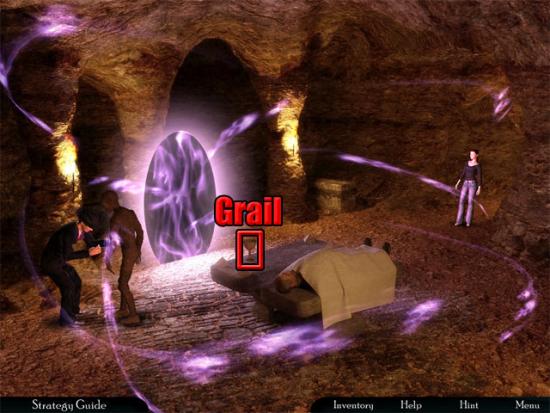
Use the torch on the lit torch. Use the lit torch on the mummy. After Mrs. Greenleaf appears, use the grail on the portal to complete the game.

More articles...
-
Grow A Garden 2 Base Price List
What's the most valuable crop? -
Evomon Best Starter [Leafbun, Blazpup, or Bubble?]
Grass-type, Fire-type, or Water-type? -
Evomon Tier List [META and BEST Evomon]
The Evomon dream team.