
Best Horror Games On Itch.io – July 2026
By Adele Wilson
Across a bounty of subgenres.![Haze Seas Accessories Tier List [Best Accessories to Equip]](/wp-content/uploads/2026/07/haze-seas-accessories-tier-list.jpg "Haze Seas Accessories Tier List [Best Accessories to Equip]")
Haze Seas Accessories Tier List [Best Accessories to Equip]
By Adele Wilson
The accessories with the best stat buffs in Haze Seas.
![[Roblox] Evomon Shiny Hunting Guide – Including Prismatic and Pris Shinies!](/wp-content/uploads/2026/06/evomon-shiny-hunting-guide.jpg "[Roblox] Evomon Shiny Hunting Guide – Including Prismatic and Pris Shinies!")

Hide & Secret 4: The Lost World Walkthrough
Welcome to the Hide & Secret 4: The Lost World walkthrough on Gamezebo.Hide & Secret 4: The Lost World is a Hidden Object game played on the PC and Mac created by Anarchy Enterprises. This walkthrough includes tips and tricks, helpful hints, and a strategy guide on how to complete Hide & Secret 4: The Lost World.


- Prefer Gamezebo on Google

Hide & Secret 4: The Lost World – Game Introduction
Welcome to the Hide & Secret 4: The Lost World walkthrough on Gamezebo.Hide & Secret 4: The Lost World is a Hidden Object game played on the PC and Mac created by Anarchy Enterprises. This walkthrough includes tips and tricks, helpful hints, and a strategy guide on how to complete Hide & Secret 4: The Lost World.
General Tips & Guide Tips
General Tips
• You have unlimited Hints.
• Hint Meter takes approximately 35 seconds to refill.
• Hidden Objects are the same every time.
• Skip Timer takes approximately 2 minutes and 30 seconds to fill.
• There is two different Game Modes, Relaxed and Expert, to choose from.
• Relaxed Mode features faster filling Hint Meter and Skip Button; Active Areas will sparkle.
• Expert Mode features slower filling Hint Meter and Skip Button and penalty for Rapid Clicking.
Guide Tips
• Hidden Objects are highlighted in Yellow.
• Items are highlighted in Red.
• Interactive Areas are highlighted in Green.
• Locations are highlighted in Blue.

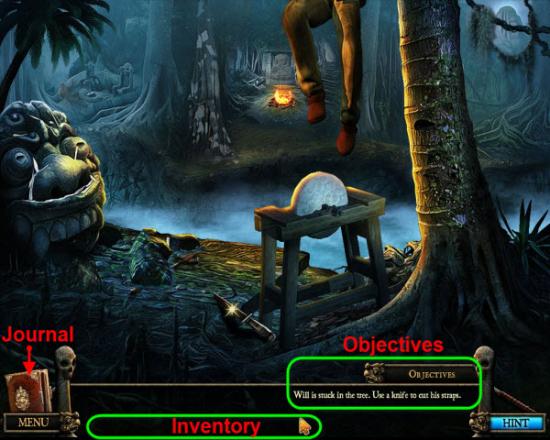
Interface
• Inventory – Hold your Mouse Pointer of the lower section of the Screen, highlighted in Green, to reveal your current inventory.
• Journal – Check the Journal often for story points and clues.
• Objectives – This lists your current goals.
• Map – Click on locations to move quickly from location to location. The White Starred Area represents your current location.
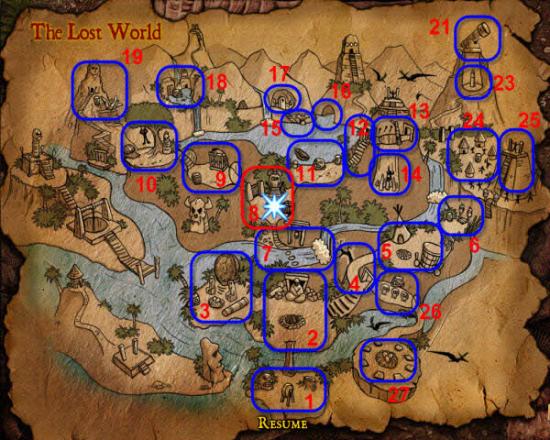
Map Key
1-Starting Area, 2-Camp, 3-Nest, 4-Cliff Path, 5-Second Camp, 6-Broken Bridge, 7-River,
8-Puzzle Statue / Wooden Door, 9-Cave / Cage, 10-Cliff Edge, 11-Lake, 12-Stone Temple Door, 13-Temple, 14-Pit, 15-Plaque Door, 16-Dock, 17-Village, 18-Pond, 19-Plane Wreck, 21-Telescope, 23-Hatch, 24-Abandon Village, 25-Pyramid, 26-Foyer, 27-Pterodactyl Baby’s Nest
Walkthrough
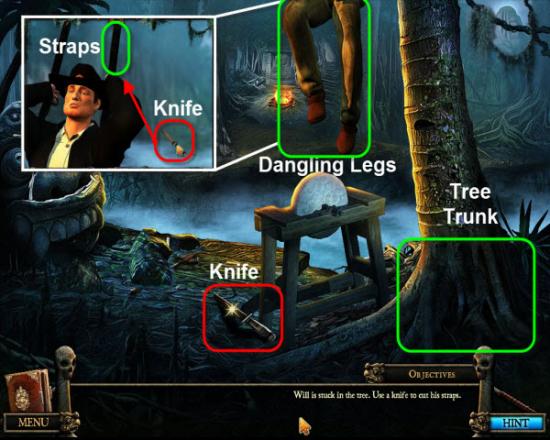
Gather the Knife highlighted in Red.
Use the Knife on the Dangling Legs highlighted in Green.
Use the Knife to cut the Straps.
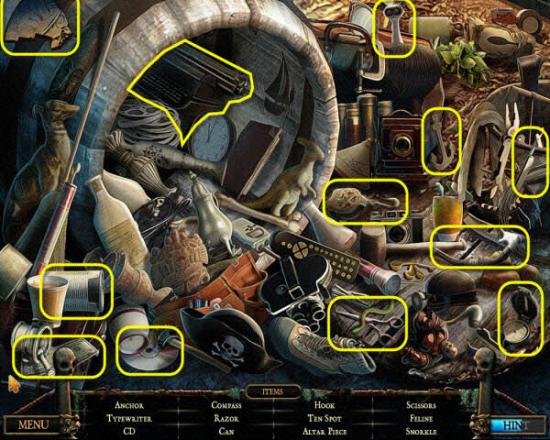
Examine the Tree Trunk.
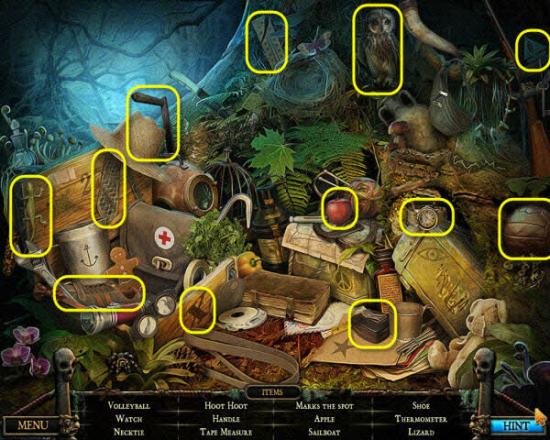
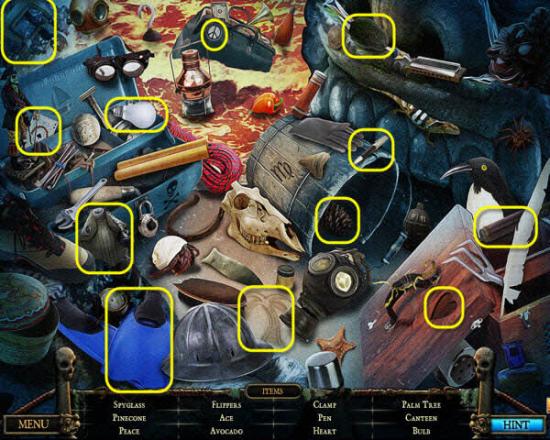
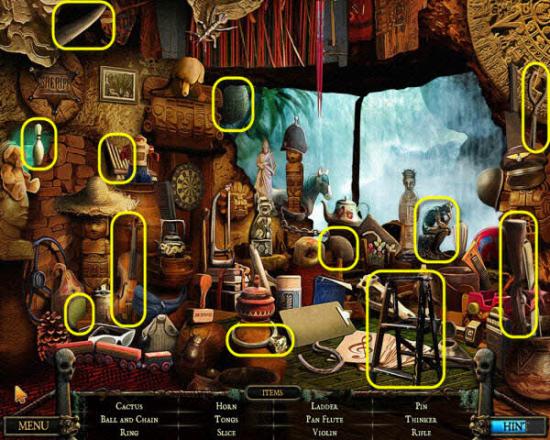
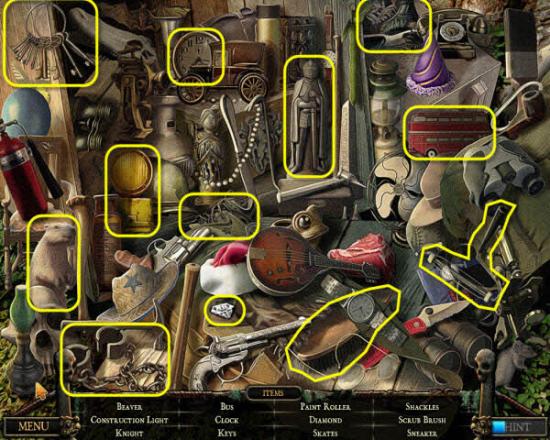
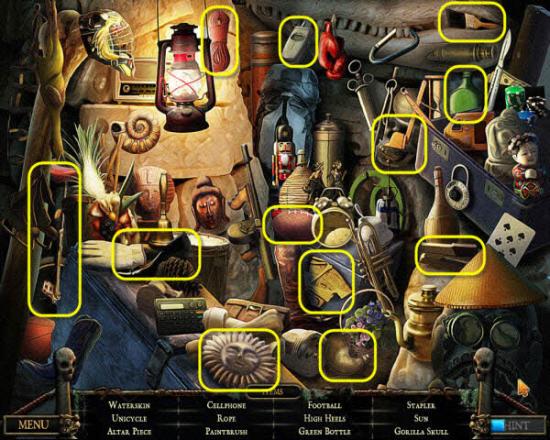
Gather the Hidden Objects highlighted in Yellow.
Receive the Handle.
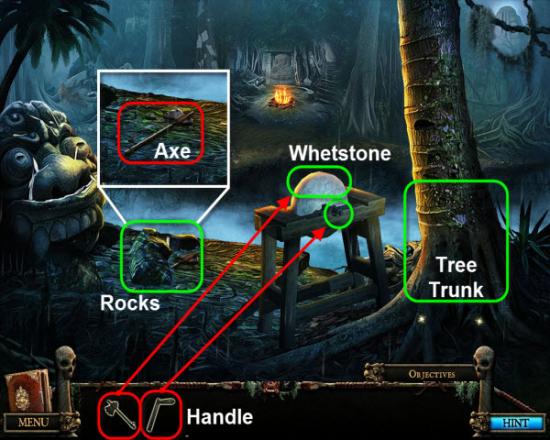
Move the Rocks highlighted in Green.
Gather the Axe highlighted in Red.
Place the Handle on the Whetstone.
Place the Axe on the Whetstone to sharpen the Axe.
Use the now Sharpened Axe on the Tree Trunk, three times, to fell the Tree.
Cross the Chasm to the Campfire.
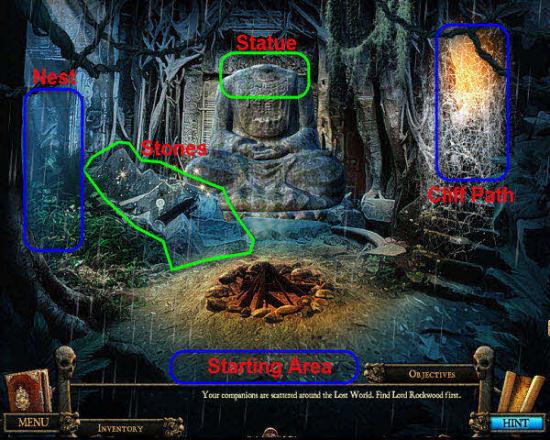
Gather the Map from the Fire.
Examine the Stones highlighted in Green.

Gather the Hidden Objects highlighted in Yellow.
Receive the Tusk.
Head to the Nest.
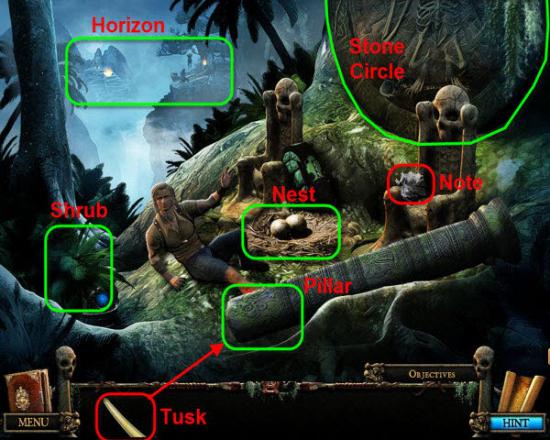
Move the Shrub highlighted in Green.
Gather the Crumpled Note highlighted in Red.
Use the Tusk on the Pillar.
Examine the Broken Leg.
Head Back one screen to the Camp.
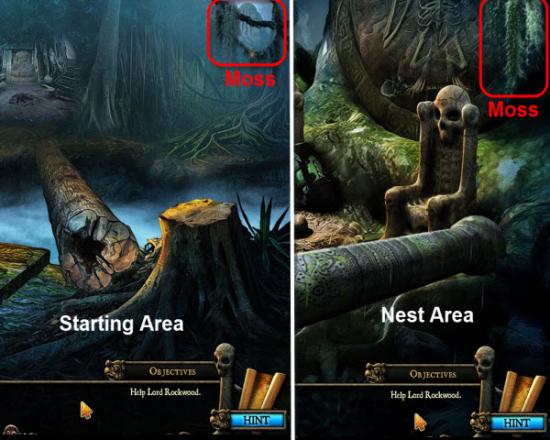
Gather the Moss.
Head Back to Starting area, gather the Moss highlighted in Red.
Return to the Nest, gather the Moss highlighted in Red.
Return back to the Camp.
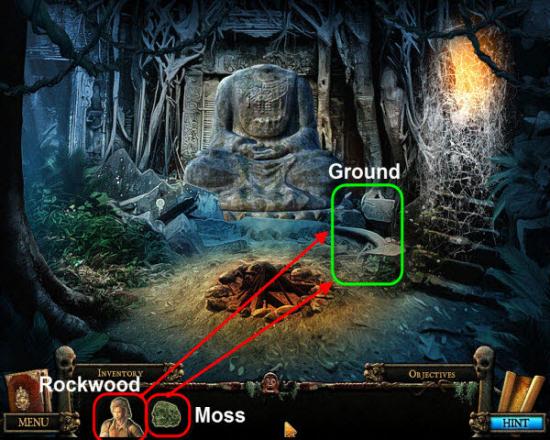
Place the three pieces of Moss on the Ground highlighted in Green.
Place Rockwood on the Moss pile.
Receive the Lighter.
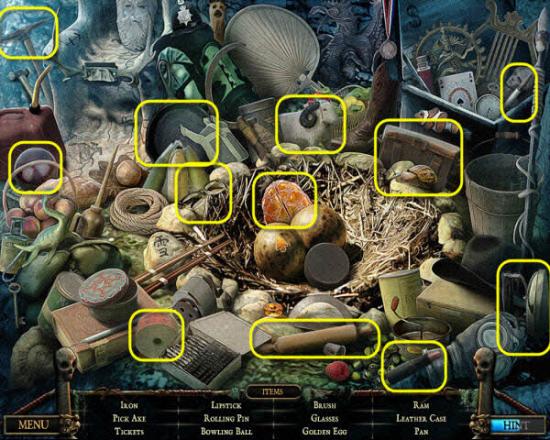
Return to the Nest.
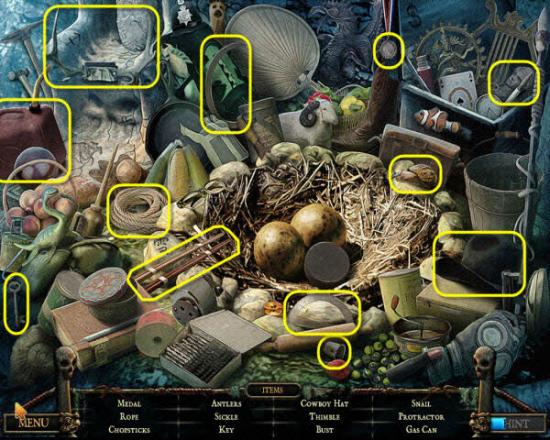
Examine the Nest.
Gather the Hidden Objects highlighted in Yellow.
Receive the Gas Can.
Return to the Camp.
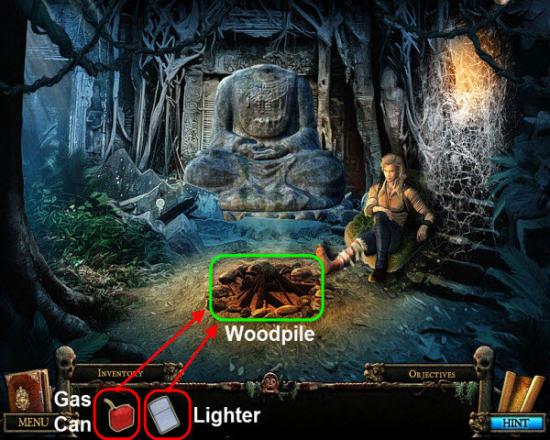
Use the Gas Can on the Woodpile.
Use the Lighter on the Woodpile.
Return to the Nest.

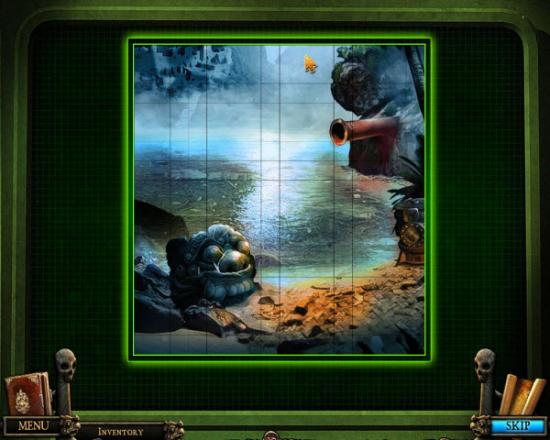
Examine the Stone Circle.
To solve the Puzzle, rotate the Rings to complete the Image.
Click to Rotate each Ring.
Once have completed the Image will receive the Torch.
Return to the Camp.
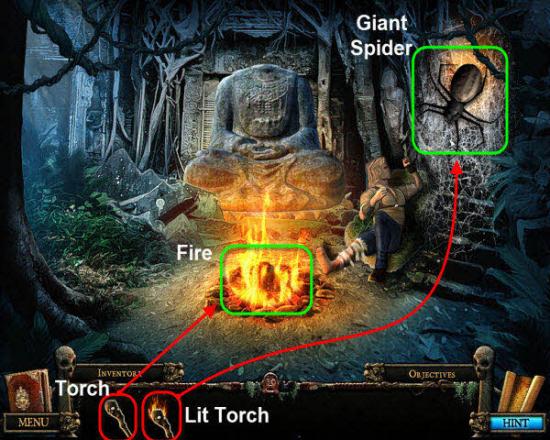
Use the Torch on the Fire.
Now use the Lit Torch to chase off the Giant Spider.
Head to the Cliff Path.
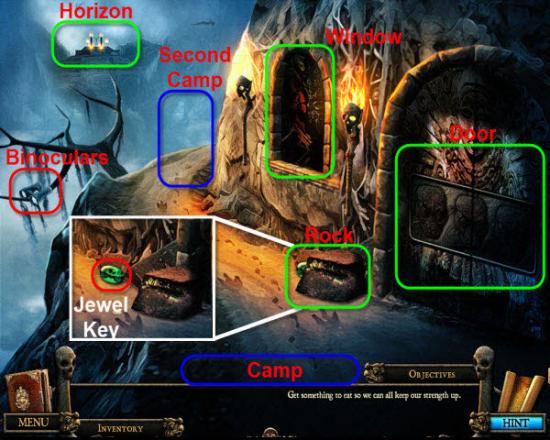
Move the Rock highlighted in Green.
Gather the Green Jewel Key highlighted in Red.
Head to the Second Camp.
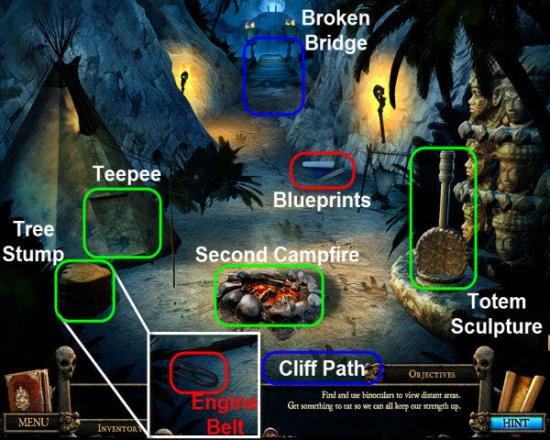
Move the Stump highlighted in Green.
Gather the Engine Belt highlighted in Red.
Gather the Blueprints highlighted in Red.
Head to the Broken Bridge.
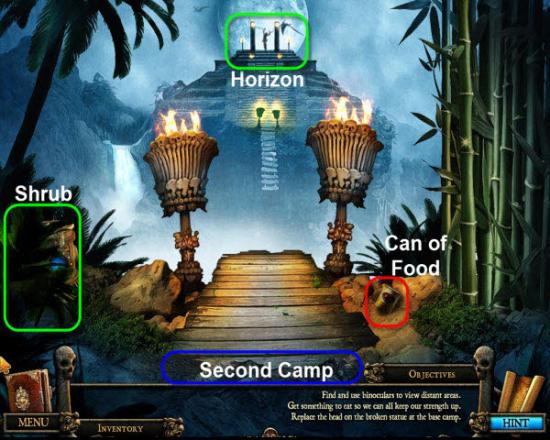
Move the Shrub highlighted in Green.
Gather the Can of Food highlighted in Red.
Return to Camp.
Give the Can of Food to Rockwood.
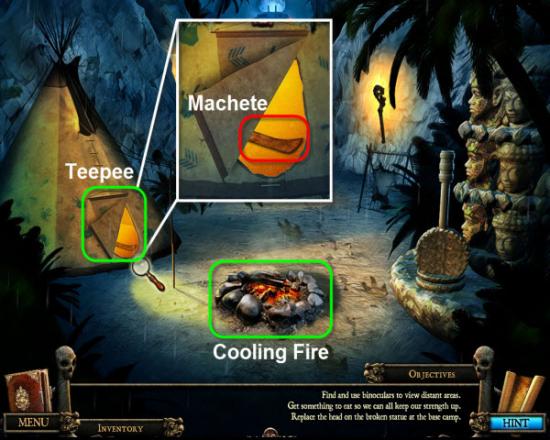
Return to the Second Camp.
Examine the Teepee.
Gather the Machete.
Head to Broken Bridge.
Return to the Second Camp
Examine the Cooling Fire-pit highlighted in Green.
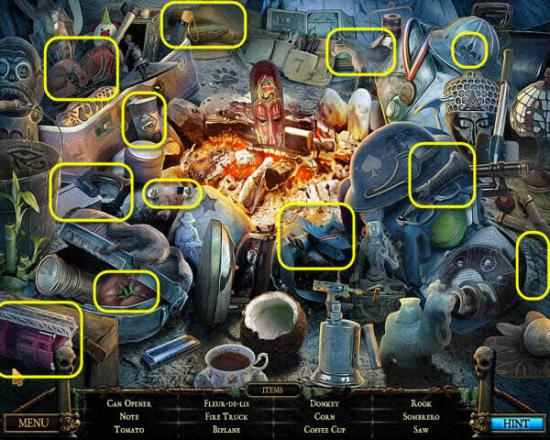
Gather the Hidden Objects highlighted in Yellow.
Receive the Can Opener.
Return to Camp.
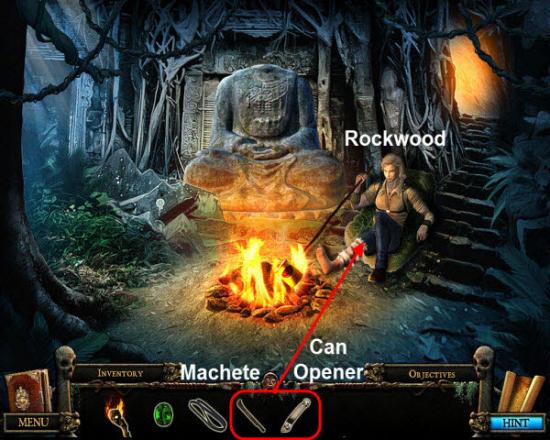
Give the Can Opener and Machete to Rockwood.
Receive a Sharpened Machete.
Return to the Broken Bridge.
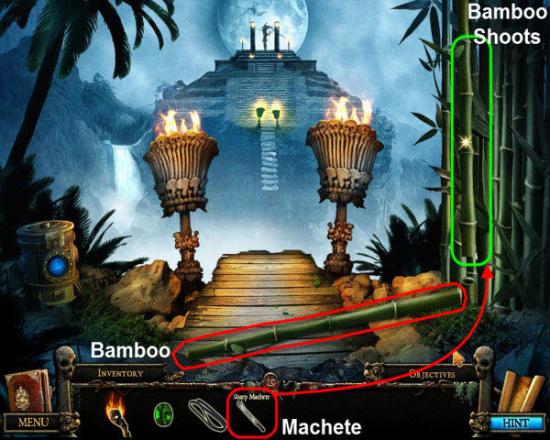
Use the Machete, highlighted in Red, on the Bamboo Shoots, highlighted in Green.
Gather the Bamboo.
Return to the Cliff Path.
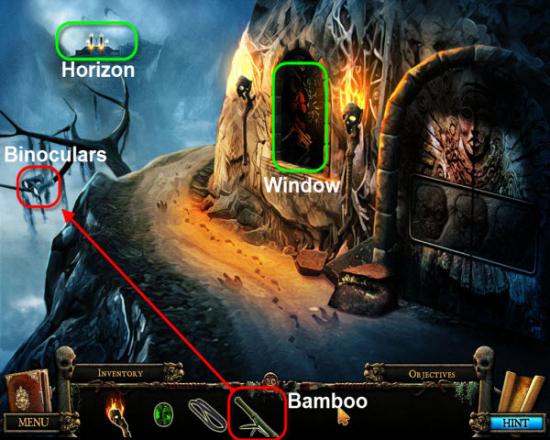
Use the Bamboo, highlighted in Red, to gather the Binoculars, highlighted in Green.
Use the Binoculars on the Horizon.
Head Back one screen.
Examine the Window.
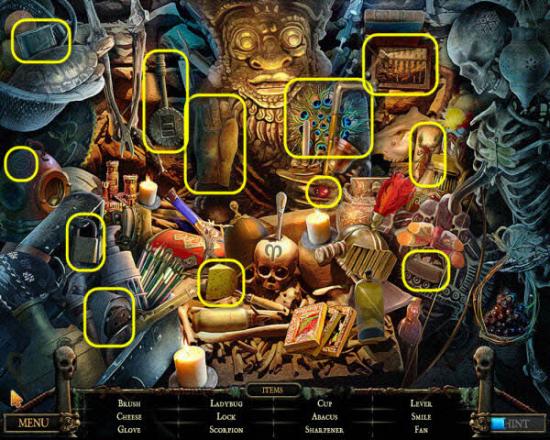
Gather the Hidden Objects highlighted in Yellow.
Receive a Lever.
Return to the Second Camp.
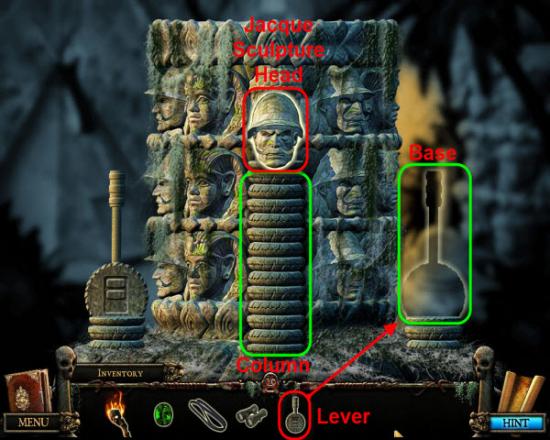
Examine the Totem Sculpture.
Place the Lever, highlighted in Red, on the Base, highlighted in Green.
Click the Center Column
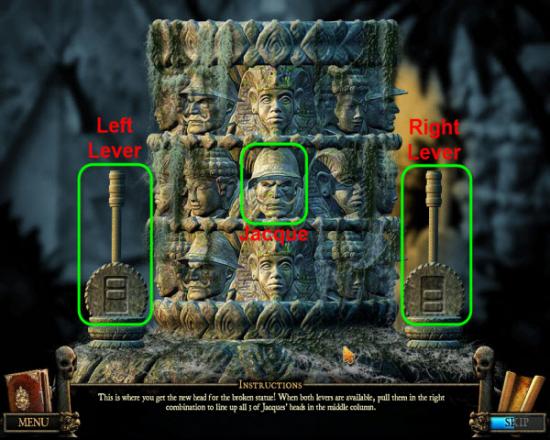
For the Puzzle you need to arrange the Sculpted Faces until all three are of Jacque.
The Left Lever turns the top two Sections.
The Right Lever turns the bottom two Sections.
TIP:
• Click the Left Lever until Jacque is in the top Ring.
• Click the Right Lever until Jacque is in the center Ring.
• Click the Left Handle once.
• Click the Right Handle until Jacque is in the bottom Ring.
• Finally, click the Left Handle until the two Jacque Faces rotate back around.
Gather the Jacque Sculpture Head.
Return to Camp.
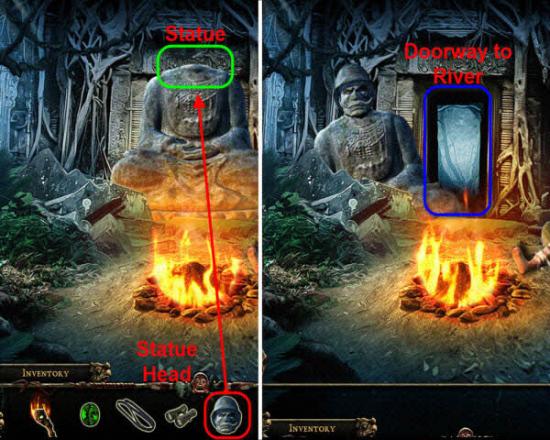
Place the Statue Head, highlighted in Red, on the Sculpture, highlighted in Green.
Head through the revealed doorway, highlighted in Blue, to the River.
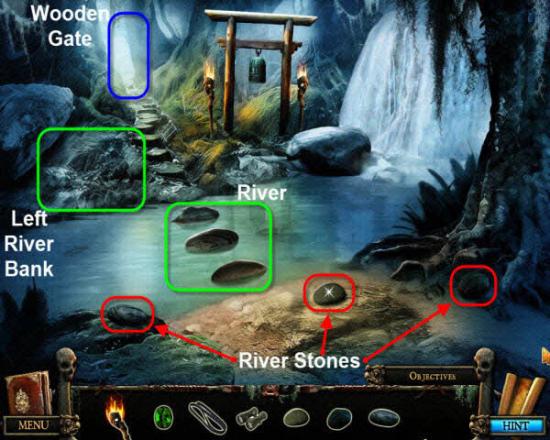
Gather the three River Stones highlighted in Red.
Place the three River Stones into the River.
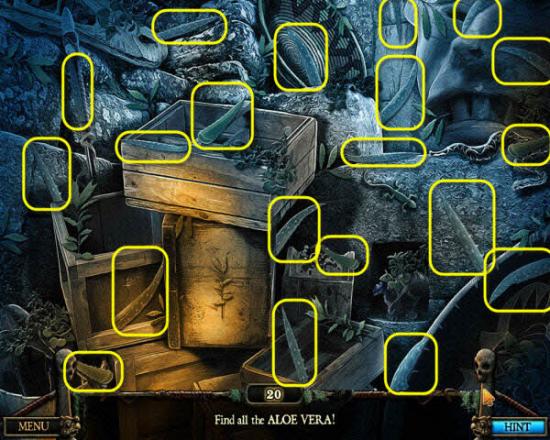
Examine the Left River Bank highlighted in Green.
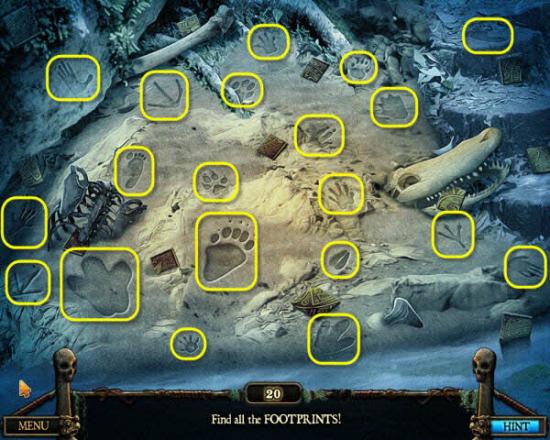
Find the 20 Footprints highlighted in Yellow.
Cross the River to the Wooden Gate.
Take the Right Path to the Lake.
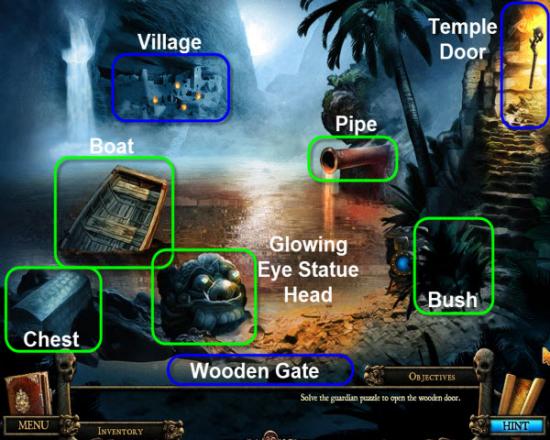
Move the Bush highlighted in Green.
Continue taking the Right Path past the Lake to the Stone Temple Door.
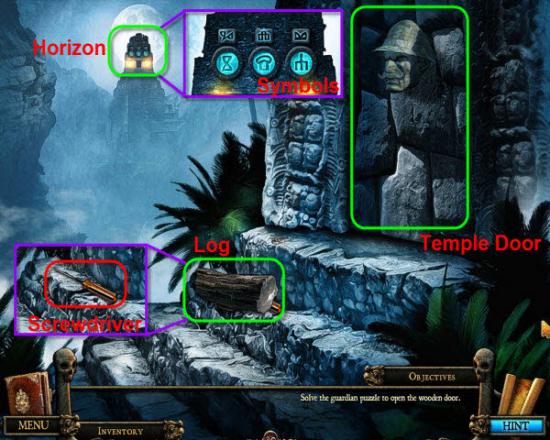
Move the Log highlighted in Green.
Gather the Screwdriver highlighted in Red.
Examine the Horizon.
Make note of the Symbols. They will also be added your Journal.
Return to the Lake.
Examine the Totem Stump.
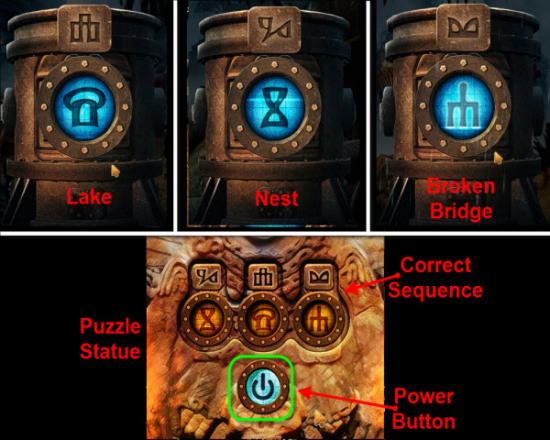
Click on the Blue Glowing Symbol to change the Symbol, rotating through a set of Symbols.
Note the Symbol at the top of the Totem Stump.
Compare to the Symbols you saw earlier on the Horizon.
Change the Glowing Symbol to match the paired Symbol on the top of the Totem Stump.
Return to the Nest and do the same to this Totem Stump.
Finally return to the Broken Bridge area and do the same once more to the Totem Stump there.
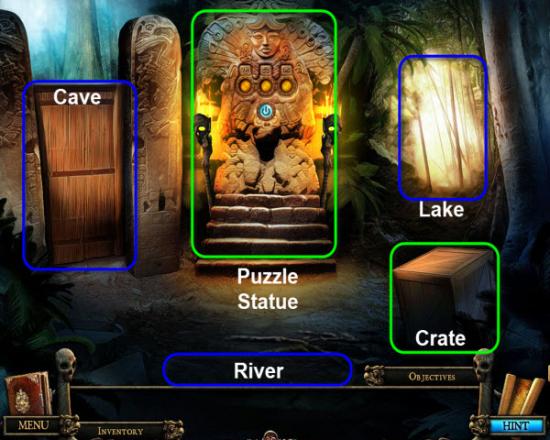
After setting all three Totem Stumps return to the Wooden Gate and the Puzzle Statue.
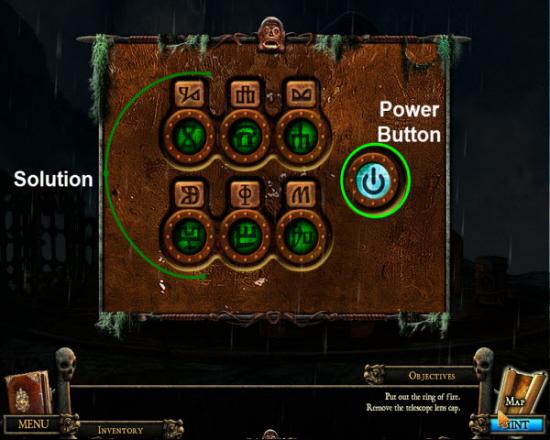
Examine the Puzzle Statue.
The Puzzle Statue will now show the correct matching Symbols.
Press the Power Button, highlighted in Green, to open the Wooden Door.
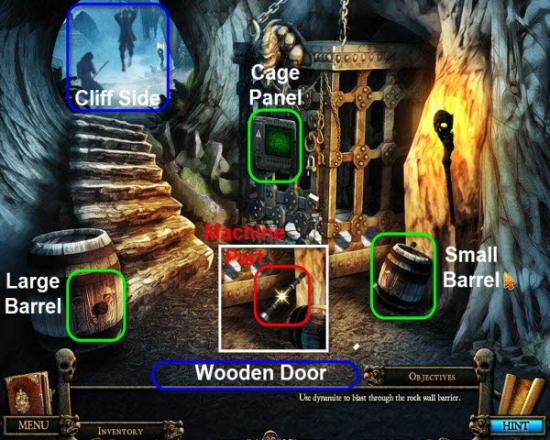
Head Left through the Wooden Door to the Cave.
Move the Small Barrel highlighted in Green.
Gather the Machine Part highlighted in Red.
Head through the Cave to the Cliff Side.
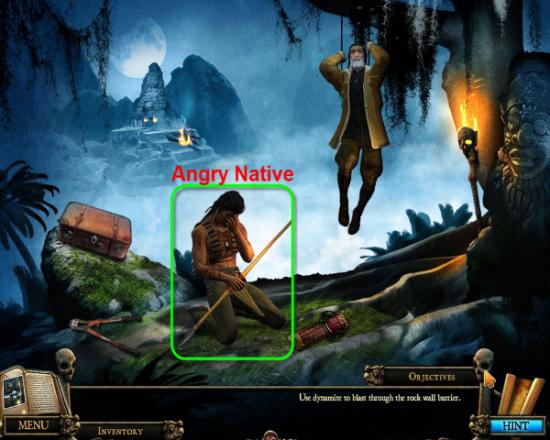
Examine the Angry Native highlighted in Green.
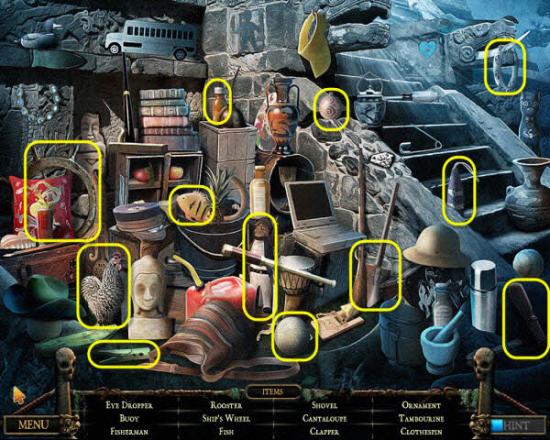
Return to the Lake.
Examine the Lake Shore.
Gather the Hidden Objects highlighted in Yellow.
Receive the Empty Canteen.
Return to the River.
Use the Empty Canteen on the River.
Receive the Full Canteen.
Return to Camp.
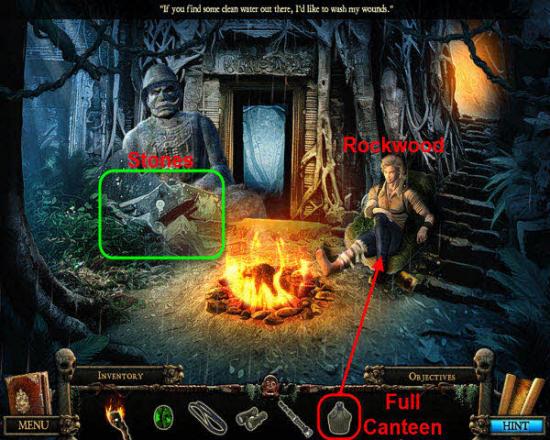
Give the Full Canteen, highlighted in Red, to Rockwood.
Examine the Stone on the Left highlighted in Green.
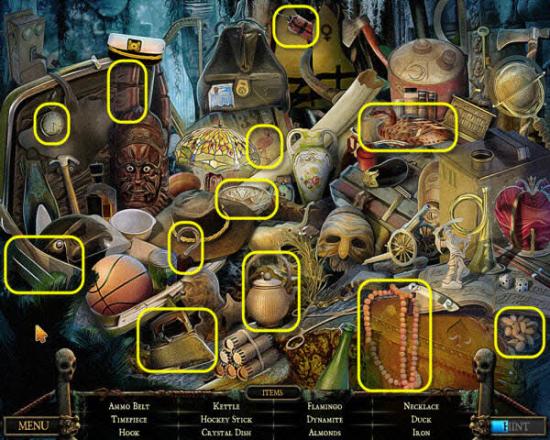
Gather the Hidden Objects highlighted in Yellow.
Receive the Dynamite.
Return to the Stone Temple Door.
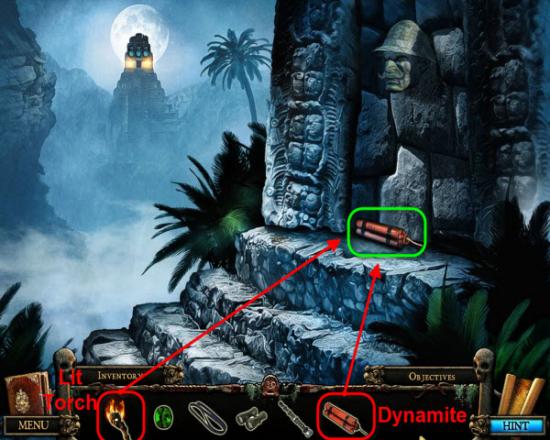
Place the Dynamite at the base of the Stone Temple Door.
Light the Fuse with the Lit Torch.
Sudden rainstorm will put out the Dynamite and Torch.
Return to Camp.
Use the Torch on the Campfire.
Receive Lit Torch once again.
Return to the Stone Temple Door.
Relight the Dynamite to open the Temple.
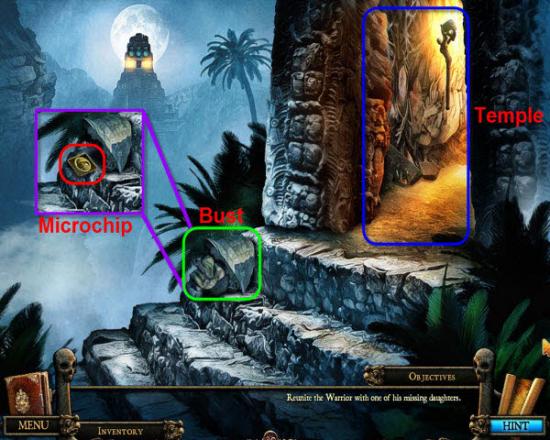
Move the Bust highlighted in Green.
Gather the Microchip highlighted in Red.
Enter the Temple.
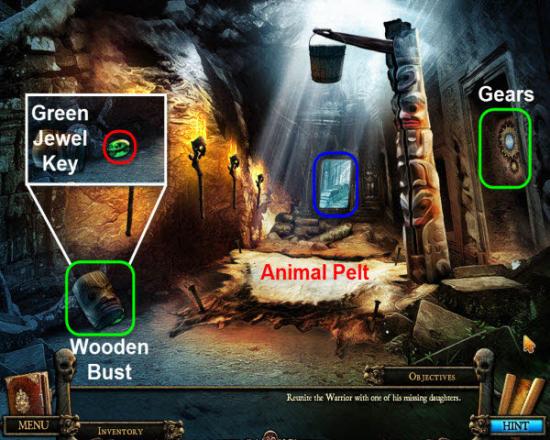
Move the Wooden Bust highlighted in Green.
Gather the second Green Jewel Key highlighted in Red.
Gather the Animal Pelt on the Floor.
Head across the Room.
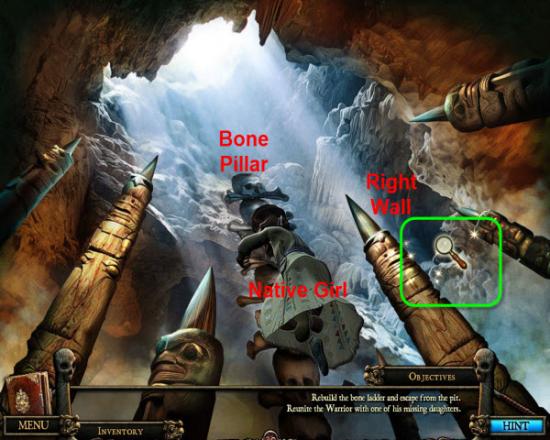
After falling in Pit, examine the Right Wall highlighted in Green.
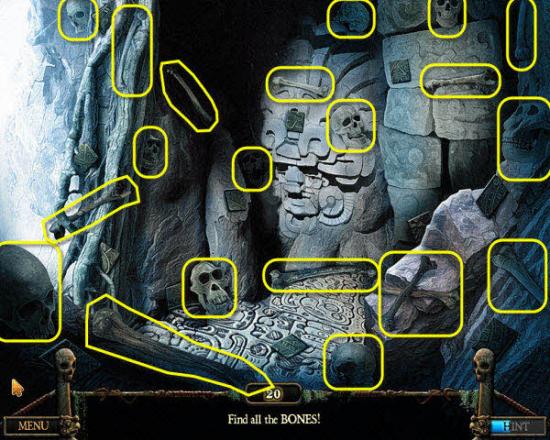
Gather the 20 Bones highlighted in Yellow.
Place Pile of Bones at top of Bone Pillar above the Native Girl.
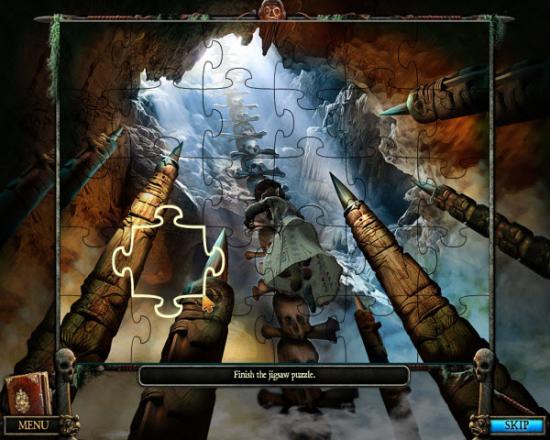
This Puzzle is a simple Jigsaw Puzzle.
Click the Pieces to move them and place them.
Rearrange the Pieces to form the completed Image.
TIP: Try placing the Border Pieces first.
Gather the Girl.
Climb the Bone Ladder.
Return to the Cliff Edge
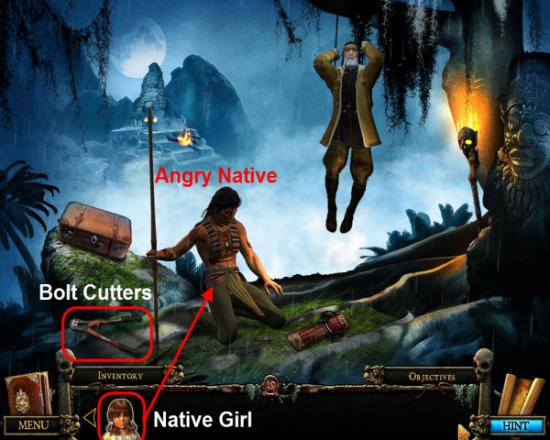
Give the Native Girl to the Angry Native.
Gather the Bolt Cutters highlighted in Red.
Head Back one screen to the Cave.
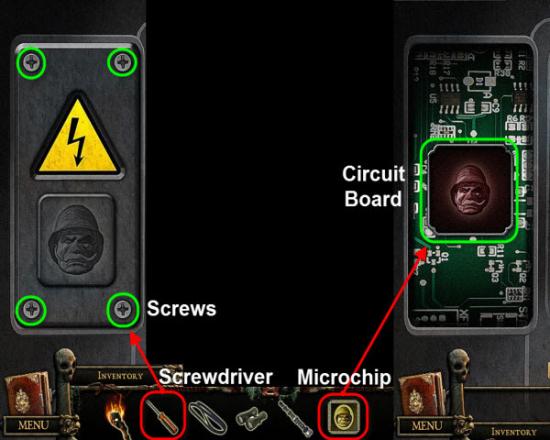
Examine the Cage Panel.
Use the Screwdriver on the four Screws.
Next, place the Microchip into the Circuit Board highlighted in Green.
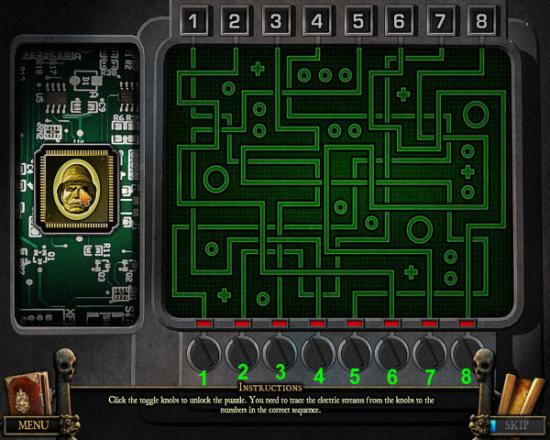
To solve this Puzzle you need to turn the Dials in chronological order, from one to eight.
Starting with number one, follow the path through all the paths on the Board, to find the Dial attached to the first number.
If correct the Red Light above each Dial will turn Green.
Finish the Puzzle to gain access to the Cage.
Solution: Turn Knobs 3, 6, 5, 1, 4, 8, 2 ,and finally 7.
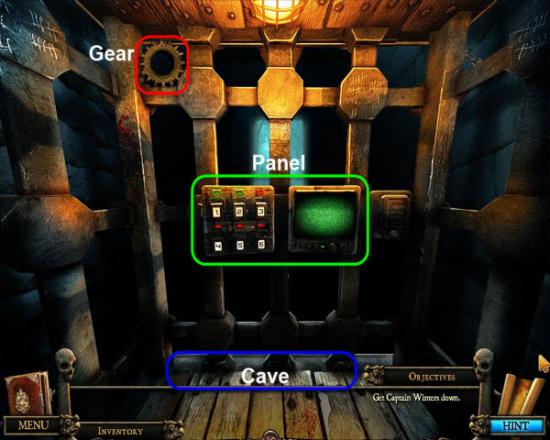
Enter the Cage.
Gather the Gear highlighted in Red.
Examine the Panels.
The Cage works as a transportation device.
There is six possible locations.
Only location one and two are currently available.
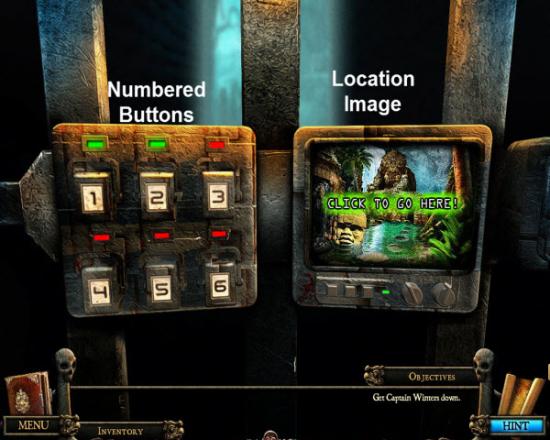
Press the Numbered Buttons to see Image of Locations can travel to.
Button 1 leads to the Cave.
Button 2 leads to the Pond.
Click the Numbered Button of your desired Location.
Then Click the Screen to travel to the Location shown.
Click on Button 2 to head to the Pond.
Click on the Screen Image to travel to the Pond.
Click at the Bottom of the Screen to exit the Cage.
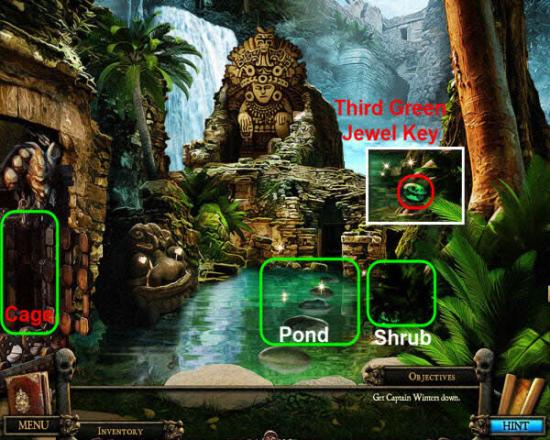
Move the Shrub.
Gather the third Green Jewel Key highlighted in Red.
Examine the Pond highlighted in Green.
Gather the Hidden Objects highlighted in Yellow.
Receive the Ladder.
Reenter the Cage
Press Button 1.
Click on Image to return to the Cave.
Head back to the Cliff Edge.
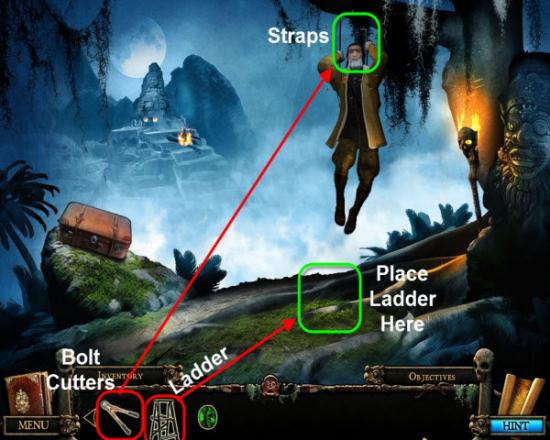
Place the Ladder under the the Captain.
Next use the Bolt Cutters on the Parachute Straps.
Return to the Pit.
Gather the Animal Pelt
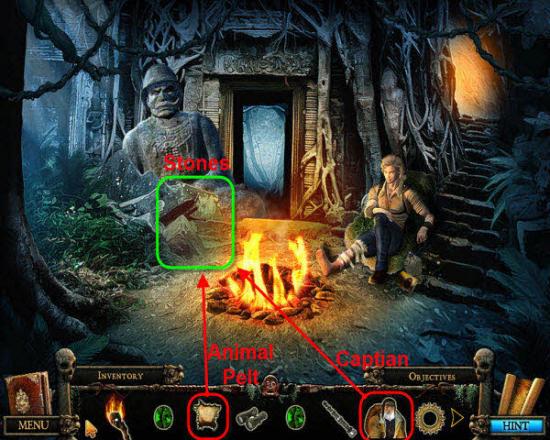
Return to Camp.
Place the Animal Pelt, highlighted in Red, on the Stones, highlighted in Green.
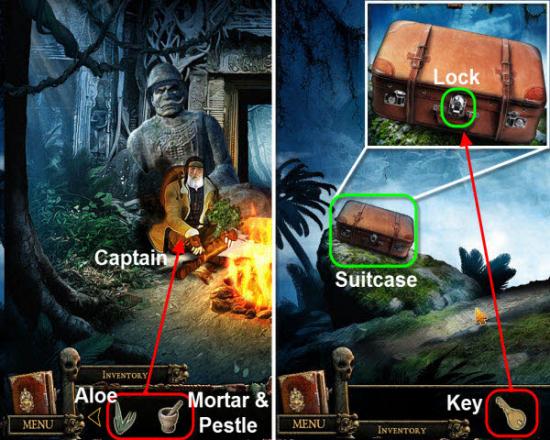
Place the Captain on the Animal Pelt.
Receive a Key.
Return to the lake.
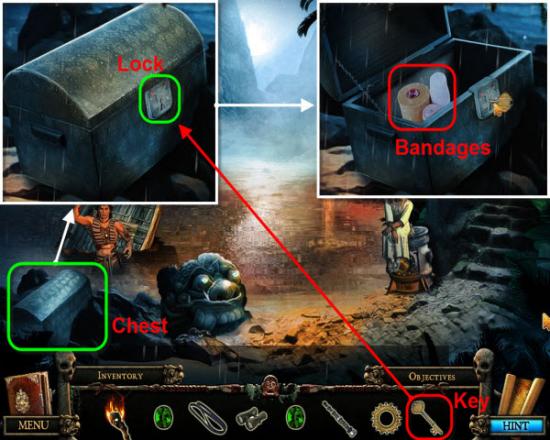
Examine the Chest highlighted in Green.
Use the Key, highlighted in Red, on the Lock, to open the Chest.
Gather the Bandages highlighted in Red.
Return to the Camp.
Give the Bandages to the Captain.
Receive the Herb Sketch.
Return to the Lake.
Gather the Gear from the Native Girl
Return to the Temple.
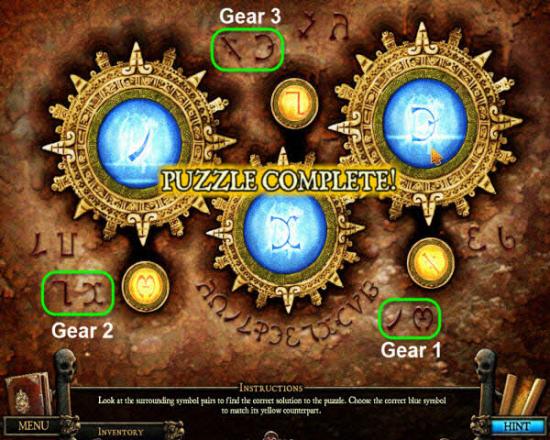
Examine the Gears on the right side.
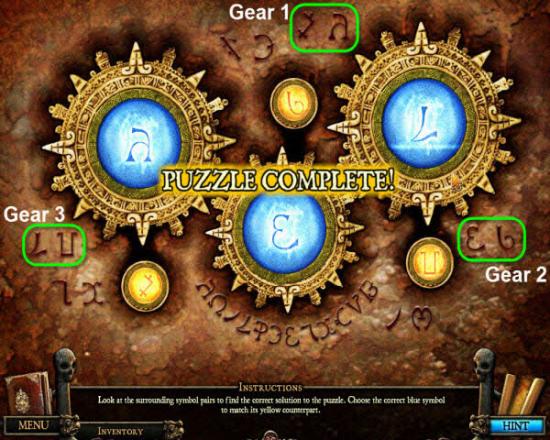
Place the two Gears in the two Empty Spots.
Each Gear has a corresponding Yellow Symbols.
Find the matching Symbol in the Symbols written around the Gears.
Notice its neighboring Symbol.
Click on the Blue Symbol, on each Gear, to change the Symbol.
Change each of the three Blue Symbols, on the Gears, to match the Symbol Pair shown in the Yellow Symbols.
NOTE: In Image above each set of Matching Symbols are highlighted. The Gears show the correct solution.
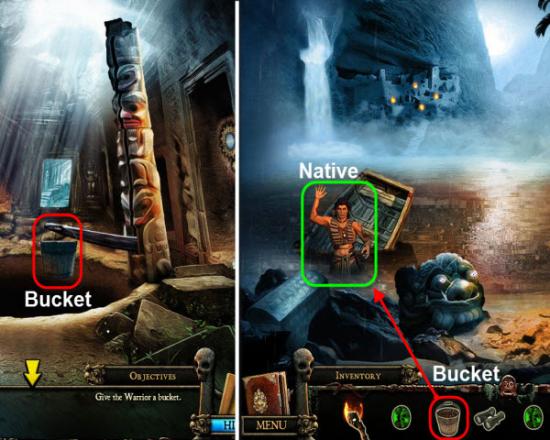
Gather the lowered Bucket highlighted in Red.
Head Back to the Lake.
Give the Bucket, highlighted in Red, to the Native, highlighted in Green.
Return to the Second Camp.
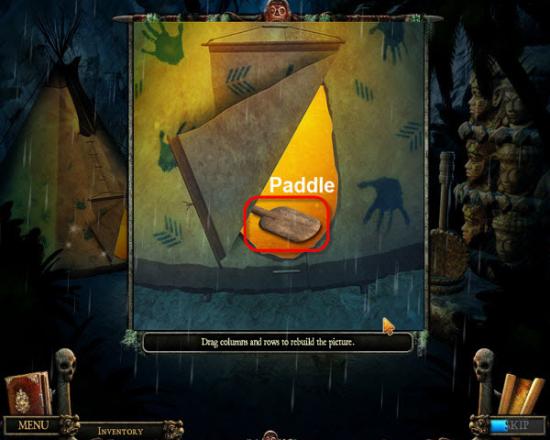
Examine the Teepee.
To Solve this Puzzle rearrange the Slices to form the completed Image.
Click to Drag Strips Up & Down or Left & Right.
Once you have completed the Image gather the Oar highlighted in Red.
Return to the Starting Area.
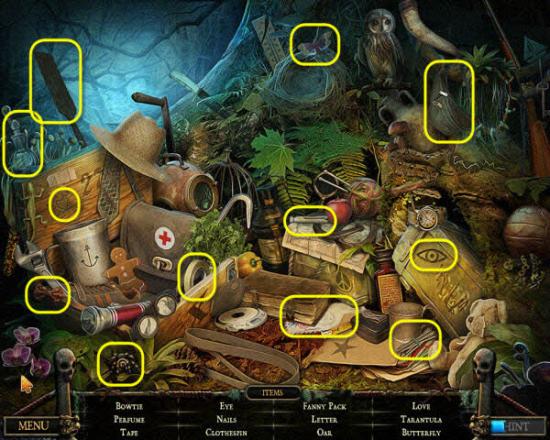
Examine the Tree Stump.
Gather the Hidden Objects highlighted in Yellow.
Receive the second Oar.
Return to the Lake once again.
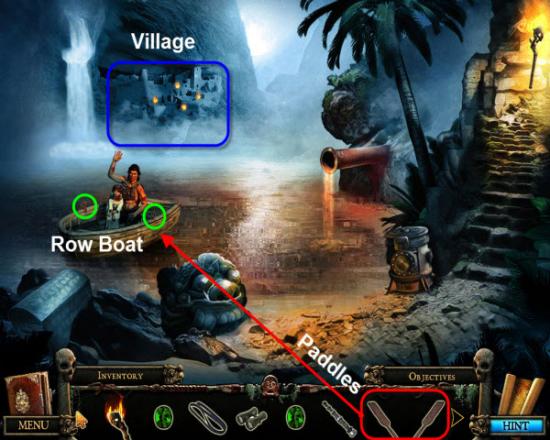
Place the two Oars, highlighted in Red, on the Row Boat, highlighted in Green.
Click the Rowboat to cross the Lake to the Village highlighted in Blue.
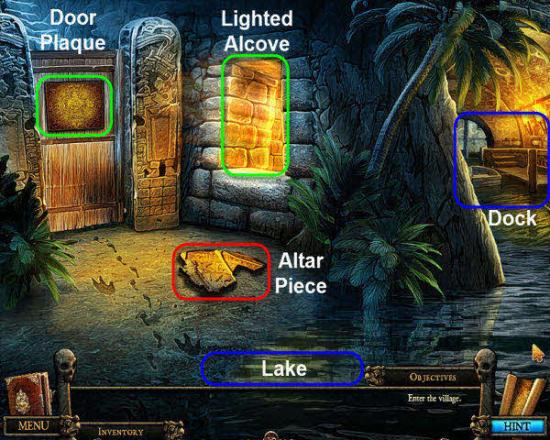
Gather the Altar Piece highlighted in Red.
Examine the Door Plaque highlighted in Green.
Head Right to the Dock.
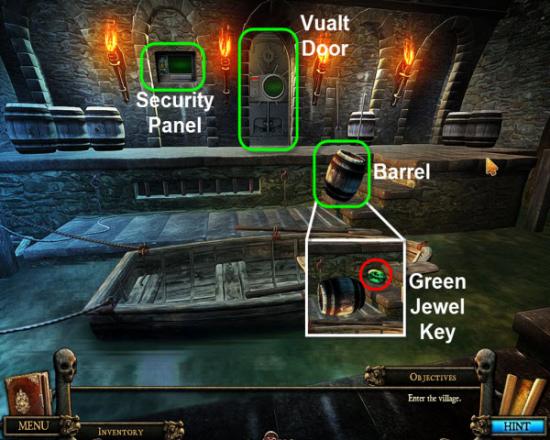
Move the Barrel highlighted in Green.
Gather the fourth Green Jewel Key highlighted in Red.
Return to the River.

Examine the Left River Bank.
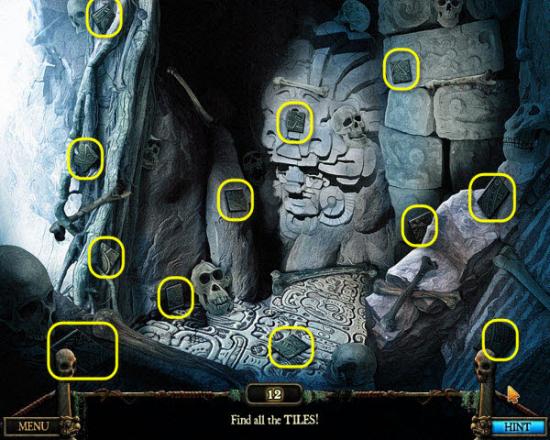
Gather the 12 Tiles highlighted in Yellow.
Return to the Temple.
Enter the Pit.
Examine the Right Wall.
Gather the 12 Tiles highlighted in Yellow.
Return to the Door Plaque.
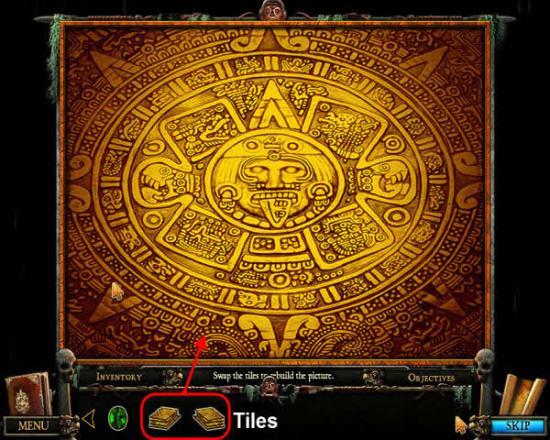
Examine the Plaque.
Place the two Piles of Tiles on the Plaque.
Click on two Tiles to swap position.
To solve this Puzzle rearrange the Tiles to form the completed Image.
The Plaque Door will open.
Climb the Stairs to the Village.
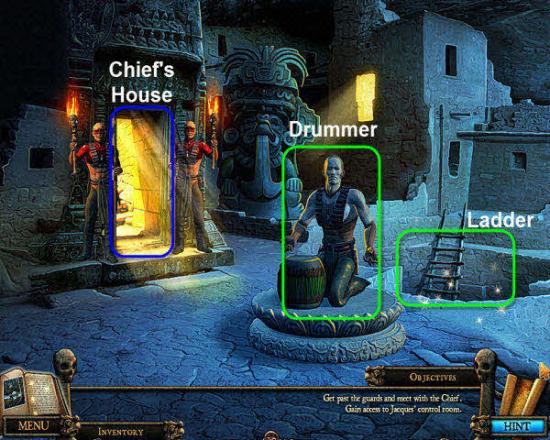
Examine the Ladder highlighted in Green.
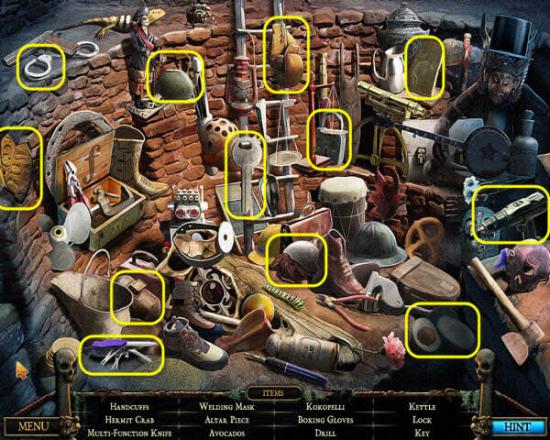
Gather the Hidden Objects highlighted in Yellow.
Receive the Altar Piece.
Return to the Teepee.

Examine the Animal Skin.
To solve this Puzzle you need to arrange the Heads so that no Lines overlap another.
Click and Drag the Heads to move them.
If you get stuck you can always use the SKIP option.
Receive the Animal Skin.
Return to the Village
Give the Animal Skin to the Drummer.
Enter the Chief;s House.
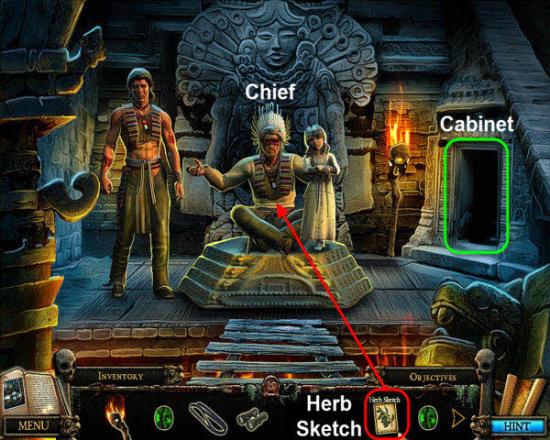
Give the Herb Sketch, highlighted in Red, to the Chief.
Receive the Security Card.
Head Back to the Docks.
Examine the Vault Door.
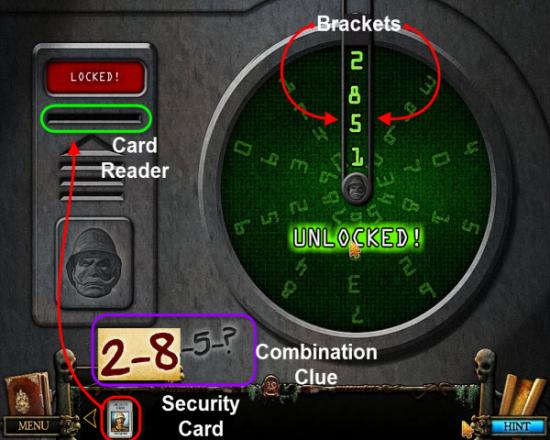
Insert the Security Card, highlighted in Red, into the Card Reader, highlighted in Green.
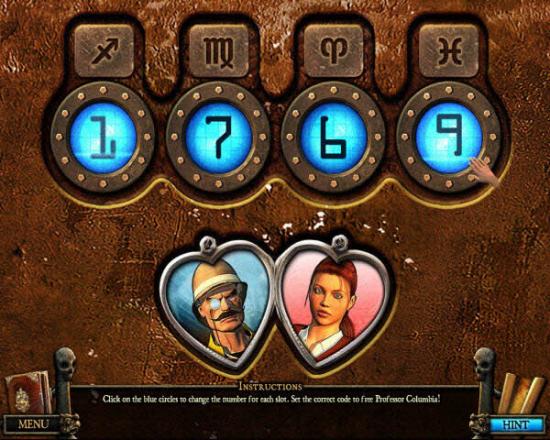
To solve this Puzzle you need to enter the correct Combination.
See your Journal for the first two Digits you picked up from the Nest. The Crumpled Note.
The third Digit is written on the Vault Door.
Click on each of the Rings of Numbers to rotate the Numbers.
Rotate the Numbers until the corresponding Number is displayed in the Brackets.
Solution: 2-8-5-1
This will open the Vault Door.
Head Back one screen.
Climb the Stairs to the Computer Room.
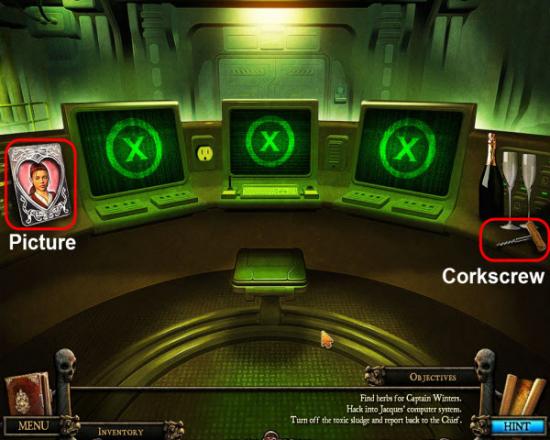
Gather the Picture and Corkscrew highlighted in Red.
Return to the Cave,
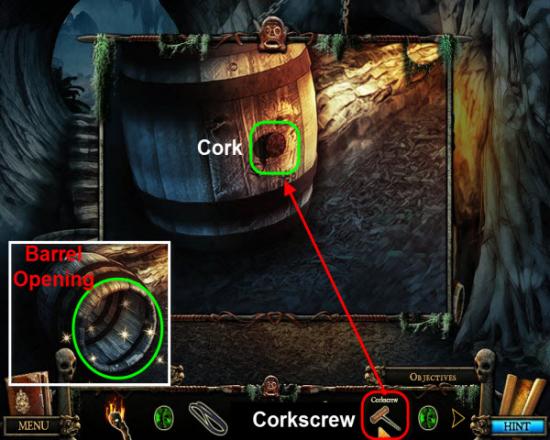
Examine the Large Barrel.
Use the Corkscrew, highlighted in Red, on the Cork, highlighted in Green.
Move the Large Barrel.
Examine the Barrel Opening.
Gather the Hidden Objects highlighted in Yellow.
Receive the Computer Cable.
Return to the Village.
Examine the Ladder again.
Gather the Hidden Objects highlighted in Yellow.
Receive the Soldering Iron.
Return to the Dock.

Examine the Security Panel.
Use the Soldering Iron on the Microchip.
To solve this Puzzle you need to turn the Dials in chronological order, from one to eight.
Starting with number one, follow the path through all the paths on the Board, to find the Dial attached to the first number.
If correct the Red Light above each Dial will turn Green.
Solve the Puzzle to gain access to Location number 3.
Solution: Turn Knobs 6, 3, 8, 5, 1, 4, 7 ,and finally Knob 2.
Return to the Cage.
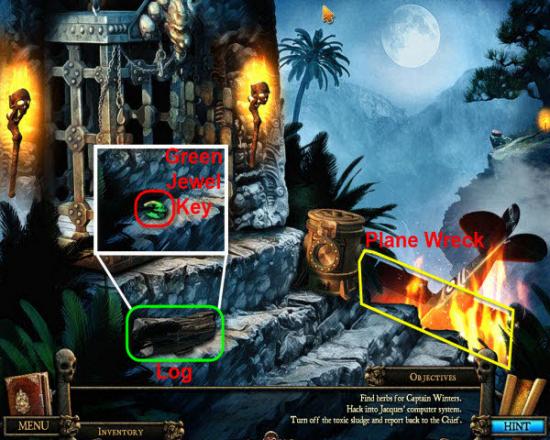
Select Button 3 to visit the Plane Wreck.
Exit the Cage.
Move the Log, highlighted in Green, and gather the fifth Green Jewel Key, highlighted in Red.
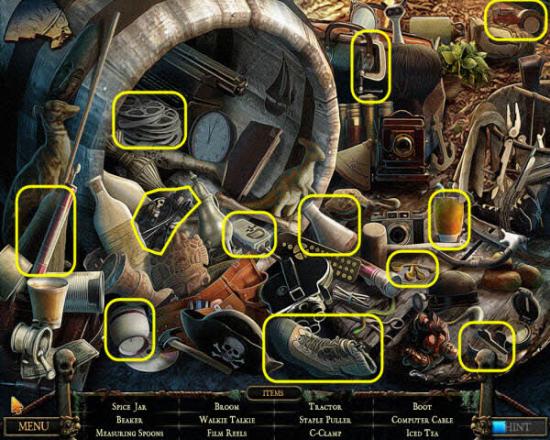
Next, examine the Plane Wreck.
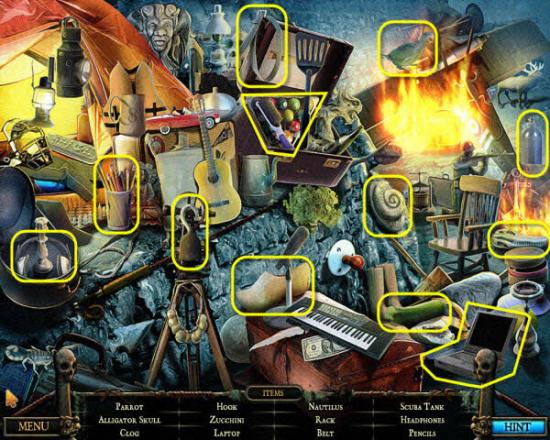
Gather the Hidden Objects highlighted in Yellow.
Receive the Laptop Computer.
Return to the Dock.
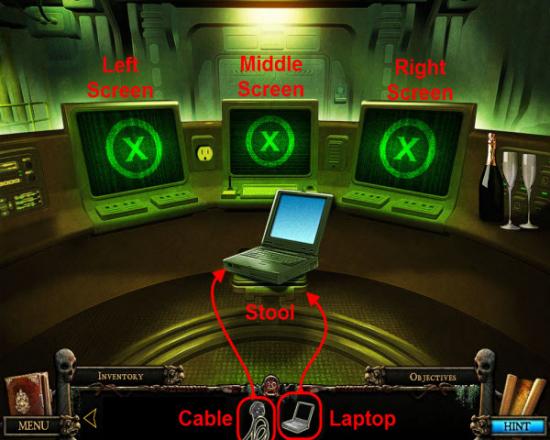
Enter the Computer Room.
Place the Laptop, highlighted in Red, onto the Stool.
Next, attach the Computer Cable to the Laptop.
Examine the Middle Computer Screen.
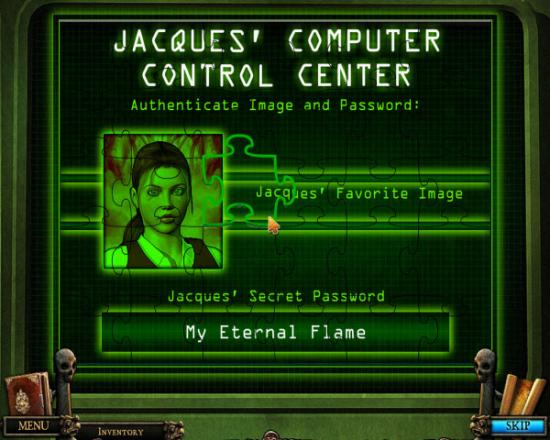
This Puzzle is another basic Jigsaw Puzzle.
Click to move and set the Puzzle Pieces.
Reassemble the Image to receive the Clue.
TIP: Start with the Edge Pieces.
Examine the Left Computer Screen.
To Solve this Puzzle rearrange the Slices to form the completed Image.
Click to Drag Strips Up & Down or Left & Right.
Once the Image is completed, the Toxic Waste will be stopped.
Return to the Chiefs House.
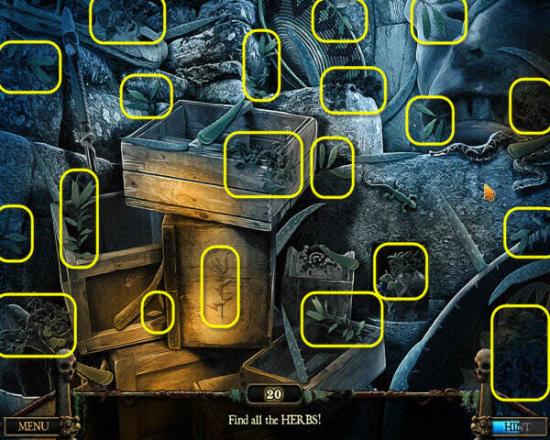
Examine the Cabinet, on the Right, next to the Chief.
Gather the 20 Herbs highlighted in Yellow.
Receive the Bunch of Herbs.
Return to Camp.
Give the Bunch of Herbs to the Captain.
Return to the Teepee.
Examine the Smoldering Fire.
Gather the Hidden Objects highlighted in Yellow.
Receive the sixth Green Jewel Key.
Head to the Cliff Path.
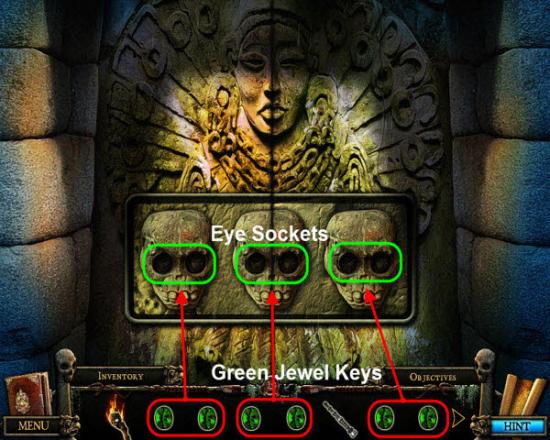
Examine the Door.
Place the six Green Jewel Keys into the empty Eye Sockets of the Faces on the Door.
The Door will open.
Enter through the Door to the Foyer.
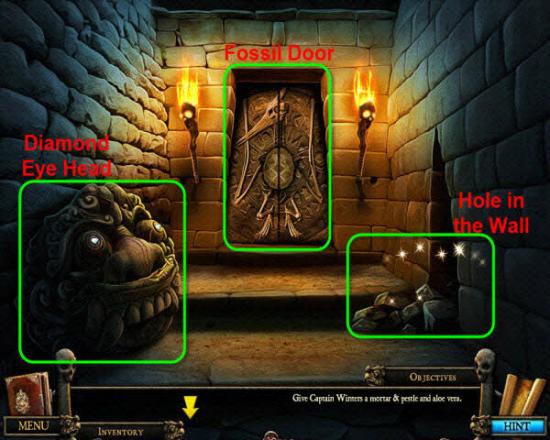
Examine the Hole in the Wall.
Gather the Hidden Objects highlighted in Yellow.
Receive the Gauge.
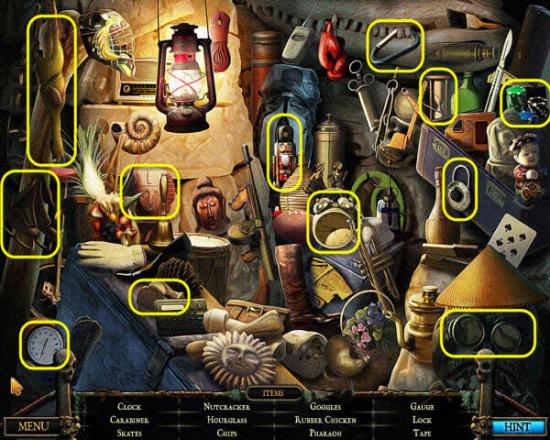
Return to the Cliff Path.
Examine the Window.
Gather the Hidden Objects highlighted in Yellow.
Receive the Mortar and Pestle.
Return to the Lake.
Examine the Lake Shore.
Gather the Hidden Objects highlighted in Yellow.
Receive an Altar Piece.
Return to the Chief’s House.
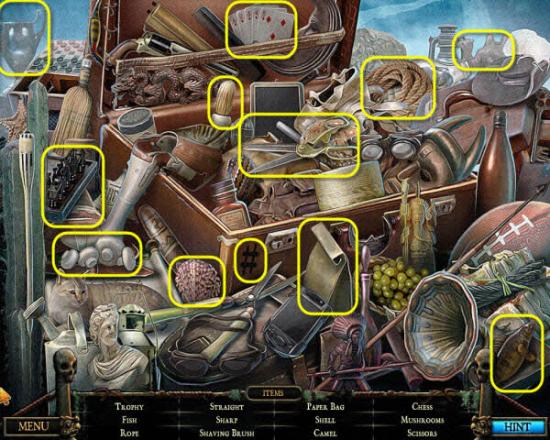
Examine the Cabinet once again.
Gather the 20 Aloe Leaves highlighted in Yellow.
Return to the Camp.
Give the Mortar & Pestle and Aloe to the Captain.
Receive the Suitcase Key.
Return to the Cliff Edge.
Examine the Suitcase.
Use the Key to open the Suitcase.
Examine the Open Suitcase.
Gather the Hidden Objects highlighted in Yellow.
Receive the Rope.
Return to the Temple.
Attach the Rope to the Wooden Arm hanging over the Pit.
Examine the Gears in the Right Wall.
Each Gear has a corresponding Yellow Symbols.
Find the matching Symbol in the Symbols written around the Gears.
Notice its neighboring Symbol.
Click on the Blue Symbol, on each Gear, to change the Symbol.
Change each of the three Blue Symbols, on the Gears, to match the Symbol Pair shown in the Yellow Symbols.
NOTE: In Image above each set of Matching Symbols are highlighted. The Gears show the correct solution.
The Wooden Arm with the Rope attached will raise.
Click on the Rope to cross the Gap to the Abandoned Village.
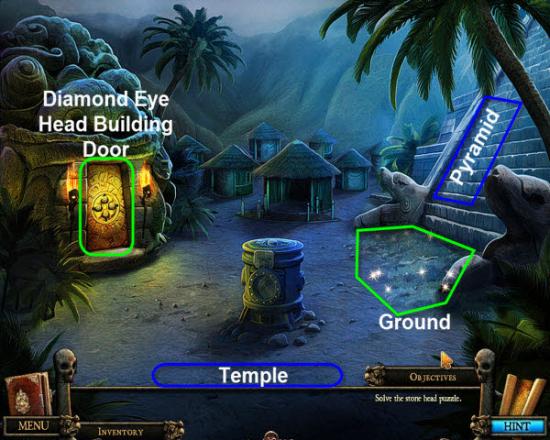
Examine the Door in the Diamond Eye Head Building.
Make note of the Symbols and Diamond Eye Colors.
Head Back one screen.
Examine the ground at the Base of the Pyramid.
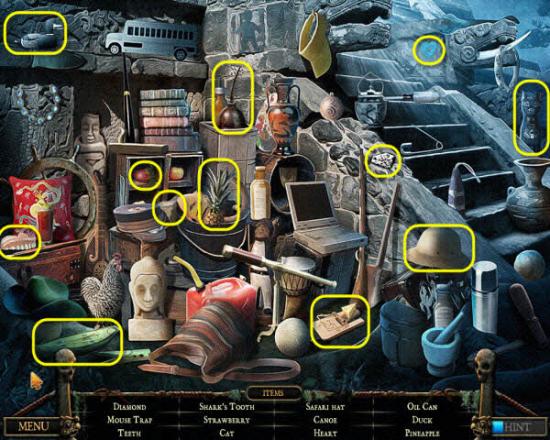
Gather the Hidden Objects highlighted in Yellow.
Receive a Diamond Eye.
Climb the Pyramid.
After the Cut scene return to the Camp.
Next, head to the Cliff Edge.
Examine the Rock under the Open Suitcase.
Gather the Hidden Objects highlighted in Yellow.
Receive the Life Preserver.
Return to Camp again.
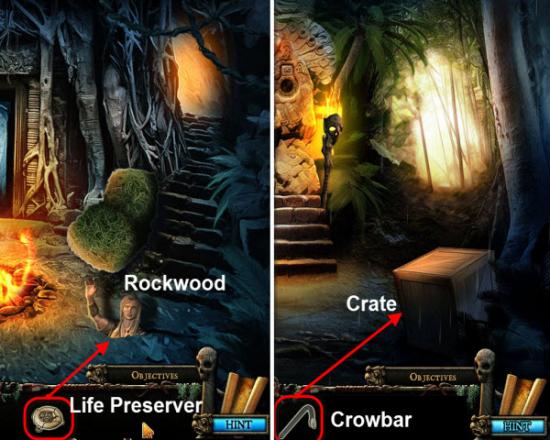
Use the Life Preserver on Rockwood to rescue him.
Receive the Crowbar.
Now head back to the Puzzle Statue.
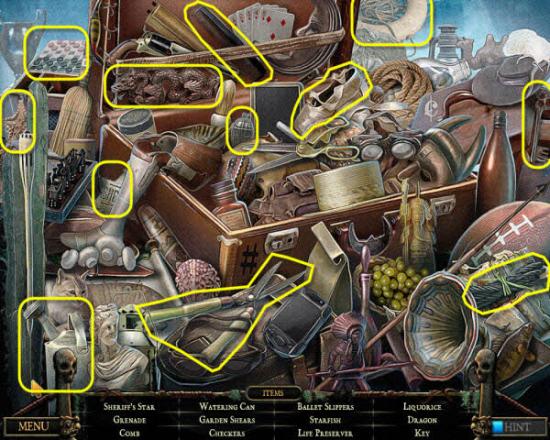
Use the Crowbar on the Crate.
Examine the Crate
Gather the Hidden Objects highlighted in Yellow.
Receive the second Diamond Eye.
Return to the Start Area.
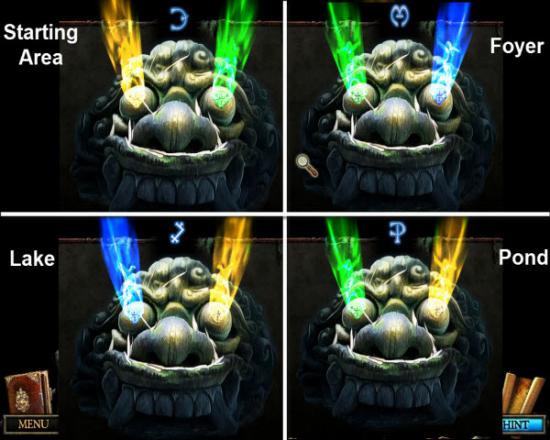
Examine the Diamond Eye Head.
Place the two Diamonds into the Heads empty Eye Sockets.
The Eyes will glow Blue and a Symbol will appear above the Head.
Use your Journal Notes for the solution to the Puzzle.
The Solution was on the Diamond Eye Head Door near the Pyramid.
See the Image for the Solution.
Click on each Eye to cycle through a set of different colors.
Starting Area Head Solution: Left Eye = Yellow / Right Eye = Green.
Next return to the Cliff Path.
Enter the Foyer.
Examine the Head.
Foyer Head Solution: Left Eye = Green / Right Eye = Blue.
Return to the Lake.
Examine the Head.
Lake Head Solution: Left Eye = Blue / Right Eye = Yellow.
Head to the Pond.
Examine the Head.
Pond Head Solution: Left Eye = Green / Right Eye = Yellow.

Examine the Pond.
Gather the Hidden Objects highlighted in Yellow.
Receive an Altar Piece.
Return to the Abandoned Village.
Examine the Diamond Eye Head Building Door.
Push the Orange Button in the center of the Door.
Head Back one screen.
Examine the Doorway.
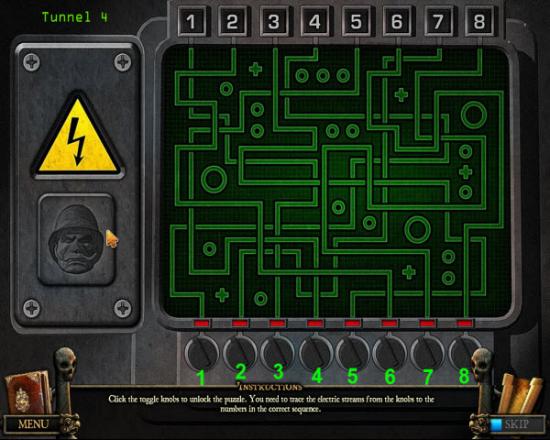
To solve this Puzzle you need to turn the Dials in chronological order, from one to eight.
Starting with number one, follow the path through all the paths on the Board, to find the Dial attached to the first number.
If correct the Red Light above each Dial will turn Green.
Solve the Puzzle to gain access to Location # 4.
Solution: Turn Dial 2, 7, 4, 6, 8, 1, 5, and finally Dial 3.
Return to the Cage.
Select Button 4 and head for the Telescope.
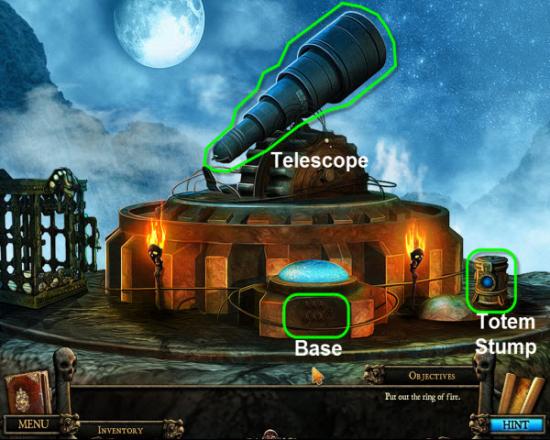
Examine the Base under the Telescope.
Return to the Cave.
Examine the Large Barrel.
Gather the Hidden Objects highlighted in Yellow.
Receive an Altar Piece.
Next need to set all the Totem Stump.
The first three Symbols you used earlier and should still be in your Journal as well.
The next two Symbols can be scene by going to the Cliff Path and using the Binoculars on the Horizon.
The final sixth Symbol appears to have no available Clue.
See the Image above for the Key to all six Totem Stumps.
Return to the Nest.
Examine the Totem Stump.
Set the Symbol using your Clues.
Next head to the Broken Bridge and repeat.
Head to the Lake and do the same.
Return to the Abandon Village and set the Totem Stump there.
Head for the Plane Wreck and set the Totem Stump.
Finally, return to the Telescope and set the sixth and final Totem Stump.
Examine the Pedestal once again and Hit the Blue Power Button.
Enter the Hatch on the Pedestal under the Telescope.
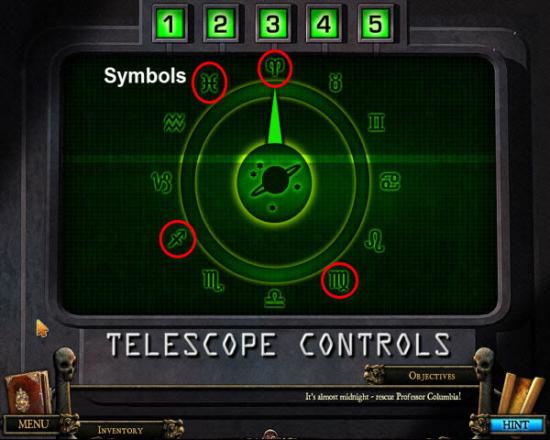
Examine the Control Panel on the Right.
Click each of the five Buttons, lighting them up in Green.
Head Back one screen,
Examine the Telescope.
Click “Activate” to remove the Lens Cap.
Return to the Computer Room
Examine the Right Screen.
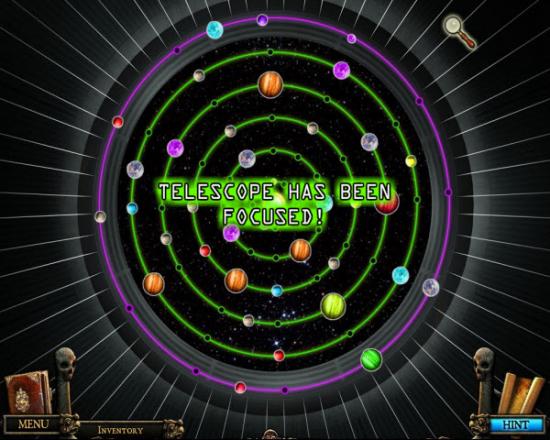
For this Puzzle you need to Focus the Planets.
There are several concentric Rings with various Planets aligned along the Rings.
Click on each Ring and bring that Ring of Planets in focus.
Once all Rings are in focus, the Telescope will be focused and ready to use.
Return to the Puzzle Statue.
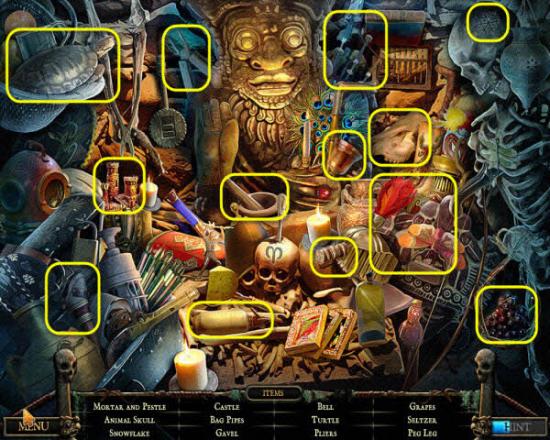
Examine the Crate.
Gather the Hidden Objects highlighted in Yellow.
Receive the Fire Extinguisher.
Head to the Pyramid.

Use the Fire Extinguisher to put out the Fires.
Examine the Column highlighted in Green.
Return to the Cliff Path.
Enter the Foyer.
Examine the Hole in the Wall.
Gather the Hidden Objects highlighted in Yellow.
Receive the final Altar Piece.
Return to the Plaque Door.
Examine the Lighted Alcove.
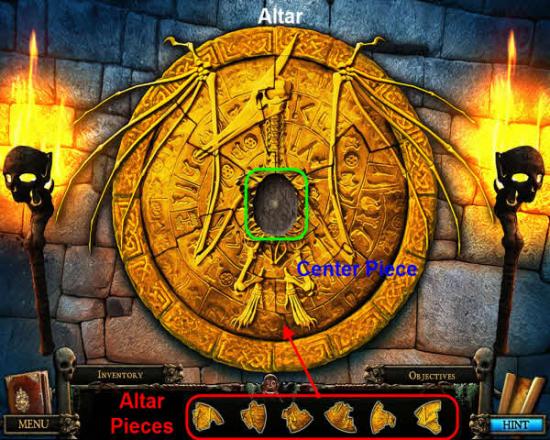
Place the six Altar Pieces into the Altar.
Note the missing Center Piece.
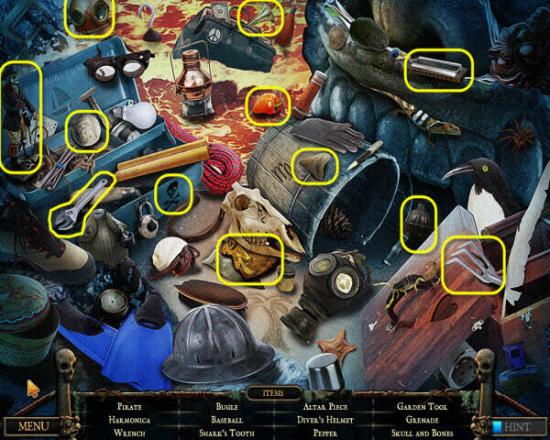
Return to the Plane Wreck.
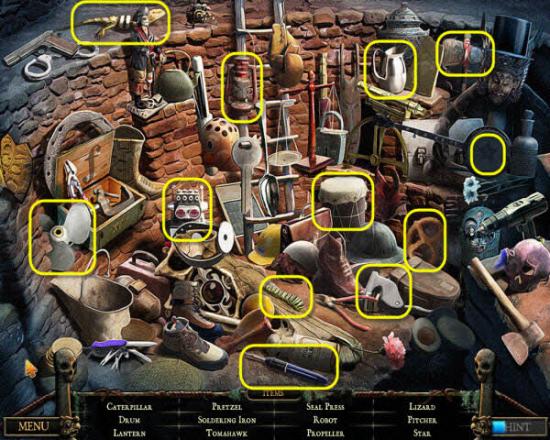
Examine the Plane Wreck.
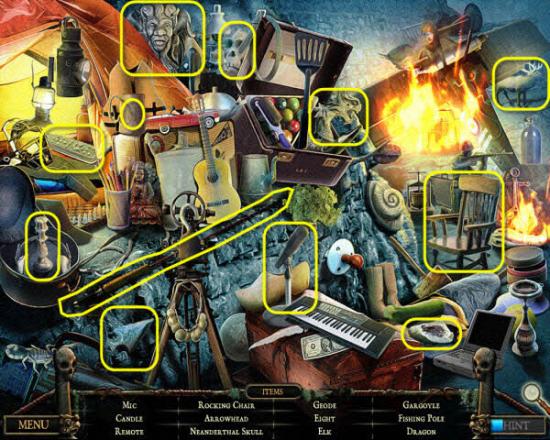
Gather the Hidden Objects highlighted in Yellow.
Receive the Fishing Rod.
Return to the River.
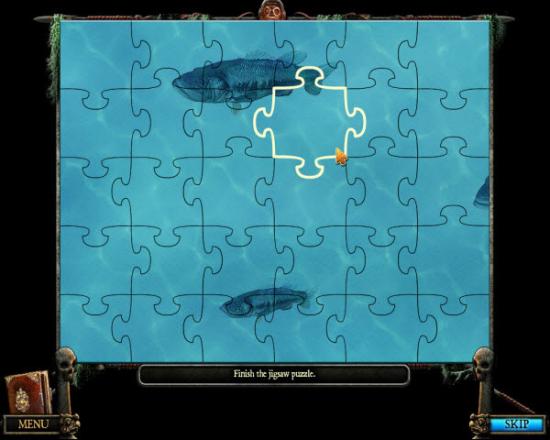
Use the Fishing Rod on the River.
This Puzzle is a simple Jigsaw Puzzle.
Click to move and place the Pieces of the Puzzle.
Once you complete the Image, you will receive a Fish.
Return to the Nest.
Give the Fish to the Pterodactyl.
Examine the Nest.
Gather the Hidden Objects highlighted in Yellow.
Receive the Golden Egg.
Return to the Plaque Door.
Examine the Lighted Alcove.
Place the Golden Egg in the center of the Display.
Return to the Cliff Path.
Enter the Foyer.
Climb the Stairs.
Rescue the Native Girl from the Pterodactyl Baby’s.
Return to the Chief’s House.
Give the Native Girl to the Chief.
Receive the Gear Mechanism.
Return to the Telescope.
Enter the Hatch on the Pedestal under the Telescope.
Examine the Alcove on the Left.
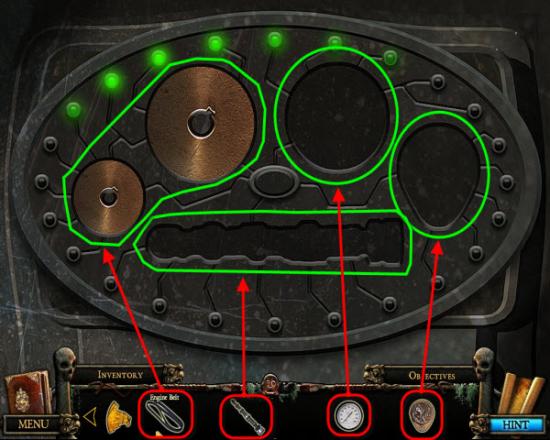
Place the Engine Belt, Gear Mechanism, Gauge, and Handle, highlighted in Red, into the matching Slots in the Machine.
Examine the Control Panel.
The Control Panel features twelve different Symbols.
Click on the Planet in the center of the Display to advance to the next Symbol.
After dialing in a Symbol.
• Head Back one screen.
• Examine the Telescope
• The Constellation will be added to your Journal.
• Return to the Control Panel.
Repeat for each of the Symbols or the four Symbols, highlighted in Red, needed just for the Column on top of the Pyramid.
Return to the Abandon Village.
Examine the Ground at the base of the Pyramid.
Gather the Hidden Objects highlighted in Yellow.
Receive the Clapper.
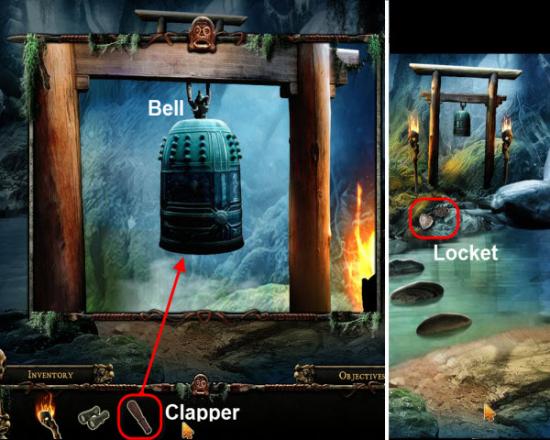
Return to the River.
Examine the Bell.
Place the Clapper, highlighted in Red, into the Bell.
Head Back one screen.
Gather the Locket highlighted in Red.
Return to the Top of the Pyramid.
Examine the Column on the Right.
Place the Locket in the Depression.
Refer to notes on Constellations in Journal.
Count the number of Stars in each Constellation and enter that number under the corresponding Constellation.
Click on the Blue Numbers to cycle through 1 through 9.
Set the number of Stars in each Constellation.
See Image above for the Solution.
Head Back one screen.
Click on the Professor to rescue her.
Congratulations you have completed the Hide and Seek 4: The Lost World.

More articles...
-
Best Horror Games On Itch.io – July 2026
By Adele Wilson
Across a bounty of subgenres. -
Haze Seas Accessories Tier List [Best Accessories to Equip]
By Adele Wilson
The accessories with the best stat buffs in Haze Seas.