![Digimon UP Tier List [Supports, Buddies, and Partners]](/wp-content/uploads/2026/07/digimon-up-tier-list.jpg "Digimon UP Tier List [Supports, Buddies, and Partners]")
Digimon UP Tier List [Supports, Buddies, and Partners]
These Digimon will get you UP the leaderboard.


By Adele Wilson

By Adele Wilson
![Haze Seas Boss Drops [Chances, Locations, and How to Spawn]](/wp-content/uploads/2026/07/haze-seas-boss-drops.jpg "Haze Seas Boss Drops [Chances, Locations, and How to Spawn]")
By Adele Wilson

By Sho Roberts
Welcome to the Hidden Mysteries: The Fateful Voyage – Titanic walkthrough on Gamezebo. Hidden Mysteries: The Fateful Voyage – Titanic is a hidden object game from GameMill Entertainment for PC. This walkthrough includes tips and tricks, helpful hints, and a strategy guide to complete Hidden Mysteries: The Fateful Voyage – Titanic.
Welcome to the Hidden Mysteries: The Fateful Voyage – Titanic walkthrough on Gamezebo. Hidden Mysteries: The Fateful Voyage – Titanic is a hidden object game from GameMill Entertainment for PC. This walkthrough includes tips and tricks, helpful hints, and a strategy guide to complete Hidden Mysteries: The Fateful Voyage – Titanic.
April 10th, 1912 (8:45am)
In this tutorial level, simply follow the instructions.

April 10th, 1912 (12:00pm)
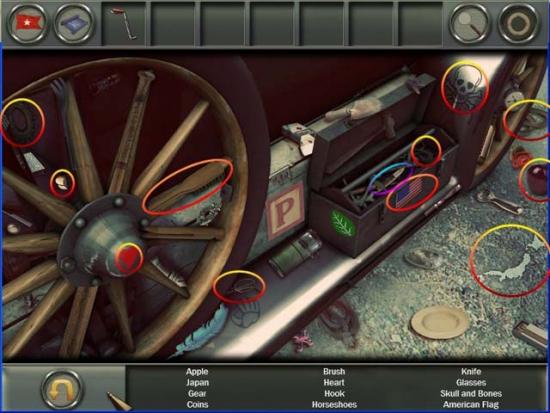
– Go to Margaret’s Stateroom, and zoom in on the boxes on the table.
– Click on the top to open the box, and grab the tweezers inside.
– Use the tweezers on the bottom of the box and pick up the lipstick.
– Go to the Parisan Café and click on the table to start a hidden object-scene.
– Go to the Galley and click to start a hidden object-scene.
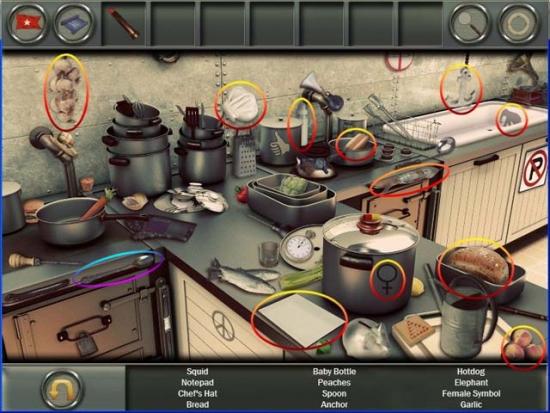
– Click on the pot on the stove; use the salt shaker, and then the spoon to pick up a boiled egg.
– Go to Robert’s Stateroom and click on the eagle. Click on it’s left leg, and put the lipstick in there. Then, click on the right leg to pick up the Bronze Eagle.
– Click on the nest above the door in Robert’s Stateroom, put the Bronze Eagle on the branche, and the boiled egg in the nest.
5 minutes later
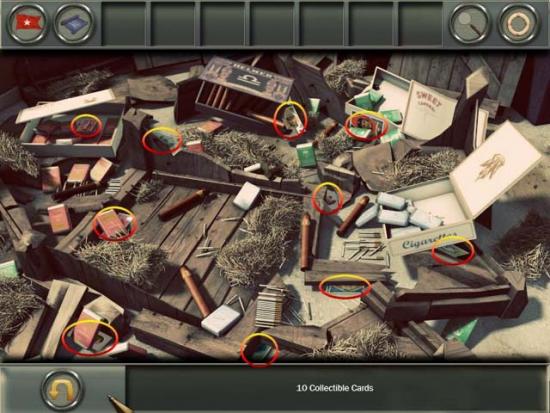
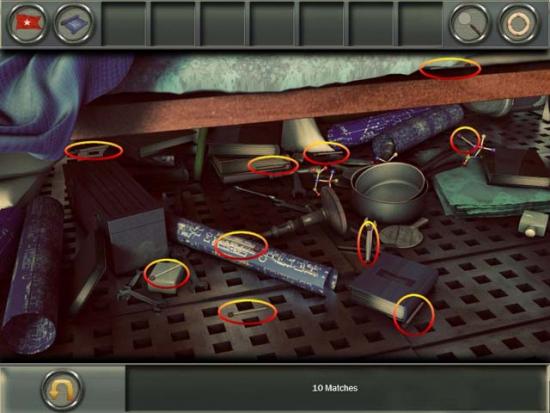
– Talk with Dean, pick up two pieces of pipe,
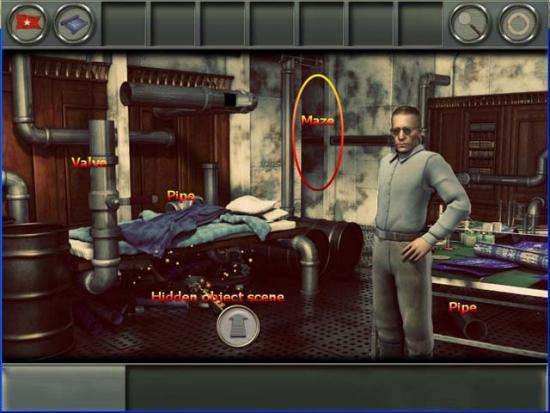
and start a hidden object-scene to find 10 matches.
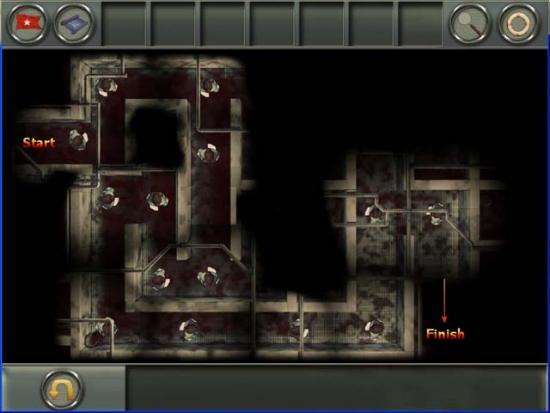
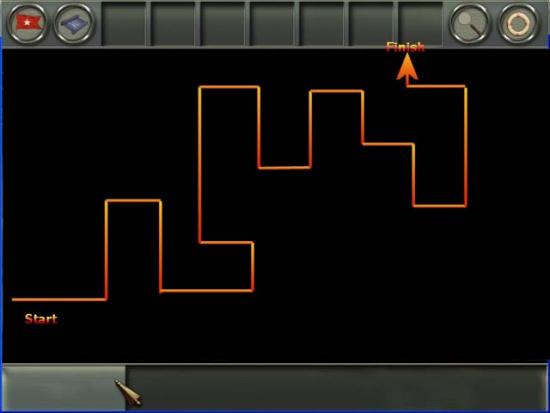
– Enter the maze, and use the arrows on your keyboard to navigate through it.
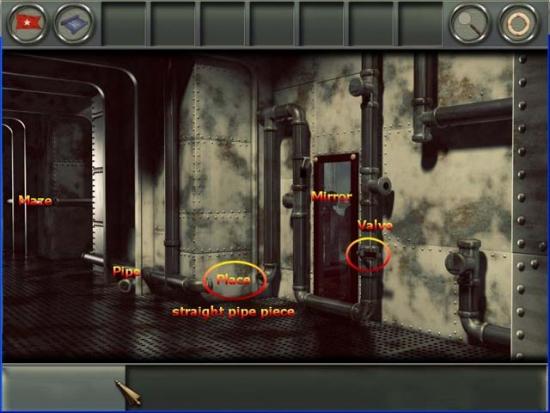
– Pick up the piece of pipe, click on the mirror, click on the valve, and place the straight pipe piece.
– Enter the maze, and use the arrows on your keyboard to navigate through it.
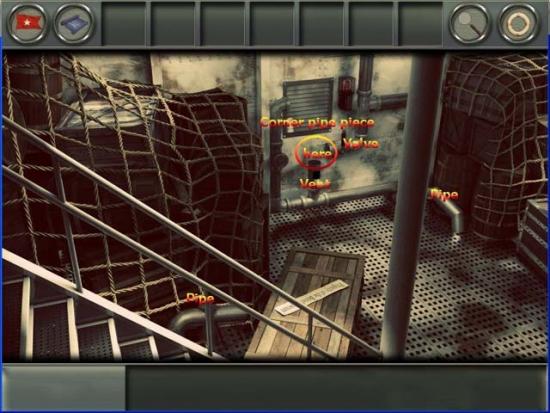
– Pick up the two pieces of pipe, click on the vent, click on the valve, and place the corner pipe piece.
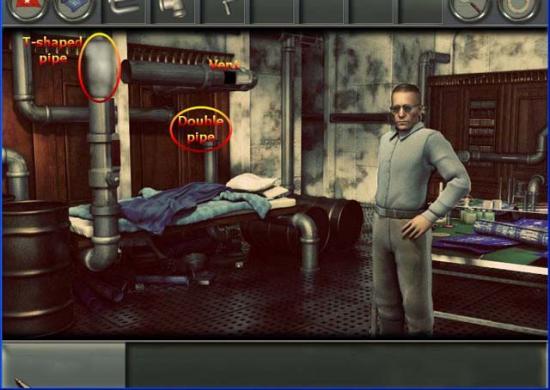
– Return to the Shipwright’s Sanctum, close the vent and place the T-shaped pipe piece and the double pipe piece.
– Return to the Overlook, place the pipe piece, click on the mirror to listen to the conversation, and then close the vent.

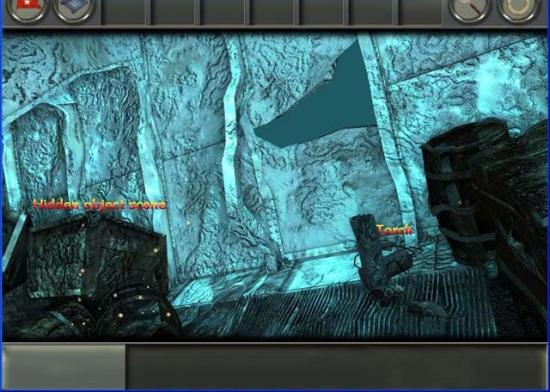
– Return to the Baggage Hold, and click on the crate to start a lock puzzle. Click in the following order: 1 – 6 – 0 – 7 – 6 – 7
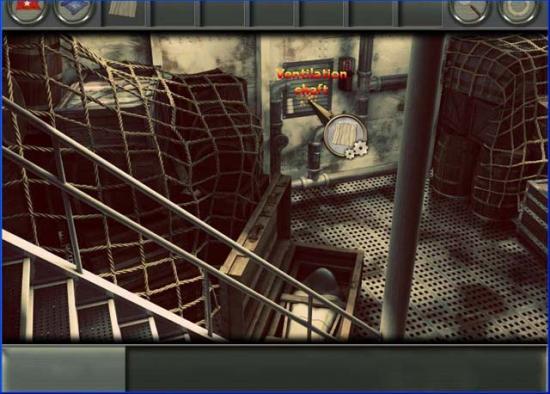
– Pick up the shroud from inside the crate, and place it over the ventilation shaft to set off the alarm.
– Return to the Overlook and click on the mirror.
April 10th, 1912 (1:30pm)
– Talk to Odette until she lets you play a card game.
– Look at the hour hand on the watch, to see which card you need to pick (1 through 10; J is 11; Q is 12), and look at the red second hand to see if you need to place a card on the top, or on the bottom.
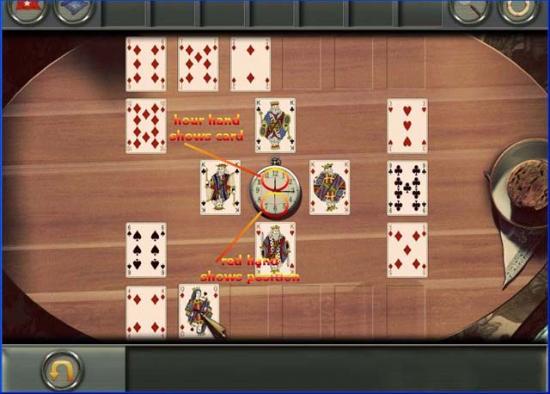
– When Odette leaves, look next to her tea cup to see Tea cake. Pick it up.
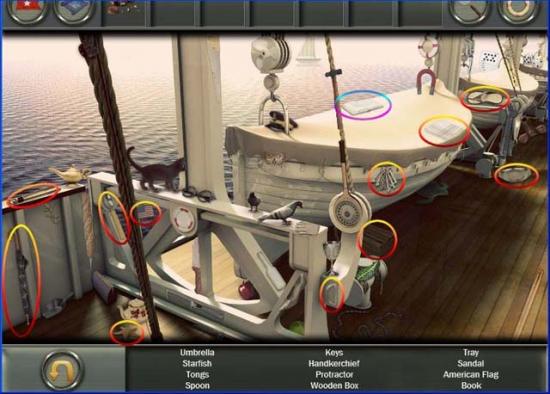
– Go to the 1st Class Promenade, and click on the hidden object-scene near the life boat.
– Go to the Reading and Writing Room and give the book to George.
– Zoom in on the book case, and rearrange the books.

– Return to the 1st Class Lounge, and use the library card on the tea cup plate to collect powdered sugar.
– Go to the elevator and talk to the attendant. Pick up the Coat Check Chit inside the elevator, and go to the Coat Closet.
– Zoom in on the door knob, to find you don’t have the code to open it. Use the powdered sugar on the door knob, and return to the 1st Class Lounge.
– Give the Coat Check Chit to the attendant, and when he returns, return to the coat closet. Check the door knob, and press the buttons that are no longer covered in sugar.
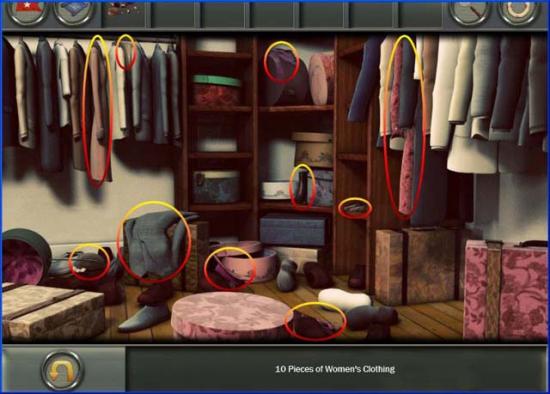
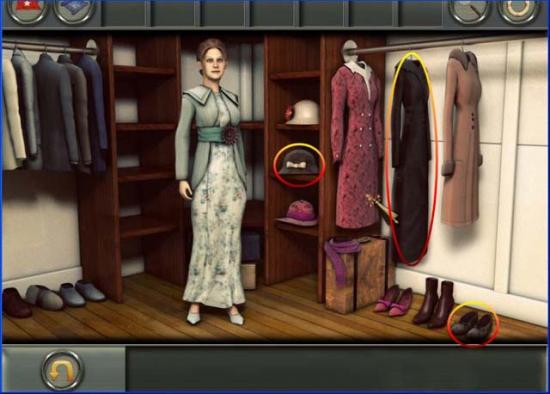
– Find 10 pieces of women’s clothing, and then choose a new outfit.
– Return to the 1st Class Promenade, and place the outfit and the tea cake on the tub. The birds will eat the cake, and ruin your dress.
– Return to the elevator.
April 10th, 1912 (3:15pm)
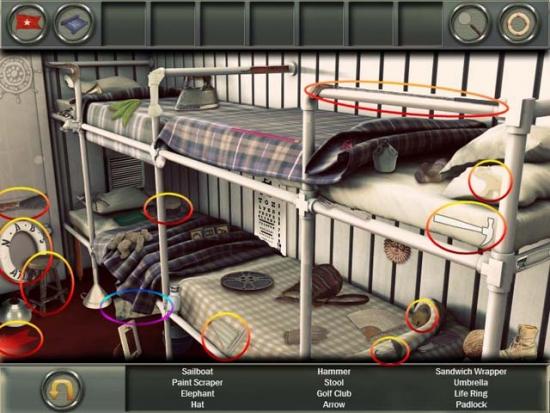
– Talk to George and enter the hidden object-scene on the bunk bed to the right.
– Go to the Equipment Storage, and pick up the golf club.
– Go to the swimming pool, zoom in on the end, and use the golf club to find some coal.
– Return to the Equipment Storage, open the top drawer, and zoom in. Put the Sandwich wrapper there, and then use the coal to see some numbers appear.
– Click on the lock on the lockers, and open it by turning left to 21, then right to 15, and finally left to 3.

– Pick up the Fishing pole and return to the Pool.
– Place the fishing pole on the pool, and aim the fishing pole for the wooden game floating in the pool.
– Return to the 3rd Class Bunks and give George the Ball game, and solve the puzzle for him.
April 10th, 1912 (6:00pm)
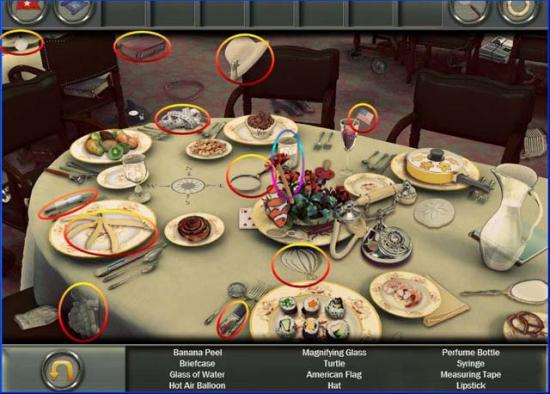
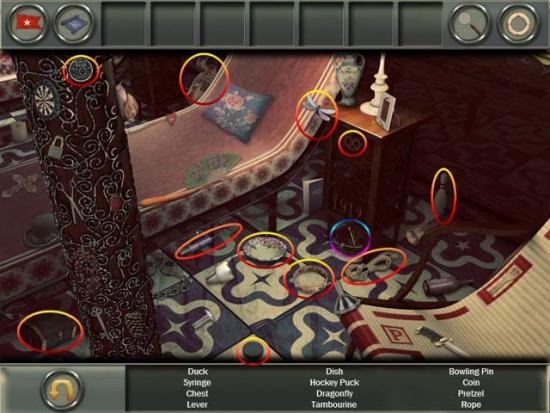
– Zoom in on the table to start a hidden object-scene.
– Go to the Cold Storage, pick up the butcher’s hook, and put down the glass of water.
– Go to any other scene, and return, to find the water frozen. Pick up the ice, and go to the Shuffleboard courts.
– Place the piece of ice on the Shuffleboard, and intentionally push it out of the playing field.
– Go to the Open Deck, and talk to the attendant that just fell.
– Go to the Hospital. Talk to the doctor twice, and he will leave.
– Pick up the instrument on the bed, and click on the closet in the back.
– Click the Sphygmomanometer’s pump on the handle and use it, and then use the Butcher’s Hook to open the door.
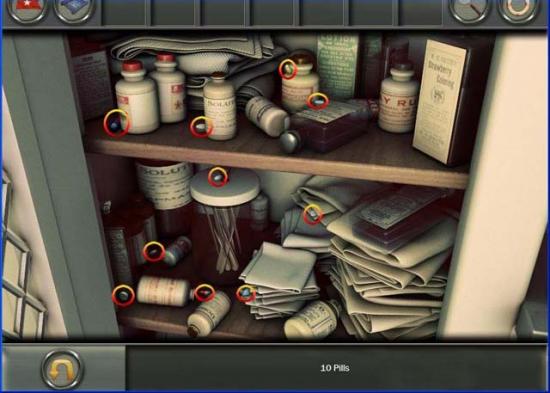
– Find the motion sickness pills, return to the 1st Class Dining Room, and give the pills to Robert.
April 14th, 1912 (11:40pm)
– Look at the left window, and pick up the crank handle.
– Go to Robert’s Stateroom and knock on the door.
– Go to Montague’s Stateroom and talk to Montague.
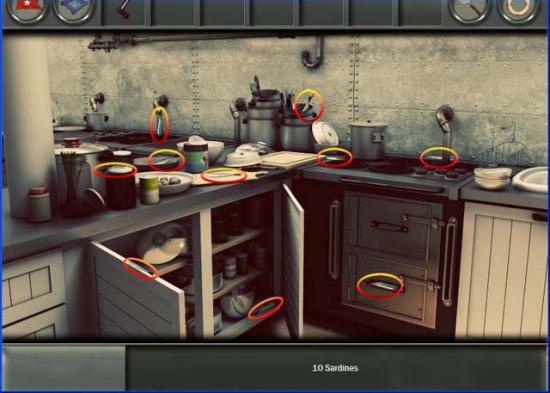
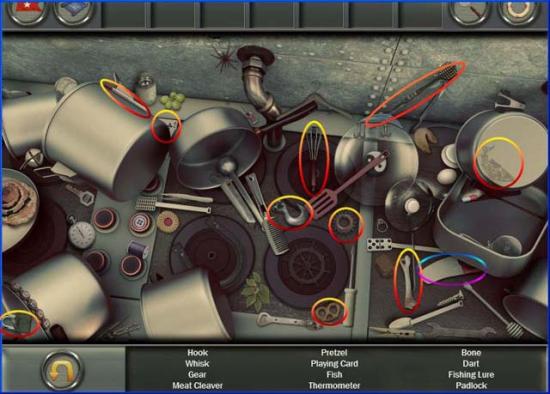
– Go to the Galley, and find 10 sardines.
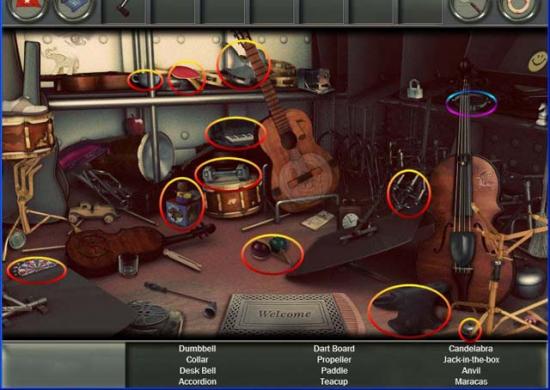
– Go to the Musician’s Storage, and finish the hidden object-scene.
– Return to Montague’s Stateroom and give the sardines to the cat hiding under the couch. Click on the window, and use the crank handle to open it.
– Pick up the cat, and put it in the other window to wake up Robert.
– Go to Robert’s Stateroom and knock on the door.
April 15th, 1912 (12:00am)
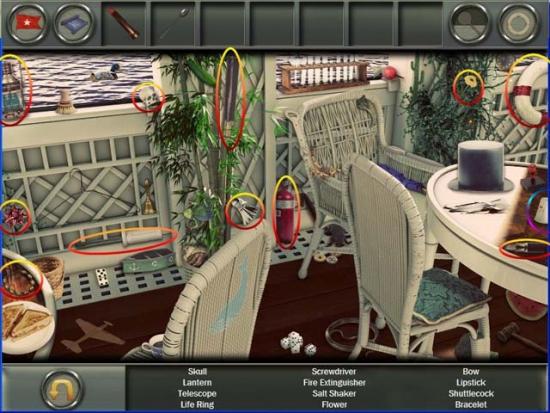
– Talk to the captain, and grab the life ring behind him.
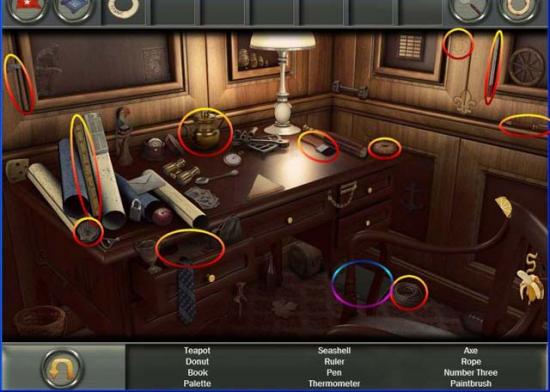
– Go to the Captain’s Sitting Room, and click on the desk to the left for a hidden object-scene.
– Go to the 1st Class Promenade, and place the life ring on the rope on the pole. Click on it, and aim it to throw it around the pole.
– Go to the Marconi Transmitting Room. Zoom in on the device on the desk, and find 5 tubes laying around.
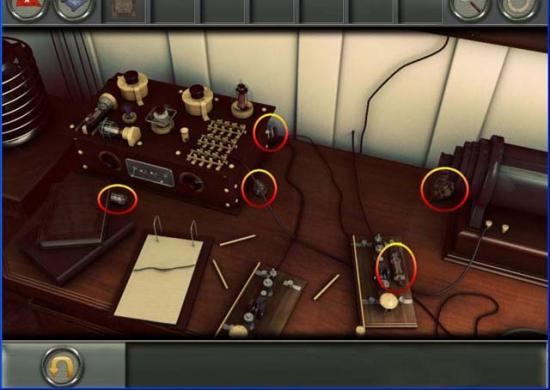
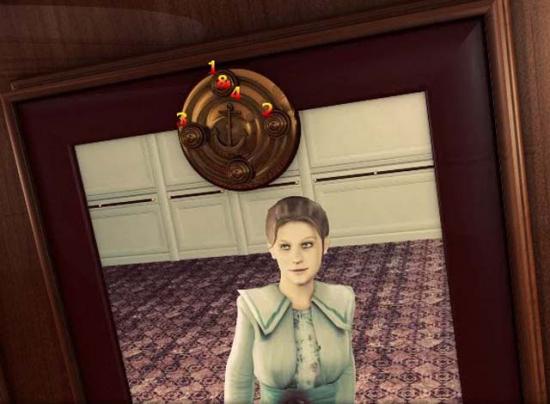
– Go to the Marconi Receiving Room, and click on the receiver. Adjust the receiver so that it looks like the image below.

– Place the morse code book on the paper coming out of the receiver machine.
April 15th, 1912 (12:38am)
– Go to your map, and try to go to the Squash Court.
– When you find that impossible, go to the Turkish bath, and play a hidden object-scene.
– Go to the 3rd Class Showers, and pick up the lever laying on the ground.
– Go to the Shipwright’s Sanctum, talk to mr. Tavalouris and click on the table for another hidden object-scene.
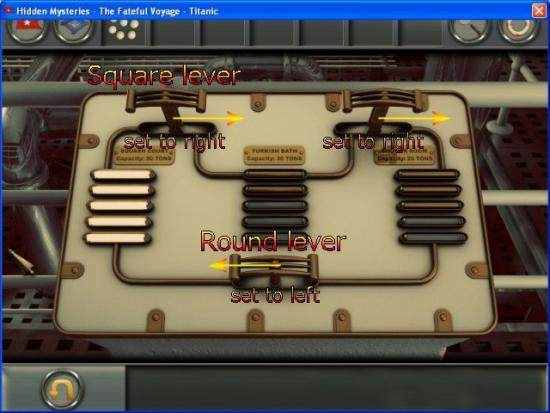
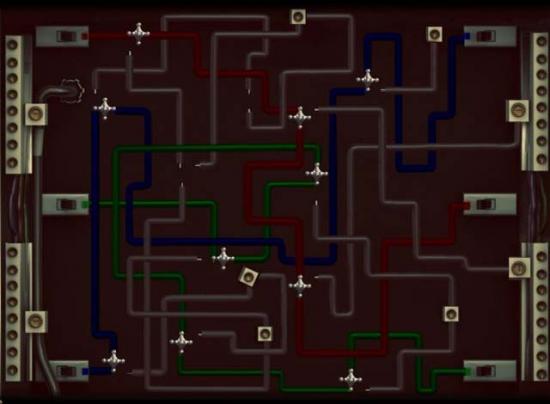
– Go to the Bilge Pump room, and zoom in on the control panel.
– Place the square lever and the round lever, and follow the instructions on the screenshot below.
– Return to the Squash Court, and pick up the racket from the water.
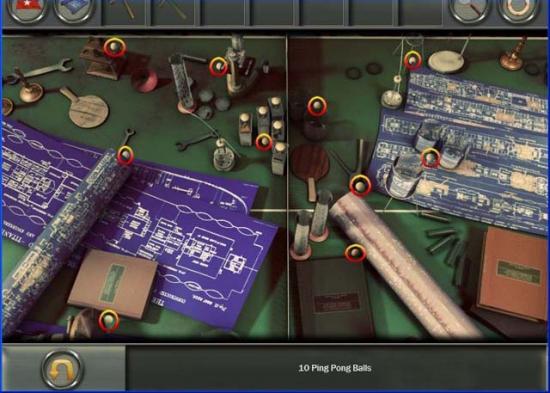
– Go to the Engine room, and place the ping pong-balls on the engine. Now aim a ping pong ball in each of the engine’s pipes.
April 15th, 1912 (12:38am)
– Go to the Starboard Loading Dock and start the hidden object-scene.
– Go to the Port Loading, and click on the burlap bags in front of the crane. Use the letter opener to find limes in the bags.
– Return to the Starboard Loading Dock and zoom in on the crane, and take the key.
– Return to the Port Loading Dock and zoom in on the crane there. Put the key in the ignition, switch the knob to Starboard, and push the lever to “Reel out”.
– Return to the Starboard Loading Dock and click on the hook of the right crane.
– Return to the Port Loading Dock and zoom in on the crane. Move the lever to “Reel in”.
– Go to the 1st Class Lounge and click on the bar on the left to trigger a puzzle.
– Make a Bermuda Highball for Robert with: Gin, Vermouth and Brandy, and finally some lime.
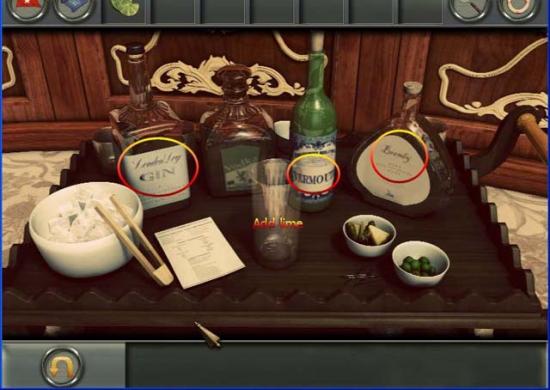
– Give the drink to Robert and go to the elevator.
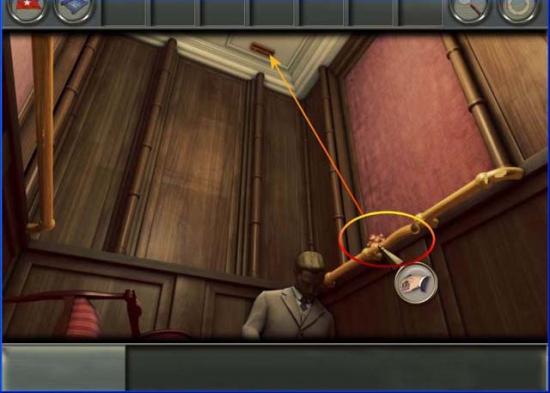
One Minute Later
– Pick up the piece of railing, and place it on the hatch on the ceiling.
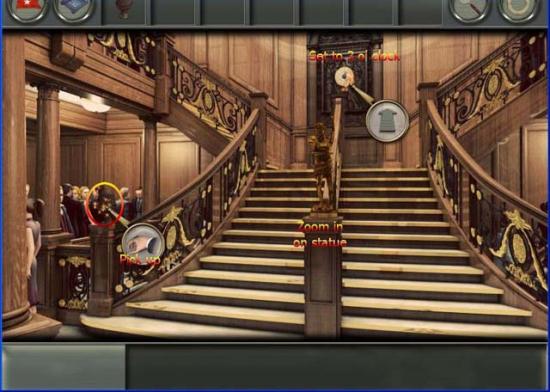
– Go to the Grand Staircase, pick up the Welcome Pineapple, zoom in on the Statue, and then zoom in on the clock. Set the clock to 3 ‘o clock.
– Go to the Hospital and use the Welcome Pineapple as a doorknob.
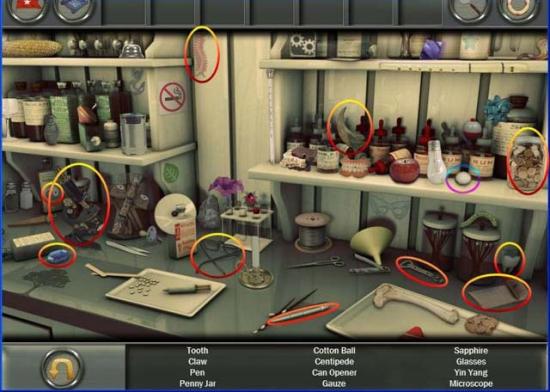
– Click on the shelves and solve the hidden object-scene.
– Click on the closet, and move the cotton ball to the S.D.M. Bottle.
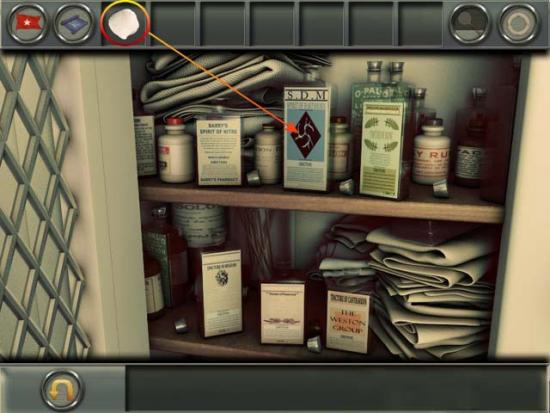
– Return to the Elevator and give the Hartshorn Medicated Cotton Ball to Robert.
April 15th, 1912 (1:00am)
– Click on the closet and pick up the Dust Pan and the Empty Bucket.
– Go to the Equipment Locker and zoom in on the bottom right drawer and find the Liniment.
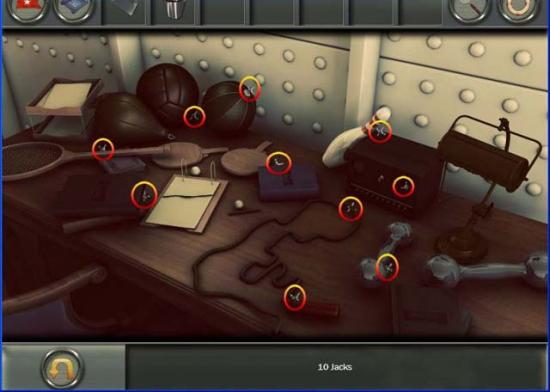
– Click on the desk, and find 10 jacks in the hidden object-scene.
– Go to the Stair Case, click on the First Aid-kit and solve another hidden object-scene.
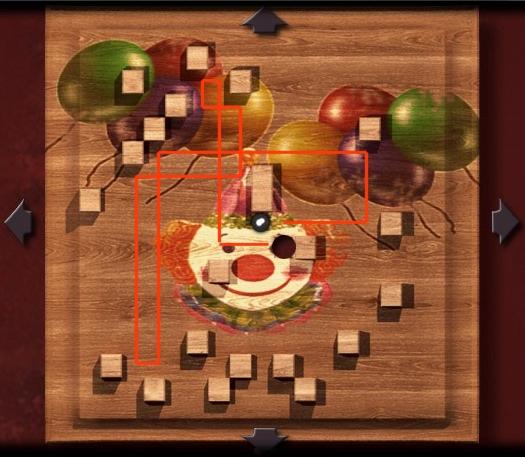
– Place the Handfull of Jacks on the broken fuse box to trigger a puzzle.
– Place the jacks in the correct spots (see image) to restore electricity.
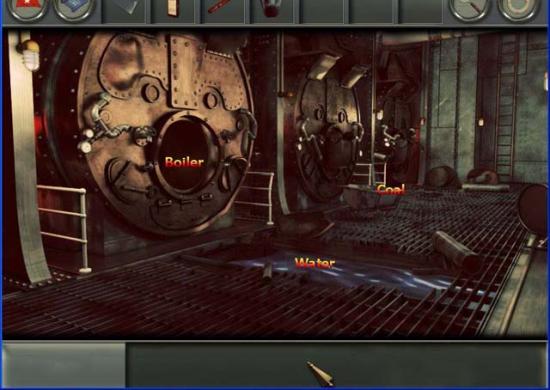
– Hold the Unlit Flare in the sparks coming from the fuse box to light it, and go to the Boiler room.
– Use the Empty Bucket on the puddle of water to fill it. Zoom in on the coal and use the Dust Pan to get a Pile of Coal. Zoom in on the boiler, and place the Pile of Coal inside. Place the Bucket of Water on top of the coal, and use the Lit Flare to heat it up.
– Zoom out, and zoom back in right away, to get the Bucket of Hot Water.
– Go to the 3rd Class Bunks, and give the Liniment and the Hot Bucket of Water to the doctor.
April 15th, 1912 (1:15am)
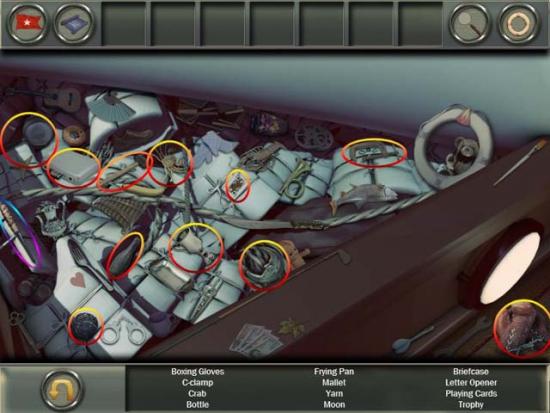
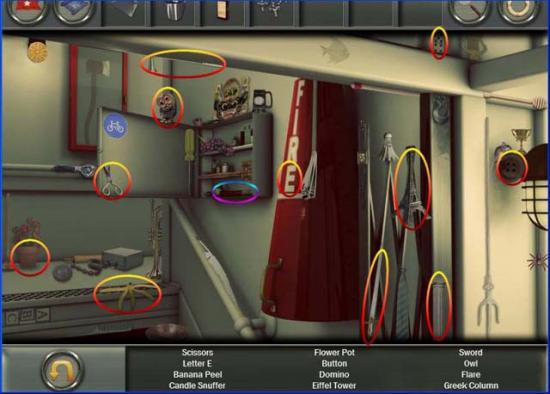
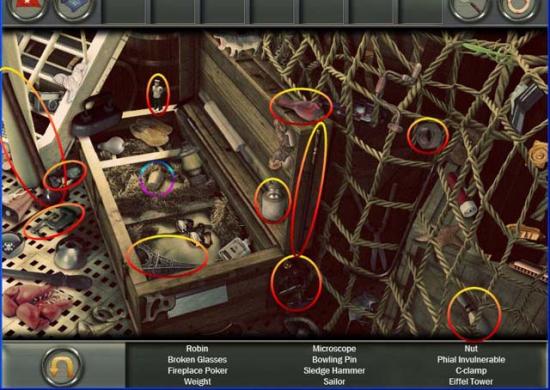
– Zoom in on the crate, and solve the hidden object-scene.
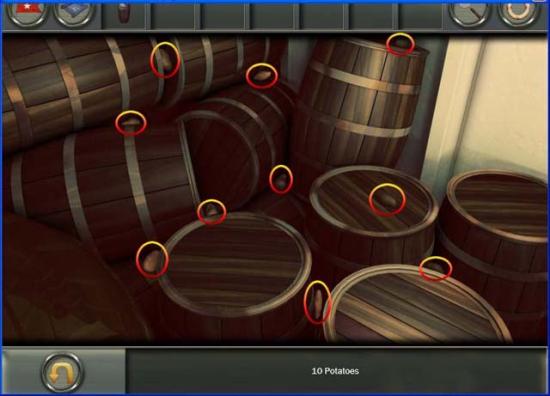
– Go to the Potato Kitchen, click on the barrels on the left, and find 10 potatoes.
– Go up the stairs, and pick up the Serrated Knife from the sink on the left.
– Place the Potatoes on the Pot on the right, and pick up the Pot of Potatoes.
– Return to the Baggage Hold, and use the Serrated Knife on the ropes in the back to get the Length of Rope.
– Return to the Potato Kitchen, and zoom in on the dumbwaiter under the stairs on the left.
– Place the Length of Rope in the center, and then click on the rope on the right to raise the dumbwaiter.
– Place the Phial Invulnerable under the dumbwaiter, go back twice, and go up the stairs.
– Place the Pot of Potatoes on the dumbwaiter, press the lever, and return downstairs to the dumbwaiter.
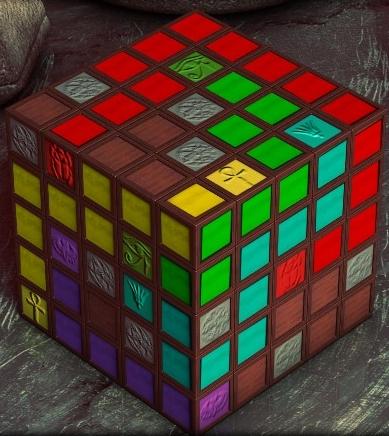
– Zoom in and click on the broken phial to trigger a puzzle. Drag one color to its counterpart elsewhere on the cube, according to the below screenshot.
– Pick up the Parchment from the pieces and return to the Baggage Hold and give the Parchment to Odette.
April 15th, 1912 (1:30am)
– Talk to Montague and Odette, and go to the Hospital to talk to Janeck.
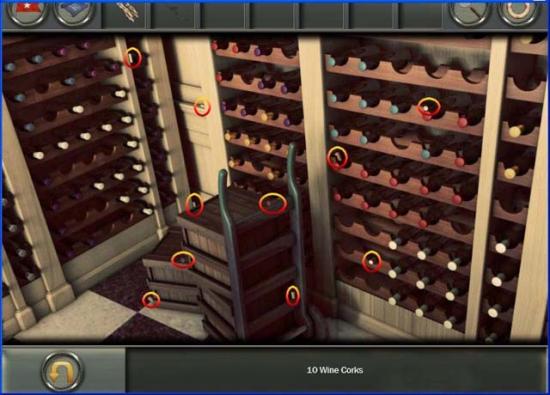
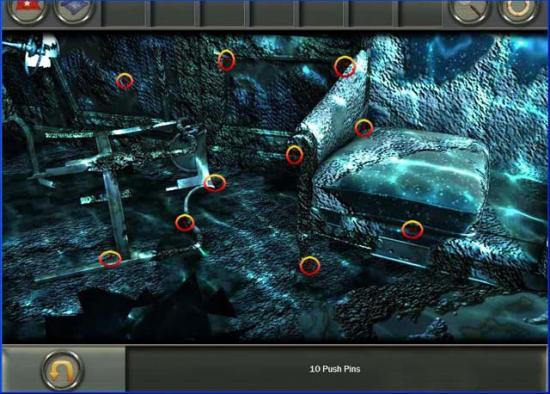
– Go to the Wine Cellar, pick up the Fake Ivy and the Collapsed Whine Rack, and solve another hidden object-scene to find 10 corks.
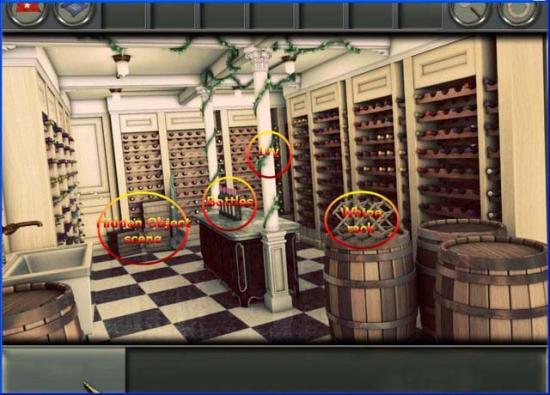
– Click on the bottles to trigger another puzzle, and sort the bottles in the right order.

– Go to the Typesetter’s Office, pick up the Blank Paper on the right and zoom in on the bottom left side of the desk for another hidden object-scene.
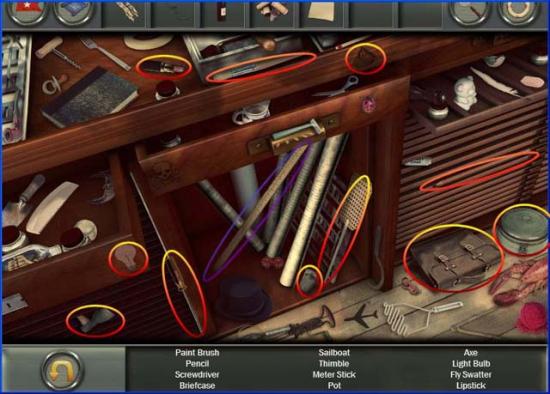
– Click on the desk to trigger a puzzle: grab the ink roller on the bottom left, use it on all 3 trays, and then use the Blank Paper on all 3 trays.
– Go to the Potato Kitchen, and put the Bottle of Vinegar and the Bunch of Corks in the jar, along with the baking soda, to create a Makeshift Fire Extinguisher.
– Go to the Hospital and use the Makeshift Fire Extinguisher on the fire.
– Zoom in on Janeck, and place the Meter Stick, Collapsed Whine Rack and Fake Ivy on his leg.
– Go to the 2nd Class Staircase.
– Zoom in on the mirror and click on the buttons in the right order to open the door.
– Talk to Mr. Tavalouris to get the Gate Key, return to the staircase and use the Gate Key on the Gate to proceed.
April 15th, 1912 (1:45am)
– Talk to Vincent and go to the 1st Class Promenade.
– Pick up the Burlack Sack on the right and go to the Gymnasium to talk to George.
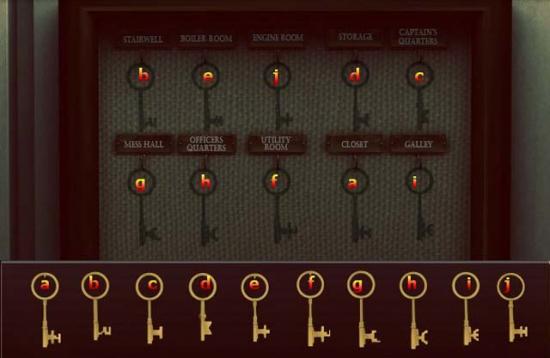
– Go to the Wheel Room, talk to Thomas twice to make him go away, and then zoom in on the desk to find 10 keys.
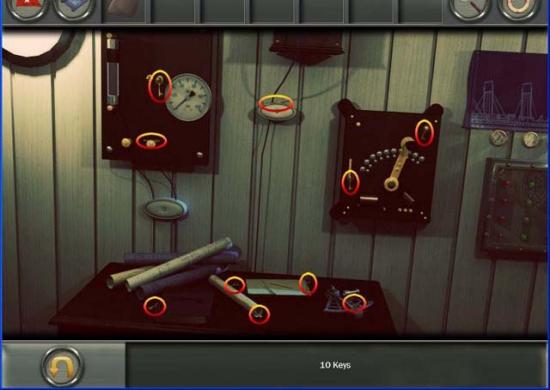
– Zoom in on the pegboard on the right, and put the keys on the right hooks.
– Zoom in on the switches on the back wall and click on the 4 switches on the left, clicking the top one first, then the 2nd, the 3rd, and the bottom one last.
– Go to the Captain’s Sitting Room, and use the Captain’s Sitting Room Key on the doorknob, and talk to Robert and the Captain.
– Go to the Gymnasium and click on the punching bag.
– Use the Burlack Sack on the pile of sand to get the Bag of Sand.
– Go to the 1st Class Promenade, and put the Bag of Sand on the oil. Keep talking to Emma until she leaves.
– Go to the Grand Staircase, and choose who you want to go with: your husband Robert, or your Mother Emma.
For this walkthrough, we choose to go with Robert.
April 15th, 1912 (2:00am)
– Go to the lifeboats and talk to Thomas to get the Galley Key.
– Go to the Galley and use the Galley Key on the door.
– Solve a hidden object-scene.
– Go to the Hallway Fire Station and click on the Red Valve to release the hose.
– Click on the glass case with the axe, to find it closed.
– Return to the lifeboats, and pick up a chunk of ice.
– Return to the Hallway Fire Station and use the ice to break the glass, and pick up the Fire Axe.
– Use the Cleaver on the end of the fire hose nozzle to get a Metal Nozzle.
– Go to Robert’s Stateroom, and use the Fire Axe on the door to be able to enter.
– Once inside, use the Metal Nozzle on the pipe leaking water from the ceiling.
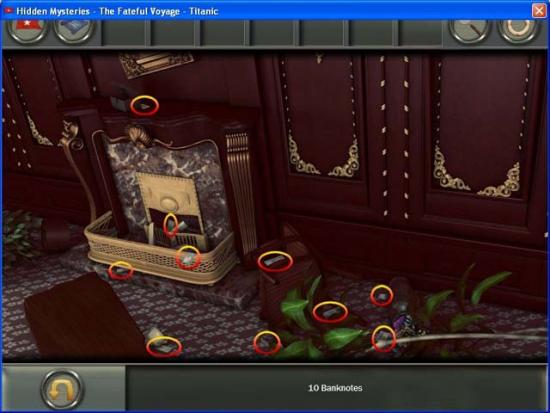
– Click on the fireplace and pick up the Poker.
– Use the Poker on the box above the fireplace to trigger a hidden object-scene, and pick up the 10 banknotes.
– Go to the Lifeboats and give the Banknotes to Robert to finish the game.
From the main menu, you can now select a Bonus level.
If you’ve exited the game, you will need to go back to the credits (you can skip them) to see the Bonus level again.
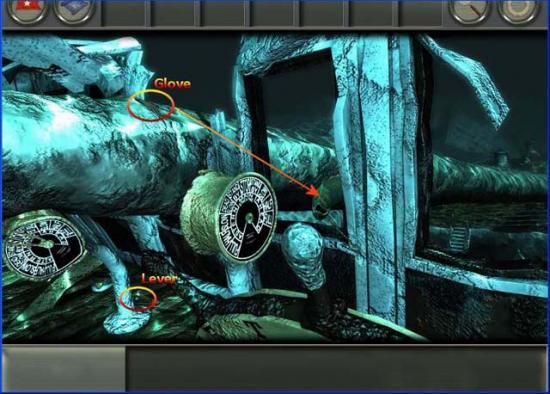
– Pick up the lever and the glove, and use the glove on the eel.
– When the eel is gone, pick up the rod.
– Use the rod and the lever on the accelerator and click on the lever.
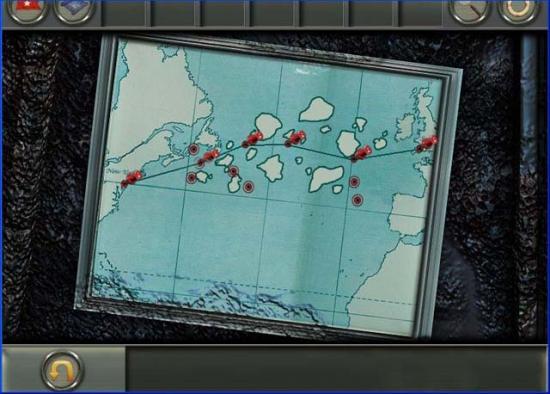
– Go to the Captain’s Sitting Room, and zoom in on the center left to start another hidden object-scene.
– Click on the blue map in the back to start a puzzle, and set out the correct route.
– Go to the Marconi Room, and click on the desk to trigger a hidden object-scene.
– Place the Message on the Chute on the right.
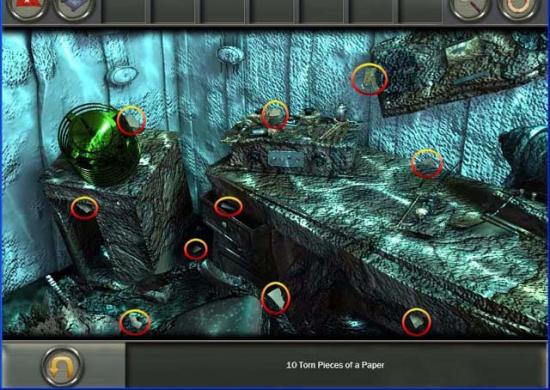
– Go to the Baggage Hold, and pick up the Acetylene Torch.
– Solve the hidden object-scene.
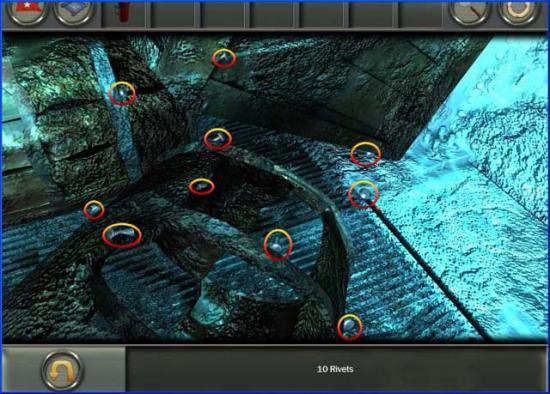
– Use the Rivets and the Acetylene Torch on the hull to finish the bonus level.
By Adele Wilson
By Adele Wilson
By Adele Wilson
By Sho Roberts
