
Best Horror Games On Itch.io – July 2026
Across a bounty of subgenres.![Haze Seas Accessories Tier List [Best Accessories to Equip]](/wp-content/uploads/2026/07/haze-seas-accessories-tier-list.jpg "Haze Seas Accessories Tier List [Best Accessories to Equip]")
Haze Seas Accessories Tier List [Best Accessories to Equip]
The accessories with the best stat buffs in Haze Seas.
![[Roblox] Evomon Shiny Hunting Guide – Including Prismatic and Pris Shinies!](/wp-content/uploads/2026/06/evomon-shiny-hunting-guide.jpg "[Roblox] Evomon Shiny Hunting Guide – Including Prismatic and Pris Shinies!")

Hidden in Time: Looking Glass Lane Walkthrough
Welcome to the Hidden in Time: Looking-Glass Lane walkthrough on Gamezebo. Hidden in Time: Looking-Glass Lane is a Hidden Object game played on the PC and created by Monkey Barrel Games. This walkthrough includes tips and tricks, helpful hints and a strategy guide on ho to complete Hidden in Time: Looking-Glass Lane.


- Prefer Gamezebo on Google

Hidden in Time: Looking Glass Lane – Game Introduction
Welcome to the Hidden in Time: Looking-Glass Lane walkthrough on Gamezebo. Hidden in Time: Looking-Glass Lane is a Hidden Object game played on the PC and created by Monkey Barrel Games. This walkthrough includes tips and tricks, helpful hints and a strategy guide on ho to complete Hidden in Time: Looking-Glass Lane.
General Tips
• Hidden Object Scenes will vary each time you play.
• Hint Meter takes approximately 25-30 seconds to refill.
• You have unlimited Hints available.
• The Skip Button takes approximately 1 minute to fill.
• Each scene contains an extra Hint.
• You can hold up to XX Hints at a time.
• Each Scene also contains a Tin Can.
• Find all 59 Tin Cans to earn an Achievement.
• Blue colored Hidden Objects will require an extra step to locate.
• Casual Mode features faster refilling Hint and Skip; Active Areas will also sparkle.
• Advanced Mode features slower filling Hint and Skip; Active areas will not sparkle.
• Completing the game will unlock a Mirrored Mode game play.
Guide Tips
• Hidden Objects are highlighted in Yellow.
• Items are highlighted in Red.
• Hints and Tin Cans are highlighted in Orange.
• Interactive Areas are highlighted in Green
• Locations are highlighted in Blue.
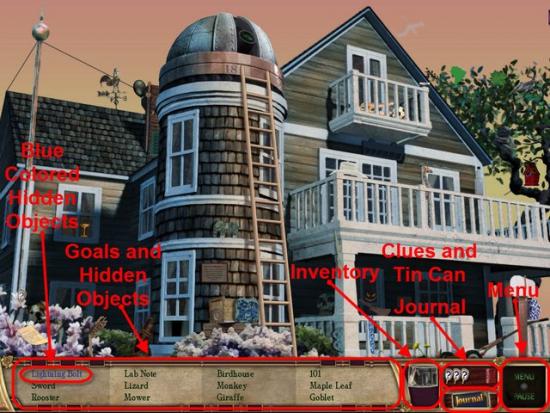
Interface

Menu – The Menu allows you access to the main functions.
Goals – This includes current goals and Hidden Objects required to find.
Hint – Hint Meter is unlimited. If you use up all available Hints, a new Hint will appear shortly. The Hint icon looks like the back of a Hand-held Mirror.
Tin Can – Tin Can is red when there is a Tin Can to find in the scene. The Tin Can will turn black after finding the Tin Can in the current scene.
Inventory – Contains your current items collected.
Journal – Contains all information gathered and visual clues found.
Walkthrough – Box 1
Examine the Sign highlighted in Green.
Examine the Lightning Rod highlighted in Green.
Pick up the Rod highlighted in Red and place under the Lightning Rod.
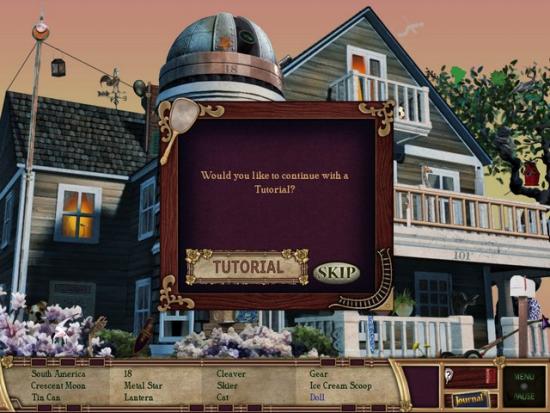
This guide will start with the Tutorial. You have the option of skipping the Tutorial at this time.
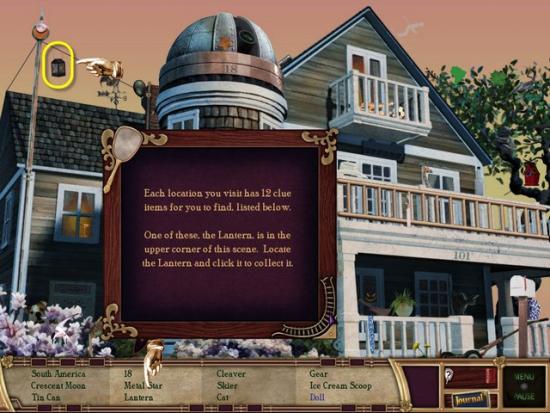
Gather the Lantern highlighted in Yellow.
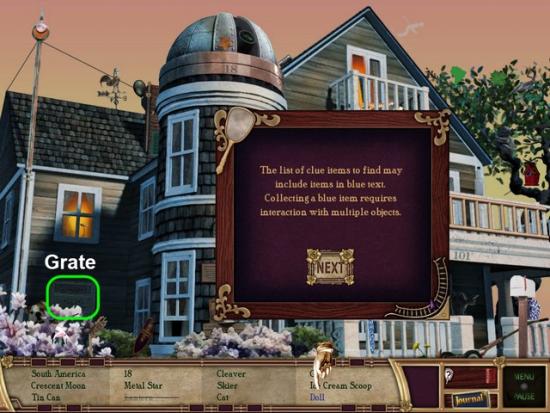
Move the Grate highlighted in Green.
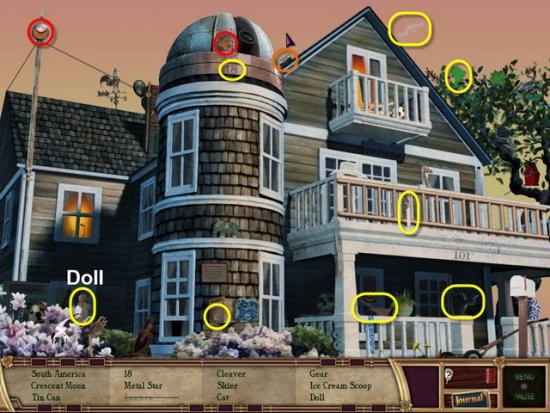
Gather the Doll highlighted in Yellow.
Gather the Tin Can highlighted in Orange.
Gather the Crescent Moon and Metal Star highlighted in Red.
Gather the Hidden Objects highlighted in Yellow.
Go toward the House/Porch.
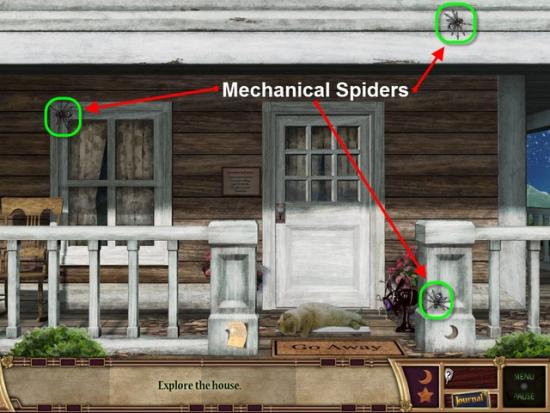
Chase off the 3 Spiders highlighted in Green.
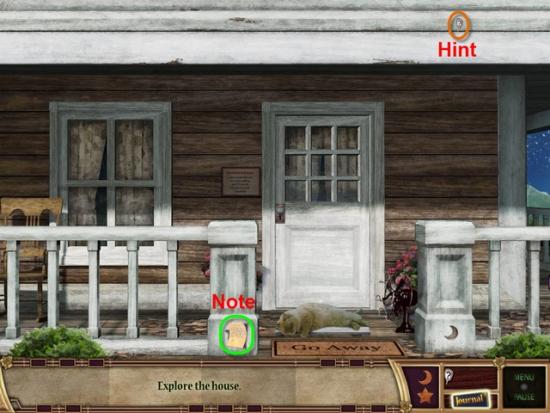
Gather the Hint highlighted in Orange.
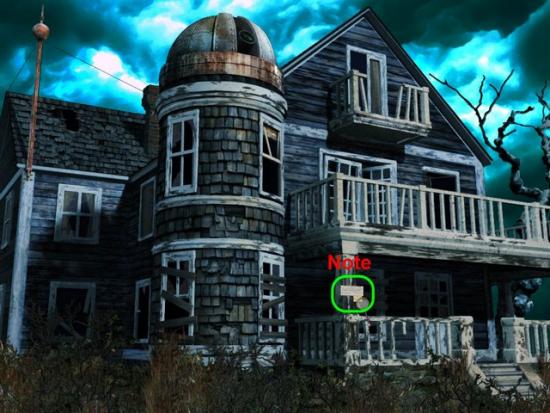
Read the Note highlighted in Green.
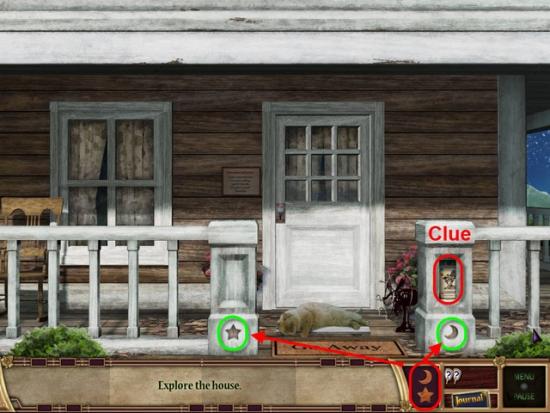
Place the Moon and Star, highlighted in Red, into the two Depressions highlighted in Green.
Gather the Clue highlighted in Red.
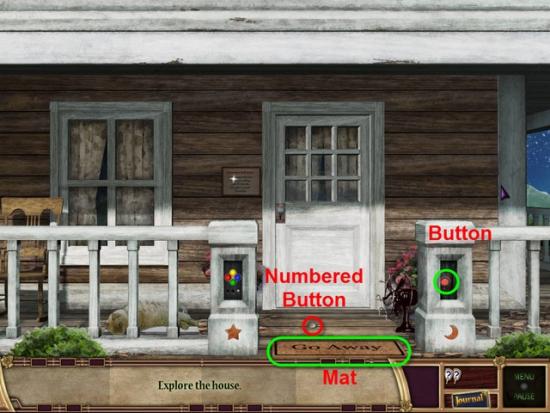
Push the Button highlighted in Green.
The Cat will move.
Examine the Newspaper.
Gather the Numbered Button highlighted in Red.
Move the Mat highlighted in Green.
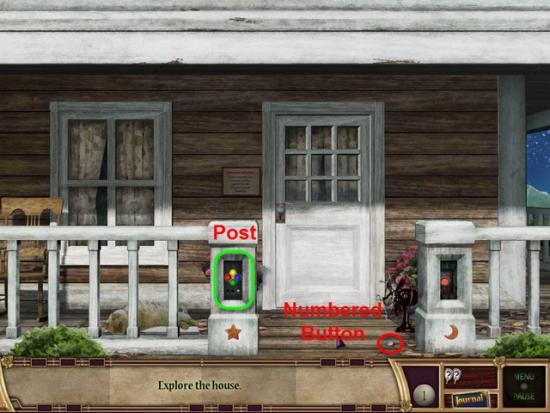
Gather the Numbered Button highlighted in Red.
Examine the left Post highlighted in Green.
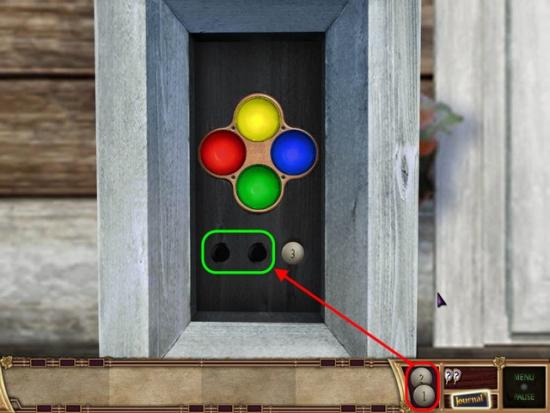
Place the Numbered Buttons, highlighted in Red, into the corresponding Holes, highlighted in Green.
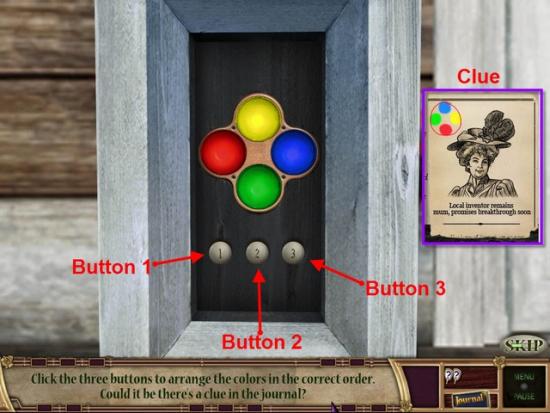
To solve this Puzzle you need to arrange the four Colors in the correct layout.
Refer to the Clue you found earlier for the solution.
The Clue can be found in your Journal.
Button 1 will swap the Top Color with the Middle Left Color and vice-a-verse.
Button 2 will rotate all four Colors Clockwise one space.
Button 3 will swap the Bottom Color and the Middle Right Color and vice-a-verse.
Solution: Press Button 3 once, press Button 1 once, and press Button 2 twice.
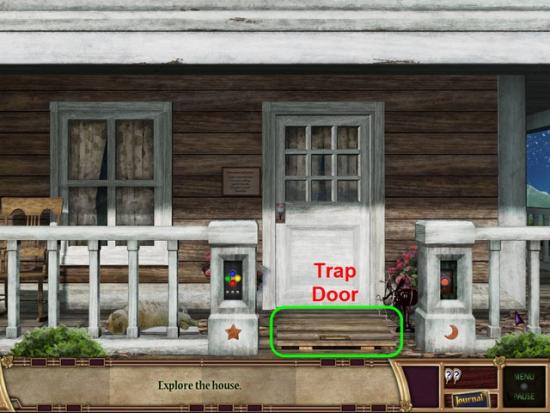
Open the Trap Door highlighted in Green.
Enter the Trap Door.
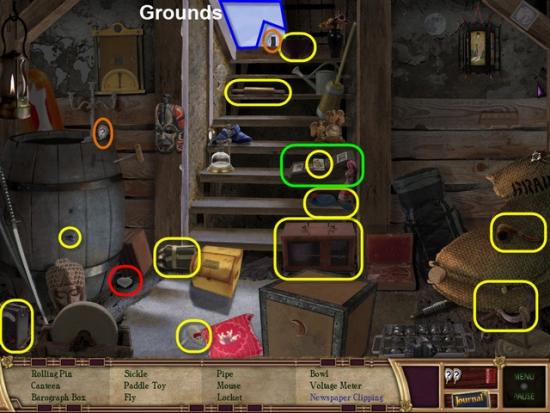
Examine the Photo Album highlighted in Green.
Gather the Clue and Tin Can highlighted in Orange.
Gather the Locket highlighted in Red.
Gather the Hidden Objects highlighted in Yellow.
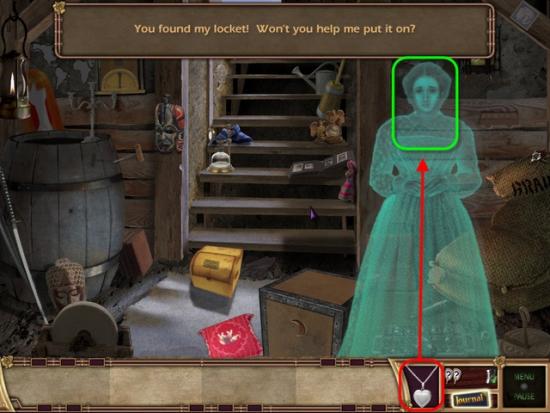
Place the Locket, highlighted in Red, around the Young Lady’s Neck, highlighted in Green.
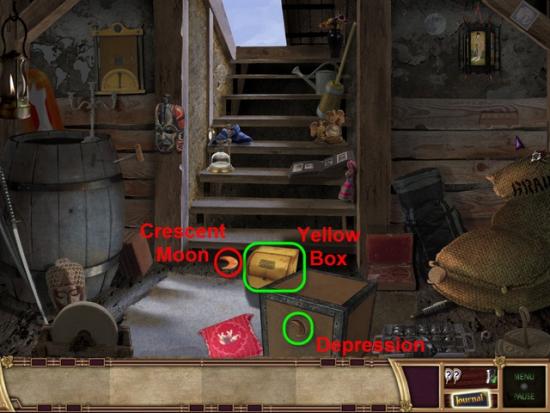
Move the Yellow Box highlighted in Green.
Gather the Crescent Moon highlighted in Red.
Place the Crescent Moon in the Depression, on the Box, highlighted in Green.
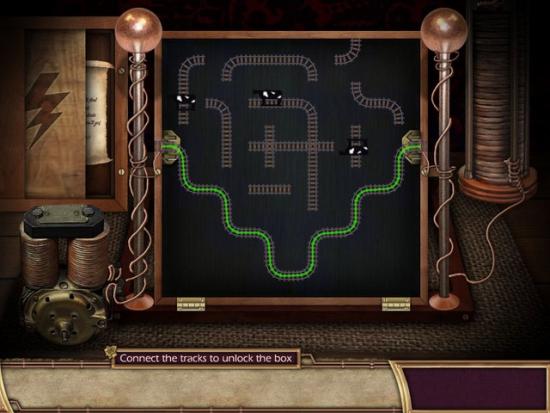
Examine the inside of the Box.
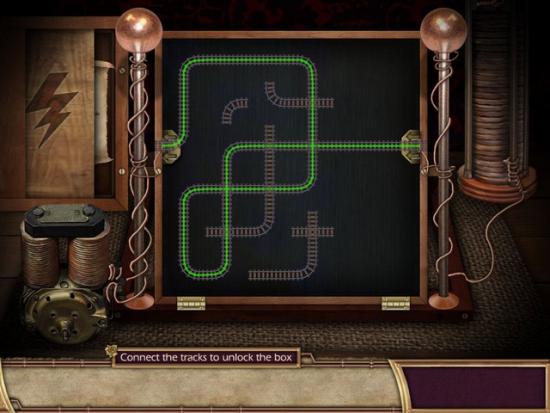
To solve this Puzzle you must align the Tracks so the Green Wire connects from the Right side to the Left side.
Only the Curved Tracks can be rotated.
Click on the Curved Tracks to rotate them a quarter turn.
See Image for Solution.
Return Upstairs.
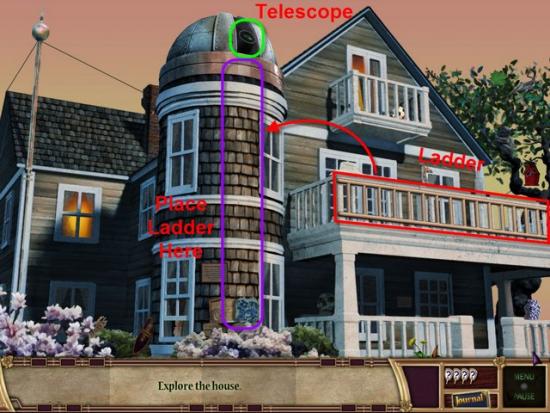
Examine the Telescope highlighted in Green.
Gather the Ladder highlighted in Red.
Place the Ladder underneath the Telescope.
Climb the Ladder and enter the Dome.
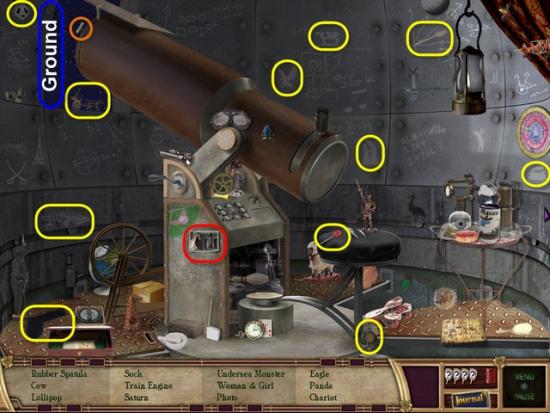
Gather the Tin Can highlighted in Orange.
Gather the Photo highlighted in Red.
Gather the Hidden Objects highlighted in Yellow.
Return to the Grounds.
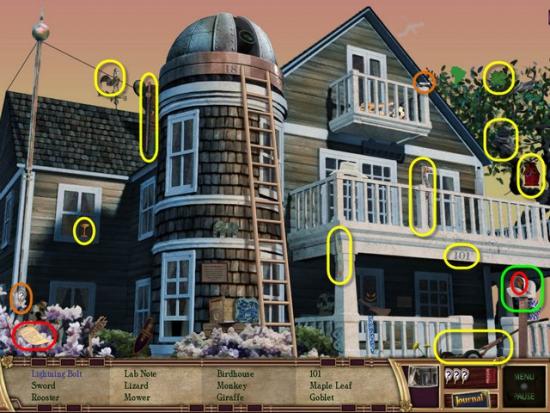
Gather the Hint and Tin Can highlighted in Orange.
Open the Mailbox highlighted in Green.
Gather the Lightning Bolt highlighted in Red.
Gather the Lab Note highlighted in Red.
Gather the Hidden Objects highlighted in Yellow.
Return to Porch and head down through the Trap Door.
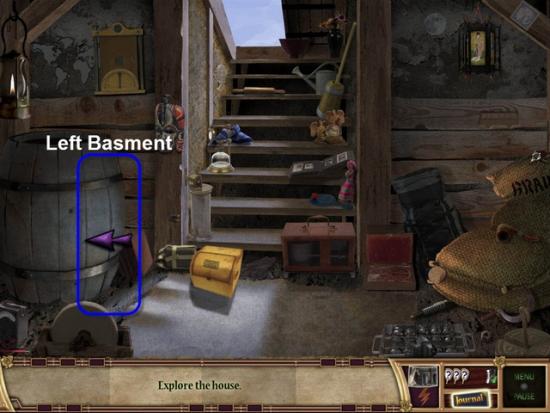
Head to the Left area of the Basement.

Chase off the Mechanical Spiders highlighted in Green.
Gather the Hint highlighted in Orange.
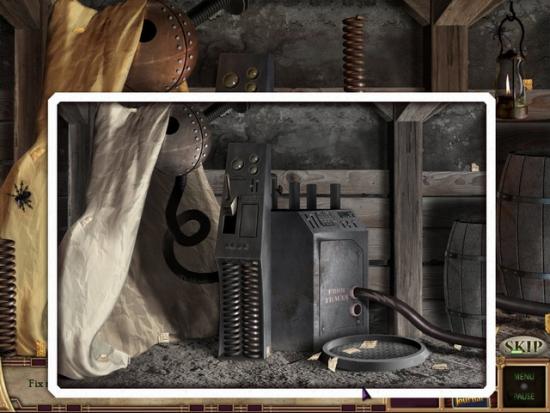
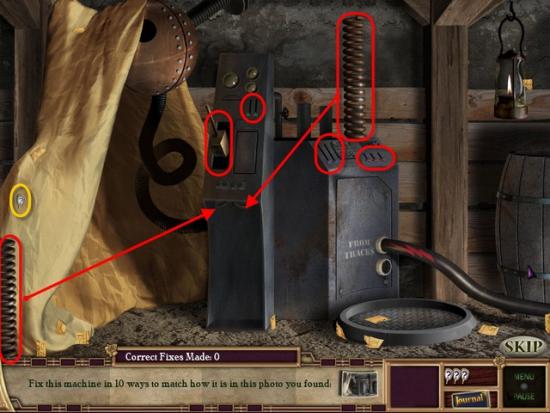
Using the Photo for reference, assemble and arrange the Mechanical Device so that it matches the Photo.
Place the two Coils into the Device.
Move the Dials and Switch to match the Image.
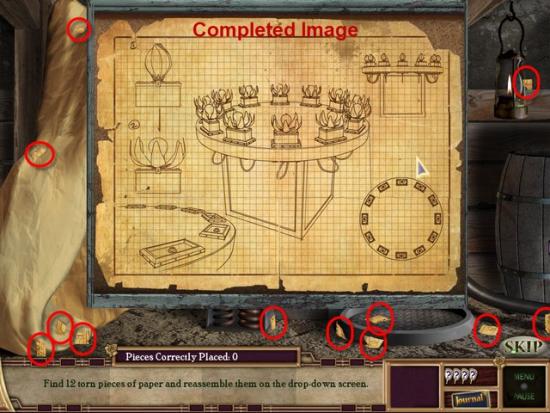
Gather the 12 Torn pieces of Paper highlighted in Red.
Next assemble the Torn pieces of Paper into the Image shown.
Right Click a Torn piece of Paper to rotate them.
Left Click a Torn piece of Paper to move and place them.
Head Back to the Right.
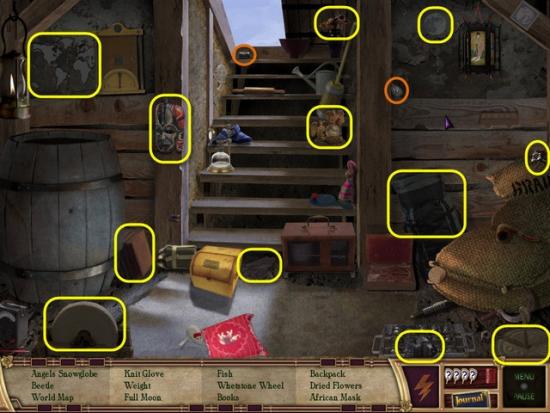
Gather the Hint and Tin Can highlighted in Orange.
Gather the Hidden Objects highlighted in Yellow.
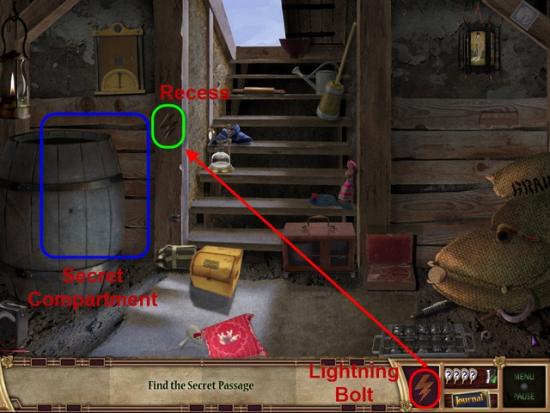
Place the Lightning Bolt, highlighted in Red, into the Recess, highlighted in Green.
Enter the Secret Compartment.
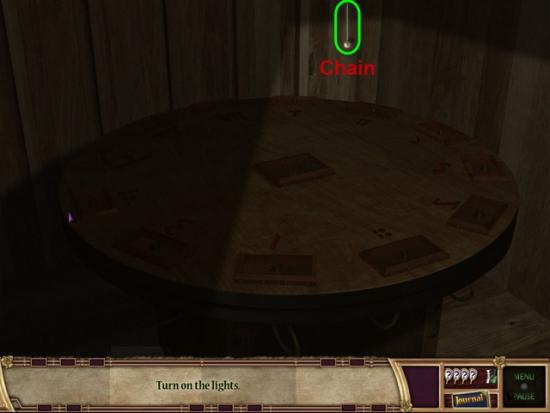
Pull on the String to turn on the Lights, highlighted in Green.
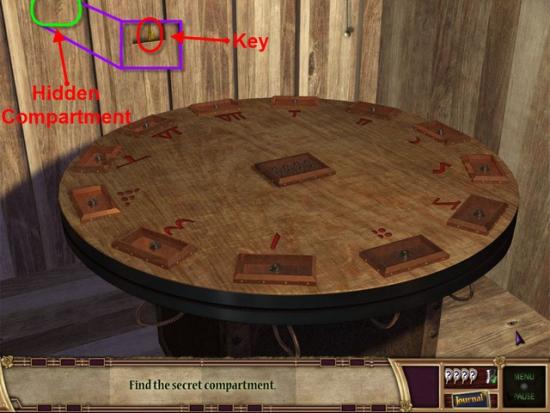
Examine the Hidden Compartment highlighted in Green.
Gather the Key highlighted in Red.
Head Back one screen.
Return to the Grounds and enter the Observatory once again.
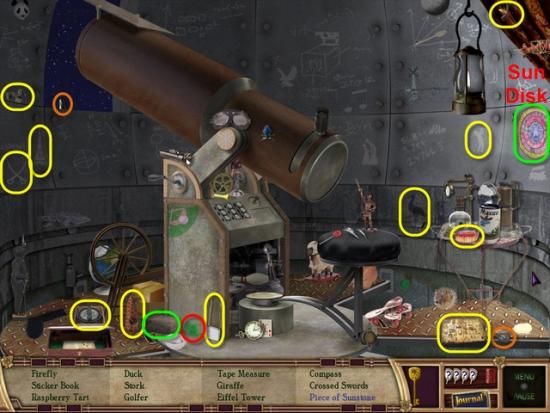
Move the Brick highlighted in Green.
Gather the Sunstone highlighted in Red.
Gather the Hint and Tin Can highlighted in Orange.
Gather the Hidden Objects highlighted in Yellow.
Examine the Sun Disk highlighted in Green.
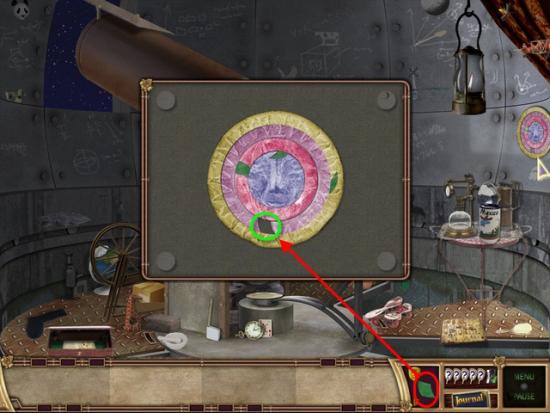
Place the Sunstone, highlighted in Red, into the Sun Disk, highlighted in Green.
To solve this Puzzle you need to rotate the pieces to form the Green Crescent Moon at the top of the Sun Disk.
Turning Ring 4 turns Ring 2 at the same time.
Turning Ring 3 turns Ring 1 at the same time.
Turning Ring 2 turns Ring 3 at the same time.
Ring1 turns by its self.
Solution: Turn Ring 4 three times, turn Ring 3 two times, and turn Ring 1 two times.
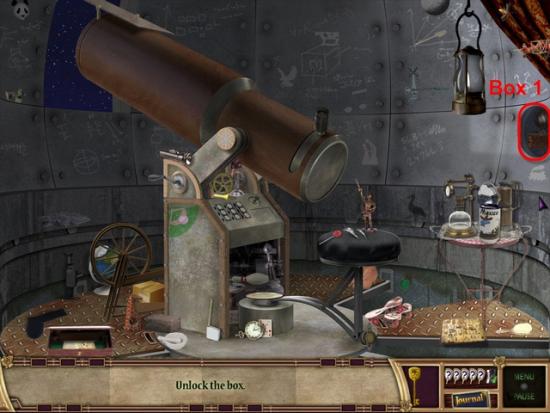
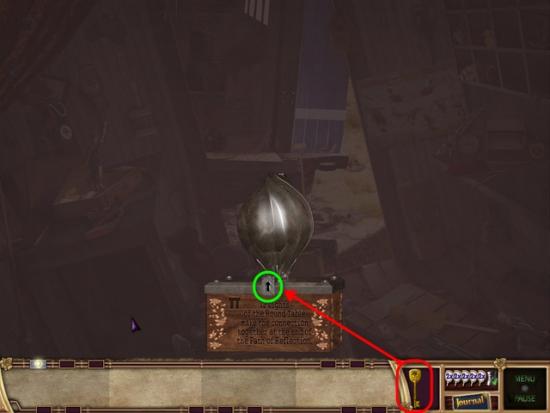
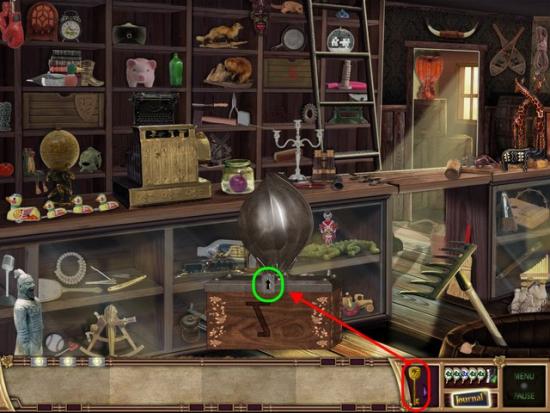
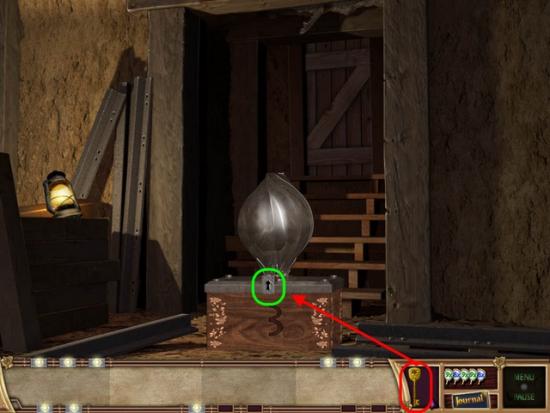
Gather Box 1 of twelve highlighted in Red.
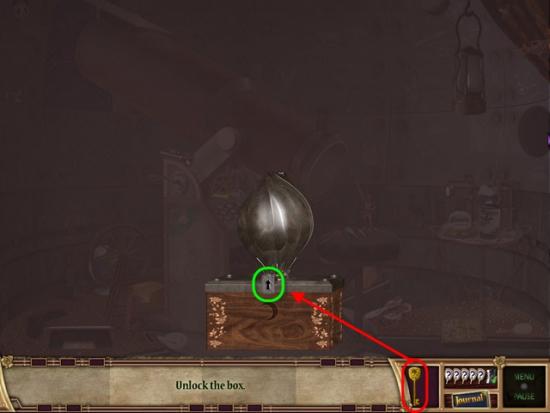
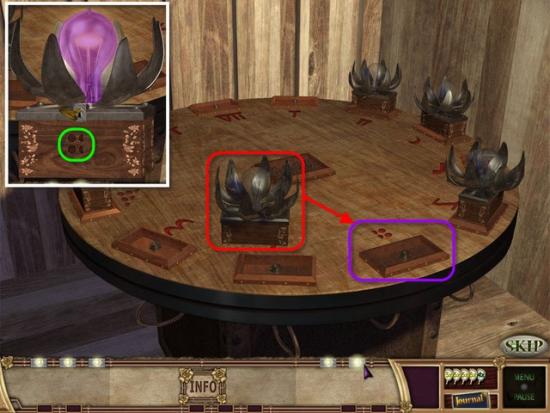
Use the Key, highlighted in Red, to unlock Box 1, highlighted in Green.
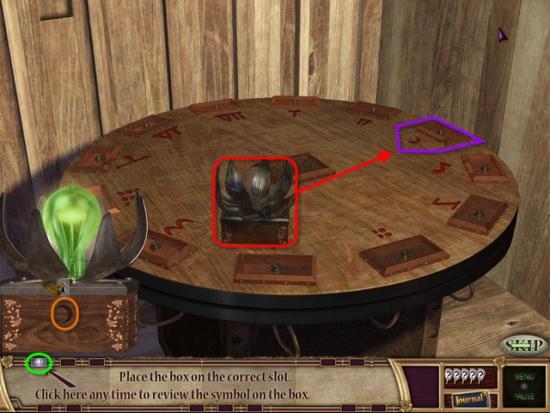
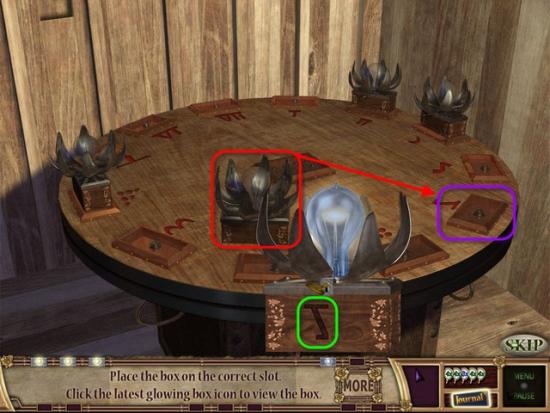
Choose to place Box 1.
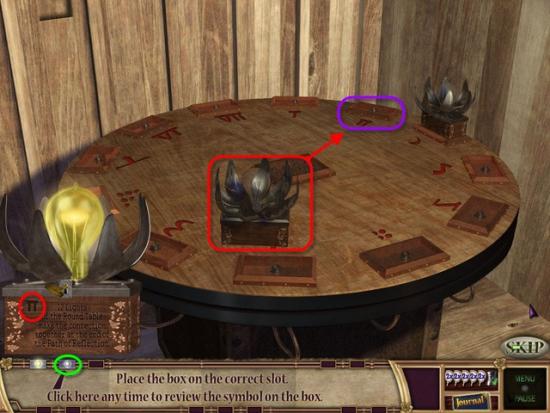
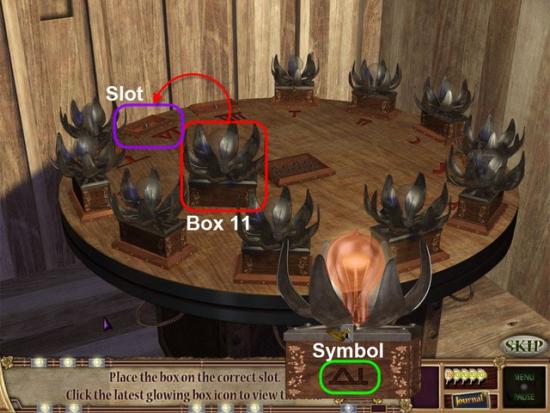
Click on the small lit box highlighted in Green to show close up of the Box.
Notice the Moon Symbol highlighted in Orange.
Place the Box, highlighted in Red, into the corresponding slot highlighted in Purple.
Box 2
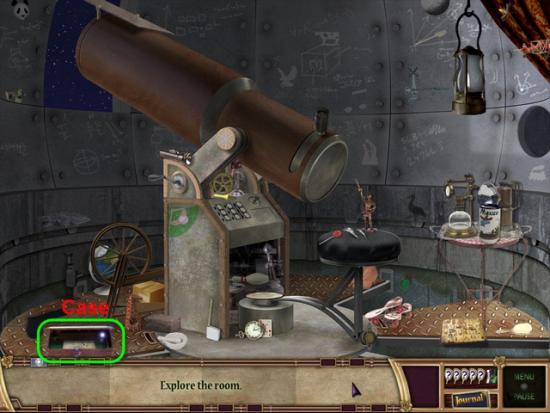
Examine the Case highlighted in Green.

To solve this Puzzle, re-orientate the pieces of the Image to form the completed Image.
Click on the edges of a square to change the orientation of the Image in that Square.
Bottom or Top edges will flip the Image vertically.
Clicking on the Left or Right edges will flip the Image horizontally.
Any action on a section of Image will also affect the adjacent Image touching the Edge your using.
Solution: See Image for completed Image.
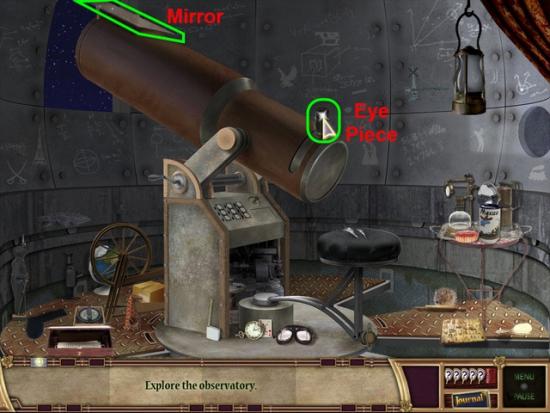
Tilt the Mirror highlighted in Green.
Next examine the Eye Piece highlighted in Green.
Gather the Hint and Tin Can highlighted in Orange.
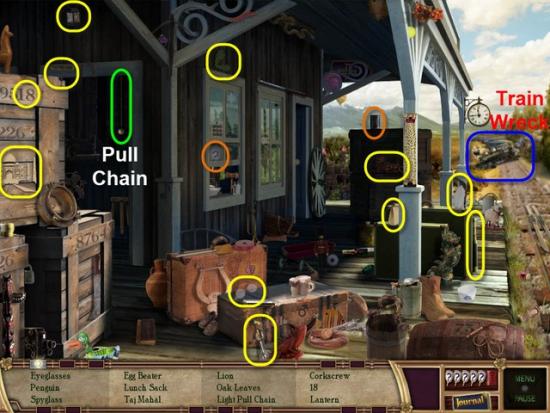
Click the Pull Chain highlighted in Green.
Gather the Hidden Objects highlighted in Yellow.
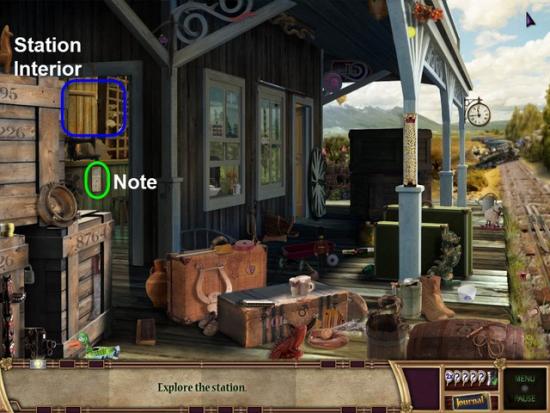
Examine the Note highlighted in Green.
Examine the Station Interior highlighted in Blue.

Gather the ten pieces of the Note highlighted in Red,
Arrange the Pieces of the Note at the X, highlighted in Green.
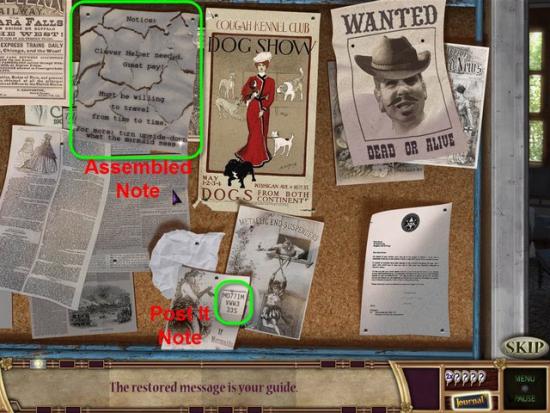
Read the Assembled Note for your next Clue.
Click the Post It Note highlighted in Green to turn the Note upside down.
Will obtain a Message, containing directions for next area.
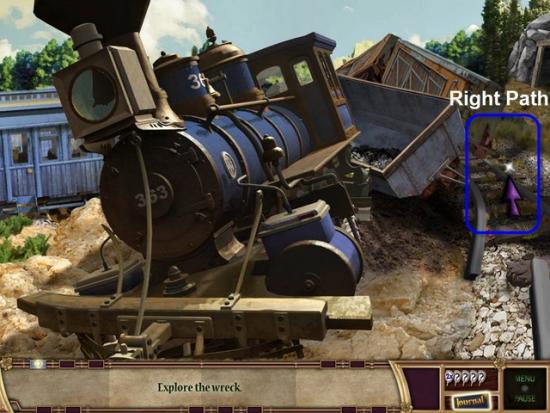
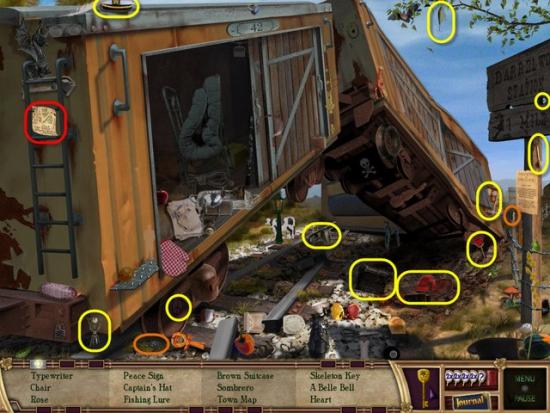
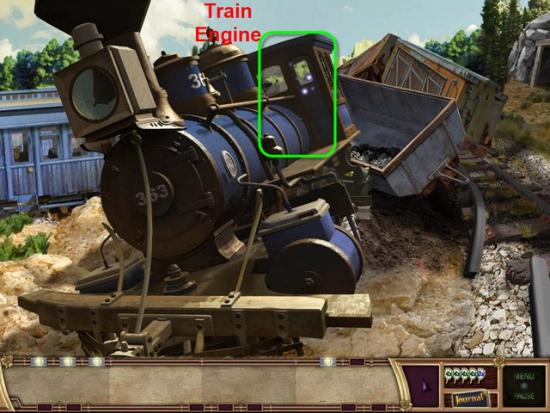
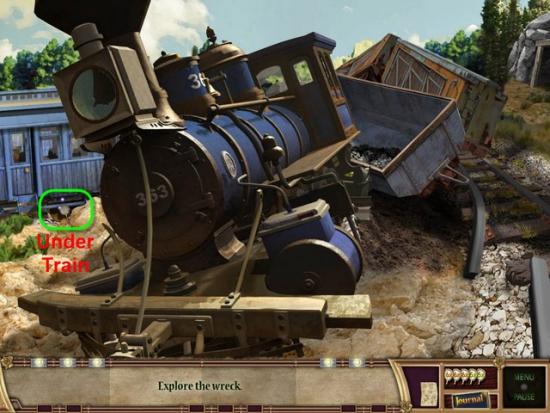
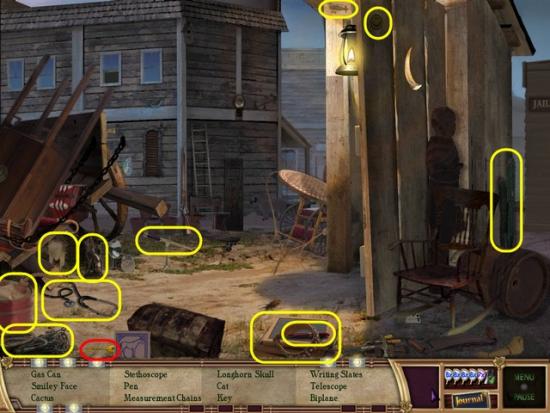
Head to the Train Wreck.
Take the Right Path past the Engine.

Gather the Hint and Tin Can highlighted in Orange.
Move the Popcorn, highlighted in Green, onto the Fire.
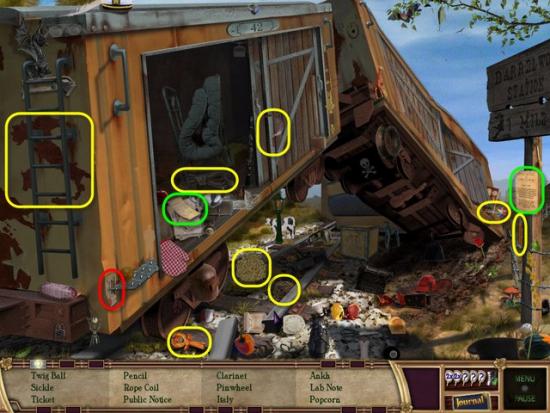
Examine the Public Notice and Lab Note highlighted in Green.
Gather the Ticket highlighted in Red.
Gather the Hidden Objects highlighted in Yellow.
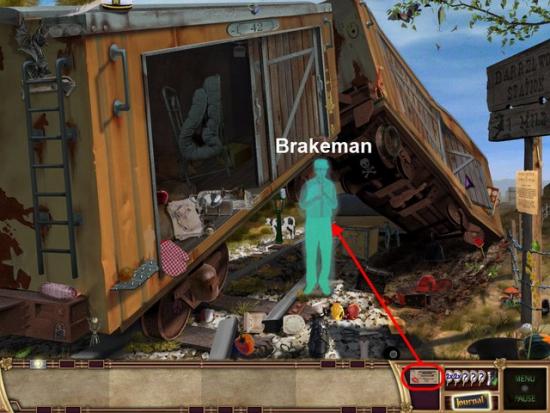
Give the Ticket, highlighted in Red, to the Brakeman.
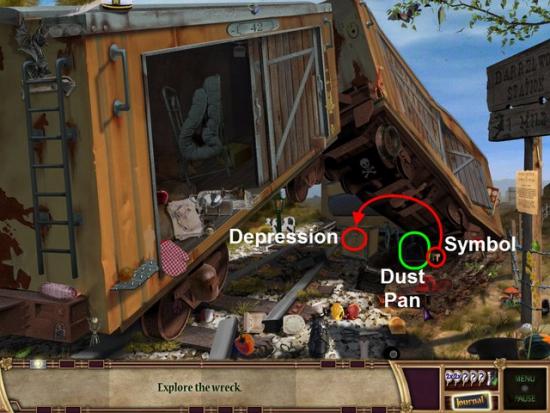
Move the Dustpan, highlighted in Green.
Gather the Symbol, highlighted in Red, and place in the Depression on the Box.
Examine the Box.
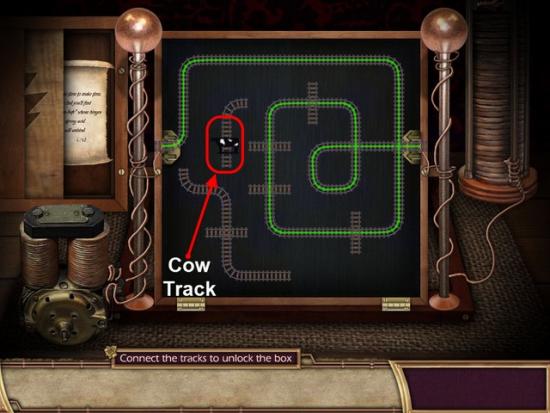
This another Train Track Puzzle with a twist. This time some Tracks have Cows on them. Any track with a Cow on it can not be used to connect the Right side with the Left side.
See the Image for Solution.
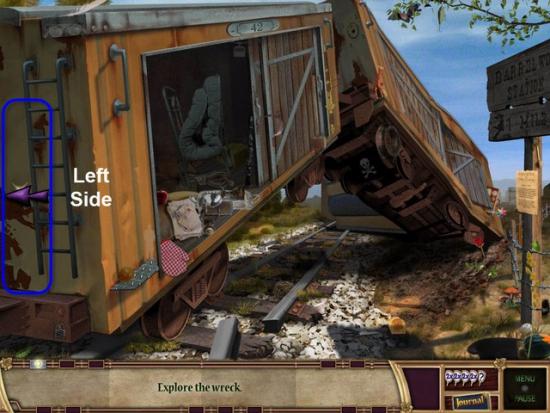
Head to the Left Side of the Train Wreck highlighted in Blue.
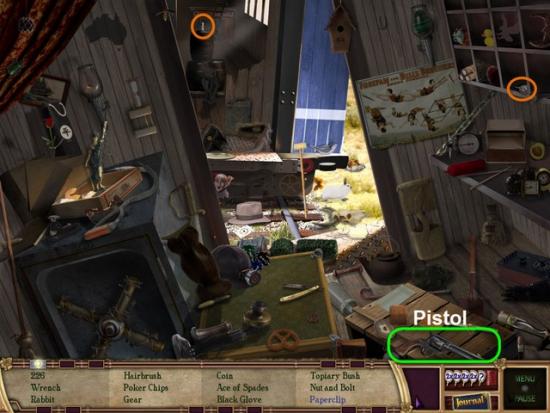
Gather the Hint and Tin Can highlighted in Orange.
Move the Pistol highlighted in Green.
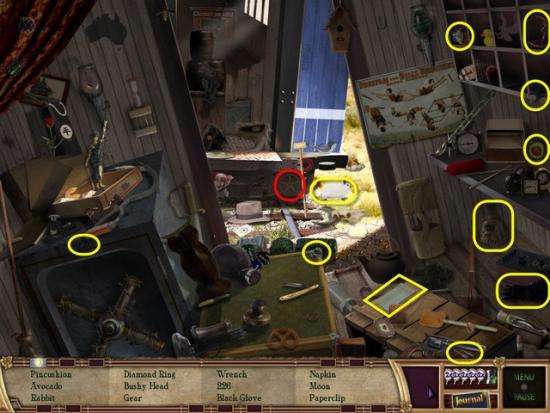
Gather the Gear highlighted in Red.
Gather the Hidden Objects highlighted in Yellow.
Exit the Box Car.
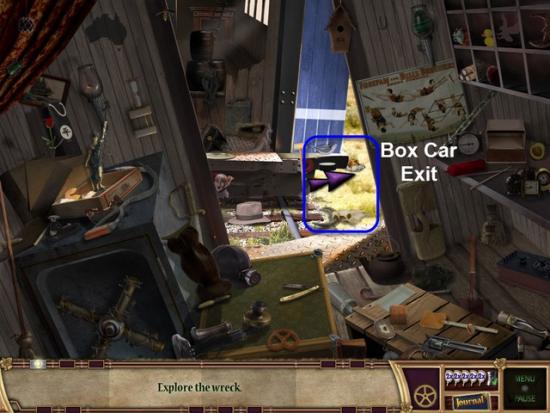
Exit the Box Car.
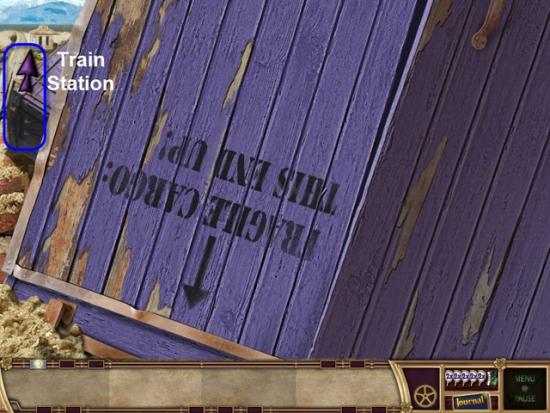
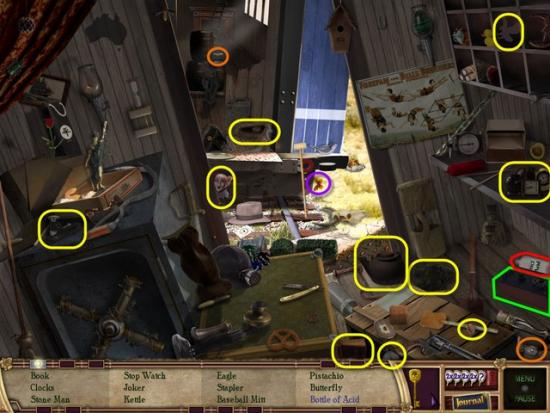
Pass the Wreckage and return to the Train Station.
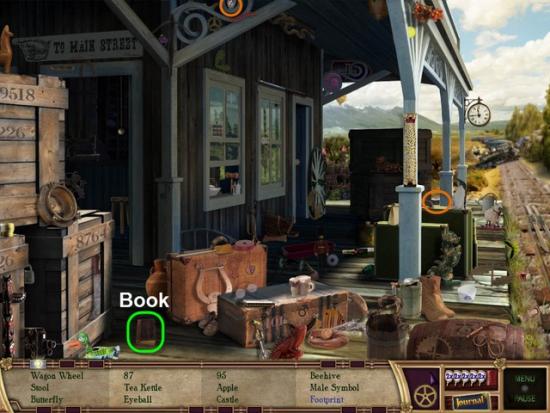
Gather the Hint and Tin Can highlighted in Orange.
Move the Book highlighted in Green.
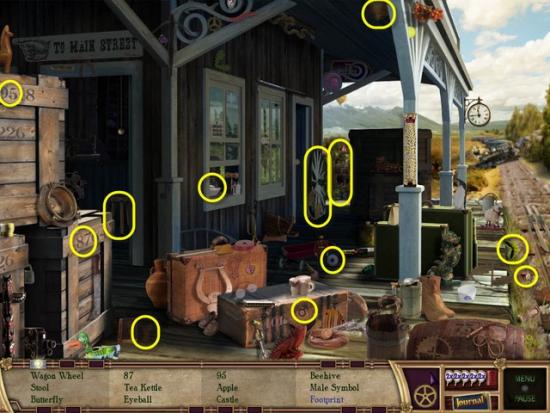
Gather the Hidden Objects highlighted in Yellow.
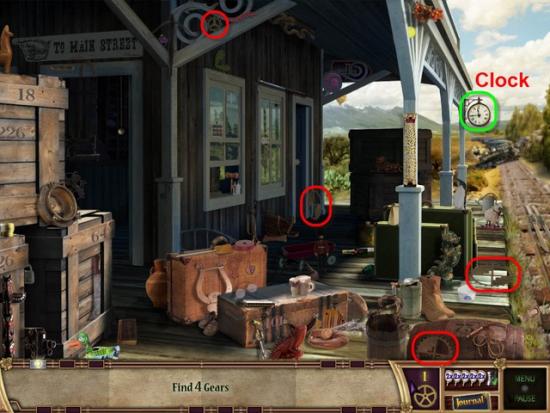
Gather the four Gears highlighted in Red.
Examine the Clock highlighted in Green.
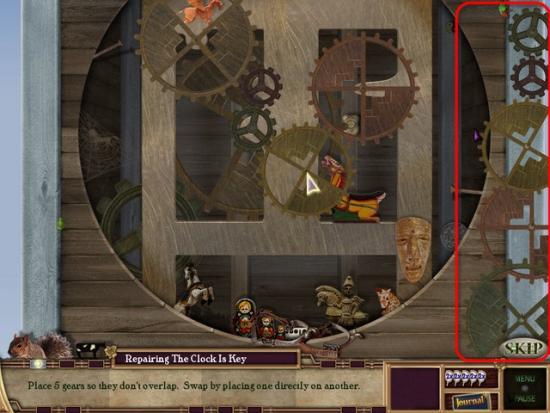
Place the five gears, highlighted in Red, onto the Clock Face in the order shown.
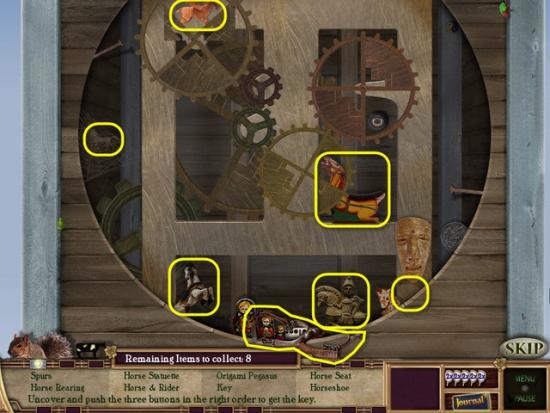
Gather the seven Hidden Objects highlighted in Yellow.
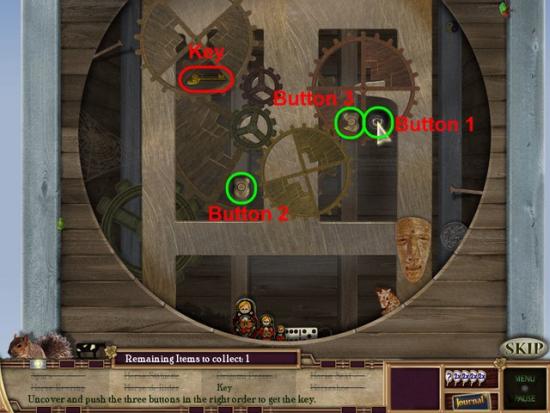
To uncover the Key you will need to press a series of Buttons in a certain order to reveal the Key.
Start by pressing Button 1 once.
Next press Button 2 twice.
Next press Button 3 once.
Finally, press Button 1 once more.
Gather the Key highlighted in Red.
Return to the Train Wreck.
Take the Right Path past the Engine.
Gather the Hint and Tin Can highlighted in Orange.
Gather the Town Map highlighted in Red.
Gather the Hidden Objects highlighted in Yellow.
Head to the Left.
Gather the Hint and Tin Can highlighted in Orange.
Move the Phone highlighted in Green.
Gather the Acid highlighted in Red.
Gather the Hidden Objects highlighted in Yellow.
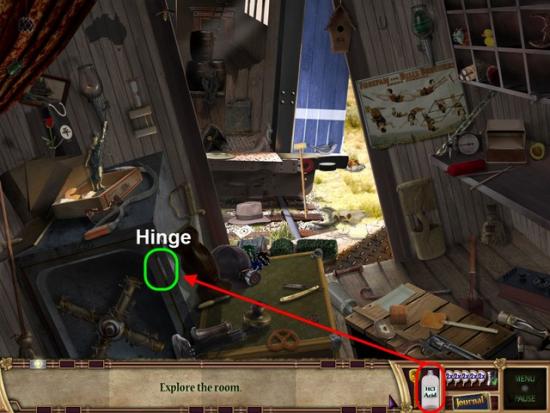
Use the Acid, highlighted in Red, on the Safe Hinges, highlighted in Green.
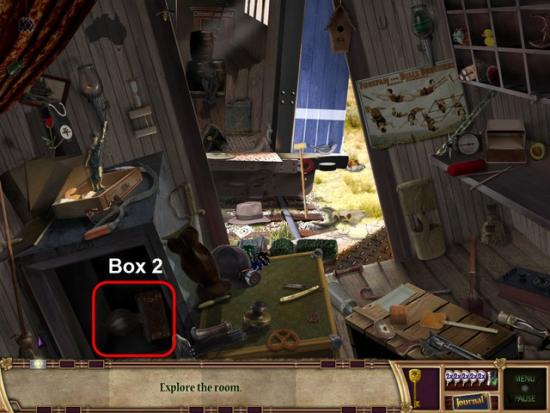
Gather Box 2 highlighted in Red.
Use the Key, highlighted in Red, on the Box.
Choose to place the Box.
Place Box 2 in the spot with the corresponding Symbol.
Obtain a Message containing a Clue.
Box 3

Exit the Box Car.
Return to the Train Station.
Head Left toward Town and Main Street
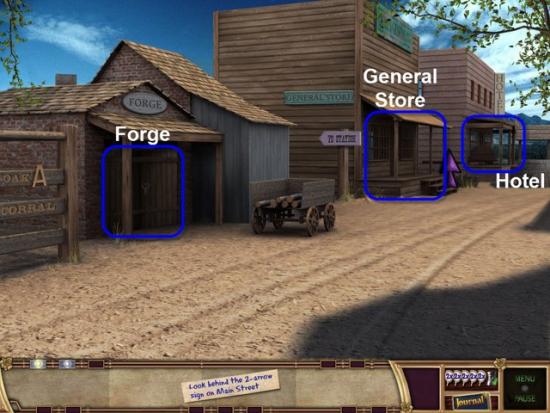
Head to the General Store highlighted in Blue.

Click to turn the Sign highlighted in Green.
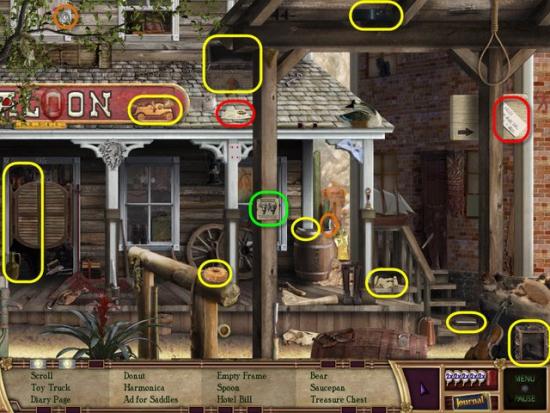
Gather the Hint and Tin Can highlighted in Orange
Examine the Ad for Saddles highlighted in Green.
Gather the Diary Page and Hotel Bill highlighted in Red.
Gather the Hidden Objects highlighted in Yellow.
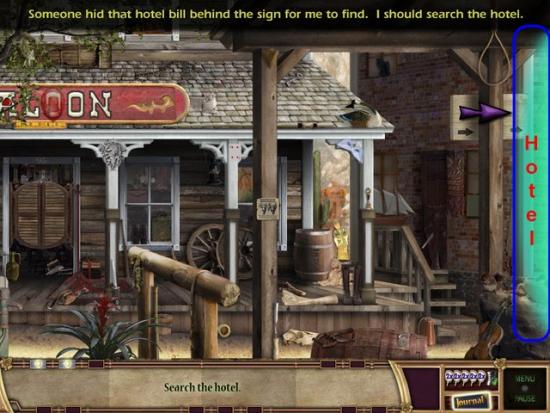
Head to the Hotel.
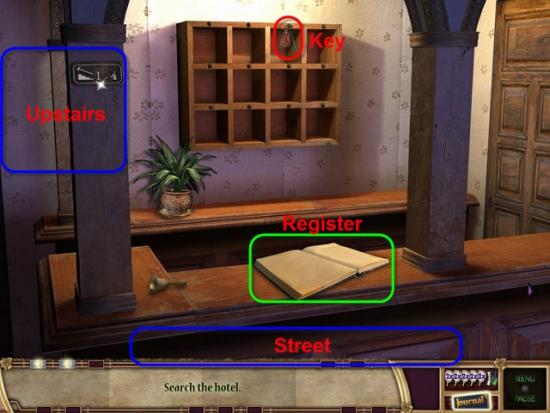
Gather the Key highlighted in Red.
Examine the Register highlighted in Green.
Head Upstairs highlighted in Blue.
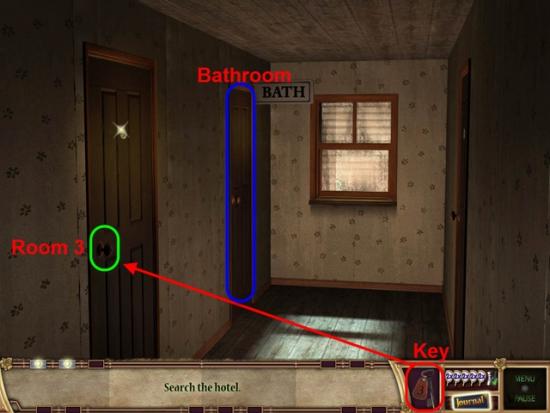
Use the Key, highlighted in Red, on Room 3, highlighted in Green.
Enter Room 3.
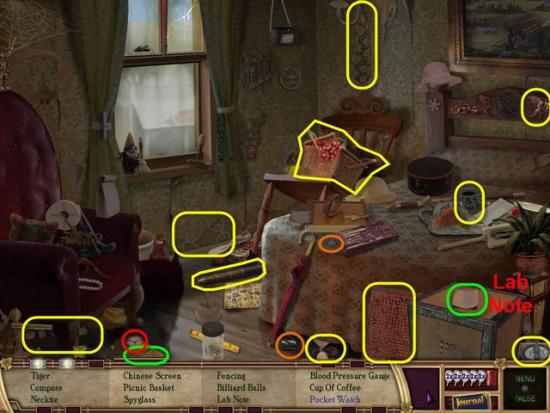
Gather the Hint and Tin Can highlighted in Orange.
Move the Yellow Box highlighted in Green.
Gather the Pocket Watch highlighted in Red.
Examine the Lab Note highlighted in Green.
Gather the Hidden Objects highlighted in Yellow.
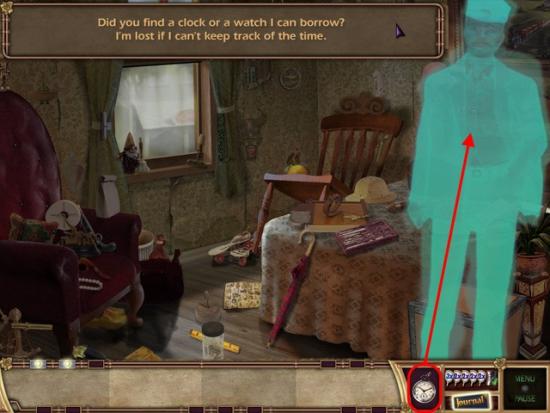
Give the Watch, highlighted in Red, to the Gentleman.
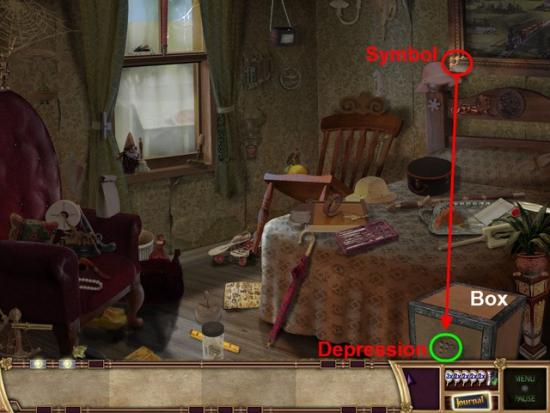
Gather the Symbol, highlighted in Red, and place in the Depression on the Box, highlighted in Green.
Examine the Box.
Another Train Track Puzzle, avoid the Cows.
See Image for Solution.
Leave Room 3.
Enter the Bathroom.
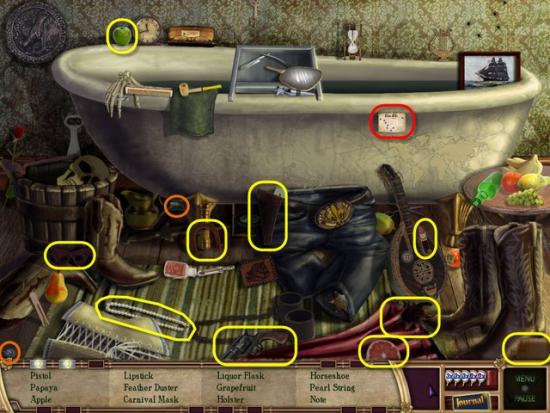
Gather the Hint and Tin Can highlighted in Orange.
Gather the Message highlighted in Red.
Gather the Hidden Objects highlighted in Yellow.
Return to Room 3.
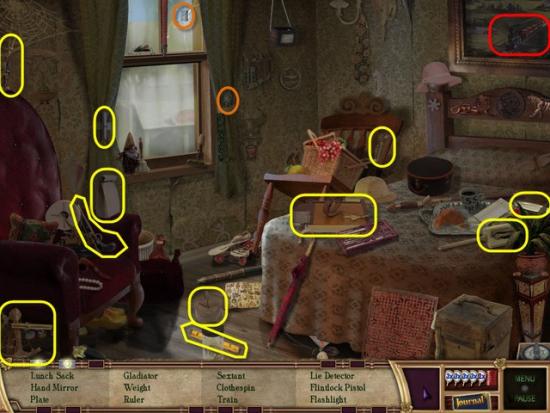
Gather the Hint and Tin Can highlighted in Orange.
Gather the Hidden Objects highlighted in Yellow.
Examine the Train highlighted in Red.
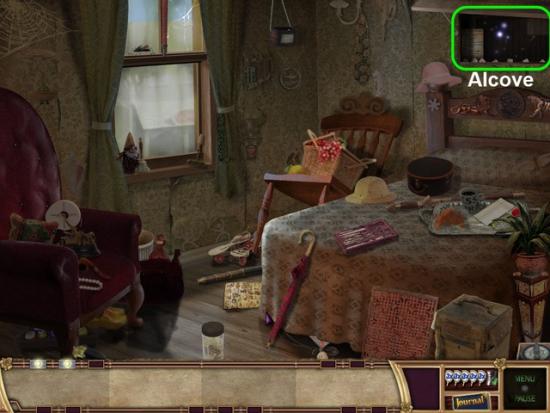
Examine the Alcove highlighted in Green.
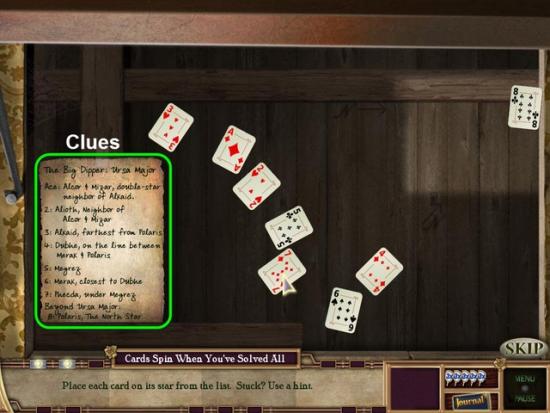
For this Mini-Game you need to arrange the Playing Cards in the correct order.
Decipher the Clues, highlighted in Green, to solve the Puzzle.
See the Image for Solution.
Return to the Main Street.
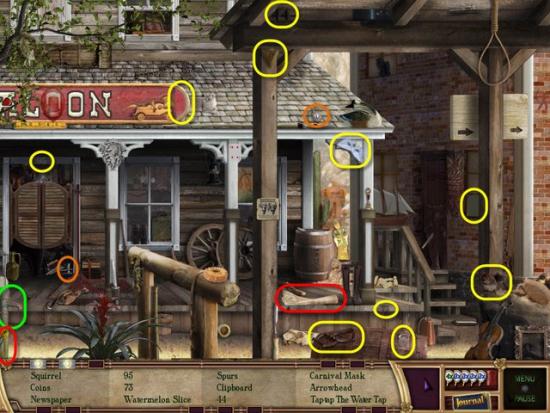
Gather the Hint and Tin Can highlighted in Orange.
Gather the Newspaper highlighted in Red.
Gather the Hidden Objects highlighted in Yellow.
Tap the Water Tap highlighted in Green.
Gather the Key highlighted in Red.
Head back to the Hotel.
Return Upstairs to the Bathroom.
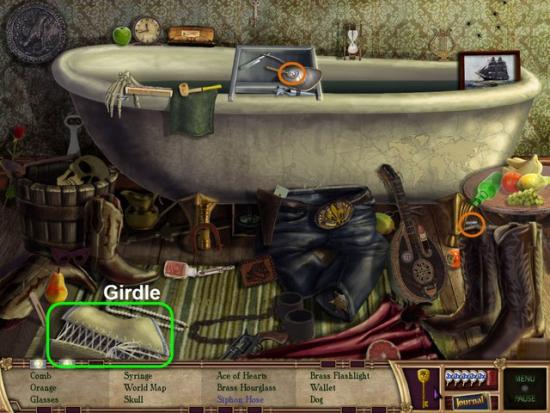
Gather the Hint and Tin Can highlighted in Orange.
Move the Girdle highlighted in Green.
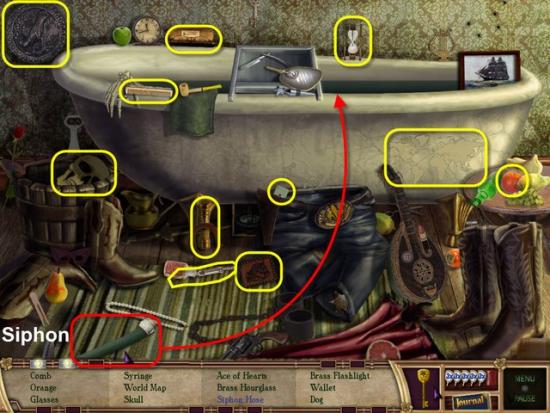
Gather the Hidden Objects highlighted in Yellow.
Gather the Siphon Hose and use on the Bathtub.
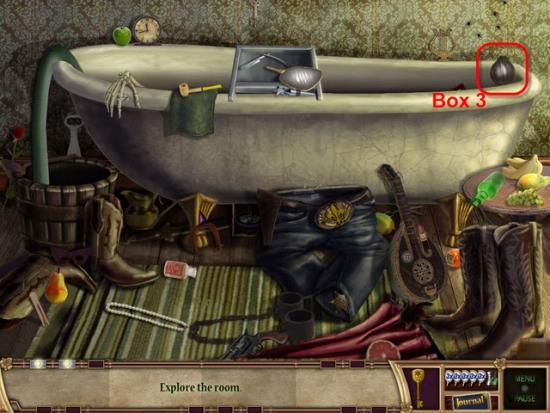
Gather Box 3 highlighted in Red.
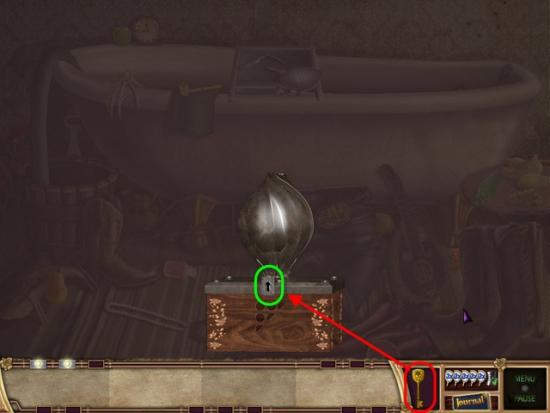
Use the Key, highlighted in Red, on Box 3.
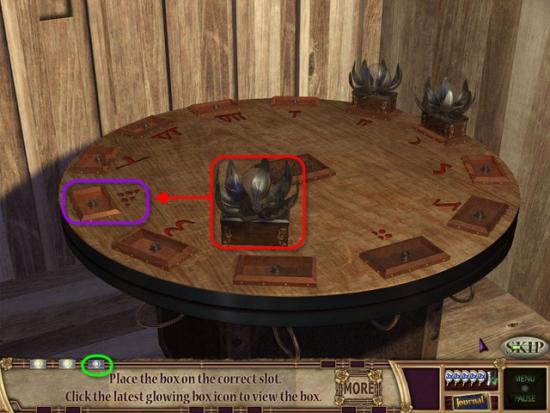
Place Box 3, highlighted in Red, into the matching Symbol spot, highlighted in Purple.
Exit the Room
Box 4
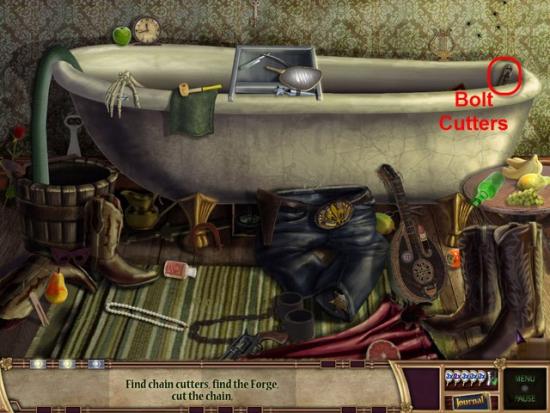
Gather the Bolt Cutters highlighted in Red.
Leave the Hotel.

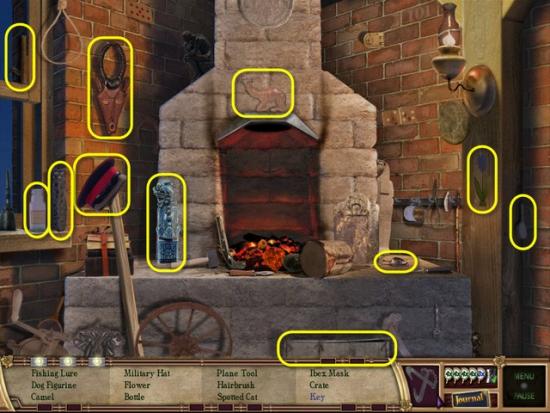
Use the Bolt Cutters, highlighted in Red, on the Chain to the Forge, highlighted in Green.
Enter the Forge.
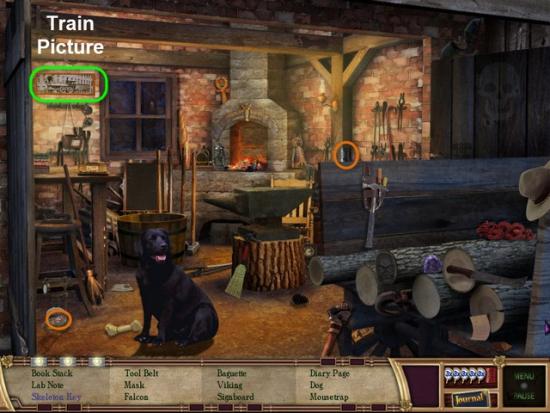
Gather the Hint and Tin Can highlighted in Orange.
Move the Train Picture highlighted in Green.

Examine the Lab Note and Diary Page highlighted in Red.
Gather the Skeleton Key highlighted in Red.
Gather the Hidden Objects highlighted in Yellow.
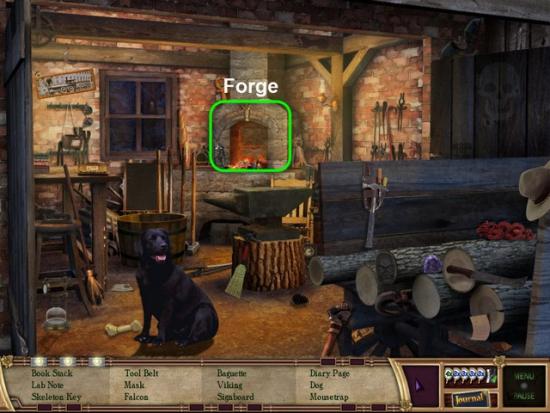
Examine the Forge highlighted in Green.
Gather the Hint and Tin Can highlighted in Orange.
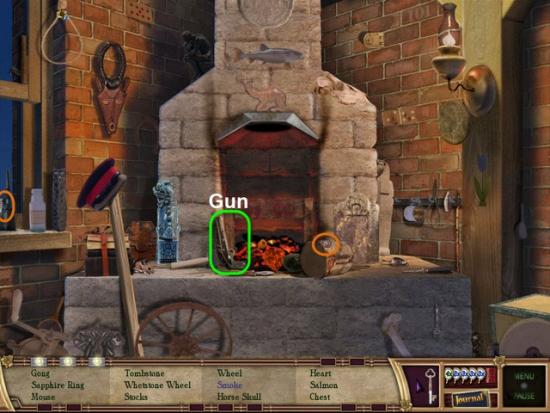
Examine the Gun highlighted in Green.
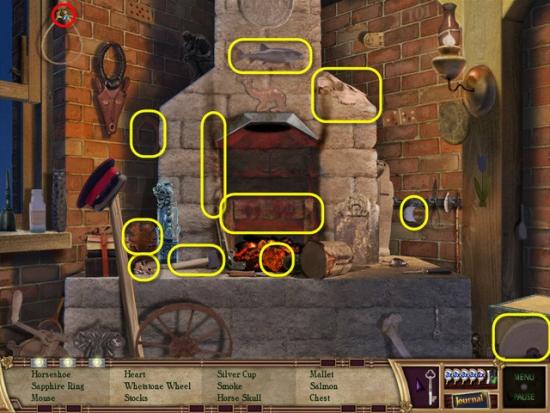
Gather the Ring highlighted in Red.
Gather the Hidden Objects highlighted in Yellow.
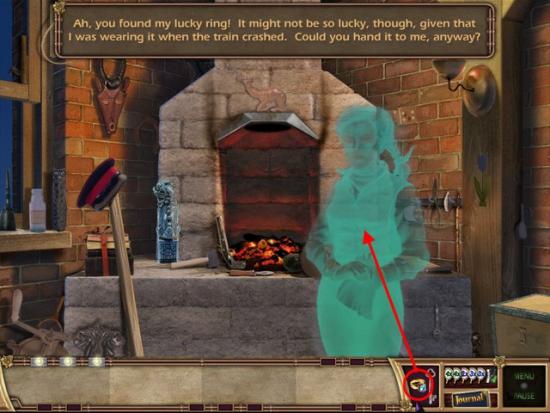
Give the Ring, highlighted in Red, to the Lady.
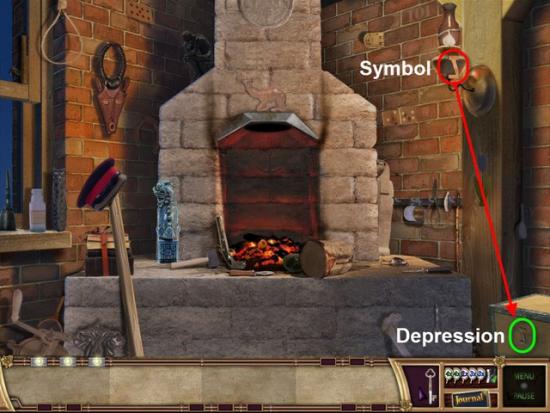
Gather the Symbol, highlighted in Red, and place in the Depression, highlighted in Green.
Examine the Box.
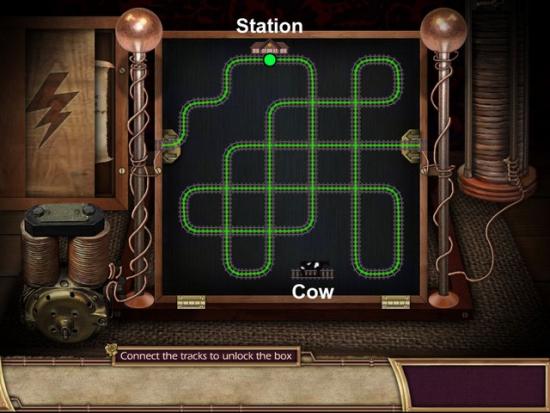
Another Train Track Puzzle.
This time you must avoid the Cows and pass through the Station as well.
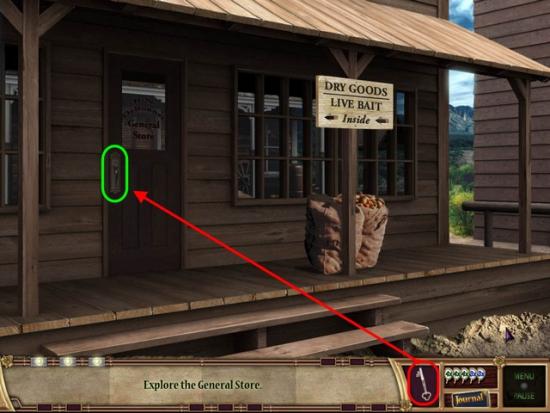
Exit the Blacksmith Forge and return to the General Store.
Use the Key, highlighted in Red, on the General Store Door, highlighted in Green.
Enter the General Store.
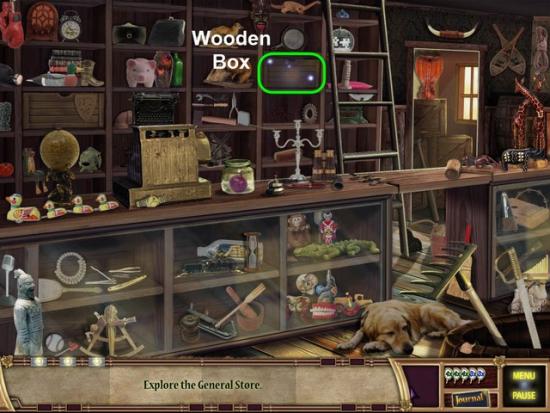
Examine the Wooden Box, with an “X”, highlighted in Green.
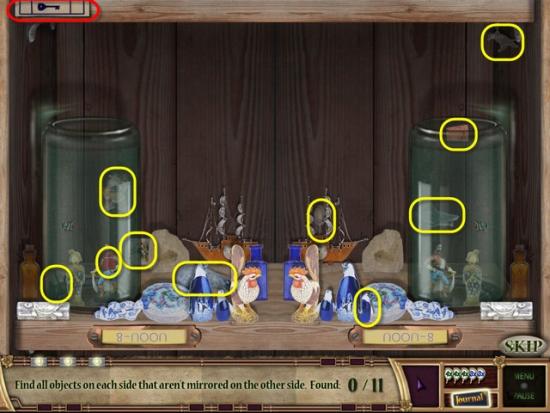
Find the ten differences between the mirrored Images, highlighted in Yellow.
Gather the eleventh difference, highlighted in Red.
Return to the Forge.
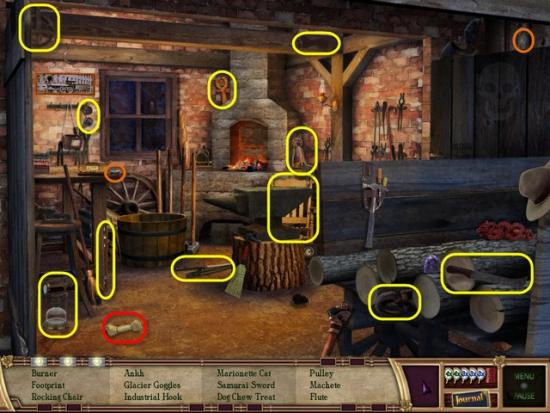
Gather the Hint and Tin Can highlighted in Orange.
Gather the Dog Treat highlighted in Red.
Gather the Hidden Objects highlighted in Yellow.
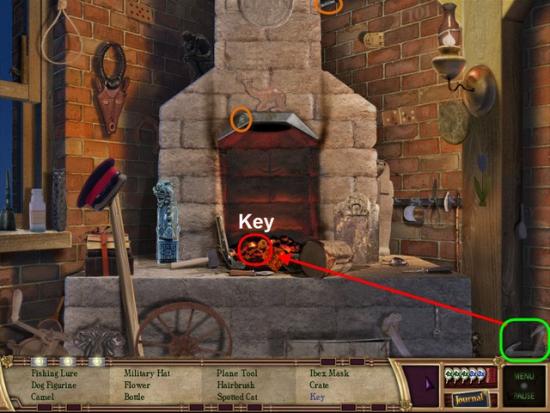
Examine the Forge.
Gather the Hint and Tin Can highlighted in Orange.
Gather the Tongs, highlighted in Green, to gather the Key, highlighted in Red.
Gather the Hidden Objects highlighted in Yellow.
Return to the General Store.
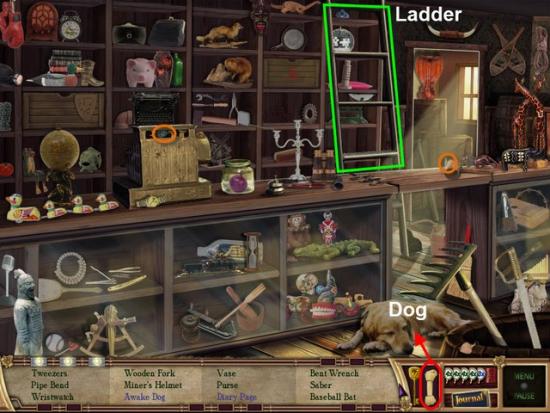
Gather the Hint and Tin Can highlighted in Orange.
Give the Bone, highlighted in Red, to the Dog.
Move the Ladder highlighted in Green.
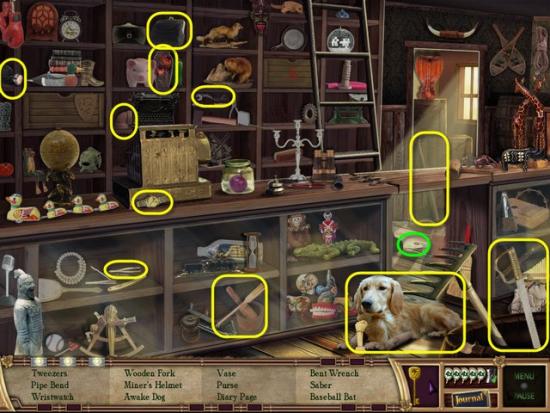
Examine the Diary Page highlighted in Green.
Gather the Hidden Objects highlighted in Yellow.
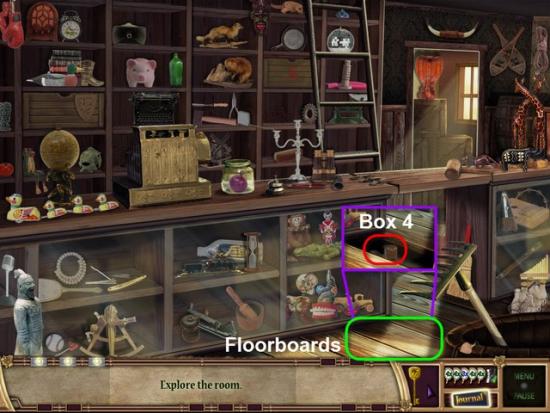
Examine the Floorboards highlighted in Green.
Gather Box 4 highlighted in Red.
Use the Key, highlighted in Red, on Box 4.
Place Box 4, highlighted in Red, into the Slot with the matching Symbol. Highlighted in Purple.
Exit the Room.
Will receive a Clue.
Box 5
Return to the Train Station.
Head back to the Train Wreck.
Examine the Train Engine highlighted in Green.
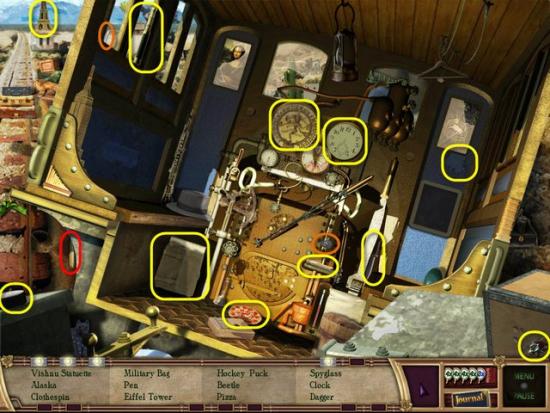
Gather the Hint and Tin Can highlighted in Orange.
Gather the Pen highlighted in Red.
Gather the Hidden Objects highlighted in Yellow.
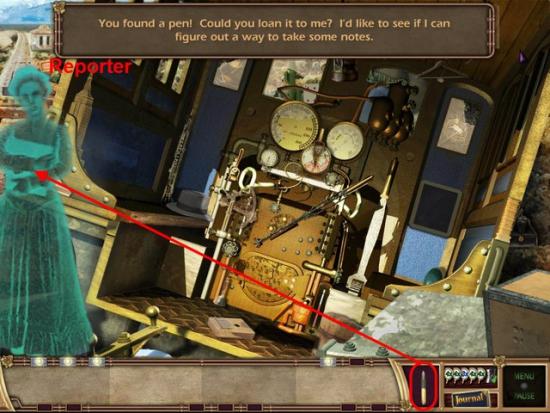
Give the Pen, highlighted in Red, to the Reporter.
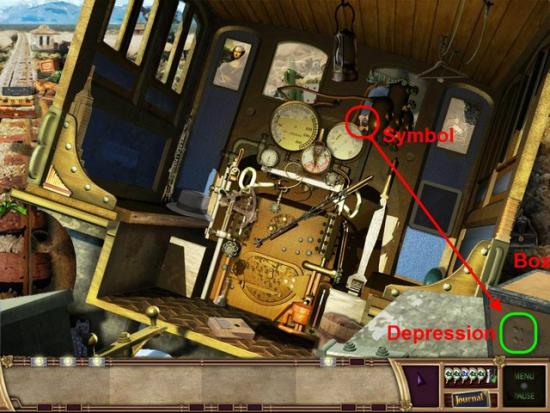
Gather the Symbol, highlighted in Red, place in the Depression on the Box, highlighted in Green.
Examine the Box.
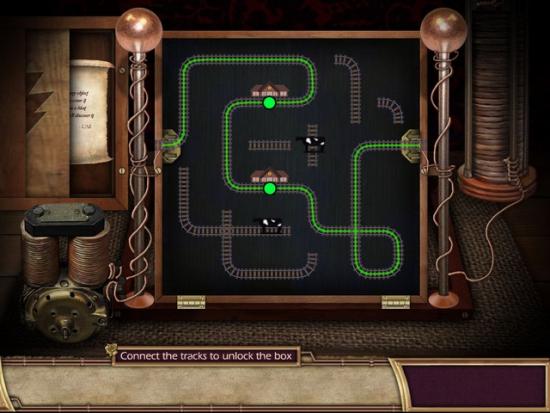
Another Train Track Puzzle.
Once again, avoid the Cows and pass through each Train Station.
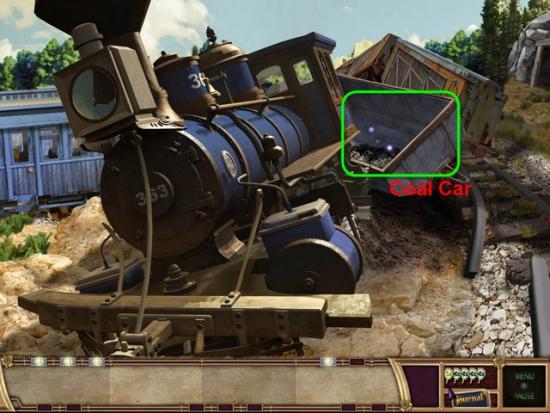
Examine the Coal Car highlighted in Green.
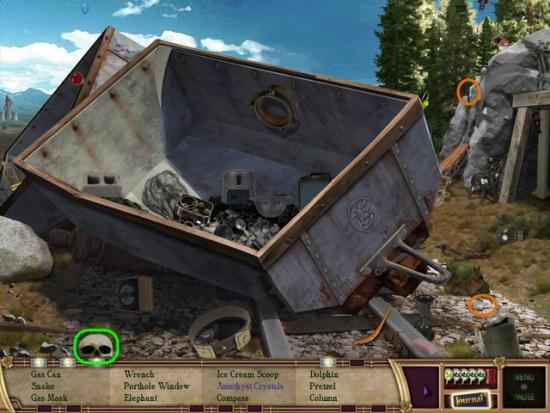
Gather the Hint and Tin Can highlighted in Orange.
Move the Skull highlighted in Green.
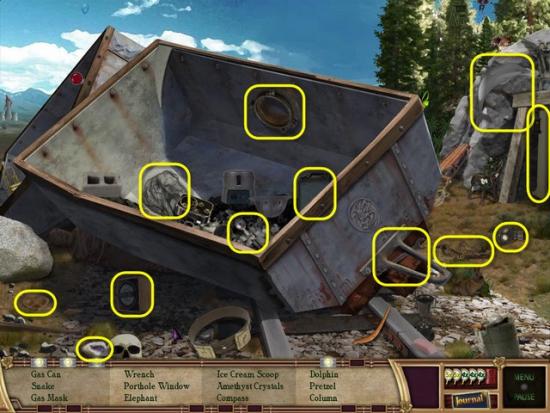
Gather the Hidden Objects highlighted in Yellow
Go Back one screen.
Examine the Train Engine again.
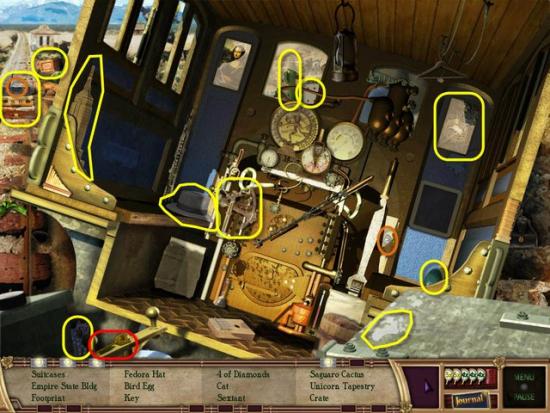
Gather the Hint and Tin Can highlighted in Orange.
Gather the Key highlighted in Red,
Gather the Hidden Objects highlighted in Yellow.
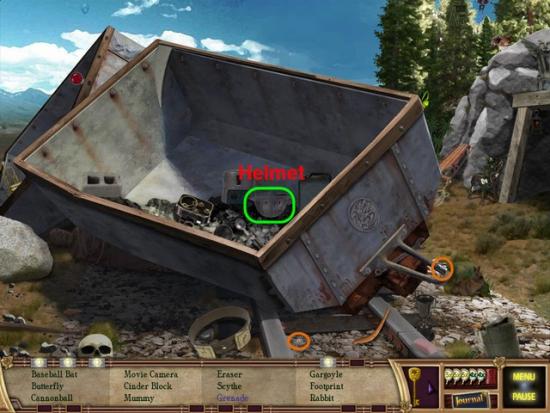
Examine the Coal Car once again.
Gather the Hint and Tin Can highlighted in Orange
Move the Helmet highlighted in Green.
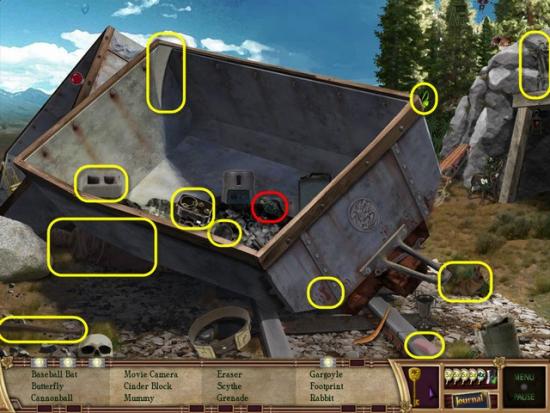
Gather the Grenade highlighted in Red.
Gather the Hidden Objects highlighted in Yellow.
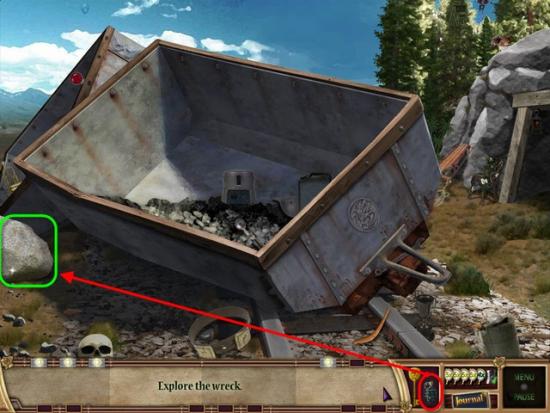
Use the Grenade, highlighted in Red, on the Rock, highlighted in Green.
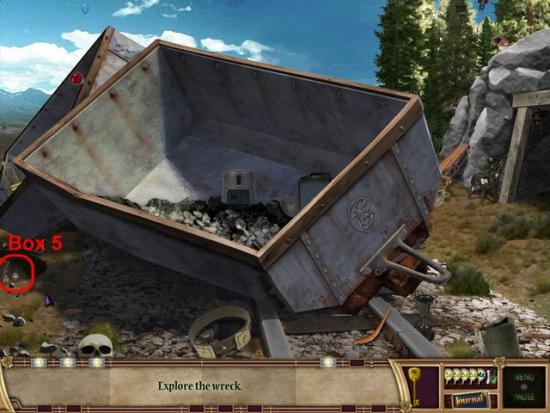
Gather Box 5 highlighted in Red.

Use the Key, highlighted in Red, on Box 5.
Place Box 5, highlighted in Red, into the Slot with the matching Symbol, highlighted in Purple.
Exit Room.
Box 6
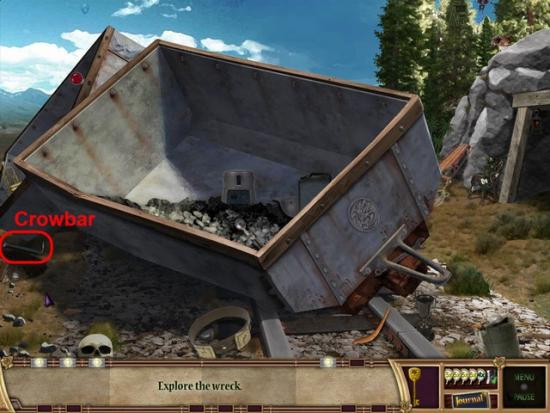
Gather the Crowbar highlighted in Red.
Go Back one Screen.
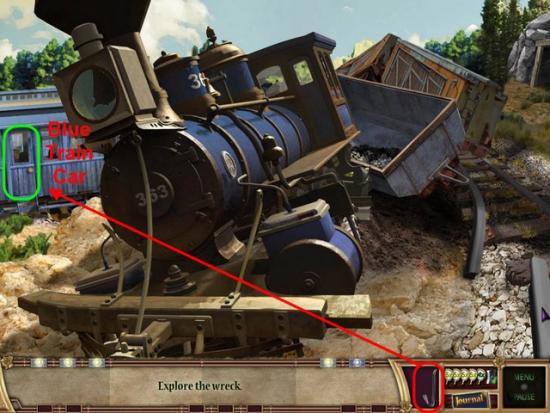
Use the Crowbar, highlighted in Red, on the Door to the Blue Train Car, highlighted in Green.
Enter the Blue Train Car.
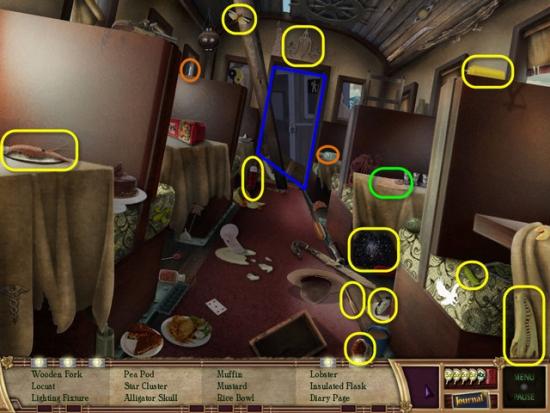
Gather the Hint and Tin Can highlighted in Orange.
Examine the Dairy Page highlighted in Green.
Gather the Hidden Objects highlighted in Yellow.
Examine the next Train Car highlighted in Blue.
Gather the Hint and Tin Can highlighted in Orange.
Gather the Book highlighted in Red.
Gather the Hidden Objects highlighted in Yellow.
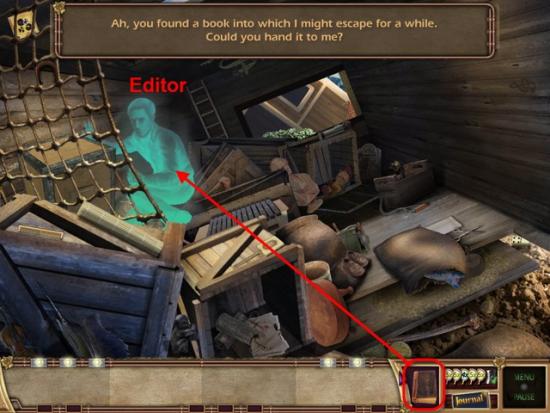
Give the Book, highlighted in Red, to the Editor.
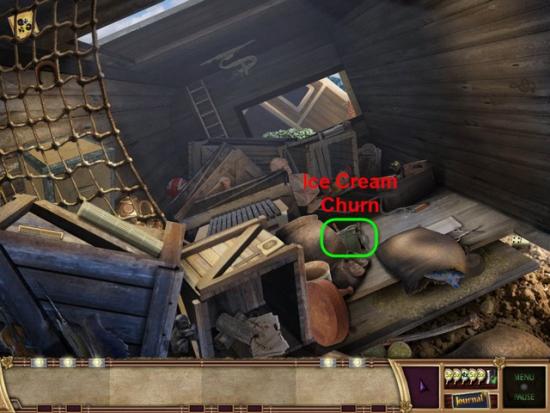
Move the Ice Cream Churn highlighted in Green.
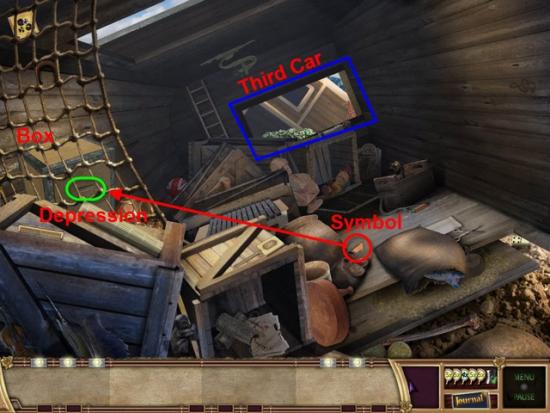
Gather the Symbol, highlighted in Red, place the Symbol in the Depression on the Box, highlighted in Green.
Examine the Box.
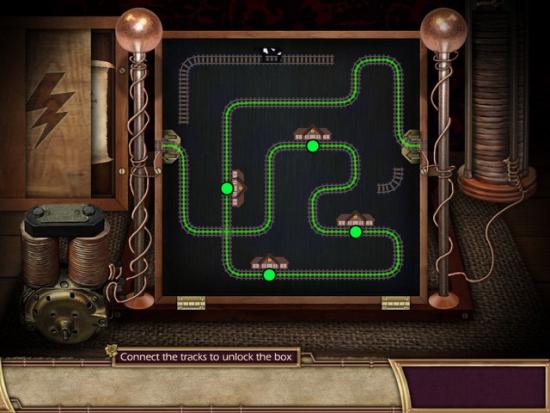
Another Train Track Puzzle.
Remember, avoid the Cows and pass through all the Train Stations.
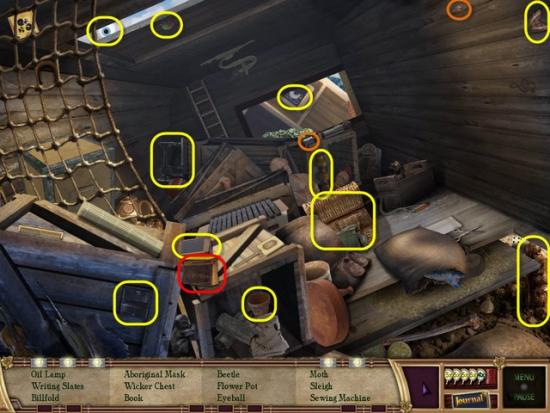
Examine the Third Car highlighted in Blue.
Gather the Hint and Tin Can highlighted in Orange.
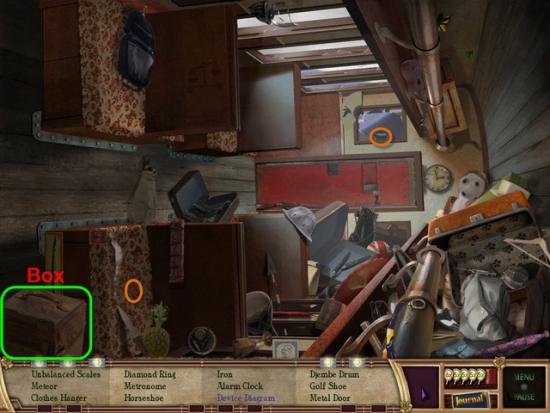
Move the Box highlighted in Green.
Examine the Diagram highlighted in Red.
Gather the Hidden Objects highlighted in Yellow.
Go Back two Screens.
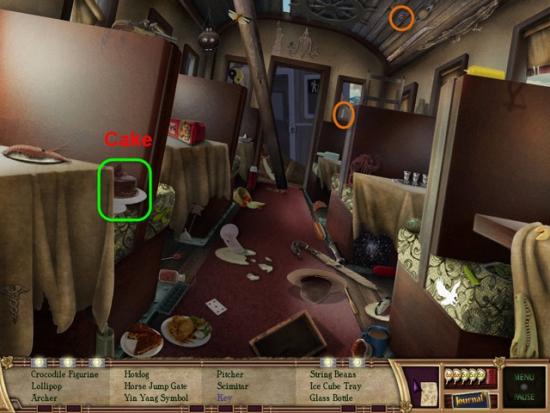
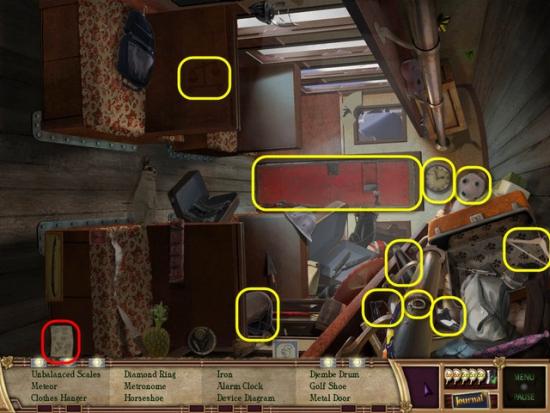
Gather the Hint and Tin Can highlighted in Orange.
Move the Cake highlighted in Green.
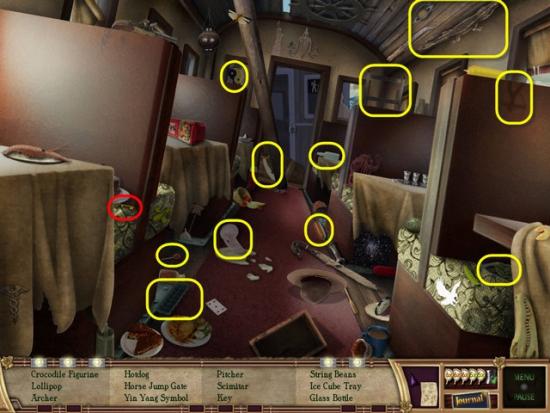
Gather the Key highlighted in Red.
Gather the Hidden Objects highlighted in Yellow.
Go Back one Screen.
Examine under the Blue Train Car highlighted in Green.
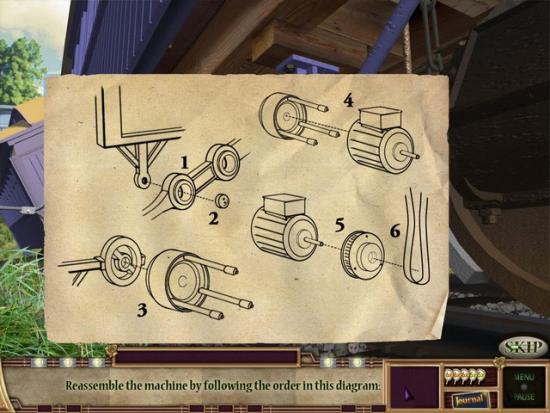
Using the Diagram you picked up earlier for directions to repair the Train.
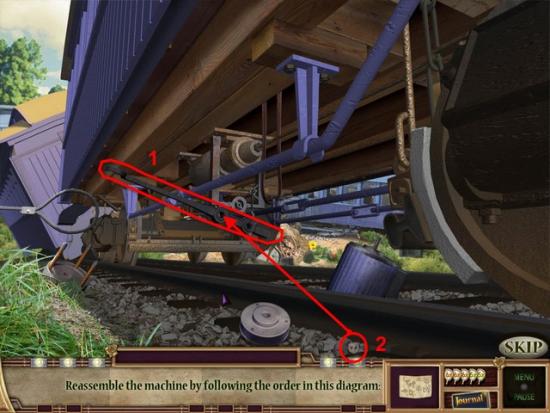
Place the Metal Bar, numbered 1, onto the Undercarriage in spot shown.
Next place Item 2 into the Hole in the Metal Bar as labeled.
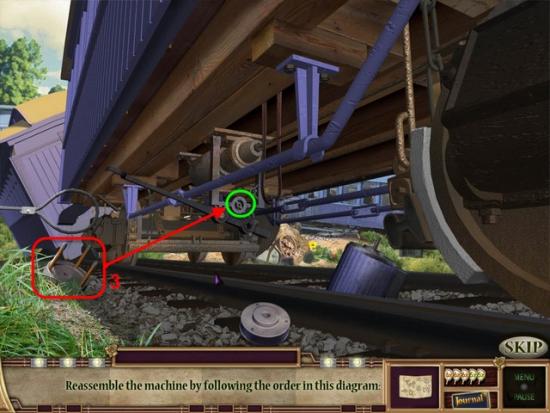
Place Part 3, highlighted in Red, into the Undercarriage, highlighted in Green.
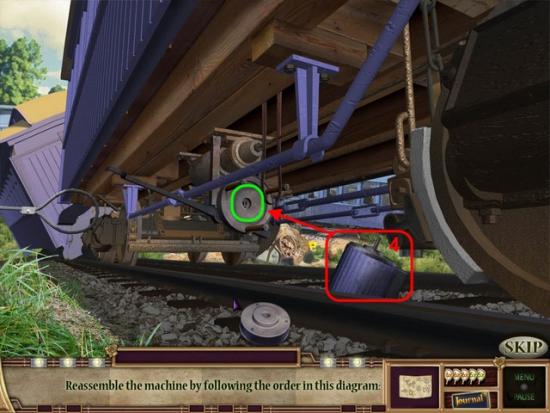
Place Part 4, highlighted in Red, onto Part 3, highlighted in Green.
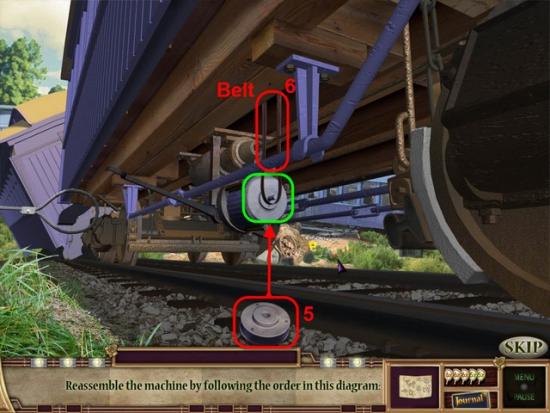
Place Part 5, highlighted in Red, onto Part 4, highlighted in Green.
Finally place the Belt, labeled Part 6, highlighted in Red, onto the completed Assembly.
Go Back one Screen.
Enter the Blue Train Car.
Move to the second Train Car.
Gather the Hint and Tin Can highlighted in Orange.
Gather the Hidden Objects highlighted in Yellow.
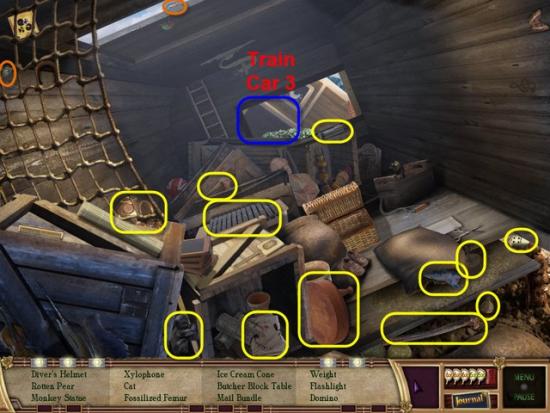
Move to the third Train Car.
Gather the Hint and Tin Can highlighted in Orange.
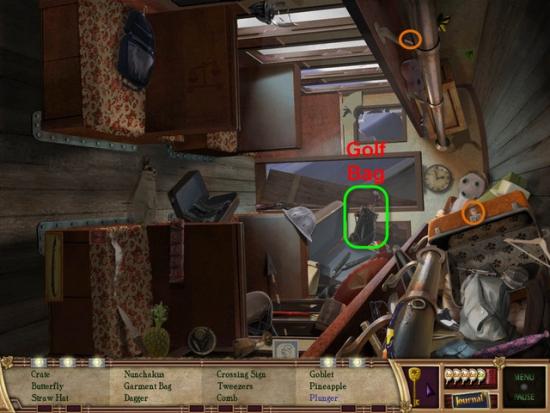
Move the Golf Bag highlighted in Green.
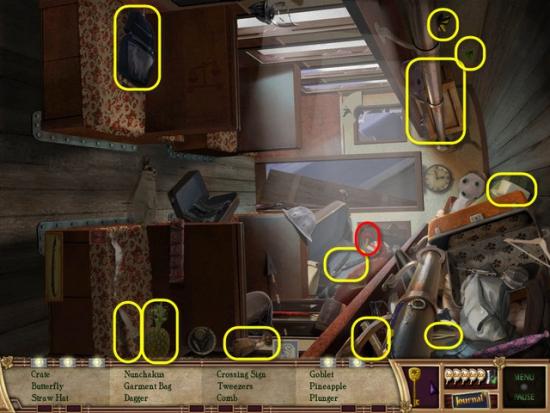
Gather the Plunger highlighted in Red.
Gather the Hidden Objects highlighted in Yellow.
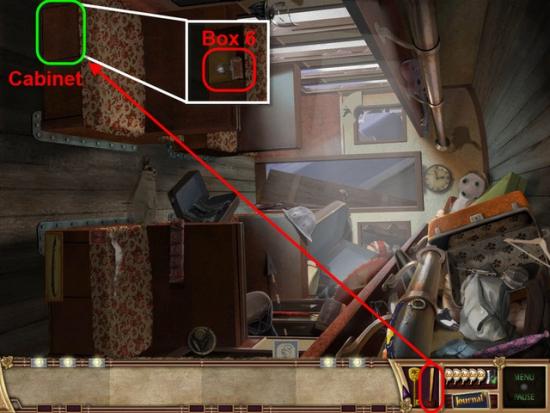
Use the Plunger, highlighted in Red, on the Cabinet, highlighted in Green.
Gather Box 6
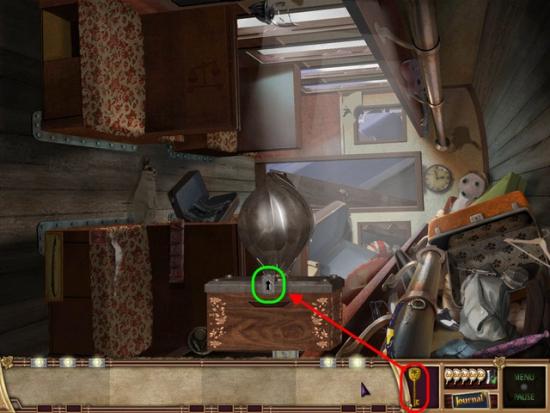
Use the Key, highlighted in Red, on Box 6.
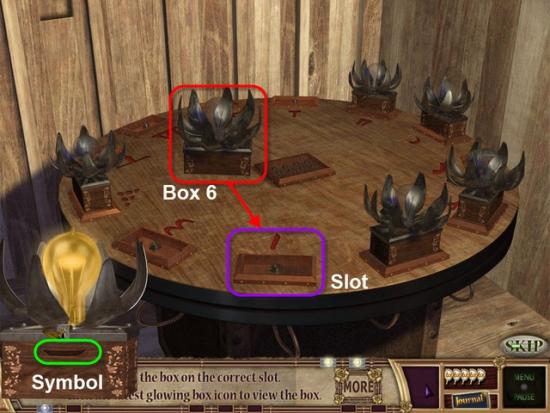
Place Box 6, highlighted in Red, into the Slot with the matching Symbol, highlighted in Purple.
Exit Room.
Box 7
Exit the Train Car highlighted in Blue.
Return to the Train Station.
Head to Main Street.
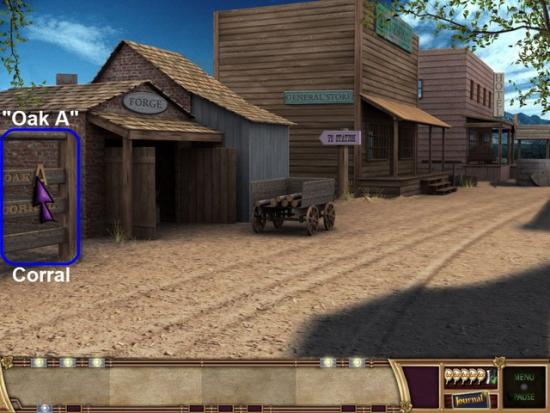
Head to the “Oak A” highlighted in Blue, to the Corral.
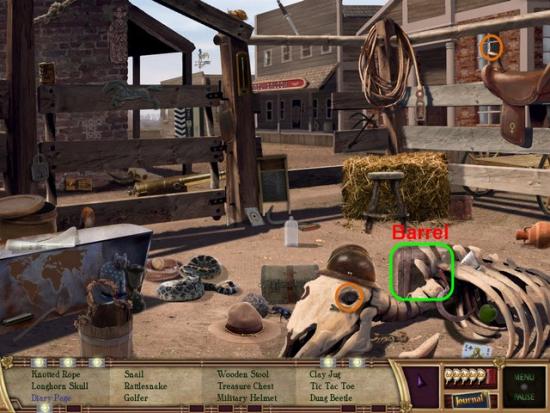
Gather the Hint and Tin Can highlighted in Orange.
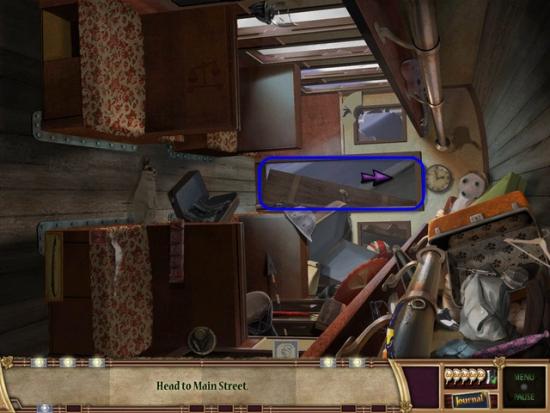
Move the Barrel highlighted in Green.
Examine the Dairy Page highlighted in Green.
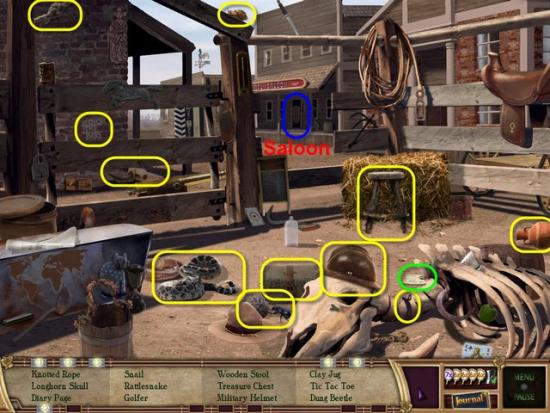
Gather the Hidden Objects highlighted in Yellow.
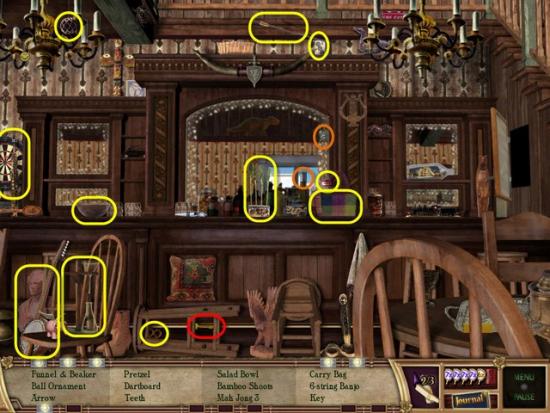
Head to the Saloon highlighted in Blue.
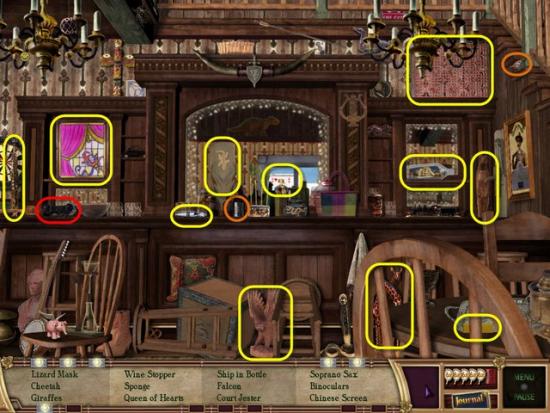
Gather the Hint and Tin Can highlighted in Orange.
Gather the Binoculars highlighted in Red.
Gather the Hidden Objects highlighted in Yellow.
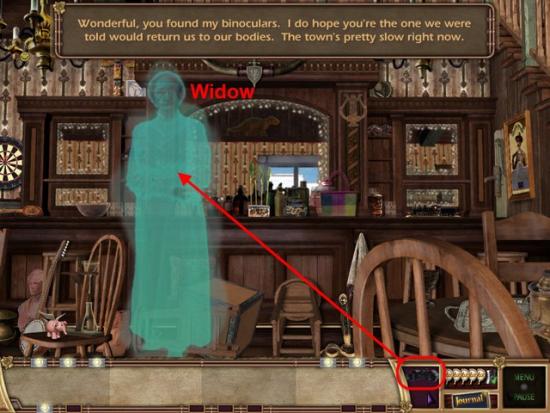
Give the Binoculars, highlighted in Red, to the Widow.
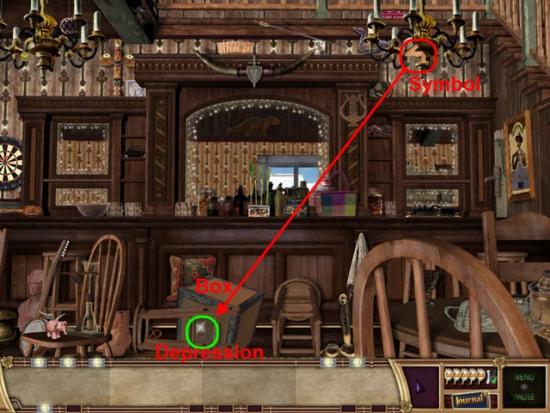
Gather the Symbol, highlighted in Red, and place in the Depression on the Box, highlighted in Green.
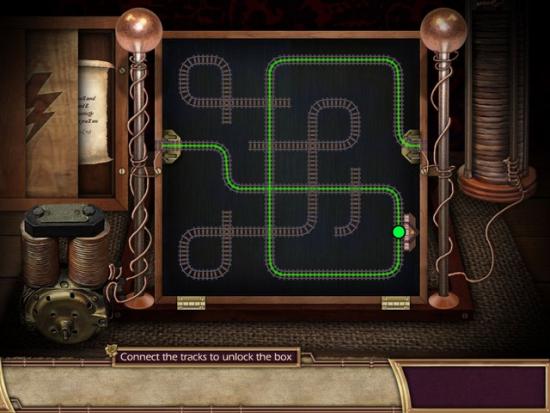
Another Train Track Puzzle.
Can only rotate Curved Track.
Avoid the Cows and pass through each Station.
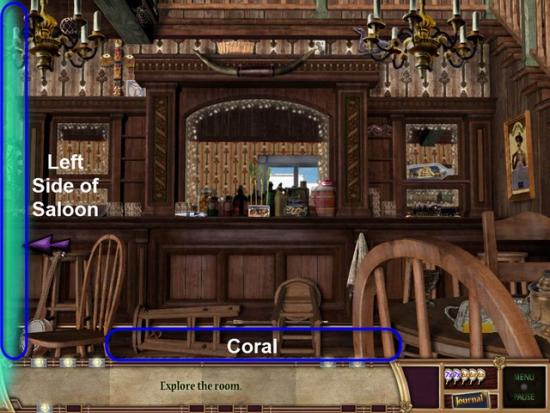
Head to the Left Side of the Saloon highlighted in Blue.
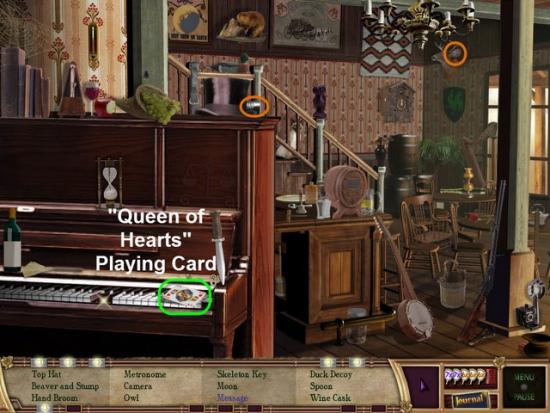
Gather the Hint and Tin Can highlighted in Orange.
Move the “Queen of Hearts” Playing Card highlighted in Green.

Gather the Message highlighted in Red.
Gather the Hidden Objects highlighted in Yellow.
Exit the Saloon back to the Coral.
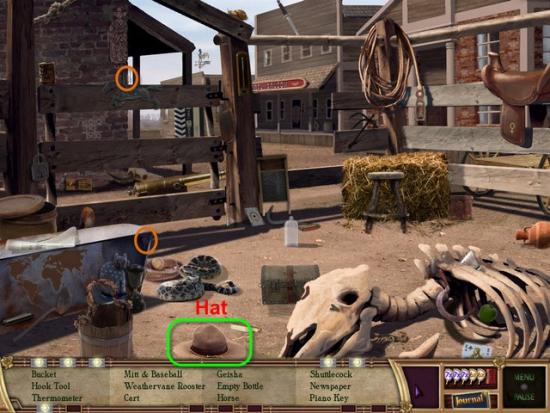
Gather the Hint and Tin Can highlighted in Orange.
Move the Hat highlighted in Green.
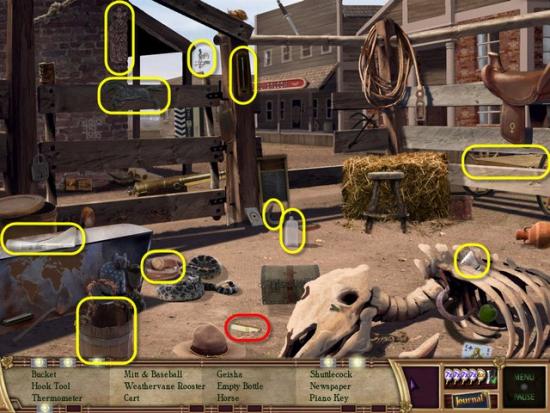
Gather the Piano Key highlighted in Red.
Gather the Hidden Objects highlighted in Yellow.
Return to the Saloon.
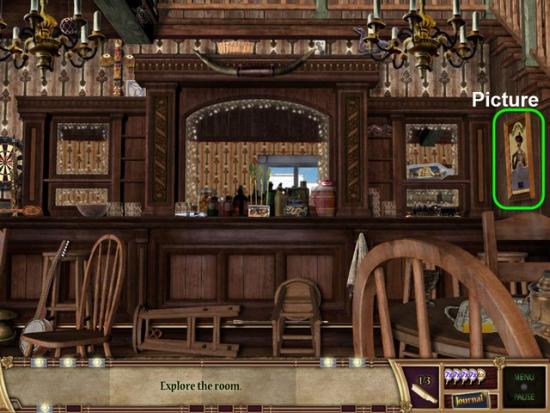
Move the Picture highlighted in Green
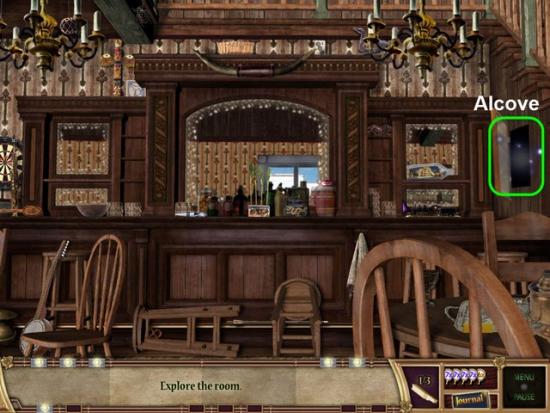
Examine the Alcove highlighted in Green.
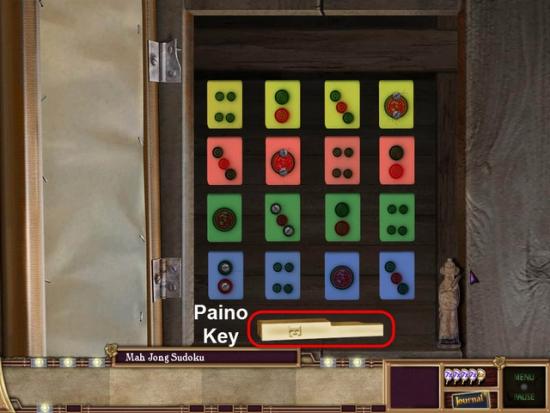
To solve this Puzzle you need to arrange the Tiles in the correct order.
Each Row of Tiles will all contain the same color.
Each Row and Column must contain one of each Number, one through four.
Completing the Puzzle will reveal the Piano Key.
Gather the Piano Key highlighted in Red.
Gather the Hint and Tin Can highlighted in Orange.
Gather the Key highlighted in Red.
Gather the Hidden Objects highlighted in Yellow.
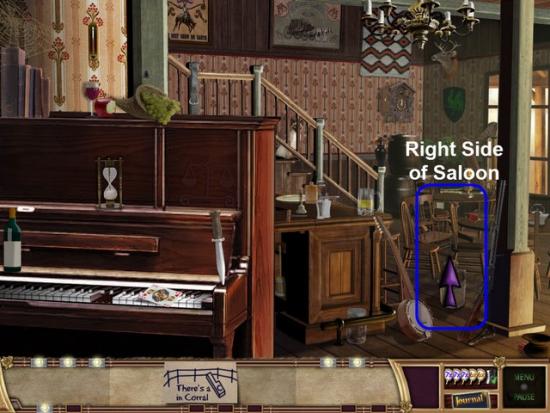
Head to the Left Side of the Saloon.

Gather the Hint and Tin Can highlighted in Orange.
Move the Books highlighted in Green.
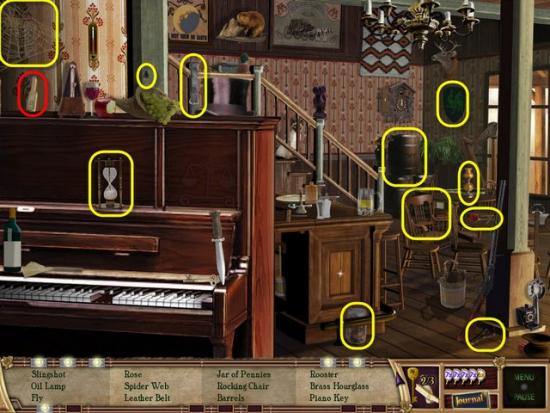
Gather the Piano Key highlighted in Red.
Gather the Hidden Objects highlighted in Yellow.
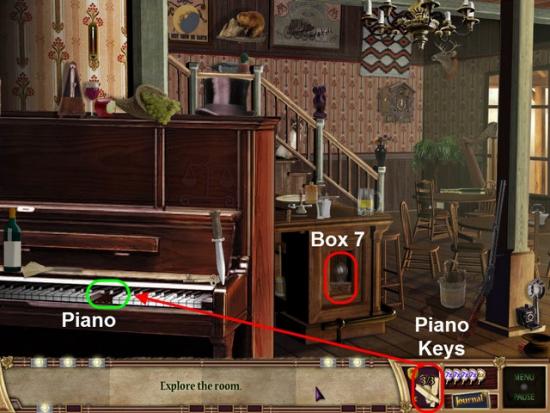
Place the three Piano Keys, highlighted in Red, onto the Piano, highlighted in Green.
Side Panel on Bar will open.
Gather Box 7 highlighted in Red.

Use the Key, highlighted in Red, on Box 7.
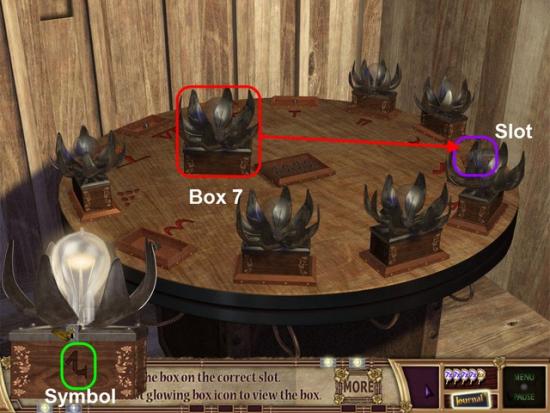
Place Box 7, highlighted in Red, into the Slot with the matching Symbol, highlighted in Purple.
Exit the Room.
Box 8

Exit the Saloon.
Exit to the Right of the Corral.
Head down Main Street, to the right of the Well.
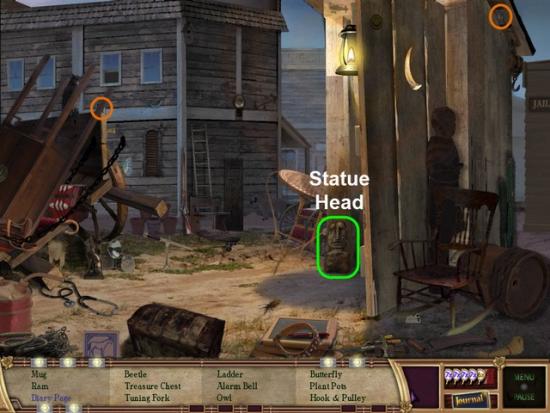
Gather the Hint and Tin Can highlighted in Orange.
Move the Statue Head highlighted in Green.
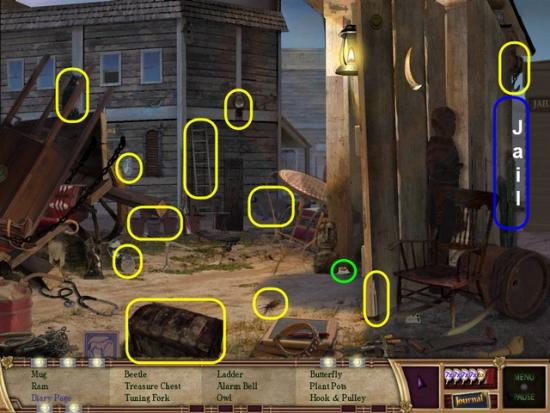
Examine the Diary Page highlighted in Green..
Gather the Hidden Objects highlighted in Yellow.
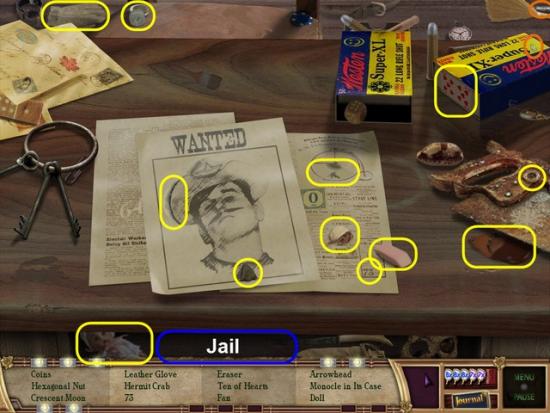
Head to the Jail.
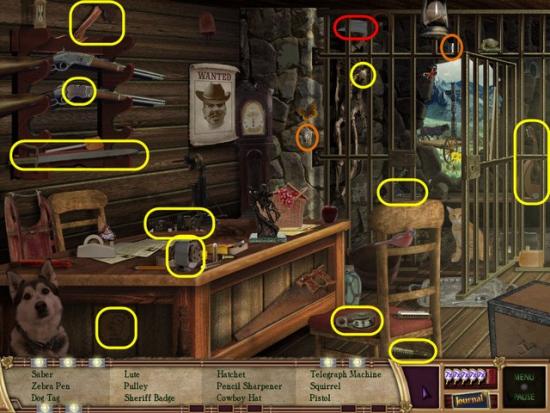
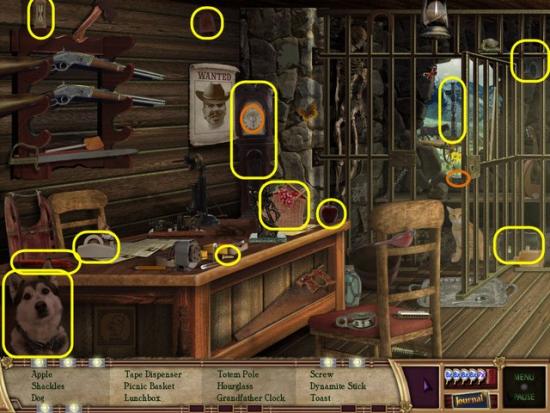
Enter the Jail.
Gather the Hint and Tin Can highlighted in Orange.
Gather the Hat highlighted in Red.
Gather the Hidden Objects highlighted in Yellow.
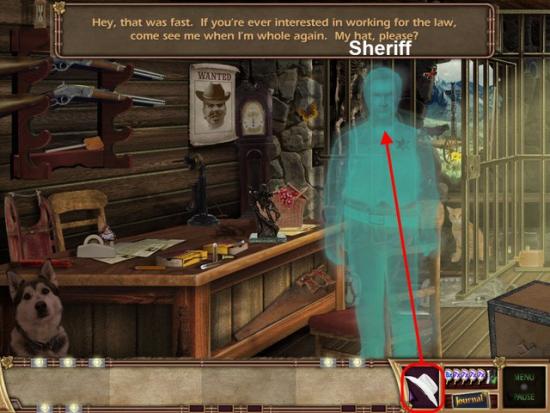
Give the Hat, highlighted in Red, to the Sheriff.
Gather the Symbol, highlighted in Red, and place in the Depression on the Box, highlighted in Green.
Examine the Box.

Another Train Track Puzzle..
Avoid the Cows and pass through each Station.
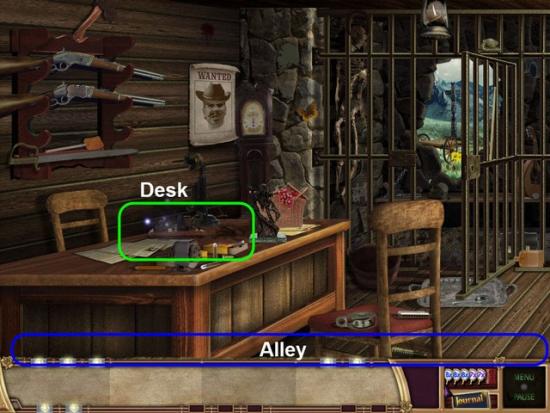
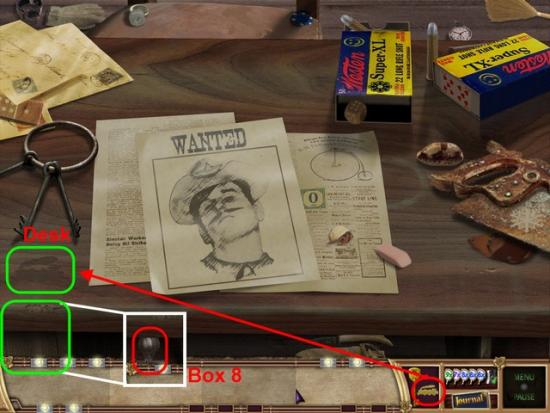
Examine the Desk highlighted in Green.
Gather the Hint and Tin Can highlighted in Orange.
Gather the Hidden Objects highlighted in Yellow.
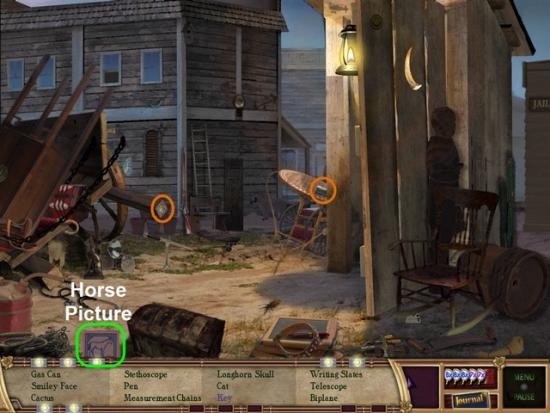
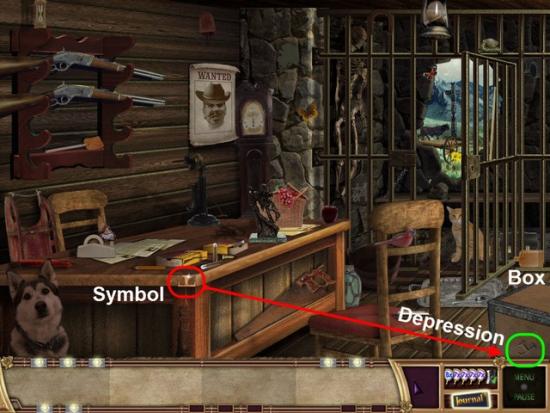
Exit the Jail and return to the Alley.
Gather the Hint and Tin Can highlighted in Orange.
Move the Horse Picture highlighted in Green.
Gather the Key highlighted in Red.
Gather the Hidden Objects highlighted in Yellow.
Return to the Jail.
Gather the Hint and Tin Can highlighted in Orange
Gather the Hidden Objects highlighted in Yellow.
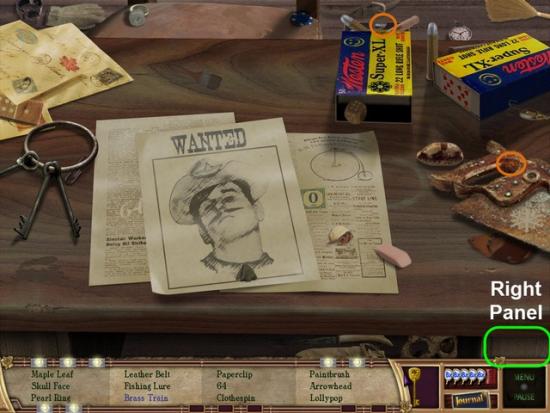
Examine the Desk once again.
Gather the Hint and Tin Can highlighted in Orange.
Open the Right Panel highlighted in Green.
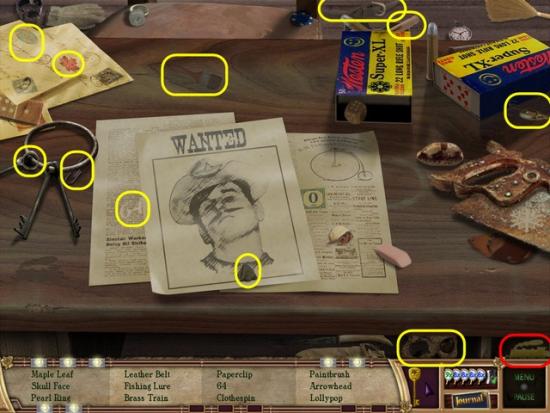
Gather the Brass Train highlighted in Red.
Gather the Hidden Objects highlighted in Yellow.
Place the Brass Train, highlighted in Red, onto the Desk, highlighted in Green.
Gather Box 8.
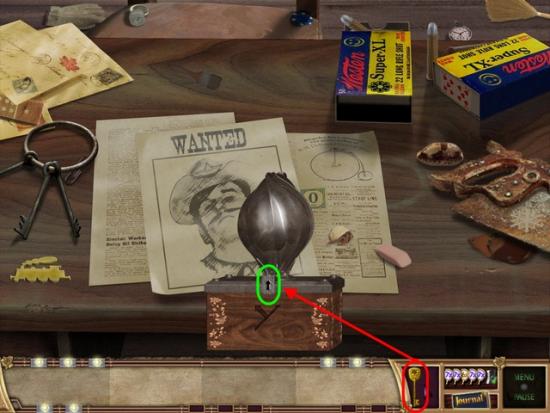
Use the Key, highlighted in Red, on Box 8, highlighted in Green.
Place Box 8, highlighted in Red, into the Slot with the matching Symbol, highlighted in Purple.
Exit the Room.
Box 9
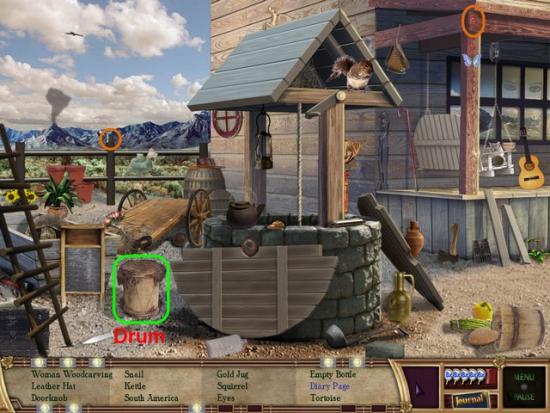
Exit the Jail and head Right.
Gather the Hint and Tin Can highlighted in Orange
Move the Drum highlighted in Green.
Read the Diary Page highlighted in Green.
Gather the Hidden Objects highlighted in Yellow.
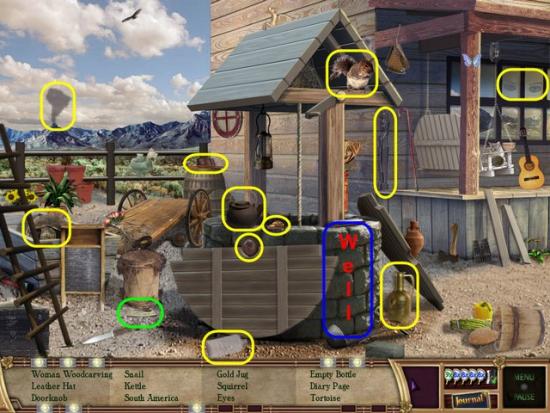
Examine the Well.
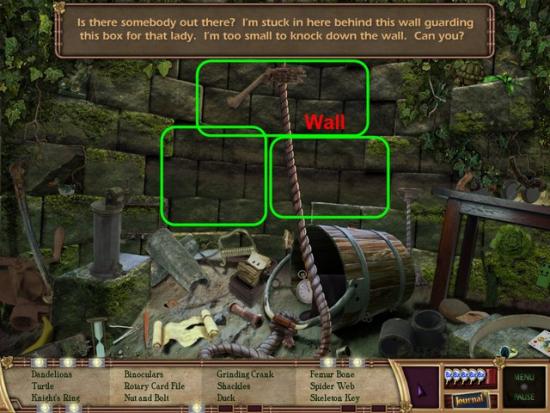
Knock down the Wall highlighted in Green.
Gather the Hint and Tin Can highlighted in Orange.
Gather the Hidden Objects highlighted in Yellow.
Head back up the Well.
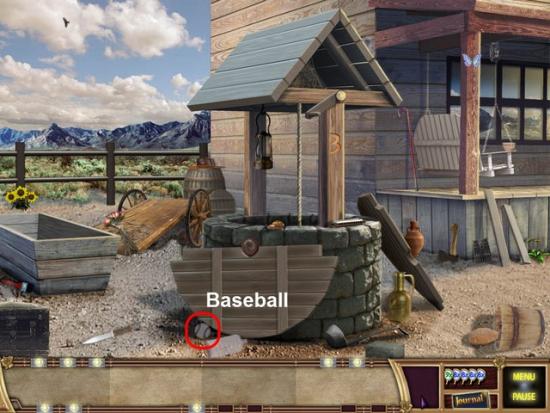
Gather the Baseball highlighted in Red.
Head back down the Well.
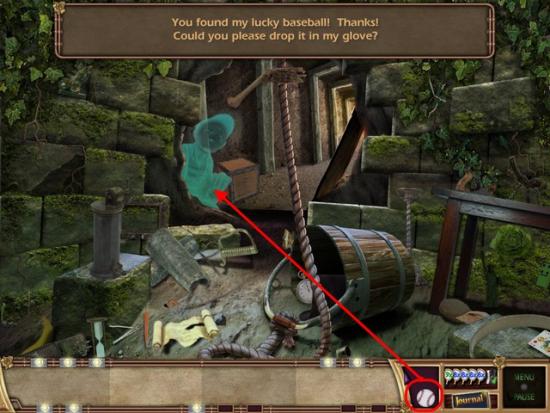
Give the Baseball, highlighted in Red, to the Little Boy.
Return Back up the Well.
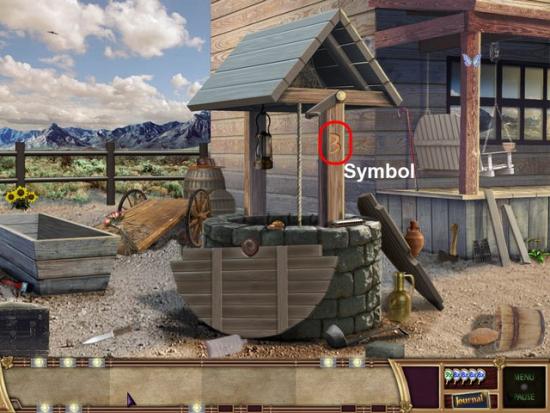
Gather the Symbol highlighted in Red.
Return back down the Well.
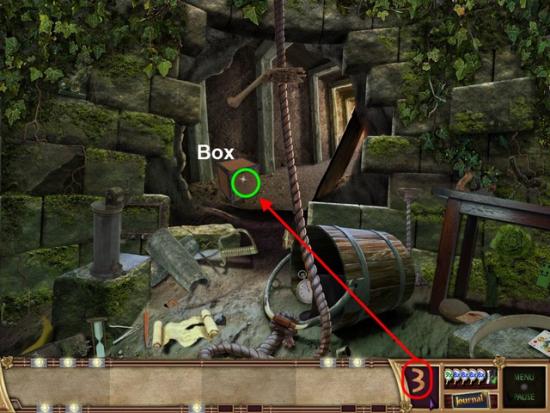
Place the Symbol, highlighted in Red, into the Depression on the Box, highlighted in Green.
Examine the Box.
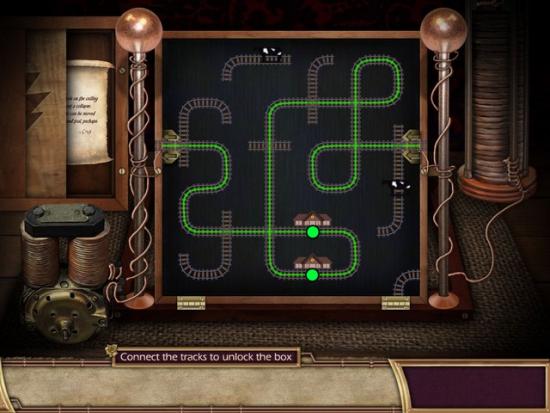
Another Train Track Puzzle.
Avoid the Cows and pass through each Station.
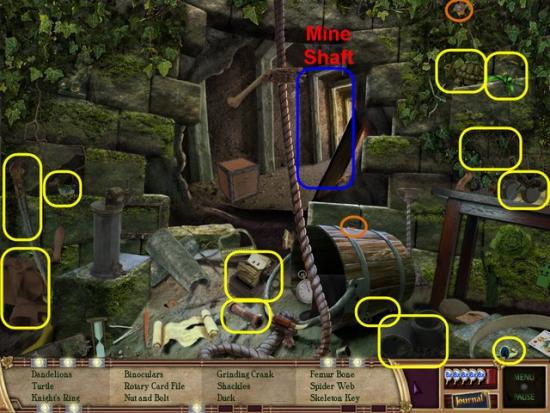
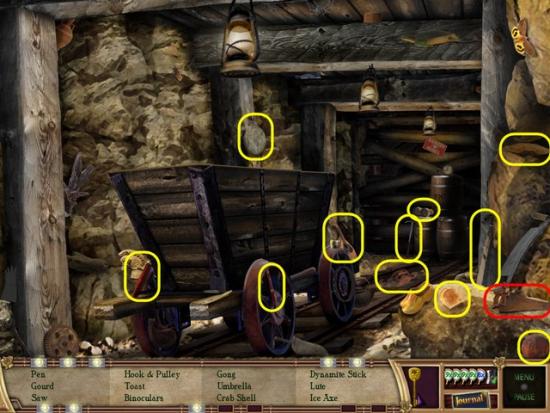
Head Down the Mine Shaft.
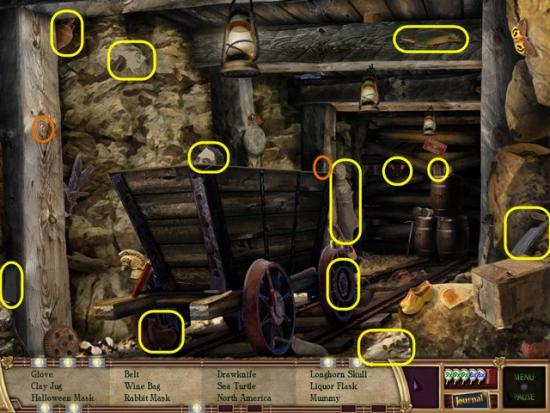
Gather the Hint and Tin Can highlighted in Orange.
Gather the Hidden Objects highlighted in Yellow.

Examine the Blockade highlighted in Green.
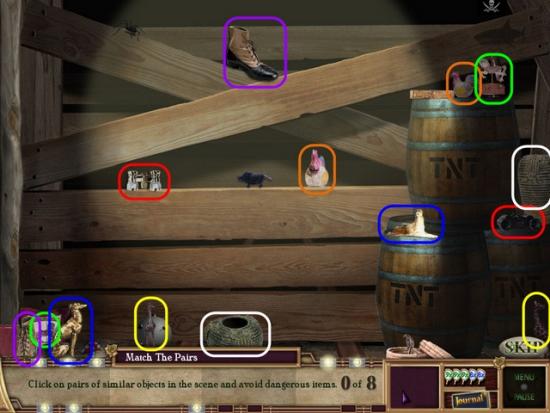
Find the eight Pairs of Items.
Avoid the Dangerous Items.
Click on both of the Items of a Pair to remove them.
Each Pair is highlighted in a different color.
Head Back two screens.
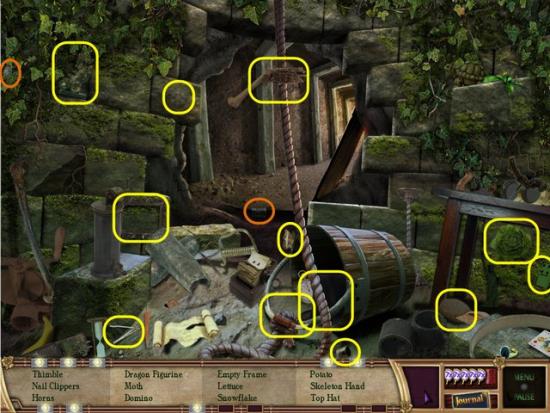
Gather the Hint and Tin Can highlighted in Orange.
Gather the Hidden Objects highlighted in Yellow.
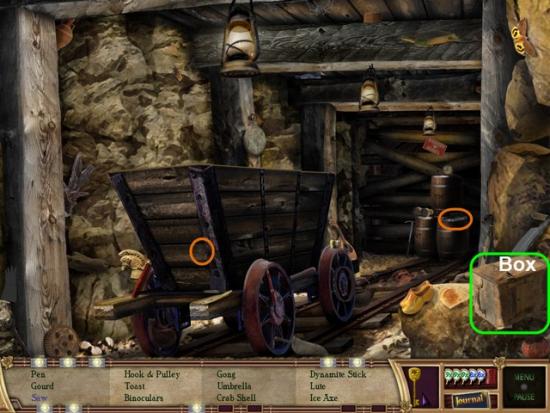
Head down the Mine Shaft again.
Gather the Hint and Tin Can highlighted in Orange.
Move the Box highlighted in Green.
Gather the Saw highlighted in Red.
Gather the Hidden Objects highlighted in Yellow.
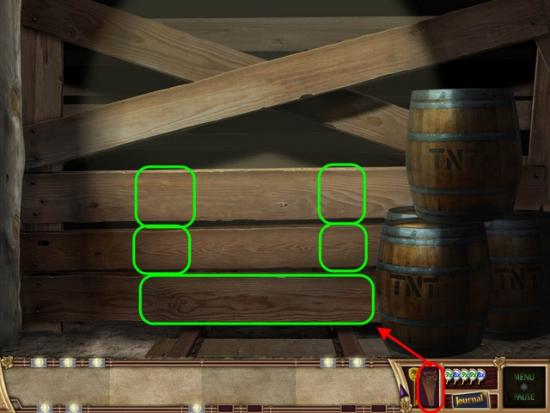
Examine the Blockade once again.
Use the Saw, highlighted in Red, to cut the Boards highlighted in Green.
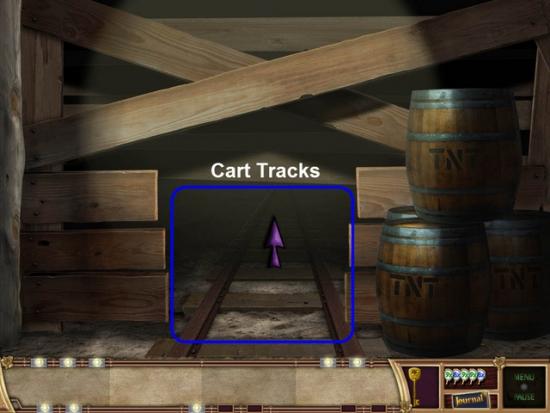
Follow the Cart Tracks.
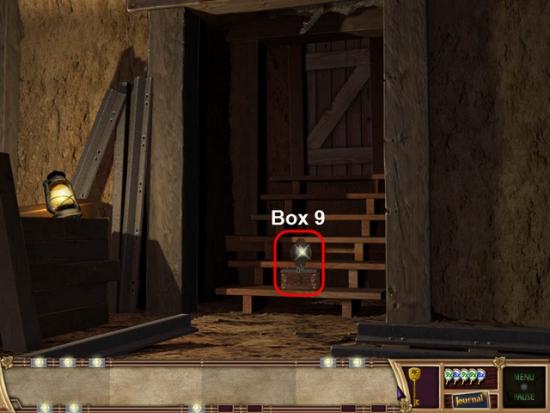
Gather Box 9 highlighted in Red.
Use the Key, highlighted in Red, on Box 9, highlighted in Green.
Place Box 9, highlighted in Red, into the Slot with the matching Symbol, highlighted in Purple.
Exit the Room.
Box 10
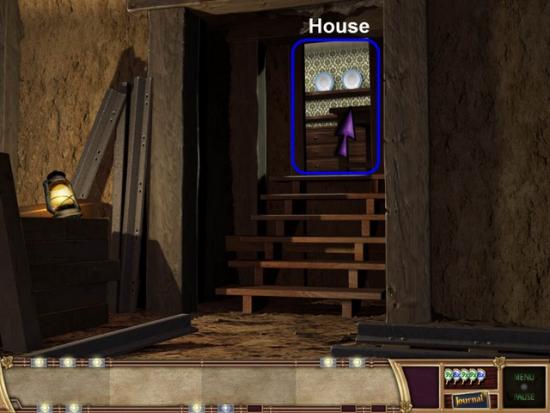
Exit the Mine into the House highlighted in Blue.
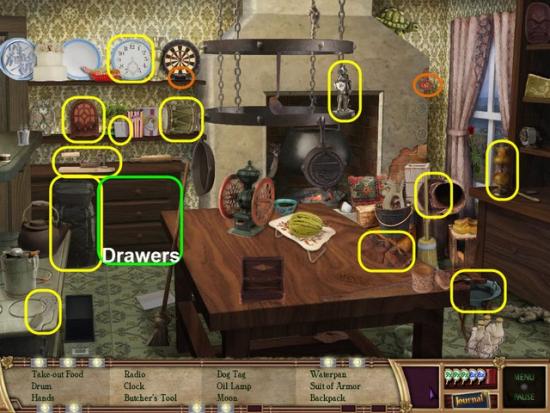
Gather the Hint and Tin Can highlighted in Orange.
Gather the Hidden Objects highlighted in Yellow.
Examine the Drawers highlighted in Green.
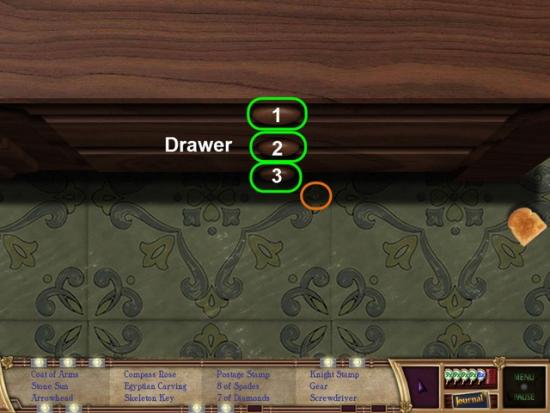
Gather the Hint highlighted in Orange
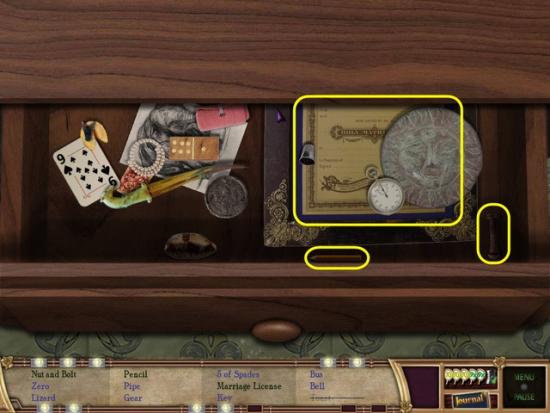
Examine Drawer 1 highlighted in Green.
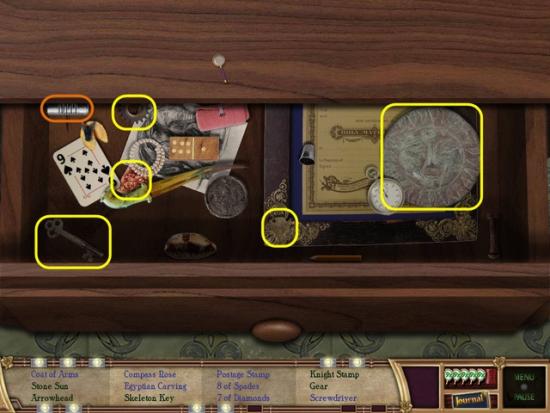
Gather the Tin Can highlighted in Orange.
Gather the Hidden Objects highlighted in Yellow.
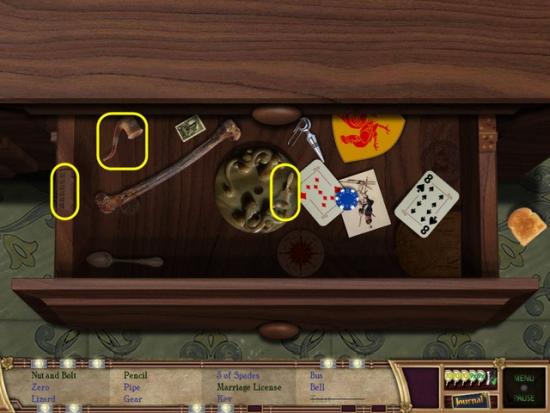
Open Drawer 2.
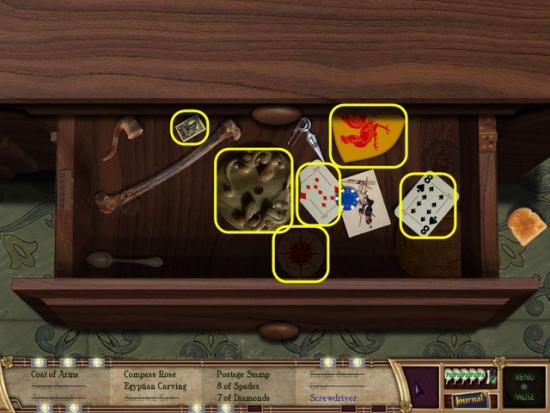
Gather the Hidden Objects highlighted in Yellow.
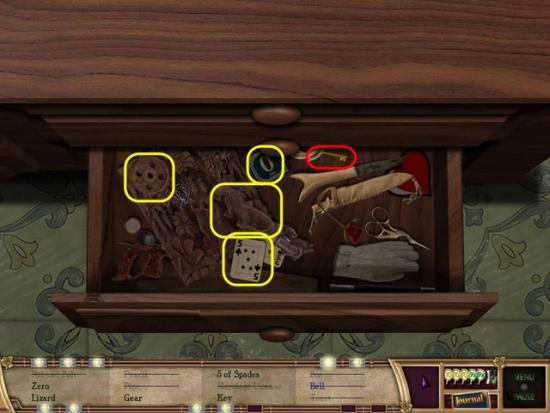
Open Drawer 3.
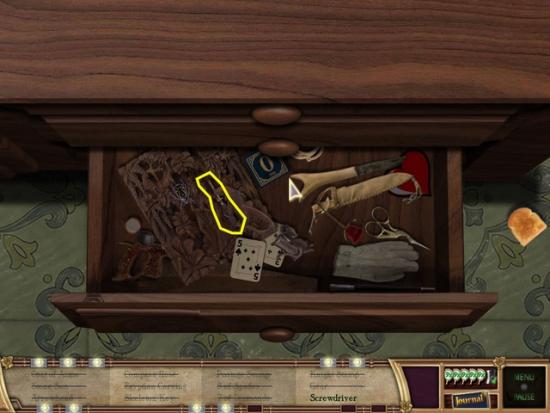
Gather the Hidden Object highlighted in Yellow.
Head Back one screen.
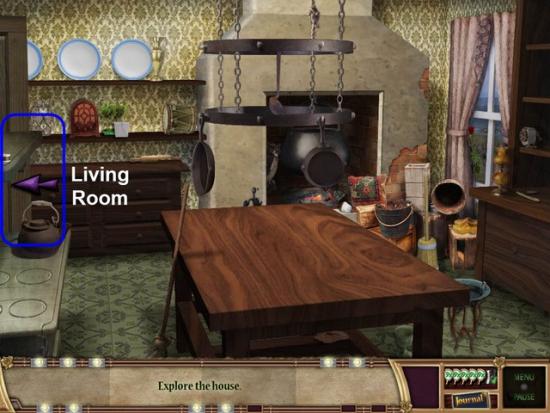
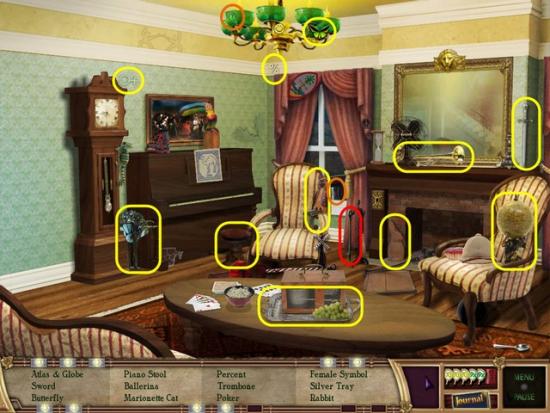
Head to the Left to the Living Room.
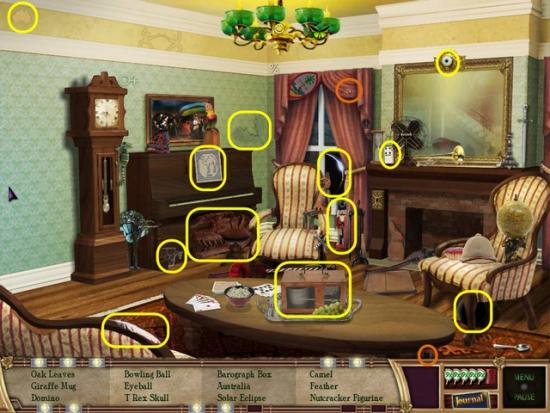
Gather the Hint and Tin Can highlighted in Orange.
Gather the Hidden Objects highlighted in Yellow.
Return to the Kitchen.
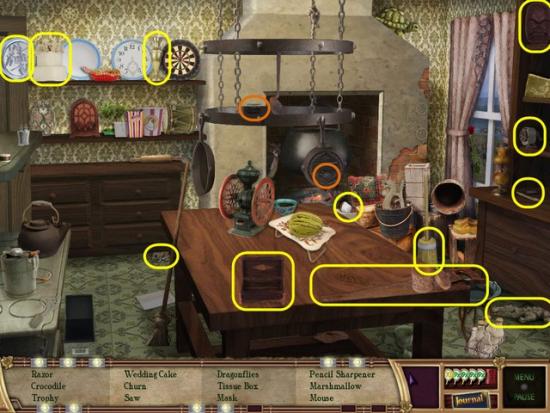
Gather the Hint and Tin Can highlighted in Orange
Gather the Hidden Objects highlighted in Yellow.
Examine the Drawers once again.
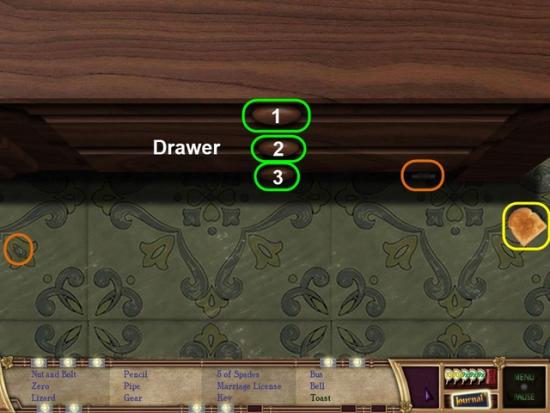
Gather the Hint and Tin Can highlighted in Orange
Gather the Hidden Object highlighted in Yellow.
Open Drawer 1.
Gather the Hidden Objects highlighted in Yellow.
Open Drawer 2.
Gather the Hidden Objects highlighted in Yellow.
Open Drawer 3.
Gather the Key highlighted in Red.
Gather the Hidden Objects highlighted in Yellow.
Return to the Living Room.
Gather the Hint and Tin Can highlighted in Orange.
Gather the Poker highlighted in Red.
Gather the Hidden Objects highlighted in Yellow.
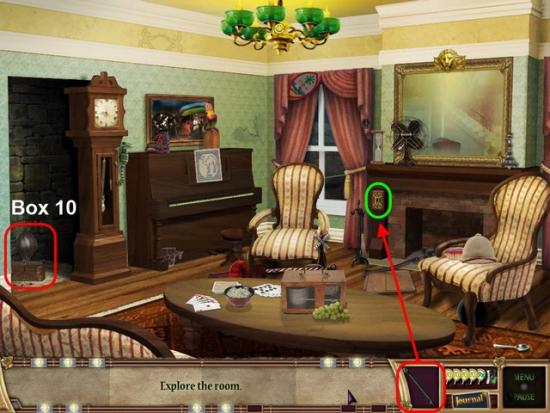
Insert the Poker, highlighted in Red, into the Hole in the Fireplace, highlighted in Green.
Gather Box 10
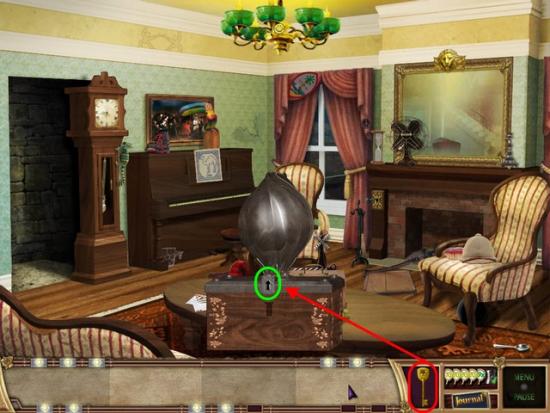
Use the Key, highlighted in Red, on Box 10..
Place Box 10, highlighted in Red, into the Slot with the matching Symbol, highlighted in Purple.
Exit the Room.
Box 11
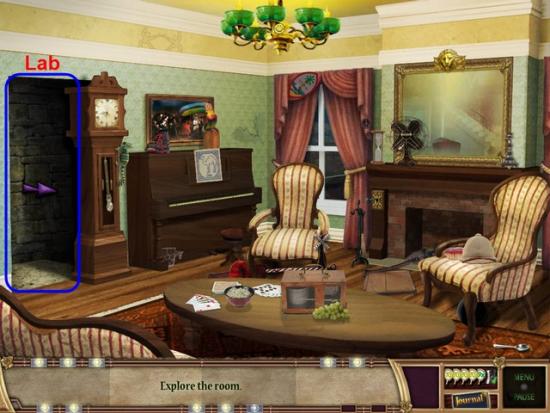
Enter the Lab highlighted in Blue.
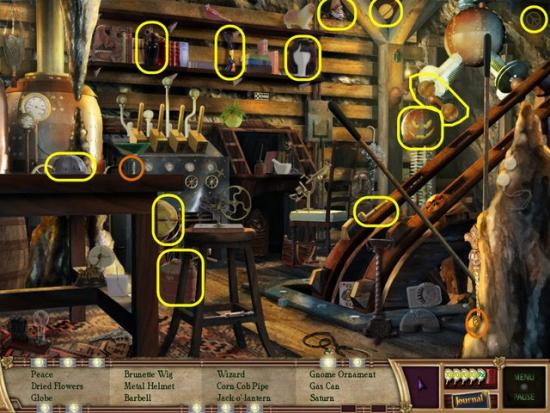
Gather the Hint and Tin Can highlighted in Orange.
Gather the Hidden Objects highlighted in Yellow.
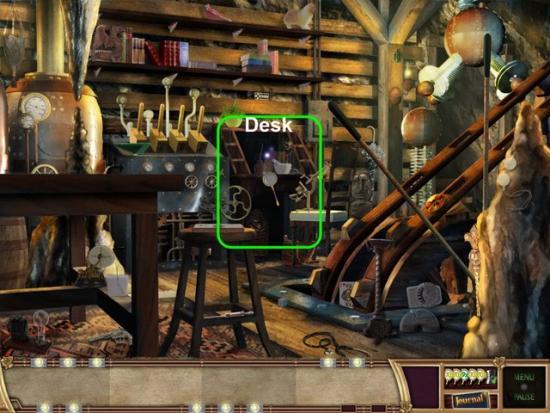
Examine the Desk highlighted in Green.
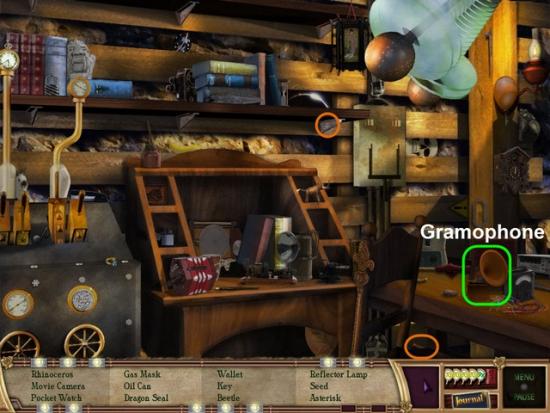
Gather the Hint and Tin Can highlighted in Orange.
Move the Gramophone highlighted in Green.
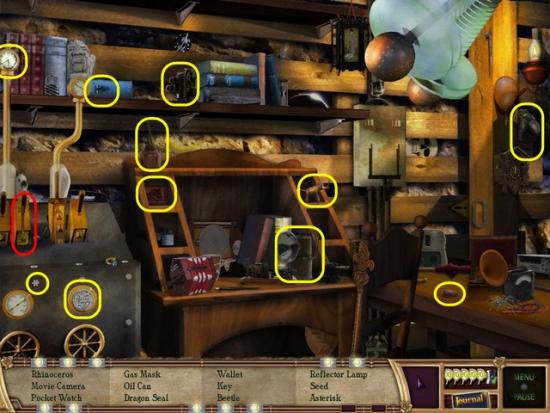
Gather the Key highlighted in Red.
Gather the Hidden Objects highlighted in Yellow.
Head Back one screen.
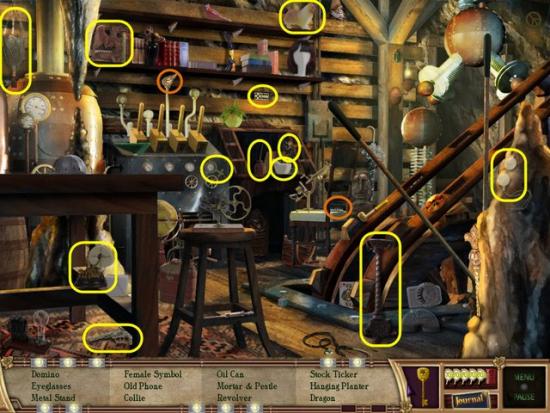
Gather the Hint and Tin Can highlighted in Orange
Gather the Hidden Objects highlighted in Yellow.
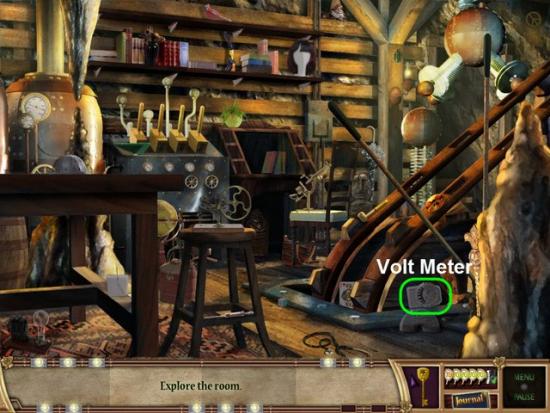
Move the Volt Meter highlighted in Green.
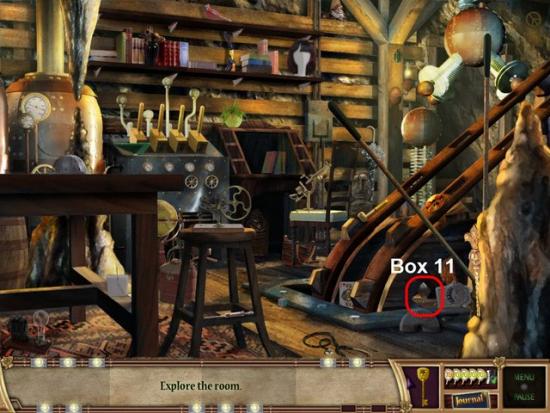
Gather Box 11 highlighted in Red.
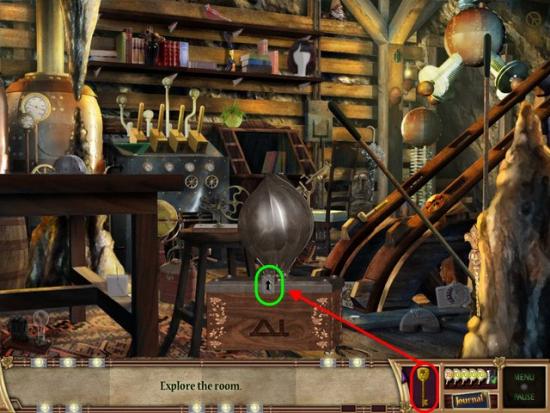
Use the Key, highlighted in Red, to open Box 11, highlighted in Green.
Place Box 11, highlighted in Red, into the Slot with the matching Symbol, highlighted in Purple.
Exit the Room.
Box 12
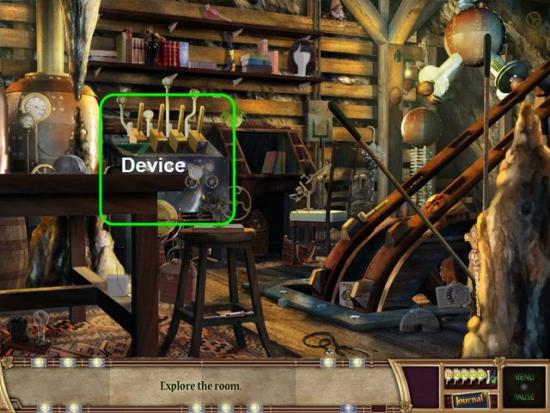
Examine the Device highlighted in Green.
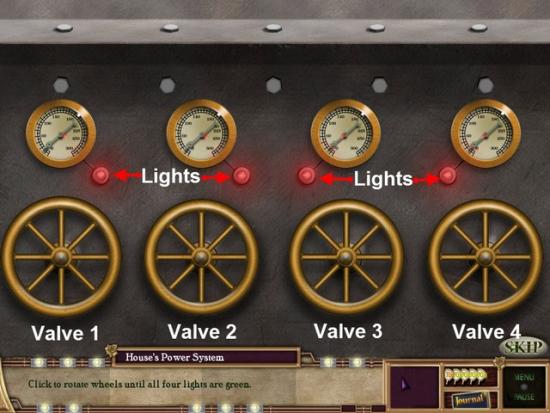
To solve this Puzzle you need to turn the 4 Valves so that the four Lights all turn from Red to Green.
Click to turn the Valves.
The Lights will be either Red, Yellow, or Green.
Solution: Turn Valve 4 two times, Turn Valve 2 two times, Turn Valve 1 two times.
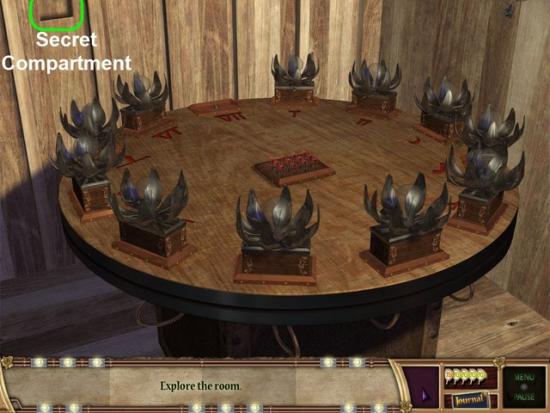
Examine the Secret Compartment highlighted in Green.
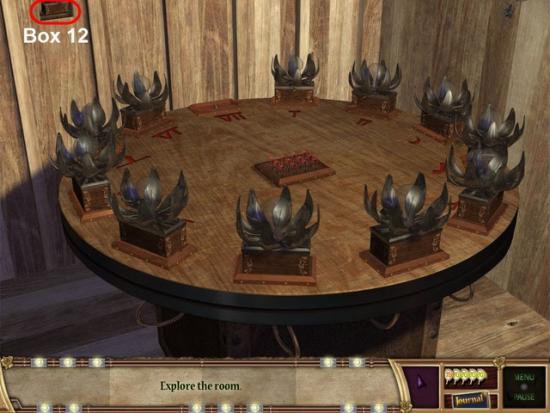
Gather Box 12 highlighted in Red.
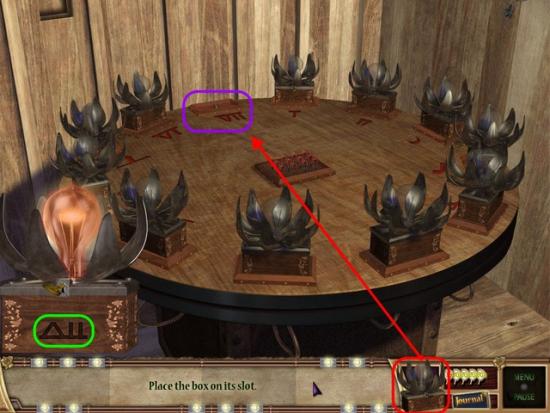
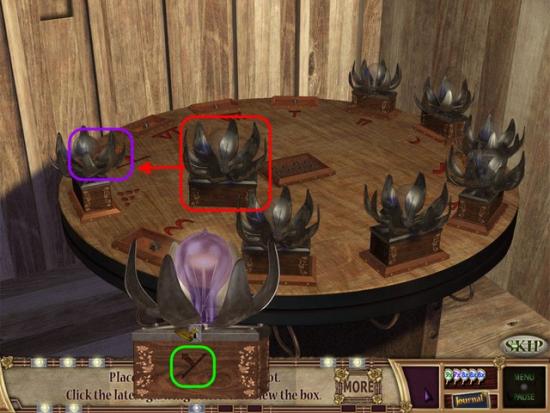
Place Box 12, highlighted in Red, into the Slot with the matching Symbol, highlighted in Purple.
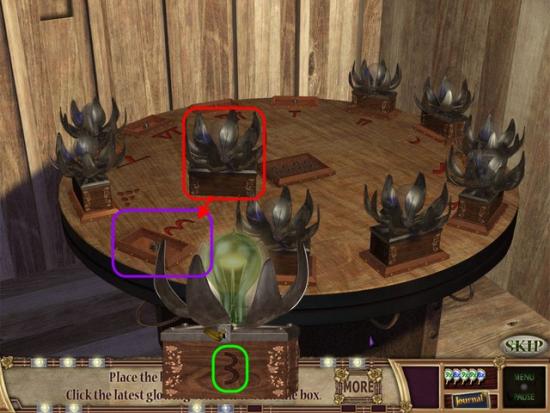
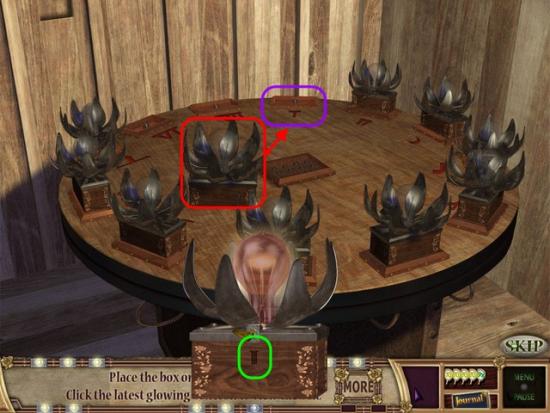
Now that you have gathered all twelve Boxes, you need to place them in their correct positions.
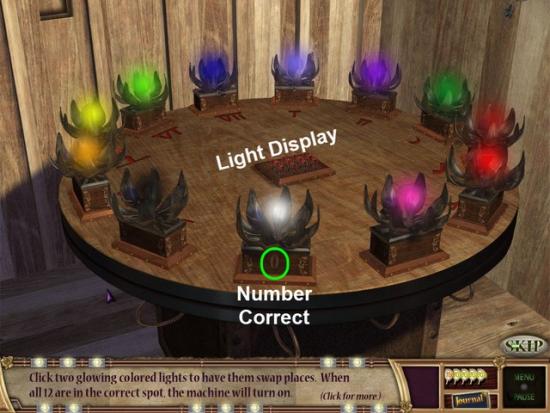
To move a Box, click on a Box, then click on the Box you wish to swap with.
The small Light Display in the center of the Table will light up a small bulb for each Box in its correct position.
Once all Boxes are properly placed the whole Light Display in the center will be lit up.
The Box, highlighted in Green, will also show your current number of correctly placed Boxes.
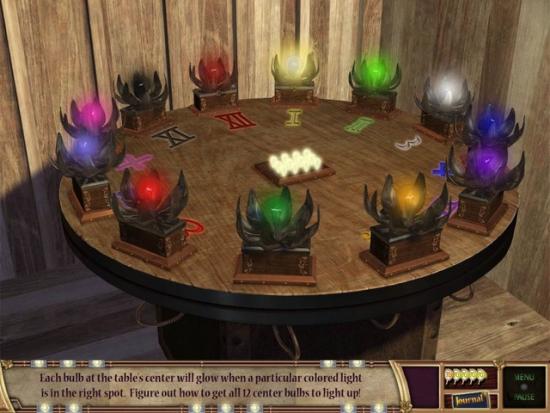
The final solution may vary for each player.
Here is my final solution for example.
Examine the Note highlighted in Green.
Congratulations you have completed the game. You will now have access to the Mirrored Mode of game play.

More articles...
-
Best Horror Games On Itch.io – July 2026
Across a bounty of subgenres. -
Haze Seas Accessories Tier List [Best Accessories to Equip]
The accessories with the best stat buffs in Haze Seas.