- Wondering how to get Monopoly GO! free rolls? Well, you’ve come to the right place. In this guide, we provide you with a bunch of tips and tricks to get some free rolls for the hit new mobile game. We’ll …
Best Roblox Horror Games to Play Right Now – Updated Weekly
By Adele Wilson
Our Best Roblox Horror Games guide features the scariest and most creative experiences to play right now on the platform!The BEST Roblox Games of The Week – Games You Need To Play!
By Sho Roberts
Our feature shares our pick for the Best Roblox Games of the week! With our feature, we guarantee you'll find something new to play!All Grades in Type Soul – Each Race Explained
By Adele Wilson
Our All Grades in Type Soul guide lists every grade in the game for all races, including how to increase your grade quickly!
Hidden Expedition: Devil’s Triangle Walkthrough
Welcome to Gamezebo's walkthrough for Hidden Expedition: Devil's Triangle. General Game Information Hidden Object/Adventure game with 5 Chapters and 18 Mini Game Puzzles. Play as a member of the Hidden Expedition team to solve the case of the missing Bio-Coil fuel cell which is the most efficient fuel cell ever developed. The game is played for story completion and has no time limits or points awarded. You can adjust the game's volume and ambient sounds …
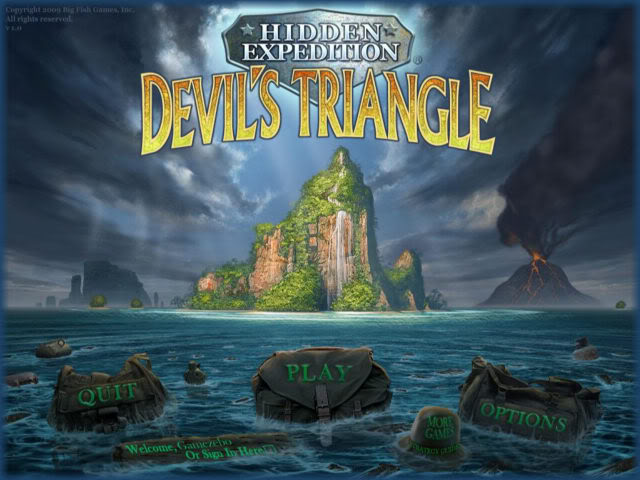
a:1:i:0;a:2:s:13:”section_title”;s:47:”Hidden Expedition: Devil’s Triangle Walkthrough”;s:12:”section_body”;s:147239:”
Welcome to Gamezebo’s walkthrough for Hidden Expedition: Devil’s Triangle.

General Game Information
- Hidden Object/Adventure game with 5 Chapters and 18 Mini Game Puzzles.
- Play as a member of the Hidden Expedition team to solve the case of the missing Bio-Coil fuel cell which is the most efficient fuel cell ever developed.
- The game is played for story completion and has no time limits or points awarded.
- You can adjust the game’s volume and ambient sounds by clicking on the "Options" button in the main menu.
- The game auto saves at the point you leave the game.
- You have the option of skipping Mini games or getting help with hints that you accrue during your game.
- Hints generate over time and are cumulative and carry over from one chapter to the next.
- If you need help finding an item in the hidden object scenes you can click on the name of the item in the list and the item’s silhouette will appear in the lower left hand corner of the screen.
- Click on and item in the list and then click on hint if you need help.
- You are given 3 hints for free at the start of the game and earn additional free hints periodically throughout your game.
- There is a logbook kept in the game and at anytime if you aren’t sure what is going on be sure to read the logbook as it keeps track of everything you have done during the game as well as information that is required to solve mini game puzzles.
- The game must be played in its entirety and you can access different areas of the game in any order you wish but you may not be allowed to progress until certain puzzles are completed.
- As you play the game many of the items you find in the hidden object screens will go into an inventory item and must be used in other areas of the game.
- Many of the items in inventory must be combined before they can be used in a scene.
- If you are lost in a scene keep your cursor at the bottom of the screen and back track until you find a familiar area.
- The items in the hidden object screens may vary from the ones you see in your game as every game generates different hidden objects to find.
- Most of the Mini games have the same solution and are included in the walkthrough where possible.
Game Elements
Game Icons/Cursors

- There are several icons to learn in this game and they are listed in the table above.
- The "eye" icon means you can take a closer look either in or behind an item or it could be a hidden object scene or mini game.
- The hand icon means you can grab an item and put it into your inventory in a scene.
- The normal cursor is for normal navigation around the scenes.
- The moving blue circles are "Areas of Interest" and if you see these click on them.
- Arrows indicate pathways in which you can navigate around the game.
- Mouse over the screen to look for arrows and ways to exit a scene. If in doubt mouse around the outer edges of the scene.
Sample Hidden Object Scene
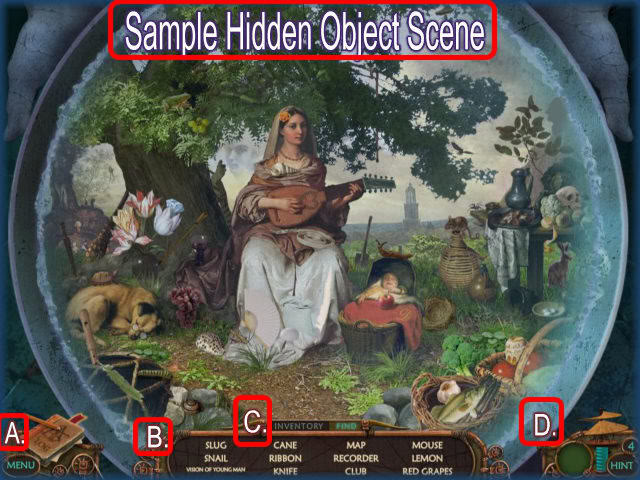
- This is an example of a hidden object scene in this game.
- Note the items are in list form at the bottom of the scene.
- There is an "Inventory tab at the bottom center where all of your inventory items are stored. You can access this at any time during the game.
- You may hold items in inventory quite a while before you use them but they are all used within the same chapter they are introduced.
- A. Logbook – This is where a log of all things in the game will be kept. You can access this at any time during the game. Important information is automatically stored here for you.
- B. Hidden Object List – This is where all the items you are to find in a scene are listed.
- C. The tabs at the top are for you to access the inventory area and toggle between the inventory and list area.
- D. Hint Buttons – Here is where you can see the silhouette of an item and click for a hint.
Using the Hint Button

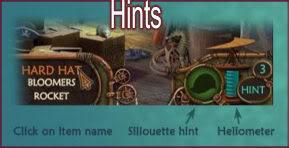
- Hints are located at the lower right of the screen in an instrument called a "Heliometer."
- Heliometer recharges hints and allows you to see the silhouette of any item you click on in the list of items you are to find.
- You must choose an item in the list first by clicking on it and then click on hint and a sparkling graphic will appear around that item for a few moments.
- Hints recharge and you are awarded hints periodically throughout the game.
- You will be given 3 free hints at the start of the game and you can have a maximum of 4 hints at any time.
- Mini-Games -Hints can be used in mini games and will either solve part of the puzzle for you or will solve the entire puzzle allowing you to skip it. There is no forewarning as to what a hint will do before you use it so be sure you are willing to skip a puzzle before you use a hint.
Inventory
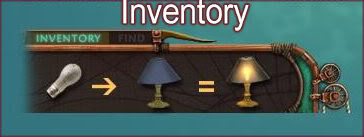
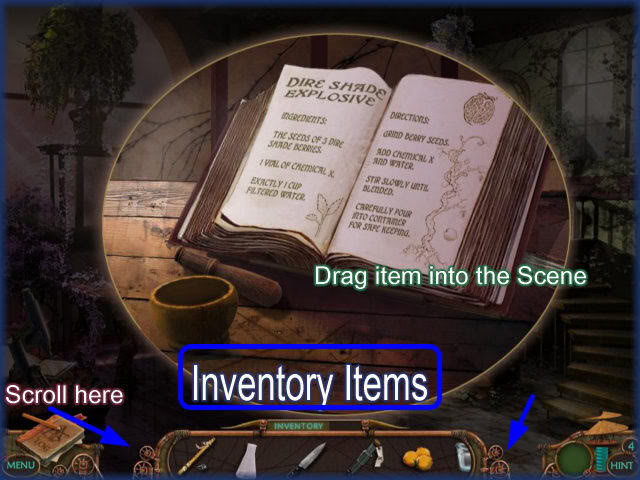
- Inventory items accumulate at the center bottom of the screen in the inventory area and if you have several items there you may scroll through it by clicking on either end of the inventory area.
- If you see an item you would like to use in the game click on it and drag it to the desired location. If you are correct you will see the item incorporate into the scene immediately and if you are incorrect it will not let anything happen.
- There is no penalty for incorrect guesses or random clicking in the game.
- Many items in the inventory area must be combined before they can be used in a scene.
- Be mindful of items that are similar or that go together. If you can’t get something to work odds are you need to combine it with something else first.
Logbook
![]()

- The logbook is located at the lower left of your screen and can be accessed at any time during the game.
- After every scene the logbook is updated.
- All critical information is kept in the logbook and you should refer to it frequently during the game. Especially if you are stuck.
- The logbook is divided into 3 categories which are "Character Files" which keeps a picture and information about the characters you meet in the game.
- Click on the characters picture to read their biographical information.
- The "Entries" portion is the journal portion and keeps track of all moves you have made in the game.
- The final category is "objectives" and this is the most useful part of the logbook as objectives are listed for you as you play along. If you become stuck this can guide you back on track but telling you what needs to be done in a given area.
- There are detailed illustrations of machines in the logbook and this can be helpful in mini games.
- Any time you need a code be sure to check your logbook as most of the codes used in the game are found there.
Walkthrough
- This walkthrough will take you from start to finish.
- The order the game is played in this walkthrough is one possible way the game can be played.
- All areas must be completed before you proceed so the order is not critical to the outcome.
- There are different hidden objects for you to find from game to game. The hidden objects in this walkthrough may or may not match the items you are asked for in your game but there will be many in common to help you along.
- All the solutions to the puzzles and mini games are the same and are listed in this walkthrough.
CHAPTER 1 – New York – Present Day
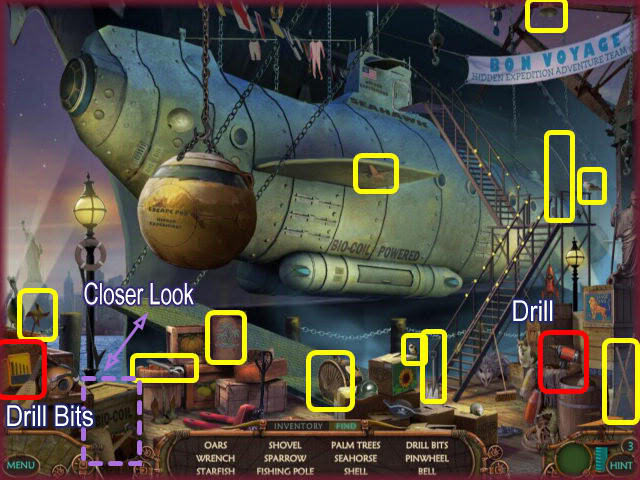
- Find the hidden objects in the scene.
- Items may differ from your game.
- You will notice the "eye" icon over the crate on the lower left that says, "Bio-Coil" on it. Click here for a closer look.
- Be sure to click on the drill and drill bits in the scene which will be added to your inventory.
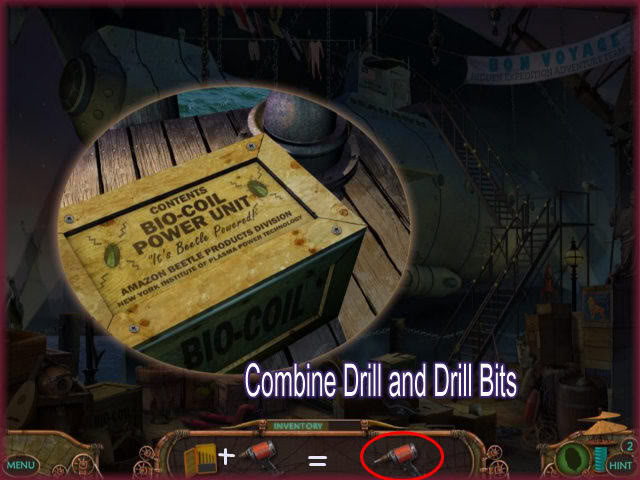
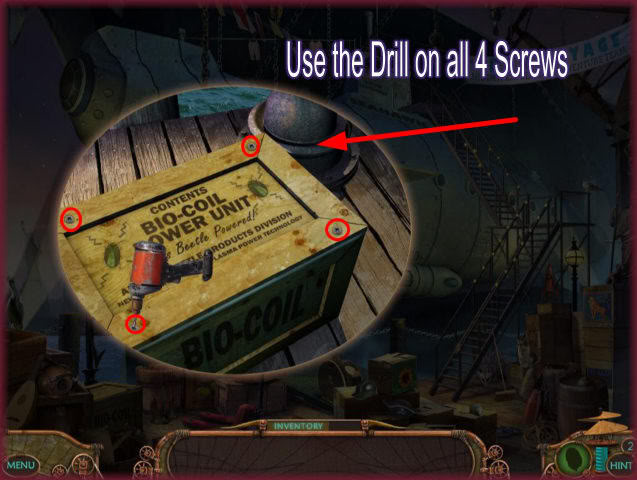
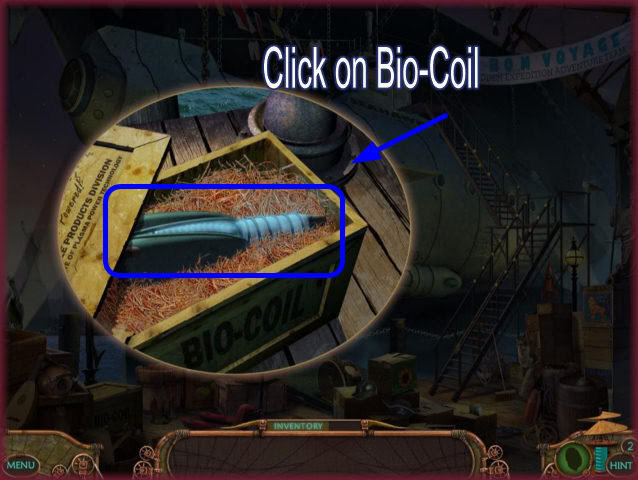
- Clicking on the crate for a closer look brings you to this scene.
- Here you will need to combine the drill and drill bits for it to work.
- Click on one then the other to combine them.
- Once they are combined use the drill to unscrew the screws on the outer edges.
- Once you get it open you will see the Bio-Coil fuel cell.
- Click on the Bio-Coil and it will move into your inventory.
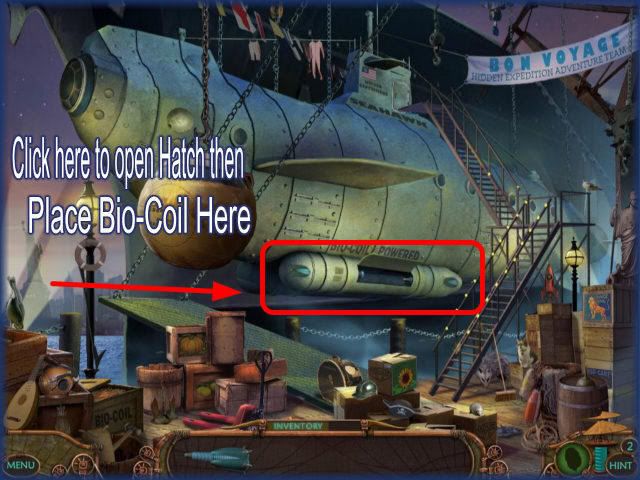
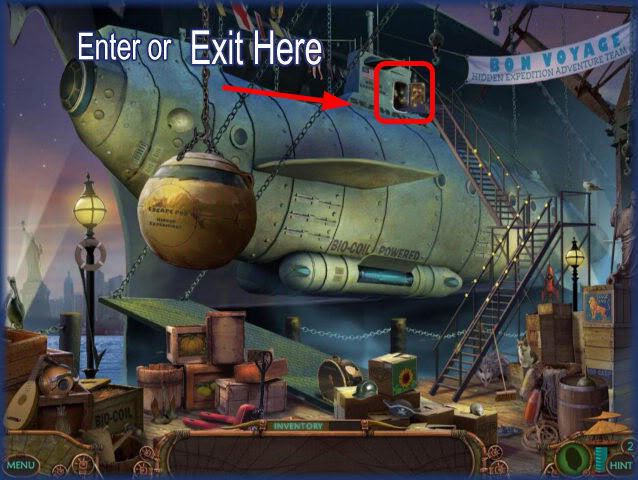
- Click on the submarine’s hatch as seen in the image above to open it and place the Bio-Coil fuel cell into the compartment.
- Once the coil is in place click on the door at the top of the submarine to enter.
Meet Emily in the Submarine’s Lounge
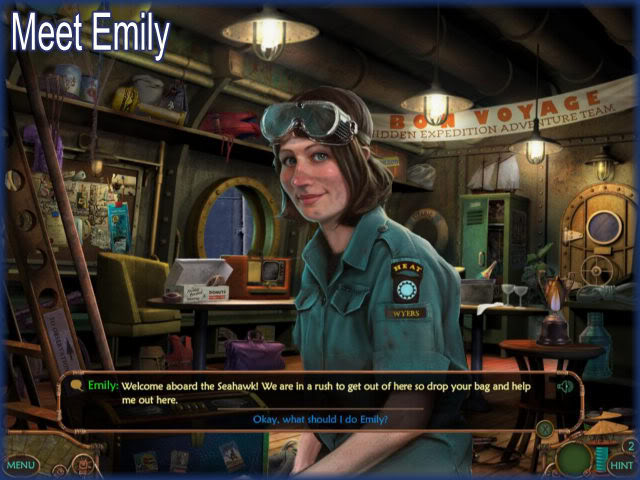
- When you enter this scene you will be greeted by Emily.
- You will have dialogue with Emily at the bottom of the screen.
- If you do not wish to hear this dialogue you can turn it off in the upper right hand corner.
- Ask Emily what you need to do and she will respond:"For security, mission details are still classified. Before we can leave you need to set up the shortwave radio and tune to H.E. Headquarters to get our exact coordinates."
- Choose option:"Right. Let’s get this sub in the water!
- Emily will explain the logbook to you and it will nest in the lower left side of the screen.
- You can ask Emily further questions but do this for fun as it has no real bearing on gameplay or outcome.
Lounge
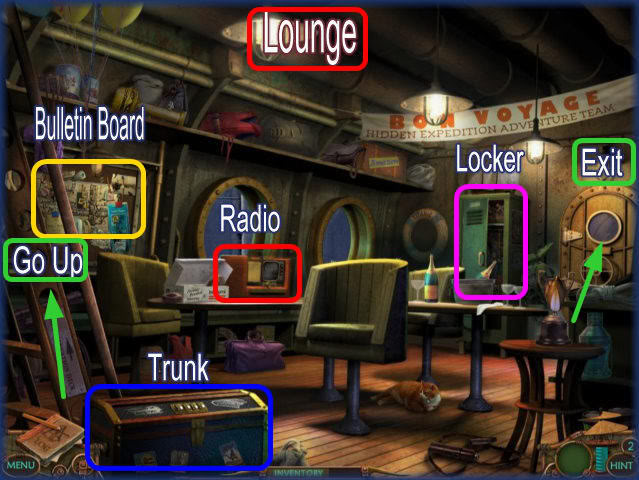
- This is the lounge and there are many areas to explore here.
- First click on the bulletin board on the left. It is a hidden object scene.
Bulletin Board
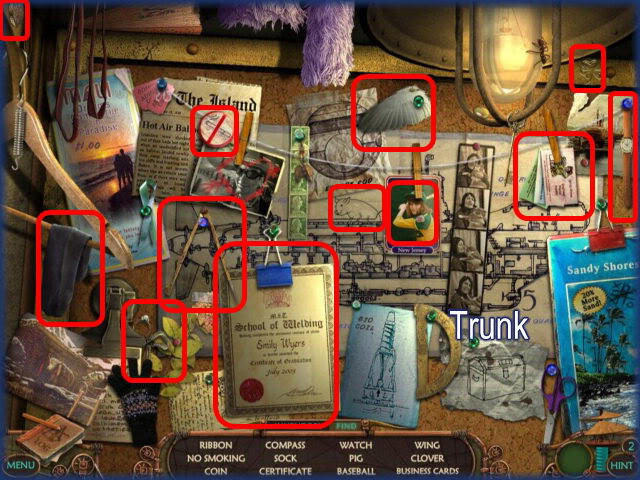
- Locate the 12 items on your list.
- Hints are available if you get stuck.
- Click on the picture of the trunk on the lower left corner and numbers will appear on the screen briefly.
- Don’t worry they are logged in the logbook and will help you get into the blue trunk in the lounge at a later time.
Locker
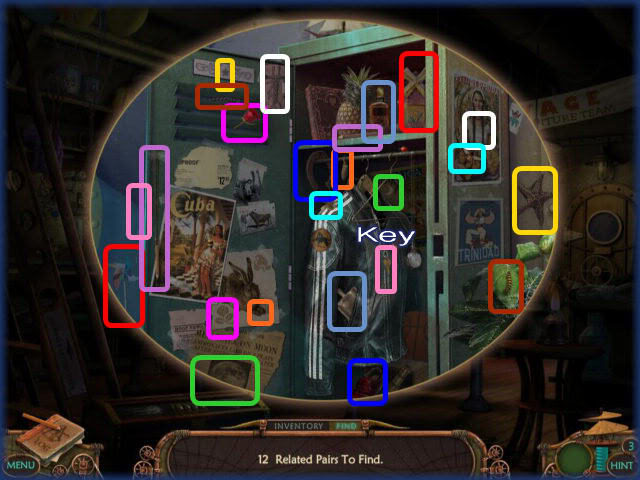
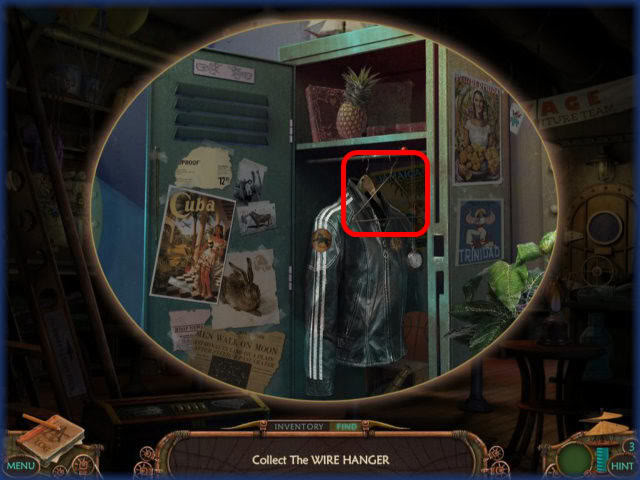
- Next click on the locker at the far right end of the lounge.
- Here you will find 12 related pairs of items. These items are either 2 of the same or 2 items that go together such as "butterfly and caterpillar."
- Your items may vary from those listed in this walkthrough.
- Answers are shown circled above.
- After you find all pairs you will be asked to find a wire hanger that will be added to your inventory as well as a key for later use.
Logbook
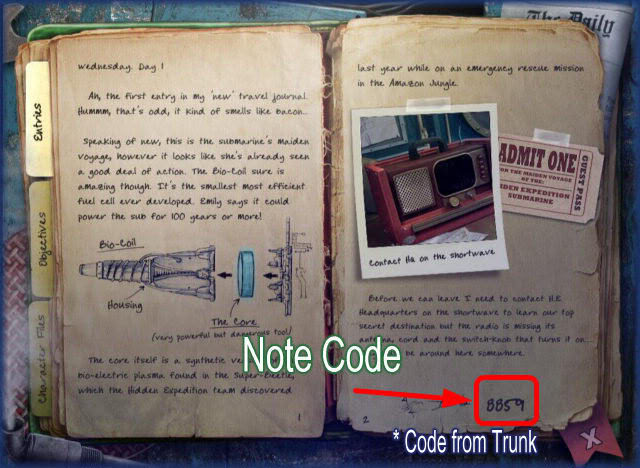
- Here you can see what your code is for unlocking the trunk.
- Mine is stated as "8859" but you may have a different code.
Unlock the Trunk
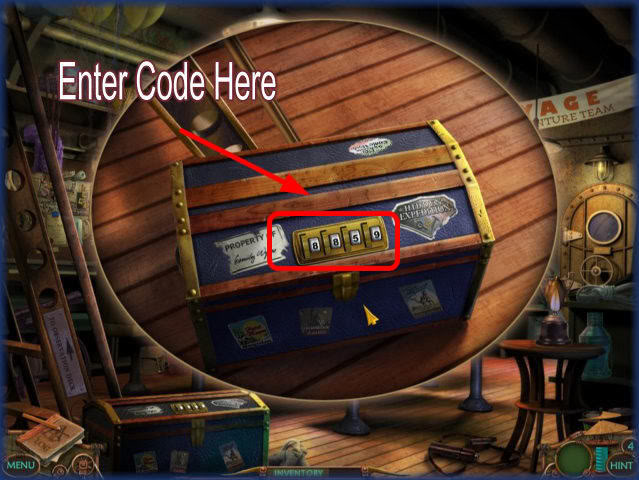
- Click on the blue trunk in the lower left of the lounge.
- You will see you can enter 4 numbers at the top of the trunk.
- You can find your number in the logbook.
- Enter it by clicking on each dial and rotating until you have the correct sequence.
Open Trunk
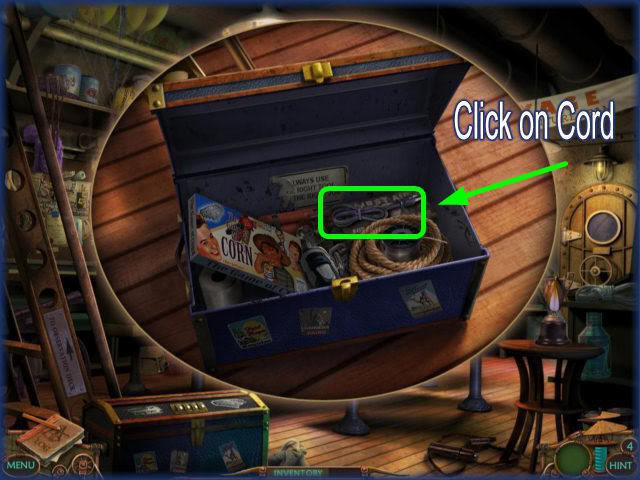
- Now the trunk is open.
- Click on the electrical cord inside the trunk and it will go into inventory.
Broken Radio
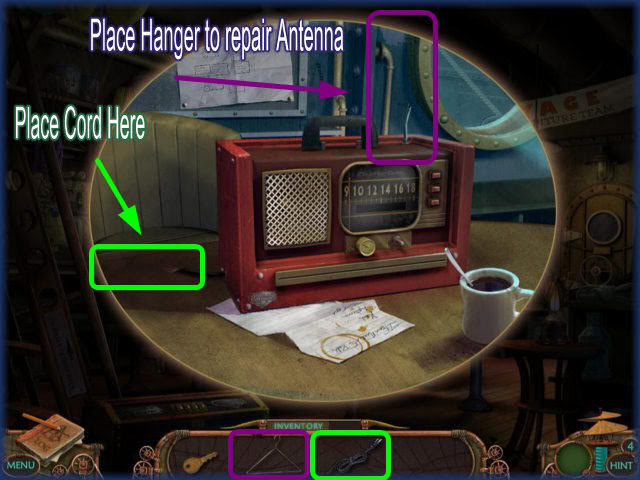
- Now move to the broken radio in the center of the lounge.
- The antenna is broken and the cord is frayed so you will need to repair this.
- You should have the wire hanger from the locker and the cord in your inventory.
- Drag the cord to the radio’s cord and drag the hanger to the radio’s antenna and it will repair.
Up the ladder
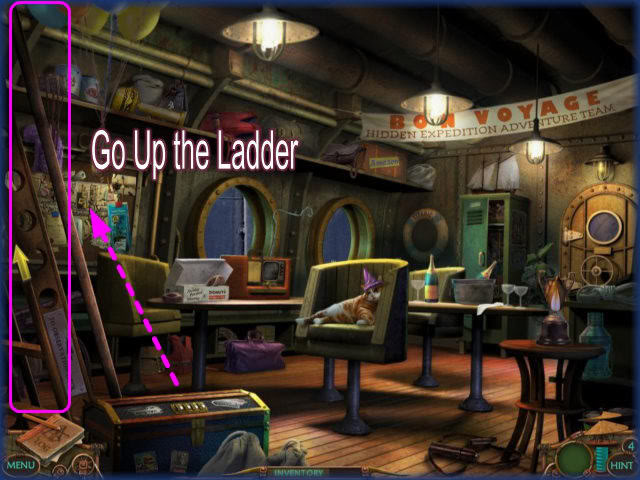
- This is all you can do for now so exit out and go up the ladder on the left side of the lounge.
Observation Deck
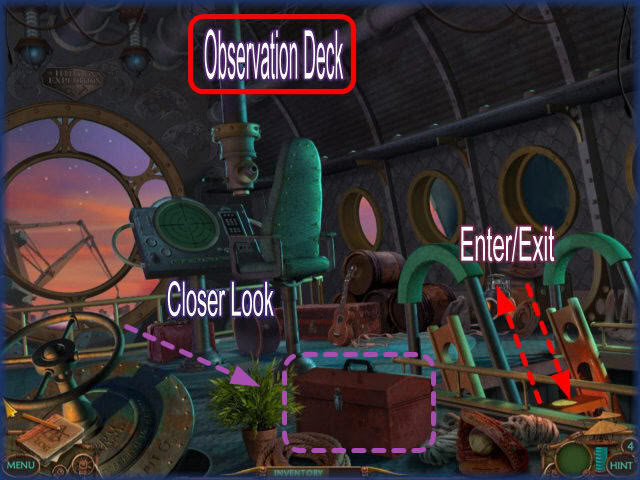
- Now you are on the observation deck of the submarine.
- There are a few areas for you to explore here.
- Click on the reddish toolbox in the center of the scene.
Red Toolbox
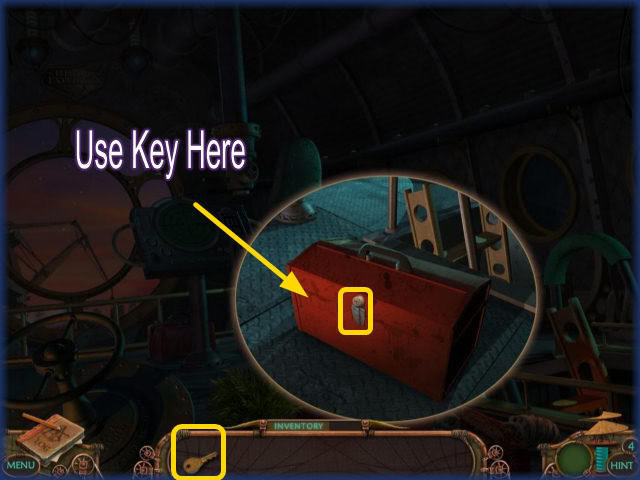
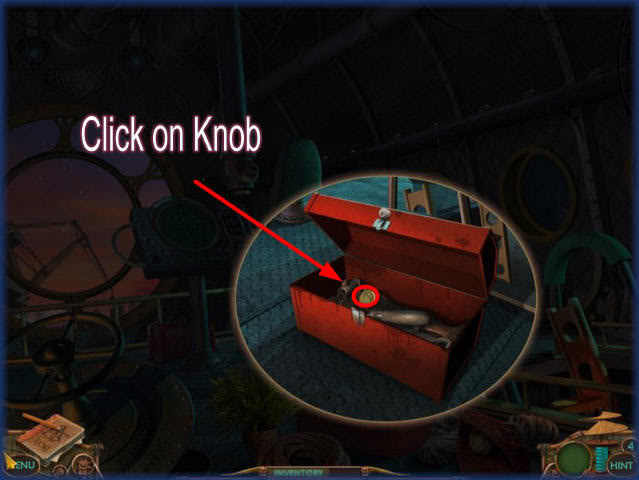
- Use the key you found in the locker to open the toolbox.
- Once it is open click on the radio knob inside and it will go into inventory.
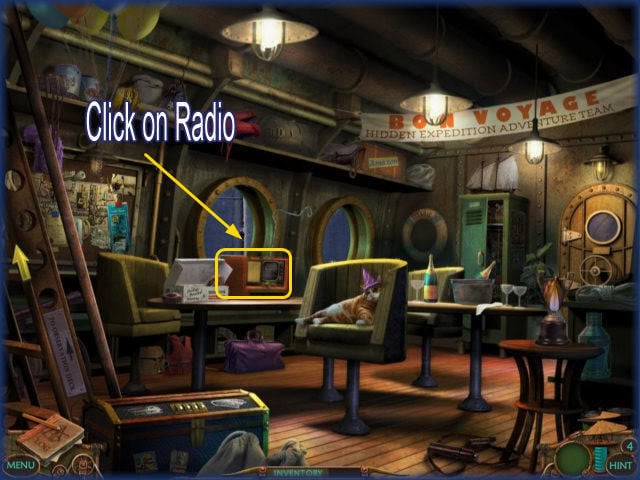
- Once finished go back downstairs to the lounge and try the radio again.
Fix and Tune the Radio
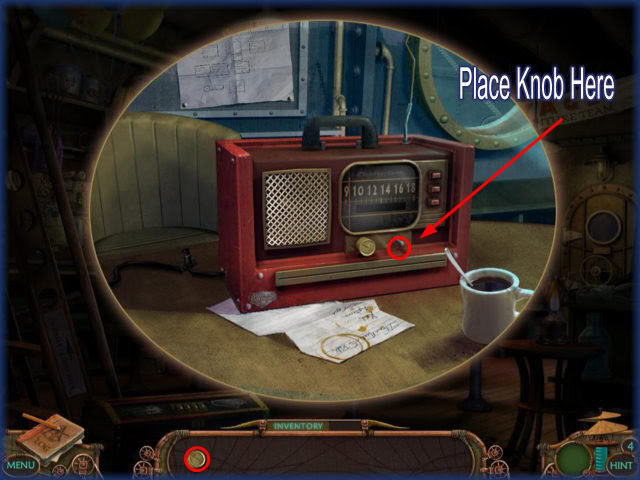
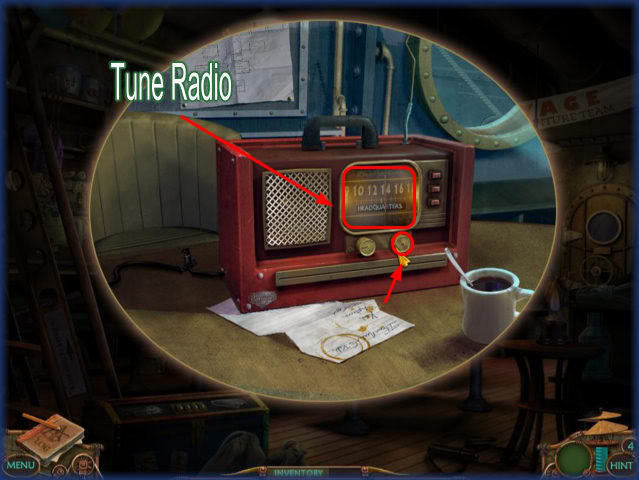
- Take the knob out of inventory and place it on the right side of the radio.
- Once the knobs are in place you can turn them to tune the radio.
- Look for the words "headquarters" to appear as you turn the knob.
- You will be shown a brief scene and learn that the sub’s sonar has been fried.
- Go back upstairs to the observation deck and look around.
Observation Deck
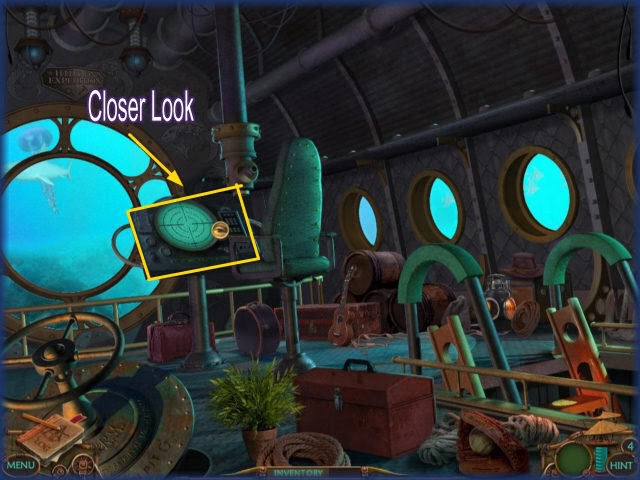
- Click on the sonar to take a closer look.
Sonar
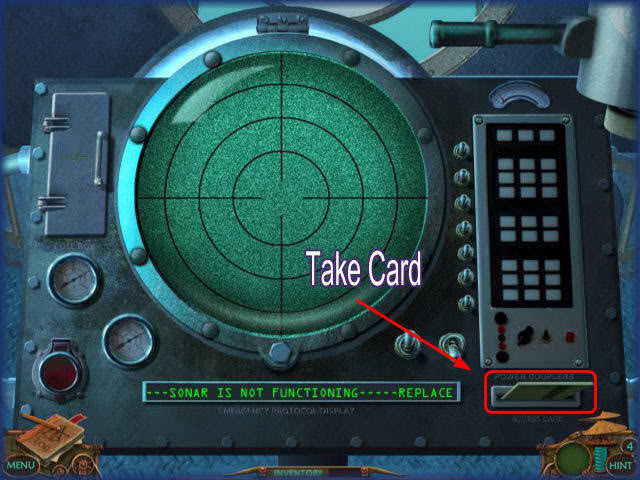
- Take the "Security Clearance" card at the lower right side of the screen.
- Exit back to the lounge area.
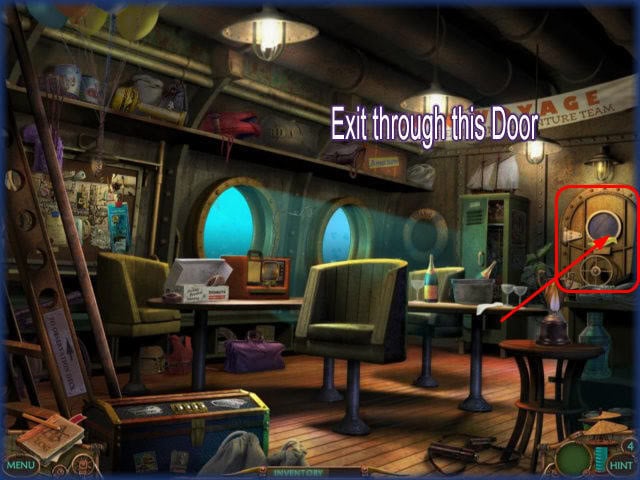
- Exit through the lounge to the door on the far right.
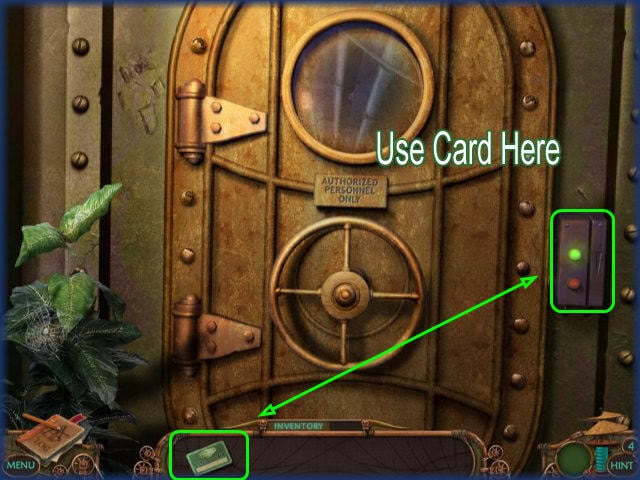
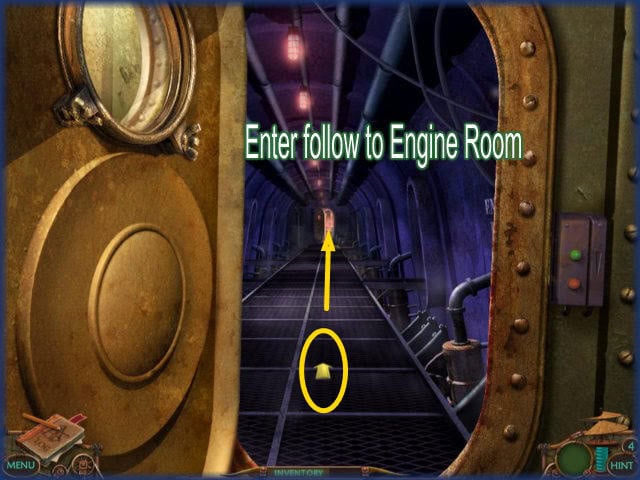
- Use the clearance card in the slot at the far right.
- Once the door is open walk straight through to the Engine room.
Engine Room
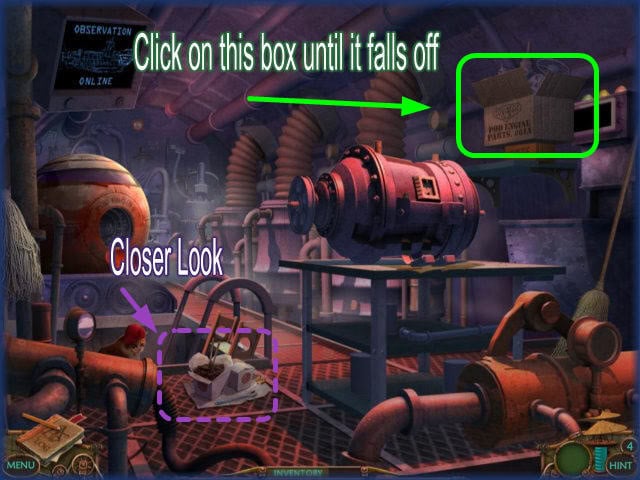
- Once in this room click on the box marked "Pod Engine Parts" located at the upper right until it falls off of the shelf.
- Next click on the Chinese food for a closer look.
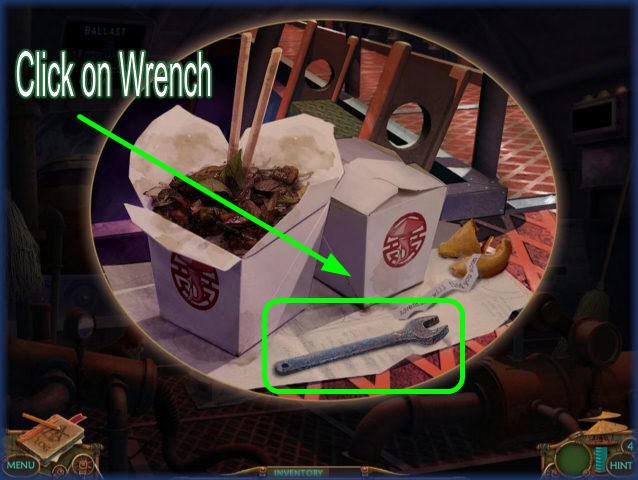
- Once the new window opens click on the wrench and it will go into inventory for later use.
- Make your way back to the observation deck.
- You can hit the down arrow and go back up the ladder in the lounge.
Observation Deck/Scary Fish
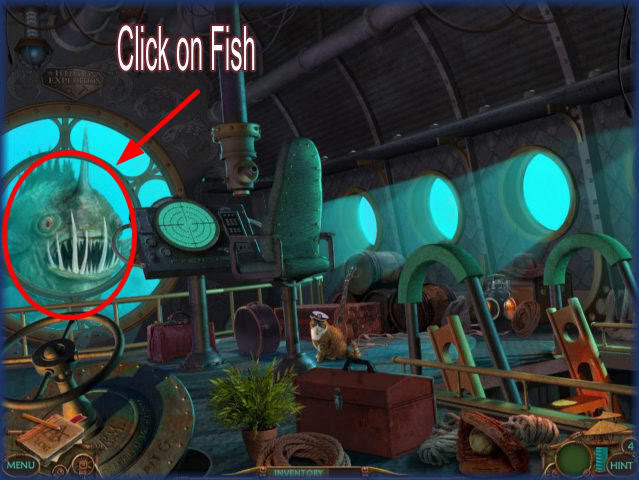
- When you enter this scene you will notice a scary fish has appeared.
- Click on the fish for a hidden object scene.
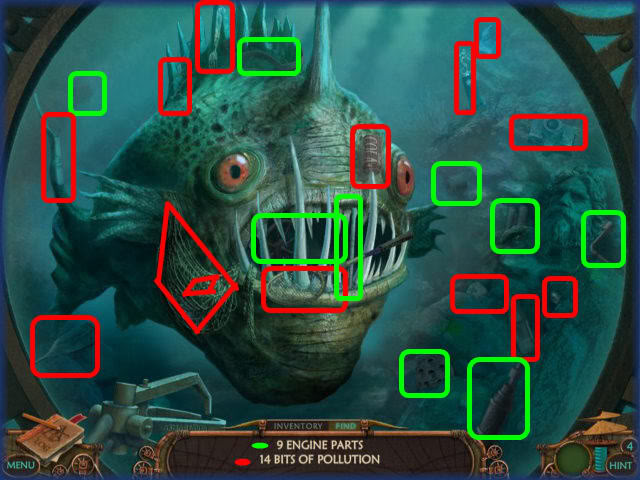
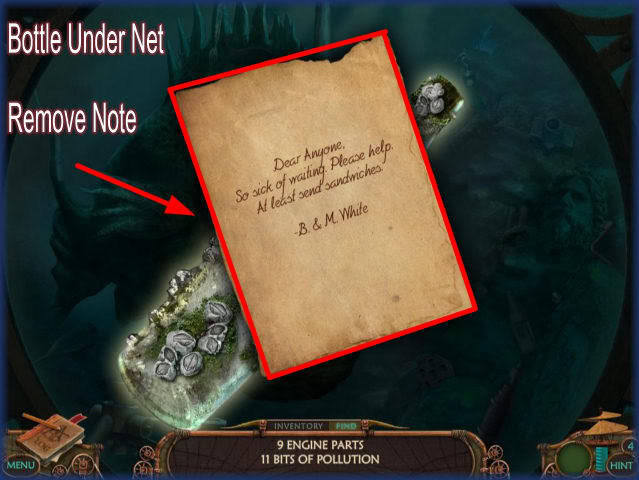
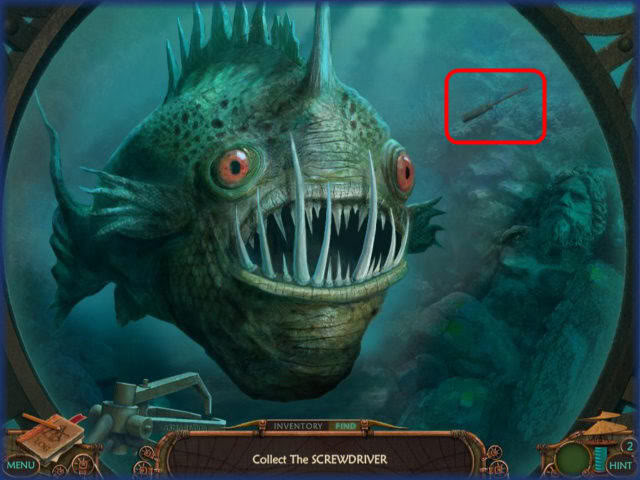
- In this scene you will be asked to find "9 Engine Parts" and "14 bits of pollution" which are color coded and circled above.
- Under the net there is a bottle and it will appear in the center of your screen.
- Click on the bottle to remove and read the note.
- Finally you will be asked to find a screwdriver which will go into inventory for later use.
- When you are done here click on the sonar to repair it.
Repair the Sonar
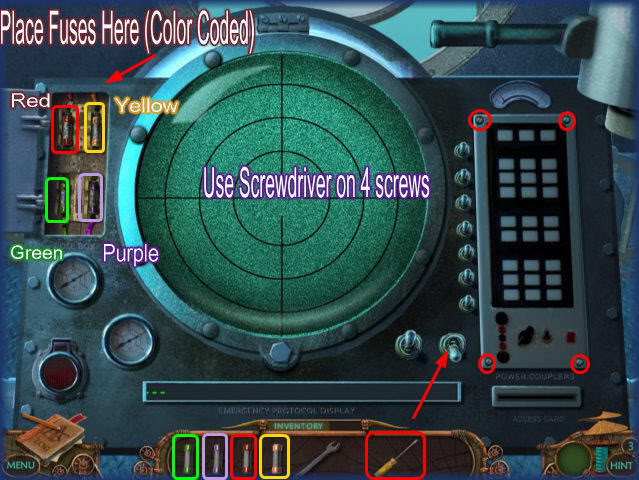
- Click on the upper left panel to open it.
- Note the old fried fuses.
- Click to remove the old fuses.
- You will see the area is color coded.
- Place the new fuses as seen in the image above.
- After you replace the fuses use the screwdriver to remove the screws and remove panel.
Engaging the Sonar/Puzzle
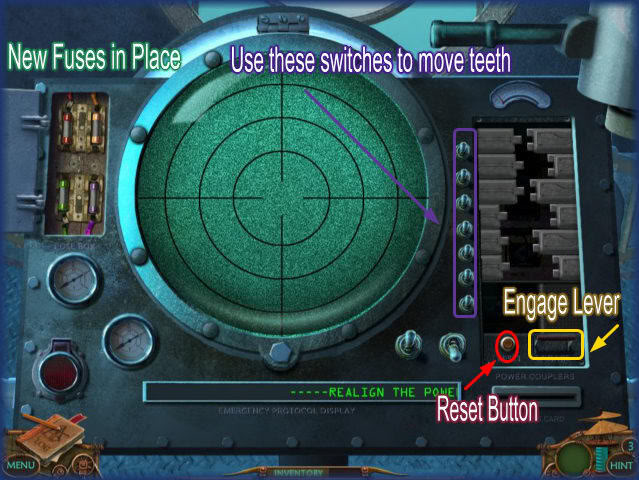
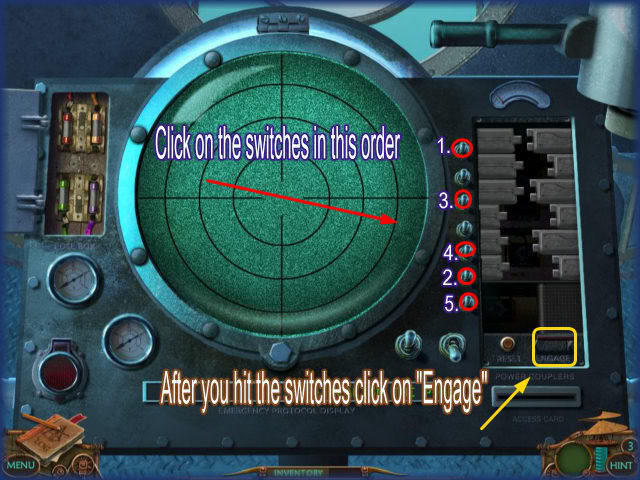
- The goal here is to match the teeth so that the long and short ones meet.
- You will have to click on the switches in the correct sequence to solve this puzzle.
- You may reset by hitting the reset button at the bottom left.
- Once you have correctly engaged the sequence hit the engage lever.
- SOLUTION: See image above and trip the 5 switches in the order shown then hit "Engage" lever.
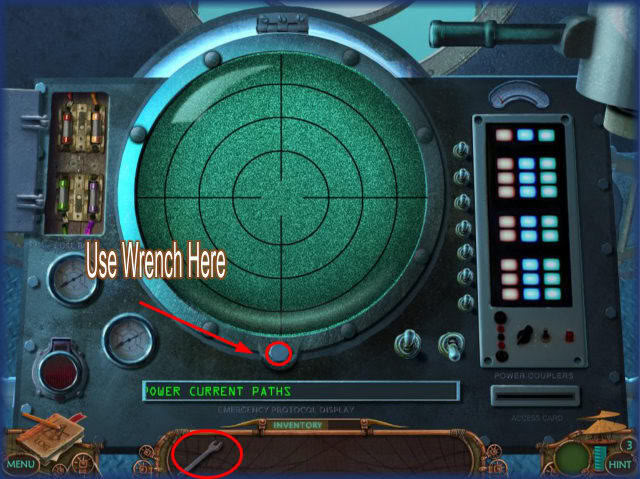
- Use your wrench in inventory as shown in the image above.
Sonar Puzzle
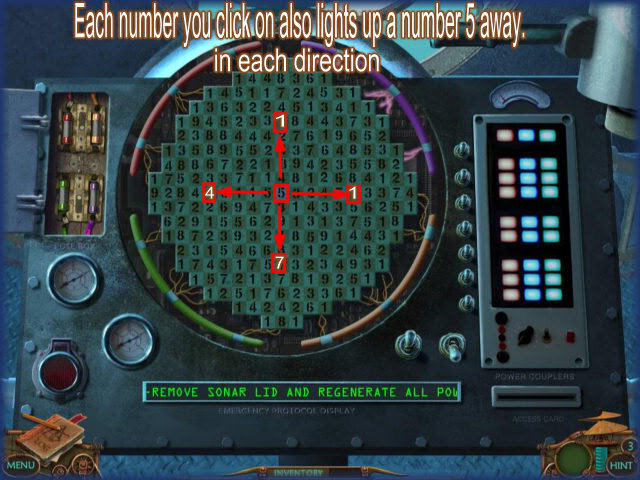
- The goal of this puzzle is to hit the correct sequence of numbers so that the number "1" is next to the bar of each color on the sonar screen.
- You will have to do this 4 times.
- Each time you click on a number it will light up numbers that are 5 numbers away from it. (See image above)
- Click one of those numbers to get a feel how the lighted numbers move.
- Note the 4 light tubes around the perimeter. Your goal is to light all 4 of these tubes and engage the sonar to work.
Purple Puzzle
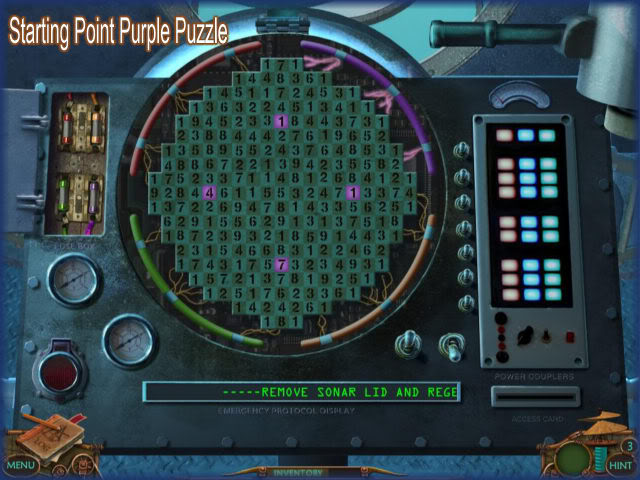

- See image above for solution.
- Click on the numbers in the following order:
- 5
1 (Top)
4
6
1
3
1 Flashing
Orange Puzzle
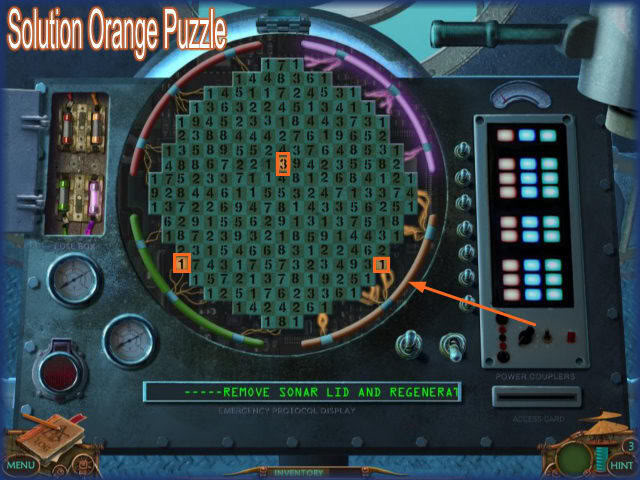
- See image above for solution.
- Click on the numbers in the following order:
5
7
1 Flashing
Green Puzzle
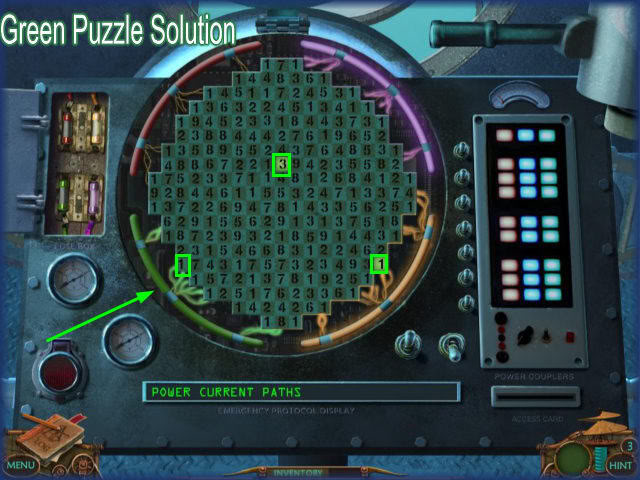
- See image above for solution.
- Click on the numbers in the following order:
5
7
1 Flashing
Red Puzzle
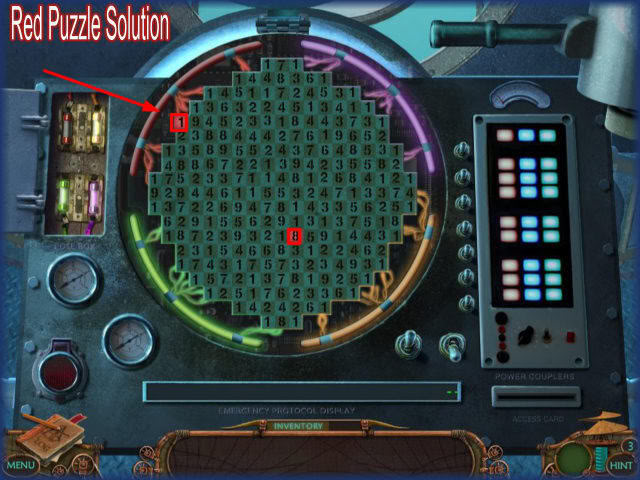
- See image above for solution.
- Click on the numbers in the following order:
5
1 (Top)
8
1 Flashing
Warning
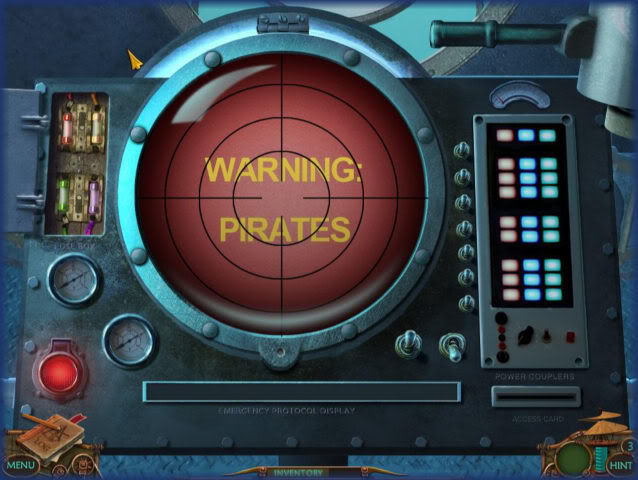
- Next you will see a scene showing that there has been a pirate attack.
- When you return make your way back to the engine room.
Escape Pod Engine
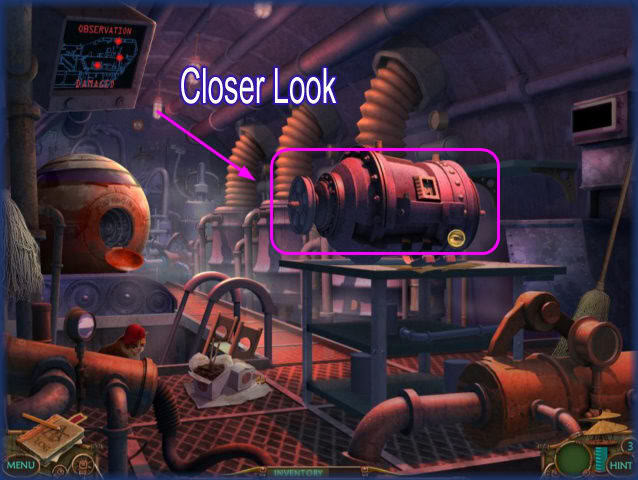
- Click on the escape pod’s engine shown at the top of scene.
Assembly of the Escape Pod Engine
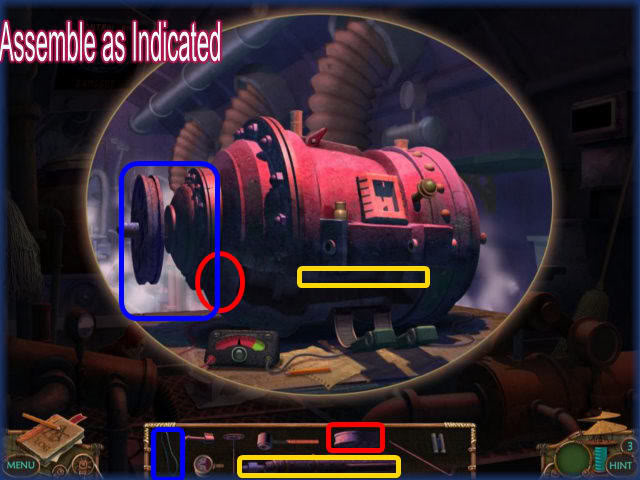
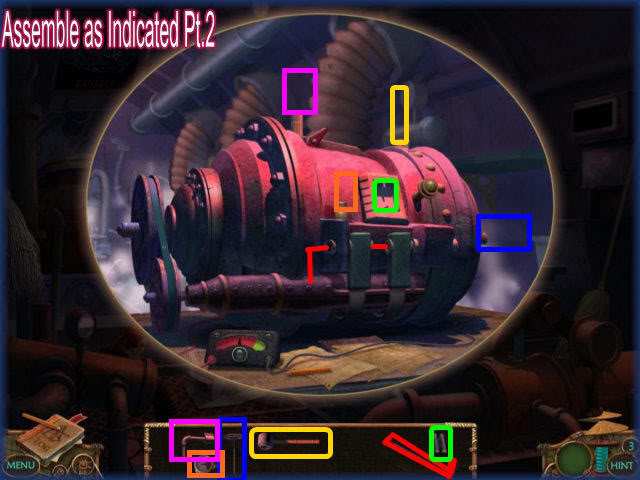
- The images above show the engine parts color coded to their correct locations.
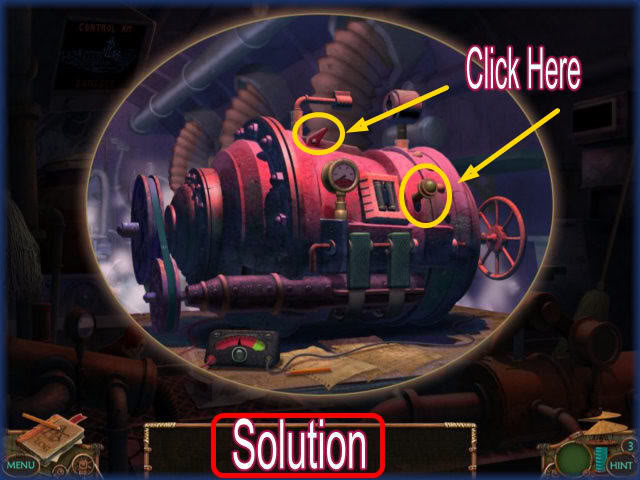
- After you assemble the engine you must hit the 2 switches shown in the final image.
- It is possible to put something in the wrong spot. If nothing happens when you hit the 2 switches you have something incorrectly placed and you will need to go back and figure out your mistake.
- If you have everything correct it will start and the window will close putting the pod engine into your inventory.
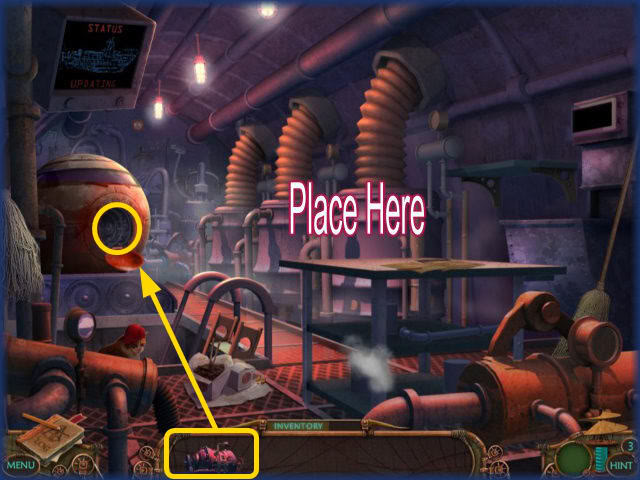
- Place the escape pod engine inside the escape pod as shown above.
- You will again talk with Emily and she will ask you to leave in the pod for your next location.
CHAPTER 2: Devil’s Triangle
Garden Shears
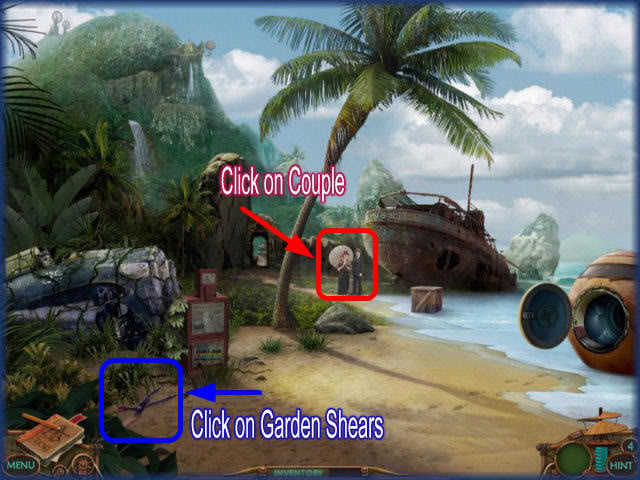
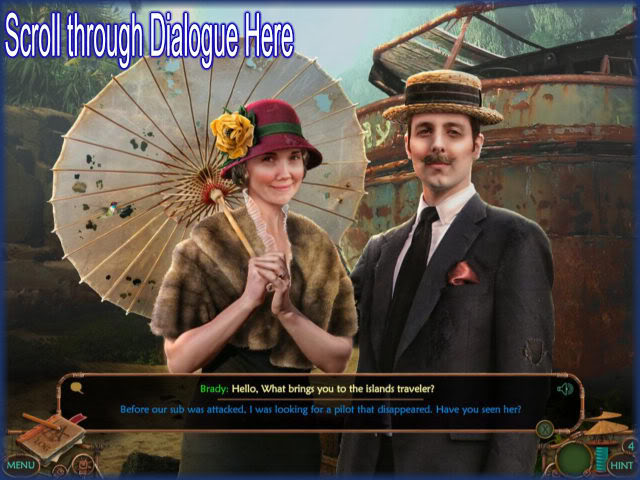
- Click on the garden shears as seen above.
- Click on the couple in the scene and read through the dialogue.
- The couple’s names are Brady and Martha. Brady needs you to find his watch and Martha needs for you to find her dog Sally.
- The couple tells you that you should talk to Gideon who lives on the other side of the cliff.
- Click in the area behind the couple.
Dog Leash
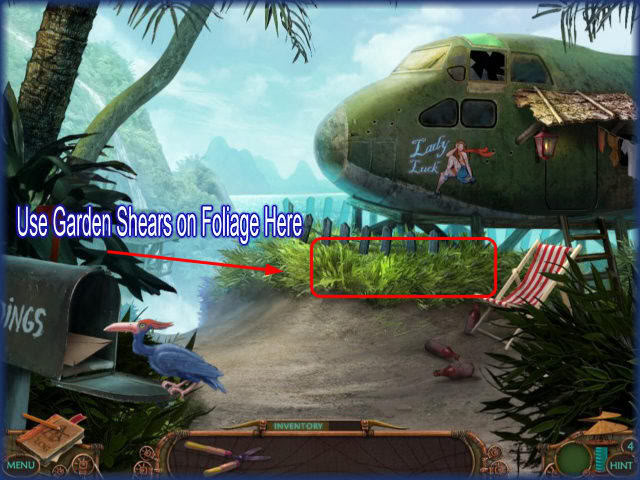
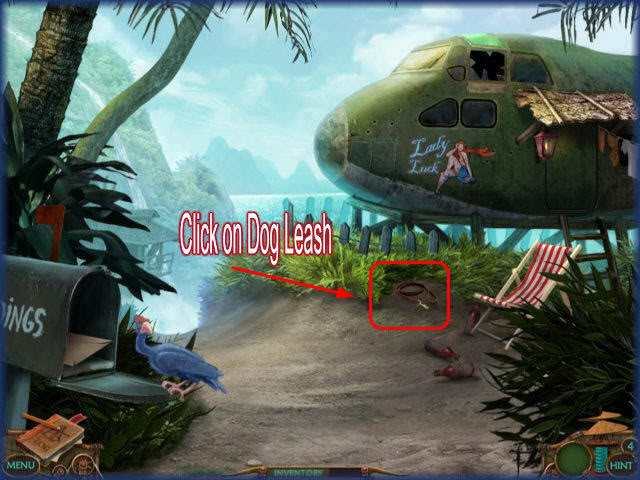
- Use the shears to cut away the foliage as seen above.
- Click on the dog leash when you can see it.
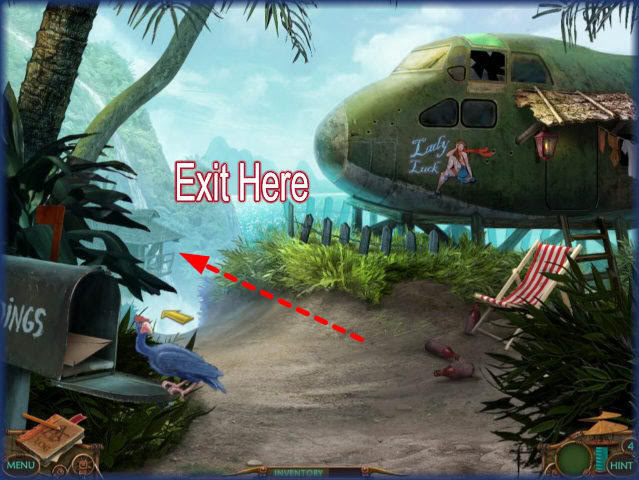
- Place your cursor to the left to go to the next scene.
Ladder/Sign
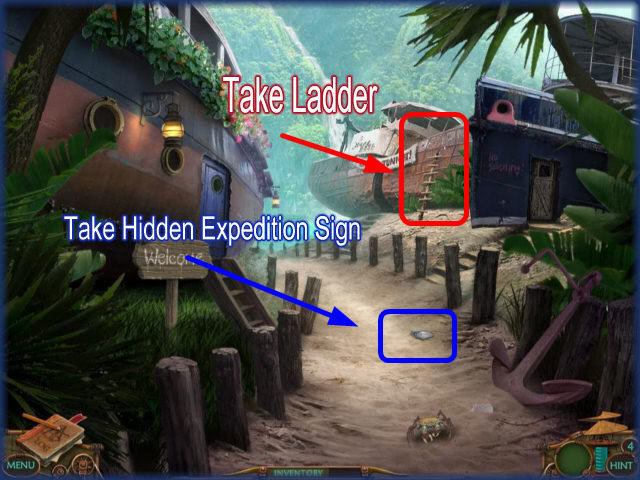
- Take the ladder and it will go into inventory.
- Click on the hidden expedition sign on the ground.
Place the ladder
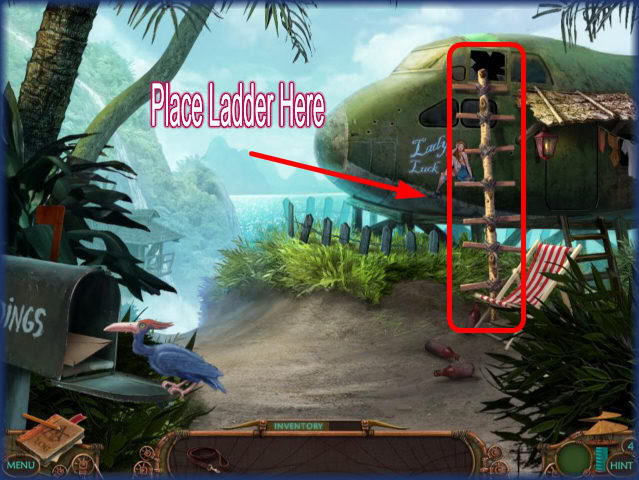
- Place the ladder against the plane as shown above.
- Click on the broken window to see inside.
Inside Plane
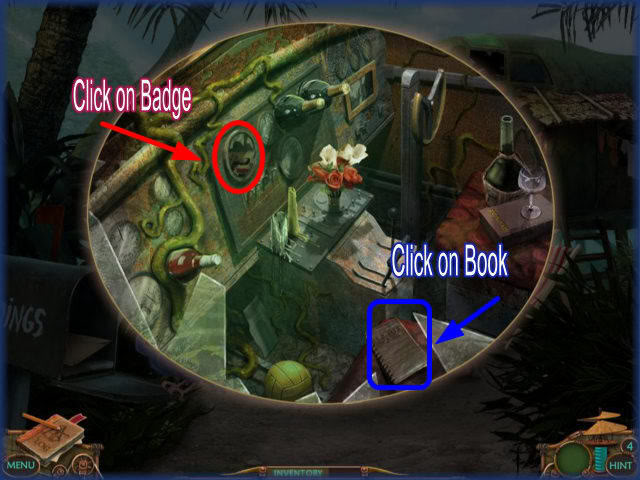
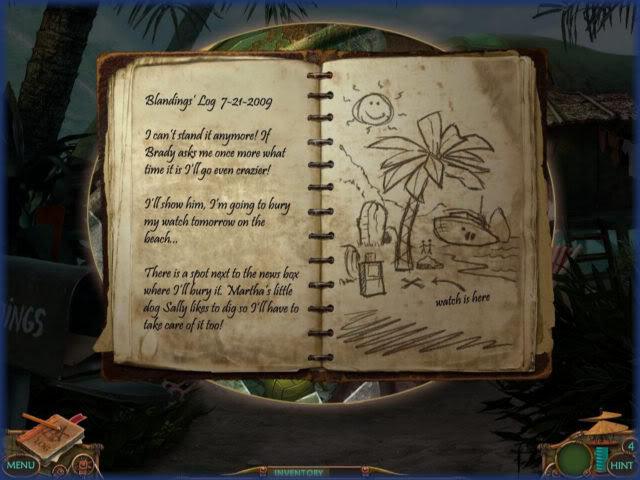
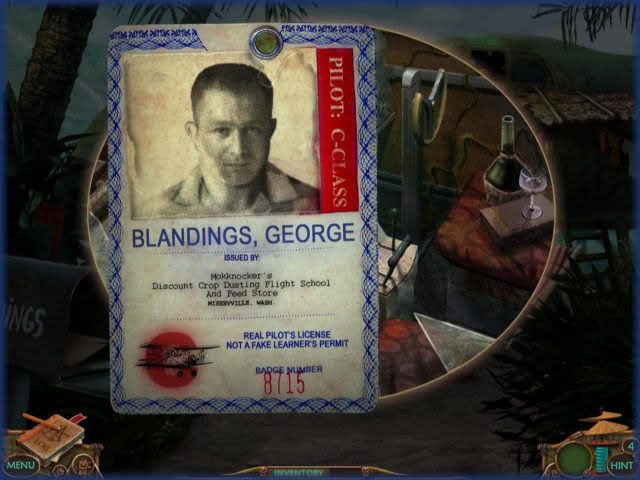
- There is a sketching book on the seat. Click on it and it will show you where you can find the watch.
- Click on the I.D. Card to read it and clicking on it again will take you out of the scene.
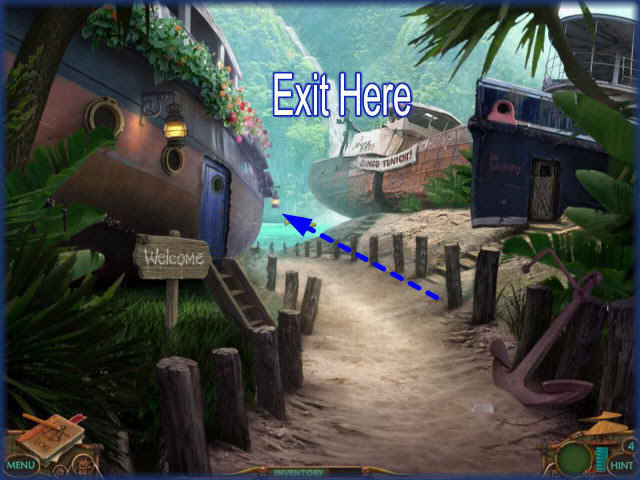
- Follow the scene as shown.
Outside Theater
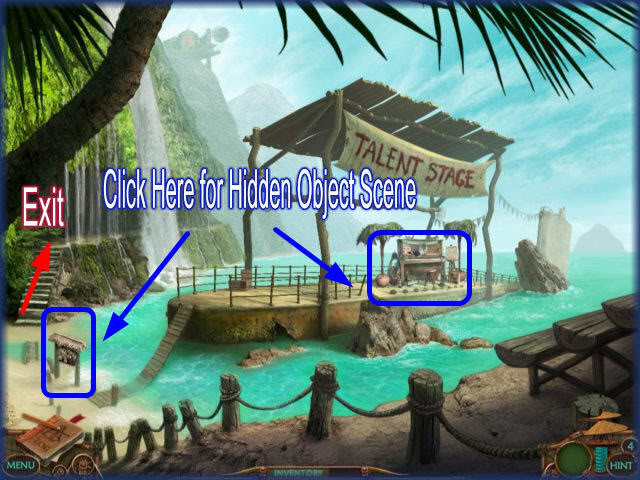
- There are 2 hidden object scenes in this area.
- Click on the piano on stage first.
Blowtorch/Hidden Object Scene
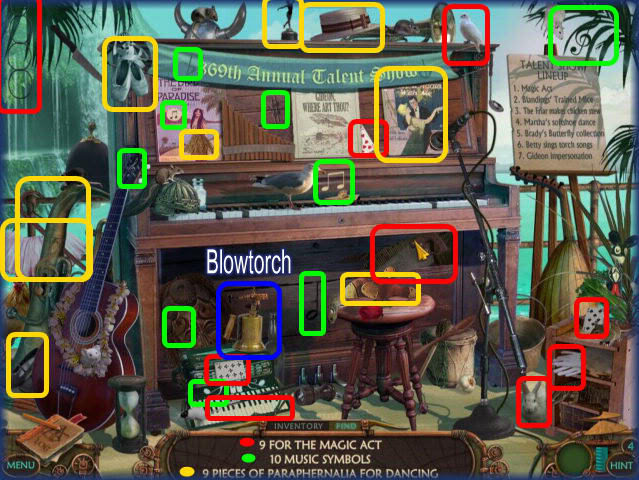
- Find the hidden objects in the scene.
- The items are color coded.
- You may have different items to find in your game.
- Click on the blowtorch and it will go into your inventory for later use.
- Exit out and click on the bulletin board.
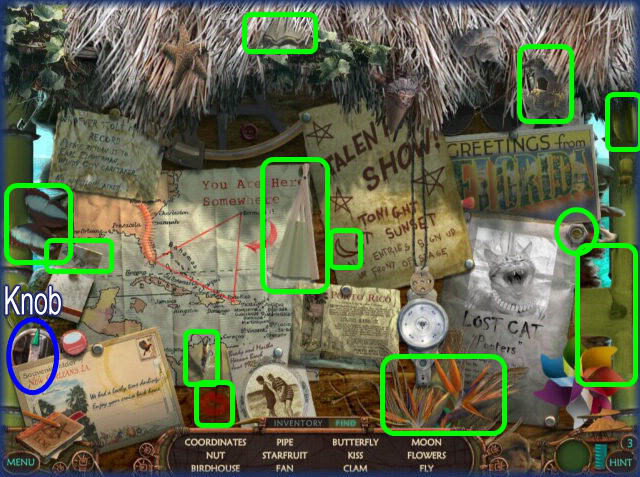
- Find the hidden objects in this scene.
- Click on the knob in the lower left and it will go into your inventory for later use.
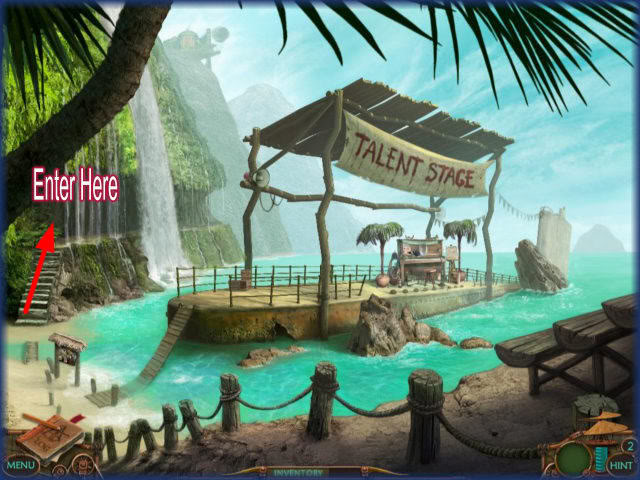
- Click on the stairs as seen above to enter the next scene.
Elevator /Shovel
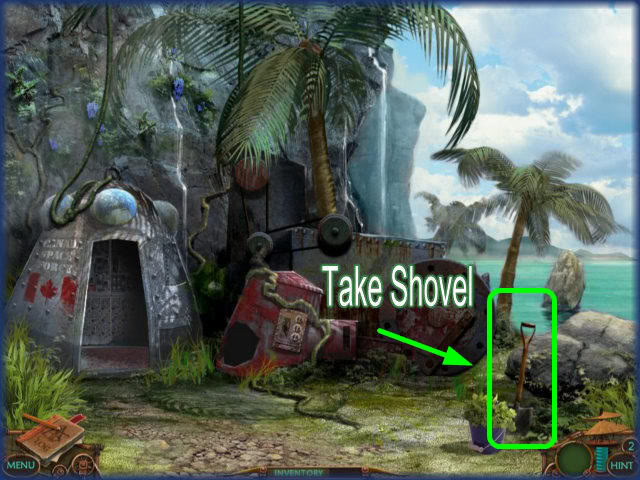
- Take the shovel and it will go into your inventory for later use.
- Go back to the beach where you met Martha and Brady.
Beach

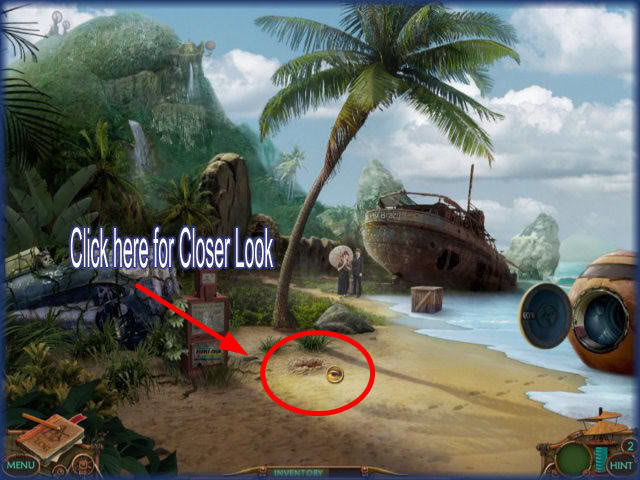
- Place your shovel in the area marked above.
- It will start to dig a hole.
- Click on it for a closer look.
- A buried toolbox will appear.
Toolbox
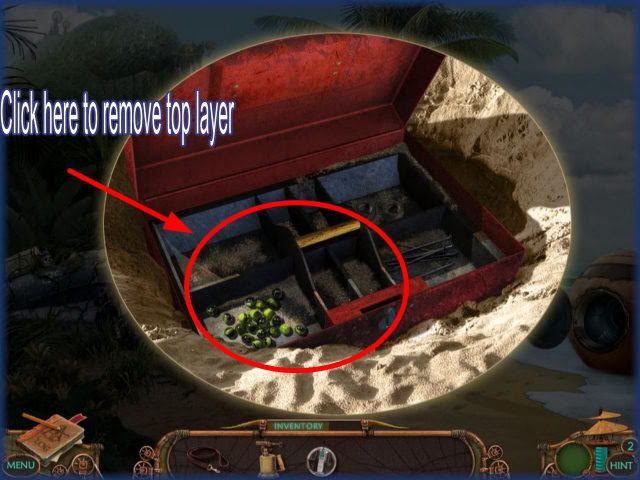

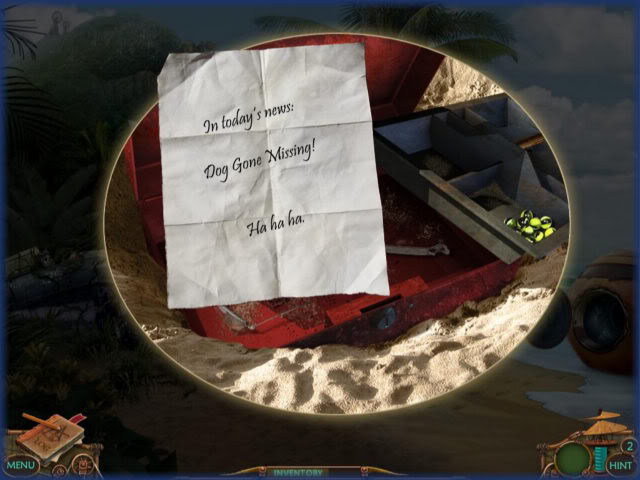
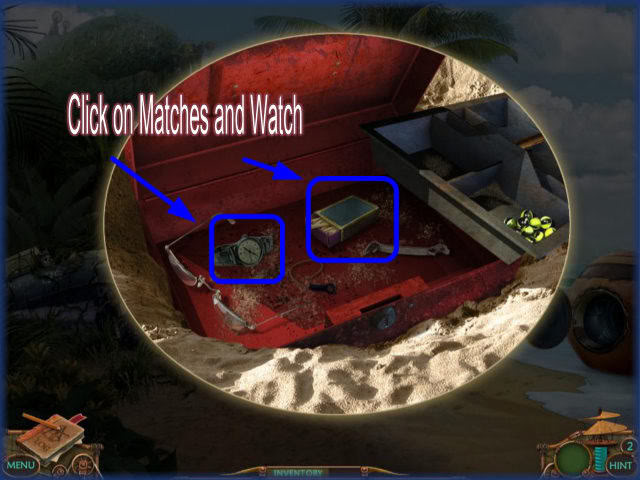
- Click on the Toolbox to open it.
- Click on the open Toolbox and the top tray will disappear.
- Click on the Note and it will appear on your screen.
- Pick up the Watch and the Matches.
Sally the Dog/Beach
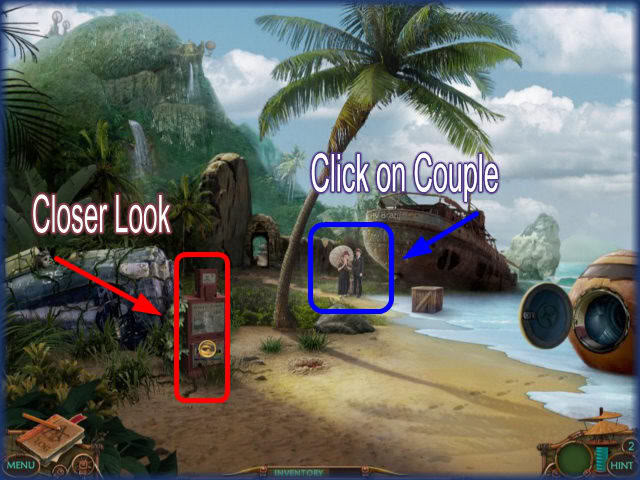
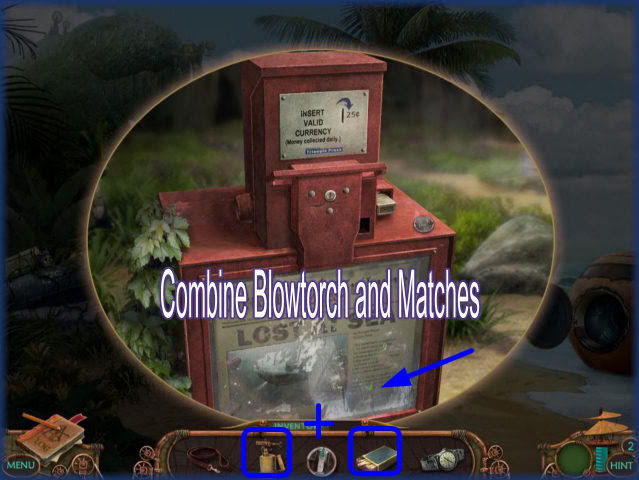
- Click on the newspaper dispensing machine for a closer look.
- From your inventory combine the blowtorch and matches and you will have a lit blowtorch.
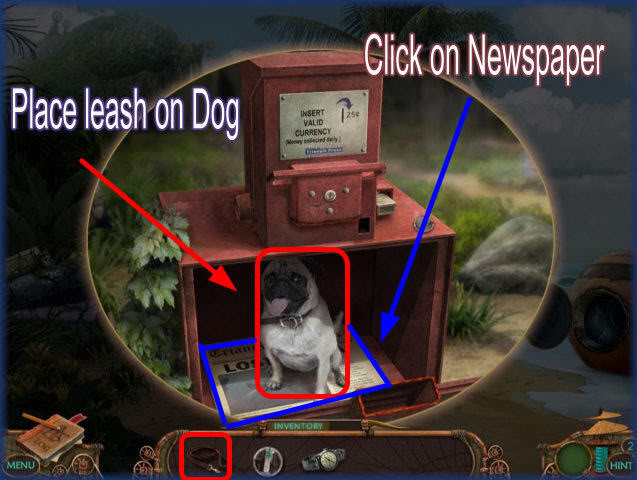
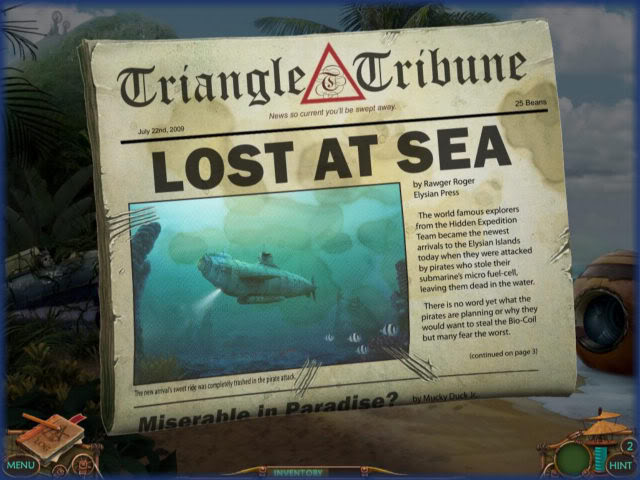
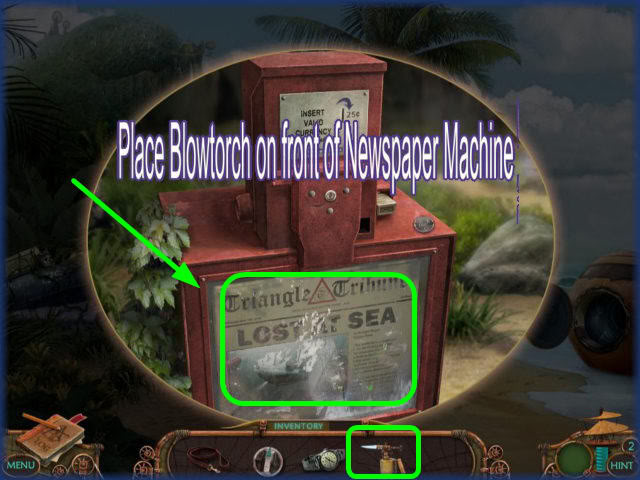
- Place the lit blowtorch on the handle of the newspaper dispenser.
- Inside the newspaper dispenser you will find a dog and a newspaper.
- Place the dog leash on the dog.
- Click on the dog and it will go into inventory.
- Click on the newspaper for a closer view.
- Click on the newspaper again to return to the beach scene.
The Couple on the Beach/Key
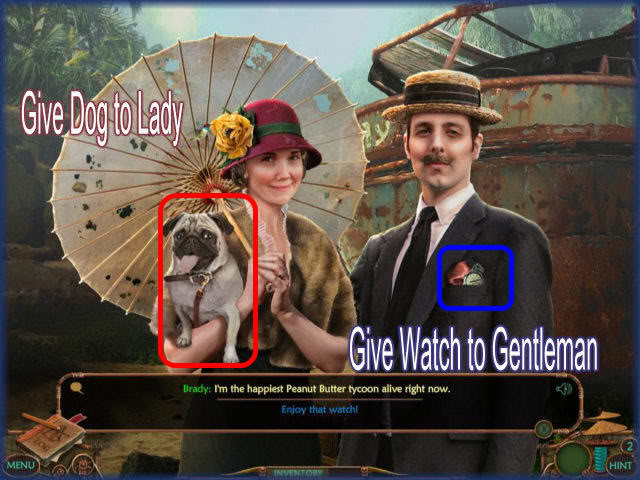
- Click on the couple on the beach for a closer view.
- Give the watch and the dog to the couple.
- Go through the dialogue in the scene.
- The couple gives you a key to their home which goes into your inventory.
- Go to the back of the beach scene and click to move to next scene.
The Blanding’s Home
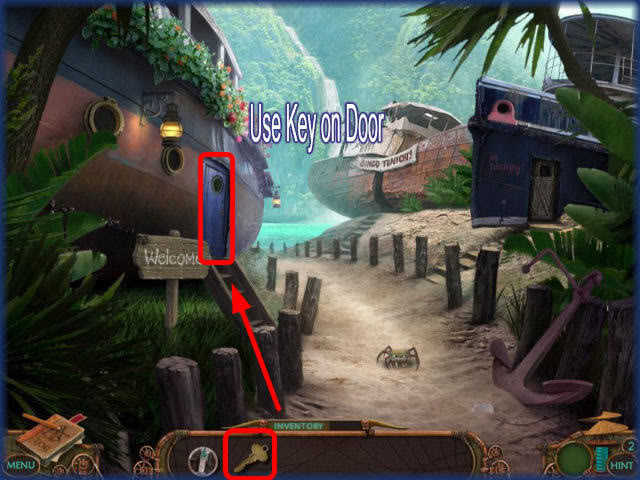
- Place key on the door to go inside the home.
12 Related Pairs/Crowbar and Fortune Cookie
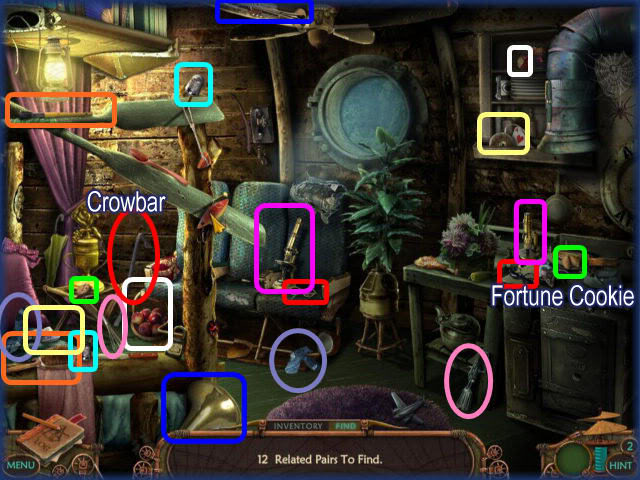

- Click on the cabinet door at the lower left of the scene first.
- Your goal in this scene is to find pairs of related items. The items can be the same or they can have something in common such as "Butterfly and Caterpillar"
- Click on an item to highlight it, then find the matching pair and both items will be taken off your list.
- If you’re stuck and can’t find something, use a hint. The hint will help you find either the first item or the pair to an item you’ve already highlighted.
- Once finished here go back to the beach.
Beach/Crate/Belt
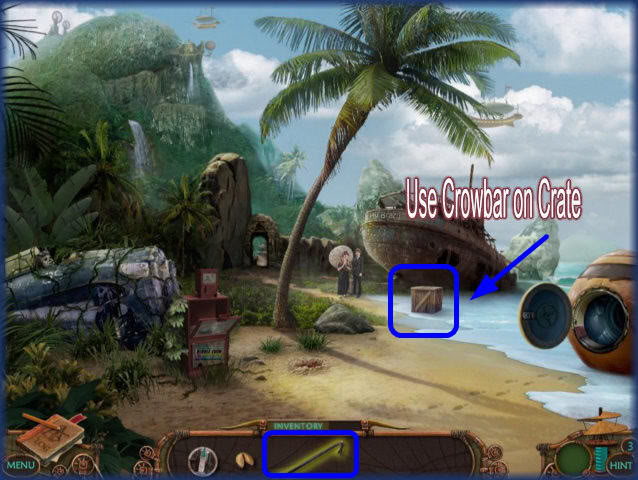
- Use the crowbar on the crate.
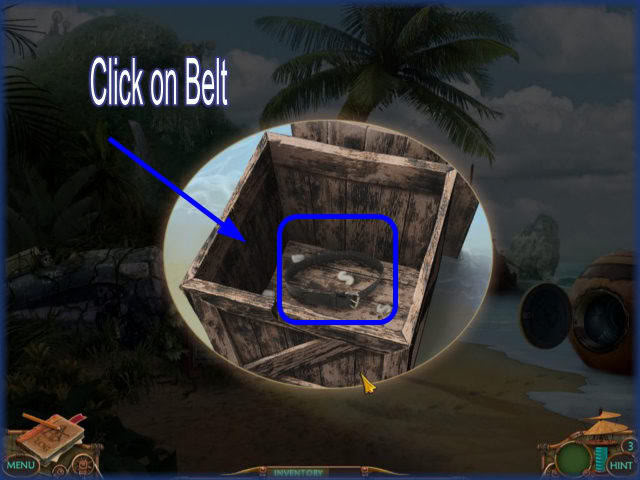
- Click on the crate several times until the packing material disappears.
- Click on the belt and it will go into your inventory for later use.
- Go back to the scene with the green airplane.
Fortune Cookie/Letter
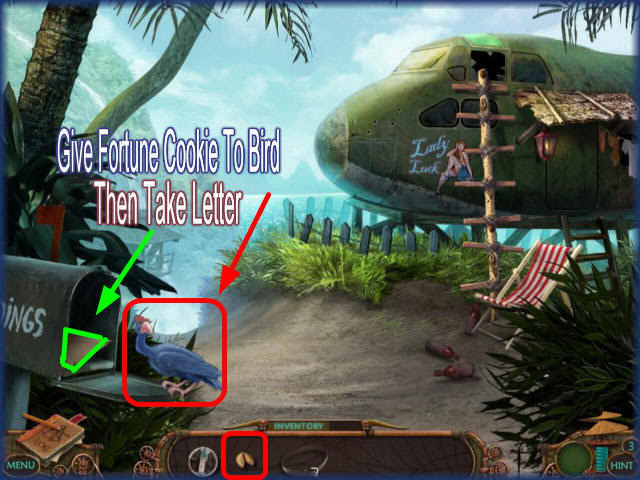
- Give the cookie to the bird.
- Take the letter out of the mailbox.
Letter Puzzle/Mini Game
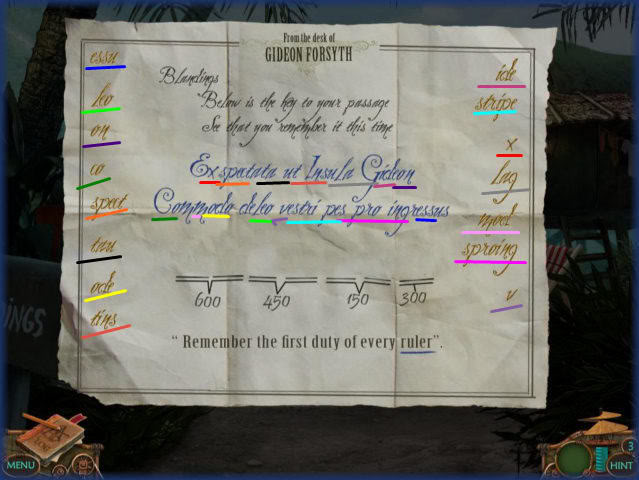
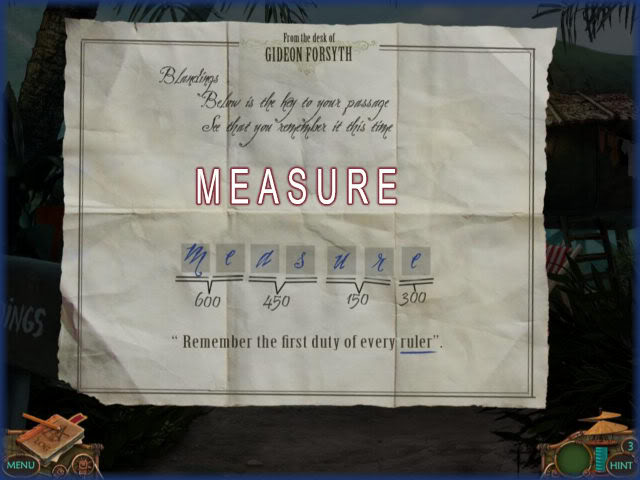
- There is a letter from Gideon Forsythe and the goal of this puzzle is to find out the secret word.
- There are gold letters along the sides of the letter.
- Click on the gold letters and place them on top of corresponding blue letters and they will disappear.
- Once you do this with all the words only 7 letters will remain and they will be scrambled.
- The solution is shown above and the answer is the word "measure."
- The puzzle is color coded to show how to solve it.
- The letter will appear in your journal once you solve it so you can go back to it later.
- Proceed to the elevator entrance.
Elevator Puzzle
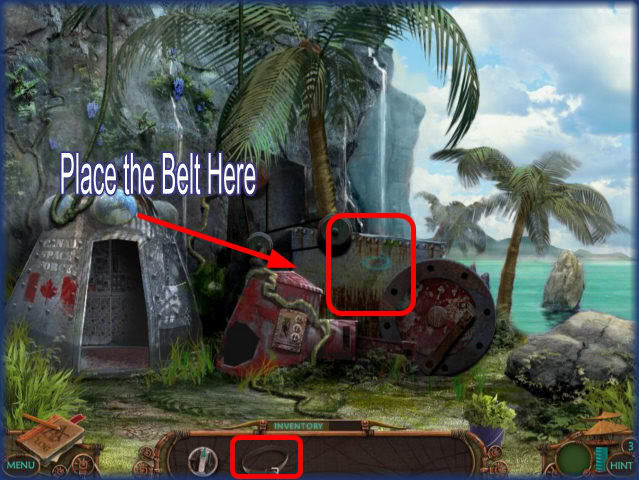
- Place the belt on the wheel of the elevator’s engine.
- Look at the numbers in logbook below the word "Measure". You need those numbers to fix the elevator.
- Click on the Elevator for a closer view.
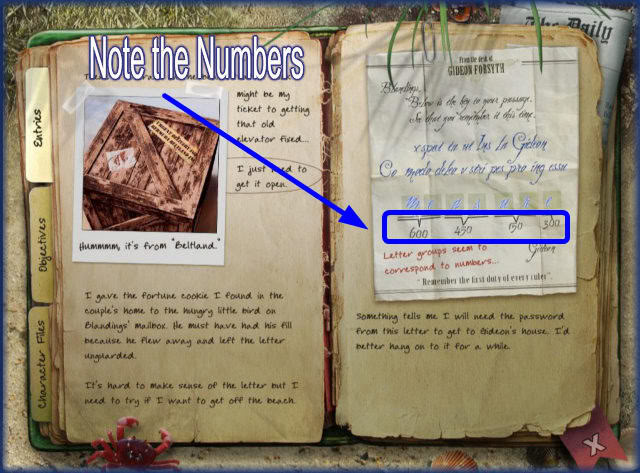
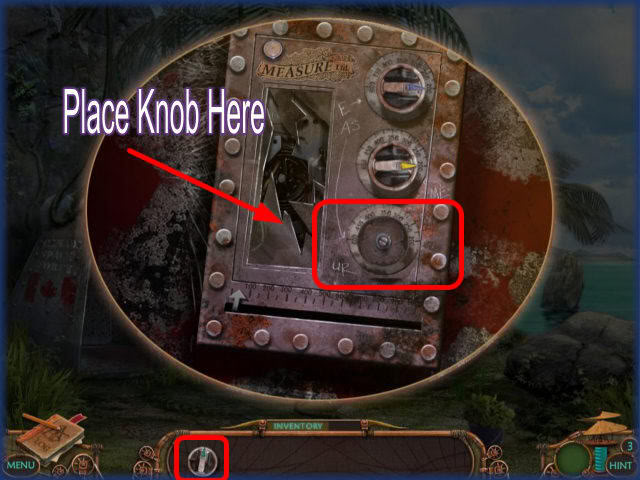
- Attach the knob on the bottom dial.
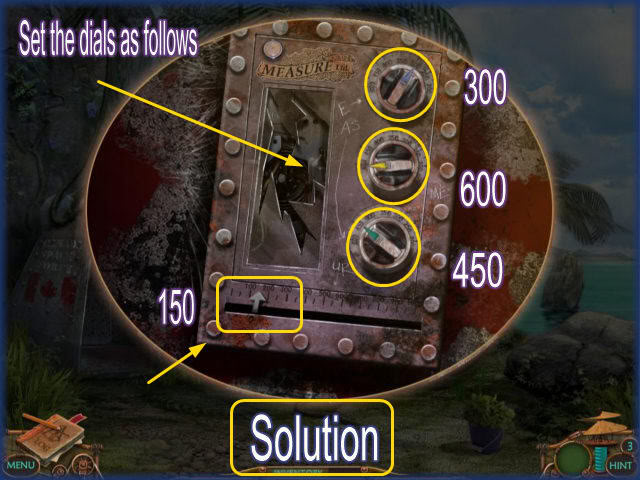
- Your goal is to turn the dials to the numbers in the journal.
- Notice the etchings on the side of the panel.
- The numbers and letters correspond to the numbers you need to enter.
- The solution from top to bottom is as follows:
- Turn the top dial to 300, which is the letter "E" in the logbook.
- Turn the middle dial to 600, which are the letters "ME" in the Logbook.
- Turn the bottom green dial to 450, which are the letters "AS" in the Logbook.
- Once all the dials are in place, slide the arrow at the bottom of the box to "150"
- This corresponds to the "UR" section in the Logbook.
Go inside Elevator
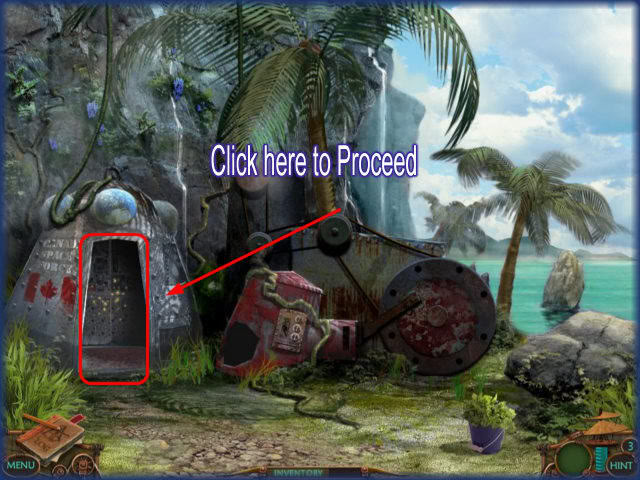
- Go inside elevator where you see the sparkling area.
- Watch scenes play out.
Chapter 3: A Strange Meeting
Gideon’s House
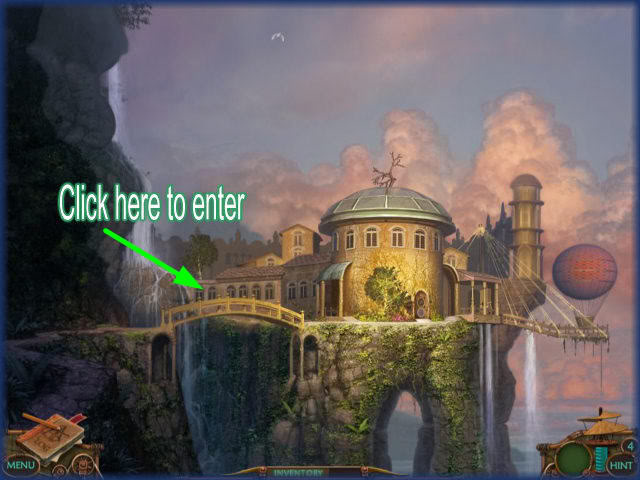
- Click on the bridge area to access Gideon’s house.
Constellation Lock Puzzle
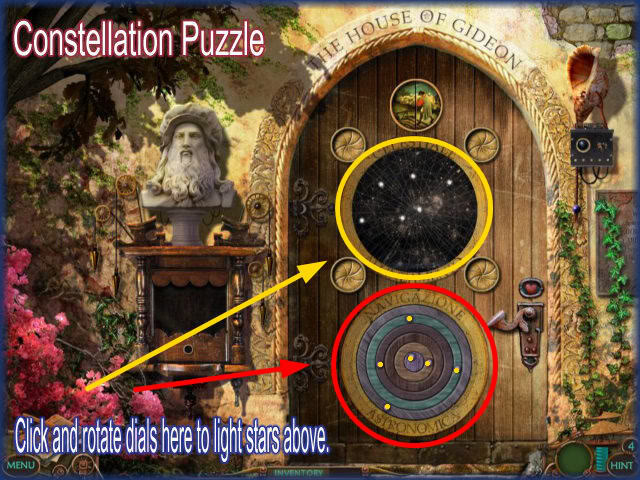
- The goal in this puzzle is to click on the circles in the lower part of the door until you see all of the stars in the constellation light up in the top part.
- Keep turning all the circles in the puzzle until the form of the stars is revealed.
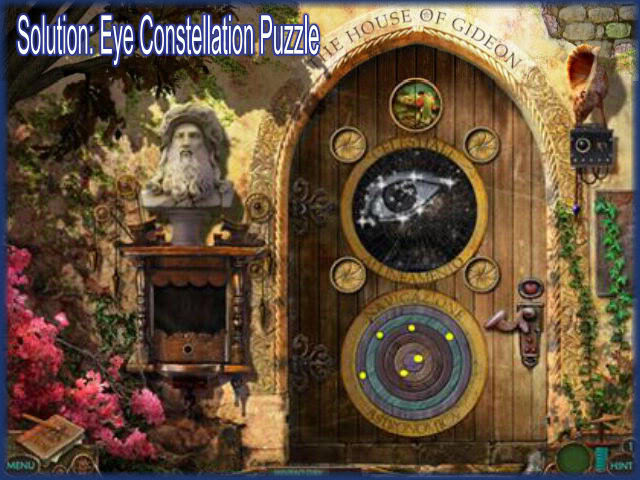
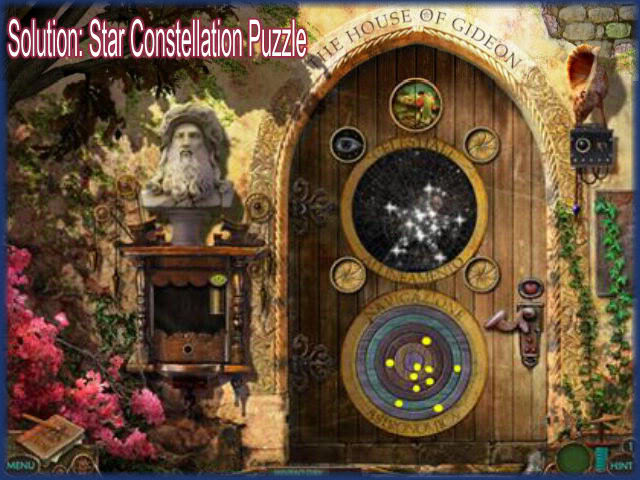
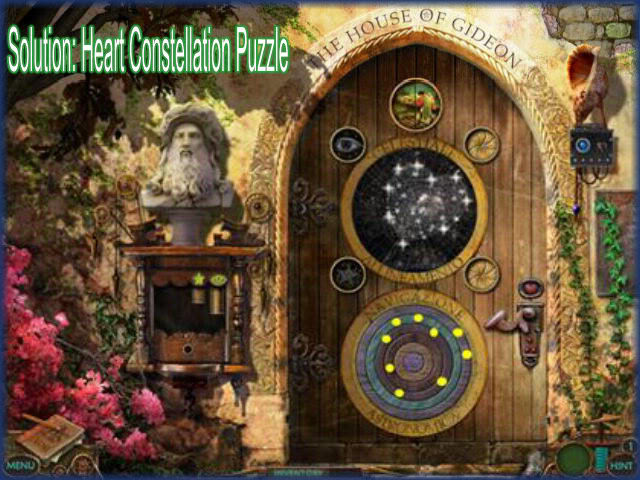
- You will have to duplicate four different patterns to pass this puzzle.
- Once all 4 puzzles have been solved the handle will appear above the door.
Eye Constellation Puzzle
Star Constellation Puzzle
Heart Constellation Puzzle
Moon Constellation Puzzle
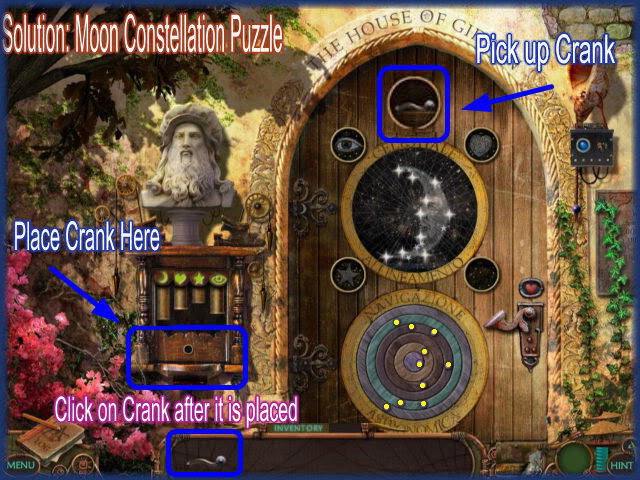
- Click on the doorbell crank that appears above the door.
- Place the handle at the bottom of the large doorbell on the left.
- Click on the crank and it will start to spin.
- The door will then open.
- Click on the door to go through it.
Atrium
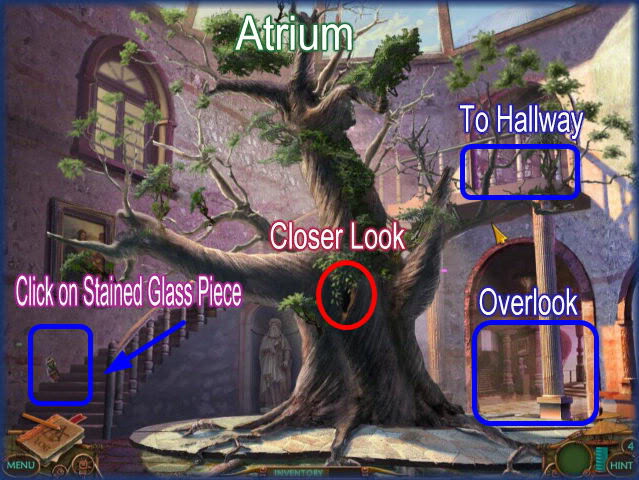
- You can access several areas from the Atrium as seen in image above.
- Click on the stained glass piece.
- Click on the tree for closer look.
Tree/Blowgun
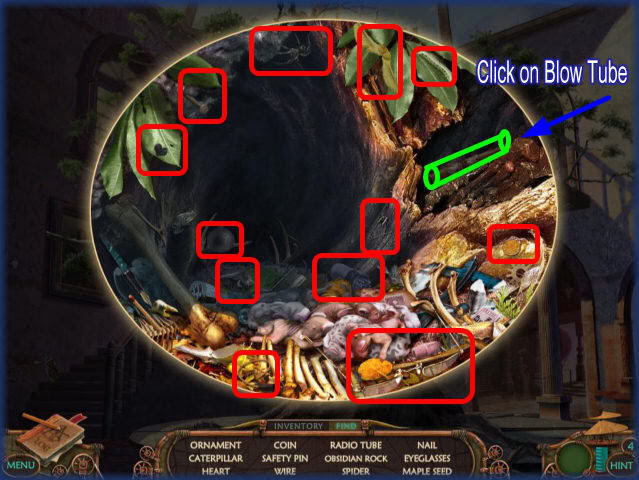
- Find the items on the list.
- Click on the blowgun at the upper left of scene.
- Head to the Overlook next.
Overlook
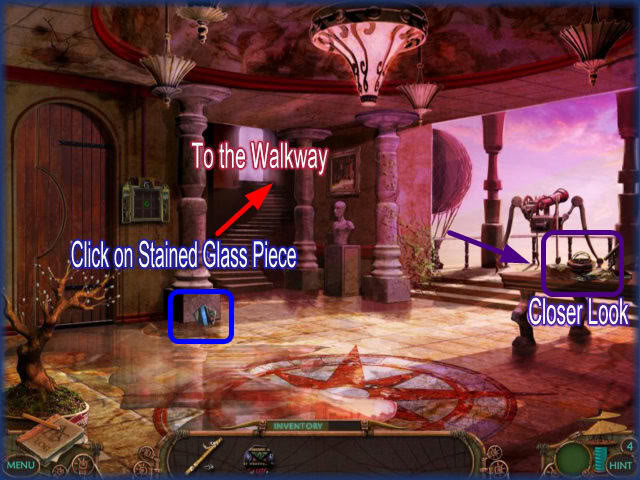
- Click on stained glass piece.
- Click on the desktop to the right for closer view.
Desktop
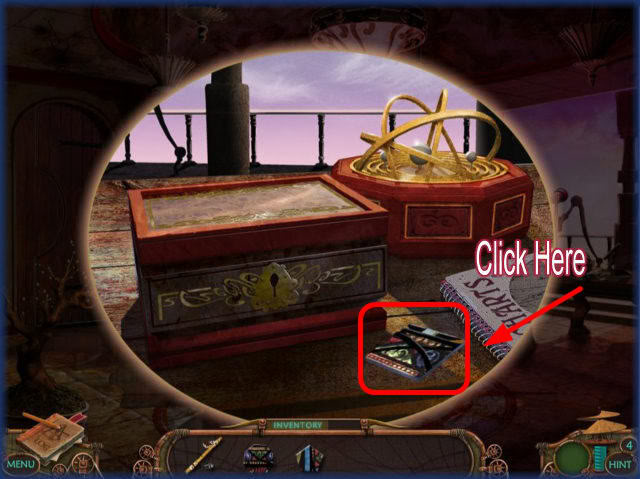
- Pick up the stained glass piece on the right.
- The box is locked and you will need to find a key to open it. You can come back to it later.
- Close the pop-up window.
Stairs to Walkway
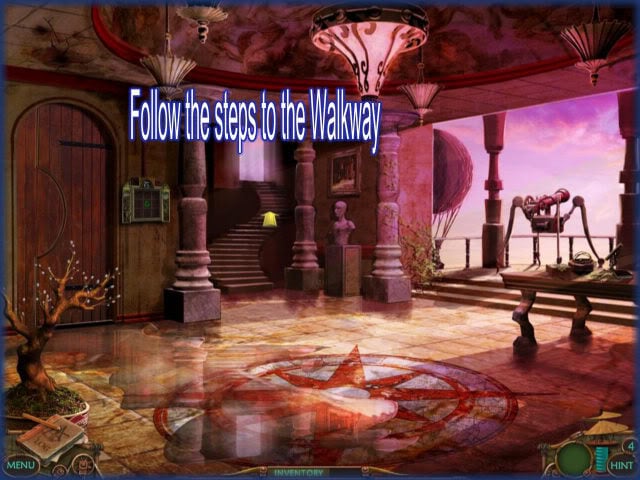
- Click on the steps of the Overlook to reach the Walkway.
Walkway
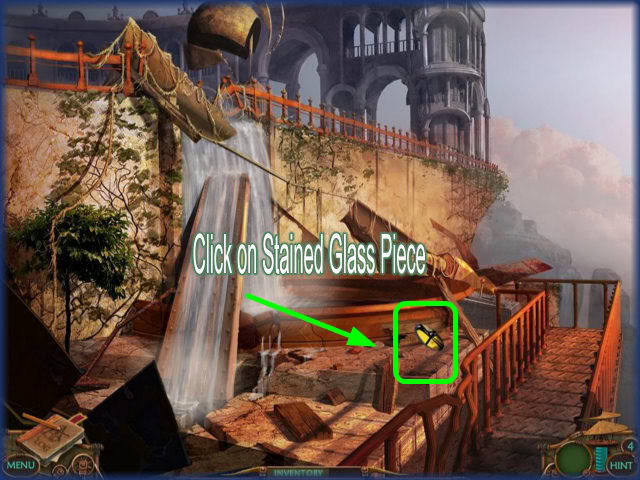
- Grab the stained glass piece on the right.
- Click on the right for a closer view.
- You need a key to work the device.
- You can come back to this spot later.
Hallway
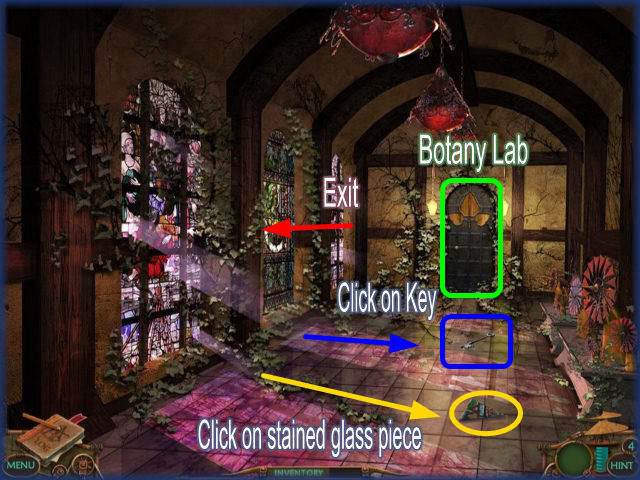
- Click on the stained glass piece and the key on the floor.
- Make note of the symbol of the door in the back, you will need this for another puzzle.
- Go back to the Overlook.
Overlook/Desk
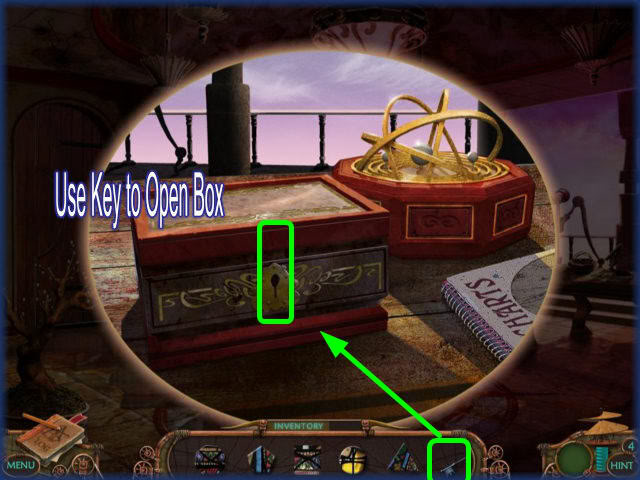
- Click on the desktop on the right for a closer view.
- Take the key from inventory and place it on the box.
- Click on the Beaker inside the box.
Hallway/Stained Glass Puzzle
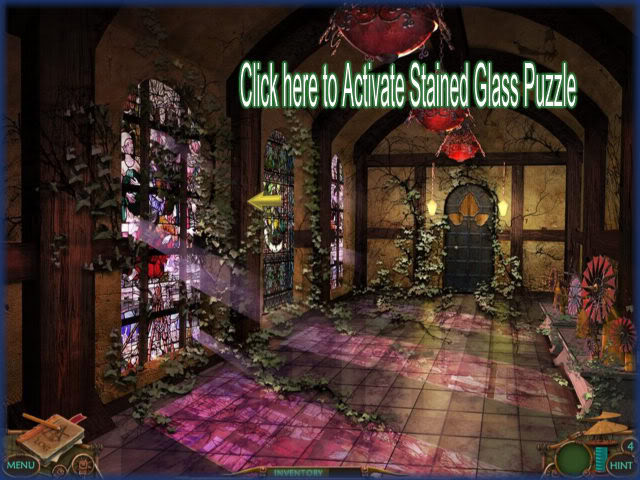
- Place your cursor to the left and click to access the puzzle.
Stained Glass Puzzle
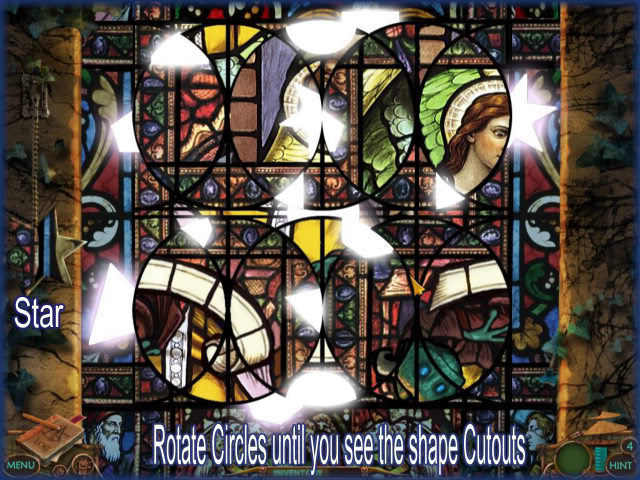

- Click on the stained glass piece at the far left.
- There are 6 circles in this puzzle with 3 on top and 3 at the bottom.
- When your cursor passes over a circle it will light up.
- Your goal is to rotate the circles until the white geometrical shapes are all aligned.
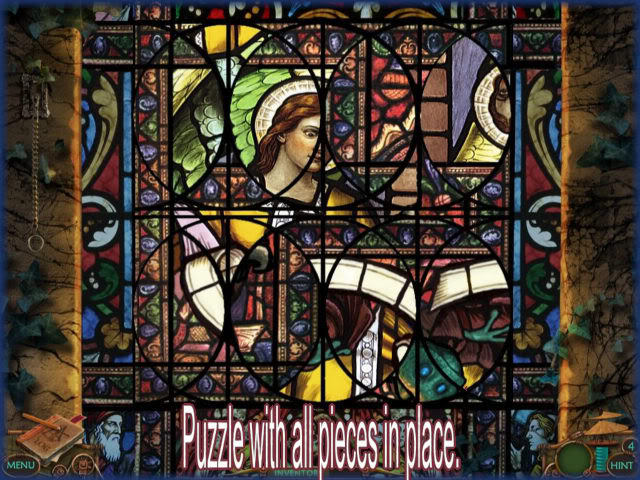
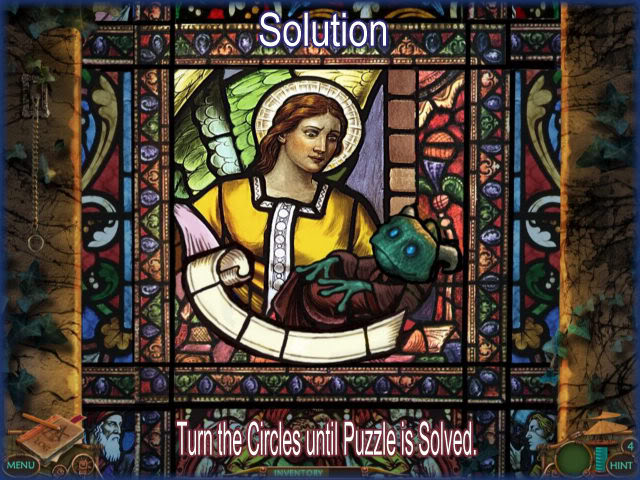
- Now you will place all the stain glass pieces into the geometrical shaped holes.
- Once all pieces are in place rotate the circles until the picture is complete.
- See solution above.
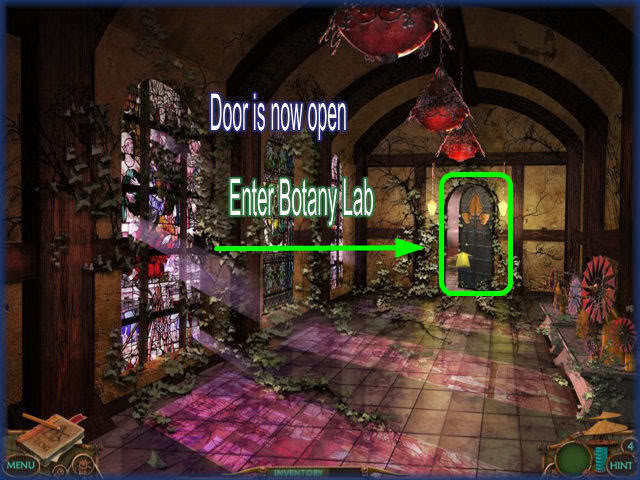
- Once this puzzle is complete the door to the botany lab is opened.
- Go inside botany lab.
Botany lab/Water Key/Knife
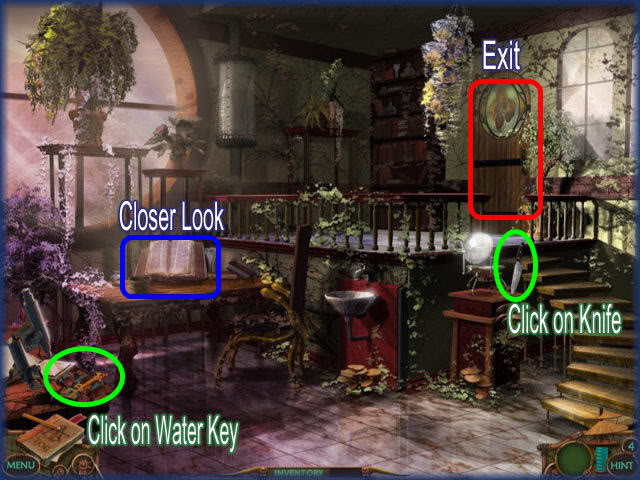
- Click on the water key in the lower left.
- Click on the knife on the far right side.
- Click on the faucet and you will notice a sign that says the water is not running.
Explosive/Chemical X
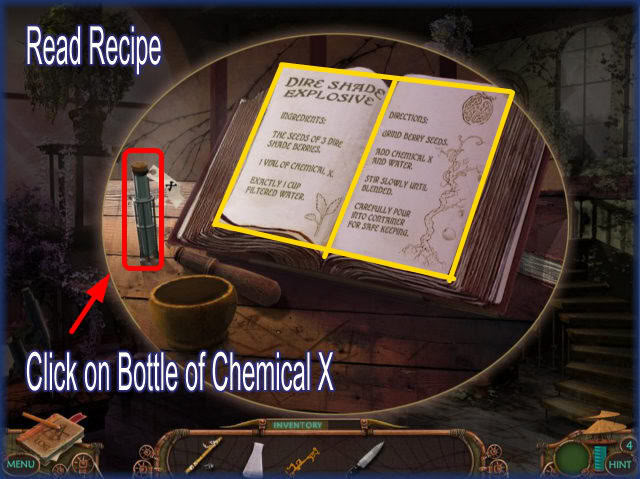
- Take a closer look at the open book on the table. It gives you a recipe for an explosive.
- It tells you that you need the seeds of 3 Dire Shade Berries, 1 Vile of Chemical X and exactly 1 Cup of Filtered Water.
- Click on the Vile of Chemical X.
Botany Lab Computer
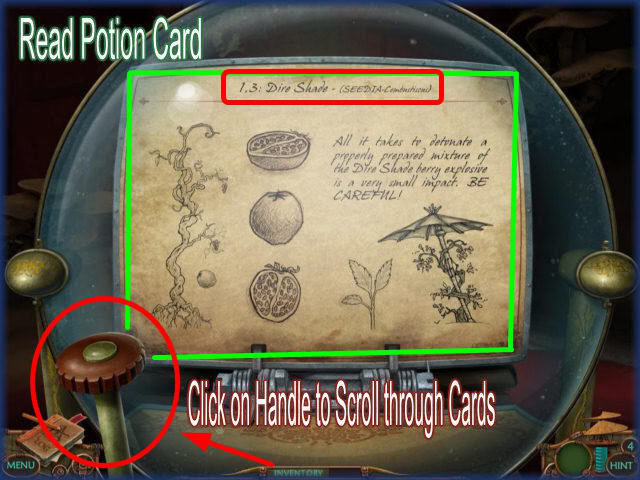
- Click on the computer in the lab.
- Use the Handle on the left to flip through the cards.
- Stop and read the card entitled "1.3 Dire Shade". It says:"All it takes to detonate a properly prepared mixture of the Dire Shade berry explosive is a very small impact. BE CAREFUL"
To Garden
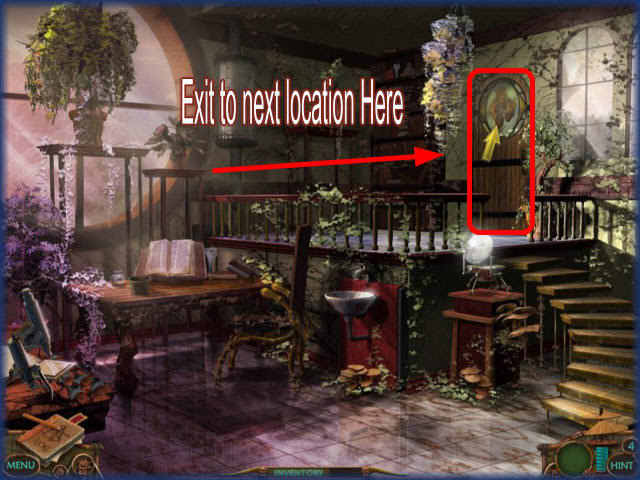
- Go through the door in the back of the lab to access the Garden.
Garden
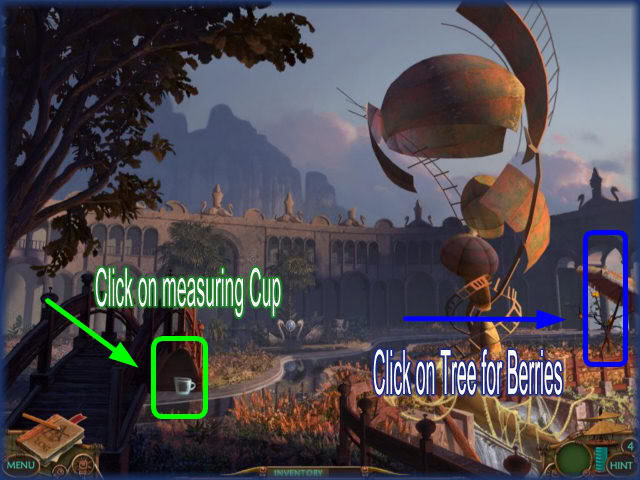
- Click on the measuring cup.
- Click on the tree to the right to collect the dire shade berries.
- Go to walkway.
Walkway/Water Key
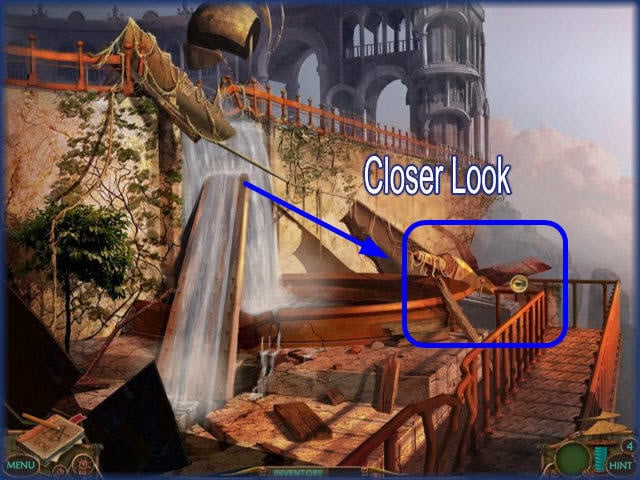
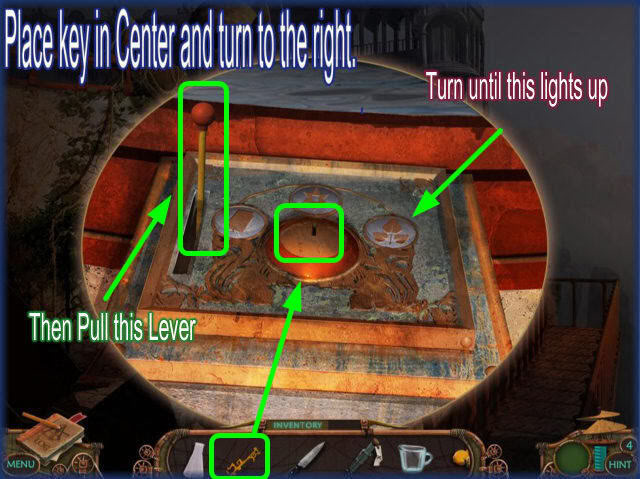
- Click on for closer look.
- Place key in device.
- Turn key until the last light on right lights up. It has the botany symbol on it.
- The water will drain and fill up the tanks in the botany lab.
Botany lab

- Click on the faucet to start the water running.
- Place the Measuring Cup under the Faucet to fill it with Filtered Water.
- Click on the faucet again to turn off the water.
Making the Explosive
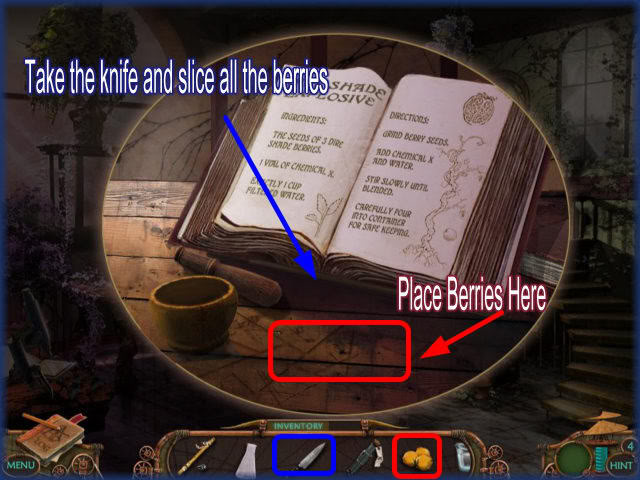
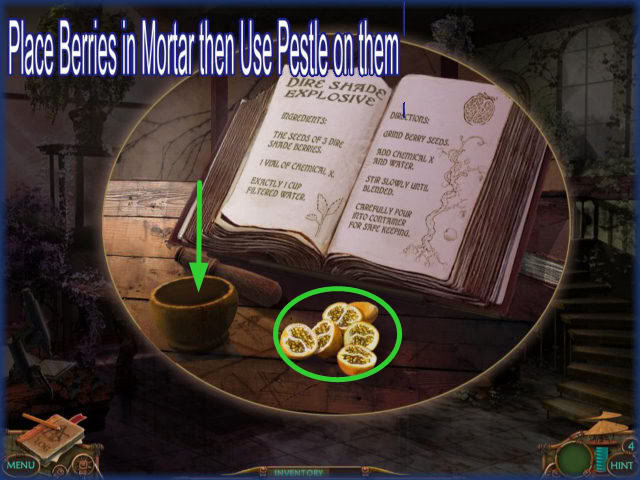
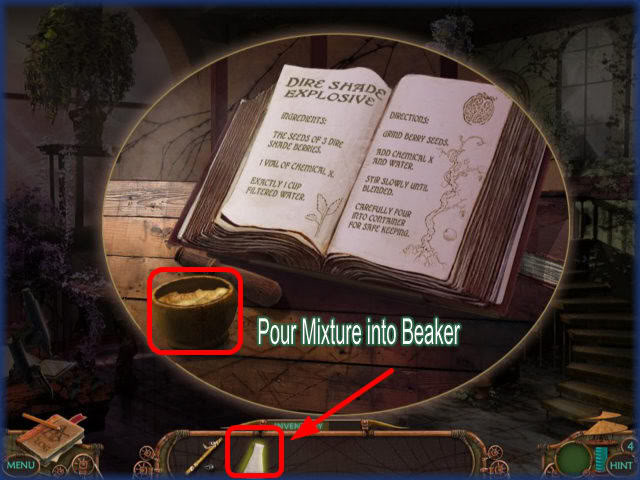
- Take the knife and slice all of the berries.
- Place the berries in the mortar and mix with the pestle.
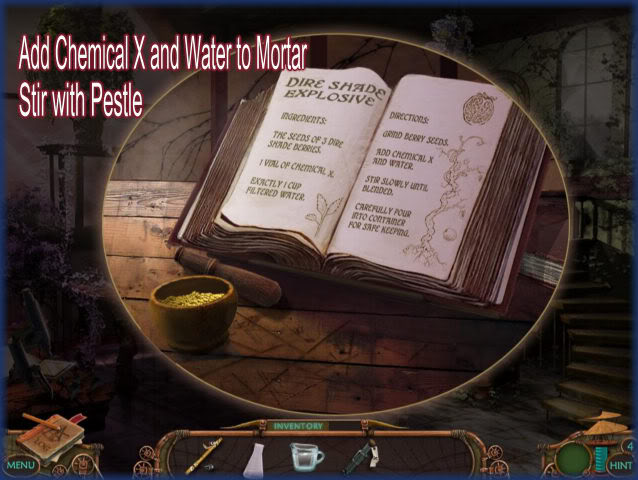
- Add Chemical X and water to mortar and mix.
- Pour mixture into beaker.
Garden

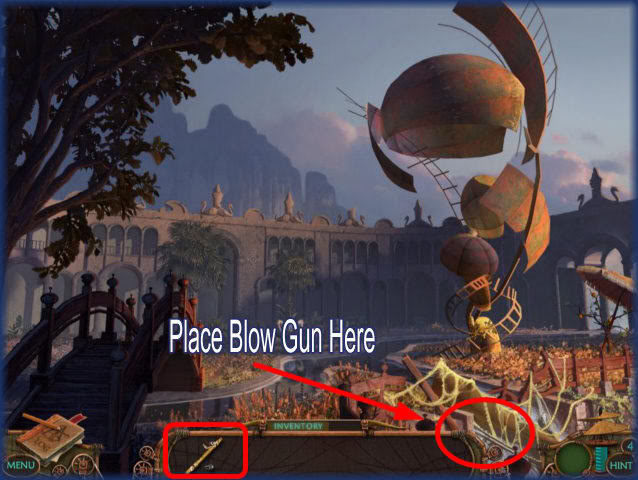
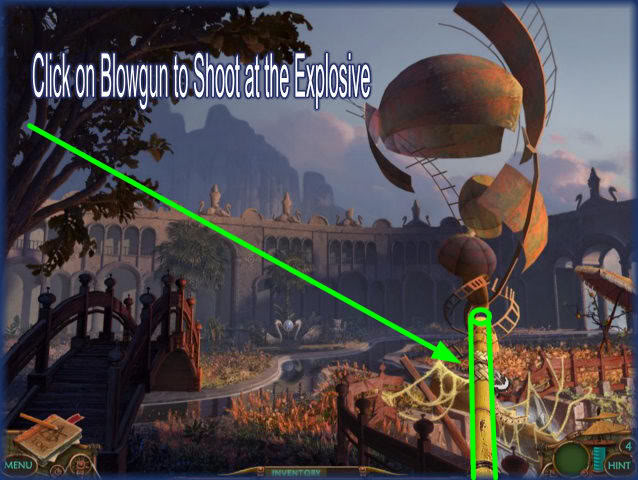
- Pour the bottle of explosive as shown above.
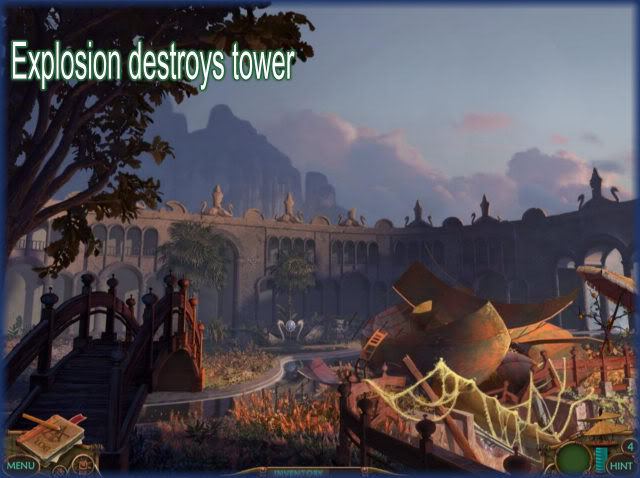
- Place blowgun as shown and shoot item to activate explosion.
- Explosion will occur and structure will be destroyed.
- Watch scenes.
- Water is no longer flowing in the walkway.
- Go back to overlook.
Library Door Lock Puzzle
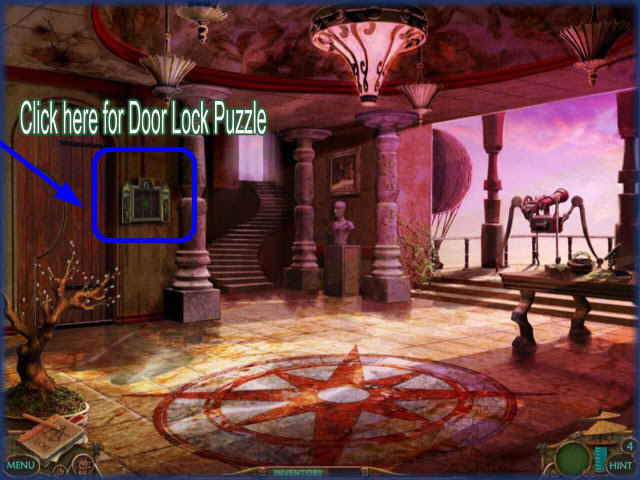
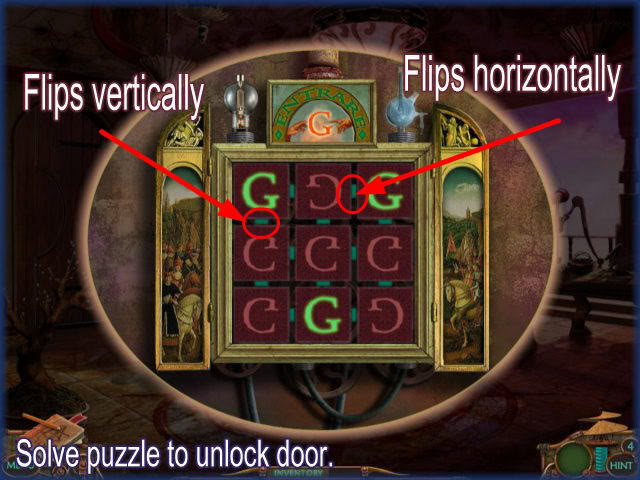

- Click here for door lock puzzle.
- Click on the green bars to rotate the letters around.
- Your goal is to turn all the letters facing in the same direction.
- The vertical green bars flip the connecting tiles horizontally.
- The horizontal bars flip the connecting tiles vertically.
- This puzzle is random each time it is played.
- The final screenshot shows you how the board should look to beat the puzzle.
Library 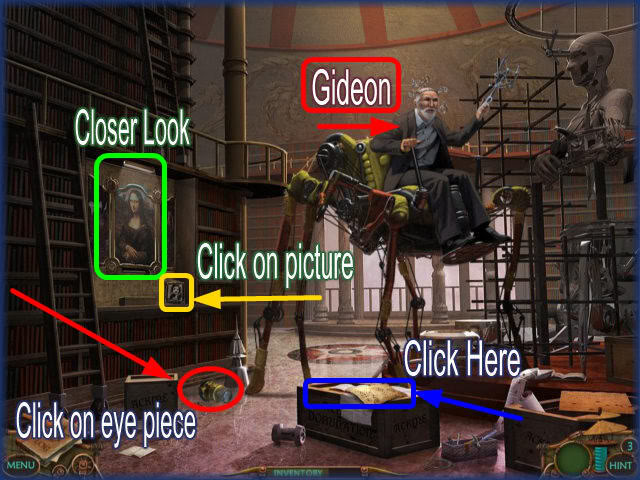
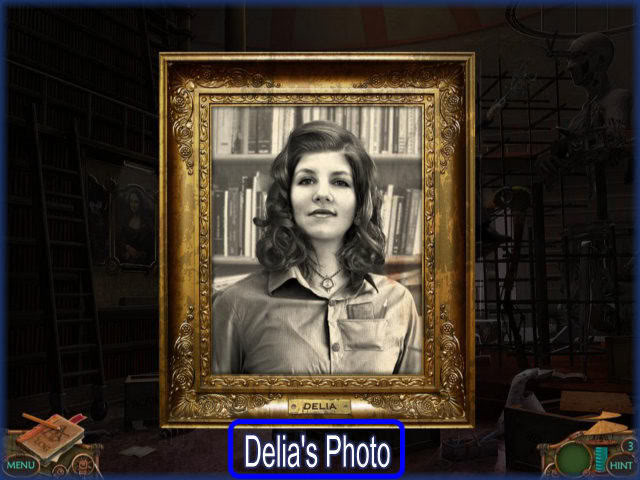
- Gideon tells you that his daughter Delia can help you get the Bio-Coil back and that you can find her in his lab.
- Then he says to take the orbs from Mona and use them in the Garden to access the lab.
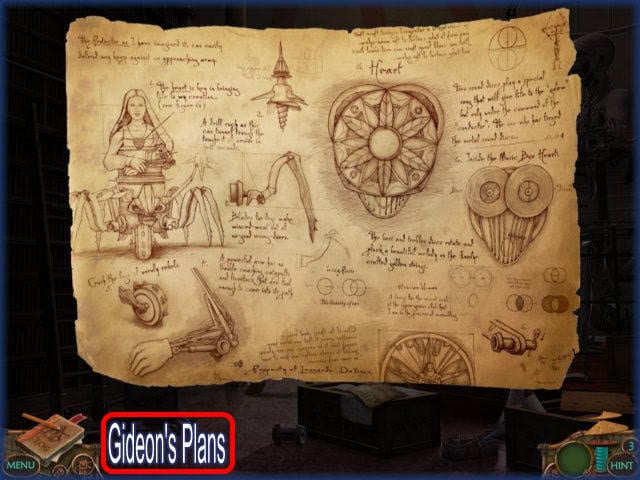
- Click on the sketch above the crate on the floor for a closer view.
- Pick up the Lens on the left side of the ground.
- Click on the picture of Delia for a closer view.
Mona Lisa Puzzle
- Find all of the hidden objects.
- There may be other puzzles not seen in your game.
Skulls
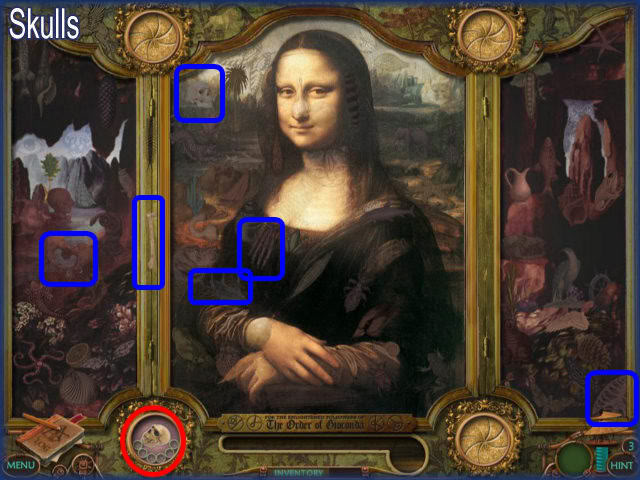
- Locate 6 hidden items.
Cats
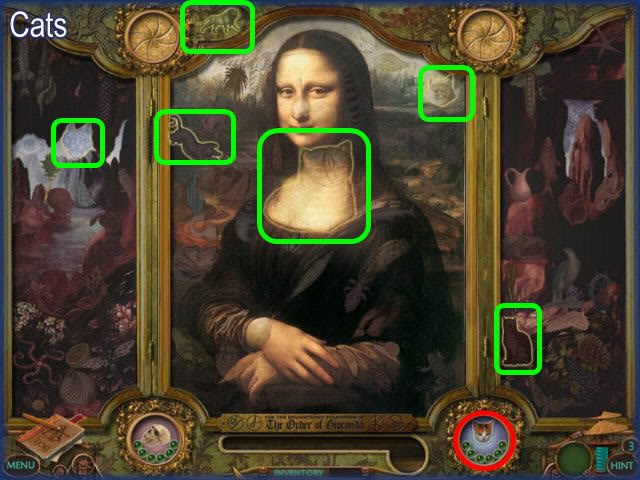
- Locate the 6 hidden items.
Frogs

- Locate the 6 hidden items.
Shells
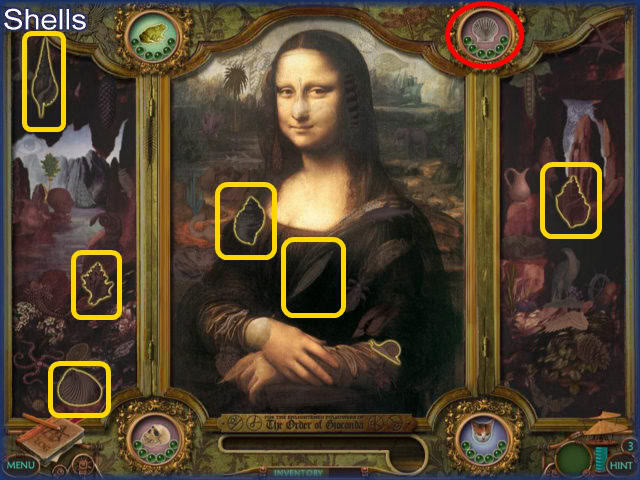
- Locate the 6 hidden items.
Final Puzzle
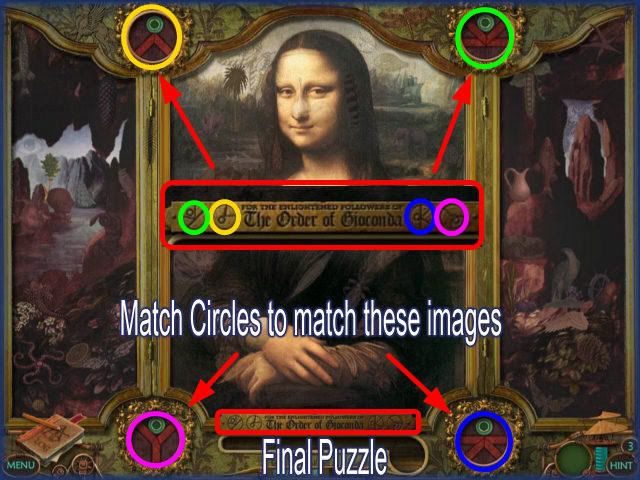
- Match the 4 corners with the symbols located at the bottom.
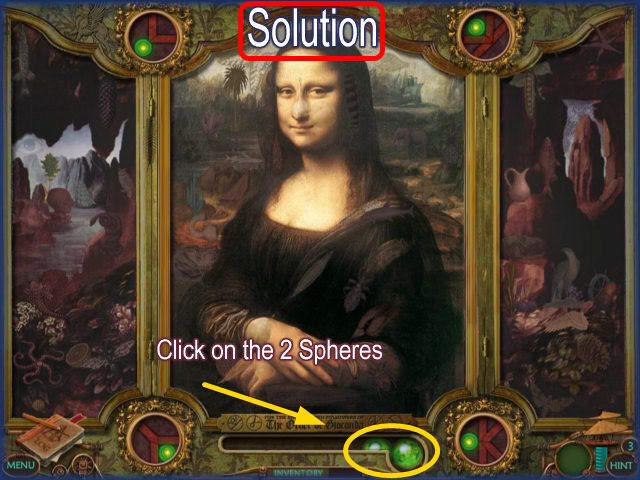
- Solution above.
- Click on the green orbs and they will go into inventory.
Overlook/Telescope

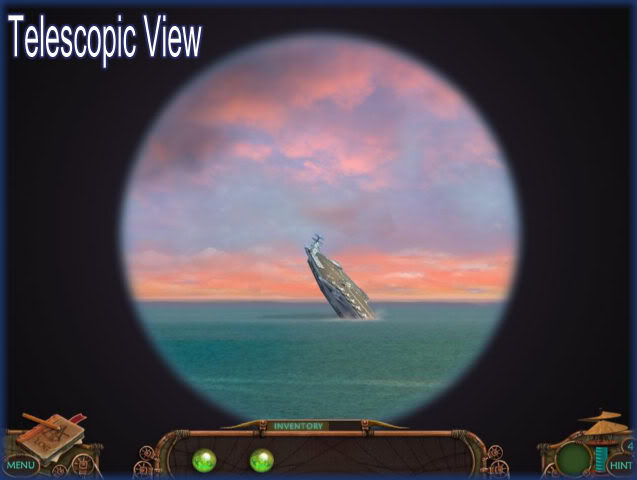
- Place the lens in the telescope and click on it.
- Look through the lens and see a sunken ship.
- Exit out and go to the reflecting pool.
Reflecting Pool
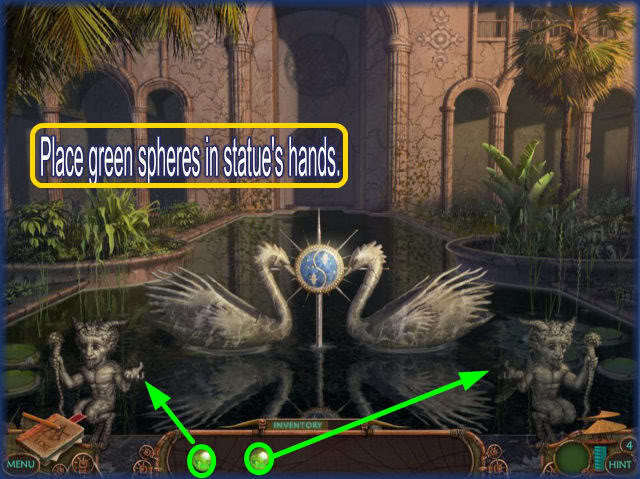
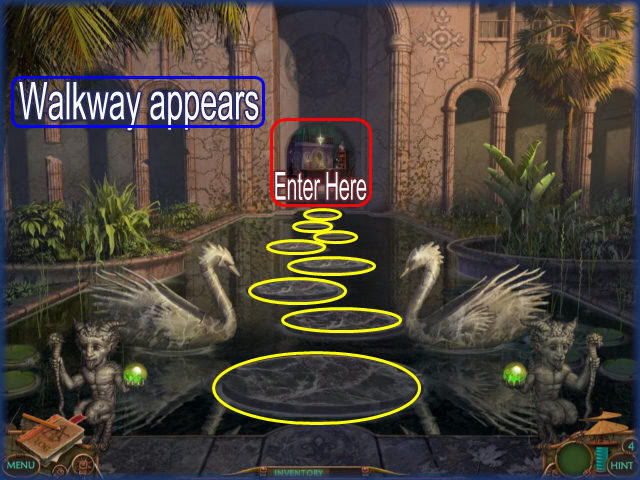
- Place the orbs in the hands of the 2 statues.
- The walkway will appear and the door to the lab will open.
Laboratory
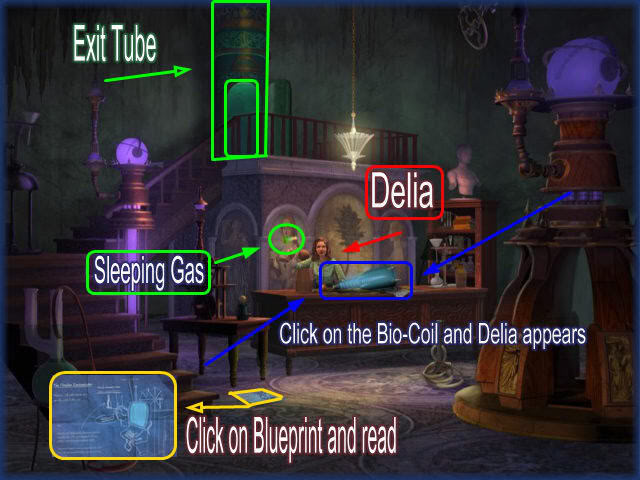
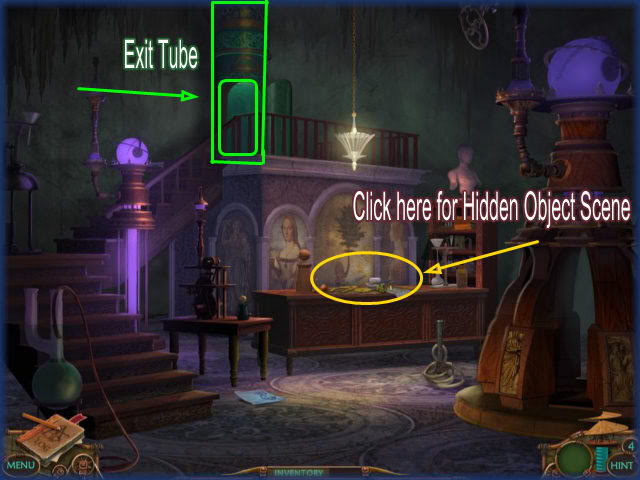
- Click on the Bio-Coil and Delia will come out from behind the counter and throw some sort of gas at you.
- The scene will go dark and when it reappears the Bio-Coil is gone.
- Click on hidden object scene.
Desk Hidden Object Scene
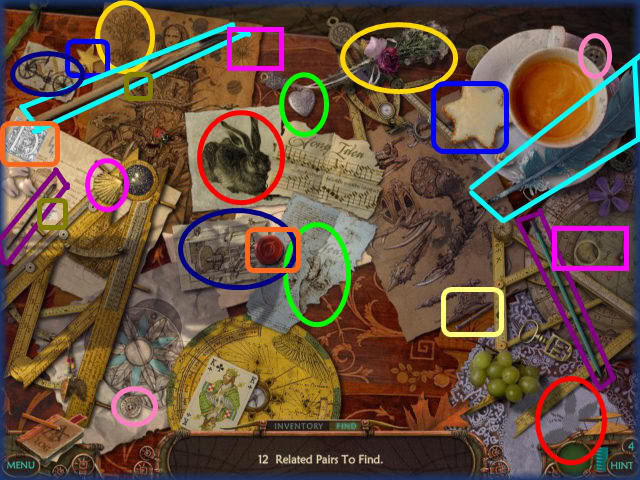
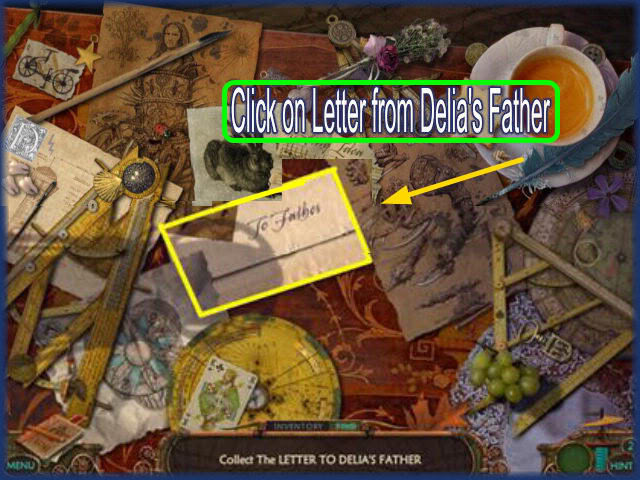
- Find 12 related pairs.
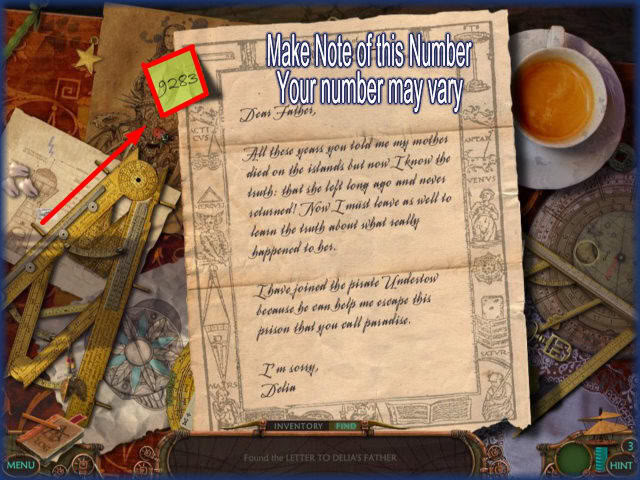
- Click on the letter from Delia’s Father.
- Note the code at the top left corner of the letter.
- Everyone will have a different code but you will need it for the next puzzle.
Exit Tube Puzzle
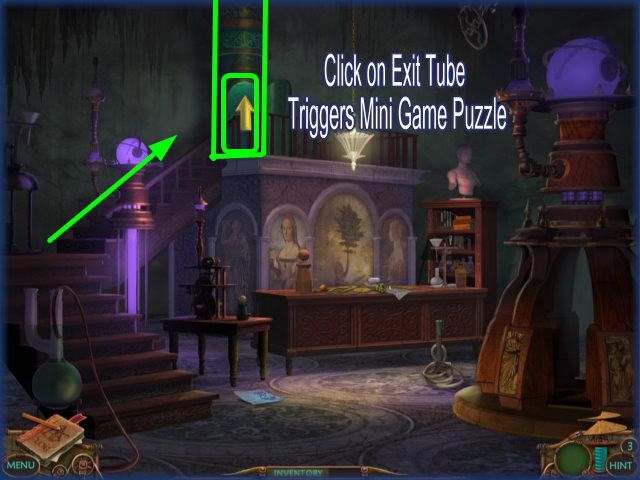
- Click on the exit tube to trigger the mini game.

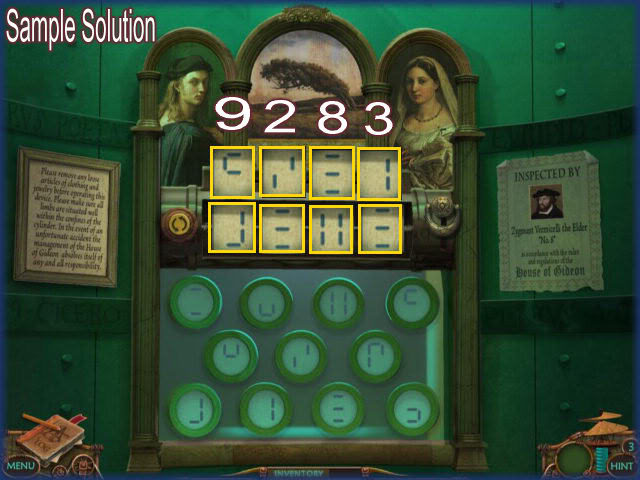
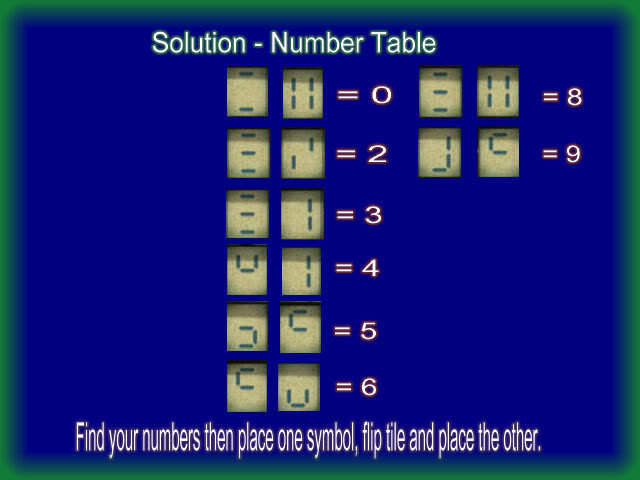
- In this puzzle you will need the 4 digit number that was in the letter to Dehlia’s father.
- This number is different for everyone so I have included a table that will help you figure out your number above.
- In this puzzle you have to combine 2 symbols that when put together form your numbers.
- You will put in one part of the symbol on one side and then flip the tile and put the other half on the other side.
- Next you pull the lever on the far right and the numbers will spin allowing you to see if you have chosen correctly.
- If you have chosen the correct symbols to make your 4 digit numbers the exit tube will take you to the next scene.
Chapter 4: Buried Secret
Crystal Cavern
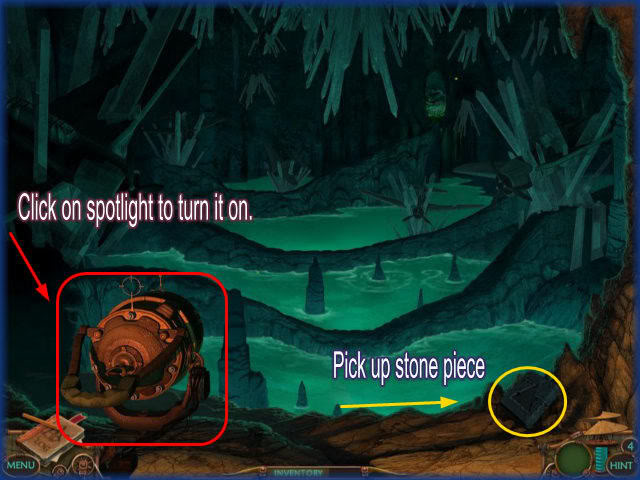
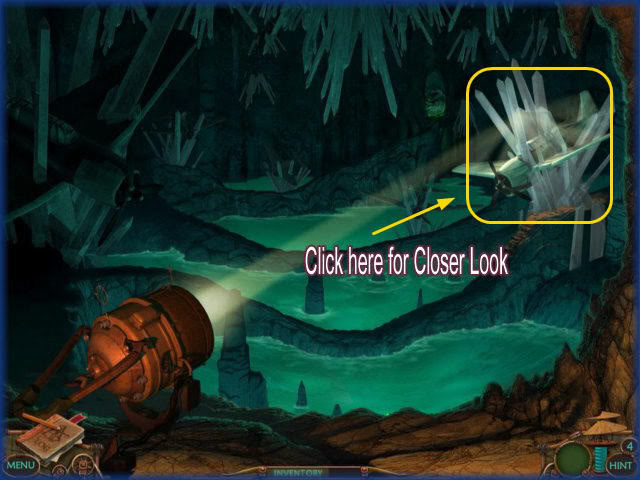
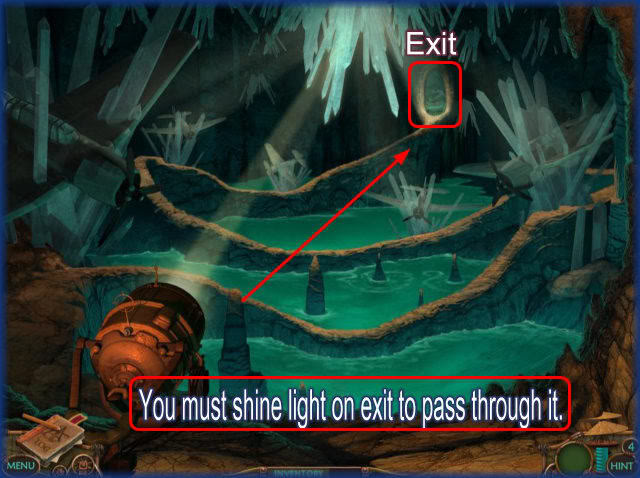
- Click on the stone tablet.
- Click on the spotlight to turn it on.
- You can click on the spotlight and cause it to shine in different areas.
- You must shine the light on the exit in order to go through it.
- Shine the light on the plane at the right for a closer view.
- Click on the plane.
- You wont be able to access anything yet because there is a crystal in the way.
- Return to this location later.
- Click on the spotlight til it shines on the exit and then go through the exit.
Lost Pilot/Phoebe
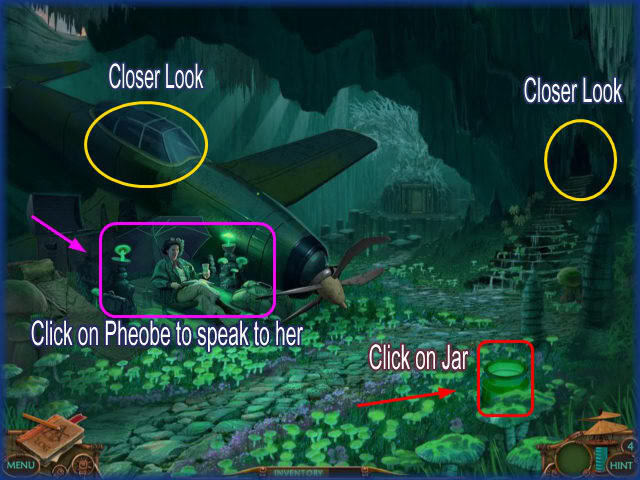
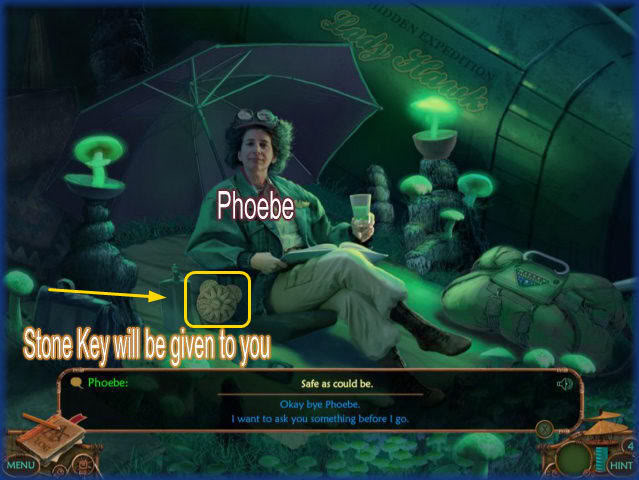
- When you enter the scene you will encounter the lost pilot Phoebe sitting by the plane.
- Click on the Glass Jar on the lower right.
- Click on Phoebe to talk to her. She says she doesn’t feel like leaving at the time but she might leave later.
- Once you’re done talking to Phoebe, the stone key will go into inventory.
Crystal Cutter
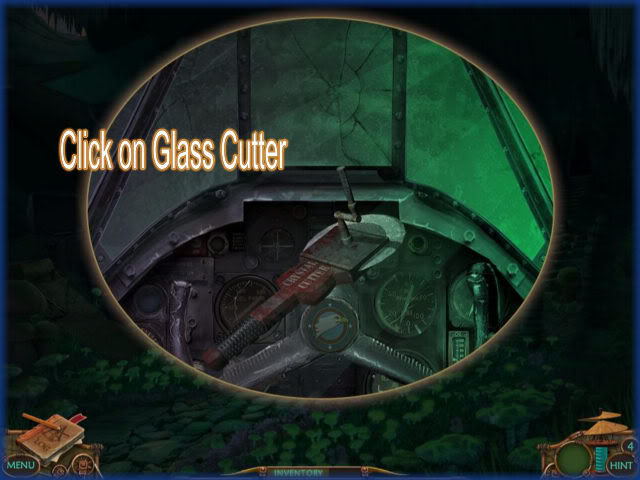
- Click on the cockpit for a closer view.
- Click on the crystal cutter and it will go into inventory.
Crystal Cavern/Jet Pack
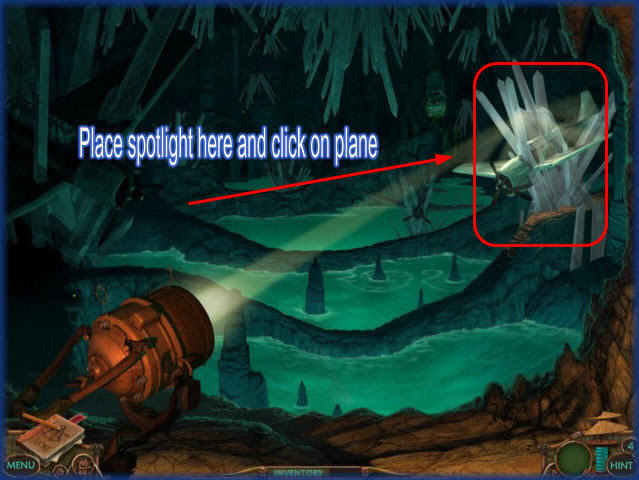
- Move the spotlight to the plane and click on it.
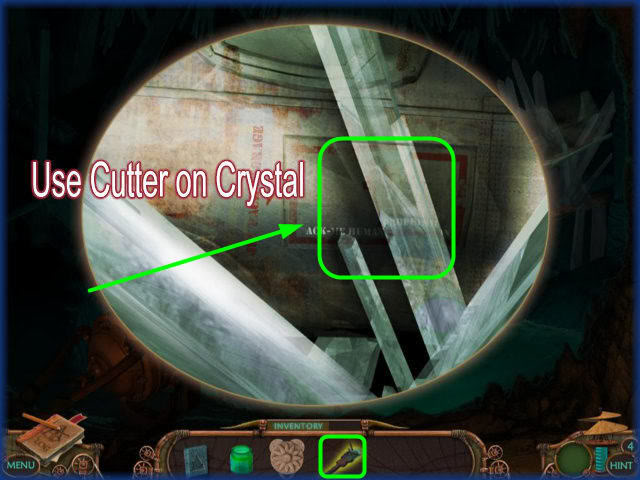
- Use the crystal cutter on the crystal.
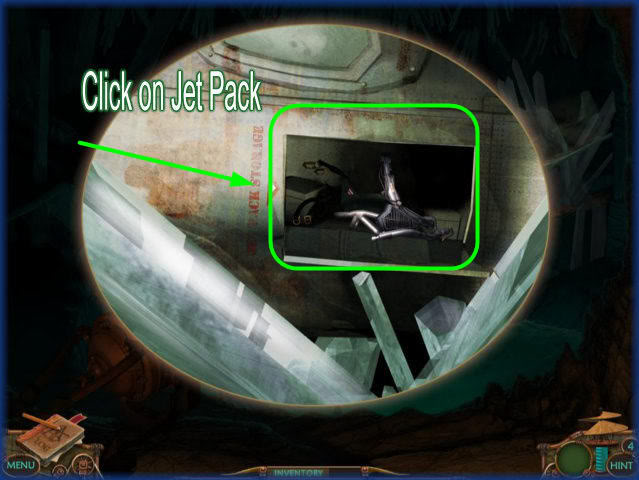
- Click on the jet pack.
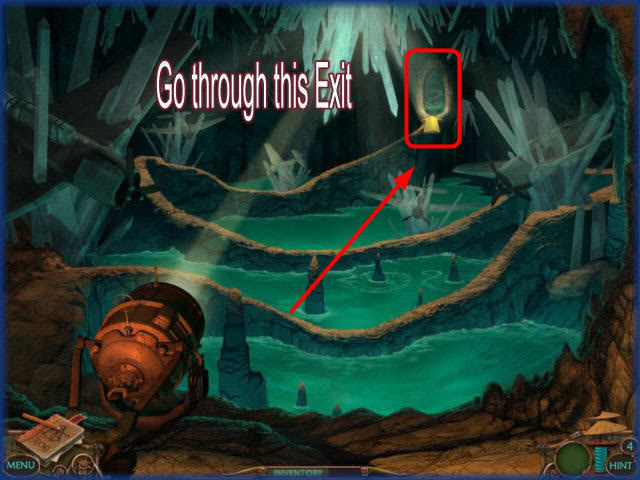
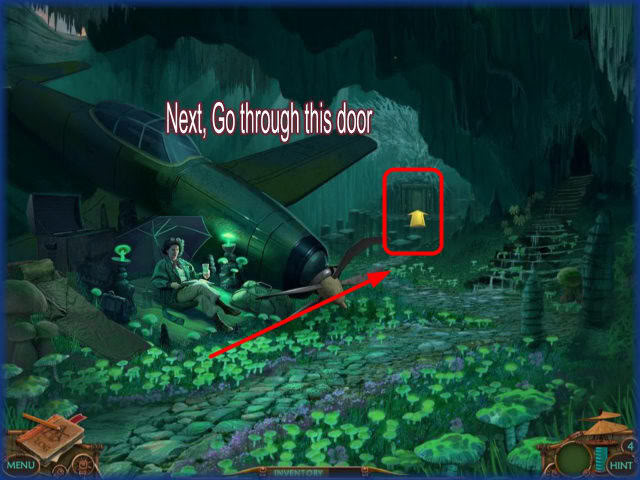
- Go through this exit.
- Then through this exit as seen above.
Tomb Exterior
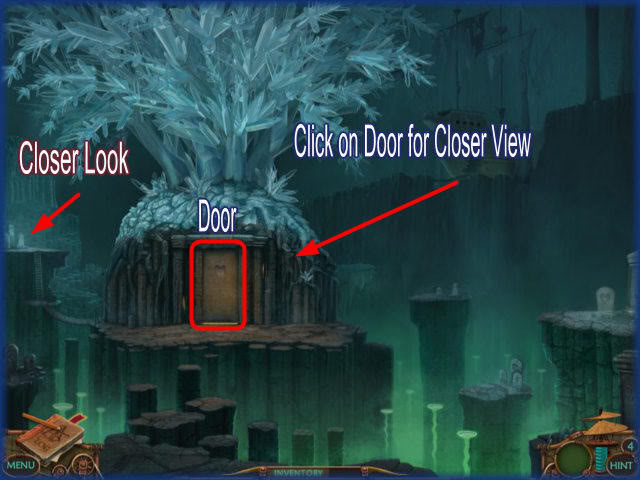
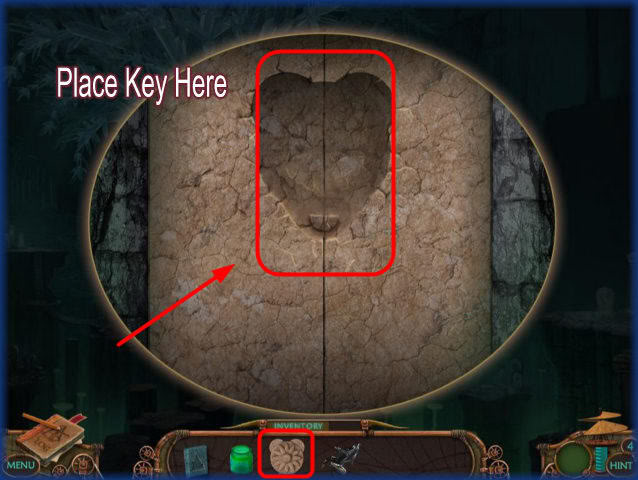
- Click on door for closer view
- Place key in door.
- Go inside.
Tomb’s Interior
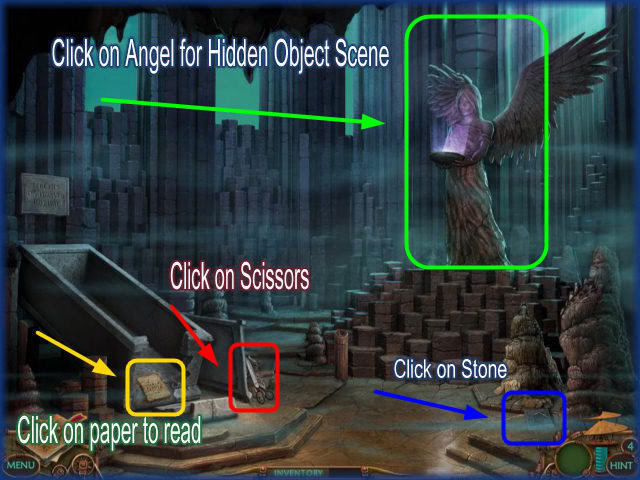
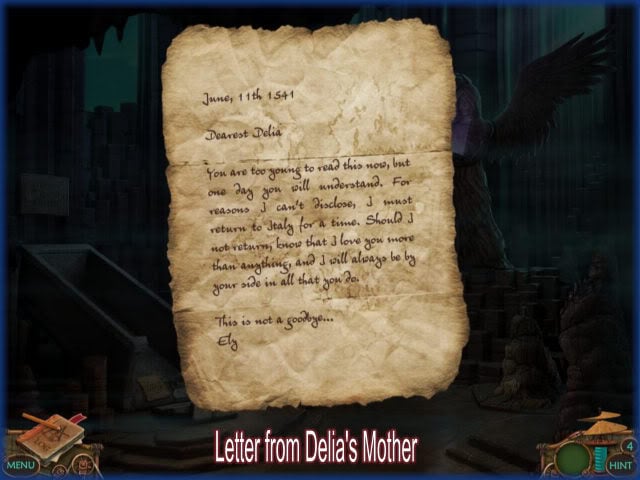
- Click on stone tablet
- Click on paper to read
- Click on Angel for hidden object scene.
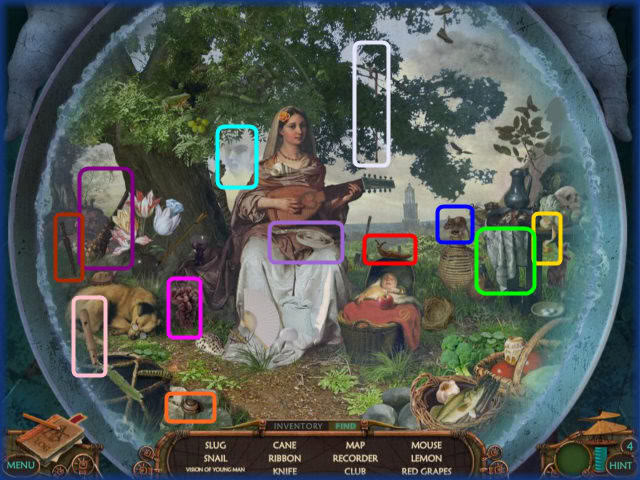
- Locate the 12 hidden objects.
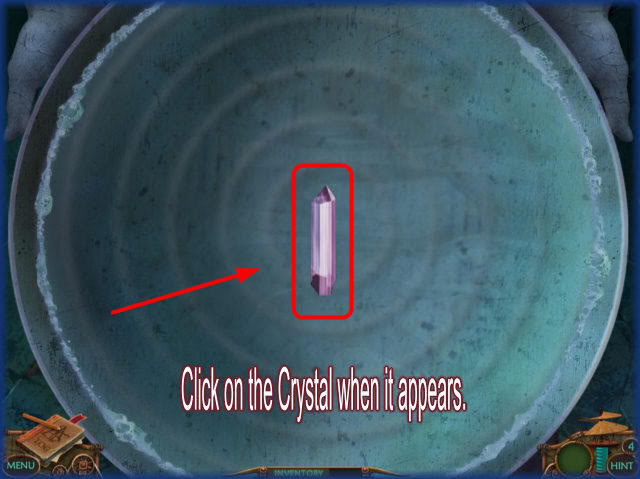
- Click on Crystal when it appears.
Using the Crystal
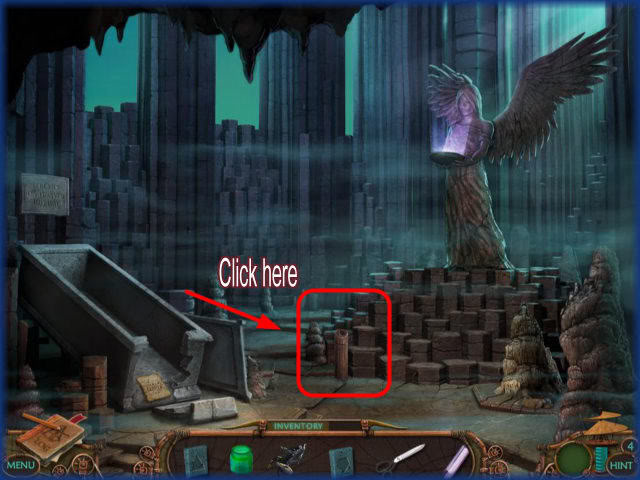
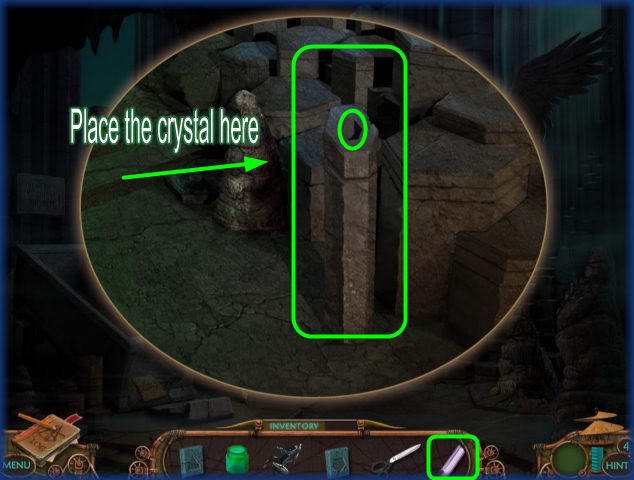
- Click to get closer look
- Place crystal in slot.
- It is a key. Doorway opens.
- Go through it.
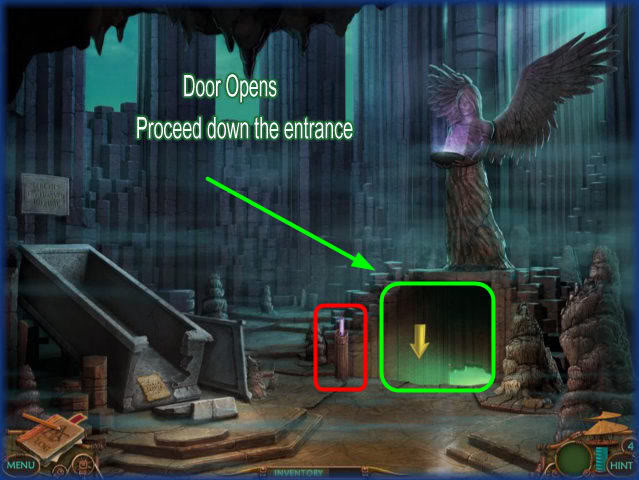
- Go down into ship’s exterior.
Ship’s Exterior/Pick Axe
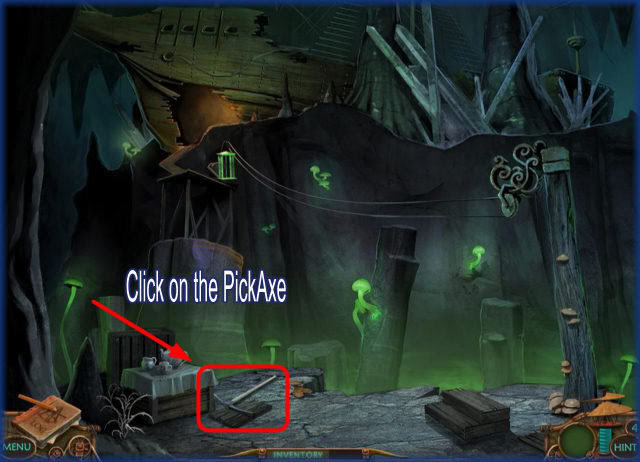
- Click on the pick axe to add to inventory.
- Go back to crystal cavern.
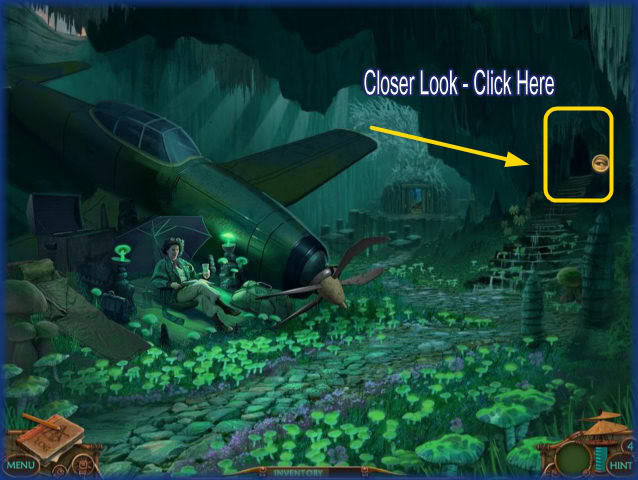
- Click to far right for closer view.
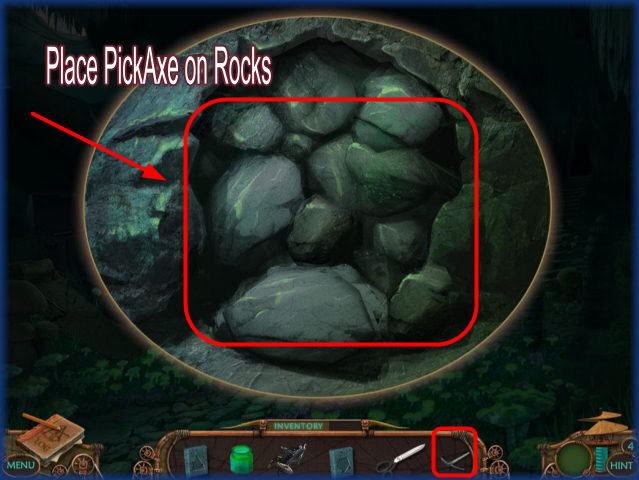
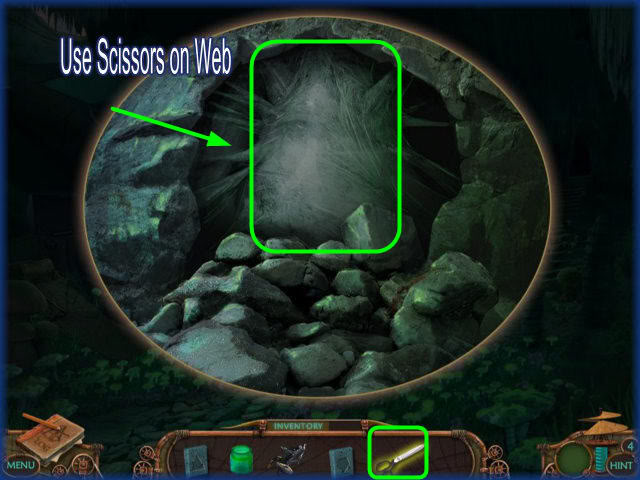
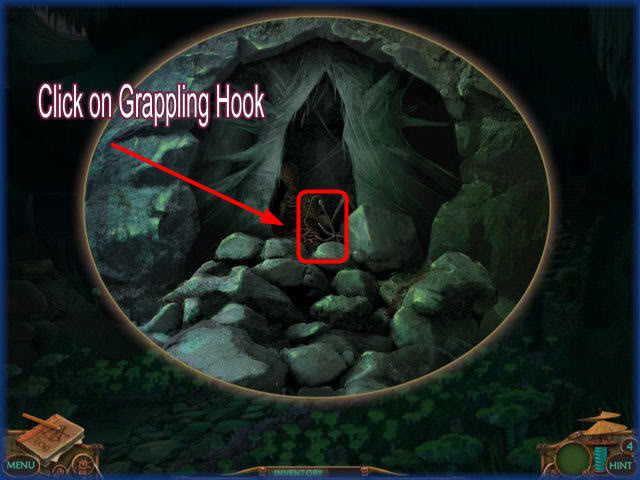
- Use pick axe on Rocks
- Use Scissors on Web
- Click on Grappling hook to add to inventory.
- Go back to ship’s exterior.
Ship’s exterior/Grappling Hook
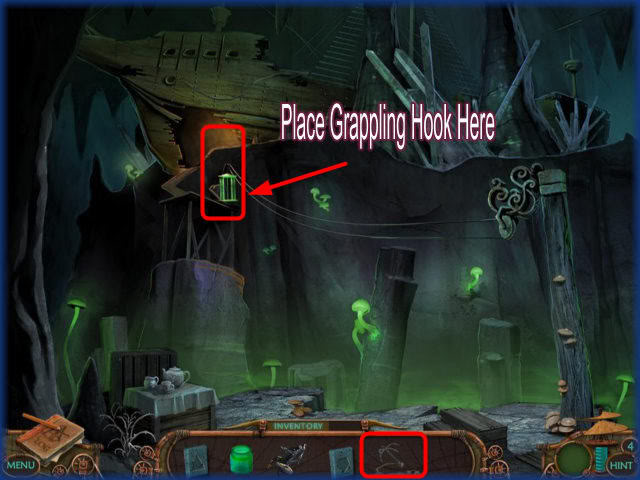
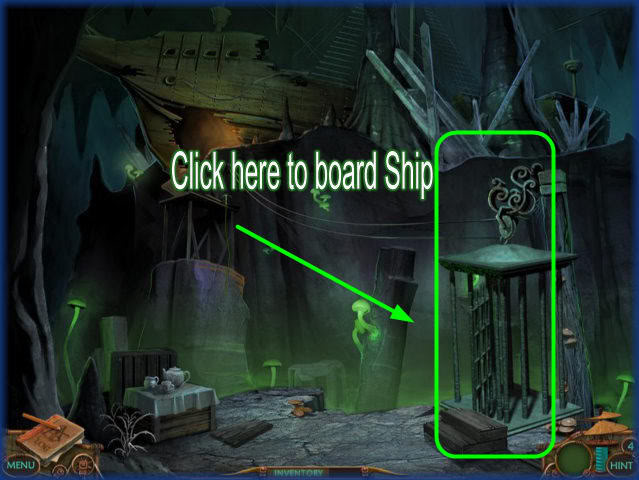
- Use grappling hook as shown above.
- Click on Gondola to board ship.
Ship’s Hallway
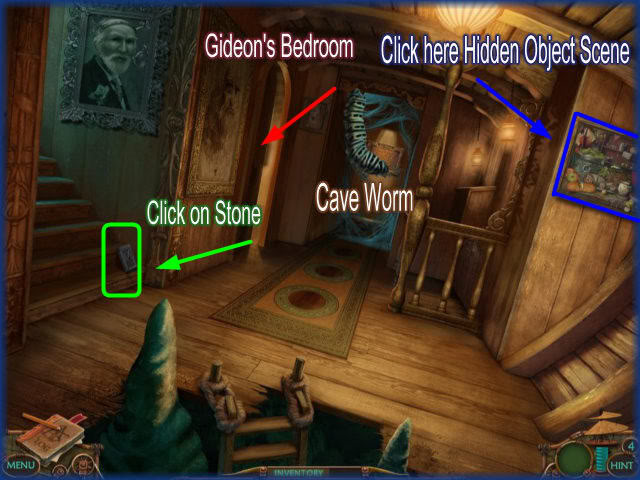
- Click on stone tablet.
- Click on hidden object scene.
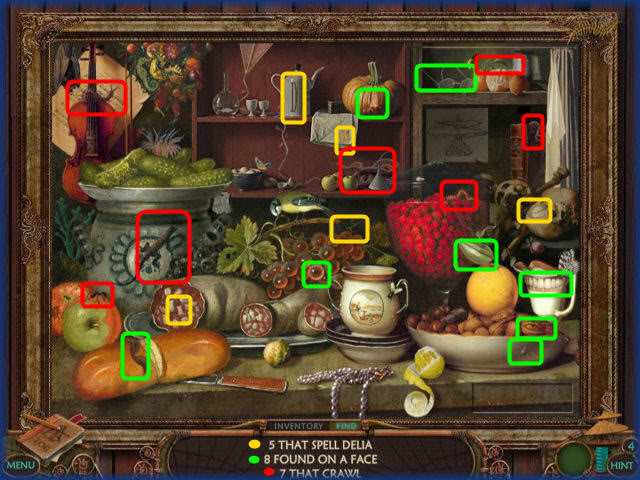
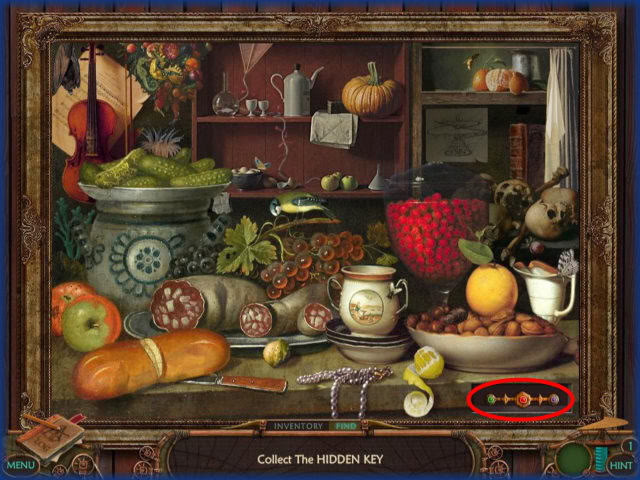
- Locate 20 hidden objects
- Locate key and put into inventory.
Gideon’s Bedroom
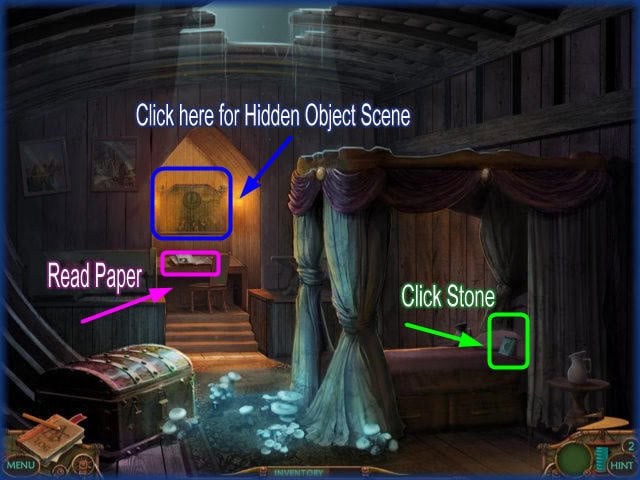
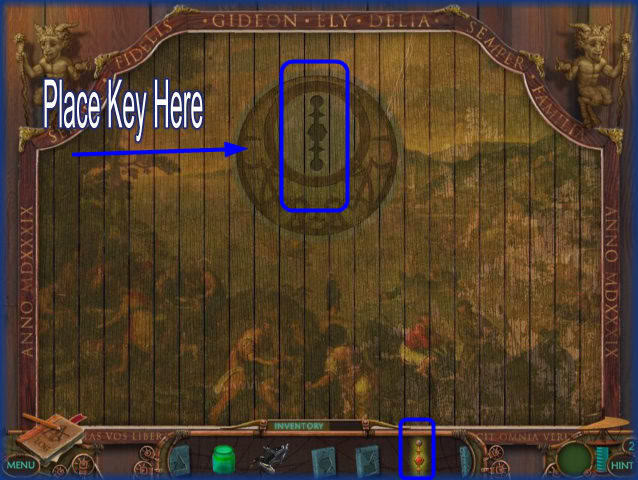
- Click on stone tablet.
- Read paper
- Click on hidden object scene.
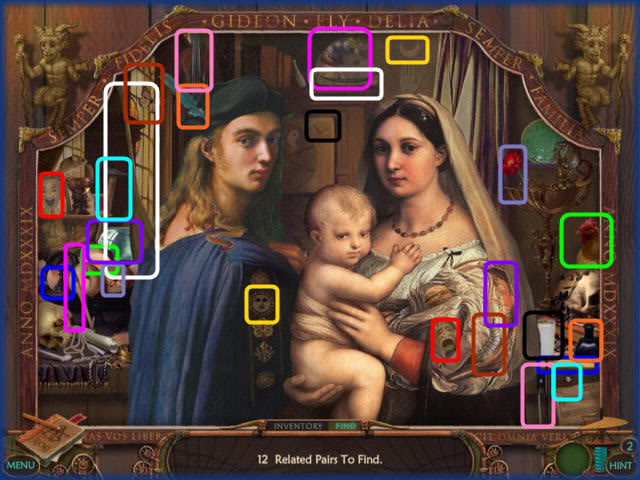
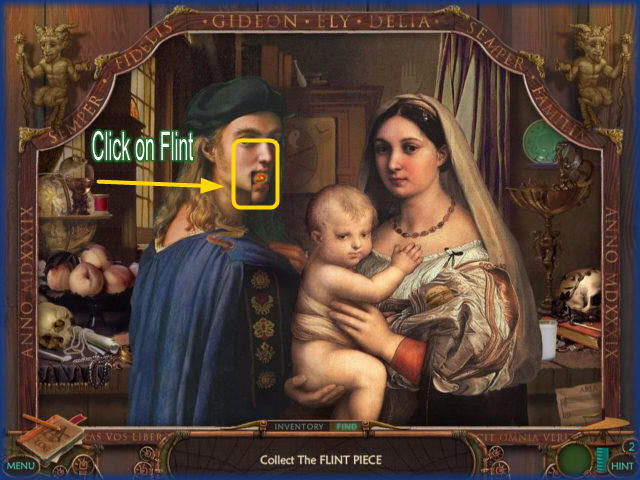
- Locate the 12 related pairs circled above.
- Items are color coded for ease.
- Once you find all items a piece of flint will appear in the man’s mouth.
- Click on the flint and it will go into inventory.
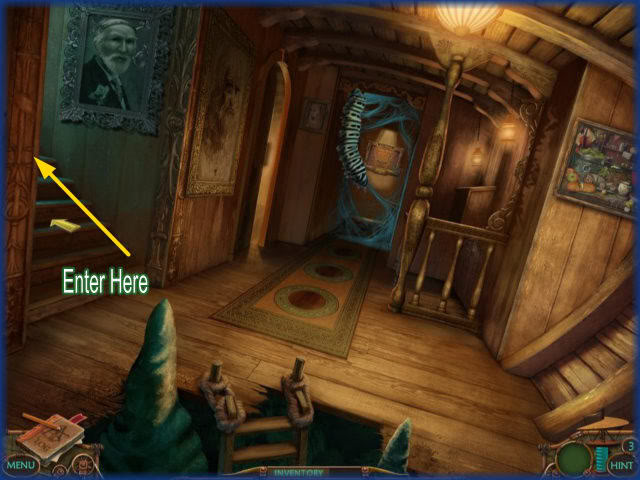
- Take this path to the ship’s deck.
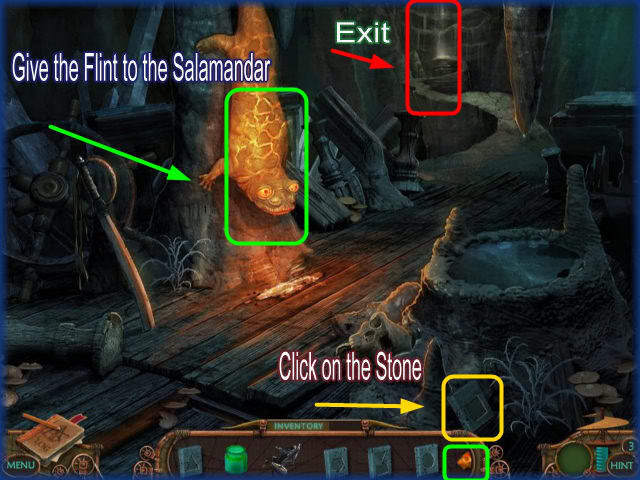
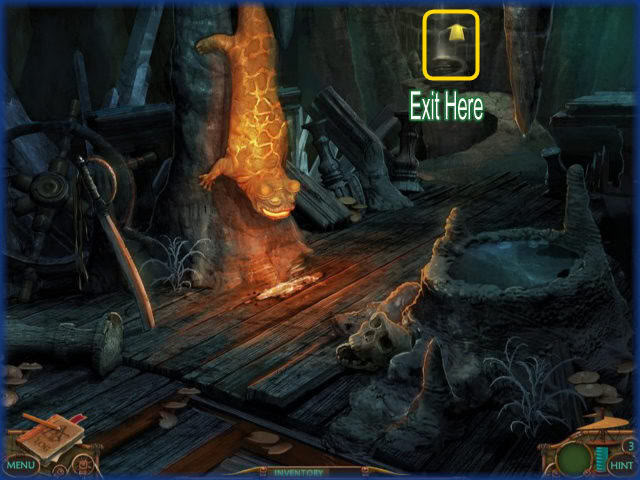
- Click on the stone tablet and it will enter into your inventory for later use.
- Give the flint to the salamander.
- Now the exit will be accessible.
- Follow the exit as shown in the image above.
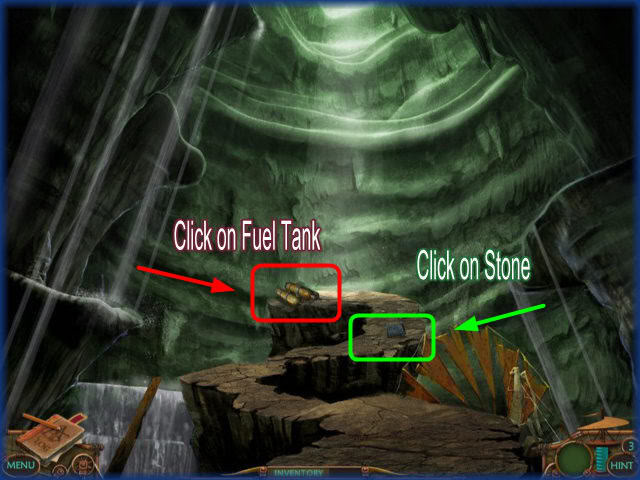
- Click on the fuel tank.
- Click on stone tablet and it will enter into your inventory for later use.
- Head back to the tomb’s exterior.
Tomb’s Exterior
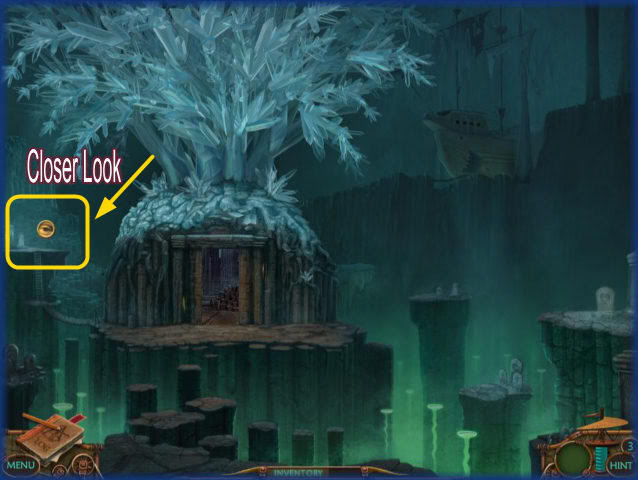
- Click on the area next to the tomb as shown above.
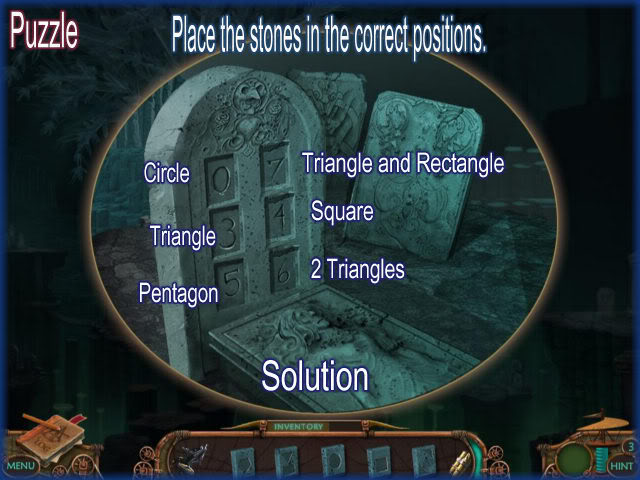
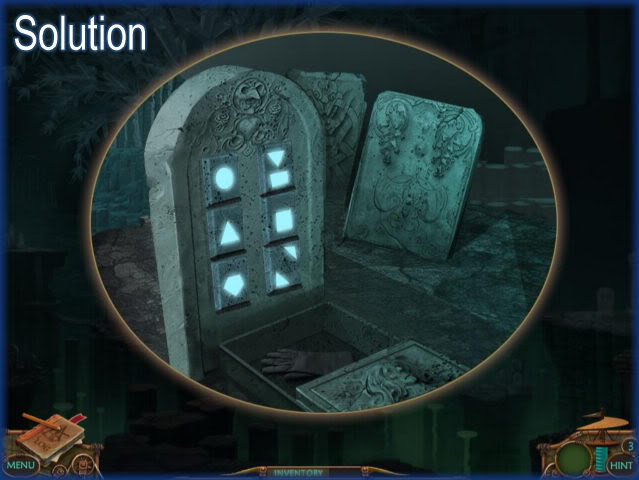
- Here you will solve the puzzle by placing the stone tablets that are in your inventory into the correct locations.
- Count the number of sides the geometrical shapes have and then place the stone that has that corresponding number.
- If there are 2 shapes add the number of sides together.
- Here are the solutions: Circle-0,Triangle-3,Square-4,Pentagon-5,Two Triangles-6, and square and rectangle – 7 sides.
- Place the correct tile and the shapes will light up if correct.
- See images above for solution.
- The ground will open up. Click on the glove inside and it will go into inventory.
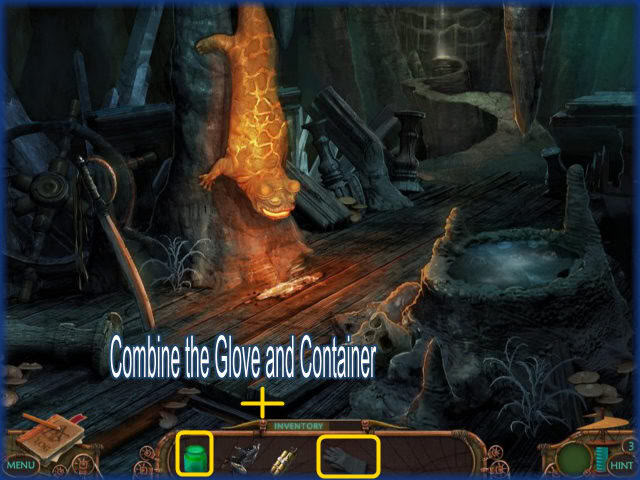
- Go back to the Ship’s Deck with the large salamander.
- Combine the glove and container in inventory.
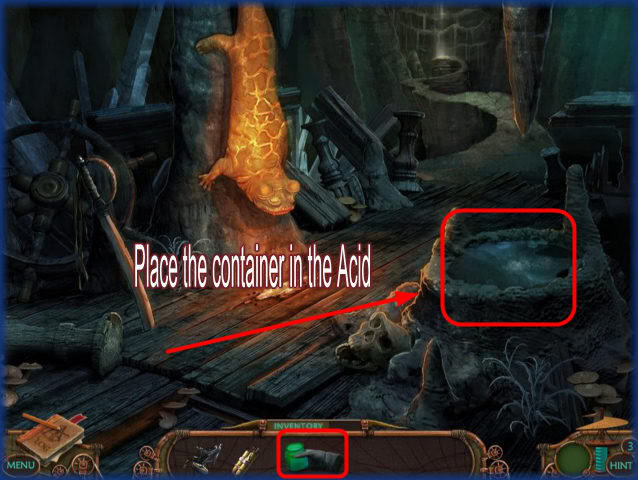
- Next place the glove and container in vat of acid to the lower right of screen as shown above.
- The acid will go back into your inventory for future use.
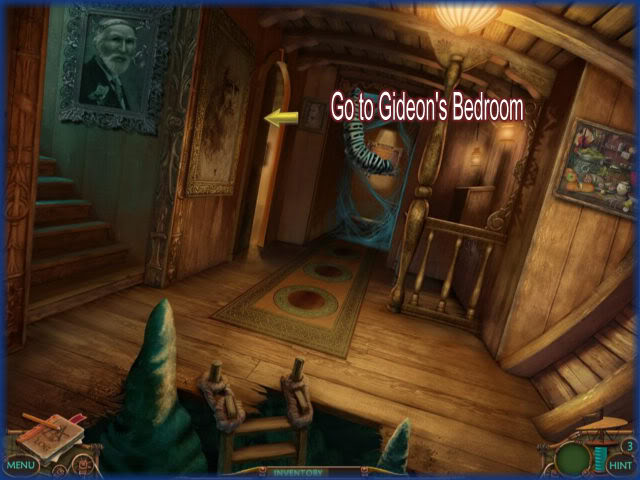
- Return to Gideon’s Bedroom.
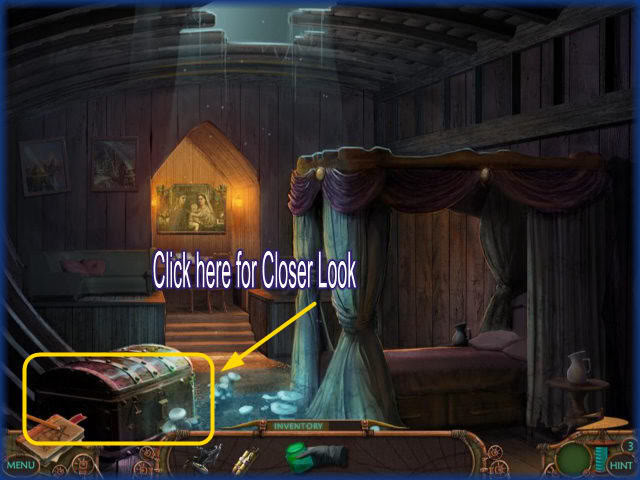
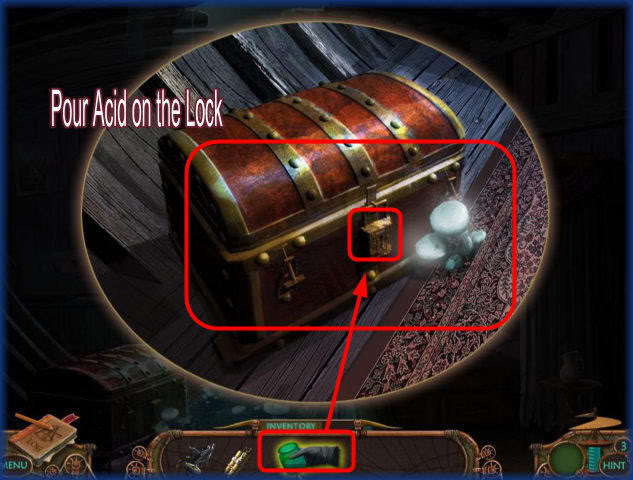
- Go into the bedroom and click on the locked chest for a closer view.
- Take the acid from inventory and place it over the lock.
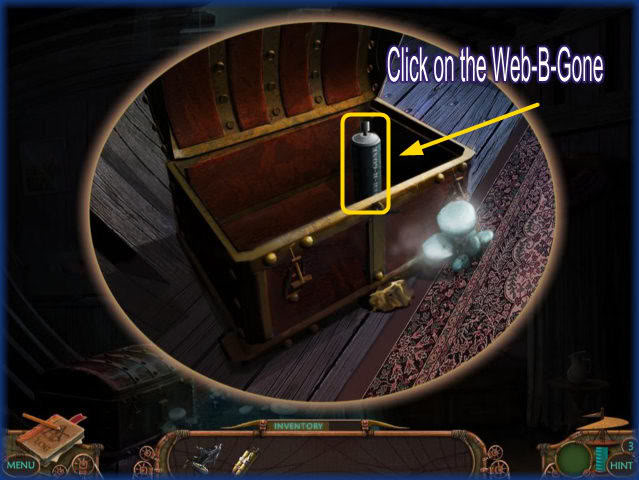
- Once the chest is open click on the can of "Web B Gone" Spray inside and it will enter into your inventory.
- Go back out into the hall where the cave worm is.
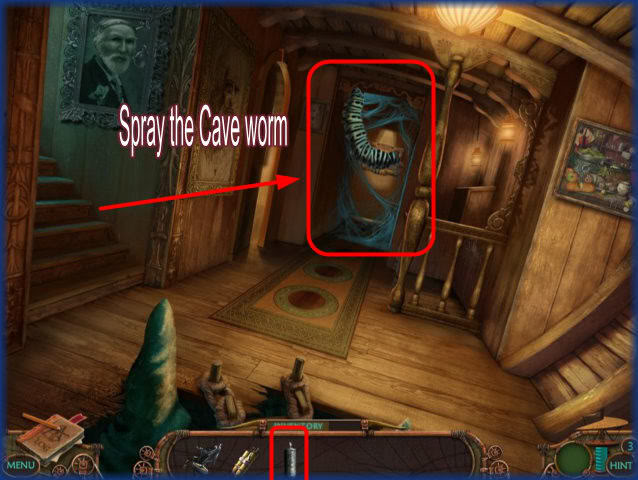
- Take the can of spray and spray it on the cave worm and web in the hallway of the ship.
- Once it all disappears you can click on the wall that was being blocked by the worm before.
- This triggers a mini game.
Delia’s Wonderland Puzzle
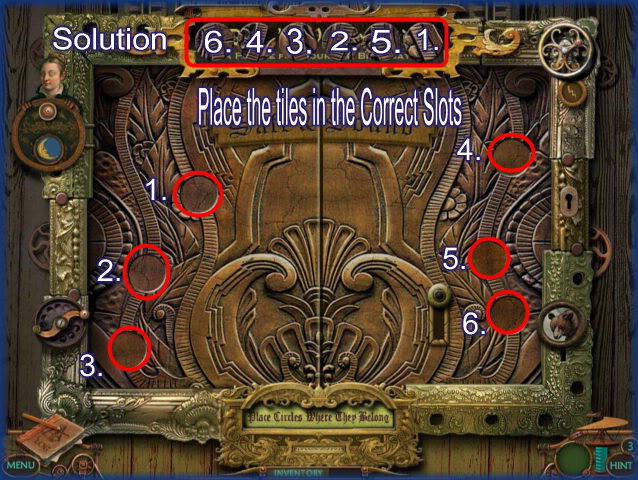
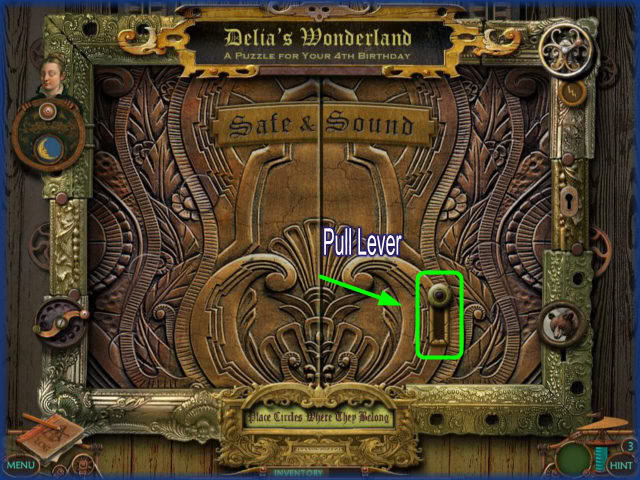
- This is the first part of the puzzle.
- Place the circles at the top into the holes along the sides.
- Once you have placed them all correctly the scene pull the lever and it opens up into another puzzle.
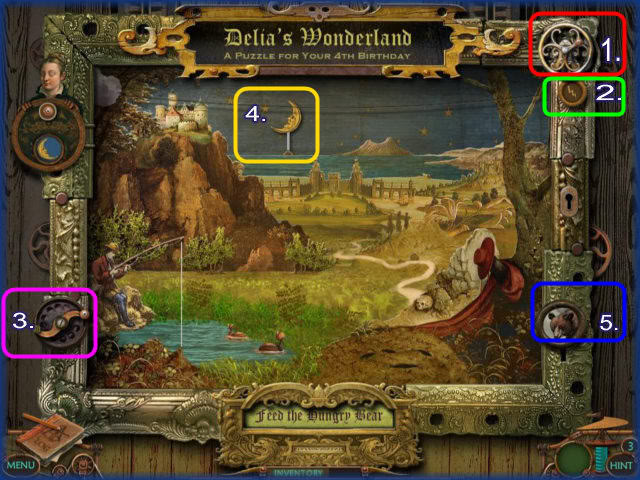
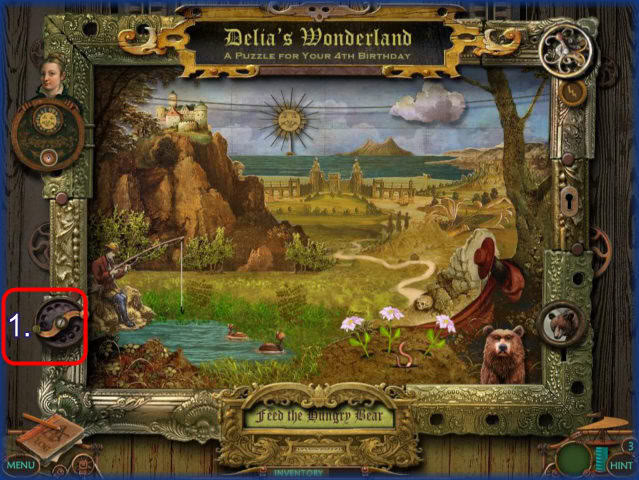
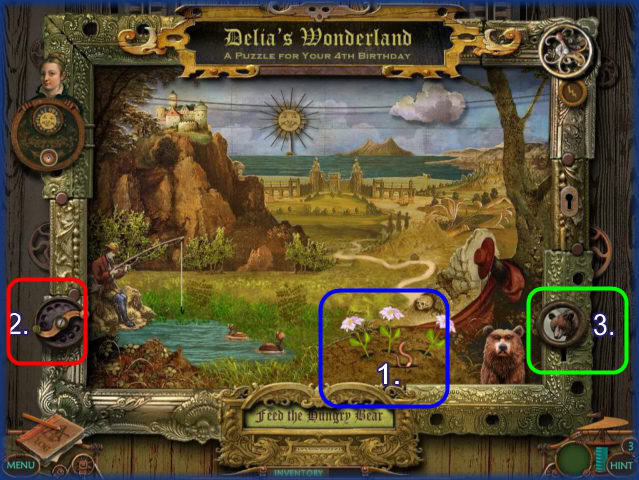
- Click on the wheel above the lighting Bolt wheel at the top right to bring the cloud out.
- Keep clicking on the wheel until the cloud is over the mound of dirt in the lower right.
- Click on the lightning bolt symbol in the upper right side of the scene as this will make it rain.
- After it rains some flowers will bloom and a worm will appear.
- Click on the wheel next to the fisherman to expose his line and hook.
- Pick up the worm and place it on the hook at the end of the line.
- If you place the worm incorrectly it will disappear and another worm will appear on the dirt mound.
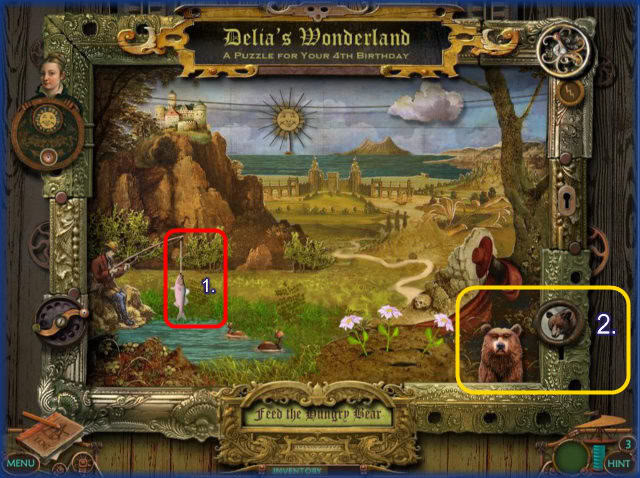
- Turn the wheel in the lower left to make the Fisherman drop the line.
- Click on the wheel in the lower left a second time to make the fish appear.
- Click on the Moon symbol in the upper left to turn it to day time.
- Click on the picture of the Bear on the lower right to make the Bear appear.
- Grab the fish and give it to the Bear.
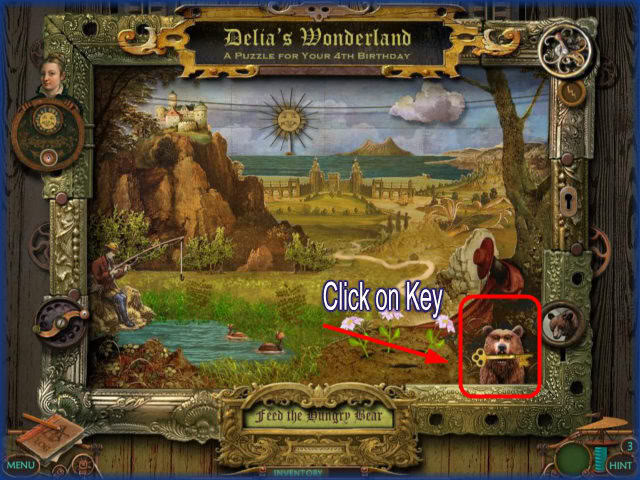
- The Bear will appear with a key in its mouth.
- Click on the key to enter it into your inventory.
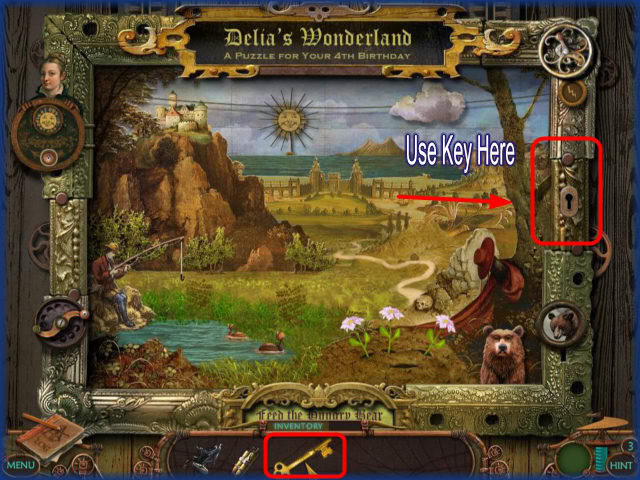
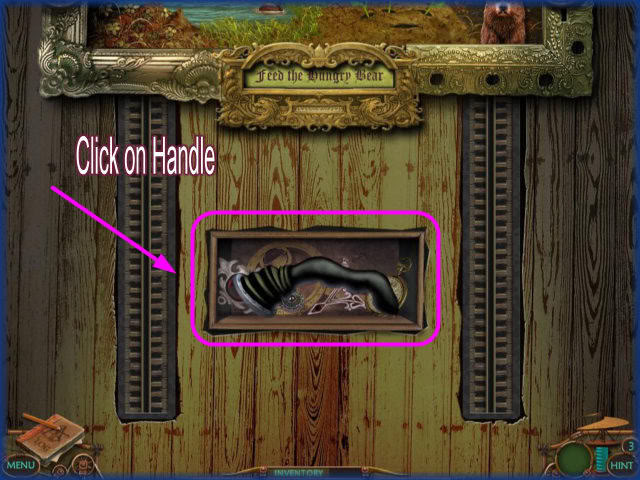
- Take key and place it in the keyhole along the right side of the frame.
- The panel will open and the handle to the jet pack will be in the center.
- Click on the handle and it will enter into your inventory.

- Follow this path.
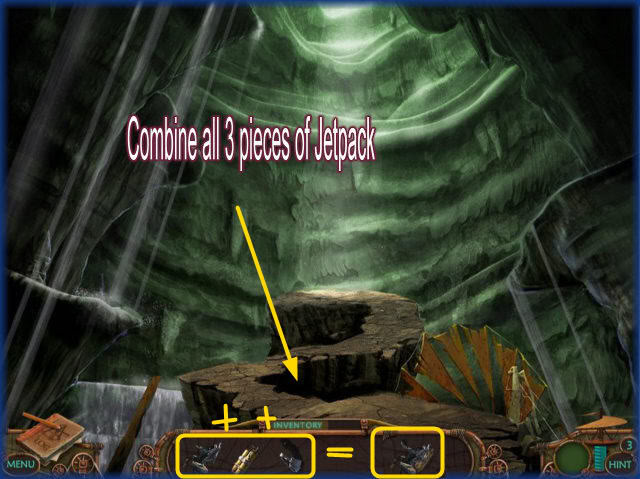
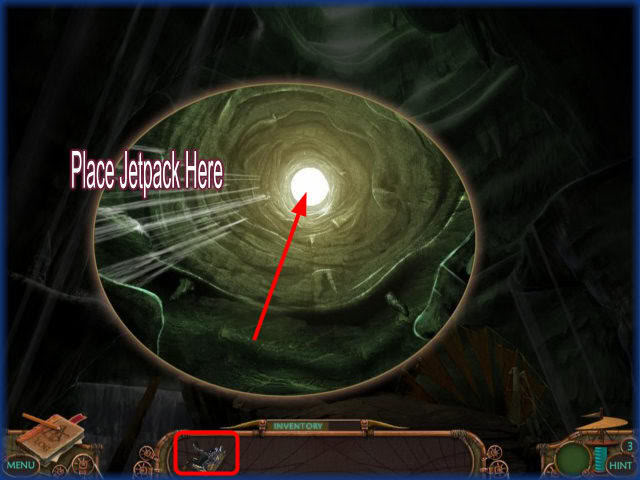
- Combine all the pieces of the jet pack.
- Place the jet pack in the hole above and you will be taken to the next location.
Chapter 5: Showdown at Windy City
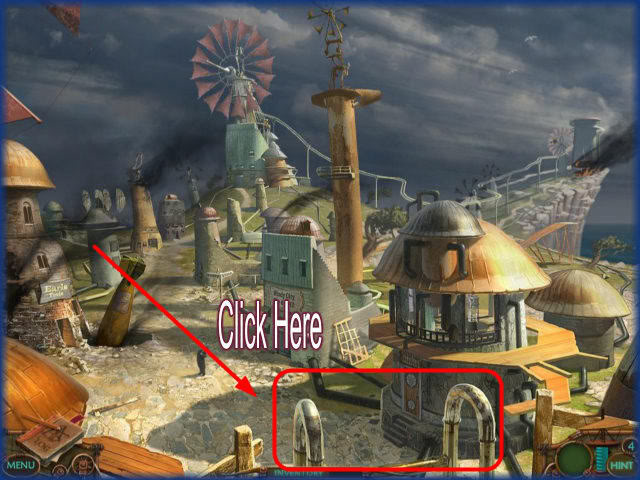
- Click on the ladder to proceed into the city.
- When you first arrive you will see Delia flying by in the jet pack.
Windy City/Outside Shed
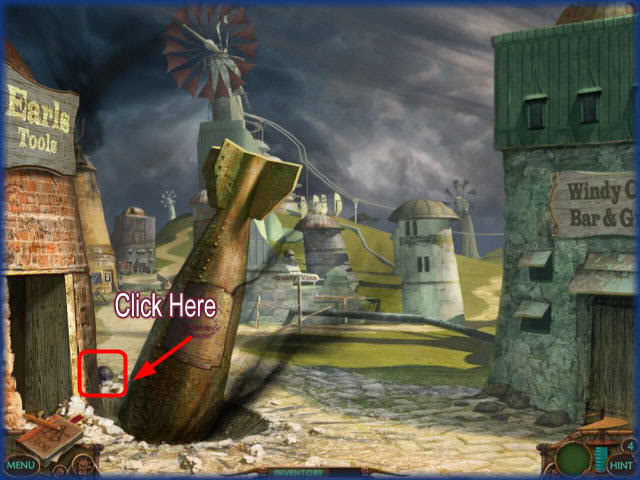

- Click on the cannonball in the scene.
- Talk to Earl and he tells you the only way to get to Delia’s house is by the "Tram car" but there is no electricity.
- Ask Earl how to restore the power.
- He tells you to look at the main Power Station but you might want to disarm the bomb first.
- You can end the conversation or continue talking to Earl.
- Follow the path in the picture above.
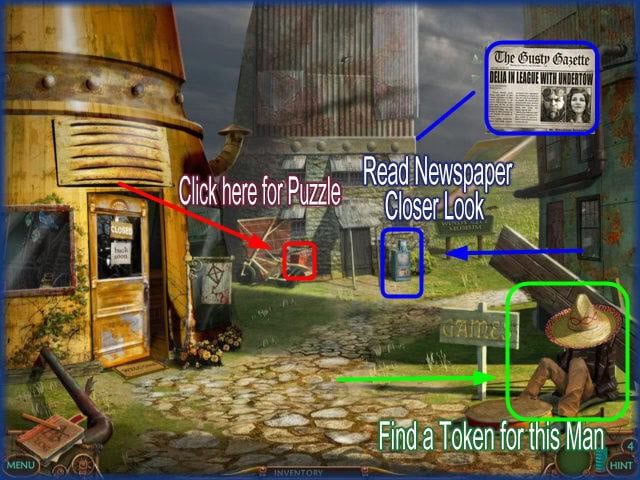
- Click on the newspaper dispensing machine for a closer look.
- Click on the man in the hat at the bottom right and he will tell you that you need a "shiny gold token" to play the game.
- Click on the Lock box in the back of the scene for a closer view.
Lock box Puzzle
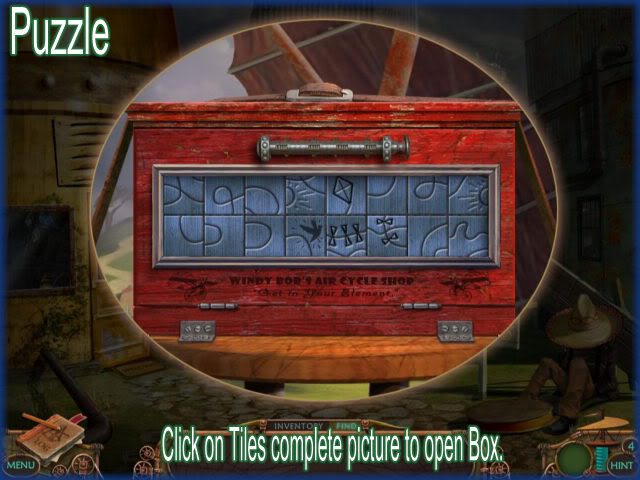
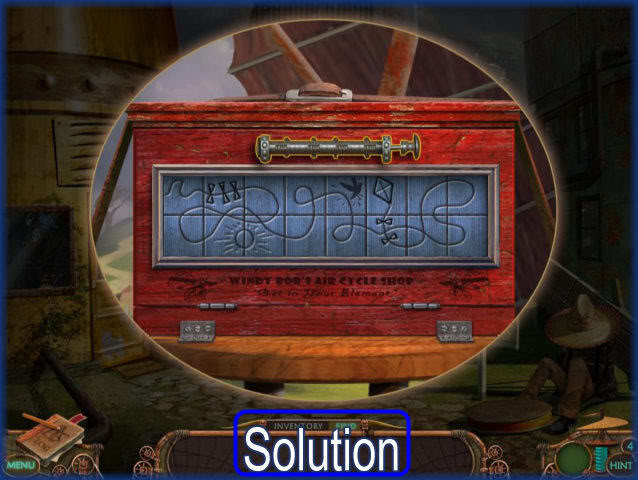
- Click on the tiles to restore the original image.
- Solution is seen above.
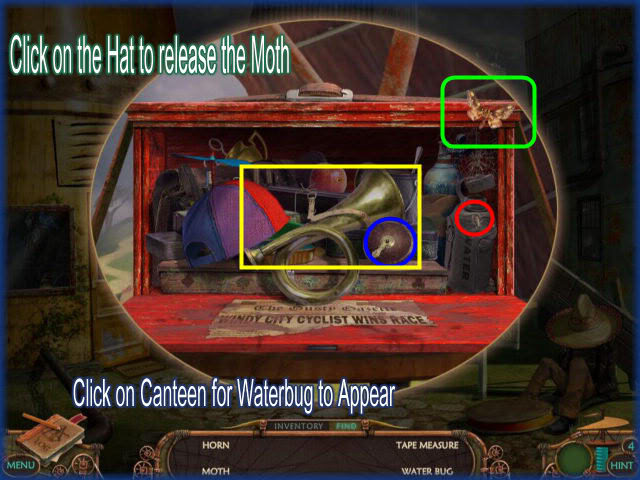
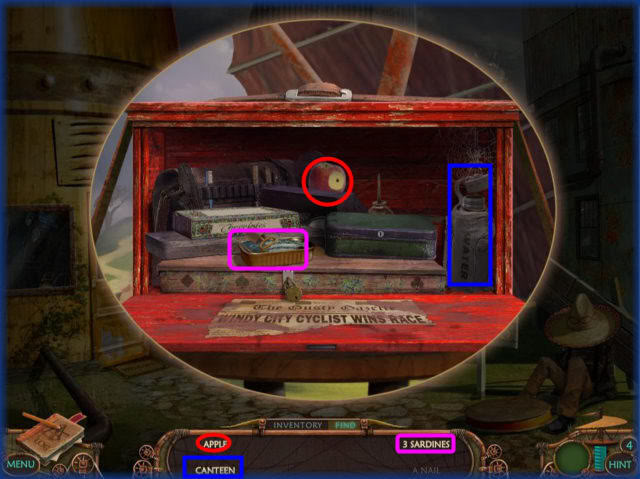
- In this puzzle only 4 items will show up at a time for you to locate.
- Some of the items you click on will go into your inventory.
- Use these items to unlock other items.
- If you use a hint, it will use one of your inventory items.
- To expose the water bug click on the canteen on the right and the Water Bug will appear at the top.
- Click on the Hat and the Moth will fly into the upper right corner.
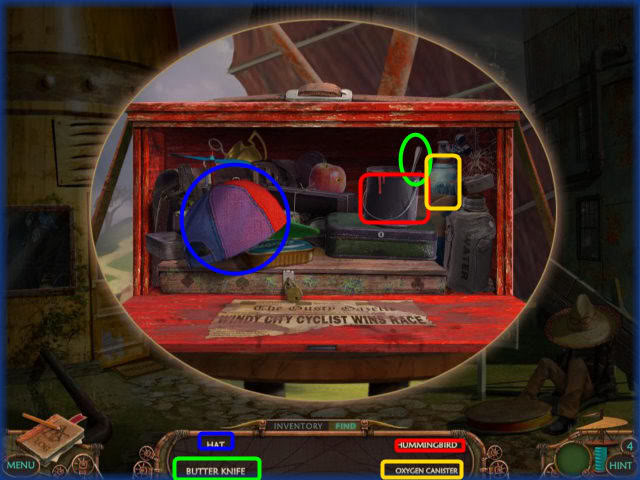
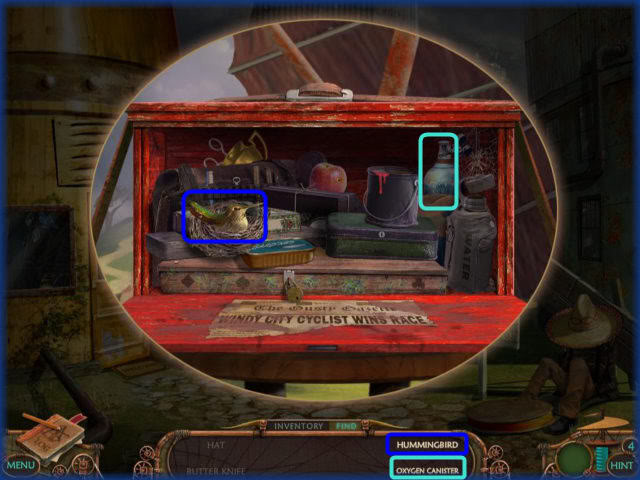
- The hummingbird is underneath the hat.
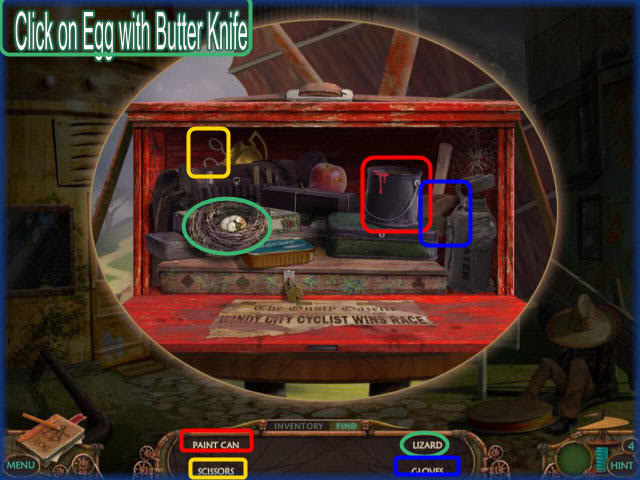

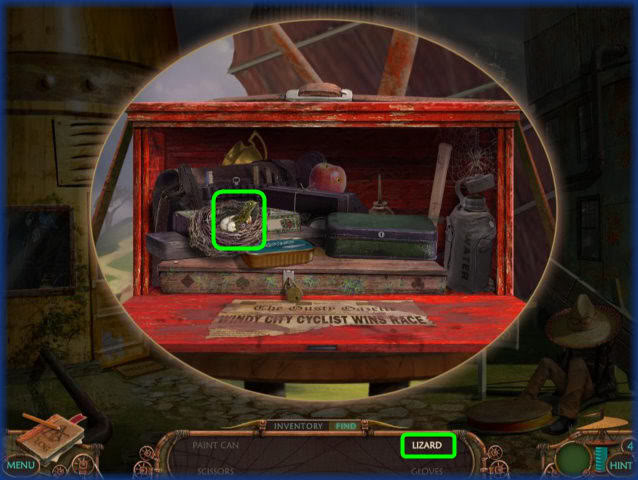
- Place the butter knife on the egg in the nest and the lizard will come out of the egg.
- Click on the scissors at the upper left.
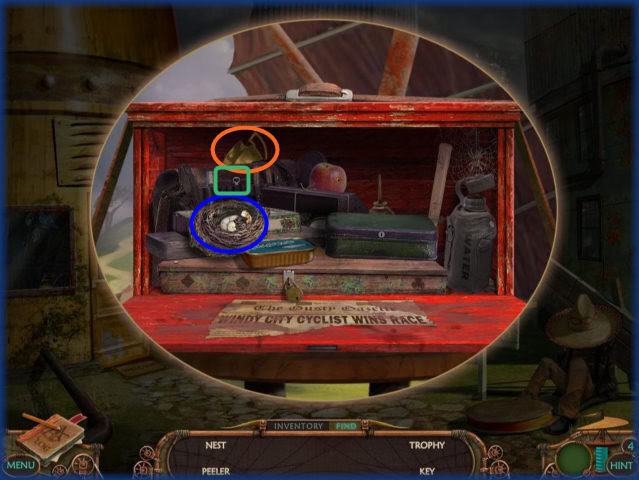
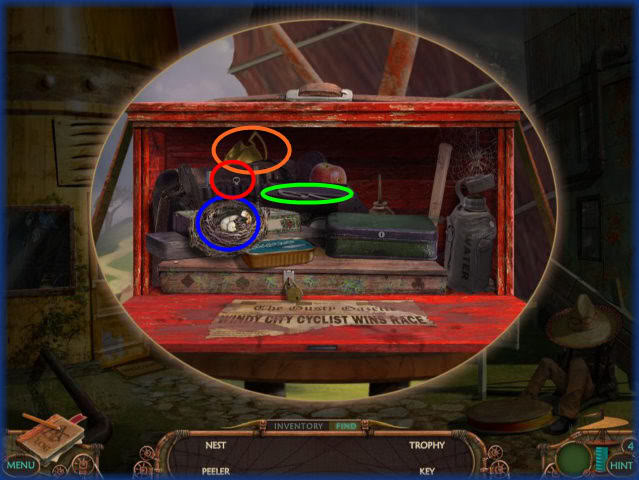
- Place the Scissors on the black box below the apple to open it.
- Click on the peeler inside box.
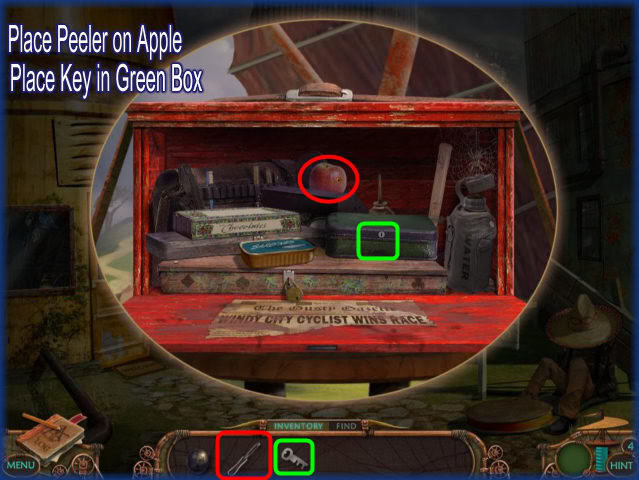
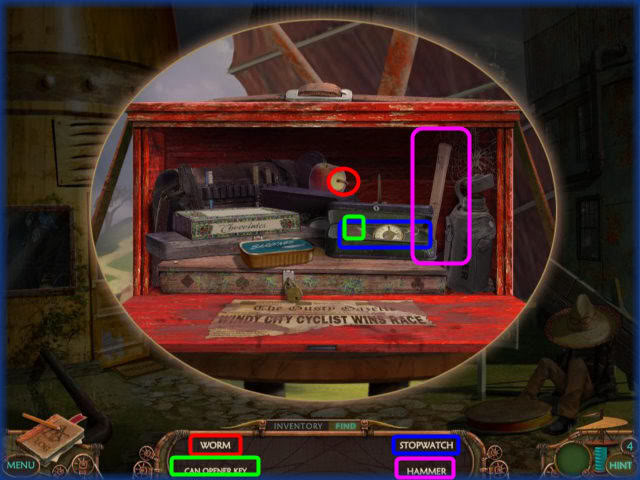
- Place the peeler on the apple for the worm to appear.
- Use the key to open the Green box.
- Click on the stopwatch and the can opener key inside.
- Pick up hammer on the right and it will go into inventory.
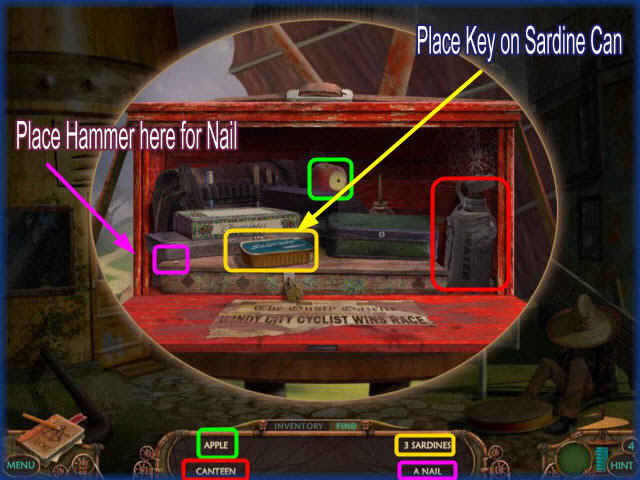
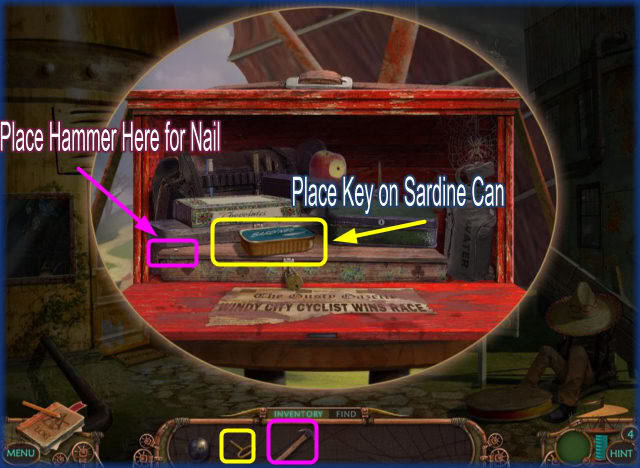
- Place the can opener key on the Sardine can to open it.
- Place the hammer on the Nail.
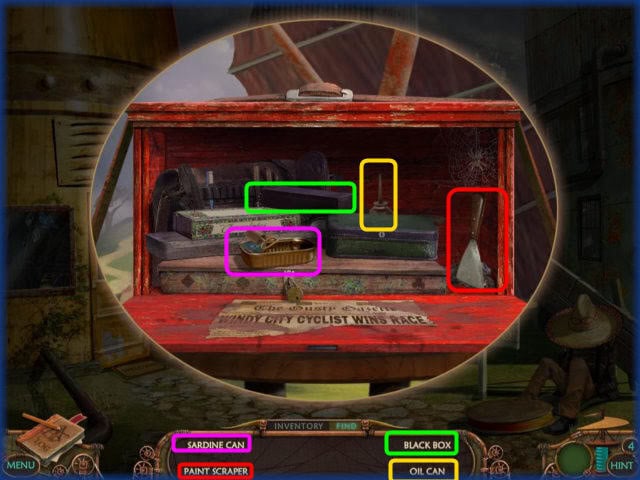

- Click on the oil can and paint scraper.
- Scrape off the label on the lid and click on the airplane decal underneath.
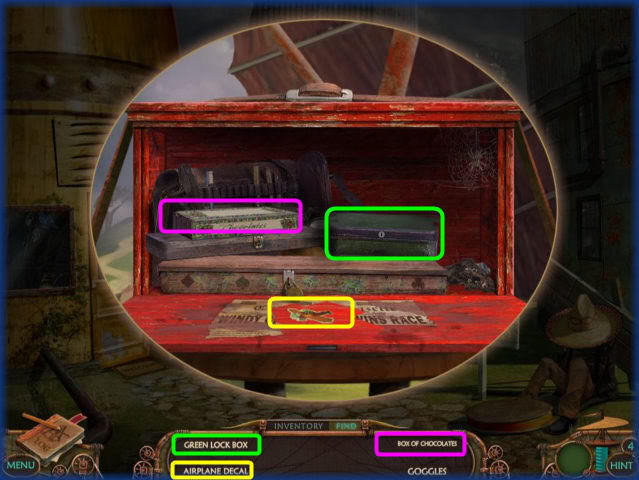
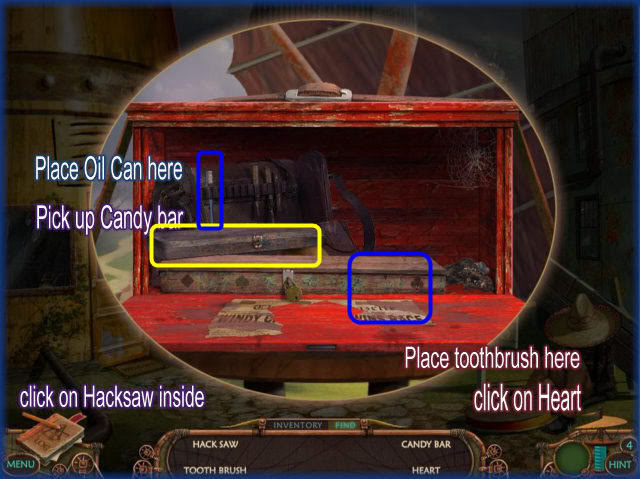
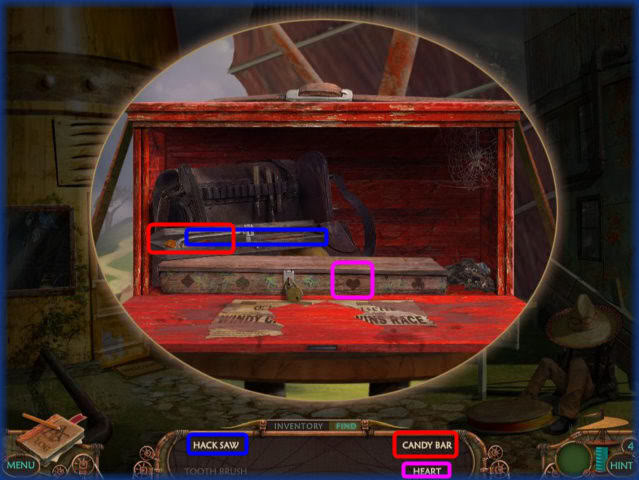
- Click on toothbrush on the left side of the satchel.
- Place the Toothbrush on the right side of the long box and click on the heart that appears on it.
- Place the Oil Can on the box on the left and click on the Hacksaw and the candy bar inside.
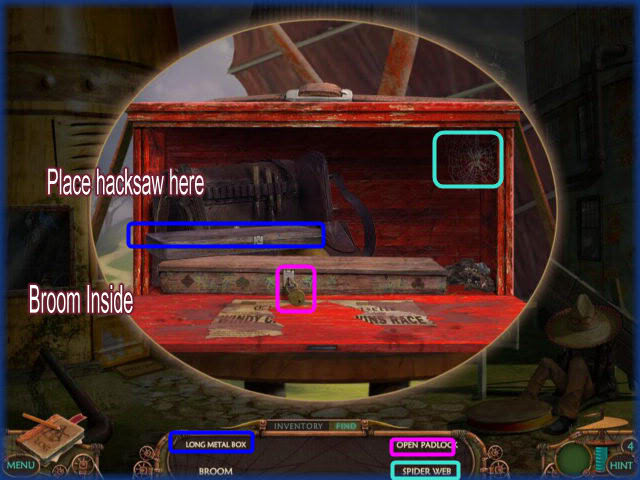
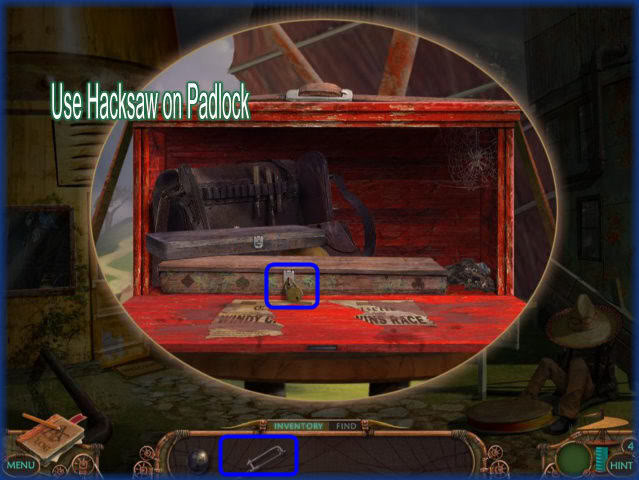
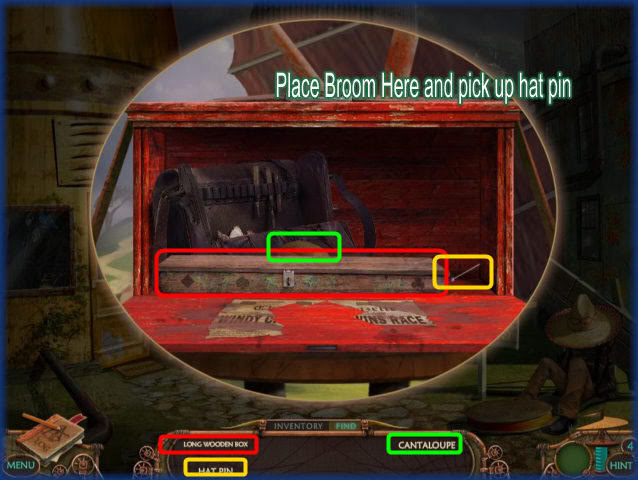
- Use the Broom to clean the debris in the lower right of the box.
- Click on the Hat Pin that appears.
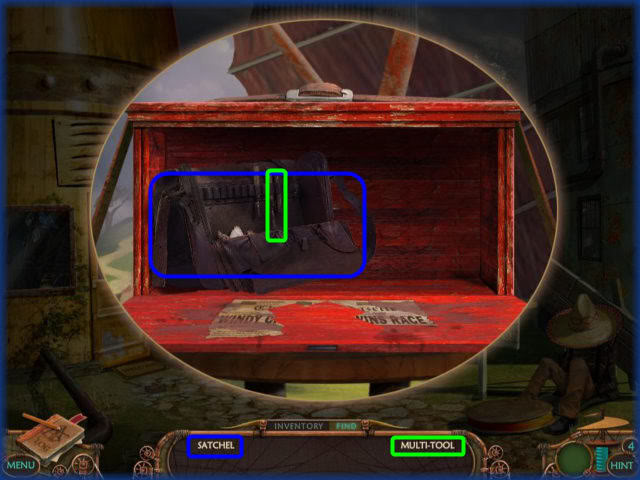
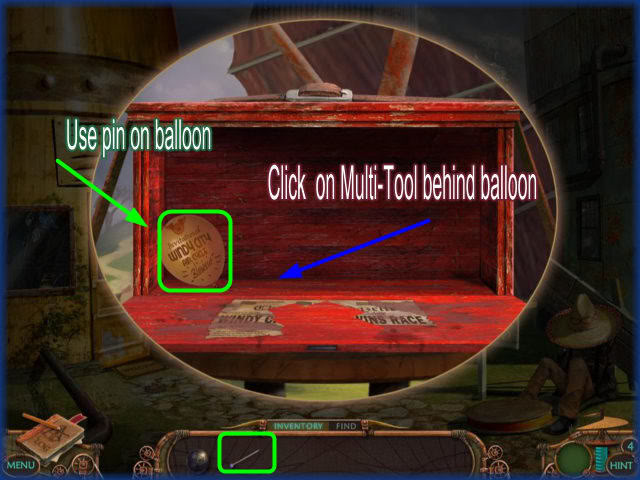
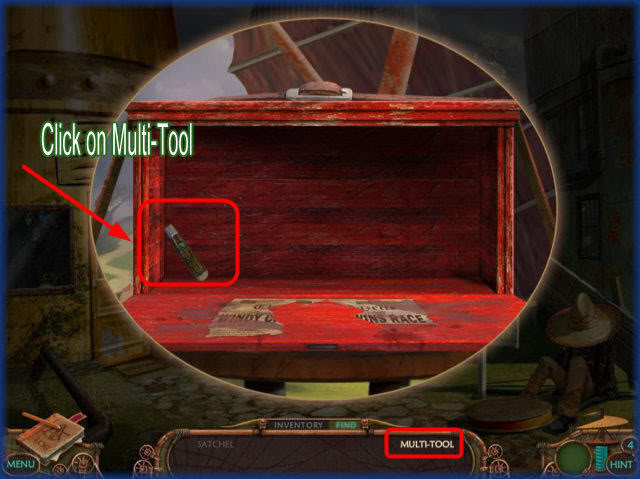
- Click on the satchel to remove it
- A balloon appears behind the satchel.
- Pop the Balloon on the left with the Hat Pin.
- Pick up the Multi-tool that appears behind the balloon and it will go into your inventory.
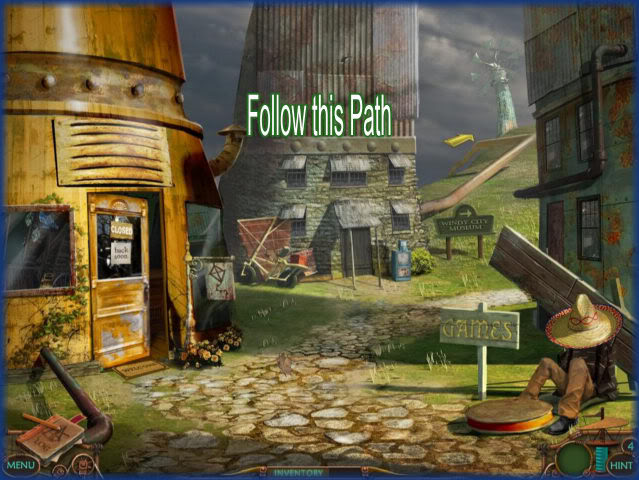
- Follow the path above to get to the next location.
Outside Museum
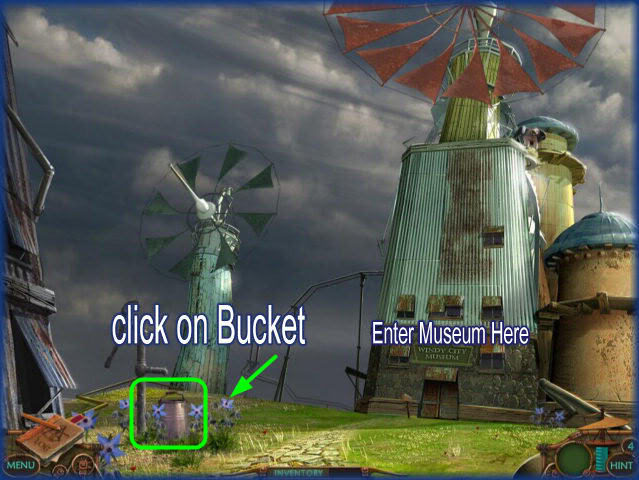
- Click on the bucket of water and it will go into your inventory for later use.
- Enter the museum on the right.
Inside Museum
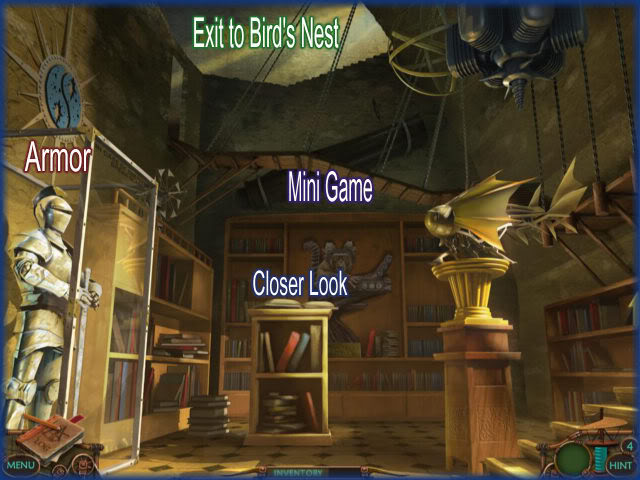

- Click on the bookshelf for a closer view.
- Flip the pages until you reach the one about the "Da Vinci Node."
- Exit out of view.
- Click on the Monkey on the back wall to trigger a mini-game.
Monkey Mini Game
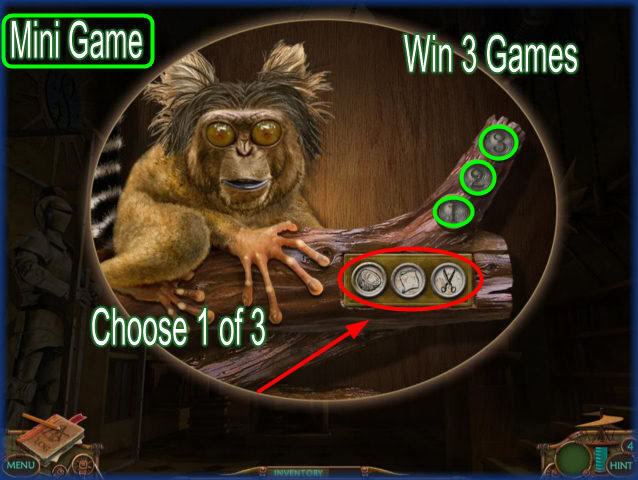

- Your goal is to beat the money at 3 games of coconut, paper, scissors.
- Choose the coconut, the paper or the scissors by clicking on one of the round icons at the bottom of the branch.
- After you make your selection, the monkey will show you his.
- If you both choose the same items it will be a tie.
- If you win, a number from 1 to 3 will light up on the upper side of the branch.
- If you tie or lose a round, no numbers will light up.
- To win, paper has to wrap the coconut, the scissors have to cut the paper or the coconut has to break the scissors.
- Once you win 3 games you can proceed.
- The monkey will throw a coconut at the display case with the armor.

- Now you can click on the armor.
- Next go up into the bird’s nest.
Bird’s Nest
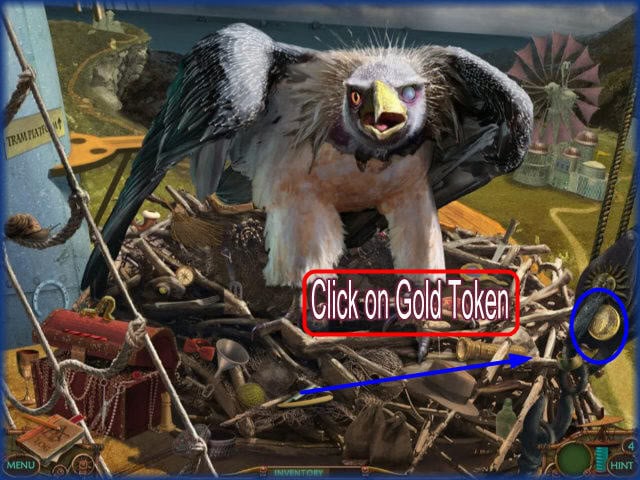
- Click on the gold token and it will go into your inventory.
- Go back to the man in front of the kite shop in town.
Token Game
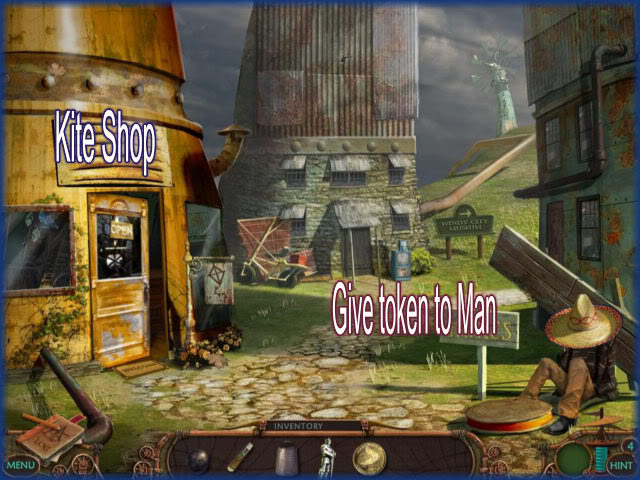
- Give the token to the man and it will trigger a mini game puzzle.
Puzzle
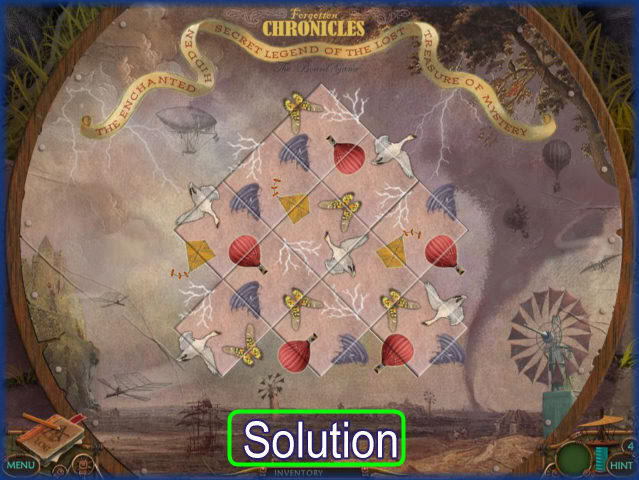
- Place the tiles to complete this puzzle.
- The solution is shown in the image above.
- Once you complete it you have earned a free kite and a free kite license to fly the kite.
- Head over to the kite shop next.
Kite Shop
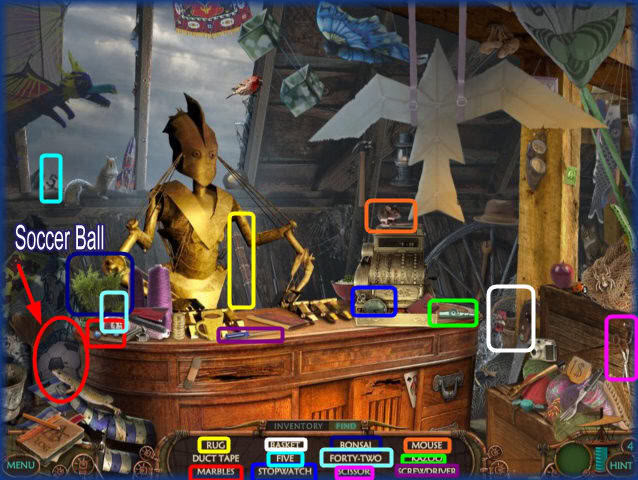

- Find the hidden objects in the scene.
- Be sure to click on the soccer ball on the left of counter.
- In the second screen shot note that you will give the certificate to the shopkeeper.
- You have one a free kite.
- The shopkeeper tells you that you need the "Big Bird Brand Kite String" for your kite.
- Click on the bird kite at the top of the screen.
- Leave shop and head for the shed near the bomb.
Outside Shed
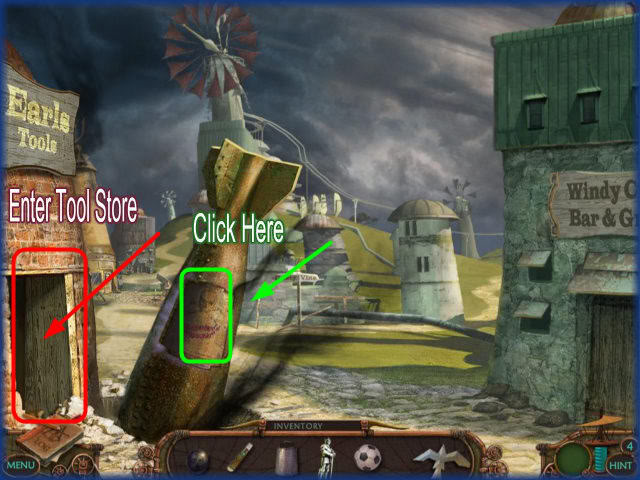
- Click on the panel of the bomb to expose mini game puzzle.
Bomb
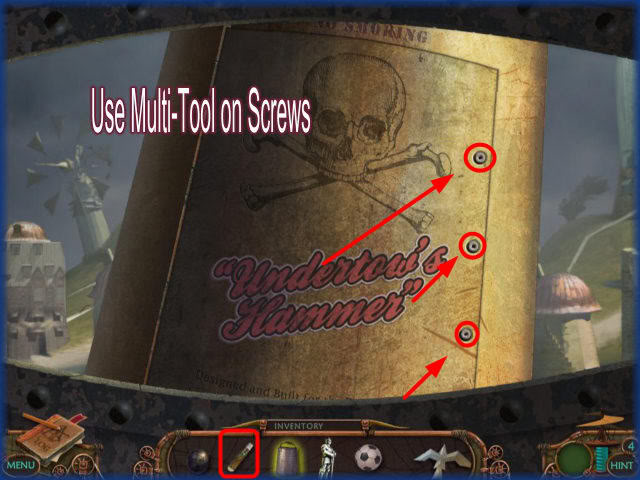
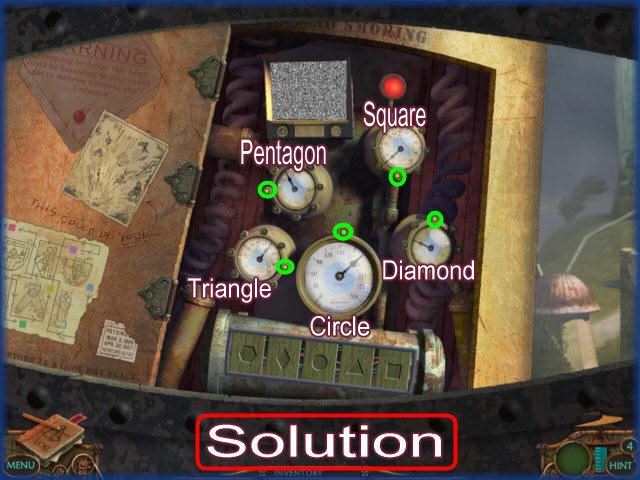
- Click on bomb for closer view.
- Use the multi-tool in inventory to remove all of the screws.
- Your goal is to click on the green round lights on each clock until all the doors open at the same exact time.
- Each clock corresponds with a particular door at the bottom of the bomb.
- Each door has a geometrical shape carved on it.
- Click on the green lights that correspond to each door to change the rhythm of the doors.
- Once you have a door going at the right rhythm move on to the next one until they are all going at the same pace.
- Once all the doors have been aligned correctly they will remain open exposing the wires for the bomb.
- Please look at the screenshot for the solution.
Cutting the Wires
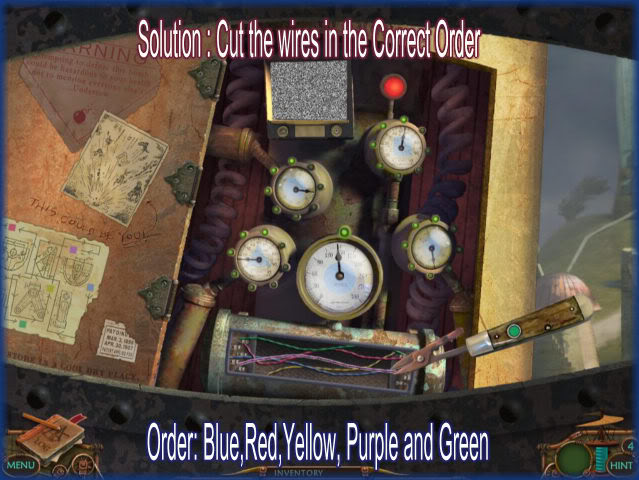
- Now you must cut the wires in the correct order.
- To cut the wires look at the diagram on the lower left side of the panel while paying attention to the direction of the colored blocks.
- When you click on the multi-tool it will have wire cutter attached to it and you will use it to cut the wires.
- Before you cut any of the wires make sure that the right one has been highlighted.
- Cut the wires in this order: BLUE,RED,YELLOW,PURPLE,GREEN
- If you cut the wrong wire you will be taken to a scene of an explosion and you can try again.
- Go to the tool shed next.
Tool Shed
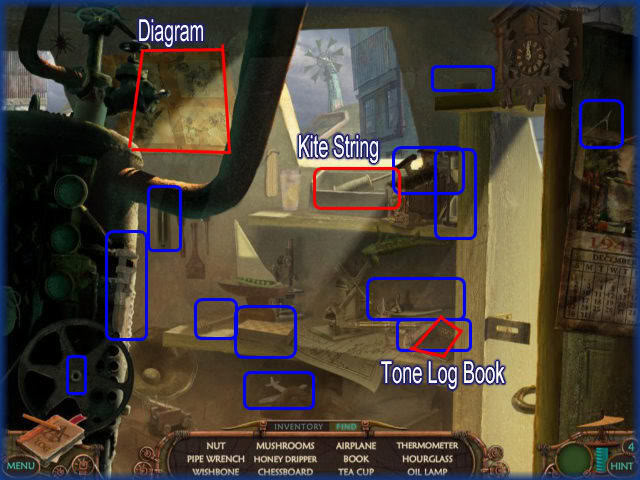
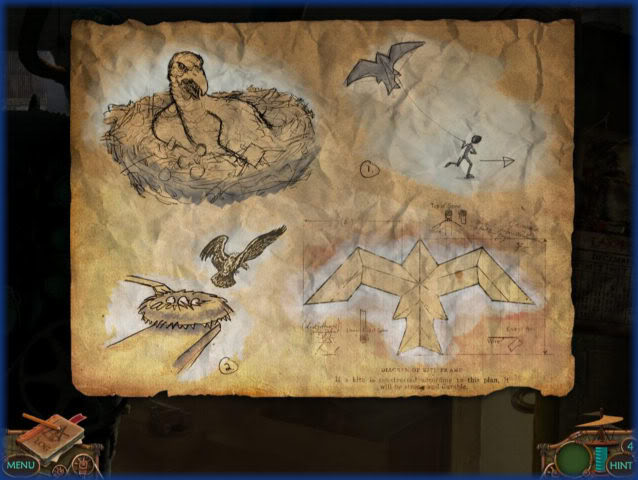
- Click on the diagram in the upper left for a closer look.
- It is a diagram of an Eagle and Kite.
- When this diagram enters your Logbook, the date of July 23rd is noted.
- You need this information for a future puzzle.
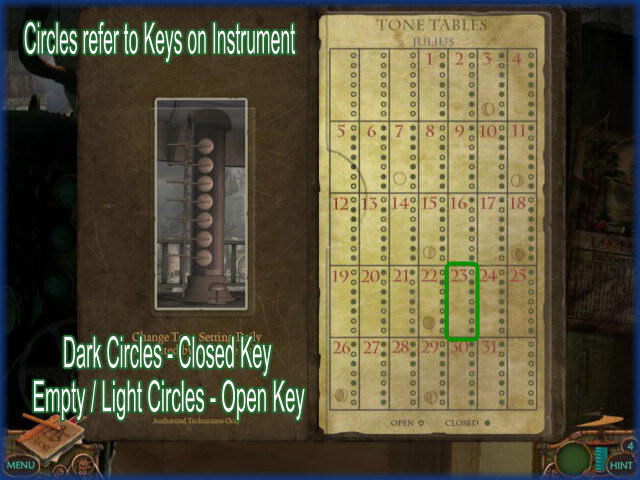
- Click on the "Tone Tables" book at the lower right and it will appear on your screen.
- Click on it again to open it, you will see the "Daily Tone Settings" for the reed Instrument in the Power Station.
- Click on the Kite String on the top shelf and it will go into your inventory.
- Head for the outside of the museum.

- Combine the kite and string here first.
- Place the kite on the scene and the bird will fly away from its nest.
- Go inside the museum so you can access the bird’s nest from there.
Bird’s Nest
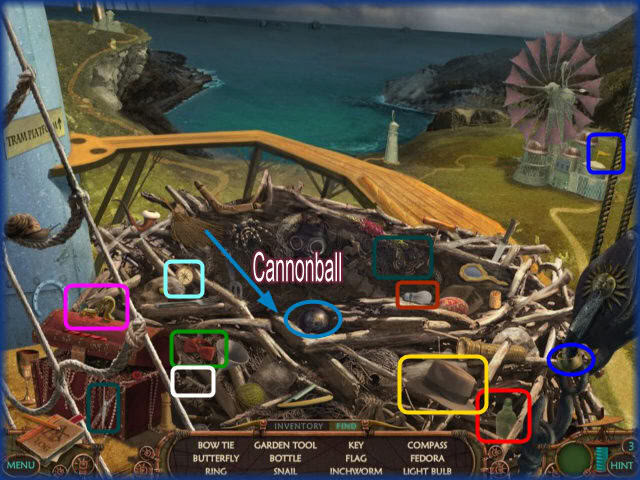
- Find the hidden objects in the scene.
- Click on the cannonball and it will go into your inventory for later use.
Powerchord Authority Station
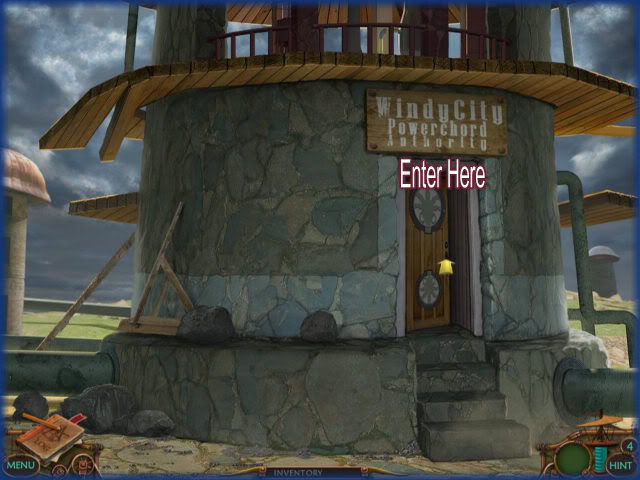
- Enter the Powerchord Station next.
Reed Instrument Puzzle
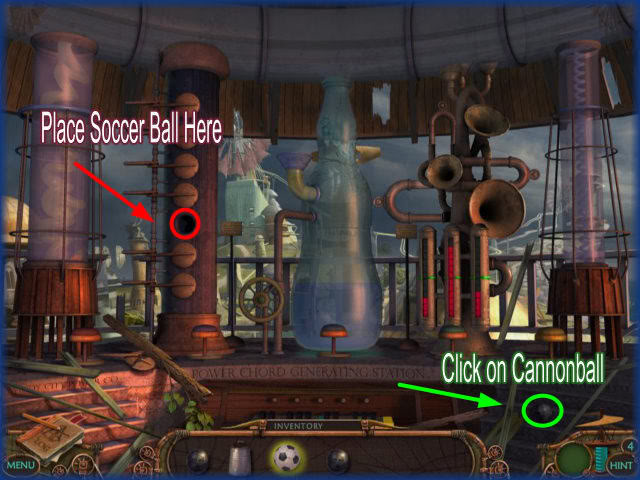
- Place the soccer ball in the hole to plug it.
- Click on the cannonball at the lower right of the scene.
- Click on the sign next to the instrument.
- The sign tells you that you must look in the "Tone Tables" book for the correct settings.
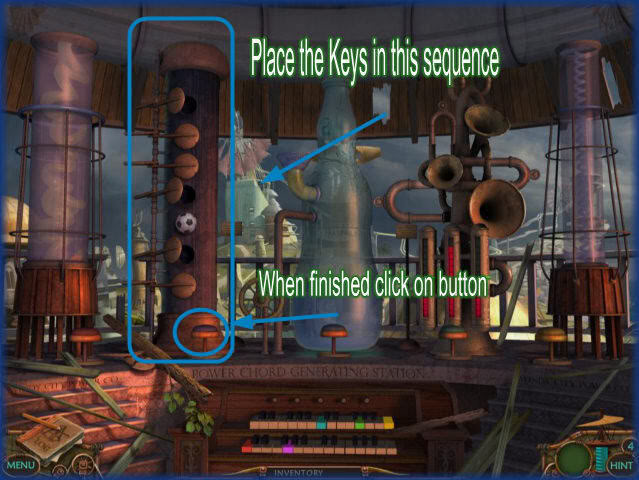
- Open the book and look for the date "July 23rd" Note the dark and light circles in the illustration as it refers to keys.
- Using the dark circles to represent closed and light to represent open you can solve the first puzzle as follows:
- From top to bottom – Opened,closed,closed,open, (soccer ball), open and closed.
- After the keys are in the correct positions click on the purple button at the bottom where it will light up and stay in the down position.
Frequency Puzzle
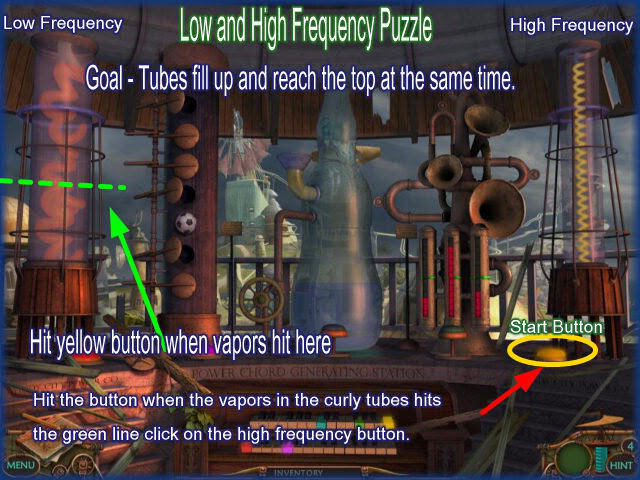
- In this puzzle your goal is to have the 2 power tubes fill up with vapors in the swirly tubing and land at the finish line (at the top) together.
- High frequency is on the far right and low is on the far left as shown above.
- High Frequency travels much faster than low so you will click on the low frequency button first and when it reaches just under the halfway mark or the green mark in the image above you will click on the yellow button to start the high frequency.
- Hopefully it will time out and both will hit the top together.
- If you don’t get it first time you can do it over again until you are successful.
- When you have successfully completed the puzzle both of the buttons will stay pressed down to reflect your success.
- After this puzzle click on the soda pop bottle puzzle in the center.
Soda Pop Bottle Puzzle
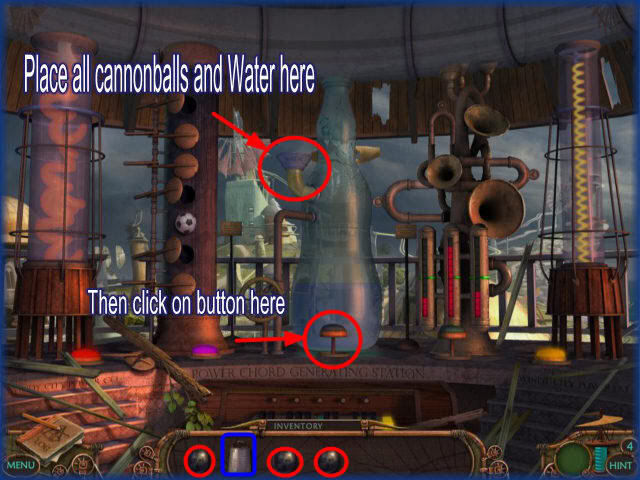
- In this puzzle you will use the cannon balls and bucket of water you have collected.
- If you do not have all the items you will need to go back and explore the area until you find them. Use this walkthrough as all cannon balls have been marked in images.
- Place the cannonballs and bucket of water in the funnel shaped spout on the left side of the bottle.
- Press down the button at the bottom.
- If you are successful, the button will light up and stay pressed down.
- Proceed to the Brass Puzzle.
Brass Instrument Puzzle
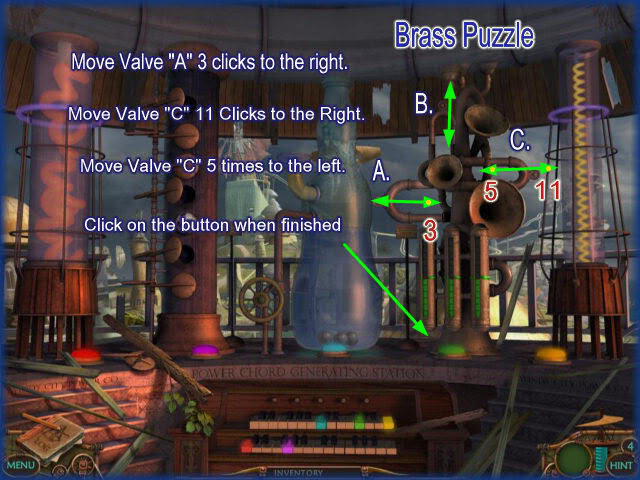
- This puzzle requires you to click on one of 3 valves a certain number of times to cause the meter at the bottom to fill to the fill line.
- There are 3 valves. Valve A. is on the left and moves horizontally. Valve B. is at the top and moves vertically up or down. Valve C. is on the far right and moves horizontally left to right as well.
- The solution to this puzzle is listed on the image above as well as here.
- When you put your mouse on a valve you will notice arrows appear to the left or right. Click on these arrows the required number of times.
- Your goal is to fill up the green meter at the bottom to the fill line.
- Solution Valve A you will click 3 times to the right. Valve C you will click its right arrow 11 times. Finally you will again click on valve C but will click it 5 times to the left. A 3R, C 11R, C 5L = Solution.
- Press the button down and it should stay down and the meter should be filled to the fill line with green as shown in the image above.
Piano Puzzle
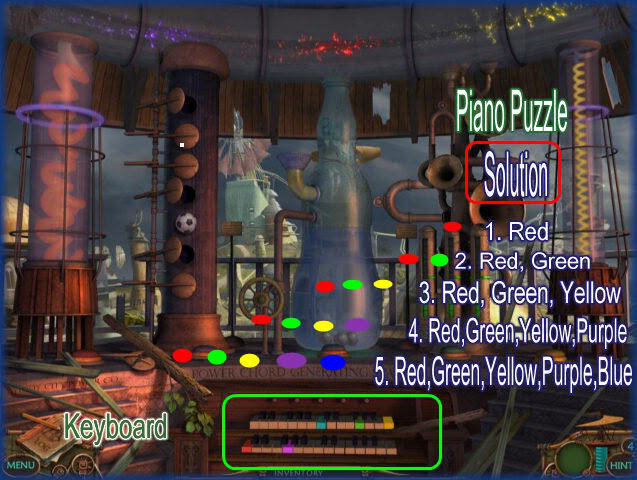
- This puzzle is a mimic what you see and hear puzzle.
- The keys on the piano will light up in a sequence and you are to play the sequence back by clicking on the piano keys repeating what you just saw and/or heard.
- If you make one mistake you will be required to start all over again.
- You must get all sequences correct to solve the puzzle.
- The game uses the same sequence every time for every person!
- Solution 1. Red 2. Red-Green 3. Red Green Yellow 4. Red Green Yellow
- The image shows the solution in text and in colors for ease.
- Once you complete this puzzle you will see colors run across the top of the screen.
- Now the power has been restored to the tram.
- Next go up to the Tram.
Tram Puzzle
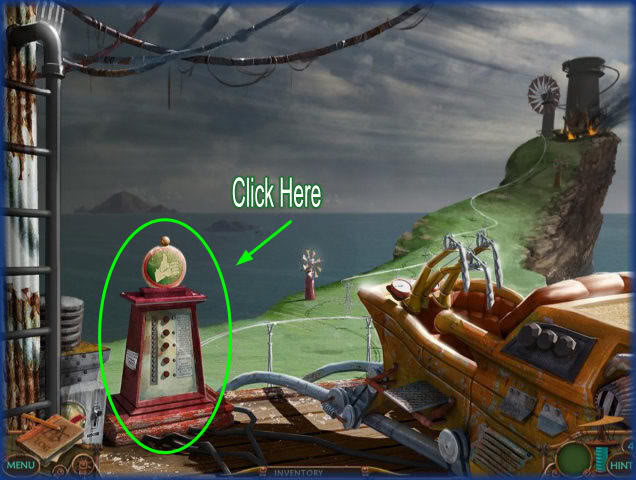

- Click on the control panel to activate the puzzle.
- The goal of this puzzle is to light all of the lights at once.
- Pushing a button results in several lights coming on and off so you need the correct combination to start the tram.
- SOLUTION – Look at the image above click on the buttons in the order shown. Option B. Number the buttons 1 to 5 top to bottom click on buttons numbered 5,3 and 1.
- Once you light up all the lights the tram will start.
- Watch the scenes play out.
Final Scenes

- Once you are at this scene click on the ramp where indicated above.
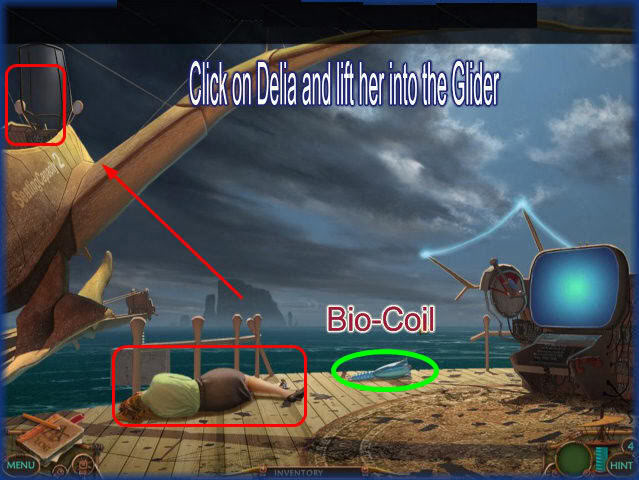
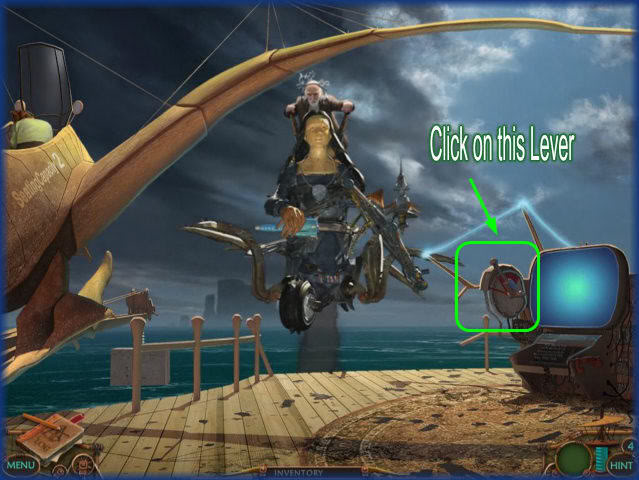
- Click on Dalia and drag her to the glider at the top left side of the screen.
- Gideon appears and takes the Bio-Coil.
- Click on the lever as shown above and Gideon will be electrocuted and fall into the ocean.
- Click on the Glider and Delia will take off.
- Watch the ending scenes.

- CONGRATULATIONS! You have completed Hidden Expedition: Devil’s Triangle.
“;
More articles...
Monopoly GO! Free Rolls – Links For Free Dice
By Glen Fox
Wondering how to get Monopoly GO! free rolls? Well, you’ve come to the right place. In this guide, we provide you with a bunch of tips and tricks to get some free rolls for the hit new mobile game. We’ll …Best Roblox Horror Games to Play Right Now – Updated Weekly
By Adele Wilson
Our Best Roblox Horror Games guide features the scariest and most creative experiences to play right now on the platform!The BEST Roblox Games of The Week – Games You Need To Play!
By Sho Roberts
Our feature shares our pick for the Best Roblox Games of the week! With our feature, we guarantee you'll find something new to play!All Grades in Type Soul – Each Race Explained
By Adele Wilson
Our All Grades in Type Soul guide lists every grade in the game for all races, including how to increase your grade quickly!


