- Wondering how to get Monopoly GO! free rolls? Well, you’ve come to the right place. In this guide, we provide you with a bunch of tips and tricks to get some free rolls for the hit new mobile game. We’ll …
Best Roblox Horror Games to Play Right Now – Updated Weekly
By Adele Wilson
Our Best Roblox Horror Games guide features the scariest and most creative experiences to play right now on the platform!The BEST Roblox Games of The Week – Games You Need To Play!
By Sho Roberts
Our feature shares our pick for the Best Roblox Games of the week! With our feature, we guarantee you'll find something new to play!All Grades in Type Soul – Each Race Explained
By Adele Wilson
Our All Grades in Type Soul guide lists every grade in the game for all races, including how to increase your grade quickly!
Haunting Mysteries: The Island of Lost Souls Walkthrough
Welcome to the Haunting Mysteries: The Island of Lost Souls walkthrough on Gamezebo.Haunting Mysteries: The Island of Lost Souls is a hidden object/adventure game created by Fuzzy Bug Interactive. This walkthrough includes tips and tricks, helpful hints and a strategy guide on how to complete Haunting Mysteries: The Island of Lost Souls.
Game Introduction – Haunting Mysteries: The Island of Lost Souls
Welcome to the Haunting Mysteries: The Island of Lost Souls walkthrough on Gamezebo.Haunting Mysteries: The Island of Lost Souls is a hidden object/adventure game created by Fuzzy Bug Interactive. This walkthrough includes tips and tricks, helpful hints and a strategy guide on how to complete Haunting Mysteries: The Island of Lost Souls.
General Tips
This hidden object game requires visiting several locations and using inventory items to advance play.
- Play is mostly linear although there are some options for the order in which to explore locations.
- Select Options to adjust the Music and SFX Volume. You may also toggle Custom Cursor and Full Screen options.
- Begin play by selecting a playing mode that suits your style of play: Casual or Expert. The mode may not be changed during game play. Create a new profile and begin again to change the playing mode.
- Game-play time is accumulated for a high score achievement.
- Awards consist of finding all forty Haunted Souls and various other unspecified achievements. Be sure to check out all parts of a scene as you may be awarded for just looking into a window or a similar task.
- Hints may be used to direct play or reveal the location of an item in a hidden object scene.
- Hidden object scenes contain items listed in yellow lettering. These items require an extra step to find.
- Extras bonus content in the Collector’s Edition includes Music, Concept Art, Wallpapers, Screensavers, Strategy Guide, Mini-Games and Bonus Awards. Bonus gameplay is available after completing the main game.
Walkthrough Tips
- This guide is based on the Collector’s Edition of the game. Some scenes and content are not available in the standard edition.
- The point of a hidden object game is to find the objects in a scene. For this reason, only inventory items are highlighted.
- CAPITALIZED inventory items are meant to make it easier to find where this guide may differ from your own play. Inventory items are highlighted in white with a blue border in the screenshots.
- If you don’t have an item referenced in this guide, click and hold the “Ctrl” key and then press the “F” key. This opens a Find area in your web browser. Type in the name of the object as it appears in this guide to find where else it’s referenced.
- To minimize back and forth moves, most available inventory items in a scene are picked up when first encountered.
Chapter 1: The Beginning

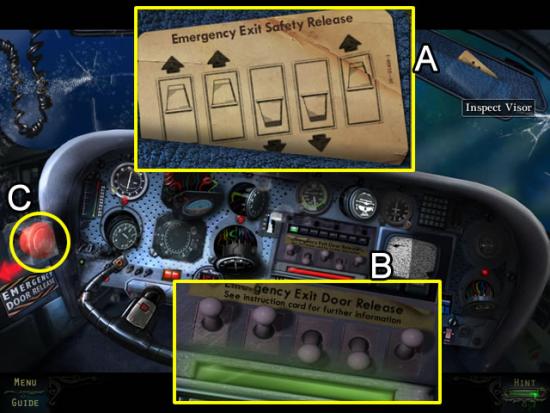
- Inspect the card in the visor (A).
- Zoom in on the toggle switches (B) and flip them up or down to match the pattern on the visor card.
- Press the emergency button to (C) exit the plane.
- Play the hidden object scene in the lifesaver.
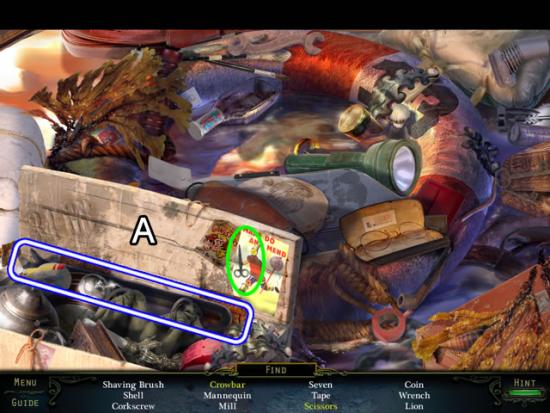
- Open the top of the box to find the yellow-listed Scissors and Crowbar.
- Find the rest of the items.
- The CROWBAR goes to inventory.
- Use the CROWBAR to pry off the damaged luggage compartment door.
- Play the hidden object scene in the luggage compartment.
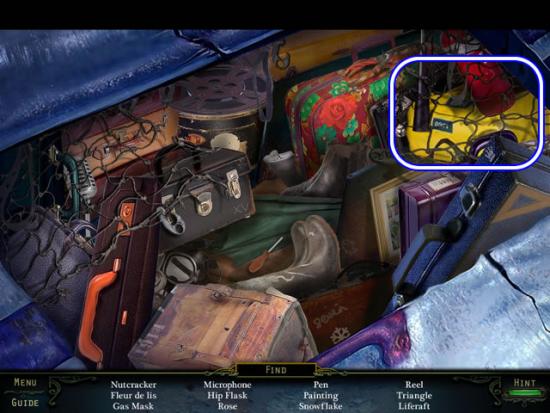
- Find the listed objects.
- The LIFE RAFT goes to inventory.
- Throw the LIFE RAFT into the water.
- Point the cursor at the lighthouse and click to get to the jetty.
Chapter 2: The Lighthouse
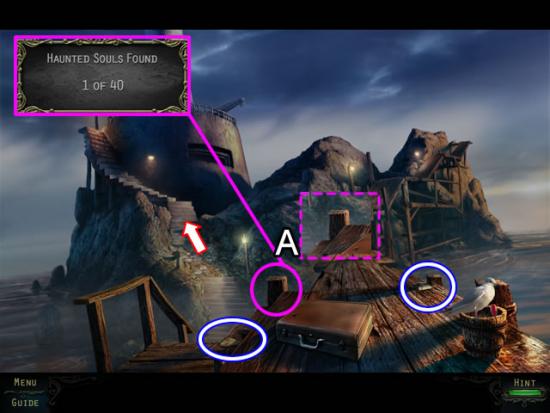
Jetty
- Items highlighted in white with a blue border are inventory items. Pick up PHOTO SCRAP (1/8) and PHOTO SCRAP (2/8) on the jetty.
- The haunted soul faces are often difficult to see as they fade in and out. The first one (1/40) is on the pier beam (A). The dashed inset is an enhancement of the area. Each Haunted Soul face is highlighted in pink in this strategy guide.
- Go up the steps on the left.
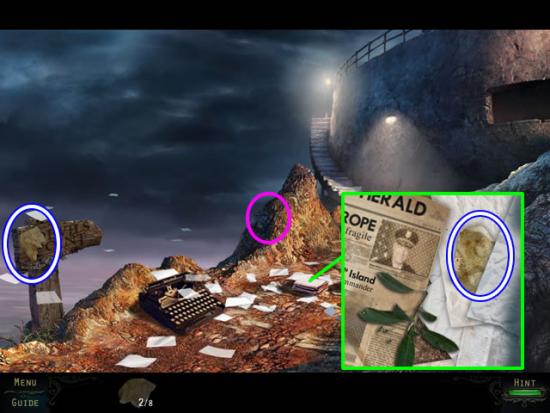
Steps
- Look closer at the sign; take PHOTO SCRAP (3/8).
- Collect Haunted Soul (2/40).
- Examine the stack of papers. Read the newspaper; take PHOTO SCRAP (4/8).
- Continue up the stairs.
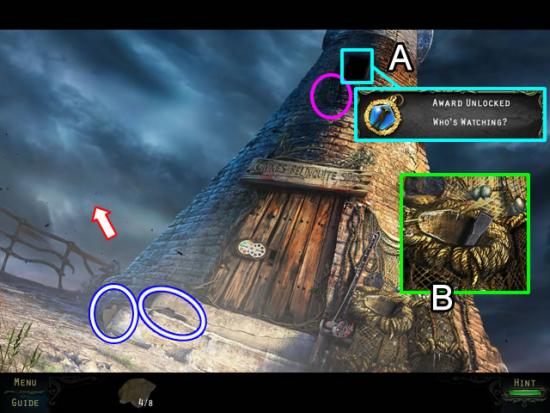
Lighthouse Front
- Peer in the window on the tower (A). Unlock the “Who’s Watching” award.
- Collect the Haunted Soul (3/40) below the window.
- Examine the net (B); take the CHISEL.
- Pick up the TYPEWRITER RIBBON and PHOTO SCRAP (5/8) on the steps.
- Go forward.
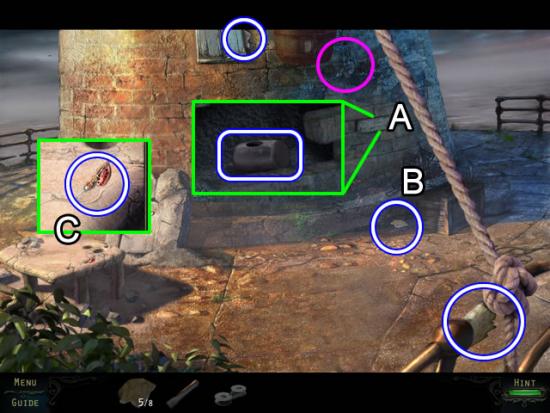
Lighthouse Back
- Use the CHISEL to remove the loose brick (A) and unlock the “Look no Hands” award. Take the HAMMER HEAD.
- Collect the Haunted Soul (4/40) from the wall above the brick.
- Move the box (B); find PHOTO SCRAP (6/8).
- Grab PHOTO SCRAP (7/8) from the boarded up window. Get PHOTO SCRAP (8/8) from the front railing.
- Examine the worktable (C); take the FISHING TACKLE.
- Go either right or left to return to the front of the lighthouse.
Lighthouse Front
- Look at the fishing net hanging on the side of the lighthouse again.
- Attach the FISHING TACKLE to the fishing pole. Take the FISHING ROD.
- Go down once to the steps.
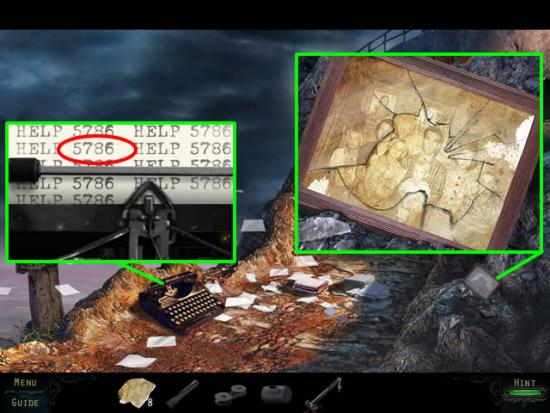
Steps
- Zoom in on the typewriter and insert the TYPEWRITER RIBBON. Note the four numbers that are typed (red).
- Look closer at the broken picture frame. Add the PHOTO SCRAPS (8/8) to open a jigsaw type puzzle.
- The goal is to reconstruct the photo.
- The best strategy is to place the corner pieces first. Match the rest based on the shape of the piece or its image. Select a piece and left-click to rotate it if necessary. Correctly place pieces lock into position. The solution is shown in the above inset. Completing the puzzle unlocks the “Repaired the Photograph” award.
- Continue down to the jetty.
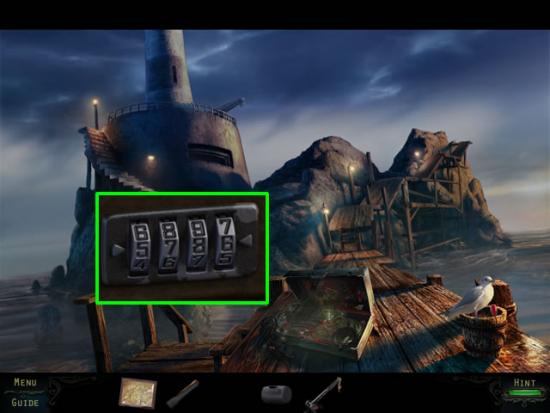
Jetty
- Inspect the suitcase.
- Rotate the tumblers until the numbers from the typewriter sheet (5-7-8-6) are aligned between the two arrows on the lock.
- Play the hidden object scene.
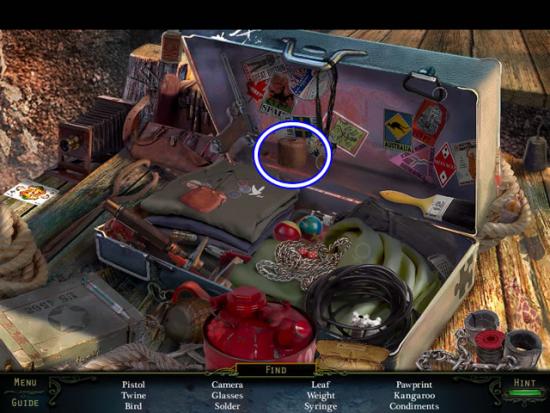
- Find the listed objects.
- The TWINE goes to inventory.
- Possible awards: “Hurry, Hurry, Hurry” for completing the scene in less than one minute. “Quick Fingered” for collecting four items in less than three seconds. “I Need a Little Help” for using the Hint bar three times to complete the scene.
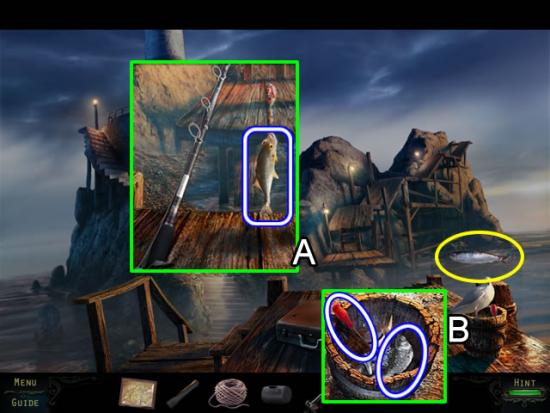
- Look into the gap in the deck (A). Use the FISHING ROD to catch a HERRING.
- Toss the HERRING to the seagull (yellow). Examine the bucket contents (B) after the gull flies off. Take the SCREWDRIVER and SILVER FISH.
- Go back up the steps to the front of the lighthouse.
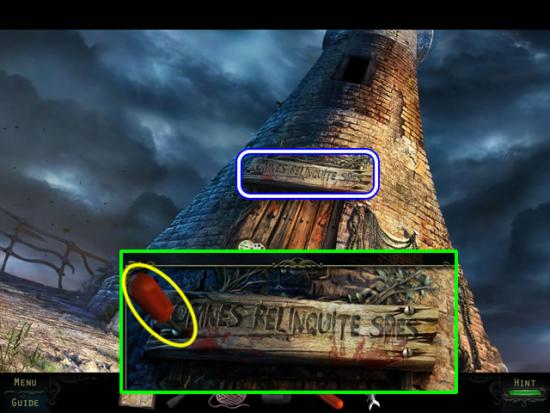
Lighthouse Front
- Zoom in on the sign above the door.
- Use the SCREWDRIVER to remove the four screws.
- Take the sign PLANK.
- Return to the jetty
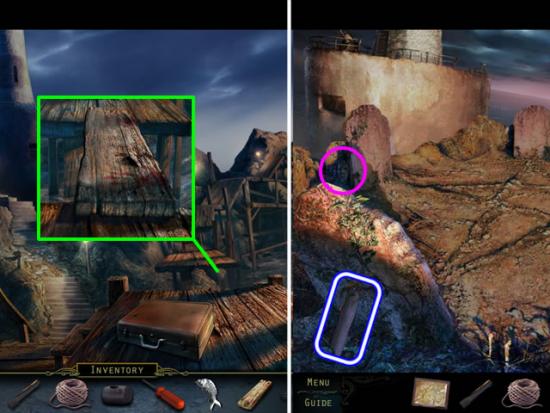
Jetty
- Look closer at the gap in the decking.
- Use the PLANK to span the gap.
- Go forward.
Small Graveyard
- Collect the Haunted Soul (5/40) from the small tombstone on the left.
- Pick up the WOODEN HANDLE.
- Return to the back of the lighthouse.
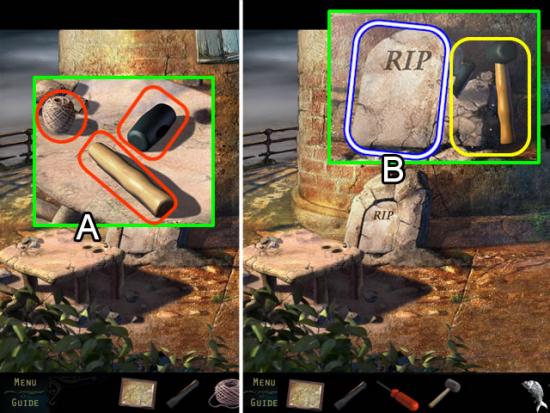
Lighthouse Back
- Zoom in on the stonemason’s table (A).
- Put the TWINE, WOODEN HANDLE and HAMMER HEAD on the table. Take the HAMMER.
- Examine the tombstone (B). Use the CHISEL and HAMMER to remove the outside pieces of stone (yellow). Take the GRAVE STONE.
- Return to the small graveyard.
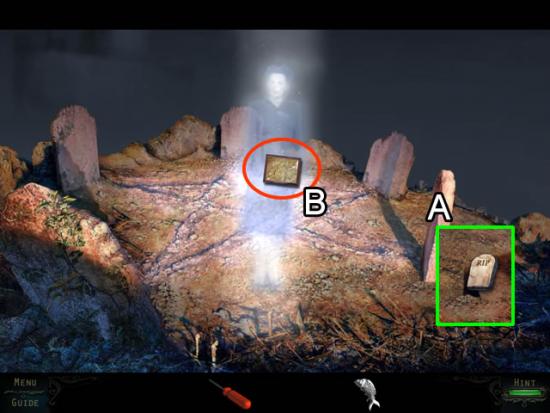
Small Graveyard
- Insert the GRAVE STONE in the empty slot (A) to open a cutscene.
- Give the woman the PHOTO; receive a PANEL.
- Return to the front of the lighthouse.
Lighthouse Front
- Zoom in on the door.
- Insert the PANEL in the empty slot to open a puzzle.
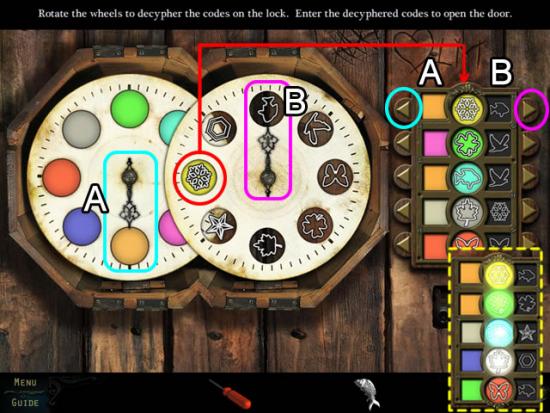
- The goal is to use the two wheels to find the correct color and symbol for the panel.
- Rotate both wheels until the circle that intersects the two wheels (red) is the same color and symbol as the center column on the panel. Note where the color hand is pointing (A). Click the arrow next to the first column (A) until it is the same color. Do the same thing with the symbol hand and the arrow for the third column (B).
- Repeat this process for each one of the icons in the center column of the panel. Correct color and symbol assignments retract the two outer columns and illuminate the center column.
- The solution for each icon is shown in the dashed inset.
- Solving the puzzle unlocks the “Enter the Lighthouse” award.
Lower Lighthouse
- Play the hidden object scene under the stairs.
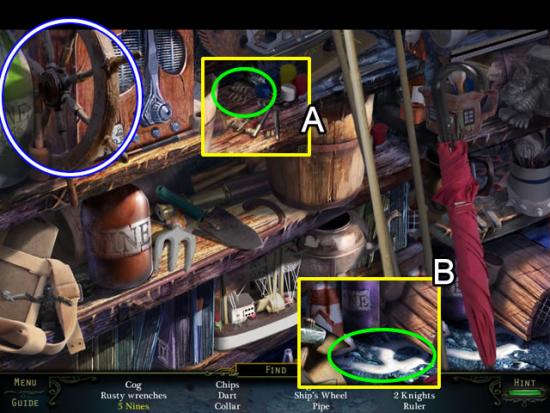
- Move the bucket (A) to find one of the hidden nines.
- Knock over the umbrella and poles (B) to find the other hidden nine.
- Find the rest of the listed objects.
- The SHIP’S WHEEL goes to inventory.
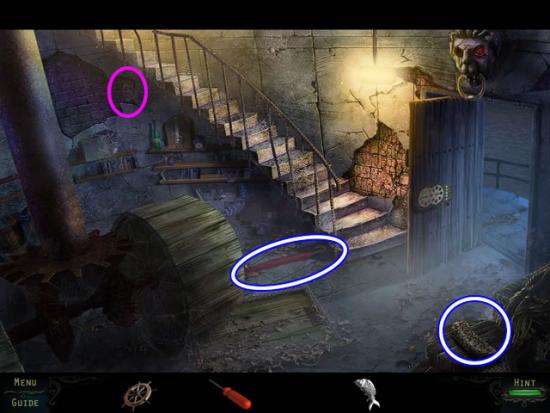
- Collect the Haunted Soul (6/40) from under the stairs.
- Pick up the UMBRELLA and DRY SPONGE.
- Go up the stairs.
Lighthouse Tower
- Pick up the OIL CAN at the base of the broken signal light.
- Go back down the stairs.
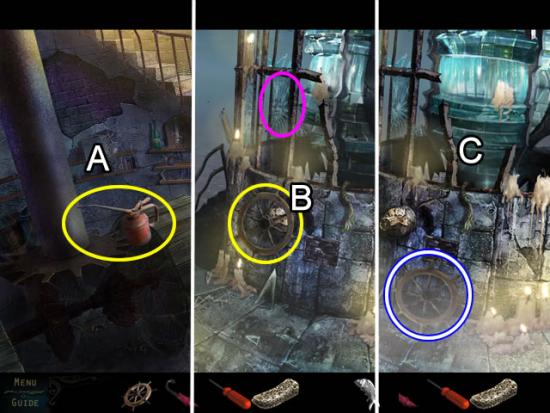
Lower Lighthouse
- Use the OIL CAN to lubricate the rusty gears (A).
Lighthouse Tower
- Collect the Haunted Soul (7/40) from the cracked glass between the lantern bars.
- Attach the SHIP’S WHEEL to the mechanism (B). Turn to summon the lighthouse keeper.
- Pick up the fallen SHIP’S WHEEL; play the hidden object scene in the lantern.
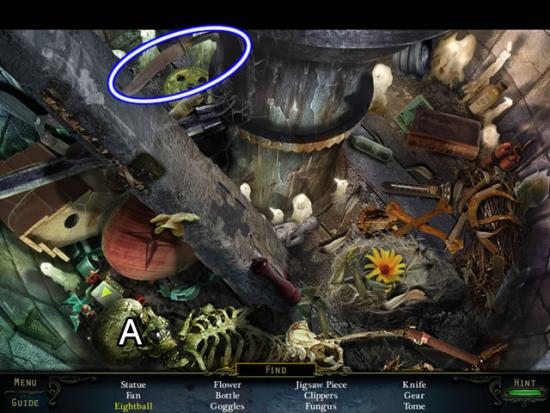
- Open the skeleton’s jaw to find the Eight ball (A).
- Find the rest of the listed objects.
- The KNIFE goes to inventory.
- Exit the lighthouse.
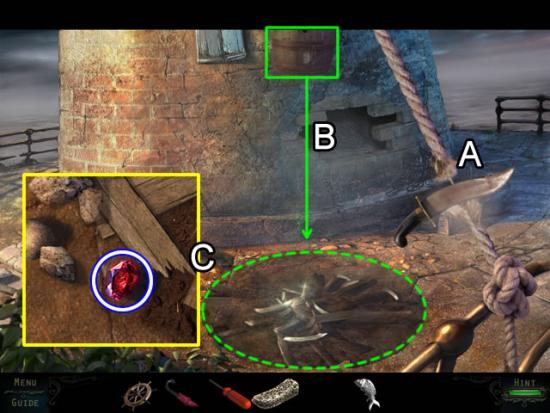
Lighthouse Back
- Cut the rope with the KNIFE (A).
- The barrel falls and breaks apart (B).
- Examine the remains of the barrel (dashed green).
- Move the rocks and boards around to find the JEWEL (C).
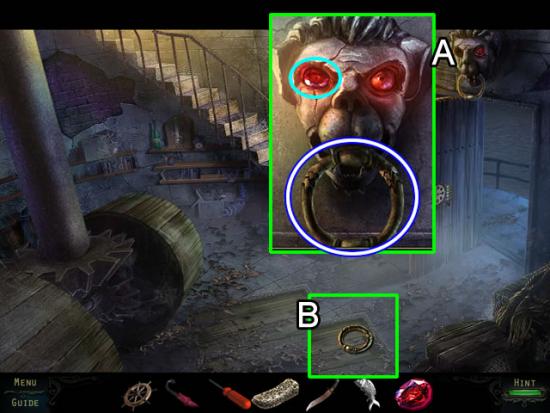
Lower Lighthouse
- Zoom in on the lion’s head above the door (A).
- Insert the JEWEL in the empty eye socket to open its mouth; take the METAL RING.
- Attach the METAL RING to the trapdoor (B). Lift the trapdoor to enter the basement.
Lighthouse Basement
- Speak to the ghosts.
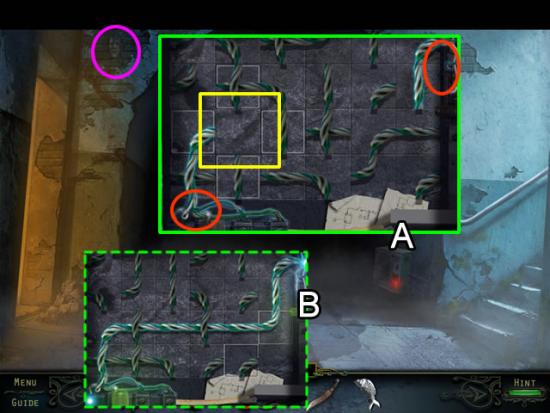
- Collect the Haunted Soul (8/40) on the upper left wall.
- Zoom in on the electrical box (A). Use the SCREWDRIVER to remove the front panel and open a puzzle.
- The goal is to form a circuit from the lower left (orange) to the upper right (orange).
- Swap the available wire tiles (white) into the empty square (yellow) to move the needed wires into place. The wires for a live connection light up. Unconnected ends do not need to be terminated.
- A possible solution is shown (B). Unlock “The Lights Are On” award.
- Enter the lighted doorway on the left.
Tower Bunker
- Play the hidden object scene on the desk.
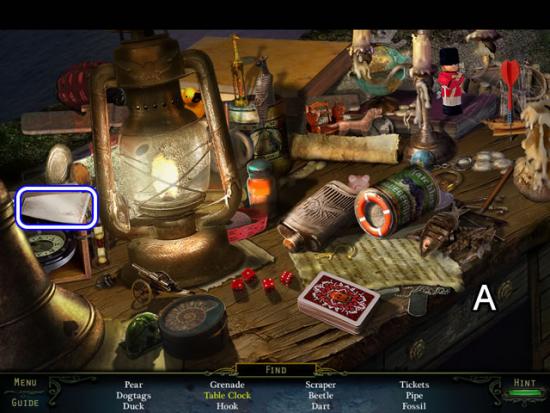
- Open the drawer (A) to find the Table Clock.
- Find the rest of the listed objects.
- The SCRAPER goes to inventory.
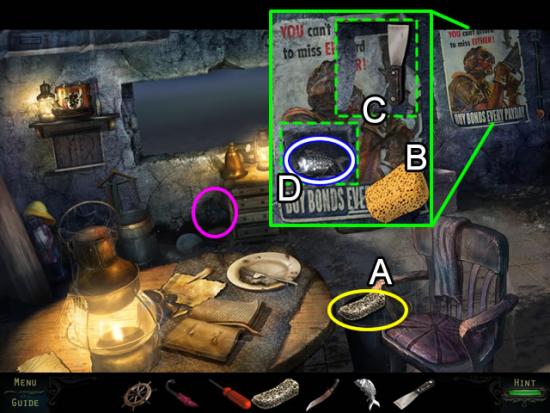
- Collect the Haunted Soul (9/40) beside the desk.
- Dunk the DRY SPONGE into the bucket of water (A); get a WET SPONGE.
- Zoom in on the poster.
- Loosen the poster with the WET SPONGE (B). Use the SCRAPER (C) to remove the poster and uncover a hidden compartment (D); take the SILVER FISH.
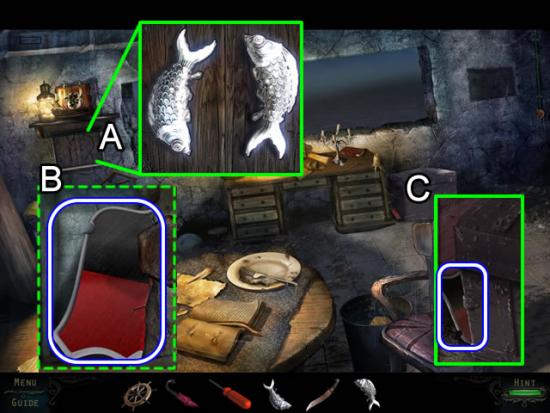
- Look at the wooden panel below the shelf (A). Insert the two SILVER FISH into the insets to open a compartment.
- Take the SHIELD HALF from the compartment (B).
- Look beside the chest (C); take the second SHIELD HALF.
- Go back twice.
Lower Lighthouse
- Play the hidden object scene under the stairs.
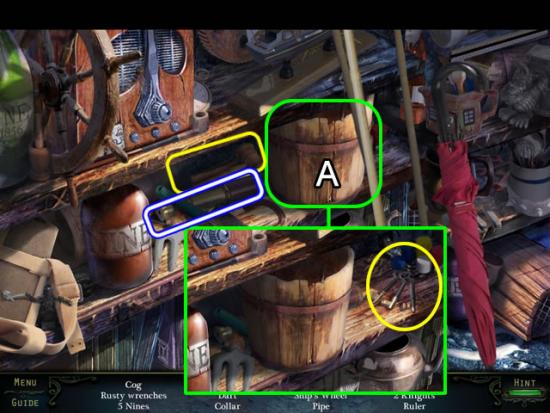
- Move the bucket (A) back and forth to uncover the Gavel and SPYGLASS and Keys.
- Find the rest of the listed objects.
- Go up the stairs.
Lighthouse Tower
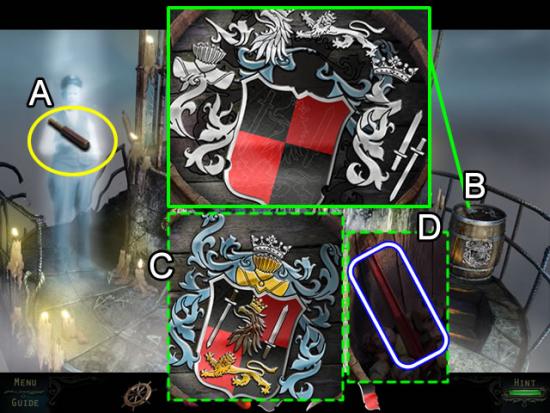
- Give the SPYGLASS to the lighthouse keeper (A); receive a PUZZLE PIECE from him.
- Examine the top of the barrel (B); place the two SHIELD HALF parts in the inset to open a puzzle.
- The goal is to drag the scattered pieces to their outlines and form a coat of arms.
- The solution is shown (C). Solving the puzzle unlocks the “Open the Barrel” award.
- Look inside the barrel (D); take the WRENCH.
- Return to the tower basement. Go left into the bunker.
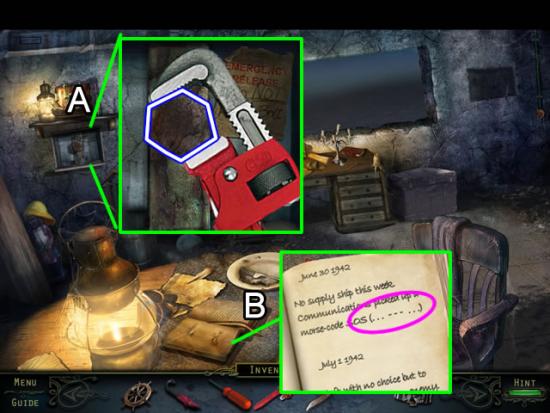
Tower Bunker
- Look in the compartment under the shelf (A); remove the LARGE BOLT with the WRENCH.
- Pick up the diary on the desk (B). Turn the page and note the Morris code entry (pink).
- Exit the lighthouse to inspect the damage caused by removing the bolt.
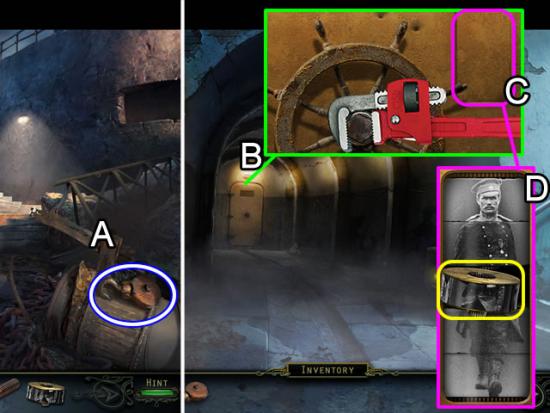
Steps
- Pick up the HEAVY DUTY HOOK on top of the debris (A).
- Return to the basement.
Lighthouse Basement
- Zoom in on the blast door (B) at the end of the corridor.
- Place the SHIP’S WHEEL on the door. Insert the LARGE BOLT in the center of the wheel. Tighten the bolt with the WRENCH.
- Turn the wheel to open the lock compartment (C).
- Insert the PUZZLE PIECE in the empty slot to open a puzzle (D).
- The goal is to rotate the five rings to complete a person.
- The best strategy is to start with a head. Try to match color and body position on each ring to the head.
- Solution:
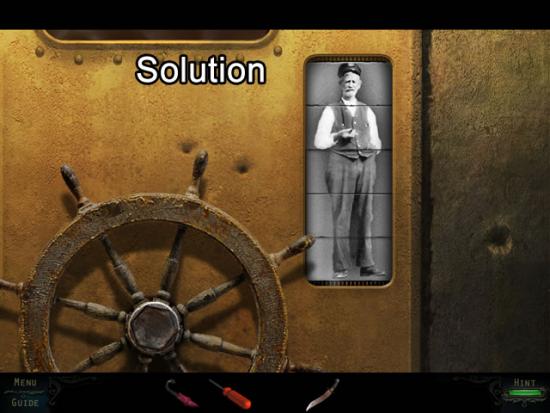
- Spin the wheel to open the door.
- Open the door unlocks the “Another Route Out” award.
Chapter 3: The Cave System
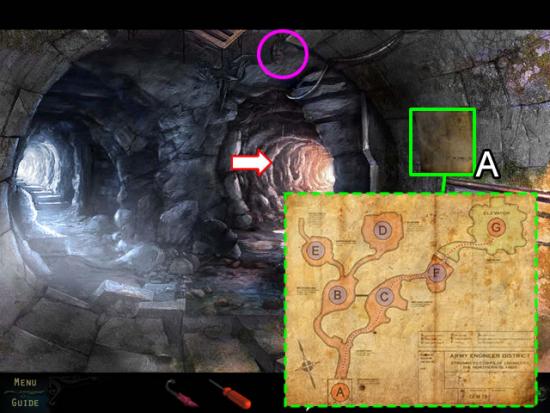
Cave Entrance
- Collect the Haunted Soul (10/40) above the entrance to the right tunnel.
- Examine the map (A) of the cave system.
- Take the right tunnel.
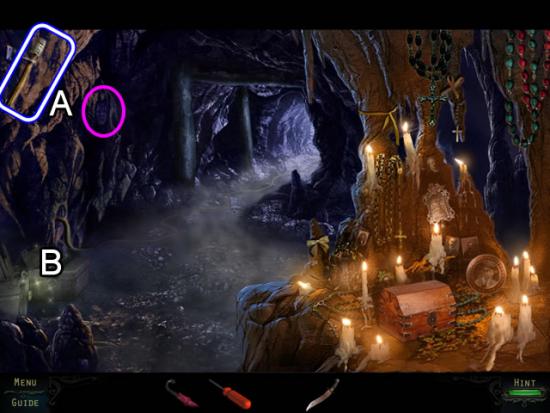
Cave C
- Pick up the UNLIT TORCH (A); collect the Haunted Soul (11/40) on the wall next to the torch.
- Play the hidden object scene in to toolbox.
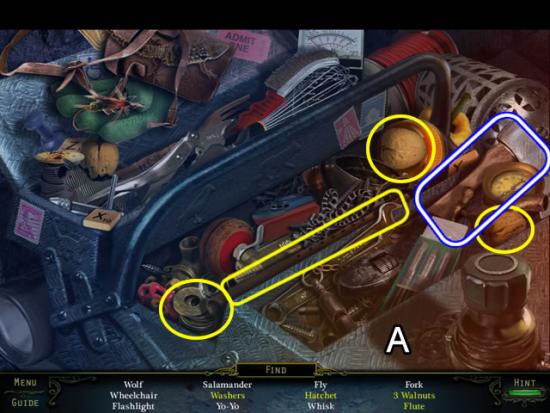
- Open the compartment (A) to find the Washers, Flute, two of the three Walnuts and the HATCHET.
- Find the rest of the listed objects.
- Go forward to the next cave.
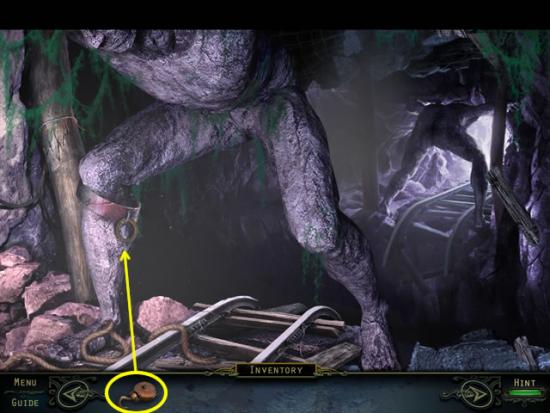
Cave F
- Attach the HEAVY DUTY HOOK to the ring on the statue’s leg.
- Return to the entrance; enter the tunnel to the left.
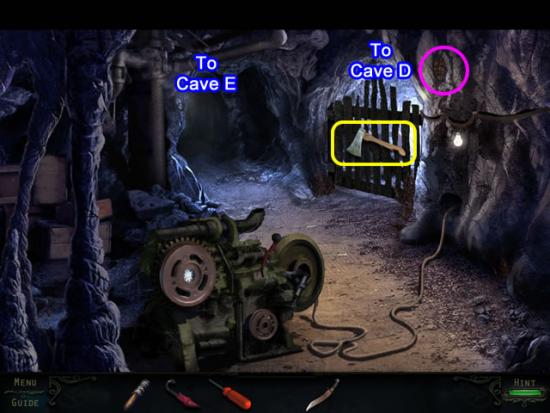
Cave B
- Collect the Haunted Soul (12/40) on the right wall above the gate.
- Use the HATCHET to chop down the gate blocking Cave D.
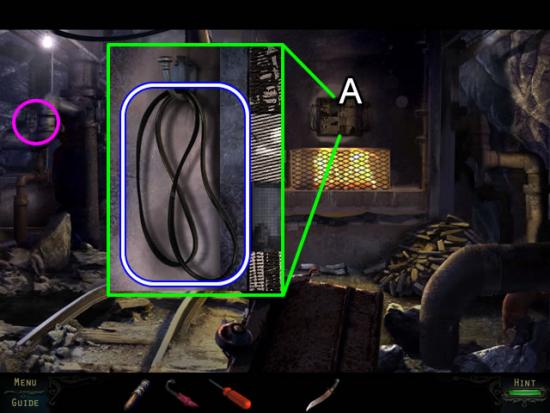
Cave D
- Collect the Haunted Soul (13/40) from the wall next to the pipe on the left.
- Examine the door to the furnace (A); take the MACHINE BELT.
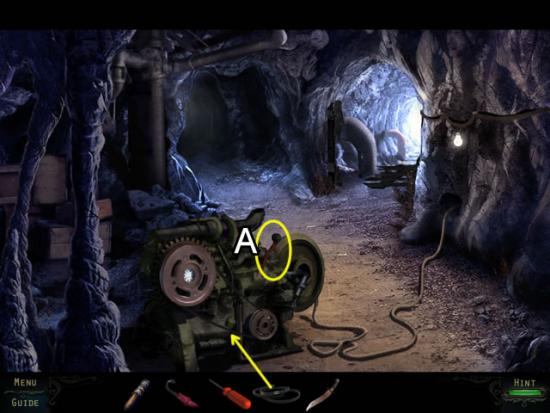
Cave B
- Use the MACHINE BELT to connect the two wheels on the machine.
- Pull the lever (A) to start the machine and pull the rope tight.
- Return to the cave entrance; go right to cave F.
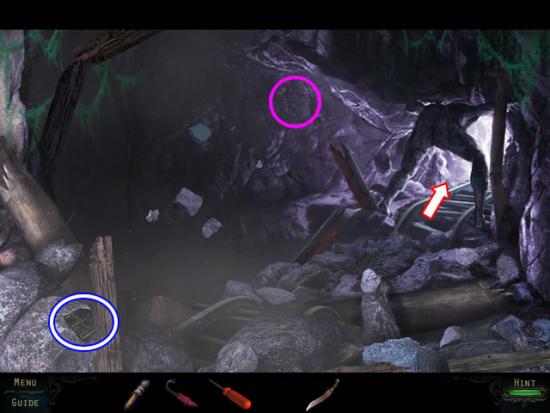
Cave F
- Collect the Haunted Soul (14/40) from the far cave wall (pink).
- Pick up the PUZZLE PIECE (1/2) by the near post.
- Go forward to the area labeled “G” on the map.
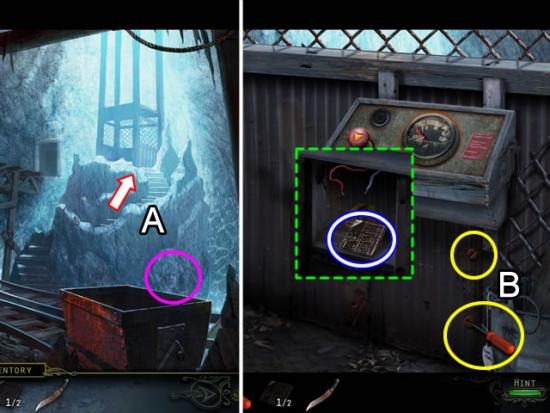
Cave G
- Collect the Haunted Soul (15/40) from the far wall above the coal cart (pink).
- Climb up the stairs (A) to the elevator.
Elevator
- Remove the two screws (B) with the SCREWDRIVER.
- Take the PUZZLE PIECE (2/2) from the open compartment.
- Return to the cave entrance; go left to Cave B. Enter Cave D.
Cave D
- Zoom in on the furnace.
- Put the two PUZZLE PIECES on the board to open a puzzle.
- The goal is to find a picture in the pattern.
- The best strategy is to match line direction and colors. Swap two pieces at a time. When a swap occurs a brief glimpse of the correct piece briefly shows the board.
- Solution:
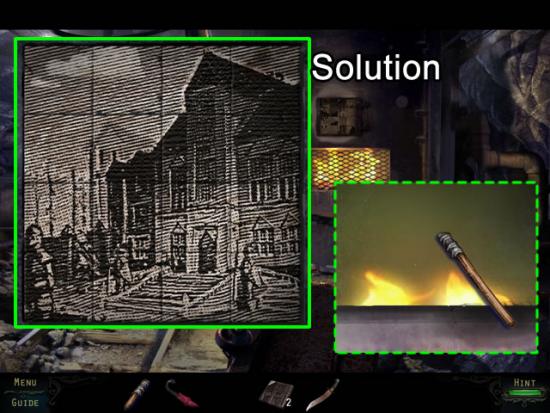
- Solving the puzzle unlocks the “Opened the Furnace” award.
- Put the UNLIT TORCH in the furnace flames; retrieve a LIT TORCH.
- Exit to Cave B. Enter the darkened Cave E.
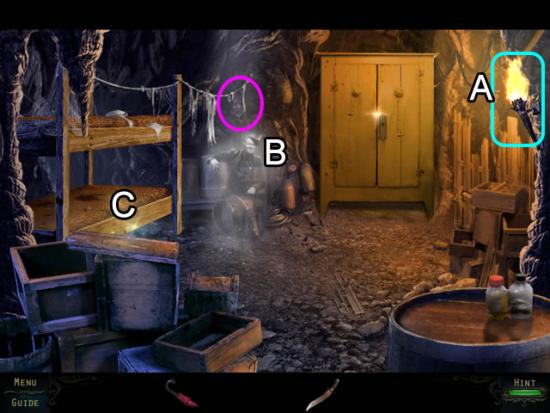
Cave E
- Insert the LIT TORCH in the torch holder on the wall (A).
- Speak to the ghost (B).
- Collect the Haunted Soul (16/40) from the wall behind the ghost (pink).
- Play the hidden object scene on the lower bunk bed (C).
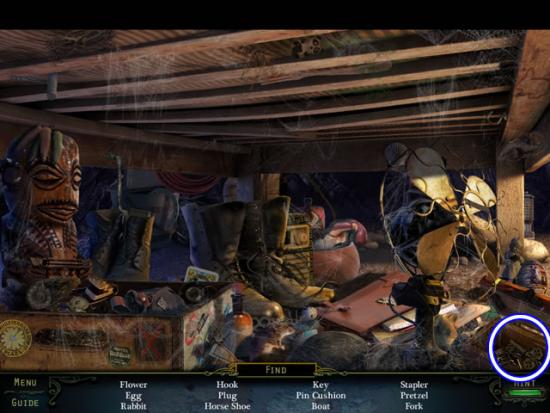
- Find the listed objects.
- The Key goes to inventory as a CHEST KEY.
- Go down three times and then left into the bunker.
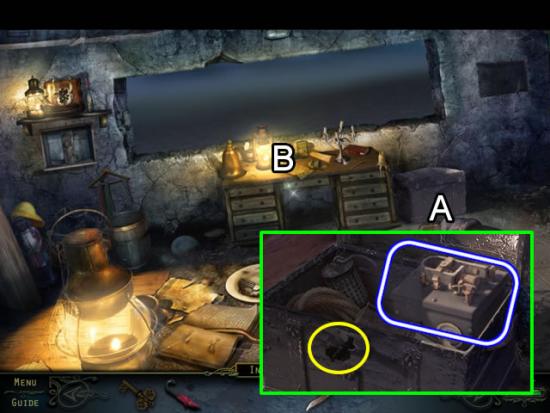
Tower Bunker
- Zoom in on the chest (A). Insert the CHEST KEY in the lock (yellow); take the BATTERY.
- Play the hidden object scene on the desk (B).
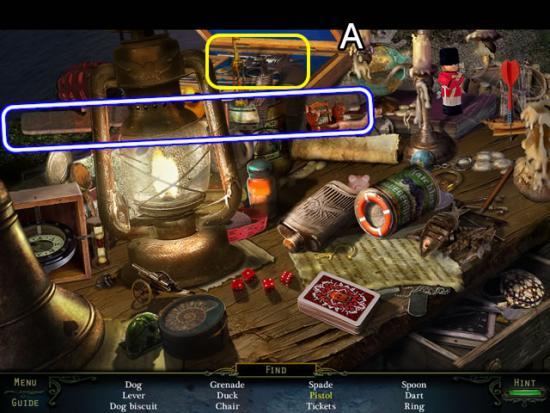
- Open the lid of the case (A) to find the Pistol.
- Find the rest of the listed objects.
- The Lever goes to inventory as a RAIL LEVER.
- Exit the bunker. Return to cave system. Take the right tunnel to the end.
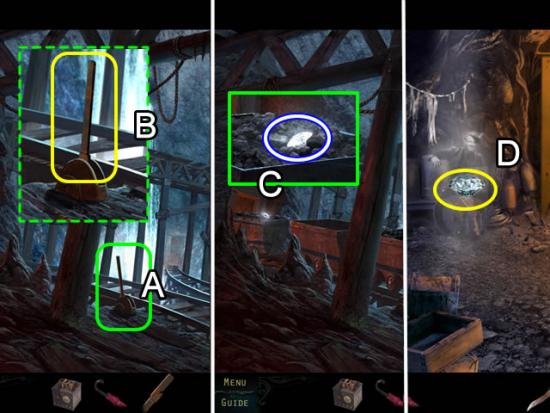
Cave G
- If you have not yet done so, click the switching lever (A); it breaks.
- Insert the RAIL LEVER in the empty slot (B) to move the coal carts.
- Examine the last cart out of the mine (C); take the DIAMOND.
- Return to Cave E.
Cave E
- Give the DIAMOND to the miner ghost (D); receive a BUTTON.
- Return to Cave G.
- Enter the elevator.
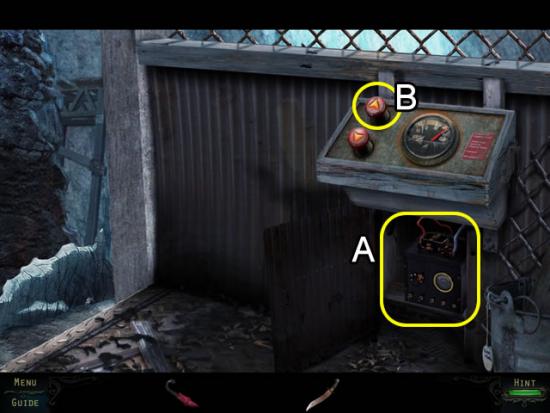
Elevator
- Attach the BATTERY to the loose wires (A).
- Insert the BUTTON in the empty slot (B); push the up-arrow button to leave the cave system.
Chapter 4: Outside the Town Gates
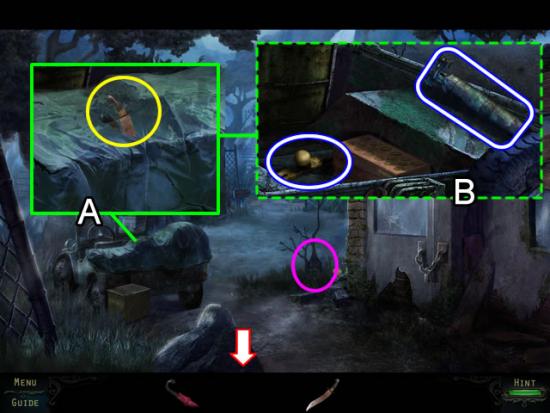
Abandoned Compound
- Collect the Haunted Soul (17/40) from the base of the dead shrub (pink).
- Examine the Jeep cover (A); slit the cover with the KNIFE.
- Take the CUPBOARD HANDLE and GAS CYLINDER from the Jeep bed (B).
- Go down to enter the elevator.
Elevator
- Press the down-arrow button.
- Exit in Cave G.
- Go down to the cave entrance; go left and straight on to Cave E
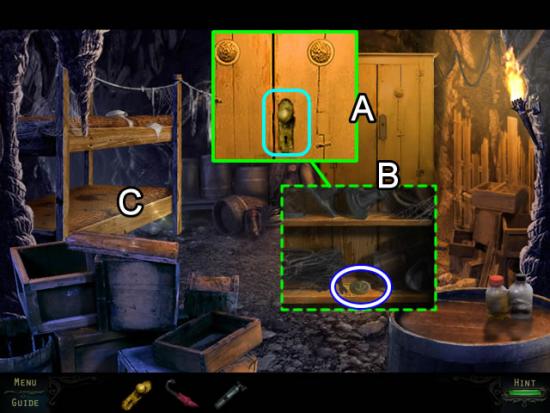
Cave E
- Zoom in on the cupboard (A); attach the CUPBOARD HANDLE.
- Take the BRASS COIN from the cupboard shelf (B).
- Play the hidden object scene on the lower bunk bed (C).
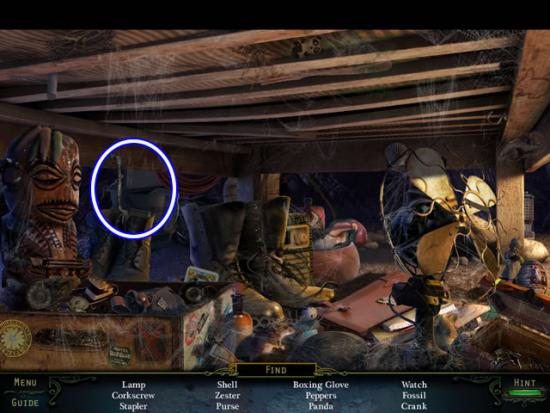
- Find the listed objects.
- The CRANK goes to inventory.
- Use the elevator to return to the abandoned compound.
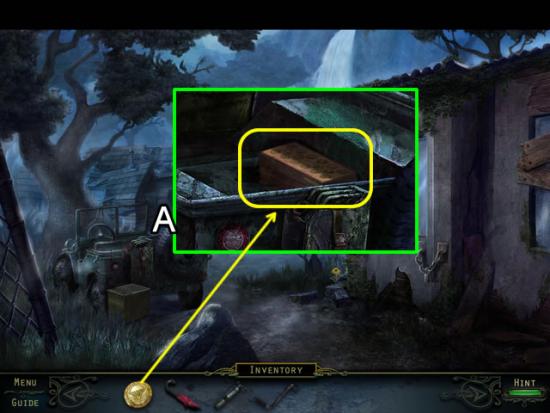
Abandoned Compound
- Look in the bed of the Jeep (A).
- Zoom in on the box (yellow); insert the BRASS COIN in the empty slot to open puzzle.
- The goal is to find the matching pairs by flipping two coins at a time.
- Solution:
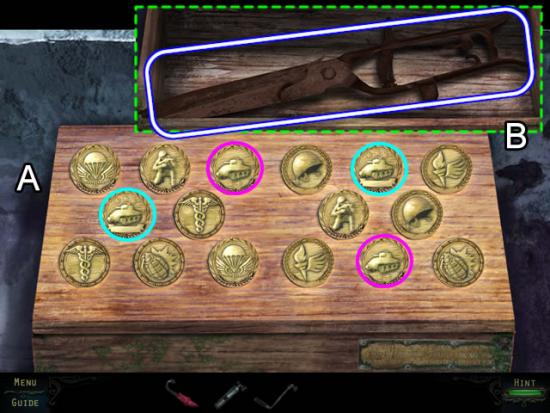
- The only pairs that are confusing are the two tanks (pink and aqua) that have minor differences.
- Matching all of the pairs (A) unlocks the Coin Op award and opens the box.
- Take the SHEARS from the box (B).
- Go forward.
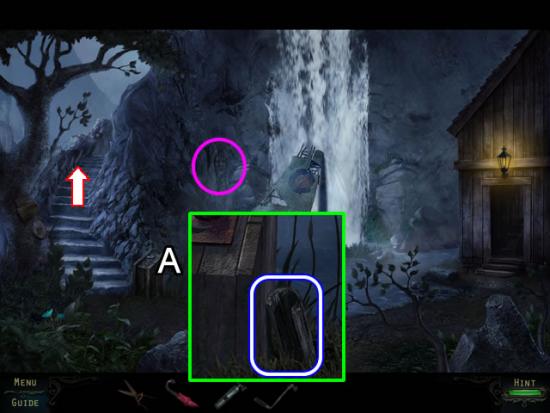
Waterfall Lake
- Collect the Haunted Soul (18/40) from the rocks by the waterfall (pink).
- Inspect the wooden pillar (A); take the WOODEN PIPE.
- Head up the path.
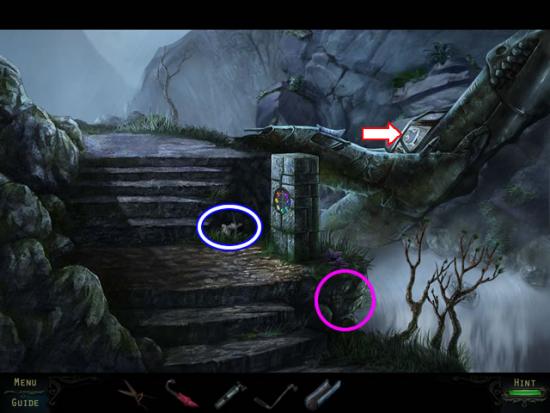
Path
- Collect the Haunted Soul (19/40) from the rocks below the stone pillar (pink).
- Take the BALLERINA.
- Enter the plane cockpit.
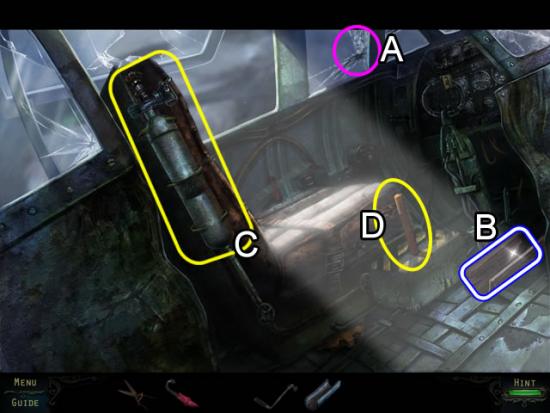
Cockpit
- Collect the Haunted Soul (20/40) from the cracked window (A). Collecting the 20th soul unlocks the Haunted Soul Novice award.
- Take the WOODEN PIPE (B).
- Insert the GAS CYLINDER in the braces on the pilot’s seat (B).
- Pull the lever (D) to eject the seat.
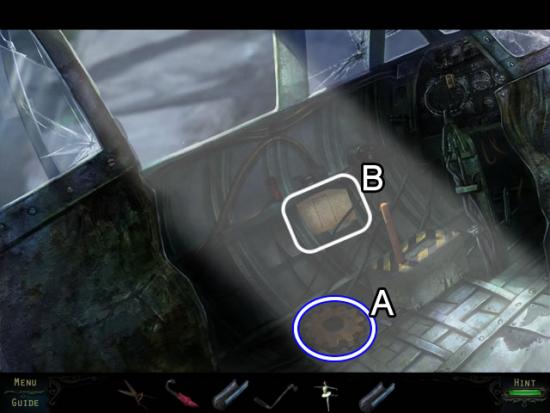
- Pick up the COG PIECE (A).
- Note the Morris code reference card (B) for later use.
- Go down to exit the cockpit. Go forward to the town gates.
Town Gates
- Play the hidden object scene on the stump.
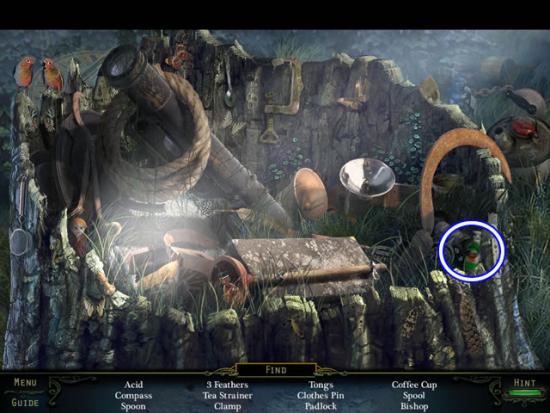
- Find the listed objects.
- The ACID goes to inventory
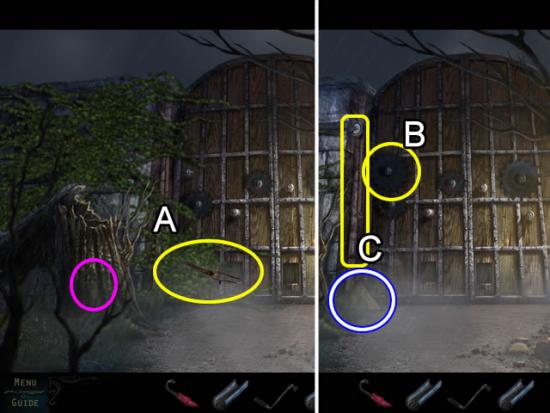
Town Gates
- Collect the Haunted Soul (21/40) on the stump (pink).
- Use the SHEARS to cut the vines away from the gates (A).
- Place the COG PIECE on the gate peg (B).
- Pull the cord (C) beside the gate; pick up the STONE WEDGE that drops to the ground.
- Return to the abandoned compound
Abandoned Compound
- Zoom in on the chain on the guardhouse door.
- Use the ACID to dissolve the chain.
- Play the hidden object scene in the guardhouse door.
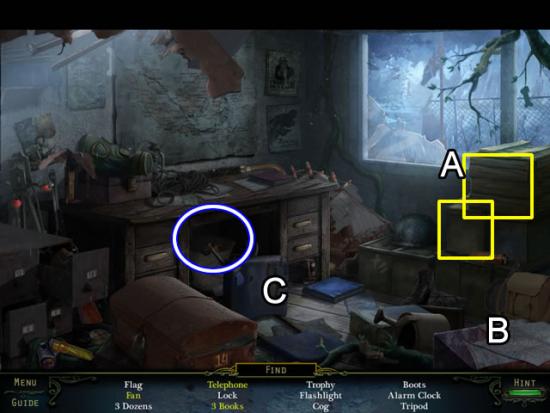
- Move the two boxes (A) to find the Telephone.
- Remove the papers (B) from the top of the one hidden Book.
- Pull the chair (C) back to get the Fan.
- Find the rest of the listed objects.
- The COG PIECE goes to inventory.
- Return to the town gates.
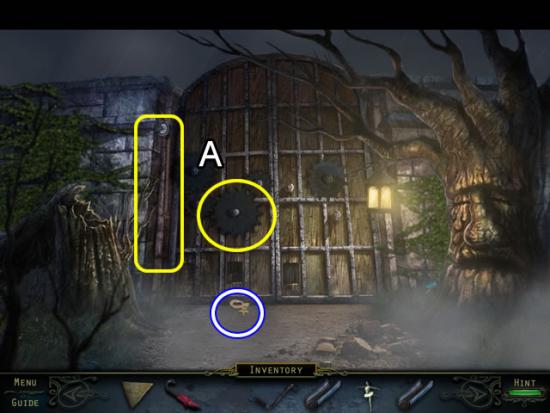
Town Gates
- Place the COG PIECE on the peg (A); pull the rope.
- Retrieve the STAR SHAPED NECKLACE.
- Return to the abandoned compound; take the elevator down to the caves.
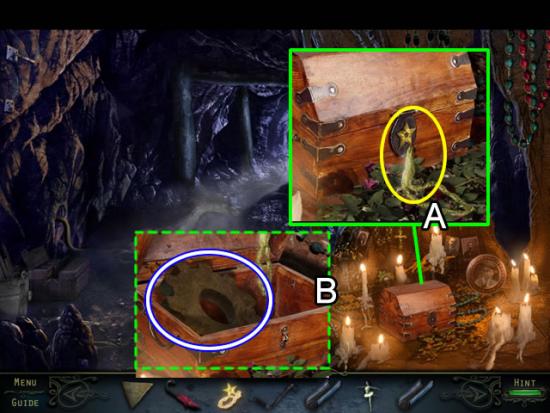
Cave C
- Zoom in on the wooden chest (A); insert the STAR SHAPED NECKLACE in the lock.
- Take the COG PIECE from the box (B).
- Return to the town gates.
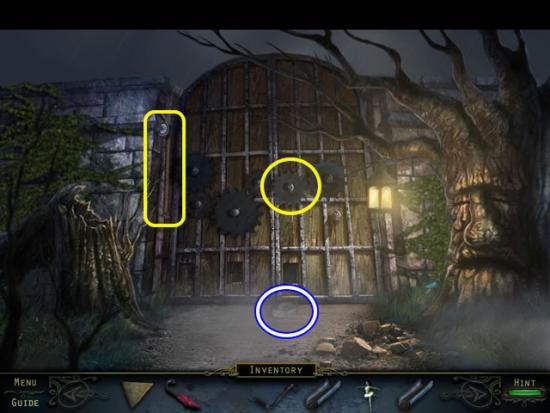
Town Gates
- Place the third COG PIECE on the gates; pull the rope.
- Take the MUSIC REEL.
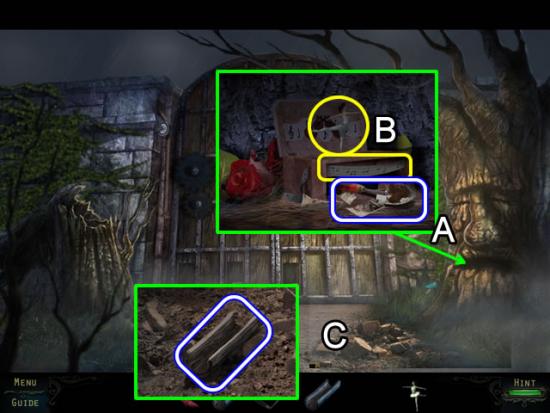
- Peer into the tree’s mouth (A).
- Place the BALLERINA and MUSIC REEL on the music box (B); take the TROWEL.
- Examine the rocks (C). Use the TROWEL to unearth a WOODEN PIPE.
- Return to Waterfall Lake; enter the water mill.
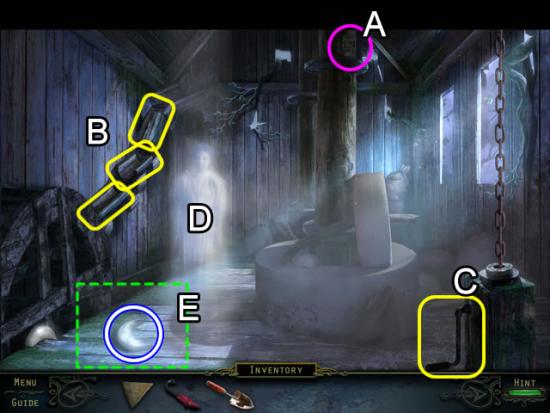
Water Mill
- Collect the Haunted Soul (22/40) from the mill wheel post (A).
- Attach the three WOODEN PIPES to the wall (B).
- Insert the CRANK in the broken winch (C). Attempt to crank the winch.
- Speak to the ghost (D); crank the winch again to open the sluice gate and allow the water to flow.
- Pick up the CRESCENT MOON that falls on the floor (E).
- Exit the mill.
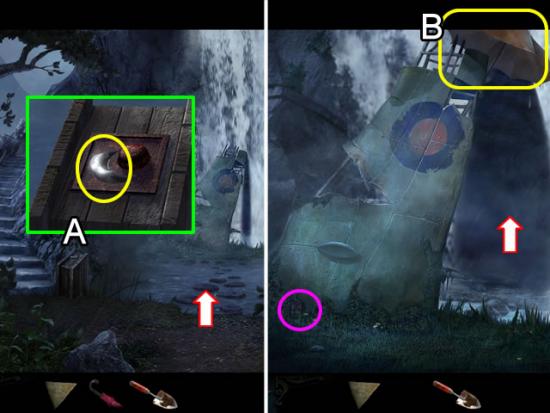
Waterfall Lake
- Inspect the wooden pillar (A); insert the CRESCENT MOON in the inset to raise the stepping-stones to the small island.
Small Island
- Collect the Haunted Soul (23/40) from the base of the airplane wing (pink).
- Attach the UMBRELLA to the wing (B) to block the water.
- Enter the hidden cave.
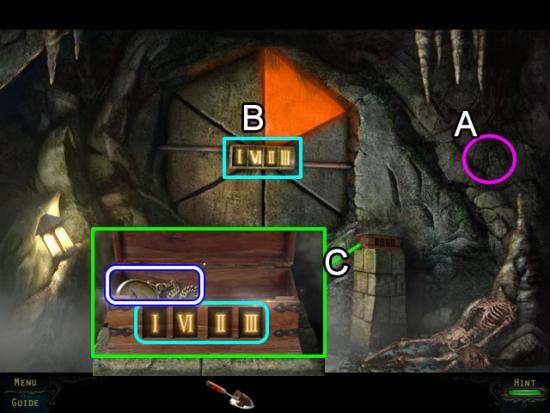
Waterfall Cave
- Collect the Haunted Soul (24/40) on the right side of the cave wall (A).
- Insert the STONE WEDGE in the missing slot to open a repeat-the-sequence puzzle.
- There are four rounds. Correctly completing a round adds a number to the center panel (B). A mistake in the sequence produces a different sequence.
- Completing the puzzle unlocks the Perfect Sync award.
- Examine the wooden box that appears on the pedestal (C). Click the tumblers on the front panel until they match the sequence on the back wall (aqua). Take the ANTIQUE WATCH.
- Exit the cave and the island.
Water Mill
- Give the ANTIQUE WATCH to the ghost; receive a COG PIECE.
- Return to the town gates.
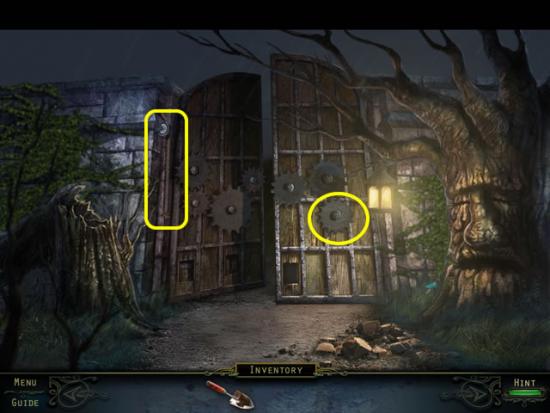
Town Gates
- Place the last COG PIECE on the gate peg.
- Pull the rope to open the gates and unlock the Open Sesame award.
Chapter 5: The Town
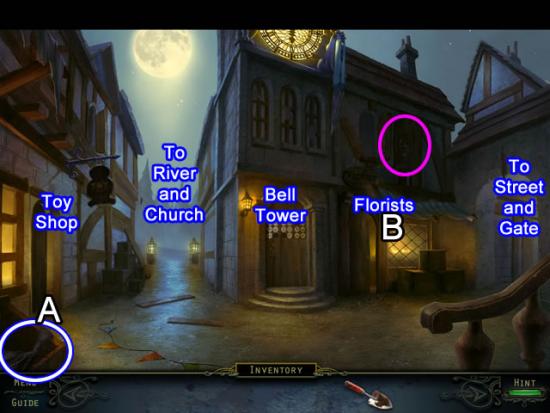
Town Square
- Look around the square.
- Pick up the WATERING CAN (A).
- Collect the Haunted Soul (25/40).
- Enter the Florists.
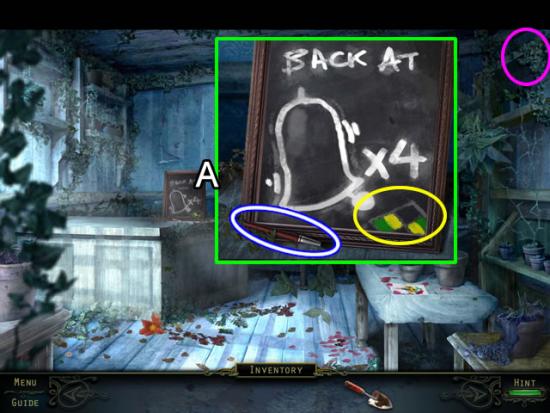
Florists
- Collect the Haunted Soul (26/40) in the foliage in the upper right corner (pink).
- Examine the sign on the desk (A). Take the DRY PAINTBRUSH and note the pattern in the lower right corner (yellow) of the sign.
- Return to the square; enter the toy shop.
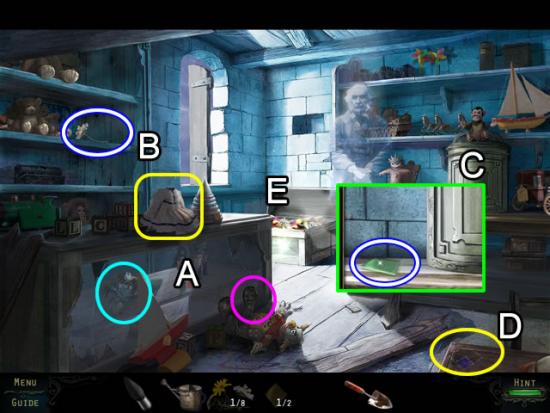
Toy Shop
- Pick up the blue bug in the display case (A) to unlock the “I’m Feelin’ Fuzzy” award.
- Collect the Haunted Soul (27/40) from the clown’s shoe.
- Move the toys around. Discover the FLOWERS (1/8) behind the bear (B).
- Note the unfinished doll on top of the display case (yellow).
- Take the GLASS DIAMOND (1/2) from the shelf by the monkey (C).
- Knock over the doll and find a pattern (D).
- Open the chest (E). Play the hidden object scene.
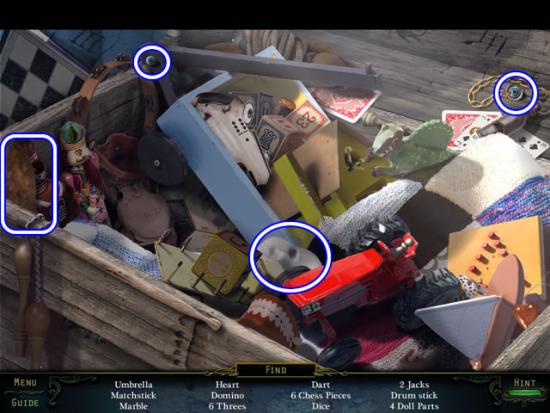
- Find the listed objects.
- The four DOLL PARTS go to inventory.
- Zoom in on the unfinished doll on the display case.
- Put the DOLL PARTS on the doll to open a puzzle.
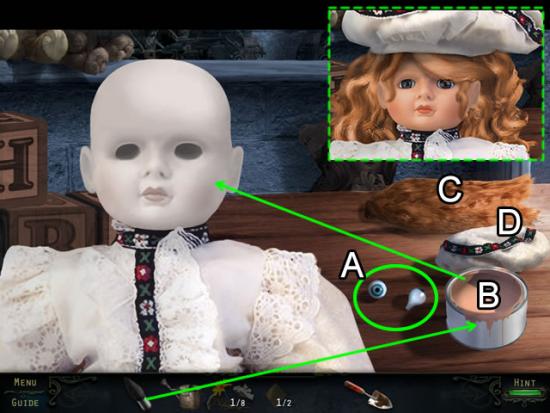
- Insert the eyes (A) in the eye sockets.
- Dip the DRY PAINTBRUSH in the flesh-tone paint (B); apply it liberally on the doll’s head.
- Attach the hair (C) and add the cap (D).
- Take the completed DOLL (dashed inset) and give it to the toy shop owner; receive a CLOCK FACE (1/3).
- Exit the shop. Go right to the street.
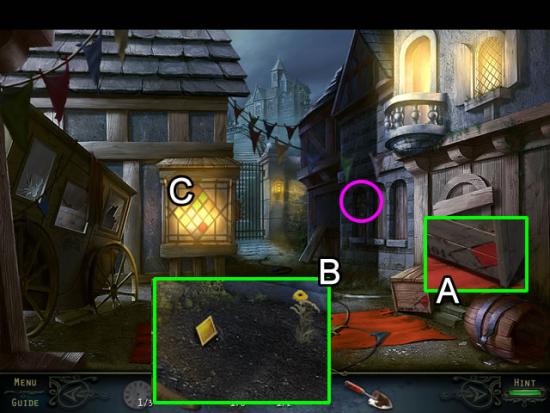
Street
- Examine the pattern on the side of the crate (A).
- Use the TROWEL to dig up the GLASS DIAMOND (2/2).
- Collect the Haunted Soul (28/40) on the shutter of the second window (pink).
- Zoom in on the window (C).
- Insert the two GLASS DIAMONDS to open a puzzle.
- The goal is to swap the pieces to find the pattern.
- Refer to the colored diamond pattern on the side of the window for the location of the blue diamonds (this is the same clue as found in the toy shop). The other pattern clues were in the florists and the side of the crate at this location.
- Solution:
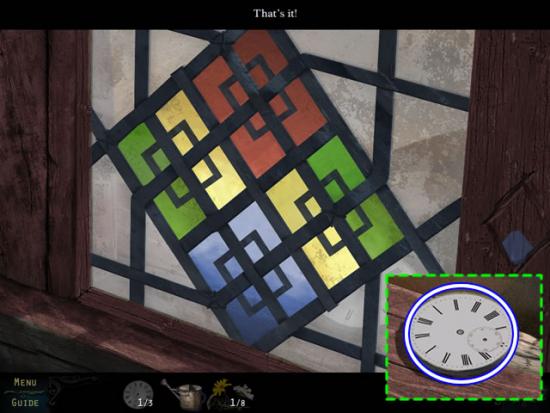
- Completing the puzzle opens the window. Take the CLOCK FACE (2/3) from the open window.
- Completing the puzzle also unlocks the “Inn the Window” award.
- Continue to the gate at the end of the street.
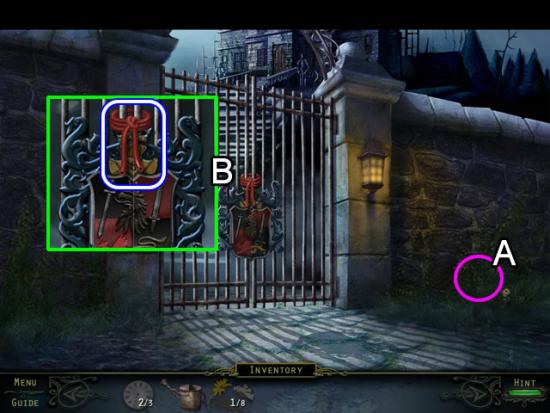
Gate
- Collect the Haunted Soul (A) in the grass by the flower (29/40).
- Examine the coat of arms on the gate (B); take the HOSE PIPE.
- Go down six times to return to the abandoned compound.
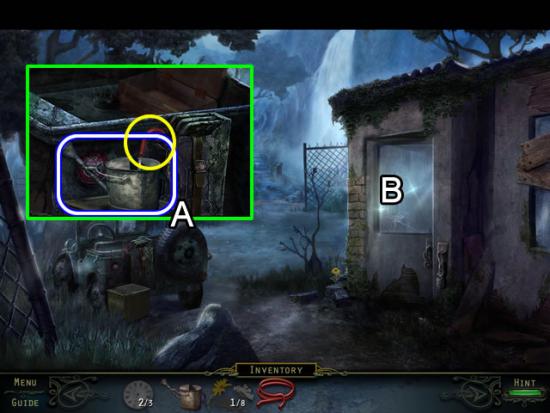
Abandoned Compound
- Zoom in on the back of the Jeep (A).
- Remove the cap from the gas can; insert the HOSE PIPE and put the WATERING CAN under the hose. Take the GASOLINE.
- Play the hidden object scene in the guardhouse.
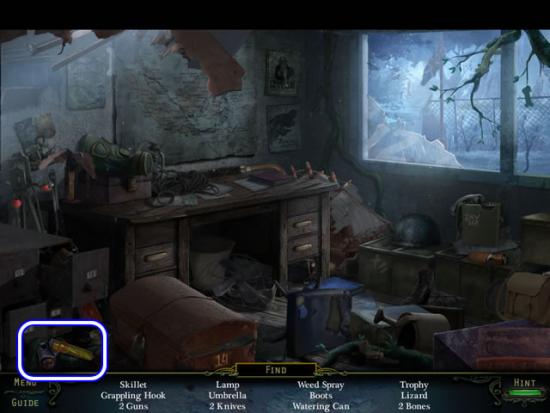
Guardhouse
- Find the listed objects.
- The Weed Spray goes to inventory as WEED KILLER.
- Return to the town.
Florists
- Spray the hungry plant with the WEED KILLER; receive a CLOCK FACE (3/3).
Bell Tower Door
- Insert the three CLOCK FACES in the door slots to open a puzzle.
- The goal is to rotate the hands on the clock so they form the letters “S O S”.
- Correctly placing the hands lights up the letter.
- Solution:
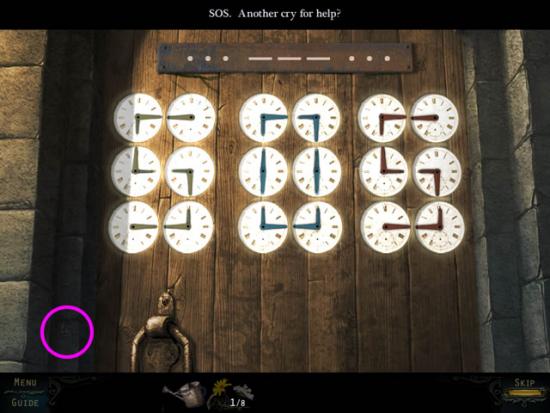
- Correctly solving the puzzle open the door to the bell tower.
- The “Distress Signal?” award is also unlocked.
- Collect the Haunted Soul (30/40) on the stones next to the door (pink).
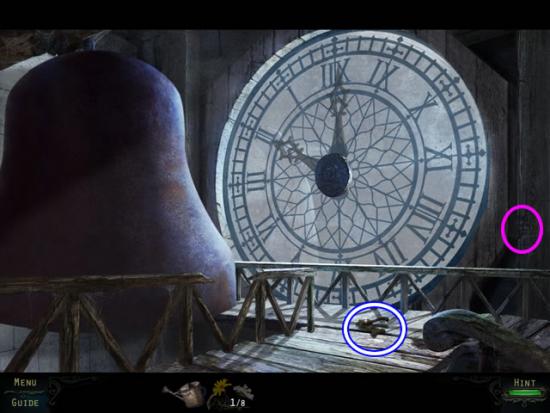
Bell Tower
- Collect the Haunted Soul (31/40) from the wall to the right of the clock (pink).
- Pick up the CARRIAGE HANDLE.
- Exit the bell tower. Go right to the street.
Street
- Zoom in on the broken carriage.
- Attach the CARRIAGE HANDLE to the door.
- Pull the handle to open the carriage door and a hidden object scene.
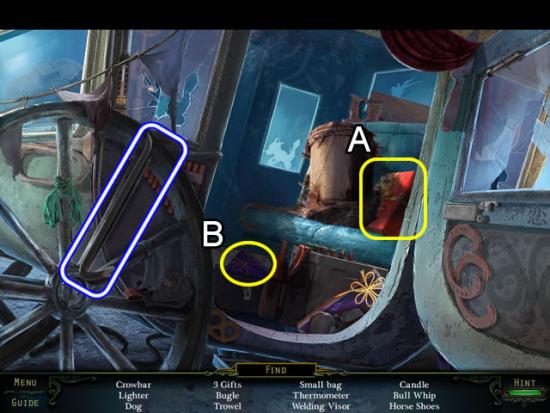
- Move the drum (A) and open the lunchbox lid (B) to find two of the three Gifts.
- Find the rest of the listed objects.
- The CROWBAR goes to inventory.
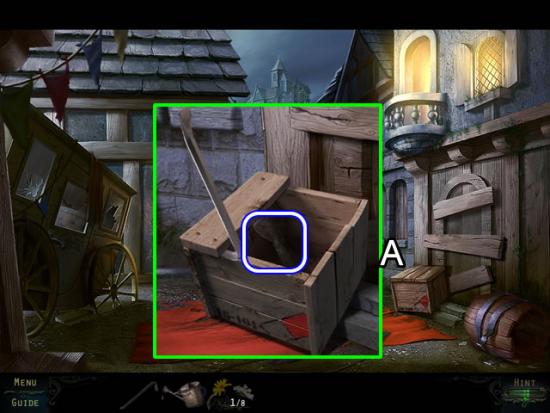
- Inspect the crate (A).
- Use the CROWBAR to pry off the three boards; take the bell CLAPPER.
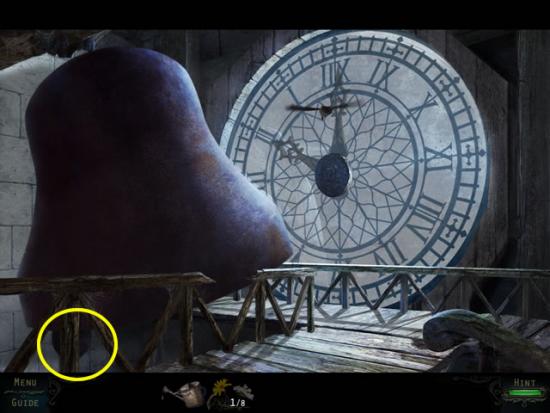
Bell Tower
- Hang the CLAPPER in the bell.
- Click the bell a couple of times to make sure the clapper works.
- Oops. Exit the bell tower.
Florists
- Speak to the florist; receive the next objective (collect flowers) and SCISSORS.
- Exit the shop. Go right to the street.
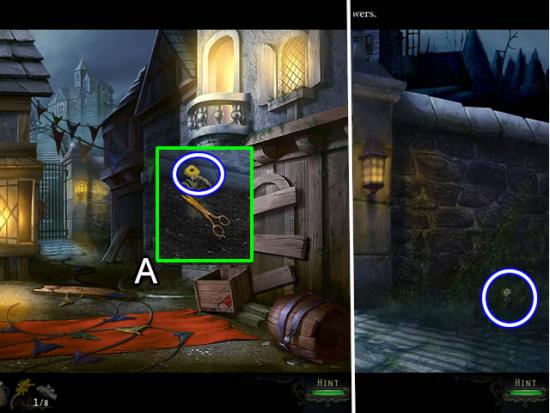
Street
- Examine the flowerbed (A).
- Use the SCISSORS to cut the FLOWERS (2/8).
- Go forward to the gate.
Gate
- Snip the FLOWERS (3/8).
- Exit the town.
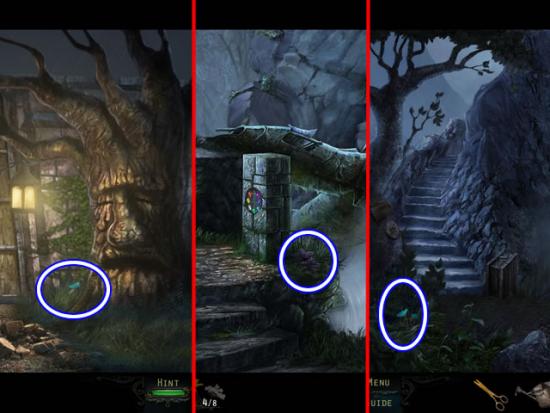
Town Gate
- Clip the FLOWERS (4/8) next to the tree.
Steps
- Cut the FLOWERS (5/8) by the stone column.
Waterfall Lake
- Cut the FLOWERS (6/8) at the base of the steps.
- Cross the stones to the small island.
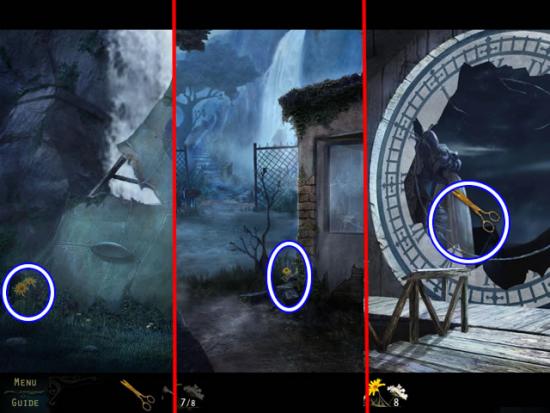
Small Island
- Clip the FLOWERS (7/8) next to the airplane wing.
Abandoned Compound
- Cut the FLOWERS (8/8) by the side of the guardhouse.
- Return to the town.
- Before returning to the florist, take a side trip to the bell tower.
Bell Tower
- Cut a piece of SILK CLOTH from the parachute hanging from the gargoyle’s mouth.
Florists
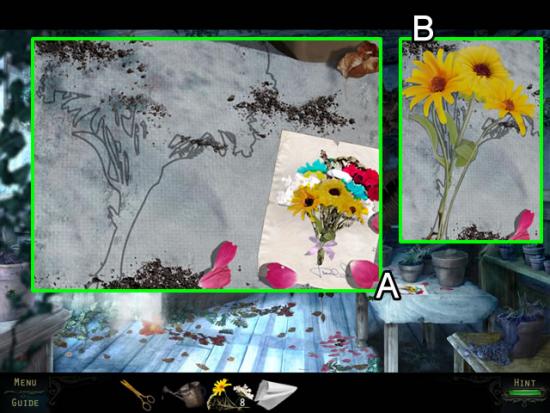
- Zoom in on the worktable (A).
- Note the drawing of a bouquet and the outline on the work surface.
- Place the FLOWERS (8/8) on the table to open a puzzle.
- The goal is to arrange the flowers to match the drawing.
- The best strategy is to start with the forward-most flowers, the yellow ones, and match them to the outline (B). Move the flowers around and continue to match the position and colors to the outline. Correctly placed flowers snap into place.
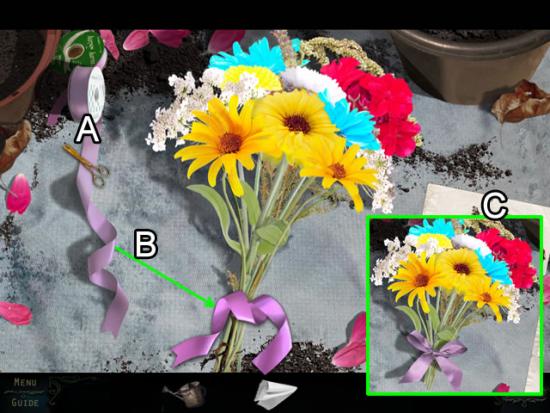
- Once the flowers are assembled, click the ribbon spool (A).
- Use the SCISSORS to clip off a piece of FLORISTRY RIBBON.
- Tie the bunch of flowers with the ribbon; snip off the stems.
- Completing the bouquet unlocks the “Flower Power” award.
- Take the completed BOUQUET (C) and give it to the florist; receive a FUNNEL.
- Exit the shop; go forward to the river.
River
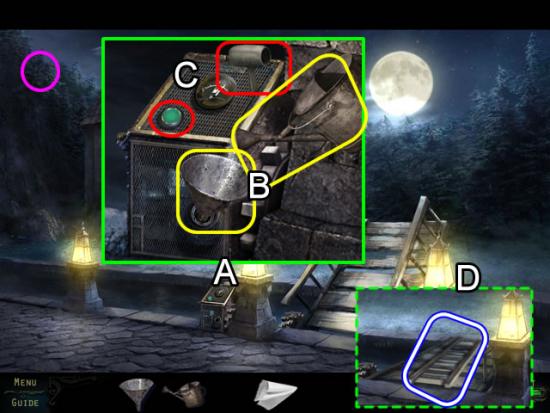
- Collect the Haunted Soul (32/40) from the cliffs on the left (pink).
- Zoom in on the bridge control mechanism (A).
- Insert the FUNNEL in the motor and pour in the GASOLINE (B).
- Press the green button to start the engine (C). Pull the lever to lower the bridge.
- Pick up the LADDER from the lowered bridge (D).
- Return to the town square; go right to the street.
Street
- Place the LADDER against the lit balcony on the building on the right.
- Climb the ladder to the bedroom.
Lillian’s Bedroom
- Play the find-the-hearts scene on the dresser.
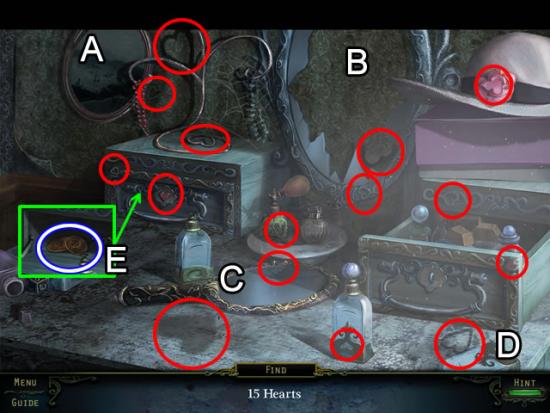
- Move the picture (A); break the mirror (B); move the hand mirror (C) and move the bottle (D) to find the hidden hearts.
- Find the rest of the hearts.
- Take the TINY CYMBALS from drawer that opens (E).
- Zoom in on the music box in the lower right corner of the room to open a puzzle.
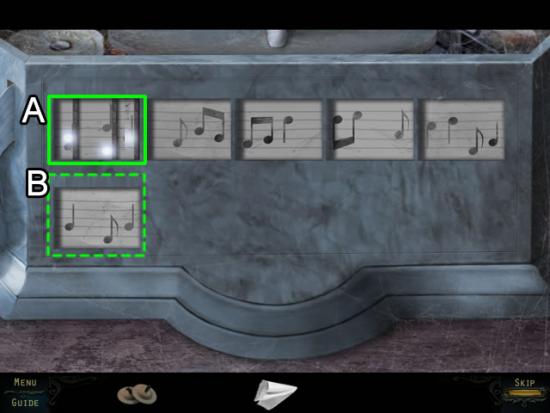
- The goal is to match the music notes to the tune.
- Watch as the bar passes across a music segment (A). The flashes indicate where the note should be. Click the notes in the segment window to find the note set that matches the flashes (B).
- Repeat this process for each window. A distinct note pattern is heard when the bar passes a correct note sequence.
- Solution:
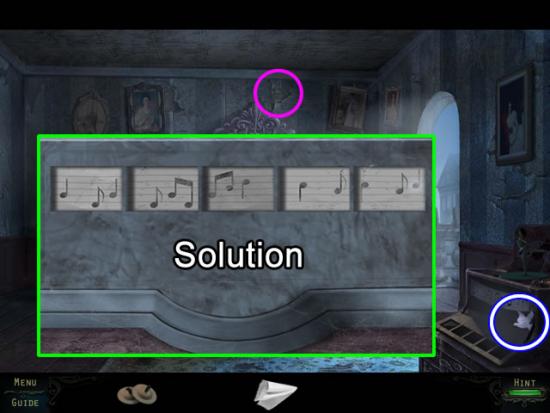
- The correct note sequence is shown above.
- Completing the puzzle unlocks the “In Tune” award.
- Take the DOVE from the opened music box.
- Collect the Haunted Soul (33/40) from the torn wallpaper above the bed (pink).
- Exit the bedroom; return to the toy store.
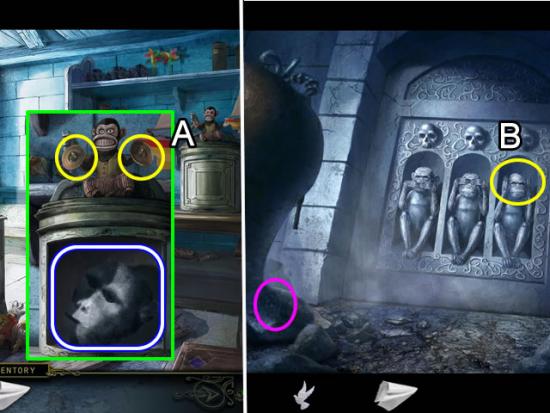
Toy Store
- Give the monkey on the back shelf (A) the TINY CYMBALS; take the MONKEY HEAD from the open compartment.
- Exit the store; enter the hole in the street.
Hole
- Collect the Haunted Soul (34/40) on the rock at the base of the bell (pink).
- Place the MONKEY HEAD in the slot in the stone (B); the monkeys turn into a symbol board.
- Zoom in on the board to open a puzzle.
- The goal is to press adjacent stones according to the legend above the board.
- A stone can only be pressed once. Pressing an incorrect symbol resets the board. Only adjacent stones of the selected stone are available.
- Solution:
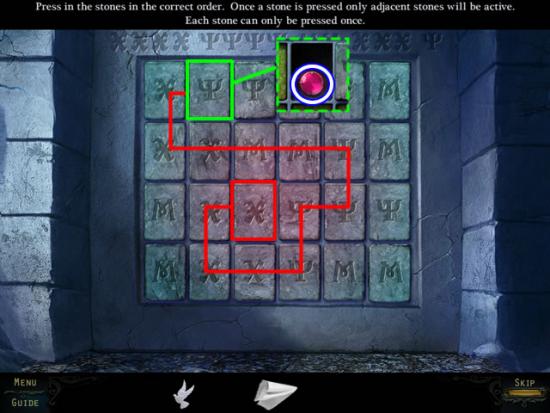
- Start with the symbol highlighted in red.
- Press the symbols along the red path to the last symbol outlined in green.
- Take the PINK GEM from the slot.
- Completing the puzzle unlocks the “On the Right Path” award.
- Exit the town; return to the steps beside the plane cockpit.
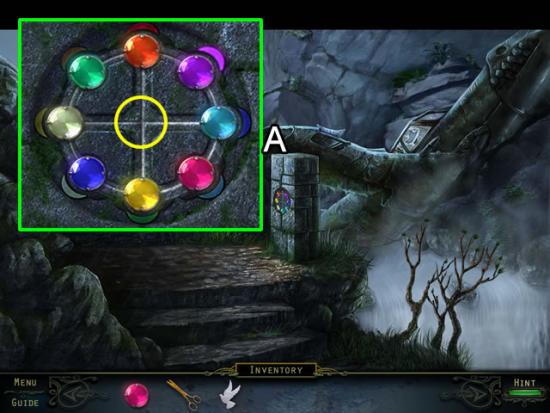
Steps
- Zoom in on the stone column (A); insert the PINK GEM in the empty slot to open a puzzle.
- The goal is to match the colored gems to their same-colored slot on the column.
- Use the empty circle in the middle to help align the gems.
- The best strategy is to solve a quadrant at a time. Correctly positioned gems light up.
- Solution:
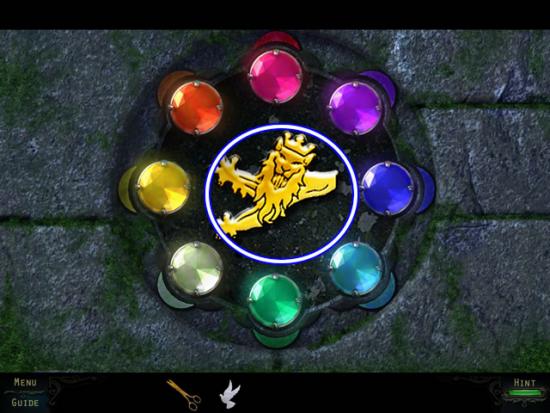
- Solving the puzzle unlocks the “Master Emerald” award.
- Take the LION HEAD from the stone.
- Return to the gate at the end of the town street.
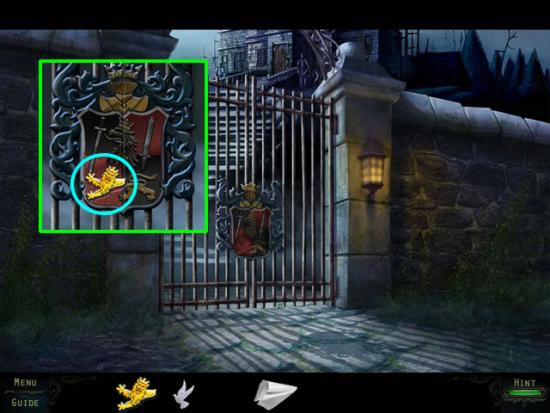
Gate
- Examine the coat of arms on the gate.
- Insert the LION HEAD in the slot (aqua) to open the gates.
Chapter 6: The Mansion and Church
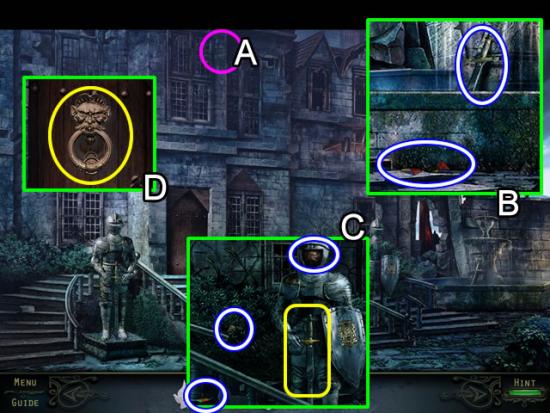
Mansion Front
- Collect the Haunted Soul (35/40) from the bricks to the right of the windows above the door (A).
- Zoom in on the fountain (B). Pick up the SWORD and the two STAINED GLASS pieces (1/16) and (2/16) at the base.
- Examine the knight on the right (C). Place the SWORD in the knight’s hands; take the DOOR KNOCKER from the visor. Pick up STAINED GLASS (3/16) from the bushes and (4/16) from the steps.
- Go to the front door (D). Attach the DOOR KNOCKER in the outline. Knock on the door to open it.
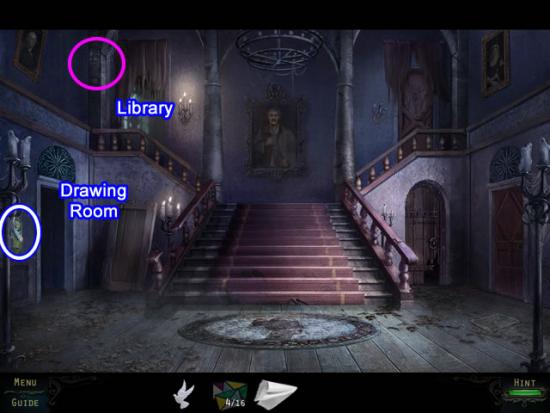
Hallway
- Collect the Haunted Soul (36/40) from the column arch by entry to the library (pink).
- Take the TORN PAINTING SCRAP.
- Enter the drawing room.
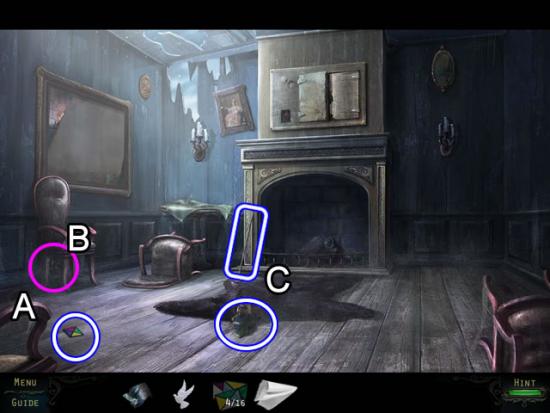
Drawing Room
- Move the chair on the left (A); pick up the STAINED GLASS (5/16) piece.
- Collect the Haunted Soul (37/40) from under the chair against the left wall (B).
- Take the second TORN PAINTING SCRAP from the mouth of the bear (C) and the fireplace POKER next to the fireplace.
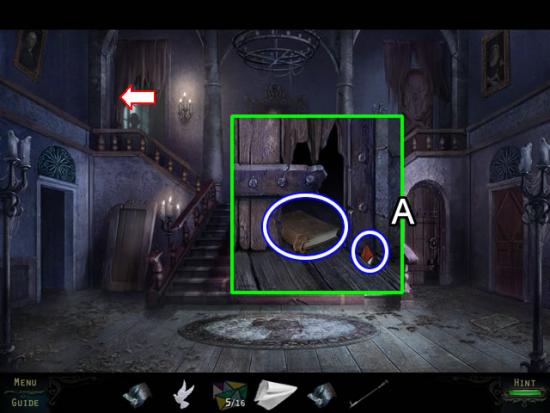
Hallway
- Peer through the crack in the door (A).
- Use the POKER to retrieve the BOOK. Pick up the STAINED GLASS (6/16) piece.
- Go up the stairs and left to the library.
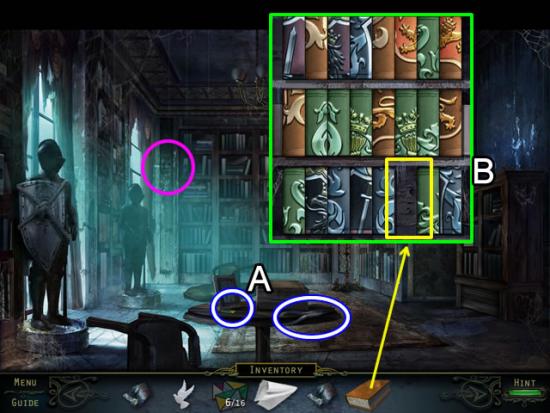
Library
- Collect the Haunted Soul (38/40) from the back post by the window (pink).
- Take the PLIERS and STAINED GLASS (7/16) piece from the table (A).
- Examine the bookcase (B). Insert the BOOK into the empty slot (yellow) to open a puzzle.
- The goal is to recreate the coat of arms using the spines on the books.
- The books can be swapped directly across rows and on the same shelf.
- The best strategy is to start with the bottom row (orange books) and find the pattern. The second row contains blue and pink books; the top shelf is all green. Arrange the books according to color and pattern.
- Solution:
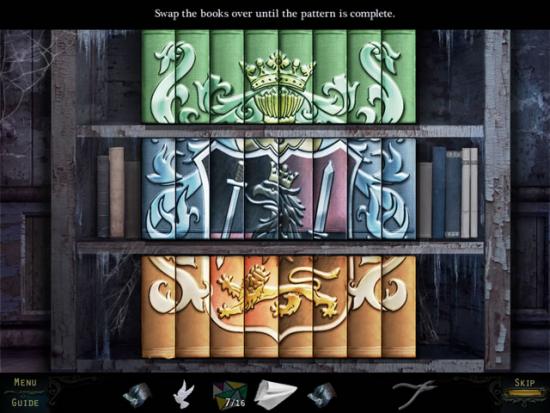
- Solving the puzzle unlocks the “Bookworm” award.
- The case slides aside to reveal a dumbwaiter.
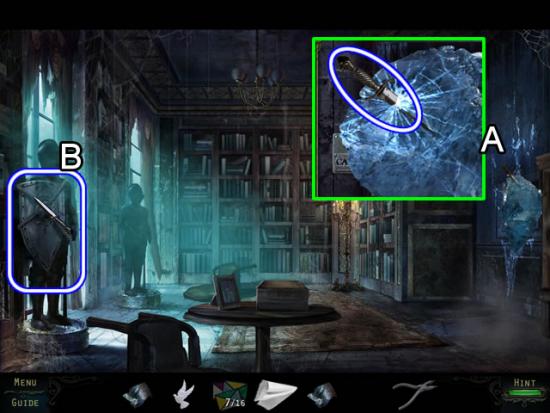
- Look closer at the icy dumbwaiter (A). Click the ice to free the DAGGER.
- Use the DAGGER to cut the ropes on the SHIELD (B).
- Exit the mansion.
Mansion Front
- Give the knight on the left the SHIELD.
- Take the third TORN PAINTING SCRAP from its visor.
- Return to the drawing room.
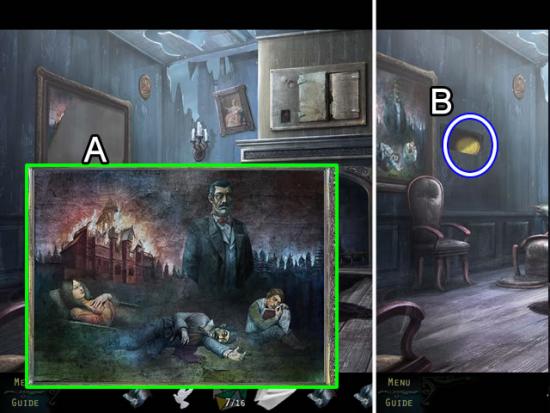
Drawing Room
- Place the three TORN PAINTING SCRAPS in the frame (A).
- The completed picture moves aside to reveal a secret compartment.
- Take the GLOWING DISC from the compartment.
Hallway
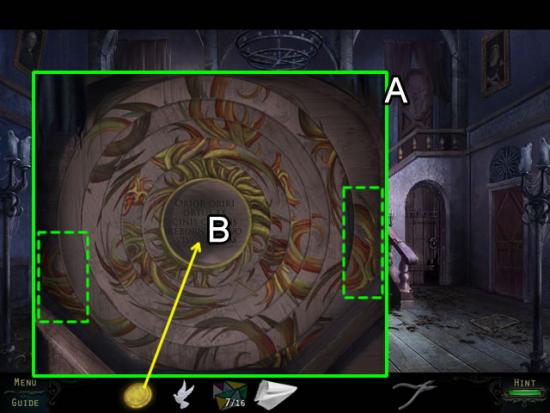
- Zoom in on the door at the top right of the stairs (A).
- Insert the GLOWING DISC in the center (B) to open a puzzle.
- The goal is to rotate the rings to find the pattern to open the door.
- The best strategy is to work from the outer rings inward. Begin by matching the outer ring with the two (dashed green) patterns sent in the frame. Work with that pattern with each inner ring. Correctly aligned rings do not lock into place.
- Solution:
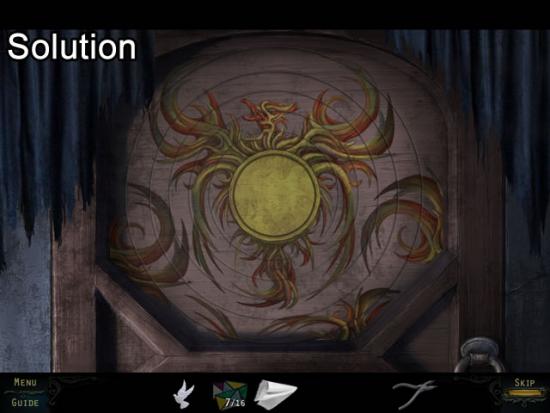
- Solving the puzzle opens the “Phoenix Rising” award.
- Enter the bedroom.
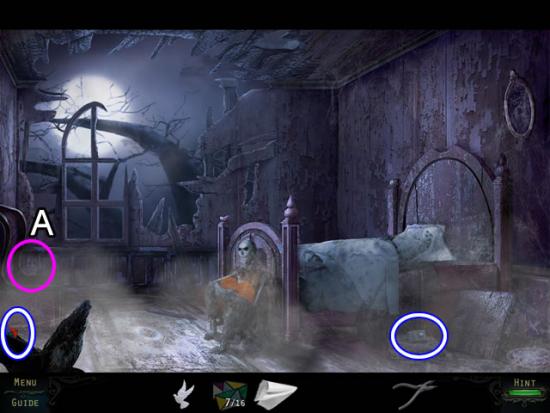
Bedroom
- Collect the Haunted Soul (39/40) from the panel below the window (A).
- Take the STAINED GLASS (8/16) and the CALL BUTTON.
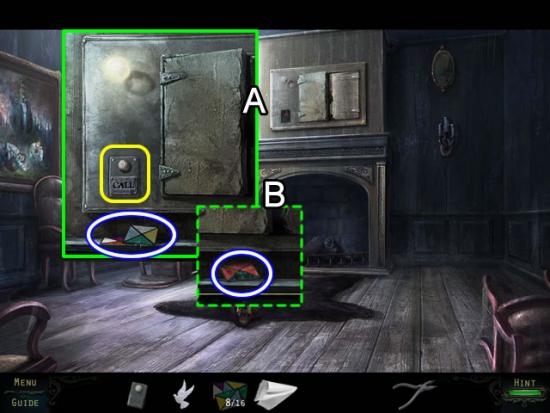
Drawing Room
- Zoom in on the broken dumbwaiter above the fireplace (A).
- Take STAINED GLASS pieces (9/16) and (10/16) from the ledge.
- Attach the CALL BUTTON to the loose wires (yellow); press the white button to activate the waiter.
- Take the STAINED GLASS piece (11/16) that drops through the door (B).
- Exit the mansion; return to the town square. Go forward to the river. Cross the bridge to the church.
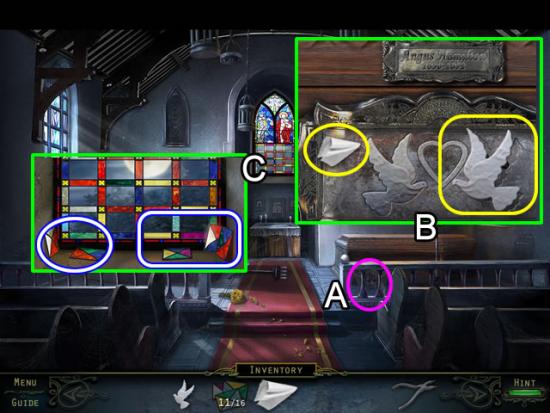
Church
- Collect the Haunted Soul (40/40) from the right railing (A). This unlocks the “Haunted Souls Master” award.
- Examine the coffin on the right (B).
- Use the SILK CLOTH to clean the plaque. Affix the DOVE to the empty spot to summon the ghost.
- Speak to the ghost and receive a BROKEN HEART.
- Zoom in on the stained glass window (C). Pick up the last pieces of STAINED GLASS (12-16/16) from the window ledge.
- Place the STAINED GLASS pieces on the window to open a puzzle.
- The goal is to insert the glass pieces so their colors on all four sides match those in the frame.
- Click a piece to rotate it.
- The best strategy is to spread out the pieces so most of the pieces are visible. Insert the pieces with three of the same color on adjoining sides first as it is easiest to spot their place in the frame. Insert the pieces with two adjoining colors next. Finally, fill in the empty spots according to their colors.
- Solution:
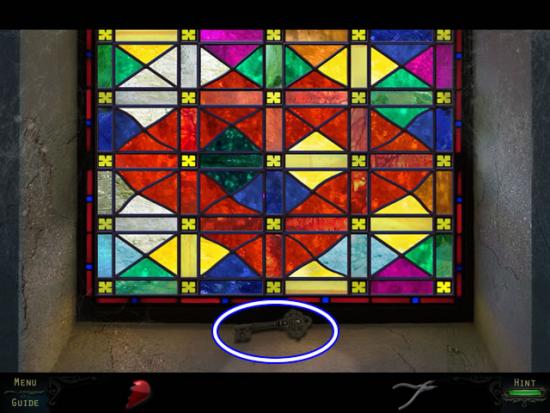
- Solving the puzzle unlocks the “Heart of Glass” award.
- Pick up the DOOR KEY that drops from the window.
- Return to the mansion.
Hallway
- Zoom in on the door on the right.
- Insert the DOOR KEY.
- Use the PLIERS to turn the broken key and open the door.
- Play the hidden object scene.
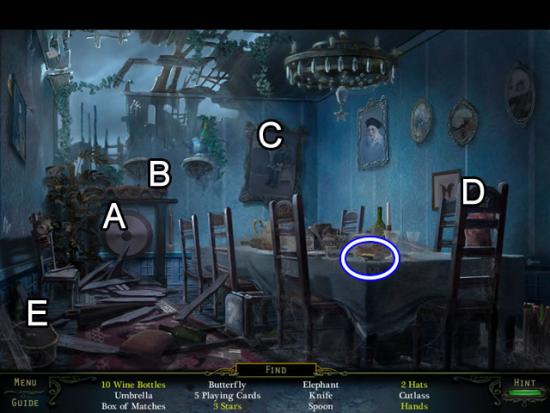
- Ring the gong (A); it falls off the stand and releases the hidden Wine Bottle.
- Click the dragon (B) to shoot flames on the wall and uncover a hidden Star.
- Remove the painting (C) to find the Hands.
- Pull back the chair (D) to find another Star.
- Open the hatbox (E) to find the hidden Hat.
- Find the rest of the listed objects.
- The Box of Matches goes to inventory as MATCHES.
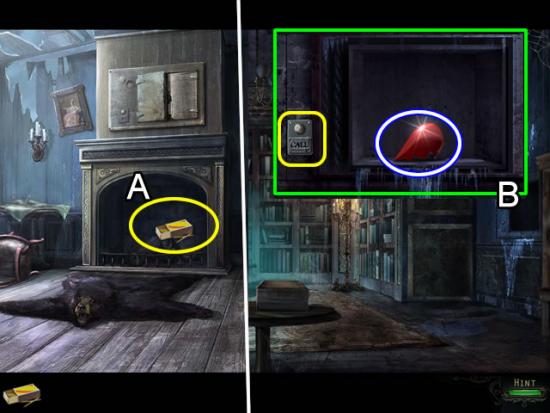
Drawing Room
- Use the MATCHES to light the fire in the fireplace (A) and melt the object in the dumbwaiter.
Library
- Look at the dumbwaiter (B).
- Press the Call button to summon dumbwaiter and get the second BROKEN HEART.
Bedroom
- Zoom in on the skeleton at the foot of the bed.
- Insert the two BROKEN HEARTS in the insets to open a puzzle.
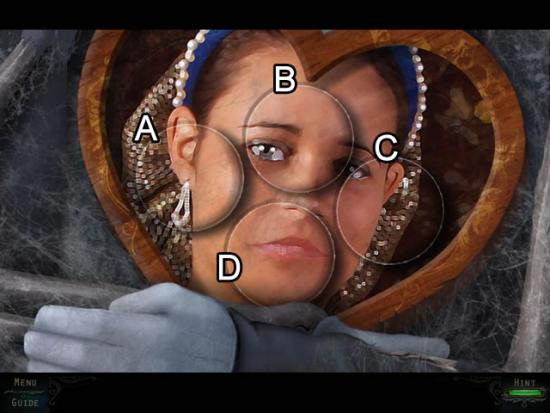
- The goal is to rotate the four disks to form the face (above).
- There is no reset button and exiting the puzzle does not reset it. Rotating one disk affects others:
- Disk A turns A, B and D.
- Disk B turns B and D.
- Disk C turns A and C.
- Disk D turns A and C and D.
- The best strategy is to see how the disks affect each other and then coordinate the movements.
- Solving this puzzle opens a jigsaw type puzzle.
- Form the same face (except that it is smiling) as the previous puzzle.
- Clicking a piece rotates it.
- The best strategy is to match the pattern in the frame and work inward to find the face.
- Solution:
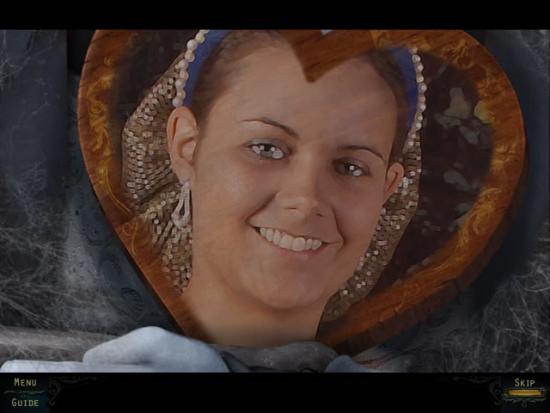
- Solving the puzzle unlocks the “Heart Breaker” award.
- Receive WEDDING RINGS.
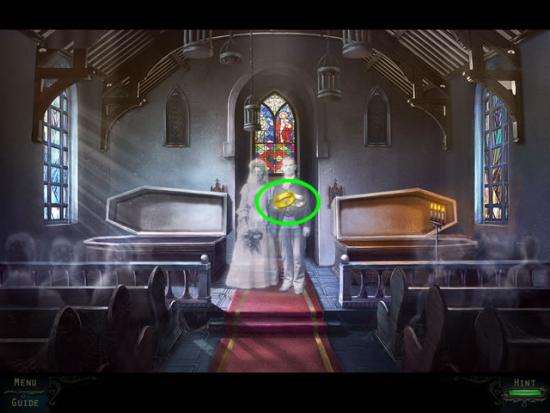
Church
- Give the WEDDING RINGS to the couple and unlock the “Together Again” award.
- The “Perfect Finish” is unlocked if none of the puzzles were skipped during game play.
- Other possible awards available: “7 Days a Week” for playing each day of the week; “I know a Short Cut” for completing the game in less than three hours and “Awards Master” for unlocking every award.
Congratulations! You have completed playing Haunting Mysteries: Island of Lost Souls. The Collector’s Edition contains bonus game play and other extras that are now available from the main menu.
Awards
There are 32 possible awards. Here is a summary of what needs to be accomplished to unlock each award. The listing is based on the likely order in which they are unlocked in this guide.
- Hurry, Hurry, Hurry – Complete any hidden object scene in less than one minute.
- Quick Fingered – Find four objects in a hidden object scene in less than three seconds.
- I Need A Little Help – Use three hints to complete a hidden object scene.
- Who’s Watching? – Peer into the window at the top of the lighthouse.
- Look No Hands! – Use a tool to pry out the loose brick at the back of the lighthouse.
- Repaired the Photograph – Assemble the eight photo scraps.
- Enter The Lighthouse – Solve the door-lock puzzle.
- The Lights Are On – Complete the wire-circuit puzzle in the tower basement.
- Opened the Barrel – Reconstruct the Coat of Arms on the barrel lid in the lighthouse tower.
- Another Route Out – Solve the door lock on the blast door in the tower basement.
- Opened the Furnace – Complete the door lock puzzle on the furnace.
- Coin Op – Match each pair of coins on the box in the Jeep in the abandon compound.
- Haunted Soul Novice – Find 20 of the 40 haunted souls.
- Perfect Sync – Complete four rounds of the repeat-the-sequence puzzle in the Waterfall Cave.
- Open Sesame – Find all of the cog pieces for the town gates.
- I’m Feelin’ Fuzzy – Find the fuzzy bug in the display case in the toyshop.
- Inn the Window – Complete the diamond pattern puzzle in the building window in the town street.
- Distress Signal? – Rotate the clock hands on the bell tower door so they form the letters S-O-S.
- Flower Power – Duplicate the flower bouquet in the florist shop.
- In Tune – Arrange the notes in the music box in Lillian’s bedroom to the correct position.
- On the Right Path – Find the path of symbols needed to unlock a gem at the hole in the street location.
- Master Emerald – Match the colored gems to their same-colored slot in the stone column on the steps.
- Bookworm – Arrange the books in the mansion’s library to form the coat of arms.
- Phoenix Rising – Rotate the rings on the door to the mansion’s bedroom to find the Phoenix.
- Haunted Souls Master – Find all 40 of the hidden haunted souls.
- Heart of Glass – Arrange the sixteen pieces of stained glass in the frame at the church.
- Heart Breaker – Complete both of the face puzzles in the broken heart board in the bedroom.
- Together Again – Give the wedding rings to the couple in the church.
- Perfect Finish – Complete all puzzles without a skip.
- 7 Days a Week – Play each day for a week.
- I Know a Shortcut – Play the game in less than three hours.
- Awards Master – Unlock all of the awards.
Collector’s Edition Bonus Play
Select “Play Bonus Game” from the main menu.
- Read the document.
- Exit the elevator to the army compound.
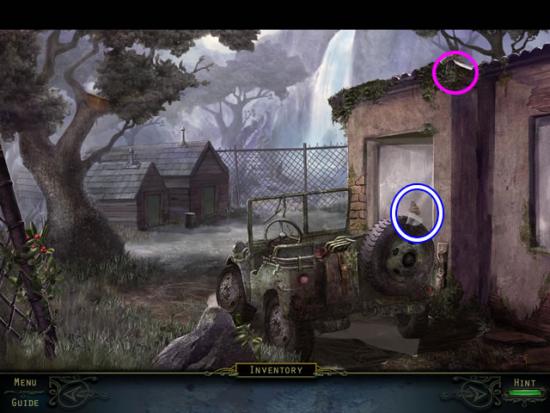
Compound
- Collect the Haunted Soul (1/12) in the foliage on top of the guardhouse (pink).
- Take the GLASS SHARD from the Jeep.
- Go forward.
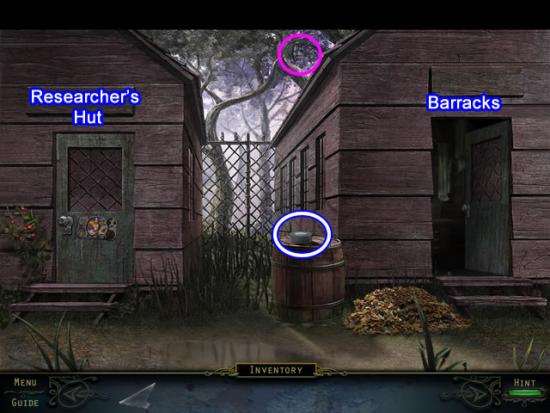
Outside Barracks
- Note the distinction between the two buildings.
- Collect the Haunted Soul (2/12) from the tree branches above the barracks (pink).
- Look closer at the barrel; take the ELECTRICAL TAPE.
- Enter the barracks.
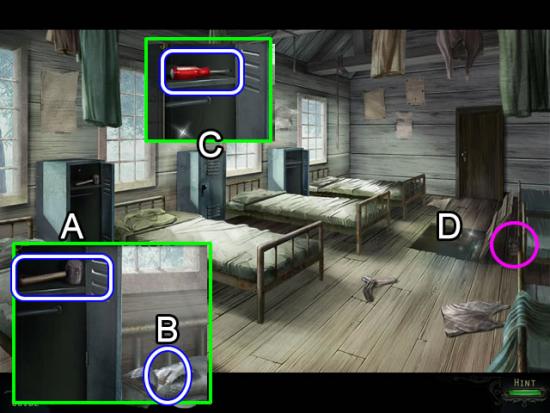
Barracks
- Collect the Haunted Soul (3/12) behind the trap door (pink).
- Look closer at the first locker (A). Take the HAMMER from the locker.
- Use the GLASS SHARD to rip the pillow open (B); take the LOCKER KEY.
- Open the second locker (C) with the LOCKER KEY; take the SCREWDRIVER.
- Play the hidden object scene in the floor.
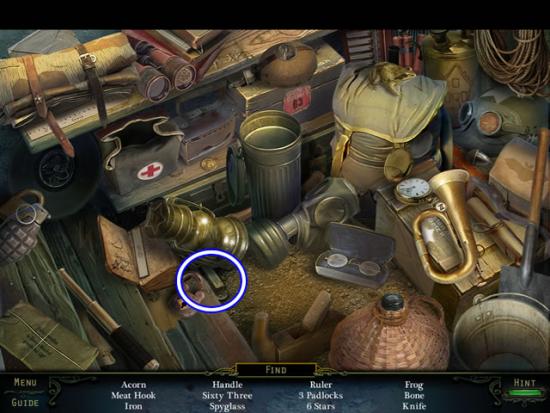
- Find the listed objects.
- The HANDLE goes to inventory.
- Exit the barracks. Go back twice to enter the elevator.
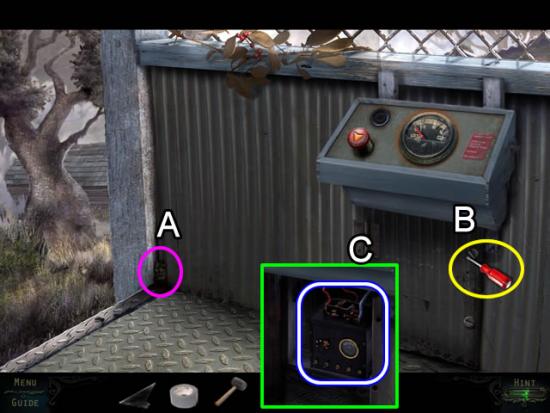
Elevator
- Collect the Haunted Soul (4/12) from the corner (A).
- Use the SCREWDRIVER to open the panel (B).
- Take the BATTERY (C).
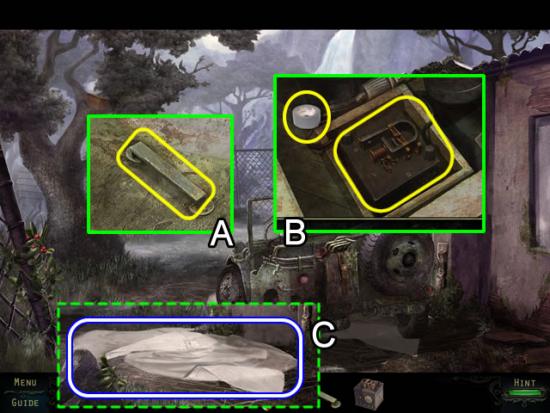
Compound
- Attach the HANDLE to the hood of the Jeep (A) to access the engine compartment (B).
- Replace the missing BATTERY; secure the wires with the ELECTRICAL TAPE.
- Pick up the PARACHUTE after the Jeep takes off (C). Note the wooden box that fell from the tree.
- Enter the guardhouse.
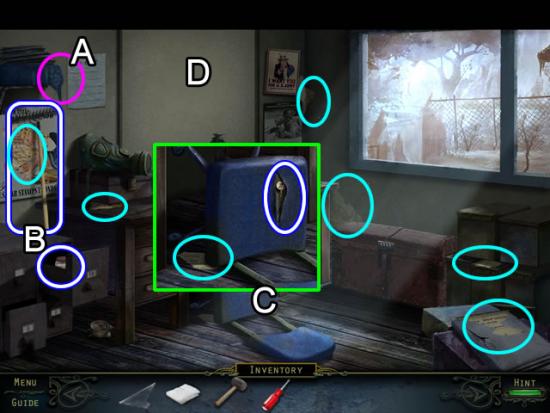
Guardhouse
- Collect the Haunted Soul (5/12) hanging from the blue blanked on the left shelf (A).
- Pick up the GARDEN RAKE leaning against the wall and the JAR OF POWER (1/3) from the cabinet drawer (B).
- Examine the chair (C). Slit the seat with the GLASS SHARD; take the TYPEWRITER KEY (1/3) and the MAP SCRAP (1/7).
- Pick up the other six MAP SCRAPS (aqua).
- Zoom in on the frame above the desk (D); place the MAP SCRAPS (7/7) on the board to open a puzzle.
- The goal is to reassemble the map.
- Left-click a piece to rotate it. Correctly placed pieces snap into place.
- Solution:
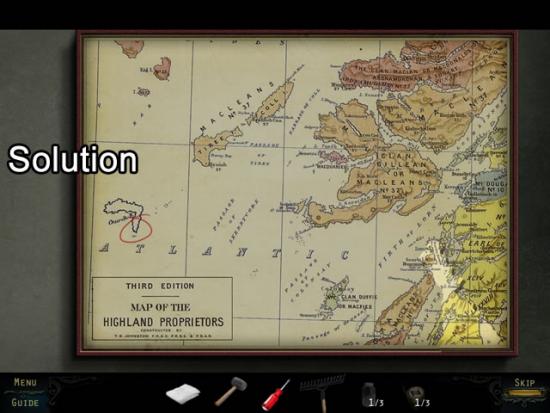
- The purpose of the map becomes apparent later.
- Unlock the “Cartographer” award.
- Exit the guardhouse.
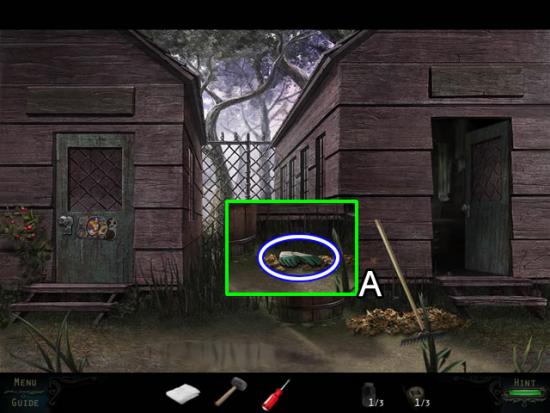
Outside Barracks
- Use the GARDEN RAKE to clear away the leaves (A).
- Pick up the GARDEN GLOVES.
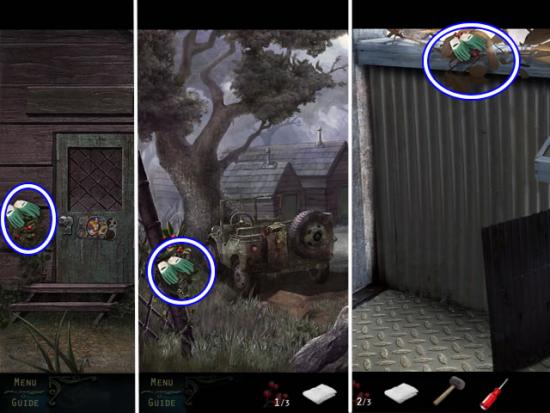
- Use the GARDEN GLOVES to pick the RIPE BERRIES (1/3) next to the researcher’s hut.
Compound
- Pick the RIPE BERRIES (2/3) next to the gate.
Elevator
- Get the RIPE BERRIES (3/3) from the ledge.
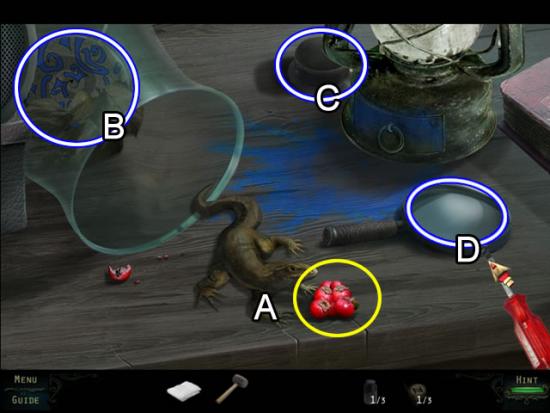
Guardhouse
- Zoom in on the desk.
- Give the RIPE BERRIES to the lizard (A) to lure it out of the bottle.
- Take the RESEARCHER DOOR PIECE from the bottle (B).
- Pick up the RADIO KNOB (C).
- Use the SCREWDRIVER to get the GLASS LENS from the magnifying glass (D).
- Exit the guardhouse.
Researcher’s Hut
- Zoom in on the door to open a puzzle.
- The goal is to rotate the rings to form a pattern.
- The center circle is fixed. Start with the ring closest to the center. Rotate the ring until the pattern matches the center circle.
- Continue matching the patterns with each successive ring.
- Completing the puzzle opens the four outside circles.
- Insert the RESEARCH DOOR PIECE in the upper right circle.
- Rotate each of the smaller circles until their colored pattern matches that of the larger circle. It is easiest to match the outside ring.
- Solution:
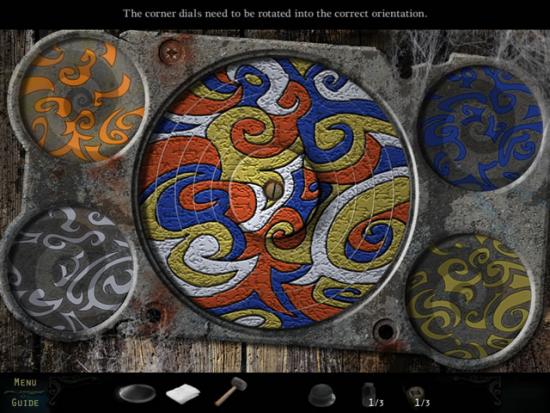
- Solving the puzzle unlocks “The Doctor is In” award and opens the door.
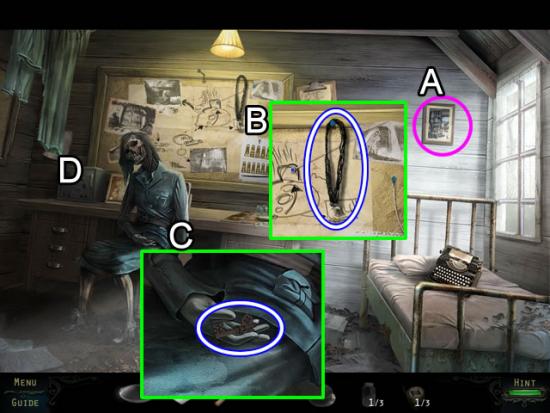
Researcher’s Hut
- Collect the Haunted Soul (6/12) from the photograph frame on the wall (A).
- Take the MOON NECKLACE from the bulletin board (B).
- Examine the skeleton’s hand (C); get the DOOR KEY.
- Look closer at the left desk area (D).
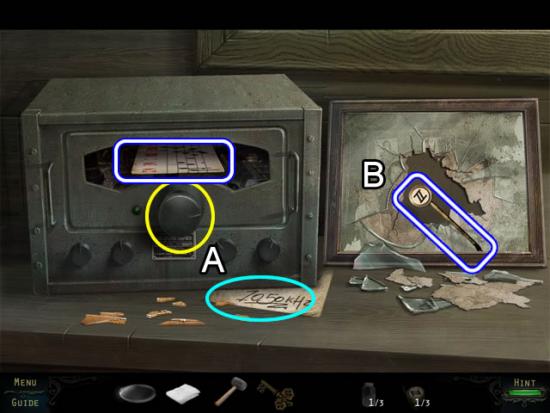
- Attach the RADIO KNOB (yellow) to the radio (A).
- Turn the knob three times to get the frequency (aqua) on the table; take the SHEET MUSIC from the broken radio.
- Smash the glass on the photograph (B) with the HAMMER. Take the TYPEWRITER KEY (2/3).
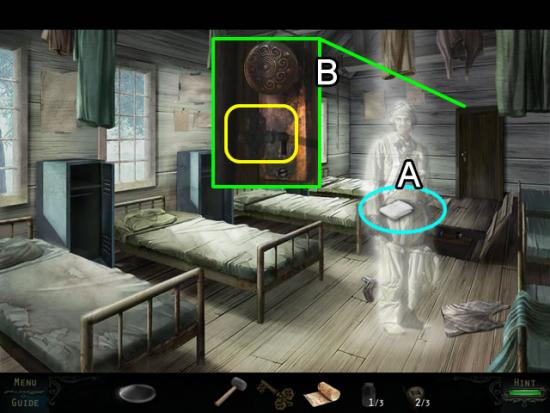
Barracks
- Give the PARACHUTE to the ghost (A); receive a SHIELD HALF.
- Use the DOOR KEY to open the lock on the back door (B).
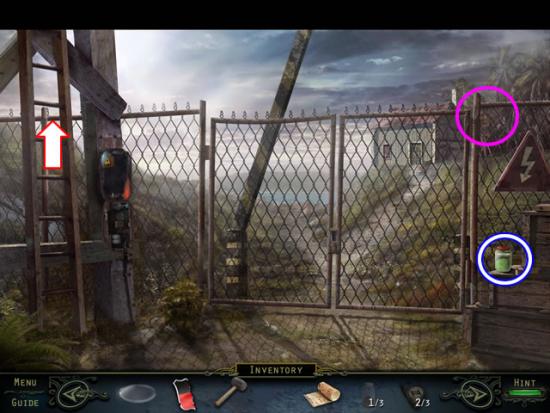
Main Gate
- Collect the Haunted Soul (7/12) from the fence corner (pink).
- Take the JAR OF POWDER (2/3).
- Climb the ladder to the watchtower.
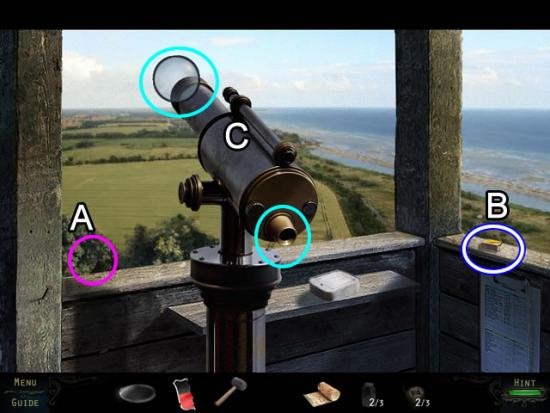
Watchtower
- Collect the Haunted Soul (8/12) from the trees on the left (A).
- Pick up the box of MATCHES (B).
- Put the GLASS LENS on the telescope (C); peer through the eyepiece to open a puzzle.
- Locate the twenty flags.
- Solution:
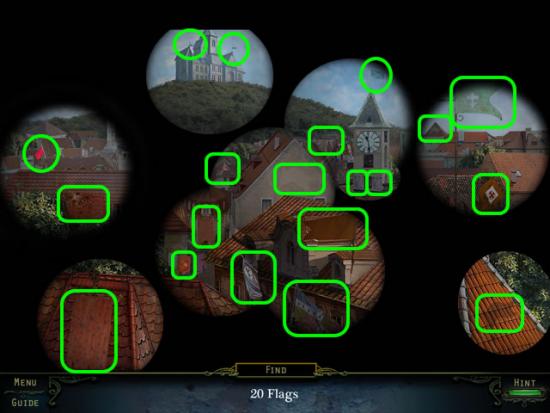
- Take the JAR OF POWDER (3/3) from the base of the telescope.
Barracks
- Play the hidden object scene.
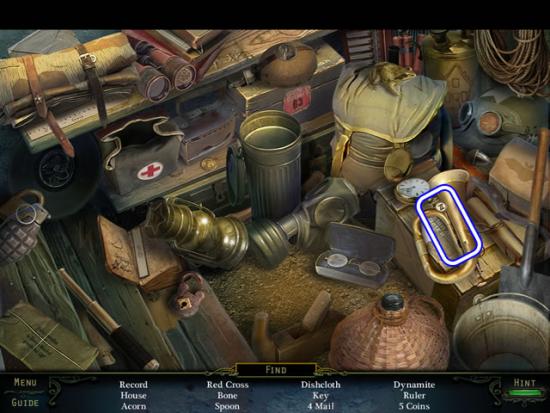
- Find the listed objects.
- The Key goes to inventory as a TYPEWRITER KEY (3/3).
Researcher’s Hut
- Zoom in on the desk area on the right.
- Put the three JARS OF POWDER on the bowls to open a puzzle.
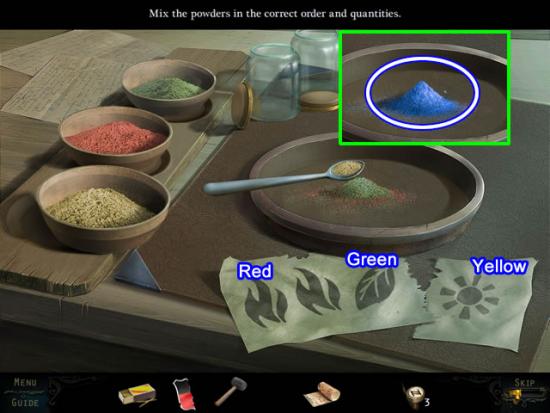
- Use the spoon to add the colored powders to the center bowl according to the number of symbols for each powder.
- Add two red, one green and one yellow to make the STRANGE POWDER.
- Making the powder unlocks the “Nice Reaction” award.
- Look at the bed.
- Add the three TYPEWRITER KEYS to the typewriter to open another puzzle.
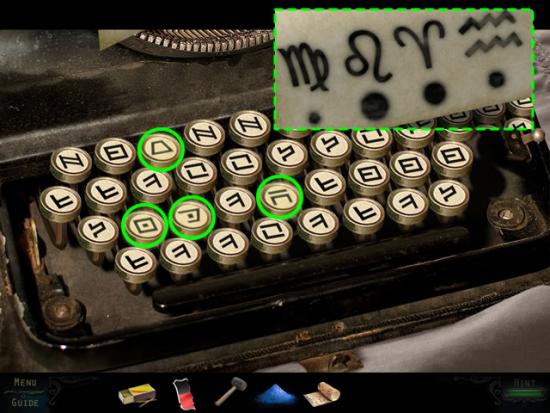
- Find the four unique keys on the keyboard.
- Depressing an incorrect key resets the keyboard and shuffles the keys.
- Make a note of the symbols and size of dots associated with each (dashed green) the typewriter produces.
- The “Key to Success” award is unlocked.
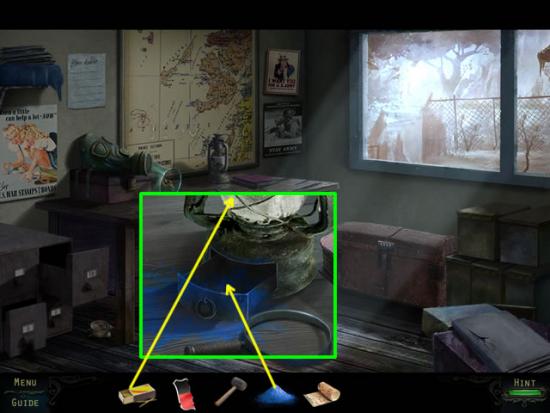
Guardhouse
- Zoom in on the desk.
- Open the drawer in the base of the lantern.
- Add the STRANGE POWER to the drawer.
- Light the lantern with the MATCHES.
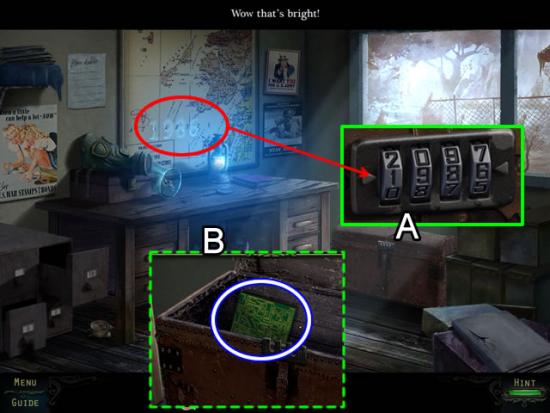
- Note the number illuminated on the map (red).
- Inspect the chest (A). Set the lock tumblers to the same number (1986).
- Take the CIRCUIT BOARD from the chest (B).
- Go back through the back door in the barracks to the main gate.
Main Gate
- Insert the CIRCUIT BOARD into the electrical panel to open a puzzle.
- Rotate the squares in the circuit board until the each line connects.
- The best strategy is to start at a corner and work the pattern horizontally and vertically.
- Solution:
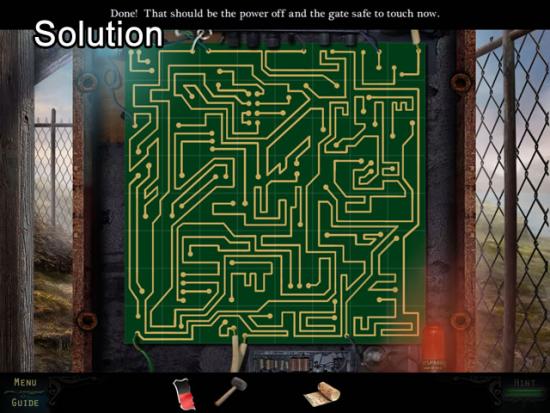
- The “Short Circuit” award is unlocked.
- Press the gates to open them; speak to the ghost.
- Go toward the beach.
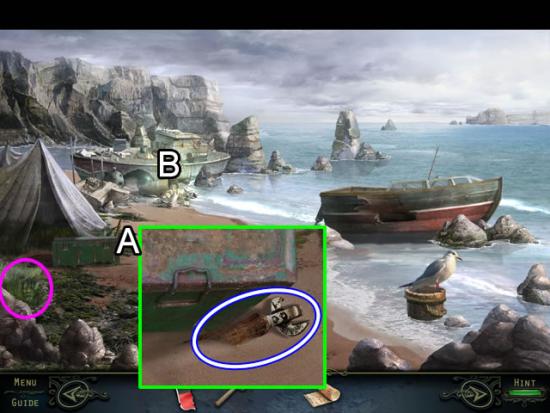
Beach
- Collect the Haunted Soul (9/12) from the grass by the rocks (pink).
- Look closer at the metal box (A); pick up the CAN OPENER.
- Play the hidden object scene at the shipwreck (B).
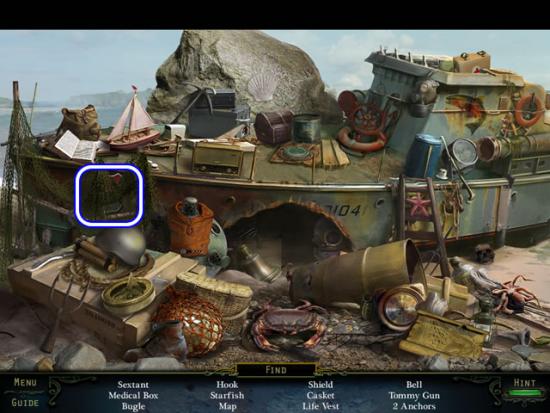
- Find the listed objects.
- The Shield goes to inventory as a SHIELD HALF.
- Return to the main gate.
Main Gate
- Go up the hill to the lodge entry.
Lodge Door
- Insert each SHIELD HALF into an outline one the door (A) to open a puzzle.
- Take the TREE BOX PIECE dangling from the door puzzle (B).
- There is no need to solve the door puzzle yet. Exit the puzzle.
- Return to the compound.
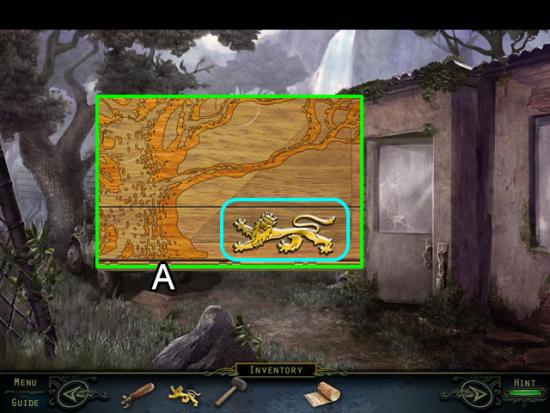
Compound
- Examine the box behind the Jeep (A).
- Place the TREE BOX PIECE in the empty slot (aqua) to open a puzzle.
- Insert the disks in the circles on the box that match the design.
- Solution:
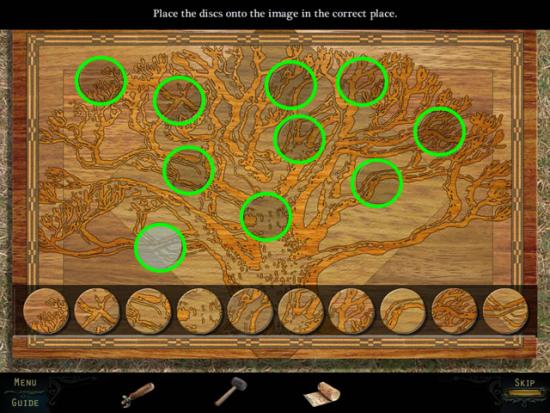
- Unlock the “Branching Out” award.
- Take the RUST REMOVE, MEDAL and SILK CLOTH from the open box.
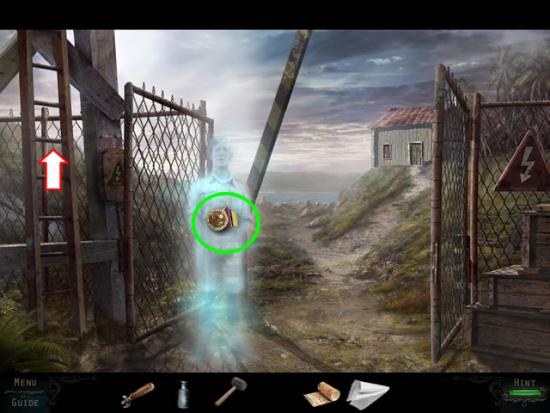
Main Gate
- Give the MEDAL to the ghost sentry; receive PLIERS.
- Climb up to the watchtower.
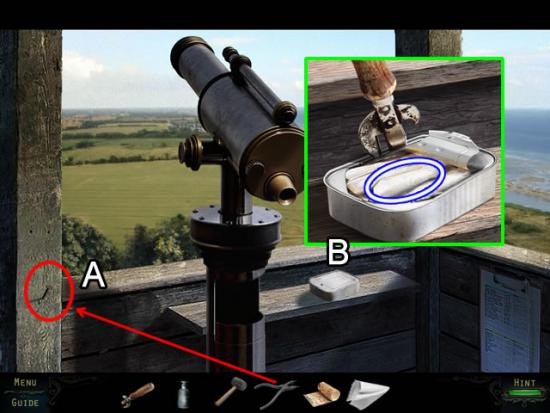
Watchtower
- Use the PLIERS to remove the NAIL (1/4) from the post (A).
- Use the CAN OPENER to open the can of SARDINES (B).
Researcher’s Hut
- Zoom in on the bulletin board.
- Remove the NAIL (2/4) on the top with the PLIERS.
- Make a note of the military rank insignias (aqua).
Beach
- Board the boat.
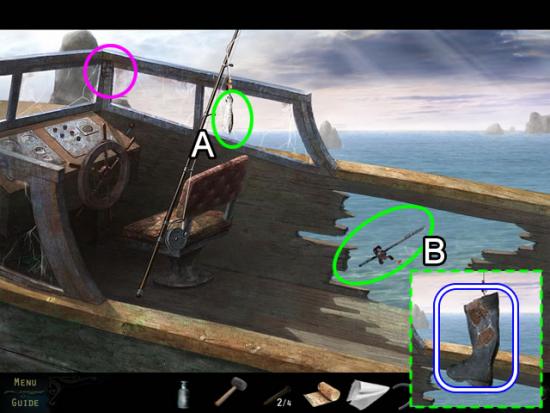
Boat
- Collect the Haunted Soul (10/12) from the corner post of the windows (pink).
- Bait the hook with the SARDINE (A).
- Cast the FISHING ROD through the hole in the hull (B); catch an OLD BOOT.
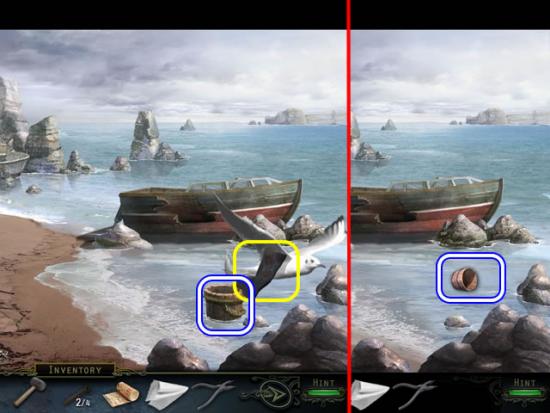
Beach
- Throw the OLD BOOT at the gull (yellow); take the EMPTY BUCKET.
- Dip the EMPTY BUCKET in the surf; receive a BUCKET OF WATER.
- Return to the main gate. Zoom in on the puzzle on the lodge door.
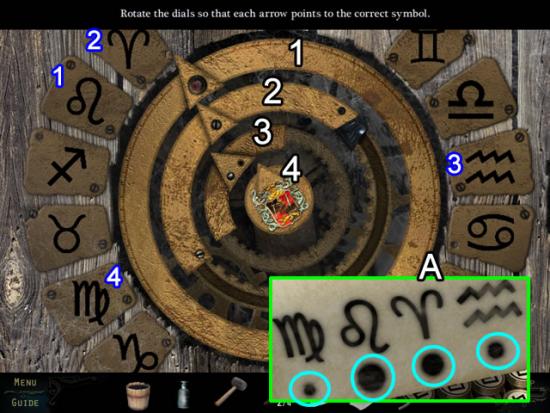
Lodge Door
- Use the scrap of paper from the typewriter as a clue for positioning the pointers on the rings (A). The code can be interpreted to mean the size of the screws on each ring or the amount of wood covering each ring. The results are the same either way.
- Align the numbers on the rings with the same number on the symbol to open the door.
- Unlock the “Stars Aligned” award.
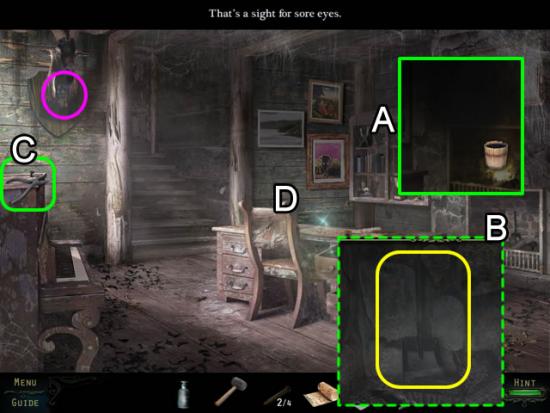
Lodge
- Throw the BUCKET OF WATER on the flames in the fireplace (A) to clear the air.
- Dig through the ashes in the fireplace (B) to find a SHOVEL.
- Collect the Haunted Soul (11/12) on the mounted animal head (pink).
- Use the PLIERS to take the NAIL (3/4).
- Play the hidden object scene on the desk (D).
- Find the listed items in the heart.
- Receive a ROSE EMBLEM.
- Zoom in on the piano. Put the SHEET MUSIC on the piano to open a puzzle.
- The goal is to play the notes on the sheet music.
- A correct key changes the note to red; an incorrect key resets the puzzle.
- Solution:
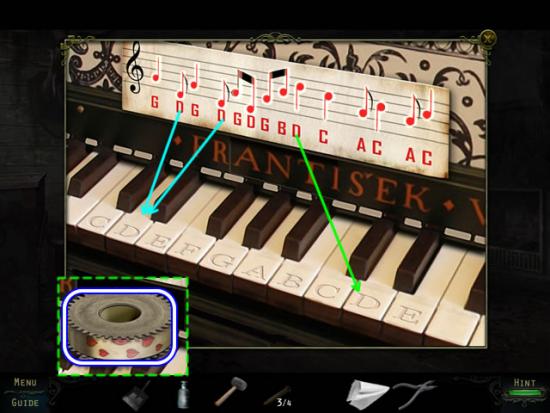
- The only tricky part is striking the correct “D” key. The above screenshot shows when to use the lower “D” key and when to use the upper one. The lowest “C” key is never used.
- Receive the HEART WHEEL for inventory.
- Exit the lodge.
Beach
- Use the SHOVEL to dig the TROPHY out of the sand.
- Return to the lodge.
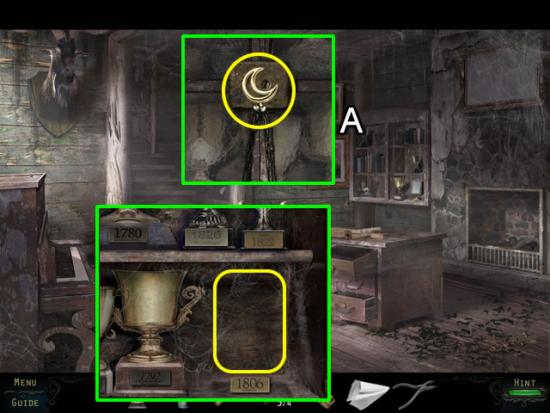
Lodge
- Examine the trophy case (A).
- Place the MOON NECKLACE symbol in the slot to open the doors.
- Put the TROPHY in the empty slot to start a puzzle.
- The goal is to match the date plates with the trophy.
- Use the height of the bars on each trophy to determine the date. The higher the bar the higher the number.
- Solution:
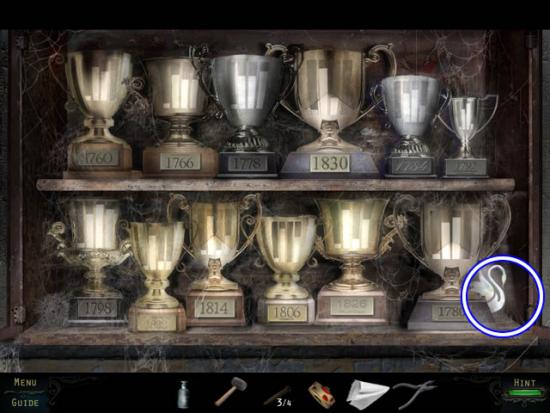
- Correctly arranging the dates unlocks the “Trophy Collector” award.
- Take the SWAN EMBLEM that appears in the lower right corner.
- Go to the door at the top of the stairs.
- Insert the HEART WHEEL in the empty slot to open a puzzle.
- The goal is to rotate the four wheels until the number of hearts on each wheel totals to 20. Use the red buttons to rotate each wheel.
- Solution:
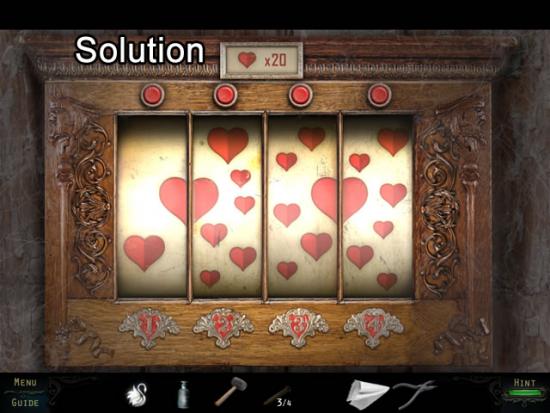
- Unlock the “Hearts Beat” award.
- Enter the attic.
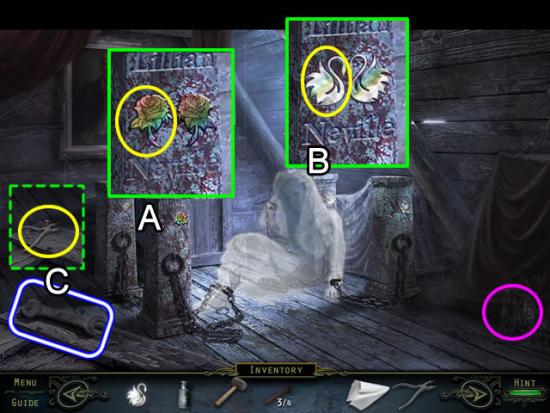
Attic
- Collect the last Haunted Soul (12/12) from the cobwebs in the right corner (pink). Unlock the “Haunted Soul Pro” award.
- Inspect the plinth in the left front (A); Insert the ROSE EMBLEM.
- Insert the SWAN EMBLEM in the right rear plinth (B).
- Pick up the WRENCH (C); use the PLIERS to remove the NAIL (4/4) in the board.
- Exit the lodge.
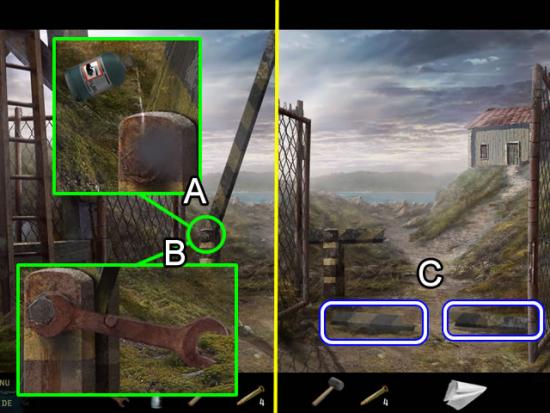
Main Gate
- Zoom in on the arm of the crossing gate.
- Pour the RUST REMOVER on the bolt (A); remove the bolt with the WRENCH (B).
- Pick up the PLANKS (2/2) on the ground.
- Go to the beach.
Beach
- Play the hidden object scene in the shipwreck.
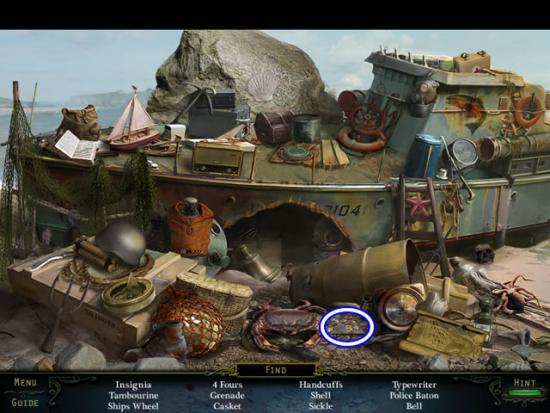
- Find the listed objects.
- The INSIGNIA goes to inventory.
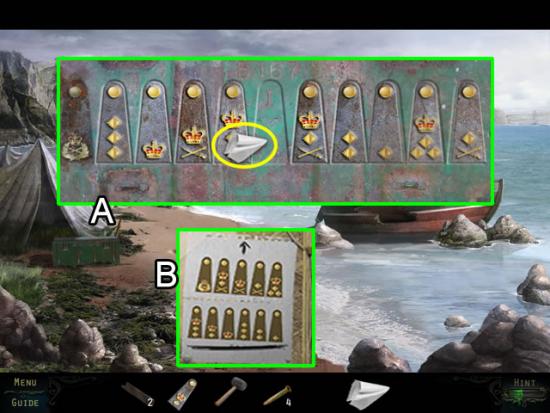
- Look closer at the green metal box (A); use the SILK CLOTH to clean the top.
- Add the INSIGNIA to the empty slot to open a puzzle.
- The goal is to swap the insignias so they are in descending rank order.
- Use the drawing from the bulletin board in the researcher’s hut as a guide (B).
- Solution:
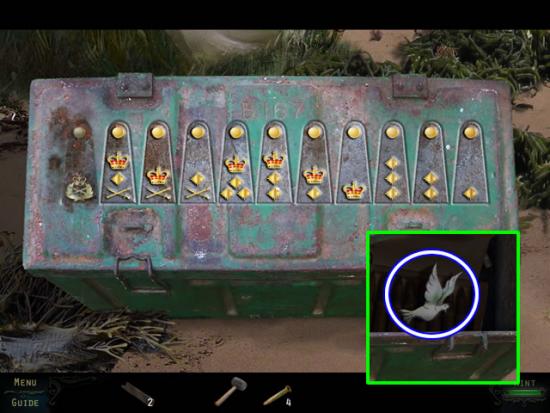
- Solving the puzzle unlocks the “Ranked Up” award.
- Take the DOVE EMBLEM from the box.
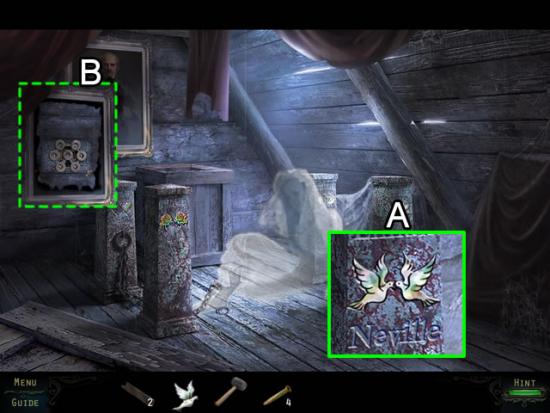
Attic
- Zoom on the right front plinth (A); insert the DOVE EMBLEM in the slot.
- A puzzle opens in the portrait (B).
- The goal is to rotate the wheels until adjacent symbols along the line match.
- Solution:
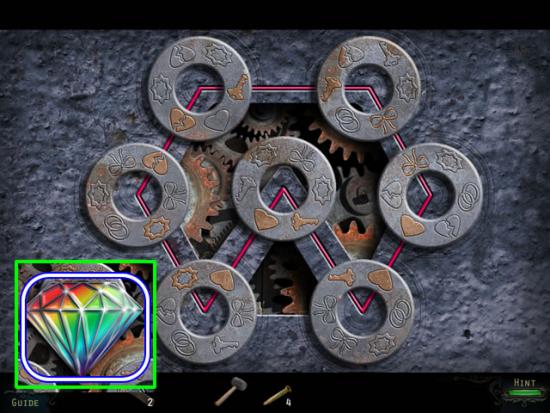
- Unlock the “Dialled In” award.
- Take the DIAMOND EMBLEM.
- Insert the DIAMOND EMBLEM in the left rear plinth.
- Receive the BOAT KEY from the released bride and unlock the “Safe (for now)” award.
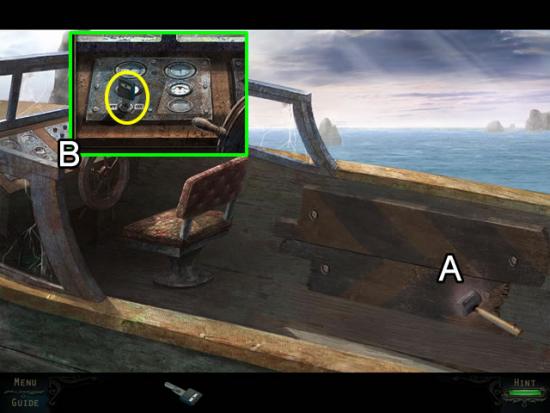
Boat
- Use the PLANKS (2/2), NAILS (4/4) and HAMMER to repair the hole in the boat (A).
- Look at the control panel (B). Insert the BOAT KEY in the ignition.
- Unlock the “No Escape?” and “Extra Perfect Finish” awards.
Congratulations! You have finished the bonus game ofHaunting Mysteries – Island of Lost Souls Collector’s Edition.
Bonus Play Awards
The following awards are available with the bonus material.
- Cartographer – Assemble the map in the guardhouse.
- The Doctor Is In – Complete the door lock puzzle on the researcher’s hut.
- Nice Reaction – Create the strange powder in the researcher’s hut.
- Key to Success – Find the unique typewriter keys on the typewriter in the researcher’s hut.
- Short Circuit – Align the wires on the circuit board at the main gate.
- Branching Out – Insert the disks in the tree image on the tree box in the compound.
- Stars Aligned – Point the ring arrows on the lodge door to the correct astrological symbol.
- Trophy Collector – Match the correct date to each trophy in the trophy case in the lodge.
- Hearts Beat – Find the combination needed to total 20 hearts in the door lock to the attic in the lodge.
- Haunted Soul Pro – Find the 12 hidden haunted soul faces.
- Ranked Up – Arrange the insignia on the metal box on the beach in the correct rank order.
- Dialled In – Match adjacent symbols on the wheels in the attic portrait puzzle.
- Safe (For Now) – Free the bride from her chains in the attic.
- No Escape? – Repairing the boat and leaving the island.
- Extra Perfect Finish – Complete the bonus game.
Other awards may be earned by completing the additional jigsaw puzzles and extra hidden object scene from the Extras tab.
More articles...
Monopoly GO! Free Rolls – Links For Free Dice
By Glen Fox
Wondering how to get Monopoly GO! free rolls? Well, you’ve come to the right place. In this guide, we provide you with a bunch of tips and tricks to get some free rolls for the hit new mobile game. We’ll …Best Roblox Horror Games to Play Right Now – Updated Weekly
By Adele Wilson
Our Best Roblox Horror Games guide features the scariest and most creative experiences to play right now on the platform!The BEST Roblox Games of The Week – Games You Need To Play!
By Sho Roberts
Our feature shares our pick for the Best Roblox Games of the week! With our feature, we guarantee you'll find something new to play!All Grades in Type Soul – Each Race Explained
By Adele Wilson
Our All Grades in Type Soul guide lists every grade in the game for all races, including how to increase your grade quickly!


