- Wondering how to get Monopoly GO! free rolls? Well, you’ve come to the right place. In this guide, we provide you with a bunch of tips and tricks to get some free rolls for the hit new mobile game. We’ll …
Best Roblox Horror Games to Play Right Now – Updated Weekly
By Adele Wilson
Our Best Roblox Horror Games guide features the scariest and most creative experiences to play right now on the platform!The BEST Roblox Games of The Week – Games You Need To Play!
By Sho Roberts
Our feature shares our pick for the Best Roblox Games of the week! With our feature, we guarantee you'll find something new to play!Type Soul Clan Rarity Guide – All Legendary And Common Clans Listed!
By Nathan Ball
Wondering what your odds of rolling a particular Clan are? Wonder no more, with my handy Type Soul Clan Rarity guide.
Haunted Manor: Queen of Death Walkthrough
Welcome to the Haunted Manor: Queen of Death walkthrough on Gamezebo. Haunted Manor: Queen of Death is a hidden object/adventure game played on the PC created by Top Evidence Studio. This walkthrough includes tips and tricks, helpful hints, and a strategy guide to how to complete Haunted Manor: Queen of Death.
Haunted Manor: Queen of Death – Game Introduction
Welcome to the Haunted Manor: Queen of Death walkthrough on Gamezebo. Haunted Manor: Queen of Death is a hidden object/adventure game played on the PC created by Top Evidence Studio. This walkthrough includes tips and tricks, helpful hints, and a strategy guide to how to complete Haunted Manor: Queen of Death.
How to Use this Walkthrough (Please read)
- This walkthrough is meant to be used as a guide to assist in solving mini-puzzles and acquiring all items in order to complete the game. You may explore locations in the order you wish, this walkthrough is written to take the most direct route to the game’s finish.
- Inventory objects will be written in bold. The walkthrough will state, “Use the inventory item on the blah blah,” because it assumes you have the item. If you don’t have the item, on your keyboard, press CTRL+F (at the same time). In the text box, type the name of the item you are looking for and press ENTER. This will scan this page for the appearance of that word.
Gameplay and Tips
- This is a hidden object adventure game. You will move from location to location solving hidden object hunts, mini-puzzles and picking up items to use in order to proceed in the game.
- There are no difficulty settings.
- Glints indicate areas of interest/inventory items and sparkles indicate hidden object hunts.
- Place inventory items as soon as you can (if you know where they go) as sometimes that will progress the game, open up new scenes, new hidden object hunts, etc.
- When you are presented with an inventory item, click anywhere outside the window to close it.
- The Menu button at the bottom left of the screen will bring you back to the main screen.
- Items collected throughout the game go into your inventory, located at the bottom of your screen.
- Closing a window – To close the zoom-in windows, click anywhere outside of the window. Tip: If you can zoom in on the area again, you likely haven’t found everything you needed to find.
- Mini-puzzles can be skipped once the Skip button fills.
- Hint system – Hints are available in the bottom right-hand of the screen.
- Hints used in the hidden object scenes will point out an object to be found.
- Hints used during the adventure mode will indicate something that can be done within a scene or it will point you in the direction to go.
- Hidden object hunts provide either a list of items to find. Click on items in the scene to cross them off the list. Once you have found all the hidden objects, an item is added to your inventory.
- Note: In hidden object hunts, items listed green require an action to be found. The scenes in this game contain many interactive areas and sometimes they do not hide objects you need to find. Because the interactive areas are indicated by glints, this walkthrough will only highlight the inventory item collected.
- Hidden object scenes are different each time you play. Hidden objects screenshots will only highlight (yellow circles) the items added to your inventory and actions needed to find items.
- This game does not have a journal.
- This game has named its areas. The name of an area appears above the cursor when the cursor is pointing to a location. This walkthrough will use that naming convention.
- There is no map.
- There are no achievements.
Walkthrough
- From the main menu screen, click Play to start the game.
- When asked if you would like some interactive help, click Yes. Even if you are a veteran of these games, playing the tutorial is always a good idea.

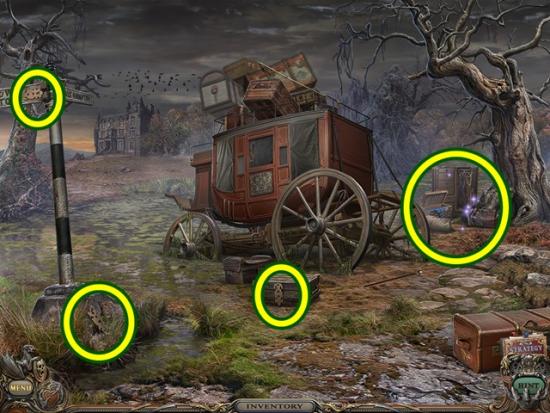
- Take the three punched key cards (3/4) and the cane. Click on the desk to start a hidden object hunt.
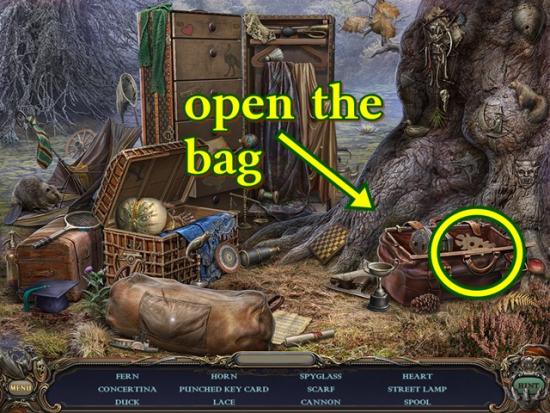
- Find all the objects. A punched key card (4/4) is added to your inventory.
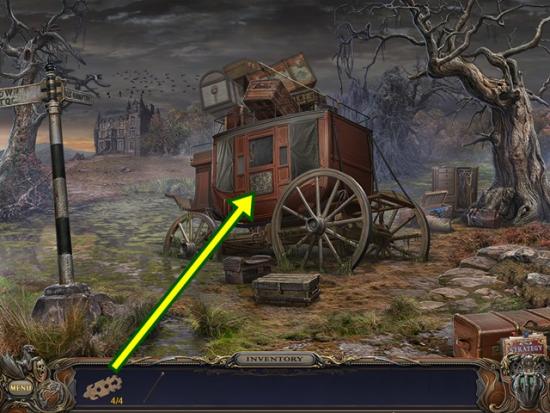
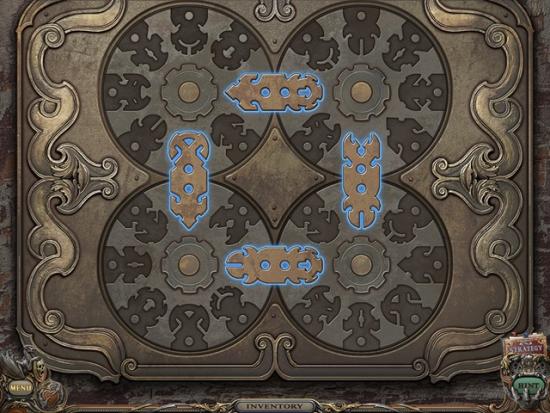
- Click on the carriage. Add the four punched key cards. A mini-puzzle starts. Rotate the discs in order to fit the four key cards. The key cards cannot be rotated.
- Solution:
- Enter the carriage.
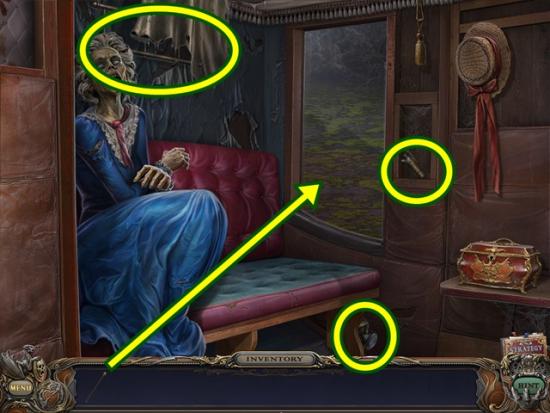
- Click on the woman. Click through the dialogue and watch the cutscene. Then take the flashlight, lighter and ladder. Break the window with the cane and take the splinter (large piece of broken glass). Leave the carriage.
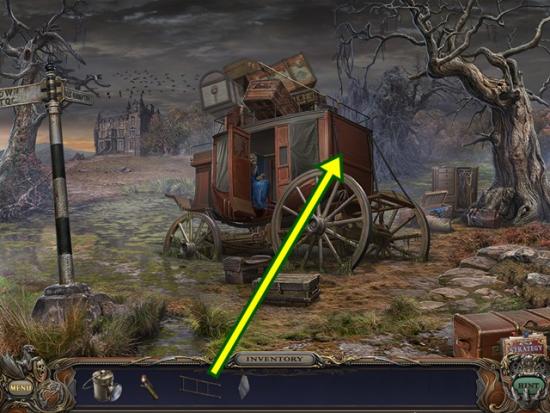
- Put the ladder against the carriage. When the owl lands on top of the carriage, shoo it away with the flashlight. Climb atop the carriage (note: make the cursor to change to an up arrow, the magnifying glass will not get you on top of the carriage).
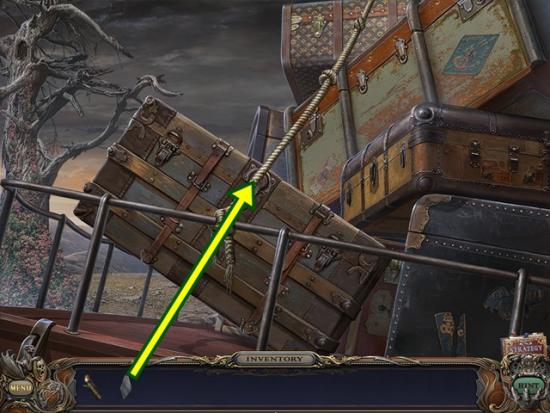
- Use the splinter to cut the rope (three clicks). Climb down.
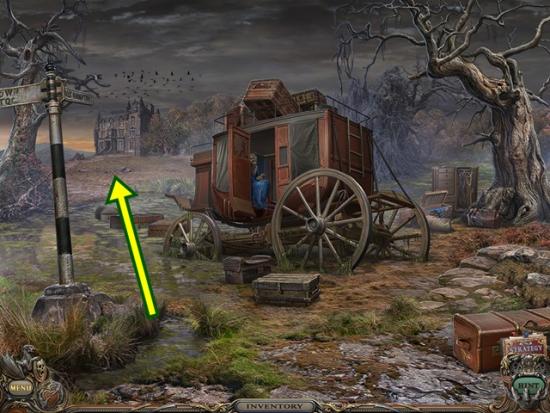
- Go towards to the yard.
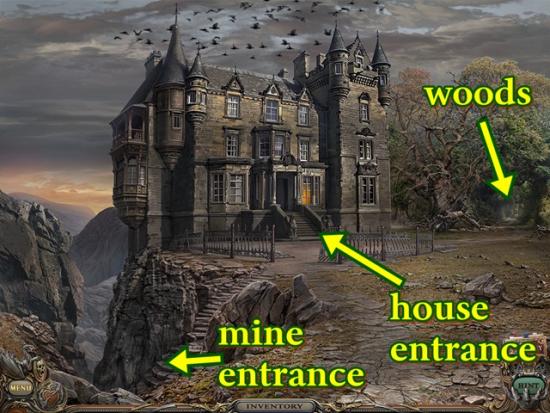
- Go left to the mine entrance.
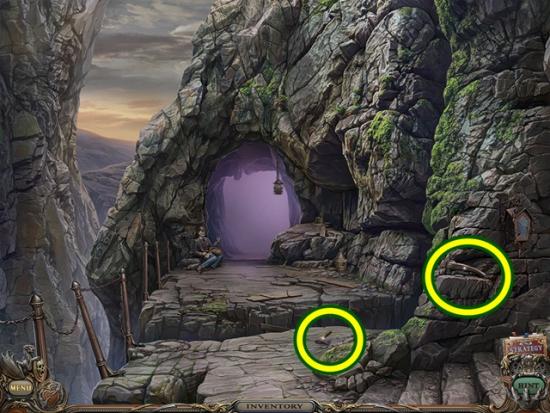
- Take the axe and the handle. Go right to towards the yard and move forward towards the house entrance.
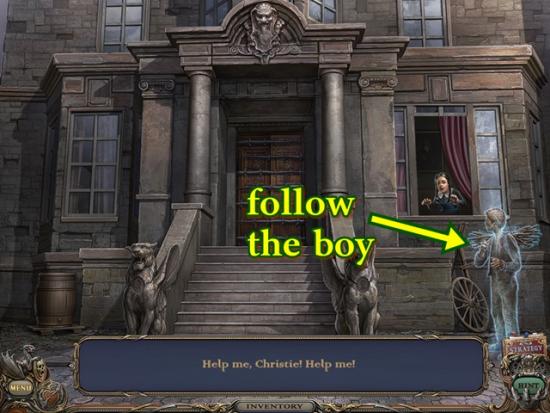
- Follow the boy (go back to the yard).
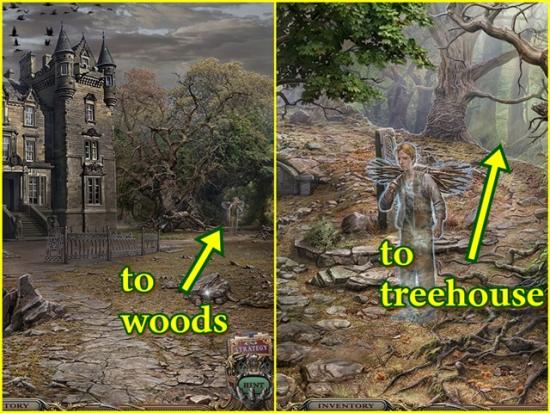
- Follow him to the woods and then to the tree house (click on the boy to make him move).
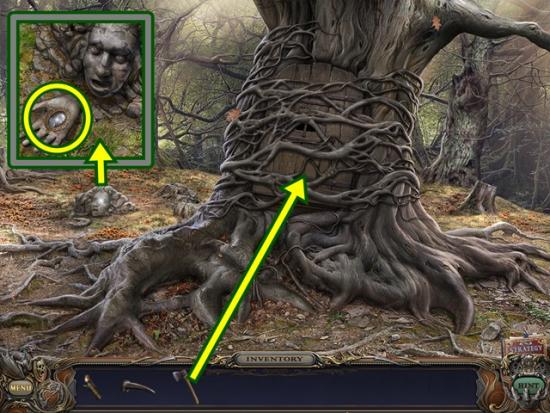
- Click on the rock head and take the cameo. Use the axe to remove the roots from around the tree. The blunt axe is added to your inventory. Go down to the woods.
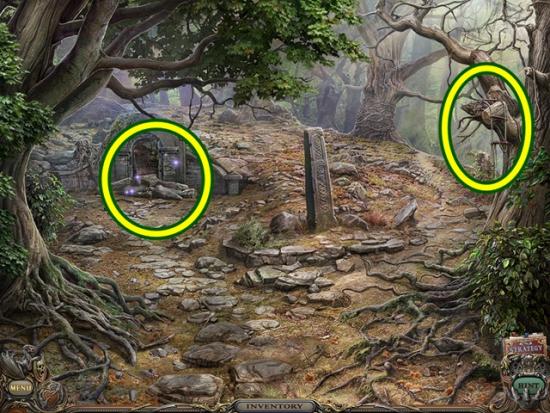
- Take the rope ladder. Click on the broken gate to start a hidden object hunt.
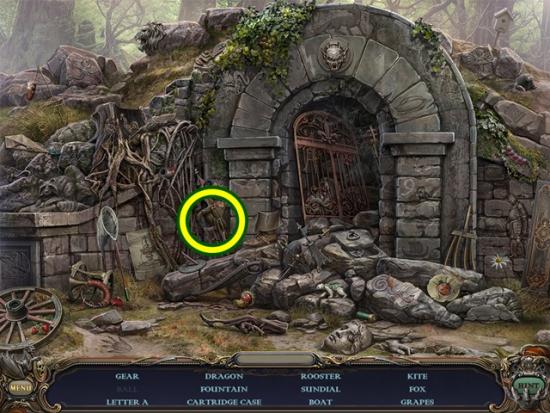
- Find all the objects. A ball is added to your inventory. Return to the tree house.
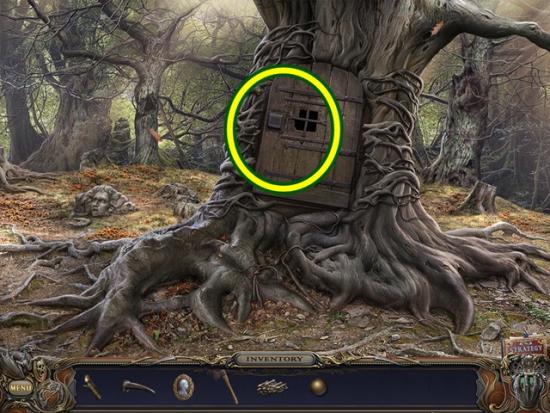
- Click on the door. Add the ball to the top left corner (start indicator in screenshot below). A mini-puzzle starts. Guide the ball to the bottom right corner. Use your mouse to guide the ball. The ball can only move in a straight line. Click where you want the ball to go. Avoid the holes or you have to start over.
- Solution:
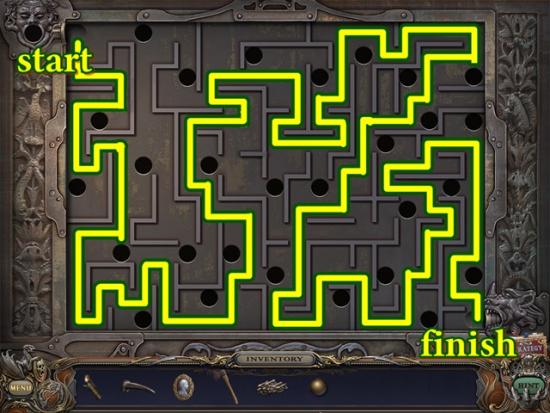
- Enter the tree house.
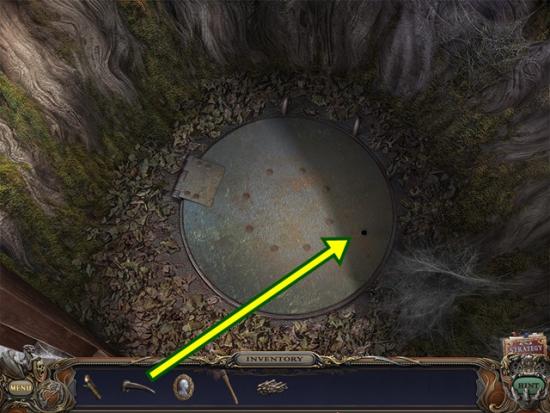
- Add the handle and turn it. When the hatch opens, add the rope ladder. Go down into the crypt.
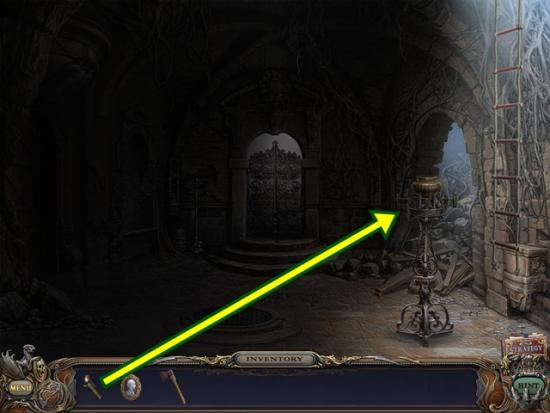
- Use the lighter to light the lamp.
- Talk to the boy. Click through the dialogue and watch the cutscene.
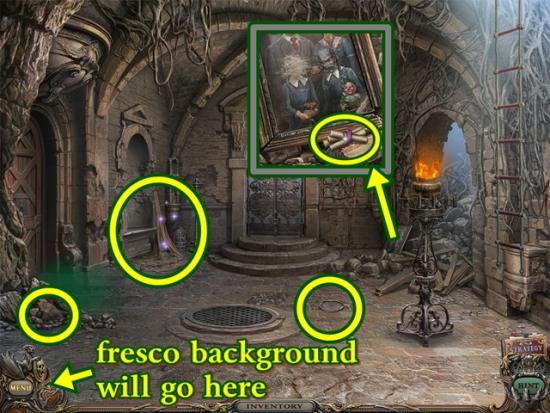
- Take the fresco background. Click anywhere outside the window to close it. Take the fresco piece. Click on the painting. Take the candles. Click anywhere outside the window to close it.
- Click on the fresco background (bottom left of screen). Add the fresco piece. Click anywhere outside the window to close it.
- Click on the shelf to start a hidden object hunt.
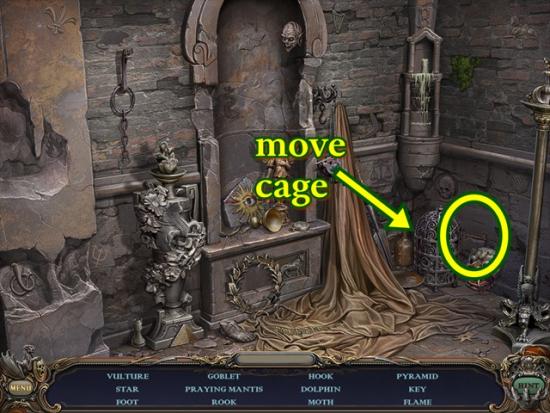
- Find all the objects. A key is added to your inventory.
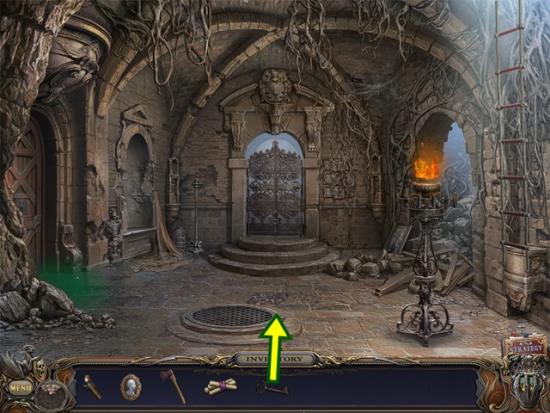
- Click on the grate. Warning: This next puzzle contains bugs. If you aren’t comfortable with bugs, this might be unpleasant.
- Unlock the grate with the key. A mini-puzzle starts. Click on the matching sets of bugs to clear them.
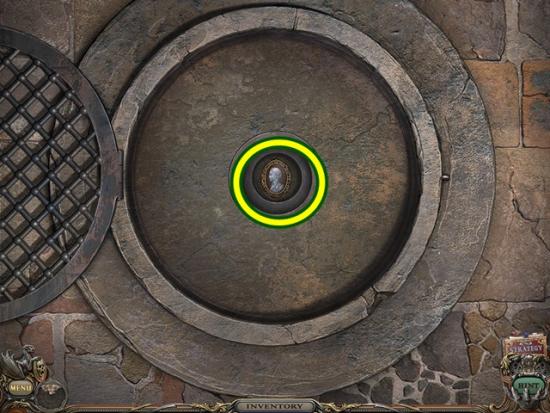
- Take the cameo. Return to the woods.
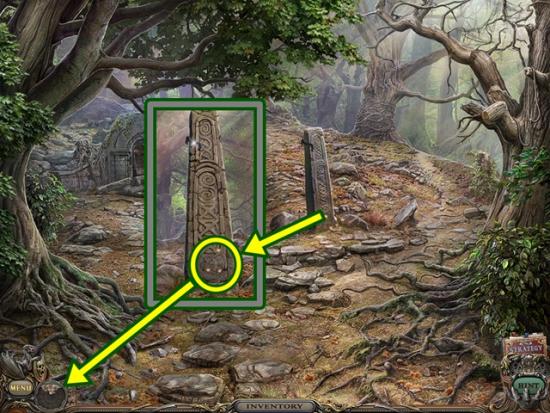
- Click on the bottom of the obelisk. Take the fresco piece. Click on the fresco background (bottom left of screen). Add the fresco piece. Click anywhere outside the window to close it. Return to the yard.
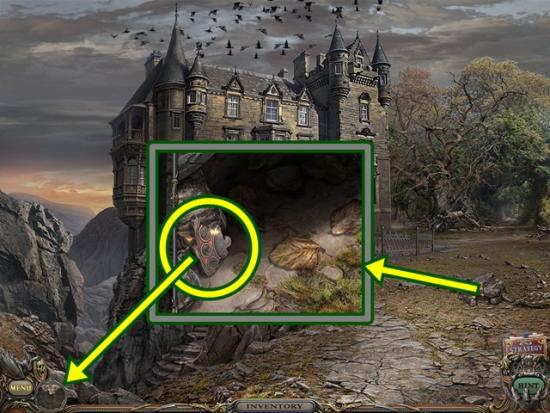
- Click on the rock. Move the small rock and take the fresco piece. Click on the fresco background (bottom left of screen). Add the fresco piece. Click anywhere outside the window to close it.
- Move towards the house entrance.
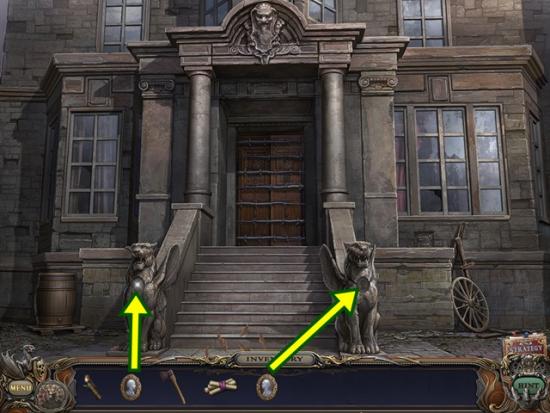
- Place the cameos on the two statues. Enter the house (to the hallway).
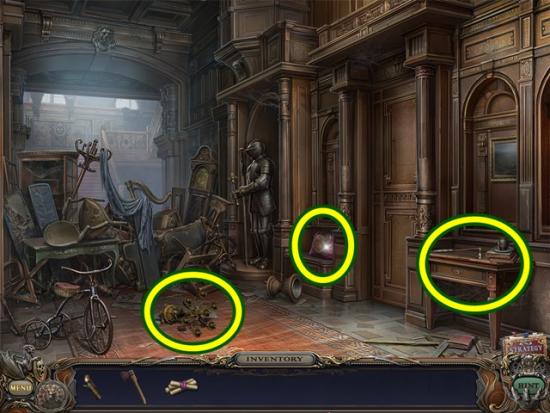
- After the animation, take the candelabra. Move the pillow and take the ball. Click on the small table. Add the candelabra, then place the candles then light them with the lighter.
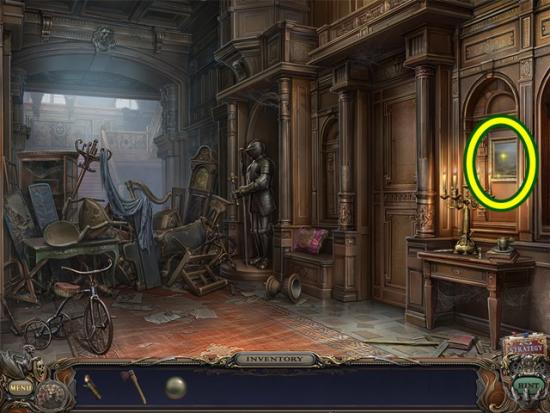
- Click on the painting. Before you do anything, take note of each demon (take a digital photo if possible for easy reference).
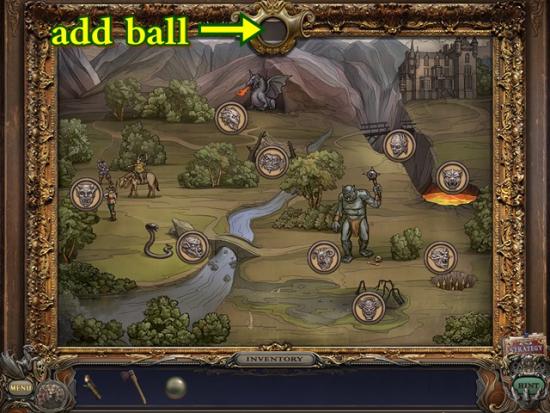
- Add the ball to the slot at the top of the painting. A mini-puzzle starts. A demon will appear at the top of the painting. Click on a circle to reveal a matching demon. If you make a mistake, the circle closes and the demon at the top may change. The screenshot above shows the placement of all the demon heads.
- Enter the parlour and follow the nanny into the music room.
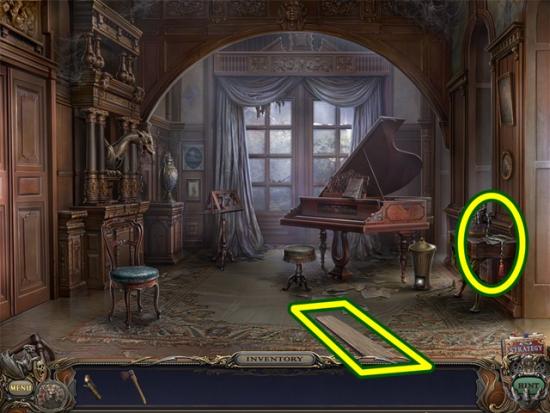
- Take the board and the pull cord. Return to the parlour (right).
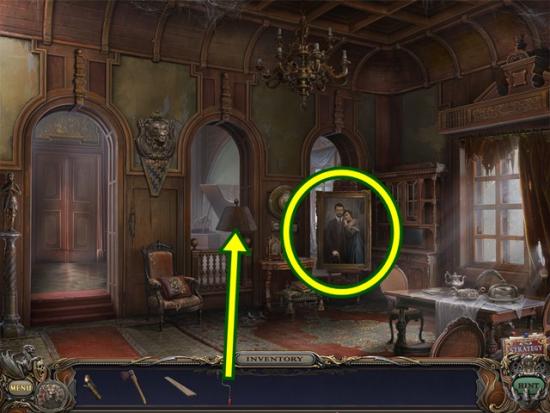
- Put the pull cord on the floor lamp and pull it to turn on the lamp. Once this is done, click on the painting to start a hidden object hunt.
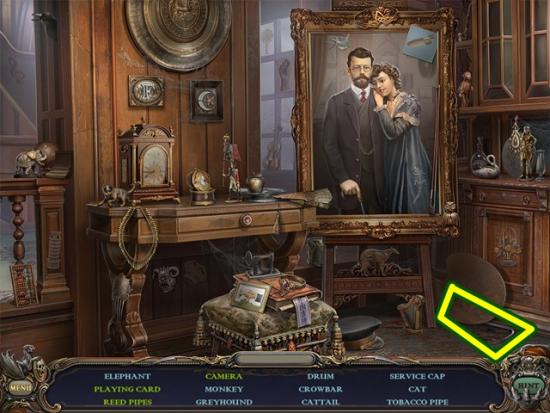
- Find all the objects. A crowbar is added to your inventory. Return to the mine entrance.
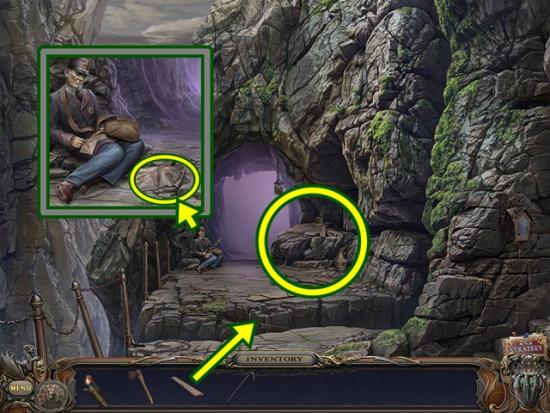
- Place the board over the chasm. Click on the mailman. Click through the dialogue. Click on the newspaper and read the article. Click anywhere outside the window to close it. Go back to the mine entrance and click on the rocks to the right of the passageway to start a hidden object hunt.
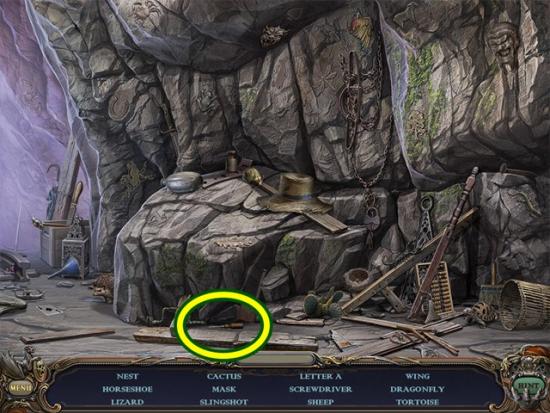
- Find all the objects. A screwdriver is added to your inventory. Return to the hallway.
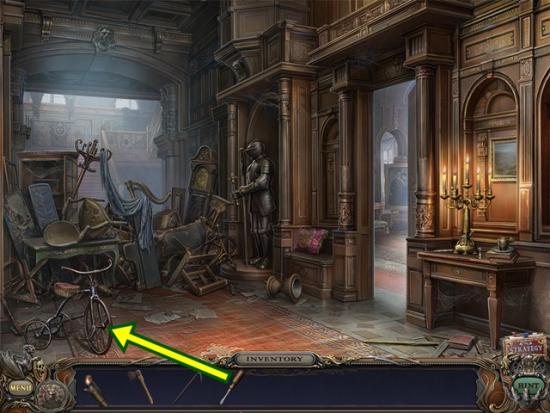
- Click on the tricycle. Use the screwdriver to take the handle. Go to the music room.
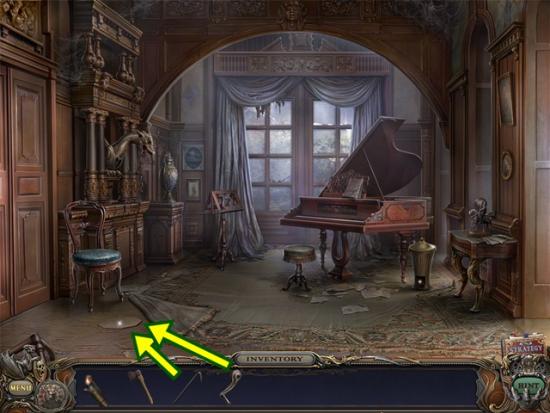
- Move the chair and lift the corner of the carpet. Pull up the tile with the crowbar. Look into the area. Add the handle and turn it. Enter the cabinet.
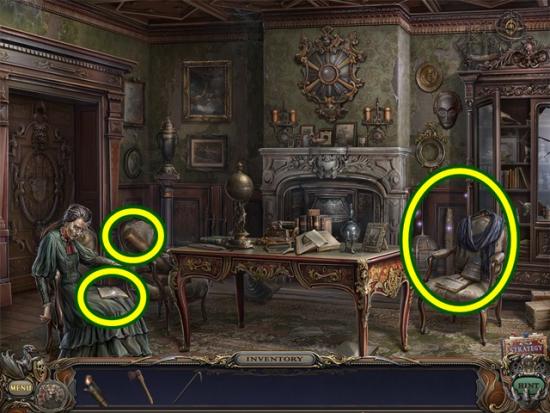
- Click on the book on the nanny’s lap. Read the entry. Click anywhere outside the window to close it. Click on the tube on the chair beside the nanny. Take the telescope. Click on the area to the right of the fireplace to start a hidden object hunt.
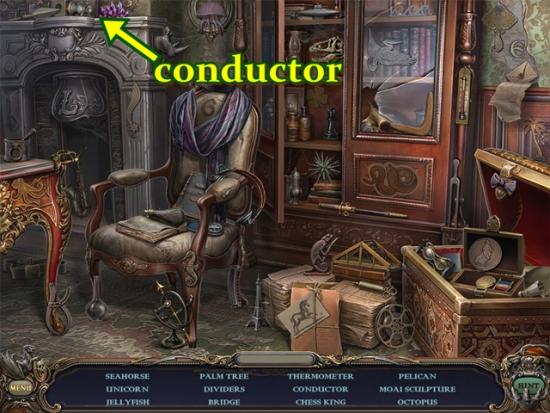
- Find all the objects. A conductor is added to your inventory. Return to the passageway (from the mine entrance).
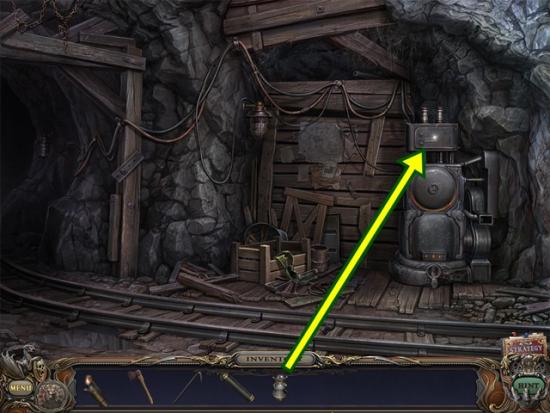
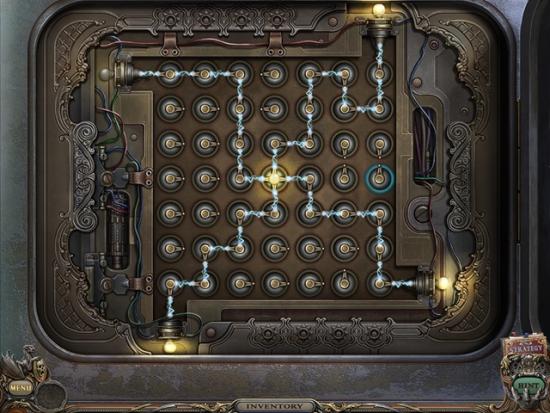
- Click on the generator. Add the conductor. A mini-puzzle starts. Adjust the conductors in order to turn on all four lamps.
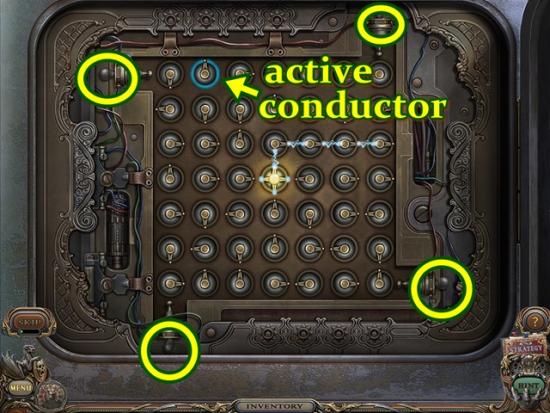
- Notice how one conductor is always highlighted by a blue ring. This is the active conductor. Note the direction the active conductor’s lever is pointing. Click on any other conductor to turn its lever to that direction. That conductor then becomes the active conductor. If you don’t wish for a conductor to be active but don’t want to move another conductor, click on another conductor whose lever is pointing in the same direction as the active conductor. Take some time to play around with the movement of the conductors.
- Note that you just need to get a continuous flow of power to each lamp, you do not have to use all the conductors.
- Solution:
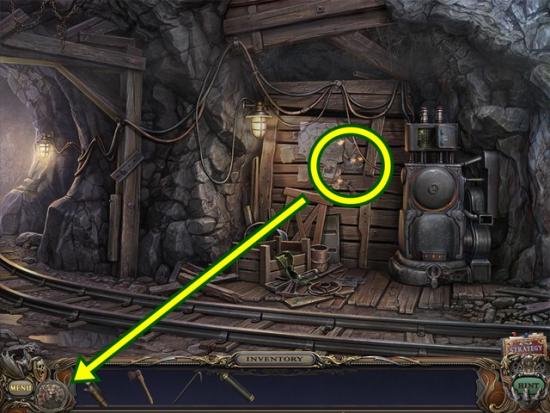
- Take the fresco piece. Click on the fresco background (bottom left of screen). Add the fresco piece. Click through the dialogue. Click anywhere outside the window to close it. Enter the mine junction.
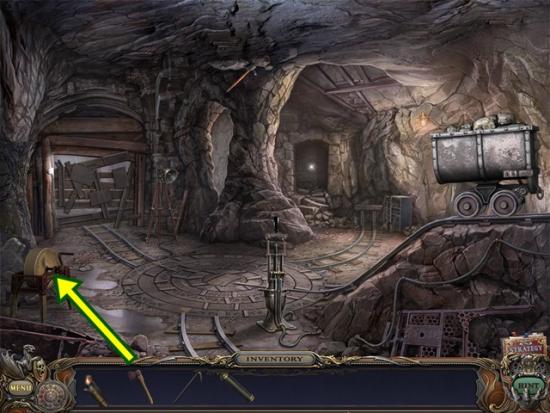
- Sharpen the blunt axe on the sharpener to get the sharp axe. Return to the crypt (go into the woods and into the tree house).
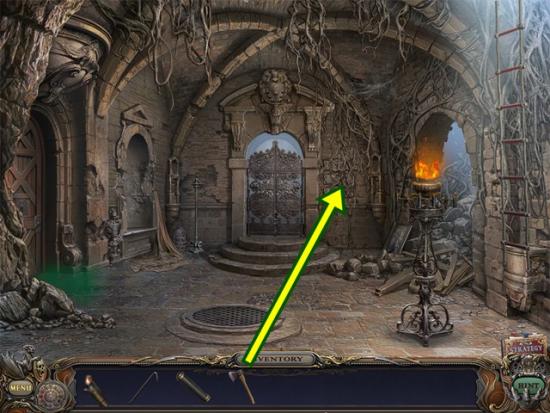
- Click on the wall to the right of the back door. Use the sharp axe to cut the roots on the wall. Warning: This area contains large spiders crawling about. A mini-puzzle starts. Click on the plaques in the proper sequence so they all remain pressed in. To start, press all three until one remains pressed in. Then press another plaque. If both plaque pop back out, press the original plaque that remained pressed in and press the other plaque. They will both remain pressed in and then you can press the other plaque. The solution is to press the middle plaque, then the top plaque, then the bottom plaque.
- Enter the mausoleum.
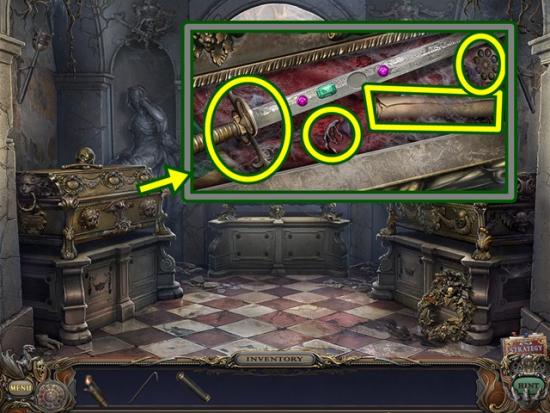
- Click on the casket on the left. Open the casket. Take the sword hilt, sphere disc and the bird foot. The fresco will open automatically. Add the bird foot. Click anywhere outside the window to close it. Read the scroll. Click anywhere outside the window to close it. Return to the hallway.
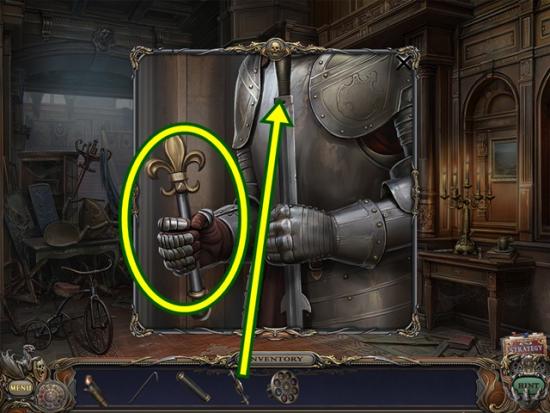
- Click on the suit of armour. Add the sword hilt and take the sceptre. Return to the cabinet (room off the music room).
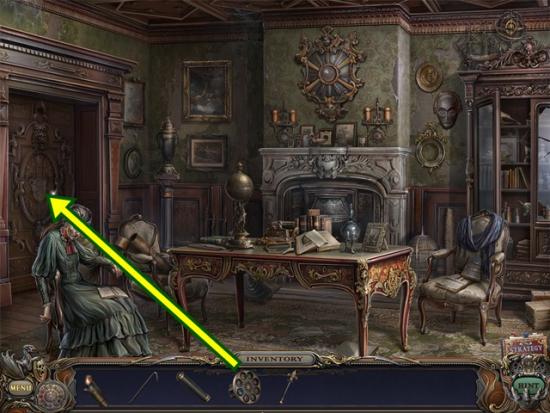
- Click on the door. Add the sphere disc. A mini-puzzle starts. Return all the marbles to their matching slot. Click on a ring until the marble reaches the vacuum tube. Click the handle to suck the marble in. Then rotate all the rings to create a clear path to the centre area. Click the handle to shoot the marble into the centre area. If it matches the slot, it will remain there.
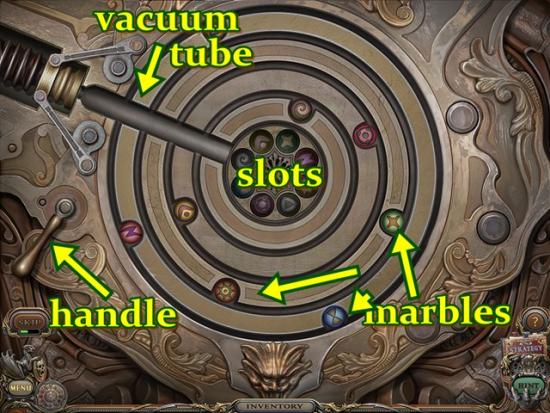
- When you press the handle, the centre area moves clockwise. Keep that in mind as you are manoeuvring the marbles.
- You may complete this puzzle in any way you see fit.
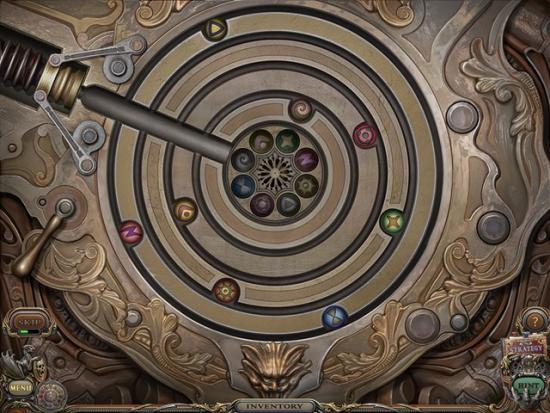
- To properly place marbles, look at the centre area and ignore the symbol that is at the base of the vacuum tube but note the symbol that is counter-clockwise to it. In the screenshot above, it’s the hourglass symbol. I will move the hourglass marble to the vacuum tube, then press the handle.
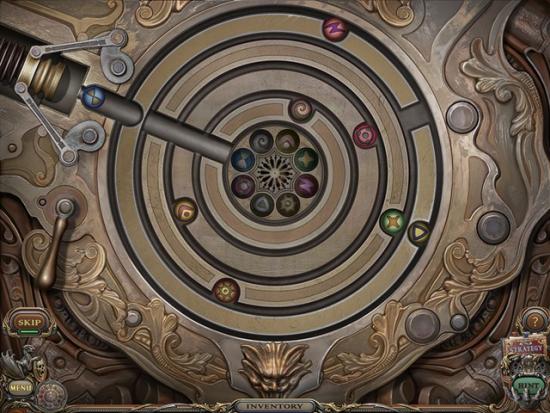
- By pressing the handle, I’ve sucked the marble into the tube and placed the hourglass slot at the base of the vacuum tube. Now I have to rotate the rings to clear a path for the marble to enter the centre area. Notice every ring has an opening. This opening is placed over the vacuum tube to clear a path.
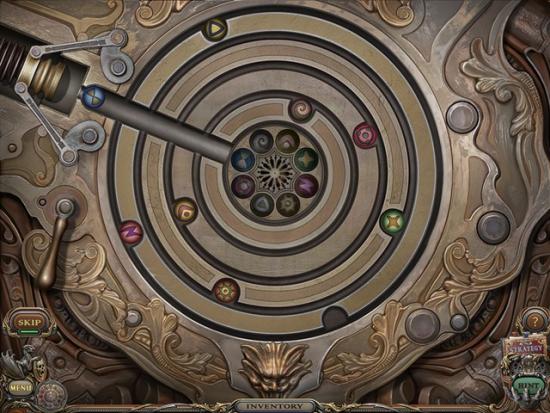
- Press the handle to release the marble.
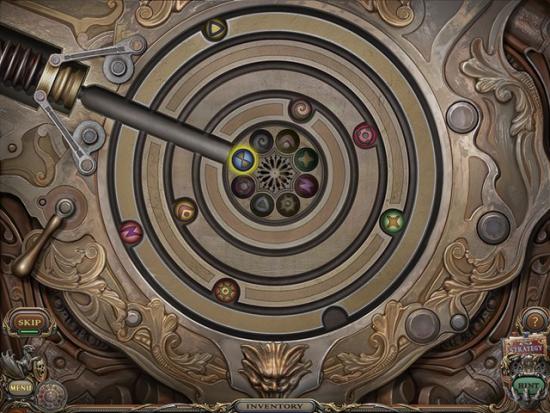
- If placed correctly, the marble will stay in the centre area and will be lit in order to indicate it has been completed. Continue to do this for all the marbles.
- When you are finished, go through the doorway to the lower stairs.
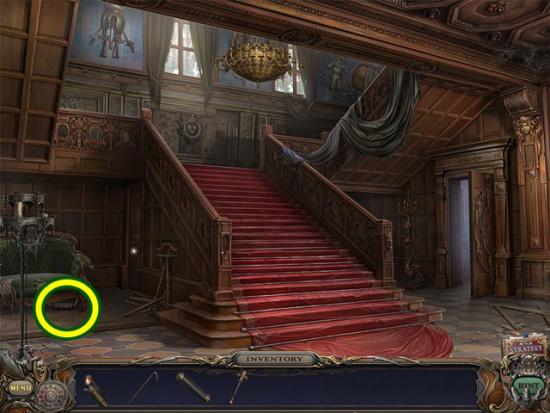
- Take the tumbler lock. Return to the parlour.
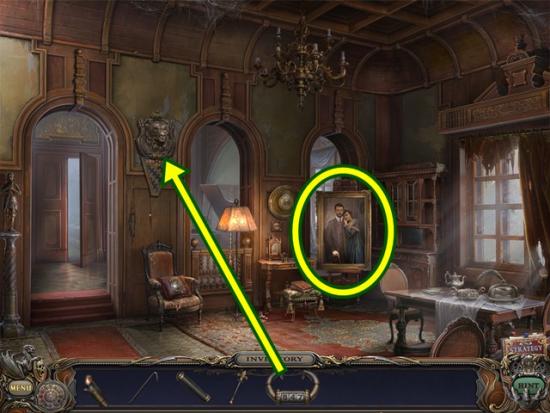
- Click on the lion head on the wall. Add the tumbler lock. Click down to return to the parlour. Click on the painting to start a hidden object hunt.
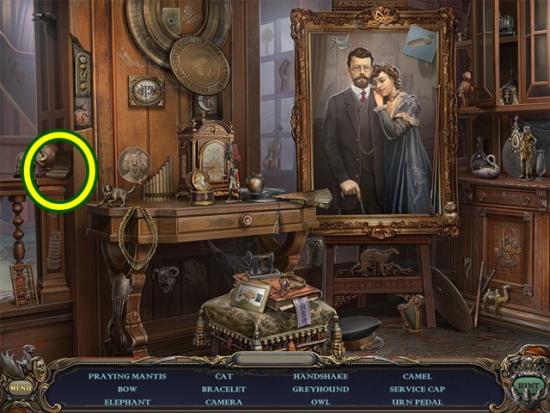
- Find all the objects. An urn pedal is added to your inventory. Return to the music room.
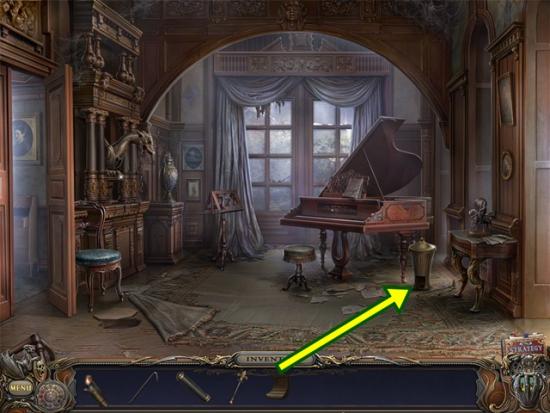
- Add the urn pedal to the urn. Press the pedal and take the scissors. Return to the parlour.
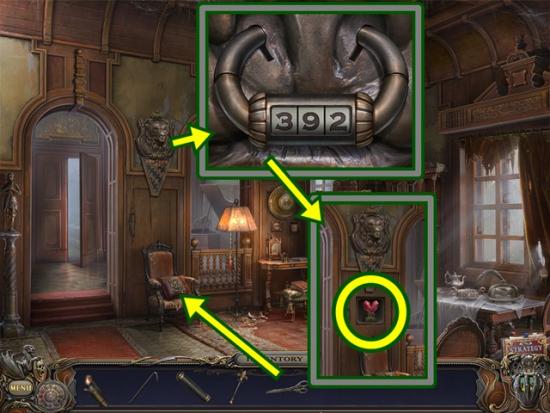
- Cut the pillow open with the scissors. Click on the pillow and click on the code (3 9). Click anywhere outside the window to close it. Click on the lion head on the wall.
- Enter the two digits you just saw on the code you got from the pillow. To turn the digits, click above or below the digit to move it in the desired direction. The first two digits are 3 and 9. For the third digit, turn the dial until the lock opens. The code is 3 9 2.
- Take the dragon heart. Return to the lower stairs and go up to the upper stairs.
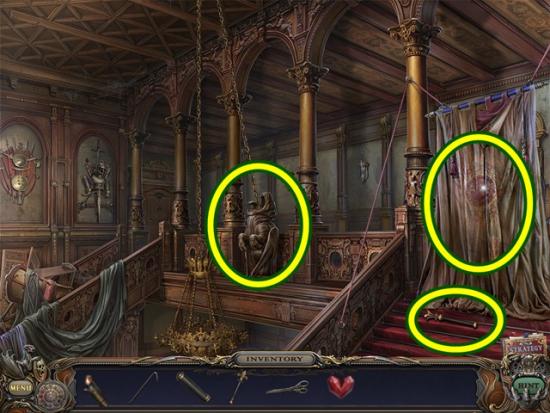
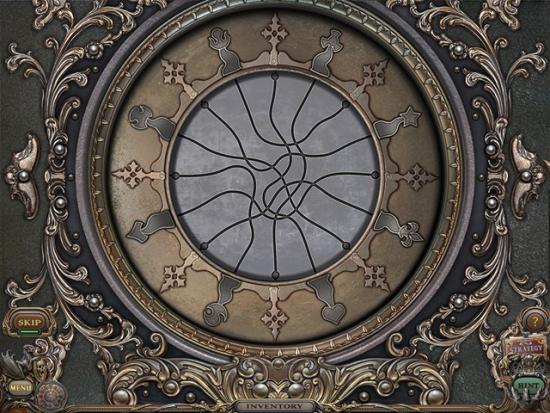
- Click on the sceptre to fling it onto the chandelier. Click on the curtain. Cut the rope with the scissors. Click on the statue the chandelier chain is attached to. A mini-puzzle starts. Slide all the lamps (symbols) into their appropriate slot on the outer ring. Click on any lamp and watch the path it takes and where it ends up. Then click to rotate the outer ring so the lamp’s slot is at the end of its path. Do this for all the lamps.
- Solution:
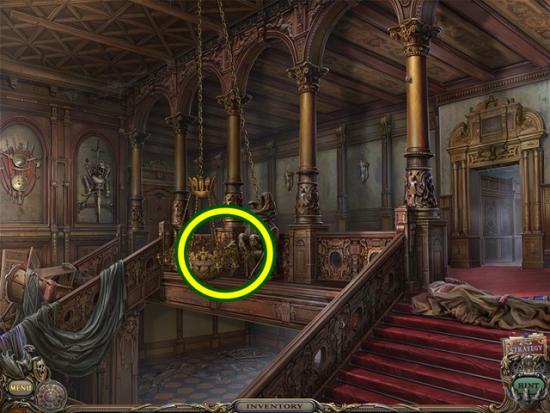
- Take the sceptre. Enter the hallway.
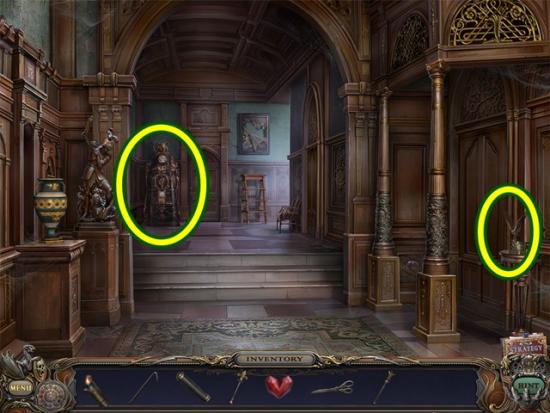
- Pick up the eagle statuette. Click on the clock. Move the upper left panel. A mini-puzzle starts. Adjust all the gears so each is rotating in the opposite direction of the gear it is touching. Click on a gear to change its rotational direction. A screenshot cannot show a solution to this puzzle as it is based on movement. Start from the beginning and work your way through the gears. Most gears are only touching one other gear. When all the gears are rotating properly, the next panel will open. Continue until all the panels are open.
- When you are finished, enter the nursery.
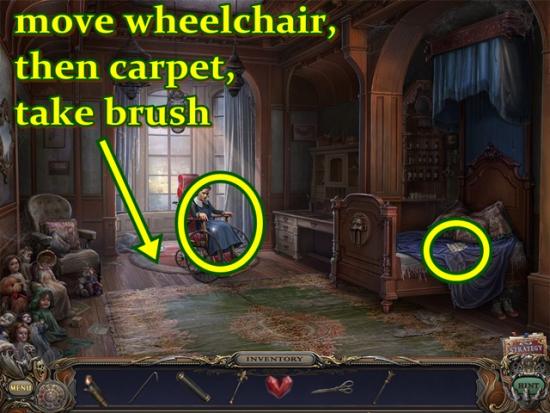
- Click on Stella. Click on the note on the bed. Click anywhere outside the window to close it. If you can’t close the note, keep clicking on the note until you wonder if you are next. Move the wheelchair. Lift the carpet and take the brush. Leave the room.
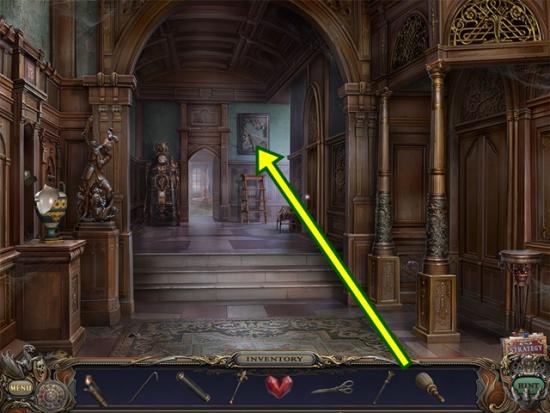
- Click on the torn painting. Clear the cobwebs with the brush and take the puzzle chest key. Go out to the balcony.
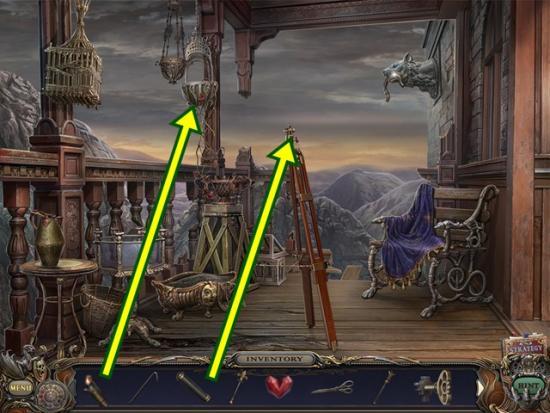
- Light the hanging lantern with the lighter. Put the telescope on the tripod. Return to the upper stairs.
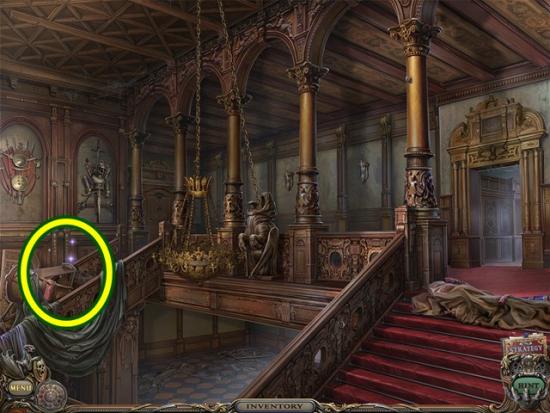
- Click on the debris on the stairs to start a hidden object hunt.
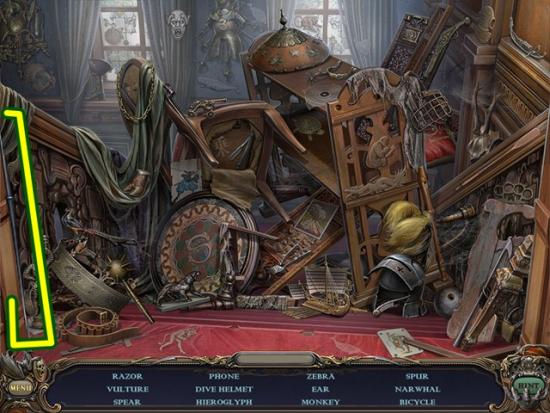
- Find all the objects. A spear is added to your inventory. Return to the (upstairs) hallway.
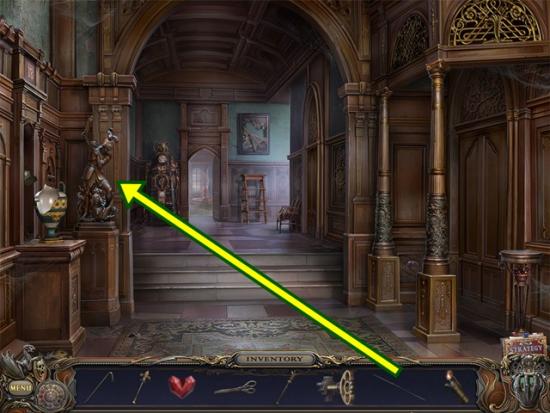
- Place the spear on the soldier statue. Enter the parent’s bedroom.
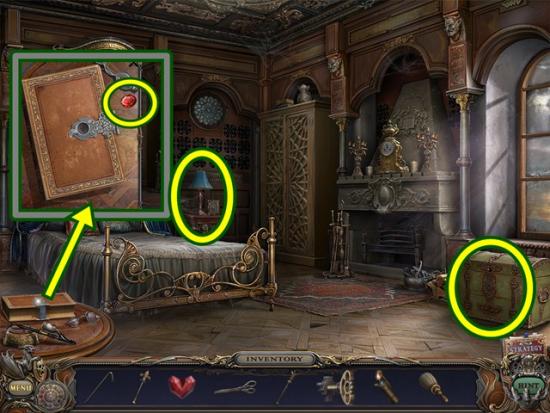
- Turn on the lamp. Click on the lamp. The spider for the amulet is here. Click on the picture. Click anywhere outside the window to close it. Click on the book. Take the ruby (1/2). Click anywhere outside the window to close it. Click on the chest. A mini-puzzle starts. Rotate the lock pieces so that when you press the lever, they will connect and open the lock. To begin, press the lever. As the lock pieces glide along the rail, they will spin. When they end in the middle, take note of the position they are in and determine how many times you must rotate each piece to put it in the proper position.
- When a piece is properly positioned, it will remain in the centre area.
- Solution:
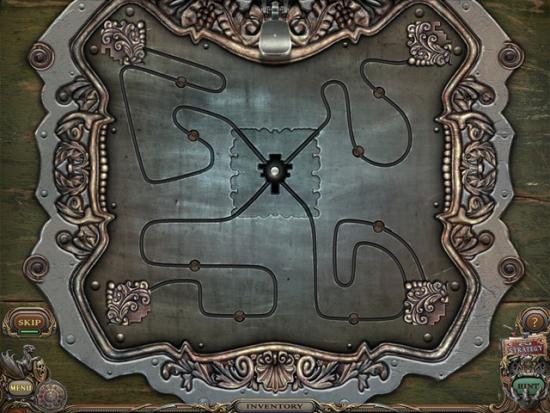
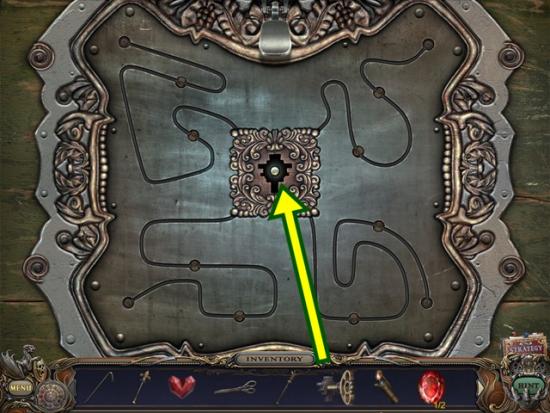
- Unlock the chest with the puzzle chest key. When the chest opens, take the snake catcher stick and the arrow. Return to the woods.
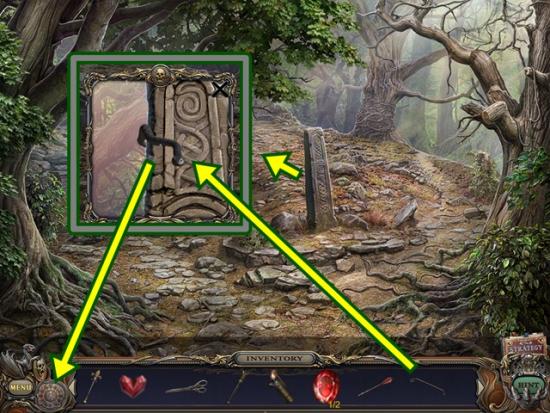
- Click on the obelisk. Try to take the snake. Try to take it again. Use the snake catching stick to take the snake. Note: At this point in the game, you may have a lot of inventory items. Note the arrows at either end of the inventory bar. Use them to scroll through your inventory.
- Add the snake to the fresco. Click anywhere outside the window to close it. Return to the tree house and enter it.
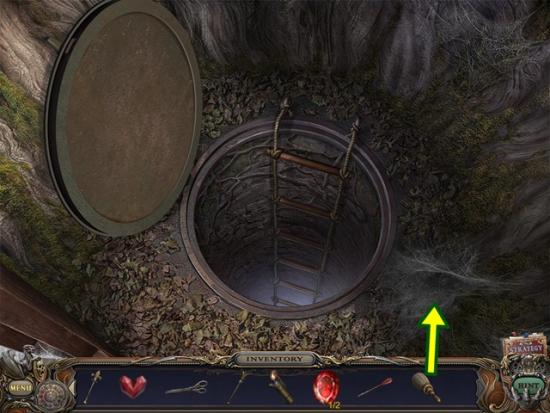
- Clear the cobwebs with the brush. Take the rapier (1/4). Enter the crypt and go through to the mausoleum.
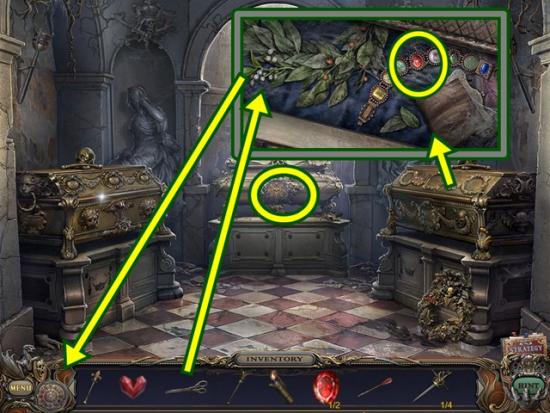
- Click on the casket on the right. Remove the lid. Take the ruby (2/2). Use the scissors to cut the mistletoe. Add the mistletoe to the fresco. Click anywhere outside the window to close it. Click on the centre casket.
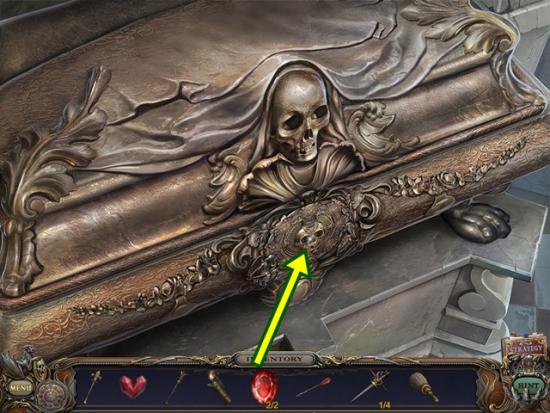
- Click on the skull. Add the two rubies to the skulls’ eyes. A mini-puzzle starts. Arrange the discs so they depict the cycle of life. Rearrange the discs by using the skull’s ring. Click on either side of the skull to move the ring in that direction. Click on a disc to slide it into the slot at the top of the skull. Rotate the skull to an empty slot, then click on the disc to move it into the slot. When a disc has been properly positioned, it will flash blue. You can still move a disc if it’s properly placed.
- Solution:
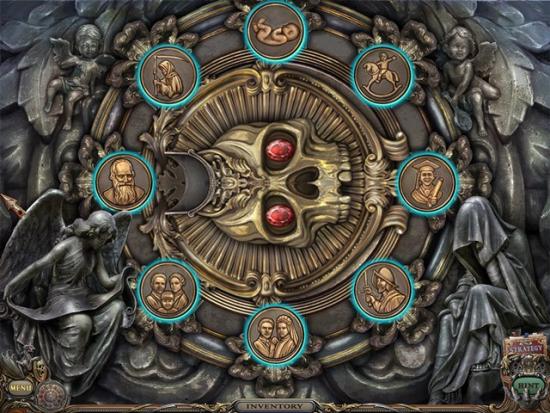
- Note: In the screenshot above, the grim reaper disc is placed automatically after you complete the puzzle.
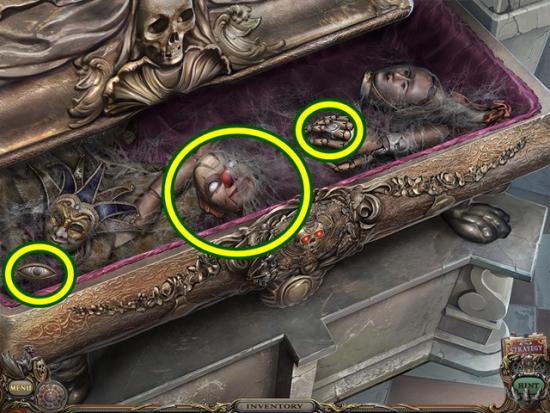
- Take the clown head, mask eye and the crypt signet. Return to the cabinet. Note: When you get to the (downstairs) hallway, the path is clear to now go straight to the lower stairs without having to go through the parlour.
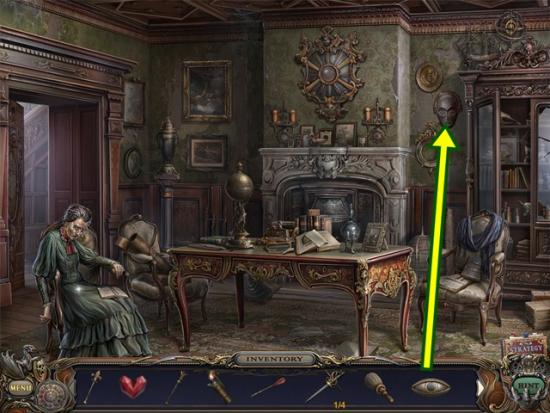
- Click on the mask on the wall. Add the mask eye. Take the dragon hook. Return to the music room.
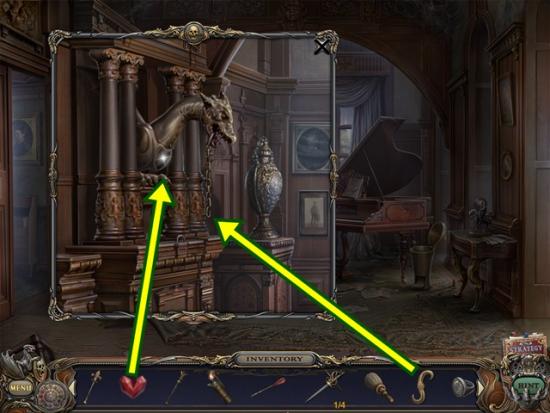
- Click on the dragon statue. Add the dragon heart and the dragon hook to the end of the chain. Click on the dragon’s head/neck so it lifts the panel. Take the rapier (2/4). Return to the nursery.
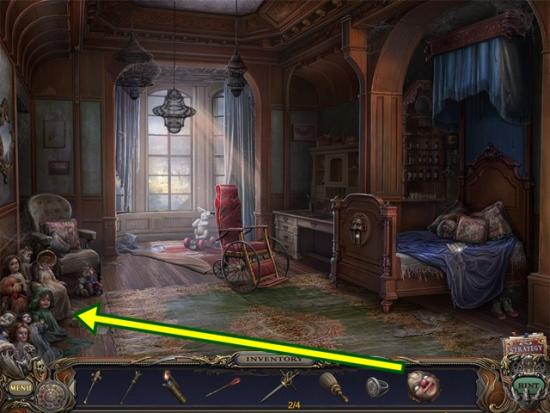
- Click on the dolls. Add the clown head. A mini-puzzle starts. Click on the dolls’ eyes so all are open. Each eye moves itself and another eye. Determine which eye moves what. Because there’s no reset button, a step-by-step instruction to this game is pointless as you have likely started moving the eyes by the time you come to this walkthrough for assistance.
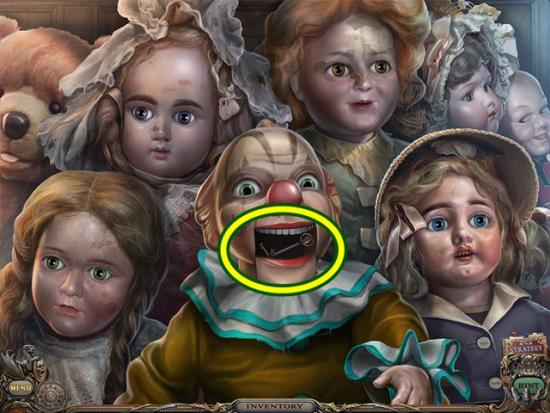
- Once all the dolls’ eyes are open, the clown’s eyes will open. Take the lantern key from its mouth.
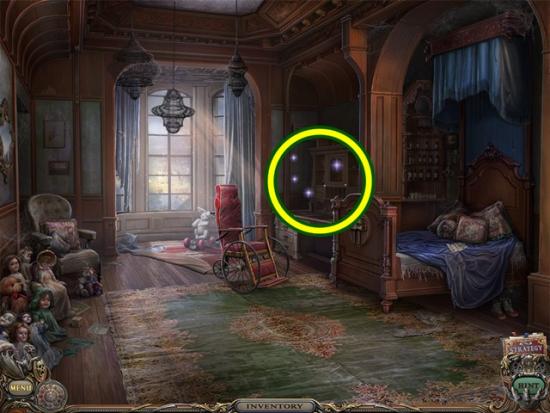
- Click on the desk to start a hidden object hunt.
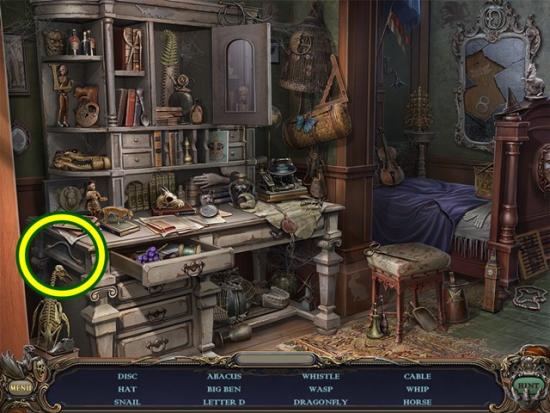
- Find all the objects. A cable is added to your inventory. Return to the parent’s bedroom.
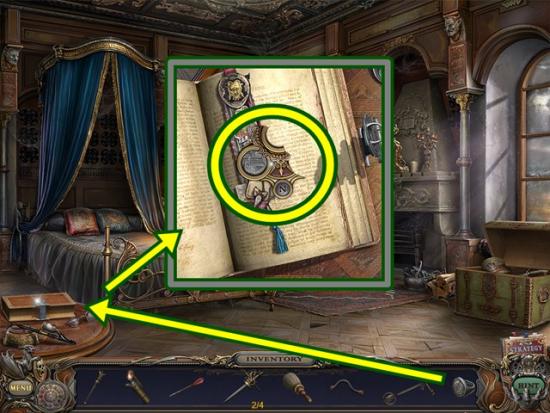
- Click on the book. Unlock it with the crypt signet. Turn the pages until you get to the key part. Take the key part. Return to the mine entrance.
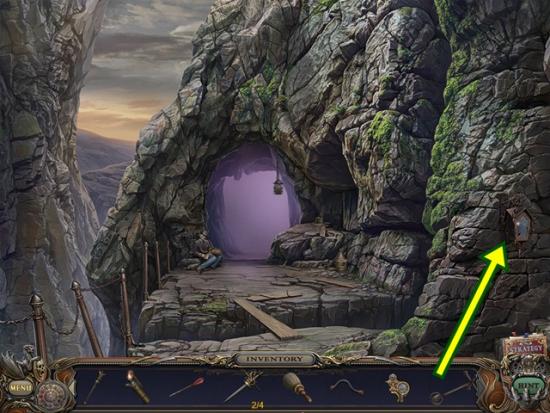
- Click on the lantern. Open it with the lantern key. Take the reflector. Enter the passageway and continue to the mine junction.
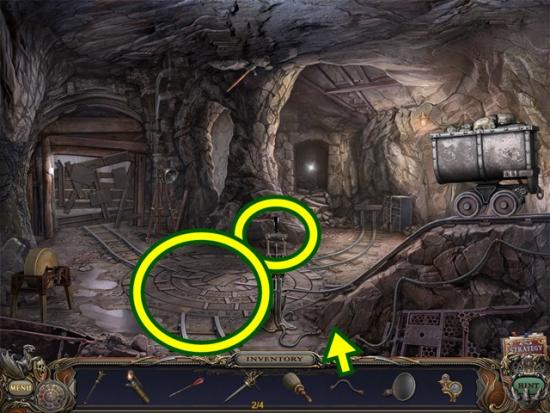
- Add the cable. Pull the lever. Click on the centre of the ground. A mini-puzzle starts. Rotate the rings to complete the image. There are six pieces to rotate. Each rotates itself and one other piece.
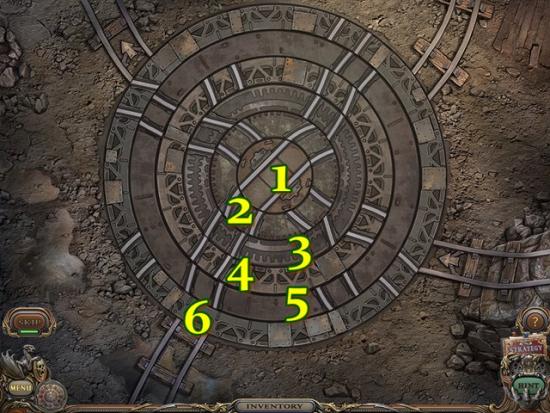
- Assuming the pieces are labelled 1-6 (screenshot above), the following pieces move:
- 1 moves 1 and 3.
- 2 moves 2 and 5.
- 3 moves 3 and 6.
- 4 moves 2 and 4.
- 5 moves 1 and 5
- 6 moves 4 and 6.
- There are many ways to solve this puzzle. First get used to the way the pieces move. Then position piece #6 as you can line it up with the static, outer image. Work your way inward to position piece #1. Try not to move piece #1 again as it is hard to line it up without everything else lined up correctly.
- Solution:
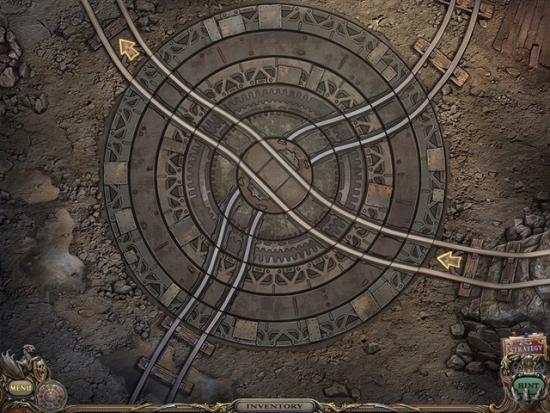
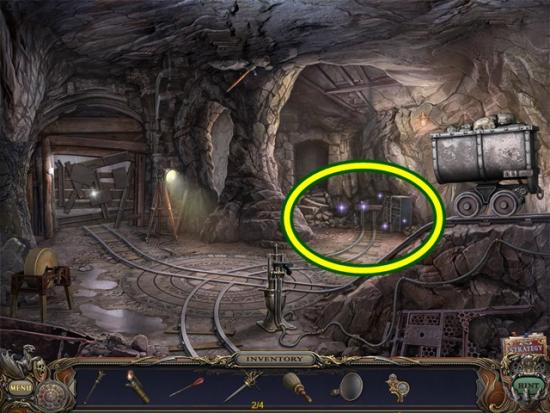
- Click on the end of the right tracks to start a hidden object hunt.
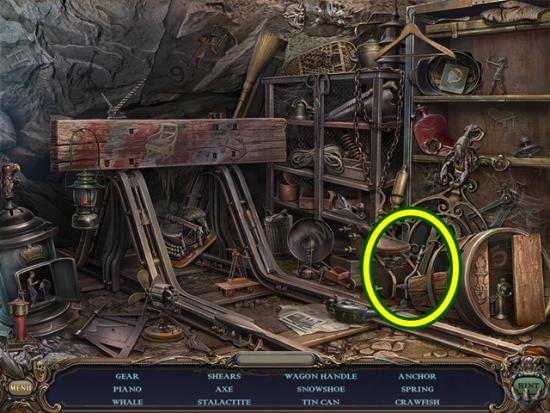
- Find all the objects. A wagon handle is added to your inventory.
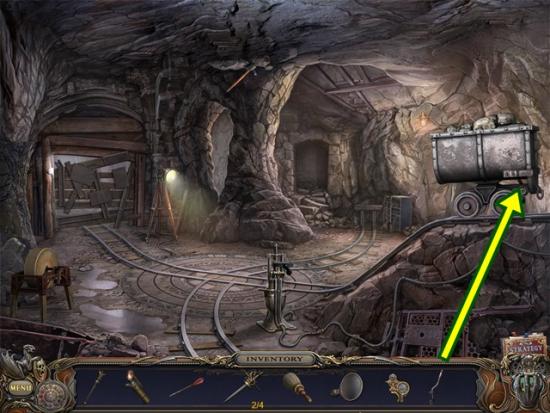
- Add the wagon handle to the wagon and pull the handle.
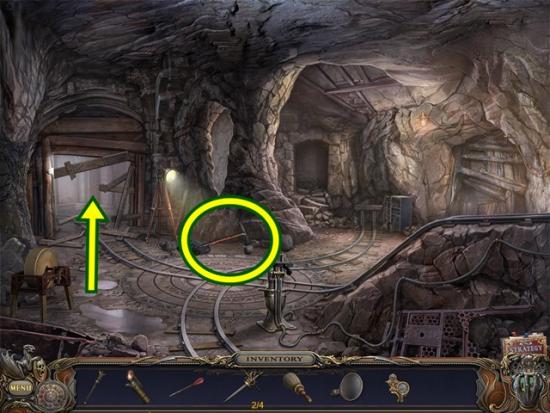
- Take the pickaxe. Go forward into Stella’s hall.
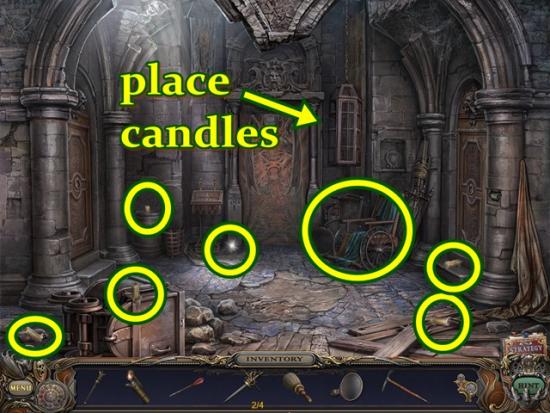
- Take the six candles (6/6). Click on the cage. Add the six candles and light all six separately with the lighter. Click on the wheelchair to start a hidden object hunt.
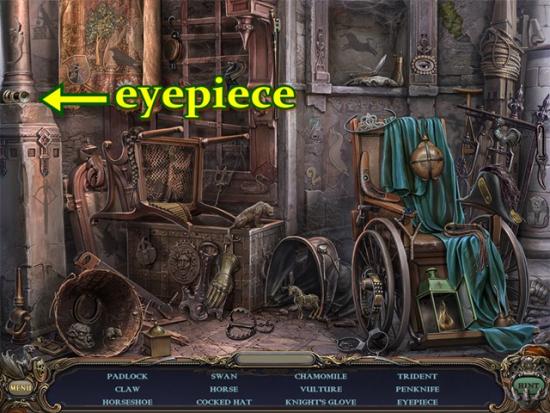
- Find all the objects. An eyepiece is added to your inventory. Return to the yard.
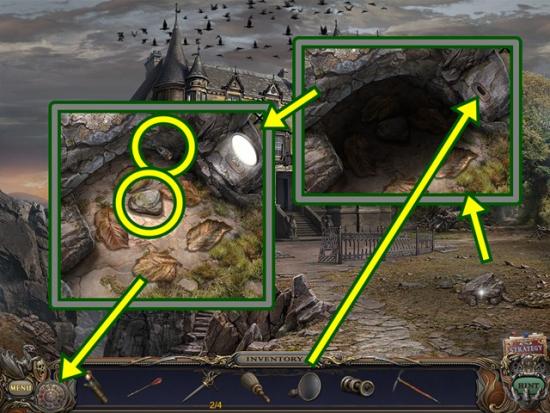
- Click on the rock. Add the reflector to the slot. Take the antitoxin and the cobble (rock). Use the cobble to smash the leaf hiding the centipede. Take the centipede. Add the centipede to the fresco. Click anywhere outside the window to close it. Return to the lower stairs.
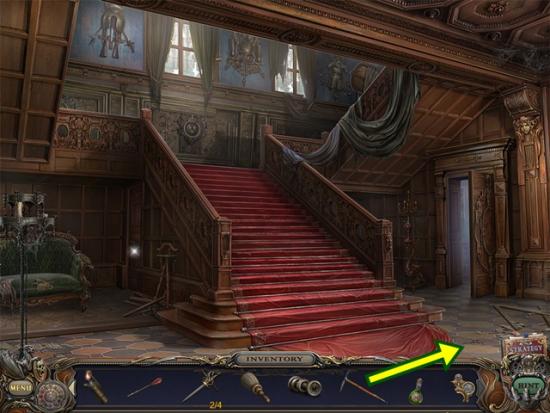
- Use the pickaxe on the crack on the floor. Take the Medusa fragment. Return to the nursery.
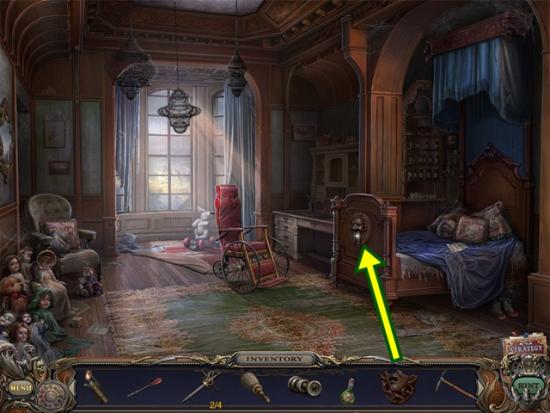
- Add the Medusa fragment to the foot of the bed. Take the valve. Return to the balcony.
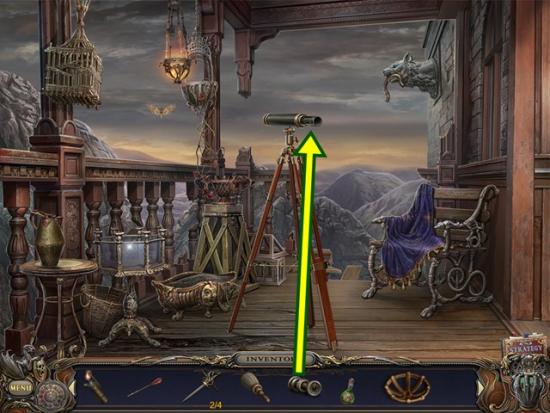
- Put the eyepiece on the telescope. Look into the telescope. A mini-puzzle starts. Move the telescope around to find five symbols. To move the telescope, click on the lens. Clicking closer to the centre of the lens will only slightly move the telescope but clicking around the outer edges will move the telescope considerably. The telescope will also move in the direction you’ve clicked. When you see a symbol, click on it. When you are close to a symbol, a circle around the lens will glow orange.
- Below are screenshots of the five symbols.
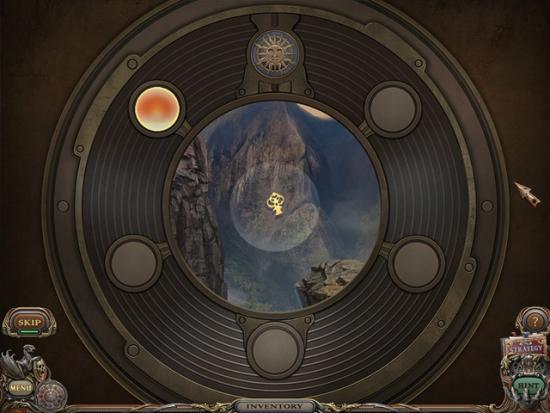
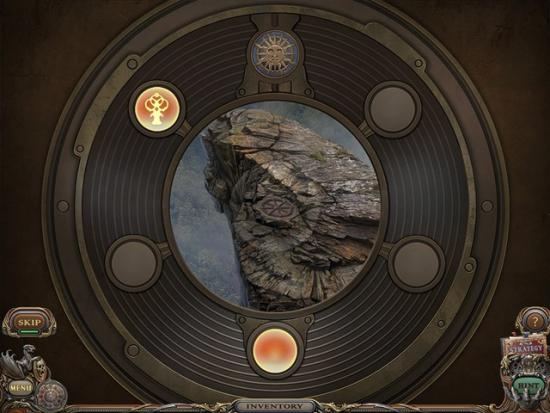
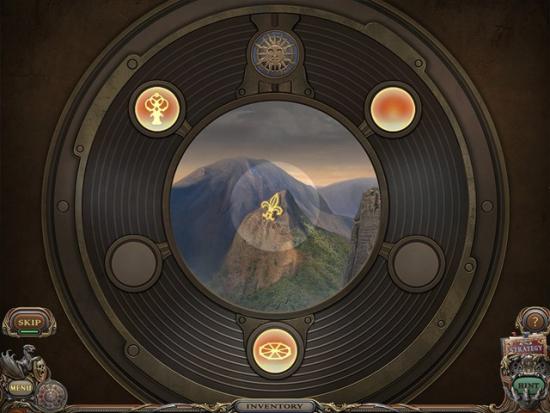
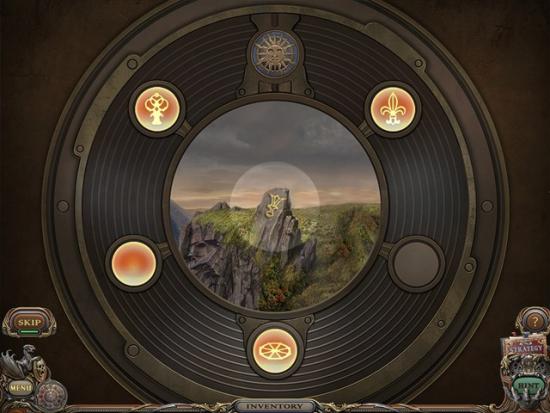
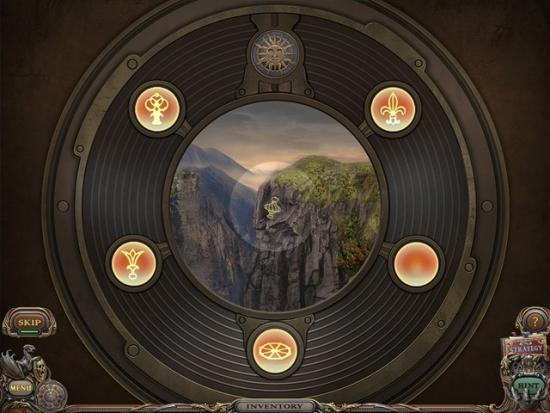
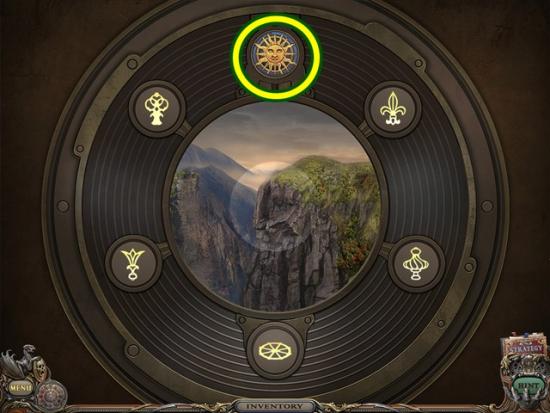
- Take the sun key. Return to the lower stairs.
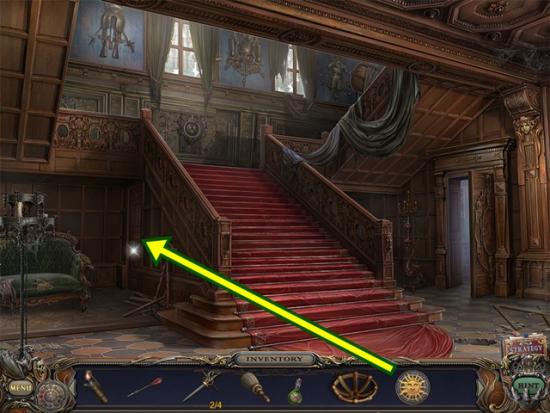
- Click on the door under the stairs. Add the sun key. Arrange the scene to match the daytime. This means clicking on everything.
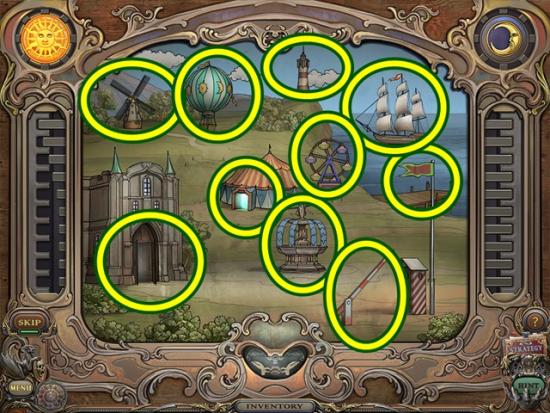
- Click on the windmill so it is turning. Click on the hot air balloon so it is floating. Click on the lighthouse so the light is not on. Click on the sailboat so its sails are up. Click on the castle so its doors are open. Click on the tent so its doors are open. Click on the ferris wheel so it is turning and playing music. Click on the fountain so water is pouring out. Click on the gate so it raises. Click on the flagpole to raise the flag.
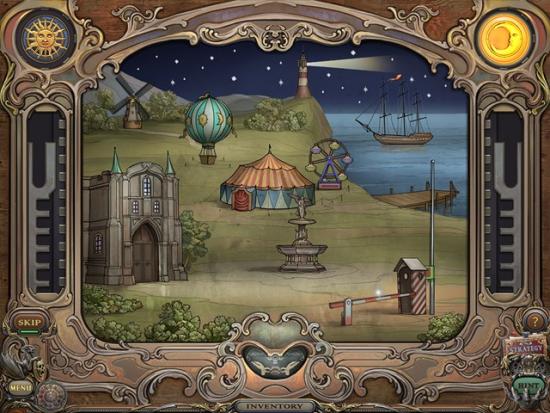
- Once you’ve set everything for daytime, click on everything to set it for night time. Enter the basement stairs.
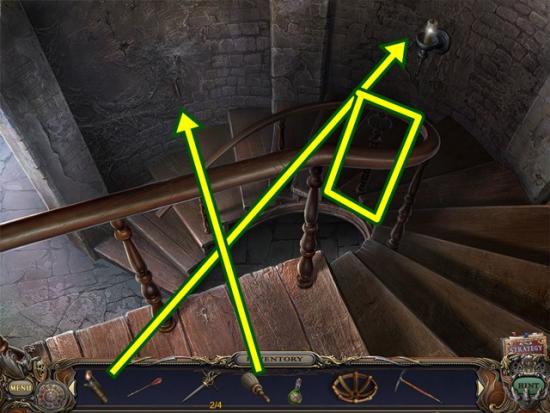
- Light the candle with the lighter. Take the sceptre. Remove the cobwebs with the brush and take the rapier (3/4). Continue down to the basement.
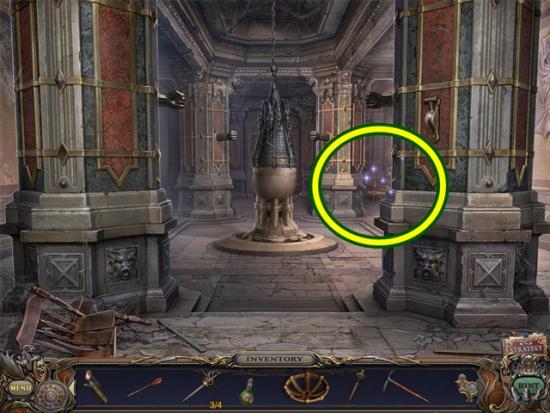
- Click on the area on the right to start a hidden object hunt.
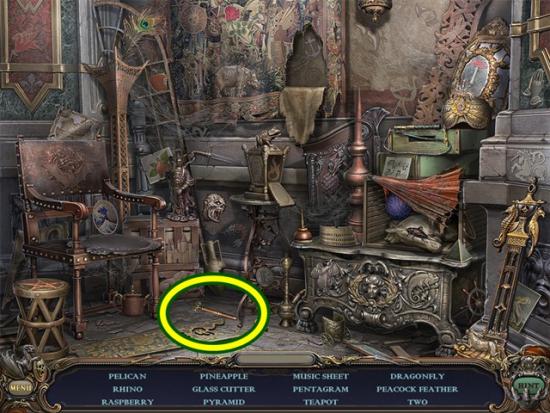
- Find all the objects. A glass cutter is added to your inventory. Return to the nursery.
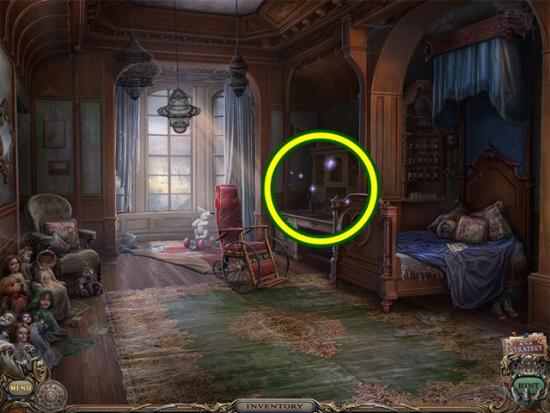
- Click on the desk to start a hidden object hunt.
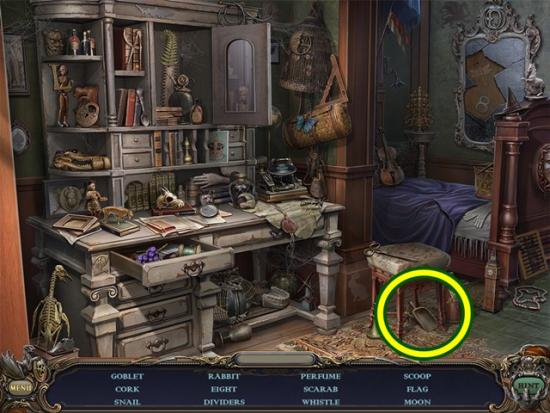
- Find all the objects. A scoop is added to your inventory. Return to the balcony
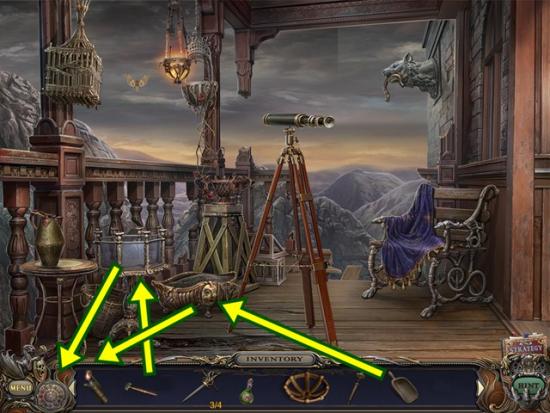
- Scoop the dirt out of the tray and take the root. Add the root to the fresco. Click anywhere outside the window to close it. Click on the aquarium. Cut the glass with the glass cutter. Remove the glass and take the toad. Add the toad to the fresco. Click anywhere outside the window to close it. Return to the basement.
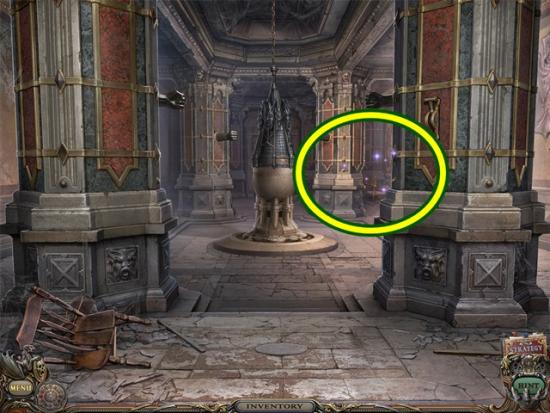
- Click on the area on the right to start a hidden object hunt.
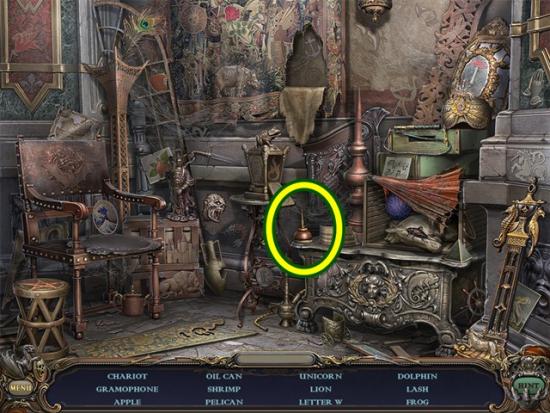
- Find all the objects. An oil can is added to your inventory. Return to the cabinet.
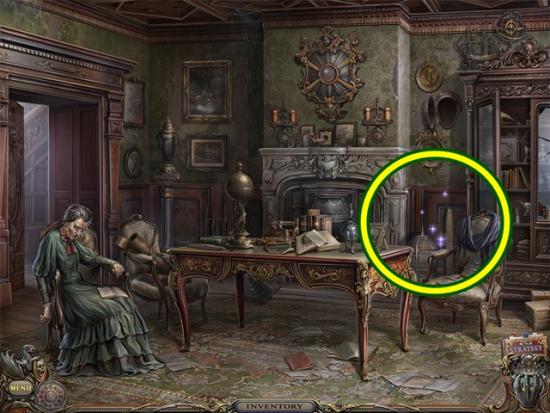
- Click on the area to the right of the fireplace to start a hidden object hunt.
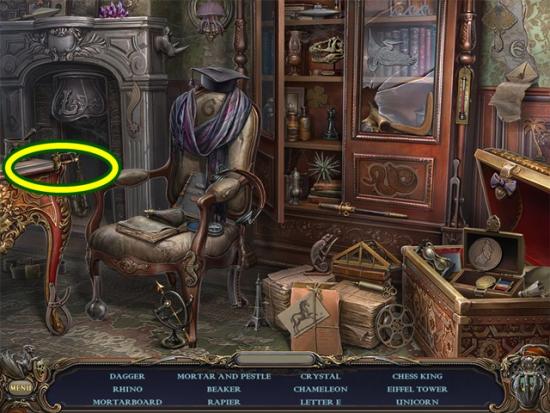
- Find all the objects. A rapier (4/4) is added to your inventory.
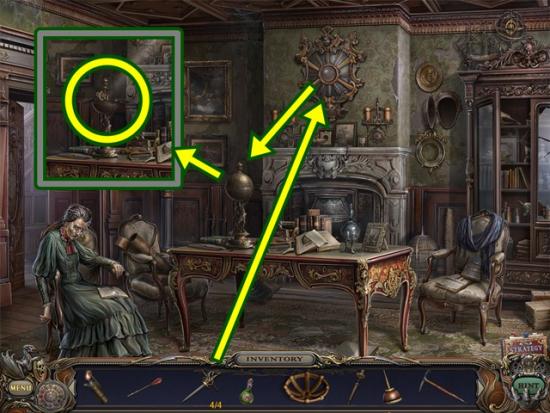
- Click on the shield above the fireplace. Add the four rapiers. Then take the key part. Return to the tree house.
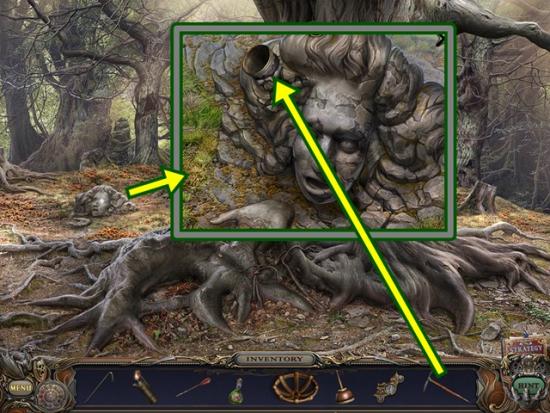
- Click on the rock head. Remove the goblet with the pickaxe. Take the goblet. Click anywhere outside the window to close it. Return to the crypt.
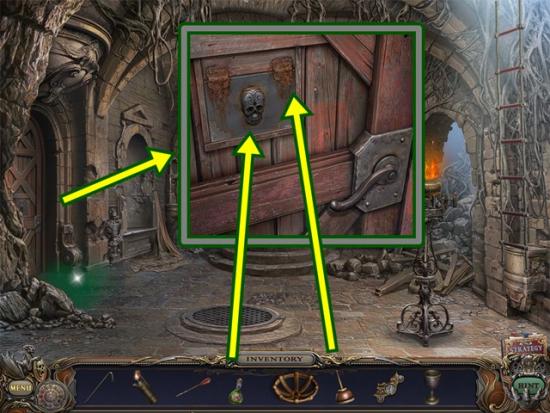
- Click on the door on the left. Use the oil can on the two hinges. Drop the antitoxin through the latch. Turn the door handle. Enter the laboratory.
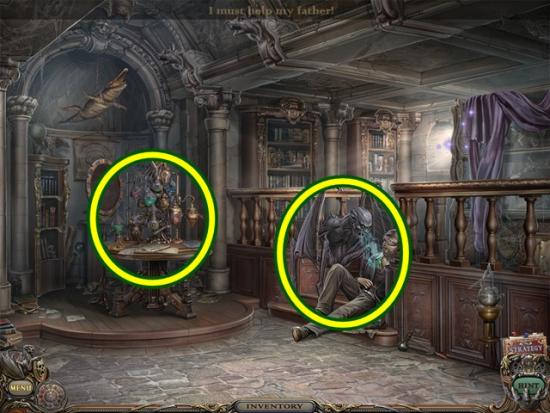
- Click on the demon. Click through the dialogue. Click on the table.
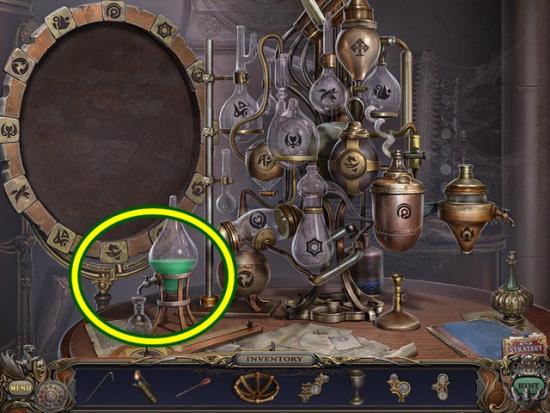
- Turn the handle on the large beaker. Take the acid. Return to the laboratory.
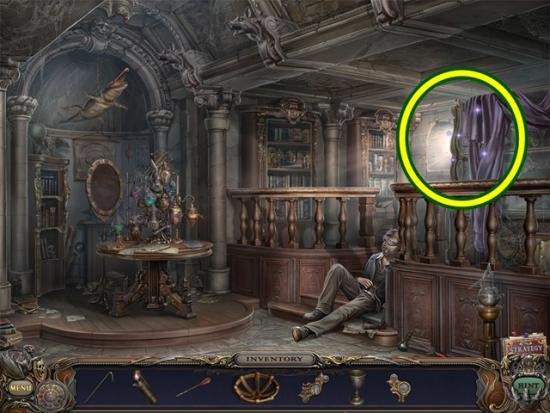
- Click on the window to start a hidden object hunt.
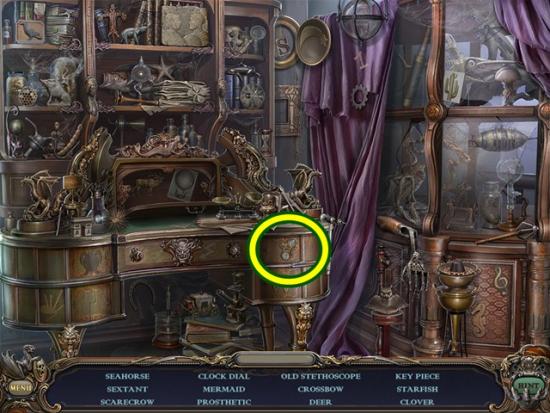
- Find all the objects. A key part is added to your inventory. Return to the upper stairs.
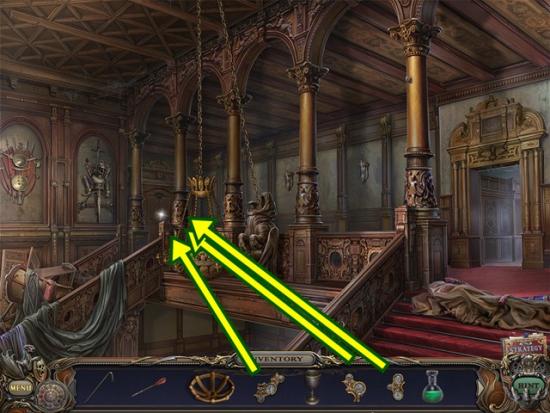
- Click on the door. Add the three key parts. A mini-puzzle starts. Find the four locations using the viewer. Drag the viewer to each location.
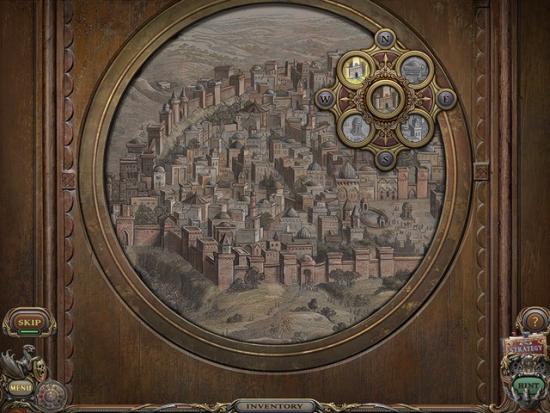
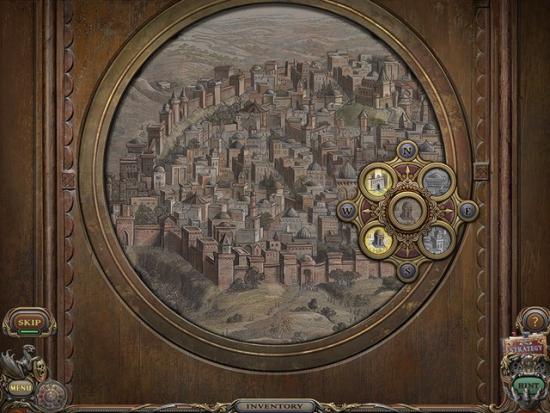
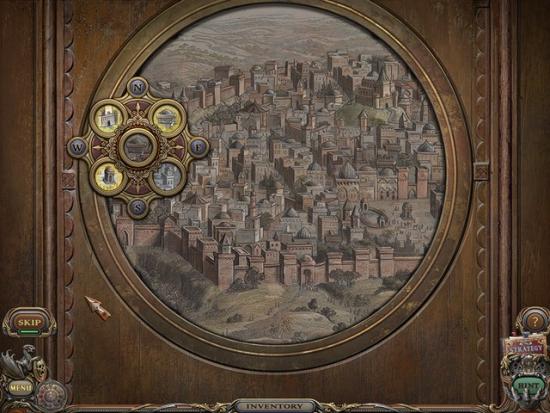
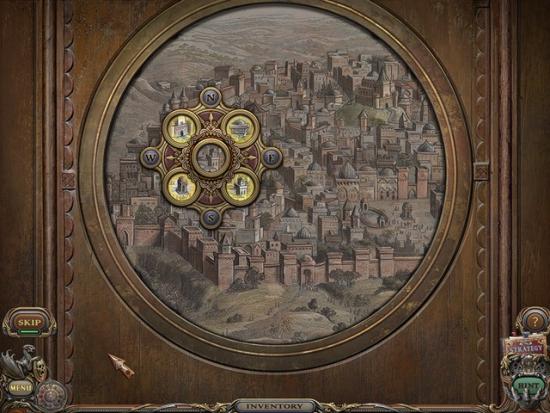
- When you are finished, enter the library.
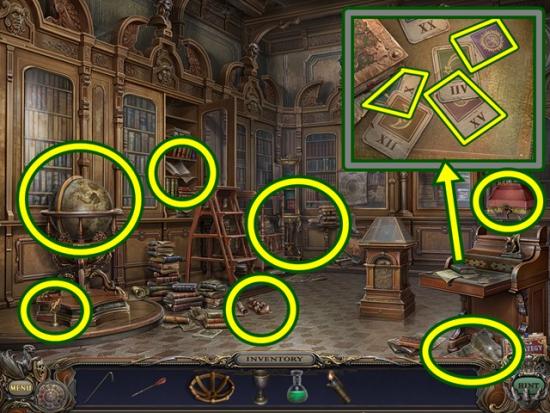
- Take the bas-relief sculpture and the statuette. Click on the newspaper below the table and take the statuette. Click on the globe. Open the panel and take the statuette. Turn on the lamp. Click on the table. Take the three cards. Click on the book. Read the story of the amulet. Click on a page to turn it. Click anywhere outside the window to close it. Click on the shelves in the corner to start a hidden object hunt.
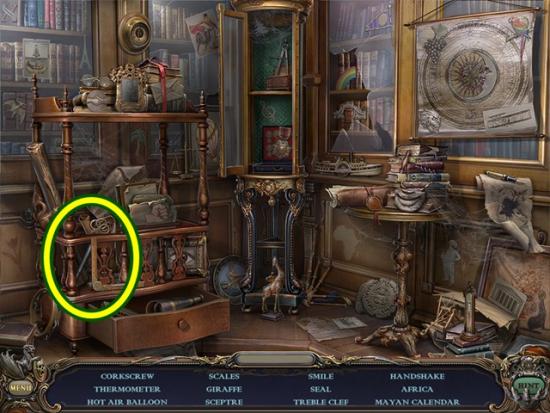
- Find all the objects. A sceptre is added to your inventory.
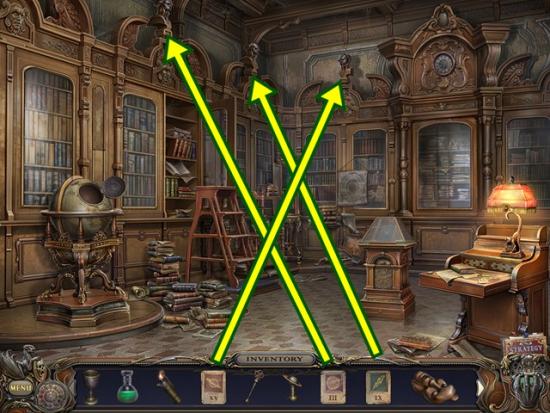
- Click on the busts atop the shelves. Place the card that matches its roman numeral. From left to right, place the III card, the IX card and the XV card.
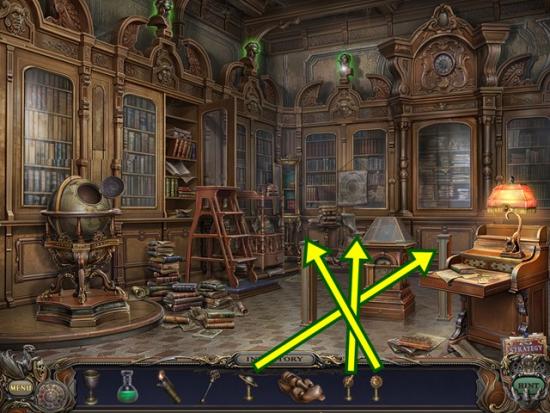
- Place the three statuettes on the pedestals. If you can’t place a statuette on one pedestal, place it on the other.
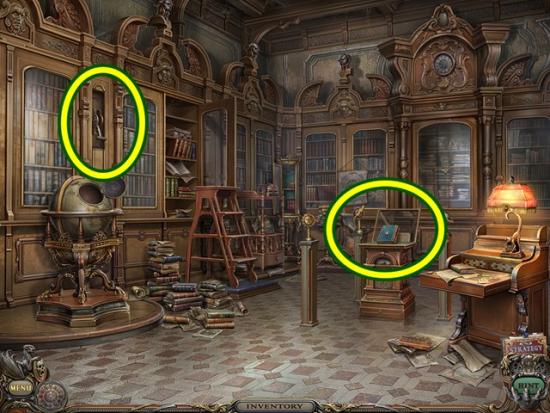
- Pull the lever. Take the book. Return to the lower stairs.
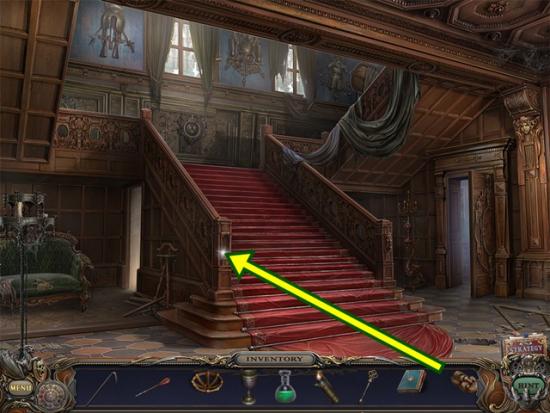
- Click on the left banister. Add the bas-relief sculpture. When the panel opens, take the gem. Return to the basement.
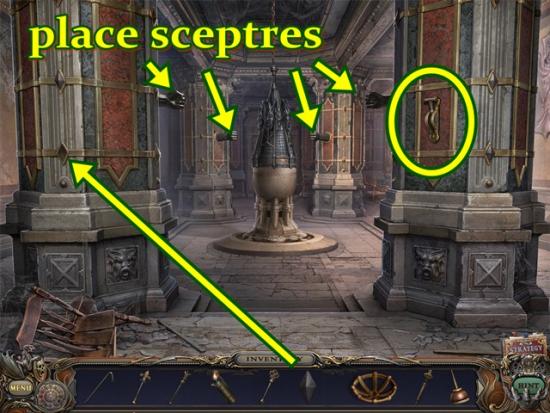
- Put the gem on the wall. Take the golden key that appears. Add the four sceptres to the hand holders. If a sceptre won’t fit in one holder, try another until it fits. Pull the lever.
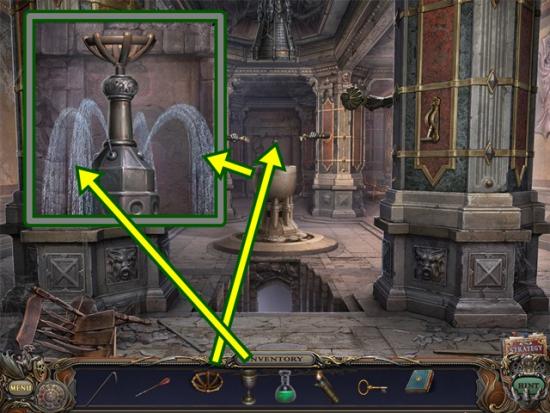
- Click on the pedestal. Place the valve and turn it. Fill the goblet wither water to get the filled goblet. Go down into the mine junction and into Stella’s hall.
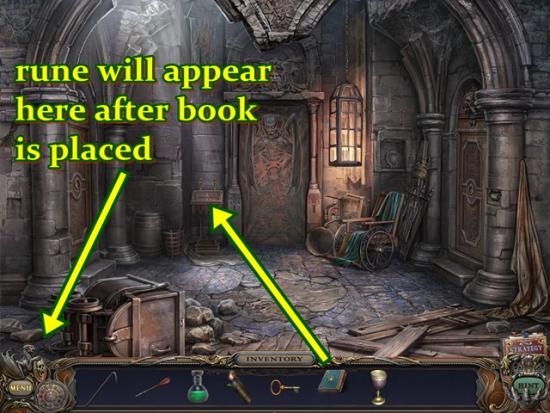
- Click on the bookstand. Add the book. You need to do this before you can collect the runes. Take the rune. Click on the bookstand. Add the book. Click anywhere outside the window to close it. Return to the mine junction.
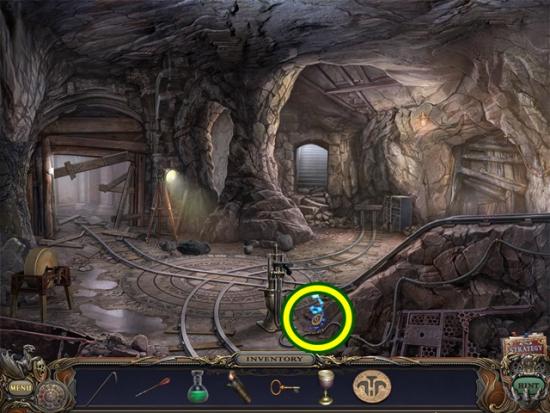
- Take the rune. Return to the mine entrance.
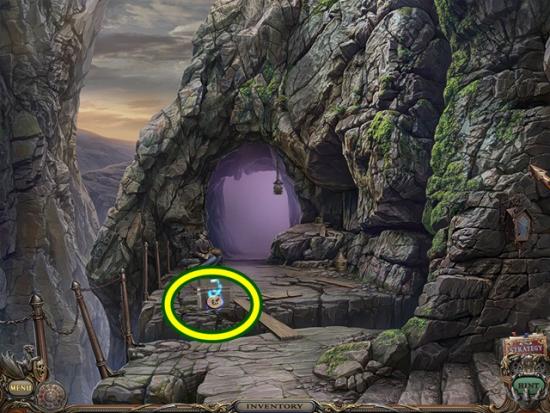
- Take the rune. Return to the woods.
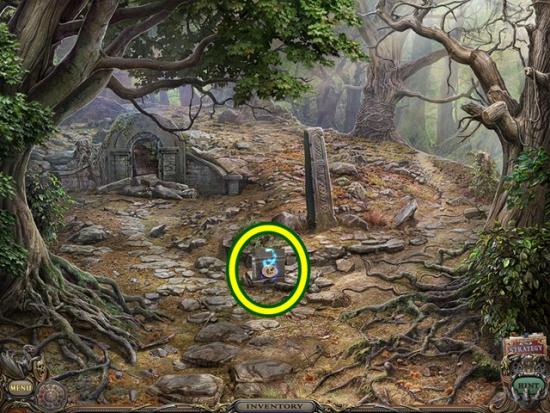
- Take the rune. Return to the tree house.
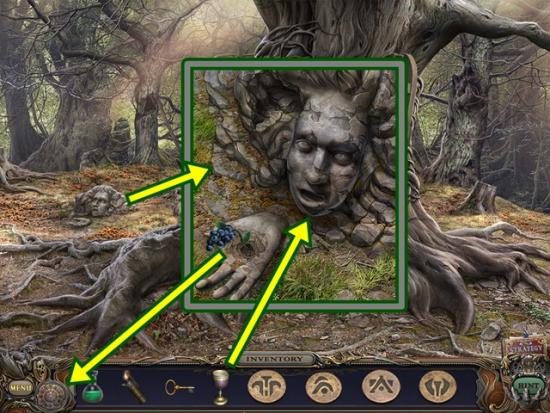
- Click on the rock head. Pour the filled goblet into its mouth. Take the blueberries. Add the blueberries to the fresco. Click anywhere outside the window to close it. Return to the swamp and enter the carriage.
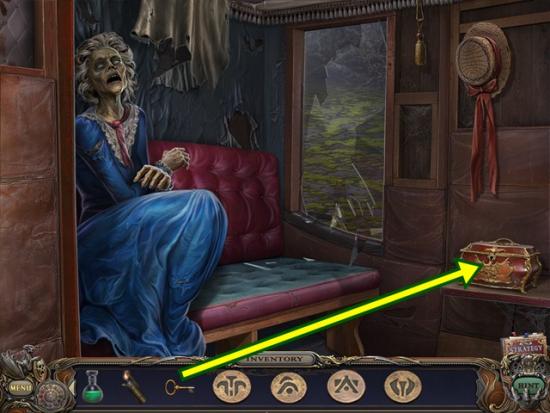
- Unlock the chest with the golden key. Open the chest and take the skull coin. Return to the basement.
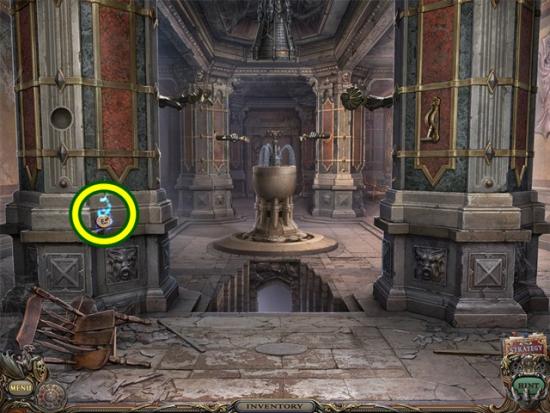
- Take the rune. Return to Stella’s hall.
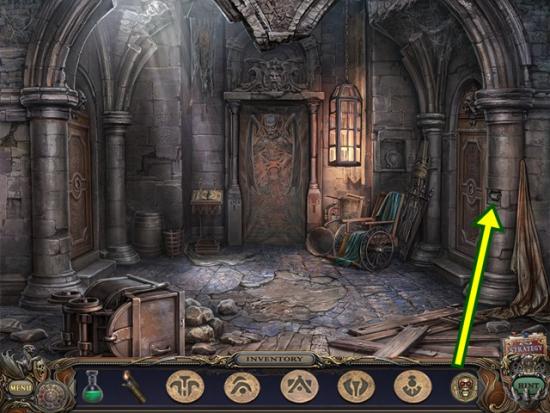
- Click on the area to the right of the door on the right. Add the skull coin to the middle piece. A mini-puzzle starts. Line up the nuts to complete the image. When you turn the nuts, they go along the bolt so they can only turn so much depending on what’s in its way. To turn a nut, click at the bottom of it to move it to the right and click at the top of it to move it to the left. A nut has 12 sides. This is important to remember when lining it up.
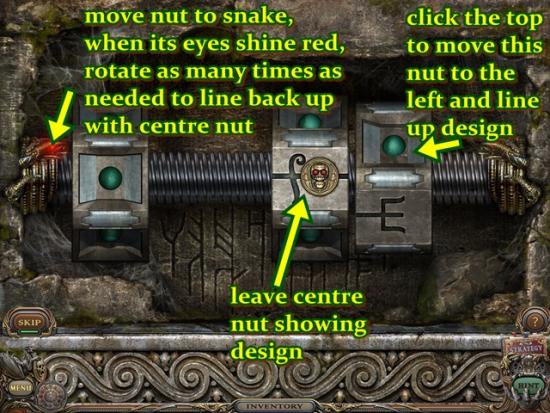
- Leave the centre nut as is, or if you have moved it, adjust the centre nut so it’s design is showing.
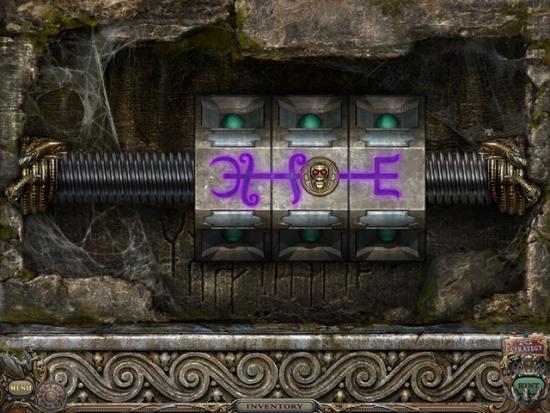
- Start by moving the right nut all the way to the right. Notice the snake’s eyes light up. When the snake’s eyes are lit, you can rotate the nut as much as you want and it won’t switch positions. Do this to position the nut so when you move it back, it will line up with the centre nut.
- Solution:
- When you are finished, enter Stella’s bedroom.
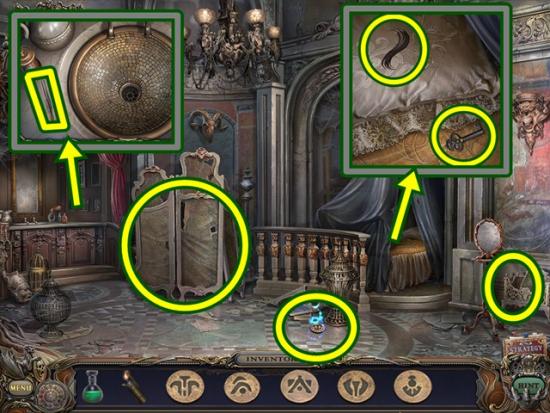
- Take the rune. Click on the bookstand. Read the entry. Click anywhere outside the window to close it. Click on the vanity stand. Take the tweezers. Click anywhere outside the window to close it. Click on the bed. Take the key. Use the tweezers to take the hair. Add the hair to the fresco. Click anywhere outside the window to close it.
- Move the privacy divider. Click on it again to start a hidden object hunt.
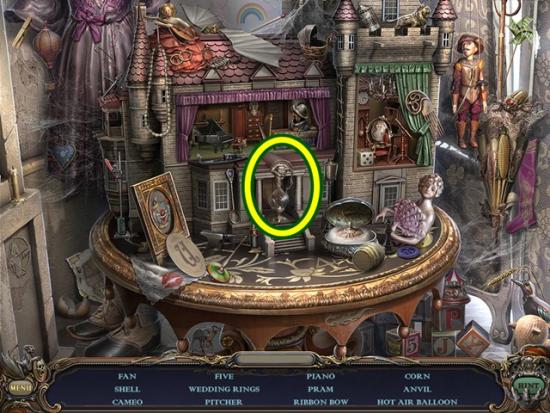
- Find all the objects. If you have to find a shell, it’s the broken egg shell. If you have to find a roundabout, it’s the carousel. An empty pitcher is added to your inventory. Return to the (upstairs) hallway.
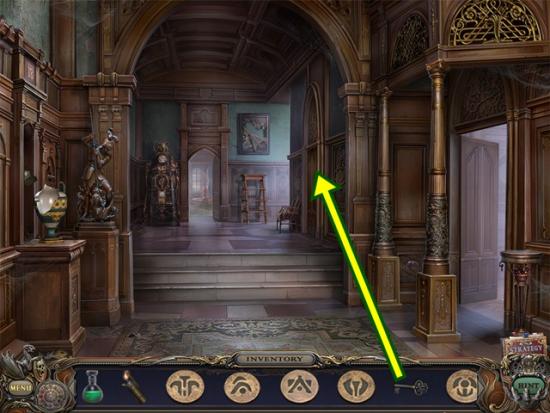
- Click on the closed door on the right. Unlock the door with the key. Turn the key and handle until the door finally opens (about four times). Enter the maid’s room.
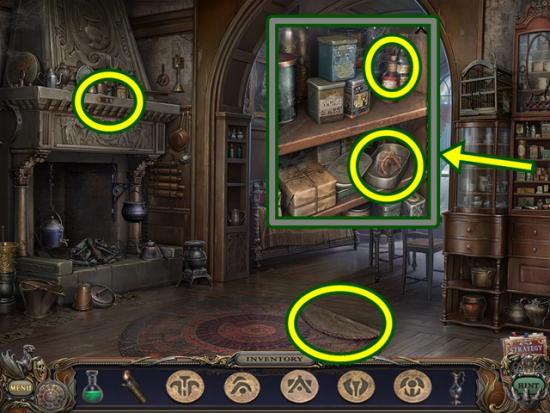
- Move the carpet and take the tension mechanism. Take the piano plate. Click on the shelves at the right. Take the corkscrew. Remove the lid from the tin. Pour the acid on the amber and take the scorpion tail. Add the scorpion tail to the fresco. Click anywhere outside the window to close it.
- Return to the upper stairs.
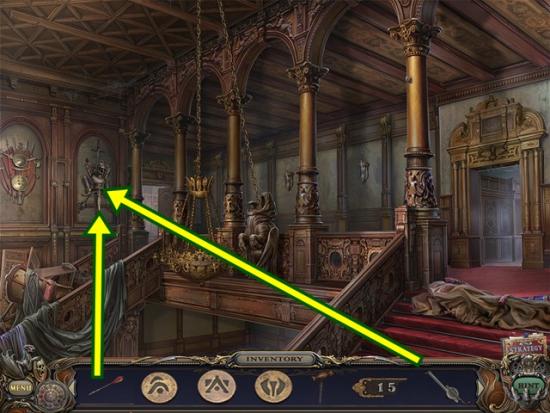
- Click on the suit of armour on the wall. Add the tension mechanism. Click on the mechanism, then add the arrow. The crossbow is added to your inventory. Return to the balcony.
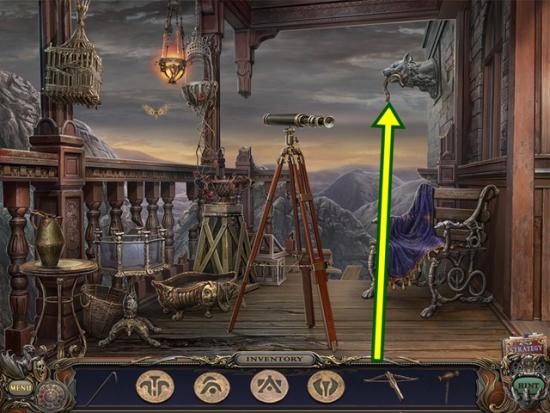
- Use the crossbow to knock the tube out of the statue’s mouth. Return to the music room.
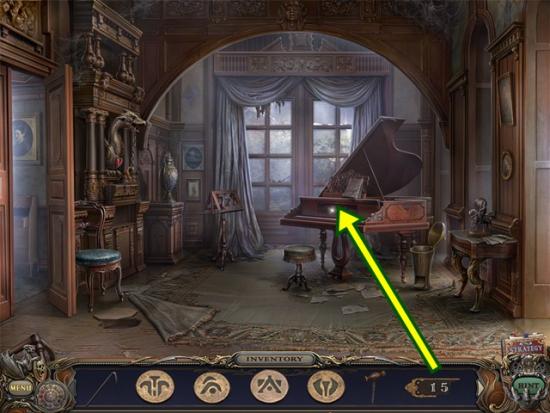
- Click on the piano. Add the piece of piano plate. A mini-puzzle starts. Each piano key will play a different number of notes. Determine which keys play one note, five notes, seven notes and two notes. Then play those keys in that order (1 5 7 2).
- One possible solution:
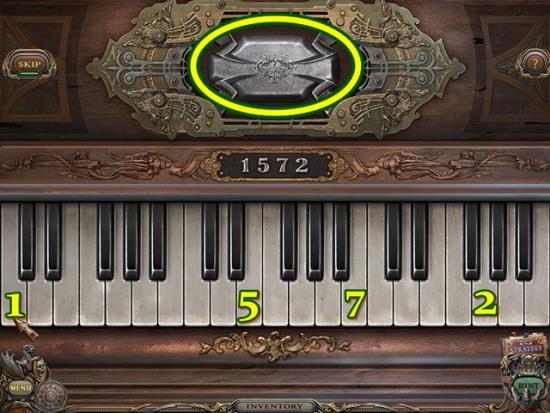
- Take the silver nugget. Return to the maid’s room.
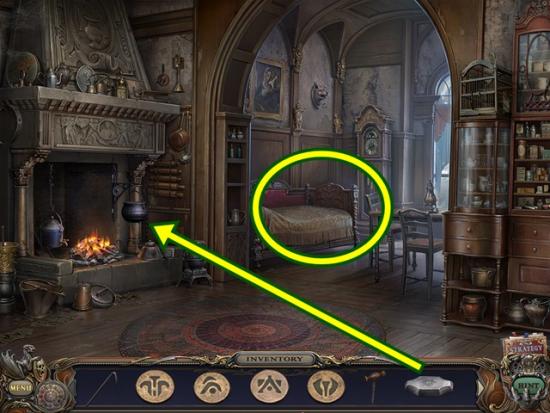
- Light the fireplace with the lighter. Put the silver nugget in the pot. Click on the chaise to start a hidden object hunt.
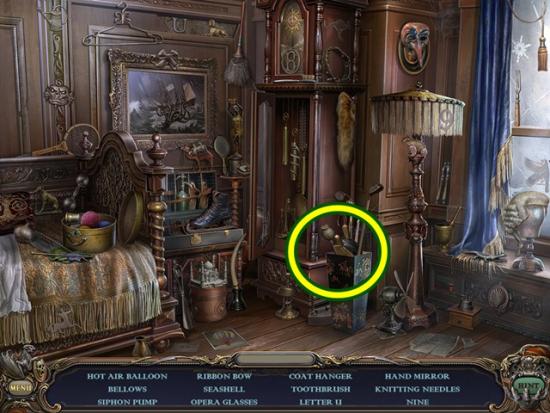
- Find all the objects. A bellows is added to your inventory.
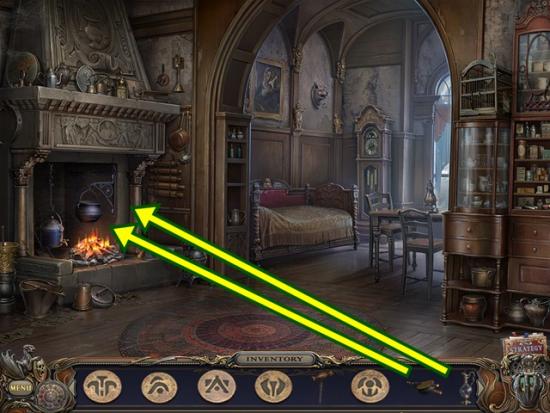
- Use the bellows on the fire. Pour the melted silver (the pot) into the empty pitcher to get the pure silver. Add the pure silver to the fresco. Click anywhere outside the window to close it. Return to the house entrance.
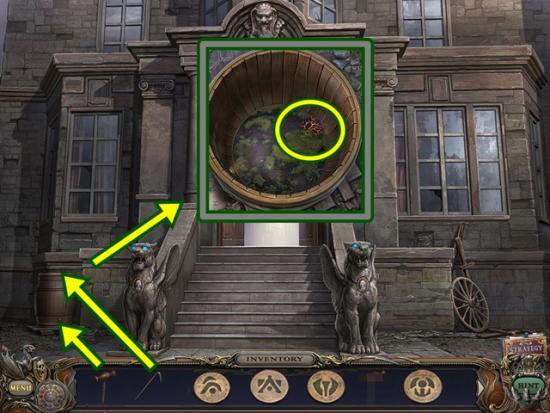
- Click on the barrel. Pry the lid off with the crowbar. Click anywhere outside the window to close it. Click on the bottom of the barrel. Remove the cork with the corkscrew. Click anywhere outside the window to close it. Look inside the barrel. Take the coral. Add the coral to the fresco. Click anywhere outside the window to close it. Return to the mine entrance.
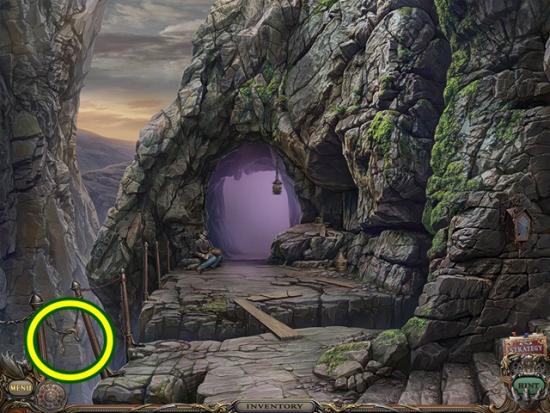
- Take the tube. Return to the woods.
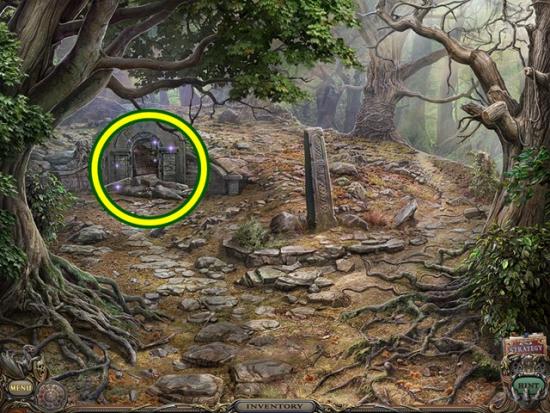
- Click on the broken gate to start a hidden object hunt.
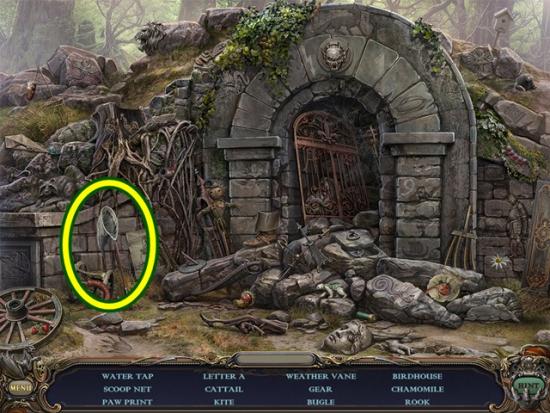
- Find all the objects. An insect net is added to your inventory. Return to the balcony.
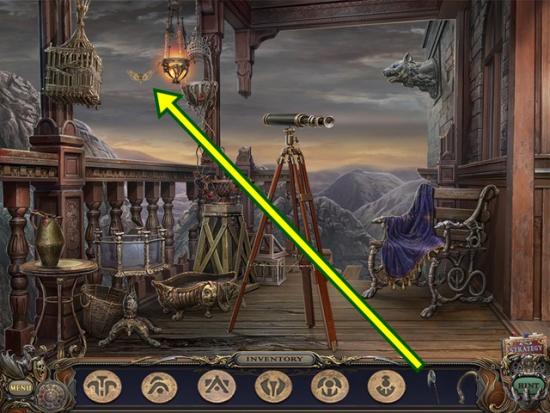
- Use the insect net to get the moth. Return to the parent’s bedroom.
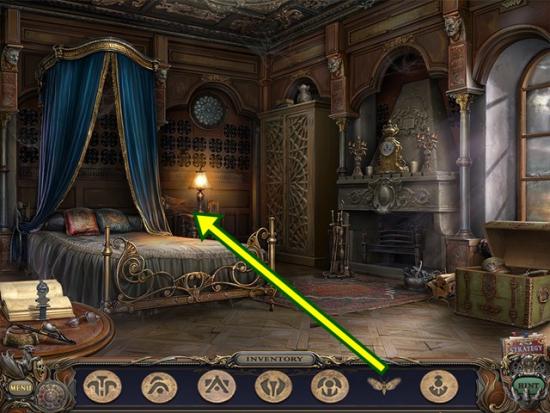
- If you haven’t already done so, turn on the lamp. Click on the bedside table. Give the moth to the spider. Take the spider. Add the spider to the fresco. Click anywhere outside the window to close it. Return to the laboratory (off the crypt).
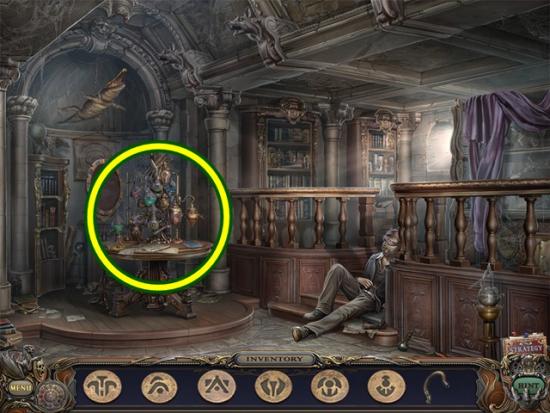
- Click on the table.
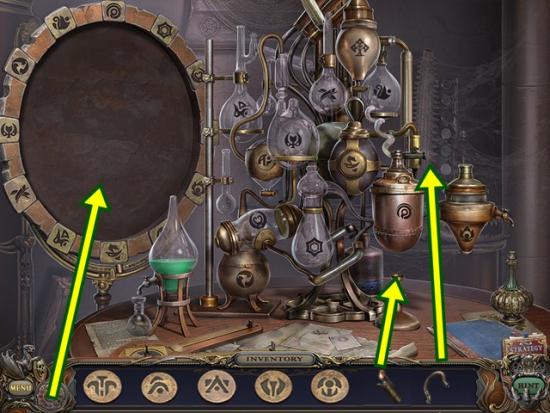
- Light the burner with the lighter. Add the tube. Click on the fresco to add it. A mini-puzzle starts. Match the elixir ingredients to their proper flask. Note the symbol beside each elixir ingredient. Click on an elixir ingredient, note its symbol, then click on the flask with the matching symbol. Do this for all the flasks.
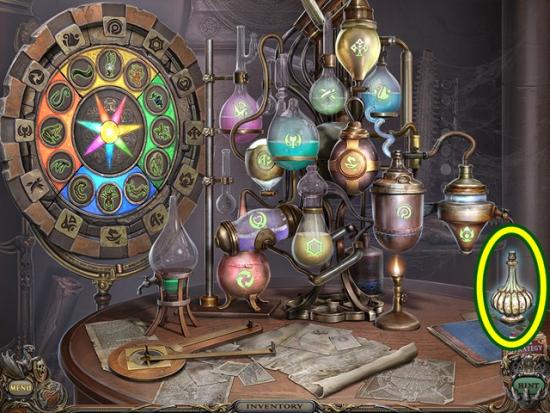
- When you are finished, take the elixir.
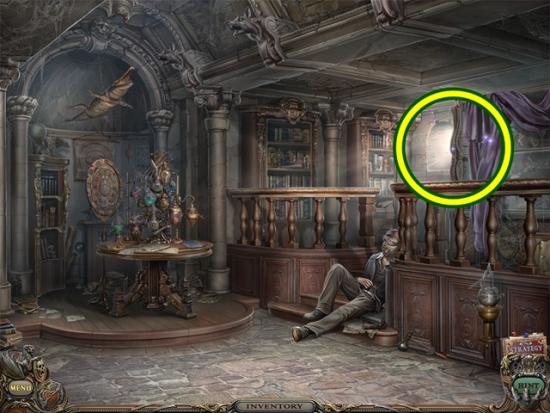
- Click on the window to start a hidden object hunt.
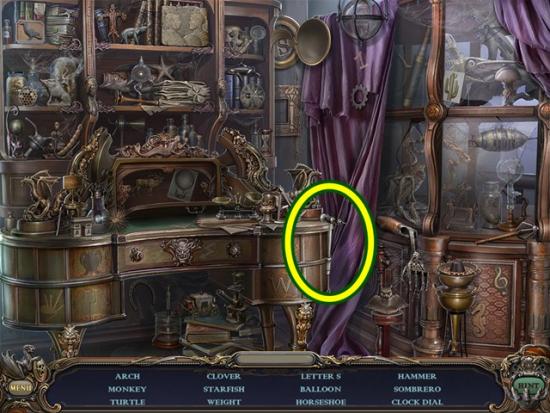
- Find all the objects. A hammer is added to your inventory. Return to Stella’s bedroom (from the mine junction and through Stella’s hall).
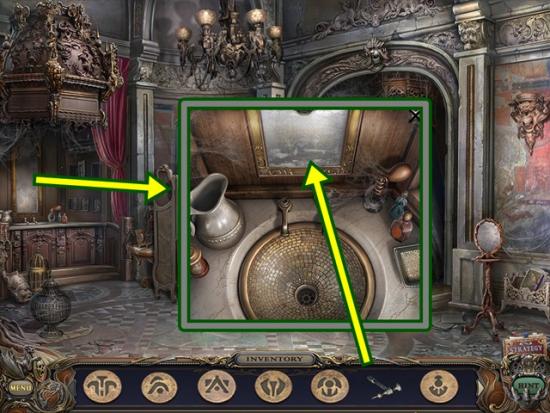
- Click on the mirror above the vanity. Smash the mirror with the hammer. Take the dagger. Return to the Stella’s hall.
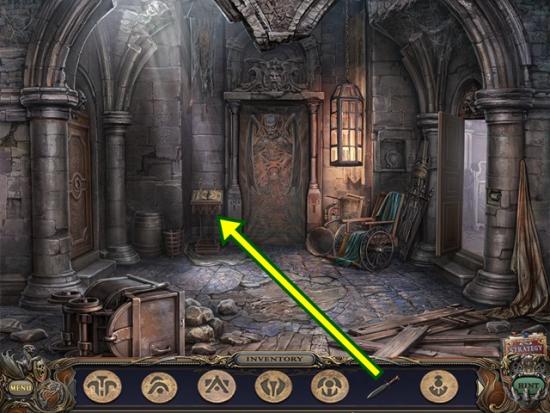
- Click on the bookstand. Add the dagger and put the runes in their matching spot.
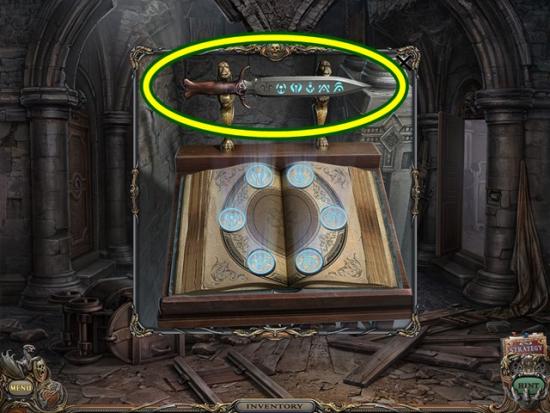
- Take the magical dagger. Click anywhere outside the window to close it.
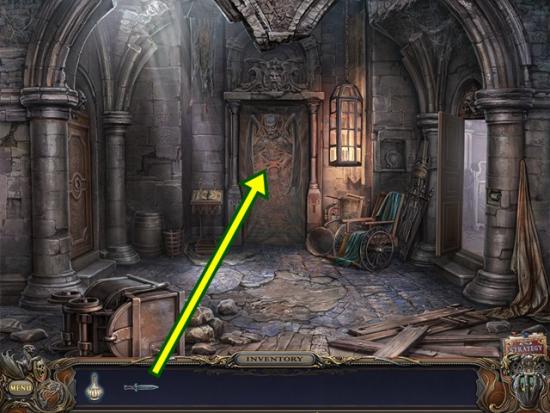
- Use the magical dagger to cut through the tapestry. Enter the secret room.
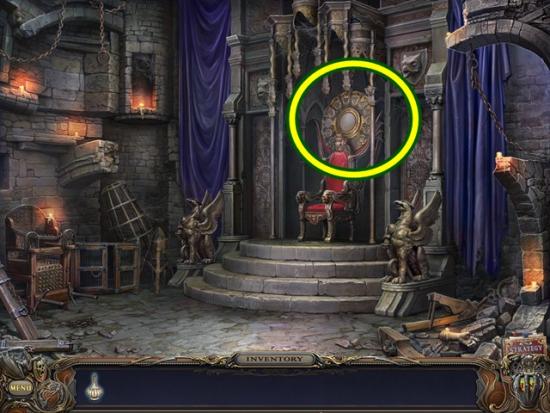
- Click on the runes above the chair. Click through the dialogue to learn you need 12 daemon heads. Return to Stella’s hall.
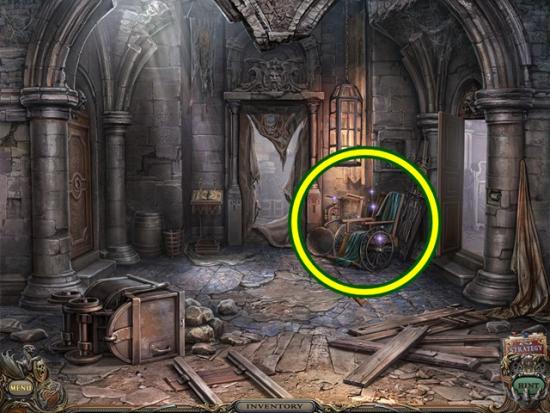
- Click on the wheelchair to start a hidden object hunt.
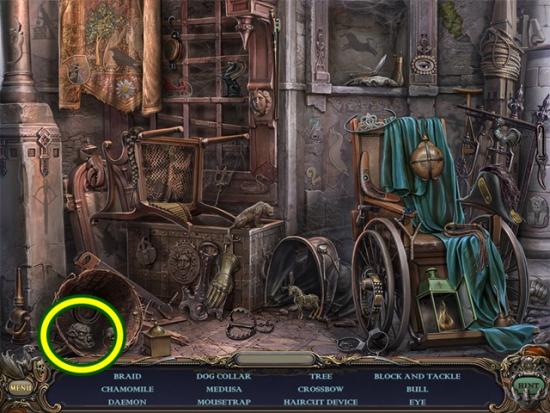
- Find all the objects. A daemon is added to your inventory. Return to the mine junction.
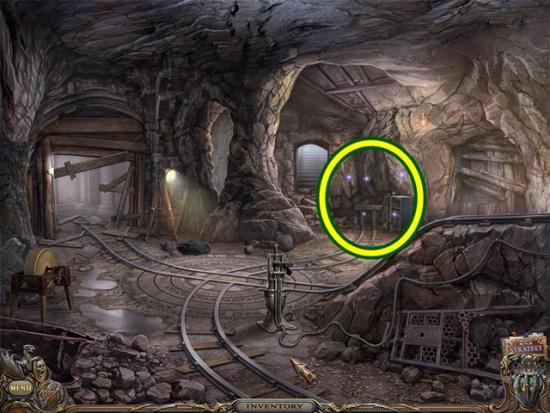
- Click on the end of the rail tracks on the right to start a hidden object hunt.
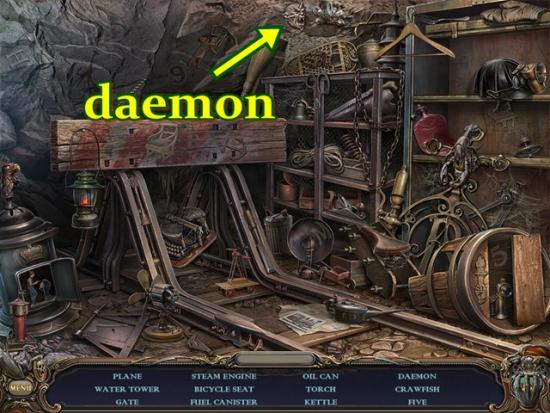
- Find all the objects. A daemon is added to your inventory. Return to the mine entrance.
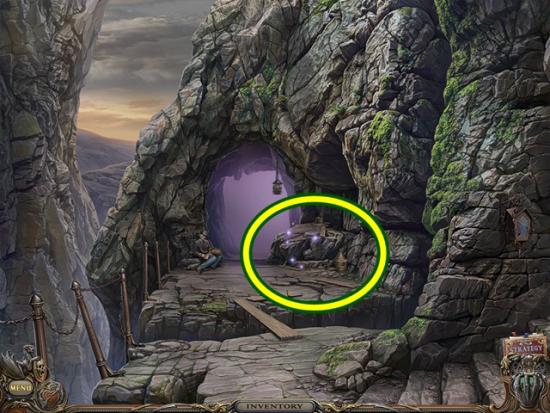
- Click on the area to the right of the passageway to start a hidden object hunt.
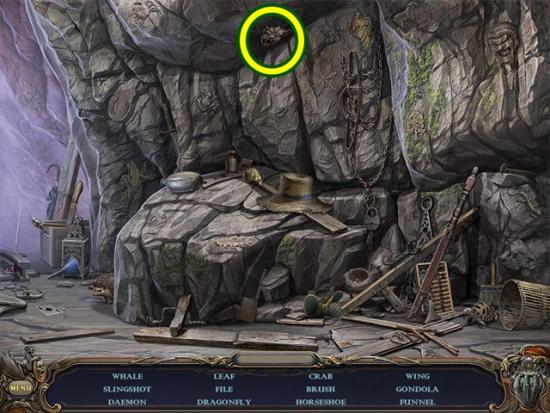
- Find all the objects. A daemon is added to your inventory. Return to the swamp.
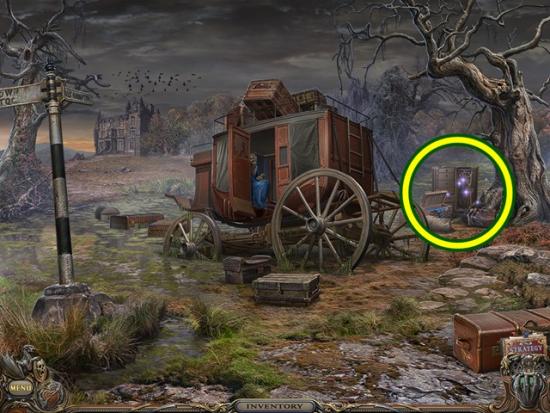
- Click on the luggage to start a hidden object hunt.
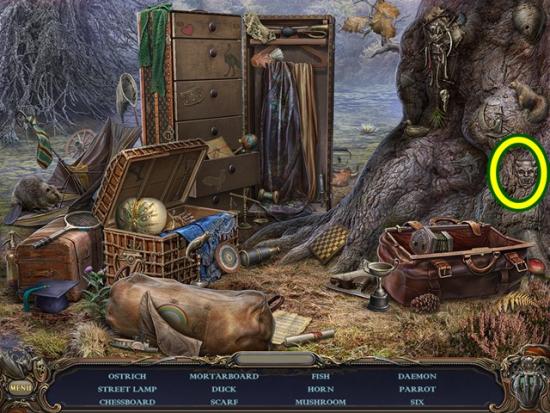
- Find all the objects. A daemon is added to your inventory. Return to the woods.
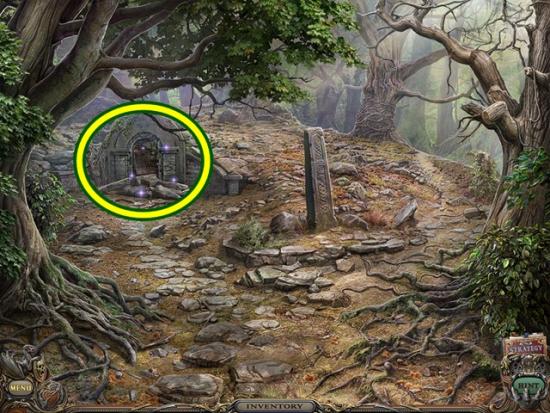
- Click on the broken gate to start a hidden object hunt.
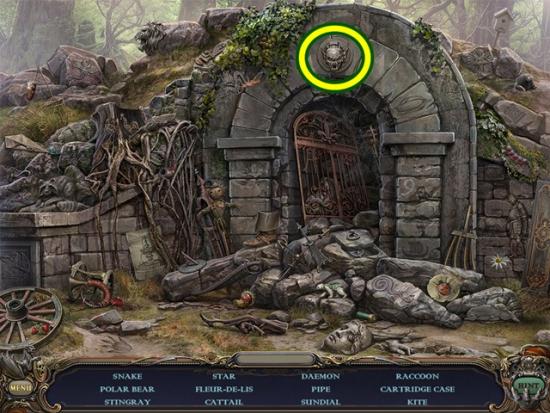
- Find all the objects. A daemon is added to your inventory. Return to the crypt.
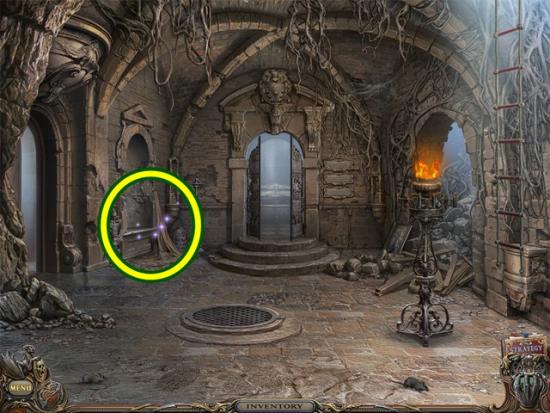
- Click on the area on the left. to start a hidden object hunt.
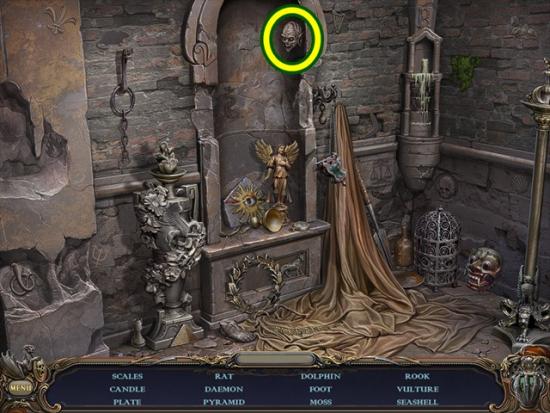
- Find all the objects. A daemon is added to your inventory. Return to the laboratory.
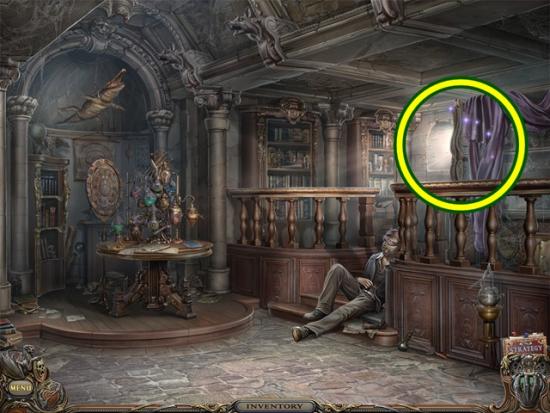
- Click on the window to start a hidden object hunt.
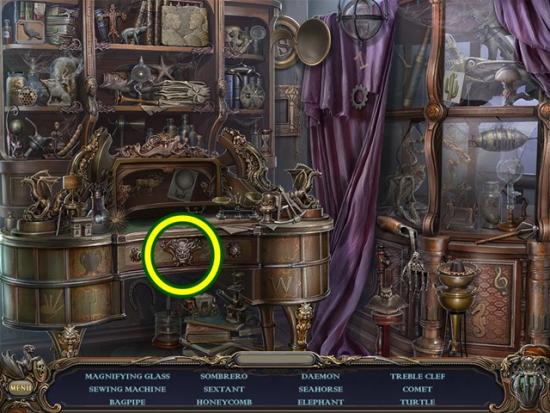
- Find all the objects. A daemon is added to your inventory. Return to the parlour.
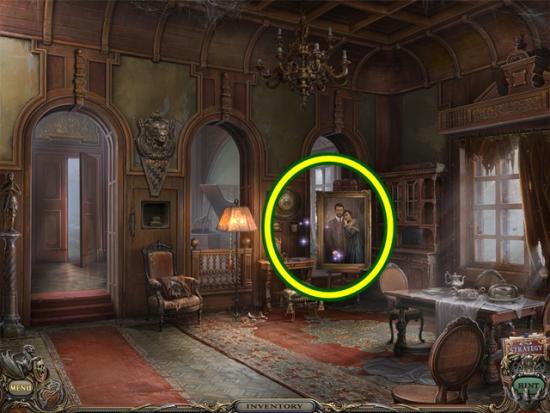
- Click on the painting to start a hidden object hunt.
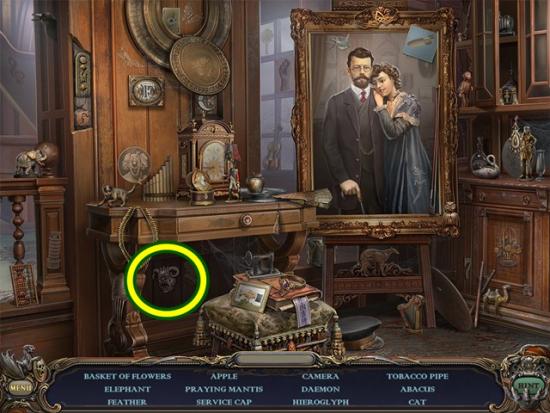
- Find all the objects. A daemon is added to your inventory. Return to the upper stairs.
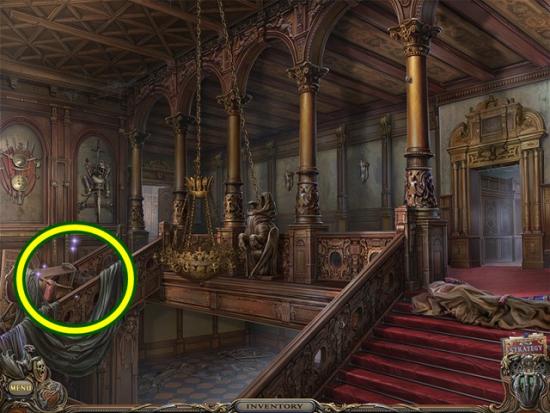
- Click on the debris on the stairs to start a hidden object hunt.
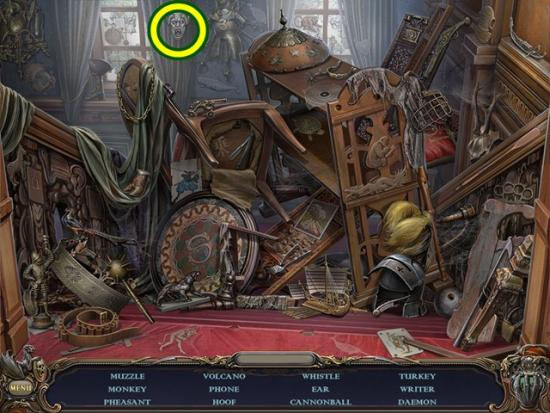
- Find all the objects. A daemon is added to your inventory. Return to the maid’s room.
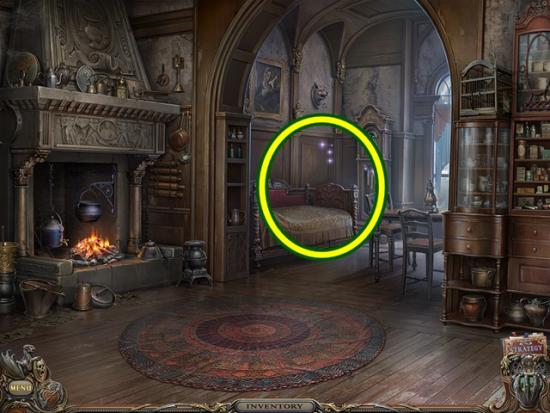
- Click on the chaise to start a hidden object hunt.
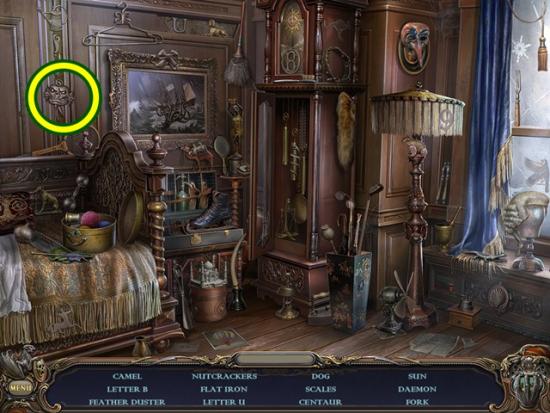
- Find all the objects. A daemon is added to your inventory. Return to the library.
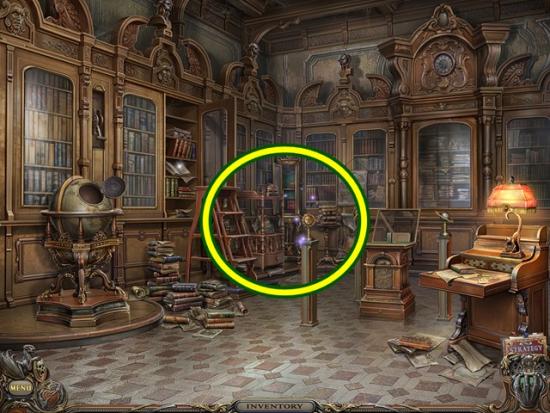
- Click on the corner to start a hidden object hunt.
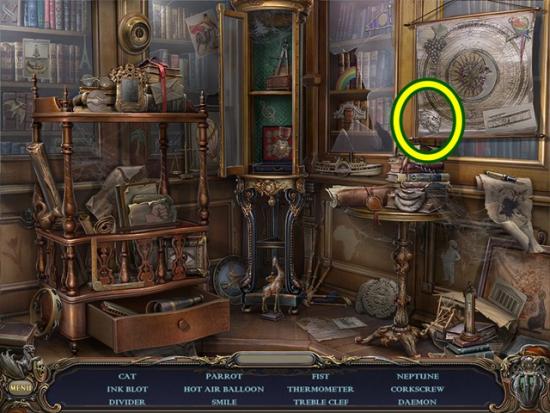
- Find all the objects. A daemon is added to your inventory. Return to the basement.
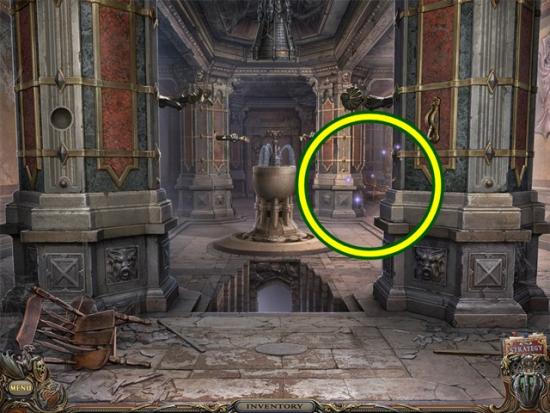
- Click on the area on the right to start a hidden object hunt.
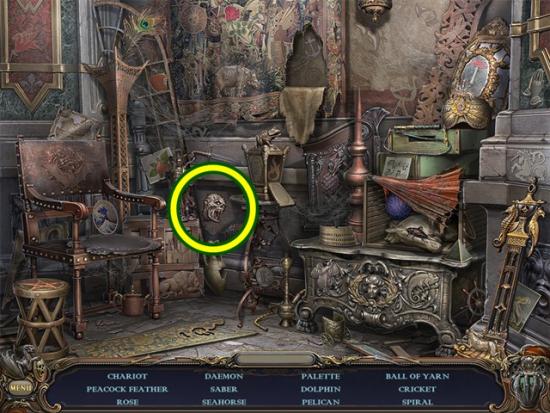
- Find all the objects. A daemon is added to your inventory. Return to the secret room (off Stella’s hall).
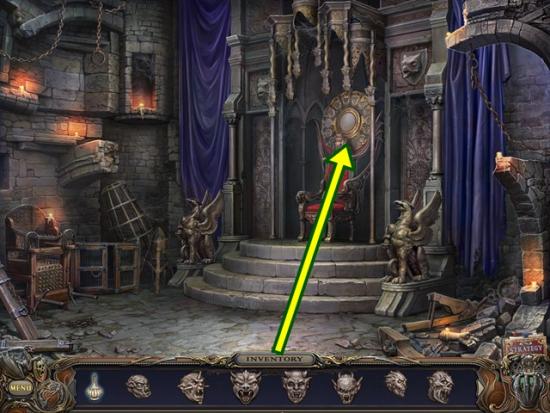
- Click on the disc above the chair. Add the 12 daemons. Watch the animation.
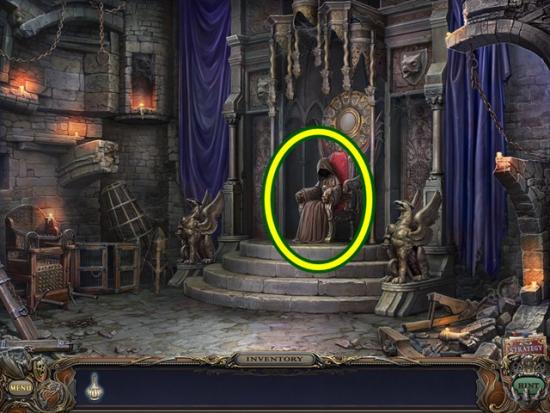
- Click on the Stella. Click through the dialogue.
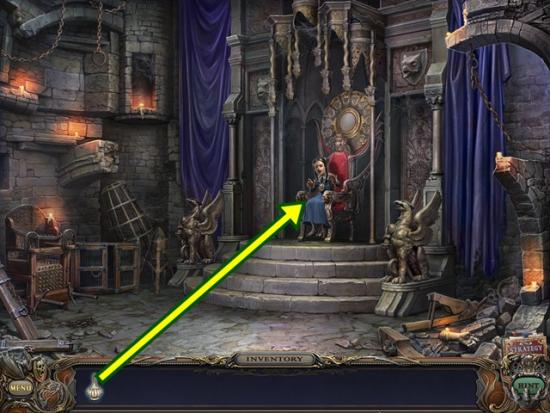
- Use the elixir on Stella. Watch the cutscene.
The end!
Collector’s Edition Bonus Chapter
If you are playing the Collector’s Edition, to play the bonus content, from the main menu, click Extras.
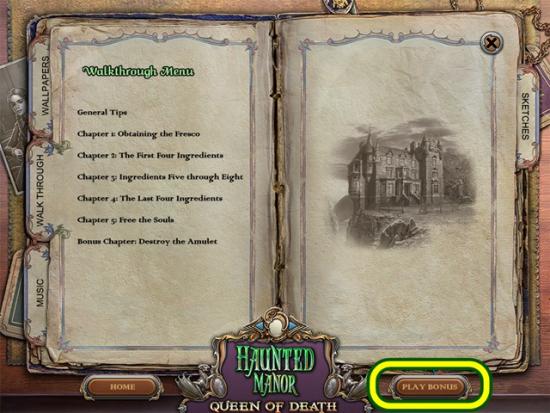
- Click on the Play Bonus.
Bonus Chapter
- Enter the secret room.
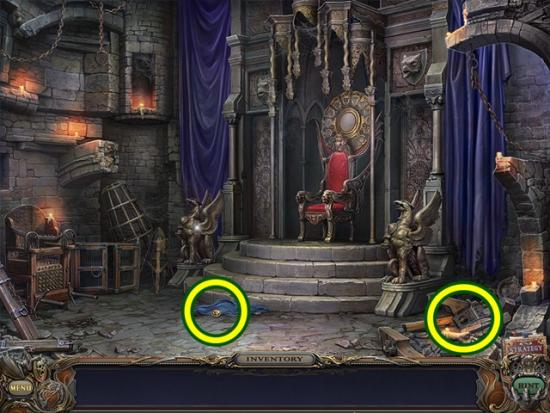
- Take theamulet. Watch the cutscene. Take thelamp. Leave and enter Stella’s bedroom.
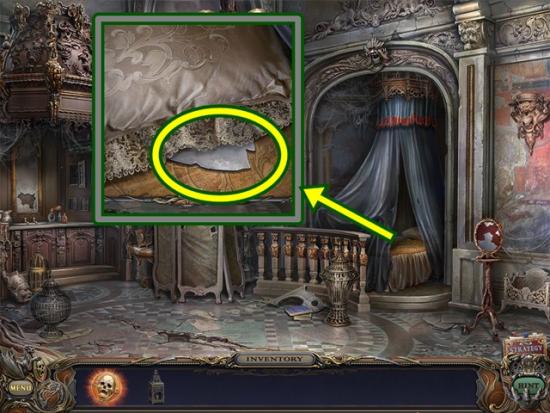
- Click on the bed. Take theshard. Return to the mine junction.
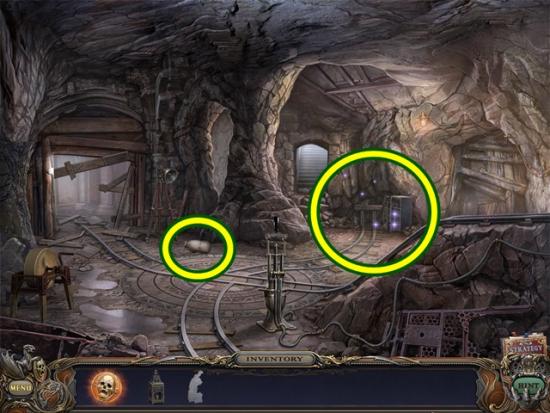
- Take thegunpowder. Click on the area on the right to start a hidden object hunt.
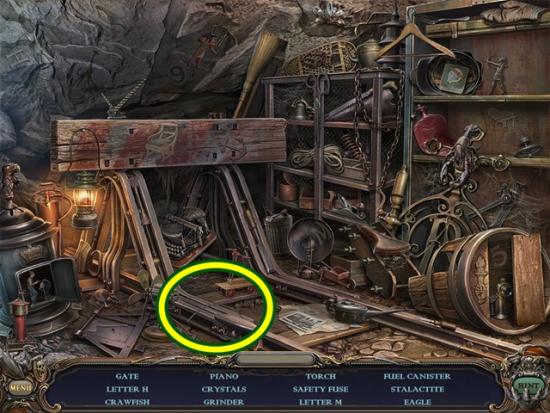
- Find all the objects. Asafety fuseis added to your inventory. Go to the basement.
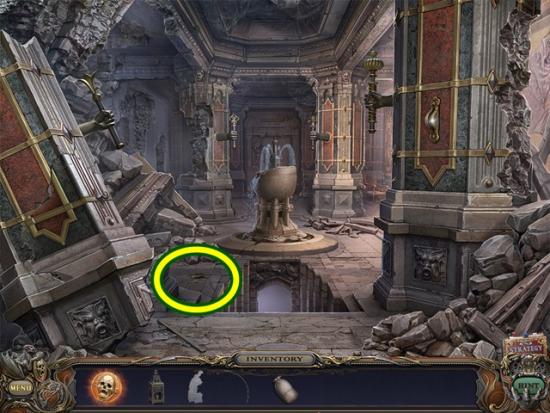
- Take thelighter. Return to Stella’s hall.
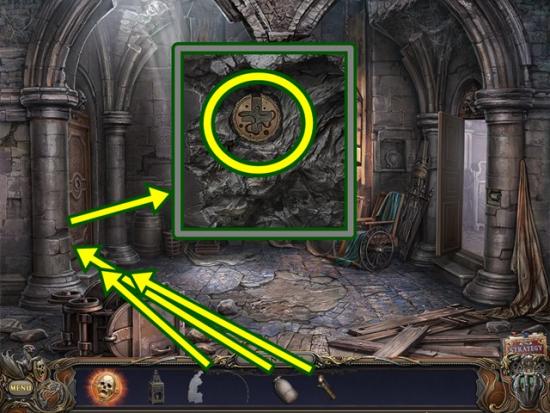
- Click on the column beside the door on the left. Add thegunpowder, thesafety fuse, then light it with thelighter. Click on the exposed column. Take thepuzzle disc. Return to Stella’s bedroom.
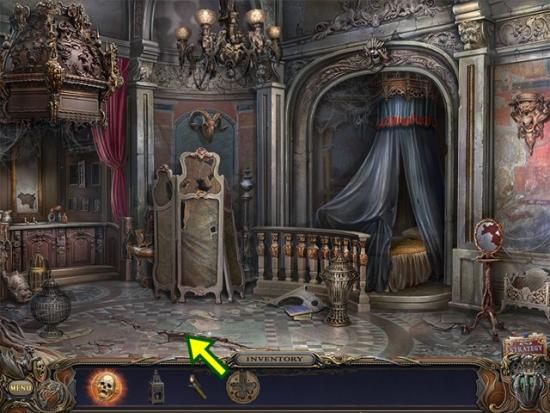
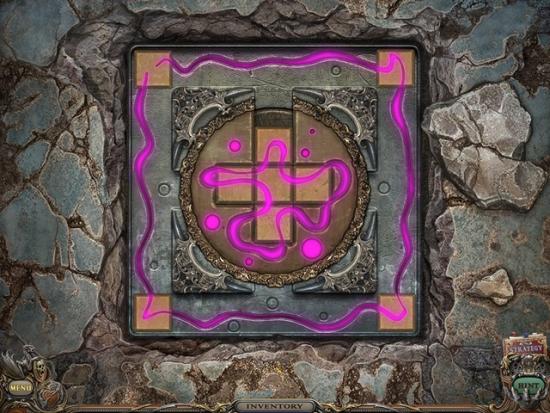
- Click on the crack on the floor. Add thepuzzle disc. A mini-puzzle starts. Arrange the tiles to complete the design. Tiles can only move in a straight line. To move a tile, click on it so it glows and then, remembering it can only move in a straight line, one direction at a time, click to where you would like it to go/stop. Guide it from the outer area into the inner area.
- Once a tile is properly positioned, its lines will turn pink. You can still move it.
- Tiles cannot be rotated. Click on the silver disc to rotate it in order to place tiles.
- Five tiles will go in the centre area and the remaining four go in the outer corners.
- Put the inner four tiles in the centre area first, then use the disc to rotate and place the four outer corner tiles, then add the last tile to the centre area.
- Solution:
- When the panel opens, take thekey. Return to Stella’s hall.
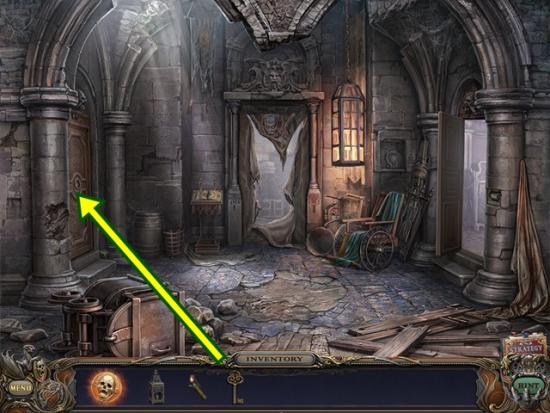
- Click on the door on the left. Put thekeyin the lock and turn it. Pull down the handle. Enter Stella’s study.
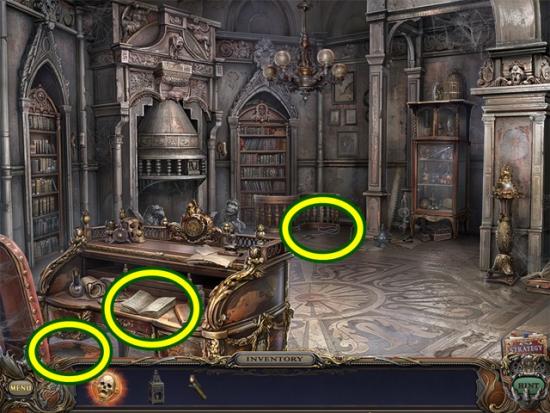
- Take thecableand theshard. Click on the book on the desk. Read the entry. Click anywhere outside the window to close it. Return to Stella’s bedroom.
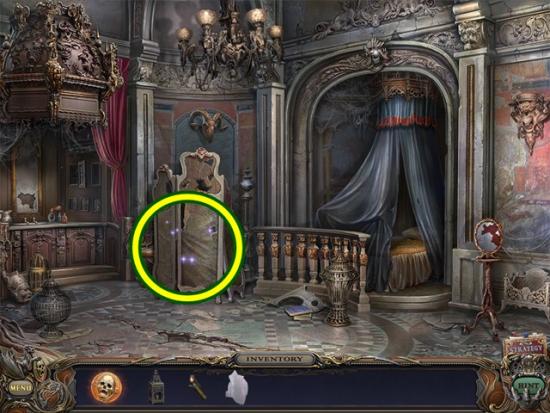
- Click on the privacy divider to start a hidden object hunt.
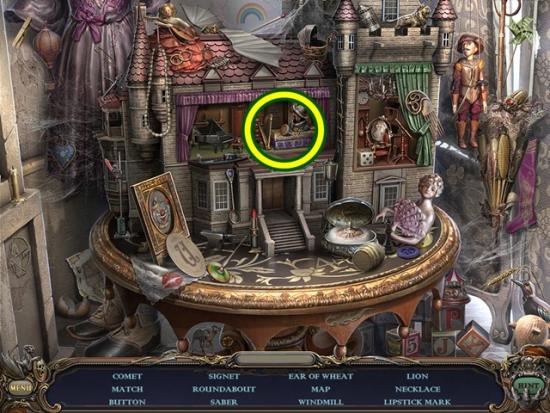
- Find all the objects. If you have to find a shell, it’s the broken egg shell. If you have to find a roundabout, it’s the carousel. Asignetis added to your inventory. Return to Stella’s study.
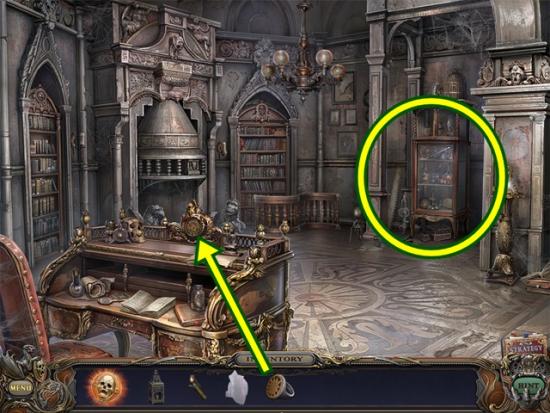
- Click on the clock on the desk. Add thesignet. Click on the glass display case to start a hidden object hunt.
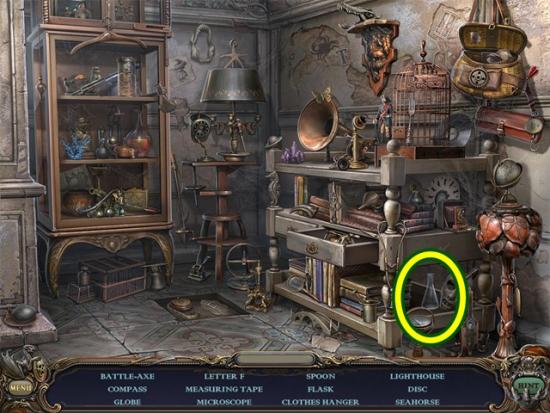
- Find all the objects. Aflaskis added to your inventory. Return to the basement.
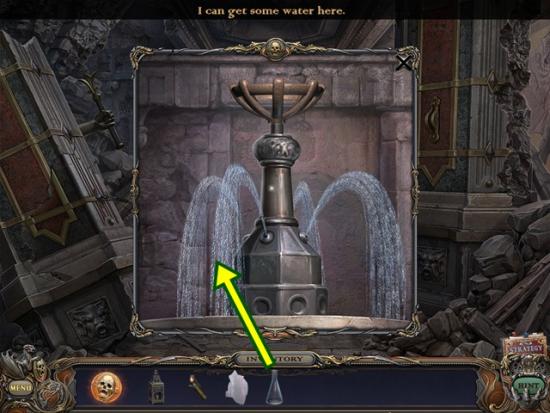
- Click on the fountain. Fill theflaskto get theflask with water. Return to Stella’s study.
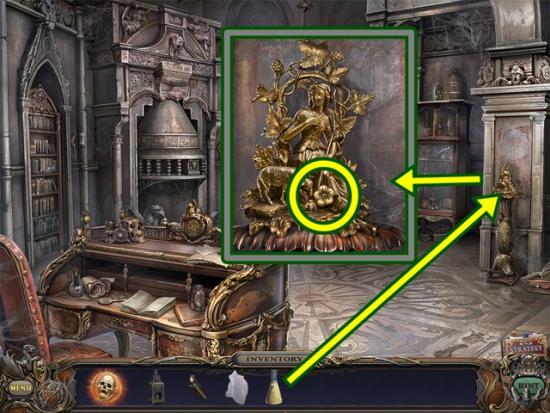
- Click on the gold statuette. Pour theflask with wateron it. Take theflower. Return to the secret room.
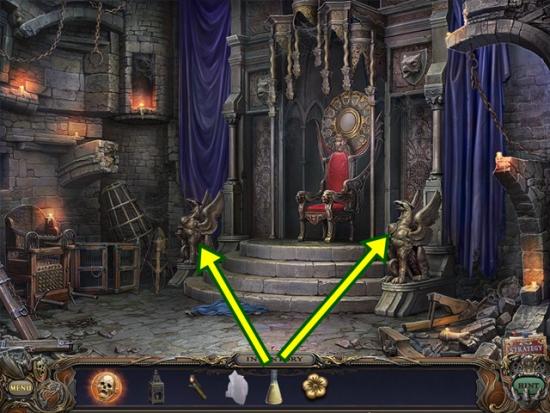
- Click on a griffin statue. Pour theflask with waterin its mouth. When the case opens, take theleft (or right) heart half. Do the same for the other griffin statue. Return to Stella’s study.
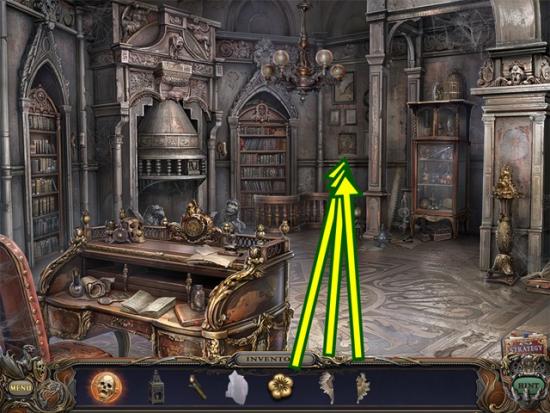
- Click on the wall panel. Add theleft heart halfand theright heart half, then theflower. Enter the waterfall pathway.
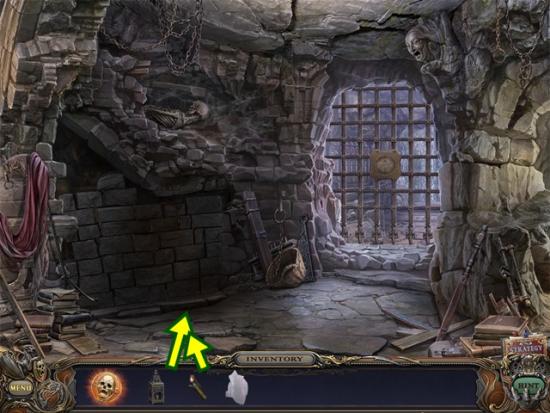
- Put thelampon the floor, then light it with thelighter.
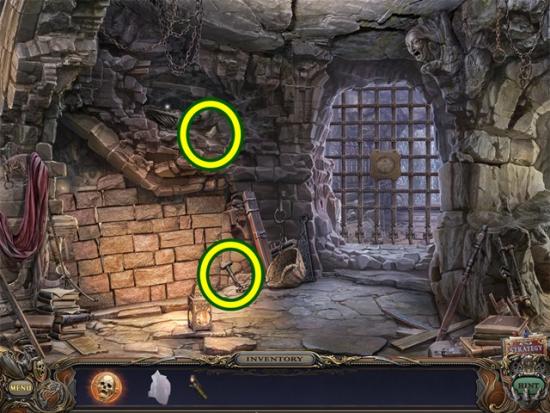
- Click on the note. Read the note. Click anywhere outside the window to close it. Take thelever. Return to the basement.
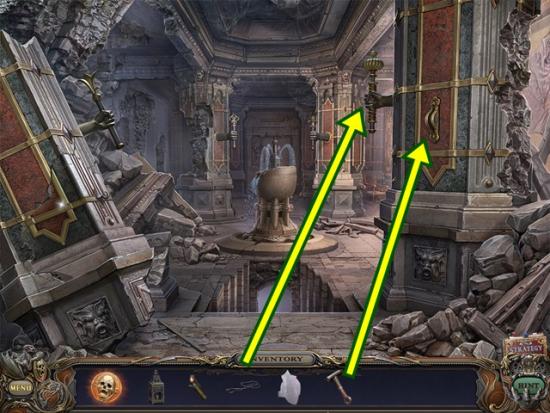
- Put thecableon the sceptre on the right pillar. Click on the end of the cable to attach it to the pillar on the left. Put theleverin the slot, then pull it. Then click on the area to the right to start a hidden object hunt.
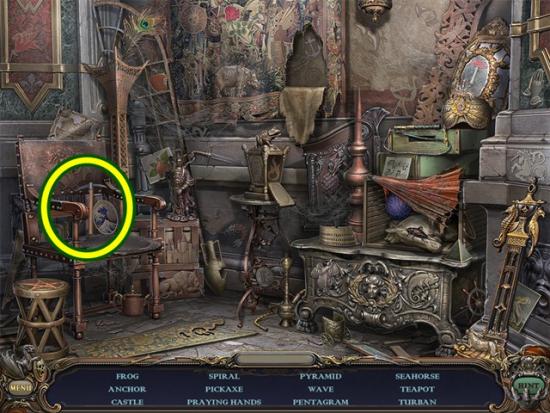
- Find all the objects. Apickaxeis added to your inventory. Return to the waterfall pathway.
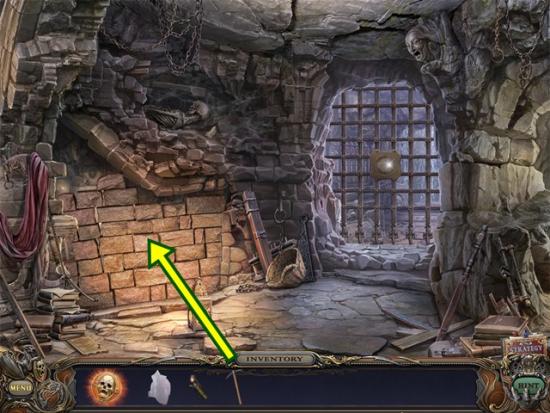
- Smash the brick wall with thepickaxe. Click on the area to start a hidden object hunt.
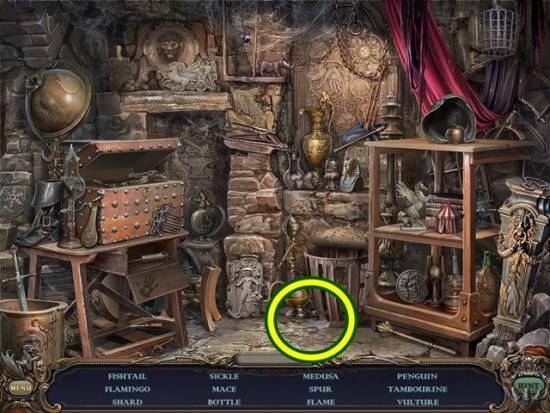
- Find all the objects. Ashardis added to your inventory. Return to Stella’s bedroom.
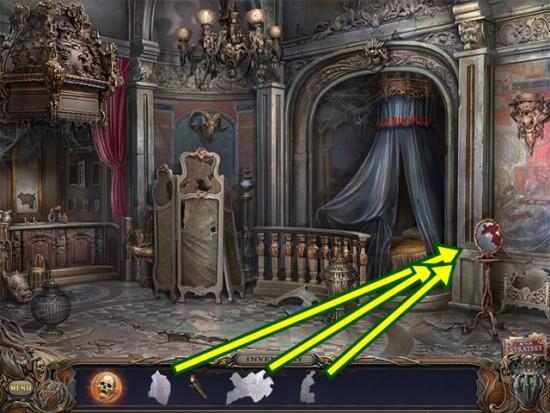
- Click on the mirror. Add the threeshardpieces. After the animation, take thelockpick. Return to the waterfall pathway.
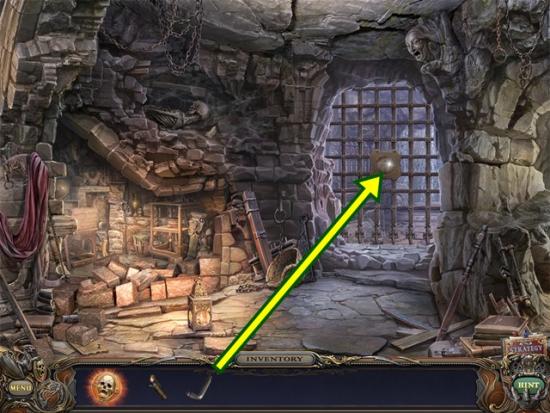
- Click on the gate. Add thelockpickand turn it twice. A mini-puzzle starts. Position the circular tiles in the large disc to complete the pattern. When an empty slot is highlighted in green, that is the active slot. Clicking on any of the circular tiles will move that tile into the slot. If it’s incorrect, it will return to its original position. If it’s correct, it will stay. Click on another slot to activate it.
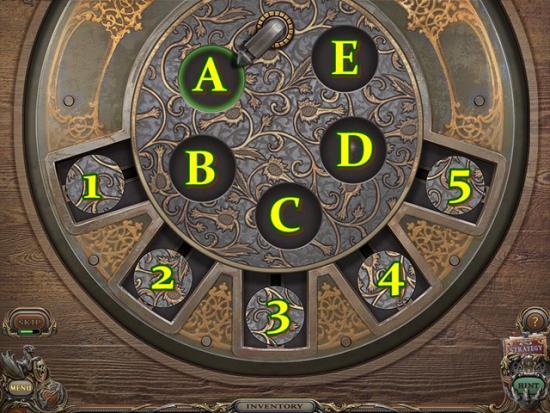
- Assume the slots are labelled A-E and the tiles are labelled 1-5 (screenshot above), make the following matches: A4, B1, C4, D5, E3.
- When you are finished, go through the gate toward the waterfall.
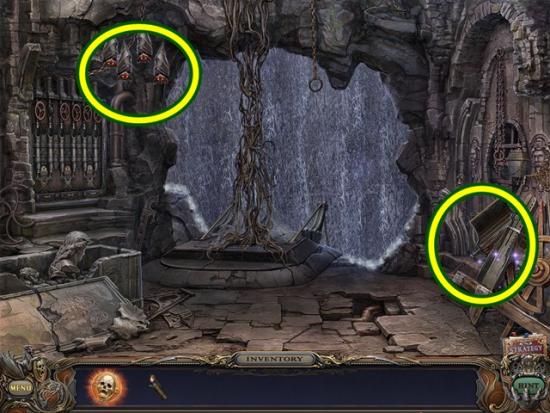
- Click on the bats. A mini-puzzle starts. Repeat the eye opening sequence. The first bat will open its eyes (they glow red). Click on that bat. Then two bats will open their eyes. Click on them in the same order. Do this five times.
- Click on the debris to start a hidden object hunt.
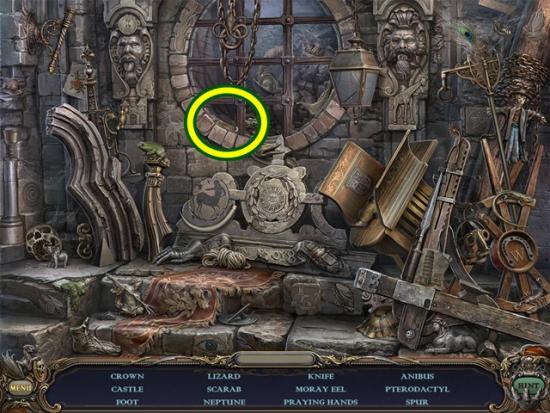
- Find all the objects. Aknifeis added to your inventory. Return to the mine junction.
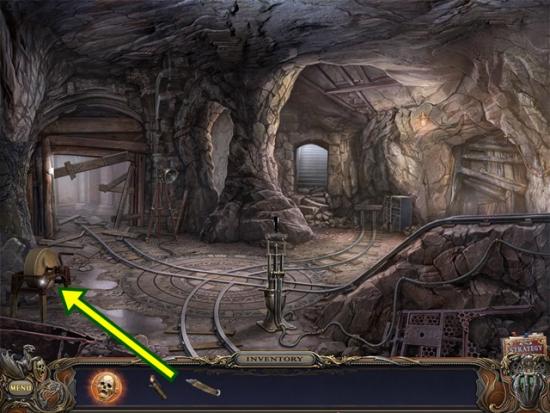
- Sharpen theknifeon the sharpening stone to get thesharp knife. Return to the waterfall.
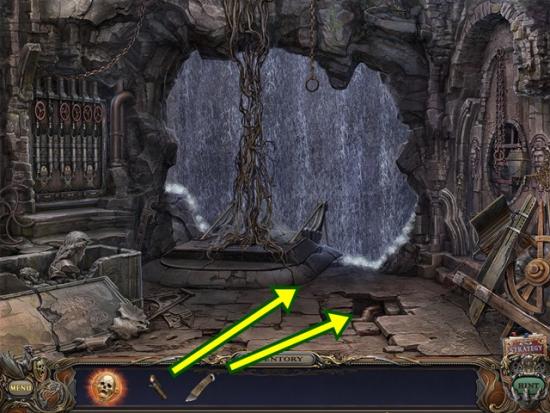
- Click on the pipe on the ground. Use thesharp knifeto cut the bandage. Remove the bandage. When the gas comes out, light it with thelighter. Return to the passageway.
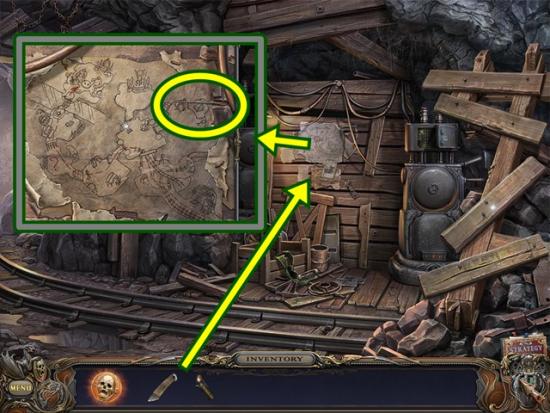
- Click on the map. Remove the map with theknife(four clicks). Take thetweezers. Return to Stella’s hall.
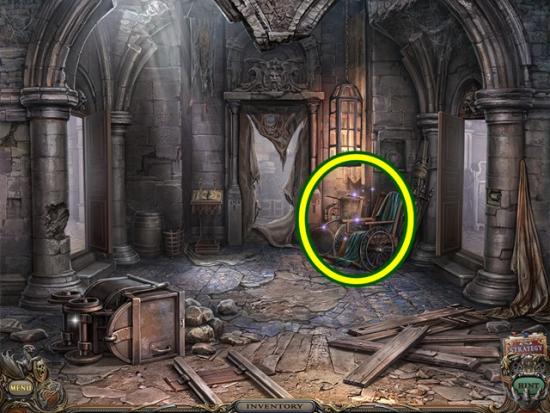
- Click on the wheelchair to start a hidden object hunt.
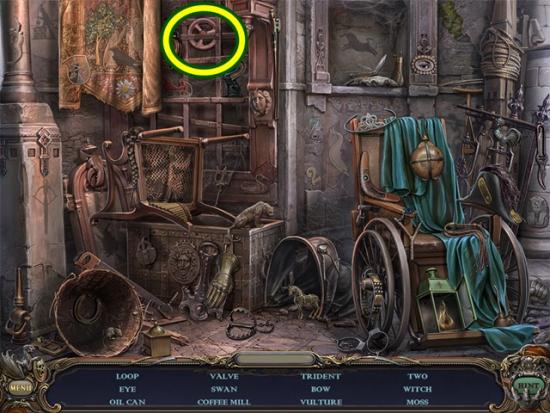
- Find all the objects. Avalveis added to your inventory. Return to the waterfall.
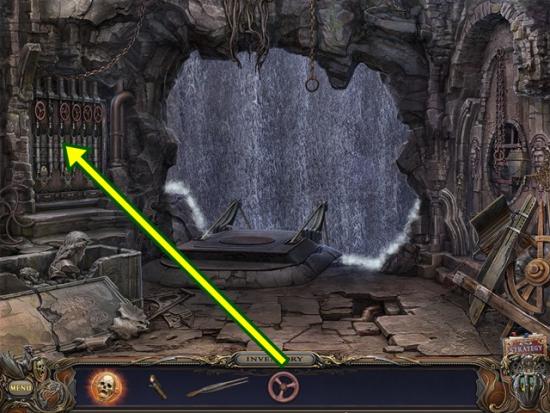
- Click on the pipes and valves. Add thevalve. A mini-puzzle starts. Adjust the valves so the gauges’ levers remain in the coloured area. Each gauge is controlled by the two valves above it. The levers are correct when the pumps start moving.
- When you are finished, return to Stella’s study.
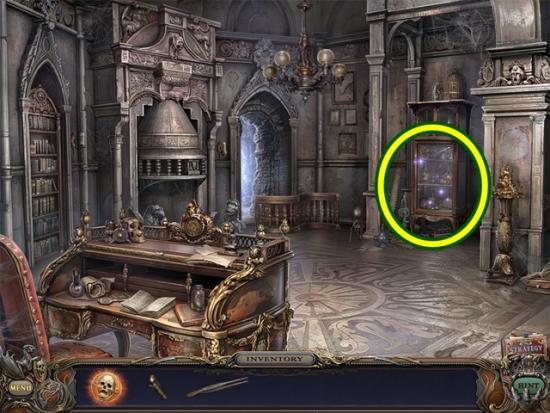
- Click on the glass display case to start a hidden object hunt.
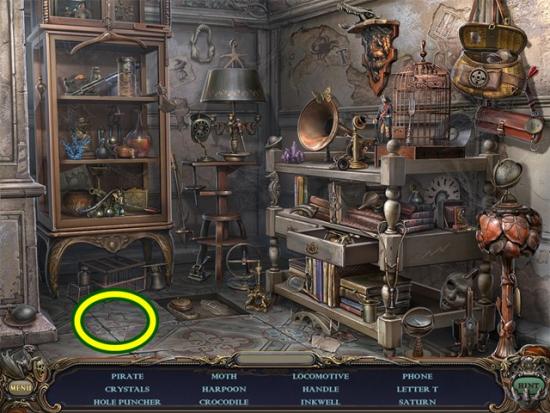
- Find all the objects. Ahandleis added to your inventory. Return to the waterfall.
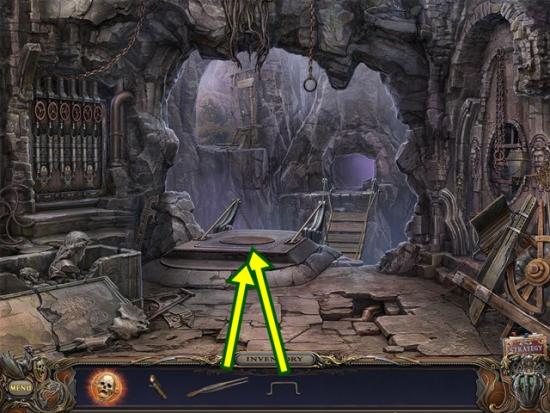
- Click on the hatch. Add thehandle. Lift the hatch. Take thewrench. Remove all the pebbles with thetweezers. Try to cross the bridge. Click on the bridge.
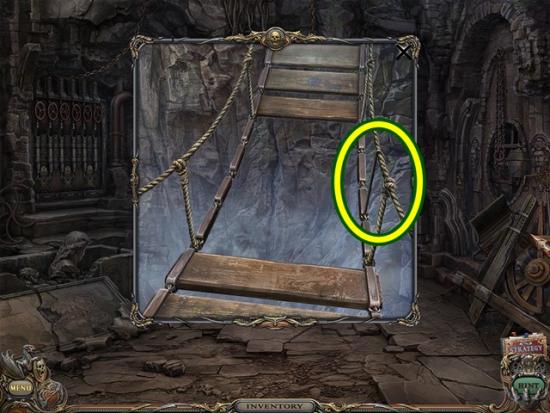
- Take thecrowbar. Click anywhere outside the window to close it. Return to Stella’s hall.
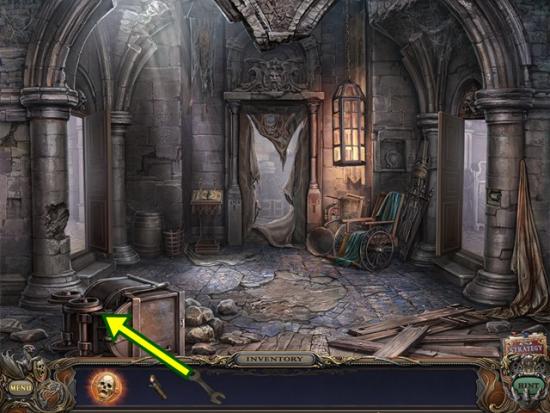
- Click on the overturned cart. Remove the nut with thewrenchand take thegear. Return to the mine junction.
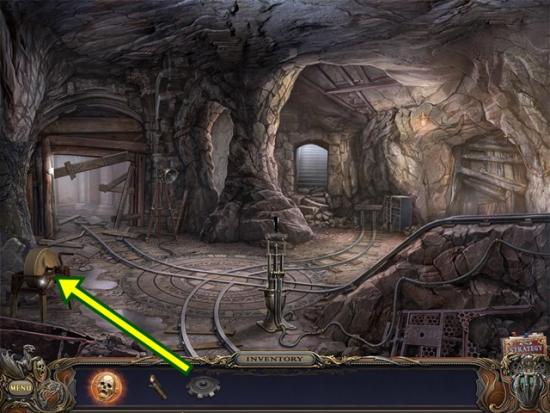
- Put thegearon the sharpener to get thewheel. Return to the passageway.
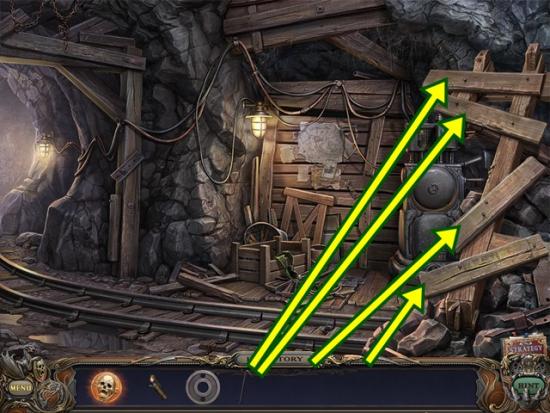
- Remove the fourboardswith thecrowbar. Return to the waterfall.
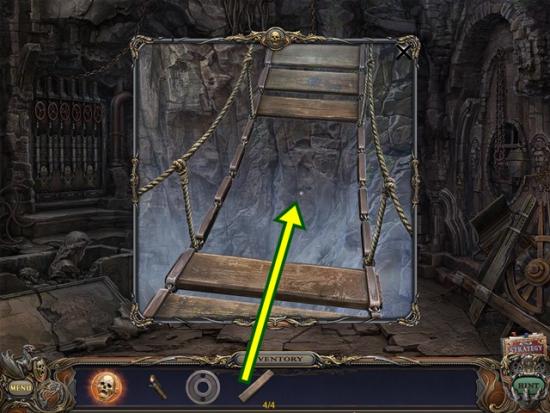
- Click on the bridge. Add the fourboards. Go to the lava seal room.
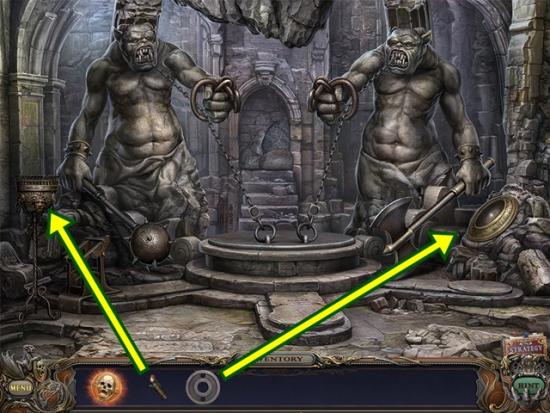
- Watch the cutscene. Light the lamp with thelighter. Click on the shield. Add thewheel. A mini-puzzle starts. Move the lenses (marbles) around the rings to reflect the laser beam back into the gem. Use trial and error. Start with the inner most lens and move it so the laser reflects off it. Then try to get the other lens to reflect the laser. No lens can so use the second most inner lens. Continue to try and get lenses to reflect off each other.
- Solution:
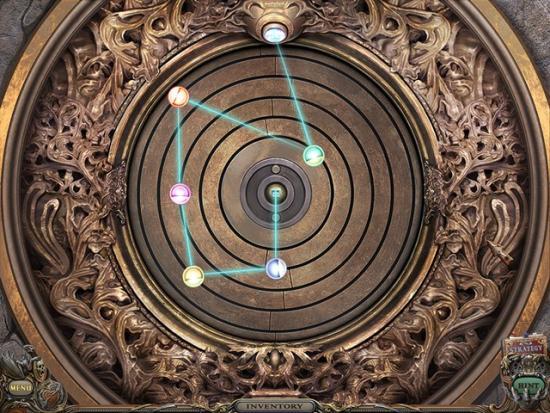
- When the panel opens, take theaxe coin. Leave.
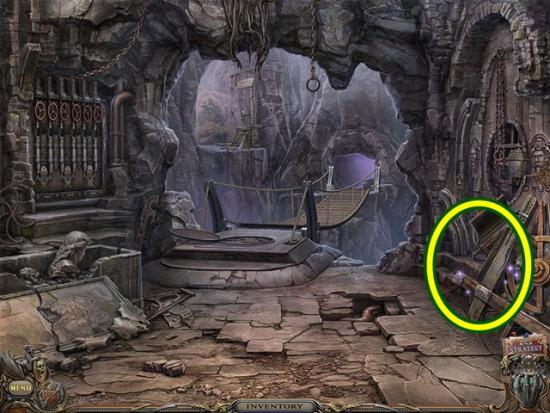
- Click on the debris to start a hidden object hunt.
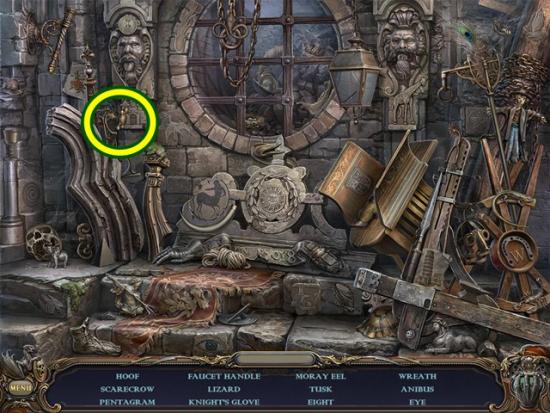
- Find all the objects. Afaucetis added to your inventory. Return to the waterfall passageway.
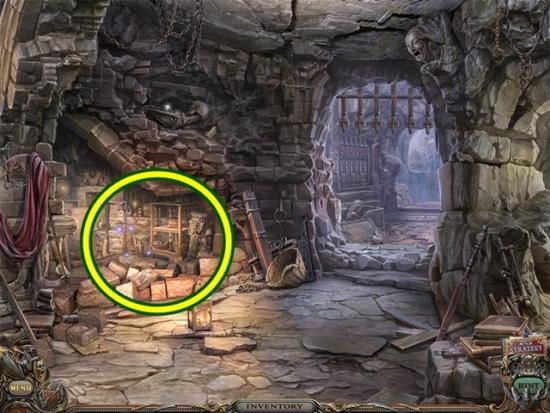
- Click on the area on the left to start a hidden object hunt.
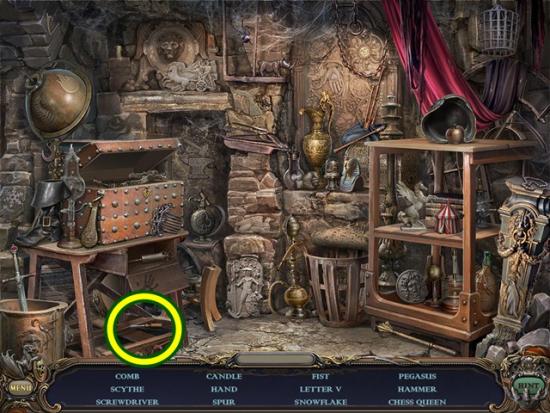
- Find all the objects. Ascrewdriveris added to your inventory. Return to Stella’s bedroom.
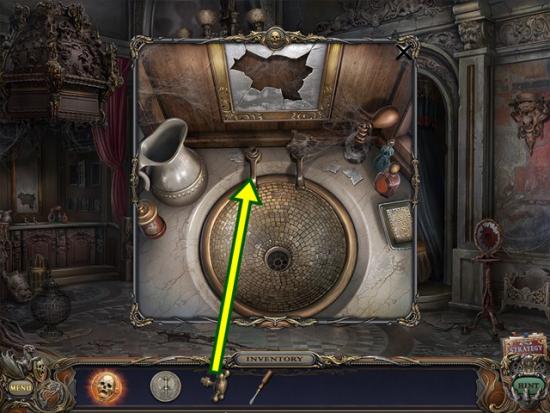
- Click on the vanity. Add thefaucetto the sink. Turn the faucet and take themace coin. Return to the basement.
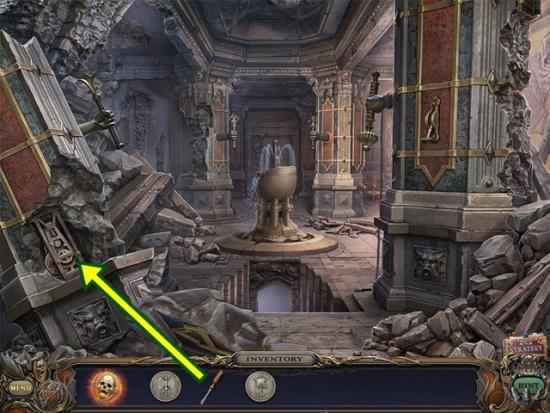
- Use thescrewdriverto take thelever mechanismfrom the pillar on the left. Return to the lava seal room.
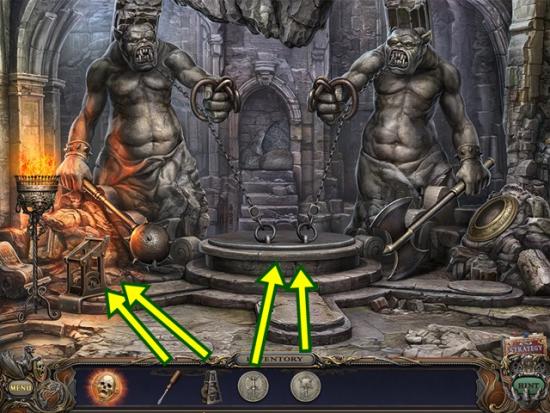
- Click on the chain rings. Add themace coinon the left and theaxe coinon the right. Add thelever mechanismto the lift mechanism and attach it with thescrewdriver.
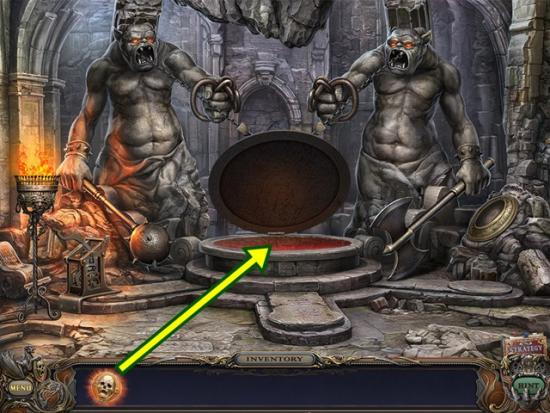
- Click on the opened hatch. Throw theamuletin the lava. Go through the newly opened door.
The end!
More articles...
Monopoly GO! Free Rolls – Links For Free Dice
By Glen Fox
Wondering how to get Monopoly GO! free rolls? Well, you’ve come to the right place. In this guide, we provide you with a bunch of tips and tricks to get some free rolls for the hit new mobile game. We’ll …Best Roblox Horror Games to Play Right Now – Updated Weekly
By Adele Wilson
Our Best Roblox Horror Games guide features the scariest and most creative experiences to play right now on the platform!The BEST Roblox Games of The Week – Games You Need To Play!
By Sho Roberts
Our feature shares our pick for the Best Roblox Games of the week! With our feature, we guarantee you'll find something new to play!Type Soul Clan Rarity Guide – All Legendary And Common Clans Listed!
By Nathan Ball
Wondering what your odds of rolling a particular Clan are? Wonder no more, with my handy Type Soul Clan Rarity guide.


