![Digimon UP Tier List [Supports, Buddies, and Partners]](/wp-content/uploads/2026/07/digimon-up-tier-list.jpg "Digimon UP Tier List [Supports, Buddies, and Partners]")
Digimon UP Tier List [Supports, Buddies, and Partners]
These Digimon will get you UP the leaderboard.


![Haze Seas Boss Drops [Chances, Locations, and How to Spawn]](/wp-content/uploads/2026/07/haze-seas-boss-drops.jpg "Haze Seas Boss Drops [Chances, Locations, and How to Spawn]")

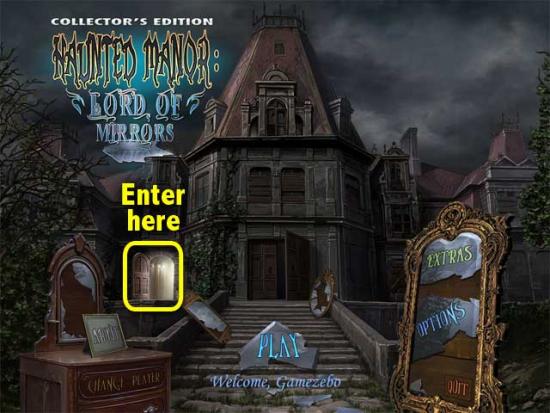
Welcome to theHaunted Manor: Lord of Mirrors walkthrough on Gamezebo. Haunted Manor: Lord of Mirrors is a hidden object game for PC. This walkthrough includes tips and tricks, helpful hints, and a strategy guide to complete Haunted Manor: Lord of Mirrors.
Welcome to theHaunted Manor: Lord of Mirrors walkthrough on Gamezebo. Haunted Manor: Lord of Mirrors is a hidden object game for PC. This walkthrough includes tips and tricks, helpful hints, and a strategy guide to complete Haunted Manor: Lord of Mirrors.
Gameplay
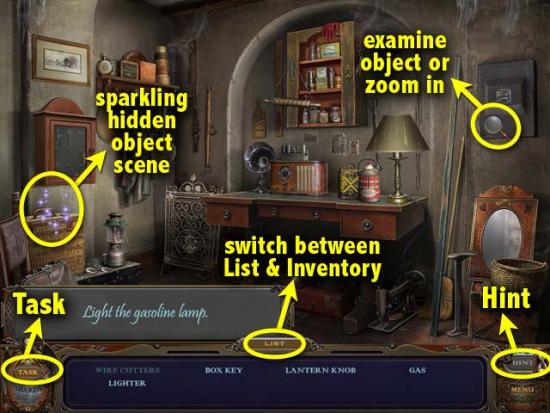
Navigating a Scene

You have the option of taking the tutorial or not, but we recommend that you do to familiarize yourself with the game’s controls and features.
Turn on all 6 wall lamps.
Pick up the flashlight and the lightbulb. Click the List button to toggle between List (objects you need to find) and Inventory (items you have collected). Take the lightbulb from your inventory and place it on the lamp. Click on the lamp to turn it on.
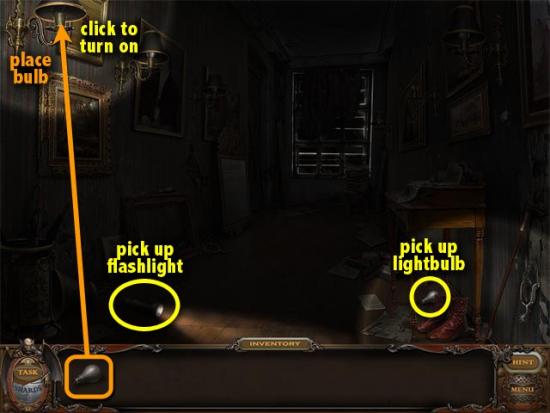
Pick up the lampshade and the screwdriver. Click on the sparkling pile of books to zoom into a hidden object scene.
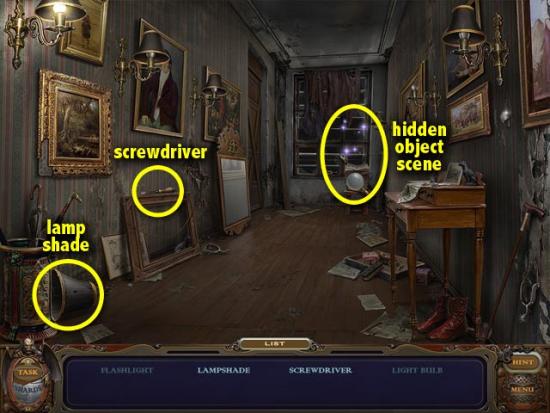
One of the items you’ll find here is the electrical tape.
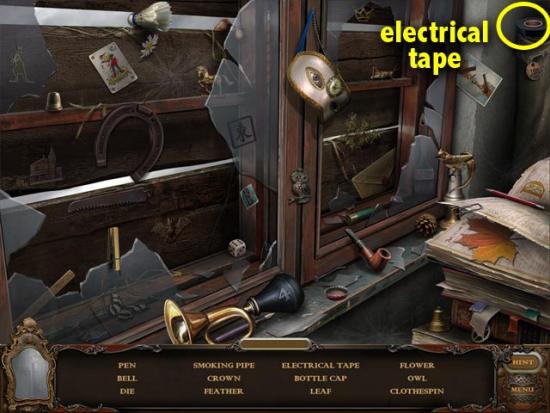
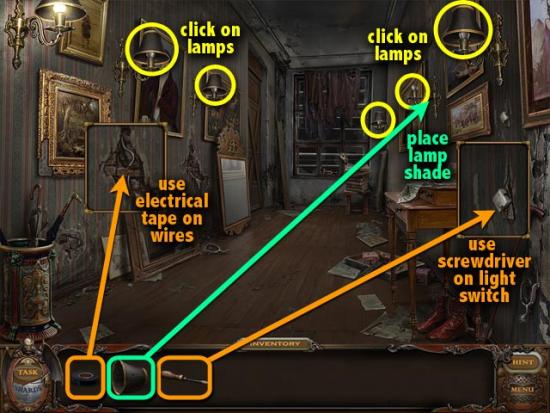
Click on the exposed wires on the left wall and use the electrical tape on it. Place the lampshade on the middle lamp on the right wall. Use the screwdriver to screw back the light switch on the right wall. Click on all the other 5 wall lamps to turn them on.
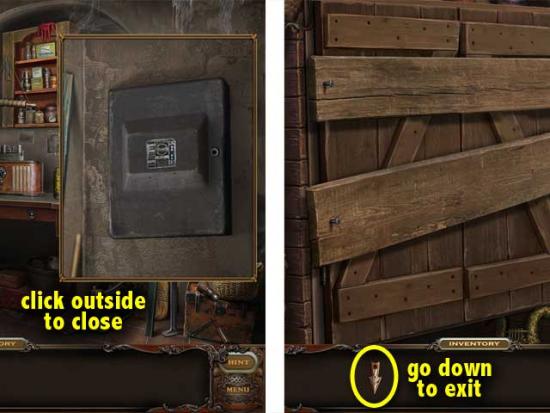
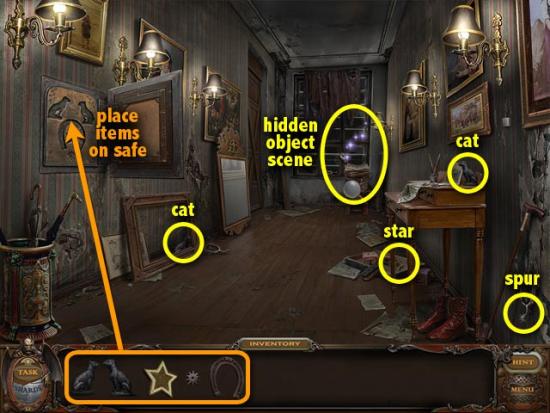
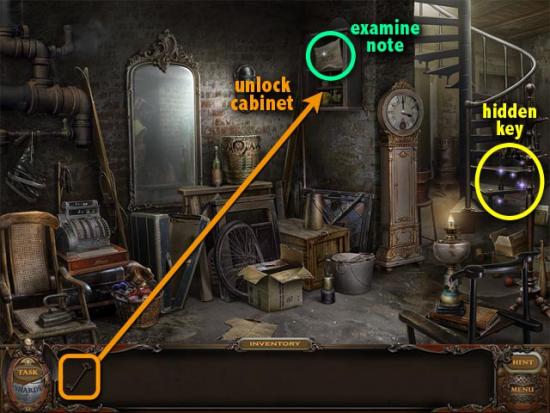
Find the safe hidden in the corridor.
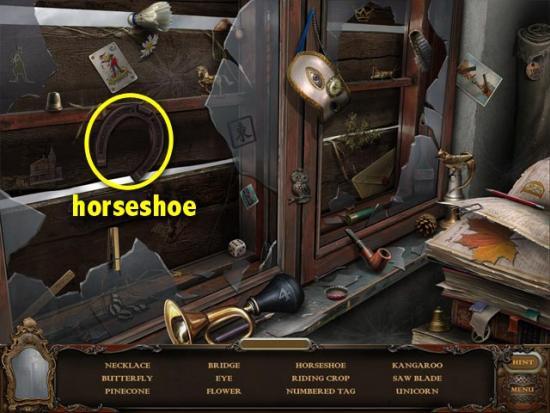
Click on the painting with the ornate gold frame on the left wall to open up a safe underneath. Find the required objects and place them in the outlines in the safe. The horseshoe can found in a hidden object scene in the pile of books.
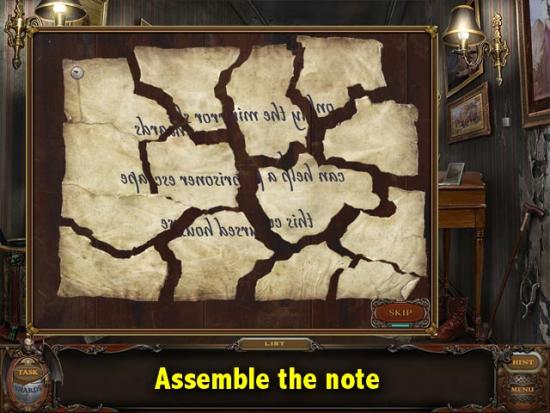
Re-assemble the note to read the message.
Take the torn-up note from inside the safe. Assemble the pieces of the note, starting from the pinned piece on the top left. The pieces will lock when in the right place.
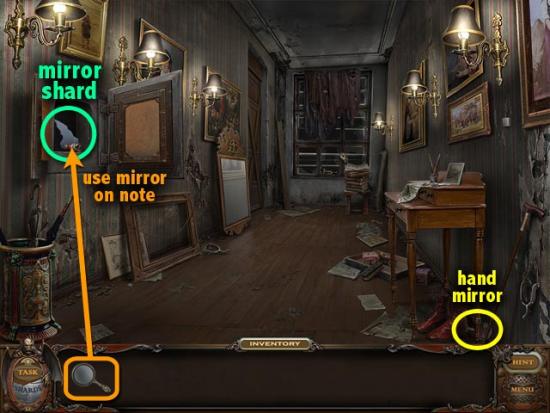
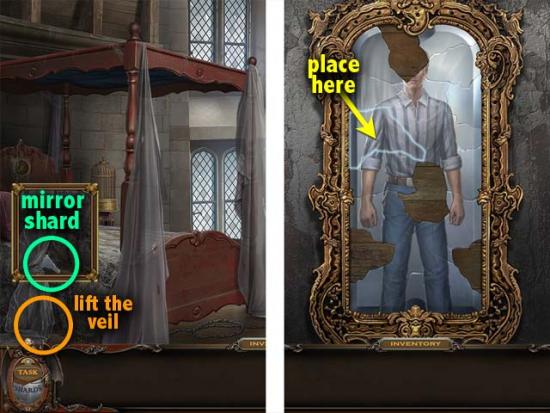
Pick up the hand mirror and use it to read the note.
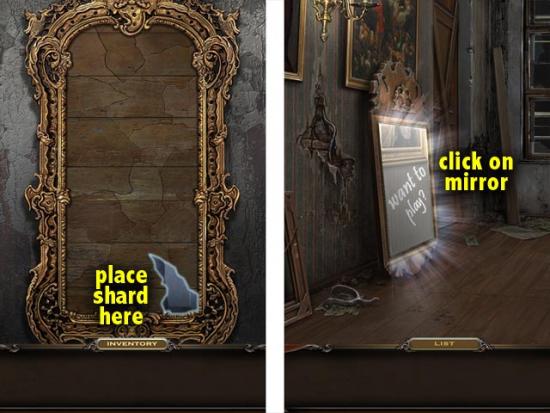
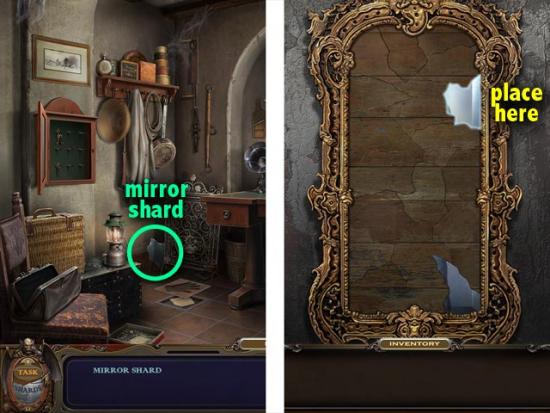
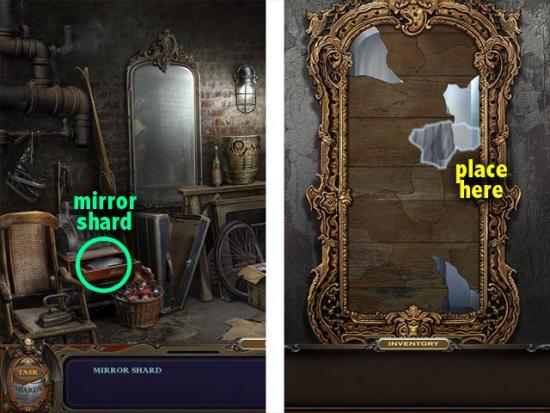
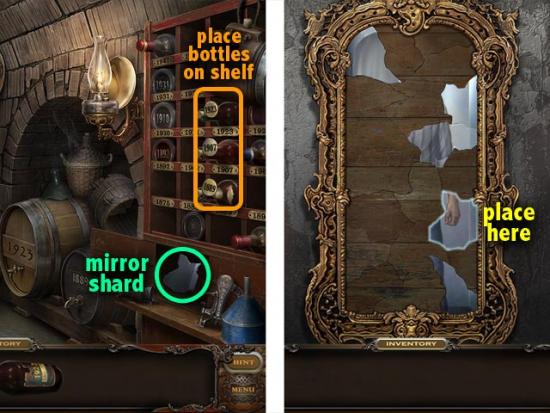
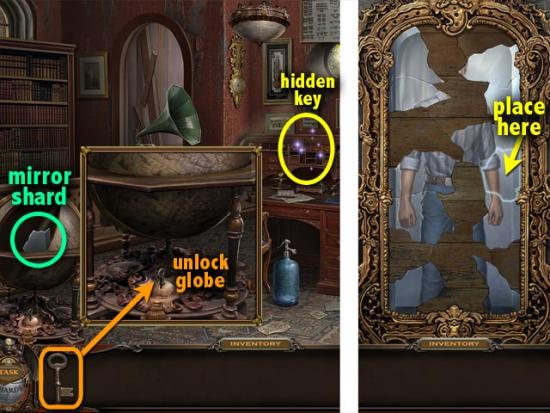
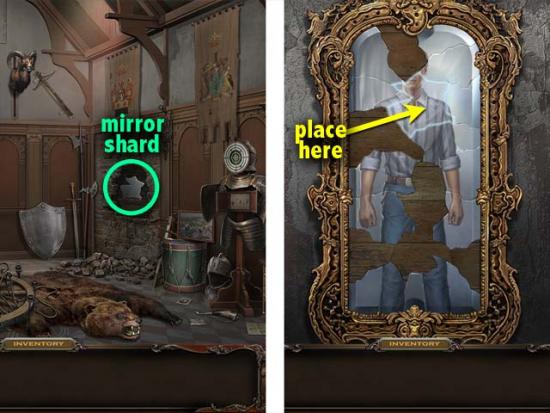
Collect the mirror shard. Take the shard that appears behind the note in the safe.
Find the right spot in the mirror to place the shard. As you later explore the manor, you will collect shards to re-assemble this mirror.
You are taken back to the Corridor. Click on the glowing mirror asking you to play a game.
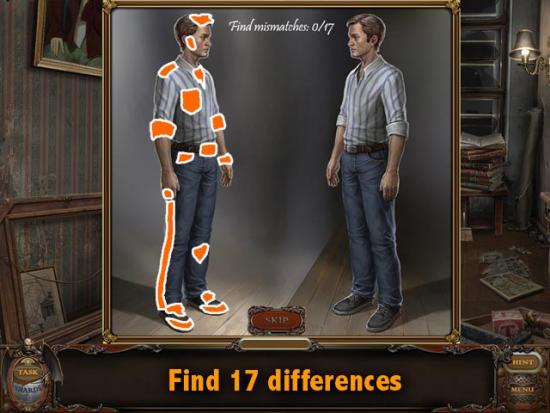
Spot the 17 differences in Stan’s reflection. Click on mismatches on the left panel that don’t appear on the right.
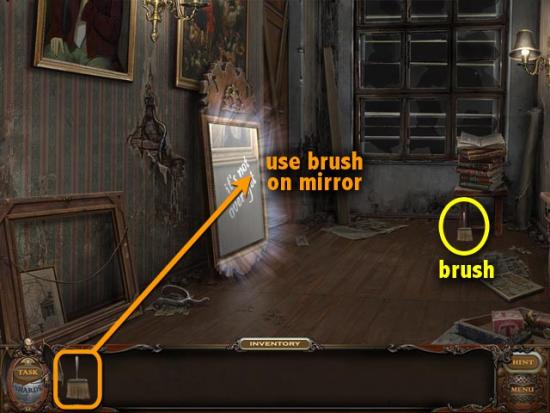
Dust off the mirror and exit the corridor. Find the brush and place it on the mirror.
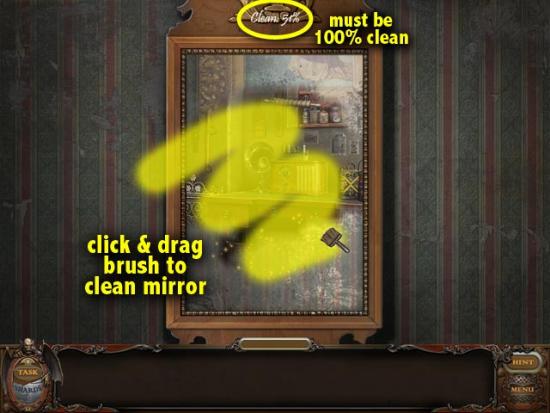
Dust off the mirror to travel to the next room. Click on the mirror and hold down the mouse button to clear away the dirt. Keep dragging the brush around until the label on top says Clean 100%.
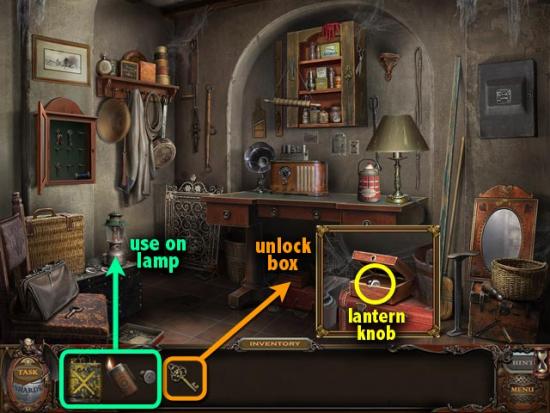
Light the gasoline lamp. Click on the sparkling wicker suitcase to find the lighter. Take the container of gas from the table and the wire cutters from the shelf. Use the wire cutters to open the key cabinet. Take the box key inside.
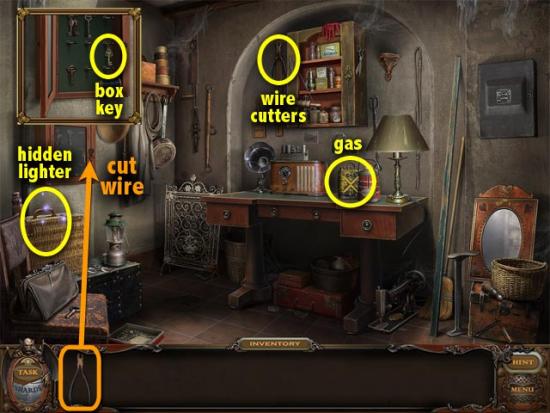
Use the box key to unlock the red box. Take the lantern knob inside. Light the lamp by using these items in order: lantern knob, gas, and lighter. Click on the lamp to summon the nanny ghost.
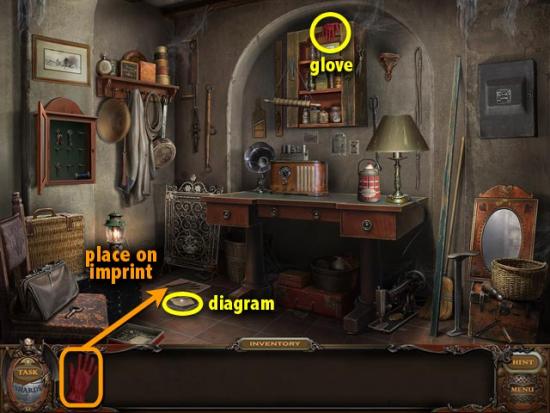
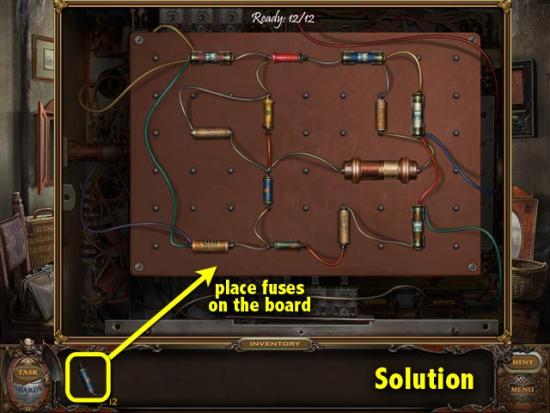
Fix the fusebox. Find the fuse box diagram.
Take the red glove from the shelf and place it on the imprint on the floor tile. Click the diagram that appears under the floor tile.
Find all the fuses. Click on the open box of fuses on the floor and collect all 12 fuses. Take the fuse box key from the chair and use to unlock the fuse box.
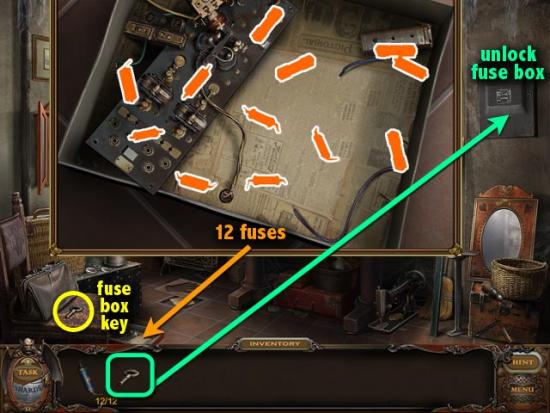
Insert the fuses in the correct positions. Click on the open fuse box. Place the fuses in and arrange them as shown below. A fuse will light up and lock when in the correct place.
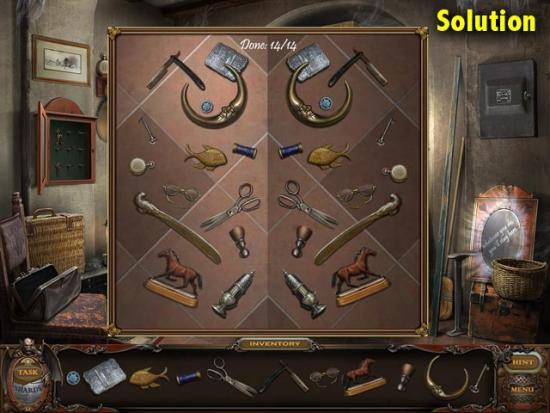
Click on the glowing mirror.
Find the listed items in the room and place them according to their reflections in the mirror. Click outside the frame to go back to the room and find the objects on the list. The button is in a hidden object scene in the rattan suitcase. Click the black purse to get the cigar case inside.
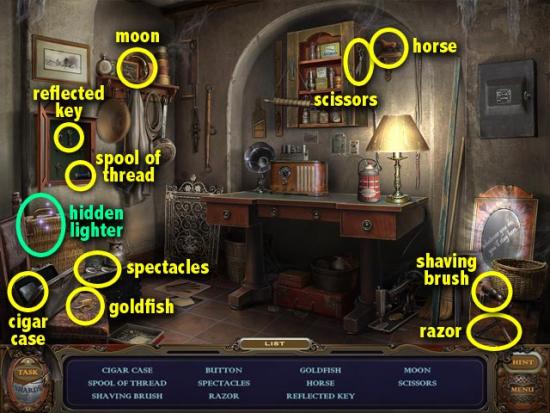
Click on the mirror and place the items so that the right side is a reflection of the left side.
Collect the mirror shard and move forward. Pick up the shard and place it on the mirror.
Dust off the mirror to travel to the next room. Click on the mirror and clean it.
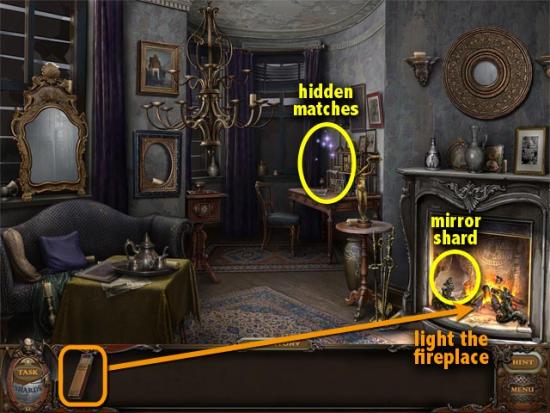
Light the fireplace. Click on the sparkling desk to find the matches. Light a match and use it on the fireplace.
Collect the mirror shard. Click on the shard in the fireplace. A metal grate suddenly slides up.
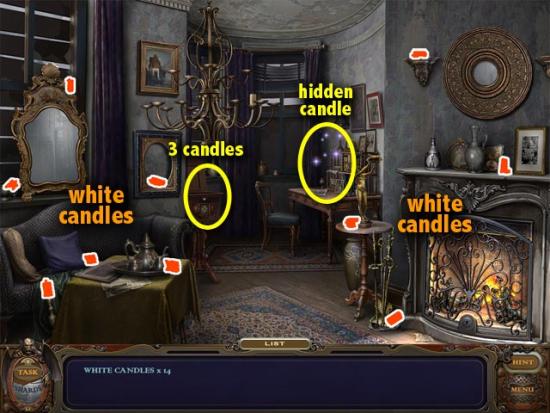
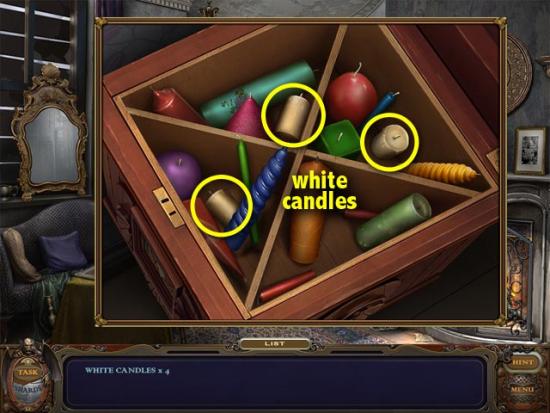
Light the chandelier. Collect 14 white candles around the room. 3 are inside the wooden box, 1 is in a hidden object scene in the sparkling desk.
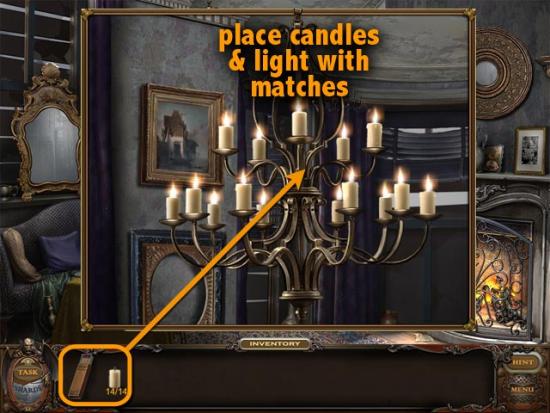
Put all the candles in the candle holders on the chandelier. Light a match and set all the candles aglow one by one. If the match goes out, just light another one.
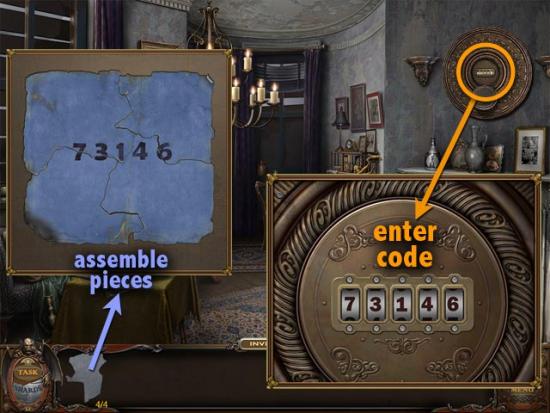
Find and open a secret stash. Click on the vase on the mantlepiece and find 4 blue pieces of paper around it.
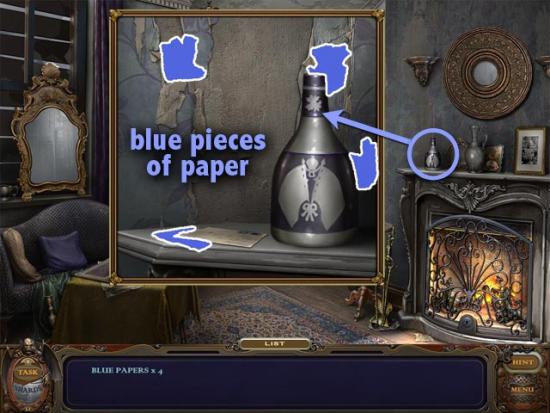
Assemble the pieces to find a secret code. Enter the code into the round frame above the mantlepiece.
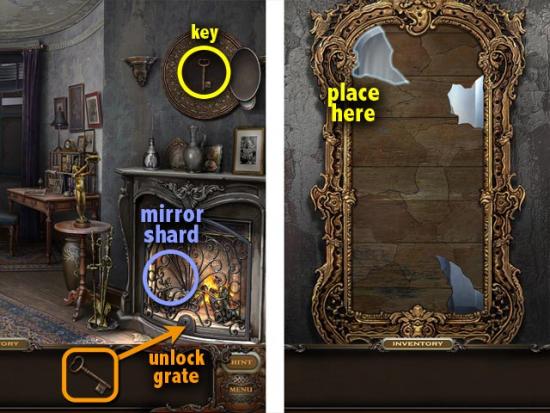
Collect the mirror shard. When the safe is open, take the key inside. Unlock the metal grate and take the mirror shard. Place it on the mirror.
Move forward through the mirror. Click on the glowing mirror.
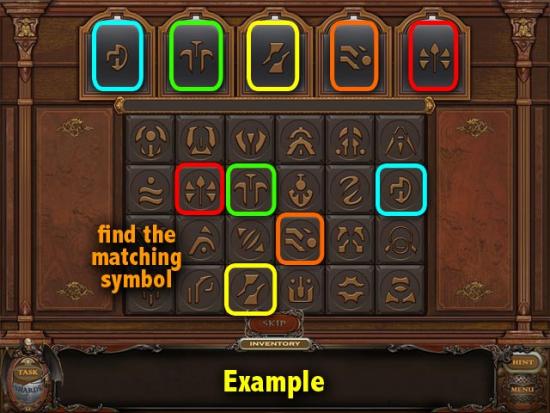
Click the matching symbols below to decode the message. Study the symbols on top and click on their matching counterparts below (in any order). There are 4 sets of symbols to complete. An example is shown below.
Dust off the mirror to travel to the next room.
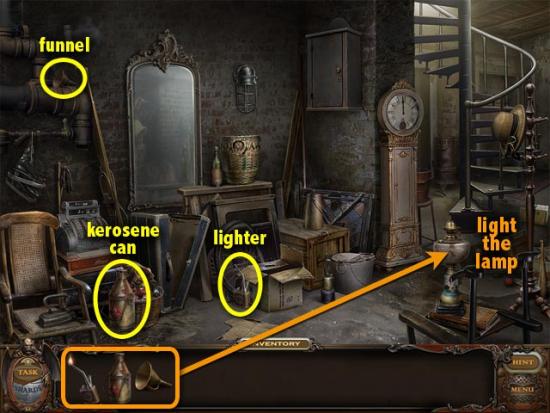
Light the kerosene lamp. Pick up the funnel, kerosene can, and lighter, and use them on the lamp in that order.
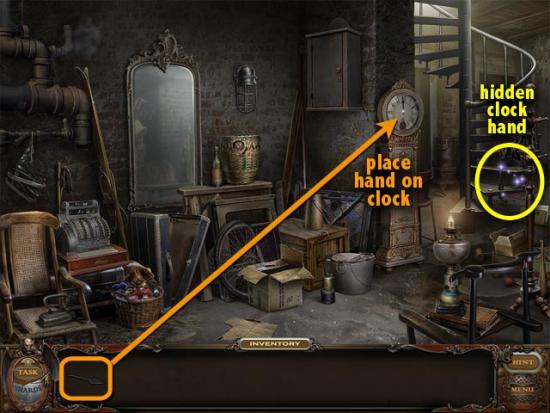
Fix the clock: Install the clock hand. Click on the sparkling box to find the clock hand. Place it on the face of the grandfather clock.
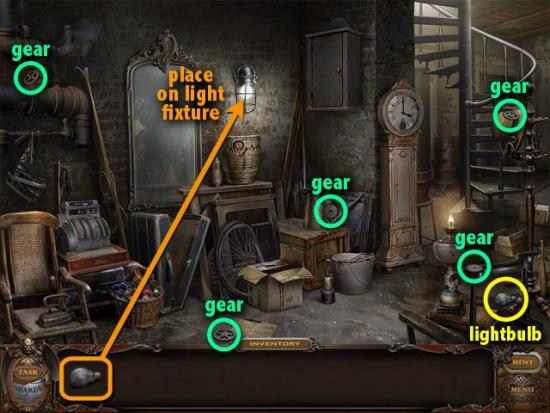
Install the gears. Pick up the lightbulb and place it on the wall mounted light fixture to shed light on the gears. Collect the 5 gears around the room.
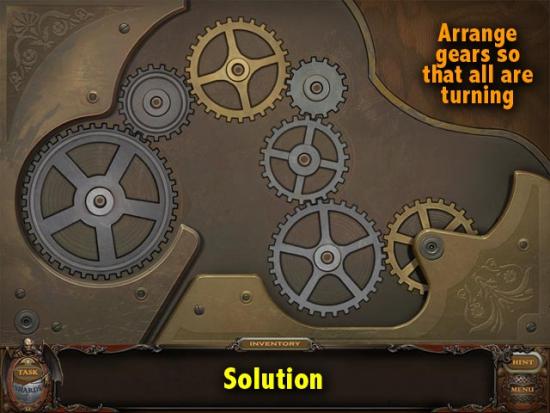
Place the gears on the grandfather clock. Arrange the gears so that all are turning (see solution below).
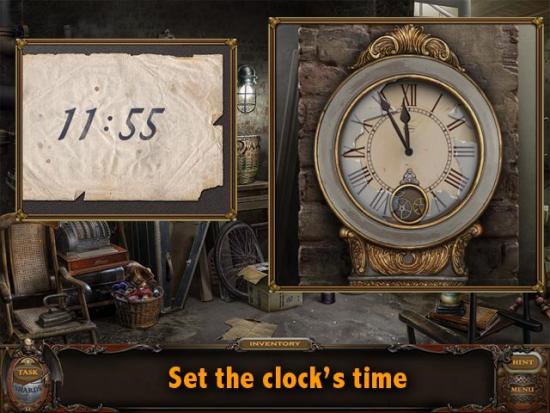
Find and set the correct time. Click on the sparkling box to find a key. Use the key to unlock the cabinet. Examine the piece of paper inside.
The piece of paper has the numbers 11:55. Set the clock’s hands to that specific time. Make the long hand point to 11, and the short hand to just a tiny notch before 12. When it is set correctly, the watchmaker’s ghost will appear and give you further instructions.
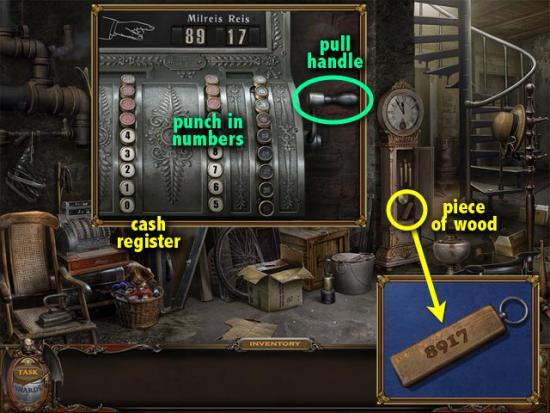
Open the cash register. Examine the piece of wood inside the clock’s body. It has the numbers 8917 printed on it. Zoom in on the cash register, punch in those numbers and pull the cash register’s handle. If the numbers are not registering correctly, punch in some numbers until the counter is in the last slot, then begin again.
Collect the mirror shard. Take the shard from the drawer beneath the cash register and place it on the mirror.
Move forward. Click on the glowing mirror.
Dust off the mirror to travel to the next room.
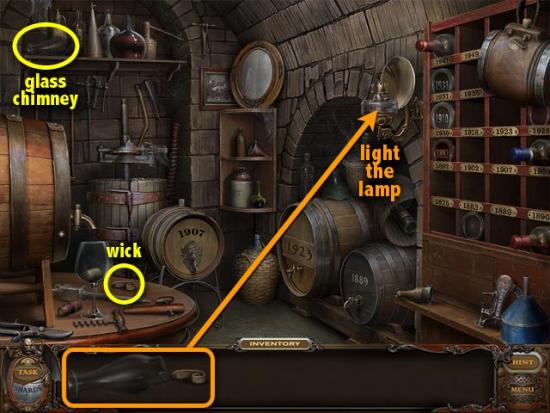
Light the gasoline lamp. Find the wick and the glass chimney and use them on the wall lamp.
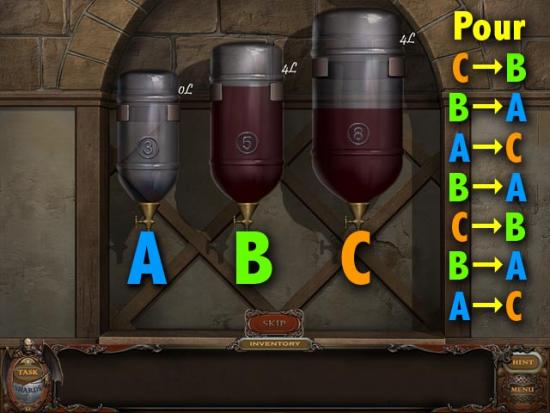
Fill empty bottle with wine from the barrels and cork them according to date. Pick up the 3 bottles and corkscrew. Click on the sparkling shelf to find a valve.
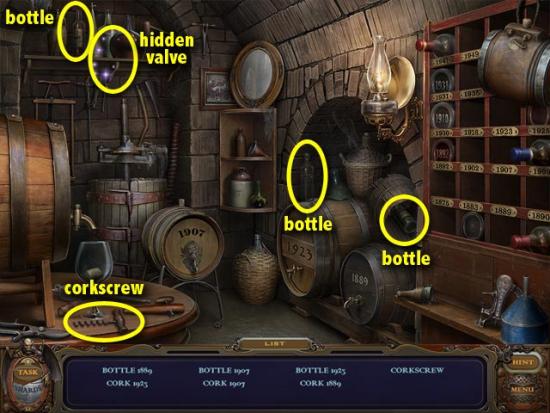
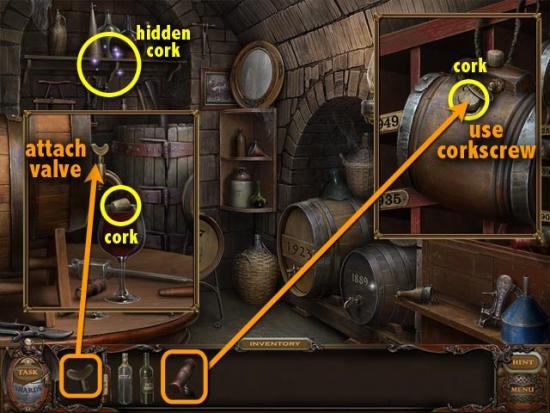
Use the corkscrew to lift the cork from the barrel on the top right. Use the valve to fill the wine glass on the table so that the cork floats to the top. The last cork is in a hidden object scene on the shelf.
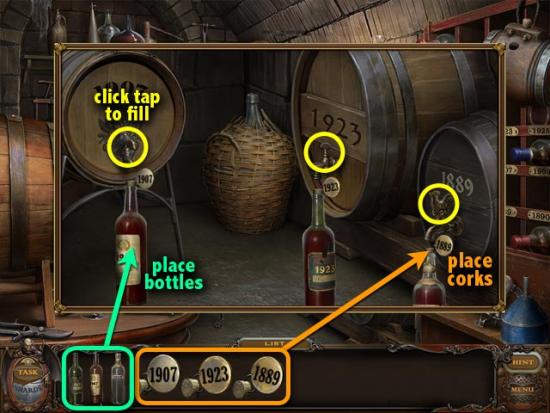
Zoom in on the three wine barrels. Place the bottles under the taps, according to the years on their labels. Click the taps to fill them up, then plug in the appropriate cork stoppers.
Place the bottles in the wine collection. Find the niches on the wall that correspond to the dates on the bottles, and put them in.
Collect the mirror shard. Take the shard from beneath the wine collection and place it into the mirror.
Move forward. Click on the glowing mirror.
You have 3 bottles: 3L, 5L, 8L. Divide 8L of wine by two. Click on two containers to transfer wine from one to the other. Move the wine around until you have 4L each in the two larger containers. See solution below.
Dust off the mirror to travel to the next room.
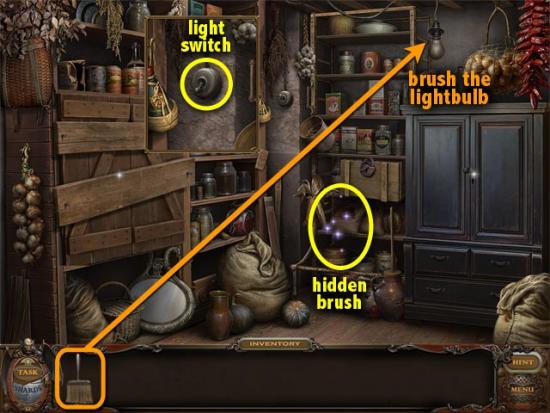
Turn on the lights. Click on the light switch, but you can’t turn it on until you find a brush. The brush is in a hidden object scene in the shelf. Use the brush to clean the lightbulb, then click on the light switch again to turn it on.
Tip: If you zoom in on the boarded up cupboard, just click downwards on the List / Inventory area to return to the room.
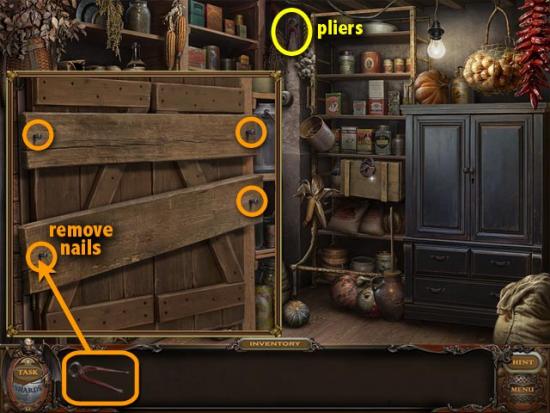
Open the boarded up cupboard. Take the pliers from the wall and zoom in on the cupboard. Use it to remove the four nails. Click on the cupboard to open it.
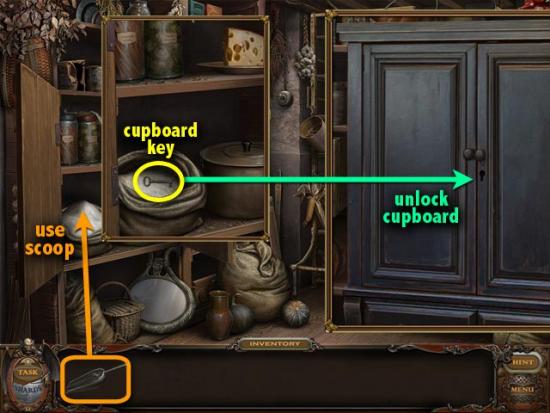
Catch the mouse: Get the key. Click downwards to return to the room. Pick up the scissors from the basket. Use it cut the red string off the sack. Go back and open the drawer to find a scoop.
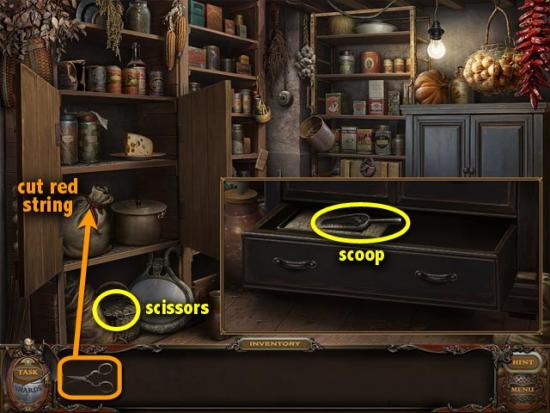
Scoop out the sugar from the sack three times, until a key remains. Take the key and use it to unlock the black cupboard.
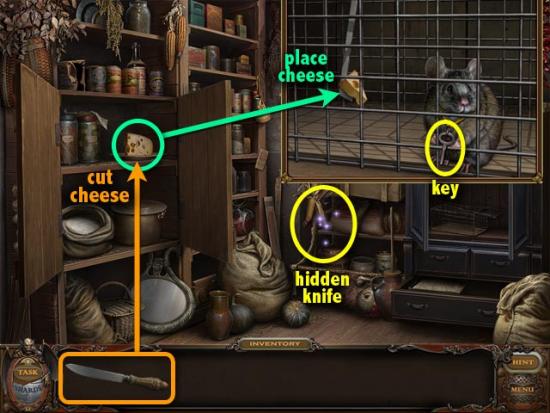
Find some bait for the trap. Click on sparkling shelf to find a kitchen knife. Use the knife to cut a piece of cheese. Place the cheese on the hook inside the cage. Exit the cage. After a few seconds, a mouse will appear. Take the key hanging from its neck.
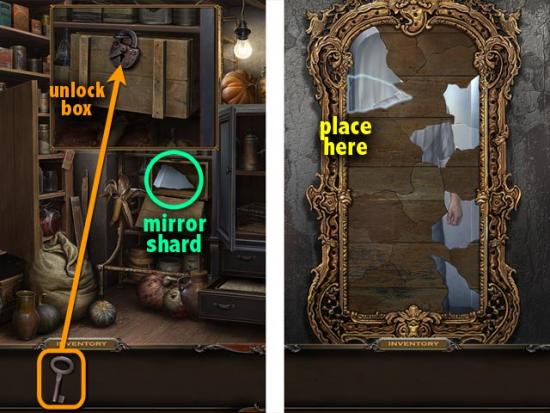
Collect the mirror shard. Unlock the padlocked box. Take the shard inside and place it on the mirror.
Enter the mirror. Click on the glowing mirror.
Dust off the mirror to travel to the next room. This time, clean the frame as well.
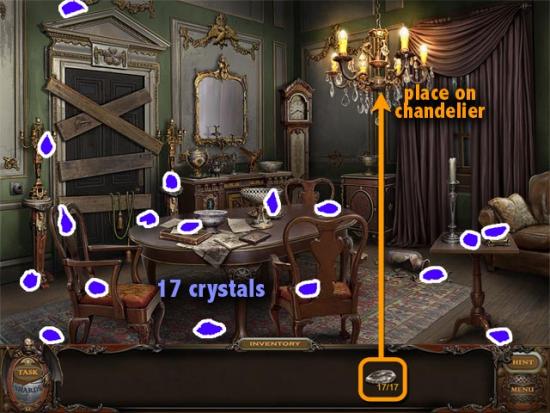
Find the chandelier’s crystal tears and attach them. Locate 17 crystals around the room. Zoom into the chandelier and place the crystals on it.
Find where secrets are stored. Take the tassel hanging from the boarded up door. Tie back the curtain to reveal a safe. Click on the safe.
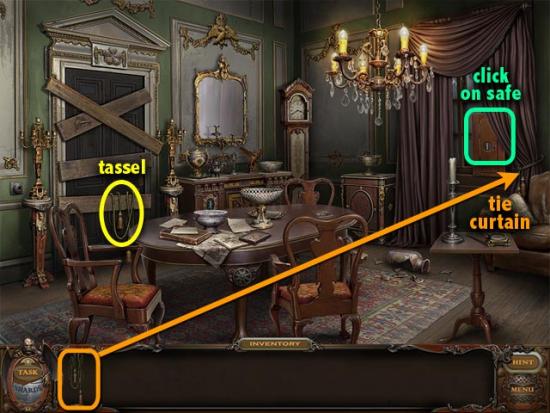
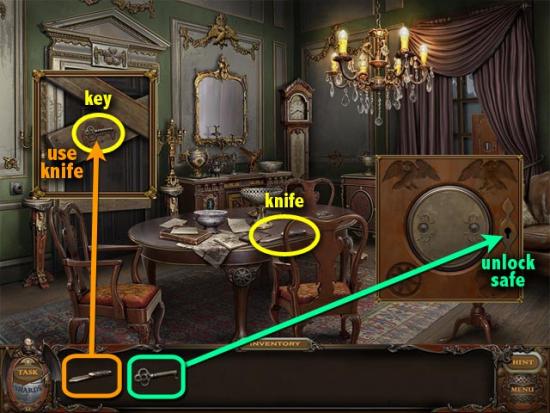
Open the safe: Insert the key. Take the knife on the table and use it to remove the key from the board. With the key, unlock the safe.
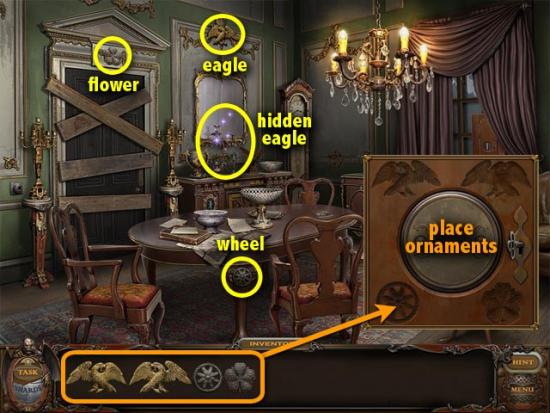
Find and replace the missing ornaments. Find the wheel, flower and eagle in the room. Click on the sparkling sideboard table to find the other eagle. Place all the ornaments on the outlines on the safe.
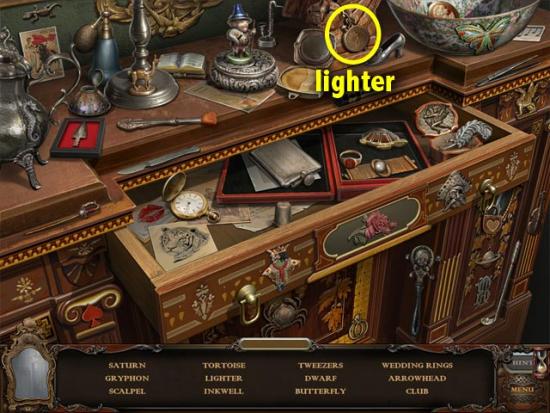
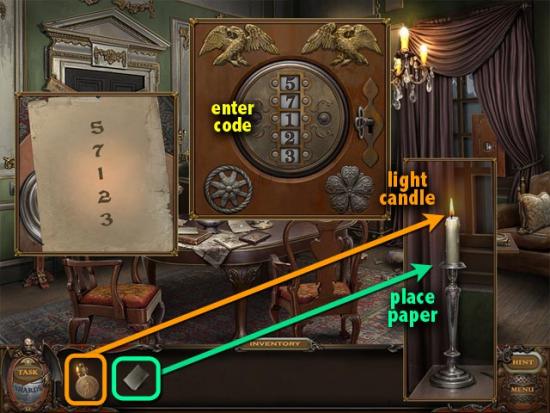
Find the code. Move the pillow on the couch aside to reveal a piece of paper. Take the paper. Read the note on the table. It says “Fire will make paper talk.” Click on the sparkling sideboard table to find a lighter.
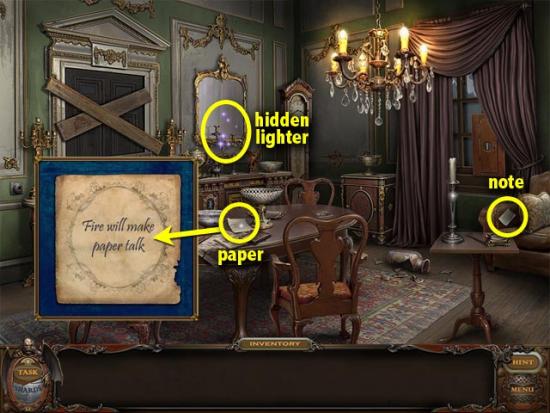
Light the candlestick with it, and place the paper on the flame. After a few seconds, a numeric code will appear. Enter that code on the safe.
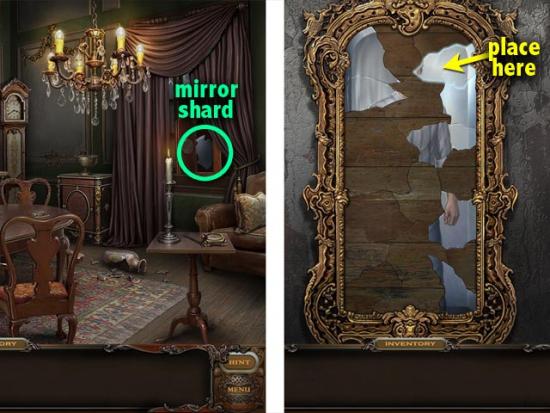
Collect the mirror shard. Take the shard from within the safe and place it on the mirror.
Enter the mirror. Click on the glowing mirror.
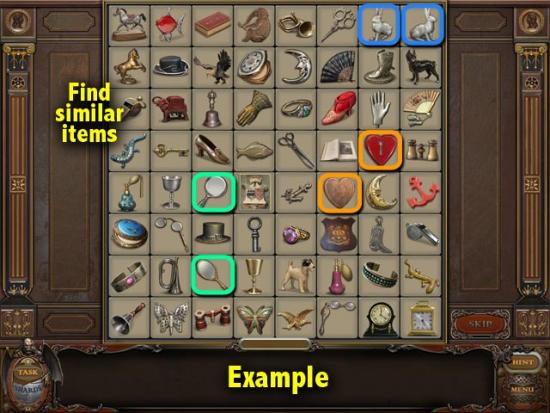
Find similar pairs of items. There are two objects of a kind on the board, such as 2 hearts, 2 mirrors, 2 rabbits. They are not identical, but similar in nature. Click on matching pairs until the board is empty.
Dust off the mirror to travel to the next room.
Find the recipe. Click on the stack of plates several times to remove them from the kitchen counter, until you see the recipe underneath. Read it.
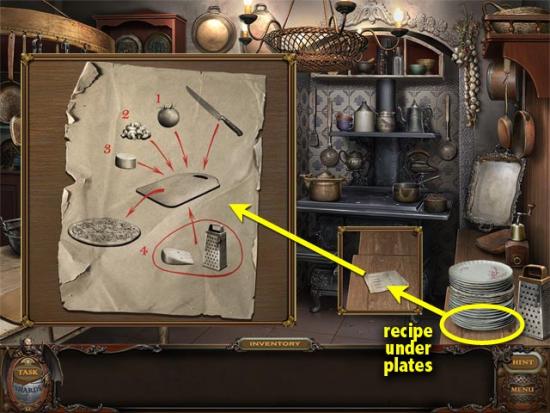
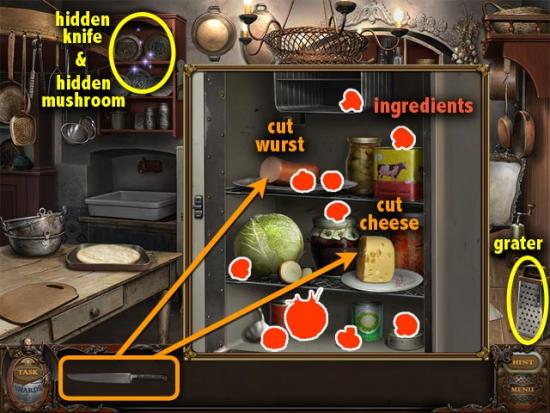
Find the ingredients and prepare the recipe. Take the grater from the counter on the right. Click on the sparkling china cabinet to find a knife. Open the refrigerator to collect the tomato and 9 mushrooms. Cut a piece of the cheese and wurst (sausage). Click on the sparkling china cabinet again to find the last mushroom.
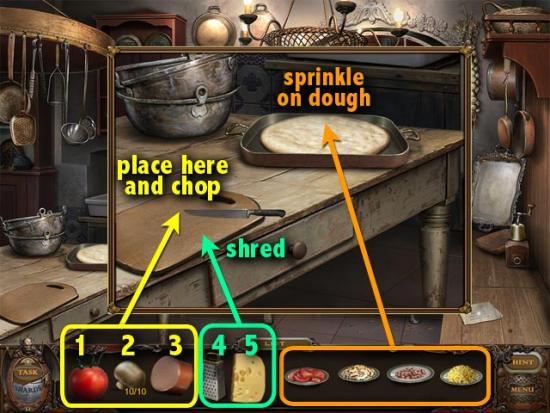
Zoom in on the kitchen table. Follow the steps on the recipe:
Cook the pizza in the oven. Take the pizza from the table, open the oven door and slide the pizza inside.
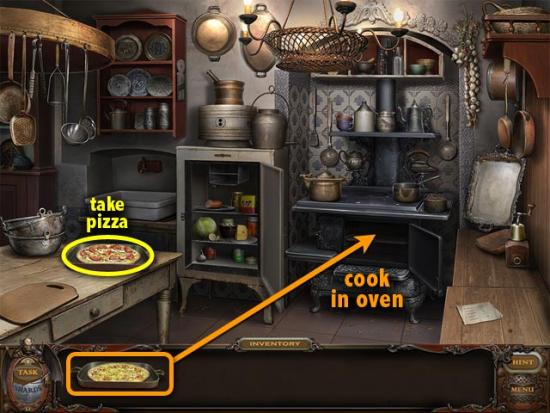
Repair the oven. Rotate the discs with pipes to send gas to all six burners. Starting with the outermost disc, click the discs to rotate them. Make sure the paths from the burners are connected to the center.

Take the pizza. Click on the oven to remove the finished pizza. Yum!
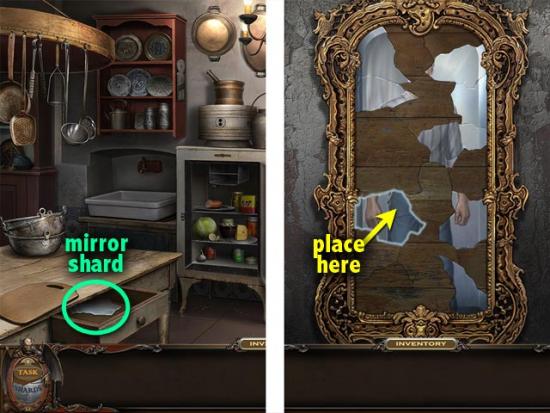
Collect the mirror shard. Open the drawer of the kitchen table. Take the shard and place it on the mirror. Click on the glowing mirrorred tray.
Dust off the mirror to travel to the next room.
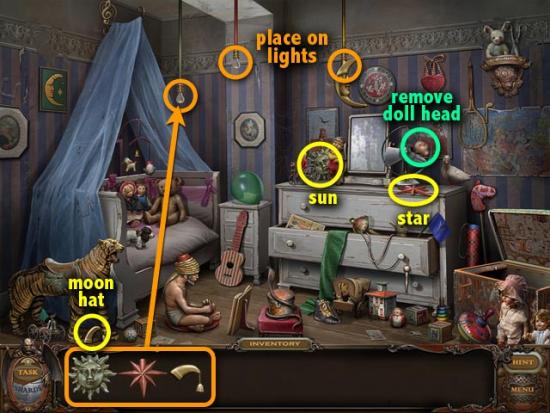
Install 3 lamp shades. Remove the doll’s head from the fan. Find the star, sun, and moon hat. Place them on the hanging lightbulbs and moon lamp.
Open the snake charmer’s box. Find the key. Click on the sparkling toy trunk to find the ice pick. Use it to pop the green balloon. Read the note inside: “Teddy bear has a key”. Take the scissors on the top-right shelf. Cut a hole in the bear and take the green key inside.
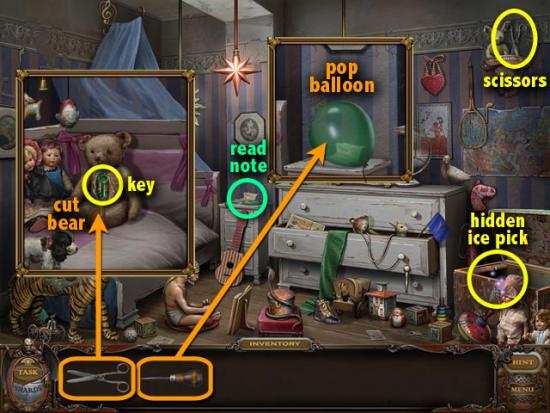
Open the snake charmer’s box: Make the snake sleep. Click on the sparkling toy trunk to find the flute. Collect five music symbols in the room.

Zoom in on the snake charmer. Give him the flute. Click on his sheet music. Place the music symbols on the staff. Once the snake is asleep, use the key to unlock the round box.

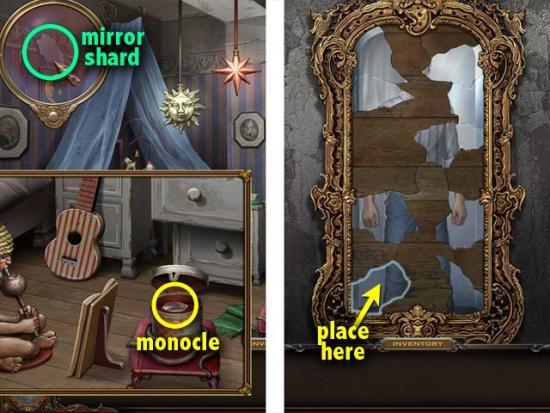
Collect the mirror shard. Take the monocle from the round box. Use the lens to search for the shard. Take the shard and place it on the mirror. Click on the glowing mirror.
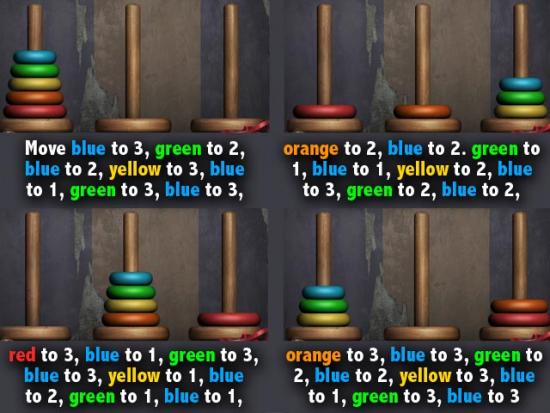
Move the rings from the left to the right. You cannot place a larger ring on a smaller one. Click on a stack to remove the topmost ring, then click another stack where you want to move the ring to. Keep moving the rings around until all the rings are on the rightmost pole. This is a classic Hanoi tower puzzle. The shortest solution is done in 31 moves.
Dust off the mirror to travel to the next room.
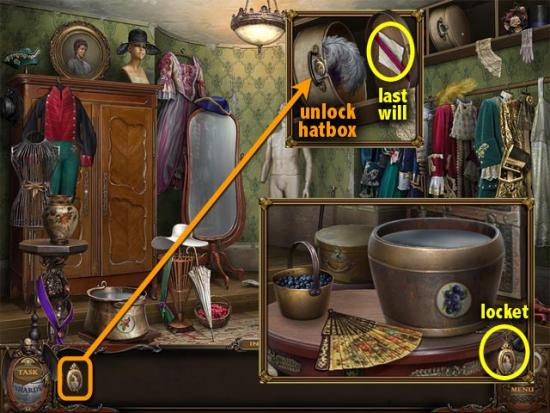
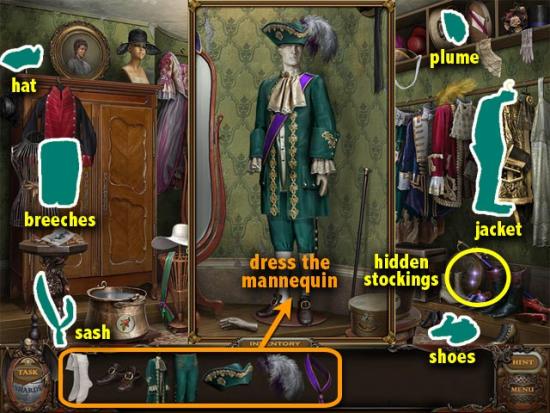
Find the last will of the soul that is moaning here. Zoom in on the bottom right bucket and take the locket. Use it to unlock the hatbox on the shelf above. Read the note tucked inside: the Duke’s last will is to be well-dressed.
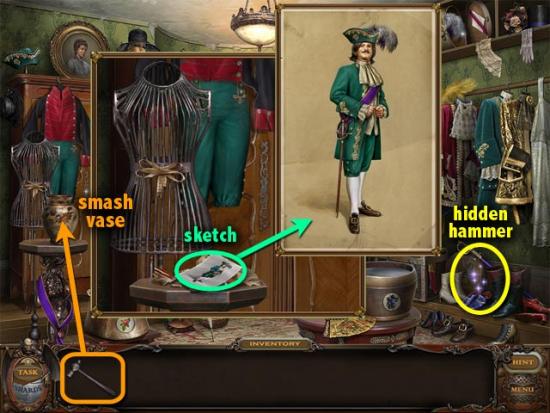
Find the sketch of Duke Remington’s desired wardrobe. Click on the sparkling shoes to find the hidden hammer. Zoom in on the closet. Smash the vase with the hammer and examine the sketch.
Dress the mannequin according to the sketch. Click on the sparkling shoes to find the stockings. Around the room you’ll find the sash, breeches, hat, jacket, plume and shoes, as shown in the sketch. Place these on the mannequin.
Find the duke’s rapier: Help the portrait get dressed. Take the white hat, white ribbon, rasberries and blueberries. Drop the rasperries into the bucket, then dye the hat pink. Do the same with the blueberries to create a blue ribbon.
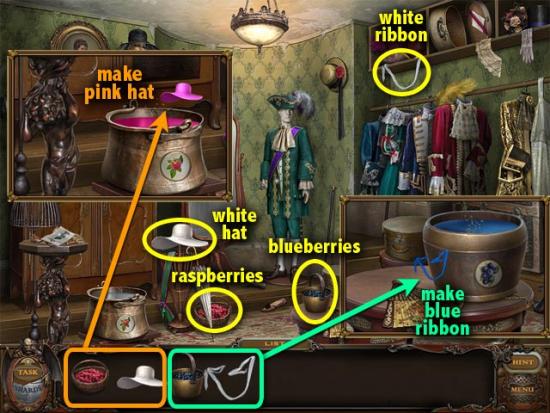
Put the pink hat and blue ribbon on the woman’s portrait, and she’ll give you the key. Use it to unlock the closet. Open the closet and get the rapier. Place the rapier on the mannequin.
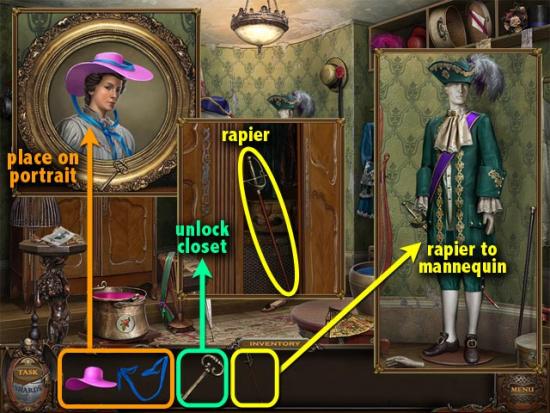
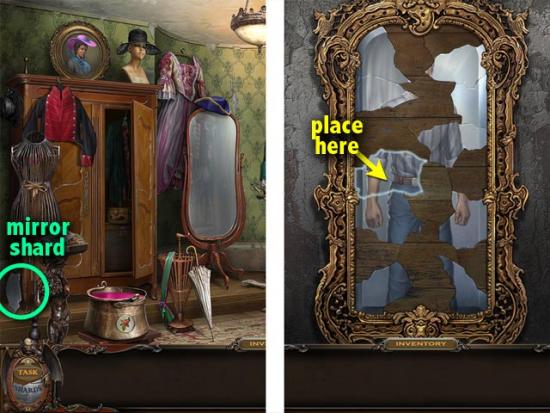
Collect the mirror shard. Take the shard from the left side of the closet and place it on the mirror. Click on the glowing mirror.
Put all the images in their proper place. To start, move the black-and-white images aside so you can see the area clearly. Place each one into its matching outline. An image will color in when placed correctly.
Dust off the mirror to travel to the next room.
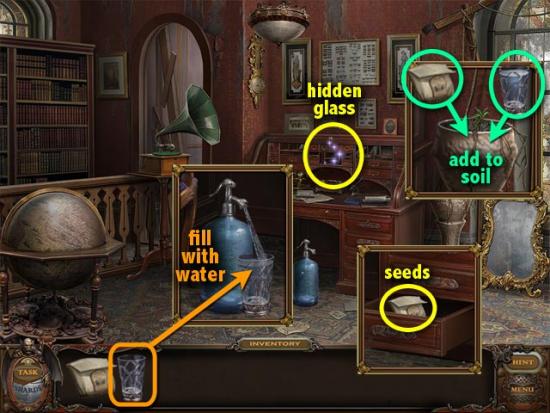
Cultivate the plant. Open the desk drawer to find the seeds. Click on the sparkling desktop to find the empty glass. Place the glass on the blue water bottle. Plant the seeds in the planter, then add water.
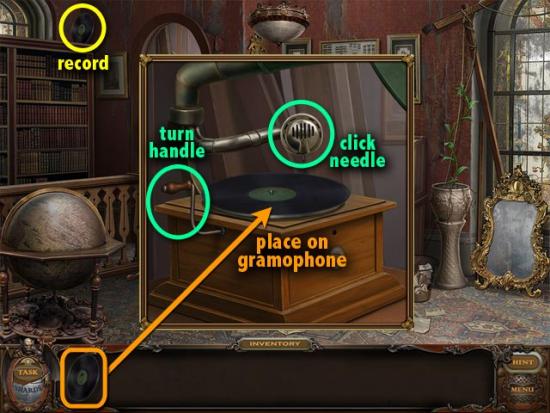
Take the record above the bookcase and place it on the gramophone. Click the handle to wind up the gramophone, then click the needle to play the record. Wait for the plant to grow so it can reach the fly swatter above it. The fly swatter will fall into your inventory automatically.
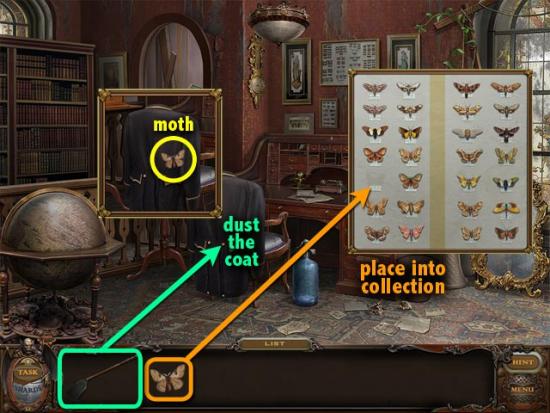
Collect the mirror shard. Use the fly swatter to dust the musty old coat several times until a moth flies out. Take the moth and place it into the moth collection on the wall.
Click on the sparkling desktop again to find the key. Use the key on the lock under the globe. Take the shard inside the globe and place it on the mirror. Click on the glowing mirror.
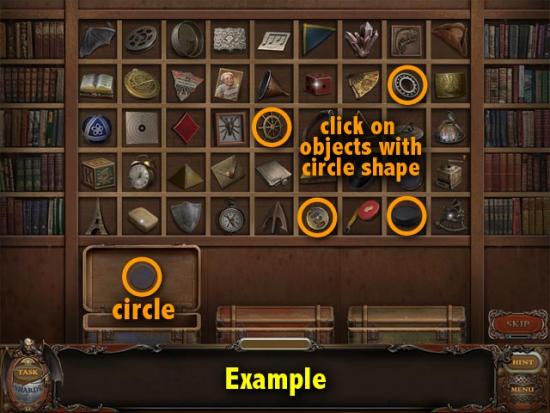
Put the items into the boxes according to their shapes. Open a box to see the shape on its lid (circle, square or triangle). Then click all the objects that resemble that shape. If you click on a wrong object, the box will slam shut, so just open it again.
Dust off the mirror to travel to the next room.
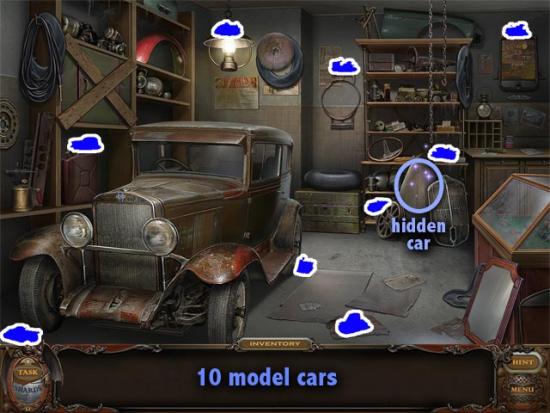
Find all the model cars and restore the collection. Click on the sparkling shelf to find a car. Find the other 9 cars around the room.
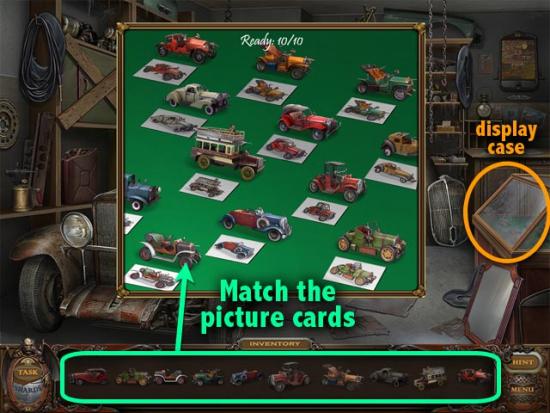
Click on the glass display case. Place the cars above their matching picture cards.
Air up the tires to reach the jack. Click the sparkling shelf again to find the pump. Take the 4 deflated tires around the room. Zoom in on the inflated tire on the trunk. Place a deflated tire on top of it and pump it with air. Do the same for the 3 other deflated tires. Take the jack on the topmost shelf.
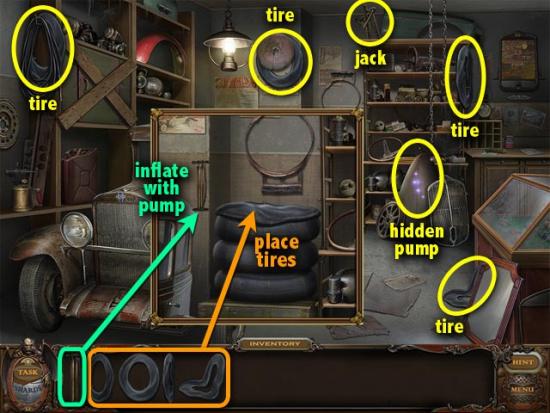
Use the jack to lift the car. Place the jack under the car. Click on its handle to raise the car.
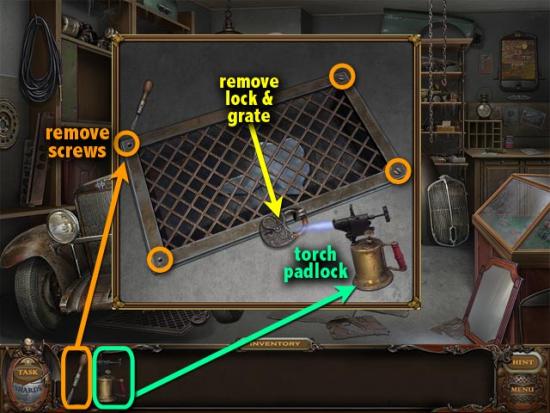
Collect the mirror shard. Find the crowbar and blowtorch in the room. Use the crowbar to open the boarded up cabinet. Take the screwdriver inside.
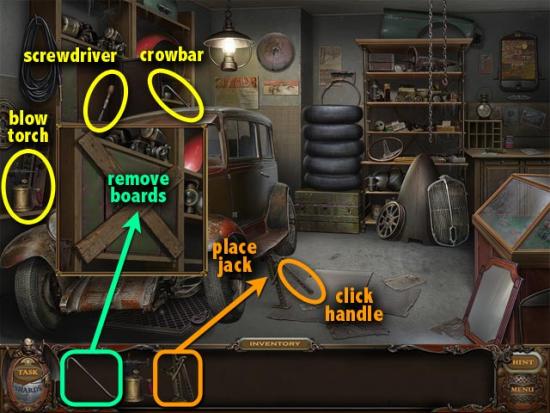
On the grate below the car, remove the 4 corner screws with the screwdriver. Then melt away the padlock with the blowtorch. Click the lock to remove it, and open the grate.
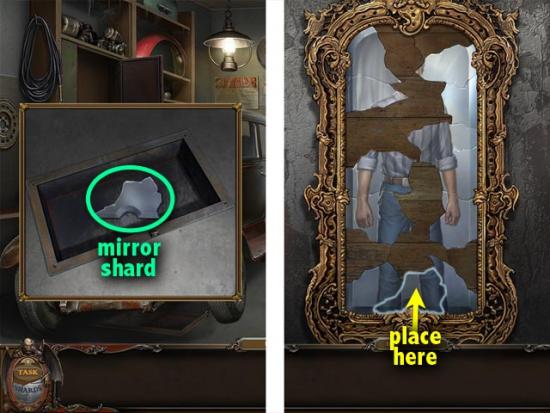
Take the mirror shard inside and place it on the mirror. Click on the glowing mirror.
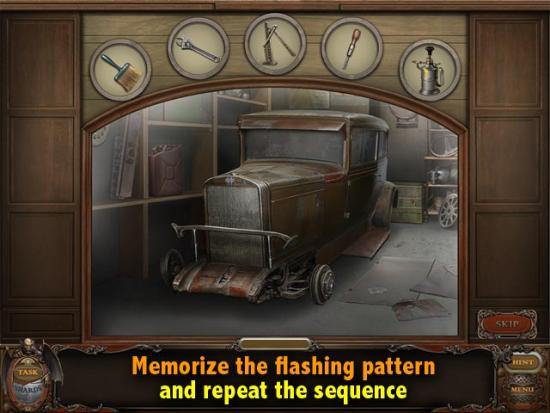
Watch the light pattern played on the tools, and then repeat it by clicking them in the same order. This is a Simon Says game. Memorize the pattern and repeat the sequence. It starts with 3 tools, then the pattern gets longer, up to 7 tools. You may want to use a pen & paper to jot down the sequence, or wait till you can Skip.
Dust off the mirror to travel to the next room.
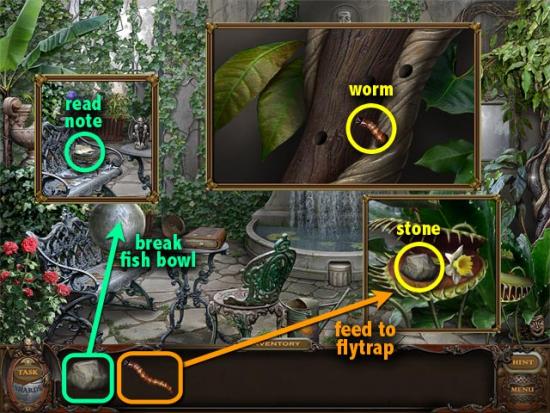
Get the note from the fish bowl. Click on the tree trunk on the right to find the worm. Feed it to the Venus Flytrap plant. Take the stone from the plant’s mouth. Use the stone to break the fish bowl. A chimera will appear. Examine the note on the bench.
Turn off the waterfall. Pick up the chimera statue from the table. Place it on the pedestal at the front of the fountain.

Discover the secret of the flowers. Find 8 types of flowers scattered around, including one inside the book and one under the heart-shaped leaf. Click on the sparkling area of vines to find the clippers. Use the clippers to cut off a red rose. Click on the sparkling vines again to find a glove. Use the glove to pluck the thorny pink thistle.
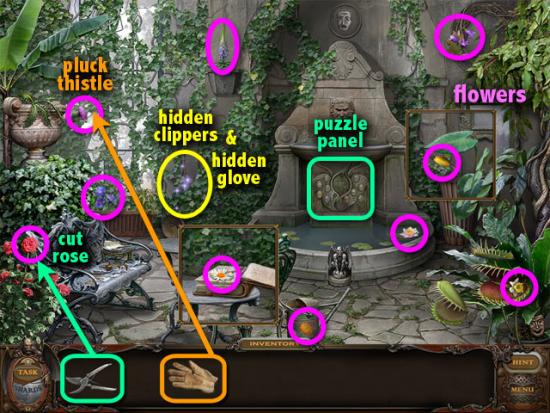
Click on the panel at the center of the fountain. Place the flowers on their matching silhouettes.
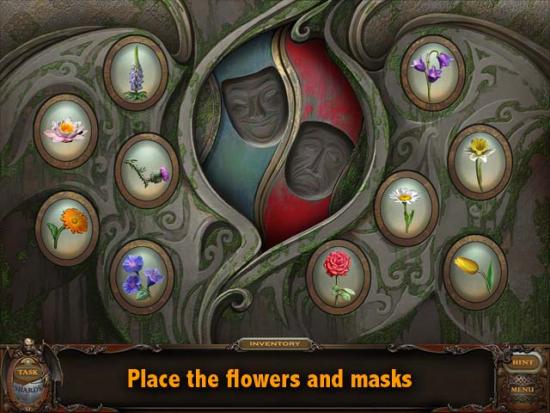
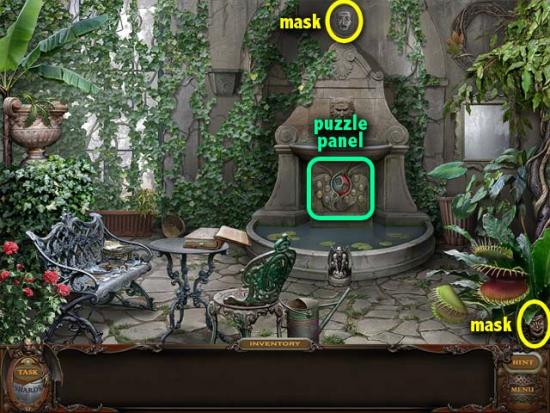
Insert the theater masks. Exit the puzzle by clicking on the bottom of the screen. Take the sad mask above the fountain, and the happy mask below the Venus Flytrap plant. Return to the puzzle to put them in.
Collect the mirror shard. Take the shard and place it on the mirror. Click on the glowing mirror.
Dust off the mirror to travel to the next room.
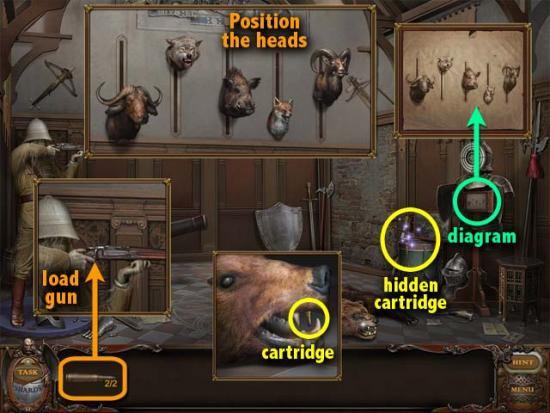
Set the animal heads in the right position. Click on the sparkling drum to find a cartridge. Click on the bear’s head to take the other cartridge from his mouth. Place a cartridge into the hunter’s gun. After he shoots, place the other cartridge in.
The target’s armor will open up. Click on it to see a diagram of how to position the animal heads. Zoom in on the wall and move animal heads to the right spots (from L-R: bottom-top-middle, bottom, middle).
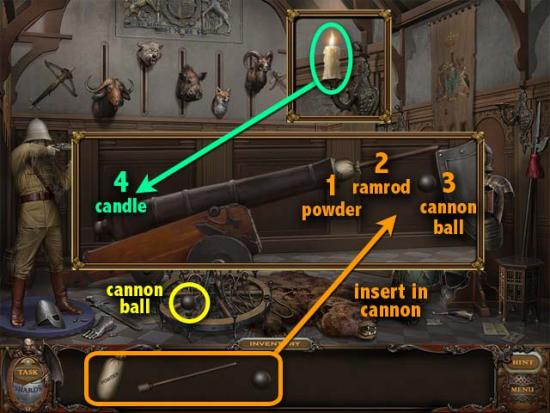
Fire the cannon: insert the powder and cannon ball. Click on the sparkling drum to find the ramrod. Open the knight’s helmet to find the powder. Take the candle and candlestick from the walls, and install them on the empty spot between the two banners.
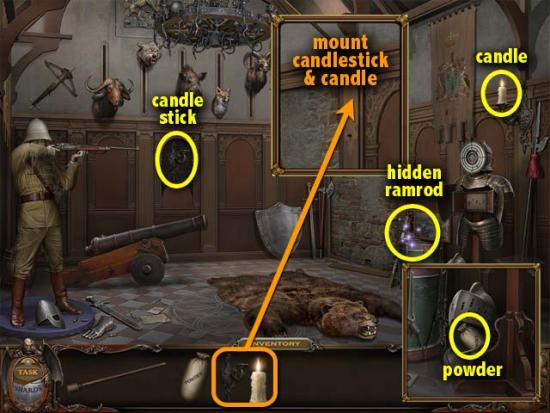
When the chandelier falls, pick up the cannon ball. Assemble the cannon:
Light the cannon’s wick. Take the candle from the wall and place it on the cannon’s wick. Boom!
Collect the mirror shard. Take the shard from the hole in the wall and place it on the mirror. Click on the glowing shield.
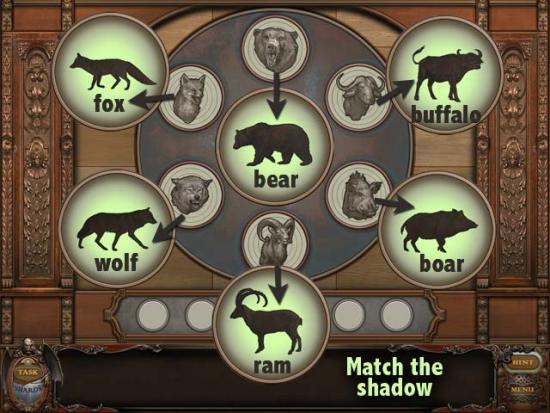
Shoot the corresponding animal shadow. A shadow will appear in the center. Figure out which of the 6 animals it is, and click on it. If correct, the barrel will turn white. If wrong, it will turn grey and you lose the round. To win, you need to get all the answers correct.
Dust off the mirror to travel to the next room.
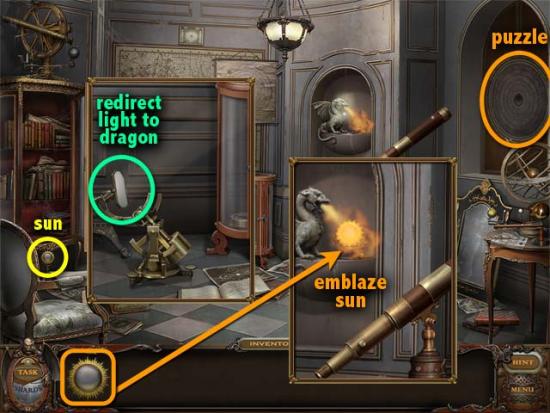
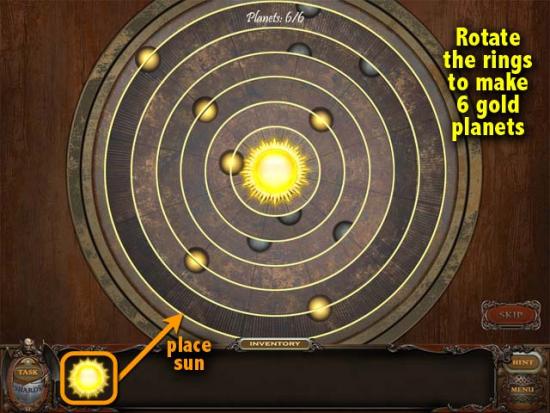
Open the window: Insert the sun emblem. Click the map on the left chair to uncover the sun. Take the sun. Zoom in on the gold mirror device on the floor. Redirect the mirror so that the beam of light falls on the dragon, making it breathe fire. Zoom in on the dragon and place the sun in the path of the fire. Retrieve the fiery sun. Click on the round puzzle on the wall and insert the sun in the center.
Align the planets. Rotate the rings until you have 6 gold planets, one in every orbit.
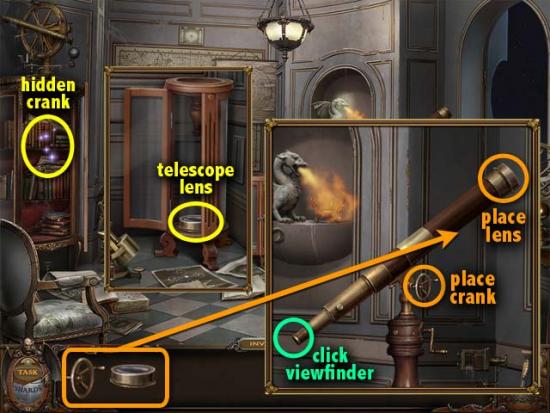
Repair the telescope. Click on the sparkling bookcase to find the crank. Click on the cylindrical glass case. Lift the latch and open the door to get the telescope lens. Place the lens and the crank on the telescope. Click on the viewfinder.
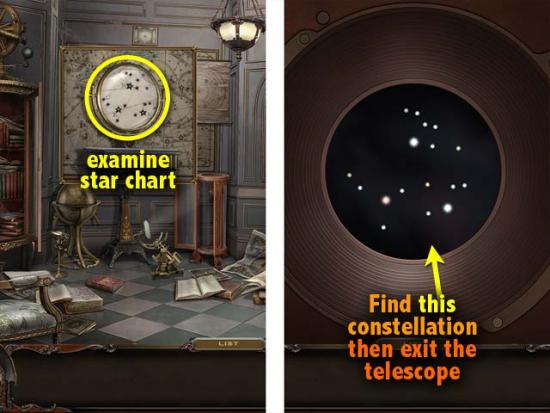
Set the correct telescope coordinates. Return to the room and examine the star chart’s magnifier. Take note of the constellation, and find it on the telescope’s viewfinder. Keep clicking until you reach a constellation with 3 stars forming a triangle. Exit the telescope when you’ve found it.
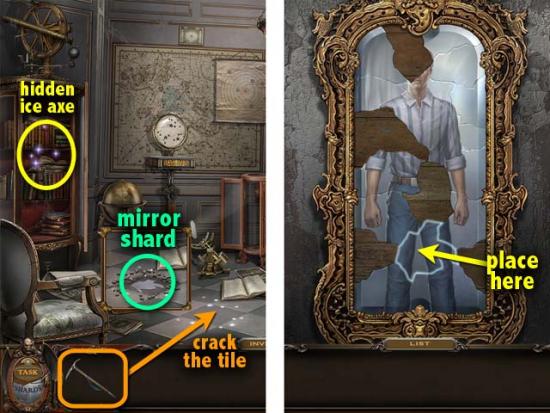
Collect the shard. Click on the sparkling bookcase again to find the ice axe. Use the ice axe on the tile with lighted spots from the telescope. Crack the tile several times until the mirror shard is revealed. Take the shard and place it on the mirror. Click on the glowing mirror.
Dust off the mirror to travel to the next room.
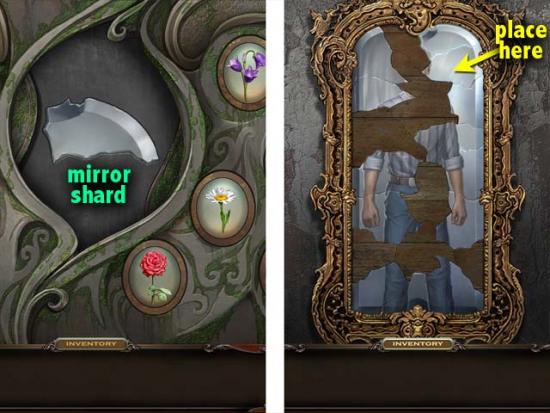
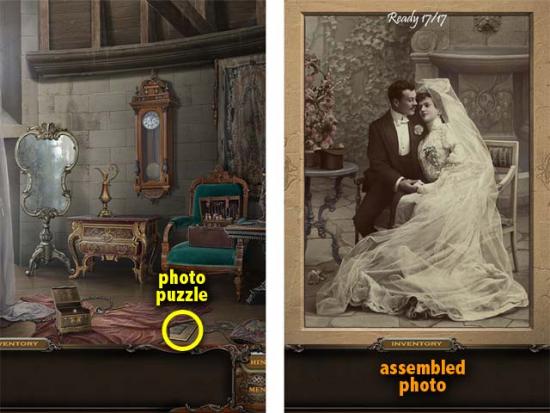
Restore the photo on the floor. Click on the photo under the pink sheet on the floor. Assemble the puzzle. The pieces will lock when in the right place.
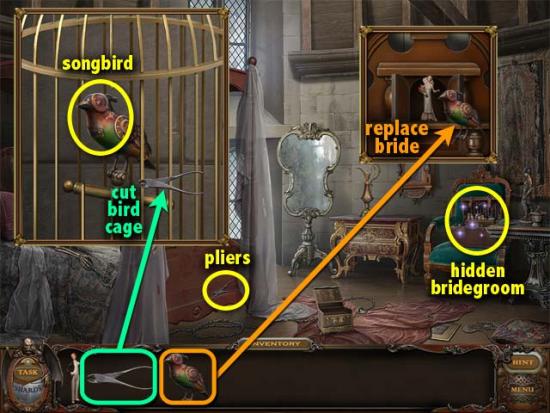
Open the jewelry box. Click on the sparkling toolbox to find the bridegroom. Take the pliers at the foot of the bed and use it to cut 3 bars off the bird cage. Take the songbird. Zoom in on the clock and open the doors. Put the songbird in place of the bride. The bride will automatically go into your inventory.
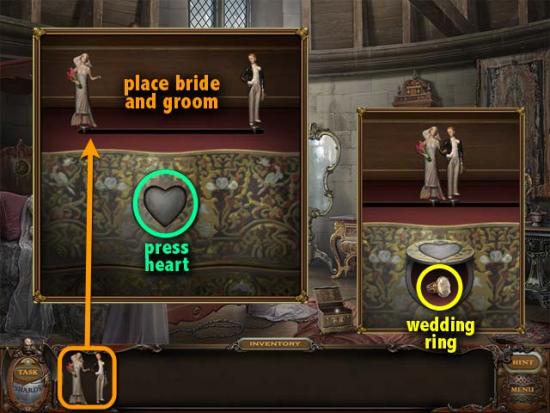
Click on the jewelry box. Place the bride and groom on the posts (bride on the left, groom on the right). Press the heart. When the couple unites, take the wedding ring that appears.
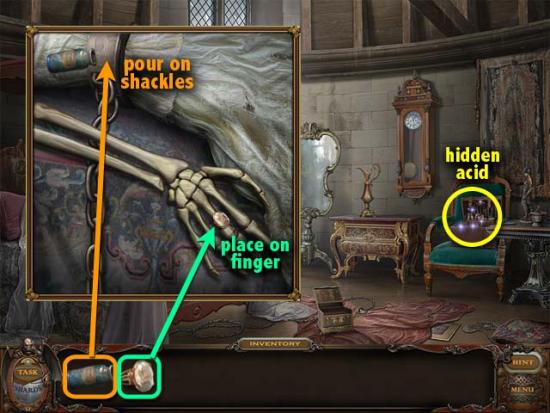
Free the bride from the chains. Click on the sparkling toolbox to find a vial of acid. Dissolve the shackles with the acid. Place the wedding ring on the skeleton’s finger.
Collect the mirror shard. Click on the skeleton’s veil to reveal the shard. Take the shard and place it on the mirror. Click on the glowing mirror.
Dust off the mirror to travel to the next room.
Open the sarcophagus. Find 2 zodiac signs in the room. Click on the sparkling pile of rocks to find a mirror shard. Place it on the mirror. Click the wall shelf on the top right to solve a puzzle.
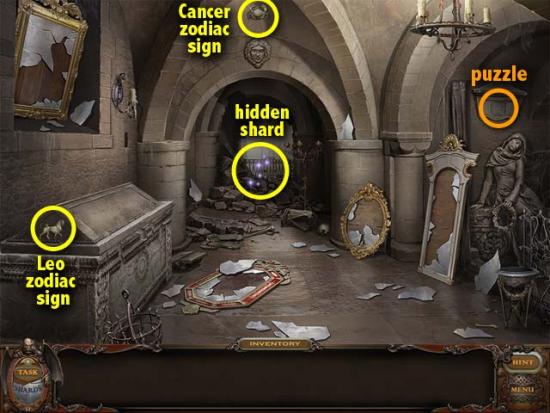
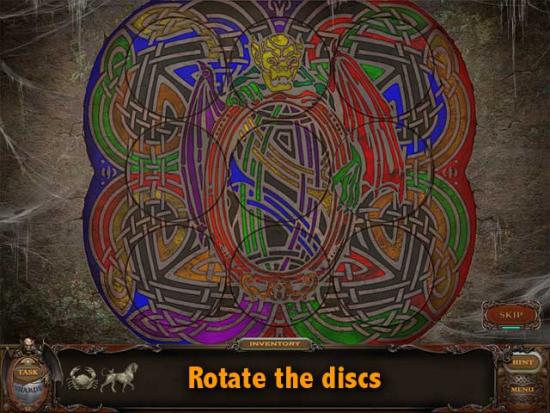
Rotate the discs to align the colored patterns and complete the image.
The chimera appears and you receive a shard. Place it on the mirror. Click on the sparkling pile of rocks again to obtain another shard to place on the mirror.
Ten glowing mirror shards appear. Click on a shard to enter a room you’ve previously visited in the manor. Each room has a sparkling hidden object scene where you’ll find a zodiac sign. Below is a list of what symbols to look for.
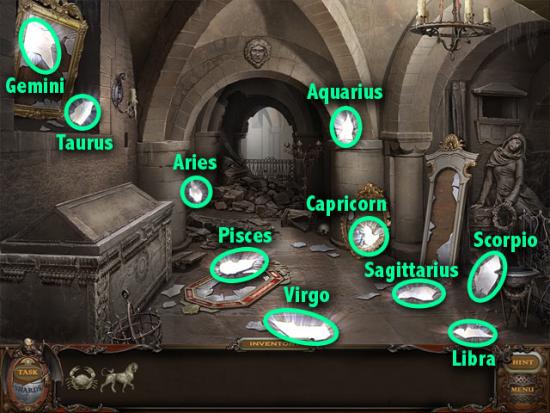
Keep visiting rooms and finding zodiac signs until you have collected them all. Tip: your hint gets automatically recharged whenever you return to the sarcophagus.
When all 12 signs are complete, click on the round carving on the sarcophagus. Place in the zodiac signs to match their silhouettes.
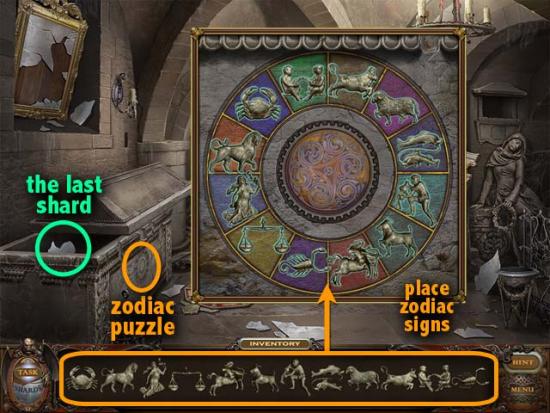
Collect the mirror shard from the sarcophagus. Take the final shard and place it on the mirror to complete your reflection. Finally, the prisoners of the mirror are now free and so are you (or perhaps not).
Congratulations! You have completed Haunted Manor: Lord of Mirrors!
This chapter is only available in the Collector’s Edition.
Once you have have completed the game, you are taken to the Main Menu. The left side door of the manor is now open. Enter to return to the manor and experience an alternate ending.
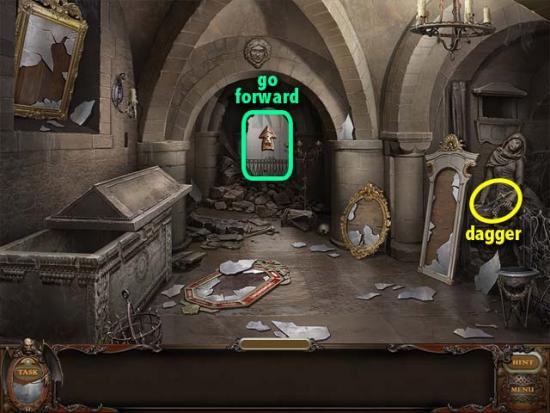
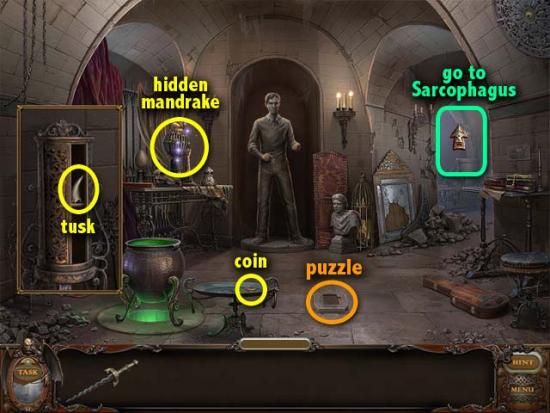
Cook the potion. Take the dagger from the woman’s statue on the right. Walk past under the arch to the next room.
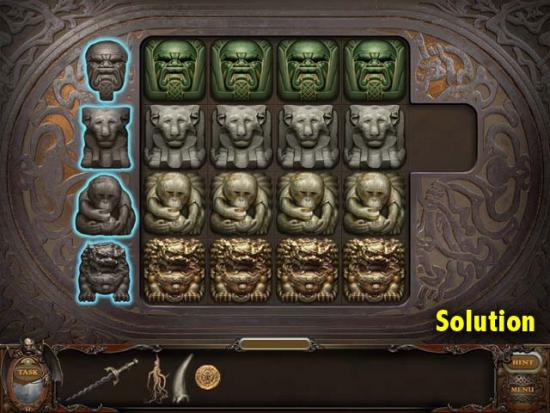
Click on the sparkling table to find a mandrake. Open the little round cabinet on the left to find a tusk. Take the gold coin from the tray beside the cooking pot. Click on the raised tile on the floor to solve a puzzle.
All the tiles in each row should match the animal / creature on the left. Click on a column to move it downwards. You can move a tile left or right only if it is beside an empty space. Completing this puzzle will activate the green flame and cooking pot.
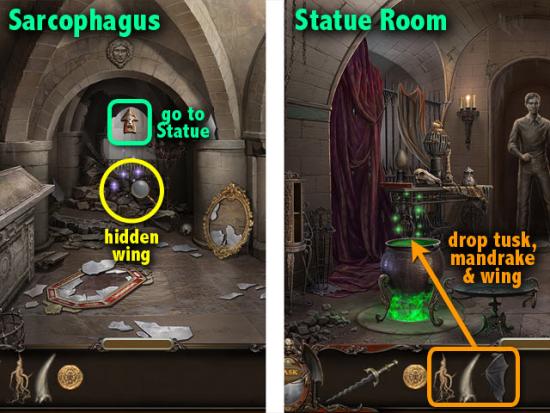
Go back to the sarcophagus room and click on the sparkling pile of rocks to find a wing. Tip: The magnifying glass cursor lets you examine or zoom in on an object. The Up arrow lets you move forward to the next room.
Go back to the inner room. Drop the ingredients into the cooking pot: mandrake, tusk, and wing.
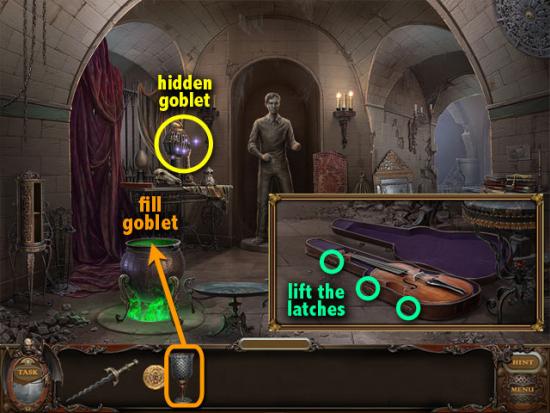
Open the underground. Click on the sparkling table to find a goblet. Fill the goblet with some green potion. Zoom in on the violin, open the 3 latches, and lift the lid, however you can’t play it without a bow.
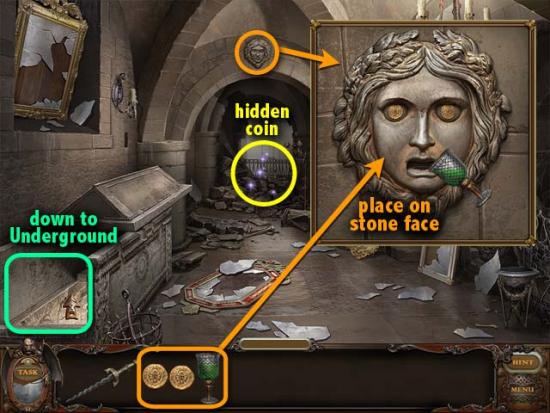
Exit to the sarcophagus area and click on the sparkling pile of rocks to find another coin. Zoom in on the stone face above the archway and click on it to open its eyes. Place the coins on its eyes and pour the green potion into its mouth. The sarcophagus opens, revealing a secret passage to the underground.
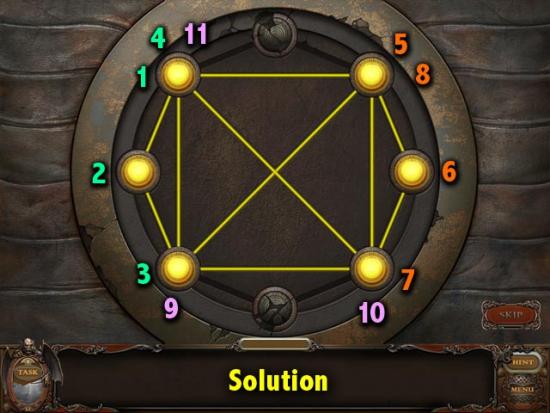
Make the monster dog sleep. Go down the stairs. Click on the sparkling treasure stash to find a violin bow. Take the red ruby from the bottom right. Click on the chair backrest to solve a puzzle.
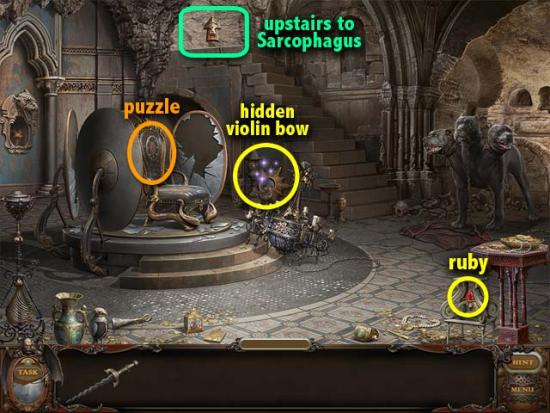
Turn all possible buttons and lines yellow, by clicking on them using a continuous, unbroken path. You may not use the same line twice, although you may click on a button more than once. Ignore the upper and lower cracked buttons, as well as the lines leading to them.
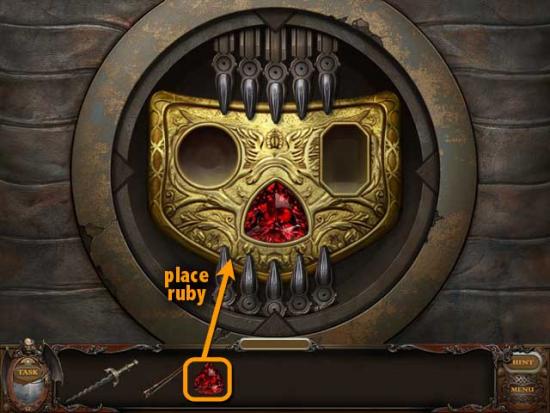
When the puzzle is solved, a golden medallion will appear. Place the ruby on the bottom triangle slot.
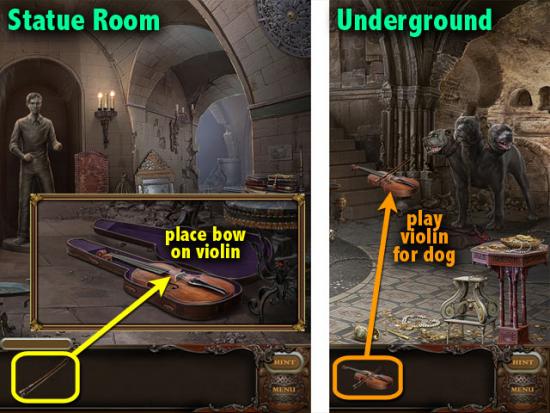
Go back upstairs to the Statue room. Now that you have a violin bow, you can play the violin. Place the bow on the violin, and the violin will automatically go into your inventory. Go back downstairs and play music for the monster dog to lull him to sleep.
Find missing pieces for the statue. Take the cloak from under the sleeping dog. Click on the sparkling treasure stash to find a scepter. Zoom in on the niche with the gargoyle. When you click on the crown, a metal grating suddenly slams down. Insert the dagger into the slot on the gargoyle’s head. When the grating lifts up, take the crown.
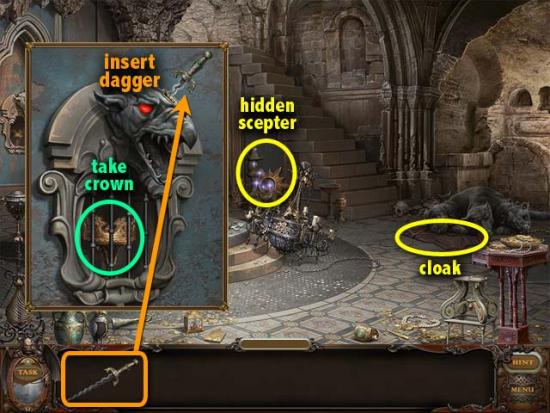
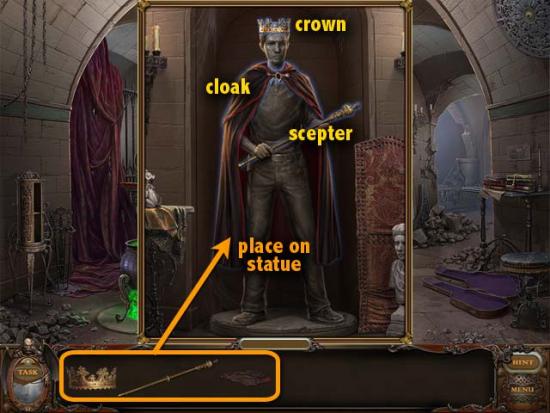
Go up to the Statue room. Place the crown, cloak, and scepter on the statue.
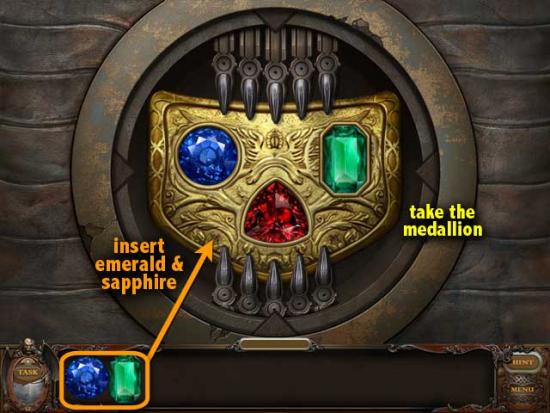
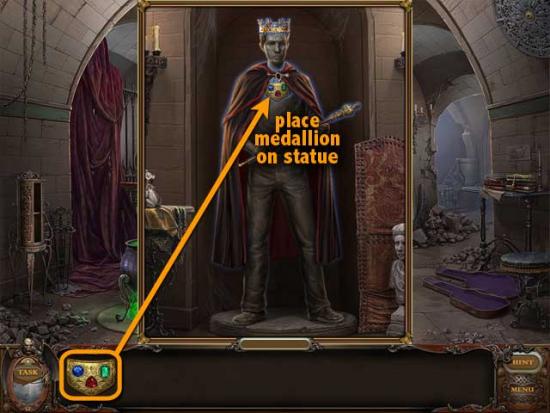
Click on the sparkling table to find a sapphire. Go downstairs and click on the sparkling treasure stash to find an emerald.
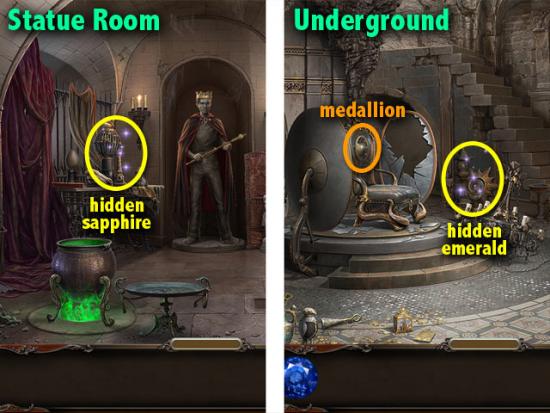
Place the emerald and the sapphire into the slots on the medallion. Take the medallion, go back upstairs and complete the statue.
Stan’s body and soul are now reunited, and the Haunted Manor is haunted no more.
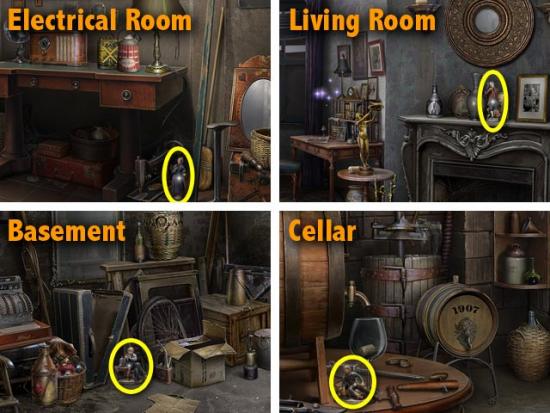
In the Collector’s Edition, you will come across figurines in some of the rooms. When you pick up a figurine, you’ll be taken to the ghost gallery to install it. You’ll then be able to view a short scene about one of the mirror’s victims. The 12 figurines are found in the following rooms: