![Digimon UP Tier List [Supports, Buddies, and Partners]](/wp-content/uploads/2026/07/digimon-up-tier-list.jpg "Digimon UP Tier List [Supports, Buddies, and Partners]")
Digimon UP Tier List [Supports, Buddies, and Partners]
These Digimon will get you UP the leaderboard.


![Haze Seas Boss Drops [Chances, Locations, and How to Spawn]](/wp-content/uploads/2026/07/haze-seas-boss-drops.jpg "Haze Seas Boss Drops [Chances, Locations, and How to Spawn]")

Welcome to the walkthrough for Haunted Hotel: Lonely Dream on Gamezebo. The Haunted Hotel: Lonely Dream is a hidden object game for the PC created by Specialbit. This walkthrough includes tips and tricks, helpful hints, and a strategy guide to complete Haunted Hotel: Lonely Dream.
Welcome to the walkthrough for Haunted Hotel: Lonely Dream on Gamezebo. The Haunted Hotel: Lonely Dream is a hidden object game for the PC created by Specialbit. This walkthrough includes tips and tricks, helpful hints, and a strategy guide to complete Haunted Hotel: Lonely Dream.
Main Scenes
Hidden Object Scenes and Mini-Games
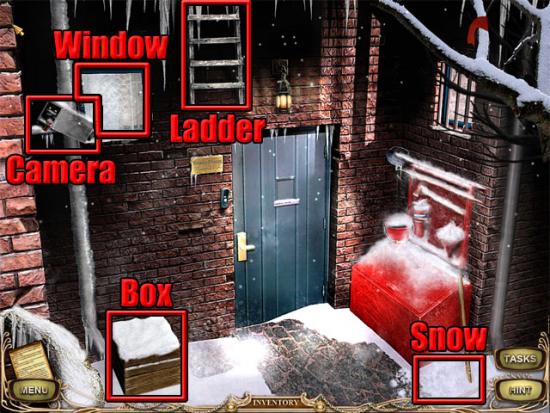
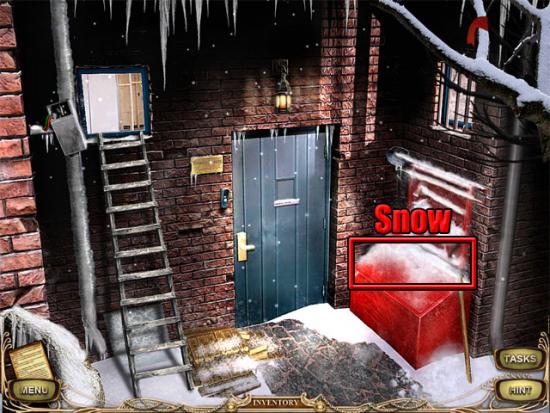
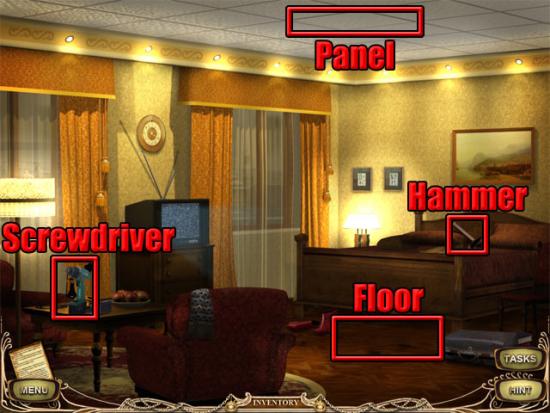
The game starts outside the hotel. Select the snow and a snowball will be added to the inventory. Use the snowball on the surveillance camera to break it. Move the box and take the screwdriver that was revealed. Select the ladder to move it down to the floor and then take the ladder. Use the ladder and the screwdriver on the window:

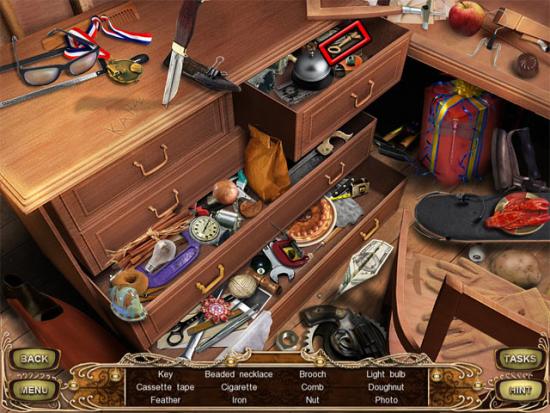
Climb through the window to enter the store room. Examine the sparkling dresser to enter a hidden object scene. Find the key:
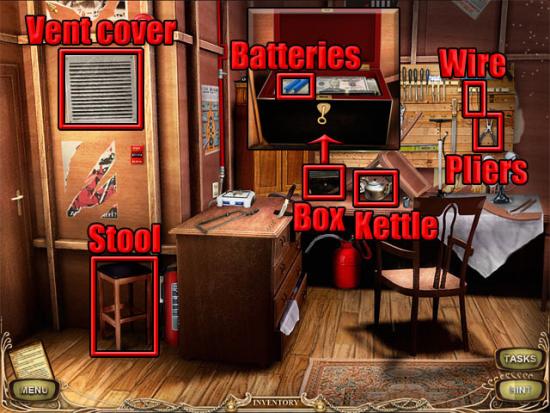
Find the remaining objects on the list and the key will be added to the inventory. Use the screwdriver on the vent cover. Take the stool, kettle, wire and pliers. Examine the small box, use the key on the lock in the close-up view and then take the batteries:
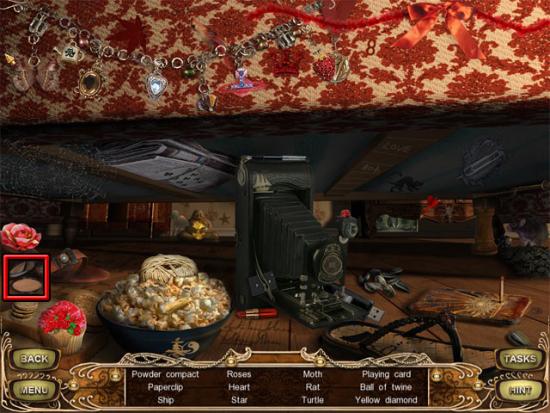
Go through the ventilation shaft to the living room. Examine the sparkling area on the red couch to enter a hidden object scene. Find the powder compact:
Find the remaining objects on the list and the powder compact will be added to the inventory. Take the key on the table. Examine the fireplace and in the close-up view take the lighter and the camera without batteries:

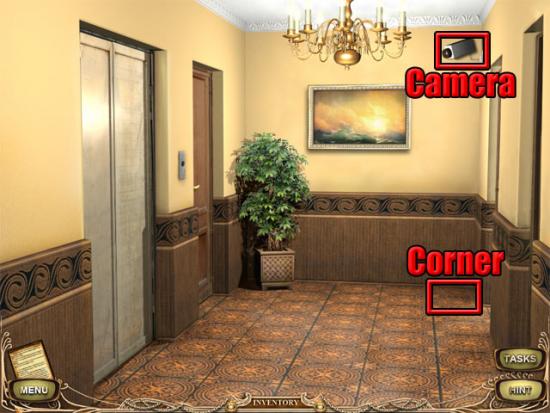
Move back to the storeroom and use the key on the locked door at the left side of the room. Go through the door to enter the hall. Use the stool on the corner of the floor below the camera:
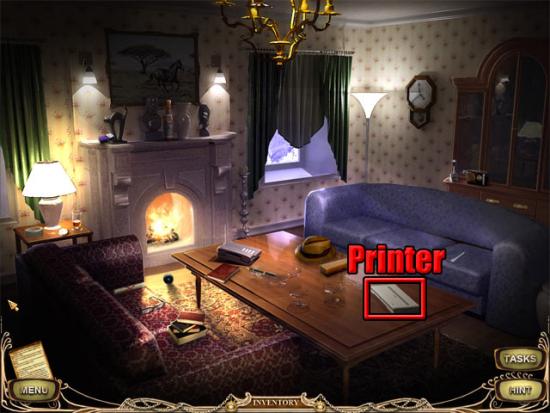
Combine the camera without batteries with the batteries in the inventory. Use the camera with batteries on the surveillance camera to take a photograph. Open the top-right door and go through the doorway to the den. Use the camera with photo on the printer:
Take the photograph from the printer. Return to the hall and use the wire and the photograph on the surveillance camera. Open the top-left door and enter the winter room. Examine the table and take the gas handle and the clamp in the close-up view. Examine the cable. Use the clamp on the cable in the close-up view and then use the pliers on the clamp:
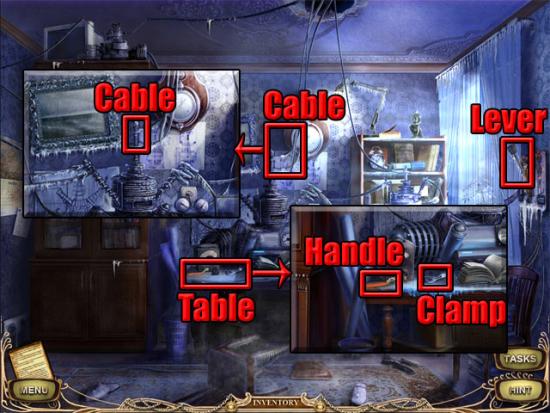
The lever is currently covered in ice and cannot be moved. Return to the back yard and use the kettle on the snow on top of the red container:
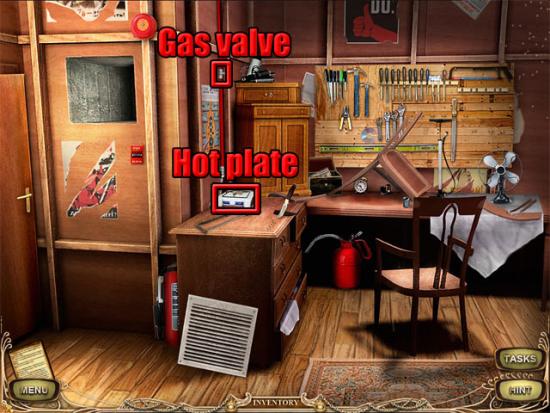
Return to the storeroom. Use the gas handle on the gas valve and then select the handle to turn it. Use the lighter and the kettle of snow on the hot plate:
Wait for the water to boil and then take the kettle of hot water. Return to the winter room and use the kettle of hot water on the lever. Select the lever to overload the machine.
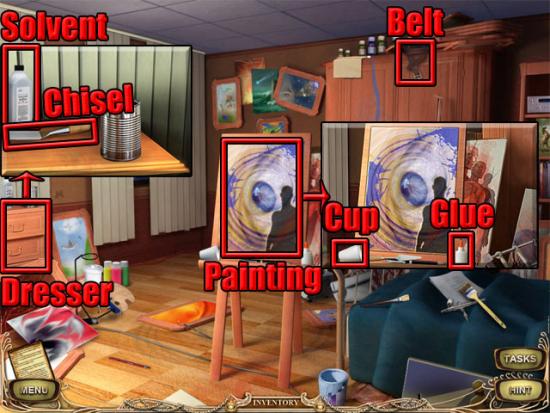
Return to the hall and press the elevator button twice to open the elevator doors. Enter the elevator to ascend to the next floor. Go through the top-right door to enter the artist’s room. Take the belt on top of the wardrobe. Examine the dresser and take the solvent and the chisel in the close-up view. Examine the painting and take the cup and the glue in the close-up view:
Select the curtains to open them and then go through the window to the ledge. Use the belt on the statue:

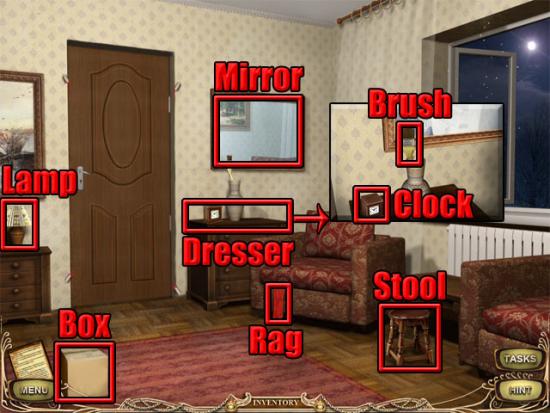
Select the right window to enter the next room. Use the powder compact on the door to reveal the laser beams. Use the screwdriver on the mirror and take the mirror shards on the couch. Take the box, rag and stool. Use the box and the stool on the door. Examine the lamp and use the glue and a mirror shard on it in the close-up view. Examine the dresser. In the close-up view, take the clock and then use the glue and a mirror shard on the brush. Use the clock on the box and a mirror shard on the stool:
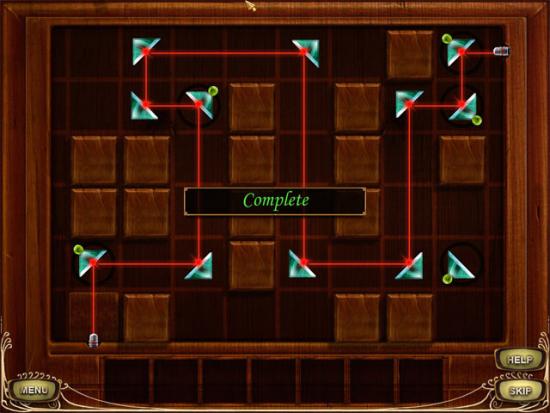
In the laser mini-game, put the mirror shards in the following positions:
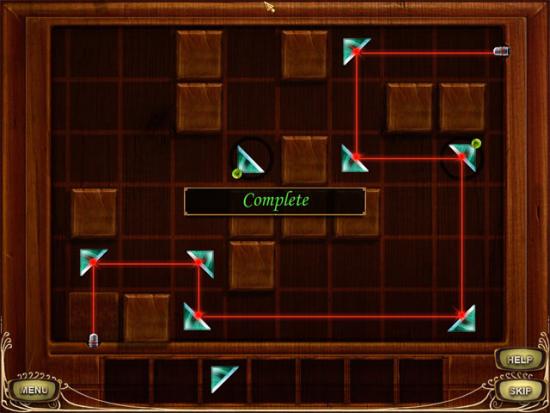
Use the final mirror shard on the clock to play another laser mini-game. Put the mirror shards in the following positions:
Return to the hall and use the disposable cup on the water cooler:
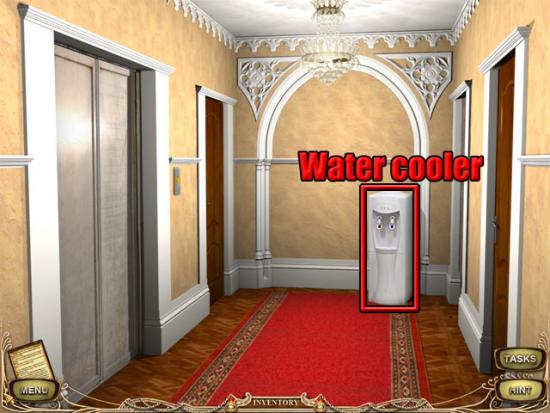
Take the cup of water from the water cooler. Return to the artist’s room. Examine the dresser and use the cup of water, solvent and the rag on the can in the close-up view. Examine the picture and use the can on the picture in the close-up view to remove the mix from the painting. Use the wet rag on the painting to see that there is a secret cache in the next room. Go through the window and enter the next room. Use the chisel on the floor panel:
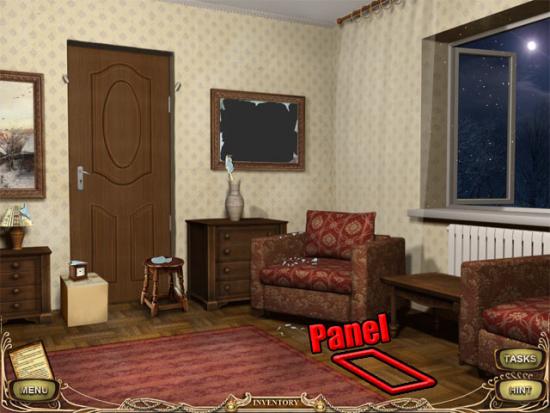
Take the key from the floor panel and use it on the door to unlock it. Enter the bathroom to play a hidden object scene. Find the seven towels:
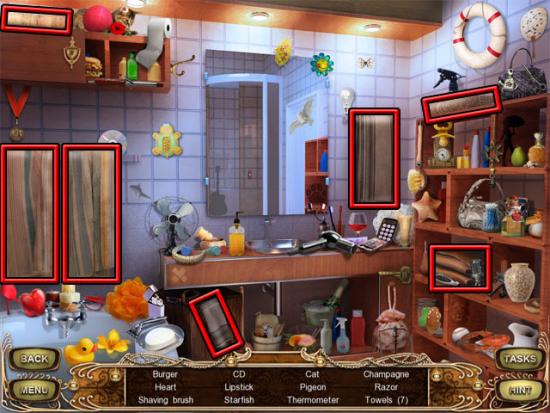
Find the remaining objects on the list and the stack of towels will be added to the inventory. Use the stack of towels on the radiator near the window. Go out the window and climb down the towel rope to the basement. Examine the shelves to enter a hidden object scene. Find the plug:

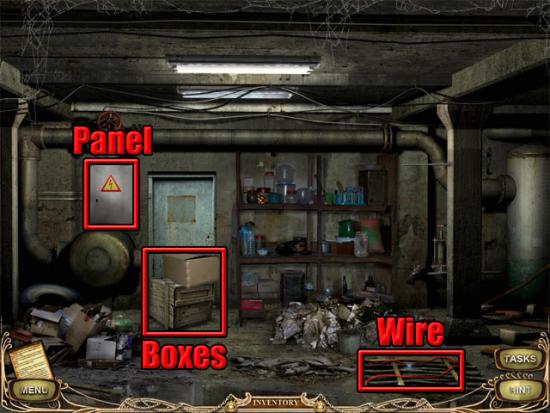
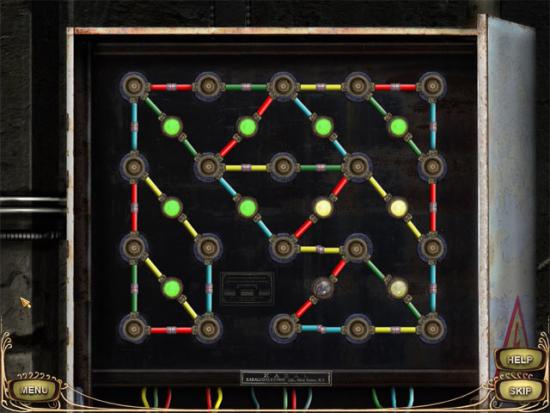
Find the remaining objects on the list and the plug will be added to the inventory. Select the boxes to move them. Take the wire. Open the electrical panel and then use the wire on it:
The aim in this mini-game is to swap the electrical fuses until all of the lights are green:
Open the door and go through the doorway to enter the hall. Move forward again and select the middle door at the right side of the hall to enter a hidden object scene in the store. Find the power drill:
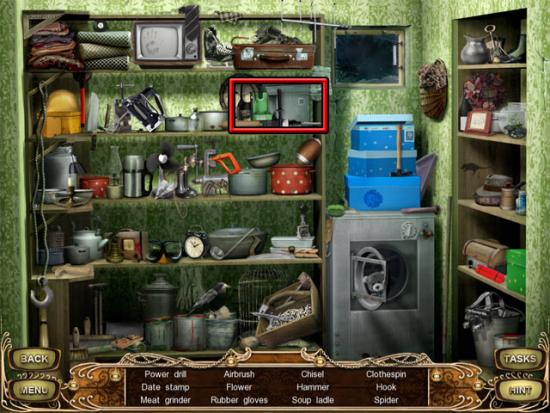
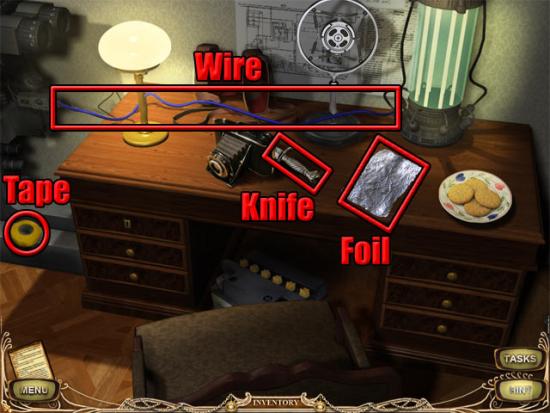
Find the remaining objects on the list and the power drill will be added to the inventory. Select the middle door at the left side of the hall to enter the workshop. Take the insulating tape, knife and foil. Combine the insulating tape with the knife in the inventory. Use the knife on the long wire to take it:
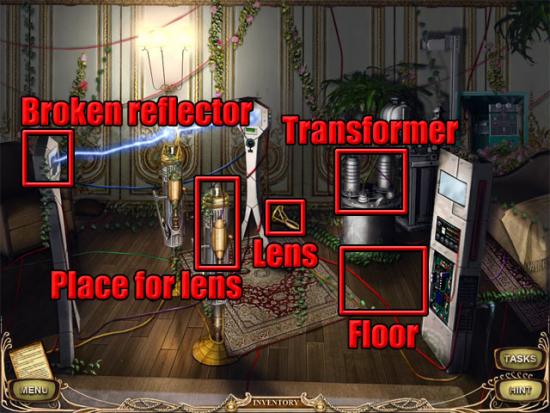
Return to the hall and select the bottom-left door to enter the summer room. Take the lens frame and use it on the place for the lens. Combine the power drill with the plug in the inventory and then use the power drill on the floor to make a hole. Use the long wire on the transformer. Use the foil on the broken reflector:
Return to the hall and go through the middle doorway at the right side of the hall to enter the hidden object scene in the store. Find the hacksaw:
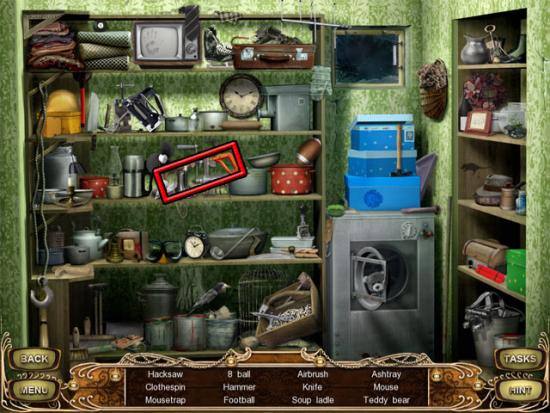
Find the remaining objects on the list and the hacksaw will be added to the inventory. Return to the basement and use the hacksaw on the rod:
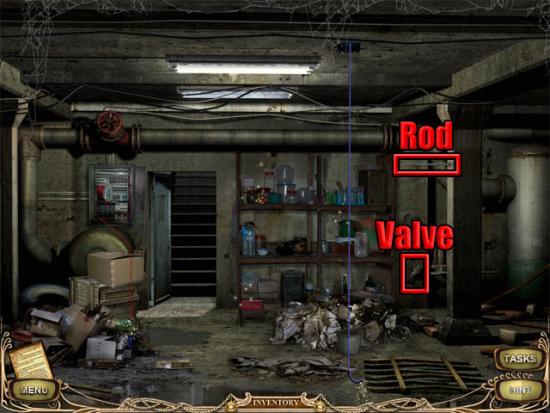
Examine the shelves to enter a hidden object scene. Find the valve handle:

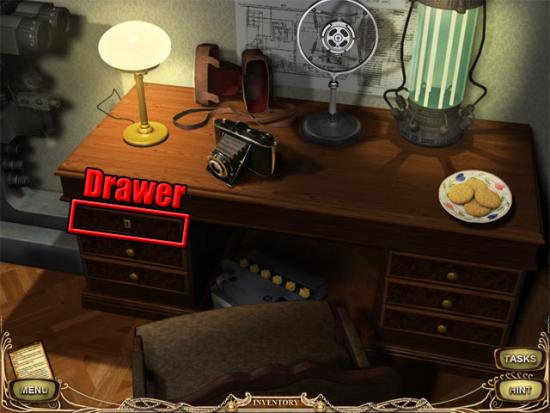
Find the remaining objects on the list and the valve handle will be added to the inventory. Examine the valve and in the close-up view use the valve handle on the valve. Return to the workshop and use the rod on the locked drawer:
Take the lenses from the drawer. Return to the summer room and use the lenses on the lens frame. Return to the basement. Examine the valve and then select the valve in the close-up view to overload the machine part.
Select the elevator button and enter the elevator. Select the bottom-left door to enter the antigravity room. Find the spool of thread:
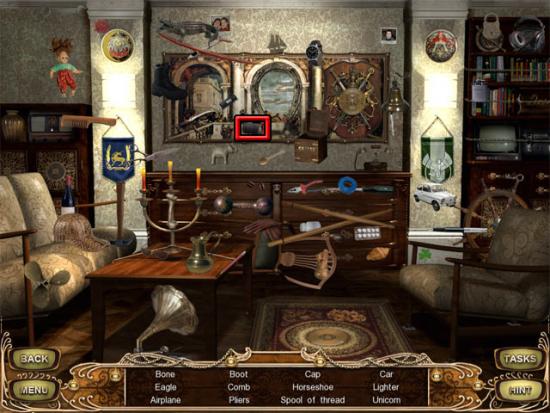
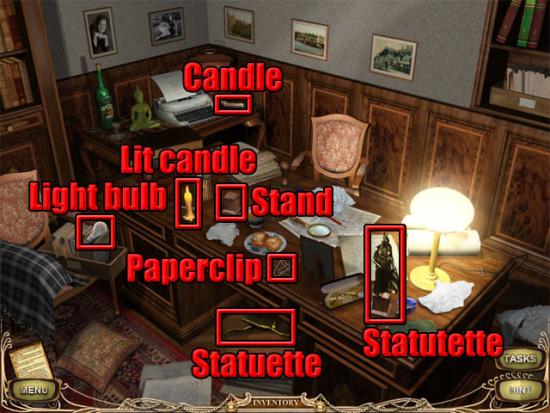
Find the remaining objects on the list and the spool of thread will be added to the inventory. Select the top-right doorway to enter the winter room. Take the light bulb, candle, paperclip and statuette below the desk. Use the candle on the lit candle and then use the burning candle on the statuette on the desk. Use the statuette on the stand:
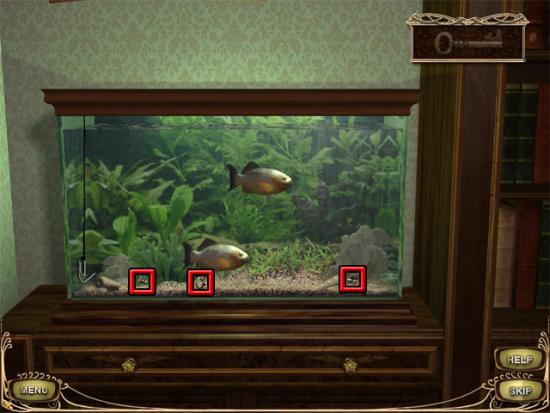
Examine the wall panel indicated by the shadows on the wall to reveal a safe. Move to the left side of the room and combine the paperclip with the spool of thread in the inventory to make the fish hook. Use the fish hook on the aquarium and slowly pull out the three pieces of the key while avoiding the piranhas:
Move to the right side of the room and use the key on the safe to open it. Take the slide and examine the note in the safe. Move to the left side of the room and use the light bulb and the slide on the projector to reveal symbols on the books. Examine the books and then select the symbols in the following order:

Take the wine bottle that is revealed and then examine the manuscript to return to the hall. Select the bottom-right door to enter a hidden object scene in the store. Find the corkscrew:
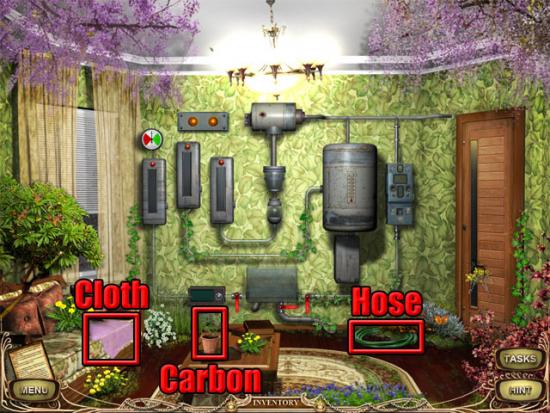
Find the remaining objects on the list and the corkscrew will be added to the inventory. Select the bottom-left door to enter the spring room. Take the cloth, carbon and hose:
Select the right door to enter the bathroom. Examine the bathtub to enter a hidden object scene. Find the L-shaped pipe:
Take the L-shaped pipe and the cleaning brush. Use the L-shaped pipes on the two left missing pipe pieces. Use the hose on the faucet and then select the faucet:
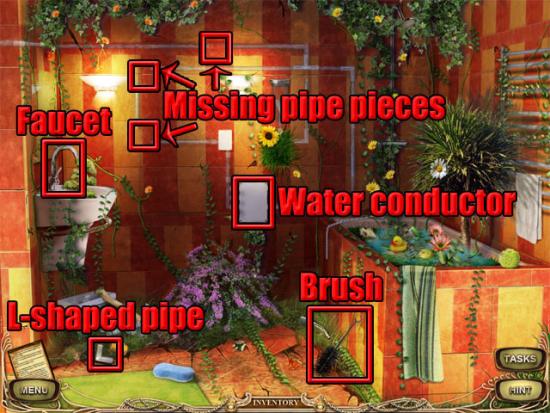
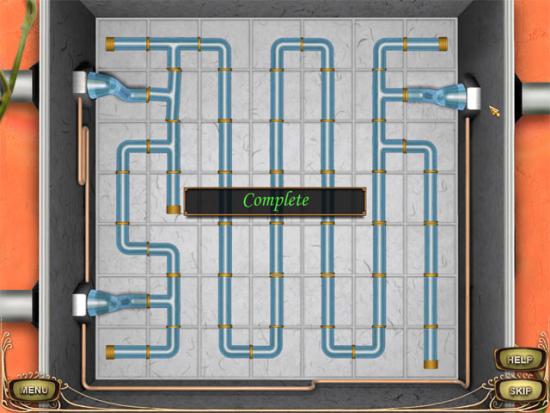
Examine the water conductor and direct the water flow until there are no leaks by rotating the pipes to the correct positions
Select the connector to fill the water in the can. Examine the can and take the pipe piece in the close-up view:
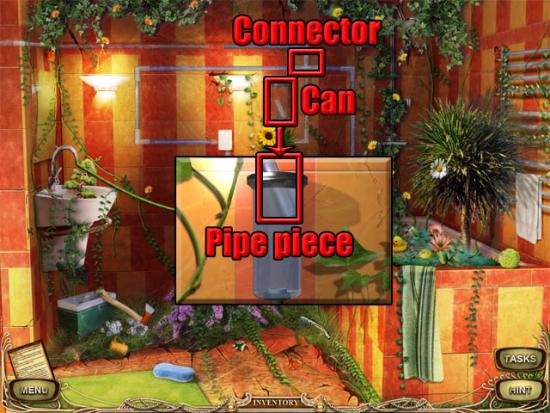
Use the pipe piece on the final missing pipe piece. Rotate the connector twice and then examine the bathtub to enter a hidden object scene. Find the fuse:
Exit the bathroom. Examine the dirty tank and select the left and right valves to cut off the water supply. Use the cleaning brush on the tank to clean it and then select the bottom valve to drain the dirty water. Exit the view of the tank. Combine the cloth with the carbon in the inventory to make the carbon filter. Examine the filter and then use the carbon filter on the filter in the close-up view. Combine the corkscrew with the wine bottle in the inventory to remove the cork. Examine the leaking hole and then use the cork on the hole in the close-up view. Examine the fuse box cover:

Use the screwdriver on the four screws in the close-up view. Remove the fuse box cover and then use the fuse on the fuse box. Examine the tank and use the bottom valve to fill the tank with clean water and overload the machine.
Select the top-right door to enter a hidden object scene. Find the kettle:

Select the bottom-left door to enter the lovers’ suite. Take the nylons. Use the kettle on the outlet:
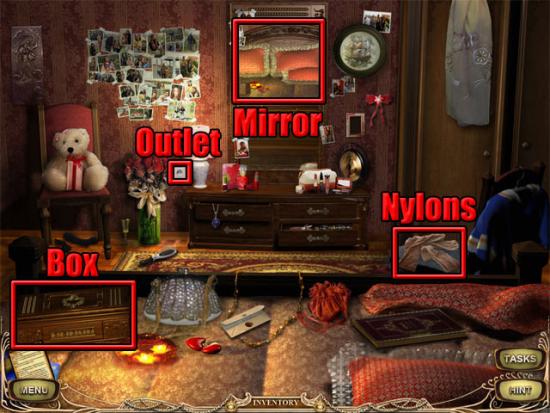
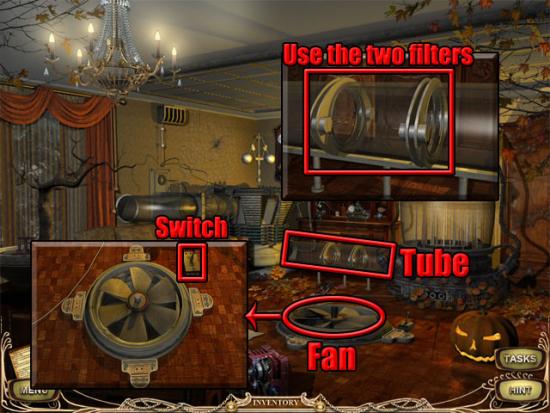
Take the steaming kettle and use it on the mirror to reveal the numbers 1375. Examine the box and enter the numbers 13705. The fourth number will vary from one game to the next, so keep changing the fourth number until the box opens. Take the nut from the box and then examine the letter. Exit the lovers’ suite and select the door at the end of the hall to enter the autumn room. Take the hammer, filter, sensor plate, filter ring, speaker with magnet and fan. Combine the hammer with the speaker with magnet in the inventory to remove the magnet. Examine the sensor tube. Use the sensor plate on the gap in the close-up view and then use the magnet on the sensor:
Examine the floor fan. Use the fan and the nut from the inventory on the floor fan and then select the switch to provide air flow to the machine. Examine the tube nearest to the machine. Combine the nylons with the filter ring in the inventory to make the filter. Use the two filters on the tube:
Exit the autumn room and select the bottom-right door to go downstairs to the medical room. Take the wires, paper, acid, funnel and screwdriver:
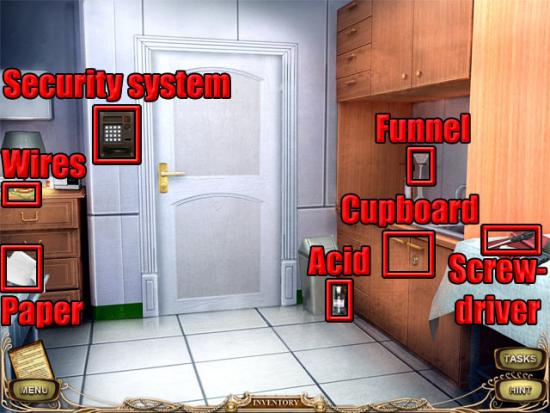
Examine the locked cupboard. Use the funnel on the lock and then use the acid on the funnel. Examine the cupboard to enter a hidden object scene. Find the voice recorder:
Find the remaining objects on the list and the voice recorder will be added to the inventory. Select the security system and then use the screwdriver on the security system to open it. Combine the voice recorder with the wires and then use the wires on the security system. Select the voice recorder to unlock the door. Open the door to enter the security hall. Select the top-left door to enter the security room. Take the pencil, match and wire. Examine the fuse box and remove the dead fuse in the close-up view. Combine the dead fuse and the wire in the inventory and then use the wired fuse on the fuse box:

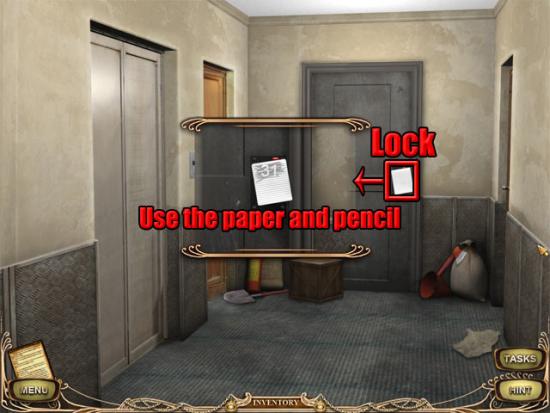
Keep pressing the selector until SC-13 is selected. A look at the table at the right side of the room shows that the number 4046 represents SC-13. Enter 4046 on the keypad nearest to the phone to show the location of the shaman’s room. Return to the security corridor and examine the lock on the door. Use the paper on the lock in the close-up view and then use the paper on the pencil to reveal the number 31:
Enter the security room and flip switches 1 and 3 below the red buttons to unlock the door in the security hall. Open the door and move forward to watch a cutscene with Jack in the shaman’s room. Take the eight scraps and the UV lamp:
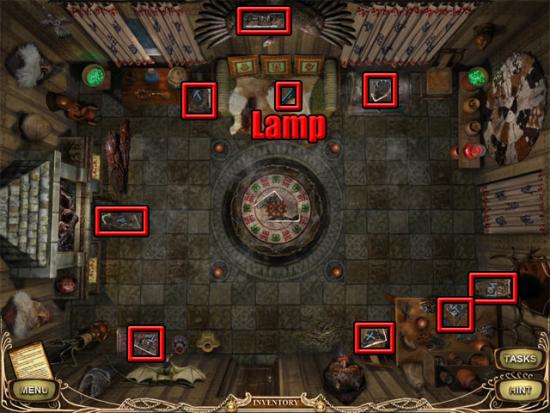
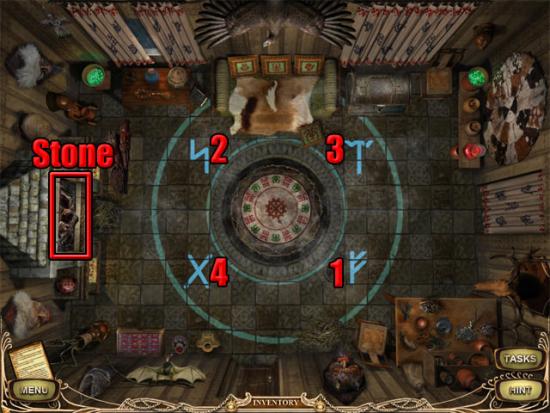
Move the UV lamp around the middle of the room until the symbols are shown. Examine the totem to play the puzzle mini-game. Select a scrap with the left mouse button and rotate the scraps with the right button. Place the scraps in the following positions:
Use the match on the fireplace stone and then light the candles in the following order to complete the first part of the ritual:
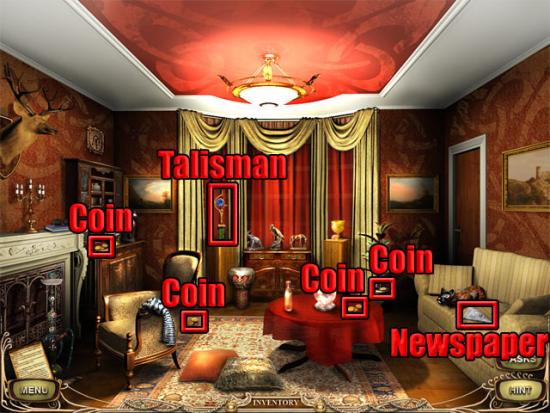
Select the bottom-left door to enter the clairvoyant’s room. Take the four sets of coins and the newspaper:
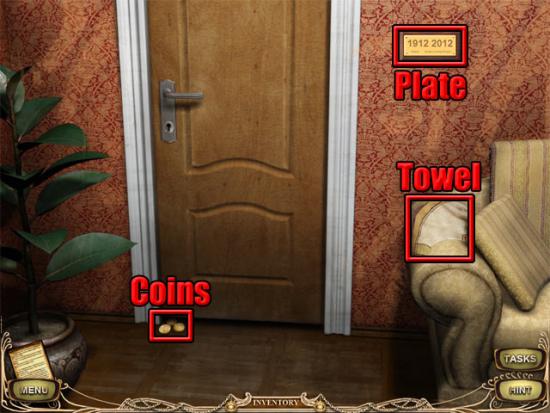
Select the right door and take the coins and the towel. Use the screwdriver on the sharp metal plate:
Use the newspaper on the door and then select the newspaper to move it to the other side of the door. Use the screwdriver on the door and then select the newspaper again to reveal the key. Take the key on the newspaper and use the key on the door to unlock it. Return to the clairvoyant’s room and examine the talisman. Combine the sharp metal plate with the towel in the inventory to make the fabric piece. Combine the fabric piece with the five sets of coin in the inventory to make the sack. Use the sack on the talisman to take the talisman. Approach the door at the right side of the room and open it to enter the gallery. Press the buttons in the following order to partially open the secret passage:
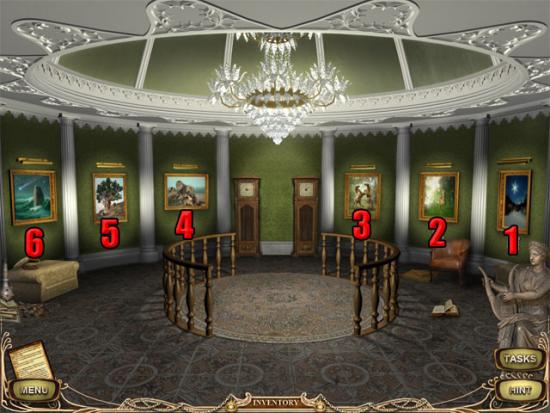
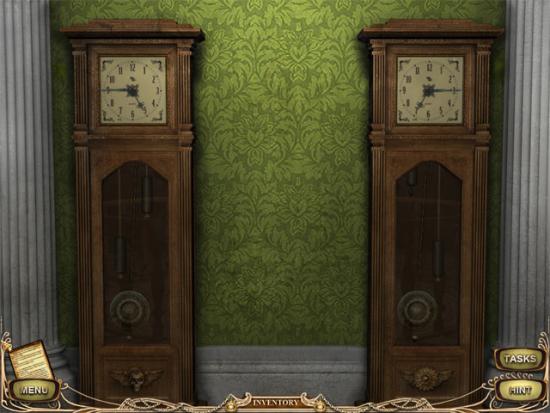
Approach the clocks and set the left clock to 5:45 and the right clock to 7:15:
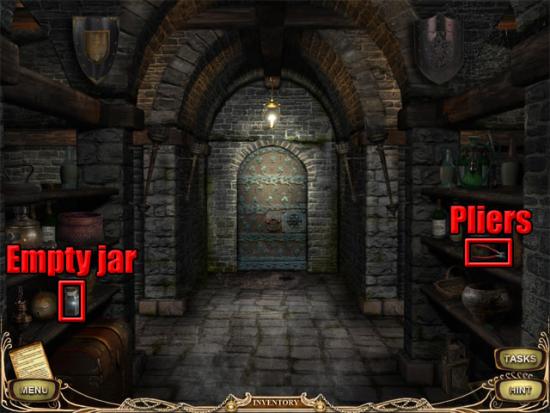
Go downstairs to enter the basement. Take the empty jar and the pliers:
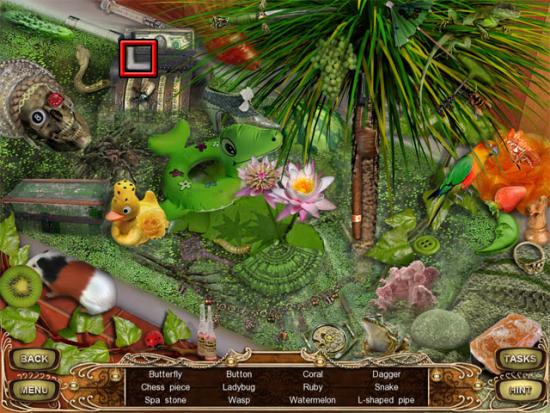
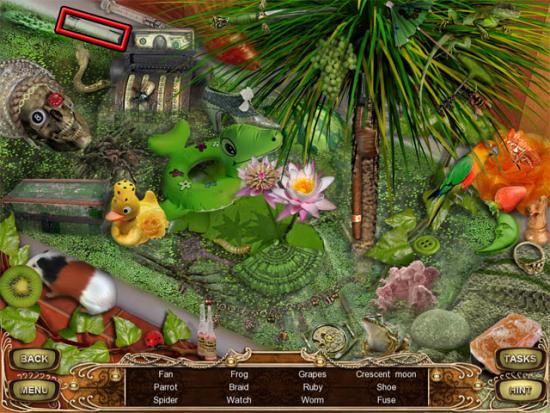
Select the sparkling area at the right side of the room to enter a hidden object scene. Find the plaster flour:
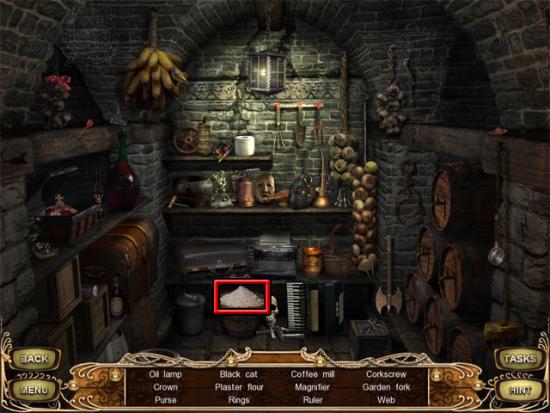
Find the remaining objects on the list and the plaster flour will be added to the inventory. Move to the left side of the room and take the rod, oil lamp and the hose:
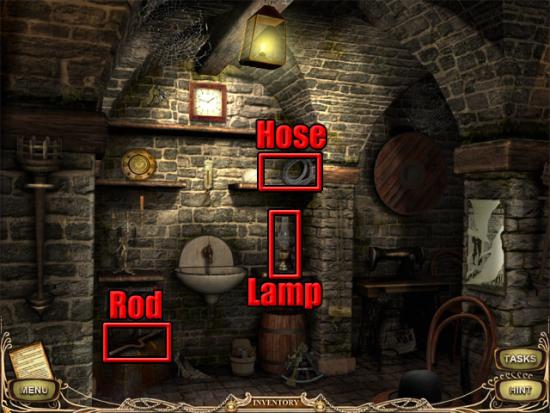
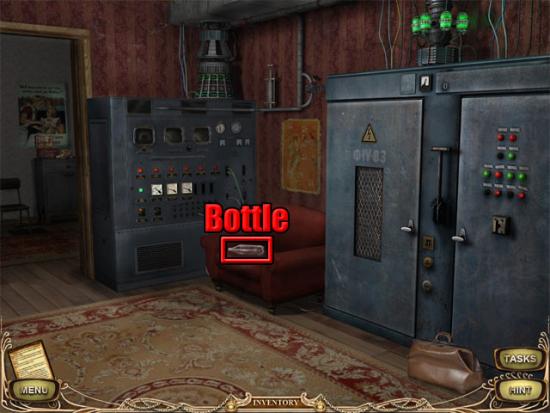
Use the pliers on the sink to turn the faucet. Use the empty jar on the sink to fill it with water. Return to the main corridor and use the plaster flour and examine the dirt pile in front of the door. Use the plaster flour on the dirt pile to make an amulet copy. Use the full jar of water on the amulet copy and then take the amulet copy. Examine the door and use the amulet copy on the symbol. Select the door to enter the next area of the basement. Take the coil of rope and the bottle:
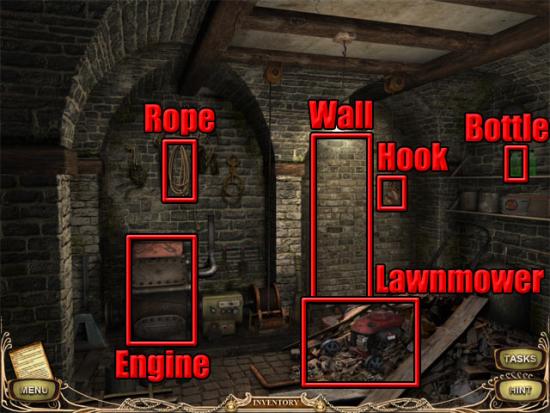
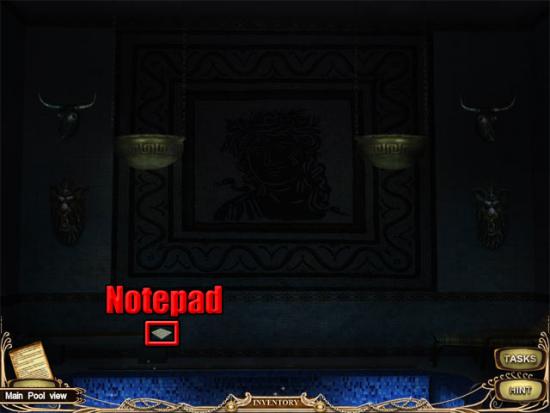
Examine the lawnmower and select it in the close-up view to remove the cap. Use the hose and the bottle on the lawnmower and then take the bottle of fuel. Select the engine and then use the bottle of fuel and the coil of rope on it. Use the rod on the wall and then select the hook to attach it to the rod. Use the oil lamp on the winch, then select the engine and the winch to tear down the wall. Go through the hole in the wall to enter the pool room. Move to the other side of the pool and take the notepad:
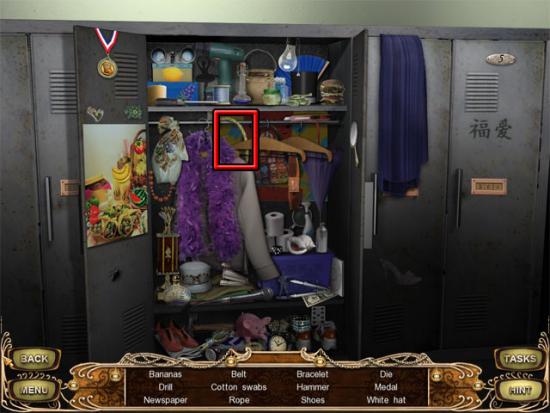
Return to the other side of the pool and enter the locker room. Take the board, broom and towels:
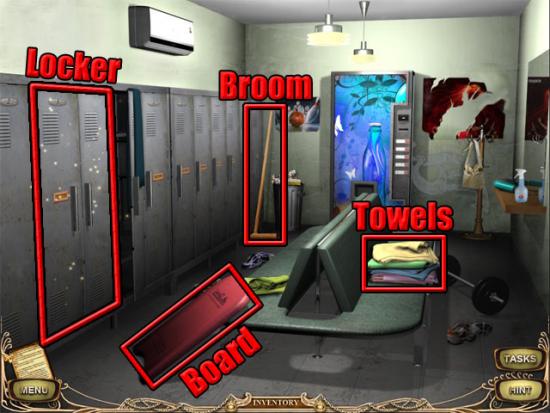
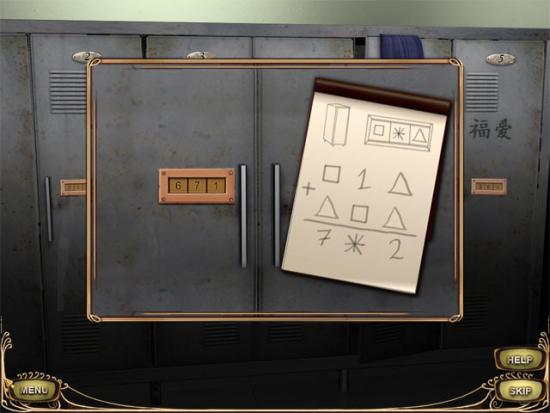
Examine the sparkling locker and in the close-up view examine locker 3 to see the notepad next to the code. The aim in this mini-game is to work out the values of the square, the star and the triangle so that the correct locker code can be entered. The solution varies from one game to the next, so it is not possible to give an exact solution, so what follows is an example of how the mini-game was solved on my version. On the notepad shown in the image above, the right column shows that a triangle plus a triangle equals 2, so the value of one triangle must equal 1. On the left column, a square plus a triangle equals 7. We know that the value of the triangle is 1, so the square must equal 6. On the middle column, 1 plus a square equals the star amount. We know that the value of the square is 6, so a square plus 1 must equal 7. So from left to right the locker code must be 671:
Find the rope:
Find the remaining objects on the list and the rope will be added to the inventory. Move back to the pool. Take the mask:
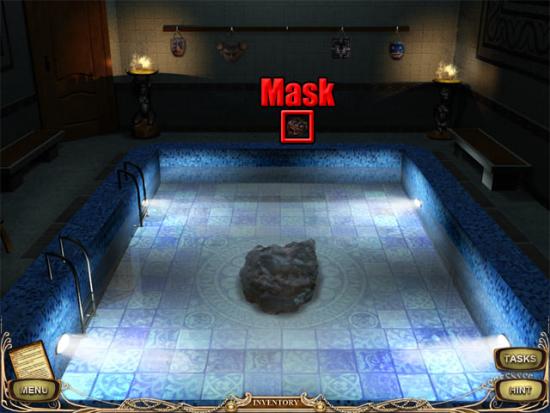
Combine the mask with the rope in the inventory and then put the mask on the rack. Combine the towels and the mop in the inventory and then use the mop on the torch. Move to the other side of the pool and use the lit torch on the two bowls. Move to the other side of the pool and use the board on the water. Use the talisman on the board to put it in place above the black meteor. Return to the locker room and examine the locker to enter a hidden object scene. Find the money:
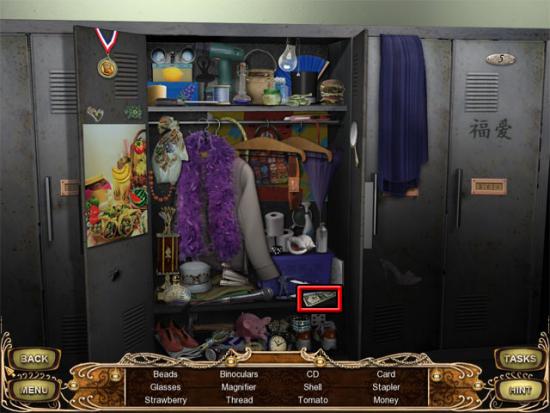
Find the remaining objects on the list and the money will be added to the inventory. Use the money on the vending machine and then select the red button. Take the four coins from the slot. Return to the pool and use the coins on the black meteor.
Take the ladder in the hall. Select the bottom-left door to enter the hacker room. Take the macrame, the keyboard and the scissors. Use the keyboard on the monitor:
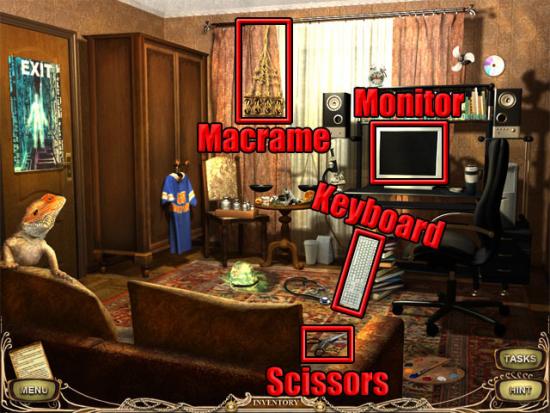
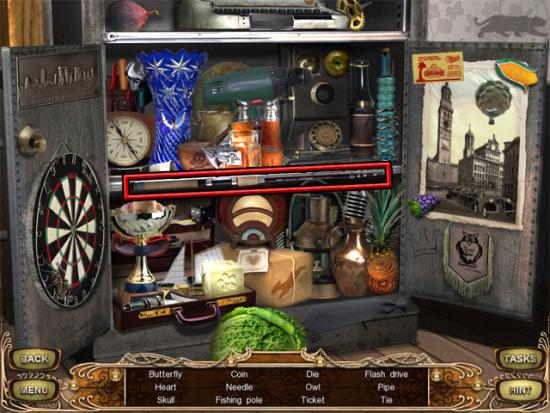
Examine the monitor to see the plan. Exit the view of the monitor and move right to the other part of the room. Take the empty bags:
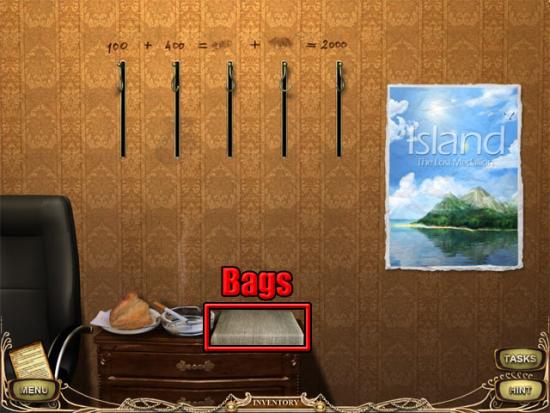
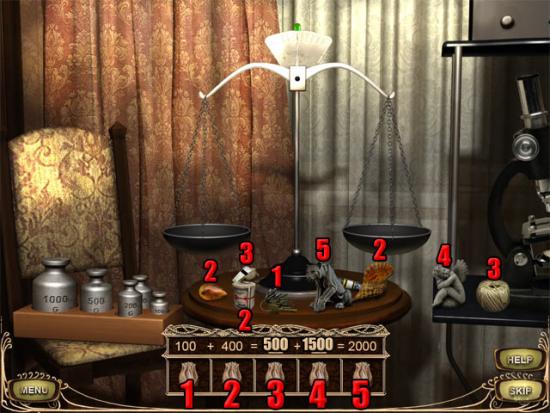
Return to the main room view and examine the scales at the left side of the computer monitor. The aim in this mini-game is to match the correct weights for all of the bags that are shown. Taking the first bag as an example, add the 100g weight to the left scale, the keys to the right scale and then select the first bag to clear it. Do the same thing for the remaining bags of 400g, 500g, 1500g and 2000g by finding the objects that match the weight:
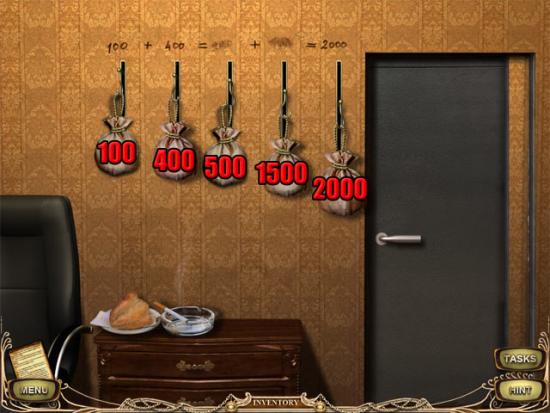
Move right to the other part of the room. Combine the scissors with the macrame in the inventory to make the ropes. Use the ropes on the five hooks and then use the bags on the ropes in the correct order:
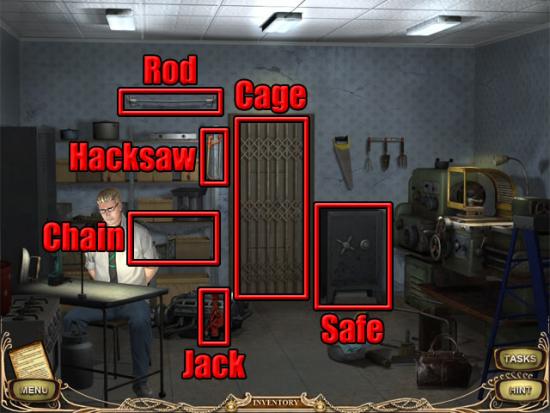
Open the door to enter the next room. Take the electric screwdriver and the hammer. Use the ladder on the floor and the electric screwdriver on the panel:
Take the hacksaw and the jack. Use the electric screwdriver on the rod with screws. Use the hacksaw on the chain. Use the jack on the safe. Use the chain on the door to attach the safe to it:
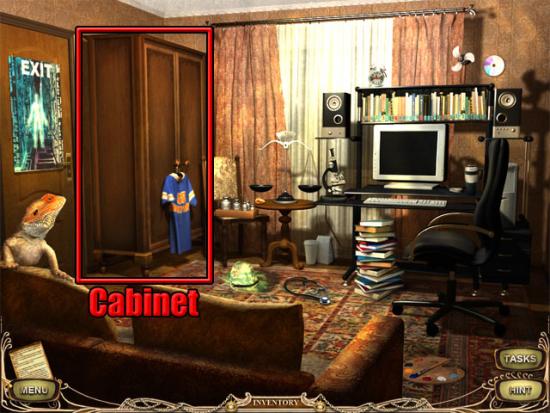
Return to the hacker’s room and use the hammer on the cabinet to block the door:
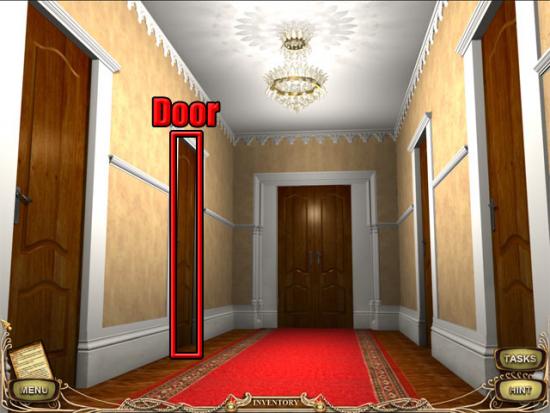
Return to the hall and use the rod with screws and the electric screwdriver on the door shown below:
Take the fan, rubber duck and metal box. Examine the table and in the close-up view take the fire extinguisher, lighter, wrench, cloth and newspaper:
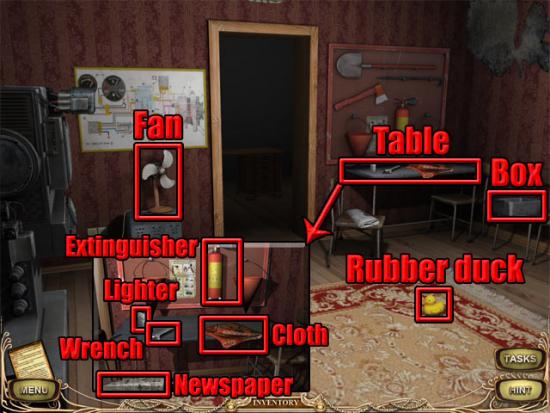
Move to the other part of the room and take the plastic bottle:
Return to the other part of the room and use the metal box on the door. Use the fan, rubber duck, newspaper, plastic bottle and cloth on the metal box. Select the fan to enter the secret room. Examine the sparkling shelves at the right side of the room to enter a hidden object scene. Find the fishing pole:
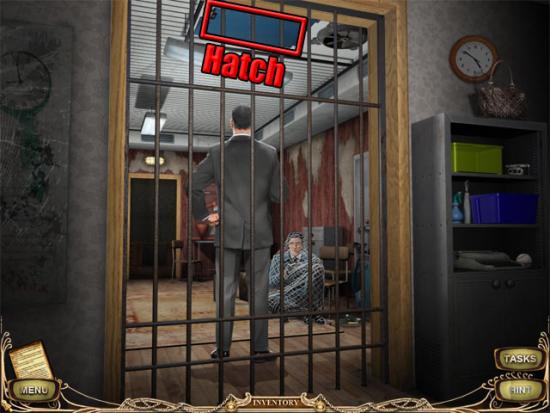
Find the remaining objects on the list and the fishing pole will be added to the inventory. Use the fishing pole on the hatch:
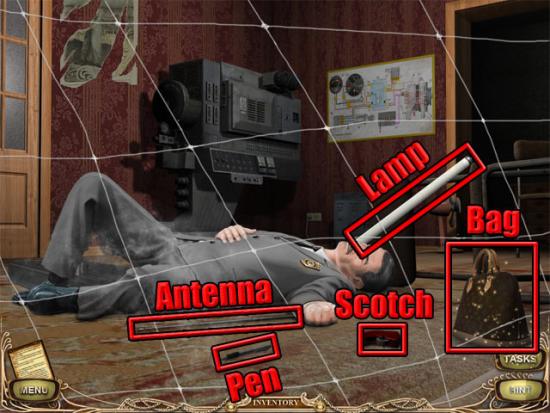
Take the pen and the scotch tape. Use the pen on the antenna and then use the antenna on the bag to enter a hidden object scene:
Find the hook:
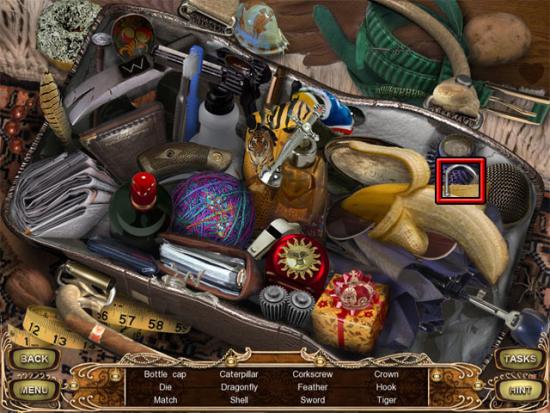
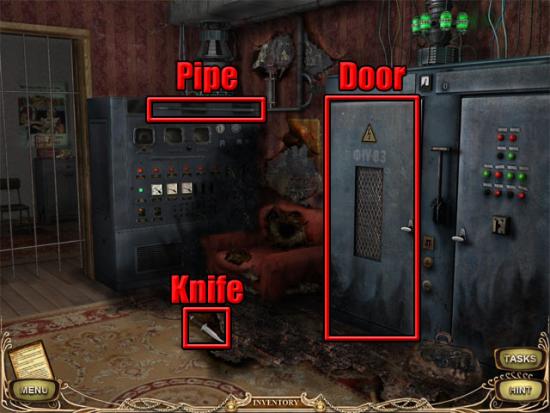
Find the remaining objects on the list and the hook will be added to the inventory. Combine the hook with the antenna in the inventory and then combine the hook with the scotch tape to make the hooking device. Use the hooking device on the lamp to take it. Use the lamp on the net. Use the fire extinguisher on the fire. Take the knife. Use the cloth on the pipe. Use the knife on the jammed door:
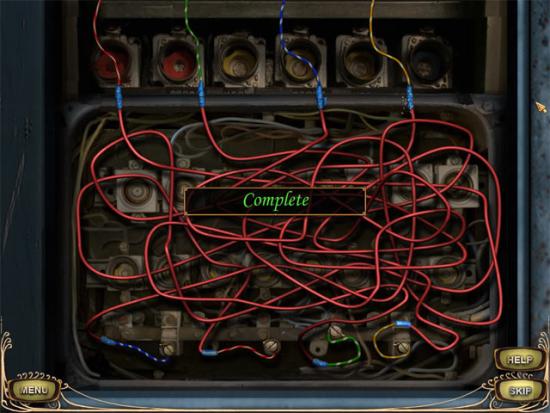
Select one of the colored wires at the top of the screen and then select the ends of one of the red wires to connect the wires. Connect the wires in the following order to complete the mini-game:
Move to the other side of the room and use the wrench on the support device:
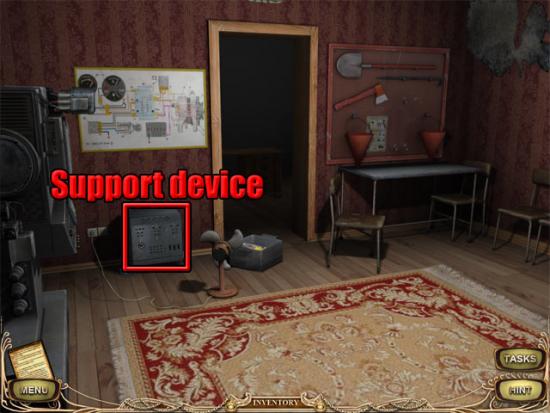
Use the pipe on the placed wrench to take the support device. Move to the other part of the room and use the support device on the cage. Use the pipe on the support device to enter the luxury room.
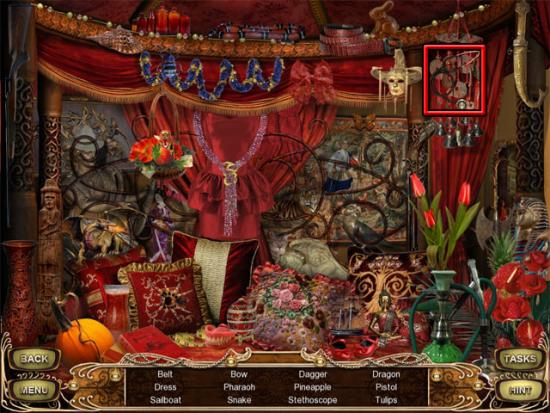
Examine the bed at the left side of the room to enter a hidden object scene. Find the stethoscope:
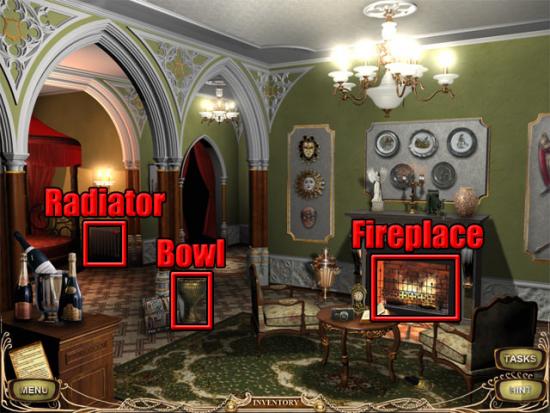
Find the remaining objects on the list and the stethoscope will be added to the inventory. Take the bowl and use it on the radiator to fill it with water. Take the bowl with water and use it on the fireplace:
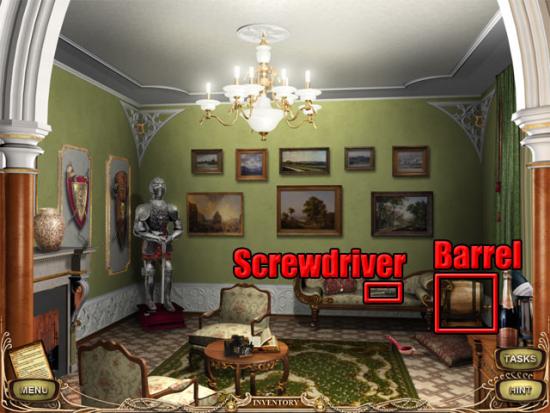
Take the deformed key from the fireplace. Move to the other side of the room. Take the screwdriver and use it on the barrel to remove the ring:
Move to the other side of the room and then move forward to the view with the spinning wheel. Take the rope and the plate. Use the rope, plate and the ring on the spinning wheel:
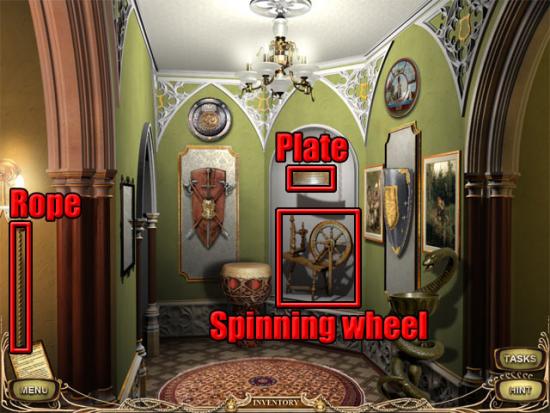
Select the spinning wheel and then use the deformed key on the spinning wheel to make the fixed key. Return to the other side of the room and use the stethoscope on the wall with the paintings to reveal a panel. Examine the panel and select the on button in the close-up view to play the mini-game. The aim is to copy the three sets of numbers that are displayed on the keypad. The numbers will vary from one game to the next so it is not possible to give an exact solution. Press the on button after completing each set of numbers. You will need to copy four numbers in the first set, six numbers in the second set and eight numbers in the third set. Use the fixed key in the keyhole after completing the mini-game. Enter the hidden niche to complete the game.
