- Wondering how to get Monopoly GO! free rolls? Well, you’ve come to the right place. In this guide, we provide you with a bunch of tips and tricks to get some free rolls for the hit new mobile game. We’ll …
Best Roblox Horror Games to Play Right Now – Updated Weekly
By Adele Wilson
Our Best Roblox Horror Games guide features the scariest and most creative experiences to play right now on the platform!The BEST Roblox Games of The Week – Games You Need To Play!
By Sho Roberts
Our feature shares our pick for the Best Roblox Games of the week! With our feature, we guarantee you'll find something new to play!Type Soul Clan Rarity Guide – All Legendary And Common Clans Listed!
By Nathan Ball
Wondering what your odds of rolling a particular Clan are? Wonder no more, with my handy Type Soul Clan Rarity guide.
Harlequin Presents: Hidden Object of Desire Walkthrough
Welcome to Gamezebo's walkthrough for Harlequin Presents: Hidden Object of Desire.Navigation: General Tips Chapter 1: Getting Our Feet Wet Chapter 2: Unexpected Invitations Chapter 3: Hazardous Diversions Chapter 4: Hidden Meanings Chapter 5: Strength and Beauty Chapter 6: Discretions and Revelations Chapter 7: Burning Desires Chapter 8: Protecting the Crown Chapter 9: Undercover Assignment Chapter 10: Love Conquers All General Tips: Hints are unlimited, though they will tak…
a:1:i:0;a:2:s:13:”section_title”;s:55:”Harlequin Presents: Hidden Object of Desire Walkthrough”;s:12:”section_body”;s:22023:”
Welcome to Gamezebo’s walkthrough for Harlequin Presents: Hidden Object of Desire.
Navigation:
- General Tips
- Chapter 1: Getting Our Feet Wet
- Chapter 2: Unexpected Invitations
- Chapter 3: Hazardous Diversions
- Chapter 4: Hidden Meanings
- Chapter 5: Strength and Beauty
- Chapter 6: Discretions and Revelations
- Chapter 7: Burning Desires
- Chapter 8: Protecting the Crown
- Chapter 9: Undercover Assignment
- Chapter 10: Love Conquers All
General Tips:
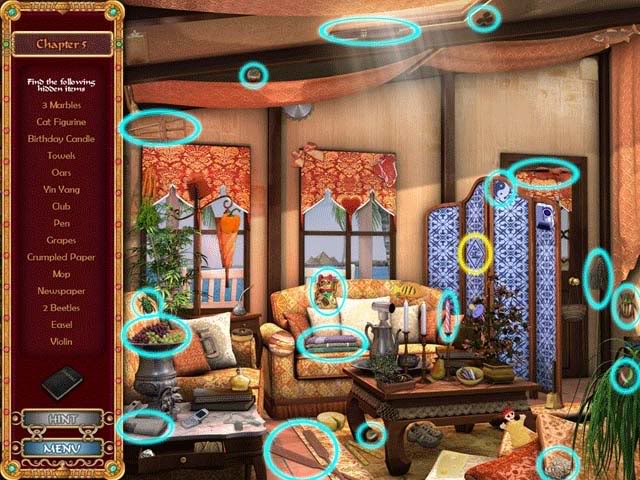
- Hints are unlimited, though they will take a short while to recharge. Finding Harlequin logos (circled in yellow in this guide) will allow your hint meter to recharge instantly.
- Finding two objects consecutively will give you a bonus, as well as cause the hint meter to refill faster.
- You may click the Journal provided in the main gameplay screens to view items collected throughout the game and recaps of the story.
- An original Harlequin story can be accessed via the Main Menu. Be aware it contains romantic themes and comes in PDF format.
Walkthrough:
Chapter 1: Getting Our Feet Wet
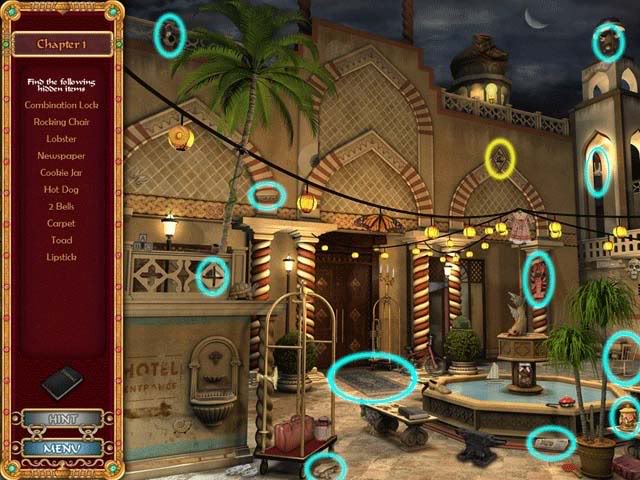
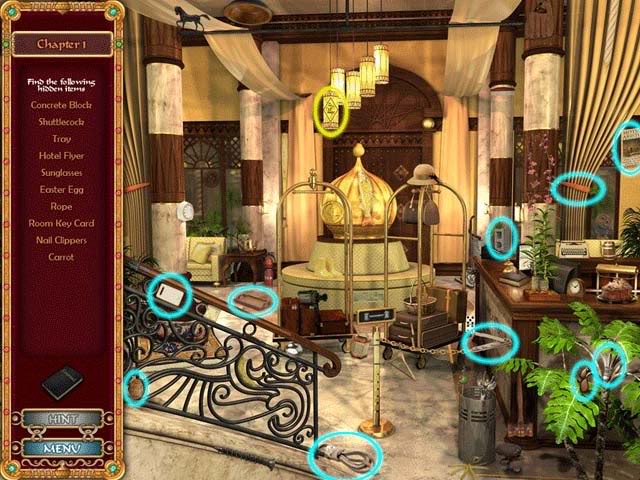
- Find the hidden objects shown below. Objects are randomized and may be different from those shown in your game. Instant hint recharge/Harlequin logo is circled in yellow.

- Find the hidden objects shown below. Objects are randomized and may be different from those shown in your game. Instant hint recharge/Harlequin logo is circled in yellow.
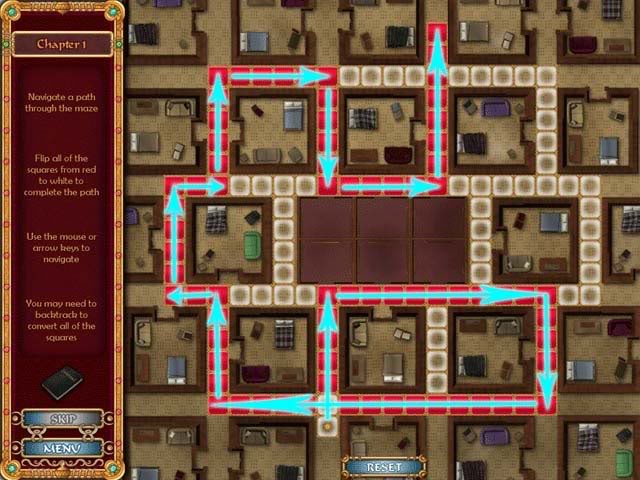
- Navigate a path through the maze, flipping all the squares from red to white. You may need to backtrack. Here’s the easiest route:
- Find the hidden objects shown below. Objects are randomized and may be different from those shown in your game. Instant hint recharge/Harlequin logo is circled in yellow.
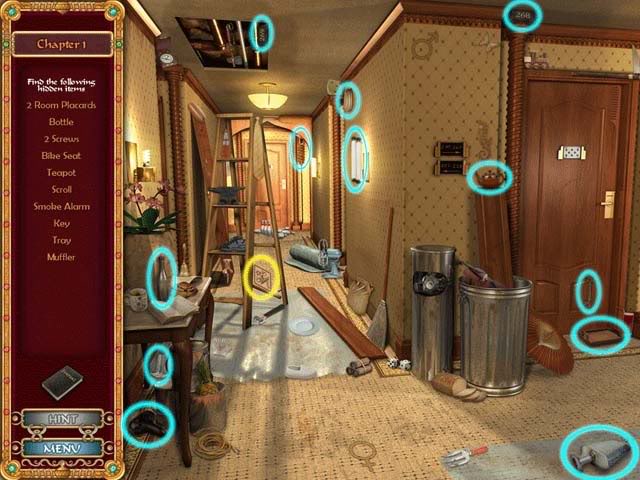
- Find the hidden objects shown below. Objects are randomized and may be different from those shown in your game. Instant hint recharge/Harlequin logo is circled in yellow.
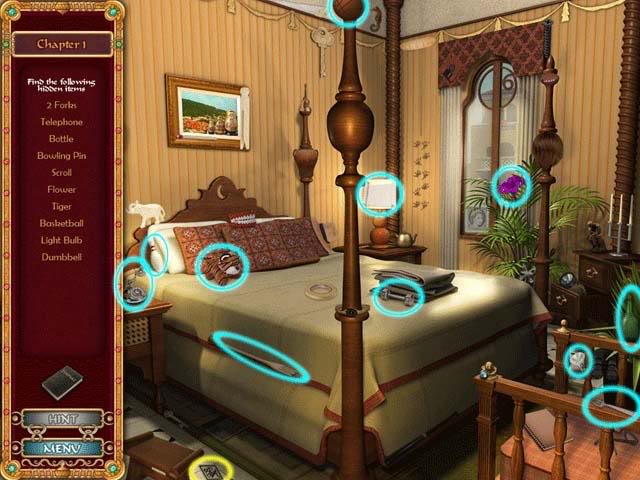
- Find the hidden objects shown below. Objects are randomized and may be different from those shown in your game. Instant hint recharge/Harlequin logo is circled in yellow.
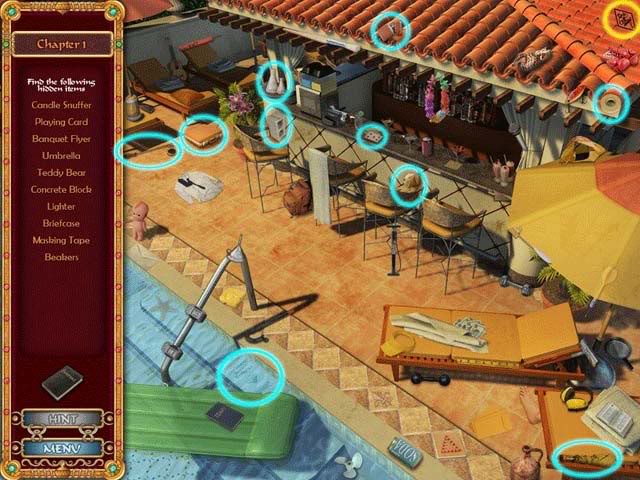
- Find the hidden objects shown below. Objects are randomized and may be different from those shown in your game. Instant hint recharge/Harlequin logo is circled in yellow.
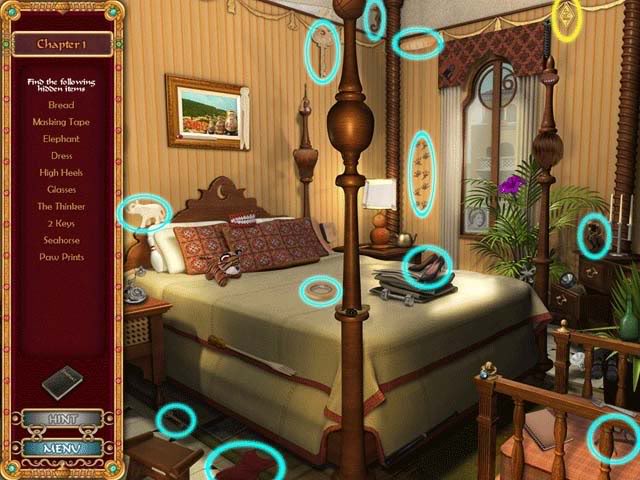
Chapter 2: Unexpected Invitations
- Find the hidden objects shown below. Objects are randomized and may be different from those shown in your game. Instant hint recharge/Harlequin logo is circled in yellow.
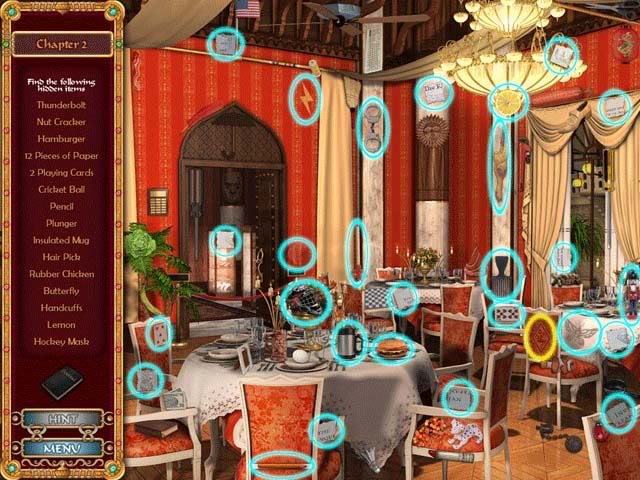
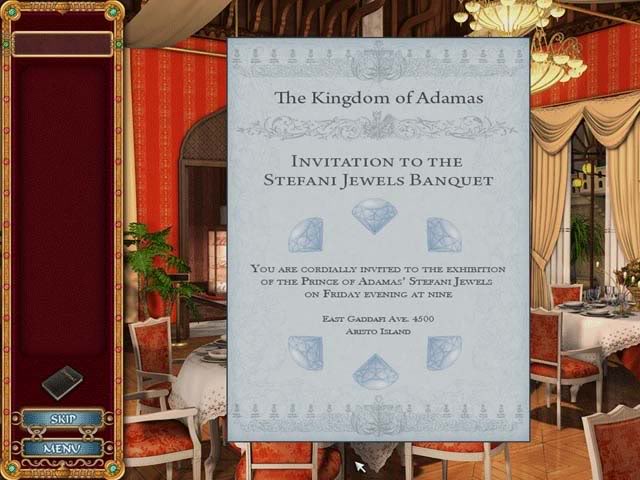
- Reassemble the note by clicking any two pieces to swap them. The solution is shown below:
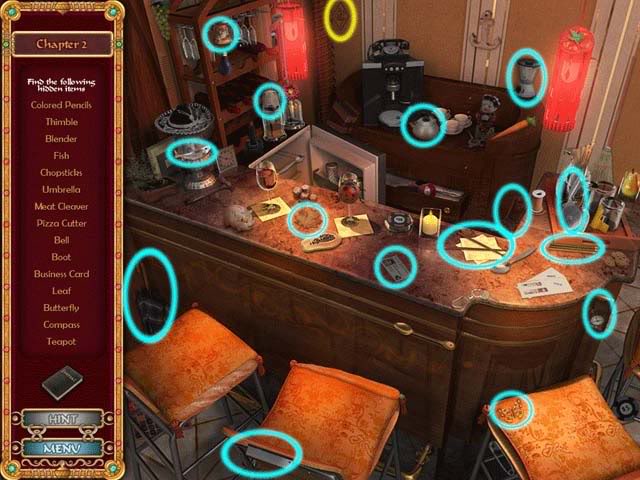
- Find the hidden objects shown below. Objects are randomized and may be different from those shown in your game. Instant hint recharge/Harlequin logo is circled in yellow.
Chapter 3: Hazardous Diversions
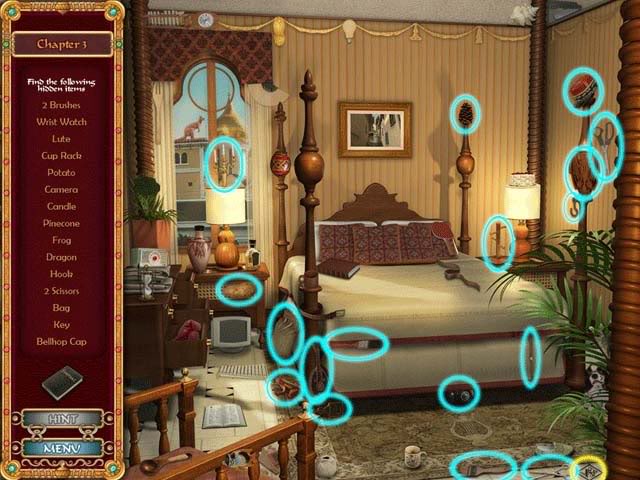
- Find the hidden objects shown below. Objects are randomized and may be different from those shown in your game. Instant hint recharge/Harlequin logo is circled in yellow.
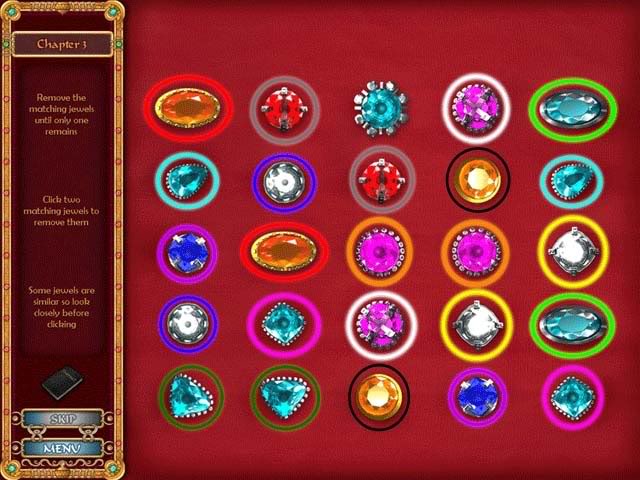
- Remove matching pairs of precious gems until only one remains. The one that remains is randomized. Example is shown below:
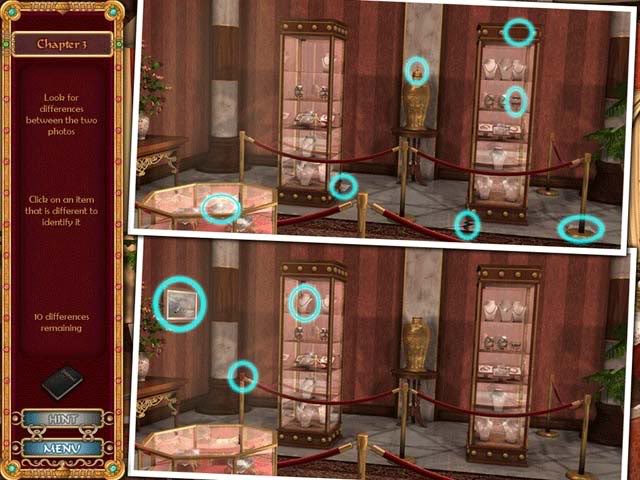
- Find the 10 differences between the two pictures. The differences are circled below:
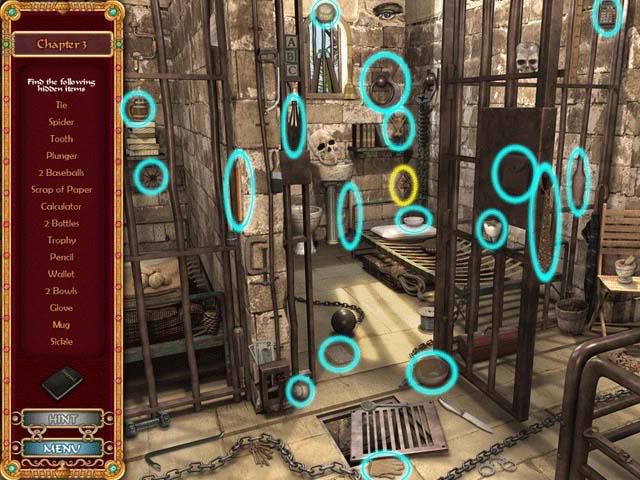
- Find the hidden objects shown below. Objects are randomized and may be different from those shown in your game. Instant hint recharge/Harlequin logo is circled in yellow.
Chapter 4: Hidden Meanings
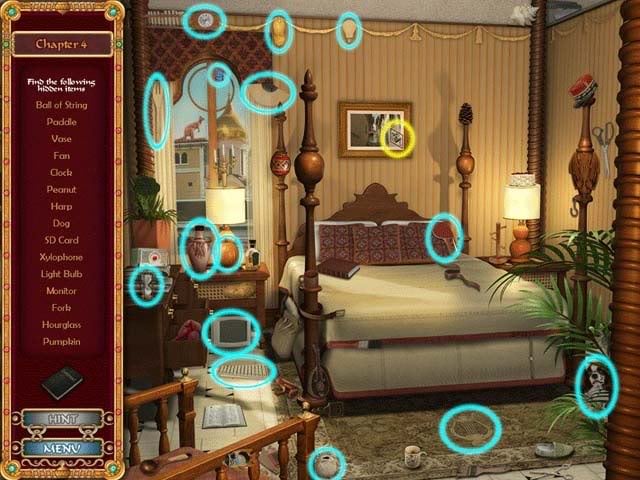
- Find the hidden objects shown below. Objects are randomized and may be different from those shown in your game. Instant hint recharge/Harlequin logo is circled in yellow.
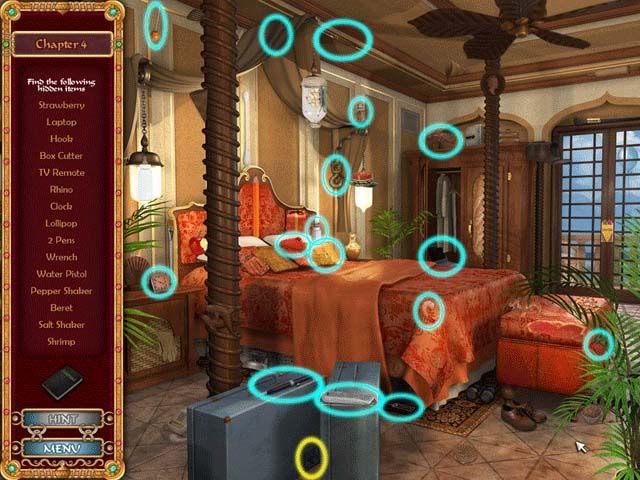
- Find the hidden objects shown below. Objects are randomized and may be different from those shown in your game. Instant hint recharge/Harlequin logo is circled in yellow.
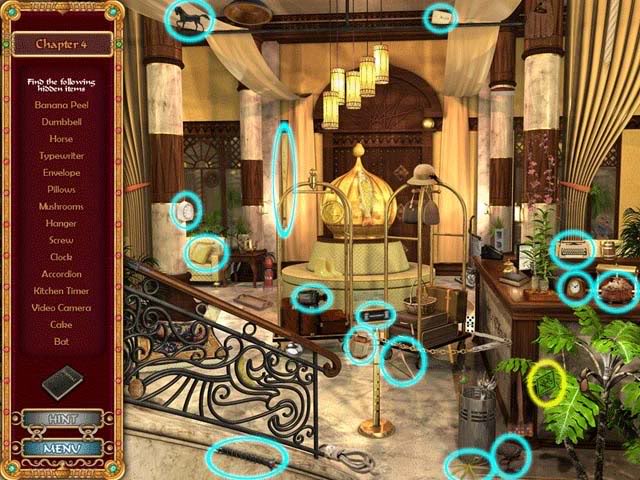
- Find the hidden objects shown below. Objects are randomized and may be different from those shown in your game. Instant hint recharge/Harlequin logo is circled in yellow.
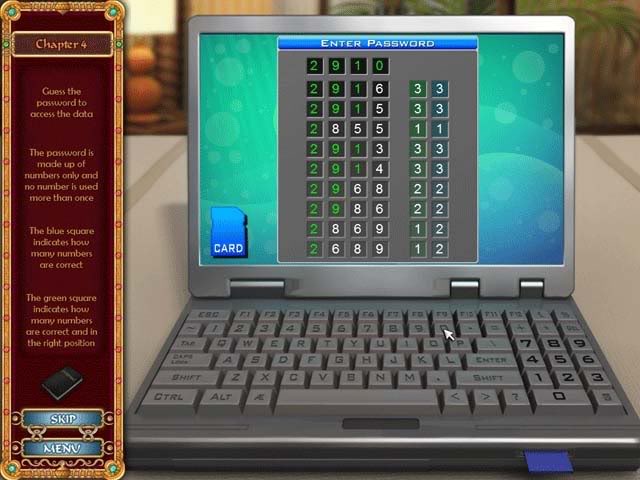
- Find the code for the SD Card by inputting numbers until you find the right solution. The blue column shows how many numbers are correct and the green column shows how many numbers are correct and in the right position. Numbers aren’t used more than once. Solutions are randomized.
Chapter 5: Strength and Beauty
- Find the hidden objects shown below. Objects are randomized and may be different from those shown in your game. Instant hint recharge/Harlequin logo is circled in yellow.
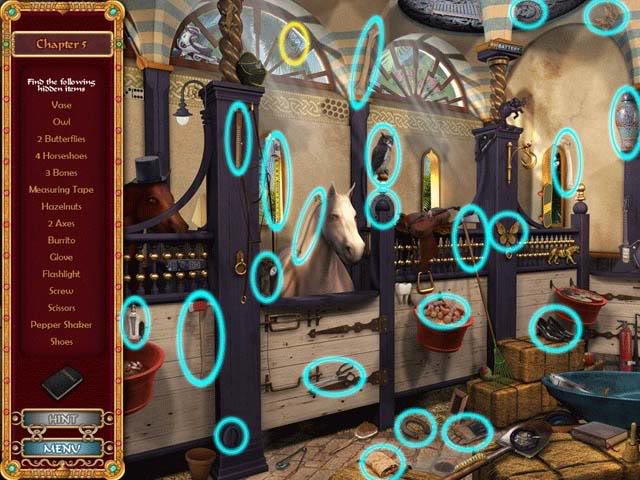
- Find the hidden objects shown below. Objects are randomized and may be different from those shown in your game. Instant hint recharge/Harlequin logo is circled in yellow.
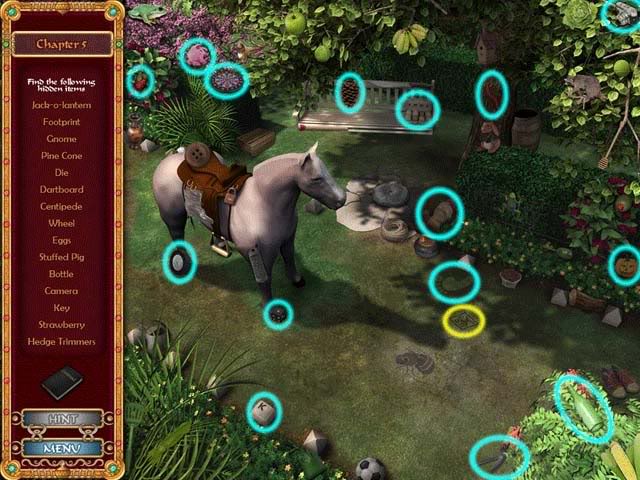
- Find the hidden objects shown below. Objects are randomized and may be different from those shown in your game. Instant hint recharge/Harlequin logo is circled in yellow.
Chapter 6: Discretions and Revelations
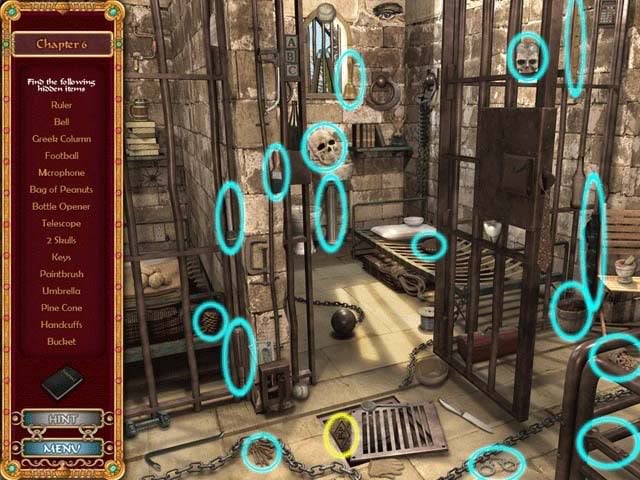
- Find the hidden objects shown below. Objects are randomized and may be different from those shown in your game. Instant hint recharge/Harlequin logo is circled in yellow.
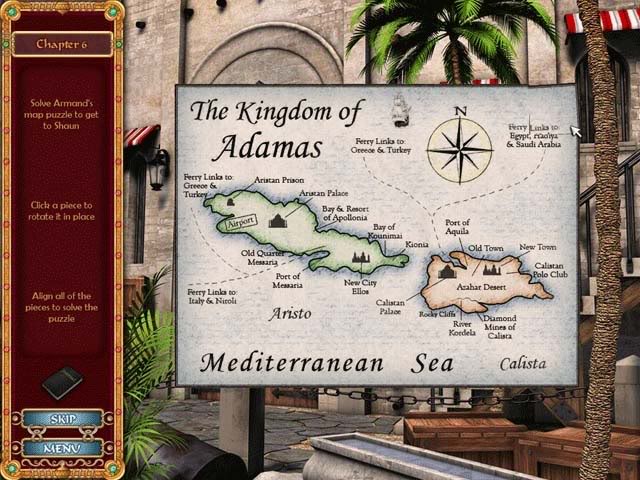
- Reassemble the map by clicking on the various pieces to rotate them into their proper positions. The solution is shown below:
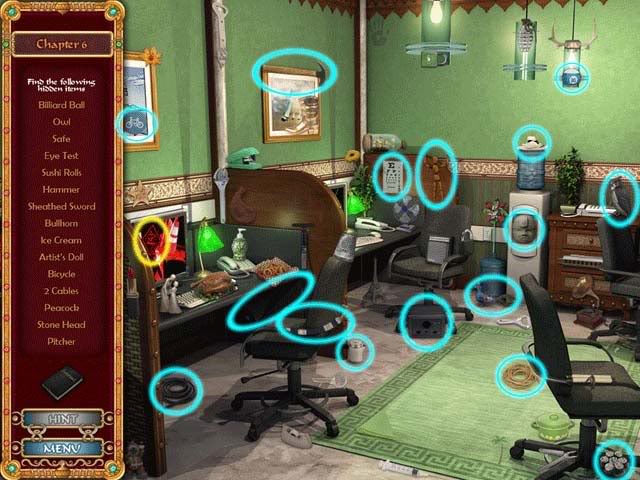
- Find the hidden objects shown below. Objects are randomized and may be different from those shown in your game. Instant hint recharge/Harlequin logo is circled in yellow.
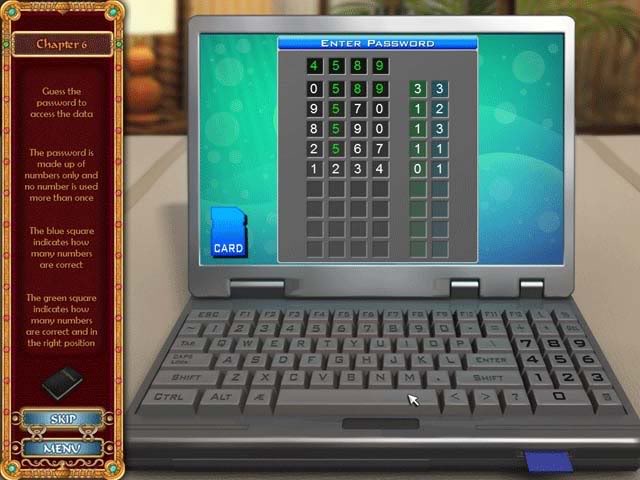
- Find the code by inputting numbers until you find the right solution. The blue column shows how many numbers are correct and the green column shows how many numbers are correct and in the right position. Numbers aren’t used more than once. Solutions are randomized.
Chapter 7: Burning Desires
- Find the hidden objects shown below. Objects are randomized and may be different from those shown in your game. Instant hint recharge/Harlequin logo is circled in yellow.

- Find the hidden objects shown below. Objects are randomized and may be different from those shown in your game. Instant hint recharge/Harlequin logo is circled in yellow.
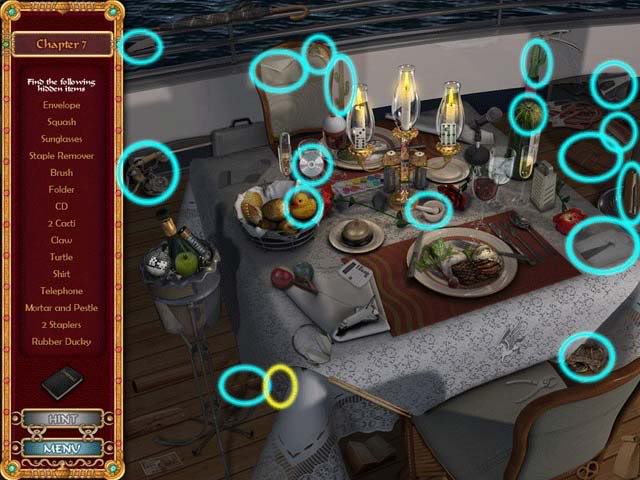
- Remove matching pairs of rings until only one remains. The one that remains is randomized. Example is shown below:
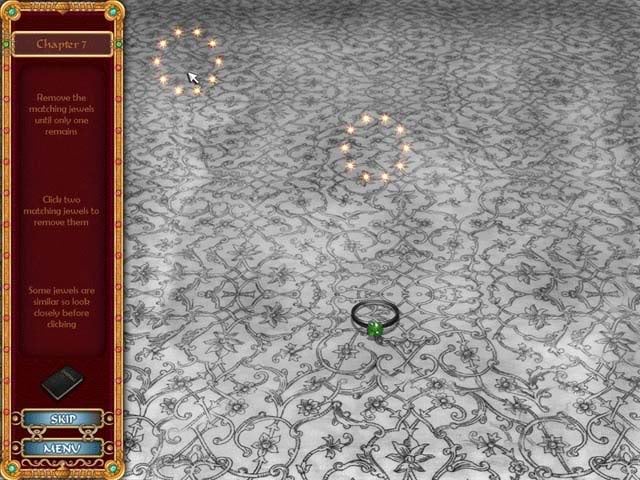
- Find the hidden objects shown below. Objects are randomized and may be different from those shown in your game. Instant hint recharge/Harlequin logo is circled in yellow.
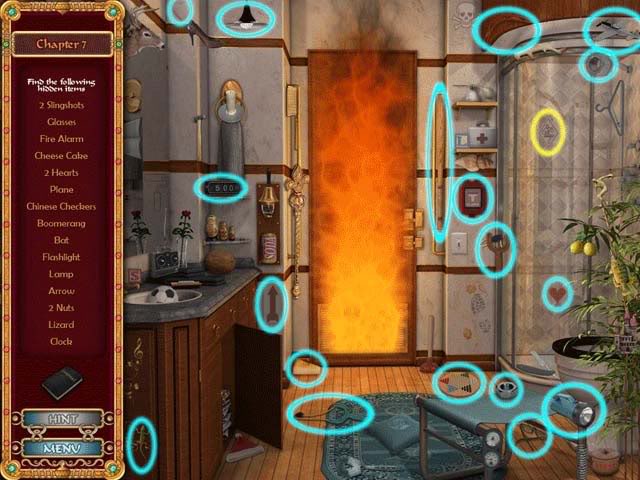
- Find the hidden objects shown below. Objects are randomized and may be different from those shown in your game. Instant hint recharge/Harlequin logo is circled in yellow.
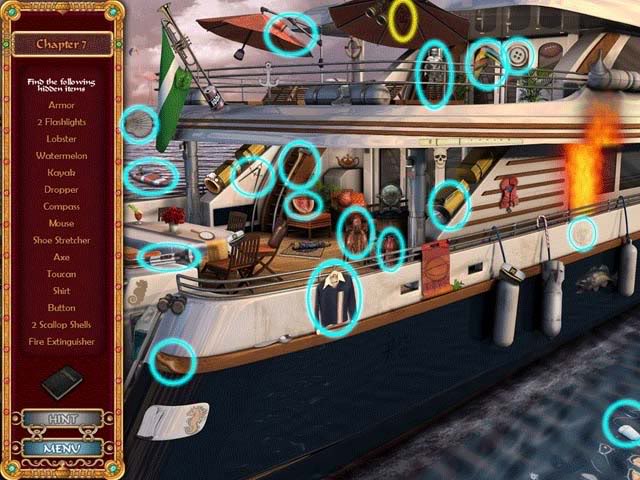
Chapter 8: Protecting the Crown
- Find the hidden objects shown below. Objects are randomized and may be different from those shown in your game. Instant hint recharge/Harlequin logo is circled in yellow.
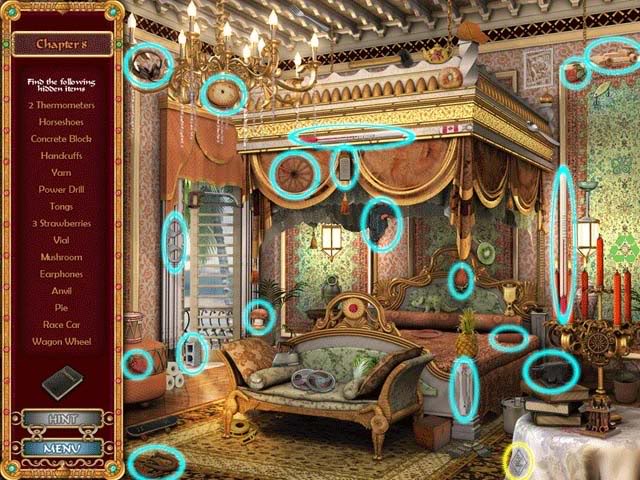
- Find the hidden objects shown below. Objects are randomized and may be different from those shown in your game. Instant hint recharge/Harlequin logo is circled in yellow.
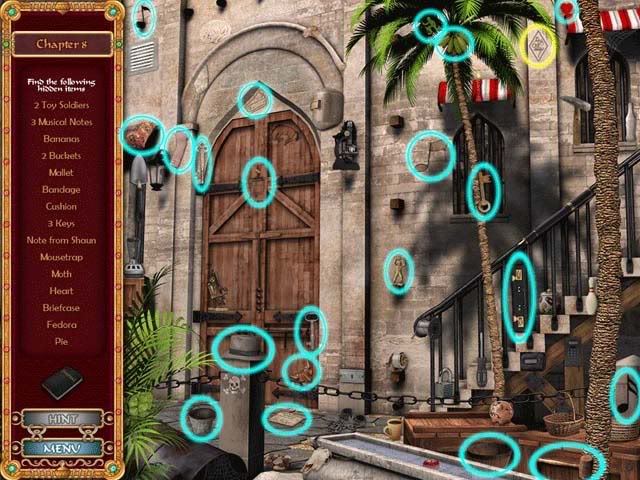
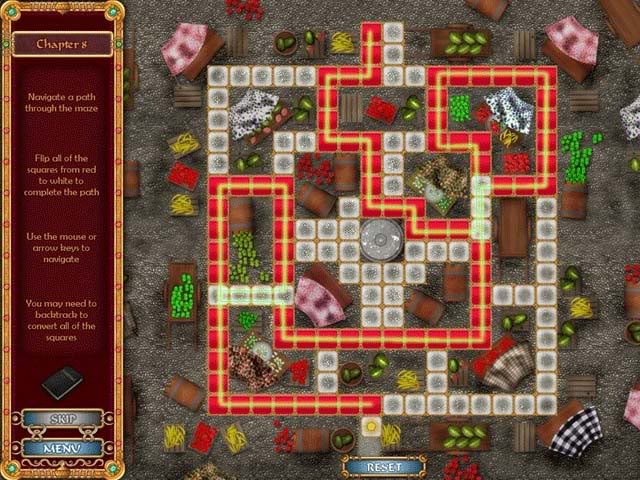
- Navigate a path through the maze, flipping all the squares from red to white. You may need to backtrack. Here’s the easiest route:
Chapter 9: Undercover Assignment
- Find the hidden objects shown below. Objects are randomized and may be different from those shown in your game. Instant hint recharge/Harlequin logo is circled in yellow.
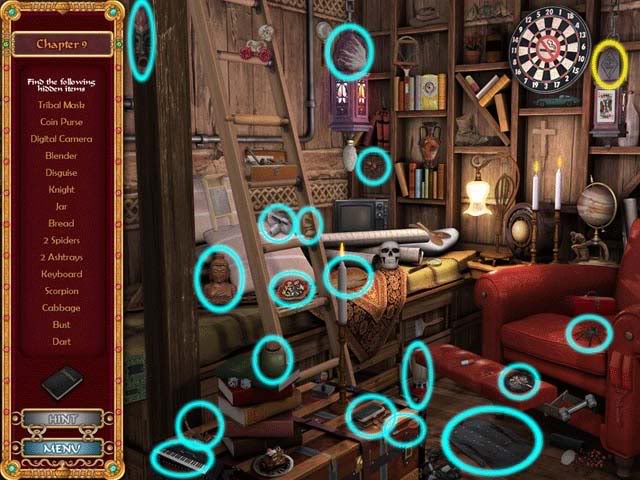
- Find the hidden objects shown below. Objects are randomized and may be different from those shown in your game. Instant hint recharge/Harlequin logo is circled in yellow.
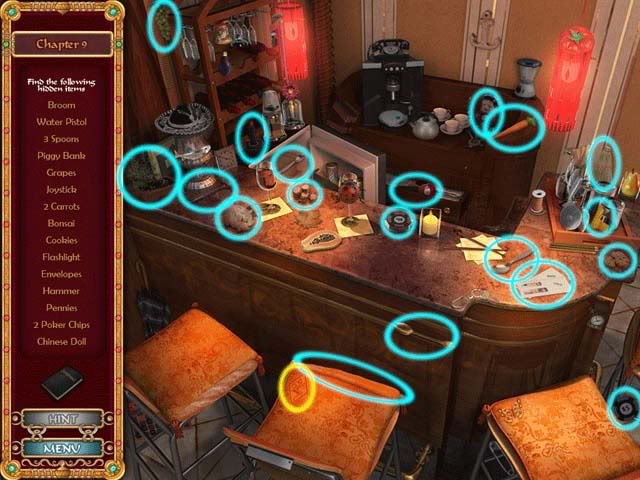
- Find the hidden objects shown below. Objects are randomized and may be different from those shown in your game. Instant hint recharge/Harlequin logo is circled in yellow.
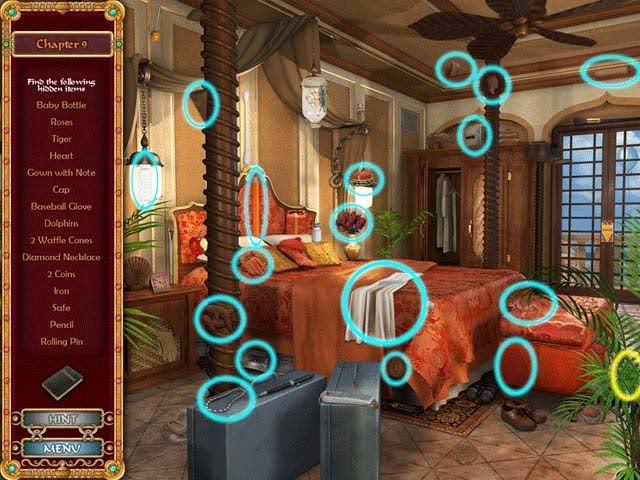
Chapter 10: Love Conquers All
- Find the 10 differences between the two pictures. The differences are circled below:
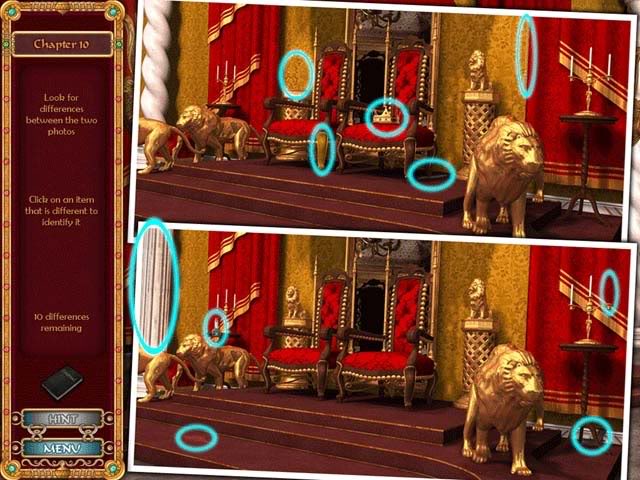
- Find the hidden objects shown below. Objects are randomized and may be different from those shown in your game. Instant hint recharge/Harlequin logo is circled in yellow.
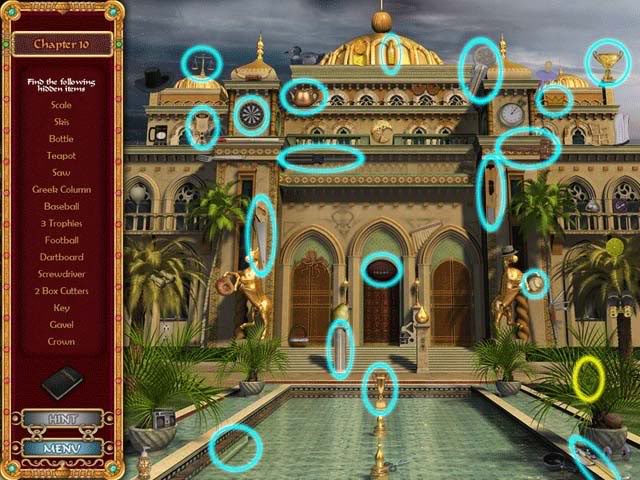
- Find the hidden objects shown below. Objects are randomized and may be different from those shown in your game. Instant hint recharge/Harlequin logo is circled in yellow.
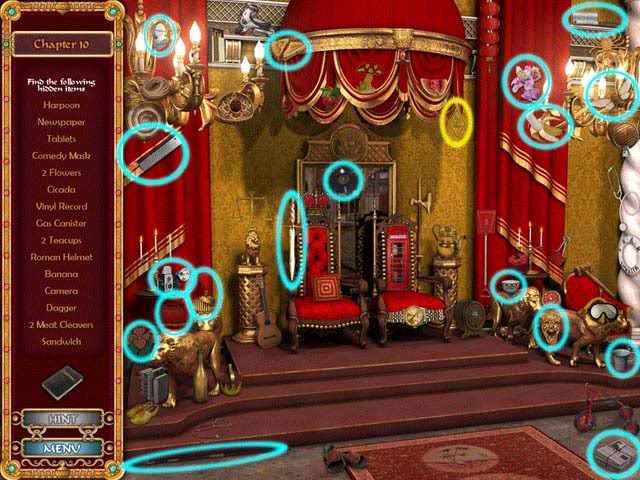
Congratulations, you’ve completed the game!
“;
More articles...
Monopoly GO! Free Rolls – Links For Free Dice
By Glen Fox
Wondering how to get Monopoly GO! free rolls? Well, you’ve come to the right place. In this guide, we provide you with a bunch of tips and tricks to get some free rolls for the hit new mobile game. We’ll …Best Roblox Horror Games to Play Right Now – Updated Weekly
By Adele Wilson
Our Best Roblox Horror Games guide features the scariest and most creative experiences to play right now on the platform!The BEST Roblox Games of The Week – Games You Need To Play!
By Sho Roberts
Our feature shares our pick for the Best Roblox Games of the week! With our feature, we guarantee you'll find something new to play!Type Soul Clan Rarity Guide – All Legendary And Common Clans Listed!
By Nathan Ball
Wondering what your odds of rolling a particular Clan are? Wonder no more, with my handy Type Soul Clan Rarity guide.


