
Best Horror Games On Itch.io – July 2026
Across a bounty of subgenres.![Haze Seas Accessories Tier List [Best Accessories to Equip]](/wp-content/uploads/2026/07/haze-seas-accessories-tier-list.jpg "Haze Seas Accessories Tier List [Best Accessories to Equip]")
Haze Seas Accessories Tier List [Best Accessories to Equip]
The accessories with the best stat buffs in Haze Seas.
![[Roblox] Evomon Shiny Hunting Guide – Including Prismatic and Pris Shinies!](/wp-content/uploads/2026/06/evomon-shiny-hunting-guide.jpg "[Roblox] Evomon Shiny Hunting Guide – Including Prismatic and Pris Shinies!")

Hallowed Legends: Samhain Walkthrough
Welcome to the Hallowed Legends – Samhain Collector’s Edition walkthrough on Gamezebo. Hallowed Legends – Samhain Collector’s Edition is a Hidden Object Game played on the PC created by Elephant Game. This walkthrough includes tips and tricks, helpful hints and a strategy guide on how to complete Hallowed Legends – Samhain Collector’s Edition.


- Prefer Gamezebo on Google

Hallowed Legends: Samhain – Game Introduction
Welcome to the Hallowed Legends – Samhain Collector’s Edition walkthrough on Gamezebo. Hallowed Legends – Samhain Collector’s Edition is a Hidden Object Game played on the PC created by Elephant Game. This walkthrough includes tips and tricks, helpful hints and a strategy guide on how to complete Hallowed Legends – Samhain Collector’s Edition.
General Tips
This hidden object game requires visiting several locations and using inventory items to advance play.
- Play is generally non-linear but some areas or tasks must be complete to open another area.
- CAPITALIZED inventory items are meant to make it easier to find where this guide may differ from your own play.
- There are no penalties for multiple clicks in a scene.
- This is not a timed game but you do collect achievement awards.
- Always move the cursor around a scene. Watch the cursor to spot an interactive area indicator.
Main Menu:
- Play – Begin or resume a game.
- Options – Change music and sound effects volume. You may select or deselect full screen and custom cursor play. You may also select a Play Mode:
- Casual – Hidden object areas are illuminated by sparkles. Hint and Skip buttons recharge faster.
- Advanced – There are no sparkles or helpful aids.
NOTE: I tried both modes with different profiles and saw no difference in play.
- Quit – Exit the game.
- Strategy Guide – Game assistance.
- Bonus Content – Concept art, wallpapers, screen savers, music and bonus game play (bonus play is not available until you have completed the game).
- Profiles – Click the “If this is not you, click here” link to create or delete player profiles.
- Achievements – There are 19 possible achievements including completing a hidden object scene in less than 1.5 minutes and using at least 10 minutes.
Screen Navigation:
- Goal – Your current objective is listed at the top of the screen.
- Menu – Change your options, resume the game or return to the main menu.
- Diary – Clicking an object can add clues or information. The diary automatically opens when new information is added.
- Inventory/Item List – A scrollable list of icons showing available items or a list of hidden items to be collected. Attention: The inventory list doesn’t always scroll forward. If you see blanks where your inventory should be, click the left scroll arrow. You have not lost all your inventory items!
- Hint/Skip Star – Clicking will show a random item from an itemized list. Hints are not limited and the star refills quickly. The star turns into a Skip star for puzzles.
Symbol Meanings:
- Magnifying Glass – Zoom in on interactive area.
- Hand – Interact with an object: pick up an item, open a door, move an object.
- Glint – Investigate this area.
- Eye – Informational clues or new information for the diary.
Walkthrough
A short clip explains the background and introduces the story line for play.
Play the optional tutorial to learn how to interact with objects and characters.
For this walkthrough, only inventory items are shown in hidden object scenes. They are highlighted in white with a blue border.
With the exception of a hidden object area, most inventory items are not collected from a scene until they are needed.
Spelling is consistent with how the items are spelled in the screenshots.

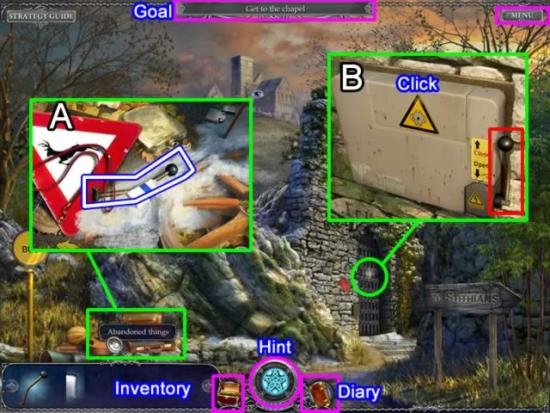
- Collect the LEVER from the abandon things hidden object area.
- Click the gate to access the operating mechanism.
- Place the lever in the slot as shown. Click the yellow triangle to open the gear mechanism. Pick up the LIGHTER that is wedged in the gears.
- Click the lever to open the gate and enter the Chapel grounds.
Chapter 1: The Chapel Grounds
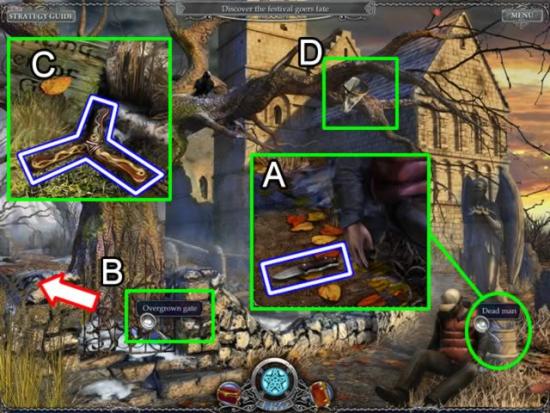
- Click the man in the vest. Collect the KNIFE (A).
- Access the overgrown gate (B). Use the knife three times to clear the tree roots and free the gate.
- Enter the cemetery. Pick up the BOOMERANG (C) and return to the path.
- Click the net in the tree (D) to access an interactive area. Use the boomerang to free the BUTTERFLY NET.
- Return to the cemetery.

- Access the hidden object area (A). Use the butterfly net to scoop out listed objects from the bottom of the pond. The TILE (B) goes to inventory.
- Access the casket (C). Place the tile in the empty space. Swap the tiles to form a pattern. Use the right mouse button to rotate the tiles. The solution is shown above. Pick up the DRAGON RING.
- Return to the path.
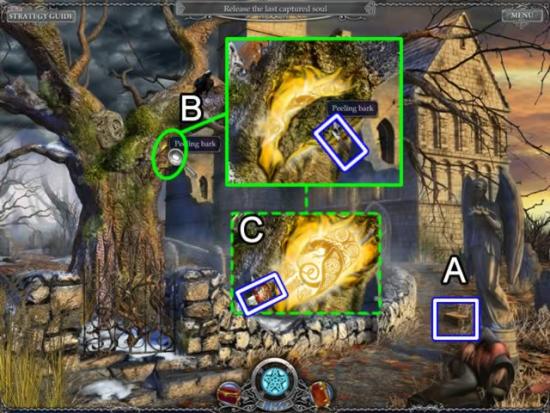
- Pick up the GAS CAN (A) on the path.
- Access the wound in the tree (B). Use the KNIFE to remove the cracked bark pieces.
- Press the DRAGON RING into the revealed symbol.
- A pall falls over the scene.
- Pour the gas from the GAS CAN on the tree. Use the LIGHTER to set it on fire.
- Find the listed objects in the hidden object area (A). The ROLLER (B) goes to inventory.
- Now that the last soul has been released, the pall lifts.
- Click the chapel door to access the lock mechanism. Place the ROLLER in the empty slot.
- Use the clues to figure out the combination. Arrange the symbols from largest to smallest:
- ^ > F + B: If the arrow symbol is greater than F and B, it must be the first or second symbol.
- X > B + ^: If X is greater than the arrow, X must be in the first position and the arrow in the second.
- ^ + B = X + F: Assign numerical values 4, 3, 2, 1 (largest to smallest; left to right) to each tumbler position. We know that X is in the first position so X = 4. The arrow is the second tumbler so arrow = 3. For this equation to be true, then B = 3 and F = 1. Replace the numbers for the symbols to prove the equation: 3 (arrow) + 2 (B) = 5; 4 (X) + 1 (F) = 5.
- SOLUTION: X ^ B F
- Enter the Chapel.
Chapter 2: Exploring the Chapel
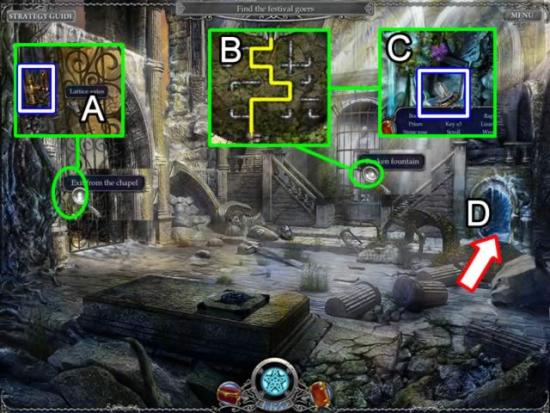
- Click the “Exit from the Chapel” area to zoom in on the Lattice gate. Pick up the TAP (A).
- Click the Broken fountain in the rear of the room to access a minigame.
- Place the TAP at the bottom of the pipes. Connect the pipes from top to bottom. Not all of the pipes must be used. One solution is shown above (B).
- The gates open to a hidden object area. Find the items. The PRISM goes to inventory (C).
- Enter the ice cave (D) on the right.
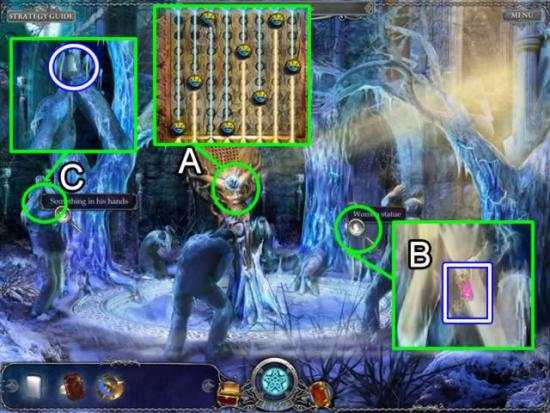
- Click the totem figure (A) to open a minigame. Add the PRISM to the board. Place the prisms to break each beam. Placing a prism closes a portion of available slots. Move the prisms around until each beam is broken. One solution is shown above. View the solution video for extra help.
- Once the beams are redirected, click the woman statue (B) and retrieve the KEY.
- Click the man on the left (C). Collect the ORB (1/3) he is holding.
- Return to the main room.
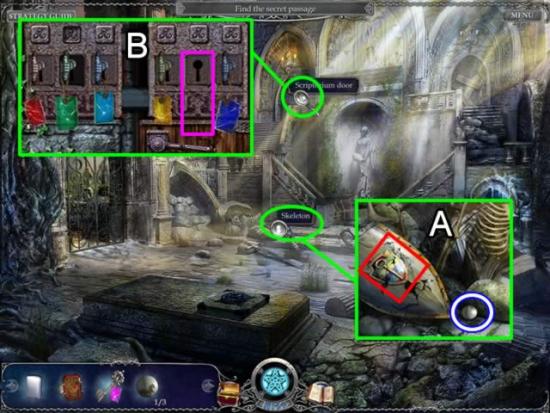
- Access the skeleton on the floor. Pick up the ORB (2/3). Note the color pattern on the shield’s emblem. They are: Pink, green, yellow, blue, aqua and red.
- Click the Scriptorium door to access a minigame.
- Place the KEY in the empty slot (B). Swap the keys until their colored tags are in the same order as the color pattern on the shield. Depress the buttons above each key. When the keys are in the correct order, the lock’s latch slides and the door opens.
- Enter the Scriptorium.
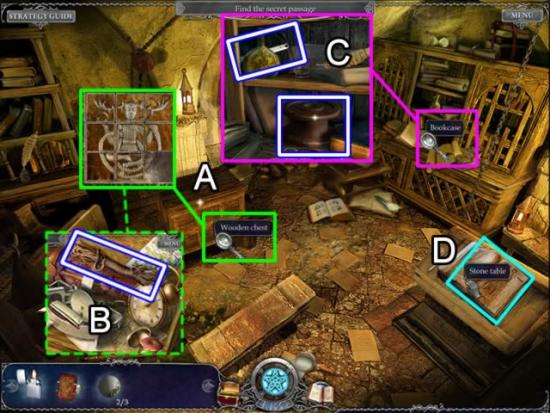
- Use the LIGHTER to light the three lanterns.
- Access the wooden chest (A) to open a slider puzzle. Slide the tiles to form the image shown in the above screenshot.
- The chest opens. Click to access the hidden object area. Collect all the objects listed. The ROPE (B) goes to inventory.
- Click the bookcase to zoom in on the area (C). Collect the ICE AXE and SPOOL.
- Click the stone table (D) to move it and uncover a hatch.
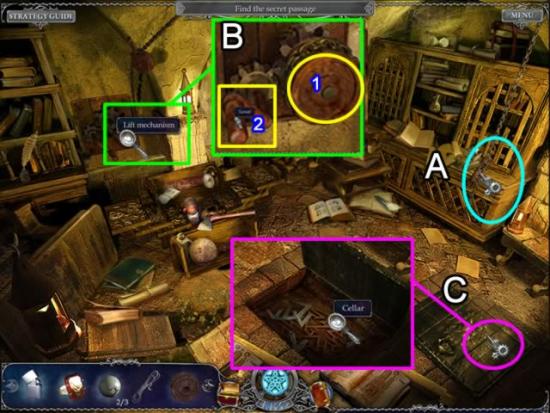
- Attach the ROPE to the end of the chain (A).
- Access the lift mechanism (B). Place the SPOOL (1) then click the lever (2) to raise the floor hatch (C).
- Click the Cellar to open a minigame. Place the shapes in the slots. Place the largest shapes first and then add the smaller “v” shapes. Once the shapes are in place, collect the BALL (3/3). See the solution in the next screenshot.
- Return to the main hall.
- Go to the Ice Cave. Click the ICE AXE on the Frozen Lake twice to break through the ice and access a hidden object scene (A). Collect all the items. The OIL CAN goes to inventory.
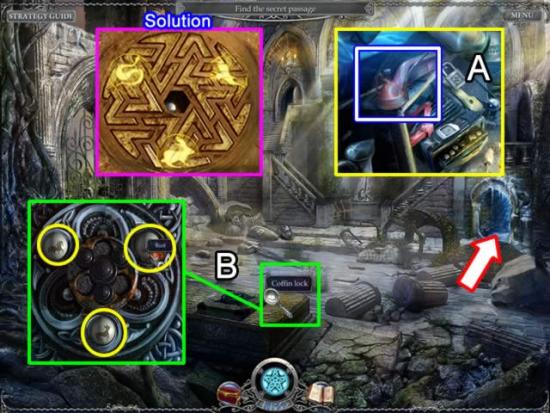
- In the main hall, access the interactive area on the coffin lock (B).
- Place the three BALLS in the empty slots. Use the OIL CAN on the rusted slot.
- Click the balls to rotate the symbols. Match the symbols on the balls with the images from the cellar puzzle (pink inset above). They should be snake, eagle, and rabbit.
- Descend into the room below the coffin.
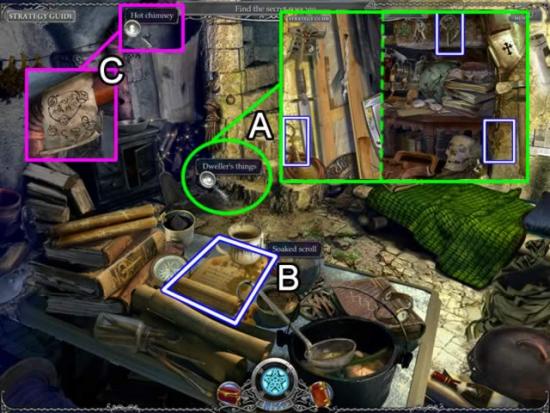
- Find the listed objects in hidden object area (A). The 3 Hook Screws go to inventory and are listed as 3 DOWELS.
- Pick up the SOAKED SCROLL (B).
- Click the hot chimney to zoom in on the area. Place the SOAKED SCROLL on the hot pipe. Examine the directions contained on the scroll.
- Pick up the HAMMER from the backpack (A).
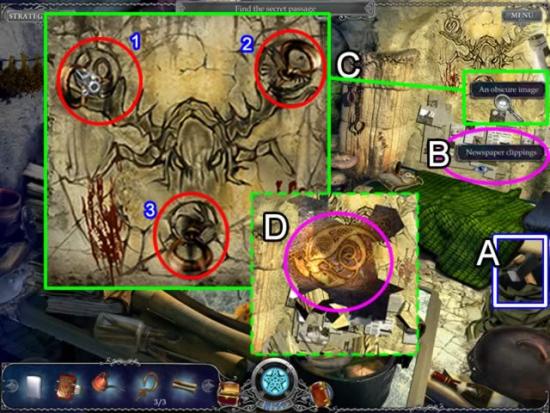
- Click the newspaper clippings (B). The information is stored in the diary.
- Access the obscure image on the back wall (C). Based on the directions from the scroll, place the 3 DOWELS in each of the three symbols on the image. Use the HAMMER to pound them in.
- The wall crumbles, revealing a Celtic dragon.
- Place the DRAGON RING on the image to enter the realm of the Sidhe.
Chapter 3: Escaping the Sanctuary
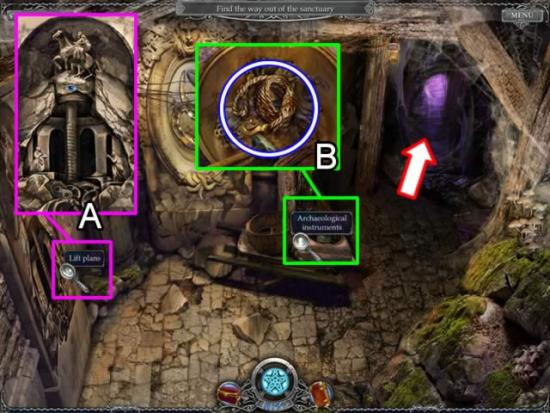
- Access the lift plans. The information is stored in the diary.
- Collect the ROPE from the archaeology instruments.
- Exit through the far door.
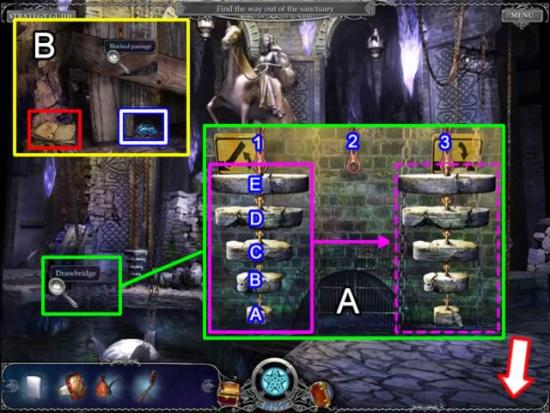
- Access the drawbridge interactive area. Solve the minigame (A) to lower the drawbridge.
- To solve the puzzle, use the three chains to move the weights from chain 1 to chain 3. Weights can only be moved to an empty slot or onto a larger weight. Larger weights cannot be placed onto smaller weights. Here are the first few moves:
- Move weight A to chain 3.
- Move weight B to chain 2.
- Attach weight A to the bottom of weight B on chain 2.
- Move weight C to chain 3.
- Continue to move the weights as described above. Please view the video for extra help.
- Cross the drawbridge (B). Access to journal on the floor. The information is added to the diary.
- Open the blocked passage interactive area. Collect the STONES.
- Cross back over the drawbridge and return to the entry room.
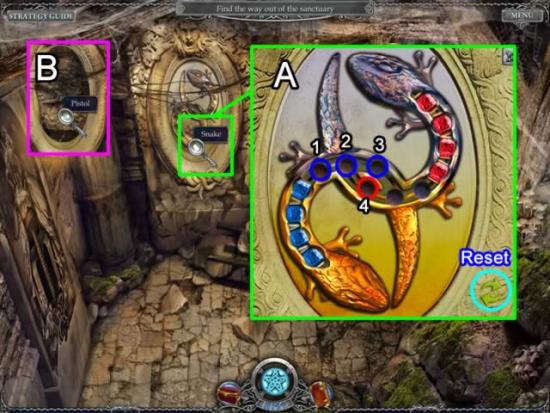
- Click on the Snake to access the minigame. The goal is to place the blue stones at the top and the red stones on the bottom. Stones may be moved multiple spaces at once but they may not jump over placed stones.
- Use the circles 1, 2, and 3 for the first three blue stones. Move the first red stone to circle 4. Move all the blue stones into the vacant circles in the red area so circle 1 is clear. Move the first red stone to the position closest to the lizard head. Move the blue stones back to clear the area for the next red stone.
- Repeat the process for each red stone until all are at the bottom. Move the blue stones into position at the top.
- Please view the video for extra help.
- When correctly solved, the lizard cover moves revealing a PISTOL (B). Collect it for inventory.
- Return to the statue room.
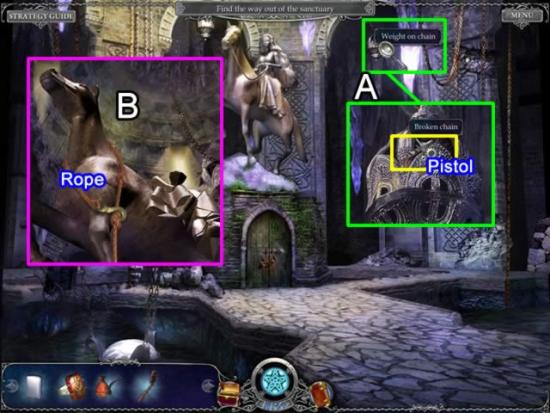
- Access the weight on chain interactive area (A).
- Drag the PISTOL to the broken chain. Click to place it.
- Watch the pistol fire and break the chain. The weight smashes the statue (and you receive an award for your destruction).
- Access the broken statue (B). Place the rope on the horse’s neck and climb aboard.
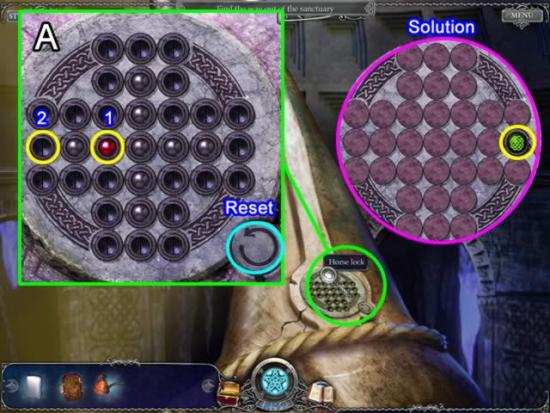
- Access the lock minigame. Eliminate all the balls from the board except the red ball. Jumps cannot be made diagonally. The first move is shown above (A). Use the red ball (position 1) to clear the ball behind it, end at position (2).
- When successfully completed, the red ball will end up on the right side of the board and turn into a green button (see the solution in the above inset). View the video solution for extra help:
- Press the green button to ride the elevator horse upward.
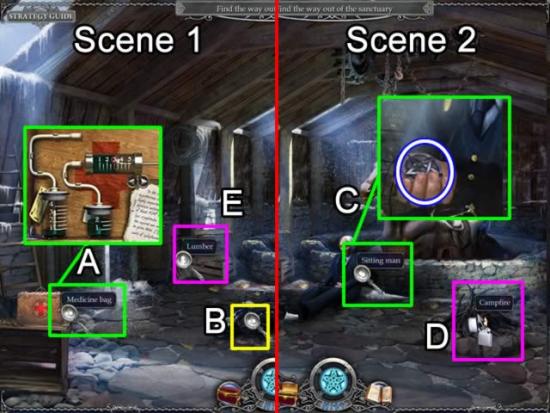
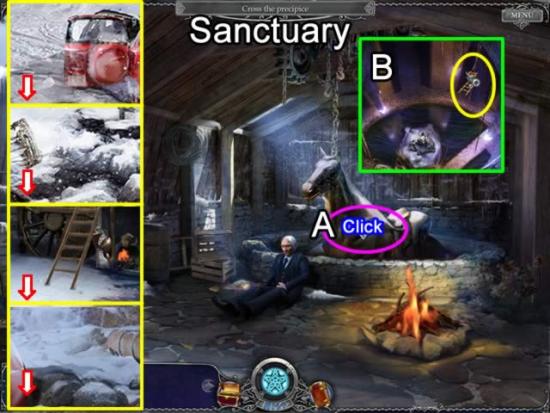
- Click the medicine bag in Scene 1 to get some medicine to revive the man.
- Move the syringe back and forth between the two bottles to obtain the correct dosage.
- Place the syringe on the bottom tube. Click the right arrow to extract the two units.
- Place the syringe on the top tube. Click the right arrow to fill the syringe to the five unit level.
- Place the syringe on the bottom tube. Click the left arrow to put two units in the bottle and leaving three units in the syringe.
- Zoom in on the man on the floor (B). Apply the MEDICINE to revive him. Click to talk to him.
- The man sits up (Scene 2). Click him again to talk some more. He gives you a LOCKET (C).
- Use the LIGHTER to light the Campfire (D).
- On the way out the door, stop at the lumber area (E) and collect the SHOVEL.
Chapter 4: Crossing the Precipice
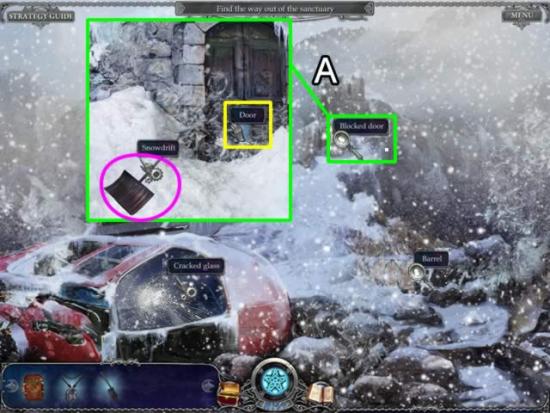
- Move quickly to the Blocked door (A). If you do not move quickly enough, you’ll get cold and end up back at the campfire.
- Use the SHOVEL three times on the lower part of the snowdrift to uncover the door.
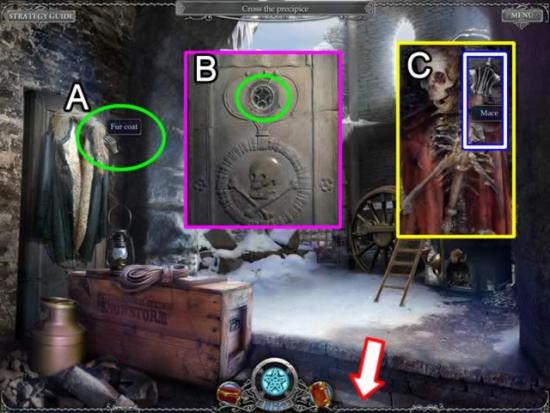
- Put the fur coat on (A) to enable you to stay out in the cold.
- Under the coat is a steel plate. Access it and place the LOCKET in the secret lock (B).
- A skeleton is revealed. Take his MACE.
- Exit and cross the precipice to the crashed helicopter.
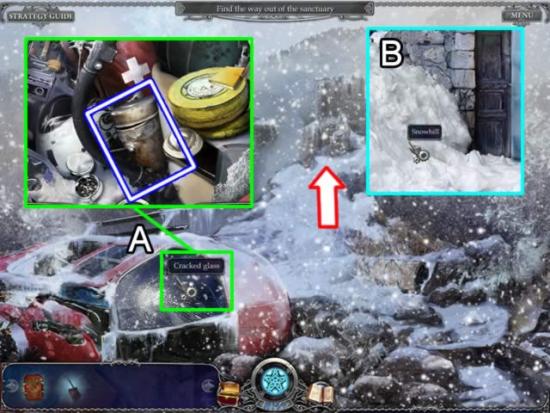
- Use the MACE to smash the cracked glass on the wrecked helicopter (A).
- Access the hidden object area. Collect all the objects. The MESS KIT goes to inventory.
- Return to the door to the ruins. Fill the MESS-KIT with snow from the snow hill.
- Return to the Sanctuary.
- Place the MESS-KIT WITH SNOW on the campfire. The snow melts. You now have a MESS-KIT WITH WATER.
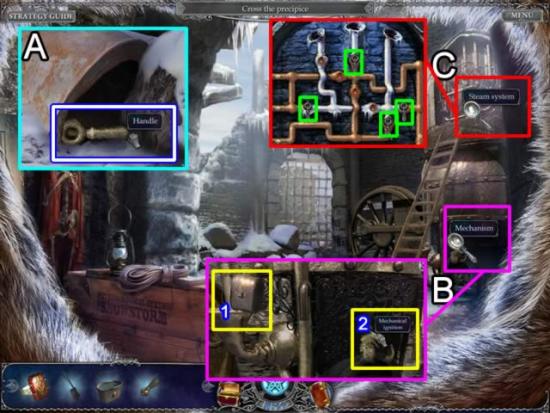
- Stop by the barrel in the snow on the way back to the ruins. Access it and collect a HANDLE (A).
- Once inside, click the mechanism (B). Fill the boiler with water from the MESS-KIT WITH WATER (1). Click the mechanical ignition (2) three times to start the fire.
- Access the steam system (C). Place the HANDLE on any valve. Move the levers so the pipes with arrows aren’t iced up and no steam is coming out of the top three vents. The solution is shown in the above inset. View the solution video to see how it was done.
- The bridge unrolls. Cross the precipice.
Chapter 5: The Weather Station
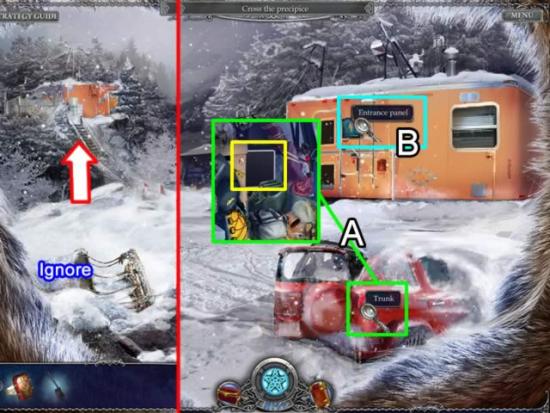
- Cross the snowy field toward the orange structure on the hill. There is an old balloon basket in the foreground. You will not need this for many scenes so unless you like carrying inventory around, skip it for now.
- Access the hidden object area on the trunk of the vehicle (A). Collect the MONITOR. This is another item you won’t need for quite a while, but who can repeatedly pass by a sparking hidden object area?
- The entrance panel on the meteorological station is a repeat-the-sequence puzzle. Complete it four times to enter the station.
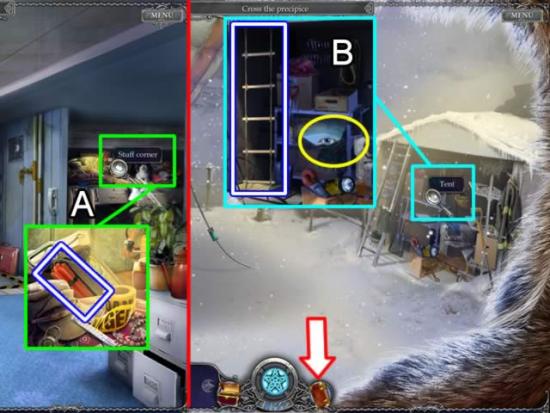
- Access the stuff corner hidden object area in the right rear of the station (A). Collect the DYNAMITE.
- Exit the station. Go left toward the balloon and tent
- Access the interactive area in the tent. Zoom in on the glowing area indicated by the blinking eye. The information goes into the diary. Collect the ROPE LADDER.
- Navigate back to the Sanctuary (see side panel).
- Click the elevator horse (A). It plunges below.
- Access the elevator shaft. Place the ROPE LADDER in the shaft. Descend to the main floor.
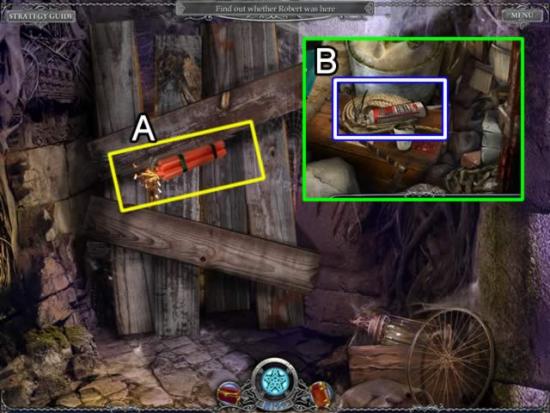
- Cross the drawbridge to the blocked passage.
- Place the self-igniting DYNAMITE on the boards.
- Access the hidden object area. Collect all the objects. The Calking gun in the object list turns into SILICONE in your inventory list.
- Return to snowy field.
- Instead of proceeding to the weather station, follow the right arrow to some ruins.
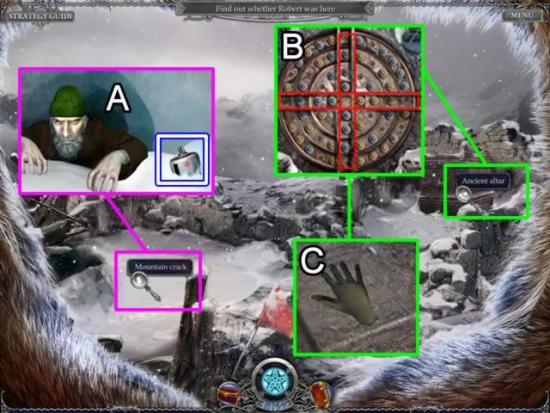
- Click the mountain crack. View the conversation with the scientist (A). Information is added to the diary. Collect the EMPTY GAS CAN.
- Access the Ancient Altar. Play the match-3 minigame (B). Drag the rings to drop either an eye or triangle into the slot. Remove all the balls. If you run short, the game will add what you need in order to match three.
- The altar rises exposing a hand print. Place the SILICONE in the mold. Extract the HAND MOLD.
- Return to the weather station.
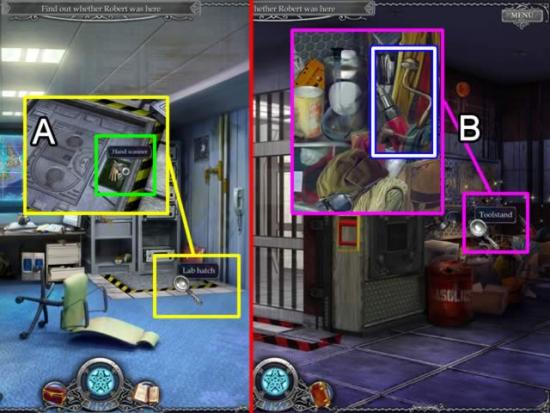
- Access the lab hatch. Click the metal floor hatch to gain access to the operating mechanism.
- Place the HAND MOLD in the hand scanner. The cover slides away.
- Descend the steps to the Underground Lab.
- Access the hidden object area by the tool stand (B). Collect all the objects listed. The HAND DRILL goes to inventory.
- Return to the Sanctuary and descend to the main floor.
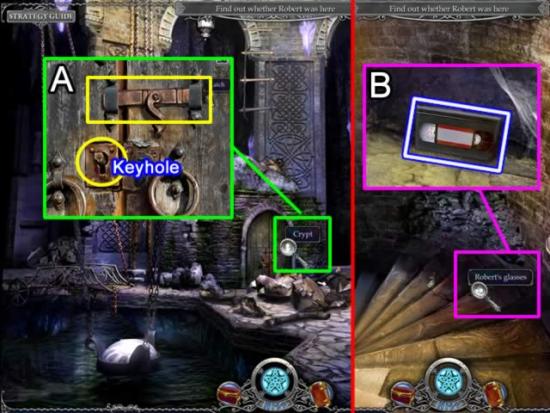
- Access the crypt interactive area. Click the latch to slide it over (A). Use the HAND DRILL on the keyhole to drill out the stuck key.
- Enter the Crypt.
- Discover Robert’s glasses on the stairs. Click to zoom in on the area. Collect the VIDEOTAPE.
- Return to the Weather Station.
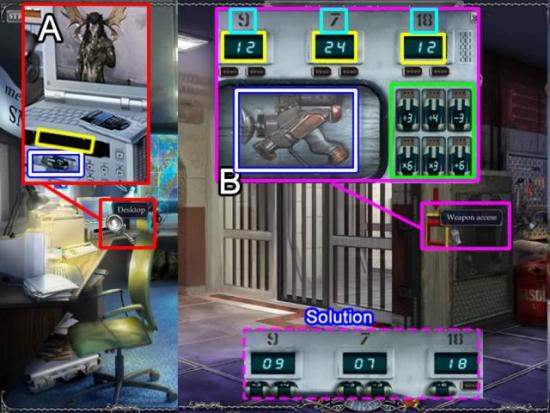
- Access the desktop area.
- Insert the VIDEOTAPE into the highlighted yellow slot (A). Watch the video. Collect the FLASH DRIVE.
- Go to the Underground Lab.
- Click the Weapon Access switch. A drawer folds out. Click to access the interactive area (B).
- Place the FLASH DRIVE in the empty slot. Using the mathematical functions on the flash drives, place them in the slots below the LED numbers so these numbers (yellow) match the number above them (aqua). Not all flash drives are used.
- SOLUTION. Slot 1:12 x 3 = 36. 36 / 4 = 9. Slot 2: 24 – 3 = 21. 21 / 3 = 7. Slot 3: 12 + 6 = 18.
- Take the PHAZERGUN.
- Exit to the snowy field.
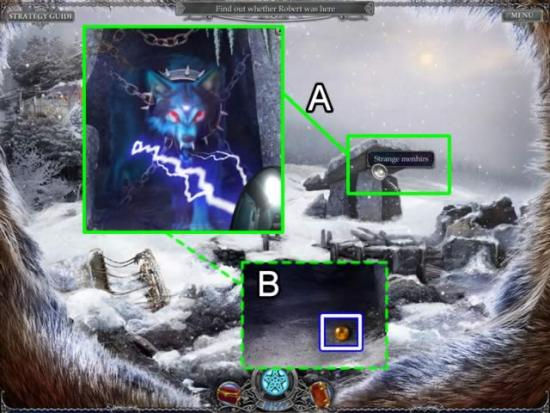
- Access the Strange Menhir area (A). Use the PHAZERGUN on the animal.
- Collect the gold SPHERE (B).
- Return to the crypt in the Sanctuary.
- Descend the stairs in the crypt.
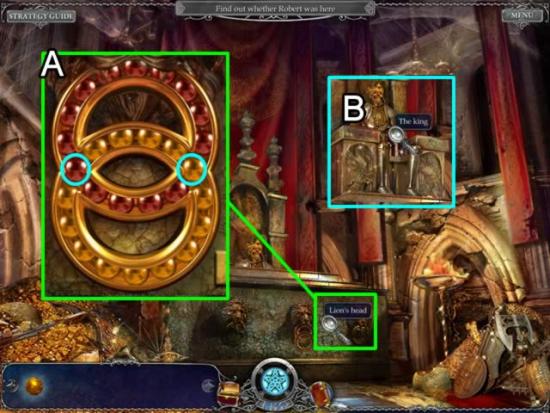
- Access the Lion’s Head puzzle (A). Place the gold SPHERE in the empty slot. This is a tough puzzle. The key is positioning the balls so that the colors of both balls in the aqua highlighted circles are correct. There six balls between these circles (the upper and lower arcs). Begin by positioning the balls so that every sixth ball is red and yellow. Then begin rotating the circles to get the solid colors as shown in the above screen shot.
- The king rises from the altar (B). Click to access a hidden object scene. Collect all the objects listed. There was no TORCH in my list but that was what was added to inventory.
- Return to the snowy field.

- If you haven’t already done so, collect the BALLOON BASKET (A) from the field.
- At the weather station, use the SHOVEL on the snow hill covering the vehicle. Click three times to uncover the vehicle’s cabin. Access the inside of the vehicle (B). Collect the listed Wrench. When added to inventory it is called a STEAM VALVE.
- Enter the station.

- Access the gas pipe on the wall by the hatch to the underground lab (A). Place the STEAM VALVE on the hex nut. Affix the EMPTY GAS TANK to the nozzle. Get a FULL GAS TANK.
- Enter the Underground Lab. Use the TORCH to set off the smoke detector. Enter the room.
- Zoom in on the capsule. Pick up the GAS BURNER in the corner. The FULL GAS TANK attaches itself to the gas burner in inventory. Click the containment capsule. Read the information placed in the diary. Click the Destruct button.
- Place the MONITOR on the desktop. Note the drawings to release the balloon (C). Click the unlock icon (outlined in yellow).
- Exit the lab and head for the balloon.
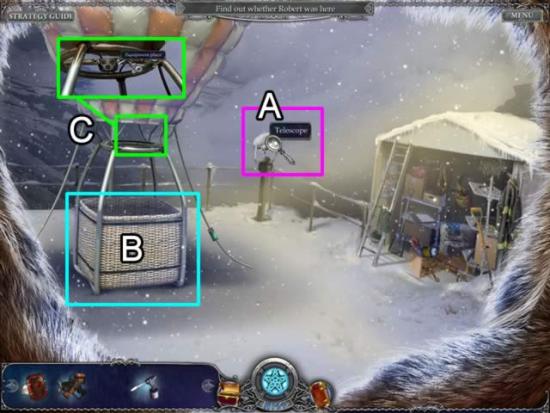
- Click the telescope to view the bird soaring by.
- Place the BALLOON BASKET as shown (B). Access the equipment place (C) and add the GAS BURNER.
- Click to take off.
Chapter 6: The Swamp
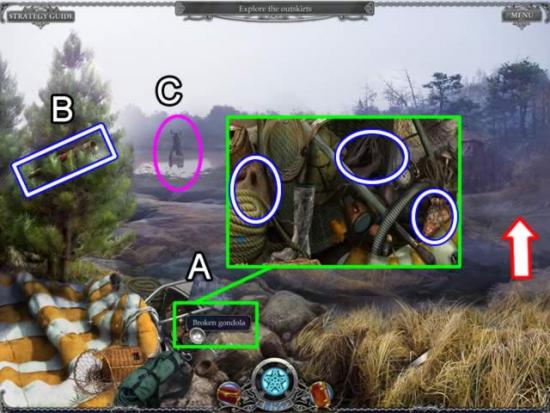
- Access the hidden object area in the broken gondola (A). Collect the 3 BAGS.
- Pick up the SPY GLASS (B) in the tree. Use it to view the antlered creature (C).
- Head toward the house in the distance.
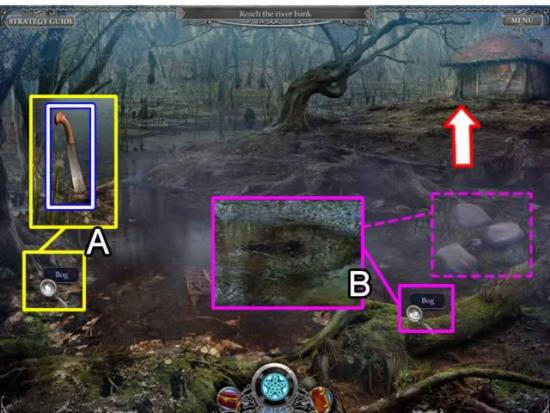
- Click the bog area on the left (A). Collect the MACHETE.
- Open the bog area on the right (B). Place the BAGS here. They form a path across the swamp.
- Head toward the house.
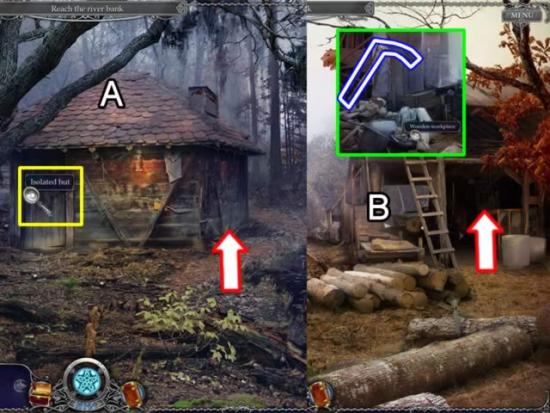
- Click the door to the isolated hut (A). Information is added to the diary.
- Follow the trail on the right side of the hut. It leads to an old sawmill.
- Enter the Sawmill (B). Access the wooden workplace on the left. Collect the SCYTHE.
- Return to the meadow where the balloon crashed.
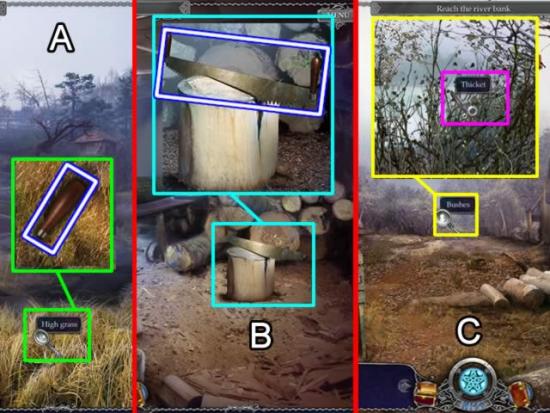
- Click the SCYTHE three times to cut the high grass interactive area (A). Collect the SAW HANDLE.
- Return to the Sawmill (B). Place the SAW HANDLE on the broken saw. A WHOLE SAW is added to inventory.
- Outside the Sawmill (C), use the MACHETE to remove the thickets covering a path.
Chapter 7: Freeing the Boat
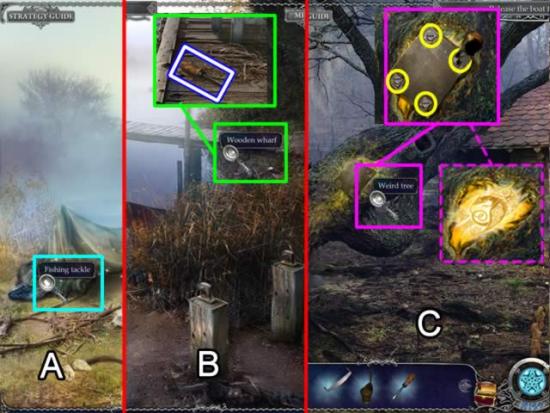
- Follow the path to a camp (A). Access the fishing tackle hidden object area. Although not on your list of objects to find, a KETTLE WITH RESIN is added to inventory.
- Continue past the fallen tree to the Wharf (B). Pick up the SCREWDRIVER from the interactive area.
- Return to the Hut (C). Use the SCREWDRIVER to remove the four screws securing a metal plate on the weird tree.
- Place the DRAGON RING on the Celtic design.
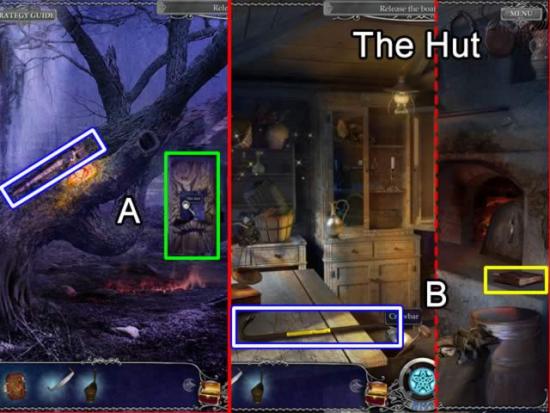
- Take the CELTIC AXE from the tree and use it on the Hut door (A).
- Enter the Hut (B). Collect the EMBLEM OF THE SUN from the utensil hidden object area.
- Pick up the CROWBAR and click the old book to add information to the diary.
- Return to the Camp.
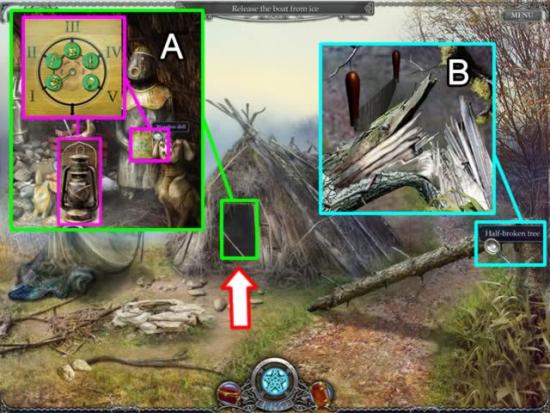
- Enter the lean-to. Access the puzzle area in the wooden doll (A).
- Place the EMBLEM OF THE SUN in the empty slot. Place the symbols in order to show the evolution of light. Use the bottom slot as a holding area. The solution is shown above. The panel slides back. Pick up the LANTERN.
- Exit the lean-to. Click the half-broken tree. Use the SAW to cut the tree and obtain WOOD.
- Return to the old Sawmill.
- Place the LANTERN in the interactive area for the cave (A). Enter the illuminated cave.
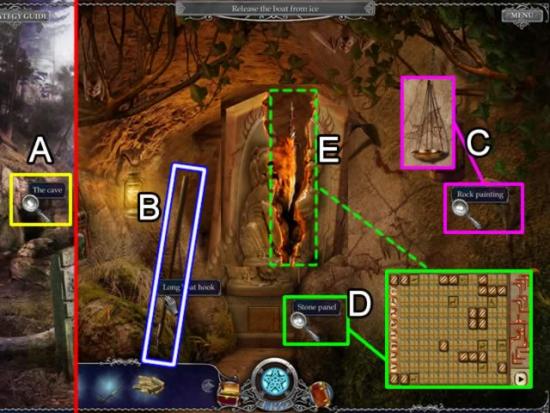
- Pick up the LONG BOAT HOOK (B).
- Access the Rock Painting (C). Collect the SCALES PAN.
- Click the Stone Panel (D) to open a minigame. Use the frames on the right to direct the symbols on the left to their corresponding symbol on the board. You cannot do one symbol at a time. Place all the frames and then press the arrow button in the lower right corner. The symbols slide out from the top to the bottom. If any are incorrect, the frames will stay as you placed them but the game will reset. See the correct frame positions in the next screenshot.
- Correctly solving the puzzle causes the stone lion to open. Collect the FIRE SWORD (E).
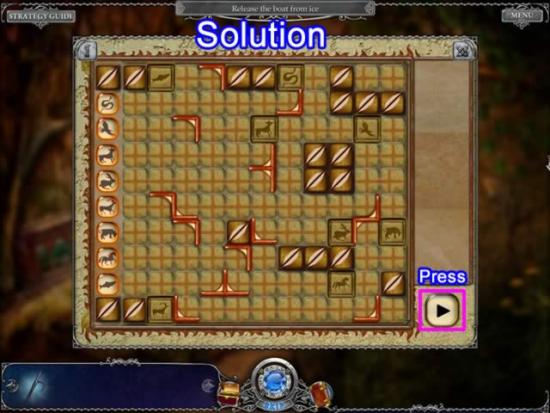
- Click the screenshot for a clearer view of the solution.
- Return to the Swamp.
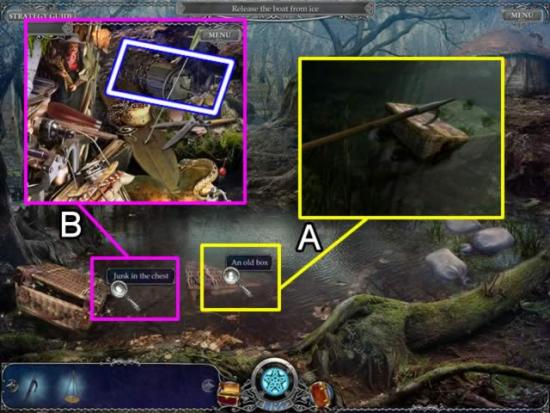
- Use the LONG BOAT HOOK to retrieve the old box (A) and drag it to shore.
- Open the junk in the chest hidden object area (B). Find all the listed items. The WINCH goes to inventory.
- Return to the Hut.
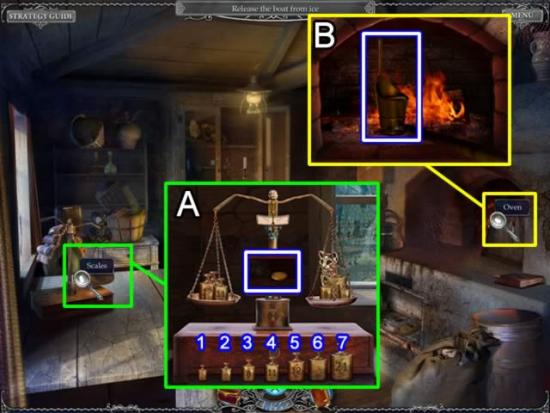
- Zoom in on the Scales to open a game.
- Hang the SCALES PAN on the left side of the scale. To balance the scales, place weights 1, 4 (11#), 5 (12#) and 6 on the left. Put the remaining weights on the right: 2, 3 (8#) and 7. A compartment at the bottom of the scale opens. Collect the COIN.
- Remove the kiln damper to access the oven. In the interactive area, place the WOOD to get a burning fire. Put the KETTLE WITH RESIN next to the flames. Use the LONG BOAT HOOK to push the kettle into the flames. RESIN is added to inventory.
- Return to the Cave.
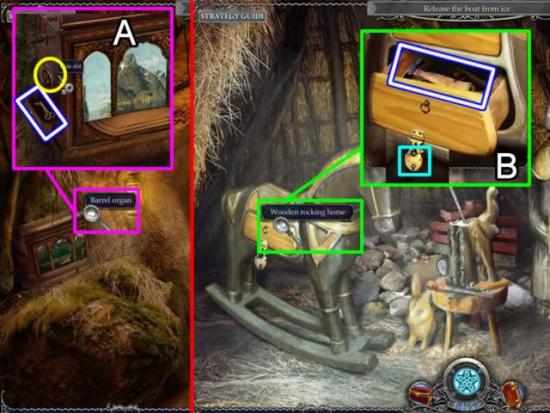
- Click the barrel organ (A). Place the COIN in the slot. Collect the KEY from the hidden drawer.
- Return to the Camp and enter the lean-to. Use the KEY to unlock the small padlock securing the drawer on the rocking horse (B). Take the HAMMER from the drawer.
- Proceed to the Wharf.
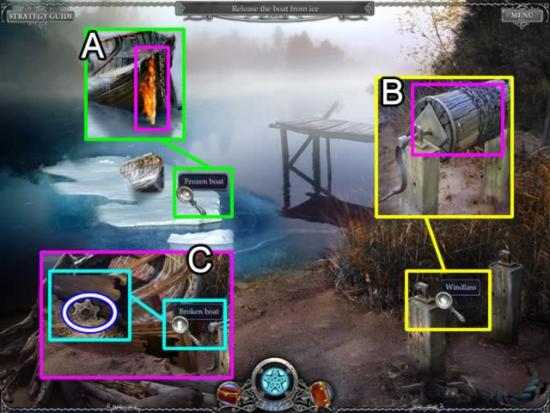
- Use the FLAMING SWORD to melt the ice around the boat (A).
- Place the WINCH in the windless (B). Click the windless to pull the boat to shore.
- Collect the GEAR from the ground by the hole in the boat’s hull (C).
- Return to the Sawmill.
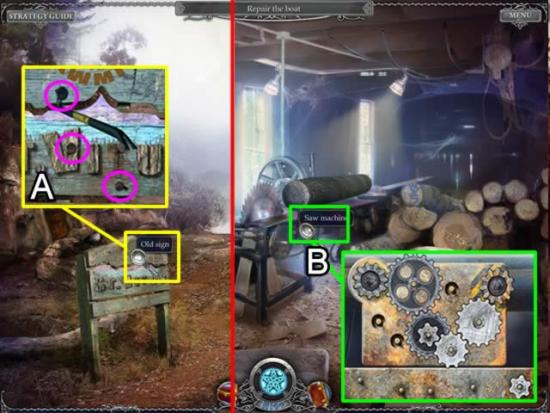
- Use the CROWBAR to remove the three NAILS from the old sign (A).
- Enter the Sawmill.
- Place the GEAR on the empty peg. Interlock the gears to start the machine. One solution is shown above.
- The saw blade cuts the log. BOARDS are added to inventory.
- Return to the Wharf.
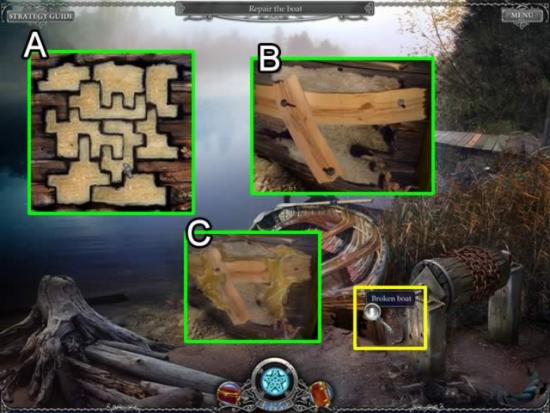
- Access the hole in the boat.
- Put the BOARDS over the hole. They break apart into jig-saw puzzle pieces. Place the pieces based on shape. A correctly fitted piece will lock into place (A).
- Place the three NAILS on the boards and HAMMER them in (B).
- Spread the RESIN over the patch to seal it.
- Sail away.
Chapter 8: The Camp
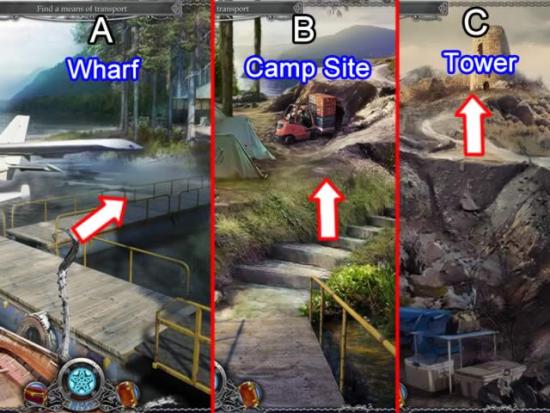
- Follow the docks (A) to a Camp Site (B).
- Proceed toward the truck.
- Continue up the hill to a Tower (C). Enter the Tower.

- Talk to the man from the Sanctuary (A).
- Click the girl (B) and watch her turn to stone. Note that acid is needed to break the chains.
- Continue up the stairs (C) to the scaffolding.
- Access the window (D). Pick up a SCREWDRIVER.
- Return to the Camp Site.
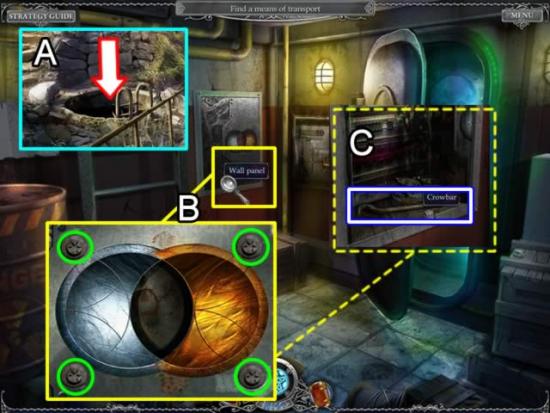
- Enter the underground entrance (A) at the Camp Site.
- Use the SCREWDRIVER on the wall panel screws to align the metal segments as shown above (B). Use the four screws to rotate the segments clockwise and counter-clockwise.
- The plate slides back. Pick up the CROWBAR.
- Return to the Tower.
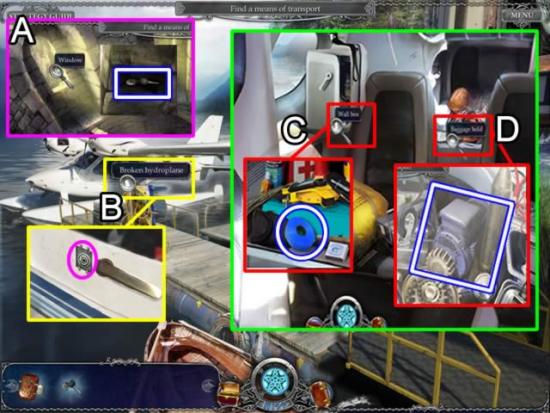
- Use the CROWBAR to pry out the loose brick by the window. Pick up the HYDROPLANE KEY (A).
- Return to the Wharf.
- Use the HYDROPLANE KEY to unlock the door to the plane (B).
- Get the DUCT TAPE from the Wall Box (C).
- Find all the objects in the hidden object scene in the Baggage Hold (D). The ELECTROMOTOR goes to inventory.
- Go past the Camp Site to the truck.

- Place the ELECTROMOTOR in the truck (A). The cargo blocking the cave entrance lifts is raised (B).
- Enter the Cave.
- Pick up the LIFT SWITCH from the illuminated devices.
- Return to the Wharf.
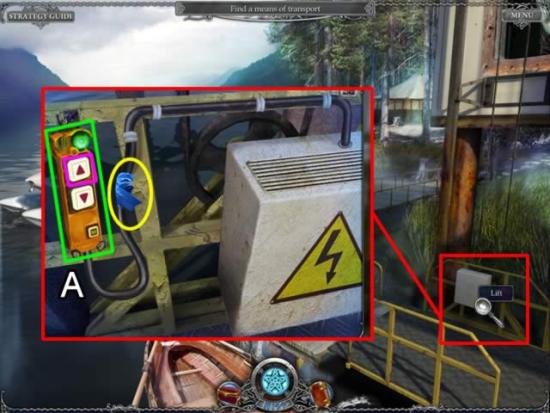
- Access the lift control box (A).
- Place the LIFT SWITCH on the exposed wires. Wrap the wires with DUCT TAPE. Press the up arrow button on the lift switch.
- Ride the lift to the pressure chamber.
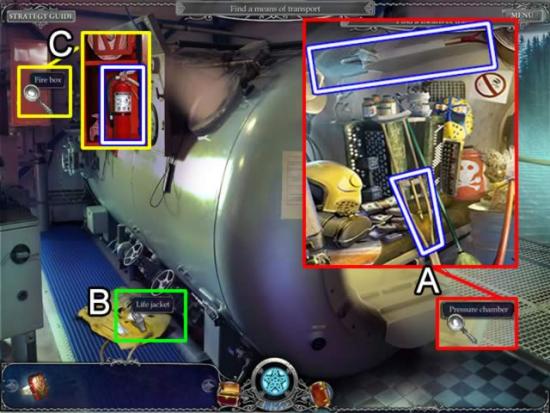
- Find all the hidden objects in the pressure chamber. The two Shovels (A) turn into one SPADE in inventory.
- Pick up the LIFE JACKET (B)
- Open the Fire Box. Take the FIRE EXTINGUISHER.
- Return to the Cave.
- Enter the door at the back center of the cave.
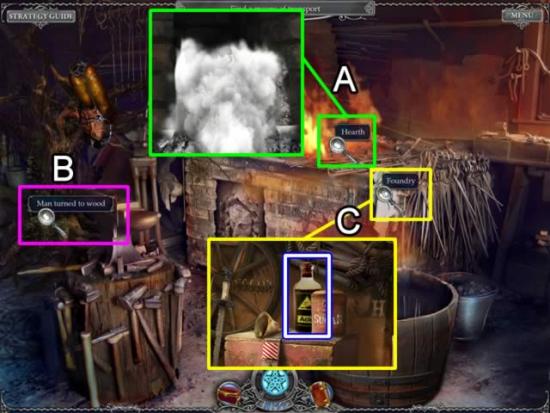
- Use the FIRE EXTINGUISHER to put out the flames in the hearth (A).
- Talk to the man turned to wood. A page is added to the diary.
- Find all the hidden objects in the Foundry (C). ACID is added to inventory.
- Return to the Tower.
- Use the ACID on the chains on the girl. Receive a diary page.
- Accept an ACORN.
- Return to the Camp Site.
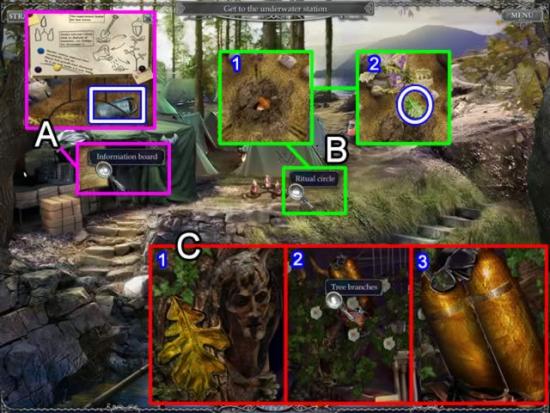
- Read the information board (A). Receive directions on how to plant the oak tree. Pick up the FULL WATER CAN.
- Access the ritual circle (B). Use the SPADE to dig a hole in the center of the circle. Place the ACORN seed in the hole (1). WATER the seed and watch it grow (2). Pluck an OAK LEAF.
- Return to the Forge in the Cave (C).
- Place the OAK LEAF in the leaf impression (1). The tree man blooms. Access the tree branches (2) and get the AQUALUNG (3).
Chapter 9: Releasing the Orb
- Use the entrance at the Camp Site to descend to the Underground Room.
- Place the AQUALUNG on the exit to water.
- Go Right.
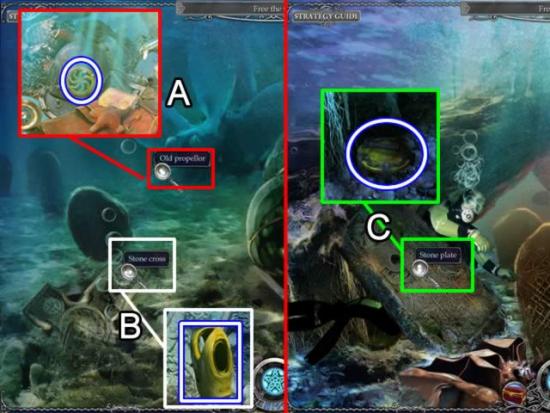
- Find all the hidden objects at the old propeller area (A). The SOLSTICE SUN goes to inventory.
- Access the stone cross (B). Fill the LIFE JACKET WITH AIR from the bubbles.
- Return to the diver in the Old Cemetery.
- Place the LIFE JACKET WITH AIR on the ropes on the stone plate (C) to lift it and free the diver. Collect the ROTARY KEY (1 of 4).
- Return to the Camp Site. Go to the plane on the Wharf.
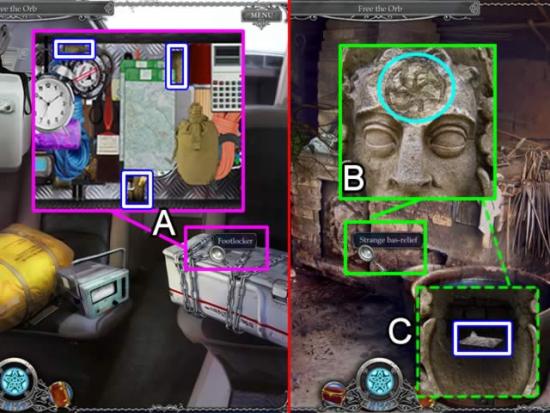
- Use the ACID on the chains securing the footlocker.
- Move the objects around and collect 12 BOARDS. The boards need not be fully exposed to collect them.
- Return to the Cave and proceed to the Foundry.
- Access the strange bas-relief (B). Place the SOLSTICE SUN on the vague imprint. The relief falls away. Pick up the CYPHER CLUE (C) and diary page.
- Exit the Cave and go up the hill to the Tower.
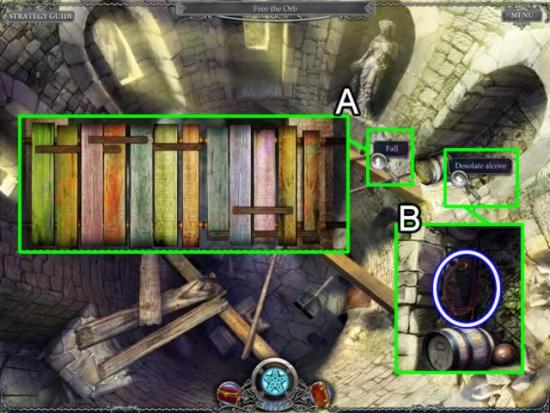
- Ascend the stairs to the scaffolding.
- Place the BOARDS on the interactive area (A). Starting at the left side, interlock the boards with the horizontal slats on top first. Places the boards with the horizontal slat on the bottom last. See the solution above.
- Access the desolate alcove and pick up the WIRE.
- Return to the underwater Cemetery.
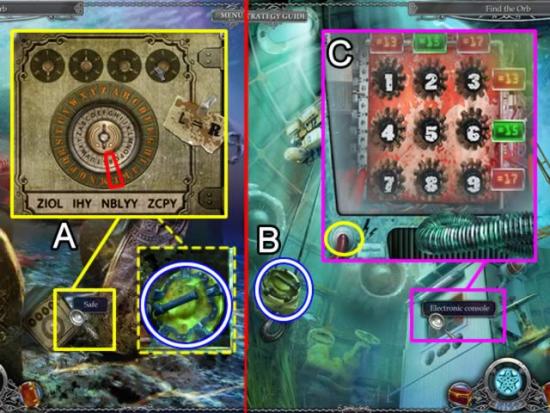
- Access the Safe (A). Place the CYPHER CLUE on the safe.
- Rotate the letters on the inner circle until the R is aligned with the L on the outer circle.
- Translate the letters below the dial into the numbers for the top knobs. Find each letter on the outside circle and write down its corresponding inside letter. For the first number, Z = F, I = O, O = U, L = R. Continue translating for each knob to get the combination.
- SPOILER ALERT: The final code is 4 – 1 – 3 – 5.
- Take the ROTARY DIAL (2 of 4) from the safe.
- Go forward into the orb control room.
- Collect the ROTARY DIAL (B) (3 of 4).
- Attach the WIRE to the electronic console. A puzzle lights up.
- Arrange the numbers so each row and column of number equals the outside number. For those of you who don’t like math, the solution is: Column 1: 7, 4, 2. Column 2: 1, 8, 6. Column 3: 5, 3, 9.
- Take the HOSE and return to the cave.
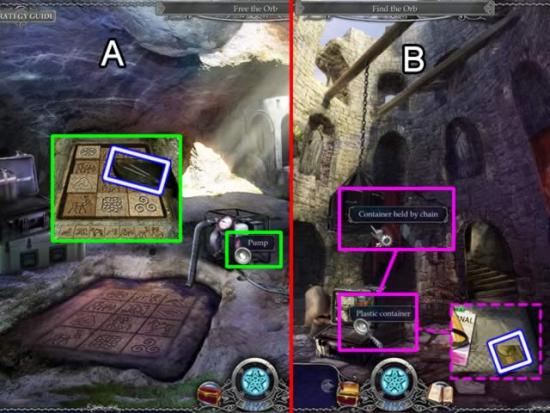
- Place the HOSE on the pump to drain the water from a puzzle. Find the sequence of tiles that when depressed, remain down. The sequence will vary each time. Collect the BOLT CUTTERS.
- Go to the Tower (B). Use the BOLT CUTTERS on the chain suspending the container. Access the container and pick up the ID CARD.
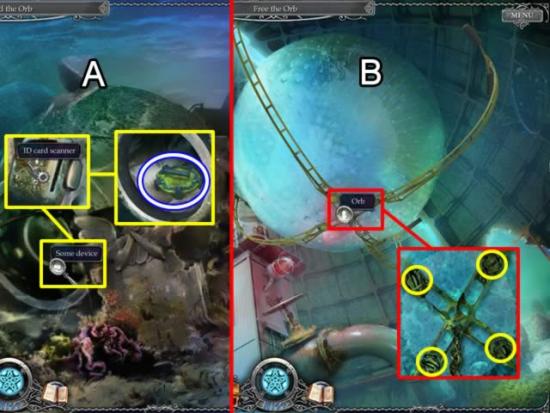
- Turn right at the underwater Cemetery.
- Access the device (A). Use the ID CARD in the scanner to open the container. Pick up the last ROTARY DIAL.
- Return to the orb control room. Place each ROTARY DIAL in a slot to detach an arm holding the orb in place.
- Click the orb and go over the falls.
Chapter 10: The Town
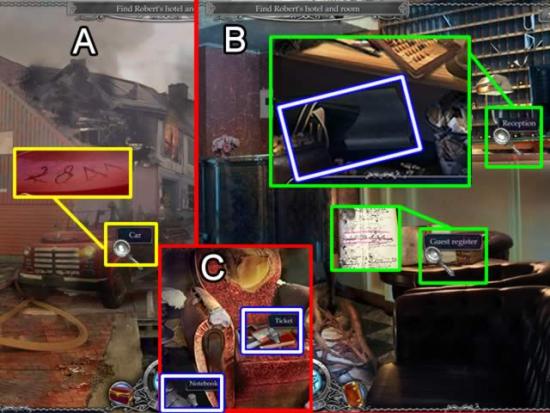
- Inspect the car (A). Click the numbers to record them in the diary. They are 2-8-4-1.
- Go forward twice and enter the Hotel (B).
- Find all the hidden objects in the reception area. The RUBBER MAT goes to inventory.
- Inspect the guest register. Click the page to add information to the diary.
- Go upstairs.
- Enter the first door on the left (the one without flames billowing out of it).
- Pick up the TICKET from the chair (C). Click the notebook beside the chair to add information to the diary.
- Exit the Hotel.
- Continue down the street to the Warehouse.
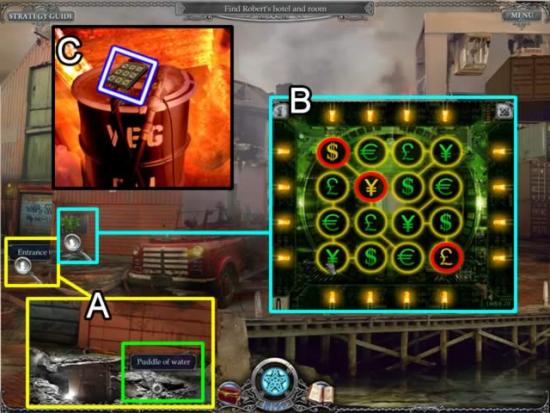
- Place the RUBBER MAT over the puddle of water at the entrance to the Warehouse (A).
- Play the security code puzzle (B). Click the symbols to change them so each row and column contains four different currency symbols. The lights at the sides and top and bottom light up when all symbols are different in that row or column. To make it a bit challenging, the symbols connected by yellow lines (bundles) must also contain different symbols. The symbols circled in red cannot be changed. The solution is shown.
- Enter the Warehouse (C) and grab the KEYPAD.
- Return to the Hotel.
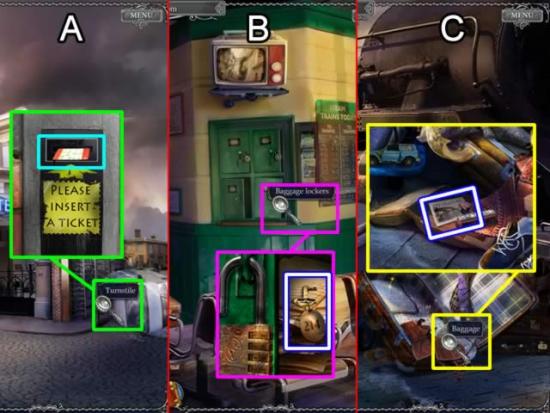
- Access the turnstile on the right side of the Hotel (A). Insert the TICKET.
- In the Train Station, zoom in on the baggage lockers (B). Use the number scratched into the paint on the truck for the code (2-8-4-1). Take the KEY for room 214.
- Exit left onto the platform (C).
- Find all the objects in the baggage hidden object scene. The BADGE goes to inventory.
- Exit the Train Station and enter the Hotel.
- Go upstairs. Use the KEY to open room 214 (A).
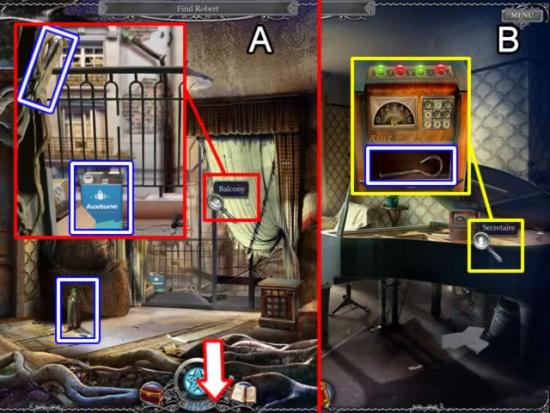
- Pick up the EMPTY WATER BOTTLE.
- On the balcony get the KNIFE and CANISTER OF ACETONE.
- Click down to exit the room. Cross the hall to room 213 (B).
- Access the secretaire to open a puzzle. Depress the buttons to guess the combination. A green light indicates a correct number and red is incorrect. A flashing green light means the number is correct but its position in the sequence is incorrect. You have six tries to guess the correct combination before the game resets with a different code.
- Collect the HOOK and return to the lobby.
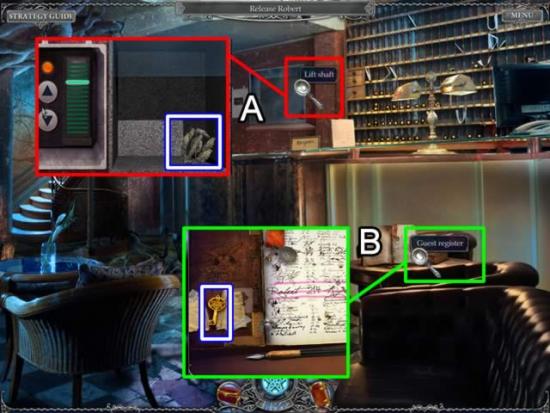
- Access the lift shaft (A). Use the BADGE to activate the puzzle. Press the up and down arrows until the box stops in the middle of the window. If there is a sequence to it, I didn’t spot it; it happened very quickly. Pick up the STAMP.
- Use the KNIFE on the cover of the guest register to get the SMALL KEY.
- Return to the Train station.
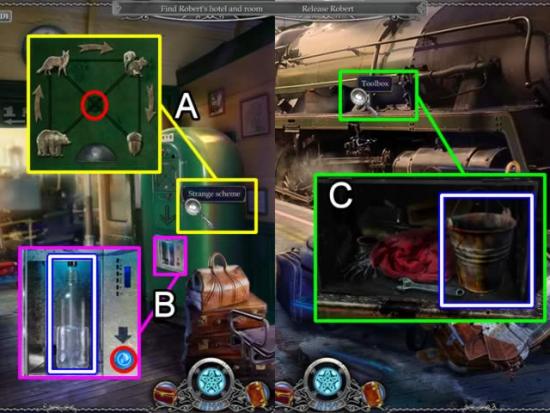
- Open the puzzle on the vending machine (A). Use the center circle to slide the objects from largest (bear) to smallest (nut). The solution is shown.
- The green arrow lights up on the machine.
- Zoom in on the water dispenser. Place the EMPTY BOTTLE in the opening. Press the water button once. Collect the BOTTLE OF WATER.
- Go to the platform.
- Access the toolbox on the train. Use the CANISTER OF ACETONE to dissolve the oil on the outside of the box. Click to open. Collect the BUCKET.
- Return to the Warehouse area.
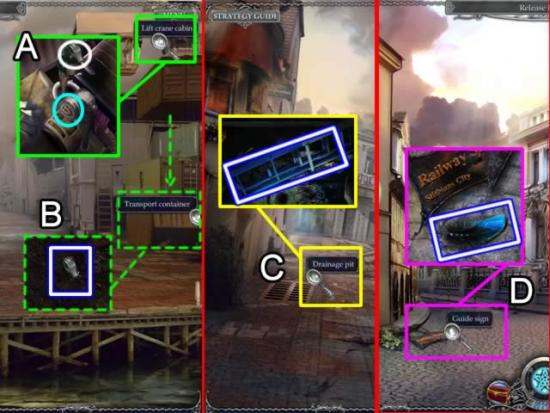
- Inside the lift crane cabin (A), place the STAMP on the impression by the lever (aqua). Click the lever. The transport container falls to the ground and bursts open.
- Pick up a handful of FERTILIZED SOIL from the container (B).
- Head up the street. Stop at the drainage pit (C). Use the HOOK to remove the grate. Get the EXTENDABLE STEPLADDER.
- Continue toward the Hotel. Pick up a FEATHER from the guide sign (D) on the street outside the Hotel.
- Go to the upstairs hallway.
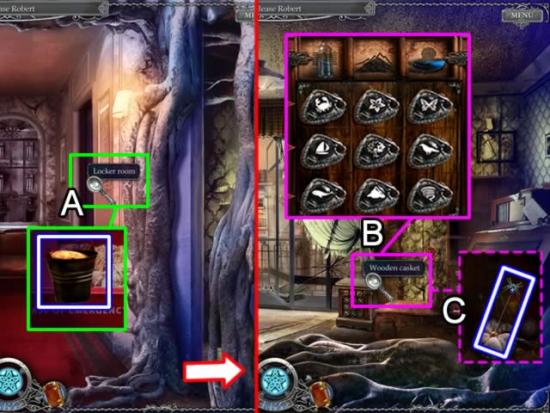
- Enter the locker room. Place the BUCKET in the sand. A BUCKET OF SAND is added to inventory.
- Enter room 214.
- Access the wooden casket. Place the BOTTLE OF WATER, FERTILIZED SOIL and FEATHER in the slots representing their element at the top of the puzzle. Swap the symbols and place them from smallest to largest according to their element. See the above solution.
- Pick up the SHARP HAIRPIN from the cabinet.
- Return to the Warehouse.
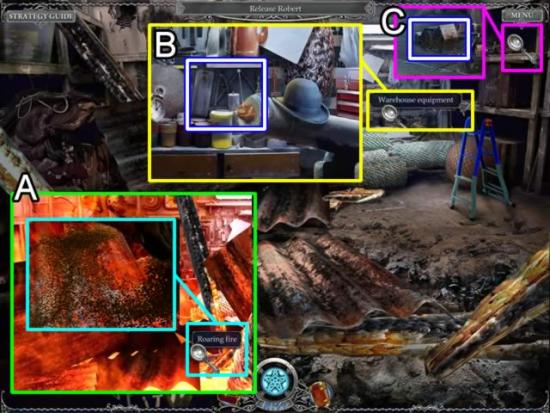
- Spread the BUCKET OF SAND on the roaring fire to extinguish it (A).
- Find all the hidden objects in the warehouse equipment area. KNITTING NEEDLES go to inventory.
- Place the EXTENDABLE STEPLADDER in front of the shelves. Collect the RAILROAD STAMP from the top shelf (C).
- Exit the Warehouse. Stop at the window on the street.
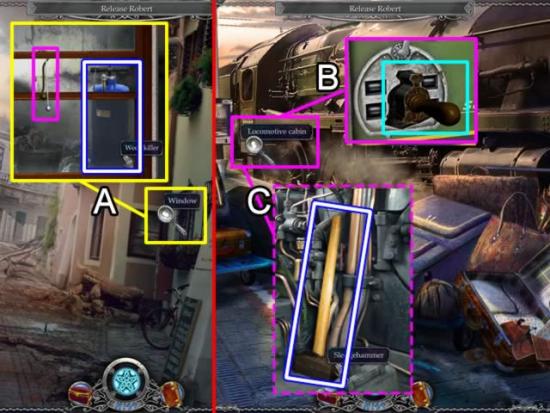
- Use the KNITTING NEEDLES to slip the hook from the window (A). Take the WEED KILLER.
- Proceed to the train platform.
- Press the RAILROAD STAMP into the lock impression on the locomotive door (B). Take the SLEDGE HAMMER (C).
- Return to room 214.
- Use the SLEDGE HAMMER (four times) to break the crystal chains (A).
- Place the SHARP HAIRPIN in the toy spider (B).
- Spray the WEED KILLER on the carnivorous flower (C).
- Robert is free.
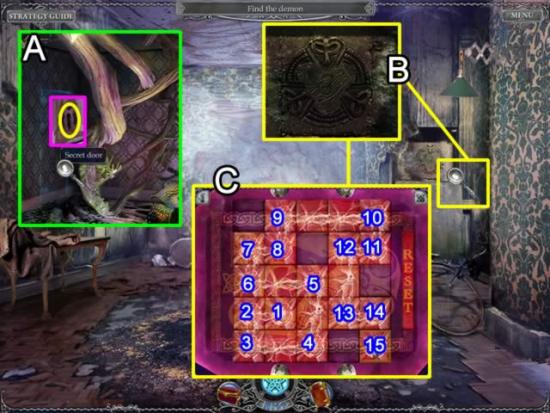
- An outline of a door appears on the left wall (A). Use the SMALL KEY on the lock.
- Place the DRAGON RING on the Celtic dragon symbol (B) to open the puzzle (C).
- Break all the blocks one row at a time. If you click an end block of a row, all blocks in the row will be break and you must continue from the end of that row. You cannot cross broken lines. The above solution shows the order in which to break the blocks or view the solution video.
Congratulations! You have completed all the chapters in Hallowed Legends – Samhain Collector’s Edition. The bonus gameplay is now available. On the main menu, click Bonus Content. Click the Bonus Gameplay tab in the lower right corner of the bonus material to continue.
Collector’s Edition Bonus Chapter
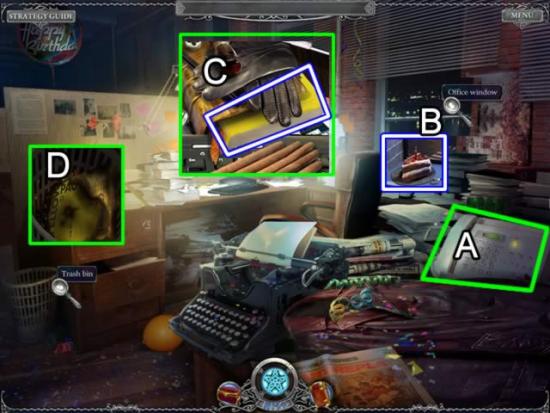
- Answer the telephone.
- Pick up the PIECE OF CAKE from the window.
- Find all the hidden objects on the desk. The PHONE BOOK goes to inventory.
- Place the PIECE OF CAKE and the PHONE BOOK in the trash bin.
- Leave for Scotland.
- Talk to the conductor at the train station. Head into town to try and find water for the conductor.
- Enter the Hotel.
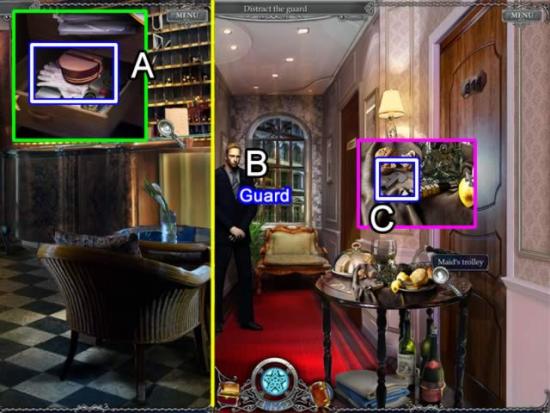
- Find all the hidden objects at the reception area. The UNIFORM goes to inventory.
- Go upstairs.
- Click the guard to add a page to the diary.
- Take the SMALL KEY from the maid’s trolley.
- Return to the train station.
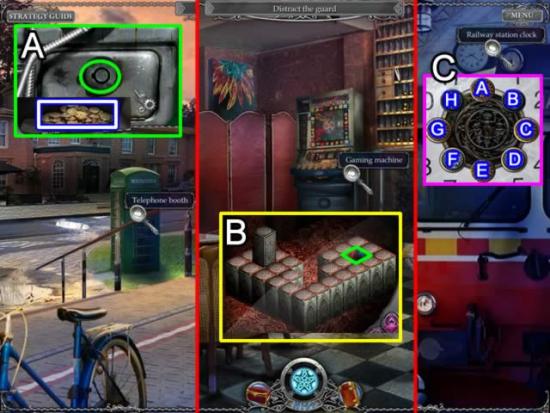
- Use the SMALL KEY open the coin storage area (A). Take a COIN.
- Return to the gaming machine in the Hotel. Place the COIN in the slot to start the game.
- Use the arrows to move the block into the open hole (green). If the block falls off, the game will restart. Pick up the SUN when the game is complete. View the video to see the solution
- Return to the train station.
- Place the SUN in the empty slot. The goal is to keep the four moons depressed and the suns raised. Click the letters on the clock face in the following order to solve the puzzle: F, D, B, G, E, C, E, H, A, B. Receive a CLAW.
- Leave the train station.
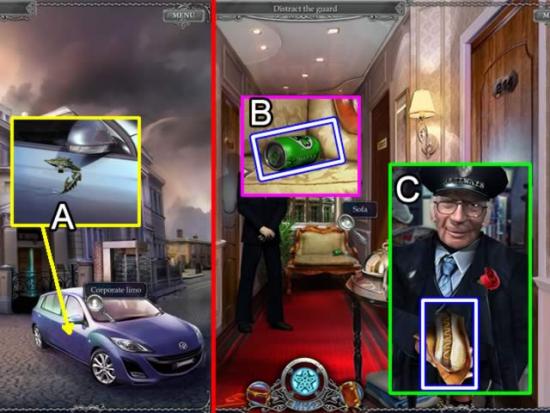
- Use the CLAW to scratch the paint on the door of the corporate limo (A). This sets off the alarm. The guard is distracted and tosses his drink on the sofa.
- Go up and get the can of SODA (B).
- Give the can of SODA to the conductor at the train station. He gives you a HOT DOG (C).
- Exit the train station.
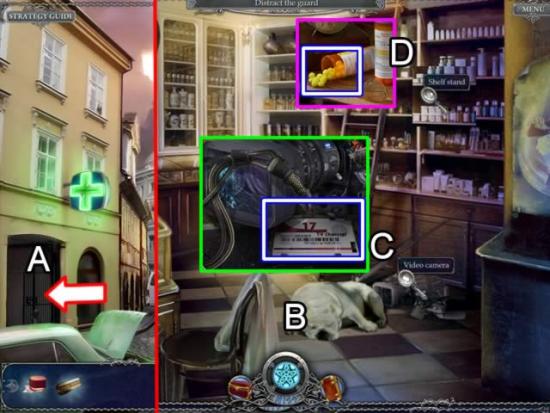
- Enter the Pharmacy (A).
- Give the HOTDOG to the guard dog. He falls asleep (B).
- Get the OPERATOR’S BADGE from under the video camera (C).
- Pick up some SLEEPING PILLS (D) from the shelf.
- Exit the Pharmacy.
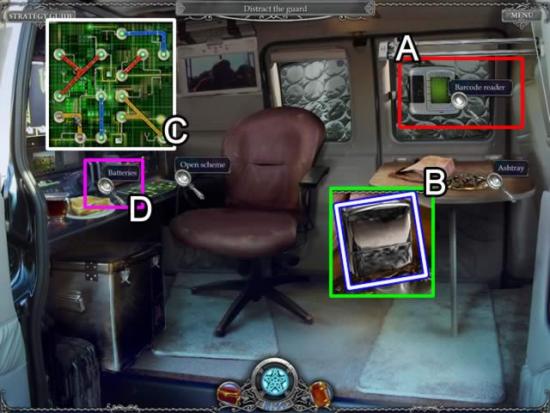
- Approach the white van to the right of the Pharmacy.
- Place the OPERATOR’S BADGE on the green screen on the barcode reader (A).
- Pick up the LIGHTER from the ashtray (B).
- Access the colored contacts on the electronic card so all connectors are covered. See the solution above (C).
- Pick up the two BATTERIES.
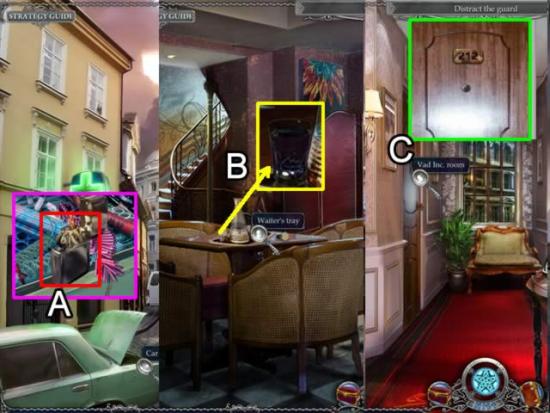
- Go to the green car in front of the Pharmacy (A). Use the LIGHTER to set off the fireworks in the trunk.
- In the Hotel lobby put the SLEEPING PILLS in the glass of water on the waiter’s tray (B). Pick up the SLEEPINGWATER and go up stairs.
- You are now dressed in your bellhop UNIFORM so you can gain entrance to room 212 (C).

- Give the guest the SLEEPINGWATER so you can look around the room.
- Open the crafty casket puzzle. Swap the pieces within each ring to form a picture. The inner circle is fixed so work outward from that. The outer gold symbols are correct but they can be moved. Be careful not to move them or that is another ring you’ll have to figure out. The solution is shown in the next screenshot.
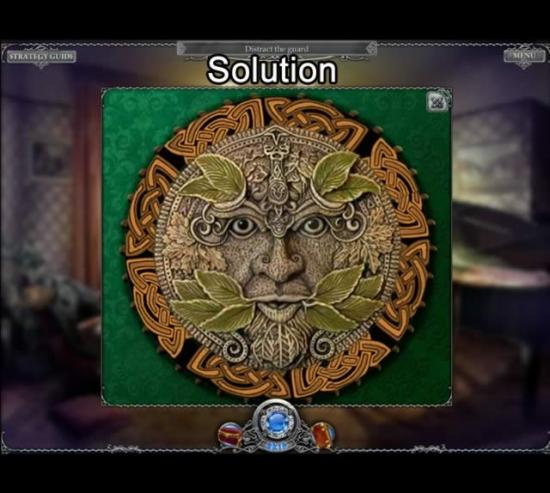
- Take the CAR KEYS from the center of the solved puzzle.
- A note is slipped under to door. Pick it up to add information to the diary.
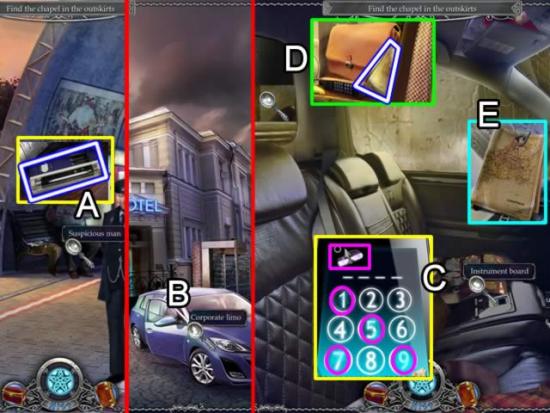
- Return to the suspicious man at the Train Station. Place the BATTERIES in the ULTRAVIOLET LIGHT.
- Open the door of the corporate limo with the CAR KEYS (B).
- Use the ULTRAVIOLET LIGHT on the instrument board to see the fingerprints on the keypad (B). Punch in the four numbers. A correctly placed number is green. Try different combinations of the four digits until the correct number is entered. Mine was 7-5-9-1.
- The rear window slides down. Find all the hidden objects in the list. The MAP is added to inventory.
- Place the MAP in the map rack (E).
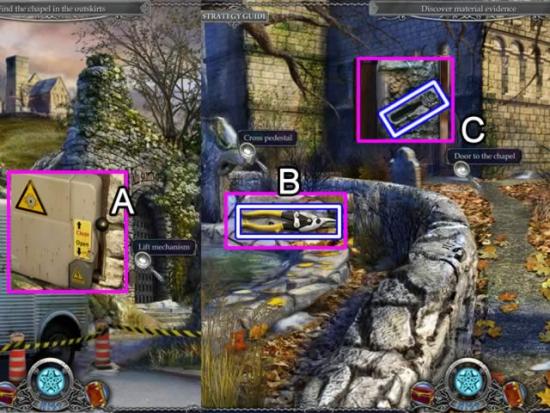
- Leave the car at the gas station. Go forward to the gates to the Chapel.
- Access the lift mechanism to open the gates (A).
- Pick up the PLIERS by the cross pedestal (B) and the GLASS CUTTER from the Chapel door (C).
- Return to the Gas Station.
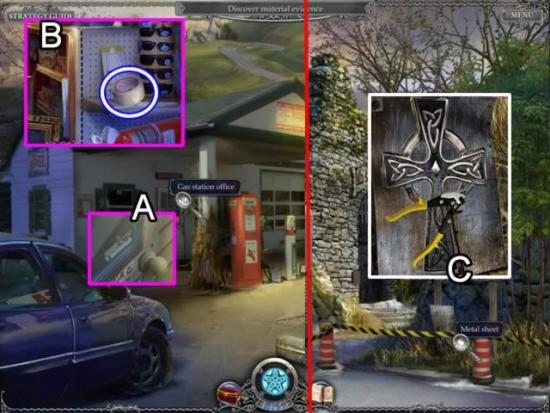
- Use the GLASS CUTTER to cut the glass on the door and open the lock (A).
- Find all the hidden objects. The TAPE goes to inventory (B).
- Return to the Chapel gate.
- Use the PLIERS to cut out the CROSS on the metal sheet (C).
- Return to the Chapel.
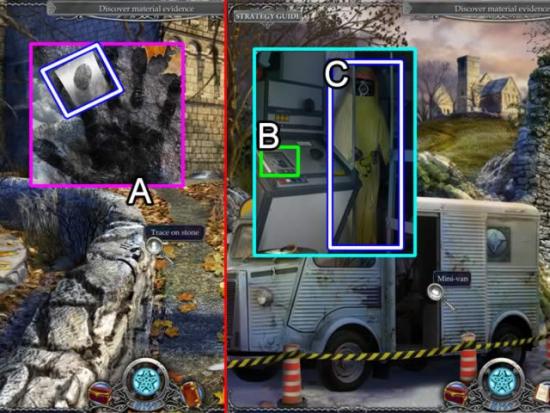
- Use the TAPE to lift a FINGER PRINT from the stone wall (A).
- Return to the mini-van. Use the FINGERPRINT on the scanner (B) to unlock the door.
- Take the COSTUME (C).
- Return to the Chapel.
- Place the COSTUME on the Chapel door.
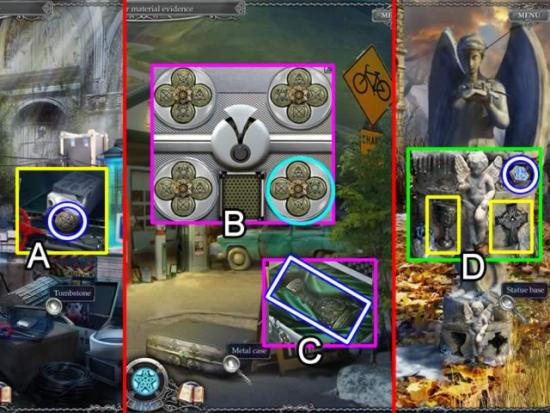
- Take the STAR from the tombstone area (A).
- Return to the Gas Station.
- Add the STAR to the other symbols (B). Place the four symbols in the bottom right area. Placement is based on the other three symbols.
- Pick up the CUP (C).
- Go back to the Chapel grounds.
- Place the CUP and CROSS in the statue base. Collect a METAL SWITCH.
- Enter the Chapel.
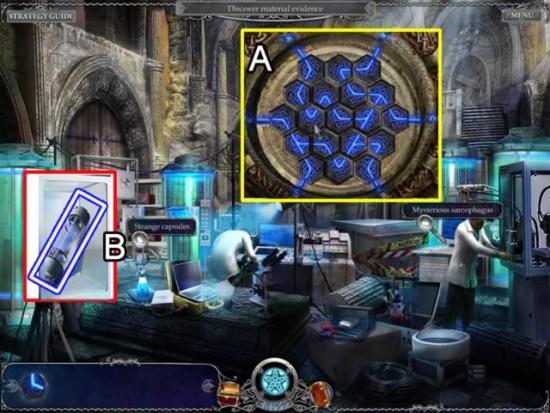
- Place the METAL SWITCH in the puzzle by the mysterious sarcophagus (A).
- Rotate all the switches to form a continuous circuit. See the above solution.
- Pick up the ODD CAPSULE (B).
- Exit the Chapel grounds. Watch the ending cut scene.
Congratulations! You have completed the Bonus Gameplay in Hallowed Legends – Samhain Collector’s Edition!

More articles...
-
Best Horror Games On Itch.io – July 2026
Across a bounty of subgenres. -
Haze Seas Accessories Tier List [Best Accessories to Equip]
The accessories with the best stat buffs in Haze Seas.