![Digimon UP Tier List [Supports, Buddies, and Partners]](/wp-content/uploads/2026/07/digimon-up-tier-list.jpg "Digimon UP Tier List [Supports, Buddies, and Partners]")
Digimon UP Tier List [Supports, Buddies, and Partners]
These Digimon will get you UP the leaderboard.


![Haze Seas Boss Drops [Chances, Locations, and How to Spawn]](/wp-content/uploads/2026/07/haze-seas-boss-drops.jpg "Haze Seas Boss Drops [Chances, Locations, and How to Spawn]")

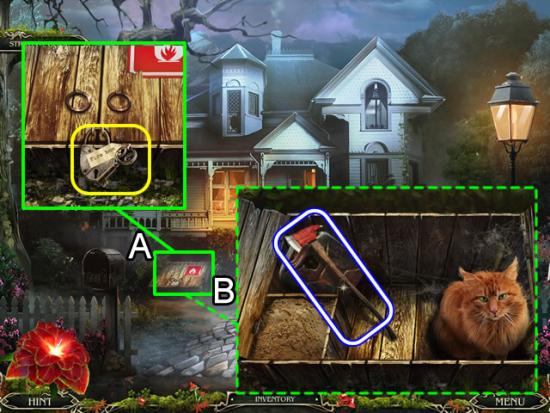
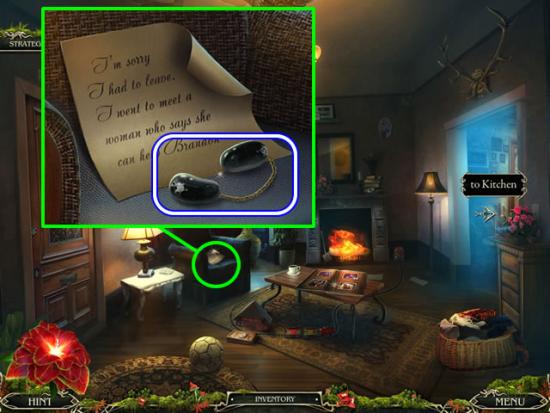
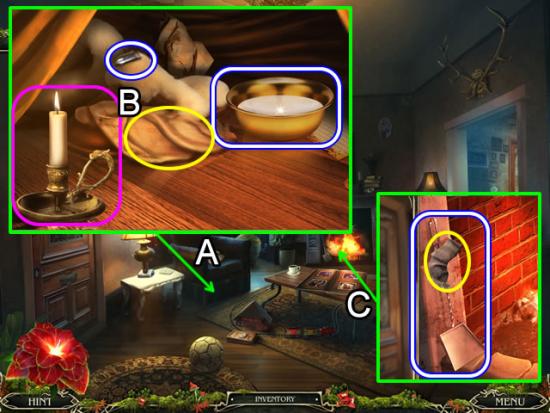
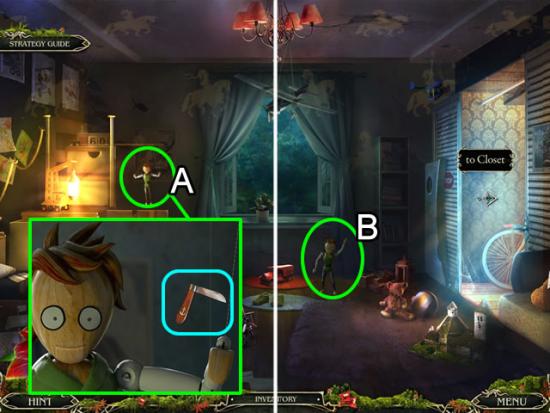
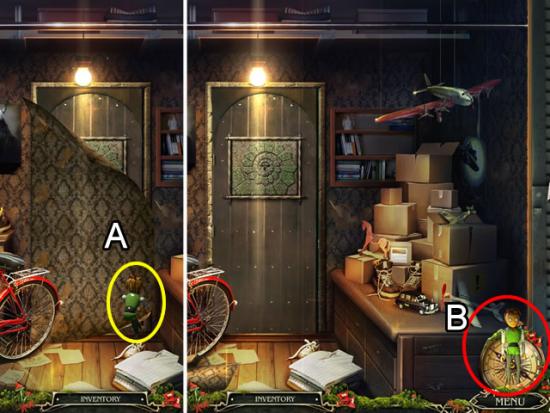
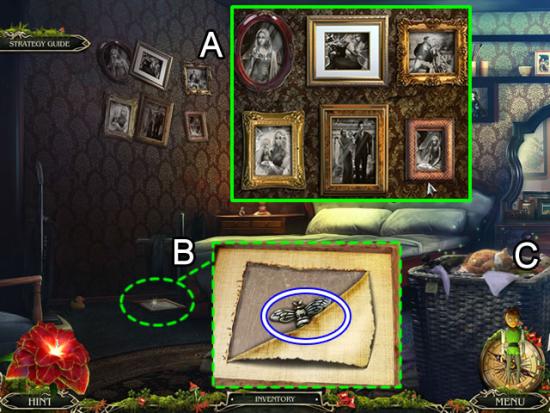
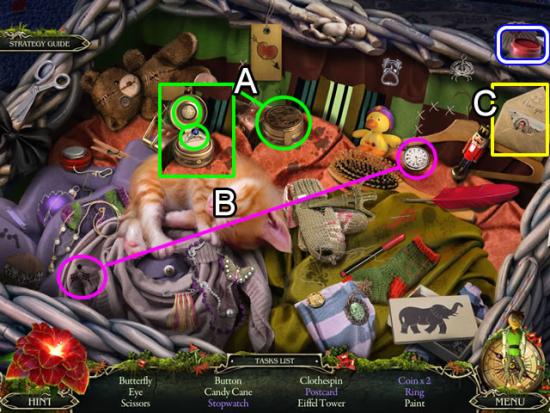
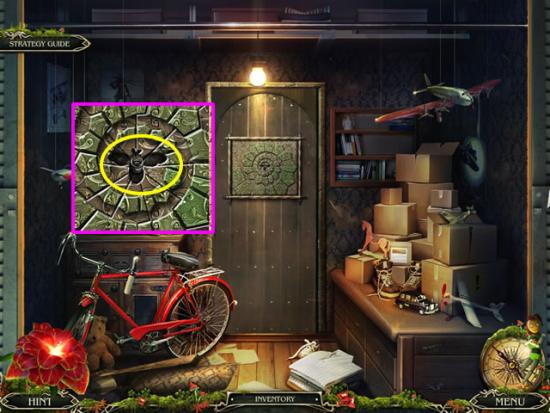
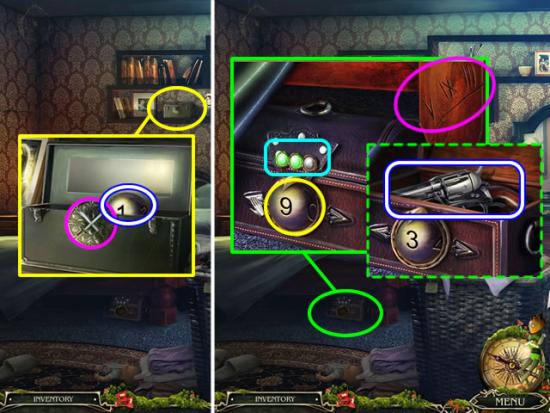
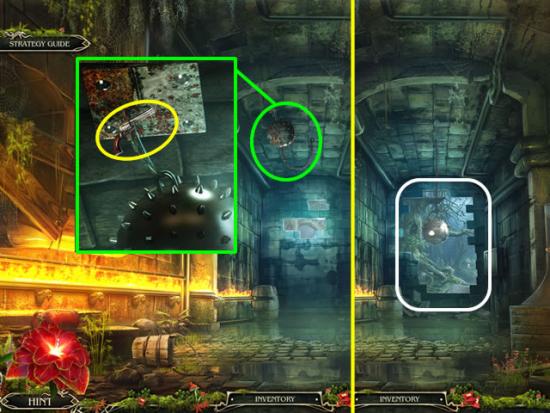
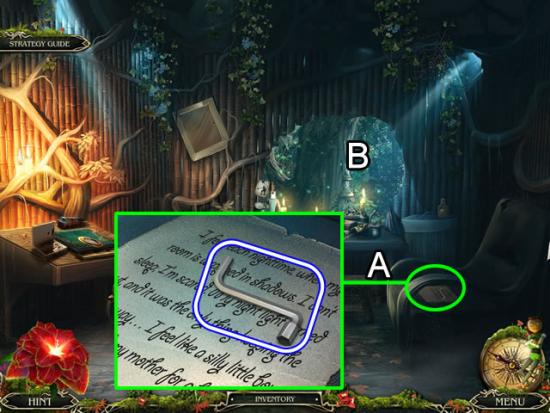
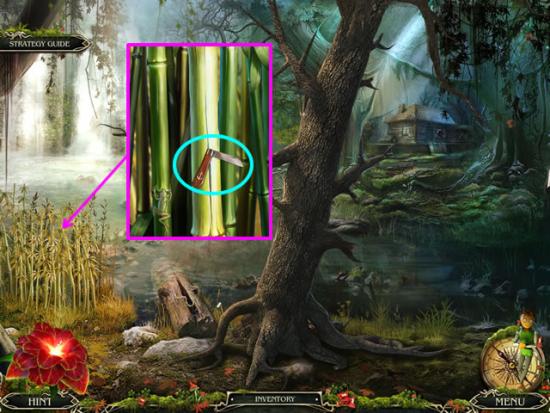
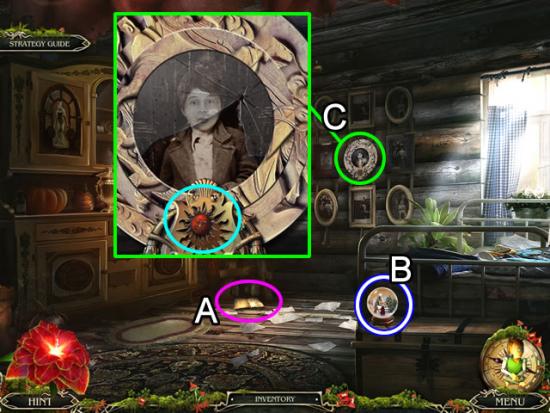
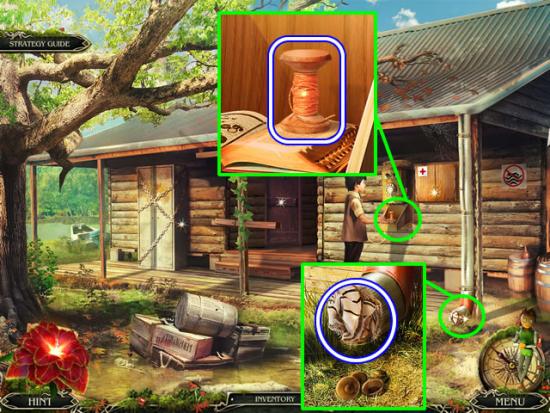
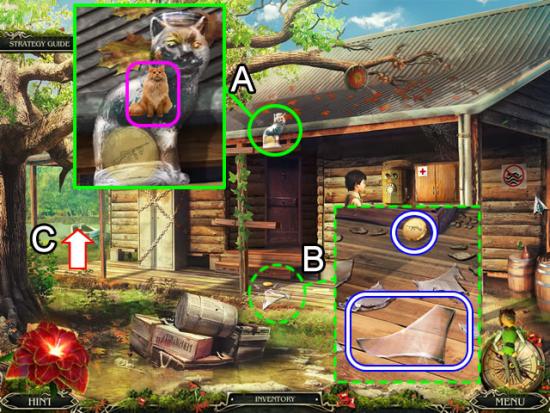
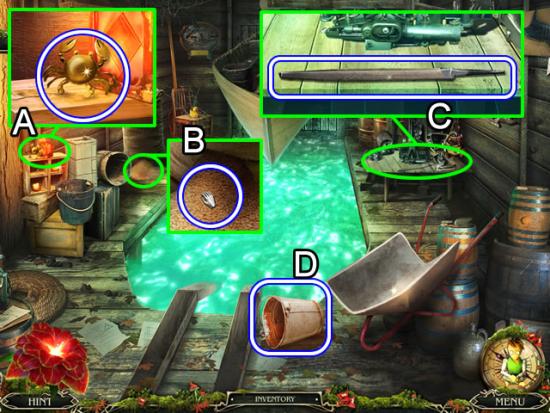
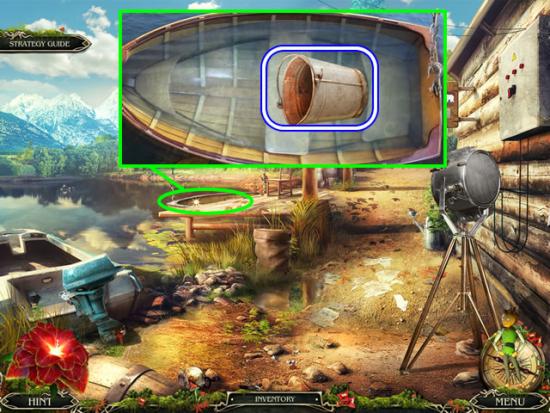
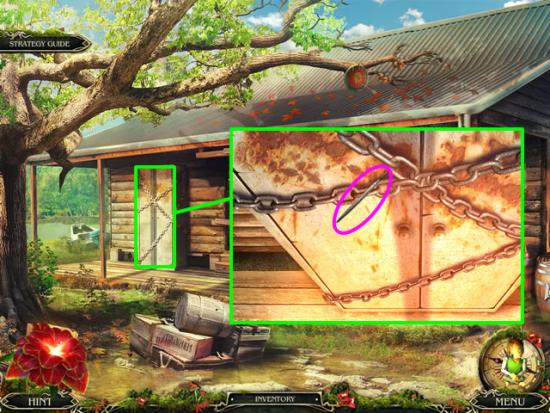
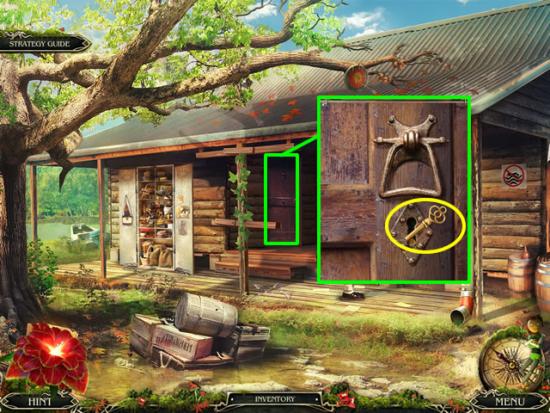
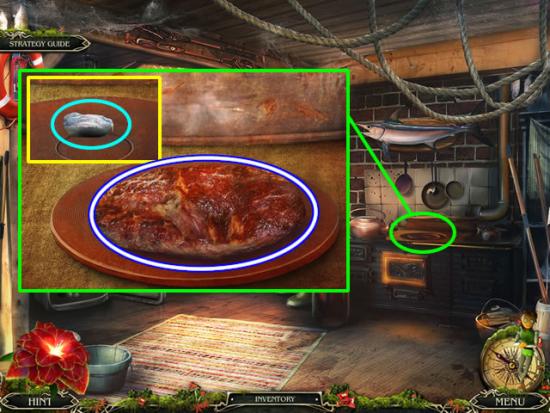
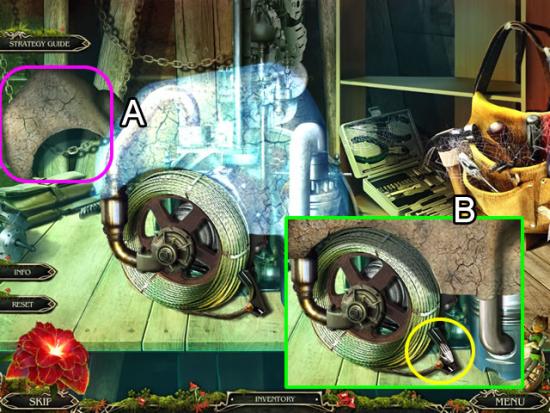
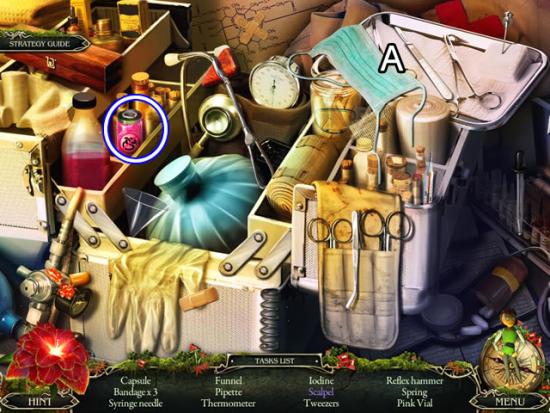
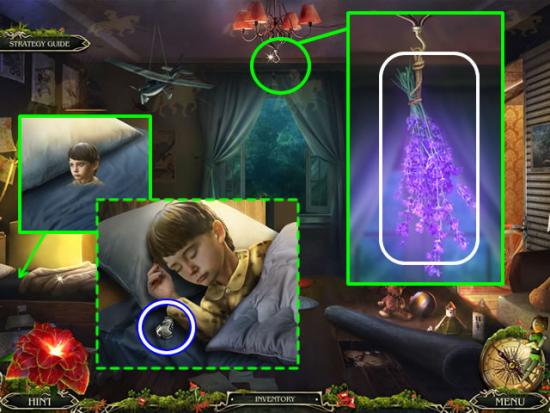
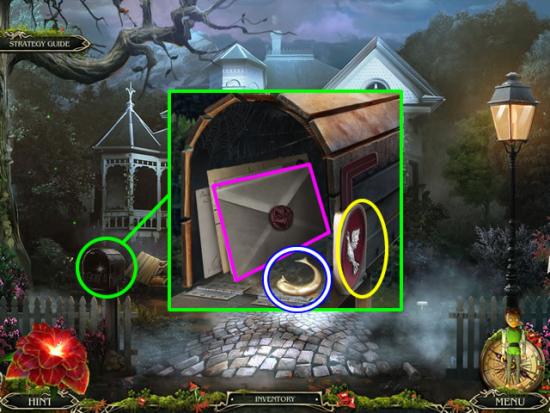
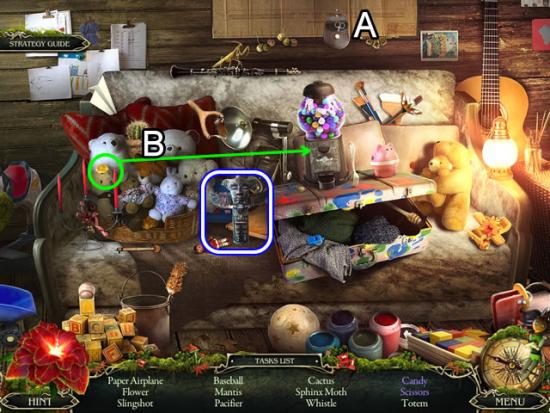
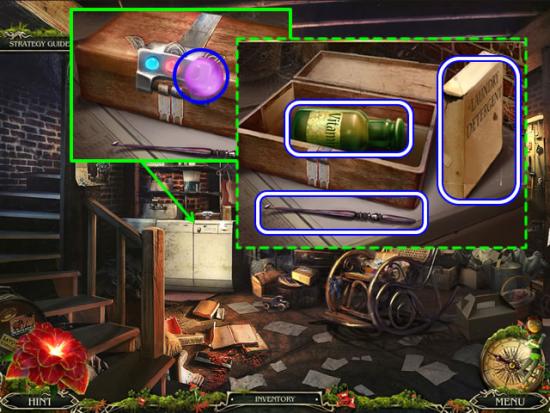
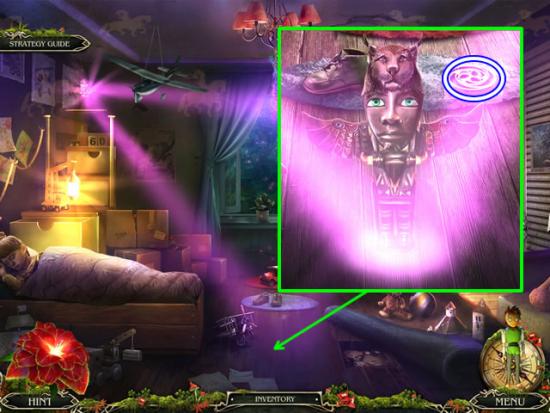
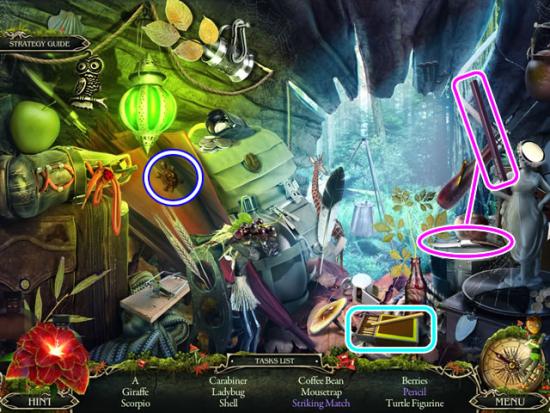
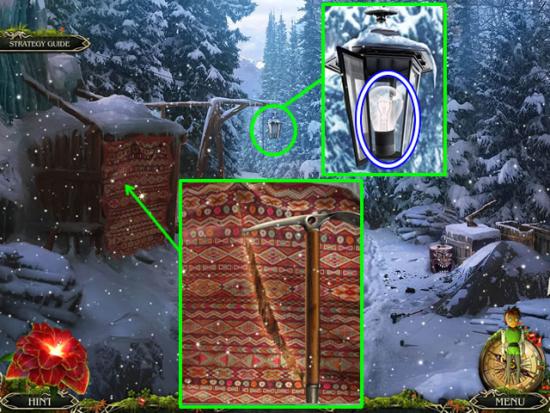
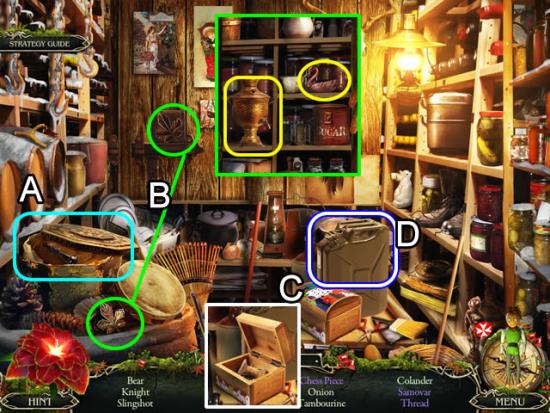
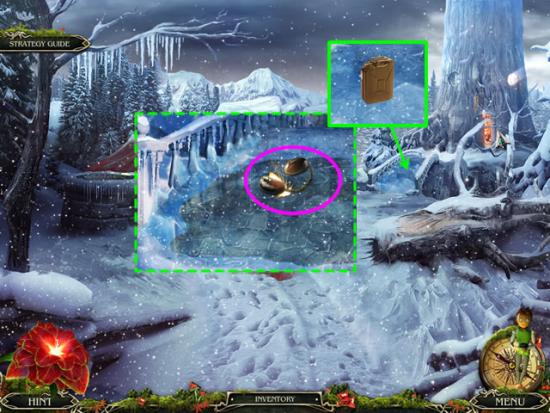
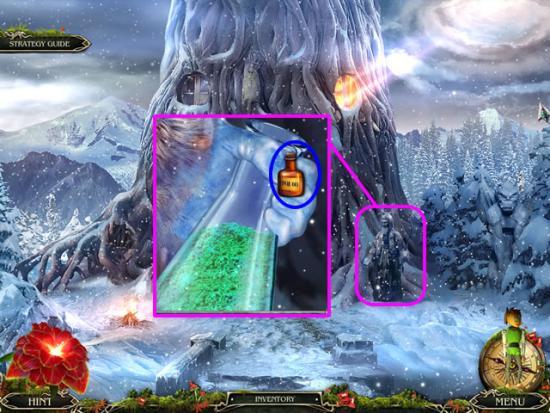
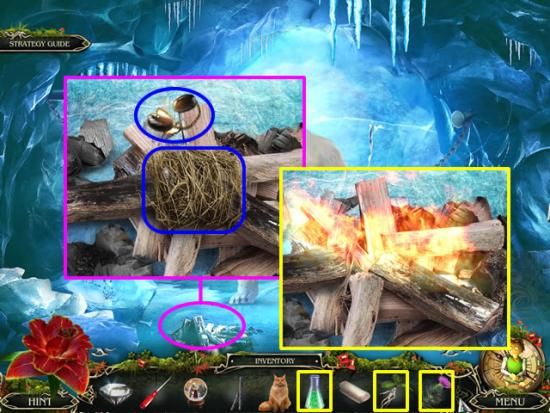
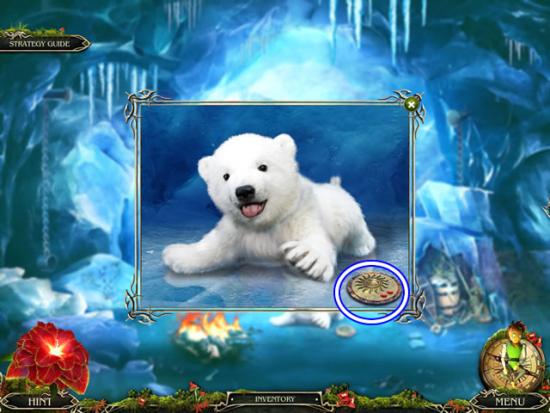
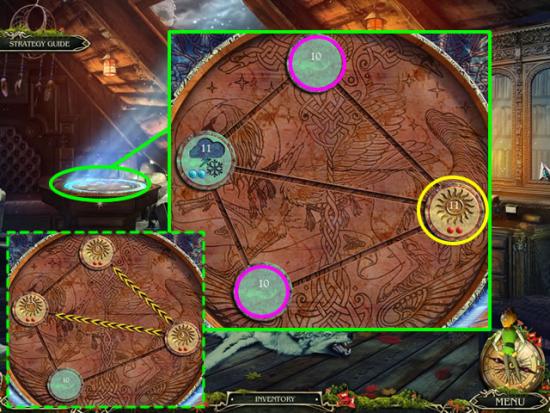
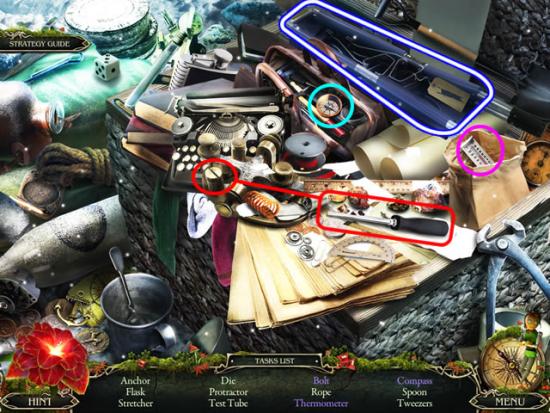
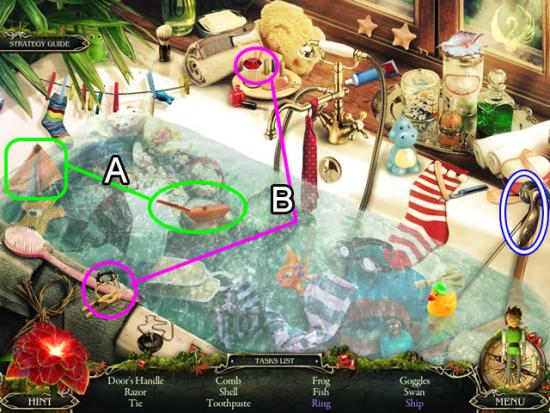
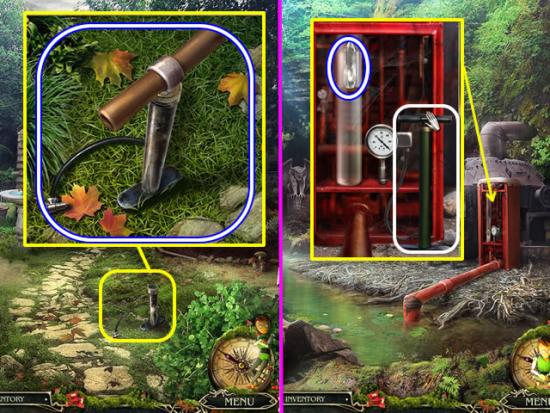
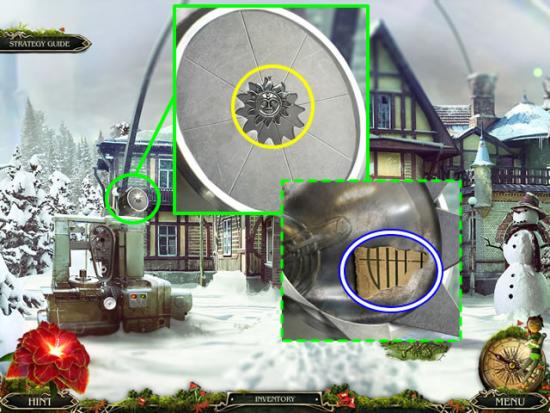
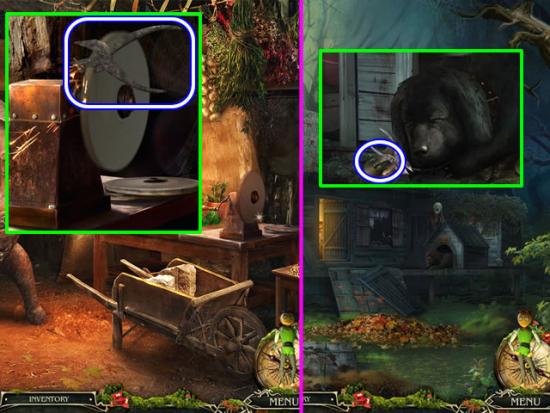
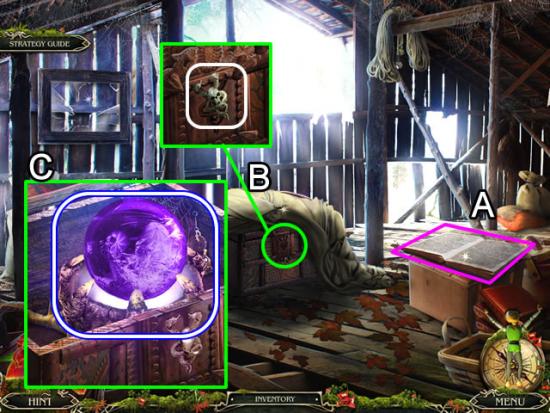
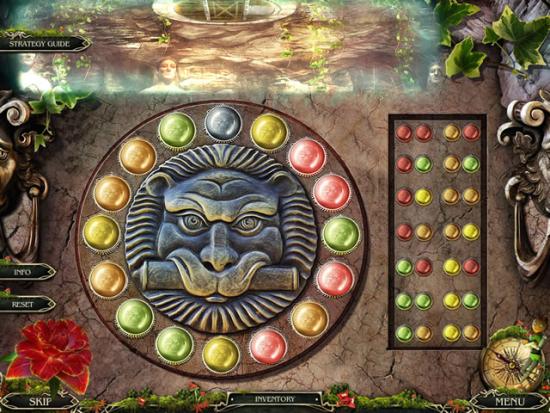
Welcome to the Grim Tales: The Wishes walkthrough on Gamezebo. Grim Tales: The Wishes is a Hidden Object/Adventure Game created by Elephant Games. This walkthrough includes tips and tricks, helpful hints and a strategy guide on how to complete Grim Tales: The Wishes.
Welcome to the Grim Tales: The Wishes walkthrough on Gamezebo. Grim Tales: The Wishes is a Hidden Object/Adventure Game created by Elephant Games. This walkthrough includes tips and tricks, helpful hints and a strategy guide on how to complete Grim Tales: The Wishes.
Difficulty Levels
Cursors
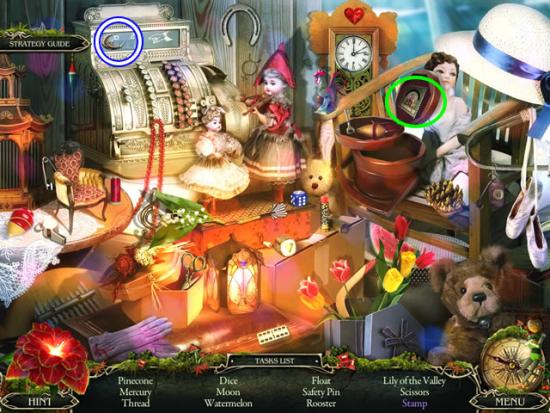
Hidden Object Scenes
Map
Hint and Skip Buttons

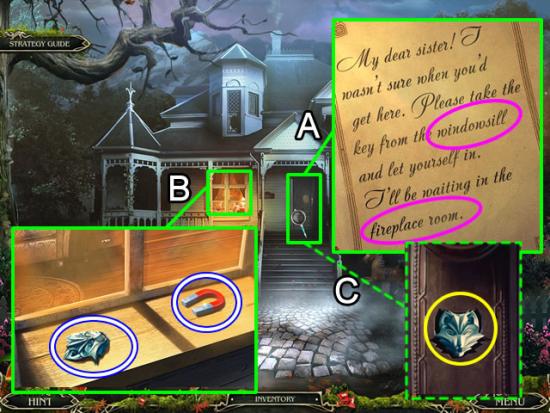
House Entrance
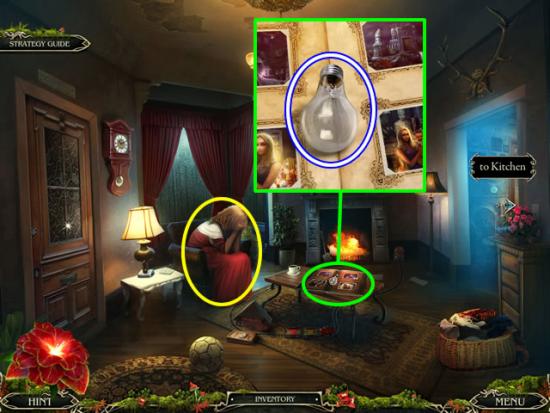
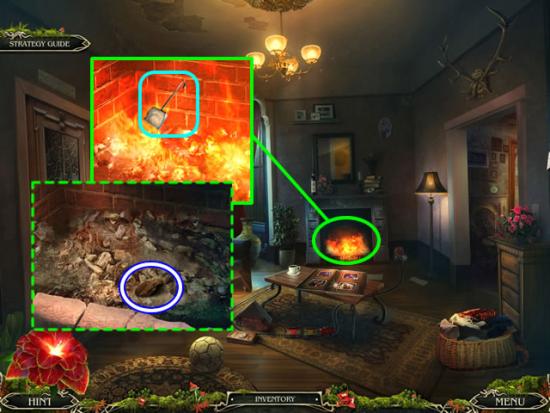
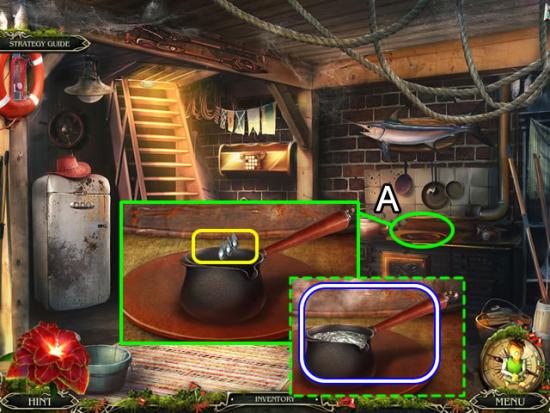
Fireplace Room
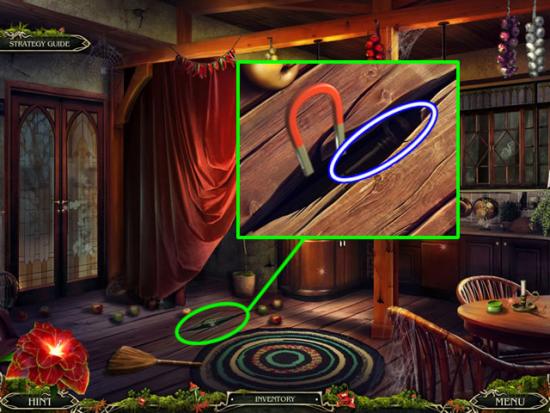
Kitchen
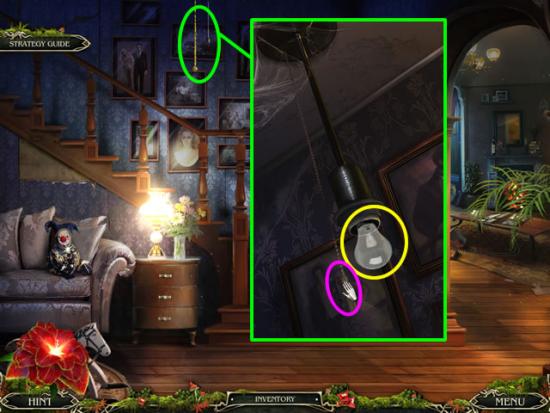
Hall

Second Floor
House Entrance

Second Floor
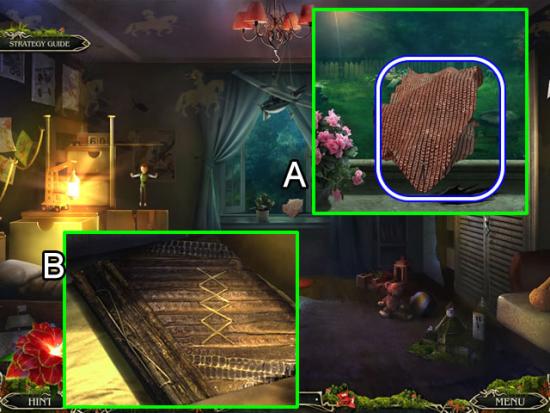
Brandon’s Room
Fireplace Room

Kitchen
Fireplace Room

House Entrance
Fireplace Room
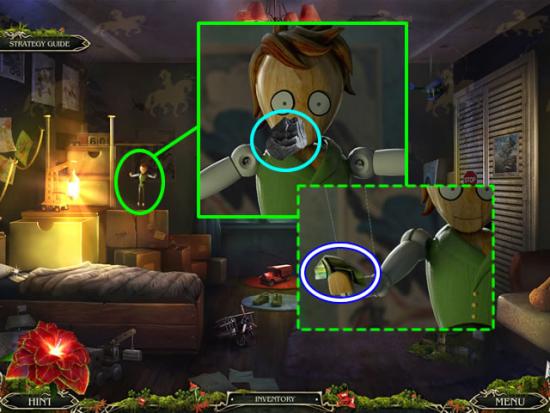
Brandon’s Bedroom
Second Floor
Brandon’s Room

Closet
Brandon’s Room
Closet
Luisa’s Room
Brandon’s Closet
Secret Passage
House Entrance
Kitchen

Secret Passage

Luisa’s Room
Secret Passage
Forest Edge
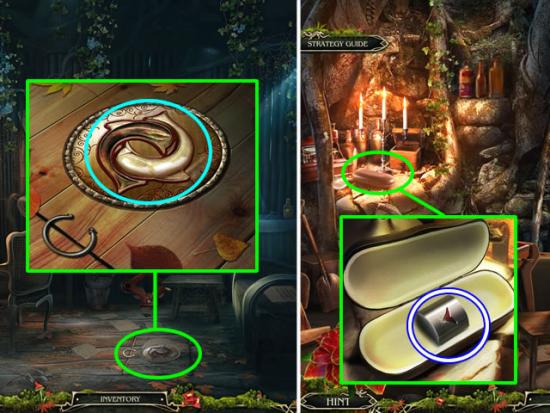
Shelter
Fireplace Room
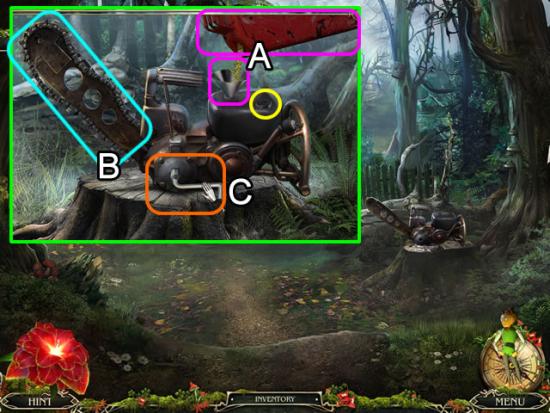
Swamp
Forest Edge
Tree House Entrance
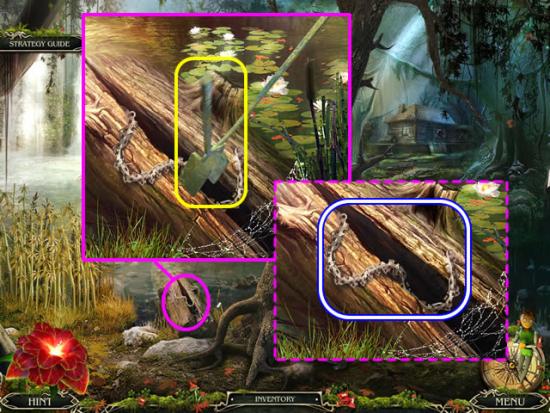
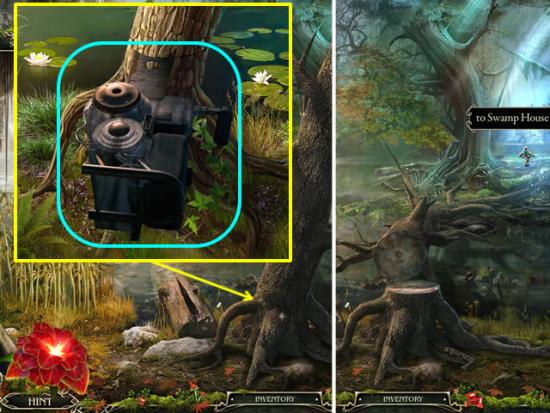
Swamp
Forest Thicket
Swamp
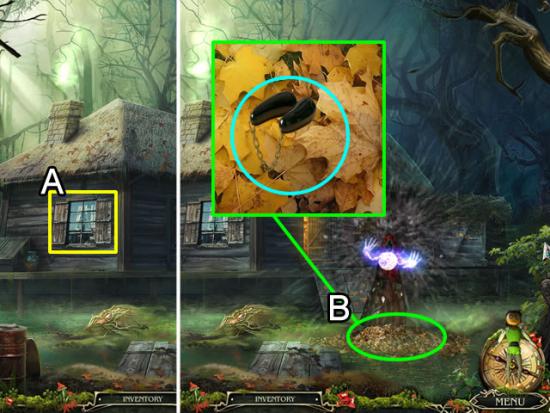
Swamp House
Demon’s Living Room (map location name)
Brandon’s Room
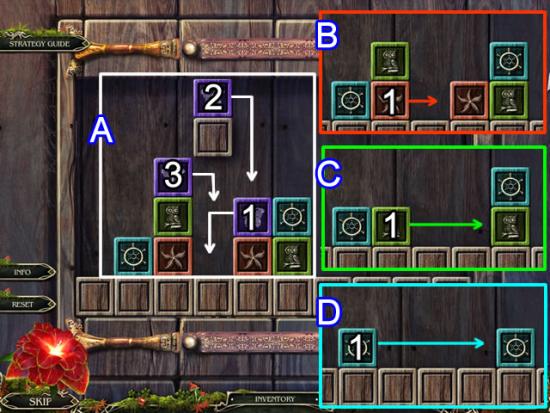
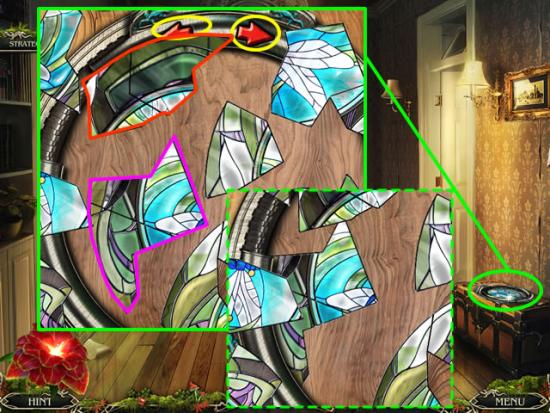
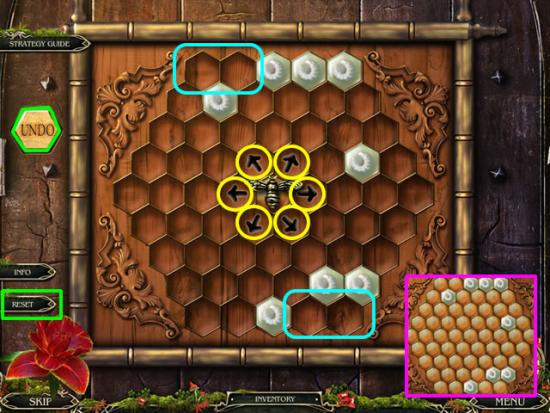
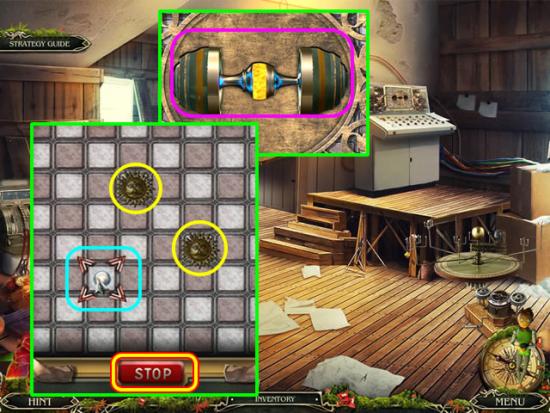
Round One
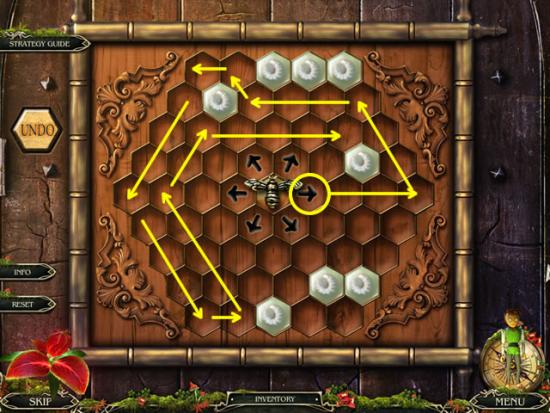
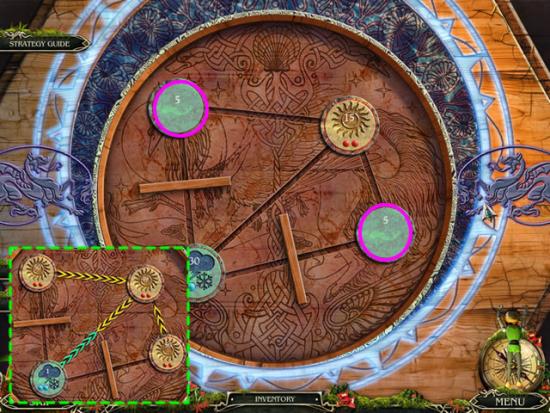
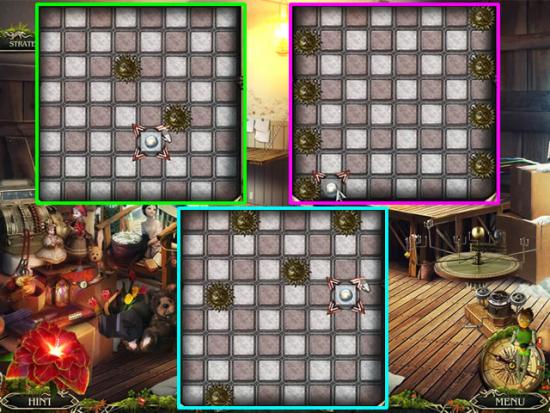
Round Two – Purple
Round Two – Brown
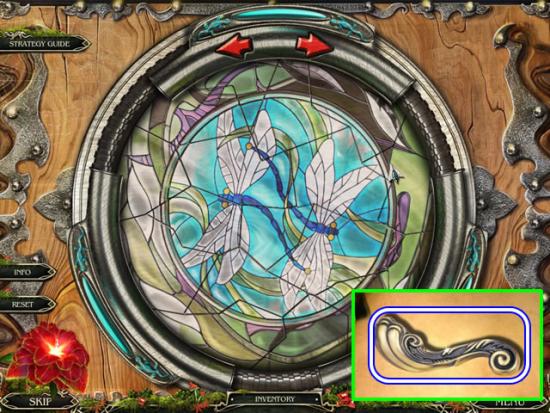
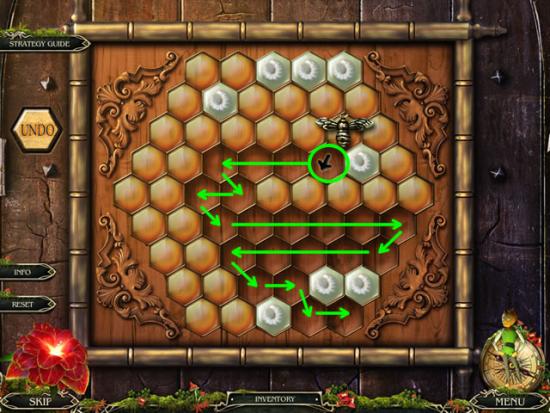
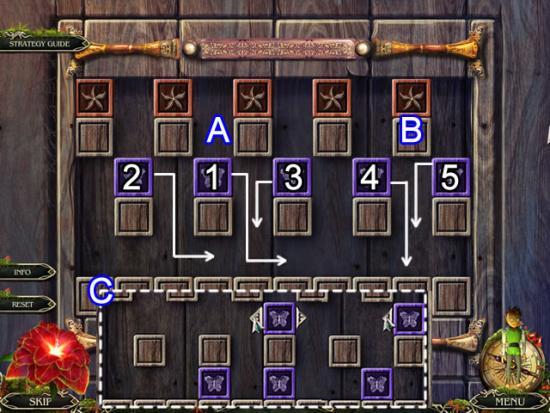
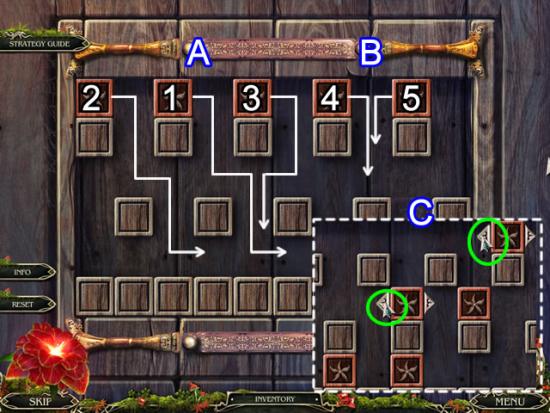
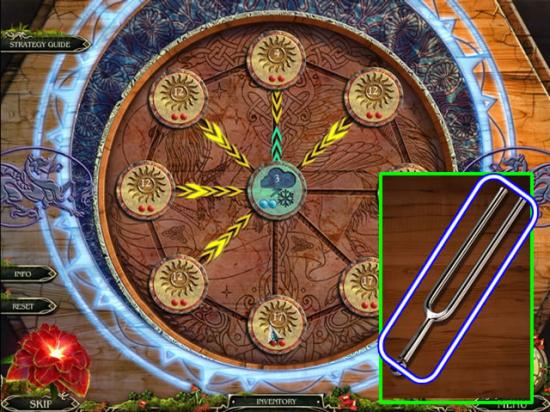
Round Three – Top Row
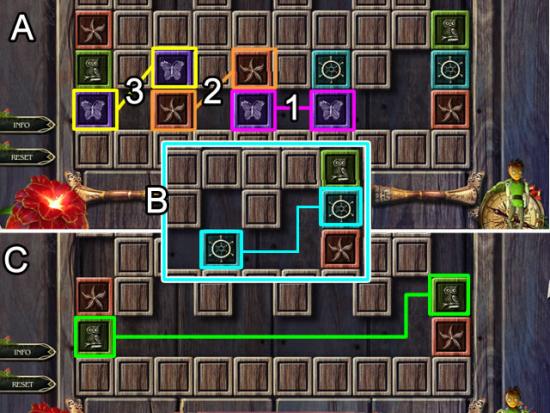
Round Three – Bottom Rows
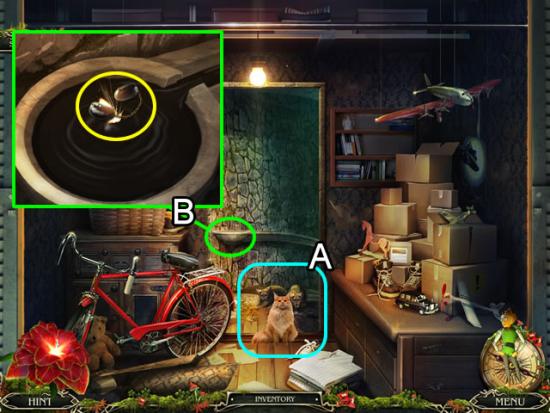
Shelter
Demon’s Living Room
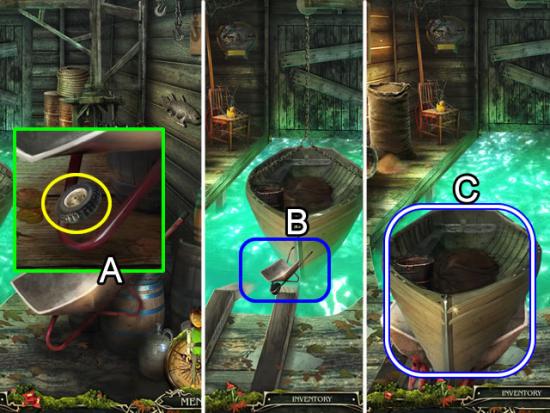
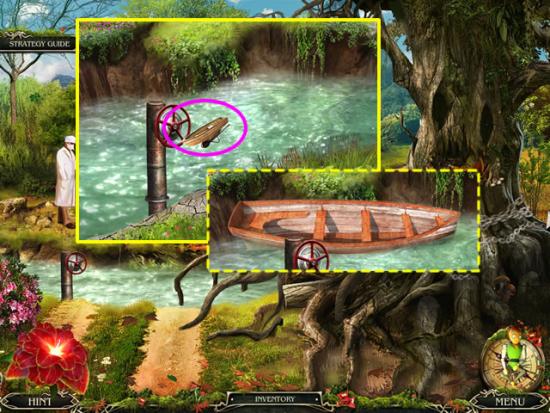
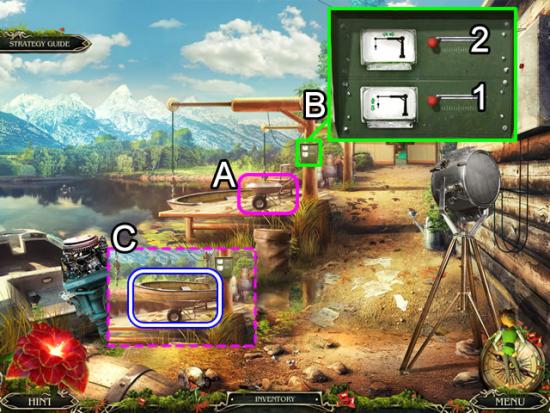
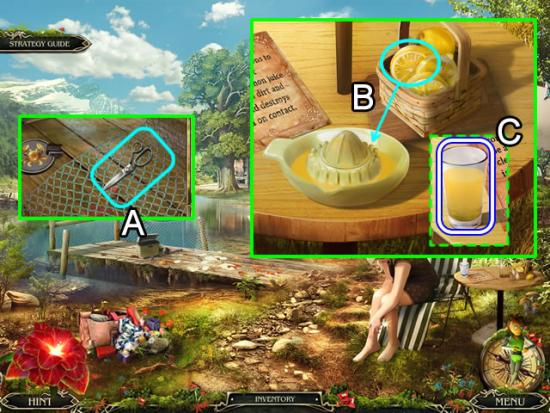
Fishing Pier
House Entrance
Boat Dock
Boathouse
Boat Dock
House Entrance
Fishing Pier
House Entrance
Hall

Fishing Pier
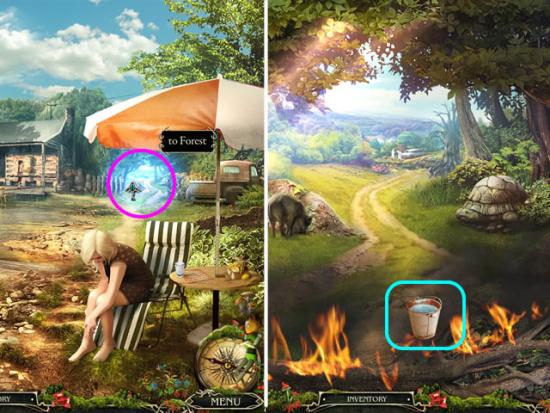
Forest
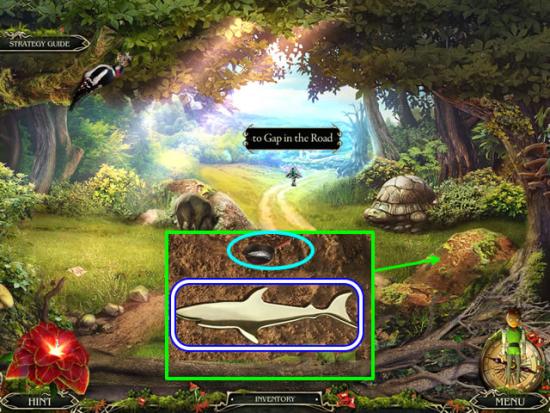
Forest

Gap in the Road
Hall
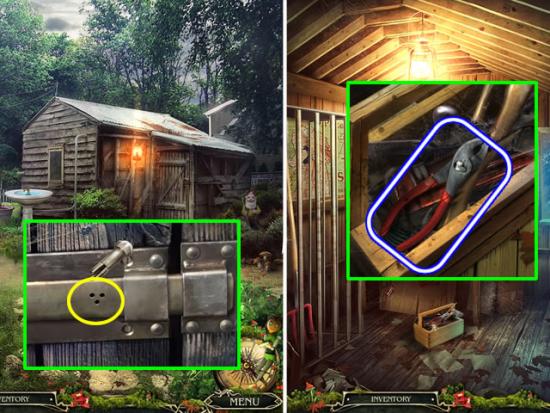
Attic
Hall
Forest
Gap in the Road


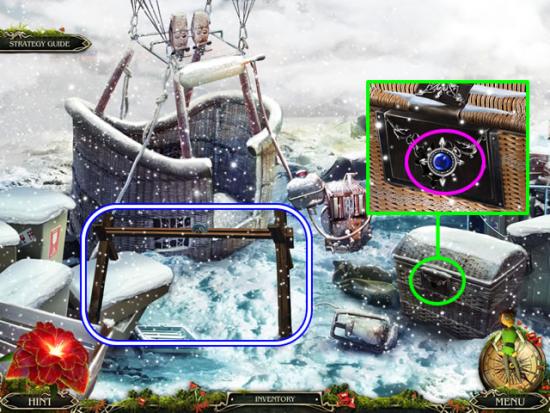
Boat Dock
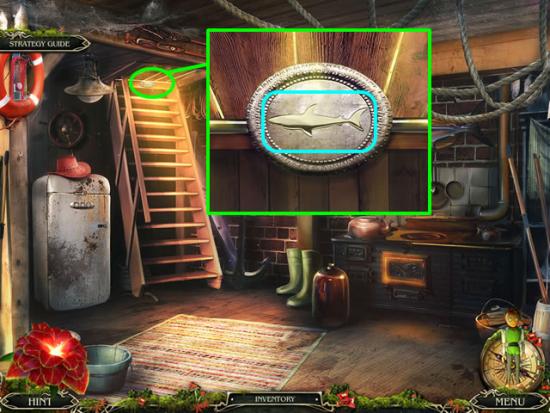
Boathouse
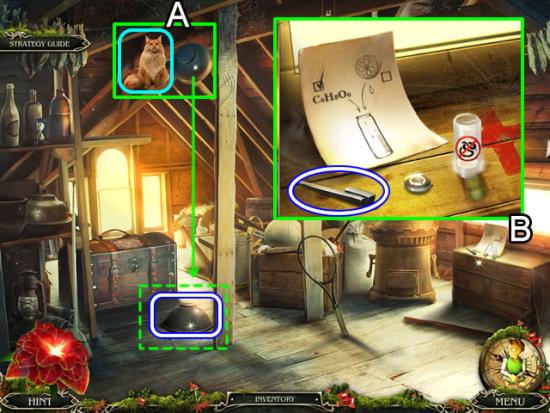
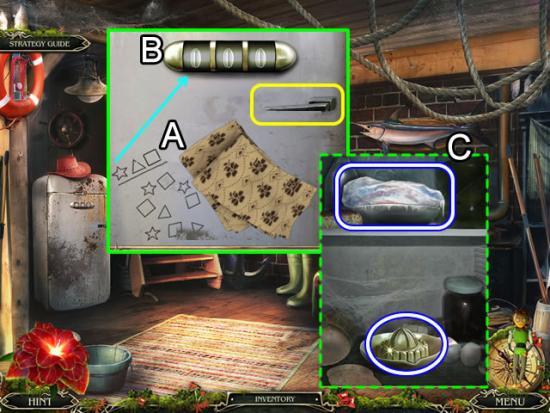
Attic
Gap in the Road
Boathouse
Gap in the Road
Boat Dock
Gap in the Road

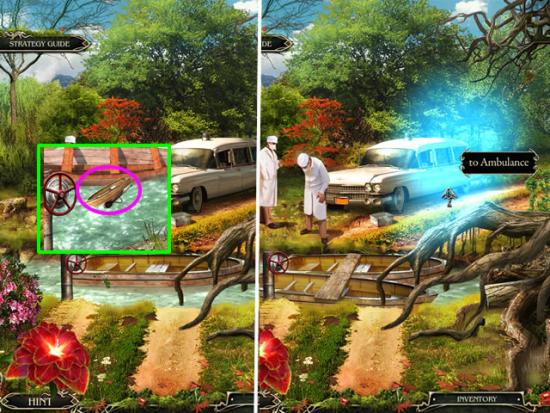
Ambulance
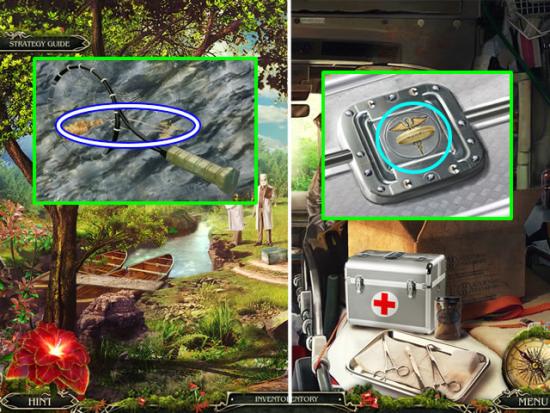
Forest

House Entrance
Forest
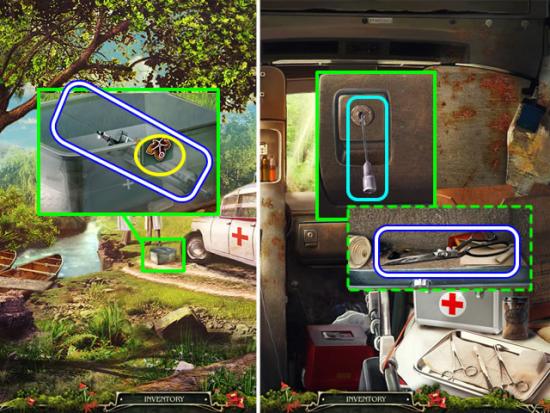
Ambulance
Ambulance Interior
Fishing Pier
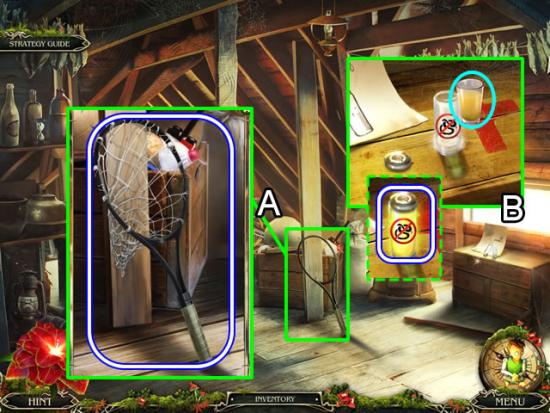
Attic
Ambulance
Ambulance Interior
House Entrance
Fishing Pier
Chapter 5: Protecting Brandon
Demon’s Living Room
Brandon’s Room
Kitchen
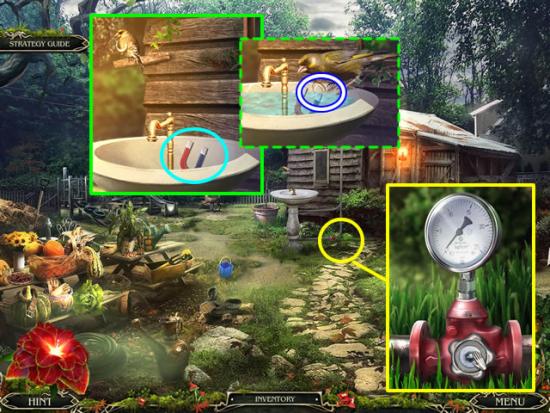
Backyard
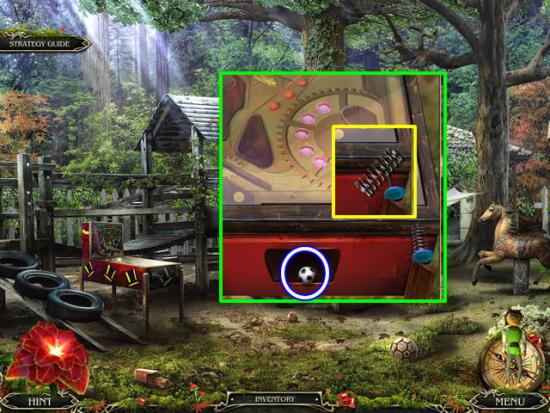
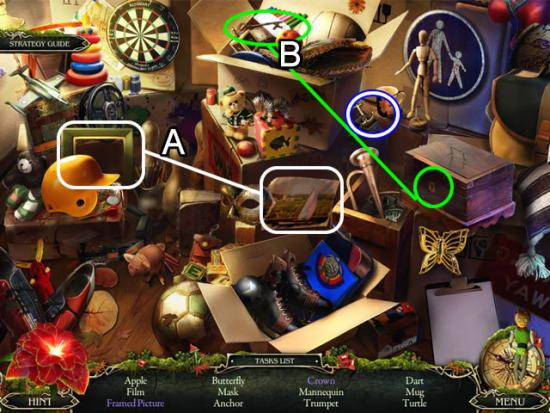
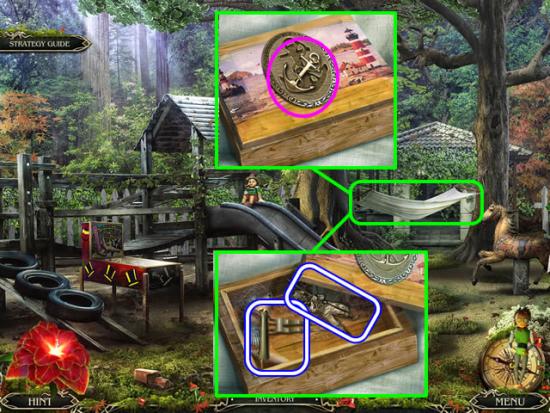
Playground
Brandon’s Room
House Entrance
Swamp

Waterfall
Backyard
Shelter
Shelter Basement
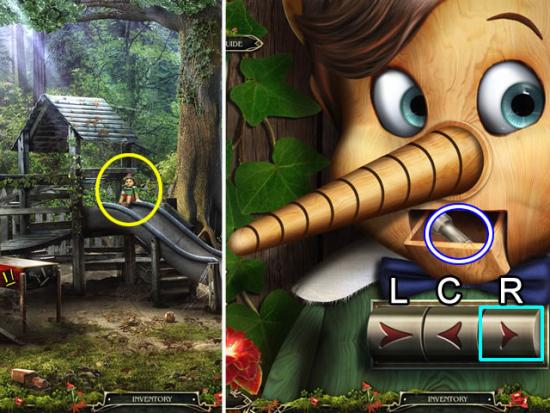
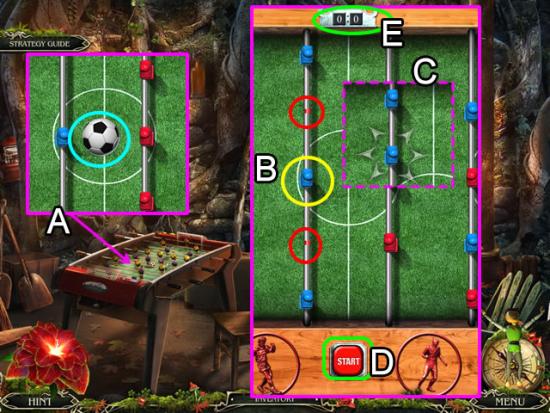
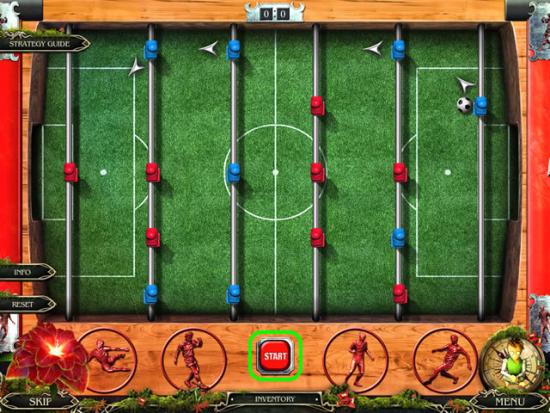
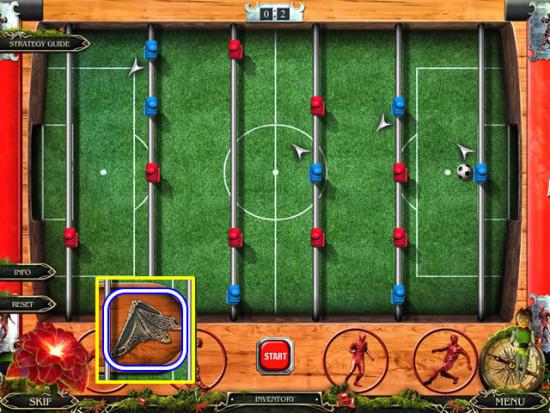
Playground
Backyard
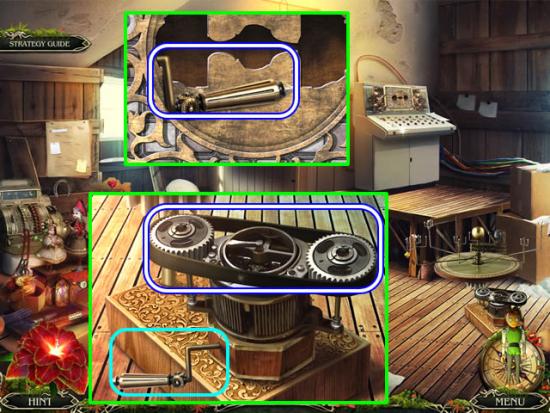
Workshop
Shelter Basement
Workshop
Tree House Entrance
Tree House
Brandon’s Room
Second Floor
Kitchen
Waterfall
Playground
Shelter Basement
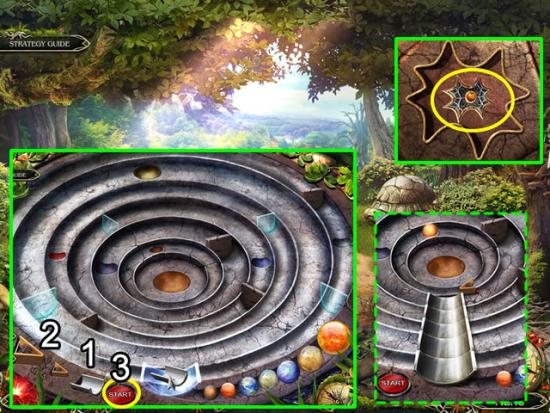
Round One

Round Two
Round three
Hall
Fireplace Room
Basement
Brandon’s Room

Kitchen
Swamp House
Demon’s Living Room
Workshop
Shelter
Workshop

Forest Thicket
Tree House
Rock
Landing

Rock
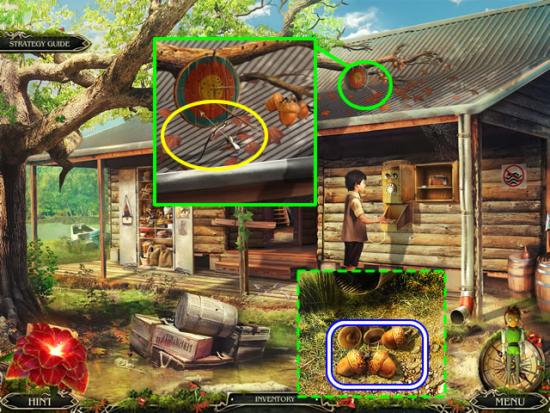
Lumberjack’s Camp
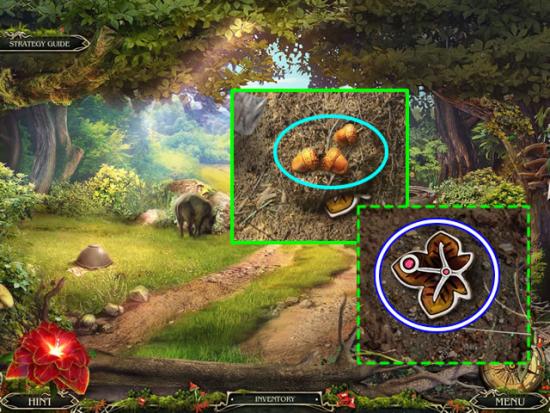
Forest Well
Lumberjack’s Camp
Forest Well
Shaman’s House
Shaman’s Living Room
Shaman’s Attic
Rock

Forest Well
Bottom of the Well
Lumberjack’s Camp
Bottom of the Well
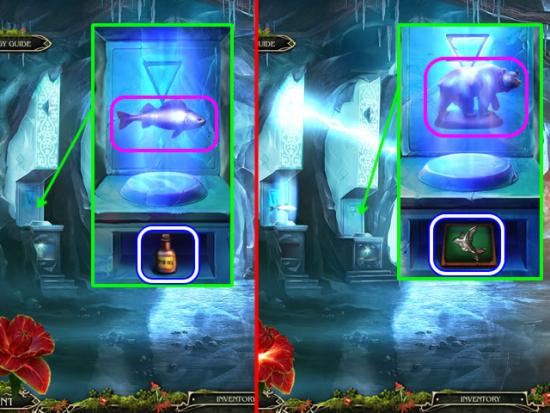
Icy Room
Icy Corridor
Shaman’s House
Shaman’s Living Room
Shaman’s Attic
Icy Corridor
Icy Room
Shaman’s Attic
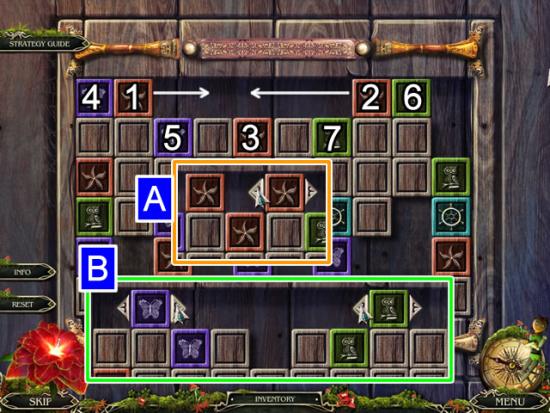
Round Two
Round Three
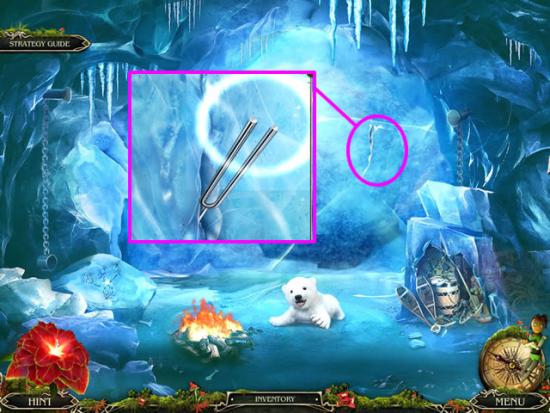
Icy Room

Cave
Landing
Rock
Cave

Rock

Landing
Tree House
Forest Edge
Waterfall

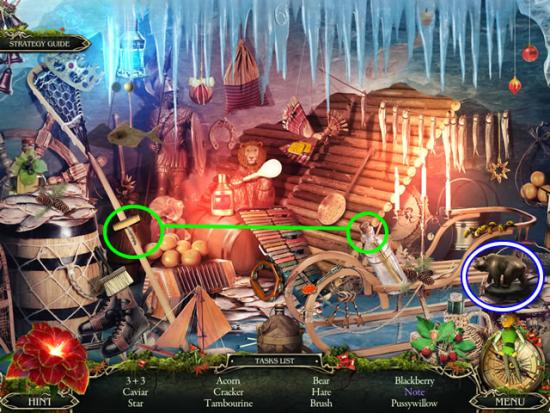
Totem Room
Asylum

Kitchen
Hall over the Kitchen
Bathroom
Hall over the Kitchen
Attic
Attic above the Kitchen
Bathroom
Backyard
Waterfall
Totem Room
Demon’s Living Room
Totem Room
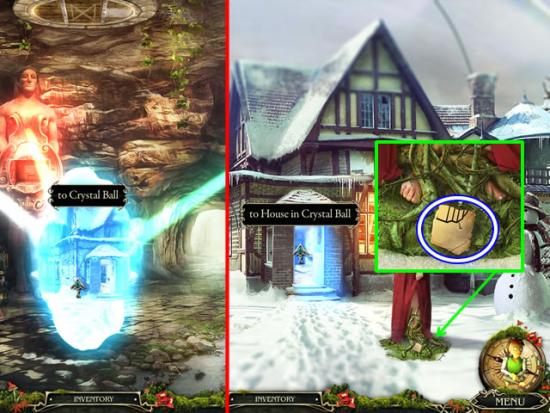
Crystal Ball
House in the Crystal Ball
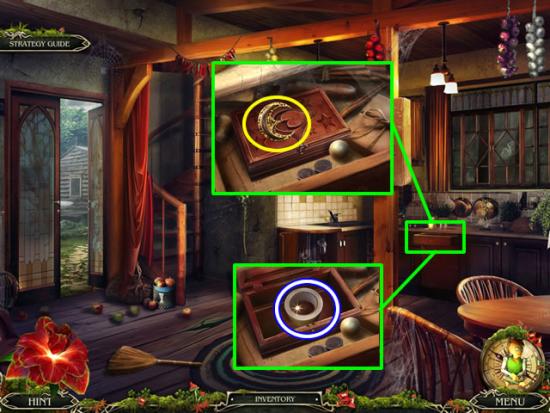
Kitchen

Crystal Ball
House in the Crystal Ball
Attic
House in the Crystal Ball
Brandon’s Room
Playground
Shelter Basement

Swamp House
Basement
Swamp House
Basement
Living Room
Attic
Living Room
Totem Room
Asylum
Congratulations!
You have completed Gamezebo’s walkthrough for Grim Tales: The Wishes. Be sure to check back often for game updates, staff and user reviews, user tips, forum comments and much more here at Gamezebo!
