- Wondering how to get Monopoly GO! free rolls? Well, you’ve come to the right place. In this guide, we provide you with a bunch of tips and tricks to get some free rolls for the hit new mobile game. We’ll …
Best Roblox Horror Games to Play Right Now – Updated Weekly
By Adele Wilson
Our Best Roblox Horror Games guide features the scariest and most creative experiences to play right now on the platform!The BEST Roblox Games of The Week – Games You Need To Play!
By Sho Roberts
Our feature shares our pick for the Best Roblox Games of the week! With our feature, we guarantee you'll find something new to play!Type Soul Clan Rarity Guide – All Legendary And Common Clans Listed!
By Nathan Ball
Wondering what your odds of rolling a particular Clan are? Wonder no more, with my handy Type Soul Clan Rarity guide.
Grim Tales: The Stone Queen Walkthrough
Grim Tales: The Stone Queen is an interactive hidden object puzzle game developed by Elephant Games. You will become submersed in a suspenseful storyline with beautiful graphics as you travel to various locations examining clues, picking up items, and using them to help you progress in the game and become the hero. You will also solve challenging mini-game puzzles and can play the game in a casual, advanced, or hardcore mode. Gamezebo’s strategy guide will provide you with detailed images, tips, hints, and information to help you play your best game.
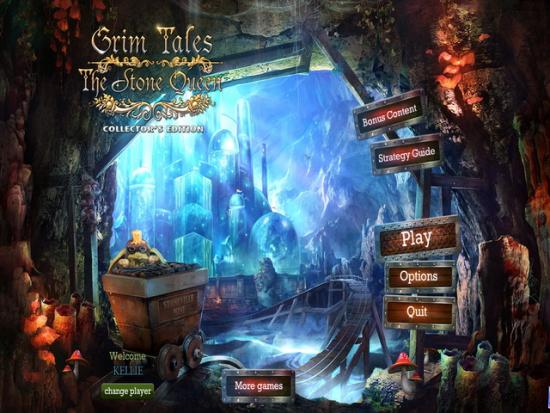
Game Introduction – Grim Tales: The Stone Queen
Grim Tales: The Stone Queen is an interactive hidden object puzzle game developed by Elephant Games. You will become submersed in a suspenseful storyline with beautiful graphics as you travel to various locations examining clues, picking up items, and using them to help you progress in the game and become the hero. You will also solve challenging mini-game puzzles and can play the game in a casual, advanced, or hardcore mode. Gamezebo’s strategy guide will provide you with detailed images, tips, hints, and information to help you play your best game.
General Tips
- Grim Tales: The Stone Queen may be found by clicking on “Buy Now” at the top of this page.
- There are four chapters of regular game play and once you complete them there is a bonus chapter.
- From the main menu there are several game “Extras” for you such as concept art, sound clips, video clips and more.
- This guide will give you the solutions to the regular game play chapters only and is played in “Casual mode”
- This strategy guide is written to help you progress in the game with more detailed information than what is given in a general game tutorial. Images will be provided and key elements will be marked and/or color coded to help you understand them. You will be shown solutions to mini game puzzles and how to move from one location to the next. Note – There may be more than one way to complete this game in such that some steps can be taken in a different order. This walkthrough will show you how to get through the game from start to finish in a most efficient manner.
- Items in images will be marked with a letter or number and may also be color coded to help you keep your steps in sequence. Any key items to be placed in your inventory will be written in all capital letters. As you place items in your inventory, they will be shown along the bottom of the screen which activates by placing your cursor in that area which causes it to lift up from the bottom. Once the inventory menu lifts up you can use the arrows along the sides to scroll through your items.

Main Menu
- The main menu screen is shown here and its features are explained.
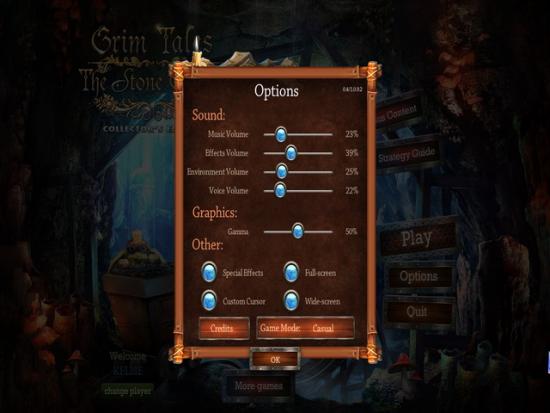
- “Options” – From the main menu click on the “Options” button where you can control the volume of game music, sound effects, and character speech by dragging the button from left to right where you will hear the sound volume as you adjust it.
- You may also set the game to play in full screen or windowed mode in this menu as well as choose a custom cursor and choose from three difficulty modes.
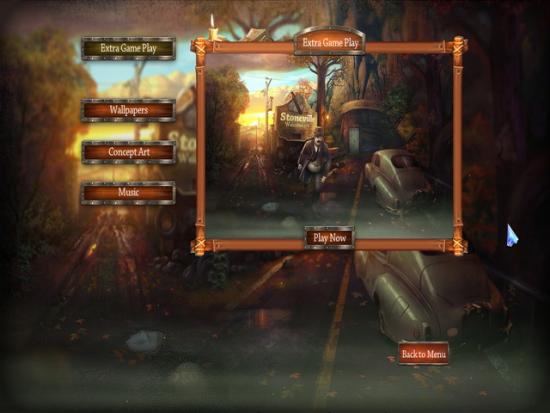
- “Extras” – Once you complete the game (Collector’s Edition) you will unlock many great extras in the game such as a bonus level, screen savers, concept art, wallpapers, and music clips you can save to your computer.
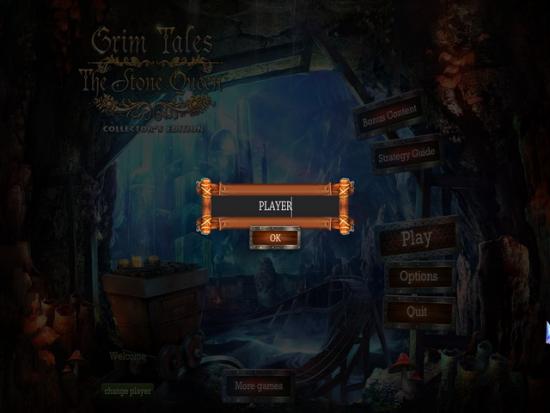
Create and Choose User Profile
- Profile/Username – To begin enter a username of your choice with up to ten characters.
- The game will allow up to nine different profiles.
- The username/profile currently in use is located at the bottom left of the main menu when you load the game. Click on the username to go to the profile menu and create a new one or change it. Once you have the correct username simply click on the white “Play” button in the main menu to begin or continue where you left off.
- You have the option to play up to nine different games using different user profiles in different difficulty modes. Each time you exit the game it will be automatically saved and you will be brought back to that exact location and user profile when you resume game play.
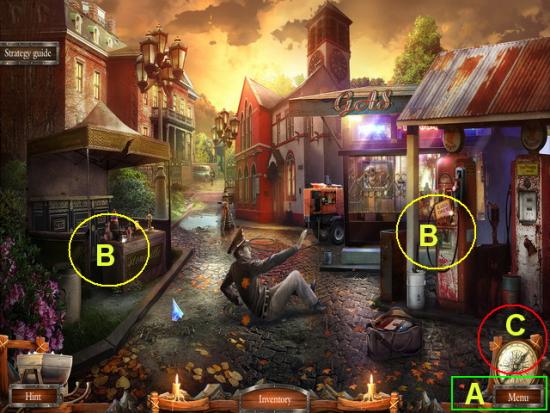
Screen Elements
- You will move your cursor around the screen looking for it to change as it passes over certain areas. You may be able to pick an item up, take a closer look, or read information about it.
(See “Cursors” below for more detailed information) - Click on an item and it will stick to your cursor, then click on the item you wish it to act upon.
- A. Main Menu – Click here when you are ready to return to the main menu to exit the game or change user profiles. Your game will save automatically when you return to the main menu.
- B. Sparkling Effects – Based on the difficulty level you have chosen you will see a slight sparkling effect on certain items which mean you should explore them. The cursor will change depending upon the type of action you need to take.
- C. Map – Click here to access the game map. (See below for more information.)
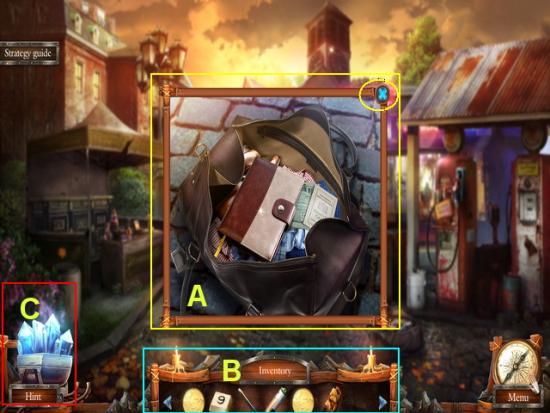
- A. Active Window – When you click on areas which show a magnifying glass cursor you will open another window which is active for a closer look. You will be able to click on items in this window and act upon them in some way.
- B. Inventory – This menu lifts up from the bottom of the screen when you place your cursor in the general area. Here any item you collect will be placed for future use. Once all the slots have filled up arrows will be used on each side allowing you to scroll through your entire inventory items. Click on an item and it will stick to your cursor. If you need to release it just click on any area outside the screen and it will return to its inventory slot.
- Once items have been used up they will disappear from your inventory. Some items may return to your inventory because they have multiple uses.
- C. Hint Button – Hints are provided for you if you get stuck and are located along the bottom left of the game screen. There is a cauldron that fills up with crystals over time. When the cauldron is full then hints are fully recharged. The speed in which the number counts down depends on the difficulty mode you have chosen to play in. Casual refills very quickly, advanced takes a little longer and hardcore disables hints altogether.
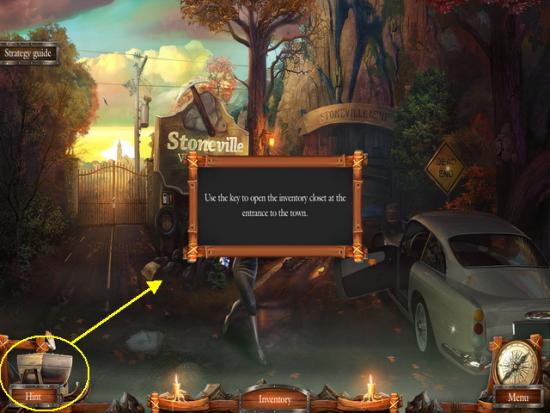
Types of Hints
- Note – There are two types of hints in the game. If you click on hint during the regular game play it will tell you the next possible step you should take in the game.
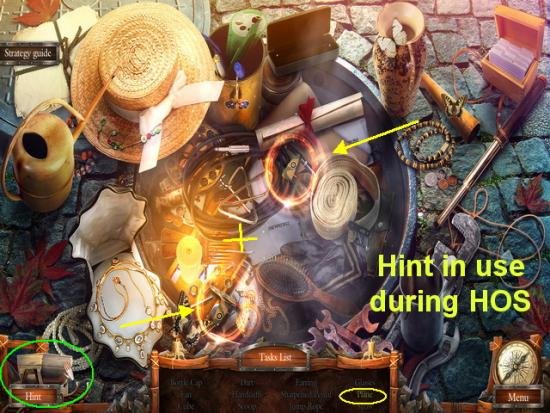
- If you choose hint while in an HOS it will show you where one of the items on the list are located by showing a brief circle around the items. If more than one item is required which need to be combined you will see both items circled as in the image above. Click on one and then the other to combine then click on it once its combine to eliminate it from the list.
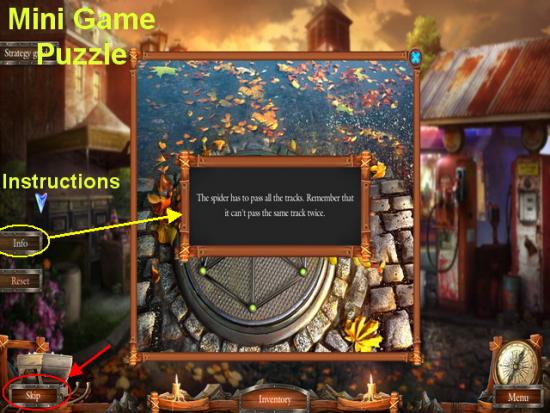
- Mini game instructions – As you play a mini game you can click on an “Info” button located on the left or right side of the screen for detailed instructions. In this guide you will be shown at least one possible solution for each mini game.
- Skipping Mini Games – You have the option to skip any mini game after a certain amount of time unless you are playing in “Hardcore” mode. This is available when the “Skip” button highlights and the speed in which is does so is determined by the difficulty mode you have chosen. Skipping a puzzle will simply allow you to progress without penalty.
- Closing windows/Message screens – You can close a screen by either clicking on it or look for an “X” in the upper right hand corner to click on which will close the mini window. To escape mini game puzzle screens simply back out at the bottom.
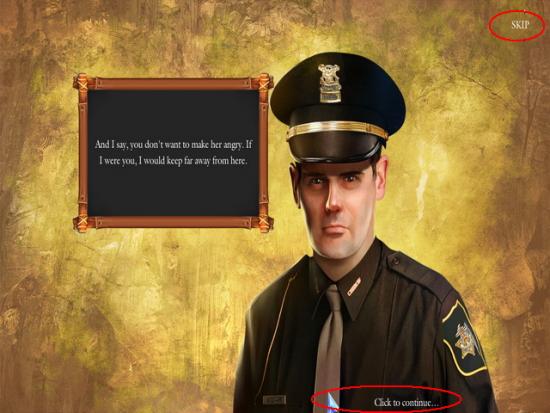
Game Dialogue
- As you play there will be several characters in the game you will have speak to you. There is a dialogue menu that appears at the top of the screen as shown above and you will hear your character speak this dialogue. You have the option to click on the dialog box itself or along the bottom of the screen to advance to the next group of sentences, or you may click on the “Skip dialogue” button at the top right and it will skip all the dialogue in that particular sequence.
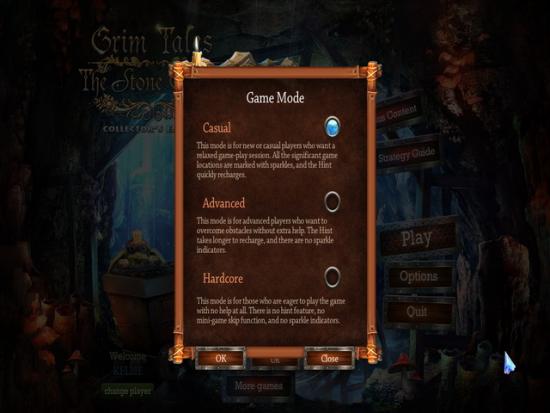
Difficulty Modes
- You may choose between three difficulty modes in the game and you have the option to change your difficulty mode at any time during the game without having to start over. To change your mode go into the main menu and click on “Options” then on “Difficulty Mode”.
- Casual Mode – This is best for beginners or those that want a little help along the way. The “Skip” and “Hint” buttons recharge more quickly and active zones are highlighted with a sparkling effect.
- Advanced Mode – The “Hint” and “Skip” buttons recharge at a slower rate and the active zones do not have any sparkling effects to help you find them.
- Hardcore Mode – The sparkles, hints, and skip buttons do not exist at all in this most challenging mode.
Cursors
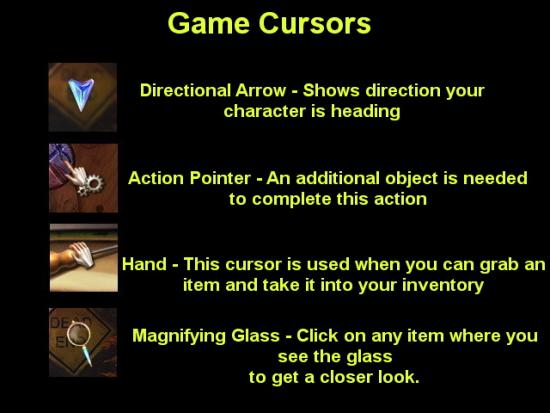
- There are four different cursors used in the game and each one is very important in guiding your game play.
- Blue Arrow – This cursor is simply a pointing arrow and can be changed to a custom cursor in the options menu if you would like to change it.
- Hand with gears – When you point to an item and see this cursor (especially in windows that open) it means you will need to find another object which will end up in your inventory to act upon the object in the window.
- Hand – When you place your cursor over an item and it changes to a hand you may click on an item and pick it up. The item will stick to your cursor and you can place it into your inventory or on another item to act upon it.
- Magnifying Glass – When you see this icon click on the area to get a closer look. Usually this will open another window which is active and you can click to find even more items.
- Directional Arrow – (Same as blue arrows shown above) You will see these blue arrows whenever you can enter a location on the screen. You will also see a text description of the location you are heading. Once you see your cursor change to an arrow click on it and you will be taken to the new location.
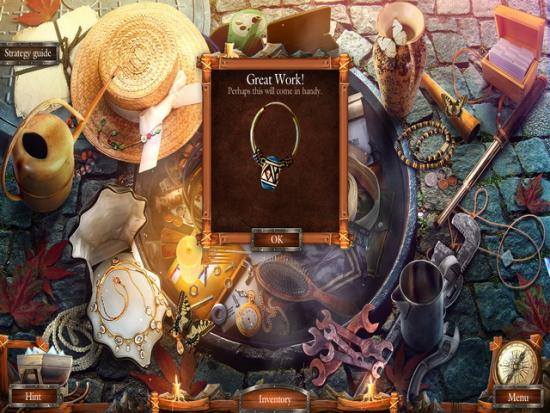
Finding Objects
- Your main objective in the game is to find objects in various areas and in hidden object scenes and to use them with other objects to help you find clues, solve mini puzzle games and progress to the next chapter.
- When you find an object that is useful to you a summary screen (usually after the completion of a HOS) a summary will appear telling you that the item is found and will be placed in your inventory.
- Remember some items are parts of other items that will need to be assembled and some are parts for mini game puzzles and you may need to find more than one of an item before it can be used.
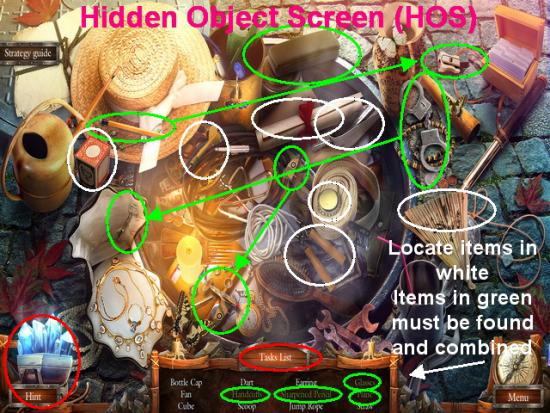
Hidden object scenes
- These are also known as “HOS” in the guide.
- When you see an area with a large number of flowing sparkles over them this is an area you click on to start a hidden object scene. Completion of these scenes will always result in an inventory item you need to complete a task.
- There is a list along the bottom of the screen where your inventory list is usually located. You must locate all the items on this list. Those listed in white text you locate out right. When you click on them they will disappear. The items listed in green text require you to do something to them before you can eliminate them. For example you may notice your cursor changes to the hand with gears on it. Click on any item when this happens and you will be able to pick it up. You must find the other item in the scene it interacts with and put them together to make the item needed. You may need to light a fire, cut an item, or any other kind of action to build the item needed. Once you do this the item will be fully assembled and then you may click on it. All items once you find them will disappear from the picture and the list.
- You must find every item in the list to earn the inventory item at the end. This is an item you will need in the game to proceed in completing another puzzle.
- Note – If you leave a HOS you can come back to it and it will save your progress.
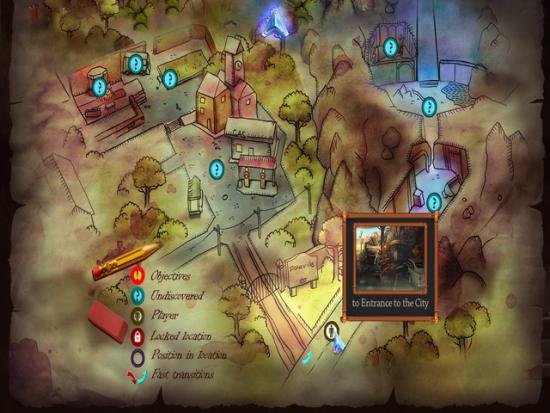
Game Map
- At the bottom right of the game screen you can click on the compass icon which will take you to the game map. The further along you progress the more helpful this map will become to you as it will save you many steps.
- There is a key along the side of the map which will tell you where you are, and locations where you can currently do things to progress. Placing your cursor over any of these icons will bring up a picture showing you where you are as shown in the image above. It will also give you valuable information to help you play the game. Be sure to study the key as it will help you complete tasks once you have the items needed to do so.
- Note – There is an arrow along the top and bottom of the screen that will take you to a second page of the map once you need it and let you toggle between the two pages.
Chapter 1 – The Town
- Here begins the step by step walkthrough of Grim Tales – The Stone Queen
- Introduction – You will see a brief cut scene of a car driving into a town called “Stoneville” and a woman is shown turning to stone but is clearly still alive. You have run out of gas and need to find a way to help the people. You learn of the evil stone queen and set out on a journey to rescue all the people that have been turned to stone as you learn the story of how this mining town has been destroyed due to the anger of the stone queen who used to protect the miners of Stoneville. What happened to make her want revenge on the people of this town?
- There will be many cut scenes or short videos in the game. You may skip them if you wish but they are critical to understanding the story line.
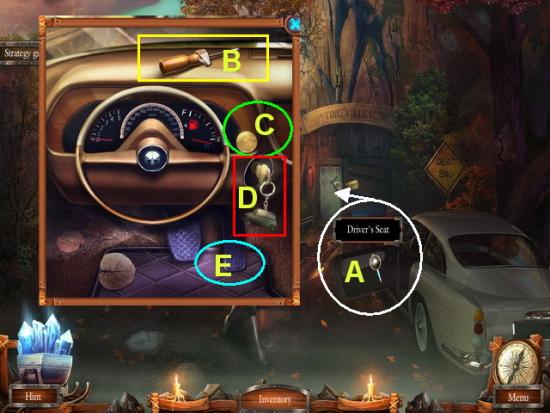
- A. Click on the DRIVER’S DOOR to open and zoom in.
- B. Take the SCREWDRIVER from the dashboard use it to remove the SCREWS and add both to inventory.
- C. Take the COIN into inventory.
- D. Click on the CAR KEYS and see the car is out of fuel.
- E. Click on the GAS PEDAL and exit out of the scene.
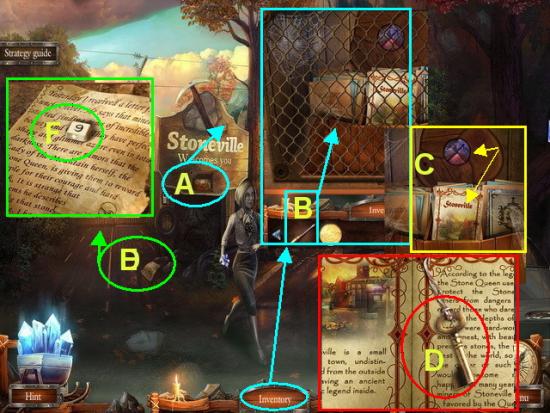
- Click on the BROUCHURE and read it. Take the MINE KEY into inventory.
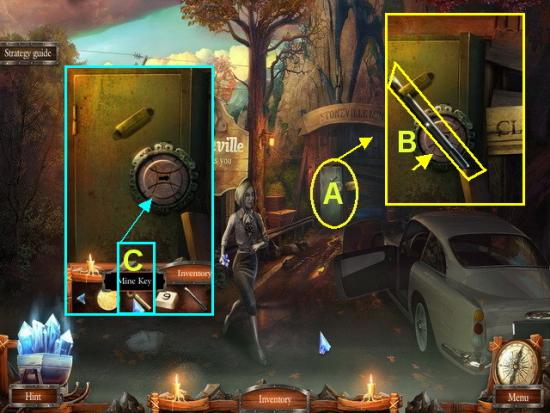
- A. Click on the CABINET door to zoom in.
- B. Take the DRILL BIT and add to inventory.
- C. Take the MINE KEY and open the door where you will find your first HOS.
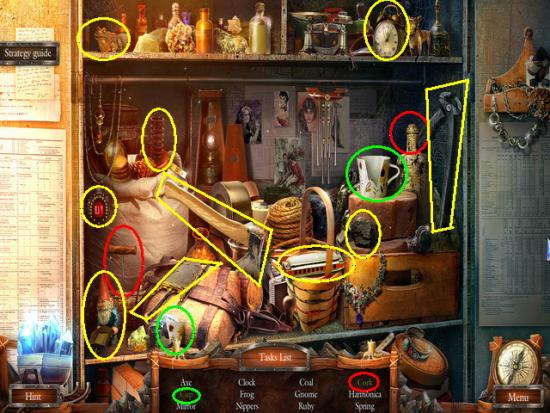
- Green items in the task list are shown color coded in green and red.
- All other hidden items are shown circled in yellow.
- Once you find all hidden items the PINCERS will be added to your inventory.
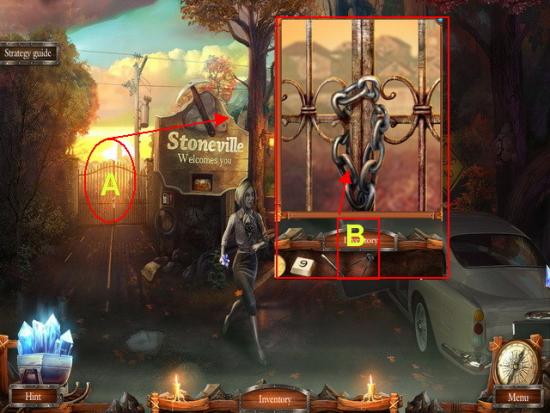
- A. Click on the GATE in the distance to zoom in.
- B. Take the PINCERS from inventory and use them to break the chain and the gate will open.
- C. Click on the STONE GIRL and note the FLOWER in her hand and exit out.
- Go through the gate to the next scene which is the SQUARE.
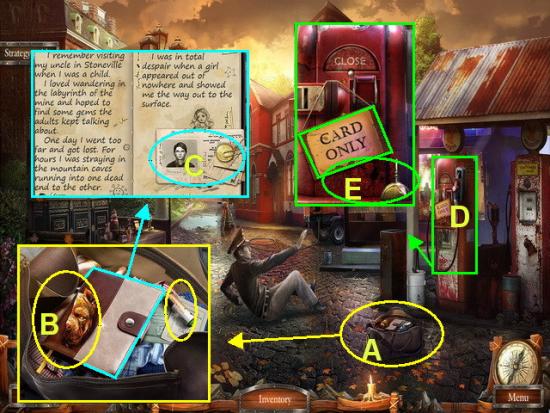
- A. Look in the LEATHER BAG to zoom in.
- B. Take the STATUE HEAD and the BATTERY into inventory.
- C. Click on the JOURNAL to open it read pages, and take the COIN (2)
- D. Click on the FUEL PUMP to zoom in.
- E. Remove the SIGN and take the OIL CAN into inventory.
- Walk down once to where the stone woman is.
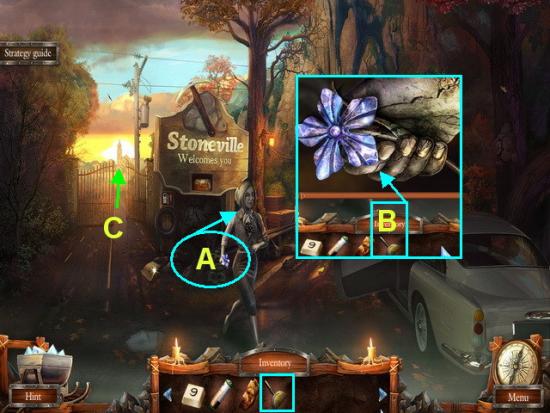
- A. Click on the GIRL’S HAND to zoom in.
- B. Use the OIL CAN from inventory on the FLOWER to release it. The FLOWER is now in inventory.
- C. Return to the Square through the gate.
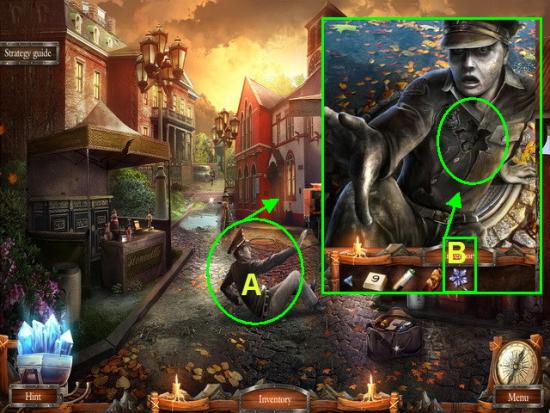
- A. Click on the STONE GUARD to zoom in.
- B. Place the STONE FLOWER on his chest in the indentation. This will free him from the stone.
- A. Click on the HATCH where Guard was sitting.
- B. Take STONE LIZARD into inventory.
- C. Click on the drilling machine to zoom in and place the STONE LIZARD at the bottom right section of puzzle. When the door opens take the COIN (3) into inventory.
- You will have to return to this later.
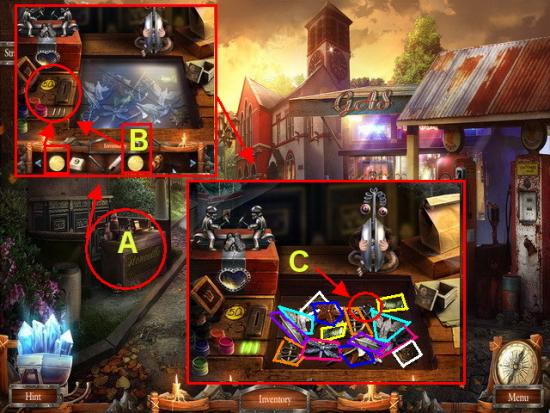
- A. Click on the STALL to zoom in.
- B. Take the 3 COINS from inventory and place them in the slots.
- C. You will now have to remove all the small toys in pairs. Click on any one then on its match until they are all gone. They are shown color coded in the image above
- D. Take the COAT OF ARMS that will be the only item remaining and take it into inventory. The COAT OF ARMS is shown circled in red.
- Exit stand and walk down once.
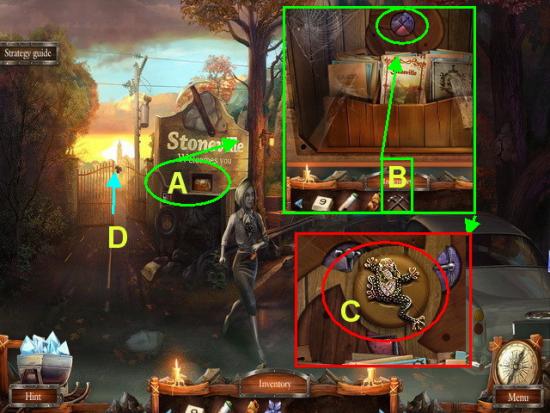
- A. Click on the Stoneville sign to zoom in.
- B. Take the COAT OF ARMS emblem and place it in the empty slot.
- C. Take the STONE FROG when the door opens and place in inventory.
- Go back through the gate to the SQUARE.
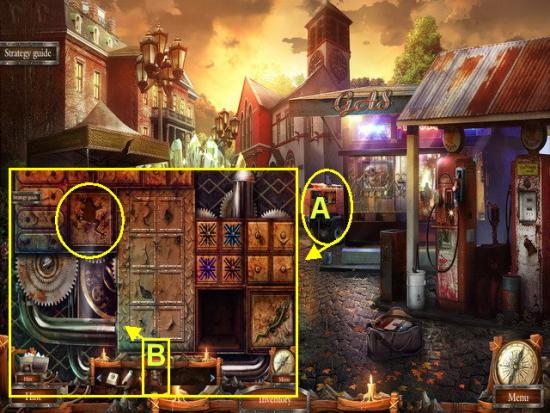
- A. Click on the DRILLING MACHINE to zoom in
- B. Place the STONE FROG in the upper left indentation to trigger a mini game puzzle.
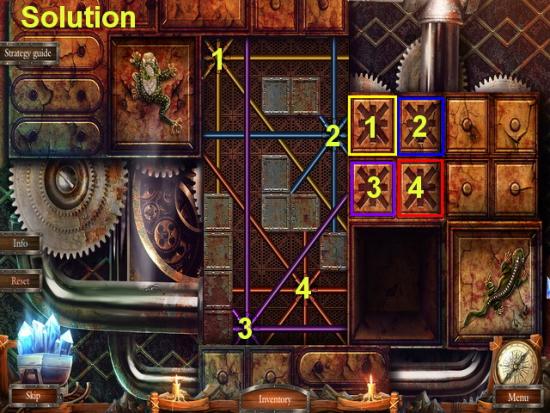
- MINI GAME – Your objective is to place the four colored stars in the correct location to open the panel.
- Place the stars as shown in the image above. They are shown with numbers and color coded to help you find their locations easier.
- Walk forward and watch the cut scenes.
- Take the BROKEN DRILL BIT from the ROCK DRILL.
- Place the DRILL BIT from inventory into the drill and click on the DRILL to clear away the crystals.
- You may now advance to the hospital.
- Go forward.
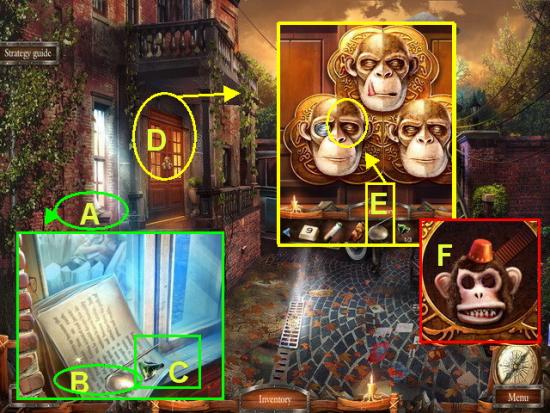
- A. Click on the window to zoom in.
- B. and C. Take the MONACLE and the EMERALD into inventory.
- D. Click on the door to zoom in.
- E. Take the MONACLE from inventory and place on the eye of the MONKEY. Take the TOY MONKEY HEAD into inventory.
- Walk back to the Square.
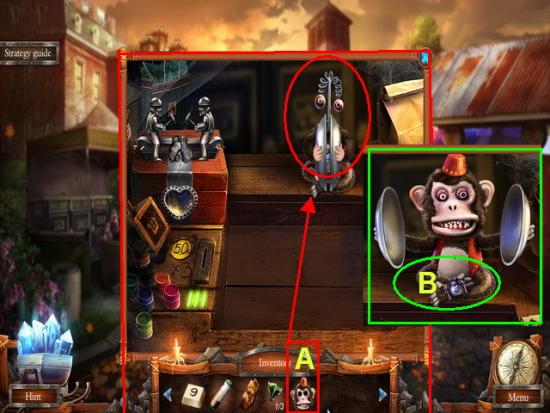
- A. Click on the square to zoom in. Take the MONKEY HEAD and place it on the TOY MONKEY.
- B. When the monkey begins to use the cymbals take the SPIDER and add to inventory.
- Exit out and click on the hatch in the ground to zoom in.
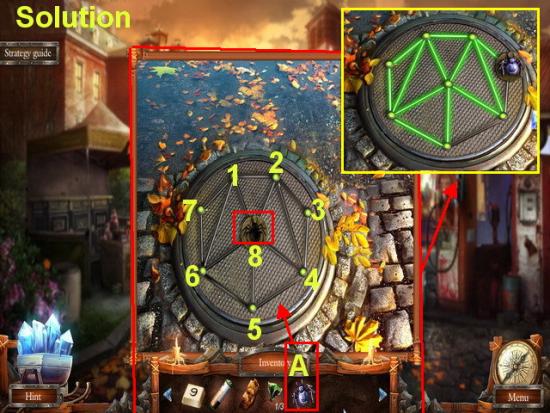
- A. Take the SPIDER from inventory and place in the indentation. This will trigger a mini game.
- Mini Game – The objective is to move the spider so it travels all the strands of the web without crossing over any others.
- Solution is shown in image above – The circles are shown numbered 1 through 8. Click on them in this order to complete the puzzle; 1,7,6,1,2,8,6,5,8,4,2,3, 4, and 5.
- Once you finish this puzzle the hatch is removed. Click on the contents to trigger a HOS.
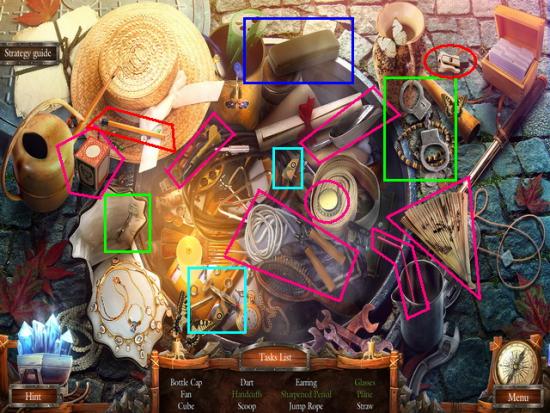
- In this HOS locate the items listed along the bottom of the screen. The items in green text are color coded to help you find them and all others are circled in dark pink.
- Green text items;
- AIRPLANE – Circled in light blue. Add the wing to the plane.
- HANDCUFFS – Circled in green. Use the key to unlock the handcuffs.
- GLASSES – Circled in dark blue. Click to open case then click on glasses.
- SHARPENED PENCIL – Circled in red. Click on sharpener then on pencil.
- The other eight items are shown circled in dark pink.
- Once all items are found place the EARRING into inventory.
- Walk forward back to the hospital.
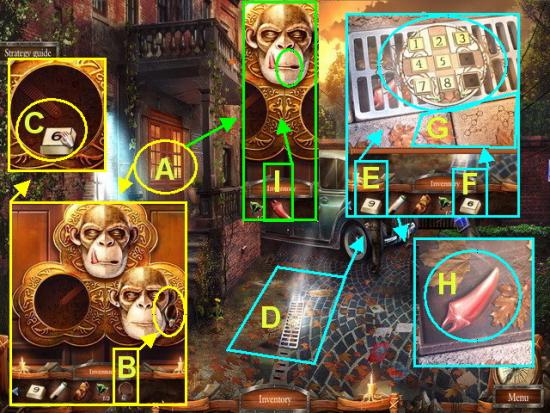
- A. Click on the door to zoom in.
- B. Take the EARRING from inventory and place it on the bottom right monkey.
- C. Take the BUTTON and place in inventory.
- D. Click on the DRAIN on the ground to zoom in.
- E. Take the “9” BUTTON from inventory and add to number pad.
- F Take the “6” BUTTON from inventory and add to number pad.
- G. Note the inscription on the ground. This is a clue to the solution to this puzzle.
- Click on the following numbers for the SOLUTION – 1, 3, 5, 7, 9, 2, 6, 8 and 4.
- H. When panel opens take FANG into inventory.
- A. Click on the door again to zoom in.
- I. Take the FANG and add to top monkey. The door is now open and you may enter the hospital.
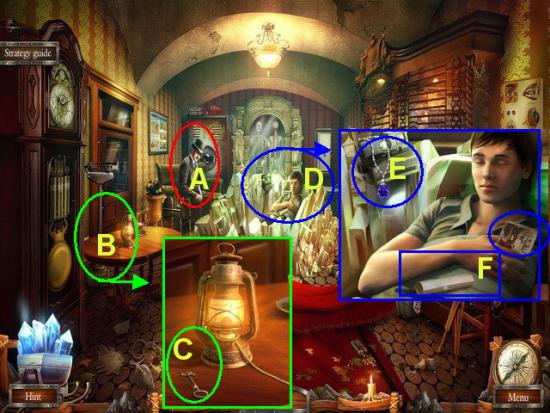
- A. Click on the MAN (Oliver) and read through the dialog take the CARD into inventory.
- B. Click on the TABLE to zoom in.
- C. Take the CROSS SHAPED KEY into inventory.
- D. Click on BRANDON to zoom in.
- E. Take the BLUE CRYSTAL and the CAMERA into inventory.
- F. Read the NOTE and view the PICTURE. Watch the cut scenes.
- Walk down once to exit room.
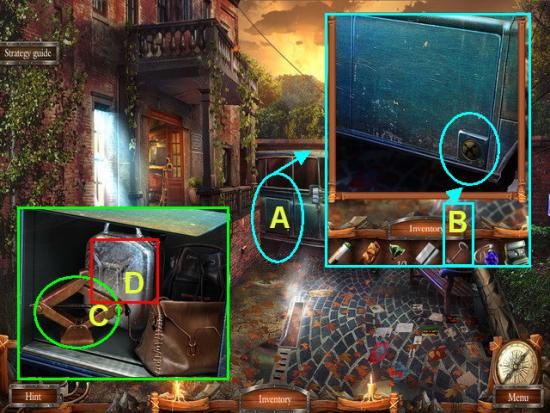
- A. Click on the CAR DOOR to zoom in.
- B. Take the CROSS SHAPED KEY and use it to open the compartment.
- C. Take the JACK into inventory.
- D. Take the GAS CAN into inventory. You will need to come back here later.
- Go back inside hospital.
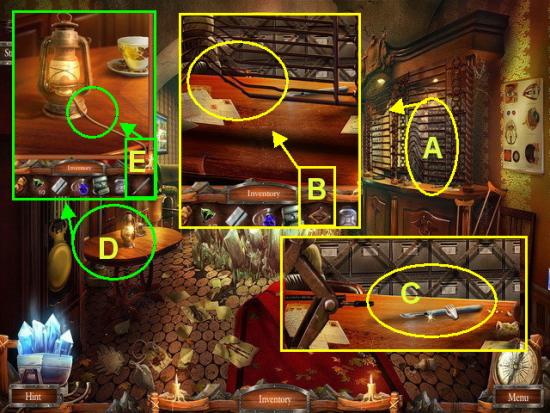
- A. Click on the CARD CATALOG to zoom in.
- B. Take the JACK from inventory and place it under the door to lift it up.
- C. Take the SCALPEL into inventory.
- D. Click on the TABLE to zoom in again.
- E. Use the SCALPEL to cut the cord and place the OIL LAMP in your inventory.
- Exit the hospital room.
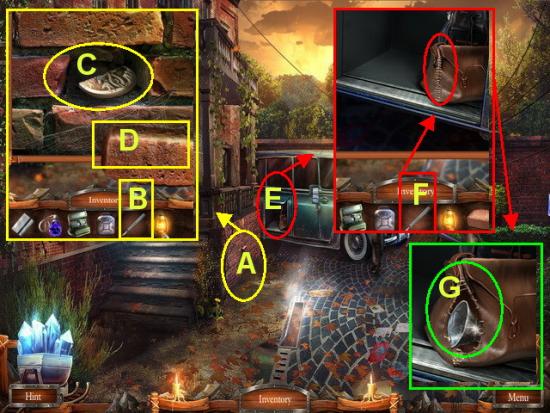
- A. Click on the WALL to zoom in.
- B. Use the SCALPEL to remove the brick.
- C. Take the PIECE OF AMULET into inventory.
- D. Take the BRICK into inventory.
- E. Click on the LUGGAGE COMPARTMENT of car to zoom in.
- F. Take the SCALPEL and use it to cut the seam along the bag.
- G. Take the FUNNEL from bag and place in your inventory.
- Go forward back to the Square.
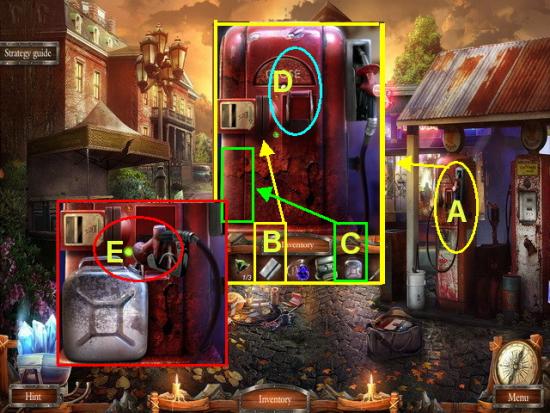
- A. Click on the left FUEL PUMP to zoom in.
- B. Take the GAS CARD from inventory and run it through the slot.
- C. Place the GAS CAN.
- D. Pull the HANDLE to start the pump.
- E. FILL the GAS CAN and place it in inventory.
- Walk down to the entrance and find the CAR.
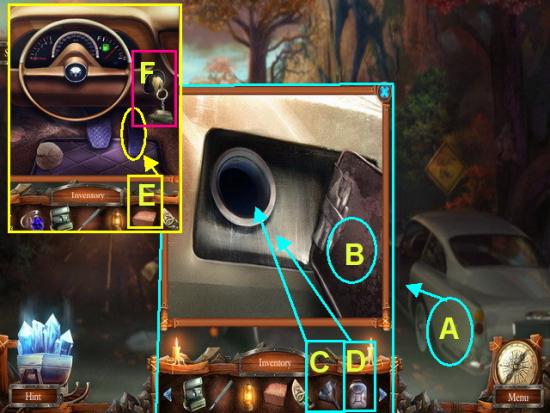
- A. Click on the GAS TANK COVER to zoom in.
- B. Open the COVER DOOR.
- C. Place FUNNEL into hole.
- D. Use GAS CAN to fuel car.
- E. Take BRICK from inventory and place it on GAS PEDAL.
- F. Turn the KEY to start the car.
- Watch the cut scenes as the car crashes into the mine.
- The mine is now open.
- Walk into mine.
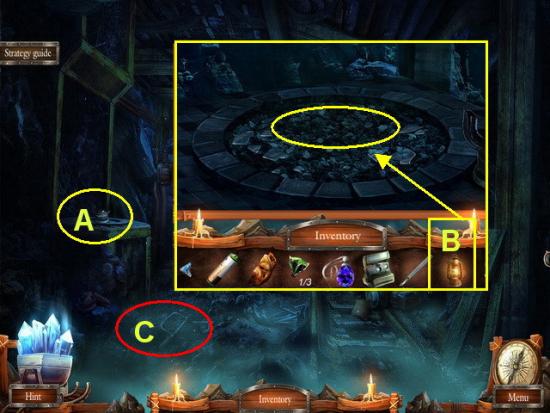
- A. Click on the NICHE to zoom in.
- B. Take the OIL LAMP from inventory and place it on the niche. Now the area is lit.
- C. Take the HAND SAW into inventory
- Click on the Trolley to the far right to trigger a HOS.
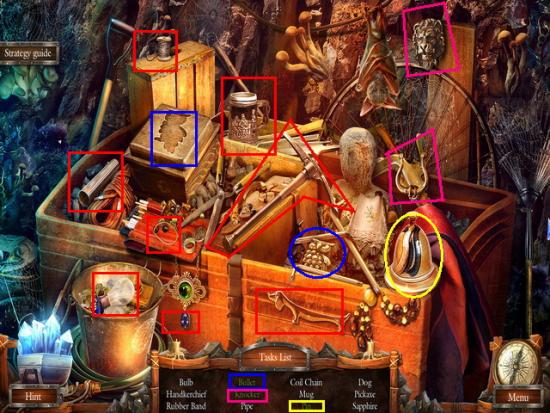
- Locate the hidden objects in the scene.
- The items that are color coded are in green text at the list at the bottom of the screen.
- BULLET – Circled in blue. Place the Owl on the box cover then click on box to open it and find bullet is inside.
- KNOCKER – Circled in dark pink. You must find the handle and Lion’s head and put them together before you can click on it.
- PIN – Click on the case shown circled in yellow and the pin is inside.
- The other nine hidden items are shown circled in red.
- When all items are located take the COIL OF CHAIN with HOOK into inventory.
- Walk down once and go left to the Square.
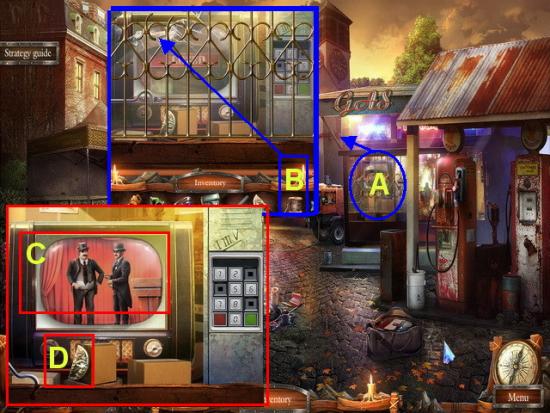
- A. Click on the SHOWCASE to zoom in.
- B. Take the COIL OF CHAIN with HOOK to take down gate and open window.
- C. Watch the cut scenes on TELEVISION.
- D. Take the PART OF AMULET into inventory.
- Return to the hospital.
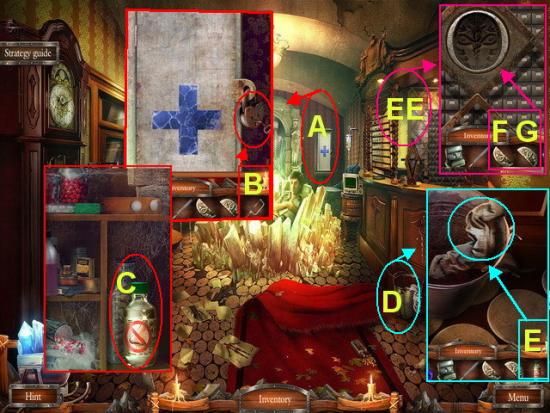
- A. Click on the MEDICINE CABINET to zoom in and you will find it is locked.
- B. Take the HACKSAW from inventory and use on the lock. Open the door.
- C. Take the “SAL AMMONIAC” and place in inventory.
- D Click on the BUCKET on the floor to zoom in.
- E. Take the SAL AMMONIAC and add to the BUCKET. Take the AMMONIA RAG and add to inventory.
- EE. Click on the CARD CATALOG to zoom in.
- F. Take the PART OF AMULET and place in open slot.
- G. Take the PIECE of AMULET and place in open slot.
- This will trigger a mini game.
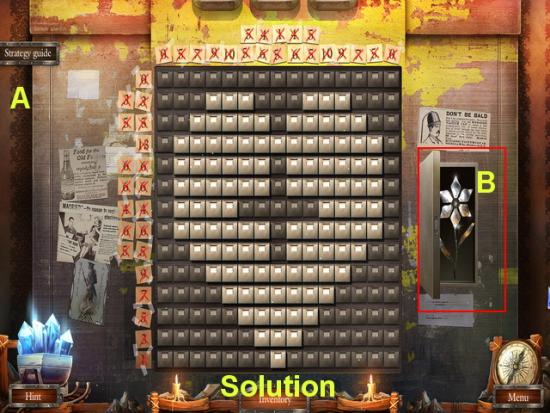
- A. MINI GAME – Open the drawers based on the numbers at the top and left.
- Each number on a paper indicates a continuous number of drawers between each block.
- Many of the rows and columns are already complete indicated by the red “X” on the papers surrounding the perimeter of the drawers.
- If you see two papers with “5” for example it means you will have five pulled drawers (which turn silver) then one closed drawer, then five more pulled silver drawers.
- Once you pull the drawers correctly a red “X” will appear on the paper as in the others.
- Once complete you will see the heart shape shown in the image above.
- B. Take the STONE FLOWER from the compartment when it opens and place in inventory.
- Go back to the MINE.
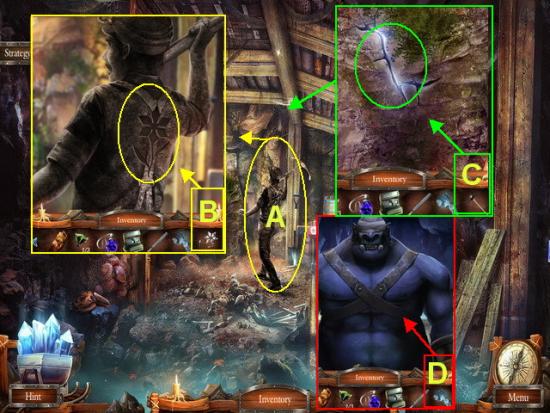
- A. Click on the MINER to zoom in.
- B. Take the STONE FLOWER and place in the indentation. When he is released watch the cut scenes and read the dialog. Take the PICK AXE the Miner gives you into inventory.
- C. Take the PICK AXE and use it on the large crack on the back wall.
- D. When the TROLL MONSTER appears use the AMMONIA RAG on him and he will leave.
- Walk forward through the opening in the mine.
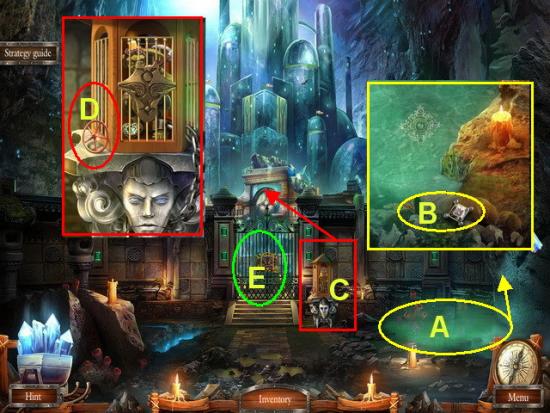
- A. Click on the WATER to zoom in.
- B. Take the DIAMOND into inventory.
- C. Click on the CELL CAGE to zoom in.
- D. Take the VALVE into inventory.
- E. Click on the GATE to view the mini game then exit out.
- Go back into the mine.
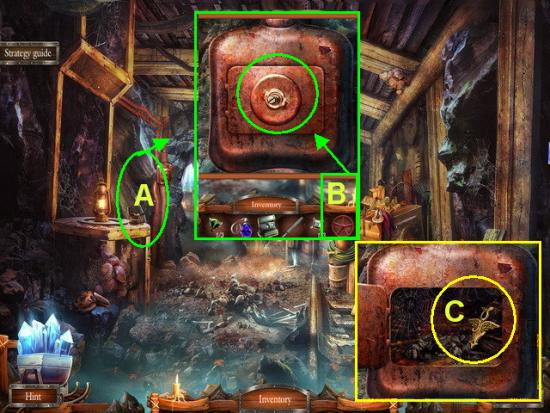
- A. Click on the SEWAGE CONTROL panel to zoom in.
- B. Take the VALVE and add it to the post.
- C. Open the door and take the AMULET into inventory.
- Walk back toward the Castle.
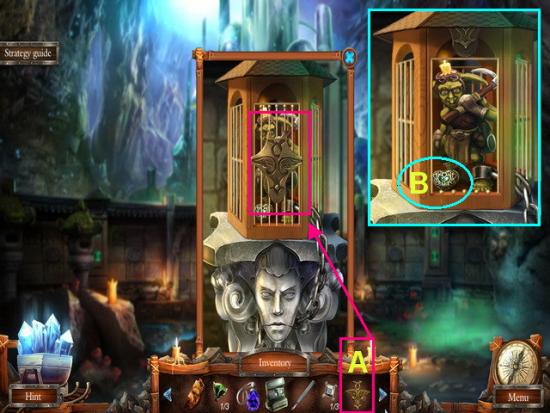
- A. Click on the CELL to zoom in and place the AMULET in the indentation.
- B. When the cage opens take the HEART KEY into inventory.
- Return to the Square.
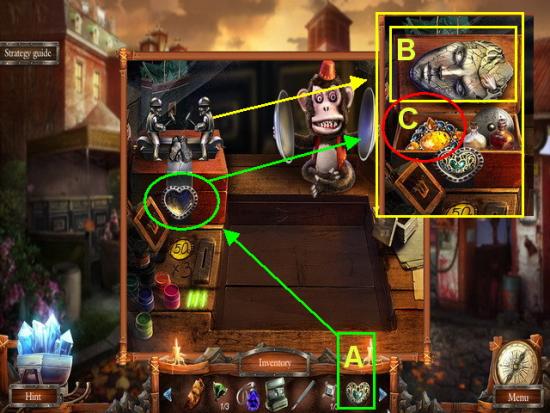
- Click on the square to zoom in.
- A. Take the HEART KEY and use it on the box at the upper left corner.
- B. When the box opens take the STONE QUEEN EMBLEM into inventory
- C. Also take the BAS-RELIEF JEWEL into inventory.
- Go back to the Castle gate.
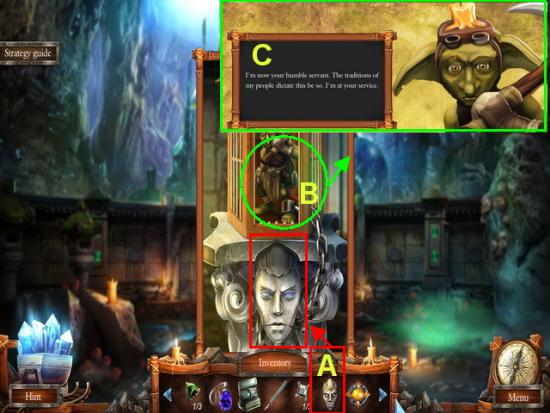
- Click on the CAGE to zoom in.
- A. Take the STONE QUEEN EMBLEM and place it over the stone face.
- B. Take the 2ND BAS -RELIEF STONE into inventory and this will free the GOBLIN.
- C. The freed GOBLIN will now be in your inventory and will work for you to help you with various tasks.
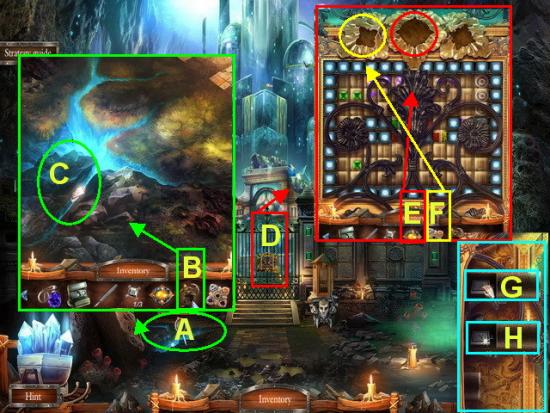
- A. Click on the CRACK to the left of the cage to zoom in.
- B. Use the GOBLIN to dig and widen the crack.
- C. Place the 9 BUTTON into inventory.
- D. Click on the GATE lock to zoom in.
- E. Place the 1st BAS-RELIEF JEWEL into the empty slot at the top of the puzzle shown circled in red.
- F. Place the 2nd BAS-RELIEF JEWEL into the empty slot at the top of the puzzle shown circled in yellow.
- G. Take the 4 BUTTON that appears on the side of the puzzle into inventory.
- H. Take the 3 BUTTON that appears on the side of the puzzle into inventory.
- Head back to the square.
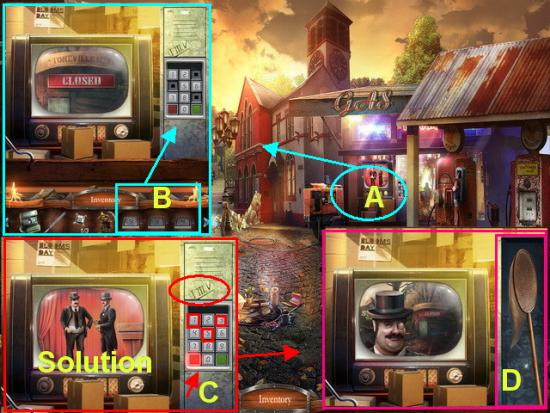
- A. Click on the SHOWCASE to zoom in.
- B. Place the 9, 4, and 3 BUTTONS on the KEYPAD.
- C. Solution – Key in “1, 3, and 5” which are shown circled in roman numerals over the keypad.
- D. Take the NET into inventory.
- Go back to the Castle.
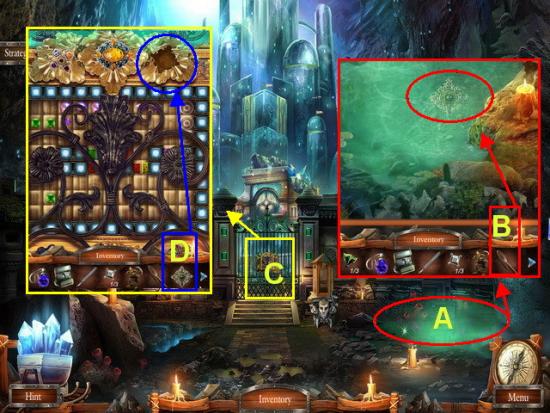
- A. Go back to the WATER at the right of the cage to zoom in.
- B. Use the NET to take the 3rd BAS-RELIEF JEWEL and place in inventory.
- C. Click on the GATE LOCK to zoom in.
- D. Place the 3rd BAS-RELIEF JEWEL along the top opening to trigger a mini game.
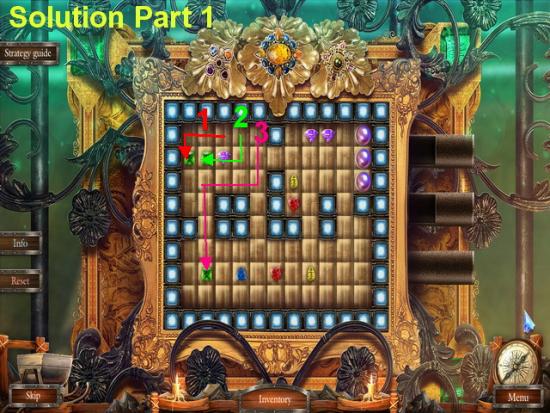
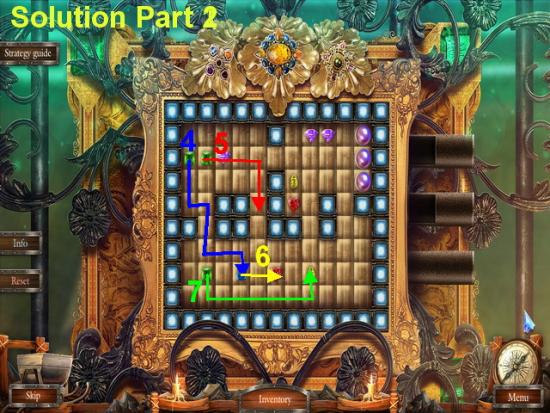
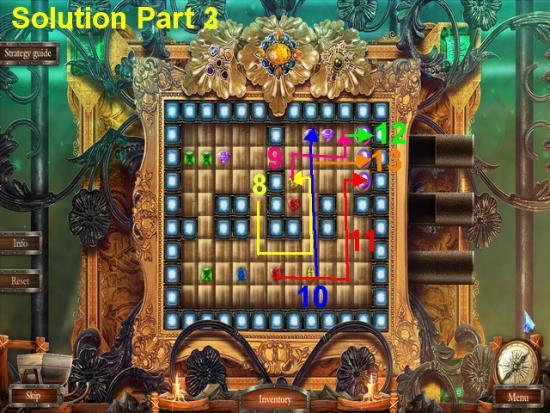
- Mini Game – Your objective is to move the three purple pearls to the circles located along the top right corner of the board.
- SOLUTION – The solution is shown in the three images above shown color coded and numbered in 13 steps.
- Once you complete the mini game puzzle the castle gate will open.
- Watch the cut scenes to follow the storyline.
- This is the end of Chapter One.
Chapter 2 – The Underground
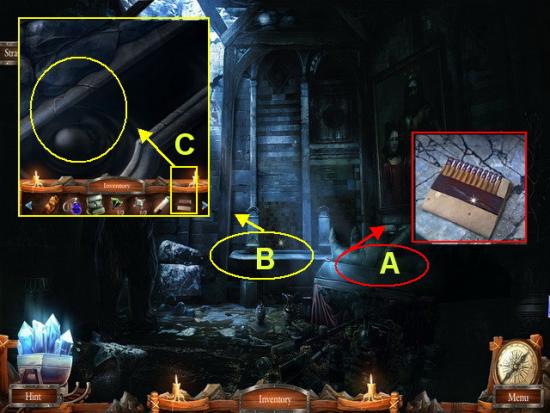
- A. Click on the COFFIN and take MATCHES into inventory.
- B. Click on the OIL TROUGH to zoom in.
- C. Use the MATCHES to start it on fire and light the room.
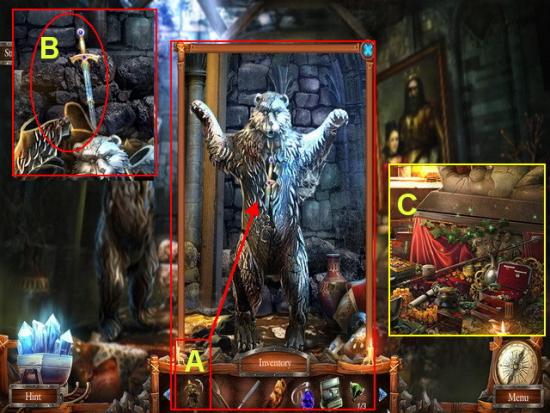
- A. Click on the BEAR to zoom in the use the GOBLIN to destroy the bear.
- B. Take the SWORD into inventory.
- C. When you see the sparkles click on the KING’s TREASURES for a HOS.
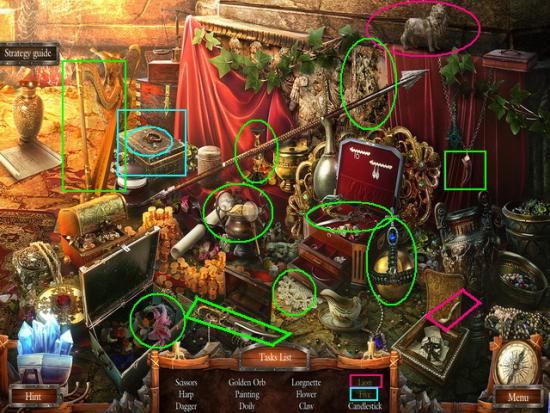
- Locate the hidden objects listed along the bottom of the screen.
- To locate the LION look for the items circled in dark pink. Place the tail on the lion.
- To locate the “5” click on the box circled in blue and when it opens you will see the five on the inside of the lid.
- Locate all other items shown circled in green.
- When you locate all hidden objects you will be given a GOLDEN ORB to place in your inventory.
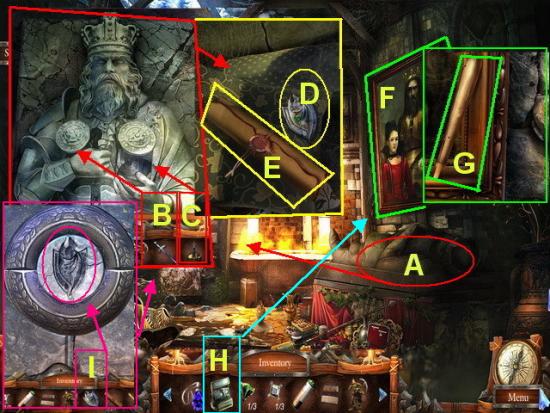
- A. Click on the King’s SARCOPHAGUS to zoom in.
- B. Place the SWORD in the king’s arm.
- C. Place the GOLDEN ORB in the kings other arm.
- D. When the panel opens take the COAT OF ARMS into inventory.
- E. Next take the LETTER and read it.
- F. Click on the King’s PICTURE to zoom in.
- G. Take the HANDLE into inventory. You will have to come back to this later.
- H. Take the CAMERA from inventory and take a picture of the KING on the wall. Place PICTURE in inventory.
- I. Click on the back wall to the far left of scene. Use the COAT OF ARMS and place it in the indentation. This will trigger a mini game puzzle.
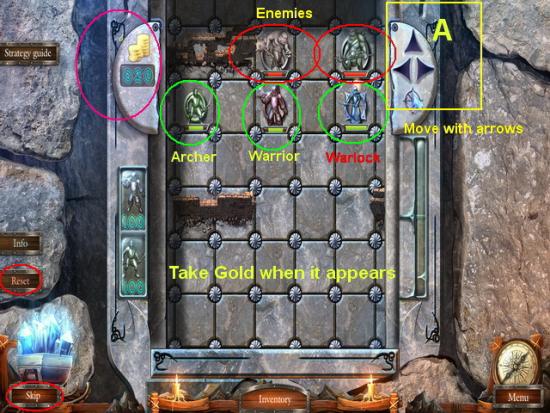
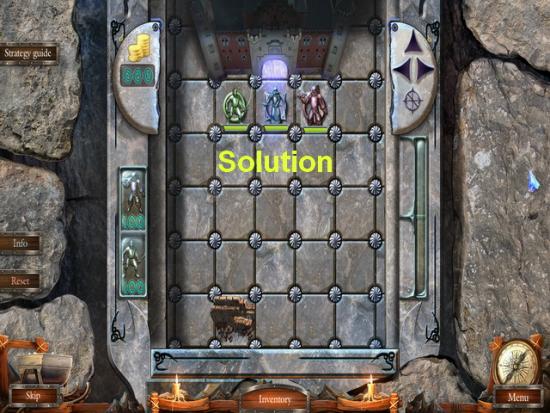
- MINI GAME – You are given three men on the board which are the “Archer”, “Warrior” and the “Warlock” The object of this game is to get at least the “Warlock” out of the three men which are assigned to you (shown circled in green and with green health meters under them) to the top of the game board. This will take a while as the enemy soldiers will be shooting at you and you at them. When you click on your men you will see tiles highlight in red. You may move your men to any of these red tiles. Always move upward as your goal is to reach the top without being killed.
- If you lose all of your men or your “Warlock” the game will automatically end and start over.
- If your man is killed a tombstone will appear in a game square. Protect your “Warlock” the most as even if the other men make it to the top if he dies the game is over.
- You have the option to skip the game when the skip button highlights at the bottom of the screen.
- A. Use the arrows along the right top corner of the game board to move your men. Click on a man then on the arrow to move them.
- In the first image your men are shown circled in green and the enemies in red.
- When you kill an enemy you will see GOLD COINS appear in the game grid. Click on these to collect them into your inventory.
- Once you complete the mini game an opening will appear. Go through it and up the STAIRS and down to the MINE.
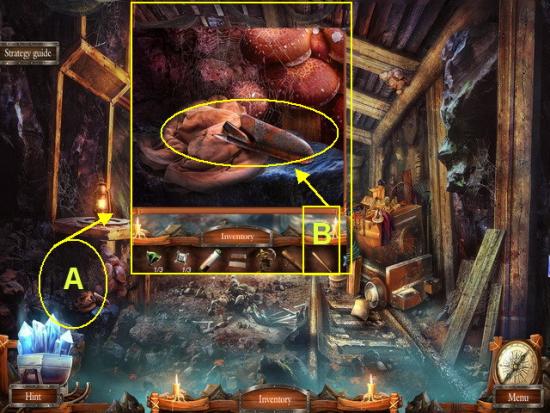
- A. Click on the broken TROWEL to zoom in.
- B. Take the HANDLE and add to TROWEL to repair then place TROWEL in inventory.
- Walk forward twice or use map to go to CASTLE SQUARE.
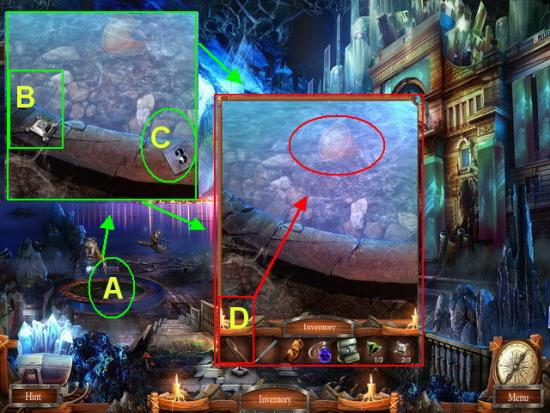
- A. Click on the FOUNTAIN to zoom in.
- B. Take the DIAMOND into inventory.
- C. Take the “3” TILE into inventory.
- D. Use the NET from inventory and get the POT from the water. Add POT to your inventory.
- Use the MAP and return to the outside of the HOSPITAL.
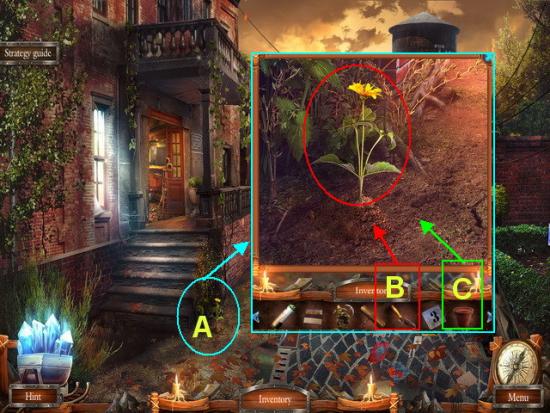
- A. Click on the FLOWER on the ground to zoom in.
- B. Take the TROWEL from inventory and dig up the FLOWER.
- C. Take the POT and place on the ground adding the FLOWER to it. Now add the POTTED SPROUT to your inventory.
- Use map and return to CASTLE SQUARE.
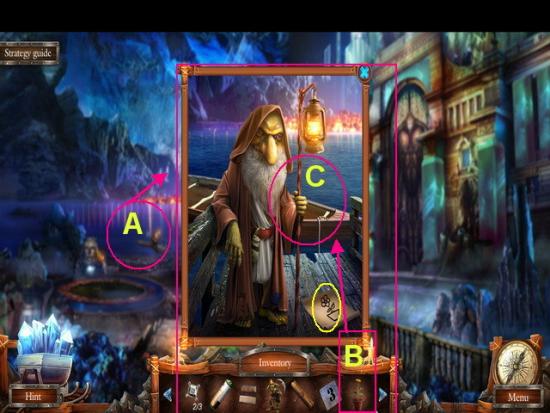
- A. Click on the FERRYMAN to zoom in.
- B. Give the POTTED SPROUT to the Ferryman.
- C. He will now let you go forward to STONE CITY.
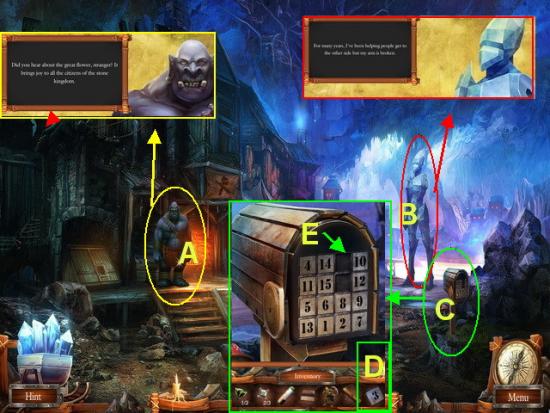
- A. Click on the BLACKSMITH to zoom in and read the dialog.
- B. Click on the GOLEM to zoom in and read the dialog.
- C. Click on the MAILBOX to zoom in
- D. Add the “3” TILE to the grid to activate a mini game puzzle.
- E. Mini Game – You will need to click on the tiles and they will exchange places.
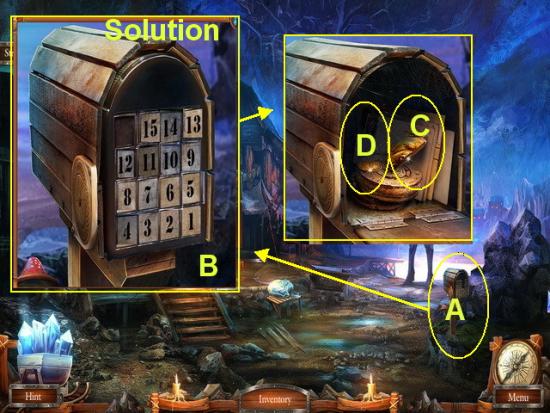
- A. Click on the MAILBOX after you add the “3” tile to activate the puzzle.
- B. The goal is to have the tiles in numerical order from one to fifteen with the “1” in the lower right corner and the blank tile in the top left corner as shown in the image marked “SOLUTION”
- Once completed the mailbox will open.
- C. Take the 2nd STATUE HEAD PIECE into inventory.
- D. Take the BRONZE coin into inventory.
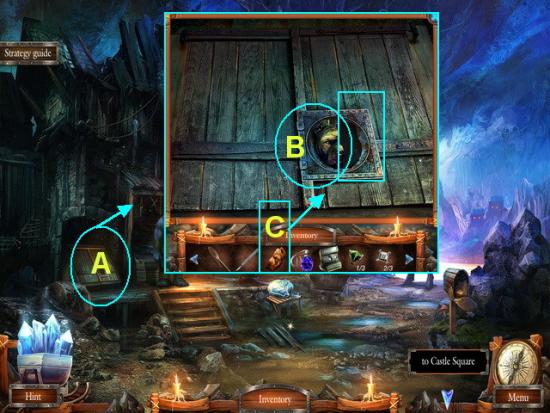
- A. Click on the BASEMENT DOOR to zoom in.
- B. Place the first STATUE HEAD PIECE in the indentation.
- C. Place the second STATUE HEAD PIECE in the indentation.
- Now you will see the door begin to sparkle. Click on it for a HOS.
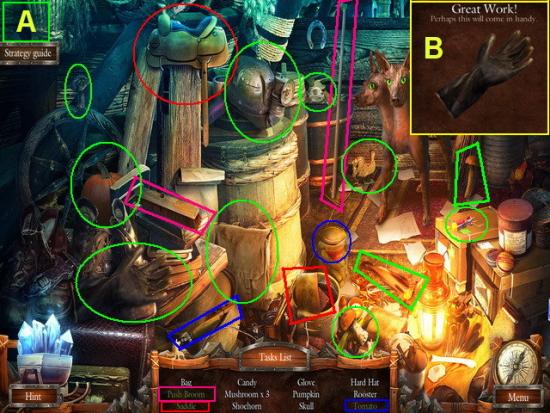
- A. Locate all the hidden objects in the scene which are listed in white text along the bottom of the screen. They are shown circled in green in the image above.
- Those items listed in green text must be assembled in steps first and are shown circled in the following colors.
- PUSH BROOM – Shown circled in dark pink. Attach broom to handle.
- SADDLE – Shown circled in red above.
- TOMATO – Shown circled in dark blue. You must find the can opener and open the jar. Then click on the tomato.
- B. Once you find all the items add the RUBBER GLOVE to your inventory.
- Use the map and travel to the outside of the HOSPITAL.
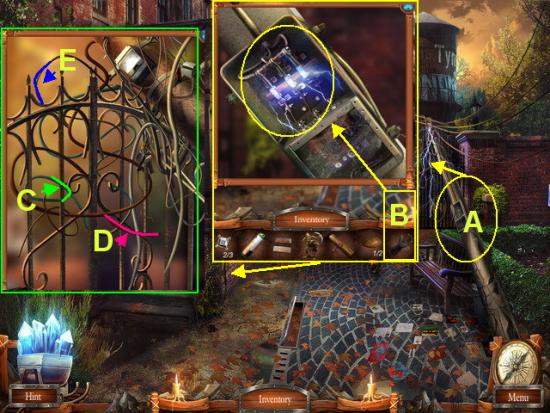
- A. Click on the TRANSFORMER to zoom in.
- B. Take the RUBBER GLOVE from inventory and use to turn off power as shown.
- Click on the GATE to zoom in once the power is off. This is a mini game puzzle.
- C. Click on the wire shown in GREEN first to make it disappear.
- D. Click on the WIRE shown in PINK second to make it disappear.
- E. Click on WIRE shown circled in DARK BLUE third to make it disappear and to open the gate.
- You may now proceed through the gate to the WATER TOWER.
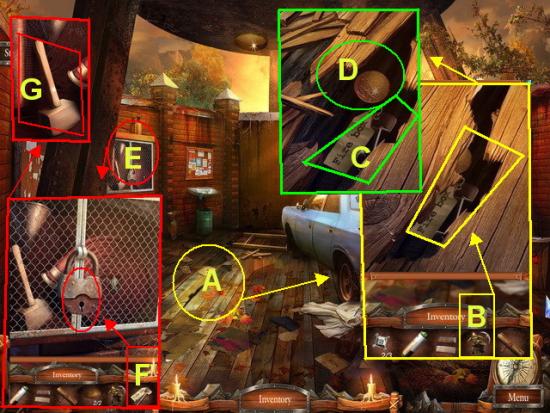
- A. Click on the FLOOR to zoom in.
- B. Use the GOBLIN in inventory on crack in floor to open it.
- C. Take the FIRE BOX KEY into inventory.
- D. Take the BRONZE coin into inventory.
- E. Click on the FIRE CABINET to zoom in and see it is locked.
- F. Take the FIRE BOX KEY and open the lock.
- G. Once the cabinet is open take the MALLET into inventory.
- Use the map and return to CASTLE SQUARE.
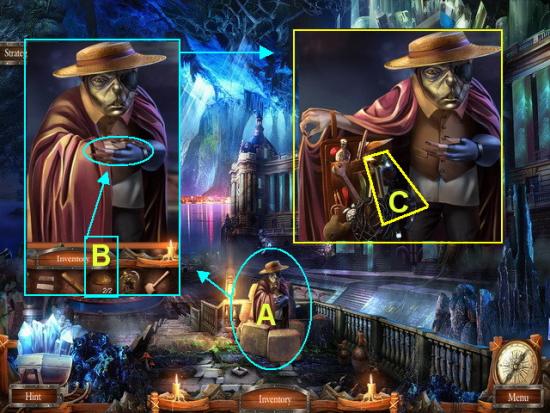
- A. Click on the TRADER to zoom in.
- B. Give the Trader the 2 BRONZE COINS from inventory and he will open his coat.
- C. Take the CHISEL into your inventory.
- Walk forward once or use map to go to STONE CITY.
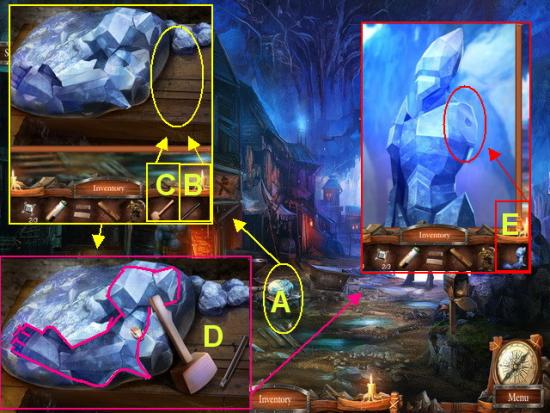
- A. Click on the BENCH to zoom in.
- B. Take the CHISEL from inventory and place on BENCH.
- C. Take the MALLET from inventory and place on bench next to chisel.
- D. Mini Game – Here you will need to use the chisel and mallet to carve out a GOLEM ARM. When you place your cursor over the stone you will see areas highlight. Click on these areas to carve. You will need to do this nine times before the arm is finished. Take the ARM into inventory.
- E. Click on the GOLEM to zoom in. Take the ARM from inventory and add to GOLEM and watch the cut scene videos.
- Walk forward once
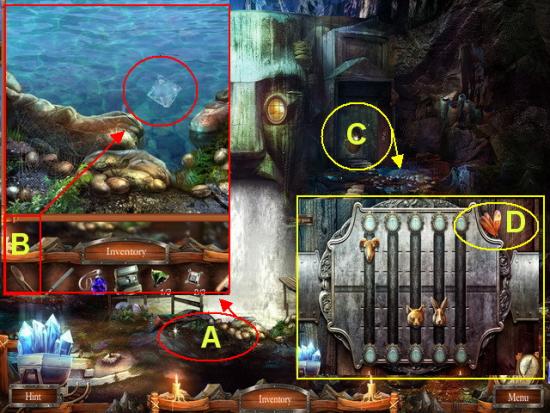
- A. Click on the WATER’S EDGE to zoom in.
- B. Take the NET from inventory and use it to capture the DIAMOND and place in inventory.
- C. Click on the DOOR to zoom in.
- D. Take the FLOWER PETAL from the upper right corner. You will need to return to this mini game later.
- Walk down once.
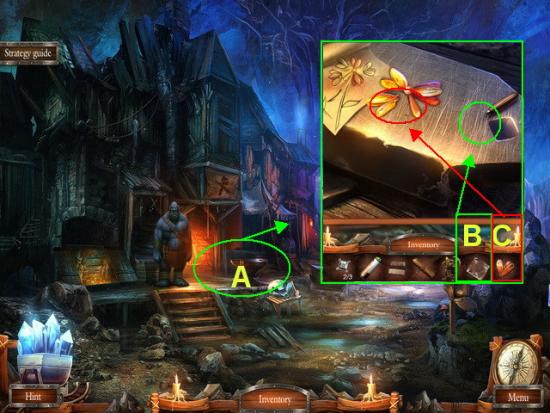
- A. Click on the ANVIL to zoom in.
- B. Take the DIAMOND from inventory and add to handle to make a GLASS CUTTER
- C. Add the FLOWER PETALS to the others on the bench.
- Walk forward.
- A. Click on the FLOWER FIELD to zoom in.
- B. Take the GLASS CUTTER and cut the RUBY FLOWER and place in inventory.
- C. Take the PETAL underneath the flower and add to inventory.
- Use the map and return to the ENTRANCE to STONEVILLE.
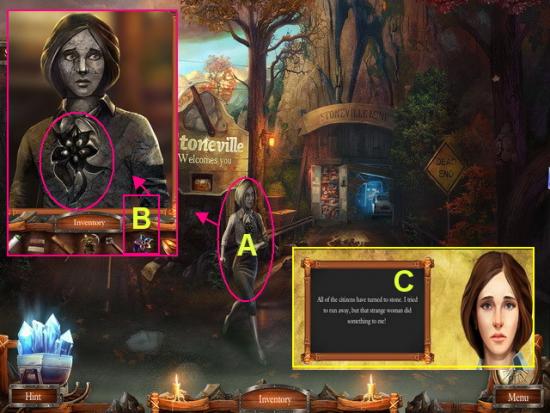
- A. Click on the GIRL to zoom in.
- B. Take the RUBY FLOWER and place on her chest to break the spell.
- C. Talk to the girl and she will give you AMBULANCE KEYS for inventory.
- Use map and return to the WATER TOWER.
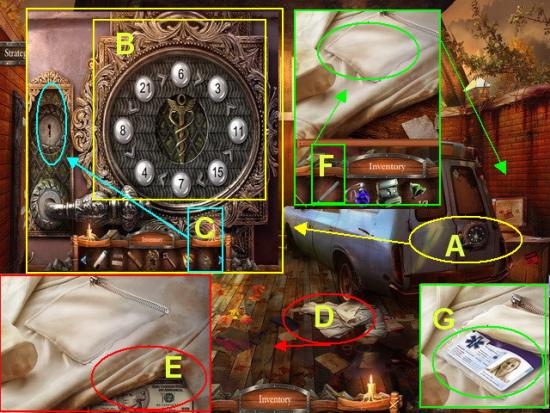
- A. Click on the back of the AMBULANCE to zoom in on a mini game puzzle.
- B. MINI GAME – The solution is shown in the image above. You must click on the numbers and put them in the correct order so the greater than or less than symbols (< or >) are correct.
- C. Once you complete the puzzle you can place the AMBULANCE KEY in the keyhole and turn the handle. The ambulance is now open.
- D. Click on the ROBE to zoom in.
- E. Take the TEN DOLLAR BILL and add to inventory.
- F. Take the SCALPEL from inventory and cut the pocket of the robe open.
- G. Take the KEY CARD into inventory.
- Look inside the ambulance.
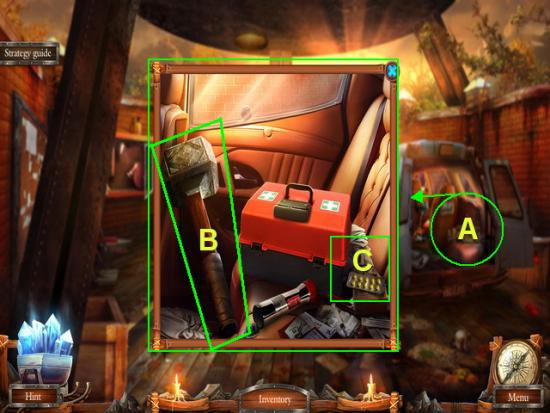
- A. Click on the AMBULANCE to zoom in.
- B. Take the HAMMER into inventory.
- C. Take the PILLS into inventory.
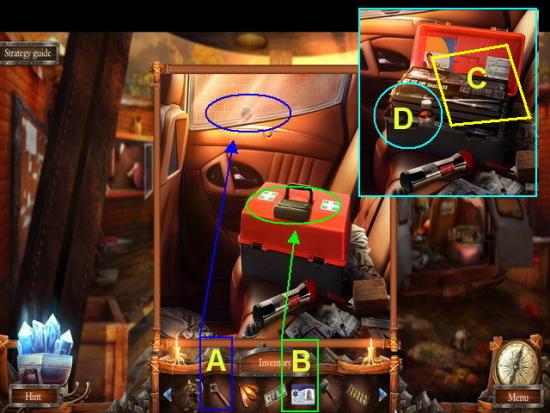
- A. Use the GLASS CUTTER from inventory and use on WINDOW take SILVER into inventory.
- B. Take the KEY CARD and use it on the case to open it.
- C. Take the TWEEZERS into inventory.
- D. Take the OIL into inventory.
- Use the map and travel to the KING’S TOMB.
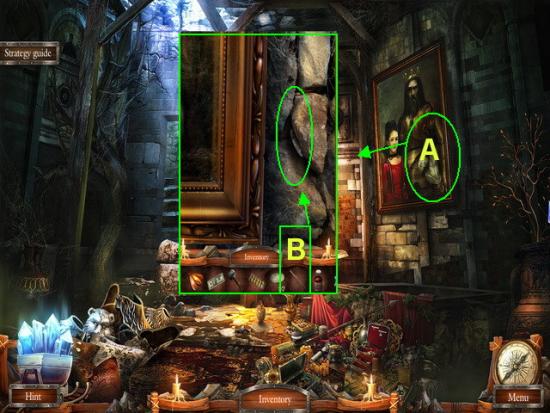
- A. Click on the KING’S PICTURE to zoom in.
- B. Take the TWEEZERS and remove the SILVER from the stone. Add SILVER to inventory.
- Use the map or walk to the CASTLE SQUARE.
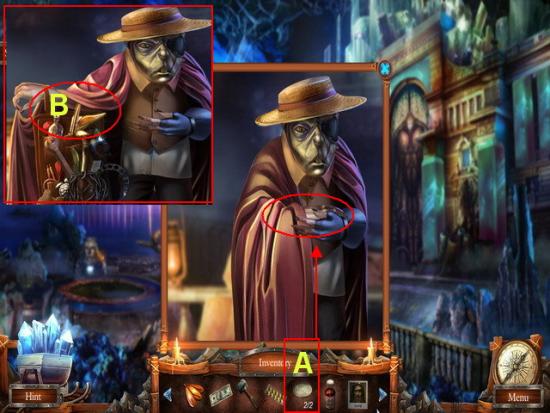
- A. Click on the TRADER to zoom in. Give him the 2 SILVER COINS as payment.
- B. Take the STEM into inventory.
- Use map and return to STONE CITY.
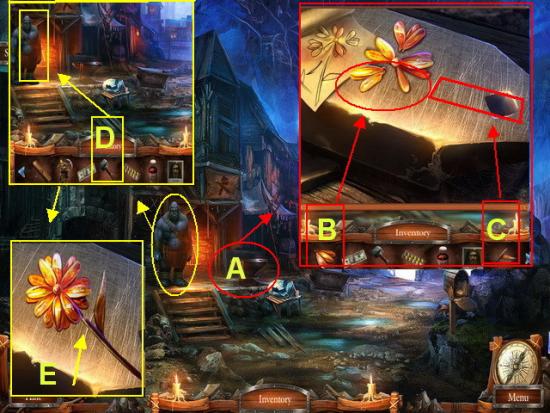
- A. Click on the ANVIL to zoom in.
- B. Take the PETAL and add to the bench.
- C. Take the STEM and add to the bench.
- D. Click on the BLACKSMITH and give him the HAMMER from inventory. Watch him form the flower.
- E. Take the STONE FLOWER from the ANVIL.
- Use the map and return to the front of the HOSPITAL.
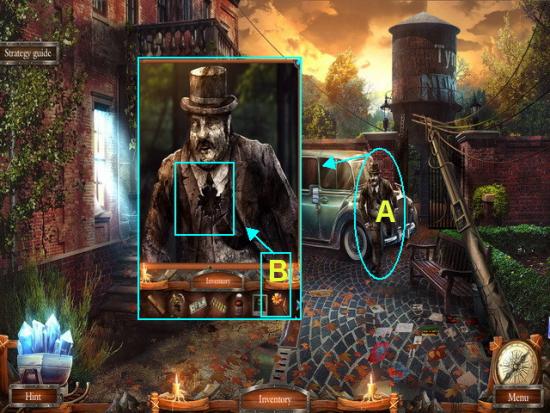
- A. Click on the STONE MAYOR to zoom in.
- B. Take the STONE FLOWER and place it on the Mayor’s chest.
- Watch the cut scenes as he drops the CAR ALARM CONTROLS on the ground.
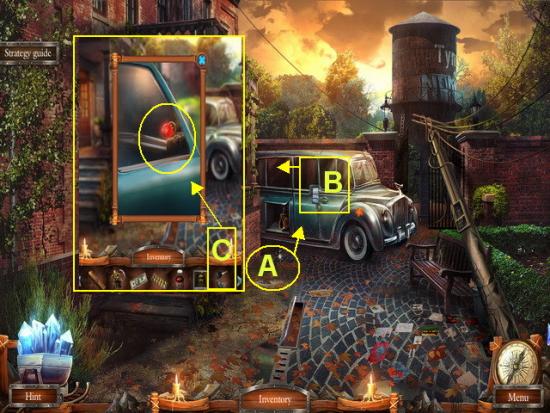
- A. Pick up the CAR ALARM CONTROLER and add to inventory.
- B. Zoom in on VAN WINDOW
- C. Use CAR ALARM CONTROLLER on the alarm.
- Note the door will open and something falls to the ground.
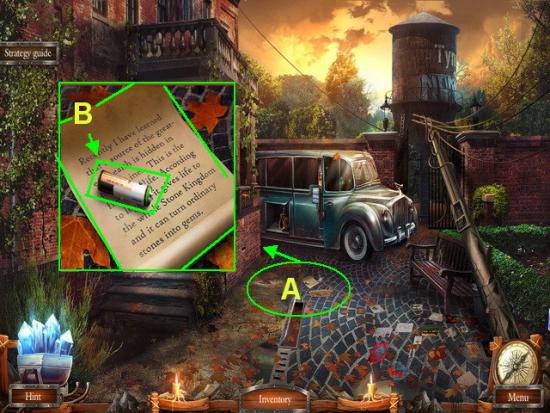
- A. Click on the NOTE to zoom in. Read the Note and watch the cut scenes and storyline.
- B. Take the 2nd BATTERY into inventory.
- Look inside the van for a HOS.
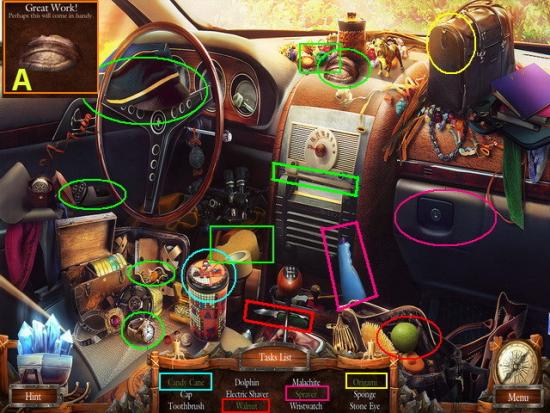
- Locate the hidden objects listed in white text below. They are shown circled in green in the image above.
- To find the items written in green text you will have to follow steps. These are shown circled in various colors.
- CANDY CANE – Shown circled in light blue. Remove the lid from canister to find it inside.
- ORIGAMI – Shown circled in yellow. Click on BAG to open it and find swan inside.
- SPRAYER – Shown circled in dark pink. Click on the GLOVE BOX to open and place in bottle.
- WALNUT – Shown circled in red. Click on the KNIFE then on the LIME to find walnut inside.
- A. Once you locate all the items a STONE EYE will be added to your inventory.
- Walk forward once.
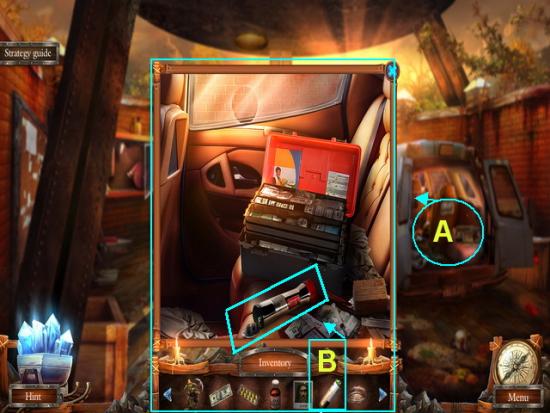
- A. Click on the AMBULANCE to zoom in.
- B. Take the BATTERIES from inventory and place them inside the FLASHLIGHT. Place the FLASHLIGHT in inventory.
- Use the MAP and go to the WATERFALL.
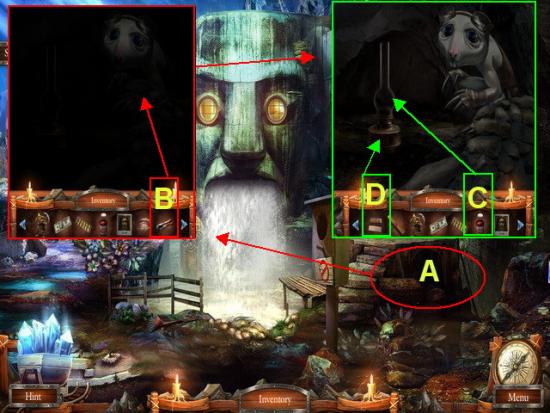
- A. Click on the MOLE to zoom in.
- B. Take the FLASHLIGHT from inventory and aim at MOLE.
- C. Take the OIL from inventory and add to LAMP.
- D. Use MATCHES from inventory on LAMP to light it.
- The MOLE will give you the STONE NOSE for your inventory.
- Use the map to return to CASTLE SQUARE.
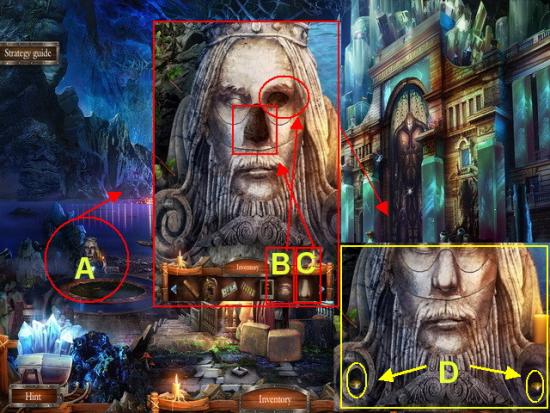
- A. Click on the KING’S FACE to zoom in.
- B. Place the STONE NOSE on the face.
- C. Place the STONE EYE on the face.
- D. When the TWO GOLD COINS appear take them into inventory.
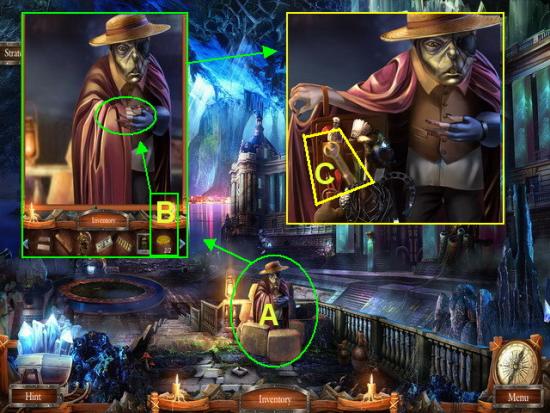
- A. Click on the TRADER to zoom in.
- B. Take the 2 GOLD COINS from inventory and pay him.
- C. Take the WRENCH into your inventory.
- Use the map and return to the WATER TOWER.
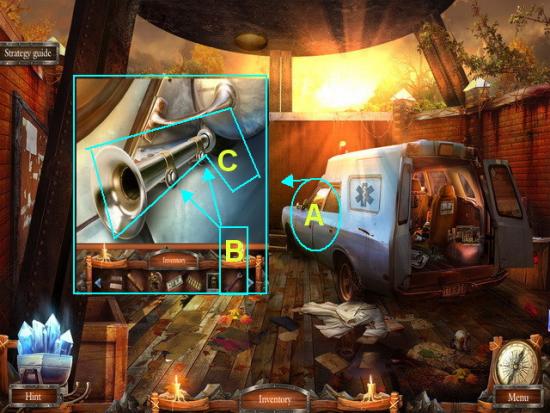
- A. Click on the AMBULANCE HORN to zoom in.
- B. Take the WRENCH from inventory and remove the BOLTS from the horn.
- C. Place the HORN in your inventory.
- Return to the WATERFALL.
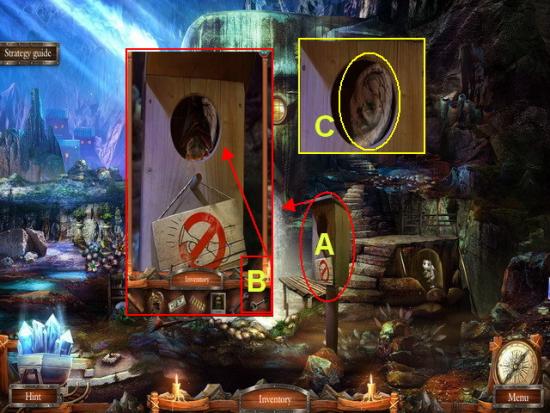
- A. Click on the STARLING HOUSE to zoom in.
- B. Take the HORN from inventory and use it to scare the bat away.
- C. Take the STONE EAR into inventory.
- Walk down twice to return to the KING’S FACE.
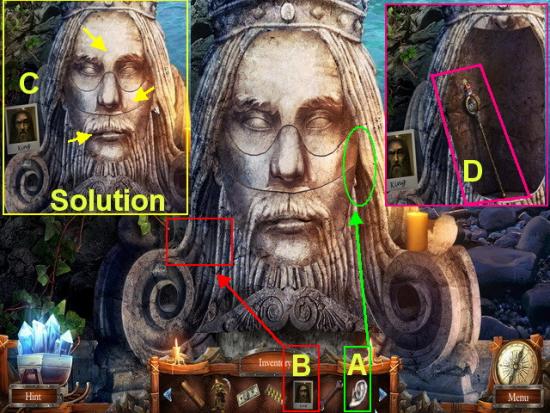
- A. Zoom in on the KING’S FACE. Take the STONE EAR and place it on the right side as shown.
- B. Take the PHOTO of the King and place it on the opposite side as shown. This will trigger a mini game.
- C. Mini Game – You will need to click on the three sections of the King’s face to get it to correctly match the photo at the left. The SOLUTION is shown above.
- D. When you complete the mini game correctly the face panel will open. Take the SCEPTER and add to your inventory.
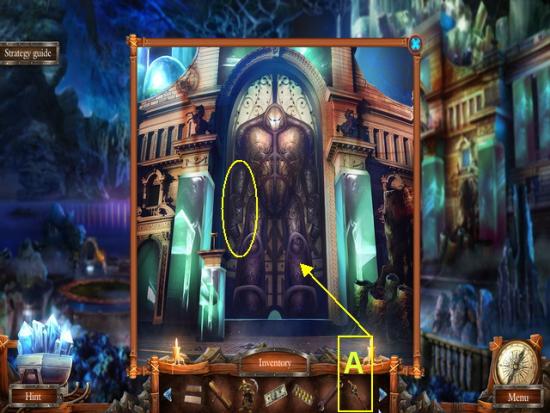
- A. Look to the right in the castle doorway and click on the GOLEM to zoom in.
- B. Give the SCEPTER from inventory to the GOLEM and the castle doors will open.
- You may now enter the STONE CASTLE.
- This is the end of Chapter two.
Chapter 3 – The Queen
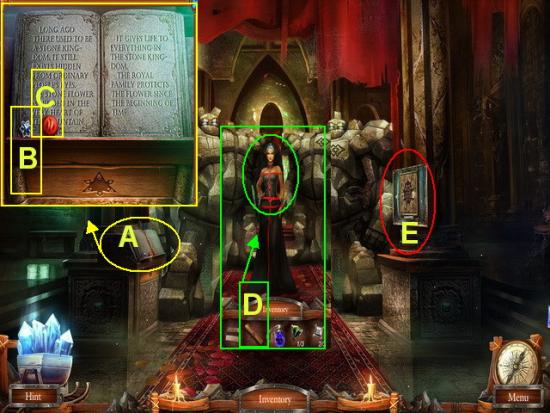
- Enter the STONE CASTLE watch the cut scenes with the STONE QUEEN.
- A. Click on the CHRONICLE to zoom in.
- B. Take the TOPAZ into inventory.
- C. Take the MOLECULE into inventory.
- D. Give the STONE QUEEN the LETTER from inventory. Watch the cut scenes. She will give you the LETTER OF POWERS which is placed in your inventory.
- E. Click on the GLASS SHOWCASE to the right of the Queen to zoom in. Here you will have a mini game but will need to come back later. Take note you will need more parts before it will activate.
- Now you will learn about the STONE QUEEN and BRANDON. Use the MAP and return to the WATERFALL.
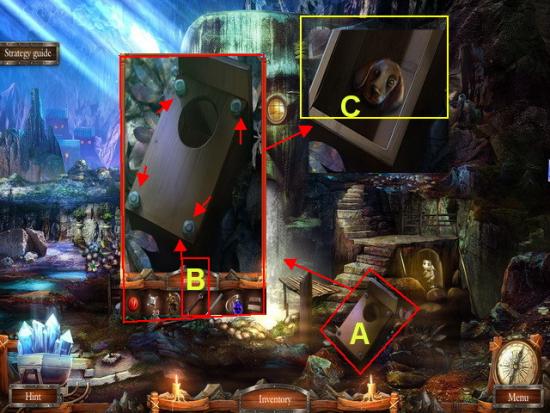
- A. Click on the STARLING HOUSE which is now on the ground to zoom in.
- B. Use the WRENCH in your inventory on the bolts and take the NUTS into inventory. (4)
- C. Remove the COVER and take the DOG HEAD into inventory.
- Use the MAP and return to the WATER TOWER.
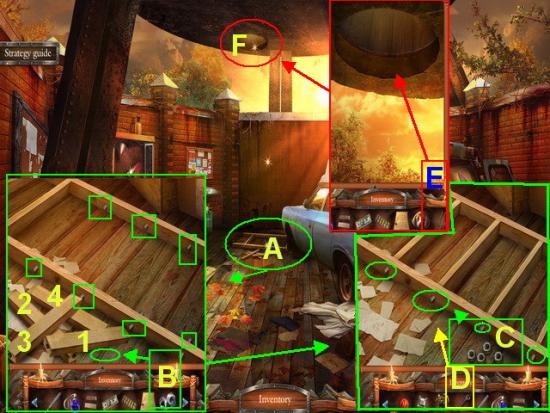
- A. Click on the LADDER to zoom in.
- B. Place the NUTS on the wood.
- C. Take each BOARD numbered 1 -4 and place in position.
- D. Place one BOLT on each of the 4 NUTS.
- E. Use the WRENCH from inventory to tighten each NUT. You may now take the LADDER into inventory.
- F. Click on the WATER TOWER HATCH opening above and place the LADDER there.
- You may now go up INTO the WATER TOWER.
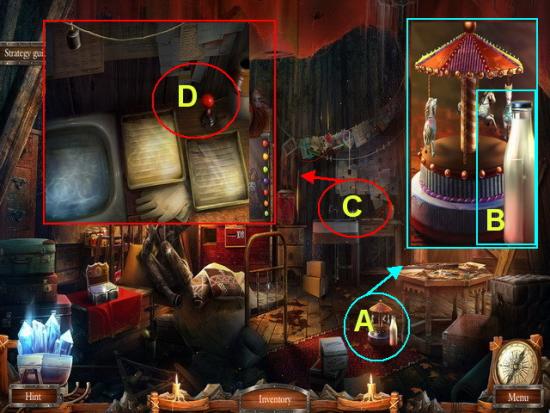
- A. Click on the CAROUSEL to zoom in and take the MILK into inventory.
- B. Click on the PHOTO DEVELOPMENT AREA and take the JOYSTICK into inventory.
- C. Click on the RIFLE TABLE to zoom in. You will need to come back here later.
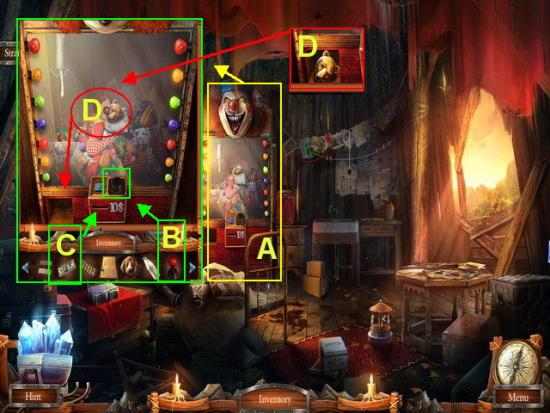
- A. Click on the CRANE MACHINE to zoom in.
- B. Place the JOYSTICK on the control.
- Place the TEN DOLLAR BILL into the machine slot.
- C. Select the RIGHT ARROW x 2, UP ARROW x 2, and then press the BUTTON.
- D. Take the HEAD into inventory.
- Return to the WATERFALL
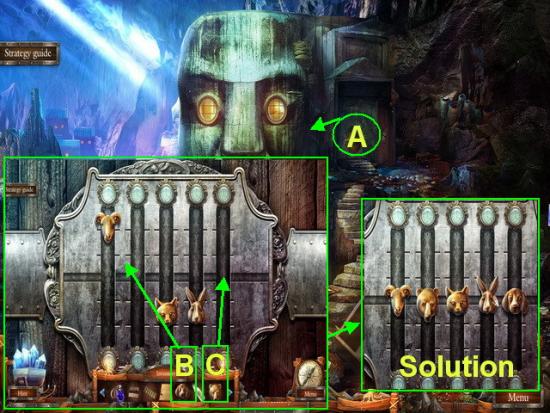
- A. Click on the DOOR to zoom in.
- B. Place the two HEADS on the door to activate a mini game.
- Mini Game – Place the heads so that they are all in the center line. One head will move some of the others.
- SOLUTION – Move the GOAT to center, CAT to center, then RABBIT to center.
- Enter the door.
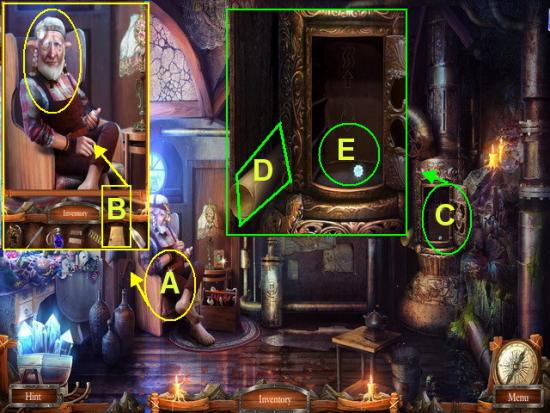
- A. Click on the HALFLING to zoom in and give him the LETTER OF POWERS.
- B. Click on the STOVE to zoom in.
- C. READ INSTRUCTIONS
- D. Take STAR into inventory.
- Go to the MAP and travel to STONE CITY.
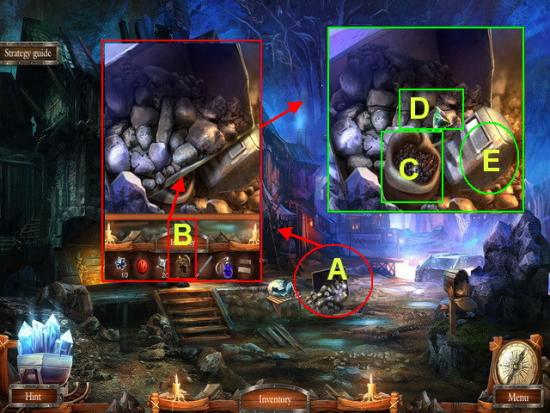
- A. Click on the TROLLEY to zoom in.
- B. Use the GOBLIN on the trolley.
- C. Take the COAL into inventory.
- D. Take the CRUSHED WELDING MASK into inventory.
- E. Take the EMERALD into inventory.
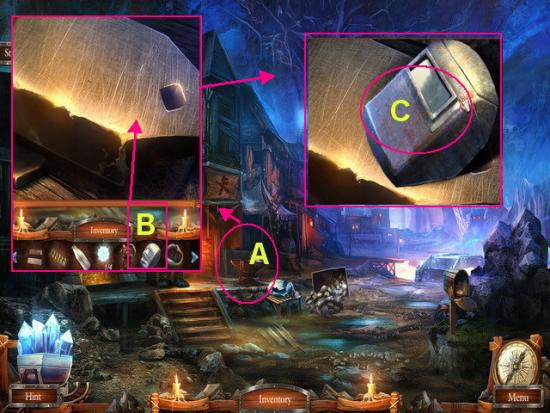
- A. Click on the ANVIL to zoom in.
- B. Place the CRUSHED WELDING MASK on the ANVIL. The Blacksmith will repair it.
- C. Take the repaired WELDING MASK into inventory.
- Travel to the HEAD WATERFALL.
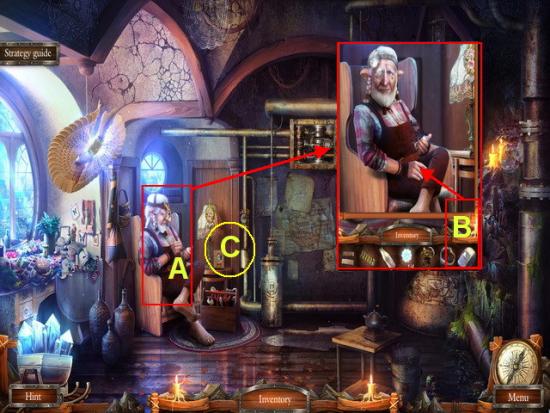
- A. Click on the HALFLING to zoom in and give him the WELDING MASK.
- B. Click on the CALENDAR and note the mini game. You will need to come back here later.
- C. Click on the HALFLING’S THINGS for a HOS.
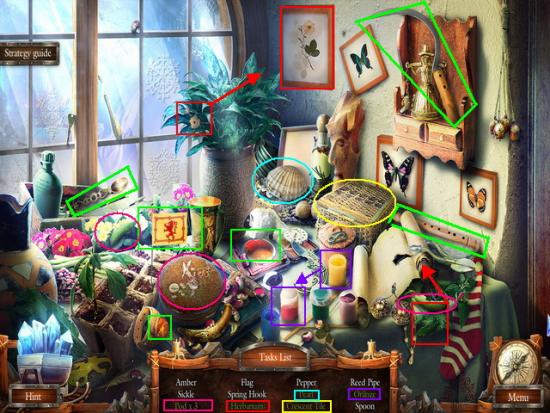
- Locate the hidden objects in the scene listed with white text they are shown circled in green in image above.
- Locate the items hidden in the scene with green text which are shown circled in the following colors.
- PEA PODS x 3 – Open the round box shown circled in dark pink and the other two are also shown circled in dark pink out in the open.
- PEARL – Open the clam shell to find the pearl circled in light blue.
- CRESCENT TILE – Open the sewing box to find the tile circled in yellow.
- HERBARIUM – Add flower and leaves to the picture shown circled in red.
- ORANGE PAINT – Pour the yellow paint into the red shown circled in purple.
- Once you locate all the items a CRESCENT TILE will be placed in your inventory.
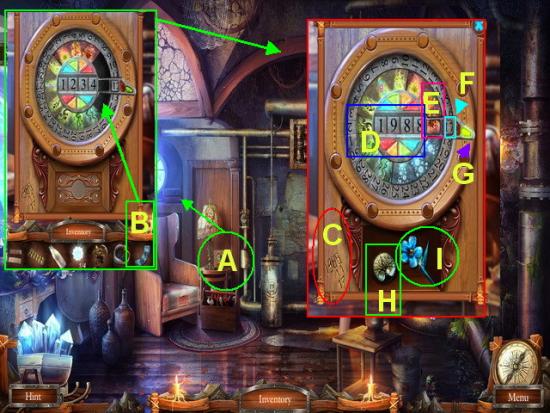
- A. Click on the CALENDAR to zoom in.
- B. Place the CRESCENT TILE in the device to activate a mini game.
- C. Note the DATE etched into the corner.
- D. Change the CENTER NUMBERS to “1988”
- E. Move the OUTER RING to the picture with the orange background and LEAF shown in image above.
- F. Turn the OUTER DIAL to “17”
- G. Press the GREEN BUTTON
- H. Take the RUNE into inventory
- I. Take the SERVANTS STONE into inventory.
- Travel to the inside of the WATER TOWER using the map.
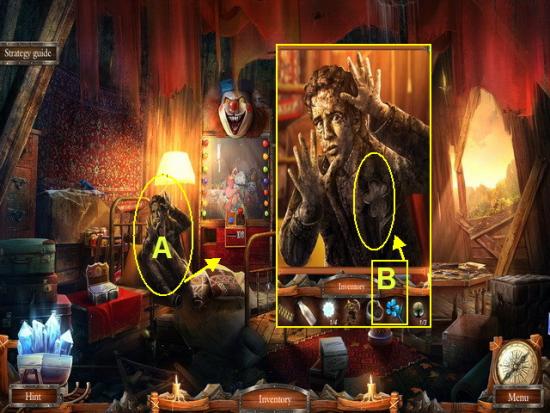
- A. Click on the SERVANT to zoom in.
- B. Take the SERVANTS STONE and place on his chest to break the spell. Talk to the Servant.
- Place the HEX KEY he gives you into inventory.
- Walk down once.
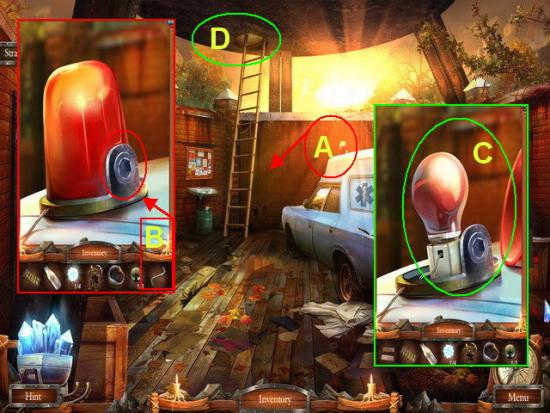
- A. Click on the EMERGENCY LIGHT on top of ambulance to zoom in.
- B. Use the HEX KEY to remove the cover.
- C. Take the RED LIGHT BULB into inventory.
- D. Climb back up the LADDER.
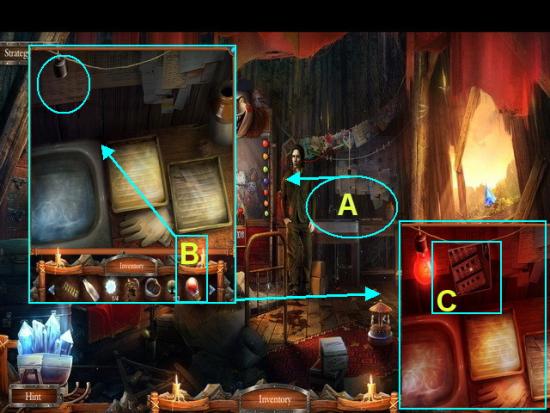
- A. Click on the PHOTO DEVELOPMENT TABLE to zoom in.
- B. Take the RED LIGHT BULB from inventory and place in the SOCKET.
- C. Take the PHOTO into inventory.
- Walk down twice.
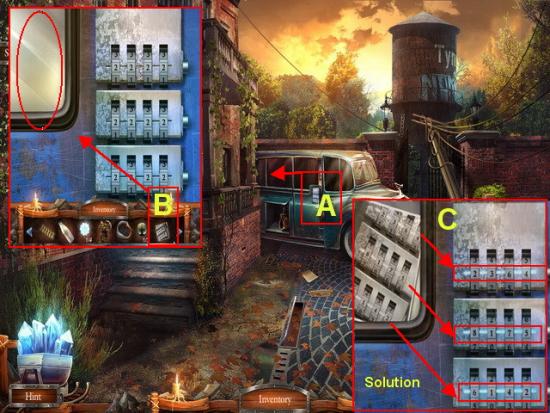
- A. Click on the LOCK on the VAN to zoom in.
- B. Place PHOTO on the left to activate the mini game puzzle.
- C. Change the LOCKS to match the photo as shown above.
- Enter the VAN LABORATORY.
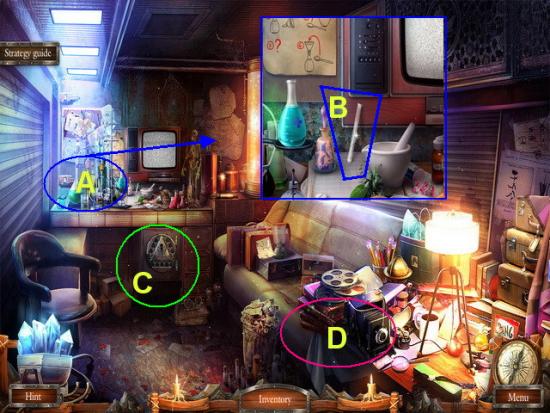
- A. Click on the CHEMISTRY TABLE and zoom in.
- B. Take the TEST TUBE into inventory.
- C. Click on the SAFE to zoom in and note the mini game. You will need to come back to this later.
- D. Click on SHELDON’S THINGS for a HOS.
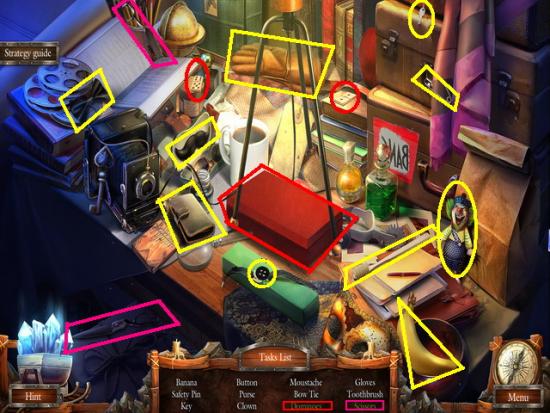
- Locate the hidden objects listed with the white text below. The items are shown circled in yellow in image above.
- The items in green text require additional steps and are circled in various colors. To find them do the following;
- SCISSORS – Place half of scissors with the other half shown circled in dark pink.
- 2 DOMINOES – Click on the case to open then locate the two dominoes and place them in the case shown circled in red above.
- When you find all the objects the SPADE KEY will be added to your inventory.
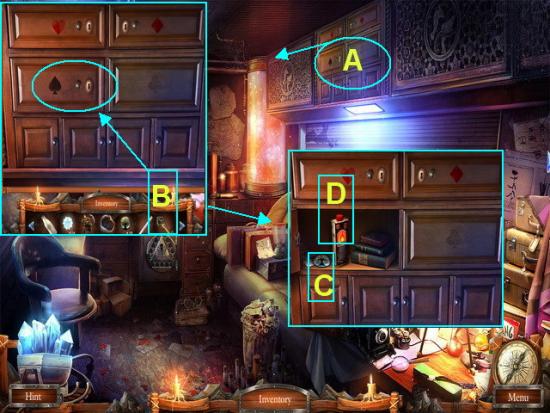
- A. Click on the COMPARTMENTS to zoom in.
- B. Use the SPADE KEY on the Spade compartment drawer.
- C. Take the RUNE into inventory
- D. Take the FUEL into inventory.
- Use map to return to the HEAD WATERFALL.
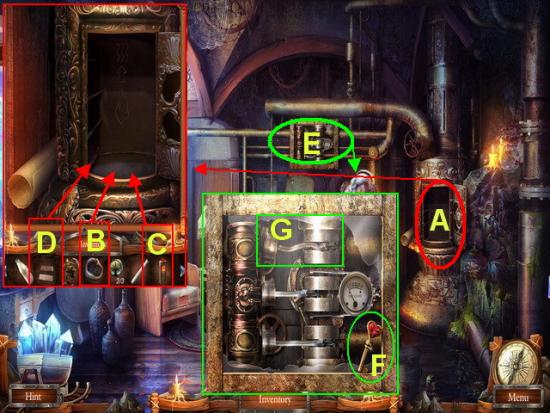
- A. Click on the STOVE to zoom in.
- B. Place the COAL inside the stove.
- C. Add the FUEL to the stove.
- D. Use the MATCHES from inventory to light the fire.
- E. Click on the PUMP to zoom in.
- F. Take the HEART KEY into inventory.
- G. Remove the BENT PISTON.
- Return to the VAN LABORATORY.
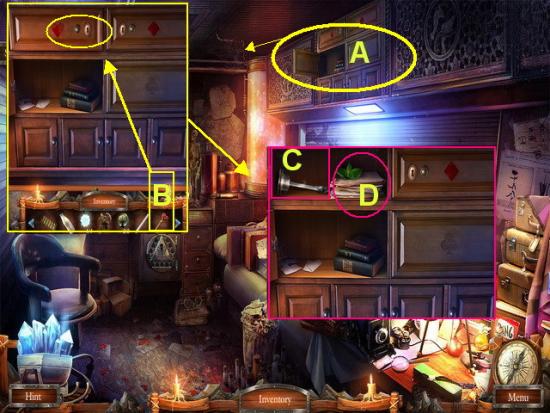
- A. Click on the COMPARTMENTS to zoom in.
- B. Take the HEART KEY from inventory and use on the heart compartment to open.
- C. Take the PISTON into inventory.
- D. Take the VALERIAN into inventory.
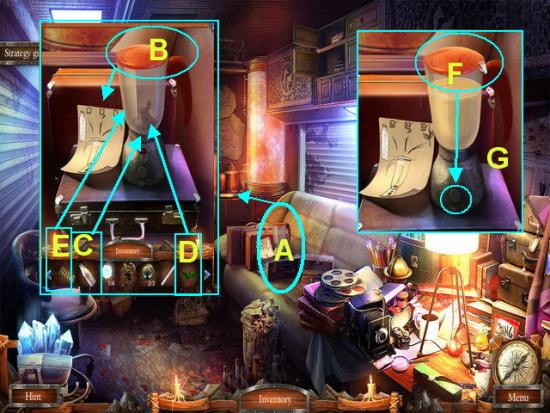
- A. Click on the MIXER to zoom in.
- B. Take the lid off the MIXER take note of the DIRECTIONS on paper.
- C. Place the VALERIAN into mixer.
- D. Place the MILK into mixer.
- E. Place the PILLS into the MIXER and close lid.
- F. Replace the lid and push MIXER button.
- G. Take the SLEEPING POTION into inventory.
- Use the map and travel to the HEAD WATERFALL.
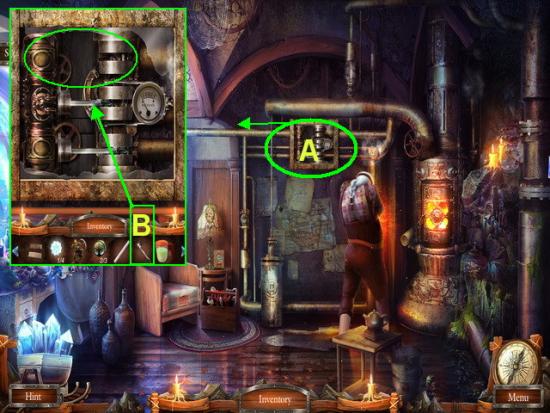
- A. Click on the PUMP to zoom in.
- B. Take the PISTON from inventory and replace it.
- C. Take the KNOWLEDGE AMULET after talking to the HALFLING and add to inventory.
- Use map and travel to STONE CASTLE.
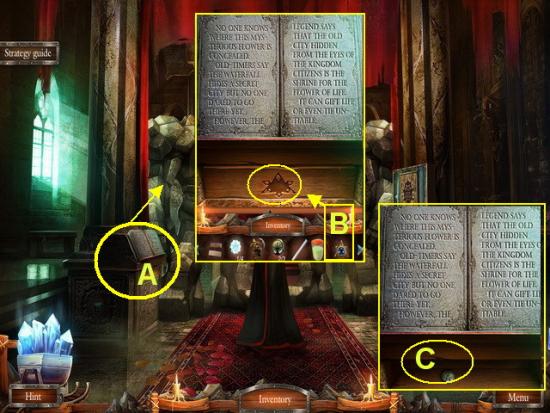
- A. Click on the CHRONICLE to zoom in.
- B. Take the KNOWLEDGE AMULET and place in the indentation.
- C. Take the 3rd RUNE into inventory.
- Return to the WATERFALL.
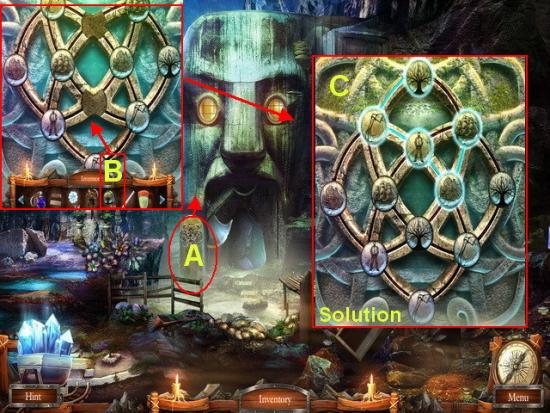
- A. Click on the RUNES AREA to zoom in.
- B. Place the 3 RUNES into the device to activate the mini game puzzle.
- C. You have 5 moves to get the runes from TREE to SHIP.
- Solution – Press in this order – TREE, AXE, MAN, LOGS, and SHIP.
- Walk to the OLD CITY.
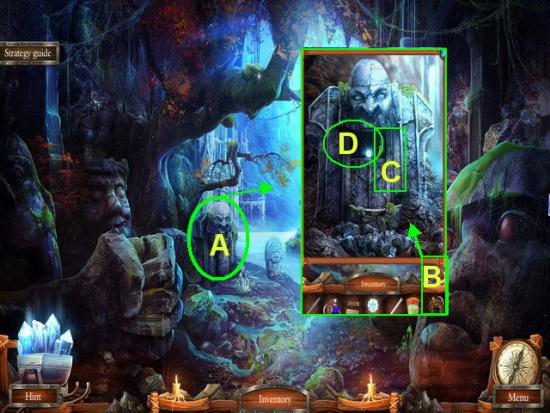
- A. Click on the HEAD to zoom in.
- B. Use the GOBLIN from inventory to open the head.
- C. Take the STAR into inventory.
- D. Take the DIAMOND KEY into inventory.
- Return to the VAN LABORATORY.
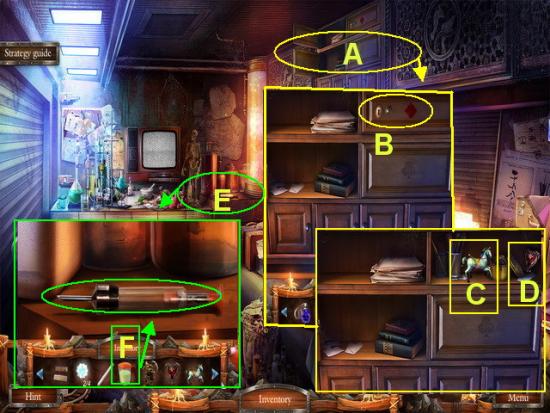
- A. Click on the COMPARTMENTS to zoom in.
- B. Use the DIAMOND KEY on the diamond drawer to open it.
- C. Place the TOY HORSE into inventory
- D. Place the RUBY HEART into inventory.
- E. Look at the TEST TUBE to zoom in.
- F. Use the SLEEPING POTION on the syringe.
- G. Take the AMPOULE into inventory.
- Use the map and travel to the HEAD WATERFALL next.
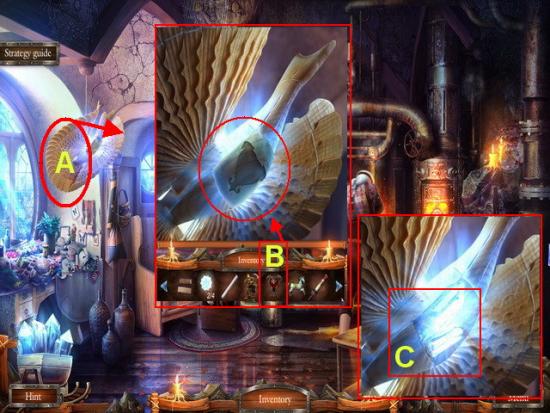
- A. Click on the BIRD to zoom in.
- B. Place the RUBY HEART in the chest of the bird.
- C. Take the CRYSTAL into inventory.
- Return to the inside of the WATER TOWER.
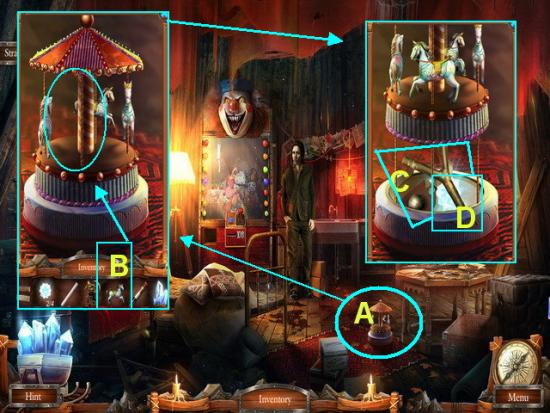
- A. Click on the CAROUSEL to zoom in.
- B. Take the TOY HORSE from inventory and place on the carousel.
- C. Take the SLINGSHOT into inventory.
- D. Take the STAR into inventory.
- Use the map and return to the OLD CITY.
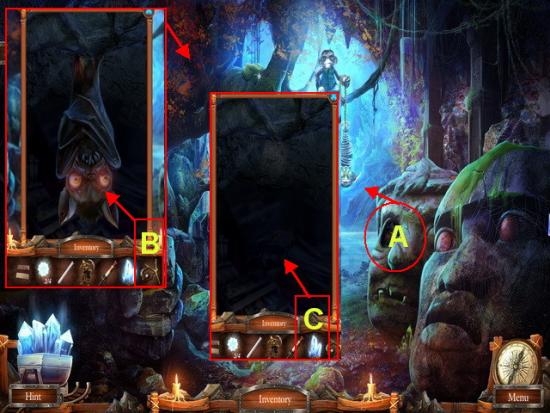
- A. Look in the EYE to zoom in.
- B. Use the SLINGSHOT from inventory to scare away the BAT.
- C. Click on the EYE again to zoom in and place the CRYSTAL inside the hole.
- Click on the MINER’S THINGS area in the eye for a HOS.
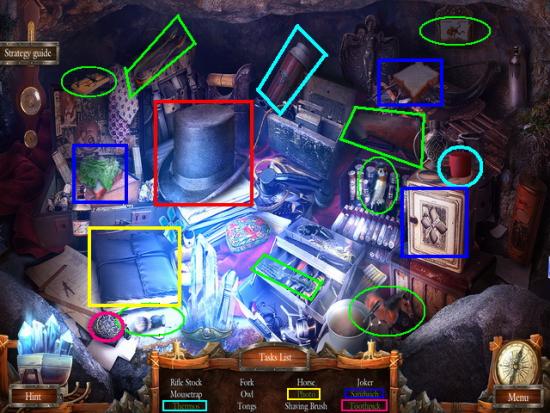
- Locate all the items listed along the bottom in white text. They will be shown circled in green above.
- Locate all the items listed in green text which require extra steps and are shown circled in the following colors;
- TOOTHPICK – Open the case to find it inside shown circled in dark pink.
- SCISSORS – Lift the hat to find the scissors shown circled in red.
- PHOTO – Use the scissors on the album to find the photo shown circled in yellow.
- THERMOS – Place the cap on the body shown circled in light blue.
- SAFE – Place the jewel on the door to open the safe shown circled in purple.
- SANDWICH – Take the meat from the SAFE, then place the bread on top of the lettuce shown circled in dark blue.
- Once you have found all items a RIFLE STOCK will be added to your inventory.
- Return to the inside of the WATER TOWER.
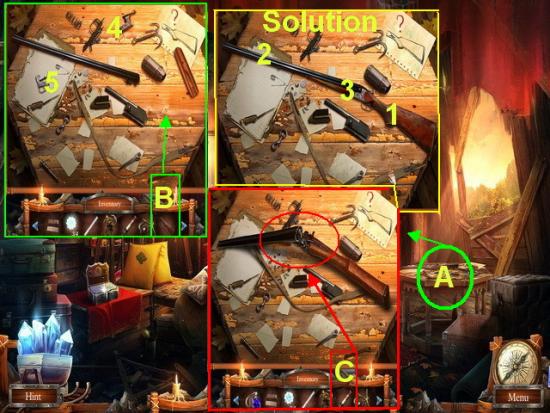
- A. Click on the RIFLE TABLE to zoom in.
- B. Place the RIFLE STOCK on the table to activate a mini game puzzle.
- Mini Game – Place the parts together shown in numerical order in five steps.
- C. Place the AMPOULE from inventory into the assembled RIFLE which goes into inventory.
- Use the map and travel to the OLD CITY again.
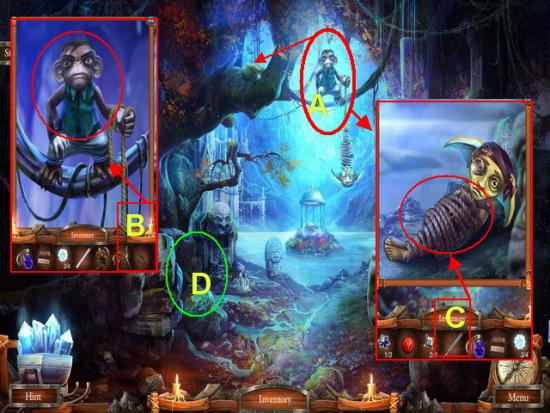
- A. Click on the MONKEY to zoom in.
- B. Use the RIFLE on the MONKEY to shoot him down.
- Click on the GOBLIN to zoom in.
- C. Use the SCALPEL to remove his ropes and take the SPIDER AMULET into inventory.
- D. Click on the OCTOPUS you will need to come back here later.
- Go back to the VAN LABORATORY.
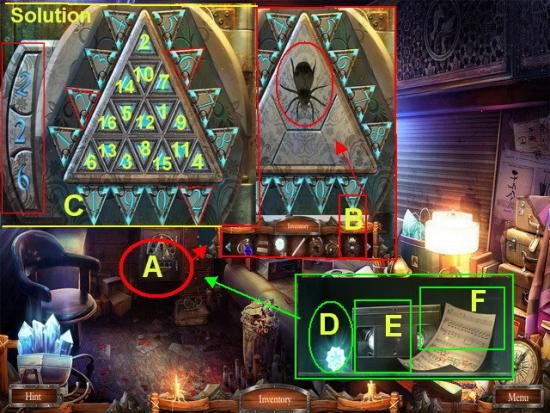
- A. Click on the SAFE to zoom in.
- B. Place the SPIDER AMULET in the indentation to trigger a mini game puzzle.
- C. Solution is shown in image above. Note the “226” number along the left side of screen. Click on the triangles in the order shown. Once they all disappear the safe will open.
- D. Take the STAR into inventory.
- E. Take the VIDEO TAPE into inventory.
- F. Take the MUSIC SHEET into inventory.
- Use the map and go to the INSIDE OF THE WATER TOWER.
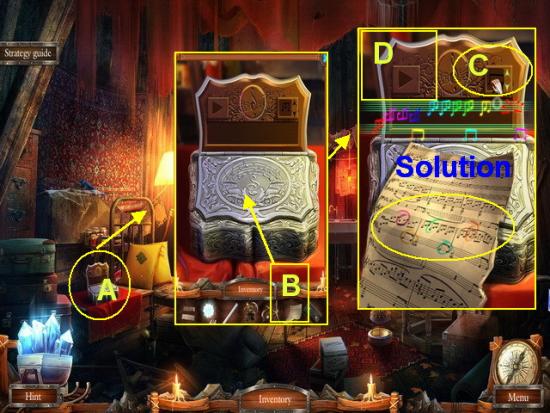
- A. Click on the MUSIC BOX to zoom in.
- B. Take the SHEET MUSIC from inventory and place on the MUSIC BOX to trigger a mini game.
- C. Take the five notes shown circled in colors and place them in the ghost circles once you make them in the upper right corner by scrolling through the up and down with the arrows in the box at the top right of the music box.
- D. Once you have the correct notes click on the GREEN BUTTON.
- Take the MUSIC BOX into inventory.
- Use the map and travel to the OLD CITY.
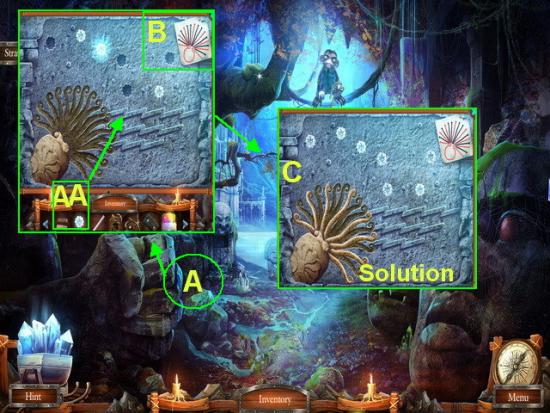
- A. Click on the OCTOPUS to zoom in.
- B. Place the FOUR STARS from inventory into the indentations to trigger a mini game.
- C. Look at the clue in the upper right hand corner then look at the red hint lines and move the legs to match the image.
- Click on a tentacle then click on where you wish to move it.
- Walk forward.
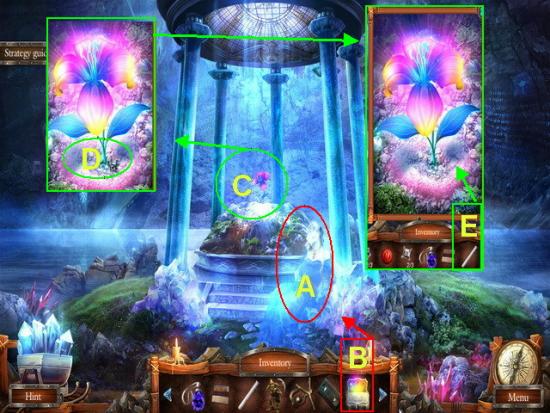
- A. Talk to the GHOST watch the cut scenes.
- B. Take the MUSIC BOX from inventory and place it next to her. She will tell you about the FLOWER OF LIFE.
- C. Click on FLOWER OF LIFE to zoom in.
- D. Take the TOPAZ into inventory.
- E. Use the TEST TUBE to gather POLLEN from the FLOWER OF LIFE.
- Travel to the VAN LABORATORY using the map.
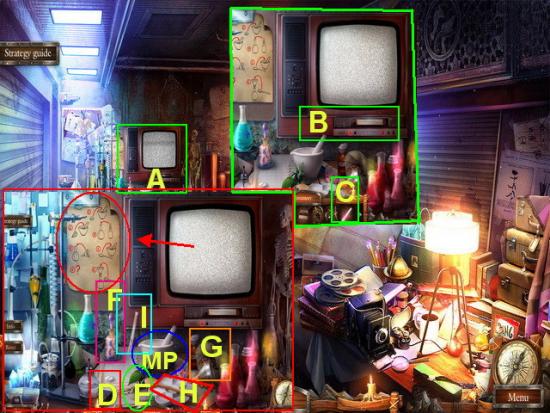
- A. Click on the CHEMISTRY TABLE to zoom in.
- B. Take the VIDEO TAPE from inventory and place in machine. Watch the video cut scenes. Note the instructions on the wall next to VCR.
- MORTAR AND PESTLE is shown marked with “MP”
- C. Take the POLLEN from inventory and place on the table.
- D. Place the TABLET into the MORTAR AND PESTLE.
- E. Place the LEAF into the MORTAR AND PESTLE.
- F. Use the DROPPER on the FLASK.
- G. Place the FUNNEL in the FLASK.
- H. Use the SPOON on the MORTAR and PESTLE then on the FLASK.
- I. Use the POLLEN on the FLASK.
- J. Take the flask of HEALING POTION into inventory.
- Use the map and return to the HOSPITAL HALL.
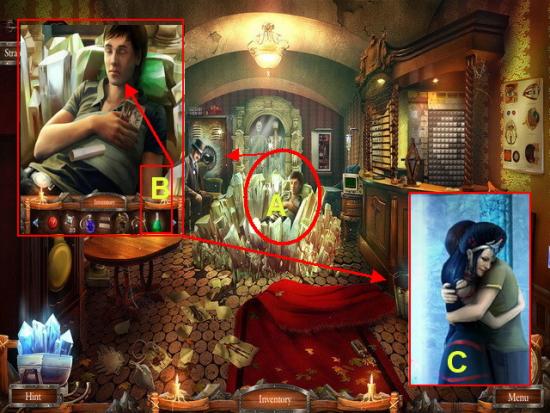
- A. Click on “BRANDON” to zoom in.
- B. Give BRANDON the HEALING POTION from inventory.
- Watch the cut scenes and talk to BRANDON.
- Use the map and return to the ROTUNDA.
- Watch the cut scenes that follow.
- This is the end of Chapter Three.
Chapter 4 – The Flower of Life
- A. Take the QUEEN AMULET into inventory
- B. Take the FUR COAT into inventory.
- C. Walk forward to the right and go to the FOREST.
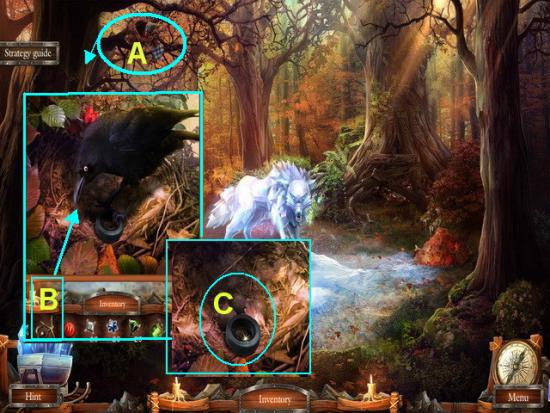
- A. Click on the NEST to zoom in.
- B. Use the SLING SHOT from inventory to remove the CROW.
- C. Take the INSULATING TAPE into inventory.
- Use the map and return to the WATERFALL.
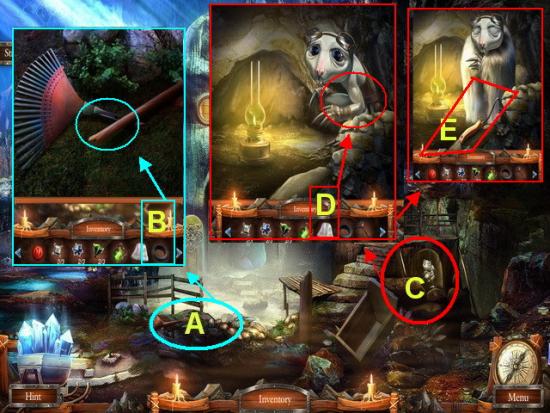
- A. Click on the BROKEN RAKE to zoom in.
- B. Use the INSULATING TAPE from inventory to repair the rake and take RAKE into inventory.
- C. Click on the MOLE to zoom in.
- D. Give the FUR COAT to the MOLE.
- E. He will give you the GARDEN HOE into your inventory.
- Use the map and return to the FOREST.
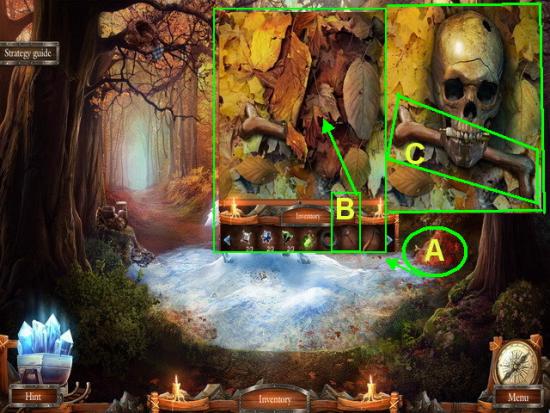
- A. Click on the SKELETON to zoom in.
- B. Use the RAKE to remove the foliage.
- C. Take the FOILAGE into inventory.
- D. Take the BONE into inventory.
- Use the map and return to STONE CITY.
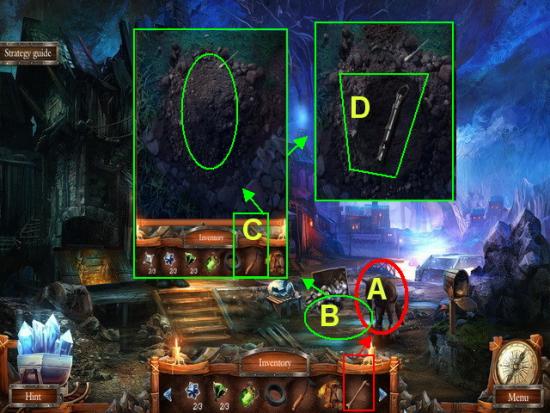
- A. Give the BONE to the DOG and he will leave.
- B. Click on the DIRT MOUND to zoom in.
- C. Use the GARDEN HOE to dig it up.
- D. Take the WHISTLE into inventory.
- Use the map and return to the FOREST.
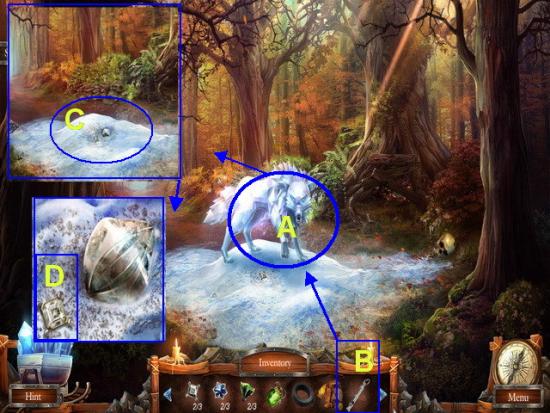
- A. Click on the WOLF to zoom in.
- B. Use the WHISTLE from inventory on the WOLF and it will destroy him.
- C. Click on the ICE to zoom in
- D. Take the DIAMOND into inventory.
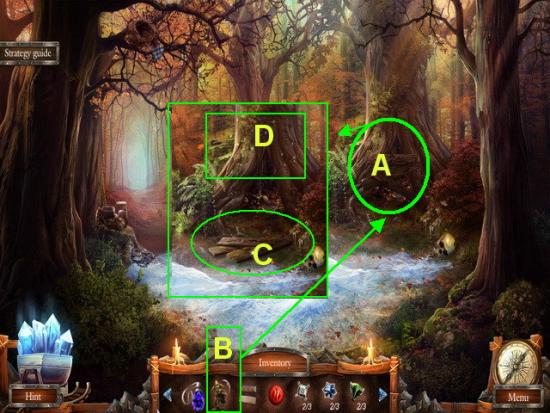
- A. Click on the DEN to zoom in.
- B. Use the GOBLIN to open it.
- C. Take the LUMBER into inventory.
- D. Click on the DEN to trigger a HOS.
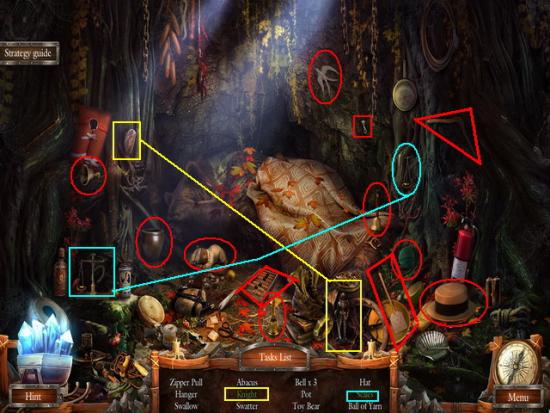
- Locate all the hidden objects listed in white text at the bottom of the screen. They are shown circled in red in image above.
- Locate the items listed in green text which will be a two or more part process they are listed below and circled in various colors.
- KNIGHT – Place the shield on the man to make the KNIGHT shown circled in yellow.
- SCALES – Place the bowl on the scales to complete it shown circled in light blue.
- Once you complete the HOS a ZIPPER PULL will be added to your inventory.
- Walk forward once to a new scene.
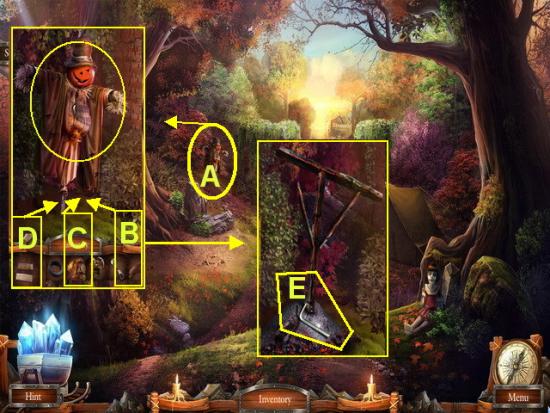
- A. Click on the SCARECROW to zoom in.
- B. Place the LUMBER at the base of the scarecrow.
- C. Place the FOILAGE over the lumber.
- D. Use the MATCHES from inventory to start the fire. Watch scarecrow burn away.
- E. Take the HEX KEY into inventory.
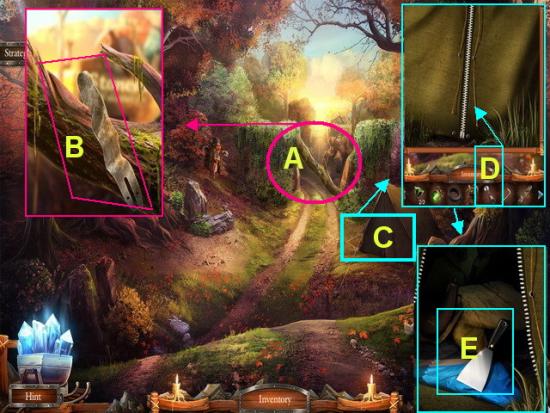
- A. Click on the BARRIER to zoom in.
- B. Take the BENT SAW BLADE into inventory.
- C. Click on the TENT to zoom in.
- D. Take the ZIPPER PULL from inventory and use to open TENT.
- E. Take the PALETTE KNIFE into inventory.
- Use the map and return to STONE CITY.
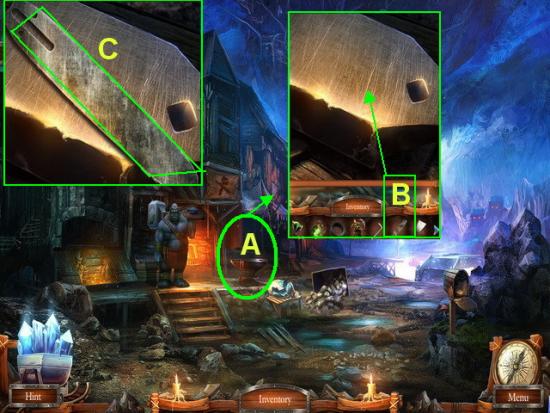
- A. Click on the ANVIL to zoom in.
- B. Place the BENT SAW BLADE from inventory on the anvil and the blacksmith will repair it.
- C Place the CHAINSAW BLADE into inventory.
- Use the map and return to the FOREST.
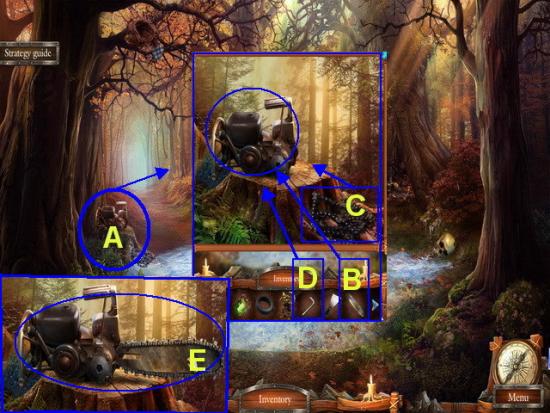
- A. Click on the CHAINSAW to zoom in.
- B. Place the CHAINSAW BLADE on the chainsaw.
- C. Take the CHAIN to the bottom right of the saw and place it on the blade.
- D. Use the HEX KEY from inventory on the BOLT to tighten the saw.
- E. Take the repaired CHAINSAW into inventory.
- Walk forward once.
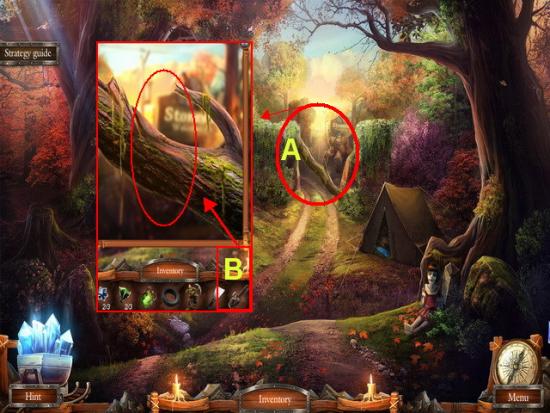
- A. Click on the BARRIER to zoom in.
- B. Use the CHAINSAW from inventory to cut the LOG.
- You may now pass through to the STONE CITY ENTRANCE.
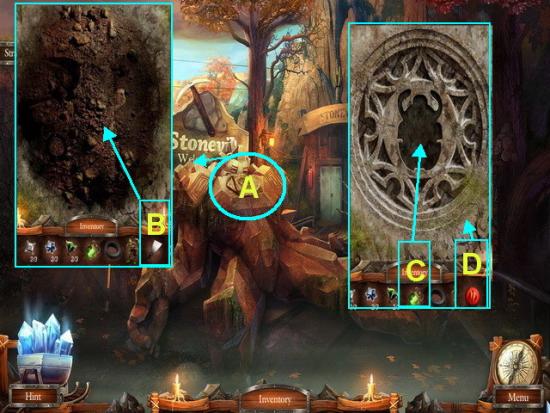
- A. Click on the GOLEM to zoom in.
- B. Use the PALETTE KNIFE from inventory to remove the MOSS.
- C. Take the QUEEN AMULET from inventory and place it on the indentation.
- D. Take the MOLECULE from inventory and place it on the board to trigger the mini game.
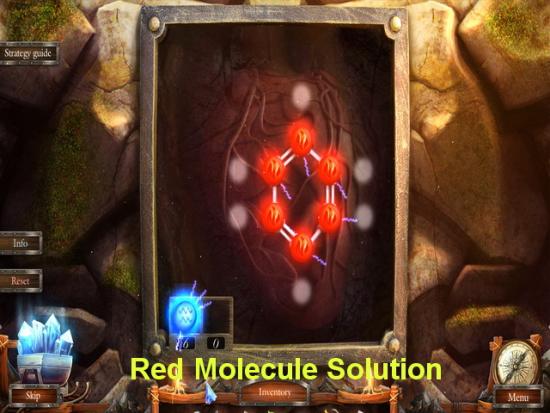
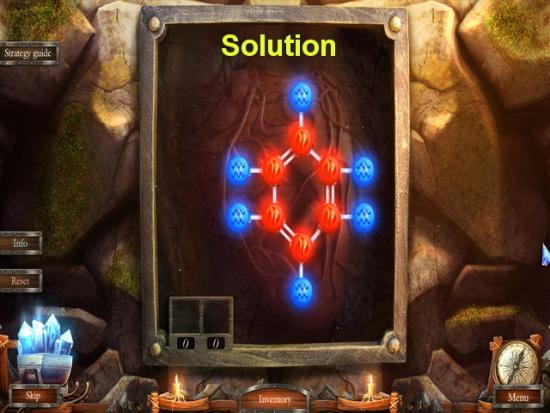
- Mini Game – Your objective is to place the molecules so the red and blue are connected with the white lines.
- You are given six of each color molecule
- The solution is shown in the image above.
- Click on the molecule then on the white circle you wish to place it.
- Each red molecule must have a blue one at the end of it.
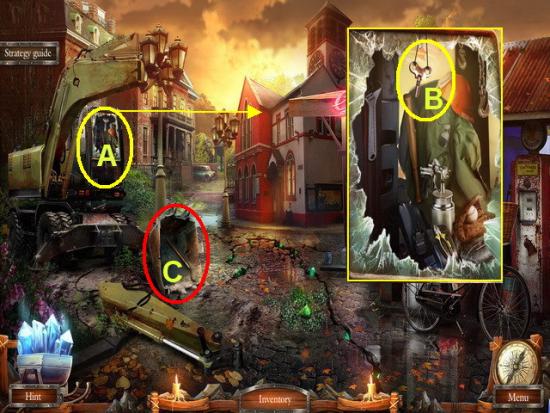
- A. Click on the BULLDOZER CABIN which is now open and take the WINDER KEY into inventory.
- B. Look toward the ground and take the GAFF into inventory.
- Use the map and return to the OLD CITY.
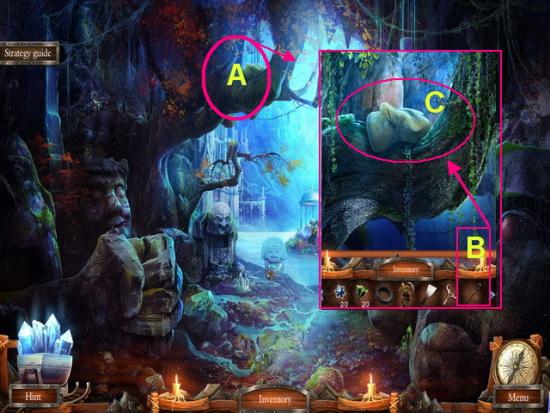
- A. Click on the ROOTS to zoom in.
- B. Use the GAFF from inventory to remove the GLOVES
- C. Add GLOVE to inventory.
- Use the map and go to the FOREST’S EDGE.
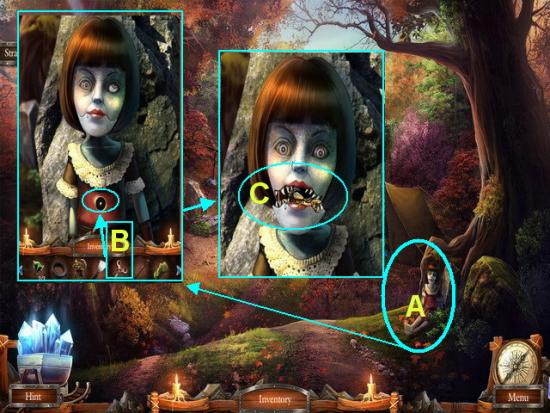
- A. Click on the DOLL to zoom in.
- B. Take the WINDER KEY from inventory and use on the indentation in her chest.
- C. When her mouth opens take the MOTORCYCLE AMULET from her mouth into your inventory.
- Return to the FOREST.
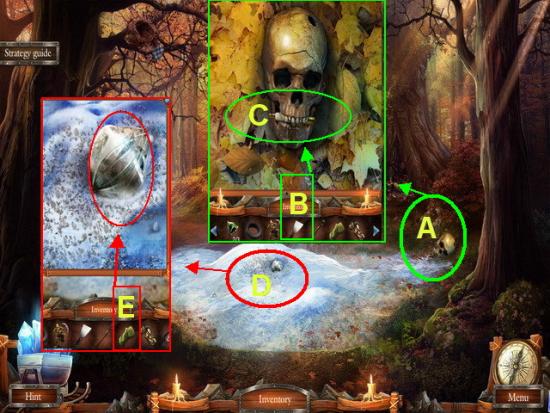
- A. Click on the SKULL to zoom in.
- B. Use the PALETTE KNIFE to loosen object.
- C. Take the SPARK PLUG into inventory.
- D. Click on the DIAMOND LEAF and zoom in.
- E. Use the GLOVE from inventory and take the WHITE PETAL into inventory.
- Use the map and return to HOSPITAL HALL.
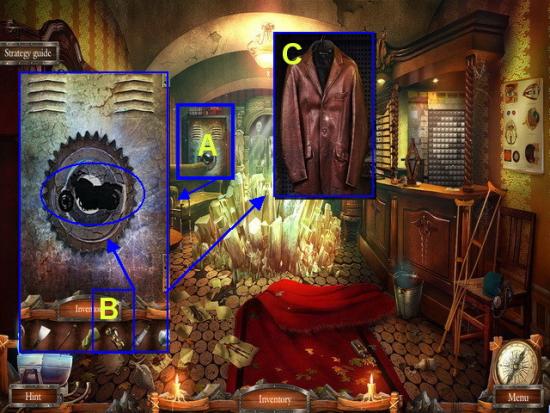
- A. Click on the LOCKER to zoom in.
- B. Place the MOTORCYCLE AMULET in the indentation and the locker will open.
- C. Take the JACKET into inventory.
- Use the map and return to the SQUARE.
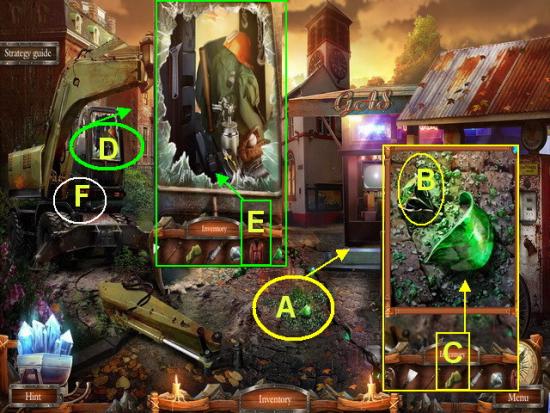
- A. Click on the EMERALD LEAF to zoom in.
- B. Take the EMERALD into inventory.
- C. Use your GLOVE from inventory and take the GREEN PETAL into inventory.
- D. Click on the BULLDOZER CABIN to zoom in.
- E. Use the JACKET to protect from the glass.
- F. When you see the sparkles click on the CABIN for a HOS.
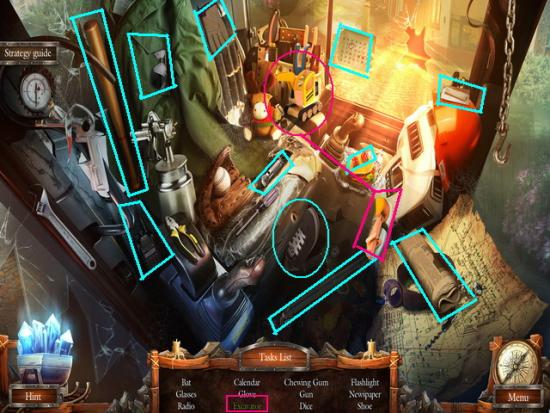
- Locate the hidden objects listed in white text at the bottom of the screen shown circled in light blue in the image above.
- Locate the hidden objects listed in green text using multiple steps shown circled in various colors shown here.
- EXCAVATOR – Place the digging arm on the machine to make the excavator, it is shown circled in dark pink above.
- Once you locate all the items a NET GUN will be added to inventory.
- Use the map and return to BELOW THE WATER TOWER.
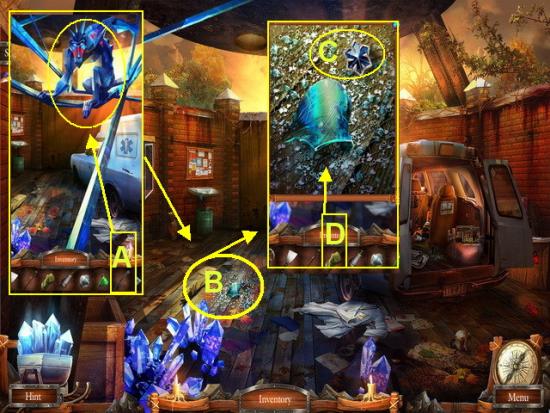
- A. Use the NET GUN from inventory on the BLUE MONKEY. Watch the cut scene video.
- B. Click on the TOPAZ LEAF to zoom in.
- C. Take the TOPAZ into inventory.
- D. Use the GLOVE from inventory to take the BLUE PETAL into inventory.
- Use the map to return to the STONE CASTLE.
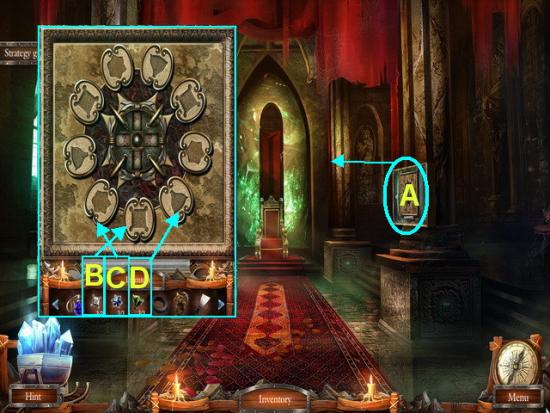
- A. Click on the GLASS SHOWCASE to zoom in.
- B. Place the 3 DIAMONDS onto the board.
- C. Place the 3 TOPAZ onto the board.
- D. Place the 3 EMERALDS onto the board.
- This will trigger a mini game puzzle.
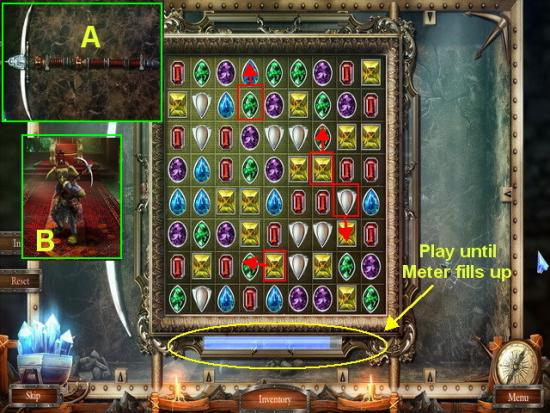
- The game board will turn into a match 3 type game.
- Click on an item then on another item directly next to it in order to switch places. Make matches of three or more and they will disappear with more moving onto the board from above.
- Your objective is to fill up the meter along the bottom of the screen. Keep making matches until the meter is full.
- A. Take the PICKAXE when it appears and it will be given to the GOBLIN.
- B. The GOBLIN is now known as the “TITANIUM GOBLIN” and you will need to take him into inventory.
- Use the map and return to the WATER TOWER.
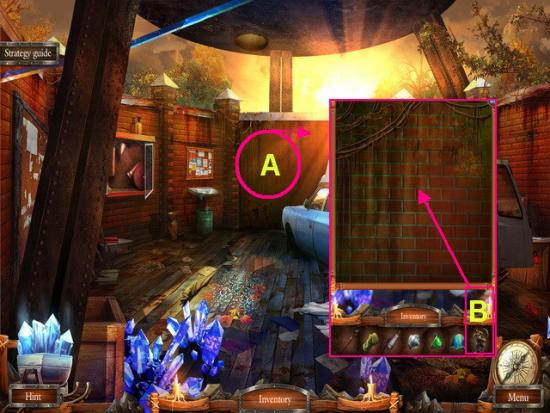
- A. Click on the TOWER WALL to zoom in.
- B. Use the TITANIUM GOBLIN to knock it down.
- C. You can now walk through the wall known as the PRECIPICE.
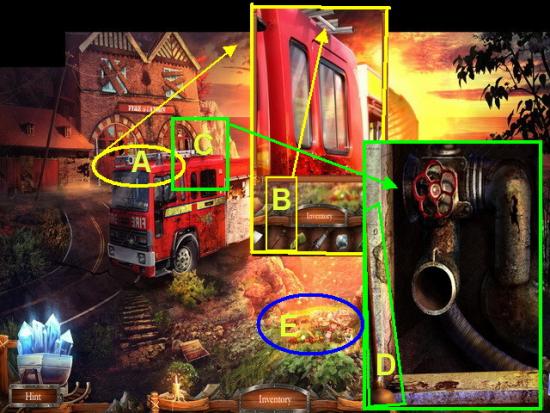
- A. Click on the LADDER to zoom in.
- B. Use the GAFF from inventory to pull it off of the fire truck.
- C. Click on the top of the truck to zoom in.
- D. Take the PLUNGER into inventory.
- E. Click on the EMERGENCY KIT on the ground once you see the sparkles to start a HOS.
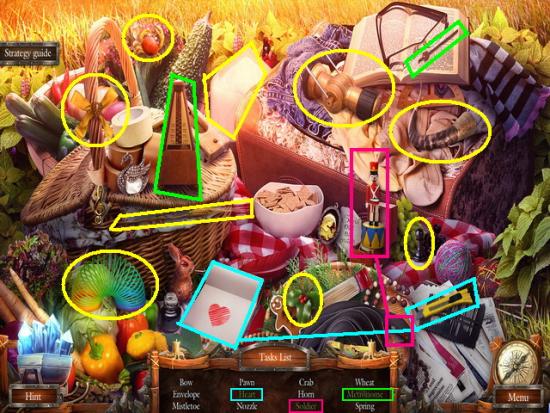
- A. Locate the hidden objects listed in white text at the bottom of the screen shown circled in yellow above.
- Locate the hidden objects listed in green text using multiple steps shown circled in various colors shown here.
- HEART – Use the utility knife to cut the heart out of the paper shown circled in light blue.
- METRONOME – Place the handle on the metronome to complete it shown circled in green.
- SOLDIER – Place the arm on the man to complete the soldier shown circled in dark pink.
- When you find all the items a NOZZLE will be added to your inventory.
- Use the map to return to the WATER TOWER.
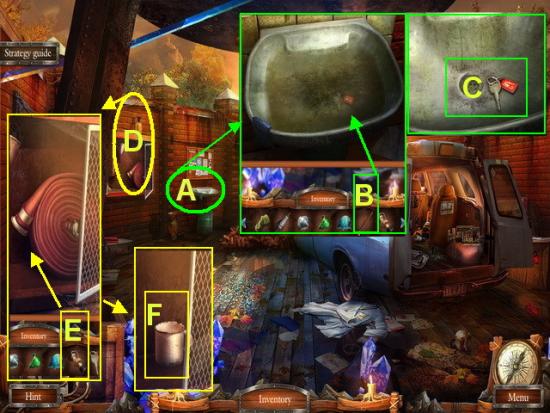
- A. Click on the BOWL to zoom in.
- B. Use the PLUNGER from inventory to repair sink and remove the water.
- C. Take the CABIN KEY into inventory.
- D. Click on the FIRE HOSE CABINET to zoom in.
- E. Place the NOZZLE on the HOSE to repair it and place the HOSE in inventory.
- F. Take the MUG into inventory.
- Use the map and return to the FOREST’S EDGE.
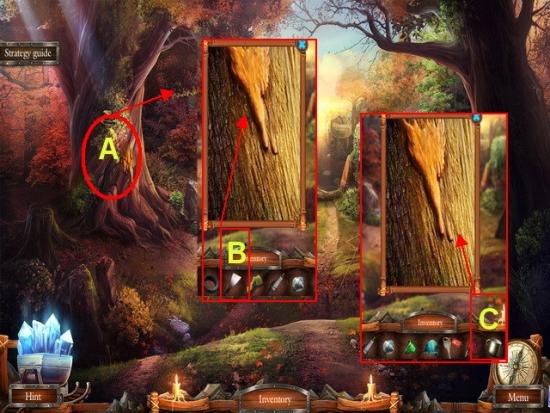
- A. Click on the TREE to zoom in.
- B. Use the PALETTE KNIFE from inventory on the SAP to loosen it.
- C. Use the MUG from inventory to collect the sap and place the PITCH into inventory.
- Use the map and return to the PRECIPICE.
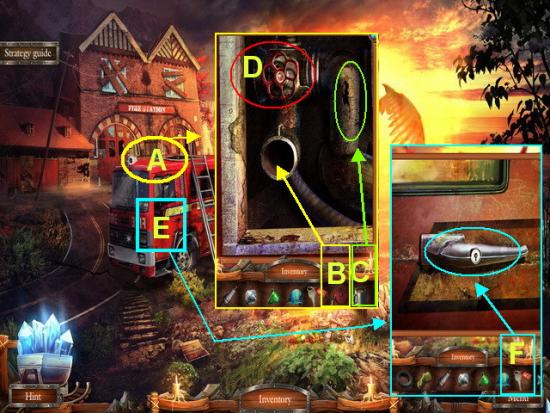
- A. Click on the FIRETRUCK to zoom in.
- B. Place the FIRE HOSE on the spout.
- C. Use the PITCH from inventory to repair the hole in the pipe.
- D. Click on the VALVE to turn it.
- E. Click on the CABIN DOOR to zoom in.
- F. Use the CABIN KEY to open the cabin.
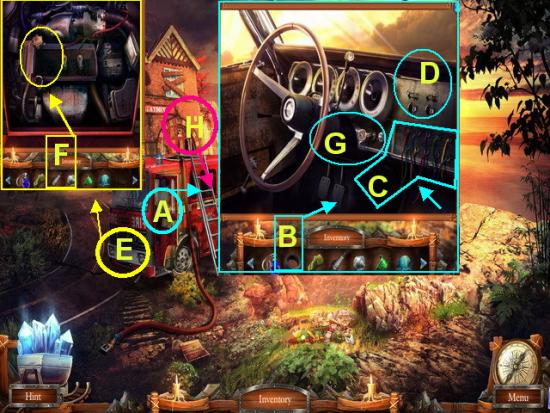
- A. Click on the CABIN to zoom in.
- B. Take the INSULATING TAPE from inventory and place it on the broken wires at the right side of the panel.
- C. Connect the colored wires by clicking on one then the other of the same color until they are all connected as shown above.
- D. Click on each of the two SLIDE BUTTONS until they are moved outward to the left.
- E. Click on the HOOD of the fire truck to zoom in.
- F. Place the SPARK PLUG from inventory into the slot.
- G. Go back into the CABIN and turn the KEY to start the water.
- H. Click on the side of the TRUCK to trigger a mini game puzzle.
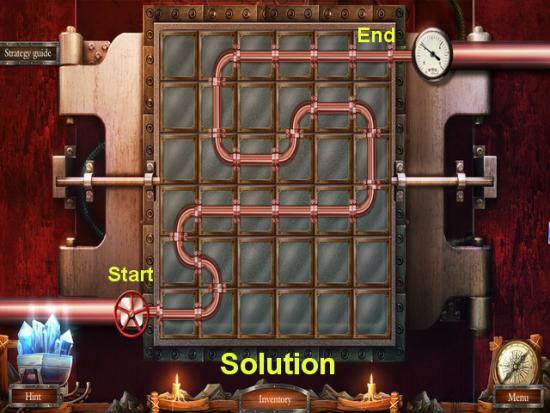
- Mini Game – The objective here is to switch the tiles until you form one solid pipe connection from the lower left to the upper right.
- Solution – Shown in the image above.
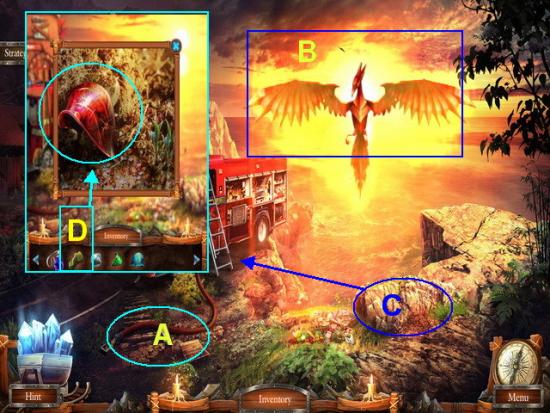
- A. Click on the FIRE HOSE to zoom in
- B. Watch the cut scenes as the final animal and mayor are destroyed.
- C. Zoom into the FIERY LEAF.
- B. Use the GLOVE from inventory and take the RED PETAL into inventory.
- Use the map and return to the ROTUNDA.
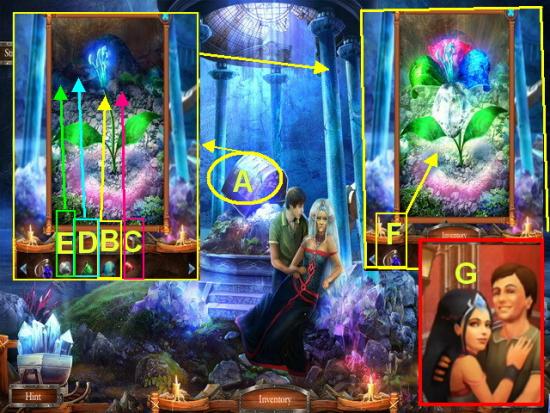
- A. Click on the FLOWER OF LIFE (FOL) to zoom in.
- B. Take the BLUE PETAL and add to the FOL stem.
- C. Take the RED PETAL and add to the FOL stem.
- D. Take the GREEN PETAL and add to the FOL stem.
- E. Take the WHITE PETAL and add to the FOL stem.
- F. Use the BLUE CRYSTAL from inventory on the FOL.
- Watch the cut scenes and the end of the storyline.
- This is the end of the game and you are now qualified to play a bonus chapter in the special features area if you choose.
Congratulations!
You have completed Gamezebo’s walkthrough for Grim Tales: The Stone Queen by Elephant Games. Be sure to check back often for game updates, Staff and user reviews, user tips, forum comments and much more here at Gamezebo.
More articles...
Monopoly GO! Free Rolls – Links For Free Dice
By Glen Fox
Wondering how to get Monopoly GO! free rolls? Well, you’ve come to the right place. In this guide, we provide you with a bunch of tips and tricks to get some free rolls for the hit new mobile game. We’ll …Best Roblox Horror Games to Play Right Now – Updated Weekly
By Adele Wilson
Our Best Roblox Horror Games guide features the scariest and most creative experiences to play right now on the platform!The BEST Roblox Games of The Week – Games You Need To Play!
By Sho Roberts
Our feature shares our pick for the Best Roblox Games of the week! With our feature, we guarantee you'll find something new to play!Type Soul Clan Rarity Guide – All Legendary And Common Clans Listed!
By Nathan Ball
Wondering what your odds of rolling a particular Clan are? Wonder no more, with my handy Type Soul Clan Rarity guide.


