
Best Horror Games On Itch.io – July 2026
Across a bounty of subgenres.![Haze Seas Accessories Tier List [Best Accessories to Equip]](/wp-content/uploads/2026/07/haze-seas-accessories-tier-list.jpg "Haze Seas Accessories Tier List [Best Accessories to Equip]")
Haze Seas Accessories Tier List [Best Accessories to Equip]
The accessories with the best stat buffs in Haze Seas.
![[Roblox] Evomon Shiny Hunting Guide – Including Prismatic and Pris Shinies!](/wp-content/uploads/2026/06/evomon-shiny-hunting-guide.jpg "[Roblox] Evomon Shiny Hunting Guide – Including Prismatic and Pris Shinies!")

Grim Tales: The Legacy Walkthrough
Welcome to the Grim Tales: The Legacy Collector’s Edition walkthrough on Gamezebo. Grim Tales: The Legacy Collector’s Edition is a Hidden Object Game played on the PC created by Elephant Games. This walkthrough includes tips and tricks, helpful hints and a strategy guide on how to complete Grim Tales: The Legacy Collector’s Edition.


- Prefer Gamezebo on Google

Grim Tales The Legacy – Game Introduction
Welcome to the Grim Tales: The Legacy Collector’s Edition walkthrough on Gamezebo. Grim Tales: The Legacy Collector’s Edition is a Hidden Object Game played on the PC created by Elephant Games. This walkthrough includes tips and tricks, helpful hints and a strategy guide on how to complete Grim Tales: The Legacy Collector’s Edition.
General Tips
This hidden object game requires visiting several locations and using inventory items to advance play.
- Play is mostly linear although there are some options for the order in which to explore locations.
- Begin play by selecting a mode:
- Casual – For new or casual players. Hint and Skip button recharge faster. Active zones are highlighted by sparkles.
- Advanced – Hint and Skip buttons recharge slower. Active zones are not indicated.
- Hardcore – No help features. No Hint or Skip buttons or sparkles indicating active zones.
- The playing mode can be changed at any time during the game by selecting Menu and Options.
- Explore all areas (sparkles or magnifying glass) within a location. This will add goals for that location.
- The Compass is a map that shows locations explored, current location and location goals. Click any location to move directly to it.
Walkthrough Tips
- CAPITALIZED inventory items are meant to make it easier to find where this guide may differ from your own play. Inventory items are highlighted in blue with a white border in the screenshots.
- If you don’t have an item referenced in this guide, click and hold the “Ctrl” key and then press the “F” key. This opens a Find area in your web browser. Type in the name of the object as it appears in this guide to find where else it’s referenced.
- To minimize back and forth moves, most available inventory items in a scene are picked up when first encountered.
- Location references correspond to the location namess on the map.
Chapter 1: Exploring the Castle

The Fallen Tree
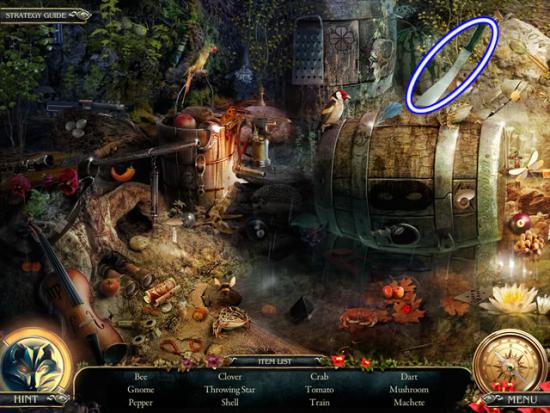
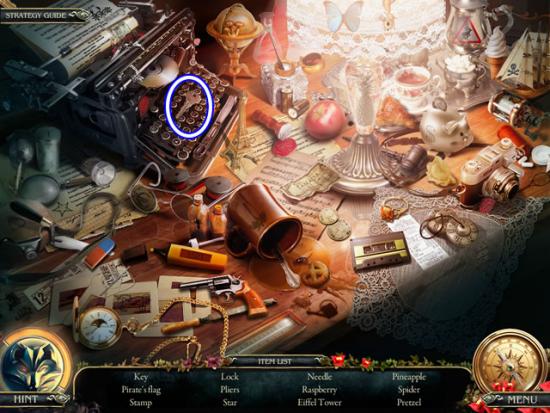
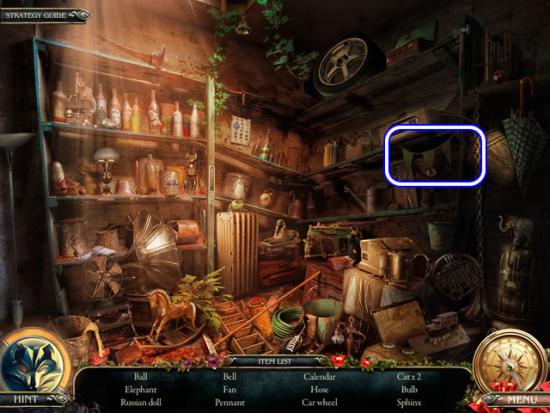
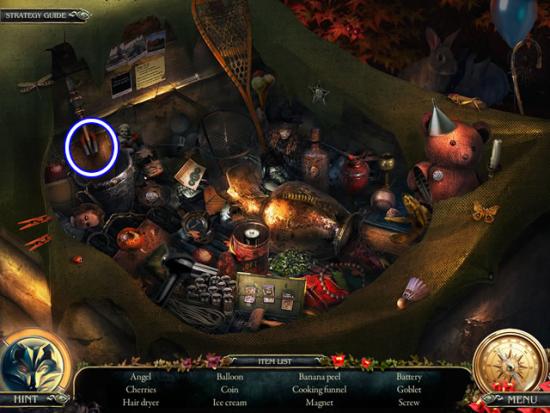
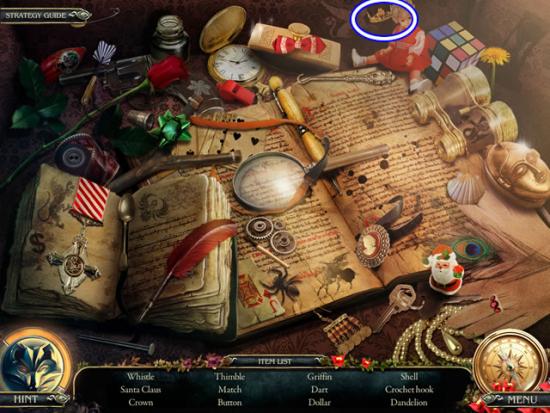
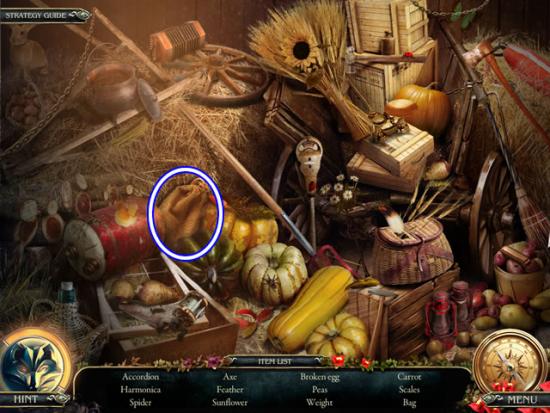
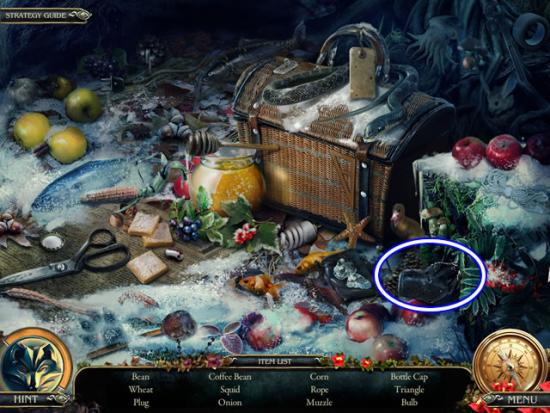
- Play the hidden object scene.
- Find the listed objects. The MACHETE is retained in inventory.
- Move the cursor around the scene. Examine those areas where a magnifying glass appears. Click an area if the cursor turns into a hand with a gear.
- Go forward.
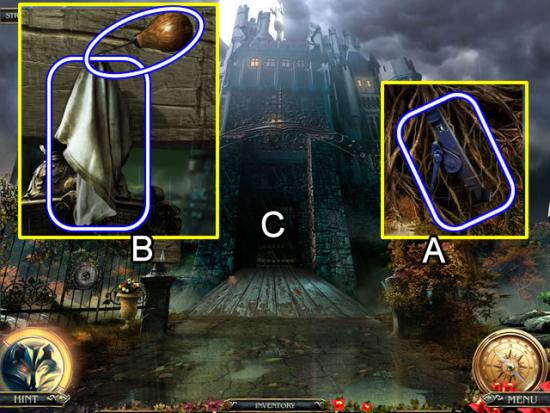
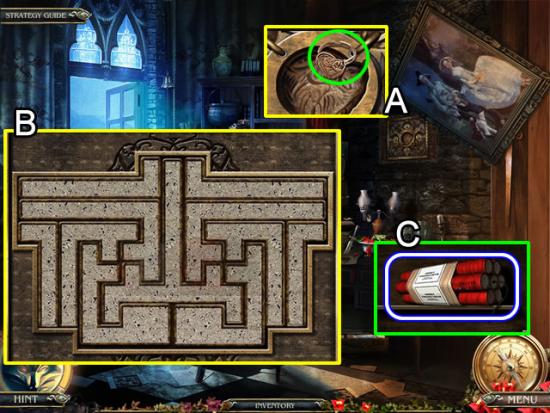
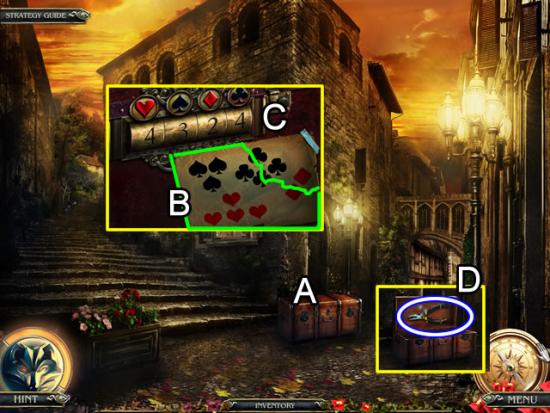
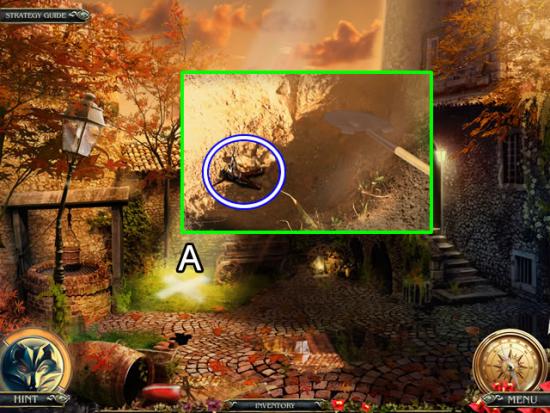
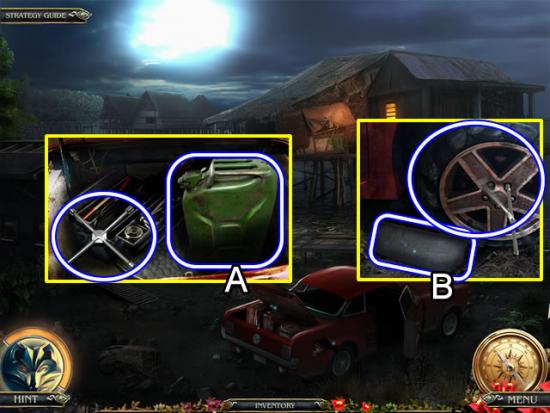
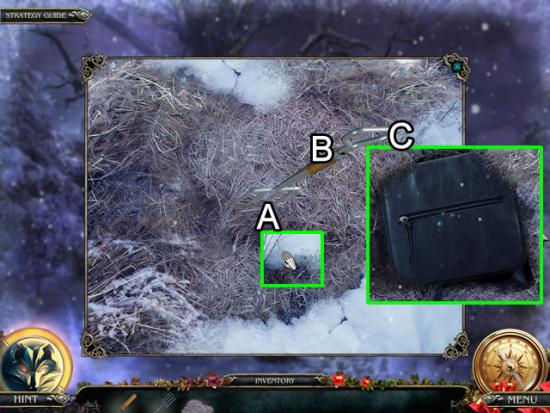
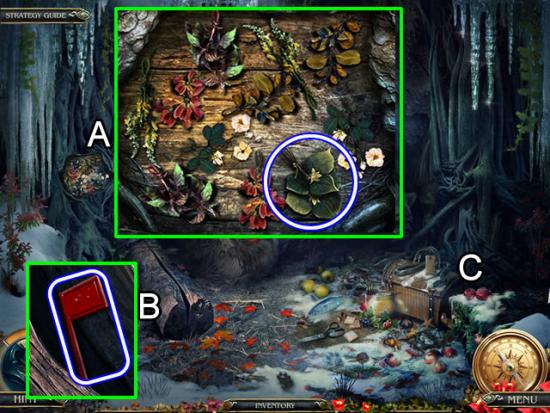
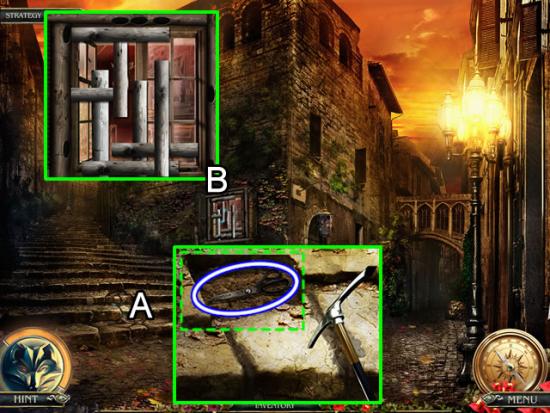
Castle Approach
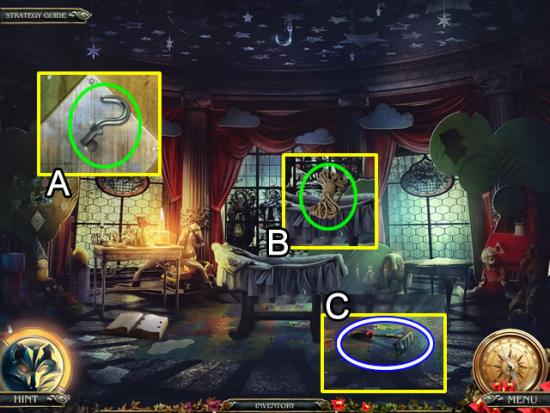
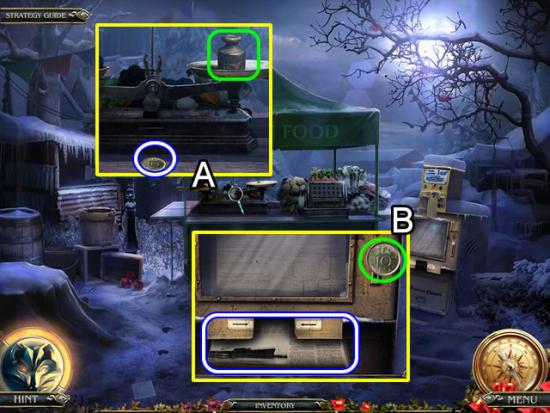
- Zoom in on the bushes on the right (A).
- Use the MACHETE to uncover the JACK.
- Look closer at the board (B). Take the RAG and AWL.
- Attempt to cross the bridge (C).
- Look down into the ravine. Take the WINCH.
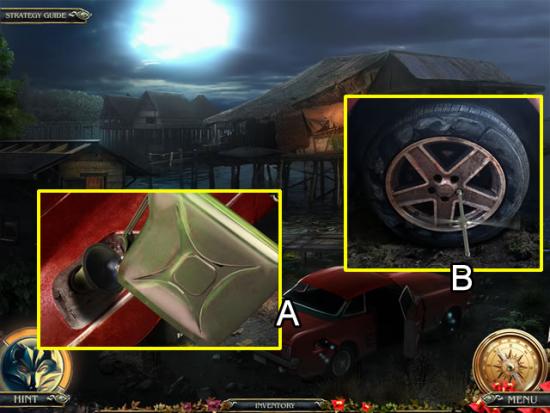
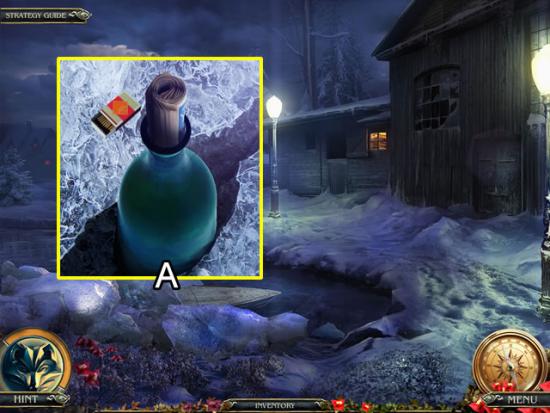
Fallen Tree
- Look at the headlights on the car.
- Use the RAG to clean them.
- Look into the pothole in the road. Use the AWL to retrieve the FROG.
Castle Approach
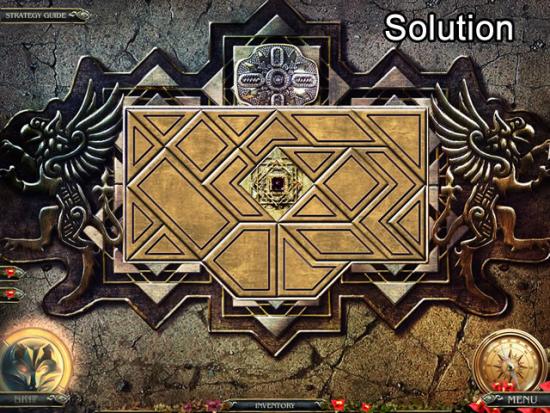
- Zoom in on the side gate.
- Place the FROG in the impression to open a puzzle.
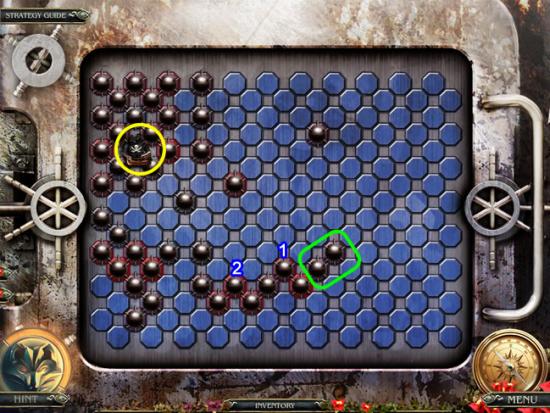
- Solve the jig-saw puzzle by matching the pieces by pattern and shape. The best strategy is to start with the outside curved pieces and work inward. Place pieces in the center of the puzzle to find buried pieces. The next screenshot shows the solution.
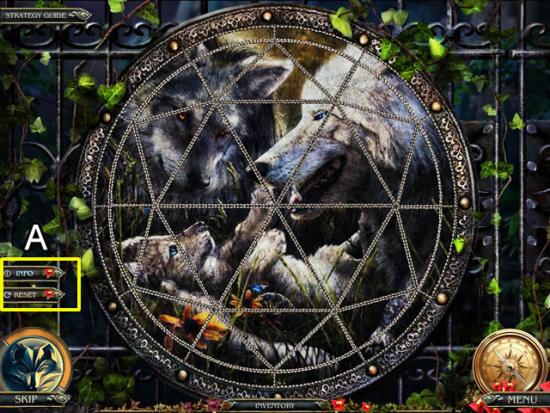
- Note the two tabs on the left (A). Click the “Info” tab for instructions. The “Reset” tab comes in handy for future puzzles.
- Go forward to the footbridge.
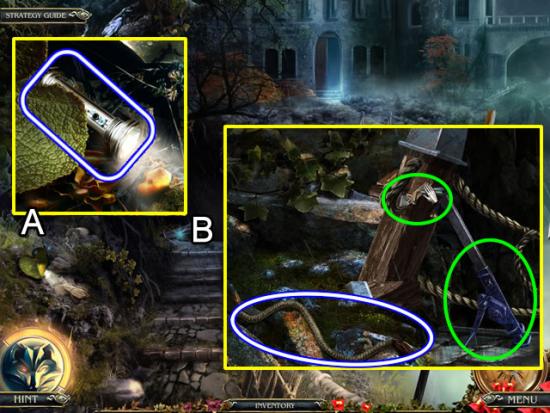
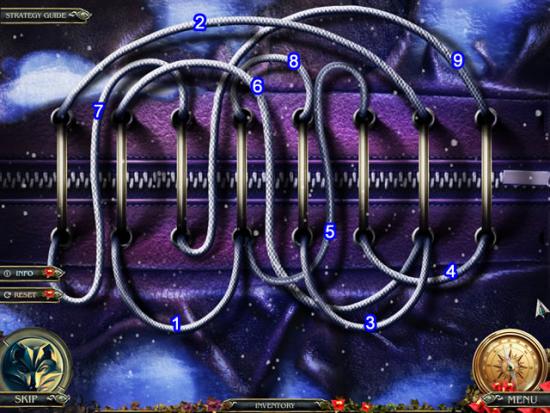
Footbridge
- Look closer at the plant (A). Move the leaf and take the FLASHLIGHT.
- Examine the post supporting the bridge (B). Take the SMALL ROPE. Use the JACK (green) to prop up the post. Add the WINCH (green) to pull the ropes tight.
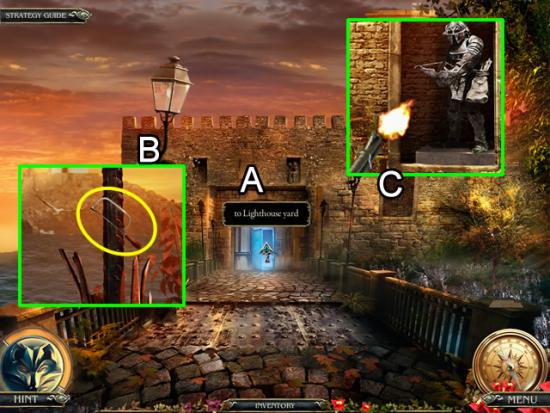
Castle Entrance
- Pick up the HOOK from the bench.
- Now is a good time to open the map. Click the Compass in the lower right corner.
- Look at the legend and move the cursor over places that have already been visited.
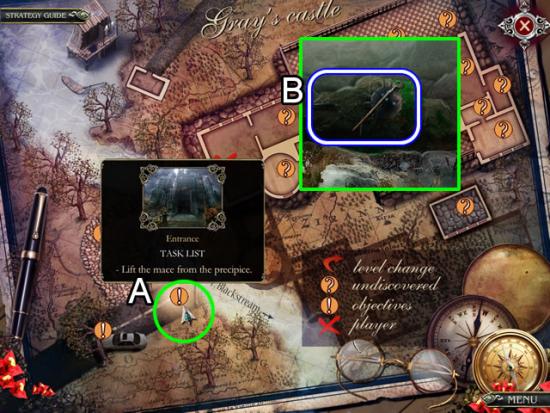
- There is still a task at the front of the castle (A). Click the exclamation mark to move directly to that location.
- Look into the ravine (B). Use the HOOK to retrieve the MACE.
- Open the map again. Note that there are no more objectives to accomplish at this area.
- Click the Castle Entrance icon to return.
- Enter the castle.
- Look around the fireplace room.
- Go up the stairs to the right.
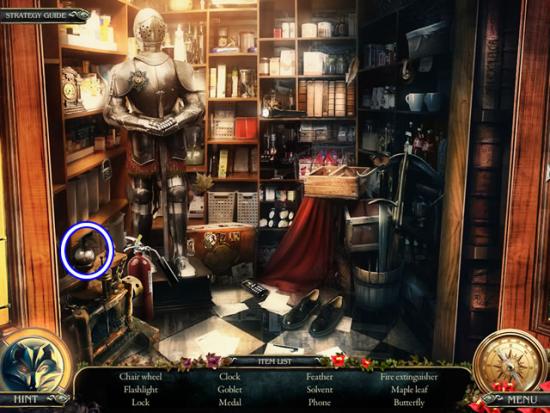
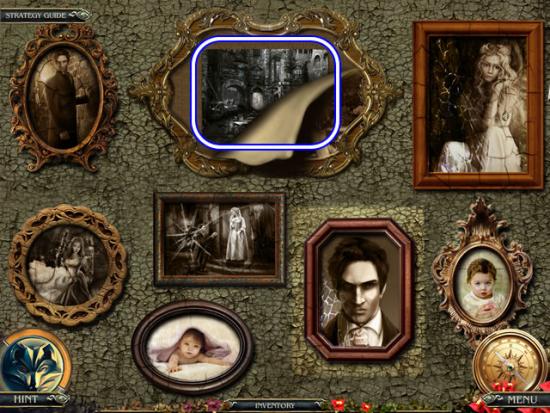
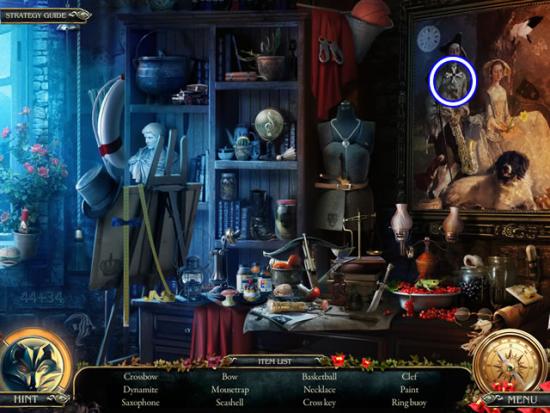
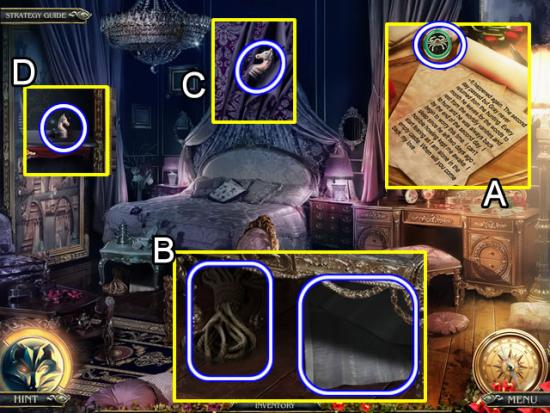
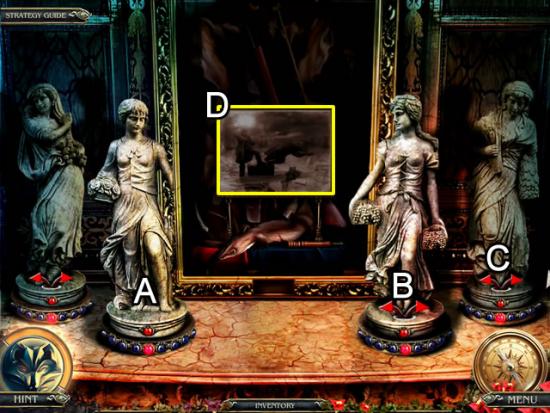
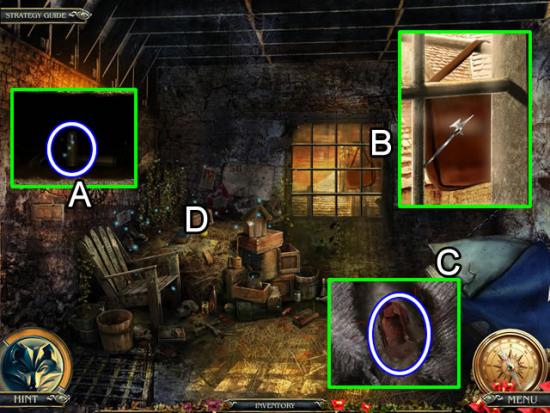
Arch
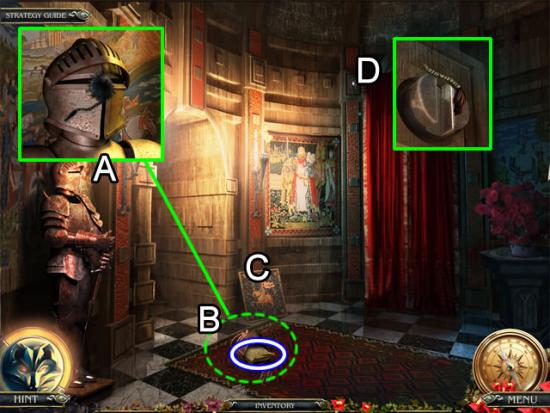
- Use the MACE to knock the helmet off the knight (A). Look inside the suit of armor.
- Take the BAG OF SAND from the fallen helmet (B).
- Move the picture (C) to see the niche.
- Examine the top of the curtains (D). Use the SMALL ROPE as a cord to open the drapes.
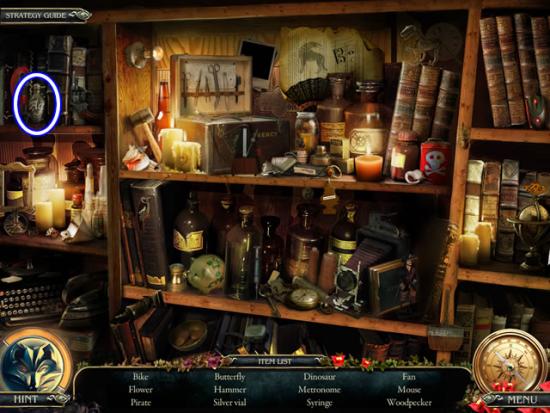
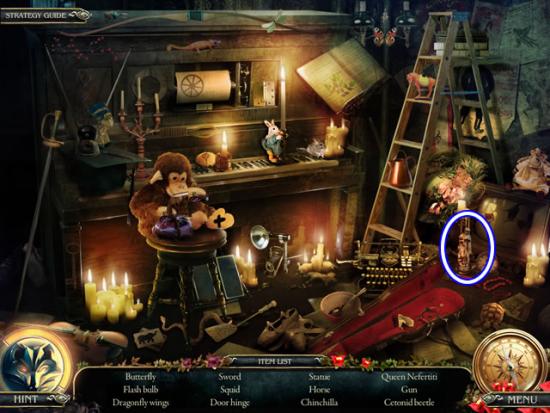
- Play the hidden object scene.
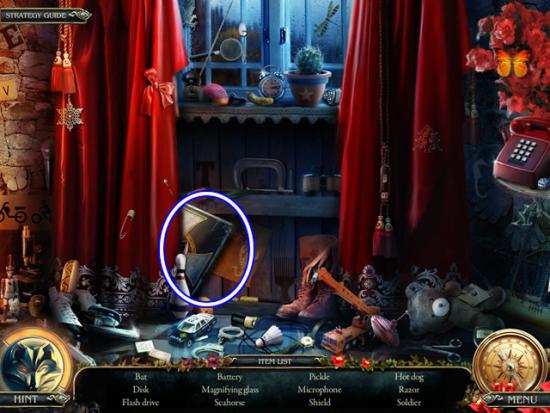
- Find the listed objects. The SHIELD is added to inventory.
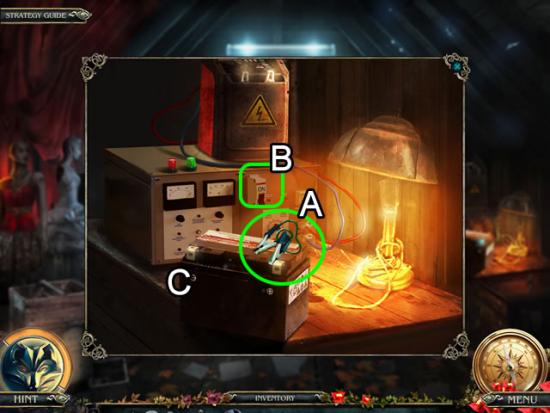
- Go forward to the hallway. Use the FLASHLIGHT to look closer at the electrical panel.
Fireplace Room
- Go left to the knight’s corridor.
Knight’s Corridor
- Use the BAG OF SAND to put out the flames.
- Take the KNIFE from the stool.
Footpath
- Use the KNIFE to cut the ropes securing the shield to the post. Take the SHIELD.
Knight’s Corridor
- Zoom in on one of the knights guarding the door. Place a SHIELD in his hand.
- Look at the other knight. Place a SHIELD in his hand.
Cabinet
- Examine the pile of clothes on the floor (A). Move the torn clothing to uncover the KNIFE SWITCH.
- Look at the book on the desk (B). Take the SCARED FACE.
- Take the CROWBAR by the torn picture on the floor (C).
Arch
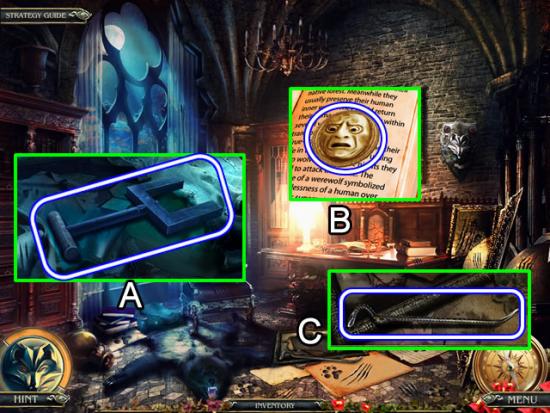
- Use the KNIFE to pry out the INDIFFERENT FACE from the niche.
- Go forward to the hallway.
Hallway
- Insert the KNIFE SWITCH in the electrical panel to turn on the lights.
- Look at the small table on the right. Pick up the NEEDLE AND THREAD.
- Take the FIGURINE from the pedestal on the left.
- Read the paper on the floor.
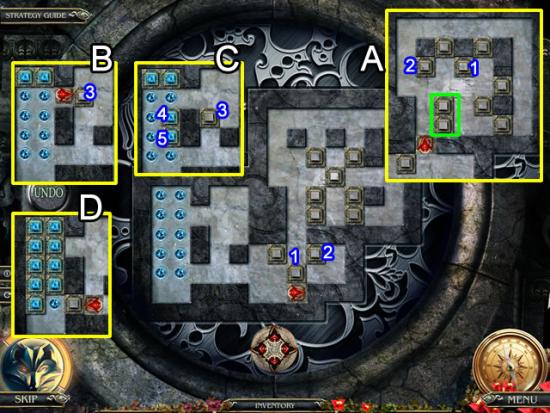
- Examine the painting on the wall. Use the CROWBAR to pry off the painting and open a slider puzzle.
- The goal is to move the three patterned tiles until they are below their matching pattern along the top.
- The following screenshots give step-by-step solution instructions or view the video solution.
- Screenshot 1 shows the starting position of the tiles. Follow these moves:
- C – Up 1, right 1.
- D – Up 2.
- E – Left 1.
- F and G – Left 1.
- B – Down 1.
- A – Right 1.
- D – Left 1, up 1.
- C – Left 2.
- Screenshot 2 shows the result of the above moves. Continue moving as follows:
- D – Right 2.
- E – Up 1, right 1.
- A – Down 1.
- B – Left 1.
- C – Left 1.
- D – Up 2.
- E – Right 1, up 1.
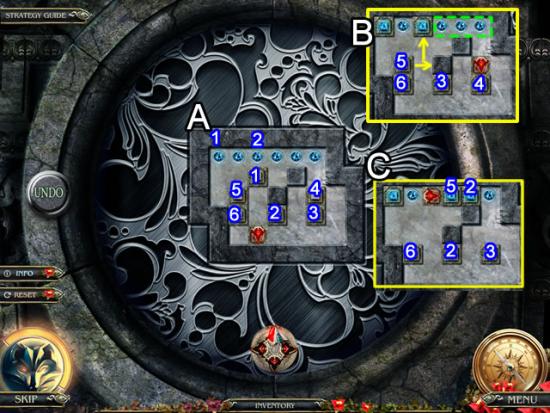
- Screenshot 3 shows the result of the above moves. Continue moving as follows:
- C – Up 1
- D – Up 1, right 1.
- E – Up 2.
- B – Right 1.
- A – Down 1.
- E – Left 1, up 1.
- D – Left 2.
- Screenshot 4 shows the result of the above moves. Continue working as follows:
- A – Down 1.
- B – Left 1.
- C – Up 1.
- A – Right 1.
- D – Right 1, up 1.
- Screenshot 5 shows to result of the previous moves. Make the following moves:
- E – Up 1.
- F – Left 1.
- D – Down 1.
- B – Down 1.
- A – Right 1
- C – Up 1.
- B – Left 1, down 1.
- Screenshot 6 shows the results of the above moves. Continue as follows:
- C – Down 1
- B – Right 1.
- A – Right 1.
- D – Up 2.
- Screenshot 7 shows the results of the above moves. Continue as follows:
- B – Left 1.
- A – Down 1.
- C – Left 1.
- D – Up 1.
- Screenshot 8 shows the solution.
- Go through the main corridor to the bedroom at the far end.
Bedroom
- Remove the cloth on the bed post. Take the ROPE.
- Play the hidden object scene.
- Find the listed objects. The SCREWDRIVER is added to inventory.
Main Corridor
- Look at the bench on the left with the stuffed bear. Use the ROPE to repair the LADDER.
- Take the BATTERIES from the sill of the broken window.
Cabinet
- Use the NEEDLE AND THREAD to repair the picture (A). Make a note of the directions.
- Zoom in on the coat of arms to open a puzzle (B). Use the picture directions to solve the puzzle.
- Solution: Click the colored buttons as follows: red, red, green, red, green, green.
- Play the hidden object scene.
- Find the listed objects. The SOLVENT is added to inventory.
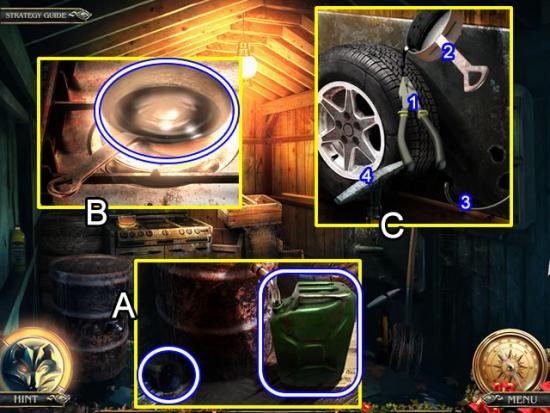
Fallen Tree
- Place the LADDER against the rocks.
- Peer into the squirrel hole.
- Use the SOLVENT to clean the SAD FACE.
Fireplace Room
- Move the cursor to the bottom of the painting.
- Use the SCREWDRIVER to remove the nameplate. Take the LEAF (If you have a problem finding this area, make sure the cursor is on the bottom of the picture, not the middle, before clicking.)
Main Corridor
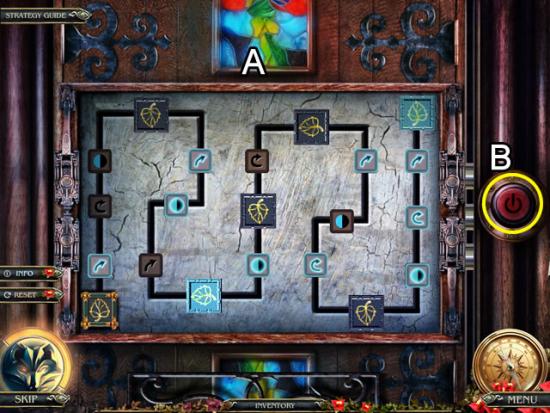
- Place the LEAF in the inset on the door to the child’s room to open a puzzle.
- The goal is to move the leaf from the bottom to the top of the board. Use the arrows and highlight buttons so the leaf matches the position and color at each path check point. Press the red button (B) to see the results.
- The solution is shown above.
Child’s Room
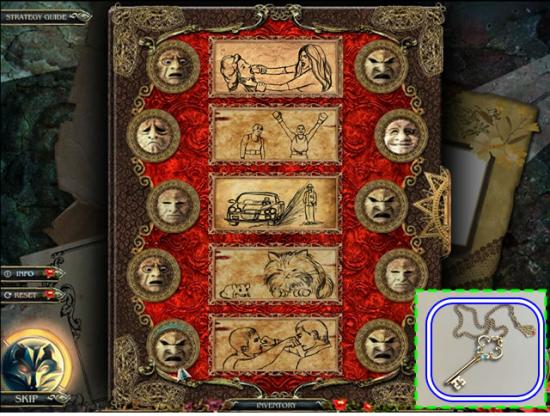
- Look at the album on the floor. Insert the SCARED, INDIFFERENT and SAD FACES in the empty slots to start a puzzle.
- The goal is to match the feelings expressed on the face with the situation for the person or animal on the left and the right. Click each face to scroll through the expressions. Correctly choosing both feelings will close that panel.
- The above screenshot shows the solution (the cat must be indifferent because it just ate a tasty bird).
- Take the STOREROOM KEY.
Fireplace Room
- Insert the key in the lock of the door on the far right.
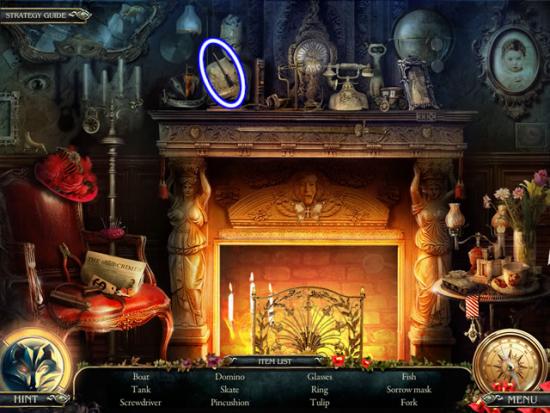
- Play the hidden object scene.
- Find the listed objects. The PHOTO is retained in inventory.
Bedroom
- Zoom in on the pictures on the wall. Add the framed PHOTO to open a puzzle.
- Swap the pictures until they are in the same order as depicted in the drawings in the child’s room.
- The solution is shown above. Take the PHOTO.
Child’s Room
- Look at the photo album on the floor.
- Insert the PHOTO.
Chapter 2: Restoring Luisa’s Memory
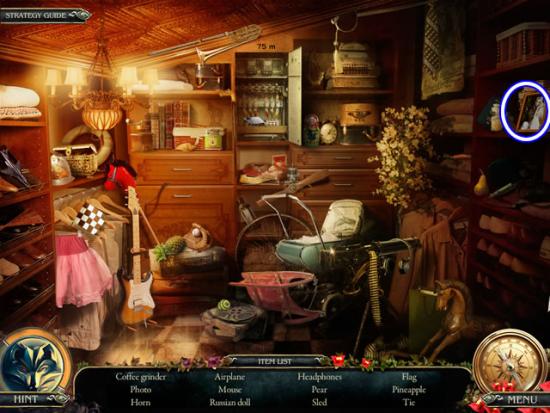
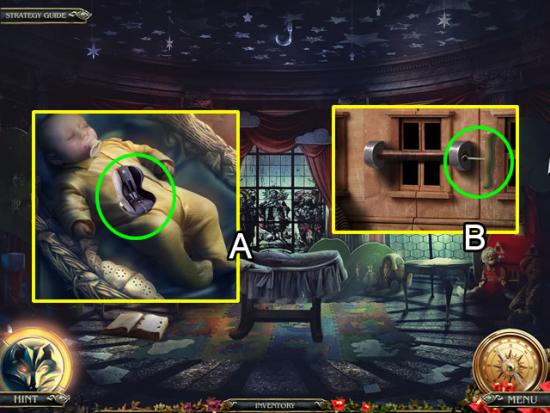
Yard
- Click anywhere to activate the scene.
- Take the SHEET of paper from the baby carriage.
- Play the hidden object scene.
- Find the listed objects. The PIN is added to inventory.
- Go forward to the gate room.
Gate Room
- Use the PIN to unlock the cupboard doors (A).
- Take the ROD. Look closer at the box (B) on the shelf. Take the PUZZLE PIECE.
- Examine the contents of the wheelbarrow (C). Take the BLUNT SHEARS.
Yard
- Look at the door on the right.
- Use the ROD to snag the hook and open the door.
Spiral Ladder
- Pick up the PIECE OF GLASS.
- Go up the steps
Second Floor
- Look at the ruins. Take the PUZZLE PIECE.
- Return to the bottom floor
Spiral Ladder
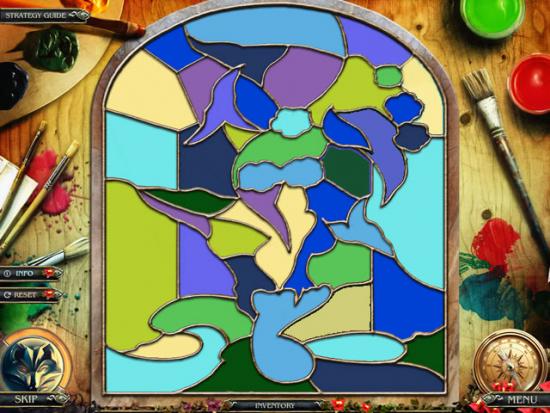
- Inspect the stained glass window in the door on the right.
- Add the two PUZZLE PIECES to start a puzzle. This is a two part puzzle.
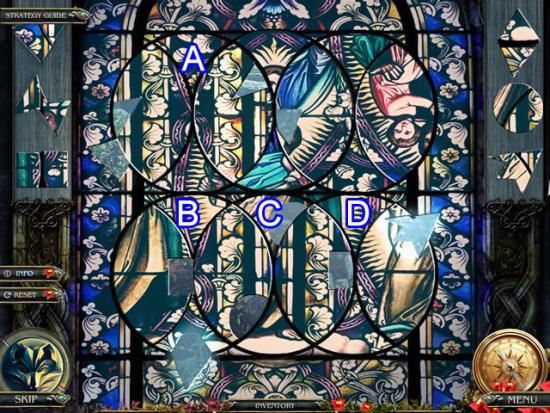
Part 1 – Add the pieces
- A glowing shape means the image is aligned correctly. Insert the diamond and arrow shapes in the bottom row.
- Click the “A” Circle once. Insert the triangle and butterfly piece.
- Click “C”. Insert the square.
- Click “D”, “C” and “D”. Insert the circle.
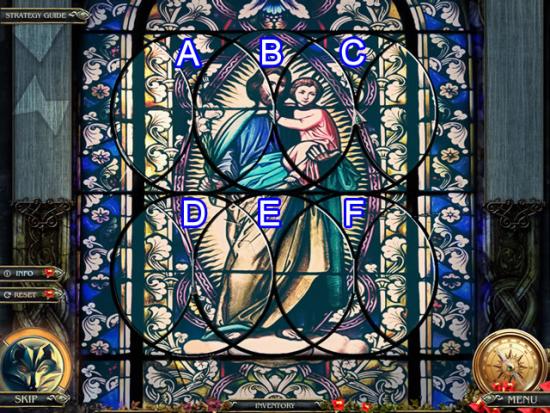
Part 2 – Form the picture
- This solution is based on completing the first part in the order given above.
- Starting at the bottom, click the circles in the following order: E-D-F-E-D-E-F-E.
- Complete the top part as follows: B-A-C-B-A-B-A-B.
Stone Steps
- Pick up the MALLET.
- Continue down the steps.
Bridge
- Take the DRILL leaning against the bridge support.
Spiral Ladder
- Use the DRILL to uncork the barrel.
- Take the SAW BLADE.
Bridge
- Insert the SAW BLADE in the sawmill mechanism. The BOARDS automatically go to inventory.
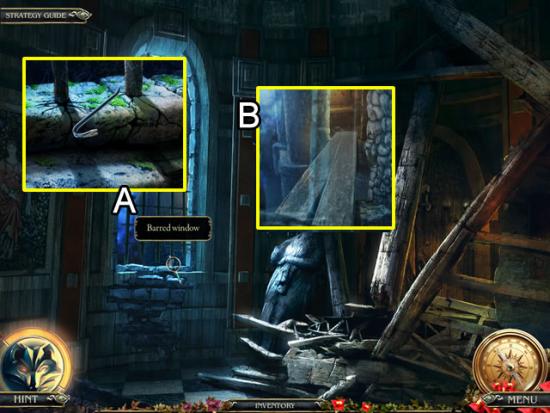
Second Floor
- Look closer at the barred window (A).
- Use the CROWBAR to remove the bars.
- Look out the window. Place the BOARDS to span the gap (B).
- Cross over to the workshop.
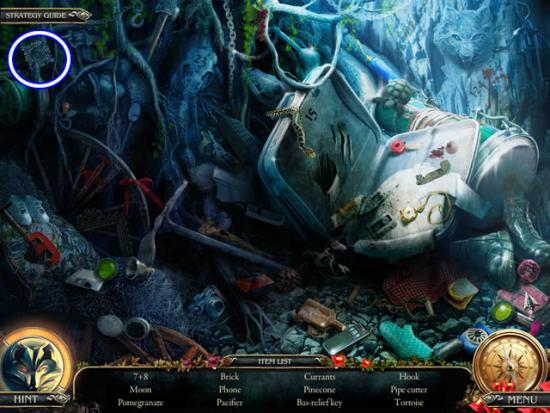
Workshop
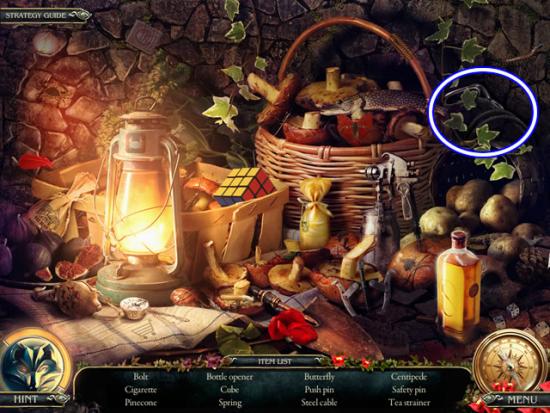
- Examine the bulletin board on the back wall. Take the DRAWING OF A WOMAN and the BLUE BAS-RELIEF.
- Play the hidden object scene.
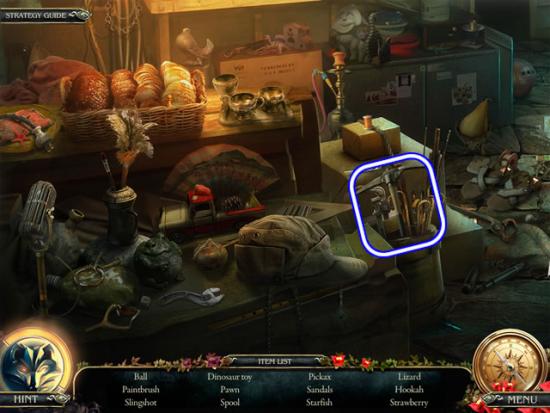
- Find the listed objects. The PICKAX is added to inventory.
Stone Steps
- Use the PICKAX to remove some STONES from the stone parapet.
Bridge
- Zoom in on the mechanism on the right side of the bridge.
- Insert the BLUE BAS-RELIEF to start a puzzle.
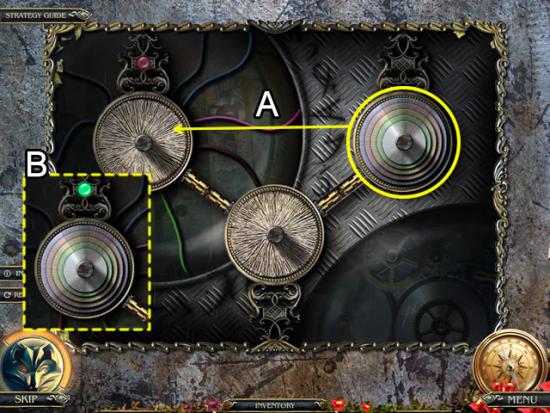
- The goal is to shift the disks to the far peg (A).
- Use the all three pegs to help swap the disks. A larger disk cannot be placed on a smaller disk.
- View the video to see the solution
- Cross the bridge.
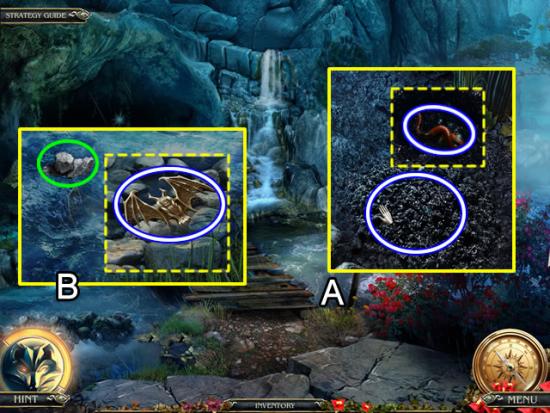
River
- Look closer at the dirt at the foot of the bridge (A). Take the loose SOIL and uncover a WORM.
- Examine the river (B). Use the STONES to dam up the river. Take the bat BAS-RELIEF.
Stone Steps
- Zoom in on the nest. Give the bird the WORM. Take the razor BLADE.
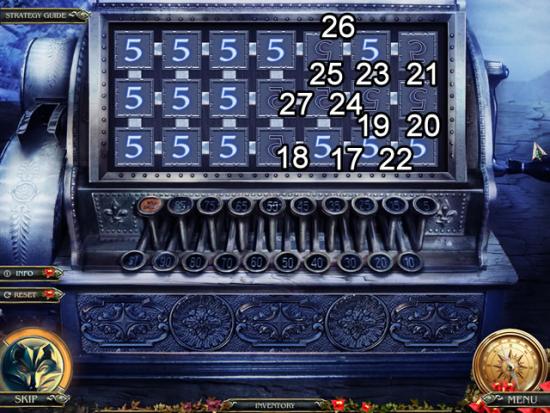
Fountain
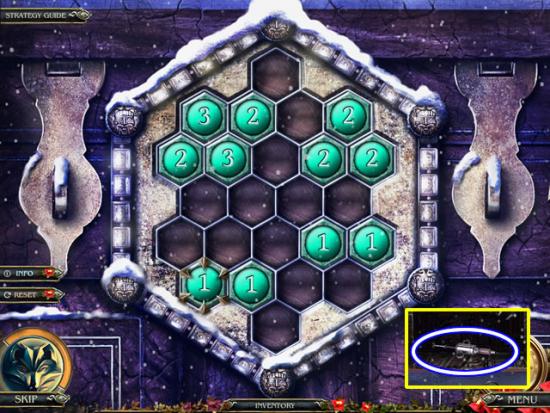
- Inspect the base of the fountain. Insert the bat BAS-RELIEF in the outline to open a puzzle.
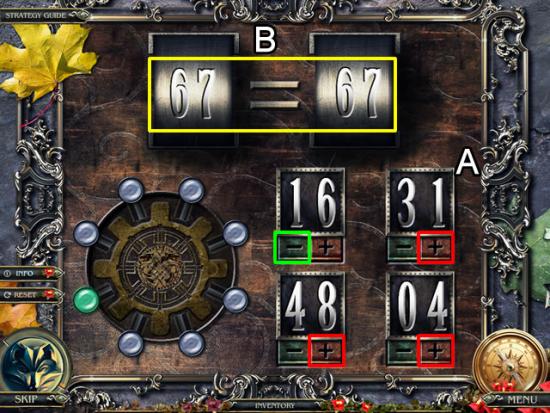
- The goal is to either add or subtract the four numbers (A) so both numbers on top equal each other. Each correct solution turns on a green light and presents a new equation. Solve all eight equations to complete the puzzle.
- Solution:
- 67 = -16 +31 +48 +04
- 38 = +13 -31 +46 +10
- 31 = +02 -28 +51 +06
- 13 = +25 +05 -06 -11
- 23 = +17 -24 +41 -11
- 22 = -12 +54 -26 +06
- 27 = -17 +35 +28 -19
- 18 = -17 +24 +26 -15
Underground
- Focus on the stone woman. Place the DRAWING OF A WOMAN on her to begin a puzzle.
- Click the joint knobs to adjust the arms so they match the drawing.
- The solution is shown above. Receive the FAN.
- Go forward and look around the torture chamber.
- Zip down to the bridge.
Bridge
- Use the fan to blow away the wood shavings on the sawdust pile.
- Pick up the WEDGE.
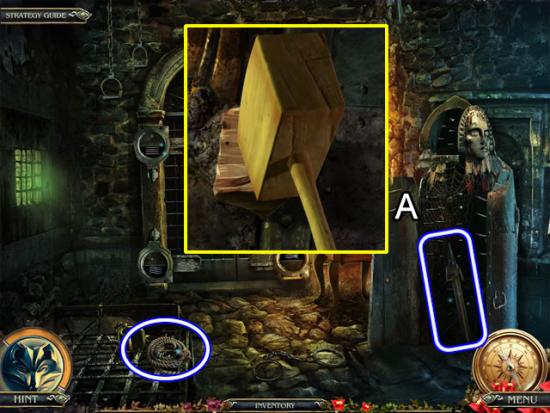
Torture Room
- Insert the WEDGE in the side of the iron maiden. Use the MALLET to drive it in.
- Take the HARPOON.
- Pick up the ROPE.
Workshop
- Put the HARPOON and ROPE on the harpoon cannon.
- Cross to the tower.
Gray’s Tower
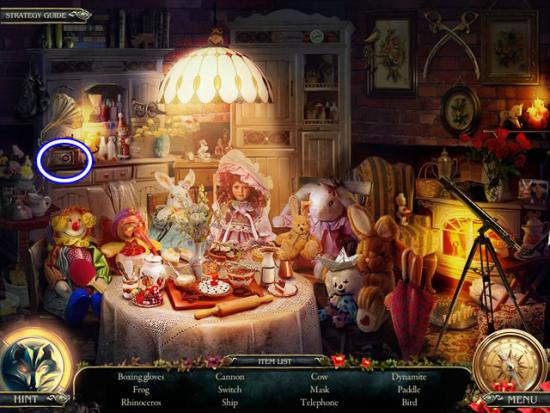
- Open the suitcase at the base of the desk. Take the GLOVE.
- Look at the spotlight. Take the EMPTY CUP on the window sill.
- Play the hidden object scene.
- Find the listed objects. The CROSS KEY is added to inventory.
Gate Room
- Zoom in on the box on the bottom of the cabinet.
- Insert the CROSS KEY. Take the BULB.
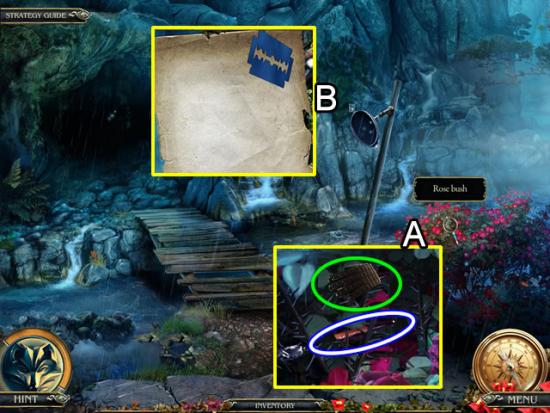
Bridge
- Inspect the rose bush (A). Use the GLOVE to pick up the GLASS CUTTER.
- Look at the mirror frame (B). Place the SHEET of paper on the frame. Use the razor BLADE to cut out a MOLD.
Workshop
- Go to the work table.
- Place the PIECE OF GLASS on the work surface. Lay the MOLD over the glass. Use the GLASS CUTTER to make a MIRROR.
Gray’s Tower
- Insert the BULB in the spotlight.
Bridge
- Put the MIRROR in the mirror frame.
- Click the mirror once to redirect the light.
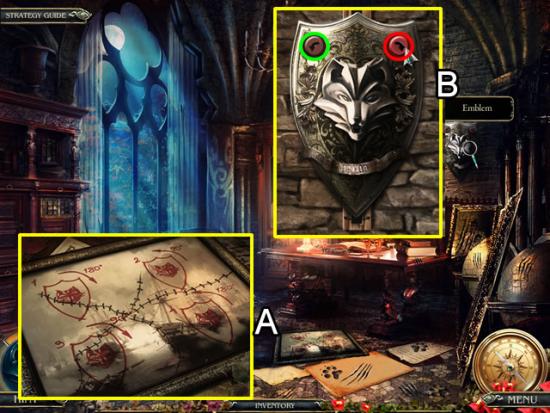
Wolf Den
- Look in the fire ring. Take the FLINT.
- Play the hidden object scene.
- Find the listed objects. The EMBLEM is retained in inventory.
Underground
- Fill the EMPTY CUP from the waterfall. A BOTTLE WITH WATER is added to inventory.

Torture Room
- Zoom in on the top of the door (A). Insert the EMBLEM in the outline.
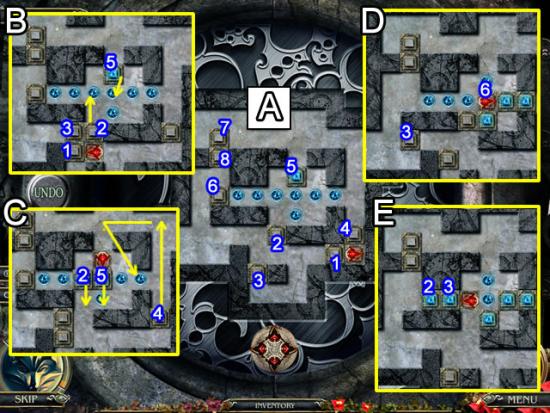
- Inspect the top left panel (A). Each panel is an element. This panel represents earth. Place the SOIL on the panel to open a puzzle.
- Click the directional arrows (A) to use the red arrow to push the gray and blue cubes. Only one cube can be moved at a time.
- The goal is to place all of the gray cubes on the blue pegs on the right side of the board (D).
- The best strategy: First move the gray cubes to clear an opening for the arrow (B). Do this carefully so all cubes can be accessed and moved individually. Beware of stacking cubes as the arrow can only push one at a time. Don’t block in a cube. Inset (B) is an example of a workable path. See the Solutions below for the moves.
- Next move the blue cubes to the sides to make it easier to place the gray cubes (C).
- Solution – Initial gray cube movements: Right, up, right, up.
- Solution video – Blue cubes:
- Solution video – Gray cubes:
- Zoom in on the right panel. Use the FLINT to open a puzzle.
- Begin this puzzle by getting cubes 1 and 2 positioned in the upper gray square to clear a path for moving all of the cubes.
- Compare the initial setup with inset (A). Note the cubes have been pushed back into the openings in the dark gray portions. The numbers show the ending positions of cubes 1 and 2.
- Begin moving the cubes to the blue pegs. Move the cubes outlined in green first. This gives more room to maneuver the remaining cubes. These cubes go on the top two pegs.
- Inset (B) shows the first two cubes and the initial placement of the cube 3. Right now this cube is blocking the access slot needed to work on the right column.
- Get cube 4 and position it at the bottom of the right peg column. Move cube 3 to the position shown in inset (B). Move cube 4 up as shown.
- Get cube 5. Position it at the bottom of the right peg column. Move cube 3 as needed to gain access to the blue pegs. Move cube 5 as shown. Cube 3 can now be moved onto the second blue peg.
- Fill the right column by pushing up from the bottom. The last cube will be the right column bottom row (D).
- Solution video – Organizing the cubes in the right gray side
- Solution video – The first five pegs
- Look at the lower left panel. Throw the BOTTLE OF WATER on it to open a puzzle.
- Solution:
- Move cube 1 to the peg labeled 1. Slide cube 2 up to the peg labeled 2 (A).
- Move cube 3 over (B) one. Slide 5 one space to the right so it abuts the dark gray stone. By leaving the right three pegs open (dashed green) the arrow cube can move around and slide cube 4 down. Next move 5 up so it’s beneath cube 2.
- The access isn’t needed any longer. Move cube 2 two positions to the right. Move cube 5 next to cube 2 (C).
- The last three cubes can now be slide to the open pegs.
- Look at the lower right panel. Use the FAN to open the puzzle.
- Solution:
- Slide cubes 1, 2 and 3 as shown in inset (B).
- Slide cube 2 up to the peg directly above it. Slide cube 5 down one. Inset (C) shows the results of the moves.
- Next slide cube 4 to the top of its current column. Move both 2 and 5 down one. This creates a lane to make it easier to navigate the board. Now move cube 4 to the first peg. Inset (D) shows the results of these moves.
- Slide cube 3 to the area to the left. Move it back and forth to gain entrance to the left column. Move cube 6 all the way forward.
- Move cube 2 to the last peg. Cube 3 can now slide in next to it.
- The remaining three cubes can now be moved on to the remaining pegs.
- Video solution – Moves up to inset (D) above.
- Video solution – Remaining moves to solve the puzzle.
Chapter 3: Lifting Caine’s Curse
Caine’s Cell
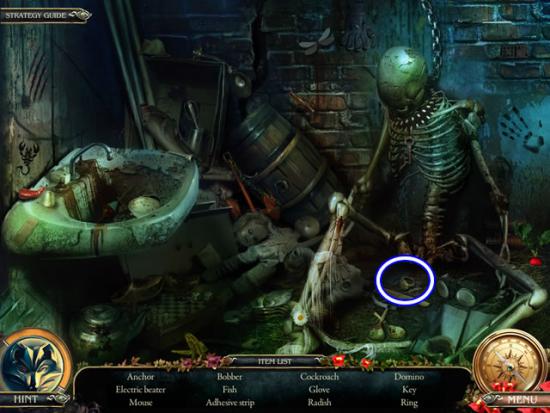
- Play the hidden object scene.
- Find the listed objects. The RING is retained in inventory.
- Look at the pile of straw by the cot.
- Use the FLINT to start a fire and uncover a GRINDSTONE.
Underground
- Add the GRINDSTONE to the grinding machine. Turn the BLUNT SHEARS into SHARP SHEARS.
Wolf’s Den
- Use the SHARP SHEARS to cut through the tree roots.
- Take the MATCHES.
Gray’s Tower
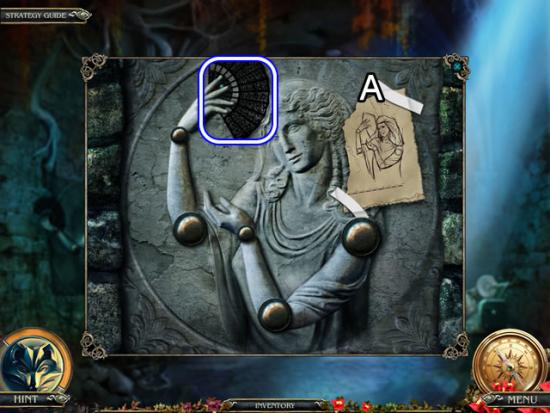
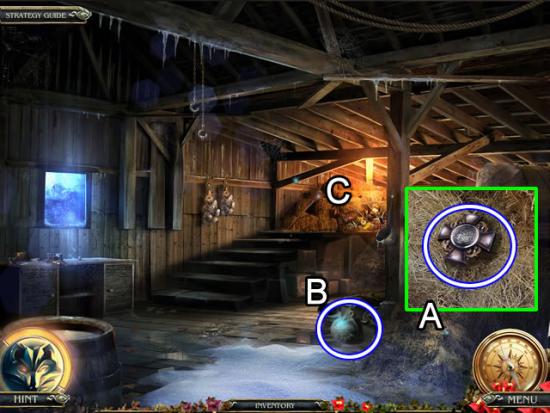
- Move the portrait aside to reveal a safe (A).
- Insert the RING in the impression on the cover to open a puzzle.
- Use all of the pieces to form a pattern with no overlapping parts. Correctly placed pieces will lock into place. The solution is shown above (B).
- Take the DYNAMITE from the safe.
Child’s Room
- Examine the cradle.
- Take the RULER.
Game Strategy
- Now is a good time to look at the map and review the tasks in the various rooms.
- Compare the inventory items with the tasks to determine which tasks can be completed.
Arch
- Peek inside the headless knight.
- Use the ROD to retrieve the REMOTE.
Cabinet
- Inspect the door.
- Use the DRILL to remove the lock.
Wall
- Look closer at the window on the wall above the trellis.
- Use the RULER to slip the latch on the window.
Luisa’s Room
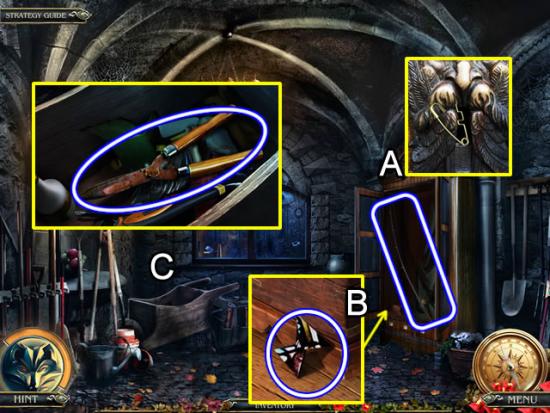
- Examine the contents of the dresser (A). Read the note. Take the CANCER symbol.
- Look under the bench (B). Take the ROPE and BAG.
- Look at the empty frame on the wall (C). Pick up the CHESS PIECE.
- Inspect the painting (D). Take the CHESS PIECE.
Entrance to Garage
- Check out the crate of bottles on the left.
- Take a BOTTLE.
- Zoom in on the garage door lock to open a puzzle.
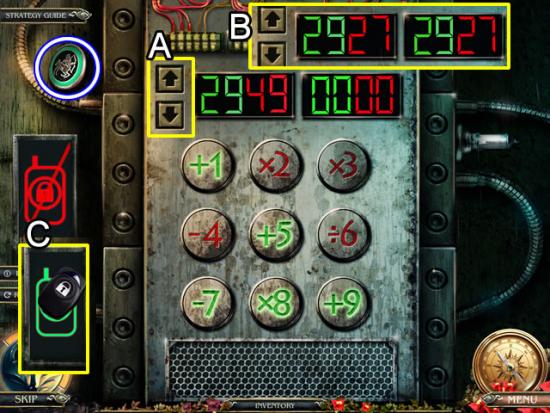
- Pick up the SAGITTARIUS button before starting the game.
- The goal is to use the green or red buttons to get the number on the right display match that on the left.
- Click the up or down arrow (A) until they lock to get the green number. Find the correct combination of green buttons to get 29.
- Click the up or down arrow again until they lock on a red number (B). Find the correct combination of red buttons to get 49.
- Green Solution: +1, +9, -7, *8, +5
- Red Solution: x2, -4, /6, x3
- Place the REMOTE on the icon (C) to open the garage doors.
Garage
- Fill the BAG with the contents of the wheelbarrow. Take the BAG WITH CEMENT.
- Remove the cloth on the car. Open the hood to find a hidden object scene.
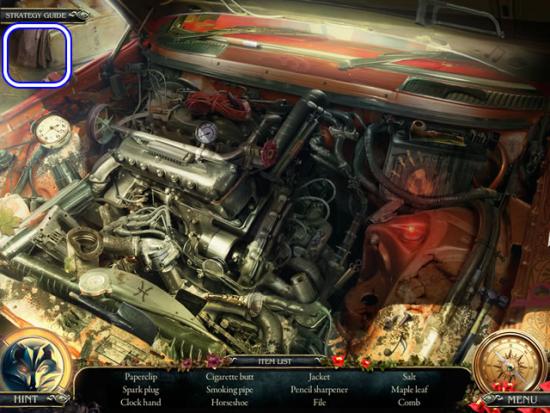
- Find the listed objects. The JACKET is added to inventory.
- Go through the door on the left to the workshop.
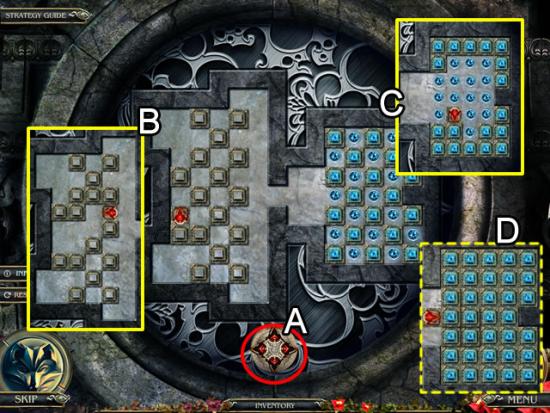
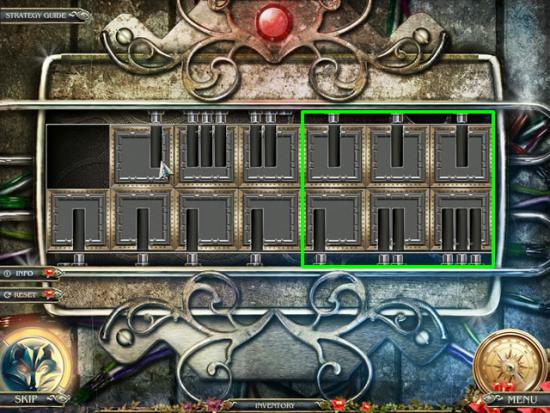
Workshop
- The goal is to slide the cubes into the row with the matching symbol on the side.
- Use the red lights on the four sides of each cube to move them around. The squares with a symbol on them on the board (pink) can be used as temporary holding squares for the symbol depicted on them.
- The best strategy is to solve the top row then the bottom row. This allows an easier swap between the two middle rows.
- Take the FLARE GUN and LEO button.
- Note that the map cannot be used right now. Go down twice to meet the wolf. Use the FLARE GUN to scare it off. The map is operational again.
Knight’s Corridor
- Inspect the flowers on the left. Use the SHARP SHEARS to remove the flowers and open a hidden object scene.
- Find the listed objects. The BOOMERANG is added to inventory.
Footbridge
- Zoom in on the bird.
- Use the BOOMERANG to retrieve the ARIES button.
Main Corridor
- Place the JACKET on the jagged glass on the broken window.
- Get the BATTERIES if they haven’t already been picked up.
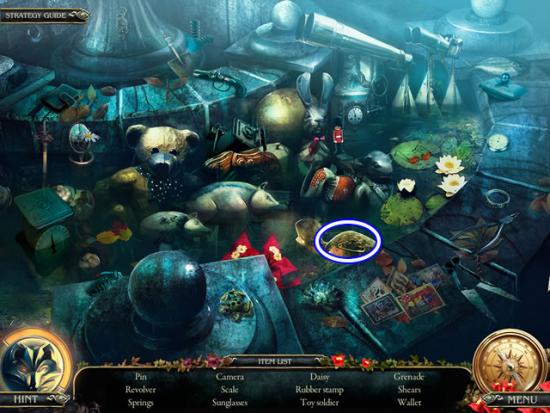
Balcony over Window
- Play the hidden object scene.
- Find the listed objects. The HOOK is added to inventory.
- Look closer at the drain spout.
- Pick up the SCORPIO button.
- Fill the BOTTLE from the spout. The BOTTLE WITH WATER is added to inventory.
Child’s Room
- Place the HOOK in the metal plate on the drawing board (A).
- Attach the ROPE to the cradle (B).
- Click the ends of the rope to raise the cradle.
- Pick up the TINY RAKE (C).
Fireplace Room
- Use the TINY RAKE to uncover the RAZOR hidden in the vase to the right of the stairs.
Luisa’s Room
- Zoom in on the large painting on the left.
- Use the RAZOR to cut the canvas.
- Go up the stairs.
Caine’s Study
- Play the hidden object scene.
- Find the listed objects. The KEY is added to inventory.
Garage
- Open the red box on the far wall.
- Take the TONGS and the VIRGO button.
Fireplace Room
- Use the TONGS to pluck a COAL from the fireplace.
Caine’s Study
- Look at the stuffed Phoenix.
- Place the COAL in the straw beneath the bird. Take the PINCERS from the ashes.
- Pick up the TAURUS button.
Wall
- Examine the trellis.
- Use the PINCERS to extract the PEN from the niche.
Garage
- Access the vise.
- Put the PEN in the vise. Click the handle. Take the PEN PART.
Caine’s Study
- Zoom in on the dresser.
- Insert the PEN PART in the side of the drawer.
- Take the LIBRA button and the SILICONE.
Workshop
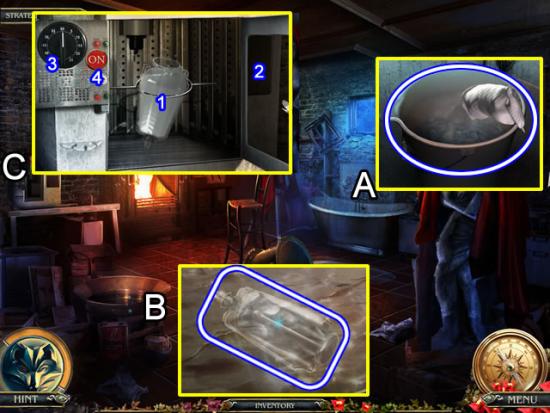
- Look inside the bath (A). Pour the BOTTLE WITH WATER in the bucket. Add the BAG WITH CEMENT. Take the BUCKET WITH CEMENT.
- Fill the basin (B) with SILICONE. Add the FIGURINE (obtained from the pedestal in the hallway) to form a MOLD. The original figurine returns to inventory.
- Open the dryer (C). Put the MOLD in the wire rack (1). Pour the BUCKET WITH CEMENT in the mold. Close the door (2). Set the timer (3). Turn on the dryer (4). Take the new FIGURINE.
Hallway
- Place the two FIGURINES on the pedestal.
- Click the compartment that opens on the pedestal to start a puzzle.
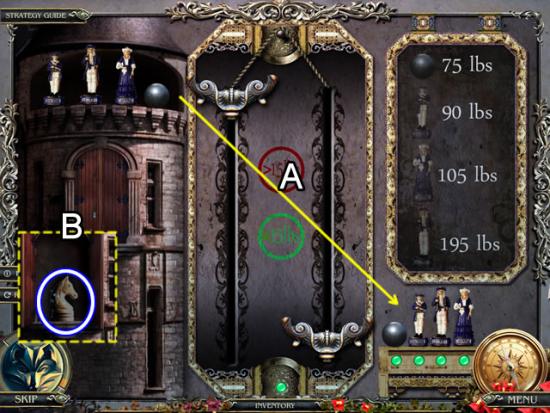
- The goal is to move the figures from the top to the bottom right (A) using the scale baskets.
- Use the weights for each figure to balance the scales so the weight difference is no more than 15 pounds. Add and remove the ball and figures to the baskets. No more than two pieces can be in a basket at a time.
- Solution. (note: the directions refer to the figures as prince, princess and king. The legend at the bottom of the figures call them knight, queen and king. This solution uses the terms prince, queen and king for ease of differentiating between the prince and princess). With the left scale in the up position as shown above, make the following moves.
- Add ball, add prince.
- Remove prince, add prince, add queen. Result: left scale ball, prince; right scale queen.
- Remove ball, add ball. Result: left scale prince; right scale queen ball.
- Remove prince, add king, remove queen, remove king. Result: left scale empty, right scale ball. King is in lower right.
- Add prince, remove prince, add queen. Result: left scale queen, right scale ball, prince.
- Remove ball, remove prince, remove queen. Result: scales empty, queen in lower right.
- Add ball, add prince, remove prince, remove ball. Result: all in lower right.
- Take the CHESS PIECE from the compartment (B).
Fireplace Room
- Zoom in on the chessboard in front of the fire.
- Add the three CHESS PIECES to start a puzzle.
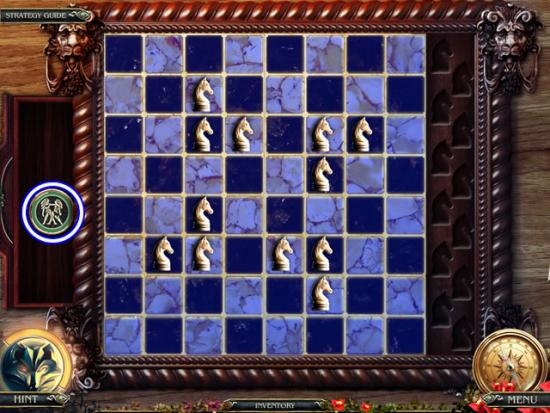
- The goal is to place the knights on the board so all the square turn blue.
- See the above screenshot for the solution. Take the GEMINI button.
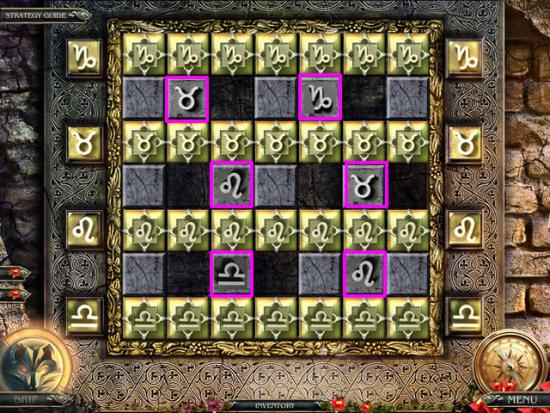
Balcony over Window
- Go up the stairs.
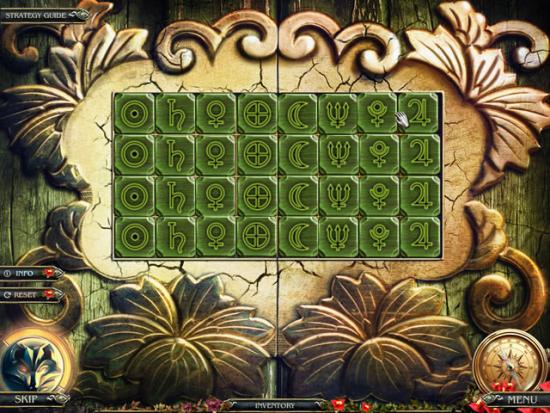
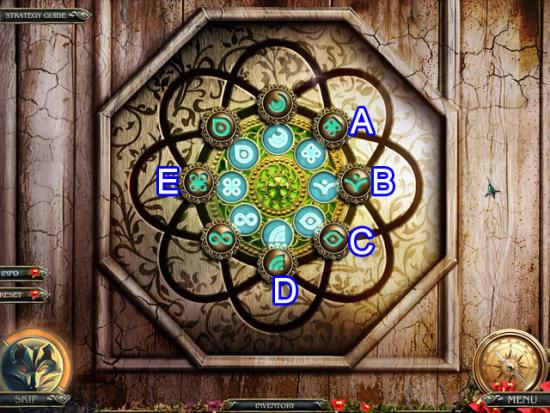
- Examine the door lock to open a puzzle.
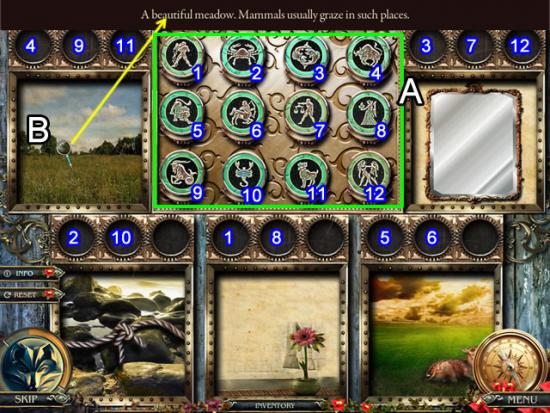
- Place the collected zodiac signs in the center panel to start a puzzle (A).
- The goal is to match the symbols with each of the five panels.
- Click a panel (B) to get a hint. Not all panels require three symbols. The scene in a panel changes when the correct symbols are placed above it.
- Solution: Look at the above screenshot. Match the numbers next to the symbols with the numbers in the circles above each scene.
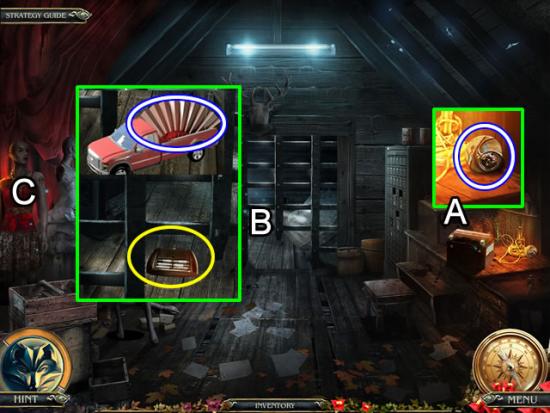
Attic
- Inspect the shelf on the left.
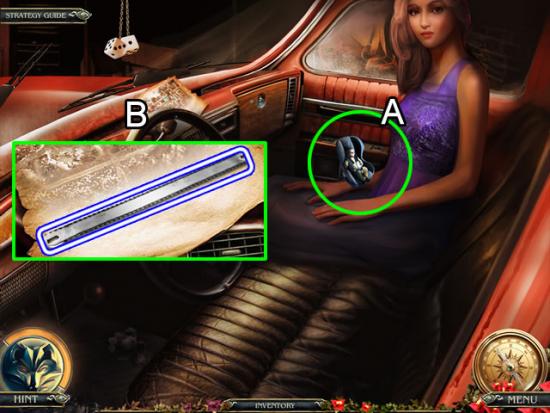
- Put the BATTERIES in the CAR REMOTE.
- Play the hidden object scene.
- Find the listed objects. The PHOTO is added to inventory.
Luisa’s Room
- Zoom in on the empty frame on the wall.
- Insert the PHOTO in the frame.
Chapter 4: Freeing Gray
Throne Room
- Look closer at the window sill (A). Take the INSULATING TAPE.
- Examine the trap (B). Pick up the 10 CENT STAMP.
- Head for the stairs landing (C).
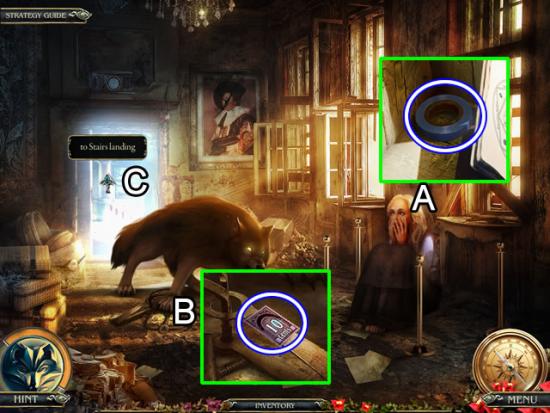
Stairs Landing
- Read the note on the floor (A). Take the KEY.
- Pick up the HACKSAW (B).
- Head for the library (C).
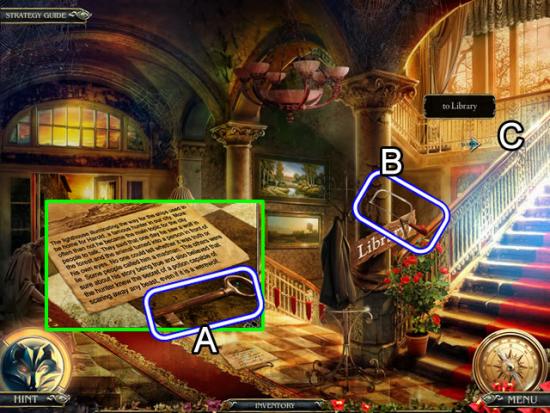
Library
- Look at the book on the bench.
- Take the 25 CENT STAMP.
- Return to the stairs landing. Exit to street with stairs.
Street with Stairs
- Examine the window on the side of the building.
- Take the 15 CENT STAMP.
Street with Shops
- Continue forward to the lighthouse entrance.
Lighthouse Entrance
- Look at the bridge abutment on the right.
- Take the RED BUTTON and 20 CENT STAMP.
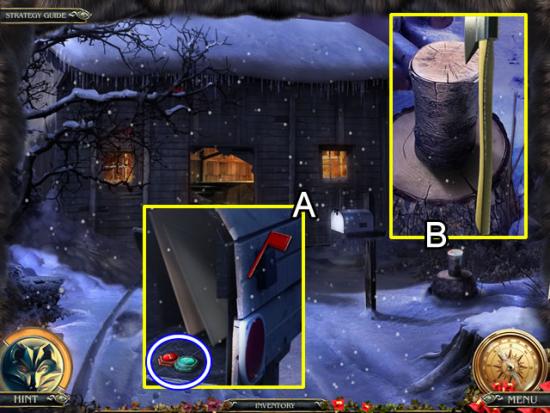
Street with Shops
- Take the MINT from the box with mint.
- Inspect the postbox attached to the wall on the left.
- Insert the 10, 15, 20 and 25 CENT STAMPS in the slots to trigger a puzzle.
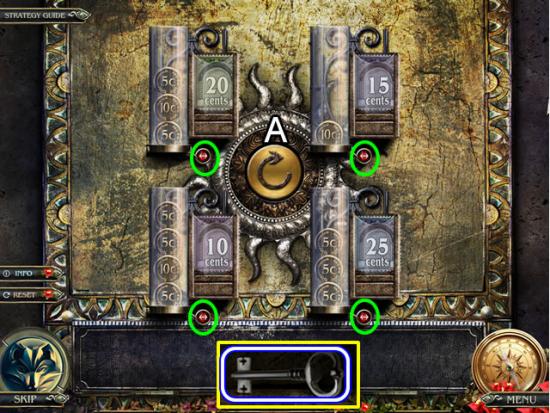
- The goal is to match the number of coins in the tube to the denomination on the stamp.
- Use the gold button in the center (A) to rotate the tubes. The red arrows (green) will drop a coin from the top tube into the tube below it.
- Solution: Rotate twice. Drop a coin from the 25 cent tube to the 15 cent tube. Rotate three times. Drop two coins from the 10 cent tube into the 25 cent tube.
- Take the KEY.
- Use the key to open the lock on the door.
Barber’s Room
- Open the padded stool.
- Take the BRUSH.
- Return to the street with stairs. Go up the stairs.
Bog Street
- Zoom in on the waterfall on the left.
- Fill the BOTTLE to get a BOTTLE WITH WATER.
- Play the hidden object scene.
- Find the listed objects. The CANDY WRAPPER is added to inventory.
Street with Stairs
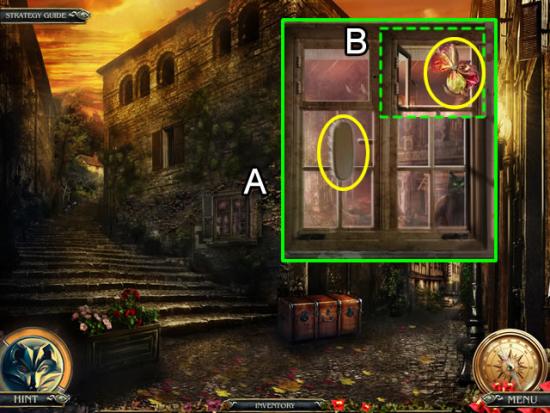
- Look at the window (A).
- Use the BRUSH to clean the window.
- Open the top left pane (B) and toss the CANDY WRAPPER through it to the cat.
Room behind the Window
- Pick up the WEIGHT from the corner of the room.
Street with Shops
- Inspect the loose wires on the right wall.
- Use the INSULATING TAPE to repair the wires.
- Open the control panel above the wires to open a puzzle.
- The goal is to slide the blocks so the slots match the rods on the upper and lower parts of the board.
- The best strategy is to solve the right six blocks first (green). The above screenshot shows the solution.
- View the video to watch the movements.

- Attach the WEIGHT to the hook (A).
- Pull the lever (B).
- Enter the room under the road (C).
Room under the Road
- Play the hidden object scene.
- Find the listed objects. The PENNANT is added to inventory.
- Pick up the CODE PIECE from the book on the chair.
Street with Stairs
- Inspect the truck (A)
- Add the CODE PIECE (B) to the lock area.
- Spin the tumblers until the symbol above the numbers (C) match the corresponding code number (B).
- Take the PLIERS from the trunk lid (D).
- Go up the stairs to bog street. Continue to the hunter’s house foyer.
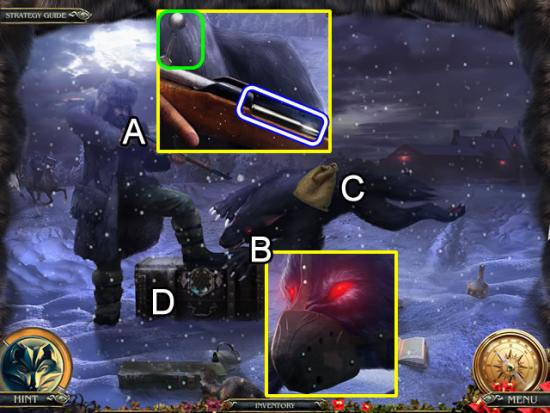
Hunter’s House Foyer
- Look at the guardhouse.
- Use the PLIERS to remove the nails.
- Take the RIFLE.
Room under the Road
- Use the PLIERS to remove some WIRE from the coil on the wall.
Lighthouse Entrance
- Attempt to approach the lighthouse yard (A).
- Use the HACKSAW to fell the lamp post (B)
- Zoom in on the archer’s statue (C). Use the RIFLE to disable the statue.
Lighthouse Yard
- Play the hidden object scene.
- Collect the listed objects. The STEEL CABLE is added to inventory.
- Examine the frame leaning against the stairs.
- Remove the rusted wires. String the WIRE on the frame. Take the SIEVE.
Bog Street
- Zoom in on the diamond spring on the left.
- Place the SIEVE under the gushing water.
- Take the DIAMOND.
Room under the Road
- Look in the box on the floor.
- Add the DIAMOND to the cutter. Take the GLASS CUTTER.
Barber’s Room
- Use the GLASS CUTTER on the display case.
- Take the ROSE BAS-RELIEF.
Room behind Window
- Insert the ROSE BAS-RELIEF in the gate lock.
Arboretum
- Look closer at the book on the desk.
- Take the SEA STAR.
Lighthouse Yard
- Inspect the door to the lighthouse.
- Insert the SEA STAR in the impression to open a puzzle.
- The goal is to plant bombs to stop the pirate ship from escaping.
- The best strategy is to build on the two existing bombs (green). The first two bombs added are numbered above. The rest of the bombs are added to fill the holes. Don’t try to plant bombs too close to the ship. Work at cutting off escape routes and circling in on the ship.

Lighthouse
- Look at the chopping block (A). Pick up the FUSE.
- Pick up the SHOVEL (B).
- Examine the broken projector (C). Insert the RED BUTTON. Click to turn on the projector.
Lighthouse Yard
- Zoom in on the “X” being projected on the grass (A).
- Use the SHOVEL to uncover the FIGURINE OF HUNTER.
Hunter’s House Foyer
- Access the winch on the front of the truck.
- Attach the STEEL CABLE to the winch.
- Flip the green switch.
Hunter’s House
- Use the KEY to open the lock on the book (A).
- Take the CRYSTAL EYE.
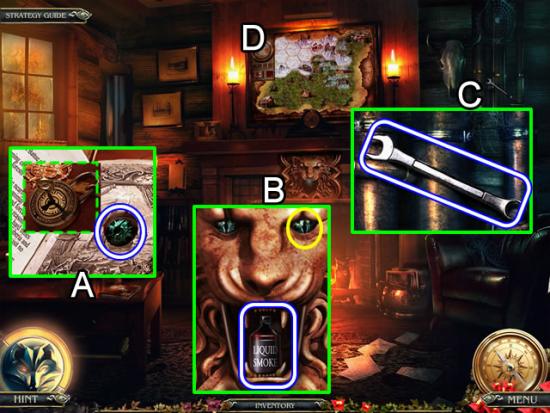
- Examine the lion on the fireplace surround (B).
- Insert the CRYSTAL EYE in the missing slot. Take the LIQUID SMOKE.
- Get the WRENCH from the pipe (C).
- Look closer at the map above the fireplace (C).
- Place the FIGURINE OF HUNTER on the map to open a puzzle.
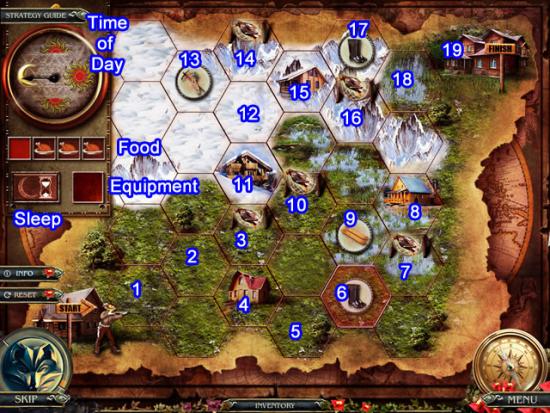
- The goal is to guide the hunter across the terrain to the house. Keep him supplied with food, the appropriate equipment for the terrain and shelter and sleep at the end of the day.
- Every polygon uses one unit of food. Landing on a duck replenishes the food. Prepare for bogs, snow and climbing by picking up the appropriate equipment. Take shelter in the huts and press the sleep icon.
- The numbers on the above map show one solution.
- Take the TRIANGLE KEY.
Barber’s Room
- Use the WRENCH to remove the bolt on the mirror.
- Take the SICKLE.
Bog Street
- Use the SICKLE to cut the FLOWER from the bush.
Hunter’s House Foyer
- Use the SICKLE to slit the tarpaulin covering the truck bed.
- Play the hidden object scene.
- Find the listed objects. The MAGNET is added to inventory.
Hunter’s House
- Use the MAGNET to get the METAL OWL from the glass pipe.
Stairs Landing
- Use the PLIERS to bend the bars on the cage.
- Take the WHEEL.
Room behind the Window
- Zoom in on the hamster cage.
- Add the WHEEL to the mechanism. Take the ROLLER.
Library
- Put the METAL OWL in the outline on the case on the bookshelf to open a puzzle.

- The goal is to move the statue pieces to the correct base as shown above.
- The only restriction is that a piece cannot be placed on top of a head. When initially starting, only one head is part of the pieces.
- The best strategy is to initially solve one statue at a time. Do not add the heads for the last three statues until the very end. This allows more room to move the pieces.
- Solution. The following moves are in order the statues were solved: Owl, oriental man, angel, blind justice. Move the pieces from the first number to the second number. Each statue is a continuation of the previous solution.
- Owl. 3-4, 2-1, 4-2, 3-4, 2-3, 2-3.
- Oriental man. 4-3, 4-2, 1-2, 3-4, 1-3, 4-1, 3-1, 4-3, 1-4, 1-4, 2-4.
- Angel and justice. 2-1, 3-2, 1-3, 1-2, 3-1, 2-3, 2-1, 2-1, 3-2, 1-3, 1-2, 3-1.
- Place the three heads.
- Look at the lamp on the side of the cabinet door.
- Place the ROLLER in the slot to light a hidden object scene.
- Find the listed objects. The Silver Vial is added to inventory as SILVER EXTRACT.
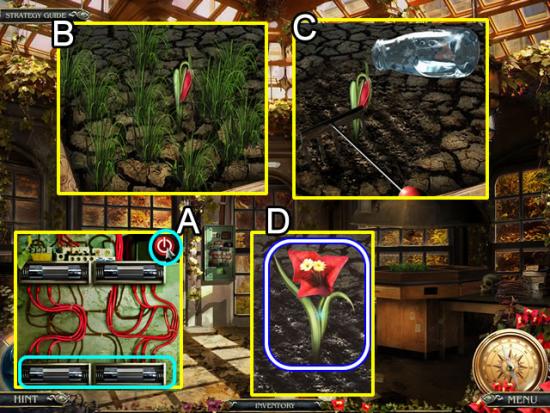
Arboretum
- Insert the two FUSES in the control panel (A). Press the red button to turn on the grow light.
- Zoom in on the planter. Pluck all the weeds (B).
- Use the TINY RAKE to smooth the soil (C). Add the BOTTLE OF WATER.
- Pluck the DIVINE FLOWER.
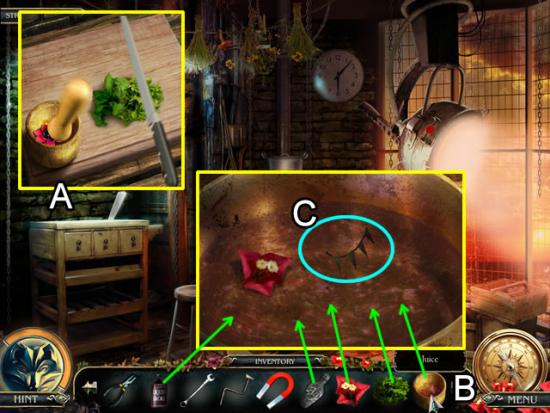
Lighthouse
- Access the chopping block (A).
- Place the MINT on the board. Use the knife to get CHOPPED MINT.
- Put the FLOWER in the mortar. Use the pestle to grind it to JUICE.
- Add the following ingredients to the pot to make the potion: JUICE, CHOPPED MINT, DIVINE FLOWER, SILVER EXTRACT and LIQUID SMOKE (B).
- Dunk the PENNANT into the potion (C). Retrieve the PENNANT WITH POTION.

Throne Room
- String the PENNANT WITH POTION on the posts (A).
- Use the TRIANGLE KEY to unlock the trap (B).
Chapter 5: Escaping the Castle
Luisa’s Room
- Pick up the BABY CHAIR.
- Go up the steps.
Caine’s Study
- Play the hidden object scene. The CROWN is added to inventory.
Fireplace Room
- Use the MAGNET to extract the ANGEL from the side chair.
Bedroom
- Insert the ANGEL in the headboard.
- Take the PIECE OF PUZZLE.
Cabinet Room
- Zoom in on the shelf.
- Place the PIECE OF PUZZLE on the board to open a puzzle.
- Swap the pieces two form to separate pictures. Once completed, the parts lock in place.
- See the next screenshot for the solution.

- Take the BLOWTORCH and SWORD from the hidden compartment.
Attic
- Use the BLOWTORCH to clear away the cobwebs.
Inside Attic
- Look at the charging battery (A). Take the TOKEN.
- Zoom in on the open air cage (B). Use the CAR REMOTE to summon the truck. The FAN is automatically added to inventory.
- Play the hidden object scene on the mannequins.
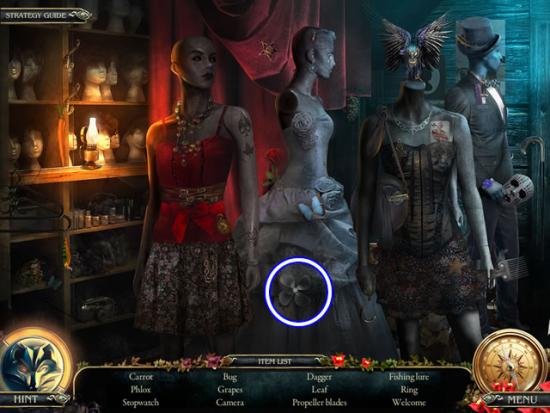
- Find the listed objects. The PROPELLER is added to inventory.
Knight’s Corridor
- Use the WRENCH to remove the bolts on the stool.
- Look at the underside of the stool. Place the TOKEN on the design to open a puzzle.
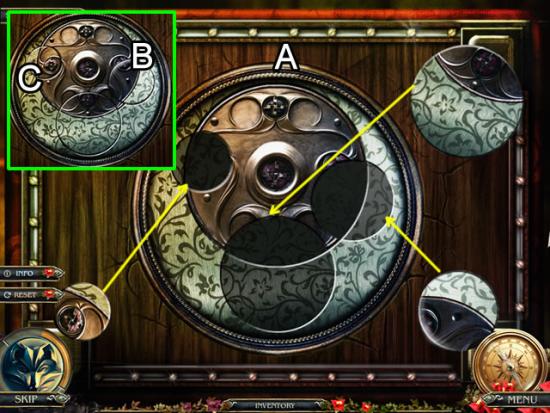
- Rotate the gold disk (A) to form the three smaller circles.
- Place the small, large and medium disks into the correct inset.
- Rotate the medium disk (B) to align its design with the gold disk.
- Rotate the small disk (C) to align its design with the gold disk.
- Take the FISHING LINE from the niche.
Main Corridor
- Inspect the statues on the left wall.
- Put the CROWN on the king. Give the knight the SWORD. Give the lady the FAN.
- Zoom in on the compartment to start a puzzle.
- Place the pieces so there are no overlapping pieces. A correctly place piece will lock into position. See the next screenshot for the solution.
- Go down the steps to the fountain.
Fountain
- Look at the water in the fountain.
- Use the FISHING LINE to retrieve the CORKSCREW.
- Play the hidden object scene.
- Find the listed objects. The STATUE is added to inventory.
Child’s Room
- Place the BABY CHAIR in the cradle (A). BRANDON is added to inventory.
- Look at the doll house (B). Use the CORKSCREW to remove the wooden bolt.
- Play the hidden object scene.
- Collect the listed objects. The SWITCH is added to inventory.
Fountain
- Place the SWITCH on the electrical panel.
- Drag the dial to “Off”. Take the JUMPER CABLES.
Inside Attic
- Zoom in on the charging unit.
- Place the JUMPER CABLES on the battery (A). Flip the switch on the charging unit (B).
- Take the CHARGED BATTERY.
Garage
- Enter the car.
- Give BRANDON to Luisa (A).
- Inspect the map (B). Take the SMALL SAW.
Workshop
- Put the PROPELLER in the generator.
- Take the WIND GENERATOR.
Castle Entrance
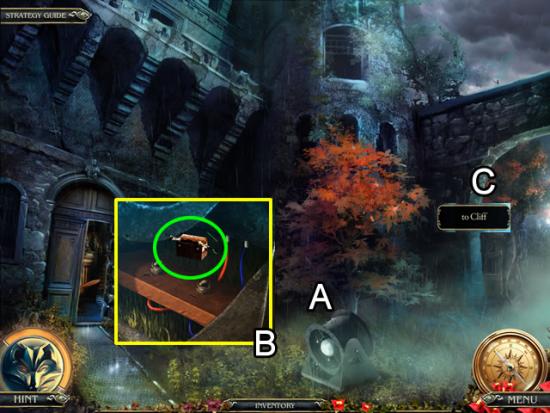
- Place the WIND GENERATOR on the ground (A).
- Attach the CHARGED BATTERY (B) to clear the fog.
- Go to the cliff.
Cliff
- Play the hidden object scene. The STATUE is added to inventory.
- Look at the stand of bamboo.
- Use the SMALL SAW to cut off a BAMBOO STICK.
Fountain
- Use the BAMBOO STICK to reach the bag on the statue.
- Pick up the CHISEL from the open bag.
Cliff
- Zoom in on the tree.
- Use the CHISEL to remove the PLASTIC CARD.

Garage
- Examine the glove compartment (A).
- Use the PLASTIC CARD to open the door (B).
- Take the HEX KEY (C).
- Look at the ignition (D).
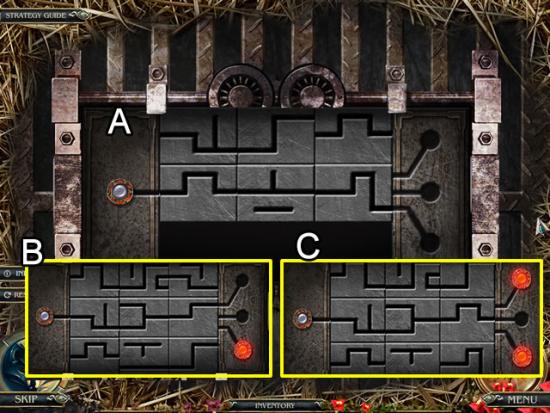
- Use the HEX KEY to remove the panel and open a puzzle.
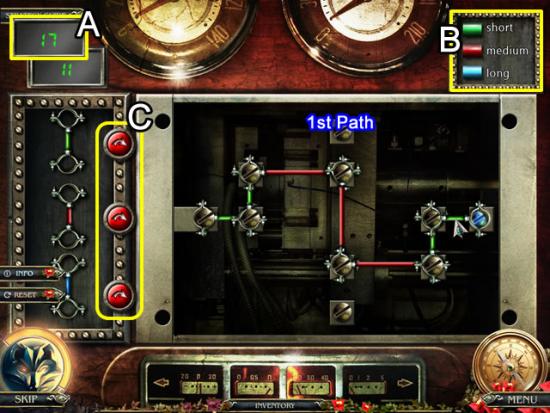
- The goal is to find a path, one panel at a time, between three panels using 17 or less connections.
- The counter (A) displays the remaining connections available. The legend (B) shows the length of each color wire. Use the arrows (C) to switch a planned placement between horizontal and vertical. Connections cannot be diagonal. Making an incorrect connection will reset all connections and return to the first panel.
- The above screenshot shows the solution for the first set of connections.
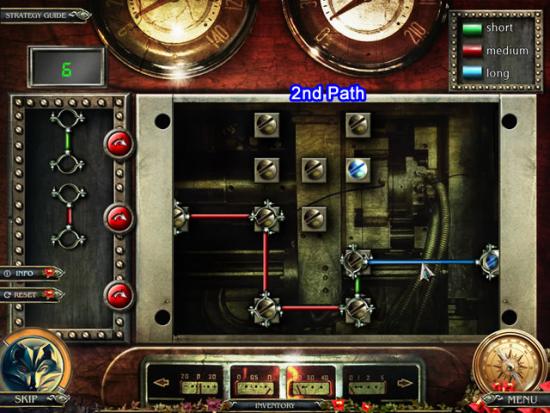
- The above screenshot shows the solution for the second set of connections.
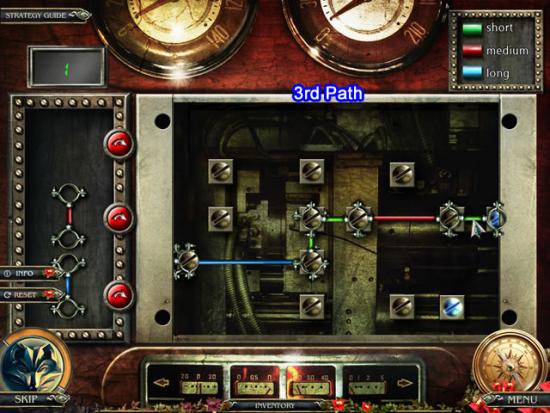
- The above screenshot shows the solution for the last set of connections.
- Completing this puzzle opens a new puzzle.
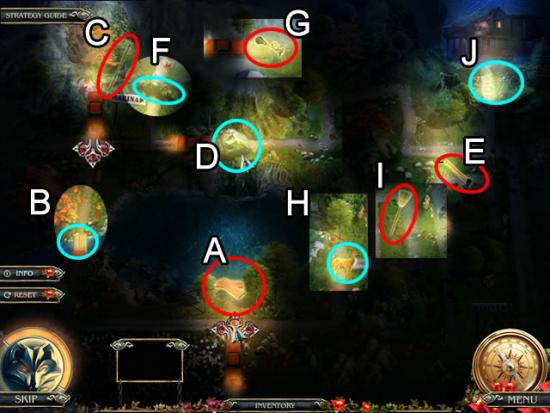
- The goal is to navigate the car to the fisherman’s hut. Pick up items to help eliminate the hazards along the way. Use the arrows on the car to direct it.
- Solution: Pick up the BOARDS (A). The boards automatically bridge the gap in the stream (B). Get the LEVER (C). Use the lever to remove the rock (D). Pick up the AXE (D) to remove the log across the road (F). Pick up the HORN (G) to scare away the deer (H). Take the BROOM to brush away the cobwebs (J) blocking the path to the hut.
Chapter 6: Helping Gray
Fishing Pier
- Look in the car trunk (A). Take the LUG WRENCH and FUEL CAN.
- Examine the tire (B). Use the LUG WRENCH to remove the FLAT TIRE. Take the PIECE OF RUBBER.
- Enter the shed on the left.
Shed
- Look at the barrel (A). Pick up the FUNNEL next to the barrel. Fill the FUEL CAN from the barrel. Take the GAS CAN.
- Place the PIECE OF RUBBER in the hot pan on the stove (B). Take the MELTED RUBBER.
- Place the FLAT TIRE on the rods on the wall (C). Use the PLIERS to remove the nail (1). Pour the MELTED RUBBER over the hole in the tire (2). Attach the air hose (3) to the valve stem on the tire. Pump (4) up the INFLATED TIRE.
Fishing Pier
- Look at the gas tank opening (A). Insert the FUNNEL. Pour the contents of the GAS CAN into the tank.
- Inspect the wheel (B). Put the INFLATED TIRE on the car. Use the LUG WRENCH to tighten the lug nuts.
- Enter the car to return to the garage.
Garage
- Pick up the STATUE from the floor of the garage.
Fireplace Room
- Inspect the fireplace mantel. Place the three STATUES on the pedestals to start a puzzle.
- The goal is use the right and left arrows at the base of the three statues to position the red light in the center.
- Solution. Statue (A) – right, left, right. Statue (B) – left, right. Statue (C) – right, left, right, right, right.
- Look at the photograph that appears (D) to transport to Siberia.
Caine’s Bite
- Pick up the TWINE on top of the chest.
- Go to the right to the tree.
Tree
- Go forward to the yard.
Yard
- Take the PITCHFORK from the snowman.
Tree
- Zoom in on the haystack.
- Remove some STRAW (A).
- Use the PITCHFORK to move the hay (B) and uncover a case (C).
- Zoom in on the case to open a puzzle.
- The goal is to remove the laces. Only the top most lace can be removed.
- Look at the numbers on the laces in the screenshot for the order they should be removed.
- Take the GLASS and RIFLE BOLT.
- Inspect the swing. Use the GLASS to free the SKI.
Yard
- Examine the sled.
- Place the SKI on the sled.
Stable Entrance
- Dig the TONGS out of the snow (A).
- Pick up the LOG by the stump (B).
Stable
- Dig around in the hay (A) to uncover the ORDER.
- Pick up the COUNTERBALANCE (B).
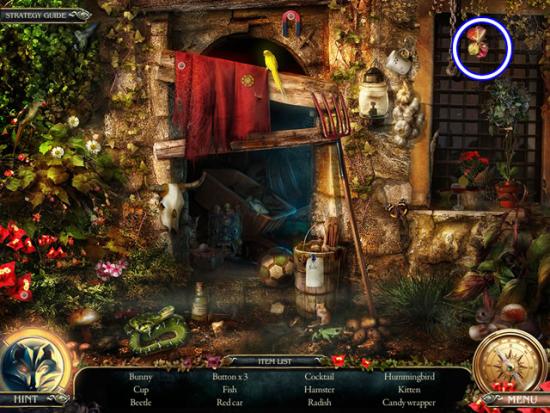
- Play the hidden object scene in the hayloft.
- Find the listed objects. The BAG is added to inventory.
Yard
- Place the COUNTERWEIGHT on the hook on the well (A).
- Take the BUCKET (B).
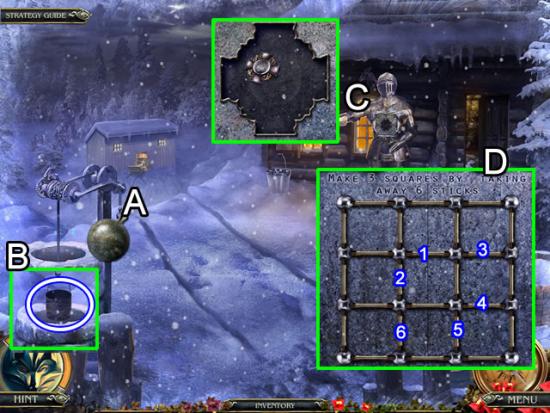
- Insert the ORDER in the center of the knight’s chest (C) to open a puzzle.
- The goal is to form three squares by removing six sticks. See the above inset for the solution (D).
- Take the TORCH.
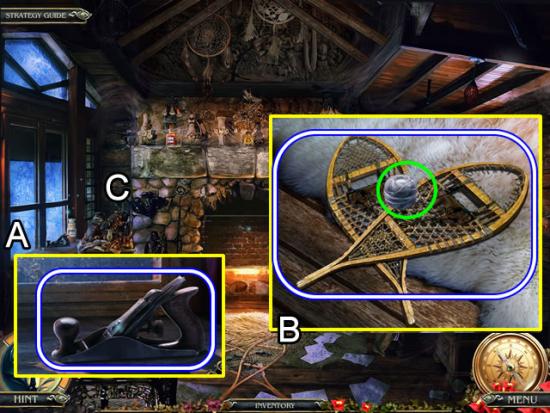
House of Healer
- Take the PLANE from the window sill (A).
- Examine the snowshoes (B). Use the TWINE to repair the SNOWSHOES.
- Play the hidden object scene on the table.

- Find the listed objects. The FUR COAT shows it goes to inventory but it is actually worn.
Stable
- Place the LOG on the work table.
- Use the PLANE to create an AX HANDLE.
Tree
- Place the SNOWSHOES on the path on the left to open the forest location.
Forest Lake
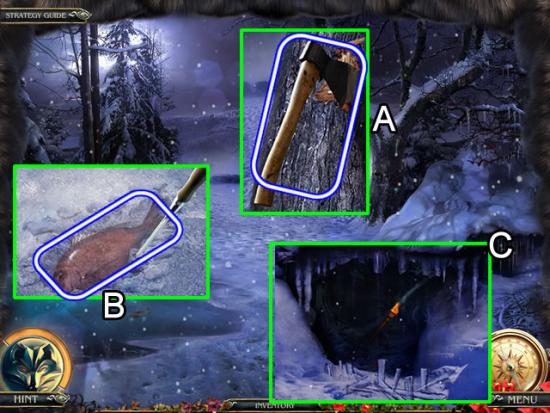
- Zoom in on the tree (A). Insert the AX HANDLE in the ax head. Take the AX.
- Use the CHISEL to remove the frozen FISH from the lake.
- Remove the icicles from the bear’s den (C) with the PITCHFORK. Light the area with the TORCH.
Bear’s Den
- Examine the herbs (A). Click an herb sprig and then click its match to remove them from the board. Remove all the herbs to find the THISTLE.
- Use the TONGS to spread the gap in the cracked log (B). Take the FLAG.
- Play the hidden object scene.
- Find the listed objects. The MUZZLE is added to inventory.
Tree
- Give the FISH to the cat.
- Take the ASH BERRY branch from the bird.
Stable Entrance
- Put the FLAG on the mailbox (A). Take the HEXAGONAL BUTTONS from the mailbox.
- Zoom in on the stump (B). Use the AX to split the log in half. Split each half into four pieces of FIREWOOD.
Caine’s Bite
- Place the RIFLE BOLT on the rifle (A). Click to open the chamber. Take the SILVER BULLET.
- Put the MUZZLE on the wolf (B).
- Put the wolf in the SACK (C). Take the muzzled, bagged WOLF.
- Inspect the lock on the chest (D). Add the HEXAGONAL BUTTONS to open a puzzle.
- The goal is to place the tokens so the number of tokens touching each one reflects the number on the token. See the next screenshot for the solution.
- Take the EMPTY SYRINGE.
House of the Healer
- Stoke the fire in the fireplace with the STRAW and FIREWOOD.
- Put the BUCKET on the hook over the flames.

- Add the ingredients to make the potion (A): SILVER BULLET, THISTLE and ASH BERRY.
- Fill the EMPTY SYRINGE with the potion to get a FULL SYRINGE (B).
- Place the WOLF on the bed. Stick the FULL SYRINGE of potion in the wolf.
Forest Lake
- Release the cured WOLF into the wild.
Congratulations! You have completed playing Grim Tales: The Legacy Collector’s Edition. Bonus content and an extra chapter are now available from the Bonus Content tab on the main menu.
Collector’s Edition Bonus Play
Street with the Stairs
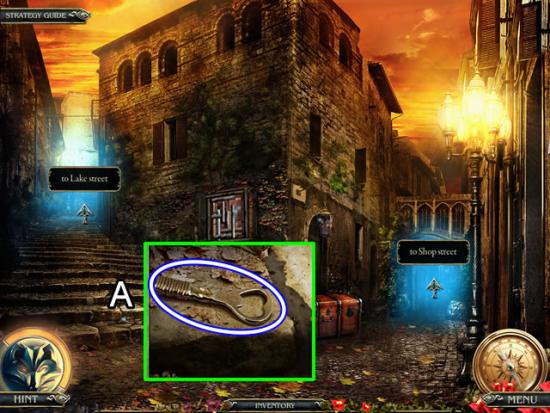
- Inspect the steps (A). Take the OPENER.
- Go right.
Shop Street
- Pull the dangling rope by the building on the right.
- Pick up the RAG that falls to the ground.
Lake Street
- Enter the kitchen of the house on the right.
- Go up the stairs to the painter’s workshop.
Painter’s Workshop
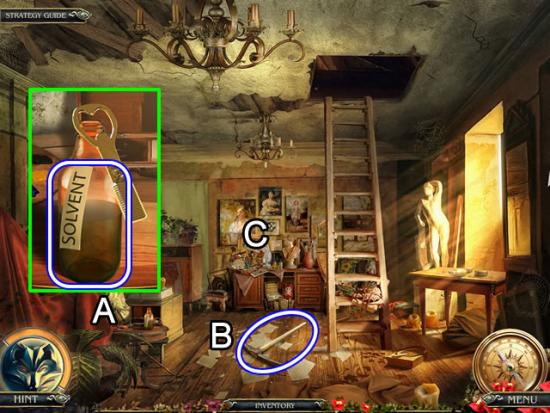
- Zoom in on the table (A). Use the OPENER to remove the top of the SOLVENT.
- Take the PICK AX on the floor (B).
- Play the hidden object scene (C).
- Find the listed objects. The Wooden Board is added to inventory as a WOODEN BAR.
- Go up the ladder.
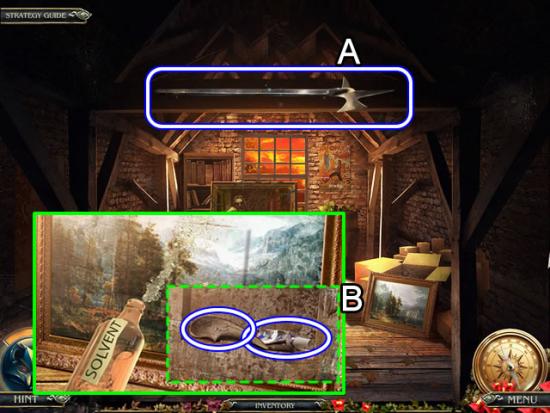
Isabelle’s Attic
- Click anywhere to open the scene.
- Take the HALBERD from the beam (A).
- Inspect the painting (B). Use the SOLVENT to reveal a hidden panel. Take the WING and BLUE PAINT from the niche.
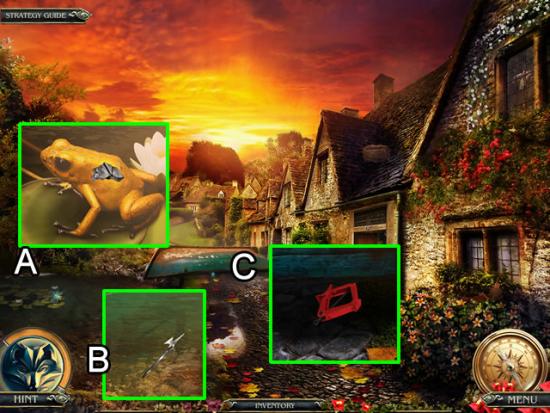
Lake Street
- Use the RAG to pick up the FROG on the lily pad (A).
- Retrieve the submerged HOIST with the HALBERD (B).
- Put the HOIST under the boat (C) to turn it over.
- Play the hidden object scene in the boat.
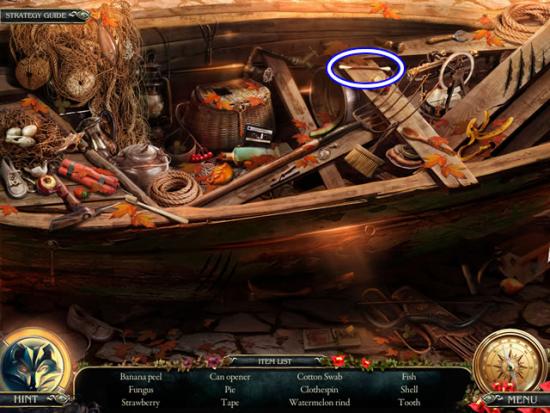
- Find the listed objects. The COTTON SWAB is added to inventory.
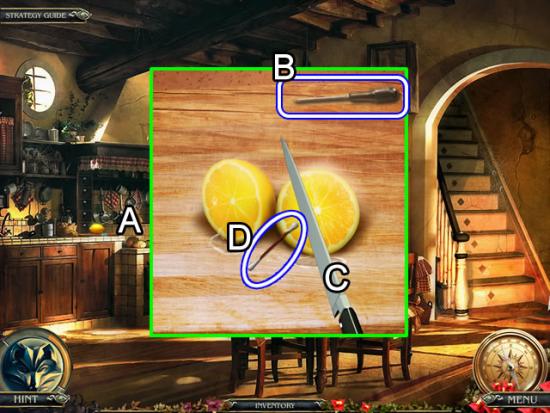
Kitchen
- Zoom in on the cutting board (A).
- Pick up the SCREWDRIVER (B).
- Use the knife to cut the lemon (C). Place the COTTON SWAB in the juice (D). Take the COTTON SWAB WITH LEMON JUICE.
Street with the Stairs
- Use the PICK AX on the loose step to reveal SCISSORS (A).
- Inspect the window (B). Add the WOODEN BAR to the window. Click each bar to retract them. Order is not important.
Room behind the Window
- Examine the bas-relief angel on the right wall. Place the WING in the impression to open the panel. Take the PUZZLE CUBES.
Kitchen
- Zoom in on the puzzle board on kitchen cupboard.
- Place the PUZZLE CUBES on the board to start a puzzle.
- The goal is to set the symbol pieces into the grid so that matching symbols align in columns. See the next screenshot for the solution.
- Play the hidden object scene in the shelves.
- Find the listed objects. The Key is added to inventory as a Z-SHAPED KEY.
Room behind the Window
- Inspect the moose head.
- Use the Z-SHAPED KEY to open its mouth.
- Take the BADGE.
Shop Street
- Look at the car headlight.
- Use the SCREWDRIVER to remove the headlight cover.
- Take the MINI BULB.
- Look at the police station door.
- Place the BADGE in the impression to open a puzzle.
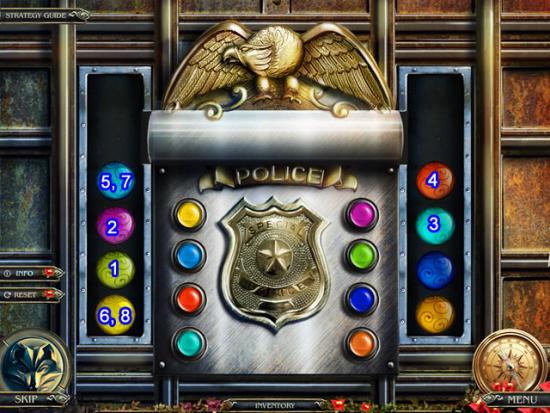
- The goal is to match the balls in the tubes to the colored buttons on each side of the badge.
- The best strategy is to work one tube at a time. Notice the right tube already has the first two colors in order. Solve for this tube first.
- Solution. Click the balls in the order shown above.
- Enter the police station. Go into the cell.
Cell
- Use the PICK AX to remove the brick (A). Take the BULLET.
- Knock the bag off the pole with the HALBERD.
- Cut open the pillow (C) with the SCISSORS. Take the PHOSPHORUS.
- Play the hidden object scene in the corner (D).
- Find the listed objects. The METAL OWL is added to inventory.
- Return to the outer room.

Police Station
- Pick up and open the gun (A). Insert the BULLET in the chamber. Close the gun. The PISTOL automatically goes to inventory.
- Read the information on the desk (B).
- Take the LADDER (C).
Lake Street
- Place the LADDER against the house.
- Look in the nest.
- Take the KEY.
Street with the Stairs
- Zoom in on the lantern on the outside of the building.
- Use the KEY to unlock the lantern.
- Take the BULB.
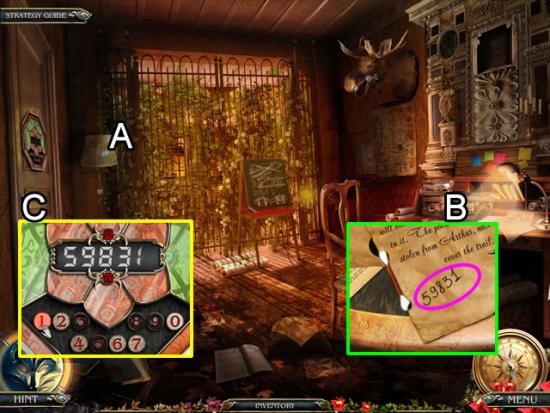
Room behind the Window
- Put the BULB in the floor lamp (A)
- Look at the desktop (B). Use the COTTON SWAB WITH LEMON JUICE on the paper to counteract the disappearing ink. Note the numbers: 59831.
- Look at the door lock (C). Use the keypad to input the code and open a puzzle.
- The goal is to match the tokens and symbols.
- The best approach is to follow the symbol loops to anticipate the symbol position. Work on one symbol to align it, reset the board and repeat for another symbol. A movement pattern emerges.
- One Solution: E, A, B, B, D, A, D, A, A, B, B.
Offender’s Room
- Note that it is too dark to see.
Room behind the Window
- Click the floor lamp to move it into the offender’s room.
Offender’s Room
- Play the hidden object scene.
- Find the listed objects. The Coin with Dragon is added to inventory as a COIN.
Isabella’s Attic
- Insert the METAL OWL in the inset in the painter’s box to open a puzzle.
- The goal is to swap the colors until no two colors in the mosaic touch. See the next screenshot for one solution.
Painter’s Workshop
- Zoom in on the work table.
- Add the BLUE PAINT, RED PAINT, FROG and PHOSPHORUS to the table.
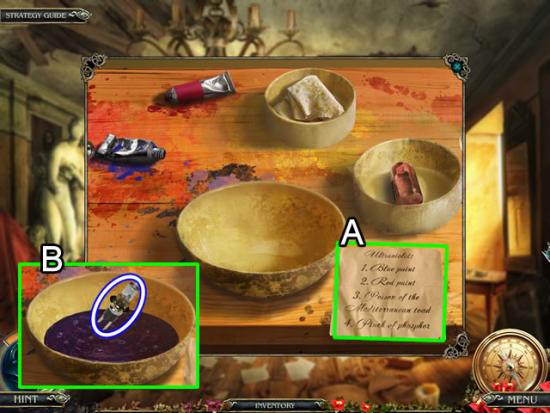
- Add the ingredients to the bowl in the order listed on the sheet (A).
- Place the MINI BULB in the solution. Take the ULTRAVIOLET LAMP.
Shop Street
- Use the SCISSORS to cut open the bag and take the COIN.
Police Station
- Zoom in on the safe.
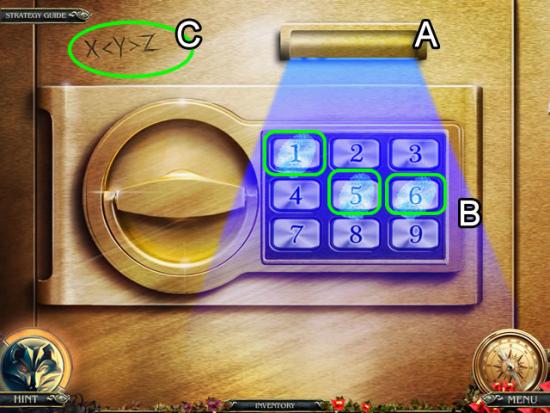
- Insert the ULTRAVIOLET LAMP in the slot (A) to illuminate the fingerprints on the keypad (B).
- Use the equation (C) to determine the order to press the keys (X is less than Y. Y is greater than Z).
- Solution: 1-6-5.
- Opening the safe starts a puzzle.

- The goal is to place the badges in the correct location based on the photo fragments.
- Compare the patterns on the fragments and other clues shown in the fragments to place the badges. The following analyzes the fragments.
- A. Badge 4 comes before badge 1.
- B. Badge 3 is before badge 8.
- C. Badge 7 is on the top shelf before badge 5 and above badge 3.
- D. Badge 1 is next to a hinge.
- E. Badge 5 is before badge 1.
- F. Badge 8 is before badge 6.
- Combine the knowledge in the fragments to place the badges.
- Top row solution: 7, 5, 4 1.
- Bottom row solution: 3, 8, 6 2.
- Take the COIN from the safe.
Offender’s Room
- Use the PISTOL to shoot the lock off the desk drawer (A). Take the COIN.
- Move the mattress.
- Insert the four COINS in the slots matching their design (B).
- Click the photograph to transport to the stable.
Stable
- Open the hand (A) and take the BOTTLE.
- Use the SCISSORS to clip the threads on the pocket (B). Take the COIN.
- Exit the stable.
Lake
- Use the HALBERD to retrieve the ROPE in the pipe in the eaves of the stable.
Stable
- Use the ROPE to tie up the man.
- Take the CROSS-SHAPED KEY he was standing on.
- Exit the stable. Go right.
Market
- Access the cash register.
- Insert the CROSS-SHAPED KEY to open a puzzle.
- The goal is to turn all of the keys so all are showing “5”.
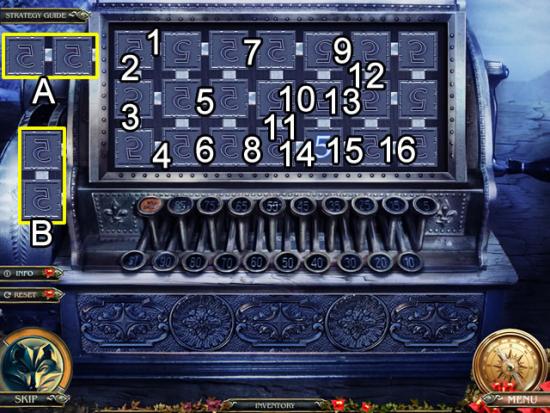
- Attempt to get pairs horizontally (A) or vertically (B) of the mirror image of a 5 to flip them.
- See above for the first set of moves.
- The last set of moves is shown above.
- Due to time constraints for completing this guide, the solution for this puzzle was taken from the Strategy Guide for the collector’s edition of this game.
- Take the WEIGHT and MATCHES.
- Put the WEIGHT on the scale pan (A). Get the COIN.
- Access the vending machine (B). Insert the two COINS. Take the NEWSPAPER.
Lake
- Zoom in on the crack in the ice by the boat.
- Insert the BOTTLE in the crack. Put the NEWSPAPER in the neck of the bottle. Light the newspaper with the MATCHES.
- Play the hidden object scene in the boat.
- Find the listed objects. The HORSE is added to inventory.
Stable
- Examine the grate in the floor.
- Place the HORSE in the grate inlay to open a puzzle.
- The goal is to create a path for the gem to each of the end slots.
- The first path is already plotted (A). Click the gem to send it on its way.
- Click the blocks until a path is established for the next gem (B).
- Click the blocks to create a path to the last slot (C).
- Take the WATCH.
- Watch the final cut scene. Give the WATCH to the man.
Congratulations! You have completed the bonus play for Grim Tales: The Legacy Collector’s Edition.

More articles...
-
Best Horror Games On Itch.io – July 2026
Across a bounty of subgenres. -
Haze Seas Accessories Tier List [Best Accessories to Equip]
The accessories with the best stat buffs in Haze Seas.