
Best Horror Games On Itch.io – July 2026
Across a bounty of subgenres.
Grow A Garden 2 Base Price List
What's the most valuable crop?![Evomon Types Guide [Strengths, Weaknesses, Resistance]](/wp-content/uploads/2026/06/evomon-types.jpg "Evomon Types Guide [Strengths, Weaknesses, Resistance]")
Evomon Types Guide [Strengths, Weaknesses, Resistance]
Your companion guide during battles.
![[Roblox] Evomon Shiny Hunting Guide – Including Prismatic and Pris Shinies!](/wp-content/uploads/2026/06/evomon-shiny-hunting-guide.jpg "[Roblox] Evomon Shiny Hunting Guide – Including Prismatic and Pris Shinies!")
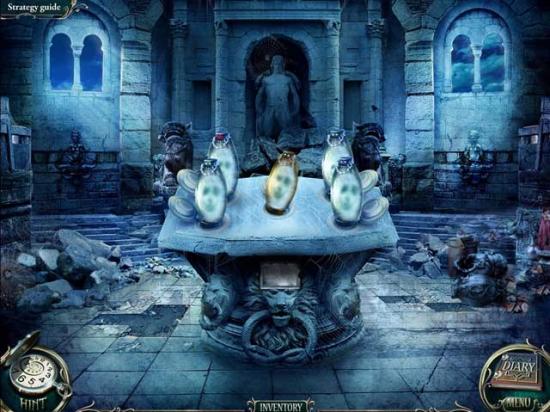
Grim Tales: The Bride Walkthrough
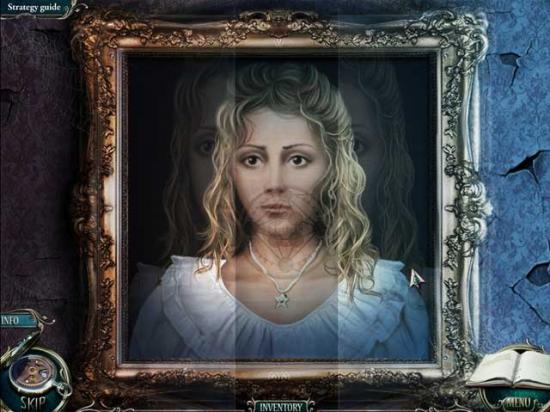
Welcome to the Grim Tales: The Bride Collector’s Edition walkthrough on Gamezebo. Grim Tales: The Bride is a hidden object adventure game played on the PC created by Elephant Games. This walkthrough includes tips and tricks, helpful hints, and a strategy guide for how to complete Grim Tales: The Bride Collector’s Edition.


- Prefer Gamezebo on Google

Grim Tales: The Bride – Game Introduction
Welcome to the Grim Tales: The Bride Collector’s Edition walkthrough on Gamezebo. Grim Tales: The Bride is a hidden object adventure game played on the PC created by Elephant Games. This walkthrough includes tips and tricks, helpful hints, and a strategy guide for how to complete Grim Tales: The Bride Collector’s Edition.
General Tips
- When starting the game, you can choose from one of three difficulty levels: Casual, Advanced, or Hardcore. The descriptions are as follows:
1. Casual mode- This mode is perfect for newer players and those who prefer the quicker reveal of a mystery to the challenge of an involved investigation. All significant game locations and interactions are marked with sparkles.
2. Advanced mode- This mode is for advanced players who are eager to play the role of detective and overcome obstacles without much help. There are no sparkle indicators or extra clues in this mode.
3. Hardcore mode- This mode is for those who are eager to play the role of a real detective taking part in a real investigation. There are no hints, no mini-game skips, and no sparkle indications.
- The Hint button is located in the bottom left corner of the screen. Depending on which difficulty mode you select, hints can either be used inside and outside of hidden object areas, or not at all. The same goes for puzzle skips: on easier difficulties, all puzzles can be skipped after an allotted amount of time has passed. For higher difficulties, the ability to skip puzzles has been removed altogether.
- There are no click penalties.
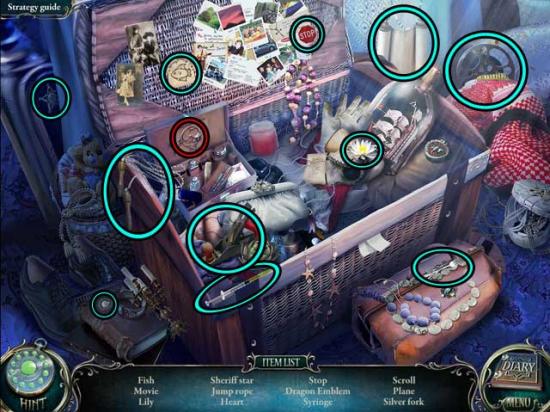
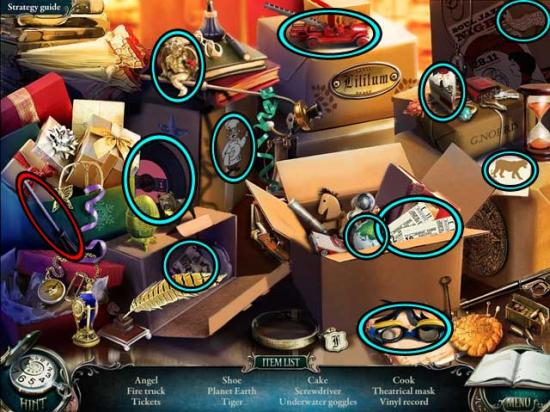
- Inventory items (or Key Items) can be found at the bottom of the screen. In the following walkthrough, they are identified with CAPS and circled in red in the screenshots below.
- Hidden object locations are not randomized, therefore all items have been circled for you in the guide below. Items insignificant to the story in these areas that must be found regardless are circled in blue.
- The Diary in the bottom right corner of the screen will keep track of developments in the story.
- Hidden object areas are a one-time occurrence per location and will not reappear twice in a location.
- The Menu can be accessed at any time during gameplay via the button beneath the Diary in the lower right corner of the screen.
- Bonus content can be accessed from the main menu. However, the bonus gameplay will not be unlocked until you complete the main story.
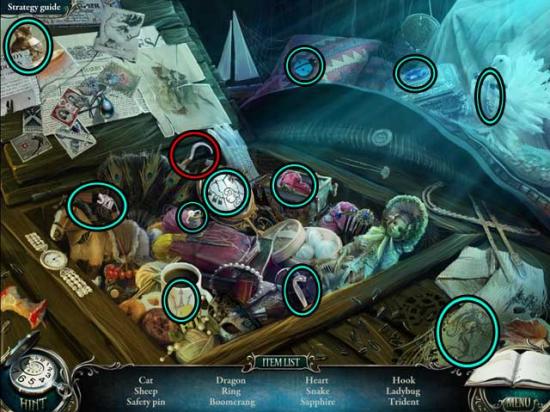
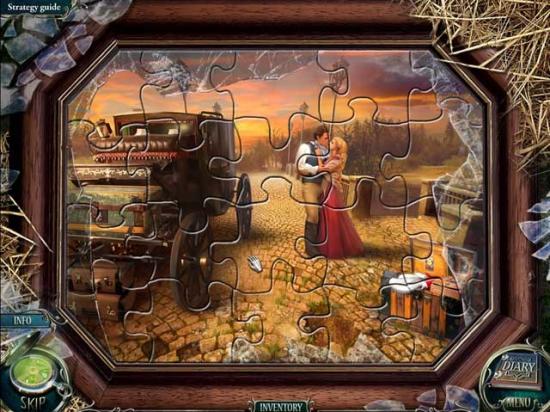
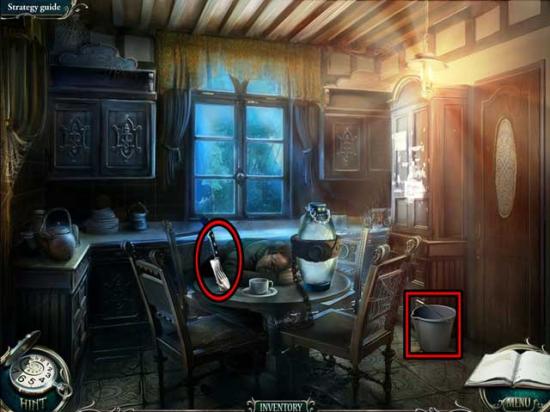
Chapter 1: The Ring
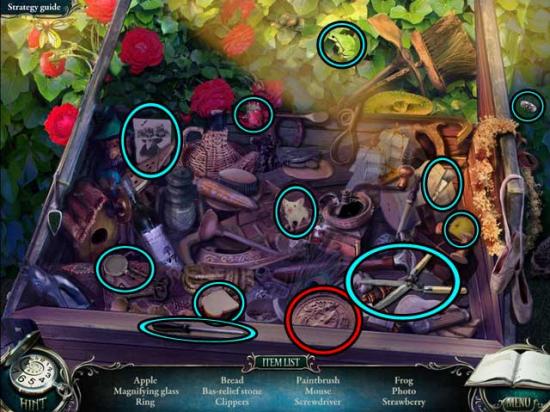
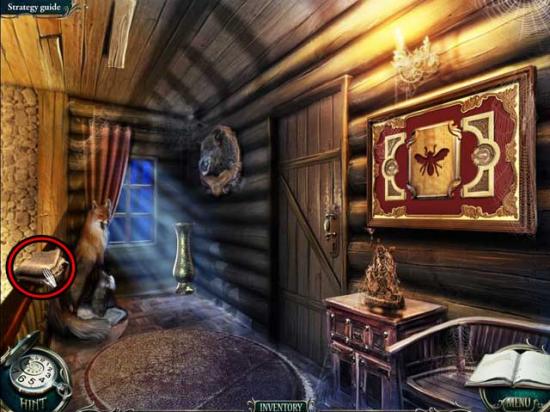
Entrance
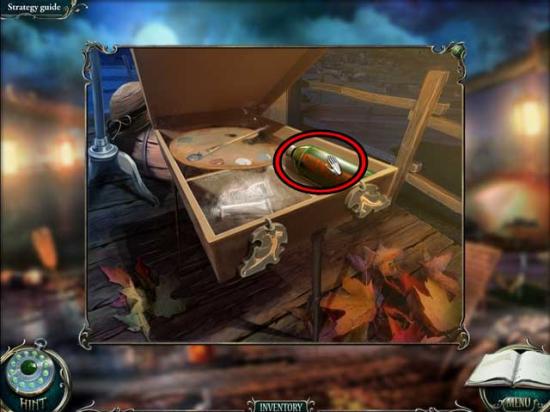
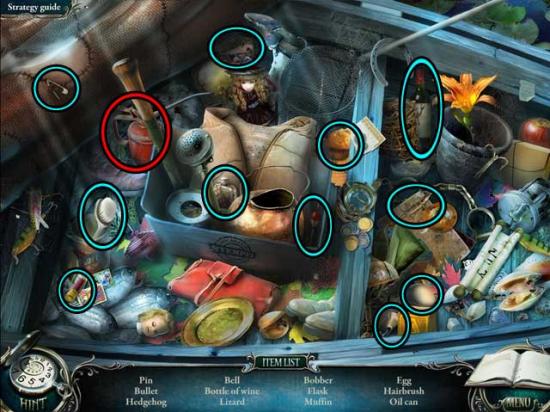
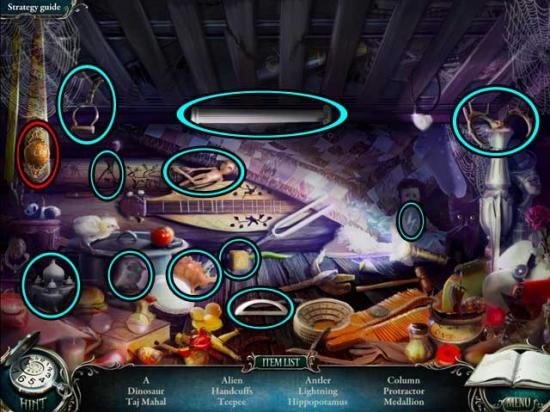
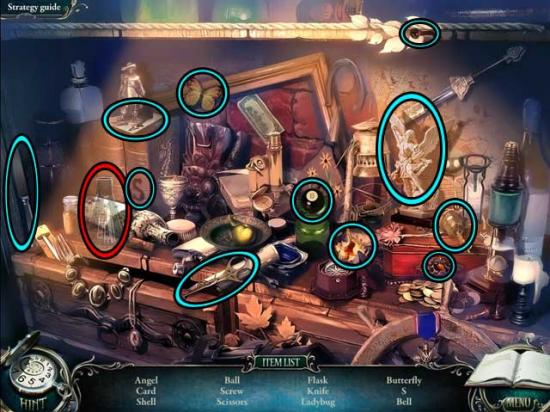
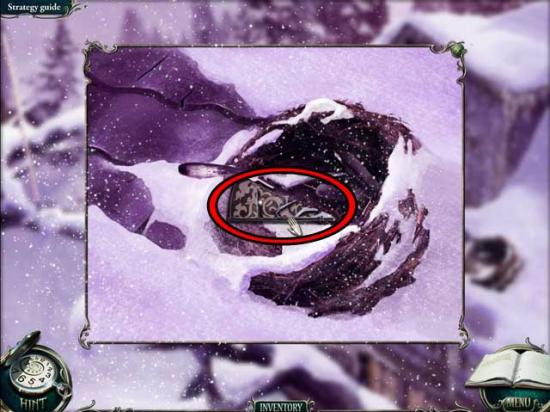
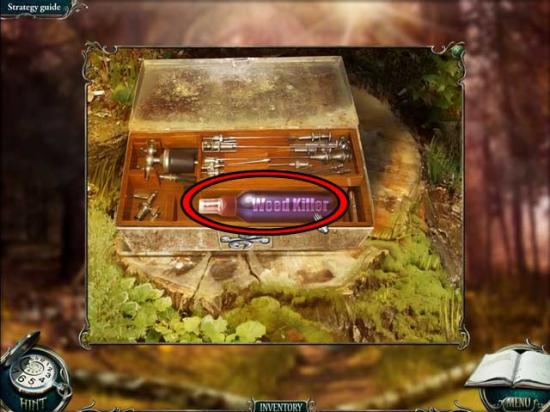
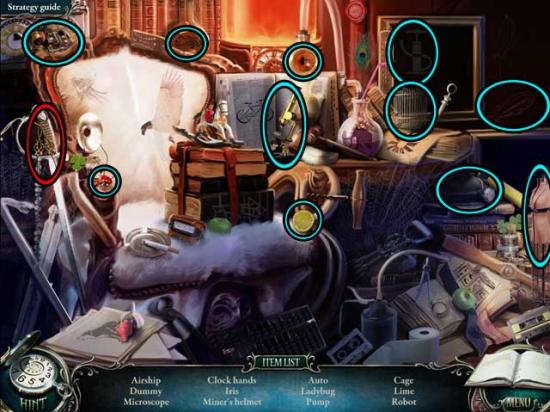
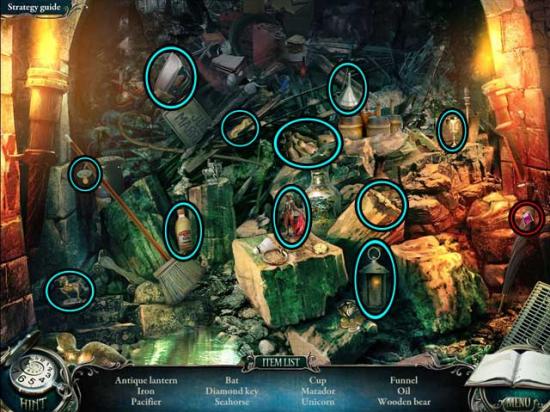
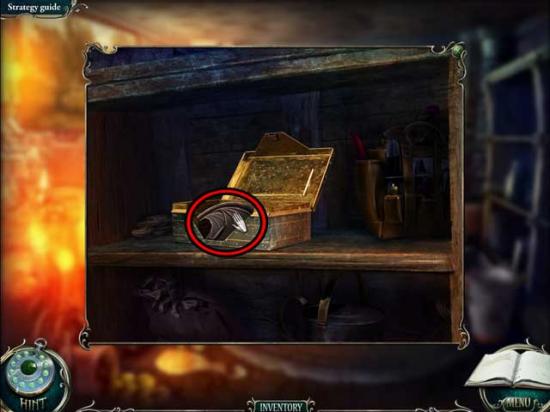
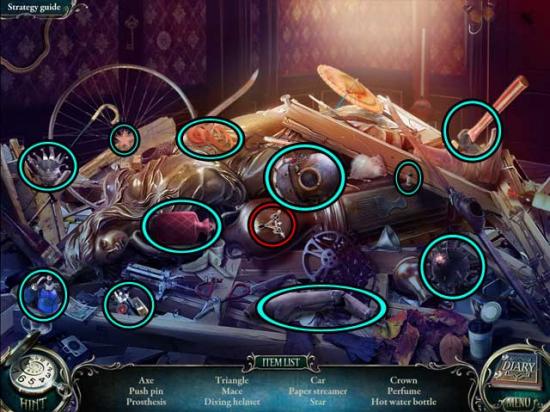
- Click on the toolbox on the right for a closer view.
- Find the items listed at the bottom of the screen. The Key Item has been circled in red.

- Upon completing the area, the BAS-RELIEF STONE will be added to your inventory.
- Click on the front door for a closer view. Use the BAS-RELIEF STONE on the cavity in the door to open it, then proceed inside.
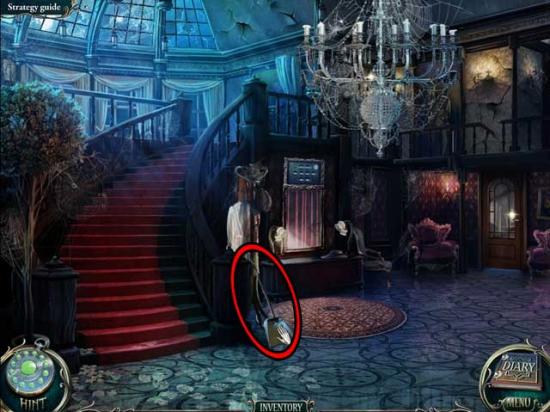
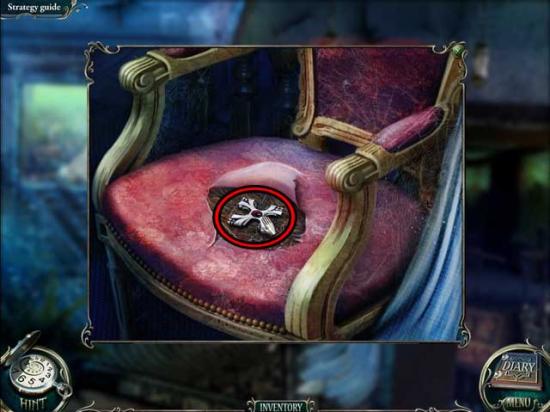
Drawing Room
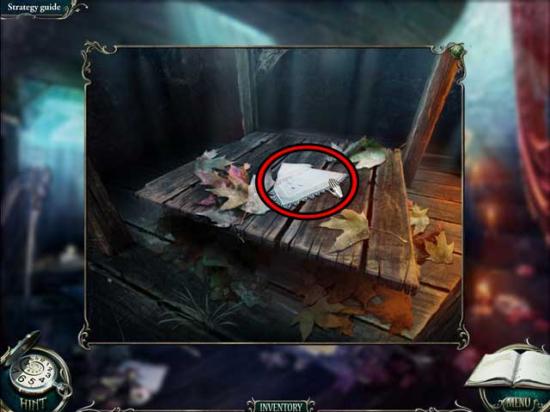
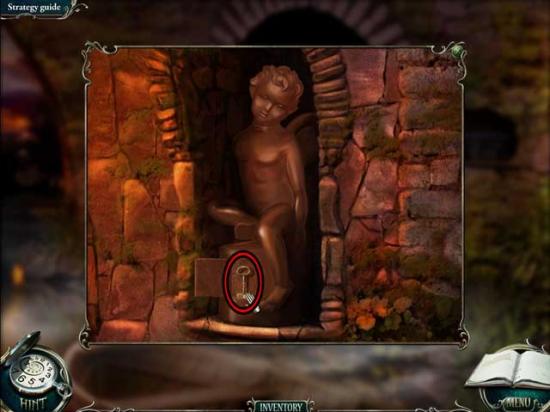
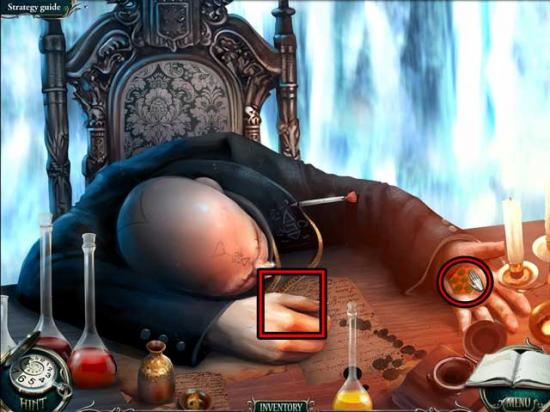
- Take a closer look at the chair where the figure was sitting. Click on the DOOR KEY to add it to your inventory.

- Examine the door on the left. Use the DOOR KEY on the lock to open it and gain access inside.
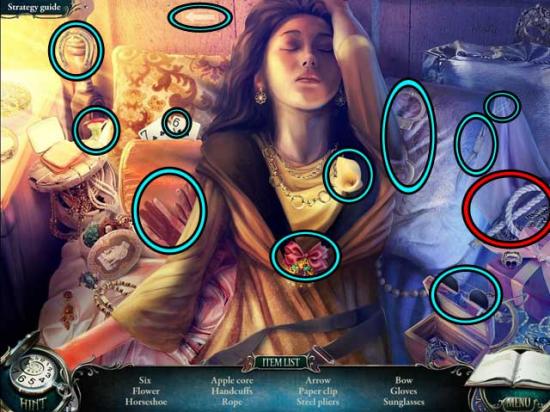
Luisa’s Room
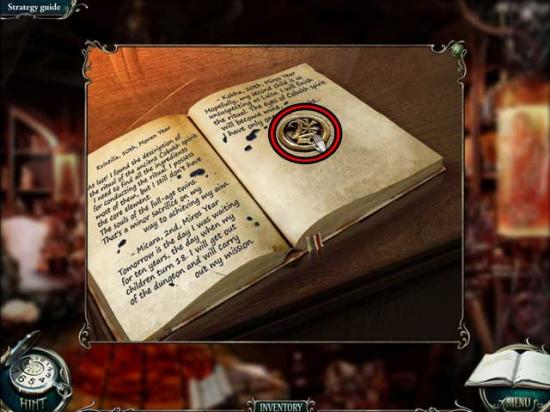
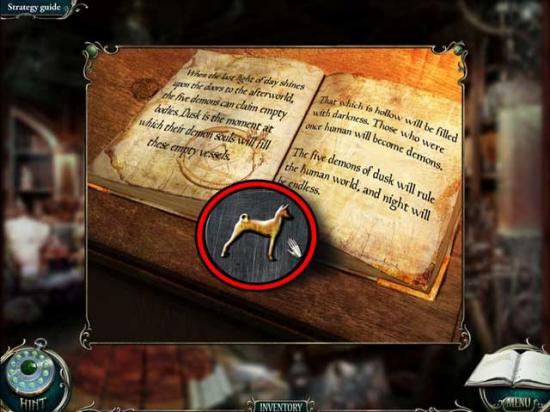
- Take a closer look at the large pillow lying on the bed. Click on the pillow to move it aside and reveal a diary. Open the diary to find a photo that will transport you to a new location.
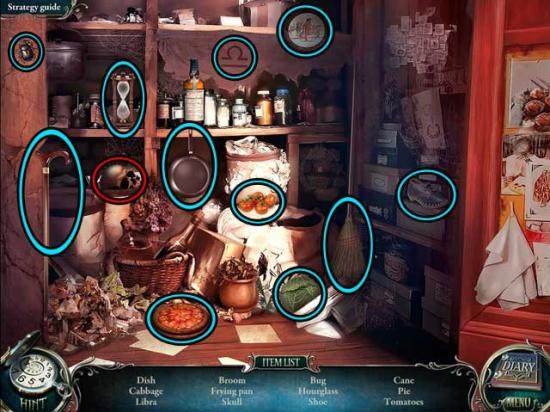
Rotunda
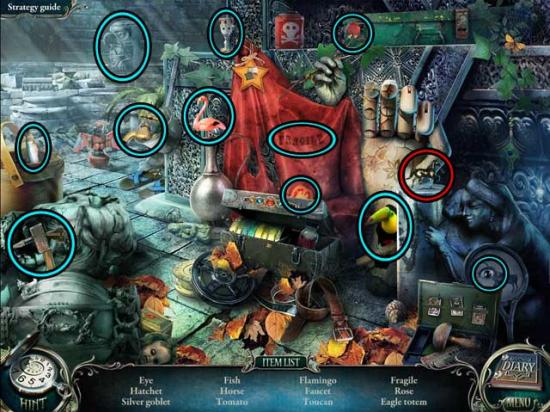
- Click on the objects/bush to the right of Luisa.
- Find the items listed at the bottom of the screen. The Key Item has been circled in red.
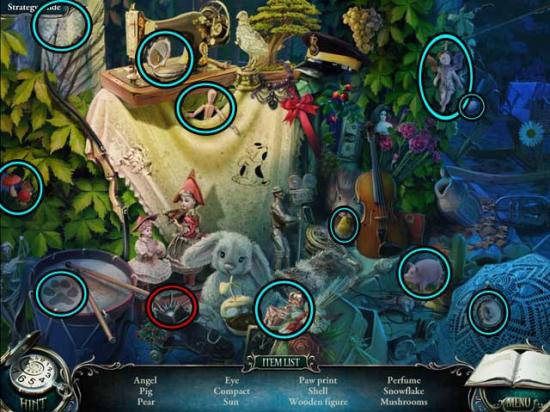
- Upon completing the area, the BAS-RELIEF PIECE 1/2 will be added to your inventory.
- Continue down the path to the left.
Church
- Take a closer look at the box on the left. Click on the LION to add it to your inventory.
- Open the panel on the front of the box and notice an incomplete puzzle. There’s nothing more you can do with this at the moment.
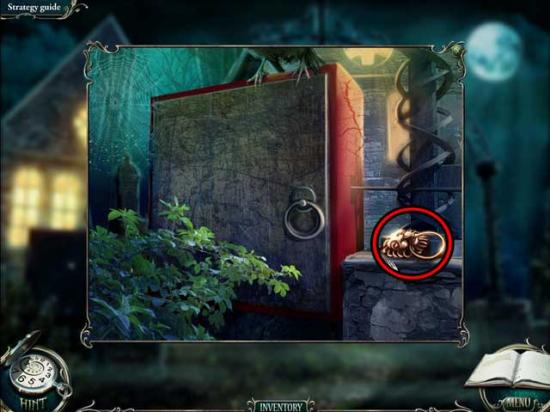
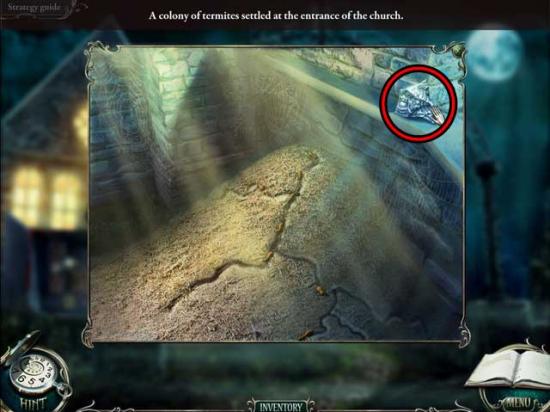
- Take a closer look at the termitary to the left of the church entrance. Click on the MOSAIC PIECE to add it to your inventory.
- Examine the closed door of the church. Use the LION on the outline on the door to gain access to the church.
Inside Church
- Notice the halberd on the right, though there’s nothing you can do with it just yet. Proceed forward to the holy man.
- Note the holy man, then click on the GOBLET to his right to add it to your inventory.
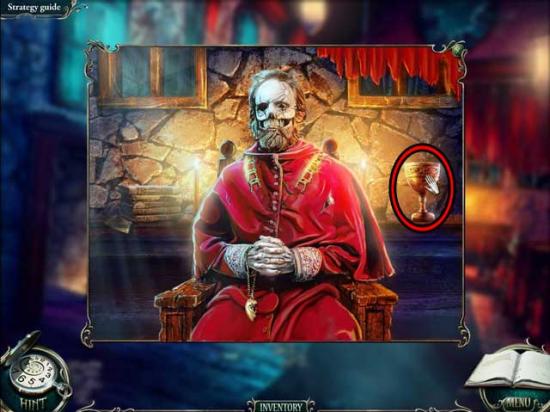
- Go through the door on the left to enter the basement.
Basement
- Click on the MACHETE lying on the ground to add it to your inventory.
- Take a closer look at the gold torch on the side of the stairs. Click on the GEAR to add it to your inventory.
- There’s a door at the back of the basement, but there’s nothing you can do in the next room just yet. Instead, head back to the outside of the church.
Church
- Take the path to the right of the church entrance to the cemetery.
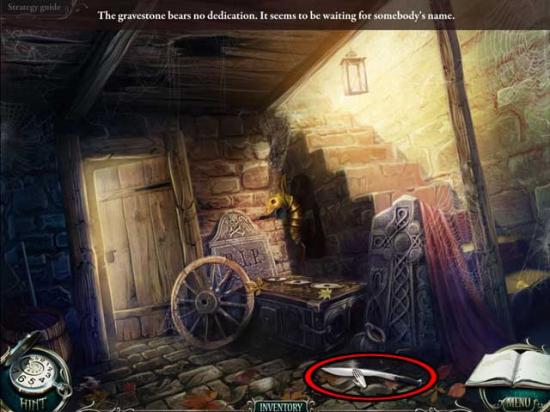
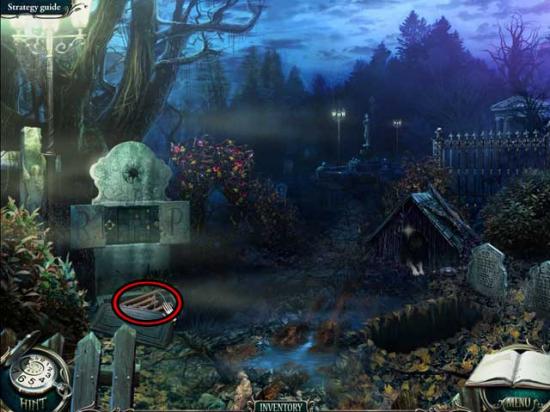
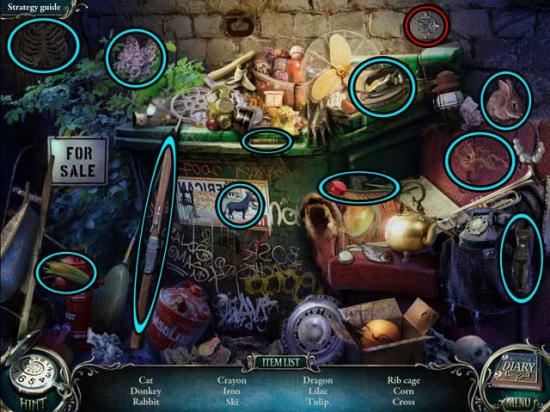
Cemetery
- Take a closer look at the bush with the pink roses to the right of the large R.I.P. gravestone. Use the MACHETE to clear the branches, then click on the ACORN to add it to your inventory.
- Use the MACHETE on the dead bushes between the bush with the pink roses and the dog house. Proceed down the newly found path to the fountain.
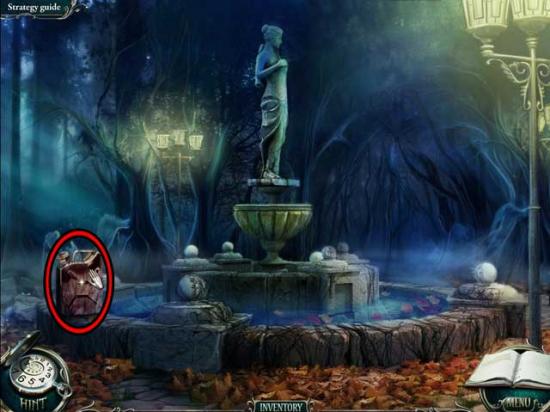
Fountain
- Take note of the various elements here, though there’s nothing more you can do at the moment.
- Proceed down the path to the left of the fountain to the tree.
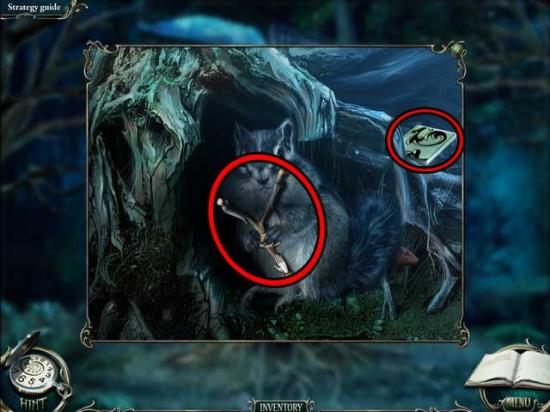
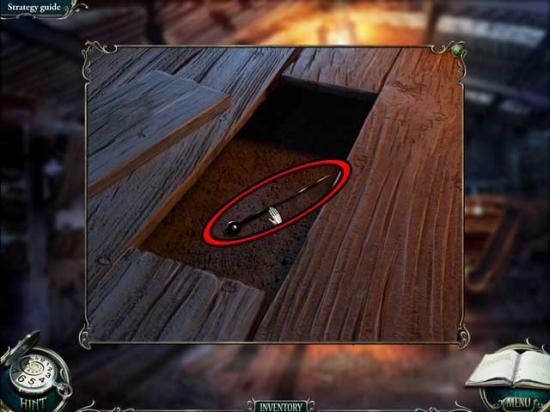
Tree
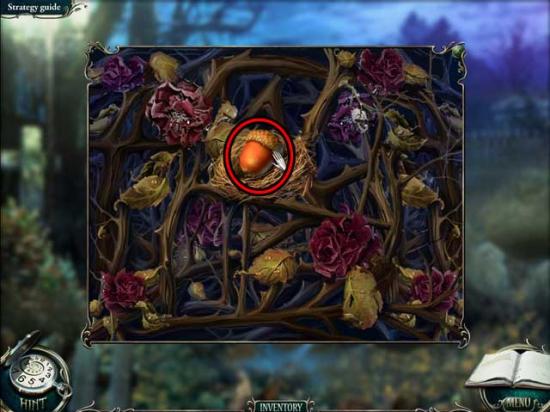
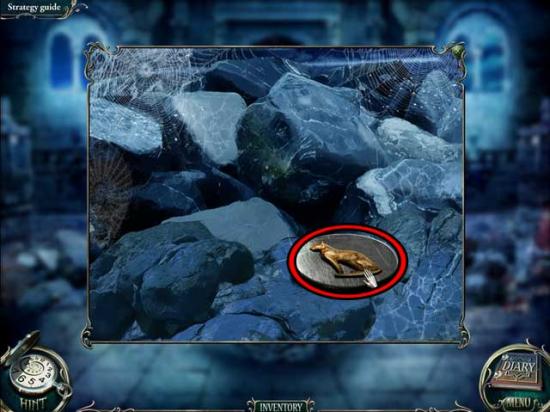
- Take a closer look at the roots of the tree. Use the ACORN on the chipmunk hiding within the hollow, then collect the SLINGSHOT from it. Don’t forget to also collect the PUZZLE PIECE before exiting the close-up.
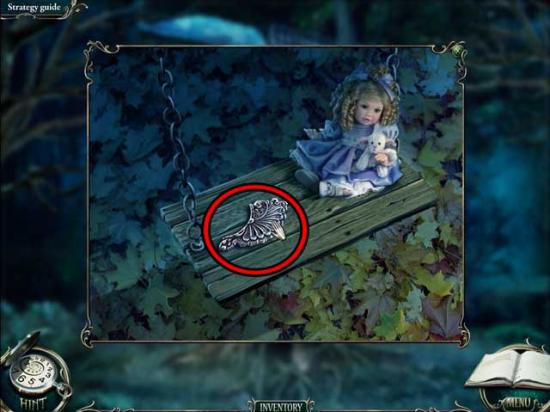
- Examine the swing on the right. Click on the PIECE OF MEDALLION 1/2 to add it to your inventory.
- Return to the church.
Church
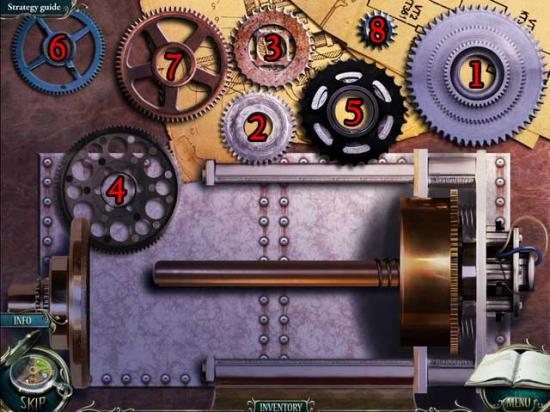
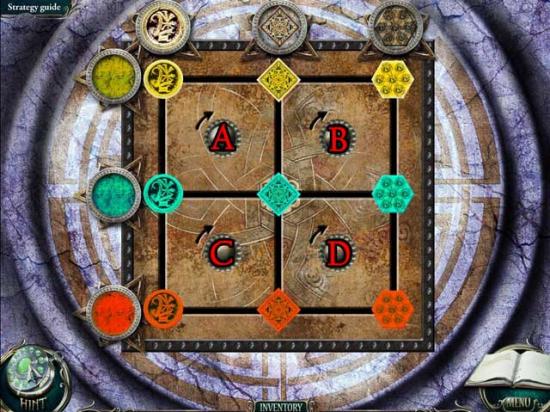
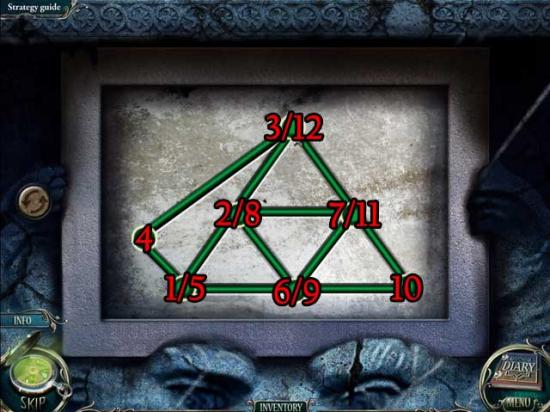
- Take a closer look at the box you saw earlier on the left. Take a closer look at the gears inside.
- Use the GEAR from your inventory on the box to trigger a puzzle.
- Set the gears in their correct locations. If the gear starts moving after you’ve placed it, it means it’s in the correct location. The solution is shown below.
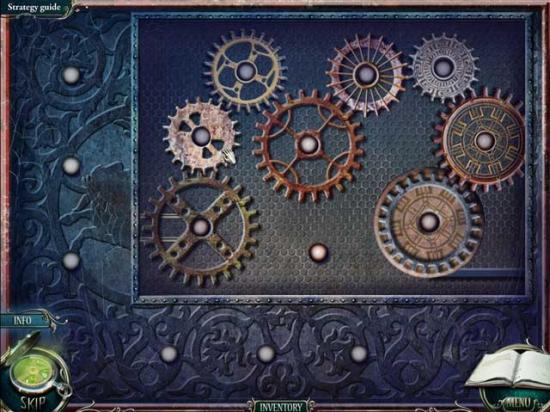
- Upon completing the puzzle, the skeleton that was hanging on the right will fall. Take a closer look. Click on the MEDALLION to add it to your inventory.
- Enter the church.
Inside Church
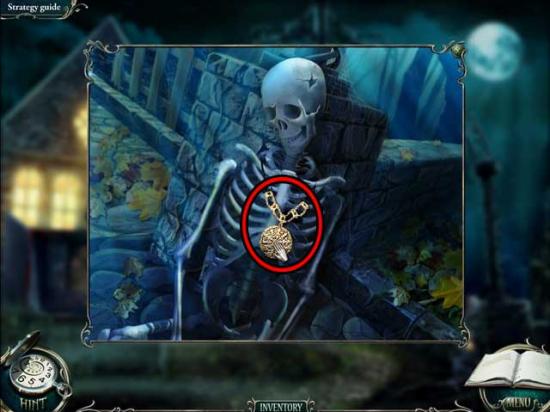
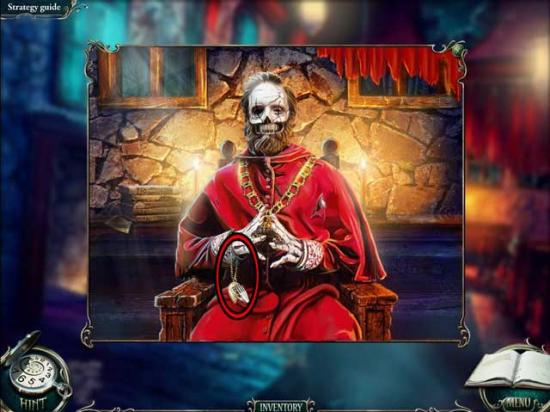
- Take a closer look at the holy man again. Use the MEDALLION on the missing segment in his necklace, then click on the HEART HALF 1/2 to add it to your inventory.
- Enter the basement.
Basement
- Proceed through the door at the back of the room.
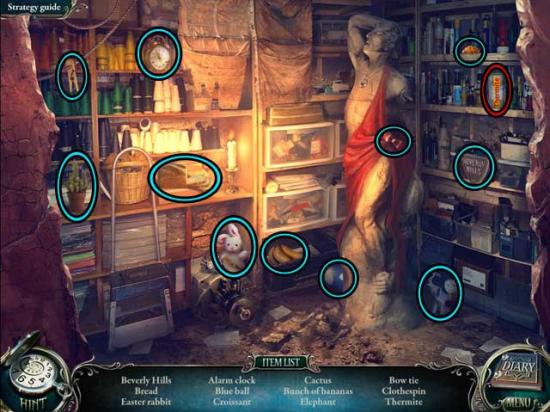
Small Room
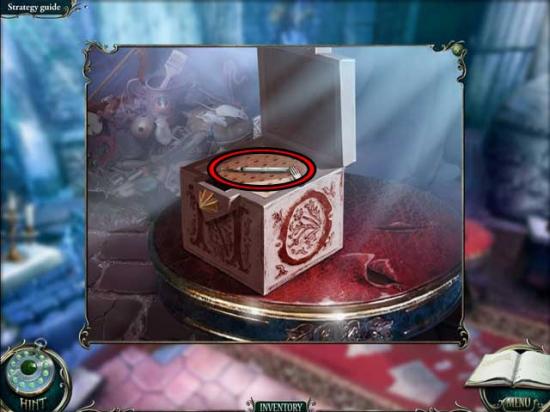
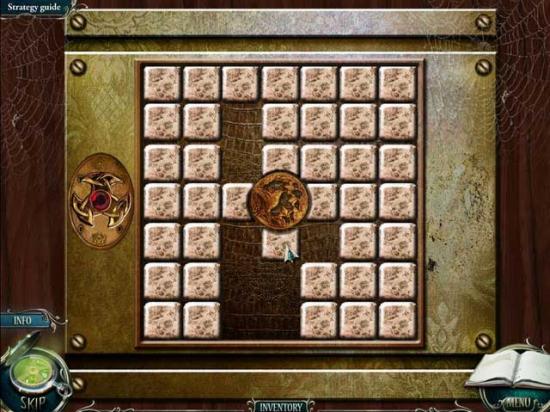
- Take a closer look at the cupboard at the back of the room. Use the PUZZLE PIECE on the puzzle to trigger it.
- Assemble the puzzle so that the image on the tiles becomes a whole. Drag the tiles from the right side then place them on the left, clicking to rotate them. Tiles that are on the border will have a slight grey line on the edge that belongs on the border, so use this to help find where each piece belongs. The solution is shown below.
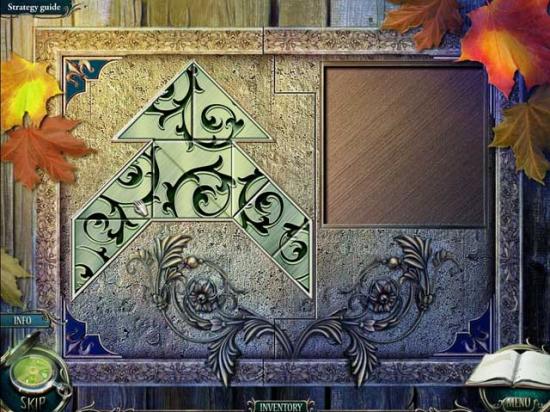
- Upon completing the puzzle, click on the RAKE inside the cupboard to add it to your inventory.
- Exit and proceed back to the fountain.
Fountain
- Use the RAKE on the leaves littering the fountain to clear them away, revealing a hidden object area.
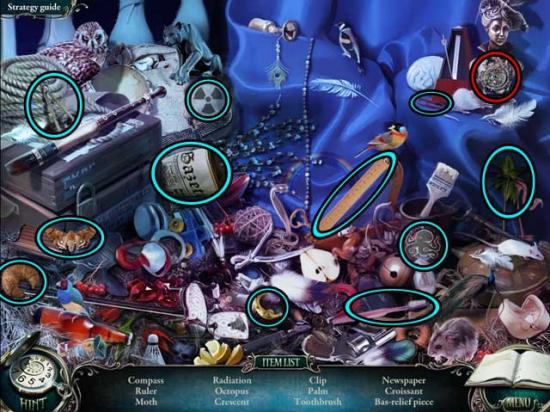
- Find the items listed at the bottom of the screen. The Key Item has been circled in red.
- Upon completing the area, the PIECE OF MEDALLION 2/2 will be added to your inventory.
- Go back to the church and enter the basement.
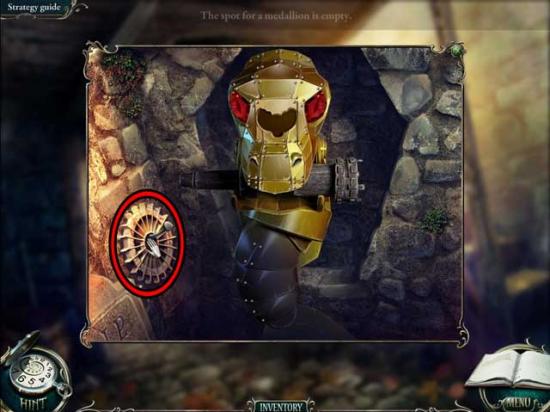
Basement
- Take a closer look at the torch on the wall/side of the stairs. Use the PIECE OF MEDALLION 2/2 on the indentation between the eyes, then collect the TORCH to add it to your inventory.
- Enter the small room.
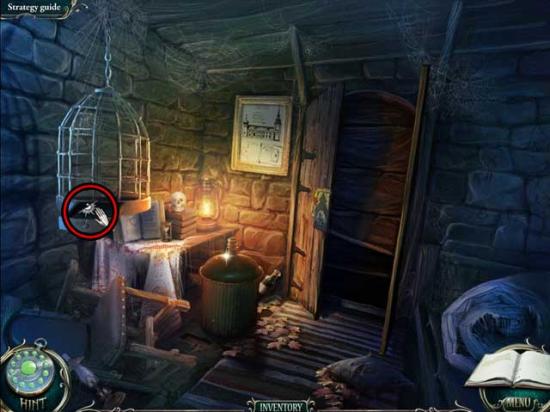
Small Room
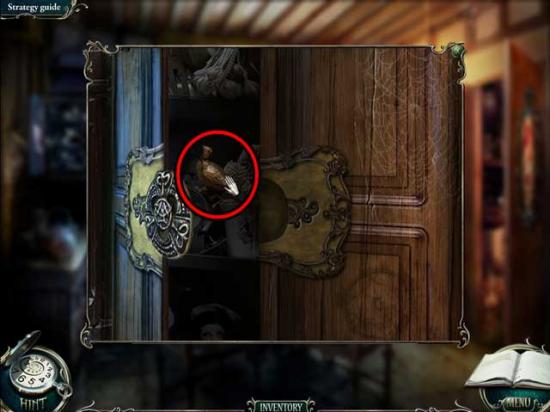
- Take a closer look at the bird cage on the left. Use the SLINGSHOT on the bird to break the skeleton apart, then click on the BAS-RELIEF PIECE 2/2 to add it to your inventory.
- Exit and return to the cemetery.
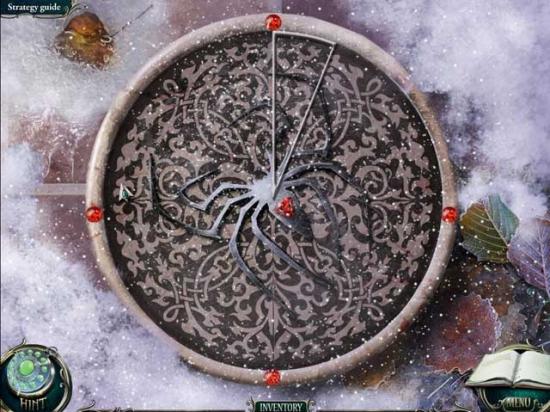
Cemetery
- Take a closer look at the large gravestone on the left. Use the BAS-RELIEF PIECE 2/2 on the indentation at the top of the gravestone to trigger a puzzle.
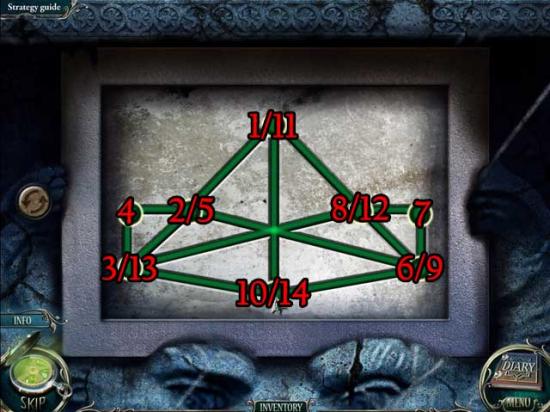
- Slide the squares around the board using the arrows on the left. Each square should end up on top of its matching colored circle. The solution is shown below and is as follows:
Red= left, up, right; Yellow= up; Blue= left; Green= left, up; Blue= right; Red= left, down, right; Yellow= down; Green= right; Yellow= up; Green= up; Blue= down, left.
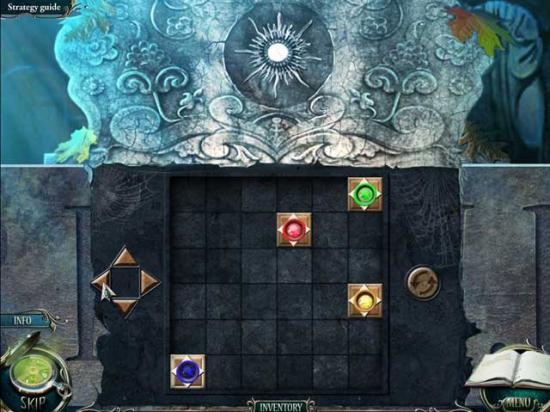
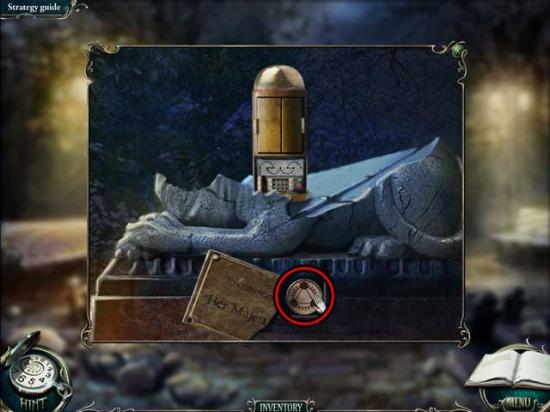
- Upon completing the puzzle, the plaque at the base of the gravestone will open, revealing the LADDER. Click on it to add it to your inventory.
- Return to the tree.
Tree
- Take a closer look at the top of the tree. Use the LADDER on the deck to gain access to the tree house.
Tree House
- The inside of the tree house is too dark. Return to the rotunda.
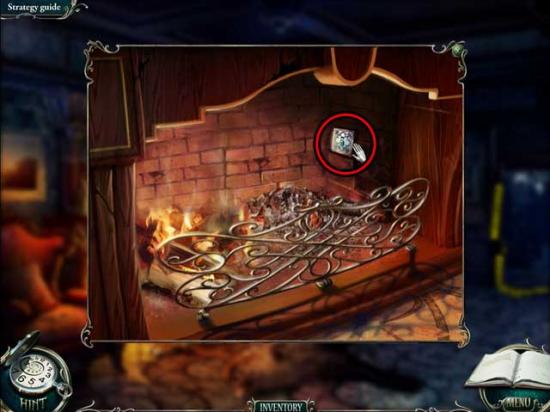
Rotunda
- Take a closer look at the torch to the right of Luisa. Use the TORCH on the fire to acquire the BLAZING TORCH.
- Return to the tree house.
Tree House
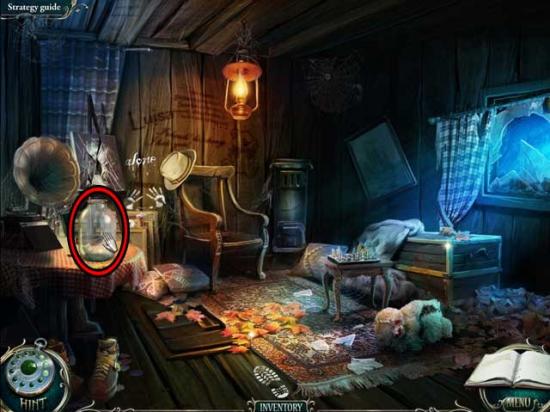
- Take a closer look at the lamp hanging from the ceiling. Use the BLAZING TORCH to light it.
- Click on the JAR sitting on the table on the left to add it to your inventory, then take note of the box on the right and the hiding place beneath the rug.
- Return to the church.
Church
- Examine the termitary. Use the JAR on the mound to gather termites, then click on the JAR WITH TERMITES to add it to your inventory.
- Return to the tree house.
Tree House
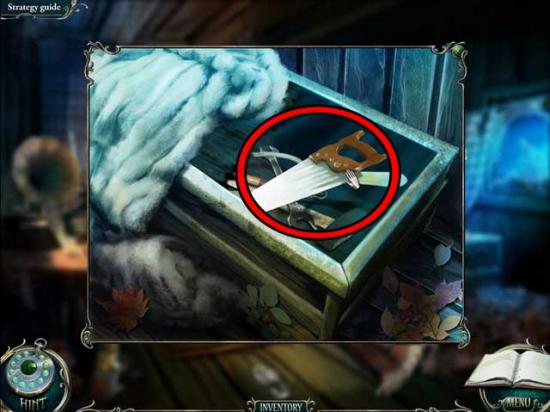
- Take a closer look at the large box on the right. Use the JAR WITH TERMITES on the box, then click on the SAW inside to add it to your inventory.
- Return to the inside of the church.
Inside Church
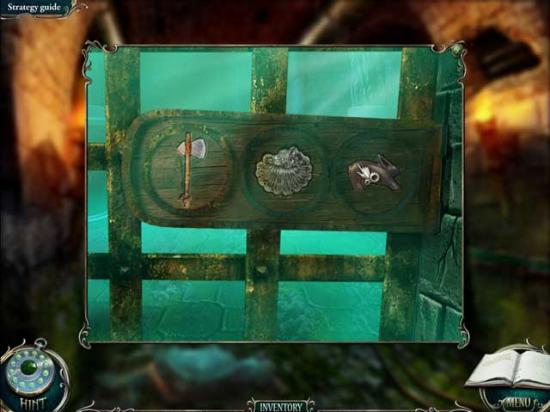
- Take a closer look at the halberd on the right. Use the SAW on the halberd to obtain the STICK.
- Return to the tree.
Tree
- Take a closer look at the ice axe stuck in the side of the tree. Use the STICK on the axe, then click on it to add the ICE AXE to your inventory.
- Return to the fountain.
Fountain
- Examine the tile at the base of the fountain. Use the ICE AXE to break it open, revealing the RUBY. Click on it to add it to your inventory.
- Return to the rotunda.
Rotunda
- Take a closer look at Luisa’s hand. Use the RUBY on her bracelet, then click on her GLOVE to add it to your inventory.
- Return to the cemetery.
Cemetery
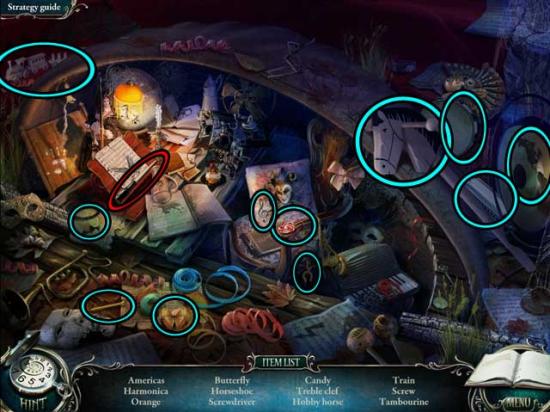
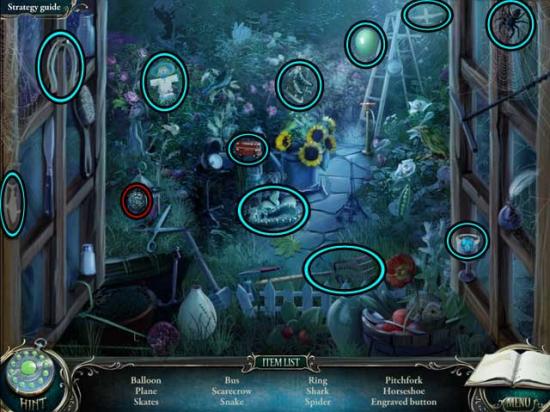
- Take a closer look at the dog house. Use the GLOVE on the dog to reveal a hidden object area.
- Find the items listed at the bottom of the screen. The Key Item has been circled in red.
- Upon completing the area, the CORKSCREW will be added to your inventory.
- Return to the small room.
Small Room
- Take a closer look at the large green bottle on the left. Use the CORKSCREW on the cork, then take a closer look at the fallen bottle. Use the GOBLET on the liquid to obtain the GOBLET WITH OIL.
- Return to the tree house.
Tree House
- Examine the hiding place beneath the rug. Use the GOBLET WITH OIL on the lion to remove the rust, then click on it to reveal an inactive puzzle.
- Use the MOSAIC PIECE from your inventory on the puzzle to trigger it.
- Assemble the picture by dragging and placing pieces to arrange them in the right order. Right click to rotate them. The solution is shown below.
- Click on the hidden object area that appears.
- Find the items listed at the bottom of the screen. The Key Item has been circled in red.
- Upon completing the area, the HOOK will be added to your inventory.
- Return to the fountain.
Fountain
- Take a closer look at the neck of the fountain’s statue. Use the HOOK to obtain the HEART HALF 2/2.
- Return to the rotunda.
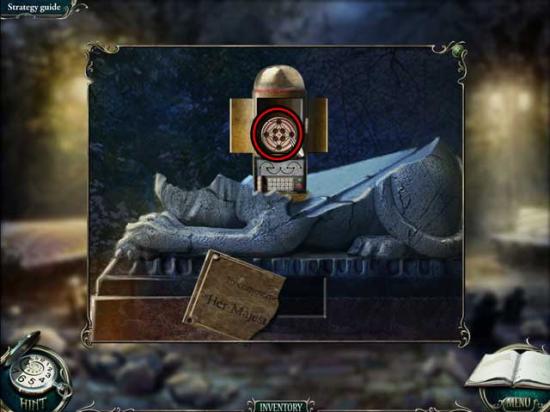
Rotunda
- Take a closer look at John Grey’s hand. Use the HEART HALF 2/2 on the slot in the box to open it and obtain the RING.
Chapter 2: The Handkerchief
Luisa’s Room
- Return to the drawing room.
Drawing Room
- Use the MACHETE on the crime tape blocking the doorway on the right, then enter through it into the next area.
Hallway 1F
- Click on the SCOOP propped against the banister to add it to your inventory.
- Proceed up to the second floor.
Hallway 2F
- Take a closer look at the red chair. Click on the torn fabric to tear it away, then click on the KEY to add it to your inventory.
- Click on the STEPLADDER just to the left of the yellow crime tape to add that to your inventory as well.
- Examine the aquarium on the left. Use the RING to cut a hole in the glass, then use the SCOOP on the pile of sand on the right to obtain the SCOOP WITH SAND.
- Return to the first floor.
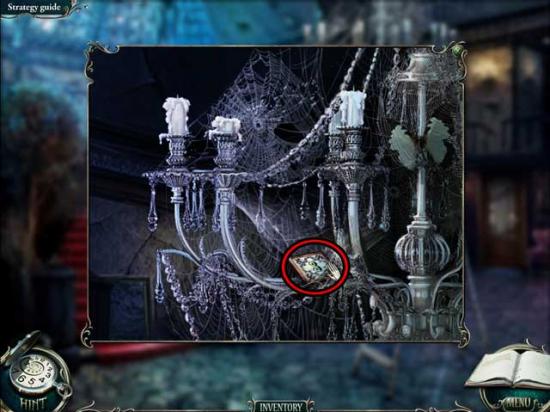
Hallway 1F
- Use the STEPLADDER in the middle of the room, beneath the chandelier, then take a closer look at the chandelier. Click on the BUTTON 1/3 to add it to your inventory.
- Return to the drawing room.
Drawing Room
- Examine the fireplace on the left. Use the SCOOP WITH SAND on the fire, then click on the BUTTON 2/3 to add it to your inventory.
- Enter Luisa’s Room.
Luisa’s Room
- Take a closer look at the cupboard at the back of the room. Use the KEY on the lock to open it, revealing a hidden object area.
- Find the items listed at the bottom of the screen. The Key Item has been circled in red.
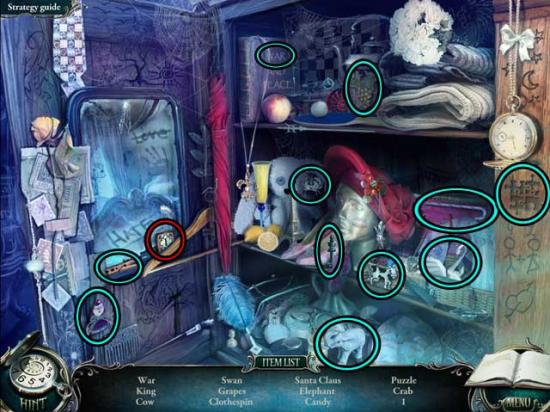
- Upon completing the area, the BUTTON 3/3 will be added to your inventory.
- Return to the second floor hallway.
Hallway 2F
- Examine the aquarium on the left again, then take a closer look at the trunk inside. Use the BUTTON 3/3 on the trunk to trigger a puzzle.
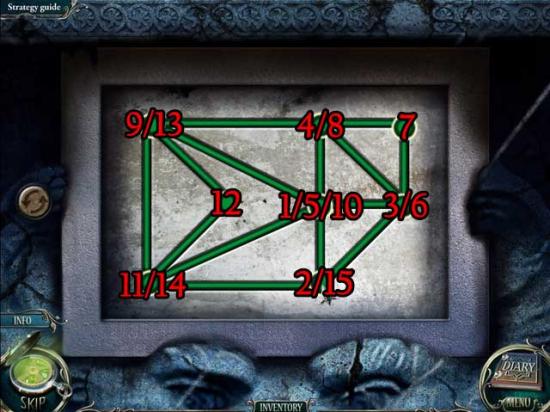
- Arrange the squares so that the total of the figures in vertical, horizontal, and diagonal lines equals 15. The solution is shown below.

- Upon completing the puzzle, you will discover a new photograph.
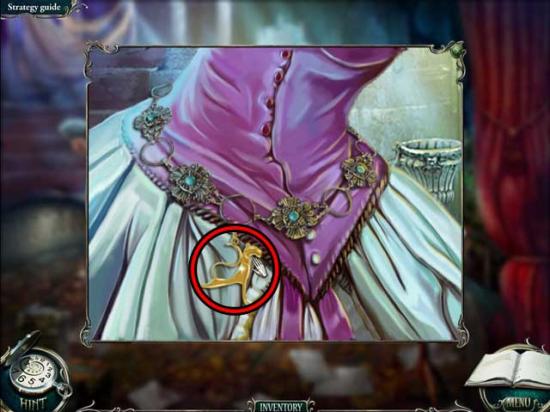
Amphitheatre
- Take a closer look at Luisa’s dress. Click on the CAT to add it to your inventory.
- Proceed to the vineyard.
Vineyard
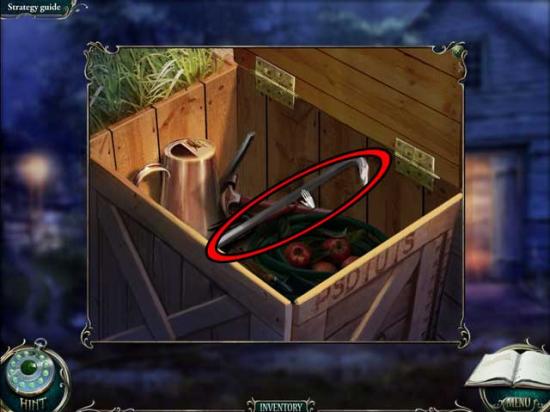
- Take a closer look at the dirt heap. Use the SCOOP to shovel aside the dirt and reveal the FEATHER DUSTER. Click on it to add it to your inventory.
- Continue forward to the landing.
Landing
- There’s nothing for you to do here quite yet, so proceed forward to the boat launch.
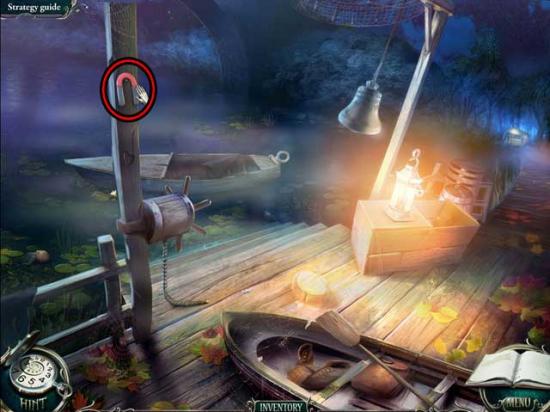
Boat Launch
- Click on the MAGNET hanging on the post on the left to add it to your inventory.
- Continue towards the right to the children’s playground.
Children’s Playground
- Take a closer look at the grass over the ruined bench. Use the MAGNET to obtain the FILE and add it to your inventory.
- Click on the hidden object area over the sandbox on the right.
- Find the items listed at the bottom of the screen. The Key Item has been circled in red.
- Upon completing the area, the NET will be added to your inventory.
- Return to the vineyard.
Vineyard
- Proceed right to the fountain.
Fountain
- Click on the GAS CAN sitting on the left to add it to your inventory.
- Take a closer look at the water inside the fountain. Use the NET to catch the FISH swimming within and add it to your inventory.
- Return to the landing.
Landing
- Take a closer look at the pelican on the left. Give it the FISH to reveal a hidden object area.
- Find the items listed at the bottom of the screen. The Key Item has been circled in red.
- Upon completing the area, the BUTTON will be added to your inventory.
- Return to the amphitheatre.
Amphitheatre
- Proceed down into the basement.
Basement
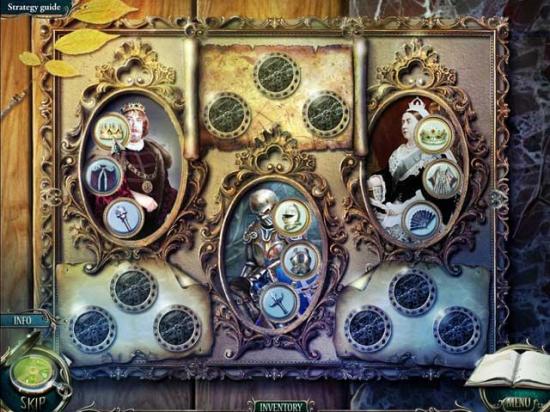
- Take a closer look at the closed door in the far corner. Use the BUTTON on the door to trigger a puzzle.
- Dress the king, the queen, and the knight. Sort the objects for every person by dragging the object into the appropriate slot. The solution is shown below.
- Enter the dressing room.
Dressing Room
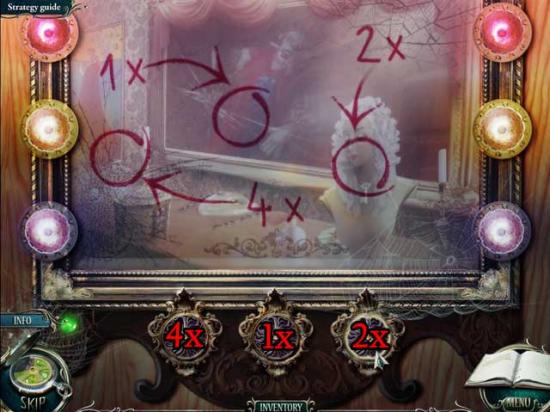
- Take a closer look at the mirror on the right. Use the FEATHER DUSTER to clear away the dust and trigger a puzzle.
- There are three face buttons at the bottom of the frame. Press each button the correct number of times: the mirror provides the answer, and the lights on the sides of the frame will light up when correct. The solution is shown below:
- Upon completing the puzzle, a hidden object area will appear.
- Find the items listed at the bottom of the screen. The Key Item has been circled in red.
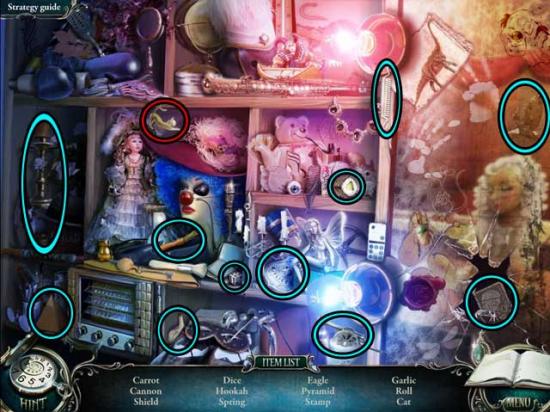
- Upon completing the area, the CAT (2) will be added to your inventory.
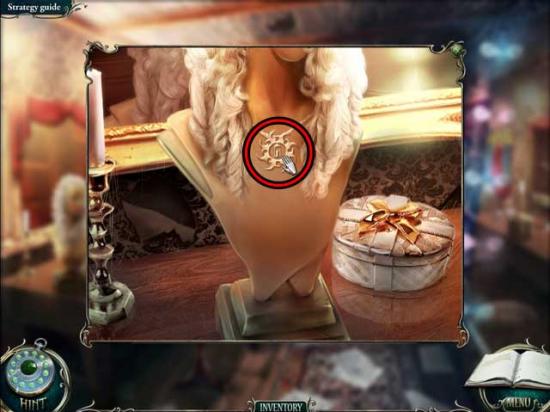
- Take a closer look at the bust on the left. Click on the KEY pendant to add it to your inventory.
- Return to the vineyard.
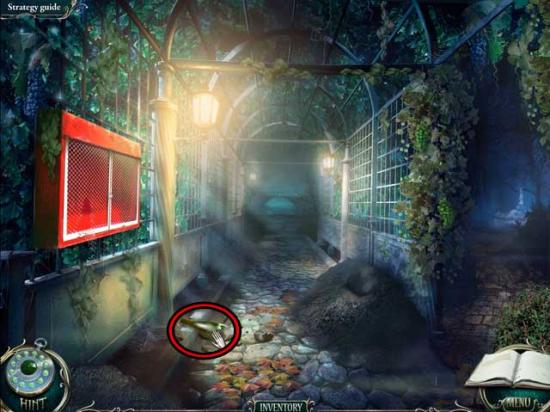
Vineyard
- Take a closer look at the red panel on the left. Use the FILE on the grate to remove it, then click on the FUNNEL to add it to your inventory.
- Proceed to the landing.
Landing
- Take a closer look at the painter’s case on the right, beneath the pole with the lifesaver. Use the CAT and CAT (2) on the locks to open the case, then click on the SOLVENT inside to add it to your inventory.
- Take a closer look at the blowtorch on the left, beneath the pelican. Use the FUNNEL on it, then use the GAS CAN on the funnel. The blowtorch still needs to be lit, though.
- Go forward to the boat launch.
Boat Launch
- Take a closer look at the lantern on the right. Use the KEY on the lock to remove it, then click on the CANDLE inside to add it to your inventory.
- Return to the landing.
Landing
- Examine the blowtorch again. Use the CANDLE to light it, then click on the BLOWTORCH to add it to your inventory.
- Return to the amphitheatre.
Amphitheatre
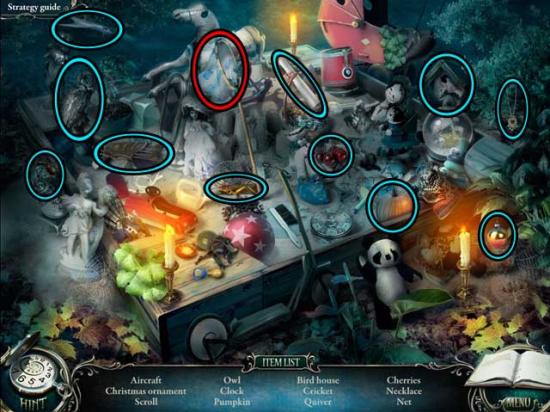
- Take a closer look at the prompt box to the left of Luisa. Use the BLOWTORCH to open a hole in it, revealing a new hidden object area.
- Find the items listed at the bottom of the screen. The Key Item has been circled in red.
- Upon completing the area, the SCREWDRIVER will be added to your inventory.
- Return to the children’s playground.
Children’s Playground
- Take a closer look at the swing handle on the left. Use the SCREWDRIVER to remove the screws, then click on the HANDLE to add it to your inventory.
- Return to the dressing room.
Dressing Room
- Take a closer look at the clown at the back of the room. Use the SOLVENT on its face to trigger a puzzle.
- To open the clown’s mouth, set white circles in every reel. Click on the reels in the order shown in the screenshot below to solve the puzzle. The solution is shown below.
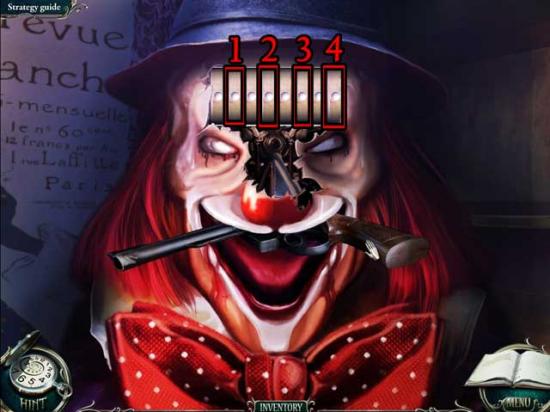
- Upon completing the puzzle, click on the GUN to add it to your inventory.
- Return to the vineyard.
Vineyard
- Take a closer look at the bottle towards the top of the screen. Use the GUN to shoot the bottle down, then click on the BROKEN BOTTLE to add it to your inventory.
- Return to the children’s playground.
Children’s Playground
- Take a closer look at the swing handle (rope) on the right side of the bench swing. Use the BROKEN BOTTLE on the rope to cut it, then click on the ROPE lying on the ground to add it to your inventory.
- Go back to the boat launch.
Boat Launch
- Use the ROPE on the reel on the left, then proceed back to the basement.
Basement
- Take a closer look at the mechanism at the back of the room. Use the HANDLE on the engine, however you can’t operate it just yet.
- Take a closer look at the mechanism to the right of the doorway to the dressing room. Use the BLOWTORCH on the rope to burn it, dropping the sandbag from the ceiling.
- Take a closer look at the hook embedded in the middle of the floor: the sandbag has broken it free. Click on the HOOK to add it to your inventory.
- Return to the boat launch.
Boat Launch
- Use the HOOK on the rope lying on the dock, then click on it to reel the boat in, revealing a new hidden object area.
- Find the items listed at the bottom of the screen. The Key Item has been circled in red.
- Upon completing the area, the OIL CAN will be added to your inventory.
- Return to the basement.
Basement
- Take a closer look at the mechanism at the back of the room. Use the OIL CAN on the rusted gears, then click on the lever below them to start the engine.
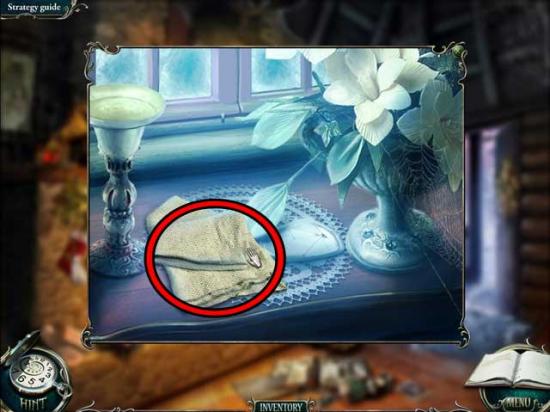
- Take a closer look at the lowered elevator on the left. Click on the HANDKERCHIEF to add it to your inventory.
Chapter 3: The Rifle
Hallway 2F
- Take a closer look at the yellow police tape. Use the BROKEN BOTTLE to cut it.
- Proceed down the corridor to the right.
Corridor
- Click on the HANDLE lying on the table to add it to your inventory.
- Enter Mother’s room.
Mother’s Room
- Take a closer look at the mirror on the right. Note the word “Faith” carved into the dresser.
- Take a closer look at the cupboard on the left. Use the SCREWDRIVER to remove the screws from the hinge and open the drawer. Click on the FUSE 1/2 to add it to your inventory.
- Return to the drawing room.
Drawing Room
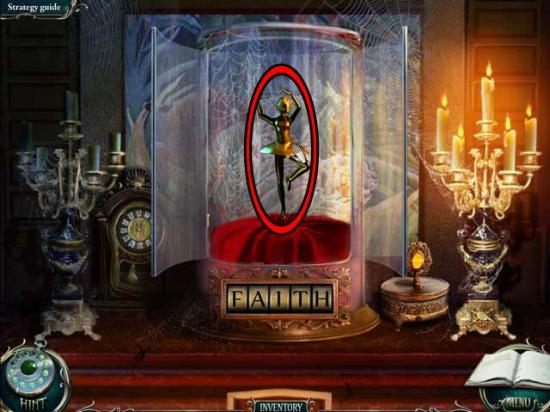
- Take a closer look at the shelf above the fireplace. Input the word “FAITH” beneath the glass case, then click on the BALLET DANCER to add it to your inventory.
- Return to Mother’s room.
Mother’s Room
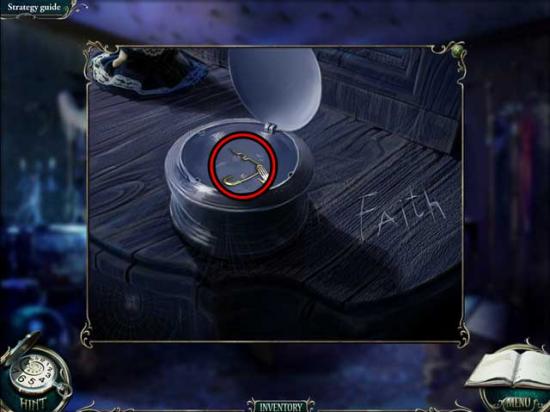
- Take a closer look at the mirror on the right again. Use the BALLET DANCER on the music box, then wait until it opens. Click on the LOCK PICK to add it to your inventory.
- Return to the first floor hallway.
Hallway 1F
- Examine the closed door on the far right. Use the LOCK PICK on the lock to open it and gain entry.
Dining Room
- Take a closer look at the cupboard on the upper left. Use the HANDLE on the cupboard door to open it, revealing a hidden object area.
- Find the items listed at the bottom of the screen. The Key Item has been circled in red.
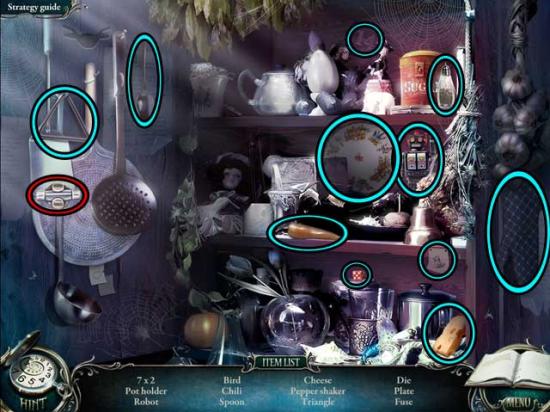
- Upon completing the area, the FUSE 2/2 will be added to your inventory.
- Return to the hallway.
Hallway 1F
- Take a closer look at the niche beneath the chandelier. Use the HANDKERCHIEF to clean the glass, then take a closer look at the top portion. Use the FUSE 2/2 to trigger a puzzle.
- Set all the fuses horizontally. Click a fuse to turn it. When clicked, a fuse will change both its position and the position of the fuses around it. Click the fuses in the order shown in the screenshot below– the completed solution is also shown there.
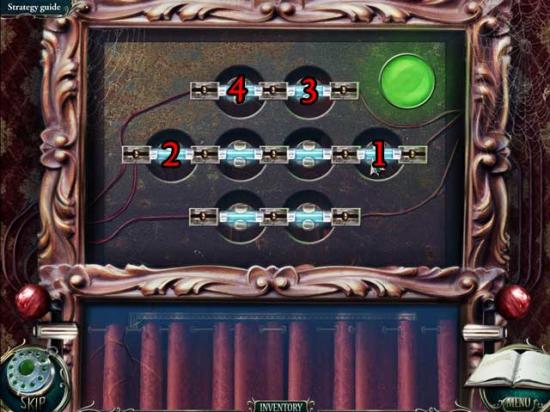
- Upon completing the puzzle, a new photograph will appear.
Fireplace Room
- Go up the stairs on the left to the second floor.
Second Floor
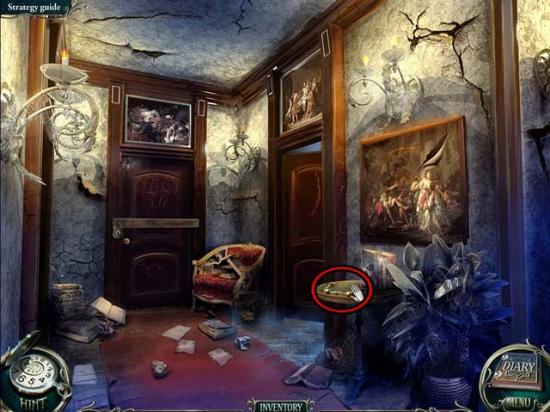
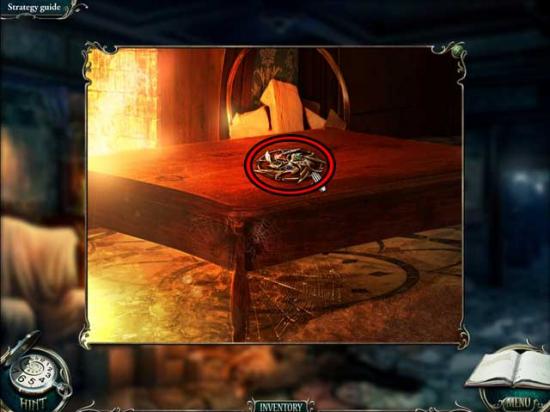
- Click on the BAG sitting on the railing on the left to add it to your inventory.
- Return to the fireplace room and proceed out the door on the right.
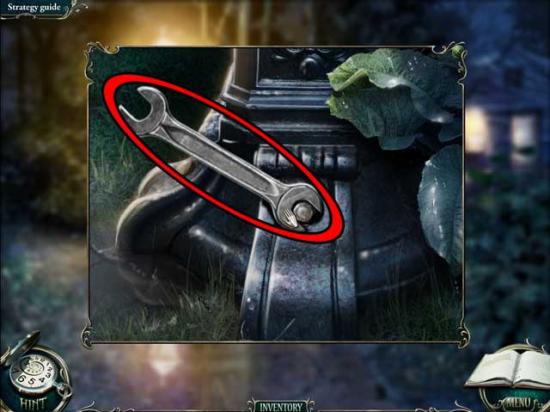
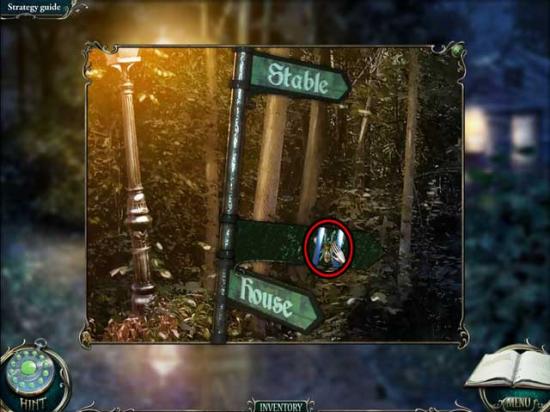
Sign
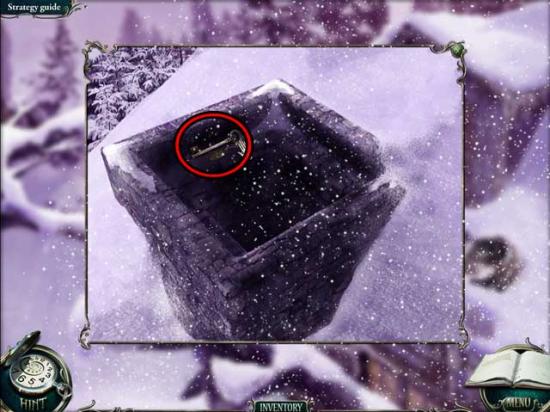
- Take a closer look at the foundation of the sign. Click on the WRENCH to add it to your inventory.
- Proceed up the road to the stable.
Stable
- Take a closer look at the spout attached to the well. Use the WRENCH to remove the bolts holding the spout grate in place. There’s nothing more you can do here at the moment.
- Proceed inside the stable.
Inside Stable
- Use the BAG on base of the chute of the grain sorter on the right.
- There’s nothing more you can do here at the moment, so exit back outside.
Stable
- Proceed down the road on the left to the pavilion.
Pavilion
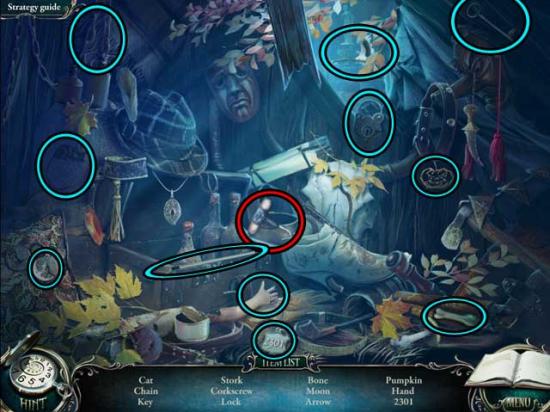
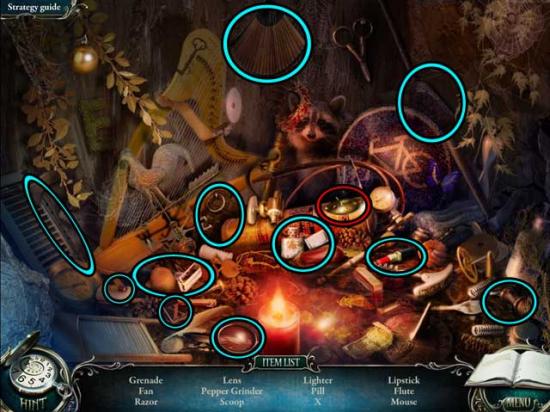
- Click on the hidden object area over the cage on the left.
- Find the items listed at the bottom of the screen. The Key Item has been circled in red.
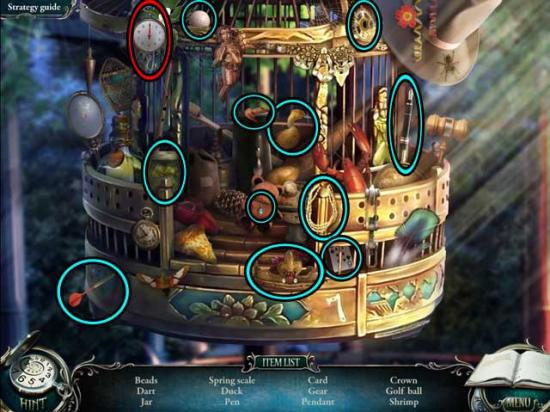
- Upon completing the area, the SPRING SCALE will be added to your inventory.
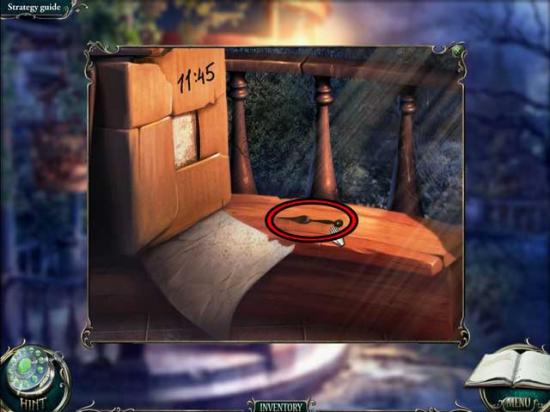
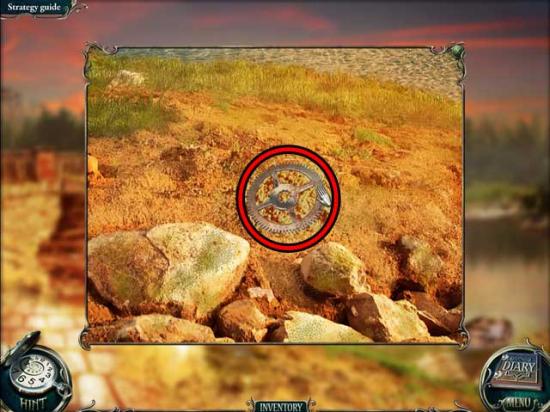
- Take a closer look at the shelf towards the top of the pavilion. Click on the ROD to add it to your inventory.
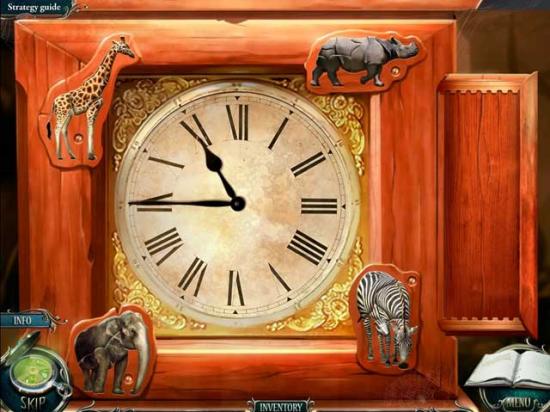
- Examine the bench within the pavilion. Click on the CLOCK HANDS 1/2 to add it to your inventory and take note of the “11:45” scribbled on the box on the left.
- Return to the stable and proceed inside.
Inside Stable
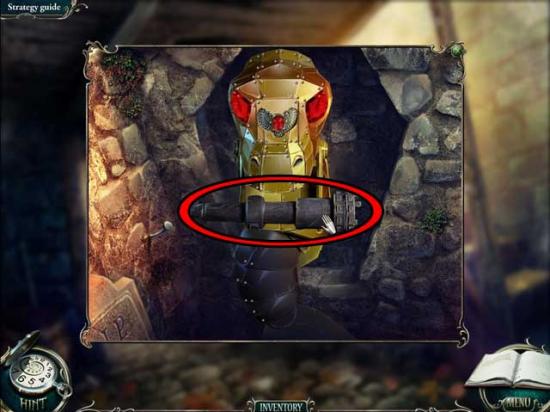
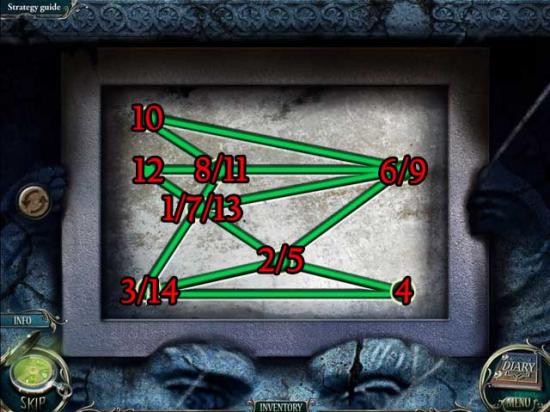
- Take a closer look at the grain sorter on the right. Use the SPRING SCALE on the middle pipe to trigger a puzzle.
- Set the weights so that every scale shows the correct weight and all weights are used. The solution is shown below.
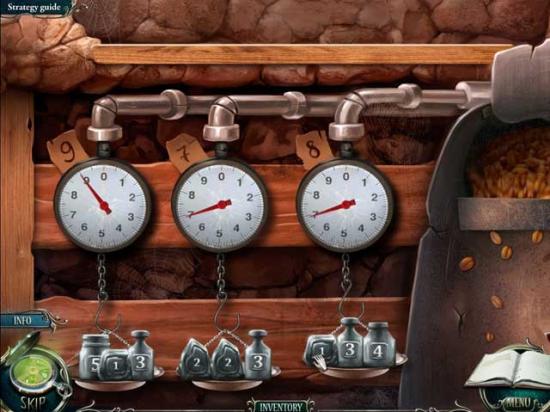
- Once the puzzle is complete, click on the FULL BAG beneath the machine to add it to your inventory.
- Return to the sign.
Sign
- Take the road to the left towards the lake.
Lake
- Take a closer look at the spring (the puddle of water on the right). Use the ROD on the water to obtain the SAW.
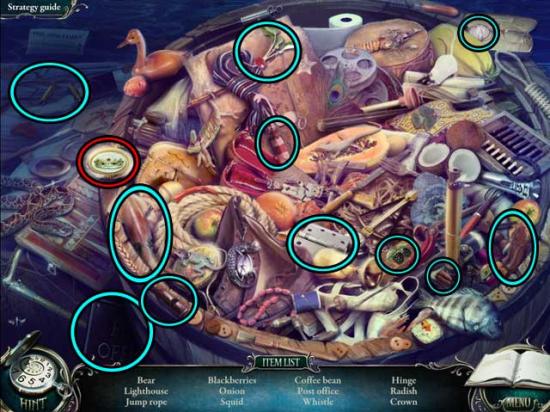
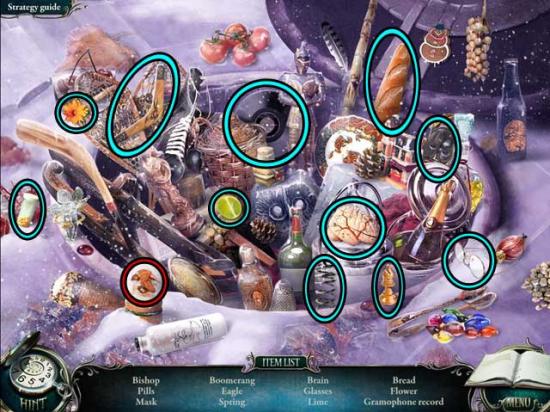
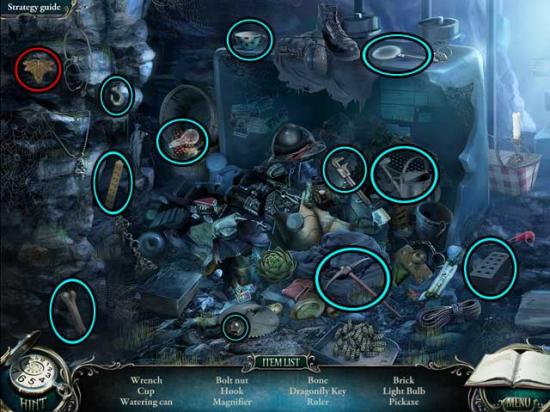
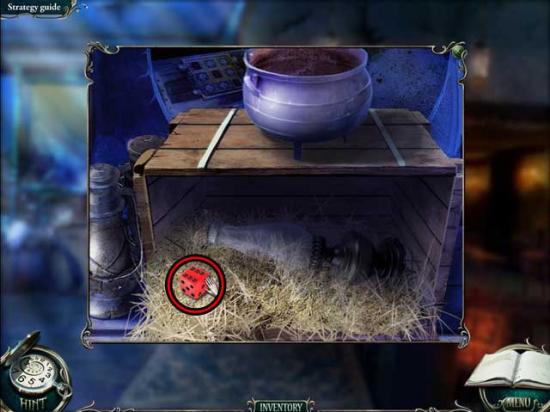
- Take a closer look at the quagmire on the left. Use the FULL BAG on the water above the sandbag to trigger a hidden object area over the raft.
- Find the items listed at the bottom of the screen. The Key Item has been circled in red.
- Upon completing the area, the FLASK will be added to your inventory.
- Return to the stable.
Stable
- Take a closer look at the motor to the left of the well. Use the FLASK on the empty slot to trigger a puzzle.
- Place the weights so that the platforms within every green tube reach the bottom. The solution is shown below.
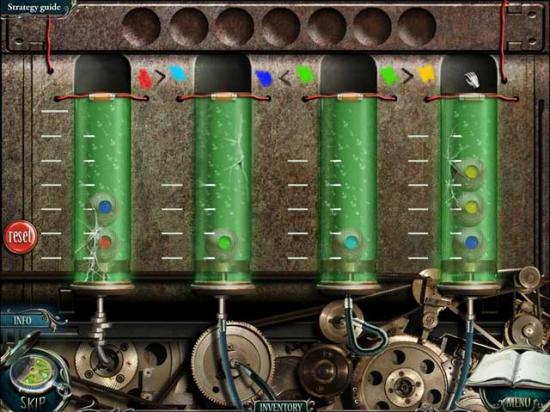
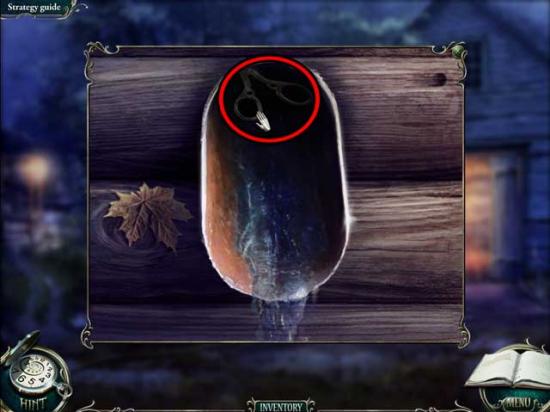
- Upon completing the puzzle, take a closer look at the spout to the right. Click on the SCISSORS inside to add them to your inventory.
- Return to the fireplace room.
Fireplace Room
- Take a closer look at Grey’s pocket. Use the SCISSORS to cut the thread, then click on the KEY inside to add it to your inventory.
- Go up to the second floor.
Second Floor
- Take a closer look at the door, then use the KEY to open it and enter.
Bedroom
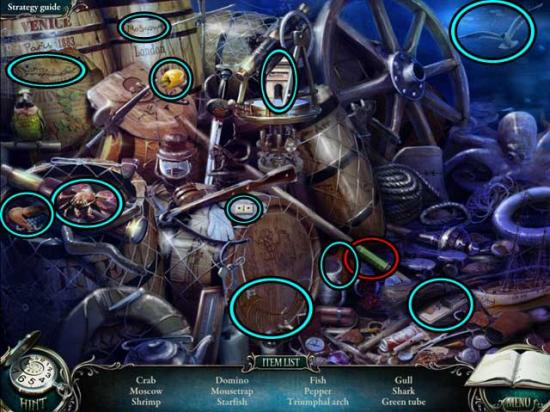
- Click on the hidden object area under the bed.
- Find the items listed at the bottom of the screen. The Key Item has been circled in red.
- Upon completing the area, the MEDALLION will be added to your inventory.
- Backtrack to the inside of the stable.
Inside Stable
- Take a closer look at the lock on the ladder. Use the MEDALLION on the slot to unlock it, then click on the LADDER to add it to your inventory.
- Take a closer look at the notch (the removed board) on the floor. Click on the CLOCK HANDS 2/2 inside to add it to your inventory.
- Return to the lake.
Lake
- Use the LADDER on the tree on the right to trigger a hidden object area.
- Find the items listed at the bottom of the screen. The Key Item has been circled in red.
- Upon completing the area, the MOUSE will be added to your inventory.
- Return to the second floor.
Second Floor
- Take a closer look at the vase at the back corner of the area. Use the MOUSE on the cat to coax it out, then click on the DYNAMITE to add it to your inventory.
- Enter the bedroom.
Bedroom
- Take a closer look at the clock on the right. Use the CLOCK HANDS 2/2 on the clock, then put them in the position so that the time reads “11:45”. This will trigger a puzzle.
- Click and drag the animal pieces into place, using the right mouse click to rotate as necessary. The completed solution is shown below.
- Upon completing the puzzle, the CLOCK will be added to your inventory.
- Return to the pavilion.
Pavilion
- Proceed forward to the square.
Square
- Take a closer look at the lion. Use the DYNAMITE on the plaque, then use the CLOCK on the dynamite to activate it. The statue will blow to pieces.
- Take a closer look at the lion again. Click on the BUTTON within the broken plaque to add it to your inventory.
- Back in the main square area, take a closer look at the fragments on the bottom left. Click on the STONE on top of the pile to add it to your inventory.
- Return to the stable.
Stable
- Take a closer look at the crate to the left of the stable doors. Use the SAW to open the crate, then click on the CROWBAR inside to add it to your inventory.
- Return to the fireplace room.
Fireplace Room
- Take a closer look at the parquet on the floor in front of the bear rug. Use the CROWBAR on the parquet to lift it, revealing the PIECES OF PUZZLE. Click on them to add them to your inventory.
- Proceed upstairs to the bedroom.
Bedroom
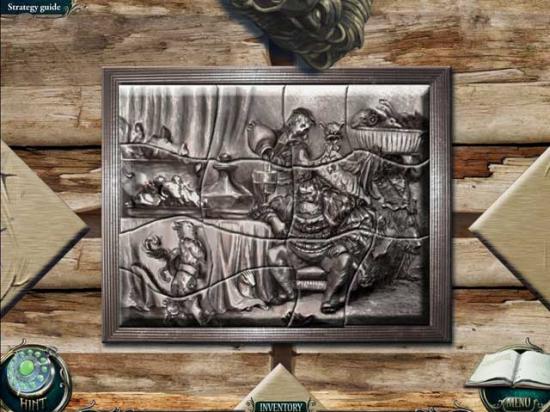
- Take a closer look at the picture hanging on the wall on the left. Use the PIECES OF PUZZLE on the frame to trigger a puzzle.
- Create the picture using the pieces. Drag lines and rows to set every part of the picture in place. It’s easier if you drag the horizontal rows into their correct locations first, then arrange the vertical columns to complete the picture. The solution is shown below.
- Upon completing the picture, click on the BUTTON (2) that’s revealed within to add it to your inventory.
- Return to the sign.
Sign
- Use the STONE on the sign, specifically hitting the “Lake” portion. The sign will turn, revealing the BEE. Click on it to add it to your inventory.
- Return to the second floor.
Second Floor
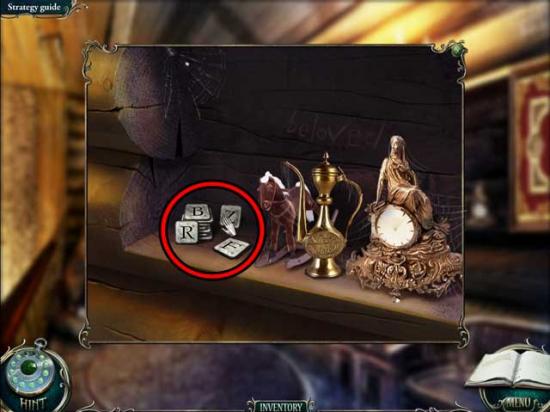
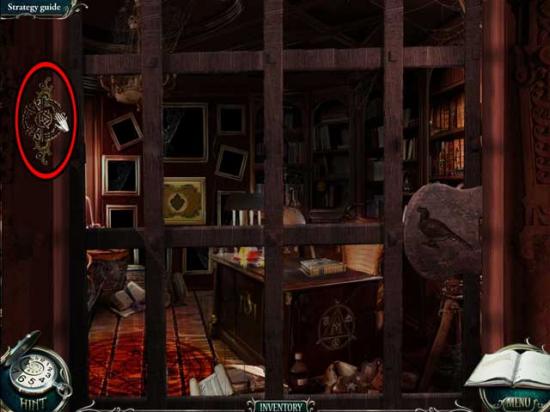
- Use the BEE on the frame on the right to open it, then take a closer look inside.
- Click on the LETTERS to add them to your inventory, then take note of the scrawled word “Beloved”.
- Return to the square.
Square
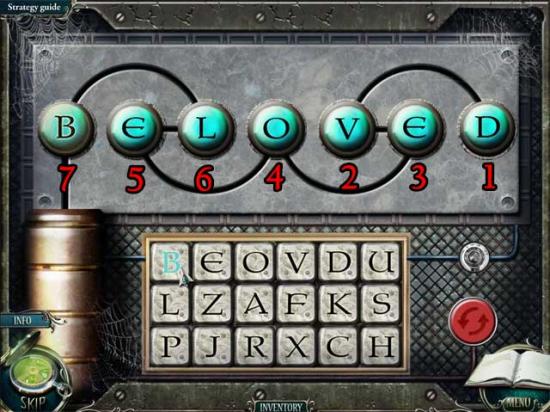
- Take a closer look at the lion, then examine the lock. Use the LETTERS on the lock to trigger a puzzle.
- Enter the code word (“beloved”). The letter order is not correct by default, so you’ll have to figure out which letters should be entered in what sequence. Use the red reset button as necessary. The correct order (and solution) is shown below.
- Upon completing the puzzle, click on the BUTTON (3) to add it to your inventory.
- Return to the fireplace room.
Fireplace Room
- Take a closer look at the gun above the fireplace, then take a closer look at the three slots below the gun.
- Use the BUTTONS (x3) on the slots to trigger a puzzle.
- Move all the chips into their correct locations. A chip can only be moved to an empty slot. The correct order in which to click/move the chips, as well as the solution, are shown below.
- Upon completing the puzzle, click on the GUN to add it to your inventory.
Chapter 4: The Rose
Hallway 1F
- Go up to the second floor corridor.
Corridor
- Take a closer look at the door lock to Father’s room. Use the GUN on the lock to destroy it, then proceed inside.
Father’s Room
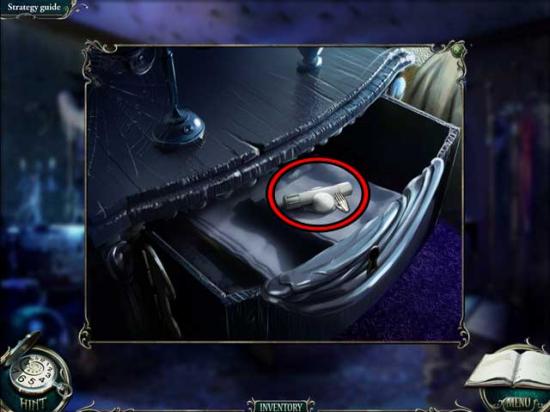
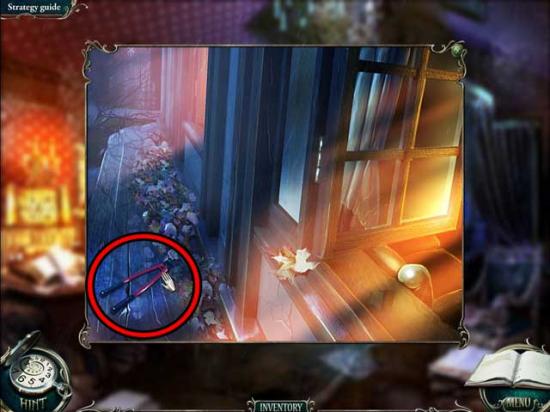
- Take a closer look at the open window. Click on the BOLT CUTTERS lying on the ledge outside to add them to your inventory.
- Return to the outside entrance of the house.
Entrance
- Take a closer look at the gates on the left. Use the BOLT CUTTERS to cut the chains, then enter the basement.
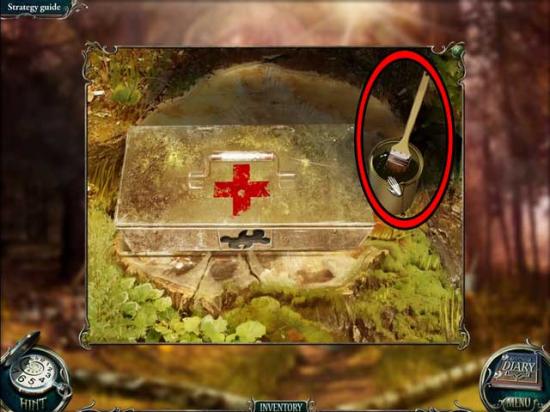
Basement
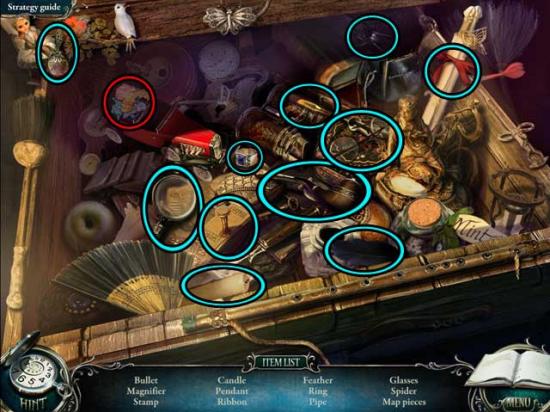
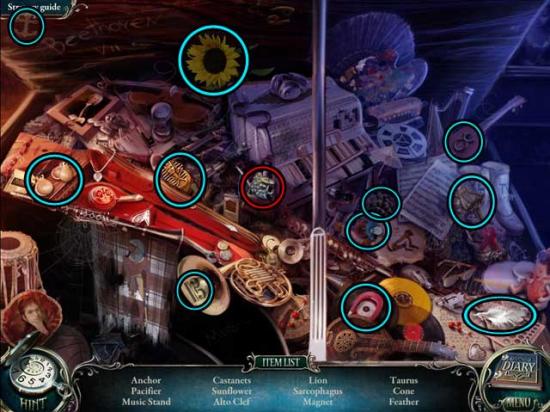
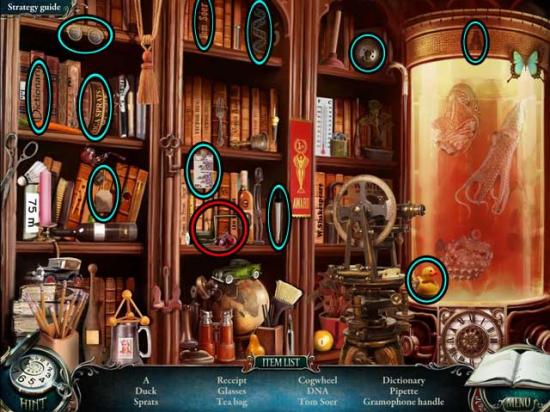
- Click on the hidden object area over the lower shelf on the right.
- Find the items listed at the bottom of the screen. The Key Item has been circled in red.
- Upon completing the area, the FLASK will be added to your inventory.
- Return to Father’s room.
Father’s Room
- Take a closer look at the table on the left, then examine the flasks at the top of the close-up. Use the FLASK on the empty middle stand to trigger a puzzle.
- There are three flasks on the table. Mix the ingredients so that the color of the liquid matches the label beneath the flask. Use the dropper to remove liquid from the test tubes. The solution is as follows and is shown below:
1. Flask 1= blue (already in), red
2. Flask 2= yellow, orange
3. Flask 3= green, yellow
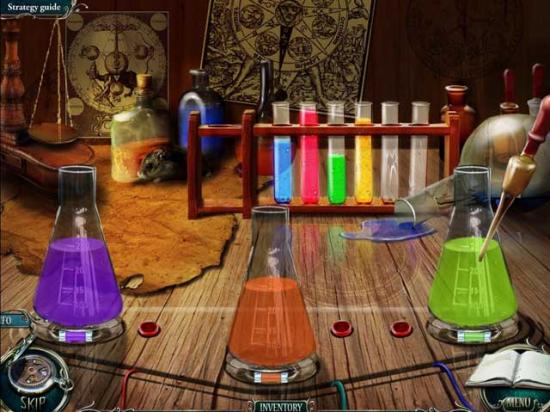
- Upon completing the puzzle, click on the KEY that appear in the hidden compartment beneath the flasks to add it to your inventory.
- Return to the basement.
Basement
- Take a closer look at the table on the left, then examine the middle drawer. Use the KEY to open the drawer, revealing a hidden object area.
- Find the items listed at the bottom of the screen. The Key Item has been circled in red.
- Upon completing the area, the MAP PIECES will be added to your inventory.
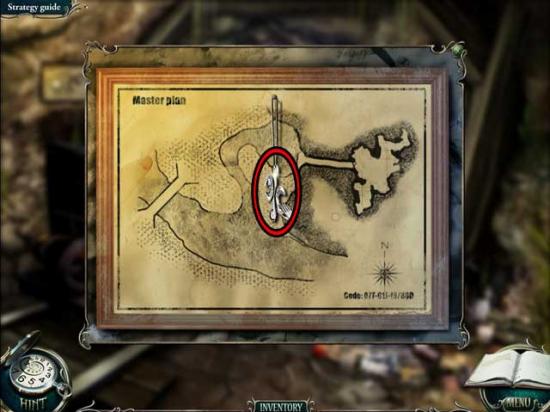
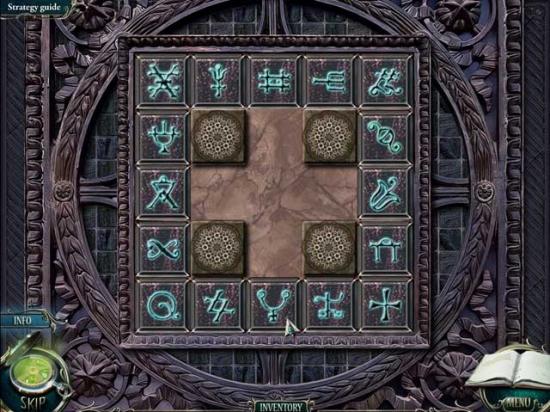
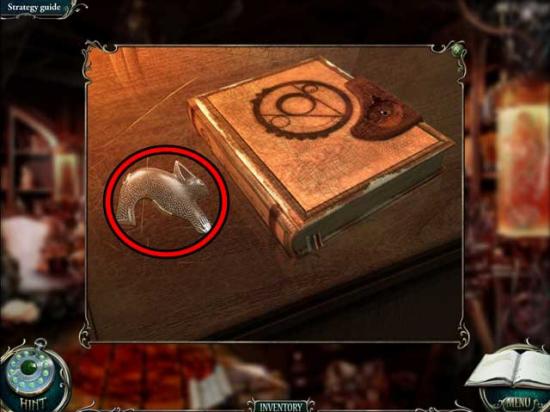
- Back in the main basement area, examine the map on the left wall above the desk/table. Use the MAP PIECES on the map to trigger a puzzle.
- Place the continents into their correct positions on the map. Drag the pieces with the left mouse button and rotate with the right. The solution is shown below.

- Upon completing the puzzle, a new photo will be revealed.
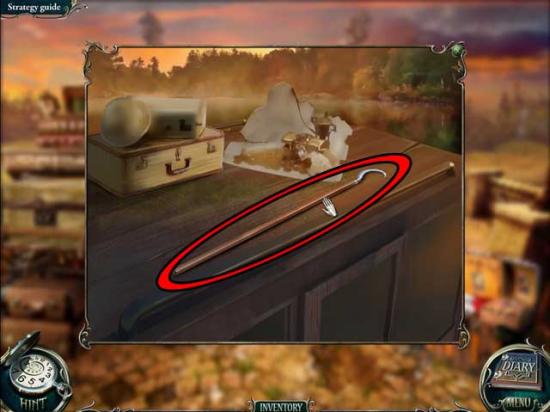
Yard
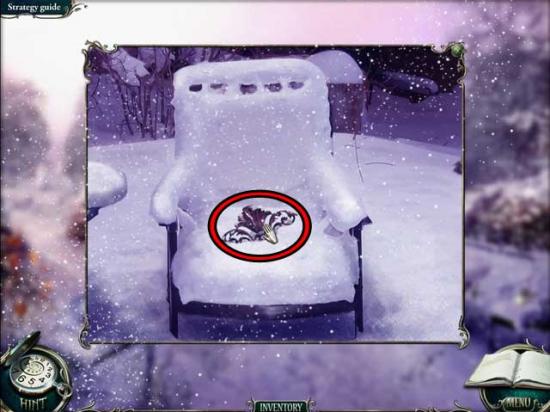
- Take a closer look at the chair on the far right. Click on the WOODEN INLAY to add it to your inventory.
- Head up the path to the right to the gazebo.
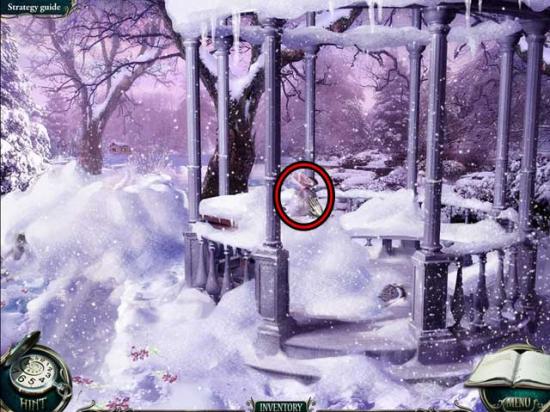
Gazebo
- Click on the SALT to add it to your inventory.
- Return to the yard.
Yard
- Proceed down the road to the left to the valley of ice figures.
Valley of Ice Figures
- Use the SALT on the ice right in front of you, then click on the BUCKET on the snowman’s head to add it to your inventory.

- Proceed forward through the gate to the bridge.
Bridge
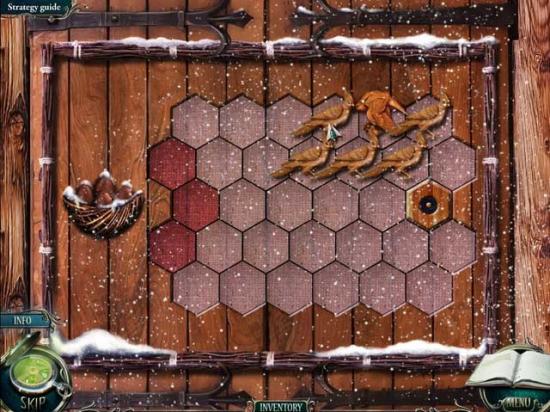
- Take a closer look at the mill door. Use the WOODEN INLAY on the slot to trigger a puzzle.
- Open the cells in logical order so that they are all showing numbers from 1 to 25. Pay attention to the placement of even and odd numbers. If you mess up, the number locations will randomize themselves after each attempt. An example solution is shown below.

- Enter the mill.
Mill
- Click on the hidden object area over the shelves.
- Find the items listed at the bottom of the screen. The Key Item has been circled in red.
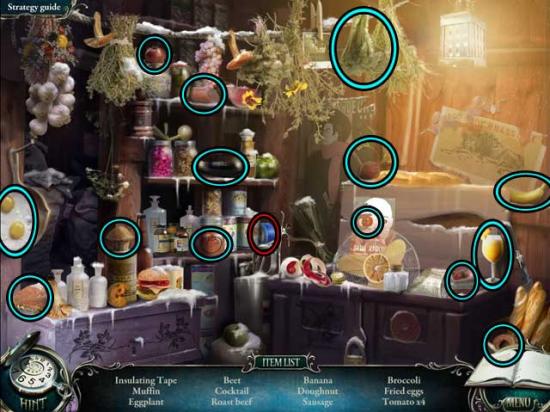
- Upon completing the area, the INSULATING TAPE will be added to your inventory.
- Return to the valley of ice figures.
Valley of Ice Figures
- Take a closer look at the spade on the left. Use the INSULATING TAPE to fix it and acquire the SPADE for your inventory.
- Return to the gazebo.
Gazebo
- Use the SPADE on the pile of snow in the gazebo, as well as to the left of it to clear it away.
- Proceed down the new path on the left to the hunting lodge entrance.
Lodge Entrance
- Click on the hidden object area over the veranda.
- Find the items listed at the bottom of the screen. The Key Item has been circled in red.
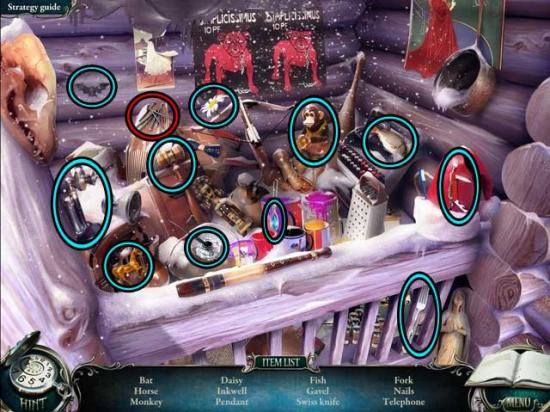
- Upon completing the area, the NAILS will be added to your inventory.
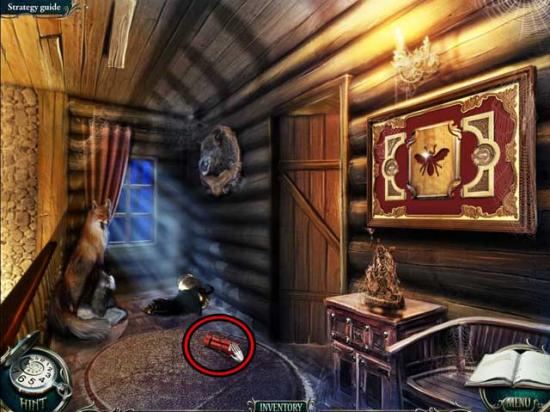
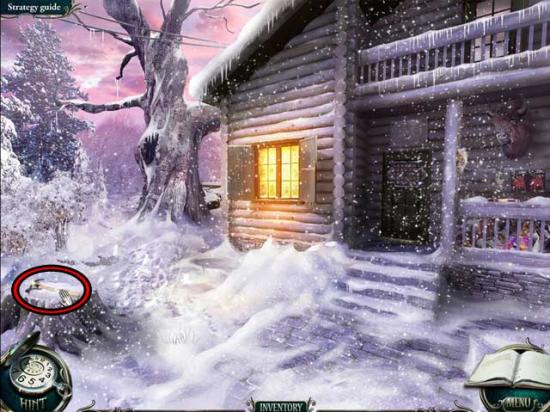
- Click on the HAMMER lying on the stump on the left to add it to your inventory.
- Return to the valley of ice figures.
Valley of Ice Figures
- Take a closer look at the fence on the right. Use the HAMMER on the BOARDS to remove them and add them to your inventory.
- Return to the lodge entrance.
Lodge Entrance
- Take a closer look at the tree. Use the BOARDS, then the NAILS, then the HAMMER on the tree, then proceed up to the roof.
Roof
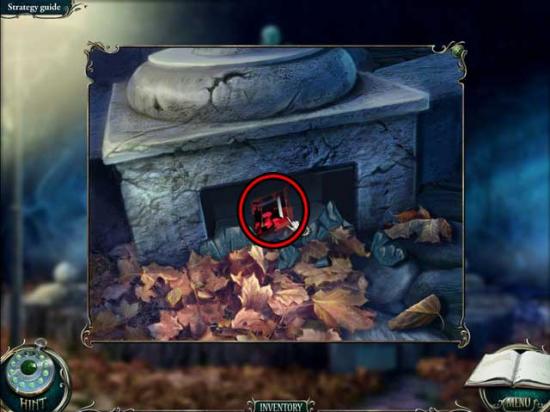
- Take a closer look at the nest on the right. Click on the BAS-RELIEF PIECE to add it to your inventory.
- Return to the gazebo.
Gazebo
- Take a closer look at the hatch at the bottom of the gazebo. Use the BAS-RELIEF PIECE on the hatch to trigger a puzzle.
- Reassemble the picture by rearranging the pieces. Click on a piece, then click on another piece to switch their positions. The solution is shown below.
- Once the hatch opens, click on the hidden object area.
- Find the items listed at the bottom of the screen. The Key Item has been circled in red.
- Upon completing the area, the EAGLE will be added to your inventory.
- Return to the roof.
Roof
- Take a closer look at the attic shutters on the right. Use the EAGLE on the shutter to trigger a puzzle.
- Keep the eagle from reaching the nest. Surround the eagle with birds, or force it to the edge. Click on a bird and then select the cell where it should move. An example solution is shown below.
- Click on the hidden object area that appears.
- Find the items listed at the bottom of the screen. The Key Item has been circled in red.
- Upon completing the area, the CROSS will be added to your inventory.
- Go back to the bridge.
Bridge
- Take a closer look at the mechanism on the left. Use the CROSS on the cavity to trigger a puzzle.
- Each cell shows the number of lamps that can be lit on its perimeter. Turn on the correct number of lamps across the board. The solution is shown below.
- Once the puzzle is complete, click on the blue DOOR on the left to add it to your inventory.
- Return to the roof of the hunting lodge.
Roof
- Use the DOOR to cross the branches, then click on the RAKE to add it to your inventory.
- Return to the lodge.
Lodge Entrance
- Take a closer look at the pile of snow beneath the window. Use the BUCKET on the snow to obtain the BUCKET WITH SNOW.
- Return to the bridge.
Bridge
- Proceed across the bridge to the forest.
Forest
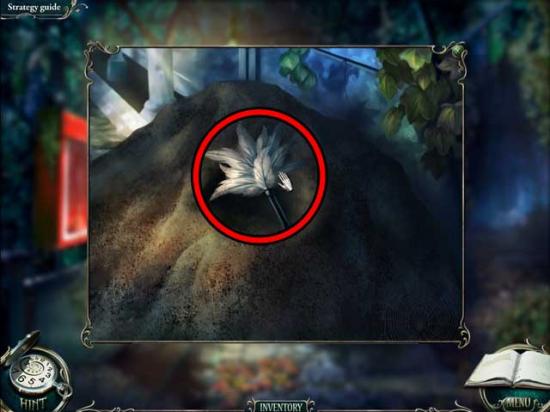
- Take a closer look at the icicle at the top of the screen. Use the RAKE to knock it down. The STAR JEWEL will automatically be added to your inventory.
- Return to the lodge entrance.
Lodge Entrance
- Take a closer look at the door. Use the STAR JEWEL on the cavity to trigger a puzzle.
- Press every button. Find the staring place that allows you to follow the direction on the arrows in sequence so that the center decoration is pressed last. The solution is shown below.
- Enter the hunting lodge.
Hunting Lodge
- Take a closer look at the fireplace. Use the BUCKET WITH SNOW on the hook to melt the snow to boiling water, then take a closer look at the window. Click on the CLOTH to add it to your inventory.
- Exit the lodge to the roof.
Roof
- Take a closer look at the chimney. Use the CLOTH on the inner rim to clean it, revealing the MILL KEY. Click on it to add it to your inventory.
- Return to the bridge and enter the mill.
Mill
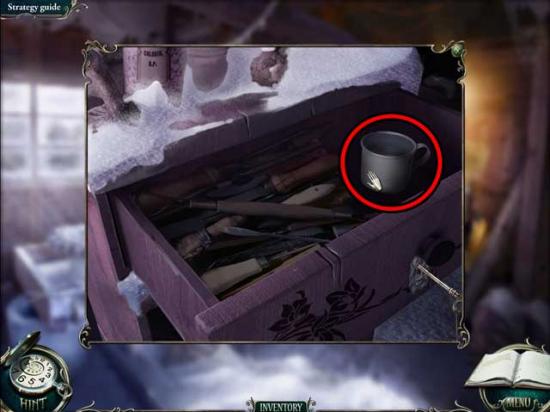
- Take a closer look at the locked drawer. Use the MILL KEY to unlock the drawer, then click on the GOBLET (mug) to add it to your inventory.
- Return to the hunting lodge.
Hunting Lodge
- Take a closer look at the fireplace. Use the GOBLET (mug) on the bucket of boiling water to obtain the MUG WITH HOT WATER.
- Return to the yard.
Yard
- Take a closer look at the plate in the lower left corner. Use the MUG WITH HOT WATER on the plate to thaw it, then open it and obtain the FROZEN MEAT.
- Return to the hunting lodge.
Hunting Lodge
- Take a closer look at the fireplace. Use the FROZEN MEAT on the boiling water to obtain the THAWED MEAT.
- Go back to the forest.
Forest
- Take a closer look at the wolf on the left. Use the THAWED MEAT on the wolf to reveal a new hidden object area.
- Find the items listed at the bottom of the screen. The Key Item has been circled in red.
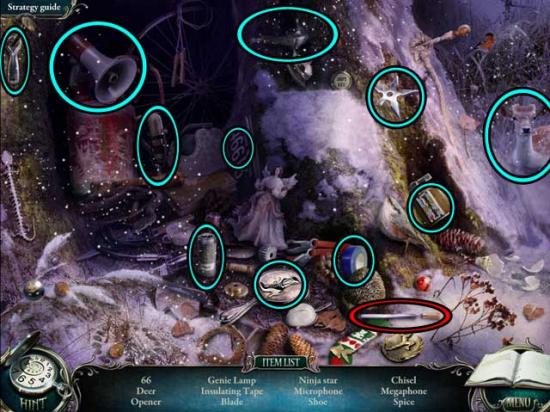
- Upon completing the area, the CHISEL will be added to your inventory.
- Return to the yard.
Yard
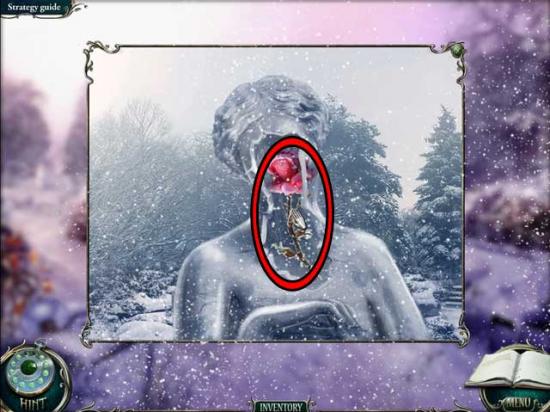
- Take a closer look at the top of the ice statue in the middle of the screen. Use the CHISEL on the face of the statue, then click on the ROSE to remove it and add it to your inventory.
Chapter 5: Demon’s Identity
Basement
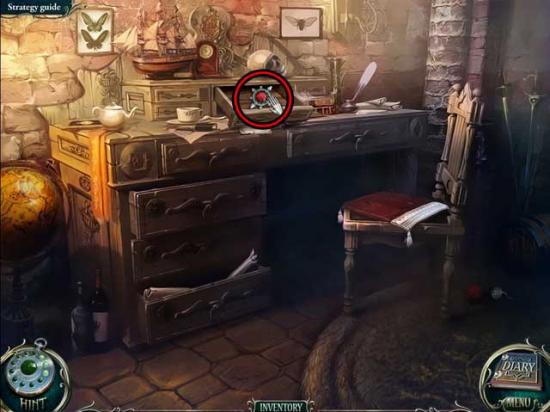
- Take a closer look at the desk on the left, opening the middle drawer from the top row of drawers above the surface of the desk. Click on the RUBY MEDALLION to add it to your inventory.
- Return to Luisa’s room.
Luisa’s Room
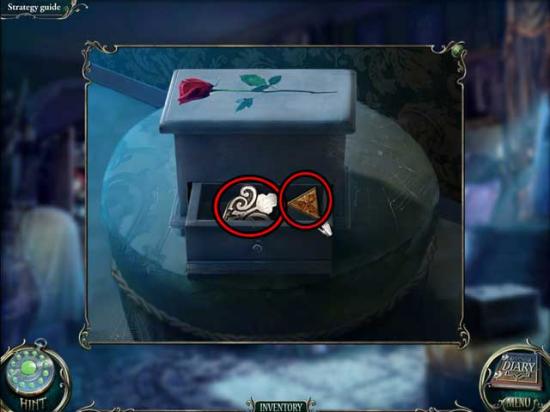
- Take a closer look at the small chest on the lower right. Use the ROSE on the top of the chest to open it, then click on the TRIANGLE and the KEY to add them to your inventory.
- Return to the outside entrance.
Entrance
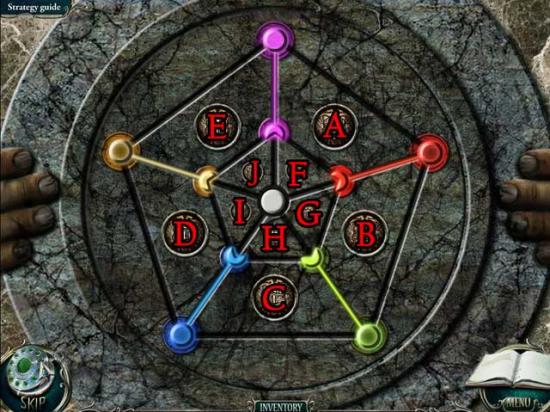
- Take a closer look at the clock hanging to the left of the door and above the entrance to the basement. Use the KEY on the slot on the right to open it and reveal a puzzle.
- Find the matching pairs, pointing the hands at the matching objects that are somehow connected. The solution is shown below.
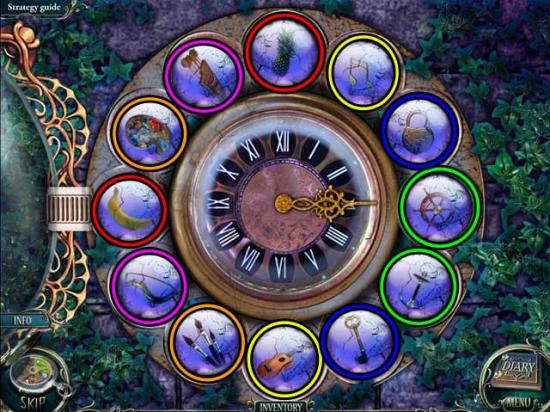
- Upon completing the puzzle, click on the CLOCK HANDS to add them to your inventory.
- Return to the basement.
Basement
- Take a closer look at the door at the far end of the room. Use the CLOCK HANDS on the indentations where the knights’ spears should be to reveal a puzzle. Click for a closer view.
- Use the TRIANGLE on the empty slot to trigger the puzzle.
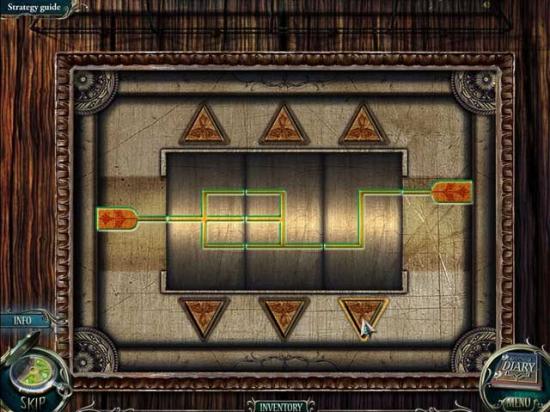
- There are leads on the left and right borders of the field. Close the circuit by rotating the three sectors using the up and down arrows. The solution is shown below.
- Enter the basement corridor.
Basement Corridor
- Click on the hidden object area over the statue on the right.
- Find the items listed at the bottom of the screen. The Key Item has been circled in red.
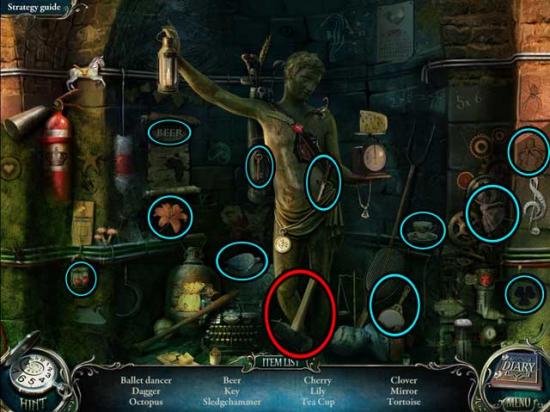
- Upon completing the area, the SLEDGEHAMMER will be added to your inventory.
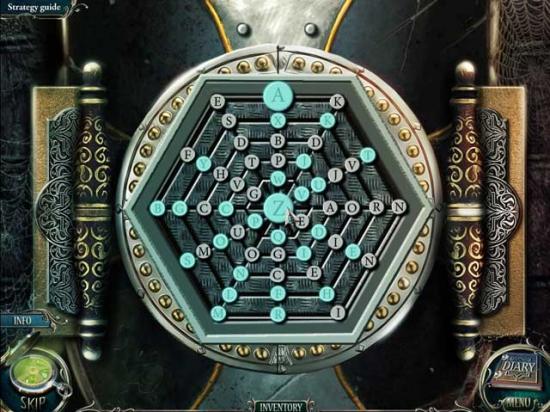
- Take a closer look at the shield on the right wall, past the statue. Take a closer look again and use the RUBY MEDALLION on the cavity to trigger a puzzle.
- Press the buttons in alphabetical order. You must choose consequent letters from the same arc or radius. The solution is shown below.
- After completing the puzzle, use the SLEDGEHAMMER to break apart the stone wall, then proceed through to the dungeon.
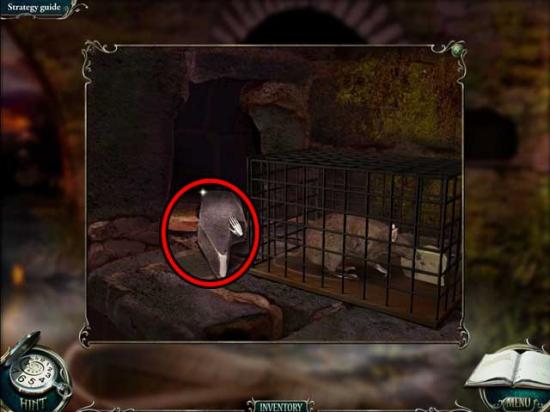
Dungeon
- Take a closer look at the prisoner and listen to what he has to say.
- Click on the hidden object area over the pile of debris on the left.
- Find the items listed at the bottom of the screen. The Key Item has been circled in red.
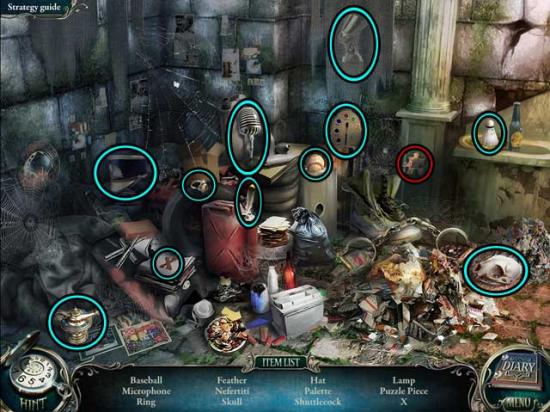
- Upon completing the area, the PUZZLE PIECE will be added to your inventory.
- Take a closer look at the frame lying on the floor. Use the PUZZLE PIECE on it to trigger a puzzle.
- Reassemble the puzzle in the frame. Use the right mouse click to rotate pieces as necessary. The solution is shown below.
- Upon completing the puzzle, a new photo will be revealed.
Bridge
- From here, proceed forward to the forest.
Forest
- Take a closer look at the hidden object area next to the tree on the left.
- Find the items listed at the bottom of the screen. The Key Item has been circled in red.

- Upon completing the area, the SAFE LOCK will be added to your inventory.
- Take a closer look at the broken wheel lying on the ground. Click on it to reassemble it, however you can’t fix it entirely just yet.
- Take a closer look at the medicine chest on the right. Click on the TAR to add it to your inventory.
- Return to the bridge.
Bridge
- Take a closer look at the roof of the carriage. Click on the HOOK to add it to your inventory.
- Proceed down to the bank via the gap on the right.
Bank
- Take a closer look at the boat on the right. Use the TAR on the gashes in the bottom of the boat to repair it.
- Before using the boat, click on the sand in the middle of the bank for a closer view. Click once to clear it, then click on the COGWHEEL to add it to your inventory.
- From here, click on the spring across the lake on the right to go there.
Spring
- Take a closer look at the branch on the upper left. Use the HOOK to pull down the CAGE and add it to your inventory.
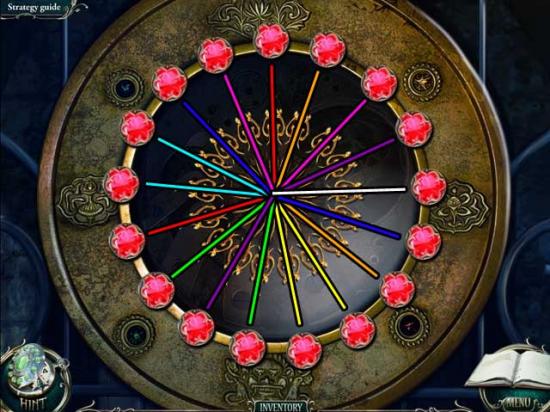
- Take a closer look at the waterfall pump just to the right of the waterfall. Use the SAFE LOCK on the pump to trigger a puzzle.
- Every symbol on the combination reel matches a letter inscribed on the safe front. Click and drag to rotate the dial and select the correct letter, beginning with the first symbol in the reel. The solution is “Fireplug” and is shown below.
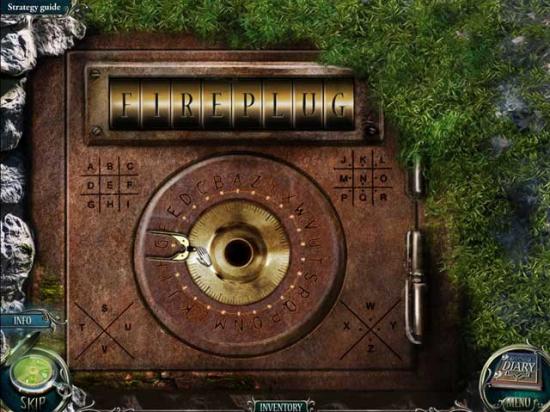
- Once the puzzle is finished, click on the red wheel to reduce the water flow.
- Enter the mine.
Mine
- Click on the hidden object area over the discarded items on the right.
- Find the items listed at the bottom of the screen. The Key Item has been circled in red.
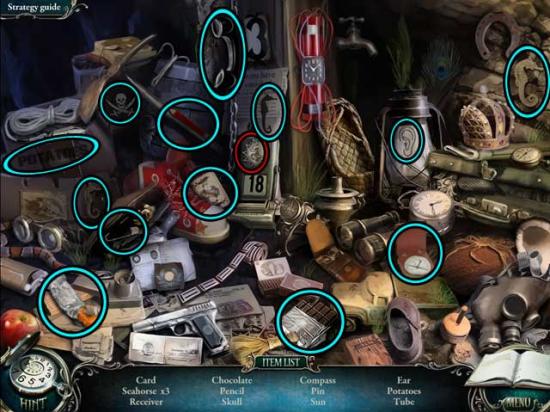
- Upon completing the area, the SUN 1/2 will be added to your inventory.
- Take a closer look at the frame hanging on the upper left portion of the wall. Click on the MEDICINE CHEST KEY to add it to your inventory.
- Return to the bank.
Bank
- From here, proceed to the overpass beneath the far end of the bridge.
Overpass
- Take a closer look at the hole in the wall on the right. Use the CAGE to trap the rat, then click on the HAMMER to add it to your inventory.
- Backtrack to the forest.
Forest
- Take a closer look at the medicine chest on the right. Use the MEDICINE CHEST KEY on the indentation to open it, then click on the WEED KILLER to add it to your inventory.
- Take a closer look at the wheel lying on the ground. Use the HAMMER to repair it, then click on the WHEEL to add it to your inventory.
- Return to the spring.
Spring
- Take a closer look at the stones at the base of the tree on the left. Use the WEED KILLER to remove the weeds, then click on the HEAD to add it to your inventory.

- Enter the mine.
Mine
- Take a closer look at the wheel at the base of the mine cart. Use the WHEEL on the area of the cart missing a wheel to restore it.
- Return to the overpass.
Overpass
- Take a closer look at the statue in the alcove on the left. Use the HEAD on the statue to restore it, then click on the STAR KEY that appears to add it to your inventory.
- Return to the bridge.
Bridge
- Examine the box in front of the carriage on the left. Use the STAR KEY on the lock to reveal a hidden object area.
- Find the items listed at the bottom of the screen. The Key Item has been circled in red.

- Upon completing the area, the SUN 2/2 will be added to your inventory.
- Return to the overpass.
Overpass
- Take a closer look at the door lock. Use the SUN 2/2 on the indentation to trigger a puzzle.
- Arrange all the cubes so that their symbols coincide with the symbols on the field. The solution is shown below.
- Enter the secret room.
Secret Room
- Take note of the instructions hanging on the bulletin board on the right.
- Examine the books sitting in the cabinet on the far end of the room.
- Rearrange the books so that they form one complete artwork together. The solution is shown below.
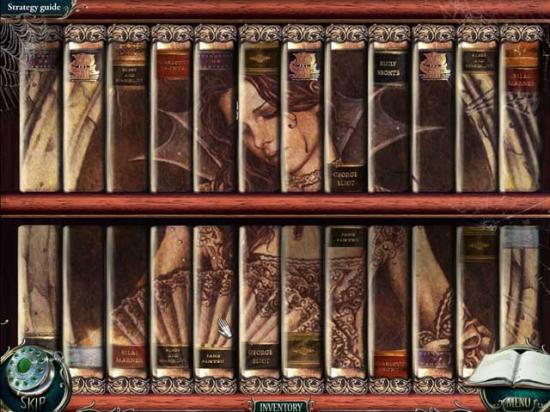
- Upon completing the puzzle, a lock will be revealed. We’ll come back to this later.
- Examine the engine on the table on the left. Use the COGWHEEL on it to trigger a puzzle.
- Put the engine back together by clicking on the gears and placing them on the rod in the order dictated by the instructions on the bulletin board. The solution order is shown below.
- Upon completing the puzzle, the ENGINE will be added to your inventory.
- Return to the mine.
Mine
- Take a closer look at the back of the cart (engine). Place the ENGINE in the empty slot.
- Follow the mine cart down to the grotto.
Grotto
- Click on the hidden object area over the toppled mine cart on the left.
- Find the items listed at the bottom of the screen. The Key Item has been circled in red.
- Upon completing the area, the DRAGONFLY KEY will be added to your inventory.
- Return to the secret room.
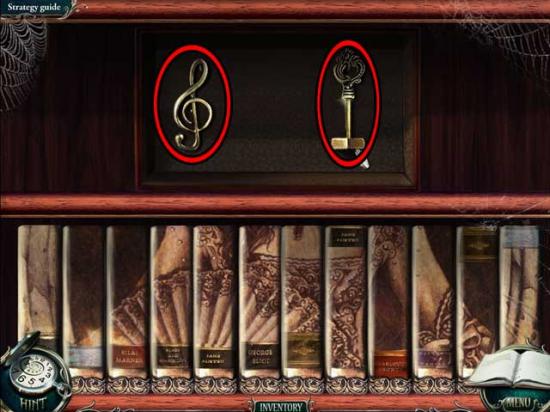
Secret Room
- Take a closer look at the books on the shelf at the back of the room again. Use the DRAGONFLY KEY on the lock slot on the top shelf to open it, then click on the TRIANGULAR KEY and the CLEF to add them to your inventory.
- Return to the grotto.
Grotto
- Take a closer look at the gate over the tracks. Use the TRIANGULAR KEY on the lock to complete the area.
Chapter 6: Rescue Luisa
Dining Room
- Upon arriving back in the mansion, you’ll find the STAINED GLASS PIECE has been added to your inventory.
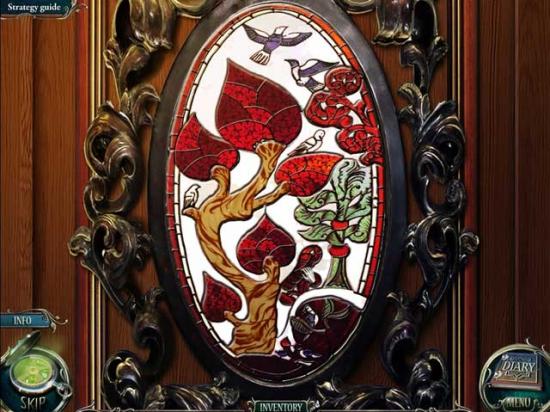
- Examine the door on the right. Use the STAINED GLASS PIECE on it to trigger a puzzle.
- Arrange the stained glass pieced within the frame. Use the right click to rotate pieces as necessary. The solution is shown below.
- Click on the hidden object area that appears.
- Find the items listed at the bottom of the screen. The Key Item has been circled in red.
- Upon completing the area, the SKULL will be added to your inventory.
- Go to the drawing room.
Drawing Room
- Take a closer look at the piano at the back of the room. Use the CLEF on the crest to trigger a puzzle.
- Play the melody written in the music book. Press the keys which correspond with the pictures on the music sheet. Watch carefully to see which note is illuminated (top to bottom, left to right) before selecting the corresponding key. The solution is shown below.
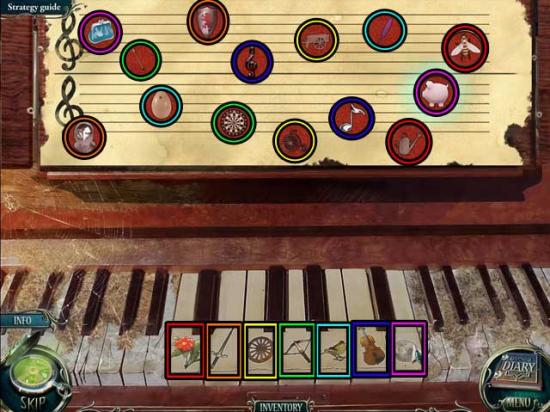
- Upon completing the puzzle, click on the hidden object area that appears.
- Find the items listed at the bottom of the screen. The Key Item has been circled in red.
- Upon completing the area, the LION will be added to your inventory.
- Return to the basement corridor.
Basement Corridor
- Take a closer look at the chest in the lower left corner of the corridor. Use the LION on the cavity to open the chest, then collect the STAINED GLASS PIECE and the CROSS to be added to your inventory.

- Take a closer look at the right wall and enter the dungeon.
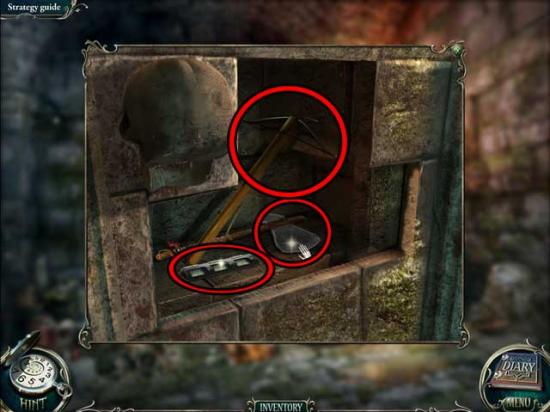
Dungeon
- Take a closer look at the niche within the arch on the far wall. Use the SKULL on the niche, then click on the AXE, the LOCK PIECE, and the CROSSBOW to add them to your inventory.
- Return to the first floor hallway.
Hallway 1F
- In case you hadn’t noticed prior to this, the stairs are now gone. Take a closer look at the banister at the top of the steps.
- Use the CROSSBOW on the banister to create a way back up to the second floor.
Hallway 2F
- Proceed forward to Mother’s room.
Mother’s Room
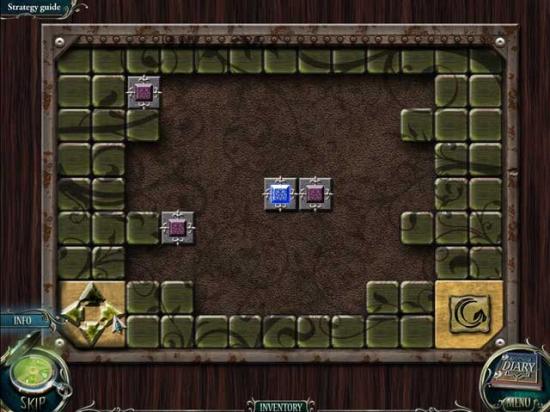
- Take a closer look at the box/chest at the base of the bed. Use the LOCK PIECE on the empty slot on the left to trigger a puzzle.
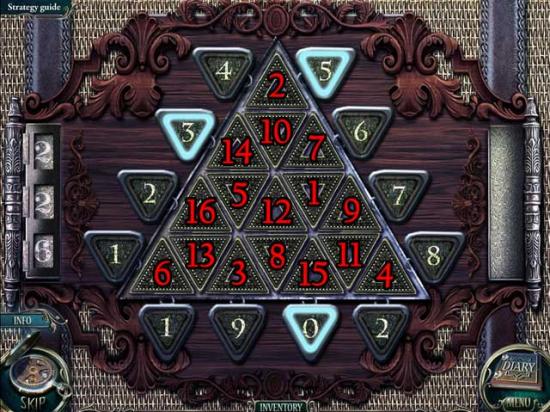
- Press all the triangles in the playing field. The numbers on the roller on the left show the numbers the triangle will occupy next. The solution is shown below.
- Upon completing the puzzle, click on the hidden object area that appears.
- Find the items listed at the bottom of the screen. The Key Item has been circled in red.
- Upon completing the area, the DRAGON EMBLEM will be added to your inventory.
- Enter Father’s room.
Father’s Room
- Take a closer look at the cabinet between the desk and the window. Use the DRAGON EMBLEM on the cavity to trigger a puzzle.
- Move the squares using the control elements so that the blue square lands on the blue stone in the center of the screen. The solution is shown and outlined below:
- Click on the squares as directed by these steps to complete the puzzle: 1)Lower left pink square= right, up; 2)Upper left pink square= right; 3)Blue square= left; 4)Upper middle pink square= down; 5)Blue square= right, up; 6)Upper right pink square= left, down; 7)Blue square= right, down; 8)Middle right pink square= left; 9)Lower right pink square= up, left; 10)Lower left pink square= up; 11)Upper right pink square= left, down, right; 12)Lower left pink square= left; 13)Upper left pink square= down, right; 14)Upper right pink square= up, left; 15)Blue square= up, left, down, right.
- Upon completing the puzzle, enter the secret room.
Secret Room
- There’s a gate blocking your way and you don’t have the key. However, pick up the MEDALLION to add it to your inventory.
- Return to the dining room.
Dining Room
- Take a closer look at the cupboard on the right. Use the MEDALLION to open it, then click on the PIGEON inside to add it to your inventory.
- Return to the secret room.
Secret Room
- Use the PIGEON on the lock to open the gate and gain access to the secret room.
- Click on the hidden object area over the bookshelves on the right.
- Find the items listed at the bottom of the screen. The Key Item has been circled in red.
- Upon completing the area, the GRAMOPHONE HANDLE will be added to your inventory.
- Examine the book lying on the desk. Click on the RABBIT to add it to your inventory.
- Return to the second floor hallway.
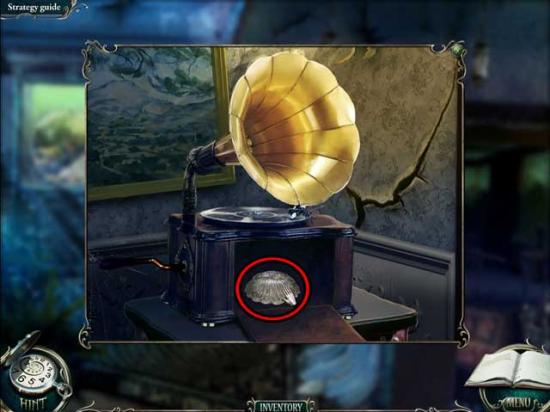
Hallway 2F
- Examine the gramophone in the corner. Use the GRAMOPHONE HANDLE on the gramophone to reveal a hidden compartment. Click on the SEASHELL to add it to your inventory.
- Return to the basement corridor.
Basement Corridor
- Examine the gate at the far end of the corridor. Use the AXE, the RABBIT, and the SEASHELL on their respective slots to open the gate.
- Continue to the stairs.
Chapel Stairs
- Take note of Luisa down below.
- Click on the hidden object area over the junk pile by the railing.
- Find the items listed at the bottom of the screen. The Key Item has been circled in red.
- Upon completing the area, the BAS-RELIEF PIECE will be added to your inventory.
- Examine the box on the table on the right. Use the CROSS to open the box, then click on the SOPORIFIC inside to add it to your inventory.
- Return to the secret room.
Secret Room
- Examine the safe amidst the picture frames at the back of the room. Use the BAS-RELIEF PIECE on the slot to trigger a puzzle.
- Note the black figure outline on the right side of the screen. Select the lines by clicking on a line segment on the board on the left to recreate the figure. The solutions are shown below.
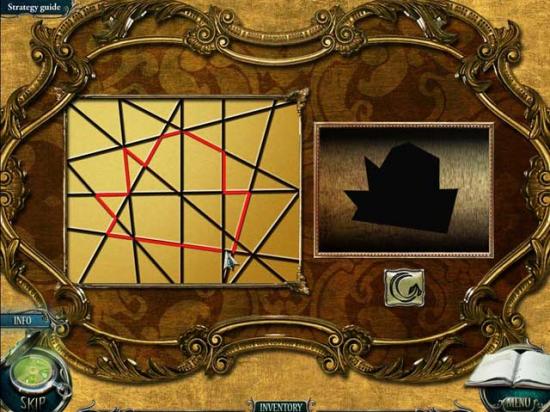


- Upon completing the puzzle, take a closer look at the opened safe. Click on the rifle to obtain the automatic RIFLE WITH SOPORIFIC combination for your inventory.
- Return to the chapel stairs.
Chapel Stairs
- Take a closer look at the demon beneath the waterfall in the distance. Use the RIFLE WITH SOPORIFIC on the demon, then proceed forward to the levitation platform.
Levitation Platform
- From here, cross the small bridge to the demon.
Demon’s Desk
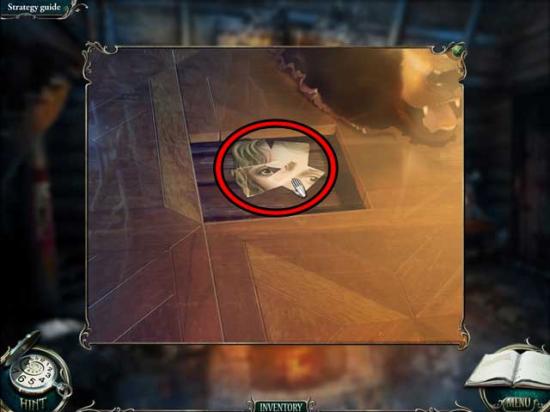
- Click on the demon’s hand on the right to open it and collect the ORANGE COIN, then click on the demon’s other hand for a closer view.
- Click on the MEDALLION within the demon’s other hand to add it to your inventory.
- Return to the secret room.
Secret Room
- Take a closer look at the book lying on the desk again. Use the MEDALLION to open the book, then retrieve the YELLOW COIN for your inventory.
- Go back to the levitation platform.
Levitation Platform
- Examine the panel beneath Luisa. Use the YELLOW COIN and the ORANGE COIN on the panel to trigger a puzzle.
- Arrange the coins so that they match vertically by shape and horizontally by color. Each square rotates the four coins around it. Follow the step-by-step below to solve the puzzle, using the screenshot below for both reference and solution.
- Click on the letter-identified buttons the number of times specified as follows to complete the puzzle: Ax2, C, D, Cx2, Dx2, Bx2, Ax3, B, C, A, C, B, D, Cx3, D, C, Bx2, D, B, Dx2, B, Dx3, Bx3.
Congratulations! You’ve completed Grim Tales: The Bride!
Collector’s Edition Bonus Gameplay
Once you’ve completed the main adventure, click on “Bonus Content”, then select “Bonus Gameplay” and “Play Game” to access this extra adventure.
Entrance
- Enter the front doors to the drawing room.
Drawing Room
- Examine the desk/table in front of the fireplace. Click on the BAS-RELIEF PIECE to add it to your inventory.
- Proceed forward into the hallway, then enter the dining room.
Dining Room
- Click on the KNIFE embedded in the table to add it to your inventory, then take a closer look at the bucket on the right. Collect the WHITE DIE inside.
- Exit to the hallway and proceed upstairs.
Hallway 2F
- Click on the AXE stuck in the banister to add it to your inventory.
- Proceed into the corridor.
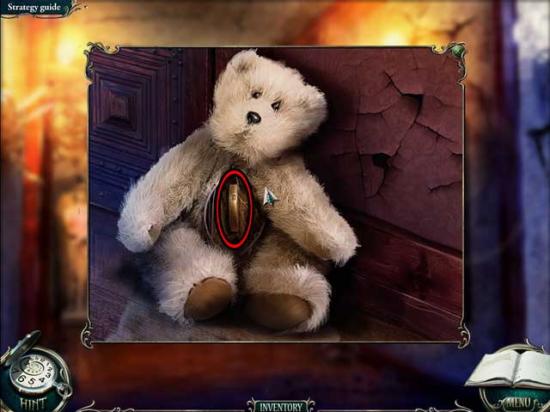
Corridor
- Examine the teddy bear beneath the painting. Use the KNIFE to cut it open and obtain the CHICKEN KEY.
- Enter Father’s room.
Father’s Room
- Click on the hidden object area over the heap of junk on the left.
- Find the items listed at the bottom of the screen. The Key Item has been circled in red.
- Upon completing the area, the SCREWDRIVER will be added to your inventory.
- Return to the second floor hallway.
Hallway 2F
- Examine the box on the left. Use the SCREWDRIVER to remove the screws and open the box, then click on the RED DIE to add it to your inventory.
- Re-enter Father’s room and enter the secret room from there.
Secret Room
- Take a closer look at the lock on the bars. Use the WHITE DIE and the RED DIE on the lock to trigger a puzzle.
- Arrange the dice so that the white ones are in the white sector and the red ones in the red sector. Once you’ve done this, arrange them in their proper order. Refer to the screenshot below (left to right) for an example of how to obtain the final solution.

- Upon completing the puzzle, you can now gain full access to the room.
- Click on the hidden object area over the armchair on the far left.
- Find the items listed at the bottom of the screen. The Key Item has been circled in red.
- Upon completing the area, the CLOCK HANDS will be added to your inventory.
- Examine the shadow book lying on the desk. Click on the DOG KEY to add it to your inventory.
- Return to the dining room.
Dining Room
- Take a closer look at Grandmother’s vase. Use the CHICKEN KEY on the lock, then click on GRANDMOTHER’S VASE to add it to your inventory.
- Return to the drawing room.
Drawing Room
- Take a closer look at Father’s vase. Use the DOG KEY on the lock, then click on FATHER’S VASE to add it to your inventory.
- Examine the door to the right of the fireplace. Use the AXE to break it down.
- Enter Luisa’s room.
Luisa’s Room
- Click on the hidden object area over the bed.
- Find the items listed at the bottom of the screen. The Key Item has been circled in red.

- Upon completing the area, the DRAGON CREST 1/3 will be added to your inventory.
- Return to the house outside entrance.
Entrance
- Examine the gate on the left. Use the CLOCK HANDS on the face to trigger a puzzle.
- Arrange the clock hands so that all the lights turn on. Use the right click to rotate clock hands as necessary. The solution is shown below.
- Enter the basement.
Basement
- Proceed forward through the door to the basement corridor.
Basement Corridor
- Click on the hidden object area over the pile of junk at the far end of the corridor.
- Find the items listed at the bottom of the screen. The Key Item has been circled in red.
- Upon completing the area, the DIAMOND KEY will be added to your inventory.
- Backtrack to the dining room.
Dining Room
- Take a closer look at the window. Use the DIAMOND KEY to open it, revealing a new hidden object area.
- Find the items listed at the bottom of the screen. The Key Item has been circled in red.
- Upon completing the area, the ENGRAVED BUTTON will be added to your inventory.
- Return to the basement corridor.
Basement Corridor
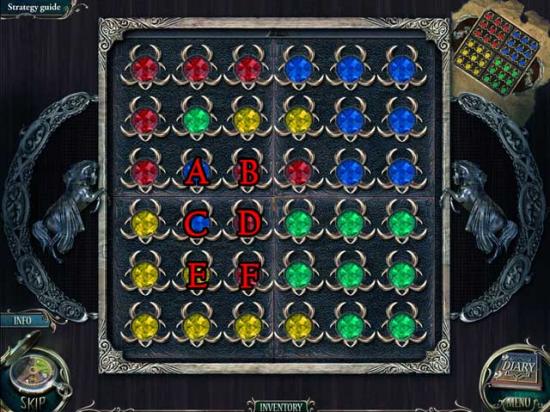
- Take a closer look at the gardener. Use the ENGRAVED BUTTON on the plaque to trigger a puzzle.
- Set the circles and three-quarter circles so that they match their underlying position in both color and shape. Click on the button to move the circles clockwise. Refer to the screenshot below for reference to the solution.
- Press the buttons in the following order: Ax2, B, D, J, B, Gx2, H, I, Cx3.
- Upon completing the puzzle, click on the MEDALLION that appears to add it to your inventory.
- Go back to the secret room.
Secret Room
- Take a closer look at the side of the desk. Use the MEDALLION on the slot on the left to trigger a puzzle.
- Move the squares with rounded edges so that they encircle the bird in the center. Click on a square and then on an empty space to move it. The solution is shown below.
- Upon completing the puzzle, click on the DRAGON CREST 2/3 and the BROOCH to add them to your inventory.
- Return to the basement.
Basement
- Take a closer look at the shelf on the right. Use the BROOCH on the box to open it, then collect the DRAGON CREST 3/3 inside.
- Return to the upstairs corridor.
Corridor
- Examine the door on the right wall. Use the DRAGON CREST 3/3 on the slot to reveal a puzzle.
- Turn on the mechanism lights. The lightning button is the power source. Use the left mouse click to rotate objects (both tiles and lightbulbs) clockwise. Once you’ve assembled the puzzle correctly, click the power button in the upper right corner. The solution is shown below.

- Enter Mother’s room.
Mother’s Room
- Click on the hidden object area over the mother/bed.
- Find the items listed at the bottom of the screen. The Key Item has been circled in red.
- Upon completing the area, the ROPE will be added to your inventory.
- Return to Father’s room.
Father’s Room
- Take a closer look at the radiator just beneath the window. Use the ROPE on the radiator, then proceed outside through the window to the garden.
Garden
- Click on the hidden object area over the dumpster on the right.
- Find the items listed at the bottom of the screen. The Key Item has been circled in red.
- Upon completing the area, the CROSS will be added to your inventory.
- Return to the secret room.
Secret Room
- Enter and watch what happens.
- Examine the back wall. Use the AXE to clear away the boards.
- Click on the hidden object area over the niche.
- Find the items listed at the bottom of the screen. The Key Item has been circled in red.
- Upon completing the area, the THERMITE will be added to your inventory.
- Return to the garden.
Garden
- Examine the gates straight ahead. Use the THERMITE on the lock to destroy it.
- Proceed forward into the cemetery.
Cemetery
- Click on the hidden object area over the gravestone on the right.
- Find the items listed at the bottom of the screen. The Key Item has been circled in red.
- Upon completing the area, the BAS-RELIEF PIECE (2) will be added to your inventory.
- Take a closer look at the face of the angel statue on the left. Click on the face to take away pieces, then click on the GLASS CUTTER to add it to your inventory.
- Return to Mother’s room.
Mother’s Room
- Take a closer look at the mirror on the right. Use the GLASS CUTTER on the bottom portion of the visible mirror, then click on the RING to add it to your inventory.
- Exit back to the second floor hallway.
Hallway 2F
- A statue will move, revealing a niche. Click on the niche for a closer view.
- Use the BAS-RELIEF PIECE (1) on the slot to open the safe, then click on the PIG KEY to add it to your inventory.
- Go downstairs.
Hallway 1F
- Click on the hidden object area over the broken statue.
- Find the items listed at the bottom of the screen. The Key Item has been circled in red.
- Upon completing the area, the TRIANGLE will be added to your inventory.
- Go back to the basement corridor.
Basement Corridor
- Take a closer look at the gardener’s vase. Use the PIG KEY on the lock, then click on the GARDENER’S VASE to add it to your inventory.
- Return to the cemetery.
Cemetery
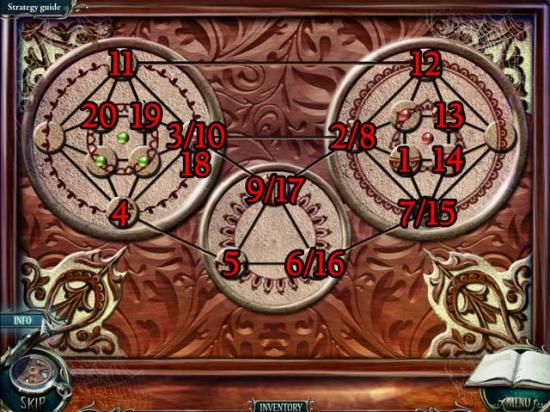
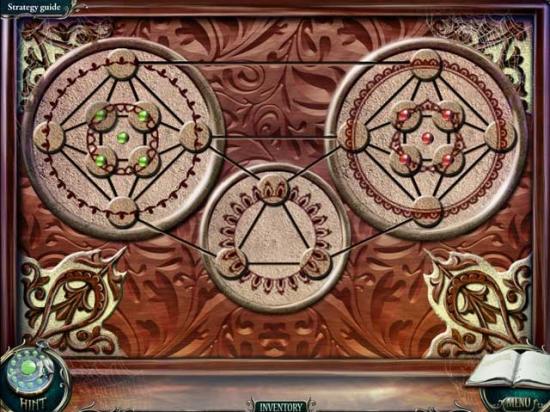
- Take a closer look at the door at the far end of the cemetery. Use the CROSS, the RING, and the TRIANGLE on their respective slots to trigger a puzzle.
- Click on the gears to spin the slots until they line up in chronological order. Each gear corresponds with one picture/slot. Click on the orange button of a gear to prevent it from spinning. The solution is shown below.

- Enter the shrine.
Shrine
- Click on the hidden object area over the debris on the right.
- Find the items listed at the bottom of the screen. The Key Item has been circled in red.
- Upon completing the area, the HORSE will be added to your inventory.
- Take a closer look at the pile of stones on the left. Click on the CAT KEY to add it to your inventory.
- Examine the area under the altar. Use the BAS-RELIEF PIECE on the indentation to trigger a puzzle.
- Light up all the lines by pressing the dots sequentially without using the same line twice. You will have to complete this puzzle five times in total. All solutions are shown below here.

- Place GRANDMOTHER’S VASE, FATHER’S VASE, and the GARDENER’S VASE on the altar.
- Return to Mother’s room.
Mother’s Room
- Take a closer look at Mother’s vase. Use the CAT KEY on the lock, then click on MOTHER’S VASE to add it to your inventory.
- Backtrack to Luisa’s room.
Luisa’s Room
- Examine the toy horse on the left. Use the HORSE on the slot to trigger a puzzle.
- Arrange the stones so that the color pattern matches the example in the upper right corner. Click a stone to rotate the surrounding ones. The solution is below: refer to the screenshot for positions.
- Solution: A, Bx3, Cx2, Dx2, Fx3, E, C, Ex2, C, Ex4, C, F, Ex2, F, E, F, E, F, Ex2, F, E, F.
- Upon completing the puzzle, click on the DOLPHIN KEY to add it to your inventory.
- Go back to Father’s room.
Father’s Room
- Take a closer look at the boy’s vase. Use the DOLPHIN KEY on the lock, then click on the BOY’S VASE to add it to your inventory.
- Return to the shrine.
Shrine
- Place the MOTHER’S VASE and the BOY’S VASE on the altar.
Congratulations! You’ve completed Grim Tales: The Bride Collector’s Edition!

More articles...
-
Best Horror Games On Itch.io – July 2026
Across a bounty of subgenres. -
Grow A Garden 2 Base Price List
What's the most valuable crop? -
Evomon Types Guide [Strengths, Weaknesses, Resistance]
Your companion guide during battles.