![Digimon UP Tier List [Supports, Buddies, and Partners]](/wp-content/uploads/2026/07/digimon-up-tier-list.jpg "Digimon UP Tier List [Supports, Buddies, and Partners]")
Digimon UP Tier List [Supports, Buddies, and Partners]
These Digimon will get you UP the leaderboard.

![Haze Seas Boss Drops [Chances, Locations, and How to Spawn]](/wp-content/uploads/2026/07/haze-seas-boss-drops.jpg "Haze Seas Boss Drops [Chances, Locations, and How to Spawn]")

Welcome to Gamezebo's walkthrough for Green Moon.General Information Main Menu The New Game button starts the game with the currently selected player profile. The Profile button allows new profiles to be added and existing profiles to be selected. The Load Game button shows a list of saved games that can be selected. The game is also automatically saved at various points of the adventure. The Options button displays a window where the sound and music volume can be changed. There is a…
a:1:i:0;a:2:s:13:”section_title”;s:22:”Green Moon Walkthrough”;s:12:”section_body”;s:63672:”
Welcome to Gamezebo’s walkthrough for Green Moon.
General Information
Main Menu

Controls
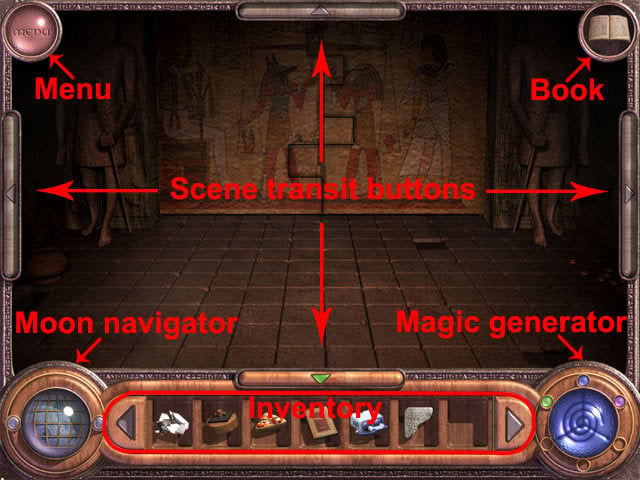
Game Interface
Alchemical Device
Types of Magic
Moon Exploration
Walkthrough
Tutorial
The game starts in the house, where a tutorial on using objects must be completed before the main adventure can begin. Take the rake from the stand at the left side of the fireplace:
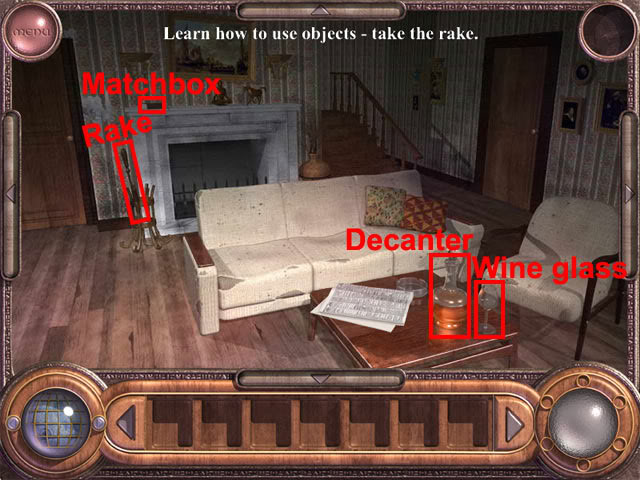
Put the rake into the left inventory slot. Select the rake from the inventory slot and put it back on the stand. Take the wineglass on the table and put it into the left inventory slot. Take the decanter on the table and then select the wine glass in the inventory to fill it.
Select the table to put the decanter back. Take the wine glass from the inventory slot, right click the mouse to drink the wine and then select the table to put the wine glass back. Select the matchbox on top of the fireplace and press the right mouse button to light a match. Select the fireplace to light a fire. Select the top of the fireplace to replace the matchbox.
Finding the Book
Take the matchbox on top of the fireplace and add it to the left inventory slot. Select the newspaper on the table:
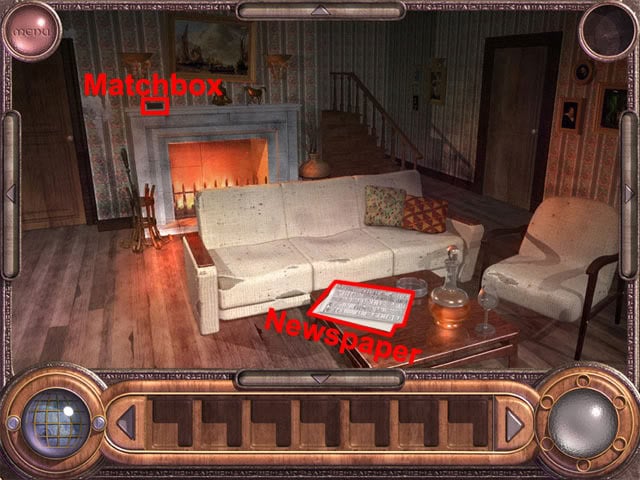
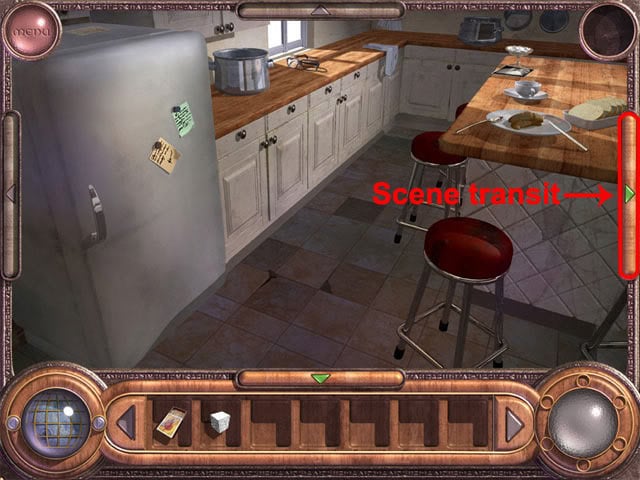
An old key is revealed below the newspaper. Take the key and use it to unlock the left and right doors. Move the key anywhere in the playing area and press the left mouse button to drop it. Go through the right doorway to enter the kitchen. Take a sugar cube from the bowl of sugar:

Select the Scene Transit button with the green arrow at the right side of the screen to turn right:
Open the clock on the wall. Take the key at the bottom of the clock:
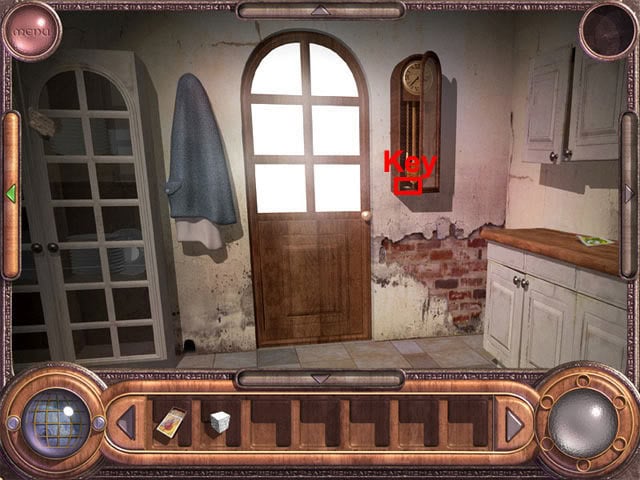
Move left and back to return to the hall. Go through the left doorway to move downstairs. Use the key from the clock on the old door to open it. Go through the doorway to enter the basement. Select the matchbox from the inventory and then press the right mouse button to light a match. Move the match to the torch at the top-left corner of the room:
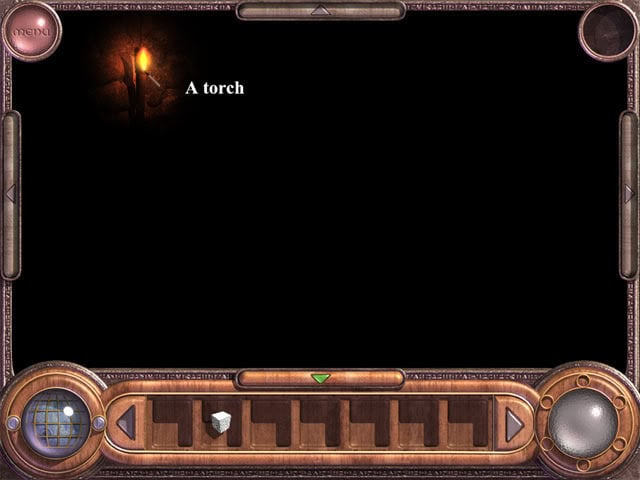
Select the torch to light the room. Examine the book on the stand to read about the children of the moon. Select the right page of the book to turn to the next page. The first task is to make a cup of sweet coffee. Select the exit button near the bottom of the screen to stop viewing the book. The book can now be examined at any point in the game by selecting the book icon at the top-right corner of the screen.
Task 1 – Coffee
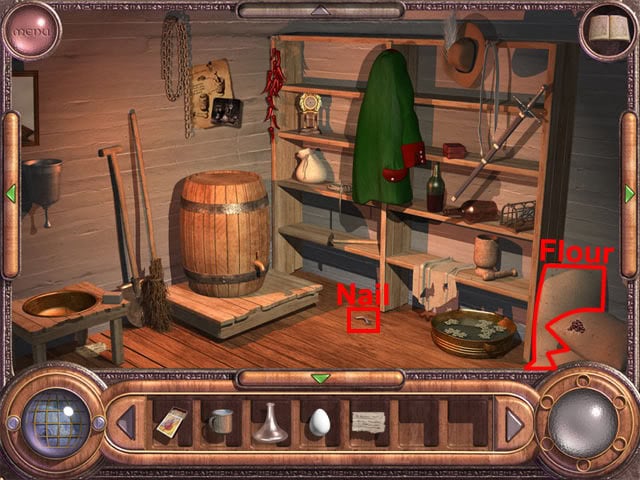
Move forward through the doorway. Take the iron nail on the floor:
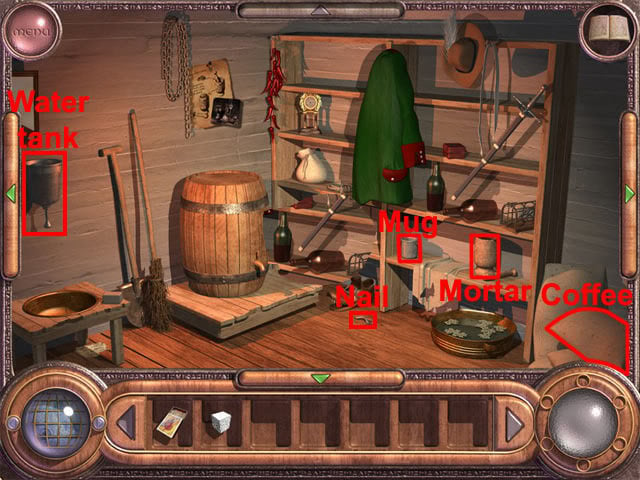
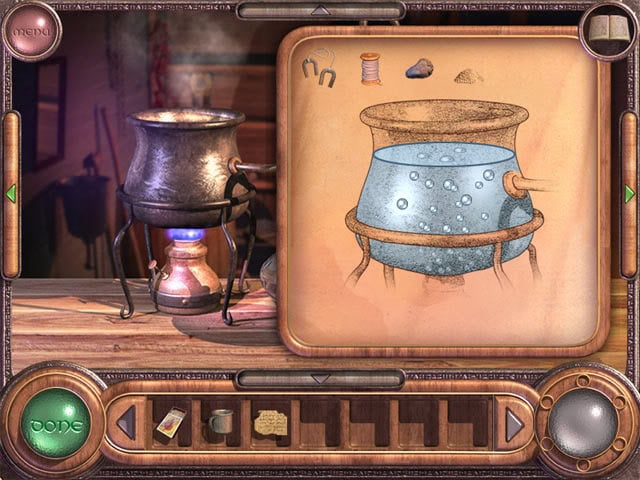
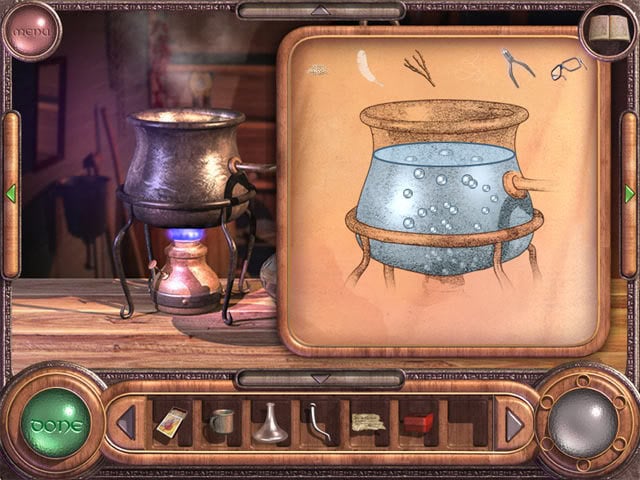
Use the iron nail on the sack at the right side of the room. Drop the iron nail. Take the coffee beans from the sack. Take the mug and mortar from the shelves. Use the mug on the water tank above the wash basin. Turn left to see the alchemical device:
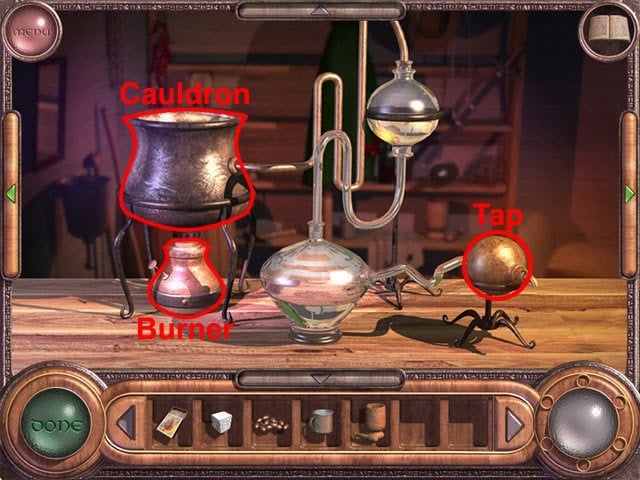
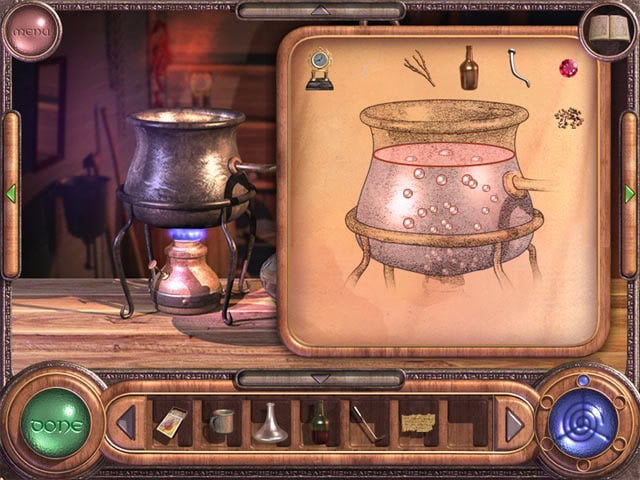
Light a match and select the burner below the cauldron. Use the mug of water on the cauldron. Combine the coffee beans with the mortar in the inventory to make the mortar with ground coffee. Use the mortar with ground coffee in the cauldron.
Select the green done button at the bottom-left corner of the screen. Use the mug on the tap to fill it with coffee. Combine the sugar cube with the mug of coffee to make the mug of sweet coffee. Select the mug of sweet coffee and then press the right mouse button to drink it.
Task 2 – Magic Boots
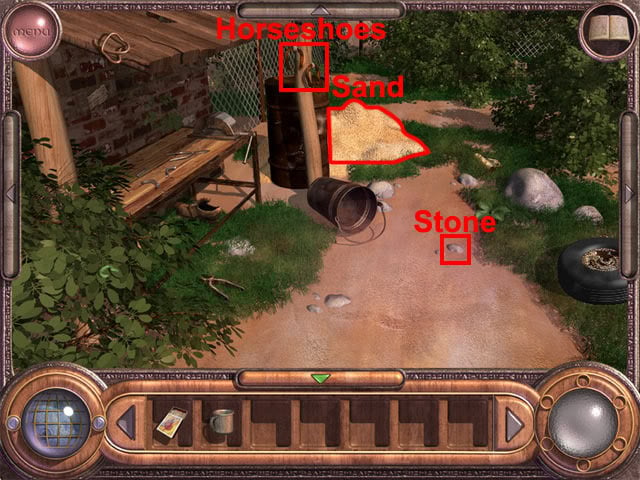
Turn right from the alchemical device and drop the mortar in the room to put it back on the shelf. Move back three times to the hall. Take the old key from the small table if you dropped it in this room earlier on. Go through the right doorway to enter the kitchen. Turn right and use the old key on the door to unlock it. Go through the doorway to enter the yard. Take the rusty horseshoes, the sand and the stone:
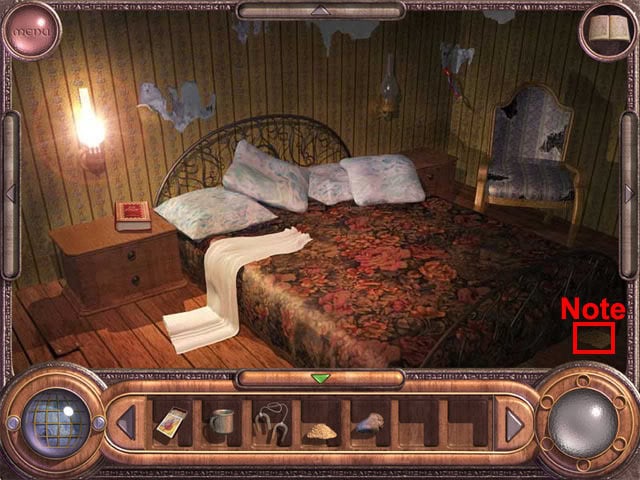
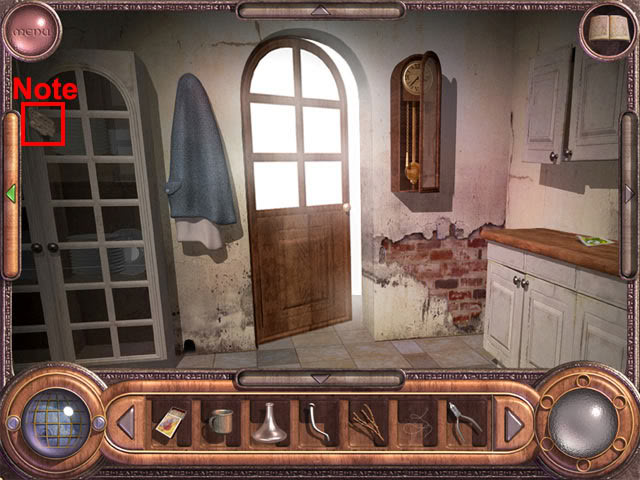
Move back, left and back to the hall. Go upstairs to the attic. Take the note below the bed:
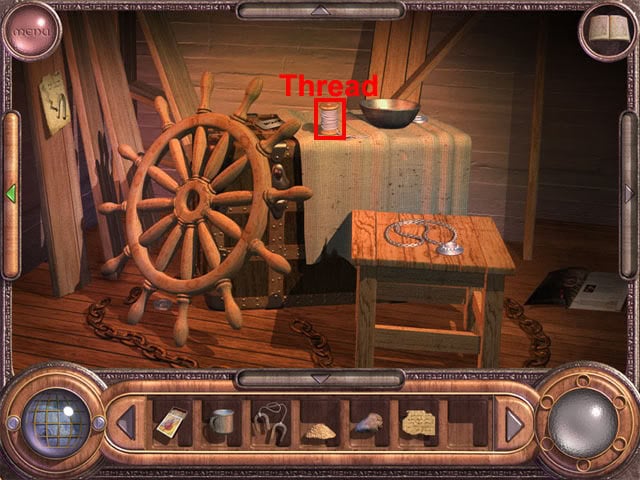
Return to the basement and use the mug on the water tank above the washbasin to fill it with water. Turn right and take the spool of thread on top of the chest:
Turn left twice to face the device. Use the mug of water on the cauldron. Use the horseshoes, thread, stone and sand on the cauldron:
Select the green Done button at the bottom-left corner of the screen to complete the liquid. Turn left and take one of the glass retorts from the shelf. Turn right and use the glass retort on the tap to fill it with the yellow liquid. Combine the glass retort with the note from the bedroom to make the magic potion. Turn right and take the old torn boot on the floor:
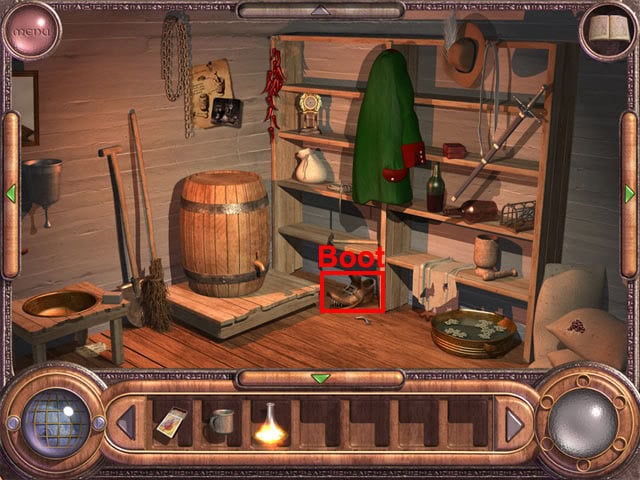
Return to the yard and take the torn boot below the workbench:
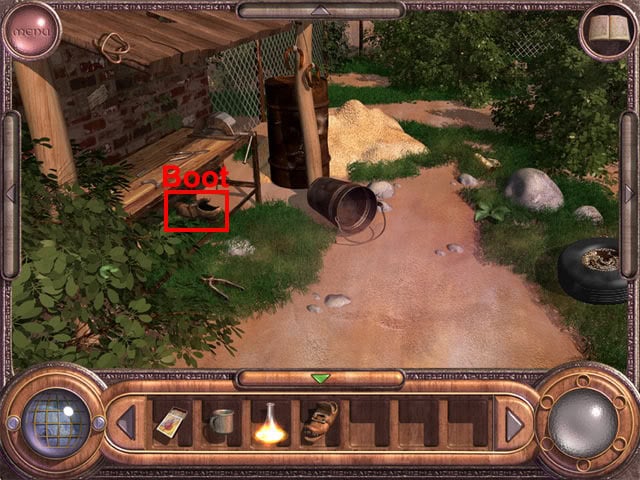
Combine the torn boot with the torn boot in the inventory to make the pair of old boots. Combine the magic potion with the pair of boots to make the new solid boots. Select the new solid boots and press the right mouse button to wear them.
Task 3 – Bread
Return to the kitchen. Open the fridge and take an egg:
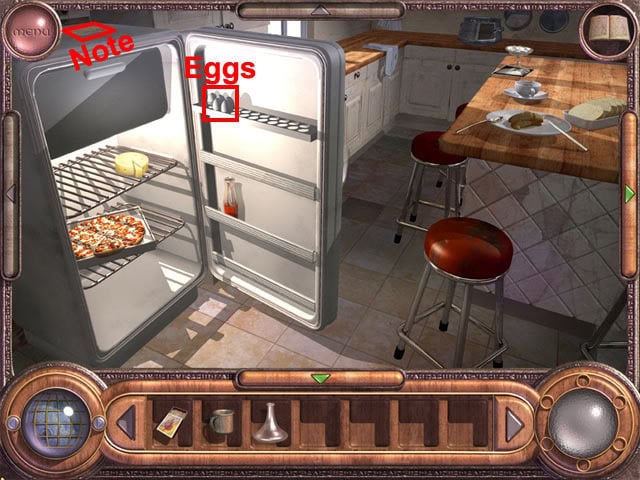
Take the note on top of the fridge. Return to the basement and fill the mug from the water tank above the washbasin. Take the iron nail on the floor and use it on the sack next to the coffee sack:
Take the flour from the sack. Combine the flour and the egg to make the flour mixed with eggs. Combine the flour mixed with eggs with the mug of water to make dough. Select the matchbox and light a match. Combine the lit match with the dough to make the lenten loaf. Combine the lenten loaf with the note from the top of the fridge in the kitchen. Eat the lenten loaf.
Task 4 – Space Travel
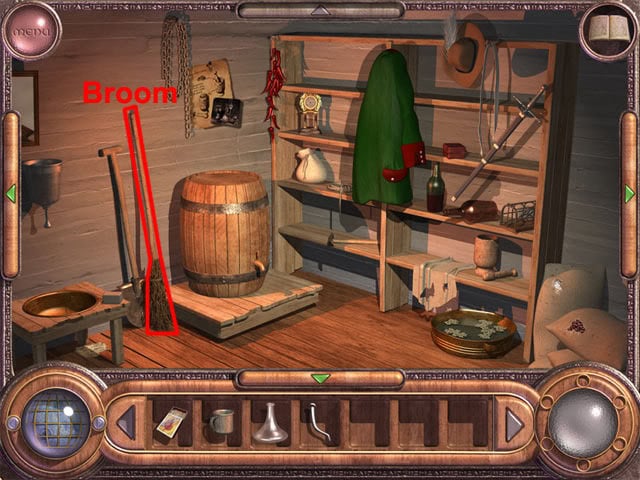
Select the broom to take a mistletoe branch:
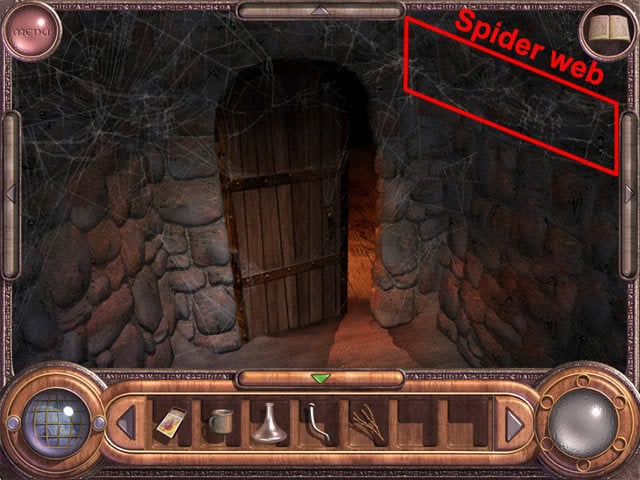
Move back twice to the basement door and select the spider web to take a thread:
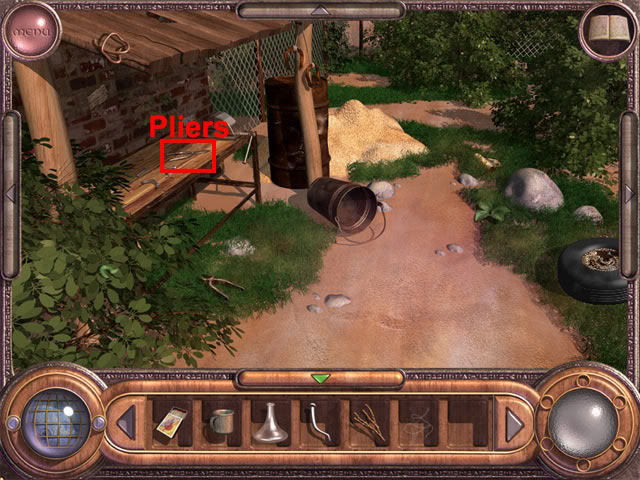
Return to the yard and take the iron pliers on the workbench:
Return to the kitchen and take the note on the cupboard:
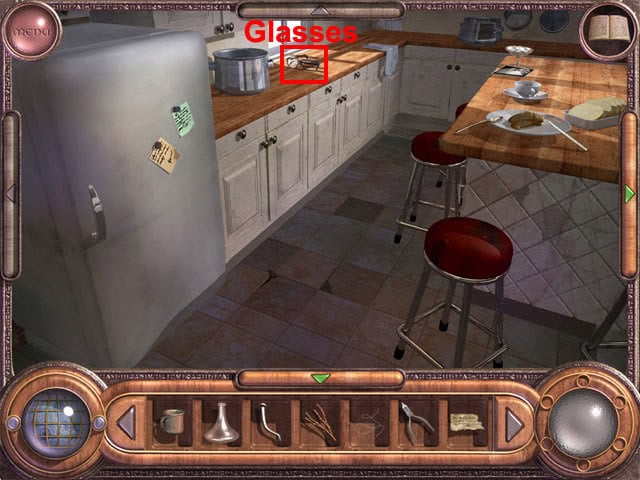
Turn left, close the door of the fridge if it is open and take the glasses:
Return to the attic and use the iron nail on one of the pillows to tear it:
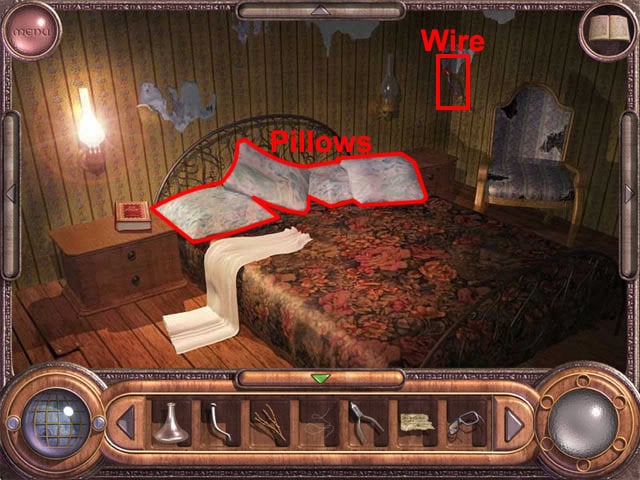
Select the torn pillow to take a bird feather. Use the iron pliers on the uninsulated wire to get the magnetized iron pliers. Return to the basement and take the powder box on the shelf:
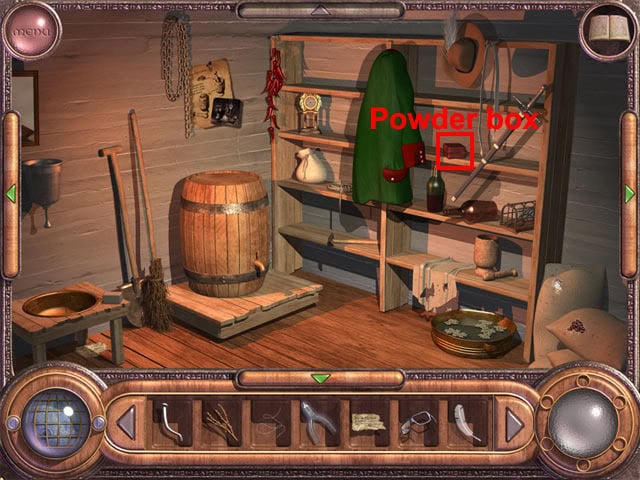
Use the mug on the water tank above the washbasin to fill it with water. Turn left and use the mug of water on the cauldron. Use the powder box, bird feather, mistletoe branch, spider web thread, magnetized iron pliers and glasses on the cauldron:
Select the green Done button. Use the glass retort on the tap to fill it with blue liquid. Combine the note from the kitchen cupboard with the glass retort to make the magic potion. Drink the magic potion and the magic of transition can now be selected from the Magic Generator at the bottom-right corner of the screen.
Turn right and drop the powder box to place it back on the shelf. Select the big blue button on the Magic Generator to view the transition locations. Only the moon is available so far, but more locations will be added as you progress through the adventure.
Select the moon to travel there. You will not be able to breathe on the moon until task 6 has been completed, so for now select the transition magic button again, select the outside of the moon option when asked where you want to travel and then select the house to return to the Earth.
Task 5 – Time Travel
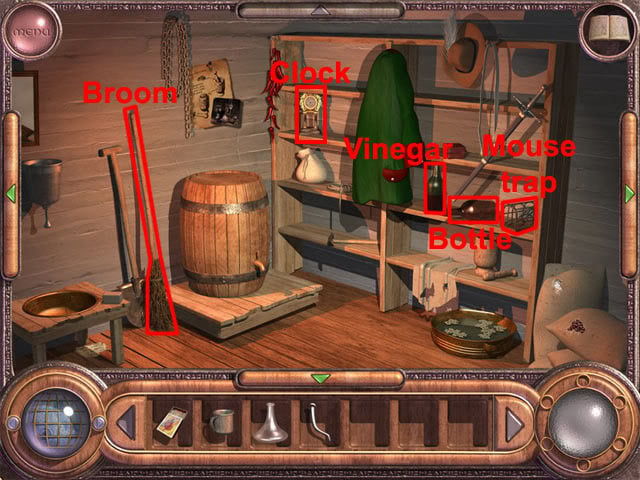
Return to the basement. Take the mistletoe branch from the broom and the antique clock, bottle of vinegar, empty bottle and mousetrap from the shelves:
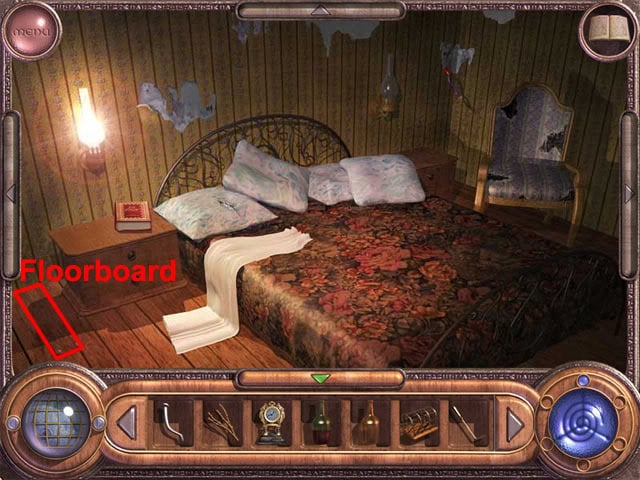
Return to the hall and take the bronze rake from the stand at the left side of the fireplace. Go upstairs and use the bronze rake on the floorboard to lift it:
Take the garnet below the floorboard.
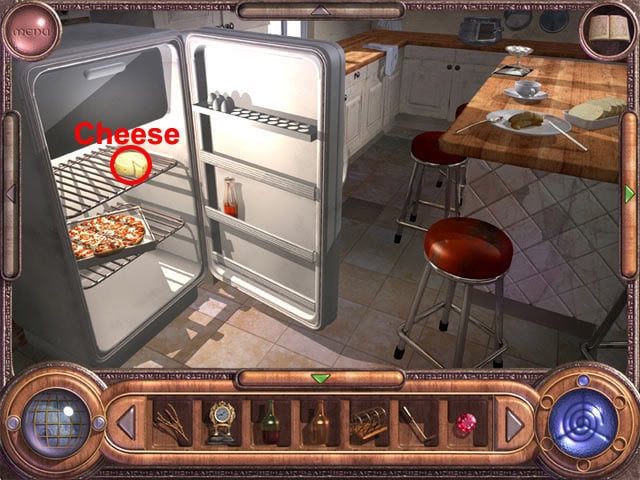
Return to the kitchen and take a piece of cheese from the fridge:
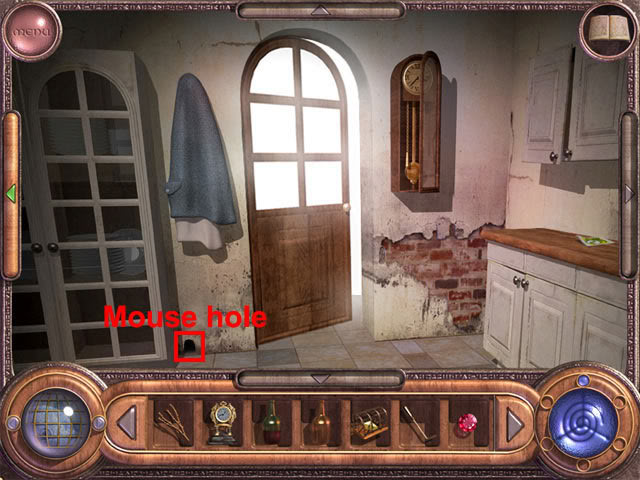
Turn right. Combine the piece of cheese with the mousetrap in the inventory to make the baited mousetrap. Use the baited mousetrap on the mouse hole:
Enter the yard and take the copper wire from the roof, the note from the wall and the steel nippers on the grass:

Combine the steel nippers with the the copper wire to make the copper shot. Drop the steel nippers to put them back on the grass. Move back to the kitchen and select the mousetrap to take a mouse whisker. Return to the device in the basement and add the vinegar, antique clock, mouse whisker, mistletoe branch, empty bottle, iron nail, garnet and copper shot:
Select the green Done button. Use the glass retort on the cauldron to fill it with pink liquid. Combine the note from the yard with the glass retort to make the magic potion. Drink the magic potion and the magic of time travelling can now be selected from the Magic Generator.
Task 6 – Healing
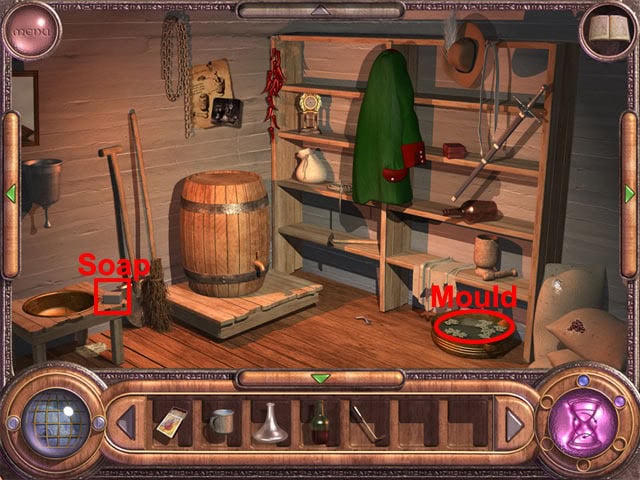
Turn right and fill the mug from the water tank above the washbasin. Take the bar of soap and the mould:
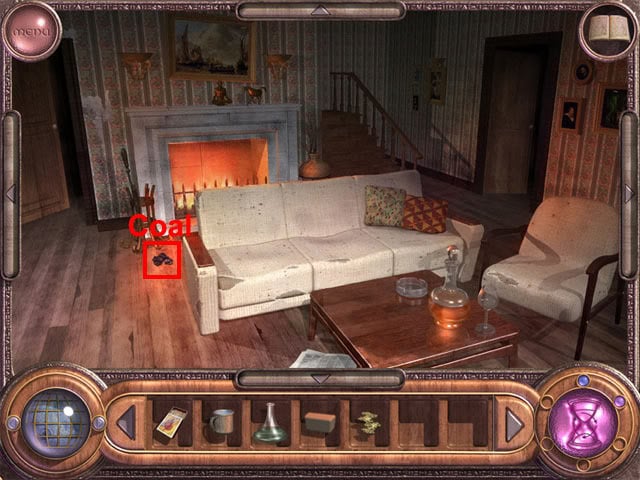
Use the glass retort on the liquid that was below the mould to fill the retort with foul water. Drop the bottle of vinegar to put it back on the shelf. Return to the hall and use the bronze rake on the fireplace to see the coal. Drop the bronze rake to put it back on the stand. Take the coal:
Return to the yard. Take the caterpillar, the plantain leaf and the soil:
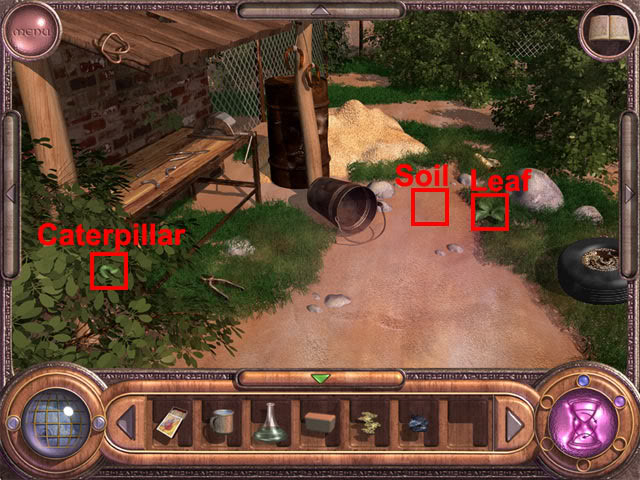
Combine the caterpillar with the plantain leaf in the inventory to make the eaten plantain leaf. Combine the soil with the mug of water in the inventory to get the mud. Drop the caterpillar to put it back on the leaf. Select the transition option on the Magic Generator and then press the blue button to see the available locations. Select the museum to travel there:
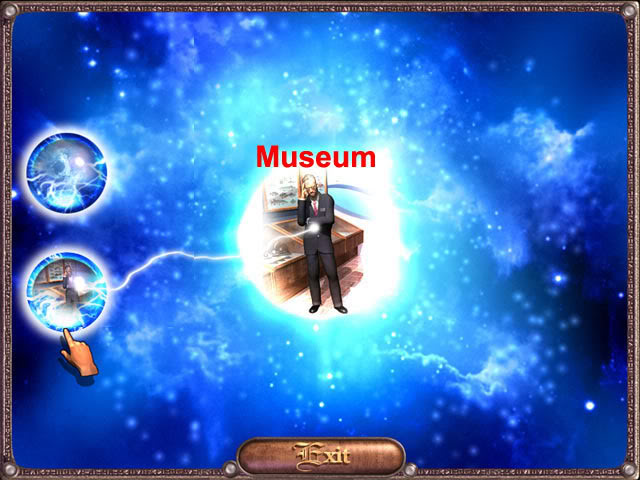
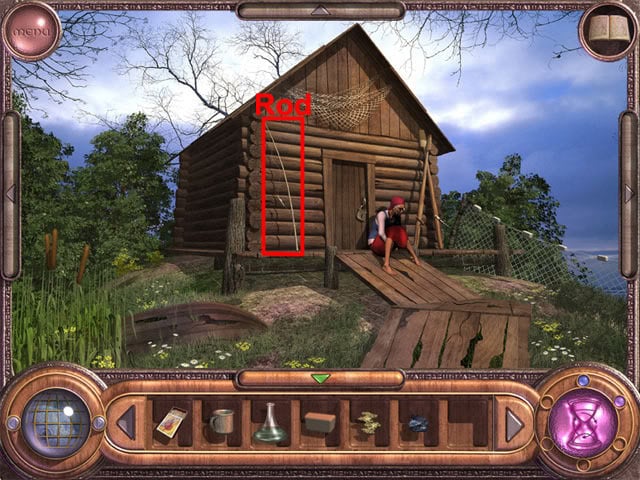
Talk to the director and he will say that a rare Nautilus Riverti shell has been stolen from the museum. Select the time travel option on the Magic Generator and then press the pink button to see the available locations. Select the cabin to travel there. Talk to the old woman to see a fishing rod. Take the fishing rod:
Move back to the lake. Use the fishing rod on the lake to start the fishing mini-game. Select the water to lower the bait. Wait until the line starts moving and then left click the water to pull a fish out. The aim is to catch the fish with the big belly shown below:
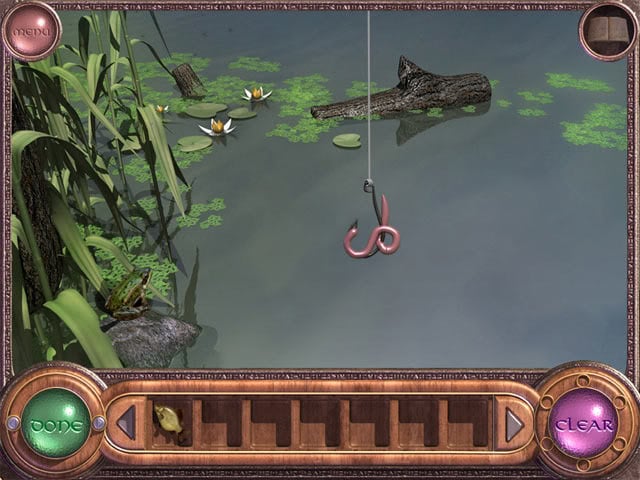
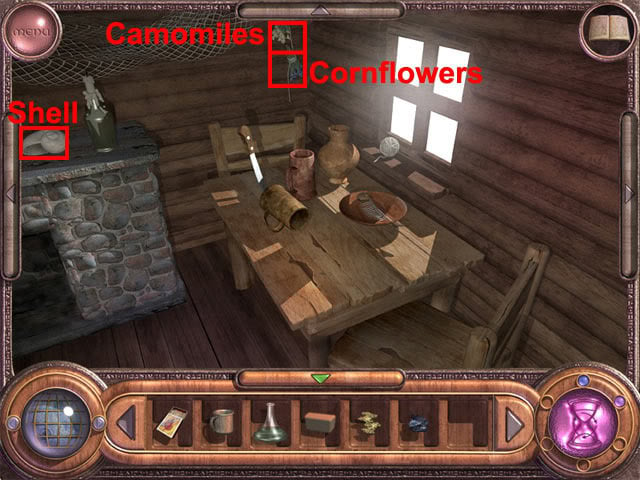
When this fish has been caught, select the green Done button to find the key to the fisherman’s hut. Back away from the lake. Use the key on the cabin door to open it. Enter the cabin and take the shell, the dry camomiles and the dry cornflowers:
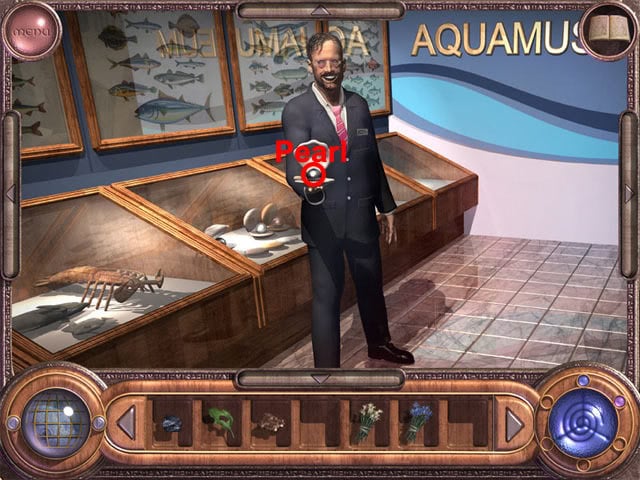
Time travel to the house and then travel back to the museum. Give the shell to the director and take the black pearl that he offers:
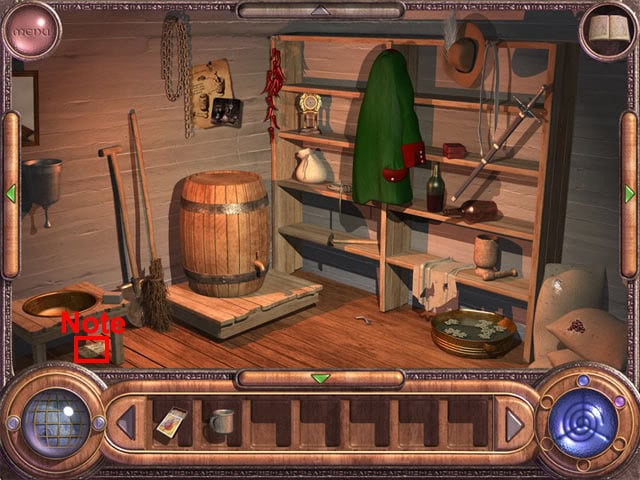
Travel to the house and return to the basement. Take the note under the small table:
Turn left to the device. Use the retort with foul water, the black tear pearl, the bar of soap, the mould, the dry camomiles, the dry cornflowers, the eaten plantain leaf, the mud and the coal on the cauldron:
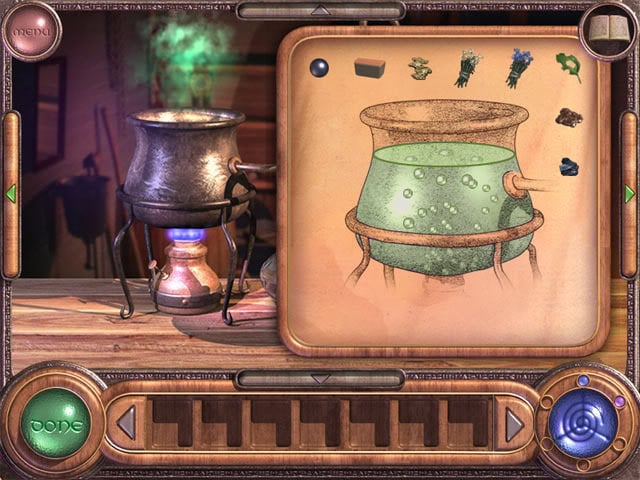
Select the green Done button. Use the glass retort on the tap to fill it with green liquid. Combine the note from under the basement table with the glass retort to make the magic potion. Drink the magic potion and the healing magic can now be selected from the Magic Generator.
Task 7 – The Black Stone
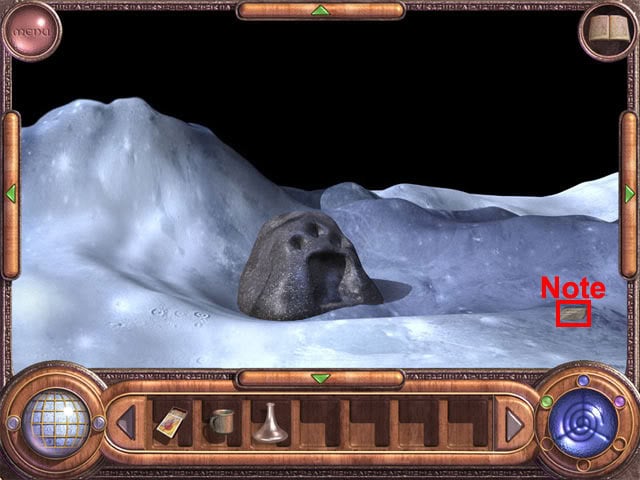
Space travel to the moon. Select the healing magic from the Magic Generator and then press the green button: You will now be able to breathe on the moon. Select the space travel from the Magic Generator and press the blue button. When asked where you want to travel, select the On the Moon option to view a map of the moon. The Moon Navigator is at the bottom-left corner of the screen. Select the arrow at the right side of the Moon Navigator to view another section of the moon. Select the Celestial Mountain grid square twice to travel there:
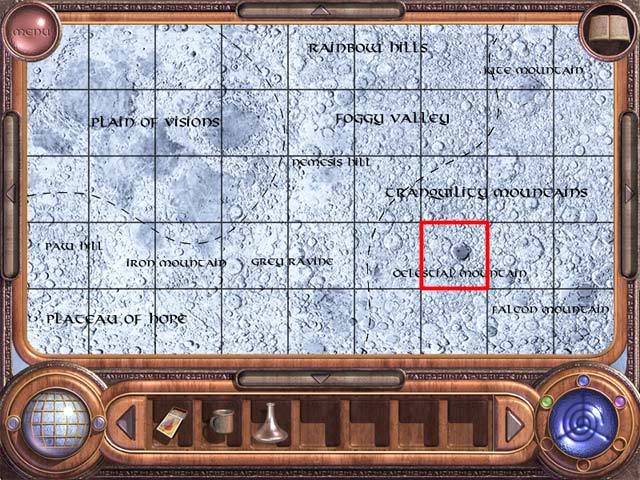
Select the note:
Read the note to discover that the black stone is the Altar of Air.
Task 8 – Altar of Air
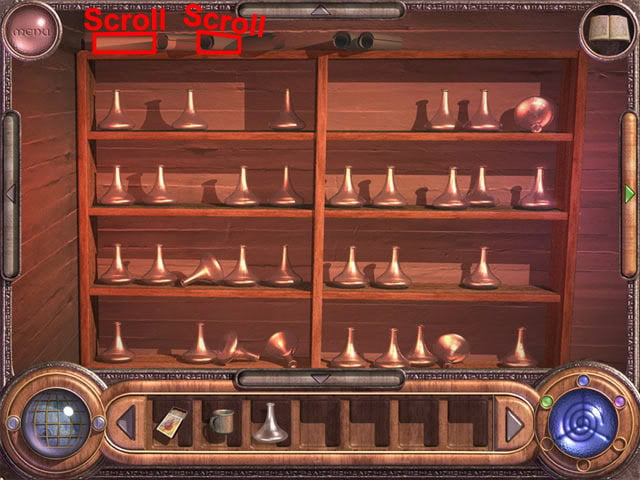
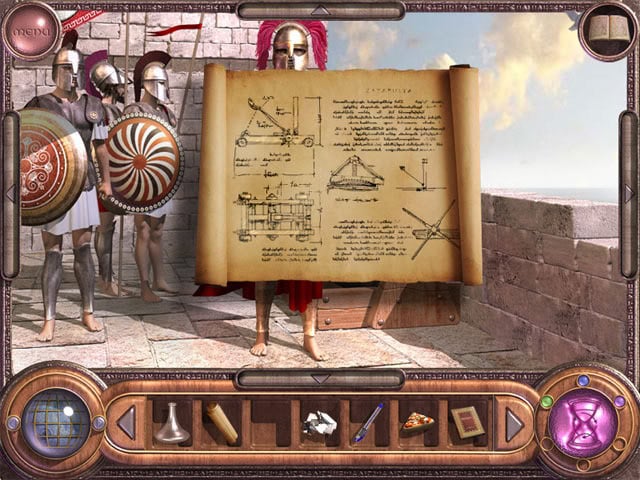
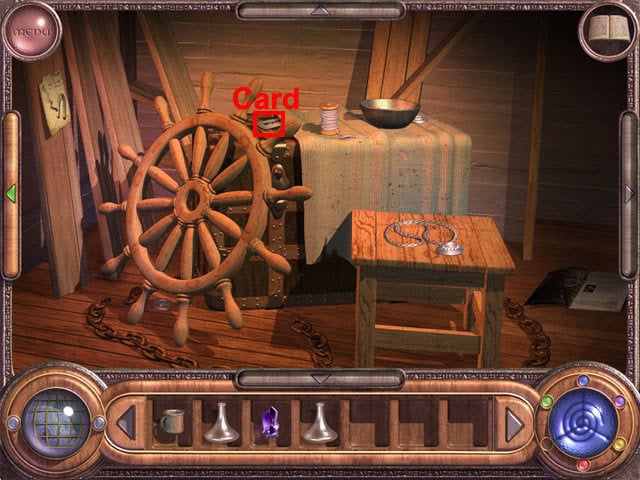
Drop the note to put it back on the moon surface. Space travel back to the house. Go to the basement and turn left twice to face the shelves of glass retorts. Take the first scroll (diagram of crane) and third scroll (diagram of catapult) on top of the shelves:
Turn right twice and take the mirror above the water tank:
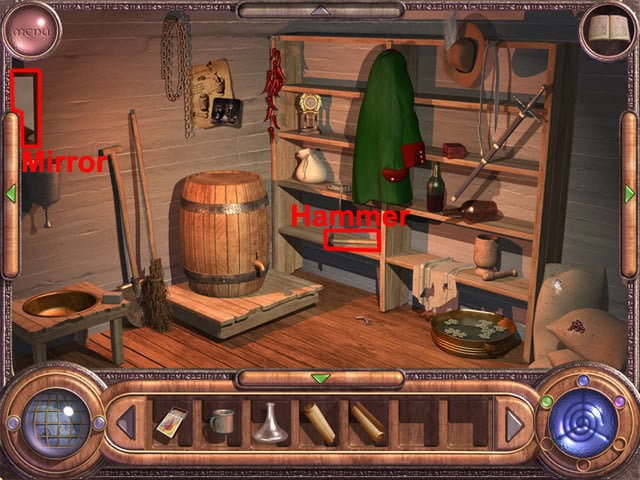
Take the hammer on the shelf and combine it with the mirror in the inventory to make the mirror fragments. Drop the hammer to put it back on the shelf. Return to the attic and open the top drawer of the bedside cabinet. Take the pen:
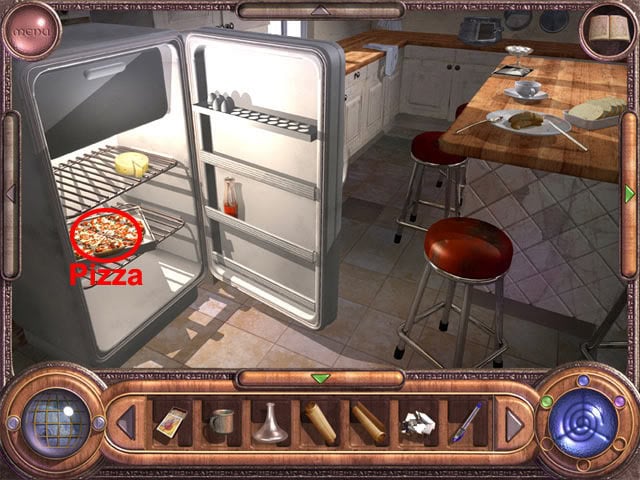
Return to the kitchen and take a slice of pizza from the fridge:
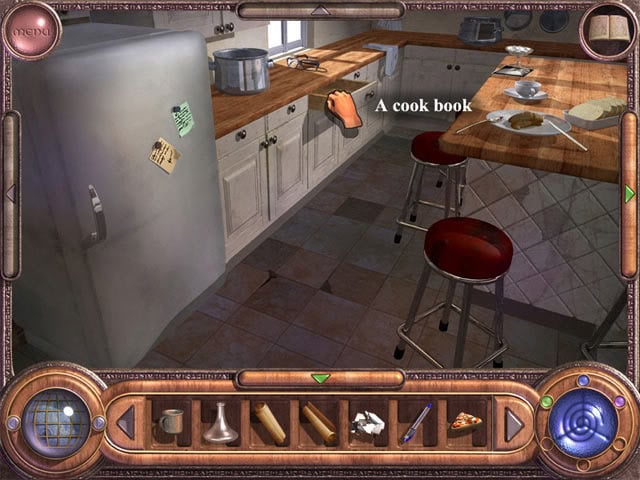
Close the fridge door. Open the drawer and take the cook book:
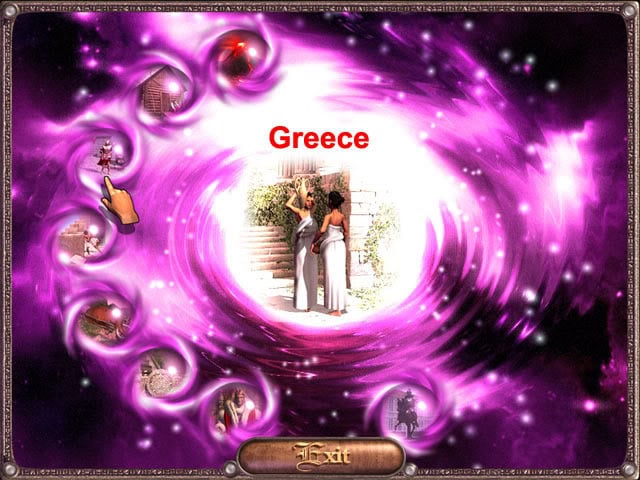
Travel back in time to Greece:
Turn left, go through the archway and then turn left twice to see the commander of the hoplites. Talk to the commander. Give the scroll with the catapult drawing to the commander:
In the catapult mini-game, the aim is to sink all 30 ships. Use the buttons on the control panel or the arrow keys and space bar on the keyboard to move and fire the catapult. After completing the mini-game, move right to jump into the sea and then use the healing magic to breathe underwater. Take the catapult wheel and the first part of the inscription:

Time travel to Egypt:
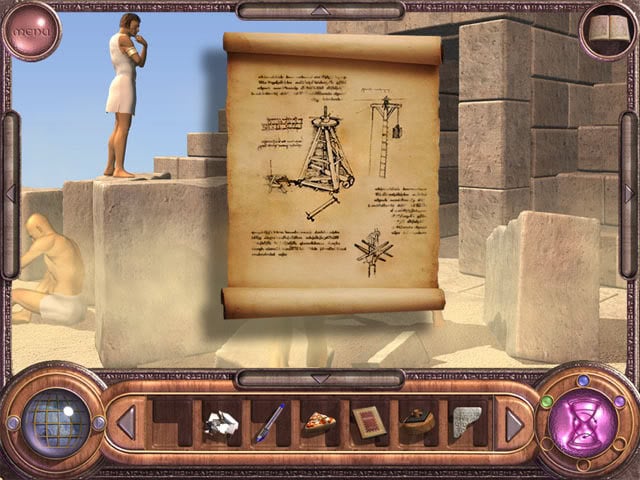
Move left twice and talk to the architect. Give the crane scroll to the architect:
Use the magic scroll on the pyramid entrance to enter the pyramid. Use the mirror fragments on the pyramid door. Go through the doorway to start the Mirrors mini-game. Connect the yellow line from the start to the finish by placing the mirror pieces on the raised areas:
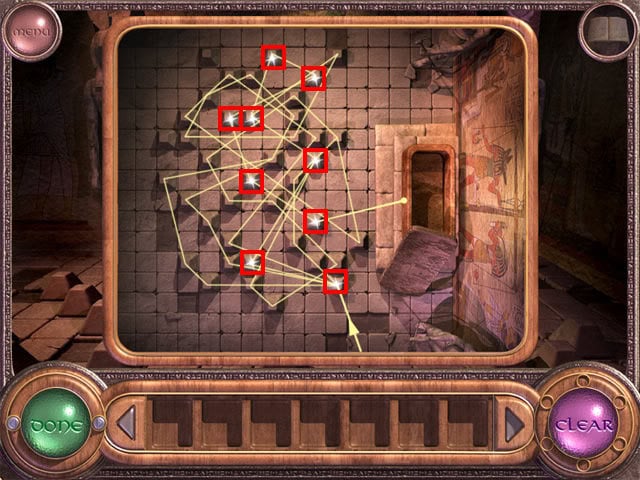
Select the green Done button after all of the mirror pieces have been placed correctly to receive the second part of the inscription. Travel back in time to the Stone Age:
Take the brushwood:
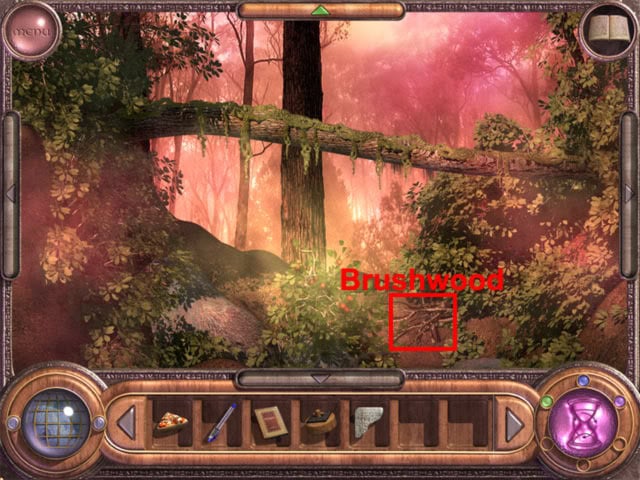
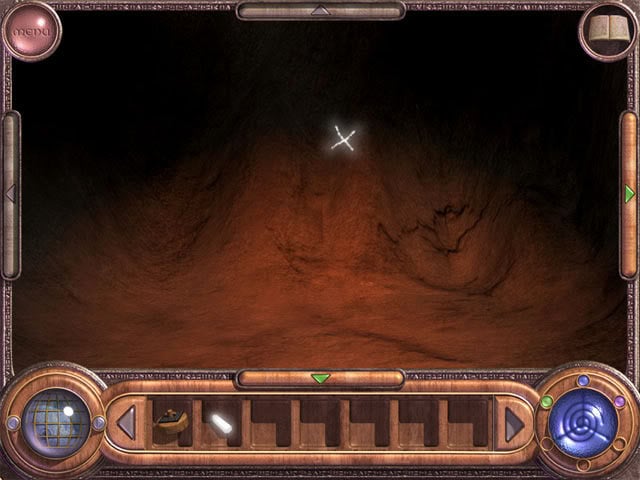
Move forward twice and talk to the top-left troglodyte to learn the location of the shaman’s cave. Move right twice and then enter the cave. Use the brushwood on the hearth. Light a match from the matchbox in the inventory and use it on the brushwood in the hearth. Talk to the shaman to receive the third part of the inscription. Time travel to the house. Space travel to the ruins:

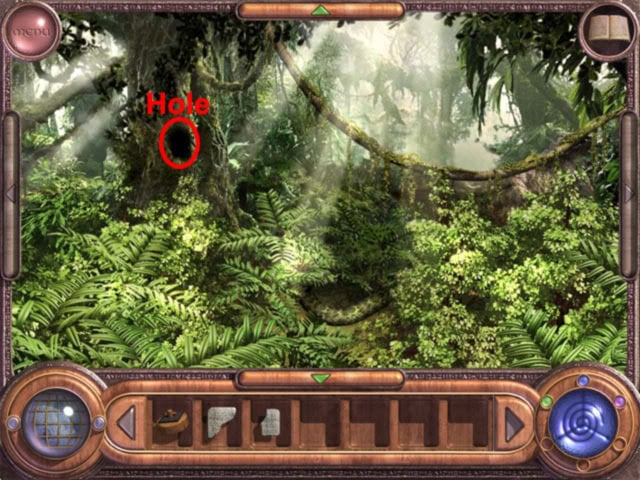
Move forward and select the hole in the tree to take the fourth part of the inscription:
Combine the four parts of the inscription in the inventory to create the plaque. Time travel to the house. Return to the basement and take the jacket, hat and sword:
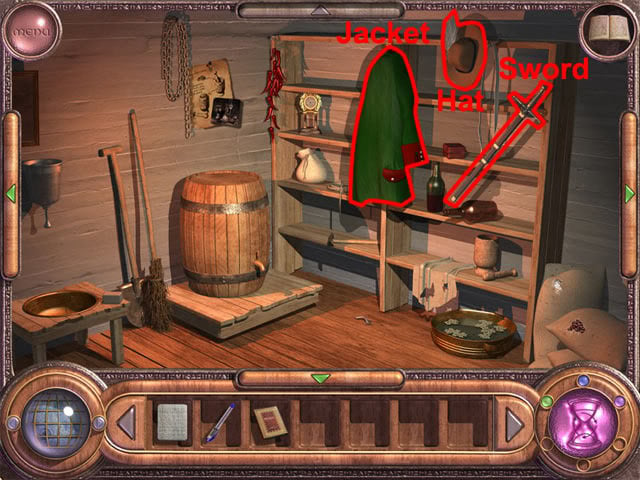
Right click the jacket, hat and sword to wear them. Time travel to the governor:
Move left and forward. Move to the door and talk to the left guard. He will let you in to see the governor if you are wearing the jacket, hat and sword from the basement in the house. Talk to the governor and he will say that his quill is broken. Give the pen to the governor to receive the sapphire. Time travel to the kingdom:
Move right and talk to the man to learn that he used to be the cook. Give the slice of pizza to the man to receive the cook’s certificate. Move right and forward to the castle door. Give the cook’s certificate to the guard. In the Cook mini-game, the King wants three dishes to be prepared. Select the cook’s notebook at the top-right corner of the screen to see that there are fourteen dishes. Only dishes 5, 10 and 13 need to be cooked for the king:
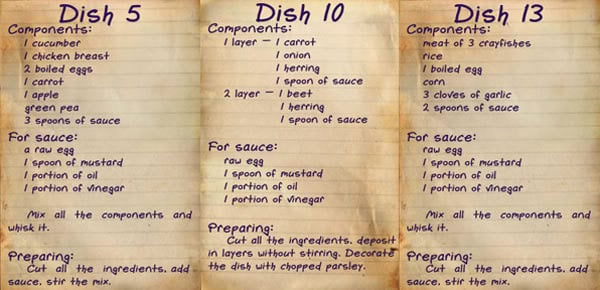
To start making dish number 5, select the cucumber and put it on the hardboard. Select one of the knives near the top-right corner of the screen and use it on the cucumber to slice it. Select the sliced cucumber and use it on the blending bowl.
Note that the progress gauge at the left side of the screen increases slightly. Put the remainder of the cucumber in the bin at the bottom-right corner of the screen. Follow the rest of the directions in the book for dish 5 until the 3 spoons of sauce are required.
To make the sauce, add a raw egg, spoon of mustard, portion of oil and portion of vinegar to the sauce bowl, use the whisk on the sauce bowl. Add three spoons of sauce to the blending bowl, then use the spoon on the blending bowl to create dish number 5. Select the green Done button to add the food to the dish.
Follow the directions for dishes 10 and 13 in the book to complete them. Note that the sauce does not have to be created again as it is the same for each dish. The king will give you the diamond after the three dishes have been completed. Time travel to the temple:
Move right and forward. Select the middle of the calendar to take the topaz. Time travel to the house. Space travel to the ruins:
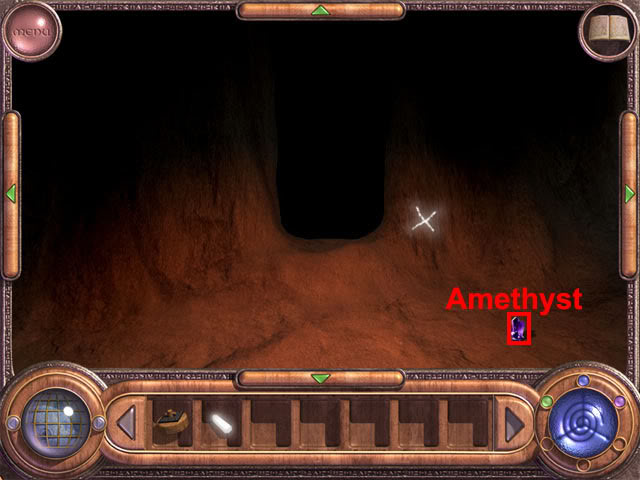
Move forward twice and use the topaz on the ancient statue to create a piece of chalk. Take a piece of chalk from the statue. Move forward to enter the cave. Select the chalk and then select the wall to draw an X:
Move right and draw an X on the wall. Take the amethyst:
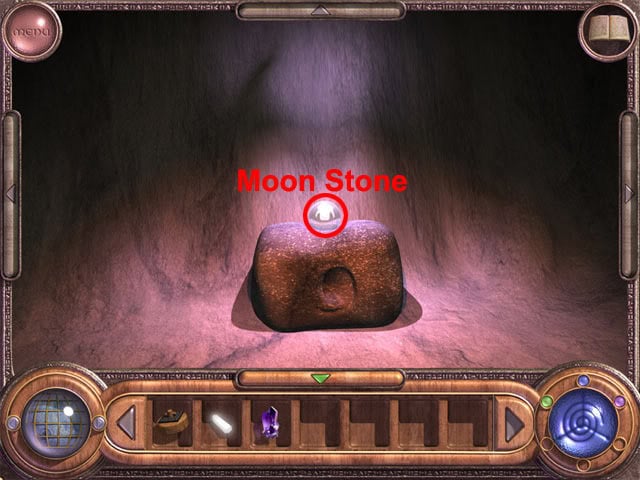
Move forward, right, forward, left and forward. Take the Moon Stone:
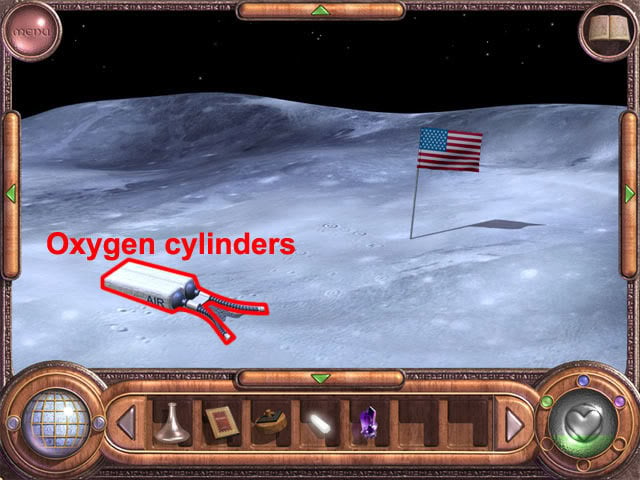
Space travel to the moon and use the healing magic to breathe. Travel one grid square south of the grey ravine:

Take the oxygen cylinders:
Travel to the Celestial Mountain:

Use the sapphire, diamond, Moon Stone, completed plaque and oxygen cylinders on the altar of air to create air on the moon.
Task 9 – Altar of Fire
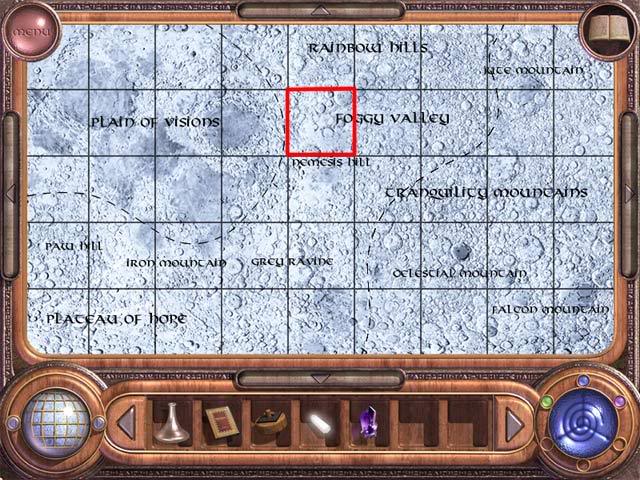
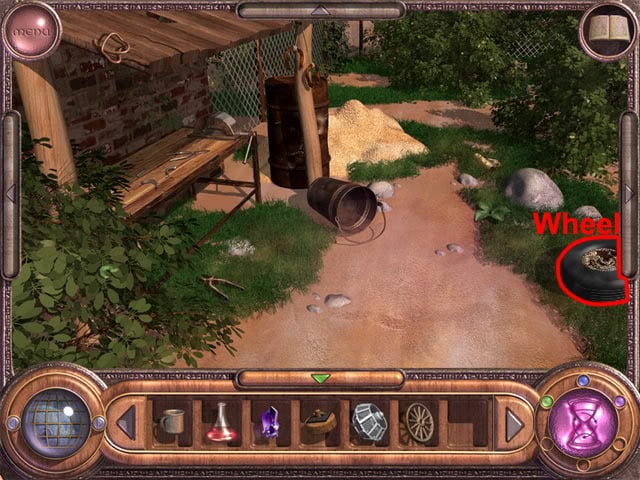
Travel to the left square of the Foggy Valley on the moon:
Take the moon walker wheel:

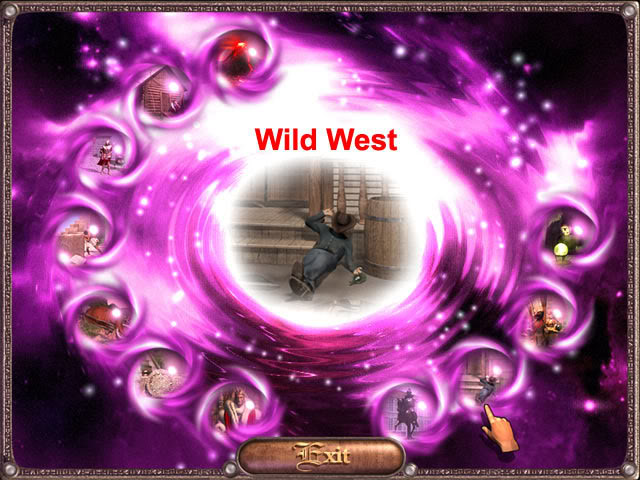
Time travel to the Wild West:
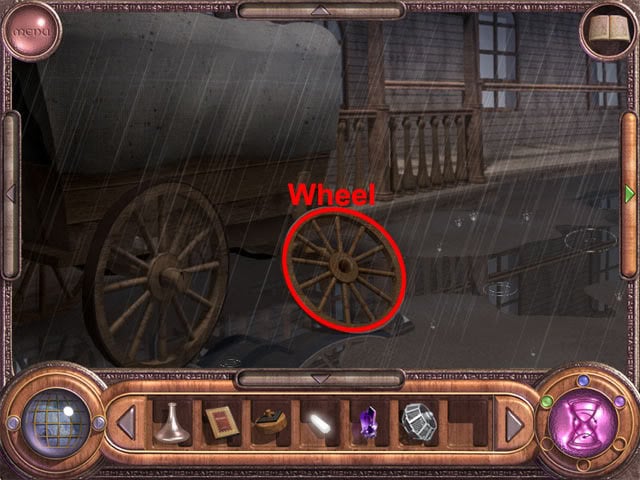
Take the wagon wheel:
Move right and enter the saloon. Talk to the cowboy to start the Marksman mini-game. The aim is to shoot three out of six glasses while drunk. Move the gun sights near to a glass, then wait until it moves over a glass before firing.
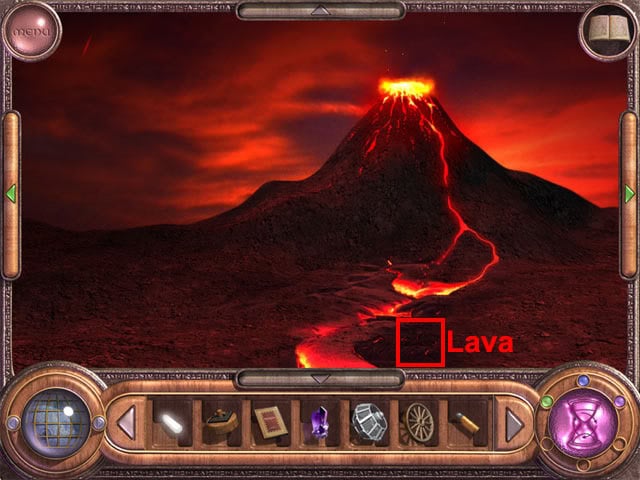
If you fail to hit three glasses, you will need to either restore a game or pay the cowboy with a gold coin from outside the temple in the present day Ruins location before the mini-game can be played again. You will be given the bullet after the Marksman mini-game has been completed. Time travel to the volcano:
Move right twice to the volcano and take the cooled lava:
Time travel to the temple. Move right and forward to see the calendar. Take one of the gold coins at the side of the screen:
Time travel to the house. Drop the matchbox, cookbook and piece of chalk as they are not needed any more. Take the rake on the stand and the decanter with some wish-wash on the table in the hall:

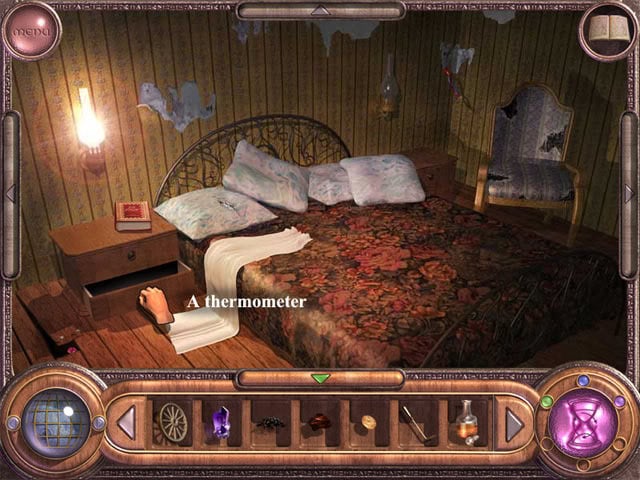
Go to the yard and take the steel nippers on the grass. Combine the steel nippers with the bullet to get the gunpowder. Go to the attic. Open the bottom bedside drawer and take the thermometer:
Go to the basement and take the pepper and the mortar:

Combine the pepper with the mortar to get the mortar with ground hot pepper. Turn left to the the device. Use the decanter with some wish-wash on the cauldron. Use the mortar with ground hot pepper, gunpowder, gold coin, cooled lava and thermometer on the cauldron:
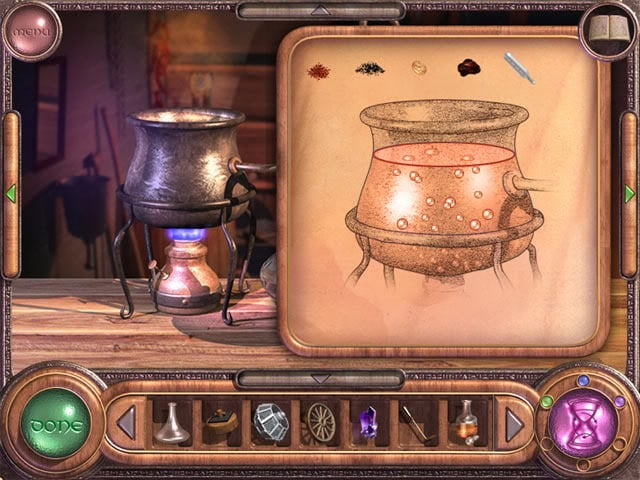
Select the green Done button and then use the glass retort on the tap to get the red liquid. Time travel to the black forest:
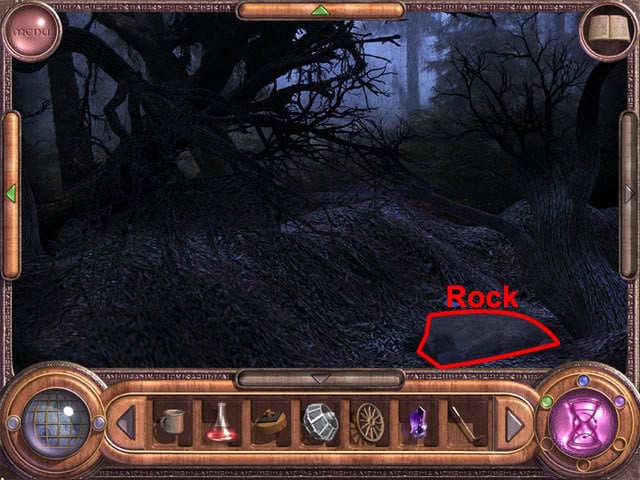
Move forward and right. Use the bronze rake on the large rock:
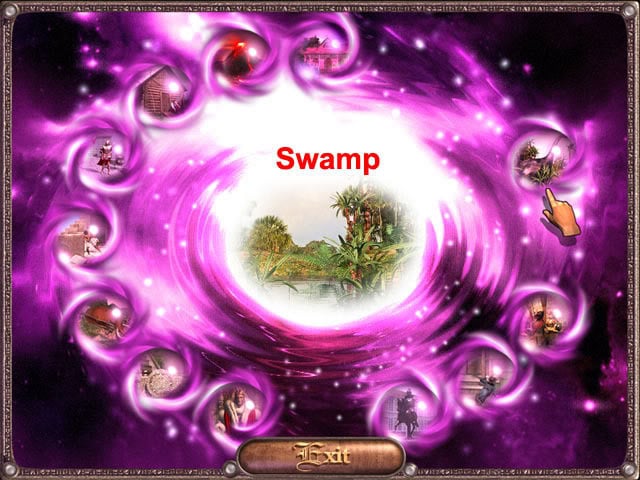
Go down the hole and talk to the witch: She wants a dragon scale. Time travel to the swamp:
Move right three times and select the dragon. Time travel to the Black Woods and return to the witch. Talk to the witch: She will exchange the potion of invisibility for the fang of a wolf. Time travel to the house. Drop the decanter and the rake. Go to the yard and take the car wheel:
Go to the basement and take an empty glass retort. Time travel to the Stone Age. Move forward twice and talk to the top-left troglodyte: He wants the mammoth to be moved. Use the catapult wheel, moon walker wheel, wagon wheel and car wheel on the mammoth to receive the wolf fang from the troglodyte.
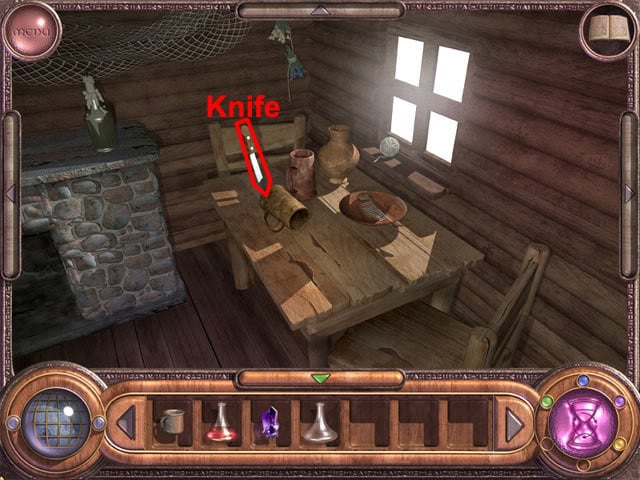
Time travel to the Black Woods and return to the witch. Give the wolf fang to the witch. Give the empty glass retort to the witch to receive the magic potion. Drink the magic potion and the invisibility magic will be added to the Magic Generator. Time travel to the fisherman’s cabin. Enter the cabin and take the knife:
Time travel back to the swamp. Move right three times to the dinosaur. Select the invisibility magic from the Magic Generator and then press the yellow button to become invisible. Use the knife from the fisherman’s hut on the dragon to get the scales.
Time travel to the Black Woods. Return to the witch and give her the scales to receive the fire stone. Combine the fire stone with the red liquid in the glass retort to make the magic potion. Drink the magic potion and the magic of fire will become available on the Magic Generator. Time travel to the house and then space travel to the moon. Travel to the middle of the Quick Ground:
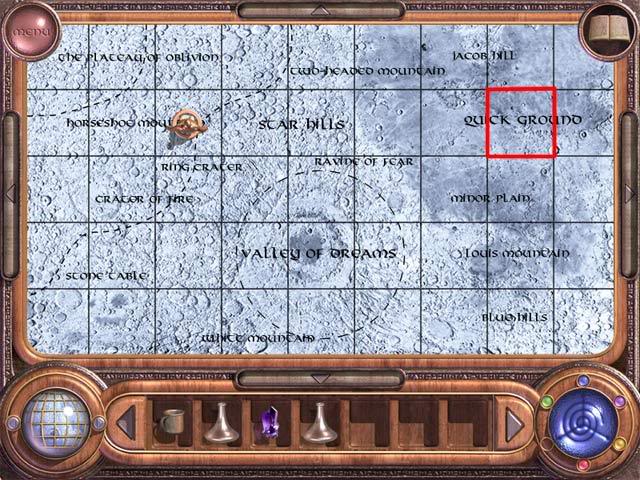
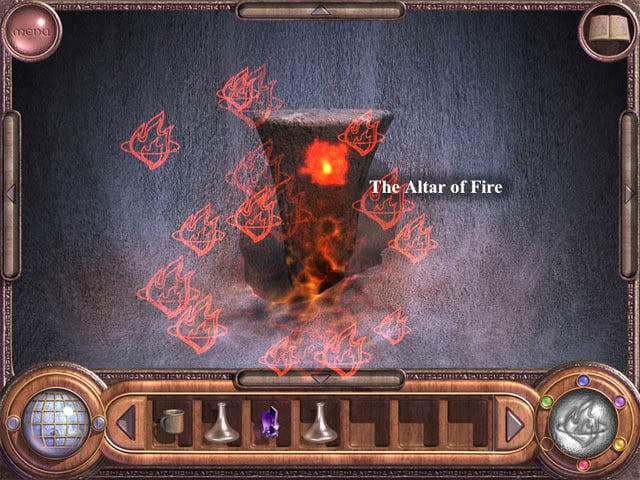
Wait a few seconds after arriving in the middle of the Quick Ground to see the fire altar. Select the fire magic from the Magic Generator and then use the flame on the Altar of Fire to warm the moon:
Task 10 – Altar of Water
Time travel to the temple:
Take the piece of parchment:
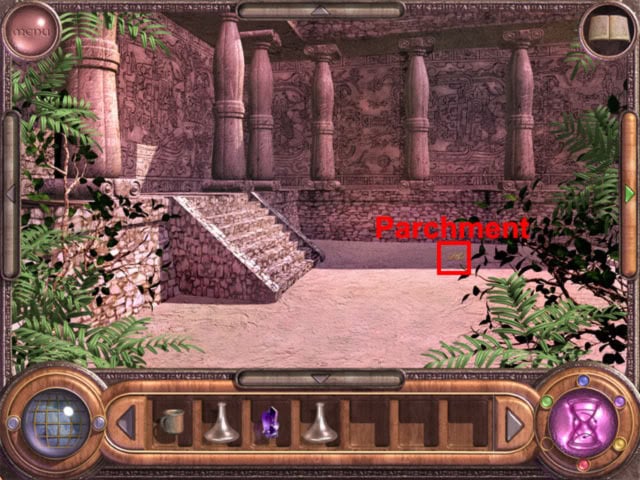
Time travel to Atlantis:
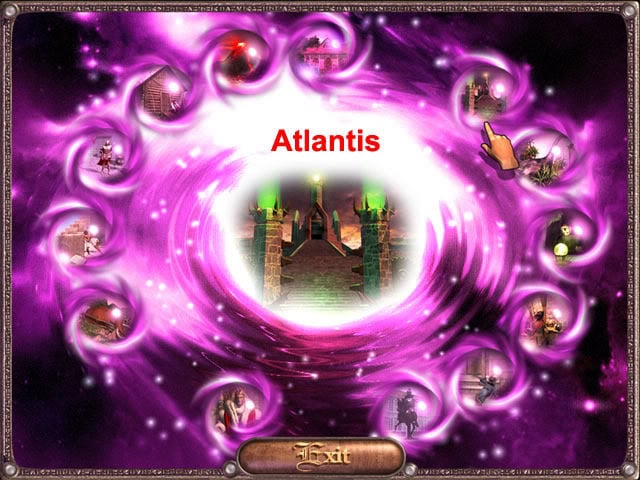
Move forward, right and forward to the altar to play the Atlantes’ Spell mini-game. Select the parchment icon at the top-right corner of the screen to display the symbols. The aim is to rotate the tiles and move them into the positions shown below:
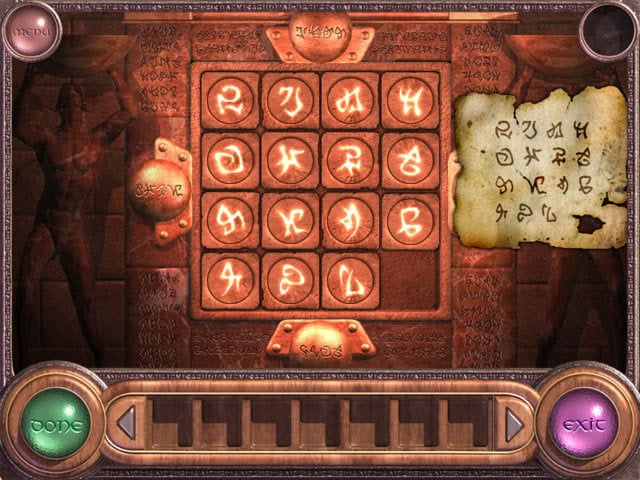
Completing this mini-game can be a very lengthy process, and as the starting position of the tiles is random each time there is no way to give an exact solution. Start by rotating all of the tiles until they are the right way up, then begin moving the squares.
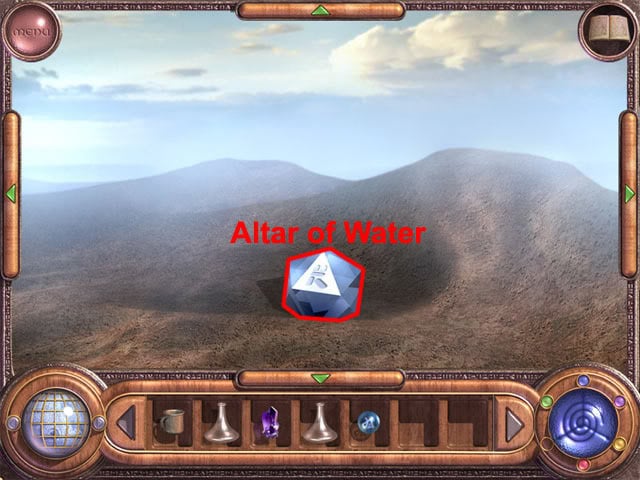
There are many ways of solving the puzzle. One way is to start by putting the top line in position first, then the second line, and then thinking of the bottom two lines as two blocks of four squares that can be rotated. After the puzzle has been solved, you will receive an ancient spell. Time travel to the house and then space travel to the moon. Travel to the left side of Two-Headed Mountain:
Use the ancient spell on the altar of water:
Task 11 – Moon Plants
Space travel to the house and go to the basement. Turn right and take the electronic card:
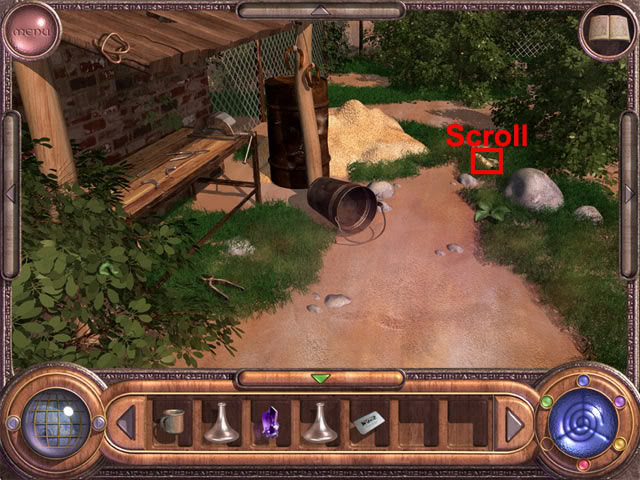
Go to the yard and take the scroll on the grass:
Time travel to the future:
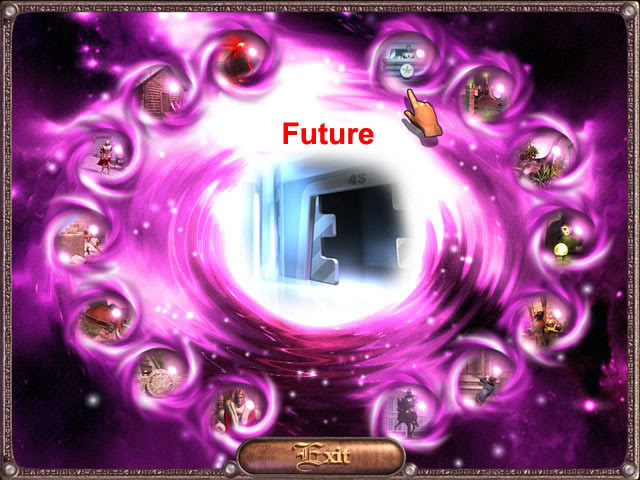
Go through the doorway and talk to the robot. Give the electronic card from the basement to the robot. Select the invisibility magic from the Magic Generator and then press the yellow button to become invisible. You can now go through the laser beams to the garden. The aim in the Seven Plants mini-game is to find the seven correct plants that are shown on the scroll from the yard. Select the scroll at the top-right corner of the screen. Find the seven plants:
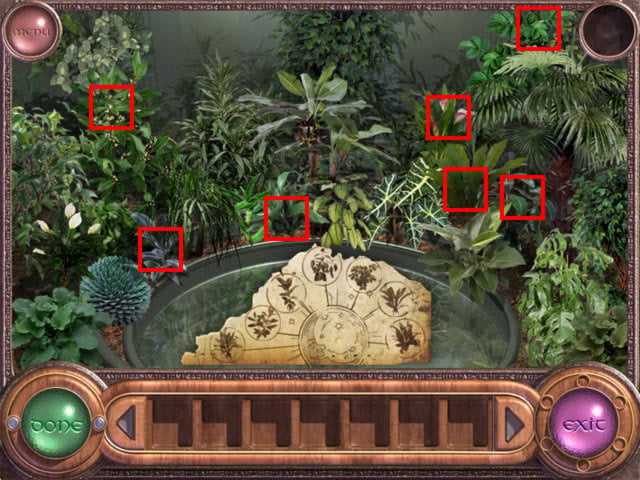
Add all of the plants to the inventory and then select the green Done button to receive the seeds container. Time travel to the house and then space travel to the moon. Use the seeds container on the moon surface.
Task 12 – Green Moon
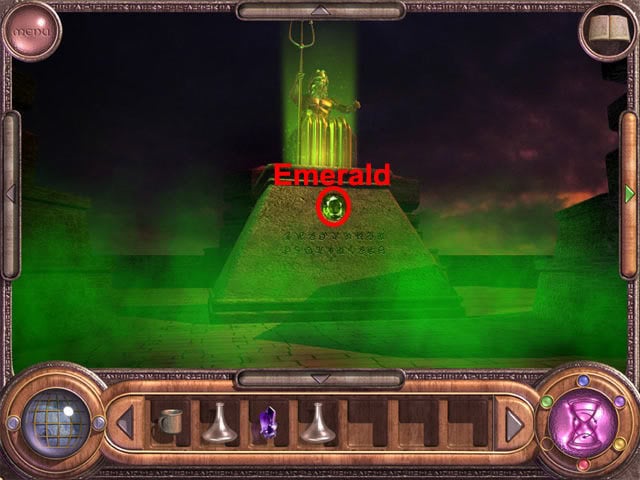
Time travel back to Atlantis. Move forward and left. Take the emerald:
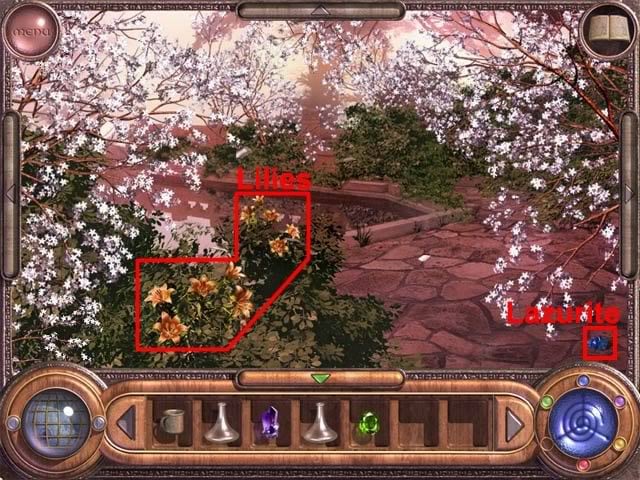
Time travel to the house and then space travel to Japan:
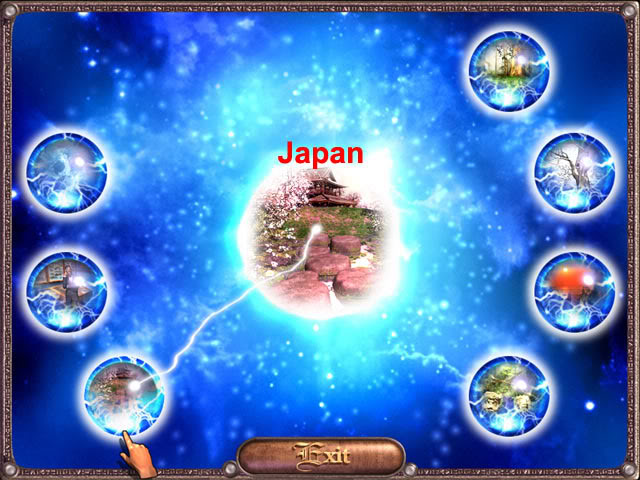
Move forward and take the lily flower and lazurite:
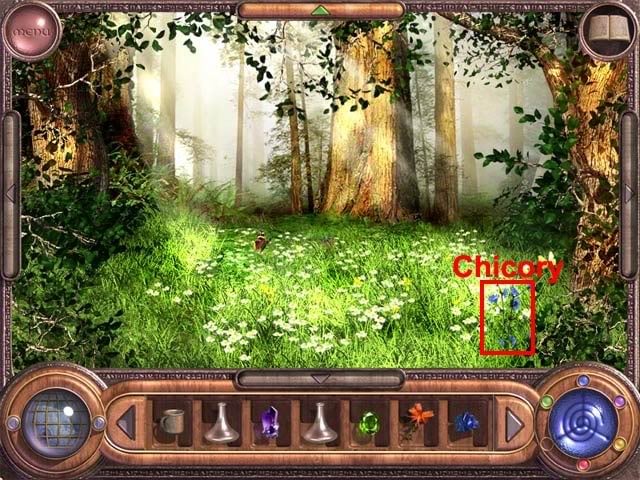
Travel to the sunny forest:

Take the chicory:
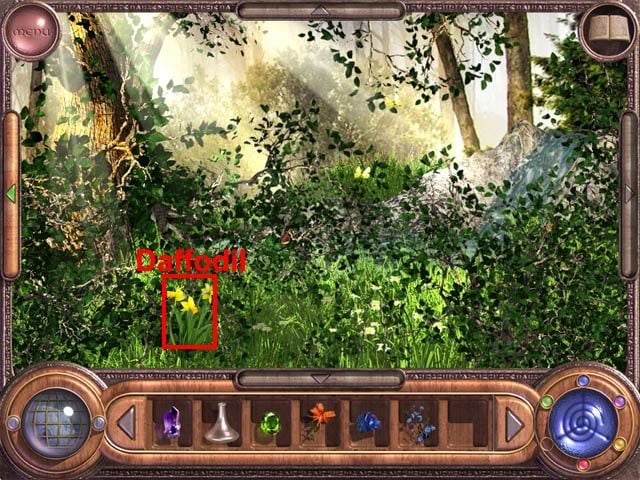
Move forward twice and right. Take the daffodil:
Space travel to the snow forest:
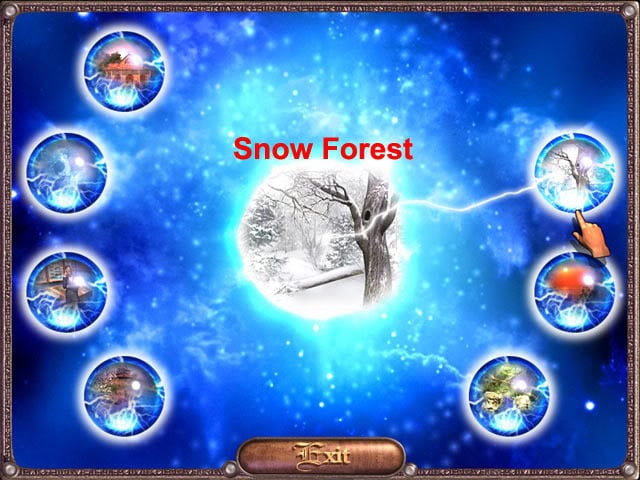
Take a handful of snow:

Space travel to the ocean:
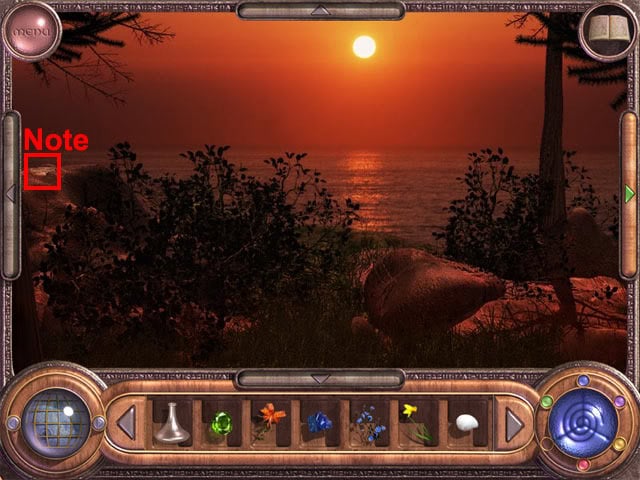
Move forward and left. Take the note on the left rock:
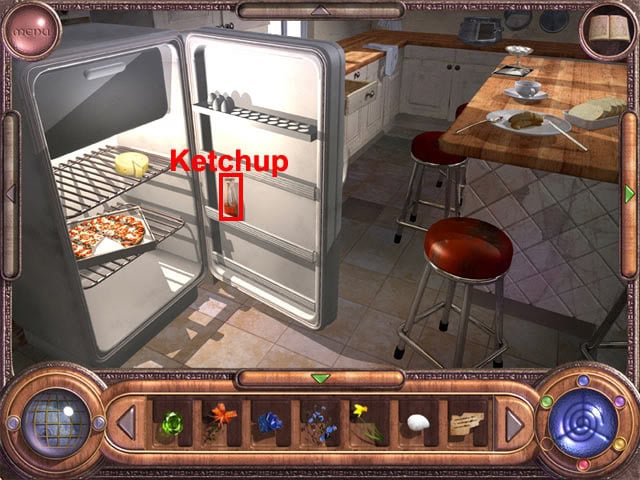
Space travel to the house. Get the coal on the floor in front of the fireplace. Go to the kitchen and take the ketchup from the fridge:
Go to the basement and fill the mug with water from the water tank above the washbasin. Turn left and examine the device. Use the mug with water on the cauldron. Use the ketchup, lily, daffodil, emerald, chicory, lazurite, amethyst, snow and coal on the cauldron:
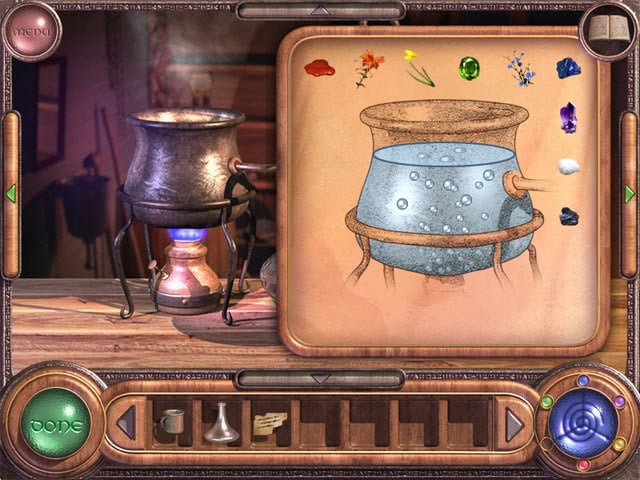
Select the green Done button and then use the glass retort on the tap to get the rainbow liquid. Combine the rainbow liquid with the note from the rock near the ocean to make the magic potion. Drink the magic potion and the rainbow magic will become active on the Magic Generator. Space travel to the moon, select the rainbow magic on the Magic Generator and then press the rainbow button to complete the game.
“;
