- Wondering how to get Monopoly GO! free rolls? Well, you’ve come to the right place. In this guide, we provide you with a bunch of tips and tricks to get some free rolls for the hit new mobile game. We’ll …
Best Roblox Horror Games to Play Right Now – Updated Weekly
By Adele Wilson
Our Best Roblox Horror Games guide features the scariest and most creative experiences to play right now on the platform!The BEST Roblox Games of The Week – Games You Need To Play!
By Sho Roberts
Our feature shares our pick for the Best Roblox Games of the week! With our feature, we guarantee you'll find something new to play!All Grades in Type Soul – Each Race Explained
By Adele Wilson
Our All Grades in Type Soul guide lists every grade in the game for all races, including how to increase your grade quickly!
Great Adventures: Lost in Mountains Walkthrough
Welcome to Gamezebo's strategy guide for Great Adventures: Lost in Mountains. Navigation: General Tips Objective 1: Find the Snow Shovel Objective 2: Turn on the TV Objective 3: Open the Kitchen Door Objective 4: Find and Open the Power Shed Objective 5: Open the Library Door Objective 6: Open the Gates to the Staff Building's Backyard Objective 7: Activate the "Book shelves" Puzzle Objective 8: Find the Combination to the "Book shelves" Puzzle Objective 9: Turn O…
a:1:i:0;a:2:s:13:”section_title”;s:47:”Great Adventures: Lost in Mountains Walkthrough”;s:12:”section_body”;s:76026:”
Welcome to Gamezebo’s strategy guide for Great Adventures: Lost in Mountains.
Navigation:
- General Tips
- Objective 1: Find the Snow Shovel
- Objective 2: Turn on the TV
- Objective 3: Open the Kitchen Door
- Objective 4: Find and Open the Power Shed
- Objective 5: Open the Library Door
- Objective 6: Open the Gates to the Staff Building’s Backyard
- Objective 7: Activate the "Book shelves" Puzzle
- Objective 8: Find the Combination to the "Book shelves" Puzzle
- Objective 9: Turn Off the Power Supply to the Cut-off Cable
- Objective 10: Find a Hidden Cache in the Manager’s Office
- Objective 11: Examine the Hidden Cache in the Laundry Room
- Objective 12: Get Inside the Garage
- Objective 13: Block the Steam Coming out of the Pipe.
- Objective 14: Fill Up the Generator
- Objective 15: Open the Door to the Exhibition Hall
- Objective 16: Open the Door to Suite #1
- Objective 17: Call for Help
- Evidence List
- Achievement Item Locations
- Record Locations
Note: Objectives are organized according to completing a group of objectives. The first objective listed of the bunch will be applied as the title to each chapter/objective of the walkthrough. The very beginning of the tutorial of the game will not be listed in the guide seeing as the game shows you exactly where everything is located.
General Tips:
- Hints- Hints come in the form of dog bones, which are scattered literally everywhere. Pick up three to fill up a hint. You can have a total of six hints at a time. Click the hint button and the dog will show you what you need, and/or where it’s located.
- Achievement Items- While you won’t get a special reward for collecting all of them, achievement items come in the form of objects such as butterflies, ladybugs, firewood, lanterns, and fish. As you collect them, your character will feel better, i.e. it may reduce your character’s fatigue by 40% or increase their fun. All achievement item locations are listed at the end of this guide.
- Choosing Characters- At the beginning of the game, it doesn’t matter which male and female character you choose to play with: they all have the same qualities, just different names. The storyline is no different when you choose different characters.
- Male vs. Female- Male characters specialize as mechanics, and are strong. Female characters have the advantage of being smart/scientists, and are light/nimble. Male characters are best used for repairs and heavy objects, while female characters are best used for various devices and accessing hard-to-reach places.
- Note on Locations- Some locations will require your female character to squeeze in and out of. If, for example, your female character is in the back area of the power shed and you want to move her somewhere, you’ll have to have her crawl out of the vent again, first. She will also forget what task you set her to if you must do this, so you’ll have to move her again.
- Moving Characters- You can simply click on the ground or and object, and if a green "X" appears, your selected character is on their way. To move them quickly, click and hold them, dragging them to the desired location.
- Fun, Food, and Fatigue- Your characters will grow hungry, tired, and bored during their adventure. To replenish their food meter, take them to the fridge in the restaurant or use the bag of chips revealed in the guide. To replenish their fatigue meter, have them nap on a couch in the main hall or use the coffee revealed in the guide. To replenish their fun, you can have them dance in the dance room or watch TV in the main hall; you can also use the gameboy revealed in the guide. Finding achievement items can also refill these various meters.
- Combination Items- To combine items, click on the puzzle-icon in the top left corner and select the items you’d like to combine from your inventory at the bottom of the screen.
- Evidence- This is the orange journal shown in the top left of the screen. From here you can select evidence you’ve discovered throughout the game and review it again. The storyline of the game does not change with the discovery (or lack thereof) of evidence.
- Pop-ups- Achievements is the best example of this. You can choose to have them displayed at all times or you can choose to hide them. If you choose to hide them, you can reveal them again by clicking the bullseye icon.
- Quickly Navigating the Guide- If you’re looking for a particular item, i.e. "gameboy", press "ctrl"+"f" on your keyboard. This will open up a search bar at the bottom of the screen where you can type in a keyword such as "gameboy" and find it much faster within the guide.
Walkthrough:
Objective 1
Find the snow shovel.
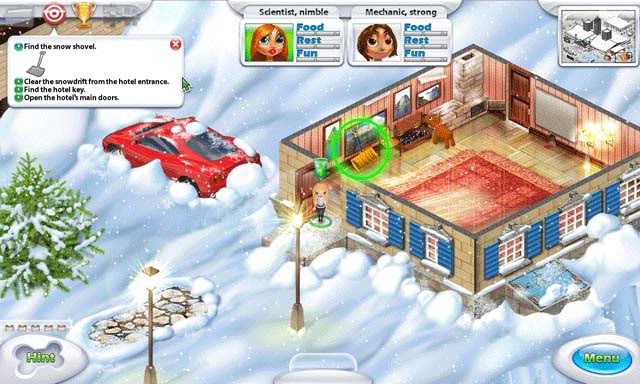
- The snow shovel is located in the small cabin. Its location is shown below:

Clear the snowdrift from the hotel entrance.
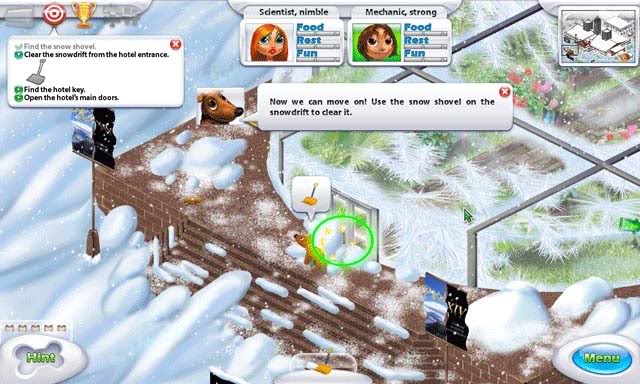
- Use the snow shovel on the snow in front of the hotel entrance to the left of the cabin to clear the snowdrift, circled below:
Find the hotel key.
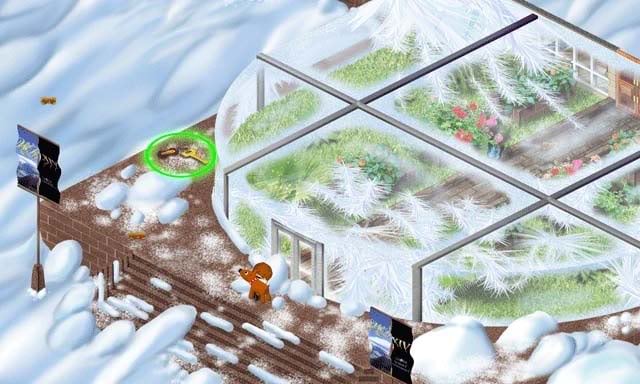
- The hotel key is located to the left of the hotel entrance. Its location is shown below.
Open the hotel’s main doors.
- Use the hotel key on the main doors within the glass entrance hall to enter the hotel.
Objective 2
Turn on the TV.
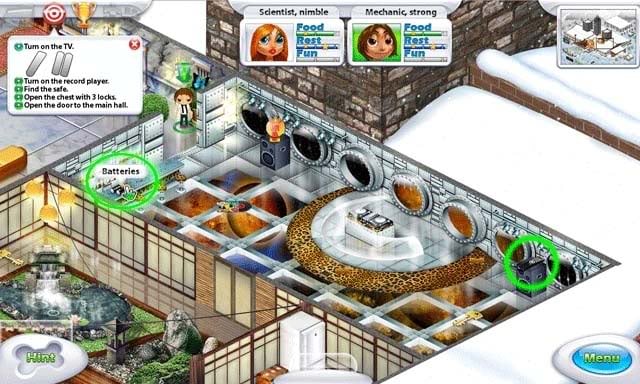
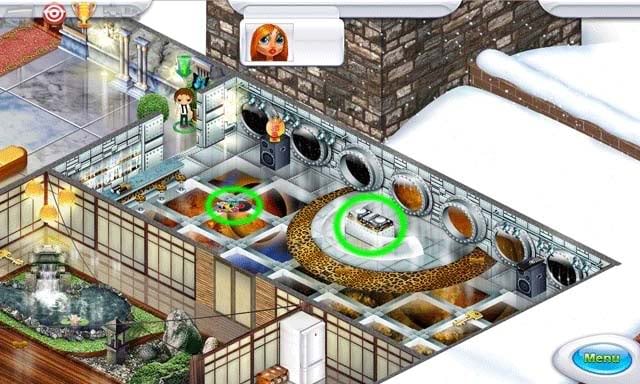
- The components you will need to turn on the TV are located in the dance/club room. You’ll need the batteries (in the left corner on the bar) and the remote (on top of the right speaker). Their locations are shown and circled below:
- The TV is located in the top left corner of the main hall. Combine the remote and batteries and then use it on the TV.
Turn on the record player.
- To turn on the record player, first pick up the record lying on the floor. Next, use the record on the DJ podium to start the music. Their locations are shown below.
Find the safe.
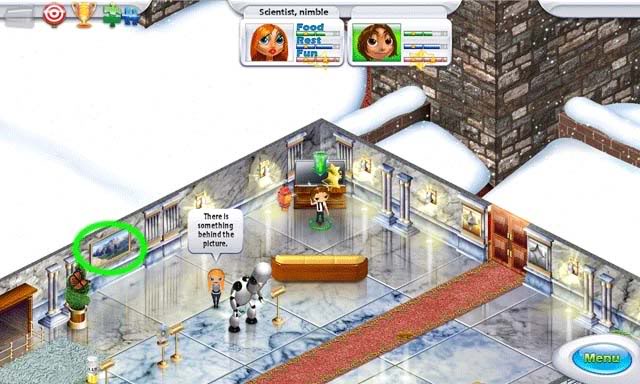
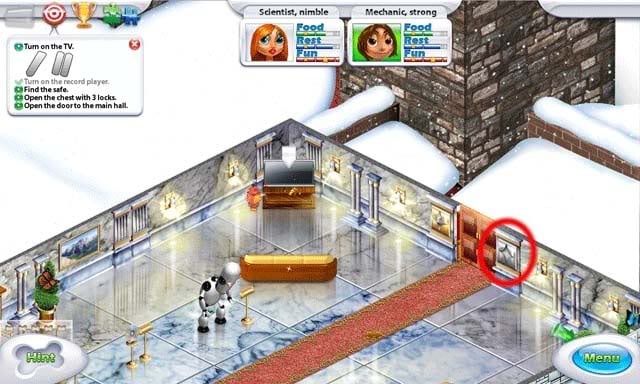
- The safe is located in the main hall behind a picture. Click on it to remove it and reveal the safe. Its location is shown below.
Open the chest with 3 locks.
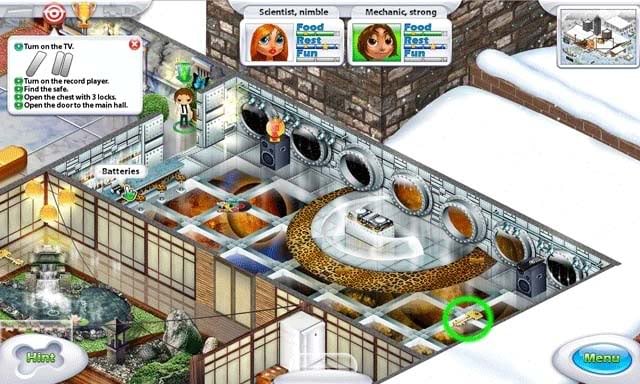
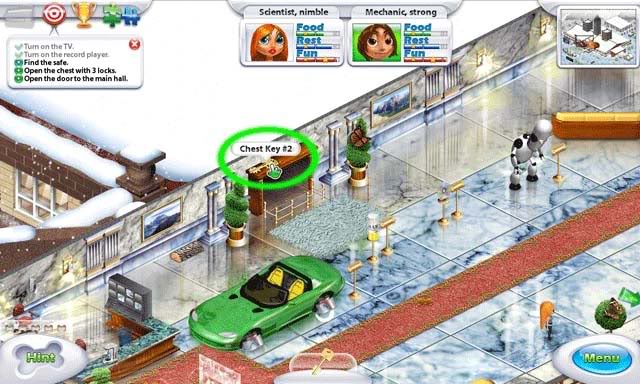
- To open the chest with the 3 locks, you will need 3 keys. Their locations are as follows:
1.In the dance/club room.
2.In the main hall.
3.In the restaurant.
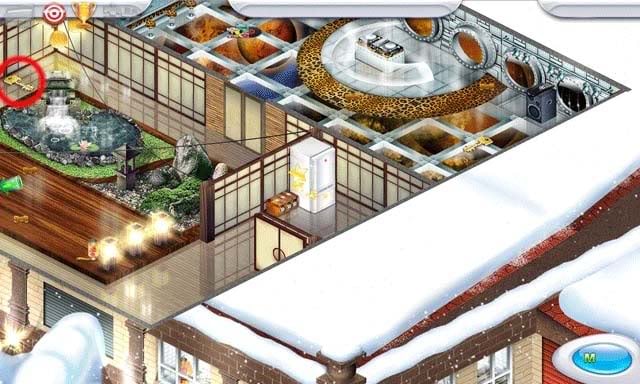
- The chest with 3 locks is located in the kitchen, next to the refridgerator. Use the three keys on it to open it and reveal the gold star. This will be added to your inventory.
Open the door to the main hall.
- Note: for guide purposes, the "main hall" referred to above will be called the corridor.
- Go to the top of the main hall. Use the gold star on the silver panel to unlock the doors.
Objective 3
Open the kitchen door.
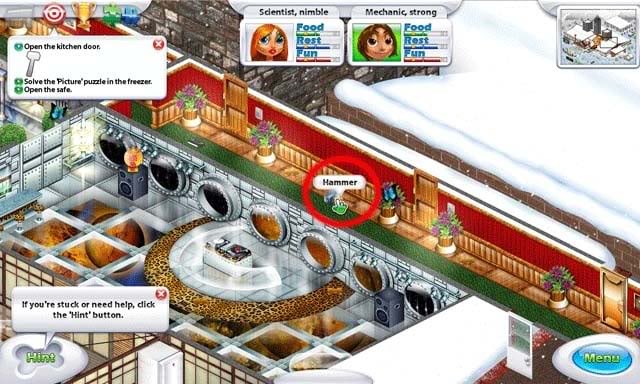
- Pick up the hammer lying in the corridor with your male character. Its location is shown below.
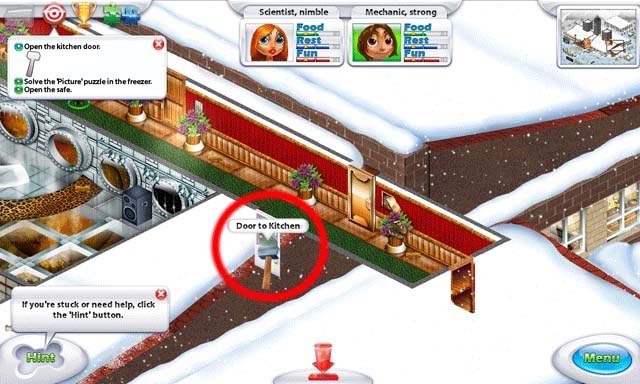
- Use the hammer on the kitchen door with the male character to open it.
Solve the "Picture" puzzle in the freezer.
- Before proceeding to the freezer, pick up the yellow bag of chips lying on the kitchen floor. You can use this repeatedly throughout the game to instantly satisfy your characters’ hunger.
- Proceed through the kitchen into the freezer and click on the large picture on the left wall to enter the "Picture" puzzle.
- Rotate the various panels by clicking and holding the mouse, then moving it and letting go when the panel is in the correct position. The puzzle solution is as follows:
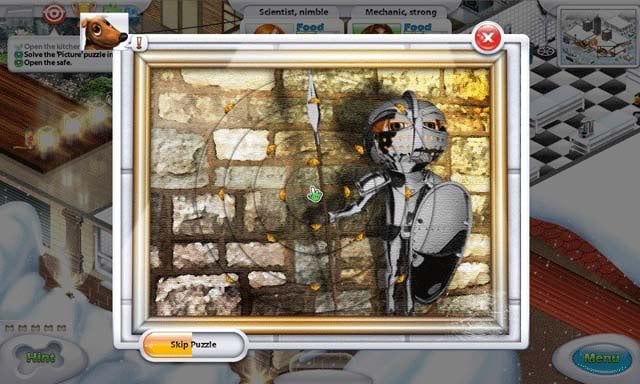
- Upon completing the puzzle, the laptop will be added to your inventory.
Open the safe.
- Proceed back to the main hall. Click on the picture to reveal the safe, then use the laptop on the safe to open it. The female character must do this.
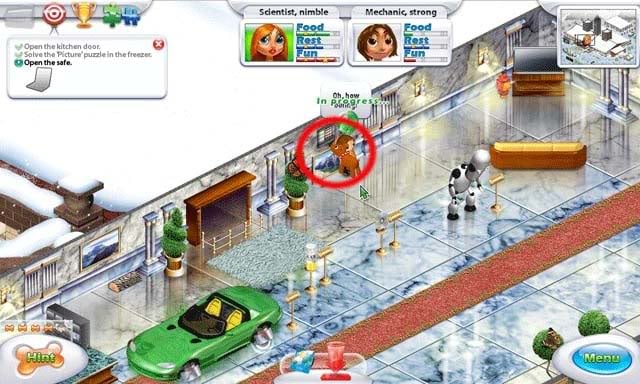
- A puzzle will appear with a question in which you must click on the letters on the right to solve it. The question is as follows:
"In the television network abbreviation ‘ABC’, what does the ‘A’ stand for?"
The answer: American
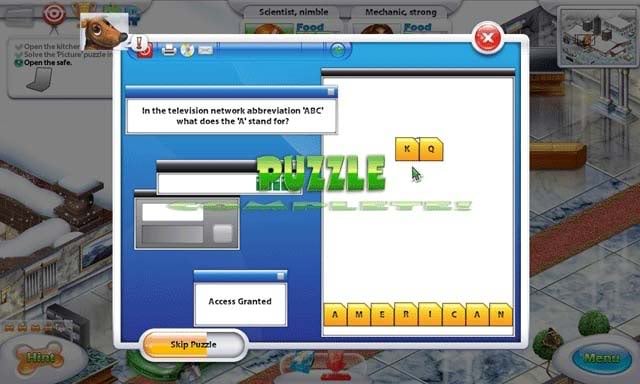
Note: Puzzle solutions may be randomized. If so, it’s more than likely the solution you’re looking for is switched with another solution listed later in the guide.
- Opening the safe will reveal key part #2 and the lodge key, which will be added to your inventory.
Objective 4
Find and open the power shed.
- To access the power shed, you’ll have to leave the hotel. However, refer to the next step before leaving for the power shed. The power shed is located around back (via going through the lodge). Its location on the map is shown below.
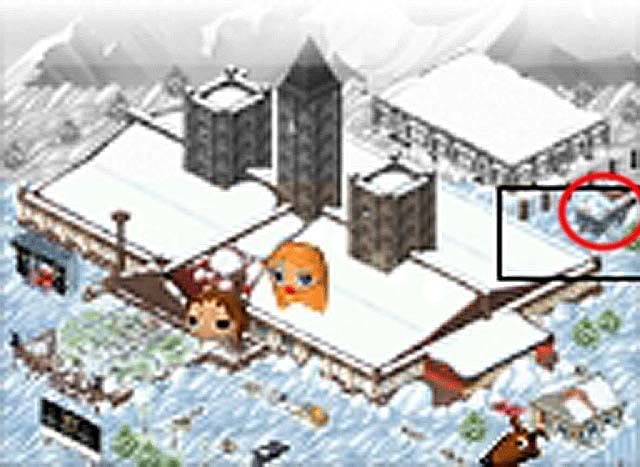
- Before leaving for the power shed, pick up the glue located in the main hall.
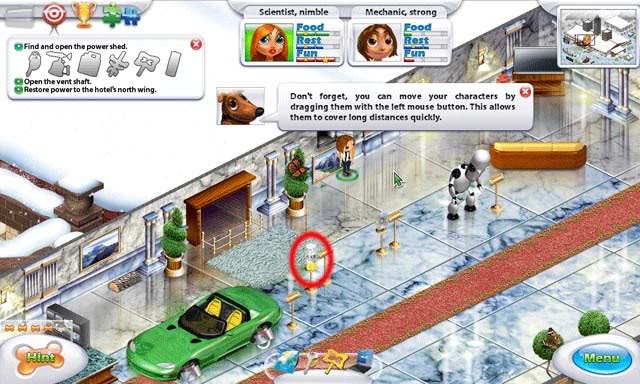
- Proceed to the lodge and enter. Use the lodge key to open the back door and access the rear outside of the building, continuing on to the power shed.
- Pick up key part #1 lying in the snow outside the power shed.
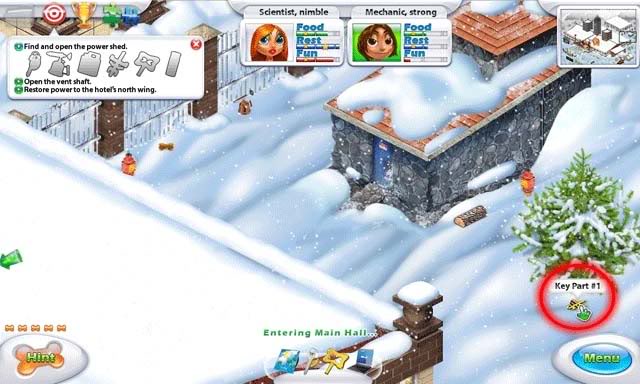
- Use the combination option to combine key part #1, key part #2, and the glue to create the key to open the power shed.
- Just north of the lodge and on the way to the power shed, you’ll come across the acetylene lying in the snow. Pick it up to add it to your inventory.
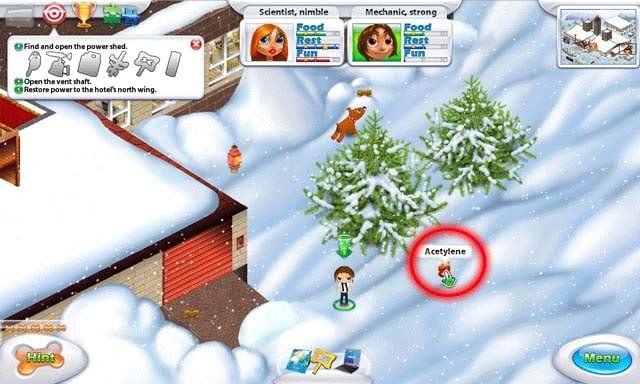
- Proceed to the power shed. Pick up the empty acetylene torch next to the gate to add it to your inventory (it’s circled below). Combine the acetylene and the empty acetylene torch together to create the full acetylene torch. Use it on the power shed door (with the male character) to defrost it.
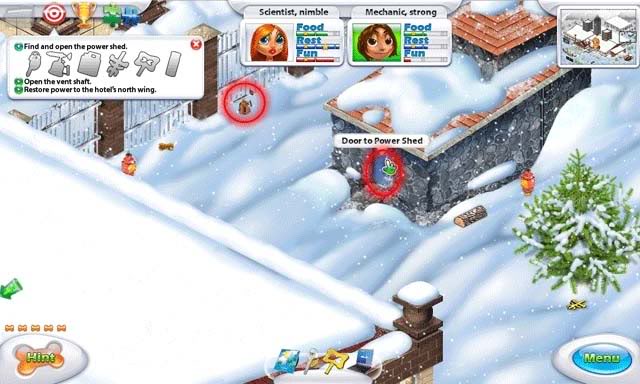
- Use the combined key (key parts 1 & 2 plus glue) to unlock and open the door to the power shed.
Open the vent shaft.
- Pick up the screwdriver lying on the floor and use it on the vent near the ceiling. Both are circled below.
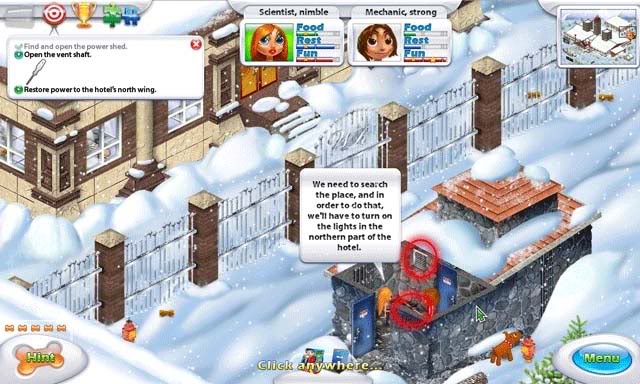
Restore power to the hotel’s north wing.
- Use your female character to squeeze through the vent and access the back area of the power shed.
- Press the blue and red switch to lower the gate, then click the power control panel to restore power to the north wing of the hotel.
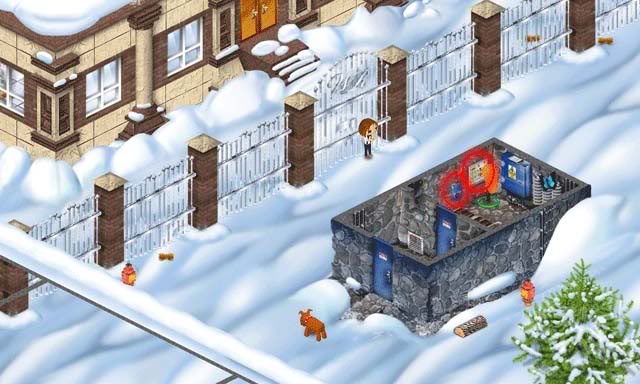
- You’ll have to approve your female character crawling through the vent again before she can leave the power shed.
Objective 5
Open the library door.
- Proceed back to the hotel and enter the corridor. The double doors straight across from the ones through which you enter are the library doors, but they’re locked. Use your female character and the laptop on the digital lock pad to the right of the doors to enter a puzzle similar to the safe one.
- You’ll be asked a question, which may be randomized. The question and answer are as follows:
"What is the name of the mountain where the mythological Greek gods live?"
The answer is "Olympus".
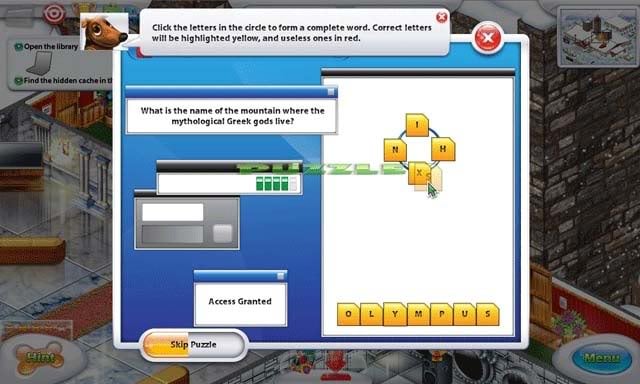
This will unlock the doors.
Find the hidden cache in the library.
- There are a couple things you’ll want to pick up in here, all circled below. First off, pick up the gameboy located between the first two shelves in the second row. You can use this repeatedly throughout the game to instantly satisfy your characters’ fun. Second, pick up the book standing next to the middle shelf against the far wall.
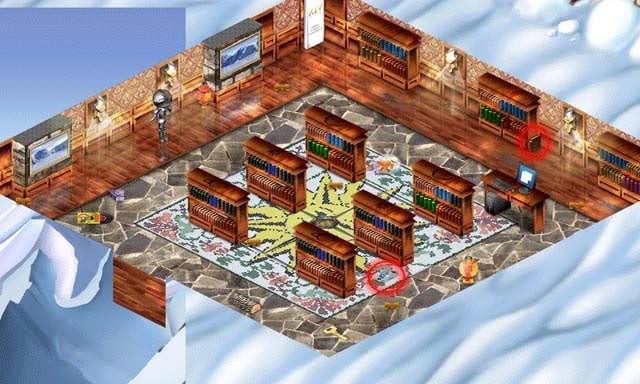
- Don’t overlook the key laying on the floor in the corner. You will also need to pick this up.
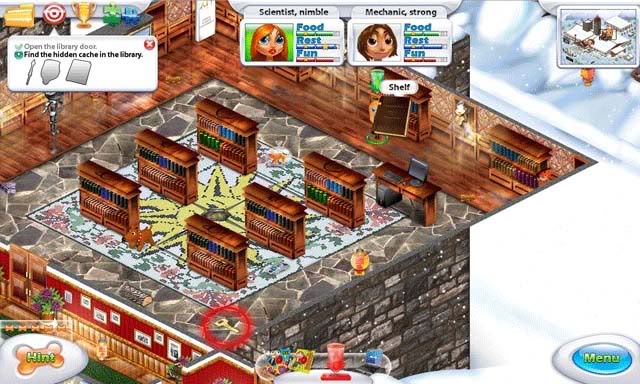
- Use the book on the shelf (circled small) to move it and reveal the knight’s spear (also circled below). Pick it up to add it to your inventory.
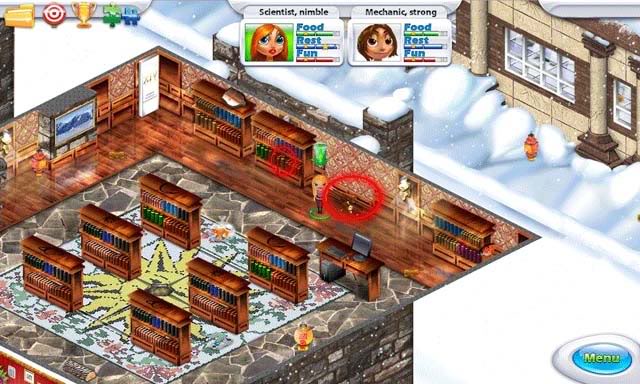
- Use your male character to knock down the large white bulletin board in the corner of the library. This will allow access to the shelf where the shield is sitting. Use your female character to climb on top of the shelf and retrieve the shield.
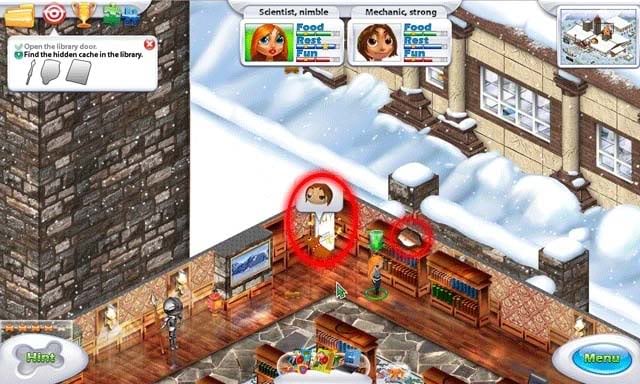
- Use the spear and shield on the knight on the left side of the library to reveal the hidden cache. This will also give you the dynamite.
Objective 6
Open the gates to the staff building’s backyard.
- Proceed back to the power shed and notice the gates to the left of it. Have your male character use the dynamite on the gates to open them.
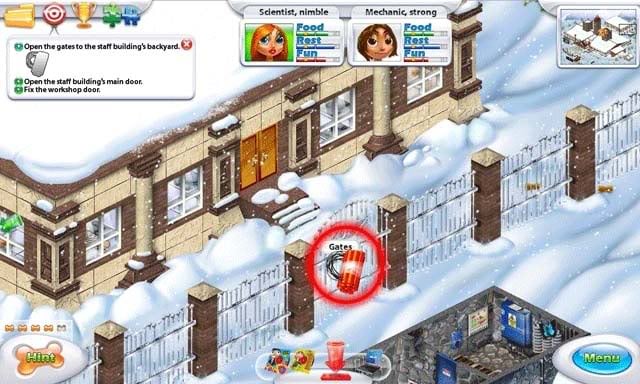
Open the staff building’s main door.
- Use the key in your inventory (which you found in the library) on the doors of the staff building to open them.
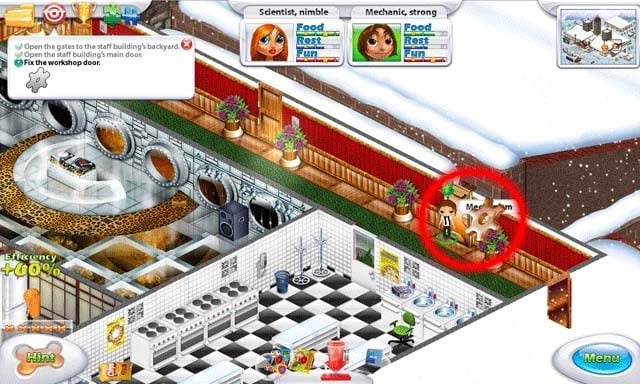
Fix the workshop door.
- Pick up the gear laying on the desk, which you can find upon entering the staff building.
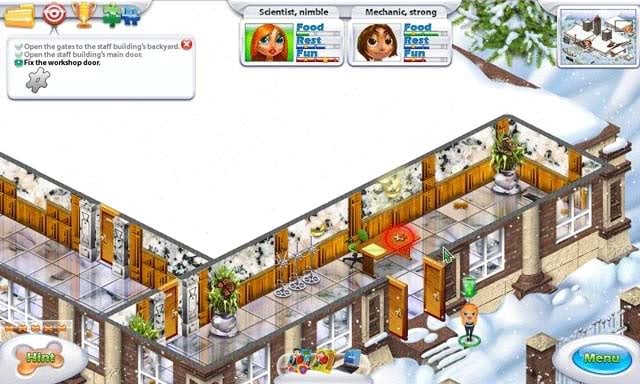
- Proceed back inside the hotel and enter the rightmost corridor (towards the kitchen). Upon closer examination of the workshop door, it’s broken. Select your male character, and use the gear on the mechanism to the right of the door to repair it.
Objective 7
Activate the "Book shelves" puzzle.
- In order to activate the bookshelves puzzle, you’ll need four stone fragments. Their locations are as follows:
1.Kitchen- Immediately right of the door, left of the sink.
2.Library- On the floor, diagonally lower left of the knight.
3.Staff Building- In the long vertical hallway towards the end, on the floor.
4.Workshop- To the right of the nearest large wooden table.
Note: Only your female character can enter the workshop, so select them to have them squeeze through the door and acquire the fragment.
- Return to the library and combine all four fragments, using them on the hole in the center of the room. This will activate the puzzle, but you won’t be able to solve it until you’ve gotten a clue on how to do it.
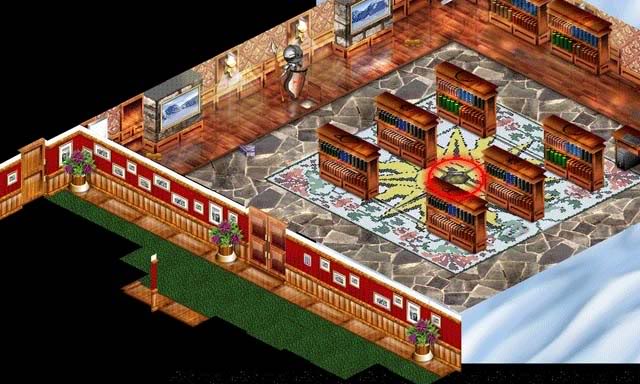
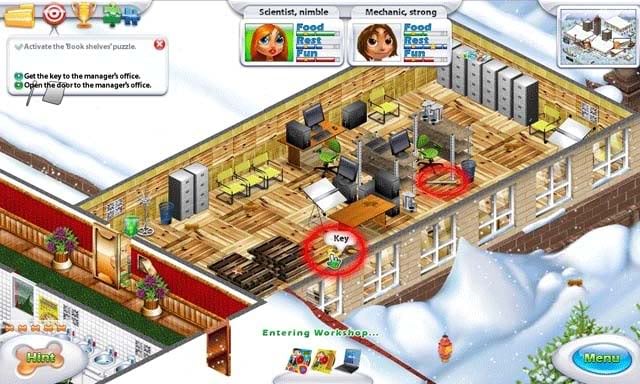
Get the key to the manager’s office.
- Have your female character enter the workshop again. Pick up the key lying on the floor, as well as the knitting needle. Both are circled below.
- Exit the hotel and proceed to the staff building.
- Enter the staff building and pick up the piece of paper lying on the desk at the entrance.
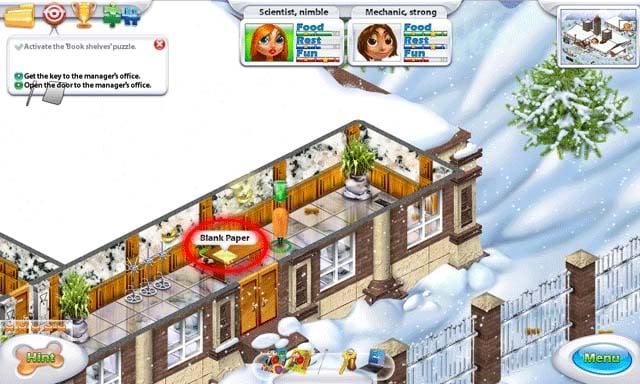
- Proceed through the door on the far left and into the second hallway. Stop at the first door (the manager’s office).
- Use the blank paper on the door first, then use the knitting needle on it to jiggle the key out of the lock. Click on the paper to pull it out and acquire the key to the manager’s office.
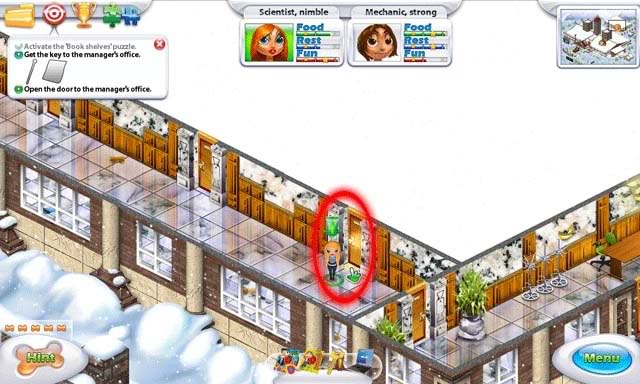
Open the door to the manager’s office.
- Use the newly acquired key on the door to open the manager’s office.
Objective 8
Find the combination to the "Book shelves" puzzle.
- Enter the manager’s office. Click on the piece of paper sitting on the table nearest to the door: this is the clue you need to solve the bookshelves puzzle.
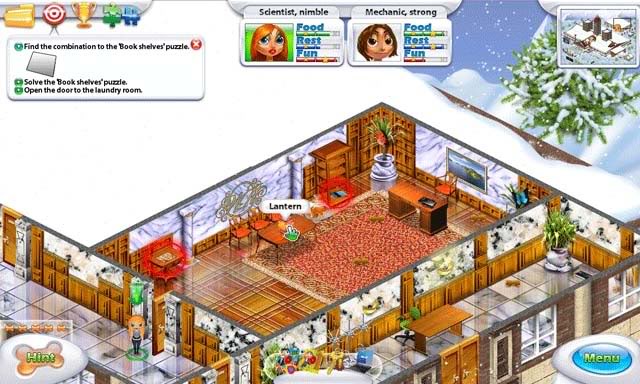
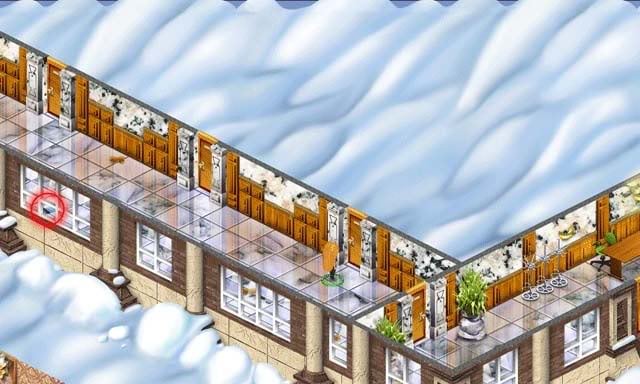
- Before leaving, pick up the blue magnetic card piece, which is also in the manager’s office, as well as the other blue magnetic card piece located in the hallway outside. This will save backtracking later.
Solve the "Book shelves" puzzle.
- Return to the library and click on the hole/fragments in the center of the room to enter the puzzle. The clue you collected can be viewed on the right. The clue shows where each shelf should go: notice the markings on the top of the shelves. Click on a shelf, then on one of the markings on the floor to move it to that location. The goal is to have the shelves match the arrangement shown on the clue.
- The solution is as follows according to the number and letter layout shown below:
A-6, B-1, A-2, E-4, C-8, E-3, D-6, C-7, D-4, F-8, E-9, D-3.
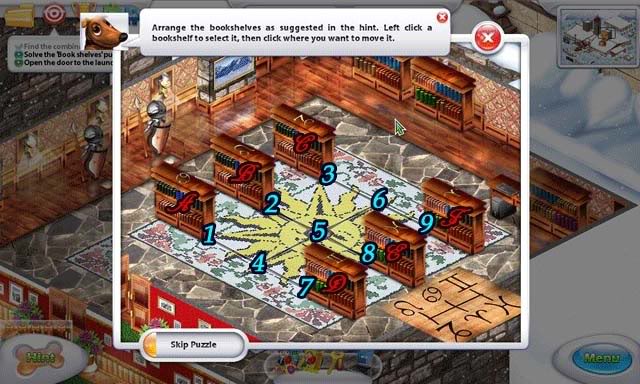
- Solving the puzzle will reward you with the cassette.
Open the door to the laundry room.
- Exit the library and proceed back to the workshop. Have your female character squeeze inside and grab the sticker, which is at the far end of the room on top of a row of lockers.
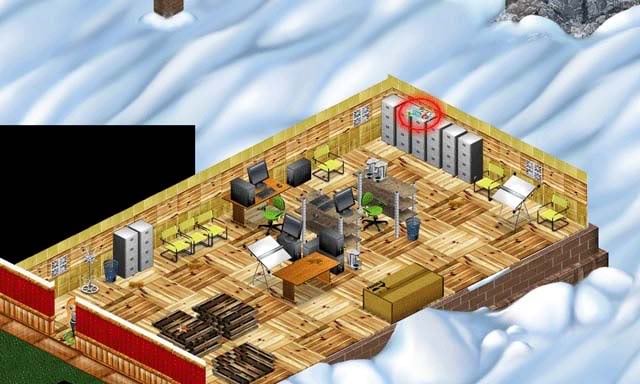
- Combine the two magnetic card pieces and the sticker to acquire the card key for the laundry room (refer to "find the combination of the ‘bookshelves’ puzzle above if you need to know how to get the card key pieces).
- Use the reassembled card key on the digital lock of the laundry room, which is located just to the right of the door to open it. The laundry room is two doors down to the left from the workshop.
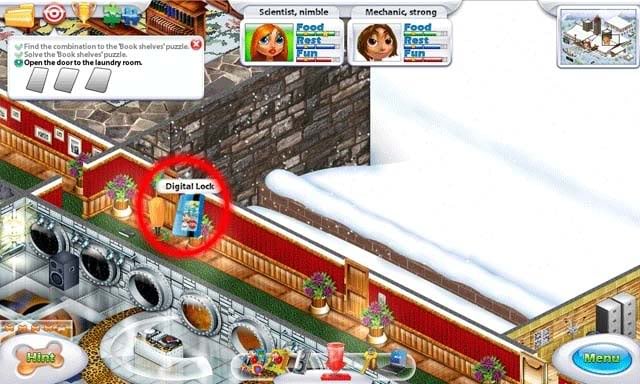
Objective 9
Turn off the power supply to the cut-off cable.
- Pick up the tape lying on the floor, then use it on the switch on the left to shut off the power supply.
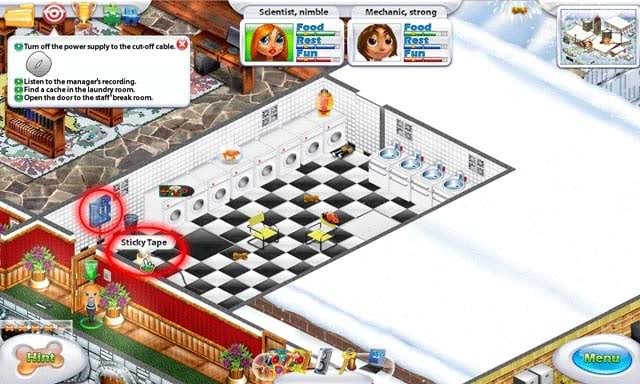
Listen to the manager’s recording.
- There’s three things you need to do this: batteries, the cassette, and a dictaphone. You’ve already got the casette in your inventory. Pick up the batteries lying in the corner of the laundry room.
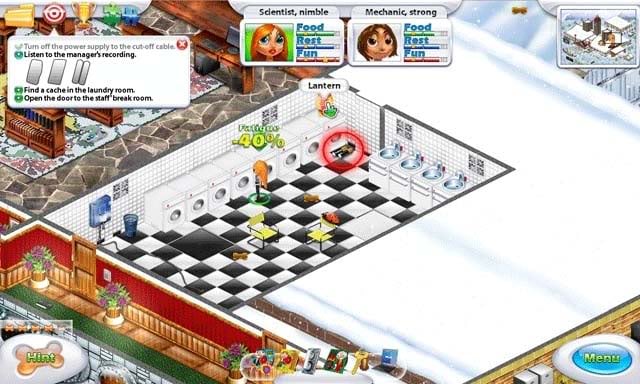
- Exit the hotel and proceed back to the staff building.
- Enter the manager’s office and pick up the dictaphone, which is sitting on the desk.
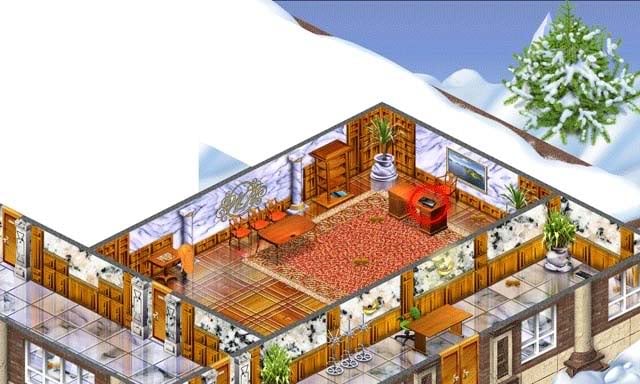
- Combine the batteries, casette, and dictaphone to listen to (read) a pre-recorded message.
Find a cache in the laundry room.
- Return to the laundry room. Make sure both your male and female character are nearby. There are two tiles in the laundry room which are 4x larger than all the others: these are switches. Have your female character stand on one, and your male character on the other to reveal the hidden cache.
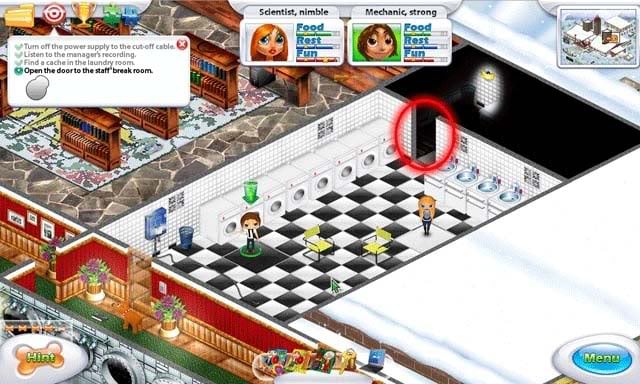
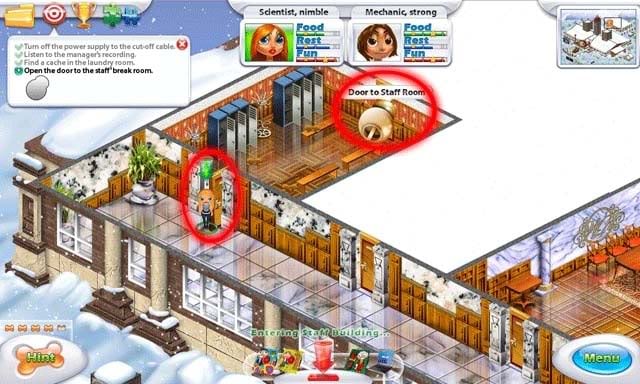
Open the door to the staff’s break room.
- Before you leave for the staff building, while you’re still in the laundry room, have a look inside the fourth washing machine from the right. Inside is a door knob.
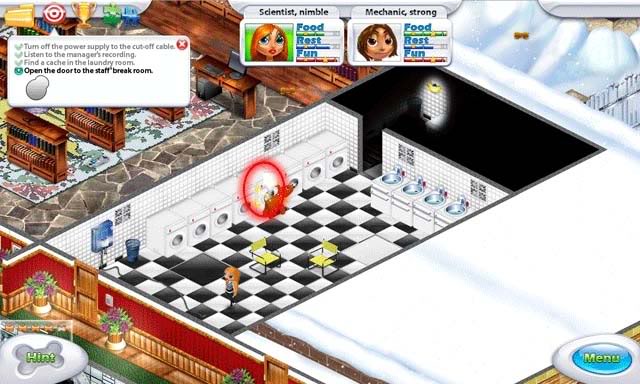
- Exit the laundry room, proceed towards and enter the staff building.
- Inside the staff building, enter the vertical hallway on the left and proceed to the door at the end.
- Use the key from your inventory on the staff room to open it. Use the door knob from your inventory to enter the second staff room area.
Objective 10
Find a hidden cache in the manager’s office.
- In the staff room is a coffee thermace. Pick this up and throughout the game, you can use it repeatedly to satisfy your characters’ rest.
- Before exiting the staff room, grab the shovel and the lighter and add them to your inventory.
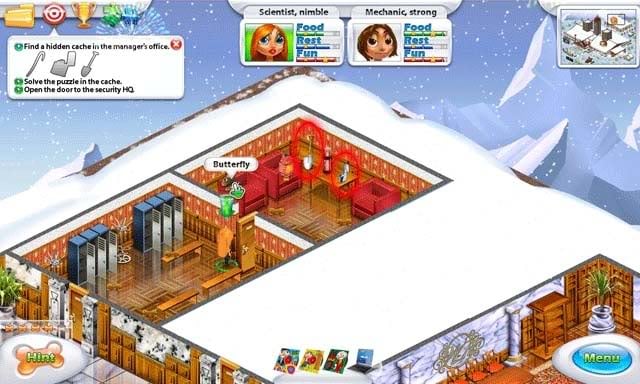
- Now, exit the staff building and proceed to the lodge. You’ll need your male character for this sequence.
- Use the shovel to shovel coal into the fireplace, then use the lighter on the fireplace to warm it.
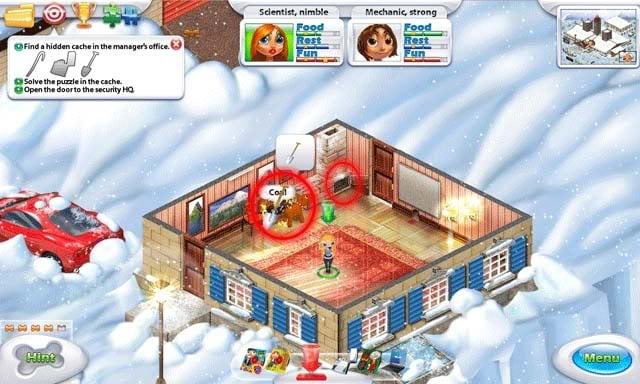
- Pick up the now-thawed crowbar to add it to your inventory.
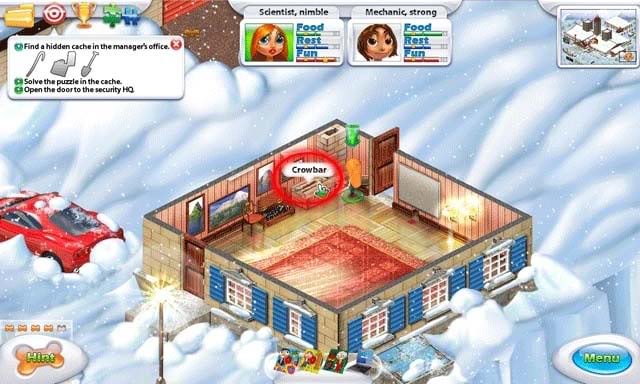
- Return to the staff building and enter the manager’s office.
- Have your male character use the crowbar on the location on the floor circled below to reveal the hidden cache.
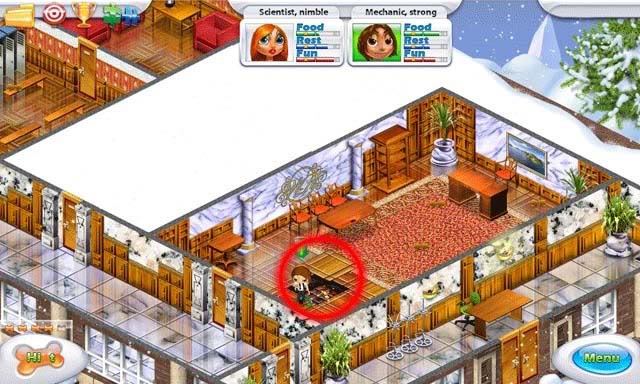
Solve the puzzle in the cache.
- Click on the cache to enter the puzzle. The goal is to click and rotate the four wheels so that the top and bottom rows of gems match each other. Here’s the solution from start to finish, using the screenshot below as a reference picture:
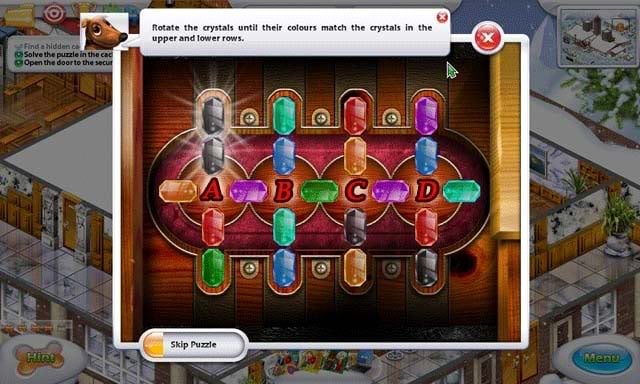
A, A, A, B, B, A, D, D, C, C, C, D, D, D, C, C, C.
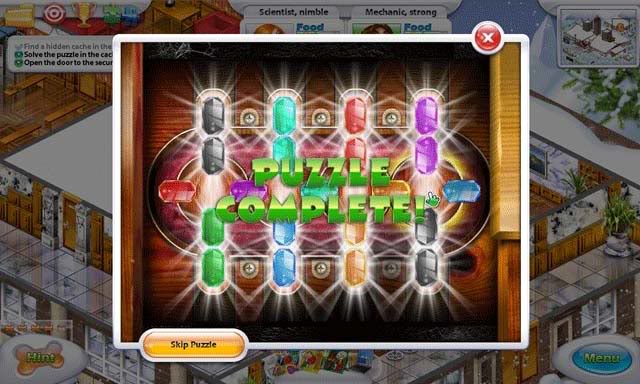
- Solving the puzzle will reward you with a key.
Open the door to the security HQ.
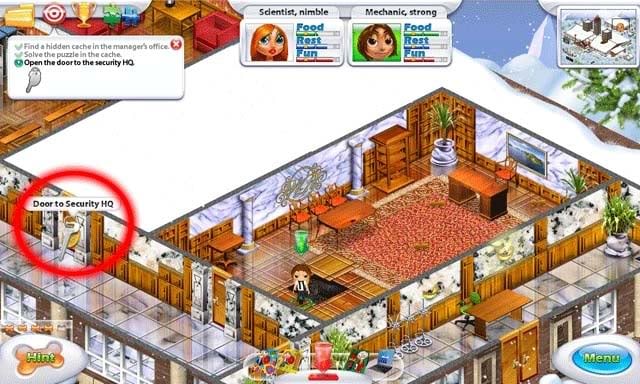
- Use the key from your inventory on the last locked door in the hallway to open and enter the door to the security HQ.
Objective 11
Examine the hidden cache in the laundry room.
- In the security HQ, pick up the towel and the garage handle to add them to your inventory.
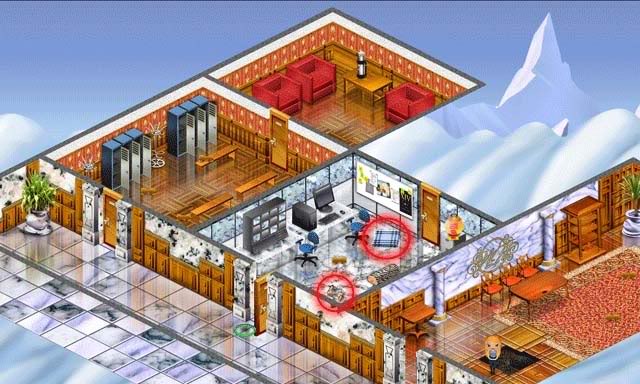
- Go back to the entry hallway of the staff building and use the towel on the bulb to add it to your inventory.
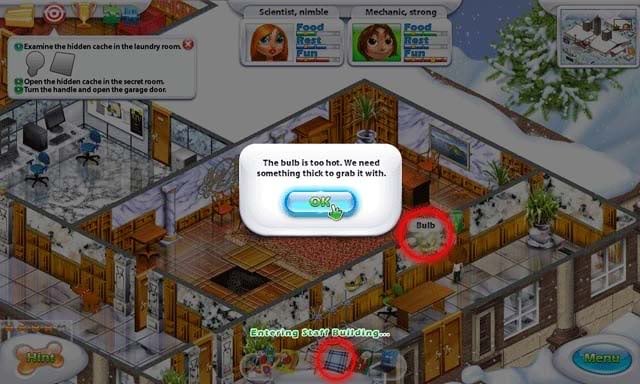
- Exit the staff building and proceed to the laundry room.
- Use the bulb on the lamp bracket to light up the dark room.
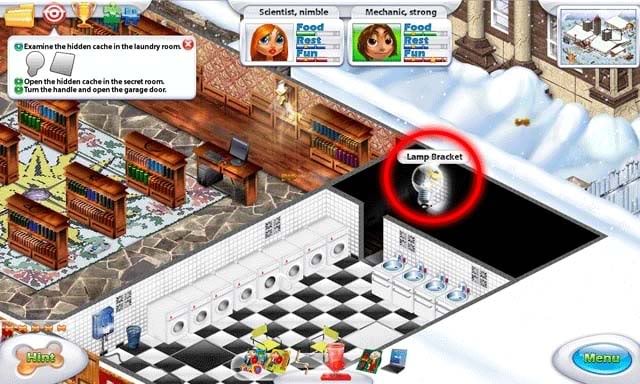
- Click on the hidden cache to enter a puzzle.
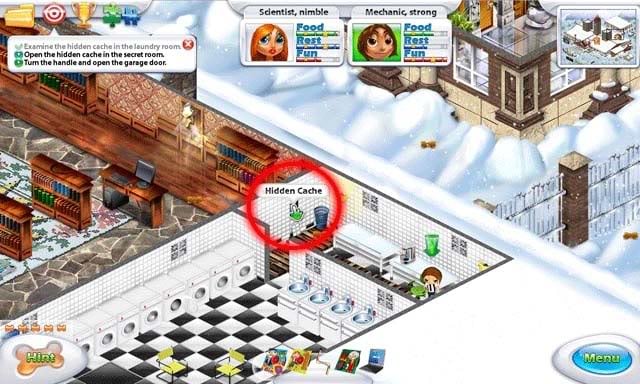
Open the hidden cache in the secret room.
- To open the hidden cache, you’ll have to solve the puzzle. Rotate the various colored tiles until the arrows lead from start to finish continuously. You don’t have to use all the tiles. In order to solve the puzzle:
-Click a green arrow once
-Click a blue arrow twice
-Click a yellow arrow twice
-Click a red arrow three times
-Click a pink arrow three times
The solution is shown below:
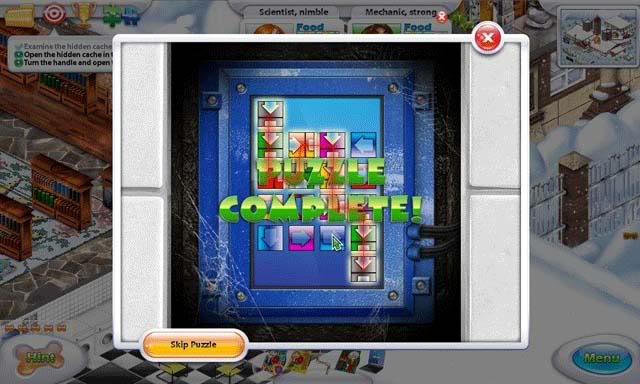
- Solving the puzzle successfully will result in the key being added to your inventory.
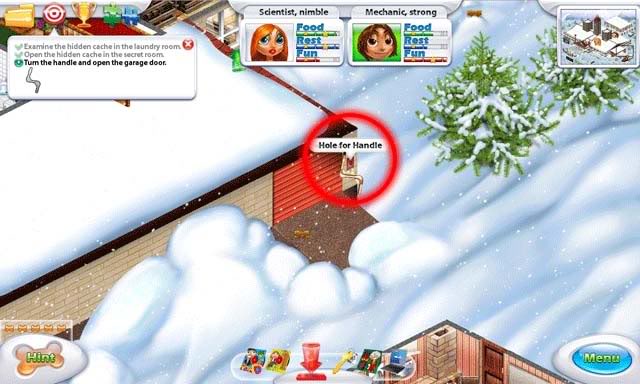
Turn the handle and open the garage door.
- Go outside through the lodge to the garage. Use the handle on the hole to open the door and proceed inside.
Objective 12
Get inside the garage.
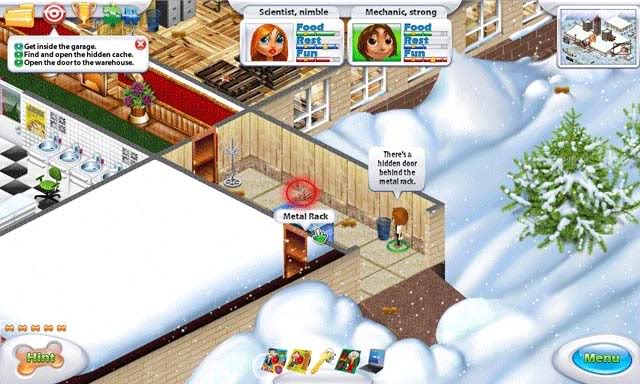
- Once inside, you can open the door straight ahead to unlock it and provide a shorter path from the hotel to the staff building. This is highly recommended.
- Inside, pick up the shell lying on the floor to add it to your inventory, then use your male character to move the large metal shelf just below out of the way, allowing access to the garage door.
Find and open the hidden cache.
- The hidden cache is located in the restaurant. Its specific location is shown below.
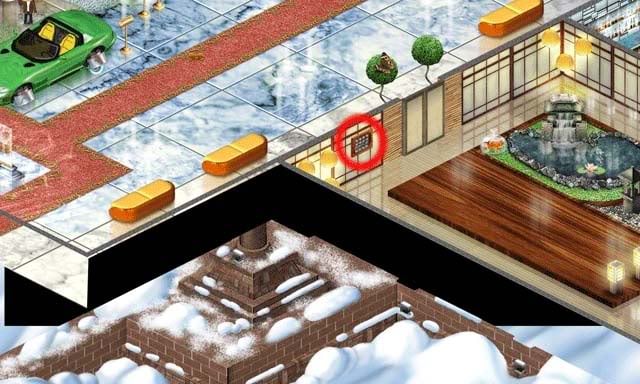
- Use the shell from your inventory on the collection of shelves to enter a puzzle.
- The goal of this puzzle is to arrange the shells that there are none of the same shell in a row or column. The solution is shown below:
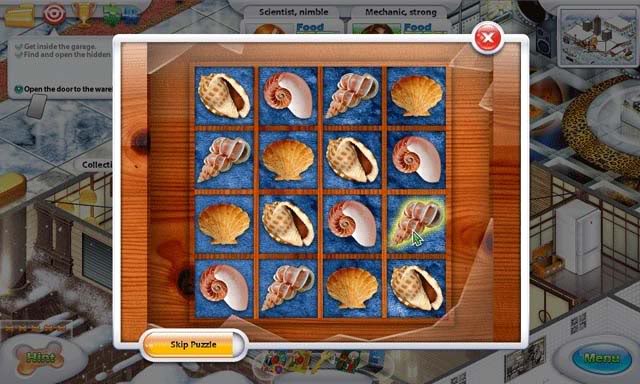
- Upon completing the puzzle, the magnetic card will be added to your inventory.
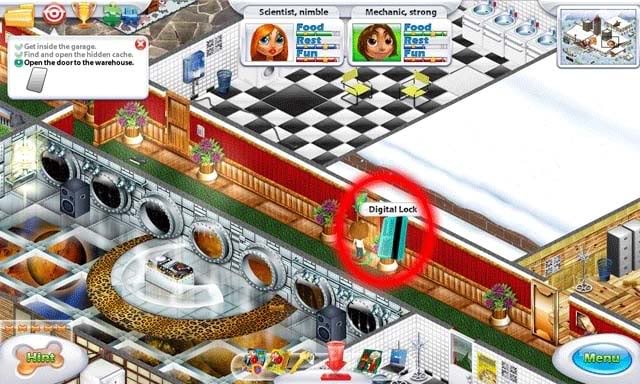
Open the door to the warehouse.
- Proceed to the warehouse door. Use the magnetic card from your inventory on the digital lock to unlock and open the door.
Objective 13
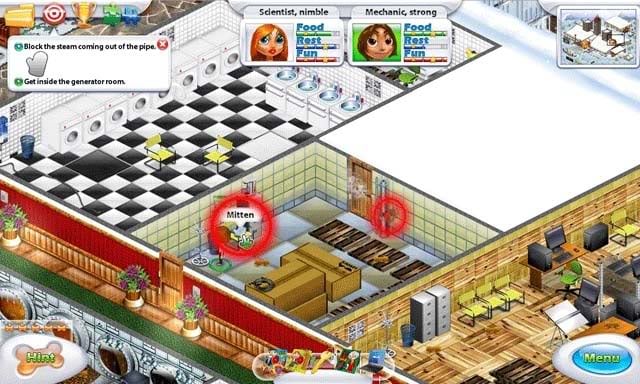
Block the steam coming out of the pipe.
- Pick up the mitten lying in the room, then use it on the red valve to stop the steam from escaping the pipe.
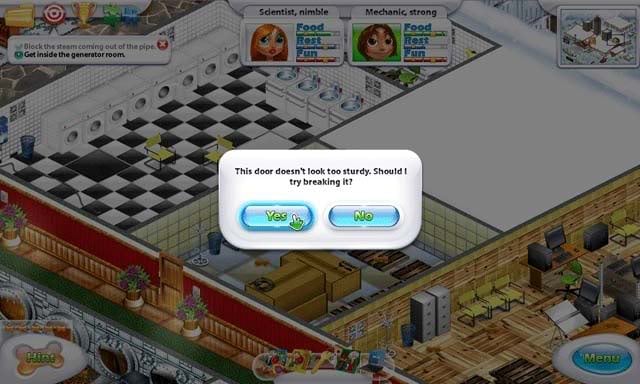
Get inside the generator room.
- Use your male character on the door at the far end of the room to break it down and gain access to the generator room.
Objective 14
Fill up the generator.
- In order to fill up the generator, you’ll have to backtrack to the garage. If you unlocked the shortcut door to the hallway earlier, it’ll be a short trip past the kitchen.
- Pick up the empty fuel can sitting on the table in front of the semi.
- Use the hose from your inventory on the semi fuel tank, then the empty fuel can to fill it.
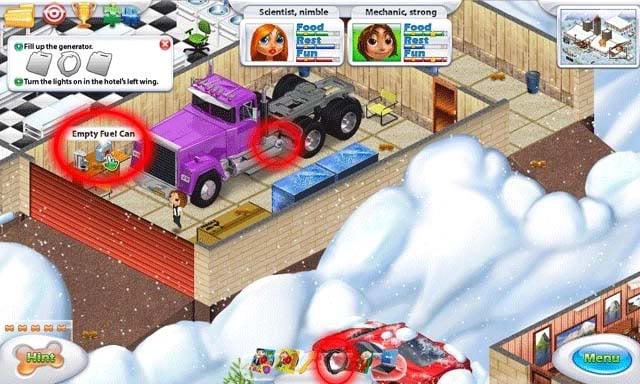
- Proceed back to the generator room and use the (filled) fuel can on the generator.
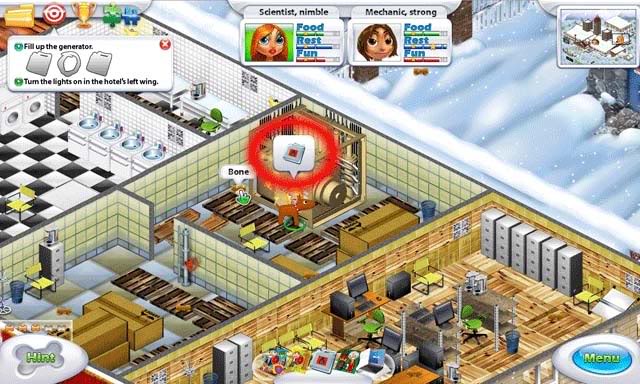
Turn on the lights in the hotel’s left wing.
- Click on the generator to access a puzzle. The goal is to find matching pairs. The solutions are shown below. Their locations are not randomized.
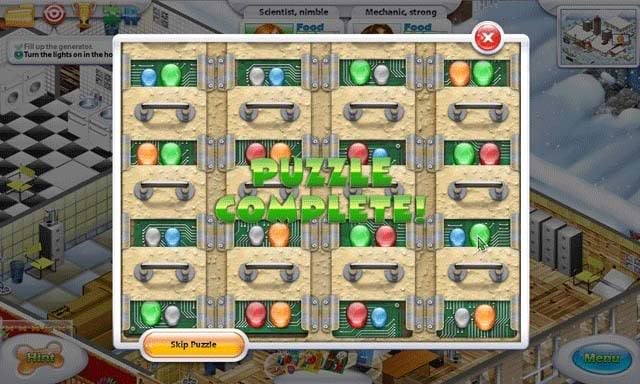
- Solving the puzzle successfully will result in the lights coming back on in the hotel’s left wing.
Objective 15
Open the door to the exhibition hall.
- Enter the left wing corridor by proceeding to the door left of the library. Select the key from your inventory and use it on the door to gain access.
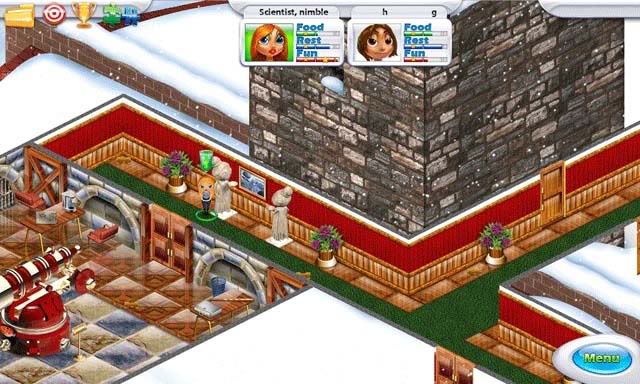
- Proceed straight down the hallway until you encounter two statues. There’s a picture between them that looks like this:
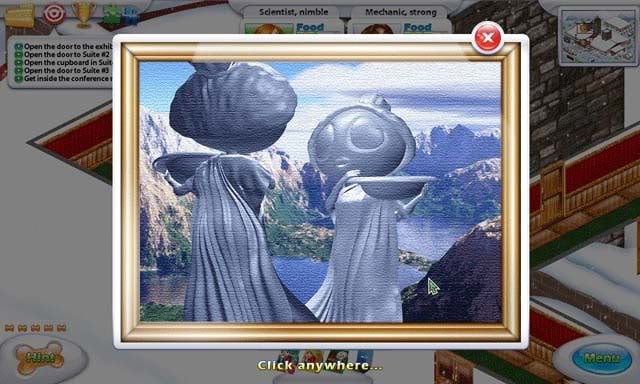
- Click on the statues to rotate them until they’re facing each other, like in the picture. Once they are, you’ll be able to open the door to the exhibition hall.
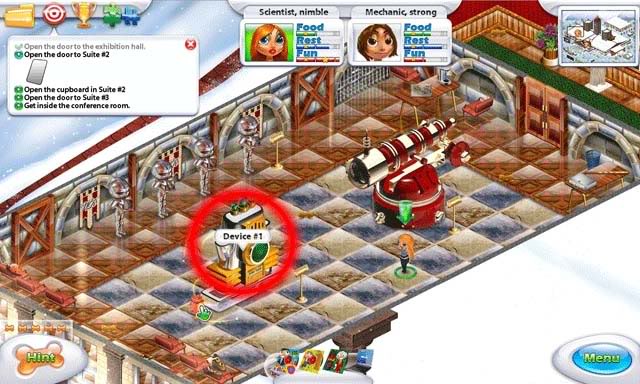
Open the door to Suite #2.
- In the exhibition hall, click on device #1 to activate a puzzle.
- The goal of the puzzle is to mimic the pattern of sounds the machine is making. The solution is the following sequence: refer to the screenshot below as a reference:
5, 1, 3, 4, 2, 7, 6
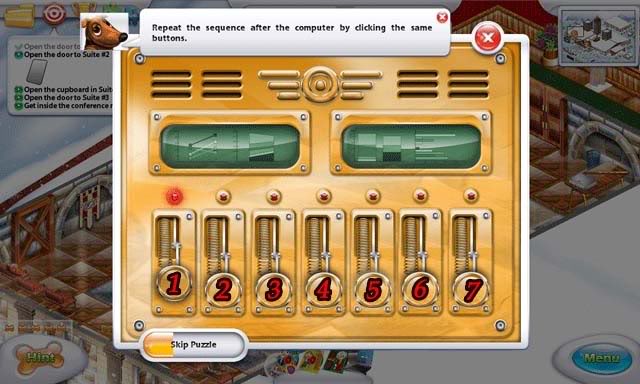
- Solving the puzzle will reward you with the magnetic card key to suite #2.
- Proceed to suite #2 (first on the left) and use the magnetic card from your inventory on the door to access a puzzle. Solve the question "Who directed the Godfather films?" to gain access. The answer is "Coppola".
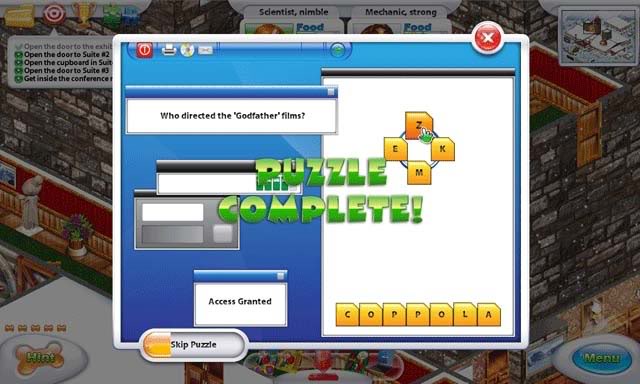
Open the cupboard in Suite #2.
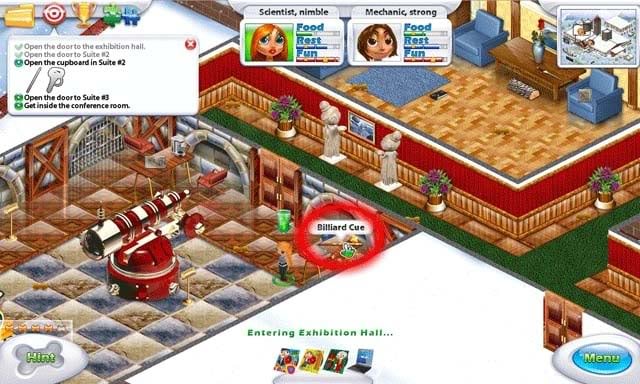
- Go back to the exhibition hall and pick up the billard cue to the right of the entrance door.
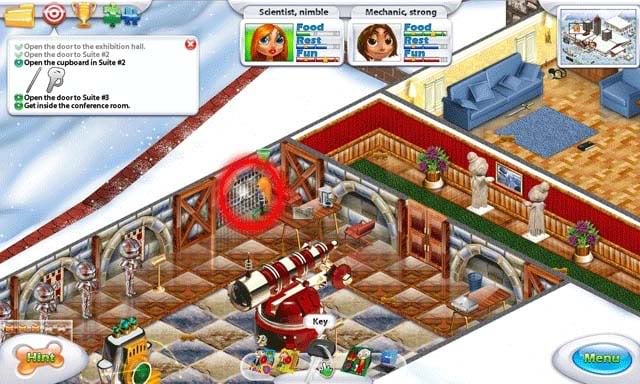
- Use the billard cue on the grate to retrieve the cupboard key.
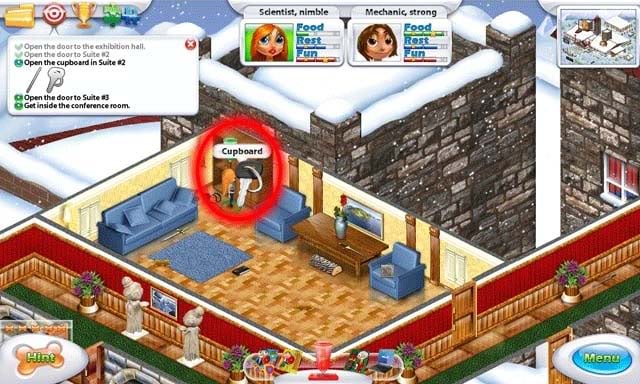
- Return to suite #2 and use the key on the cupboard to acquire the golf club.
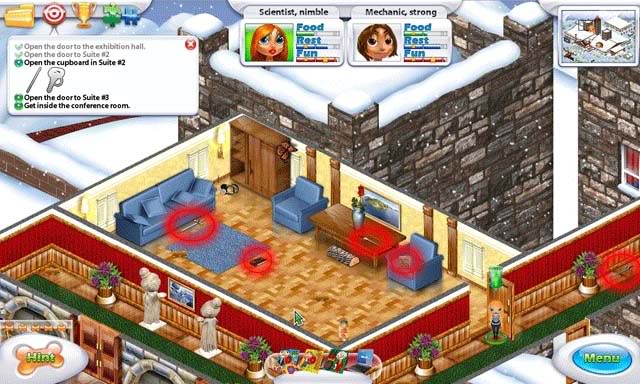
Open the door to Suite #3.
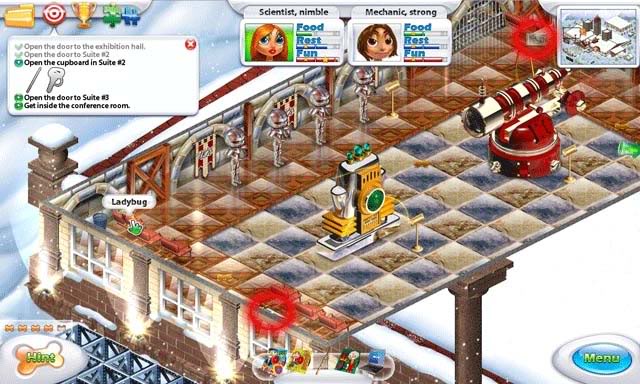
- There are several things you will need to pick up in the immediate area, including the video tape (as evidence), part of photo #2, and swords #1, #3, and #4. Their locations are shown and circled below:
- Return to the exhibition hall to retrieve sword #2 and part of photo #1. Their locations are once again shown and circled below:
- Combine part of photo #1 and #2 to reveal a picture that shows where each sword should be located. The photo looks like this:
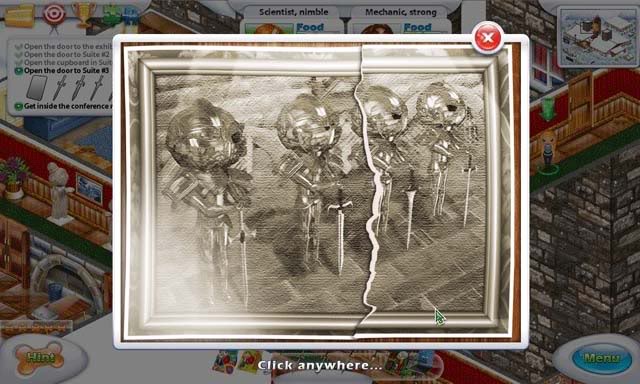
- Place swords #1-4 from your inventory with their appropriate knight statue (according to the picture above). If you number the statues #1-4 from left to right, they match the number of each sword. Placing the swords correctly will reward you with the magnetic card for suite #3.
- Proceed to suite #3 (last door on the right) and use the magnetic card on the door to gain access to a puzzle. The question is "What is the name of the Beatles’ 1966 album?" The answer is "Revolver".
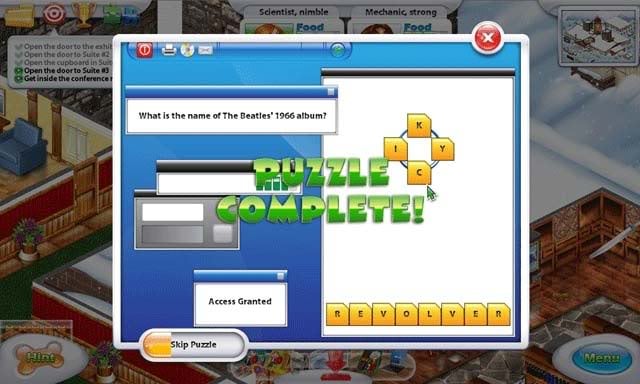
Doing this successfully will give you access to suite #3.
Get inside the conference room.
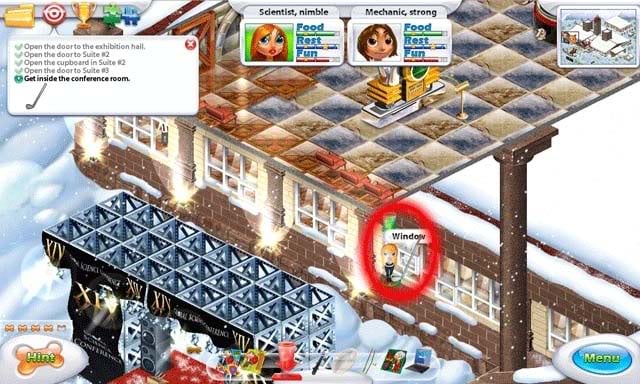
- Return to the exhibition hall and click on the window at the end to open it.
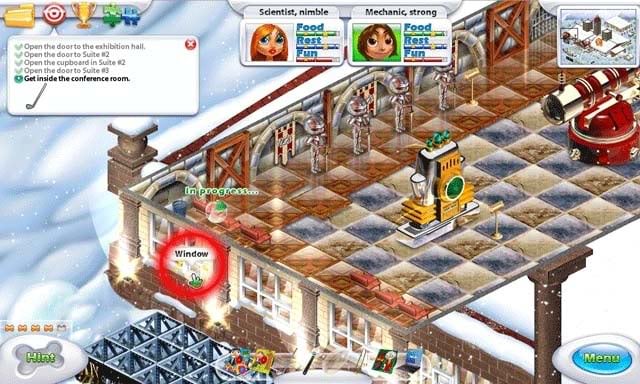
- Use your female character to exit the window out onto the ledge and proceed to the window outside the conference room. Use the golf club on it to gain access and enter the conference room.
Objective 16
Open the door to Suite #1.
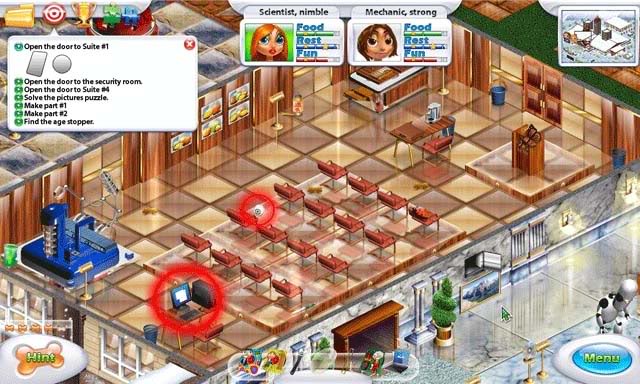
- Click on the window to gain access to the conference room. You can click the computer on the left to access another evidence-related e-mail. Make sure you pick up the artificial eye lying on the floor, too. Both their locations are shown and circled below.
- Exit the conference hall by unlocking the doors from the inside and proceed back to the exhibition hall.
- Use the artificial eye on the steel suitcase to acquire the key to suite #1.
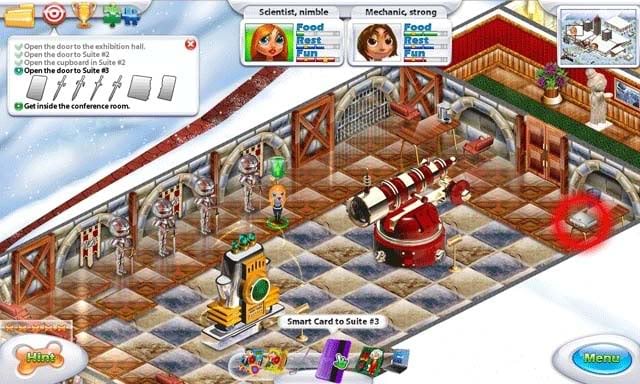
- Proceed to suite #1 (last door on the left) and use the key from your inventory to gain access to a puzzle. The question is "The 4th president of the USA. The largest sports arena in the world is named after him." The answer is "Madison".
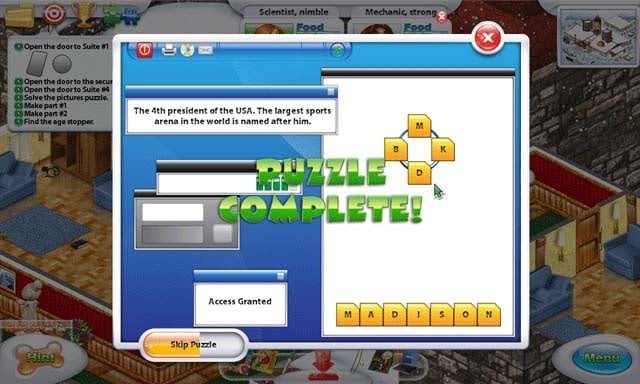
- Solving the puzzle will give you access to suite #1.
Open the door to the security room.
- Go back to the conference room, pick up the knife and use it on the leather suitcase, both shown and circled below.
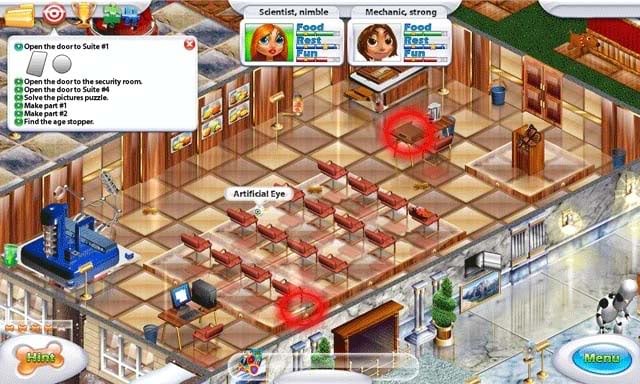
- You’ll find a key inside. Proceed to the staff building, to the security room (middle room of the corridor). Enter it and use the key on the second door to gain access.
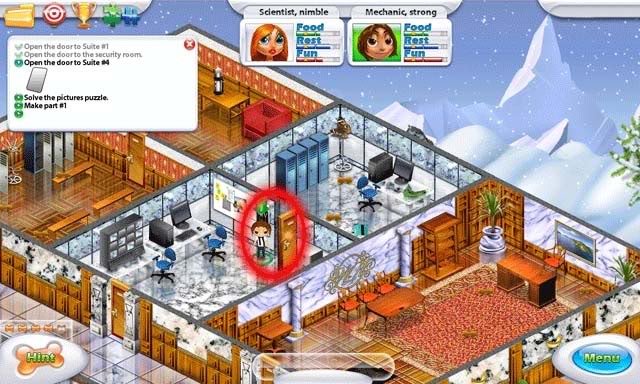
Open the door to Suite #4.
- Inside the security office, pick up the card key lying on the floor. This is the key to suite #4.
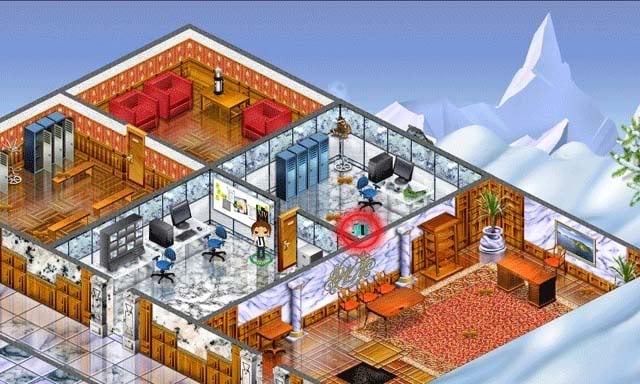
- Return to the hotel, to the left wing corridor and use the key on suite #4 (first door on the right) to access a puzzle. The question is "Which city was Walt Disney born in?" The answer is "Chicago".
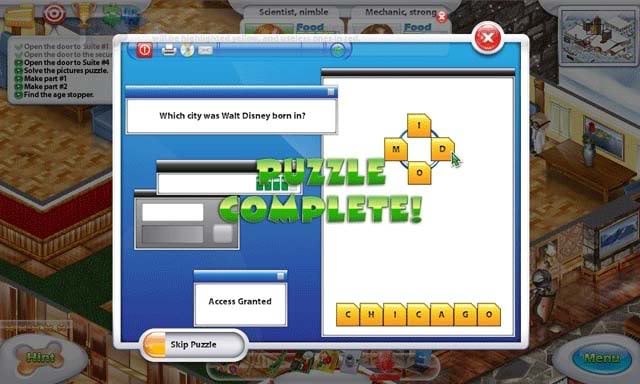
- Solving the puzzle will give you access to suite #4.
Solve the pictures puzzle.
- Inside suite #4, pick up the USB cable lying on the table on the left.
- Proceed back to the staff building and enter the security room. Click on the lockers to open them: there’s a camera located inside one of them. Finding it will have it added to your inventory.
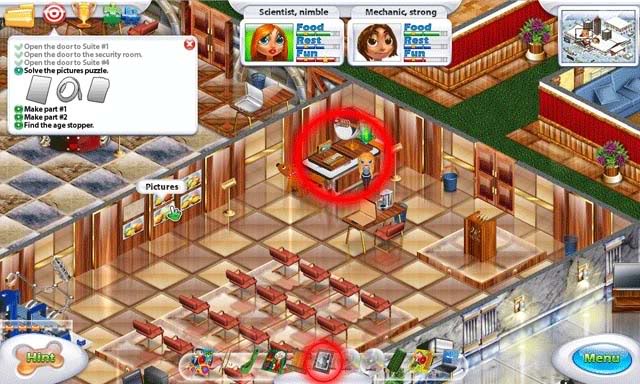
- Combine the camera and the USB cable, then proceed back to the conference room.
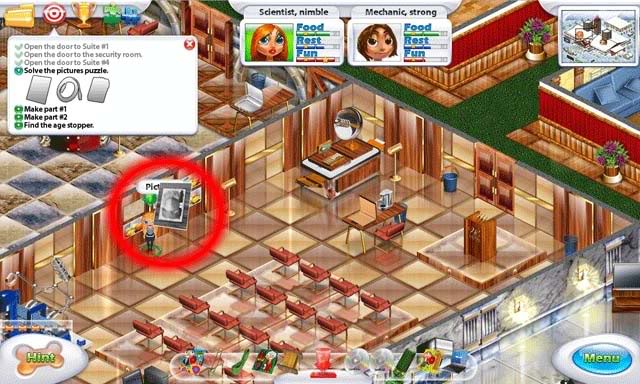
- Use the camera with cable on tricky device #4 (near the door) to get a print-out of a picture. This will be added to your inventory.
- Use the photo print-out on the pictures on the left wall of the conference room to enter a puzzle.
- The goal of the puzzle is to arrange the pictures with the numbers so that they all add up to the same sum vertically, horizontally, and diagonally. That sum is 15. The solution is shown below:
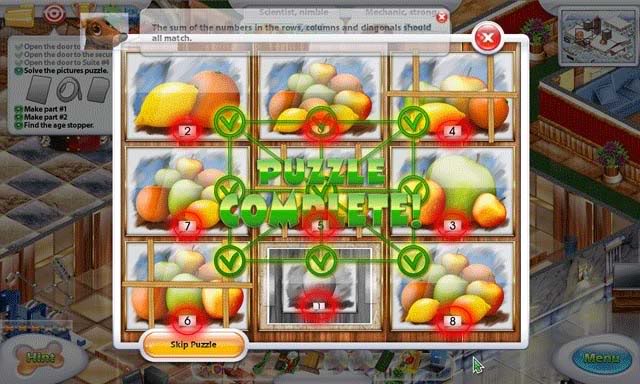
- Solving the puzzle successfully will reward you with part #4.
Make part #1 & part #2.
- Go back to suite #3 and pick up the lens and the wrench (the wrench is located in the very bottom corner).
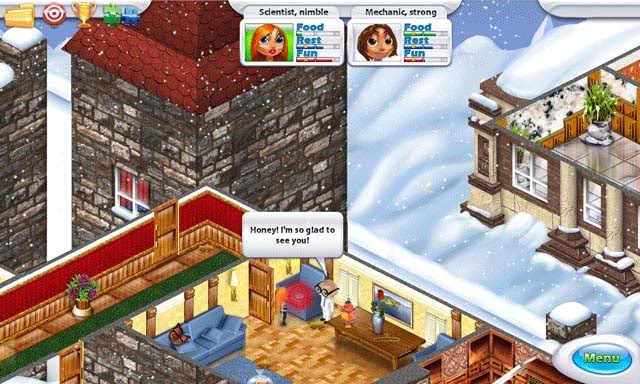
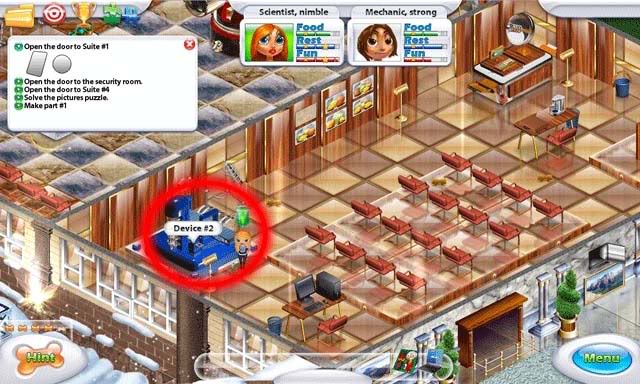
- Go back to the conference room, to tricky device #2 (the blue machine near the windows). Have your female character use the lens on the machine and your male character use the wrench on it.
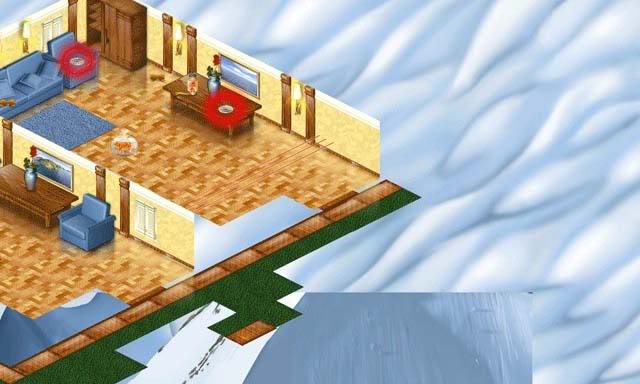
- Now go to suite #4 and pick up the mirror hanging on the right wall.
- Go to suite #1 and use the mirror on the lasers to gain access to the rest of the room. Pick up sketch parts #1 and #2.
- Return to device #2 in the conference room. Use sketch parts #1 and #2 on it to acquire part #1 and part #2.
Find the age stopper.
- Pick up the bucket handle from the bucket next to the conference room doors to add it to your inventory.
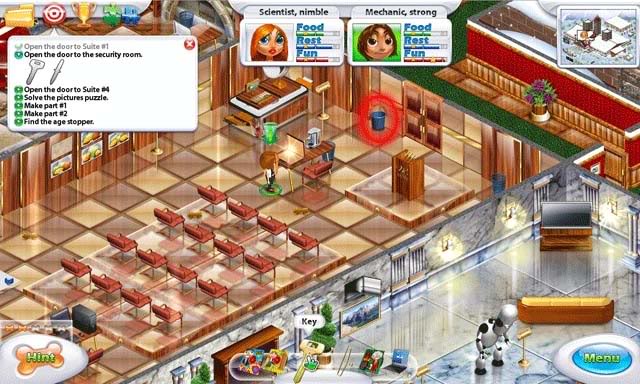
- Go back to the security room and pick up the rope to add it to your inventory.
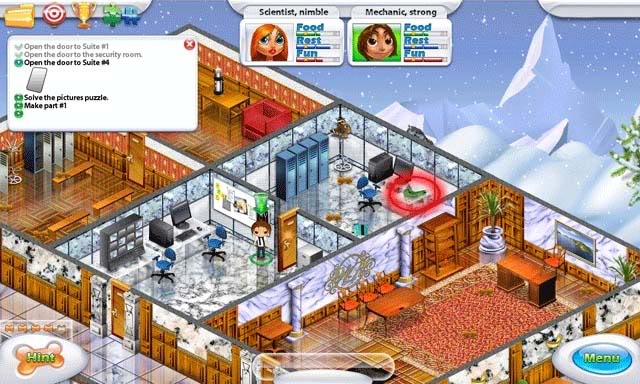
- Combine the bucket handle and the rope in your inventory to acquire the pulley.
- Proceed towards the lodge, towards the snowy cliff. Use the pulley from your inventory on strange part #3 to grab it and add it to your inventory.
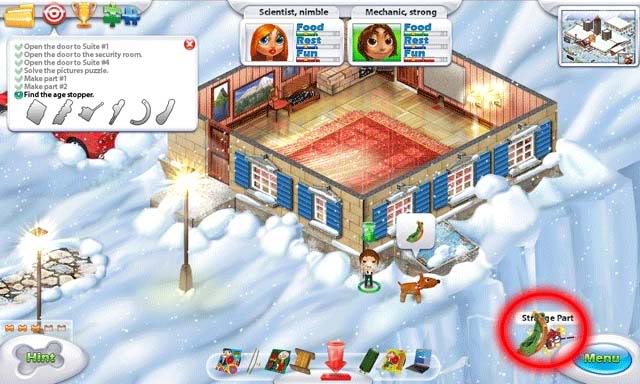
- Go back to the exhibition hall, back to device #3 (the large red one). Use all part# items from your inventory on it to acquire the age stopper and the adapter.
Objective 17
Call for help.
- Go back to suite #2 and pick up the headphones lying on the floor near the cabinet.
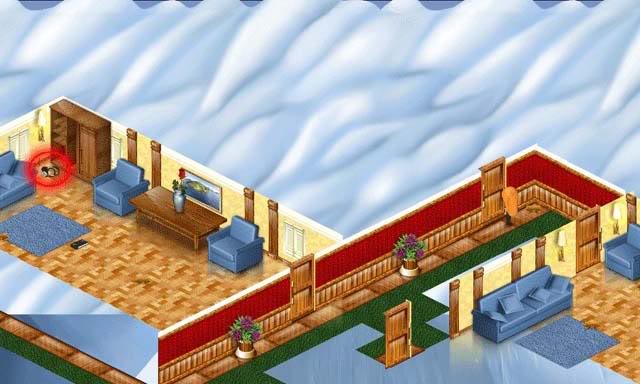
- Go to suite #4 and pick up the electromagnetic coil (right of the door) and the capacitor (left of the blue chair in the far right corner).
- Go to suite #3 and pick up the clothes hanger.
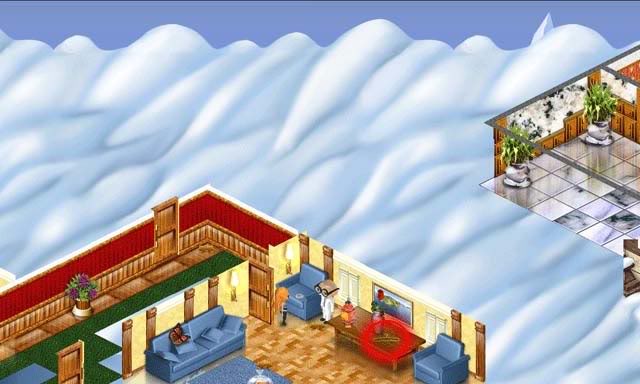
- Combine the adapter, the electromagnetic coil, the capacitor, the headphones, and the clothes hanger to assemble a radio and call for help.
Congratulations, you’ve completed the game!
Evidence List
Hidden throughout the game are various pieces of evidence which allow more insight into the situation at hand. Their locations are listed below:
- Video Tape 1: In the corridor, in front of the laundry room door.
- Video Tape 2: In the first corridor of the staff building on the far right.
- Email 1: Located on the computer in the library.
- Video Tape 3: Located in Suite #2.
- Email 2: Located on the computer in the conference room.
Achievement Item Locations:
The following objects are organized in list format according to their type and location.
![]() Brown Butterflies
Brown Butterflies![]()
1.Main Hall- In small tree to left of Restaurant Door
2.Garage- In entryway
3.Warehouse- On left wall
4.Corridor- To right of library doors
5.Corridor- To right of Workshop door
6.Suite #4- In bottom corner
7.Exhibition Hall- In bottom right corner
8.Staff Room- On leftmost red chair
9.Security Room(2)- In far back corner
10.Staff Building- In right hallway corner
![]() Blue Butterflies
Blue Butterflies![]()
1.Glass Hall- To left of main path
2.Main Hall- In far upper right corner
3.Kitchen- Topmost corner
4.Generator Room- Rightmost corner
5.Corridor- To left of Warehouse door
6.Corridor- Far corner to left of Library doors
7.Left Wing Corridor- At first corner
8.Power Shed- In back right corner of the farthest room
9.Manager’s Office- Far rightmost corner
10.Staff Building- In corner of farthest left area of the hallway
![]() Monarch Butterflies
Monarch Butterflies![]()
1.Main Hall- On tree to right of fireplace
2.Kitchen- In far right corner
3.Garage- Behind Semi-truck
4.Generator Room- Sitting on generator
5.Workshop- In top corner to left of lockers
6.Suite #3- On blue couch
7.Suite #2- Sitting on bookcase/cupboard
8.Left Wing Corridor- To left of statues
9.Conference Hall- On speaker’s podium
10.Staff Building- To right of door to second hallway
![]() Ladybugs
Ladybugs![]()
1.Main Hall- At front entrance
2.Garage- On Semi
3.Laundry Room- On floor near large white tile/switch
4.Library- Far right corner
5.Left Wing Corridor- Between Suites #1 and #2
6.Exhibition Hall- On large red machine
7.Exhibition Hall- At far lefthand corner
8.Conference Hall- On far right chair in front row
9.Manager’s Office- Upper corner on planter tree
10.Corridor- To left of Library doors
![]() Fish
Fish![]()
1.Restaurant- On floor to left of pond
2.Laundry- Sitting on washing machines
3.Suite #3- On floor near left wall
4.Library- Between farthest mid-room shelves
5.Corridor- To left of Library doors
6.Suite #1- On floor in middle of room
7.Left Wing Corridor- Just around first corner (right)
8.Exhibition Hall- On floor between devices
9.Staff Room- On floor to right of bench
10.Manager’s Office- On floor to right of table
![]() Large Lanterns
Large Lanterns![]()
1.Dance Floor- On left speaker near door
2.Freezer- In far left corner (through window)
3.Laundry Room- In corner above washing machines
4.Laundry Room- In right area of back room
5.Generator Room- In bottom-most corner
6.Workshop- Against right wall (through window)
7.Suite #4- To right of cabinet
8.Security Room- Far upper right corner, first room
9.Staff Building- Far corridor near dead-end (through window)
10.Library- To right, near wall
![]() Red Lanterns
Red Lanterns![]()
1.Main Hall- To the immediate left of the TV
2.Suite #3- On table
3.Library- To left of Suit of Armor
4.Exhibition Hall- To left of yellow machine
5.Power Shed- (outside) to right of shed
6.Power Shed- (outside) to left of Staff Building
7.Manager’s Office- on table
8.Staff Room- To left near lockers
9.Outside- To the left of the Power Shed, at the gate corner
10.Outside- Right of the outside garage entrance
![]() Small Lanterns
Small Lanterns![]()
1.Restaurant- Near large square lights
2.Freezer- Through bottom windows
3.Freezer- Through left windows
4.Garage- On table in corner
5.Corridor- To left outside Library doors
6.Suite #1- On table on right wall
7.Suite #2- In bottom left corner
8.Exhibition Hall- To left of row of knights
9.Conference Hall- On left wall, below printing machine
10.Staff Room- On red chair in second room
![]() Firewood
Firewood![]()
1.Main Hall- To left of fireplace
2.Freezer- On metal shelves
3.Garage- Near large red garage door
4.Library- On floor below second row of shelves (closest wall)
5.Suite #2- Below table
6.Left Wing Corridor- To right of statues and planter
7.Power Shed- (outside) to right of shed
8.Security Room- Near wall of Manager’s Office
9.Staff Building- Through bottom-corner window
10.Outside Staff Building- Upper left corner outside near cliff
Record Locations
Scattered throughout the game is a small selection of records which you can find and use in the dance room. While entirely optional and offering no benefits other than some different music, their locations are listed below:
- Record #1: located on the floor in the dance room
- Record #2: located in the freezer
- Record #3: located in the left corner of the library
- Record #4: located on top of the washing machines in the laundry room
“;
More articles...
Monopoly GO! Free Rolls – Links For Free Dice
By Glen Fox
Wondering how to get Monopoly GO! free rolls? Well, you’ve come to the right place. In this guide, we provide you with a bunch of tips and tricks to get some free rolls for the hit new mobile game. We’ll …Best Roblox Horror Games to Play Right Now – Updated Weekly
By Adele Wilson
Our Best Roblox Horror Games guide features the scariest and most creative experiences to play right now on the platform!The BEST Roblox Games of The Week – Games You Need To Play!
By Sho Roberts
Our feature shares our pick for the Best Roblox Games of the week! With our feature, we guarantee you'll find something new to play!All Grades in Type Soul – Each Race Explained
By Adele Wilson
Our All Grades in Type Soul guide lists every grade in the game for all races, including how to increase your grade quickly!


