
Grow A Garden 2 Base Price List
What's the most valuable crop?![Evomon Best Starter [Leafbun, Blazpup, or Bubble?]](/wp-content/uploads/2026/06/evomon-best-starter.jpg "Evomon Best Starter [Leafbun, Blazpup, or Bubble?]")
Evomon Best Starter [Leafbun, Blazpup, or Bubble?]
Grass-type, Fire-type, or Water-type?![Evomon Tier List [META and BEST Evomon]](/wp-content/uploads/2026/06/evomon-tier-list.jpg "Evomon Tier List [META and BEST Evomon]")
Evomon Tier List [META and BEST Evomon]
The Evomon dream team.
![[Roblox] Evomon Shiny Hunting Guide – Including Prismatic and Pris Shinies!](/wp-content/uploads/2026/06/evomon-shiny-hunting-guide.jpg "[Roblox] Evomon Shiny Hunting Guide – Including Prismatic and Pris Shinies!")
Gravely Silent: House of Deadlock Walkthrough
Welcome to the Gravely Silent: House of Deadlock walkthrough on Gamezebo. Gravely Silent: House of Deadlock is a hidden object adventure game played on the PC created by Vogat Interactive. This walkthrough includes tips and tricks, helpful hints, and a strategy guide for how to complete Gravely Silent: House of Deadlock.


- Prefer Gamezebo on Google

Gravely Silent: House of Deadlock – Game Introduction
Welcome to the Gravely Silent: House of Deadlock walkthrough on Gamezebo. Gravely Silent: House of Deadlock is a hidden object adventure game played on the PC created by Vogat Interactive. This walkthrough includes tips and tricks, helpful hints, and a strategy guide for how to complete Gravely Silent: House of Deadlock.
General Tips
- From the start of the game, you may choose one of two modes: Casual or Challenge. Casual mode offers helpful hint sparkles, faster hint and skip recharging, and the misclick penalty is short in hidden object scenes. Challenge mode offers less sparkles, slower hint and skip recharge, and longer misclick penalties in hidden object scenes.
- During gameplay, you can check your Tasks in the bottom left corner of the screen. Tasks will list several to-do items you should be working on.
- Inventory items are shown and stored at the bottom of the screen. Holding an inventory item over an area where it can be used correctly will result in numerous sparkles surrounding it.
- Hints can be accessed by clicking the orb in the bottom right corner of the screen. Hints are unlimited, but will take time to recharge.
- All puzzles may be skipped after an allotted amount of time has passed.
- Moving your cursor over an area that requires further interaction will often result in gears appearing by the cursor. In the same way, a magnifying lens encourages you to take a closer look, while the cursor turning into a hand means you can pick up or move an object.
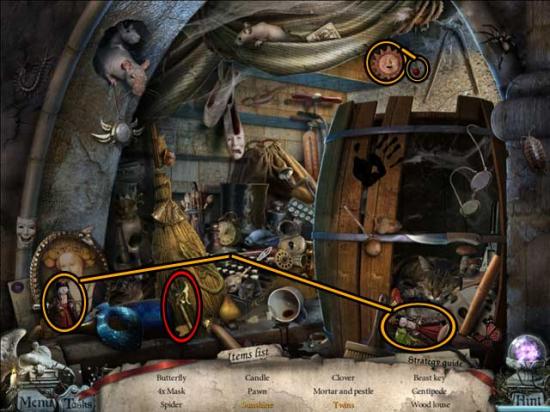
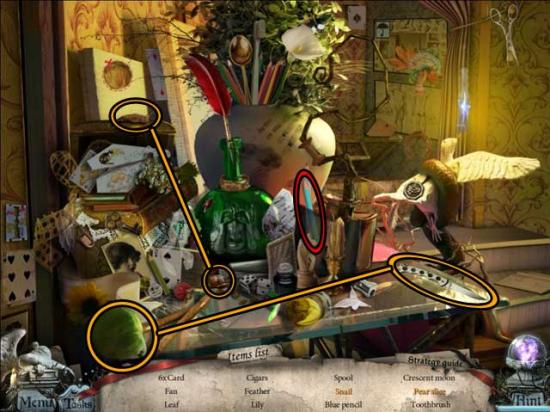
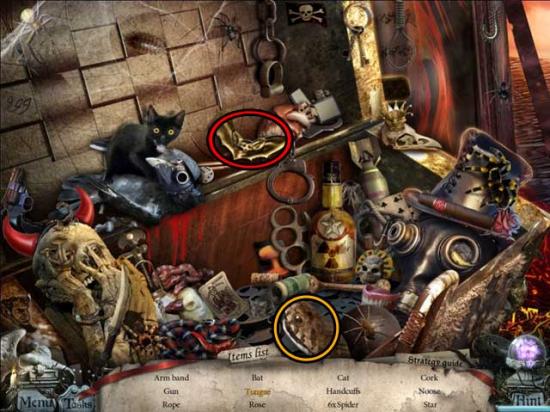
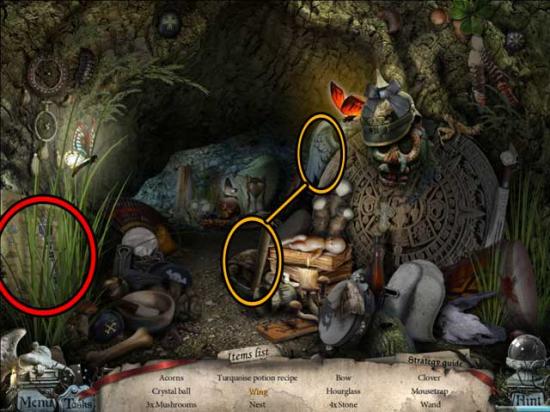
- In some hidden object scenes, some items will be listed in an orange-colored font: this means you’ll need to accomplish an extra step or two in order to cross it from the list. In the walkthrough below, these items are circled in orange. If any object is solely circled in orange, you’ll only have to click on it once or twice to interact with it. If an object is circled in orange and linked to another object circled in orange, it means you will have to move the corresponding object to the other to have them interact in such a way as to make the item on the list appear.
- Key Items (or Inventory Items) throughout the guide are circled in red in screenshots, and identified with CAPS in the written portions of the guide.
- Red boxes in screenshots below signify an area where a Key Item can be found, or where a Key Item should be used. Blue circles, when they are used, indicate a hidden object scene.
- The following walkthrough also covers the Collector’s Edition of the game. For the Bonus Adventure, see “Bonus Content: Tower of Rain”.
- Collector’s Edition owners can access their exclusive content via the “Extra Content” button in the Main Menu. From here you may choose to play Tower of Rain, view artwork, listen to music, or download the screensaver. Tracks from the game’s soundtrack may be saved to the “My Documents” portion of your computer when clicking the “Save” button, but will only save one track at a time, specifically the one selected. Artwork and the Screensaver may also be saved to the “My Documents” portion of your computer when “Save” is selected.
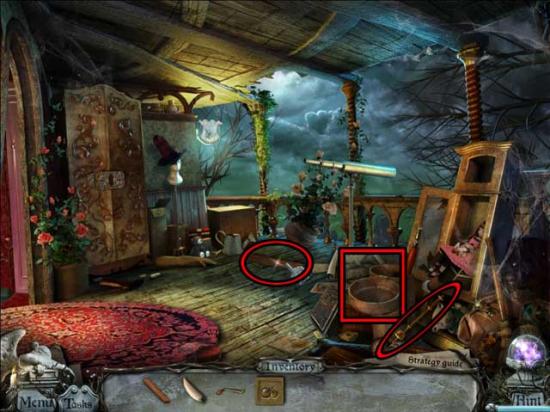
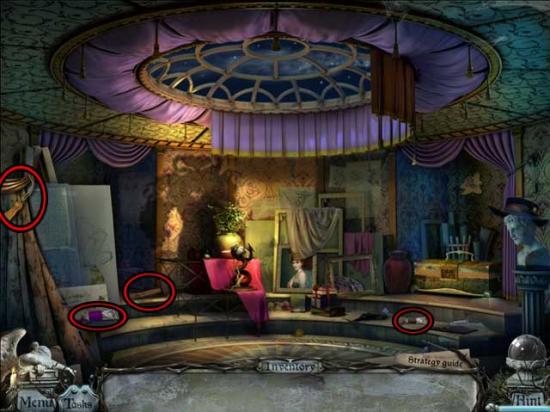
Chapter 1: The Cemetery
Entrance Path
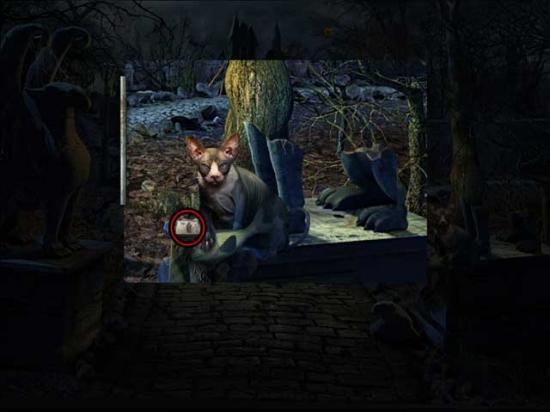
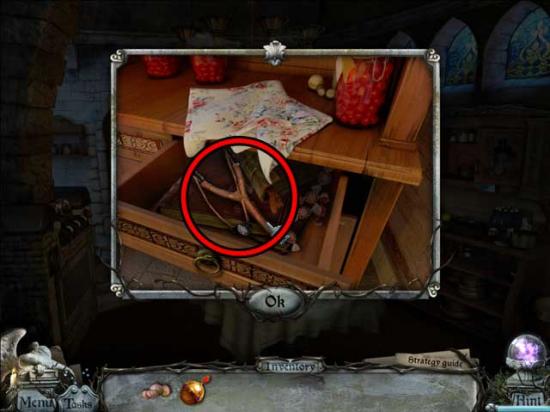
- Take a closer look at the pile of twigs lying on the ground. Remove each of the branches until they’re cleared away, revealing the LEFT CAT HEAD. Click on it to add it to your inventory.

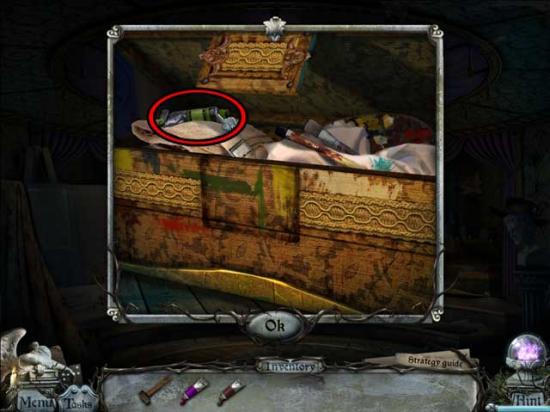
- There is an abandoned bag in the lower right portion of the screen: inside is a newspaper clipping.
- Proceed forward down to the path to the Entrance Gate.
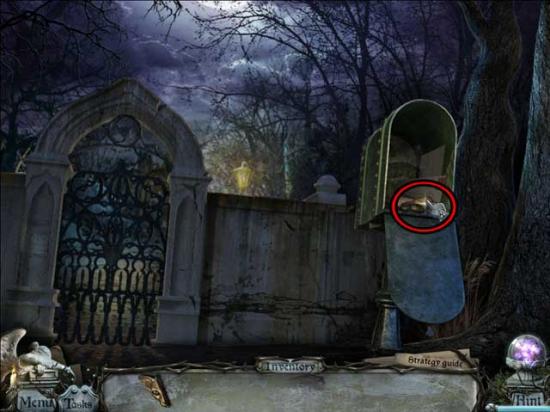
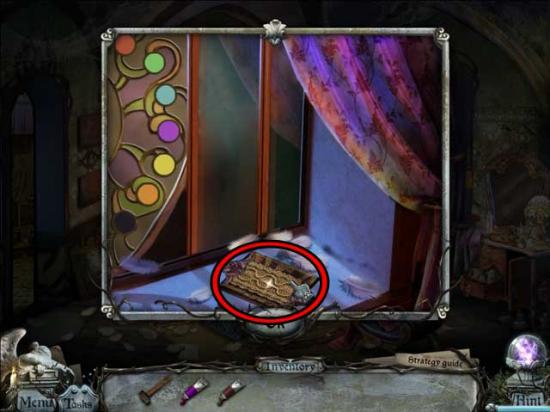
Entrance Gate
- Pick up the LADDER lying against the wall.

- Return to the Entrance Path.
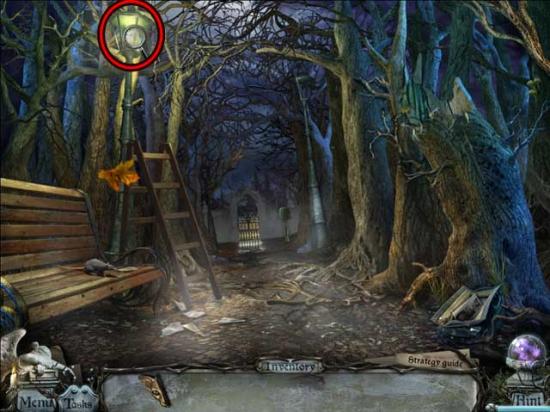
Entrance Path
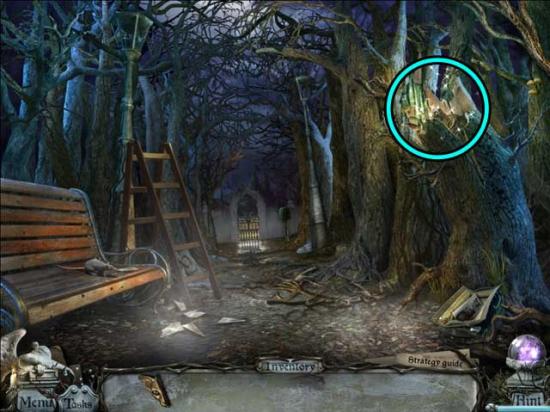
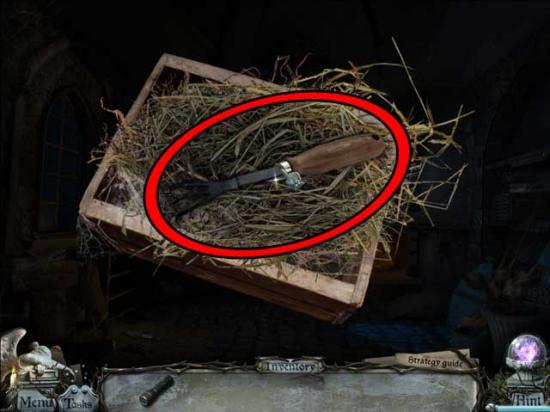
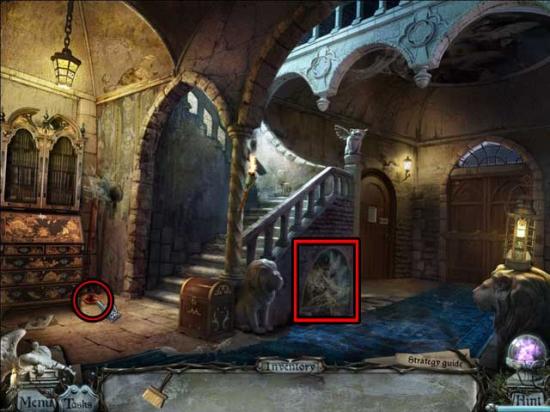
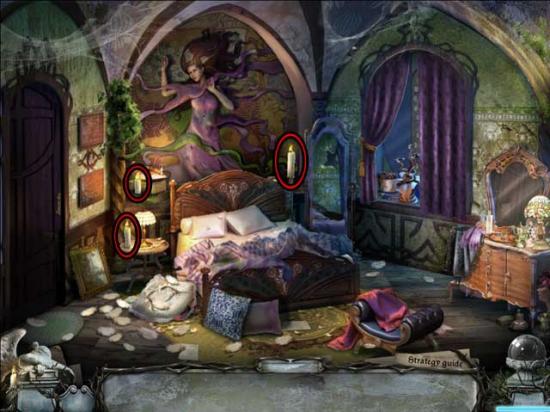
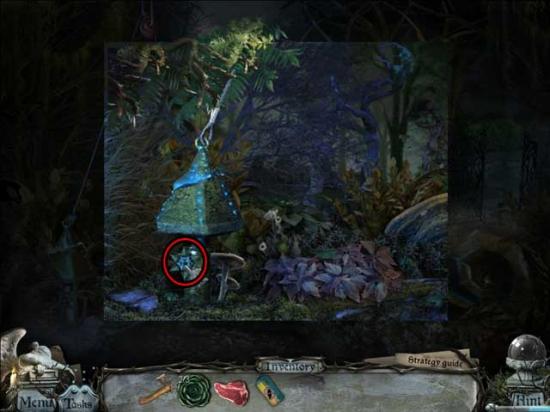
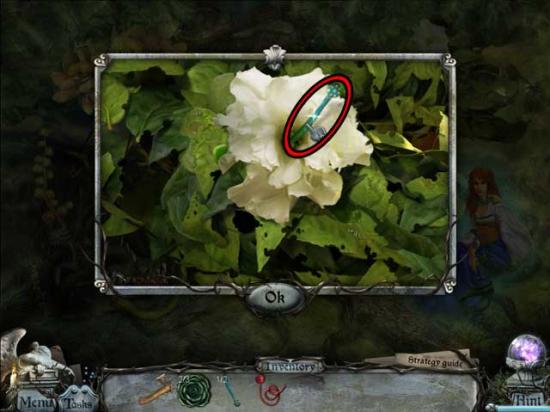
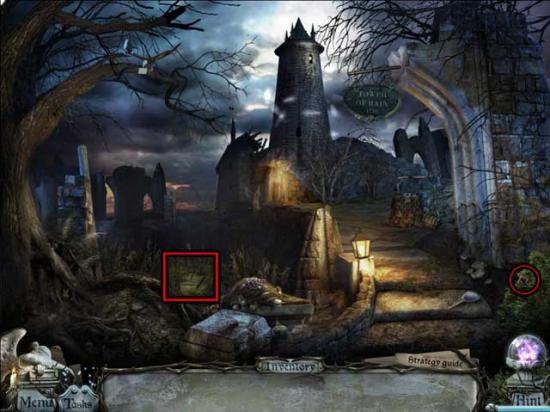
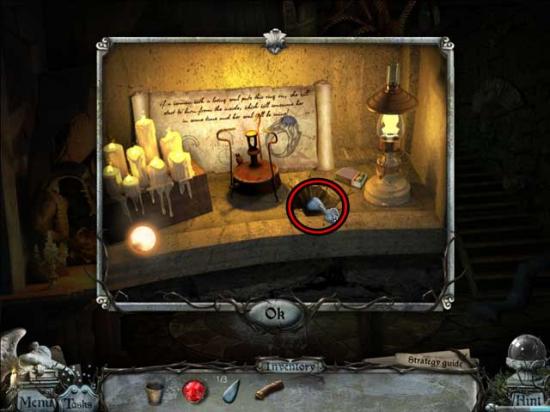
- Use the LADDER on the lamppost on the left, then click on the top for a closer view.
- Click on the BRIGHT CANDLE to add it to your inventory.
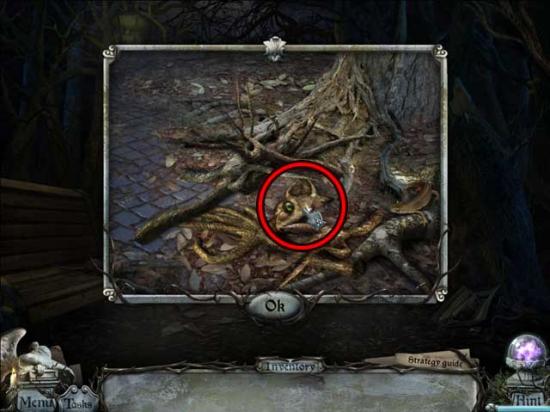
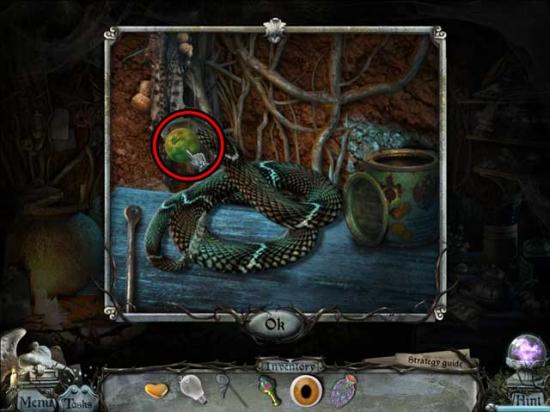
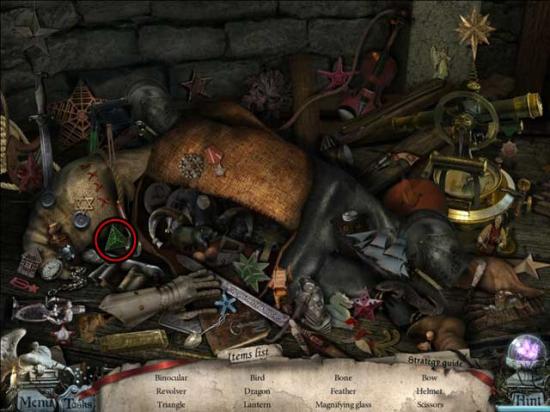
- Use the BRIGHT CANDLE on the hollow tree on the right to trigger a hidden object scene.
- Find the objects listed at the bottom of the screen: items listed in black may be randomized. Any applicable Key Items are circled in red, while any applicable items listed in orange that require an additional action are circled in orange.
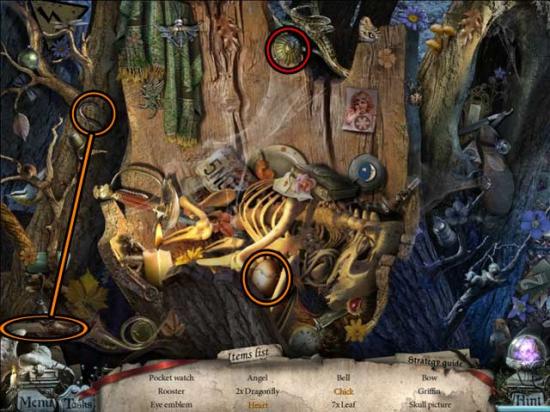
- Upon completing the hidden object scene, the EYE EMBLEM will be added to your inventory.
- Return to the Entrance Gate.
Entrance Gate
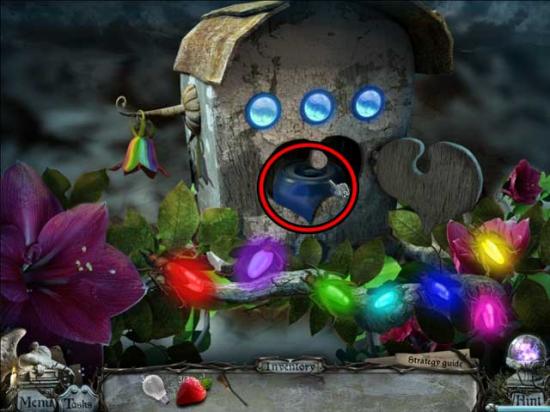
- Use the EYE EMBLEM on the mailbox on the right to open it, then collect the RIGHT CAT HEAD to be added to your inventory.
- Inside the Mailbox, you may also read postcards addressed to Mr.Rainheart.
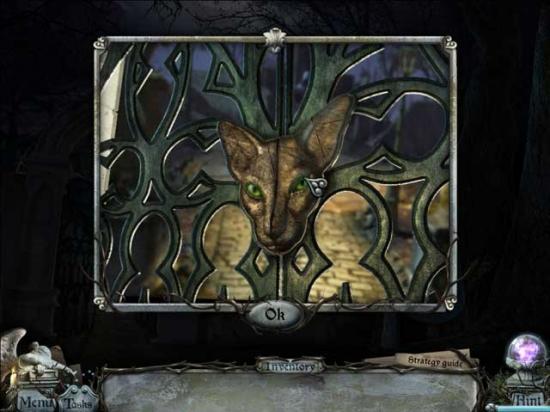
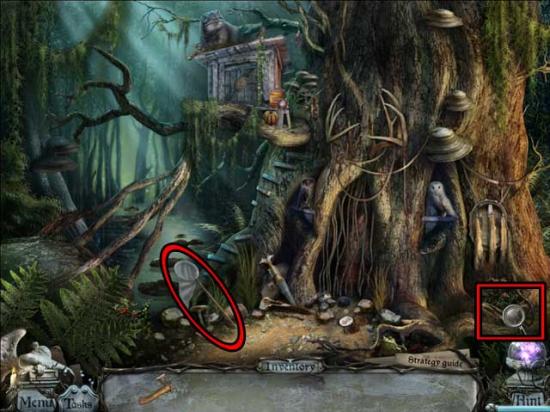
- Take a closer look at the Gate on the left. Use the LEFT CAT HEAD and the RIGHT CAT HEAD on the grooves in the gate to open it and gain access to the next area.
- Enter through the Gate to the Crossroads.
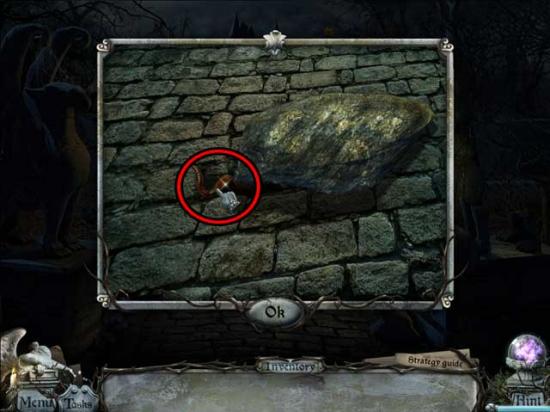
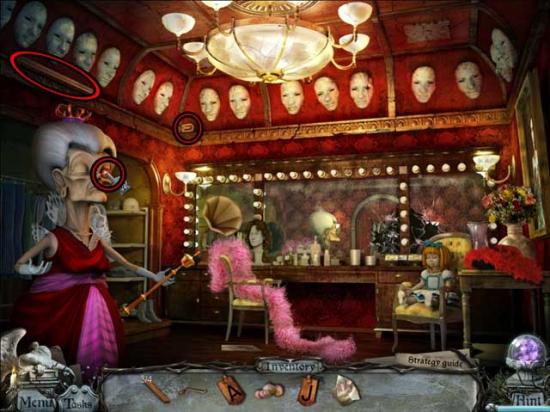
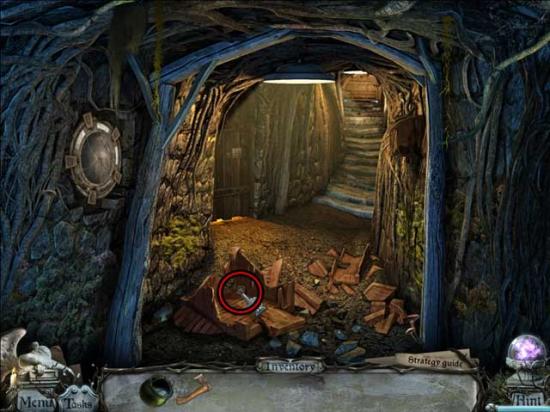
Crossroads
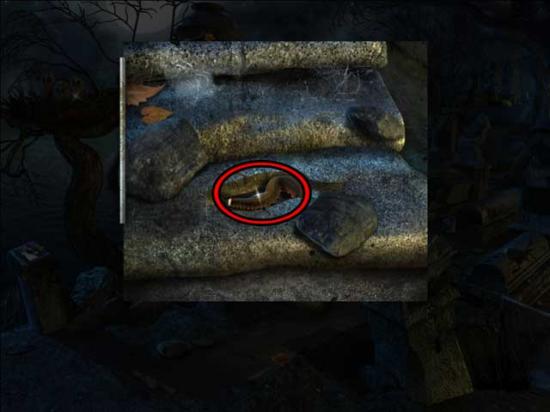
- Examine the Stone lying on the path closest to you. Once zoomed in, click on it to move it aside, then collect the WORM 1/3 to be added to your inventory.
- Continue to the right, into the next area.
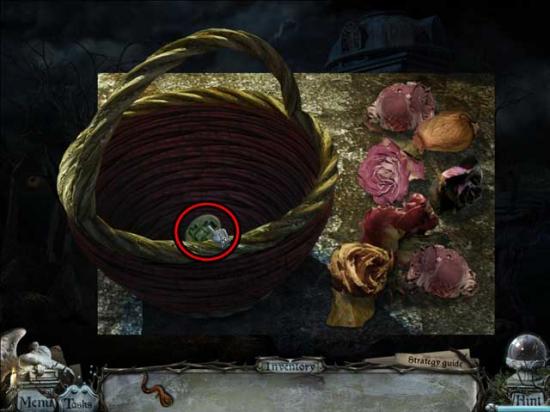
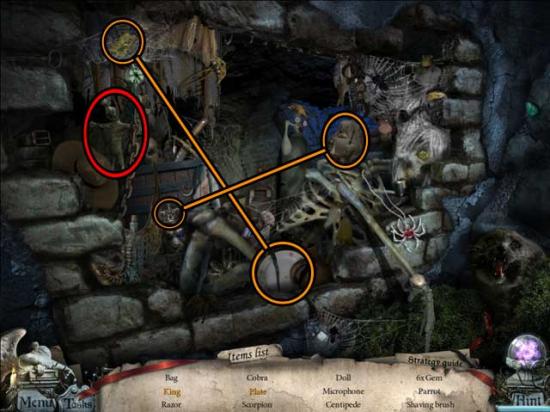
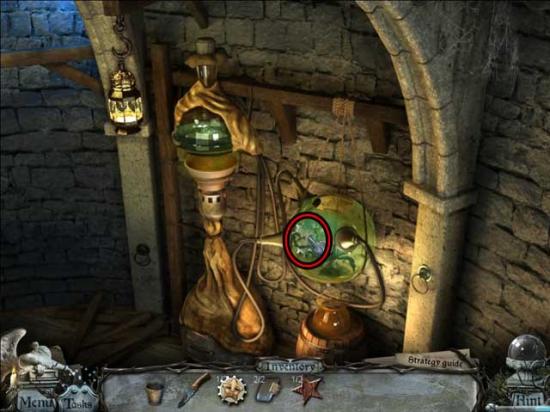
Hangman’s Tree
- Examine the Basket on the ground to the right, beneath the benches.
- Click on the flowers inside the basket until all of them have been removed, then click on the GREEN CRYPT TOKEN to add it to your inventory.
- Look at the Hangman’s Tree on the left, and you’ll notice a rotten apple on one of the leftmost branches. Click on the apple to knock it onto the ground, then take a closer look. Click on the WORM 2/3 to add it to your inventory.
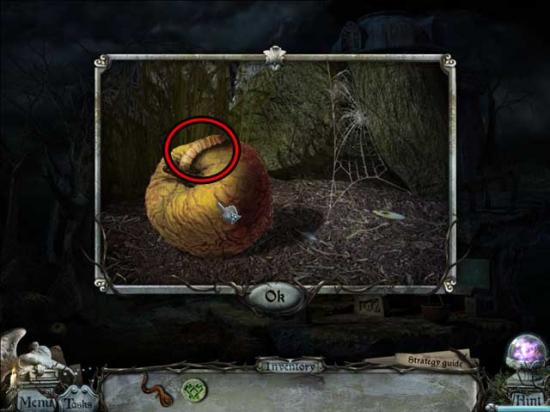
- Return to the Crossroads, then take the path to the left.
Graveyard
- On the far left is a photo you can choose to examine.
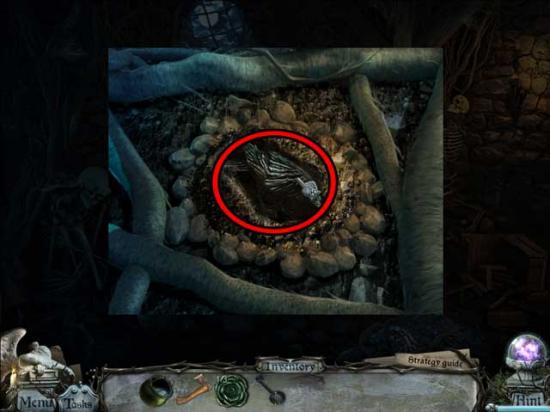
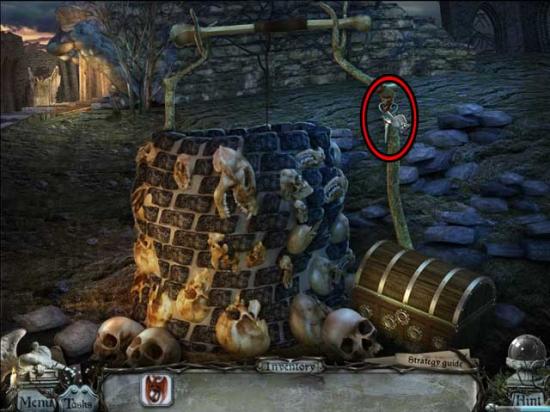
- Take a closer look at the pile of rocks atop the stone steps leading to the Mausoleum. Click on each of the stones to remove them, then collect the final WORM 3/3 to be added to your inventory.
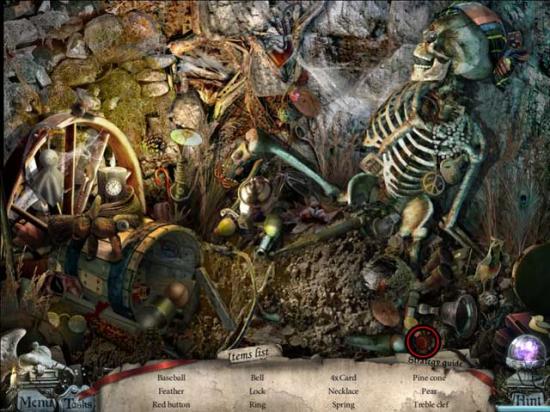
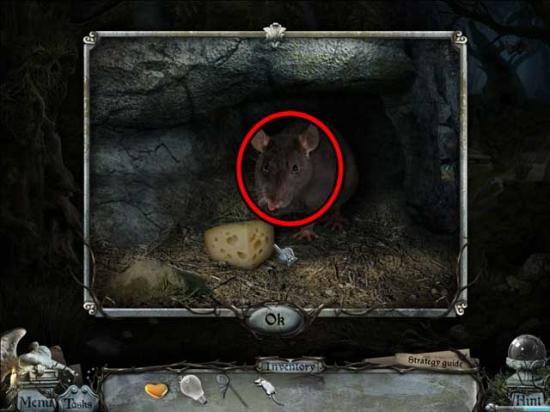
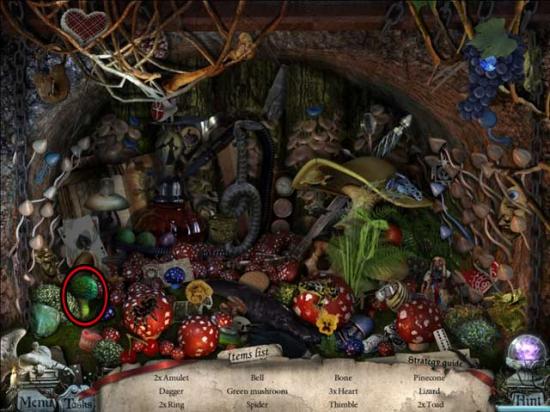
- Examine the nest of owls in the upper left corner of the screen. Use each of the WORMS from your inventory on each of the owlets to trigger a new hidden object scene.
- Find the objects listed at the bottom of the screen: items listed in black may be randomized. Any applicable Key Items are circled in red, while any applicable items listed in orange that require an additional action are circled in orange.
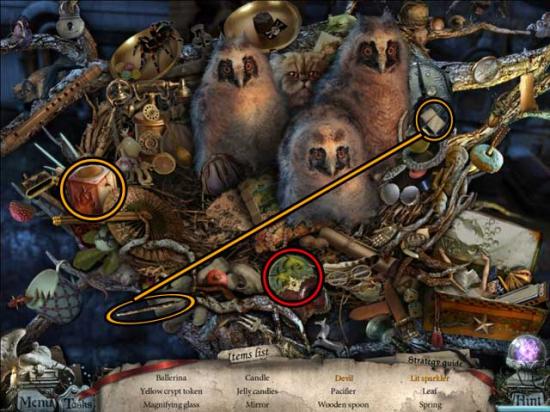
- Upon completing the hidden object scene, the YELLOW CRYPT TOKEN will be added to your inventory.
- Continue further into the graveyard by proceeding to the right.
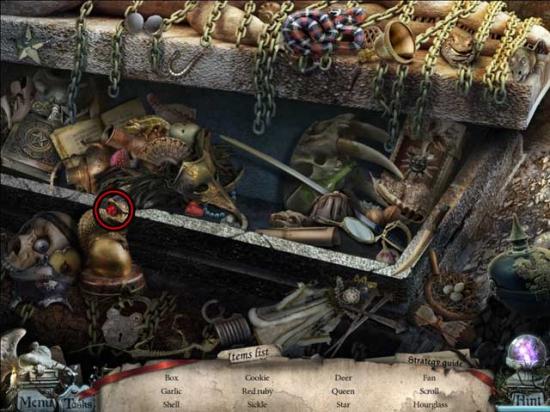
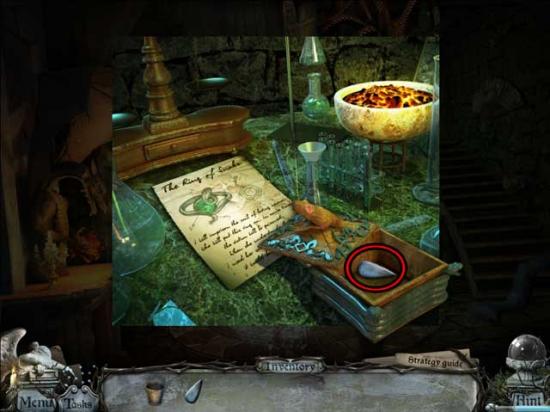
The Unmarked Graves
- Click on the YELLOW GLASS FLOWER and the PLIERS to add them to your inventory.
- You can choose to examine the unmarked graves, but for now, return to the Graveyard.
Graveyard
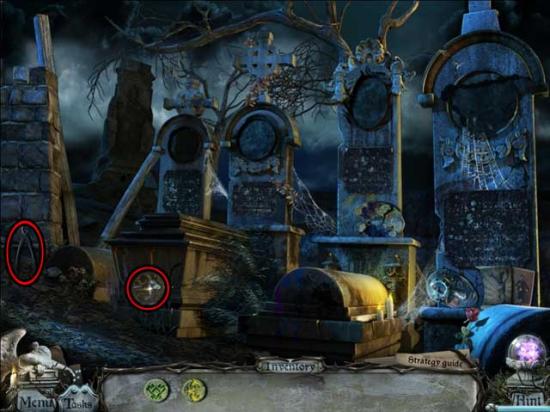
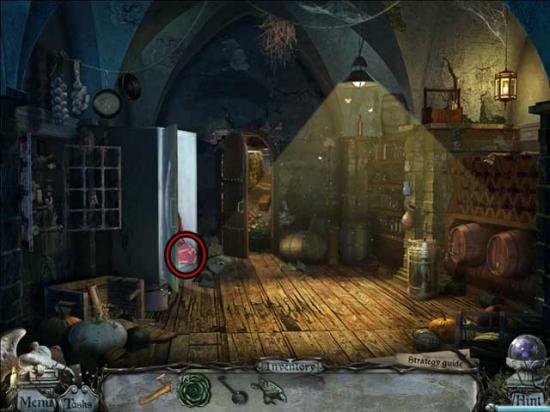
- Take a closer look at the metal grate located to the left, below the stone steps.
- Use the PLIERS to remove a portion of the grate, and collect the LEFT SHIELD LOGO inside to add it to your inventory.
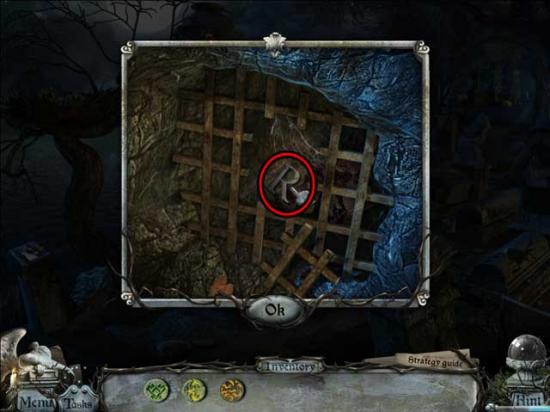
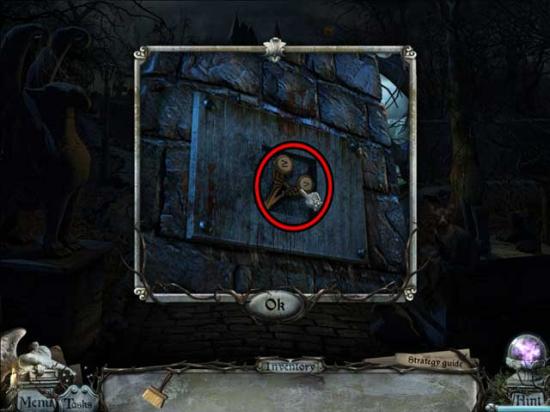
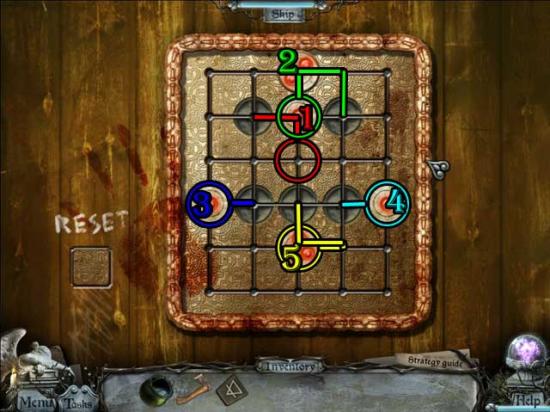
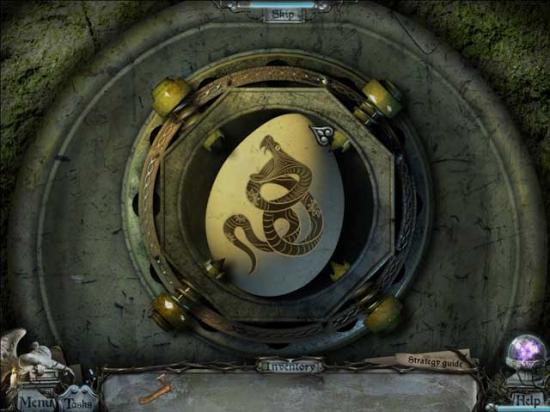
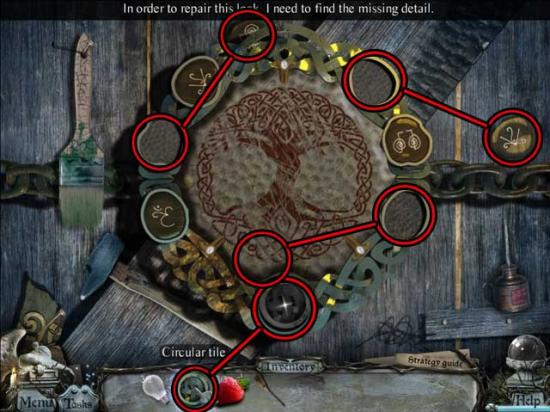
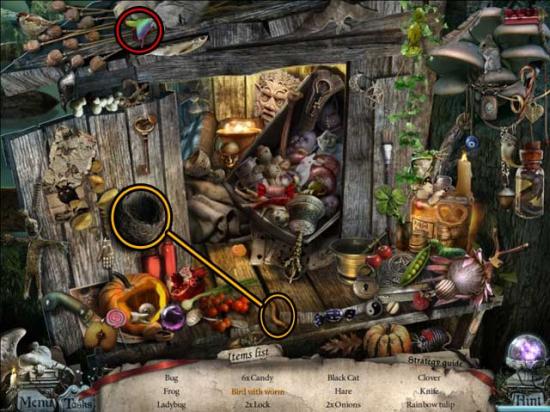
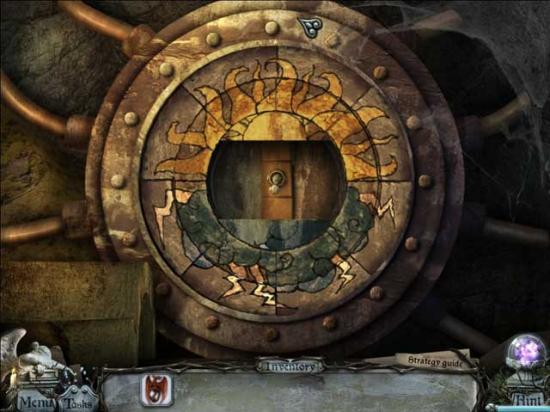
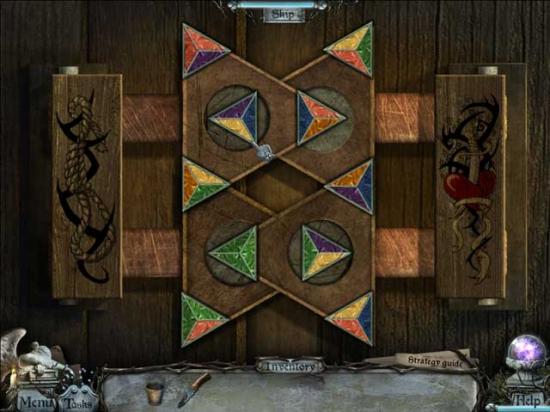
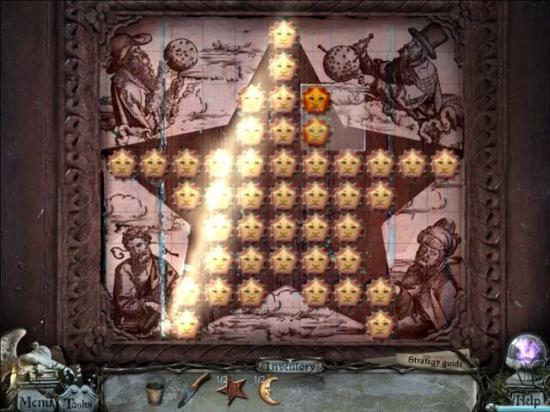
- Take a closer look at the Mausoleum gate. Place the GREEN CRYPT TOKEN and the YELLOW CRYPT TOKEN in their missing posts to trigger a puzzle.
- Move the colored tokens into their correct positions according to the design in the middle of the lock. Tokens can only jump another token into the next slot (any way but not diagonally). You can place tokens in the middle slot/lock as a placeholder position. The solution is shown below:
- Enter the Mausoleum.
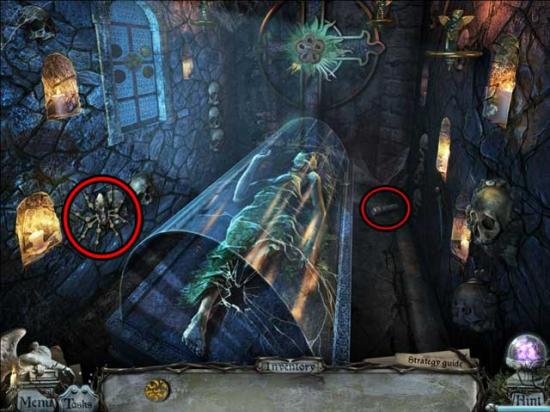
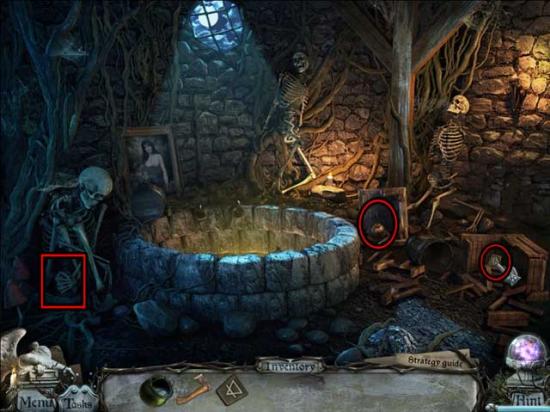
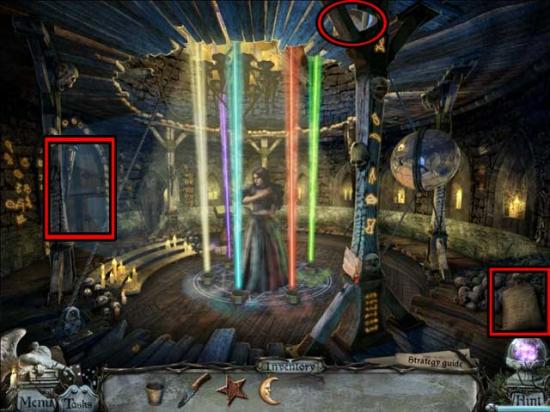
Mausoleum
- Upon entering the Mausoleum, you will be greeted by the spirit of your sister Jennie, who will give you instructions on how to free her.
- Pick up the FLASHLIGHT and the MECHANICAL SPIDER to add them to your inventory.
- Exit the Mausoleum and return to the area of the Hangman’s Tree.
Hangman’s Tree
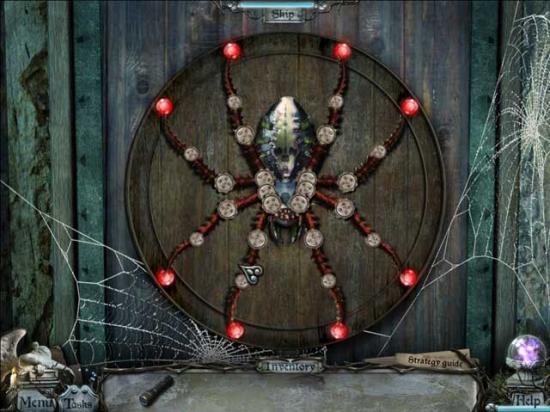
- Examine the door of the small house on the right.
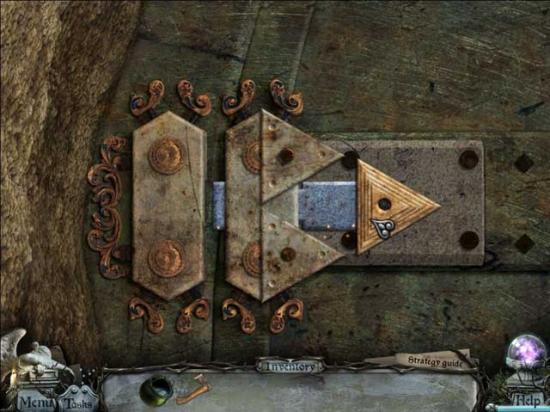
- Place the MECHANICAL SPIDER into the groove on the door to trigger a puzzle.
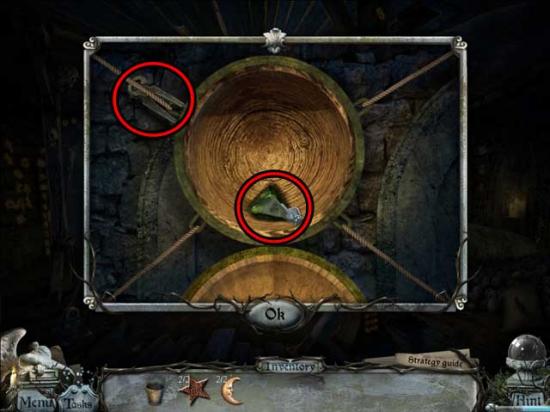
- Click on the various joints of the spider (or the sections of leg themselves) to move its legs into the same positions as those of the groove in the door. Once a leg is in the correct position, it will turn red. The solution is shown below:
- Enter the Graveyard House.
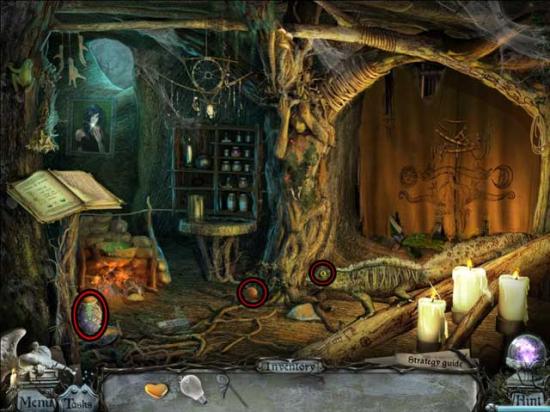
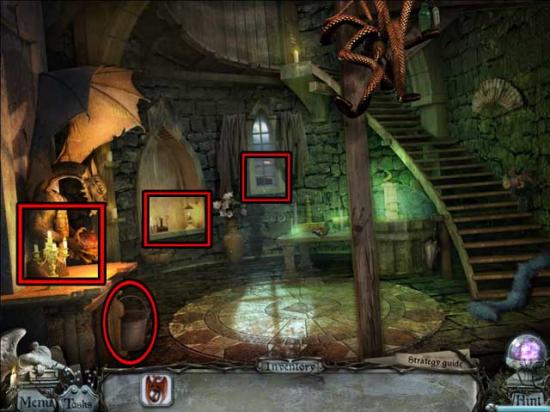
Graveyard House
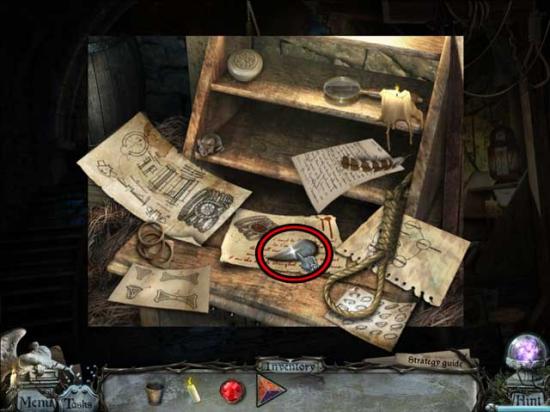
- On the ground on the left is a note you can choose to examine.
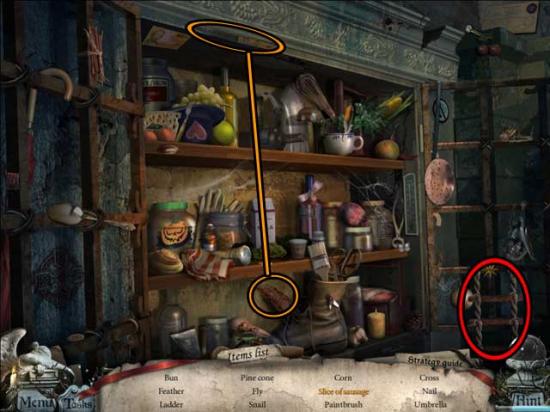
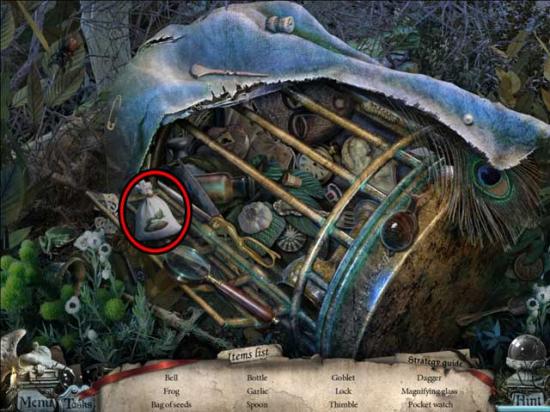
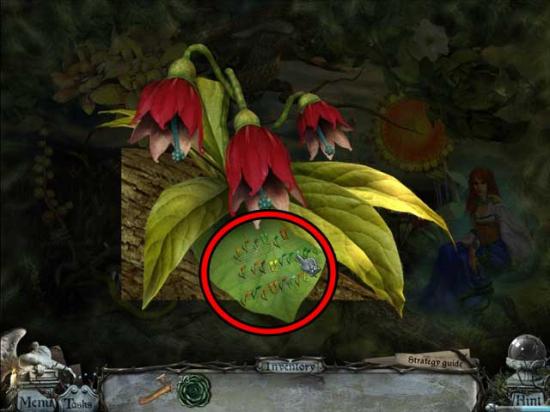
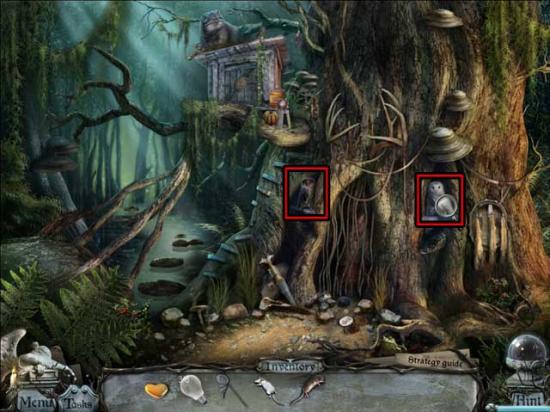
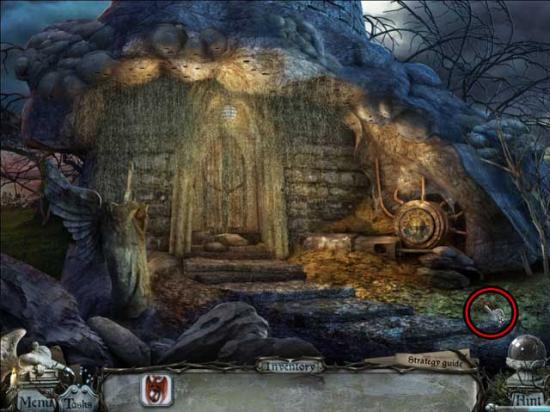
- Take a closer look at the crate on the left, then collect the RAKE inside to add it to your inventory.
- Use the FLASHLIGHT on the dark corner near the back of the house to trigger a hidden object scene.
- Use the Flashlight (attached to your cursor) to find the objects listed at the bottom of the screen: items listed in black may be randomized. Any applicable Key Items are circled in red, while any applicable items listed in orange that require an additional action are circled in orange.
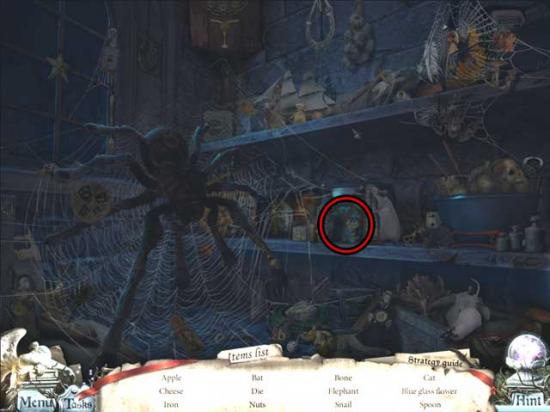
- Upon completing the hidden object scene, the BLUE GLASS FLOWER will be added to your inventory.
- Go back outside to the Hangman’s Tree.
Hangman’s Tree
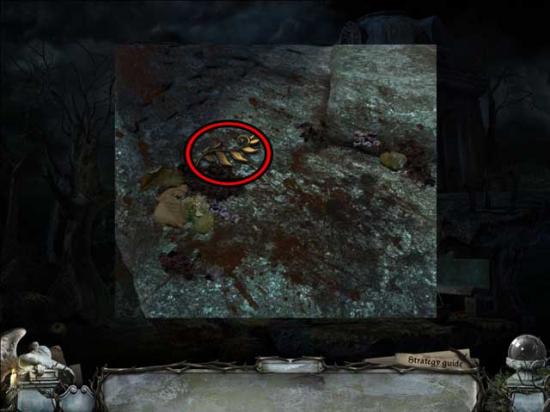
- Take a closer look at the pile of leaves on the ground at the base of the steps. Use the RAKE to clear the leaves away, then collect the gold HERBARIUM STEM that appears to add it to your inventory.
- Return to the Graveyard House.
Graveyard House
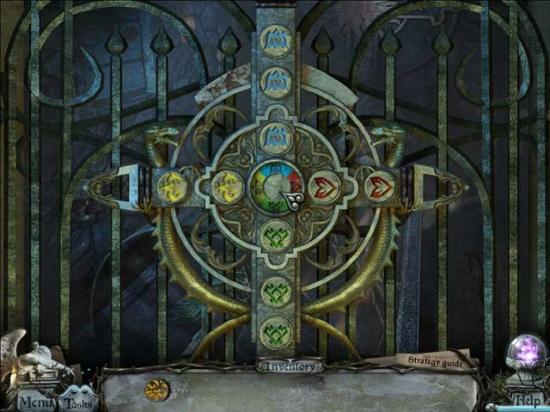
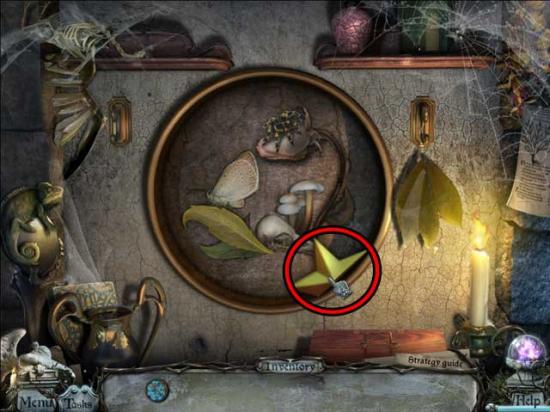
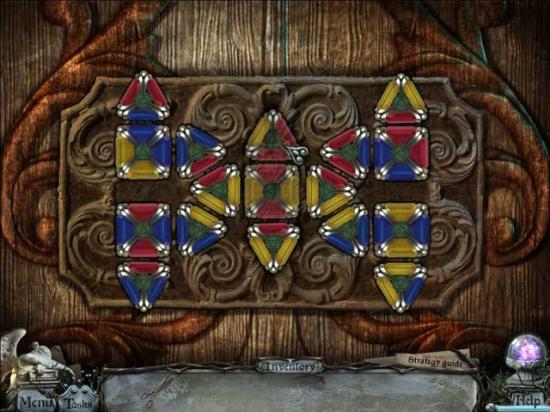
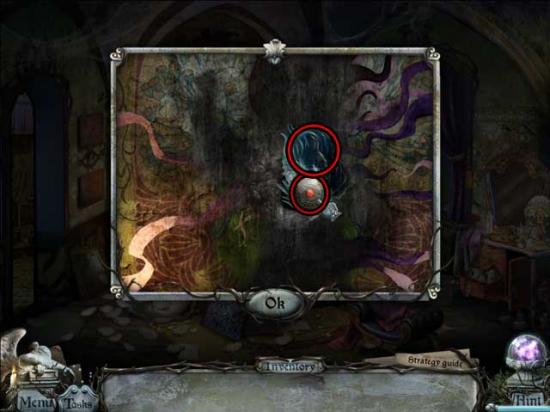
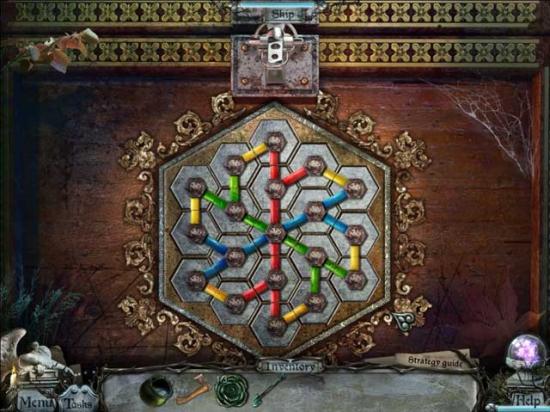
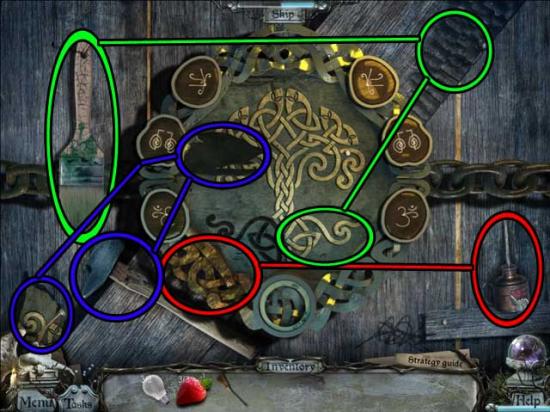
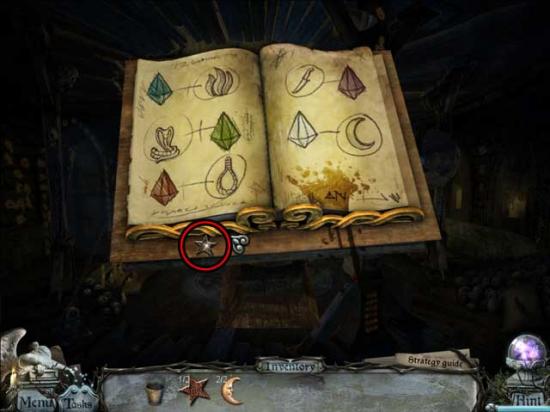
- Take a closer look at the plaque above the fireplace. Use the HERBARIUM STEM on the imprint to trigger a puzzle.
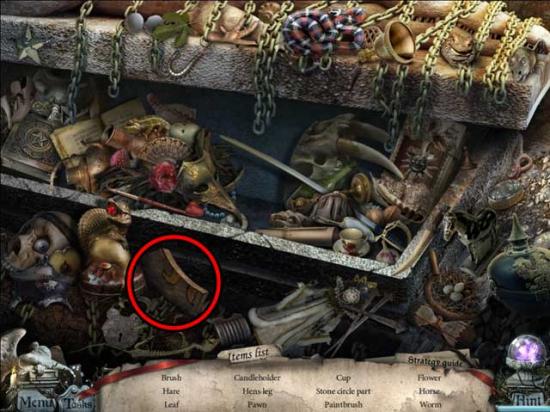
- Now, there’s a lot to do here in order to complete the puzzle, so the solution will be written below on a numbered, step-by-step basis:
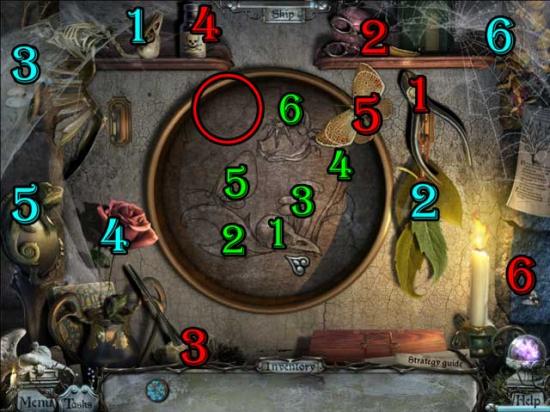
1. Use the Pliers (red) to cut the Skull loose (blue) and place it in its correct location (green).
2. Use the Scissors (red) to cut the Leaves loose (blue) and place them in their correct location (green).
3. Use the Feather Duster (red) on the cobwebs in the upper left, then grab the Mushrooms from the same location (blue) and place them in their correct position (green).
4. Use the Poison (red) on the Rose (blue) to dry it out/kill it, then place it in its correct position (green).
5. Click on the Butterfly (red) until it lands in the vicinity of the CIRCLE (red) shown in the screenshot above. Then, click the Chameleon (blue): it will catch the Butterfly. Place the Butterfly in its correct location (green).
6. Click on the Fly (red) until it lands in the spiderweb in the upper right corner, triggering the Spider to appear (blue). Click on the Spider and move it to its correct location (green).
- Upon completing the puzzle (solution shown below), click on the LEFT STAR PIECE that appears to add it to your inventory.
- Return to the Mausoleum.
Mausoleum
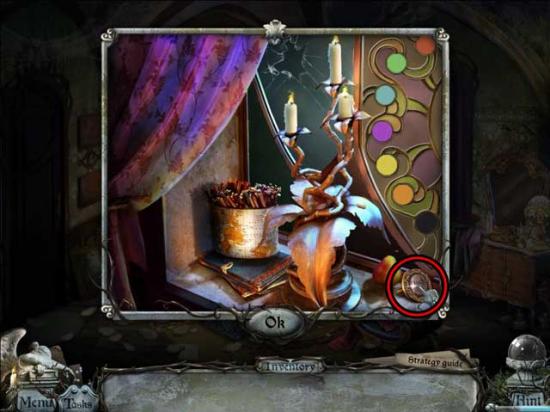
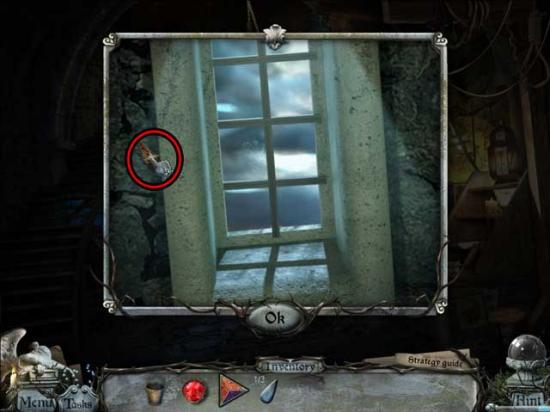
- Take a closer look at the window on the left wall.
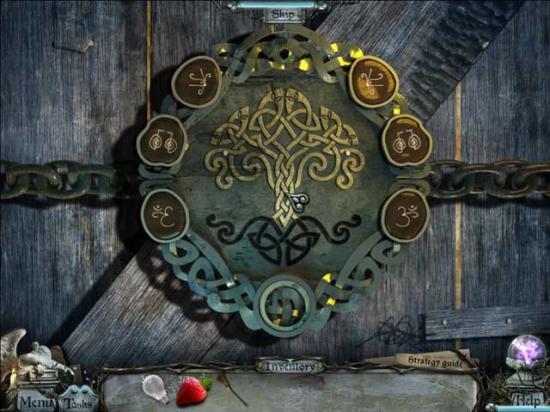
- Place the YELLOW GLASS FLOWER and the BLUE GLASS FLOWER from your inventory into their empty slots in the window to trigger a puzzle.
- Click on the colored buttons next to each of the colored Glass Flowers to rotate them: the goal is to move them into the same position as their locations on the middle circle. The solution is shown below:
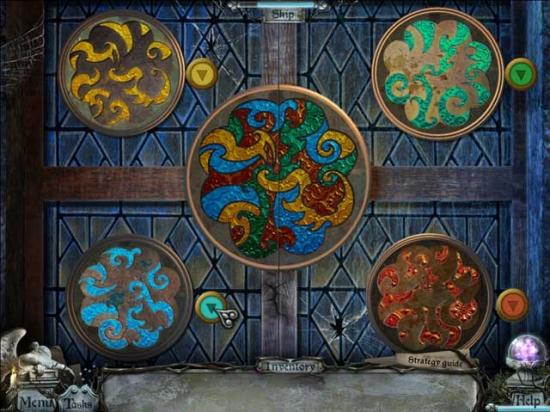
- Upon completing the puzzle, the window will open and a new hidden object scene will appear.
- Find the objects listed at the bottom of the screen: items listed in black may be randomized. Any applicable Key Items are circled in red, while any applicable items listed in orange that require an additional action are circled in orange.
- Upon completing the hidden object scene, the RIGHT STAR PIECE will be added to your inventory.
- Exit the Mausoleum and return to the area of the Hangman’s Tree.
Hangman’s Tree
- Take a closer look at the closed window on the side of the Graveyard House. Place the LEFT STAR PIECE and the RIGHT STAR PIECE into their correct locations on the star-shaped groove. The result: the window will then open.
- Enter the Graveyard House.
Graveyard House
- Opening the window outside reveals a new hidden object scene in the corner.
- Find the objects listed at the bottom of the screen: items listed in black may be randomized. Any applicable Key Items are circled in red, while any applicable items listed in orange that require an additional action are circled in orange.
- Upon completing the hidden object scene, the BRUSH will be added to your inventory.
- You may choose to examine the broken Clock in the corner: it’s missing a piece.
- Exit the Graveyard House and return to the Crossroads.
Crossroads
- Examine the dirty Plaque on the left crumbling wall, near the entrance towards the castle.
- Use the BRUSH on the plaque to clean it, then click on the CLOCK PART it reveals to add it to your inventory.
- Return to the Graveyard House.
Graveyard House
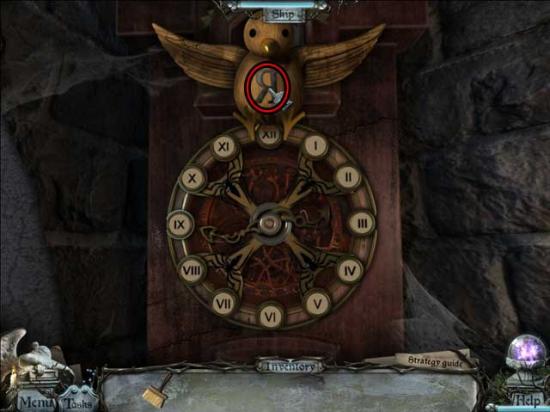
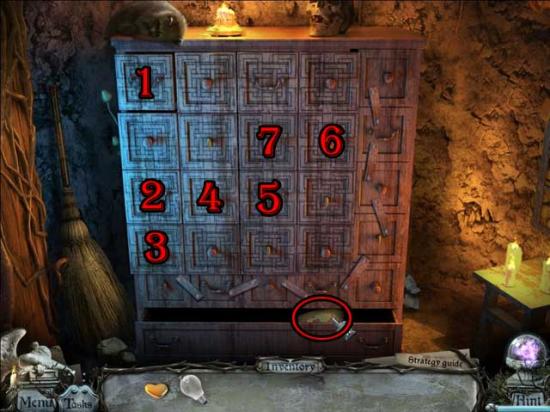
- Examine the Clock in the upper corner of the room. Use the CLOCK PART on the Clock to trigger a puzzle.
- Arrange the numbers on the clock face in the right order: the arrows (clock hands) will rotate the numbers, and the spiders will swap them. Spiders can only swap numbers they are touching. The best strategy is to start by moving the “XII” and the like-numbers into their general location, then working backwards to the “I” and “II”, though the puzzle may be handled in several different ways. The solution is shown below.
- Upon completing the puzzle, click on the backwards-R RIGHT SHIELD LOGO that appears to add it to your inventory.
- Exit the Graveyard House and return to the Crossroads.
Crossroads
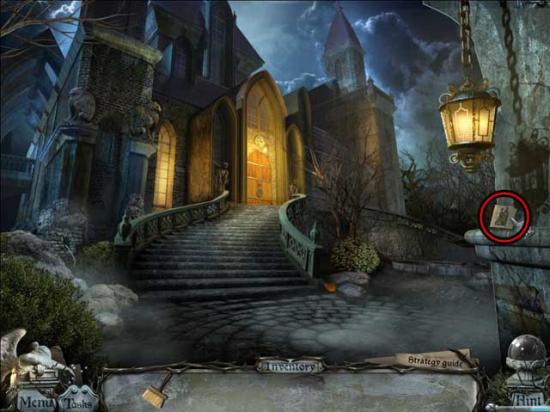
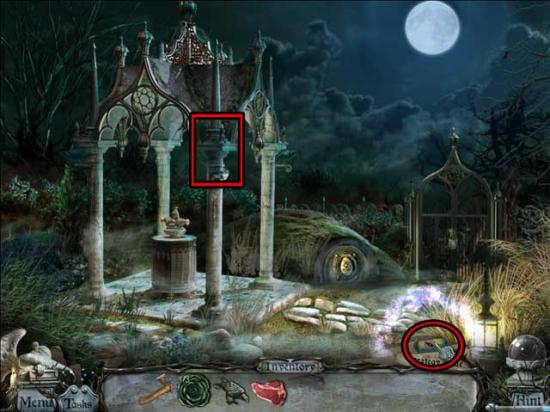
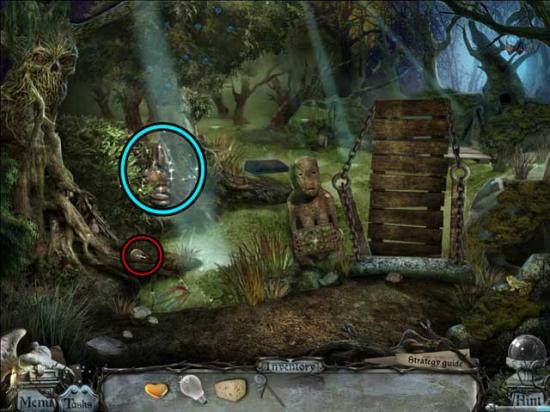
- Take a closer look at the two robed figures with swords at the far end of the screen, straight ahead.
- Use the LEFT SHIELD LOGO and the RIGHT SHIELD LOGO on their respective shields. Once this is done, the swords will raise: you now have access to Rainheart Castle.
Chapter 2: Rainheart Castle
Courtyard
- Pick up the BLOCK CRYPTEX 2 on the right, then proceed to continue to the next area to the right.
Fountain
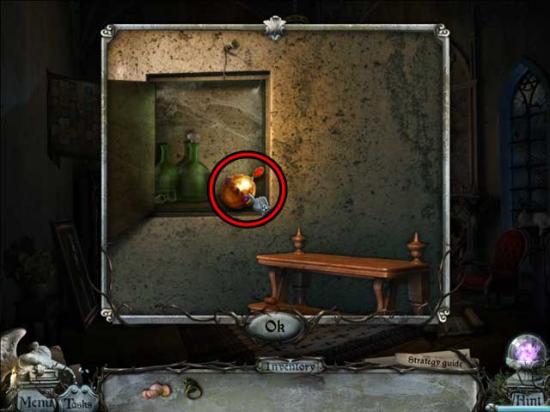
- Pick up the SLEDGEHAMMER lying in the dirt on the right, then move aside the ivy and take a closer look at the switch near the bush on the right.
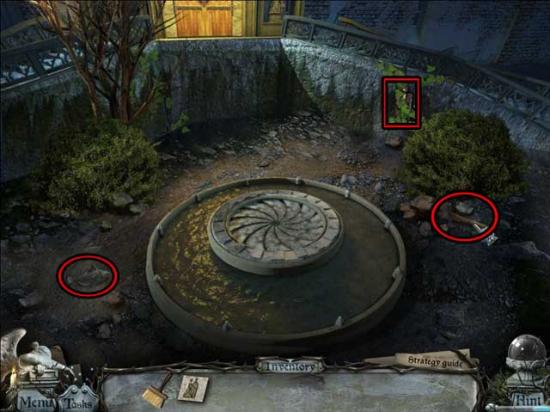
- Flip the switch: the Fountain will appear, simultaneously revealing the FISH in the dirt on the right. Click on it to add it to your inventory.
- Return to the Crossroads.
Crossroads
- Take a closer look at the Cat on the right. Give the FISH to the Cat, then collect the BLOCK CRYPTEX 1 previously beneath its paw to add it to your inventory.
- Proceed back to the Courtyard.
Courtyard
- Take a closer look at the stone wall on the left, just to the left of the stairs.
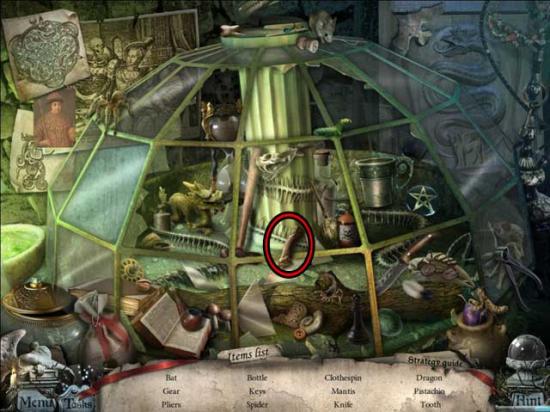
- Use the SLEDGEHAMMER to break the wall apart, revealing a hidden object scene.
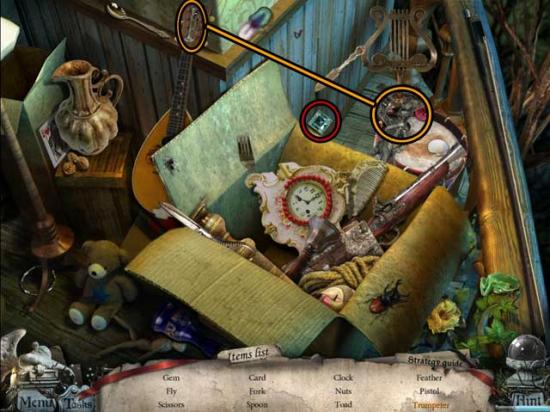
- Find the objects listed at the bottom of the screen: items listed in black may be randomized. Any applicable Key Items are circled in red, while any applicable items listed in orange that require an additional action are circled in orange.
- Upon completing the hidden object scene, the DOLL will be added to your inventory.
- Backtrack to the Hangman’s Tree.
Hangman’s Tree
- Use the DOLL on the rope noose hanging from the tree, then take a closer look at the opening in the tree from where the rope is coming. Click on the CRYPTEX PROMPT to add it to your inventory.
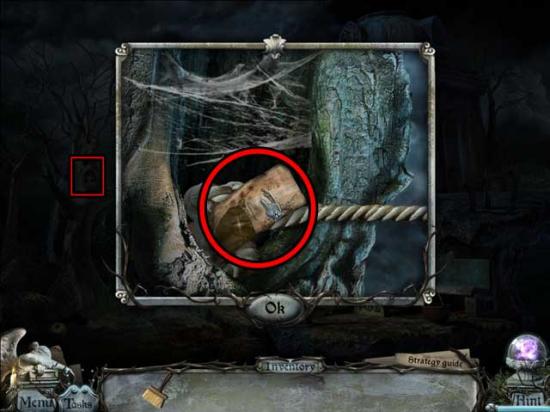
- Return to the Courtyard.
Courtyard
- Proceed up the steps to the Doorway.
Doorway
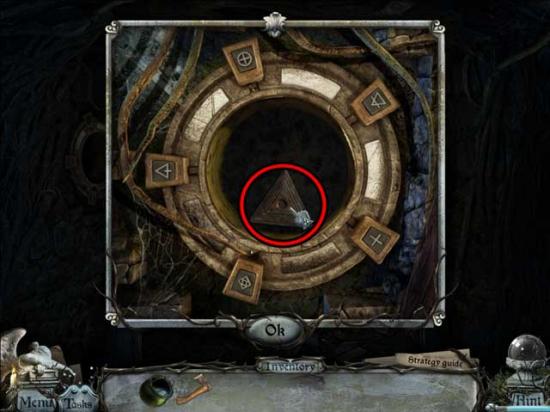
- Take a closer look at the Gargoyle on the left. Place the BLOCK CRYPTEX 1 and 2, as well as the CRYPTEX PROMPT, into their proper locations to trigger a puzzle.
- Using the hint from the Cryptex Prompt at the top of the screen, use the arrows to toggle the Cryptex Blocks until they’re all in the correct order. The solution is shown below:
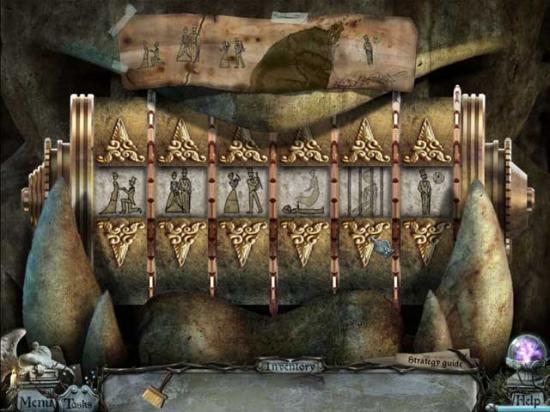
- Upon completing the puzzle, collect the KEY that appears to add it to your inventory.
- Take a closer look at the large entrance door. Use the KEY on the lock to open it and gain access to the castle.
Entryway
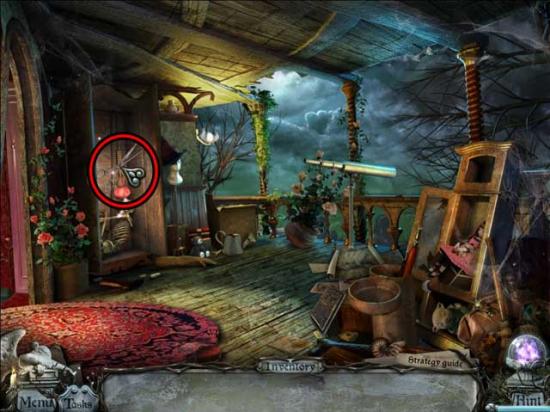
- You may choose to examine the photo lying on the floor on the left.
- Pick up the GARGOYLE’S RIGHT EYE lying on the floor on the left to add it to your inventory, then use the BRUSH on the cobweb-covered alcove beneath the stairs to clear it and reveal a hidden object scene.
- Find the objects listed at the bottom of the screen: items listed in black may be randomized. Any applicable Key Items are circled in red, while any applicable items listed in orange that require an additional action are circled in orange.
- Upon completing the hidden object scene, the GALLERY KEY will be added to your inventory.
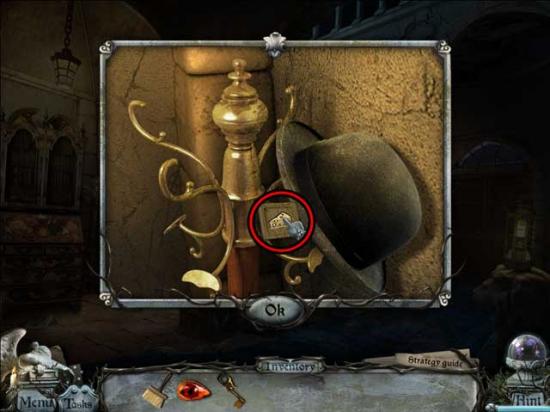
- Take a closer look at the hatstand on the right, just to the right of the beginning of the staircase.
- Use the BRUSH to clear the cobwebs, then click on the KITCHEN DOOR DETAIL 1/4 to add it to your inventory.
- Proceed up the stairs and into the next area.
Upstairs Hallway
- Pick up the KITCHEN DOOR DETAIL 2/4 on the floor to add it to your inventory, then take a closer look at the statue head on the top right.
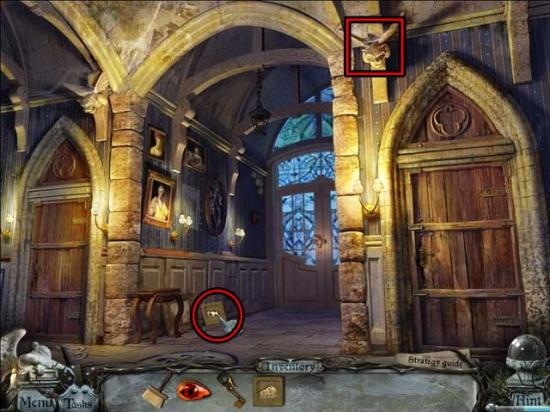
- Use the BRUSH to clear the cobwebs, then click on the FANG 1/2 to add it to your inventory.
- Examine the Gallery Door (the blue door in the middle). Use the GALLERY KEY on the lock to open it and gain access into the room.
Gallery
- Click on the EMPTY VASE and the STEPS 1/4 to add them to your inventory, then take a closer look at the Book lying on the table on the right.
- While examining the Book, turn the page and click on the KITCHEN DOOR DETAIL 3/4 to add it to your inventory as well.
- Exit to the Upstairs Hallway.
Upstairs Hallway
- Click on the STEPS 2/4 to add it to your inventory, then proceed back to the Fountain.
Fountain
- Use the EMPTY VASE on the Fountain to obtain the VASE OF WATER, which will automatically be added back to your inventory.
- Return to the Gallery.
Gallery
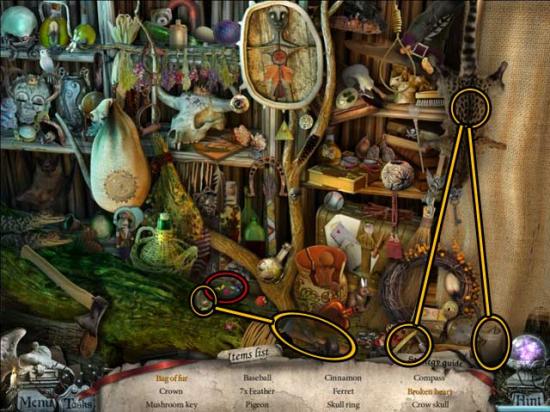
- Use the VASE OF WATER on the Fireplace to extinguish the flames, revealing a hidden object scene.
- Find the objects listed at the bottom of the screen: items listed in black may be randomized. Any applicable Key Items are circled in red, while any applicable items listed in orange that require an additional action are circled in orange.

- Upon completing the hidden object scene, the ACTRESS’ DRESSING ROOM KEY will be added to your inventory.
- Exit the Gallery to the Upstairs Hallway.
Upstairs Hallway
- Take a closer look at the door on the right. Use the ACTRESS’ DRESSING ROOM KEY on the lock to open it, then proceed inside.
Chapter 3: Sophia Rainheart- The Actress
Sitting Room
- Upon entering the Sitting Room, you will be greeted by the spirit of Sophia Rainheart (or rather, formerly Sophia Swift), who will give you further instructions.
- Pick up the GRAMOPHONE HANDLE and the KITCHEN DOOR DETAIL 4/4 to add them to your inventory, then click on the picture on the wall to remove it, revealing a strange alcove. Click on it to take a closer look and trigger a puzzle.
- Place the balls in the right slots, so that they match the pictures behind the window. By clicking the “window” in the middle of the red jester, you will see several pictures scroll by, each with an object that gives a hint as to what order the ball colors should be in. The solution is shown below:
- Completing the puzzle successfully will move aside the stage curtain, allowing you access to the Balcony.
Balcony
- Click on the STEPS 3/4 and the SCEPTER to add them to your inventory, then take a closer look at the round box on the right (consequently, it will give you a close-up of the floor).
- Click on the various letters and papers to move them aside, then click on the LETTER A to add it to your inventory.
- From the main Balcony again, you may also choose to read the note lying on the floor, or examine the telescope. Should you choose to examine the telescope, you can move the adjustment dials on the right. Adjusting the telescope properly will trigger a comment about Jennie.
- Exit and return to the Castle Entryway.
Entryway
- Take a closer look at the rounded door on the right side of the screen (not the double entrance doors, but the single one with the small window in the middle).
- Use all 4 of the KITCHEN DOOR DETAILS on the puzzle to activate it.
- Place all the pieces/tiles in their correct locations by association with the pictures in the middle. The solution is shown below:
- Enter the Kitchen.
Kitchen
- Pick up the LETTER J and the ONIONS circled in the screenshot below to add them to your inventory, then take a closer look at the drawer on the right.
- Open the Drawer on the right, then click the KNIFE inside to add it to your inventory.
- Return to the Balcony.
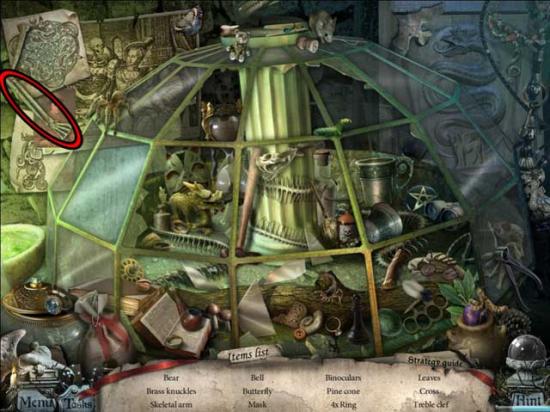
Balcony
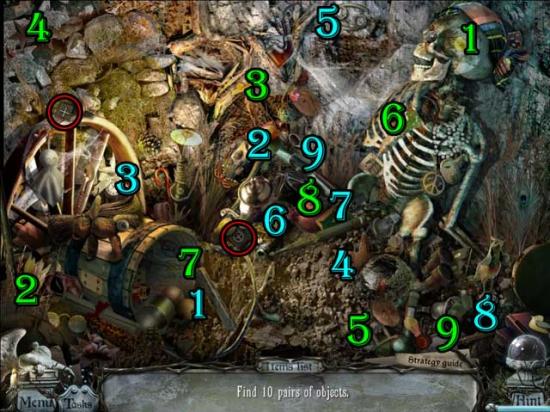
- Take a closer look at the cardboard Box on the far end of the Balcony. Use the KNIFE to cut open the box, revealing a new hidden object scene.
- Find 10 pairs of objects. Normal pairs are numbered in blue and green, while the Key Item pair is circled in red.
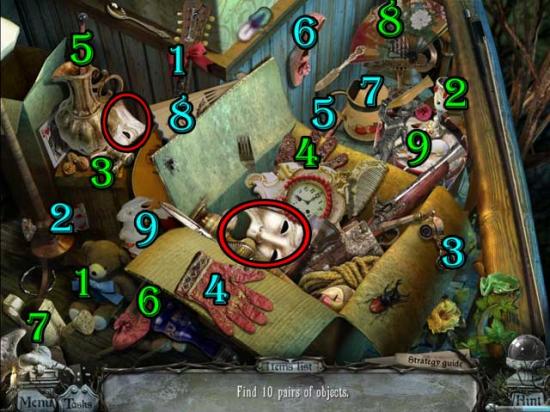
- Upon completing the hidden object scene, the TWO MASKS will be added to your inventory.
- Return to the Sitting Room.
Sitting Room
- Take a closer look at the doorway on the left. Use the TWO MASKS on the indentation on the door to open it and gain access into the next area.
Dressing Room
- Click on the hidden object area that appears over the dressing table.
- Find the 15 mirror pieces scattered throughout the scene. Their locations are shown below:

- Upon completing the hidden object scene, the MIRROR PIECES will be added to your inventory.
- Before leaving the room, there’s a few more things to do, including reading the note lying on the floor if you’d like.
- Use the SCEPTER on the Queen’s left hand. Her eye will open, then click on GEMSTONE 2 that appears to add it to your inventory. Also, pick up the STEPS 4/4 and the LETTER U to add them to your inventory.
- Before leaving, click on the Doll sitting on the chair on the right. Click the red button on her torso, and she’ll say “What’s my name?”. Use the LETTER J, LETTER U, and LETTER A on her necklace. We’ll return later for the last letters.
- Take a closer look at the Gramophone on the left end of the dressing table for a closer look. Use the GRAMOPHONE HANDLE on the Gramophone, but it’ll need a record before it can be more useful. For now, exit back to the Sitting Room.
Sitting Room
- Use the MIRROR PIECES on the empty mirror frame on the right, then take a closer look.
- Reassemble the mirror by putting the pieces in their correct locations: the solution is shown below. Take note of the message “Julia likes candies!”. Upon completing the broken mirror, the DRAWER PULL will drop out of the jester’s mouth. Pick it up to add it to your inventory.
- Time to do a little backtracking. Exit the Sitting Room and return to the Gallery.
Gallery
- Take a closer look at the ladder on the left. Use all four of the STEPS on the ladder to repair it, then take a closer look at the painting of Jennie on the left wall.
- Click on the painting to remove it, revealing a hidden alcove. Click for a closer view.
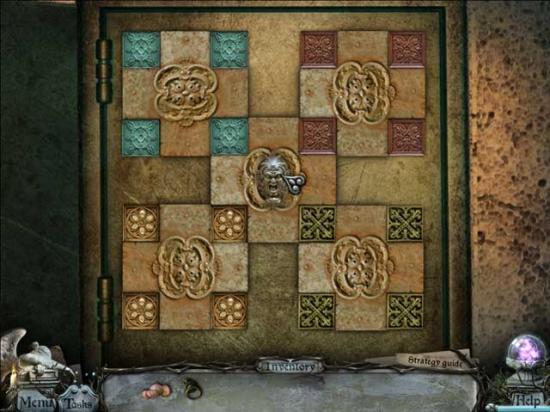
- A puzzle will appear. Rotate the squares so that each of the outer squares has four tiles of the same color. The solution is shown below:
- Once the puzzle has been solved, click on the area again for a closer view. Click on the SPHERE to add it to your inventory.
- Exit the Gallery and return to the Kitchen.
Kitchen
- Take a closer look at the cabinet on the back wall, specifically the right drawer. Use the DRAWER PULL on the hole to repair it, then click to open the drawer. Collect the SLINGSHOT to add it to your inventory.
- Return to the Dressing Room.
Dressing Room
- Use the SPHERE on the Queen’s right hand: her right eye will open, revealing the GEMSTONE NO.1. Click on it to add it to your inventory.
- Exit the Dressing Room and go back to the Balcony.
Balcony
- Use the SLINGSHOT on the white wall lamp to break it, triggering a new hidden object scene.
- Find the objects listed at the bottom of the screen: items listed in black may be randomized. Any applicable Key Items are circled in red, while any applicable items listed in orange that require an additional action are circled in orange.
- Upon completing the hidden object scene, GEMSTONE 3 will be added to your inventory.
- Return to the Sitting Room.
Sitting Room
- Take a closer look at the statue in the corner. Use GEMSTONE 1, 2, and 3 on the jewelry box. The Actress will appear again, opening a portal to the netherworld.
- Enter the portal.
Netherworld Stage
- Take a closer look at the mask in the very upper left corner of the screen for a closer view.
- Use the ONION on the mask of tragedy to make it cry, dropping the Scissors in its mouth.
- Pick up the SCISSORS, LETTER L, LETTER I, and PIANO KEYS 1/3 and 2/3. Their locations are shown below:
- Proceed to the right.
Netherworld Chairs
- There’s nothing you can do about the sad furniture at the moment, but be sure to pick up the final PIANO KEY 3/3 on the right to add it to your inventory.
- Exit the Netherworld and return to the Dressing Room.
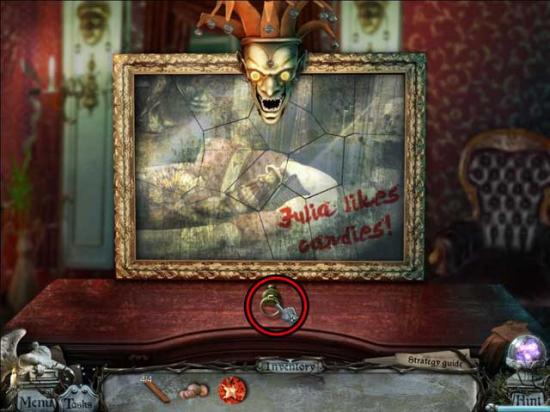
Dressing Room
- Take a closer look at the Doll on the right. Place the remaining LETTER L and LETTER I on her broken necklace to reveal her name: Julia. The doll will open her mouth. Remember the message “Julia likes candies!”? That’s the next hint, but we’re not ready just yet.
- Click on the hidden object scene that’s reappeared over the dressing table.
- Find the objects listed at the bottom of the screen: items listed in black may be randomized. Any applicable Key Items are circled in red, while any applicable items listed in orange that require an additional action are circled in orange.
- Upon completing the hidden object scene, the FEATHER will be added to your inventory.
- Return to the Netherworld Stage.
Netherworld Stage
- Take a closer look at the mask of comedy, just to the right of Sophia’s spirit.
- Use the FEATHER on the mask of comedy to make it laugh, dropping the record.
- Pick up the RECORD to add it to your inventory.

- Once again, return to the Dressing Room.
Dressing Room
- Take a closer look at the Gramophone on the left.
- Use the RECORD on the Gramophone, then click on the handle to play it. Click on the MUSIC SHEET that appears to add it to your inventory.
- Return once again to the Netherworld Stage.
Netherworld Stage
- Take a closer look at the Piano on the left. Use the PIANO KEYS and the MUSIC SHEET on the Piano to make it happy again, revealing a new hidden object scene.
- Find the objects listed at the bottom of the screen: items listed in black may be randomized. Any applicable Key Items are circled in red, while any applicable items listed in orange that require an additional action are circled in orange.

- Upon completing the hidden object scene, the QUEEN will be added to your inventory.
- Now that you’ve obtained the QUEEN, take a closer look at the Gate on the right.
- Use the QUEEN on the front of the Gate. She will proceed inside, then return with the CANDY. Click on it to add it to your inventory.
- Exit back to the Dressing Room.
Dressing Room
- Take a closer look at the Doll, Julia.
- Use the CANDY on the Doll’s open mouth. A compartment in her chest will open, revealing the INSULATING TAPE. Click on it to add it to your inventory.
- Return to the Netherworld Chairs.
Netherworld Chairs
- Use the INSULATING TAPE to repair each of the chairs’ broken parts (shown below).
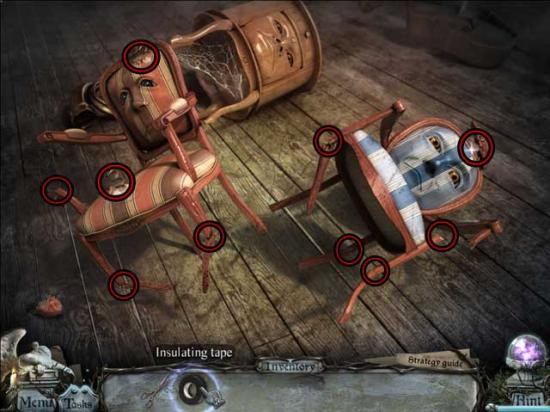
- Upon fixing the chairs completely, they’ll stand up, revealing the PUZZLE PIECE. Click on it to add it to your inventory.
- Go back to the Balcony.
Balcony
- Take a closer look at the wardrobe on the left.
- Use the PUZZLE PIECE on the lock to trigger a puzzle.
- Click on the various shapes to rotate them. Set their sides into position so that the adjoining sides of the other shapes are the same color. The solution is shown below:
- Use the SCISSORS to cute the rope noose in the wardrobe and collect the CRIMSON POTION.
- Return to the Netherworld Stage.
Netherworld Stage
- Use the CRIMSON POTION on the spirit of Sophia Rainheart. You’ll be transported back to the Sitting Room.
Sitting Room
- Take a closer look at the Statue remains in the corner. Pick up the ACTRESS’S FACE and the ARTIST’S STUDIO KEY to add them to your inventory.

- Enter through the portal that appears.
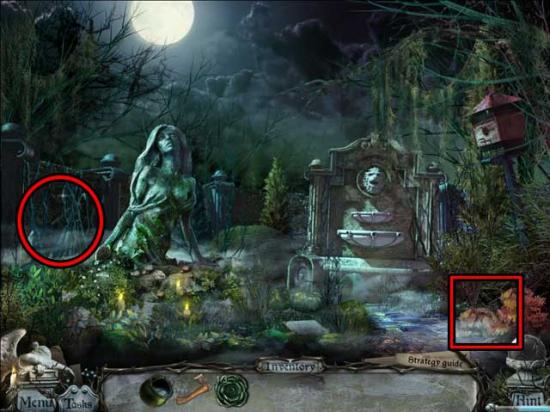
The Unmarked Graves
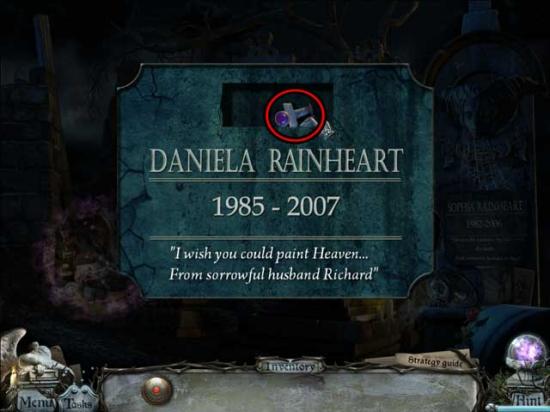
- Use the ACTRESS’S FACE on the top of the grave farthest to the right, then take a closer look at the plaque that appears.
- Click on the ACTRESS’S RING to add it to your inventory.
- Go down once, to the Mausoleum.
Mausoleum
- Take a closer look at the back wall. Use the ACTRESS’S RING on the red circle.
- Return to the Unmarked Graves.
The Unmarked Graves
- Enter through the portal and back to the Sitting Room.
Chapter 4: Daniela Rainheart- The Artist
Sitting Room
- Exit the Sitting Room back to the Upstairs Hallway.
Upstairs Hallway
- Take a closer look at the door on the left.
- Use the ARTIST’S STUDIO KEY on the lock to open it and gain access into the next area.
Artist’s Bedroom
- Upon entering, you will be greeted by the spirit of Daniela Rainheart, who urges you to help her.
- Collect the three Candles in the room to obtain the 3 CANDLELIGHTS.
- Take a closer look at the window on the right.
- Use the 3 CANDLELIGHTS on the Candle-holder, then collect the BUTTON to be added to your inventory. Take note of the color pattern on the right before exiting.
- Take a closer look at the Dresser on the far right.
- Use the BUTTON on the missing area in the lower right corner to trigger a puzzle.
- Arrange the buttons on the palette in the correct order. The hint was the color pattern located on the window. Press the Button once you’ve arranged the buttons into the correct order. The solution is shown below:
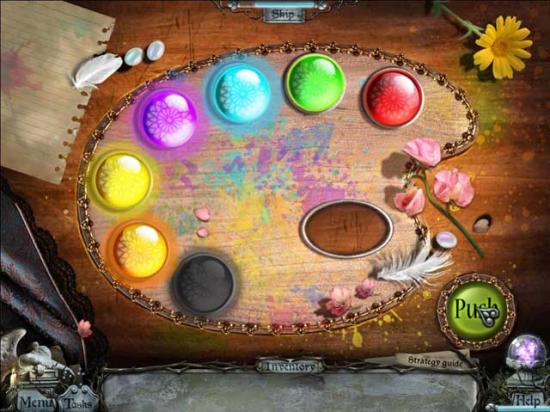
- Finishing the puzzle successfully will trigger a hidden object scene to appear.
- Find the objects listed at the bottom of the screen: items listed in black may be randomized. Any applicable Key Items are circled in red, while any applicable items listed in orange that require an additional action are circled in orange.
- Upon completing the hidden object scene, the DOOR HANDLE will be added to your inventory.
- Take a closer look at the Door on the left. Use the DOOR HANDLE to open it and gain access into the next area.
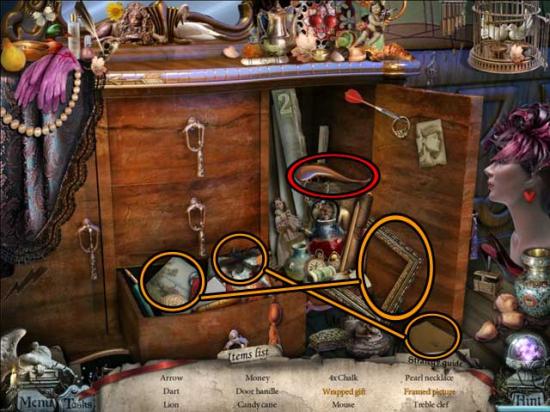
Artist’s Studio
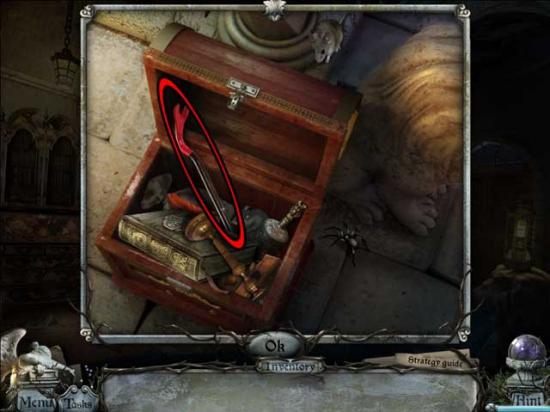
- Click on the MAGENTA PAINT, BROWN PAINT, HAMMER, and the ROPE to add them to your inventory. You may also choose to view the self-portrait of Daniela or the note on the easel.
- Return to the Artist’s Bedroom.
Artist’s Bedroom
- Use the ROPE on the curtain on the right to pull it aside, then take a closer look.
- Click on the BOX LOCK to add it to your inventory.
- Return to the Artist’s Studio.
Artist’s Studio
- Take a closer look at the large Box on the right.
- Use the BOX LOCK to open the Box, then click on the GREEN PAINT inside to add it to your inventory.
- Return to the Artist’s Bedroom.
Artist’s Bedroom
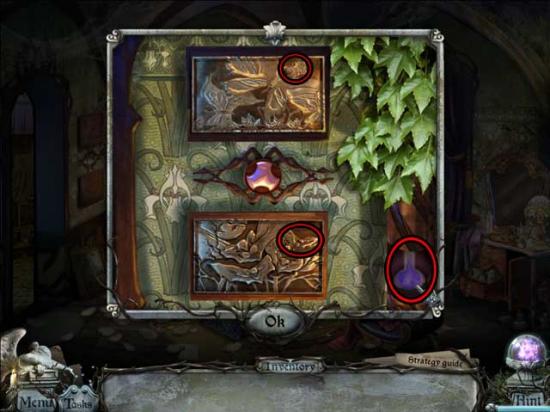
- Take a closer look at the sculpted mural on the back wall.
- Use the MAGENTA PAINT, BROWN PAINT, and GREEN PAINT to restore the sculpture back to normal. The locations in need of restoration are shown below:
- Exit the close-up after restoring the sculpted mural, and Daniela will appear again, this time opening up a portal to the Netherworld.
- Enter the Portal.
Artist’s Netherworld
- Pick up the STONE on the lower left to add it to your inventory, then use it to knock down the ICICLE on the upper right. Click on the ICICLE to add it to your inventory.
- Take a closer look at the Painting of Evil on the left.
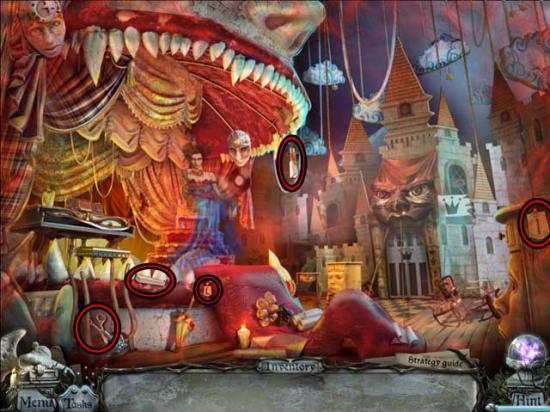
Painting of Evil
- Use the HAMMER on the Skull near the bottom of the screen to break it open, then collect the SNAKE inside. Use the ICICLE on the flames coming from the dragon’s mouth to stop them, then collect the FANG 2/2 in its mouth to be added to your inventory.
- Return to the Gallery.
Gallery
- Take a closer look at the Trophy Beast head above the fireplace.
- Use the FANGS from your inventory on the missing grooves in the beast’s mouth to cause it to open, revealing the HEAD OF A DOVE. Click on it to add it to your inventory.
- Return to the Artist’s Studio.
Artist’s Studio
- Take a closer look at the object on the right wall above the Box you opened earlier.
- Use the SNAKE on the Clock to trigger a puzzle. Use the pieces on the right side of the Clock and place them into their correct positions to restore it: the solution is shown below. Upon completing the puzzle, click on the SKULL that appears to add it to your inventory.
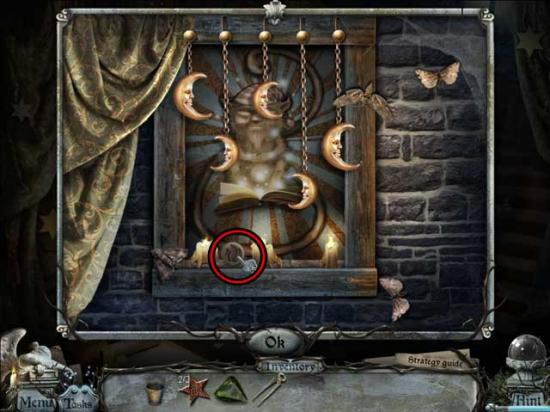
- Take a closer look at the Dove Stand at the center/back of the room. Use the HEAD OF A DOVE on the stand to reveal a new hidden object scene.
- Find the objects listed at the bottom of the screen: items listed in black may be randomized. Any applicable Key Items are circled in red, while any applicable items listed in orange that require an additional action are circled in orange.
- Upon completing the hidden object scene, the BLUE PENCIL will be added to your inventory.
- Return to the Artist’s Netherworld.
Artist’s Netherworld
- Take a closer look at the Painting of Evil on the left.
Painting of Evil
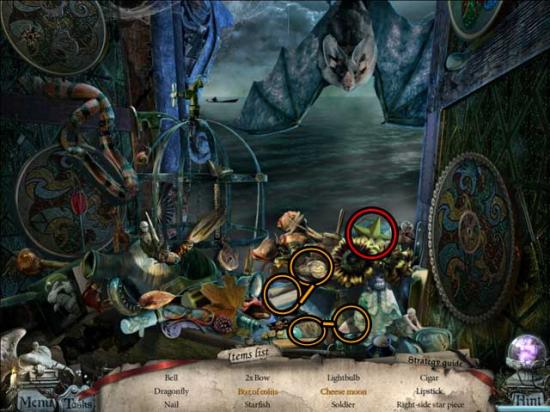
- Use the SKULL on the Chest beneath the dragon to open it, revealing a new hidden object scene.
- Find the objects listed at the bottom of the screen: items listed in black may be randomized. Any applicable Key Items are circled in red, while any applicable items listed in orange that require an additional action are circled in orange.
- Upon completing the hidden object scene, the BAT will be added to your inventory.
- Take a closer look at the Painting of Good on the right.
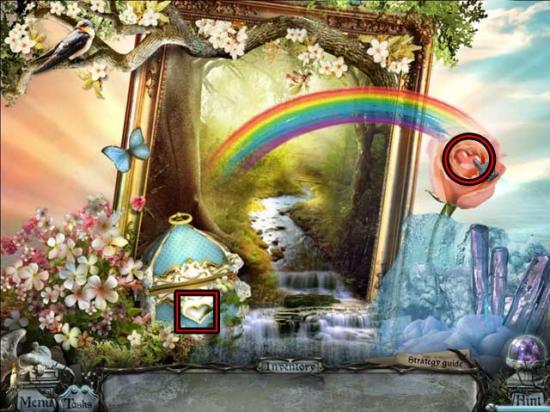
Painting of Good
- Use the BLUE PENCIL to fill in the missing stripe in the Rainbow. The Rainbow will grow, causing a rose to bloom and revealing the HEART. Click on it to add it to your inventory, then use the HEART to open the blue Chest on the left.
- A hidden object scene will appear. Click on it.
- Find the objects listed at the bottom of the screen: items listed in black may be randomized. Any applicable Key Items are circled in red, while any applicable items listed in orange that require an additional action are circled in orange.

- Upon completing the hidden object area, the BUTTERFLY will be added to your inventory.
- Return to the Artist’s Bedroom.
Artist’s Bedroom
- Take a closer look at the artworks on the left wall near the open door.
- Use the BAT and the BUTTERFLY on their respective artworks, then collect the VIOLET POTION to add it to your inventory.
- Return to the Artist’s Netherworld.
Artist’s Netherworld
- Use the VIOLET POTION on the Artist’s spirit to free her. You will automatically be taken back to the Artist’s Bedroom.
Artist’s Bedroom
- Take a closer look at the wall where the sculpted mural used to be. Click on the ARTIST’S FACE and the CHEST ELEMENT to add them to your inventory.
- Enter through the portal to the Unmarked Graves.
The Unmarked Graves
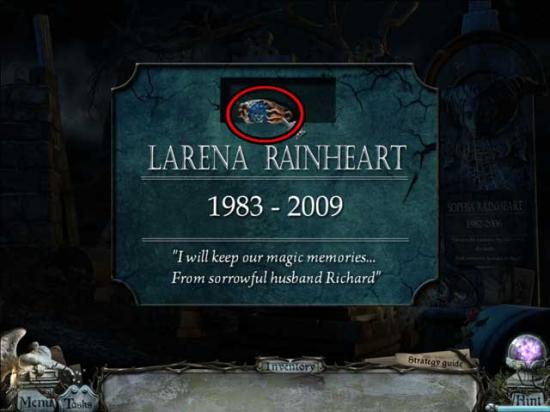
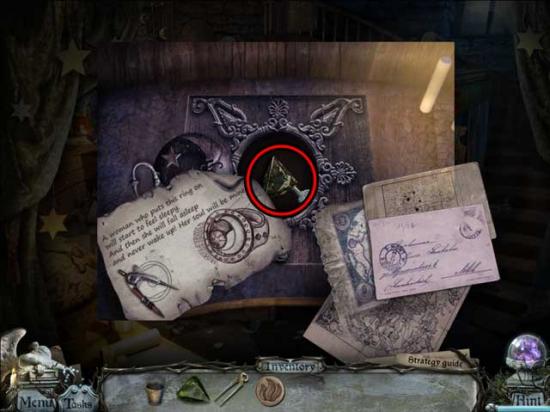
- Take a closer look at the second grave from the right. Use the ARTIST’S FACE on the hole near the top to trigger the appearance of the grave plaque.
- Take a closer look at the Plaque. Click on the ARTIST’S RING to add it to your inventory.
- Go down to the Mausoleum.
Mausoleum
- Take a closer look at the back wall. Use the ARTIST’S RING on the purple circle on the bottom right, then return through the portal at the Unmarked Graves.
Chapter 5: Rosemary Rainheart- The Florist
Artist’s Bedroom
- From here, return to the Castle’s Entryway.
Entryway
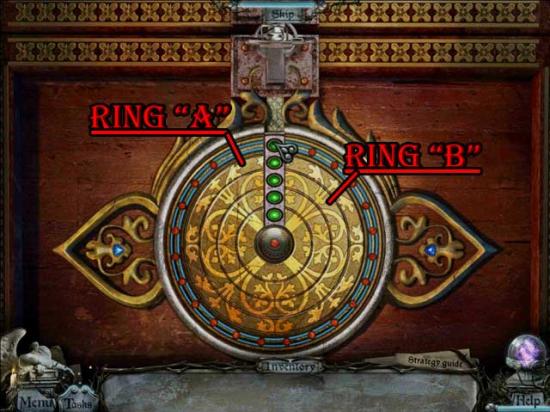
- Take a closer look at the Chest at the base of the staircase. Use the CHEST ELEMENT on the Chest to trigger a puzzle.
- Click on the various circles to rotate them. Turn all the gems green to open the lock. There are numerous ways to solve this puzzle, but if you’re using this guide from the start, click Ring A 3 times, then Ring B 8 times to solve the puzzle. Refer to the screenshot below for the solution and the reference to Rings A and B.
- Click on the open Chest for a closer view.
- Click on the CROWBAR to add it to your inventory, then proceed to the Kitchen.
Kitchen
- Take a closer look at the Door at the back of the room.
- Use the CROWBAR to remove each of the nails (and therefore also their boards).
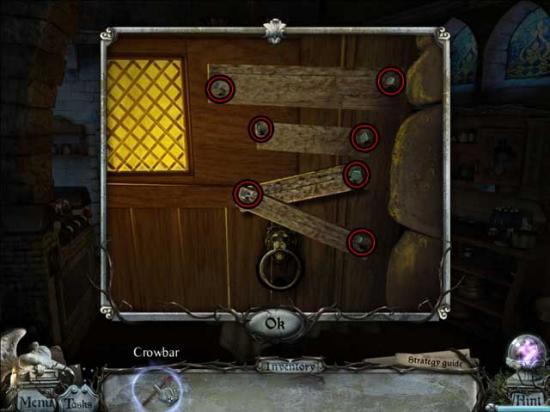
- Proceed through the door and into the next area.
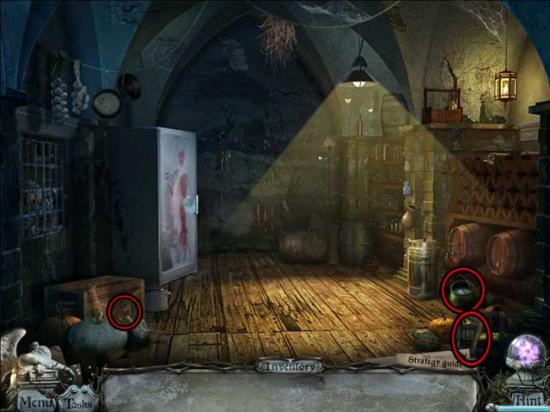
Cellar
- Click on the COLD WATER and the AXE to add them to your inventory, then use the AXE to break open the crate on the left. Click on the GARGOYLE’S LEFT EYE inside to add it to your inventory.
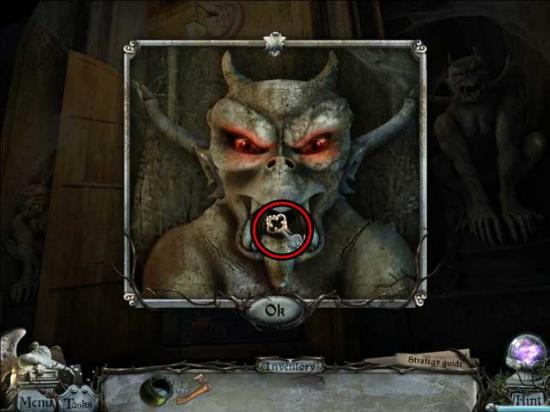
- Exit to the Doorway.
Doorway
- Take a closer look at the Gargoyle on the right. Place the GARGOYLE’S LEFT EYE (and if you didn’t already, the RIGHT EYE as well) in the correct socket, and the Gargoyle will open it’s mouth, revealing the SECRET KEY. Click on it to add it to your inventory.
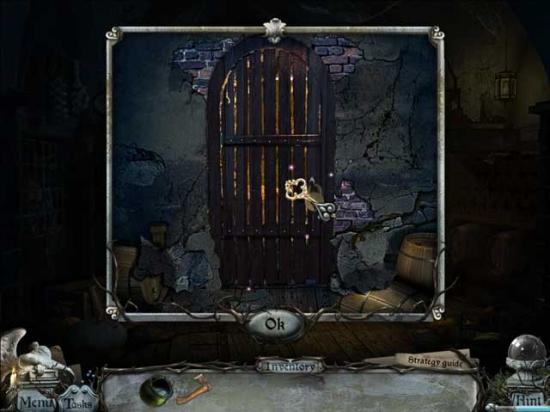
- Return to the Cellar.
Cellar
- Take a closer look at the back wall. Use the AXE to remove the wall covering the Hidden Door, then use the SECRET KEY on the lock to open it and gain access into the next area.
Underground Passage
- Use the AXE to break the crate on the ground. Click on the PUZZLE TILE 1 inside to add it to your inventory.
- Take a closer look at the door ahead and on the left to access a puzzle.
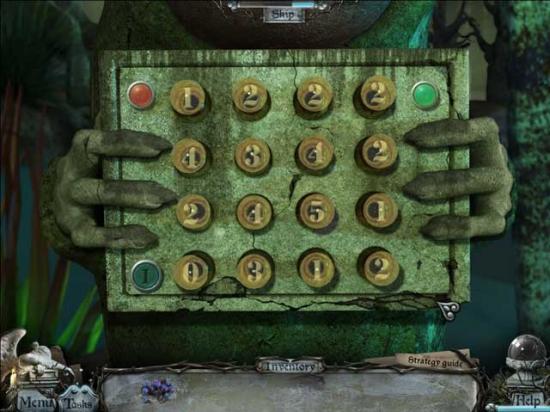
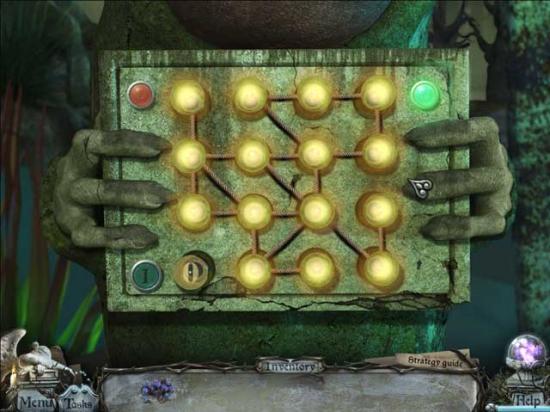
- Move the circles into the gray slots to turn on all the lamps. If all the lamps on the board are turned on, it can’t move. Press “reset” to start over again if necessary. The number of lights on a circle will tell you how many moves it has left. The trick to this puzzle is to move the middle-most circle up one into the space of the other: this will cause the other to move up without depleting the number of moves it has left. The solution is shown below:
- Once you’ve completed the puzzle and all the circles are green and in their correct positions, move forward into the next area.
Well
- Use the AXE to open the crates, then collect the OILER and PUZZLE TILE 2 to be added to your inventory. Next, look at the hand of the skeleton on the left: click on it to open it and collect PUZZLE TILE 3.
- You may also choose to read the note or look at the painting in this room before returning to the Cellar.
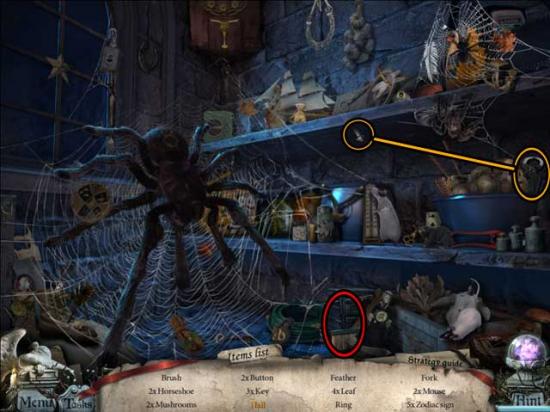
Cellar
- Take a closer look at the Grate in the left wall. Use the OILER on the rusty spots in the middle of the Grate to open it, revealing a new hidden object scene.
- Find the objects listed at the bottom of the screen: items listed in black may be randomized. Any applicable Key Items are circled in red, while any applicable items listed in orange that require an additional action are circled in orange.
- Upon completing the hidden object scene, the ROPE LADDER will be added to your inventory.
- Return to the Well.
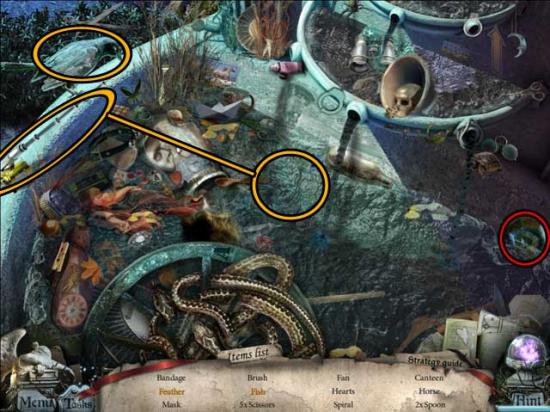
Well
- Use the ROPE LADDER on the rungs inside the Well to trigger another hidden object scene.
- Find 10 pairs of objects: the Key Item pair have been circled in red below:
- Upon completing the hidden object scene, the PUZZLE TILE PAIR will be added to your inventory.
- Return to the Underground Passage.
Underground Passage
- Take a closer look at the contraption on the left that resemble a covered porthole.
- Use the all the PUZZLE TILES on their correct positions to open the cover, revealing the HATCH LOCK PART. Click on it to add it to your inventory.
- Take a closer look at the door at the far end of the passage, at the top of the stairs.
- Use the OILER to remove the rust on the lock, then use the HATCH LOCK PART on the lock to trigger a puzzle.
- Move all the triangles into the right-most part of the lock, placing them in a pyramid shape. In other words, smaller triangles can be placed on top of bigger triangles, but not vice-versa. Use the three triangular portions of the locks to gradually move all the pieces onto the right-most triangle. The puzzle’s not too difficult: it just requires some patience. The solution is shown below:
- Once the puzzle is finished, enter through the door and into the next area.
Garden
- Click on the ROSES 1/3 lying on the ground to add it to your inventory. You may also choose to read the note lying on the ground as well.

- Proceed forward up the garden steps.
Garden Fountain
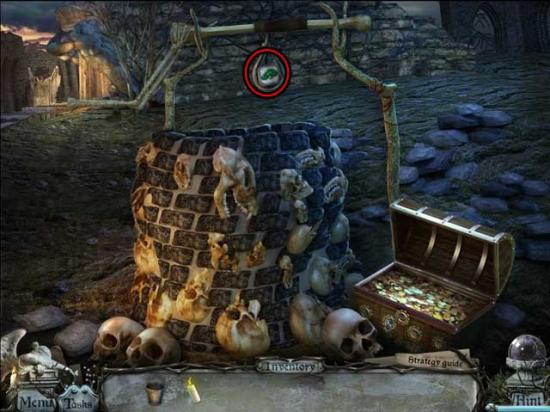
- Upon entering here, you will be greeted by the spirit of Rosemary Rainheart, who will encourage you to help free her.
- Use the AXE on the wall on the left to free the SHOVEL and add it to your inventory, then take a closer look at the pile of leaves on the right. Click 3 times to remove all the leaves, then click on the FAUCET HANDLE to add it to your inventory.
- Return to the Garden.
Garden
- Take a closer look at the strange mechanical mushroom in the lower left corner. Use the FAUCET HANDLE on the mushroom, then click on it to lower the Cage.
- Click on the Cage to enter a hidden object scene.
- Find the objects listed at the bottom of the screen: items listed in black may be randomized. Any applicable Key Items are circled in red, while any applicable items listed in orange that require an additional action are circled in orange.
- Upon completing the hidden object scene, the BAG OF SEEDS will be added to your inventory.
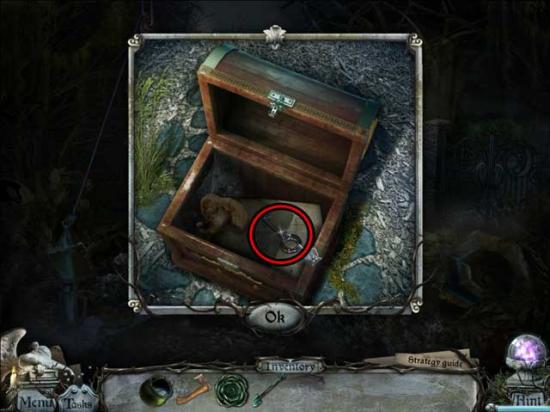
- Use the SHOVEL on the chest buried beneath the swing, then take a closer look at it to trigger a puzzle.
- Swap the various pieces so that the wire colors match between each tile. The solution is shown below:
- After completing the puzzle, click once again for a closer view. Collect the GATE KEY inside the chest to add it to your inventory.
- Return to the Well.
Well
- Use the SHOVEL on the small mound of earth at the bottom right portion of the screen, using it to uncover the dirt. Collect the RAVEN hidden beneath to add it to your inventory.
- Click on the reappeared hidden object scene over the Well.
- Find the objects listed at the bottom of the screen: items listed in black may be randomized. Any applicable Key Items are circled in red, while any applicable items listed in orange that require an additional action are circled in orange.
- Upon completing the hidden object scene, the RED BUTTON will be added to your inventory.
- Return to the Kitchen.
Kitchen
- Take a closer look at the Oven on the left. Use the RED BUTTON on the area where it’s missing in the upper right corner to trigger a puzzle.
- Bet the images in the lower slots to match those in the upper slots. Everytime you press the Red Button, the slots will go again. The goal is to rotate the pictures above the slots to match those in the slots: solutions are completely randomized. An example solution is shown below:
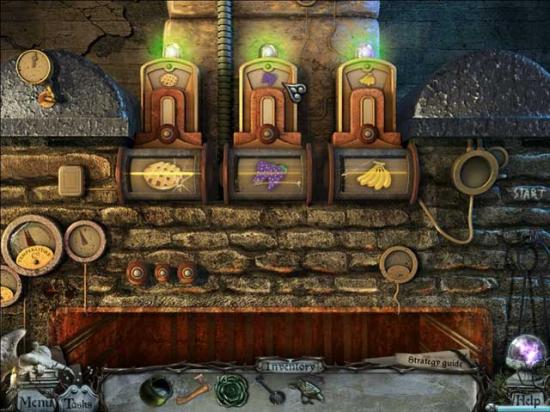
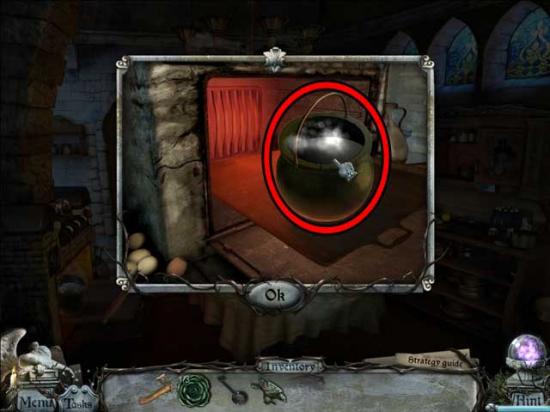
- Upon completing the puzzle, the Oven will be restored to working order. Click on the inside of the Oven for a closer view.
- Use the COLD WATER from your inventory on the Oven to heat it. Then when it’s done, collect the HOT WATER for your inventory.
- Go back to the Cellar.
Cellar
- Take a closer look at the Freezer on the left. Use the HOT WATER on the frozen handle to open it. Collect the MEAT inside to add it to your inventory.
- Return to the Garden.
Garden
- Use the GATE KEY on the Gate on the right to open it and gain access into the next area.
Gazebo
- Pick up the BUG KILLER to add it to your inventory, then take a closer look at the Gazebo pillar closest to you.
- Place the RAVEN on its pedestal to reveal the hidden location of ROSES 2/3. Click on it to add it to your inventory.

- Return to the Garden Fountain.
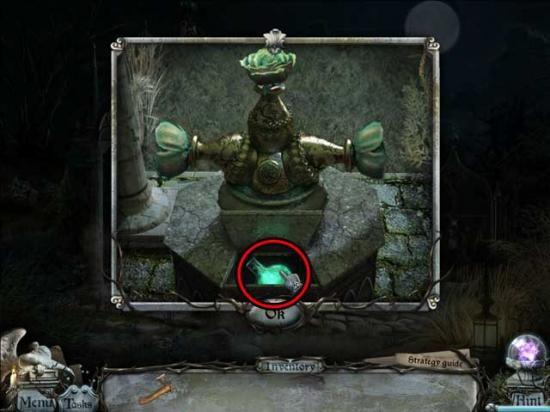
Garden Fountain
- Take a closer look at the birdhouse on the right. Use the BAG OF SEEDS on the dish to have the bird pick out the bad ones, then collect the THREE SEEDS remaining to add them to your inventory.
- Examine the right hand of Rosemary’s Statue.
- Click to remove the dead sprouts, then use the THREE SEEDS on the holes in the soil to grow three new healthy plants. This will trigger Rosemary reappearing and opening the gate to her Netherworld. Enter through the portal.
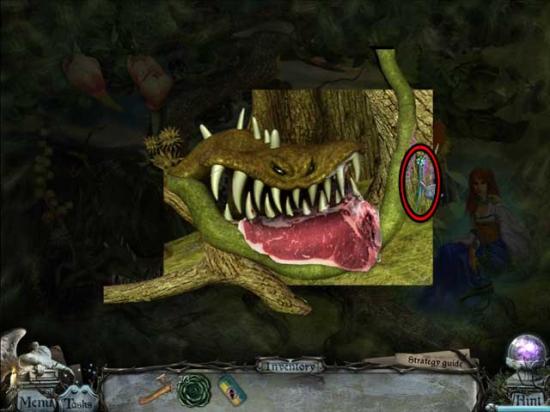
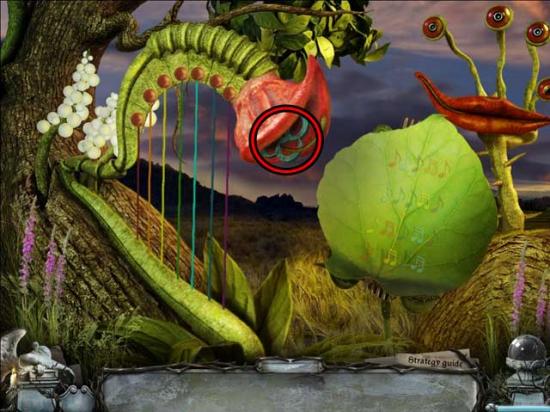
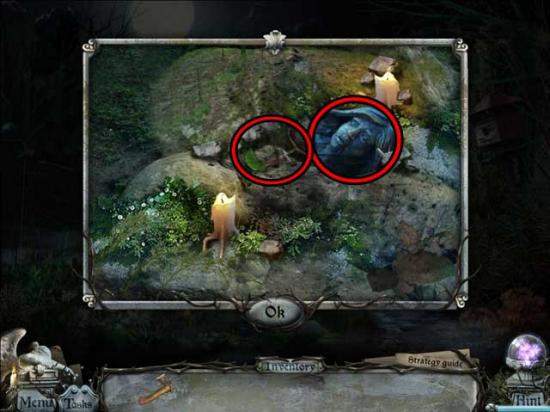
Netherworld Garden
- Take a closer look at the angry-looking carnivorous plant on the lower left. Give the plant the MEAT, then collect the blue STAMENS 1/2.
- A hidden object scene will appear.
- Find the objects listed at the bottom of the screen: items listed in black may be randomized. Any applicable Key Items are circled in red, while any applicable items listed in orange that require an additional action are circled in orange.
- Upon completing the hidden object scene, the HARP STRING will be added to your inventory.
- Take a closer look at the small group of caterpillars, up in the tree leaves in the upper right corner of the screen.
- Use the BUG KILLER to get rid of the caterpillars, then collect the blue STAMENS 2/2 to add it to your inventory.
- Examine the group of red flowers just to the left of Rosemary.
- Use the STAMENS on the red flowers in the left and middle to scare the butterflies away, then click on the NOTES that appear to add them to your inventory.
- Zoom in on the harp at the base of the tree in the middle of the screen.
- Use the HARP STRING on its empty spot on the Harp, then use the NOTES on the music stand to trigger a puzzle.
- Click on the corresponding colored string according to the next music note shown on the music sheet: linked notes mean you must click the string twice. Once you’ve done this successfully, the FOUNTAIN FAWCET HANDLE will appear. Click on it to add it to your inventory.
- Return to the Garden Fountain.
Garden Fountain
- Take a closer look at the base of the Fountain. Use the FOUNTAIN FAWCET HANDLE on the Fountain to activate it, revealing a new hidden object scene.
- Find the objects listed at the bottom of the screen: items listed in black may be randomized. Any applicable Key Items are circled in red, while any applicable items listed in orange that require an additional action are circled in orange.
- Upon completing the hidden object scene, the SPIRAL will be added to your inventory.
- Return to the Garden.
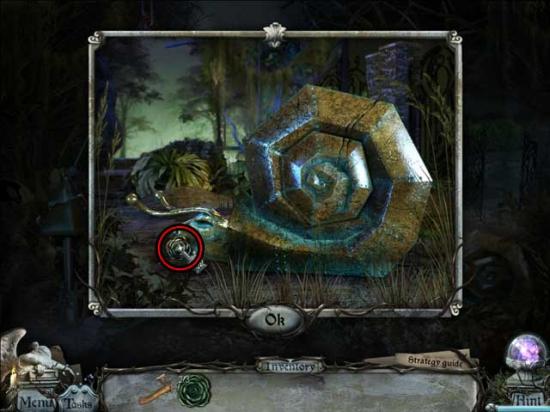
Garden
- Take a closer look at the large metal snail on the right.
- Use the SPIRAL on the missing portion of the snail’s shell, then rotate it until the snail’s head pops out, carrying the ROSES 3/3 in its mouth. Click on it to add it to your inventory. The solution is shown below:
- Go back to the Gazebo.
Gazebo
- Take a closer look at the sculpture in the middle of the Gazebo.
- Use all the ROSES on the sculpture (one in each opening) to reveal the secret hiding place of the EMERALD POTION. Click on it to add it to your inventory.
- Return to the Netherworld Garden.
Netherworld Garden
- Use the EMERALD POTION on the Florist to free her spirit. You will automatically be taken back to the Garden Fountain.
Garden Fountain
- Examine the remains of the sculpture. Pick up the FLORIST FACE and the KEY TO THE BLACK TREE to add them to your inventory.
- Enter through the portal to the Unmarked Graves.
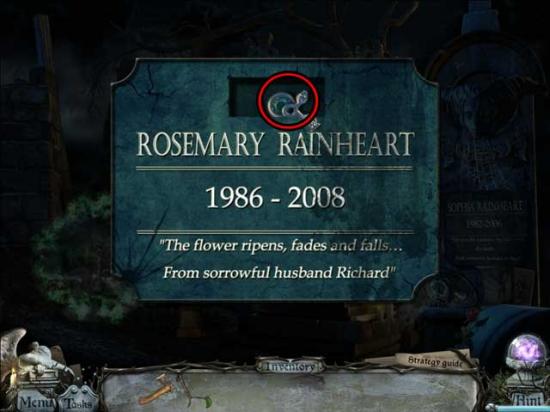
The Unmarked Graves
- Use the FLORIST FACE on the second gravestone from the left, then take a look at the Plaque that appears. Click on the FLORIST’S RING to add it to your inventory.
- Go down to the Mausoleum.
Mausoleum
- Take a closer look at the back wall. Use the FLORIST’S RING on the green circle in the upper right, then return to the Unmarked Graves and through the portal back into the Garden.
Chapter 6: Larena Rainheart- The Witch
Garden Fountain
- Proceed to the Gazebo.
Gazebo
- Take a closer look at the Gate on the right. Use the AXE to clear the branches away, then use the KEY TO THE BLACK TREE on the lock to open it, then proceed through the Gate and into the next area.
The Black Tree
- Pick up the NET to add it to your inventory, then take a closer look at the tree roots in the lower right corner of the screen.
- Use the AXE to remove the branches, then click on the SHARP BOLT to add it to your inventory.
- Proceed back to the Gazebo.
Gazebo
- Examine the door of the Hobbit-like mound hill. Use the SHARP BOLT on its missing location to crack the egg and trigger a puzzle.
- Click on the various eggshell pieces to shuffle their designs until a complete picture is formed. The solution is shown below:
- Enter through the door.
Witchcraft Hollow
- Pick up the LIGHTBULBS 1/3 and 2/3, then use the AXE to break open the pumpkin. Collect the HEART PUZZLE PIECE inside to add it to your inventory.

- Take a closer look at the chest of drawers at the far end of the room.
- Click on the drawers in the proper order until all of them are closed. The solution is shown below. Upon completing the puzzle, click on the CHEESE in the bottom drawer to add it to your inventory.
- Return to the Black Tree, then continue forward through the bog on the left.
Swamp
- Click on the LIGHTBULB 3/3 to add it to your inventory, then click on the hidden object scene.
- Find the objects listed at the bottom of the screen: items listed in black may be randomized. Any applicable Key Items are circled in red, while any applicable items listed in orange that require an additional action are circled in orange.

- Upon completing the hidden object scene, the WHITE MOUSE will be added to your inventory.
- Take a closer look at the large rock/small cave-like area just to the right of the bridge. Use the CHEESE to lure the BLACK MOUSE out of its hiding place, then click on it to add it to your inventory.
- Return to the Black Tree.
The Black Tree
- Give the WHITE MOUSE to the White Owl on the right, then give the BLACK MOUSE to the Black Owl on the left. Appeasing these guard owls will allow you to gain access to the passageway between them. Enter.
Witch’s Home
- You will be greeted by the spirit of Larena Rainheart, who pleads with you to restore her sculpture.
- Click on the ORANGE, EMPTY VIAL, and NEWT’S EYE to add them to your inventory.
- You may also choose to look at Larena’s potion books, the note she left, or her portrait hanging on the far wall.
- Take a closer look at the curtain on the right to trigger a puzzle.
- Click on segments of the ropes to unpin and unlace them from the burlap. A hand icon will appear if you can remove a segment. It’s best to start with one rope, i.e. the horizontal striped one, then the diamond-patterned one. Start at the ends and work your way to the finish. Once completed, a new hidden object scene will be revealed.
- Find the objects listed at the bottom of the screen: items listed in black may be randomized. Any applicable Key Items are circled in red, while any applicable items listed in orange that require an additional action are circled in orange.
- Upon completing the hidden object scene, the MUSHROOM KEY will be added to your inventory.
- Backtrack and return to the Witchcraft Hollow.
Witchcraft Hollow
- Take a closer look at the desk lining the back wall on the right side of the screen. Use the ORANGE on the Snake to obtain the ORANGE POISON for your inventory.
- Take a closer look at the Grate in the wall at the back of the room. Use the MUSHROOM KEY on the empty lock on the right to open the Grate and trigger a new hidden object scene to appear.
- Find the objects listed at the bottom of the screen: items listed in black may be randomized. Any applicable Key Items are circled in red, while any applicable items listed in orange that require an additional action are circled in orange.
- Upon completing the hidden object scene, the GREEN MUSHROOM will be added to your inventory.
- Return to Witch’s Home.
Witch’s Home
- Take a closer look at the fireplace on the left.
- Use the ORANGE POISON, NEWT’S EYE, GREEN MUSHROOM, and the HEART PUZZLE PIECE on the cauldron (the four dots on the outside will turn green once all the ingredients have been placed inside). Use the EMPTY VIAL on the mixture to obtain the TERMITE POISON.
- Take a closer look at Larena’s wooden statue in the center of the room. Use the TERMITE POISON on it to remove the infestation.
- Larena’s spirit will appear and open a portal to the netherworld. Enter the portal.
Witch’s Netherworld
- Click on the CIRCULAR TILE at the bottom of the screen to add it to your inventory, then take a closer look at the bottom left corner of the screen. Collect the 3 STRAWBERRIES to add them to your inventory, then take a closer look at the BROOM in the background. Click the knot three times to free it and add it to your inventory.
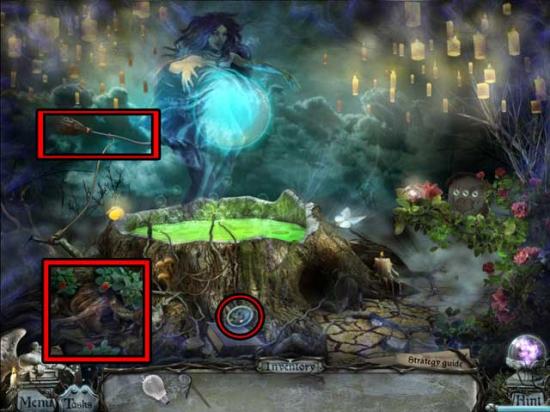
- Next, use the NET to catch the 3 MAGIC BUTTERFLIES to add them to your inventory, then use the MAGIC BUTTERFLIES on the hollow to trigger a hidden object scene.
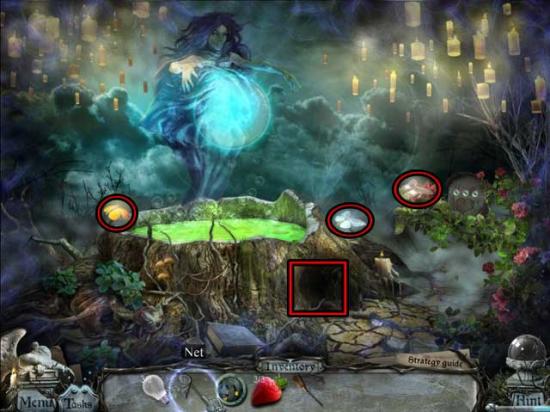
- Find the objects listed at the bottom of the screen: items listed in black may be randomized. Any applicable Key Items are circled in red, while any applicable items listed in orange that require an additional action are circled in orange.
- Upon completing the hidden object scene, the TURQUOISE POTION RECIPE will be added to your inventory.
- Return to Witch’s Home.
Witch’s Home
- Take a closer look at the book sitting on the stand on the left. Use the TURQUOISE POTION RECIPE on the torn-out right page to discover which ingredients you’ll need.
- Exit to the Black Tree.
The Black Tree
- Take a closer look at the small house-like structure at the top of the screen. Use the CIRCULAR TILE on the door to activate a puzzle.
- Restore the image in the center of the door by using the resources given to you. The items used to repair what are shown below, as well as a separate screenshot for the completed solution.
- Once you’ve completed the puzzle, a hidden object scene will appear.
- Find the objects listed at the bottom of the screen: items listed in black may be randomized. Any applicable Key Items are circled in red, while any applicable items listed in orange that require an additional action are circled in orange.
- Upon completing the hidden object area, the RAINBOW TULIP will be added to your inventory.
- Return to the Swamp.
Swamp
- Use the BROOM to knock the BLUEBERRIES at the top of the screen out of the tree– this will trigger a hidden object scene.
- Find 12 Blueberries. Their locations are shown below.
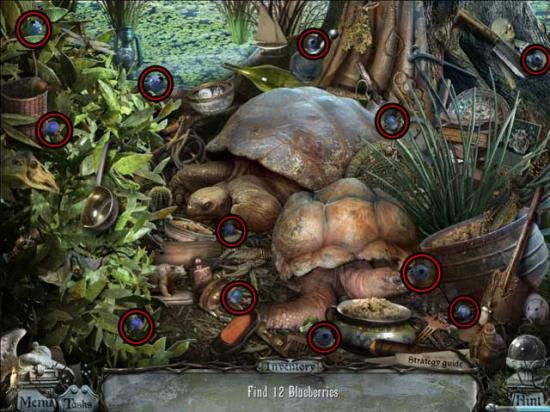
- Upon completing the hidden object scene, the BLUEBERRIES will be added to your inventory.
- Take a closer look at the Magnet in the swamp water, at the base of the scary tree on the left. Use the STRAWBERRIES to draw the leeches away, then click on the MAGNET to add it to your inventory.
- Examine the strange statue holding the board next to the bridge. Place the 3 LIGHTBULBS into the empty sockets to trigger a puzzle.
- Connect all the lamps in reference to the number on each one: each lamp cannot have more connections than the number written on it. Solutions and layouts are entirely random, but an example is shown below:
- Once you’ve completed the puzzle, examine the area in the background, just above the strange statue’s head. Click on the CHAIN to add it to your inventory.
- Use the MAGNET and the CHAIN on the grayish box floating in the swamp water to open it, then take a closer look inside. Click on the CARBIDE to add it to your inventory.
- Return to the Witch’s Netherworld.
Witch’s Netherworld
- Take a closer look at the area on the right. Use the RAINBOW TULIP on the hanger on the left to trigger a puzzle.
- Ring the Bell (Rainbow Tulip) and click on the lightning bugs in the order that they flash their colors. The flash order is entirely random. Once you’ve successfully completed three rounds, the heart-shaped door will open up, revealing the NECTAR. Click on it to add it to your inventory.
- Exit the Netherworld and return to the Witchcraft Hollow.
Witchcraft Hollow
- A new hidden object scene has appeared over the mushroom garden.
- Find 10 Blue Mushrooms. Their locations are shown below.
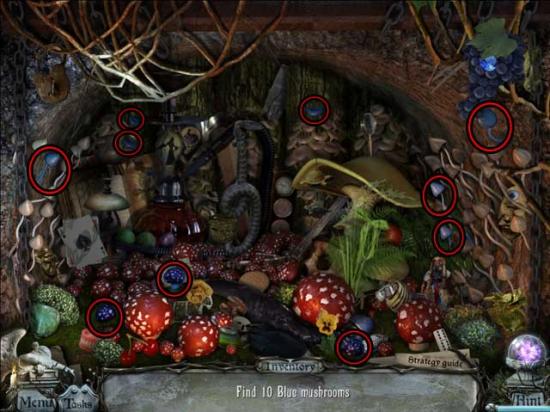
- Upon completing the hidden object scene, the BLUE MUSHROOMS will be added to your inventory.
- Time to return to Witch’s Home.
Witch’s Home
- Take a closer look at the table in the left-middle of the room. Use the CARBIDE, BLUE MUSHROOMS, NECTAR, and BLUEBERRIES on their respectively labeled plates.
- Use the Pestle lying on the table to crush the Carbide, Blue Mushrooms, and Blueberries. Next, place each of these plates into the container. Lastly, use the Nectar plate on the container and click on it to obtain the TURQUOISE POTION.
- Return to the Witch’s Netherworld.
Witch’s Netherworld
- Use the TURQUOISE POTION on the Sorceress’ spirit. You will automatically be taken back to Witch’s Home.
Witch’s Home
- Take a closer look at where the wooden statue used to be. Click on the WITCH FACE to add it to your inventory.

- Enter through the portal to the Unmarked Graves.
The Unmarked Graves
- Take a closer look at the grave on the left. Use the WITCH FACE on the head of the gravestone to make the plaque appear, then take a closer look.
- Click on the WITCH RING to add it to your inventory.
- Return to the Mausoleum.
Mausoleum
- Take a closer look at the back wall. Use the WITCH RING on the blue circle on the lower left.
- The glass casket will crack. Take a closer look at the crack that’s appeared over Jennie’s hand.
- Click on JENNIE’S RING to add it to your inventory, then look at the back wall again.
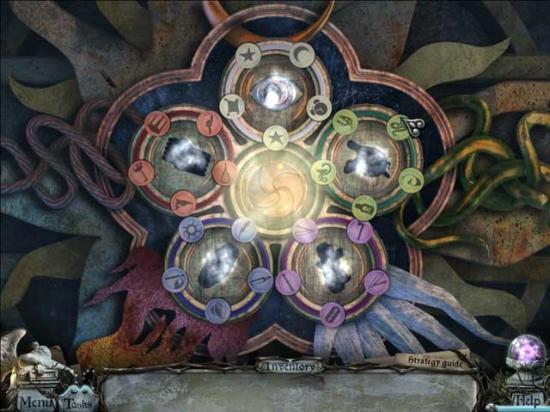
- Use JENNIE’S RING on the white circle at the top to trigger a puzzle.
- Rotate the various colored rings so that all the small circular tiles of the same color surround those respective rings. The solution is shown below:
Congratulations! You’ve completed Gravely Silent: House of Deadlock!
Bonus Content: Tower of Rain
If you purchased the Collector’s Edition of Gravely Silent: House of Deadlock, this bonus content will become available once you complete the game. In order to access it, go to the Main Menu, click “Extra Content”, and then select “Extra Gameplay”.
Casket Grove
- Take a closer look at the bush on the right: pick up the SNAKE TILE 1/3 to add it to your inventory, then take a closer look at the swamp-like area on the left. Click on the three frogs to move them out of the way, then collect the GOLD KEY for your inventory.
- Proceed forward to/take a closer look at the Well.
Well
- Click on the SILVER KEY to add it to your inventory.
- Proceed forward to the Tower Entrance.
Tower Entrance
- The entrance is blocked for now, but we’ll get to that soon. For now, click on the GRAIN lying on the ground on the right to add it to your inventory.
- Return to the Casket Grove.
Casket Grove
- Take a closer look at the base of the tree on the left. Use the GRAIN to lure the mouse out.
- This will trigger a hawk flying down and grabbing the mouse, meanwhile also knocking a note out of the tree. Take a closer look at the Note lying on the ground.
- Read the Note, then collect the COPPER KEY to add it to your inventory.

- Take a closer look at the casket with the crocodile on top. Use the GOLD KEY, SILVER KEY, and COPPER KEY on their respective locks to reveal a hidden object scene.
- Find the objects listed at the bottom of the screen: items listed in black may be randomized. Any applicable Key Items are circled in red, while any applicable items listed in orange that require an additional action are circled in orange.
- Upon completing the hidden object scene, the CLOUD PART will be added to your inventory.
- Return to the Tower Entrance.
Tower Entrance
- Take a closer look at the mechanism on the right. Use the CLOUD PART on the empty area to trigger a puzzle.
- Switch the pieces to set the sun’s rays on the side of the sun and the clouds on the side of the storm. The solution is shown below:
- Upon completing the puzzle, click on the button that appears in the center to deactivate the rain blocking the Tower Entrance.
- Take a closer look at the doorway. Click on the CHEST KEY hanging on the left to add it to your inventory.
- Return to the Well.
Well
- Use the CHEST KEY on the Chest to open it, then click on the BRACELET inside to add it to your inventory.

- Return to the Tower Entrance.
Tower Entrance
- Take a closer look at the doorway again. Use the BRACELET on the left hand to open the door and proceed inside the tower.
Ground Floor
- Click on the BUCKET to add it to your inventory, then take a closer look at the window sill at the far end of the room. Click on the SNAKE TILE 2/3 to add it to your inventory, then take a closer look at the alcove in the far wall. Click on the COAL in the bottom right corner to add it to your inventory. Take a closer look at the dragon on the left: click on the small BURNING CANDLE on the far left to add that to your inventory as well.
- Examine the terrarium on the right, beneath the stairs. Use the COAL to shatter the glass and reveal a hidden object scene.
- Find the objects listed at the bottom of the screen: items listed in black may be randomized. Any applicable Key Items are circled in red, while any applicable items listed in orange that require an additional action are circled in orange.
- Upon completing the hidden object scene, the SKELETAL ARM will be added to your inventory.
- Return to the Well.
Well
- Use the SKELETAL ARM on the left side of the well to raise the rope and hook, revealing the SNAKE TILE 3/3. Click on it to add it to your inventory.
- Use the BUCKET on the hook, then click the Skeletal Arm again to raise it, revealing the BUCKET WITH WATER. Click on it to add it to your inventory.
- Return to the Casket Grove.
Casket Grove
- Click on the hidden object scene.
- Find the objects listed at the bottom of the screen: items listed in black may be randomized. Any applicable Key Items are circled in red, while any applicable items listed in orange that require an additional action are circled in orange.
- Upon completing the hidden object scene, the RED RUBY will be added to your inventory.
- Return to the Ground Floor of the Tower.
Ground Floor (1F)
- Proceed to the top of the stairs. Use all 3 of the SNAKE TILES on the door to trigger a puzzle.
- Swap adjacent tiles to create matches of three or more tiles. Pieces cannot move over an empty space. If you create a gap, click on the Reset button to start over. There are three sets of tiles that have 5 pieces each, and these must all be eliminated at once or you will have to start over. Be careful not to accidentally eliminate tiles while moving them around. Completing the puzzle will reward you with the door opening into the next area.
Experimentation Floor (2F)
- Take a closer look at the desk on the left beneath the stairs. Click on the LOCK PART 1/3 on the top shelf to add it to your inventory.

- Take a closer look at the desk on the right. Click on the papers covering the desk to move them aside and reveal the RAIN DROP 1/3. Click on it to add it to your inventory.
- Take a closer look at the window. Click on the RIGHT PHOENIX WING to add it to your inventory.
- Examine the laboratory contraption on the right. Use the BURNING CANDLE on the dish on the left. There’s nothing else to do here yet, so return to the Ground Floor.
Ground Floor (1F)
- Click on the re-appeared hidden object scene.
- Find the objects listed at the bottom of the screen: items listed in black may be randomized. Any applicable Key Items are circled in red, while any applicable items listed in orange that require an additional action are circled in orange.
- Upon completing the hidden object scene, the KNIFE HANDLE will be added to your inventory.
- Take a closer look at the alcove in the wall. Use the RIGHT PHOENIX WING on the small Phoenix insignia to remove it and reveal the RAIN DROP 2/3. Click on it to add it to your inventory.
- Return up the stairs to the second floor.
Experimentation Floor (2F)
- Take a closer look at the strange contraption on the back wall to the left of the window.
- Use the KNIFE HANDLE on the blade lodged in the wall to obtain the KNIFE and add it to your inventory.
- Use the KNIFE on the rope holding the suspended hanging dummy to drop it to the floor. Click on the hidden object scene that appears.
- Find the objects listed at the bottom of the screen: items listed in black may be randomized. Any applicable Key Items are circled in red, while any applicable items listed in orange that require an additional action are circled in orange.
- Upon completing the hidden object scene, the LOCK PART 2/3 will be added to your inventory.
- Return to the Ground Floor.
Ground Floor (1F)
- Take a closer look at the table just to the right and beneath the window. Use the RED RUBY on the golden snake head on the right to open the box and reveal the RAIN DROP 3/3. Click on it to add it to your inventory.
- Return to the Casket Grove.
Casket Grove
- Take a closer look at the ruinous stone wall on the far right side of the screen.
- Use all 3 of the RAIN DROPS on the grooves in the panel to open it, then collect the LOCK PART 3/3 inside to add it to your inventory.

- Return to the Experimentation Floor.
Experimentation Floor (2F)
- Take a closer look at the door at the top of the stairs. Use the 3 LOCK PARTS on the panel to trigger a puzzle.
- Rotate the small and large triangles (holding a small triangle in each corner) so that the color of each small triangle’s sides matches the sides of the other triangles facing it. The solution is shown below:
- Enter through the door and into the next area.
Bedroom Floor (3F)
- Click on the bed covers to reveal a hidden object scene.
- Find the objects listed at the bottom of the screen: items listed in black may be randomized. Any applicable Key Items are circled in red, while any applicable items listed in orange that require an additional action are circled in orange.

- Upon completing the hidden object scene, the SAD STAR 1/2 will be added to your inventory.
- Click on the DIVIDER 1/2 sitting on the globe on the left to add it to your inventory, then click on the pile of pillows at the base of the bed. Click to remove each of the pillows until they reveal the DIVIDER 2/2. Click on it to add it to your inventory.

- Take a closer look at the desk in the upper left corner of the screen.
- Click on the EMPTY FLASK to add it to your inventory.
- Examine the red flowers in the upper right corner of the bed’s canopy. Click on each of the red flowers with dewdrops on them until you’ve collected all the dew and obtained the POPPY NECTAR for your inventory.
- Exit to the previous floor.
Experimentation Floor (2F)
- Click on the hidden object scene.
- Find 14 Stars. Their locations are shown below.
- Upon completing the hidden object scene, the TABLE STAR 1/2 will be added to your inventory.
- Take a closer look at the strange contraption on the back wall to the left of the window again. Use the DIVIDERS on the slits to fill them, then click on the CRESCENT 1/2 to add it to your inventory.
- Go back down to the Ground Floor.
Ground Floor (1F)
- Take a closer look at the writhing snakes near the top of the screen. Use the POPPY NECTAR on the snakes to put them to sleep, then click on the GREEN POWDER to add it to your inventory.
- Return to the second floor.
Experimentation Floor (2F)
- Take a closer look at the apparatus on the right wall.
- Use the GREEN POWDER on the dish on the left and wait for the spider to die, then click on the lid of the sphere containing the spider on the right to open it. Collect the SAD STAR 2/2 inside to add it to your inventory.
- Return to the Bedroom Floor.
Bedroom Floor (3F)
- Take a closer look at the door at the top of the stairs. Use the 2 SAD STARS on the missing grooves in the puzzle to activate it.
- Use the white square to move the stars. Each click will rotate them clockwise. Move all the small sad stars into the large star outline to make them happy again. It’s not a difficult puzzle, just a long one. The solution is shown below:
- Continue through the door into the next area.
Top Floor (4F)
- Click on the MIRROR PART 1/2 at the top of the screen to add it to your inventory, then take a closer look at the shuttered window (it looks like a door) on the left. Click on the MIRROR PART 2/2 in the middle to add it to your inventory. Next, take a closer look at the sack on the right. Use the KNIFE to cut it open and collect the CRESCENT 2/2 to add to your inventory.
- Take a closer look at the spellbook stand behind Rain and the colorful light rays. Click on the TABLE STAR 2/2 at the base of the book on the stand to add it to your inventory.
- Take a closer look at the large mirror-like orb hanging on the right side of the screen. Use the 2 MIRROR PARTS to restore the orb and open it. Collect the GREEN CRYSTAL and the PLIERS to add them to your inventory.
- Return to the Bedroom Floor.
Bedroom Floor (3F)
- Click on the hidden object scene.
- Find 15 Gems. Their locations are shown below.
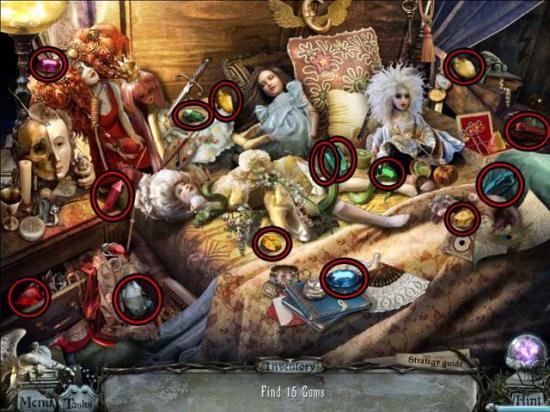
- Upon completing the hidden object area, the RED CRYSTAL will be added to your inventory.
- Take a closer look at the frame hanging at the back of the room on the wall. Use the 2 CRESCENTS on the chains missing them to reveal the FIRE SIGN. Click on it to add it to your inventory.
- Take a closer look at the desk on the left. Use the 2 TABLE STARS on the star-and-moon panel to open it. Collect the WHITE CRYSTAL inside to add it to your inventory.
- Go back down to the Experimentation Floor.
Experimentation Floor (2F)
- Take a closer look at the desk on the left beneath the stairs. Use the PLIERS to remove the skull pins from the heart on the right. Remove all three and the spiked container on the left will open, revealing the VIOLET CRYSTAL. Click on it to add it to your inventory.
- Go down to the Ground Floor.
Ground Floor (1F)
- Take a closer look at the dragon on the left. Use the BUCKET WITH WATER to quench the flames of the orb it’s holding, then use the FIRE SIGN on the small indentation on the front to open the container and reveal the BLUE CRYSTAL. Click on it to add it to your inventory.
- Return to the Top Floor.
Top Floor (4F)
- Take a closer look at the boxes from which the light rays are shooting at Rain’s feet.
- Use the RED CRYSTAL, BLUE CRYSTAL, GREEN CRYSTAL, WHITE CRYSTAL, and VIOLET CRYSTAL on their respective colors to block the rays of light.
- Take a closer look at Rain: collect the CHANDELIER KEY in her hand to add it to your inventory.
- Examine the device on the lower left. Use the CHANDELIER KEY on the lock to release the chandelier…
Congratulations! You’ve completed the bonus level: Tower of Rain!

More articles...
-
Grow A Garden 2 Base Price List
What's the most valuable crop? -
Evomon Best Starter [Leafbun, Blazpup, or Bubble?]
Grass-type, Fire-type, or Water-type? -
Evomon Tier List [META and BEST Evomon]
The Evomon dream team.