![Digimon UP Tier List [Supports, Buddies, and Partners]](/wp-content/uploads/2026/07/digimon-up-tier-list.jpg "Digimon UP Tier List [Supports, Buddies, and Partners]")
Digimon UP Tier List [Supports, Buddies, and Partners]
These Digimon will get you UP the leaderboard.

![Haze Seas Boss Drops [Chances, Locations, and How to Spawn]](/wp-content/uploads/2026/07/haze-seas-boss-drops.jpg "Haze Seas Boss Drops [Chances, Locations, and How to Spawn]")

Welcome to the Golden Trails 2: The Lost Legacy walkthrough on Gamezebo. Golden Trails 2: The Lost Legacy is an interactive, hidden object game played on PC, created by Awem Studio. This walkthrough includes tips and tricks, helpful hints, and a strategy guide for how to complete Golden Trails 2: The Lost Legacy.
Welcome to the Golden Trails 2: The Lost Legacy walkthrough on Gamezebo. Golden Trails 2: The Lost Legacy is an interactive, hidden object game played on PC, created by and available at Awem Studio. This walkthrough includes tips and tricks, helpful hints, and a strategy guide for how to complete Golden Trails 2: The Lost Legacy.
Copyright Information
This walkthrough was created by Lynne Basinet, for gamezebo.com, and is protected under US and International Copyright laws. Any unauthorized use, including re-publication, in whole or in part, without permission, is strictly prohibited.
Create your profile, adjust the Options, if desired, and then click on Play.
Lost Items: Mrs. Hopkin’s Clock in the Butcher Shop, Mary’s Music Box in the Cabinet (at the Mansion).
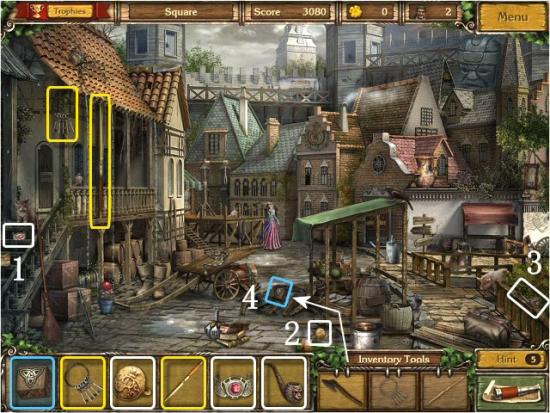
Find the available items and then continue to the Square. Click on the Chest to reveal the Purse. Inventory Item: Axe.

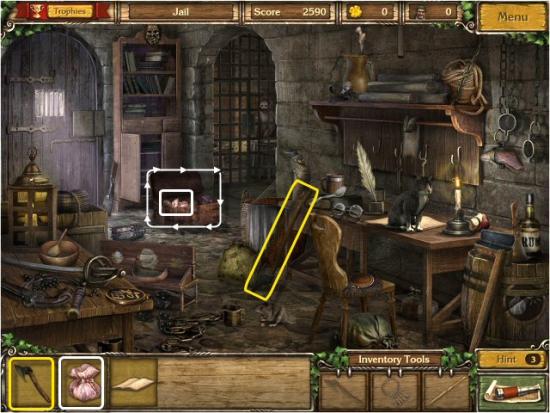
Find all the available items. Click on the Newspaper (1), Bottle (2) and Hedge (3) to reveal the Bracelet, Gold Button and Pipe. Use the Axe on the Barrel (4) to reveal the Puzzle Piece and then return to the Jail. Inventory Items: Keys, Letter Opener.
Use the Keys on the Cell Door Lock (1) and then use the correct Keys in each of the Locks (2).

Find all the available items. Click on the Coat Sleeve to reveal the Envelope and use the Letter Opener to reveal the Document. Inventory Item: Boot.

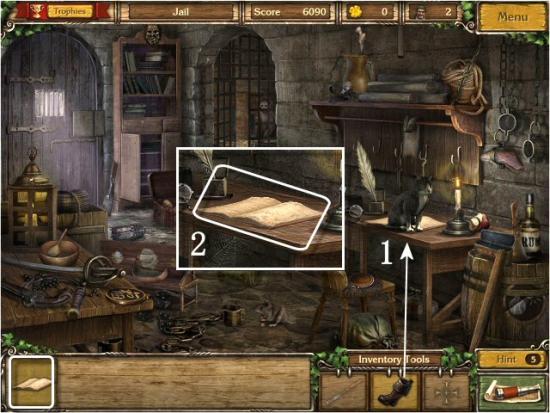
Use the Boot on the Cat (1), collect the Warrant (2) and then continue to the Butcher Shop.
Reminder: Beginning with the next location, you will be able to find Lost Items. These are always in the same location, every time you play. Note that if you forget to collect one, you won’t be able to return for it once you’ve completed the location.
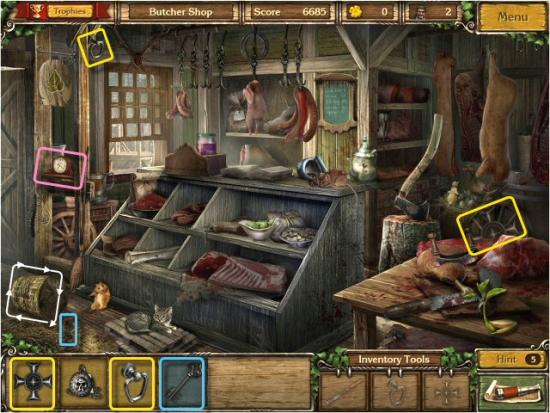
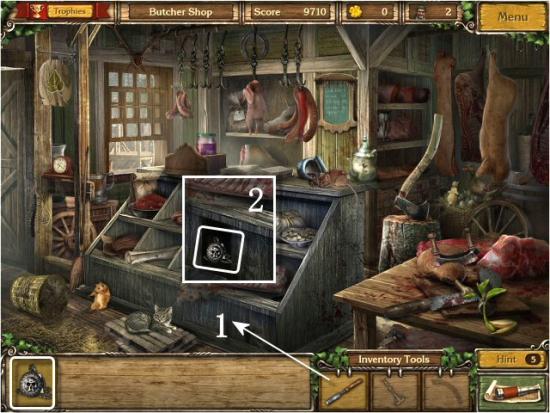
Click on the Basket to reveal the Puzzle Key. Find all the available items and then continue to the Town Hall. Inventory Items: Cabinet Door Handle, Iron Cross Key. Lost Item: Mrs. Hopkin’s Clock.
Use the Handle on the Cabinet (1) to reveal the Puzzle Piece (2). Find all the available items and then click on the Bookshelf (3). When complete, return to the Butcher Shop. Inventory Item: Chisel.
Move the Books to the correctly colored shelf and arrange them in height order (4) to reveal the Lock. Click on a Book and then click on another to switch their places. You may move the Books to their correct shelves and then arrange them by height, or you may begin arranging them as you move them to the correct shelves. When complete, click on the Lock (5), use the Iron Cross Key in the Lock (6) and collect the Newspaper Clippings (7).
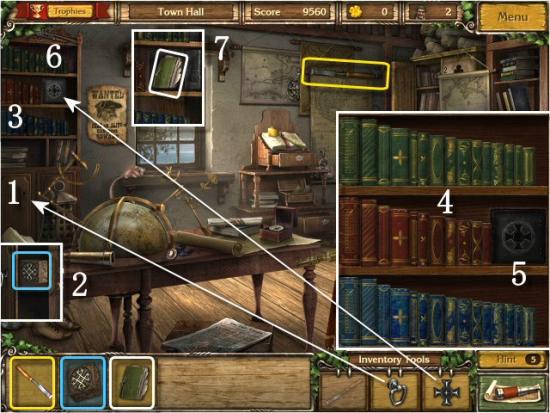
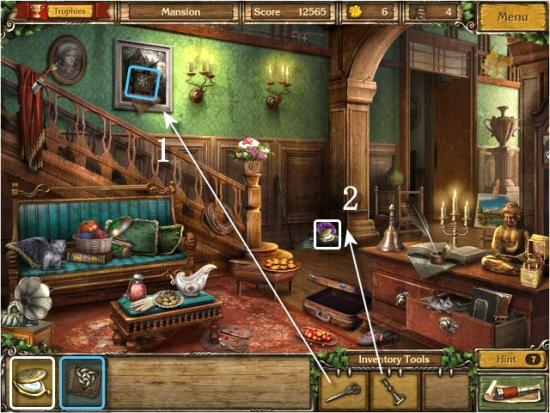
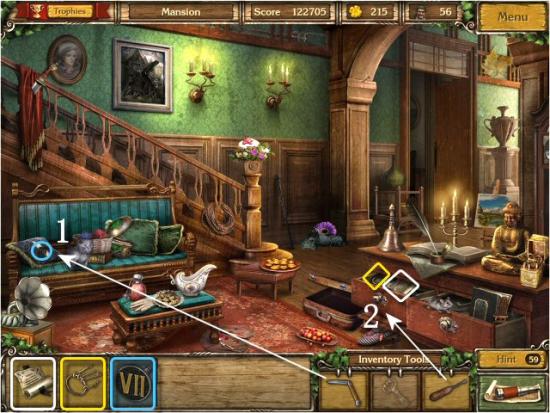
Use the Chisel on the Display Case (1) to reveal the Medallion (2) and then continue to the Mansion.
Reminder: Beginning with the next location, you will be able to find between 2 and 4 Lucky Clovers in each place. Be sure to search each location, thoroughly, to find all the Lucky Clovers. Once you’ve found them all, you’ll receive notification that there aren’t any more in that area. You won’t be able to return to completed areas; we recommend you collect them before finding the items in the Object Search lists. Please note that the number of Lucky Clovers, and their locations, are random every time you play and the locations shown in the walkthrough images may be different than yours.
Find all the available items and then click on the Crumpled Paper (1). Reassemble the image by clicking and dragging the pieces into position (2). When complete, collect the Map and then enter the Cabinet (3). Inventory Item: Globe Stand Piece.
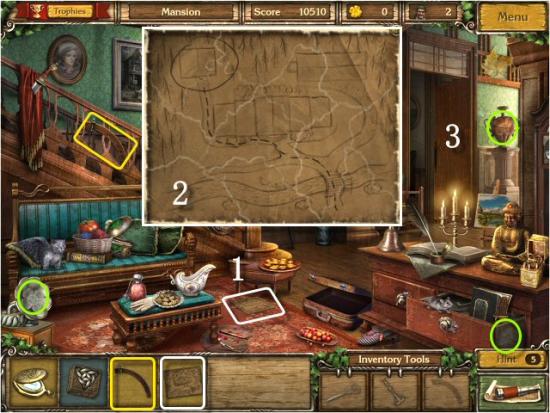
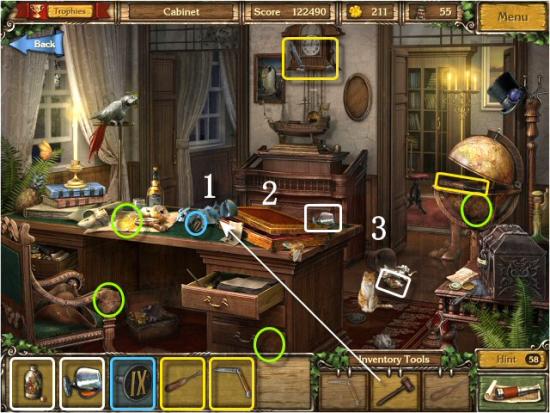
Find all the available items. click on the Desk Drawer (1), Curtain (2) and Oval Frame (3) to reveal the Ring, Candle Stick and Girl’s Portrait. Use the Globe Stand Piece on the Globe (4) to reveal the Puzzle Piece. Inventory Item: Scissors. Lost Item: Mary’s Music Box.
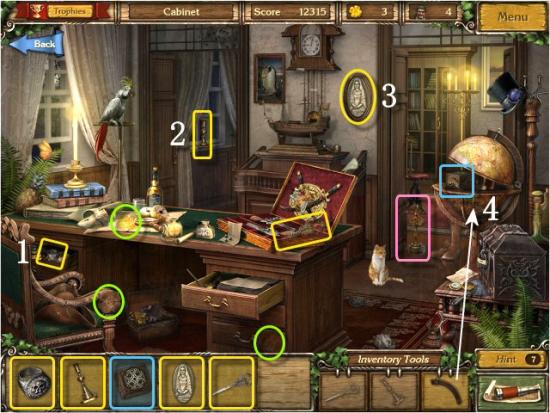
Use the Scissors on the Painting (1) and the Candlestick on the Vase (2) to reveal the Puzzle Piece and the Pocket Watch.
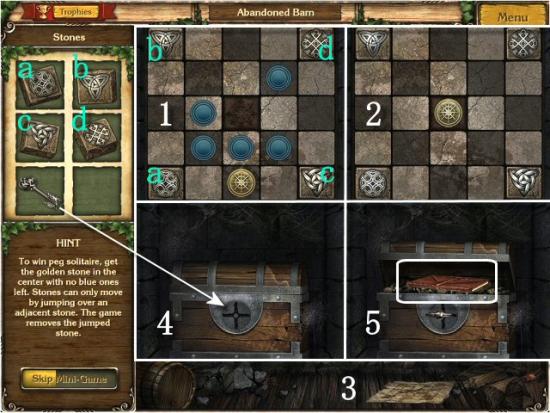
Use the Puzzle Pieces on the Board (1). The object is to get the Golden Stone to the Center (2), without leaving any Blue Stones. Click on the Golden Stone, or one of the Blue Stones, and then click on an available open space by jumping over another Blue Stone. Jumping over a Blue Stone will eliminate it from the Board. Click on the Document (3) for the Solution. Use the Key in the Lock (4) and then collect the Logbook (5).
Shooting Gallery Minigame 1
Shoot each Bandit (1) as he pops up and avoid shooting any Citizens (2). Each Bandit you shoot will gain you an additional Lucky Clover. This minigame is random, but only one Bandit, or one Bandit and one Citizen, will pop up.
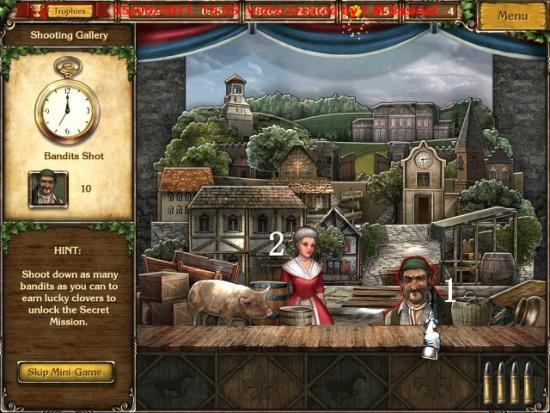
Click on the following for a short video example of gameplay. Note that gameplay is not as fast as the video shows; some blank frames were edited out.
Lost Items: Mr. Coil’s Quill at the Dock, Gloria’s Perfume at the Inn, John’s Medal in the Churchyard, Miss Rachel’s Encyclopedia in the Lodge (at the Churchyard).
Find all the available items and then continue to the Bar. Inventory Item: Branch. Lost Item: Mr. Coil’s Quill.
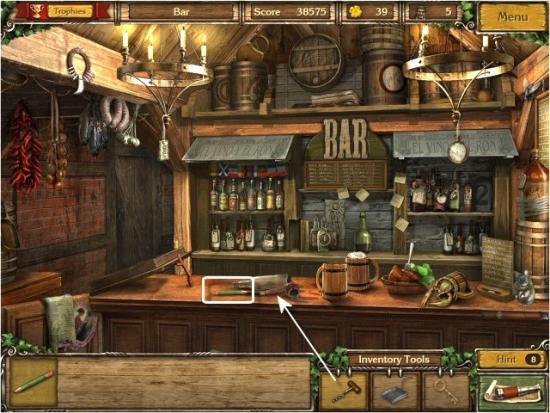
Find all the available items. Use the Branch on the Tray (1) to reveal the Newspaper and then click on the Bottles (2). When complete, click on the Panel (3) to reveal the Ship Puzzle Piece and then return to the Dock.
The object is to rearrange the Bottles of Liquor underneath the Flags of their country of origin. Click on one and then click on another to switch them. From left to right:
Country | Spain | Scotland | Mexico | Germany | Russia | Portugal | France | Italy |
Liquor | Jerez | Whisky | Tequila | Beer | Vodka | Porta | Champagne | Amaretto |
Use the Cookie on the Parrot (1) and the Broom on the Debris (2) to reveal the Corkscrew and the Ticket and then return to the Bar.
Use the Corkscrew on the Bottle to reveal the Pencil and then continue to the Inn.
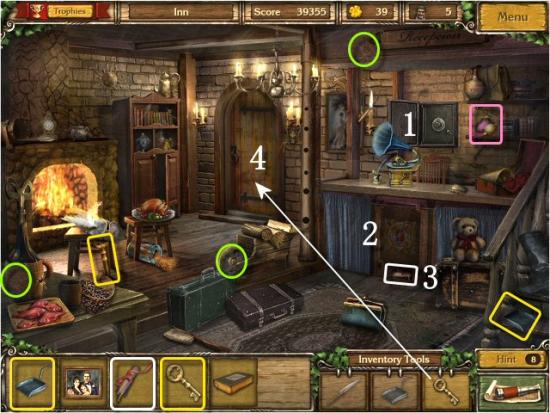
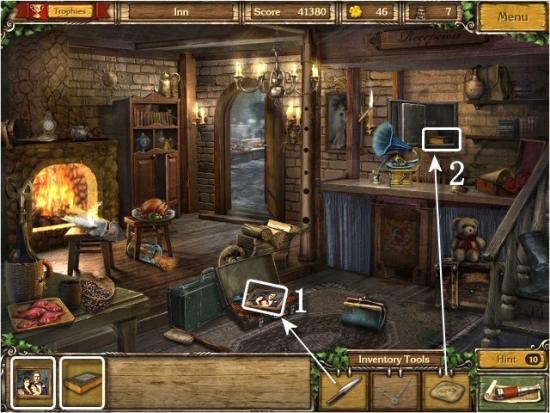
Find all the available items. Click on the Picture (1) and the Fabric (2) to reveal the Safe and the Crest and then click on the Crest. When complete, click on the Compartment (3) to reveal the Note and then use the Key on the Door (4).
Inventory Items: Dustpan, Key. Lost Item: Gloria’s Perfume.
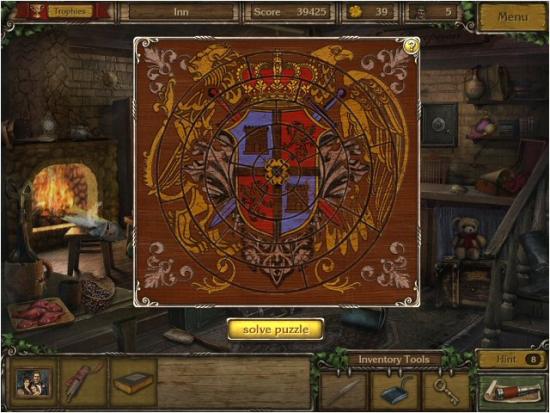
The object is to restore the Crest. Click on a piece and then click on another to switch them. You can only switch pieces that are next to each other and in the same ring.
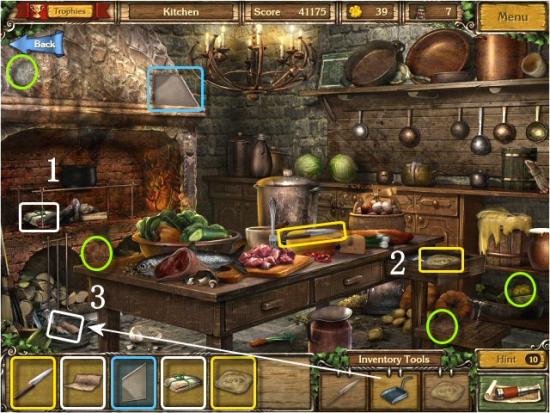
Find all the available items. Click on the Cauldron (1) and the Drawer (2) to reveal the Love Letters and Safe Code. Use the Dust Pan on the Ash Bin (3) to reveal the Logbook Page. Inventory Item: Safe Code.
Use the Knife on the Suitcase (1) and the Safe Code on the Safe (2) to reveal the Morgan Family Portrait and the Inn Register and then continue to the Churchyard.
Find all the available items. Click on the Skull (1) to reveal the Shoe Buckle and then enter the Lodge (2). Inventory Item: Clock Hands. Lost Item: John’s Medal.
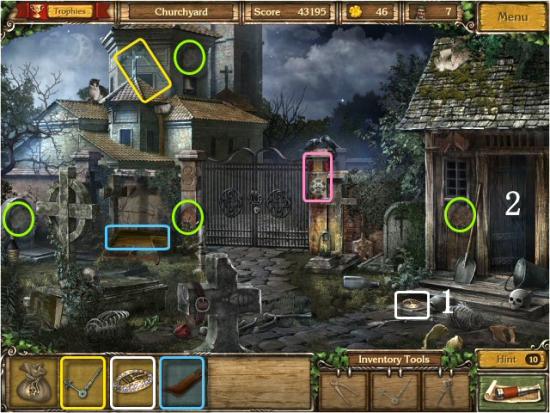
Find all the available items. Click on the Firewood (1) to reveal the Keys and then use the Clock Hands on the Clock (2) to reveal the Pocket Watch. Inventory Items: Bolt Cutters, Hammer and Chisel. Lost Item: Miss Rachel’s Encyclopedia.
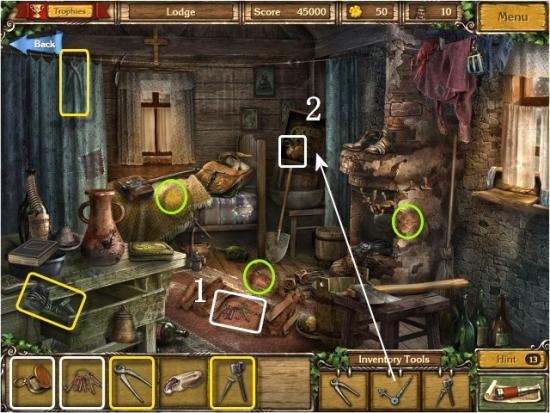
Use the Hammer and Chisel on the Tomb (1) to reveal the Bag of Money and then use the Bolt Cutters on the Chain (2).

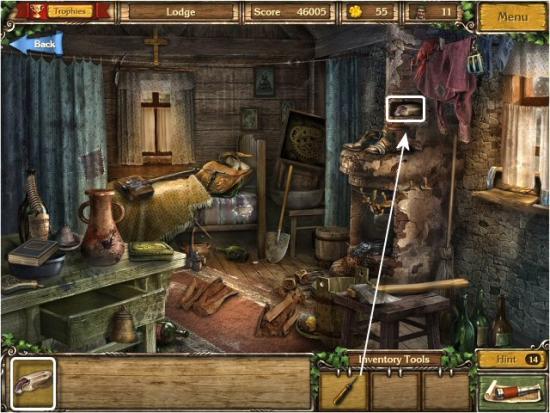
Find all the available items. Click on the Curtain (1) to reveal the Prayer Beads and then click on the Statue Pedestal (2). When complete, click on it again, collect the Ship Puzzle Piece and then return to the Lodge. Inventory Item: Awl.

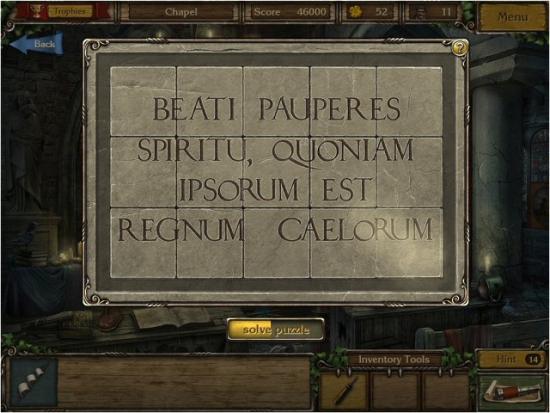
The object is to rearrange the Tiles to restore the Latin Inscription. Click on a Tile and then click on the adjacent empty space to move it. Continue moving the Tiles around until the Inscription is correct. The solution is always the same; however, the initial configuration is completely random so there isn’t a single solution.
Use the Awl on the Loose Brick and collect the Gun.
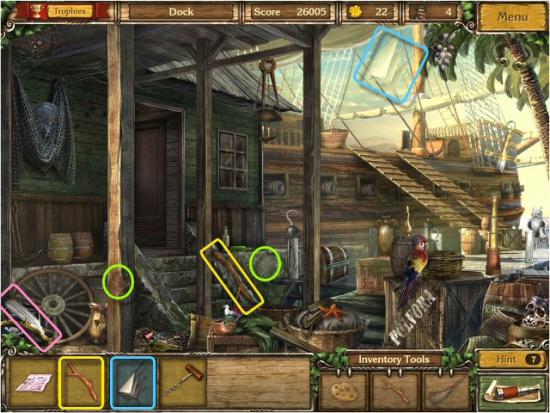
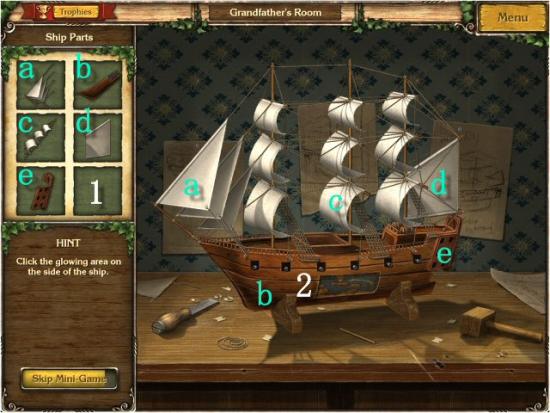
Place the Ship Parts (1) in the correct locations and then click on the Side of the Ship (2). When complete, collect the Ship.
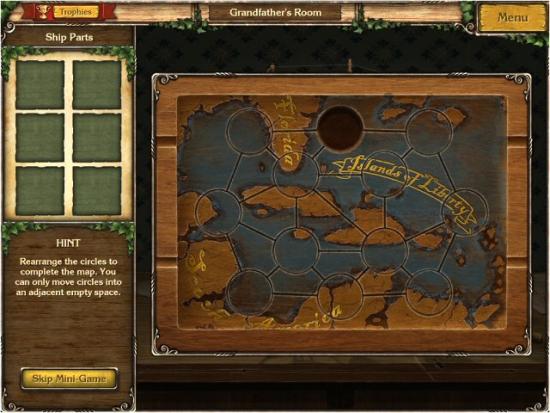
Rearrange the Circles so that the Map is correct. Click on a Circle and then click on the adjacent Empty Space. You can only move the Circles that are on a direct path to the adjacent Empty Space. Continue moving the Tiles around until all the Circles are in the correct positions. The solution is always the same; however, the initial configuration is completely random so there isn’t a single solution.
Shooting Gallery Minigame 2
See the previous information and video example, at the end of Episode 1, for how to play.
Lost Items: Daniel’s Mask in the Lodge (in the Bar), Sportsman Jack’s Cup at the Ship Graveyard, Mr. Alvaro’s Pistol at Montego Bay, Shaman’s Beads in the Witch’s Hut (on Witch’s Island).
Find all the available items. Click on the Coat (1) to reveal the Riding Crop and then enter the Lodge (2). Inventory Items: Axe, Leather Marker.
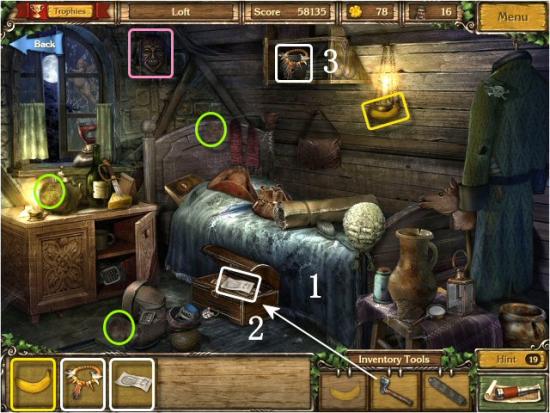
Find all the available items. Click on the Bedspread (1) to reveal the Chest, use the Axe on the Chest (2) to reveal the Hot Air Balloon Diagram and then click on the Upper Cabinet (3). When complete, click on it again to reveal the Voodoo Amulet. Inventory Item: Banana. Lost Item: Daniel’s Mask.
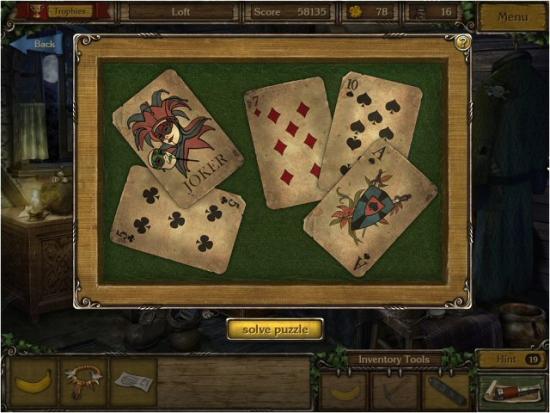
The object is to reassemble the Image. Click on a Tile and then click on any other Tile to switch their places.
Use the Banana on the Monkey, collect the Banknotes and then continue to the Ship Graveyard.
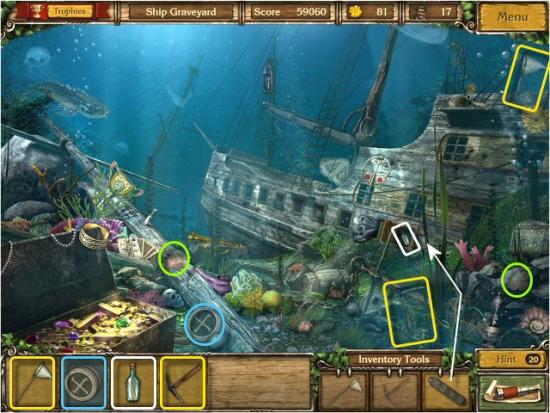
Find all the available items and then use the Leather Marker on the Lock. When complete, click on the Compartment, collect the Bottle with the Note and then continue to the Deserted Island. Inventory Items: Butterfly Net, Pick Axe. Lost Item: Sportsman Jack’s Cup.
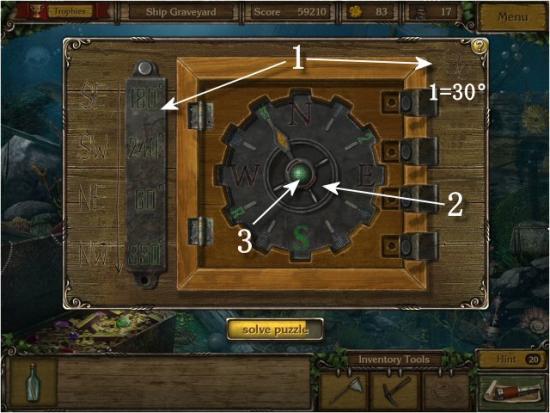
The object is to enter the Code using the information on the Board (1). Click on the Grey Ring (2) to advance the Arrow (it only rotates clockwise) to the correct Heading and then click the Green Button in the center (3); repeat for each Heading.
Position | N | 1 | 2 | E | 4 | 5 | S | 7 | 8 | W | 10 | 11 |
Degrees | 360/0 | 30 | 60 | 90 | 120 | 150 | 180 | 210 | 240 | 270 | 300 | 330 |
The Solution is S, 8, 2 and 11:
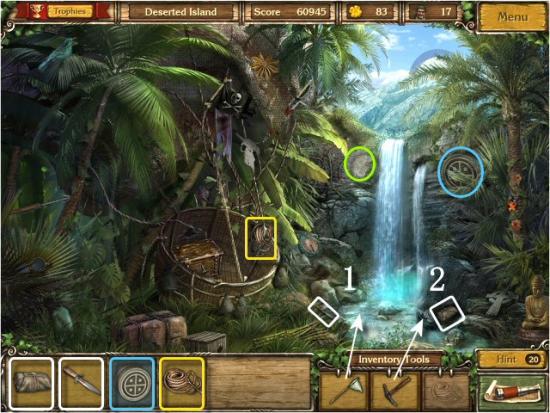
Find all the available items. Use the Pick Axe on the Rock (1) and the Net in the Water (2) to reveal the Bag of Clothes and the Knife and then continue to the British Colony. Inventory Item: Rope.
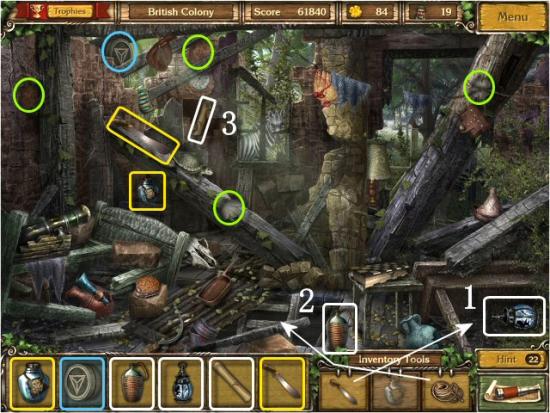
Find all the available items. Use the Rope on the Hole (1) and the Machete on the Vine (2) to reveal the Fuel Jug and the Broken Oil Lamp and then click on the Bricks (3). When complete, click on them again, collect the List and then continue to Montego Bay. Inventory Items: Machete, Poison.
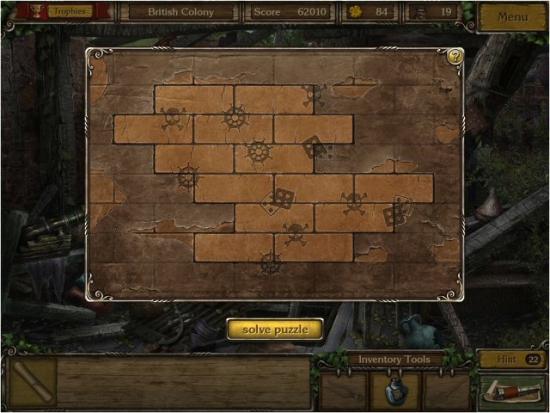
The object is to rearrange the Bricks to restore the Design. Click on a Brick and then click on any other to switch their places.
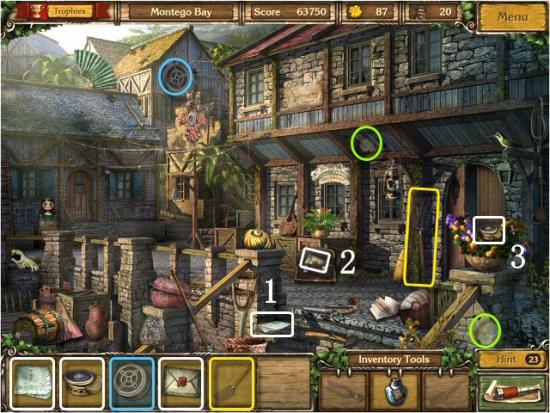
Find all the available items. Click on the Basket (1), Briefcase (2) and Flower Pot (3) to reveal the Handkerchief, Letter and Snuffbox and then continue to Witch’s Island. Inventory Item: Pitchfork. Lost Item: Mr. Alvaro’s Pistol.
Find all the available items and use the Poison on the Vine to enter the Witch’s Hut.
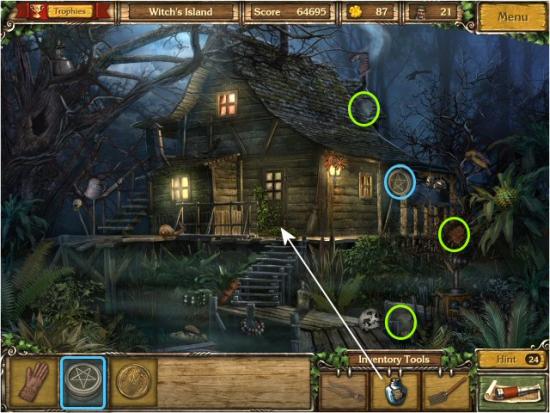
Find all the available items, use the Pitchfork on the Hay and then click on the Chest. When complete, click on it again to reveal the Aztec Totem. Inventory Items: Lantern, Pliers. Lost Item: Shaman’s Beads.

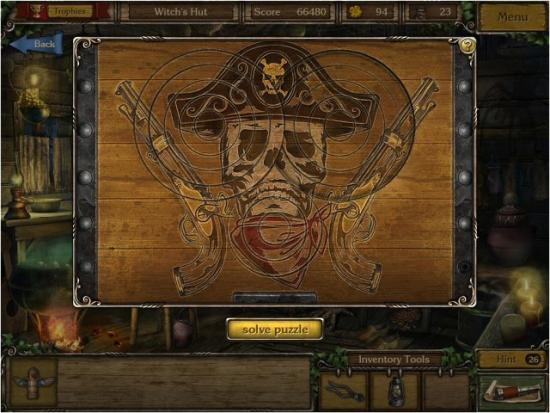
The object is to restore the Image. Click on each Ring until it lines up to the adjacent parts of the rest of the Image; each Ring rotates independently, so there is no strategy for solving except to click on each Ring. Note that the Rings alternately rotate clockwise and counter-clockwise.
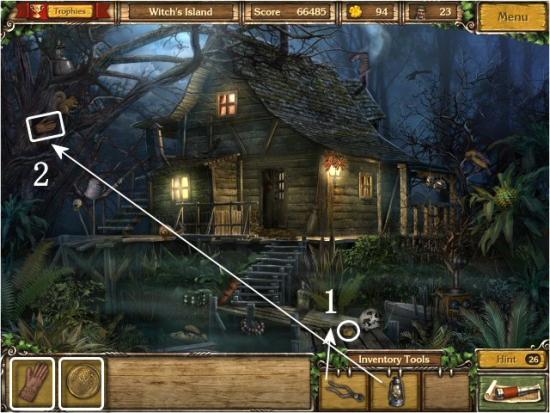
Use the Lantern on the Hole in the Tree (1) and use the Pliers on the Boardwalk (2) to reveal the Glove and the Gold Coin.
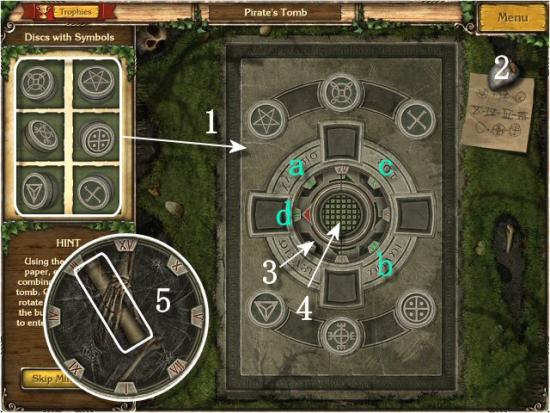
Place the Symbols on the Tomb (1) according to the Clue (2). Click on the Grey Ring (3) to rotate the Red Arrow to one of the Numbers and then click the Green Button (4) in the center. The Clue shows the Numbers for the Code – X, IV, III and VII (10, 4, 3 and 7); however, they are out of order. The correct order is III, VII, X and IV (3, 7, 10 and 4).
When complete, collect the Logbook Pages (5).
Shooting Gallery Minigame 3
See the previous information and video example, at the end of Episode 1, for how to play.
Lost Items: Kevin’s Parrot at Shipwreck Site, Grace’s Locket at the Abandoned Ship, Gabriel’s Solar System Model in the Captain’s Cabin (at the Abandoned Ship), Elian’s Compass in the Cave (in the Cave Entrance).
Find all the available items. Click on the Tiki Torch (1) and the Leaves (2) to reveal the Holster and the Footprint and then continue to the Hut. Inventory Items: Map Piece, Pry Bar. Lost Item: Kevin’s Parrot.
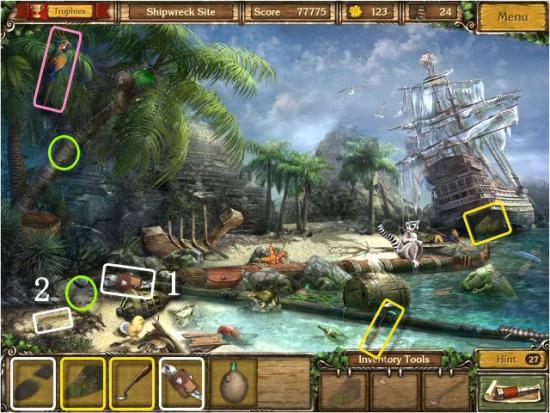
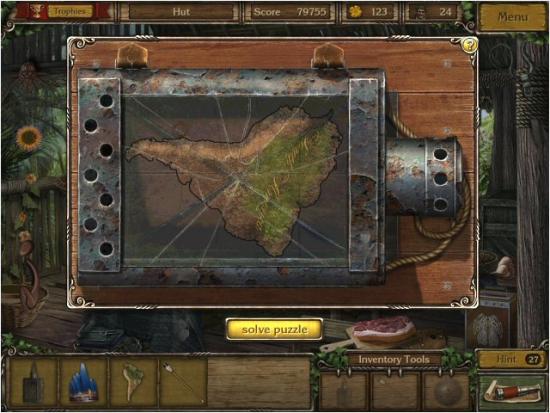
Find all the available items. Use the Pry Bar on the Crate (1) to reveal the Headdress and then use the Glass Fragment on the Lantern (2). When complete, collect the Lantern, use it on the Hook (3) to reveal the Map of South America and then return to the Shipwreck Site. Inventory Items: Arrow, Lantern.

The object is to reassemble the broken Lantern Glass. Click and drag each piece into position.
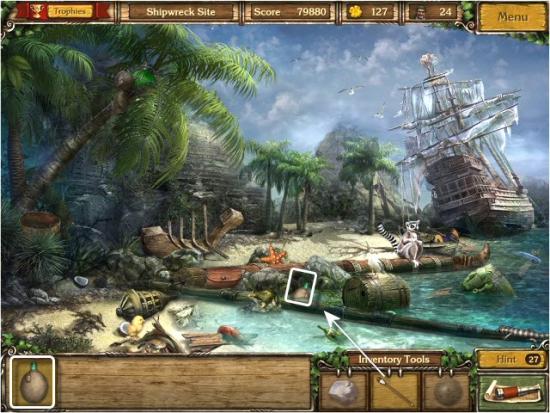
Use the Arrow on the Seaweed to reveal the Flask and then continue to the Abandoned Ship.
Find all the available items. Click on the Chest (1) and the Coins (2) to reveal the Peaked Hat and the Shoulder Strap, use the Stone on the Crow (3) to reveal the Scrap of Fabric and then enter the Ship (4). Inventory Items: Stone, Cannonball. Lost Item: Grace’s Locket.
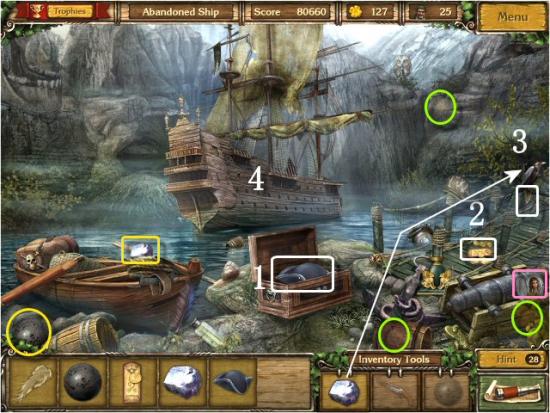
Find all the available items. Click on the Sack to reveal the Grate (1), use the Cannonball on the Grate (2) to reveal the Gold Bars and the Knife (click on the Gold Bars to reveal the Knife) and then use the Pistol on the Door to the Captain’s Cabin (3). Inventory Item: Pistol, Knife.
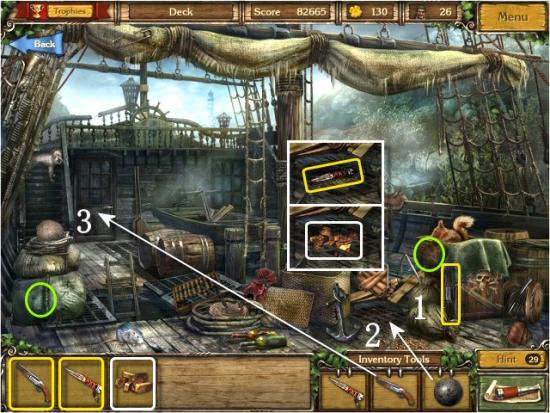
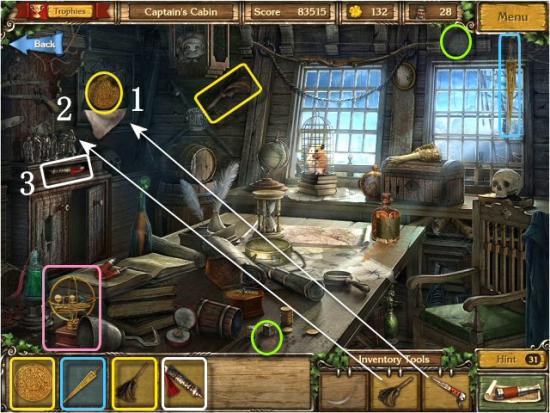
Find all the available items. Use the Knife on the Map (1) to reveal the Golden Medallion, use the Duster on the Metal Figures (2) and then click on them. When complete, click on the Compartment (3) to reveal the Ancient Scroll and then continue to the Cave Entrance. Inventory Item: Duster. Lost Item: Gabriel’s Solar System Model.
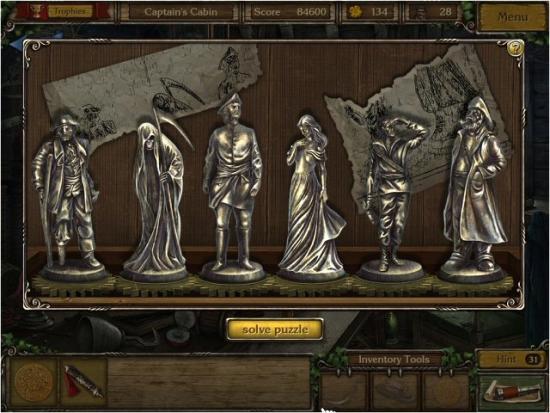
The object is to rearrange the Figures in the correct order. Click on a Figure and then click on an adjacent Figure to switch their places. Use the clues on the Drawing for correct placement.
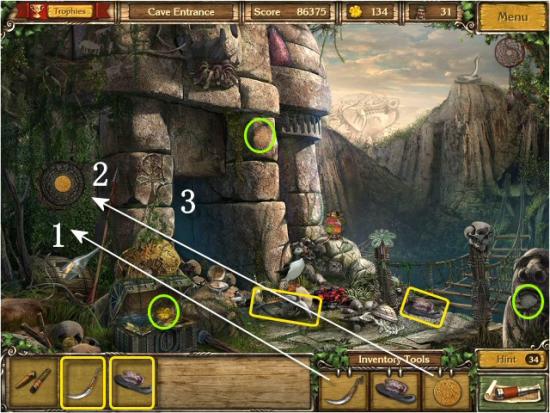
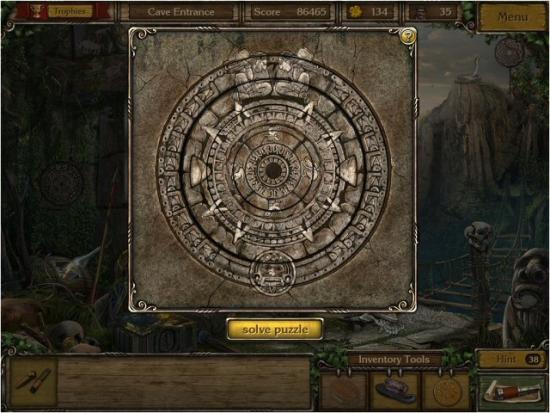
Find all the available items, use the Scimitar on the Vine (1) to reveal the Stone Circle and then click on it. When complete, use the Golden Medallion on the Stone Circle (2) and then enter the Cave. Inventory Items: Scimitar, Flint.
The object is to restore the Stone Circle. Click on each Ring until it lines up with the other Rings; each Ring rotates independently, so there is no strategy for solving except to click on each Ring. Note that the Rings rotate, alternately, clockwise and counter-clockwise.
Find all the available items. Use the Flint on the Torch (1) and the Brush on the Rock (2) to reveal the Spear and the Drawing. Inventory Items: Brush, Spear. Lost Item: Elian’s Compass.
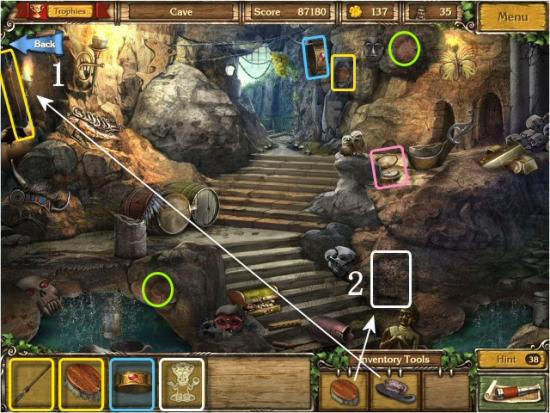
Use the Spear on the Embers to reveal the Cigars.
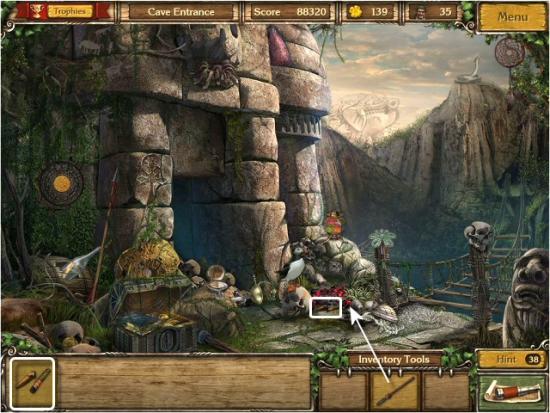
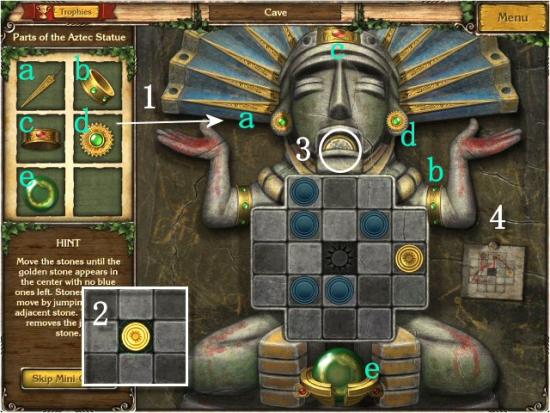
Use the Jewelry Pieces on the Idol (1). The object is to get the Golden Stone to the Center (2), to reveal the Medallion (3), without leaving any Blue Stones. Click on the Golden Stone, or one of the Blue Stones, and then click on an available open space by jumping over another Blue Stone. Jumping over a Blue Stone will eliminate it from the Board. Click on the Document (4) for the Solution.
Shooting Gallery Minigame 4
See the previous information and video example, at the end of Episode 1, for how to play.
Lost Items: Bob’s Dice in the Bazaar, Mr. Newell’s Inkwell in the Observatory (inside the Observatory Yard).
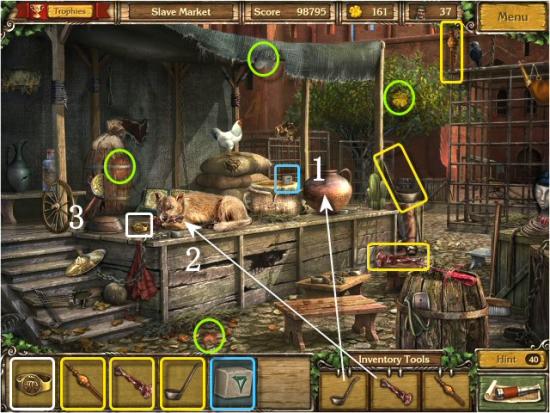
Find all the available items. Use the Ladle on the Pot (1), use the Bone on the Dog (2) and click on the Bowl (3) to reveal the Puzzle Piece and the Ring and then continue to the Harem. Inventory Items: Bone, Ladle, Flute.
Find all the available items, click on the Rug (1) to reveal the Manhole Cover and then click on the Lantern (2). When complete, click on the front of the Lantern to reveal the Puzzle Piece and then continue to the Bazaar. Inventory Items: Oil Can.
The object is to light all the Sections of Glass on the Lantern. Click on a Section of Glass to light the adjacent sections; clicking on a section that is adjacent to one you’ve already lit will dim it again. Work around the Sections of Glass until all sections are lit.
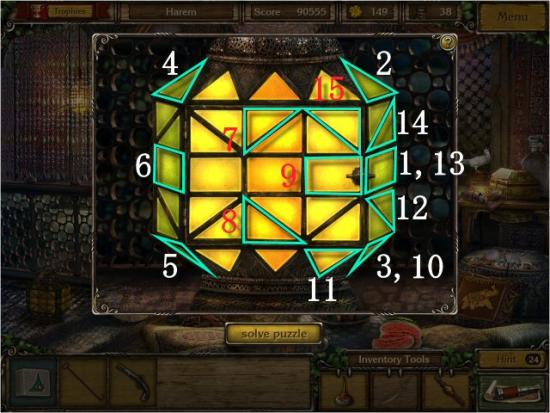
Click on the following for the video solution.
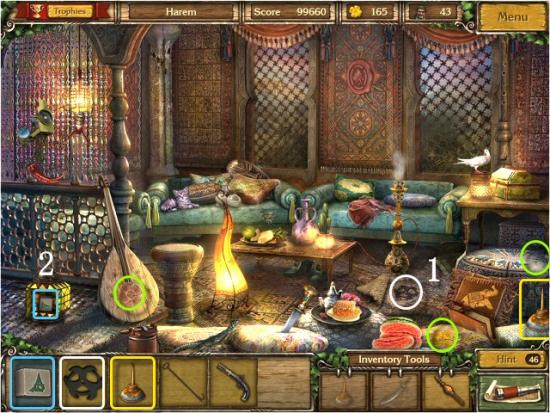
Find all the available items, use the Flute on the Snake (1) and click on the Tea Set (2) to reveal the Compact and the Newspaper and then return to the Harem. Inventory Items: Scimitar. Lost Item: Bob’s Dice.
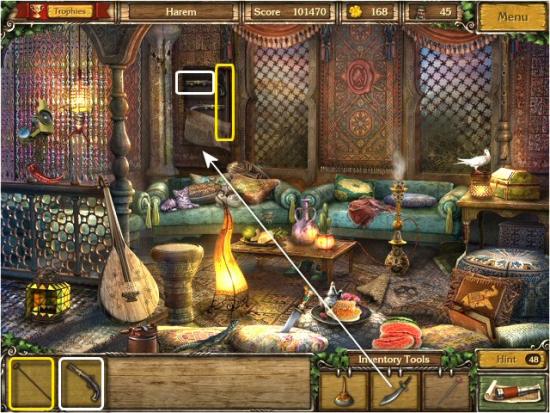
Use the Scimitar on the Tapestry to reveal the Pistol and the Long Hook and then return to the Harem. Inventory Item: Long Hook.
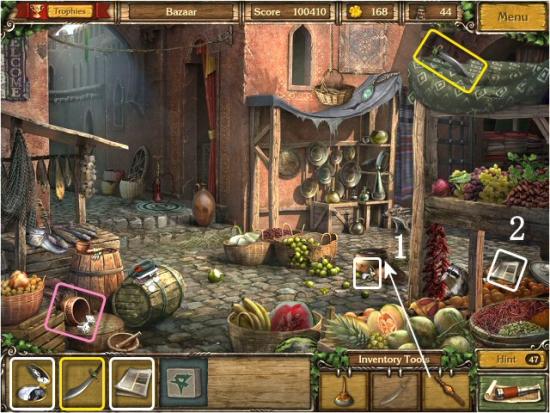
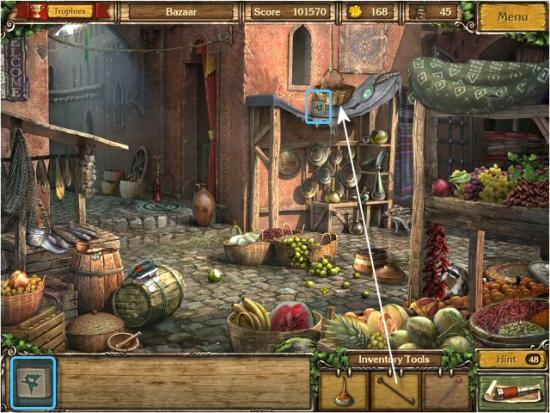
Use the Long Hook on the Basket to reveal the Puzzle Piece and then continue to the Observatory Yard.
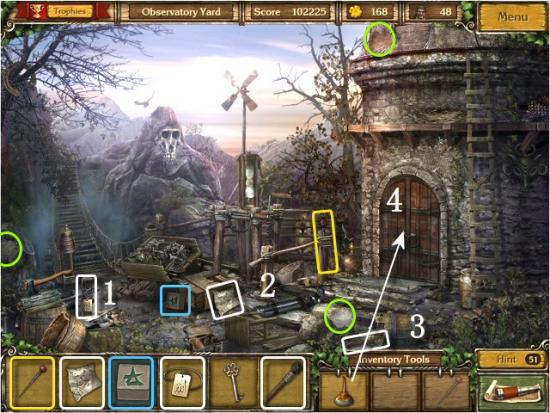
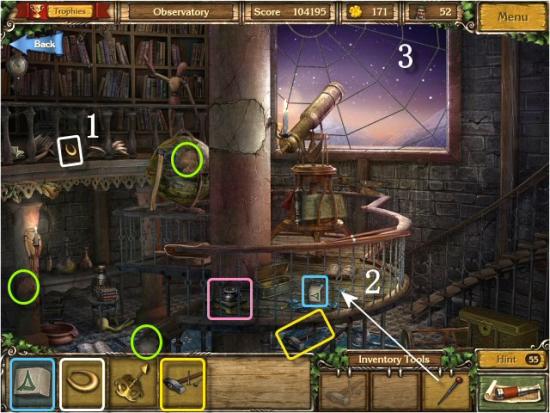
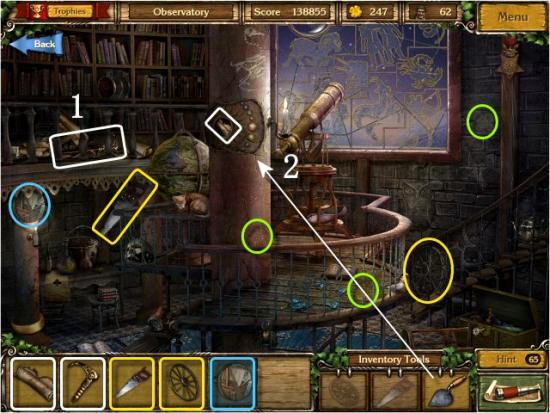
Find all the available items. Click on the Tablecloth (1), Telescope (2) and Bucket (3) to reveal the Logbook Page, Muslim Medallion and Torch and then use the Oil Can on the Door (4). Inventory Item: Pin.
Find all the available items. Click on the Book (1) and use the Pin on the Balloon (2) to reveal the Gold Earring and the Puzzle Piece and then click on the Window (3). Inventory Item: Hammer and Nails. Lost Item: Mr. Newell’s Inkwell.
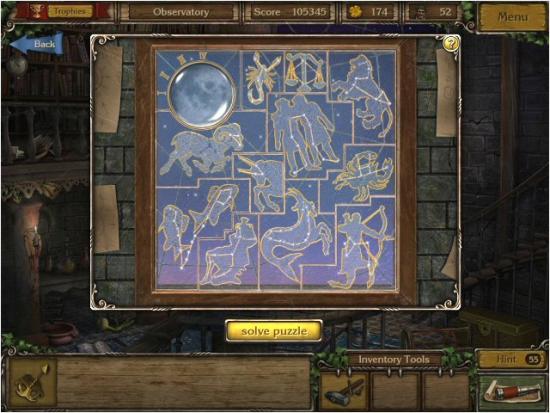
The object is to restore the Constellations in the Stained Glass Window. Click and drag to place each piece.
Use the Hammer and Nails on the Ladder Rung (1), click on the Nest (2) to reveal the Key and then return to the Observatory. Inventory Item: Key.
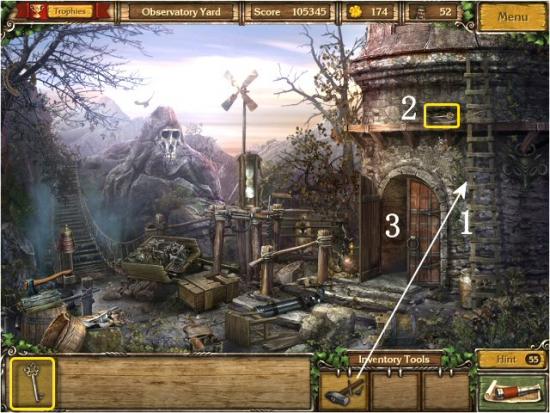
Use the Key on the Chest to reveal the Manhole Cover Key.

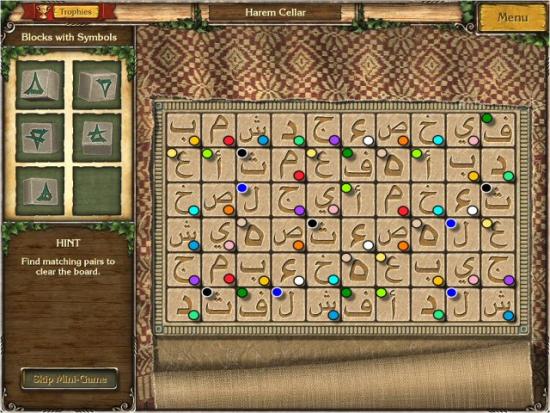
Find all the Matching Pairs. Note that there are 4 each of 15 different Symbols. Click on one Symbol and then click a matching Symbol to eliminate those 2 Blocks. Note this puzzle is always the same.
Place the Puzzle Pieces (1) on the Board (2). The object is to rearrange all the Green Symbols so that they fall on their matching square and turn Yellow (3). Most of the Symbols are already near their Matching Square and only require moving one out of the way, moving the correct one in and moving the other into its nearby Square. There are a couple that need to be moved across the board; the rest are very simple. Click on a Green Symbol and then click on an Empty Square to move it; once placed correctly, they will lock in place. Collect the Medallion (4).
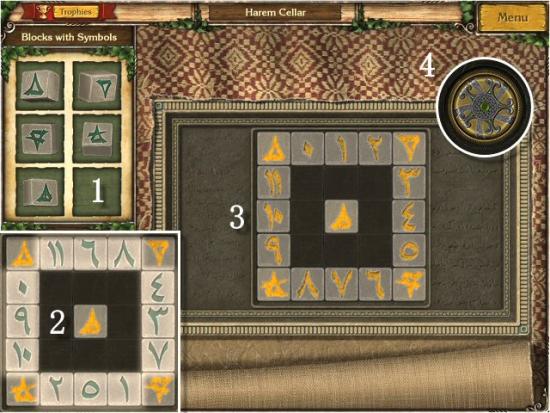
Click on the following for a video solution. Note that there isn’t one correct solution; however, solving this puzzle is simply a matter of navigation, rather than logic.
Shooting Gallery Minigame 5
See the information and video example, at the end of Episode 1, for how to play.
To begin the Secret Mission, click on the Ship on the Main Menu screen. If you exit the game, after you begin, remember to do this each time you continue your game. Lost Items: Thomas’ Sextant at the Mansion, Samantha’s Pearl at the Apothecary, Miss Amelia’s Jewelry Box at the Antique Shop.
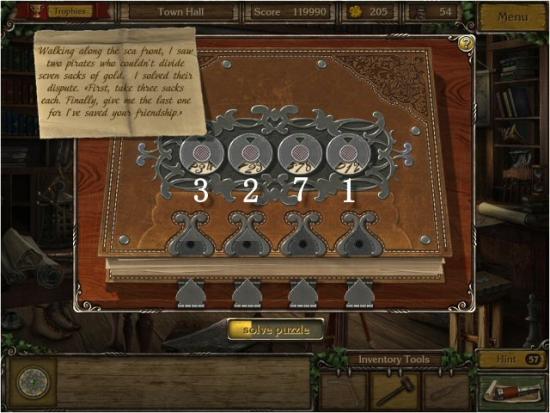
Find all the available items. Use the Paper on the Diary and solve the Code to reveal the Medallion. When complete, continue to the Mansion.
The Message is not a riddle, but it does contain the numbers you need for the Code – 2, 7, 3 and 1. These are the order of the numbers that appear in the Message; however, they aren’t in the correct order. The correct order is 3, 2, 7 and 1. Click on each Dial (click on the number) until you enter all 4 numbers.
Find all the available items and then enter the Cabinet. Lost Item: Thomas’ Sextant
Find all the available items. Use the Gavel on the Piggy Bank (1), click on the Lid to the Gun Case (2) and click on the Waste Basket (3) to reveal the Cufflink, Brandy Glass and Medecine Bottle. Inventory Items: Screwdriver, Pocket Knife.
Use the Knife on the Pillow (1) and the Screwdriver on the Drawer (2) to reveal the Puzzle Piece, Condolence Letter and Keys and then continue to the Apothecary.
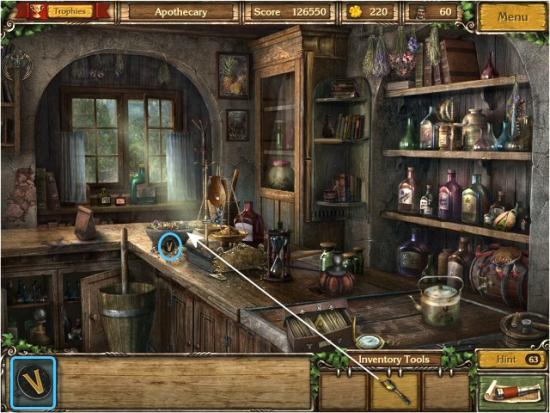
Find all the available items. Use the Keys on the Locked Cabinet (1) to reveal the Medecine Bottle and then click on the Torn Prescription (2). When complete, click on the Prescription and then continue to the Antique Shop. Inventory Items: Key, Tile. Lost Item: Samantha’s Pearl.
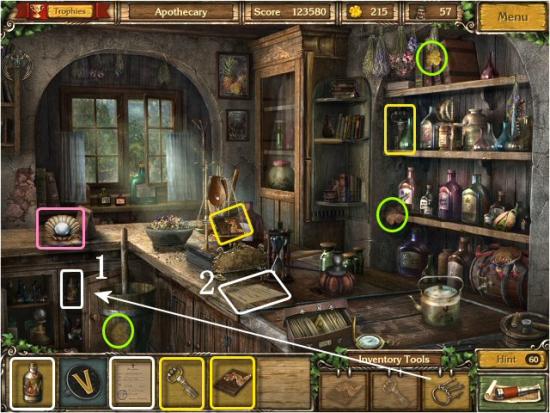
The object is to reassemble the Prescription. Click and drag the pieces into position; when placed correctly, they will lock in place.

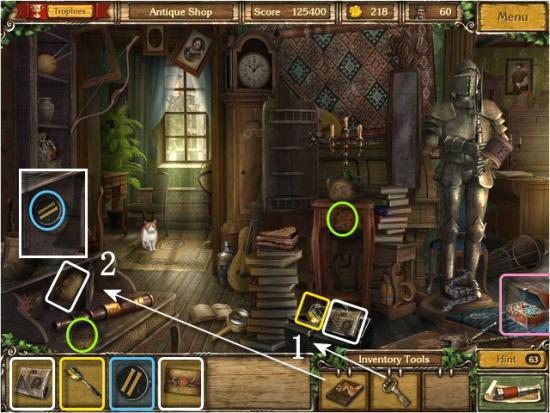
Find all the available items. Use the Key on the Travel Case (1) to reveal the Newspaper and the Scoop and then use the Tile on the Desk Compartment (2). When complete, click on it to reveal the Letter and the Puzzle Piece (remove the Letter to reveal the Puzzle Piece) and then return to the Apothecary. Inventory Item: Scoop. Lost Item: Miss Amelia’s Jewelry Box.
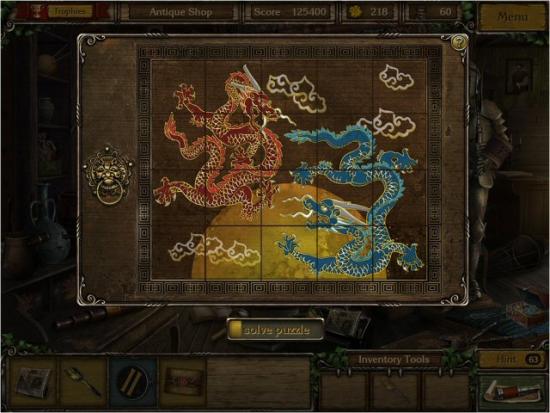
The object is to rearrange the Tiles to restore the Dragon Image. Click on a Tile and then click on the adjacent empty space to move it. Continue moving the Tiles around until the Image is correct. The solution is always the same; however, the initial configuration is completely random so there isn’t a single solution.
Use the Scoop on the Potpourri to reveal the Puzzle Piece.
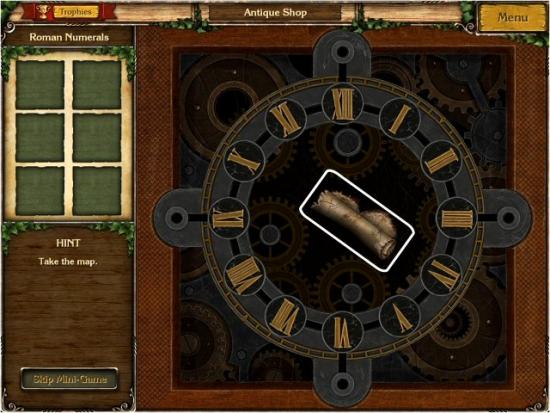
Place the Puzzle Pieces on the Clock (in any open space) and then rearrange the Numbers so they’re in the correct order. Use the 4 Slots (top, bottom and sides) to move numbers out of the way so you can move others. When complete, collect the Map Piece.
Author’s note: Normally speaking, this type of puzzle should only be a little challenging. Unfortunately, this puzzle’s mechanics are extremely tedious as you can only move each number one space. You must click on it, place it and then click on it again before you can move it further. You may want to skip it; however, you won’t receive the 7,500 points for completing the Episode.
The best strategy would be to place the 5 and 7 so that you have a consecutive sequence (moving clockwise, from the bottom right) of 5, 6, 7 and 8 at the bottom, place the 9 at the top and then place the 2 and 12 in the remaining 2 spots at the top left and right. Move the 9 and 10 into the spaces above and to the right of their positions and move the numbers around, moving the 9 and 10 out of their holding positions when you have a long sequence of 5, 6, 7, 8, 9 and 10. From there, move the other numbers around the clock, moving them into the holding positions, as needed, until you get the complete clock sequence. Due to the nature of this puzzle’s mechanics, neither a list of moves or a video was possible…a video would have been over 15 minutes long, even moving very quickly.
Shooting Gallery Minigame 6
See the information and video example, at the end of Episode 1, for how to play.
Watch the ending movie and credits. Congratulations! You’ve completed Golden Trails 2: The Lost Legacy.
You now have access to Unlimited Mode. Click to access all 39 Scenes and try to find all the objects in the quickest time.
To begin the Bonus Chapter, click on Bonus Content and then click on Play (in the center of the screen). If you exit the game, after you begin, remember to do this each time you continue your game.
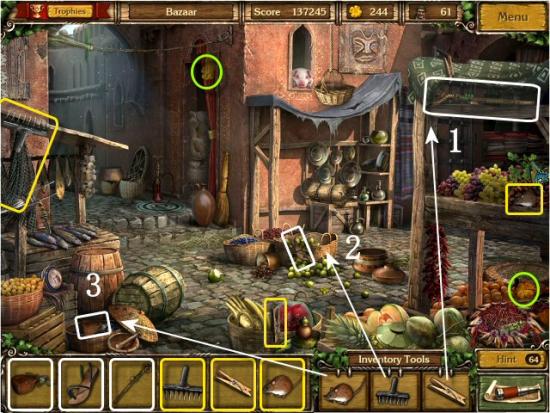
Find all the available items. Use the Mouse on the Falcon (1), the Rake on the Basket (2) and the Clothespin on the Awning (3) to reveal the Purse, Sandal and Staff and then continue to the Observatory Yard.
Find all the available items and then enter the Observatory.
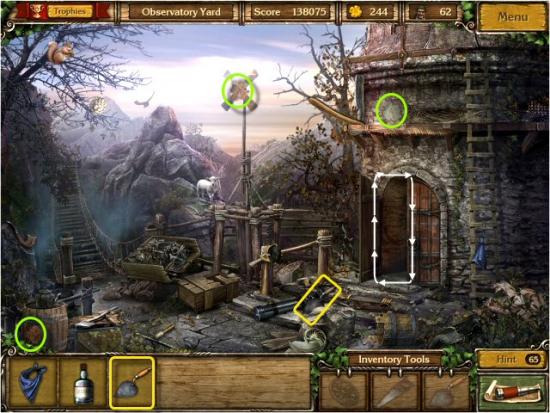
Find all the available items. Click on the Scrolls (1) to reveal the Cane and then use the Trowel on the Column (2). When complete, click on the center of the Sun to reveal the Map Piece.
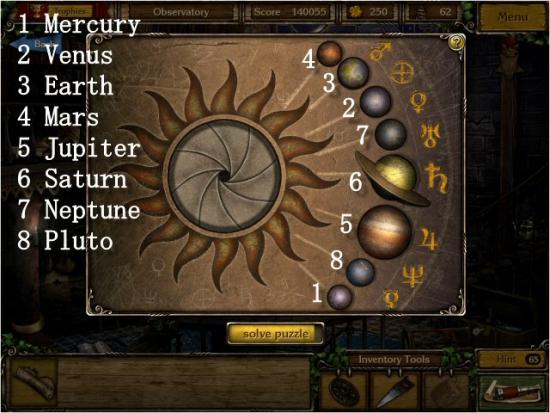
The object is to click on the Planets, in order, from nearest to farthest from the Sun, and light up their Planetary Symbols. Note that the game developer included Pluto, which is no longer a planet.
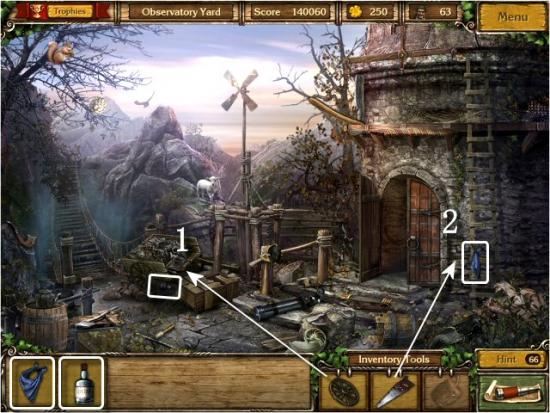
Use the Wheel on the Cart (1) and the Saw on the Ladder (2) to reveal the Rum and Neck Cloth and then continue to the Bedouin Tent.
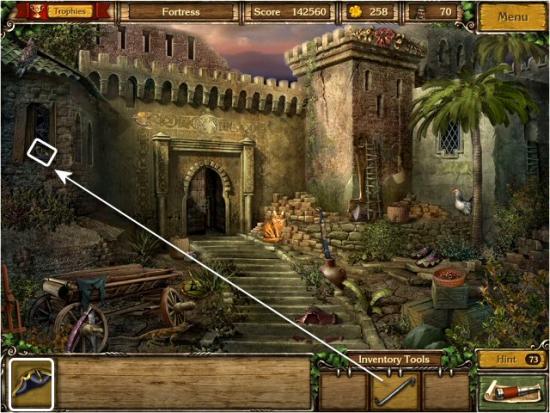
Click on the Pillow (1) to reveal the Bedouin Head Covering and use the Club on the Chest (2) to reveal the Model Ship and then continue to the Fortress.
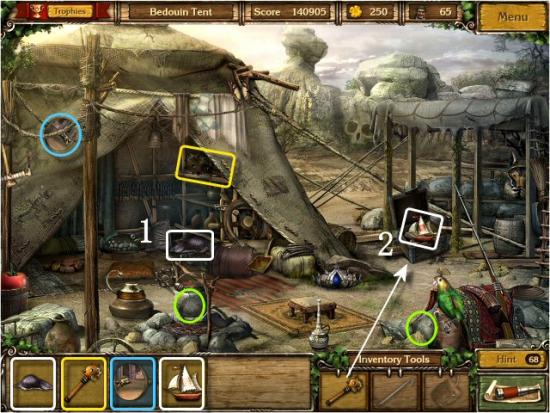
Find all the available items and then click on the Door.
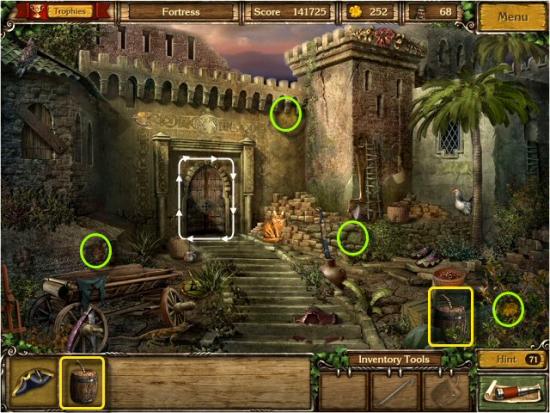
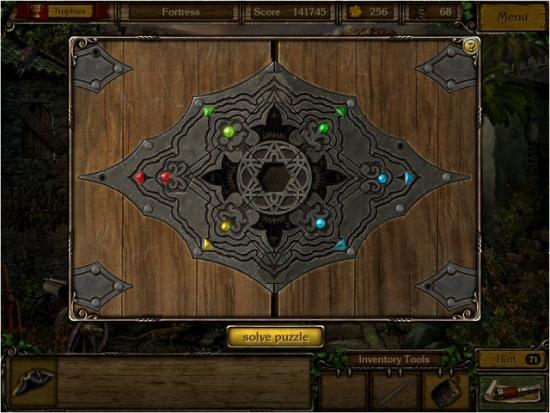
The object is to rearrange the Tiles to restore the Image. Click on a Tile and then click on the adjacent empty space to move it. Continue moving the Tiles around until the Image is correct. A good strategy for solving this puzzle would be to move the Tiles in triangular sections and then work around the perimeter until the a section of Tiles will fall into to line behind it. You may want to work on the 2 Tiles without jewels first, since they’re the farthest apart.
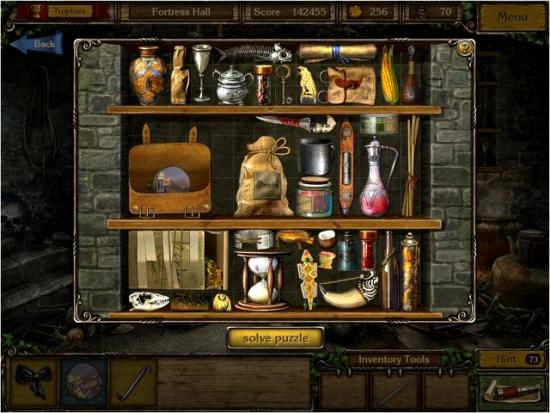
Find all the available items. Use the Gunpowder on the Barrels (1) to reveal the Black Bow and then click on the Shelves (2). When complete, collect the Puzzle Piece.
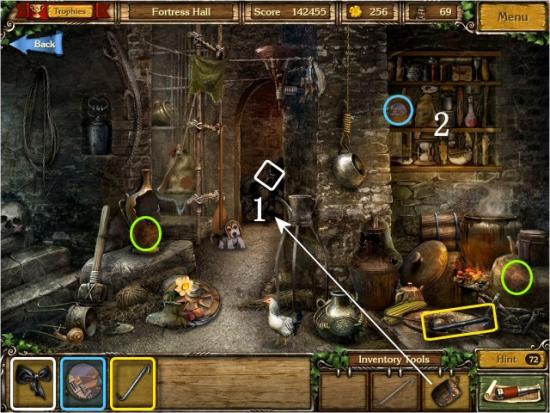
The object is to rearrange all the Items to reveal the Puzzle Piece. Click on a piece and move it anywhere it will fit into an open space. Remember that each item takes up a specific number of grids (these will be highlighted in yellow during gameplay), and that you can’t place items in mid-air. Note that there are many correct solutions.
Use the Crowbar on the Board to reveal the Hat.
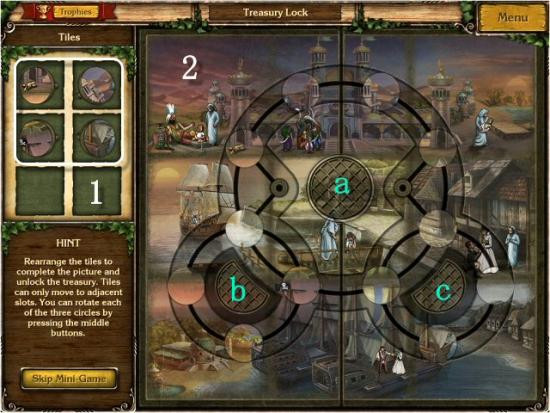
Place the Puzzle Pieces on the Board (1). The object is to align all the Circles to match the background Image (2). Click on a Circle and then click on an adjacent hole to move it. Click on the Center Buttons (a, b and c) to rotate each section. A good strategy would be to begin working with the 2 Towers at the center top. Once you have those 2 Circles in the correct positions, continue working on the other Circles, moving them out of the way as needed to move others.
Watch the ending movie. Congratulations! You’ve completed the Bonus Chapter of Golden Trails 2: The Lost Legacy.
In the Collector’s Edition you can click on Bonus Content for Wallpapers, The Making of, Shooting Gallery, Comprehensive Guide and Original Sound Tracks. These are unlocked throughout the game.
There are 5 types of Trophies (25 in total) and 3 Letters of Commendation for a total of 28 Trophies. Mouseover each one for a description; you can do this after you’ve received your first trophy and unlocked the Trophy Room.
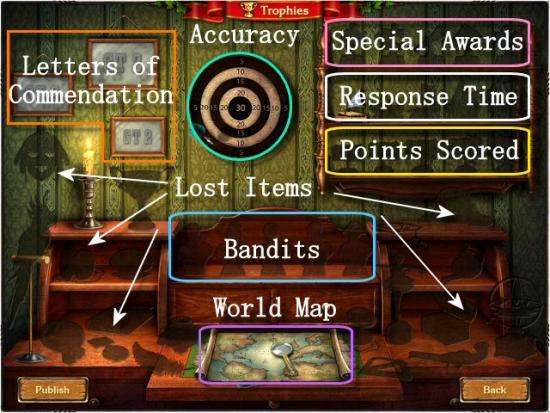
There are 19 Lost Items and they can be viewed in the Trophy Room. Before you collect them, you can mouseover them to get a description of where they’re located in the game. The items are listed in the order encountered in this walkthrough.
