
Grow A Garden 2 Base Price List
What's the most valuable crop?![Evomon Best Starter [Leafbun, Blazpup, or Bubble?]](/wp-content/uploads/2026/06/evomon-best-starter.jpg "Evomon Best Starter [Leafbun, Blazpup, or Bubble?]")
Evomon Best Starter [Leafbun, Blazpup, or Bubble?]
Grass-type, Fire-type, or Water-type?![Evomon Tier List [META and BEST Evomon]](/wp-content/uploads/2026/06/evomon-tier-list.jpg "Evomon Tier List [META and BEST Evomon]")
Evomon Tier List [META and BEST Evomon]
The Evomon dream team.
![[Roblox] Evomon Shiny Hunting Guide – Including Prismatic and Pris Shinies!](/wp-content/uploads/2026/06/evomon-shiny-hunting-guide.jpg "[Roblox] Evomon Shiny Hunting Guide – Including Prismatic and Pris Shinies!")
Ghost Encounters: Deadwood Walkthrough
Welcome to the Ghost Encounters: Deadwood walkthrough on Gamezebo. Ghost Encounters: Deadwood is a Hidden Object Game created by Anarchy Enterprises. This walkthrough includes tips and tricks, helpful hints and a strategy guide on how to complete Ghost Encounters: Deadwood.


- Prefer Gamezebo on Google

Game Introduction – Ghost Encounters: Deadwood
Welcome to the Ghost Encounters: Deadwood walkthrough on Gamezebo. Ghost Encounters: Deadwood is a Hidden Object Game created by Anarchy Enterprises. This walkthrough includes tips and tricks, helpful hints and a strategy guide on how to complete Ghost Encounters: Deadwood.
General Tips
This hidden object game requires visiting several locations and using inventory items to advance play.
Play is mostly linear although there are some options for the order in which to explore locations.
Begin play by selecting a mode:
Casual – Hint and Skip buttons recharge faster. Active zones are highlighted by sparkles.
Advanced – Hint and Skip buttons recharge slower. Active zones are not indicated.
Modes can only be changed by creating a new profile.
Options – The “Eye Candy” option refers how sharp the graphics are. The lower the setting the faster it may play on slower computers.
The Journal opens and glows when new information is added.
Always move the cursor around a scene. Watch the cursor to see if it changes into a hand to interact with objects or magnifying glass for to inspect an area. Gears indicate a task that needs to be performed with an inventory item. A blue hand means a special sense is being used to obtain clues.
Walkthrough Tips
CAPITALIZED inventory items are meant to make it easier to find where this guide may differ from your own play. Inventory items are highlighted in blue with a white border in the screenshots.
If you don’t have an item referenced in this guide, click and hold the “Ctrl” key and then press the “F” key. This opens a Find area in your web browser. Type in the name of the object as it appears in this guide to find where else it’s referenced.
To minimize back and forth moves, all available inventory items in a scene are picked up when first encountered.
Chapter 1: Getting through the Gate

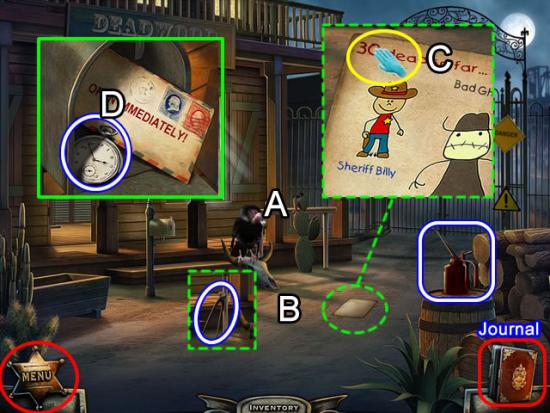
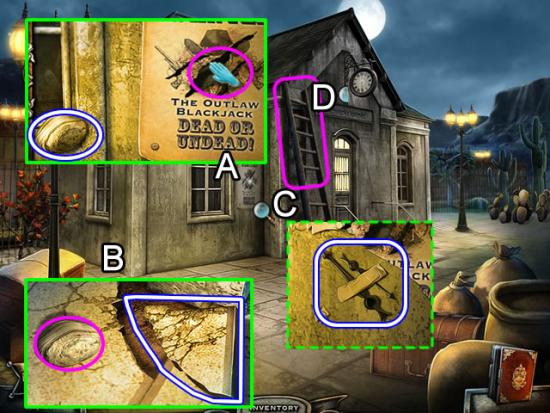
Town Entrance
Refer to the Journal for more story information. It opens and glows when new material is added.
Click the Menu badge to change options or return to the main menu.
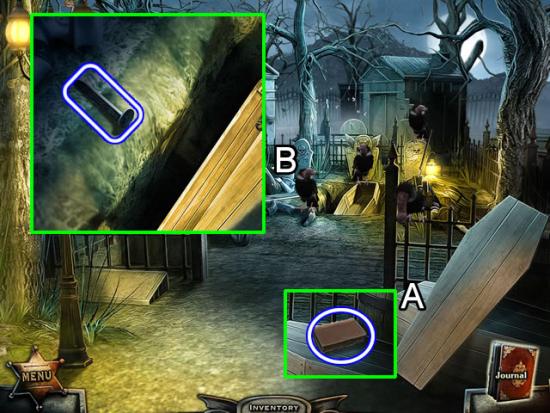
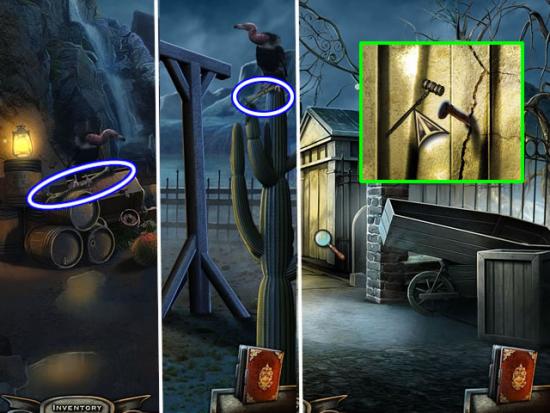
Pick up the OIL CAN for inventory.
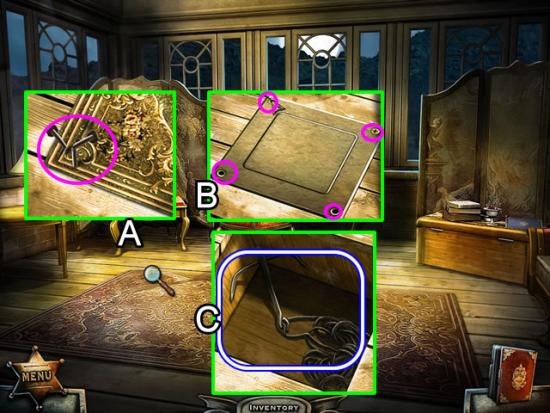
Scare away the buzzard (A). Take the NAIL PULLER the buzzard was hiding (B) and look closer at the dropped piece of paper.
Drag the cursor over the note (C). The cursor turns into a blue hand indicating a paranormal sense is activated, in this case by the number “30”.
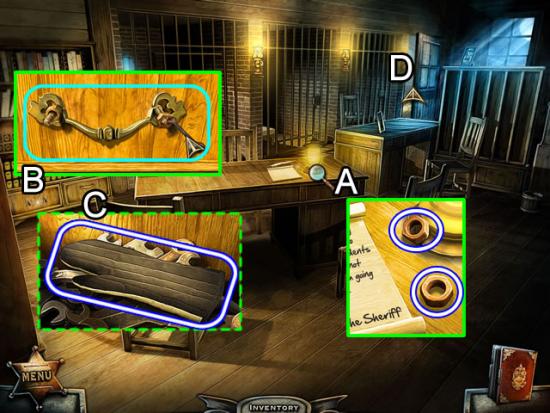
Examine the mailbox. Use the OIL CAN to open the stuck door. Take the POCKET WATCH. Read the Sheriff’s letter.
Enter the saloon.
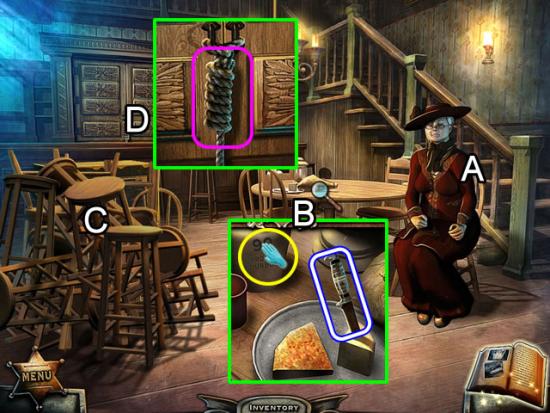
Saloon
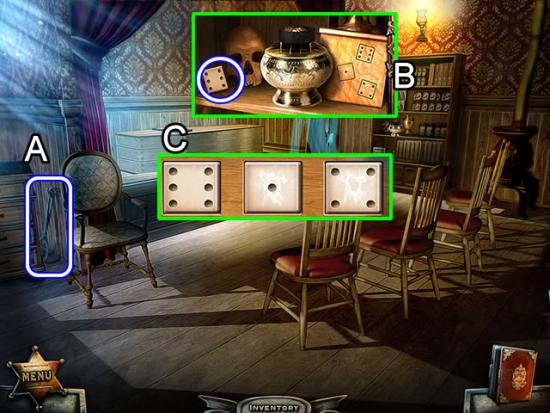
Speak to Granny (A) to obtain an objective.
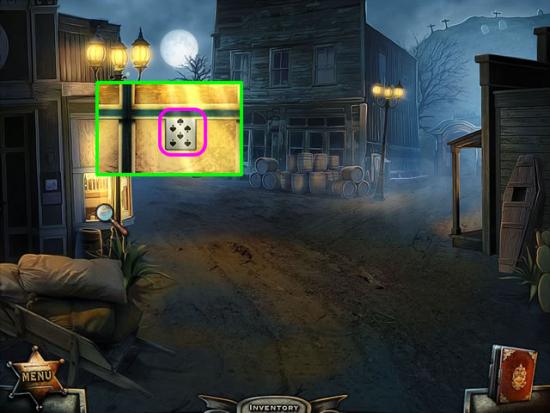
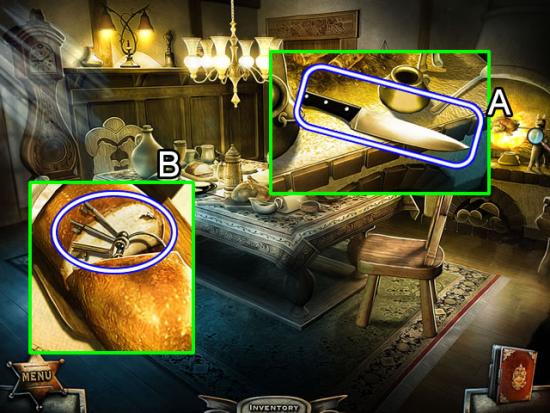
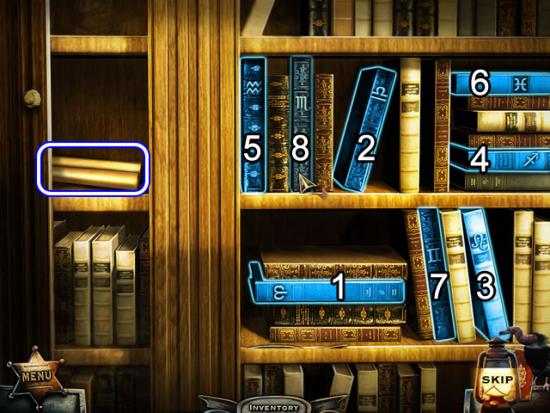
Examine the contents on the table (B). Get a sense from the number “90”. Take the KNIFE.
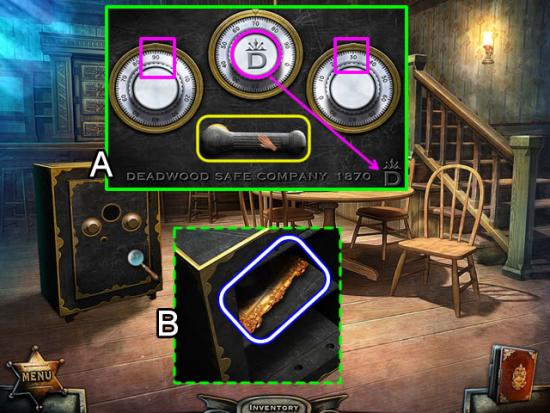
Move the pile of stools (C) to uncover a safe missing a dial and handle.
Look closer at the cabinet on the back wall (D). Slit the rope with the KNIFE.
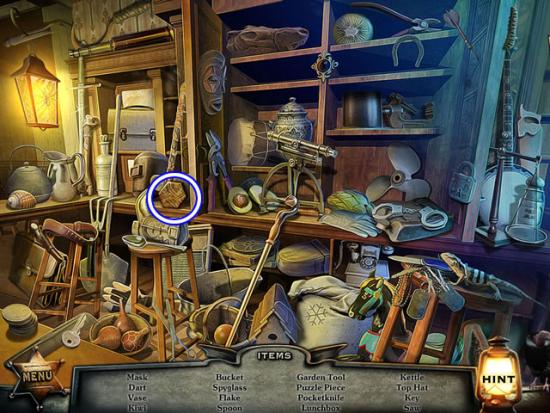
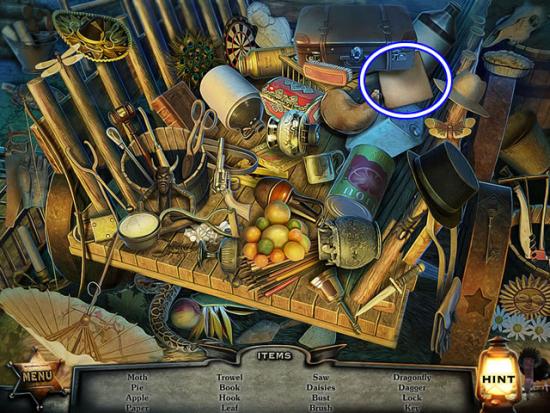
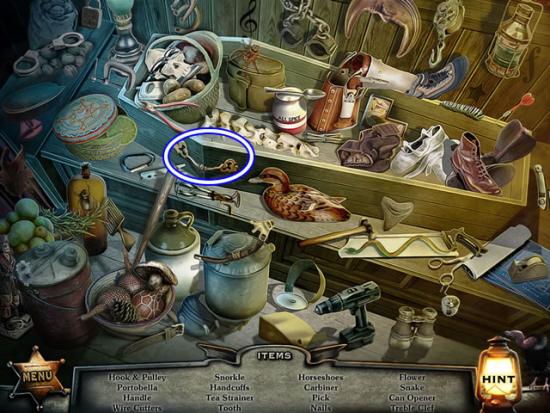
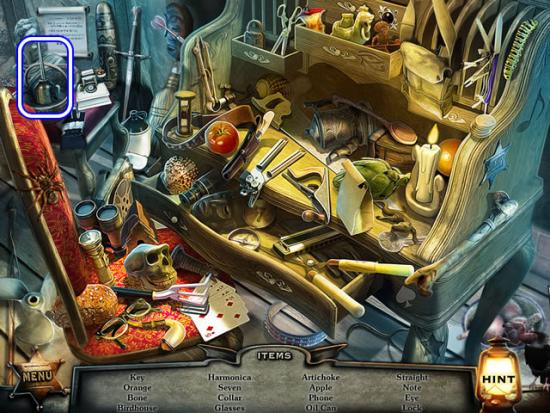
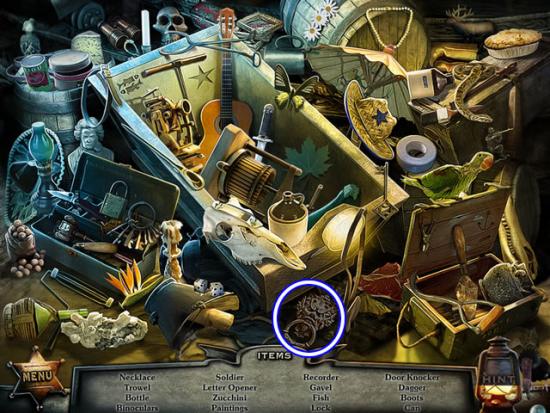
Play the hidden object scene.
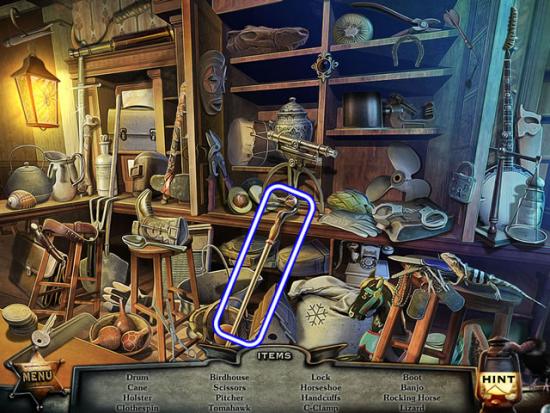
Find the listed objects.
The CANE goes to inventory.
Give the cane to Granny. Follow her upstairs.
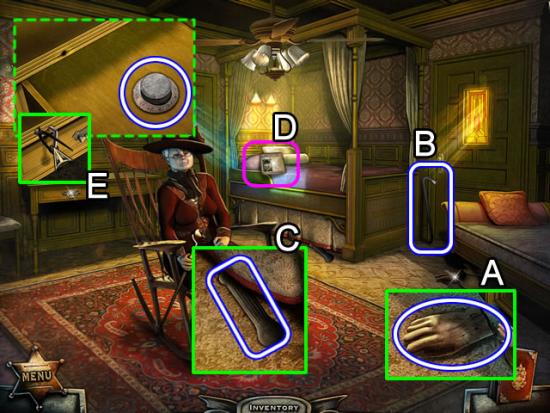
Saloon – Bedroom
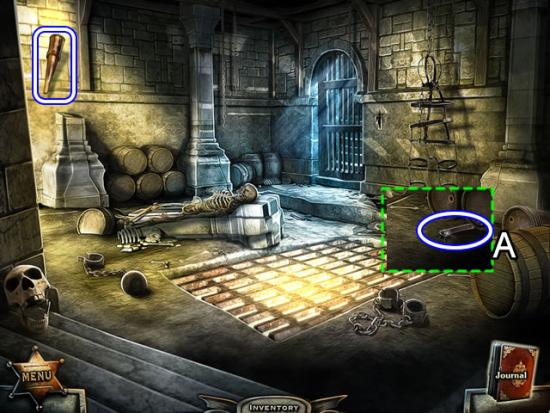
Take the GLOVE from under the couch (A).
Zoom in and take the CROWBAR leaning against the door (B).
Grab the SAFE HANDLE from under the bed (C).
Read the newspaper on the bed (D).
Look closer at the desk drawer (E). Use the NAIL PULLER to remove the nail. Open the drawer and take the SAFE DIAL.
Go downstairs.
Saloon
Examine the safe.
Place the SAFE DIAL and SAFE HANDLE in the empty slots.
Enter the two numbers “sensed” earlier (30 and 90) on the two side dials. Deduce that the design on the middle dial should be in the same position as the logo on the bottom right.
Click the safe handle to open the safe.
Take the PORTRAIT (B).
Return to the bedroom.
Saloon – Bedroom
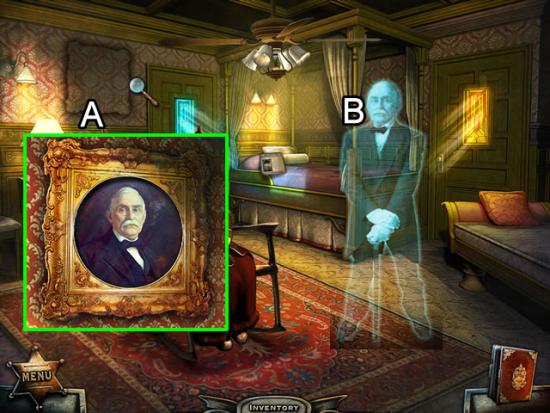
Look at the area above the desk (A).
Place the PORTRAIT in the space.
Receive the GATE KEY and a warning from the spirit (B).
Go back downstairs.
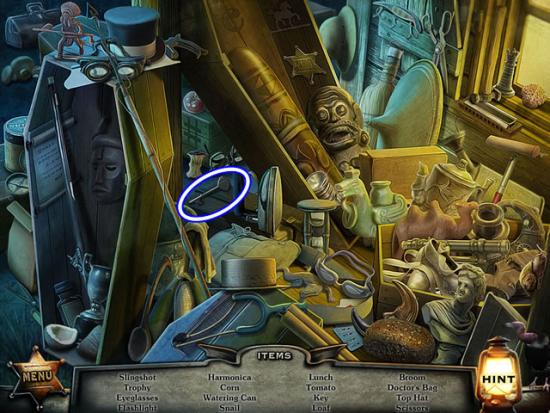
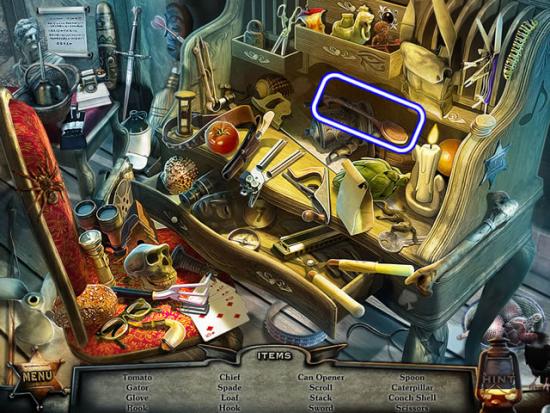
Play the hidden object scene.
Find the listed objects.
The PUZZLE PIECE goes to inventory.
Exit the saloon.
Town Gate
Speak with little Billy.
Ignore all of the warning signs on the gate and insert the GATE KEY in the lock.
Chapter 2: Helping the Town Folk
Main Street – Sheriff’s Office
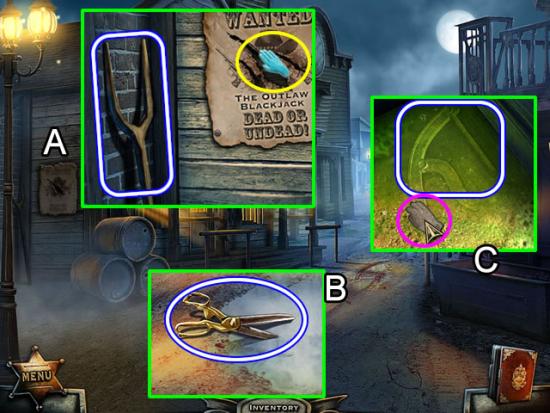
Zoom in on the wanted poster on the side of the sheriff’s office (A).
Sense what Blackjack looks like. Take the PITCHFORK.
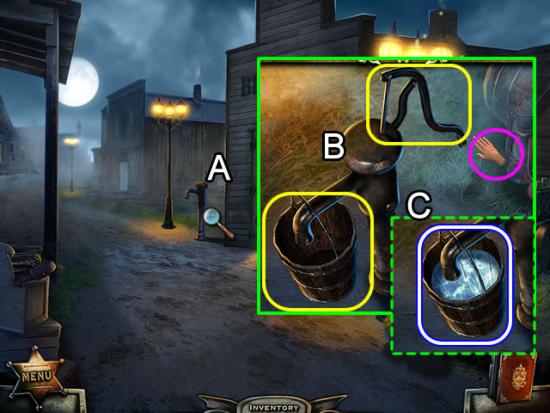
Pick up the SCISSORS from the water puddle (B).
Use the GLOVE to retrieve the PUMP HANDLE from the gunky water in the trough.
Go forward.
Crossroads
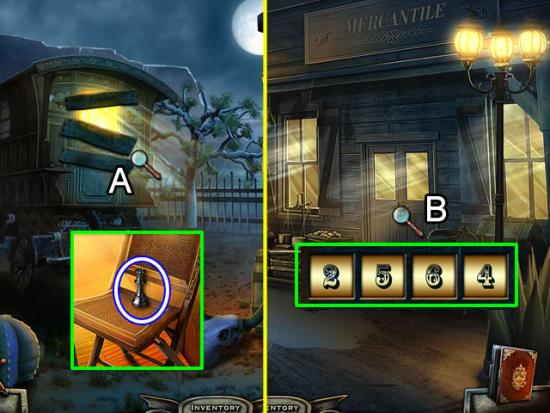
Look closer at the lit window (A). Sense the numbers 2-5-6-4. Make a note of them.
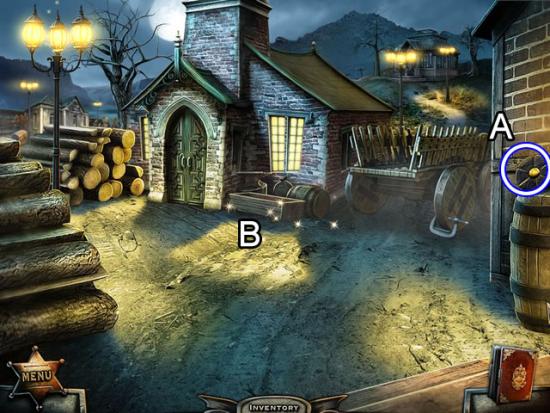
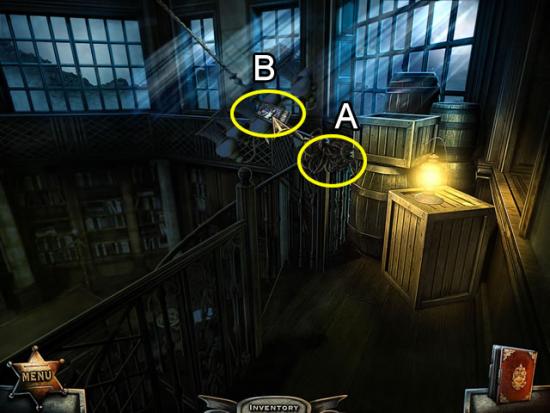
Examine the barrels (B). Use the CROWBAR to pry off the lid. Take the SPOKES.
Head right to the cemetery.
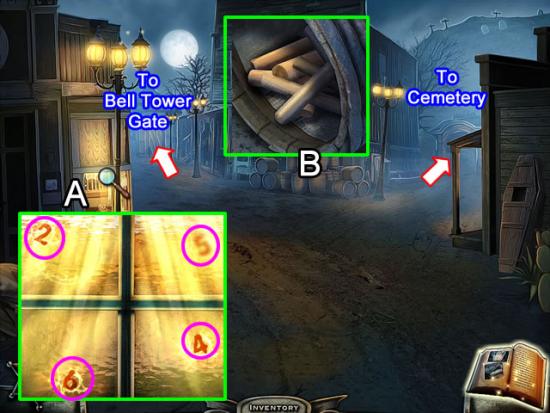
Outside the Cemetery
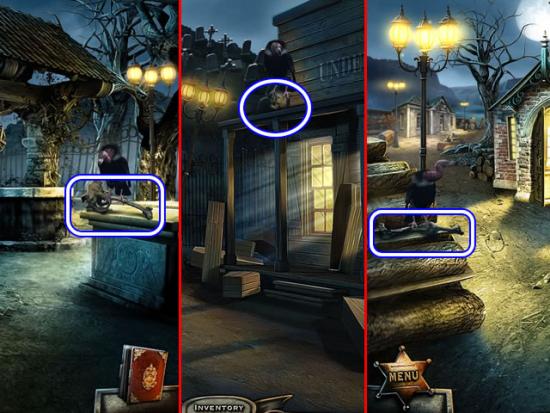
Zoom in on the coffin outside of the undertakers (A).
Use the CROWBAR to pry open the lid of the coffin and speak with the undertaker. Get your next objective.
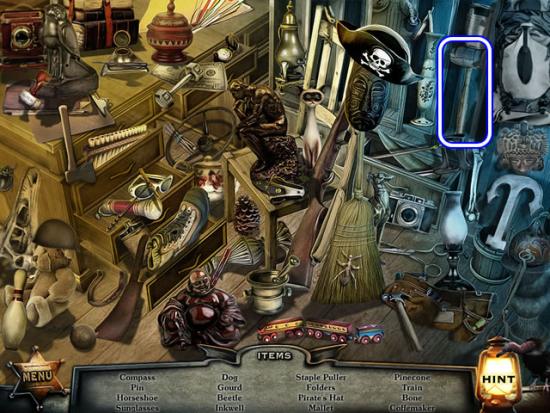
Play the hidden object scene (B).
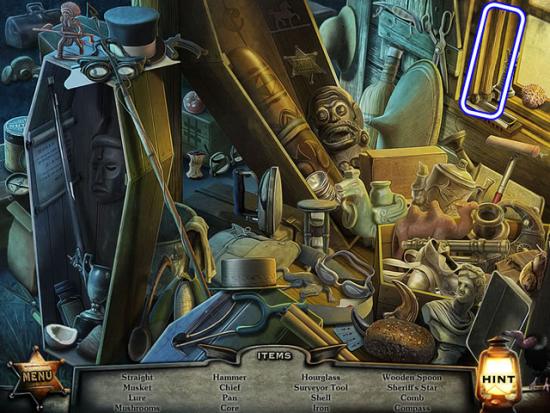
Find the listed objects.
The Hammer goes to inventory as the BLACKSMITH’S HAMMER.
Go down once to return to the crossroads. Go left.
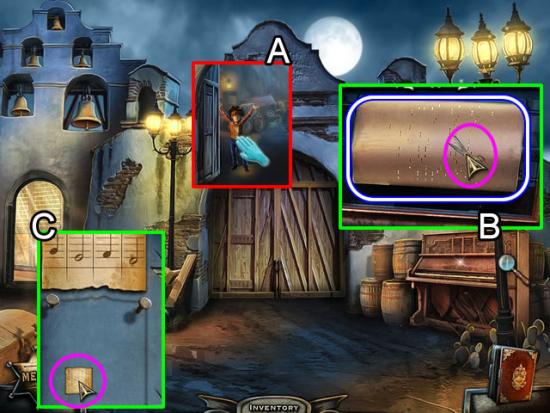
Bell Tower Gate
Sense little Billy before the gates slam shut (A).
Examine the player piano (B). Use the SCISSORS to obtain the PLAYER PIANO ROLL.
Enter the bell tower (C). Place the PLAYER PIANO ROLL next to the bells to open a puzzle.
The goal is to find the correct combination of bells to open the gate.
Correctly striking a bell will turn the hole on the piano roll green. An incorrect strike resets the puzzle.
Solution:
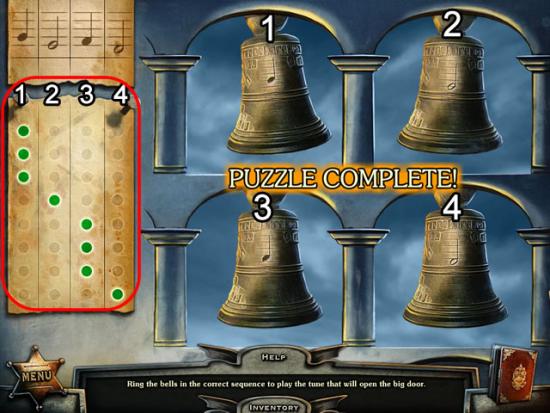
Refer to column numbers on the red highlighted player roll and the numbered bells to see the order in which to strike them 1-1-1-2-3-3-3-4.
Enter the gates.
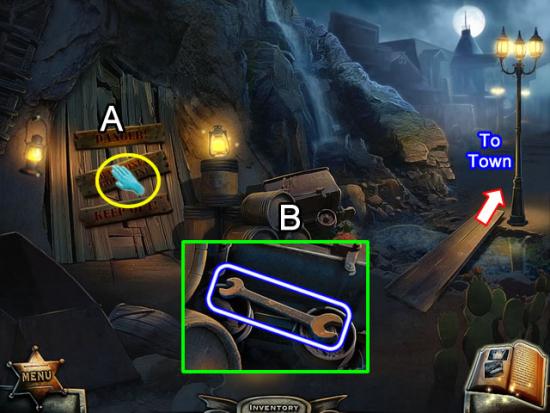
Mine
Sense the tragedy that occurred in the mine (A).
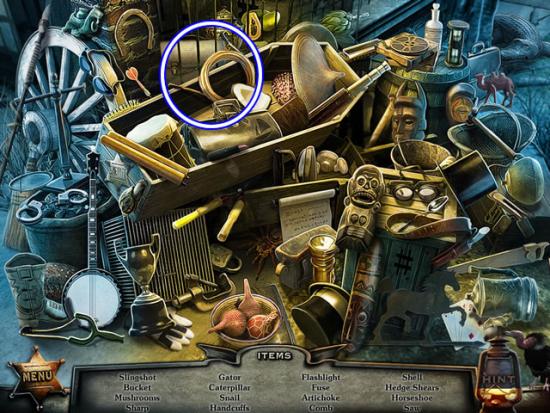
Look closer at the old barrels (B). Take the WRENCH.
Use the board to cross the stream to access more of the town.
Outside the Blacksmith’s Shop
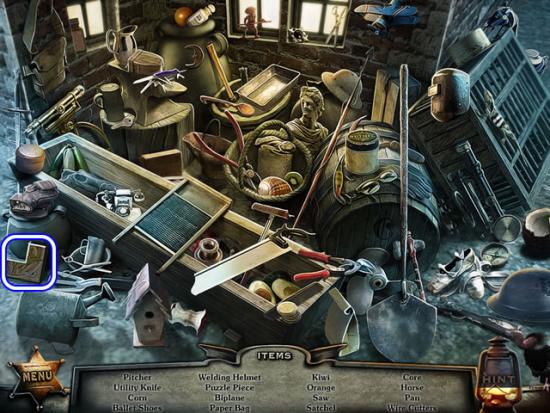
Use the PITCHFORK to uncover the hidden object scene inside of the hay roll.
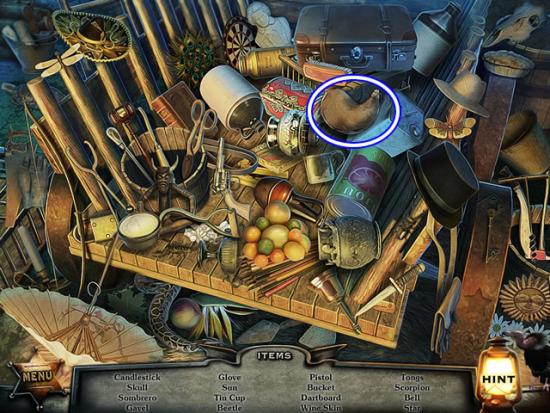
Find the listed objects.
The Wine Skin goes to inventory as an EMPTY WINE SKIN.
Enter the Blacksmith’s shop.
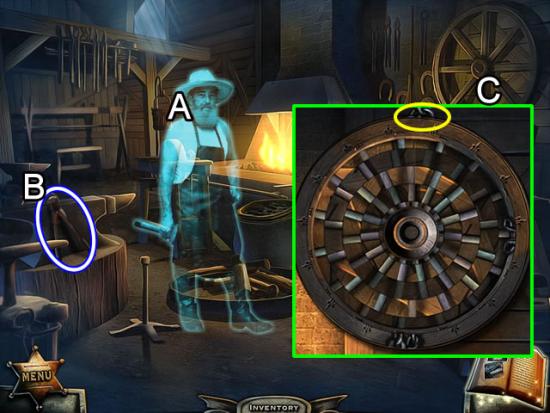
Blacksmith’s Shop
Discuss what the blacksmith needs to be done (A).
Pick up the BOLT CUTTERS beside the anvil (B).
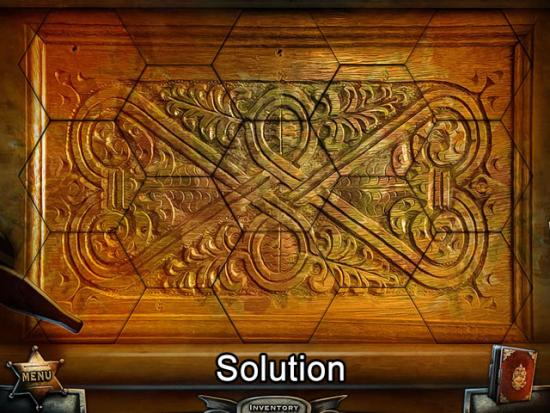
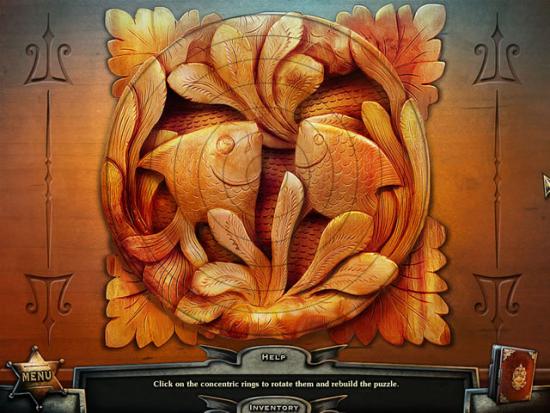
Zoom in on the wagon wheel (C). Add the SPOKES to the wheel to open a puzzle.
The goal is to rotate each ring until all of the spokes and the wheel hub are in alignment.
Each ring works independently. A correctly positioned ring lights up but does not lock into place. Exiting the puzzle resets the rings.
The best strategy is to begin with the outside ring and work toward the center. Align the two outer rings with the fixed chain element at the top (yellow). This shows the spoke placement to match. Continue to click each ring until they match the first two.
The hub is the last to be matched. Rotate the small inner hub based on the orange color.
Solution:
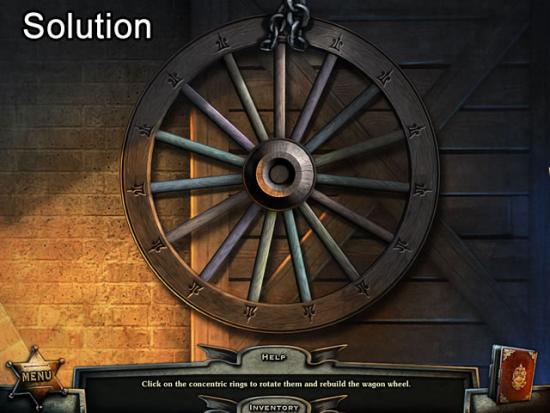
Take the completed WAGON WHEEL from the wall.
Exit the shop and go left.
Stagecoach
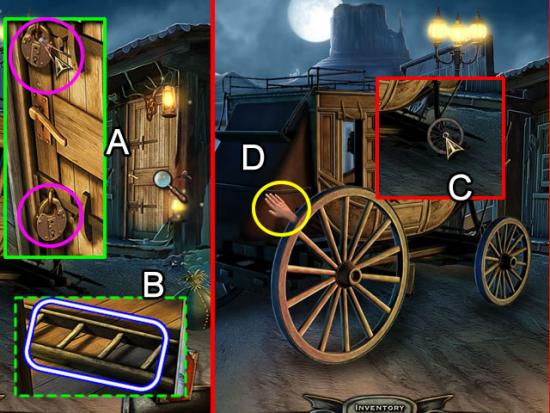
Inspect the door on the shack in front of the stagecoach (A).
Use the BOLT CUTTERS to remove the two padlocks (pink).
Open the door. Take the LADDER (B).
Replace the missing WAGON WHEEL (C) on the stagecoach.
Push the coach out of the middle of the road (D).
Go forward.
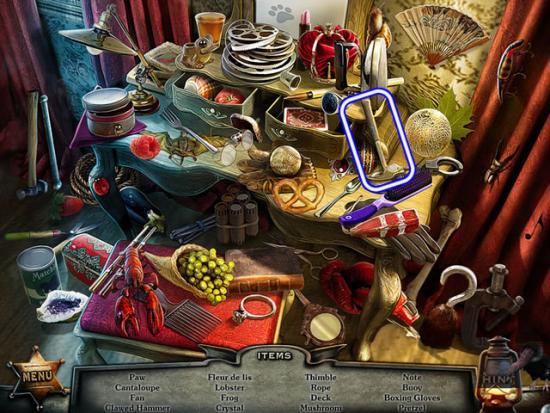
Outside the Mercantile
Play the hidden object scene
Find the listed objects.
The Bucket goes to inventory as an EMPTY BUCKET.
Go forward toward the hanging man.
Outskirts of Town
Zoom in on the wagon door (A).
Use the BLACKSMITH’S HAMMER to remove the boards covering the door.
Move the junk away inside the wagon’s entry to uncover a MISSING CHESS PIECE (1/2).
Return to the mercantile.
Outside the Mercantile
Examine the lock (B). Click the tumblers until they match the number from the window (2564).
Speak to the patron to see what she needs.
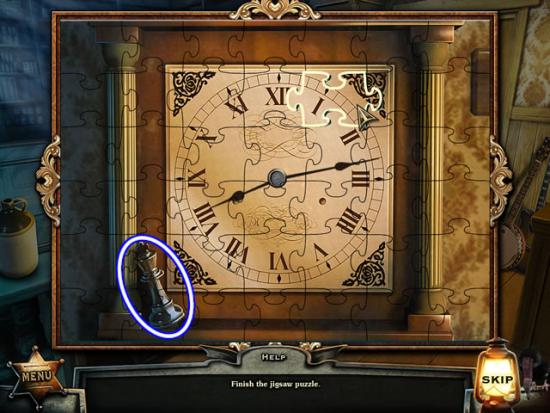
Examine the top of the grandfather clock to open a jigsaw puzzle.
The goal is to recreate the clock face.
Start by finding the outside edges and corners. A correctly placed piece snaps into position.
Solution:
The MISSING CHESS PIECE (2/2) automatically goes to inventory.
Zoom in on the chessboard on the counter.
Place the two MISSING CHESS PIECES on the board to open a puzzle.
The goal is to swap the pieces to recreate the chessboard.
The best strategy is to swap the pieces with the gold borders to form the edges of the board. Next match colors and finally chess pieces.
Solution:
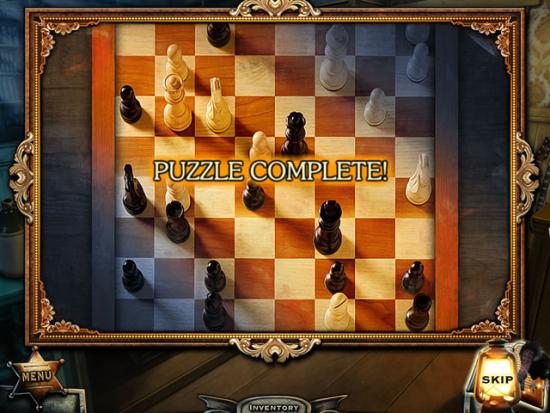
Receive the SHEARS.
Exit the mercantile.
Return to the hanging man.
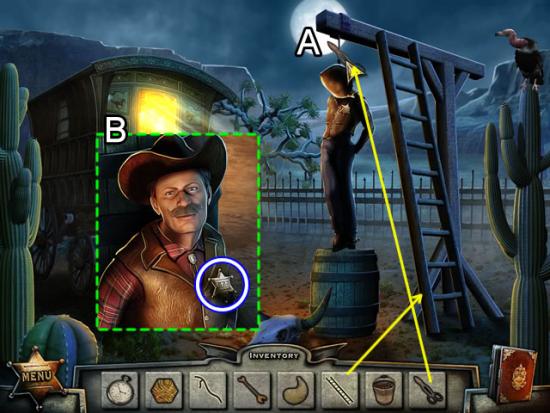
Outskirts of town
Place the LADDER against the scaffold and use the SHEARS to cut the noose (A).
Speak to the sheriff (B).
Receive the SHERIFF’S STAR.
Go down the street to the front of the mercantile.
Mercantile
Play the hidden object scene.
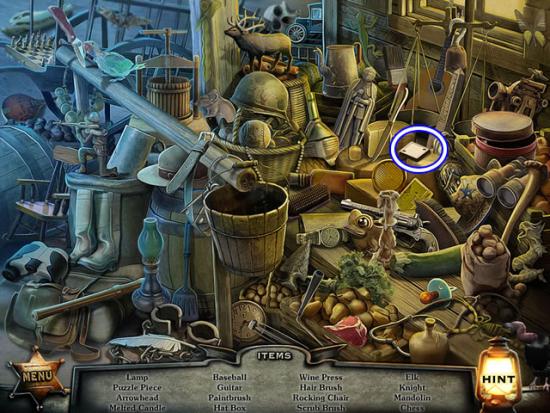
Find the listed objects.
The Puzzle Piece goes to inventory as DICE PUZZLE PIECE (1/2).
Go down twice to the front of the blacksmith’s shop.
Outside the Blacksmith’s Shop
Play the hidden object scene by the wagon.
Find the listed objects.
The Paper goes to inventory as an UNSIGNED CERTIFICATE.
Inspect the broken pump (A).
Attach the PUMP HANDLE and place the EMPTY BUCKET to the spout (B).
Press the handle. Take the BUCKET OF WATER (C).
Enter the blacksmith’s shop.
Blacksmith’s Shop
Go to the forage.
Pour the BUCKER OF WATER on the fire.
Take the piece of CHARCOAL.
Exit the shop.
Go up to the old stagecoach.
Stagecoach
Examine the door.
Place the PUZZLE PIECE in the empty slot to open a puzzle.
The goal is to rotate the pieces to form a design.
The best strategy is to work with the outside pieces first. Next match the pieces based on color and pattern.
Solution:
Enter the stagecoach.
Hear the last words of the stage driver.
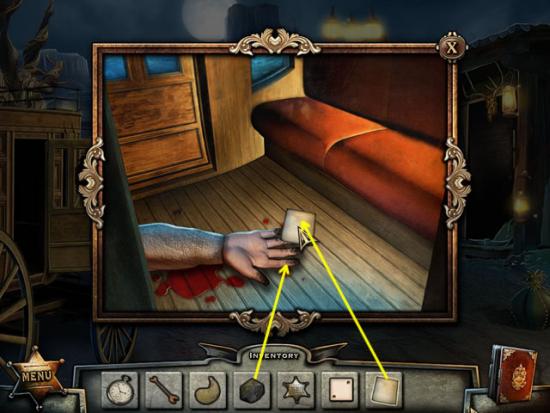
Rub the piece of CHARCOAL on the driver’s fingers.
Place the UNSIGNED CERTIFICATE on the fingers to obtain a DEATH CERTIFICATE.
Go down four times to reach the crossroads.
Go right to the undertaker.
Outside the Undertakers
Give the DEATH CERTIFICATE to the undertaker.
Chapter 3: Disappointing the Undertaker
Undertakers
Pick up the TONGS in the corner (A).
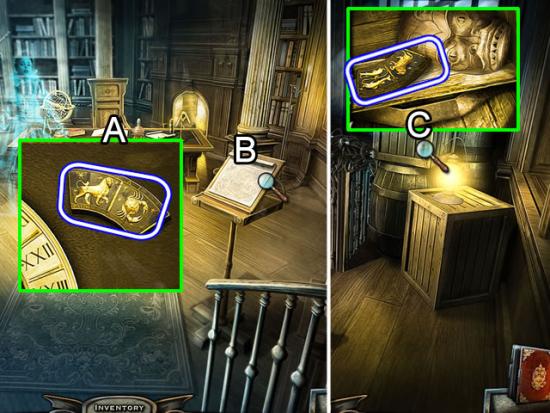
Examine the bookshelf (B). Take the DICE PUZZLE PIECE (2/2). Open the scroll and note the numbers and position of the dice on the diagram.
Look closer at the coffin lid (C).
Place the two DICE PUZZLE PIECES in the empty slots. Click each die until the numbers match those on the diagram.
Play the hidden object scene in the coffin.
Find the listed objects.
The HANDLE goes to inventory.
Exit the building.
Play the hidden object scene by the coffins.
Find the listed objects.
The Key goes to inventory as the SHERIFF’S KEY.
Go down twice to the sheriff’s office.
Examine the door. Insert the SHERIFF’S KEY to enter the office.
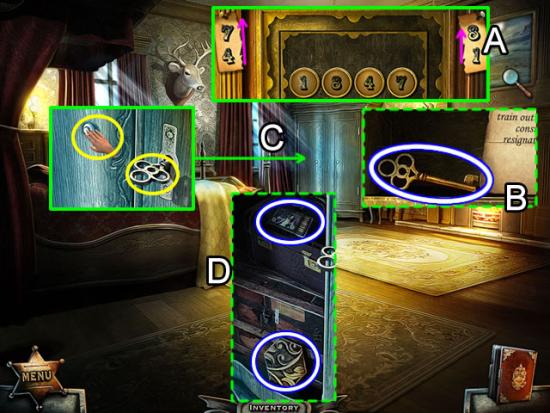
Sheriff’s Office
Get instructions from the sheriff.
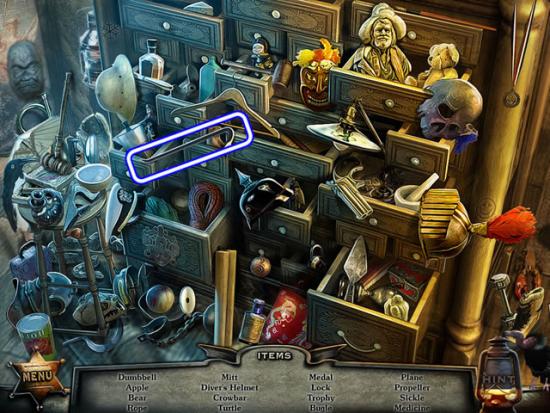
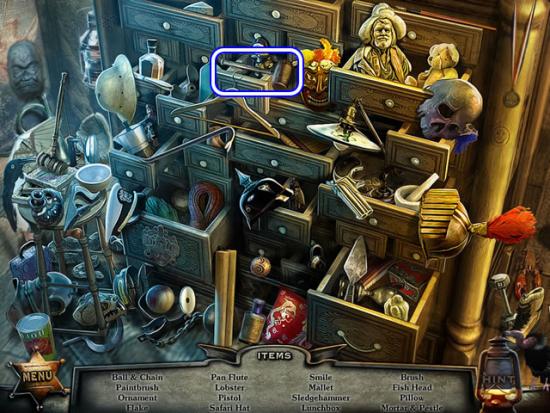
Play the hidden object scene.
Find the listed objects.
The MALLET goes to inventory.
Examine the desktop (A). Read the sheriff’s note. Pick up NUT (1/2) and NUT (2/2).
Look closer at the drawer below the bookshelf.
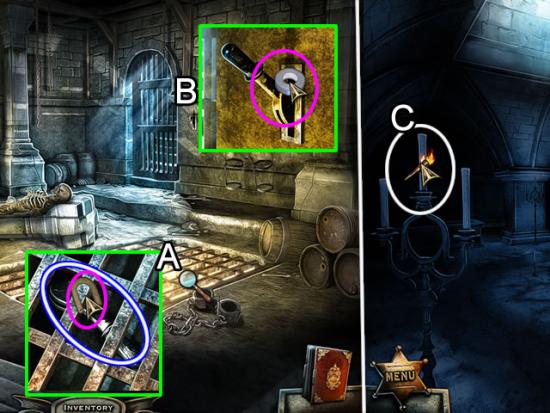
Attach the HANDLE. Add the two NUTS to each end. Tighten with the WRENCH (B).
Open the drawer and take the OVEN MITT (C).
Go out the rear door (D).
Blocked Road
Pick up the PUZZLE DISC (1/3) from the top of the barrel (A).
Play the hidden object scene.
Find the listed objects.
The PUZZLE PIECE (3/3) is the first puzzle piece of this type added to inventory.
Return through the sheriff’s office.
Go back to the undertakers.
Undertakers
Zoom in on the stove (A).
Use the OVEN MITT to open the door.
Retrieve the PUZZLE PIECE (1/3) from the flames with the TONGS.
This triggers a hidden object scene on the coffin (C).

Find the listed objects.
The PUZZLE PIECE (2/3) goes to inventory.
Return to the mercantile (down twice to the crossroads and up five).
Mercantile
Look closer at the bottom panel on the door.
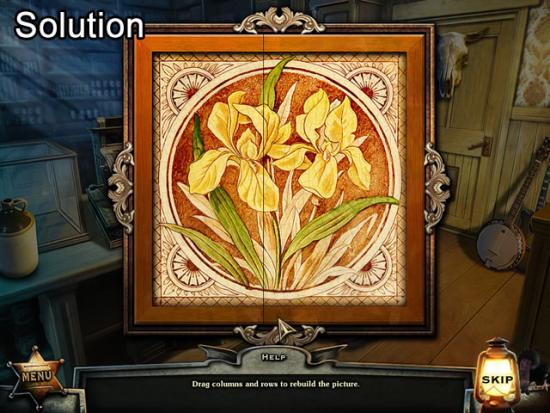
Place the three PUZZLE PIECES to start a puzzle.
The goal is to drag the rows and columns to form a picture.
The best strategy is to place the outside wooden borders first. Use the colors in the wood and the pattern to place the rows and columns.
Solution:
Take the STORE ROOM KEY.
Insert the key in the lock to enter the storeroom.
Storeroom
Play the hidden object scene.
Find the listed objects.
The SCOOP goes to inventory.
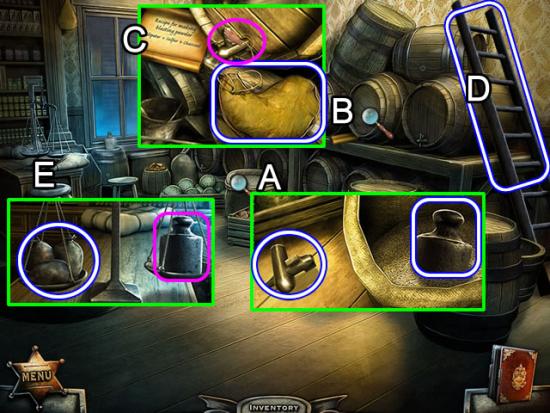
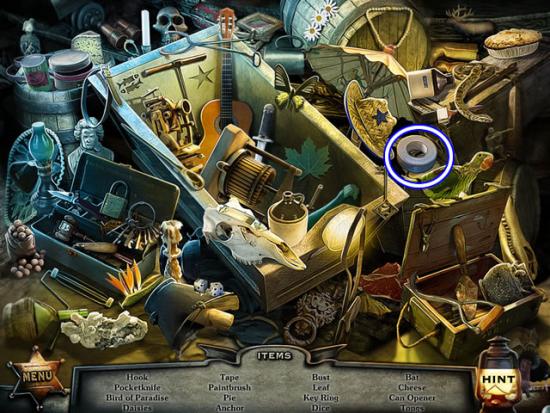
Zoom in on the sack of grain (A). Use the SCOOP to uncover a WEIGHT. Pick up the TAP beside the bag.
Look closer at the barrel (B). Place the TAP on the barrel. Use the MALLET to drive the tap into the barrel. Put the EMPTY WINE SKIN under the tap. Open the tap to fill the wine skin with WHISKY.
Open the scroll next to the barrel (C). The recipe is added to the journal.
Pick up the LADDER (D).
Inspect the scale (E). Put the WEIGHT in the empty pan. Take the three sacks to get a BAG OF SULFUR.
Taking the sulfur triggers a hidden object scene.
Find the listed objects.
The Card goes to inventory as a PLAYING CARD.
Exit the mercantile.
Continue down the streets to the crossroads.
Crossroads
Look at the building window again.
Use the PLAYING CARD to slip the latch on the window.
Enter the building.
Dining Room
Look at the fire (A). Take the KNIFE.
Zoom in on the table (B). Sense there is something in the loaf of bread. Use the KNIFE to cut the bread. Take the JAIL CELL KEYS.
Return to the sheriff’s office.
Sheriff’s Office
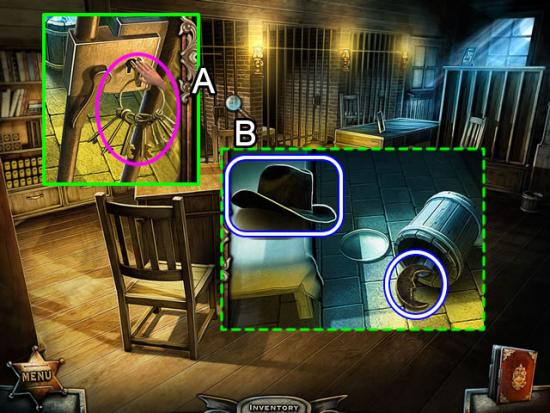
Inspect the jail cell (A).
Use the JAIL CELL KEYS to open the cell door.
Enter the cell (B). Take BLACKJACK’S HAT. Tip over the bucket to find a MOON.
Play the hidden object scene.
Find the listed objects.
The AXE goes to inventory.
Go out through the rear door.
Chapter 4: The Last Train from Deadwood
Blocked Road
Use the AXE to chop the wood blocking the road to the left.
Train Station
Inspect the poster (A). Get a sense there is something behind the poster. Take the ROCK.
Look closer at the stone tiles at the corner of the building (B). Use the ROCK to break off a SHARP TILE PIECE.
Go back to the poster (C). Use the SHARP TILE PIECE to rip the poster. Take the CLOCK HANDS.
Place the LADDER on the side of the building (D).
Look closer at the clock.
Place the missing CLOCK HANDS on the station clock. Put the POCKET WATCH next to the clock to open a puzzle.
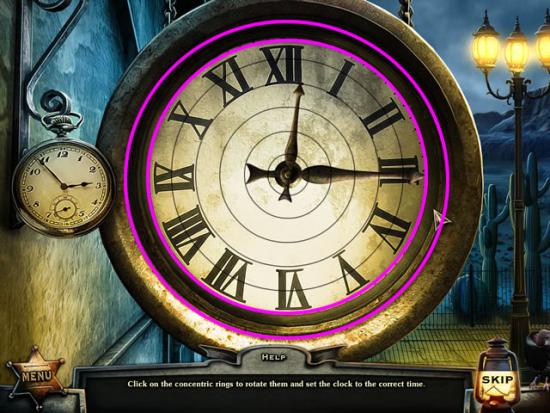
The goal is to set the station clock to that of the pocket watch.
Beginning with the outer number rings; rotate each concentric circle to match. Correctly placed rings light up but don’t lock.
The hands continue to spin. Rotate the rings until the hand designs match (see above).
The last step is to move the outer most ring (pink) until the colors match those of the clock housing. When all rings are correctly aligned, the hands stop at the same time as those on the pocket watch.
Enter the depot.
Depot
Pick up the POCKETKNIFE lying on the bench on the left.
Play the hidden object scene.

Find the listed objects.
The DOORKNOB goes to inventory.
Return to the dining room (down four and up one)
Dining Room
Zoom in on the door.
Put the DOORKNOB in the empty slot.
Go up the steps.
Bedroom
Play the hidden object scene.
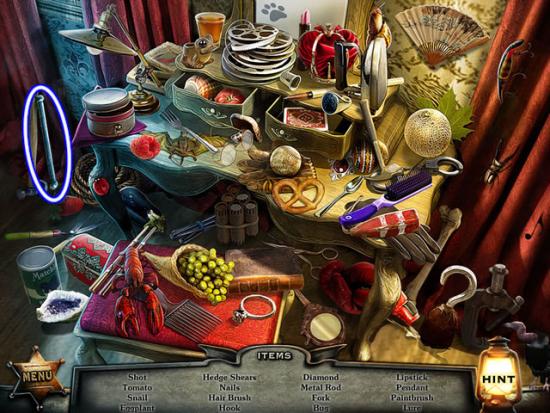
Find the listed objects.
The Metal Rod goes to inventory as a C-CLAMP HANDLE.
Pick up the TORN PAPER (1/2) on the floor.
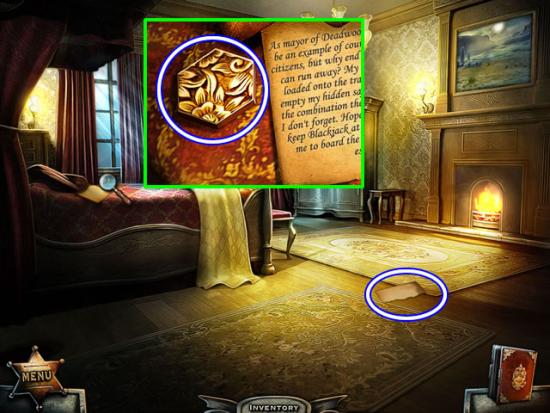
Examine the bed.
Read the mayor’s note. Take the HEX PUZZLE PIECE (1/3).
Return to the blocked road behind the sheriff’s office.
Blocked Road
Play the hidden object scene.
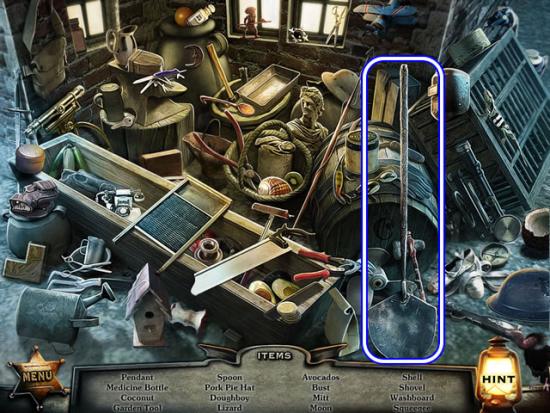
Find the listed objects.
The SHOVEL goes to inventory.
Inspect the wheel on the cart (A).
Insert the C-CLAMP HANDLE in the clamp to move the cart.
Return to the train station (B). Take the LADDER.
Return to the formerly blocked road.
Head up to the house on the hill (C).
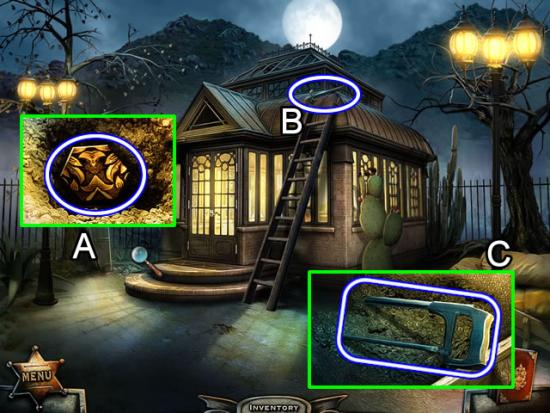
Cottage
Examine the loose dirt by the side of the cottage (A).
Use the SHOVEL to dig up a HEX PUZZLE PIECE (2/3).
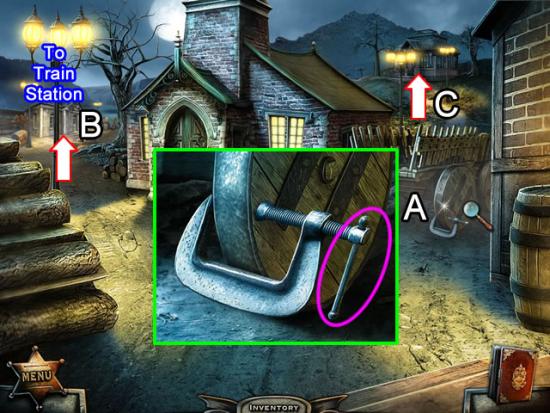
Place the LADDER against the side of the house (B) to reach the SHARP METAL ROD on the roof.
Look closer at the bags in the wheelbarrow (C). Use the SHARP METAL ROD to slit open a bag. Retrieve the HACKSAW.
Return to the train station. Enter the depot.
Depot
Play the hidden object scene.

Find the listed objects.
The CHISEL goes to inventory.
Use the HACKSAW to cut the chains securing the door leading to the platform.
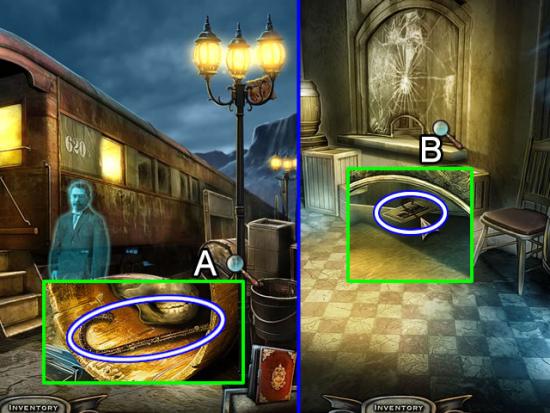
Platform
Speak to the mayor.
Examine the barrels (A). Pry off the top with the CHISEL. Take the CANE.
Return to the depot.
Depot
Peek through the ticket window (B).
Use the CANE to retrieve a TICKET.
Return to the cottage on the hill.
Cottage
Take the LADDER leaning against the side of the cottage.
Return to the train platform.

Platform
Prop the LADDER against the lamppost (A). Take the PUZZLE PIECE stuck at the top.
Examine the train car door (B).
Insert the TICKET in the slot. Open the door.
Put the PUZZLE PIECE in the center of the wooden box just inside the door. This opens a puzzle.
This is another rotate-the-rings puzzle.
Use the same strategy to solve this puzzle as on previous puzzles of this type.
Solution:
Take the TORN PAPER (2/2) from the cabinet compartment.
Return to the mayor’s bedroom (down five times, up one. Enter the window and go up the stairs).
Bedroom
Play the hidden object scene.
Find the listed objects.
The CLAW HAMMER goes to inventory.
Inspect the painting. (A).
Use the POCKETKNIFE to remove the canvas and reveal a safe.
Place the two pieces of TORN PAPER on either side of the safe door. Remember from the note found on the bed that the combination is the mayor’s birth year. Read the numbers from bottom to top.
Click through the numbers until they read 1-8-4-7.
Examine the contents of the safe (B). Read the mayor’s resignation letter. Take the CABINET KEY.
Zoom in on the cabinet door (C). Insert the CABINET KEY in the lock. Press the button on the left door to open the cabinet.
Inspect the contents (D). Take the MATCHES and HEX PUZZLE PIECE (3/3).
Exit the house.
Return to the cottage: go down once and enter the sheriff’s office. Exit through the back door and go up the hill.
Chapter 5: Unearthing the Curse
Cottage
Zoom in on the cottage door.
Place the three HEX PUZZLE PIECES to open a rotate-the-pieces puzzle.
Use the same strategy to solve this puzzle as on previous puzzles of this type.
Solution:
Enter the cottage.
Play the hidden object scene.
Find the listed objects.
The OIL CAN goes to inventory.
Zoom in on the low chest on the right. Take the LIBRARY BOOK (1/3).
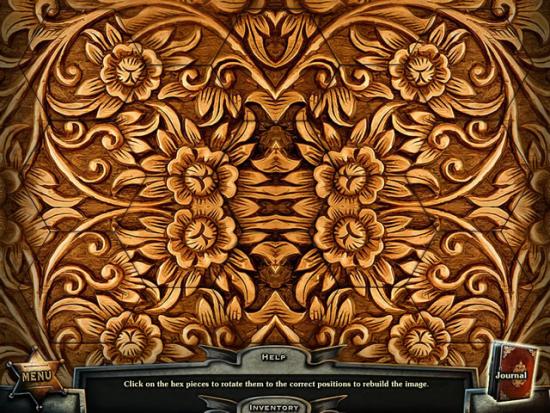
Inspect the screen divider on the left to open a puzzle.
This is another swap-the-tiles puzzle.
Use the same strategy to solve this puzzle as on previous puzzles of this type.
Solution:
Receive a SUN.
Exit the cottage.
Go down to the building at the bottom of the hill.
Library
Examine the door.
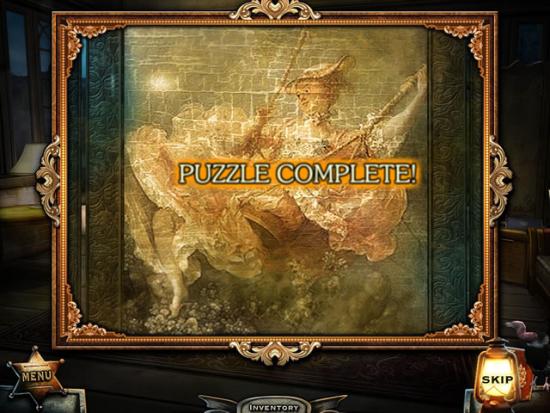
Place the MOON and the SUN in the insets to open a jigsaw puzzle.
Use the same strategy to solve this puzzle as on previous puzzles of this type.
Solution:
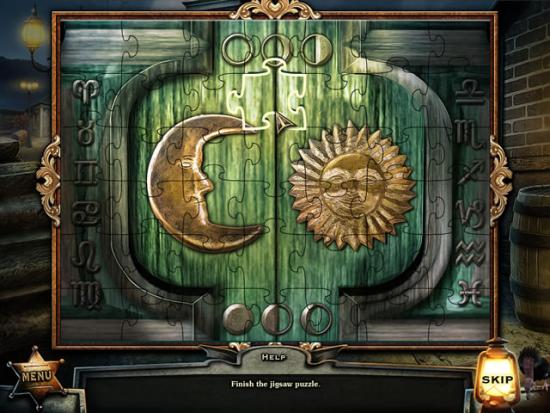
Enter the library.
Use the MATCHES to light the lantern on the crate on the right.
Take the SCREWDRIVER.
Return to the cottage on the hill.
Cottage
Play the hidden object scene.
Find the listed objects.
The MIXING SPOON goes to inventory.
Examine the corner of the carpet (A).
Remove the nails with the CLAW HAMMER. Lift the carpet.
Use the SCREWDRIVER to remove the four screws (B). Open the lid.
Take the HOOK from the compartment (C).
Return to the library.
Library
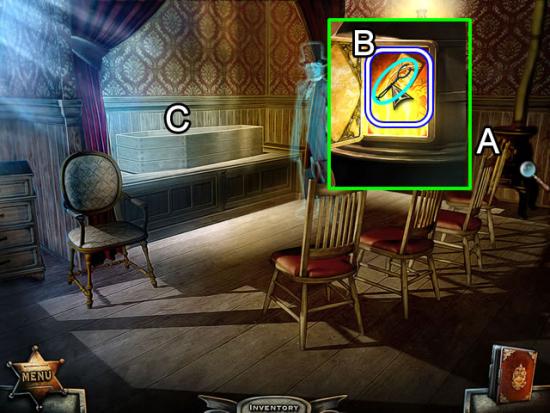
Use the HOOK to snag the chandelier and tie it to the railing (A).
Light the chandelier with the MATCHES (B). It swings free to light the building.
Go down the steps.
Listen to the librarian.
Play the hidden object scene.
Find the listed objects.
The CROWBAR goes to inventory.
Examine the items on the desktop (A). Take the PUZZLE DISC (2/3).
Read the good news on the paper lying on the bookstand (B).
Go back upstairs.
Pry open the crate (C) with the CROWBAR. Take the PUZZLE DISC (3/3).
Go back downstairs.
Look at the desktop again. Place the three PUZZLE DISCS in the empty slots to open a ring-rotation puzzle.
This is more difficult than previous puzzles of this type. Begin by matching the red tab on the outer ring with the book next to the puzzle. Next find a number whose missing part is obvious, such as only a portion of a “V”. The next ring can be matched with the partial stars on the second ring. Continue to match partial patterns from the outside toward the center.
Solution:
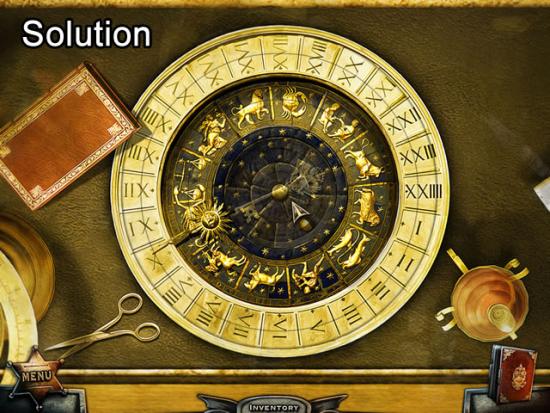
Take the GRAVEYARD KEY from the center of the puzzle.
Exit the library.
Return to the undertakers (down twice, up once and right at the crossroads).
Approach the cemetery gates.
Insert the GRAVEYARD KEY in the lock.
Cemetery
Play the hidden object scene
Find the listed objects.
The FUSE goes to inventory.

Look at the side of the mausoleum (A).
Pick up the BUCKET OF CHARCOAL.
Head left.
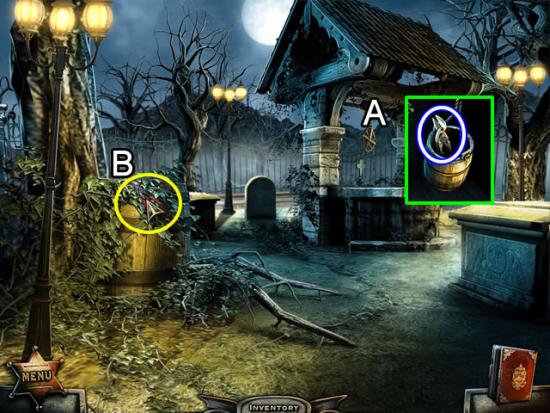
Zoom in on the well.
Use the OIL CAN to free the pulley.
Lower the bucket. Take the GARDEN SHEARS that come back.
Cut back the vines covering the barrel (B) with the garden shears.

Inspect the barrel. Remove the top (A). Note it contains the last ingredient needed for blasting power.
Add the BAG OF SULFUR and BUCKET OF CHARCOAL to the saltpeter (B).
Use the MIXING SPOON to combine the ingredients (C).
Replace the lid and insert the FUSE into the contents (D). Take the BLASTING POWDER.
Return to the mine entrance (down three and up twice).
Mine Entrance
Place the barrel of BLASTING POWER on the boarded up entrance.
Light the FUSE with the MATCHES.
Enter the mine.
Mine
Pick up the LIBRARY BOOK (2/3) from the top of the barrel on the right.
Play the hidden object scene.
Find the listed objects.
The Door Knocker goes to inventory as a GATE HANDLE.
Retrace your steps to the cemetery.

Cemetery
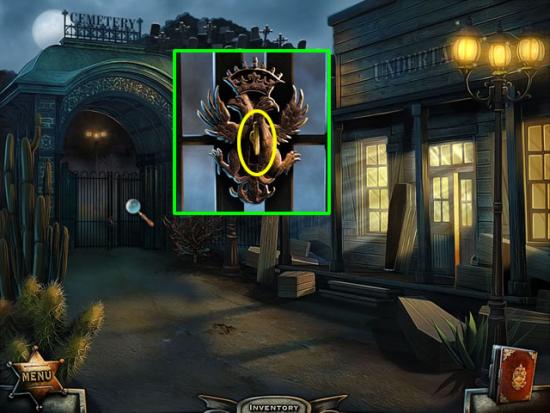
Zoom in on the back gate (A).
Insert the GATE HANDLE in the empty slot to open a jigsaw puzzle.
Use the same strategy to solve this puzzle as on previous puzzles of this type.
The solution is shown in the above inset.
Blackjack’s Grave
Move the coffin lid (A). Take the LIBRARY BOOK (3/3).
Chase the vultures off the coffin (B). Take the SPIKE.
Return to the well (down one and left).
Chapter 6: Collecting the Bones
Collect BONE (5/6) from the well area.
Get BONE (1/6) from in front of the undertakers.
Go down to the sheriff’s office. Exit the back door.
Get BONE (4/6) from outside of the library.
Enter the library.
Library
Play the hidden object scene.
Find the listed objects.
The MALLET goes to inventory.
Zoom in on the bookshelves.
Place the three LIBRARY BOOKS on the shelves to open a puzzle.
The goal is to find the correct sequence to light up the eight magical books.
Finding the correct order is a matter of trial and error. A correct book stays lit. An incorrect selection resets the puzzle.
Solution:
Select the books in the order indicated above.
Take BLACKJACK’S CURSE from the cabinet.
Exit the library.
Go up to the mine entrance.
Take BONE (2/6).
Continue up the streets to the outskirts of town.
Find BONE (3/6).
Return to the cemetery.
Zoom in on the mausoleum.
Insert the SPIKE in the crack. Use the MALLET to open the tomb.
Underground Vault
Move the barrel (A). Retrieve the LOCK PICK.
Take the TORCH off the wall.
Return to the mine.
Mine
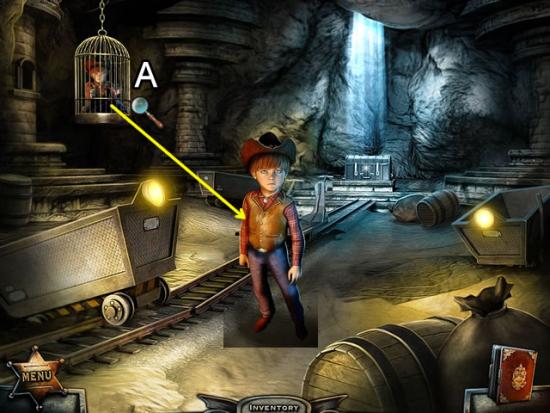
Zoom in on the cage (A).
Use the LOCK PICK to free Billy.
Billy gives you a MAGNET.
Play the hidden object scene.
Find the listed objects.
The TAPE goes to inventory.
Return to the underground vault.
Underground Vault
Zoom in on the grate (A).
Use the MAGNET to retrieve the LEVER.
Look at the broken lever by the gate (B).
Attach the LEVER. Secure it with the TAPE.
Go up the stairs to the upper chamber.
Use the TORCH to light the candles on the left (C).
Secret Tomb
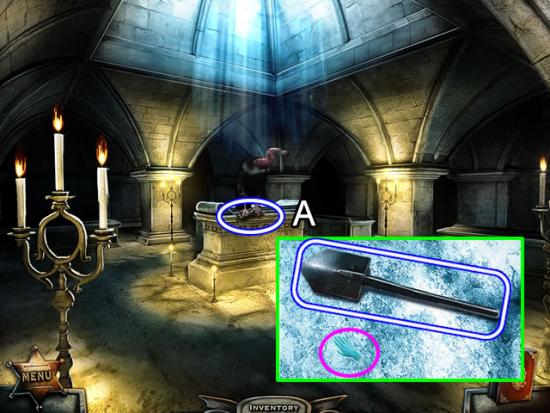
Take the last BONE (6/6).
Approach the altar (A).
Take the SHOVEL. Sense the importance of the area.
Back out of the underground vaults.
Go forward to Blackjack’s grave.
Chapter 7: Breaking the Curse
Blackjack’s Grave
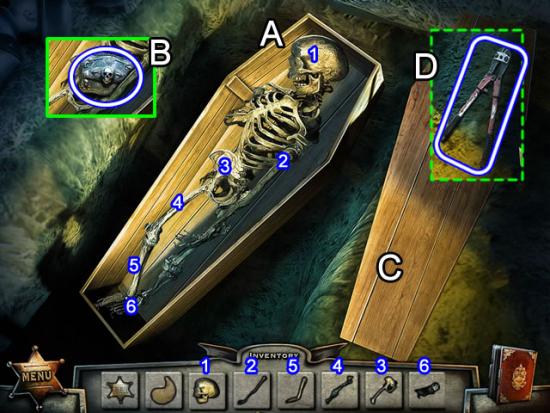
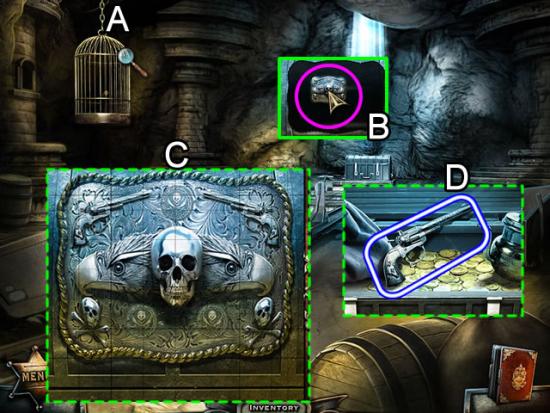
Zoom in on the coffin.
Reassemble the skeleton (A) as shown above.
Take the TREASURE CHEST KEY from the completed skeleton (B).
Place the coffin lid (C) on the coffin.
Find the BOLT CUTTERS (D) under the lid.
Return to the mine.
Mine
Use the BOLT CUTTERS to cut the chain holding the CAGE (A).
Insert the TREASURE CHEST KEY in the slot on the trunk (B) to open a puzzle.
This is another drag rows and columns to create a picture puzzle.
Use the same strategy to solve this puzzle as on previous puzzles of this type.
Take the SIX-SHOOTER from the trunk (D).
Return to the well in the cemetery
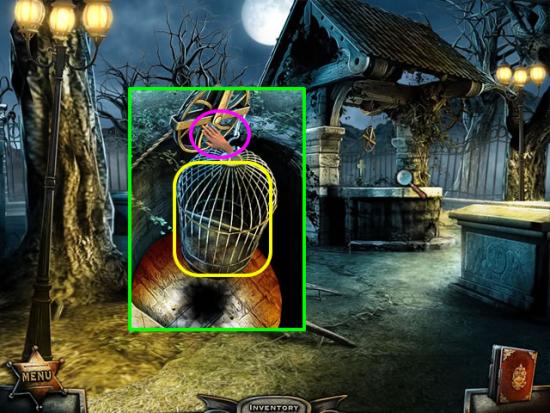
Cemetery – Well
Zoom in on the well.
Swap the bucket with the CAGE.
Lower the cage over Blackjack’s spirit.
Go down once to find a hidden object scene.

Find the listed objects.
The HAMMER goes to inventory.
Return to Blackjack’s grave.
Blackjack’s Grave
Use the HAMMER to pound in all the nails.
Tap the shovel on the top of the coffin (green) to cover the coffin.
Return to the underground vault. Go up the stairs to the secret tomb.
Secret Tomb
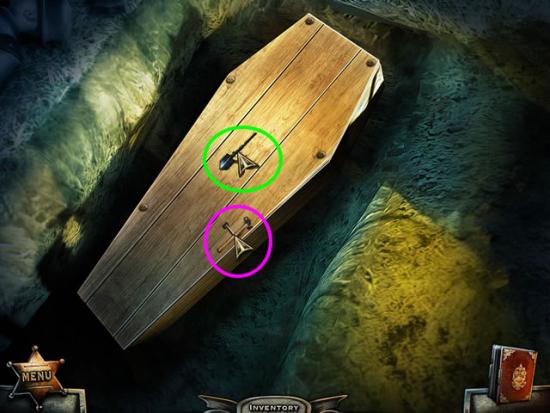
Pick up a LIT CANDLE from the candelabra.
Approach the altar.
Put the LIT CANDLE in the holder. Place BLACKJACK’S HAT on the altar. Pour the WHISKY into the hat (A).
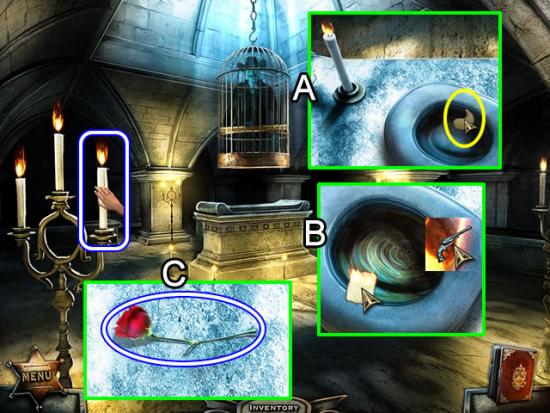
Ignite BLACKJACK’S CURSE with the candle. Drop the burning curse into the hat (B). Add the SIX-SHOOTER to the flames.
Watch the cut scene.
Go back to the altar and pick up the ROSE (C).
Exit the underground chambers.
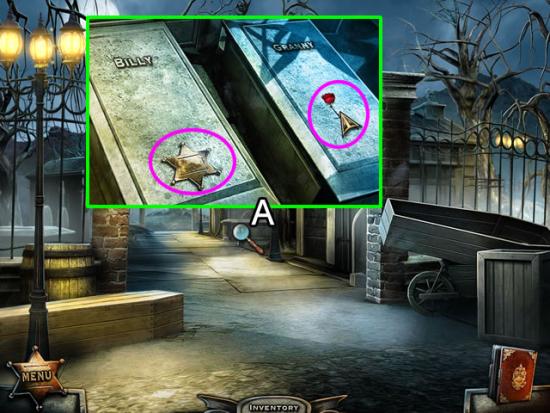
Zoom in on the two graves.
Place the SHERIFF’S STAR on Billy’s grave.
Place the ROSE on Granny’s grave.
Watch the final cutscenes.
Congratulations! You have completed playing Ghost Encounters: Deadwood.

More articles...
-
Grow A Garden 2 Base Price List
What's the most valuable crop? -
Evomon Best Starter [Leafbun, Blazpup, or Bubble?]
Grass-type, Fire-type, or Water-type? -
Evomon Tier List [META and BEST Evomon]
The Evomon dream team.