
Best Horror Games On Itch.io – July 2026
Across a bounty of subgenres.
Grow A Garden 2 Base Price List
What's the most valuable crop?![Evomon Types Guide [Strengths, Weaknesses, Resistance]](/wp-content/uploads/2026/06/evomon-types.jpg "Evomon Types Guide [Strengths, Weaknesses, Resistance]")
Evomon Types Guide [Strengths, Weaknesses, Resistance]
Your companion guide during battles.
![[Roblox] Evomon Shiny Hunting Guide – Including Prismatic and Pris Shinies!](/wp-content/uploads/2026/06/evomon-shiny-hunting-guide.jpg "[Roblox] Evomon Shiny Hunting Guide – Including Prismatic and Pris Shinies!")
Gemini Lost Walkthrough
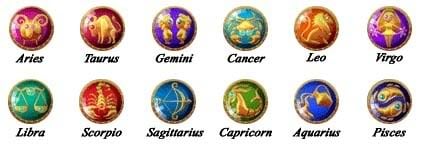
Welcome to Gamezebo's walkthrough for Gemini Lost. Understanding the Zodiac Signs Gemini Lost is a game that is based on and involves the Zodiac on a very large scale. It's important to understand which signs are what as you play through this title and browse this guide. These are the signs from the game and their names for your own reference, in their official order: Navigation: I. General Tips II. Zodiac Key 1: Aries III. Zodiac Key 2: Taurus IV. Zodiac Key 3:…


- Prefer Gamezebo on Google

a:1:i:0;a:2:s:13:”section_title”;s:23:”Gemini Lost Walkthrough”;s:12:”section_body”;s:62813:”
Welcome to Gamezebo’s walkthrough for Gemini Lost.
Understanding the Zodiac Signs
Gemini Lost is a game that is based on and involves the Zodiac on a very large scale. It’s important to understand which signs are what as you play through this title and browse this guide. These are the signs from the game and their names for your own reference, in their official order:

Navigation:
I. General Tips
II. Zodiac Key 1: Aries
III. Zodiac Key 2: Taurus
IV. Zodiac Key 3: Gemini
V. Zodiac Key 4: Cancer
VI. Zodiac Key 5: Leo
VII. Zodiac Key 6: Virgo
VIII. Zodiac Key 7: Libra
IX. Zodiac Key 8: Scorpio
X. Zodiac Key 9: Sagittarius
XI. Zodiac Key 10: Capricorn
XII. Zodiac Key 11: Aquarius
XIII. Zodiac Key 12: Pisces
XIV. Science Upgrades
XV. Tools
XVI. Potions
XVII. Mini-games
XVIII. Trophies
XIX. Completing Gemini Lost
I.General Tips:
This section of the guide deals with general strategies and basic game understanding. Topics are bolded and bulleted for easier browsing.
- The Main Menu Screen– From here you can access the following options:
–Play– Select this to start the game. Be sure to choose "Continue" when continuing instead of "Start a New Game", otherwise you’ll lose all your data.
–Trophies- Here you can view all the trophies you’ve acquired, as well as which you still need.
–Options– Here you can alter Sound, Music, and Ambient volume. You can also select whether or not you’d like the game in Full Screen, or the sound muted. Game speed can be altered from this screen and Credits may also be viewed.
–Help– Select this and press "Next" to get an overview of game goals and gameplay.
–Quit– Select this to end your game. When exiting gameplay, you’ll need to select a speed for your village while you’re away.
- In-Game Menu– The in-game menu while you’re playing is located on the bottom right. It consists of the following options:
–Knowledge Menu– Click this to upgrade, purchase tools, and find potion recipes using Knowledge.
–Trophies– Click this to view your current trophies and what you need to acquire others.
–Game Exit– This is the computer icon: it will allow you to exit your game back to the Main Menu.
- Moving Around– You can move your mouse to the corners of the screen to move, or click and drag to move the screen to a new location. You can also click on the miniature map in the bottom righthand corner to quickly move to another area. To move a villager, click and hold them, dragging them to the desired location, and let go to move them.
- Understanding the Mini-Map– The "Mini-Map" is the small map located at the bottom righthand corner of your screen during gameplay. You can use it to quickly navigate to different areas and to keep an eye on your villagers. Villagers show up as dots on your map. The dot color meanings are as follows:
-Dark Blue- A working adult villager
-Light Blue- A child villager
-Yellow- A non-working adult villager (either relaxing, eating, or sleeping)
-Red- A sick villager
Your current full-screen view will appear as a white box on the mini-map.
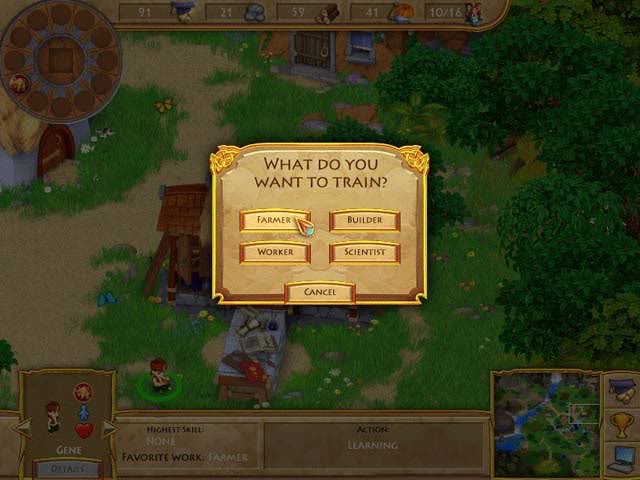
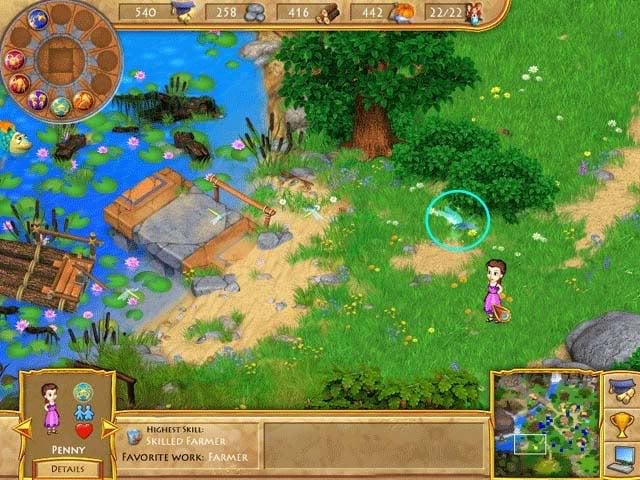
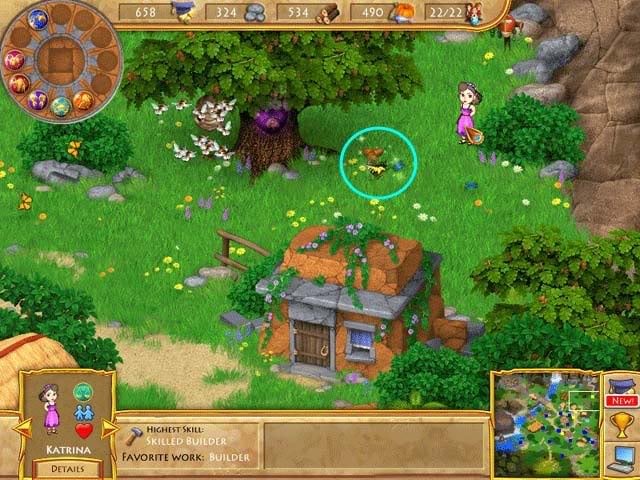
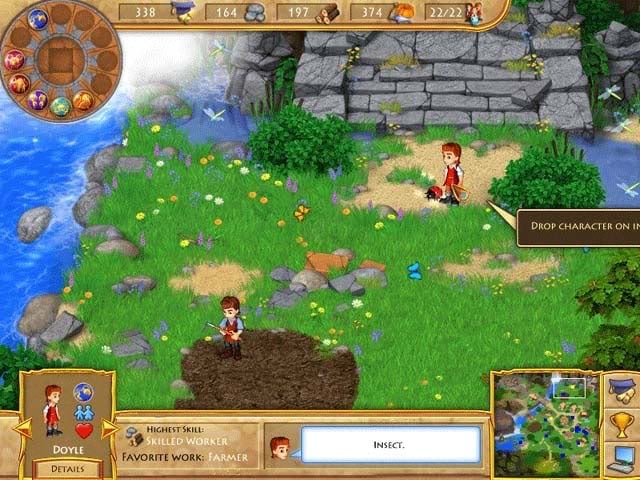
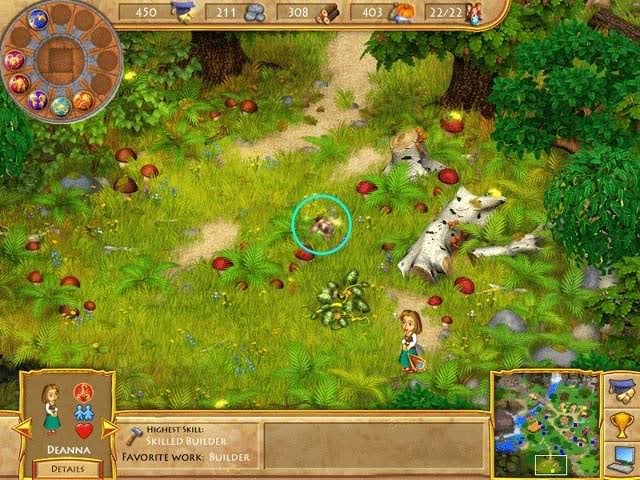
- Villager Work Types– There are four kinds of "work types" in Gemini Lost: Farmer, Worker, Builder, and Scientist. Each villager is born with a preference or favorite type of work. Putting a villager to work on their favorite medium will result in very fast, efficient work and results. You can put villagers on their non-preferred types of work, too, but they’ll work much slower in comparison to those who enjoy it, even if they’re masters in the trade. Here are the following work type descriptions:
–Farmer– Gather food. May work in the Pumpkin Patch, Wheat Field, Mill, Bakery, Bee Hives, Fuzzle Stable, or Fishing Dock.
–Worker– Essential to gathering supplies. Best put to work mining or chopping/collecting wood. They’re also the best for clearing obstructions.
–Builder– The best for building anything. That includes new houses, buildings, bee hives, etc.
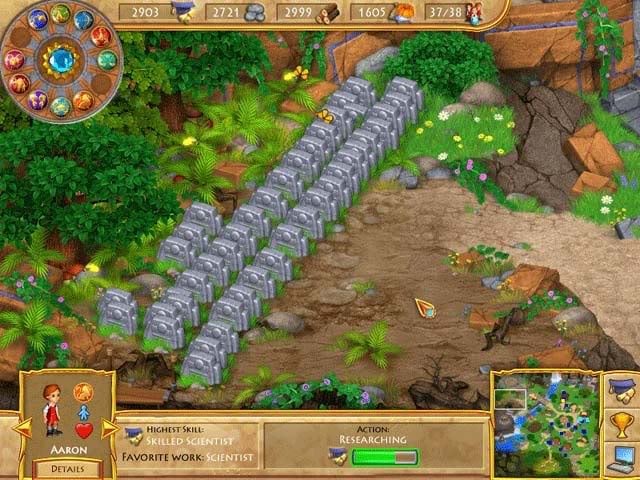
–Scientist– These types gather knowledge. Knowledge is essential for purchasing upgrades and acquiring new tools and potions. Acquired Knowledge is kept track of in the stats bar at the top of the screen. To purchase upgrades and proceed in the game, you will need to earn and "spend" Knowledge. These are the most important workers in regards to game goals.
- Marriage– Marriage is important in order to increase the population of your village. Once the Chapel is built, you can drag a single villager onto it to have them married. Click on the bell to summon the other villagers and find potential mates. Each to-be-married villager has a mate preference. Pick the matching "preference" Zodiac sign for a successful marriage: each to-be-married villager has two.
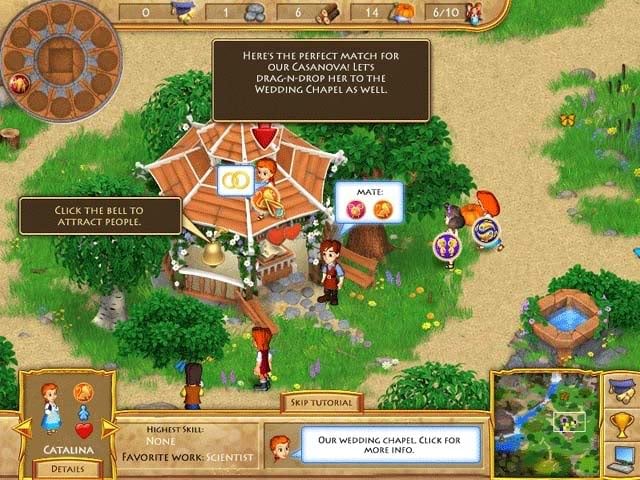
Sometimes a marriage won’t be successful, and if so everyone will return to what they were doing. When a marriage is successful, the newly wed couple will run off to one of the houses and when they exit, will introduce a new baby to your village. If the population is at its maximum, they will not do this. There are no advantages to marriage except increasing population.
- Children– Children are essential to population and village growth. Children cannot work, but they can gather items such as potion ingredients. Once the School is built, you should always drag all your village’s children to it: this makes keeping track of them very easy, and they will also study to be excellent workers as adults. To turn out the best for your village, always have them study their favorite profession, unless you absolutely need, for example, more scientists.
When children turn 18, they will become adults and be ready to work and marry.
- Death– It’s imminent your villagers will eventually die of old age. While the average age varies, typically around Medicine Level 2 they will live to be an average of about 95 years old. When a villager dies, a gravestone will be left behind at the place where they were last standing. However, these gravestones can be moved. Move them to a remote area where they will be out of the way of your villagers: you can stack them on top of each other so it appears there’s only one, too.
It should be noted gravestones should not be placed in the forest meadow, as they will cover the bee hives you will later need to build.
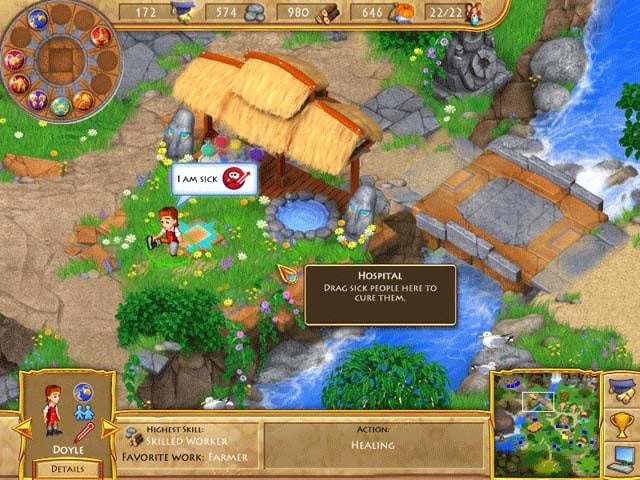
- Sickness– There are times when your villagers will become ill. To cure them, you will need to make a healing potion (covered in the game’s tutorial), whose ingredients can be found listed under "Potions" in the Knowledge Menu. Ingredients are scattered, but all can always be found in specific locations. At Medicine Level 2, a hospital can be built to cure the sick without the need of potions.
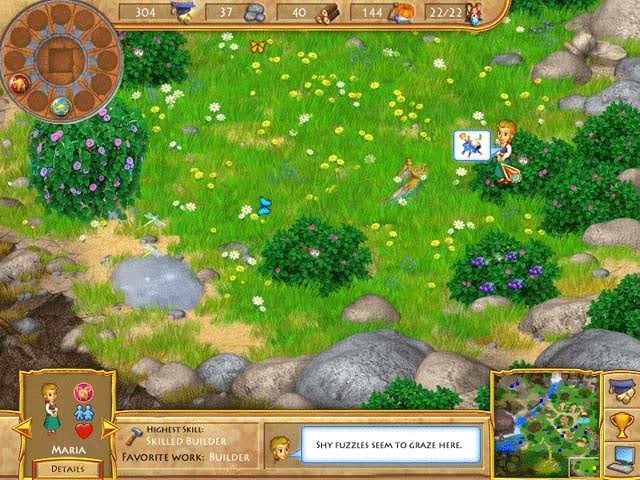
- Fuzzles– Fuzzles are the little purple sheep-like creatures. They are especially good for providing food/milk, and eating away heavy brush. However, they are shy. You will need to build a Stuffed Fuzzle in order to tame them (available under Tools at Handicraft Level 1).
- Relaxing Villagers– There will be times in the game where villagers of a certain profession aren’t needed. In such cases, they can be used as extra help in other jobs and tasks, or you can make a potion to change their desired profession, therefore making them efficient workers once again. It’s important not to let your villagers "Relax": there’s always something for them to do or help with, and a relaxing villager is no help at all.
- School– Once the School is built, you can use it to help your villagers increase their knowledge/experience on a work subject. While this is best used on children, it can also be used on adults.
- Game Speed– Unless paused when you exit the game, the game itself is "never-ending". This means if you don’t pause it when you exit it, villagers, while they will continue to work and gather resources for you, will also die and others will be born, get sick, etc. However, you can use this "never-ending" aspect to your advantage in having your villagers continue to work towards goals while you’re away.
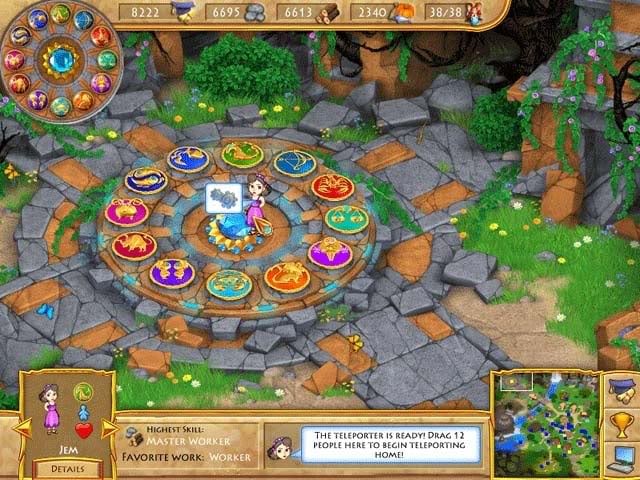
- Getting Stuck/Game Goals– While past the initial tutorial there is no area to see current goals, your main objective is to find the twelve Zodiac Keys. You can keep track of which you have and which you’re missing via the wheel in the top left corner of the screen. If you’re stuck, this is almost always an issue of needing an upgrade. Collect more Knowledge to purchase tools and upgrades: these will almost always lead you into the right direction and are essential to finding all twelve keys.
Zodiac Keys: The following portion of the guide will help you find the various Zodiac Keys needed. While these can be found and goals accomplished in various orders, this particular guide is ordered according to the actual Zodiac. Requirements for obtaining these individual keys will be listed at the beginning of each section.
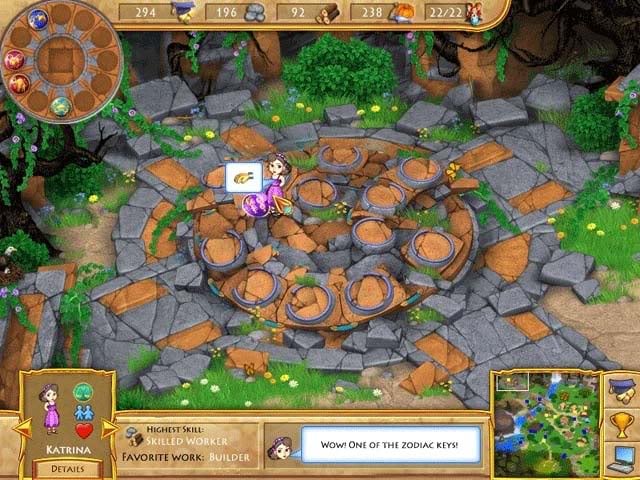
![]() II.Zodiac Key 1: Aries
II.Zodiac Key 1: Aries![]()
Requirements: Construction Level 1, Farming Level 1, Handicraft Level 1, Stuffed Fuzzle
- First, you’ll need to earn Construction Level 1 and Farming Level 1. This can be achieved through obtaining Knowledge points. Put your Scientist villagers at the laboratory to study once it’s been built to obtain Knowledge. Farming Level 1 costs 25 and Construction Level 1 costs 10.
- Construction Level 1: Obtaining this will allow you to build another house (requires 15 wood and 15 stone)and the School (30 wood and 30 stone). The house will allow your population to increase and the School can be used to teach a trade: it’s a good idea to keep village Children here.
- Farming Level 1: Obtaining this will allow you to build the Fuzzle Farm (requires 50 wood and 20 stone).
- Use 20 more Knowledge to purchase Handicraft Level 1: now you can make a Stuffed Fuzzle. Click on the "Tools" tab in the Knowledge menu to build the Stuffed Fuzzle. Making a Stuffed Fuzzle requires 70 Knowledge, 30 Stone, and 20 Wood.
- Once you’ve acquired the Stuffed Fuzzle, pick up a Villager and drag them over to the meadow with the Fuzzles (bottom right corner of the map). Place them on top of one of the bushes with the Fuzzles hiding inside to place the Stuffed Fuzzle and tame the shy creatures.
- Now that the Fuzzles have been tamed, you can use them as you like. You can drag the Fuzzles over to the farm and have them milked by a farmer if you wish. Fuzzles will wander into the Fuzzle Farm when they want to be milked on their own, though, coming and going as they need to graze and be milked. Fuzzle milk is a source of food for your villagers.
- Fuzzles can also be used to clear brush. Drag the Fuzzles (all of them is best) to the large bush on the left side of the Fuzzle meadow: it has small purple and pink flowers and is above the small puddle/pond. They will eat at it until it’s clear: you can move the cursor over the bush to check on their progress.
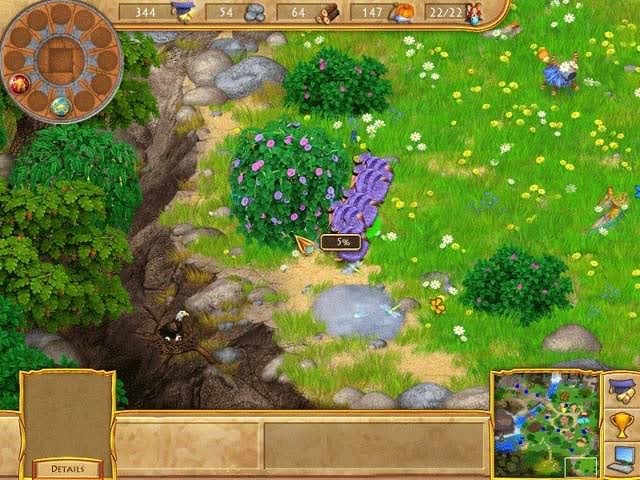
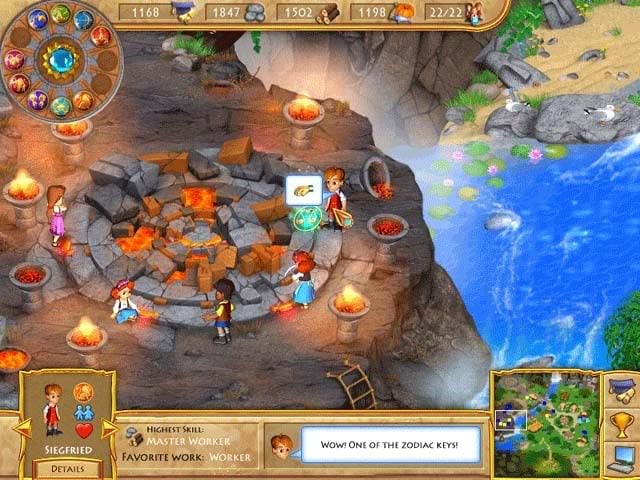
- Once it’s clear, a sort of altar will be revealed with the Aries Key in the middle. Move a villager over it to pick it up.
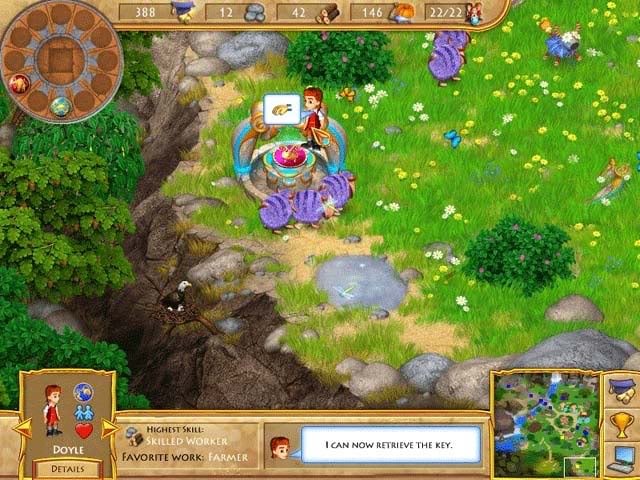
Congratulations, you’ve obtained the Aries Zodiac Key!
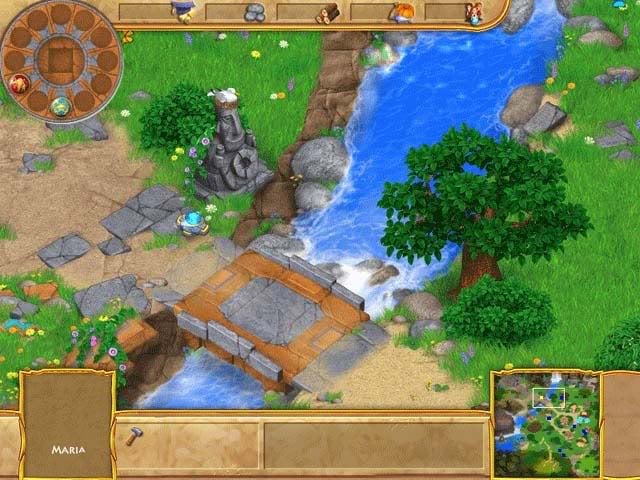
![]() III.Zodiac Key 2: Taurus
III.Zodiac Key 2: Taurus![]()
Requirements: none
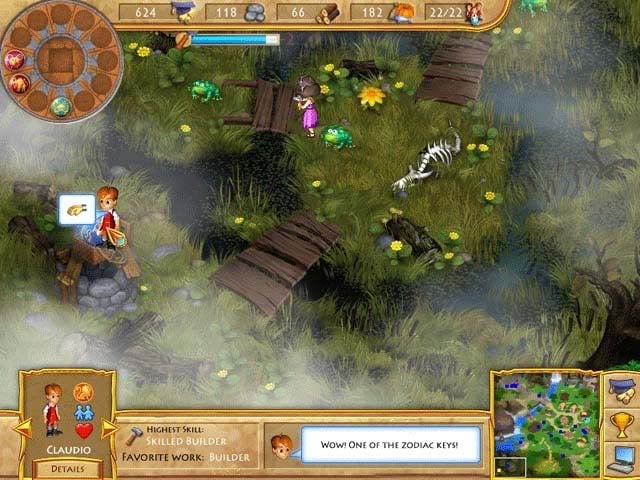
- This particular Zodiac Key is used in the game’s tutorial, which will also show you how to clean up and till the Pumpkin Field, chop for wood, mine for rock, build the Wedding Chapel, marry, build the Laboratory and use the Knowledge Menu. See as how the game covers this in the starting tutorial, we won’t elaborate on it in this portion of the guide.
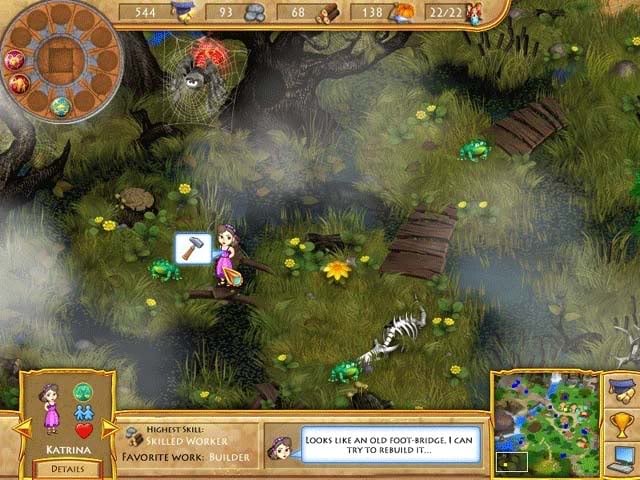
- This Zodiac Key will be pointed out with a big red arrow: the trouble is getting to it. Drag a villager over to the broken bridge in the dark foggy woods at the bottom left corner of the map to rebuild it: your goal is to repair the bridge where the two wooden poles are now. It’ll require 3 stone and 3 wood. If you don’t have the resources already, the game will show you how to gather them.
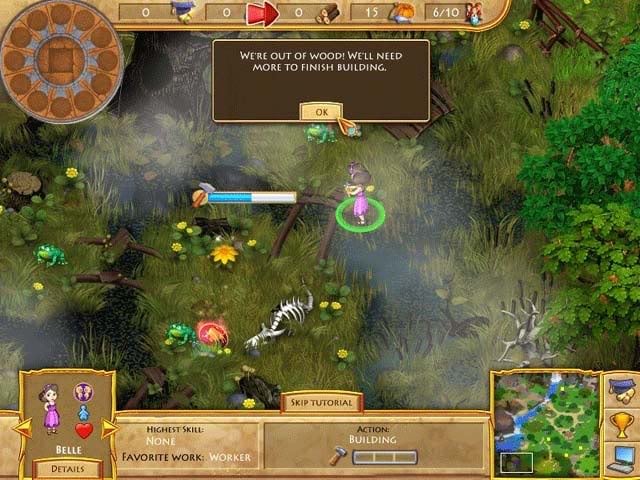
- Once the bridge is complete, move a character over the Zodiac Key to pick it up and claim it.
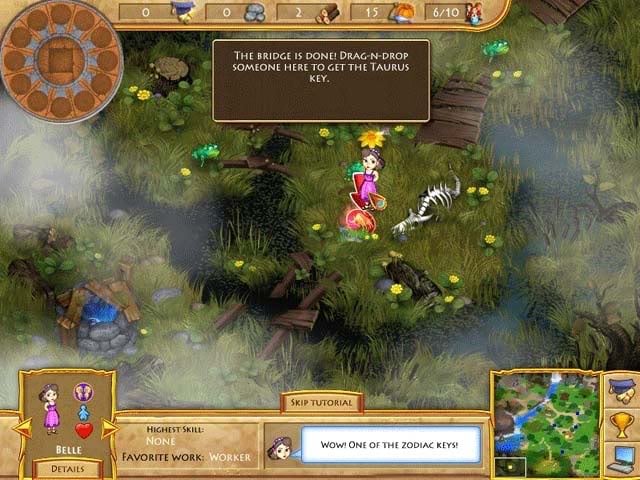
Congratulations, you’ve obtained the Taurus Zodiac Key!
![]() IV.Zodiac Key 3: Gemini
IV.Zodiac Key 3: Gemini![]()
Requirements: Handicraft Level 2 (recommended)
- Optionally obtain Handicraft Level 2 with 300 Knowledge to build more advanced tools, but more importantly to increase your max worker skill cap to gather more wood and stone.
- Place a builder villager (or more if you wish) onto the broken stone bridge above the wood and stone gathering shed to have them repair the bridge. You’ll need 100 stone and 100 wood to do so.
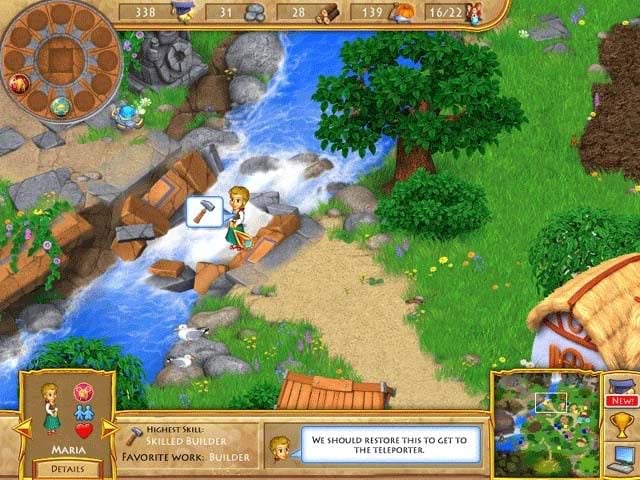
- Upon repairing the bridge, proceed to the Portal on the back half of the newly discovered land. Place your villagers on top of the obstruction to clear it. This job is best suited for a worker. Villagers will be able to take the stones obstructing the Portal and bring them back to the supplies shed as reusable stone.
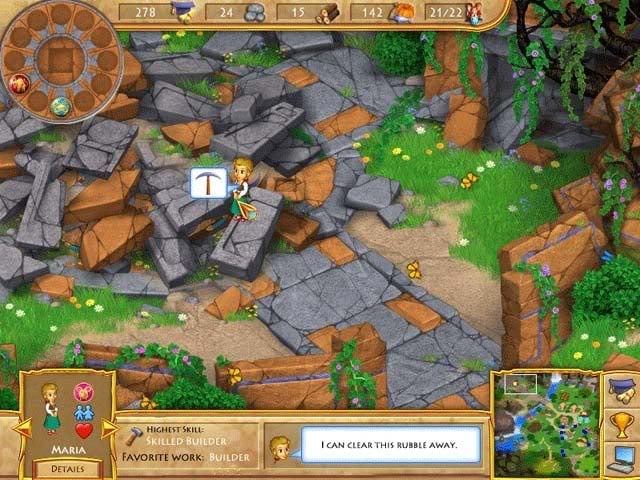
- Clearing the Portal will result in the Gemini Zodiac Key being revealed from underneath the stone rubble. Place a villager over it to pick it up.
Congratulations, you’ve obtained the Gemini Zodiac Key!
![]() V.Zodiac Key 4: Cancer
V.Zodiac Key 4: Cancer![]()
Requirements: none
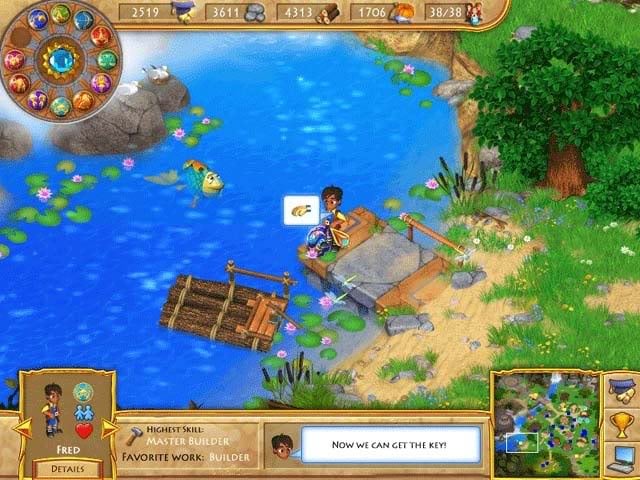
- This will likely be one of the first Zodiac Keys you’ll pick up on your own. Drag a villager (builder is best) to the ruins of a raft, located below the stone Fishing Dock and above the foggy woods. You’ll need 100 wood to restore it.
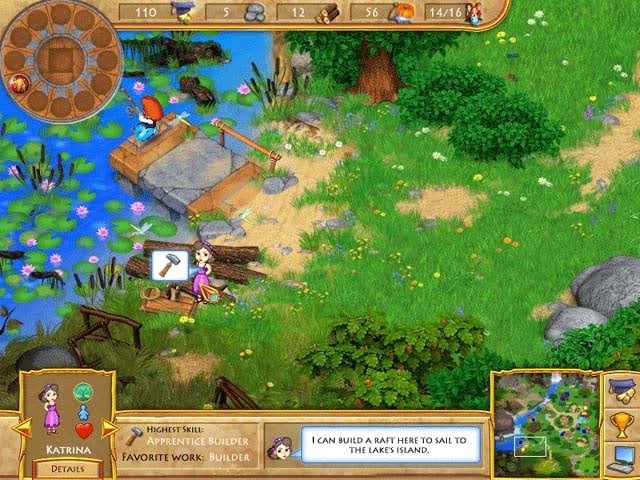
- Restoring the raft will allow your characters to be able to move around on the water. Drag a villager onto the raft to use it. They’ll float out to the island and retrieve the Zodiac Key.
- Upon returning to shore, the Key will be there but your villager won’t pick it up automatically. Drag a villager over the Key lying on the raft to pick it up.
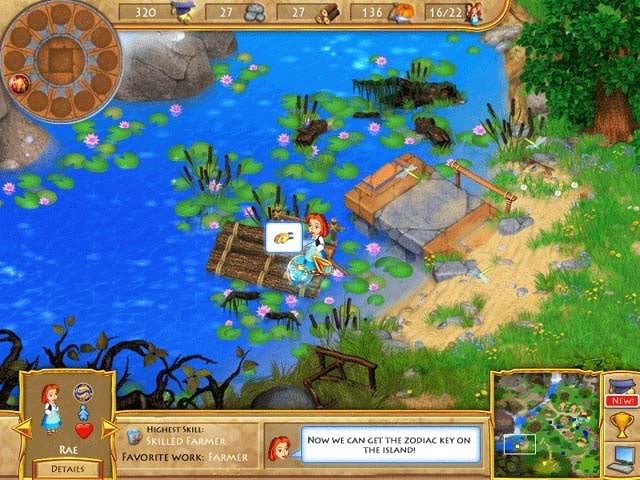
Congratulations, you’ve obtained the Cancer Zodiac Key!
![]() VI.Zodiac Key 5: Leo
VI.Zodiac Key 5: Leo![]()
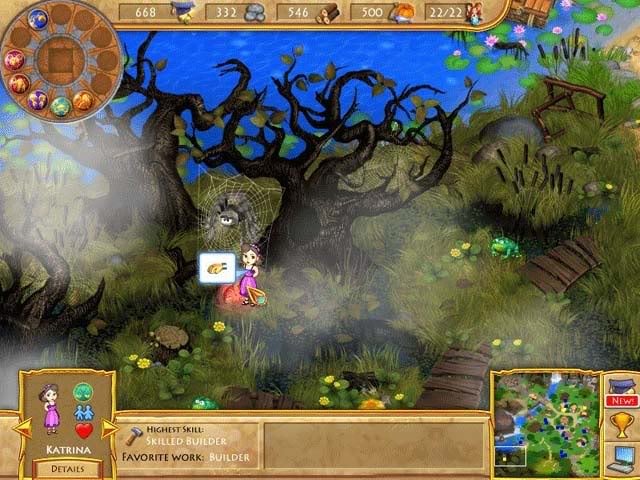
Requirements: Tamed Fuzzles (see Zodiac Key 1: Aries), 3 Cave Crystals
- Before we can even gain access to the Leo Zodiac Key, we need to obtain 3 cave crystals.
- First Crystal: "A cave crystal has fallen from the sky!" Depending on how long you’ve been playing the game so far, you may have already gotten this message. If so, good, because it’s one of the 3 we need. The crystal that’s fallen from the sky has landed on the stone Fishing Dock. Drag one of your villagers over it to pick it up. Two to go.
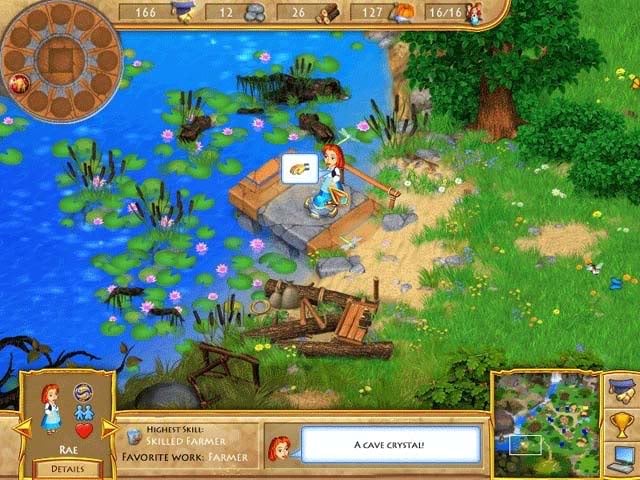
- Second Crystal: This one lies in plain sight just on the other side of the broken bridge from Zodiac Key 3: Gemini. Repair the broken bridge (100 stone and 100 wood) to get to the other side and pick up the second Cave Crystal sitting next to the statue. Just one left.
- Third Cave Crystal: Having tamed the Fuzzles, we can use them again to clear brush. Drag your Fuzzle fleet over to the left side of the screen where you can see the large dead tree: there’s briars and bushes scattered all below.
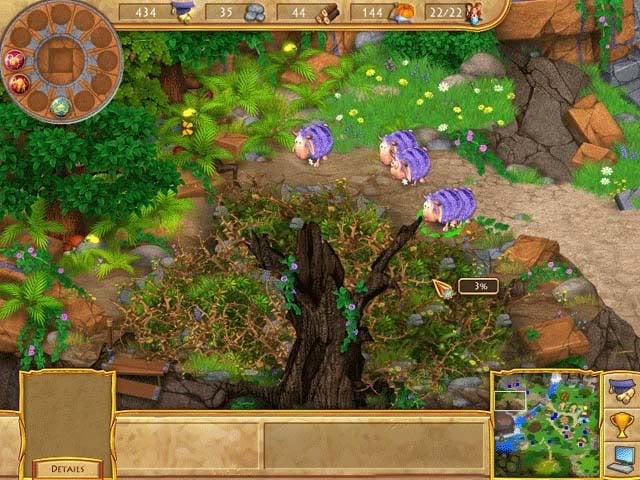
Have the Fuzzles eat it all away: this will reveal the third and final Cave Crystal. Don’t worry about putting the Fuzzles back, they’ll be happy to walk back on their own.
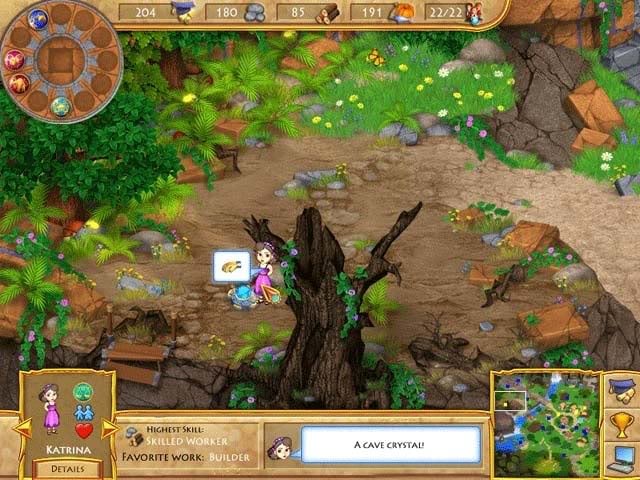
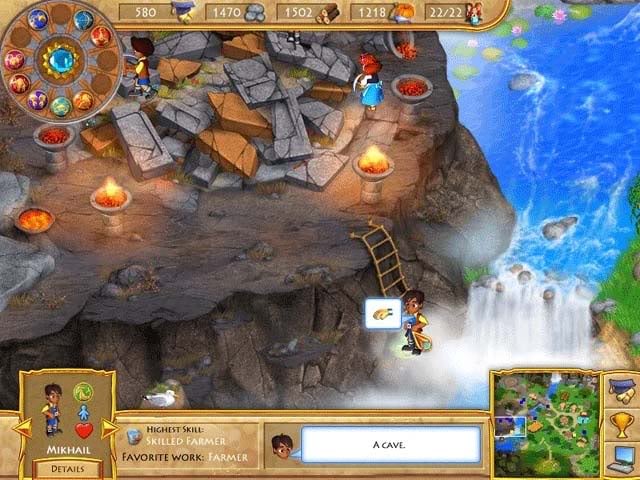
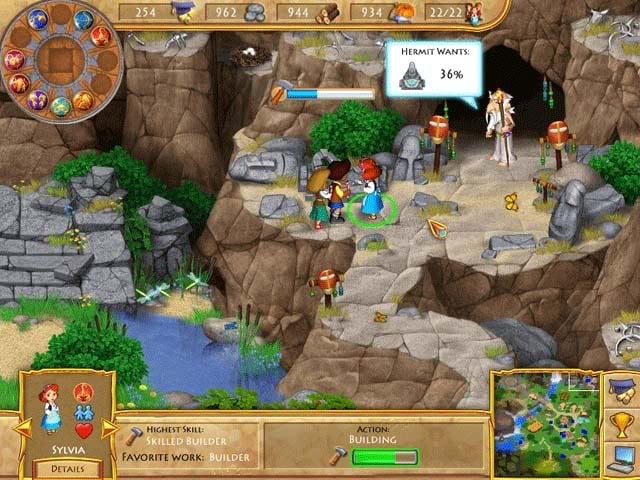
- Having found all the Cave Crystals, pick up a villager and move to the top right corner of the screen, dropping them on top of a mysterious cave door. Having all 3 Cave Crystals will start up a mini-game. Move the stone tiles on the board until you’ve reassembled the picture below as it was intended.
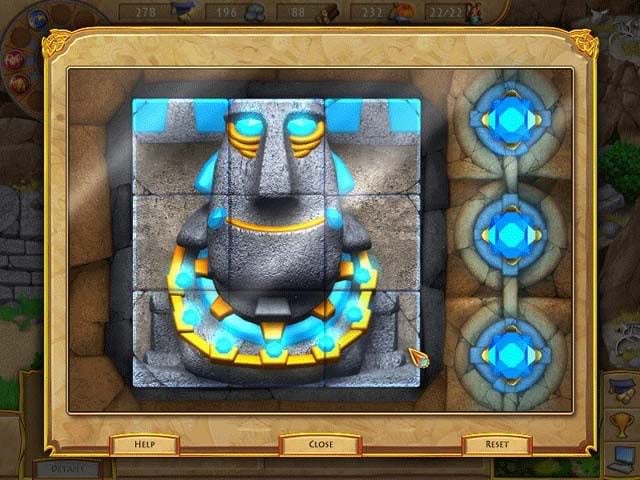
Successfully completing this puzzle will open the cave door and reveal a Hermit frozen in a giant ice cube.
- Wait a short while for the ice cube to melt. Once the Hermit is free, drag a villager on top of him to have them talk. He’ll give you the Leo Zodiac Key and a scroll with Plans. Drag a villager over both to pick them up.
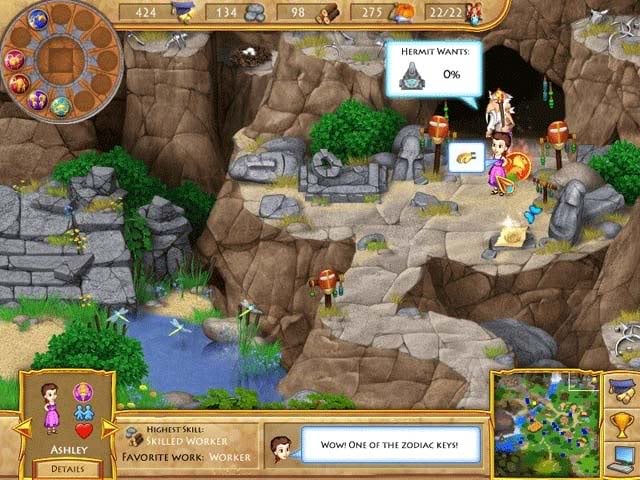
Congratulations, you’ve obtained the Leo Zodiac Key!
![]() VII.Zodiac Key 6: Virgo
VII.Zodiac Key 6: Virgo![]()
Requirements: Farming Level 3, Handicraft Level 2, Bee Keeper’s Mask, Fuzzle
- This is probably one of the last Zodiac Keys you’ll be picking up. Before anything else, you’re going to need to use Knowledge to upgrade to Farming Level 3 and Handicraft Level 2.
- Farming Level 3 can be unlocked with 2,000 Knowledge. This will give you the ability to build the Bakery and also build Bee Hives. The Bakery (which is not required to obtain the Virgo Zodiac Key) requires 200 stone and 200 wood. The bases of the Bee Hives you will need to build are located in the Autumn Meadow, frequented by hedgehogs, just to the left and down from your wood quarry. Take (preferably a builder) villager and drag them over the Bee Hives to build them: each requires 50 wood and 50 stone.
- Handicraft Level 2 for 300 Knowledge is also required: this will give you the ability to create the Tool "Bee Keeper’s Mask". This tool requires a whopping 500 Knowledge, 100 Stone, and 70 Wood to create, but it’s mandatory in obtaining the Virgo Zodiac Key.
- Now, pick up a Fuzzle and drag it over to the Bee Hive, which is located below the Cave, to the right of the Pumpkin Patch, and above the School and Houses. Drop the Fuzzle on the Bee Hive to transport the bees from their tree hive to the Bee Hives you built in the Autumn Meadow.

You now have the ability to harvest honey as food, but more importantly for now, the tree is clear.
- Drag a villager over to the tree that previously housed the bees and drag them on the Zodiac Key to pick it up: it’s located in a hole in the tree and can easily be identified by the purple fog that surrounds it.
Congratulations, you’ve obtained the Virgo Zodiac Key!
![]() VIII.Zodiac Key 7: Libra
VIII.Zodiac Key 7: Libra![]()
Requirements: Handicraft Level 3, Big Axe
- Before you can even dream of getting this Zodiac Key, you’ll need to upgrade to Handicraft Level 3, which costs 2,500 Knowledge. Upon leveling up, you can proceed to the Tools menu and build the Big Axe. It’s essential in obtaining this Key.
- After leveling up and obtaining the Big Axe, drag a villager (preferably several workers) onto the large dead tree on the far half of the land, towards the left side of the screen, to have them chop it down.
Chopping down the tree will create a bridge that lets your villagers access the last section of the island: the Observatory.
- Drag a villager (again preferably several workers) onto the ruined stone heap that is the Observatory to clear it.

Clearing this will, for the meantime, also serve as a viable rock quarry. Clearing away the rubble will reveal the Libra Zodiac Key. Drag a villager over it to pick it up.
Congratulations, you’ve obtained the Libra Zodiac Key!
![]() IX.Zodiac Key 8: Scorpio
IX.Zodiac Key 8: Scorpio![]()
Requirements: Knowledge Level 1, Collect 6 Rare Bugs
- For this Key, return to the Foggy Woods at the bottom left corner of the map. Our goal is to get to the Spider: but first we need to build another bridge. Drag a villager (preferably a worker or two) over the second broken bridge to rebuild it: it’ll require 20 Wood and 10 Stone.
- If you haven’t done so already, upgrade to Knowledge Level 1 in the Knowledge Menu. It will require 15 Knowledge to do so.
- Upon completing the bridge, drag a villager over the Spider to talk to it: the Spider has the Scorpio Zodiac Key, but he wants something in return: 6 rare bugs. Those six rare bugs consist of the following:
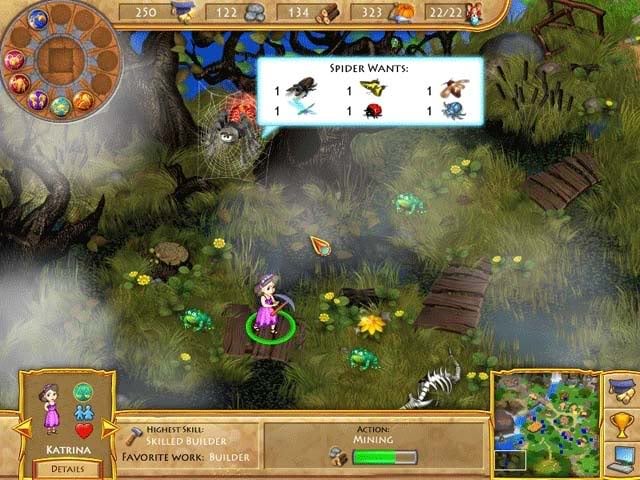
–Stag Beetle- Can be found in the area just above the large dead tree.
–Dragonfly– Can be found flying near the Fishing Dock
–Butterfly– Can be found flying beneath the Bee-infested tree above the village
–LadyBug– Can be found above the Pumpkin Patch
–Cicada- Can be found flying across the Autumn Meadow
–Blue Spider– Can be found crawling around the entrance to the Portal
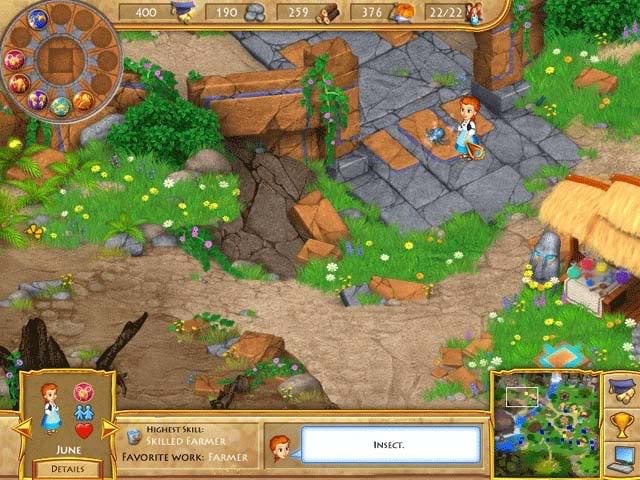
Each insect will appear for a brief amount of time in each area before disappearing, but will always follow the same pattern of movement. Drag and drop a villager over the insect to collect it.
- After collecting all the insects, return to the Spider. Drag a villager over him to talk to him. In return for the bugs, he gives you the Scorpio Zodiac Key.
Congratulations, you’ve obtained the Scorpio Zodiac Key!
![]() X.Zodiac Key 9: Sagittarius
X.Zodiac Key 9: Sagittarius![]()
Requirements: Knowledge Level 2, 12 Gems
- Start the process of finding this Key by clearing the stone rubble against the Cliff Face and above the Pumpkin Patch: it’s best if you use worker-skilled villagers for this. Stone rubble will be transported to the Supplies Shed as usable Stone for later.
- Before you can continue in this area, upgrade to Knowledge Level 2 in the Knowledge Menu. This will cost 600 Knowledge to do so.
- After upgrading, drag a villager over the Cliff/Stone Face to talk to it: it recently swallowed a Zodiac Key, and has agreed to give it to you if you bring it 12 Gems to help pretty it up.
- The 12 Gems you need to find don’t have a specific location, and will turn up around the village at random. Popular spots for them to appear though are near the Lumber Quarry, near the Fishing Dock, and near the Pumpkin Patch. The best way to find them is to scroll all around the village, and eventually they will turn up. They are often accompanied by large brown speech bubbles telling you to drag a villager over the gem to pick it up: this is the easiest way to find them. You can also check back with the Stone Face to see how many are left and what they look like.
- After you’ve found all 12 Gems, return to the Stone Face. Drag a villager over it to talk to it, and it will give you the Sagittarius Zodiac Key.

Congratulations, you’ve obtained the Sagittarius Zodiac Key!
![]() XI.Zodiac Key 10: Capricorn
XI.Zodiac Key 10: Capricorn![]()
Requirements: Handicraft Level 3, Ladder
- Before you can obtain this Key, you’ll need to have upgraded to Handicraft Level 3, which costs 2,500 Knowledge. After upgrading, proceed to the Tools Menu to build the Ladder: it’s absolutely essential in obtaining this Zodiac Key.
- Move a villager over to the Observatory, surrounded by the large torch bowls. Scrolling down the cliffside towards the river where your villagers fish, you should notice a Zodiac Key sparkling faintly in the fog near a cave. Use the Ladder on the "cave"/Zodiac Key to throw it down the cliff face. Drag a villager over the Key to obtain it.
Congratulations, you’ve obtained the Capricorn Zodiac Key!
![]() XII.Zodiac Key 11: Aquarius
XII.Zodiac Key 11: Aquarius![]()
Requirements: Handicraft Level 1, Basket
- Make sure you have Handicraft Level 1 and the Basket before you snatch this Key. Handicraft Level 1 costs 20 Knowledge and building the Basket from the Tools menu costs 10 Knowledge, 10 Stone, and 10 Wood. This is more likely one of the first Zodiac Keys you will acquire.

- After rebuilding both bridges in the Foggy Woods at the bottom left corner of the map, proceed to the Well. Drag a villager onto the Well to use the Basket to pull up a Zodiac Key. Drag a villager on top of the Key to collect it.
Congratulations, you’ve obtained the Aquarius Zodiac Key!
![]() XIII.Zodiac Key 12: Pisces
XIII.Zodiac Key 12: Pisces![]()
Requirements: Knowledge Level 3, Handicraft Level 2, Lake Dredger
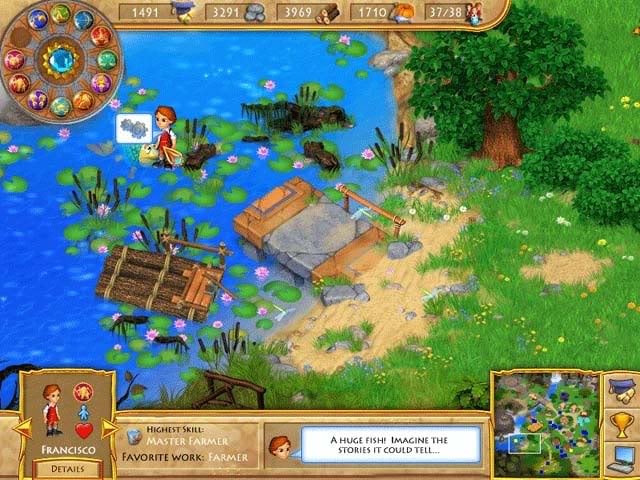
- First off, you’ll probably have noticed the giant Fish that surfaced near the Fishing Dock. Contrary to common sense, the goal isn’t to catch him.
- If you haven’t already, upgrade to Knowledge Level 3: this costs 3,000 Knowledge, but it will enable you to speak with the giant/Talking Fish. He’s found a Zodiac Key, but he asks you to clean the lake in return.
- Upgrade to Handicraft Level 2, which costs 300 Knowledge. In the Tools Menu, assemble the Lake Dredger for 300 Knowledge, 50 Stone, and 100 Wood.
- Drag villagers onto the overlying pond scum (the Dredger icon will appear) to have them clean the lake: you can get several villagers to work together on this. Workers are the best.
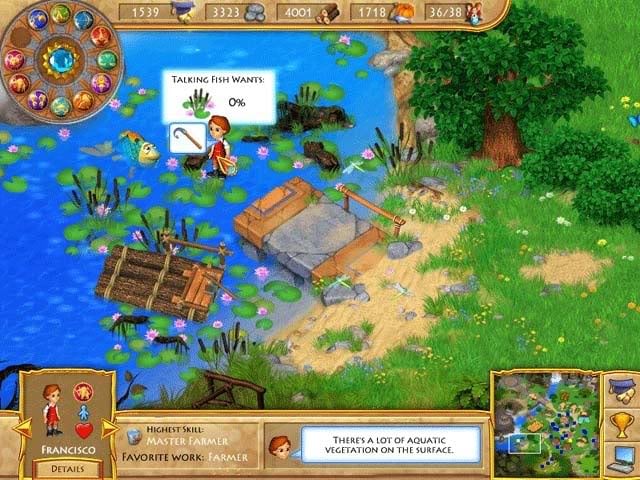
- After you’ve cleared all the scum, the Talking Fish will thank you by rewarding you with the Zodiac Key.
Congratulations, you’ve obtained the Pisces Zodiac Key!
XIV.Science Upgrades
There are various upgrades which can be purchased in Gemini Lost via the Science/Knowledge Upgrades menu, notable by the graduation cap at the bottom right corner of the screen. The following is a list of upgrades, how much they cost, and how they will help you in your game.
Farming:
Farming Upgrade Level 1 (25 Knowledge)
- Gives villagers the ability to fish from the Fishing Dock
- Gives villagers the ability to collect milk from Fuzzles
Farming Upgrade Level 2 (200 Knowledge)
- Gives characters the ability to harvest wheat (this can be done at the wheat field and flour made at the mill. Later, when the Bakery is built, the flour can be used to make bread).
Farming Upgrade Level 3 (2,000 Knowledge)
- Increases farming capacity skill of villagers
- Allows the Bakery to be built (to make bread)
- Allows the Bee Hives to be built (to harvest honey)
Construction:
Construction Upgrade Level 1 (10 Knowledge)
- Allows new houses to be built that will increase population capacity
Construction Upgrade Level 2 (300 Knowledge)
- Allows more new houses to be built that will increase population capacity
Construction Upgrade Level 3 (2,000 Knowledge)
- Allows more new houses to be built that will increase population capacity
Medicine:
Medicine Upgrade Level 1 (250 Knowledge)
- Increases maximum age of villagers
- Increases birthrate
Medicine Upgrade Level 2 (500 Knowledge)
- Increases maximum age of villagers
- Increases birthrate
- Hospital becomes available for construction (on other side of stone bridge)
Medicine Upgrade Level 3 (2,000 Knowledge)
- Increases maximum age of villagers
- Increases birthrate
Handicraft:
Handicraft Upgrade Level 1 (20 Knowledge)
- Skill capacity to gather wood and stone increases for villagers
- Fishing Rod, Basket, and Stuffed Fuzzle tools unlocked
Handicraft Upgrade Level 2 (300 Knowledge)
- Skill capacity to gather wood and stone increases for villagers
- Wheat Scythe, Lake Dredger, and Bee Keeper Mask tools unlocked
Handicraft Upgrade Level 3 (2,500 Knowledge)
- Skill capacity to gather wood and stone increases for villagers
- Big Axe, Ladder, and Astrocompass tools unlocked
Knowledge:
Knowledge Upgrade Level 1 (15 Knowledge)
- Increases maximum scientist skill capability
- Health, Slow, and Speed potion recipes unlocked
- Allows you to speak with Spider
Knowledge Upgrade Level 2 (600 Knowledge)
- Increases maximum scientist skill capability
- Fishing Lure, Favorite Profession Change, and Love potion recipes unlocked
- Allows you to speak with Stone Face
Knowledge Upgrade Level 3 (3,000 Knowledge)
- Increases maximum scientist skill capability
- All remaining potion recipes unlocked
- Allows you to speak with Talking Fish
Astrology:
Astrology Upgrade Level 1 (700 Knowledge)
- Gives villagers ability to build/restore the Portal/Teleporter
Astrology Upgrade Level 2 (1,500 Knowledge)
- Gives villagers ability to build/restore the idol that controls/powers the Portal/Teleporter
Astrology Upgrade Level 3 (3,500 Knowledge)
- Gives villagers ability to rebuild Observatory
XV.Tools
Various tools are unlocked with each Handicraft level upgrade. The following is a list of tools and what they are to be used for.
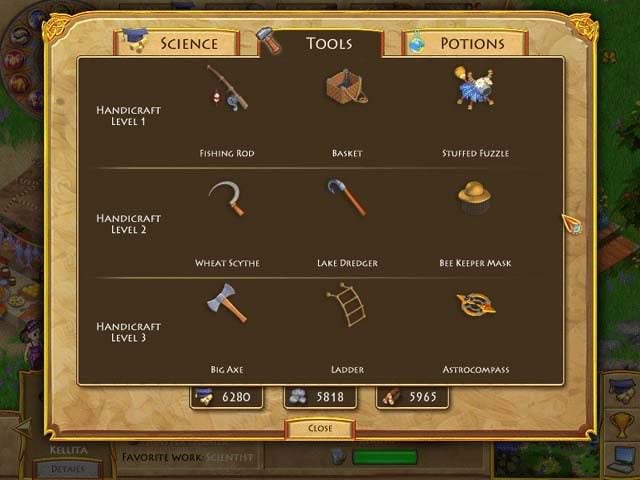
Handicraft Level 1:
- Fishing Rod- (30 Knowledge, 30 Stone, 50 Wood) This is a tool to be used for gathering food: more specifically, fish, and is to be used at the Fishing Dock.
- Basket- (10 Knowledge, 10 Stone, 10 Wood) This is to be used with the Well in the Foggy Woods. Its sole purpose is to retrieve the Aquarius Zodiac Key from the bottom of the well.
- Stuffed Fuzzle- (70 Knowledge, 30 Stone, 20 Wood) Use this in the flowery meadow at the bottom right corner of the map to tame the Fuzzles.
Handicraft Level 2:
- Wheat Scythe- (50 Knowledge, 80 Stone, 80 Wood) Use this tool to harvest Wheat from the Wheat Field as a new food source.
- Lake Dredger- (300 Knowledge, 50 Stone, 100 Wood) This tool is exclusively used for cleaning up gunk from the water/river/lake at the request of the Talking Fish: it will earn you the Pisces Zodiac Key.
- Bee Keeper Mask- (500 Knowledge, 100 Stone, 70 Wood) After obtaining Farming Level 3, this will give you the ability to harvest honey as a food source.
Handicraft Level 3:
- Big Axe- (700 Knowledge, 200 Stone, 100 Wood) This tool is exclusively used to chop down the large dead tree, which will lead to the Observatory as a makeshift bridge.
- Ladder- (1,000 Knowledge, 150 Stone, 300 Wood) Use this on the cliff on the Observatory grounds to reach the Capricorn Zodiac Key.
- Astrocompass- (1,500 Knowledge, 200 Stone, 200 Wood) This item is mandatory to rebuild and access the Observatory.
XVI.Potions
Potions can be made at the Laboratory after gathering various ingredients. Here is a map showing where all the possible ingredients are located:
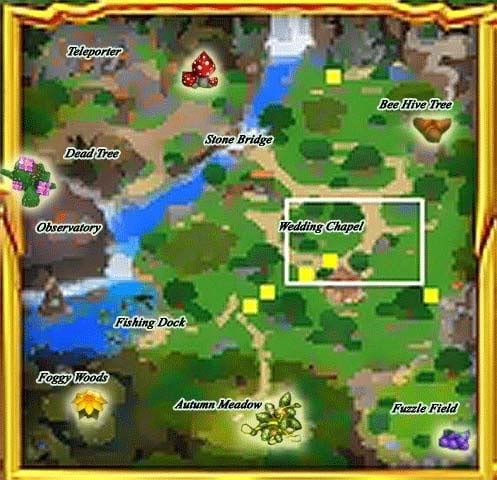
The following is a list of potion recipes, what they do, and their required ingredients:
- Health Potion- This cures sick people and fills your health meter.

- Slow Potion- Slows down a character for a brief amount of time.

- Speed Potion- Speeds up a character for a brief amount of time.

- Fishing Lure- Fish caught by this person are worth 1 more food.

- Favorite Profession Change- Allows you to choose a new favorite profession for a person.

- Love Potion- Allows a person to be married to anyone.

- Plant Growth Potion- Drop on a Garden and all plants will instantly ripen.

- Skilled Builder Potion- Maxes a person’s building skill.

- Skilled Farmer Potion- Maxes a person’s farming skill.

- Skilled Worker Potion- Maxes a person’s worker skill.

- Skilled Scientist Potion- Maxes a person’s scientist skill.

- Any Profession Potion- Makes all professions a favorite.
- Character Growth Potion- Ages a child by 18 years and an adult by 1 year.

- Youth Potion- Makes any adult 18 years old.

XVII. Mini-games
There are three different mini-games present in Gemini Lost. The following describes the mini-game and what must be done to solve it.
- Stone Puzzle (Cave Entrance): After collecting the three Cave Crystals (covered under Zodiac Key 5: Leo) and using them on the cave entrance, this mini-game will be entered. Move the tiles until they match the background image. Click on a tile next to the missing tile to move it. The solution looks like this:
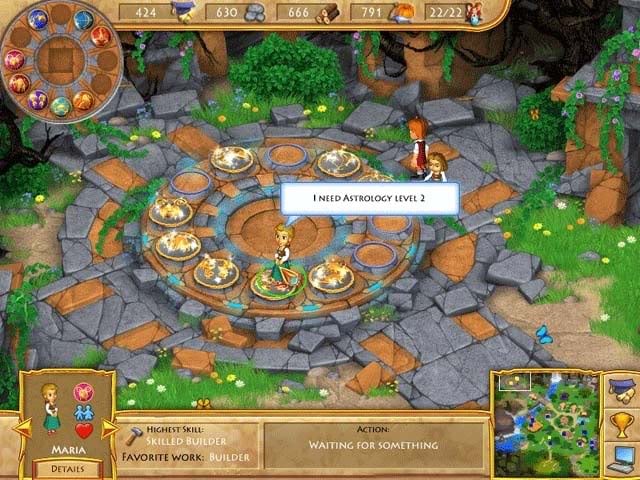
- Observatory Ring Alignment: Upon achieving Astrology Level 3 and entering the Observatory, you will be faced with this mini-game. Align the Zodiac symbols until they are all lit up in a line. Drag and align each ring in place. Some rings are attached to one another. For your sake of ease, they’ve been numbered. The following instructions are the easiest way to align them (you can reset the puzzle at any time):
1. Align ring 1 to its proper place: it will glow when properly aligned.
2. Drag ring 3 until ring 2 is properly aligned and glowing.
3. Drag ring 4 until ring 3 is properly aligned and glowing.
4. Drag ring 5 until ring 4 is properly aligned and glowing.
5. Drag ring 6 to properly align rings 5 and 6 and complete the puzzle.
The solution looks like this:

- Zodiac Keys Match Game: Activating any of the Zodiac Keys on the Portal will result in this mini-game. Make enough pairs (usually 3) to fill the key’s meter on the bottom to activate it. Grab any Zodiac Key from the bottom row and place it next to one of the same type also on the bottom row, like so:
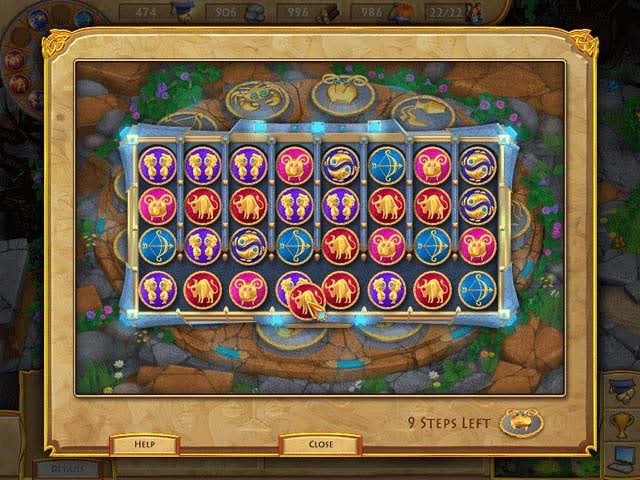
Three matches will result in the Zodiac Key’s activation. You must do this a total of 12 times for all Zodiac keys to be activated.
XVIII.Trophies
Trophies can be viewed in-game or from the main menu and show your accomplishments, or what other goals you can still achieve. The following is a list of trophies attainable, there are 51 total:
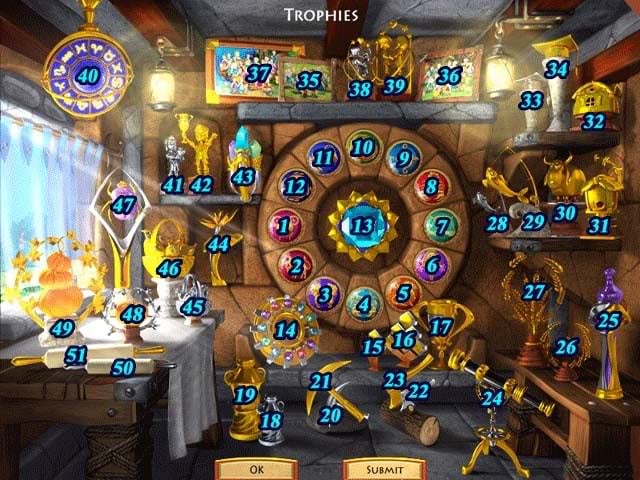
1. Aries collected
2. Taurus collected
3. Gemini collected
4. Cancer collected
5. Leo collected
6. Virgo collected
7. Libra collected
8. Scorpio collected
9. Sagittarius collected
10. Capricorn collected
11. Aquarius collected
12. Pisces collected
13. Idol restored
14. Teleporter complete
15. 50 honey harvested
16. 150 honey harvested
17. All sciences upgraded
18. 30 milk harvested
19. 100 milk harvested
20. 200 stone collected
21. 2,500 stone collected
22. 200 wood collected
23. 2,500 wood collected
24. Observatory puzzle solved
25. All potions discovered
26. 50 wheat harvested
27. 100 wheat harvested
28. 30 fish caught
29. 100 fish caught
30. Fuzzles tamed
31. Bees captured
32. First building built
33. 1,500 Knowledge researched
34. 20,000 Knowledge researched
35. 10 population reached
36. 20 population reached
37. 35 population reached
38. First couple married
39. 25 couples married
40. Teleporter activated
41. One skill maxed
42. All skills maxed (Note: You’ll need to use the various skilled potions to get this one)
43. Stone Face quest completed
44. Lake cleaned
45. 500 food harvested
46. 1,500 food harvested
47. All rare bugs collected
48. 50 pumpkins harvested
49. 200 pumpkins harvested
50. 50 bread baked
51. 200 bread baked
XIX.Completing Gemini Lost
Once you’re ready to finish the game, these are the steps you need to take to do so:
- Rebuild the Teleporter- The Teleporter is located in the upper left corner of the map. You’ll need Astrology Level 1, 100 Stone, and 500 would to rebuild it. Builder villagers are best for this job.
Once the Teleporter is restored, we can concentrate on the next order of business.
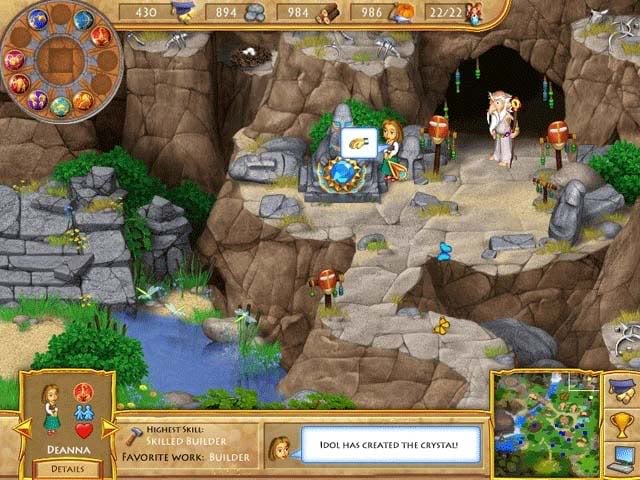
- Restore the Idol- Remember the Old Man encased in ice? He still wants you to restore the Idol located just to the left of him. Restoring the Idol requires Astrology Level 2 and 200 Stone. Drag villagers (preferably builders) over it to restore it.
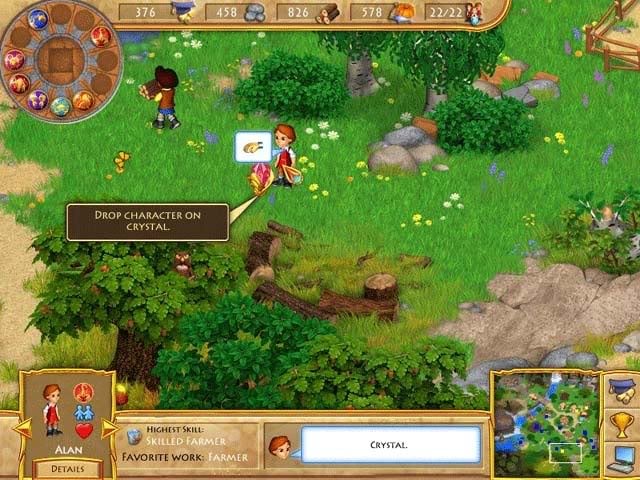
Upon restoring the Idol, a massive blue Crystal will appear. Drag a character on top of it to pick it up.
- Rebuild the Observatory- This requires Astrology Level 3. After your villagers have cleared all the rubble, drag (preferably the builders) back over to the Observatory to restore it: it’ll take 1,000 Stone and 1,000 Wood.
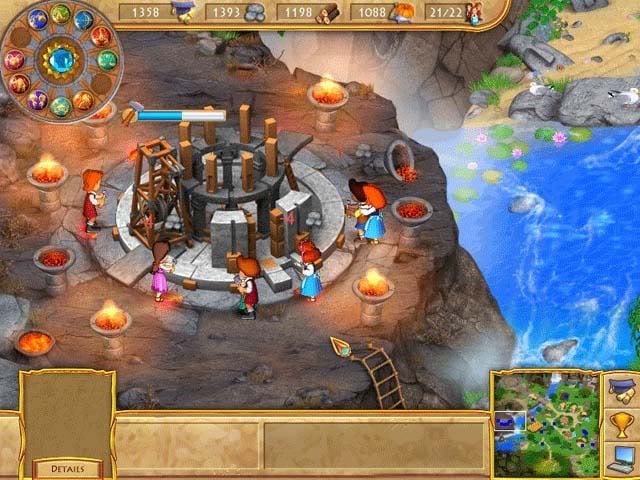
To actually use the Observatory, you will require Handicraft Level 3’s Astrocompass. Once that’s acquired, drag a villager on top of the Observatory to use it.

Complete the Observatory Ring Alignment mini-game to restore power to the Observatory (solution shown under the section XVII. Mini-games).
- Collect all the Zodiac Keys- If you haven’t done so already, finish collecting all twelve Zodiac Keys, individually covered in the guide above. After each Key is collected, it will appear in the Teleporter, powered by the large blue Gem from the Idol in the middle.
- Activate the Teleporter- Once all the Zodiac Keys are restored (or even before), drag a villager over each Key to enter the Zodiac Keys Match Game (solution/how to play shown under section XVII. Mini-games). Completing each will restore power to the Keys: you’ll need to do this a total of 12 times. (Note: You’ll need Astrology Level 2 to activate the Keys.)
- Going Home- Once the Keys are all activated, drag a total of 12 (adult) villagers over the various Zodiac signs (they don’t need to match themselves: 12 random villagers will do).
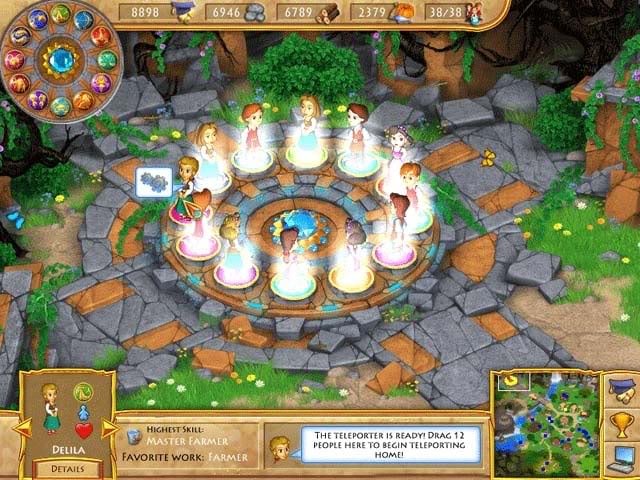
You’ll be asked if you’re ready to go home: select yes if you are (don’t worry, this will NOT overwrite your progress and the game will save before you select "Yes"). Enter the game’s final cutscene, to be continued…
Congratulations, you’ve completed Gemini Lost!
“;

More articles...
-
Best Horror Games On Itch.io – July 2026
Across a bounty of subgenres. -
Grow A Garden 2 Base Price List
What's the most valuable crop? -
Evomon Types Guide [Strengths, Weaknesses, Resistance]
Your companion guide during battles.