![Digimon UP Tier List [Supports, Buddies, and Partners]](/wp-content/uploads/2026/07/digimon-up-tier-list.jpg "Digimon UP Tier List [Supports, Buddies, and Partners]")
Digimon UP Tier List [Supports, Buddies, and Partners]
These Digimon will get you UP the leaderboard.


![Haze Seas Boss Drops [Chances, Locations, and How to Spawn]](/wp-content/uploads/2026/07/haze-seas-boss-drops.jpg "Haze Seas Boss Drops [Chances, Locations, and How to Spawn]")

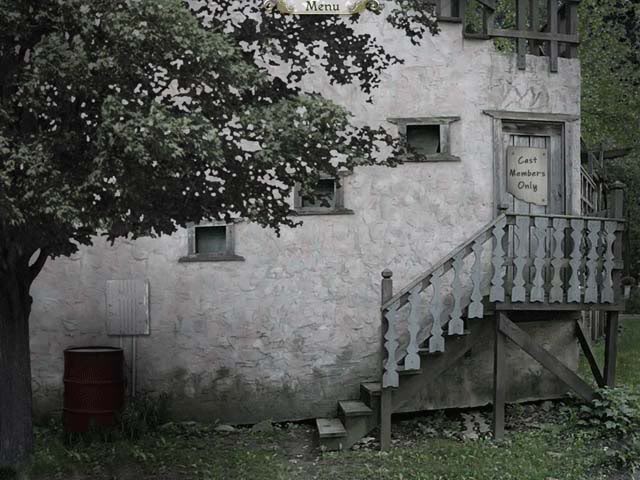
Welcome to our strategy guide for G.H.O.S.T Chronicles: Phantom of the Renaissance Faire. A Quick Introduction: Items in need of finding are circled in red Actions in need of doing/items for inventory are circled in green Fairies are circled in purple Objects that will only appear after finding all the others will be circled in a dotted line Objects/Items in need of finding in your game may not match our guide due to the random generator. If you need to quickly locate something in the guide…

a:1:i:0;a:2:s:13:”section_title”;s:67:”G.H.O.S.T. Chronicles: Phantom of the Renaissance Faire Walkthrough”;s:12:”section_body”;s:29460:”
Welcome to our strategy guide for G.H.O.S.T Chronicles: Phantom of the Renaissance Faire.
A Quick Introduction:
Table of Contents
Part 1: The Entrance Area
Part 2: Gnome Home & Decor
Part 3: Music Shop & Clothes
Part 4: The King’s Weaponry
Part 5: Tavern & Theater
Part 6: The Entertainment Plaza
Part 7: Sherwood Forest
Part 8: Castle Hotel
Part 9: Backtracking
WALKTHROUGH
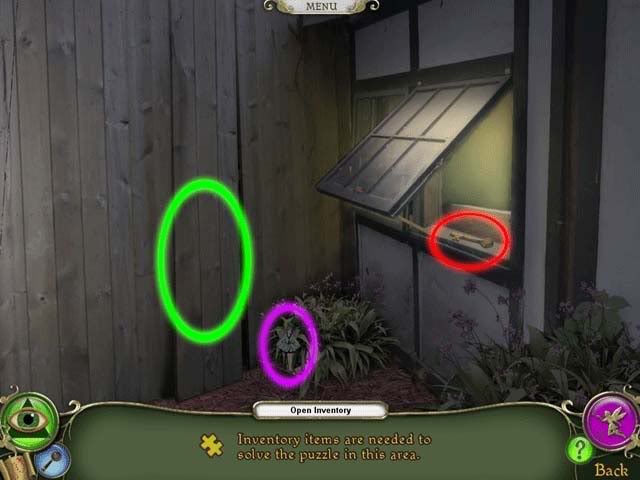
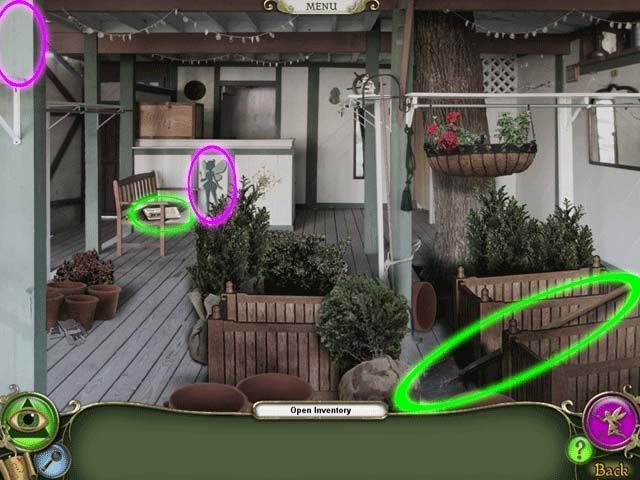
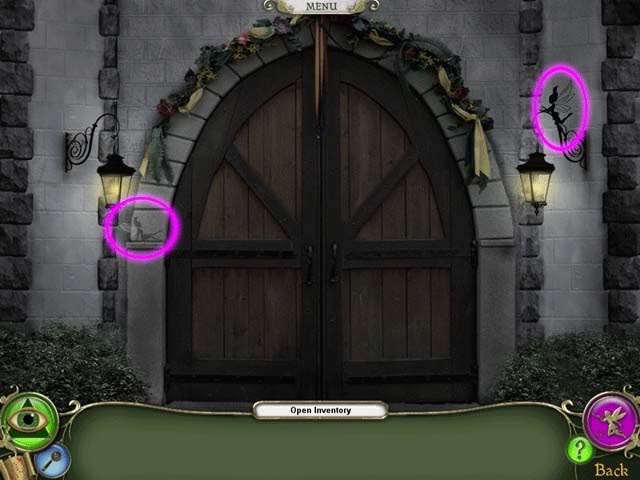
You will be introduced to a large panorama-like area through which you can scroll. Click on the Souvenir Shop to begin.
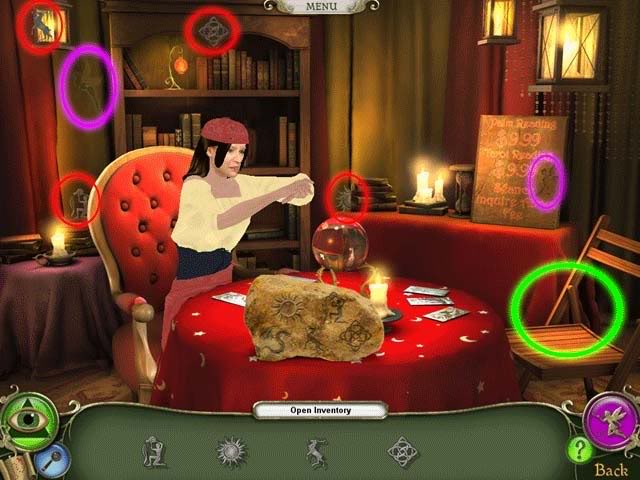
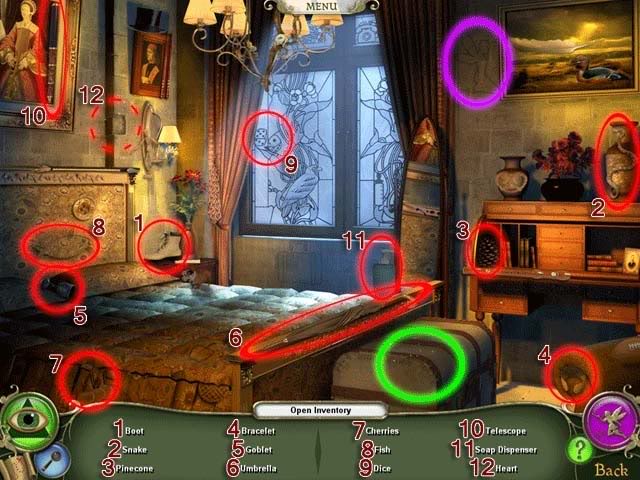
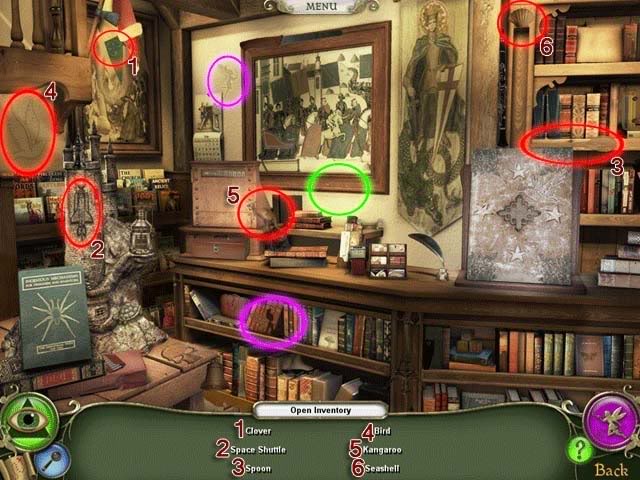
Souvenir Shop
Fairies: 2

1. Read the newspaper on the shelf
2. Find/Assemble all the parts of the dragon’s wing to retrieve the key
3. Use the key on the chest
4. Assemble the knight (only after opening the chest) and pick up the Spider to finish the area.
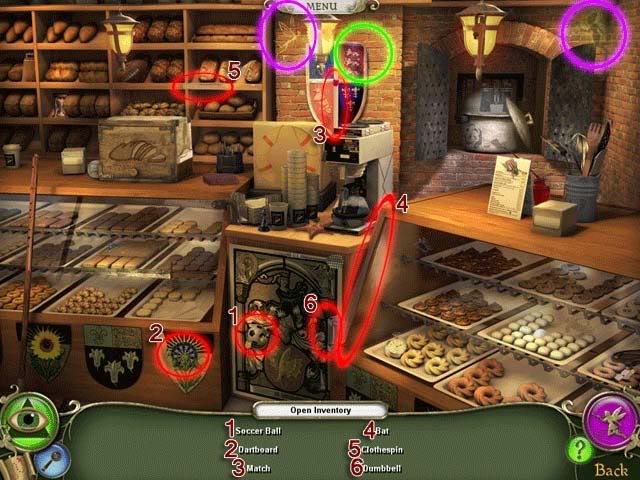
Ye Old Bakery
Fairies: 2
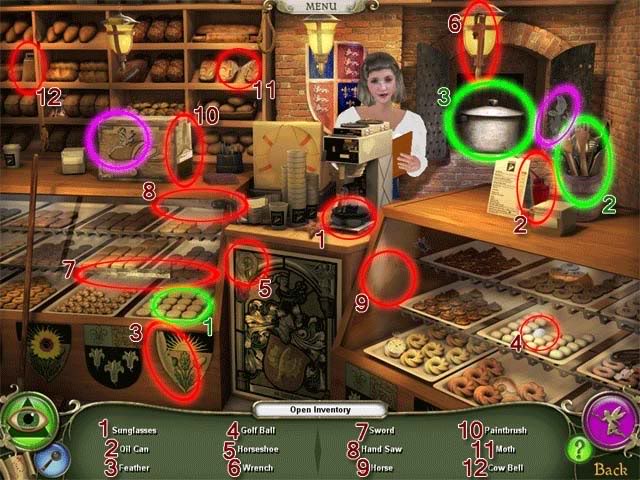
1. Pick up the Oven Mitt
2. Pick up the large Thongs
3. Use Oven Mitt and Thongs on the Pot to recover the Faucet
Merlin’s Spells
Fairies: 1
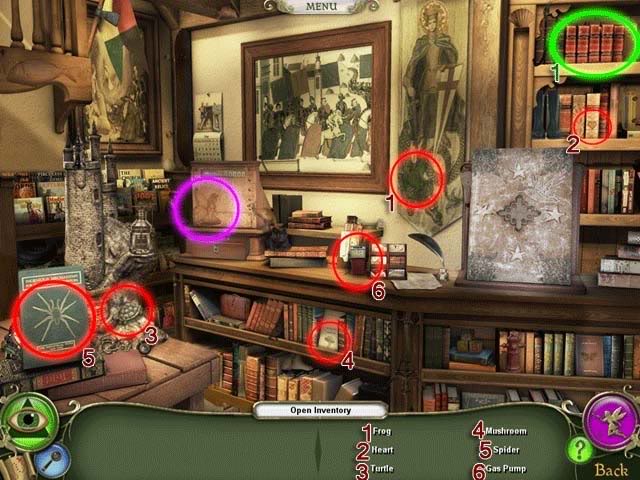
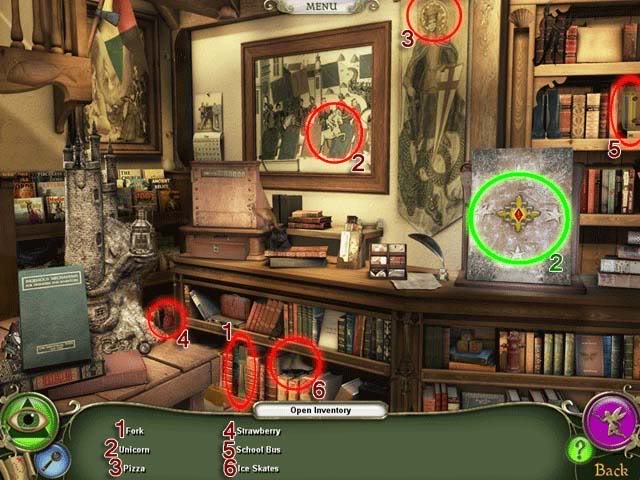
1. Recover the missing crest and use it on the book
2. Pick up the Hose hidden within the book
Corn Cob
Fairies: 1

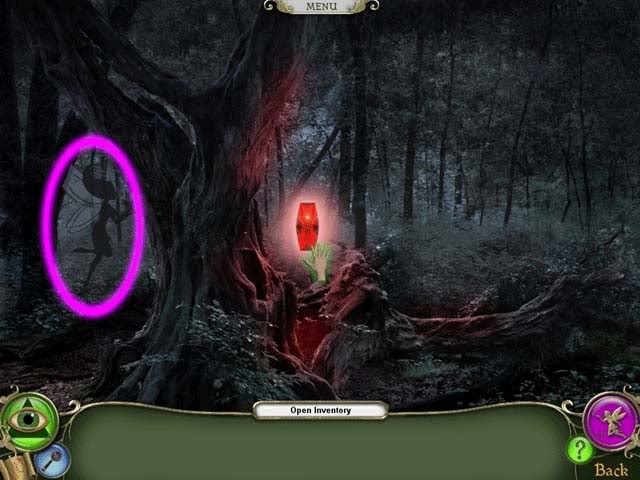
1. Take the Spider from your inventory and put it on the spider web, this will wake up the tree
2. Use the Faucet on the tree sap
3. Pick up the Bucket and use it on the faucet to gather the tree sap
4. Pick up the Axe Head
5. Use Sap on the broken axe
6. Place the Axe Head on the broken axe (w/sap)
7. Pick up the Pump Pulley
Wishing Well
Fairies: 1
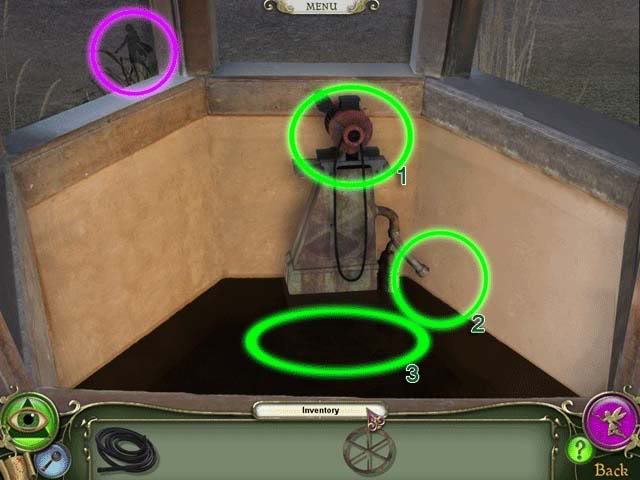
1. Use the Pump Pulley on the pump
2. Use the Hose on the water faucet
3. Pick up the Hammer
There’s nothing left to do in this area, so proceed to the next by exiting around the corner of the Souvenir Shop.
Gnome Home
Fairies: 3

1. Read the newspaper clipping lying on the floor
2. Once the shovel is assembled, pick up the Rock
3. Pick up the Flower Seeds on the shelf and use them on the hole the Gnome has dug
Note: You will need to return for a step 4 and 5, listed below, after completing Medieval Jewelry
4. Give the Diamond to the female Gnome on the porch
5. Pick up the Flower
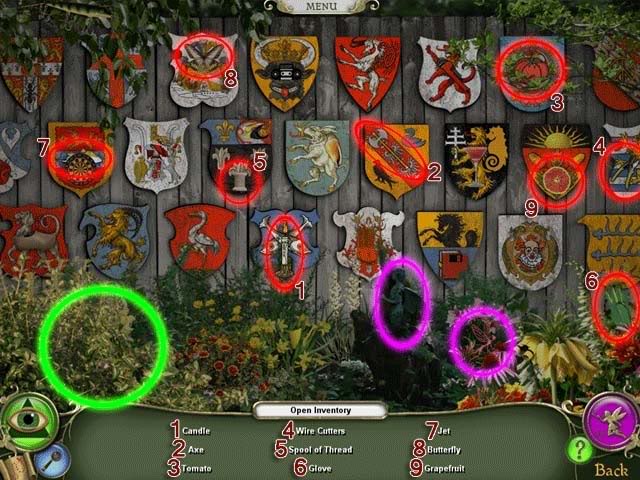
Back Fence (Medieval Jewelry)
Fairies: 1
1. Pick up the key: you will need it to unlock the shop
Note: The green circle is for after you finish The Queen’s Chocolates
Medieval Jewelry
Fairies: 2
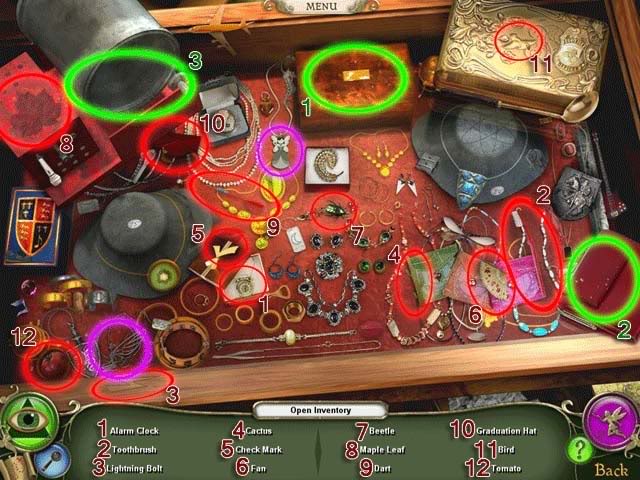
1. Pick up the Tumbler Pulley hidden inside the box (once it appears)
2. Pick up the Motor Belt (once it appears)
3. Use Tumbler Pulley, Motor Belt, and Rock on the machine and pick up the Diamond
(Note: If you didn’t note above, return to Gnome Home and give the Diamond to the girl Gnome. Pick up the watering can piece she reveals and pick up the Flower).
Tapestries
Fairies: 2
1. Use the Flower in your inventory on the empty Vase to make the butterfly appear
2. Pick up the Rocket (after you’ve found all other objects)
3. Pick up the Playing Card hidden under the tapestry (once you’ve found the rocket)
The Queen’s Chocolates
Fairies: 3
1. Once you’ve found all the playing cards, give the Playing Card in your inventory to the spirit: in return, he’ll give you some information and the Crowbar.
Back Fence (Medieval Jewelry)
Return to the back fence. Use the Crowbar on the loose boards in the fence, then pick them up and add them to your inventory.
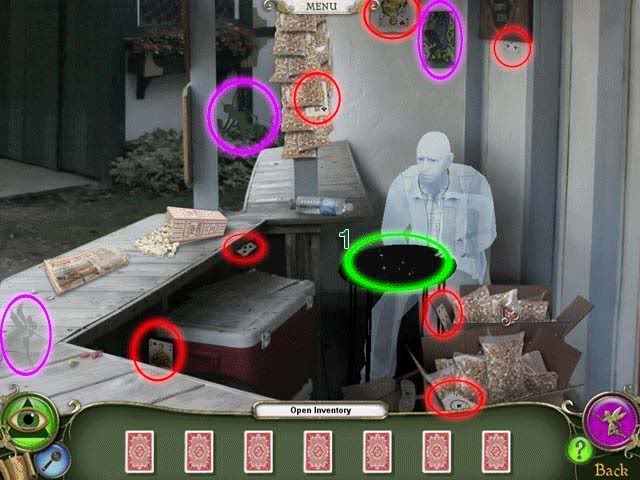
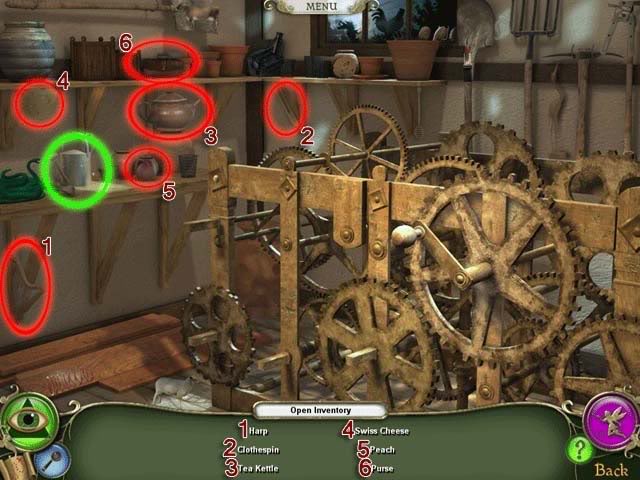
Storage Area (to right of Music Shop)Fairies: 2
1. Read the newspaper article sitting on the bench
2. Pick up the Shovel
(Note: There is a fairy in the upper left-hand corner: it was just accidentally collected before the screen was captured.)
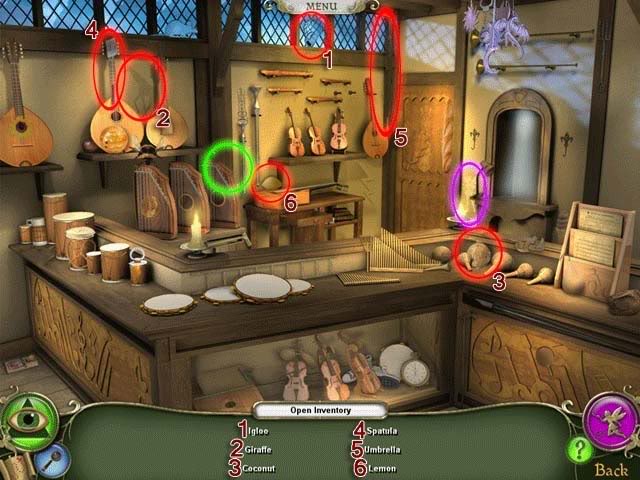
Music Shop
Fairies: 3
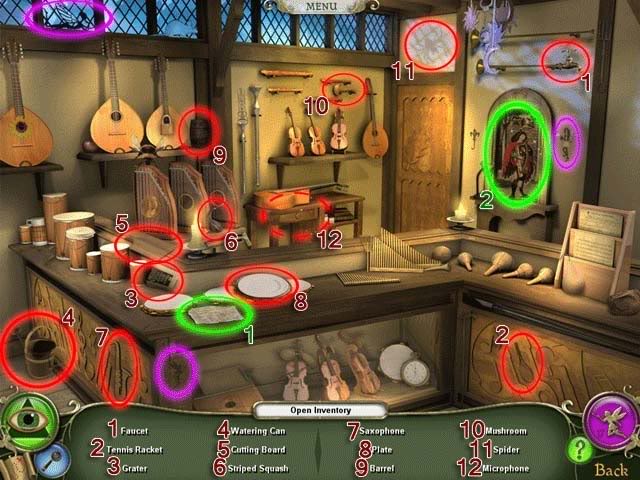
1. Read the newspaper clipping
2. Pick up the Toy Cannon (after collecting all the items)
Ye Clothier
Fairies: 3
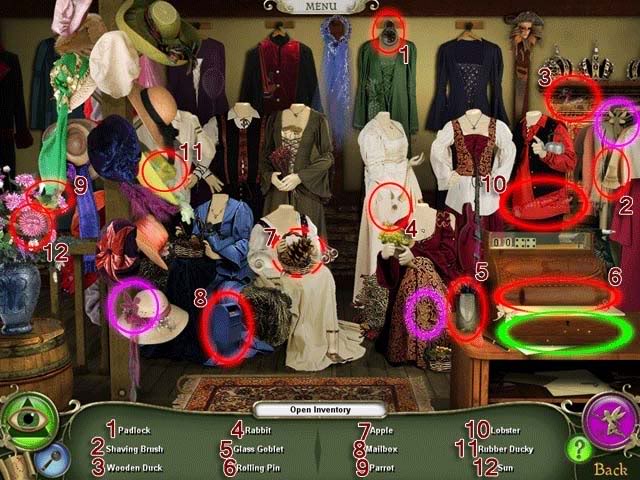
1. After finding all the items on the list, collect the Empty Bags
Follow the bright green arrow past the Magic Herbs shop to get to the next area.
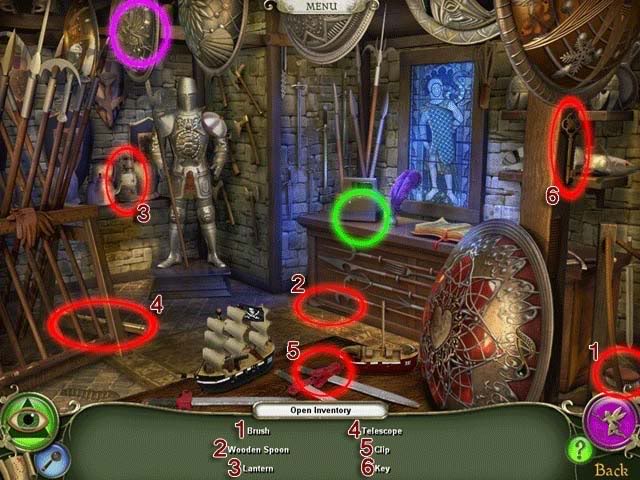
The King’s Armory
Fairies: 2
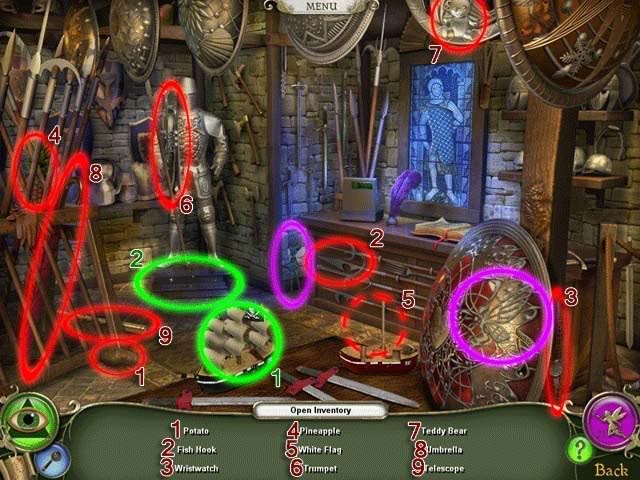
1. Use the Toy Cannon from your inventory on the pirate ship to make the White Flag appear
2. After finding all the items, pick up the Sledgehammer
Castle Hotel
Fairies: 2
The door is locked from the inside, so you can’t do anything here, but there are two fairies to collect.
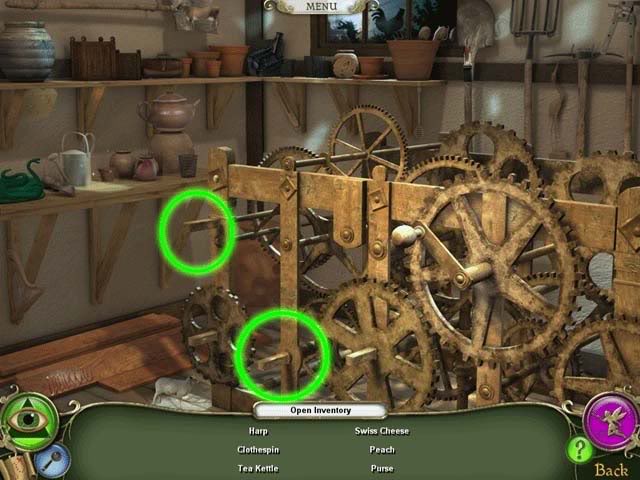
Trebuchet
Fairies: 0
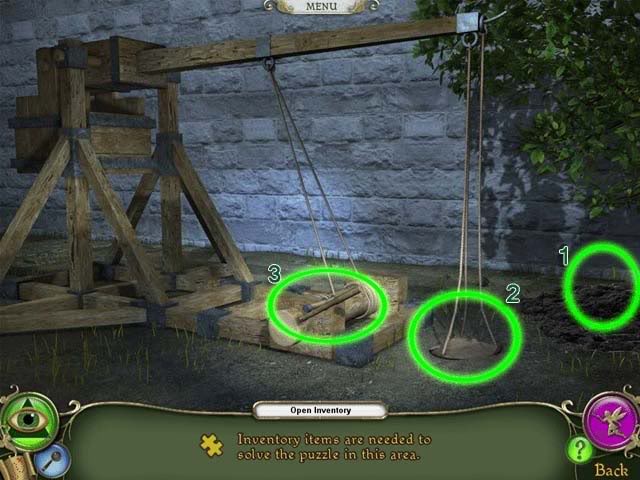
1. Use the Shovel on the pile of dirt
2. Put the Empty Bags in the sling to load them with dirt
3. Use the Sledgehammer on the pin to activate the Trebuchet
Grounds Keeper
Fairies: 1
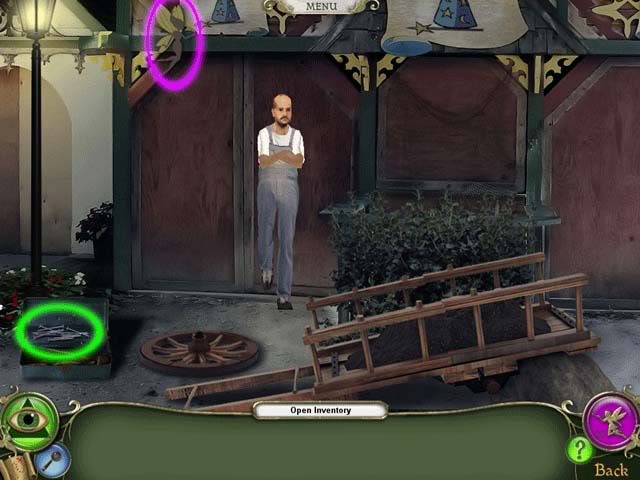
If you talked to him earlier, the Grounds Keeper’s cart is broken, so he can’t move the dirt. Return after the Trebuchet and you’ll have moved the dirt for him: he’ll thank you and leave. Pick up the Nails in the tool box to finish the area.
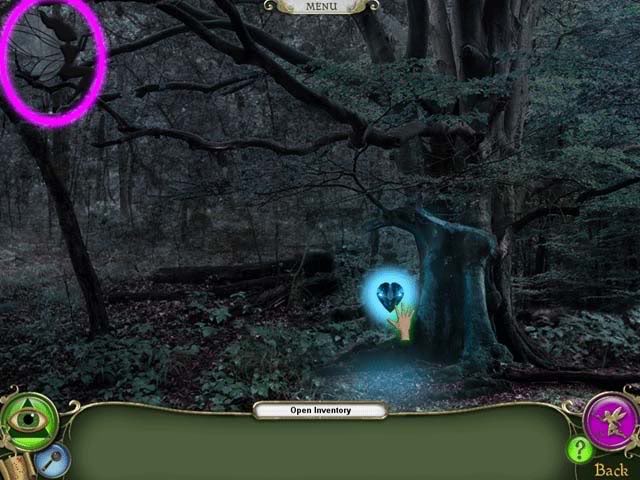
Exit (green arrow down) twice to the first area (Part 1) and enter the dark forest-like area next to Corn Cob.
Broken Bridge
Fairies: 0
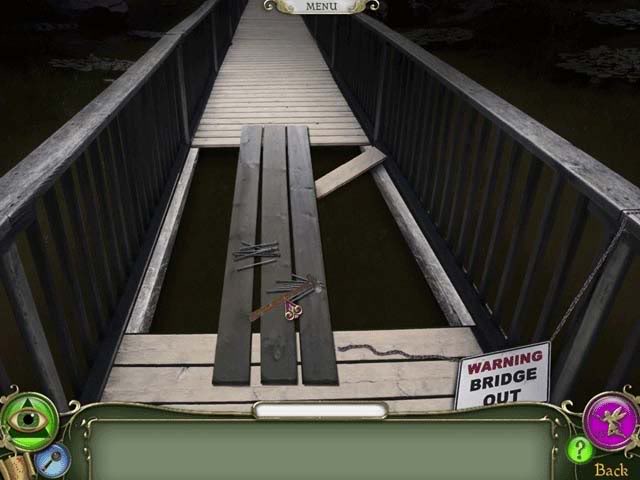
1. Use the Planks from your inventory on the gap in the bridge.
2. Use the Nails on the planks.
3. Use the Hammer on the nails to repair the bridge and continue to the next area.
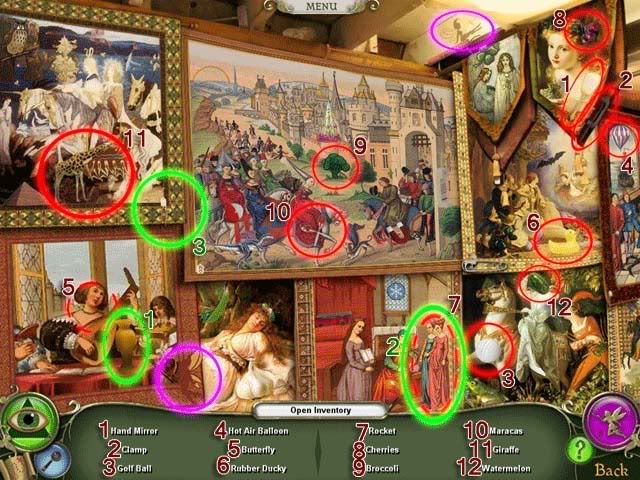
Portraits
Fairies: 3
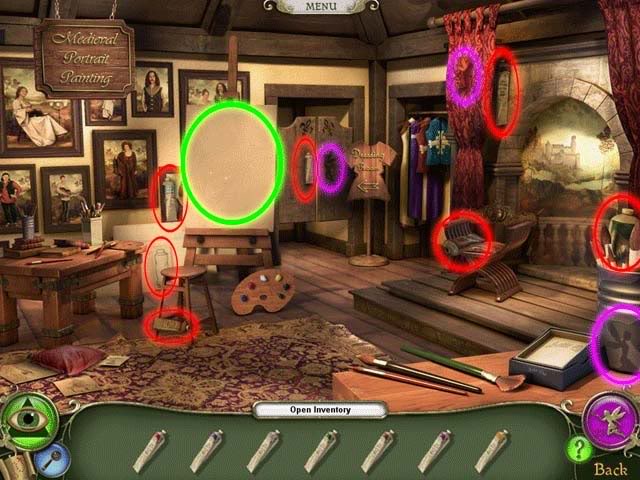
1. Pick up the completed Painting once you’ve found all the tubes of paint to add it to your inventory.
Tavern
Fairies: 2
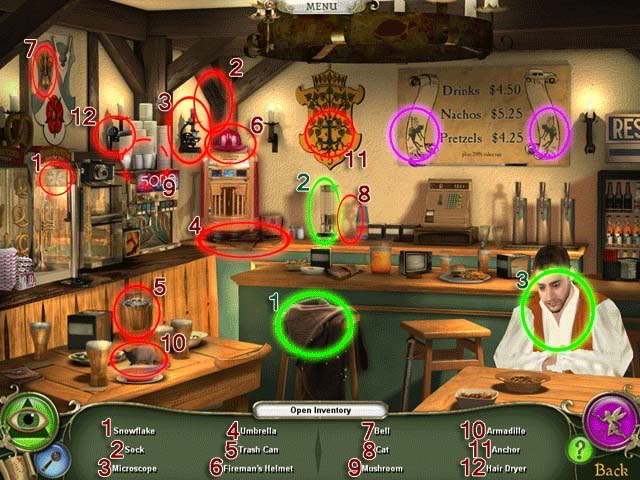
Talk to the man in the Tavern, and he’ll tell you more about Robbie.
1. Once you’ve found all the items, pick up the Pineapple
2. Use the Pineapple on the blender to make a smoothie and add it to your inventory
3. Give the Smoothie to the man and he’ll give you Money.
Candle Shop
Fairies: 2
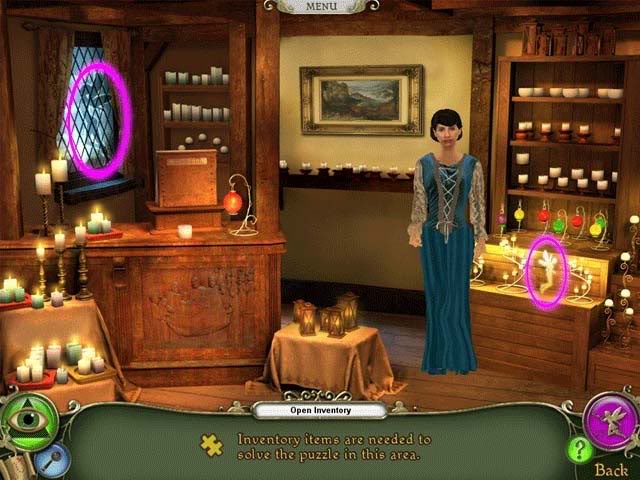
Talk to the woman tending the store, and she’ll tell you her suspicions. Give her the Money the man at the Tavern gave you, and she’ll give you your Candle. Don’t forget to pick up the fairies while you’re there!
Go up the path to where the sign points "Nottingham" to the next area.
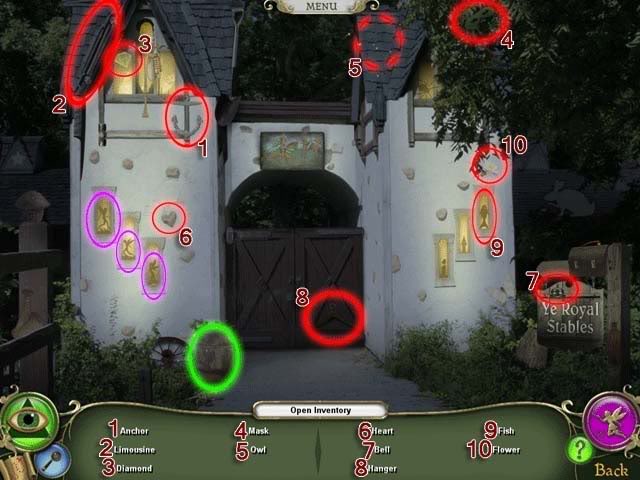
Nottingham Gate
Fairies: 0
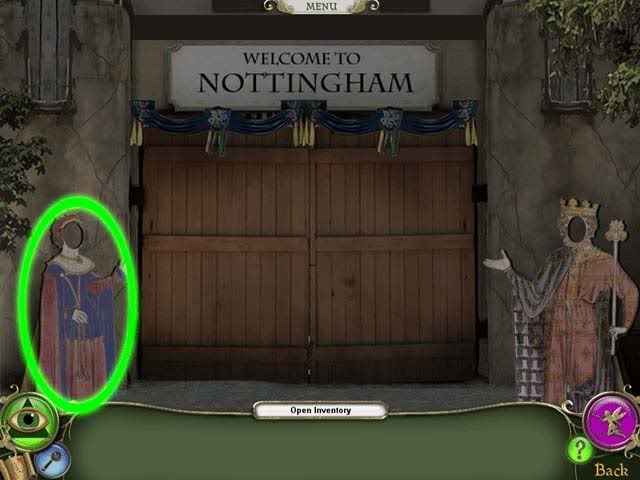
1. Pick up the Queen cutout and add it to your inventory.
Old Mill
Fairies: 2
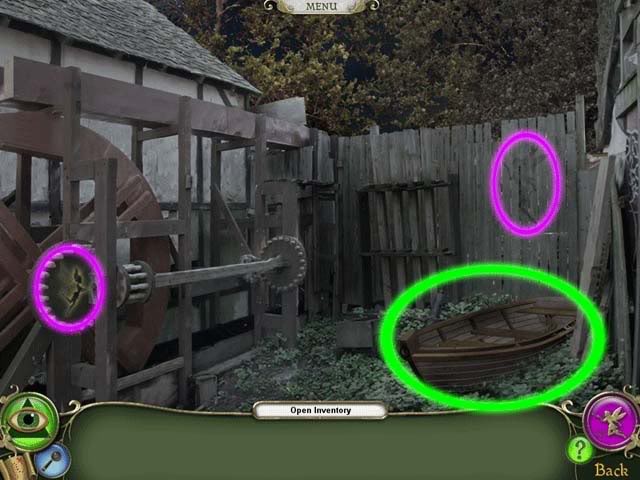
1. Pick up the Boat and add it to your inventory. Underneath you will also find Alum. Pick that up also to finish this area.
Pharmacy
Fairies: 0

1. Click on the Sugar to add it to the flask
2. Click on the Flour to add it to the flask
3. Put the Alum from your inventory into the crushing bowl. Click on it again to add it to the flask.
4. Place the candle from your inventory underneath the flask to make glue. Click on the flask to add Glue to your inventory.
Time to exit to the previous area via the down green arrow.
Theater
Fairies: 0 (Note: there are no fairies in the Theater area)
1. Talk to the spirit to learn more about what she’s doing there
2. Place the Boat from your inventory onto the moving trolley
3. Place the Queen cutout into the boat
4. Use Glue on the queen cutout
5. Use the Painting on the glued area to complete the task. The stage is all yours now.
The following section all takes place on the Theater Stage:
Part 6: The Entertainment Plaza
Wall of Shields
Fairies: 2
1. Once you’ve collected all the items, pick up the Shield that falls out of the bush and add it to your inventory.
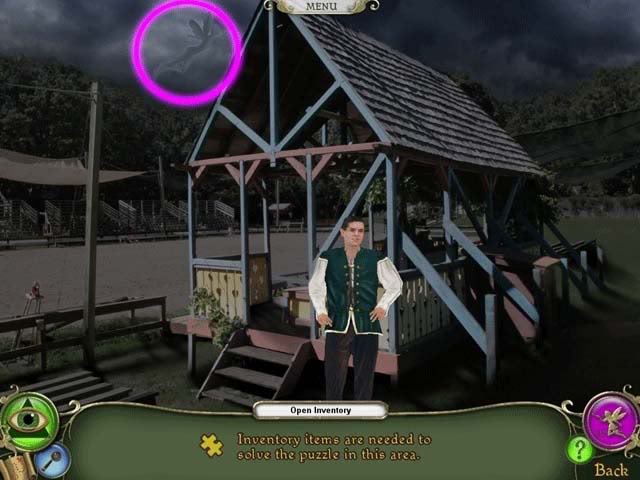
Ye Royal Stables (Jousting Area)
Fairies: 3
1. Once you’ve collected all the items, be sure to pick up the Horse that was hidden in the barrel
Stable Boy (Jousting Area)
Fairies: 1
1. Give the Shield from your inventory to the stable boy.
Tickets Booth/Egg Throwing Game
Fairies: 2
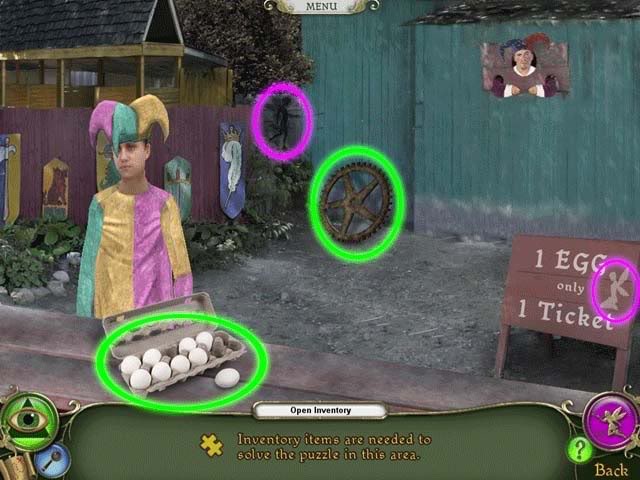
1. If you checked this area earlier, you’ll notice the man manning the booth is gone. Pick up the eggs from off the counter. You can try and take the Gear, but the other jester won’t let you.
Truth Fountain
Fairies: 2
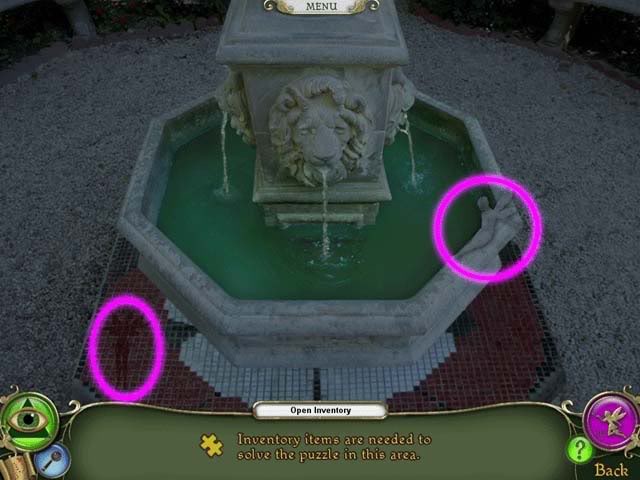
1. Take the eggs from your inventory and toss them into the fountain. Pick up the rotten egg (the one that floats).
Return to the Tickets Booth/Egg Throwing Game and use the rotten egg on the remaining jester to make him disappear with disgust. Pick up the Gear left over to finish up this area.
Storage Hut (next to Wall of Shields)
Fairies: 0
1. Once you’ve collected all the items, pick up the Light Bulb and add it to your inventory.
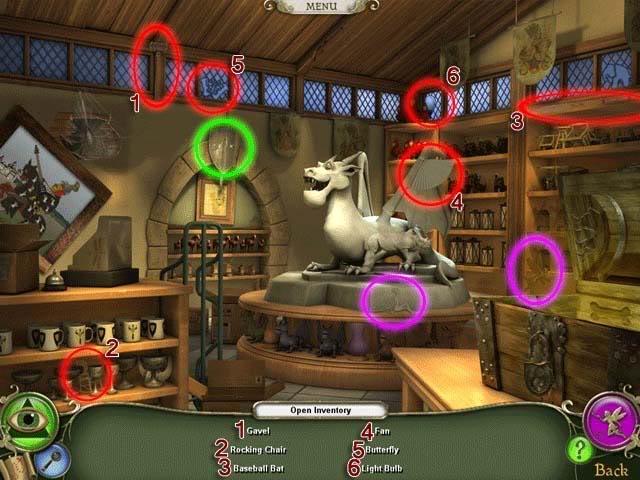
Puppet Show
Fairies: 1
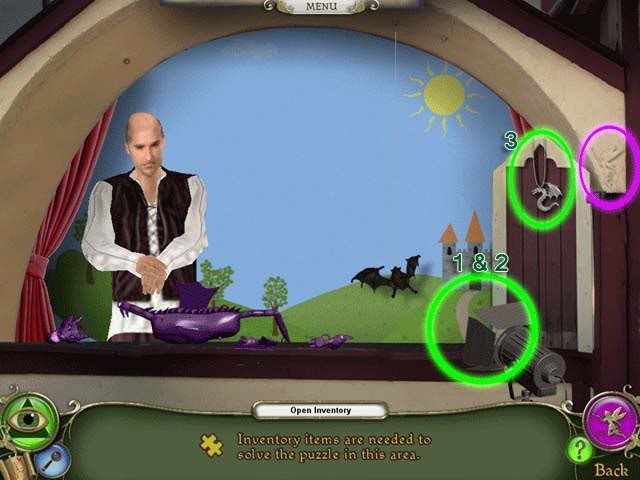
1. Use the Light bulb on the light on the right.
2. Use the Toy Horse in front of the light.
3. Pick up the Dragon Amulet.
Psychic Readings
Fairies: 2
1. Use the Dragon Amulet on the stone. The psychic will give you a Gear. Don’t forget to pick it up off the chair!
Storage Hut (next to Wall of Shields) – Revisited
Fairies: 0
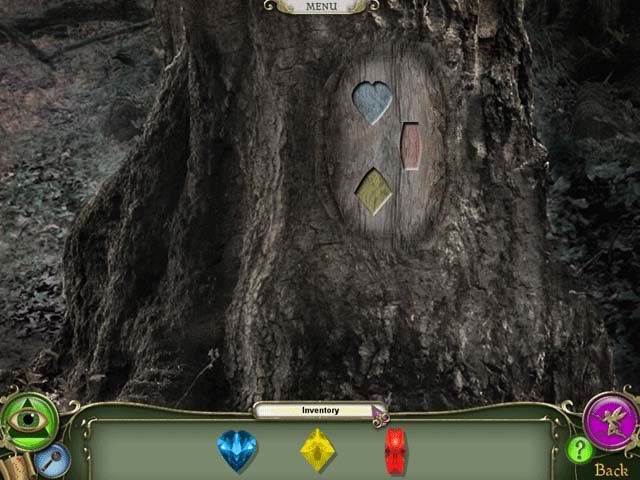
1. Use both Gears from your inventory. This will open the Gates to Sherwood Forest.
Fairies: 3
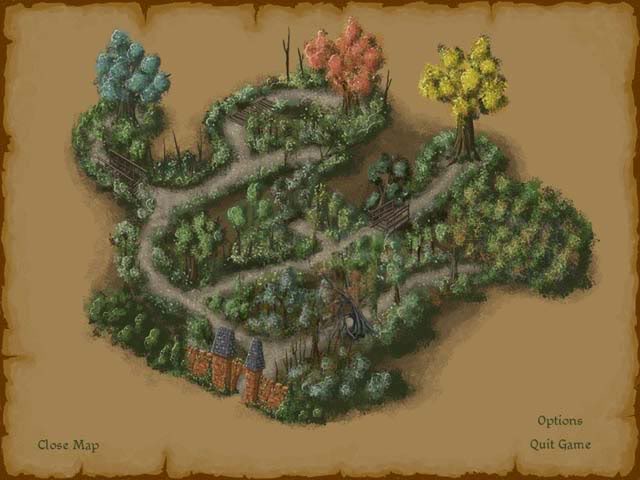
The following section is done in bullet points. If you get lost at any point in the forest, simply refer to the map provided above.
Front Desk
Fairies: 0
Click on the drawer in the desk area.
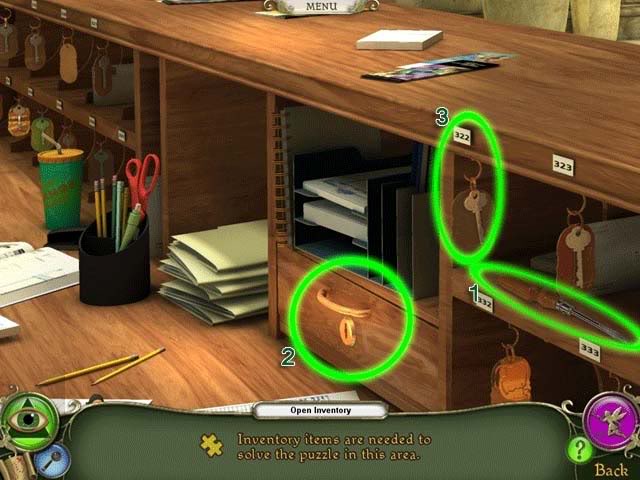
1. Pick up the Screwdriver on the shelf
2. Use the screwdriver on the drawer to open it: open the guest registry to find the number of Margaret Spears’ room, 322.
3. Pick up Room Key 322 and exit to the Hallway/Rooms
Room 322
Fairies: 1
1. Once you’ve found all the items, be sure to collect the Marble Orb hidden inside the chest.
Back in the Lobby, click on the Statue.
Queen’s Statue
Fairies: 1
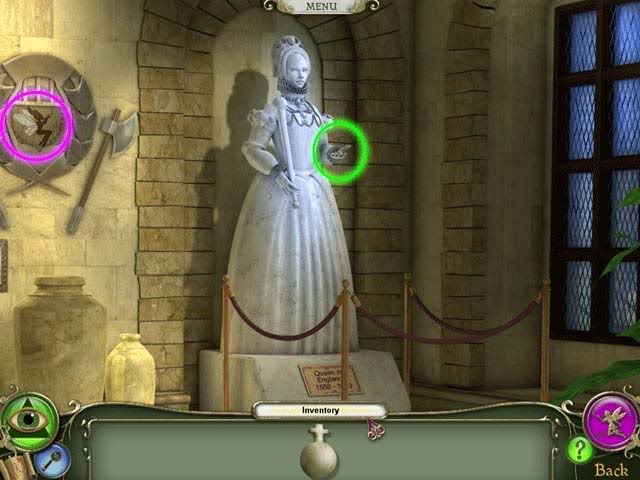
1. Place the Orb in the Queen’s hand to open up a secret passage.
Upstairs is Margaret, who admits to the fake hauntings and that the park really belongs to Robbie, but she’s torn up the evidence and is confident there’s no way anyone could ever find it. Looks like you’ve got one more task to do!
After finding all the items on each level, a piece of the will, will be revealed. Don’t forget to pick it up.
Souvenirs
Fairies: 2
Ye Old Bakery
Fairies: 2
Merlin’s Spells
Fairies: 2
Music Shop
Fairies: 1
Storage Area (to right of Music Shop)
Fairies: 2

The King’s Armory
Fairies: 1
Now enter the Castle Hotel gates. From the lobby, proceed up the secret staircase to confront Margaret. Congratulations, you’ve finished the game!
“;
