![Digimon UP Tier List [Supports, Buddies, and Partners]](/wp-content/uploads/2026/07/digimon-up-tier-list.jpg "Digimon UP Tier List [Supports, Buddies, and Partners]")
Digimon UP Tier List [Supports, Buddies, and Partners]
These Digimon will get you UP the leaderboard.

![Haze Seas Boss Drops [Chances, Locations, and How to Spawn]](/wp-content/uploads/2026/07/haze-seas-boss-drops.jpg "Haze Seas Boss Drops [Chances, Locations, and How to Spawn]")

Welcome to the Flux Family Secrets: The Rabbit Hole walkthrough on Gamezebo.com. Flux Family Secrets: The Rabbit Hole is a Hidden Object game for the PC created by Skunk Studios and published by Big Fish Games. This walkthrough includes tips and tricks, helpful hints, and a strategy guide on how to complete Flux Family Secrets: The Rabbit Hole.
Welcome to the Flux Family Secrets: The Rabbit Hole walkthrough on Gamezebo.com. Flux Family Secrets: The Rabbit Hole is a Hidden Object game for the PC created by Skunk Studios and published by Big Fish Games. This walkthrough includes tips and tricks, helpful hints, and a strategy guide on how to complete Flux Family Secrets: The Rabbit Hole.
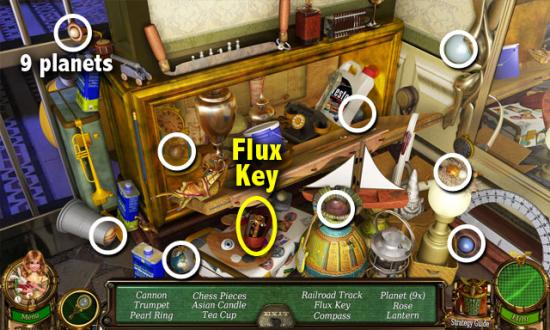
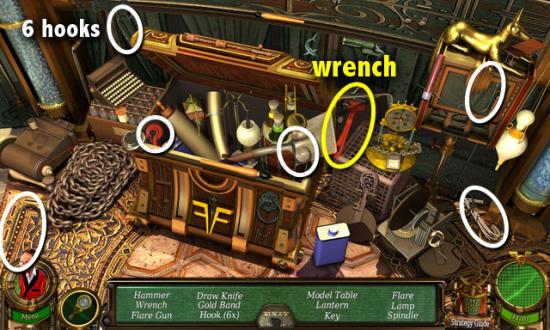
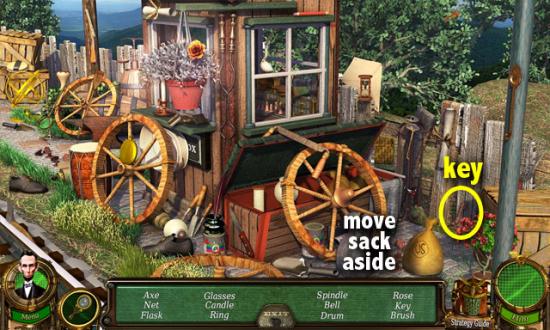
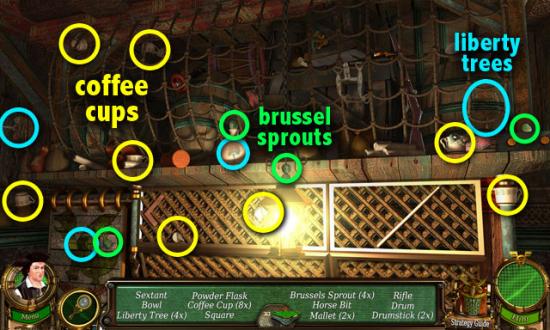
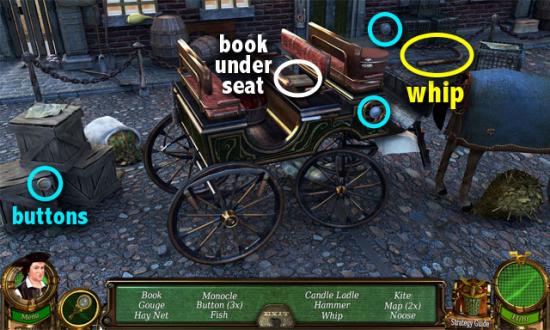
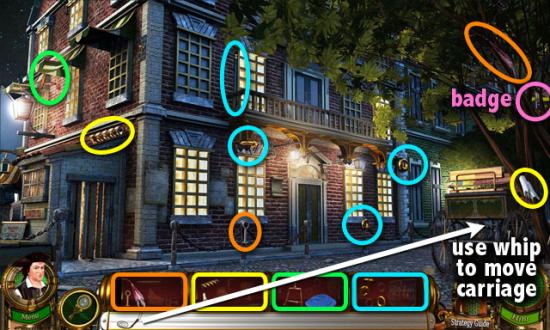
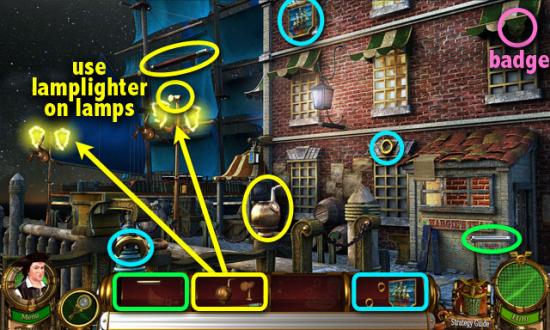
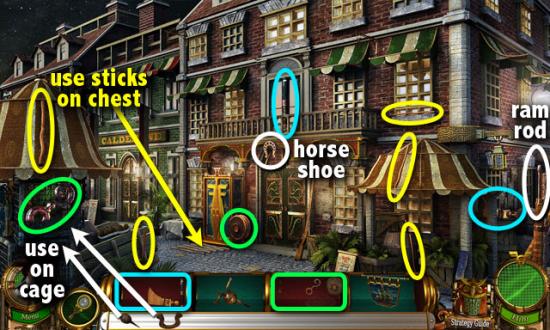
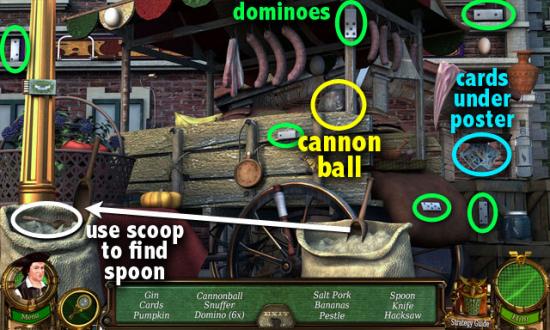
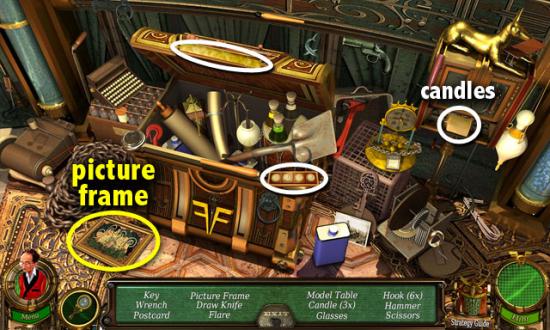
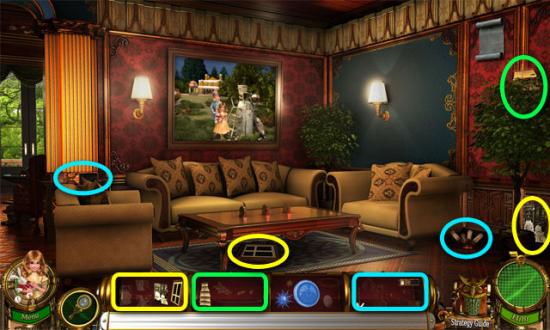
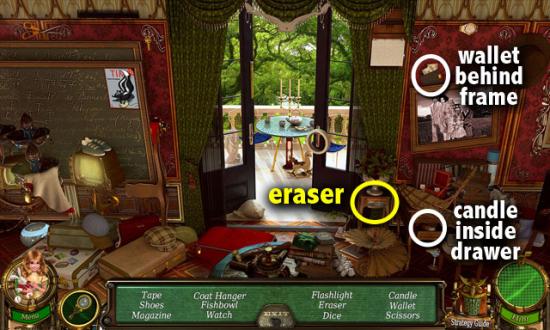
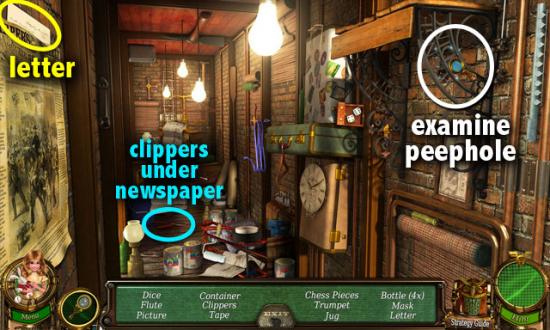
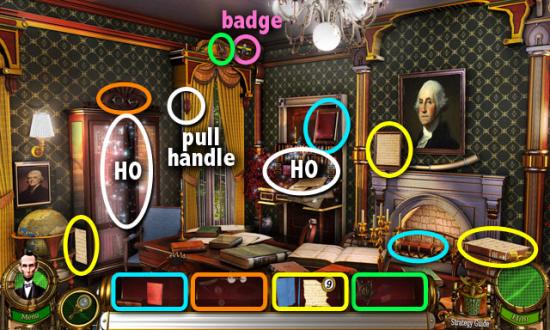
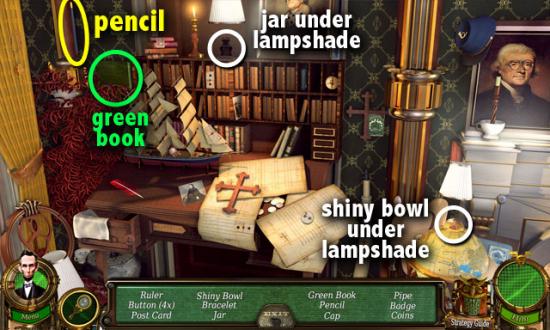
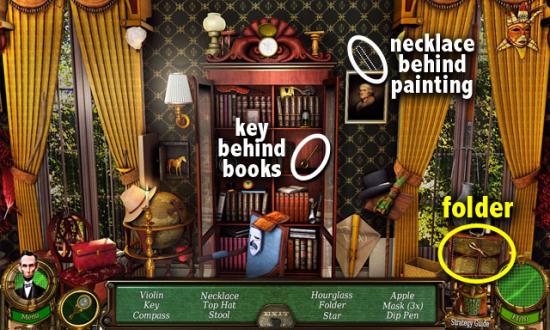
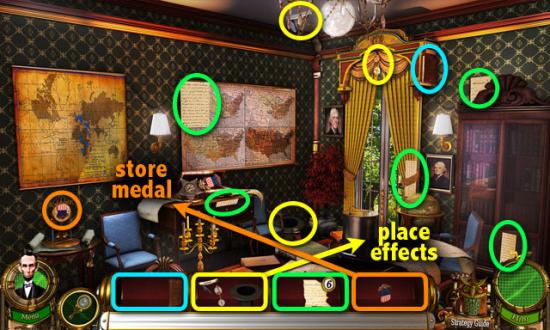
Since the list of items to find varies each time you play the game, the screenshots for the Hidden Object scenes do not mark the location of each object. Only the items that are constant in every game are indicated below.
A Tutorial is available at the start of the game. You may skip it, but when playing the game for the first time, we recommended that you take the tutorial.
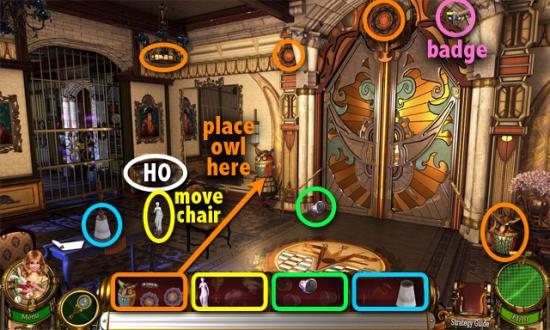
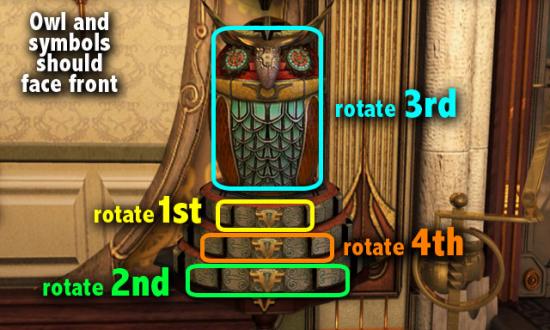
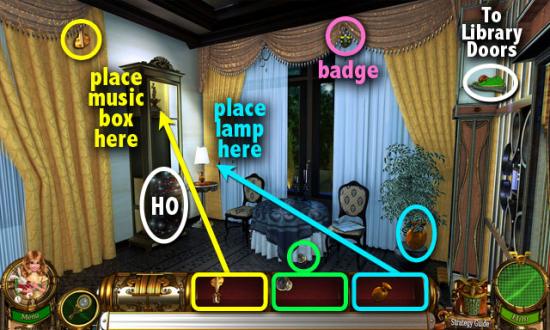
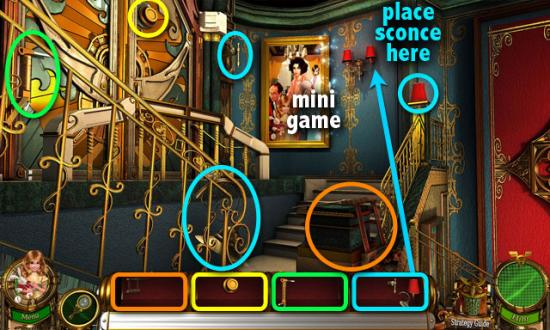
MANSION – FOYER

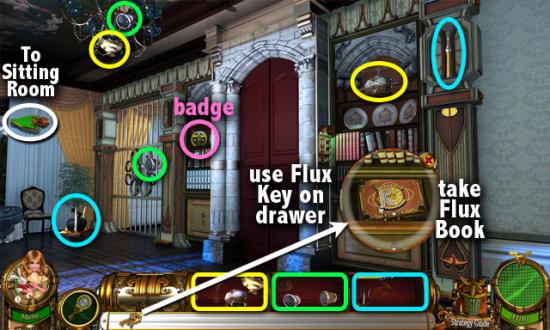
MANSION – DOOR TO LIBRARY
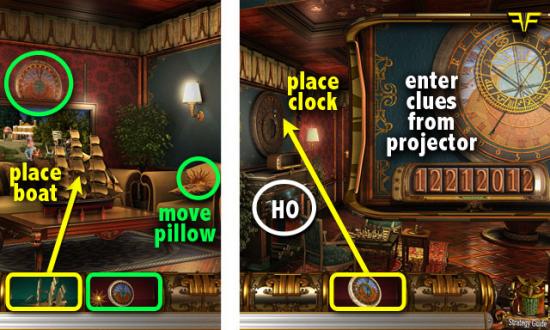
MANSION – SITTING ROOM
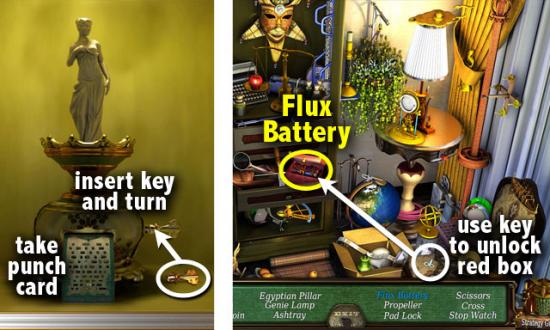
MANSION – DOOR TO LIBRARY
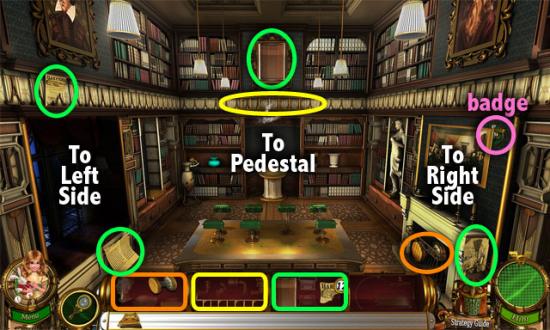
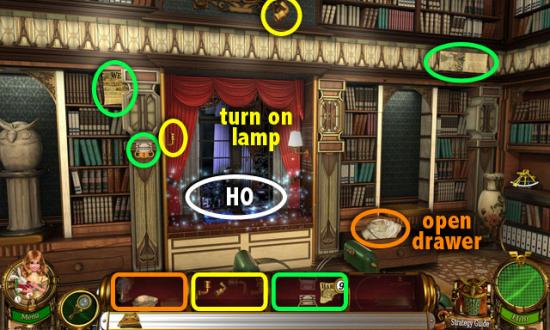
LIBRARY – MAIN FRONT VIEW
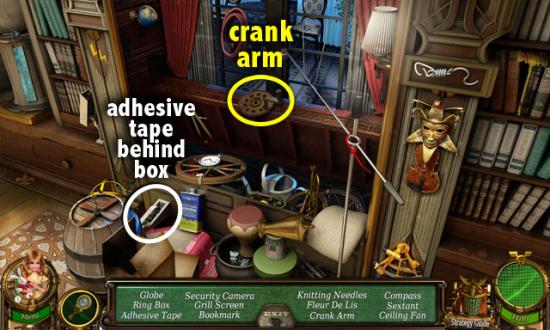
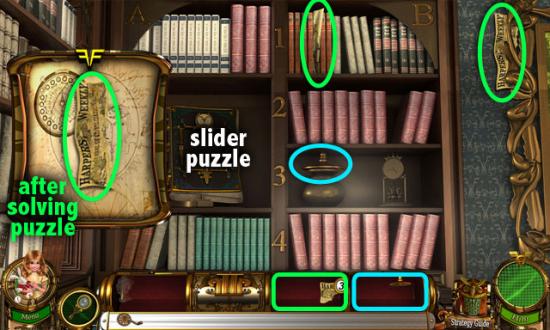
LIBRARY – LEFT SIDE
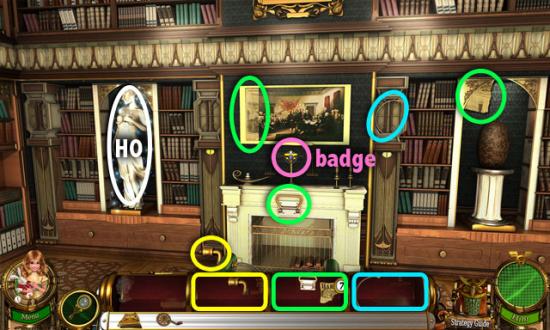
LIBRARY – RIGHT SIDE
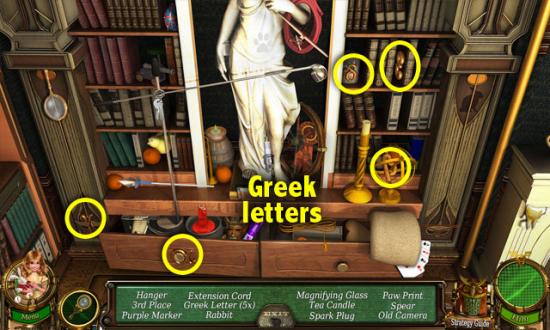
LIBRARY – PEDESTAL
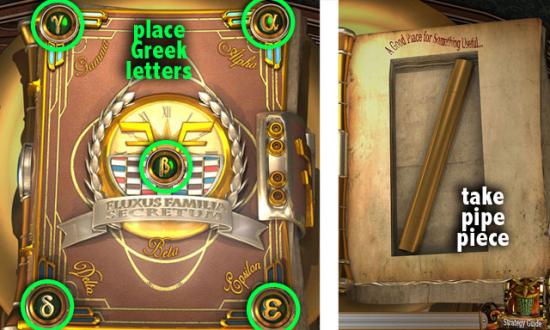
LIBRARY – UPPER SHELF
LIBRARY – PEDESTAL
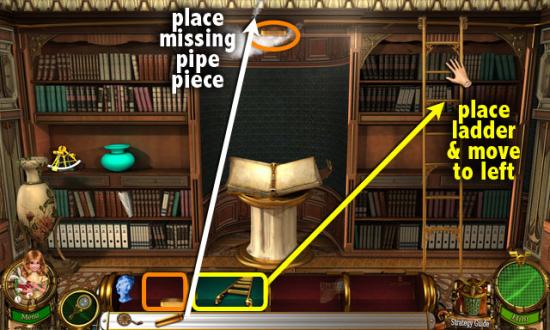
LIBRARY – MAIN FRONT VIEW
LIBRARY – PEDESTAL
LIBRARY – LEFT SIDE
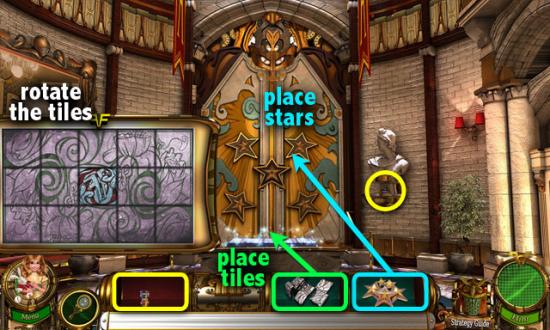
ROUND ROOM – DOORS
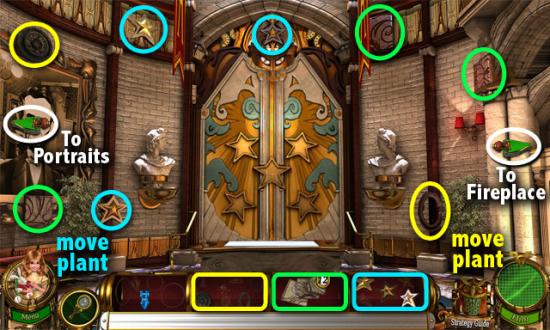
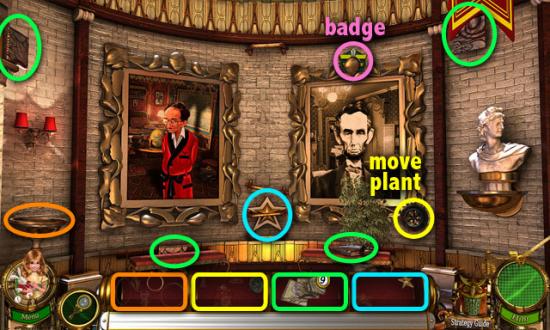
ROUND ROOM – PORTRAITS
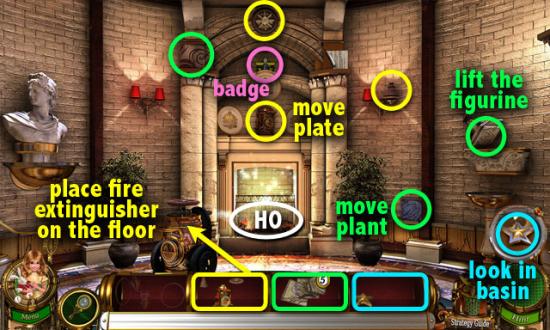
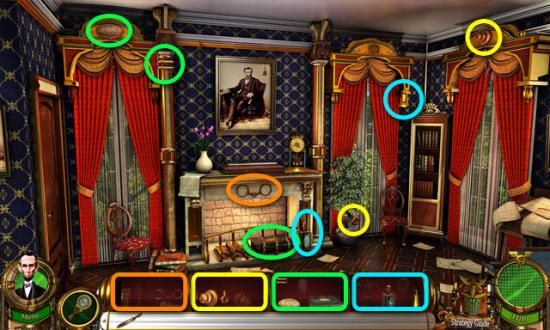
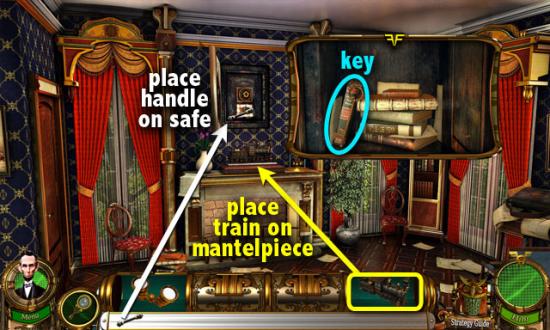
ROUND ROOM – FIREPLACE
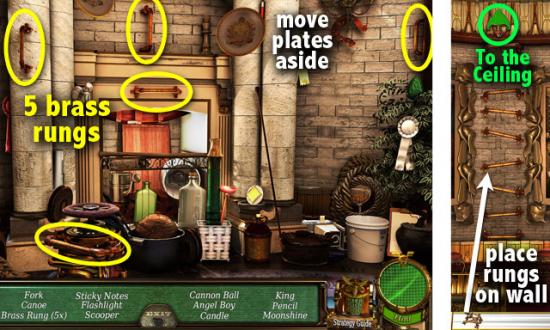
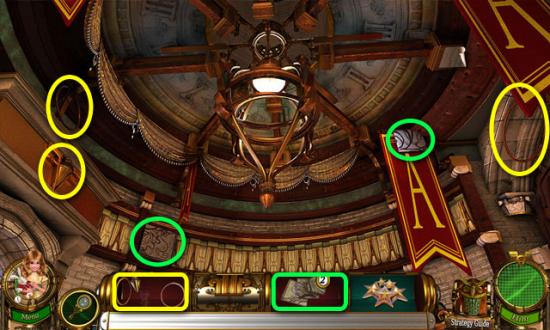
ROUND ROOM – CEILING
ROUND ROOM – DOORS
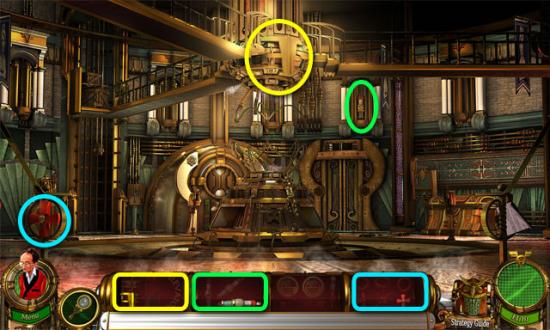
APOLLO ROOM – MAIN FRONT VIEW
APOLLO ROOM – RIGHT SIDE

APOLLO ROOM – LEFT SIDE
APOLLO ROOM – PIPES
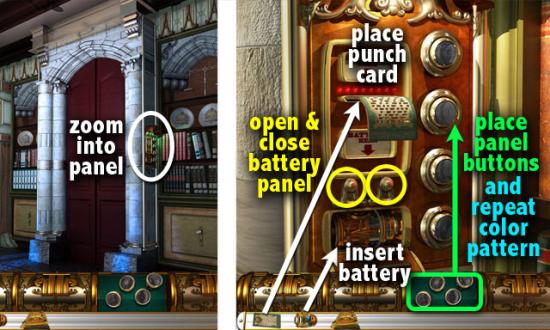
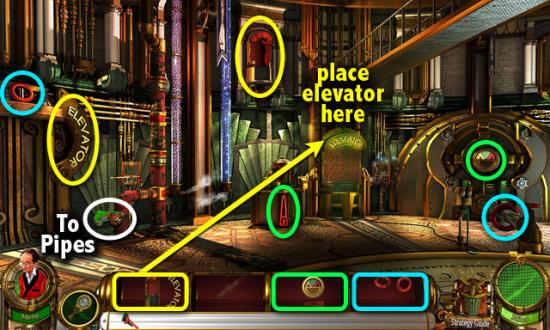
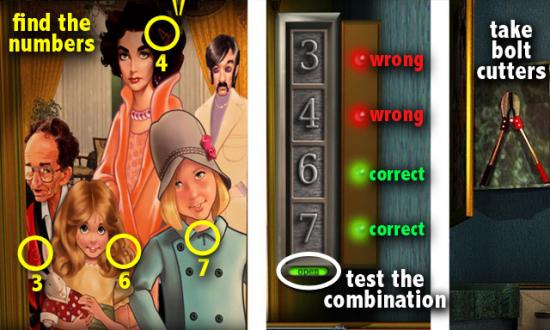
APOLLO ROOM – ELEVATOR PANEL
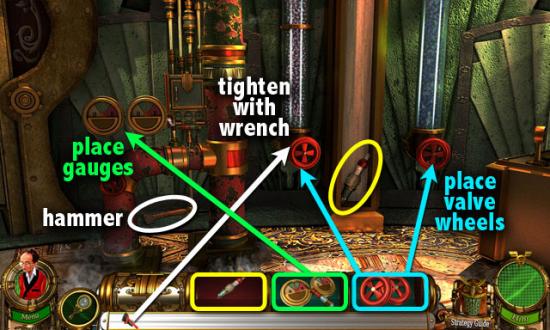
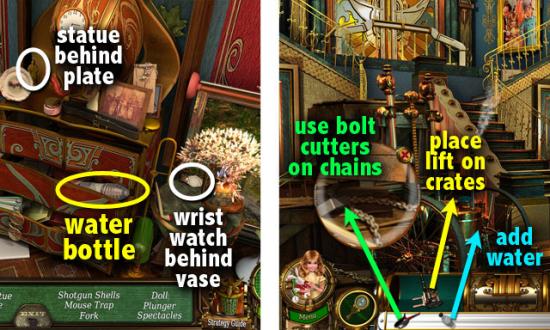
APOLLO ROOM – SCAFFOLD
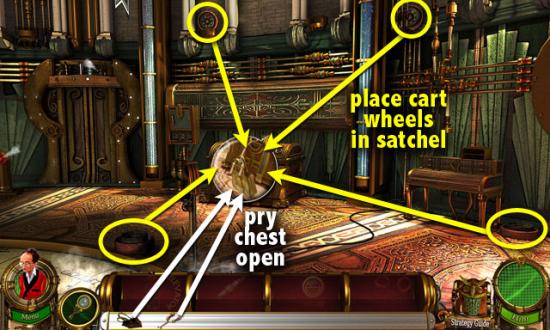
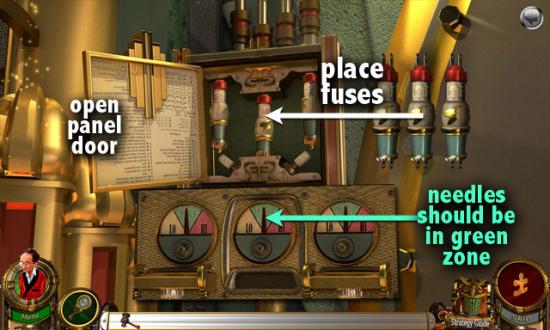
APOLLO ROOM – APOLLO MACHINE
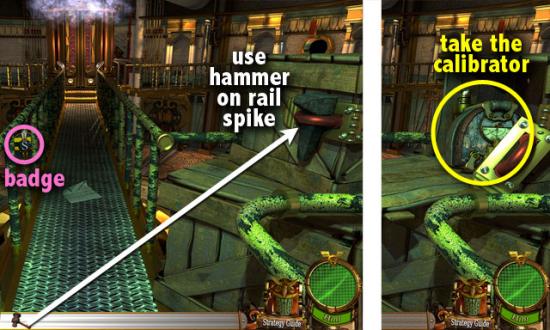
RAILROAD – TRAIN
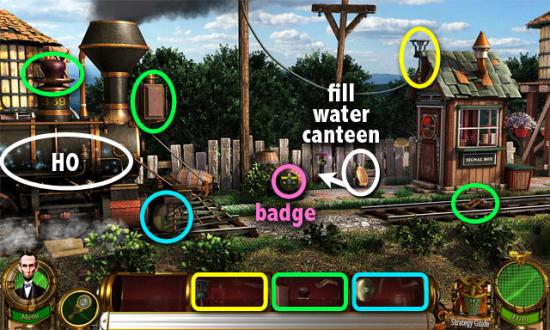
RAILROAD – LAMP POST
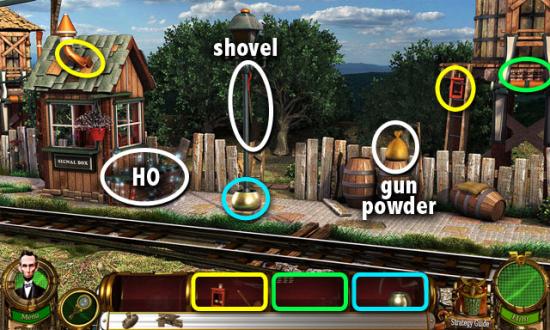
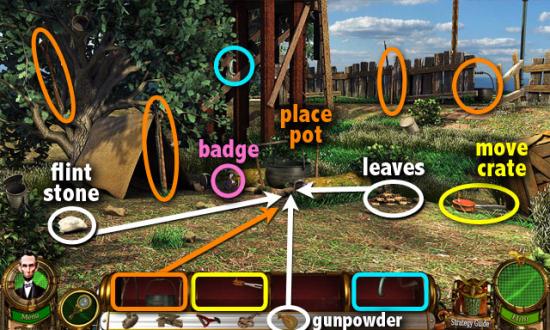
RAILROAD – BEHIND FENCE
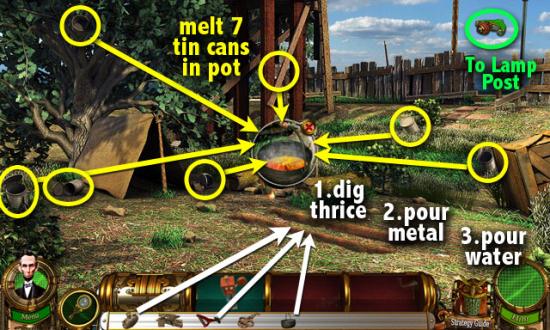
RAILROAD – LAMP POST
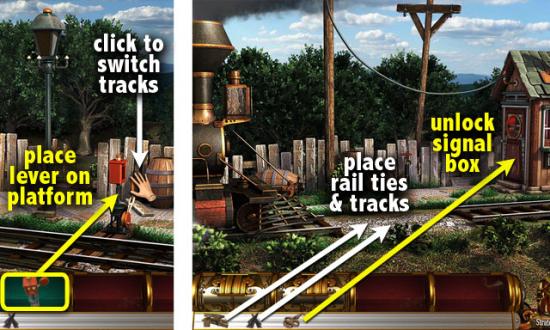
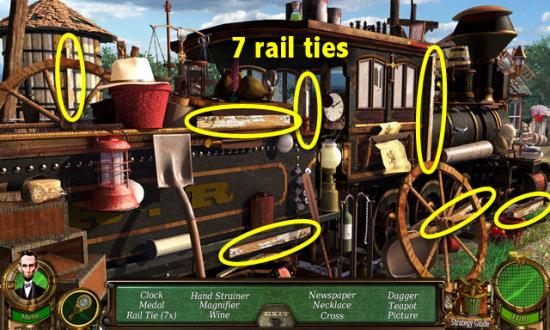
RAILROAD – TRAIN
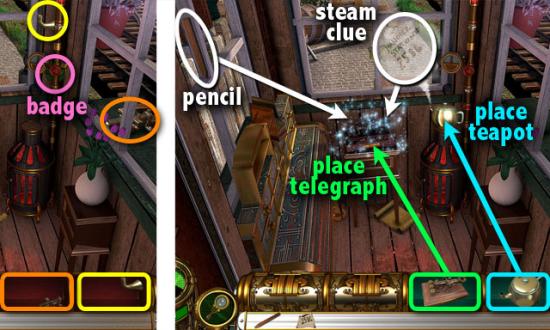
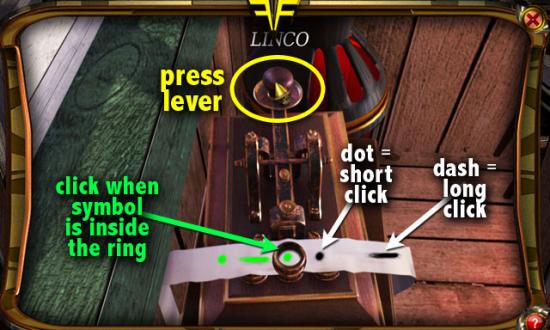
RAILROAD – SIGNAL BOX
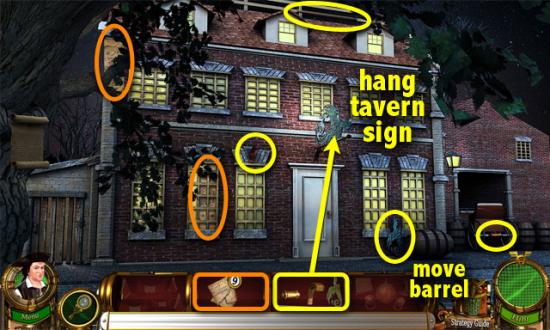
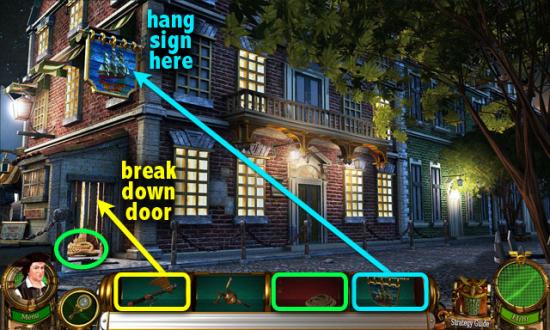
TAVERN – OUTSIDE
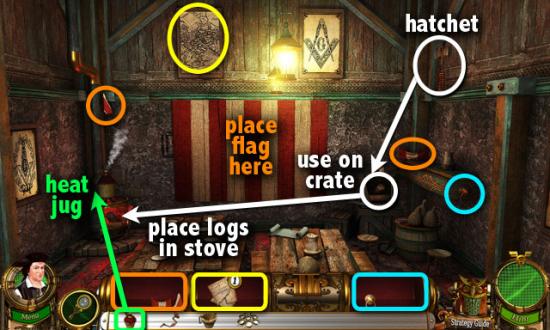
TAVERN – ENTRANCE
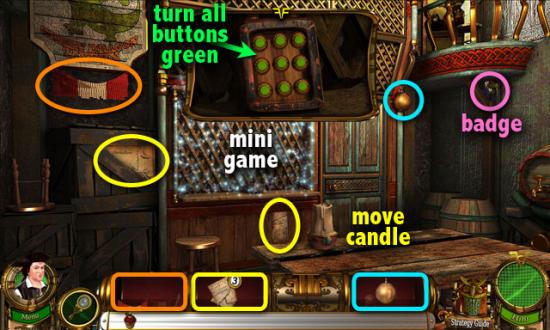
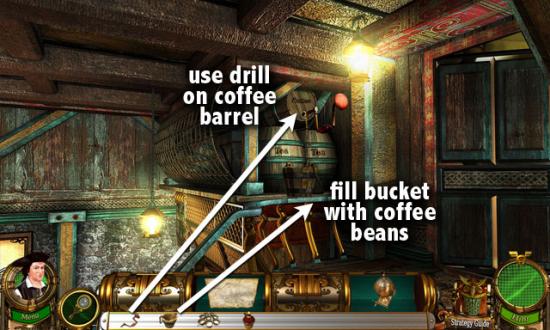
TAVERN – DOWNSTAIRS
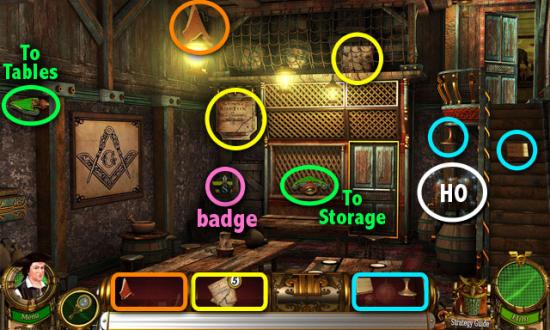
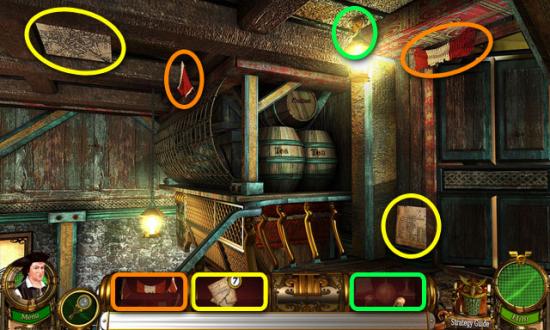
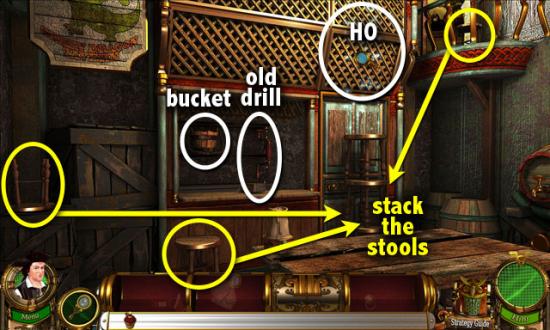
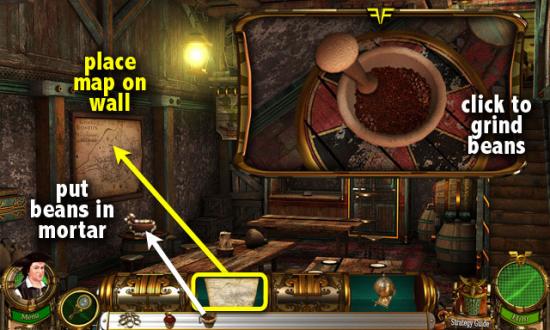
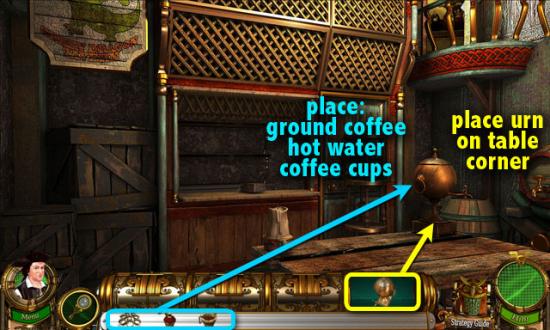
TAVERN – STORAGE
TAVERN – TABLES
TAVERN – ENTRANCE
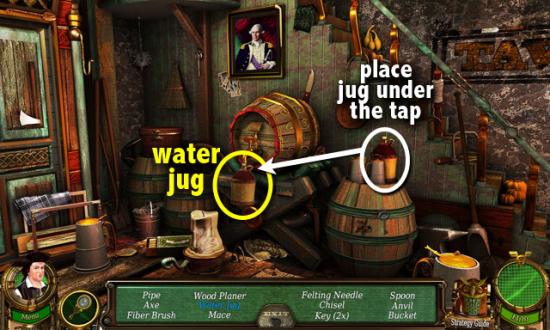
TAVERN – DOWNSTAIRS

TAVERN – STORAGE
TAVERN – TABLES
APOLLO ROOM

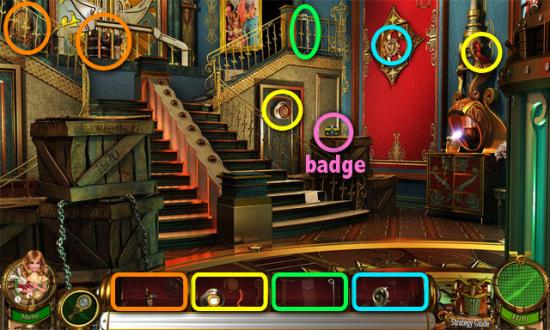
ANTIQUITIES – STAIRCASE
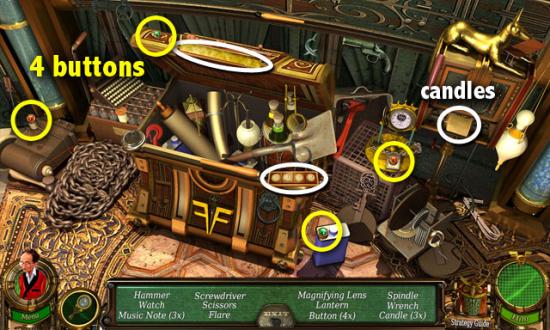
ANTIQUITIES – DRESSER
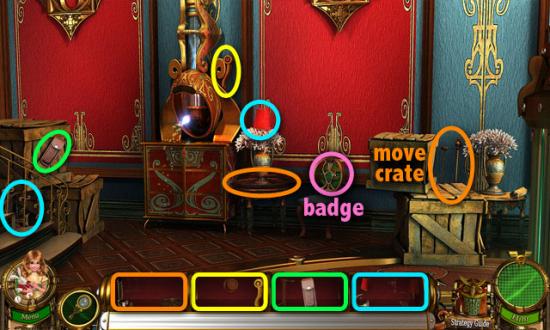
ANTIQUITIES – TOP OF STAIRS
ANTIQUITIES – DRESSER

ANTIQUITIES – STAIRCASE
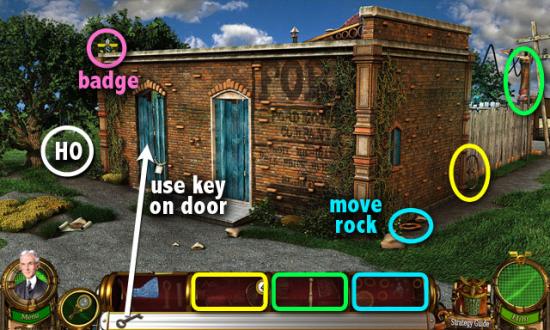
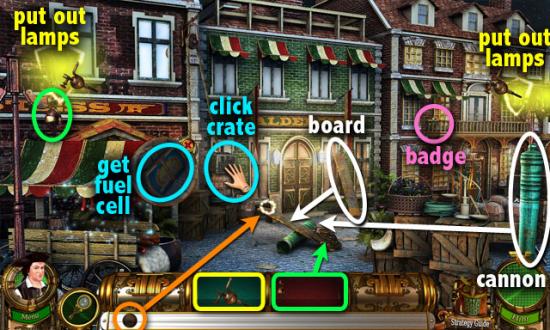
FORD MOTOR – OUTSIDE
FORD MOTOR – INSIDE
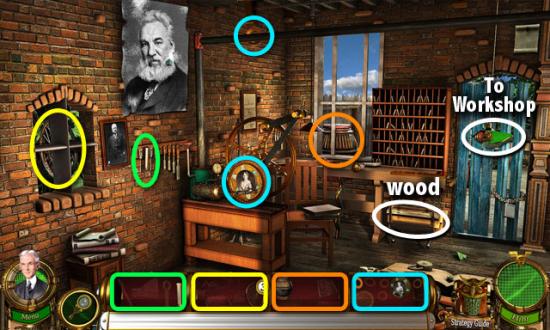
FORD MOTOR – WORKSHOP

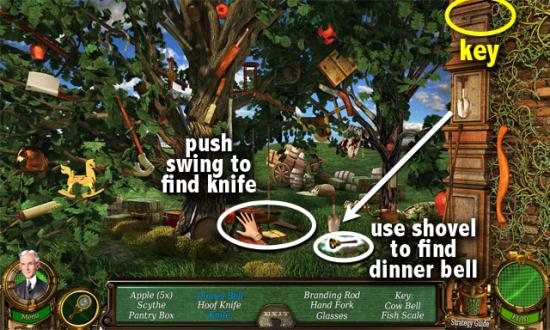
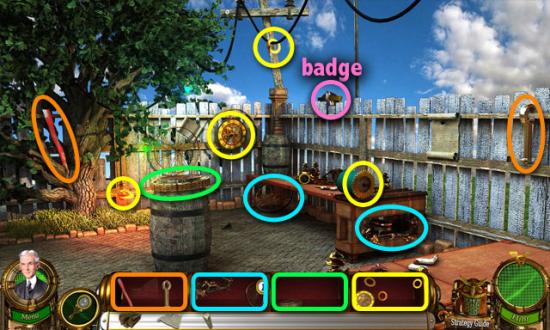
FORD MOTOR – BACKYARD
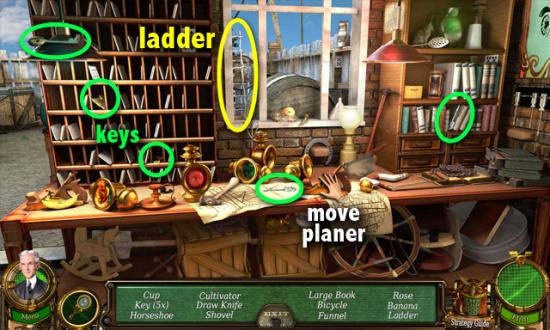
FORD MOTOR – WORKSHOP


FORD MOTOR – OUTSIDE

WHARF – FRONT OF BUILDING
WHARF – PIER
WHARF – BACK OF BUILDING
WHARF – FRONT OF BUILDING
WHARF – MORE BUILDINGS
APOLLO ROOM
BEDROOM – SITTING ROOM
BEDROOM – FIREPLACE

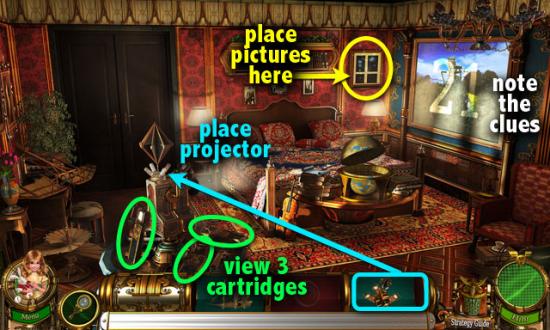
BEDROOM – BED


BEDROOM – SITTING ROOM
BEDROOM – FIREPLACE
OUTER OFFICE – DOORS
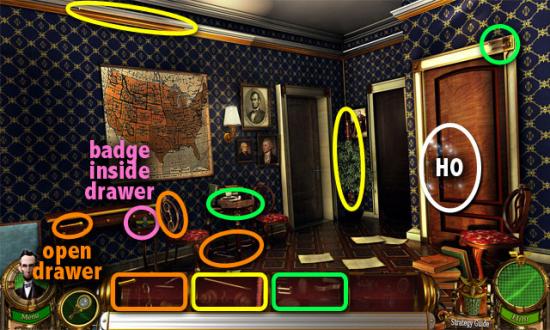
OUTER OFFICE – FIREPLACE
OUTER OFFICE – DESKS
OUTER OFFICE – FIREPLACE
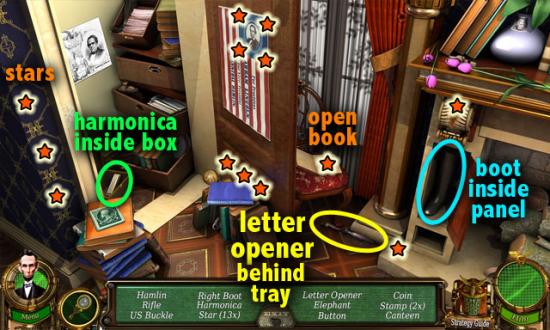
INNER OFFICE – TABLE
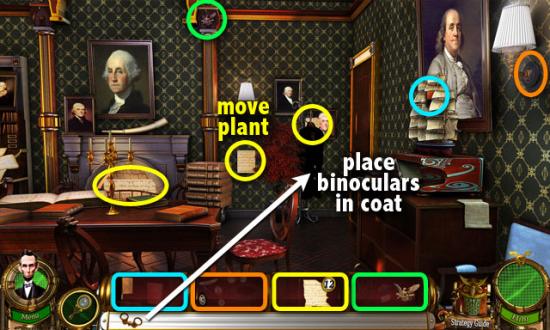
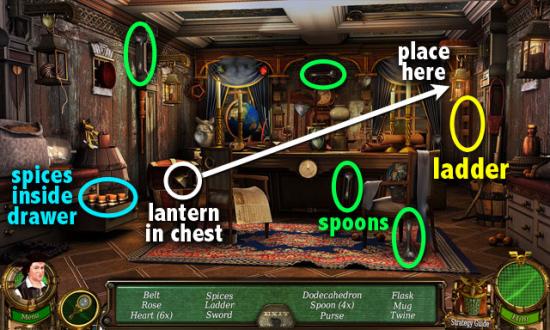
INNER OFFICE – DESK
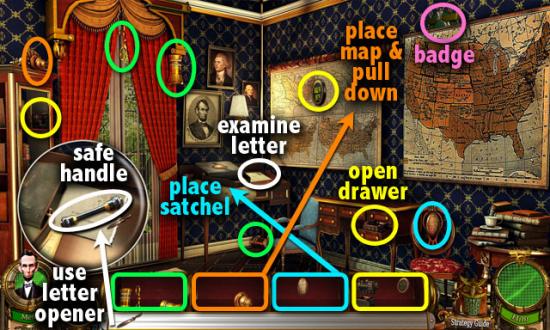
INNER OFFICE – MAPS
INNER OFFICE – TABLE
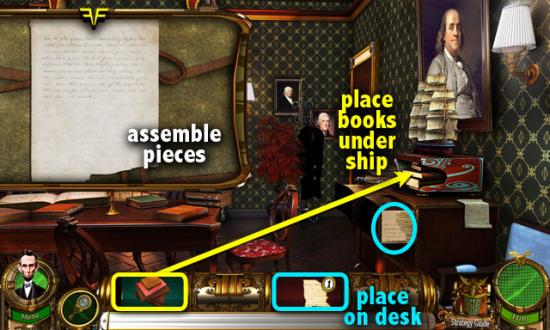
INNER OFFICE – DESK
SHIP – DOCKS
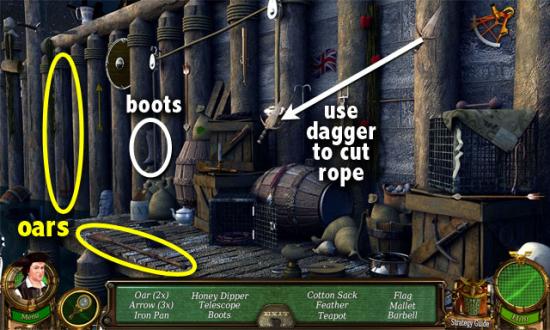
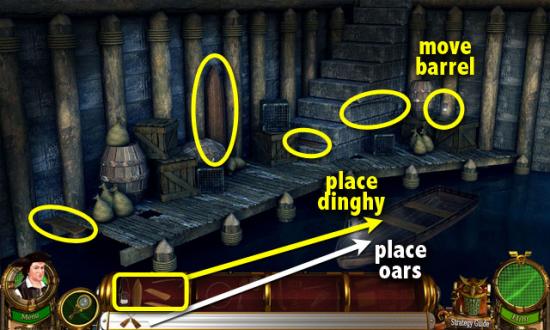
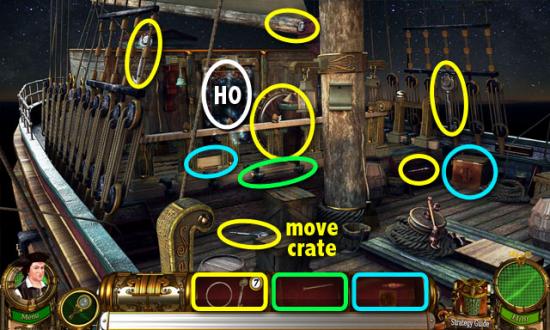
SHIP – STARBOARD
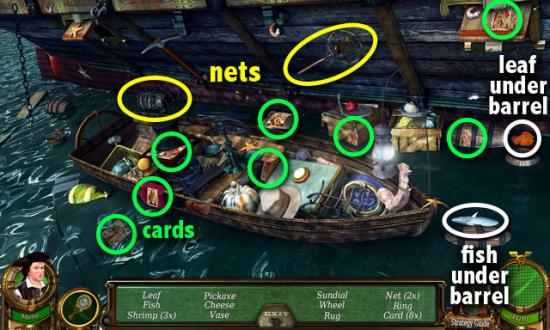
SHIP – DECK
SHIP – STERN
SHIP – BOW
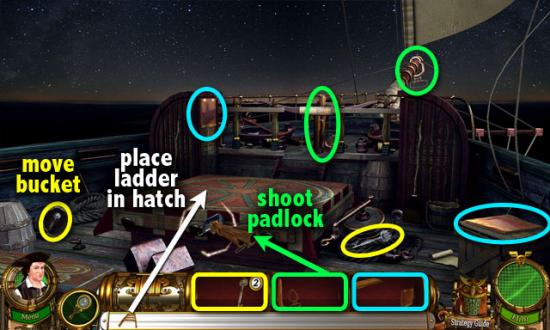
SHIP – DECK
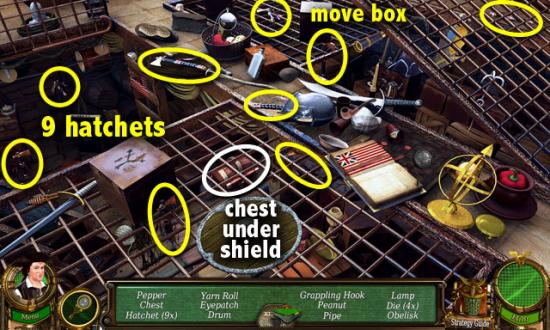
SHIP – FORWARD HOLD
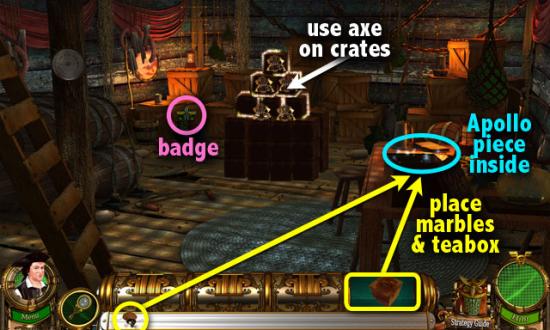

APOLLO ROOM
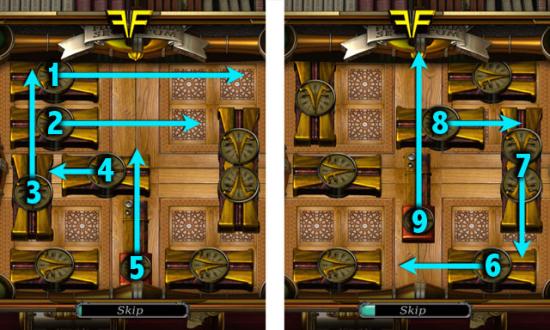
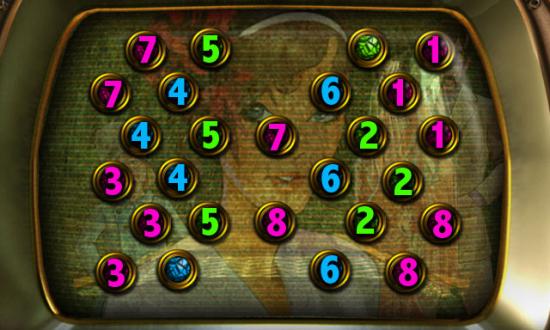
Click on 3 atoms of the same color to make them group together and disappear. Don’t let them collide with another color, or they’ll explode and you’ll have to start over.
You don’t need to eliminate all the atoms in a round. It’s okay if 1 or 2 of a color remain.
In the screenshots below, click on the atoms in the order they’re numbered. If several atoms have the same number, it doesn’t matter which of them you click on first.
Round 1

Round 2

Round 3

Round 4
You have completed Flux Family Secrets: The Rabbit Hole.
Be sure to click on “set an alert” on the top of this page to be notified of any updates, reviews, posts, tips, and cheats for Flux Family Secrets: The Rabbit Hole. Have tips of your own? Post your user tips in the User Tips + Cheats section.
