
Best Horror Games On Itch.io – July 2026
Across a bounty of subgenres.
Grow A Garden 2 Base Price List
What's the most valuable crop?![Evomon Best Starter [Leafbun, Blazpup, or Bubble?]](/wp-content/uploads/2026/06/evomon-best-starter.jpg "Evomon Best Starter [Leafbun, Blazpup, or Bubble?]")
Evomon Best Starter [Leafbun, Blazpup, or Bubble?]
Grass-type, Fire-type, or Water-type?
![[Roblox] Evomon Shiny Hunting Guide – Including Prismatic and Pris Shinies!](/wp-content/uploads/2026/06/evomon-shiny-hunting-guide.jpg "[Roblox] Evomon Shiny Hunting Guide – Including Prismatic and Pris Shinies!")
Fix-it-Up: Kate’s Adventure Tips Walkthrough
Check out our strategy guide for Fix-it-Up: Kate's Adventure. GUIDING SCREENSHOTS (click to enlarge) 1. Your goals will be listed up here. 2. These are your car's upgrades. Select a car to see its upgrades. 3. The rent meter here shows how much this car is collecting. When the meter fills up over time, it will automatically collect the rent. 4. This shows the time limit in digits. 5. This also shows the time limit and it also shows how close you are to dropping out of prime …


- Prefer Gamezebo on Google

a:1:i:0;a:2:s:13:”section_title”;s:32:”Fix-it-Up: Kate’s Adventure Tips”;s:12:”section_body”;s:37998:”
Check out our strategy guide for Fix-it-Up: Kate’s Adventure.
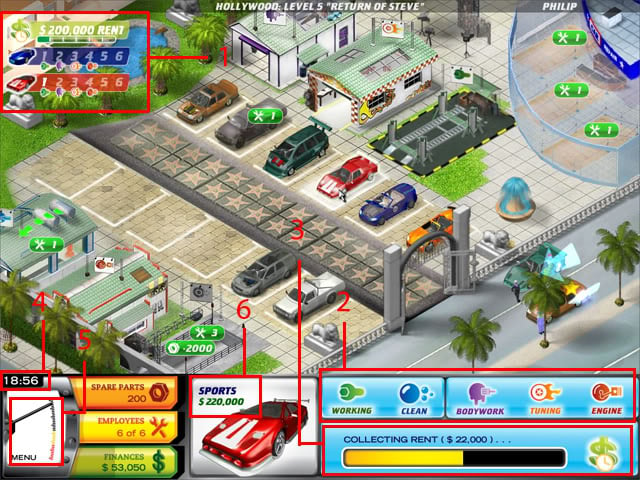
GUIDING SCREENSHOTS (click to enlarge)

- 1. Your goals will be listed up here.
- 2. These are your car’s upgrades. Select a car to see its upgrades.
- 3. The rent meter here shows how much this car is collecting. When the meter fills up over time, it will automatically collect the rent.
- 4. This shows the time limit in digits.
- 5. This also shows the time limit and it also shows how close you are to dropping out of prime time. When you reach into the red part of the meter you will no longer be in prime time.
- 6. This shows how much the car is worth, get used to looking at it whenever you are selling or buying a car.
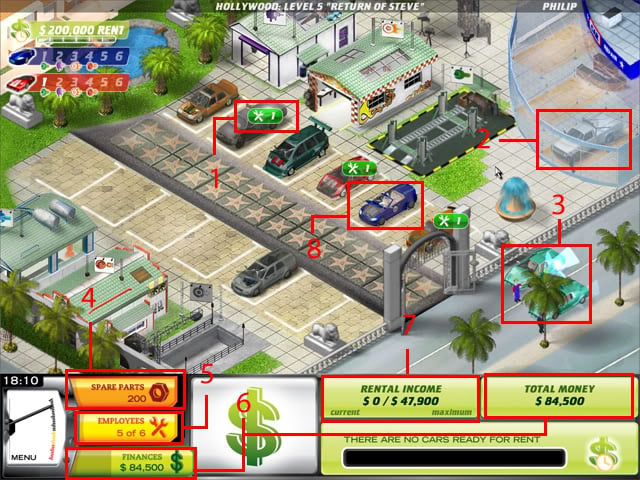
- 1. Shows how many employees are needed to perform a task. This also indicates that a car needs to be washed.
- 2. This is a selling lot. Placing your car in one of these areas will allow you to sell a car.
- 3. This is where you purchase cars from. From here you can click a car to see how much it is being sold for.
- 4. This is how many parts you currently have. And if you click here you can buy extra parts when needed.
- 5. This is the current amount of employees you have. It should how many are available and how many you have in total here. You can also buy extra employees whenever you click this button.
- 6. These display your total amount of money.
- 7. This shows the amount of money being collected from your lot. The number to the right side of the backslash shows the amount of money that you could be making. The number on the left side shows the amount being collected. If your cars are dirty or broken they will not be allowed to collect rental income.
- 8. This is a broken car. Broken cars always have their hoods open.
LEVEL REQUIREMENTS
BODYWORK
- Bodywork done on a car basically upgrades the paint job on that car, but only if that car needs a paint job.
- Body work done on any car will increase the car’s value.
- Doing bodywork requires the use of employees and car parts.
- The number of employees and car parts used does depend on the car you are upgrading.
- Also the time it takes to do a paint job depends on the car.
- To construct a body shop it costs $10,000.
TUNE UP
- Tuning a car changes the car’s outer physique.
- Tuning a car increases a car’s overall value.
- You cannot tune a car that has been tuned already.
- Just like with a body shop, the number of employees and parts used depends solely on the car being upgraded.
- The time it takes to upgrade a car depends on the car itself.
- To construct a Tuning shop it will cost $15,000
WAX JOB
- A wax job will keep a car clean on your lot forever. However if you wax a car then do any other upgrade on it the wax job will be nullified and you will have to do another wax job.
- Make sure you save the waxing for last when upgrading a car.
- A wax job won’t cost you any parts, and it only takes one employee to use.
- A wax job will not increase a car’s value.
- Constructing a car wash takes $30,000.
UPGRADE ENGINE
- Upgrading an engine will give the car a higher value.
- You cannot upgrade a car’s engine more than once.
- The amount of employees and parts used depends on the car being upgraded.
- Also the time it takes to upgrade a car depends on the car itself.
- It will take $100,000 to construct an Engine shop.
DISASSEMBLE WORK
- Unlike any other construct the disassemble pit converts cars into parts.
- The number of parts gain from a car depends on the vehicle being scrapped.
- The number of employees needed to operate this depends on the car being used.
- Time does not vary depending on the car.
- It takes $100,000 to build this construct.
TRAIN EMPLOYEES TO DO CONVERTIBLES (CABRIOS)
- To train your employees you will need $400,000 and all of your current employees must be fully available.
- It takes no time at all to be trained once you have the requirements above, just click the green check mark where the employee training spot is, and you are finished.
- Afterward your employees will be able to upgrade and fix convertibles.
TRAIN EMPLOYEES TO DO SPORTS CARS
- You will need all of your current employees to be available to you and $1,000,000.
- After you have the requirements above, click the green check mark where the employees are to be trained.
- Afterward your employees will be able to upgrade and fix sports cars.
RENT
- Rent has no connection to the amount of income you have displayed at the bottom of the screen.
- Rent is the total value of all the cars on your lot divided by 10. So if the combine value of all the cars on your lot adds up to $90,000 the rent value will be $9,000.
- If your car on the lot is dirty, or broken then it has no rent value.
- Be sure to keep your cars clean if you want their rent values to be included in the lot’s total rent value.
- Once the rent value of the cars on your lot has reached or overcome the rent required, that goal will be cleared. The rent goal can become undone again if the rent value of your lot drops below the requirement needed, so mindful of that.
INCOME
- Some levels want you to have a certain amount of income.
- Income is shown at the bottom of the screen.
- You can gain income by selling cars, and by collecting rent.
- Rent is collect very often.
- Whenever you see the rent meter fill all the way up, rent is collect from all of the clean, and working cars on your lot.
- The rent value that is collected is 10% of the car’s real value.
WASH CAR
- Sometimes you will be asked to have all cars on the lot clean to advance.
- To wash a dirty car, just double-click it, then an employee will go over to the car and wash it.
- If you do not have any available employees then the car cannot be washed.
- Washing any car only takes one employee.
- Clean cars become dirty over time, so be careful
BUY CARS
- Whenever you spot a car stopping in the road beside your shop, it means that the person driving wants to sell their car to you.
- When you click on the car you will see a price offer for the car.
- You will also be able to see its resale value, upgrades, and it’s current condition.
- At first you will receive fair deals for the cars you buy for example if a car is worth $300 you will be able to buy it for $300.
- Later on you will start to get good deals and bad deals, they will be indicated by a green thumbs-up or a red thumbs-down.
- Some deals are not that bad even though they have a thumbs down, so be sure to check the car’s real value as indicated earlier by the SCREEN SHOT.
- Whenever you accept an offer the car becomes yours, whenever you decline an offer the car drives away, and another one comes along shortly after.
- If you leave a person who is selling a car on the road for too long they will eventually drive away.
SELL CARS
- To sell a car, place a car in a "selling spot", and then wait until a customer comes along to purchase what you are selling.
- Click the car that a customer is occupying to see the offer, and the details of the car.
- From here you can either accept the offer or decline it.
- Later on in the game you will start to receive good deals and bad deals indicated by the colored thumbs.
- No matter what the thumbs indicate you should always check the real value of the car before making your final decision.
- You cannot sell a broken or dirty car.
- Buying customers will not leave no matter how long you leave them beside a car.
FIX CARS
- To fix a broken car place it in the repair shop.
- The number of employees and parts used in repairing process depends on the car being repaired.
- Also the time it takes to repair a car does depend on the car.
- It takes $20,000 to construct a repair shop.
CAR STATS
SEDAN
- $10,000 = Absolute worth (no upgrades, and working)
- $7,000 = Broken
- +$3,500 = Bodywork
- +$4,500 = Tuning job
- +$25,000 = Engine work
- +$50,000= Owned by Star
- +100 Parts =Disassemble
Employee and Part usage:
- 1 Employee, 20 Parts = Bodywork
- 2 Employees, 30 Parts = Tuning Job
- 4 Employees, 40 Parts = Engine work
- 1 Employee, 50 Parts = Repair job
- 1 Employee = Disassemble
PICKUP
- $15,000 = Absolute worth (no upgrades, and working)
- $7,500 = Broken
- +$5,000= Bodywork
- +$6,500 = Tuning job
- +$20,000 = Engine work
- +$20,000= Owned by Star
- +200 Parts =Disassemble
Employee and Part usage:
- 2 Employees, 30 Parts = Bodywork
- 2 Employees, 50 Parts = Tuning Job
- 4 Employees, 125 Parts = Engine work
- 1 Employee, 70 Parts = Repair job
- 1 Employee = Disassemble
MINI
- $8,000 = Absolute worth (no upgrades, and working)
- $7,000 = Broken
- +$9,000= Bodywork
- +$10,000 = Tuning job
- +$10,000 = Engine work
- +$50,000= Owned by Star
- +250 Parts =Disassemble
Employee and Part usage:
- 1 Employee, 20 Parts = Bodywork
- 2 Employees, 30 Parts = Tuning Job
- 3 Employees, 50 Parts = Engine work
- 1 Employee, 50 Parts = Repair job
- 1 Employee = Disassemble
WAGON
- $20,000 = Absolute worth (no upgrades, and working)
- $10,000 = Broken
- +$7,000= Bodywork
- +$9,000 = Tuning job
- +$8,000 = Engine work
- +$23,750= Owned by Star
- +350 Parts =Disassemble
Employee and Part usage:
- 2 Employees, 40 Parts = Bodywork
- 3 Employees, 70 Parts = Tuning Job
- 3 Employees, 75 Parts = Engine work
- 2 Employees, 100 Parts = Repair job
- 1 Employee = Disassemble
VAN
- $30,000 = Absolute worth (no upgrades, and working)
- $15,000 = Broken
- +$10,000= Bodywork
- +$14,000 = Tuning job
- +$12,000 = Engine work
- +$20,000= Owned by Star
- +500 Parts =Disassemble
Employee and Part usage:
- 3 Employees, 50 Parts = Bodywork
- 4 Employees, 100 Parts = Tuning Job
- 4 Employees, 100 Parts = Engine work
- 3 Employees, 150 Parts = Repair job
- 2 Employees = Disassemble
CONVERTIBLE
- $50,000 = Absolute worth (no upgrades, and working)
- $25,000 = Broken
- +$17,500= Bodywork
- +$23,000 = Tuning job
- +$20,000 = Engine work
- +$50,000= Owned by Star
- +1,000 Parts =Disassemble
Employee and Part usage:
- 4 Employees, 100 Parts = Bodywork
- 5 Employees, 175 Parts = Tuning Job
- 5 Employees, 175 Parts = Engine work
- 4 Employees, 250 Parts = Repair job
- 2 Employee = Disassemble
SPORTS CAR
- $140,000 = Absolute worth *always has engine* (no other upgrades, and working)
- $50,00 = Broken
- +$35,000 = Bodywork
- +$45,000 = Tuning job
- +$31,750 = Owned by Star
- +2,000 Parts = Disassemble
Employee and Part usage:
- 4 Employees, 100 Parts = Bodywork
- 5 Employees, 175 Parts = Tuning Job
- 5 Employees, 175 Parts = Engine work
- 6 Employees, 450 Parts = Repair job
- 3 Employees = Disassemble
GENERAL HINTS
- Even though the thumb deal indicator is nice, you should still look at the value of the car, and compare it to the offer given.
- Try to place the cars you want to keep on the lot in a specific order unique to you, so that you can focus on other cars that need your attention.
- All dirty cars look alike, so once again try to place cars in a certain order so that you don’t go off and do something you might regret later.
- Dirty cars cannot collect rent. It is possible to lose potential money this way.
- Most of the time it is worth it to wax a car. It takes time for an employee to run all the way to a car then wash it. On top of that, cars get dirty over time if not waxed, this can be taxing at times.
- When you buy a car take it off the road as soon as possible, otherwise you will not get any more cars in the spot your car is in.
- When a car is finished do not forget to place it back onto the lot to let it collect rent.
- Buying a broken Mini is a great investment, they do cost much, but when upgrade they are worth more than a pickup.
- Completing a level before your meter reaches the red part will earn you a gold medal.
- Buying parts in bulk is a good thing, the more you buy the more you save.
ADVANCED TIP
SWITCHOUT TACTIC
- To use the Switchout tactic follow these instructions.
- 1. Begin buying cars and fixing them up until your lot is completely full.
- 2. Then buy a car that has a greater value than one of the cars on your lot. Fix it up, then switch places with the car with less value than the one you just fixed up.
- 3. By "switch places" I mean take the car with the lesser value, and place it into a selling spot. Then place the car with the greater value in the spot where the other car used to be.
- 4. Now you will once again have a full lot, but you will be gaining more money through total rent value, and you will also gain extra money from the car you are selling.
- 5. Continue this process until all your cars are the best cars available to that chapter. They should all be the same kind of car when you complete the process.
- 6. You can still continue the Switchout tactic but it’s not needed when all your cars are top of the line, and making the maximum amount money for you.
STAGE GUIDES
NOVICE STAGE S
CHAPTER 1, STAGE 1
- Just go ahead and follow what Kate’s father tells you to.
- This is a tutorial stage, so there is no way to lose here.
- Take your time and read things out carefully, there is no time limit.
CHAPTER 1, STAGE 2
- Just as in the previous stage there is no time limit, you can just take your time and follow the tutorial.
CHAPTER 1, STAGE 3
- Now here is your first real challenge, you have 3 goals, and a time limit.
- Go ahead and place the Sedan in the Bodywork shop, this will complete part of your bodywork goal and will give your sedan a higher rent value.
- After that repeat this simple process: buy 2 cars, (fix them if they are broken) then place them in the Bodywork shop to increase their values.
- Also make sure they are clean, by then you will have completed the buy 2 cars, use bodyshop 3 times, and the $3000 rent goal.
- If you need more parts buy 50 at most.
CHAPTER 2, STAGE 1
- This one is easy you just have higher rent, and you will have to construct a bodyshop.
- You will start with 3 cars, place the fixed one in a selling lot right away, and begin fixing the other 2.
- Once you have sold the first car, begin constructing the bodyshop. Sell the other cars once they are fixed.
- Once the bodyshop is constructed you will get another goal to accomplish.
- New Goal: Do bodywork x3.
- First buy 250 parts with your money, then begin buying cars, and upgrading them to the best of your ability.
- You should focus on only purchasing Sedans at this point.
- Every Sedan do bodywork on should be kept on the lot to collect rent, which will get you more money to buy more Sedans with,
- Keep the cars clean to collect rent.
- When you finally have 4 bodyworked Sedans you will have over $5000 which will take care of the rent goal.
- That’s it you have passed this stage.
CHAPTER 2, STAGE 2
- This time you will need to construct a tuning shop, and the rent is a bit higher.
- You start with 3 Sedans and 1 Pickup.
- Fix the cars you have and make sure they all have bodywork done on themselves too.
- Construct a tuning shop with your money, then give your Pickup a tuning job to complete the new tuning goal you received after constructing the tuning shop.
- From here you can either keep buying cars and fixing them up until you get your rent value, or you can just give all of your current cars tuning jobs.
- Experiment as you see fit.
CHAPTER 2, STAGE 3
- This is another simple stage, just come up with $50,000 in finances(income not rent), and hire one employee.
- First begin fixing and upgrading cars.
- Try using the Switchout process here to collect rent more efficiently.
- When you hit $50,000 go ahead and buy an employee, then sell your Sedans, but keep your Pickups.
- By the time you have received a new employee you will get a new goal stating that you need to have 3 wagons with bodywork done.
- You have enough to buy wagons now, just make sure right now you buy parts as well. Buy them now so you don’t run out later.
- Keep buying parts as needed and collecting rent on your cars until you have 3 wagons that have bodywork done, and until you have $50,000 in income.
CHAPTER 3, STAGE 1
- You must have $8,000 in rent value, and all cars on the lot must be waxed.
- Please not that you don’t have to wax all the cars you buy. It is more like the final goal you should complete, after you have all the other goals covered.
- You start with 3 vehicles this time.
- Wax the Pickup, and make sure you keep it.
- Sell the Sedan, fix the Wagon, and put it through both machines.
- As you will soon notice, whenever you buy or sell anything you will get either good deals or bad deals starting on this stage.
- Buy a broken Wagon and put it through both machines.
- By this time you should have 2 waxed and tuned wagons, with a Pickup that is also tuned and waxed. Now you have enough rent to finish that rent goal.
- All you have to do now is sell 2 cars. So buy 2 cars and then sell them back.
- Note, the sell 2 cars goal will show up at the 10 minute mark.
- Now that you have sold the 2 cars you have completed the stage.
STANDARD STAGES
CHAPTER 3, STAGE 2
Goals: construct Bodyshop, have $15,000 rent, have 4 Wagons(working, bodyworked, and tuned).
Cars: 2 Wagons
- Construct a Bodyshop right away, then tune the Wagons.
- Buy 250 parts, then begin buying Wagons.
- You will get a new goal (Wax 5 Police trucks), until then start waxing your wagons after you give them a bodywork, and tune them.
- Never turn down an officer, even if you have no where to put them just accept their offer, and leave them in the road if you have to until you can wax them. If you have space in your lot you can leave them in your lot until the wax machine is vacant.
- When you have 4 Wagons fully upgraded and waxed, buy one more car, and make sure that it works and is clean. That will be enough to finish off your rent goal.
- Now all you have to do is finish waxing the police trucks and you are finished.
CHAPTER 3, STAGE 3
Goals: Fix Steve’s Pickup, hire 2 employees, and have $12,000 rent.
Cars: Steve’s Pickup, and 2 Sedans
- Repair Steve’s Pickup
- Begin upgrading both Sedans to their fullest, but do not wax them.
- When Steve’s truck is fixed you will get a new goal (have 4 Minis working, with bodywork, and tuning done).
- Sell both Sedans then focus your attention on buying, upgrading, and waxing Minis
- To Speed things up buy 2 employees.
- When you have completed the "Have 4 minis goal" goal buy one more car to reach the required rent.
CHAPTER 3, STAGE 4
Goals: Fix 6 Police trucks, tune 3 cars.
Cars: 2 Wagons, 1 Mini
- This one is a little trickier so read carefully.
- Fix up the 3 cars you have, and leave them in the lot to collect rent.
- When you have the money, buy 3 employees. And buy parts when you know you are about to need them.
- Use the Switchout tactic explained above.
- The most valuable car in this level is a wagon, therefore by the end of this level you should have all wagons on your lot.
- This is required because soon you will need 2000 parts, and $250,000 to complete this stage.
- Fix the police trucks require 3 men, and 100 parts so be mindful this.
- You should win with no problem if you follow the switchout process. It starts off a bit slow but with time you will be earning money at full speed.
- You will have enough money to buy the 2000 parts and have $250,000. If you need to have $250,000 right after you purchase the 2000 parts you can begin selling the Wagons you have.
CHAPTER 4, STAGE 1
Goals: Construct a car wash, and a bodywork shop.
Cars: 2 Sedans, 2 Minis
- About 2 seconds into the game you will get another goal (Buy 8 cars). This is great because you would have needed to buy about 8 cars to win anyways.
- Begin the Switchout strategy, but do not buy anything higher than a pick-up truck(unless it is a Mini).
- Try to buy mostly broken cars.
- Construct the bodywork shop first and then the car wash last.
- In no time you will have finished this level, there are no more surprise goals.
CHAPTER 4, STAGE 2
Goals: Have 4 Vans(bodywork, tuned), $20,000 rent, hire 2 employees.
Cars: 1 Sedan, 1 Pickup, 1 Wagon.
- Wagons and Vans look alike so be cautious of that fact, and try not to fix up the wrong cars.
- This one is also a bit tricky, so again read carefully.
- Before you purchase any cars fix up the ones you have and sell the Sedan. When you have about $50,000 buy 250 parts.
- Begin using the Switchout process to gain money. During the Switchout process you will sell a Sedan or a Pickup for every van you purchase even if your lot is not full.
- Hire 2 employees when you can spare the money.
- After you have finished all the work required on the 4 vans you won’t need much more cars to complete the rent goal. Even a fully upgraded Mini added to your 4 vans would complete the rent goal.
CHAPTER 4, STAGE 3
Goals Own 5000 parts, have $25,000 rent, and hire 8 employees.
Cars: 1 Van, 1 Pickup, 1 Mini.
- Fix up the cars on you lot first before you do anything.
- Now you can start collecting Vans. For every Van you buy sell a car.
- It will take 6 fully upgraded Vans to cover the rent, so any Vans acquired after you those 6 can be sold.
- Buying 5000 parts costs $325,000, so selling Vans would be great for quick money.
- After you have 5000 parts this level will be complete.
CHAPTER 4, STAGE 4
Goals: Fix 8 cars, and have $30,000 rent.
Cars: 2 Vans, 1 Truck, 1 Mini
- Fix the cars you have first, then you can start the Switchout process as usual.
- Make sure that somewhere along this stage you order more employees.
- Keep your eye on fixing 8 cars.
- Later you will receive 2 more goals (construct Engine shop, and put a car through the Engine shop).
- It will take $100,000 to construct the Engine shop.
- Right after that just place anyone of your cars in the shop and let it upgrade your car.
- Buy then you should be finished.
CHAPTER 4, STAGE 5
Goals: Have 4 sedans, and 3 minis with a bodywork, tune, and engine upgrade done on them.
Cars: 2 Vans, 1 Sedan, 1 Pickup
- Fix and upgrade your cars, but don’t add any engines just yet.
- First buy 3 employees, then start buying Sedans, and minis. Upgrade them fully as you buy them.
- When you have finally met your goals you will get a new goal (have $500,000 in cash).
- Just keep your cars clean until you get $500,000, or you can buy extra cars and sell them for a higher value.
ADVANCED STAGES
CHAPTER 5, STAGE 1
Goals: Have $300,000 cash, sell 9 cars, have 6 Wagons (with bodywork done, tuned, and with an upgraded engine).
Cars: 2 Vans, 1 Mini, 1 Sedan, 1 Wagon.
- Fix all the cars you have, buy 3 extra employees, and buy an abundance of parts.
- After you get your 3 employees, purchase another 3.
- Because you will be installing a lot of engines you will need your extra employees to help you out.
- Continue the Switchout process, and be sure to only add engines to Wagons.
- Don’t focus too much on buying sedans, instead go for Minis.
- Once you have 6 Wagons ready with everything upgraded sell the other cars. That should complete this level.
CHAPTER 5, STAGE 2
Goal: Have $25,000 rent, construct a disassemble pit, and disassemble 3 cars.
Cars: 1 Wagon, 1 Sedan, 1 Pickup, 2 Vans
- Fix the cars you have and upgrade them, however do not install any engines this round, they are a waste of parts and employees.
- Purchase 3 employees, and 500 parts.
- Again begin the ever-efficient Switchout tactic. Note that right now Vans are still the best in value for now.
- As soon as you have enough money to construct the Disassemble pit, do it. Then place 3 of your least valuable cars one by one inside the construct to finish the "disassemble 3 cars" goal.
- By now you should have enough rent to win, if not continue to purchase and upgrade cars until you do.
CHAPTER 5, STAGE 3
Goals: Have $330,000 income, and improve 5 taxi cabs.
Cars: 1 Sedan, 2 Vans, 2 Pickups
- Hire 3 employees, improve the first taxi cab, and purchase 500 parts.
- Begin fixing the cars you have and using the Switchout process.
- When you get the new goal (have 5 Sedans tuned, with engine work, and improved bodywork) begin purchasing Sedans until you have 5, do what is required. Do not wait until you have 5 Sedans to start upgrading them, start as soon as you buy your first Sedan.
- Do not fix any more Taxi cabs until you have those 5 Sedans finished.
- You can begin fixing the taxi cabs now, and you should be able to get $300,000 with no problem.
- Remember you do no have rent, you can sell cars to your liking as long as you do not sell any of your Sedans.
CHAPTER 5, STAGE 4
Goals: Have $40,000 rent, and hire 4 employees.
Cars: 1 Mini, 2 Sedan, 1 Van, 2 Wagons
First hire 3 employees, then buy 500 parts.
- Begin fixing the cars you have first, then use the Switchout method.
- Later you will get a goal (have 4 Pickups cleaned, with bodywork, and engine work done).
- So make sure you buy 4 Pickups and upgrade them according to the goal.
- Soon enough you will have 4 upgraded trucks, and $40,000 in rent with no problem.
CHAPTER 5, STAGE 5
Goals: Have $32,000 rent, and own 5000 parts.
Cars: 2 Sedans, 1 Mini, 1 Van
- Purchase 500 parts (fixing Taxi cabs are optional).
- Fix the cars you have and upgrade them, then start the Switchout process.
- You will get a new goal later (Train employee in servicing Convertibles)
- Do not buy any broken Convertibles because you do not know to fix them yet.
- When you have $400,000, and are ready to train them make sure that none of your employees are busy first, then train them.
- You will now receive a new goal (have 3 Convertibles clean, working, and with an engine upgrade).
- After you complete that goal all you have to do is have 5000 parts to complete this stage.
CHAPTER 6, STAGE 1
Goals: Construct a Car wash, Tuning, and an Engine shop. Also have $70,000 rent.
Cars: 3 Vans, 2 Sedans, 1 Convertible
- As usual fix your cars up before doing anything else.
- Then when you have enough money buy 500 parts.
- Begin the Switchout process, and use the rent money earned to construct the shops.
- You will need Convertibles to meet the $70,000 rent requirement, so make sure you have a few.
- After you have Constructed your 3 shops and have made $70,000 in rent you will be finished with this stage.
CHAPTER 6, STAGE 2
Goals: Have 3 Convertibles with bodywork done, and owned previously by a Star. Have $90,000 rent, and have all cars fixed by the end of the game.
Cars: 3 Sedans, 2 Minis, 2 Pickups, 2 Vans, 1 Convertible
- Fix your current cars first, and when you have enough money be sure to buy 3 extra employees. (buy parts as needed)
- Use the Switchout method here.
- In the end you will need a good amount of Convertibles to make $90,000 in rent so consider buying them when you can.
- When you have completed the 3 goals mentioned above, this level will be complete.
CHAPTER 6, STAGE 3
Goals: Have $120,000 rent, have 4 clean Sports cars.
Cars: 3 Starowned Convertibles.
- Begin by upgrading your cars, and buying 3 employees as soon as you possibly can.
- Start the Switchout process. It’s okay to turn down those expensive cars until you can afford them.
- When you have enough money to buy Sports cars do not buy any broken ones yet.
- After you purchase 4 Sports cars you will need to train your employees to service the Sports cars.
- It will cost $1,000,000 to train your employees, but it is worth it.
- You will need at least 12 employees to get things moving at a moderate pace.
- You will have enough rent money once you have 5 sports cars, and if you still have your 3 Starowned Convertibles.
- By then you will be finished with this stage.
CHAPTER 6, STAGE 4
Goals: Have $150,000 rent.
Cars: 2 Pickups, 1 Convertible, 1 Sports car, 2 Vans
- When the game starts you will receive an extra goal (have $500,000 in cash).
- When you complete that goal you will receive 3 more goals(have 4 Sports cars, 2 Pickups, and 4 Vans with bodywork, and tuning done).
- Even when you have all of those cars upgraded to their maximum potential you still won’t have enough rent money. So you will need to obtain at least 5 cars previously owned by stars to reach the rent.
- So begin to upgrade the cars you have and get going with the Switchout process.
- Do not sell your Pickups, you will use them later for the goal above.
- By the end of this stage be sure to have 15 employees they will be greatly needed.
- Read carefully, when you want to Switchout the Pickups, place the Pickups in the selling slots but do not sell them. This counts as extra space to put a car without really getting rid of it. You can also place a car in the Car wash and leave it there if needed. Note that only cars on the main lot will collect rent.
CHAPTER 6, STAGE 5
Goals: Have $200,000 rent. Have 6 Convertibles, and 6 Sports cars with bodywork, tuning , and engine upgrade done on them.
Cars: 2 Convertibles, 2 Pickups, 1 Sports car, 1 Van, 1 Sedan
- This level contrary to the rest in this chapter is very easy going, there are no surprises, just complete the goals given above.
- Start off by fixing and upgrading the cars you have, and begin the Switchout process.
- To your comfort, hire employees as you see fit.
- You should have at least 1 star owned car to get the rent goal completed.
- That’s it you have completed this stage.
TROPHY STAGES
CHAPTER 2
Goal: Construct a Harvester
Cars: 2 Pickups, 1 Sedan, 1 Van
- Fix the cars you own, and begin the Switchout routine.
- To construct a Harvester it takes a lot time.
- The Harvester has 3 STAGE s, when you look at it, it should be showing a stage 1 indicator.
- Stage 1 of the Harvester requires 4 employees and 300 parts.
- Stage 2 of the Harvester requires 4 employees and 400 parts.
- Stage 3 of the Harvester requires 5 employees and 500 parts.
- The 3 stage of its development is its last stage. When it is constructed you will win.
CHAPTER 3
Goal: Construct 10 Police trucks
Cars: 2 Pickups, 1 Wagon, 1 Sedan
- To construct a Police truck it requires a Pickup with tuning, and bodywork done on it.
- As usual fix the cars you have, then start the Switchout process.
- For every truck you construct, you will receive $20,000.
- Be sure to hire at least 3 extra employees to hold a nice pace.
CHAPTER 4
Goal: Construct 6 Buggies
Cars: No cars
- You have no cars so you will need to go ahead and start buying some right away. Which cars you decide to buy first really won’t impact the rest of the game.
- You have enough time to complete the Switchout process, so get started.
- The Buggy has stages too but it just keeps count of how many Buggies you have plus 1. I know, it’s a little confusing.
- It takes 6, employees and 500 parts to make each Buggy.
- Making 6 will take a while, so get started on making Buggies as soon as possible.
CHAPTER 5
Goal: Construct 12 Taxi cabs
Cars: 2 Sedans, 1 Mini, 1 Wagon, 1 Convertible
- Constructing a Taxi requires a sedan with bodywork, tuning, and engine work done.
- You receive $40,000 for every Taxi you make, so it is worth it.
- It takes 7 employees and 400 parts to convert a Sedan into a Taxi.
- Fix the cars you have, upgrade them, then start the Switchout process.
- Having at least 15 employees will help a ton, so consider it.
CHAPTER 6
Goal: Construct a Helicopter
Cars: 1 Sedan, 1 Mini
- Fix the cars you have, and immediately begin the Switchout process.
- Constructing a Helicopter takes a massive amount of parts and employees.
- It has 3 STAGE s.
- Stage 1 requires 10 employees, and 5000 parts.
- Stage 2 requires 15 employees, and 10,000 parts.
- Stage 3 requires 20 employees, and 25,000 parts.
- This stage is fun but don’t take it lightly. When you have completed all 3 stages you will automatically win.
KNOWN GLITCH
If you have all the gold medals for the last chapter, and you still can’t seem to unlock the trophy level, you will need to play the 5 level in chapter 6 again to unlock it. Be sure to press "next" when you complete the stage again.
“;

More articles...
-
Best Horror Games On Itch.io – July 2026
Across a bounty of subgenres. -
Grow A Garden 2 Base Price List
What's the most valuable crop? -
Evomon Best Starter [Leafbun, Blazpup, or Bubble?]
Grass-type, Fire-type, or Water-type?