
Best Horror Games On Itch.io – July 2026
Across a bounty of subgenres.![Haze Seas Accessories Tier List [Best Accessories to Equip]](/wp-content/uploads/2026/07/haze-seas-accessories-tier-list.jpg "Haze Seas Accessories Tier List [Best Accessories to Equip]")
Haze Seas Accessories Tier List [Best Accessories to Equip]
The accessories with the best stat buffs in Haze Seas.
![[Roblox] Evomon Shiny Hunting Guide – Including Prismatic and Pris Shinies!](/wp-content/uploads/2026/06/evomon-shiny-hunting-guide.jpg "[Roblox] Evomon Shiny Hunting Guide – Including Prismatic and Pris Shinies!")

Final Cut: Death on the Silver Screen Walkthrough
Welcome to the Final Cut: Death on the Silver Screen walkthrough on Gamezebo. Final Cut: Death on the Silver Screen is a hidden object adventure game created by Eipix. This walkthrough includes tips and tricks, helpful hints, and a strategy guide on how to complete Final Cut: Death on the Silver Screen.


- Prefer Gamezebo on Google

Game Introduction – Final Cut: Death on the Silver Screen
Welcome to the Final Cut: Death on the Silver Screen walkthrough on Gamezebo. Final Cut: Death on the Silver Screen is a hidden object adventure game created by Eipix. This walkthrough includes tips and tricks, helpful hints, and a strategy guide on how to complete Final Cut: Death on the Silver Screen.
General Tips
- When starting a game for the first time, you can choose between one of two difficulty modes: Regular and Expert. Regular mode features the Hint and Skip buttons recharging quickly, active zone that glimmer frequently, and locations with an available action and objectives being indicated on the Map. Expert mode features the Hint and Skip buttons taking longer to recharge, active zones not being indicated, and objectives only being indicated on the Map.
- The Hint button is located in the lower right corner of the screen. Hints are unlimited, but will require time to recharge after use.
- The Diary is located in the lower left corner of the screen. Any important clues or pieces of information you uncover will be stored here.
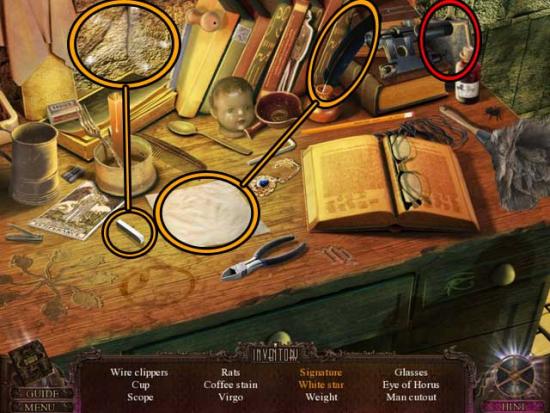
- The Inventory is located at the bottom of the screen. Simply toggle over it to bring it up. Inventory items are identified with CAPS and circled in red in the guide below.
- Objects within hidden object areas are often randomized. Therefore, only Inventory items, and items that require more than one action will be identified.
- There are a number of achievements that can be unlocked during the course of the game. Achievements that require further object-hunting are outlined in the guide below. Refer to this color key when searching for them:
- Hidden Estate Photos= circled in green (20 total)
Father’s Secret Cards= circled in blue (10 total)
Warrior of Light (Lamps)= circled in yellow (10 total) - Mystery (Cats)= circled in purple (6 total)
- A temporary penalty that disables use of your cursor will occur as a result of excessive clicking.
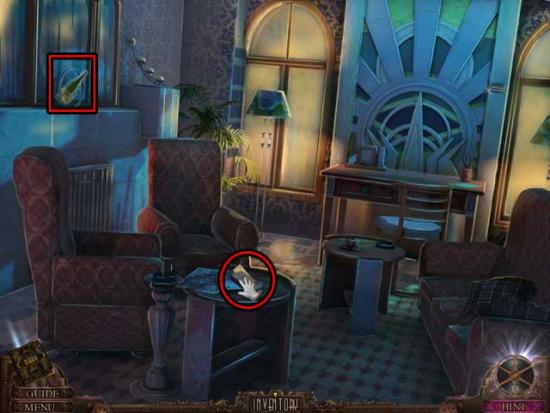
Chapter 1: The Mansion
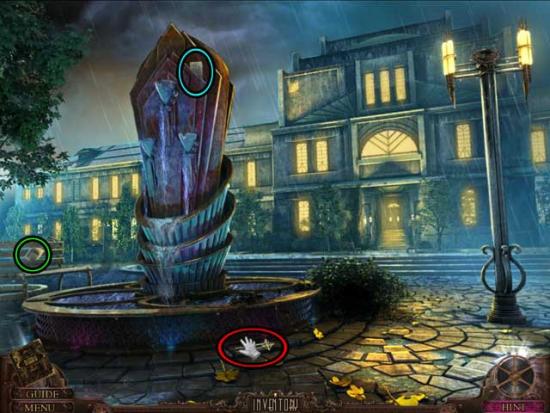
Fountain
- Click on the HAIRPIN to add it to your inventory.
- Click on the Estate Photo (1) and the Secret Card (1) to collect them.

- Take a closer look at the fountain. Use the HAIRPIN on the button at the bottom of the screen to add the BUTTON to your inventory.
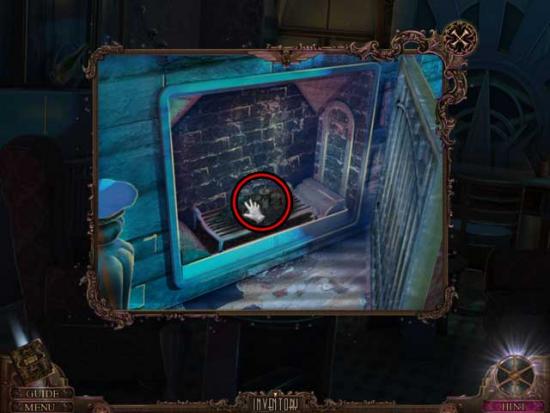
- Once you exit the area, a hidden object area will appear. Click on the fountain to enter it.
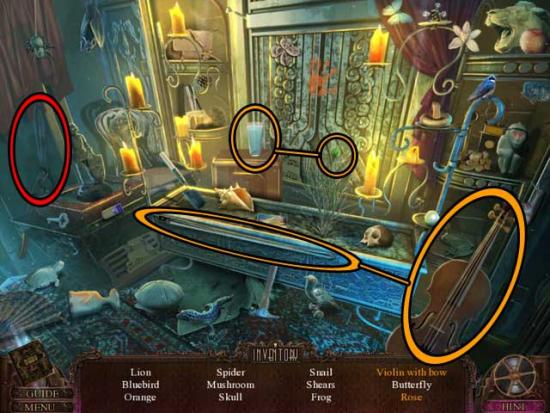
- Find the objects listed at the bottom of the screen. Inventory Items are circled in red, and additional-action items are outlined in orange.
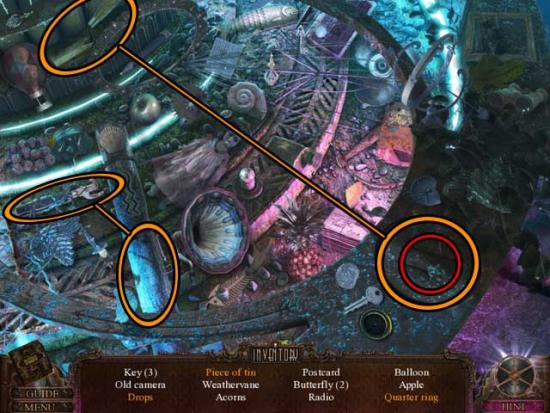
- Upon completing the area, the QUARTER RING will be added to your inventory.
- Proceed forward to the Mansion Entrance.
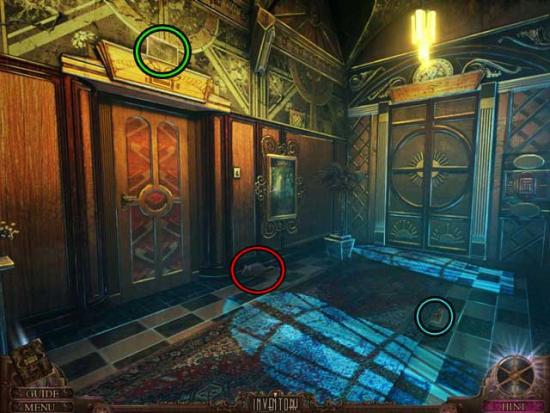
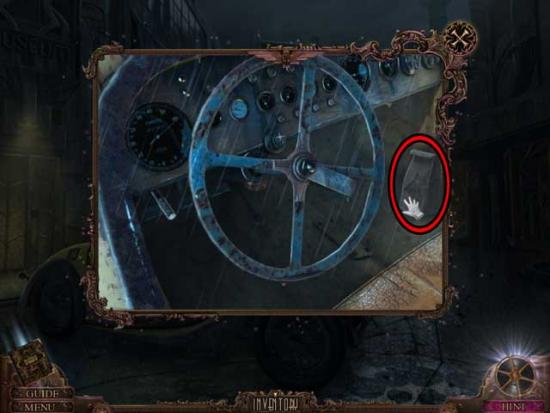
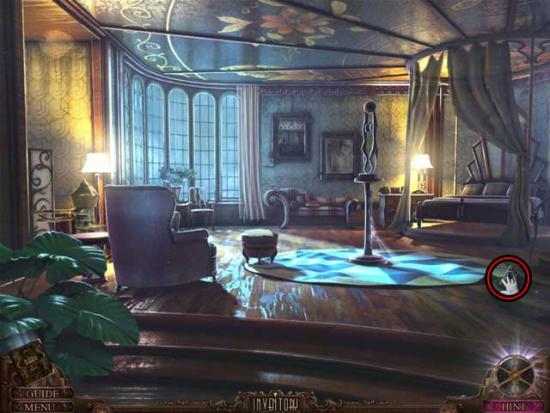
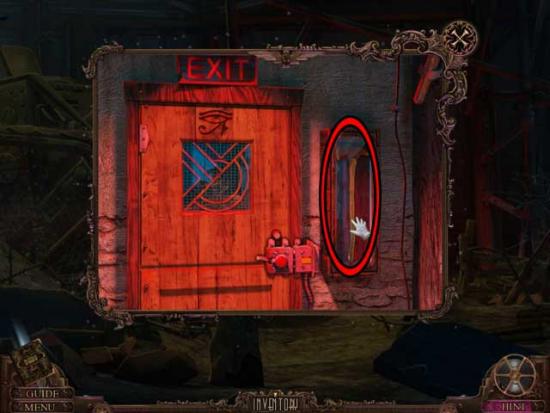
Mansion Entrance
- Take a closer look at the gap in the step towards the right, about halfway up. Examine the gap, then click on the Inquiry to add it to your Diary.
- Click on the Estate Photo (2) and the Secret Card (2) to collect them.
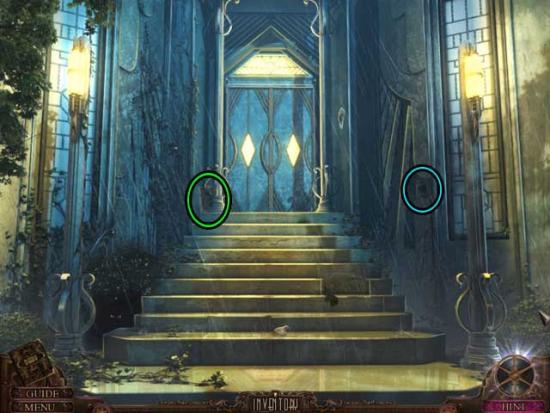
- Examine the doorbell to the right of the front doors. Use the BUTTON on the slot, then click on it to have the doors open.
- Proceed inside to the Foyer.
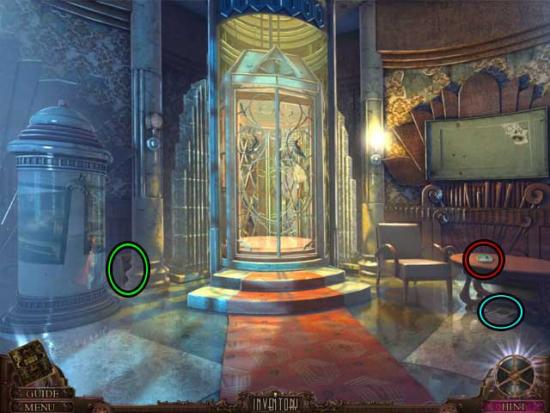
Foyer
- Click on the Estate Photo (3) to collect it.
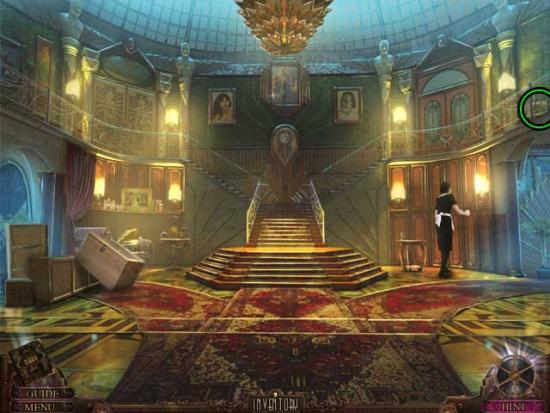
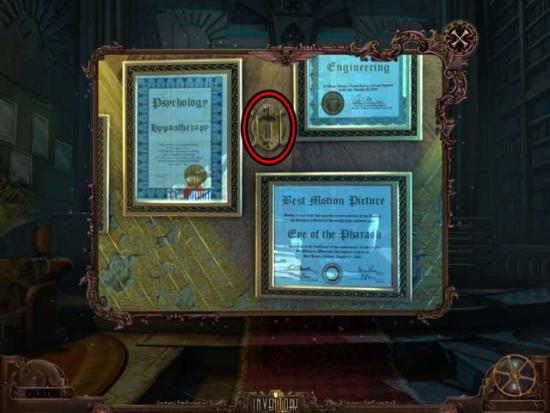
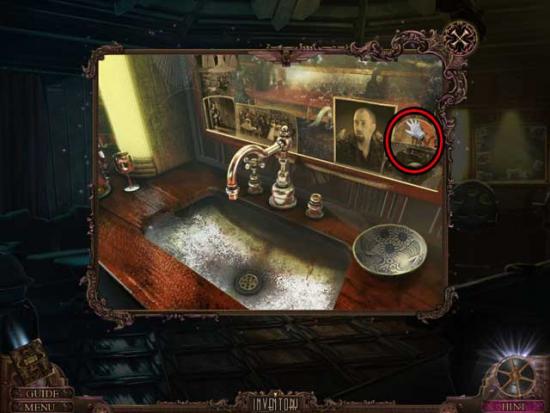
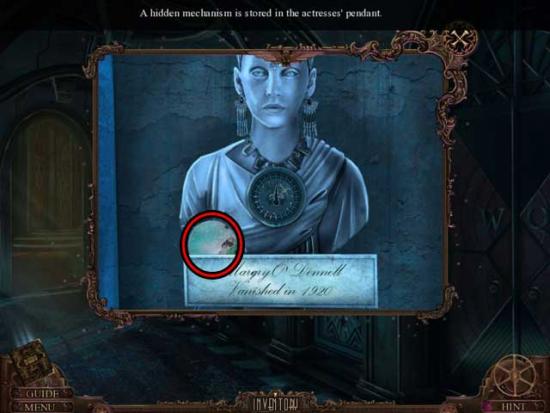
- Examine the middle picture frame ahead, above the stairs.
- Next, examine the small table beside the Maid on the right. Click on the photo to examine it, then click on the Prescription name to add it to your Diary.
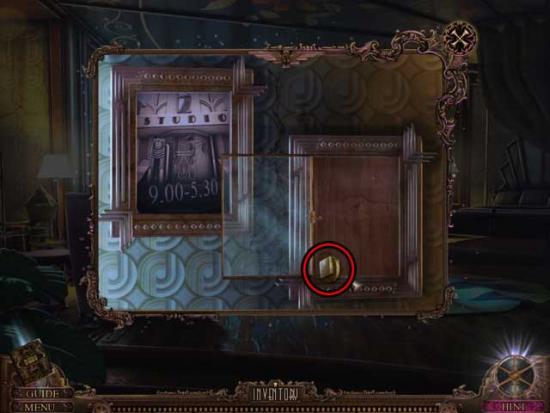
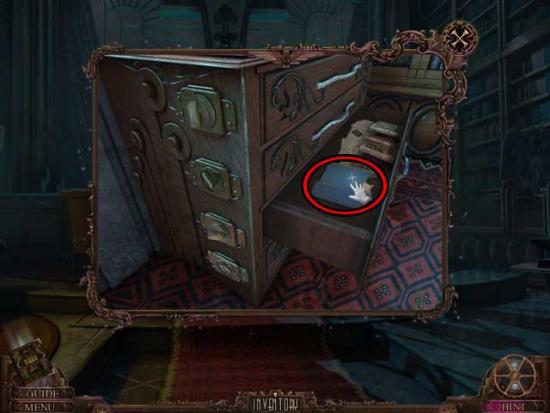
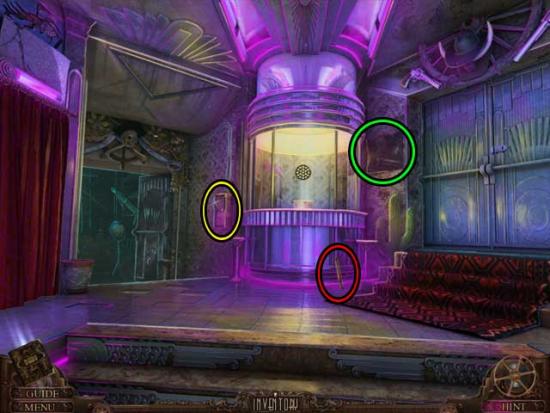
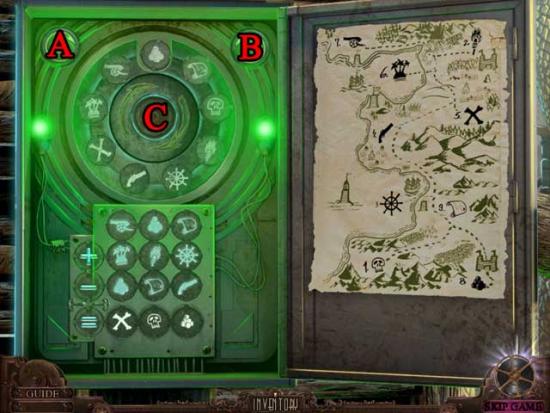
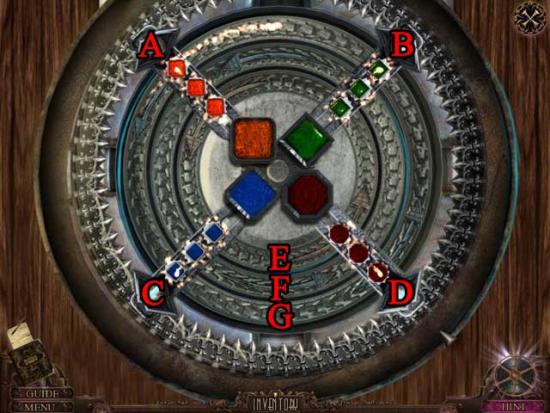
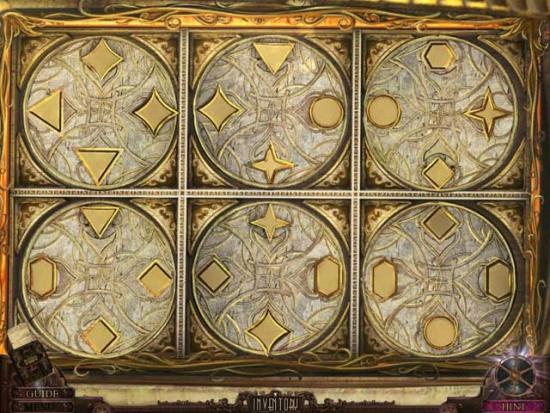
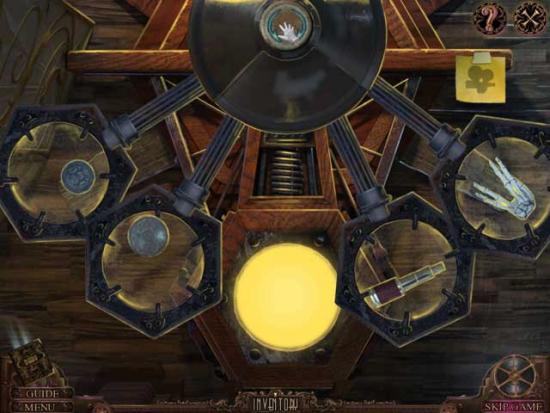
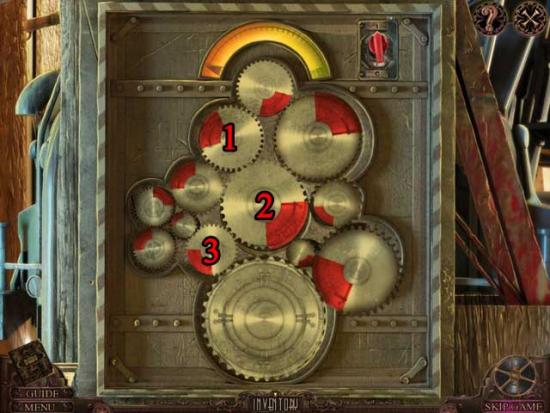
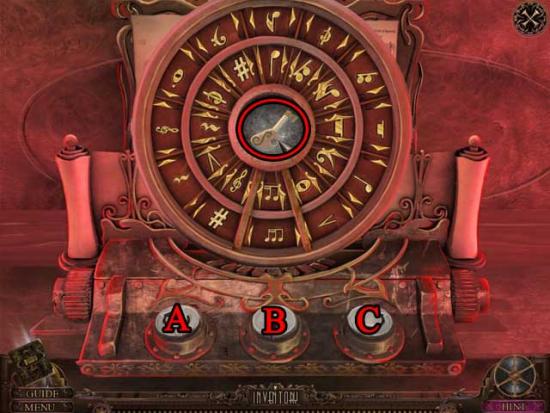
- Examine the door on the upper left. Use the QUARTER RING on the door to trigger a puzzle.
- Rotate the rings to align the colored jewels so that the jewel holder is the same color as the jewel in the quarter circle. There is only one winning combination. Refer to the screenshot below as reference to the solution, which is as follows, then click on the button to open the door.
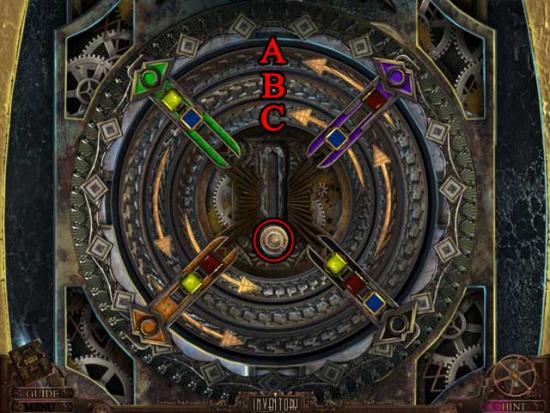
- Solution: Ax2, B, Cx3.
- Upon completing the puzzle, enter Father’s Study.
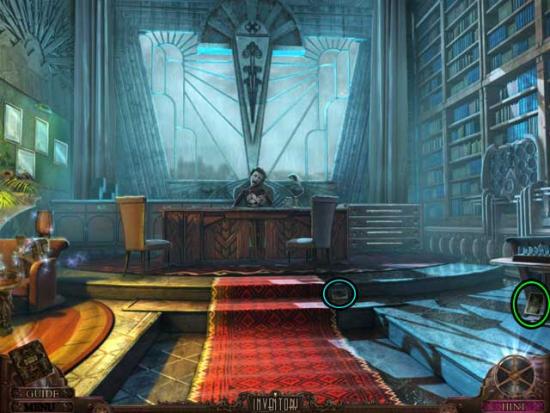
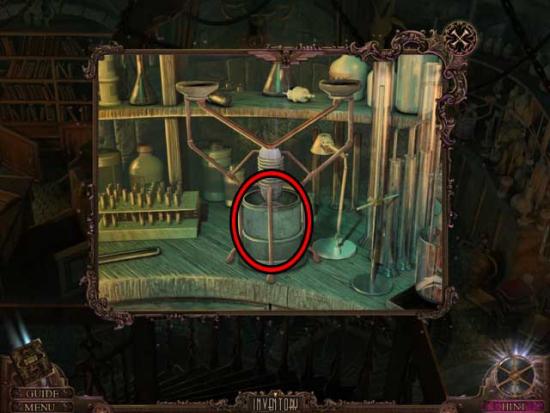
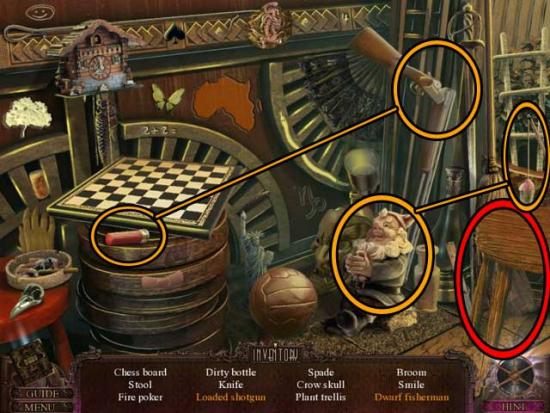
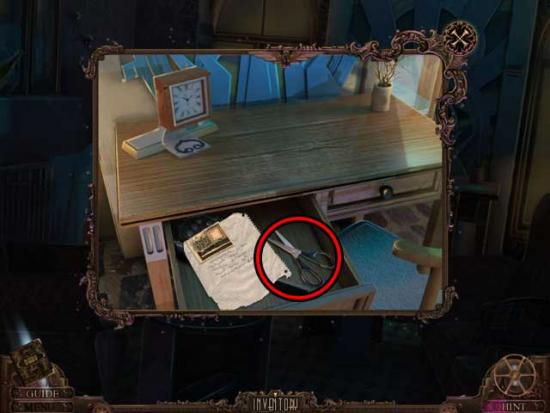
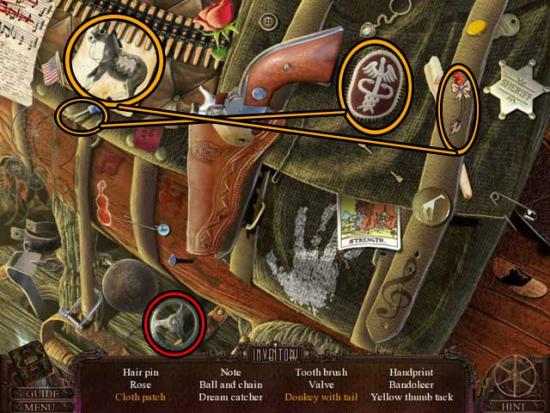
Father’s Study
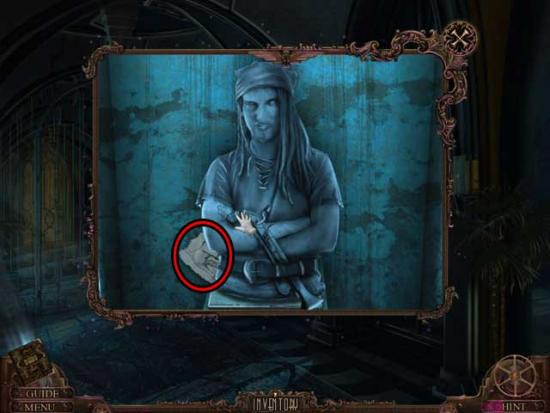
- Take a closer look at the desk ahead. Click on the blanket to remove it, then click on the tape recorder to play a message.
- Back in the main area, click on the Estate Photo (4) and the Secret Card (3) to collect them.
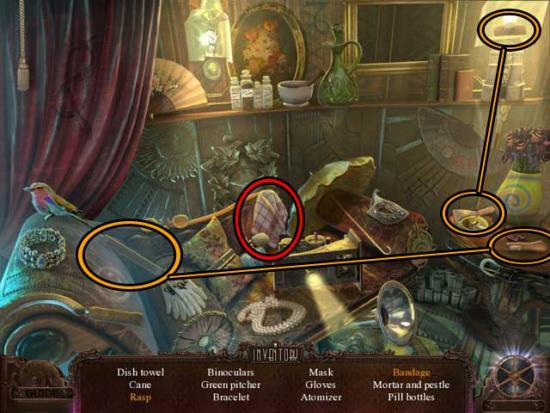
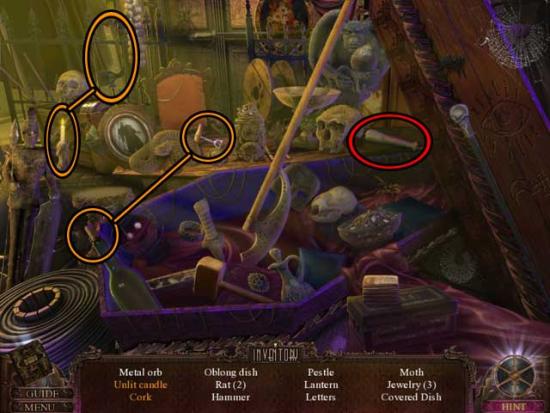
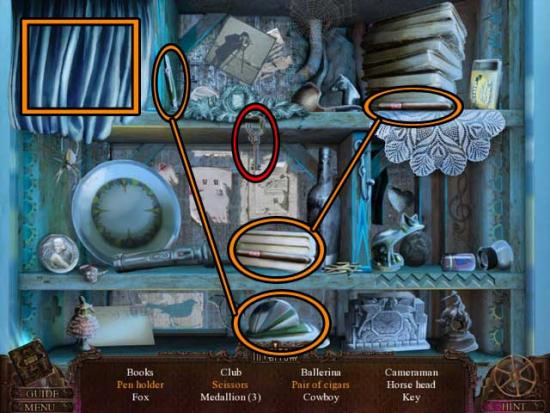
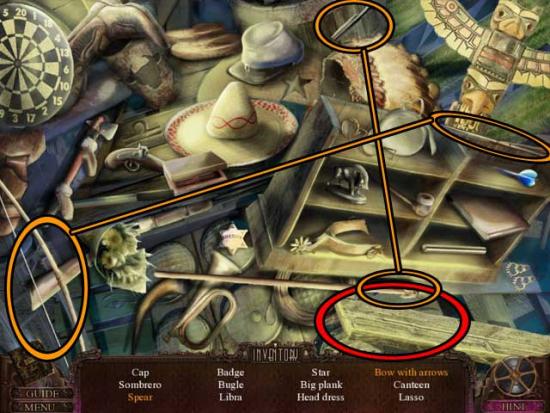
- Click on the hidden object area that appears on the left.
- Find the objects listed at the bottom of the screen. Inventory Items are circled in red, and additional-action items are outlined in orange.
- Upon completing the area, the SWITCH will be added to your inventory.
- Take a closer look at the plaques on the wall on the left. Click on the LETTER T to add it to your inventory.
- Return to the Foyer.
Foyer
- Proceed through the door on the lower right to the East Hall.
East Hall
- Notice the missing switch on the right. Use the SWITCH from your inventory on the area, then click on it to turn the lights on. This will fulfill Warrior of Light (1).
- Take a closer look at the frame to the right of the first door. Click on the SMALL GARDEN LOCK 1/3 to add it to your inventory.
- Proceed down the Hall.
East Hall End
- Click on the Secret Card (4) and the Estate Photo (5) to collect them. Also click on the MOUSE TOY to add it to your inventory.
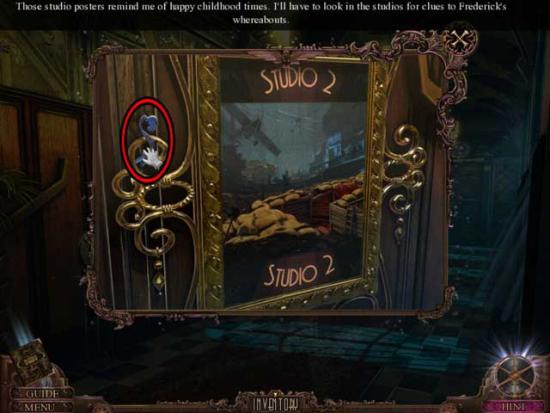
- Take a closer look at the poster frame on the wall. Click on the SMALL GARDEN LOCK 2/3 to add it to your inventory.
- Go back to the East Hall.
East Hall
- Proceed through the door on the left into the Library.
Library
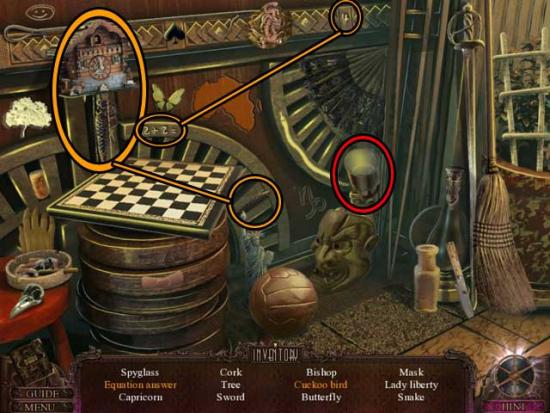
- Click on the Estate Photo (6) to collect it.
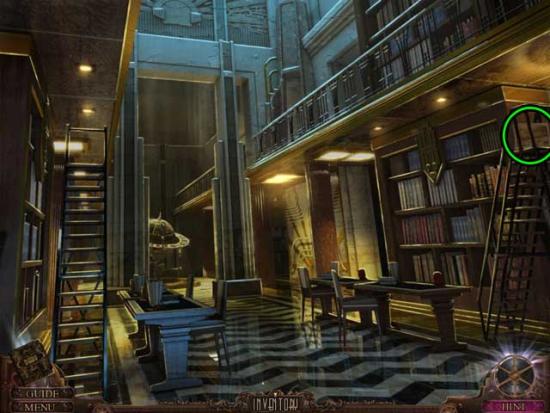
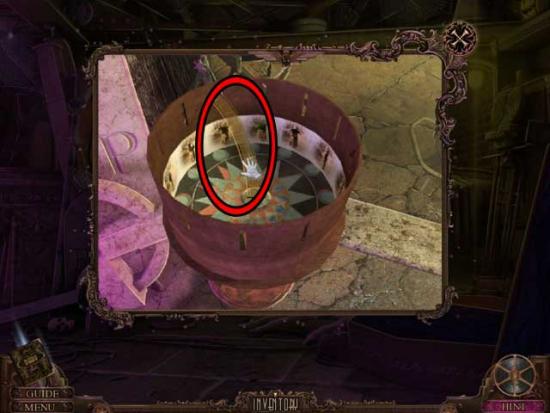
- Examine the table on the left for a closer view. Click on the Light to get Warrior of Light (2), then click on the book to open it. Click on the BLUNT PENCIL to add it to your inventory, and on the pages themselves to add a scrap to your Diary.
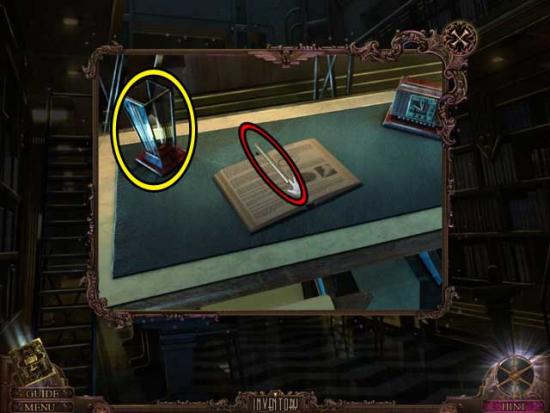
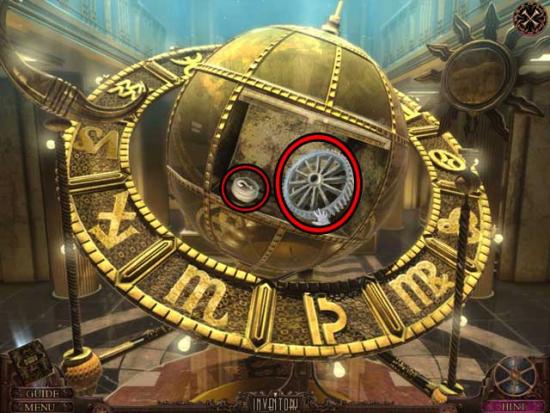
- Take a closer look at the golden globe at the back of the library. Click on the PINCERS to add them to your inventory.
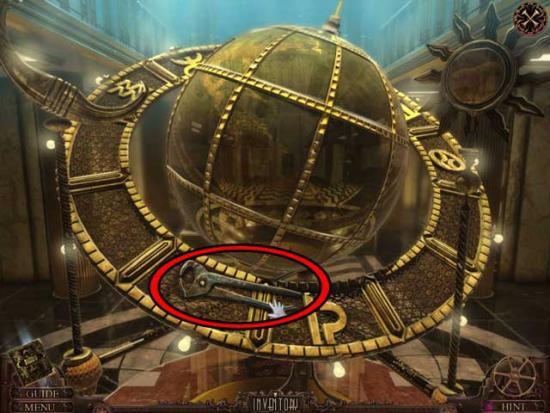
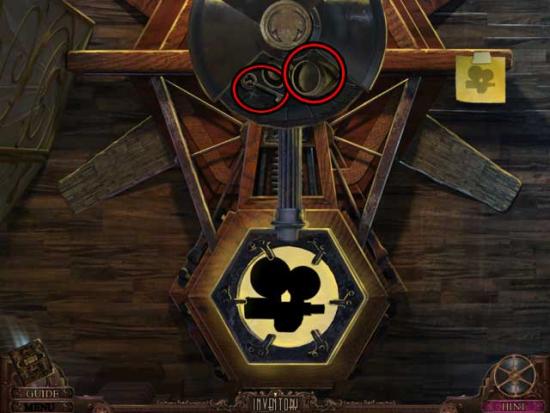
- Examine the bookshelf on the right. Use the LETTER T on the books to trigger a puzzle.
- The first letter of each book is in a font that doesn’t match the rest. Spell a word by rearranging the books and referring to the clue below. The solution is “Theater”.
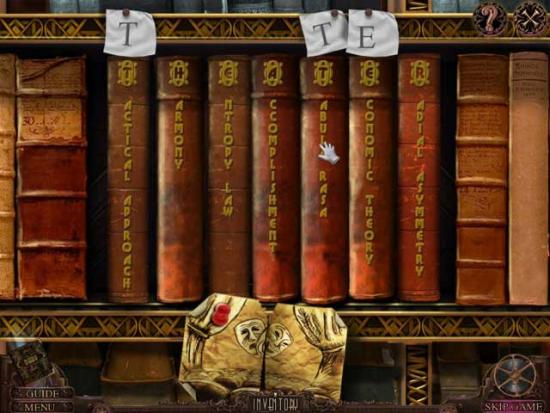
- Upon completing the puzzle, click on the panel to slide it aside, then click on the THEATER KEY inside to add it to your inventory.
- Go back out to the East Hall.
East Hall
- Take a closer look at the gold sculpture on the left. Use the PINCERS to obtain the SPADE and add it to your inventory.
- Go down to the East Hall End.
East Hall End
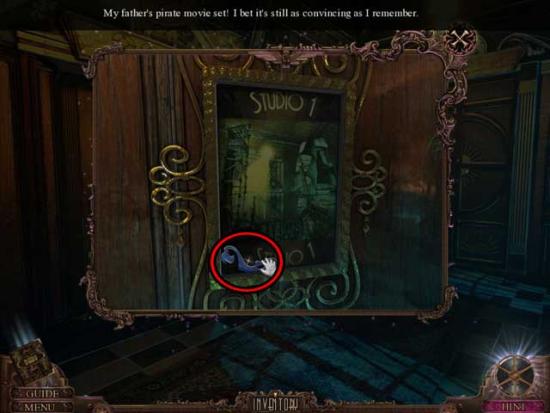
- Take a closer look at the door on the left. Use the THEATER KEY to unlock the door, then proceed inside.
Theater
- Examine the jukebox in the back corner. Click on the GOLD RECORD to add it to your inventory.

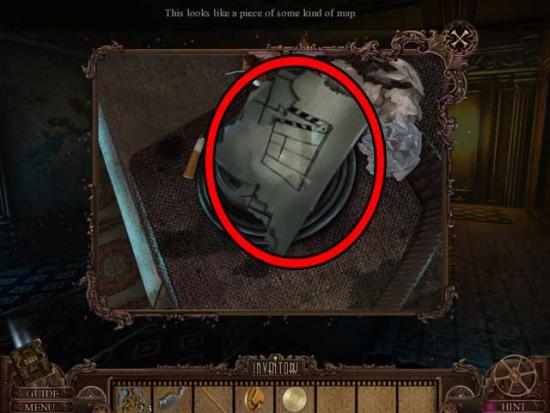
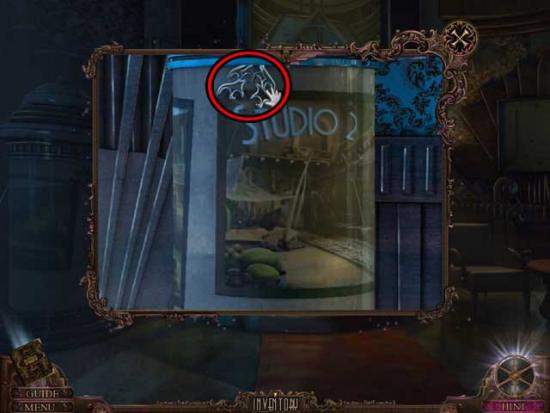
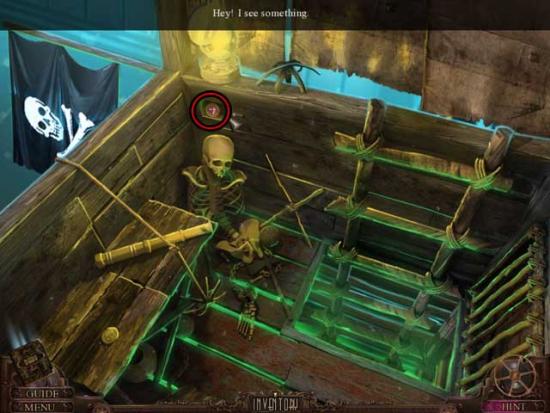
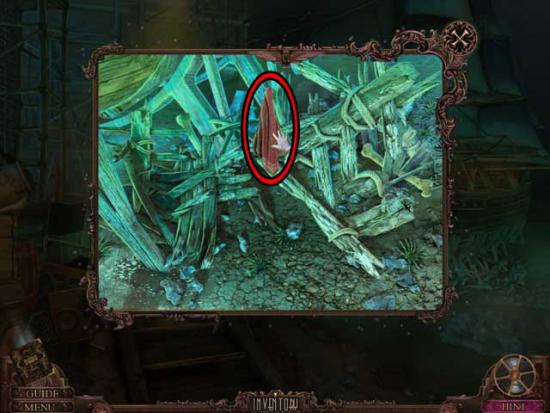
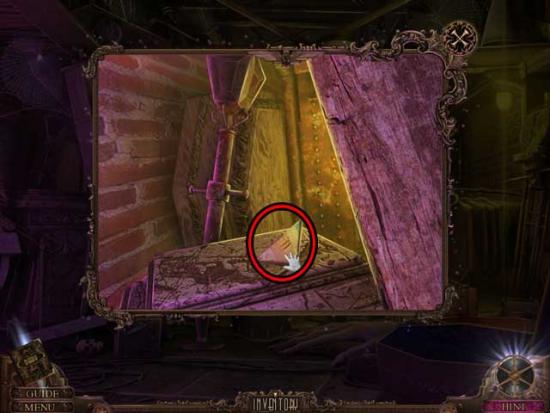
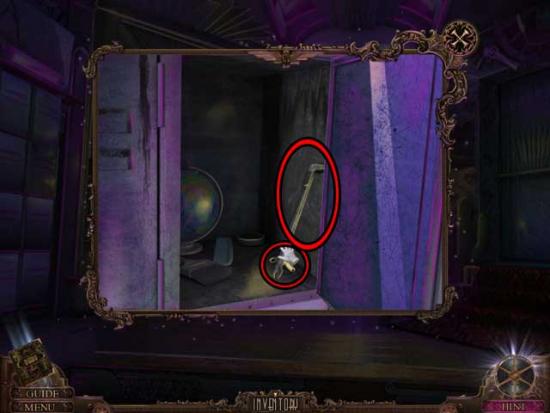
- Take a closer look at the front-most edge seat. Click on the items within the ashtray to remove them, then click on the MAP PIECE 1/5 to add it to your inventory.
- Make your way back to the Mansion Entrance.
Mansion Entrance
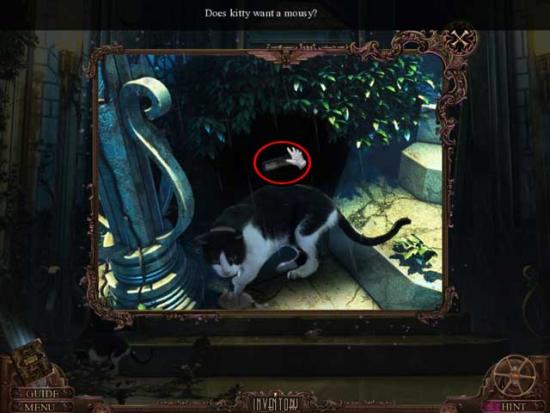
- Take a closer look at the dark corner at the bottom left of the stairs. Use the MOUSE TOY to lure out the cat, then click on the WOODEN HANDLE to add it to your inventory.
- Return to Father’s Study.
Father’s Study
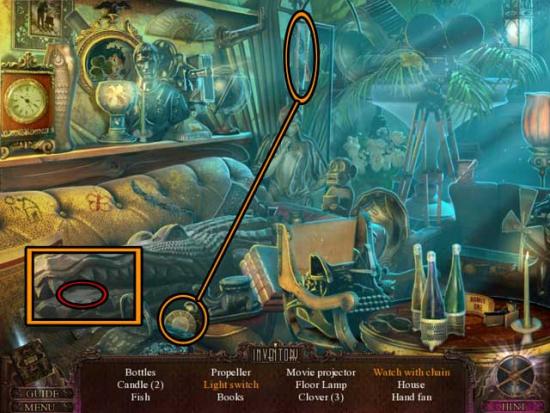
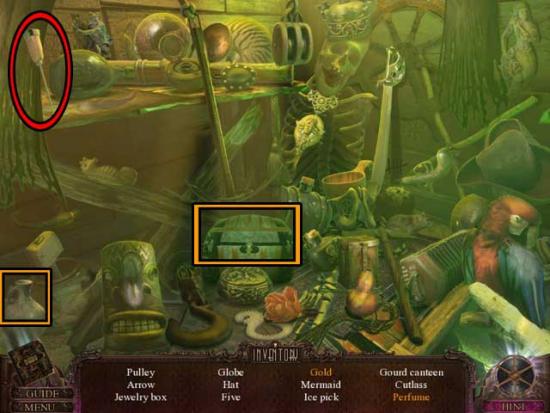
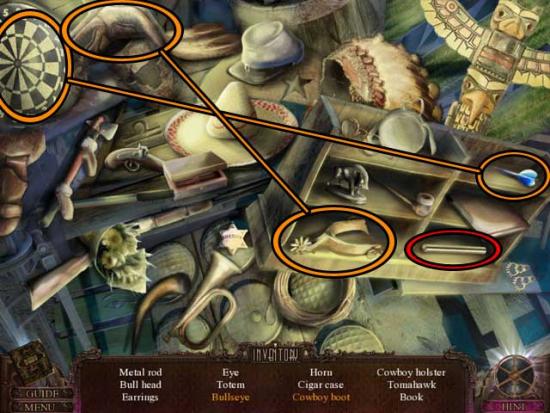
- Click on the hidden object area that appears on the left.
- Find the objects listed at the bottom of the screen. Inventory Items are circled in red, and additional-action items are outlined in orange.

- Upon completing the area, the GRAMOPHONE ARM will be added to your inventory.
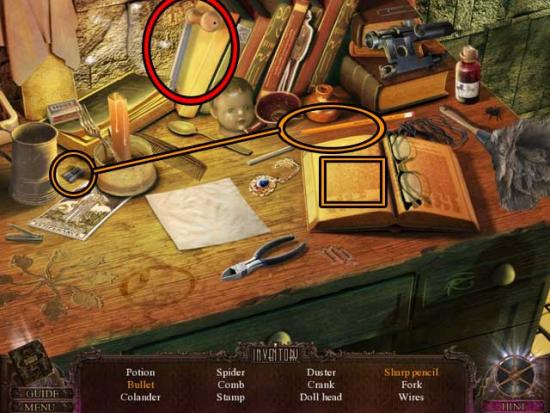
- Back in the main area, examine the desk again. Click on the BLANK PAPER to add it to your inventory, then use the BLUNT PENCIL on the sharpener on the right to acquire the SHARP PENCIL.

- Return to the Theater.
Theater
- Examine the wall on the left where the screen should be. Use the BLANK PAPER on the scribble on the wall, then use the SHARP PENCIL to obtain the pass code for the door outside (3144).
- Go out to the East Hall End.
East Hall End
- Examine the number pad on the right. Input the code “3144” to open the door, then enter the Music Room.
Music Room
- Click on the Estate Photo (7) to collect it.
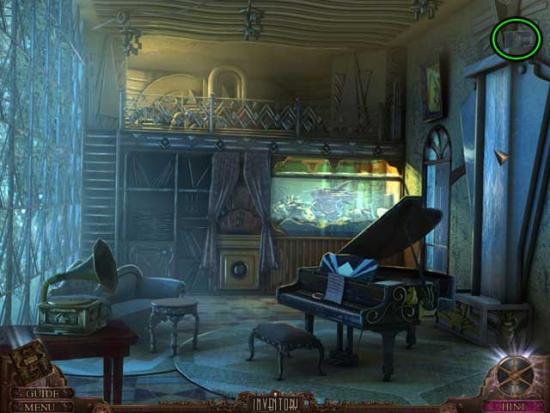
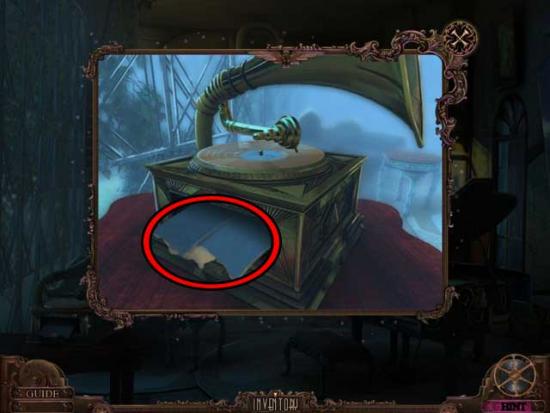
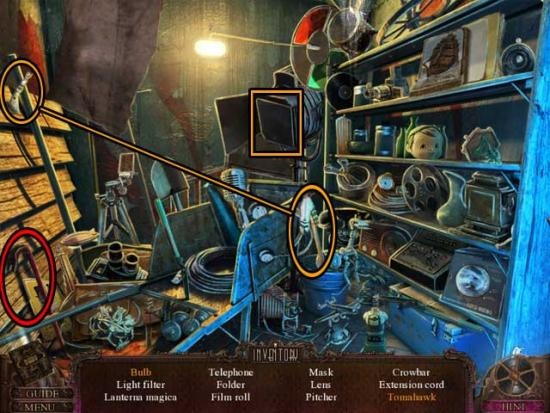
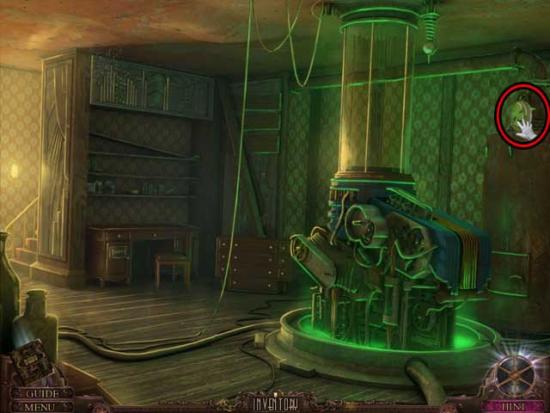
- Examine the gramophone on the left. Use the GOLD RECORD, then the GRAMOPHONE ARM on the gramophone, then click on the Letter that appears to add it to your Diary and the PROJECTOR BLUEPRINT HALF to add it to your inventory.
- Take a closer look at the piano. Click on the MAGNET to add it to your inventory.

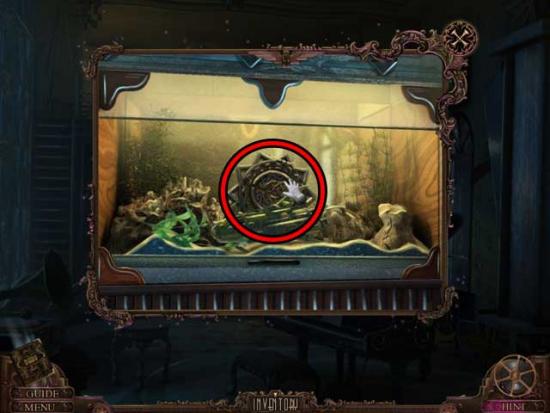
- Back in the main area again, examine the upper railing on the left. Click on each of the valves to shut off the water, emptying the aquarium.
- Once this is done, examine the aquarium towards the right. Click on the glass panel to open it, then click on the LARGE GARDEN LOCK to add it to your inventory.
- Return to Father’s Study.
Father’s Study
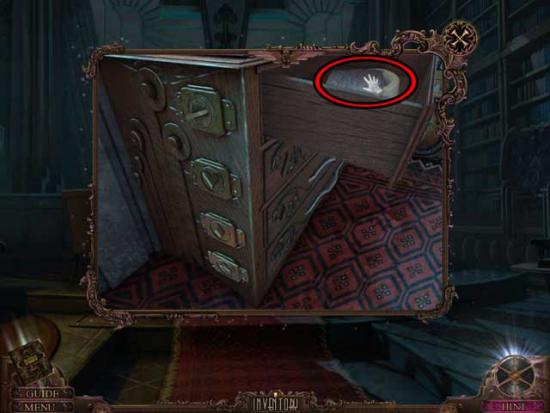
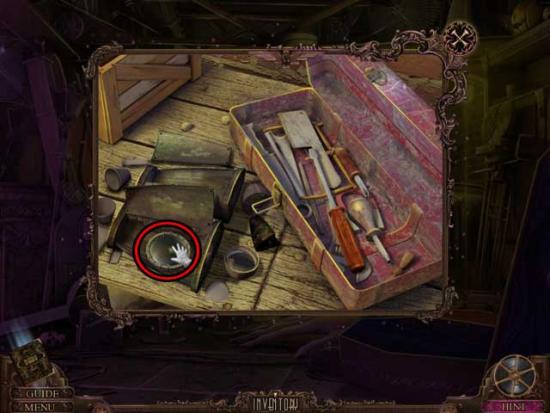
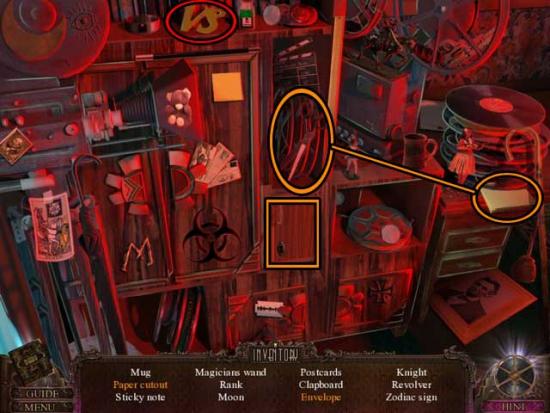
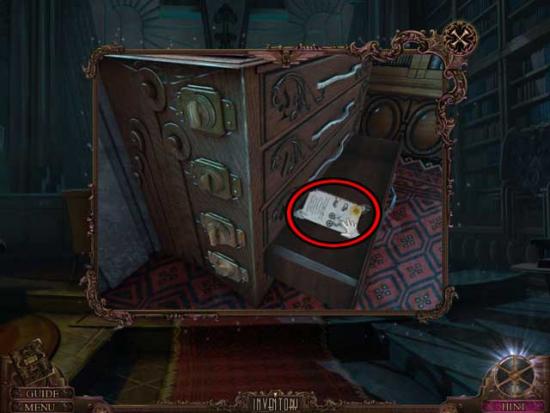
- Examine the chest of drawers in the right corner. Use the SPADE on the slot next to the top drawer to open it, then click on the Paper and the STICKY TAPE inside to collect them.
- Return to the Mansion Entrance.
Mansion Entrance
- Take a closer look at the cat on the lower left again. Use the MAGNET on its collar, then the STICKY TAPE to secure it. Click on the CAT WITH MAGNET to add it to your inventory.
- Return to the Theater.
Theater
- Click on the bottom of the door on the right to remove the lower panel. Take a closer view. Use the CAT WITH MAGNET to retrieve the PROJECTOR ROOM KEY.
- Once you’ve acquired the key, take a closer look at the upper portion of the door on the right. Use the PROJECTOR ROOM KEY to unlock the door, then proceed inside.
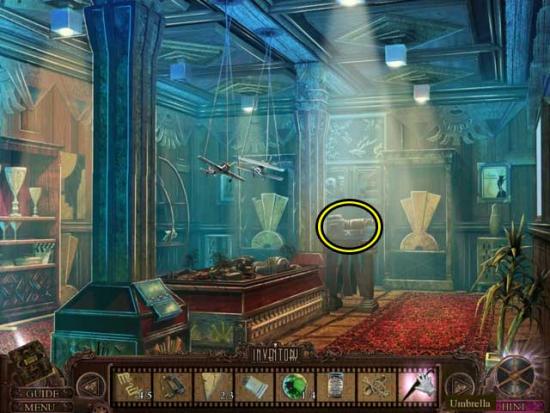
Projector Room
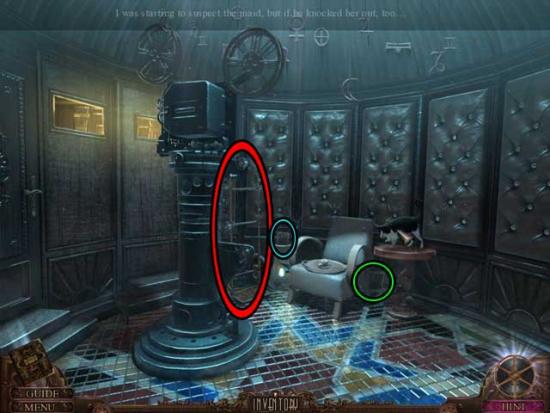
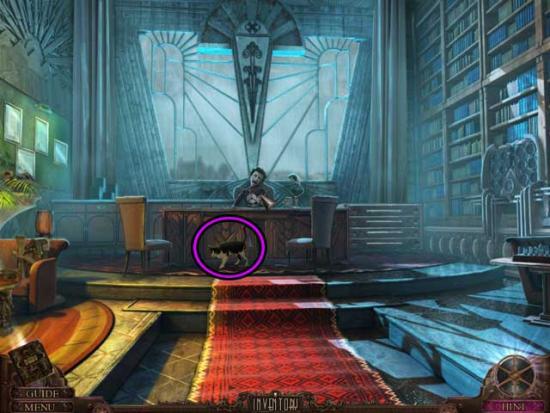
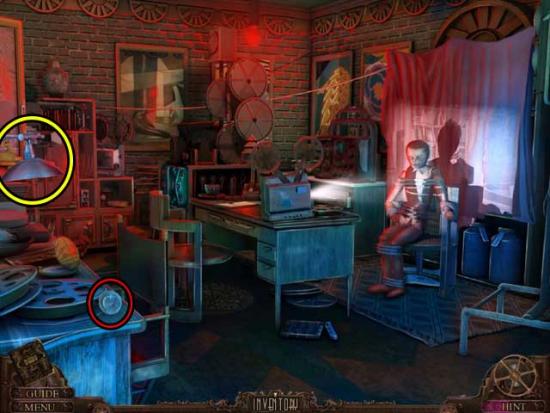
- Click on the Maid to wake her up and speak with her. She will give you the REC ROOM KEY.
- Click on the Cat (1) for the Mystery Achievement.
- Next, click on the HAND CART, the Estate Photo (8), and the Secret Card (5) to collect them all.
- Return to the Foyer.
Chapter 2: The Gardener
Foyer
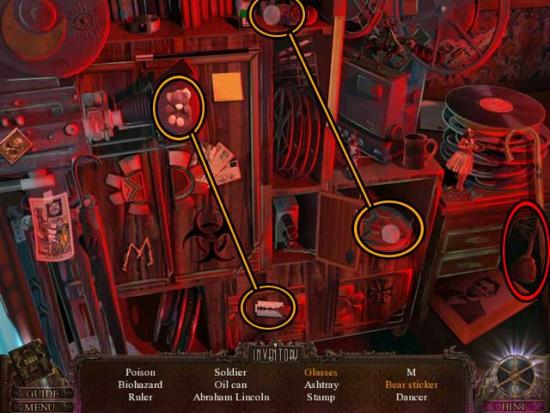
- Use the HAND CART on the crates on the left to move them all away, then click on the hidden object area that appears on the left.
- Find the objects listed at the bottom of the screen. Inventory Items are circled in red, and additional-action items are outlined in orange.
- Upon completing the area, the MAP PIECE 2/5 will be added to your inventory.
- Go left to the West Hall.
West Hall
- Take a closer look at the statue bust ahead. Click on the MAP PIECE 3/5 to add it to your inventory.
- Examine the door on the right. Use the REC ROOM KEY on the door to open it, then proceed inside.
Rec Room
- Follow the man outside to the Garden.
Garden
- Speak with the man, who turns out to be the Gardener.
- Click on the LADDER, the Estate Photo (9) and the Secret Card (6) to collect them.
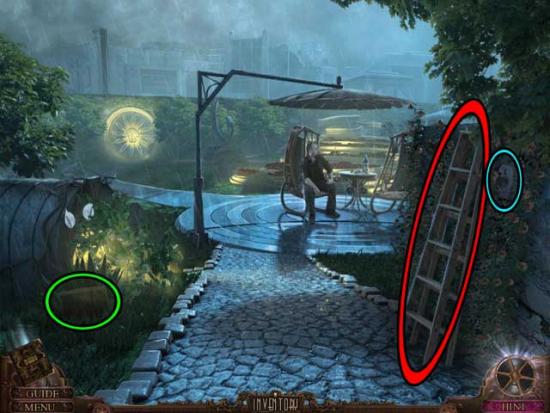
- Take a closer look at the large round door in the distance on the left. Use the LARGE GARDEN LOCK on the slot, then exit for now.
- Return to the Rec Room.
Rec Room
- Click on the Estate Photo (10) to collect it. Click on the Light to gain Warrior of Light (3).
- Examine the mirror on the far right. Click on the THAUMATROPE 1/5 to collect it.
- Examine the table towards the left. Click on the Letter to add it to your Diary, then click on the TRANSPARENT MAP to add it to your inventory.
- Take a closer look at the globe on the left. Click on it to open it, then click on the BOTTLE 1/3 inside to add it to your inventory.
- Make your way back to the Fountain.
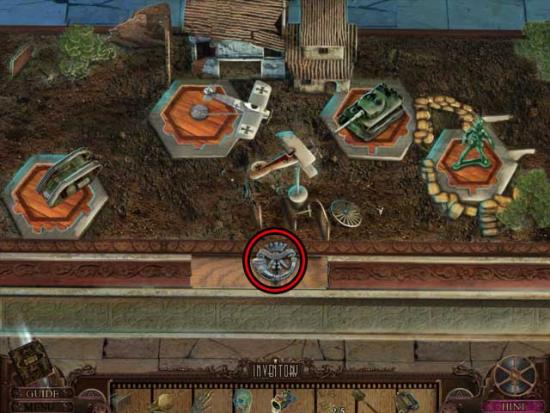
Fountain
- Click on the hidden object area over the fountain.
- Find the objects listed at the bottom of the screen. Inventory Items are circled in red, and additional-action items are outlined in orange.
- Upon completing the area, the CANDLE HOLDER will be added to your inventory.
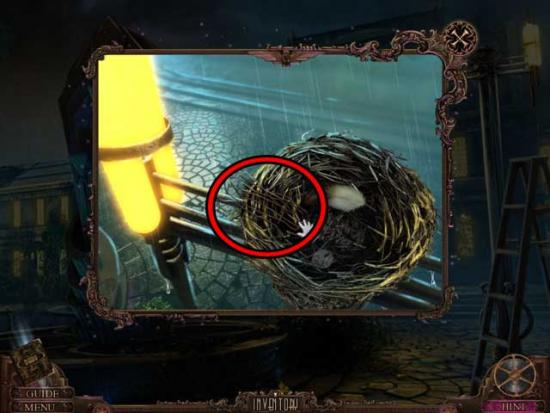
- Back in the main area, use the LADDER on the light post on the right. Take a closer look at the nest at the top and click on the WIRE to add it to your inventory.
- Return to the West Hall.
West Hall
- Examine the gates in the hall. Use the WIRE on the lock to open it, then continue forward to the West Hall End.
West Hall End
- Click on the hidden object area ahead in the corner.
- Find the objects listed at the bottom of the screen. Inventory Items are circled in red, and additional-action items are outlined in orange.
- Upon completing the area, the SHEARS will be added to your inventory.
- Back in the main area, click on the BOTTLE 2/3 to add it to your inventory.
- Examine the statue bust. Click on the THAUMATROPE 2/5 to add it to your inventory.
- Proceed forward to the Elevator Room.
Elevator Room
- Click on the Estate Photo (11), the Secret Card (7), and the THAUMATROPE 3/5 to collect them.
- Take a closer look at the rotating advertisement on the left. Click on the SMALL GARDEN LOCK 3/3 to add it to your inventory.
- Make your way back to the Garden.
Garden
- Use the SHEARS on the plants on the left where the light is seeping through, marked by the white calla lilies.
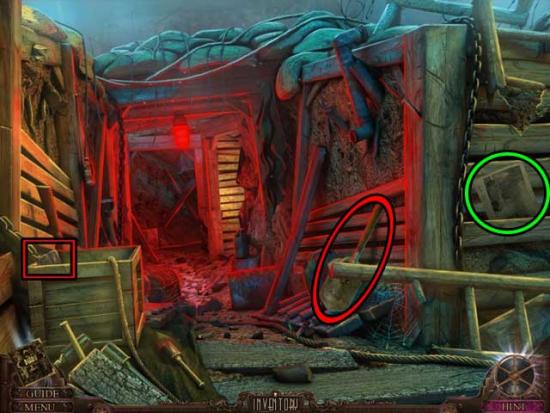
- Proceed down into the Basement.
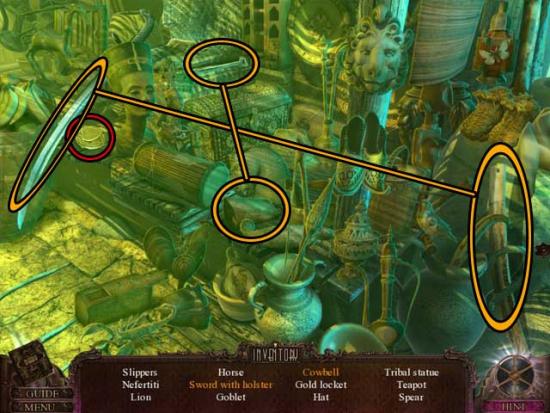
Basement
- Click on the hidden object area on the left.
- Find the objects listed at the bottom of the screen. Inventory Items are circled in red, and additional-action items are outlined in orange.
- Upon completing the area, the CROWBAR will be added to your inventory.
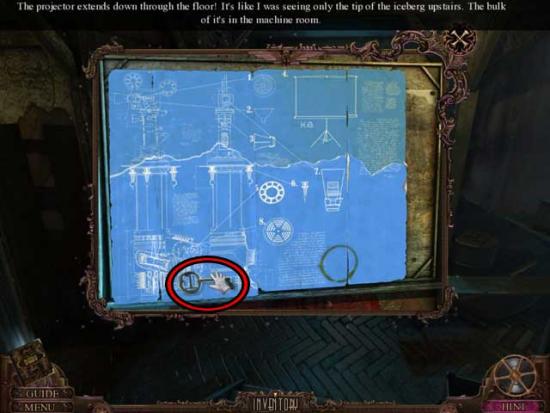
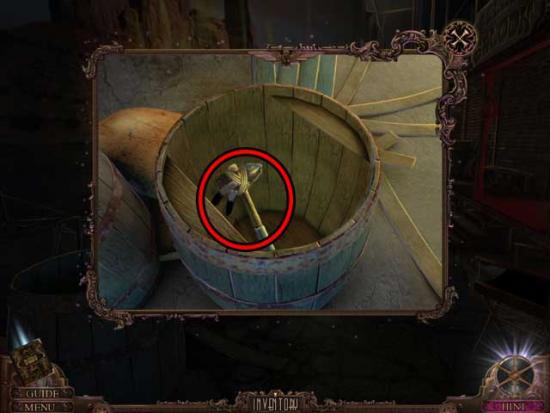
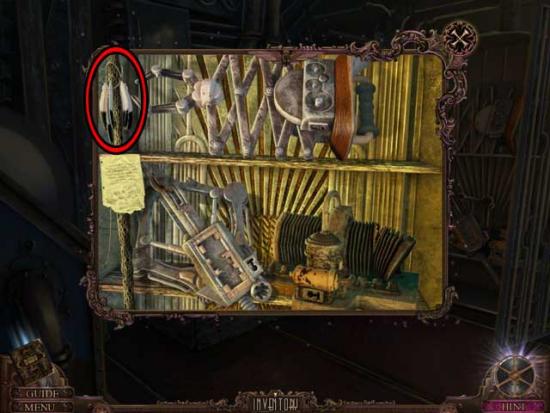
- Take a closer look at the workbench ahead. Use the WOODEN HANDLE on the file caught in the vice, then click on the FILE to release it and add it to your inventory.
- Examine the board on the left. Use the PROJECTOR BLUEPRINT HALF on the board, then click on the MAP PIECE 4/5 that appears to add it to your inventory.
- Return to the Garden.
Garden
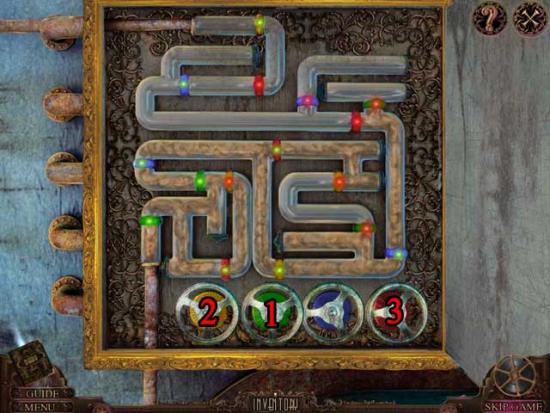
- Take a closer look at the round door again. Use the FILE to remove the rust covering it, then use the SMALL GARDEN LOCK 3/3 on the door to trigger a puzzle.
- Lead the butterfly out of the maze in eleven steps. Click on the direction keys to enter the move commands, then the play button to start. The game will restart if the butterfly hits a wall. The solution is as follows and is shown below: Right, Up, Up, Right, Down, Right, Up, Up, Right, Up, Right.
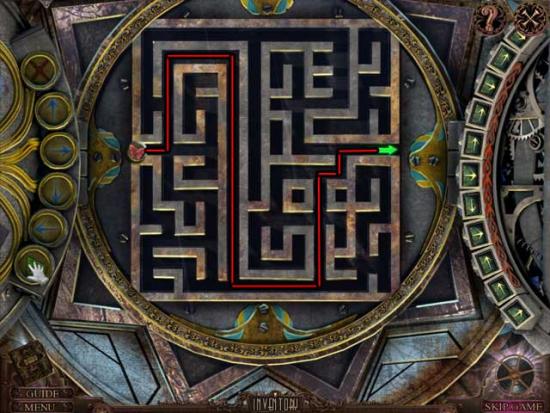
- Upon completing the puzzle, proceed forward to the Studio Entrance.
Studio Entrance
- Take a closer look at the clock on the right, next to the door on the right. Use the CANDLE HOLDER to break open the glass, then click on the THAUMATROPE 4/5 to add it to your inventory.
- Back in the main area, take a closer look inside the car. Click on the BIRD FOOD to add it to your inventory.
- Go back to the Garden.
Garden
- Give the BIRD FOOD to the Gardener. He will reward you with the BOTTLE 3/3.
- Enter the Rec Room.
Rec Room
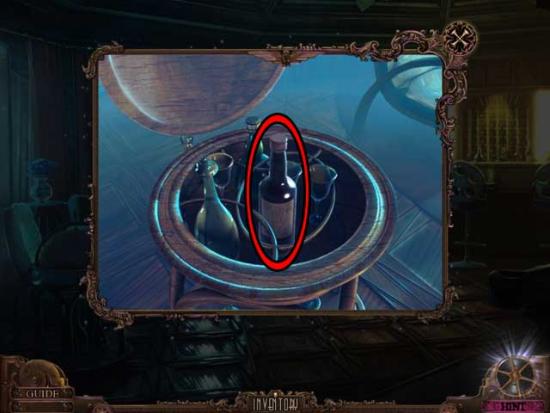
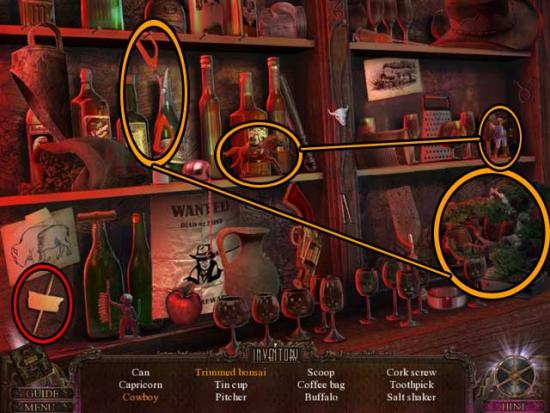
- Examine the wine shelf towards the right for a closer view. Use the BOTTLE 3/3 on the shelf to trigger a puzzle.
- Each sticker on each bottle represents a number. Place all four bottles on their stands so that the numbers below correspond with the stickers on the bottles. The solution is shown below.
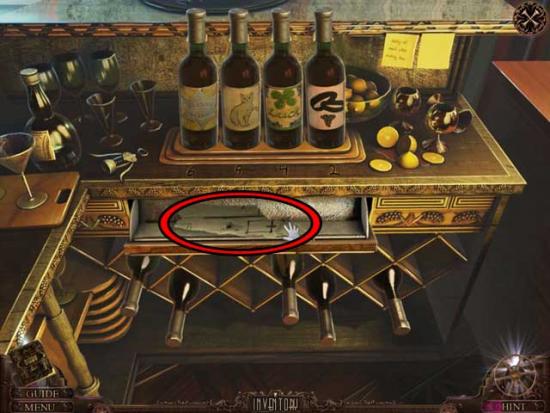
- Upon completing the puzzle, click on the MAP PIECE 5/5 to add it to your inventory.
- Return to the Elevator Room.
Elevator Room
- Use the CROWBAR to open the elevator door ahead.
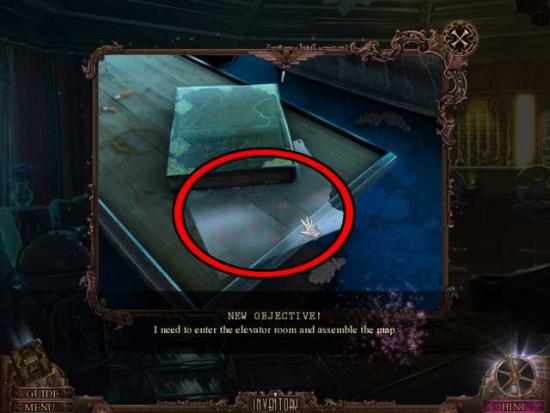
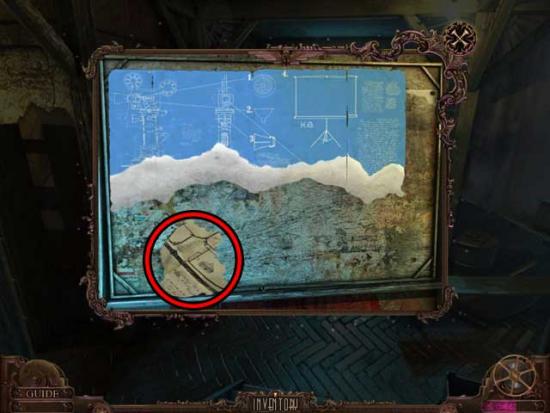
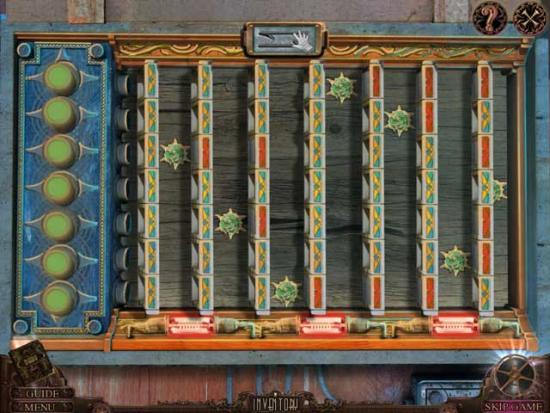
- Next, examine the board on the right. Use the MAP PIECE 5/5 on the board to trigger a puzzle.
- Drag and drop the map pieces until the map is whole. When a piece is correctly positioned, it will snap into place. The solution is shown below.
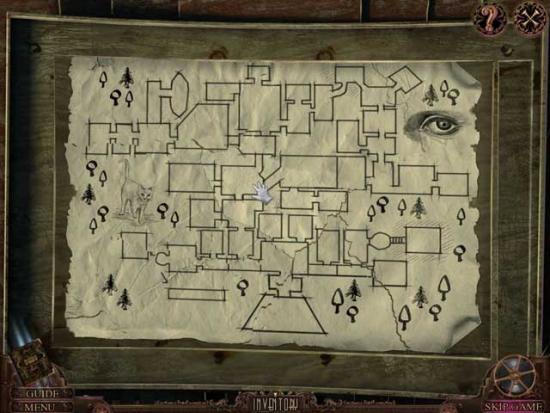
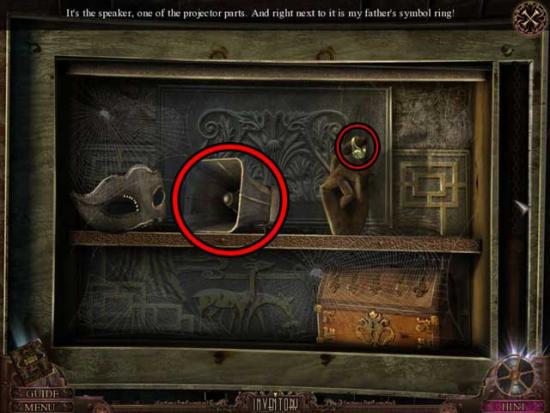
- Upon completing the puzzle, use the TRANSPARENT MAP on the whole map. The notes will be added to your Diary. Click on the pull lever on the right to reveal a secret compartment, then click on the PROJECTOR SPEAKER and FATHER’S RING to add them to your inventory.
- Back in the main area, enter the Elevator.
Elevator
- Click on the Note on the right to add it to your Diary.
- Examine the control panel on the right. Use FATHER’S RING on the top button. The ring will be added back to your inventory as the RING WITHOUT SYMBOL.
- Click on the top button to proceed up to the next floor.
Chapter 3: The Pirate Studio
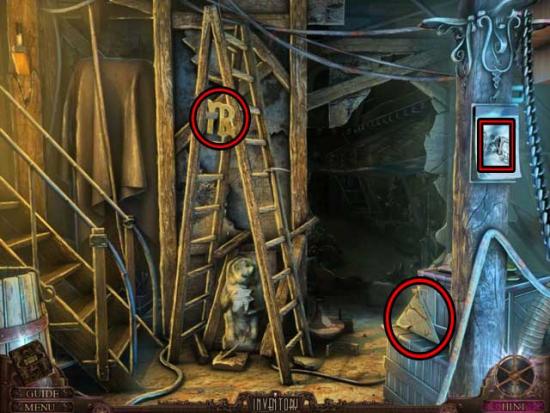
Father’s Room
- Click on the EGYPTIAN SYMBOL on the floor on the right to add it to your inventory.
- Read the Note lying on the foot rest, then examine the pictures on the back wall. Click on the left picture to add a note to your Diary, then click on the right frame to open it. Click on the photo inside to view it, then click on the DIAMOND to add it to your inventory.
- Make your way back to the West Hall End.
West Hall End
- Click on the hidden object area in the corner.
- Find the objects listed at the bottom of the screen. Inventory Items are circled in red, and additional-action items are outlined in orange.

- Upon completing the area, the VALVE will be added to your inventory.
- Go back to the Rec Room.
Rec Room
- Examine the mirror on the right. Use the VALVE on the faucet to restore the sink entirely, then exit for now.
- Go to the Foyer.
Foyer
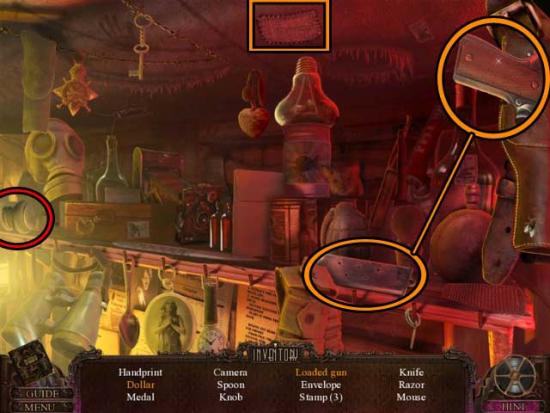
- Click on the hidden object area on the left.
- Find the objects listed at the bottom of the screen. Inventory Items are circled in red, and additional-action items are outlined in orange.
- Upon completing the area, the DISH TOWEL will be added to your inventory.
- Enter Father’s Study.
Father’s Study
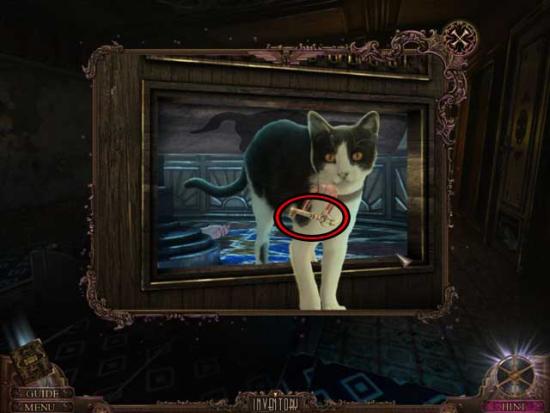
- Click on the Cat (2) for the Mystery Achievement.
- Examine the chest of drawers to the right of the desk. Use the DIAMOND on the third drawer down to open it, then click on the Letter and the BLUEPRINT SECOND HALF to collect them.
- Return to the West Hall End.
West Hall End
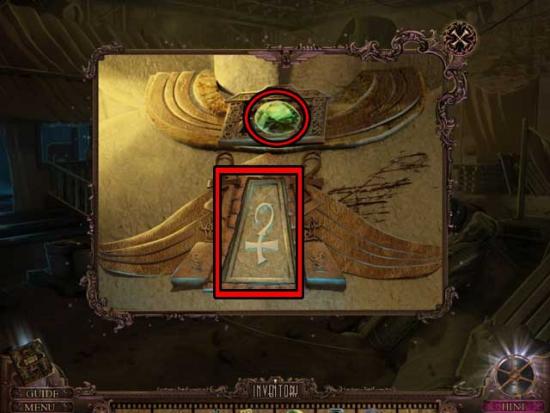
- Examine the statue bust. Use the EGYPTIAN SYMBOL on the medallion slot, then click for a closer view.
- The ball in the middle indicates the color you are trying to collect. Click on the middle ring to rotate it. Make sure there’s a block first. Click on the outer ring to rotate it. The goal is to drop balls from the outer ring into the middle ring that match the color of the ball in the middle. Once you have the correct color at the top, click on the middle ring to allow the ball to drop into a slot. Repeat this process for all colors to complete the puzzle. An example is shown below.
- Upon completing the puzzle, click on the JAR WITH THAUMATROPE to add it to your inventory.
- Return to the Rec Room.
Rec Room
- Examine the mirror on the right. Place the JAR WITH THAUMATROPE into the sink, then click on the right faucet to run the hot water. Click on the jar lid to open it and add the THAUMATROPE 5/5 to your inventory.
- Make your way to the Studio Entrance.
Studio Entrance
- Take a closer look at the fuel flap on the back of the car. Use the DISH TOWEL to remove the cap.
- Go back to the Basement.
Basement
- Click on the hidden object area on the left.
- Find the objects listed at the bottom of the screen. Inventory Items are circled in red, and additional-action items are outlined in orange.
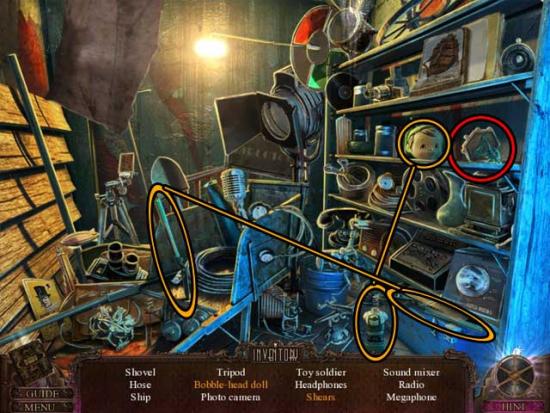
- Upon completing the area, the TOY SOLDIER will be added to your inventory.
- Examine the board on the wall on the left. Use the BLUEPRINT SECOND HALF on the board, then click on the STUDIO KEY to add it to your inventory.
- Return to the Studio Entrance.
Studio Entrance
- Examine the door ahead in the distance. Use the STUDIO KEY on the lock, then turn it to open the door and proceed inside.
Ticket Hall
- Click on the WOOD PIECE 1/3 to collect it. Click on the Light switch to obtain Warrior of Light (4).
- Enter the doorway on the left to go to the next area.
Pirate’s Entrance
- Click on the CABLE to add it to your inventory.
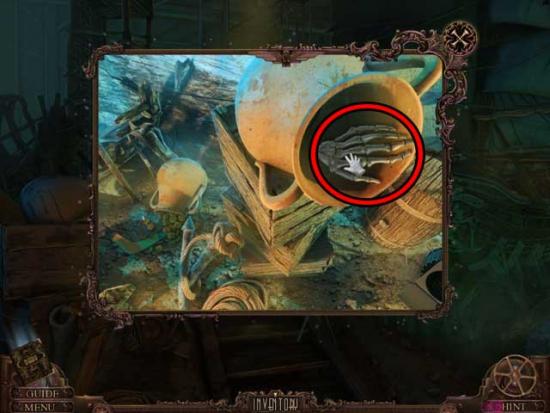
- Take a closer look at the pile of objects on the left. Click on the SKELETON HAND to add it to your inventory.
- Proceed forward to the next area.
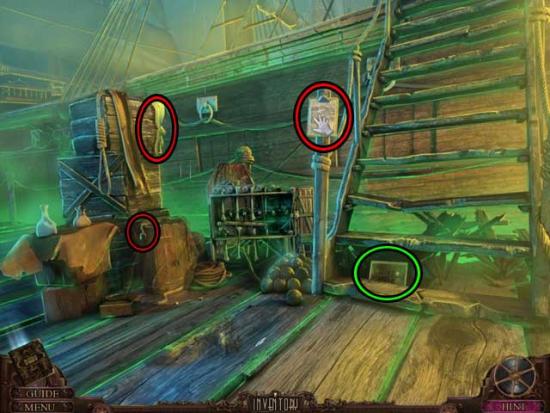
Pirate’s Gangway
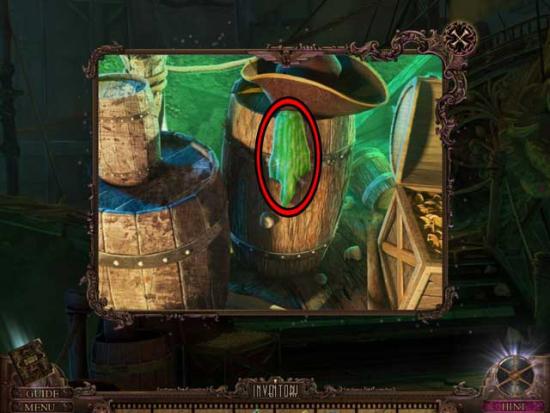
- Take a closer look at the barrels on the left. Click on the BANDANA 1/3 to add it to your inventory.
- Back in the main area, click on the WOOD PIECE 2/3 and the SKULL to add them to your inventory.
- Proceed forward to the next area.
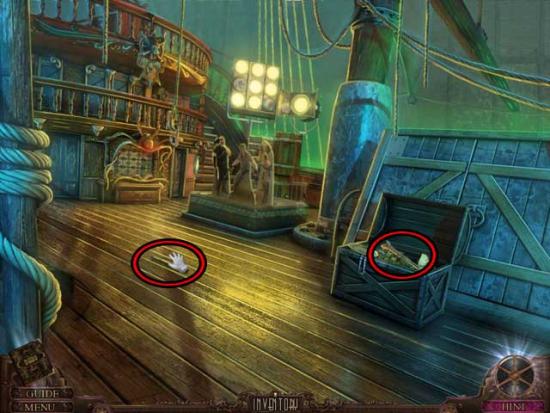
Pirate’s Ship Side
- Click on the Note, the Estate Photo (12), the BANDANA 2/3, and the HOOK to collect them.
- Continue up the steps to the next area.
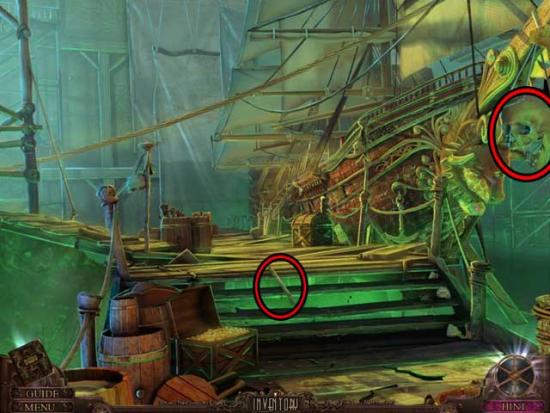
Pirate’s Ship Deck
- Click on the Estate Photo (13) and the Secret Card (8) to collect them.
- Click on the WOOD PIECE 3/3 and the BONE to add them to your inventory.
- Examine the rest of the area, then exit back to the Pirate’s Ship Side for now.
Pirate’s Ship Side
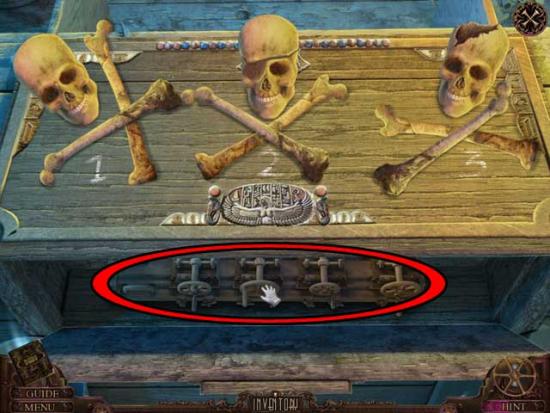
- Take a closer look at the shelf next to the steps. Use the BONE on the shelf to trigger a puzzle.
- Click on the bones in the correct order to open the cage. The solution is shown below.
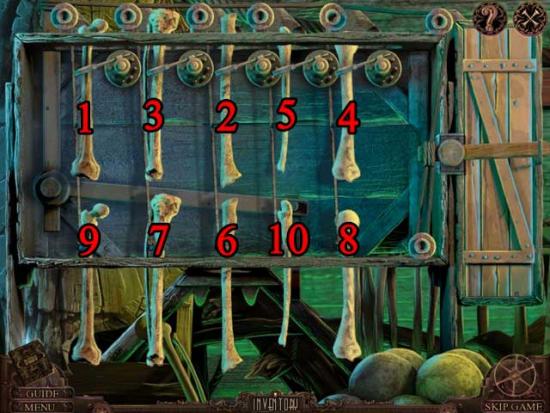
- Upon completing the puzzle, click on the SWORD that appears on the right to add it to your inventory.
- Return to the Pirate’s Gangway.
Pirate’s Gangway
- Proceed left to the Pirate’s Tower Base.
Pirate’s Tower Base
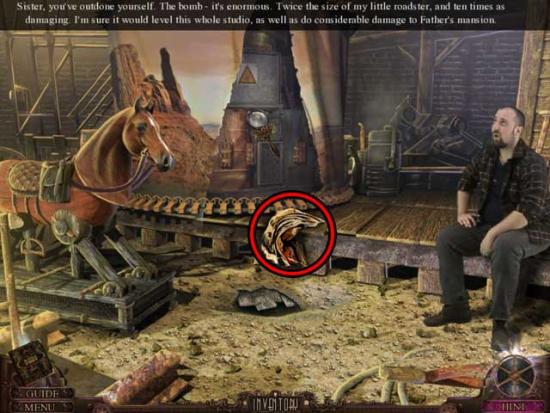
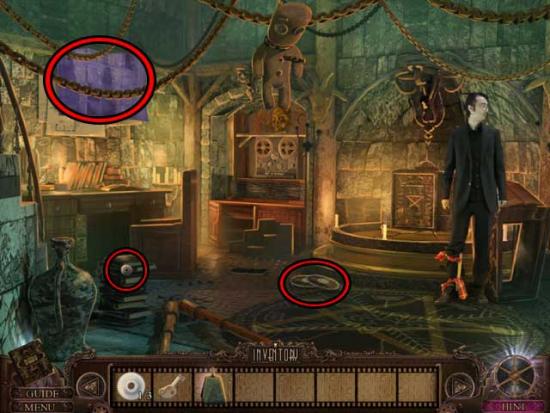
- Use the SWORD on the rope tied around the electrical box to cut it, then take a closer look inside. Click on the box to open it, then click on the Note to add it to your Diary.
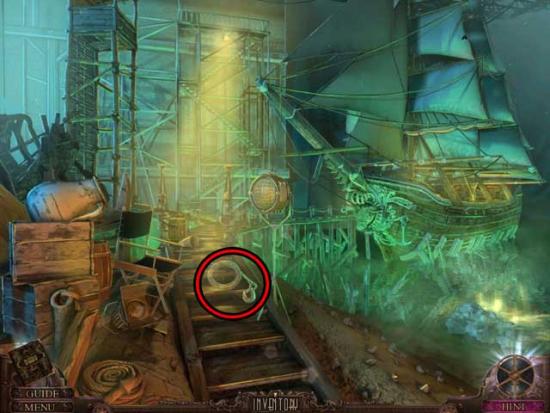
- Back in the main area, click on the Estate Photo (14) and the PIECE OF ROPE to collect them.
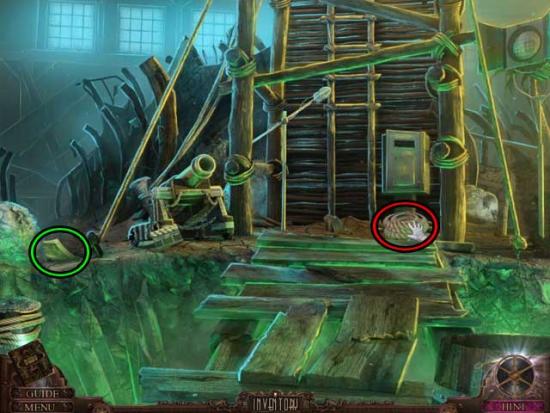
- Take a closer look at the cannon towards the left. Click on the CANNONBALL to add it to your inventory.
- Next, use the WOOD PIECES 3/3 on the ladder frame ahead, then use the PIECE OF ROPE to secure them.
- Proceed up to the next area.
Pirate’s Tower
- Click on the hidden object area on the left.
- Find the objects listed at the bottom of the screen. Inventory Items are circled in red, and additional-action items are outlined in orange.
- Upon completing the area, the GAS CAN will be added to your inventory.
- Make your way back to the Studio Entrance.
Studio Entrance
- Use the CABLE on the door on the left, then take a closer look at the back of the car. Use the GAS CAN to refuel it.
- Make your way back to Father’s Office.
Father’s Study
- Examine the circular slots on the right wall. Use the THAUMATROPES 5/5 on the slots to trigger a puzzle.
- Position the thaumatrope discs so that they form three distinct stories, looking at them across from left to right. The fixed discs will provide clues as to what should go where. The solution is shown below.
- Upon completing the puzzle, click on the Morse Code and CAR KEYS to collect them.
- Return to the Studio Entrance.
Studio Entrance
- Take a closer look at the inside of the car. Use the CAR KEYS on the ignition behind the wheel, then click on them to start the car.
- The door to the Museum will be opened. Proceed inside.
Chapter 4: The WWI Studio
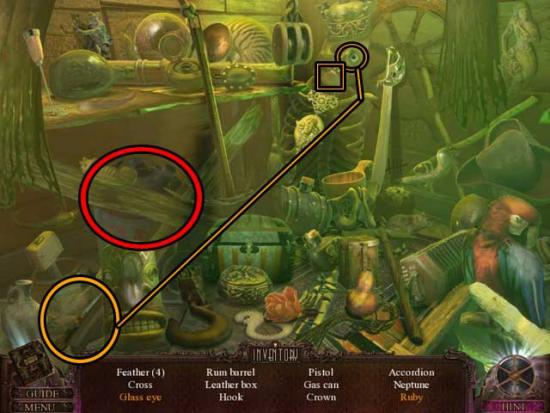
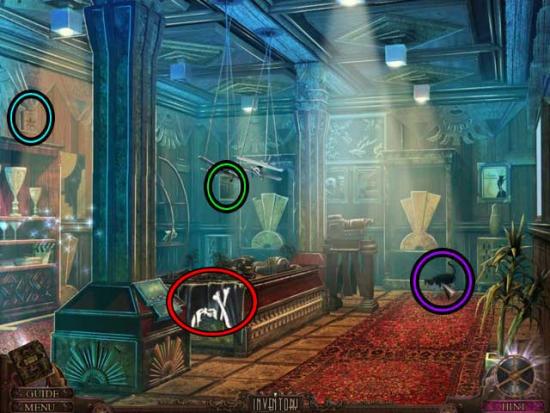
Museum
- Click on the Estate Photo (15), the Secret Card (9), the Cat (Mystery, 3), and the TORN JOLLY ROGER to collect them.
- Click on the hidden object area on the left.
- Find the objects listed at the bottom of the screen. Inventory Items are circled in red, and additional-action items are outlined in orange.

- Upon completing the area, the PIRATE MAP will be added to your inventory.
- Take a closer look at the scene mockup display. Use the TOY SOLDIER on the display, then exit for now.
- Make your way back to the Pirate’s Tower.
Pirate’s Tower
- Click on the hidden object area on the left.
- Find the objects listed at the bottom of the screen. Inventory Items are circled in red, and additional-action items are outlined in orange.
- Upon completing the area, the ICE PICK will be added to your inventory.
- Back in the main area, use the TORN JOLLY ROGER on the flag on the left to restore it, then click on the PINK CRYSTAL 1/2 that appears to add it to your inventory.
- Go down to the Pirate’s Tower Base.
Pirate’s Tower Base
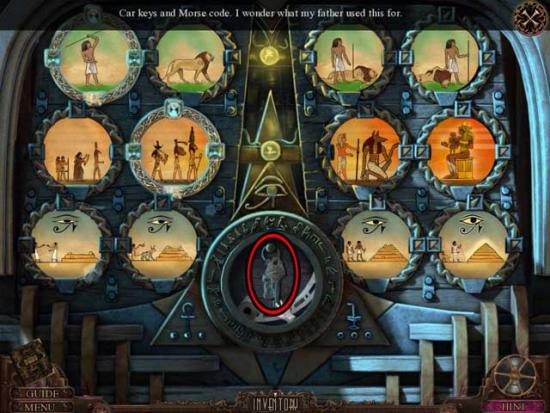
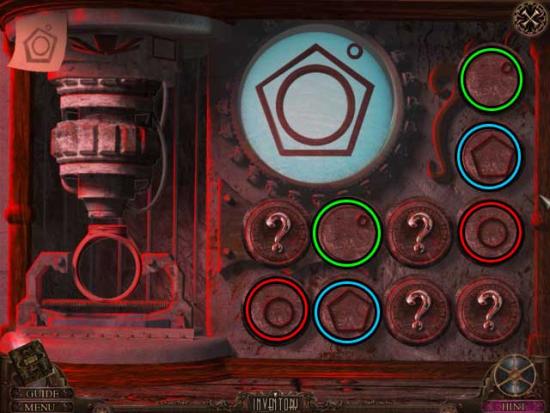
- Zoom in on the electrical box. Use the PIRATE MAP on the torn map on the right to trigger a puzzle.
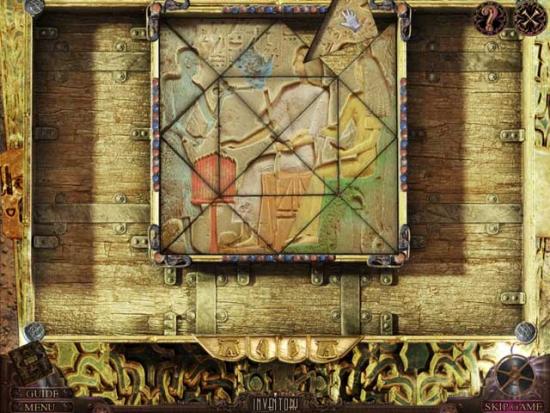
- The map tells you which symbols go with which numbers. Match up the symbols with the numbers and then choose the right symbol to slot into place after the = sign. The 2 and 3 buttons move the wheel of symbols. Using the screenshot below as reference, the solution is as follows: B, A, B, C, A, A, C, A, C.
- Once you’ve completed the puzzle, return to the Pirate’s Entrance.
Pirate’s Entrance
- Now that the water has been drained, examine the bottom of the ship on the right. Click on the BANDANA 3/3 to add it to your inventory.
- Proceed forward to the Pirate’s Gangway.
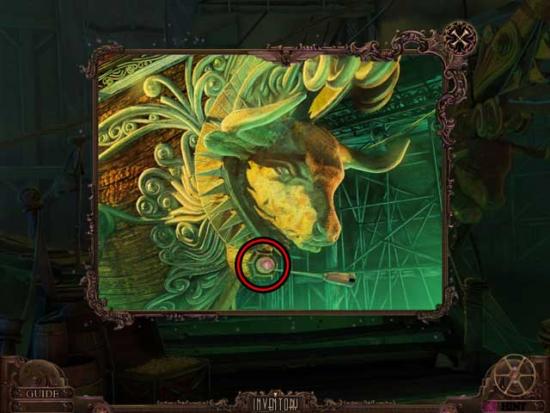
Pirate’s Gangway
- Examine the gold ox head on the right. Use the ICE PICK to obtain the PINK CRYSTAL 2/2.
- Make your way back to the Museum.
Museum
- Examine the first display on the left. Use the PINK CRYSTALS 2/2 on the empty slots to trigger a puzzle.
- Push the buttons in order to cycle through the parts to find the right ones to recreate the flintlock from the movie. The solution is shown below.
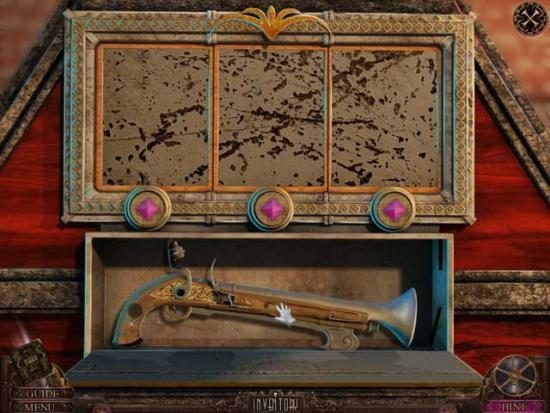
- Upon completing the puzzle, click on the FLINTLOCK to add it to your inventory.
- Make your way back to the Pirate’s Ship Deck.
Pirate’s Ship Deck
- Take a closer look at the pirate cutouts slightly in the distance. Use the HOOK, the FLINTLOCK, and the BANDANAS 3/3 on the cutouts to trigger a puzzle.
- Position the bandanas, the flintlock, and the hook to match the cardboard cutout of The Three Pirates movie poster. You will also need to arrange the limbs correctly. The solution is shown below.

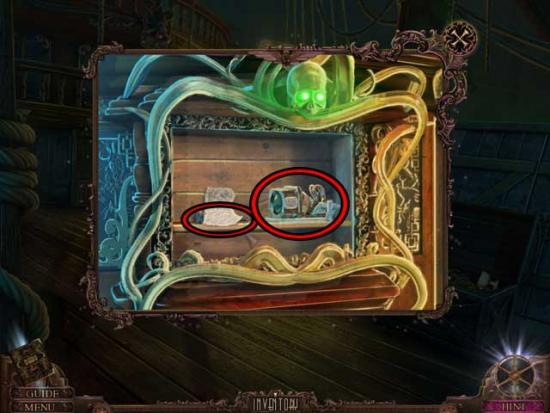
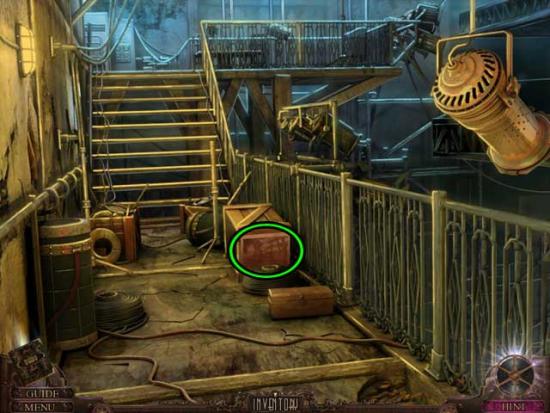
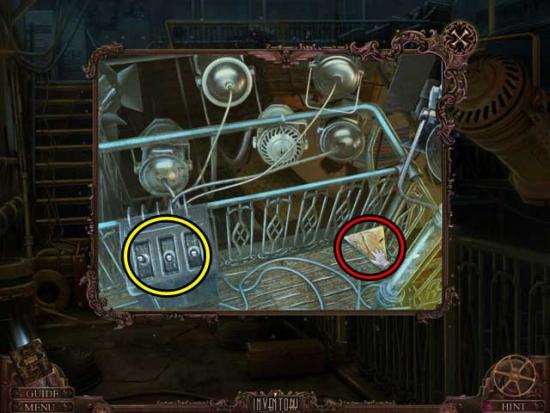
- Take a closer look at the compartment that opens to the left of the cutouts. Click on the Note, the CLOCK HAND, and the PROJECTOR LAMP to collect them.
- Return to the Studio Entrance.
Studio Entrance
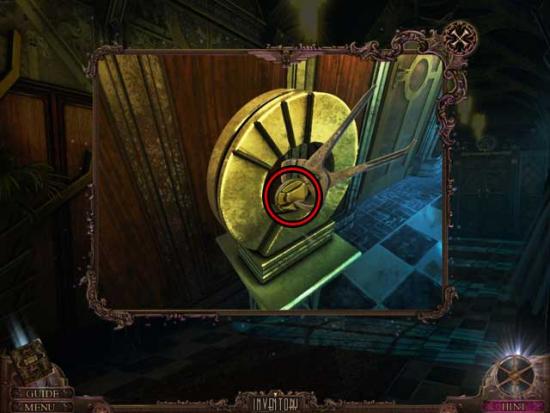
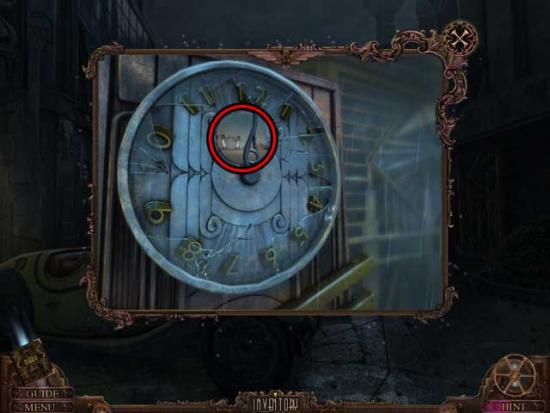
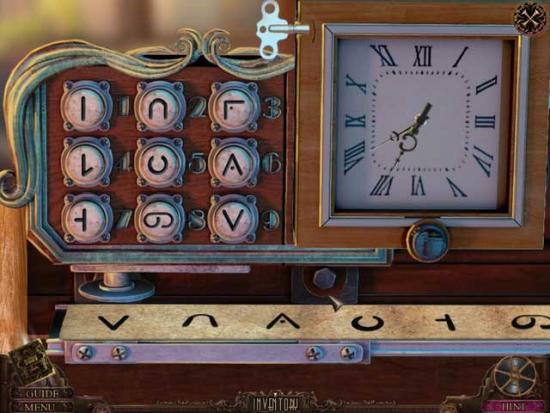
- Examine the clock next to the door on the right. Use the CLOCK HAND on the clock, then move the hands so that the time reads 9:00. This will cause the door to the right to open.
- Proceed through the door on the right into the next location.
WWI Entrance
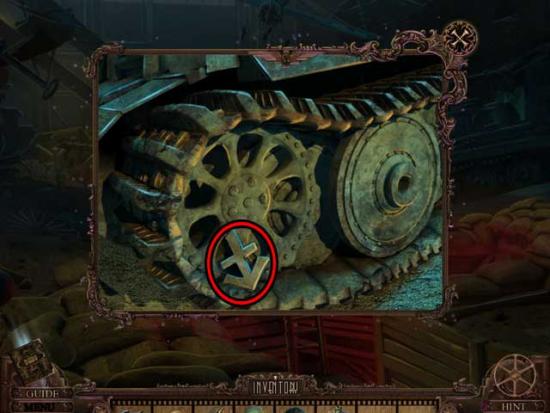
- Take a closer look at the tank wheels towards the right. Click on the ZODIAC 1/5 to add it to your inventory.
- Proceed forward to the WWI Exit.
WWI Exit
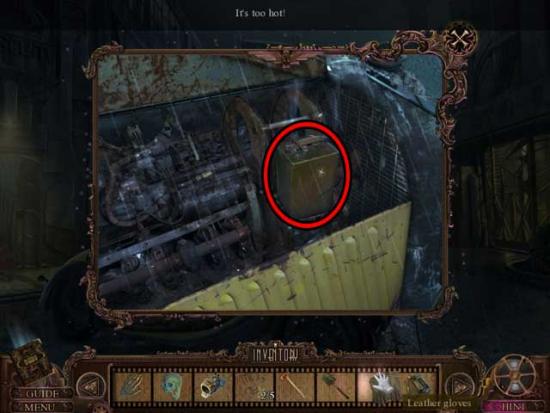
- Open the top of the tank on the left, then take a closer look inside. Open the slot at the bottom of the screen and note you will need powder.
- Back in the main area, examine the glass case to the right of the door. Use the CANNONBALL to break open the case, then click on the AXE inside to add it to your inventory.
- Return to the WWI Entrance.
WWI Entrance
- Proceed right into the WWI Trench.
WWI Trench
- Click on the Estate Photo (16), the SHOVEL, and the LEATHER GLOVES to collect them.
- Proceed forward to the WWI Trench End.
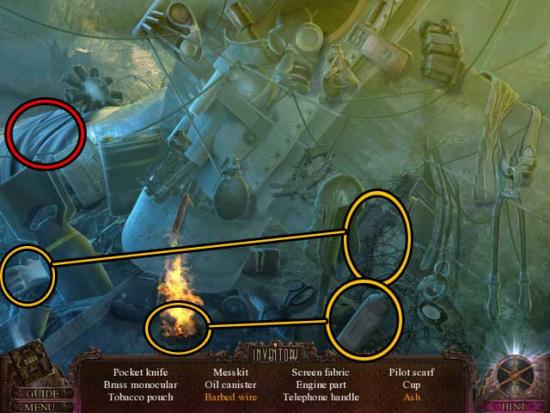
WWI Trench End
- Click on the hidden object area on the right.
- Find the objects listed at the bottom of the screen. Inventory Items are circled in red, and additional-action items are outlined in orange.
- Upon completing the area, the TRUNK LEVER will be added to your inventory.
- Back in the main area, click on the Estate Photo (17) and the BINOCULARS to collect them.
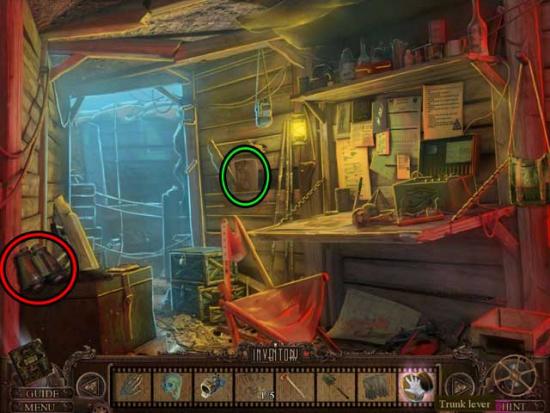
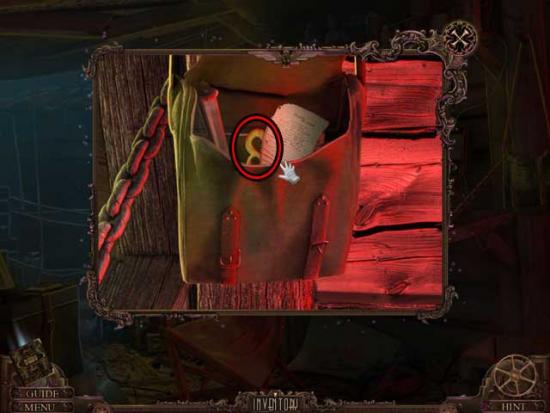
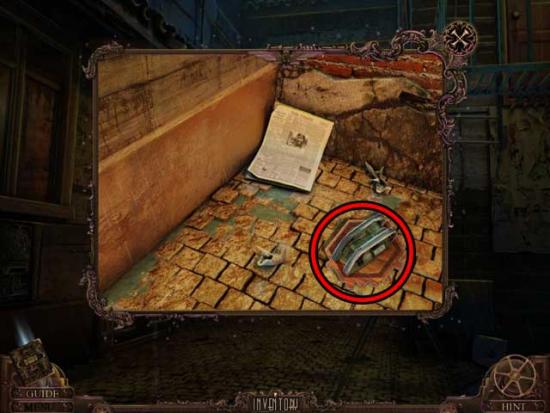
- Take a closer look at the bag hanging on the far right. Click to open it, then click on the Note and the ZODIAC 2/5 inside to collect them.
- Make your way back to the Studio Entrance.
Studio Entrance
- Examine the inside of the car. Use the TRUNK LEVER on the rod on the left, then click on it to pop the hood.
- Examine the front of the car. Click on the hood to open it, then use the LEATHER GLOVES to collect the BATTERY inside and add it to your inventory.
- Return to the WWI Trench End.
WWI Trench End
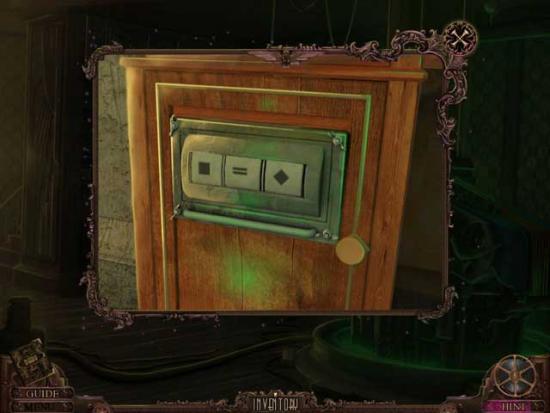
- Take a closer look at the table on the right. Use the BATTERY to the left of the code machine, then click on it to send the signals.
- Go to the WWI Exit.
WWI Exit
- The door is now open. Proceed outside to the next area.
Chapter 5: The Egyptian Studio
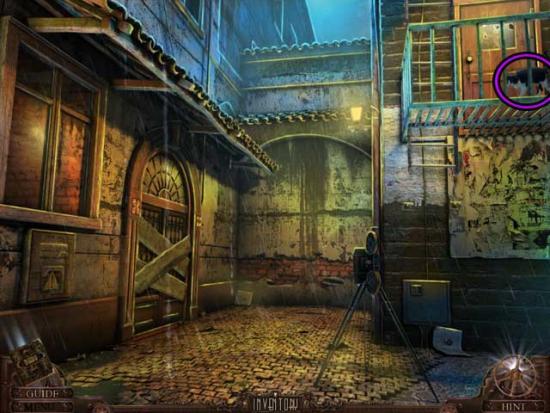
Alley
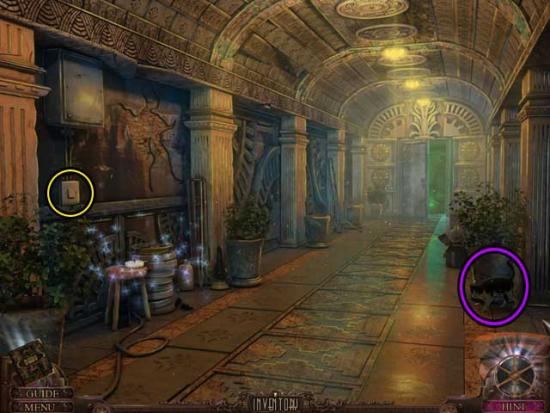
- Click on the Cat (Mystery, 4).
- Examine the electrical box on the left. Note the missing fuse.
- Take a closer look at the back corner of the alley. Click on the TOY TANK to add it to your inventory.
- Examine the door on the left. Use the AXE to remove the boards.
- Go back to the Museum.
Museum
- Examine the large model display. Use the TOY TANK on the display to trigger a puzzle.
- Insert four miniatures into the slots that correspond to their bases. The solution is shown below.
- Upon completing the puzzle, click on the BUCKLE to add it to your inventory.
- Return to the WWI Trench End.
WWI Trench End
- Click on the hidden object area on the right.
- Find the objects listed at the bottom of the screen. Inventory Items are circled in red, and additional-action items are outlined in orange.
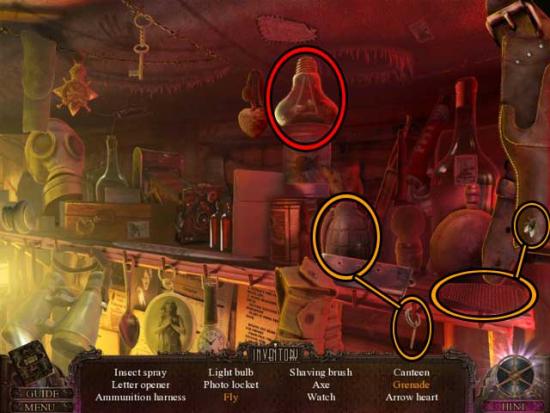
- Upon completing the area, the LIGHT BULB will be added to your inventory.
- Examine the chest to the left of the table. Use the BUCKLE on the lock to open it, then click on the flag inside to move it and click on the FUSE to add it to your inventory.
- Return to the Alley.
Alley
- Click on the electrical box on the left.
- Use the FUSE on the slot on the right to trigger a puzzle.
- Place the wires so that the power source at the bottom is connected to all four lamps. Three blue wires are already set. Avoid the current blockers. The solution is shown below.
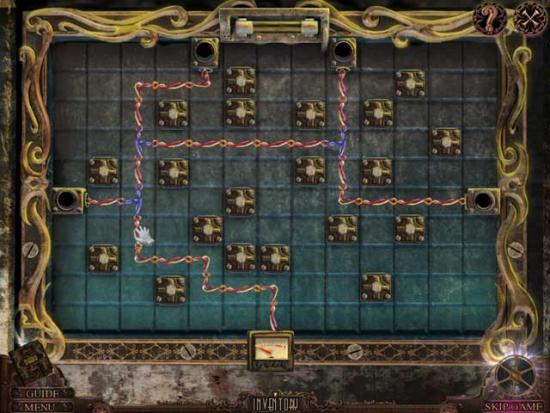
- Upon completing the puzzle, power will be restored. You will also get Warrior of Light (5).
- Enter through the door on the left.
Backstage Down
- Click on the ZODIAC 3/5, the SARCOPHAGUS PART 1/3, the Note, and the LANTERNA MAGICA SLIDE to collect them.
- Proceed up the steps on the left to the next area.
Backstage Up
- Take a closer look at the large light on the right. Use the LIGHT BULB on it, then exit for now.
- Click on the Estate Photo (18) to collect it.
- Examine the area at the top of the steps for a closer view. Click on the SARCOPHAGUS PART 2/3 to add it to your inventory, then click on the levers on the left so they’re all positioned up to obtain the Warrior of Light (6).
- Return to Backstage Down.
Backstage Down
- Proceed forward to the Bazaar.
Bazaar
- Click on the hidden object area on the right.
- Find the objects listed at the bottom of the screen. Inventory Items are circled in red, and additional-action items are outlined in orange.
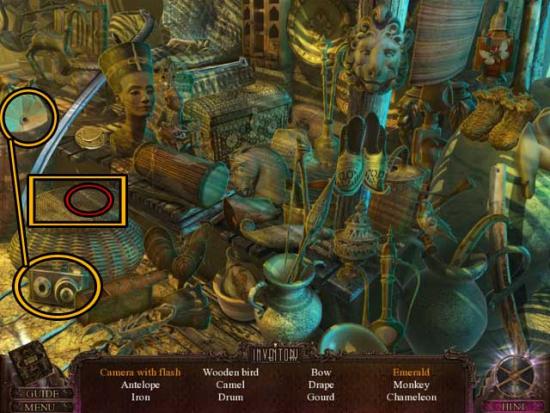
- Upon completing the area, the EMERALD 1/4 will be added to your inventory.
- Take a closer look at the chart on the clipboard next to the jackal statue to the left of the stone path. Note it for your Diary.
- Proceed forward to the Tent Exterior.
Tent Exterior
- Click on the ZODIAC 4/5 to add it to your inventory.
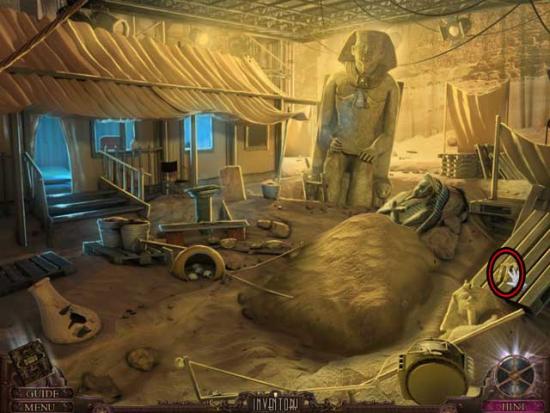
- Use the SHOVEL on the pile of sand over the sarcophagus. You will need to use it twice to clear the pile entirely.
- Continue forward/left into the Tent Interior.
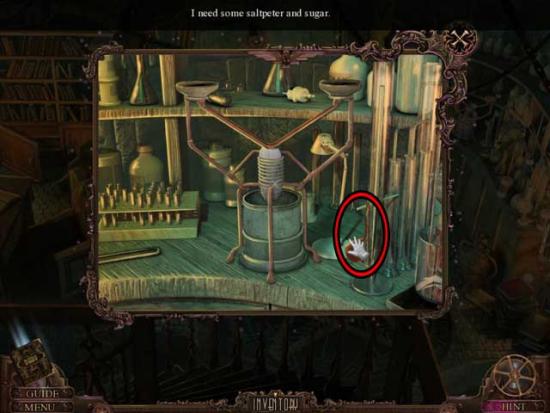
Tent Interior
- Click on the Estate Photo (19) to collect it, then take a closer look at the shelf in the back. Click on the Chart to add it to your Diary, then click on the SALTPETER to add it to your inventory.
- Take a closer look at the open box on the left. Click on the tool on the right and use it to clear out the dust and cobwebs from within the box, then click on the resulting BONES to add them to your inventory.
- Backtrack to the Museum.
Museum
- Click on the hidden object area on the left.
- Find the objects listed at the bottom of the screen. Inventory Items are circled in red, and additional-action items are outlined in orange.
- Upon completing the area, the UMBRELLA will be added to your inventory.
- Take a closer look at the projector/lanterna magica.
- Use the LANTERNA MAGICA SLIDE on the lanterna magica, then flip the switch to acquire the Warrior of Light (7).
- Take note of the symbol that appears to add it to your Diary.
- Go to the Alley.
Alley
- Use the UMBRELLA to pull down the ladder on the right, then enter the door up top to go to the Film Archive.
Film Archive
- Click on the Estate Photo (20), the Secret Card (10), the Warrior of Light (8), and the EMPTY FILM ROLL to collect them.
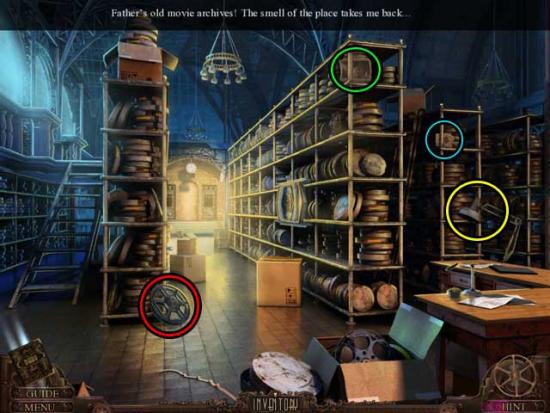
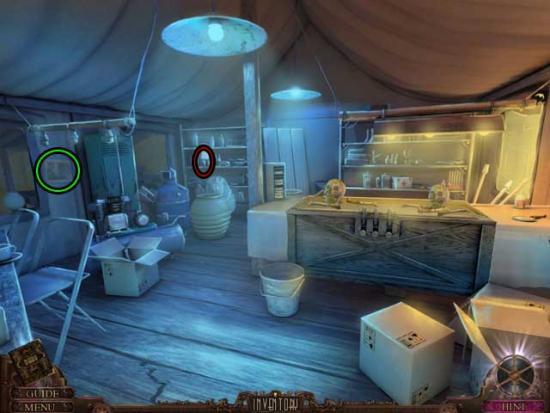
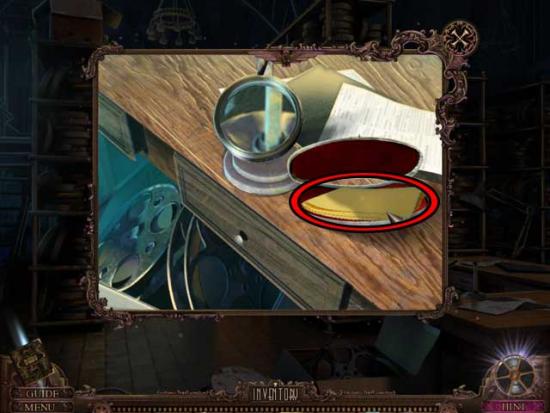
- Examine the desk on the right. Click on the glasses case to open it, then click on the SOFT CLOTH inside to add it to your inventory.
- Proceed forward into the Props Archive.
Props Archive
- Speak with the Gardener.
- Click on the hidden object area on the right.
- Find the objects listed at the bottom of the screen. Inventory Items are circled in red, and additional-action items are outlined in orange.
- Upon completing the area, the LIGHT FILTER will be added to your inventory.
- Examine the props on the left. Click on the SARCOPHAGUS PART 3/3 to add it to your inventory.
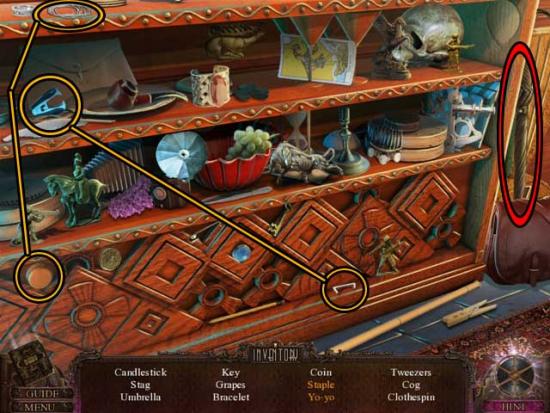
- Take a closer look at the workbench ahead on the back wall. Click on the toolbox to open it, then use the BINOCULARS on the table. Click on the appropriate screwdrivers to remove all the nuts and bolts, then click on the resulting LENS to add it to your inventory.
- Return to Backstage Up.
Backstage Up
- Take a closer look at the large light on the right. Use the LIGHT FILTER on the light.
- Go down to the Bazaar.
Bazaar
- Click on the EMERALD 2/4 to add it to your inventory.
- Continue forward to the Tent Exterior.
Tent Exterior
- Take a closer look at the sarcophagus. Use the SARCOPHAGUS PARTS 3/3 on it to trigger a puzzle.
- Place the pieces into their proper locations to complete the puzzle. The solution is shown below.
- Upon completing the puzzle, a secret passageway will be revealed. Proceed down into the Maid’s Lair.
Chapter 6: The Maid
Maid’s Lair
- Take a closer look at the desk on the left. Click on the book to trigger a cutscene.
- Click on the curtains covering an altar to move them aside. Take a closer look if you wish, though there’s nothing more you can do here at the moment.
- Examine the laboratory equipment on the right. Click on the EYE PATCH to add it to your inventory.
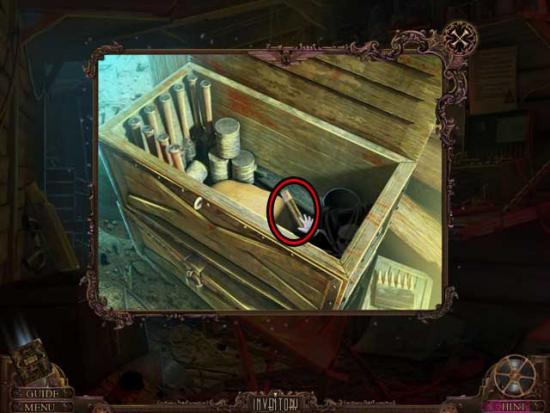
- Take a closer look at the desk on the left again. Click on the box to open it, then click on the TAPE PART 1/3. Don’t forget to also collect the Chart and EMERALD 3/4.
- Make your way back to the Tent Interior.
Tent Interior
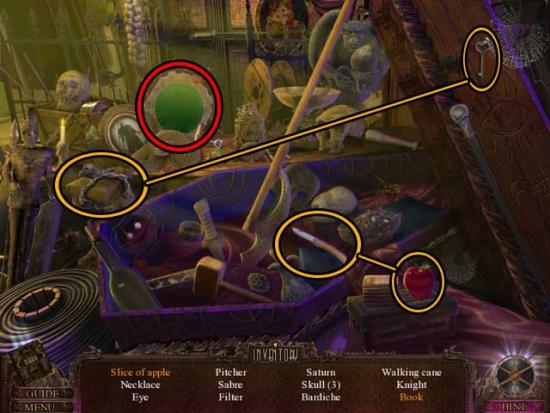
- Examine the crate ahead. Use the SKULL, the BONES, and the EYE PATCH on it to trigger a puzzle.
- Arrange the skulls, bones, and eye patch so that they match the Jolly Rogers you’ve been seeing. The solution is shown below.
- Upon completing the puzzle, click on the OPTICAL DEVICE to add it to your inventory.
- Go to the Tent Exterior.
Tent Exterior
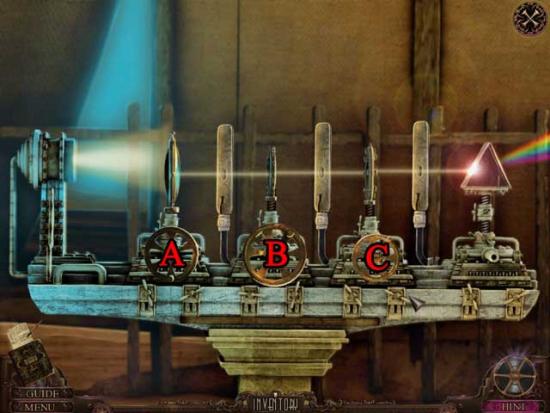
- Use the OPTICAL DEVICE on the stand to the right of the steps, then click for a closer view. Use the LENS on the third screw and the SOFT CLOTH on the prism at the end to trigger a puzzle.
- Move the optic sections to get the ray of light to travel from one end to the other. Using the screenshot below as reference, the solution is as follows: A x3, B x5, C x4.
- Upon completing the puzzle, examine the statue where the ray of light hit. Click on the EMERALD 4/4, the Note, and the PROJECTOR LENS that appears to collect them.
- Enter the Maid’s Lair.
Maid’s Lair
- Examine the altar straight ahead. Use the EMERALDS 4/4 on the slots to trigger a puzzle.
- Change the colors in the outer circles to match the part of the inner circle that section is touching. There are three rounds total. Their locations are shown below and are as follows:
1)A x2, B x2, C, D, E x3, F.
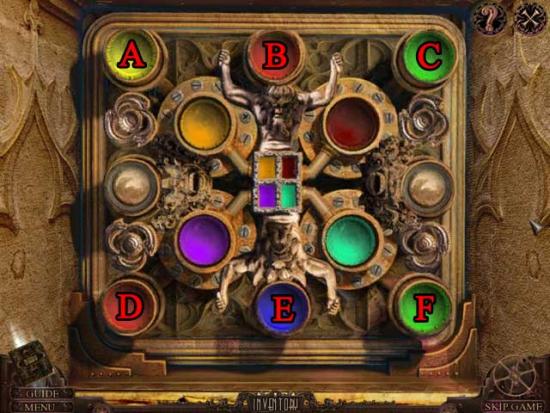
2)A x2, B x2, C, D x3, F.
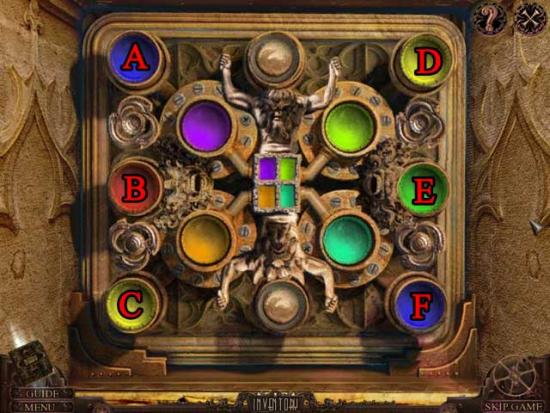
3)B, D x2, E x3, C.
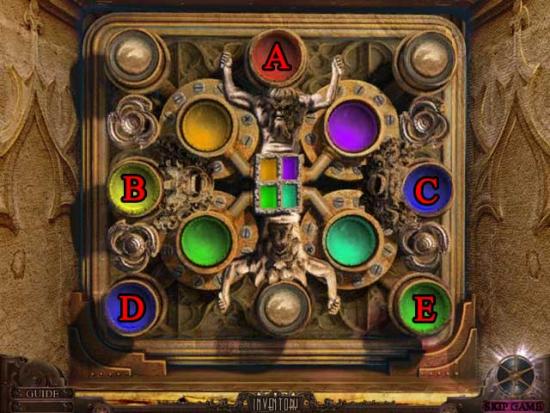
- Upon completing the puzzle, click on the PROJECTOR IRIS and the ZOETROPE BOTTOM to add them to your inventory.
- Make your way back to the Props Archive.
Props Archive
- Click on the hidden object area on the right.
- Find the objects listed at the bottom of the screen. Inventory Items are circled in red, and additional-action items are outlined in orange.
- Upon completing the area, the PESTLE will be added to your inventory.
- Take a closer look at the stand on the left, across from the Gardener. Use the ZOETROPE BOTTOM on the stand, then place the top on. Click on the resulting TAPE PART 2/3 to add it to your inventory.
- After fixing the zoetrope, the Gardener will give you FATHER’S PHOTO.
- Return to the Film Archive.
Film Archive
- Examine the desk on the right again. Use FATHER’S PHOTO on the magnifying lens, then note the resulting code.
- Take a closer look at the panel on the side of the film storage shelf ahead. Click on the front panel to open it, triggering a puzzle.
- Arrange the colored disks by row and by color so that their color matches the disk on the left. Align the numbers on the disks in the middle row to match the one found on the photo. You can rotate all disks with the exception of the few immobilized ones by pressing the small buttons between them. The code you found is located in the upper left as a reminder. Click on the buttons in the following order to solve the puzzle (refer to the screenshot below): A, B x2, C, D, E x2, F, G, H x2, I, J.
- Upon completing the puzzle, click on the TAPE PART 3/3 and the SUGAR to add them to your inventory.
- Return to the Maid’s Lair.
Maid’s Lair
- Examine the laboratory equipment on the right. Use the SALTPETER on the upper left dish and the SUGAR on the upper right dish. Use the PESTLE to crush the sugar, then click on the resulting SMOKE POWDER to add it to your inventory.
- Return to the Bazaar.
Bazaar
- Click on the hidden object area on the right.
- Find the objects listed at the bottom of the screen. Inventory Items are circled in red, and additional-action items are outlined in orange.
- Upon completing the area, the HEART will be added to your inventory.
- Go back to the WWI Exit.
WWI Exit
- Take a closer look inside the tank on the left. Use the SMOKE POWDER on the open slot at the bottom of the screen. Click on the red firing button on the right when the plane comes into view. Shoot it twice to shoot it down.
- Proceed to the WWI Entrance.
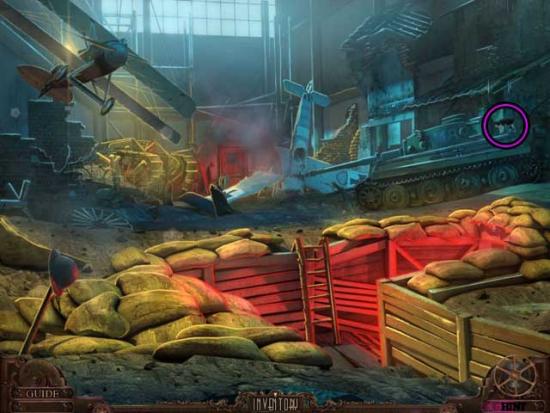
WWI Entrance
- Click on the hidden object area over the crashed plane.
- Find the objects listed at the bottom of the screen. Inventory Items are circled in red, and additional-action items are outlined in orange.
- Upon completing the area, the SCREEN FABRIC will be added to your inventory.
- Back in the main area, click on the Cat (Mystery, 5).
- Make your way back to Father’s Study.
Father’s Study
- Examine the chest of drawers in the back right corner. Use the HEART on the on the second slot down to open the drawer, then click on the Note and the MOON SHAPE inside to collect them.

- Exit to the Foyer.
Foyer
- Take a closer look at the clock straight ahead. Use the MOON SHAPE on the slot to trigger a puzzle.
- Position the clock hands for each of the pairs of signs in the lower corner. One of the solutions is shown below as an example. Upon completing the puzzle, click on the PADLOCK DIAL to add it to your inventory.
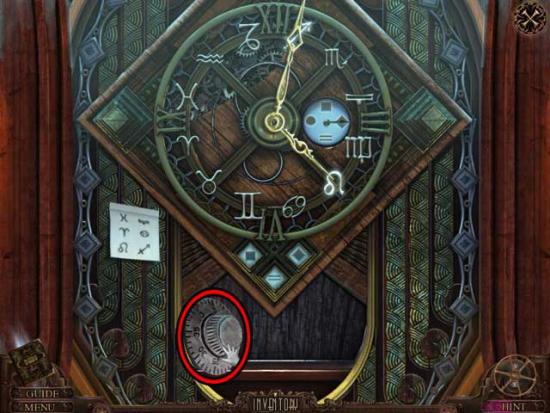
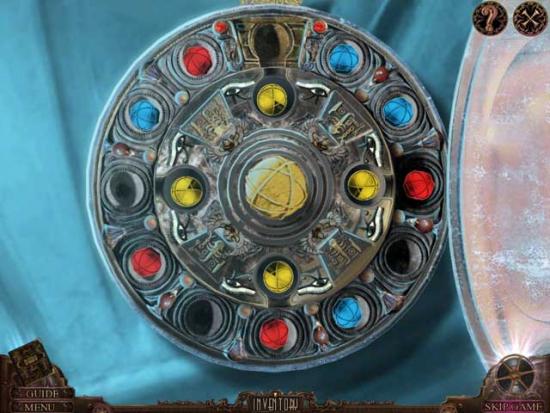
- Examine the door on the upper right. Use the PADLOCK DIAL on the door, then click to open it and reveal a puzzle.
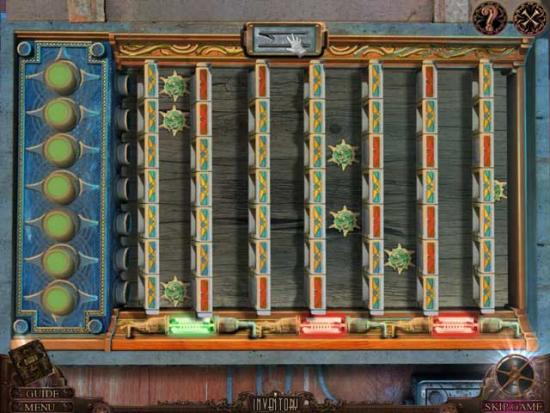
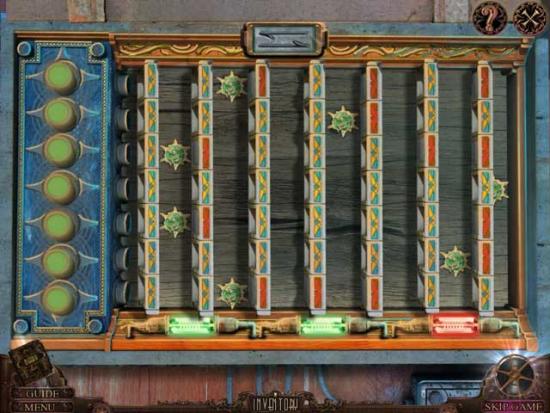
- Align the jewels with the colors in the middle by rotating the rings one at a time. The outer rings will unlock as you correctly align the inner rings. Push the arrows to remove one jewel at a time. Correctly positioned jewels will glow, but these are the best to remove while repositioning the incorrect ones. Referring to the screenshot below as reference, the solution is as follows: A, D, E x2, A, D, B, F, C, D, F, B, C, D, C, D, G, A, G x2, A, C, D.
- Upon completing the puzzle, enter the now-accessible Editing Room.
Chapter 7: The Antidote
Editing Room
- Click on the hidden object area on the left.
- Find the objects listed at the bottom of the screen. Inventory Items are circled in red, and additional-action items are outlined in orange.
- Upon completing the area, the ZODIAC 5/5 will be added to your inventory.
- Back in the main area, click on the COIN 1/2 and the Warrior of Light (9) to collect them.
- Take a closer look at the film combiner at the back of the room straight ahead. Use the TAPE PARTS 3/3 and the EMPTY FILM ROLL on the machine, then exit for now.
- Examine the machine to the left of the hostage. Use the RING WITHOUT SYMBOL on the stand on the left, then exit for now.
- Make your way back to the Library.
Library
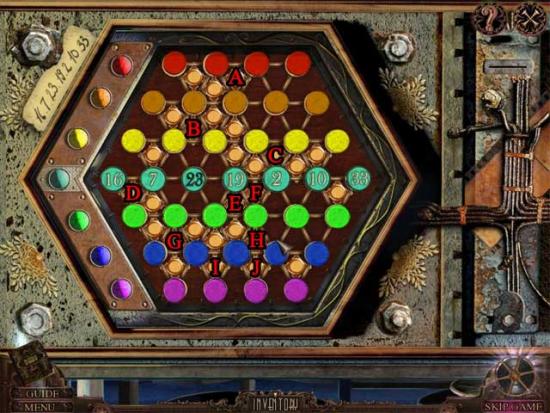
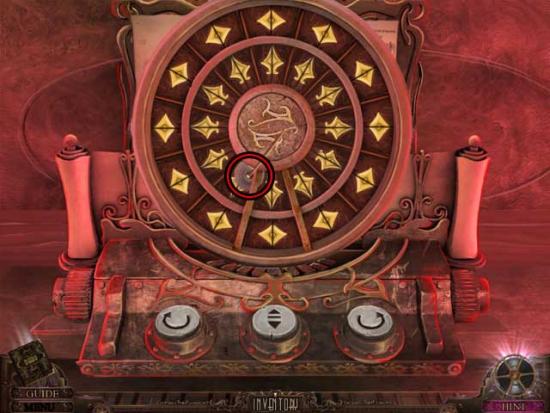
- Examine the gold globe at the back of the room. Use the ZODIAC 5/5 on the globe, then click on the puzzle that appears.
- Align the discs so that all three columns and rows are connected horizontally and vertically to the same symbol. The solution is shown below.
- Upon completing the puzzle, click on the PROJECTOR SPROCKET and the COLOR SHAPE to add them to your inventory.
- Return to the Editing Room.
Editing Room
- Take a closer look at the machine to the left of the hostage again. Use the COLOR SHAPE on the empty slot to trigger a puzzle.
- Match pairs of symbols until you have the engraving pattern for the ring. It will take three pairs to make up the pattern. The solution is shown below.
- Upon completing the puzzle, FATHER’S RING 2 will be added to your inventory.
- Make your way back to the Elevator.
Elevator
- Take a closer look at the controls on the right. Use FATHER’S RING 2 on the bottom button, then press it to be lowered down to the next area.
Secret Passage
- Take a closer look at the wall on the left. Click on the switch to unlock Warrior of Light (10).
- Click on the Cat (Mystery, 6) to complete the achievement.
- Click on the hidden object area on the left.
- Find the objects listed at the bottom of the screen. Inventory Items are circled in red, and additional-action items are outlined in orange.
- Upon completing the area, the STOOL will be added to your inventory.
- Proceed through the door at the end of the passage.
Lower Projector
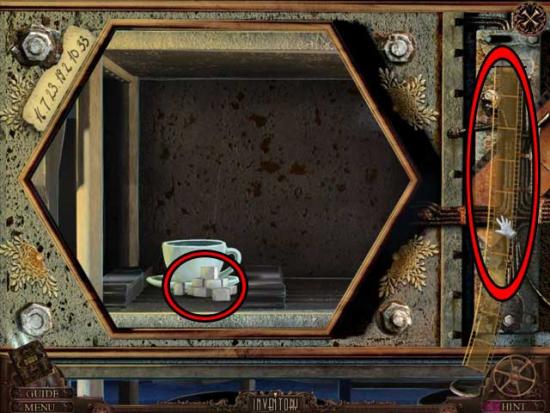
- Click on the CLUB to add it to your inventory.
- Examine the desk on the left. Input the code according to the screenshot below, then click on the PROJECTOR COIL to add it to your inventory.
- Back in the main area, place the STOOL to the left of the projector, then use the PROJECTOR COIL on the area at the top to put it in place.
- Take a closer look at the main portion of the projector and use the PROJECTOR SPROCKET next to the two small gears at the top.
- Go left to the next area.
Connecting Door
- Take a closer look at the door, then click on the peephole cover to move it. Click on the COIN 2/2 to add it to your inventory.
- Return to the Secret Passage.
Secret Passage
- Click on the hidden object area on the left.
- Find the objects listed at the bottom of the screen. Inventory Items are circled in red, and additional-action items are outlined in orange.
- Upon completing the area, the SPYGLASS will be added to your inventory.
- Make your way back to Father’s Study.
Father’s Study
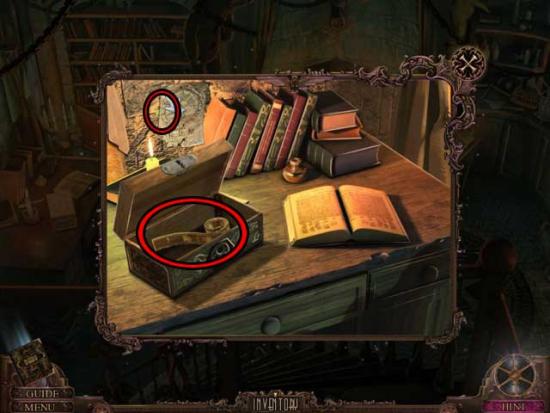
- Examine the dresser to the right of the desk. Use the CLUB on the remaining slot to open the corresponding drawer, then click on the Note and the BUTTER KNIFE inside to collect them.
- Return to the Editing Room.
Editing Room
- Click on the hidden object area on the left.
- Find the objects listed at the bottom of the screen. Inventory Items are circled in red, and additional-action items are outlined in orange.
- Upon completing the area, the OIL will be added to your inventory.
- Examine the film combination machine ahead on the back wall. Use the BUTTER KNIFE on the machine to trigger a puzzle.
- Press the symbols to move from the blue one on the left to the green one framed in gold on the right. You can move any distance along a line of symbols, but must end on one of the same color or shape as the symbol of the start of your move. Click on the symbols according to the solution screenshot shown below.
- Upon completing the puzzle, click on the PROJECTOR TAPE to add it to your inventory.
- Once you’ve collected this, click on the ELECTRIC CABLE that appears to collect that as well.
- Make your way back to the Theater.
Theater
- Use the SCREEN FABRIC on the wall on the left, then take a closer look at the jukebox in the corner. Use the ELECTRIC CABLE to plug it in.
- Now that the jukebox is on, take a closer look at it to trigger a puzzle.
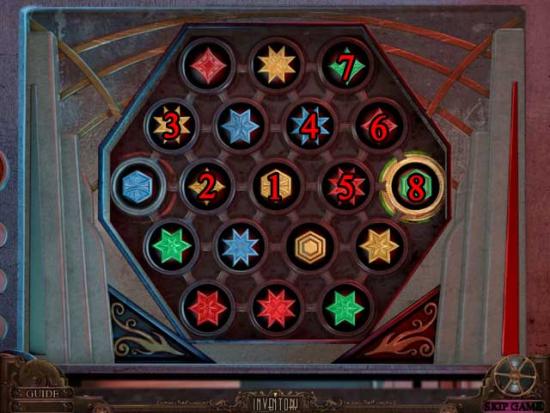
- Align the numbers so that no number occurs twice in any row, column, or tile sequence. The solution is shown below.

- Upon completing the puzzle, the Maid will be lured out of the Projector Room.
- Backtrack to Father’s Room via the Elevator.
Father’s Room
- Take a closer look at the area on the left. Use the OIL, the SPYGLASS, the SKELETON HAND, and the COINS 2/2 on the mechanism to trigger a puzzle.
- Arrange the skeleton hand, miniature telescope, and coins so that when overlapped, they form a shadow projector image as shown in the note taped to the side of the machine. Click on the button at the top of the machine to overlap the items. The correct positions are shown below.
- Upon completing the puzzle, click on the SECRET KEY and the GOGGLES to add them to your inventory.
- Return to the Lower Projector.
Lower Projector
- Take a closer look at the projector again. Use the PROJECTOR TAPE on the empty spot to restore it.
- Proceed left to the Connecting Door.
Connecting Door
- Take a closer look at the door knob. Use the SECRET KEY on the lock to open it, then open the door and proceed inside.
Projector Room
- Examine the projector. Click on the slot on the right side to open it, then insert the PROJECTOR LAMP. Place the PROJECTOR IRIS followed by the PROJECTOR LENS on the top front, then place the PROJECTOR SPEAKER at the bottom. If you’re not sure where something goes, simply click on a portion of the projector for a prompt as to what goes where.
- Click on the switch on the side of the projector to turn it on and equip the GOGGLES.
- After a brief cutscene, exit left to the Theater.
Theater
- Take a closer look at the Maid. Click on the ANTIDOTE and the WORKERS’ QUARTERS KEY on her necklace to add them to your inventory.
- Return to the West Hall End.
West Hall End
- Examine the doors on the right. Use the WORKERS’ QUARTERS KEY on the lock to open the doors, then proceed inside.
Workers’ Quarters
- Give the ANTIDOTE to Freddy.
- Watch the cutscene that follows.
Congratulations! You’ve completed Final Cut: Death on the Silver Screen! You can now access the Bonus Chapter via the unlocked Extras content.
Bonus Chapter
Workers’ Quarters
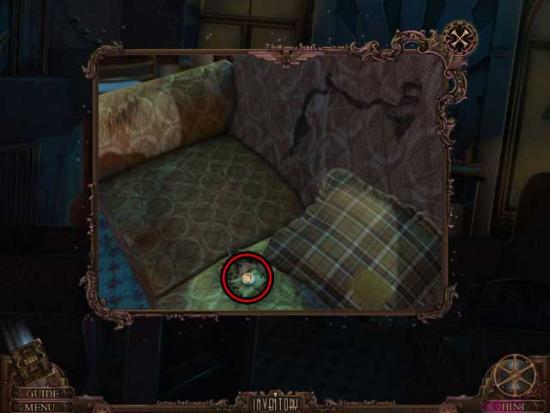
- Take a closer look at the couch on the right. Move the pillow aside, then click on the FIRE ROD to add it to your inventory.
- Examine the desk ahead. Click on the METAL SYMBOL 1/3 to add it to your inventory.
- Back in the main area, click on the MATCHES and the CARDBOARD CARD on the small table to add them to your inventory.
- Next, examine the bottle on the mantle on the left. Click on the CORK to remove it and add it to your inventory.
- Take a closer look at the fireplace on the left. Click on the grate to remove it, then use the FIRE POKER on the ashes. Click on the COAL to add it to your inventory, then click on the METAL SYMBOL 2/3 that is revealed beneath to collect it as well.
- Examine the desk again. Use the CORK on the hole in the drawer on the left to open it, then click on the SCISSORS and the Note inside to collect them. Click on the device at the bottom of the drawer to attach it to the clock on the desk.
- Take a closer look at the couch again. Use the SCISSORS on the patch to remove it, then click on the METAL SYMBOL 3/3 to add it to your inventory.
- Examine the desk again. Use the METAL SYMBOLS 3/3 and the CARDBOARD CARD on the clock device, then click on it for a closer view. Note it’s missing a component.
- Exit down to the Ticket Room.
Ticket Room
- Take a closer look at the lockers on the left. Click on the locker to open it, then click on the CAT PAW and the WIND-UP KEY to add them to your inventory.
- Return to the Workers’ Quarters
Workers’ Quarters
- Examine the clock device on the desk again. Use the WIND-UP KEY on the slot at the top to trigger a puzzle.
- Wind up the clock so it shows a certain hour of the day. The symbols on the keypad will help you translate the digits the clock hands are showing into symbols the machine will stamp on a plate. Enter the number that the large clock hand is showing first, then the number that the small clock hand shows. You will need to repeat the wind-up each time. The completed solution is shown below.
- Upon completing the puzzle, the PRINTED CARD will be added to your inventory.
- Next, examine the small slot on the wall to the right above the desk. Use the PRINTED CARD on the slot. A section of wall above the desk will move, revealing a hidden object area.
- Find the objects listed at the bottom of the screen. Inventory Items are circled in red, and additional-action items are outlined in orange.
- Upon completing the area, the WESTERN STUDIO KEY will be added to your inventory.
- Return to the Ticket Room.
Ticket Room
- Examine the doors on the right. Use the WESTERN STUDIO KEY on the lock to open it, then proceed through to the next area.
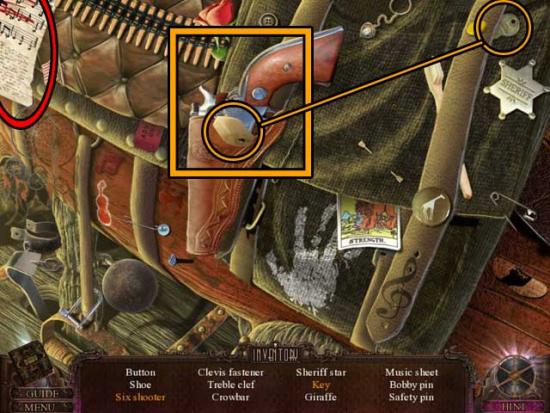
Western Wide
- Examine the barrel on the left. Use the CAT PAW to tear open the top of the barrel, then click on the NATIVE-AMERICAN AXE inside to add it to your inventory.
- Enter the Western Bar on the right.
Western Bar
- Click on the hidden object area on the left.
- Find the objects listed at the bottom of the screen. Inventory Items are circled in red, and additional-action items are outlined in orange.
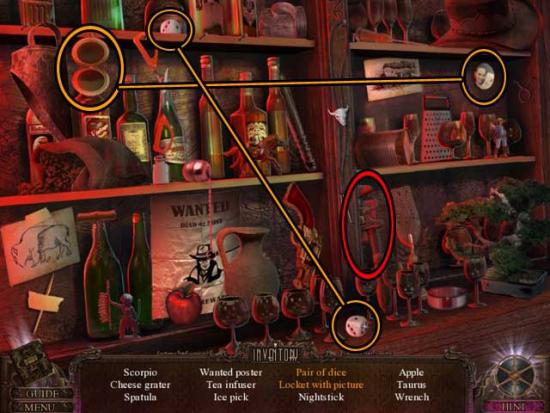
- Upon completing the area, the WRENCH will be added to your inventory.
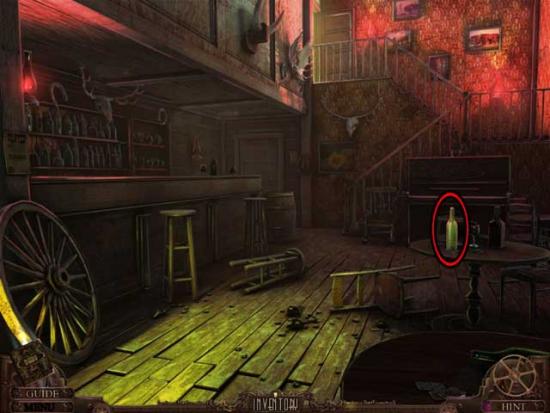
- Back in the main area, click on the EMPTY BOTTLE to add it to your inventory.
- Take a closer look at the door in the far corner. Click on the NEEDLE AND THREAD to add them to your inventory.
- Back in the main area, proceed up the stairs and enter the Western Room.
Western Room
- Click on the LANTERN, the CURTAIN, and the PIANO KEY (under the bed) to add them to your inventory.
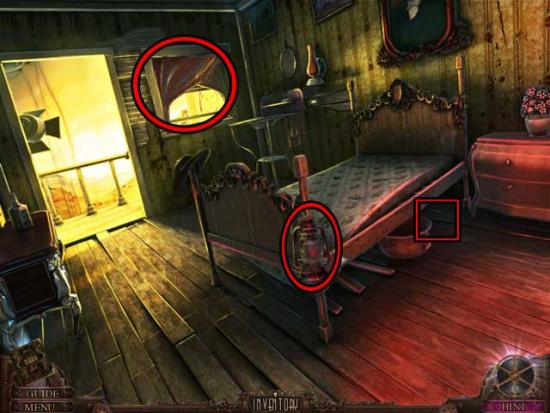
- Examine the sink in the far corner of the room. Use the EMPTY BOTTLE on the water to obtain the BOTTLE OF WATER.
- Take a closer look at the open doorway. Use the NATIVE-AMERICAN AXE on the rope to cut it, knocking down the large curtain in Western Wide.
- Before leaving the room, take a closer look at the open doorway again. Click on the ROPE tied to the railing to add it to your inventory.

- Go back to the Western Bar.
Western Bar
- Examine the piano. Use the PIANO KEY on the missing slot, then exit for now.
- Go outside to the Western Wide.
Western Wide
- Proceed forward to the Locomotive.
Locomotive
- Use the COAL, the LANTERN, and the MATCHES on the open furnace in that order to light it up again.
- Examine the gear bolted to the floor. Use the WRENCH to remove the bolts (you will have to do them individually), then click on the GEAR to add it to your inventory.
- Exit the Locomotive.
Western Wide
- Take a closer look at the cart on the tracks on the left. Use the GEAR on the empty slot to trigger a puzzle.
- Connect the engine gear on top with the wheel gear on the bottom. Raise the right number of gears from the engine panel. Try not to run out of steam- watch the dial on top and the worn-down sections of gears marked in red. Click the red switch to start or stop the machine. You can only raise the gears when the machine is off. Click on the gears in the order shown in the screenshot below to solve the puzzle.
- Upon completing the puzzle, the cart will move out of the way. Proceed left to the Carousel.
Carousel
- Click on the hidden object area on the left.
- Find the objects listed at the bottom of the screen. Inventory Items are circled in red, and additional-action items are outlined in orange.
- Upon completing the area, the PRESSURE VALVE will be added to your inventory.
- Notice the engine in the back to the right of the carousel that powers it. Use the BOTTLE OF WATER on the engine to stop it.
- Return to the Locomotive.
Locomotive
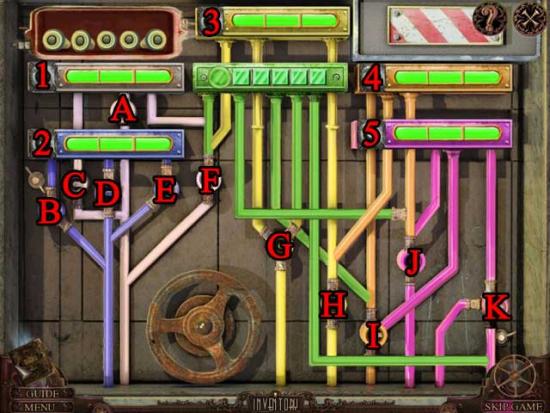
- Take a closer look at the panel above the furnace. Open it, then use the PRESSURE VALVE on the empty slot on the left to trigger a puzzle.
- Click the valves on the bottom to turn the steam on or off. Each valve controls every bracket of the same color, turning them on or off. Guide the steam through the pipe to the outlet at the top. The solution is shown below and is as follows: Green, Yellow, Red.
- Upon completing the puzzle, the invention locker on the right will open. Take a closer look inside.
- Click on the Note and the NATIVE-AMERICAN SPEAR to collect them.
- Return to the Carousel.
Carousel
- Click on the hidden object area on the left.
- Find the objects listed at the bottom of the screen. Inventory Items are circled in red, and additional-action items are outlined in orange.
- Upon completing the area, the MUSIC SHEET will be added to your inventory.
- Use the NATIVE-AMERICAN SPEAR on the carousel to cut the fabric, then click on the FABRIC to add it to your inventory.
- Return to the Western Bar.
Western Bar
- Click on the hidden object area on the left.
- Find the objects listed at the bottom of the screen. Inventory Items are circled in red, and additional-action items are outlined in orange.
- Upon completing the area, the TOOTHPICK will be added to your inventory.
- Take a closer look at the piano again. Use the MUSIC SHEET on the music sheet stand, then take a closer look at the compartment that opens.
- Use the TOOTHPICK to acquire the SMALL COG 1/3.
- Now the puzzle will be triggered. Click the buttons on the left and right to rotate the outer and inner rings respectively. Click on the middle button to check the cards under the marker for a match. You must find all the pairs. The solution is as follows (refer to the screenshot below as reference): B, C, A x2, B, C, A x2, B, C, A x2, B, C, A, B, C, A x2, B, C, A x4, B, C, A x9, B, C, A x10, B, C, A x3, B, C, Ax4, B, C, A x2, B.
- Upon completing the puzzle, click on the Note and the DEVICE KEY to collect them.
- Proceed to the Locomotive.
Locomotive
- Take a closer look at the shelves on the right. Use the FABRIC on the rip in the accordion on the lower right, then use the NEEDLE AND THREAD to repair it. Click on the ACCORDION DEVICE to add it to your inventory.
- Return to the Western Bar.
Western Bar
- Examine the door in the corner again. Use the ACCORDION DEVICE in front of the door, then use the DEVICE KEY to operate it.
- The door is now open. Proceed through to the next area.
Passage
- Click on the hidden object area on the right.
- Find the objects listed at the bottom of the screen. Inventory Items are circled in red, and additional-action items are outlined in orange.
- Upon completing the area, the BIG PLANK will be added to your inventory.
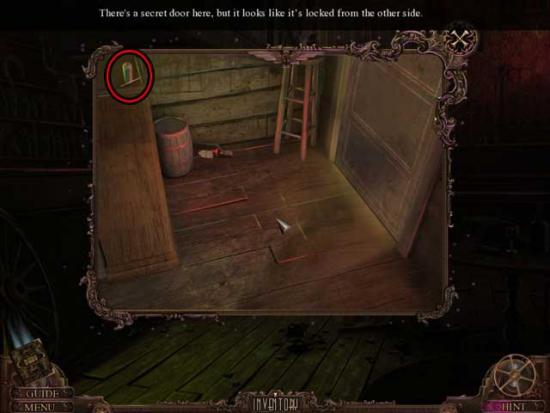
- Take a closer look at the compartment in the wall on the left. Use the ROPE on the third hook, then exit for now.
- Return to the Locomotive.
Locomotive
- Use the BIG PLANK on the table saw on the left to cut it, then click on the SMALL PLANK to add it to your inventory.
- Return to the Passage.
Passage
- Use the SMALL PLANK and the CURTAIN on Freddy to brace his leg, then click on the hidden object area that appears on the right.
- Find the objects listed at the bottom of the screen. Inventory Items are circled in red, and additional-action items are outlined in orange.
- Upon completing the area, the METAL ROD will be added to your inventory.
- Take a closer look at the large door. Use the METAL ROD on the empty slot to trigger a puzzle.
- Move the brackets so that the rods reach the green jewel star. Extend the rods using the button at the top. The lights on the left will show you which rods are correctly aligned. Repeat this three times to light the three bulbs at the bottom. The solutions are shown below.
- Upon completing the puzzle, the door will open. Proceed into the Maid’s Lair.
Maid’s Lair
- Click on the hidden object area on the left.
- Find the objects listed at the bottom of the screen. Inventory Items are circled in red, and additional-action items are outlined in orange.
- Upon completing the area, the WEIGHT will be added to your inventory.
- Back in the main area, click on the AUDIO TAPE, the SMALL COG 2/3, and the Blueprint to collect them.
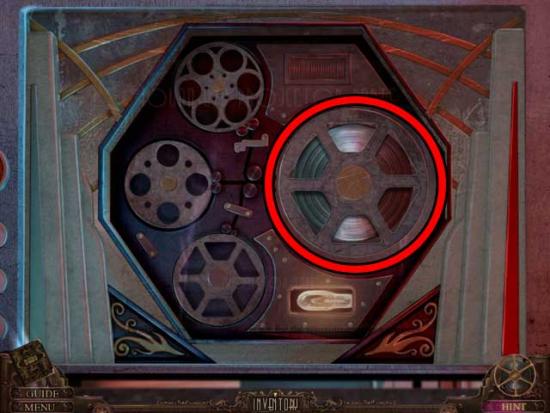
- Take a closer look at the audio device ahead on the back wall. Use the AUDIO TAPE on the left reel slot to trigger a puzzle.
- There’s only one way to string the film strip through the tape recorder. Click on the highlighted knobs in the correct order. When you click on a wrong one, the machine will reset. Click on the knobs according to the numbering in the screenshot below to solve the puzzle.

- Upon completing the puzzle, exit for now and return to the Passage.
Passage
- Examine the compartment in the wall on the left again. Use the WEIGHT on the third rope.
- Take a closer look at the platform that lowers. Click on the toolbox to open it, then click on the WIRE CUTTER and the SMALL COG 3/3 inside to add them to your inventory.

- Make your way back to the Carousel.
Carousel
- Take a closer look at the device within the carousel. Click on the panel to open it, then use the WIRE CUTTER on the wires.
- Once you’ve done this, take a closer look at the device inside again to trigger a puzzle.
- Pick up the plugs in the upper left corner and use them to cut off power in each of the colored wires. One they’re turned off, use the switch to the left of the power indicator for each color to turn it off permanently. Once all the colored wires are turned off, repeat the procedure to shut down the main element, shown in green. The solution is as follows (refer to the screenshot below):
- 1)A, C, F, 1, then remove the capacitors.
- 2)B, D, E, 2, then remove the capacitors.
- 3)F, G, I, J, 3, 4, then move F to K, 5, then remove the capacitors.
- 4)F, G, I, J, K.
- Upon completing the puzzle, click on the POWER SOURCE to add it to your inventory.
- Return to the Locomotive.
Locomotive
- Take a closer look at the shelves on the right again. Use the POWER SOURCE on the invention on the lower shelf and the SMALL COGS 3/3 on the device on the upper shelf, then click on the EXTENDABLE ARM on the upper shelf to add it to your inventory.
- Make your way back to the Maid’s Lair.
Maid’s Lair
- Click on the hidden object area on the left.
- Find the objects listed at the bottom of the screen. Inventory Items are circled in red, and additional-action items are outlined in orange.
- Upon completing the area, the STARTER HANDLE will be added to your inventory.
- Go back to the Locomotive.
Locomotive
- Examine the shelves on the right again. Use the STARTER HANDLE on the device on the bottom shelf, then click on the SPIDER (device) to add it to your inventory.
- Go to the Carousel.
Carousel
- Take a closer look at the hole in the ground. Use the EXTENDABLE ARM on the hole, then use the DEVICE KEY to power it. You will acquire the BIRD WHISTLE.
- Return to the Maid’s Lair.
Maid’s Lair
- Take a closer look at the recording device again. Click on the red recording button, then use the BIRD WHISTLE on the microphone on the right. Click on the Play button to trigger a cutscene.
- Go out to the Passage.
Passage
- Examine the hole in the wall on the right through which the bird is peeking. Use the SPIDER on the hole in the wall, then use the DEVICE KEY to power it.
- Watch the cutscene that ensues.
Congratulations! You’ve completed the Bonus Chapter of Final Cut: Death on the Silver Screen Collector’s Edition!

More articles...
-
Best Horror Games On Itch.io – July 2026
Across a bounty of subgenres. -
Haze Seas Accessories Tier List [Best Accessories to Equip]
The accessories with the best stat buffs in Haze Seas.