
Best Horror Games On Itch.io – July 2026
Across a bounty of subgenres.
Grow A Garden 2 Base Price List
What's the most valuable crop?![Evomon Types Guide [Strengths, Weaknesses, Resistance]](/wp-content/uploads/2026/06/evomon-types.jpg "Evomon Types Guide [Strengths, Weaknesses, Resistance]")
Evomon Types Guide [Strengths, Weaknesses, Resistance]
Your companion guide during battles.
![[Roblox] Evomon Shiny Hunting Guide – Including Prismatic and Pris Shinies!](/wp-content/uploads/2026/06/evomon-shiny-hunting-guide.jpg "[Roblox] Evomon Shiny Hunting Guide – Including Prismatic and Pris Shinies!")
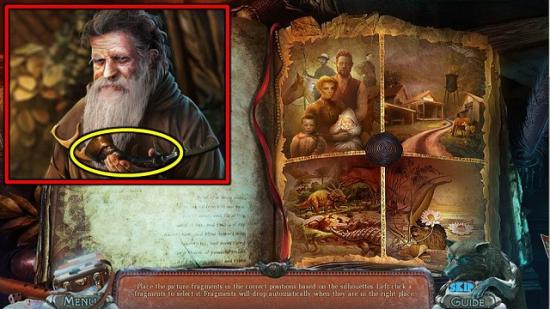
Fierce Tales: The Dog’s Heart Walkthrough
Welcome to the Fierce Tales: The Dog’s Heart walkthrough on Gamezebo. Fierce Tales: The Dog’s Heart is a Hidden Object game created by Blam! Games. This walkthrough includes tips and tricks, helpful hints, and a strategy guide on how to complete Fierce Tales: The Dog’s Heart.
Share this


- Prefer Gamezebo on Google

Game Introduction – Fierce Tales: The Dog’s Heart
Welcome to the Fierce Tales: The Dog’s Heart walkthrough on Gamezebo. Fierce Tales: The Dog’s Heart is a Hidden Object game created by Blam! Games. This walkthrough includes tips and tricks, helpful hints, and a strategy guide on how to complete Fierce Tales: The Dog’s Heart.
General Tips
Difficulty Levels
- You can play in Casual, Advanced or Hardcore mode.
- In Casual Mode all significant locations are marked with sparkles and hint and skip buttons recharge quickly.
- In Advanced Mode there are no sparkle indicators and hints recharge more slowly.
- In Hardcore Mode there are no sparkle indicators, no hints and mini games can’t be skipped.
- You can change to a different difficulty mode at any point in the game by clicking on “menu” in the bottom left of the screen and then selecting “options”.
Cursors
- The default cursor looks like an arrow with a dog’s paw print on it. It can change into the following icons:
- A magnifying glass indicates areas you can inspect more closely.
- A grabbing hand indicates items you can pick up for your inventory.
- A hand with pointed finger indicates objects that require another action. Usually it means you need to use an inventory item on the object.
- A smaller, red arrow indicates places where you can move to the next scene.
Hidden Object Scenes
- Hidden Object scenes (HOS) are straightforward: you get a list of items you need to find. These items are the same each time you play the game, so they are all shown in the images in this walkthrough.
- Some items are listed in blue. This means the items require an extra action to be found; for example, you need to open a drawer or put two items together. However, this system seems to be somewhat inconsistent as I found various scenes in which white items were hidden in cupboards.
- Cursor icons in HOS are the same as in the rest of the game.
Journal and Map
- In the bottom left of the screen are your case files. The files consist of a journal and an interactive map.
- The journal keeps track of the story for you. You can refer to the journal for codes and clues you found in previous scenes.
- The map shows all locations you have visited so far. Your current location is shown in black. Move your cursor over the locations to see screenshots of these locations in the top left corner of the map. You can use the map to quickly jump from one location to another without having to walk all the way yourself. However, the game is divided in several different sections that have their own maps. You can’t use the map to travel between these sections.
Hint and Skip Buttons
- In casual and advanced modes there will be a hint button at the bottom right of the screen. If there are no actions to be completed in your present location, the hint button will guide you in the direction you need to go for your next action. The hint button only gets depleted and will need to recharge if it finds an action for you to complete in the current location. The hint button can also be used in HOS.
- In casual and advanced modes mini games can be skipped once the skip button has charged.
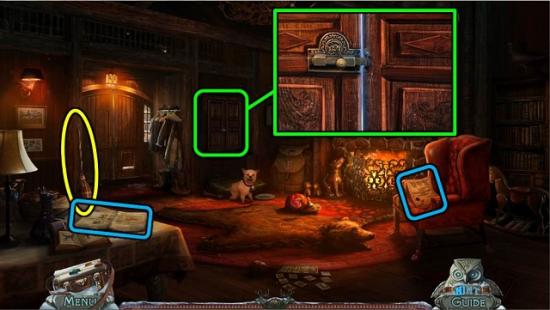
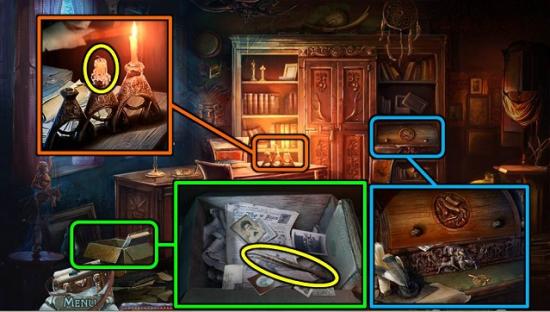
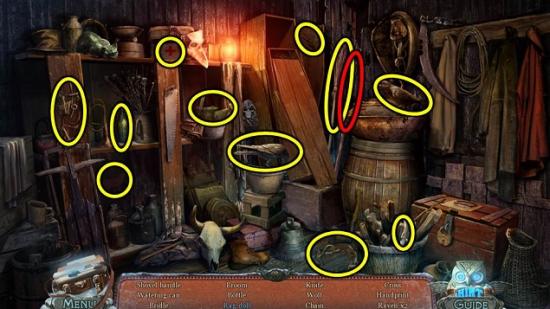
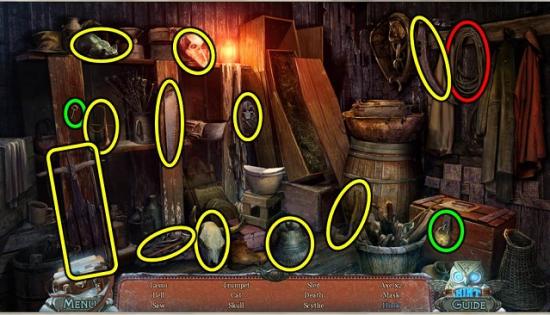
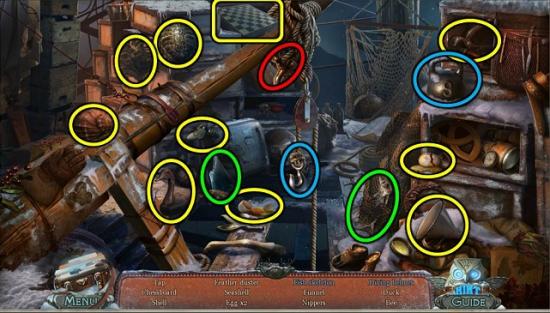
Chapter 1: The House and the City

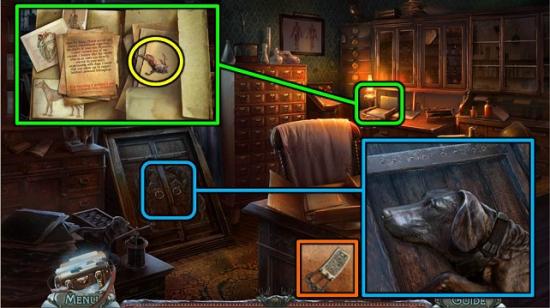
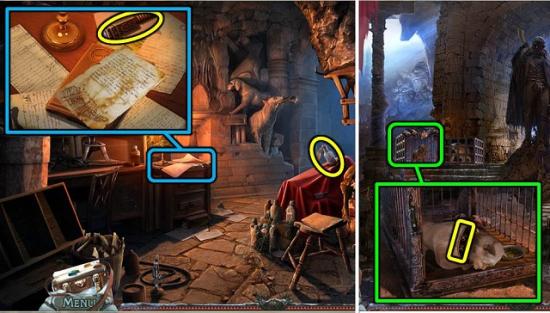
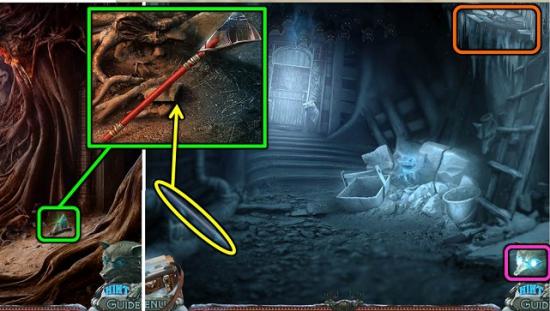
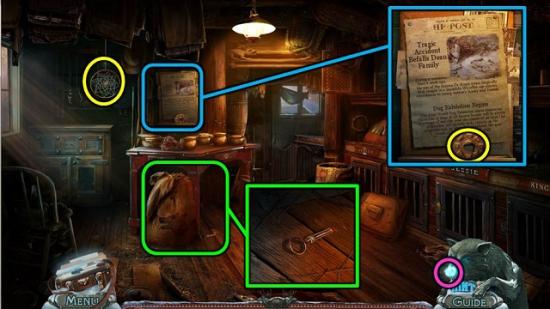
- Grab the BROOM.
- Read the certificate on the chair and the newspaper on the table.
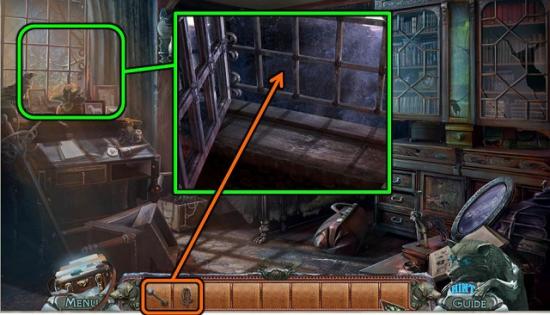
- Open the shutters and look through the window.
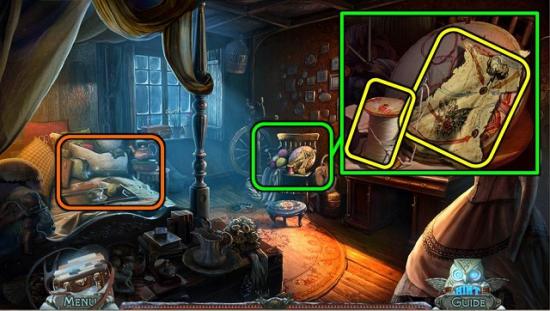
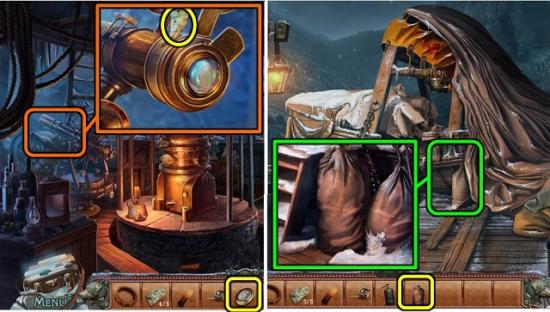
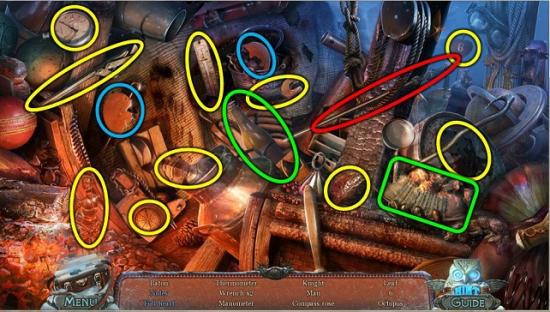
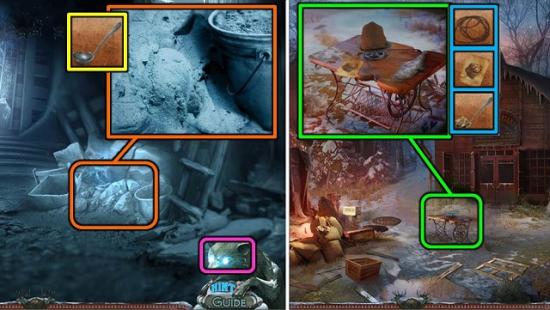
- You can now play a HOS in the backpack behind Pippa the dog.
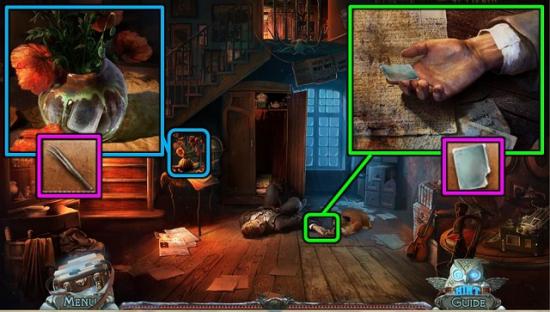
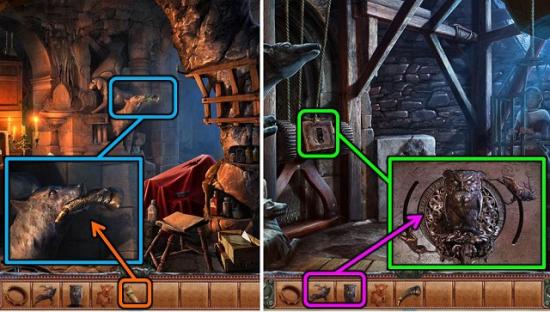
- Behind the flap inside the backpack is a knife. Use it to undo the stitches (blue) and find a coin. The CAN OPENER (red) is behind the front flap. Clean the wall with the rag to find the train (green).
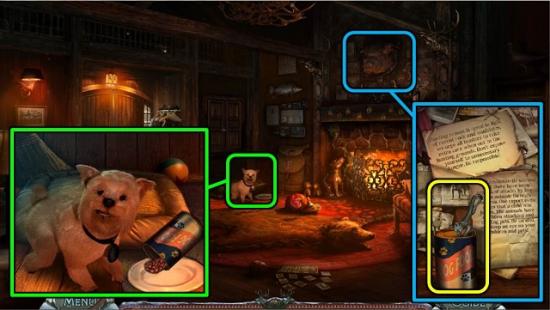
- Zoom in on the mantelpiece and use the CAN OPENER on the can of dog food.
- Take the DOG FOOD.
- Zoom in on Pippa and put the DOG FOOD on her plate.
- Follow Pippa outside.

- Talk to the children.
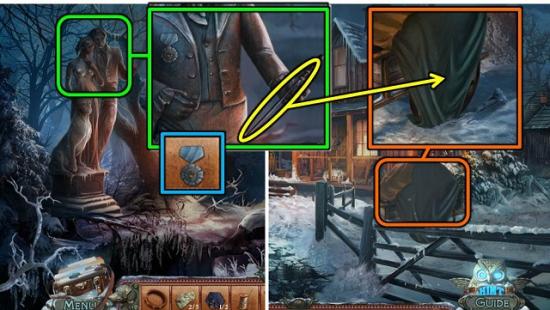
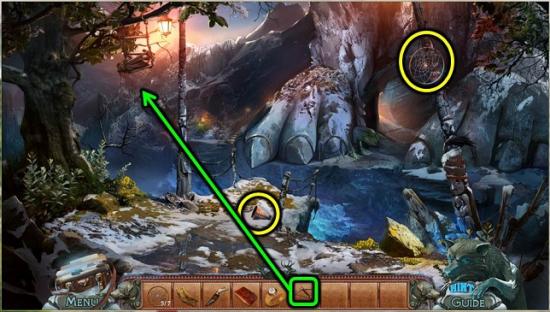
- Take the SNOWSHOE from the snowman.
- Zoom in on the snow in the middle and pick up Pippa’s medallion.
- Use the BROOM on the snow blocking the garage door.
- Go into the garage.
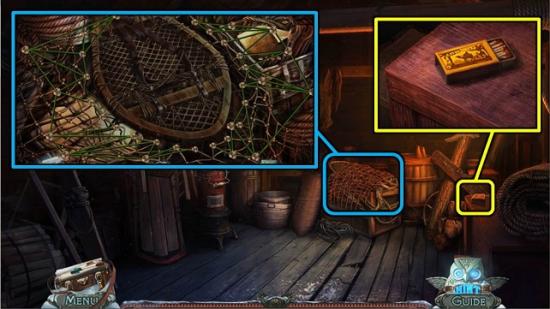
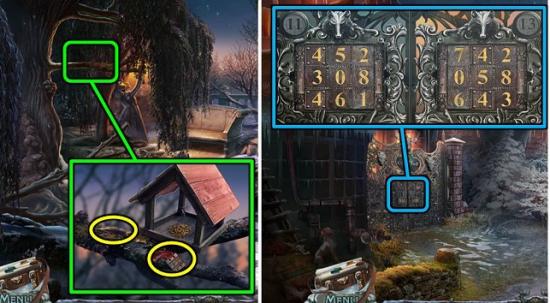
- Zoom in on the right and take the MATCHES.
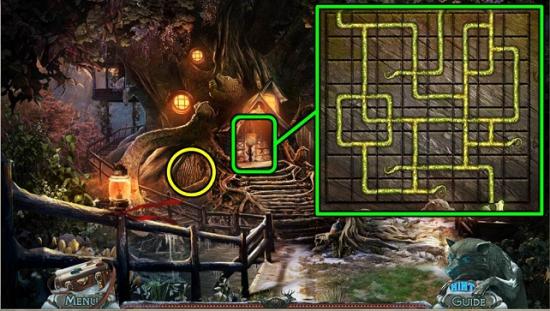
- Zoom in on the fishing net for a mini game.
- You need to untangle the net by moving the knots. However, in this puzzle some of the smaller knots are fixed in place. Basically, all you need to do is move the larger knots to the outside and clear the center.
- You get another SNOWSHOE.
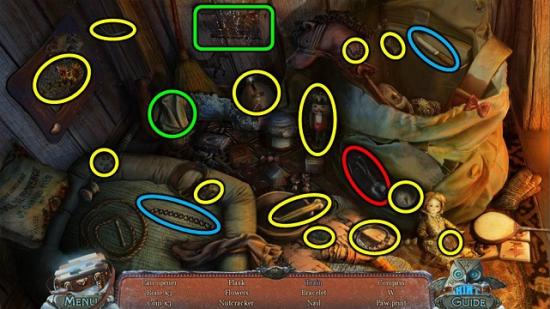
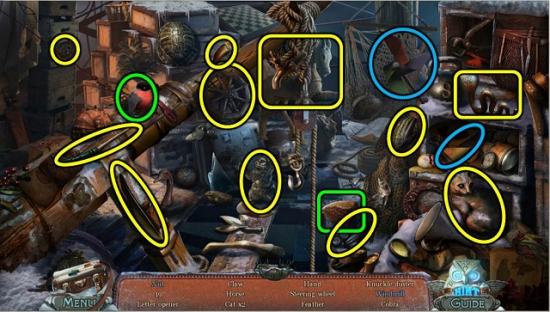
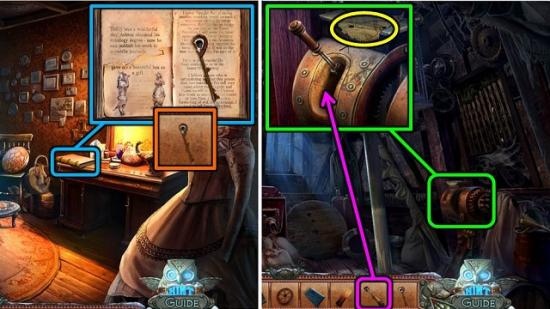
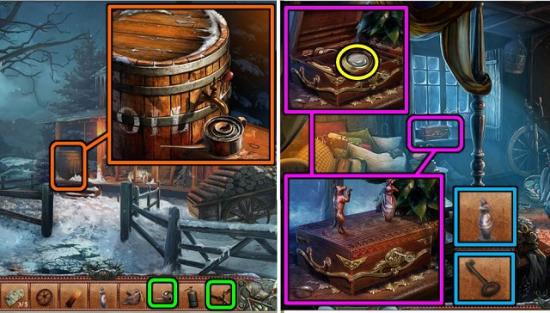
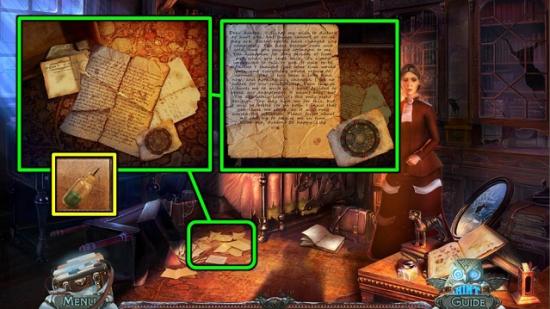
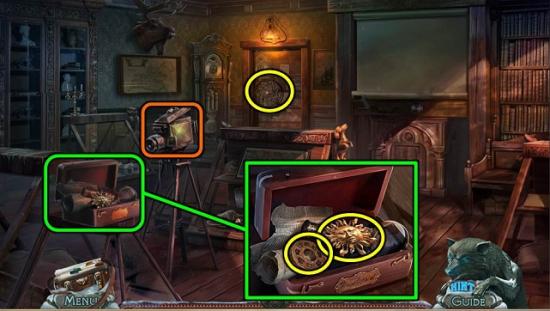
- There is a HOS in the suitcases.
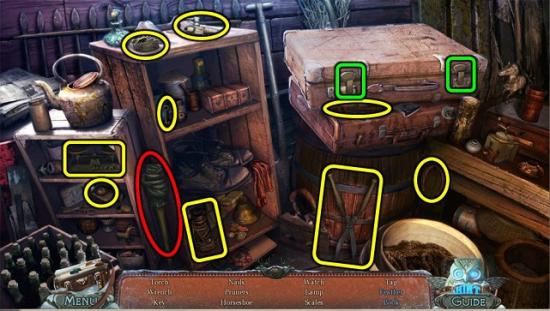
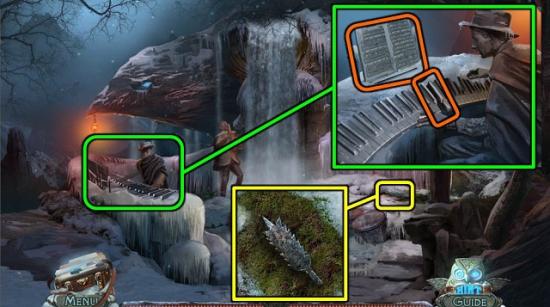
- Undo the two clasps on the top suitcase to open it (green). Inside are the feather and the book.
- When you’re done you get a TORCH (red).
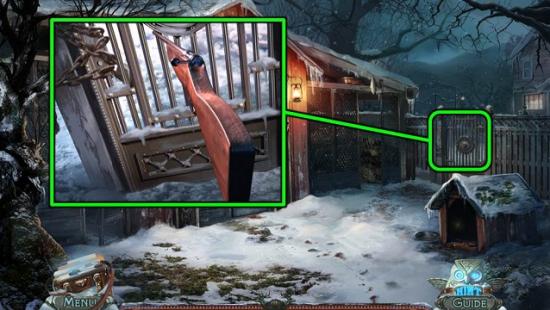
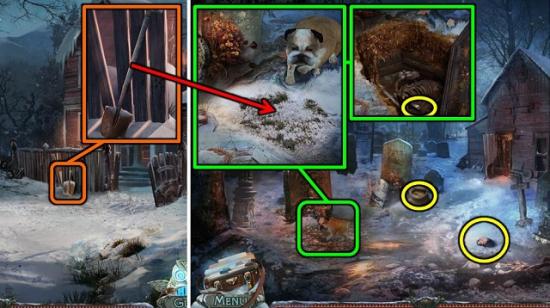
- Back out and use the SNOWSHOES on the snow at the back of the yard.
- Inspect the notice board.
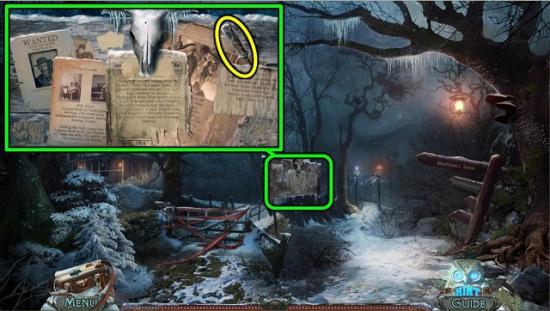
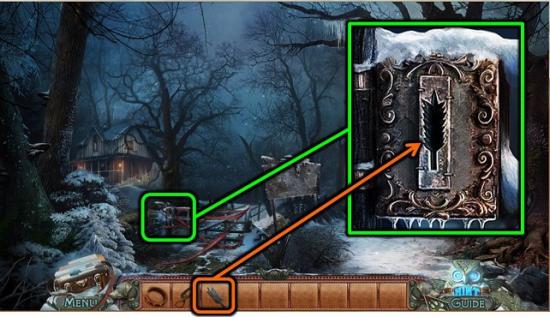
- Read the messages (some will go into your journal) and take the ICE PICK.
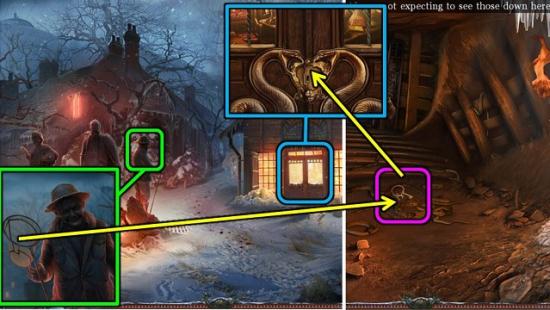
- Go on towards the bridge in the back right.
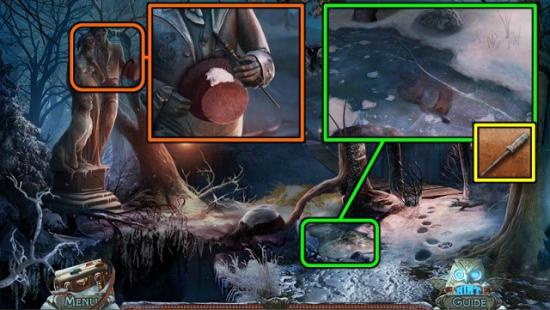
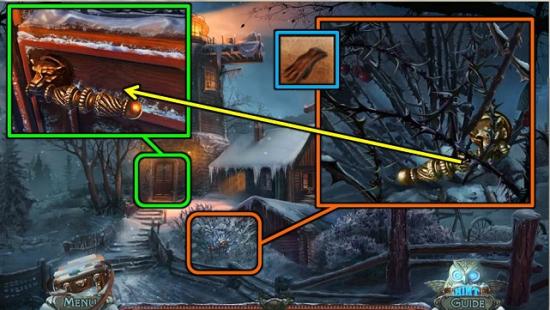
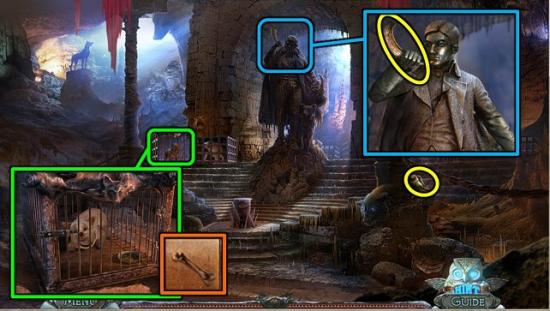
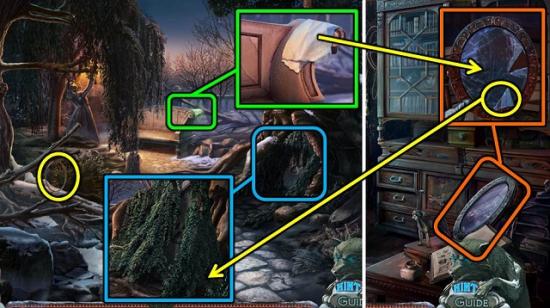
- Zoom in on the statue and take the HAT.
- Zoom in on the ice and use the ICE PICK to take the SAW HANDLE.
- Attempt to cross the bridge.
- Back out two screens to the yard and go into the garage.
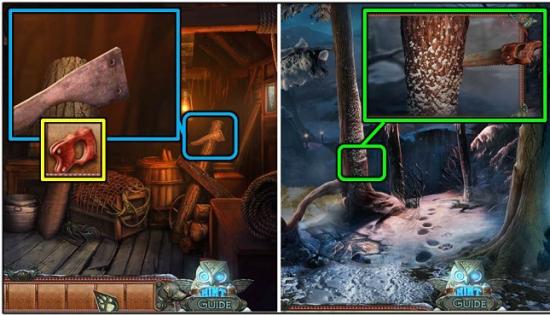
- Zoom in on the saw blade in the log and put the SAW HANDLE on it.
- Take the SAW.
- Go back to the bridge.
- Zoom in on the tree and take it down with the SAW.
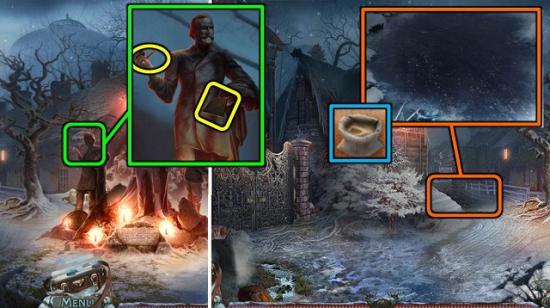
- Cross the bridge to the Left Square of the city.
- There’s nothing to do here right now so go right to the Right Square.
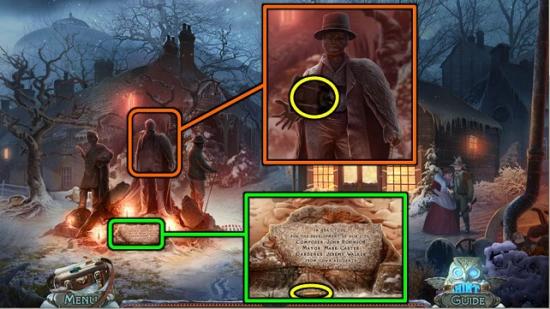
- Talk to the sheriff.
- Zoom in on the middle figure of the statue and give him the HAT.
- Take the DOG HEAD from the compartment.
- Zoom in on the plaque under the statue and take the SHELL.
- Go down the street to the City Kennels.
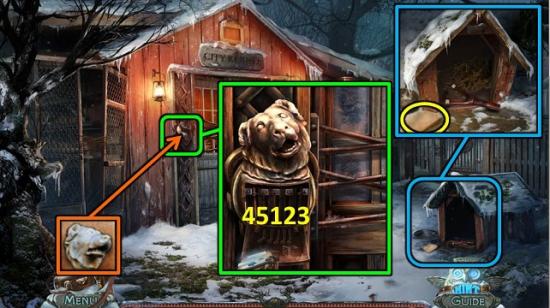
- Zoom in on the doghouse and look at the note with the clue.
- Put the DOG HEAD on the broken head by the door.
- Push down the little levers on the left to remove the metal bars. You need to figure out the right order. Make a mistake and the puzzle will be reset.
- Go into the kennels.
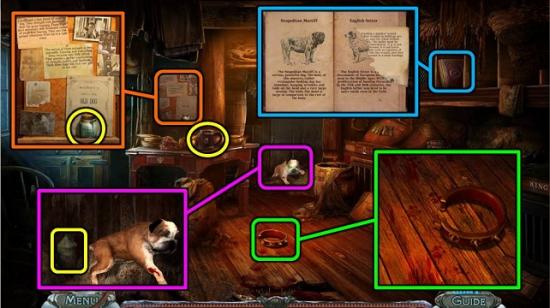
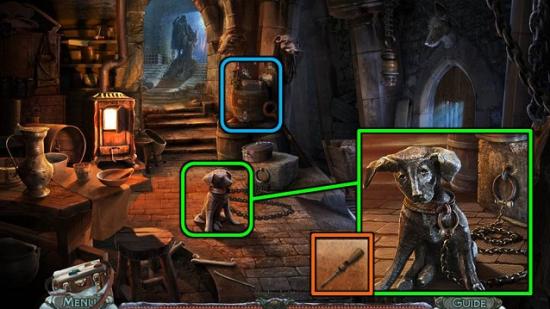
- Zoom in on the floor and take the STRANGE COLLAR.
- Take the EMPTY CUP from the table.
- Open the book on the shelf and turn the pages until you can take the INSTRUCTIONS PIECE.
- Zoom in on the pin board, read the messages and take the BOTTLE.
- Zoom in on the wounded dog and take the KEROSENE.
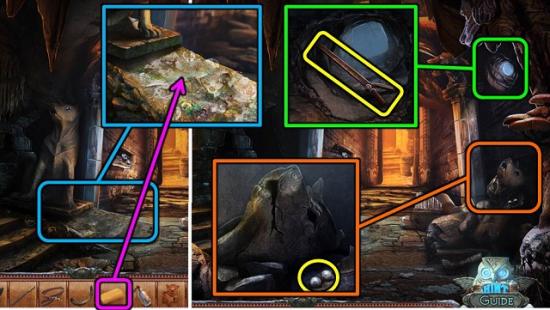
- Back out to the Left Square.
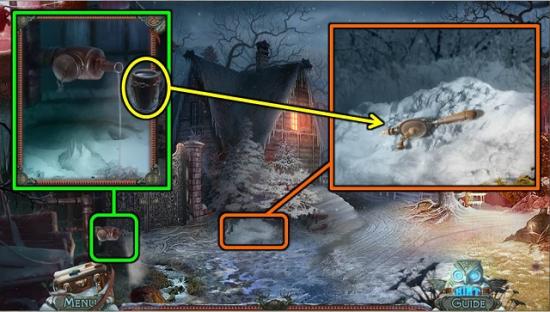
- Zoom in on the fire hydrant and fill the EMPTY CUP with water to get a CUP OF WARM WATER.
- Zoom in on the snow by the gate and put the CUP OF WARM WATER on it to melt the snow.
- Take the DRILL.
- Go back to the outside of the City Kennels.
- Zoom in on the roof on the right.
- Put the DRILL on the broken bits to get the DRILL WITH BIT.
- Go back to the square with the statues.
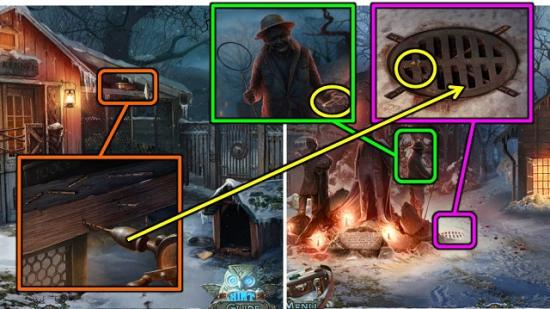
- Zoom in on the right figure and try to take the key. It falls down to the manhole below.
- Zoom in on the manhole cover and try to take the key again.
- Use the DRILL WITH BIT on the cover to remove it.
- Go down the manhole.
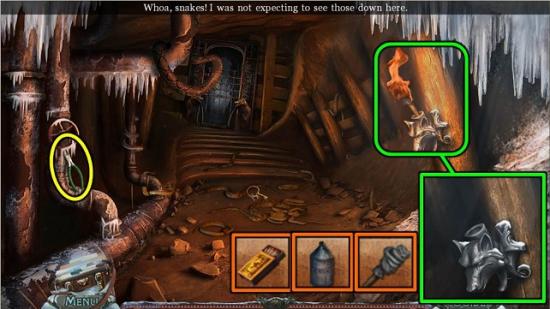
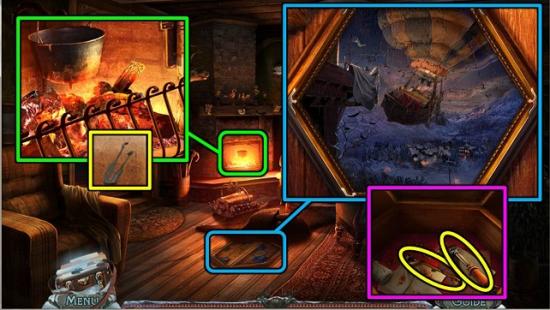
- Zoom in on the holder on the right and place the TORCH.
- Put KEROSENE on the torch and light it with the MATCHES.
- Take the NIPPERS.
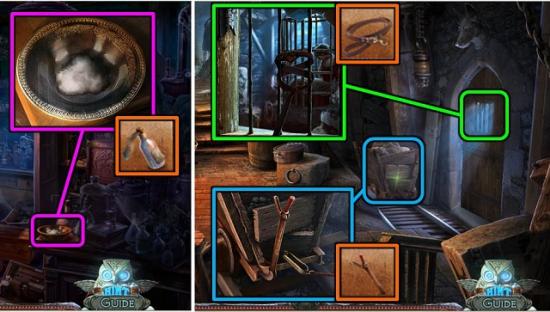
- Back out to the square and go back to the kennels.
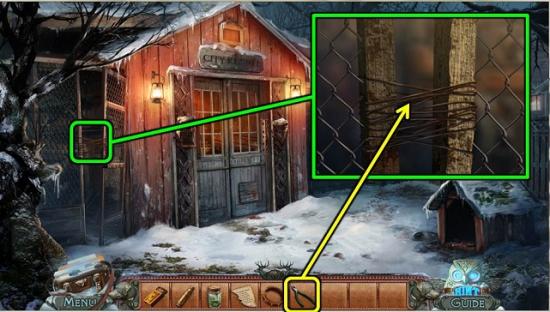
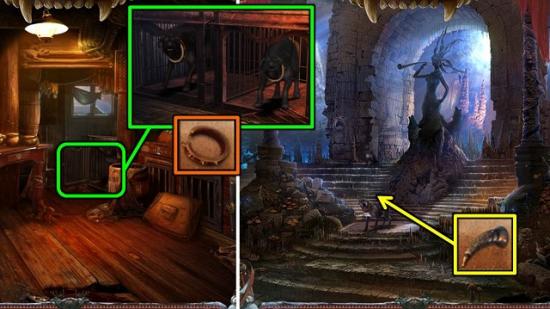
- Zoom in on the gates to the left of the door and remove the wire with the NIPPERS.
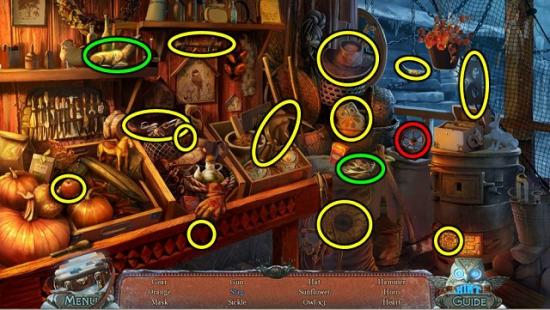
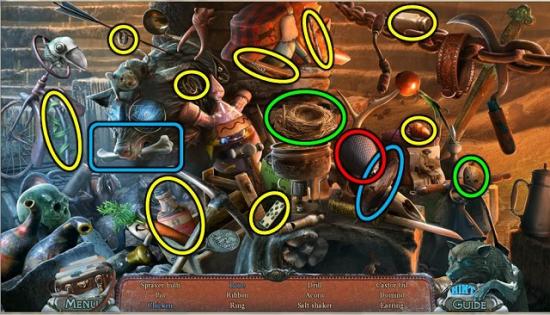
- Play the HOS behind the gate.
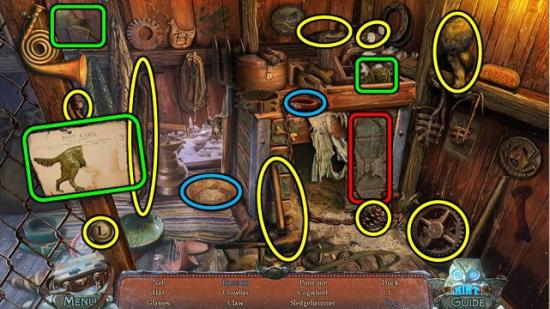
- Put the sausage in the bowl to get the raccoon (blue). Put the three pieces of the dog together (green).
- Get the NET (red).
- Back out to the square with the statues.
- Zoom in on the right statue and give him the NET.
- Take the NET.
- Go back down the manhole.
- Use the NET to take the VETERINARIAN’S KEY.
- Back out to the Right Square.
- Zoom in on the door of the pharmacy (it says veterinarian on the door but pharmacy on the interactive map).
- Use the VETERINARIAN’S KEY to unlock it.
- Go into the pharmacy.
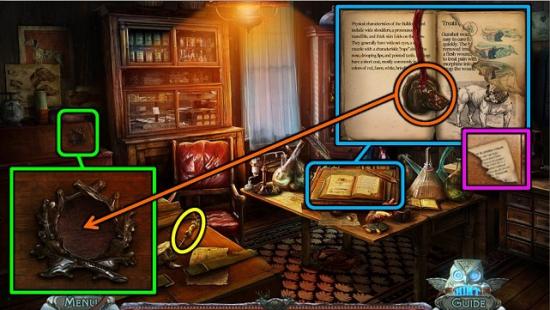
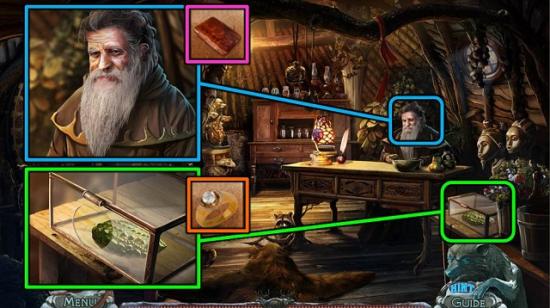
- Take the SYRINGE from the table.
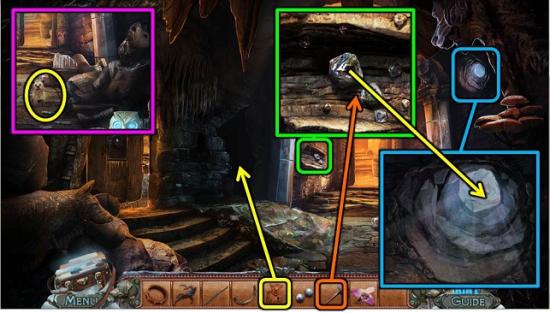
- Read the book on the desk and turn the pages.
- Put the INSTRUCTIONS PIECE on the torn page to find out how to cure the dog.
- Take the DOG MEDALLION.
- Open the writing desk on the left with the DOG MEDALLION.
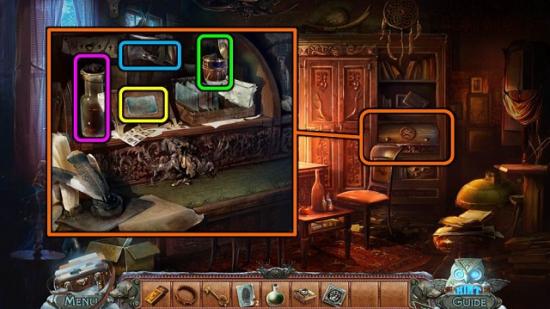
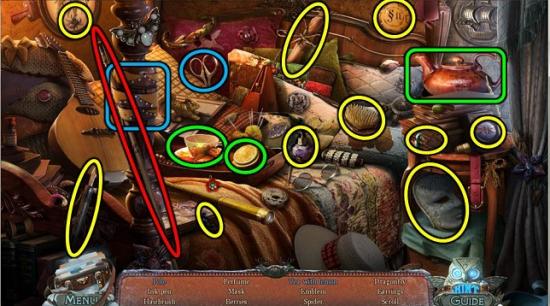
- Play the HOS.
- The amber is in a small compartment (green). The limestone is behind the compass (blue). Open the middle compartment with the small key to find the squirrel (pink).
- You will get the GUNPOWDER (red).
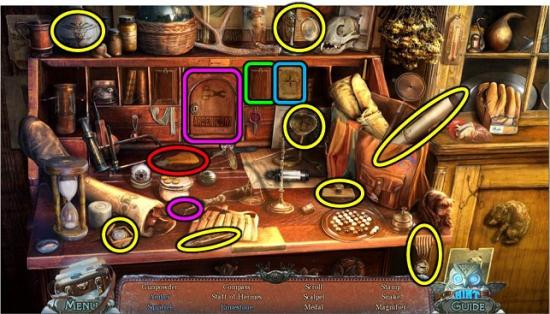
- Zoom in on the cabinet on the right wall and enter the code you found in the dog house.
- Take the BANDAGE and SYMBOL 1.
- Look at the instructions in the back.
- Zoom in on the middle cabinet
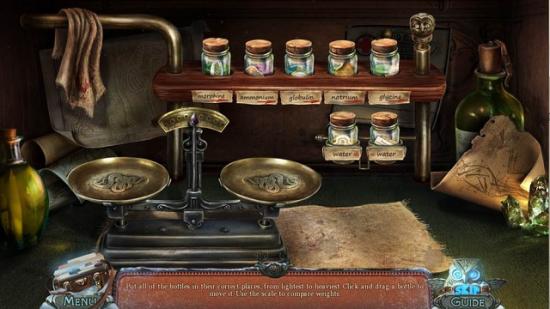
- Place the BOTTLE.
- Weigh the bottles in pairs to determine which is the heaviest and which the lightest. Then place them light to heavy, from left to right. Two are the same weight, which are the water ones.
- You will get the MORPHINE.
- Go back to the City Kennels and go in.
- Zoom in on the dog.
- Put down the MORPHINE, SYRINGE and BANDAGE.
- Put the syringe in the morphine and inject it into the dog’s leg.
- Put the bandage on it.
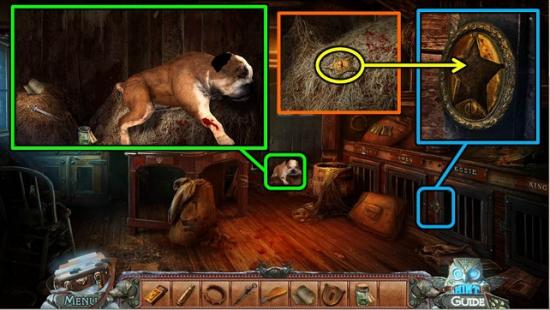
- Zoom in on the dog’s bed after he leaves and take the STAR KEY.
- Zoom in on Jessie’s cage on the right and open it with the STAR KEY.
- Go into Jessie’s cage for another HOS.
- Pour the milk in the cup (blue). Open the bag of wheat (green) for the ear of wheat. Open the trap to find the mouse (orange).
- You will get the BUCKSHOT (red).
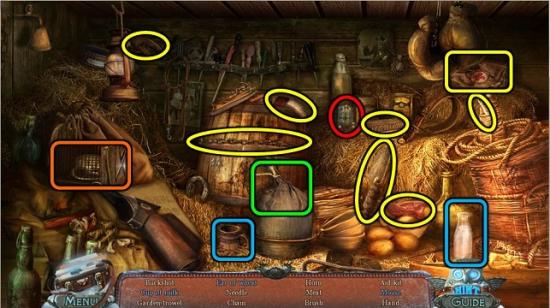
- Zoom in on the rifle in the back.
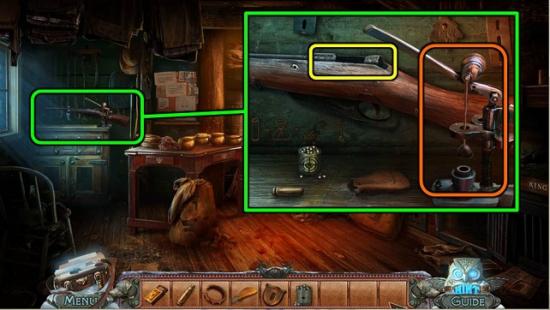
- Put the SHELL, BUCKSHOT and GUNPOWDER on the table.
- Put the shell in the device on the right, fill it with the gunpowder and top it up with the buckshot. Then pull the lever to make a BULLET.
- Put the BULLET in the RIFLE.
Chapter 2: The Detective’s House and the Graveyard
The Detective’s House
- Exit the kennels and zoom in on the metal gate.
- Shoot the gate with the RIFLE.
- Go through the gate.
- Click on the dog waiting by the door.
- Pick up SYMBOL 2.
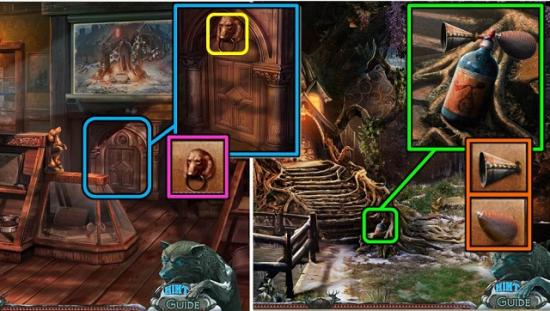
- In the zoom of the front door, click on the door panel with the shields.
- Put SYMBOL 1 and SYMBOL 2 in the empty slots.
- Find pairs of symbols with the same theme. There is one group of three.
- Go into the hall of the detective’s house.
- Zoom in on the cupboard and click the handle to open it.
- On the bottom of the cupboard is a JAR.
- Click on the detective’s hand and take the NEWSPAPER PIECE and KEY.
- Zoom in on the newspapers on the floor and move them aside.
- Put the NEWSPAPER PIECE on the torn page.
- Read the clue on the paper.
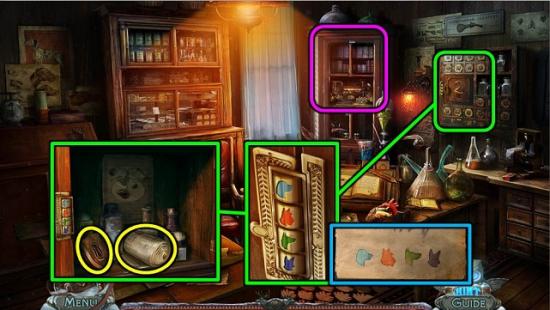
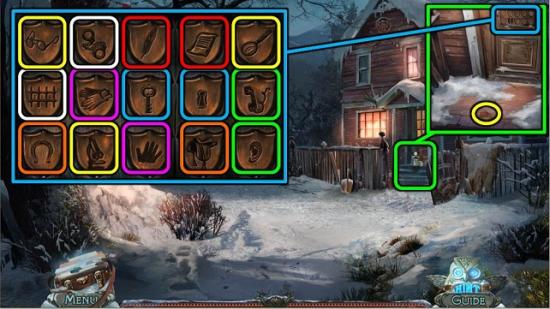
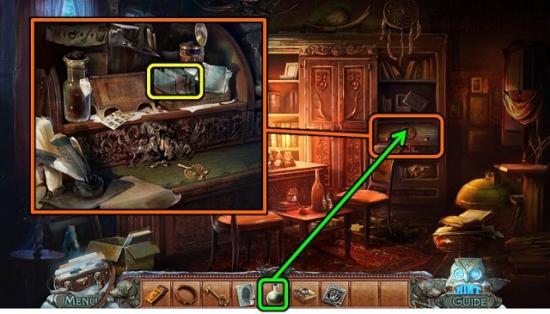
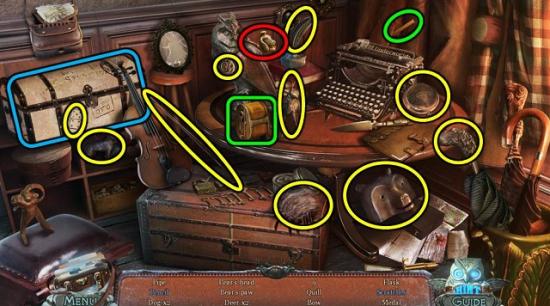
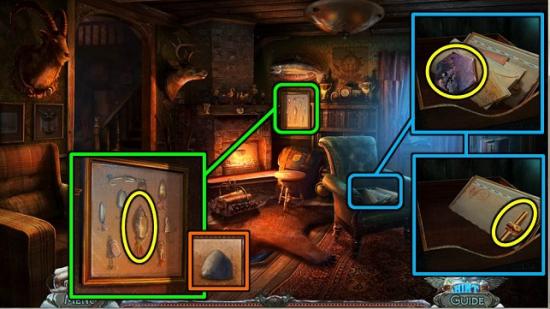
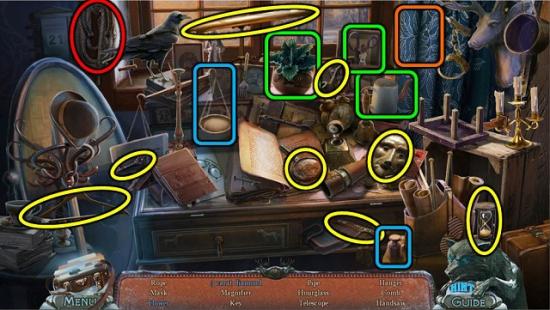
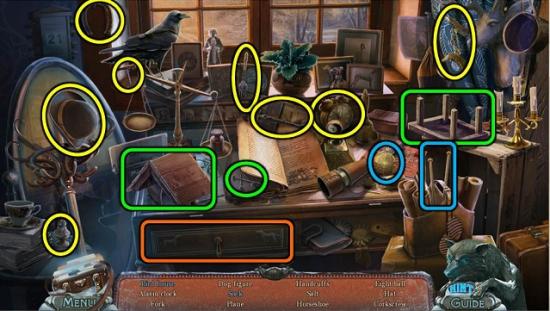
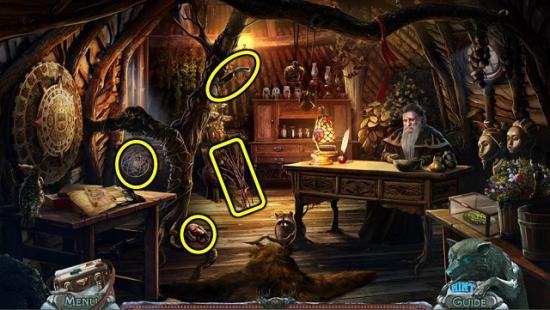
- Zoom in on the filing cabinet and open drawer #3.
- Take the SLINGSHOT BAND and read the notes in the folder.
- There is a HOS by the owl on the right.
- To clean the boot, dip the brush in the polish and then use it on the boot (green). To get the butterfly you need to break the frame with the hammer (blue).
- At the end of the HOS you get a bottle with PURPLE SOLUTION (red).
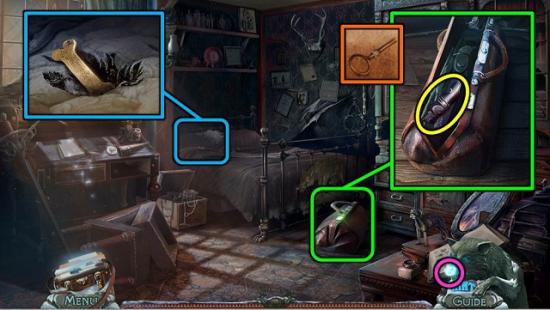
- Go upstairs.
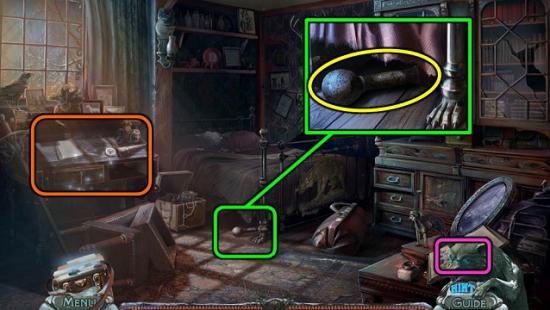
- Look in the box on the left and move the stuff around until you find the TWEEZERS.
- Behind the mask on the wall is a safe that needs to be opened with a set of fingerprints.
- Zoom in on the candles on the desk and take the CANDLE.
- Zoom in on the locked cabinet and try to open it with the KEY. It breaks.
- Back out four screens to the square with the statues.
- Go down the manhole.
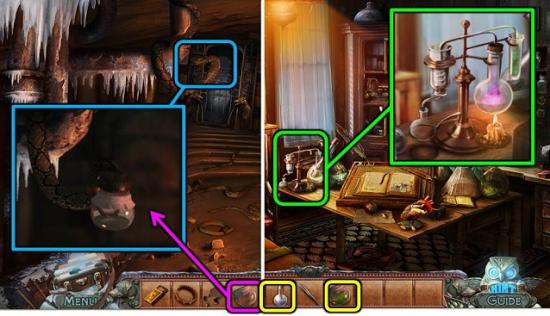
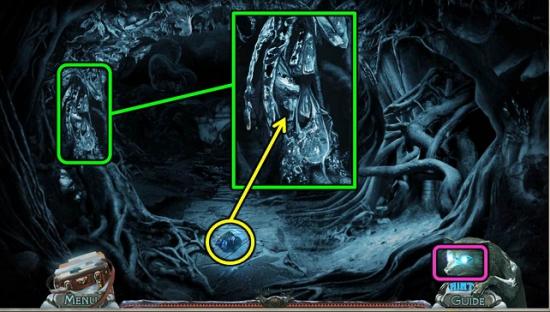
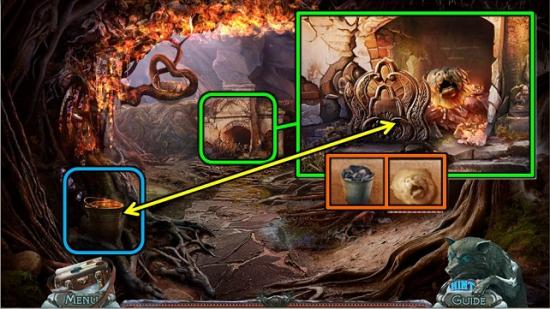
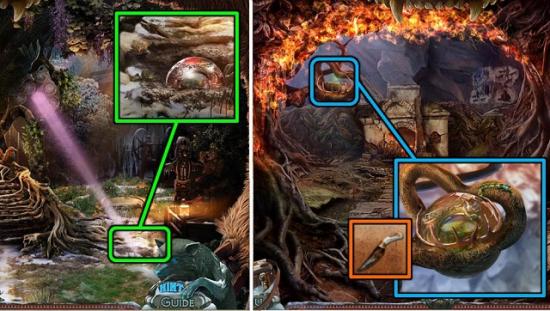
- Zoom in on the big snake on the left and use the JAR to get a JAR WITH POISON.
- Back out to the square and go into the pharmacy.
- Zoom in on the strange device on the table and put the JAR WITH POISON and PURPLE SOLUTION on it.
- Put the CANDLE under it and light it with your MATCHES.
- Take the ACID.
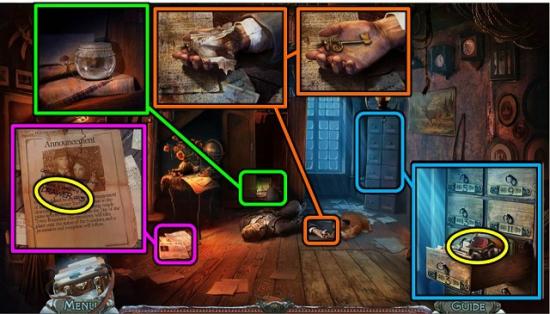
- There is a new HOS in the writing desk.

- Put the two pieces of the scales together (green). The BOX OF TOBACCO is in a closed compartment (red).
- Go to the City Kennels.
- Zoom in on the dog house.
- Put the SLINGSHOT BAND on the SLINGSHOT.
- Go back to the street outside the detective’s house.
- Use the SLINSHOT on the nest in the tree.
- Pick up the SYMBOL OF MATURITY.
- Go back into the detective’s house and go upstairs.
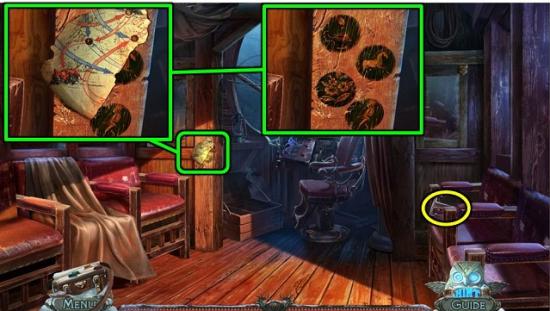
- Go back to the locked cabinet with the broken key and use the ACID to open the lock.
- Take a SLIDE.
- Go back downstairs.
- Zoom in on the flowers by the stairs.
- Use the TWEEZERS to take out the FINGERPRINT.
- Zoom in on the detective’s hand and use the SLIDE on his fingers to get an INVISIBLE FINGERPRINT.
- Go upstairs.
- Go back to the cabinet and put the INVISIBLE FINGERPRINT on the little stand (yellow).
- Put powder from the blue jar on it (green).
- Wipe off the excess with the brush (blue).
- Fix it with the solvent from the bottle (pink).
- You get the second FINGERPRINT.

- Access the safe on the wall.
- Put the two FINGERPRINTS on the safe.
- Move the five prints around until you have them from thumb to pinkie from left to right. The thumb and pinkie are quite easy to figure out, but for the other three there isn’t much to go on, so just try.
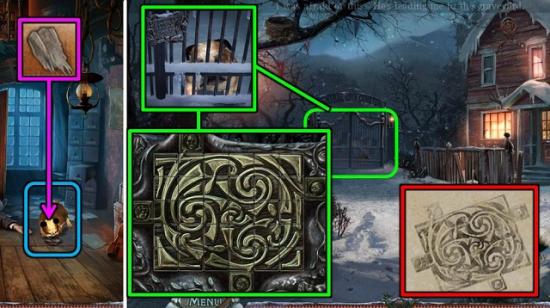
- Inside the safe is a folder with the SYMBOL OF BIRTH (pink), a STRANGE PAPER (blue) and a SCRAP OF CLOTHING (yellow) with the clue “candlelight reveals secrets”.
- Zoom in on the candles on the table and warm the STRANGE PAPER in the fire.
- You get a paper with a diagram that goes into your journal.
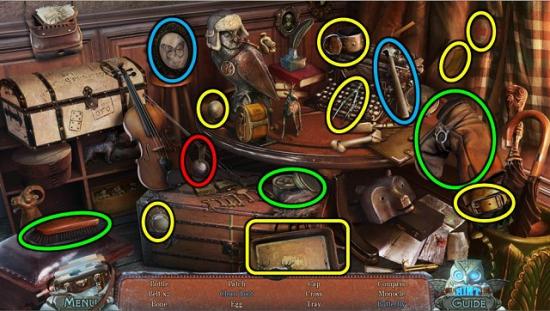
- Go downstairs and play the new HOS by the owl.
- Sharpen the pencil in the pencil sharpener on the table (green). The scratches and one of the deer are inside the chest (blue).
- You get a PIPE (red).
The Cemetery
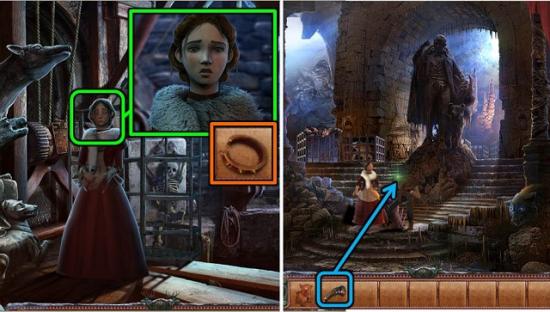
- Give the SCRAP OF CLOTHING to your friend the dog.
- Follow the dog outside.
- Zoom in on the cemetery gates.
- Place the SYMBOL OF MATURITY and SYMBOL OF BIRTH in the slots on the left and right.
- Swap the tiles until you’ve recreated the image from the strange paper. It’s in your journal in case you need to refer back to it.
- Go through to the cemetery.
- Play the HOS in the house.
- The rag doll is inside the coffin.
- When you’re done you get the SHOVEL HANDLE (red).
- Go back to the street outside the detective’s house.
- Zoom in on the fence and put the SHOVEL HANDLE on the SHOVEL.
- Go back to the cemetery
- Take the BAG OF SAND.
- Dig where the dog is scratching.
- After the scene, take the PIANO KEY from the grave.
- Don’t forget to also pick up the STONE.
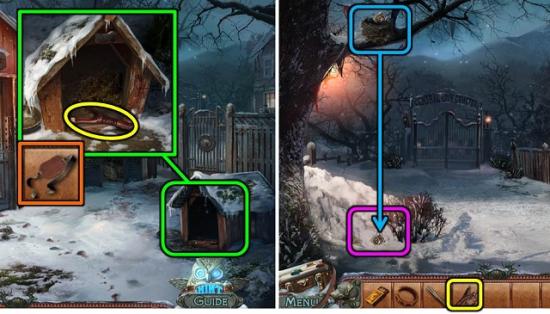
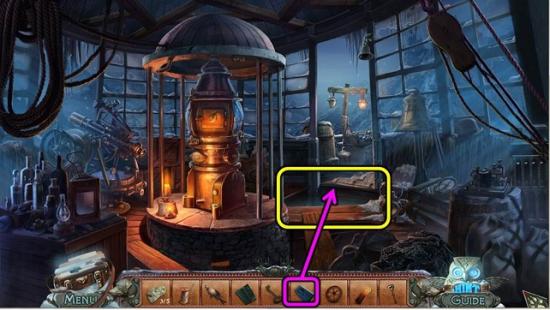
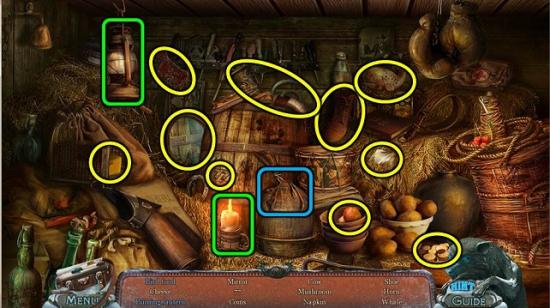
- Play the new HOS in the shed.
- Open the chest with the small key (green) to find the hook.
- When you’re done you get a LASSO (red).
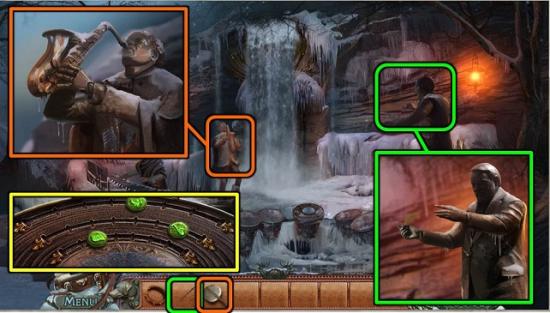
- Go to the three statues.
- Zoom in on the left statue and give him the PIPE.
- Put the TOBACCO in the pipe and light it with the MATCHES.
- Take the MUSIC SHEET.
- Back out to the Left Square.
- Zoom in on the ice in the back and put the BAG OF SAND on it.
- You can now go down the street to the fountains.
- Zoom in on the pianist and give him the PIANO KEY and the MUSIC SHEET.
- When he’s finished playing, pick up the FARM KEY.
Chapter 3: Sherman’s Farm and the Lighthouse
Sherman’s Farm
- Back out to the crossroad on the other side of the bridge.
- If you’ve done everything you need to do, the bridge will collapse. If it doesn’t, go back and check what you missed.
- Zoom in on the fence and open it with the FARM KEY.
- Go to Sherman’s Farm.
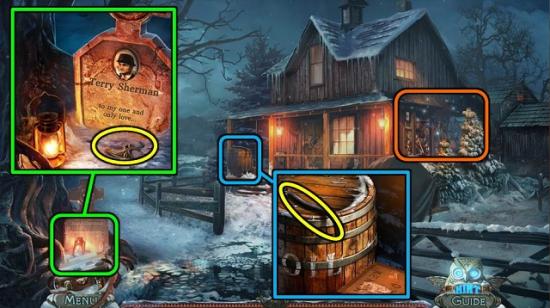
- Inspect the grave and pick up LOCK PART 1.
- Zoom in on the barrel on the porch and take the SHORT HOSE.
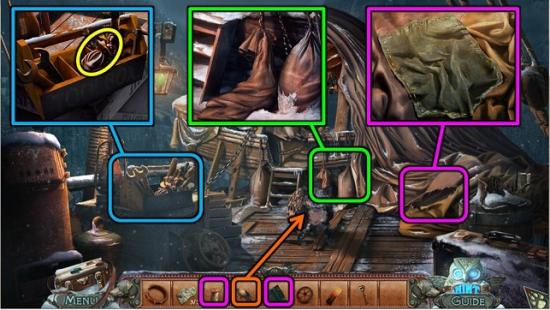
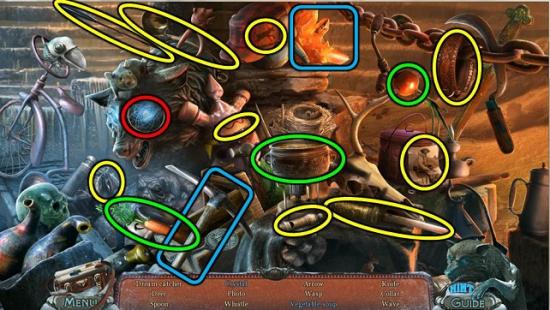
- Play the HOS behind the cart.
- Put the two pieces of the slingshot together (green). The doll is inside the small box (blue).
- You receive a CANDY JAR (red).
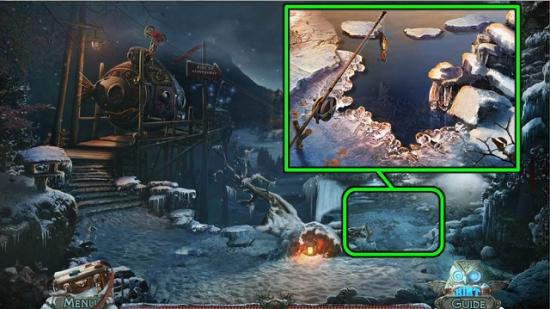
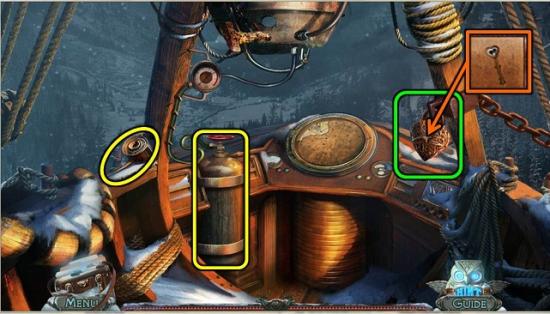
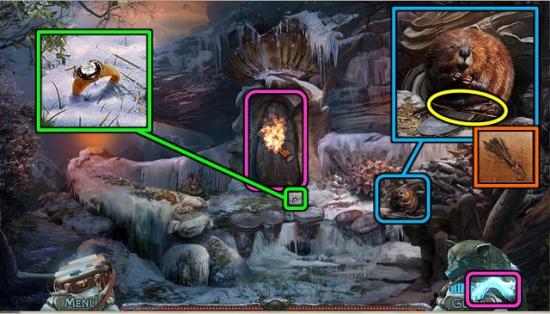
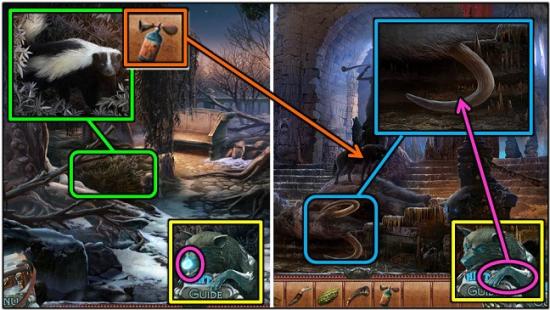
- Go down the path to the cliff.
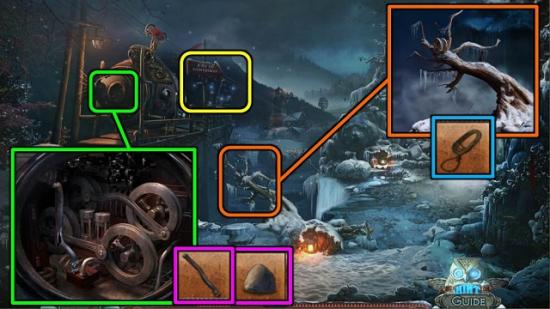
- Have a look at the dead tree and use the LASSO to get the FISHING REEL.
- Zoom in on the door mechanism of the shuttle.
- Remove the broken hose and replace it with the SHORT HOSE.
- Use the STONE to bend the metal bar into shape.
- There is a HOS at the end of the pier.
- Put the two parts of the windmill together (blue). Feed the bird some bread (green) and he will drop a NUT.
- Enter the shuttle.
- Zoom in on the wall beside the door and take the MAP PIECE (1/5).
- Click on the symbols on the wall so they go into your journal.
- Pick up LOCK PART 2 from the chair on the right.
- Back out two screens to the farm and zoom in on the door.
- Put LOCK PARTS 1 and 2 on the door.
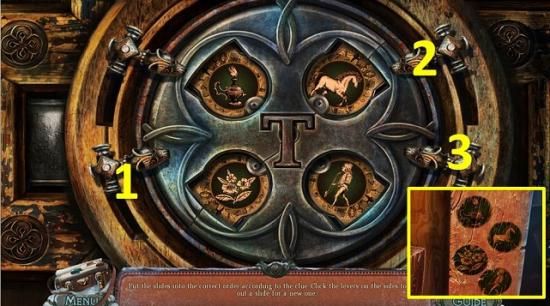
- From the default position: click the handle 1 until the bottom left circle shows flowers; click handle 2until you get a horse; click handle 3 until you get an image of a man.
- Go into the farm.
- Zoom into the tray of letters on the chair.
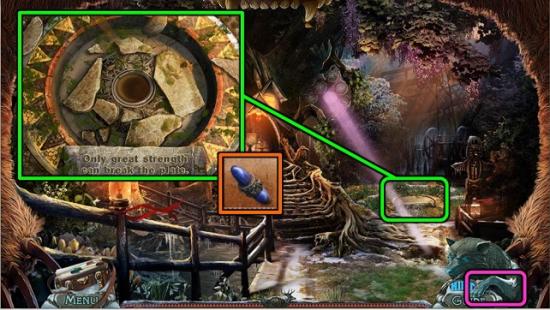
- Go through the letters until you’ve found a MOSAIC PIECE (1/2) and a SMALL VALVE.
- Zoom in on the frame on the wall and break the glass with the STONE.
- Take the FISHING LURE.
- Go upstairs.
- Zoom in on the chair and take the NEEDLE AND THREAD and a MAP PIECE (2/5).
- Play the HOS on the bed.
- Pour tea in the cup and put a slice of lemon in it (green). Cut the belt with the scissors (blue) so you can take the POLE (red).
- Go outside and forward to the cliff.
- Zoom in on the water.
- Put down the POLE and put the FISHING REEL and FISHING LURE on it to catch a FRESH FISH.
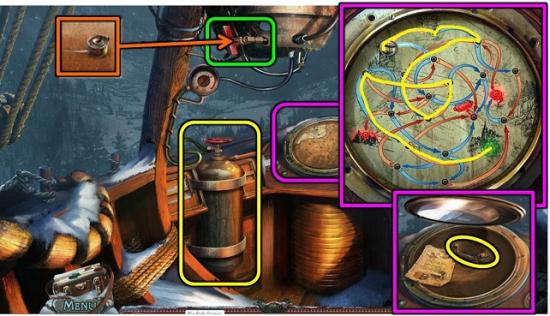
- Go into the shuttle, move the curtain and go into the cockpit.

- Put the SMALL VALVE on the control panel.
- You now need to turn the valves to move all levers to the left. Each valve controls one or two levers. Once all levers are to the left, the puzzle resets and you have to do the same thing again, this time moving the levers to the middle position. Then it resets again and you need to move the levers to the right. If a valve controls two levers, there usually is another valve that moves one of those two on its own. Use the second valve to put the two levers in the same position, then use the first valve to move them both to the position they need to go. From the default position, click the valves in the following order:
Level 1 (left): 3, 6
Level 2 (middle): 1, 3, 6, 5
Level3 (right): 3, 6, 4, 6 - You will be taken to the lighthouse.
The Lighthouse
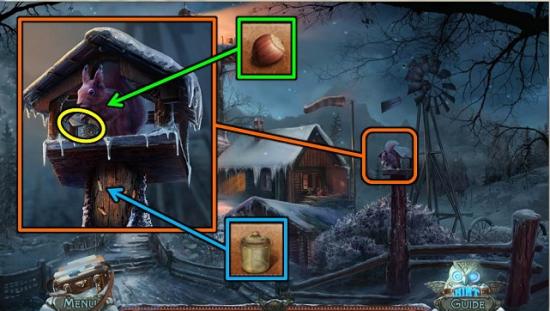
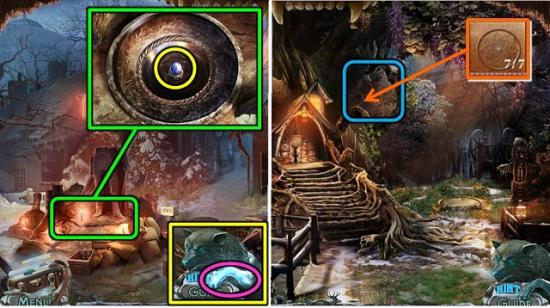
- Zoom in on the birdhouse.
- Give the NUT to the squirrel so you can take the MEDAL.
- Use the CANDY JAR to catch the termites. A JAR OF TERMITES will go into your inventory.
- Back out three scenes to the crossroads. Then go on towards the bridge.
- Zoom in on the statue and give him the MEDAL.
- You can take his CANE.
- Go back to the farm.
- Zoom in on the cart and use the CANE to get the wheel unstuck.
- Take the TARPAULIN and the GLOVE that’s underneath the tarp.
- Take the shuttle back to the lighthouse.
- Zoom in on the shrub and use the GLOVE to get the DOOR HANDLE.
- Open the lighthouse door with the DOOR HANDLE.
- Go in.

- Zoom in on the gas canister on the left and take the NAIL PULLER.
- Inspect the painting and take the SMALL KEY.
- Release the JAR OF TERMITES on the painting so you can take the TONGS and another MOSAIC PIECE (2/2).
- Back out three scenes to the farm.

- Zoom in on the fence and use the NAIL PULLER to remove the BOARD.
- There is a new HOS behind the cart.
- Give the stag his antlers (green).
- At the end of the scene you get a GEAR (red).
- Go into the farm.
- Zoom in on the fire and use the TONGS to take out a BURNING COAL.
- Move the bear rug to reveal a mosaic.
- Zoom in on the mosaic and place your two MOSAIC PIECES.
- To restore the mosaic, click to select a piece, then move it over the board. When it’s above the board you can click on it to rotate it. If a piece is the right way up and above the correct spot, it will click into place automatically.
- Take the PART OF KEY and BIG LEVER from the compartment that opens.
- Go upstairs.
- Open the book on the desk and put the PART OF KEY with the other half of the key.
- Take the ZEPPELIN KEY.
- Go back to the lighthouse and go inside.
- Zoom in on the mechanism on the right.
- Take the MAP PIECE (3/5).
- Put the BIG LEVER on the mechanism and pull it down.
- Go up the stairs.
- Ignore this area for now, just place the BOARD across the gap and move on to the landing zone.
- Give the FRESH FISH to the big cat (oh so THAT’S why we’ve been walking around with a dead fish in our bag!).
- Inspect the tool box on the left and take the GIRL FIGURINE.
- Zoom in on the big hole in the balloon.
- Put the TARPAULIN on it and sew it into place with the NEEDLE AND THREAD.
- Next to the ladder is an EMPTY SACK.
- Go into the zeppelin.
- Take the EMPTY OILER and the EMPTY GAS TANK.
- Unlock the heart-shaped lock with the ZEPPELIN KEY.
- Back out to the cliff.
- There is a new HOS on the pier behind the shuttle.
- To get the diving helmet, put the weight on the hook (blue). Cut the net with the glass shard to get the fish skeleton (green).
- When you’re done you get a TAP (red).
- Back out to the farm.
- Zoom in on the barrel on the porch.
- Put the TAP in the barrel and put the EMPTY OILER under it.
- Turn the handle to fill the oiler.
- Take the FULL OILER.
- Go into the farm and upstairs.
- Zoom in on the box on the windowsill.
- Put the GIRL FIGURINE on it, then open it with the SMALL KEY.
- Inside is a LENS.
- Play the new HOS on the bed.
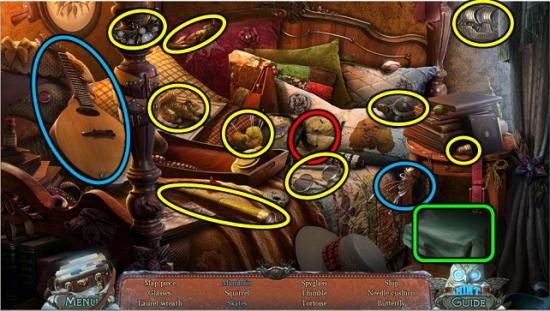
- Put the strings on the mandolin (blue). Remove the cloth under the table (green) to find the skates.
- When you’re done you get another MAP PIECE (4/5) (red).
- Go back to the lighthouse and go in.
- Zoom in on the gas tank on the left.
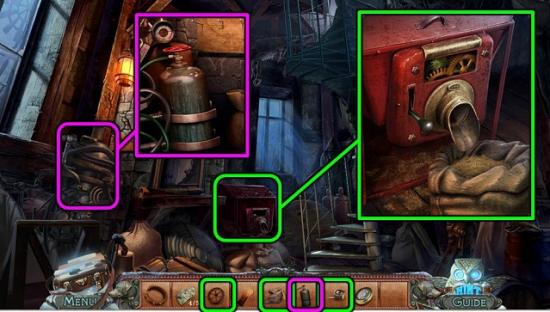
- Put the EMPTY GAS TANK in the holder, attach the rubber hose and turn the red valve.
- Take the FULL GAS TANK.
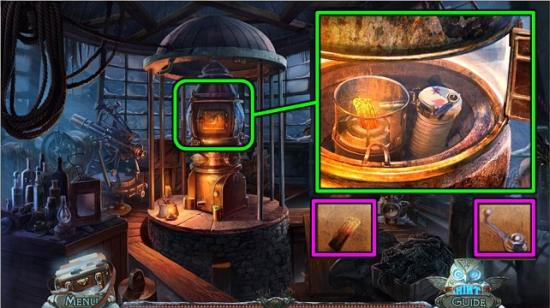
- Zoom in on the red device in the middle of the room.
- Put the EMPTY SACK under it.
- Put the GEAR in the mechanism and oil it with the FULL OILER (for both you need to click on the little window with the gears).
- Pull the lever and take the SACK WITH SAND.
- Go upstairs.
- Zoom in on the telescope on the left, remove the broken lens and replace it with your LENS.
- Watch the scene through the telescope and take the final MAP PIECE (5/5).
- Go on to the landing zone.
- Put the SACK WITH SAND by the door.
- Enter the zeppelin.
- Use the FULL OILER on the valve at the top.
- Put the FULL GAS TANK in the holder and turn the red valve at the top of the tank.
- Turn the valve you just oiled.
- Zoom in on the dashboard and place your MAP PIECES.
- Move the balloon to the green area on the right by clicking on the arrows. If you hit a red zone the balloon will be taken back to the start.
- A compartment opens.
- Take the GAS VALVE.
- Back out two screens and zoom in on the lighthouse light.
- Open the hatch.
- Light the fire with your BURNING COAL.
- Put the GAS VALVE on the right and turn it.
- Close the hatch.
- Enter the zeppelin.
Chapter 4: Dr. Dean’s House
- Pick up the HOSE.
- Back out to the Left Square.
- Zoom in on the fire hydrant by the gate.
- Attach the HOSE to it and go back to the Right Square.
- Click on the fire to activate the fire hose.
- There is a HOS inside the burning zeppelin.
- Extinguish the fire with the liquid from the bottle to get the notes (green). Put the two pieces of the heart together (blue).
- You get a BATON (red).
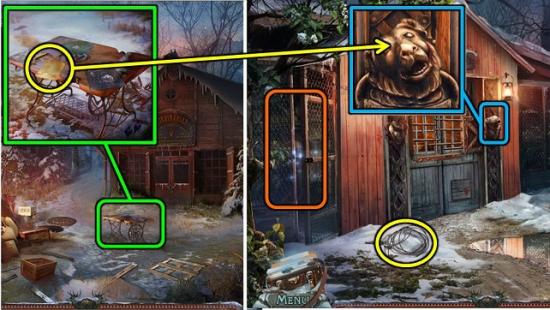
- Go right to Dr. Dean’s house.
- Pick up the SAXOPHONE KEY (shown in later image).
- Back out two screens and go to the fountains in the back.
- Give the right statue the BATON and the middle statue the SAXOPHONE KEY.
- You need to move the sliders until the three musicians all play at the same speed. Fortunately, this is made easier by the fact that the buttons on the sliders turn green when they’re in the correct spot.
- Go through the tunnel to the canyon.
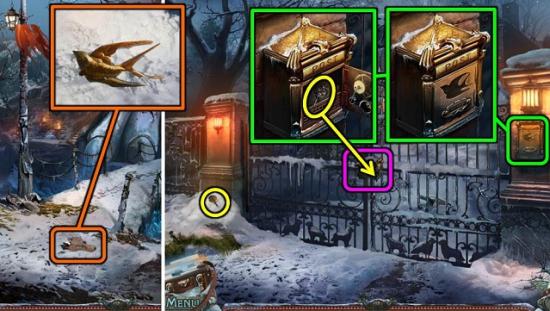
- Pick up the note and the SWALLOW.
- Attempt to cross the bridge.
- Go back to Dr. Dean’s house.
- Zoom in on the mailbox and put the SWALLOW in the indentation.
- Take DEAN’S KEY and use it to open the gate.
- There is a HOS by the snowman.
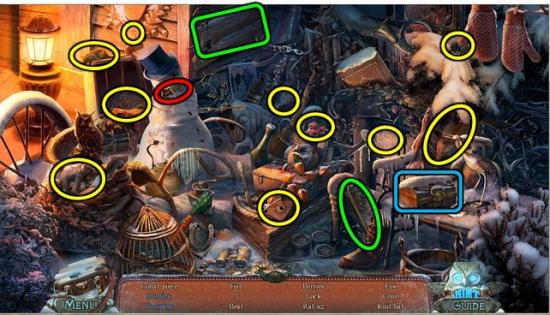
- The domino is inside the small chest (blue). Remove the weatherboards with the hammer to find the compass (green). The bear is not the Teddy bear on the right.
- You get a COLLAR PIECE (red).
- Go into Dr. Dean’s house and through the door to Roger’s cabinet.
- Inspect the folder on the far table and move the documents until you find the DEER FIGURINE.
- Zoom in on the hatch.
- Put the COLLAR PIECE on the dog’s collar to open the hatch.
- Go down the hatch to the operating room.
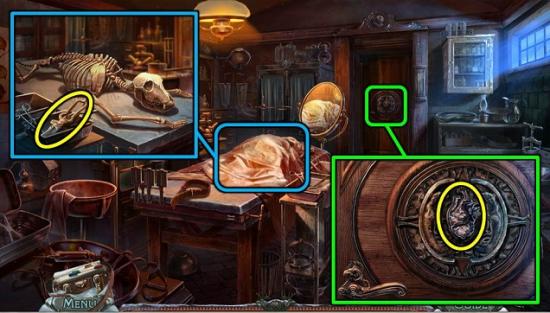
- Remove the sheet from the table and zoom in on the skeleton.
- Take the PRUNER.
- Zoom in on the door and take the STONE HEART.
- Back out three scenes to the front of the house.
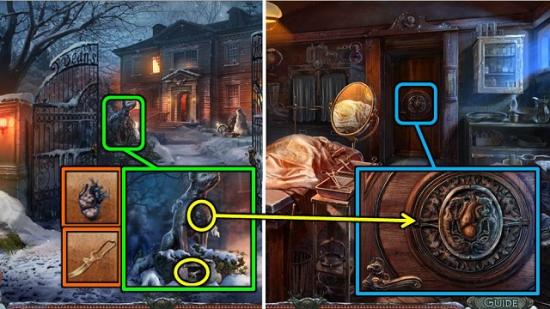
- Zoom in on the dog statue.
- Use the PRUNERS to get rid of the vines.
- Take the WOODEN HEART and give the dog the STONE HEART.
- Take the DOG PUPPET from the hidden compartment.
- Go back to the operating room and put the WOODEN HEART on the lock on the door.
- Pull the handle and go through to the laboratory.

- Take the RETRACTOR.
- Back out to the operating room and zoom in on the skeleton.
- Use the RETRACTOR to spread the ribs and take the RULER and the WEB CUTTER.
- Go to the laboratory.
- Zoom in on the glass jar on the bench and remove the cobwebs with the WEB CUTTER.
- Take the safe combination from the jar.
- Zoom in on the door and lift the latch with the RULER.
- Take the SMALL HOOP NET.
- Back out two screens and zoom in on the fish tank.
- Use the SMALL HOOP NET to take the CARD FILE KEY.
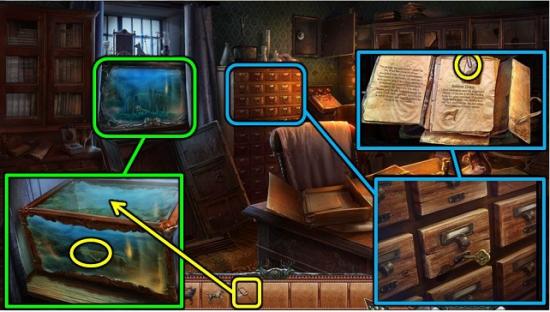
- Zoom in on the filing cabinet and unlock the drawer with the CARD FILE KEY.
- Take the CLIP.
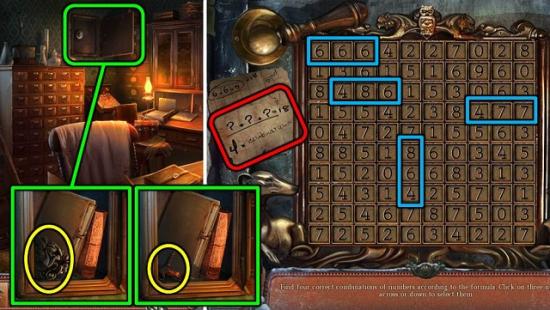
- There’s a safe on the wall. Now you have the safe combination, you can open it by finding four horizontal or vertical sets of three numbers that add up to 18.
- Take the PATTERN and CORKSCREW from the opened safe.
- Go into the operating room.
- Zoom in on the first aid box and “jimmy the lock open” with the CLIP.
- Take the FILE and read the note.
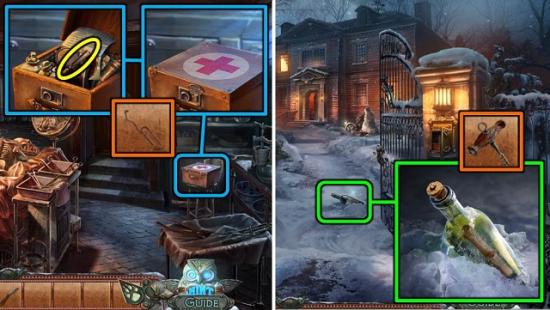
- Back out to the garden.
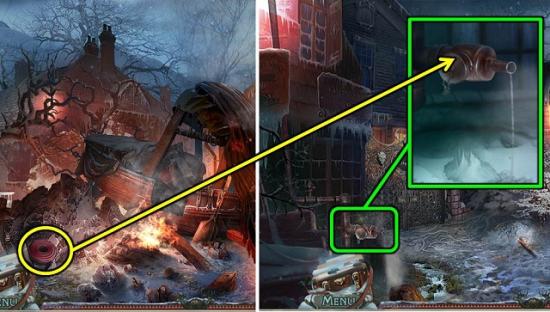
- Zoom in on the bottle in the snow and take out the cork with the CORKSCREW.
- Inside the bottle is a pattern.
- Go back into the house and zoom in on the door under the stairs.
- Place the PATTERN on the lock.
- Play the HOS in the cupboard.
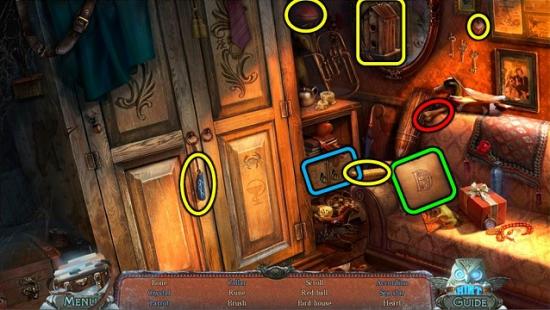
- The scroll is behind the cushion (green). The collar is inside the small cabinet next to the sofa (blue).
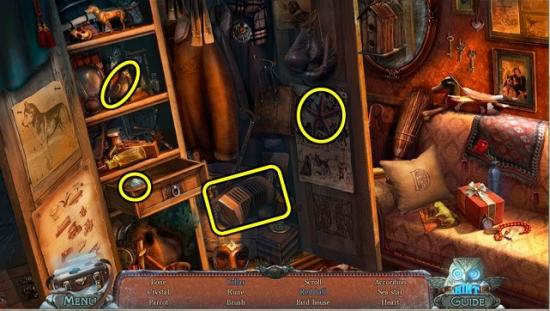
- Some items are inside the cupboard. You can close the cupboard doors again by clicking on below the starfish on the right door. The crystal is inside the drawer in the cupboard.
- At the end of a scene you get a BONE (red). (You know, I always wonder what possesses the people in these games to rummage through piles and piles of useful stuff like guns and keys and crowbars and whatnot and then decide the only thing they take is … a bone.)
- Go back into the house and click on the door at the top of the stairs.
- Put the DOG PUPPET on the door.
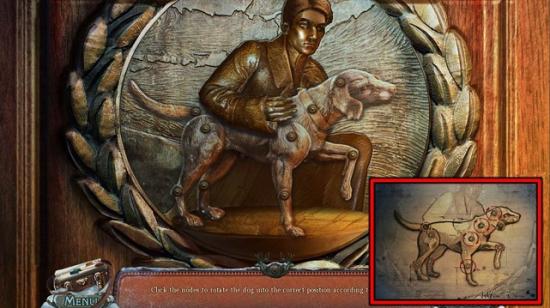
- Now check the clue you just found in your journal to figure out how to configure the dog. This is the only puzzle I skipped. The differences in position are just too subtle. But I’ve made a screenshot for your viewing pleasure. You know, just in case it helps at all. If you’ve come here from the default position: the two sections of the hind limbs should be as far forward as possible. Don’t touch anything else.
- Go through the door into Ashton’s room.
- Talk to Ashton’s mother and take the DOG SCENT.
- Read Ashton’s diary on the floor.
- Tear back the wallpaper and find the PIECES OF LETTER.
- Back out to the hallway and play the new HOS in the cupboard.
- The crab is carved into the front of the door. Light the candle with the matches (green).
- The R can be seen in the mirror when the doors are open.
- When you’re done you get the GLUE (red).
- Go back upstairs
- Put the PIECES OF LETTER with the other pieces on the floor.
- Use the GLUE to glue the pieces of letter on the floor together.
- Go to the outside of the house and play the new HOS by the snowman.
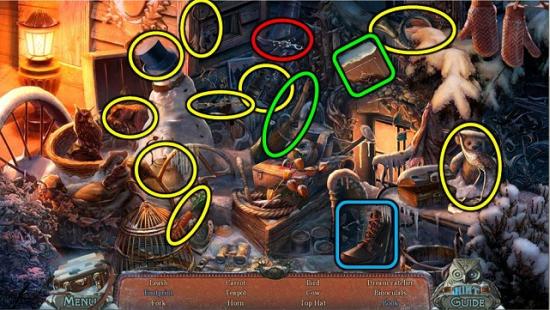
- Move the boot to find the footprint (blue). Wipe the snow off the book with the broom (green).
- At the end of the scene you get a LEASH (red).
Chapter 5: Dog’s Town
- Go to the fountains and through to the canyon.
- Release the DOG SCENT on the dogs guarding the bridge.
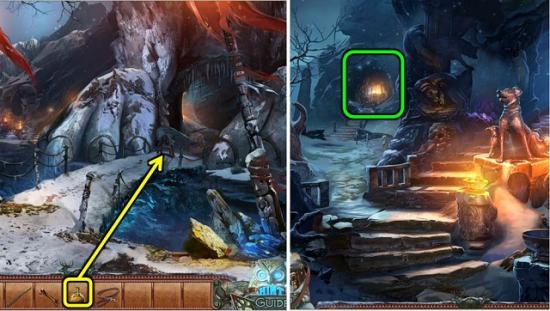
- Cross the bridge to the cave entrance.
- Play the HOS in the cave on the left.
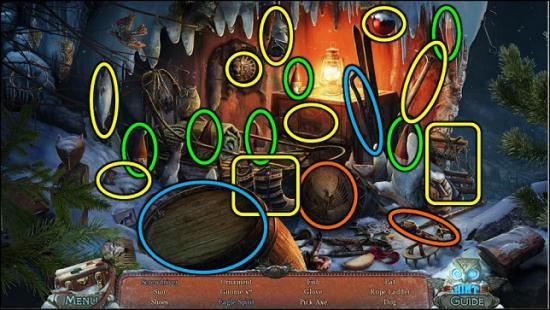
- Hit the drum with the stick to get the eagle spirit (orange). Open the barrel with the crowbar (blue) to find the SCREWDRIVER and one of the gnomes.
- Go into the tunnel, which on the map is indicated as the road fork.
- Go straight through to the dining room in the back.
- Go through to Dog’s Town.
- Pick up the BIRD SKULL.
- Zoom in on the left cage and open it.
- Give Pippa the BONE.
- Zoom in on the statue and take the MAMMOTH TUSK.
- Back out to the dining room.
- Zoom in on the PUPPY STATUE and release him with the SCREWDRIVER.
- Zoom in on the barrel for a mini game.
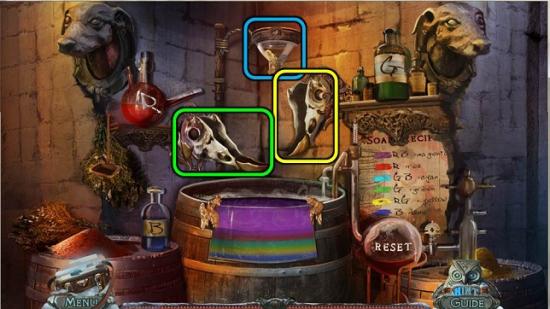
- Put the BIRD SKULL on the puzzle to activate it.
- You need to make soap by creating a series of colored layers in the barrel, as indicated by the list of colors on the side. Sometimes you need to combine two colors before they go into the barrel to make a new one. Red will always go into the left skull (green), blue and green will always go into the funnel at the top (blue). The tricky part is that the right bird skull (yellow) flips up and down between moves. When the right skull is down, any blue or green you put in will fall straight through into the barrel. When the skull is up, it will tip when you put something in it and the content will be combined with whatever is in the left skull. The left skull needs two lots of dye to tip. So, to enter the layers shown on the barrel, click on the colors in the following order:
- 1. Blue (with the right skull down it will fall straight into the barrel)
- 2. Green (goes into the right skull), followed by red (combined to make yellow)
- 3. Green (will tip into the left skull).
- 4. Green again (will fall straight into the barrel).
- 5. Blue (combined with the green from step 3 to make cyan).
- 6. Red and red again to make one layer of red.
- 7. Red, followed by blue to make the magenta layer.
- You get SOAP.
- Back out to the cave entrance.
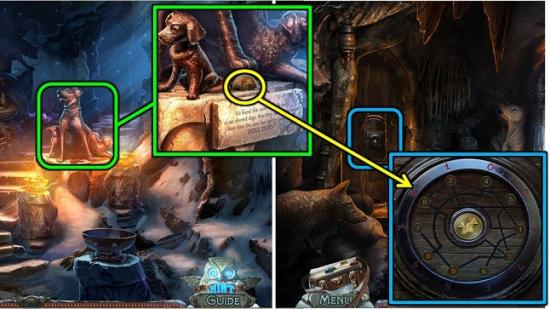
- Zoom in on the statue and put the PUPPY STATUE on it.
- Take ASHTON’S MEDAL.
- Go back to the road fork.
- Zoom in on the door and put ASHTON’S MEDAL on it.
- As with most mini games, the game will only be triggered if you’ve previously found the clue. The clue for this game was on the floor in Ashton’s room, next to the torn letter. It needs to be in your journal.
- Swap the numbers around until they match the numbers around the outside. When you click on a number, the numbers it can be swapped with will be highlighted in green. From the default position, swap them in the following order:
- 0 and 4
- 2 and 8
- 1 and 8
- 3 and 9
- 3 and 7
- 9 and 5
- 7 and 5
- Go through the door into Roger’s laboratory.
- Take the TRIANGLE and the clue about what to do with the mammoth tusk from the table.
- Pick up the SMELLING SALTS.
- Go back to Dog’s Town in the back and zoom in on Pippa’s collar.

- Put the TRIANGLE on the collar.
- This is a straightforward maze puzzle. Just move the triangle to the center of the maze. (Apologies for my very awkward drawing!)
- Take Pippa.
- Back out two screens to the fork.
- Zoom in on the base of the statue and SOAP it.
- Click on the statue to make it slide down.
- Zoom in on the broken statue and take the PEARLS.
- You can now climb to the window and take the LEVER.
- Now go all the way back to the laboratory in the basement of Dr. Dean’s house.
- Zoom in on the bowl on the table and put the SMELLING SALTS in it.
- Take the SMELLING SALTS COTTON out of the bowl.
- Go back to the dining room outside of Dog’s Town.
- Zoom in on the locked door and wrap the LEASH around the bars.
- Zoom in on the cart and put the LEVER on it.
- Pull the lever.
- Go into the cages.

- Take the PICKAXE.
- Zoom in on Lily and revive her with the SMELLING SALTS COTTON.
- Take the LIFE FLOWER.
- Back out to the road fork.
- Zoom in on the wall in the back corridor.
- Use the PICKAXE to get a DIAMOND.
- Zoom in on the hole in the roof and put the DIAMOND in it.
- Put Pippa down the gap behind the statue.
- Pick up the OWL SYMBOL and take PIPPA again, too.
- Back out to the canyon.

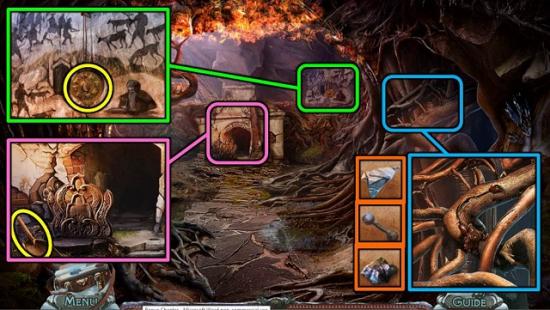
- Zoom in on the table on the left and put down the MAMMOTH TUSK, the FILE, the PEARLS and the LIFE FLOWER.
- You need to carve the tusk according to the instructions you found in the laboratory. Each section can only be cut with one specific tool. Please refer to the screen shot to see which tool is used for which section. Each section needs to be cut three times. If you make a mistake you have to start over. Once all seven sections are carved, put the pearls and life flower on the horn.
- Take the HORN COPY.
- Go to the road fork and into the laboratory.
- Zoom in on the dog statue and give it the HORN COPY.
- You will get the actual HORN.
- Go to the cages.
- Zoom in on the mechanism on the wall and put the DEER FIGURINE and OLW SYMBOL on it.

- You need to slide all the boxes to the slots on the right side of the field. Once in a slot, you can still move the boxes in and out or even between slots. The boxes labeled 1 and 11 need to go into the slots labeled 1 and 11.
- Give Lily the STRANGE COLLAR.
Go to Dog’s Town, watch the scene and blow the HORN.
Bonus Chapter (Collector’s Edition Only)
- You now have a new power called Super Vision. This skill allows you to find new interactive places in areas that are otherwise too dark. To use this, click on the eyes of the dog in the bottom right corner of the screen when they’re lit up.
- Use your Super Vision to find the curtains, and click on the curtains to open them.
- Look under the bed to find a DUMBBEL.
- There is a HOS on the desk.
- Water the flower and cut it with the scissors (green). The handsaw is behind the curtain (orange). Put the weight on the scale for the diamond (blue).
- When you’re done you get a ROPE (red).
- Zoom in on the window.
- Use the DUMBBEL to remove the metal grid.
- Put the ROPE out the window.
- Climb out the window to the garden.
- Take the DREAM CATCHER (1/7).
- Zoom in on the bench and take the NAPKIN.
- Go back inside.
- Zoom in on the mirror – it will break.
- Use the NAPKIN to take the MIRROR PIECE.
- Go outside.
- Zoom in on the door under the tree.
- Use the MIRROR PIECE to cut the vines.
- Click on the door.
- Use your Super Vision.
- Grab the FLINT.
- Zoom in on the resin on the left and ignite it with the FLINT.
- Zoom in on the oven in the back and take the SCOOP.
- Zoom in on the mural and take the SLIDE (1/3)
- Zoom in on the branches on the right.
- Jam the MIRROR PIECE into the branch and drive it deeper in with the DUMBBEL.
- Ignite this resin with the FLINT, too.
- Go through the door that’s revealed.
- Use your super vision again to find the STICK.
- Back out to the previous map.
- Zoom in on the mirror shard on the ground by the door.
- Attach the STICK to the shard to get a STICK WITH MIRROR.
- Go back through the door and zoom in on the ceiling.
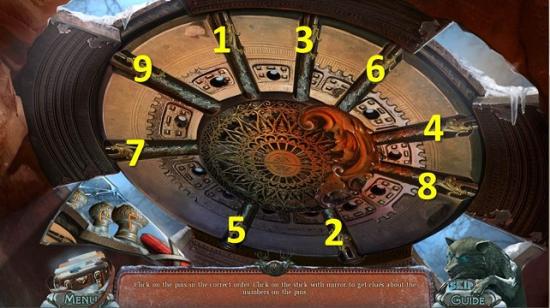
- Put your STICK WITH MIRROR on the puzzle.
- The stick with the mirror will show you the numbers on the backs of the pins. The first mirror says 7, 9, 1, click on it once to see 4, 6, 3, and click again to see 8, 2, 5. This means the pins are numbered in that order going clockwise from the one nearest the mirror. Except the middle section is in reverse order because of how the mirror is positioned. So the pins are numbered 7, 9, 1, 3, 6, 4, 8, 2, 5, clockwise from the one nearest the mirror. Click them in numerical order.
- Go through the hole in the roof.
- Oh look where you are!
- Zoom in on the pottery wheel and take the PAPER AND PENCIL.
- Also read the instructions on the blueprint.
- Go down the street to the kennel.
- Pick up the BELT.
- Zoom in on the dog head to the right of the door and use the PAPER AND PENCIL to make a DRAFT OF DOG.
- Play the HOS behind the left fence.
- Use the knife to carve the Jack-o-lantern (green). Put the rolled up paper cone in the net and click on the sunflower to collect the seeds (blue).
- You get a LADLE (red).
- Go back to the square and down the manhole.
- Use your super vision to find the clay.
- Use the LADLE to get a LADLE WITH CLAY.
- Go to the square.
- Zoom in on the pottery wheel.
- Put the LADLE WITH CLAY, BELT and DRAFT OF DOG on the wheel.
- Take the CRUDE DOG HEAD.
- Back out to the Left Square and go down the road to the fountains.
- Take the EMPTY BUCKET and DREAM CATCHER (2/7).
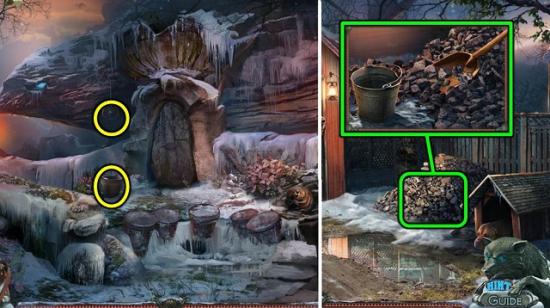
- Go to the kennel and zoom in on the pile of coal.
- Put down the EMPTY BUCKET and use the SCOOP to fill it with coal.
- Take the BUCKET WITH COAL.
- Go down the manhole and back one screen to the catacombs.
- Zoom in on the oven and put the BUCKET WITH COAL in it.
- You will get the EMPTY BUCKET back.
- Put the EMPTY BUCKET down under the dripping resin.
- Take the BUCKET WITH RESIN.
- Zoom in on the oven again and put the BUCKET WITH RESIN on the coals.
- Put the CRUDE DOG HEAD in the fire and take out the DOG HEAD once it’s baked.
- Go back to the kennels.
- Put the DOG HEAD on the broken head beside the door.
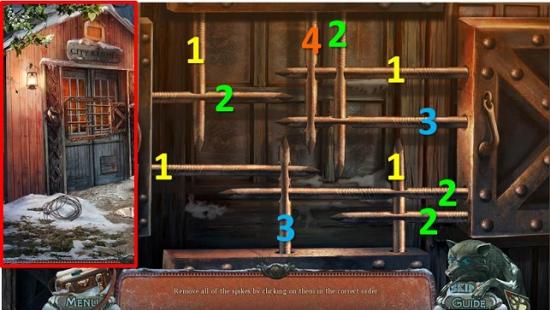
- Zoom in the door for a mini game.
- You need to remove the metal bars in the right order. Look carefully which bars are free to move (which is if they don’t have another bar going through them).
- Go into the kennel and talk to Lily.
- You now have another new ability called Super Smell. This will lead you to new items to find, that you weren’t able to click on before. To use Super Smell, click on the dog’s nose when it’s lit up.
- Use Super Smell.
- Move the sack of dog food.
- Find the SUITCASE KEY.
- There is another SLIDE (2/3) on the pin board.
- Take the DREAM CATCHER (3/7).
- Back out to the square and receive an EMPTY CROSSBOW.
- Go down the manhole and back all the way out to the bedroom.
- Zoom in on the suitcase and open it with the SUITCASE KEY.
- Find the DOG WHISTLE.
- Use your super smell and zoom in on the pillow on the bed.
- Find the BONE KEY.
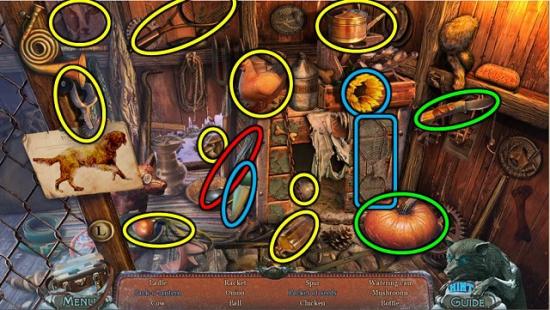
- Play the new HOS on the desk.
- Put the two pieces of the birdhouse together, put the nails in them (green) and fix them in place with the hammer from the drawer (orange). The dog figure is under the roof of the birdhouse. The eight ball is also in the drawer. Put the knitting needles on the yarn to knit a sock (blue).
- You get the BIRDHOUSE.
- Go all the way back to the kennels.
- Open Jessie’s cage with the BONE KEY.
- Play the HOS.
- Open the sack of grain to find the bird food (blue). Light the lantern with the candle (green).
- You get BIRD FOOD.
- Go to the garden on the other side of the catacombs.
- Zoom in on the tree branch and put the BIRDHOUSE on it.
- Put the BIRD FOOD in the birdhouse and take the PLATE and the FEATHER.
- Go out through the manhole and then back out to the Left Square.
- Zoom in on the City Hall gates.
- Put the PLATE on the puzzle.
- Swap the numbered tiles on each plate until all rows and columns on the left plate add up to 11 and those on the right plate add up to 13. All fours are fixed in place.
- Go into the City Hall.
- Take the DREAM CATCHER (4/7).
- Zoom in on the small case on the left and take the SUN SYMBOL and SLIDE (3/3).
- Zoom in on the projector and put your SLIDES in it.
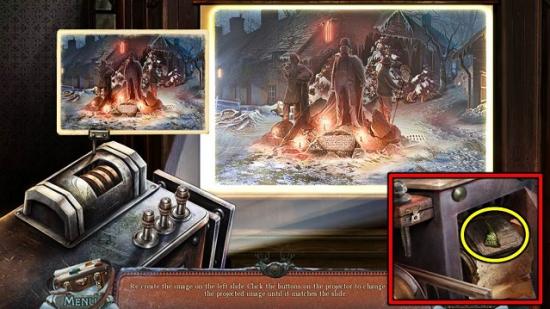
- You need to click the three buttons until the large image matches the small one on the left. This is quite tricky as it comes down to quite small details. Check carefully if you don’t have any extra items scattered around the main slide.
- Zoom in on the projector again to take the ROOT and look at the clue.
- Go back to the right square and go down the manhole.
- Use super vision.
- Use the DOG WHISTLE to scare away the bats.
- Zoom in on the door and put the SUN SYMBOL in the empty space.
- Slide the symbols around until they match the clue you just found in the City Hall.
- Go through the door.
- Take the BARK.
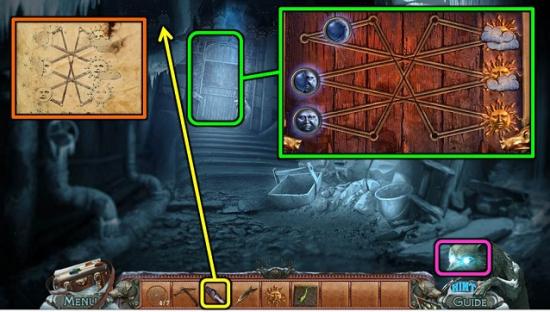
- Zoom in on the door in the tree and put the ROOT on the puzzle.
- Rotate the sections until all root sections are connected.
- Go into the tree house.
- Talk to the Elder, but you can’t understand him.
- Take the DREAM CATCHER (5/7), BRUSHWOOD, OBSIDIAN KNIFE and DOOR KNOCKER.
- Read the notes on the side table.
- Go to the fountains.
- Talk to Lily.
- You now have Super Strength, which can be used to break heavy things. Activate super strength by clicking on the dog’s paw when it’s lit up.
- Select your super strength and use it on the cave door.
- Pick up Lily’s ENGAGEMENT RING.
- Zoom in on the beaver and give him the BRUSHWOOD.
- Pick up the BLANK FOR ARROW.
- Before we go through the cave, let’s go back to the kennels.
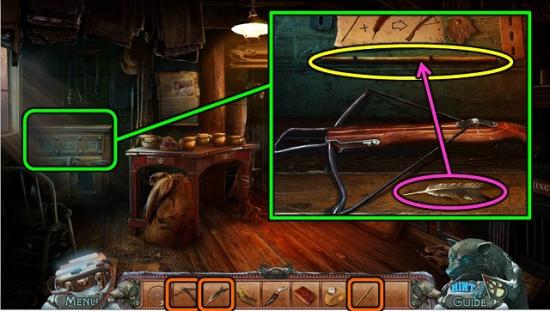
- Zoom in on the table in the back and put down the EMPTY CROSSBOW, FEATHER and BLANK FOR ARROW.
- Put the feather on the arrow, then put the arrow on the crossbow.
- Take the LOADED CROSSBOW.
- Go back to the fountains.
- Go through the cave to the canyon.
- Pick up the SPRAYER NOZZLE and the DREAM CATCHER (6/7).
- Shoot the rope ladder with the LOADED CROSSBOW.
- Go down the ladder into Dogs Town.
- Play the HOS by the pillar on the right.
- Put the egg on the nest to hatch a chicken (green). Tickle the statue’s nose with the feather to get the bone (blue).
- Get the SPRAYER BULB (red).
- Go to the City Hall
- Zoom in on the small wooden door and put the DOOR KNOCKER on it.
- Click on the knocker to open the door.
- Take the DICTIONARY.
- Go to the winter gardens outside the Elder’s house.
- Zoom in on the sprayer by the tree’s roots and put the SPRAYER BULB and SPRAYER NOZZLE on it.
- Pick up the EMPTY SPRAY (sic).
- Go into the Elder’s house.
- Zoom in on the glass cabinet on the right.
- Cut a hole in the glass with the ENGAGEMENT RING.
- Take the CROCODILE SKIN.
- Put the DICTIONARY on the Elder to get a puzzle.
- You quite simply need to put all the pieces that were cut out of the book back in place.
- The Elder will give you a HORN.
- Also take the scroll he’s holding after you’ve taken the horn.
- Back out to the garden on the other side of the sewers.
- Use the Super Smell ability to find the skunk in the bushes.
- Use the EMPTY SPRAY to collect some of the skunk’s smell.
- You get a SPRAYER WITH SCENT.
- Go to Dog’s Town.
- Use the SPRAYER WITH SCENT on the wolf blocking the way.
- Use your Super Strength to break off a MAMMOTH BONE.
- Play the new HOS by the pillar.
- Put the onion and carrot into the vegetable soup (green). Use the pickaxe to get the crystal (blue).
- Get your last DREAM CATCHER (7/7) (red).
- Go back to the square.
- Talk to the man, who will give you a wolf pelt. You won’t see it anywhere because you’re wearing it!
- Use your Super Strength to move the broken statue.
- Take the CAPSULE.
- Go back to the winter garden.
- Zoom in on the dream catchers in the tree and put your DREAM CATCHERS on the puzzle.
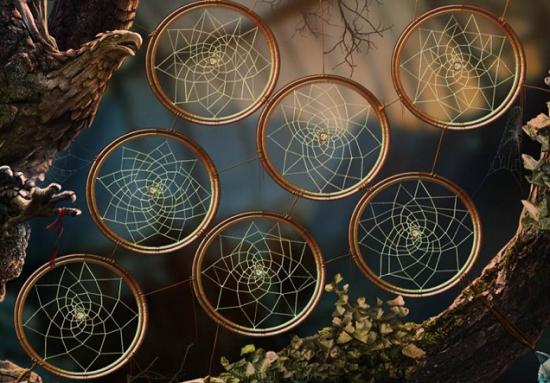
- Swap the bottom halves of the dream catchers until they’re all complete. This is quite hard to see and I’m afraid the screenshot won’t be that much help. You can always start swapping things at random, which is how I got there…
- Look on the ground where the light is shining and dig with your bare hands until you find an EMPTY SPHERE.
- Back out to the catacombs.
- Zoom in on the container under the dripping resin and place the EMPTY SPHERE.
- Cut a hole in the branch with the OBSIDIAN KNIFE.
- Take the SPHERE WITH RESIN.
- Go to the winter garden.
- Zoom in on the stone plate and use your super strength to break it.
- Put the CAPSULE in the hole.
- Zoom in on the pedestal and put down the BARK, CROCODILE SKIN, MAMMOTH BONE and SPHERE WITH RESIN on it.
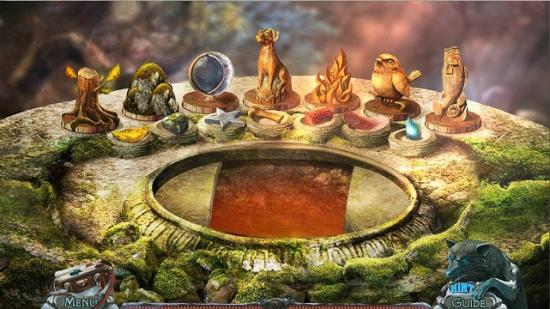
- Swap two items that are next to each other to match them with the larger objects. It’s easiest to start at one end and move your way down the line.
- You get COLLARS.
- Go to the kennels.
- Zoom in on the dogs and give them the COLLARS.
- Go to Dogs Town.
- Use the HORN on your dogs.

More articles...
-
Best Horror Games On Itch.io – July 2026
Across a bounty of subgenres. -
Grow A Garden 2 Base Price List
What's the most valuable crop? -
Evomon Types Guide [Strengths, Weaknesses, Resistance]
Your companion guide during battles.