
Best Horror Games On Itch.io – July 2026
Across a bounty of subgenres.![Haze Seas Accessories Tier List [Best Accessories to Equip]](/wp-content/uploads/2026/07/haze-seas-accessories-tier-list.jpg "Haze Seas Accessories Tier List [Best Accessories to Equip]")
Haze Seas Accessories Tier List [Best Accessories to Equip]
The accessories with the best stat buffs in Haze Seas.
![[Roblox] Evomon Shiny Hunting Guide – Including Prismatic and Pris Shinies!](/wp-content/uploads/2026/06/evomon-shiny-hunting-guide.jpg "[Roblox] Evomon Shiny Hunting Guide – Including Prismatic and Pris Shinies!")

Fear for Sale: The Mystery of McInroy Manor Walkthrough
Welcome to the Fear for Sale: The Mystery of McInroy Manor Collector’s Edition walkthrough on Gamezebo. Fear for Sale: The Mystery of McInroy Manor Collector’s Edition is a Hidden Object Game played on the PC created by EleFun Games. This walkthrough includes tips and tricks, helpful hints, and a strategy guide on how to complete Fear for Sale: The Mystery of McInroy Manor Collector’s Edition.


- Prefer Gamezebo on Google

Fear for Sale: The Mystery of McInroy Manor – Game Introduction
Welcome to the Fear for Sale: The Mystery of McInroy Manor Collector’s Edition walkthrough on Gamezebo. Fear for Sale: The Mystery of McInroy Manor Collector’s Edition is a Hidden Object Game played on the PC created by EleFun Games. This walkthrough includes tips and tricks, helpful hints, and a strategy guide on how to complete Fear for Sale: The Mystery of McInroy Manor Collector’s Edition.
Tips
General description
This hidden object game requires visiting several locations and using inventory items to advance play.
- Play is generally non-linear but some areas or tasks must be complete to open another area.
- CAPITALIZED inventory items are meant to make it easier to find where this guide may deviate from your own play.
- There is no timer but achievements can be earned, among them completing the game in less than five hours.
- There are no penalties for multiple clicks in a scene.
- Always move the cursor around a scene. Watch the cursor to see if it changes into a hand.
Beginning Play:
- Profiles – Create or delete player profiles.
- Options – Change music and sound effects volume. You may select or deselect full screen and custom cursor play.
- Achievements – Some achievements are measured throughout the game (i.e. the number of hidden object scenes completed without using a hint). Others are earned after completing the game.
Navigation:

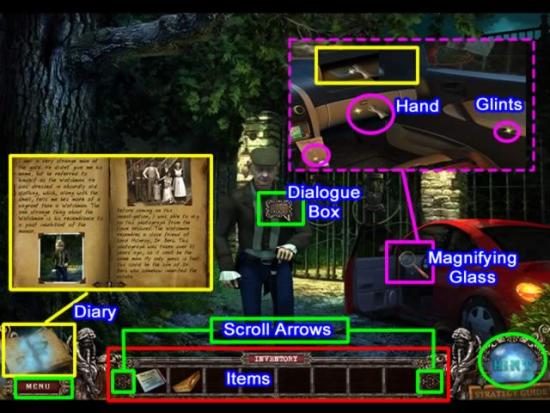
- Diary – Clicking an object can add clues or information. A glowing diary indicates new information.
- Menu – Continue, Options, Help or Exit.
- Inventory/Item List – A scrollable list of icons showing available items or a list of hidden items to be collected.
- Hint/Skip Globe – Clicking will show a random item from an itemized list or a part of an item. Hints are not limited but the globe refills slowly. The globe turns into a Skip globe for puzzles.
Symbol Meanings:
- Magnifying Glass – Zoom in on interactive area.
- Hand – Interact with an object: pick up an item, open a door, move an object.
- Glint – Investigate this area.
- Dialogue Box – Have a conversation with a character.
Walkthrough
A short clip explains the background and introduces the story line for play.
Play the optional tutorial to learn how to interact with objects and characters.
- Collect a SANDWICH and IDENTITY CARD from the car.
- Give the IDENTITY CARD to the Watchman. Receive a KEY to the house.
- Enter the gates.
Chapter 1: Entering the House
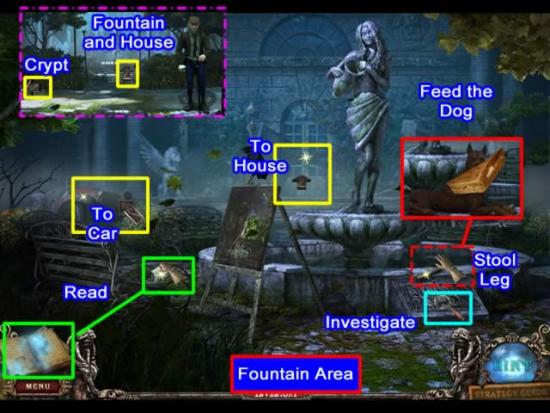
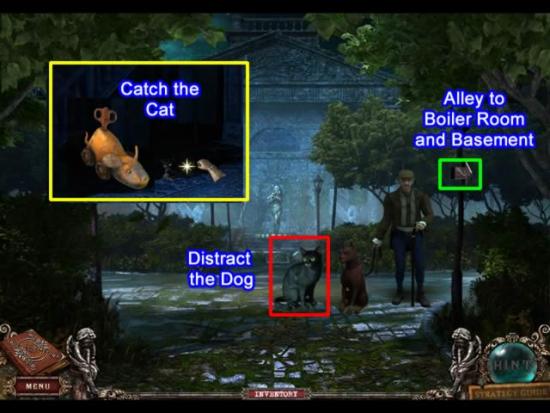
Have a conversation with the Watchman (inset above). Click the forward arrow to enter the Fountain Area.
- Click the note on the bench. Read the new information in the diary.
- Give the SANDWICH to the dog. He leaves. Two new areas are now available: The house entrance and the car.
- Collect the STOOL LEG.
- Clicking the magnifying glass at the base of the fountain shows a locked door.
Click the left arrow to go to the car.
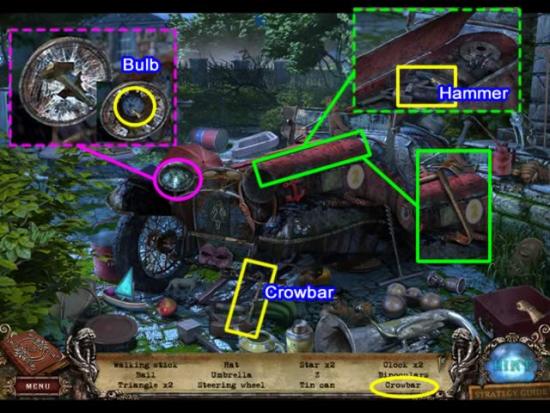
Find the listed hidden objects (your list may differ from the above screenshot). The CROWBAR goes to inventory.
Find all the objects without using a Hint to begin working toward the Lead Writer Achievement.
- Use the CROWBAR to pry open the tool box.
- Collect the HAMMER.
- Use the HAMMER to smash the headlight (pink inset above). The LIGHT BULB goes to inventory.
Removing the jack from under the car cannot yet be done.
Return to the Fountain Area.
Click the arrow for the House.
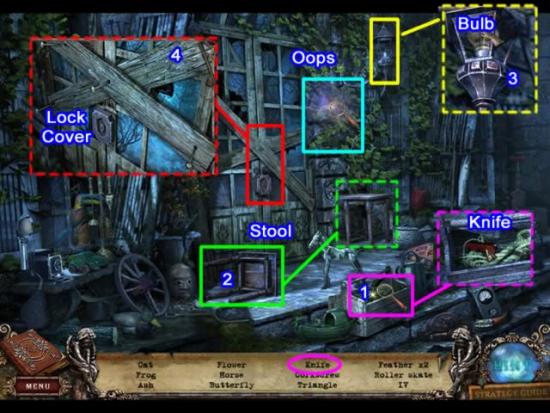
Find the listed hidden objects (your list may differ from the above screenshot). The KNIFE goes to inventory.
- Use the STOOL LEG to repair the STOOL. The stool goes beneath the lamp.
- Place the BULB in the light (inset in yellow above). Click to screw it in. There seems to be a minor electrical problem behind the foliage.
- Click the door to open the interactive area.
- Use the CROWBAR to remove each of the NAILS. The boards fall away revealing a lock cover.
Click the down arrow to return to the fountain.
Click the down arrow to return to the Watchman.
Click the left arrow to approach the graveyard area.
- Click the glowing head to get diary information.
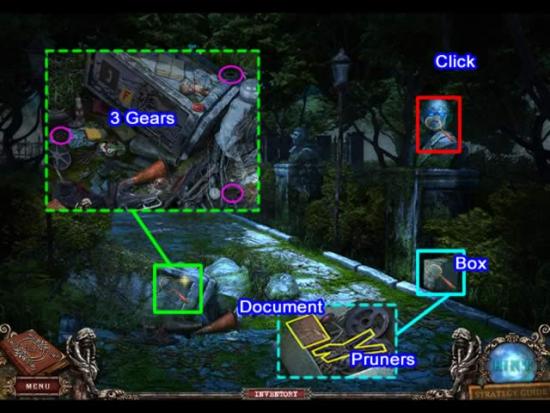
Click the box to access the interactive area.
- Use the KNIFE on the wire binding the box. Click to reveal the contents of the box.
- Get the documents from the original police investigation (added to the diary) and the GARDEN PRUNERS.
- Click the statue to access a hidden object area. Collect all listed items. THREE GEARS go to inventory.
Click the down arrow to return to the Watchman.
Click the up arrow to return to the fountain.
Click the up arrow to return the house entrance.
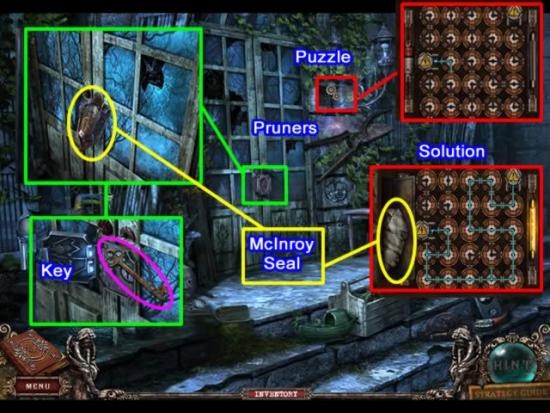
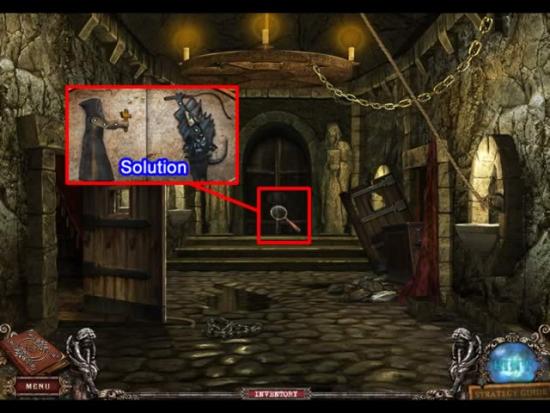
- Use the GARDEN PRUNERS on the foliage to expose the fuse box.
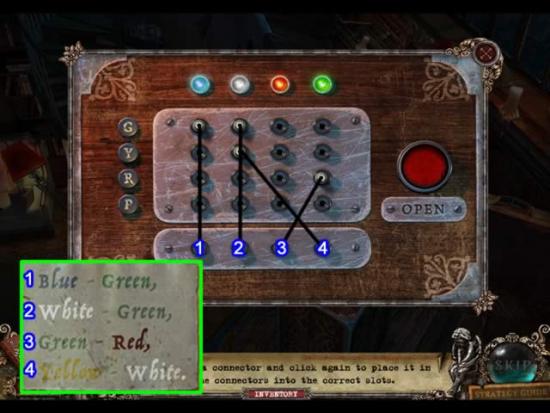
Click the gears icon to open the puzzle area.
- Rotate the connectors to complete the circuit.
- The easiest way to solve the puzzle is to start and the ending point and work backwards.
- See the above inset for a solution.
- Retrieve the MCINROY SEAL.
Click the magnifying glass on the door lock to open the interactive area.
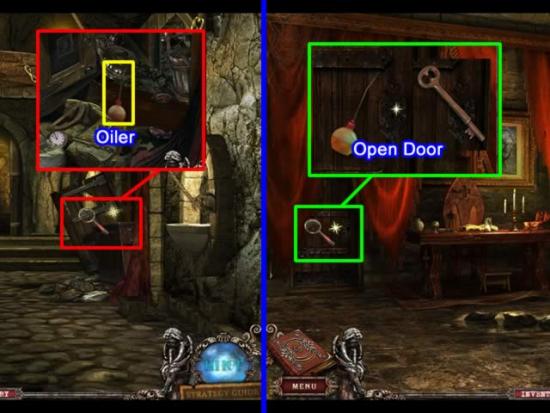
- Click the MCINROY SEAL and place it on the door lock cover.
- Click to open the cover and reveal the lock.
- Place the KEY in the lock. Click to open the door.
Enter the house.
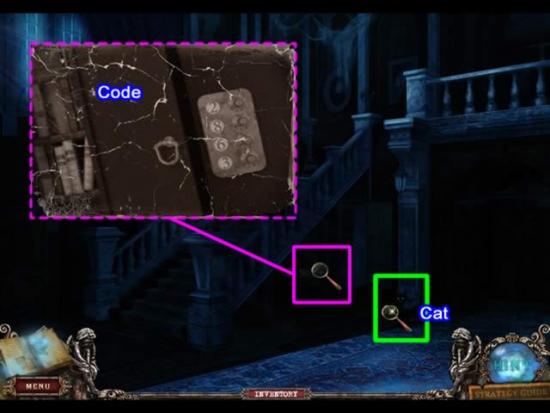
There is sufficient light to see an object under the stairs and a black cat beside it.
- Click the lit area. The code 2 – 8 – 6 – 3 is revealed and added to the diary.
Exit the house.
Click the down arrow to return to the fountain.
Click the down arrow to return to the Watchman.
Click the left arrow to approach the graveyard area.
Click the up arrow to get to the graveyard gate.
Chapter 2: Starting the Boiler
Explore the area.
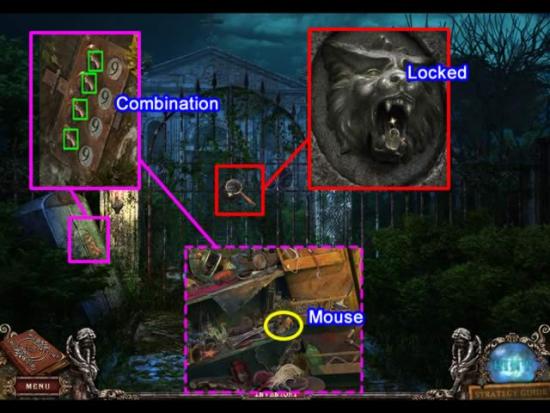
- Click the magnifying glass on the safe to access the interactive area.
- Rotate each dial to duplicate the combination that was found in the house. In this case, it is 2-8-6-3. Your combination may be different.
- Click to access the hidden object area. Collect all the listed items. The MECHANICAL MOUSE goes to inventory.
- Click the magnifying glass on the gate to access the interactive area. The required cryptic lock is not in inventory.
Nothing further can be done in this location right now.
Click the down arrow twice to return to the Watchman.
Click the up arrow three times to re-enter the house.
Inside the house:
- Place the MECHANICAL MOUSE in front of the cat.
- The cat pounces on the mouse. Click to catch the CAT.
Exit the house.
Click the down arrow twice to return to the Watchman.
- Place the CAT by the dog. The dog and Watchman chase after the cat, allowing access to the right alley.
Click the right arrow once.
Explore the area.
- An axe wielding guard blocks the area to the left.
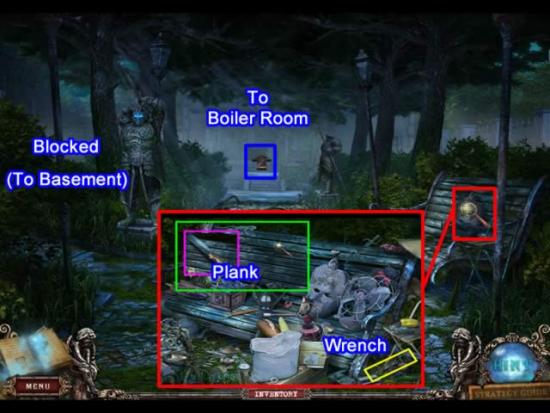
Click the magnifying glass on the bench to access the interactive area.
- Find the listed hidden objects. The WRENCH goes to inventory.
- Click the magnifying glass on the back of the bench to access the interactive area.
- Use the CROWBAR to pry the PLANK loose.
Click the forward arrow to access the entrance to the Boiler Room.
There are many things to do in this scene. For right now, only do one:
- Use the GARDEN PRUNERS to snip the string holding the pot.
- The pot falls to the ground and breaks open.
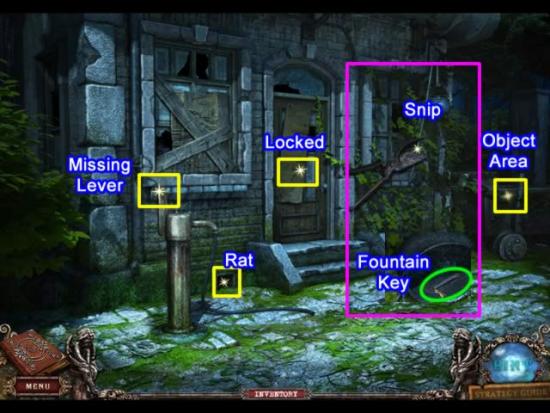
- Click the magnifying glass to zoom in on the area. Pick up the FOUNTAIN KEY.
Return to the Fountain area:
- Click the down arrow twice.
- Click the up arrow once.
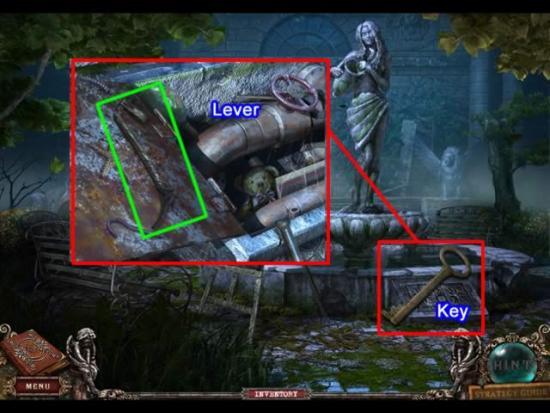
- Use the KEY to unlock the fountain mechanics door.
- Click to access the interactive area.
- Find all the listed hidden objects. The HYDRANT LEVER goes to inventory.
Return to the Boiler Room entrance.
- Click the down arrow.
- Click the right arrow.
- Click the up arrow.

Complete all the tasks to enter the Boiler Room.
Access the hidden object area by the coal cart.
- Find the items listed. Open the wardrobe door to find the MAGNET.
Get the lock pick.
- Pick up the hose and place it in the rat’s hole.
- Place the HYDRANT LEVER on the pump.
- Click the lever to start the water flowing. The rat scurries away.
- Use the MAGNET to retrieve the LOCK PICK.
Open the door.
- Place the LOCK PICK on the door to open the puzzle.
- Raise the lock tumblers in the right order so they all stay up.
- SOLUTION: 5, 1, 2, 4, 3 (your solution may vary).
Enter the Boiler Room.
Task: Get the water running.
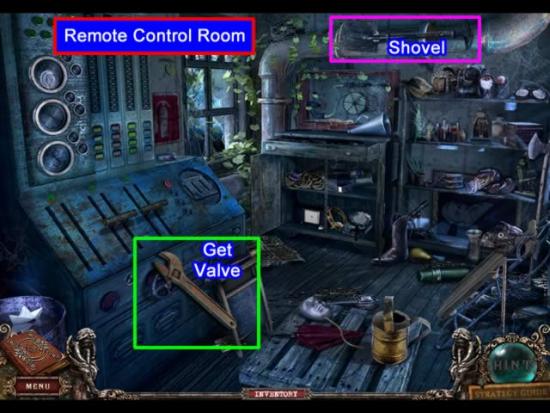
- Inside the Boiler Room, follow the arrow to the right to enter the Remote Control Room.
- Find the listed hidden objects. The SHOVEL is shown above.
- Use the WRENCH to remove the VALVE.
- Exit this room
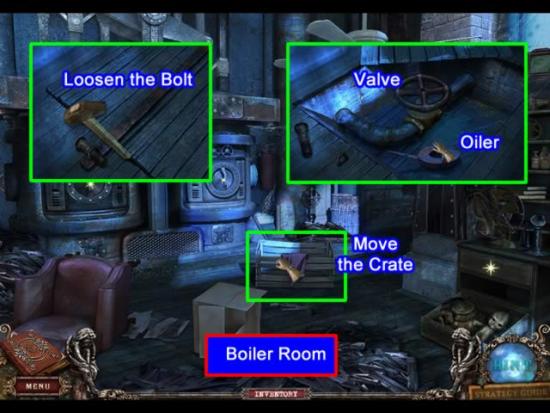
- Move the crate to one side to access the trap door.
- Use the HAMMER to loosen the bolt securing the door.
- Click to remove the door.
- Pick up the OILER.
- Position the VALVE and turn it to restore the water to the boiler.
Note that the light is green on the control panel next to water.
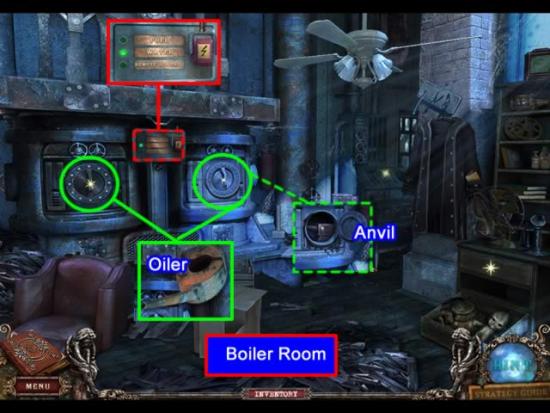
Task: Get Remote Control working.
- Use the OILER on both of the boiler doors.
- Click the left door. It is empty and requires coal.
- Click the right door. There is an ANVIL inside. Take the ANVIL.
Exit the Boiler Room.
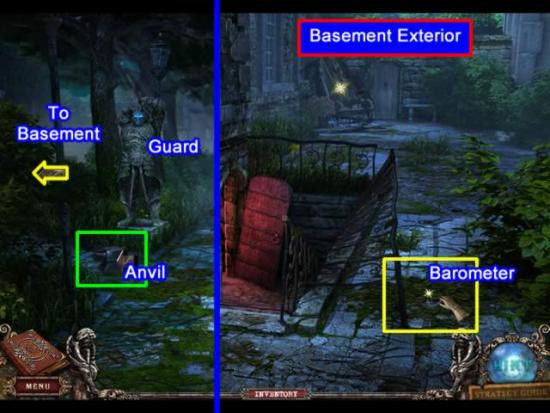
- Click the down arrow to return to the guard with an axe.
- Place the ANVIL on the ground in front of the guard.
- Click the left arrow in front of the guard. The axe comes down and breaks.
- Click once to arrive at the entrance to the Basement.
- Click the leaves on the right side of the paving stones to reveal a BAROMETER.
Retrace your steps to the Boiler Room.
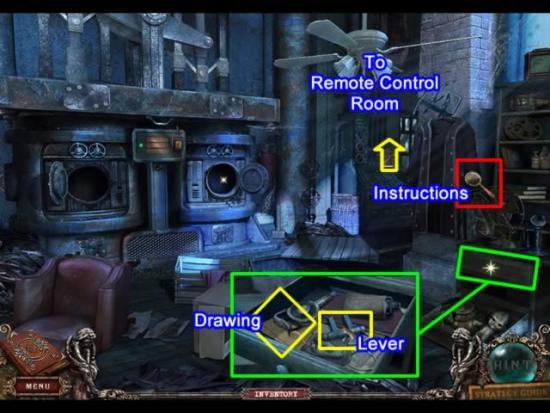
- Open the desk drawer.
- Remove the LEVER.
- Click the drawings. The information is saved in the diary.
- Click the instructions in the coat pocket. They are also added to the diary.
- Proceed to the Remote Control Room.

- Place the missing LEVER in the first slot.
- Place the BAROMETER in the round slot on the right.
- Following the directions found in the coat pocket, move the first lever to the second position in the slot. Move the second lever to the bottom, or fourth position.
- The last lever position is missing. Move this lever to different positions and press the red button on the right. Correctly positioning all the levers activates the remote control. The yellow lights at the top of the panel light up.
- A compartment in the bottom of the control panel opens. Collect the LIGHTER.

- Exit the Boiler Room
- Click the coal cart to the right to acces the interactive area.
- Upright the bucket at the base of the coal supply.
- Use the SHOVEL to fill the COAL BUCKET
Return to the Boiler Room
- Place the coal from the COAL BUCKET in each of the ovens.
- Use the LIGHTER to light both of them.
The boiler control now shows a fully functioning boiler. Click the button at the top to start the boiler.
Exit the Boiler Room.
Click the down arrow to get to the guard.
Click the left arrow to get to the Basement exterior.
Chapter 3: Turning on the Lights
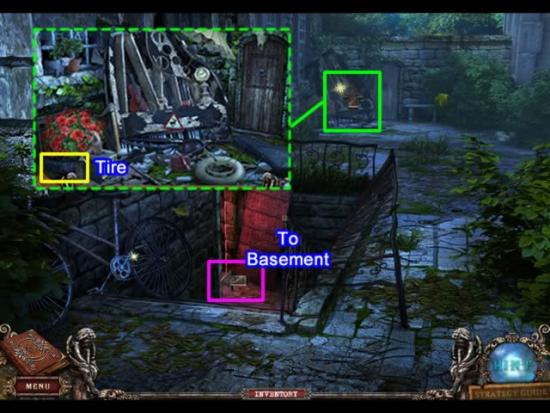
- Click the forward arrow to access the hidden object area by the fallen piano.
- Find all the listed items. The TIRE (show in inset) goes to inventory.
- Exit the piano area and enter the Basement.
- Use the LIGHTER to light the lamp.
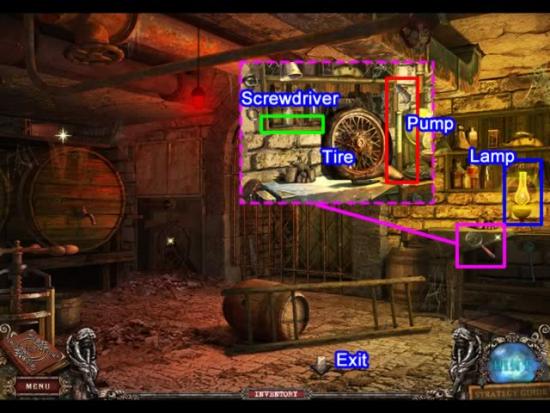
- Click the magnifying glass by the work bench to access the hidden object area.
- Find all the hidden objects. The SCREWDRIVER goes to inventory.
- Take the FLAT TIRE from inventory. Use the pump on the work bench to inflate the tire.
Exit the Basement.
Return to the car by the fountain.
- Click the down arrow twice.
- Click the up arrow once to get to the fountain.
- Click the arrow for the car.
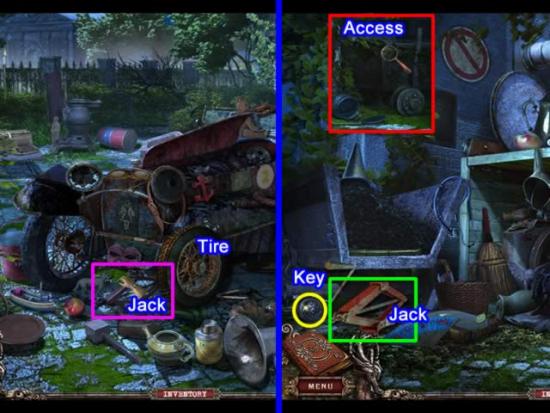
- Place the TIRE on the car.
- Retrieve the JACK.
Go to the coal cart outside the Boiler Room.
- Click the down arrow to leave the fountain.
- Click the right arrow.
- Click the up arrow.
Click the magnifying glass to access the area.
- Place the JACK under the coal cart.
- Pick up the ODD KEY.
Return to the Basement.
- Click the down arrow.
- Click the left arrow at the guard statue.
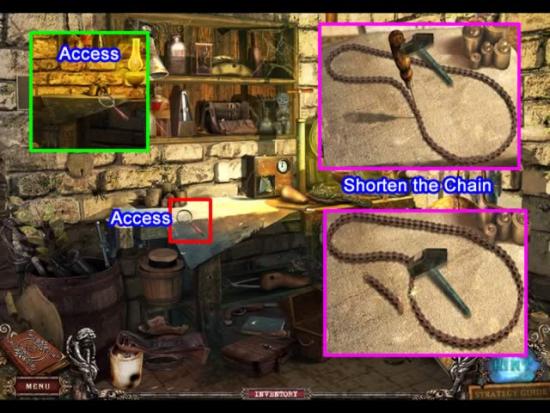
Stop at the bicycle at the top of the stairs.
- Use the SCREWDRIVER to pop the chain off the bike.
- Pick up the LONG CHAIN.
Enter the Basement.
Access the workbench area.
Click the magnifying glass to access the tinkering area.
- Place the LONG CHAIN on the table.
- Use the SCREWDRIVER and HAMMER to remove some links.
- Click to join the two pieces.
- Use the HAMMER to make the new join solid.
- Exit the area.

Task: Raise the gate.
- Place the SHORT CHAIN on the wheel by the gate.
- Access the gearbox. Place the GEARS on the pegs in the box.
Solve the gear puzzle.
- There are many solutions to this puzzle.
- You need not use all the gears on the board or all the gears from inventory.
- Use the pegs to help rearrange the gears. All gears will rotate from bottom to top.
- The inset above shows one possible solution.
The gate rises.
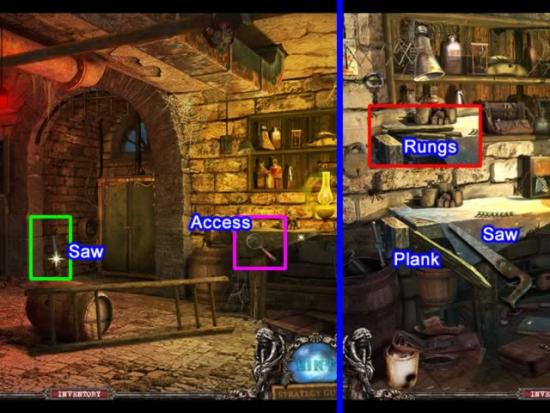
- Pick up the SAW.
- Access the work bench area.
- Place the PLANK in the vice.
- Use the SAW to cut the plank into RUNGS.
Exit the area.
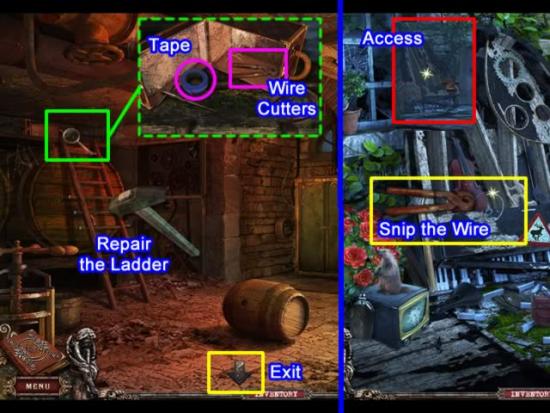
- Pick up the BROKEN LADDER.
- Lean it against the far wall.
- Place the PLANKS and NAILS on the ladder. HAMMER them to the ladder.
- Access the area at the top of the ladder.
- Pick up INSULATING TAPE and WIRE CUTTERS.
Exit the Basement.
Access the interactive area by the fallen piano.
- Use the WIRE CUTTERS to snip the PIANO WIRE.
- Exit the area.
Return to the Basement.
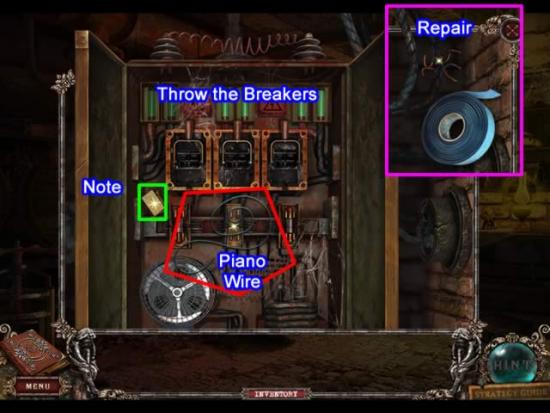
Access the fuse box at the back of the room.
- Use the INSULATING TAPE to repair the broken wires.
- Open the door.
- Use the PIANO WIRE to act as the missing fuse.
- Pick up the note in the corner. The contents are recorded in the diary.
- Throw the three breakers to restore the lights.
Exit the Basement.
Return to the house.
- Click the down arrow twice.
- Click the up arrow three times to enter the house.
Chapter 4: Freeing Julia
Task: Release Julia’s soul.
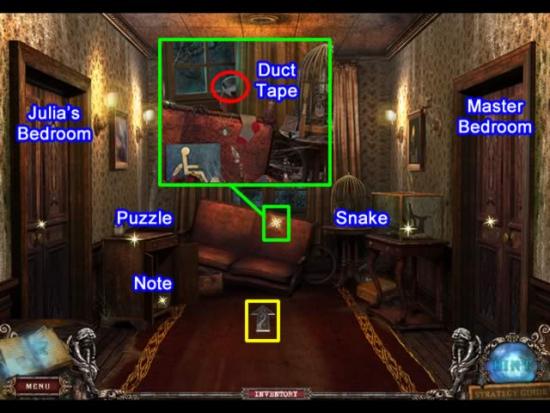
After entering the house, go up stairs to second floor landing.
- Approach the sofa to access a hidden object area.
- Collect all the hidden objects. The location of the DUCT TAPE is shown above.
Go down stairs.
- Use the DUCT TAPE to repair the BELLOWS.
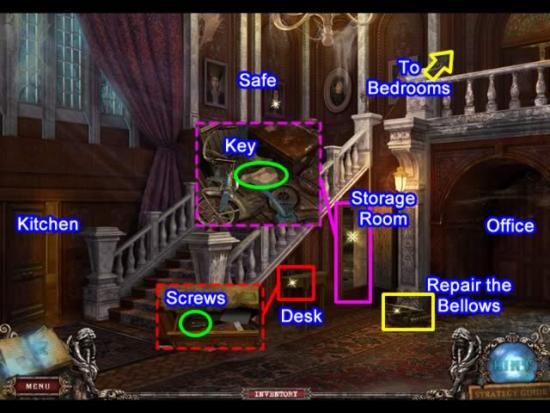
- Enter the Storage Room.
- Collect all the hidden objects. The CAGE KEY location is shown above.
- Open the desk drawer. Pick up the SCREWS.
Enter the Kitchen.
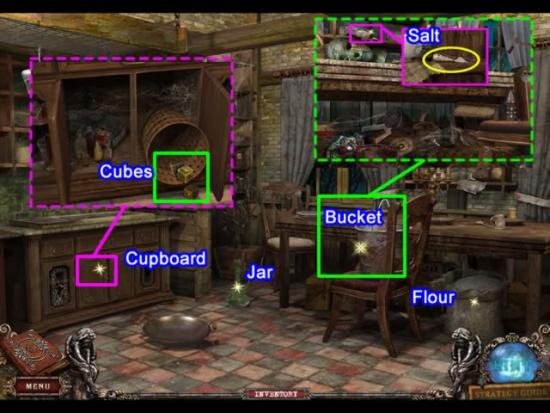
- Open the cupboard doors.
- Tip the basket over and retrieve the CUBES.
Pick up items for later use.
Click the bucket to access the hidden object area.
- Collect all the hidden objects. The SALT location (outlined in yellow) is shown above.
Pick up the JAR.
Return to the second floor.
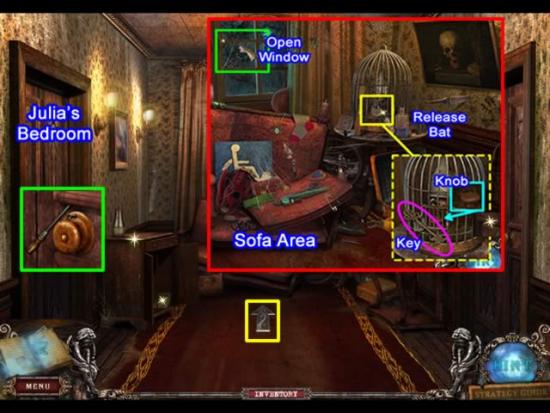
Approach the sofa area.
- Open the window above the sofa.
- Use the CAGE KEY to open the bat’s cage. The bat flies out the window.
- Pick up the DOORKNOB.
- Exit the area
Click the interactive area on Julia’s bedroom door.
- Position the DOORKNOB on the pin.
- Place the SCREWS and use the SCREWDRIVER to secure the screws.
- Click the knob to open the door.
Enter Julia’s Bedroom.
Click the globe in front of the window to gain access to the hidden object area.
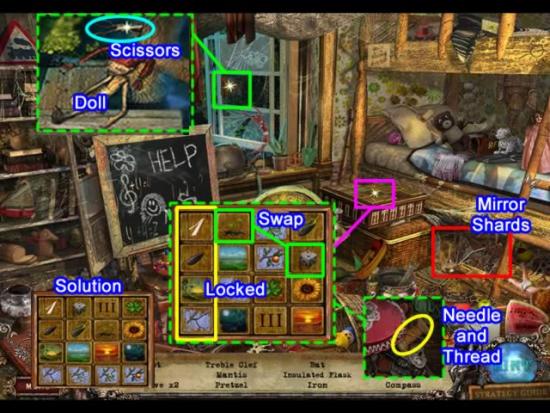
- Collect all the hidden objects. The MIRROR SHARDS location (outlined in red) is shown above.
Click the box to access the puzzle.
- Add the CUBES.
- The cubes in the left column (outlined in yellow) do not move. Use these as the key for swapping the cubes to form a sequence.
- You do not have to shuffle the cubes from one square to another; they can be swapped directly from any position on the board. See the inset for the solution.
- The box lid slides off. Pick up the NEEDLE AND THREAD.
Access the window area.
- Collect the BROKEN DOLL and SCISSORS
Exit the room.

Click the snake’s cage to access the area.
- Use the BELLOWS to retrieve the DRAWING PIECE.
Click the desk to access the puzzle.
- The first piece of the puzzle is taped to the board (marked “1” above.)
- Click to select the second piece (marked “2” above). It belongs on the right side of the first piece.
- Correctly placed pieces will lock into position. See the solution in the inset.
- The finished puzzle reveals the code 3, 5, 0, 6 (yours may be different.)
Return down stairs.
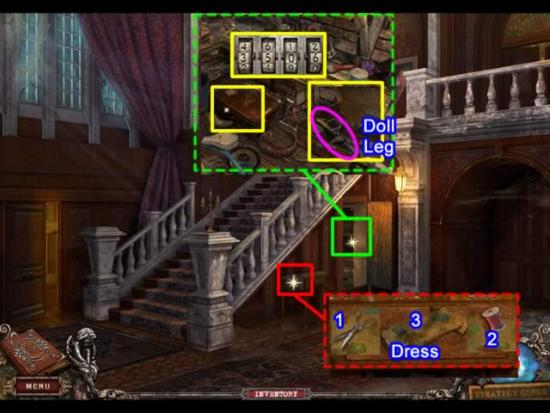
Enter the Storage Room.
- Click the suitcase to access the lock.
- Enter the digits from the drawing. Click to open.
- Collect the DOLL LEG.
- Exit the room
Click to access the desk area.
- There is patched fabric on the tabletop.
- Use the SCISSORS to cut the fabric.
- Use the NEEDLE AND THREAD to sew a DRESS.
Return to Julia’s room.
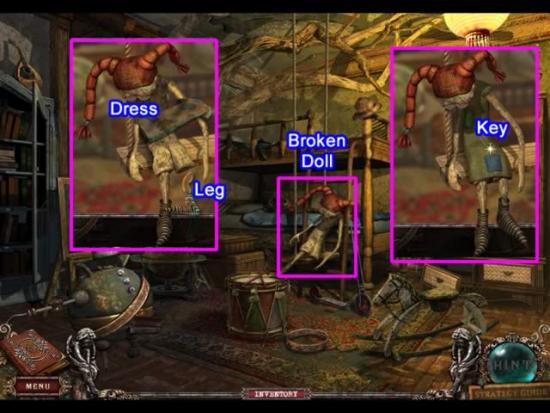
- Place the BROKEN DOLL on the swing.
- Click to attach its LEG.
- DRESS the doll.
- Take the OFFICE KEY from the dress pocket.
Julia’s spirit is now free.
Chapter 5: Lady Averill’s Death
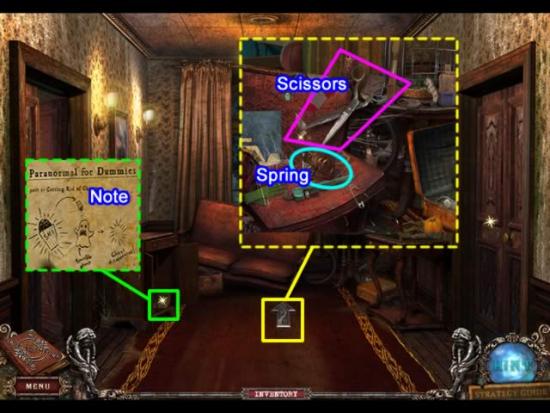
Exit Julia’s room.
- Click the note in the bottom of the cabinet. This critical information can be referred to at a later time.
Approach the sofa area.
- Use the SCISSORS to widen the rip in the sofa.
- Collect the SPRING.
Go down stairs.
- Use the OFFICE KEY to unlock the office door.
Enter the Office
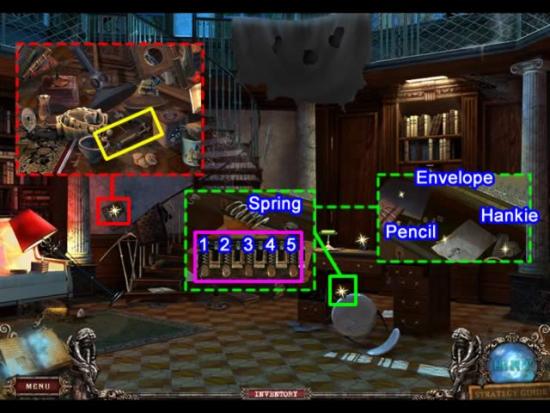
Click the picture frame on the far wall to access a hidden object area.
- Collect all the hidden objects. The HAND SET location is shown above.
Click the chair in front of the desk to access an interactive area.
- Use the SPRING to pick the lock on the drawer.
- Raise the lock tumblers in the right order so they all stay up.
- SOLUTION: 3, 2, 5, 1, 4 (your solution may be different).
- Open the drawer.
- Pick up the ENVELOPE, DULL PENCIL and HANDERCHIEF.
Exit the Office.
Enter the Storage Room.
- Sharpen the DULL PENCIL using the pencil sharpener located on the top right shelf.
Return to the Office.
Click the picture frame on the far wall to access a hidden object area.
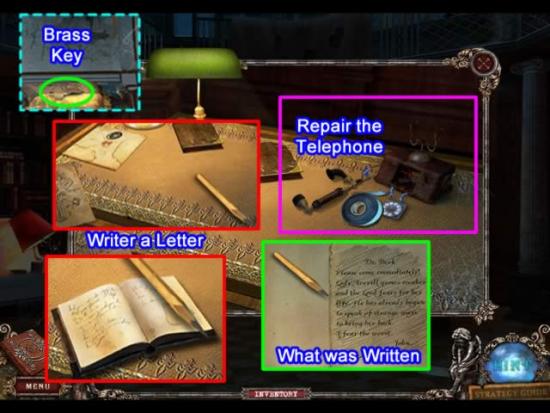
- Collect all the hidden objects. The BRASS KEY location is shown above. When the key is in inventory it is referred to as the BEDROOM KEY.
Access the desk area
- Use the INSULATING TAPE to repair the wires.
- Replace the components so the butler may telephone for the doctor.
- Plan B: Place the ENVELOPE and PENCIL on the desk so John can write to the doctor.
- Click the notebook to open the puzzle area.
- Click to move the PENCIL over the page to see what John wrote.
Exit the Office.
Go upstairs.
Use the BEDROOM KEY to unlock the Master Bedroom.
- Place a tray with cool water and a handkerchief on the chair.
Exit the house and return to the Boiler Room
- Click the down arrow twice.
- Click the right arrow.
- Click the up arrow.

- Place the JAR at the base of the water pump.
- Place the hose in the jar.
- Pump a JAR OF WATER.
Return to the house.
Enter the Kitchen.
- Place the SALT on Mary so she will release the tray.
- Pick up the SILVER TRAY.
- Access the work area on the counter.
- Place the SILVER TRAY on the cutting board.
- Add the JAR OF WATER and the HANDKERCHIEF.
- Pick up the TRAY FOR LORD.
- Pick up the SPOON in the sink for later use.
Return to the Master Bedroom
- Place the TRAY FOR LORD on the chair.
Watch the short cut scene of the death of Lady Averill and clues for the next step.
Chapter 6: The Attic
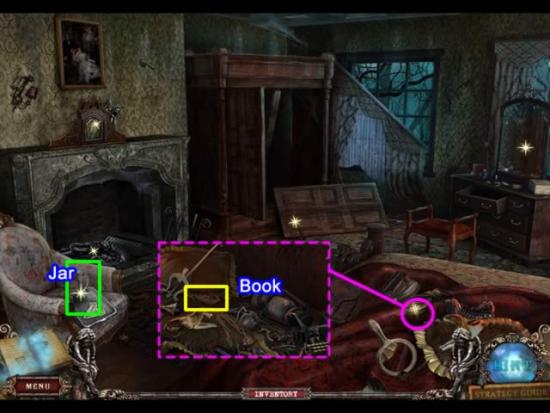
Click the magnifying glass on the bed covers to access a hidden object area.
- Collect all the hidden objects. The BOOK location is shown above.
Click the JAR for later use.
Exit the Master Bedroom and return to the Office.
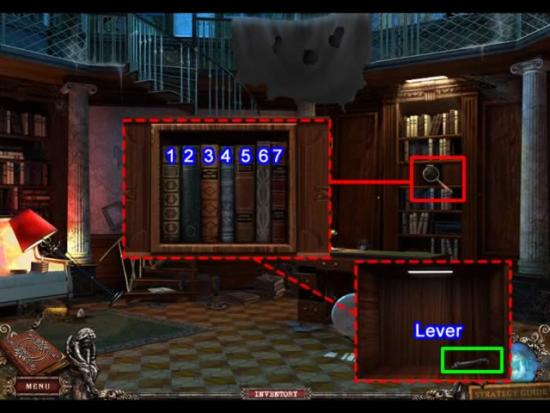
Access the interactive area in the bookcase.
- Place the BOOK in the empty slot.
- Click each book in the right order so they all tilt forward.
- SOLUTION: 4, 5, 7, 1, 6, 3, 2 (your solution may be different).
- The books slide away revealing a secret compartment.
- Pick up the LEVER.
Exit the Office.
Go to the portraits mounted on the wall of the stair case.
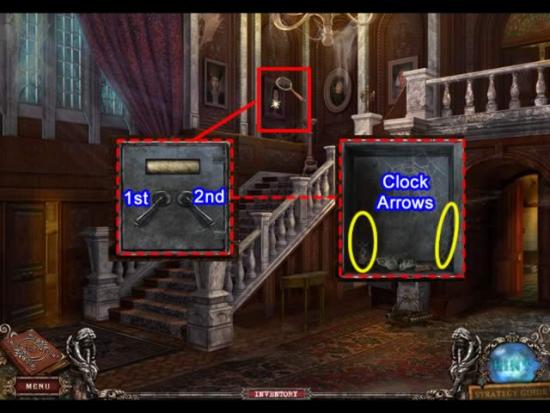
Click the magnifying glass on the portrait to open the interactive area.
- Place the LEVER on the empty slot.
- Click the left lever first. Drag it downward. Repeat the procedure with the right-hand lever.
- The safe door opens. Collect both CLOCK ARROWS.
Proceed to the Master Bedroom.
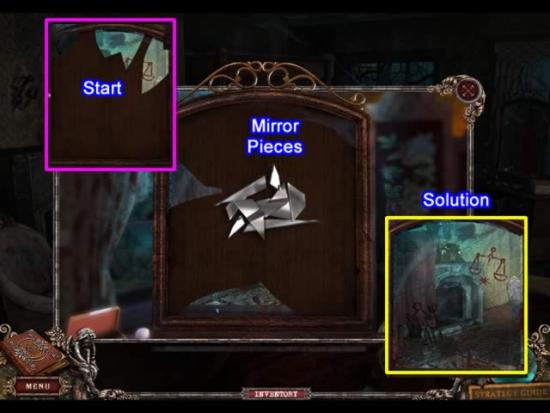
Go to the dresser. Click to access the mirror.
- Place the MIRROR PIECES on the mirror to begin the puzzle.
- Place pieces based on shape and color.
- Correctly placed pieces lock into position. See the pink inset for the first two pieces and the yellow inset for the solution.
Two zodiac signs are on the mirror, Libra and Aquarius.
- Pick up the POKER. Use it to stir the ashes in the fireplace.
- Find the LION.
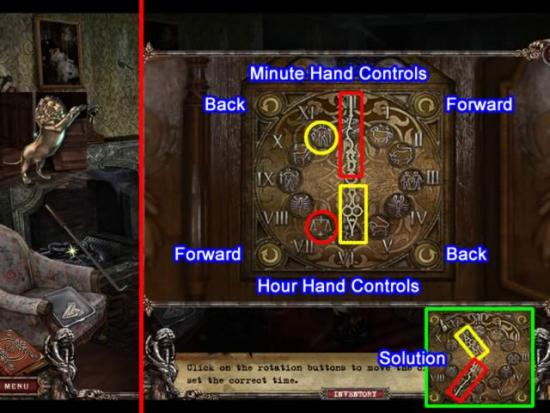
Access the clock on the mantle.
- Place the LION and both CLOCK ARROW pieces.
- Click to access the puzzle area.
- Using the forward and back controls for each hand, move the hour hand to Libra and the minute hand to Aquarius.
- The top two controls move the minute hand. The bottom controls move the hour hand.
- Click forward to move a hand three positions clockwise. Click backward to move four positions counter clockwise.
- To reset the hand positions, exit then re-enter the puzzle area.
SOLUTION:
- Hour hand: from the starting position, click the back control once. Click the forward control three times.
- Minute hand: from the starting position, click the forward control twice (the second forward click will stop at the correct position.)
- See the inset for the correct hand positions.
The rear fireplace wall slides back.
Enter the attic.
A short clip explains Lord McInroy’s death.
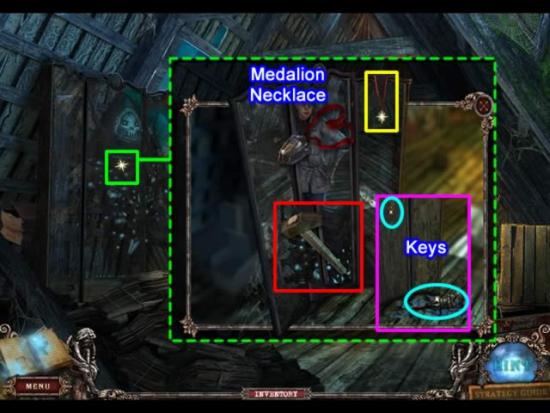
Click the mirror to summon Aggel and discuss your situation.
- Pick up the MEDALLION NECKLACE and put it on.
- Use the HAMMER to smash the mirror.
- Collect the two KEYS.
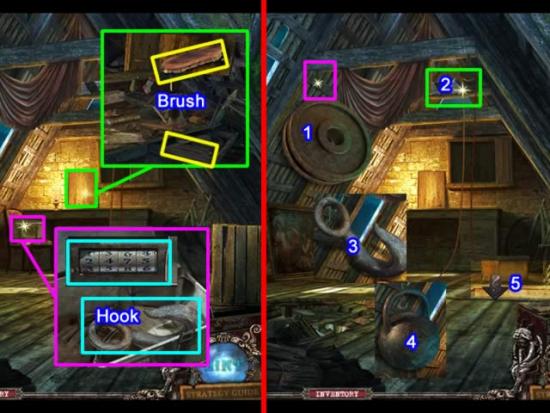
Pick up the WHEEL and WEIGHT on the attic floor.
Click the magnifying glass on the cabinet to access a hidden object area.
- Collect all the hidden objects. The BRUSH location is shown above.
- Use the BRUSH on the inside of the cabinet door. A code is revealed.
Click the case to access the interactive area.
- Click the tumblers on the case until they match the code (my code was 2-4-7-5).
- Click the case to open it.
- Get the HOOK.
Escape the attic.
- Place the WHEEL on the peg on the beam (1).
- Click to string the rope (2) through the wheel.
- Place the HOOK (3) on the end of the rope.
- Add the WEIGHT (4) to the hook to open the attic door (5) and re-enter the Master Bedroom.
Chapter 7: The Resurrection Room
Exit the House. Proceed past the fountain.
Click the left arrow to go to the alley to the Graveyard.
Click the up arrow to approach the Graveyard gate.
- Click the gate lock to access the interactive area.
- Place the GATE KEY in the slot. Click to open the gates.
Enter the Graveyard.
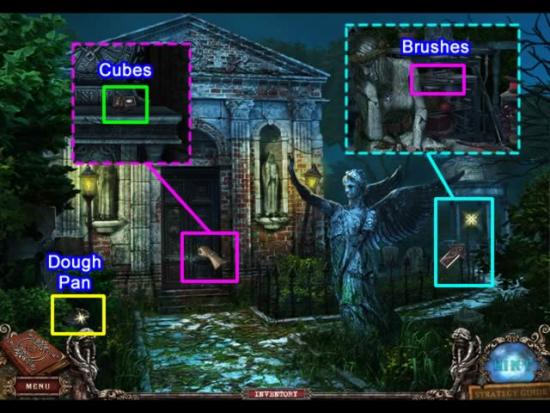
- Pick up the DOUGH DISH.
Enter the Crypt.
- Get the CUBES.
Go to the Gazebo to access the hidden object area.
- Collect all the hidden objects. The BRUSHES location is shown.
Exit the Graveyard.
Go to the Basement entrance.
- Click the down arrow twice to get back to the cross roads.
- Click the right arrow to get to the stone guard.
- Click the left arrow to arrive at the Basement entrance
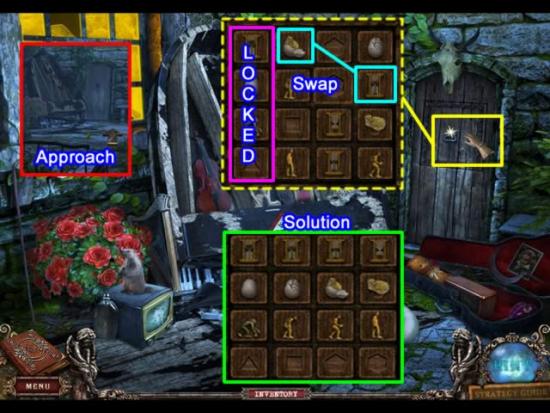
Approach the piano area.
Click the door to access the puzzle.
- Add the CUBES.
- The cubes in the left column (outlined in pink) do not move. Use these as the key for swapping the cubes to form a sequence.
- You do not have to shuffle the cubes from one square to another; they may be swapped directly from any position on the board. See the inset for the solution.
- The gate opens.
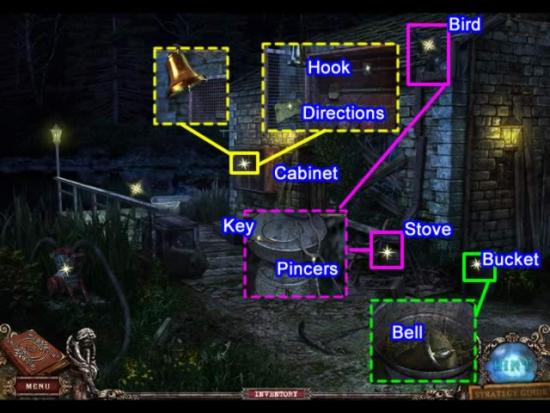
Enter the Boat House area.
- Click the bucket to get the BELL.
Click the locked cabinet to acess an interactive area.
- Place the BELL on the end of the hook.
- Click to make it ring.
- The ringing scares off the bird. It drops a KEY.
The stove area opens.
- Pick up the KEY and PINCERS.
- Close the area.
Access the locked cabinet interactive area.
- Use the KEY on the lock.
- Click the lock to open the cabinet.
- Pick up the BOAT HOOK and directions for the diary.
Click the arrow for the wharf.
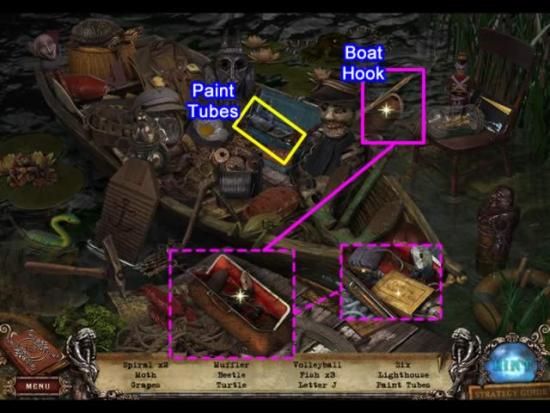
Click the arrow for the wharf to access the hidden object scene.
- Collect all the hidden objects. The PAINT TUBE location is shown.
- Use the BOAT HOOK to retrieve the bag.
- Open the bag. Pick up the CLEANING KIT and STARTER handle.
The fountain pump is in the grass on the left side of the scene. Click to access it.
- Attach the STARTER handle.
- Click to start the pump for the fountain.
Return to the fountain.
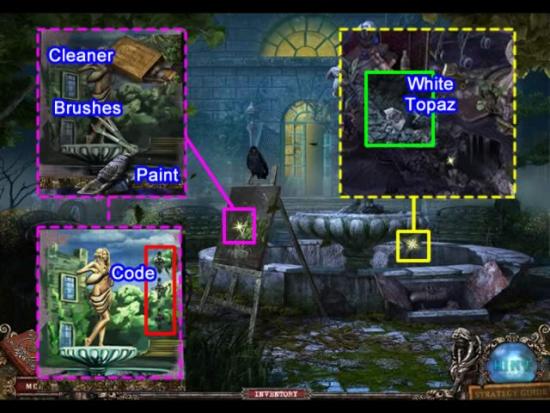
Click to access the hidden object area in the fountain.
- Collect all the hidden objects.
- Click to open the interactive area. Click twice to uncover the WHITE TOPAZ.
Click the painting to open the interactive area.
- Use the CLEANING KIT to remove the grime.
- Add the PAINTS and BRUSHES to restore the painting.
- A code appears on the right side of the painting. This information is recorded in the diary.
Enter the house and go to the kitchen.
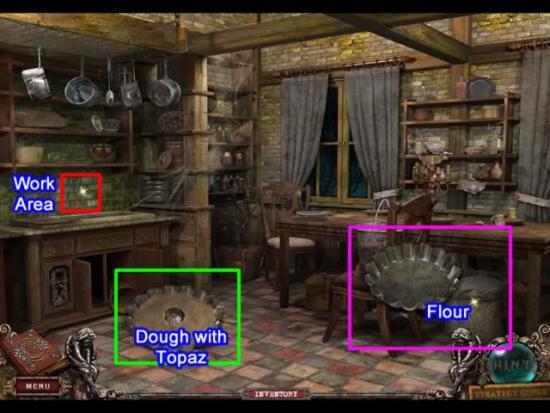
- Dip the DOUGH DISH in the flour.
- Access the work area and place the DISH WITH FLOUR on the cutting board.
- Add the JUG with water and mix with the SPOON.
- Place the WHITE TOPAZ in the center.
Exit the house.
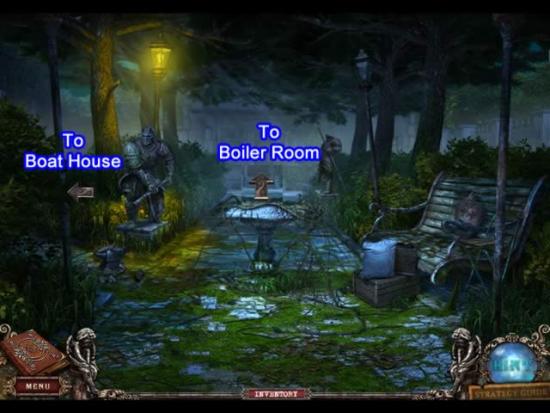
Return to the Boiler Room.
Enter the Boiler Room.
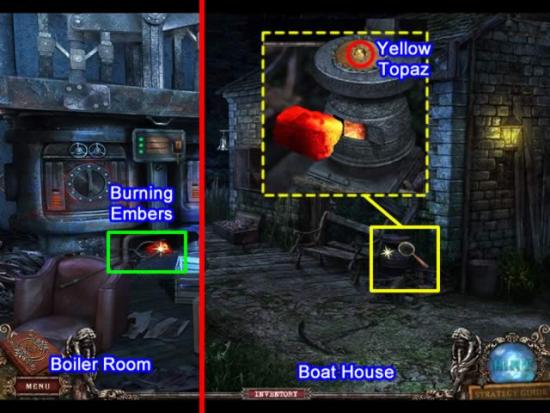
- Use the PINCERS to remove the BURNING EMBERS from the furnace.
Go to the Boat House.
Click the magnifying glass on the stove to access the interactive area.
- Click the small door to open it.
- Place the BURNING EMBERS inside. A fire begins to blaze.
- Put the DISH WITH TOPAZ on the top of the stove.
- When the dough turns brown, pick up the YELLOW TOPAZ.
Return to the Graveyard and enter the crypt.
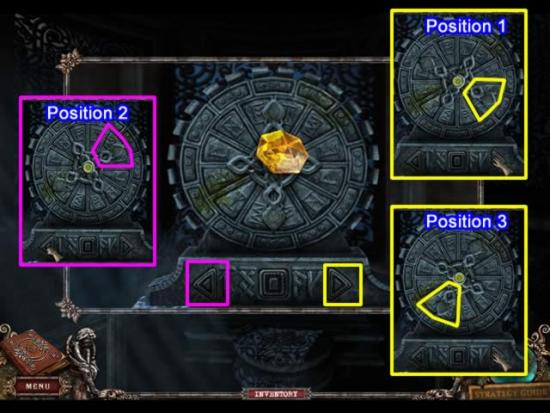
- Place the YELLOW TOPAZ in the center of the wheel.
- Click the right (yellow) button four times (Position 1).
- Click the left (pink) button twice (Position 2).
- Click the right button five times (Position 3).
A door at the bottom opens.
Enter the Resurrection Machine Room.
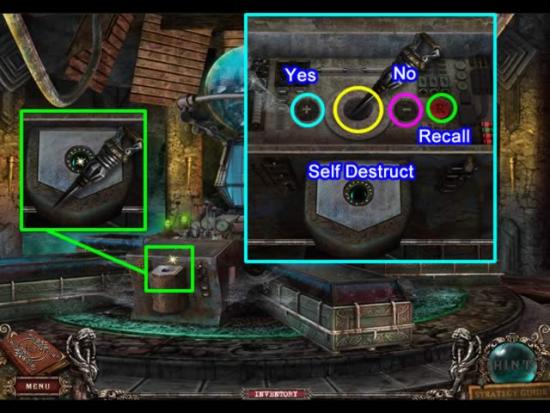
Click to access the interactive area on the side of the machine.
- Attempt to deactivate the machine by placing the KEY in the hole.
That did not work well.
- Access the panel above the first key hole.
- Remove the KEY from the first location and put it in the second.
Answer a series of questions from the computer.
- Answer questions by first clicking on the button to access it. Click a second time to input the answer. Use the “+” button for “Yes.” Use the “-” button for “No.”
Questions:
- Lord McInroy met his wife after a horse riding accident. Yes.
- Lord McInroy had two children – a daughter and a son. No.
- Lord McInroy proposed to Lady Averill by the fountain in the courtyard of the estate. Yes
- Lord McInroy always dreamed of destroying the world. No.
Watch the thanks for releasing each soul and the destruction of the machine room.
Congratulations! You finished playing Fear for Sale: The Mystery of McInroy Manor Collector’s Edition.
Bonus Chapter (Special Edition only)
Extras – Doctor Berk’s Secret Study
Click the Extra Game Play from the menu.
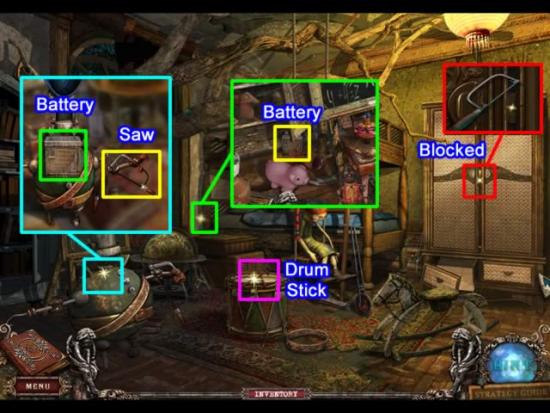
Start in Julia’s Bedroom.
- Pick up the DRUM STICK.
Click to access the hidden object area behind the globe.
- Collect all the hidden objects. The BATTERY location is shown.
Click the cowboy robot to access the interactive area.
- Click to turn him and access his back.
- Place the BATTERY.
- Click to turn him around again. Pick up the SAW.
Click the handle area on the wardrobe.
- Use the SAW to saw through the wooden bar.
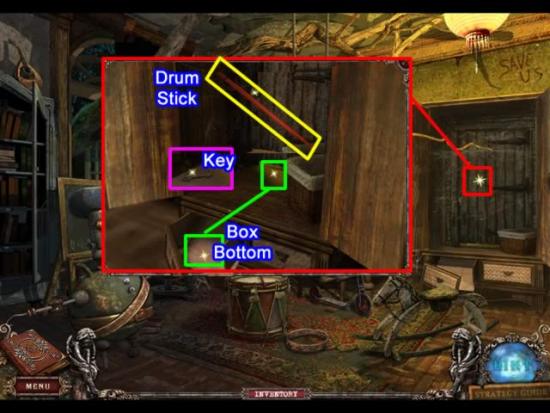
Click to access the wardrobe interactive area.
- Click the BOX BOTTOM. Place it at the base of the door.
- Click to slide the BOX BOTTOM under the door.
- Use the DRUM STICK to push the key out of the lock.
- Click the BOX BOTTOM to retrieve the DOCTOR’S ROOM KEY.
- Use the DOCTOR’S ROOM KEY to open the door.
Enter Doctor Berk’s secret study.
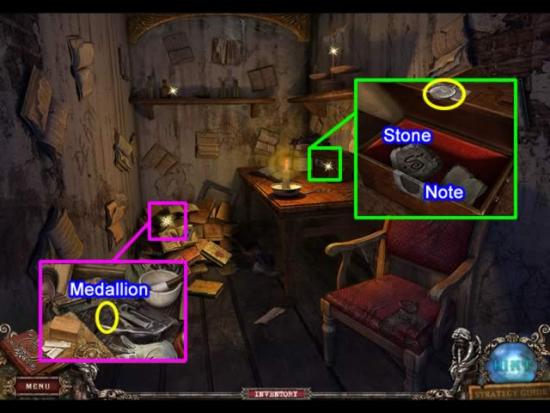
Click the debris pile at the back of the room to access the hidden object area.
- Find all the hidden objects. The MEDALLION is highlighted.
Click the box on the desk to access the interactive area.
- Place the MEDALLION in the slot on the front of the box.
- Click to open.
- Pick up the STONE WITH SYMBOL and the note from Doctor Berk.
Exit the room.
Extras – Lord McInroy’s Secret Room
Go to the Office.
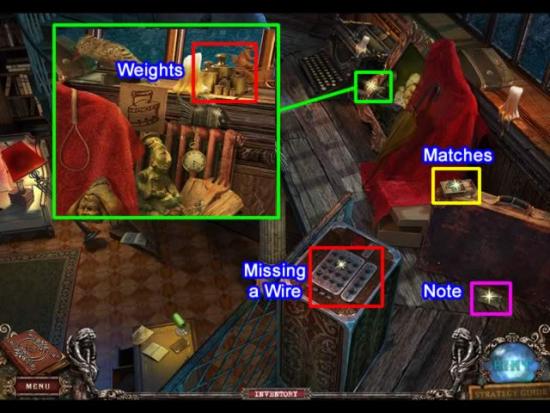
Click the up arrow on the circular stairs.
- Pick up the MATCHES and the note. Information for operating the control panel is added to the diary.
- Access the hidden object area.
- Find all the hidden objects. See the inset for the WEIGHTS location.
Return to Doctor Berk’s secret study.
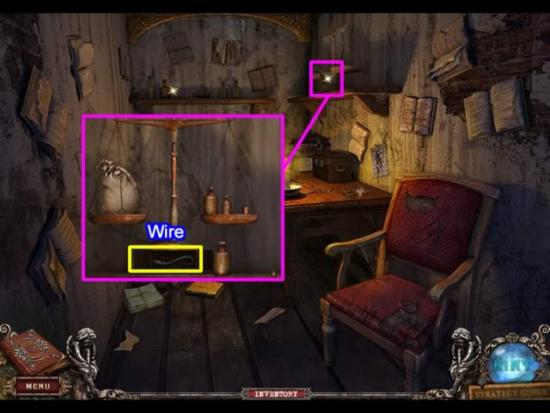
Click the interactive area for the scales.
- Place the WEIGHTS on the shelf.
- Balance the scale by placing the middle three weights on the right scale.
- A compartment opens. Pick up the WIRE.
Return to the Office Landing.
Click the control panel to access the interactive area.
- Attach the WIRE to the first slot.
- Refer to the color combination note in the diary.
- Use the lights and letters to form the color combinations.
- Place the wires to form the combinations in the order written.
- Correctly placing the wires lights up the panel.
- Click the Open button.
A stairway opens.
Click the down arrow to enter Lord McInroy’s Secret Room.
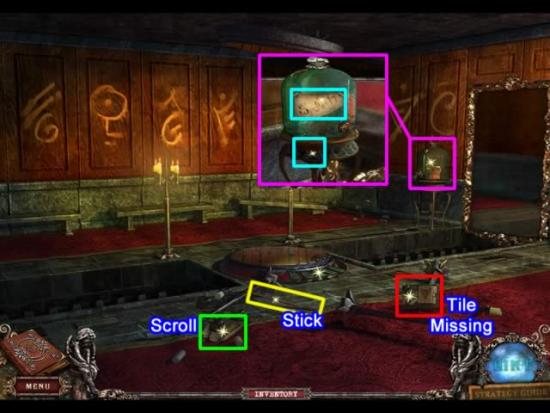
- Use the MATCHES to light the candles.
- Pick up the SCROLL and STICK.
Click the container to access the interactive area.
- Click the fluid composition. The information is now in the diary.
- Pick up two BEAKERS along the base of the container.
Exit the room.
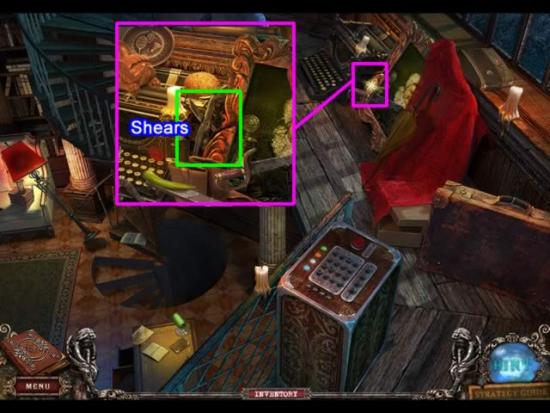
Click the interactive area on the Office Landing to access the hidden object area.
- Find all the hidden objects. See the inset for the METAL SHEARS location.
Continue up to Doctor Berk’s study.
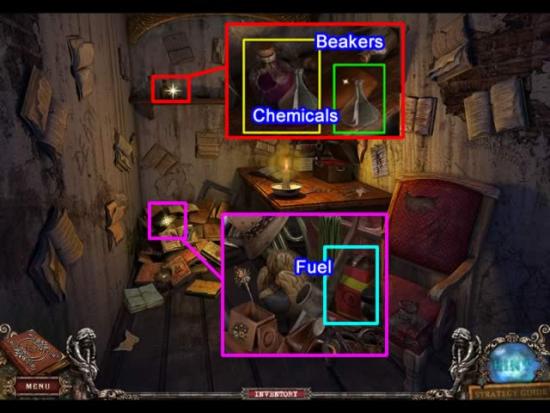
Click the hidden object interactive area.
- Find all the hidden objects. See the inset for the FUEL location.
Click the interactive area for the chemicals.
- Place an empty BEAKER next to the orange chemical to fill it.
- Use the METAL SHEARS on the purple bottle to break it.
- Place the second BEAKER next to the purple chemical to fill it.
Return to the secret room.
Click the container to access the interactive area.
- Use the METAL SHEARS to snip the WIRE top.
- Add the FUEL and both CHEMICALS.
- Click the tap on the side to release the red liquid.
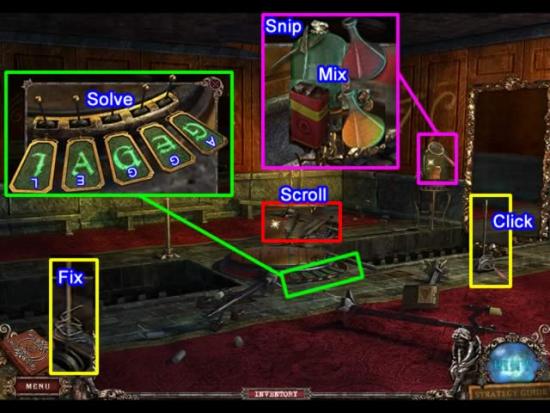
Click the puzzle area outlined in green.
- Swap the letters and use the levers to reverse them so the the name is a mirror image.
- Letters should be facing inward toward the mirror.
- From left to right, the letters should be L-E-G-G-A.
Access the lever on the left side.
- Use the STICK and WIRE to repair it.
- Click to activate it.
- A mirror moves forward from the left.
Access the lever on the right.
- Click to activate it.
- A mirror moves forward from the right.
Place the SCROLL in the center mirror (see red insert above).
Welcome to the hidden room.
Extras – Escaping the Hidden Room
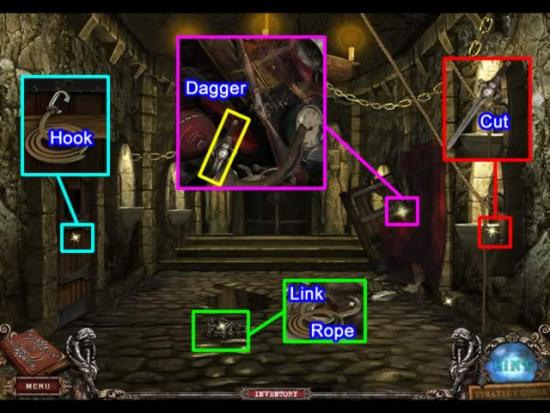
Click the red curtain to reveal an interactive area.
- Find all the hidden objects. See the inset for the DAGGER location.
Use the DAGGER to cut the ROPE (red inset).
Join the ROPE with a chain link to form a HOOK (green insert).
Use the HOOK to open the door to the Master’s Quarters.
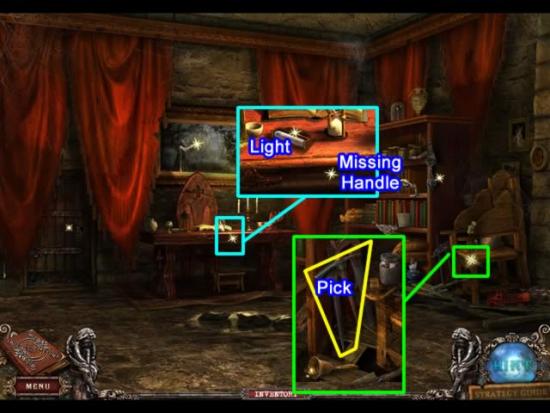
Click the chair to reveal an interactive area.
- Find all the hidden objects. See the inset for the PICK location.
Click the desk to open an interactive area.
- Click the LUMINESCENT LIGHT.
Exit the room.
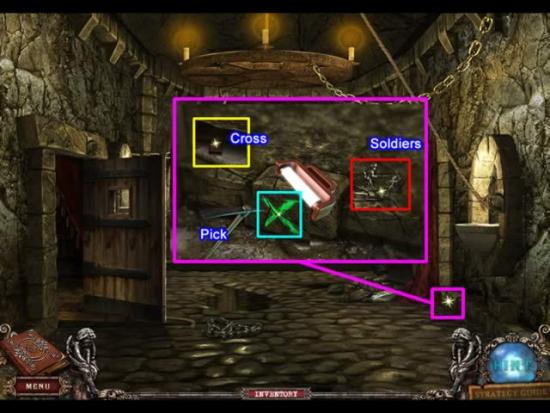
Click to access the interactive area.
- Use the LUMINESCENT LIGHT to reveal the green “X”.
- Use the PICK on the “X” to open a compartment.
- Click the CROSS in the compartment
- The SOLDIERS won’t be needed until later, but pick them up now.
Re-enter the Master’s Quarters.
Click the interactive area on the bookcase to access it.
- Place the CROSS in the mold.
- The bookcase opens, revealing a hidden compartment.
- Pick up the GLASS WITH SYMBOL and the EXORCIST FIGURINE.
- Note the scull is missing a gem for an eye.
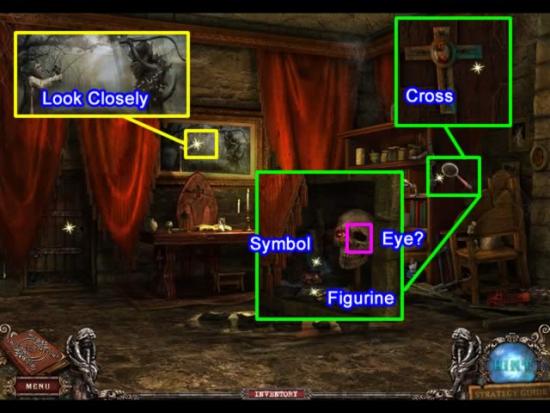
Closely inspect the painting behind the desk.
Exit the room.
Approach the door at the far end.
Click to access the interactive area.
- Place the EXORCIST FIGURINE in the door slot.
- Manipulate the arms on both figurines until they match the positions depicted in the painting.
- See the inset for the solution.
Enter the Main Hall.
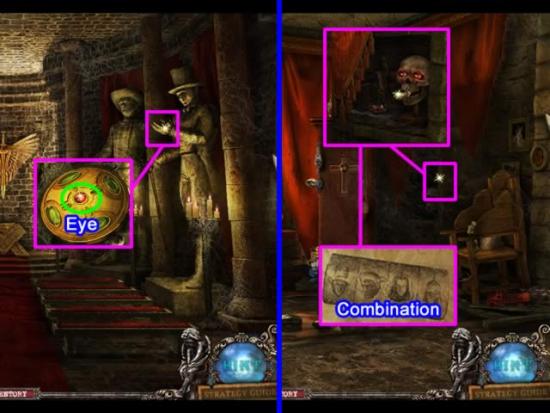
Access the hand on the first statue.
Retrieve the SKULL EYE.
Return to the Master’s Quarters.
- Place the SKULL EYE in the skull’s eye socket.
- The mouth opens. Take the RING.
- The combination is recorded in the diary.
Return to the Main Hall
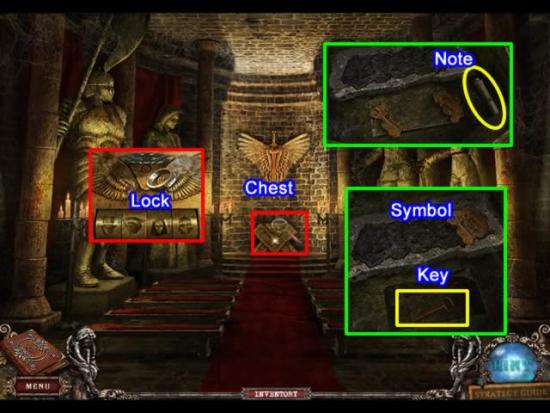
Click the chest to access the lock.
- Scroll the tumblers until they match the combination in the diary.
- Place the RING in the slot. The chest opens.
- Collect the note for the diary.
- Pick up both wooden symbol pieces.
- Combine the broken SYMBOLS in the nameplate.
- A drawer opens. Retrieve the STORAGE KEY.
Exit the hall.
Access the hidden object area in the hallway.
- Find all the hidden objects. See the inset for the OILER location.
Enter the Master’s Quarters.
- Access the door lock.
- Use the OILER to oil the lock.
- Insert the KEY. Click to open the door.
Enter the Store Room
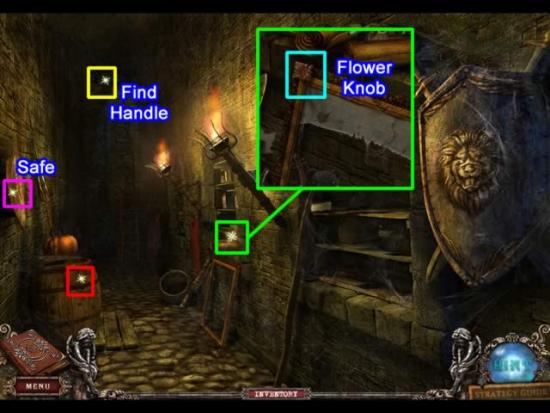
Access the hidden object area.
- Find all the hidden objects. See the inset for the FLOWER KNOB location.
Return to the Master’s Quarters.
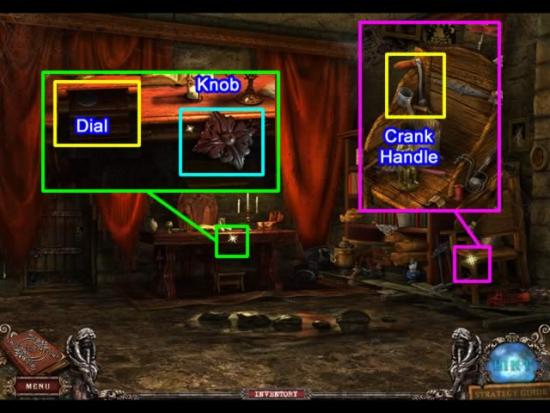
Access the hidden object area by the chair.
- Find all the hidden objects. See the inset for the CRANK HANDLE location.
Access the desk drawer.
- Place the FLOWER KNOB on the drawer.
- A compartment opens. Retrieve the DIAL FOR SAFE.
Return to the Storage Room.
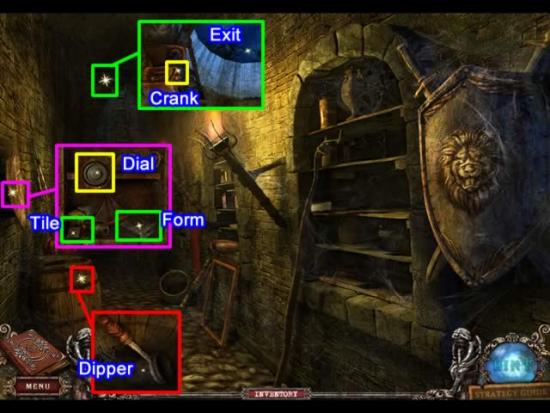
Click the shield on the wall. It slides away to reveal a safe.
- Place the DIAL FOR SAFE in place. Click to open the safe.
- Pick up a PUZZLE PIECE tile and the FORM FOR SMELTING.
Access the barrel.
- Use the PICK to remove the lid.
- Pick up the DIPPER.
Access the mechanism at the top of the ladder.
- Place the CRANK HANDLE.
- Click to open the hatch.
Exit the hidden room.
Extras – Vanquish the Demon

Go to the Boat House.
- Click the left arrow.
- Arrive at the Basement entrance.
- Continue past the fallen piano.
- Exit the gate at the rear.
Click the stove to access the interactive area.
- Remove the dish used to cook the yellow topaz.
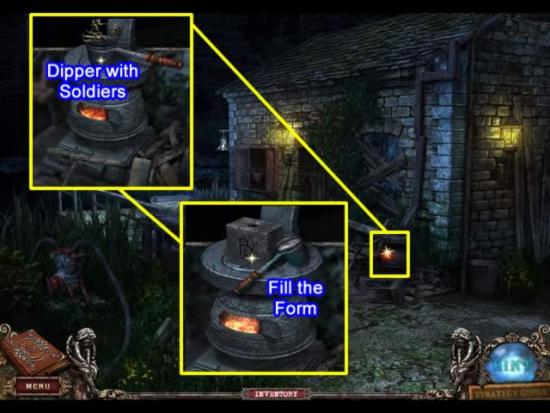
- Place the DIPPER on the top of the stove.
- Add the TIN SOLDIERS. They melt.
- Replace the DIPPER WITH TIN with the FORM FOR SMELTING.
- Pour the DIPPER WITH TIN into the form.
- The mold needs cooling.
Retrace your steps to old fountain.
- Click the up arrow to go to the entrance to the Boiler Room.
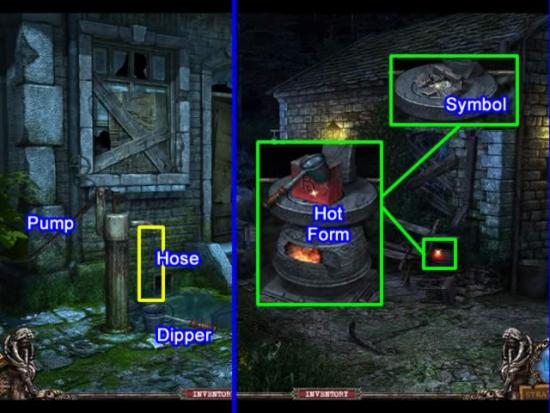
- Place the DIPPER in the water puddle.
- Click the hose to put it in the dipper.
- Pump the handle once. Retrieve the DIPPER WITH WATER.
Return to the Boat House.
Access the stove area.
- Place the DIPPER WITH WATER on the hot form.
- The form cracks. Pick up the TIN WITH SYMBOL.
Return to the house.
Enter the office and go up to the landing.
Enter the secret room
Click the to access the puzzle.
- Add the PUZZLE PIECE tile.
- Flip the tiles to form the pattern shown in the solution.
Once solved, access the book again.
- Pick up the SCROLL and COPPER WITH SYMBOL.
Exit the house.
Return to the old fountain area and re-enter the hidden room.
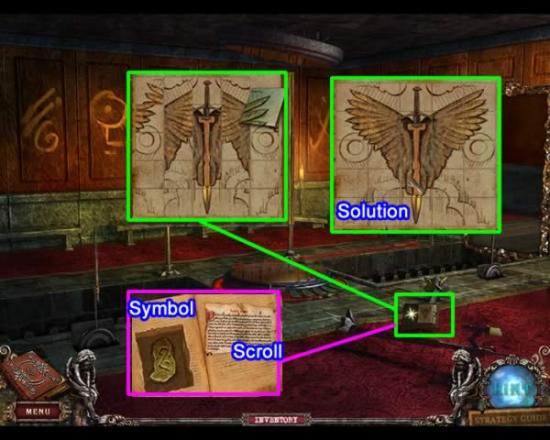
Go to the Main Hall.
Access the chest at the front of the hall.
- Place each SYMBOL in the nameplate.
- The Demon’s true name appears.
- Click to pick it up.
Exit the Hidden Room.
Return to the house.
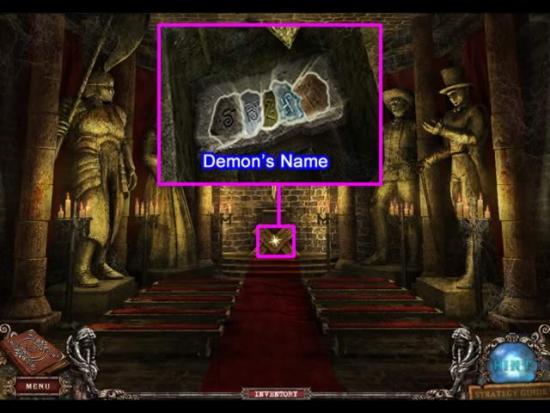
Access the Secret Room via the Office Landing.
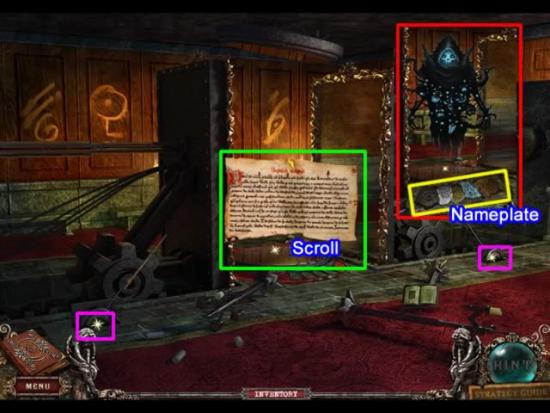
- Click the levers on each side to move the mirrors.
- Place the SCROLL on the center mirror.
The Demon appears.
- Have a brief conversation.
- Place the DEMON’S NAME at the base of the mirror.
- This is the demon’s true name.
The estate is now free of the demon and Doctor Berk is free as well.
Congratulations! You finished playing the additional scenes for Fear for Sale: The Mystery of McInroy Manor Collector’s Edition.

More articles...
-
Best Horror Games On Itch.io – July 2026
Across a bounty of subgenres. -
Haze Seas Accessories Tier List [Best Accessories to Equip]
The accessories with the best stat buffs in Haze Seas.