![Hololive Dreams Tier List [Best Cards]](/wp-content/uploads/2026/07/hololive-dreams-tier-list.jpg "Hololive Dreams Tier List [Best Cards]")
Hololive Dreams Tier List [Best Cards]
The best cards for the best performances.


![Iron Soul Dungeon Weapon Tier List [Best Weapons]](/wp-content/uploads/2026/07/iron-soul-dungeon-weapon-tier-list.jpg "Iron Soul Dungeon Weapon Tier List [Best Weapons]")

Welcome to the Fallen Shadows walkthrough on Gamezebo. Fallen Shadows is a Hidden Object game played on the PC and Mac created by Happy Muffin Top. This walkthrough includes tips and tricks, helpful hints, and a strategy guide on how to complete Fallen Shadows.
Welcome to the Fallen Shadows walkthrough on Gamezebo. Fallen Shadows is a Hidden Object game played on the PC and Mac created by Happy Muffin Top. This walkthrough includes tips and tricks, helpful hints, and a strategy guide on how to complete Fallen Shadows.
• There are two Game Modes available, Casual Mode and Advanced Mode.
• Casual Mode features faster refilling Hint Button and Skip Option; Active Areas will also sparkle.
• Advanced Mode features slower filling Hint and Skip; Active areas will not sparkle.
• In Casual Mode the Hint Meter takes approximately 30 seconds to refill.
• You have unlimited Hints.
• In Casual Mode the Skip Option will take approximately 45 seconds to fill.
• Hidden Objects will vary from game to game.
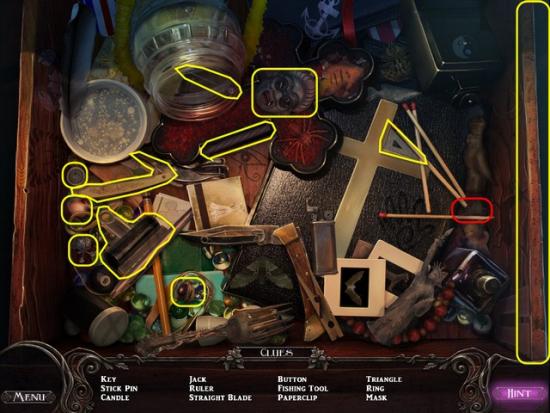
Guide Tips
• Hidden Objects are highlighted in Yellow.
• Items are highlighted in Red.
• Interactive Areas are highlighted in Green.
• Locations are highlighted in Blue or Purple.

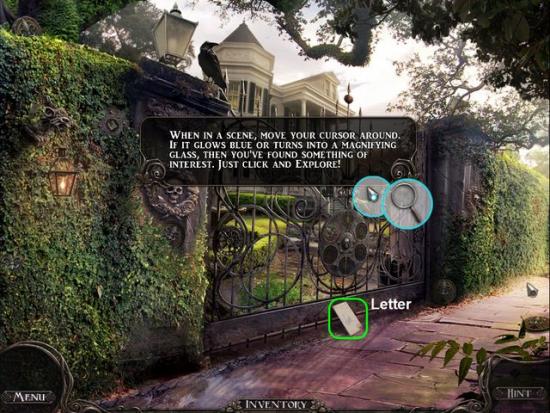
Examine the Letter highlighted in Green.
Examine the Gate highlighted in Green.
Go Back one screen.
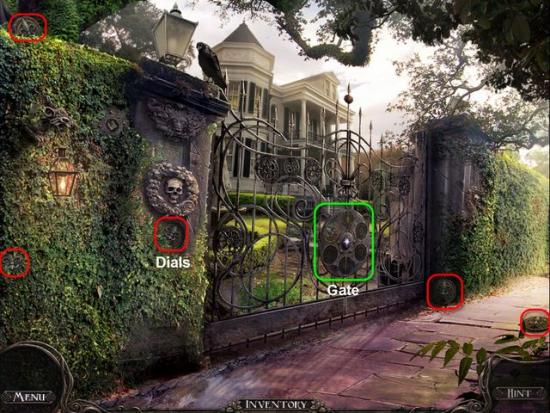
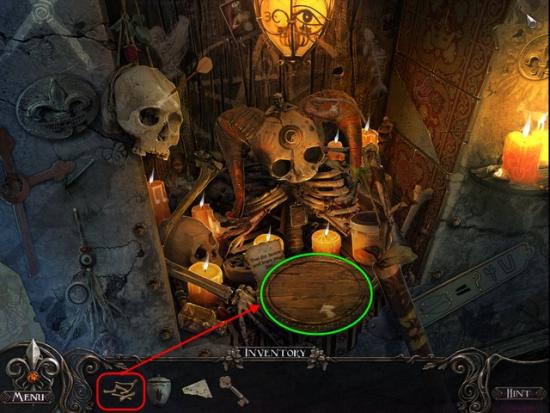
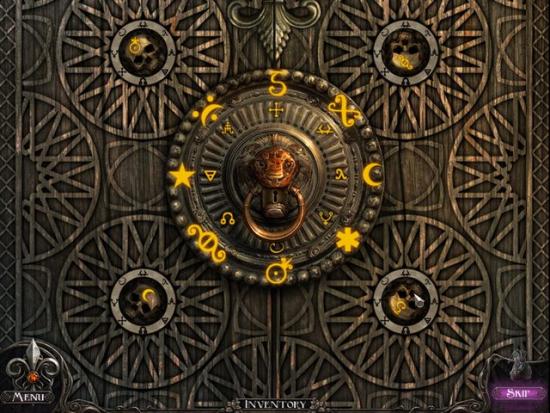
Gather the five Dials highlighted in Red.
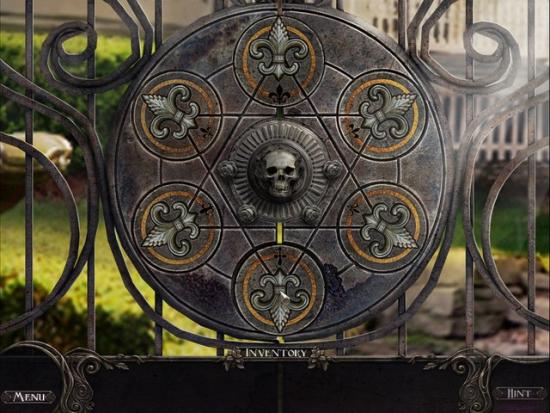
Place the five Dials into the Gate, in the order shown.
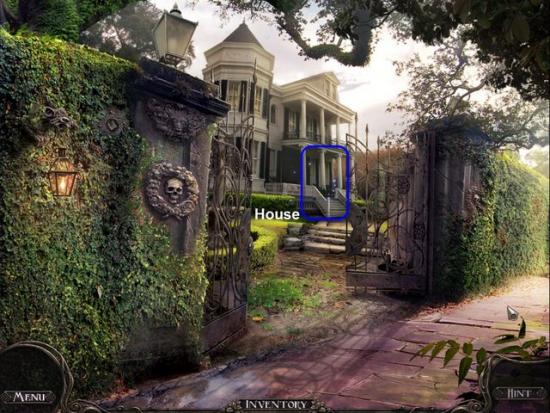
Head to the House highlighted in Blue.
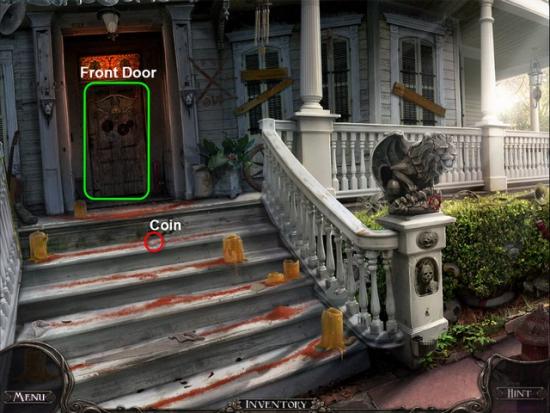
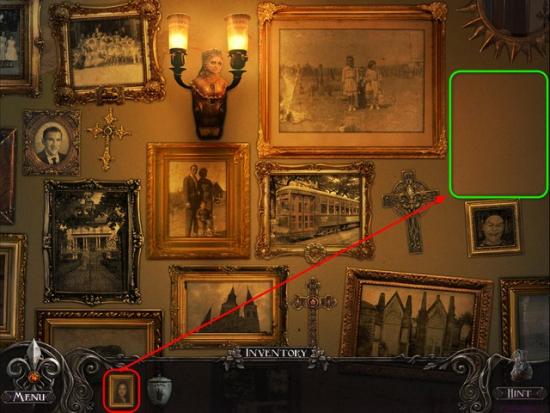
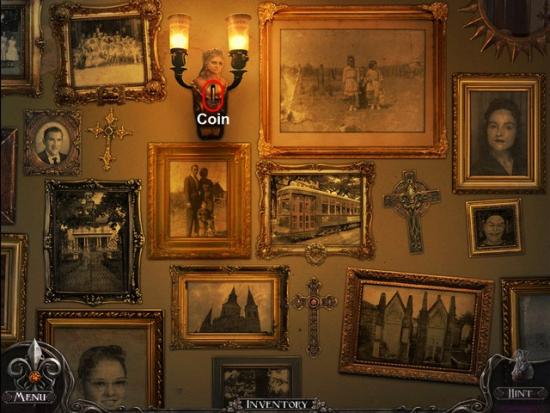
Gather the Coin highlighted in Red.
Examine the Front Door highlighted in Green.
Go Back one screen.
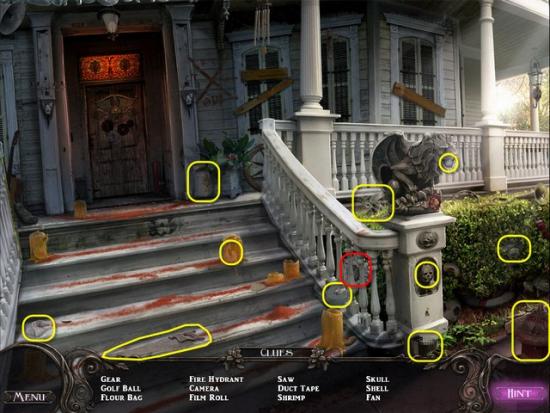
Gather the Gear highlighted in Red.
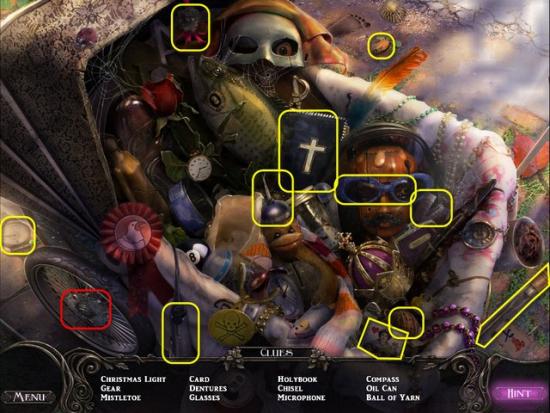
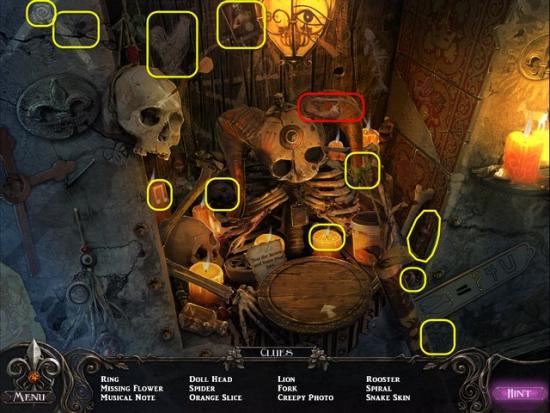
Gather the Hidden Objects highlighted in Yellow.
Return to the Gate.
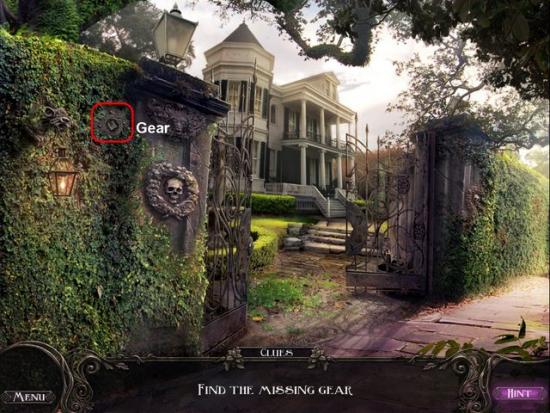
Gather the Gear highlighted in Red.
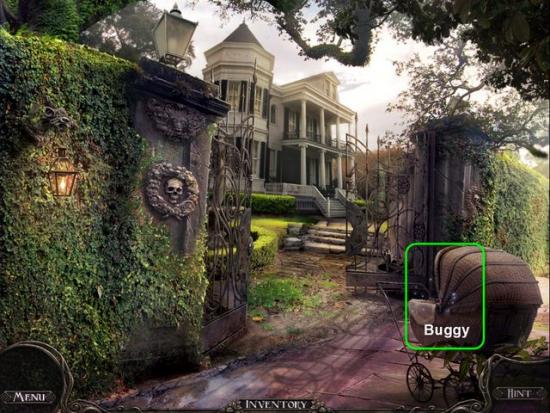
Examine the Baby Buggy highlighted in Green.
Gather the Gear highlighted in Red.
Gather the Hidden Objects highlighted in Yellow.
Return to the Front Door.
Place the three Gears into the Door in the position shown.
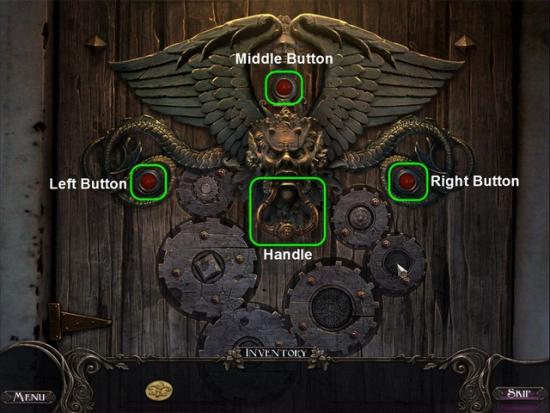
Next is a Simon Says Puzzle.
To solve this Mini-Game press the Buttons in order they light up.
You will have to do this three times.
• Left, Right, Middle
• Left, Right, Middle, Right
• Left, Right, Middle, Right, Left
Finally pull the Handle to open the Front Door.
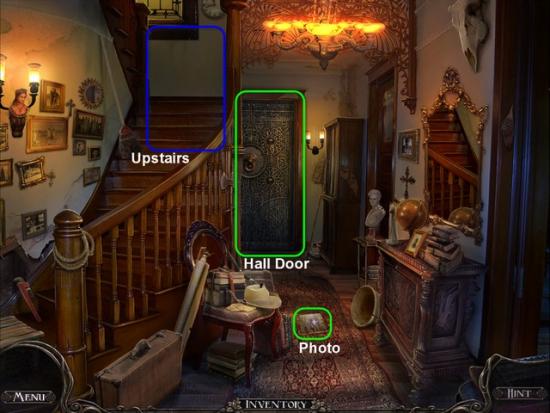
Examine the Photo highlighted in Green.
Examine the Hall Door highlighted in Green.
Head Upstairs, highlighted in Blue.

Examine the Bedroom Wall highlighted in Green.
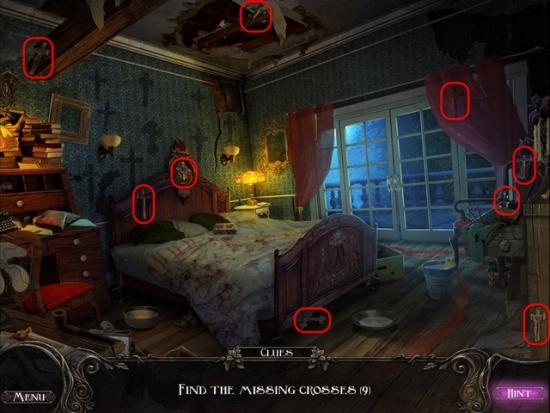
Gather the nine Crosses highlighted in Red.
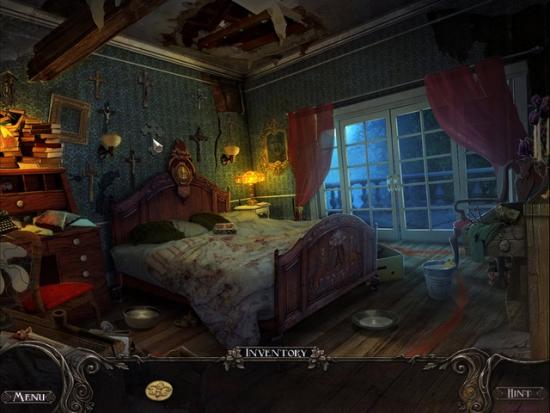
Place the nine Crosses onto the wall in the positions shown.
Examine the Bedside Table.
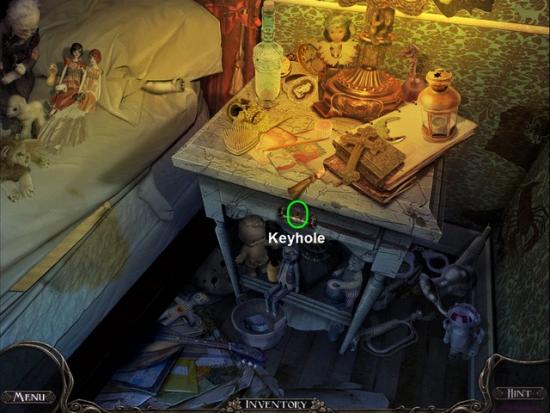
Examine the Keyhole highlighted in Green.
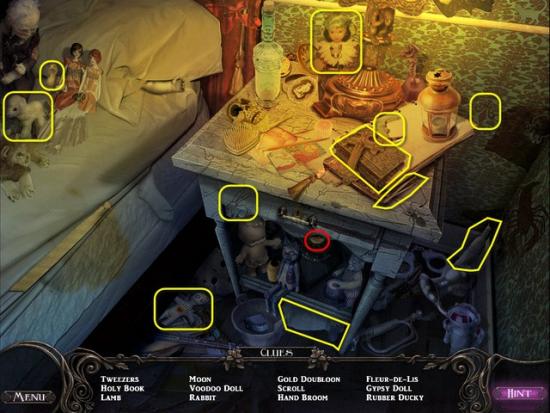
Gather the Coin highlighted in Red.
Gather the Hidden Objects highlighted in Yellow.
Go Back one screen.
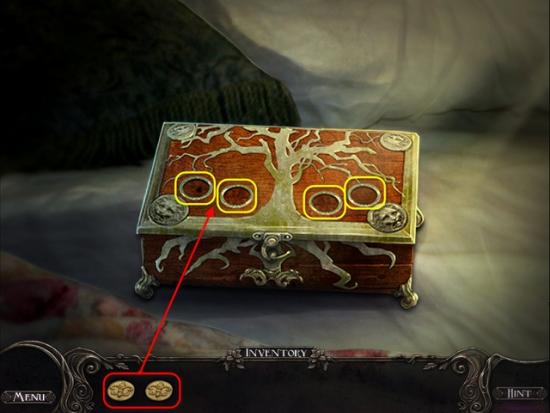
Examine the Box on the Bed.
Insert the two Coins, highlighted in Red, into the Lid of the Box, highlighted in Yellow.
Go Back one screen.
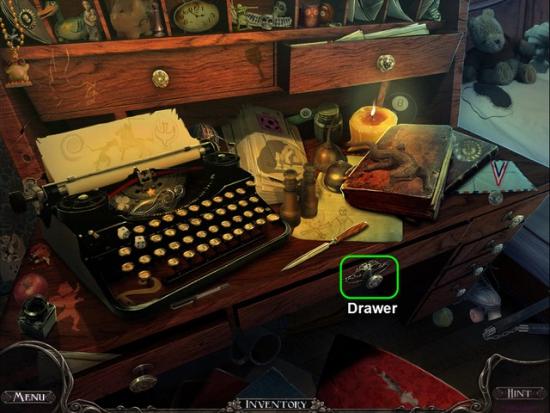
Examine the Desk.
Examine the Drawer highlighted in Green.
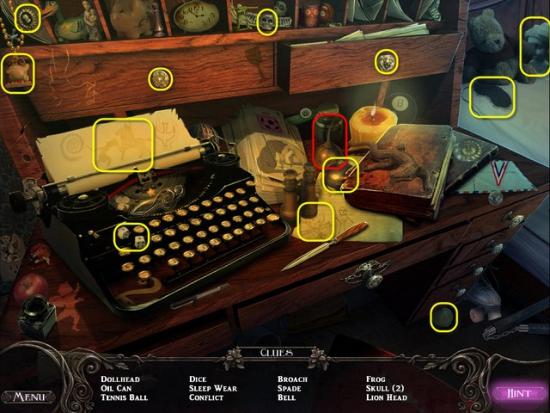
Gather the Oil Can highlighted in Red.
Gather the Hidden Objects highlighted in Yellow.
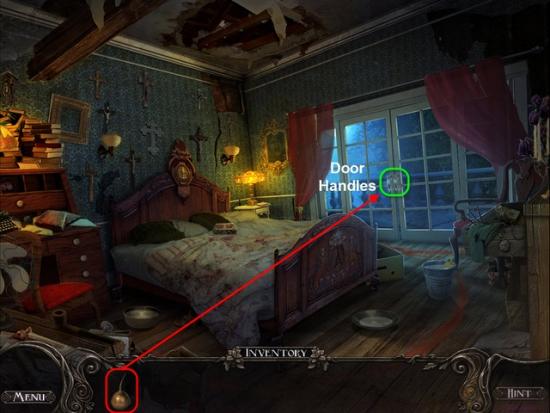
Use the Oil Can, highlighted in Red, on the Door Handles, highlighted in Green.
Head to the Balcony.
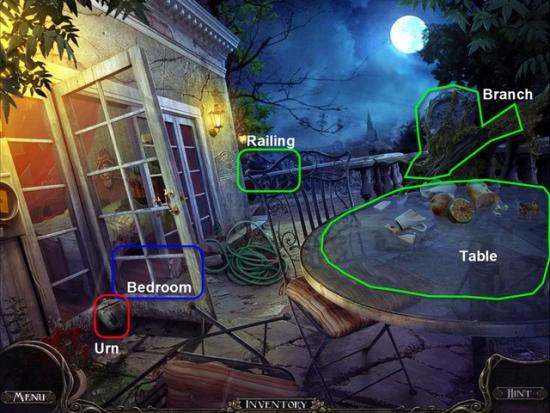
Examine the Railing highlighted in Green.
Examine the Statue.
Go Back one screen
Gather the Urn highlighted in Red.
Examine the Branch highlighted in Green.
Return to Bedroom.
Head back Downstairs.
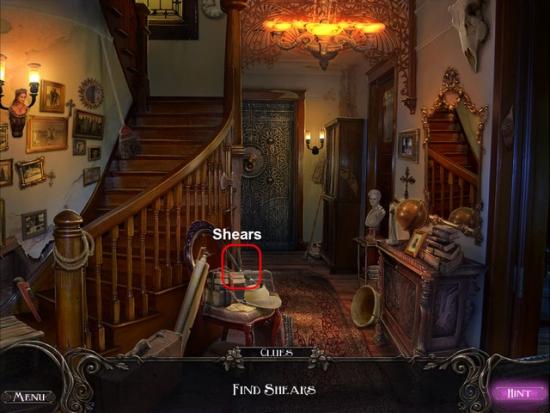
Gather the Shears highlighted in Red.
Return to the Balcony.
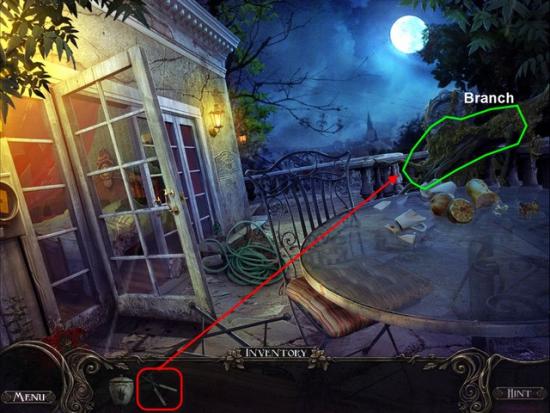
Use the Shears, highlighted in Red, on the Branch, highlighted in Green.
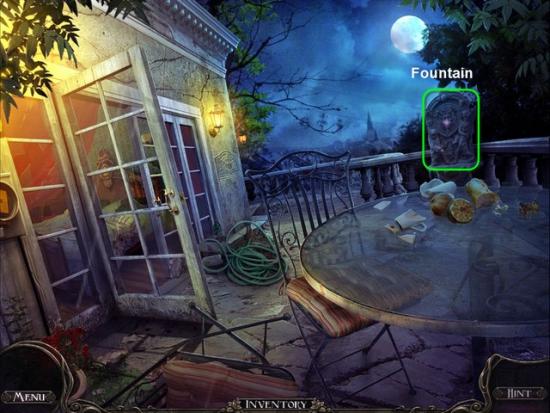
Examine the Fountain highlighted in Green.
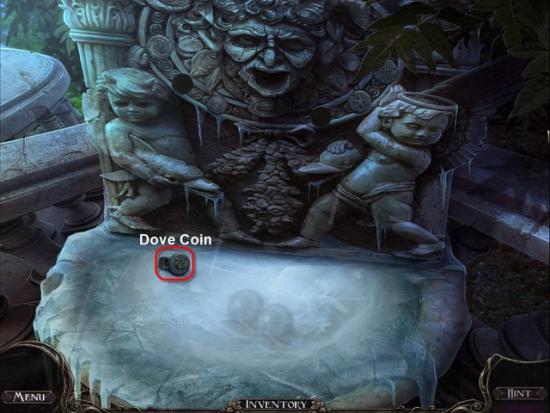
Gather the Dove Coin highlighted in Red.
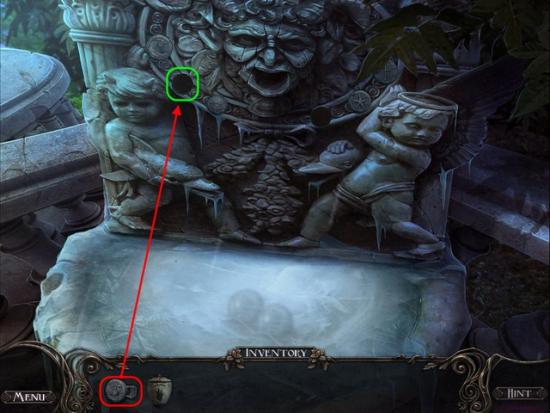
Place the Dove Coin, highlighted in Red, into the Fountain, highlighted in Green.
Go Back one screen.
Examine the Table.
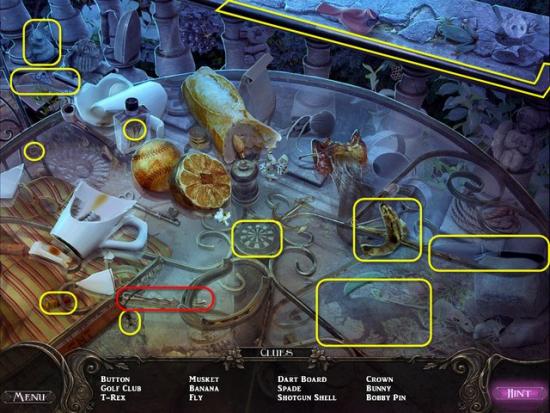
Gather the Bobby Pin highlighted in Red.
Gather the Hidden Objects highlighted in Yellow.
Return to the Bedroom
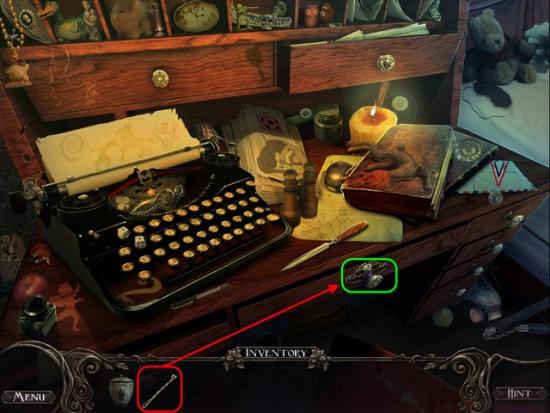
Examine the Desk.
Use the Bobby Pin, highlighted in Red, on the Drawer, highlighted in Green.
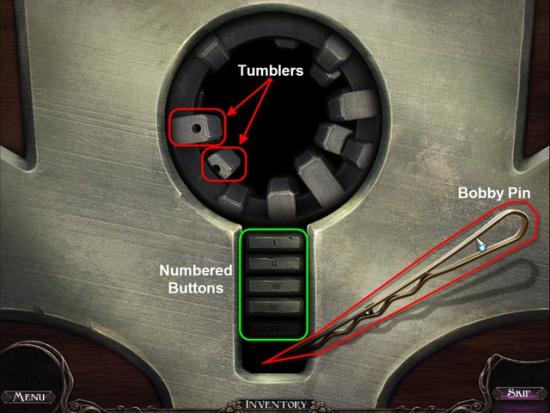
To solve this Mini-Game you need to align all the Tumblers to unlock the Drawer.
Click on each of the Numbered Buttons, then click and drag the Bobby Pin to move the Tumbler into the correct position.
Your Goal is to align all the Tumblers, the ones with a Hole in the center, so they are all lined up under each other.
Once all the Tumblers are aligned properly the Drawer will open.
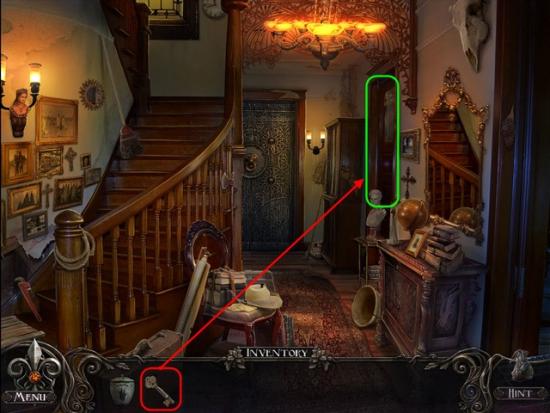
Gather the Key highlighted in Red.
Gather the Hidden Objects highlighted in Yellow.
Return to the Bedroom.
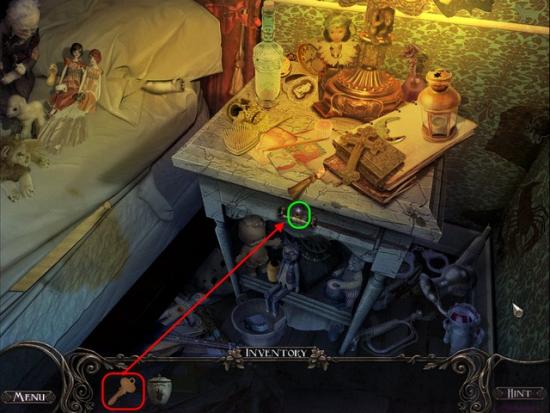
Examine the Bedside Table.
Use the Key, highlighted in Red, on the Keyhole, highlighted in Green.
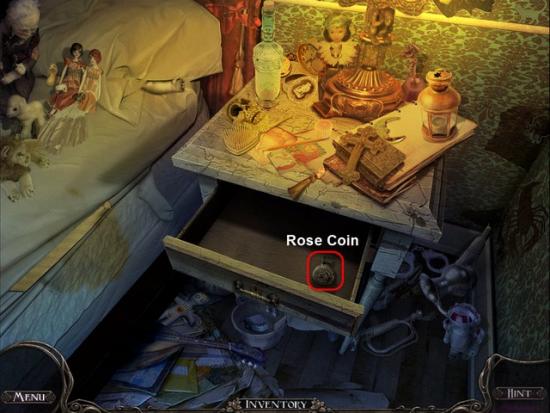
Gather the Rose Coin highlighted in Red.
Return to the Balcony.
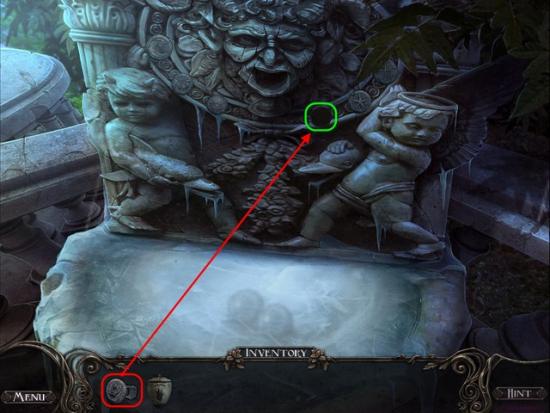
Examine the Fountain.
Place the Rose Coin, highlighted in Red, into the Fountain, highlighted in Green.
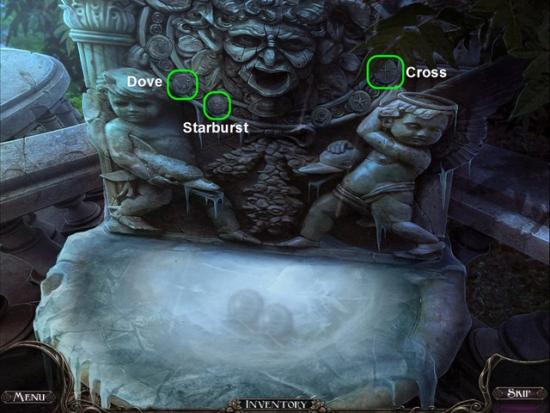
To solve this Puzzle you will need to press the Symbols in the correct order.
Solution: Press the Cross, the Dove, and finally the Star-burst.
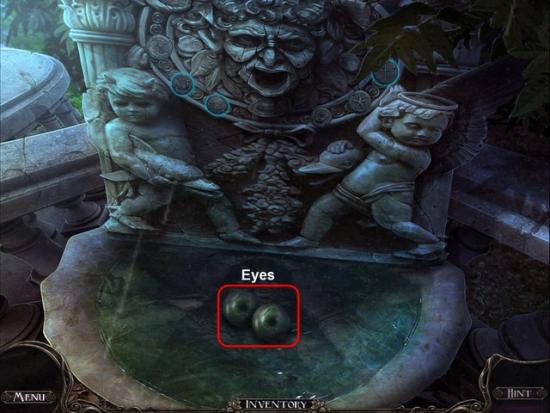
Gather the Eyeballs highlighted in Red.
Go Back one screen.
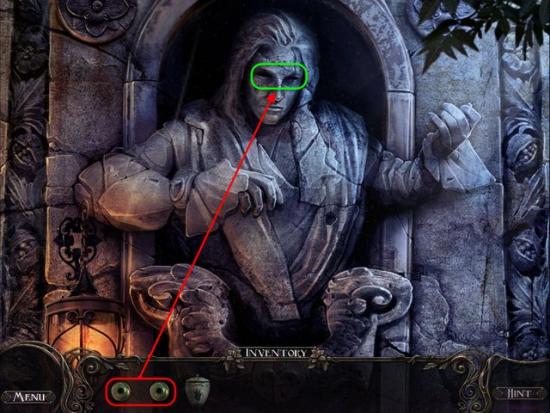
Examine the Railing once more.
Place the Eyes, highlighted in Red, into the Eye Sockets, highlighted in Green, on the Sculpture.

Gather the Pendant highlighted in Red.
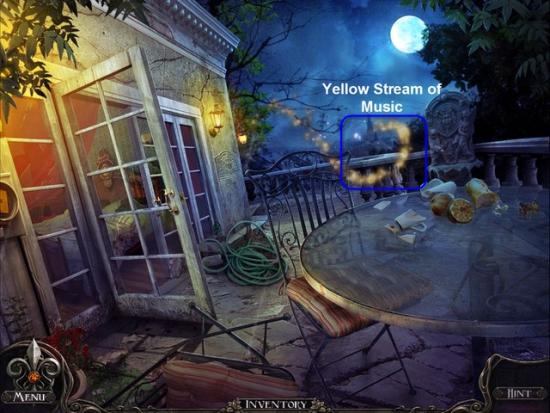
Follow the Yellow Stream of Music.
Gather the Key highlighted in Red.
Examine the Newspaper highlighted in Green.
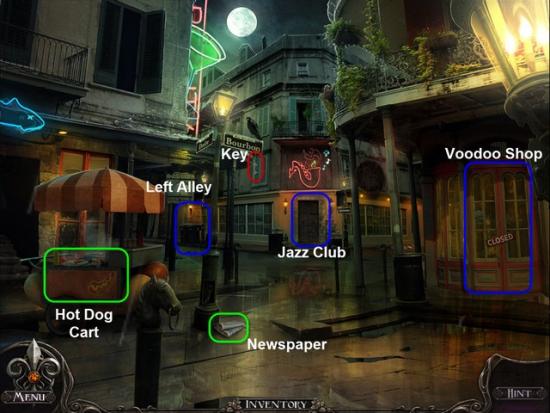
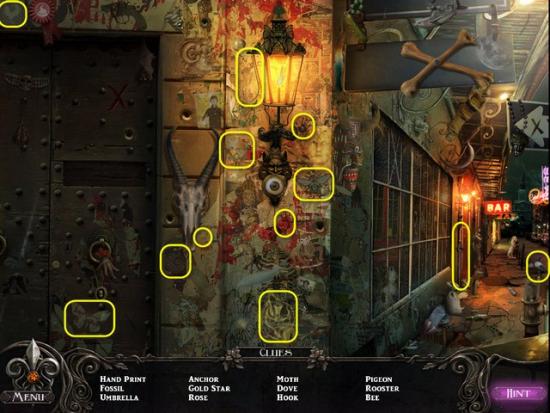
Head to the Jazz Club.
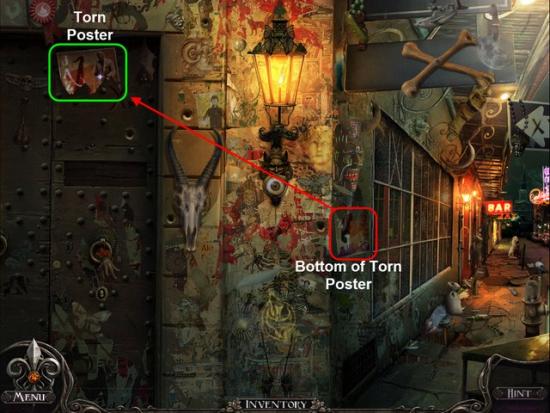
Examine the Torn Poster highlighted in Green.
Gather the bottom of the Torn Poster highlighted in Red.
Place the bottom Torn Poster with the top half.
Go Back one screen.
Examine the Hot Dog Cart.
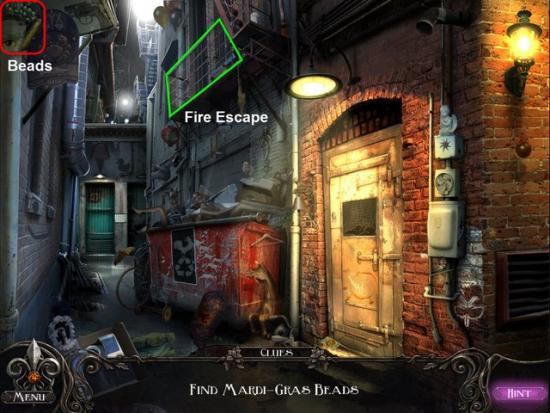
Head down the Left Alley.
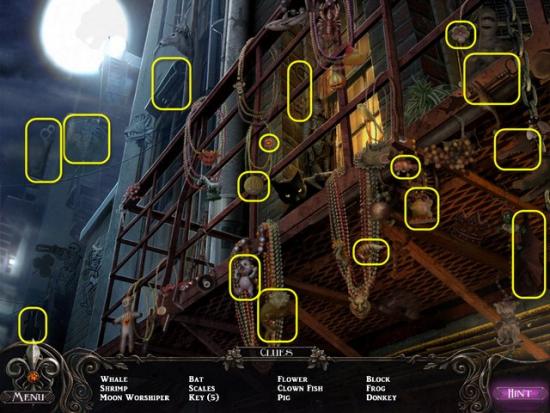
Gather the Beads highlighted in Red.
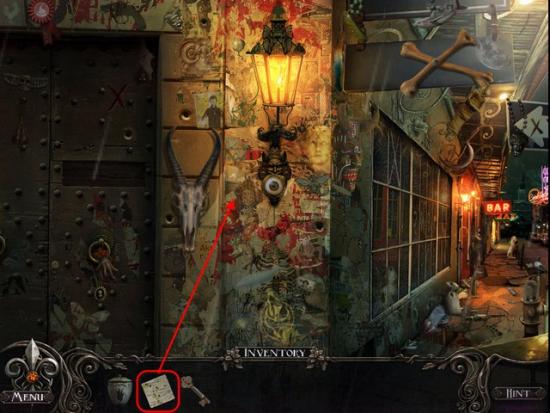
Examine the Fire Escape highlighted in Green.

Gather the Hidden Objects highlighted in Yellow.
Receive a bunch of Beads.
Go Back two screens.
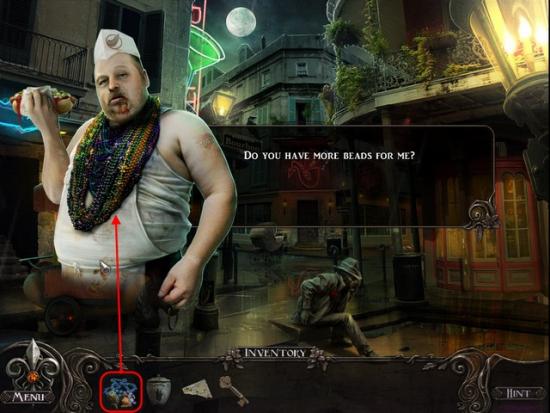
Examine the Hot Dog Cart.
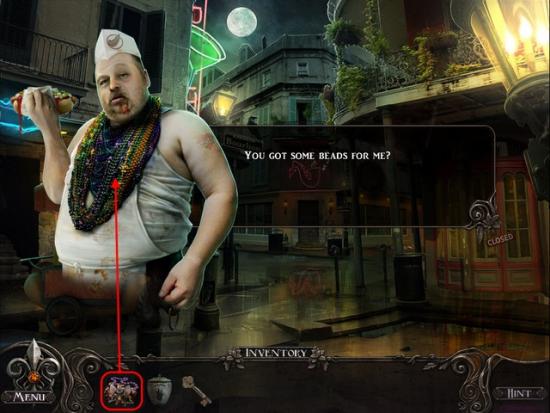
Give the Beads, highlighted in Red, to the Hot Dog Vendor,
Examine the Hot Dog Cart.
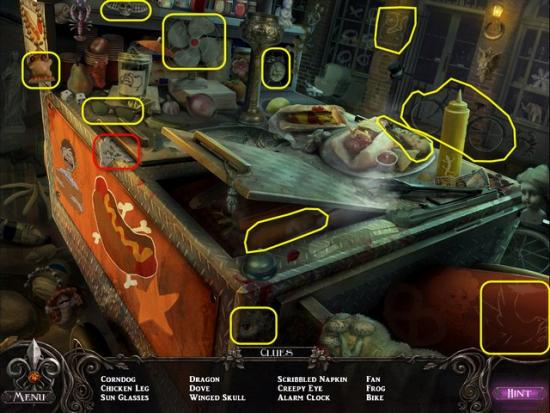
Gather the Torn Napkin highlighted in Red.
Gather the Hidden Objects highlighted in Yellow.
Go Back one screen.
Enter the Voodoo Shop.
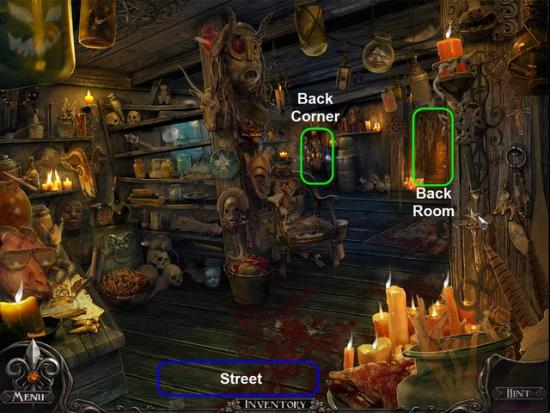
Examine the Back Corner highlighted in Green.
Gather the two Golden Bones highlighted in Red.
Gather the Hidden Objects highlighted in Yellow.
Examine the Back Room.
Gather the Gold Bone highlighted in Red.
Gather the Hidden Objects highlighted in Yellow.
Go Back one screen.
Examine the Back Corner.
Throw the Bones, highlighted in Red, into the Ring, highlighted in Green.
Go Back to the Street.

Head back to the Jazz Club.
Examine the Door highlighted in Green.
Go Back one screen.
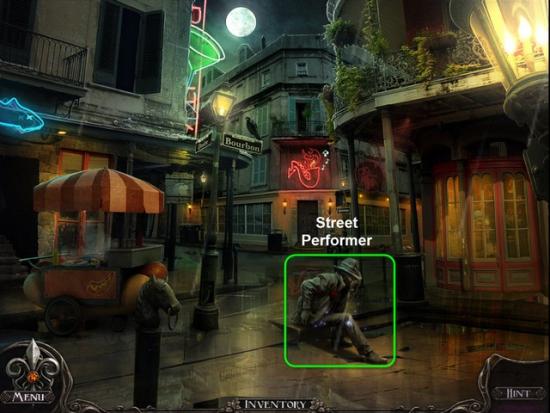
Examine the Street Performer highlighted in Green.
Go Back one screen.
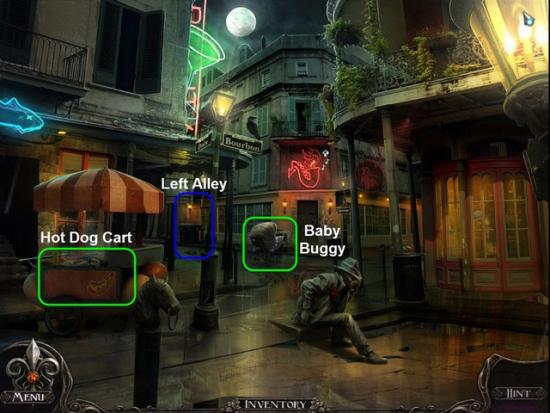
Examine the Baby Buggy highlighted in Green.
Examine the Hot Dog Cart.
Head down the Left Alley.
Examine the Fire Escape.
Gather the Hidden Objects highlighted in Yellow.
Receive a bunch of Beads.
Go Back two screens.
Examine the Hot Dog Cart.
Give the Beads, highlighted in Red, to the Hot Dog Vendor.
Examine the Hot Dog Cart
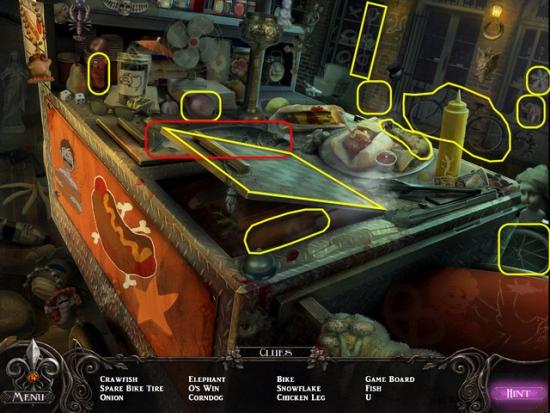
Gather the Fish highlighted in Red.
Gather the Hidden Objects highlighted in Yellow.
Go Back one screen.
Head down the Left Alley.
Examine the Fire Escape.
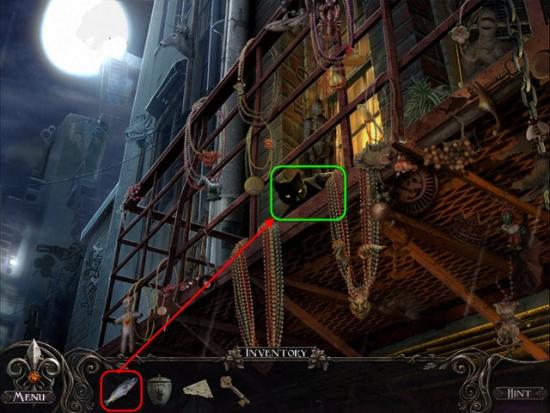
Give the Fish, highlighted in Red, to the Black Cat, highlighted in Green.
Receive the Black Cat.
Go Back two screens.
Examine the Baby Buggy.
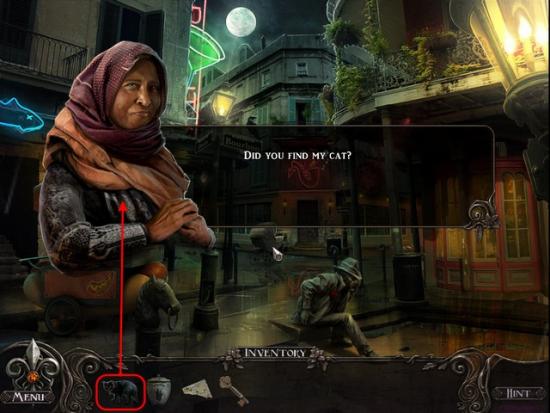
Give the Black Cat, highlighted in Red, to the Woman.
Examine the Baby Buggy once again.
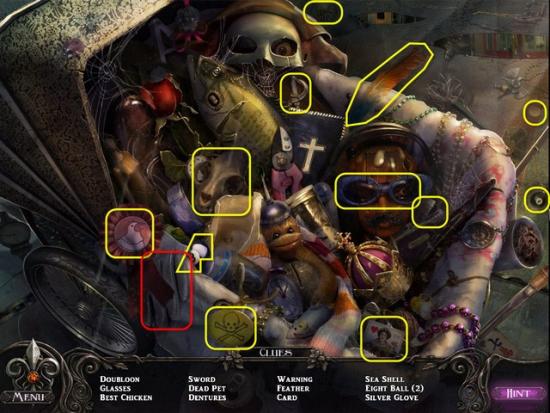
Gather the Glove highlighted in Red.
Gather the Hidden Objects highlighted in Yellow.
Go Back one screen.
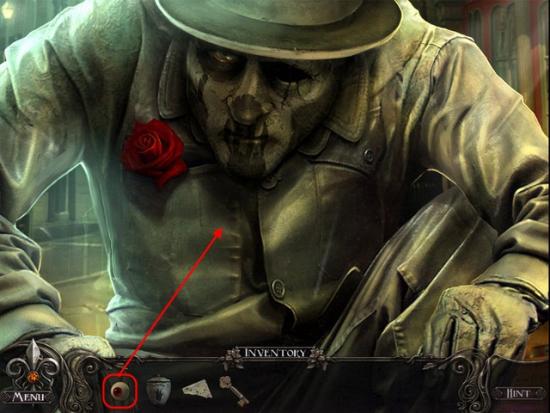
Examine the Street Performer.
Give the Silver Glove, highlighted in Red, to the Street Performer.
Go Back one screen.
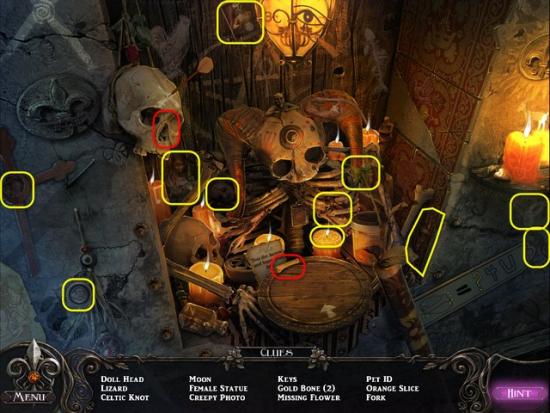
Enter the Voodoo Shop.
Examine the Back Room.
Gather the Moss highlighted in Red.
Gather the Hidden Objects highlighted in Yellow.
Go Back one screen.
Gather the Hidden Objects highlighted in Yellow.
Examine the Back Corner.
Gather the Snake Skin highlighted in Red.
Gather the Hidden Objects highlighted in Yellow.
Go Back one screen.
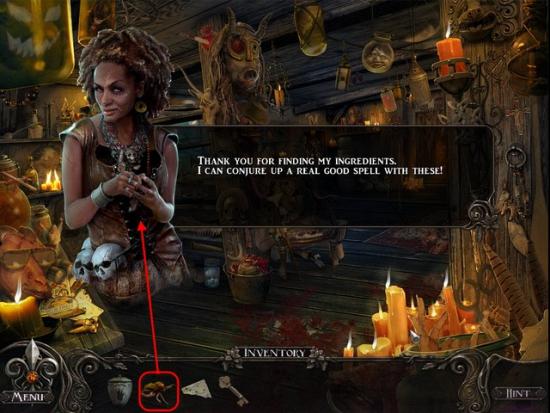
Give the Moss & Snake Skin, highlighted in Red, to the Shop Owner.
Receive a Glass Eye.
Return to the Street.
Examine the Street Performer.
Give the Glass Eye, highlighted in Red, to the Street Performer.

This Mini-Game is a simple Matching Game.
Match each of the Cards to pass this Puzzle.
See the Image for Solution.

Gather the second Torn Napkin Piece high in Red.
Return to the Jazz Club.
Place the Napkin, highlighted in Red, onto the Screen.
Find the Hidden Objects highlighted in Yellow.
Enter the Club.
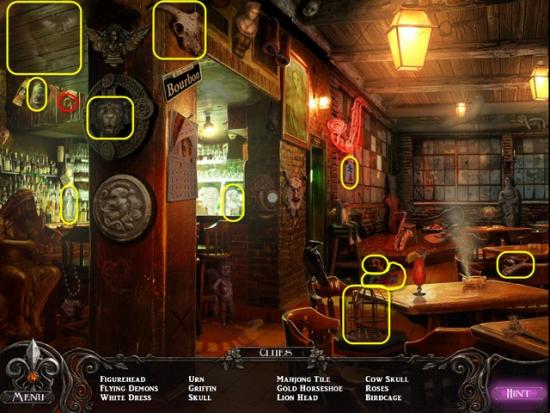
Gather the Horseshoe highlighted in Red.
Gather the Hidden Objects highlighted in Yellow.
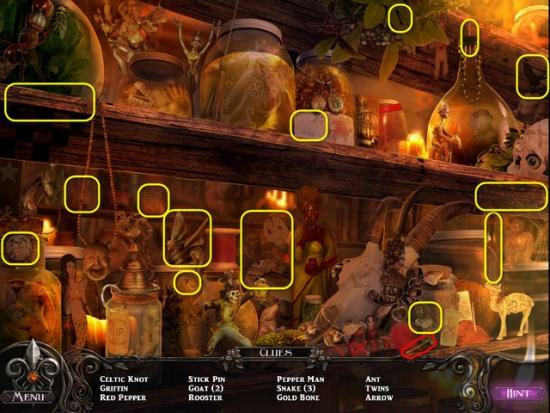
Examine the Bar.
Examine the Bar once again.
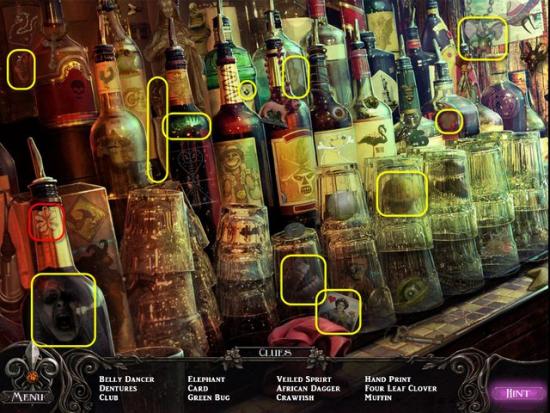
Gather the Four Leaf Clover highlighted in Red.
Gather the Hidden Objects highlighted in Yellow.
Go Back one screen.
Examine the Stage.
Gather the Pot of Gold highlighted in Red.
Gather Hidden Objects highlighted in Yellow.
Go Back one screen.
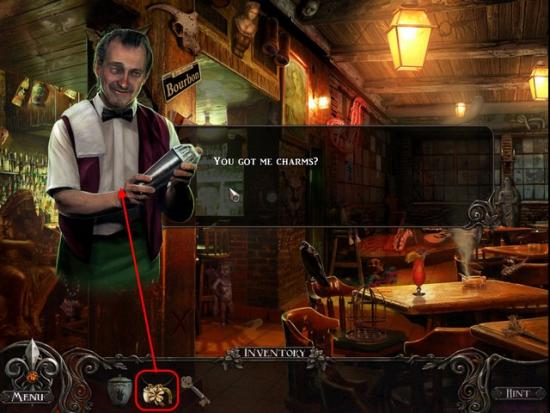
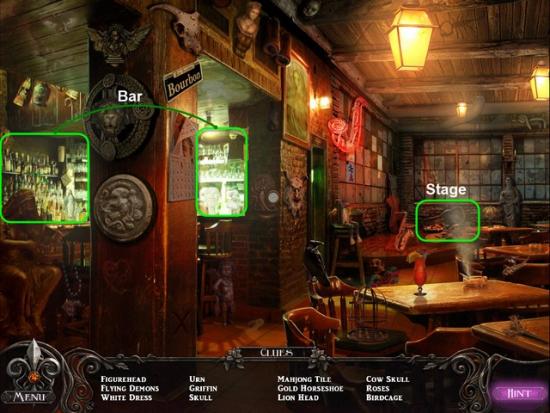
Examine the Bar
Give the Charms, highlighted in Red, to the Bar Tender.
Examine the bar once more.
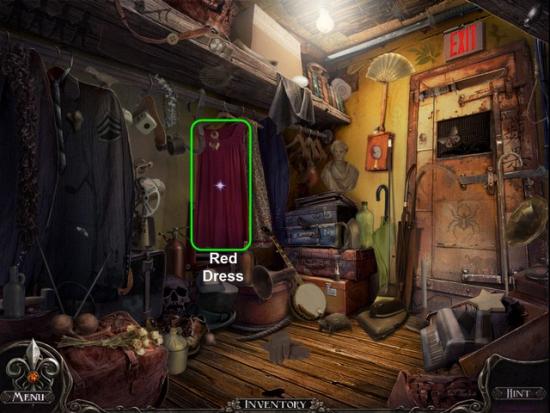
Click to move the Red Dress highlighted in Green.
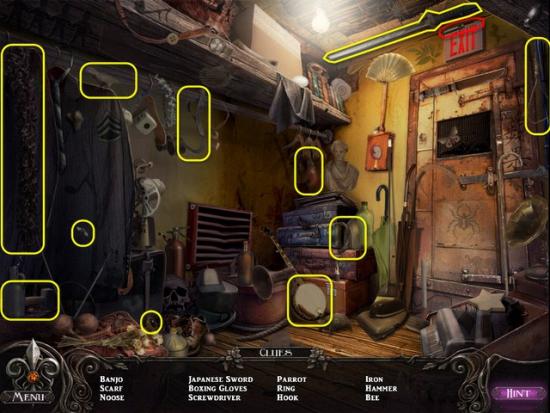
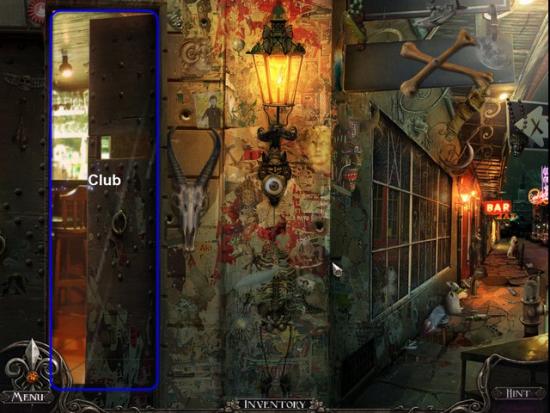
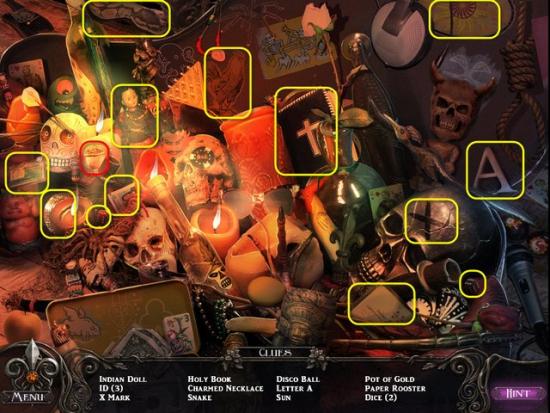
Gather the Screwdriver highlighted in Red.
Gather the Hidden Objects highlighted in Yellow.
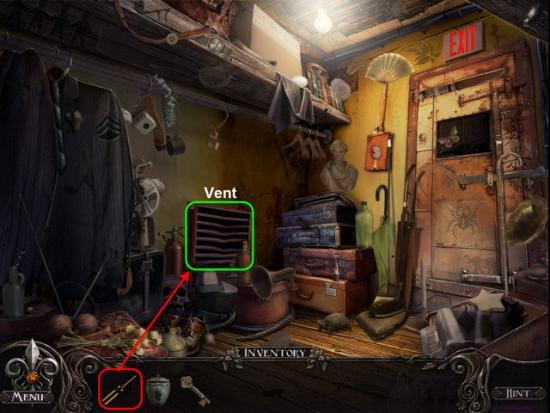
Use the Screwdriver, highlighted in Red, on the Vent highlighted in Green.
Enter the Vent.
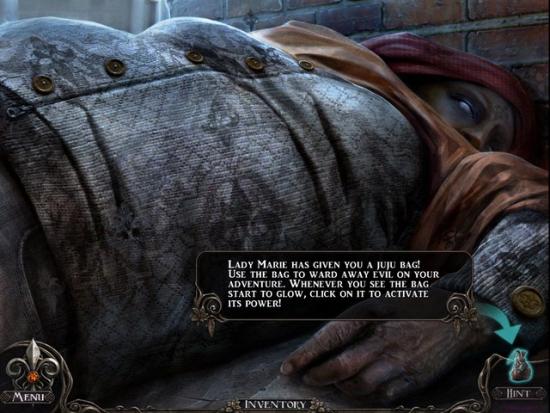
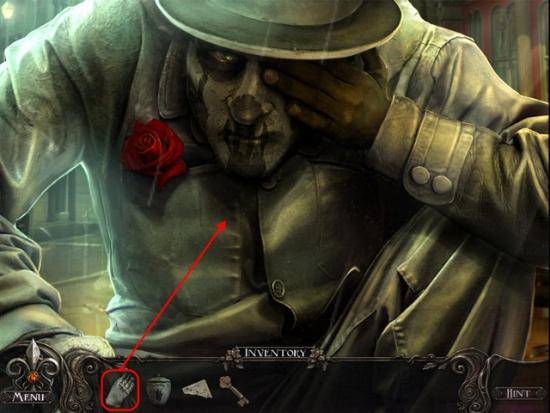
Receive the Special Item – Juju Bag.
Use the Pouch on Ruth’s Body.
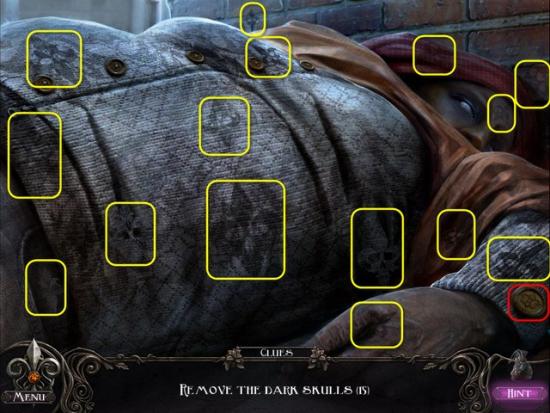
Gather the 15 Skulls highlighted in yellow.
Gather the Coin high in Red.

Examine the Box on the Bed.
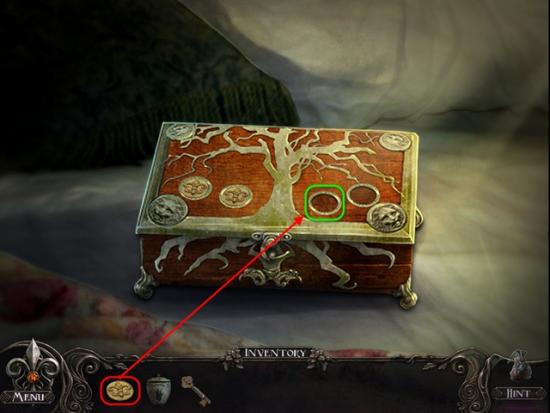
Place the Coin. Highlighted in Red, onto the Box Lid, highlighted in Green.
Go Back one screen.
Head Downstairs.
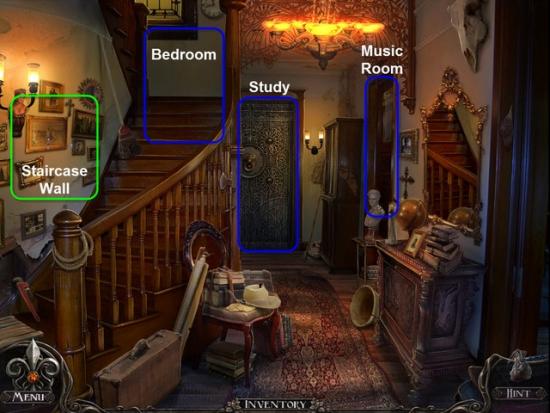
Examine the Staircase Wall highlighted in Green.
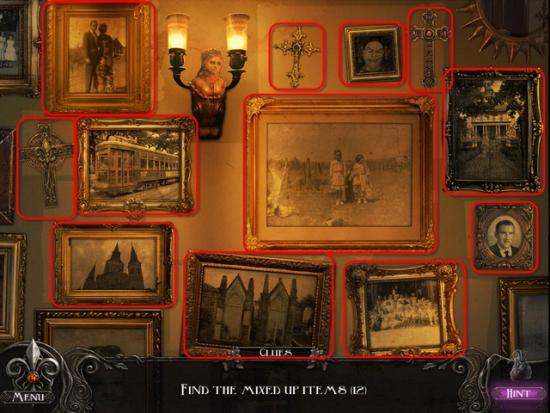
Gather the twelve Items highlighted in Red.
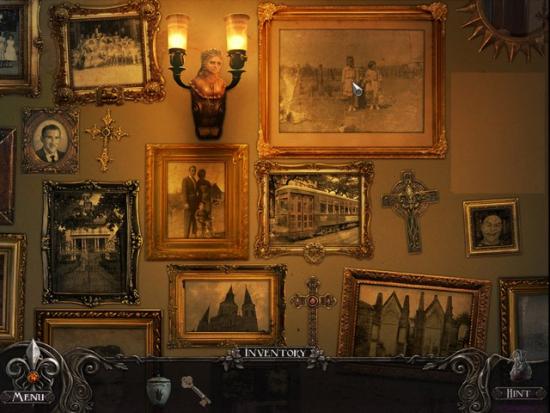
Place the twelve Items back on the Wall in the order shown.
Go Back one screen.
Use the Key, highlighted in Red, on the Music Room Door, highlighted in Green.
Enter the Music Room.
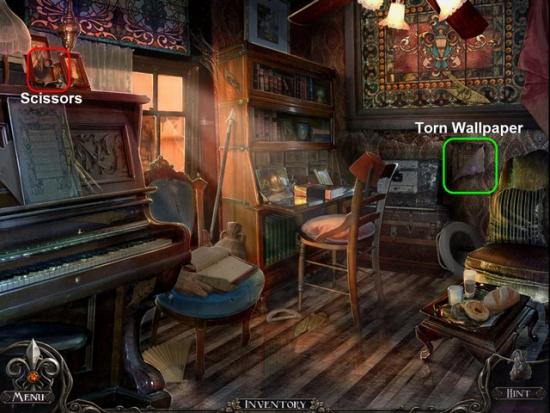
Examine the Torn Wallpaper on the Back Wall highlighted in Green.
Gather the Scissors highlighted in Red.
Use the Scissors, highlighted in Red, on the Torn Wallpaper, highlighted in Green.
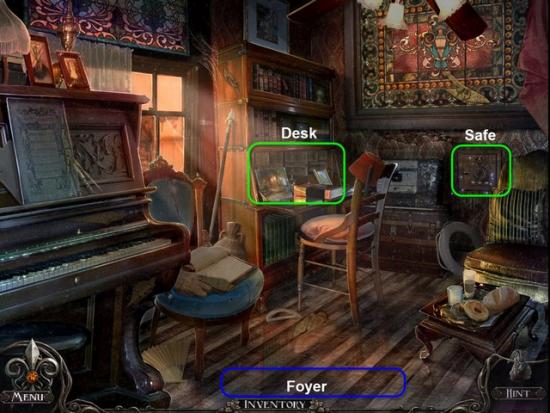
Examine the Safe.
Go Back one screen.
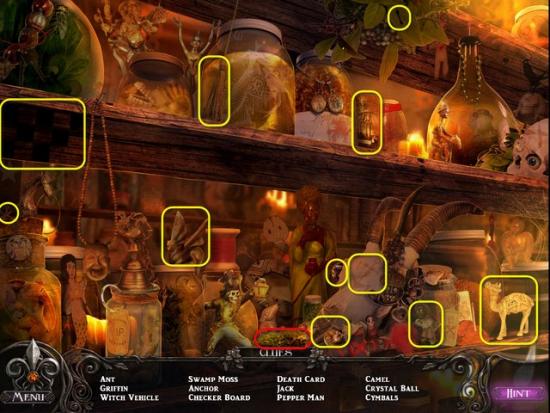
Examine the Desk.
Gather the Photo highlighted in Red.
Gather the Hidden Objects highlighted in Yellow.
Go Back two screens.
Examine the Staircase Wall.
Place the Photo, highlighted in Red, onto the Wall, highlighted in Green.
Gather the Coin highlighted in Red.
Return to the Bedroom.
Examine the Box on the Bed once again.
Place the Coin, highlighted in Red, onto the Box, highlighted in Green.
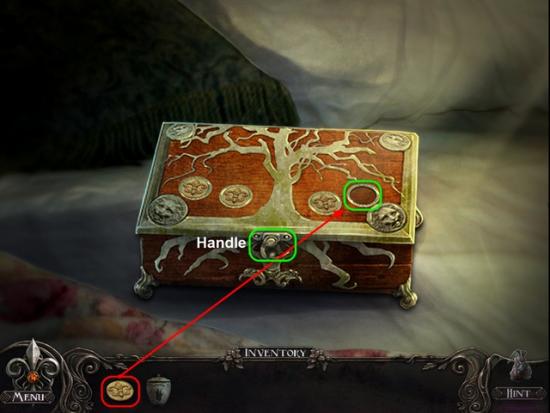
Click the Handle to open the Box.
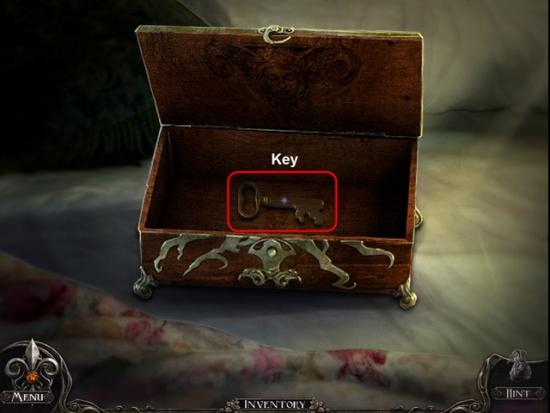
Gather the Key highlighted in Red.
Return Back Downstairs.
Examine the Study Door.
Use the Key on the Study Door.
To solve this Mini-Game you will need to rotate the four Skulls to match pairing symbols aligned around the center of the Door.
Click on the Skulls to rotate them clockwise.
Once all Skull are in correct position, as shown, the Door will open.
Enter the Study.
Examine he Claw Marks highlighted in Green.
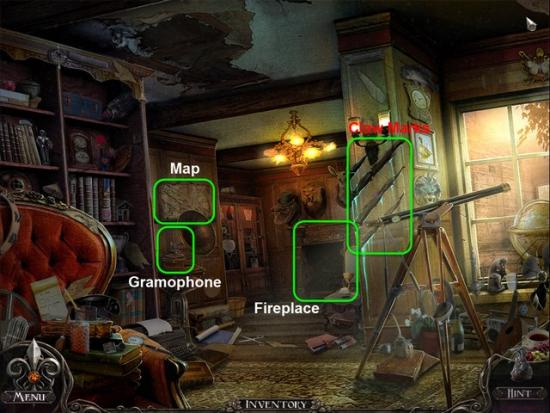
Examine the Map.
Go Back one screen.
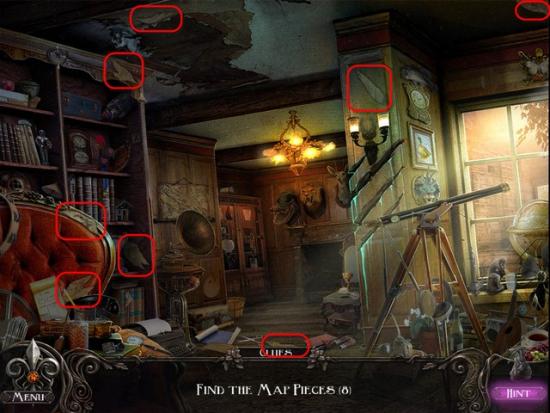
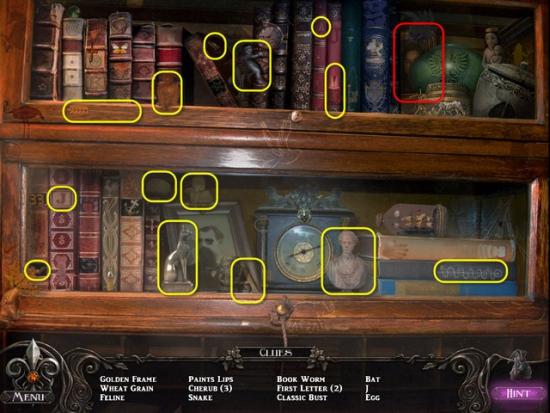
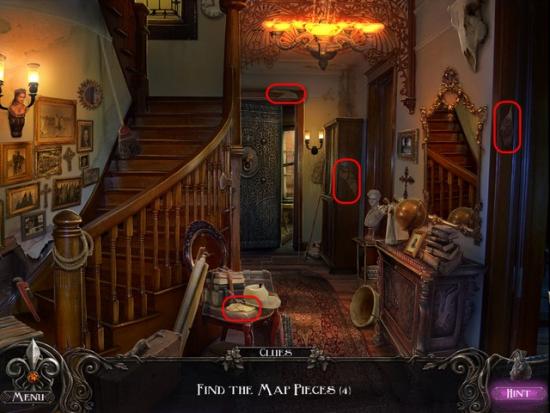
Gather the eight Map Pieces highlighted in Red.
Examine the Map once again.
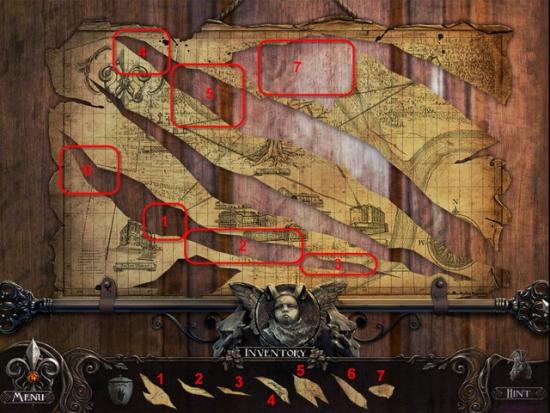
Place the Map Pieces into the position shown.
Go Back two screens to the Hallway.
Gather the four Map Pieces highlighted in Red.
Enter the Music Room.

Gather the seven Map Pieces highlighted in Red.
Return to the Study.
Examine the Map.
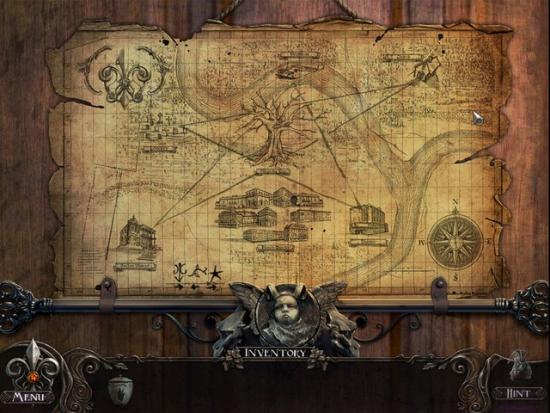
Place the Map Pieces in the positions shown to complete the Map.
Receive the Combination to the Safe.
Examine the Gramophone.
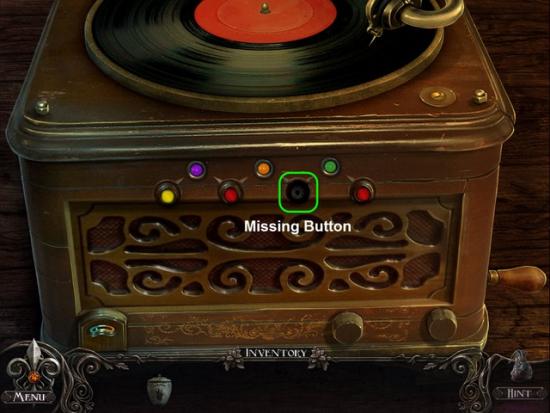
Examine the Missing Button.
Return to the Music Room.
Examine the Safe.
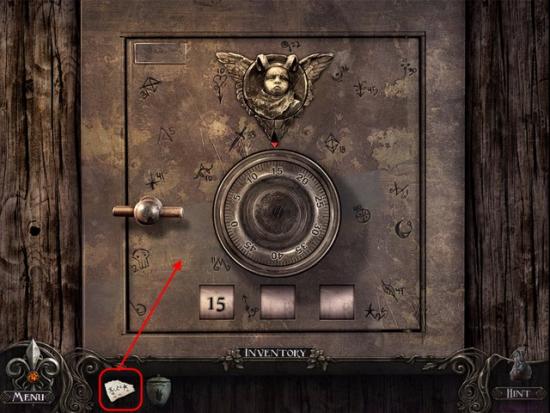
Place the Combination, highlighted in Red, onto the Safe.
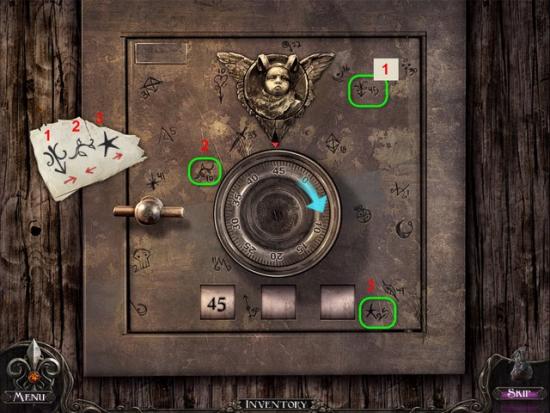
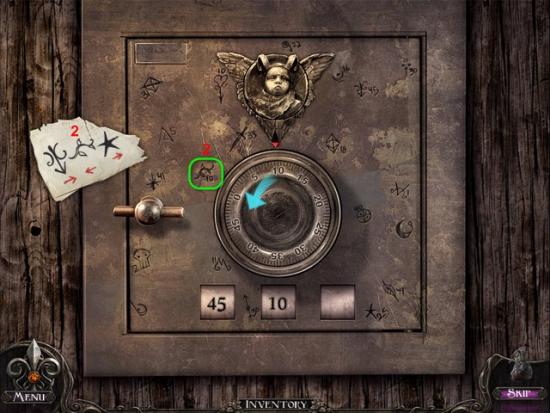
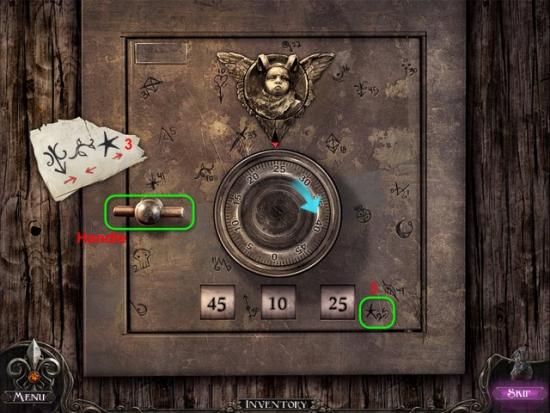
To solve this Mini-Game you need to enter the correct combination you wrote down earlier.
Find each Symbol and its corresponding Number.
Then turn the Dial the corresponding direction shown in the Clue till you reach the correct Number.
Do this for all three Numbers.
Once you have entered the correct Combination, click the Handle to open the Safe.
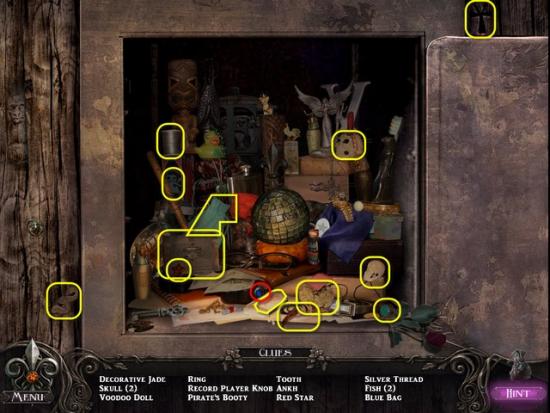
Gather the Record Player Button highlighted in Red.
Gather the Hidden Objects highlighted in Yellow.
Return to the Study.
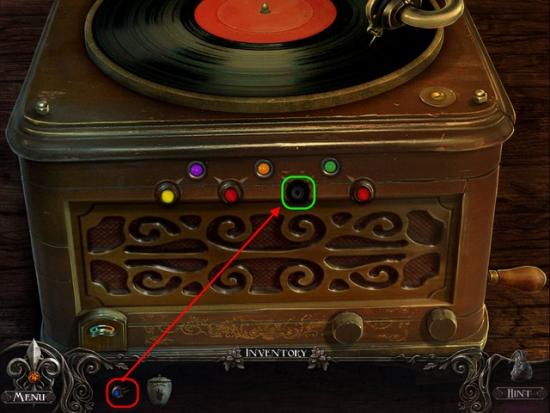
Examine the Gramophone.
Place the Button, highlighted in Red, into the Gramophone, highlighted in Green.
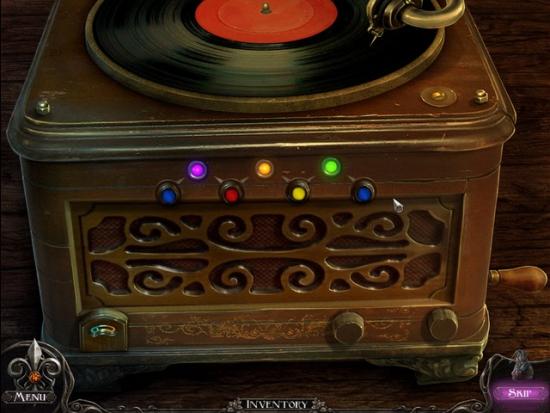
To Solve this Mini-Game you need to change the Color of each of the Buttons.
Change the Color of the Buttons so that the pairs combined Colors would form the Color of the Lights above the Buttons.
Solution: Blue & Red = Purple, Red & Yellow = Orange, and Yellow & Blue = Green.
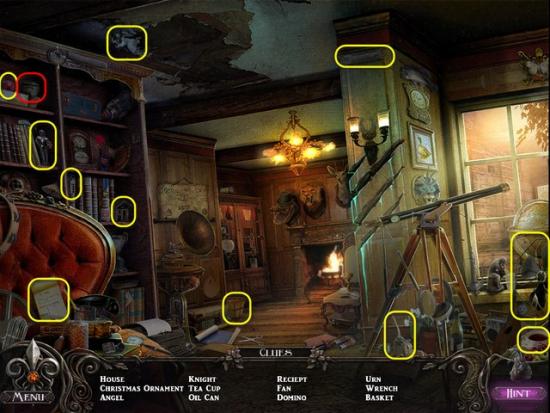
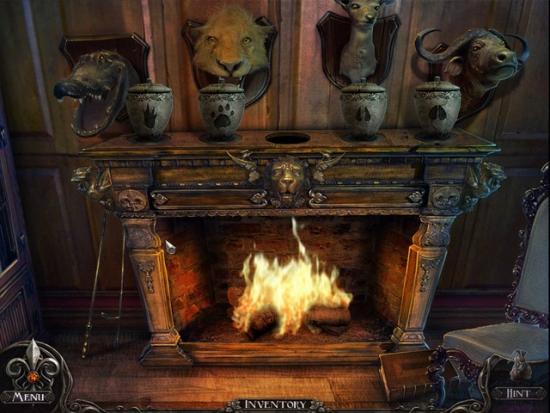
Examine the Fireplace.
Go Back one screen.
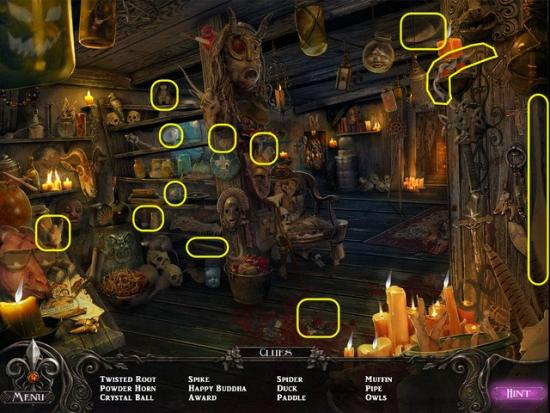
Gather the Urn highlighted in Red.
Gather the Hidden Objects highlighted in Yellow.
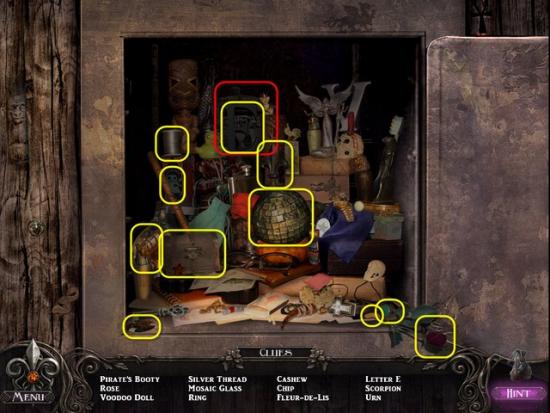
Head to the Music Room.
Examine the Safe.
Gather the Urn highlighted in Red.
Gather the Hidden Objects highlighted in Yellow.

Go back one screen.
Examine the Desk.
Gather the Urn highlighted in Red.
Gather the Hidden Objects highlighted in Yellow.
Return to the Study.
Examine the Fireplace.
Place the four Urns under the matching Animal Heads.
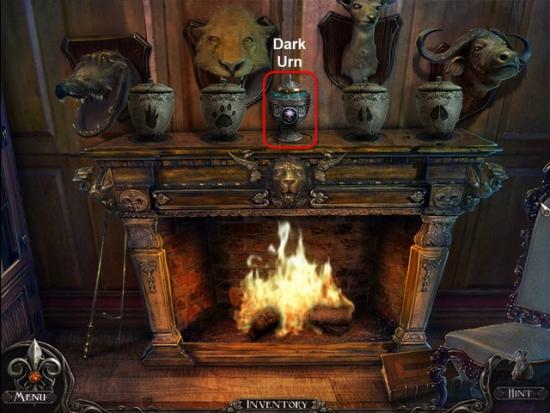
Gather the Urn that raises up in the Center, highlighted in Red.
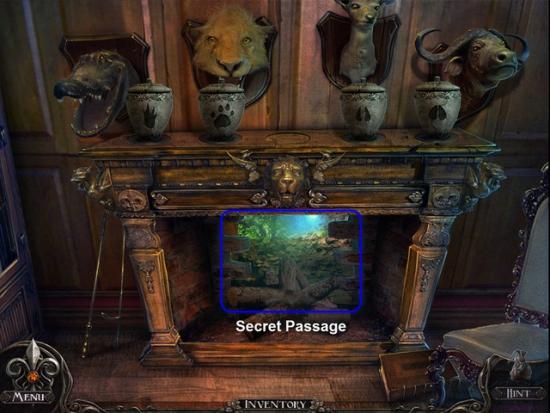
Exit through the Secret Passage in the Fireplace highlighted in Blue.
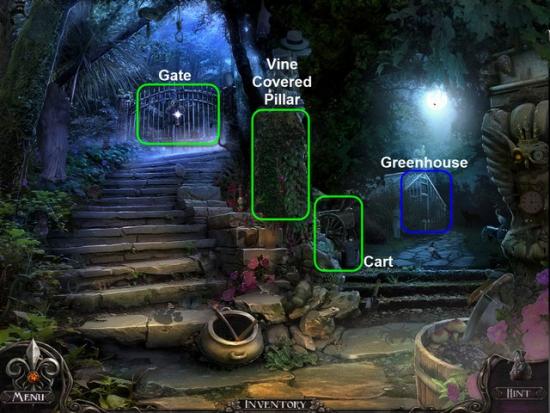
Examine the Gate highlighted in Green.
Go Back one screen.
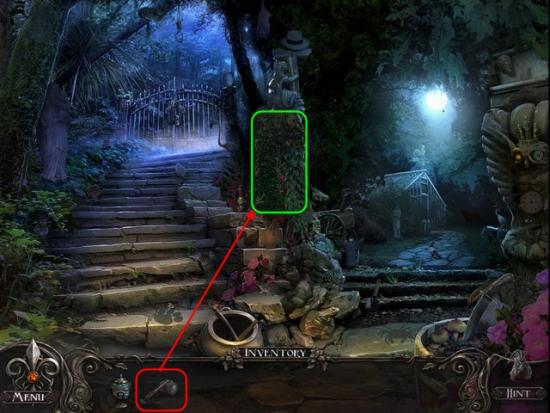
Examine the Ivy Covered Pillar.
Head to the Greenhouse.
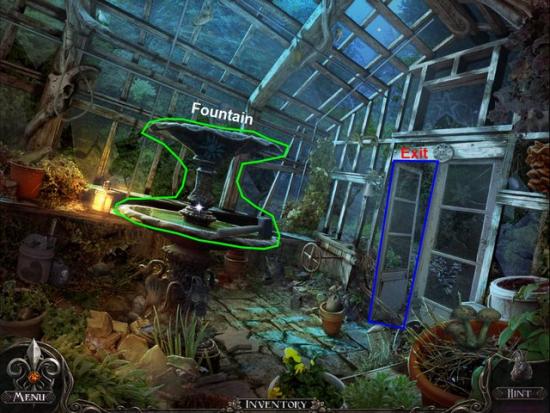
Examine the Fountain highlighted in Green.
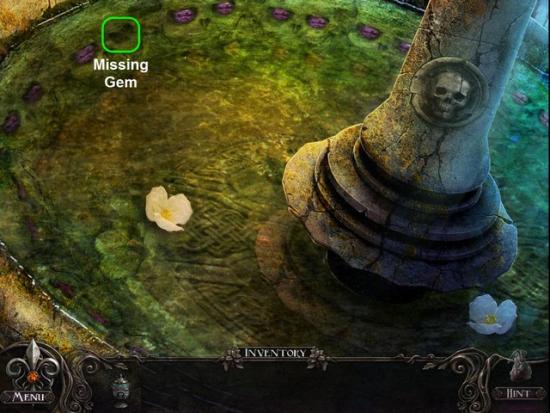
Examine the Missing Gem.
Go Back one screen.
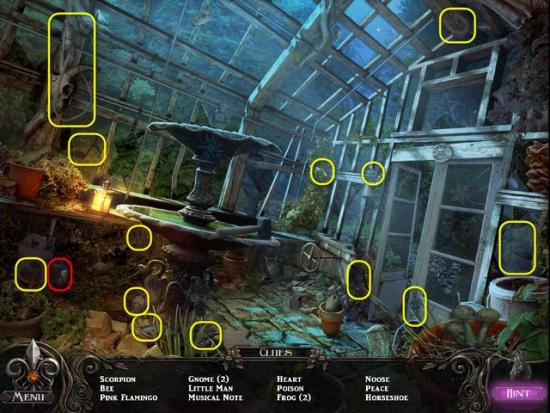
Gather the Poison highlighted in Red.
Gather the Hidden Objects highlighted in Yellow.
Exit the Greenhouse.
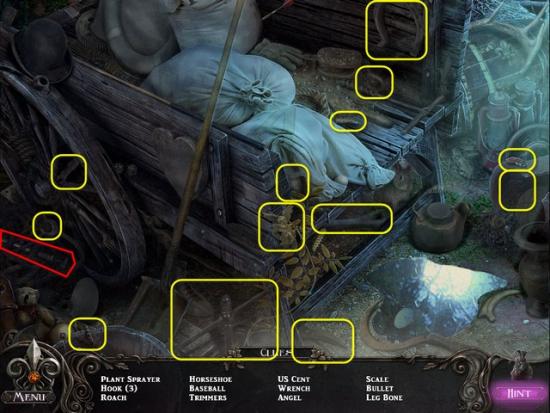
Examine the Cart.
Gather the Plant Sprayer highlighted in Red.
Gather the Hidden Objects highlighted in Yellow.
Go Back one screen.
Use the Plant Sprayer, highlighted in Red, on the Vine Covered Pillar.
Examine the Pillar.
Go Back one screen.
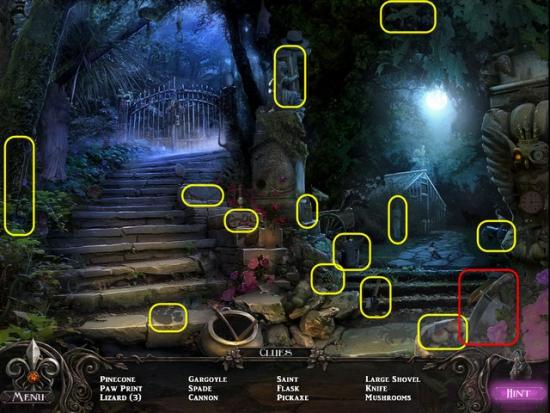
Gather the Knife highlighted in Red.
Gather the Hidden Objects highlighted in Yellow.
Examine the Pillar again.
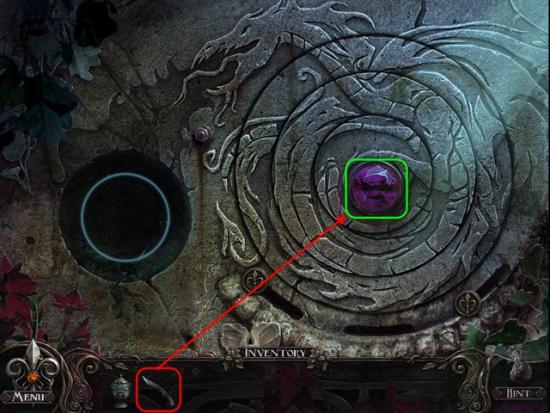
Use the Knife, highlighted in Red, to remove the Gem.
Receive the Gem.
Return to the Greenhouse.
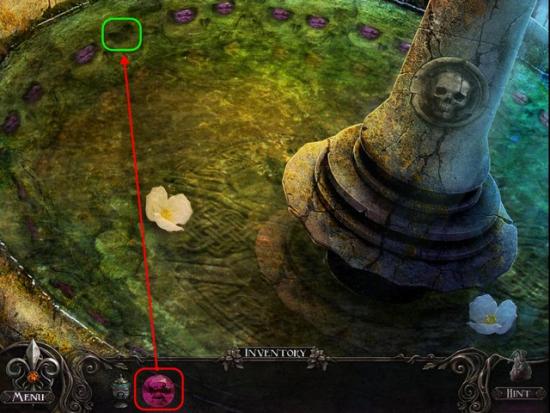
Examine the Fountain.
Place the Gem, highlighted in Red, into the Fountain, highlighted in Green.
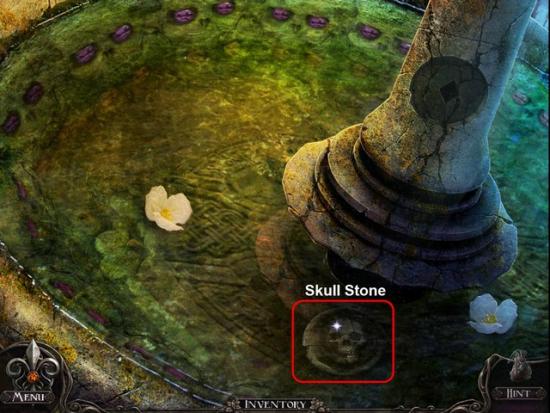
Gather the Skull Stone highlighted in Red.
Exit the Greenhouse.
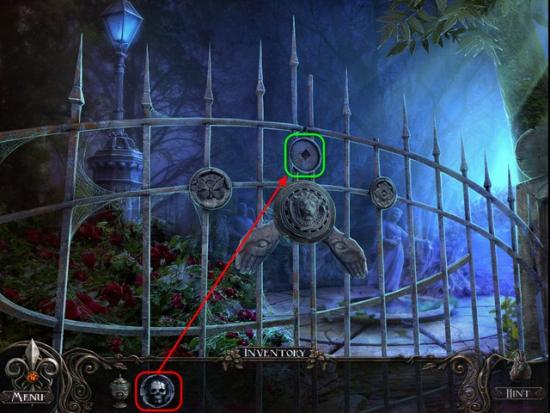
Examine the Gate.
Place the Skull Stone, highlighted in Red, onto the Gate, highlighted in Green.
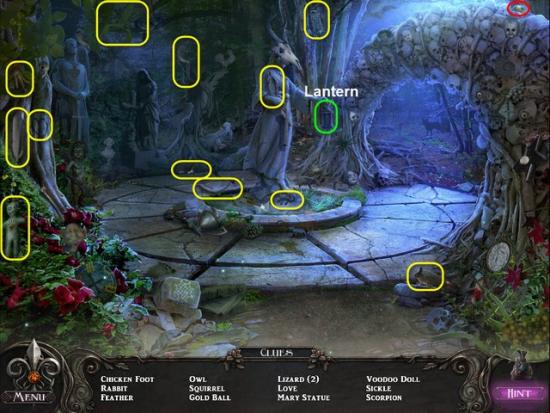
Examine the Lantern highlighted in Green.
Gather the Gold Ball highlighted in Red.
Gather the Hidden Objects highlighted in Yellow.
Go Back one screen.
Examine the Pillar.
Place the Gold Ball, highlighted in Red, into the Socket, highlighted in Green.
Go Back one screen.
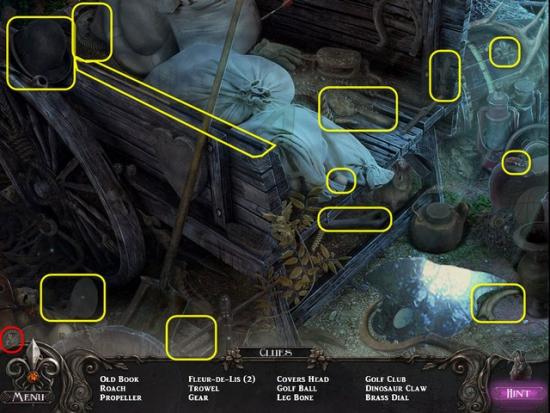
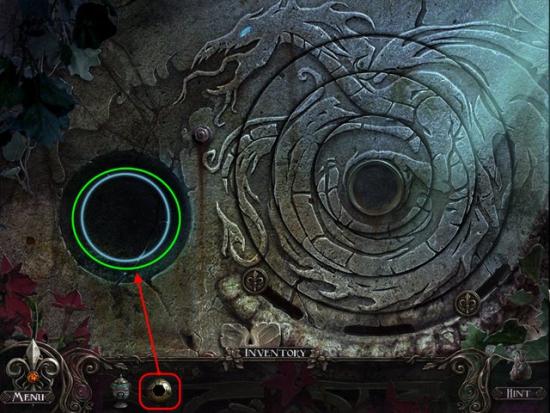
Examine the Cart
Gather the Brass Dial highlighted in Red.
Gather the Hidden Objects highlighted in Yellow.
Go Back one screen.
Examine the Pillar again.
Place the Brass Dial, highlighted in Red, into the Groove, highlighted in Green.
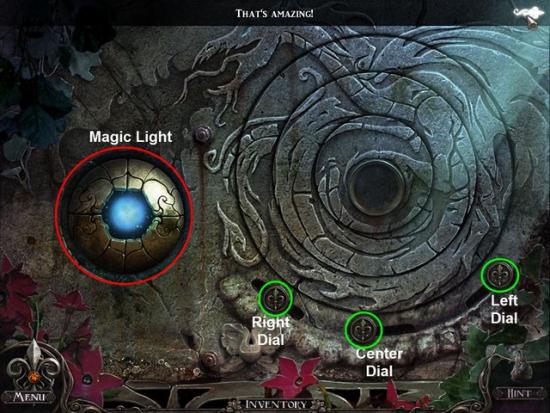
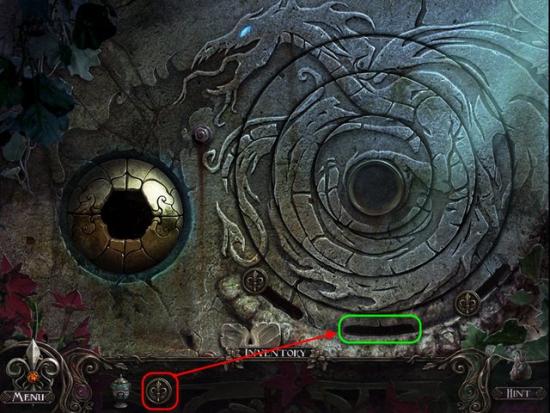
For this Puzzle you need to rearrange the circular pieces to form an image.
The Right Dial controls the Outer Ring.
The Center Dial controls the Middle Ring.
The Left Dial controls the Innermost Ring.
Rotate the circular pieces to form the Image shown.
Gather the Magic Light highlighted in Red.
Return to the Gate.
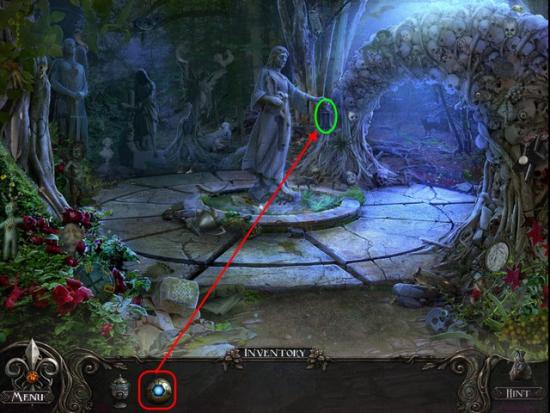
Place the Magic Light, highlighted in Red, into the Lantern, highlighted in green.
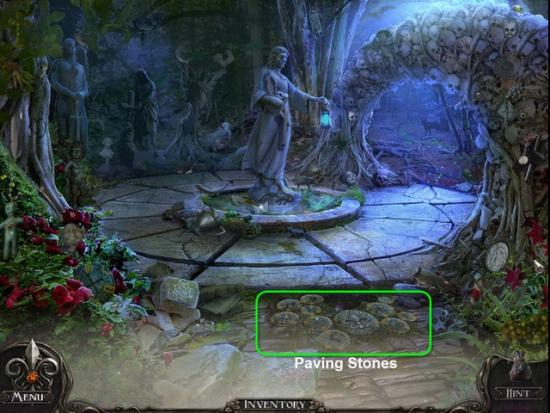
Examine the Paving Stones highlighted in Green.
Go Back one screen.
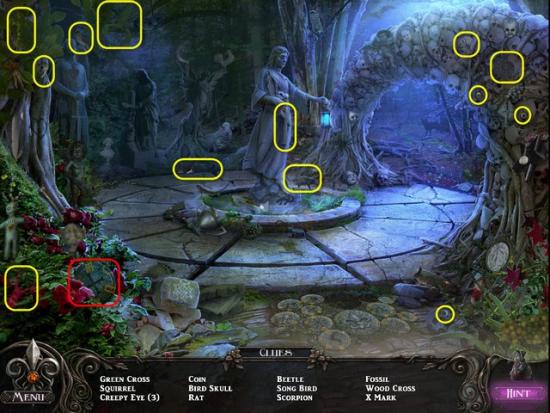
Gather the Stone highlighted in Red.
Gather the Hidden Objects highlighted in Yellow.
Return to the Greenhouse.
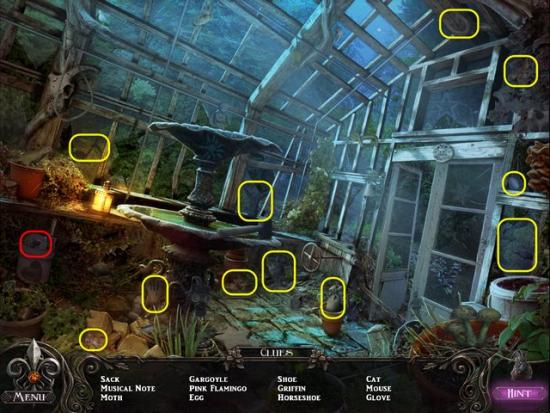
Gather the Stone highlighted in Red.
Gather the Hidden Objects highlighted in Yellow.
Return to the Gate.
Examine the Paving Stones once more.
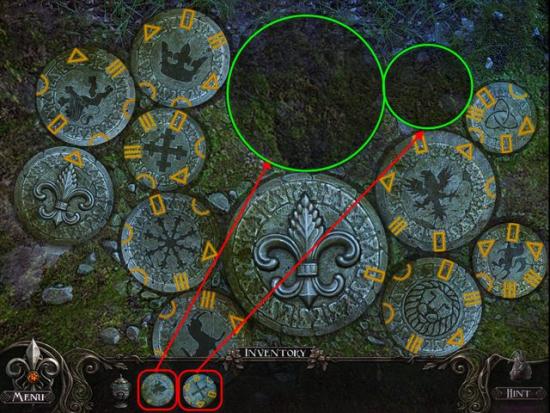
Place the two Stones, highlighted in Red, into the Depressions.
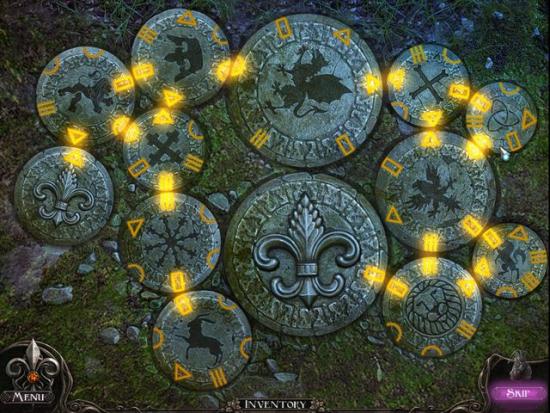
For this Mini-Game you need to align the Stones so that the Symbols around the edge of the Stones match their neighboring Stones.
Click and Hold to turn Stones.
Once all Stones are arranged in corresponding order, as shown in Image, the Portal will open.
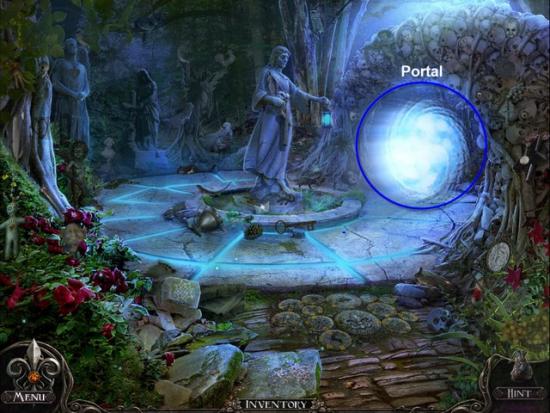
Enter the Portal highlighted in Blue.
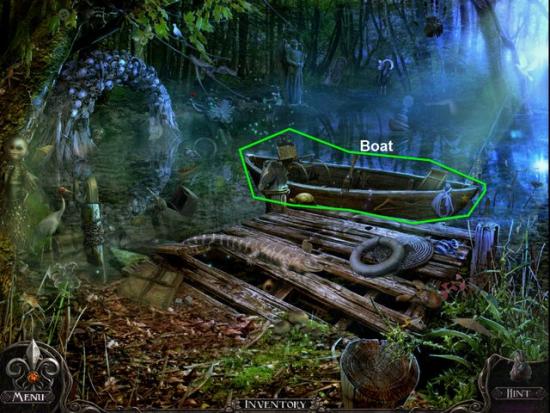
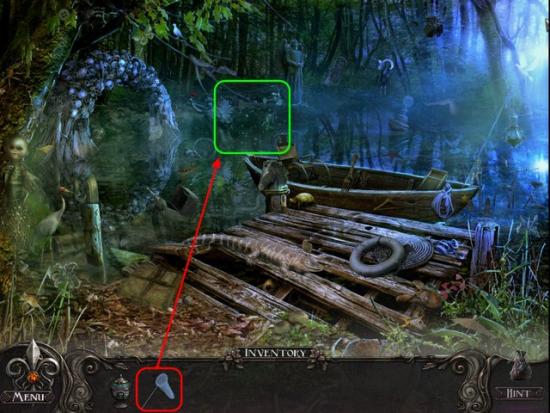
Examine the Boat highlighted in Green.
Gather the Lantern highlighted in Red.
Gather the Hidden Objects highlighted in Yellow.
Go Back one screen.
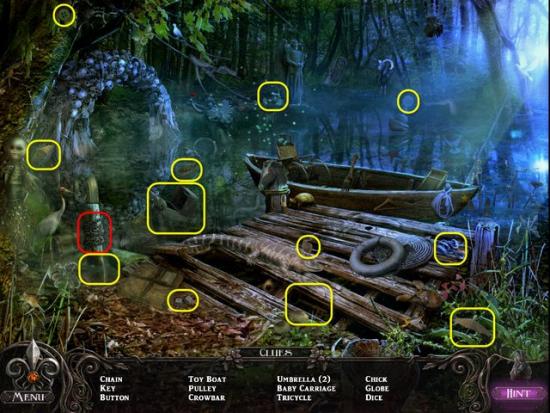
Gather the Chain highlighted in Red.
Gather the Hidden Objects highlighted in Yellow.
Place the Chain, highlighted in Red, onto the Pole, highlighted in Green.
Place the Lantern, highlighted in Red, onto the Chain, highlighted in Green.
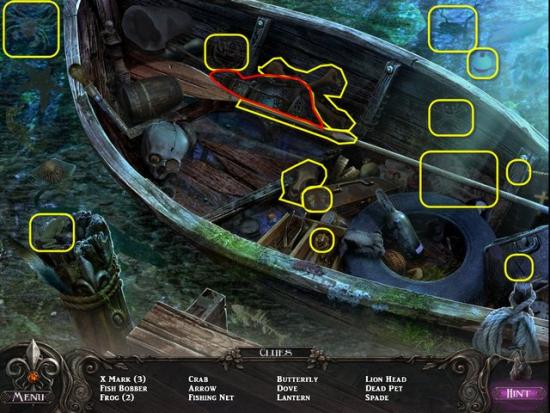
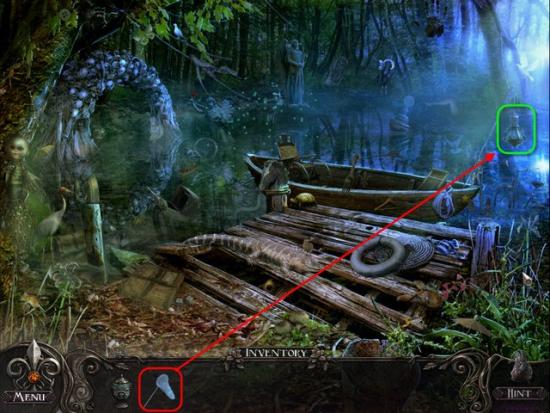
Examine the Boat once again.
Gather the Net highlighted in Red.
Gather the Hidden Objects highlighted in Yellow.
Go Back one screen.
Use the Net, highlighted in Red, to catch the Bugs, highlighted in Green.
Use the Net of Bugs, highlighted in Red, on the Lantern, highlighted in Green.
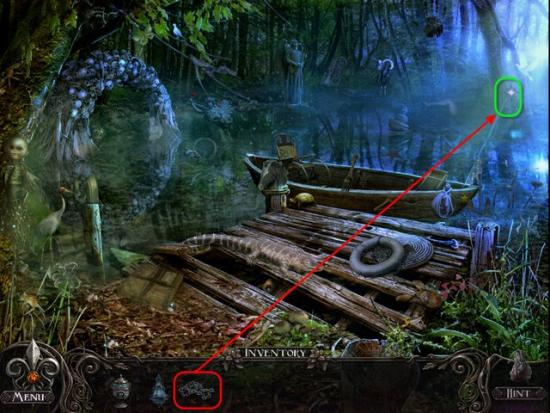
Get in the Boat.
Use your Juju Bag, highlighted in Green.
Find the sixteen Skulls highlighted in Yellow.
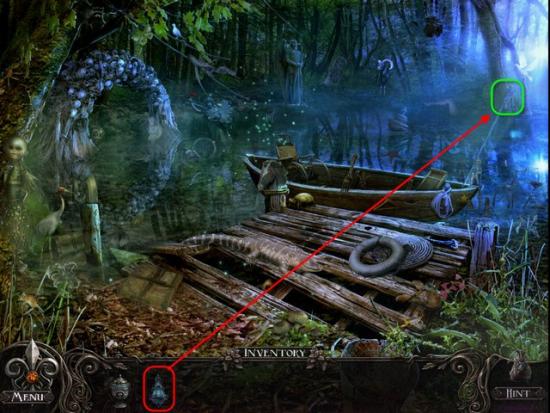
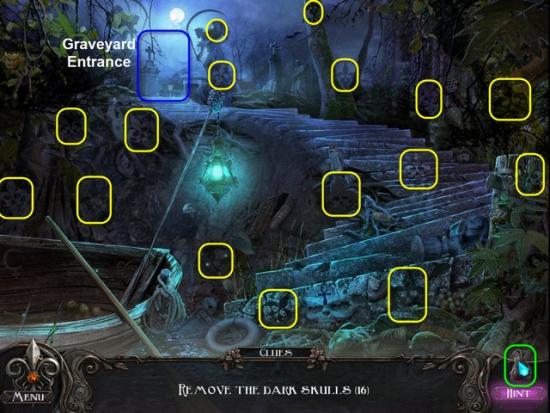
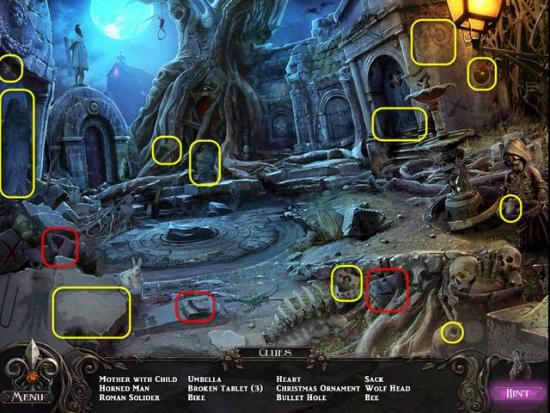
Climb the Stairs to the Graveyard Entrance.
Use your Juju Bag again, highlighted in Green.
Find the sixteen Skulls highlighted in Yellow.
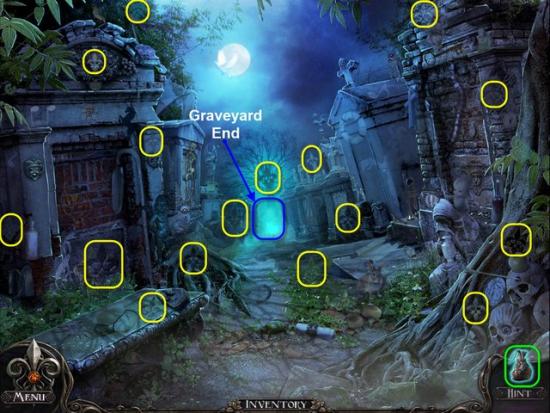
Head forward to Graveyard End.
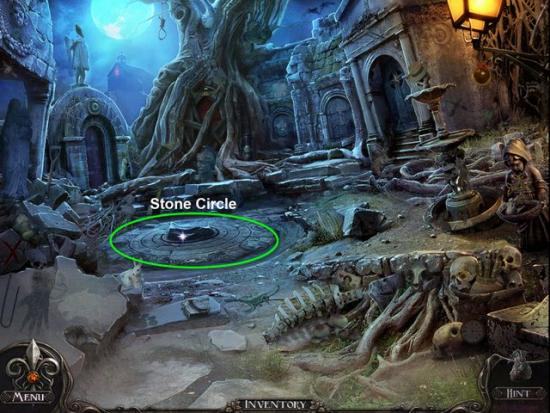
Examine the Stone Circle highlighted in Green.
Go Back one screen.
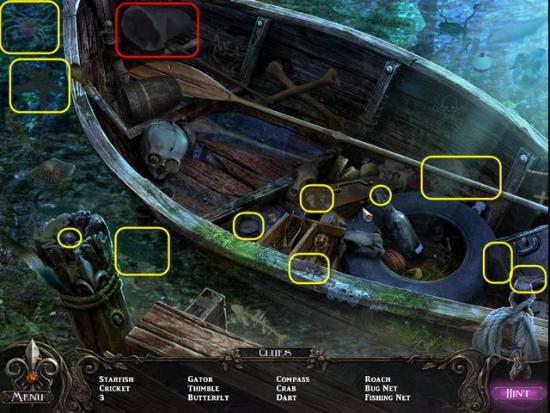
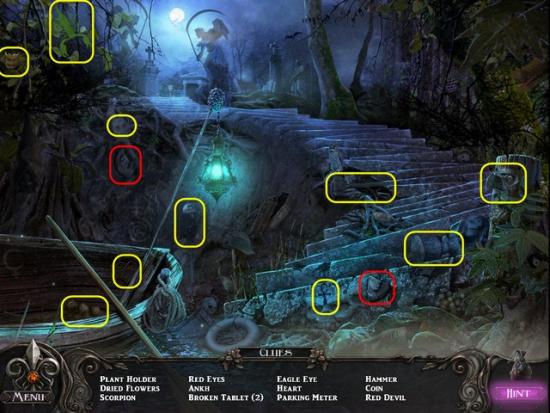
Gather the three Tablet Pieces highlighted in Red.
Gather the Hidden Objects highlighted in Yellow.
Go Back one screen to the Graveyard Entrance.

Examine the Right Crypt.
Gather the Tablet Piece highlighted in Red.
Gather the Hidden Objects highlighted in Yellow.
Examine the Left Crypt.
Gather the Hammer highlighted in Red.
Gather the Hidden Objects highlighted in Yellow.
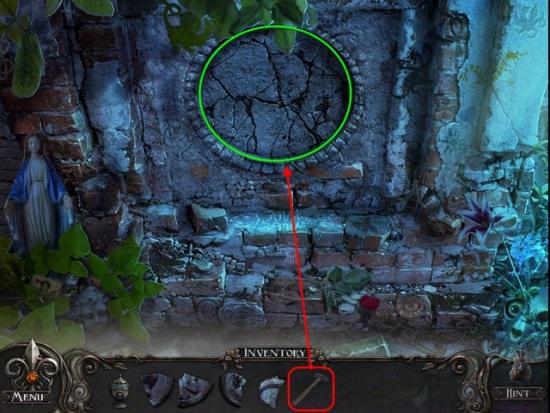
Use the Hammer, highlighted in Red, on the Crypt, highlighted in Green.
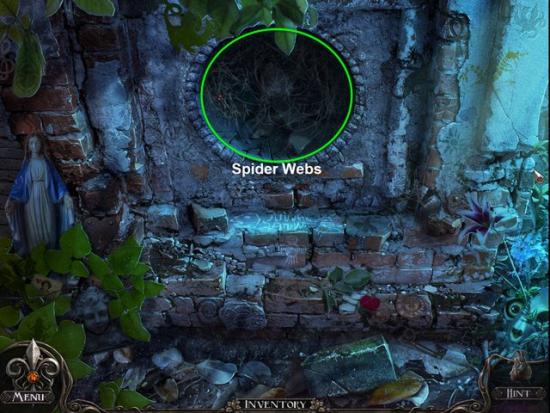
Examine the Spider Web three times to clear the Spider Webs out.
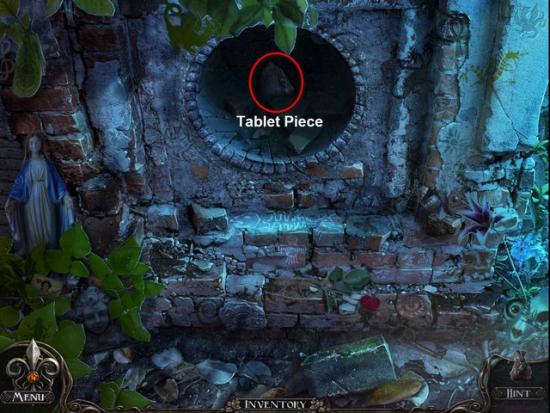
Gather the Tablet Piece highlighted in Red.
Go Back two screens to the Boat Landing.
Gather the two Tablet Pieces highlighted in Red.
Gather the Hidden Objects highlighted in Yellow.
Go Forward two screens to the Graveyard End.
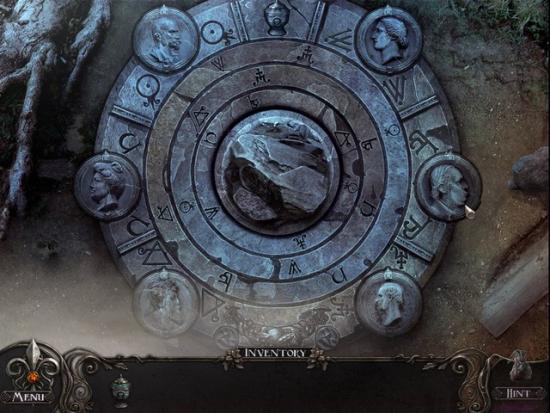
Examine the Stone Circle.
Place the Tablet Pieces into the corresponding positions.
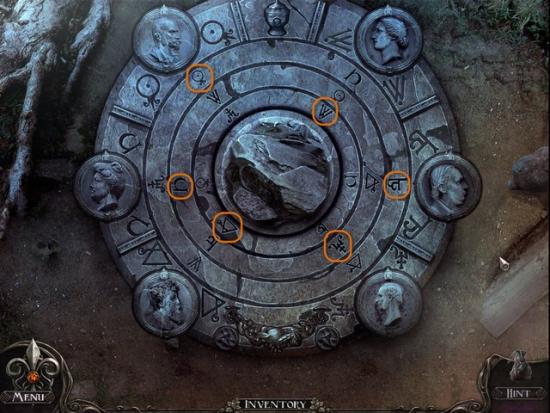
To solve this Mini-Game you need to align the three Rings to light up the Symbols around the Figure Heads.
Click and Drag to move the three Rings.
Once the Rings are in the correct position, all the Symbols will be light.
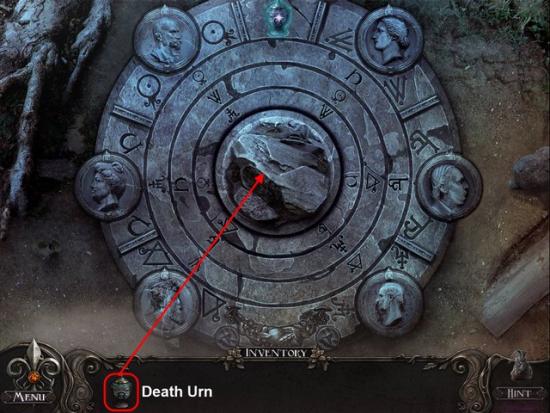
Use the Dark Urn on the Stone Circle.
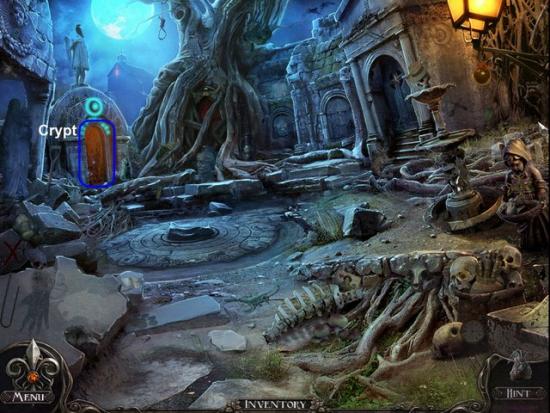
Enter the Crypt highlighted in Blue.
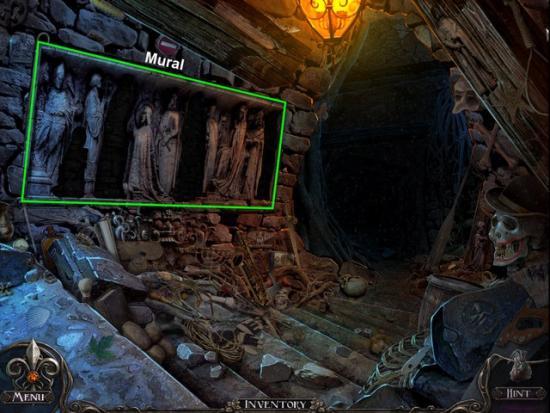
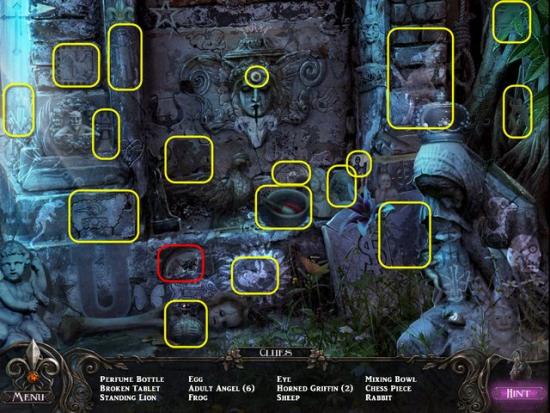
Examine the Mural highlighted in Green.
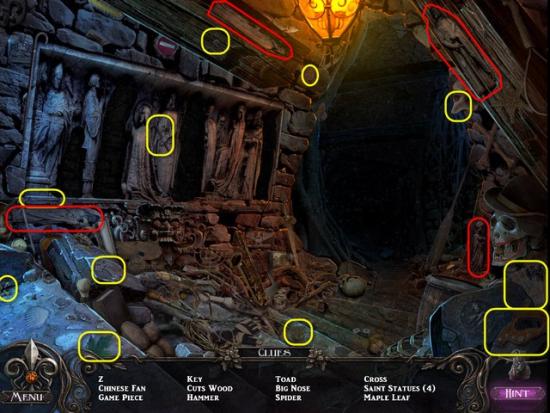
Gather the four Statues highlighted in Red.
Gather the Hidden Objects highlighted in Yellow.
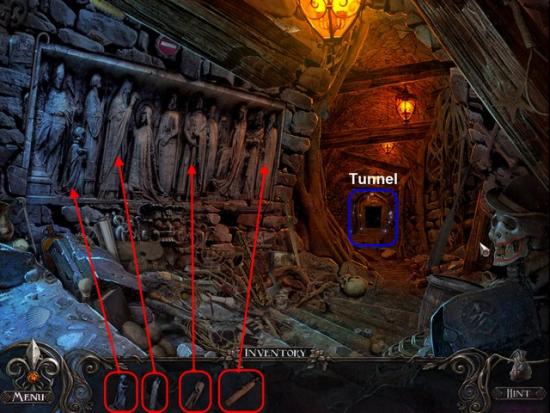
Place the four Statues into the Mural in the corresponding positions.
Follow Tunnel forward.

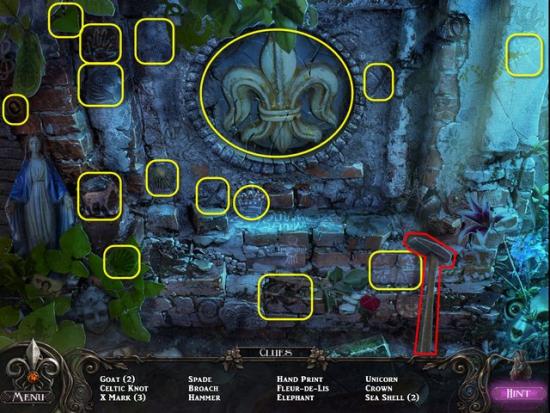
Examine the Stone Casket highlighted in Green.
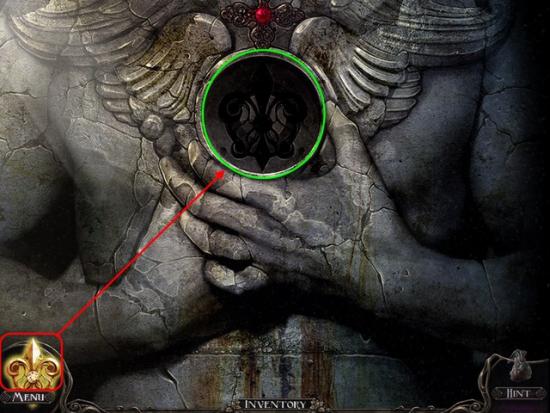
Place the Pendant, highlighted in Red, into the Recess, highlighted in Green.
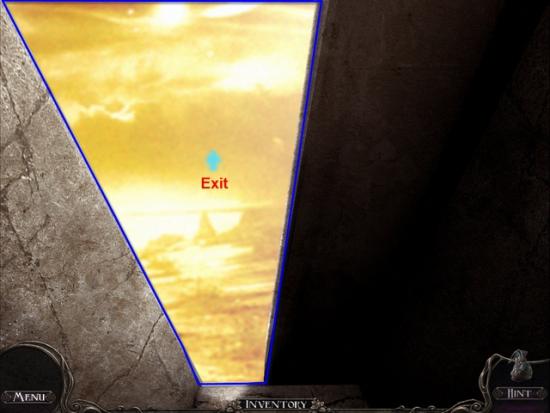
Exit the Casket highlighted in Blue.
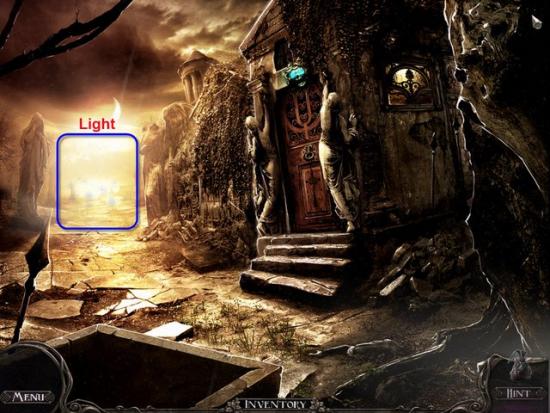
Move forward toward the Light highlighted in Blue.
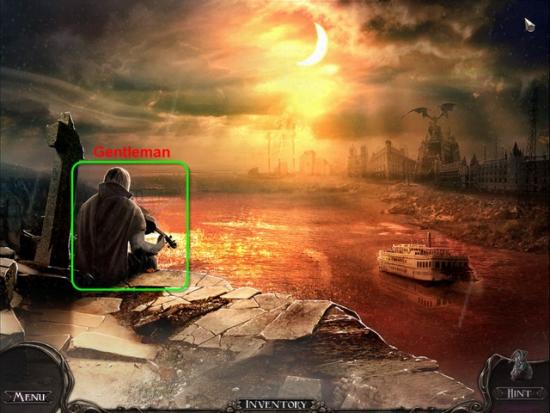
Talk to the Gentleman highlighted in Green.
Congratulations, you have completed the Fallen Shadows game.
