- Wondering how to get Monopoly GO! free rolls? Well, you’ve come to the right place. In this guide, we provide you with a bunch of tips and tricks to get some free rolls for the hit new mobile game. We’ll …
Best Roblox Horror Games to Play Right Now – Updated Weekly
By Adele Wilson
Our Best Roblox Horror Games guide features the scariest and most creative experiences to play right now on the platform!The BEST Roblox Games of The Week – Games You Need To Play!
By Sho Roberts
Our feature shares our pick for the Best Roblox Games of the week! With our feature, we guarantee you'll find something new to play!All Grades in Type Soul – Each Race Explained
By Adele Wilson
Our All Grades in Type Soul guide lists every grade in the game for all races, including how to increase your grade quickly!
Fabled Legends: The Dark Piper Walkthrough
Welcome to the Fabled Legends: The Dark Piper walkthrough on Gamezebo. Fabled Legends: The Dark Piper is a hidden object/adventure game created by Blue Tea Games. This walkthrough includes tips and tricks, helpful hints, and a full guide to help you unravel the mysteries of the dark piper!
Game Introduction – Fabled Legends: The Dark Piper
Welcome to the Fabled Legends: The Dark Piper walkthrough on Gamezebo. Fabled Legends: The Dark Piper is a hidden object/adventure game created by Blue Tea Games. This walkthrough includes tips and tricks, helpful hints, and a full guide to help you unravel the mysteries of the dark piper!
How to Use this Walkthrough (Please Read)
- This walkthrough is meant to be used as a guide to assist in solving mini-puzzles and acquiring all items needed in order to complete the game. You may explore locations in the order you wish, but this walkthrough is written to offer the most direct route to the game’s finish.
- Inventory objects will be written in bold. The walkthrough will state, “Use [the inventory item] on the [interactive object]” under the assumption that you you have the item mentioned. If you don’t have the item at that point, press CTRL+F on your keyboard while reading the walkthrough. In the text box that appears, type the name of the item you are looking for and press ENTER. This will scan this page for the appearance of that word, which you can use to ensure you are able to find its original location.
- Play the tutorial! It will explain gameplay elements. The tutorial is available in Casual mode only. For those who are confident it will not be needed, however, feel free not to set the game to Casual mode.
- Often you will need to perform an action (i.e., place or collect an inventory item) in order for the game to progress. Before assuming the game is in error, please go through your inventory to see if you can place any of your items in the given position, or look in the vicinity for an item to pick up, switch to flip, etc.
- Have fun!
Gameplay and Tips
- This is a hidden object adventure game. You will move from location to location completing hidden object hunts, mini-puzzles and picking up items to use in order to proceed forward.
- Move your cursor over every aspect of a scene and watch for it to change slightly. (Besides this guide), it’s the only way to find everything!
- The Options button at the bottom right of the screen gives access to the Options screen and will bring you back to the main menu.
- Items collected throughout the game go into your Inventory, located at the bottom of your screen.
- There are three difficulty settings. You cannot switch settings mid-game.
- In Casual mode, sparkles indicate areas of interest and the Hint and Skip meters fill quickly.
- In Normal mode, there are occasional sparkles, but the Hint and Skip meters take longer to fill.
- In Hard mode, there are no hints or sparkles, and you cannot skip a mini-puzzle. For this mode, the puzzle guides here will be particularly handy.
- Hidden object scenes provide a list of items to find. Items listed in white text are immediately available. Items listed in orange need further actions to uncover. When you have found everything from the list, an item will be added to your Inventory. In this walkthrough, the Inventory item will be indicated by a yellow highlight and the item(s) that require further action to find them will be indicated by a white highlight.
- Your objectives are located at the bottom left hand of the screen.
- Closing a window – To close the zoom-in windows, click Close. Tip: If you can zoom in on the area again, you likely haven’t found everything you need to find.
- Mini-puzzles can be skipped once the Skip button fills completely. The Skip button is located at the bottom of the puzzle window. The word “Skip” will appear once the meter has filled and is available for use.
- Hints are available in the bottom left of the screen.
- Hints used in the hidden object scenes highlight an item or will show how to get a yellow-listed object.
- Hints will not point to a Fabled Object.
- Hints used during the adventure mode will point out something to do in that scene or tell you conclusively that there is nothing more to be done.
Fabled Objects
There are 20 Fabled (morphing) Objects to collect throughout the game.
- Collecting Fabled Objects speeds up the Hint meters’ refill speed.
- Fabled Objects don’t appear immediately in some locations. A Fabled Object will sometimes appear later into the game, requiring you to back-track.
- To find Fabled Objects, look carefully at each screen to look for something morphing or changing its appearance. Your cursor will not change to a hand when you hover it over a Fabled Object, so each one requires more scrutiny.
- Hints will not point to a Fabled Object.
- A location may have a second Fabled Object as the game progresses, so don’t count any locale out.
- In this walkthrough, Fabled Objects will be indicated by green highlights.
- A list of all locations compiled appears at the bottom of this walkthrough.
The Grail, Map and Naming Convention
- The grail is in the bottom right corner of the screen.
- The golden compass contains the map. Click on the mini-map to view a map of the area. Areas of interest will be indicated. You cannot jump to another location from the map.
- This walkthrough will use the names of each location as indicated by the map. If the walkthrough states, “return to the Town Square,” check the map for the correct route, if necessary.
- The Ravenlore Whistle will summon a raven only if you are outside. The raven can reach areas you cannot.
- The skeleton key will work in any lock.
- The Pied Piper’s flute will either summon or disperse rats.
Chapter One

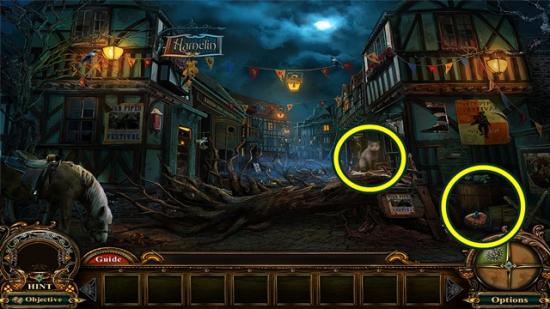
- Click on the cat to add it to the Hint system. Click Yes to play the tutorial. Even if you have played many games of this genre, playing the tutorial will show all facets of gameplay and is strongly suggested.
- Click on the barrels to start a hidden object hunt.
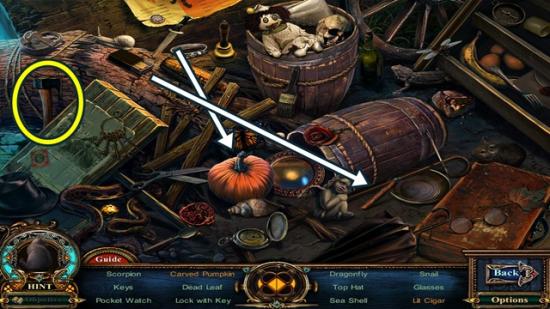
- Find all the objects as listed. Use the knife (shown) on the pumpkin (shown) and take the carved pumpkin. Use the matches (shown) on the cigar (shown) and take the lit cigar. Once you have found all the necessary items, a wooden axe is added to your inventory.
- Click on the fallen tree. Cut it with the wooden axe. Move forward to the Town Square.
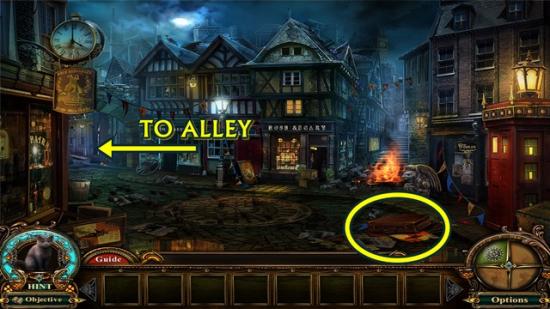
- Open the suitcase and take the rock.
- Go left to the alley.
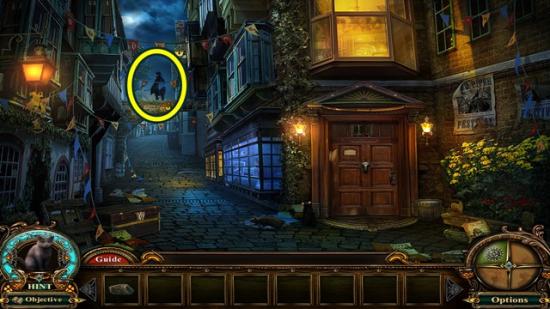
- Click on the Dark Piper. Watch the cutscene.
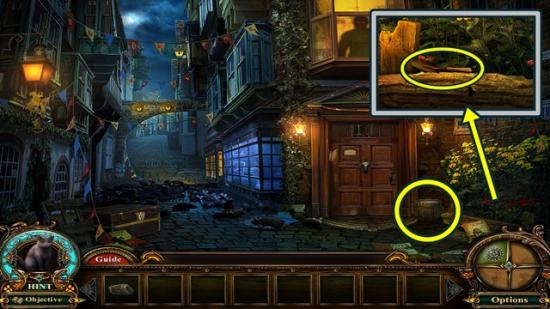
- Take the bucket of water. Click on the flowers. Take the hand shovel.
- Move down to the Town Square.
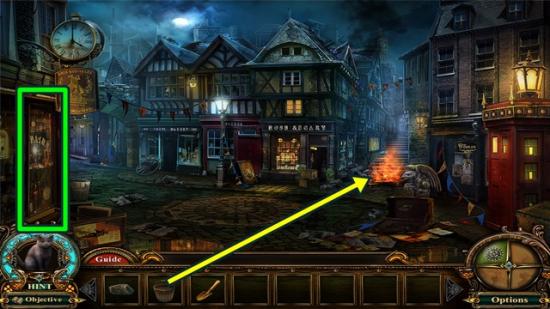
- Click on the window to take the Fabled Object (1/20).
- Use the bucket of water on the fire.
- Go up the stairs to the Courtyard.
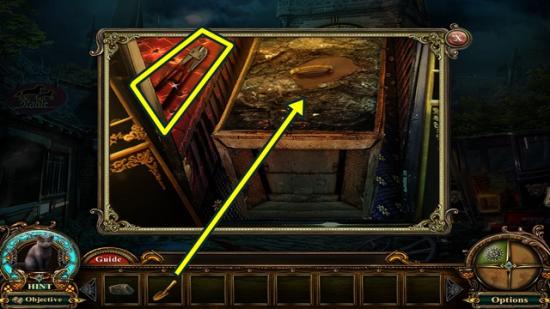
- Click on the Dark Piper.
- Click on the carriage. Take the bolt cutter. Use the hand shovel on the crate. Click on the revealed board. A mini-puzzle starts.
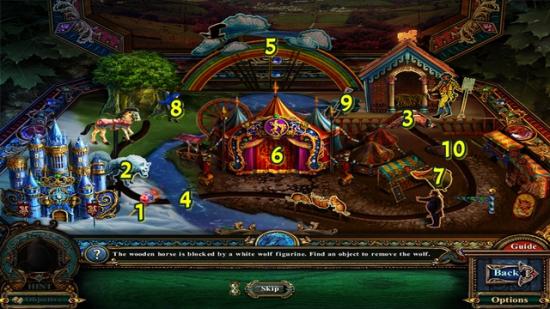
- Interact with the items on the board to clear a path so the horse can reach the stable.
- Use the torch (1) on the wolf (2). Put the bridge (3) over the water (4). Click on the rainbow (5) to change it to night time. Click on the tent (6) to scare the rats away. Put the saddle (7) on the horse, then add the rider (8). Use the shovel (9) on the pile of dirt (10).
- When you are finished, take the stable key.
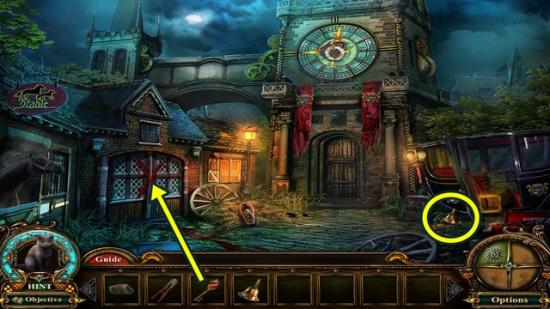
- Take the gold bell. Click on the stable doors to add a new objective. Click on the stable doors again and use the stable key. Enter the stable.
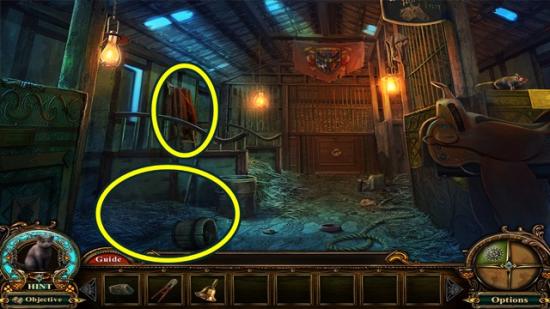
- Watch the cutscene.
- Click on the stall on the left to add an objective. Remove the blankets and take the ladder.
- Return to the alley.
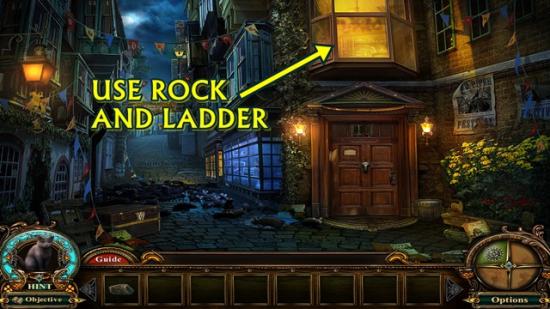
- Click on the upper window. Add the ladder. Smash the window with the rock. Go through the window into the house top.
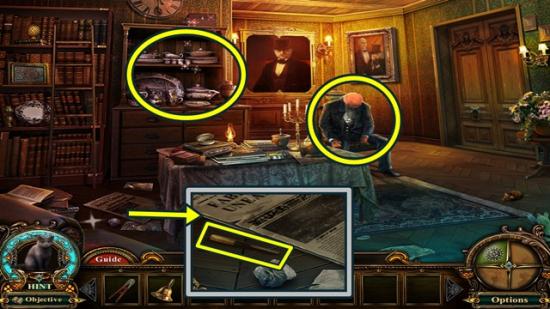
- Click on the butler to add a new objective.
- Click on the newspaper and take the chisel. Click anywhere outside the window to close it.
- Click on the buffet to start a hidden object hunt.
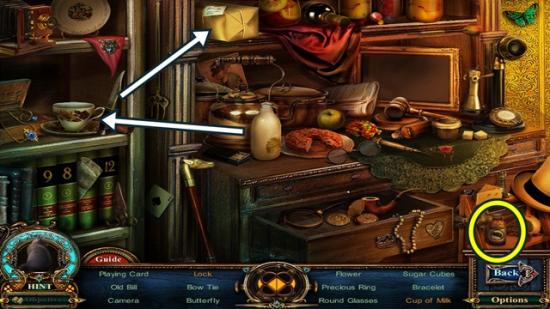
- Find all the objects. Pour the milk in the cup and take the cup of milk. Cut the package with the knife and take the lock. Once you have found all the items, vermin repellent is added to your inventory.
- Move down to the alley.
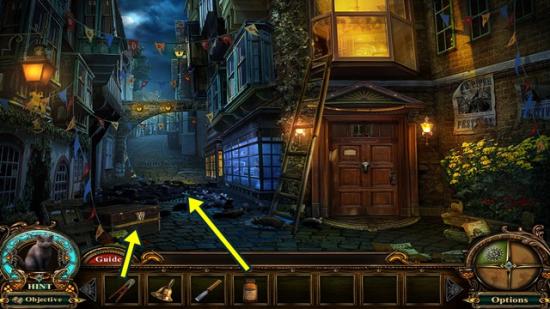
- Use the vermin repellent on the rats.
- Click on the chest and cut the wires with the bolt cutter. Click on the chest to start a hidden object hunt.
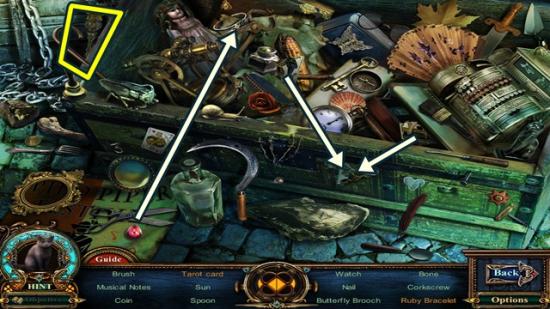
- Find all the objects. Put the ruby on the bracelet and take the ruby bracelet. Put the tarot pieces back together and take the tarot card. First attach the tarot piece on the left, then the tarot piece on the right. Once you have found all the items, a bronze sceptre is added to your inventory.
- Move forward to the gravesite.
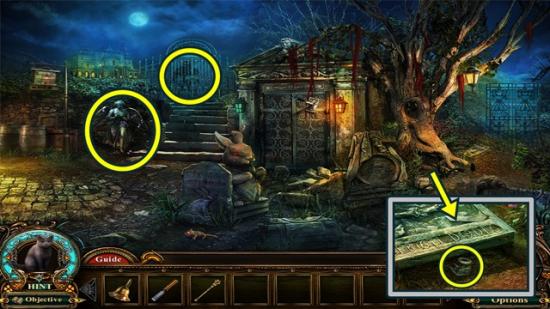
- Click on the Dark Piper. Click on the base of the tree. Move the headstone and take the invisible ink.
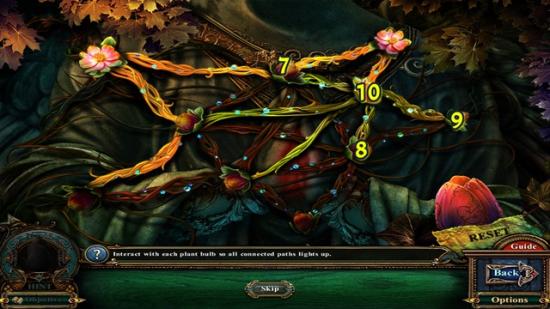
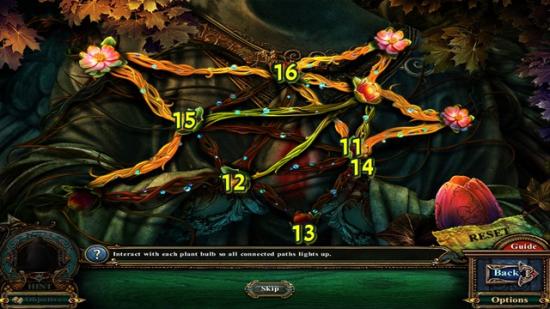
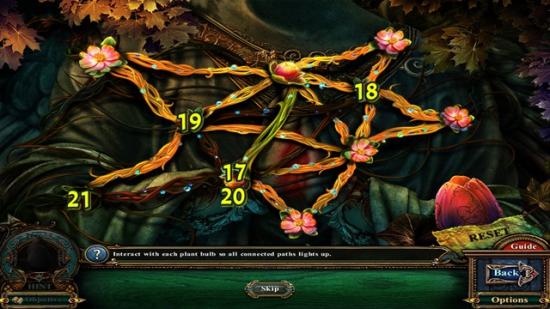
- Click on the angel statue. A mini-puzzle starts. Click on the bulbs such that, eventually, all paths are lit up and the bulbs are all in bloom. A bulb will bloom when all its particular paths are lit up. To start, click on any bulb; the bulbs flashing are the bulbs to which it can connect. When you click on another bulb, the path between it and the first one will be lit up (yellow) and the other bulb options will be flashing (paths are green).
- There are many possible solutions for this puzzle. The screenshots below show one possible solution. To follow the screenshots below, press Reset to start from the beginning, then press the bulbs in the order indicated in the screenshots below in sequence:
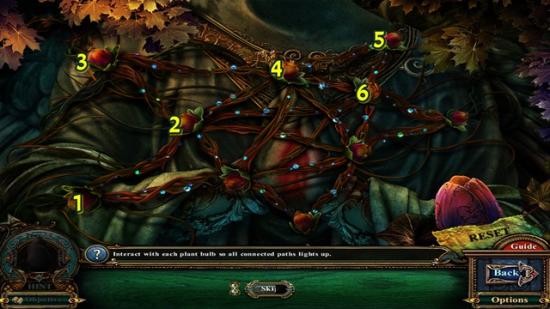
- When you are finished, take the ruby eye.
- Move left to the street.
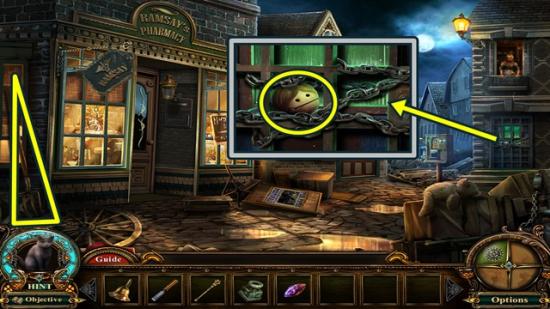
- Take the hay fork. Click on the lower window of the morgue (house on the right). Take the wooden doll head.
- Move down to the gravesite. Click on the gates on the right and go through them to the lake.
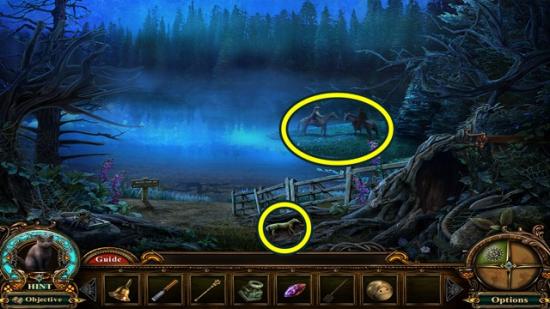
- Take the horse figurine. Click on the horsemen. Watch the cutscene. A new objective is added.
- Return to the Town Square.
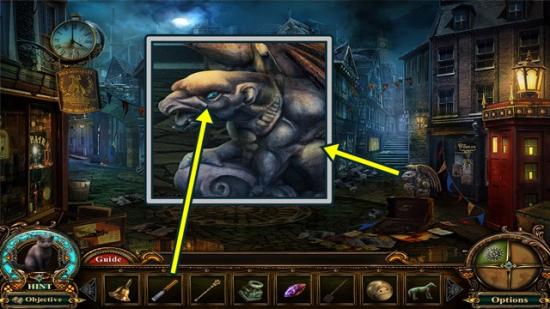
- Click on the gargoyle. Use the chisel to remove the sapphire eye.
- Go up the stairs to the courtyard.
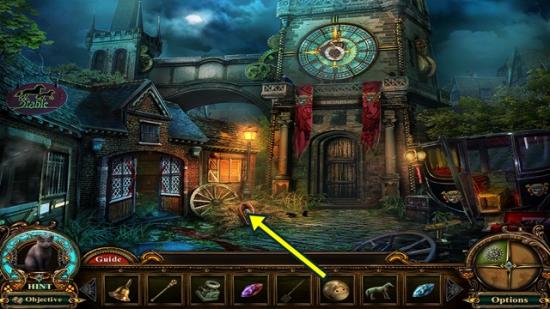
- Click on the wooden doll case. Add the wooden doll head and take the silver coin.
- Enter the stable.
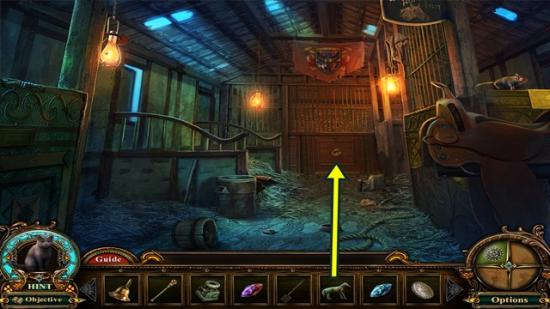
- Click on the wooden door to a stall. Add the horse figurine. Click on the stall to start a hidden object hunt.
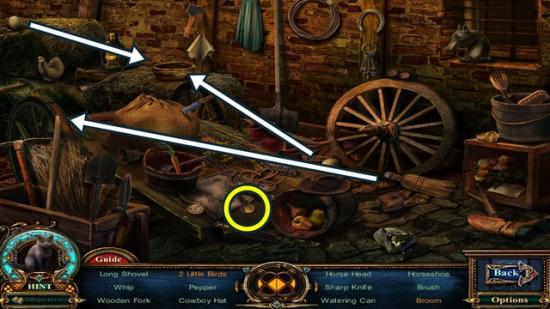
- Find all the objects. Put the broom top on the handle and take the broom. Put the two eggs in the nest and take the two little birds. Once you have found all the items, a gold coin is added to your inventory.
- Return to the street.
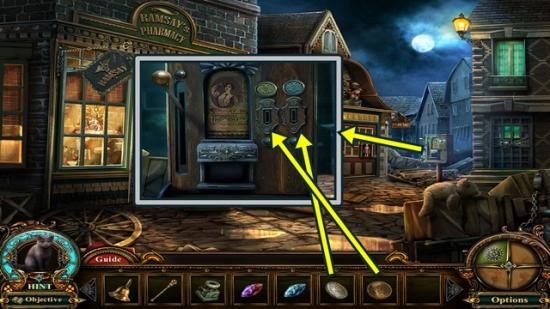
- Click on the vending machine. Add the silver coin to the silver slot and the gold coin to the gold slot. Take the tonic water.
- Return to the house top.
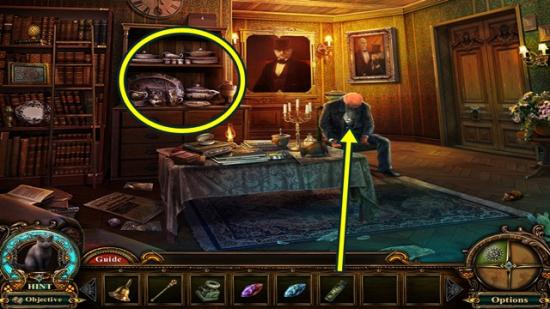
- Give the tonic water to the butler. Watch the cutscene. A new objective is added. The butler will reward you with the white swan emblem.
- Click on the buffet to start a hidden object hunt.
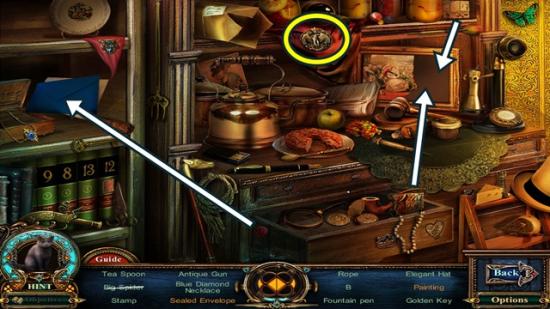
- Find all the objects. Put the painting pieces back together and take the painting. Put the wax seal on the envelope and take the sealed envelope. Once you have found all the items, a raven disk is added to your inventory.
- Return to the alley and enter the house bottom.
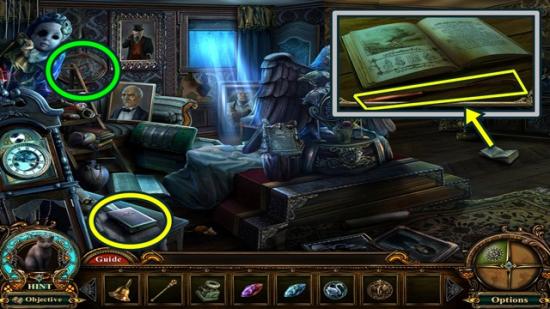
- Click on the painting to take the Fabled Object (2/20).
- Click on the raven statue to add a new objective.
- Click on the book on the floor. Take the long hook. Click anywhere outside the window to close it.
- Click on the red book. Open the book and take the shiny button.
- Return to the street.
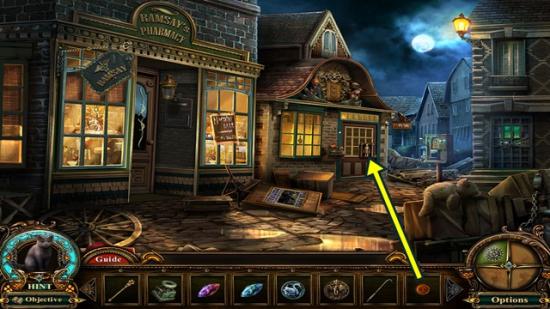
- Click on the door of the toy store. Add the shiny button. Take the crystal eye from its hat. Click anywhere outside the window to close it.
- Return to the gravesite.
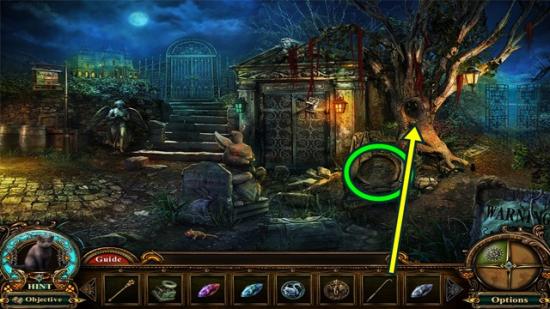
- Click on the headstone to take the Fabled Object (3/20).
- Click on the hole in the tree. Use the long hook to retrieve the police key.
- Return to the Town Square.
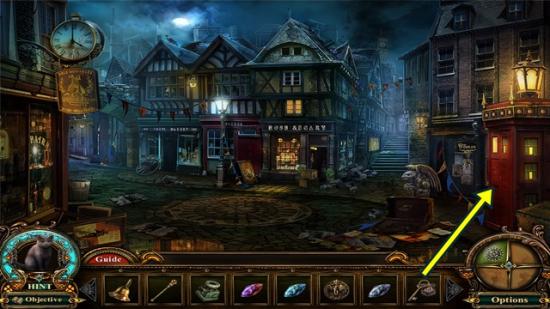
- Click on the police station’s door. Insert the police key and take the bulb.
- Return to the alley.
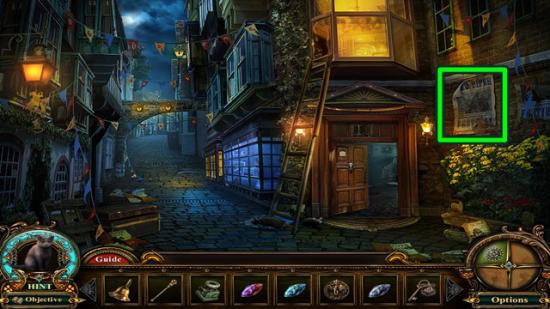
- Click on the poster to take the Fabled Object (4/20).
- Enter the house bottom.
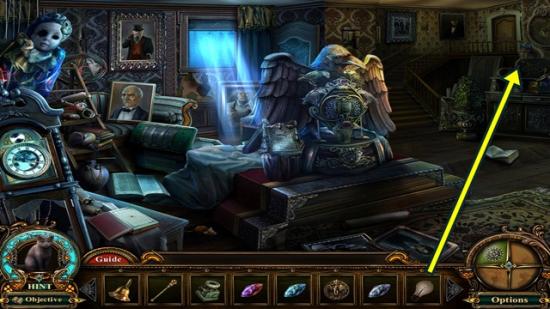
- Click on the far right wall. Add the bulb. Click on the credenza to start a hidden object hunt.
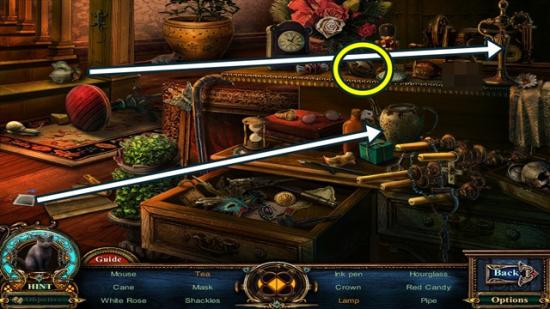
- Find all the objects. Put the tea bag in the kettle and take the tea. Put the lamp shade on the lamp, then take the lamp. Once you have found all the items, a rat knob is added to your inventory.
- Return to the courtyard.
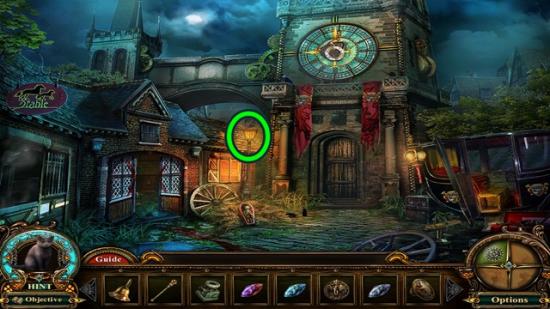
- Click on the lantern to take the Fabled Object (5/20).
- Enter the stable.
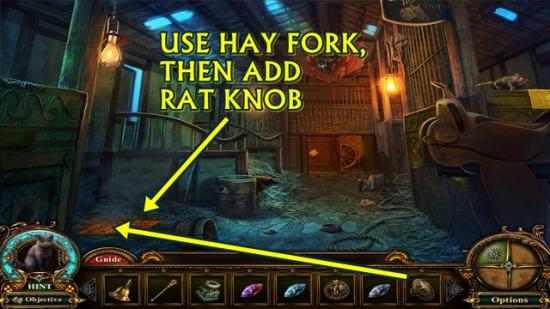
- Use the hay fork on the hay in the stall. Click on the grate. Add the rat knob. Go down into the sewer.
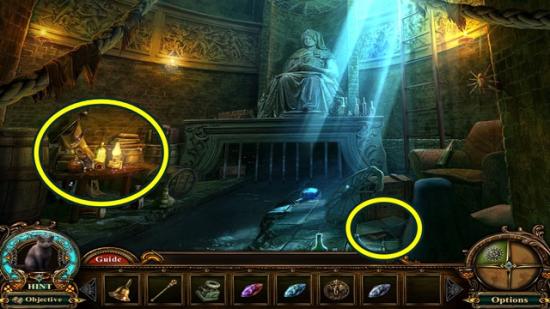
- Lift the book and take the phoenix plate. Click on the table. A mini-puzzle starts. Rotate the discs such that the three liquid colours can flow into the centre.
- Solution:
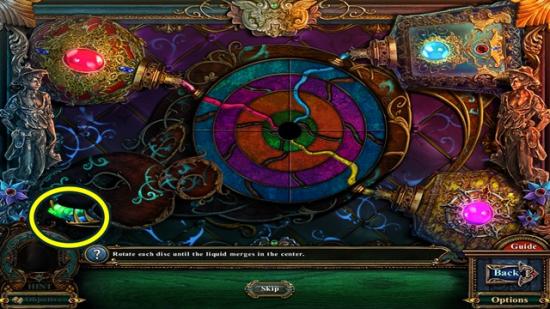
- Take the jade eye from the rat’s mouth.
- Return to the house bottom.
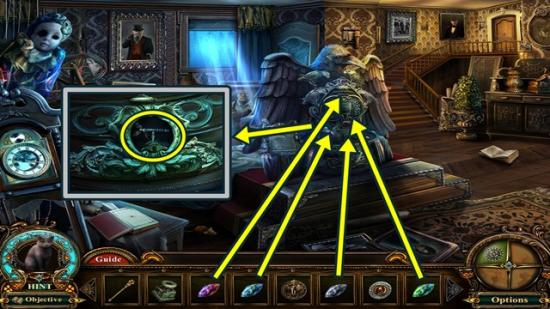
- Click on the raven statue. Add the jade, crystal, ruby and sapphire jewels (matching the eyes to the jewel hanging from the bird’s neck). When the centre piece opens, add the raven disk. Take the Ravenlore Whistle.
- Watch the cutscene.
- The Ravenlore Whistle is added to the bottom right hand corner of the screen. Click the raven icon to summon a raven.
- Return to the entrance.
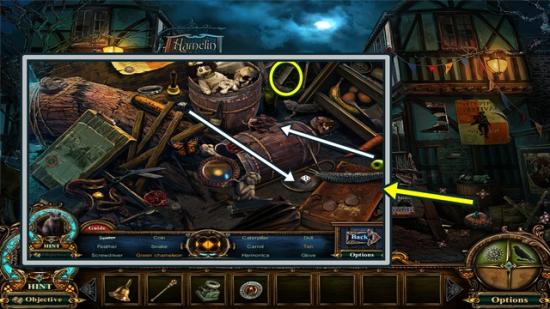
- Click on the barrels to start a hidden object hunt.
- Find all the objects. Put the dice together on the plate, then take the “10”. Put the green apple beside the chameleon, then take the green chameleon. Once you have found all the items, a decoder is added to your inventory.
- Return to the lake.
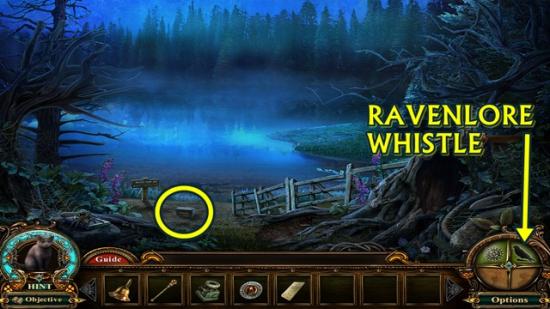
- Summon the raven using the Ravenlore Whistle (raven icon, bottom right corner of the screen).
- Click on the chest the raven brought you. Open the chest and take the gold chalice.
- Return to the Town Square.
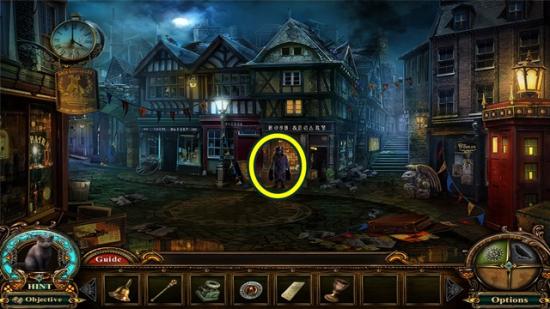
- Talk to the Dark Piper. Watch the cutscene. A new objective is added.
Chapter Two
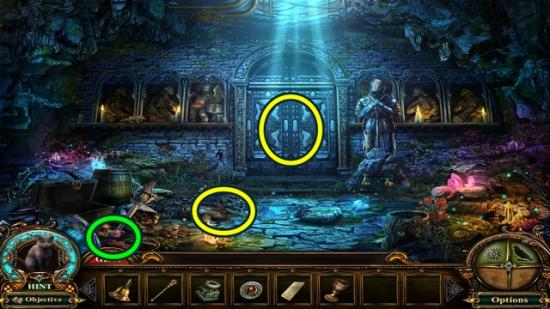
- Click on the flower/shell to take the Fabled Object (6/20).
- Take the scissors.
- Click on the door, then go through it to the Piper’s lair.
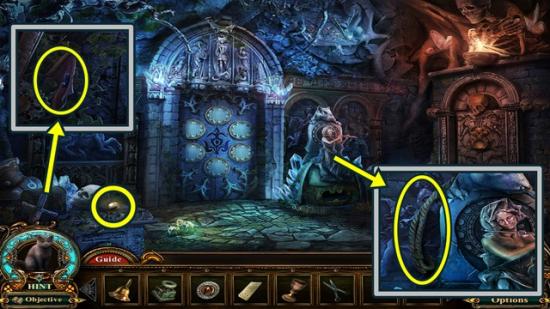
- Take the pearl. Click on the statue. Take the rope with hook. Click anywhere outside the window to close it.
- Click on the casket on the left. Take the flag.
- Move down to the underground cave.
- Click on the area on the right to start a hidden object hunt.
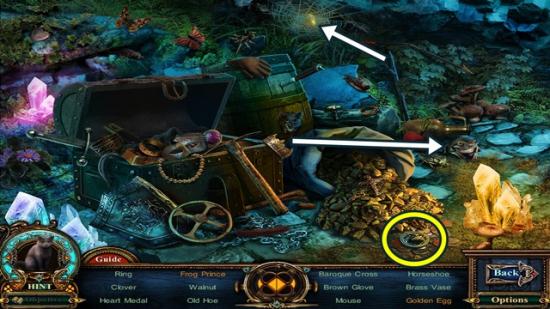
- Find all the objects. Put the crown on the frog, then take the frog prince. Use the stick to clear away the cobwebs, then take the golden egg. Once you have found all the items, a black swan emblem is added to your inventory.
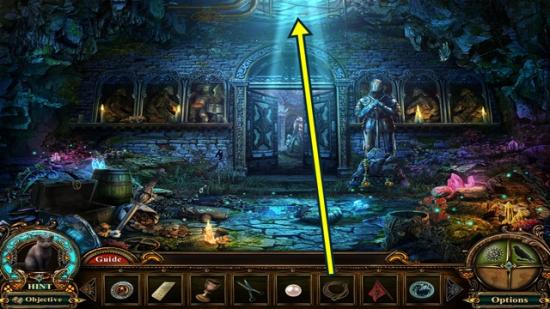
- Click on the ceiling opening (centre). Add the rope with hook, then climb up to return to the Town Square.
- Return to the house top.
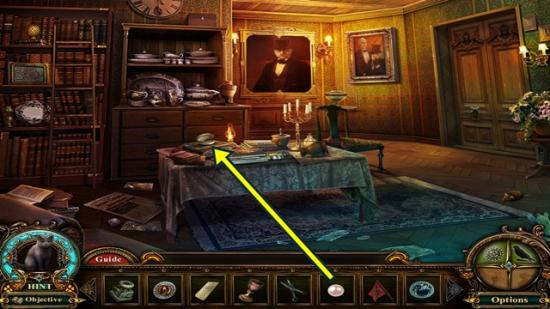
- Click on the shell-topped chest on the table. Add the pearl. Take the clock tower key.
- Return to the gravesite.
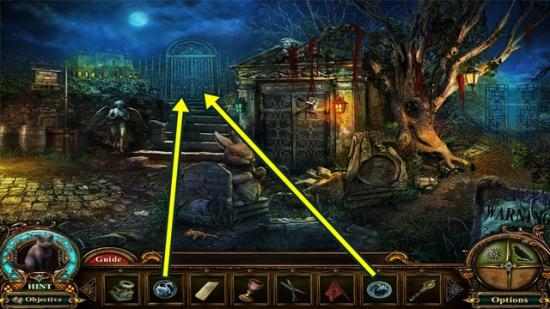
- Click on the gate. Add the white swan emblem and the black swan emblem. Go through the gate to the garden.
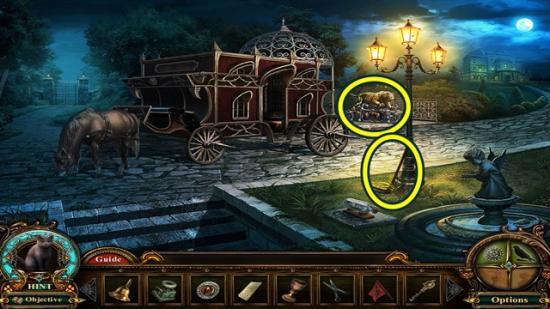
- Take the rusty pickaxe.
- Click on the tiger. A mini-puzzle starts. Put the broken pieces back on the tiger. Pick up a piece and place it on the tiger. The pieces cannot be rotated.
- Solution:
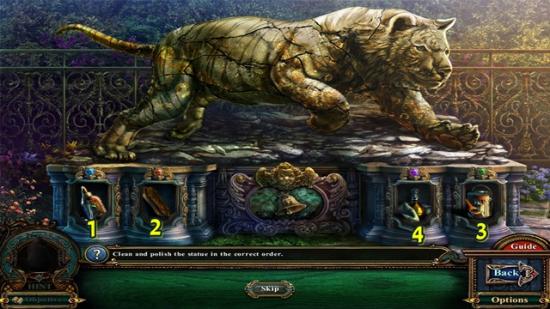
- When you are finished, use the tools to clean the tiger. See the screenshot above for guidance. First use the glue (1), then the brush (2), then the paint (3), then the oil (4). When you are finished, take the silver bell.
- Go up the path on the right to the mansion entrance (your cursor will turn into a magnifying glass when hovered over the mansion, slowly move your cursor downwards until it turns into an arrow).
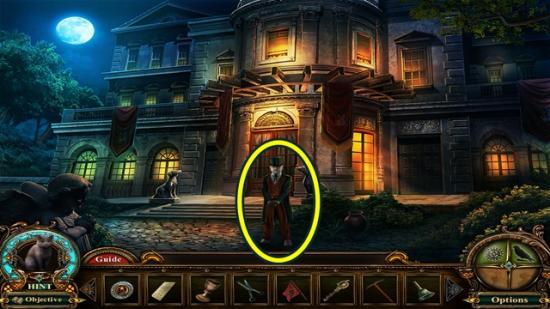
- Talk to Duke Alfred. Watch the cutscene. A new objective is added. A wolf plate is added to your inventory.
- Return to the entrance.
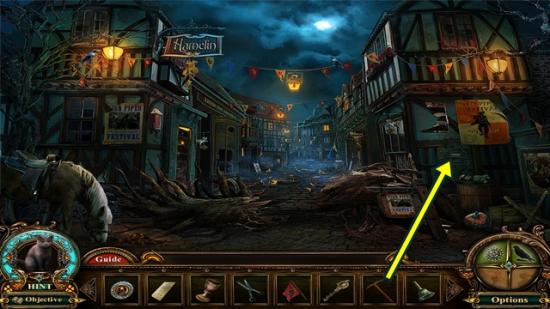
- Click on the brick wall. Smash the bricks with the rusty pickaxe, then take the sea serpent plate.
- Return to the stable.
- Click on the stall to start a hidden object hunt.
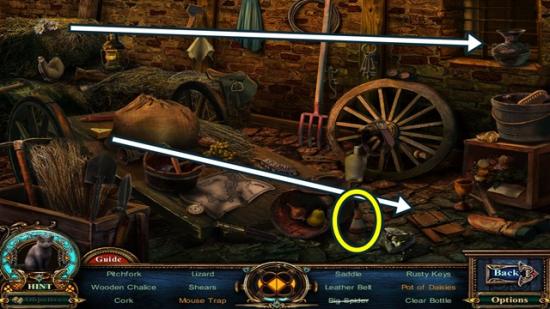
- Find all the objects. Put the cheese on the mouse trap, then take the mouse trap. Put the daisies in the vase, then take the pot of daisies. Once you have found all the items, a rust remover is added to your inventory.
- Go down into the sewer.
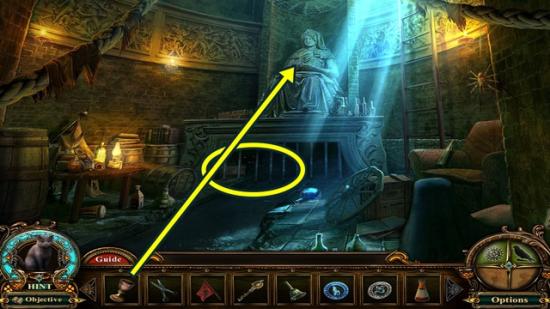
- Click on the statue. Put the gold chalice in its hands. Click on the area below the statue. Take the pharmacy key. Click anywhere outside the window to close it.
- Return to the courtyard.
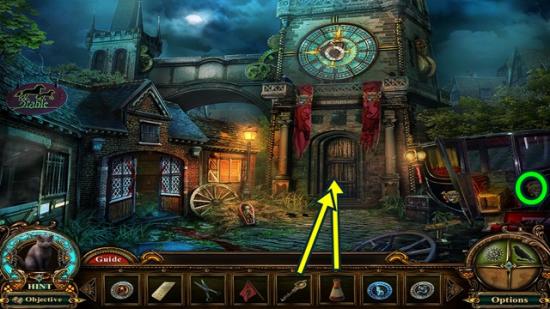
- Click on the carriage to take the Fabled Object (7/20).
- Click on the clock tower door. Pour the rust remover on the lock, then insert the clock tower key. Enter the clock tower.
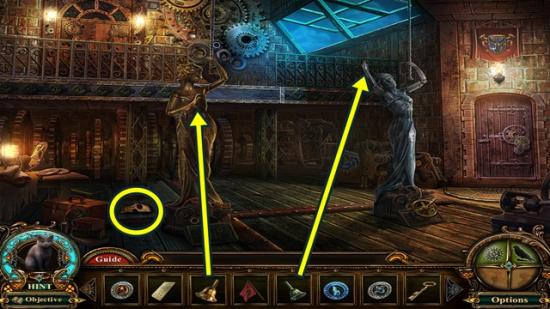
- Take the skeletal half mask. Add the gold bell to the gold statue and the silver bell to the silver statue. A new objective is added.
- Click on the table on the left to start a hidden object hunt.
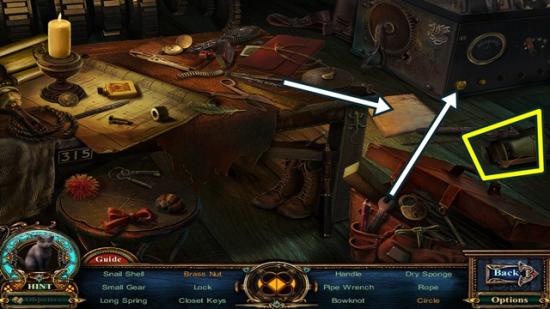
- Find all the objects. Use the compass on the paper and take the circle. Use the wrench to loosen the brass nut, then take it. Once you have found all the items, a lamp is added to your inventory.
- Return to the street.
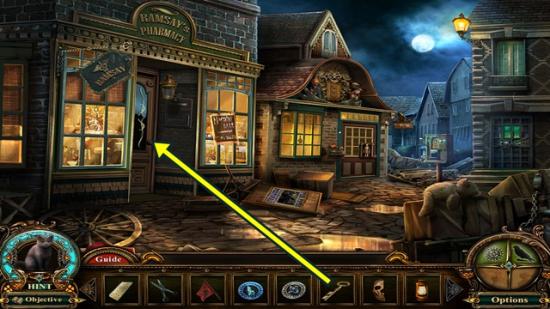
- Click on the pharmacy door. Insert the pharmacy key. Enter the pharmacy.
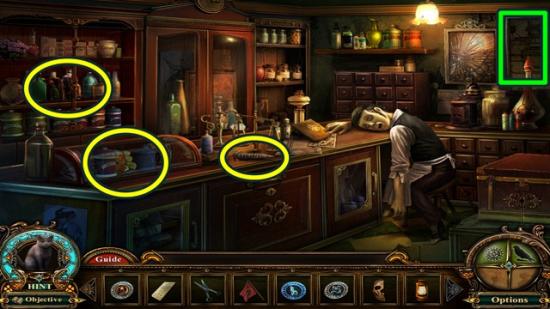
- Click on the poster to take the Fabled Object (8/20).
- Take the stone carrot. Click on the shelves on the left. Take the insecticide. Click on the display case on the counter. Take the small ship.
- Return to the gravesite.
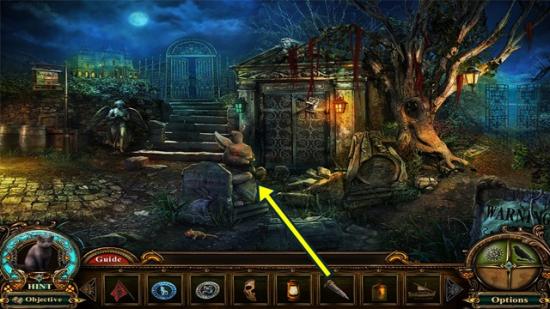
- Click on the stone rabbit. Add the stone carrot. When the panel opens, take the diary key and the cabinet key.
- Go through the gates to the lake.
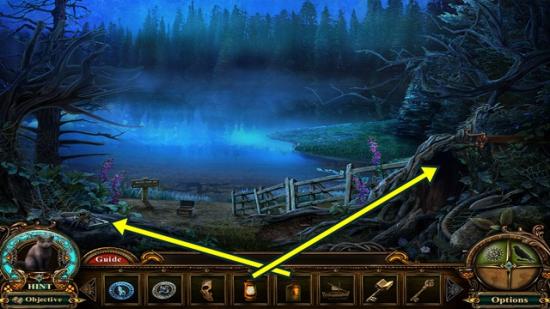
- Click on the spider. Use the insecticide to get rid of it, then take the address book.
- Put the lamp on the tree stump. Click on the tree stump to start a hidden object hunt.
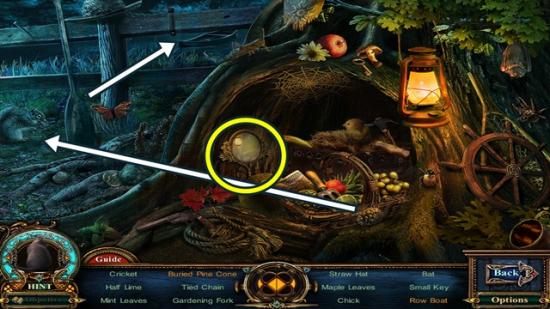
- Find all the objects. Give the pinecone to the squirrel, then take the buried pinecone. Put the paddle on the boat and take the row boat. Once you have found all the items, a hand mirror with moon engraving is added to your inventory.
- Return to the garden.
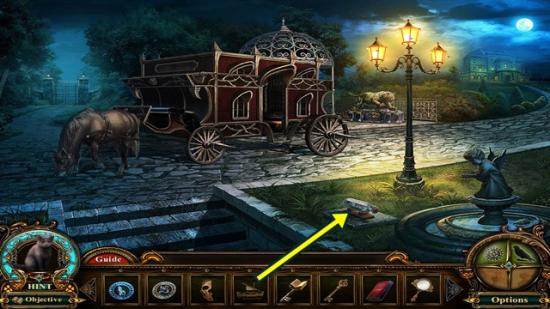
- Click on the bottle. Add the small ship, then take the golem plate.
- Return to the pharmacy.
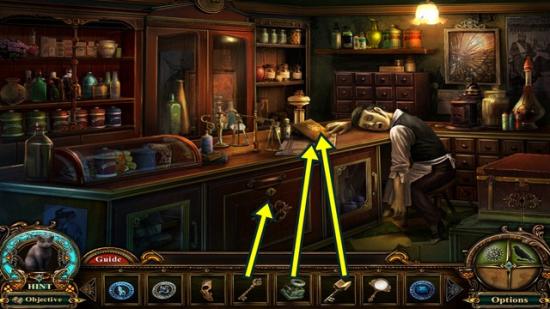
- Click on the journal in the pharmacist’s hand. Unlock it with the diary key, then use the invisible ink on the pages. Turn the pages to get a new objective. The encrypted receipt is added to your inventory.
- Use the cabinet key on the cabinet. Click on the cabinet to start a hidden object hunt.
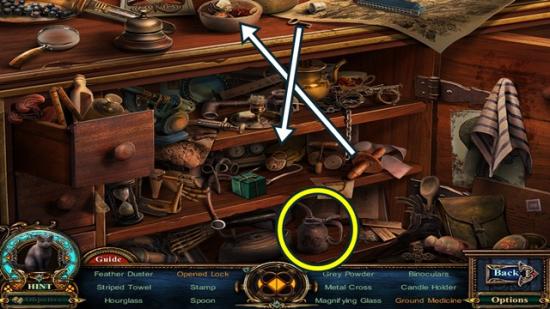
- Find all the objects. Put the key in the lock, then take the opened lock. Use the pestle in the mortar and take the ground medicine. Once you have found all the items, oil is added to your inventory.
- Return to the house bottom.
- Click on the credenza on the right to start a hidden object hunt.
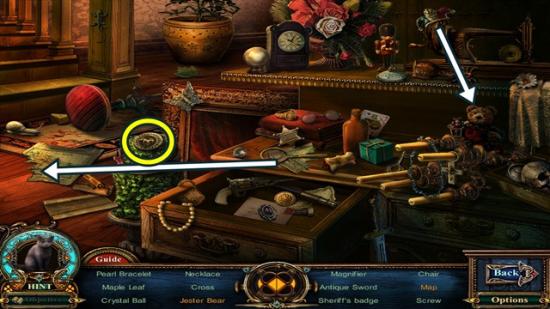
- Find all the objects. Put the jester hat on the bear and take the jester bear. Put the map piece back on the map, then take the map. Once you have found all the items, a unicorn plate is added to your inventory.
- Return to the clock tower.
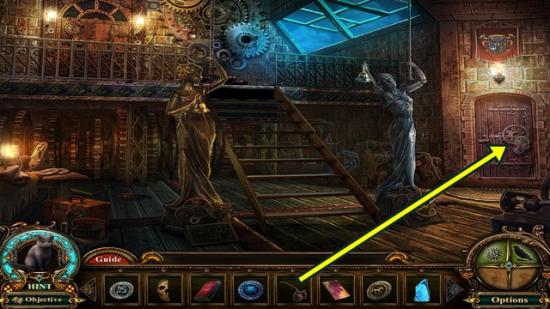
- Click on the door. Add the oil. Enter the clock tower basement.
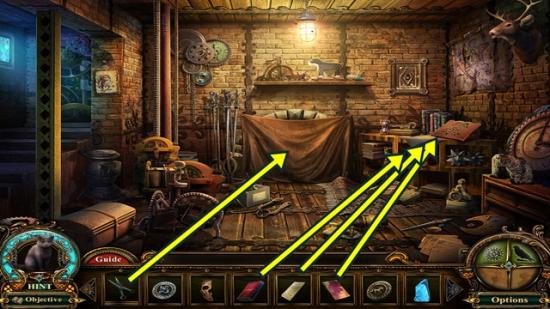
- Click on the tabletop. Add the encrypted receipt, then add the decoder, then the address book. Open the address book. A new objective is added. Take the morgue code. Click anywhere outside the window to close it.
- Cut the heavy curtain with the scissors and take the bottle of sour milk.
- Return to the street.
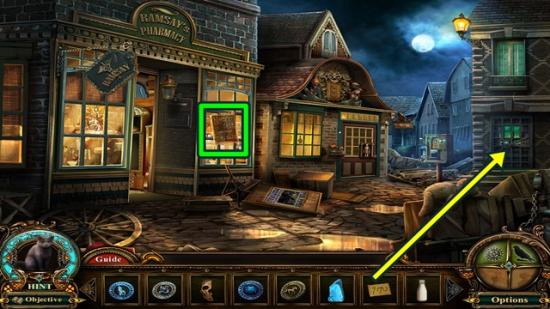
- Click on the poster on the pharmacy window to take the Fabled Object (9/20).
- Click on the morgue window. Add the morgue code. Enter the morgue.
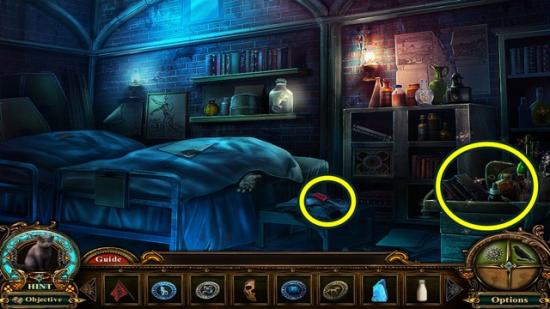
- Take the screwdriver.
- Click on the tray to start a hidden object hunt.
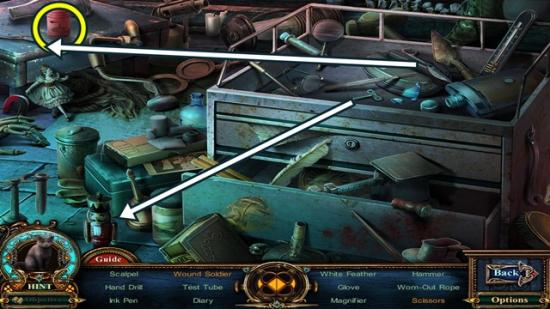
- Find all the objects. Put the winder on the soldier, then take the wound soldier. Put the scissors back together, then take the scissors. Once you have found all the items, embalming acid is added to your inventory.
- Return to the mansion entrance.
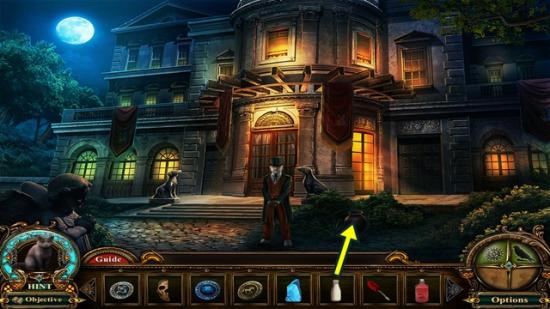
- Click on the urn. Pour the bottle of sour milk into the urn. Take the eagle plate.
- Return to the underground cave (hole on the ground in the Town Square).
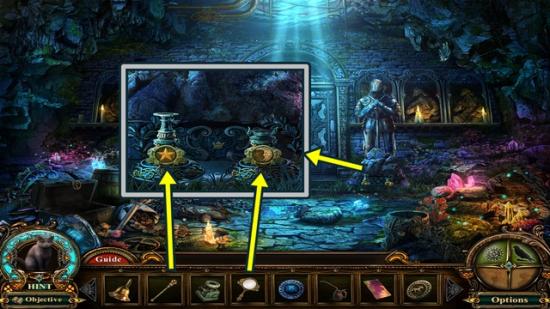
- Click on the base of the knight statue. Add the bronze sceptre and the hand mirror with moon engraving. Take the blue crystal #1 from the knight’s chest.
- Go through the door to the Piper’s lair.
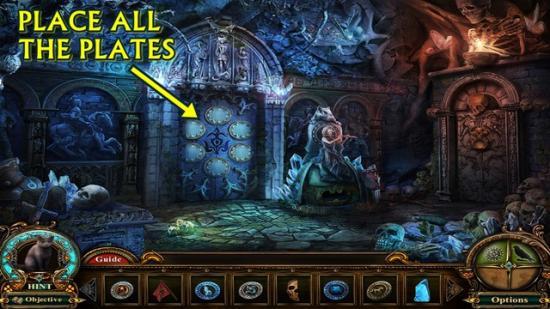
- Click on the door. Add the eagle plate, sea serpent plate, golem plate, unicorn plate, wolf plate and the phoenix plate.
- Go through the newly opened door to the vault entrance.
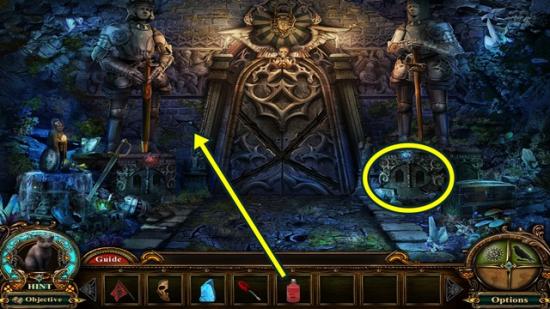
- Click on the broken wall. Pour the embalming acid on the broken bricks, then take the blue crystal #2.
- Click on the base of the statue on the right. Add the two blue crystals to the slots. Click on the newly opened panel. A mini-puzzle starts. Move the horse across the board so it passes over and “takes” the objects. To move the horse, click on the horse disc and click on an arrow to move it in that direction. The horse disc will move in that direction until stopped by a barrier.
- The rotating arrow icon at the top will reset the puzzle. To solve the puzzle, follow the directions in the screenshot below:
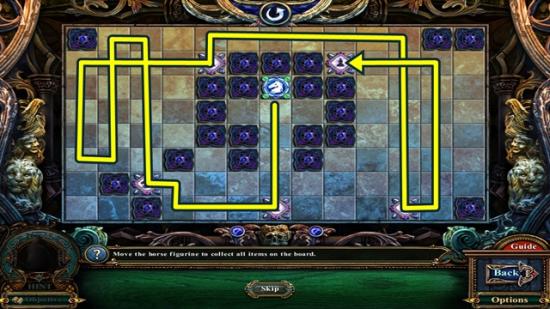
- When you are finished, take vault key #1.
- Return to the mansion entrance. Watch the cutscene. A new objective is added.
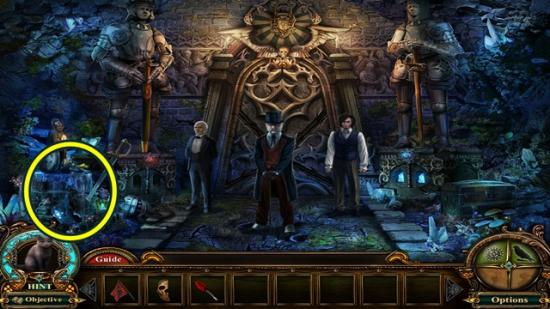
- Click on the area at the left to start a hidden object hunt.
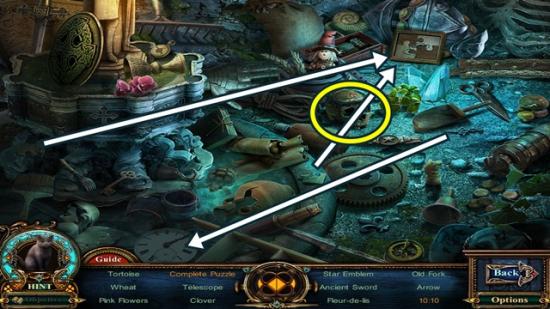
- Find all the objects. Put the puzzle pieces on the board, then take the complete puzzle. Put the hour hand on the clock, then take 10:10. Once you have found all the items, a skull is added to your inventory.
- Move down to the Piper’s Lair.
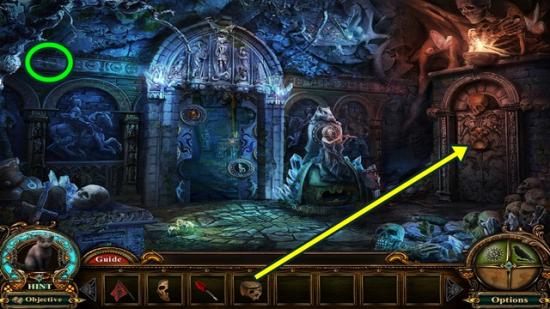
- Click on the wall to take the Fabled Object (10/20).
- Click on the door on the right. Add the skull. Enter the skeleton lair.
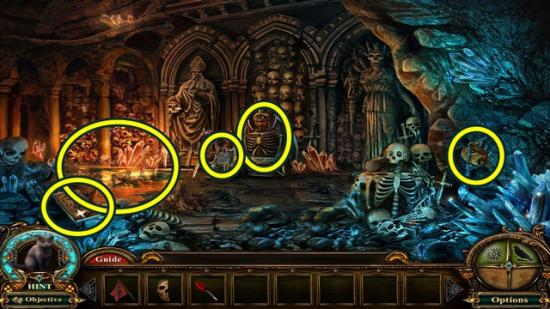
- Take the wooden dragon and the book on the Pied Piper.
- Click on the centre skeleton to add a new objective. Click anywhere outside the window to close it. Click on the inscription beside the centre skeleton. Read the inscription. Click anywhere outside the window to close it.
- Click on the left area to start a hidden object hunt.
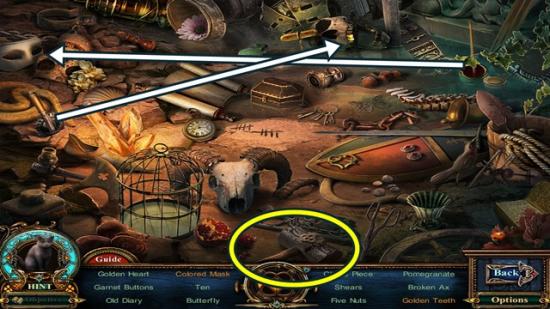
- Find all the objects. Paint the mask, then take the coloured mask. Use the chisel on the skull’s teeth, then take the gold teeth. Once you have found all the items, a sledgehammer is added to your inventory.
- Return to the underground cave.
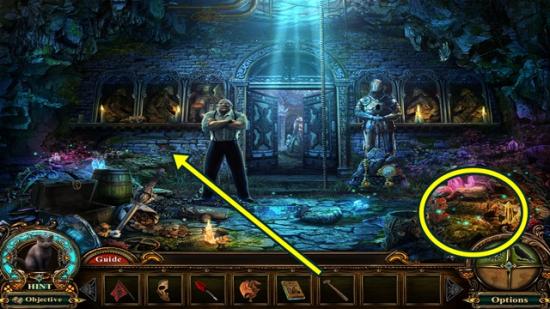
- Click on the broken wall. Smash the bricks with the sledgehammer. Take the ruby crystal #1.
- Click on the area on the right to start a hidden object hunt.
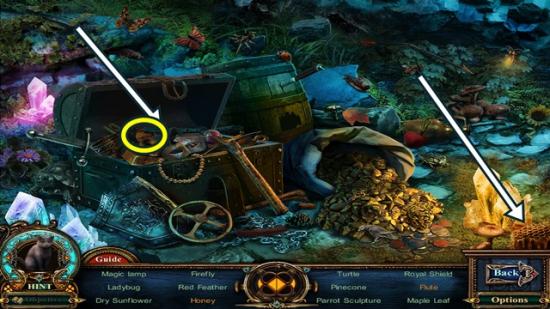
- Find all the objects. Put the flute back together, then take the flute. Put the been on the honeycomb, then take the honey. Once you have found all the items, a compass is added to your inventory.
- Return to the vault entrance.
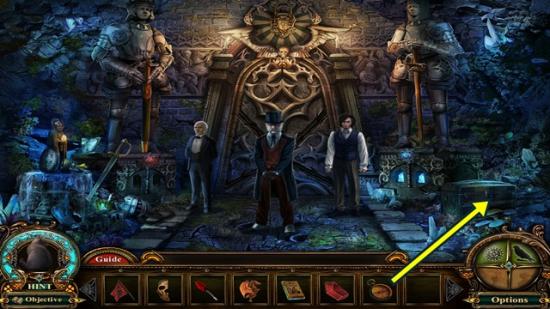
- Click on the chest. Add the compass, then take the bones from the chest.
- Return to the skeleton lair.
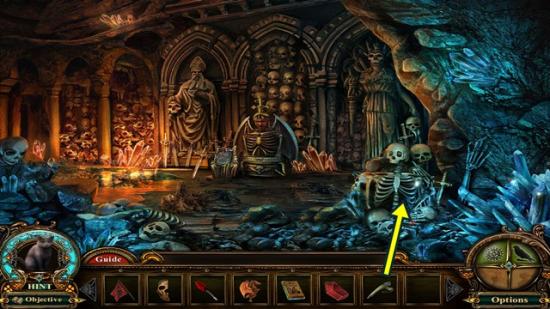
- Add the bones to the skeleton on the right. Take the ruby crystal #2.
- Return to the vault entrance.
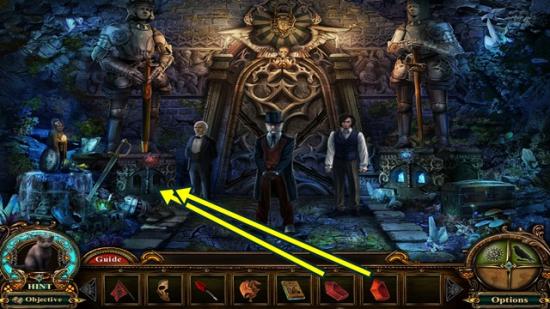
- Click on the base of the statue on the left. Add the two ruby crystals. Click on the newly opened panel. A mini-puzzle starts. Move the horses through the board to collect the items.
- Solution:
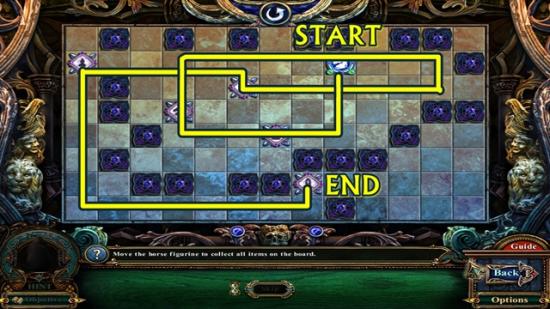
- When you are finished, take the vault key #2.
- Give vault key #2 to the Duke. Watch the cutscene. A new objective is added.
Chapter Three
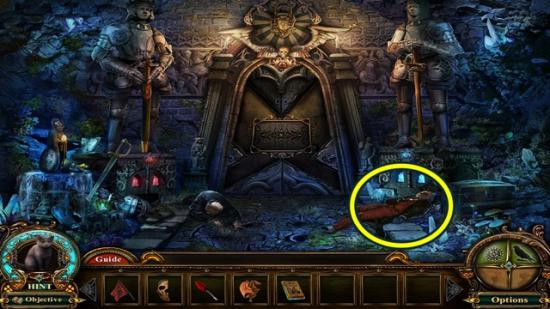
- Click on the Duke. Take the mansion key.
- Return to the Piper’s lair.
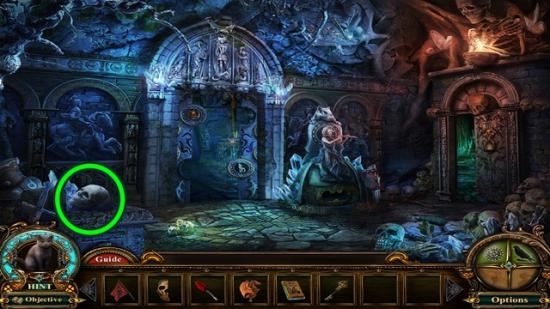
- Click on the skull on the casket to take the Fabled Object (11/20).
- Return to the clock tower (climb to the surface from the underground cave).
- Click on the table to start a hidden object hunt.
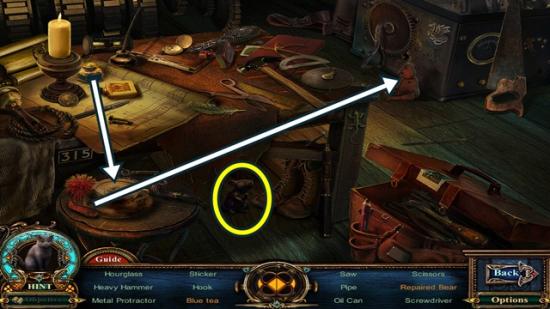
- Find all the objects. Put the blue ink in the tea, then take the blue tea. Put the arm on the bear, then take the repaired bear. Once you have found all the items, a rat carving is added to your inventory.
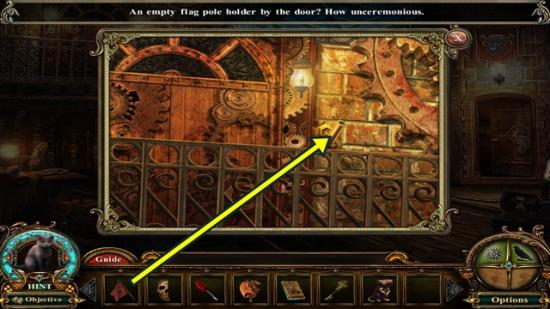
- Click on the top of the stairs. Add the flag. Go through the door to the clock tower top.
- A new objective is added.
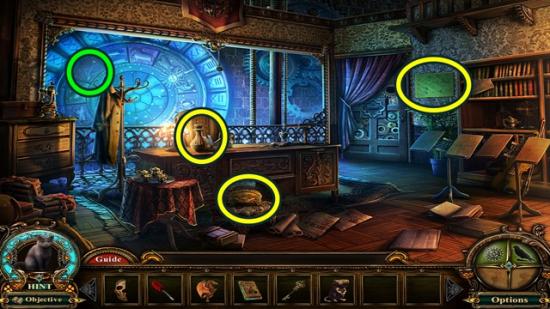
- Click on the zodiac symbol to take the Fabled Object (12/20).
- Take the metal vase and the blueprint.
- Click on the small chest. Remove the cover and take the wooden knight.
- Return to the alley.
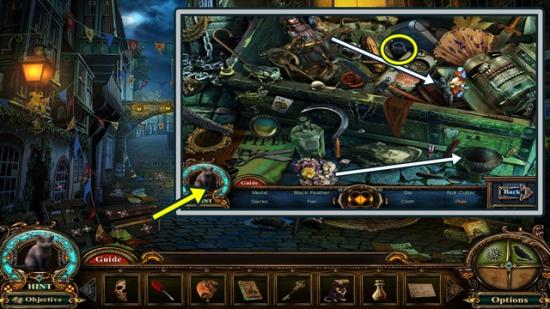
- Click on the chest to start a hidden object hunt.
- Find all the objects. Put the flowers in the vase, then take the flower vase. Put the wing on the statuette, then take the pixie. Once you have found all the items, a silver lock is added to your inventory.
- Return to the gravesite.
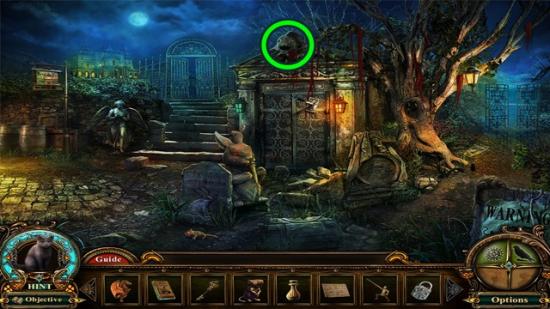
- Click on the top of the mausoleum to take the Fabled Object (13/20).
- Return to the mansion entrance.
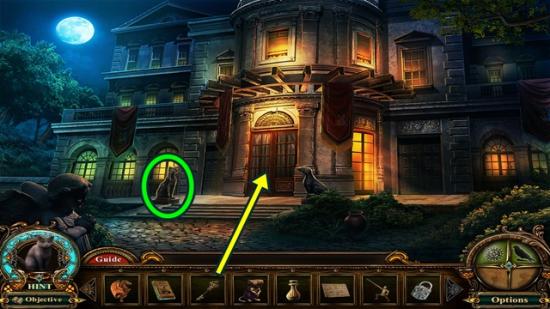
- Click on the left statue to take the Fabled Object (14/20).
- Use the mansion key on the mansion doors. Go through the door to the mansion ground.
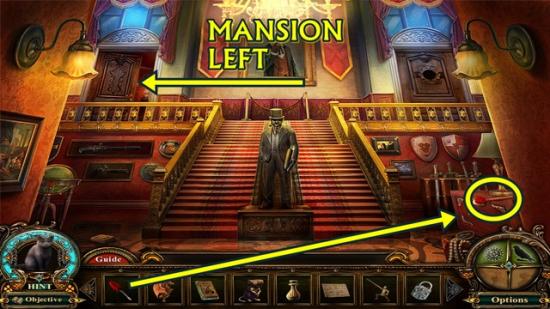
- Take the blow dart.
- Click on the drawers. Unscrew the hinge with the screwdriver, then take the burnt half mask.
- Go through the upper left door to mansion left.
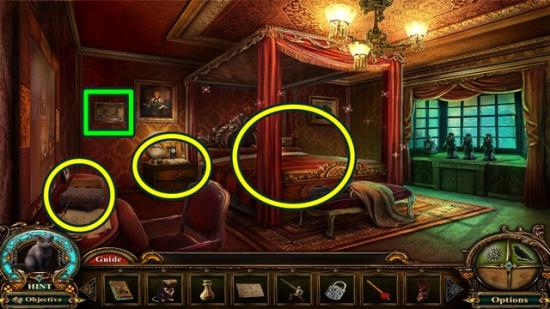
- Click on the painting to take the Fabled Object (15/20).
- Click on the desk. Read the note. Click anywhere outside the window to close it.
- Click on the bedside table. Read the entry. Click anywhere outside the window to close it.
- Click on the bed to start a hidden object hunt.
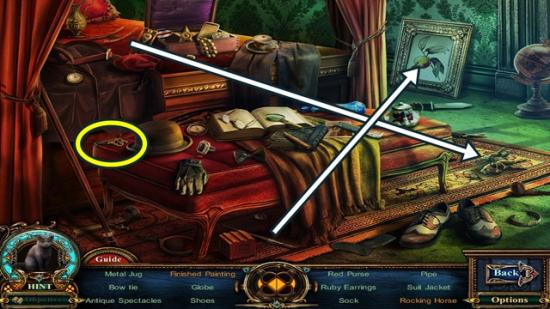
- Find all the objects. Use the paintbrush on the painting, then take the finished painting. Put the rocker on the horse, then take the rocking horse. Once you have found all the items, a workshop key is added to your inventory.
- Return to the garden.
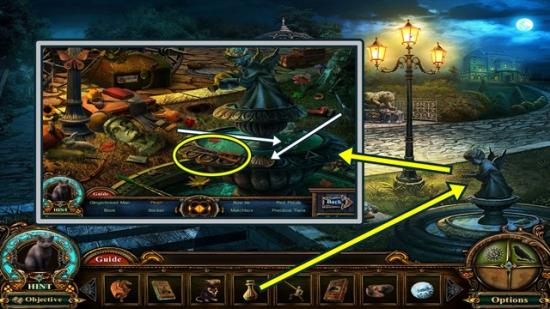
- Put the metal vase on the fountain. Click on the fountain to start a hidden object hunt.
- Find all the objects. Use the yellow paintbrush on the duck, then take the yellow duck. Use the chisel on the shell, then take the pearl. Once you have found all the items, tongs are added to your inventory.
- Return to the street.
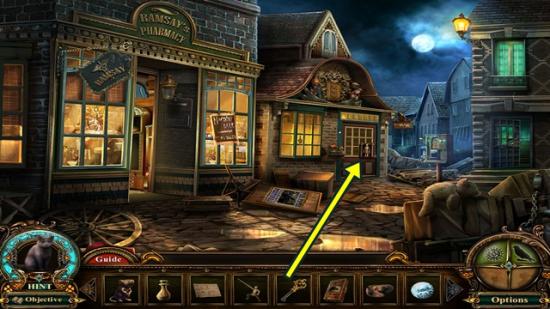
- Click on the workshop. Insert the workshop key. Enter the workshop bottom.
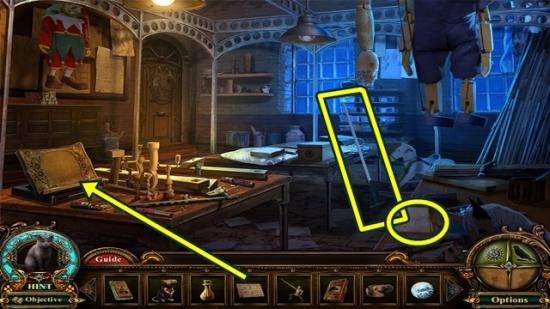
- Take the rake.
- Click on the stand. Add the blueprint, then take the diamond lock.
- Click on the table on the right. Read the note. Click anywhere outside the window to close it.
- Return to the morgue.
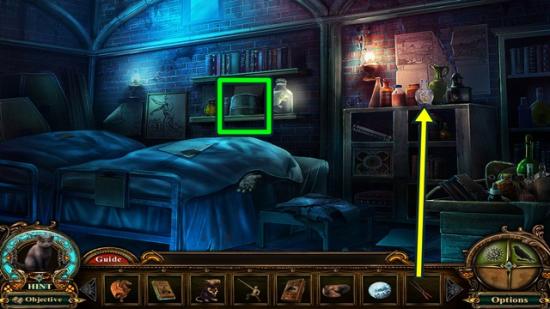
- Click on the bottles/bucket on the shelf to take the Fabled Object (16/20).
- Click on the jar on the bookshelf. Use the tongs to retrieve the gold lock.
- Return to the lake.
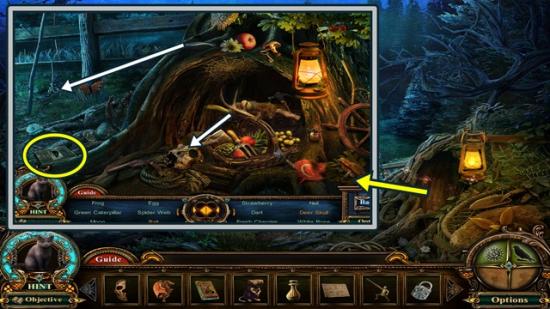
- Click on the tree stump to start a hidden object hunt.
- Find all the objects. Put the antler on the skull, then take the deer skull. Put the fish on the hook, then take the bait. Once you have found all the items, a book of rats is added to your inventory.
- Return to the Town Square
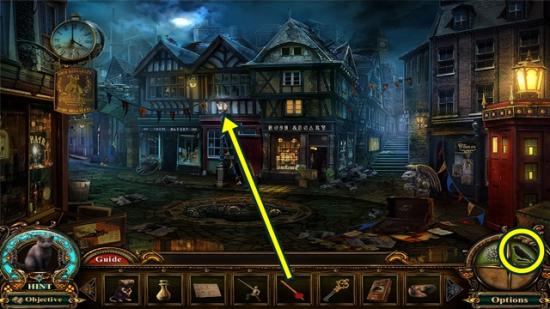
- Use the Ravenlore Whistle to summon the raven and break the lantern. Click on the broken lantern and use the blow dart to get the white crystal #1.
- Return to the skeleton lair (go through the hole in the ground in the Town Square).
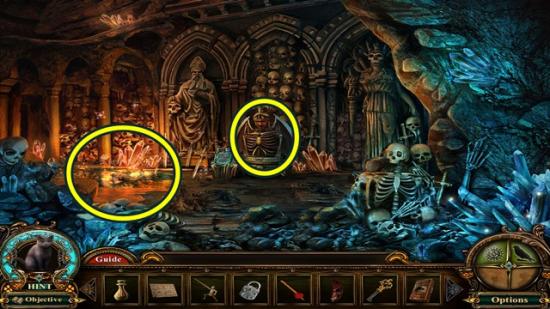
- Click on the skeleton in the centre. Add the skeletal half mask and the burnt half mask to the face. When the chest opens, add the gold lock, diamond lock and the silver lock. Take the skeleton key. The skeleton key is added to the grail; it will open any lock.
- Click on the area on the left to start a hidden object hunt.
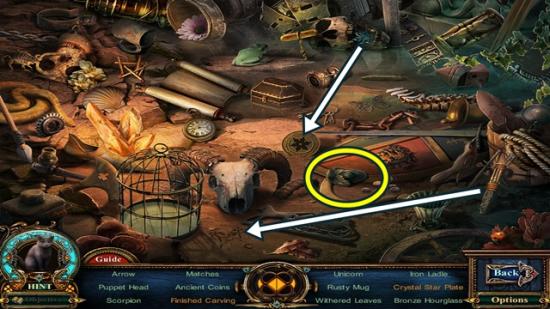
- Find all the objects. Put the crystal star on the plate, then take the crystal star plate. Use the knife on the half carving, then take the finished carving. Once you have found all the items, a miniature hat is added to your inventory.
- Return to the morgue.
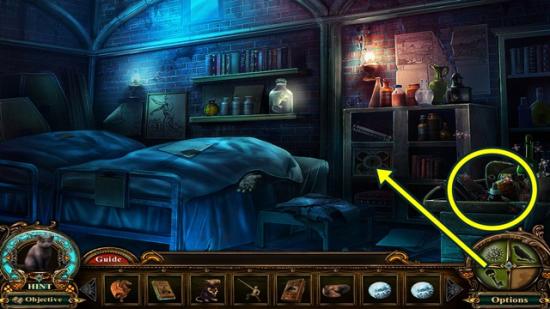
- Click on the locked panel. Use the skeleton key to unlock it. Take the book of poison.
- Click on the tray to start a hidden object hunt.
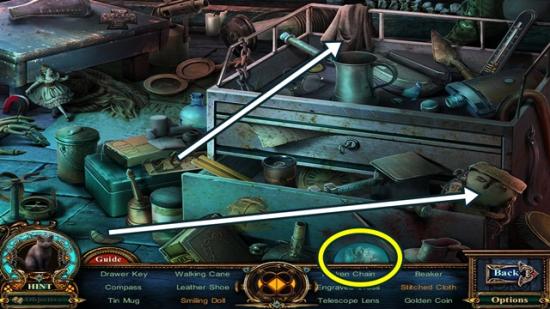
- Find all the objects. Use the needle and thread on the clock, then take the stitched cloth. Put the smile on the doll, then take the smiling doll. Once you have found all the items, a glowing orb is added to your inventory.
- Return to the mansion ground.
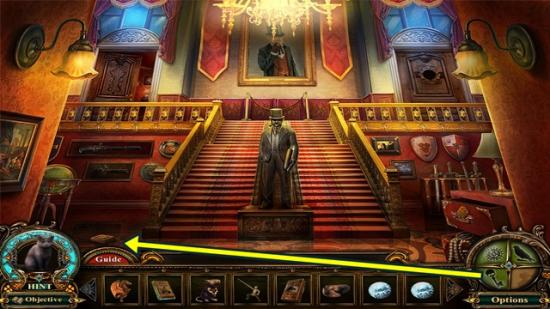
- Click on the small chest on the floor. Use the skeleton key to unlock the chest, then take the book of maps.
- Return to mansion left.
- Click on the bed to start a hidden object hunt.
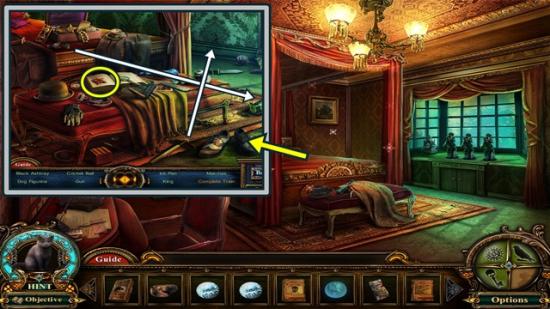
- Find all the objects. Put the chimney on the train, then take the complete train. Use the pickaxe on the broken wall, then take the magic orb. Once you have found all the items, a star emblem is added to your inventory.
- Return to the workshop.
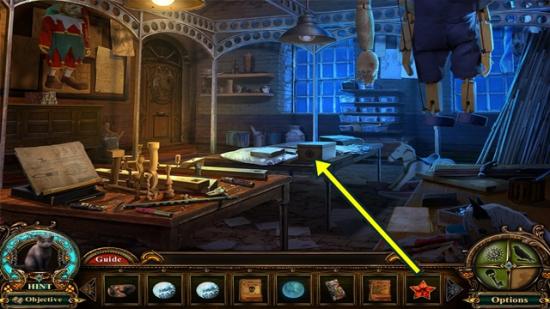
- Click on the box on the table. Add the star emblem, then take the faucet tap.
- Return to the sewer.
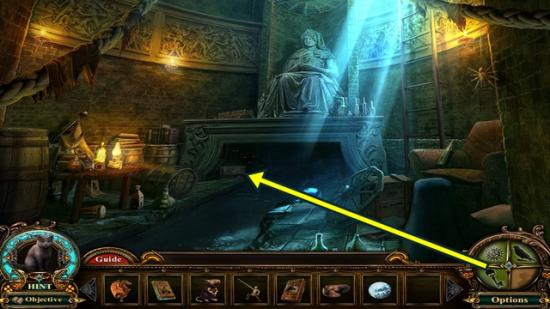
- Click on the area under the statue. Use the skeleton key to open the chest. Take the white crystal #2.
- Return to the clock tower top.
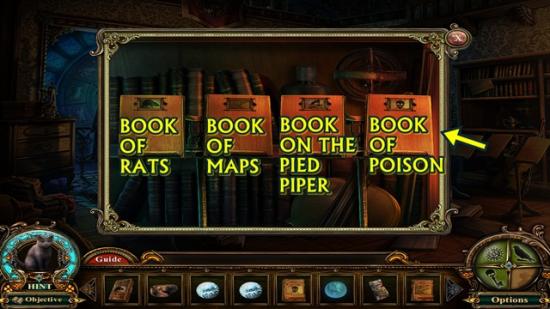
- Click on the bookstands. Add the book of maps, book of poison, book of rats and the book on the Pied Piper (match the symbols).
- Enter the clock tower secret room.
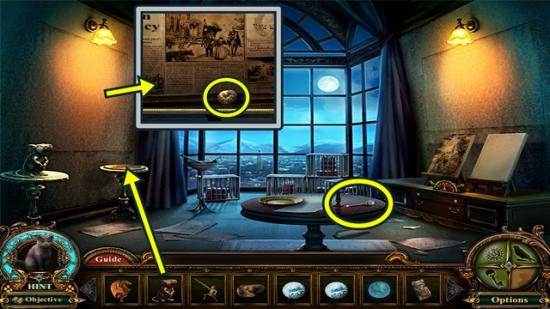
- Take the miniature wand.
- Put the rat carving on the round table. Click on the newly revealed panel. Take the white crystal #3.
- Return to the garden.
- Click on the fountain to start a hidden object hunt.
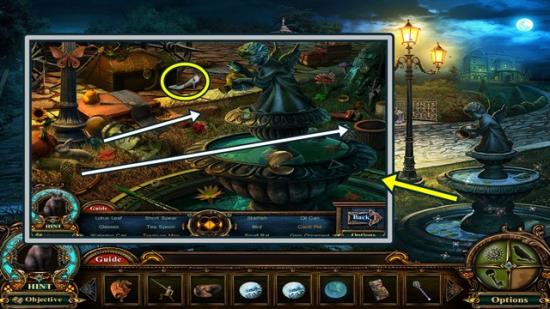
- Find all the objects. Put the cactus in the pot, then take the cacti pot. Use the hand shovel on the mound of dirt, then take the treasure map. Once you have found all the items, miniature heels are added to your inventory.
- Return to the mansion entrance.
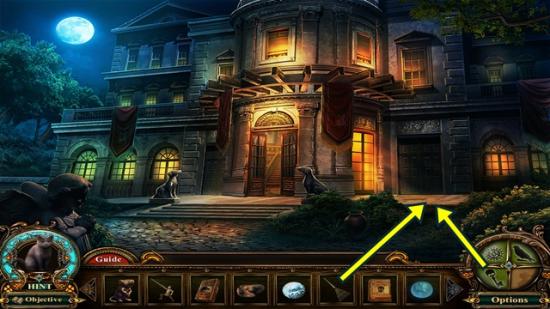
- Click on the right side of the terrace. Use the rake to remove the leaves. Use the skeleton key to open the cellar doors. Enter the cellar.
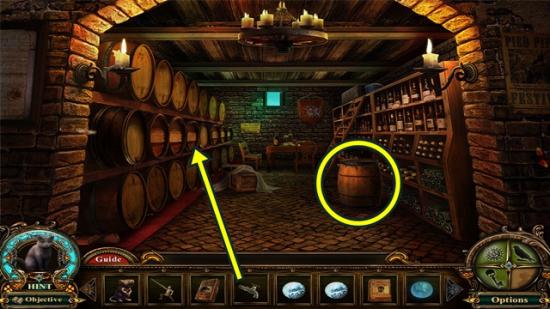
- Move the barrel and take painting piece 2.
- Click on the barrels on the left. Add the faucet tap. Click anywhere outside the window to close it.
- Return to mansion left.
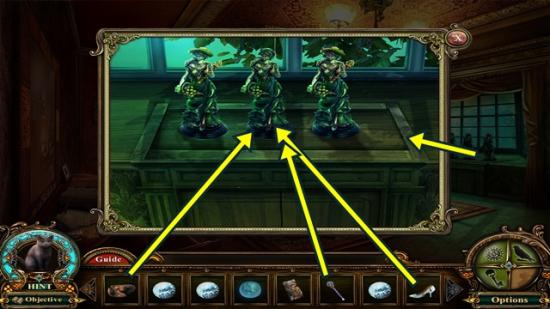
- Click on the dolls. Add the miniature hat, miniature heels and miniature wand to the middle doll. Take painting piece 3.
- Return to the pharmacy.
- Click on the cabinet to start a hidden object hunt.
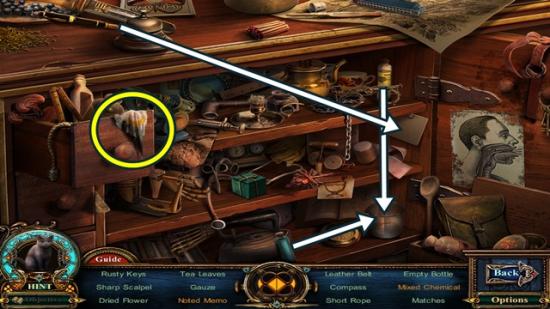
- Find all the objects. Pour the chemicals in the flask, then take the mixed chemical. Use the pen on the piece of paper, then take the noted memo. Once you have found all the items, painting piece 1 is added to your inventory.
- Return to the clock tower secret room.
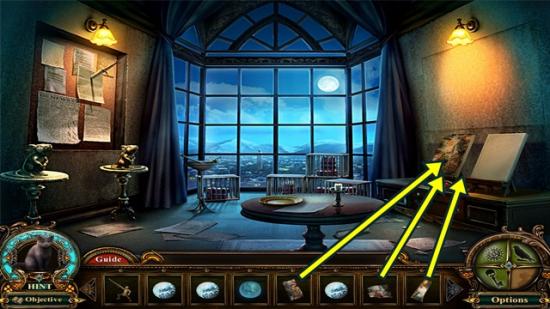
- Click on the easels. Add the three painting pieces. Click on the paintings. A mini-puzzle starts. Find the eight differences. It doesn’t matter what side you click on.
- Solution:
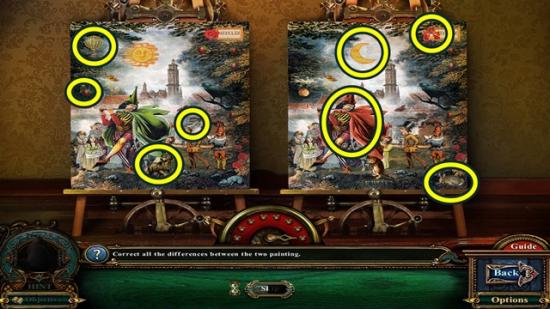
- When you are finished, click on the newly revealed panel. Take the white crystal #4.
- Return to the vault entrance.
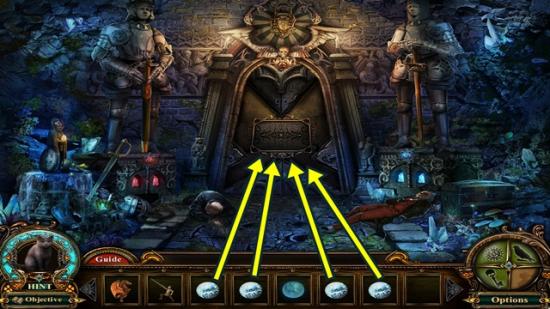
- Click on the door. Add the four white crystals. A mini-puzzle starts. Guide the horse to collect all the items.
- Solution:
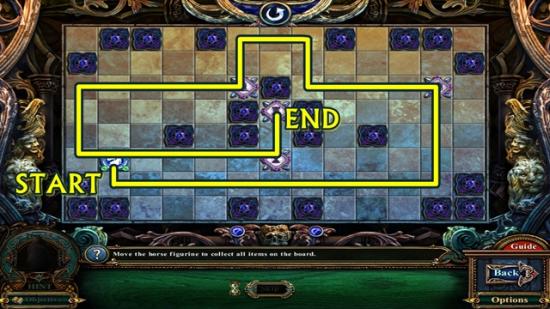
- When you are finished, click on the newly opened panel to open the door. Enter the vault.
- Click on the Dark Piper. Watch the cutscene.
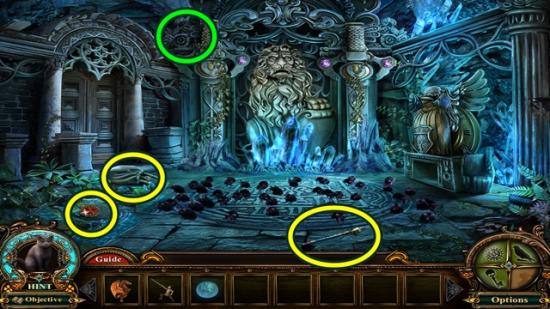
- Click on the top left of the column to take the Fabled Object (17/20).
- Take the wooden sun.
- Click on the flute. A new objective is added. Click anywhere outside the window to close it.
- Click on the sack. A new objective is added. Open the box and take the flute gem. Click anywhere outside the window to close it.
- Click on the flute again. Add the flute gem. The Pied Piper’s flute is added to the grail. Click on the Pied Piper’s flute to disperse the rats.
- Return to the gravesite. Use the Pied Piper’s flute to disperse the rats.
- Return to the workshop.
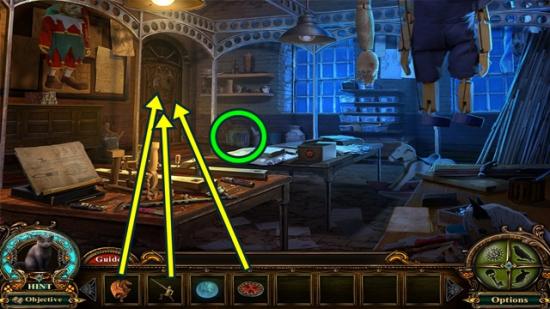
- Click on the vase/paint cans to take the Fabled Object (18/20).
- Click on the door. Add the wooden knight, the wooden sun and the wooden dragon.
- Enter the workshop top.
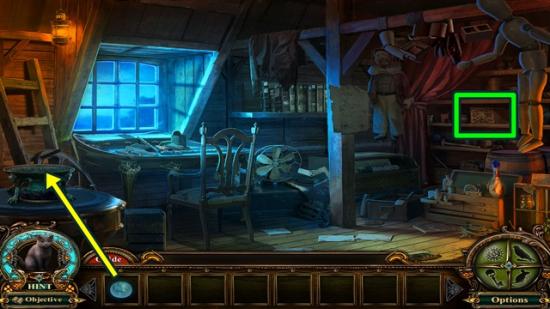
- Click on the box on the shelf to take the Fabled Object (19/20).
- Click on the pedestal. Add the glowing orb. When the drawer opens, take the hacksaw.
- Return to the gravesite.
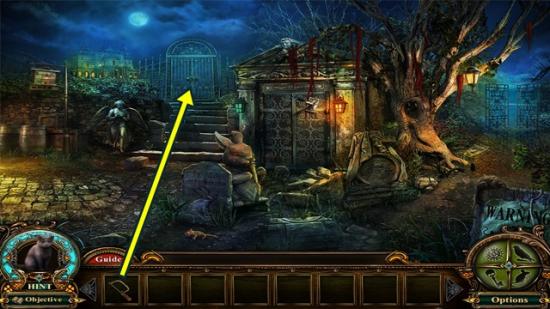
- Click on the gates that lead to the mansion. Use the hacksaw to cut the chains.
- Go through the gates to the garden.
- Use the Ravenlore Whistle to summon the raven. Watch the cutscene. Use the Pied Piper’s flute to summon rats. Watch the cutscene.
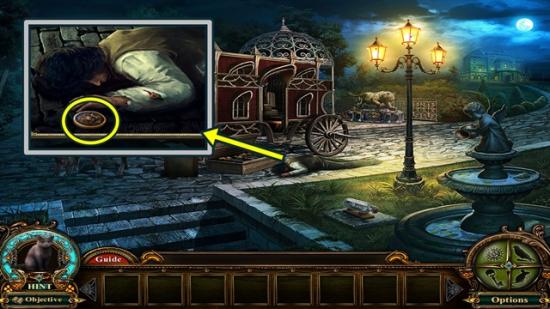
- Click on the Dark Piper. Take the Duke’s emblem.
- Return to the mansion entrance.
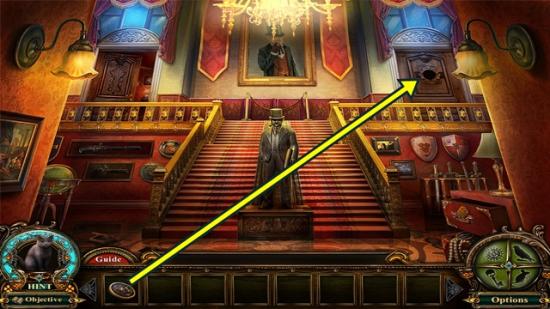
- Click on the upper right door. Add the Duke’s emblem. Enter the mansion right.
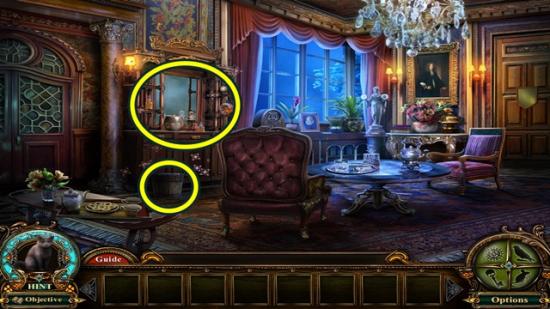
- Take the bucket.
- Click on the buffet to start a hidden object hunt.
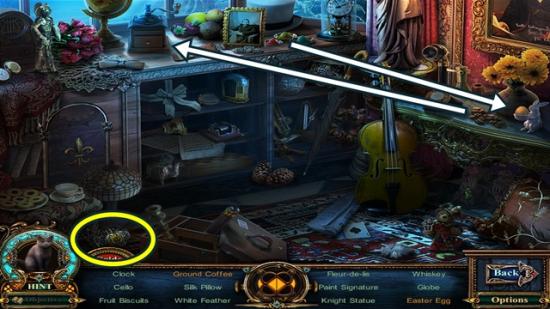
- Find all the objects. Put the coffee beans in the grinder, then take the coffee grounds. Use the dyes on the egg, then take the Easter egg. Once you have found all the items, the fire emblem is added to your inventory.
- Return to the cellar.
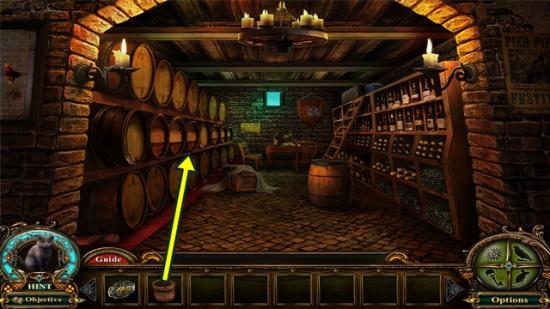
- Click on the barrels on the left. If you haven’t already, add the faucet tap, then the bucket. Take the bucket of alcohol.
- Return to the garden.
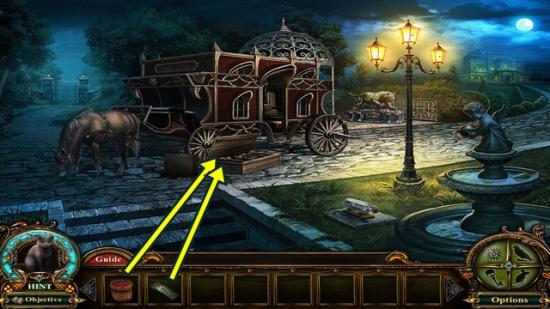
- Pour the bucket of alcohol over the case of flutes, then light it with the matches.
- Return to the courtyard. Use the Pied Piper’s flute to disperse the rats.
- Return to the clock tower top.
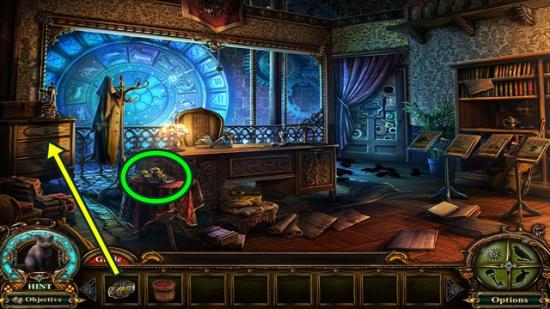
- Click on the tea set/gramophone to take the Fabled Object (20/20).
- Click on the drawers on the left. Add the fire emblem. Take the matches.
- Use the Pied Piper’s flute to disperse the rats.
- Open the door and enter the clock tower secret room.
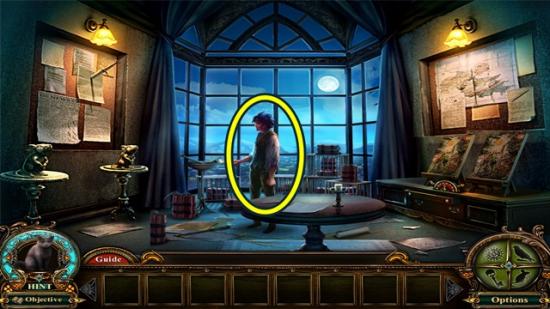
- Click on the Dark Piper. Watch the cutscene.
- When you are finished reading the epilogue, click OK.
The end!
- The Skip function will be available a few seconds after the credits start.
- If you are playing the Collector’s Edition, you may now play the Bonus Chapter.
- From the main screen, click The Midas Lair.
The Midas Lair (Bonus Chapter)
- Read the prologue, then click on the checkmark.
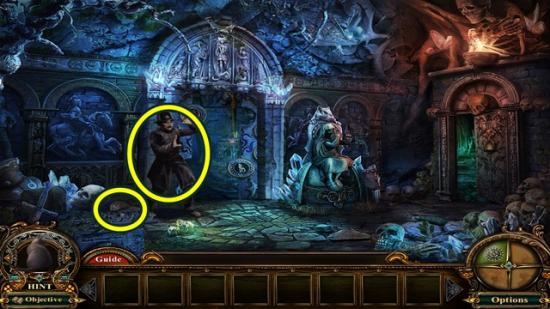
- Take the Zeus left emblem. Click on the policeman to get an objective.
- Go forward to the vault entrance.
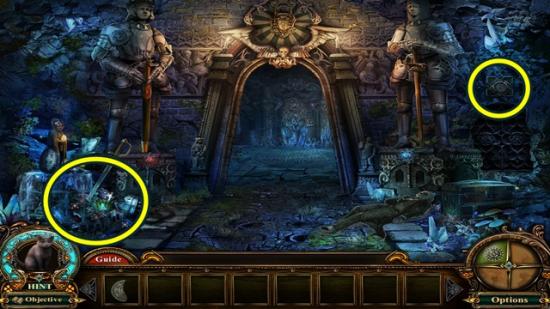
- Click on the inset above the small door on the right. Take the bone key.
- Click on the area on the left to start a hidden object hunt.
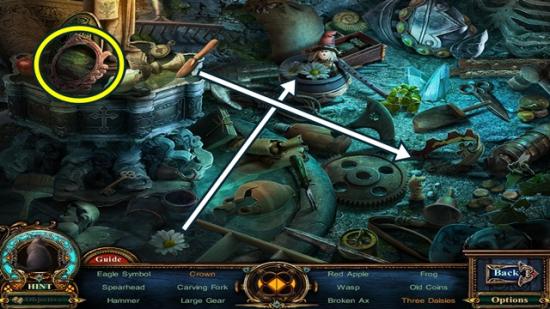
- Find all the objects. Put the daisy with the others, then take the three daisies. Use the hand shovel to dig up the half-buried crown, then take the crown. Once you have found all the items, a mirror shield is added to your inventory.
- Move forward into the vault.
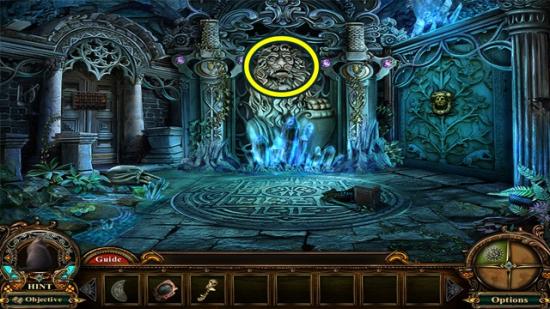
- Click on the stone lion’s head. Take the ruby eye.
- Return to the skeleton lair (right of the Piper’s lair).
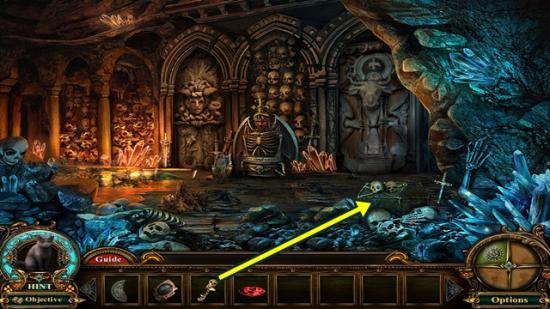
- Click on the chest. Unlock it with the bone key, then take the flute figurine.
- Move down to the Piper lair.
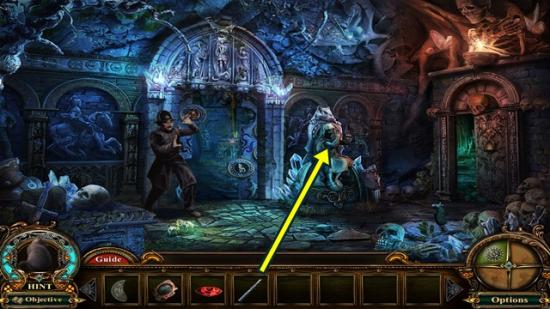
- Click on the statue. Add the flute figurine. Take the bag of sand and sapphire eye.
- Go back into the skeleton lair.
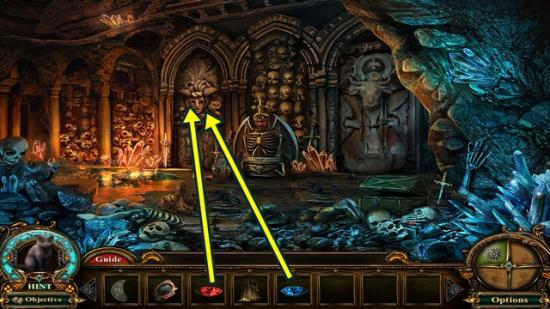
- Click on the Medusa carving. Add the ruby eye to the red painted eye and the sapphire eye to the blue painted eye. Watch the cutscene.
- Enter the snake room.
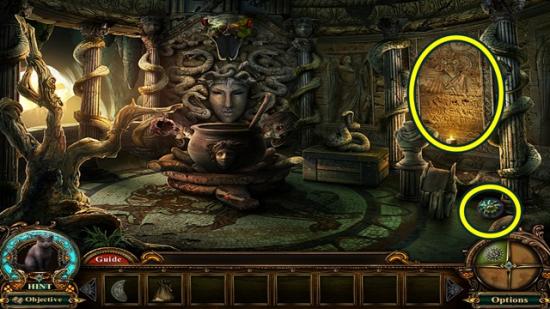
- Take the flower emblem. Click on the right wall. Read the inscription for the spell ingredients. Click anywhere outside the window to close it.
- Move back down to the skeleton lair.
- Click on the area on the left to start a hidden object hunt.
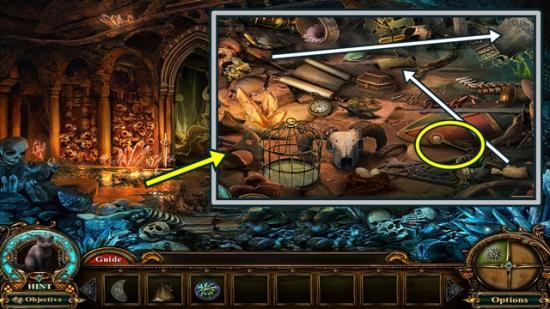
- Find all the objects. Reattach the statue, then take the Greek statue. Use the chisel on the stone, then take the engraved stone. Once you have found all the items, an Apollo chest key is added to your inventory.
- Return to the vault entrance.
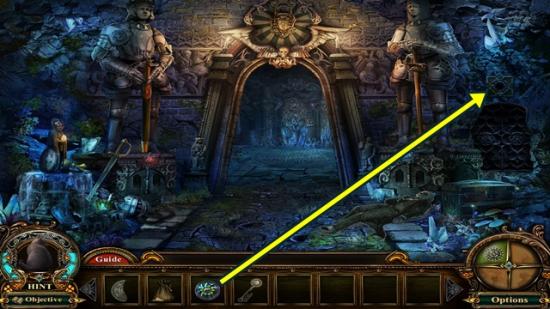
- Click on the inset above the small door on the right. Add the flower emblem. Enter the garden.
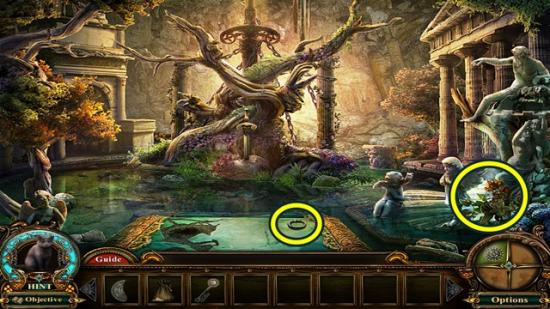
- Take the nose ring. Click on the cherubs and take the magical herb.
- Return to the skeleton lair.
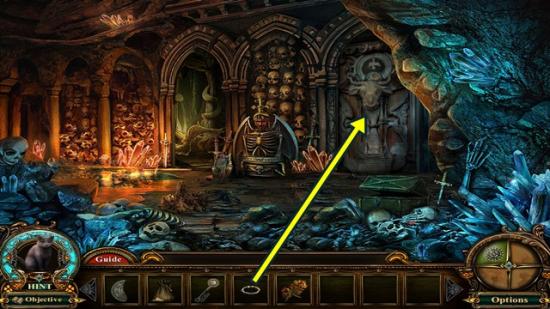
- Click on the minotaur carving. Add the nose ring. Enter the underworld entrance.
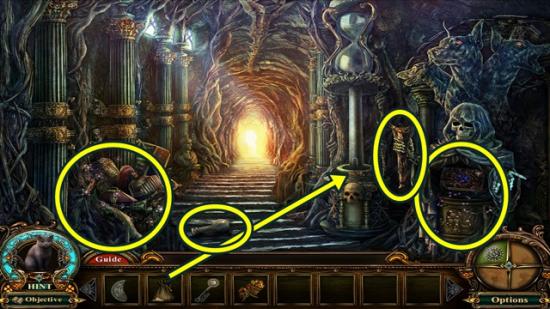
- Take the burning torch and the empty bottle.
- Click on the hourglass base. Add the bag of sand, then take the shears and the golden crown.
- Click on the skeleton statue on the right. A mini-puzzle starts. Rearrange the tokens so each sits on its matching slot. There are two empty slots. Click on a token and the slots to which it can move light up. There are many ways to solve this puzzle.
- Solution:
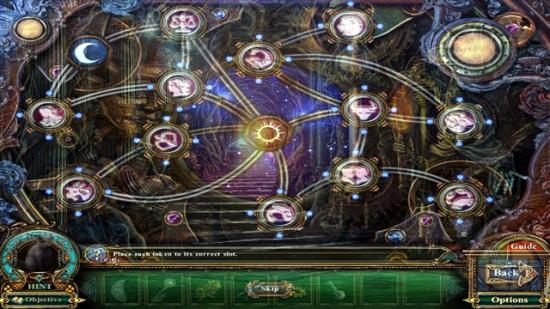
- The puzzle disappeared before a proper screenshot could be taken.
- Click on the items on the left to start a hidden object hunt.
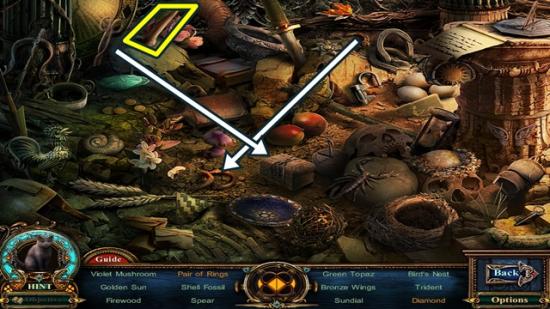
- Find all the objects. Use the scissors on the box, then take the diamond. Put the ring piece with the rings, then take the pair of rings. Once you have found all the items, a fiend tooth is added to your inventory.
- Return to the snake room.
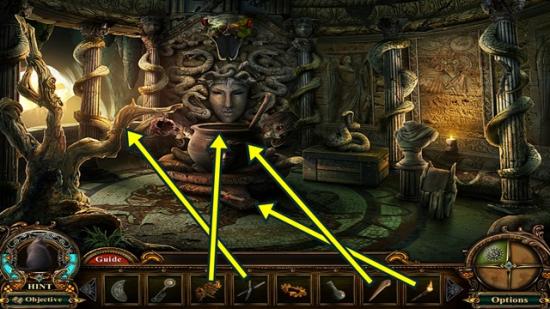
- Click on the branch at left. Use the shears to get the rotten apple.
- Use the burning torch on the wood under the cauldron, then click on the cauldron. Add the rotten apple, magical herb and fiend tooth. Use the empty bottle to get the light potion, which is now added to the grail. The light potion is used on those who have been turned to stone.
- Return to the Piper’s lair.
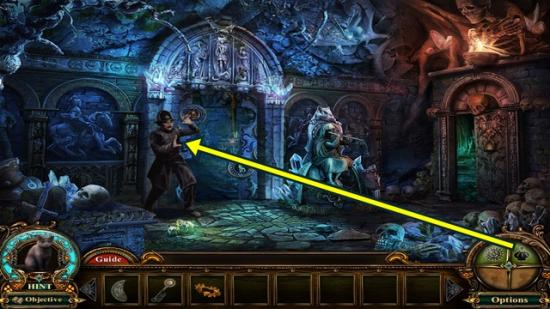
- Use the light potion on the policeman. Watch the cutscene. He gives you a jeweled key.
- Return to the vault entrance.
- Use the light potion on the body. The gilded gemstone is added to your inventory.
- Return to the garden.
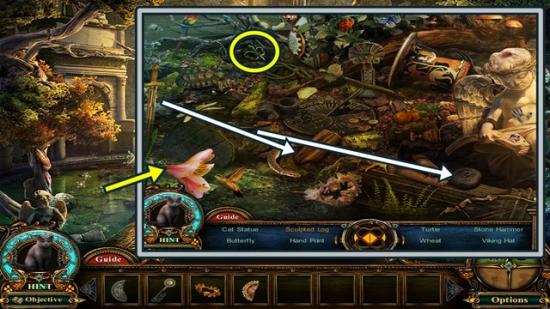
- Click on the area on the left to start a hidden object hunt.
- Find all the objects. Use the sword on the log, then take the sculpted log. Use the key on the round box, then take the ring. Once you have found all the items, a fleur de lis embossment is added to your inventory.
- Return to the vault.
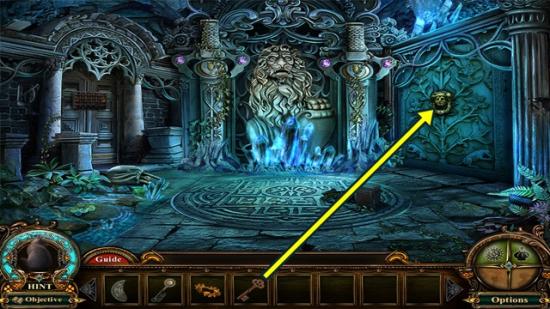
- Click on the knocker on the right. Insert the jeweled key, then enter the treasure room.
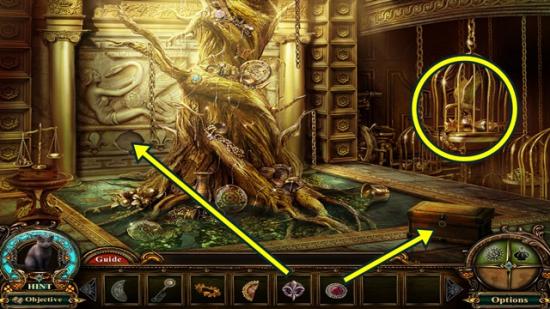
- Click on the chest. Add the gilded gemstone. Take the harp and garden shovel.
- Click on the back wall. Add the fleur de lis embossment, then take the handle ring from the open panel.
- Click on the cage to start a hidden object hunt.
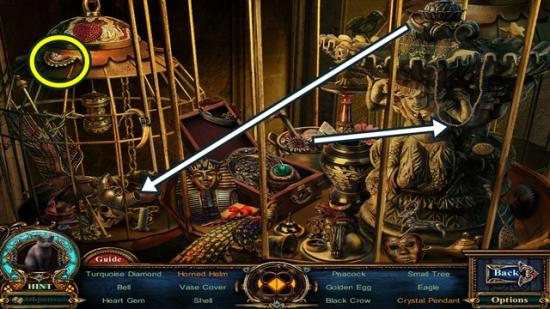
- Find all the objects. Add the pendant to the necklace, then take the crystal pendant. Put the horn on the helmet, then take the horned helm. Once you have found all the items, a half left gorgon gem is added to your inventory.
- Return to the garden.
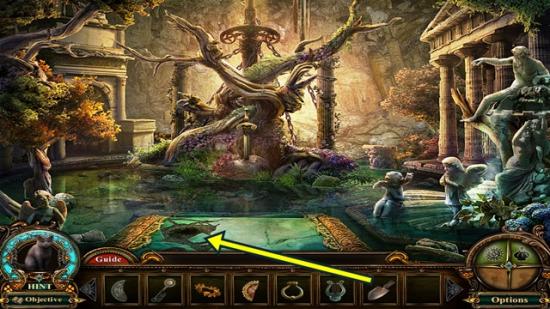
- Click on the cracked marble. Use the garden shovel to dig up the crowbar.
- Return to the Piper’s lair.
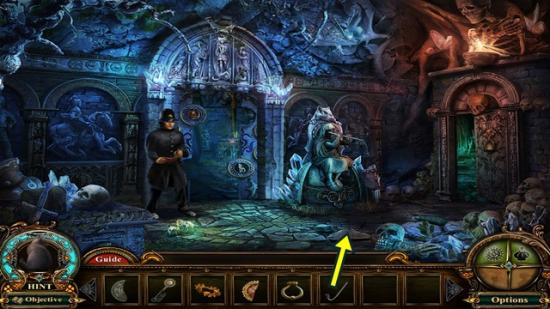
- Click on the loose stone. Use the crowbar, then take the chain.
- Return to the vault.
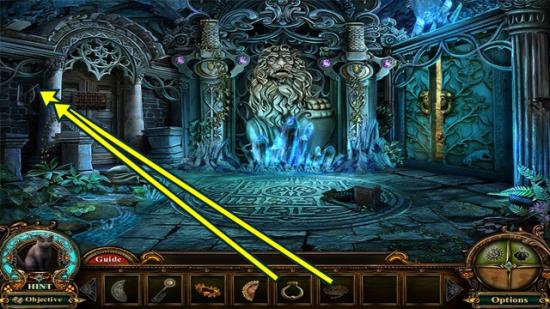
- Click on the lever on the left. Add the chain, then the handle ring. Click on the panel. A mini-puzzle starts. Move the king and horse tokens around the board to gather the items.
- Use the screenshots below for the solution to solve the puzzle.
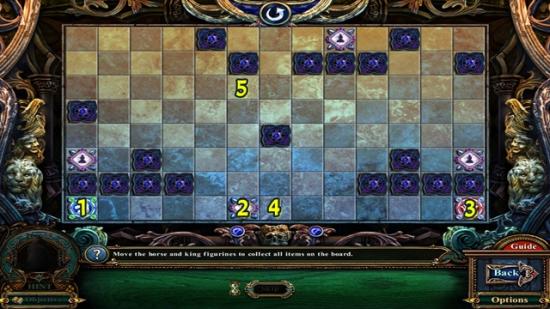
- First move the horse token (1) to the right so it stops on the item (2). Then move the king token (3) to the left so it’s beside the horse token (4). Then move the horse token up as far as it can go (5).
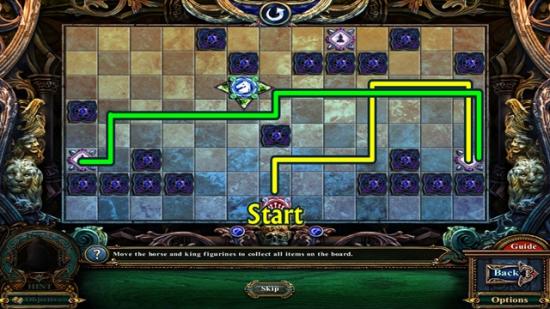
- Leave the horse token where it is. You need it in that position to get the king token into the upper area to get the last item. Using the screenshot above as a guide, move the king first according to the yellow line, then follow the green line so the king token is on the far left side.
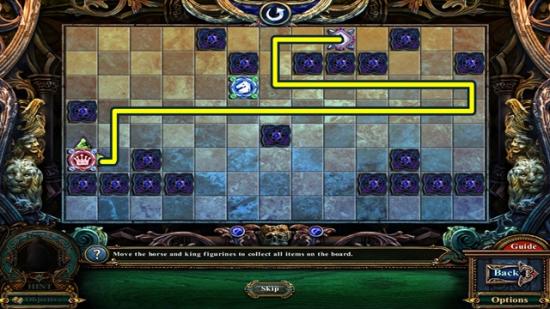
- When you are finished, click on the button, then enter the hall.
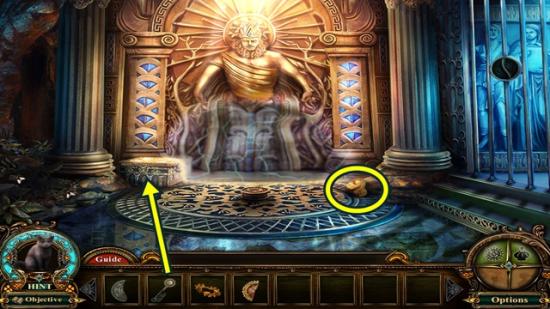
- A new objective is added. Take the golden princess head.
- Click on the chest. Open it using the Apollo chest key. Take the snake flute.
- Return to the garden.
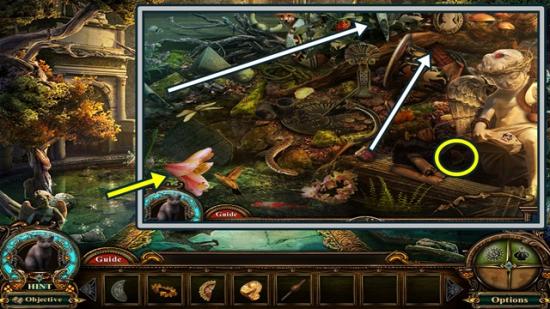
- Click on the area on the left to start a hidden object hunt.
- Find all the objects. Reattach the mask pieces, then take the mask. Put the doll head on the doll body, then take the traditional doll. Once you have found all the items, a half right gorgon gem is added to your inventory.
- Return to the snake room.
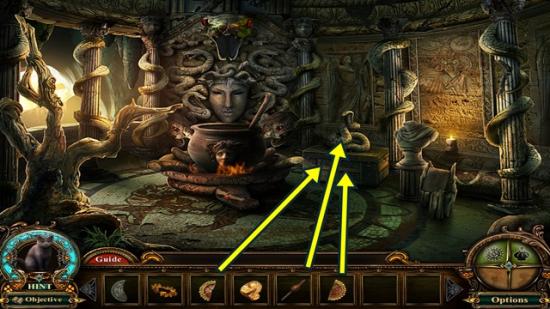
- Click on the snake chest. Use the snake flute, then place the two gorgon gems. Take the right Zeus emblem.
- Return to the hall.
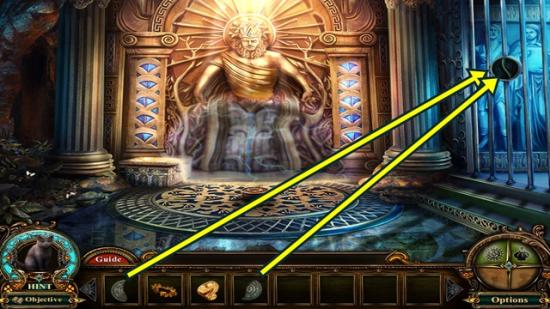
- Click on the gate lock. Add the two Zeus emblems. Enter the temple.
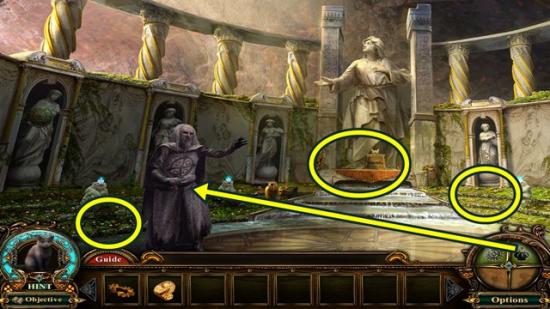
- Use the light potion on the knight statue. Click on the knight to trigger the hidden object hunt.
- Take the golden statue base and the horn.
- Click on the large statue to start a hidden object hunt.
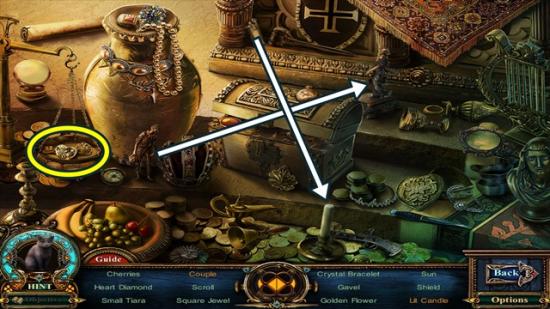
- Find all the objects. Put the male statuette on the base, then take the couple. Use the lighter on the candle, then take the lit candle. Once you have found all the items, a golden key is added to your inventory.
- Return to the garden.
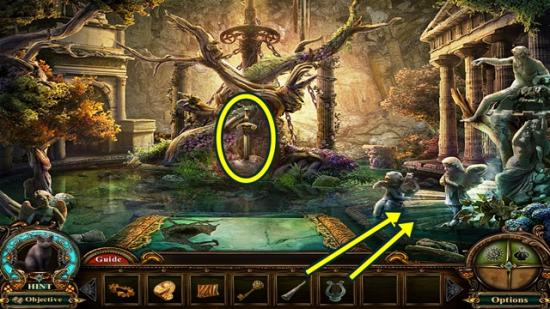
- Click on the cherubs. Add the horn and the harp. Take Caliburn, the Sword.
- Return to the temple.
- Give Caliburn, the Sword to the knight. Watch the cutscene.
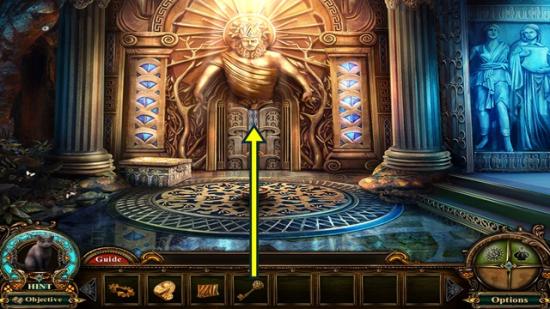
- Click on the door. Unlock the door using the golden key.
- Enter the golden room. A new objective is added.
- Return to the temple.
- Click on the statue to start a hidden object hunt.
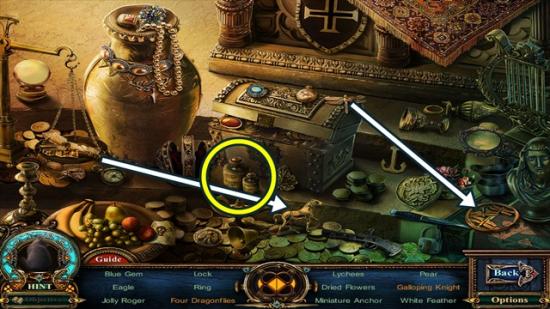
- Find all the objects. Put the dragonfly with the other dragonflies, then take the four dragonflies. Put the knight on the horse, then take the galloping knight. Once you have found all the items, weights are added to your inventory.
- Return to the treasure room.
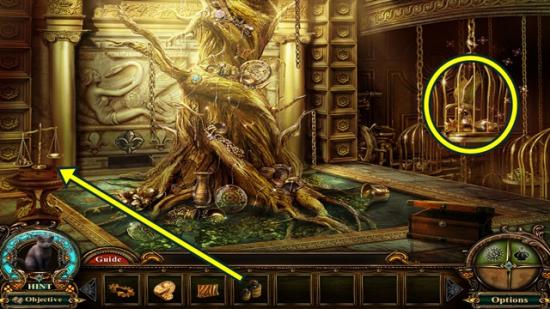
- Click on the scale. Add the weights, then take the gold coin.
- Click on the cage to start a hidden object hunt.
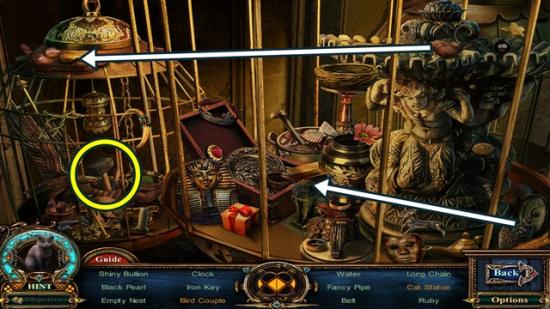
- Find all the objects. Put the cat head on the body, then take the cat statue. Put the bird with the other bird, then take the bird couple. Once you have found all the items, a mallet and chisel is added to your inventory.
- Return to the underworld entrance.
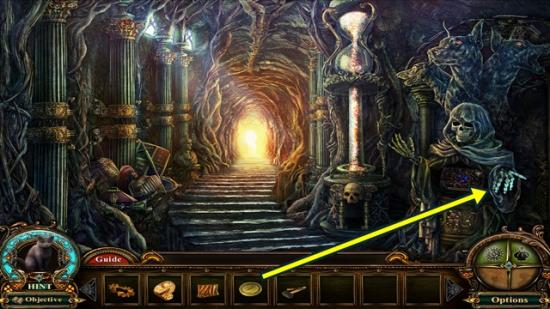
- Click on the statue. Put the gold coin in the outstretched hand, then take the golden star.
- Return to the vault.
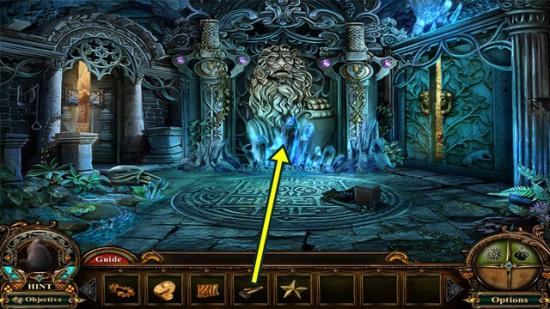
- Click on the crystals. Use the mallet and chisel on the crystal, then take the golden necklace.
- Return to the golden room.
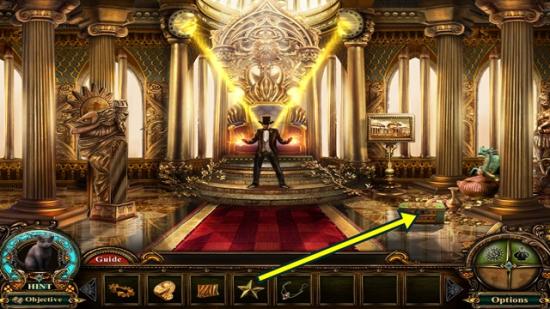
- Click on the chest. Add the golden star, then take the statuette.
- Return to the temple.
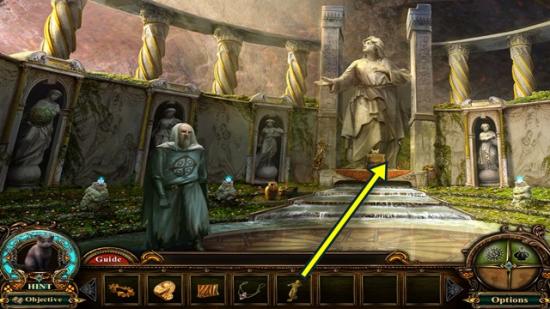
- Click on the statue base. Add the statuette to the empty spot on the right. Click on the panel. A mini-puzzle starts. Move the coloured tokens so they are inline with their matching tokens at the bottom. Move the golden coins out of the way, then arrange the coloured tokens.
- Solution:
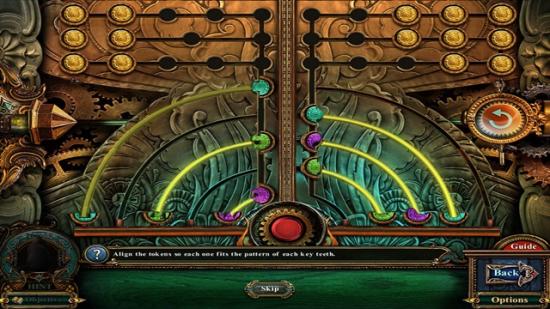
- When you have arranged the tokens, click on the red button in the middle. Take the golden body.
- Return to the golden room.
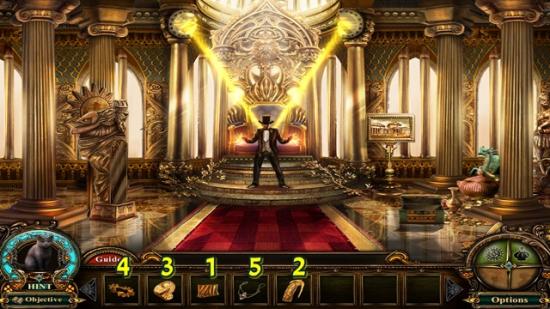
- On the statue, add the golden statue base, the golden body, the golden princess head, golden crown, and the golden necklace.
- Watch the cutscene.
- Read the epilogue, then click on the checkmark.
The End!
Fabled Object Locations
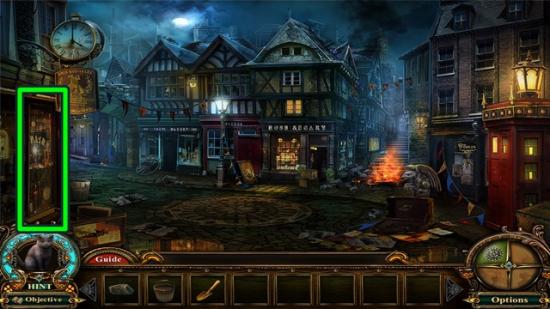
- Town Square (available immediately)
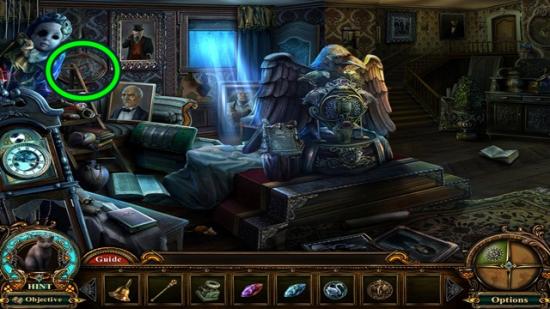
- House bottom (available immediately)
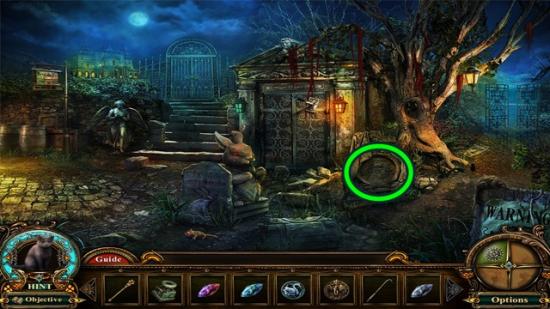
- Gravesite (available eventually)

- Alley (available eventually)

- Courtyard (available eventually)
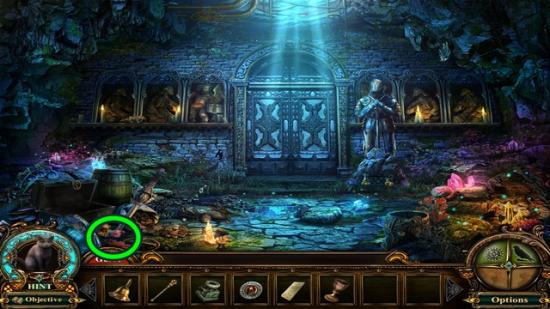
- Underground cave (available immediately)
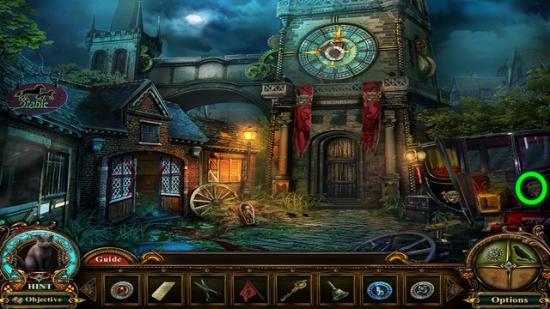
- Courtyard (available eventually)
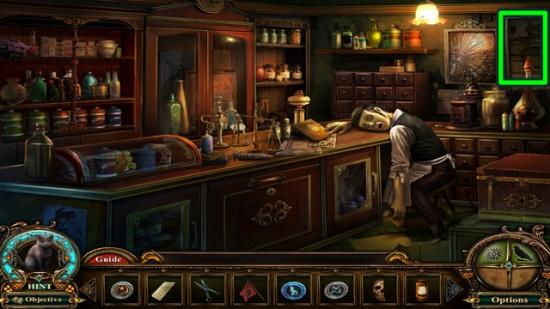
- Pharmacy (available immediately)
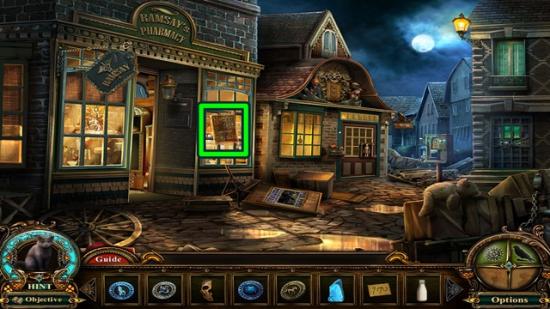
- The street (available after getting the morgue code)
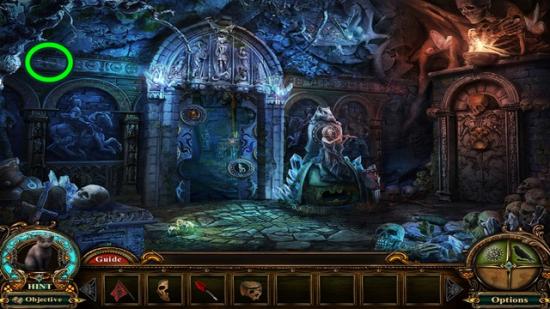
- Piper’s lair (available eventually)

- Piper’s lair (available after the Duke is dead)
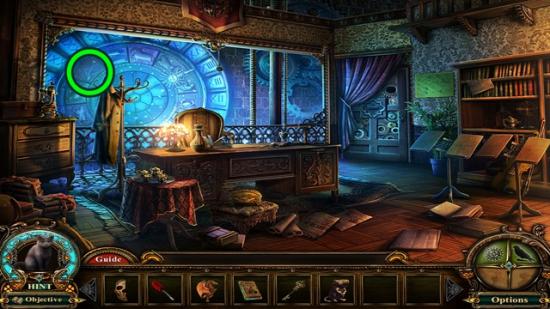
- Clock tower top (available immediately)

- Gravesite (available after visiting the clock tower top)
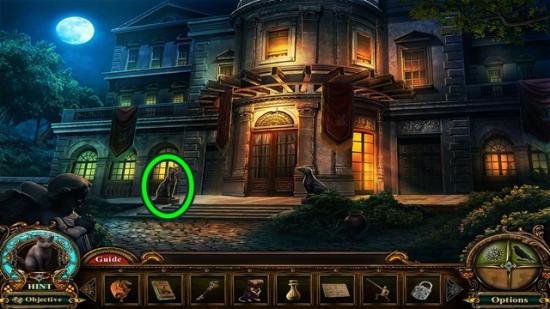
- Mansion entrance (available after visiting the clock tower top)
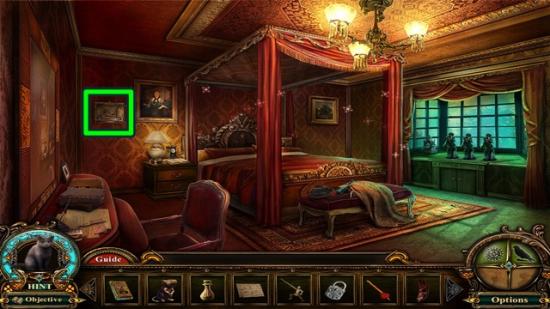
- Mansion left (available immediately)
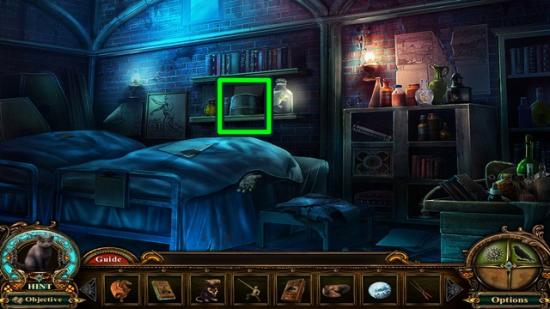
- Morgue (available eventually)
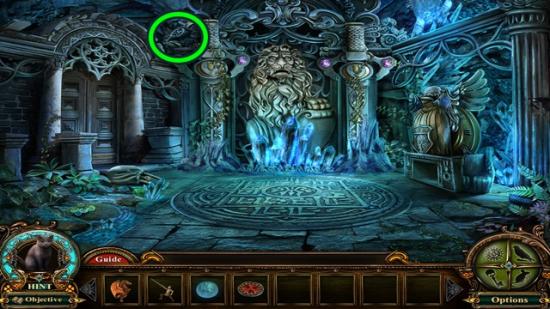
- Vault (available immediately)
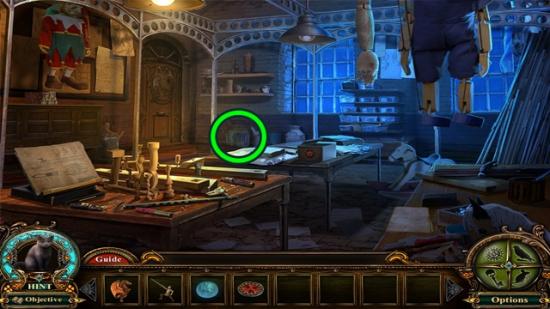
- Workshop (available after getting the Pied Piper’s flute)
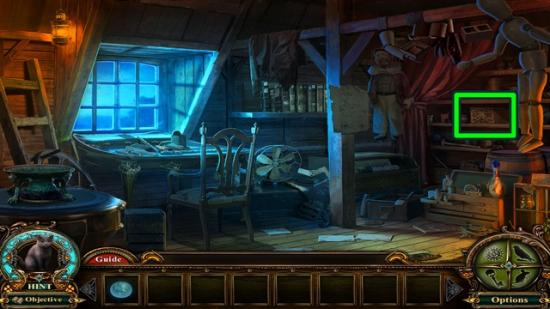
- Workshop top (available immediately)
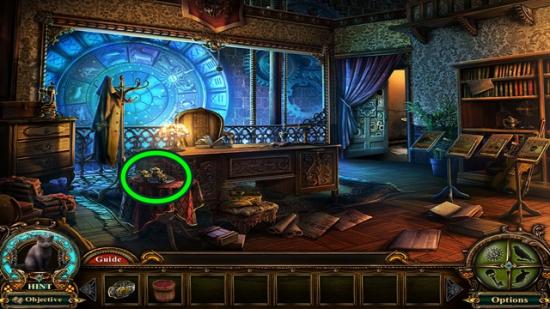
- Clock tower top (available after getting the fire emblem)
More articles...
Monopoly GO! Free Rolls – Links For Free Dice
By Glen Fox
Wondering how to get Monopoly GO! free rolls? Well, you’ve come to the right place. In this guide, we provide you with a bunch of tips and tricks to get some free rolls for the hit new mobile game. We’ll …Best Roblox Horror Games to Play Right Now – Updated Weekly
By Adele Wilson
Our Best Roblox Horror Games guide features the scariest and most creative experiences to play right now on the platform!The BEST Roblox Games of The Week – Games You Need To Play!
By Sho Roberts
Our feature shares our pick for the Best Roblox Games of the week! With our feature, we guarantee you'll find something new to play!All Grades in Type Soul – Each Race Explained
By Adele Wilson
Our All Grades in Type Soul guide lists every grade in the game for all races, including how to increase your grade quickly!


