
Grow A Garden 2 Base Price List
What's the most valuable crop?![Evomon Best Starter [Leafbun, Blazpup, or Bubble?]](/wp-content/uploads/2026/06/evomon-best-starter.jpg "Evomon Best Starter [Leafbun, Blazpup, or Bubble?]")
Evomon Best Starter [Leafbun, Blazpup, or Bubble?]
Grass-type, Fire-type, or Water-type?![Evomon Tier List [META and BEST Evomon]](/wp-content/uploads/2026/06/evomon-tier-list.jpg "Evomon Tier List [META and BEST Evomon]")
Evomon Tier List [META and BEST Evomon]
The Evomon dream team.
![[Roblox] Evomon Shiny Hunting Guide – Including Prismatic and Pris Shinies!](/wp-content/uploads/2026/06/evomon-shiny-hunting-guide.jpg "[Roblox] Evomon Shiny Hunting Guide – Including Prismatic and Pris Shinies!")
Eternity Walkthrough
Welcome to the Eternity walkthrough on Gamezebo. Eternity is a time travel Hidden Object Game, created by Turtle Games. This walkthrough includes tips and tricks, helpful hints, and a strategy guide to how to complete Eternity.


- Prefer Gamezebo on Google

Eternity Game Information
Welcome to the Eternity walkthrough on Gamezebo. Eternity is a time travel Hidden Object Game, created by Turtle Games. This walkthrough includes tips and tricks, helpful hints, and a strategy guide to how to complete Eternity.
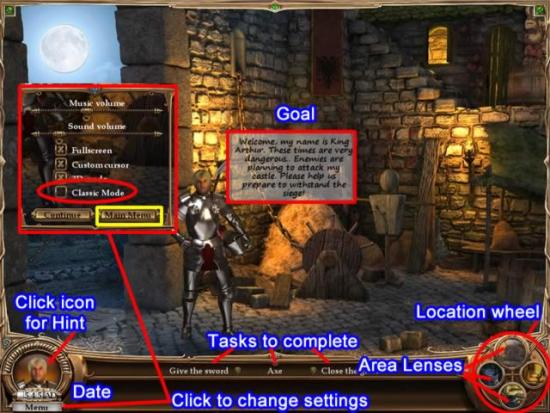
How to Play
There are two modes of play:
- Easy – Items to collect and area-specific tasks to complete are given for each area. Some inventory items need to be combined to form an object. In Easy mode, as soon as all the items are available for assembly they will glow and show which items should be combined.
- Classic – General goals and tasks are listed in the task bar. It is up to you to decide how to accomplish them. Inventory items to be combined are not highlighted so you must to decide what to combine and when.
It is easy to switch back and forth between the two modes while you are playing.
- There is no time limit to complete a location nor are there penalties for incorrect clicks. There is, however, a statistic sheet that appears when the location is complete showing how much time it took and an efficiency percentage for clicks.
- Hints are unlimited but refill slowly.

- Each time location’s character has a main goal to be completed and the tasks needed to assist in that goal are itemized.
- The main tasks are broken down into smaller tasks and assigned to an area accessed by clicking on an area lens on the location wheel.
- It is often necessary to go back and forth between areas to collect objects to complete an area-specific task. Placing the mouse over the area lens will show the name of the location.
- When you change locations, the area lenses will rotate. Your current location will always be in the top position on the location wheel.
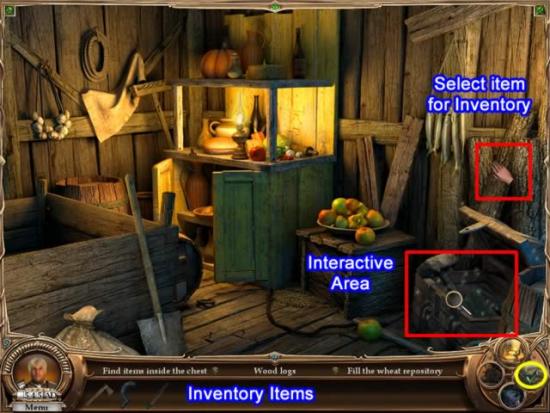
- A hand icon will appear when the mouse is placed over a listed inventory item. Click to move it to inventory.
- A magnifying glass icon will appear over a sparkling interactive area. Clicking on the area will enlarge it and give you a list of items to find.
- Glowing inventory items (in Easy play mode) indicate they need to be combined to form an object.
- Once all tasks have been completed for an area, a green check mark will appear on the area lens.
Once the goal is achieved, the character will give you an artifact and you can continue to the next date via the time machine
Chapter 1: 1895 AD – The Time Machine
The first part of this chapter is a tutorial than cannot be skipped. This chapter is played in Classic mode to help you decide if this is a good play mode for you.
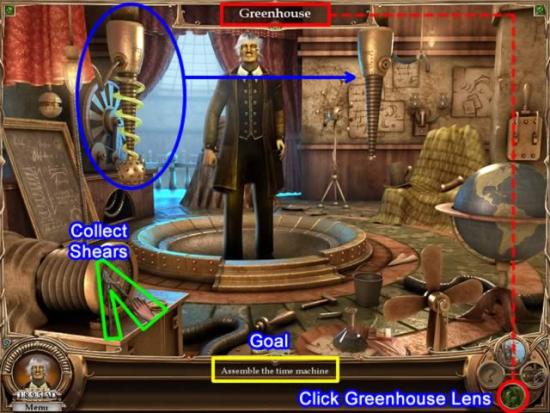
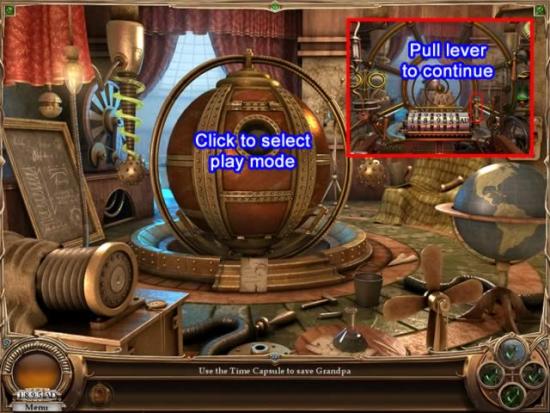
Time Machine Stand
The goal is to assemble a time machine similar to the one circled on the left.
- Collect the garden shears for inventory
- Click the Greenhouse lens from the location wheel to change locations.
Greenhouse
- Select the garden shears from inventory by clicking on them.
- An area of greenery by the post will start glowing.
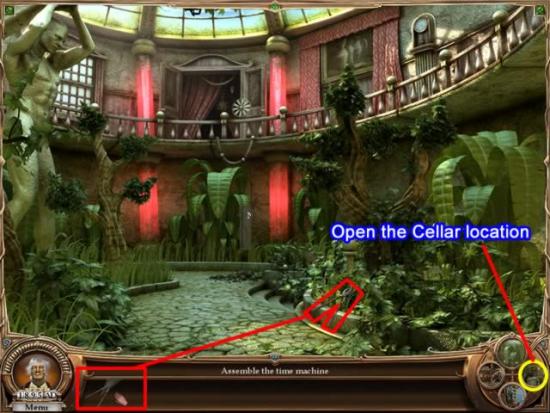
- Drag the shears to the area. They will cut away the overgrown shrubbery and reveal stairs to the cellar.
- A new lens, Cellar, will replace the question mark on the location wheel.
- Click the Cellar lens.
Cellar
- It is too dark to see in the cellar.
- Click the Laboratory lens to change locations and locate a light to use in the cellar.
Laboratory
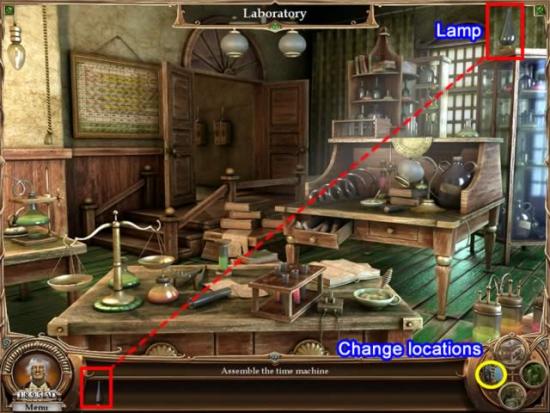
- Collect the lamp for inventory
- Click on the Time Machine Stand lens to get matches for the lamp
Time Machine Stand
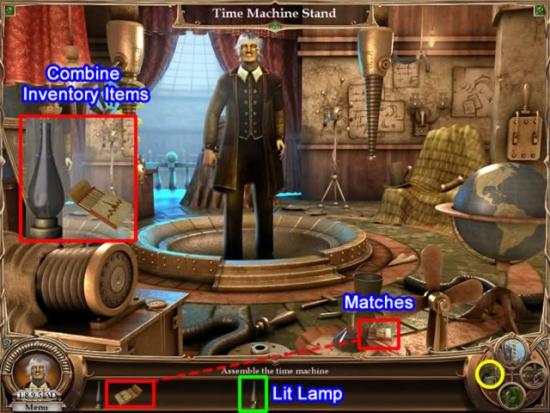
- Click on the matches to add them to inventory.
- To light the lamp, drag the matches to the lamp in the inventory bar. A scene showing the lamp getting lit will appear.
- The lit lamp and the matches will go back into inventory.
- Click on the Cellar lens.
Cellar
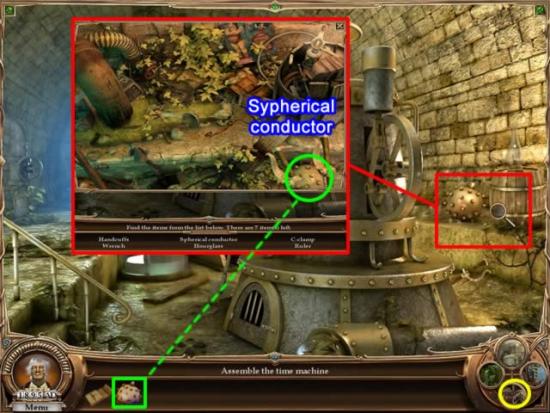
- Drag the lit lamp from inventory and place it anywhere in the scene. The cellar will light up.
- Place the mouse near the gold ball near the barrel (highlighted in red). The cursor turns into a magnifying glass indicating an interactive area.
- Click the gold sphere to open the area and find the objects listed. The “Sypherical conductor” (circled in green) will go to inventory.
- This temporarily completes the area. Click on the Laboratory lens to change locations.
Laboratory
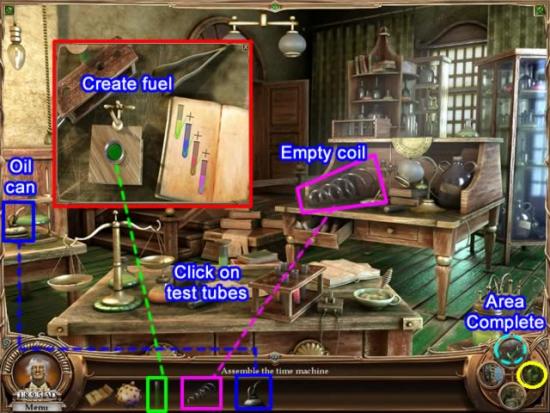
- Click on the test tubes on the desk to open the interactive area to create fuel.
- To create the fuel for the time machine, find the correct combination of colors. Drag a tube to the circle, if it is in the correct order, it will show in the book with a check. An incorrect guess will show an “X” for the color and erase any progress. The order of correct colors does not change so if you guessed wrong, re-select the correct tubes and continue. The solution will vary each time you play.
- The green tube will go to inventory
- Click on the empty coil and the oil can to add these items to inventory.
- This completes this area. Note the lens dims and a green check appears in it. Click the Greenhouse lens.
Greenhouse
- Place the mouse on the coal pile near the doors at the back of the walk. The cursor turns into a hand. Click to collect the coal.
- Click on the Cellar
Cellar
- Click on the door to the boiler to open it.
- Drag the coal from inventory to the boiler furnace.
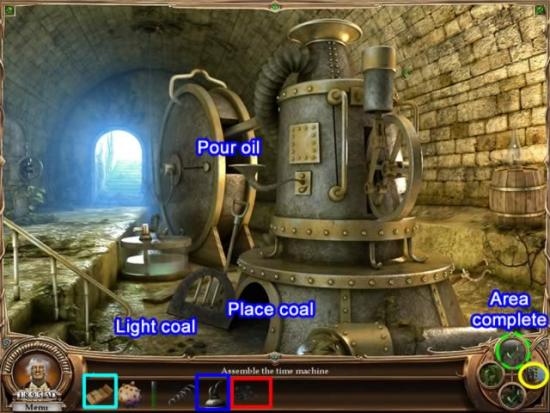
- Drag the oil to the funnel spout to pour it into the boiler.
- Light the coal with the matches.
- The boiler will start up. This area is complete
Time Machine Stand
- Place the sphere at the base of the apparatus on the right.
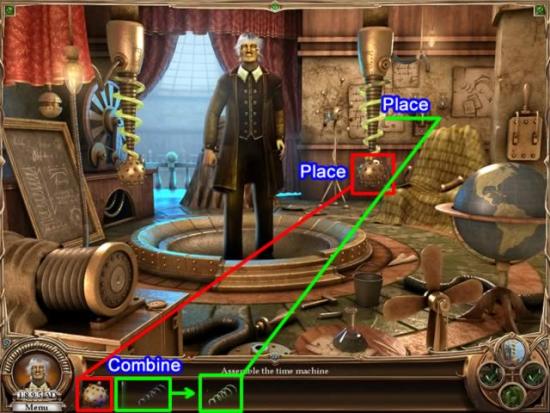
- Drag the green tube of liquid to the coil in inventory to fill the coil.
- Place the filled coil around the apparatus.
- Click on the Greenhouse lens
Greenhouse/Time Machine Stand
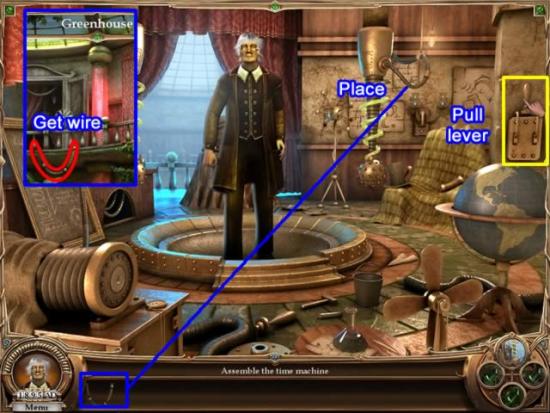
- Collect the wire from the balcony of the Greenhouse. This completes this area.
- In the Time Machine Stand, place the wire from inventory to complete the machine.
- Pull the lever and watch Grandpa disappear leaving instructions to find the time capsule.
Note that all the green checks are gone from each area lens. The areas are open again to complete this new task.
Greenhouse
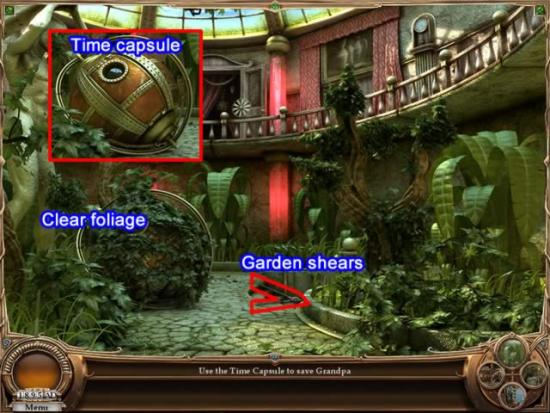
- Collect the garden shears to clear the foliage around the time capsule.
- There are no other pieces in the other areas.
Time Machine Stand
Click the time capsule.
- You now have the option of playing in either “Easy” or “Classic” mode. The first chapter was an example of Classic mode. You might want to try Easy for a while to see which you prefer. You can switch back and forth by clicking the Menu tab at the bottom left and selecting Options.
The rest of the guide will be done in Easy mode to illustrate the specific tasks necessary to complete an era.
Pull the lever in the time capsule to continue your adventure.
Chapter 2: 9384 BC – Caveman
Goal: Help Boo get warm and construct a cart for food
Cave
First Task: Build a fireplace and start a fire.
Jungle
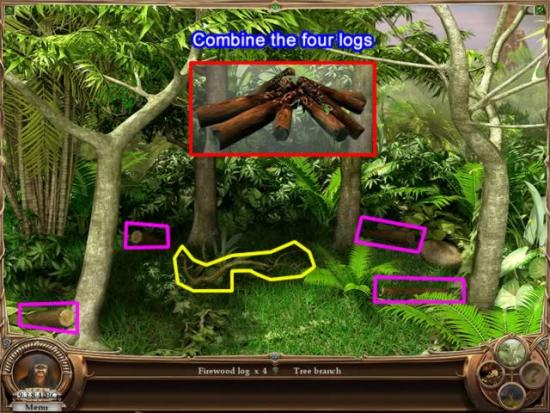
- Collect the four logs and the tree branch
- Click on each log in inventory to combine them into firewood
- All tasks are completed for this area
Volcano Valley
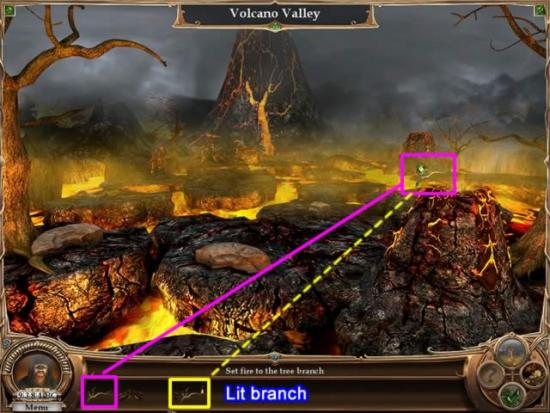
- Drag the branch from inventory to the volcano.
- Click to light it. The lit branch returns to inventory.
- This location is complete.
Cave
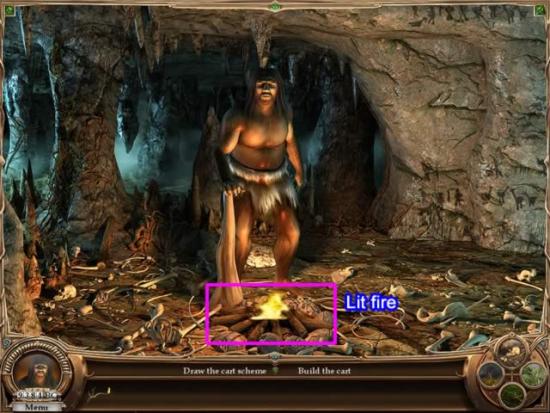
- Drag the logs to the stone fire ring.
- Use the lit branch to light the fire
New task: Draw plans for a cart large enough to hold a mammoth
Jungle
- There is a large dragon fly flying around. Place the hand-cursor over it to catch it.
- The dragon fly goes to inventory
Deadly Swamp
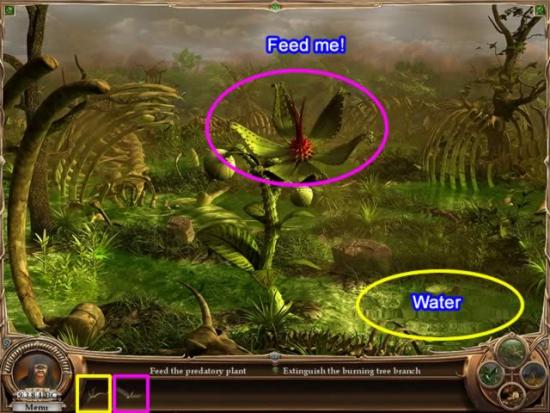
- Drag the dragon fly to the hungry plant.
- Douse the lit branch in the water to extinguish the fire.
Cave
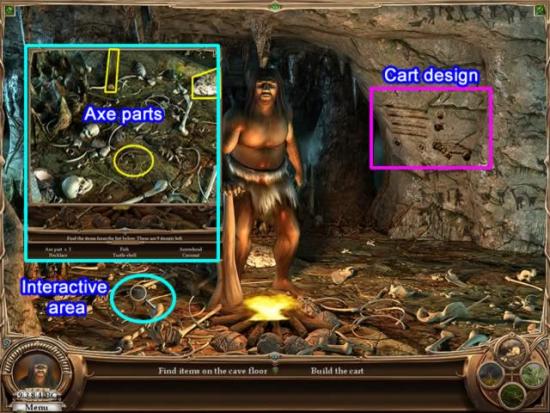
- Drag the charcoal stick to the back wall to draw the design for the cart
- Click on the interactive area on the cave floor to open the area and find the listed objects.
- The three parts of the axe are highlighted. After all objects are found they will go to inventory. Combine all three parts to form the axe.
Collect Cart Parts
To assemble all the parts for the cart, go to:
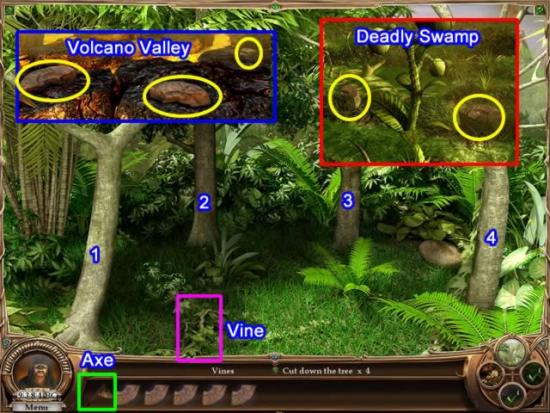
- Volcano Valley – Collect three parts of the wheel
- Deadly Swamp – Collect two parts of the wheel
- Jungle – Collect the vine. Use the axe to cut down the four trees
Return to the cave to assemble the cart according to the diagram on the wall
Cave
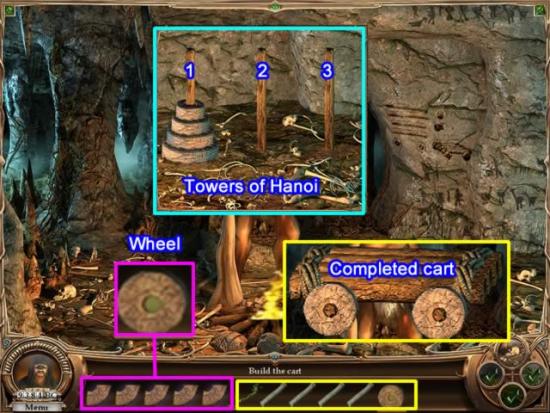
- Click on each wheel piece to combine them and form the wheel. It will go back to inventory.
- Click on the vine, logs and wheel to form the cart.
- A mini-game commonly called the Towers of Hanoi will appear. The goal is to move all the rings from the first peg to the last peg so they are stacked from largest to smallest. Use peg two for intermediate moves. To see how this is done, view this video:
- The game can be skipped after waiting for the Hint bar to fill.
- The insert shows the completed cart
The caveman gives you an artifact in appreciation for you help.
Click on the lever in the time machine to continue your journey.
Chapter 3: 2470 BC – Pharaoh
Goal: Help Amenhotep II build a pyramid.
First task: Collect wood for the foundation.
Pyramid Building Site
- Click on the axe in the foreground to add it to inventory.
- Click on the Cypress Forest lens to change locations.
Cypress Forest
- Using the axe from inventory, continually click anywhere in the scene to cut down the trees. The axe will disappear when the required number of logs has been cut.
- Click on the logs to add them to inventory. Return to the building site.
Pyramid Building Site
- The foundation for the site will be erected using some of the logs.
New task: Build a dam and dig a trench to get water.
Nile River
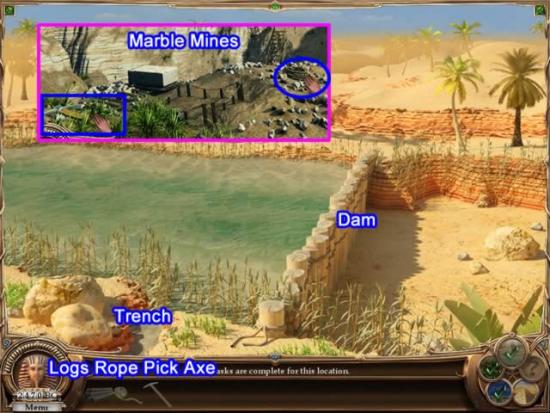
- Go to the Marble Mines and collect the Pickaxe and Rope.
- At the Nile River location, use the pickaxe to dig the trench by the rock on the left.
- Drag the logs to the river to create the dam.
- Use the rope to secure the logs.
- Return to the Pyramid Building Site.
Nile River
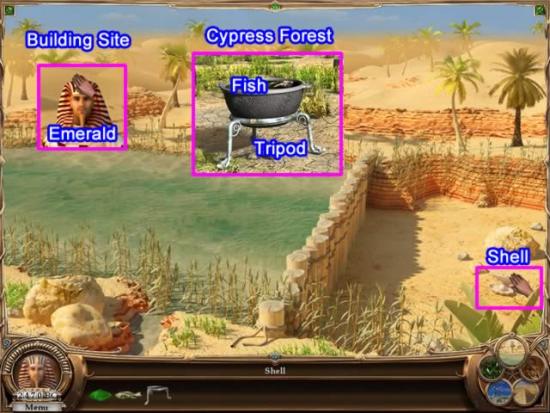
New Task: Get more stone for the pyramid.
- Pyramid Building Site – Place the cursor on the Pharaoh’s head until the cursor turns into a hand over the emerald in his head dress. Click to collect it. A new location lens will appear on the location wheel.
- Cypress Forest – Click on the cauldron. It will rise up and the fish will go to inventory. Click on the tripod to add it to inventory.
- Collect the oyster shell containing the pearl as shown above.
Temple of Ra
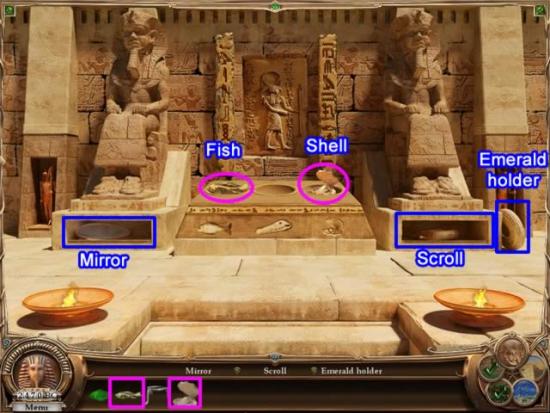
- Place the fish and shell as offerings on the temple alter.
- The compartments at the base of each statue will open revealing a mirror and a scroll. Collect both items.
- Click on the emerald holder on the right
Marble Mine
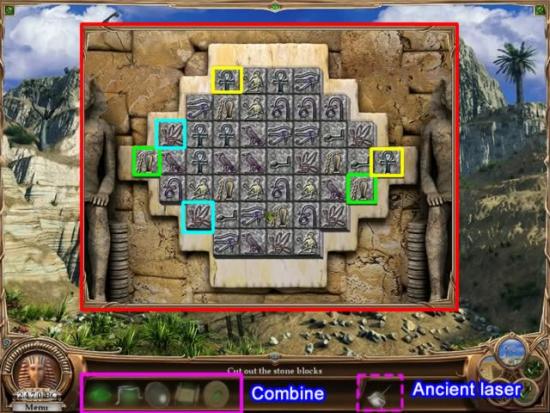
- Click on each inventory item to combine them.
- A tile matching game appears. Match the tiles from the outside in. You can skip the game after the Hint bar has filled.
- After you finish (or skip) the puzzle, an ancient laser appears in inventory.
- Click on the laser to select it and place it on the hillside. It will cut the needed stones and transport it to the Pyramid Building Site for you.
- Return to the building site
Temple of Ra
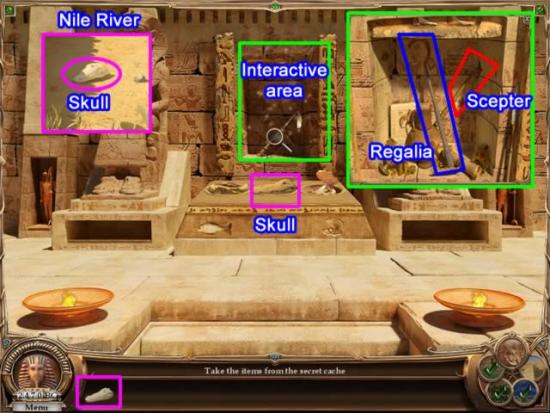
New task: Obtain the Regalia and the Scepter of Ra.
- Nile River – Collect skull
- Place the skull as an offering on the temple alter. An interactive area becomes available.
- Collect the listed objects including the Regalia and Scepter of Ra.
Pyramid Building Site
- Give the Regalia and Scepter to the Pharaoh and collect and artifact.
Pull the lever on the time machine to continue your journey
Chapter 4: 1640 BC – Perseus
Goal: Help Perseus destroy Medusa.
Atrium
First task: Find the winged sandals.
Depot
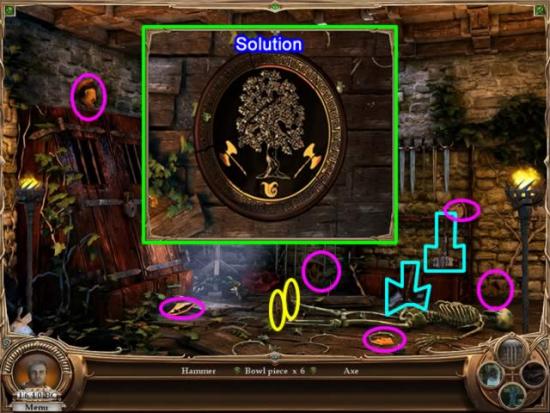
- Collect a hammer and axe (aqua above), a pair of sandals (yellow) and six shards of a bowl (pink).
- Combine the bowl shards from inventory to form the bowl.
- A fit-the-pieces puzzle appears. Rotate the pieces and place them until they form the picture shown in the above insert. The pieces are hard to rotate. The directions say to click twice to rotate a piece but it often took more clicks than that. The pieces will lock into place they are correctly placed.
- The last task, open the locked closet, can’t be performed yet.
Workshop
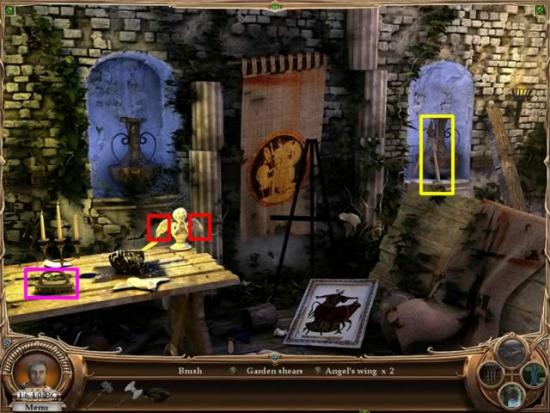
- Collect the brush, two angel’s wings and garden shears
Forest
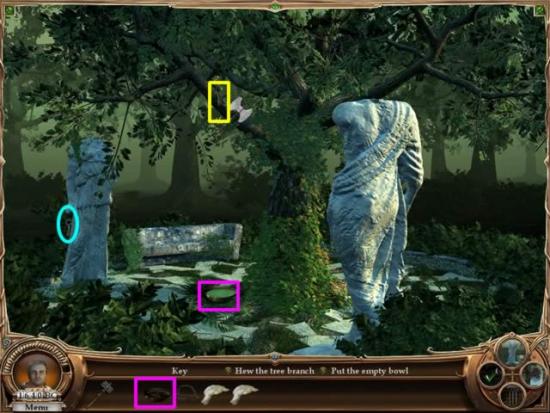
- Use the garden shears to cut away the bushes hiding the statues.
- Use the axe to cut a notch in the tree branch. Sap begins to fall.
- Place the empty bowl as shown to collect the “tree juice”. When it is full, click it to place it in inventory.
- Collect the key from the side of the statue.
Depot
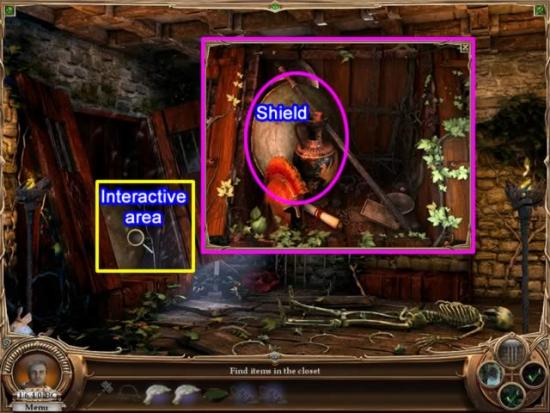
- Use the key to open the cabinet lock.
- Click on the interactive area and find the listed objects.
- The shield will go to inventory.
Atrium
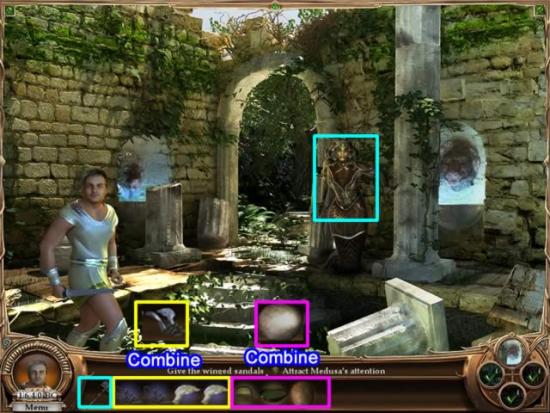
- Combine the sandals and angel’s wings to form winged sandals.
- Combine the brush, tree juice and shield to get a shiny shield.
- Give the winged sandals and shield to Perseus.
- Click on Medusa to get her attention.
- After Perseus has turned Medusa to stone, use the hammer to destroy her.
- Collect the artifact.
Pull the lever on the time machine to continue your journey
Chapter 5: 1138 BC – Mayan
Goal: Protect the knowledge scroll.
Crescent Square
- Collect the papyrus scroll.
Moon Temple
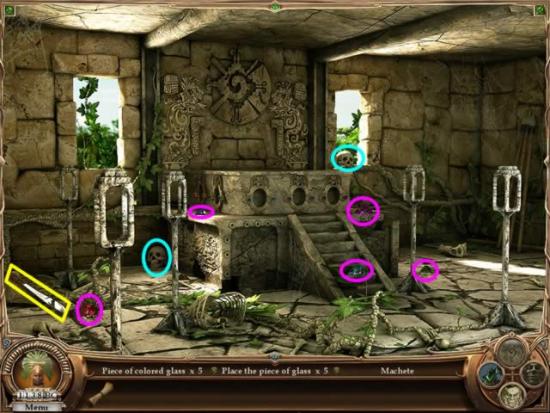
- Collect the five gems (pink), two skulls (aqua) and the machete (yellow).
- Leave all the items in inventory for now.
Tunnel of Silence

- Collect the three skulls and the board.
Moon Temple
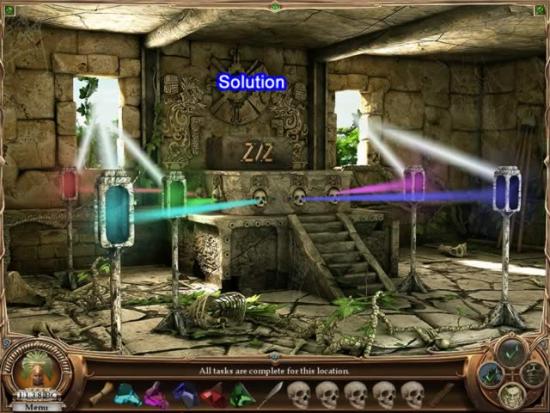
- Place the five gems in the stands according to the colors shown above (red, turquoise and green on the left; pink and purple on the right).
- Place the five skulls in the holes where the light reflects.
- The stone with “Z” markings rises up.
Tunnel of Silence
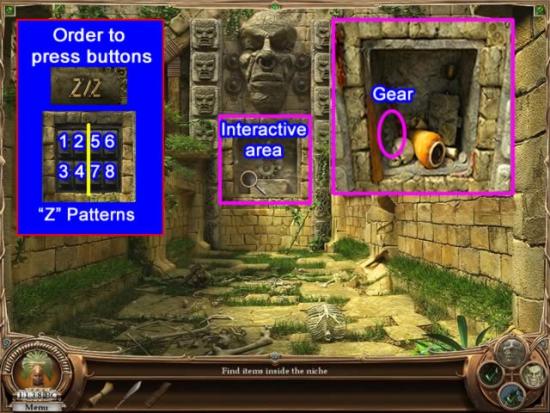
- To open the interactive area, use the stone markings from the Moon Temple to determine the sequence to push the buttons. The markings look like two Zs. Press the buttons in the order shown in the insert above.
- Collect the gear.
Eagle Canyon
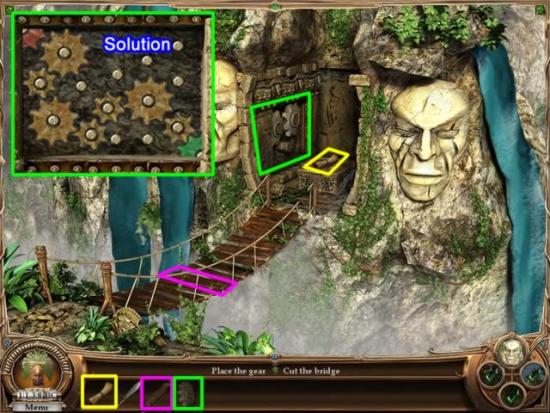
- Place the board on the bridge to fix it.
- Place the scroll on the pedestal on the far side of the bridge.
- Place the gear on the wall area outlined in green.
- A gear placement puzzle pops up. To get all gears rotating, place them according to the insert above.
- Finally, use the machete to cut the ropes on the near side of the bridge.
- Water now falls over the alcove hiding the knowledge scroll
Crescent Square
Collect an artifact from the grateful Mayan.
Click the leaver in the time machine to continue your journey.
Chapter 6: 225 BC – Theseus
Goal: Help Theseus defeat the Minotaur by escaping the labyrinth.
Lair of the Minotaur
Task: Find the ball of string.
Mystic Sanctuary
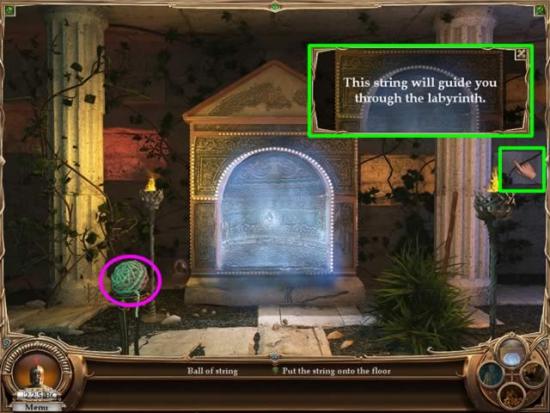
- Click on the writing on the wall on the right. A description for the use of the string appears.
- Click the string. It will go into inventory.
New Task: Place the string on the floor of each room to escape the labyrinth.
- Click on the ball of string in inventory to select it.
- Click on the floor. A portion of the string appears on the floor. The rest returns to inventory.
Zeus’ Pool / Hall of Fame / Lair of the Minotaur
- Click on the ball of string in inventory to select it
- Click on the floor. A portion of the string appears on the floor. The rest returns to inventory
New Task: Find a bow and arrow to help Theseus drop the beam on the Minotaur.
- Click on the wheel near the back right wall. It will rotate. If you do not have the sound volume turned too low, you will hear water draining.
Zeus’ Pool
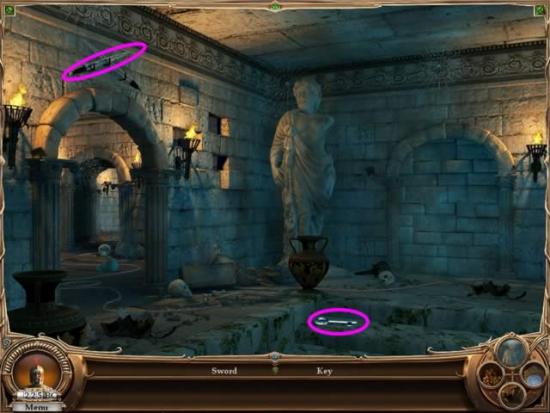
Note that the water has drained from the pool
- Collect the key and the sword.
- The task of opening a secret niche cannot be done yet.
Hall of Fame
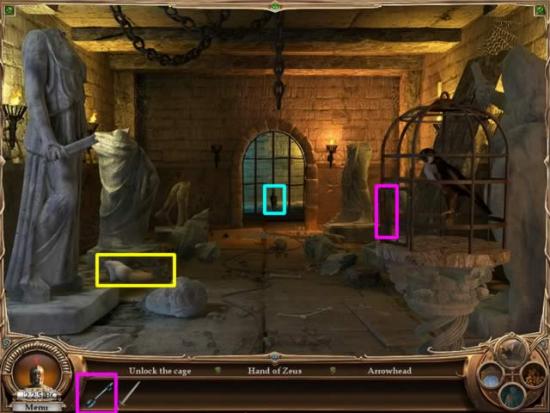
- Use the key to open the bird cage door.
- Collect the hand of Zeus and the arrowhead.
Zeus’ Pool
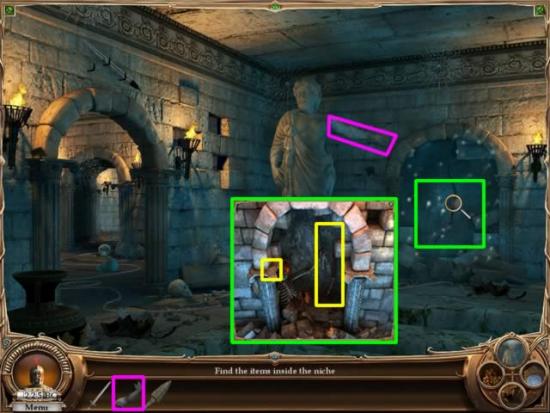
- Place the hand of Zeus on the statue
- The bricks fall away to reveal the secret niche. Click to open the interactive area.
- Collect the list of objects. The cheese and bow will go to inventory.
Mystic Sanctuary
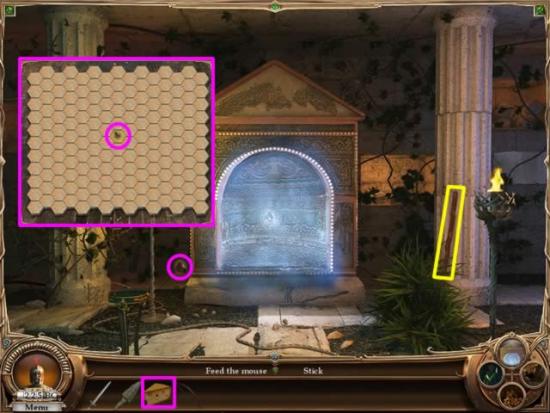
- Collect the stick for inventory.
- Click on the cheese and place it in front of the mouse hole to catch the mouse.
- A contain-the-mouse game opens. To solve this game, start by keeping one hexagon between the hexagon depressed and the mouse. Slowly close the outer circle and shut the mouse in a smaller and smaller area. Here is a video of one way to do it:
Hall of Fame
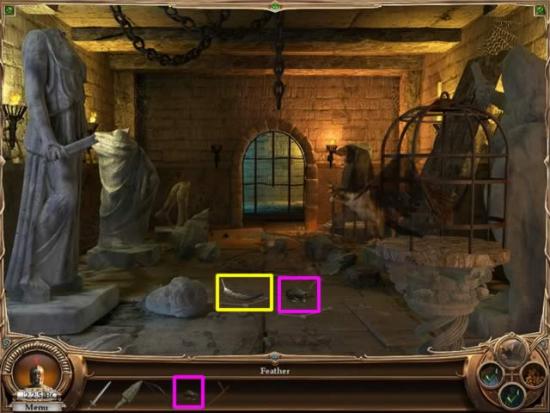
- Place the mouse on the floor in front of the bird cage.
- The bird will swoop down, take the mouse gently in its talons, and fly over to the lamp.
- The bird will drop a feather. Pick it up for inventory.
Lair of the Minotaur
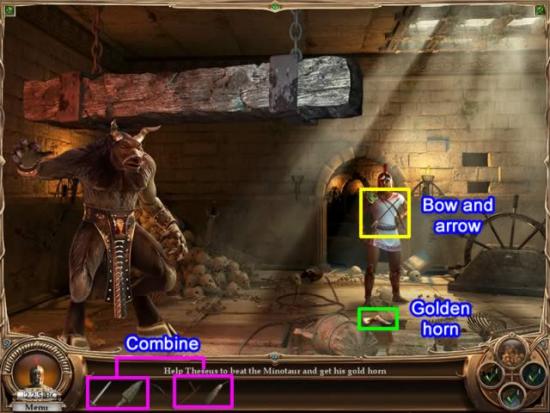
- Combine the sword, arrowhead, stick and feather to make an arrow.
- Give the bow and arrow to Theseus. He will shoot the chain holding the beam and drop it on the Minotaur.
- A gold horn from the Minotaur will come loose and fall on the floor. Pick it up and give it to Theseus.
Collect an artifact from the grateful Theseus
Click the leaver in the time machine to continue your journey.
Chapter 7: 545 AD – King Arthur
Goal: Help King Arthur prepare the castle for an enemy siege.
First Task: Secure the castle.
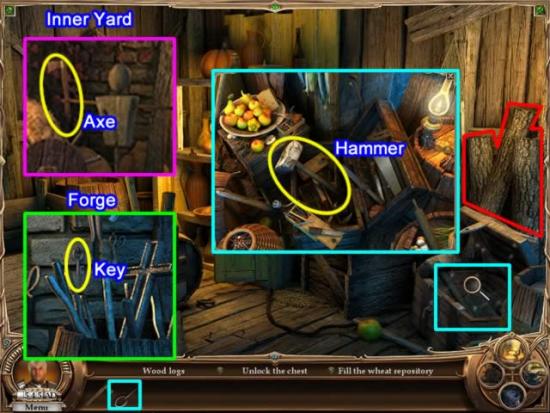
- Inner Yard – Collect the axe held by the target dummy.
- Forge – Collect the key located next to the tools.
- Barn – Use the key to open the chest. Collect the items listed in the interactive area. Among them will be a hammer for inventory.
- Click on the logs on the back wall to add them to inventory.
Forge
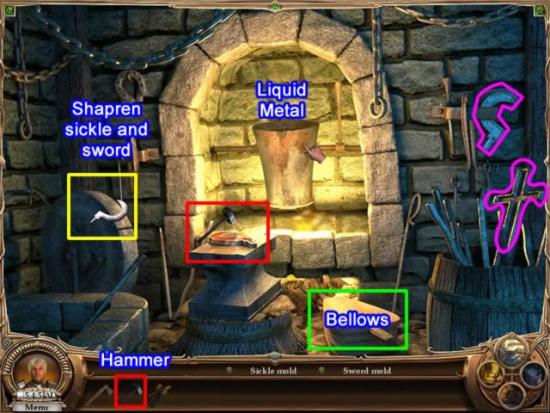
- Collect the sickle and sword molds.
- Place the sickle mold on the anvil.
- Click on the bellows to make the fire hotter.
- Click on the liquid metal bucket to fill the sickle mold.
- Use the hammer to pound the sickle.
- Click to return the blunt sickle to inventory.
- Repeat the above steps for the sword.
- Sharpen the sickle and sword by placing them on the grindstone in the left corner.
Castle

- Combine the sword and logs to create a war hedge.
- Place the war hedge as shown beside the castle.
- Use the sickle to cut the wheat. It will form stacks. Click to add to inventory.
- Use the hammer to break the dam.
- A dig-the-trench game will appear. Starting at the top, click the ground in front of the input water. A pipe section will appear. Clicking it will rotate the section. When it is in the correct position, click the next piece of land. Continue until you have a complete path to the exit. Solutions will vary. To see how this is done, view the video:
Barn
- Place the wheat from the field in the wheat repository.
Inner Yard
- Give the sword to King Arthur.
- Click the wheel the raise the gate.
Collect an artifact from the grateful King Arthur.
Click the leaver on the time machine to continue your journey.
Chapter 8: 1066 AD – Viking
Goal: Help defeat the Clan of Red Dogs.
First Task: Fix the Catapult.
Hall of Glory – Pick up the rope on the floor in front of the Viking.
Stonehenge – Pick up the catapult handle from the grass next to the first ruin.
Red Dogs Village
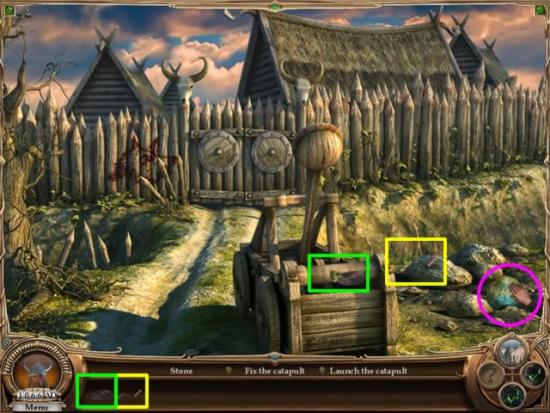
- Pickup the rock from the ground on the right of the screen.
- Attach the handle to the side of the catapult as shown in yellow above.
- Attach the rope in the position as shown in green above.
- The basket for the catapult will lower. Put the stone in the basket. Click on the handle to launch the stone. The gates are damaged but not broken.
Hall of Glory
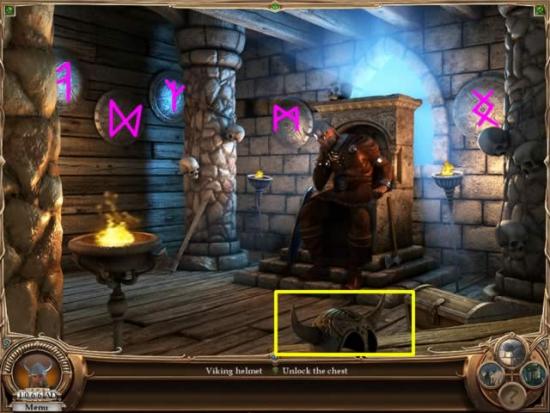
New Task: Defeat the witchcraft that protects the Clan’s gates,
- Pick up the Viking helmet in the foreground of the screen.
- Note the runes on the shields on the wall. They are a code sequence for Stonehenge.
Stonehenge
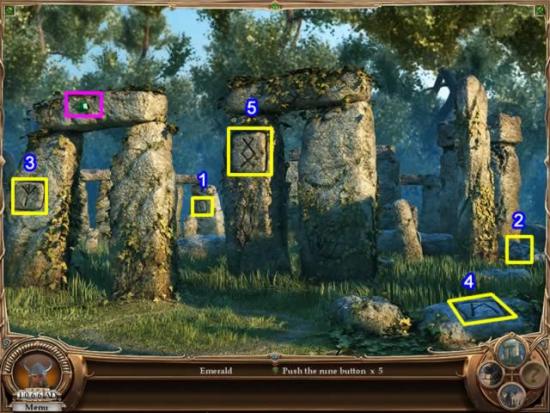
- Collect the emerald.
- Click on the center of the rune symbols in the sequence indicated.
- The Sanctuary Crypt location is now available
Red Dogs Village
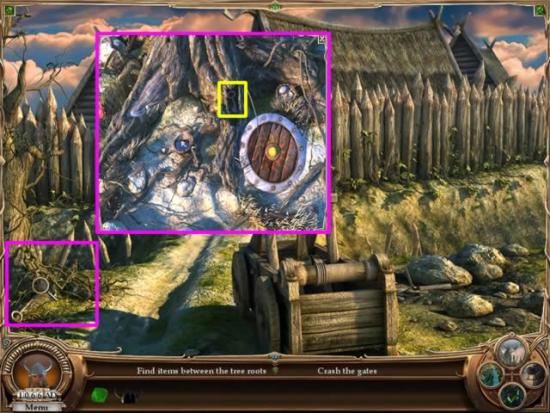
- Click on the interactive area
- Find the items listed. The key will go to inventory
Hall of Glory
- Use the key to open the chest
- Collect the goblet.
Sanctuary Crypt
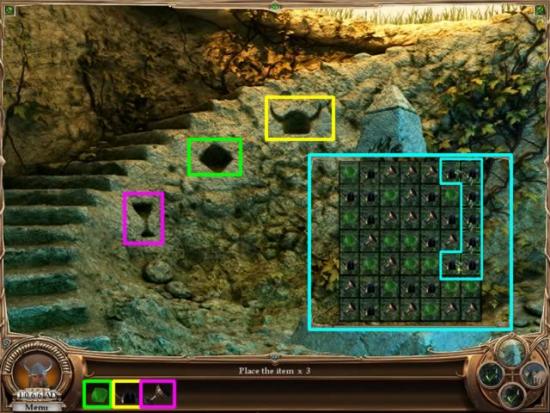
- Place the goblet, emerald, and helmet in their respective spots
- A clear-the-board puzzle pops up. The best strategy for this type of game is to always select as many matching pieces as possible. It will sometimes be necessary to select areas that are already cleared to try and get the minimum three pieces to clear a block. Work from the top down for best results. Here is a video to demonstrate:
- Collect Odin’s Horn.
Red Dogs Village
- Take Odin’s Horn from inventory and place it against the gate and defeat the clan.
Hall of Glory
Collect an artifact from the grateful Viking.
Click the leaver in the time machine to continue your journey.
Chapter 9: 1492 AD – Christopher Columbus
Goal: Help Columbus find gold.
First Task: Go ashore.
Offering Beach
- Collect two oars from the beach.
The Caravel
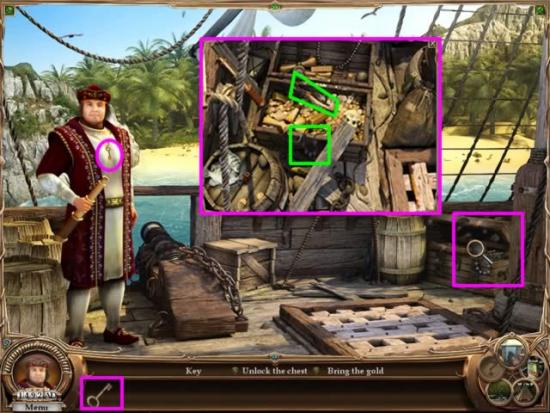
- Place the two oars in the boat. It will be lowered.
- Take the key from around Columbus’ neck and use it to open the chest.
- Collect the blocky necklace and torch from the chest.
Native Settlement
- Collect the tomahawk and flint.
Green Meadow
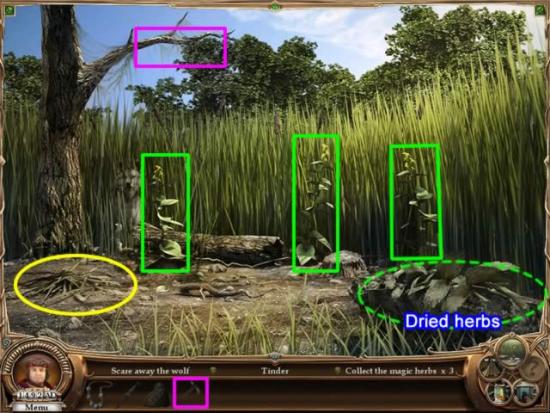
- Throw the tomahawk at the tree limb to scare away the wolf.
- Collect the tinder and the three magical herbs.
- Combine the three herbs. They will fall to the rock on the right. Wait a few seconds for them to dry, and then add them to inventory.
Native Settlement
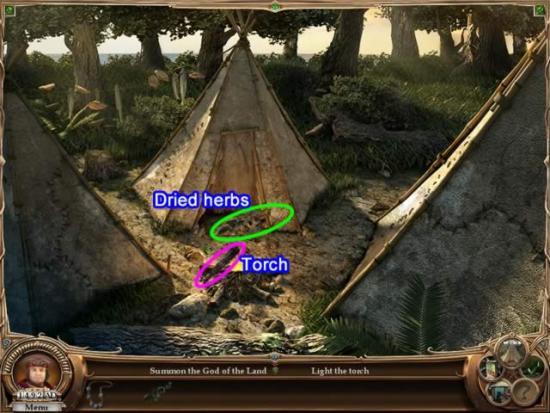
- Place the tinder in the fire ring.
- Use the flint to start the fire.
- Light the torch from the fire. It will go back to inventory.
- Place the dried herbs on the fire. Green smoke appears and you are transported to the Offering Beach
Offering Beach
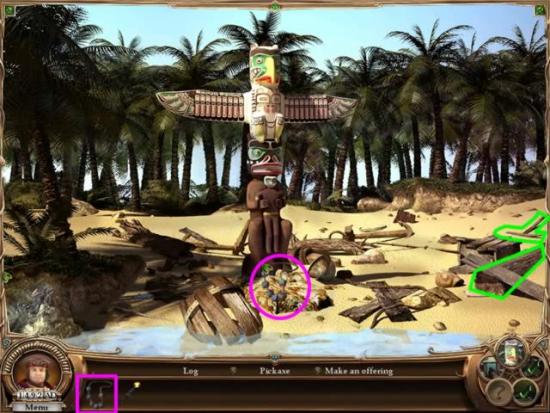
A totem has appeared on the Offering Beach.
- Collect the log and pickaxe.
- Place the blocky necklace at the base of the totem as an offering.
- The Secret Mines location is now available.
Secret Mines

- Use the log to repair the beam.
- Place the torch to light the mine.
- Use the pick to find the gold.
- When you collect the gold, a slider puzzle appears. The solution is shown above. To see how it was done, here is a video solution.
The Caravel
- Give the gold to Columbus
Collect an artifact from the grateful Columbus.
Click the leaver in the time machine to continue your journey.
Chapter 10: 1530 AD – Robin Hood
Goal: Help Robin retrieve the money from the sheriff and return it to the poor.
Barn
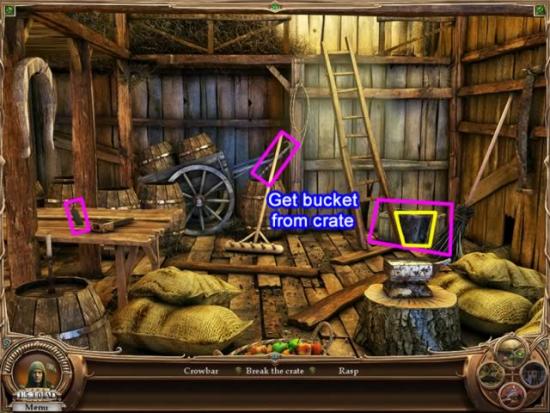
- Get the rasp from the table.
- Pick up the crowbar and use it open the crate and retrieve the bucket.
Prison

- Get the bat from the wall for inventory.
- Use the rasp to open the cell bars.
- Collect the items from the interactive area. The ball and chain will go into inventory.
Sheriff’s Room
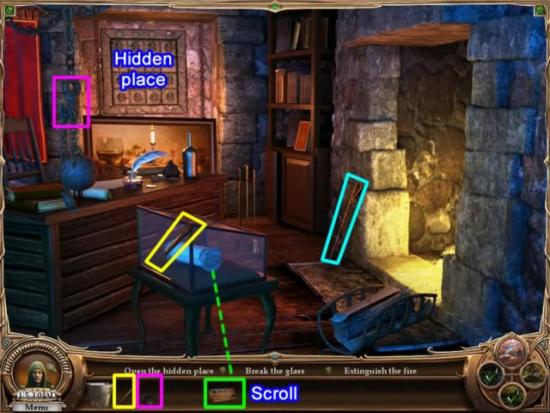
- Attach the ball and chain onto the hook beside the picture. This holds the picture down and reveals the hidden place.
- Use the bat to break the glass case and obtain the scroll.
- Pick up the poker beside the fire place.
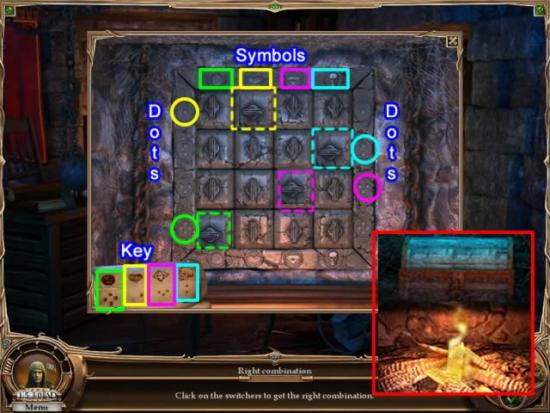
The scroll contains the key to the switches
- Each symbol corresponds with a number of dots: Circle = 4 dots; Heart = 1 dot; Diamond = 3 dots, skull = 2 dots.
- Follow the symbol down to the corresponding dots and click the switch.
- When all the switches are correctly positioned, the back of the fireplace reveals a locked chest.
Village
- Fill the bucket with water from the puddle next to Robin Hood
Sheriff’s Room
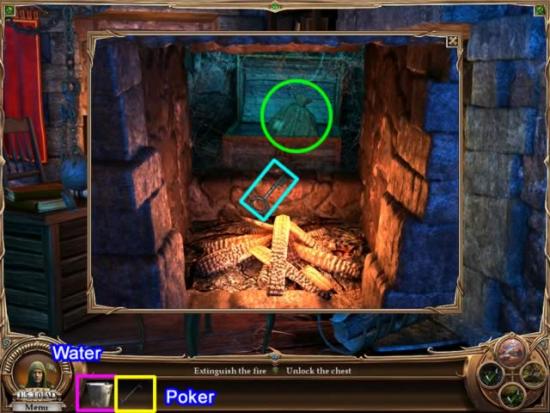
- Use the water to extinguish the fire.
- Sift through the embers with the poker to retrieve the key.
- Unlock the chest and retrieve the money.
Village
- Return the money to Robin for redistribution.
Collect an artifact from a grateful Robin Hood.
Click the leaver in the time machine to continue your journey.
Chapter 11: 1572 AD – Captain John
Goal: Return Captain John’s sword to him.
Pirate’s Camp
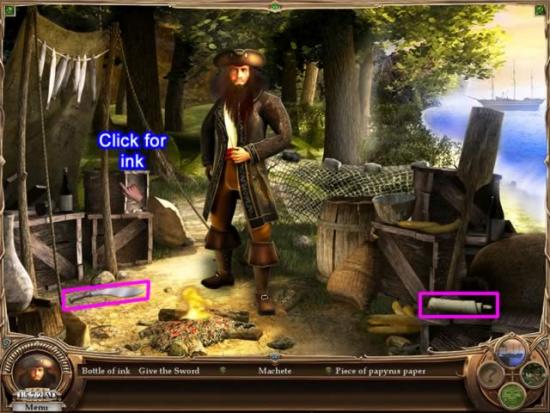
- Pick up the machete and papyrus roll.
- Click the box to get a bottle of ink. A move-the-boxes puzzle appears.
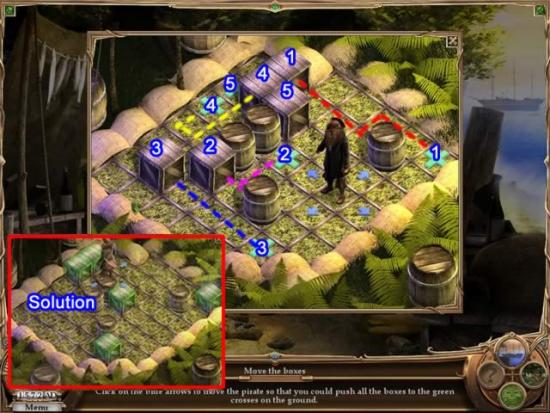
One Solution to the puzzle:
- Click the directional arrows one square at a time to move the man.
- Push the boxes along the indicated paths.
- Once box 4 is in place, box 5 can be pushed back and over one square to complete the puzzle.
Obtain the bottle of ink for inventory.
Rain Forest
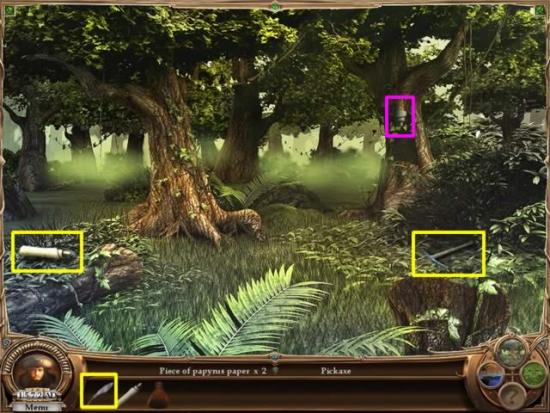
- Use the machete to cut down both bushes and collect the piece of papyrus and a pickaxe.
- The second papyrus piece is in the back tree.
Ancient Temple Ruins
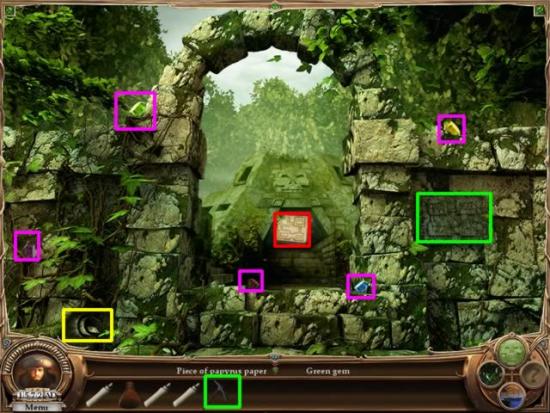
- Collect the piece of papyrus.
- Collect the five colored gems.
- Use the pickaxe on the stone map on the wall and put it in inventory.
- Combine all four pieces of papyrus into one piece.
- Combine the sheet of papyrus, ink and stone map to get a copy of the map on the papyrus piece.
- Place the map on the entrance to the temple (outlined in red above) to gain access to the Hidden Meadow.
Hidden Meadow
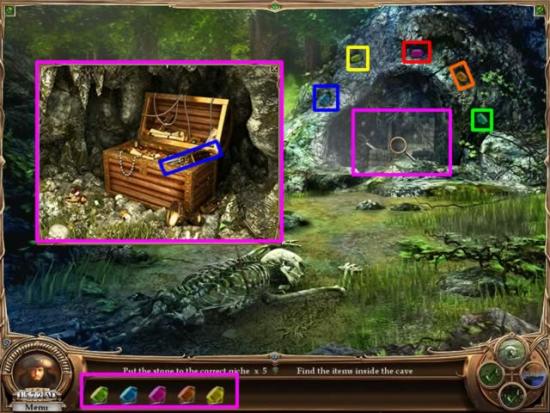
- Place the colored gems into their corresponding colored niches around the cave entrance.
- Open the interactive area and collect the sword.
Pirate’s Camp
- Give Captain John the sword
Collect an artifact from a grateful Captain John.
Click the leaver in the time machine to continue your journey.
Chapter 12: 1662 AD – D’Artagnan
Goal: Help find the Queen’s necklace.
Tavern
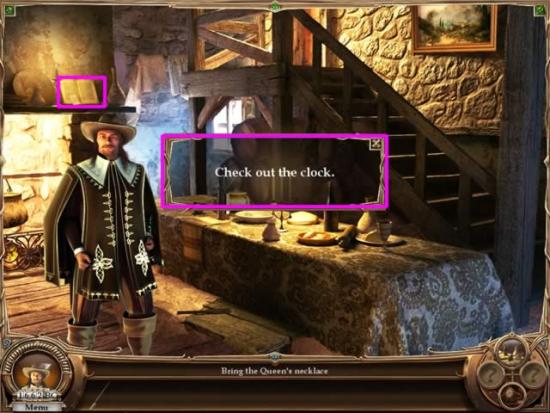
- Take the sword D’Artagnan is holding for inventory.
- Click on the book on the back wall to open it.
- Click on the note inside and receive a clue to “Check out the clock”
Duke Room
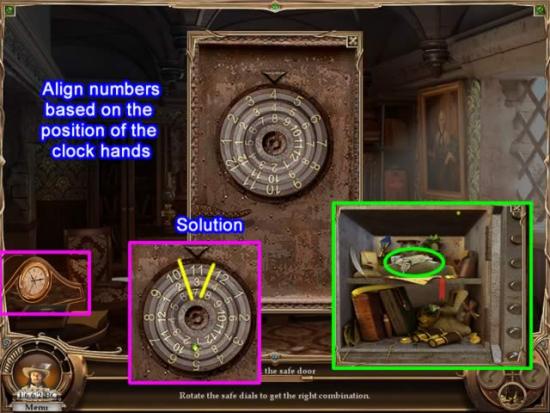
- Use the sword to cut the curtain on the back wall and reveal a safe.
- Click on the safe. There are three dials, each corresponding to a hand on the clock’s face.
- According to the clock: Hour hand = 11; minute hand = 3; seconds hand = 7
- The outside ring represents the hour, the middle ring is minutes and the inner ring is seconds. See the above inset for the combination solution.
- The safe opens when the combination is correct. Click to enlarge the contents and find the items listed. The necklace will go to inventory.
Tavern
- Give the necklace to D’Artagnan.

New Task: The Queen has been ambushed. Save the Queen.
- Collect the purse on the table located in front of the candelabra.
- The barrel with gun powder is the top barrel under the stairs. When clicked it will open a mini-game.
- Game strategy: There must be two barrels of the same color horizontally or vertically to remove them. Click once to select the barrels you want to remove. This will allow you to analyze your move before exploding them. Click a second time to remove them. Try to eliminate one color. Before eliminating large segments of a color, check to see that you don’t end up with only one of that color stranded in another column. As columns are eliminated, the others will move in to close the gap. Here is a video demonstration:
Monastery
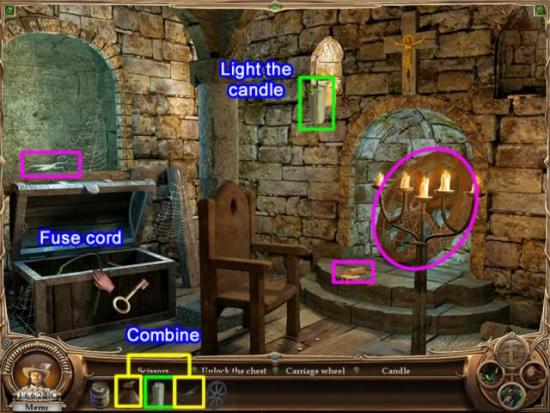
- Collect the carriage wheel, candle and scissors.
- Light the candle from any of the already lit candles.
- Combine the purse and scissors. The scissors will cut open the purse and a key will drop out.
- Use the key to unlock the chest. Collect the fuse cord from the chest.
Ambush in the Forest
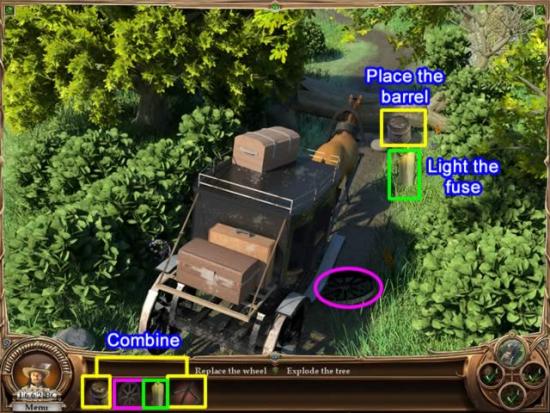
- Replace the carriage wheel.
- Combine the power keg and fuse cord.
- Place the barrel in front of the tree.
- Light the fuse cord with the candle to remove the tree.
You have saved the Queen.
Tavern
Collect an artifact from the grateful D’Artagnan.
Click the leaver in the time machine to continue your journey.
Chapter 13: 1814 AD – Monte Cristo
Goal: Help Edmond Dantes escape.
First Task: Bring food with filling.
Kitchen

- Collect coffee grinder, pot, flour, bowl, egg and spoon.
- Combine flour, egg, bowl and spoon to make bread dough.
- Combine the coffee grinder and the pot.
Coffin Maker’s Workshop
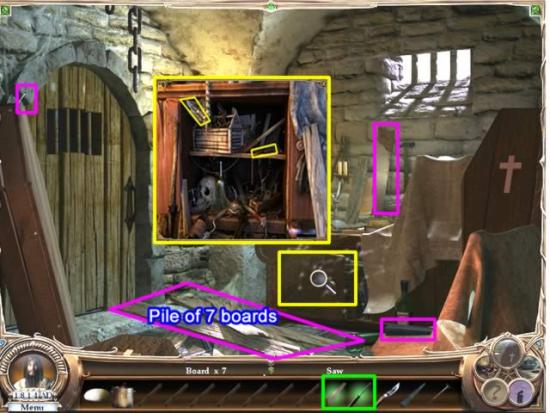
- Collect the 7 boards from the pile on the floor and the saw from the wall below the window.
- Open the cabinet and find the listed items. The knife and screw driver will go to inventory.
- Collect the chisel and nail.
- Combine the screw driver and saw. The saw handle will be removed and go to inventory.
Kitchen

- Combine the dough, chisel, screw driver and saw handle
- Placed the dough with the tools in the oven.
- When the bread is ready it will appear on the stove top. Place it in inventory.
Pier in Marseille
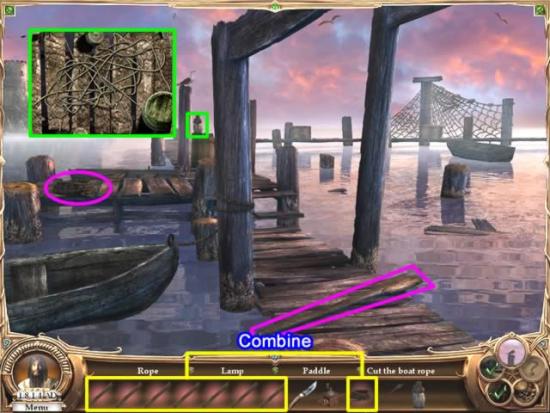
New Task: Help Dante escape.
- Collect the paddle and rope.
- Click on the lamp and a remove-the-string puzzle appears.
- To solve the puzzle click on the string on top. It will be removed. Continue the process until all strings are gone. The lamp goes into inventory.
- Combine all the boards and the rope to form a rope ladder.
- Place the lamp and paddle in the row boat. Use the knife to cut the rope holding it to the pier.
Castle of Iff
- Place the rope ladder below the window on the tower
Prison Cell
E74
- Place the bread on the bench and click it. The tools will fall out
- Place the pot with the coffee grinder in it on the bench with the tools.
- Click on the pot. A wall hammer will be constructed from the parts.
- Use the wall hammer on the wall below the cell window.
- An opening appears and Dante can make good his escape.
Collect an artifact from the grateful Dante.
Click the leaver in the time machine to continue your journey.
Solve the Riddle
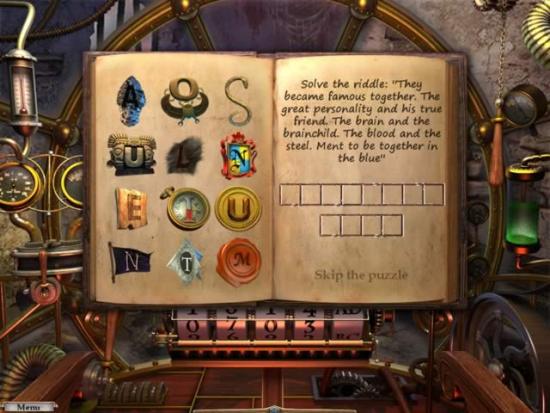
Drag the artifact letters you’ve collected to the squares on the page. When a letter is in the correct position it will transform into a letter fitting the square.
To solve the puzzle, it would help if you recognized the clue as a quote from Jules Verne’s book Twenty Thousand Leagues under the Sea.
The solution is NAUTILAS NEMO
Chapter 14: 1869 AD – Captain Nemo
Goal: Help Captain Nemo free the Nautilus from the clutches of a giant squid.
First Task: Close the porthole shutter
Corridor

- Collect the screw driver and door panel (pink)
- Collect the five parts of the door hand (green) and combine them.
- Click on the steam pipe wheel to turn off the steam.
- Lock Chamber – Get the oil can from the shelf by the door.
- Apply the oil to the door mechanism
- Affix the door panel (yellow) and place the door handle in the center hole as shown in the fixed door insert.
Workshop
- Collect the yellow fuse from the pipe next to the work table.
Captain’s Bridge

- Use the screw driver to open the fuse box.
- Place the fuse in the box.
- A mini-game pops up. Click the switches so all lights are on at the same time. Start at the corners and watch the patterns as you click the lights. Each time you play the game the solution will be different.
- Click the handle to close the porthole shutter.
New Task: Assemble the harpoon and aqualung to defeat the octopus.
Lock Chamber
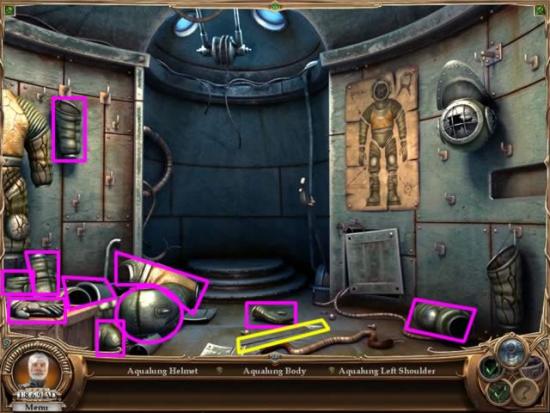
- Collect all ten pieces of the aqualung (pink)
- Collect the arrow (yellow)
Workshop

- Open the interactive area and collect the items listed.
- Five parts for the harpoon will be added to inventory.
- Combine the harpoon parts with the arrow to form the loaded harpoon.
Lock Chamber

- Assemble the aqualung according to the diagram on the wall
Underwater
- Use the harpoon on the eye of the octopus to defeat it and free the Nautilus.
Epilogue: 2010 AD
- Use the time machine one last time to return to the current time.
- Watch the credits to see what happened to all the characters you helped along the way.
Welcome home!

More articles...
-
Grow A Garden 2 Base Price List
What's the most valuable crop? -
Evomon Best Starter [Leafbun, Blazpup, or Bubble?]
Grass-type, Fire-type, or Water-type? -
Evomon Tier List [META and BEST Evomon]
The Evomon dream team.