![Digimon UP Tier List [Supports, Buddies, and Partners]](/wp-content/uploads/2026/07/digimon-up-tier-list.jpg "Digimon UP Tier List [Supports, Buddies, and Partners]")
Digimon UP Tier List [Supports, Buddies, and Partners]
These Digimon will get you UP the leaderboard.


![Haze Seas Boss Drops [Chances, Locations, and How to Spawn]](/wp-content/uploads/2026/07/haze-seas-boss-drops.jpg "Haze Seas Boss Drops [Chances, Locations, and How to Spawn]")

Welcome to the Escape from Frankenstein’s Castle walkthrough on Gamezebo. Escape from Frankenstein’s Castle is a point-and-click adventure game played on PC, created by SparkPlug Games and available at Big Fish Games. This walkthrough includes tips and tricks, helpful hints, and a strategy guide for how to complete Escape from Frankenstein’s Castle.
Welcome to the Escape from Frankenstein’s Castle walkthrough on Gamezebo. Escape from Frankenstein’s Castle is a point-and-click adventure game played on PC, created by SparkPlug Games and available at Big Fish Games. This walkthrough includes tips and tricks, helpful hints, and a strategy guide for how to complete Escape from Frankenstein’s Castle.
Click on Profiles to create your first user name. Your user name may contain up to 15 letters and numbers (no other characters). Thereafter, click on the Profiles button (or the Not You? link) to create a New Player (you may create up to 10 profiles), or click on a profile and Edit or Delete it.
Click on Achievements to view your progress. The Achievements are [related to your progress and you will need to complete them to finish the game] [related to your progress and include extra things for you to find. You do not need to find everything in order to complete the game]. The Achievements will be included in the body of this guide, but won’t specifically mention when you’ve found one. This will be up to you to keep track of…or not, as you wish.
Click on Options to adjust the Sound FX and Music Volumes, turn Full Screen and Mute All sounds on or off and to view the Credits.
Click on Help to view detailed explanations for the Task List, Achievements, Navigation devices, using Hints, the Inventory and additional helpful information. I recommend you look at the Help, as this guide won’t include any detailed information already explained (very well) within the game.
Click on the “X,” at the upper right, to skip cutscenes
Click on Next to progress through the dialogs, or click Skip to end them.
Move your cursor around to find areas to explore and then click to change locations.
During play, click on the Map to view your current location (red square).
Hints are always available and do not need to recharge. Click on Isabella, once you’ve encountered her, to receive a Hint, or instructions on completing Puzzles and Minigames. She’s located at the lower right.
Click on an item in your Task list to get more information about what you need to do next.
When zoomed into areas, click anywhere outside the circle to return to the scene.
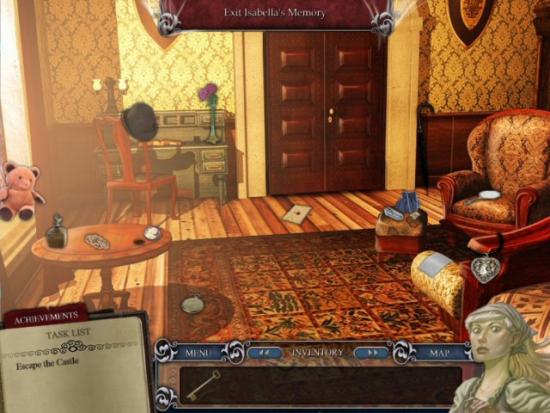
Once it’s available, click on View Isabella’s Memory to learn more about her story, her Forgotten Items and valuable clues. Click again to Exit and return to the scene.
You can Skip some Puzzles and Minigames. Just click on the Skip button at the top center; you don’t need to wait for it to charge.
You must complete some tasks before you can progress or move to another location.
Gameplay Tips
Some tasks must be completed in a specific order or you won’t be able to progress. If you feel you’ve completed the tasks discussed in this guide, try repeating them or click on things you may not have tried.
Look everywhere and click on everything, to make sure you don’t miss any items. There is no mis-click penalty.
There are 32 Achievements. Some are automatic; others are for finding specific items or completing puzzles. If you don’t find all the items, you can do so at the end of the game.
Warning: it’s possible there is a random bug, or two. You may come across a game stopping bug if you do certain things out of order. If this happens, be sure to contact Customer Service at BigFish Games, for help.
Walkthrough Notes
This guide assumes you’ve looked at the game’s Help menu, and read the General Information, to familiarize yourself with the game functions.
Navigation arrows are easy to locate and won’t be shown in this guide.
Various features (Hints, Isabella’s Memory, Task List, Achievements, etc.) won’t be mentioned in this guide, unless required in order to proceed.
Click Play to begin your adventure and watch the opening movie.
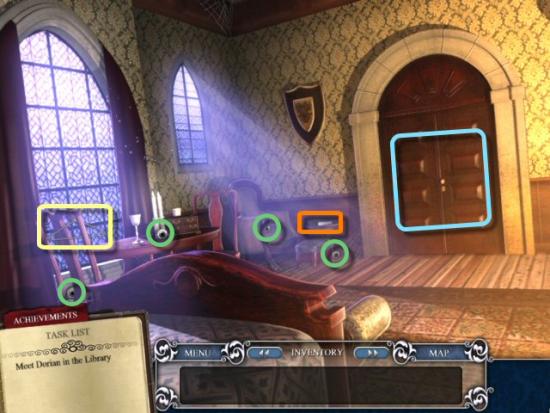
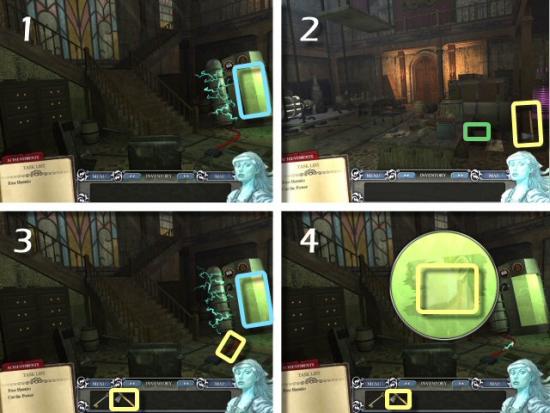
Click on the Door (blue) to attempt to exit to the Upper Hall. Click on the Diary (orange) to hear part of Isabella’s story, collect the Wire Hanger (yellow) and the 4 Eyeballs (green) and then move to the Armoire.

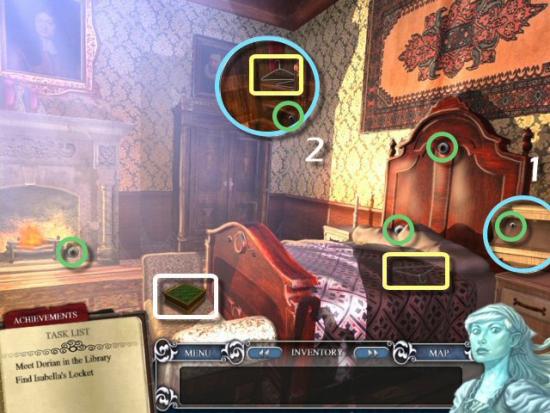
Collect the Wire Hanger (yellow) and the 3 Eyeballs (green), click on the Drawer (1) and collect the Eyeball (green), click on the Armoire (2) and collect the 2 Wire Hangers (yellow) and the Eyeball (green) and then click on the Box (white) at the foot of the Bed.
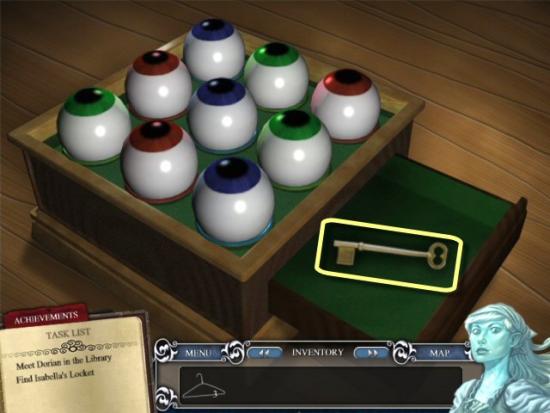
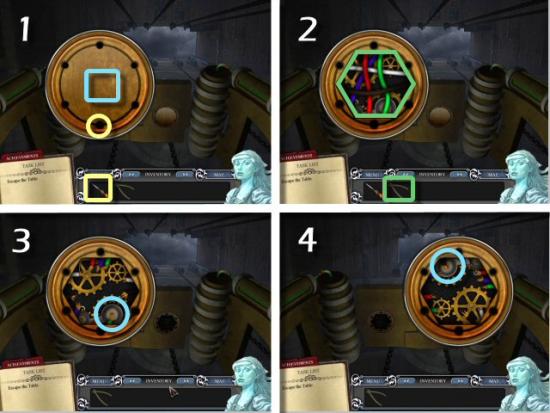
Puzzle Box: Use the Eyeballs in the top of the Box, placing the different colored Eyeballs in the matching color holes. Collect the Key (yellow). Move back to the Window.
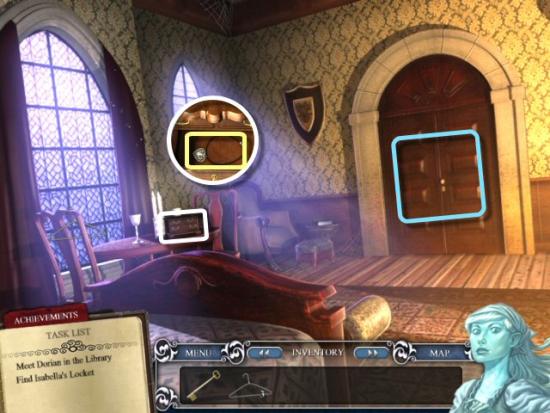
Use the Key on the Jewelry Chest (white), collect Isabella’s Locket (yellow) and then click on Isabella’s Memory (located at the top of the screen). Click on the Door (blue) to exit to the Upper Hall, click Forward, Left and then Forward to enter the Library.
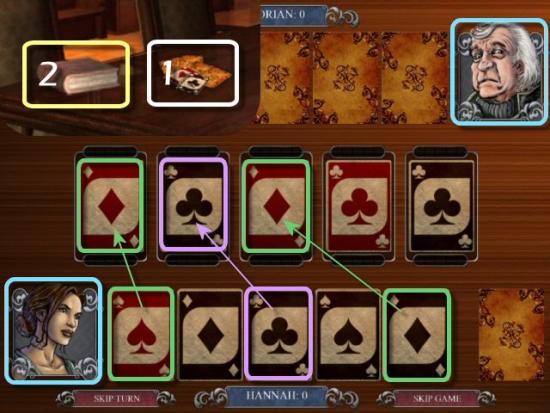
Click on the Cards (1) to play a game of Towers of Solitude, with Dorian.
Towers Card Game: The object of the game is to win the most Towers. To play, choose a card from your hand and drag it to one of the Towers in the Tableau. The card must match either in suit (Diamond, Spade, Heart or Club) or color (Red or Black), for a half of a point (green), or match both suit and color for a full point (purple). You need 5 points to win a Tower, and 3 Towers to win a game. Click on either Hannah or Dorian (blue – lower left or upper right, respectively) for the rules.
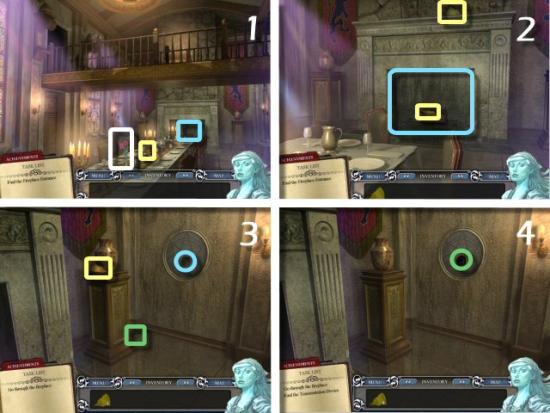
Once you’ve won the game, click Done and ask Dorian your 1 question. Each answer will result in the assignment of your next task, regardless. If you’d like to ask all three questions, you need to click on Done, ask 1 question and then click on the Cards, again. Repeat for each question. Collect the Book (2) and then go to the Fireplace.
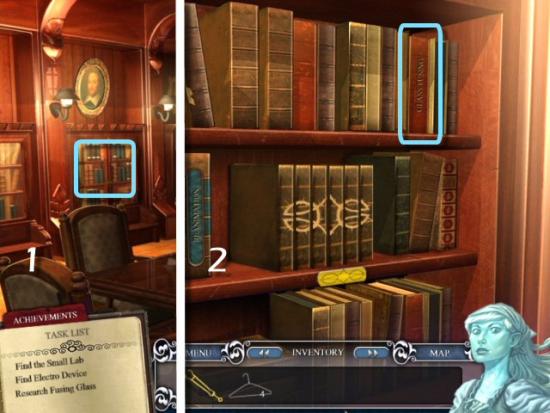
Collect the Fireplace Tongs (1 – purple), the 5 Books (green) and the Dust Cloth (yellow) and then return to the main part of the room. Click on the Reference area (2).
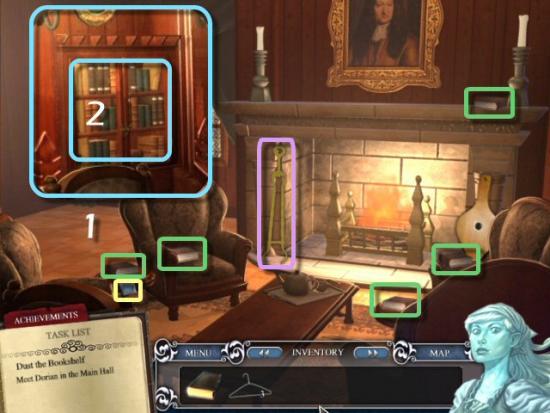
Use the Dust Cloth on the 6 Cobwebs.
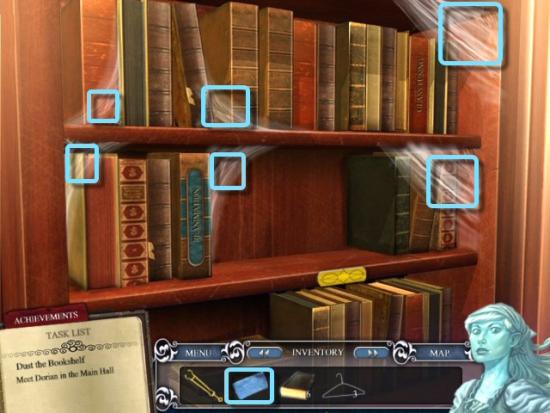
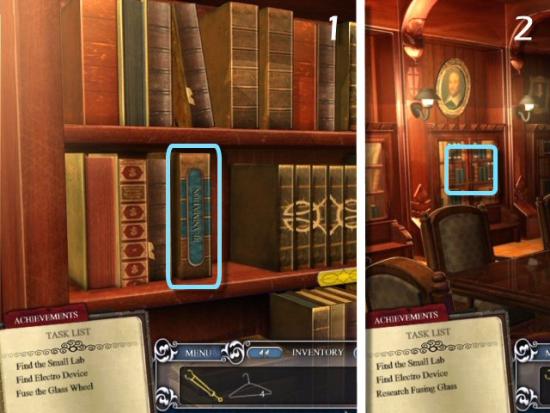
Use the Books on the Shelf (1); arrange them so they match the shape on the Gold Plaque (2). To create the Symbol, click on one book, and then click on another so they switch places (3). When complete, you’ll receive Frederick’s Letter (4). Exit the Library and go down to the Main Hall.

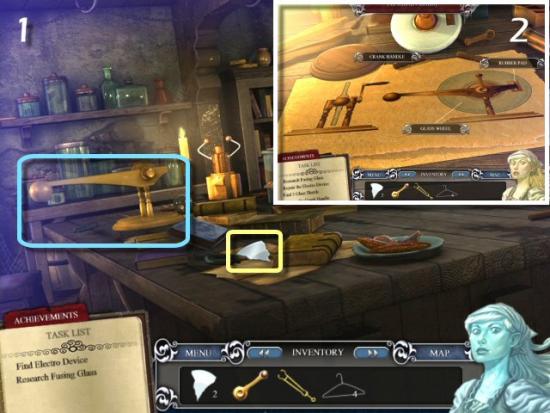
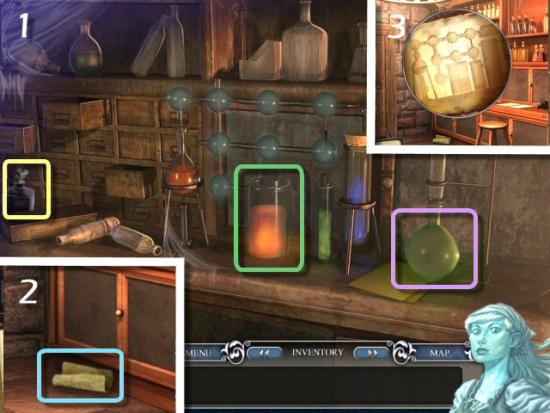
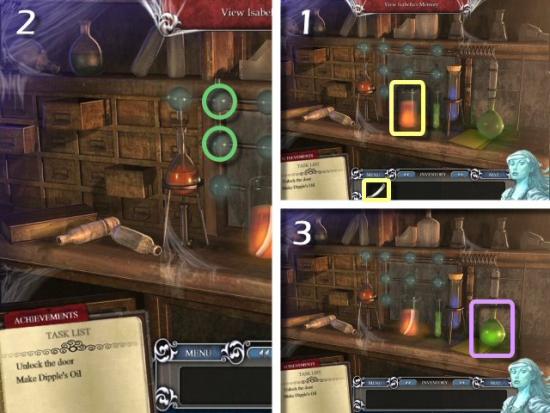
Exit the Main Hall back to the Upper Hall, go right towards the Small Lab and then enter the Chemistry area. Collect the 2 Glass Shards (yellow) and the Handle (green) and then head right to the Electrical area.
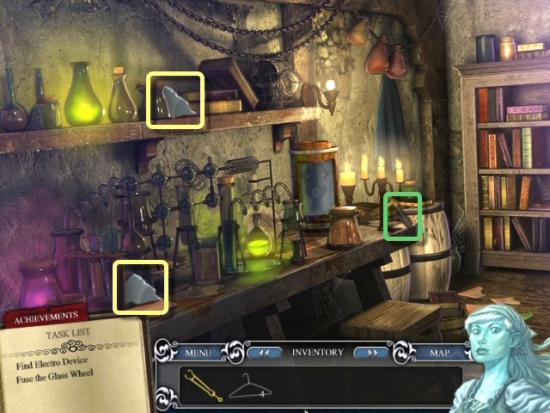
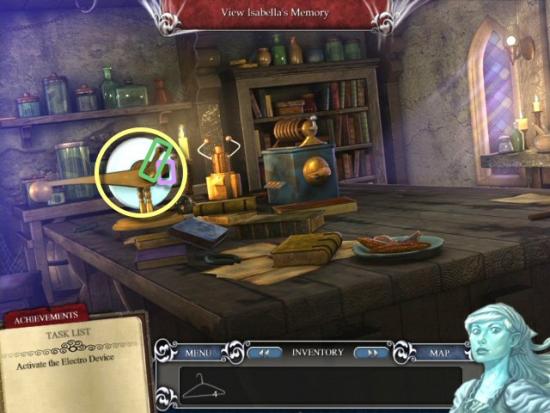
Collect the Glass Shard (yellow) and click on the Electro Device (1). Click on Isabella’s Memory for the Diagram (2) to the Device.
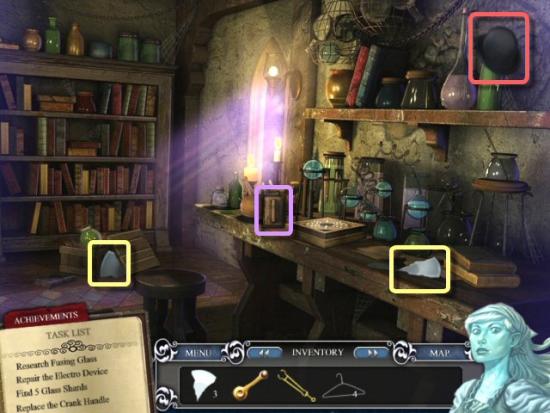
Head right to the Alchemy area, collect the 2 Glass Shards (yellow), the Rubber Pad (purple) and Frederick’s Hat (red). Exit the Small Lab and return to the Library.
Go forward to the Reference area (1), click on the book about Fusing Glass (2) and then head to the Fireplace area.
Click on the Fireplace (1), use the 5 Glass Shards on the Fireplace (2), use the Fireplace Tongs (3) on the Glass Wheel (4), exit the Library and then return to the Electrical area in the Small Lab.

Use the Glass Wheel (yellow), Rubber Pad (purple) and Handle (green – in any order) on the Electro Device (blue) and then click the Handle. Exit the Small Lab and return to the Library.
Go forward to the Reference area (1), click on the book about Reanimation (2) and then exit the Library and head down and into the Main Hall.
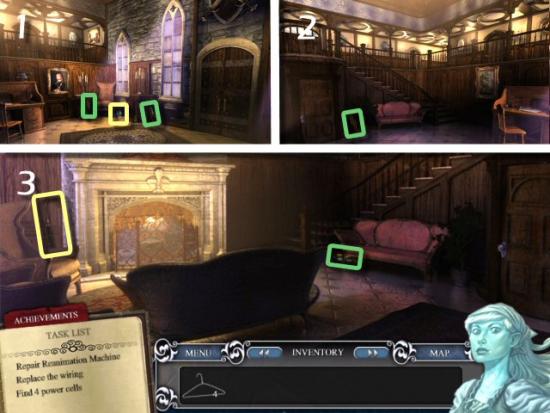
Collect the 2 Power Cells (yellow), Isabella’s Purse (green) and then head left to the Right Staircase (1). Collect the Power Cell (yellow) and then head left to the Left Staircase (2). Collect the Power Cell (yellow), Isabella’s Umbrella (green) and then return to the Electrical area in the Small Lab (3 – you can head up from here; you don’t need to return to the Main Hall).
Use the Wire Hangers (green) and 4 Power Cells (1 – yellow) on the Reanimation Device (2) and return to the Chemistry area. Collect the Pickled Frog (3) and then return to the Electrical area. Use the Pickled Frog (yellow) in the Compartment (4) on the Reanimation Device.

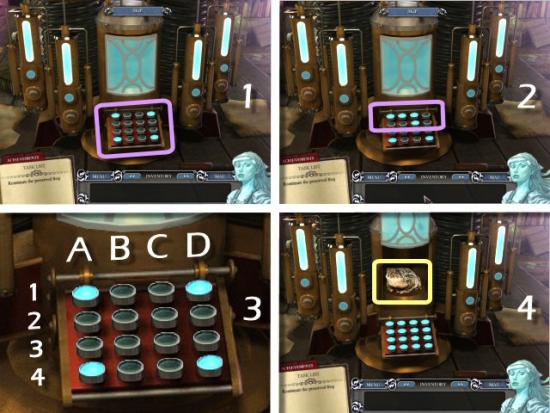
Reanimation Puzzle: You need to turn all the Buttons on (1). Each time you click on a Button, it changes its state (on or off) and the ones adjacent to it (2 – top, bottom, left and right). To solve this puzzle, click on the Buttons, as follows: C1, C2, B3, C3, B2 AND C1 (3). When complete, collect the Frog (4).
Click on the following for a video solution to the Reanimation Puzzle
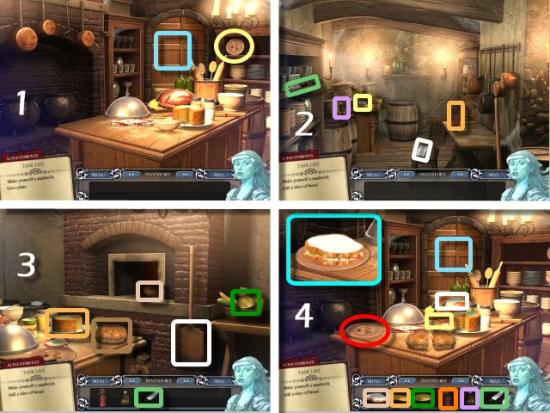
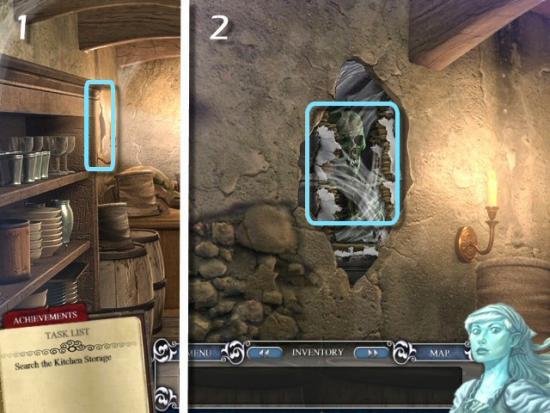
Return to the Main Hall, left to the Right Staircase, enter the Lower Hall and then click right into the Prep Table area of the Kitchen. Collect the Plate (yellow) and click forward to the Kitchen Storage (1).
Collect the Knife (green), Oil (purple), Ground Spices (orange), Isabella’s Handkerchief (white) and Isabella’s Crystal Keepsake (pink) and then return to the Prep Table area of the Kitchen and head right to the Bread Oven (2).
Collect the Bread Paddle (white) and use it on the Bread (light brown), use the Knife (green) on the Lettuce (dark green), Cheese (light orange) and Bread (brown), collect Isabella’s Hand Mirror (pink) and then return to the Prep Table area of the Kitchen (3).
Use the Knife (green) on the Turkey (white), collect the Tomato Slices (yellow), use one slice of the Bread (light brown) on the Plate (red), use the Cheese (light orange), Turkey, Lettuce (dark green), Tomatoes, Oil (purple) and Ground Spices (orange) on the Bread, use the second slice of Bread on the Plate, and then click on the Sandwich (cyan). Return to the Kitchen Storage (4 – blue).
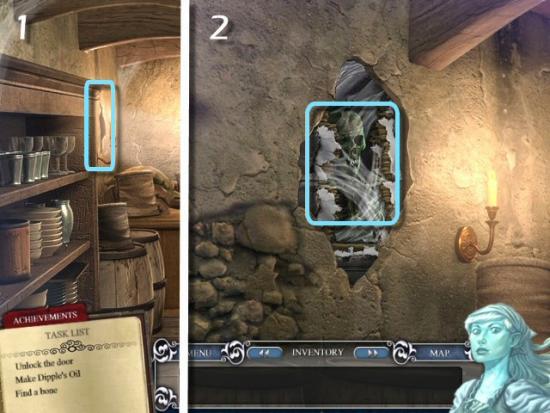
Click on the Mysterious Crack (1), click on Isabella’s Body (2) and then return to Prep Table area in the Kitchen. Exit the Kitchen, Turn Around and then click forward into the Banquet Hall.
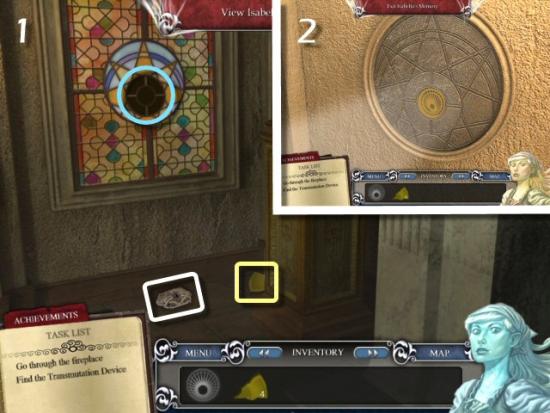
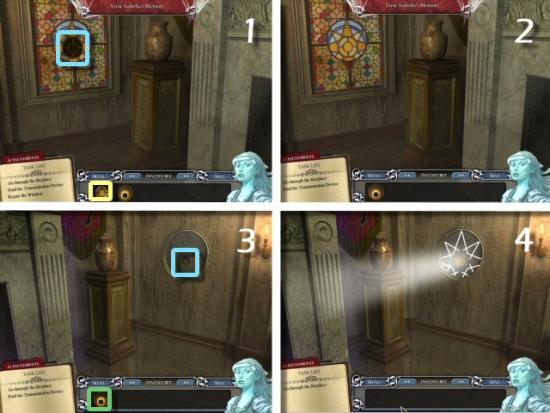
Collect Isabella’s Lovely Flower (white), the Window Shard (yellow) and click on the Fireplace (1). Collect the 2 Window Shards (yellow), click on the Fireplace (blue) and then click right to the Wall Carving (2). Collect the Window Shard (yellow) and the Medallion (green), use the Medallion in the Carving (3) and then collect the Medallion again (4). Return to the Fireplace and click left to the Window.
Collect the Window Shard (yellow), Isabella’s Hair Clip (1 – white), view Isabella’s Memory for a clue (2) on the Broken Window (blue) and then return to the Fireplace in the upstairs Library.
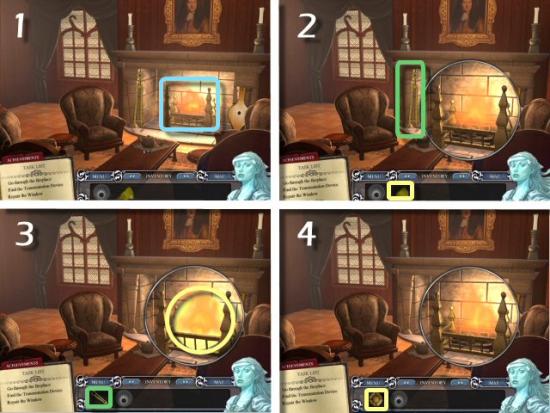
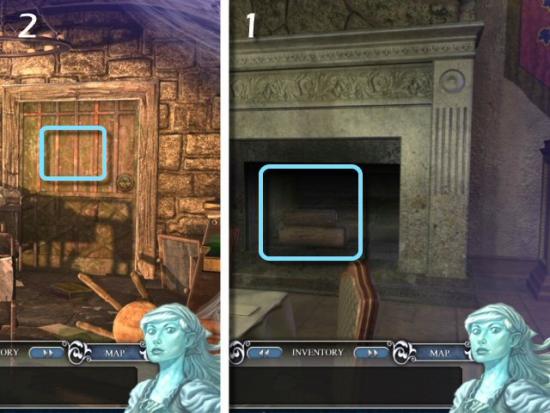
Click on the Fireplace (1), collect the Fireplace Tongs (green) and use the Window Shards (yellow) in the Fireplace (2). Use the Fireplace Tongs (green) on the Window Glass (2 – yellow). Exit the Library with the Window (4) and return to the Alchemy area in the Small Lab.
Click on the Transmutation Device (1) and use the Medallion (yellow) in the center of the Device (2).
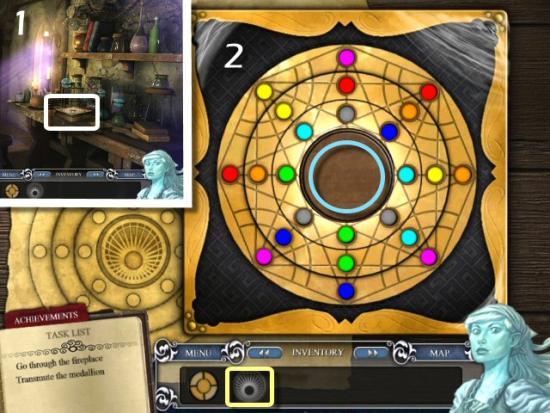
Transmutation Puzzle: line up each color in a straight line. In order to do this, you need to work back and forth between switching the positions of the colors within each column and rotating the rings to move the color to a new location. Repeat this until all the colors line up. When switching the position of colors in a column, you may have to click on it more than once, depending where in the column it moves. Also, be careful where you click. You may want to rotate a ring and accidentally switch a color in a column. The rings rotate clockwise, only. This puzzle is different for every player and each time you exit and return to the puzzle before competing it. Click on the following for an example of one solution. Again, your puzzle will be completely different and this video is only an example of one solution.
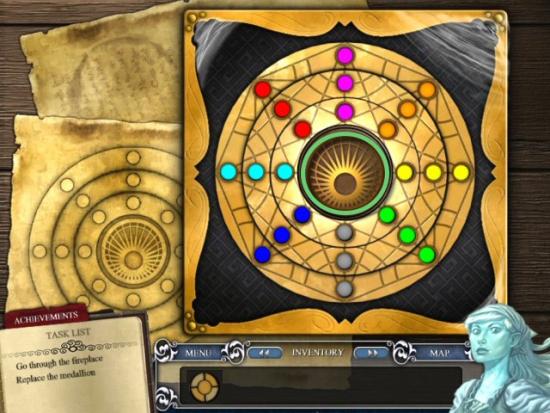
Collect the Transmuted Medallion (green) and return to the Window in the downstairs Banquet Hall.
Use the Window Glass (yellow) on the Broken Window (1), return to the Wall Carving at the right (2) and then use the Medallion (green) on the Wall Carving (3) to activate the Mechanism (4). Click on the Fireplace to enter the Hidden [].
Click on the Fireplace (1) to enter the Hidden Storage, click on the Door (2) to the Lab Storage and then click right to enter the Apothecary.
Collect Isabella’s Perfume Bottle (yellow), click on the Green Flask (purple), view Isabella’s Memory (2), click on Victor’s Notes (3) and then click on the Orange Beaker (green). Return to the Kitchen Storage area in the Kitchen.
Click on the Mysterious Crack (1), click on Isabella’s Body (2) to collect a Bone Fragment. Return to the Apothecary area in the Hidden Storage.
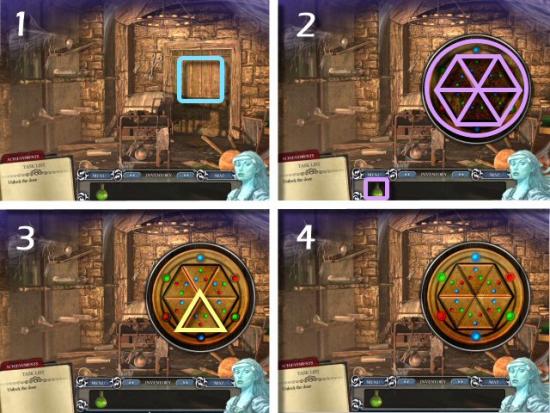
Use the Bone Fragment (yellow) on the Orange Beaker (1), align the Tubes (2 – this is a very simple Pipes Puzzle and you only need to rotate the 2 that are highlighted in green) and then collect the Dipple’s Oil (3). Exit the Apothecary area.
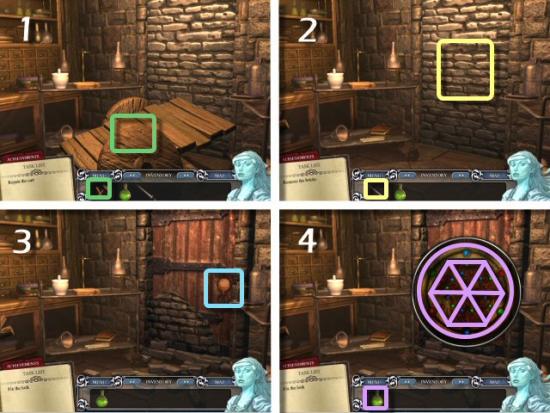
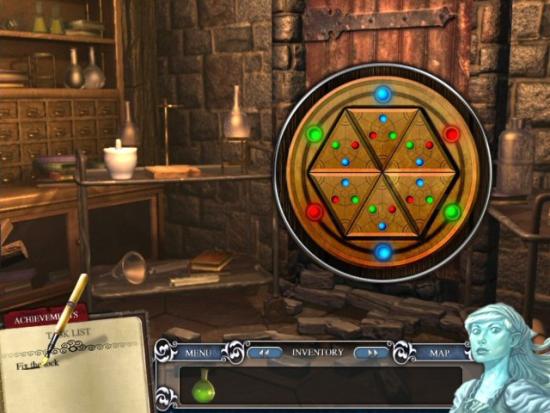
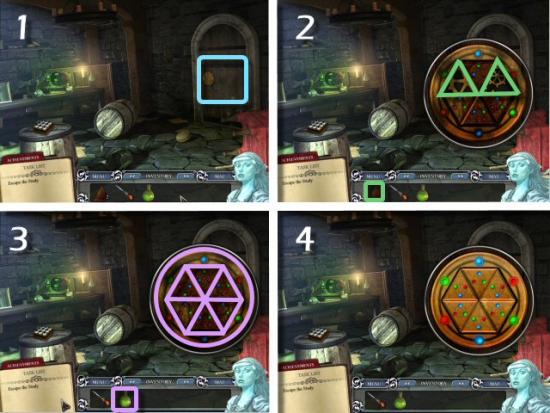
Click on the Door (1); use the Dipple’s Oil (purple) on each of the 6 Triangles and on the outer ring (2). Lock Puzzle: you need to rotate the Triangles so the color at the point of the Triangle matches the one on the outer ring, and the color on the sides match the adjacent Triangles. Just click on a Triangle to rotate it; they will only rotate clockwise (3). When complete (4), click on the Door to enter the Lab Storage.
Collect the Mallet (yellow), click on the Door (1), click on the Broken Cart (2), exit the area and then click left to the Prep Table (3) area. Collect the Pin (green), Isabella’s Hairbrush (white), Isabella’s Jeweled Brooch (pink) and then exit (3), click right to the Shield area and then click on the Shield (4).
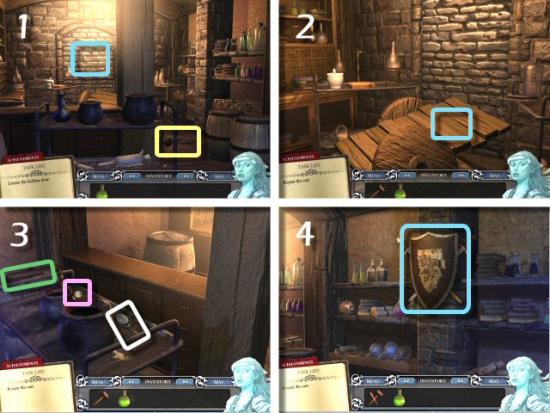
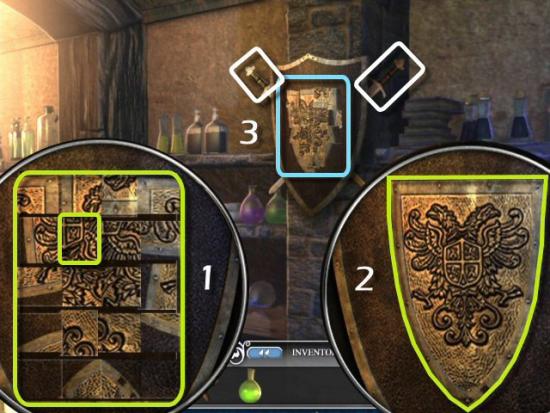
Shield Puzzle: switch the tiles to form the correct image. Click on a tile to rotate it into its correct orientation (1). Continue until all tiles are in their correct positions (2). When complete, collect either Sword (3 – white). Return to the Broken Cart.
Use the Pin (green) on the Broken Cart (1), use the Sword (yellow) on the Bricks (2), click on the Lock (3) and then use the Dipple’s Oil (purple) on each of the 6 Triangles and on the outer ring (4).
Lock Puzzle: you need to rotate the Triangles so the color at the point of the Triangle matches the one on the outer ring, and the color on the sides match the adjacent Triangles. Just click on a Triangle to rotate it; they will only rotate clockwise. When complete, click on the Door to enter the Lab Storage.
Collect the Dust Cloth (yellow) and click left to the Stasis Chamber (1). Click on each of the Drawers (2) and collect a Gear from Drawer A (3), a Gear from Drawer B (4), Isabella’s Teddy Bear (pink) and Frederick’s Pocket Watch (white) from Drawer C (5) and then click on the Stasis Chamber (red).
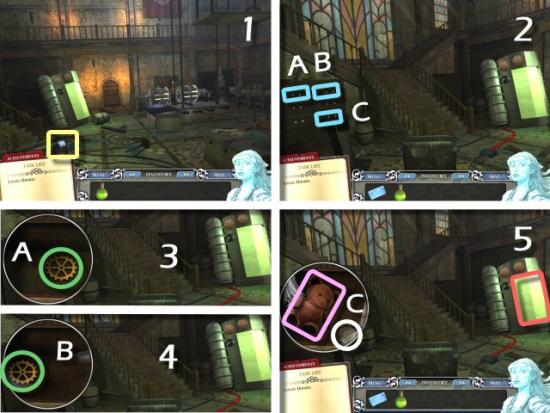
Use the Dust Cloth (yellow) on the Glass (1), click 4 times (2), click on each side of the Access Panel (3) and then click on the Screws (4 – click anywhere; do one side of the Access Panel and then the other). Exit the Stasis Chamber and click right towards the Lower Hall.
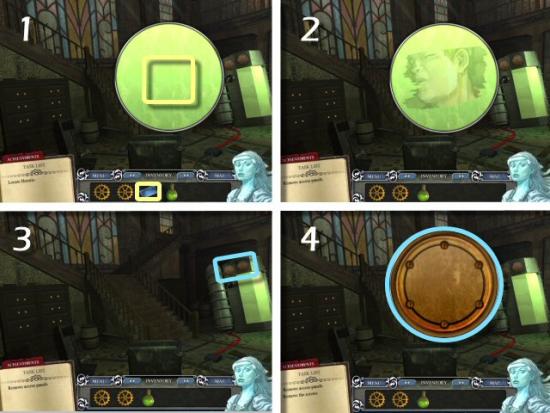
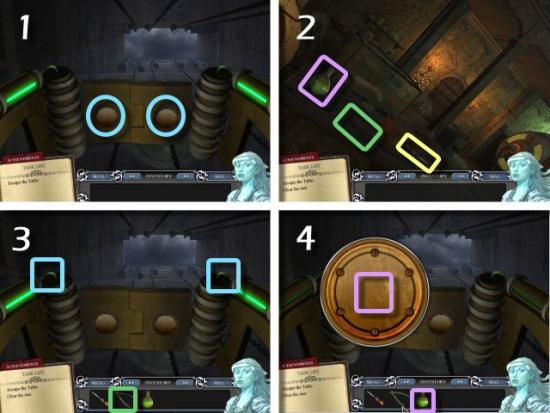
Collect the Screwdriver (yellow), click on the Note (blue), click on the center section (red) of the Note until the number 1 appears and then click on the left section (green) of the Note until the number 2 appears (you only need to click once or twice on each section). Return to the Stasis Chamber.
Click on one side of the Access Panel (1), use the Screwdriver (yellow) on each Screw (2), – you will need to click 6 times on each of the 6 Screws – click on the Panel Door (3) click on the Mechanism (blue) and use the 2 Gears (green) in the Mechanism (4). Repeat steps 1 through 3, for the other side of the Access Panel.
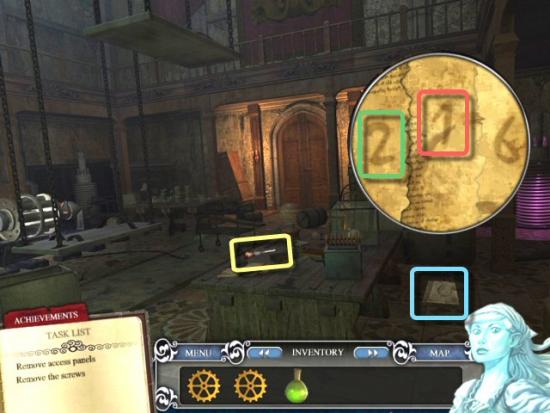
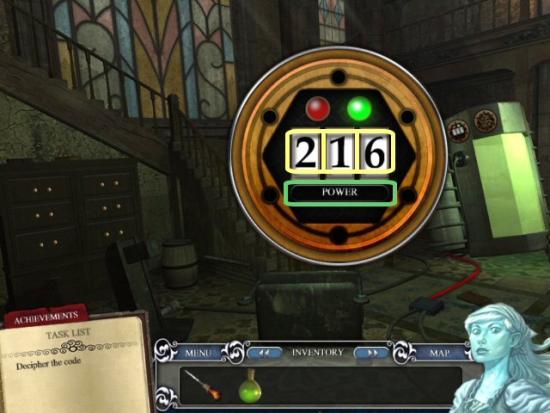
Click on each number (yellow) to enter the Code: 2 1 6 and then click the Power button (green).
Collect the 5 Eyeballs (green), click left to the Prep Table area (1) and collect the 4 Eyeballs (green). Click on the Doctor’s Notes (2 – blue) and click on each section (red) of the Note to reveal the Reanimation Sequence (3 – you should only need to click on each section once or twice). Click on each node (orange), in each section of the Arm, to change its color (the colors change from black to green, to red and then to blue, in that order) and click on the Handle (blue). Collect Isabella’s Wedding Ring (4 – pink). Return to the Private Study.

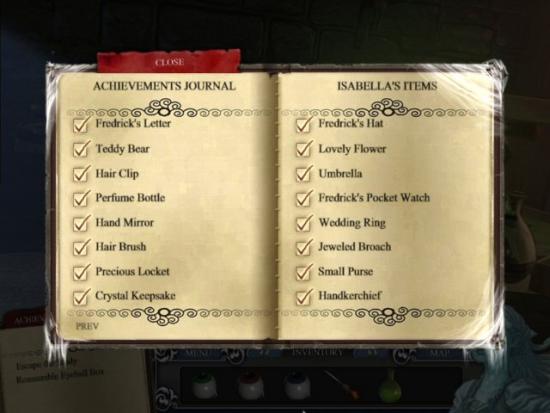
Note: you should now have all of Isabella’s Artifacts (click on Achievements to check). If not, you can retrieve the ones you missed, later.
Click on the Puzzle Box (1), use the Eyeballs in the matching color Holes (2) and collect the 2 Triangle Pieces (green).

Click on the Door (1), use the Triangle Pieces (green) in the Lock (2) and then use the Dipple’s Oil (purple) on each of the 6 Triangles and on the outer ring (3). Lock Puzzle (4): rotate the Triangles so the color at the point of the Triangle matches the one on the outer ring, and the color on each side matches the adjacent Triangles. Just click on a Triangle to rotate it; they will only rotate clockwise. When complete, click on the Door to enter the Main Lab.
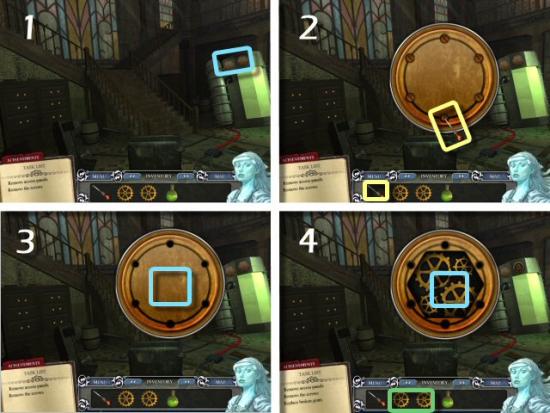
Click on each side of the Access Panel (1), click on the Screws (2 – click anywhere; do one side of the Access Panel and then the other) and then click left to Look Left. Collect the Dipple’s Oil (purple), the Wire Snips (green) and the Screwdriver (yellow) and then return. Use the Wire Snips (green) on both Wires (3 – blue), click on each side of the Access Panel and use the Dipple’s Oil (4 – purple). Be sure to do both sides.
Use the Screwdriver (yellow) on all 6 Screws (you’ll have to click each one, 6 times) and then click on the Cover (1); repeat for the other side. Use the Wire Snips (green) on all the Wires (2); repeat for the other side (Note: it may not matter, but I clicked on the topmost Wires first, before trying the ones below them). Click on the Mechanism (3) on the left side and then click on the Mechanism (4) on the right side.
Click left to the Stasis Chamber area and click on the Stasis Chamber (1 – blue). Return and click right towards the Lower Hall, collect the Axe (yellow) and the Key (green) and then return to the Stasis Chamber (2). Use the Axe (yellow) on the Cable and then click on the Stasis Chamber (3 – blue). Use the Axe (yellow) on the Stasis Chamber (click 3 times) and then click on Horatio to free him (4).
Return to the Main Lab, click right towards the Lower Hall and then click forward to enter the Lower Hall. Turn Around and then click left to enter the Main Hall.
At this point, you can return to Hannah’s room, click on Isabella’s Memory and view all the Artifacts you’ve collected.
If there are any missing, this is the point to go back and collect them. If you have them all, or don’t wish to collect the rest, simply click forward into the Main Hall.
Click on the Door (1) and use the Key (green) in the Lock (2).

Lock Puzzle: simply click on the Rings to rotate them so that all the colors line up in columns. Click on the following for a solution. Note: your puzzle may be different.
You have one last chance to complete all your Achievements…if not, click on the Front Door (blue) to escape this house or horrors!
You’ve done it! You’ve saved Hannah and Horatio. Watch the closing movie…The End?
Congratulations, you’ve completed Escape from Frankenstein’s Castle.
