
Best Horror Games On Itch.io – July 2026
Across a bounty of subgenres.![Haze Seas Accessories Tier List [Best Accessories to Equip]](/wp-content/uploads/2026/07/haze-seas-accessories-tier-list.jpg "Haze Seas Accessories Tier List [Best Accessories to Equip]")
Haze Seas Accessories Tier List [Best Accessories to Equip]
The accessories with the best stat buffs in Haze Seas.
![[Roblox] Evomon Shiny Hunting Guide – Including Prismatic and Pris Shinies!](/wp-content/uploads/2026/06/evomon-shiny-hunting-guide.jpg "[Roblox] Evomon Shiny Hunting Guide – Including Prismatic and Pris Shinies!")

Entwined: Strings of Deception Walkthrough
Welcome to Entwined: Strings of Deception walkthrough on Gamezebo. Entwined: Strings of Deception is a hidden object adventure game played on the PC created by Urchin Games. This walkthrough includes tips and tricks, helpful hints, and a strategy guide for how to complete Entwined: Strings of Deception.


- Prefer Gamezebo on Google

Game Introduction – Entwined: Strings of Deception
Welcome to Entwined: Strings of Deception walkthrough on Gamezebo. Entwined: Strings of Deception is a hidden object adventure game played on the PC created by Urchin Games. This walkthrough includes tips and tricks, helpful hints, and a strategy guide for how to complete Entwined: Strings of Deception.
General Tips
- Upon starting a new game, you can choose between one of two difficulties: Normal Mode or Hard Mode. Normal Mode features Hints recharging faster, sparkles indicating active areas, and achievement items being easier to spot. Hard Mode features slower charging Hints, no sparkles to indicate active areas, and achievement items are harder to spot.
- At any point in the game, you can click on the Case File on the lower left. This will keep track of your hints, progress, suspects, and clues you uncover.
- At the bottom of the screen are two important buttons: Inventory and Objectives. Toggle over Inventory to access items you’ve found. Toggle over Objectives to view the current tasks at hand.
- In the lower right corner of the screen is a “?” button– this is the Hint. Click on it outside of a hidden object area to view your current objective. Click on the button inside a hidden object area to receive a hint as to where an item is located. Click on the button during a puzzle to opt to skip it.
- Also in the lower right corner of the screen is a Map. Use this as reference on where rooms are located and where you should go.
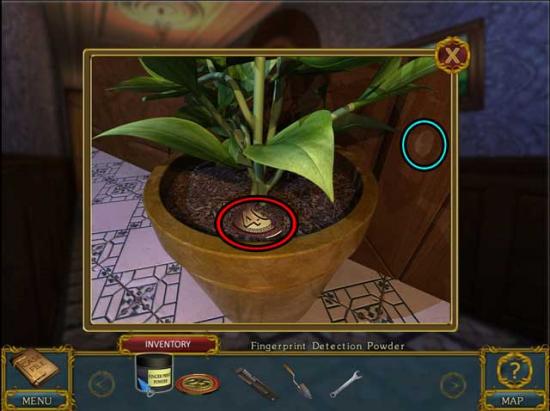
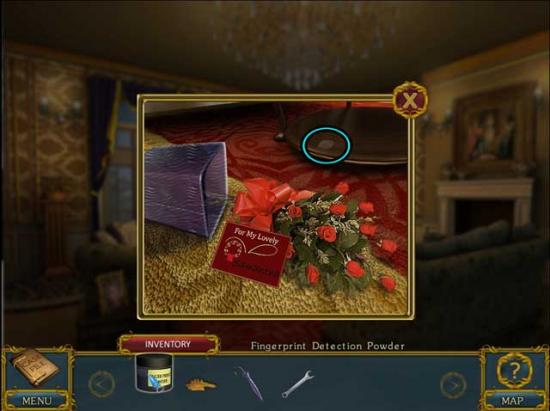
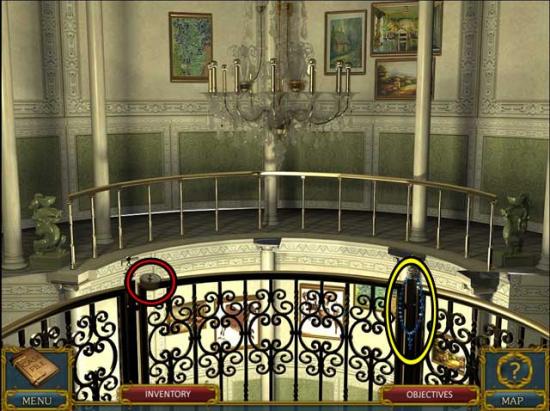
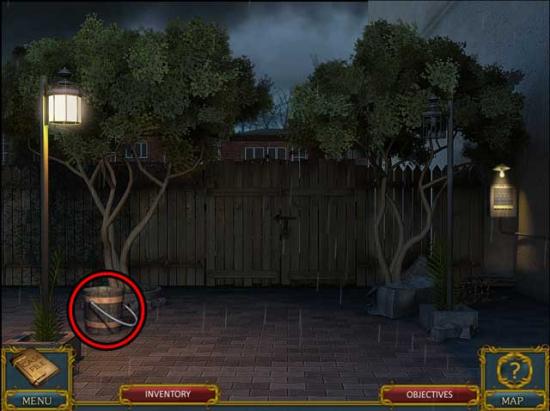
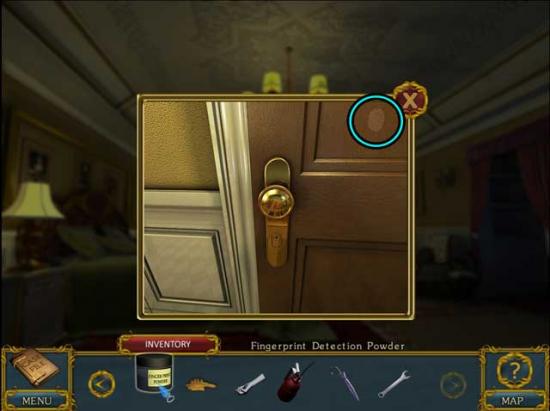
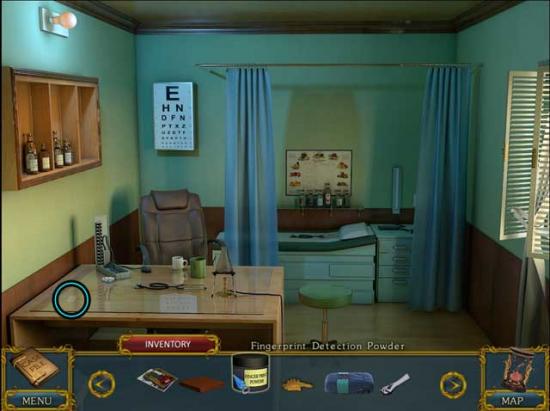
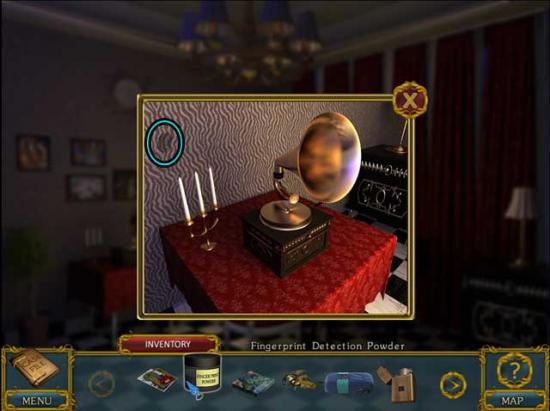
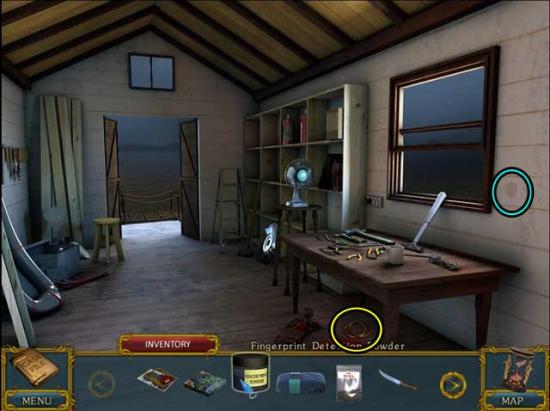
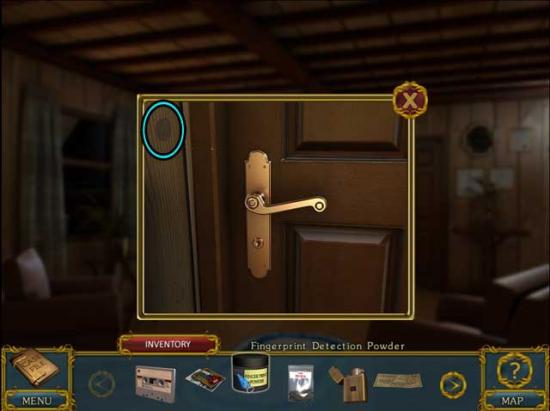
- A series of Achievement Items are scattered throughout the game. There are Fingerprints and Jewelry to be found. Jewelry will be circled in yellow and Fingerprints will be circled in blue in the guide below. When you find a Fingerprint, you must use the Fingerprint Detection Powder in your inventory on it before you can collect it. Note sometimes a powdered Fingerprint will move and/or differ slightly in location from before it was powdered.
- Inventory items, or KEY ITEMS are circled in red in the guide below and are identified with CAPS.
Chapter 1: The Crime Scene
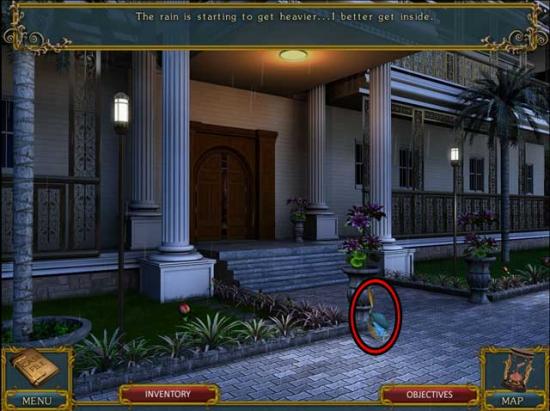
Drive Way
- Proceed forward to the Entrance.
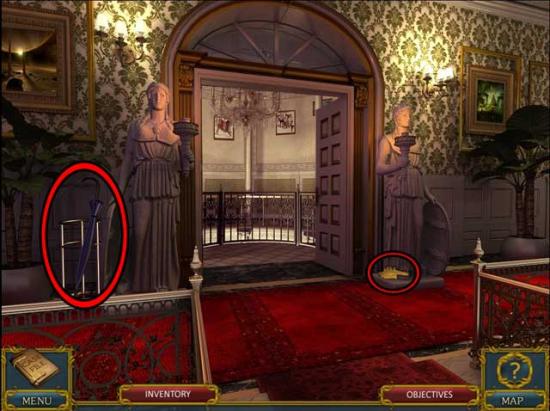
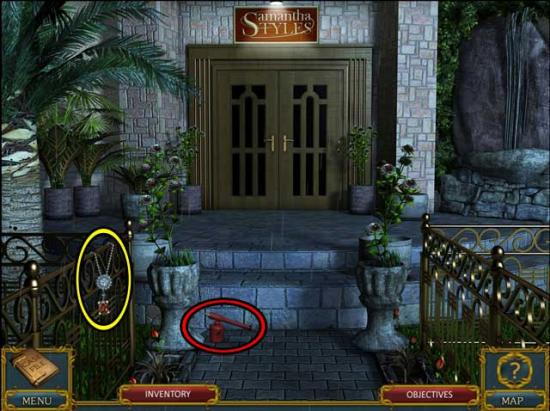
Entrance
- Click on the TROWEL to add it to your inventory.

- Enter the house into the Foyer.
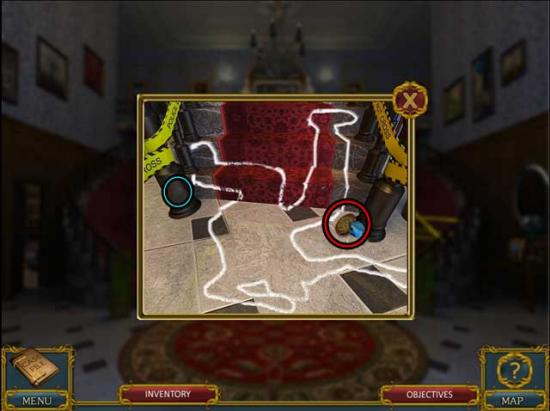
Foyer
- Examine the crime scene over the stairs on the right. Click on the NUMBERED COIN to add it to your inventory. Fingerprint 1/17 is also here.
- Enter the Store on the far left.
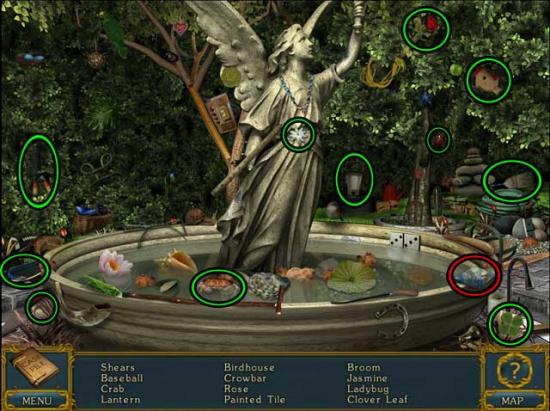
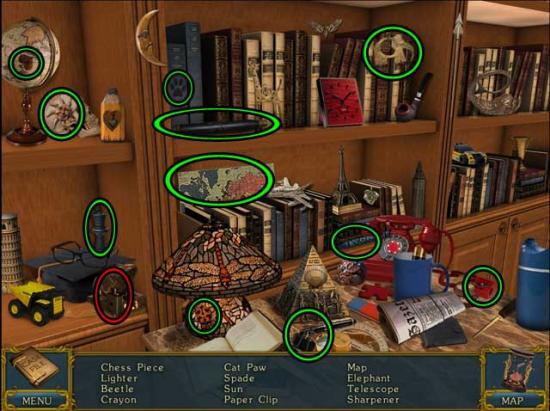
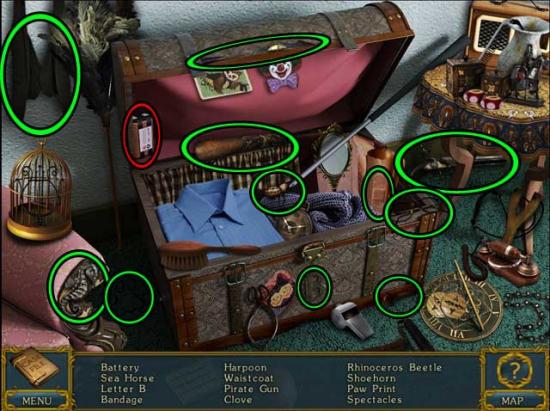
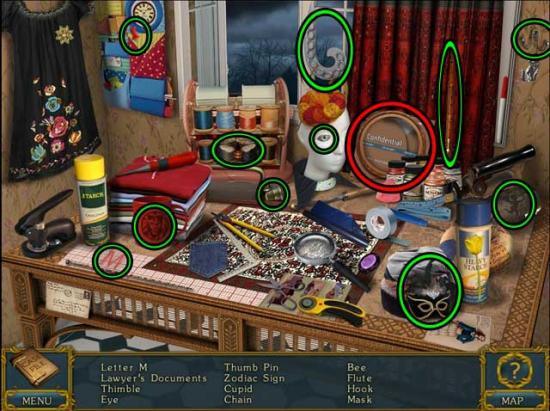
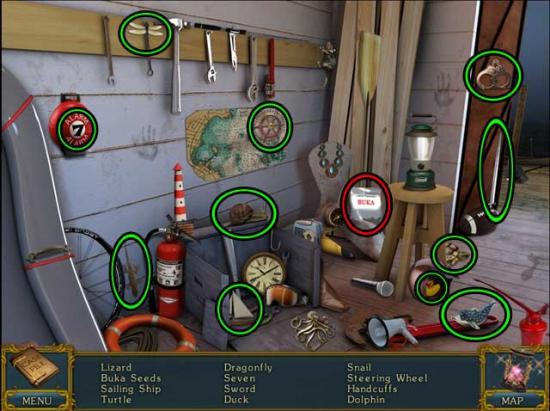
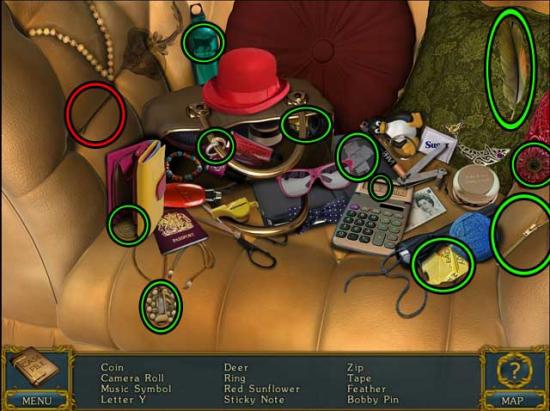
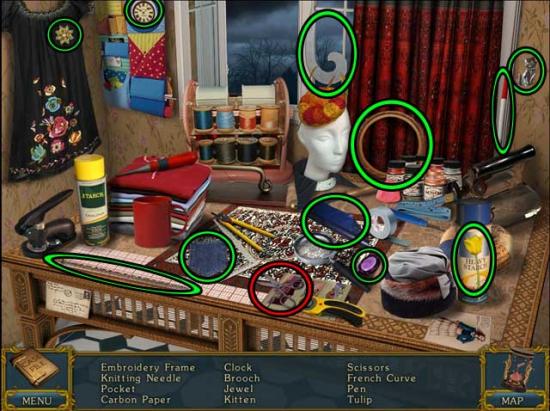
Store
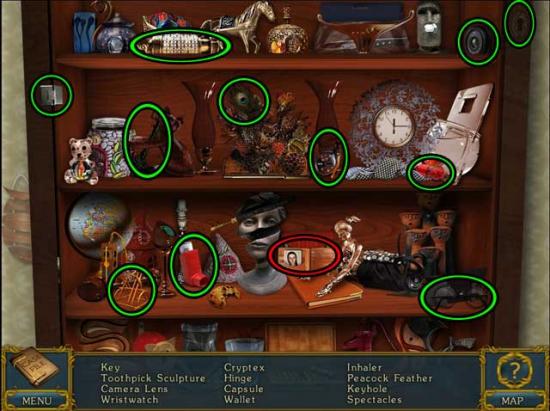
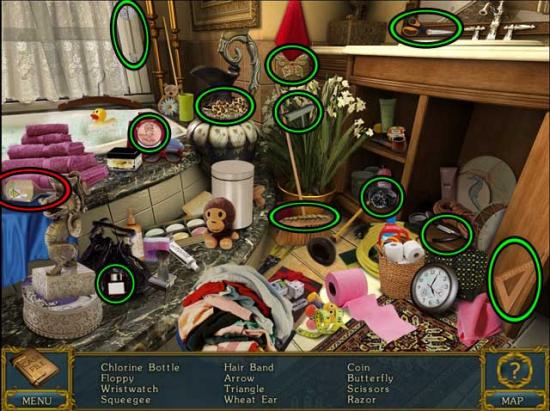
- Click on the hidden object area over the shelves.
- Find the objects listed at the bottom of the screen. The Key Item is circled in red.
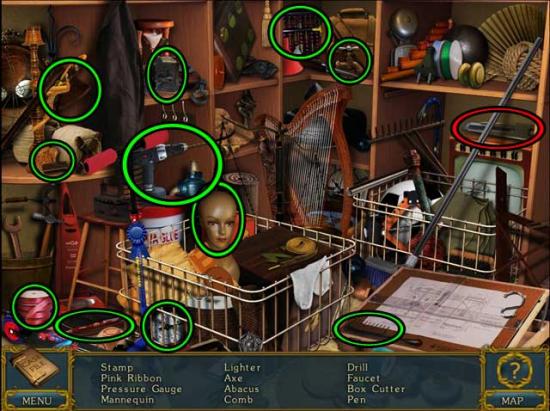
- Upon completing the area, the BOX CUTTER will be added to your inventory.
- Click on the WRENCH to add it to your inventory.
- Return to the Foyer.
Foyer
- Proceed through the lower doorway to the Hallway.
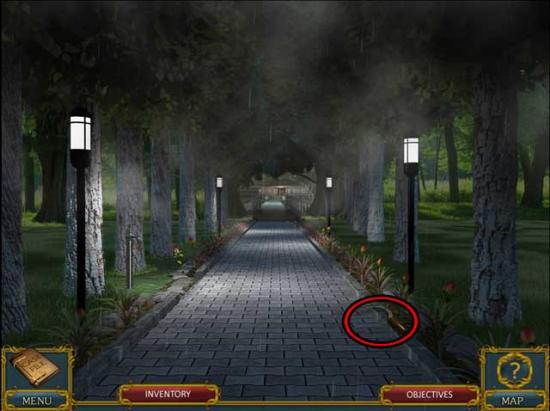
Hallway
- Take note of the scale on the left, then continue down the Hallway.
Hallway (2)
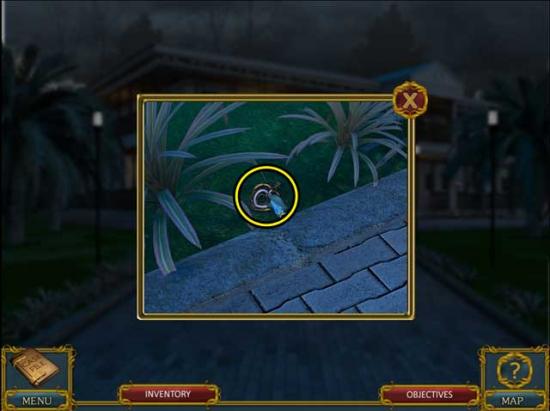
- Take a closer look at the red plant that’s farthest away. Use the TROWEL on the dirt to retrieve the NUMBERED COIN (2) and add it to your inventory. You will also find Fingerprint 2/17 here.
- Enter the Drawing Room.
Drawing Room
- Take a closer look at the fireplace and note the new objective.
- Return to the Hallway (2).
Hallway (2)
- Proceed forward into the Living Room.
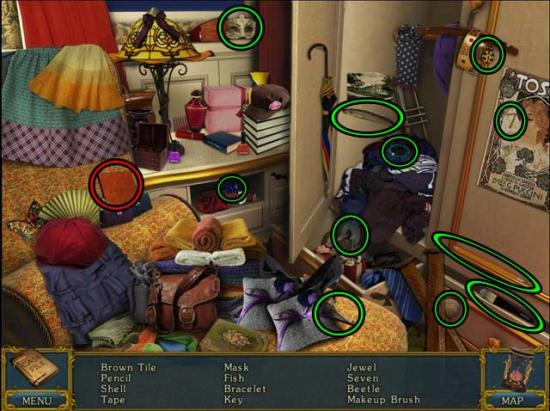
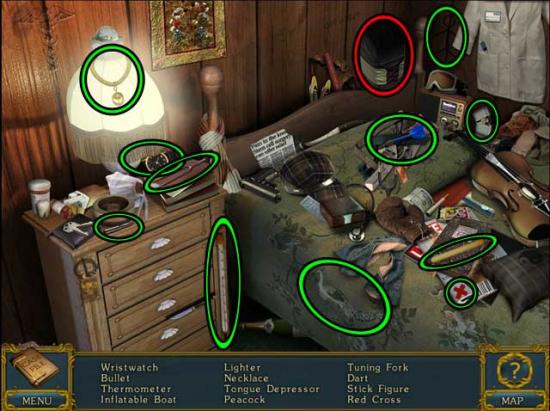
Living Room
- Examine the brown bookcase for a closer view. Collect the Fingerprint 3/17 here.
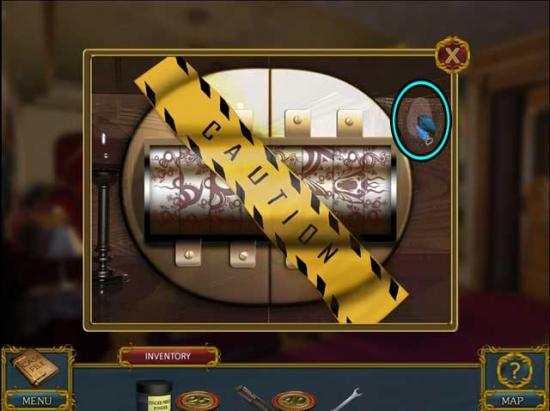
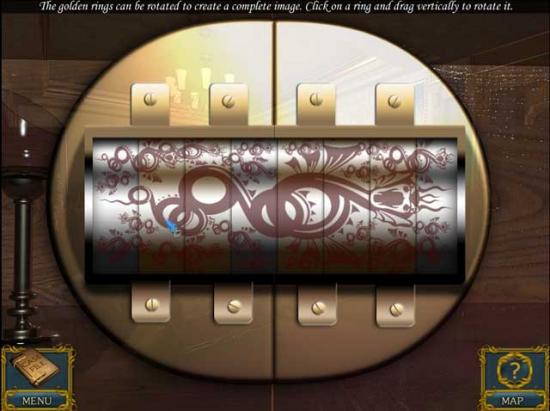
- Use the BOX CUTTER on the crime tape to remove it, triggering a puzzle.
- The golden rings can be rotated to create a complete image. Click on a ring and drag vertically to rotate it. The solution is shown below.
- Upon completing the puzzle, click on the hidden object area that appears.
- Find the objects listed at the bottom of the screen. The Key Item is circled in red.
- Upon completing the area, the Wallet will be collected.
- Return to the Foyer.
Foyer
- Proceed up the Stairs.
Stairs
- Click on the UMBRELLA and the GLOVES to add them to your inventory.
- Proceed to the right to the Upstairs Hallway.
Upstairs Hallway
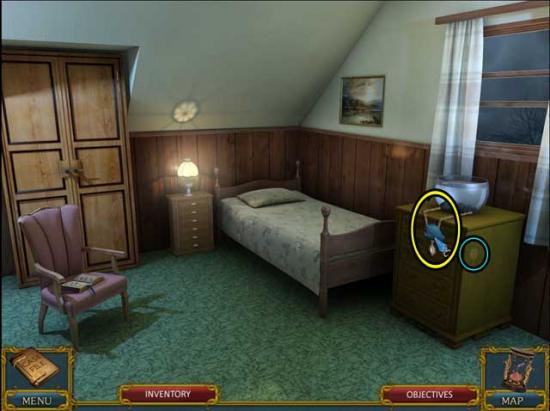
- Click on the Jewelry 1/20 to collect it.
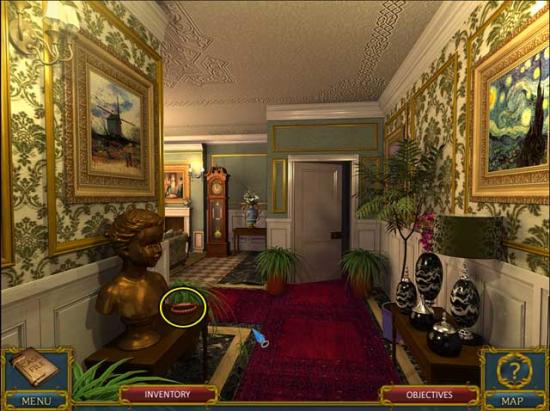
- Enter the Office.
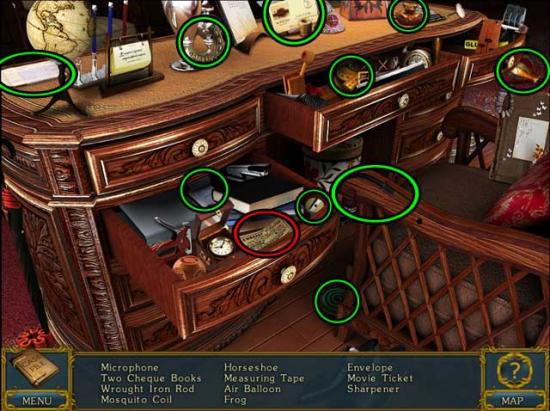
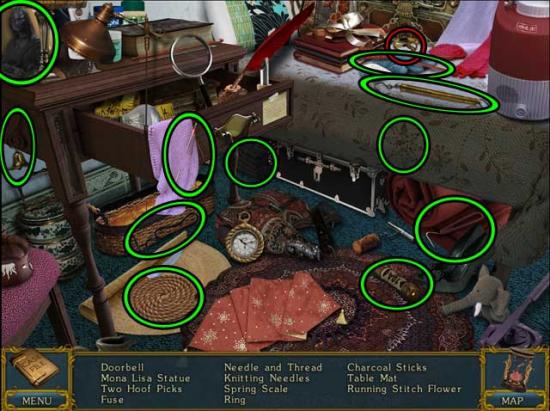
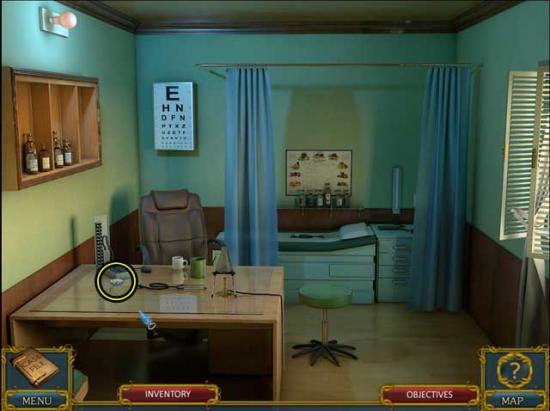
Office
- Take a closer look at the journal on the table on the left. Note the phone number of the secretary: 40786. Don’t forget to also collect Fingerprint 4/17.
- Examine the phone on the desk in the corner, then click on it to trigger a puzzle.
- Dial the number by clicking and dragging the phone dial. Press the “Reset” button to start over. Dial the number 40786 to complete the puzzle.
- Upon completing the puzzle, click on the hidden object area that appears over the desk.
- Find the objects listed at the bottom of the screen. The Key Item is circled in red.
- Upon completing the area, the NUMBERED COIN (3) will be added to your inventory.
- Return to the Upstairs Hallway.
Upstairs Hallway
- Proceed left into the Upper Living Room.
Upper Living Room
- Take a closer look at the device on the small table on the left. Use the NUMBERED COINS (x3) from your inventory on the device to trigger a puzzle.
- The numbered coins can be placed inside the empty slots below. Place the numbers so that the equation adds up to 53. The solution is shown below.
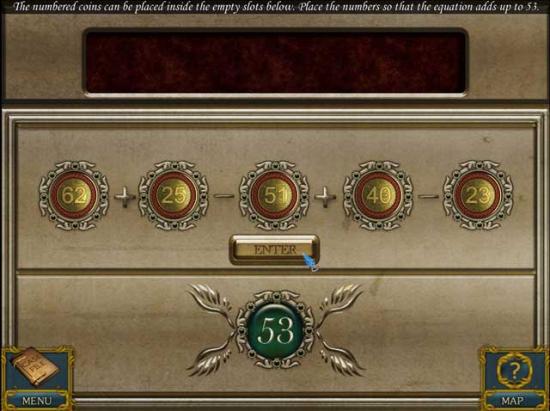
- Upon completing the puzzle, a cassette tape will play for you.
- Examine the roses lying on the floor. Click on the Fingerprint 5/17 to collect it.
- Return to the Stairs.
Stairs
- Enter the Art Gallery Balcony ahead.
Art Gallery Balcony
- Click on the WEIGHT to add it to your inventory, then click on Jewelry 2/20 to collect it.
- Proceed back down to the Foyer.
Foyer
- Speak with the Butler on the right. You will obtain a new objective, as well as the QUARTER’S GATE KEY.
Chapter 2: The Maid
- Enter the Hallway ahead.
Hallway
- Take a closer look at the scale on the left. Place the WEIGHT on the scale, then exit to the Driveway.
Driveway
- Proceed left to the Garage Gate.
Garage Gate
- You may choose to examine the trash bag or the garage, but there’s nothing you can do here just yet. Continue right to the Quarters Gate.
Quarters Gate
- Click on the BUCKET to add it to your inventory.
- Take a closer look at the gate straight ahead to trigger a puzzle.
- The keyhole is blocked by metal plates that can be moved. Click and drag to move the plates in order to uncover the keyhole. Plates can be moved in any direction. A possible solution is shown below.
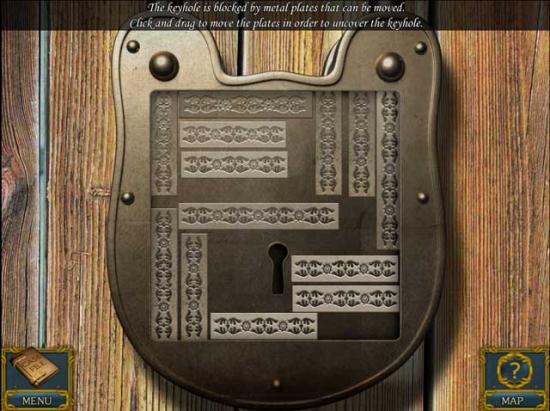
- Now that the gate is open, proceed forward to the Servant Quarters.
Servant Quarters
- Talk with the Maid standing on the right. After speaking with her, you’ll be notified that the Doctor has arrived at the mansion.
- Proceed through the middle door into the Butler’s Room.
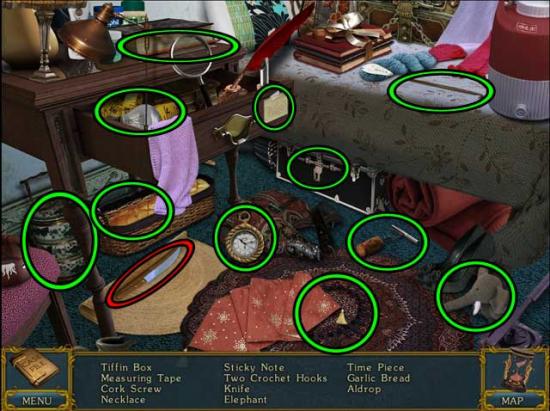
Butler’s Room
- Click on the hidden object area over the open chest on the left.
- Find the objects listed at the bottom of the screen. The Key Item is circled in red.
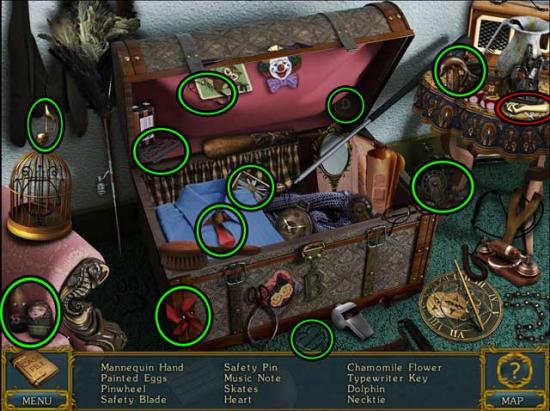
- Upon completing the area, the MANNEQUIN PART will be added to your inventory.
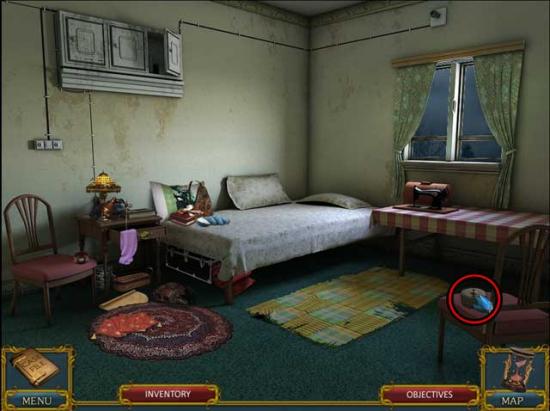
- Examine the letter lying on the pillow on the bed for more information.
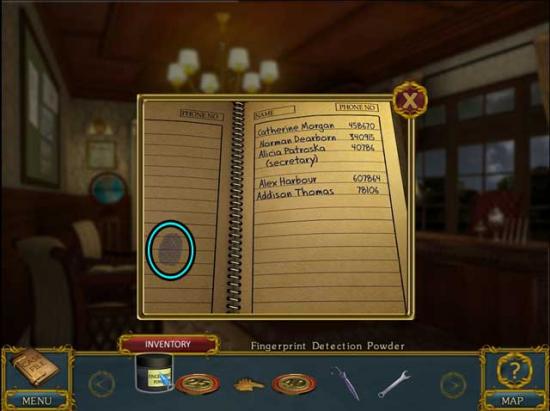
- Take a closer look at the desk at the far end of the room. Note the calendar, then click on the DRAWER KEY to add it to your inventory. Don’t forget to also collect Fingerprint 6/17.
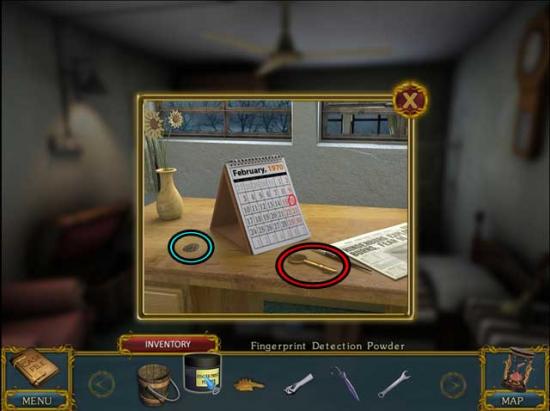
- Examine the cupboard in the corner. Use the DRAWER KEY to open it, then take a closer look inside. Note the number in the Butler’s diary: 63894675.
- Exit to the Servant Quarters.
Servant Quarters
- Enter the Laundry on the left.
Laundry
- Click on the hidden object area over the machine.
- Find the objects listed at the bottom of the screen. The Key Item is circled in red.
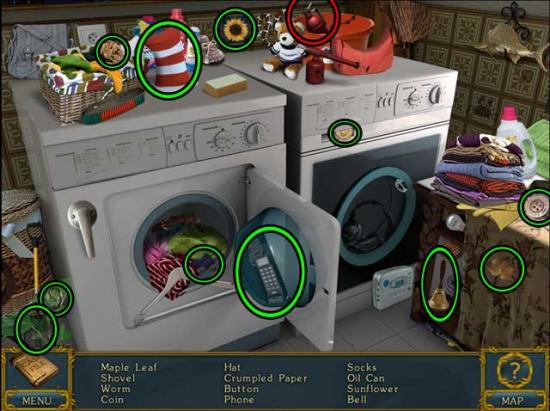
- Upon completing the area, the OIL CAN will be added to your inventory.
- Exit the area and return to the Driveway.
Driveway
- Examine the empty patch between the plants on the right. Click on the Jewelry 3/20 to collect it.
- Return to the Living Room.
Living Room
- Speak with the Doctor. Afterward, a new objective will be added.
Chapter 3: Mrs. Edward
- Return to the Upper Living Room.
Upper Living Room
- Enter the now-open Master Bedroom.
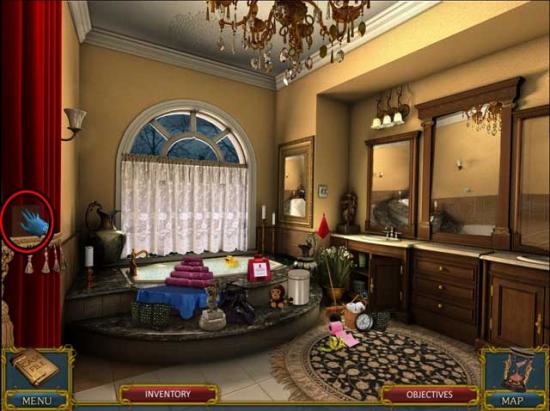
Master Bedroom
- Speak with Mrs. Edward.
- Examine the broken picture lying on the floor at the foot of the bed.
- Take a closer look at the door at the far end of the room and collect Fingerprint 7/17. Next, use the OIL CAN on the knob to open the door and proceed inside.
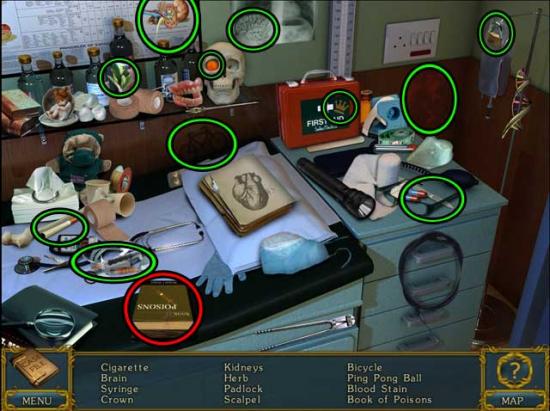
Washroom
- Click on the hidden object area over the open cabinet.
- Find the objects listed at the bottom of the screen. The Key Item is circled in red.
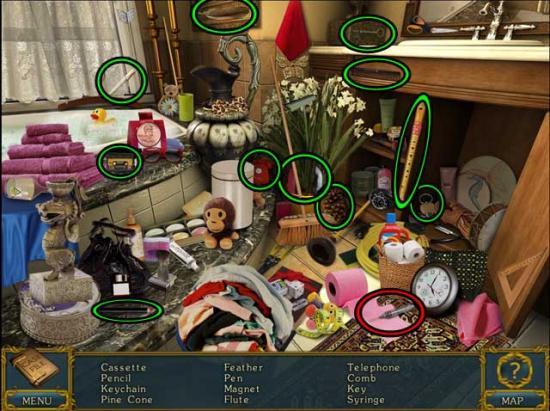
- Upon completing the area, the SYRINGE will be added to your inventory.
- Click on the WOODEN TILE to add it to your inventory.
- Return to the Master Bedroom.
Master Bedroom
- Enter the Dressing Room on the right.
Dressing Room
- Click on the hidden object area over the chair.
- Find the objects listed at the bottom of the screen. The Key Item is circled in red.
- Upon completing the area, the WOODEN TILE (2) will be added to your inventory.
- Click on the letter on the dresser on the right to read it.
- Backtrack to the Office.
Office
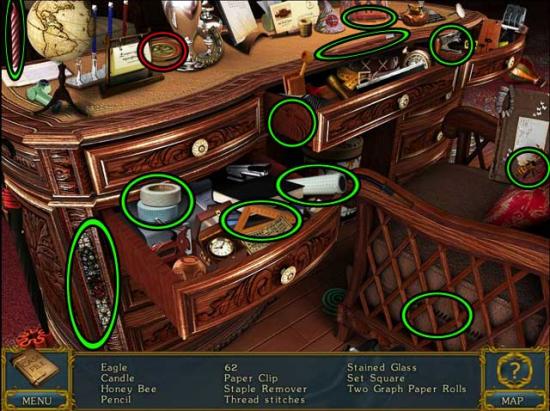
- Click on the hidden object area over the desk.
- Find the objects listed at the bottom of the screen. The Key Item is circled in red.
- Upon completing the area, the MOVIE TICKET will be added to your inventory.
- Exit the mansion.
Chapter 4: The Doctor
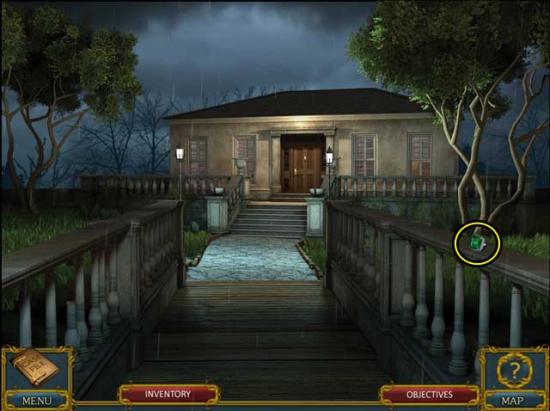
Entrance
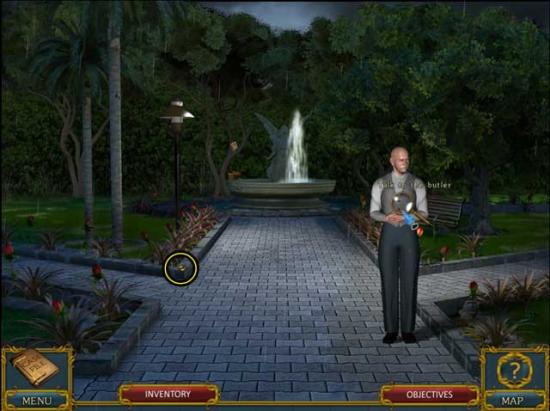
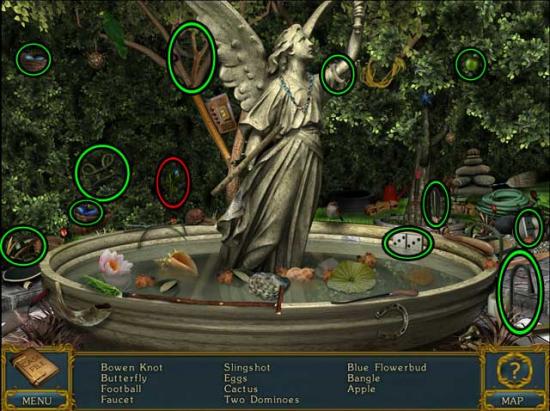
- Proceed right to the Fountain.
Fountain
- Speak with the Butler.
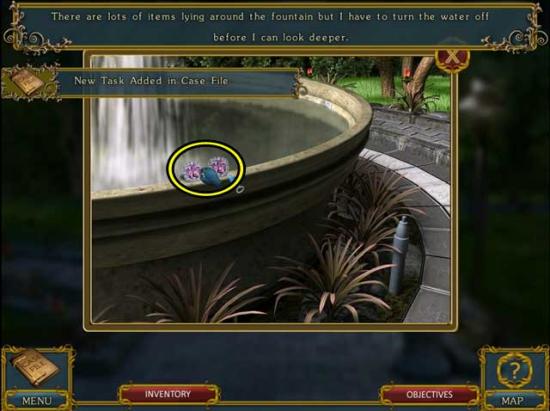
- Click on the Jewelry 4/20 to collect it.
- Examine the Fountain ahead. Click on the Jewelry 5/20 to collect it.
- Back in the main Fountain area, proceed left to the Boutique Door.
Boutique Door
- Click on the Jewelry 6/20 to collect it and the MOSQUITO REPELLENT SPRAY to add it to your inventory.
- Examine the door and note that it’s locked. Return to the Fountain.
Fountain
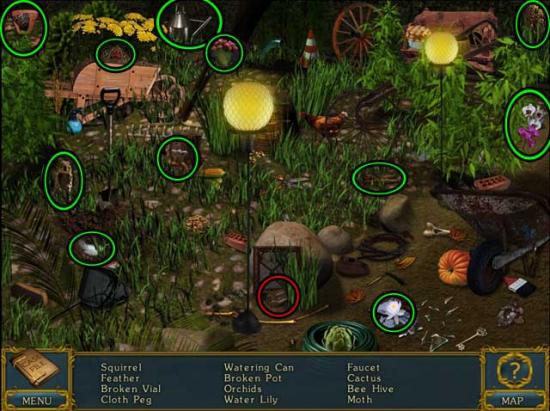
- Proceed right to the Garden.
Garden
- Click on the SICKLE to add it to your inventory.
- Take a closer look at the spigot on the left. Use the BUCKET on the spigot, then use the WRENCH to loosen it. You will obtain the FILLED BUCKET.
- Proceed forward to the Bridge.
Bridge
- Click on the Jewelry 7/20 to collect it.
- Proceed forward to enter the Clinic Living Room.
Clinic Living Room
- Click on the Jewelry 8/20 to collect it.
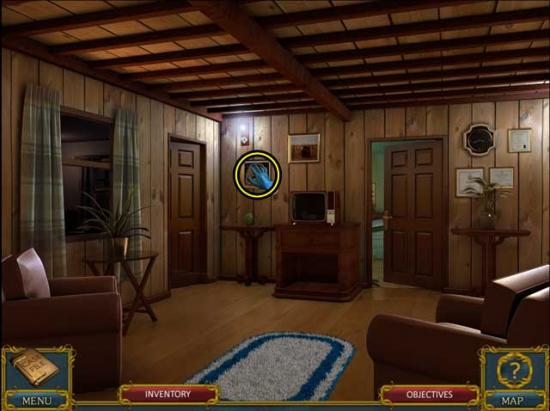
- Enter the Bedroom on the left.
Bedroom
- Click on the hidden object area over the bed.
- Find the objects listed at the bottom of the screen. The Key Item is circled in red.
- Upon completing the area, the INFLATABLE BOAT will be added to your inventory.
- Examine the journal sitting on the chair on the left for an important clue.
- Click on the Jewelry 9/20 and the Fingerprint 8/17 to collect them.
- Return to the Clinic Living Room.
Clinic Living Room
- Proceed forward to enter the Clinic.
Clinic
- Click on the hidden object area over the examination table.
- Find the objects listed at the bottom of the screen. The Key Item is circled in red.
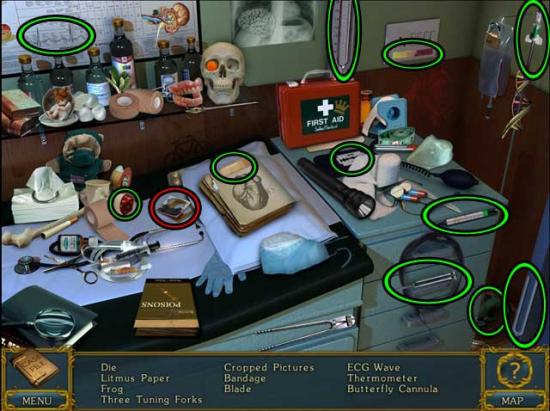
- Upon completing the area, the CROPPED PICTURES will be added to your inventory.
- Before leaving, collect the Fingerprint 9/17.
- Exit to the Clinic Living Room.
Clinic Living Room
- Speak with the Doctor.
- Return to the Drawing Room of the mansion.
Chapter 5: Outside the Mansion
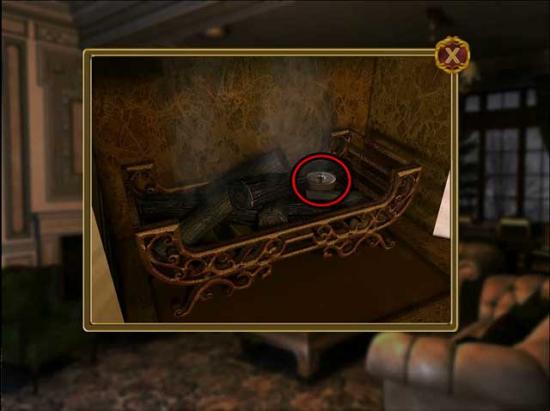
Drawing Room
- Examine the fireplace for a closer view. Use the FILLED BUCKET on the fire, then click on the WEIGHT to add it to your inventory.
- Return to the Hallway.
Hallway
- Examine the scale on the left. Use the WEIGHT on the scale, then exit to the Garage Gate outside.
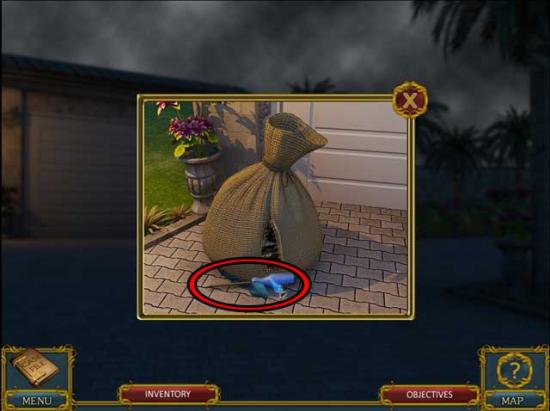
Garage Gate
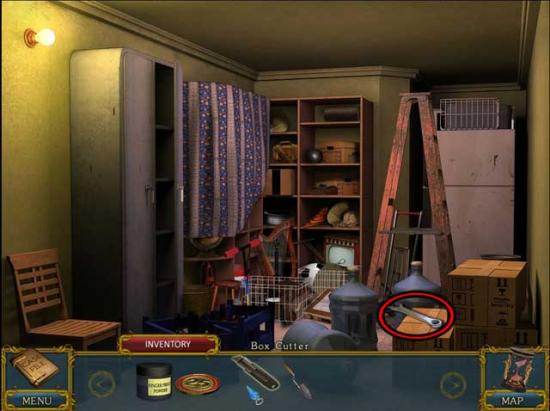
- Take a closer look at the trash bag on the left side of the garage. Use the SICKLE to tear it open, then click on the SCREWDRIVER to add it to your inventory.
- Continue right to the Quarters Gate.
Quarters Gate
- Examine the illuminated box on the right. Use the SCREWDRIVER to remove the cover panel, then use the GLOVES to restore the switch. The panel should be complete now.
- Backtrack to the Living Room.
Living Room
- Enter the Kitchen on the right.
Kitchen
- Click on the hidden object area over the counter on the right.
- Find the objects listed at the bottom of the screen. The Key Item is circled in red.

- Upon completing the area, the WEIGHT will be added to your inventory.
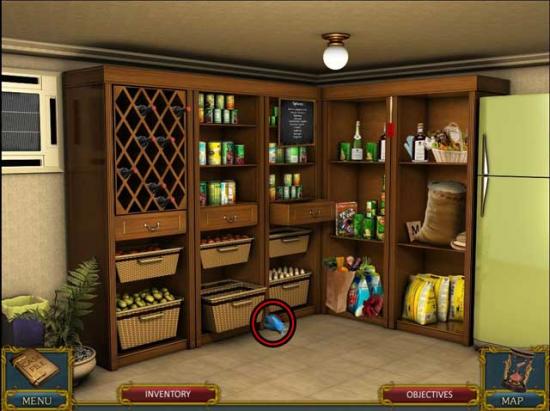
- Enter the Storage Area on the left.
Storage Area
- Click on the hidden object area over the pantry.
- Find the objects listed at the bottom of the screen. The Key Item is circled in red.
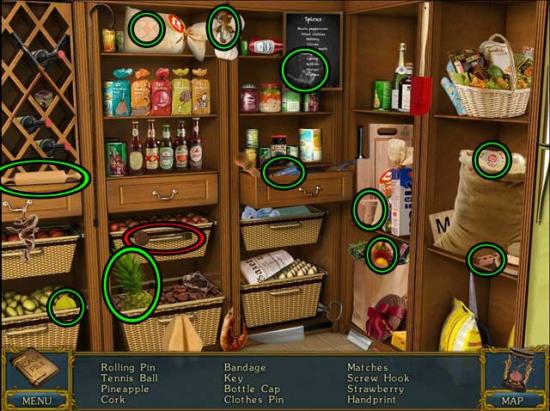
- Upon completing the area, the SPARE KEY FOR MAID’S ROOM will be added to your inventory.
- Click on the VALVE to add it to your inventory.
- Return to the Hallway.
Hallway
- Take a closer look at the scale on the left. Place the WEIGHT on the scale, then exit back outside to the Fountain.
Fountain
- Use the VALVE on the pipe on the right to turn off the flow of water to the Fountain.
- Click on the hidden object area that appears over the Fountain.
- Find the objects listed at the bottom of the screen. The Key Item is circled in red.
- Upon completing the area, the PICTURE TILE will be added to your inventory.
- Return to the Servant Quarters.
Servant Quarters
- Examine the door on the right. Use the SPARE KEY FOR MAID’S ROOM on the lock and proceed inside.
Maid’s Room
- Click on the hidden object area over the small table on the left.
- Find the objects listed at the bottom of the screen. The Key Item is circled in red.
- Upon completing the area, the RING will be added to your inventory.
- Click on the WEIGHT on the right to add it to your inventory.
- Return to the Master Bedroom.
Chapter 6: The Art Gallery
Master Bedroom
- Speak with Mrs. Edward.
- Return downstairs to the Hallway. The Secretary has arrived.
Hallway
- Examine the scale on the left. Use the WEIGHT on the scale to trigger a puzzle.
- Pick weights from the top bar and place them on either side of the scale to try and balance it. You can move weights back to the top bar if they’re not correct, and then reposition them from there. Upon completing the puzzle, the door next to the scale will open.
- Enter the Art Gallery.
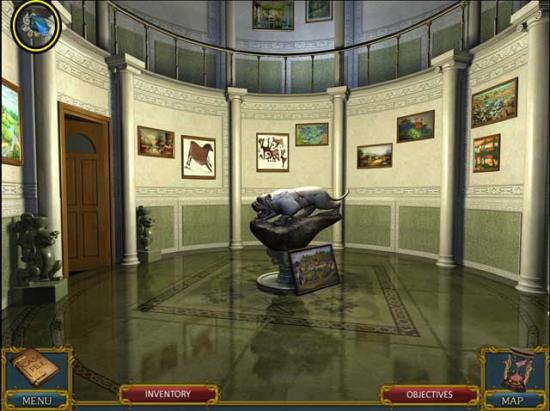
Art Gallery
- Click on the hidden object area over the painting at the base of the statue.
- Find the 12 dragons. Their locations are shown below.
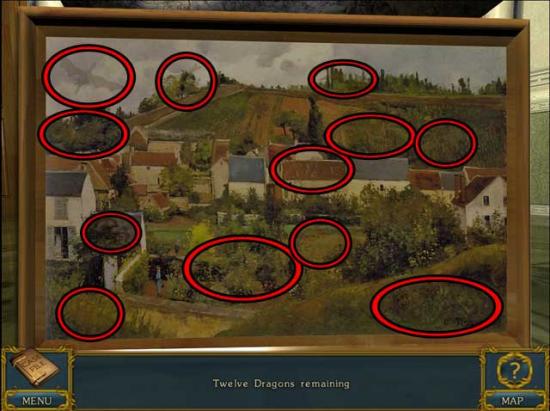
- Upon completing the area, the DRAGON EMBLEMS will be added to your inventory.
- Click on the Jewelry 10/20 to collect it.
- Enter the Study on the left.
Study
- Click on the hidden object area over the desk.
- Find the objects listed at the bottom of the screen. The Key Item is circled in red.
- Upon completing the area, the LIGHTER will be added to your inventory.
- Examine the box sitting on the small table on the right. Use the WOODEN TILES (x2) on the top of the box to restore it, then click for a closer view, triggering a puzzle.
- Each square contains an image that pairs with another image in some other square. Match all the pairs to complete this puzzle. The solution is shown below.
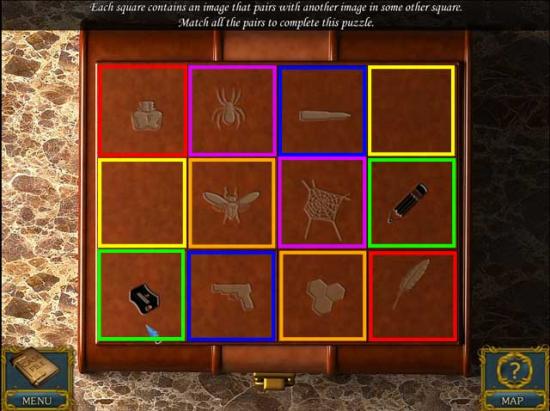
- Upon completing the puzzle, take a closer look inside the box and take note of the odd sketch.
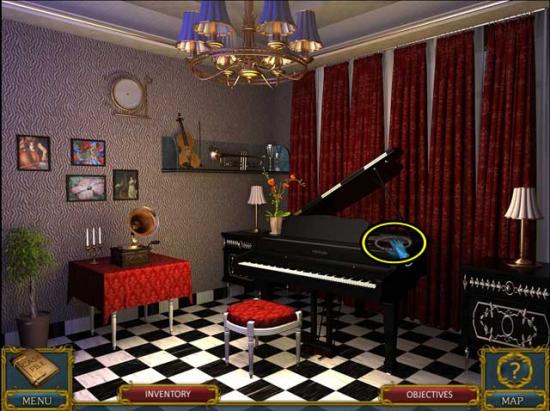
- Enter the Music Room via the door on the left.
Music Room
- Take a closer look at the gramophone. Note that the disc is missing. Click on the Fingerprint 10/17 to collect it.
- Back in the main view, click on the Jewelry 11/20 to collect it.
- Proceed to the Drawing Room.
Drawing Room
- Speak with the Secretary. Once she’s gone, click on the hidden object area that appears where she was previously sitting.
- Find the objects listed at the bottom of the screen. The Key Item is circled in red.
- Upon completing the area, the MOVIE TICKET (2) will be added to your inventory.
- Proceed to the Office.
Chapter 7: The Garage
Office
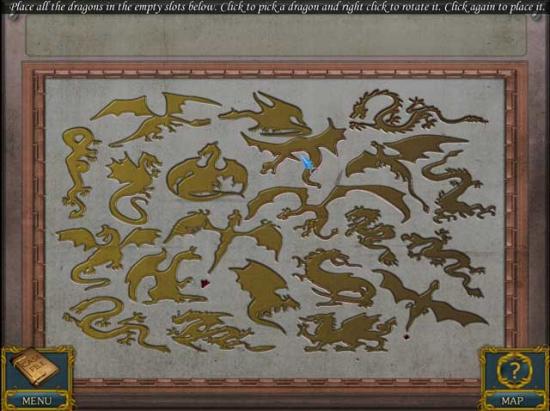
- Examine the door at the far end of the room. Use the DRAGON EMBLEMS on the door to trigger a puzzle.
- Place all the dragons in the empty slots below. Click to pick a dragon and right click to rotate it. Click again to place it. The solution is shown below.
- Enter the Workshop.
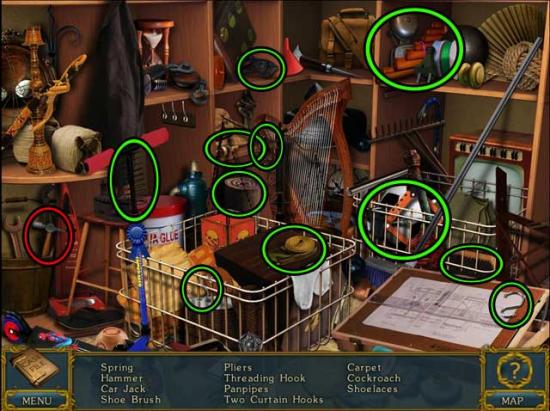
Workshop
- Click on the hidden object area over the work bench in the middle of the room.
- Find the objects listed at the bottom of the screen. The Key Item is circled in red.
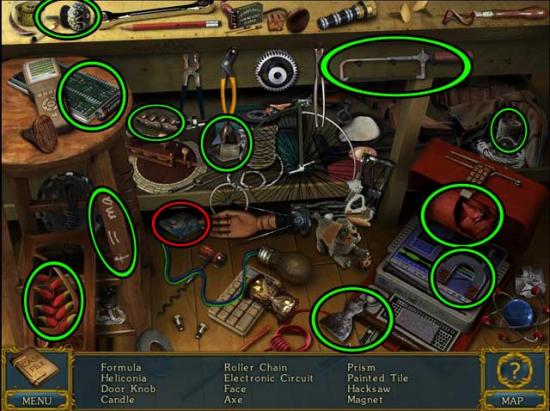
- Upon completing the area, the PICTURE TILE (2) will be added to your inventory.
- Click on the Jewelry 12/20 to collect it.

- Examine the painting on the wall on the far left. Place the PICTURE TILES (x2) into the empty slots, then exit for now.
- Return to the Master Bedroom.
Master Bedroom
- Talk with Mrs. Edward.
- Backtrack all the way back to the Butler’s Room.
Butler’s Room
- Click on the hidden object area over the open chest at the foot of the bed.
- Find the objects listed at the bottom of the screen. The Key Item is circled in red.
- Upon completing the area, the BATTERY will be added to your inventory.
- Return to the Maid’s Room.
Maid’s Room
- Click on the hidden object area over the small table on the left.
- Find the objects listed at the bottom of the screen. The Key Item is circled in red.
- Upon completing the area, the KNIFE will be added to your inventory.
- Return to the Garage Gate.
Garage Gate
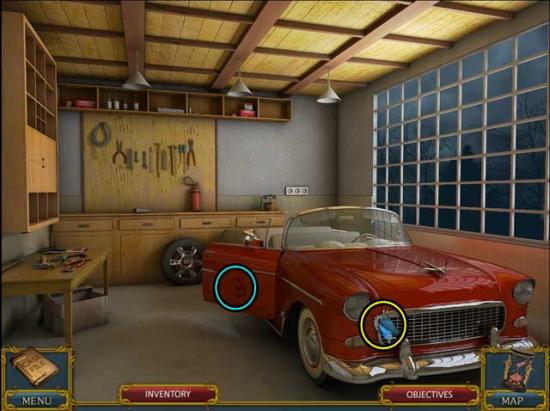
- Take a closer look at the panel on the right side of the garage. Use the BATTERY on the empty slot, then input the code 63894675 and press Enter.
- Enter the Garage.
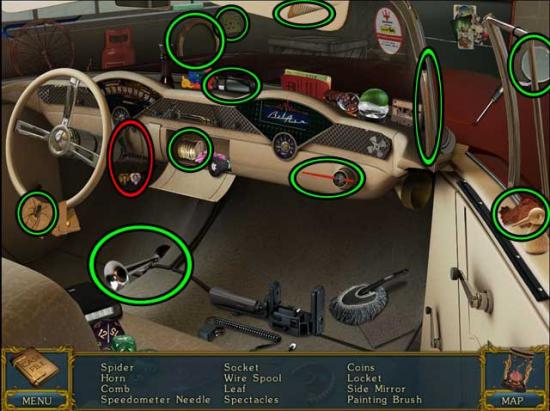
Garage
- Click on the hidden object area inside the car.
- Find the objects listed at the bottom of the screen. The Key Item is circled in red.
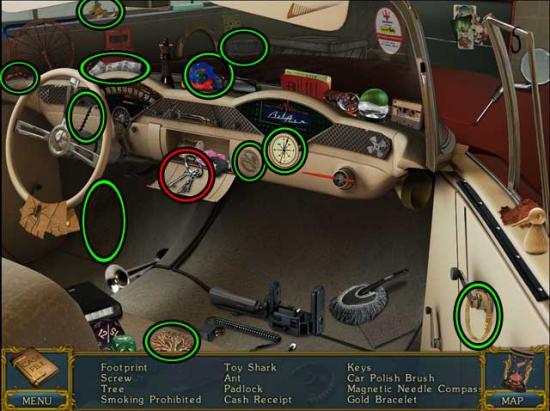
- Upon completing the area, the BOUTIQUE KEYS will be added to your inventory.
- Click on the Jewelry 13/20 and the Fingerprint 11/17 to collect them.
- Exit the Garage and make your way back to the Boutique Door.
Chapter 8: The Boutique
Boutique Door
- Take a closer look at the front door, which is locked. Use the BOUTIQUE KEYS on the door to open it and gain access inside.
Passage
- Enter the Boutique on the left.
Boutique
- Click on the hidden object area over the table at the very back of the room.
- Find the objects listed at the bottom of the screen. The Key Item is circled in red.
- Upon completing the area, you will obtain the LAWYER’S DOCUMENTS.
- After you’ve read the documents and find yourself back in the main area, collect the Fingerprint 12/17 and the Jewelry 14/20.
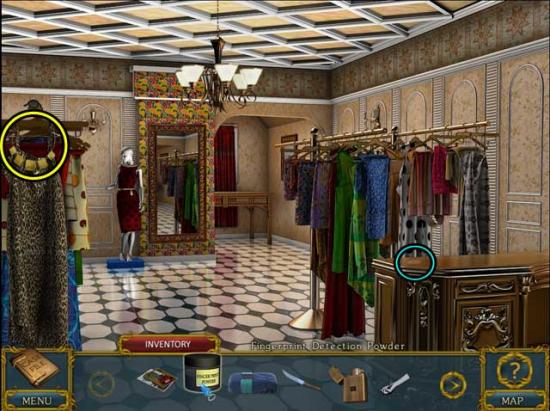
- Examine the mannequin at the back of the room. Place the MANNEQUIN PART on the missing hand area of the arm to trigger a puzzle.
- Click on the mannequin head and arms to modify its pose. The correct positioning is shown below.
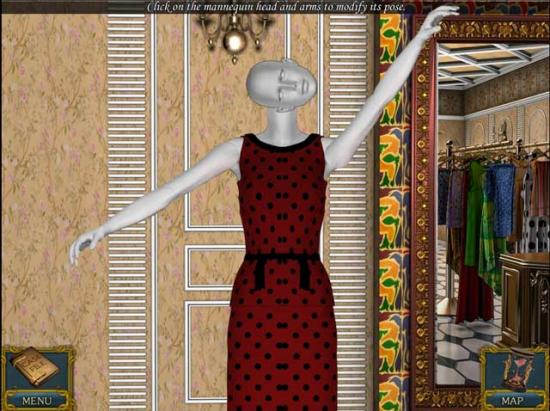
- Upon completing the puzzle, click on the BACKYARD KEYS to add them to your inventory, and read the letter stowed inside.
- Exit back to the Passage.
Passage
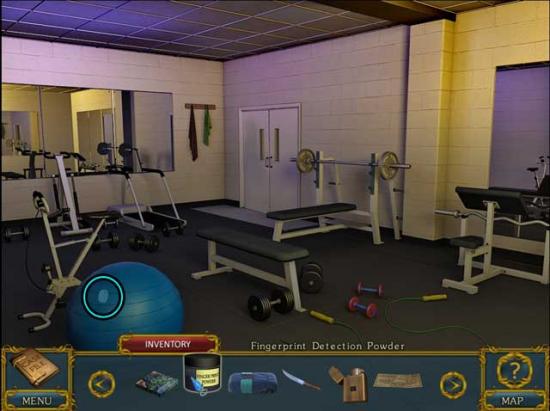
- Enter the Exercise Area.
Exercise Area
- Click on the hidden object area over the center weight bench.
- Find the objects listed at the bottom of the screen. The Key Item is circled in red.
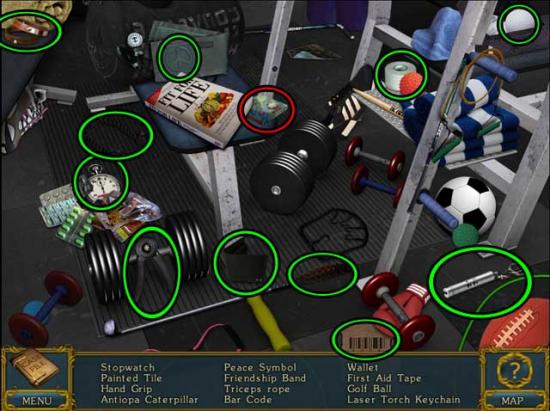
- Upon completing the area, the PICTURE TILE will be added to your inventory.
- Before leaving, collect the Fingerprint 13/17.
- Return to the Living Room inside the mansion.
Chapter 9: The Boathouse
Living Room
- Examine the doors at the back of the room. Use the BACKYARD KEYS on the lock to open the door and proceed outside.
Backyard
- Examine the footprints near the potted plant on the right.
- There’s no way to proceed through the thicket for now, so return to the Storage Area within the Kitchen.
Storage Area
- Click on the hidden object area over the pantry.
- Find the objects listed at the bottom of the screen. The Key Item is circled in red.
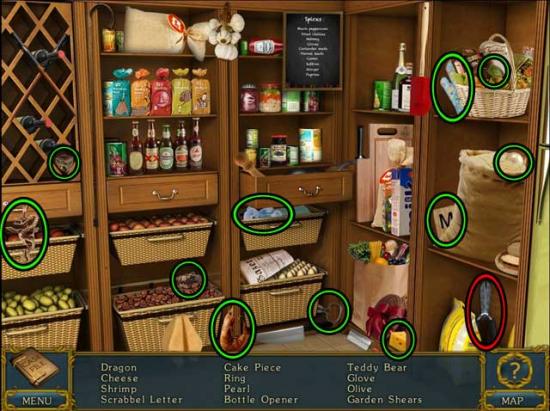
- Upon completing the area, the GARDEN SHEARS will be added to your inventory.
- Return to the Backyard.
Backyard
- Use the GARDEN SHEARS on the thicket to remove it.
- Take a closer look at the left side of the stones bordering the path. Use the MOSQUITO REPELLENT SPRAY on the insects to get rid of them, then click on the hidden object area that appears over the same area.
- Find the objects listed at the bottom of the screen. The Key Item is circled in red.
- Upon completing the area, the INJECTION VIAL will be added to your inventory.
- Proceed forward down the path to the Riverside.
Riverside
- Click on the Jewelry 15/20 to collect it.
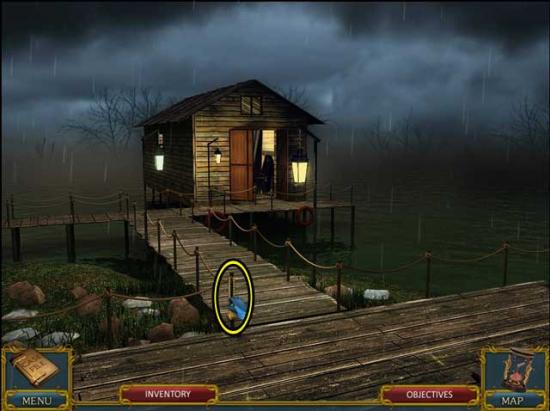
- Enter the Boathouse.
Boathouse
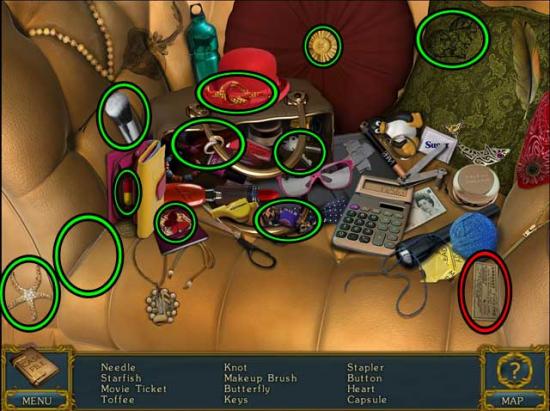
- Click on the hidden object area in the left corner.
- Find the objects listed at the bottom of the screen. The Key Item is circled in red.
- Upon completing the area, the BUKA SEEDS will be added to your inventory.
- Click on the Fingerprint 14/17 and the Jewelry 16/20 to collect them.
- Use the INFLATABLE BOAT on the air pump lying on the floor to fill it with air, then take a closer look inside the boat and examine the footprint inside.
- Backtrack all the way back to the Study.
Chapter 10: Catching a Killer
Study
- Click on the Jewelry 17/20 to collect it.
- Return to the Store via the Foyer.
Store
- Click on the hidden object area over the shelves.
- Find the objects listed at the bottom of the screen. The Key Item is circled in red.
- Upon completing the area, the HAMMER will be added to your inventory.
- Return to the Hallway (2).
Hallway (2)
- Take a closer look at the framed record on the right wall. Use the HAMMER to break the glass, then click on the GRAMOPHONE DISC inside to add it to your inventory.
- Return to the Music Room.
Music Room
- Take a closer look at the gramophone sitting on the table. Use the GRAMOPHONE DISC on the gramophone. You will acquire the PICTURE TILE (2).
- Make your way back to the Workshop.
Workshop
- Examine the framed painting on the far left. Use the PICTURE TILES (x2) on the gaps to trigger a puzzle.
- Swap tiles to create a complete image. Clicking on any tile swaps it with the tile above. The solution is shown below.
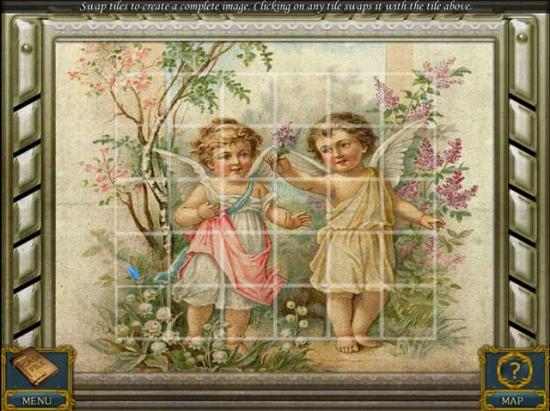
- Upon completing the puzzle, enter the Secret Office.
Secret Office
- Click on the Jewelry 18/20 and the Fingerprint 15/17 to collect them. (Note: the Fingerprint will likely end up on the corner of the nearby shelf once you powder it. It can be hard to see.)
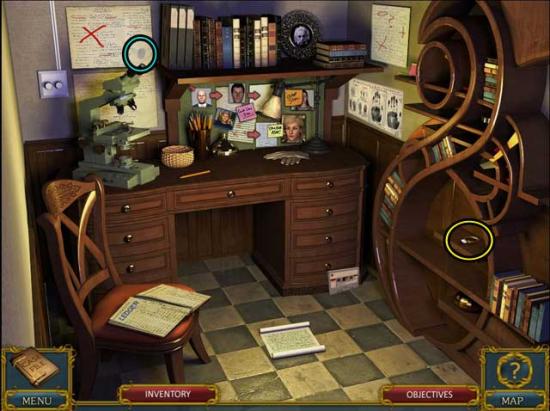
- Click on the CASETTE lying on the floor to add it to your inventory.

- Take a closer look at the microscope on the desk. Use the INJECTION VIAL on it to trigger a puzzle.
- Select a suspect fingerprint from the right side panel and find the one that matches the fingerprint on the vial. Move dials left and right to rotate them and try to match the fingerprints. The correct fingerprint is Charles, and the correct alignment is shown below.
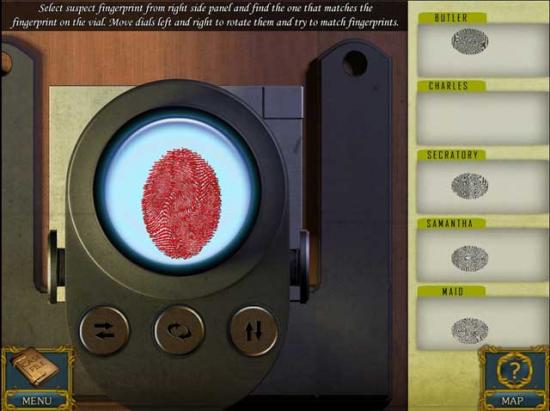
- Return to the Workshop.
Workshop
- Click on the hidden object area over the center workbench.
- Find the objects listed at the bottom of the screen. The Key Item is circled in red.
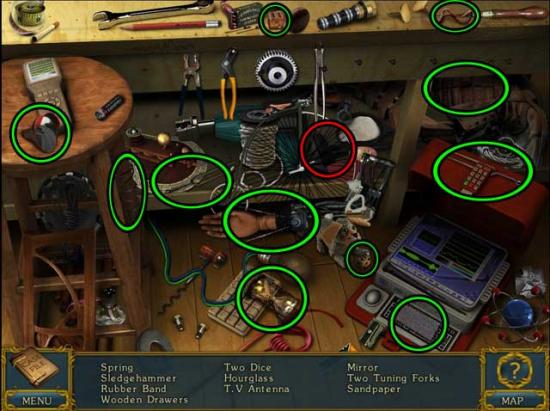
- Upon completing the area, the SLEDGEHAMMER will be added to your inventory.
- Make your way back outside to the Bridge.
Bridge
- A vicious dog blocks the way. You won’t be able to pass just yet.
- Return to the Kitchen.
Kitchen
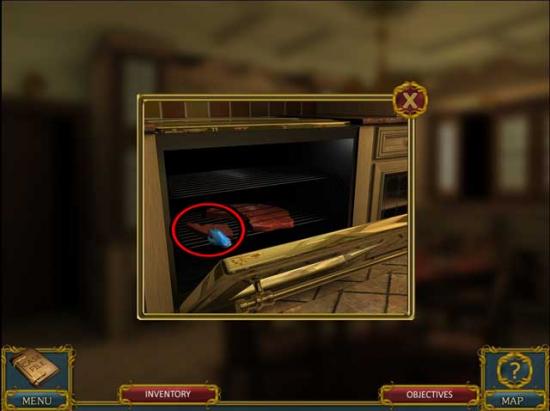
- Take a closer look at the golden oven. Use the KNIFE on the steak inside to cut off a piece, then click on the smaller MEAT to add it to your inventory.
- Return to the Bridge.
Bridge
- Use the MEAT on the dog to make it go away, then take a closer look at the front door of the Clinic: it’s locked. Click on the Fingerprint 16/17 to collect it.
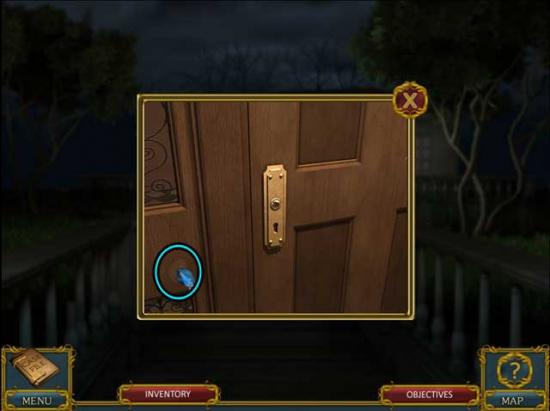
- Examine the window on the far right of the building. Click on the Jewelry 19/20 and the Fingerprint 17/17 to collect them, then use the SLEDGEHAMMER to break open the window and proceed inside.

Clinic Living Room
- Take a closer look at the rightmost door leading into the Clinic. It’s locked. Collect the Fingerprint 18/17 (Yes, there is an extra!).
- Enter the Bedroom on the left.
Bedroom
- Click on the hidden object area over the pillow on the bed.
- Find the objects listed at the bottom of the screen. The Key Item is circled in red.
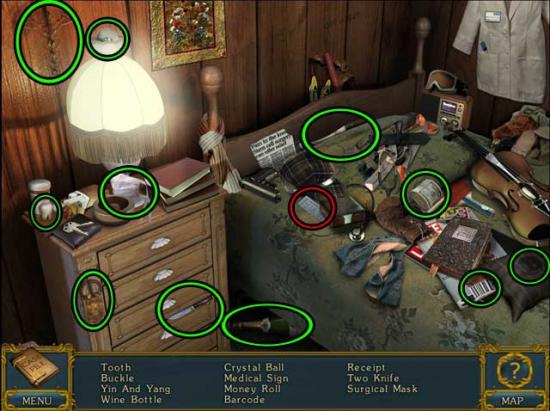
- Upon completing the area, the RECEIPT will be collected.
- Make your way all the way back to the Upper Living Room inside the mansion.
Upper Living Room
- Take a closer look at the tape playing device on the left. Use the CASSETTE on the device to listen to the message.
- Return to the Drawing Room.
Drawing Room
- Click on the hidden object area over the loveseat.
- Find the objects listed at the bottom of the screen. The Key Item is circled in red.
- Upon completing the area, the BOBBY PIN will be added to your inventory.
- Backtrack to the Clinic Living Room.
Clinic Living Room
- Take a closer look at the locked door on the right again. Use the BOBBY PIN to unlock it and proceed inside.
Clinic
- Click on the hidden object area over the examination table.
- Find the objects listed at the bottom of the screen. The Key Item is circled in red.
- Upon completing the area, the BOOK OF POISONS will be collected.
- Read and examine the book.
- Back in the main area, click on the final piece of Jewelry 20/20 to collect it.
- Make your way back to the Fountain.
Fountain
- Click on the hidden object area over the Fountain.
- Find the objects listed at the bottom of the screen. The Key Item is circled in red.
- Upon completing the area, the FLOWER BUD will be added to your inventory.
- Return to the Boutique.
Boutique
- Click on the hidden object area over the table at the back of the room.
- Find the objects listed at the bottom of the screen. The Key Item is circled in red.
- Upon completing the area, the SCISSORS will be added to your inventory.
- Make your way back to the Garage.
Garage
- Click on the hidden object area over the car.
- Find the objects listed at the bottom of the screen. The Key Item is circled in red.
- Upon completing the area, the LOCKET will be added to your inventory.
- Return to the Living Room.
Living Room
- Click on the hidden object area over the bookcase.
- Find the objects listed at the bottom of the screen. The Key Item is circled in red.
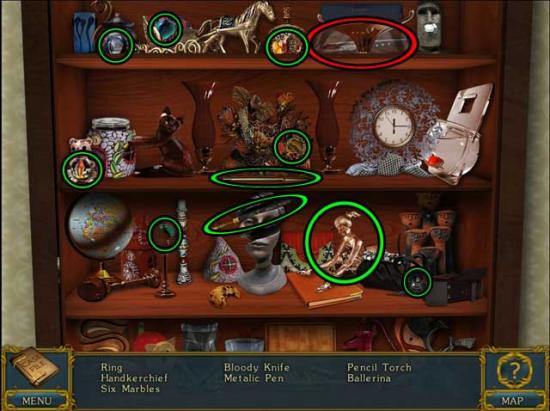
- Upon completing the area, the BLOOD STAINED DAGGER will be added to your inventory.
- Enter the Kitchen.
Kitchen
- Click on the hidden object area over the counter on the right.
- Find the objects listed at the bottom of the screen. The Key Item is circled in red.
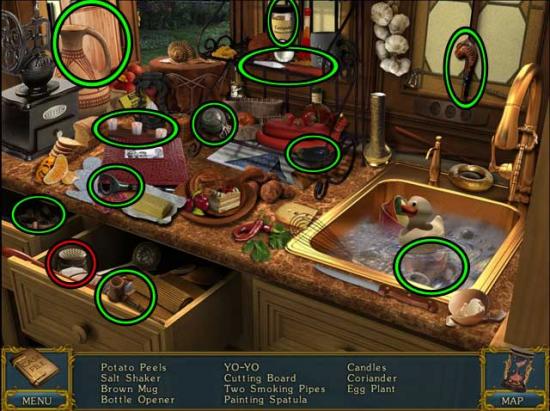
- Upon completing the area, the SALT will be added to your inventory.
- Backtrack to the Washroom.
Washroom
- Click on the hidden object area over the open cupboard.
- Find the objects listed at the bottom of the screen. The Key Item is circled in red.
- Upon completing the area, the CHLORINE will be added to your inventory.
- Return to the Clinic.
Clinic
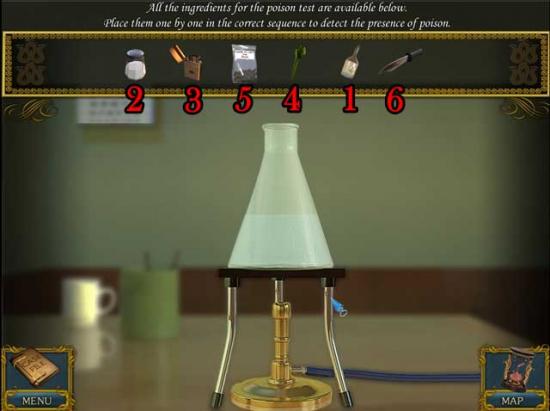
- Take a closer look at the experimental equipment on the desk. This will trigger a puzzle.
- All the ingredients for the poison test are available below. Place them one by one in the correct sequence to detect the presence of poison. The sequence is as follows: Chlorine > Salt > Burner (Lighter) > Henbane Flower > Buka Seeds > Blood.
- Watch the final cutscene.
Congratulations! You’ve completed Entwined: Strings of Deception!

More articles...
-
Best Horror Games On Itch.io – July 2026
Across a bounty of subgenres. -
Haze Seas Accessories Tier List [Best Accessories to Equip]
The accessories with the best stat buffs in Haze Seas.