
Grow A Garden 2 Base Price List
What's the most valuable crop?![Evomon Best Starter [Leafbun, Blazpup, or Bubble?]](/wp-content/uploads/2026/06/evomon-best-starter.jpg "Evomon Best Starter [Leafbun, Blazpup, or Bubble?]")
Evomon Best Starter [Leafbun, Blazpup, or Bubble?]
Grass-type, Fire-type, or Water-type?![Evomon Tier List [META and BEST Evomon]](/wp-content/uploads/2026/06/evomon-tier-list.jpg "Evomon Tier List [META and BEST Evomon]")
Evomon Tier List [META and BEST Evomon]
The Evomon dream team.
![[Roblox] Evomon Shiny Hunting Guide – Including Prismatic and Pris Shinies!](/wp-content/uploads/2026/06/evomon-shiny-hunting-guide.jpg "[Roblox] Evomon Shiny Hunting Guide – Including Prismatic and Pris Shinies!")
Enigmatis: The Ghosts of Maple Creek Walkthrough
Welcome to the Enigmantis: Ghosts of Maple Creek Collector’s Edition walkthrough on Gamezebo. Enigmantis: Ghosts of Maple Creek Collector’s Edition is a Hidden Object Game played on the PC created by Artifex Mundi. This walkthrough includes tips and tricks, helpful hints and a strategy guide on how to complete Enigmantis: Ghosts of Maple Creek Collector’s Edition.


- Prefer Gamezebo on Google

Enigmatis: The Ghosts of Maple Creek – Game Introduction
Welcome to the Enigmantis: Ghosts of Maple Creek Collector’s Edition walkthrough on Gamezebo. Enigmantis: Ghosts of Maple Creek Collector’s Edition is a Hidden Object Game played on the PC created by Artifex Mundi. This walkthrough includes tips and tricks, helpful hints and a strategy guide on how to complete Enigmantis: Ghosts of Maple Creek Collector’s Edition.
General Tips
This hidden object game requires visiting several locations and using inventory items to advance play.
- Play is mostly linear although there are some options for the order in which to explore locations.
- The Hint button is a good tool for determining the next location to explore.
- CAPITALIZED inventory items are meant to make it easier to find where this guide may deviate from your own play.
- Always move the cursor around a scene. Watch the cursor to see if it changes into a hand or magnifying glass.
Main Menu:
- Play – Begin or resume a game. The first time you play you must select a difficulty level:
- Regular – Hint and Skip buttons recharge faster. Active zones glimmer frequently. There are no mis-click penalties in the hidden object scenes. The player character gives more direct hints. Locations with an available action are indicated on the map in the notebook.
- Expert – Hint and Skip buttons take longer to recharge. Active zones are not indicated. A mis-click penalty is assessed in hidden object scenes. There are fewer direct hints from the player character and available action areas are not shown on the map in the notebook.
- Options – Change music and sound effects volume. Switch between Expert and Regular difficulty levels. You may select or deselect full screen, aspect correction and a custom cursor.
- Help – Describes how to interact with the game.
- Exit – Quit the game.
- Extras – Concept art, wallpapers, videos, hidden object scenes and bonus play are only available after completing the game.
- Profiles – Click the “If this is not you – CLICK HERE” link to create, delete or switch player profiles.
- More Info – Contains the strategy guide, credits and a link to the Big Fish Games website for forum help.
Screen Navigation:
- Menu – Change your options, resume the game, see the help screens or return to the main menu.
- Hint/Skip Bar – Clicking will show a random item from an itemized list. Hints are not limited and the bar refills quickly in regular play mode. The bar turns into a Skip bar for puzzles.
- Notebook – Clicking an object can add clues or information. The notebook glows when new information is added.
- Inventory/Item List – A scrollable list of icons showing available items or a list of hidden items to be collected.
Symbol Meanings:
- Magnifying Glass – Zoom in on interactive area.
- Gears – Interact with an object: open a door or move an object.
- Hand – Pick up an object.
- Sparkles – Hidden object areas.
Walkthrough
A short clip explains the background and introduces the story line for play.
If you are not familiar with hidden object games, click “Yes” when asked if you would like a tutorial. This will show you how to interact with objects and characters.
The objects for hidden object scenes are randomly generated. That is why only inventory items are shown in this walkthrough. They are highlighted in white with a blue border. Objects listed in blue require an extra step to find them. Move your cursor around until the cursor turns into a set of gears.
With the exception of a hidden object area, most inventory items are not collected from a scene until they are needed.
Assumptions:
- You know to click through the conversations with characters.
- After you have gone back and forth between locations more than once, you don’t need to be told how many times to go up or down. Refer to the map in the notebook as needed.
- Just as in the movies, you will always enter a darkened door, window or cave.
This guide is written using Regular play mode.
Chapter 1: The Arrival

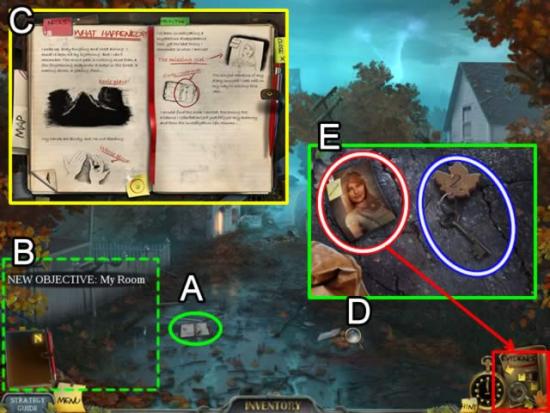
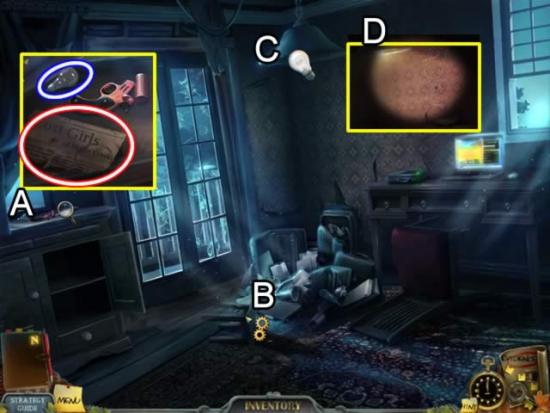
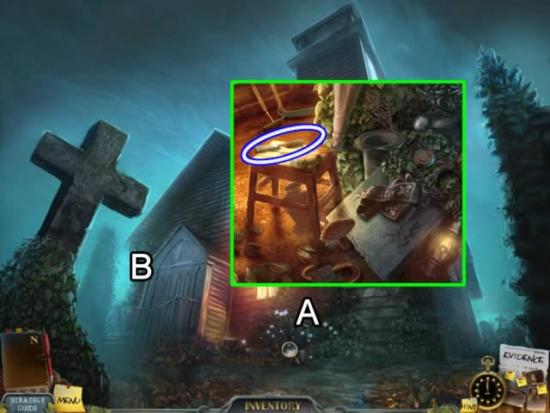
- Pick up the Notebook (A). It is added to the bottom of the screen (dashed green) and the first objective is displayed (B).
- Examine the parts of the Notebook. Although there isn’t much information now, it is a key element of the game. Use the Map to help navigate to visited areas.
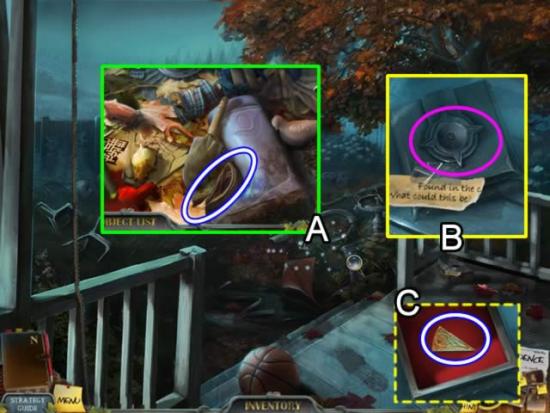
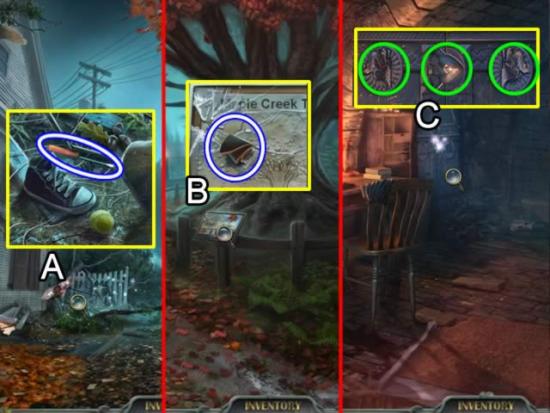
- Zoom in on the pile of rubbish (D). Click each piece of paper to move it out of the way and uncover the ROOM KEY and the first piece of evidence (E). Pieces of accumulated evidence can be reviewed at any time.
- Go forward into the town.
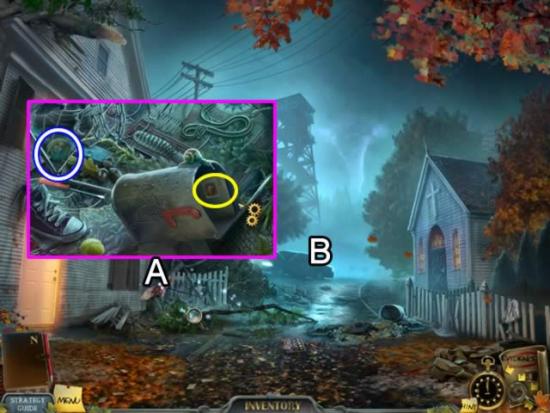
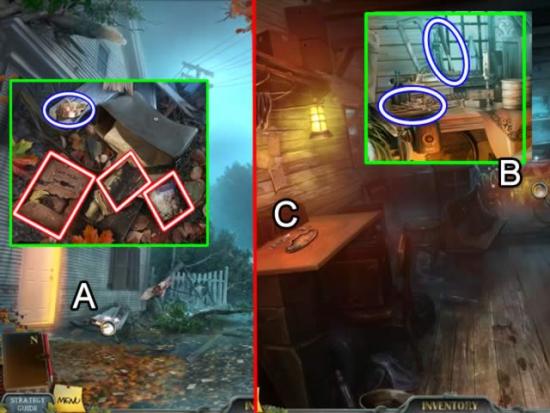
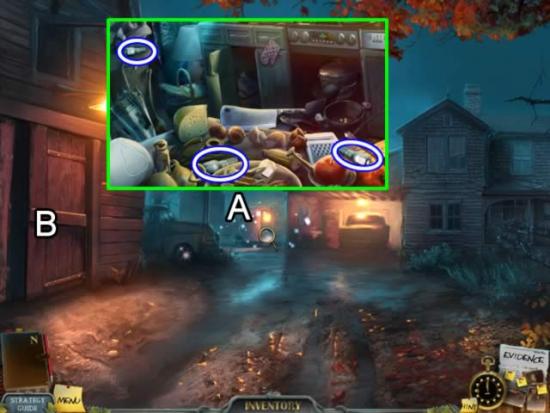
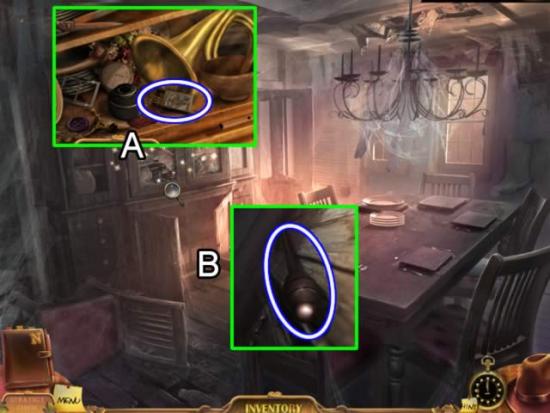
- Play the hidden object scene on the left (A). Click the mailbox to open the door to find the Stamp (yellow). Find the rest of the listed objects. The YELLOW ANGEL HEAD is retained in inventory.
- Go look at the car (B).
- Watch the hooded figures in the distance to add information to the notebook.
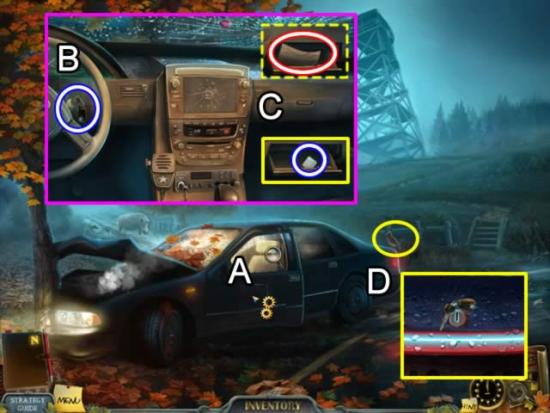
- Click the door to open it (A) then zoom in on the interior.
- Take the TRUNK KEY (B). Open the glove compartment (C). Examine the piece of evidence from 1979. Take the ACCESS CARD. Exit the interior.
- Click the bird on the trunk to shoo it away (D). Zoom in on the trunk. Use the TRUNK KEY to open it.
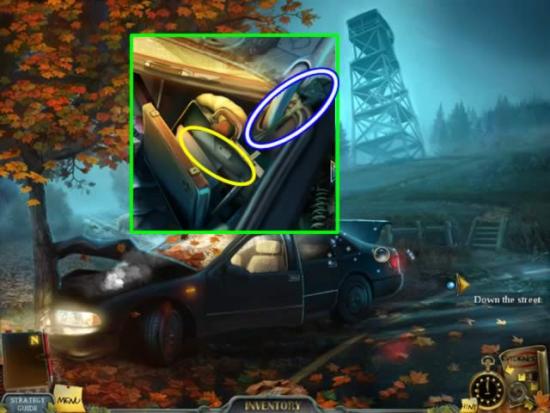
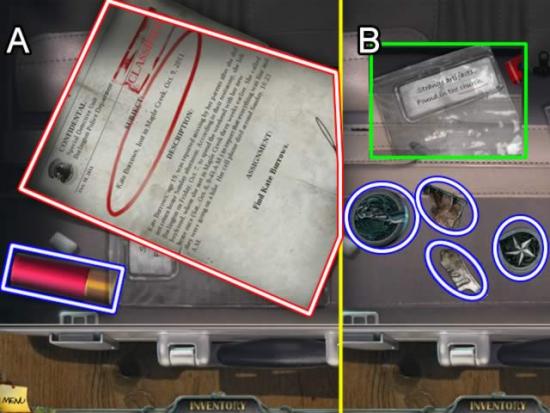
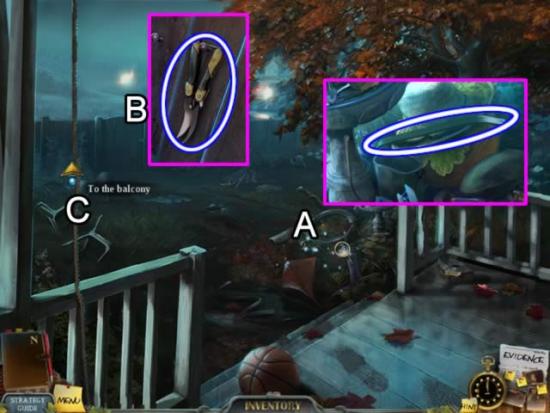
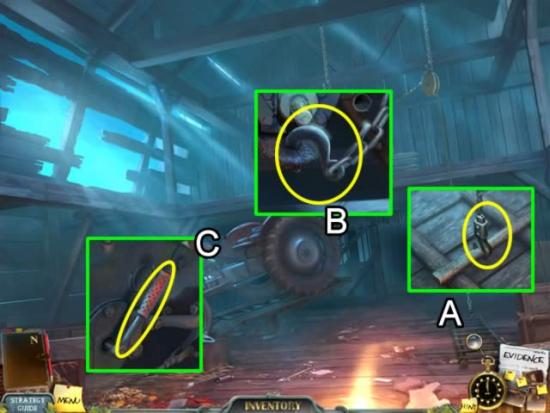
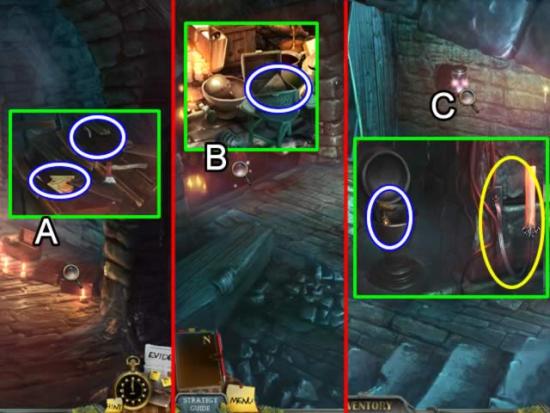
- Play the hidden object scene. Open the briefcase to find the Ruler. Collect the rest of the hidden objects. The BOLT CUTTERS are retained in inventory.
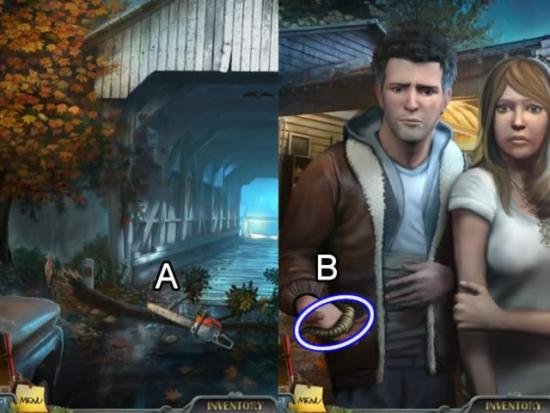
- Go down the street and cross the covered bridge.
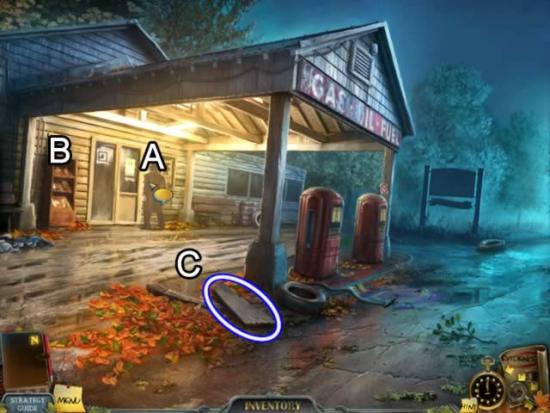
- Zoom in on the man (A). Inspect the poster area when he has gone.
- Look at the various brochures (B).
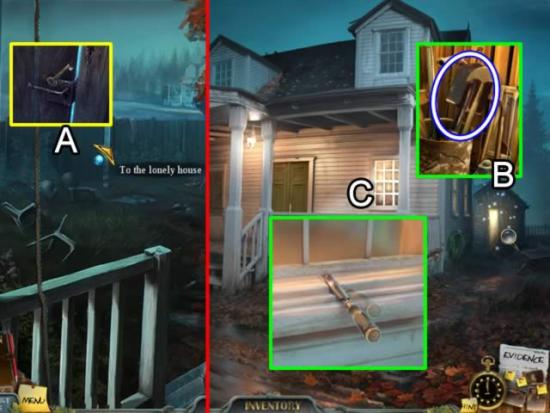
- Pick up the PLANK (C).
- Retrace your steps to the street in the town center.
Chapter 2: The Guestroom
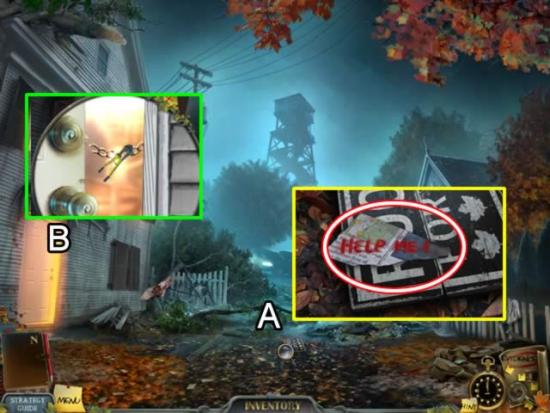
- Look closer at the sign in the middle of the street (A). Examine the piece of evidence.
- Use the BOLT CUTTERS on the safety chain on the boarding house door (B).
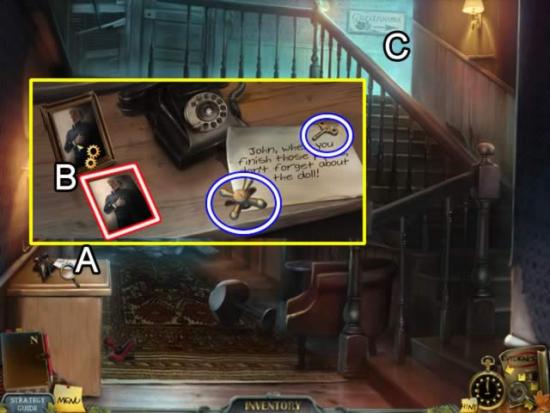
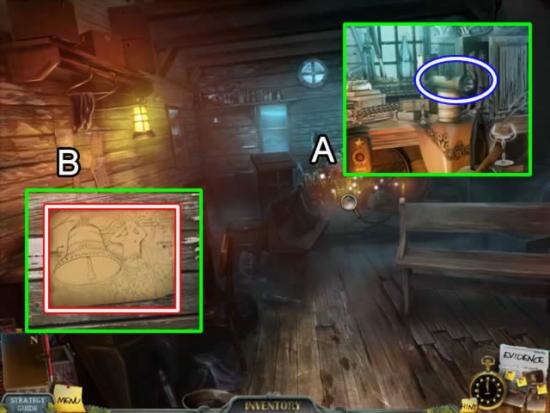
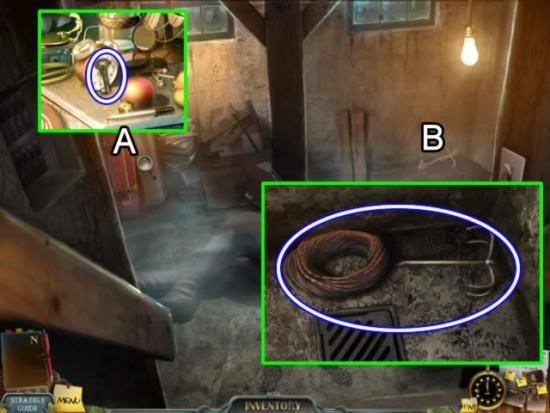
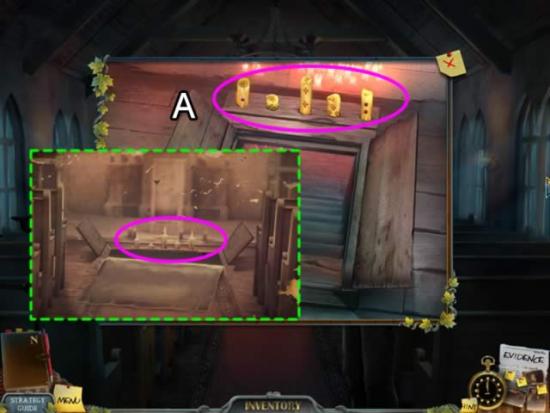
- Zoom in on the cabinet (A). Pick up the WIND-UP KEY and TAP HANDLE for inventory.
- Click the framed photo (B) to remove the photo. Take the evidence photo.
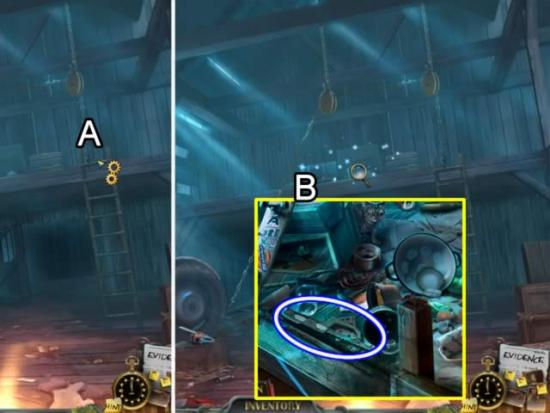
- Go up the stairs on the right (C).
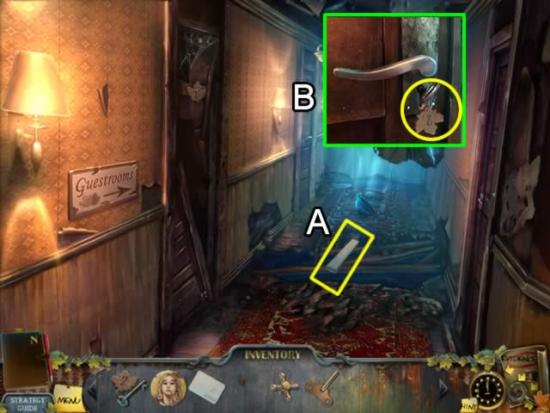
- Place the PLANK over the gap in the hallway (A).
- Zoom in on the last door on the left (B). Insert the ROOM KEY in the keyhole. Click to unlock the door. Click the door handle to enter the room.
- Zoom in on the cabinet (A). Watch the cut scene. Zoom in again.
- Take the LIGHT BULB. Examine the newspaper clipping for the evidence file.
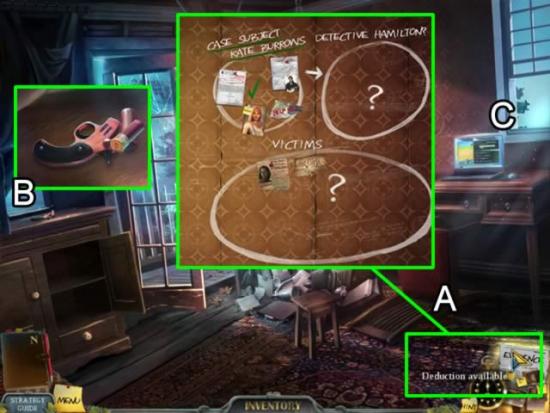
- Click the stool (B) to right it. Place the LIGHT BULB in the overhead lamp (C).
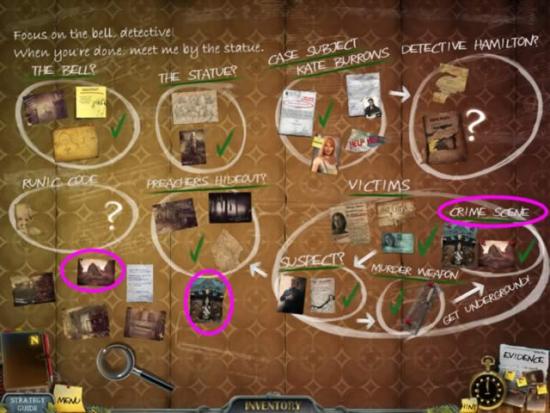
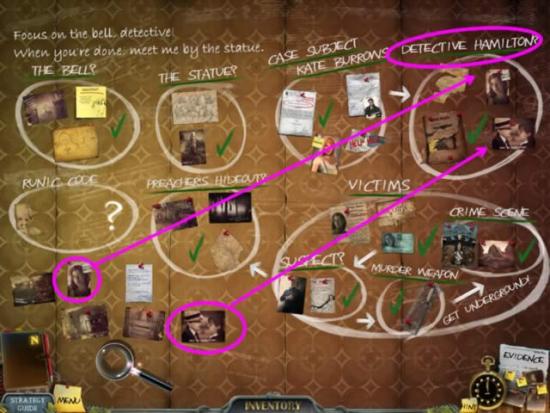
- Follow the evidence board tutorial (D) for directions on how to arrange the collected information. View the next screenshot for the completed wall.
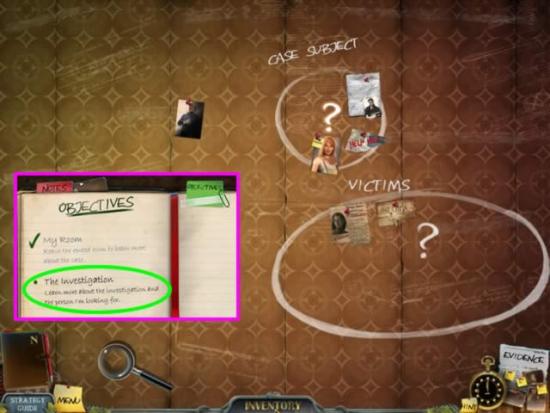
- Drag the photos and articles to their appropriate circles. A correctly placed item locks into place.
- Remove the thumbtacks and bits of useless paper.
- Note the new objective in the notebook.
- Exit the evidence wall.
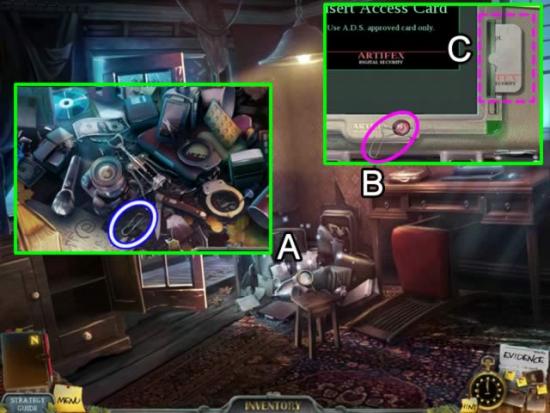
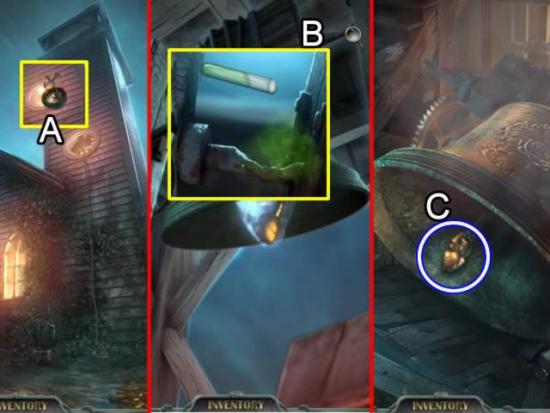
- Play the hidden object scene (A). Open the cabinet draw at the back of the scene to find the Compass. Find the remaining objects. The Paperclip is added to inventory as a BENT PAPERCLIP.
- Inspect the briefcase on the desk to the left of the computer (B).
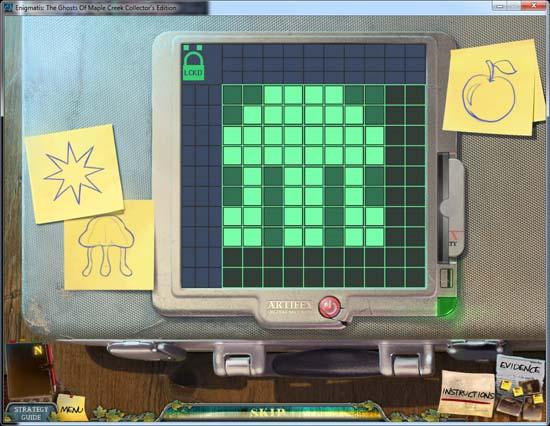
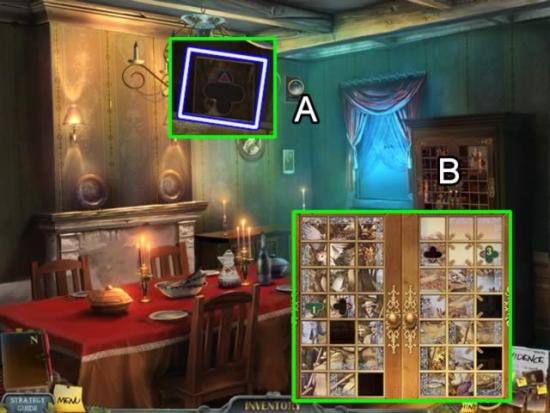
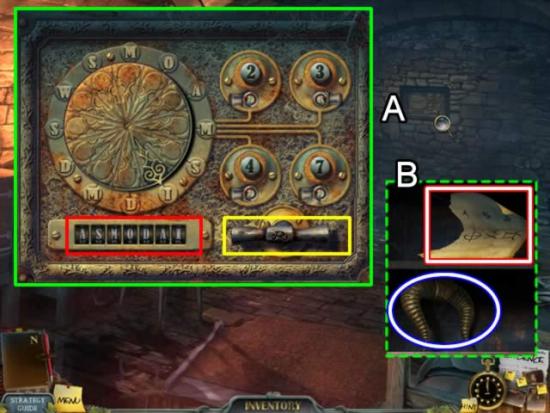
- Use the BENT PAPERCLIP to free the stuck red button. Press the button to start the security device attached to the briefcase. Insert the ACCESS CARD in the slot (C) to open a puzzle.
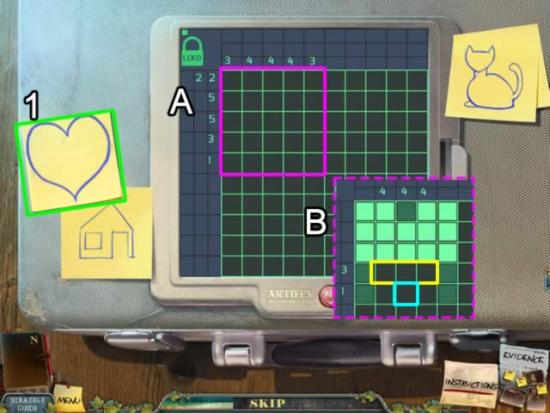
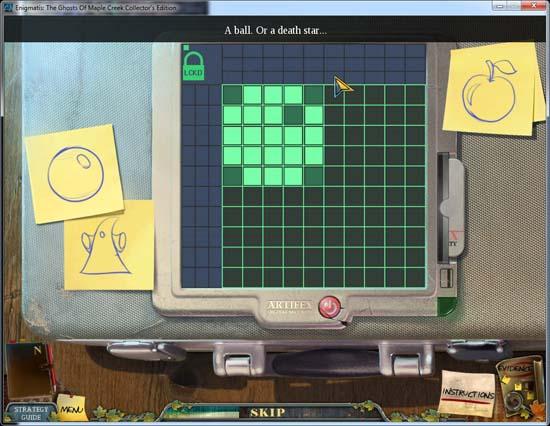
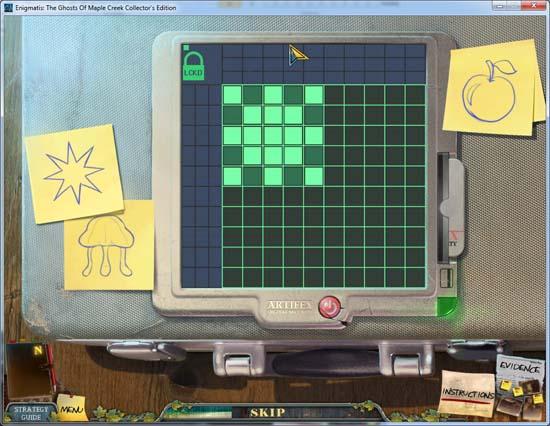
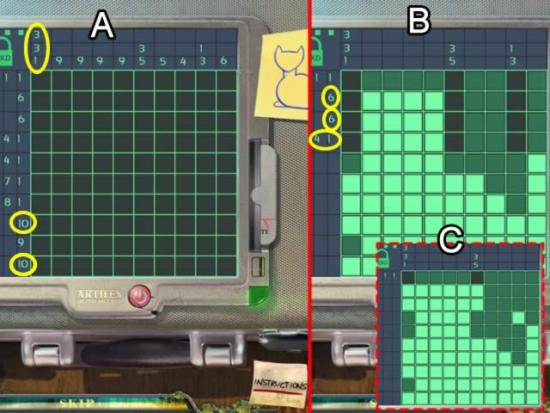
- The goal is to recreate the pictures on the yellow notes by filling in the grid. The numbers on the left are associated with the adjacent rows. The numbers on top refer to the columns below them. The numbers indicate how many consecutive squares should be filled in.
- The puzzle repeats three times with the size of the grid increasing with each round.
- The best strategy for each round is to fill in the largest numbers first. This will often indicate the start or end of smaller numbers.
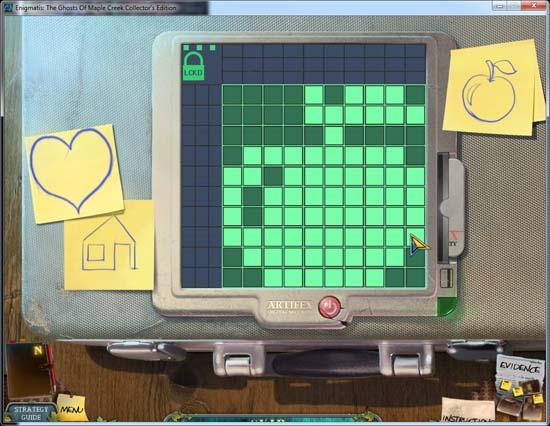
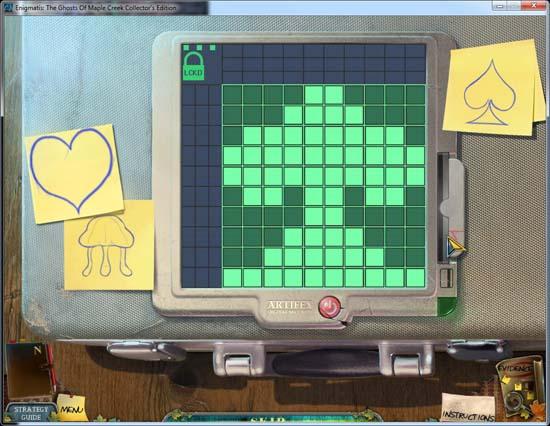
- There are three rounds, and for each round there are three possible pictures to fill in, which are chosen at random.
- The first round is a 5 x 5 grid highlighted in pink above. The other two possible solutions are below:
- Click the screen to start the second puzzle.
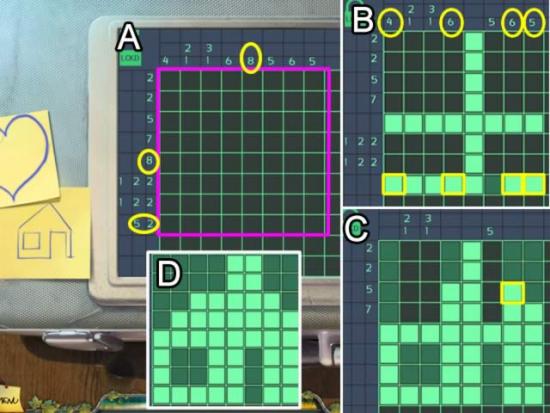
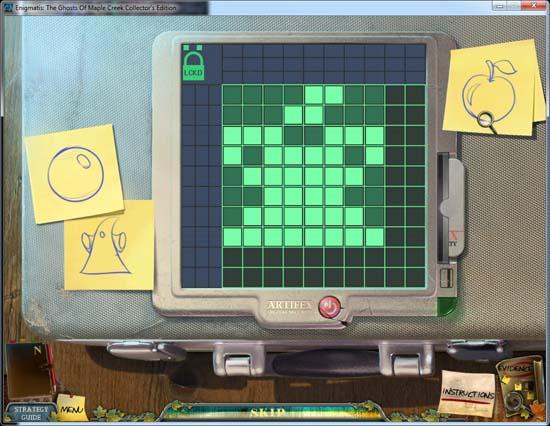
- This grid is 8 x 8. Use the same logic as the first puzzle and solve the largest number of squares first (A).
- Click the screen to begin the last puzzle.
- This is a 10 x 10 grid, and there are three possible solutions (one above, and two below)
- Click the security screen twice to open the briefcase.
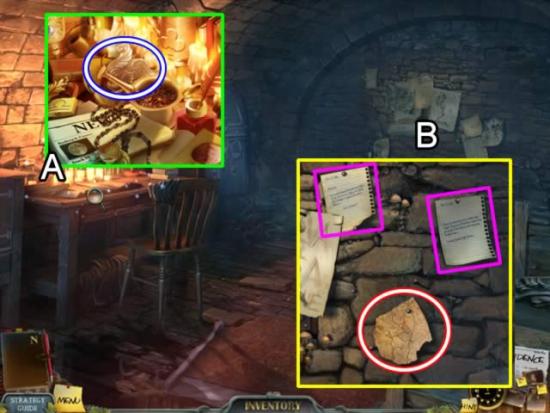
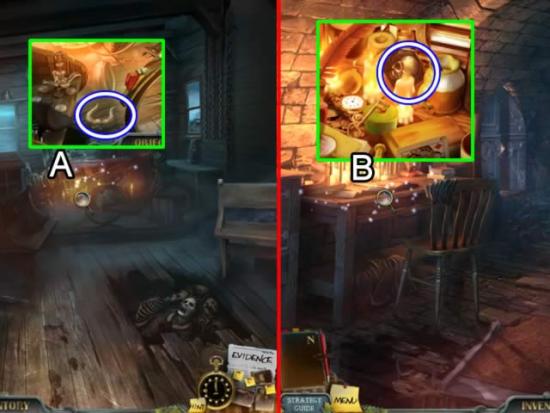
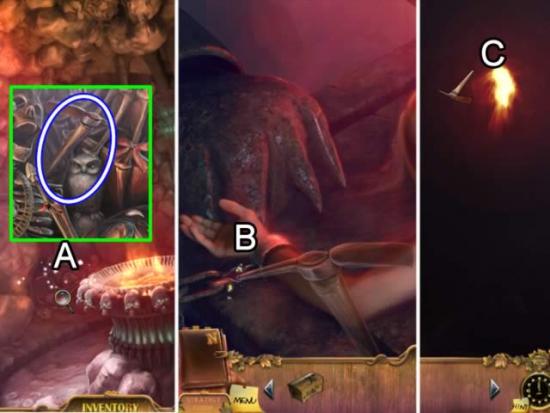
- Pick up the piece of evidence and the FLARE (A).
- Open the baggie at the bottom of the briefcase (B). Take the STAR SYMBOL, RIGHT-HAND RELIEF and RELIEF PIECES (2/4).
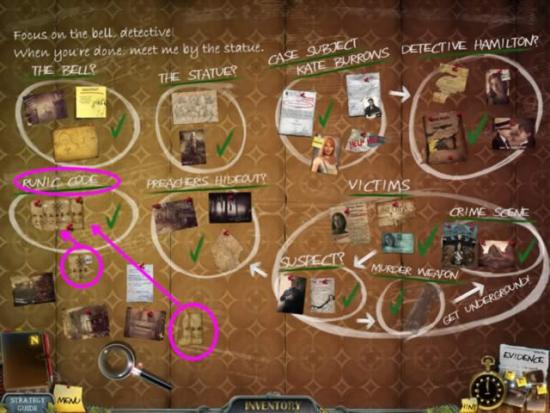
- Click the Evidence tab (A) to open the wall. Place the new piece of evidence in the top circle. Click through the steps to update the conclusions. There is now a related case to pursue.
- Zoom in on the cabinet (B). Put the FLARE in the gun. Take the loaded FLARE GUN.
- Look at the different tabs on the computer (C).
- Exit the room and return to the street.
Chapter 3: The Chapel and Boarding House
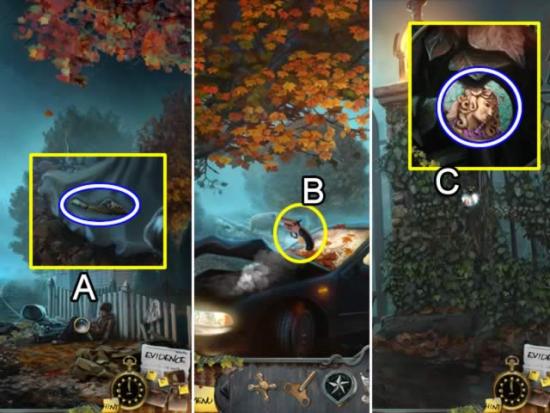
- Click on the fallen man (A). Watch the cut scene. Zoom in on him again. Take the RELIEF PIECE (3/4).
- Go to the car.
- Use the FLARE GUN to scare off the wild boars (B). Once they have wandered off, follow the road past the landmark tree to the church yard gate.
- Examine the ivy covered gate post (C). Take the BLUE ANGEL HEAD.
- Retrace your steps to the street in the center of town.
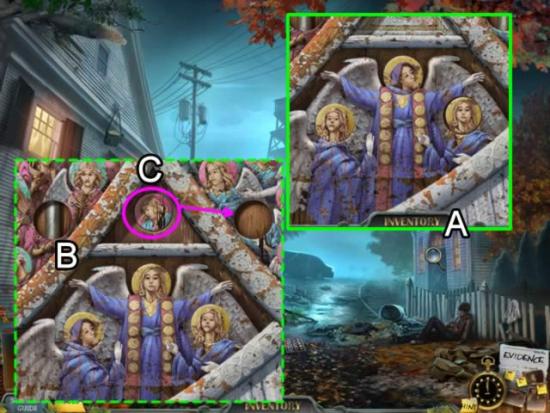
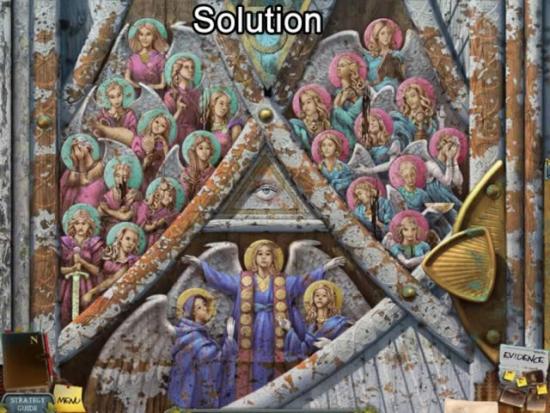
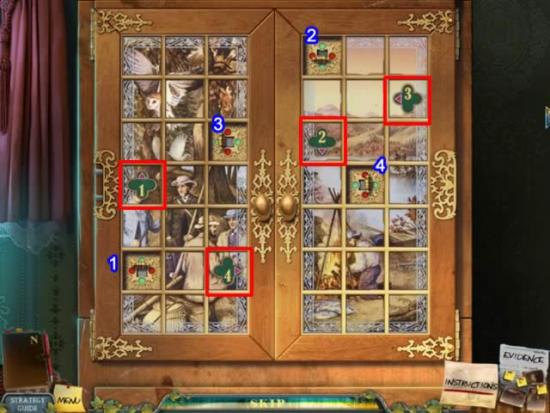
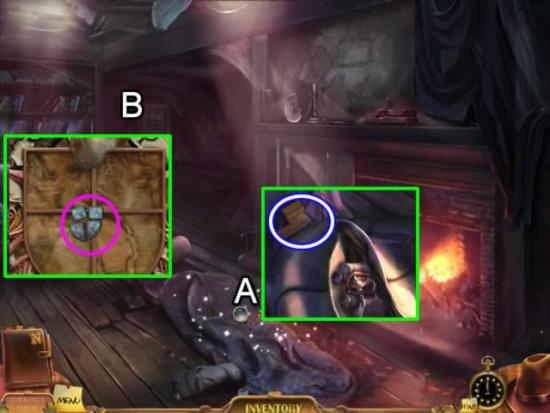
- Look at the chapel door (A). Insert the YELLOW ANGEL HEAD in the empty slot to start a puzzle.
- The goal is to match the heads with the correct body. Examine the background and swap the heads so they match the pattern around the body. The solution for the three yellow angel heads is shown in inset (B).
- Correctly placing the heads opens the center nook (C) to reveal a PINK ANGEL HEAD. Place it in the empty slot as shown. Repeat the matching process to solve this door section.
- Finally, insert the BLUE ANGEL HEAD in the left side. Swap those correctly to solve the puzzle.
- The full solution is shown below.
- Enter the chapel.
- Play the hidden object scene at the back (A). Find all of the objects. The FLASHLIGHT is added to inventory.
- Examine the wall (B). Remove the pieces of paper to uncover a piece of evidence.
- Exit the chapel. Cross the street to the boarding house.
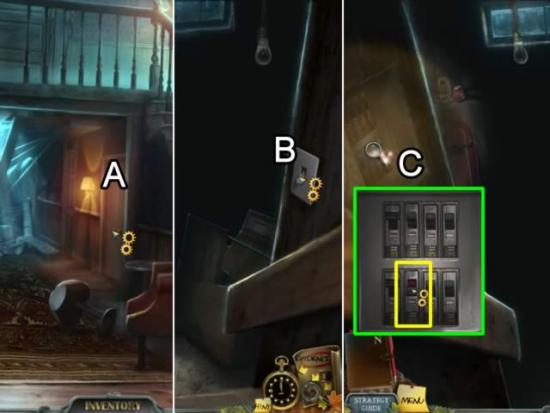
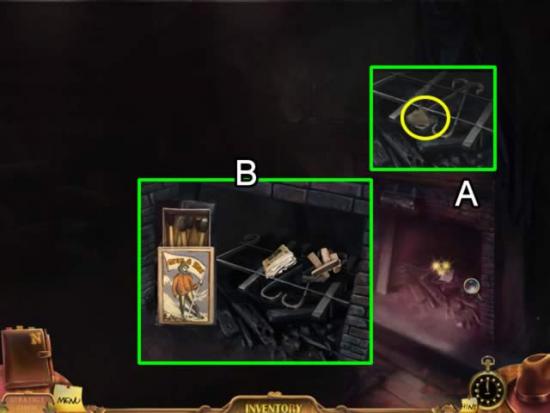
- Go through the door on the right to the basement (A).
- Flip the light switch (B) and watch the lights short out.
- Use the FLASHLIGHT to look closer at the fuse box (C). Click the tripped fuse lever to turn on the lights.
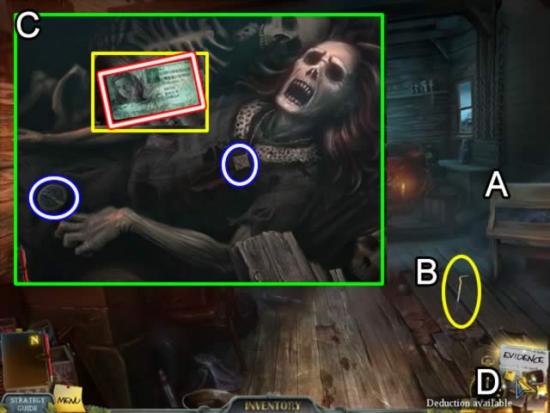
- Play the hidden object scene (A). Collect all of the objects. The HATCHET is retained in inventory.
- Zoom in on the man’s hand and take the piece of evidence (B).
- Go up to the guestrooms on the second floor.
- Examine the first door on the right (C). Use the HATCHET to break open the door.
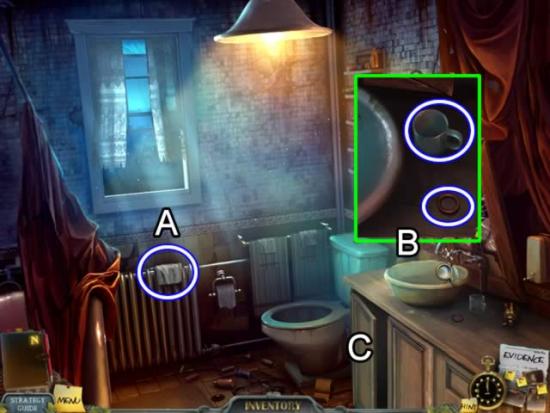
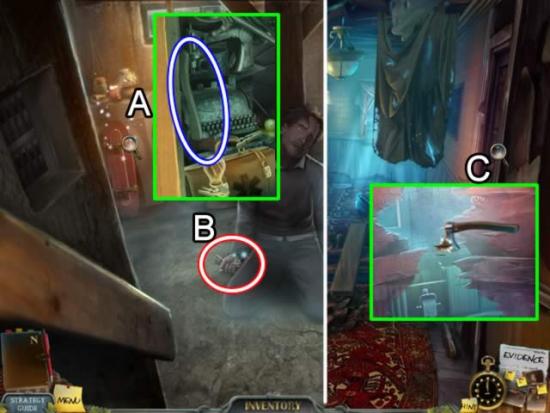
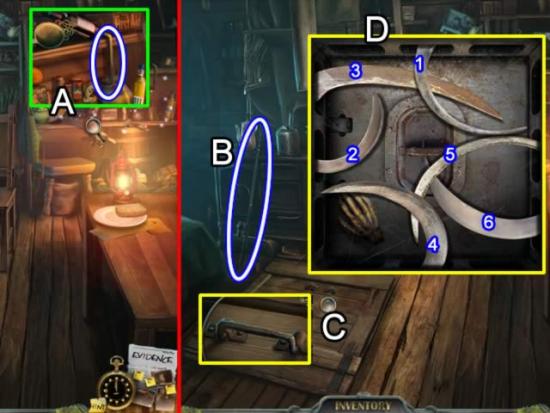
- Take the DIRTY RAG off of the radiator (A).
- Inspect the sink area (B). Pick up the MUG and O-RING SEAL.
- Open the cabinet door (C) and zoom in on the plumbing.
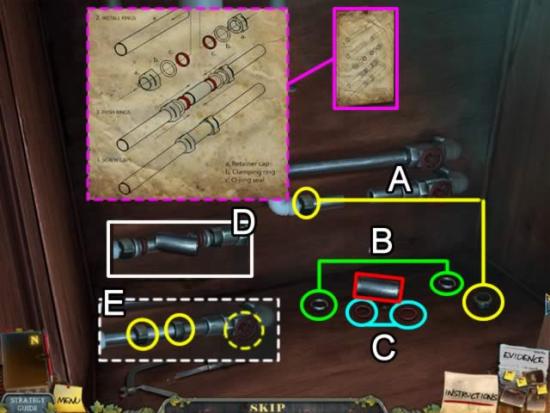
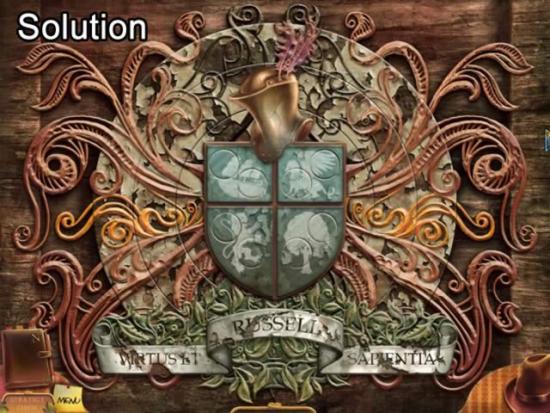
- Place the O-RING SEAL with the other parts to start the puzzle.
- Follow the instructions (dashed pink) to assemble the parts: Add the second Retainer Cap (A) on the right side of the pipe. Put both Clamping Rings (B) on next. Place the O-Ring Seals (C) last.
- Use the short piece of pipe (red) to connect the two pipes (D).
- Click both Retainer Caps to seal the connection (E). Turn the valve (dashed yellow) to turn on the water.
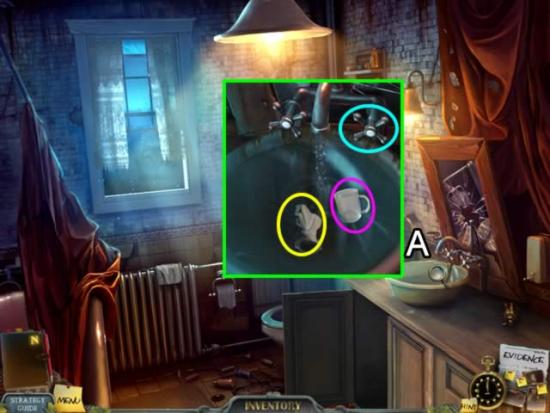
- Go back to the sink (A).
- Place the TAP HANDLE on the pipe. Click to start the water flowing.
- Dip the MUG into the water and get a CUP OF WATER for inventory.
- Rinse the DIRTY RAG to get a CLEAN RAG.
- Exit the boarding house.
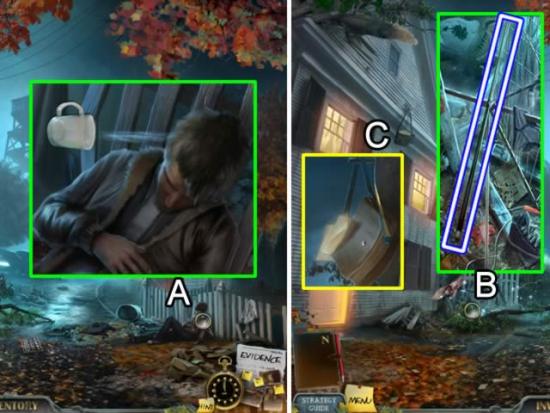
- Zoom in on the unconscious man (A). Throw the CUP OF WATER on him to impolitely revive him. Have a conversation and receive a new goal.
- Play the hidden object scene in front of the boarding house (B). Find all of the items. The BILLIARDS CUE is retained in inventory.
- Return to the bathroom in the boarding house.
- Look out the window to see the bag (C). Use the BILLIARDS CUE to free the bag.
- Return to the boarding house entrance.
- Examine the contents of the bag (A). Pick up the RELIEF PIECE (4/4) and three new pieces of evidence.
- Enter the Chapel.
- Play the hidden object scene at the back (B). Find all of the listed objects. The NAILS and HAMMER are added to inventory.
- Zoom in on the table on the left (C).
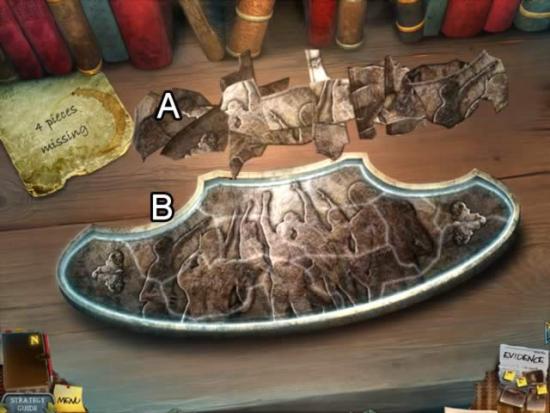
- Place the four RELIEF PIECES on the table to start a puzzle (A).
- Solve the jig-saw puzzle by selecting pieces and inserting them into the frame. Left-click to rotate a piece. Match the pattern and color. Correctly placed pieces lock into place. Take the METAL RELIEF.
- Exit the chapel.
- Go to the car.

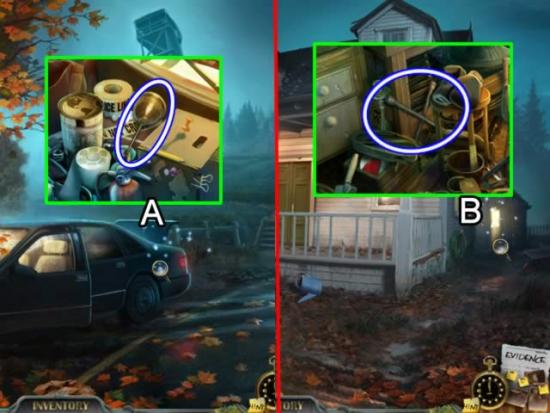
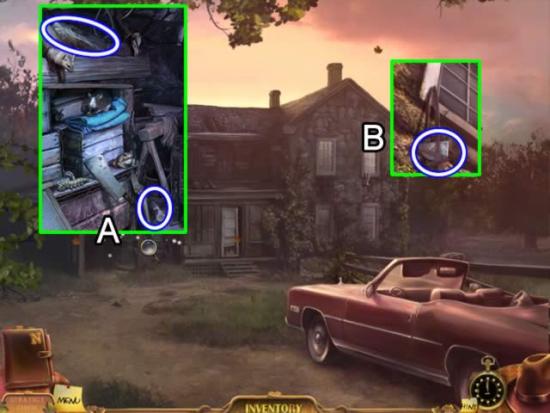
- Play the hidden object scene in the trunk (A). Find all of the items. The HOOK AND ROPE are retained in inventory.
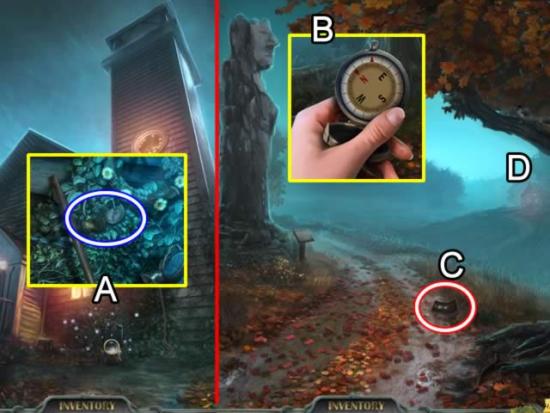
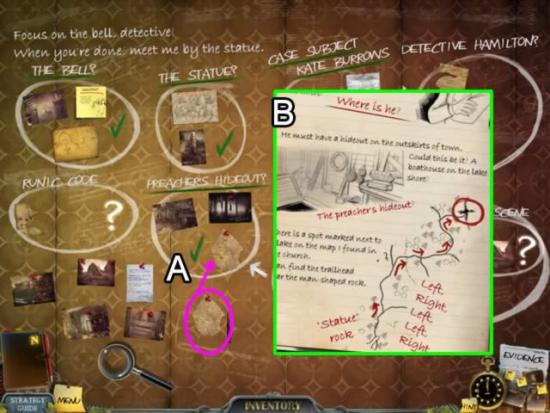
- Pick up the piece of evidence, the picture of the preacher, next to the car (B).
- Go up to the tower (C). Get the picture of the secret hideout picture for evidence.
- Return to the car.
- Go to the left up the road. Pick up the picture of the statue rock in the road in front of the landmark tree (D). Continue up the road to the church gates. Take the page from Detective Hamilton’s investigation at the base of the gate entrance (E).
- The Evidence tab begins flashing and the message “Deduction Available” after picking up the last piece of paper.
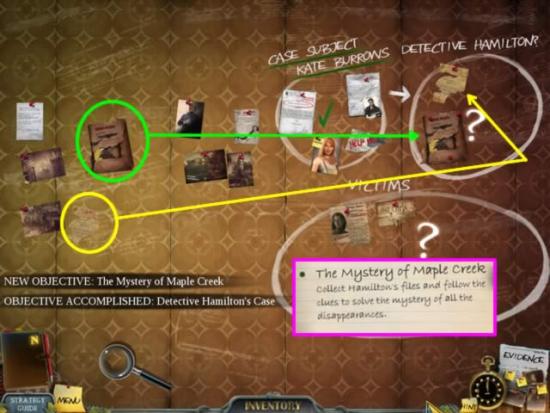
- Click the Evidence tab to open the evidence board.
- Move the two pieces of evidence into Detective Hamilton’s circle as shown above.
- The objectives are updated. Read the description in the notebook for more information about the new objective.
- Return to the guestroom in the boarding house.
- Take a closer look at the evidence wall (A).
- Click through the new information and locations. Place the three pieces of evidence in the new locations as shown.
- Exit to the balcony (B).
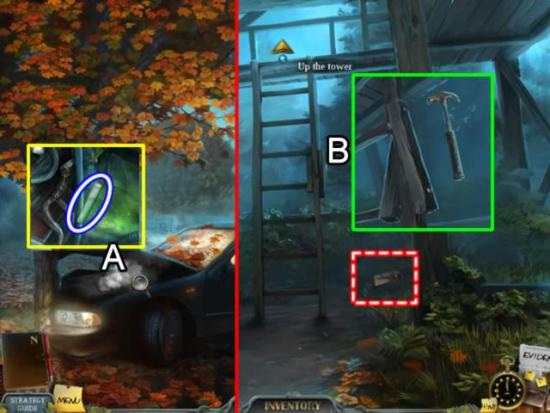
- Place the HOOK AND ROPE on the railing (C) and repel to the backyard.
- Play the hidden object scene (A). Find all of the items. The CROWBAR is added to inventory.
- Examine the back gate (B). Take the GARDEN SHEARS.
- Climb the rope back to the balcony (C).
- Return to the chapel.
- Click the bench (A) three times to move it out of the way.
- Use the CROWBAR to remove the loose floorboards (B). Remove the rocks and tarp covering the bodies (C).
- Take the LEFT-HAND RELIEF and PENDANT. Zoom in on the pocket and extract the wallet. Get the driver’s license for evidence.
- Click the Evidence tab to update the deductions.
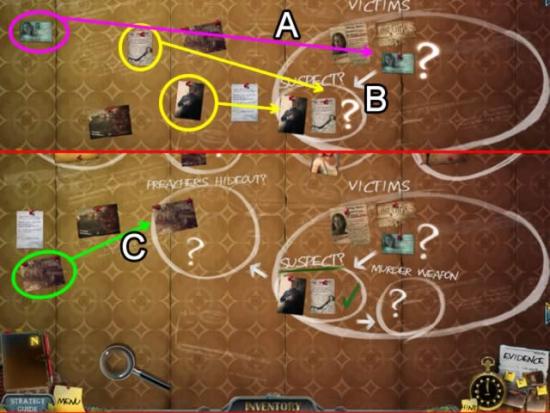
- Move the driver’s license into the Victims circle (A). The category “Suspect” is created.
- Put the two pieces of information about the preacher (yellow) in the Suspect circle. Two new categories are added.
- Drag the boathouse/secret hideout photo to the Preacher’s Hideout circle.
- Exit the evidence board.
- Go past the car, up the road on the left to the church gates.
Chapter 4: The Church and Countryside
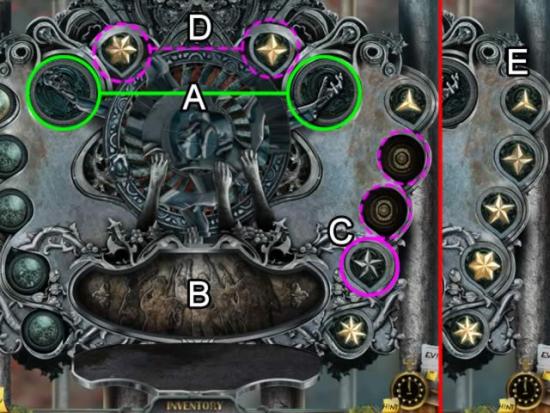
- Zoom in on the gate lock.
- Insert the LEFT- and RIGHT-HAND RELIEF medallions (A) to open the lower slot (B). Place the METAL RELIEF in the outline.
- Put the STAR SYMBOL in one of the empty slots on the right (C). This releases the covers for two additional stars (D). Place these stars in the remaining two openings. Rearrange the stars top to bottom from fewest points to most points (E).
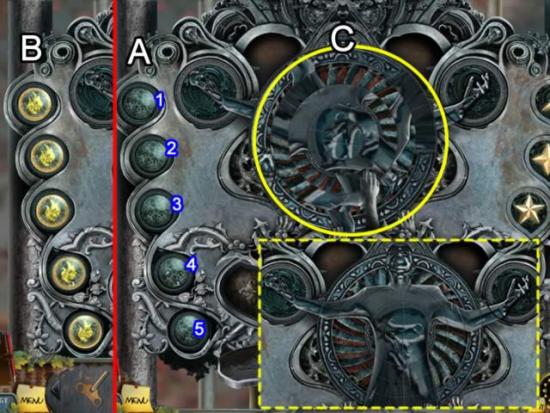
- Correctly aligning the stars triggers the buttons on the left (A).
- Find the sequence that will keep all buttons lit (B). My sequence was 2-5-4-1-3.
- Now all the hands have retracted. Click the center (C) to play a disc rotation puzzle. Start with the outside circle and work inward. Match the patterns. See the dashed inset for the solution
- Play the hidden object scene outside of the church (A). Find all of the objects. The CHISEL is saved in inventory.
- Enter the church (B).
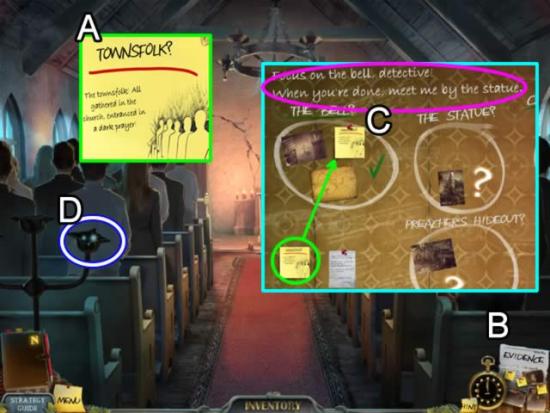
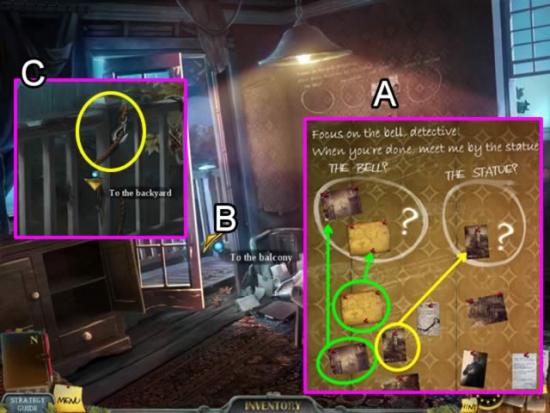
- Receive a new piece of evidence (A).
- Click the Evidence tab to update the evidence board (B).
- Place the note in the Bell circle. Watch as the notes and objectives are updated. Read the note on the top of the board (C) for a clue to the next location.
- Pick up the CANDELABRUM PART (D).
- Exit the church. Head to the graveyard on the right.
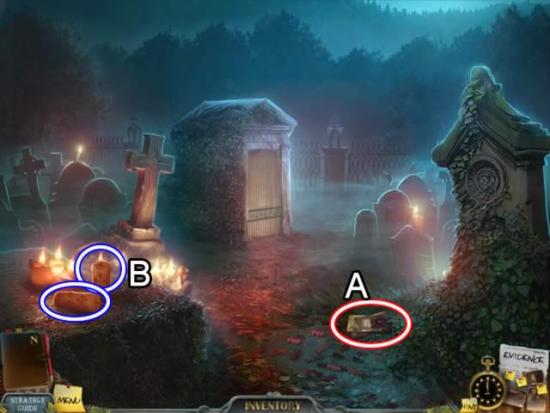
- Pick up the piece of evidence (A).
- Take both of the LARGE CANDLES (2/3).
- Return to the guestroom in the boarding house.
- Go down the rope to the backyard.
- Play the hidden object scene (A). Find all of the items. The ROPE is added to inventory.
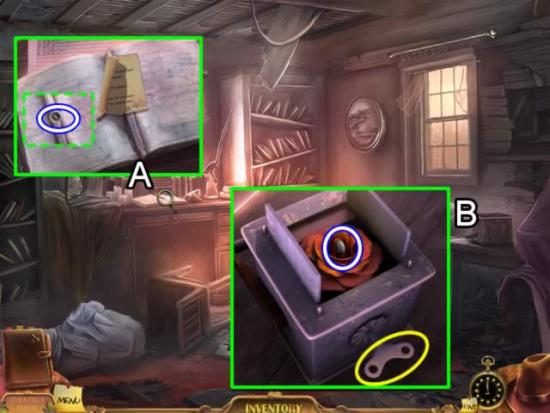
- Examine the box on the porch (B). Insert the CANDELABRUM PART in the center. Click to open. Take the BRASS WEDGE (1/6).
- Click back up the rope.
- Go to the basement.
- Play the hidden object scene in the corner (A). Find the listed items. The Key is added to inventory as a RUSTY KEY.
- Inspect the right corner (B). Place the ROPE on the hook. Take the GRAPPLING HOOK.
- Return to the backyard.
- Zoom in on the gate at the back (A). Use the RUSTY KEY to open the gate. Exit the backyard.
- Play the hidden object scene in the shed (B). Collect the objects. The SHOVEL is retained in inventory.
- Look at the front window (C). Use the CHISEL to open it.
- Zoom in on the vent (A). Use the CHISEL to remove the cover. Take the GLASS PIECE.
- Look closer at the hutch (B).
- Insert the GLASS PIECE in the left side to start a three-stage puzzle.
- Use the established patterns and edge-piece indicators to slide the pieces to form a picture.
- Correctly solving the left side releases the right side. Do the same to solve this slider puzzle.
- Finally, use the arrow position on the numbered pieces to flip the locks. The solution is shown below.
- Look at the arrow position in the numbered pieces in the red squares above. Flip the switch either up or down, left or right on the correspondingly numbered switch.
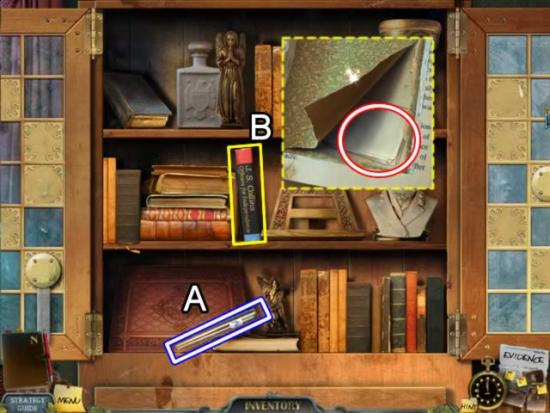
- Take the TEST TUBE (A).
- Open the book (B). Take the piece of evidence (runes and numbers scrap) hidden under the paper.
- Exit the house.
- Go left along the country lane.
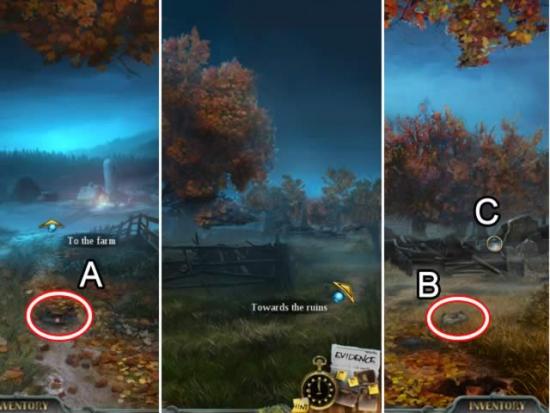
- Pick up the piece of evidence (candle arrangement in the church photo) in the middle of the road (A). NOTE: This evidence can be found randomly in one of three locations: the Country Lane, next to the Lonely House (one location earlier), or next to the Farm Gates (one location further). If you don’t see the evidence in the Country Lane as indicated in the screenshot above, check the other two locations.
- Continue to the farm.
- Do not enter the farm. Go to the right to the ruins.
- Pick up the piece of evidence (photo of mysterious place) in the road (B). Inspect the ruins (C).
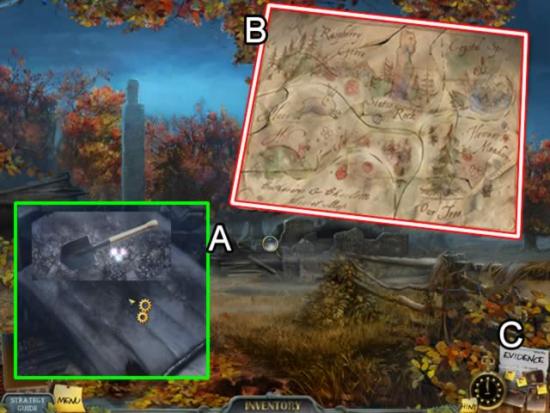
- Remove the wood from the mattress. Use the SHOVEL to scrape off the dirt. Lift the mattress (A).
- Zoom in to open a jig-saw puzzle. Left click to select and rotate pieces. Use the pattern and edge pieces to complete the puzzle (B). It is added to evidence (a map showing the statue).
- Click the evidence tab to update the evidence board.
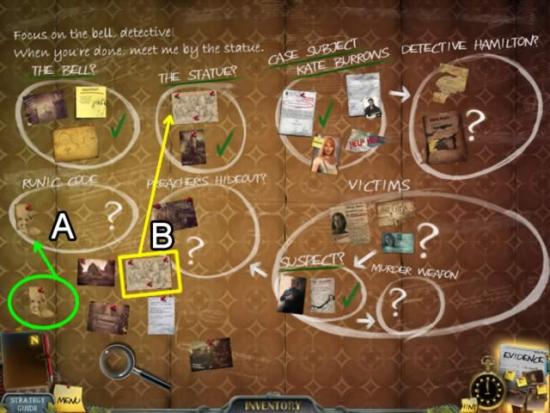
- Watch as the notes are updated and the “Runic Code” circle is added. Put the code scrap in the circle (A).
- Put the map (B) in “The Statue?” circle to complete that objective.
- Return to the lonely house. Play the hidden object scene in the shed. Collect all of the items to receive GLASS CLEANER for inventory (it was not a list item).
- Go through the back fence and up to the guestroom.
- Play another hidden object scene. Collect all of the listed items. Receive a DOLLAR COIN (not on the list).
- Exit the boarding house. Go to the car.
Chapter 5: Finding the Statue
- Zoom in on the battery (A). Fill the TEST TUBE with the dripping battery ACID.
- Go up the hill to the tower.
- If you have been following this guide, you will already have picked up the piece of evidence (Secret hideout) at the base of the tower (dashed red).
- Use the HAMMER AND NAILS to repair the ladder and gain entrance to the tower.
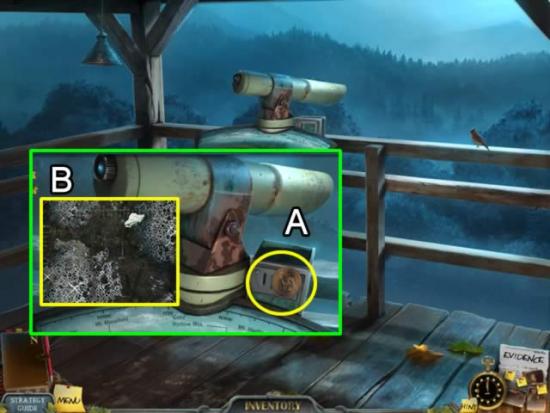
- Inspect the telescope. Insert the DOLLAR COIN in the slot (A).
- Use the GLASS CLEANER and CLEAN RAG to clean the lens (B) and start a puzzle.
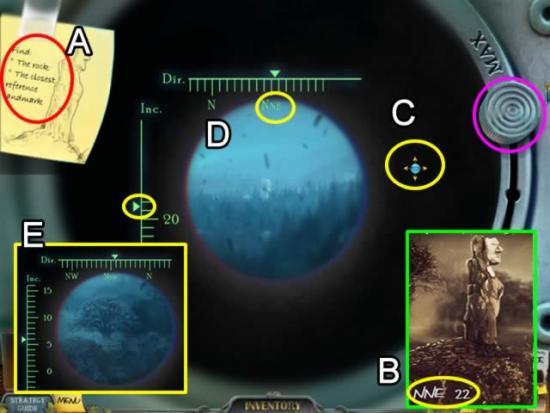
- The goal is to find the rock figure and the closest reference landmark (A). The coordinates for the rock were noted on the evidence piece.
- Click the lens to move the viewer (C). Use the mouse to change direction and distance. Use the buttons on the side for focus. Click the mouse again on the lens to stop the viewer movement.
- Solution for the rock. Put the focus on Max. Drag the mouse until the coordinates are approximately at NNE 22. The viewer will automatically zoom in when close.
- Solution for the nearest landmark. Put the focus in the middle position. Move the viewer to approximately NNW 5. The viewer stops on the landmark tree.
- Exit the tower. Continue up the road to the church.
- Throw the GRAPPLING HOOK at the window in the bell tower (A).
- Climb to the top of the bell tower.
- Inspect the bell support (B). Pour the ACID on the weakend metal.
- Descend to the belfry. Take the HORNED CLAPPER (C).
- Return to the church grounds.
- Play the hidden object scene in front of the church (A). Collect all of the items listed. The COMPASS is retained in inventory.
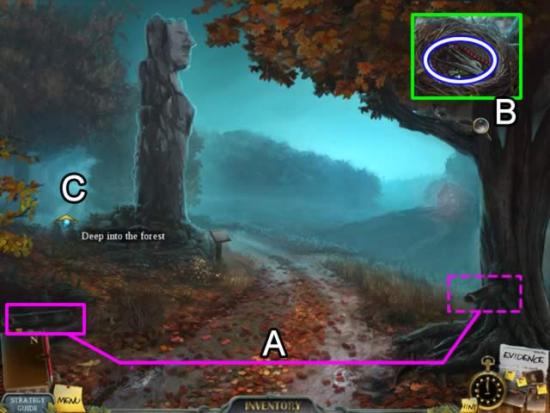
- Return to the landmark tree and take the path into the woods.
- The COMPASS appears in your hand (B). The directions were to go north from the landmark tree. Continue to take whichever path is most likely to take you north. If the “N” is to the left of center, go left. If it is on the right, go right. Continue until you reach the statue.
- Pick up picture of the preacher in the woods for evidence (C).
- Head right to the cabin in the distance (D).
- Enter the cabin to meet the stranger.
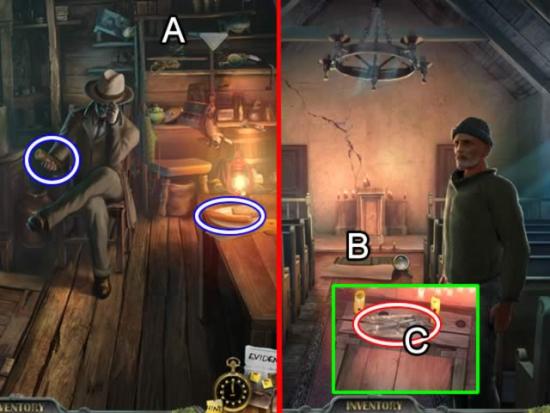
- Speak to the stranger (A) to get a new focus for the investigation. Take the CANDLE (3/3) and the SAUSAGE.
- Return to the landmark tree. Go up and enter the church.
- Speak to the man.
- Click the end of the carpet (B) to reveal a trapdoor (B). Zoom in and take the dagger for evidence.
- Click the Evidence tab to update the board.
Chaper 6: Finding the Mysterious Place
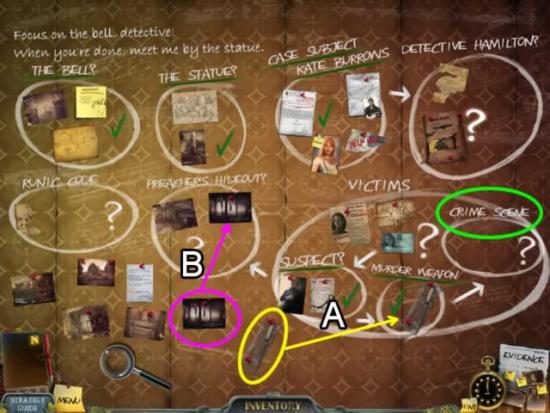
- Put the dagger in the Murder Weapon circle (A). A new area appears: Crime Scene.
- Drag the picture of the preacher at night to the “Preacher’s Hideout” circle.
- Exit the board.
- Zoom in on the trapdoor again (A). Place the three CANDLES in the slots to start a puzzle.
- Refer to the picture on the evidence board for the placement (dashed green). Swap the candles so they match the picture.
- Solution based on pattern: one hole, one cross, two crosses, three crosses, two holes.
- Go down the steps.
- Play the hidden object scene on the desk (A). Collect all of the items. The METAL FIGURINE is added to inventory.
- Examine the papers on the back wall (B).
- Remove the papers to uncover a map piece for evidence and two interesting notes (pink).
- Click the Evidence tab to update the board.
- Drag the map piece to the “Preacher’s Hideout?” circle (A).
- Note the instructions added to the notes (B).
- Exit the church. Return to the landmark tree and head into the woods.
- Pick up the BRANCH and place it in the tree hollow (A).
- Zoom in on the bird’s nest. Shoo the bird away and take the LOCK PICKS from the nest (B).
- Take the left path deep into the forest. Follow the directions at each turn: left, right, left, left, right.
- Approach the lake.
- Inspect the lock on the boathouse.
- Place the LOCK PICKS on the locks to open a puzzle.
- Place a pick in the slot. The goal is to lift all tumblers consecutively. Do no try to lift a tumbler with the mouse over the handle of the pick. Place the mouse inside the lock (see above screenshots) and time the click when the pick is under the tumbler.
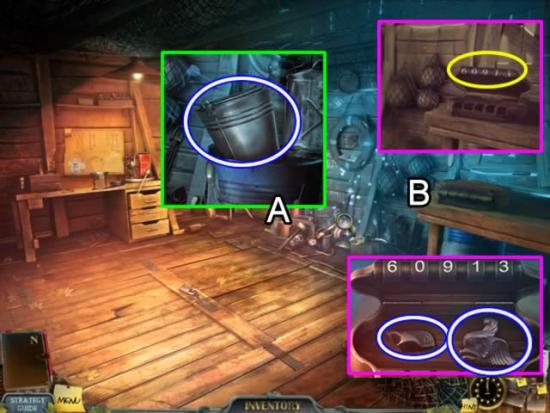
- Play the hidden object scene (A). Collect all of the items. The BUCKET is retained in inventory.
- Examine the box (B). Look at the photo in the Hideout circle on the evidence board to get the combination (6-0-9-1-3).
- Take the SKULL PLATE PIECE and METAL FIGURINE.
- Return to the boarding house. Go up to the bathroom.
- Dip the BUCK in the water to get a BUCKET WITH WATER.
- Go down to the basement.
- Play the hidden object scene (B). Collect all of the items. The DROPPER is added to inventory.
- Examine the drain in the corner (C). Pour the BUCKET WITH WATER in the drain. The CORK floats to the top.
- Go out the back gate and return to the farm.
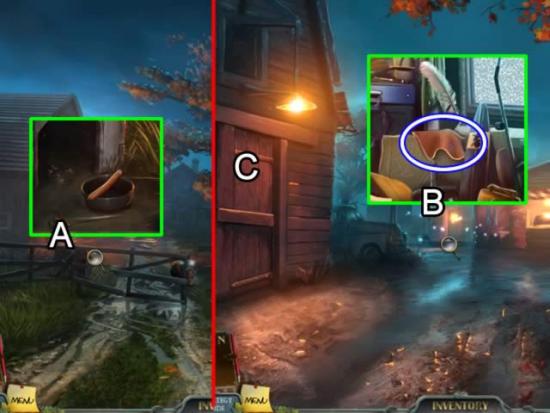
- Zoom in on the dog house on the left (A). Put the SAUSAGE in the bowl for the dog.
- Enter the farmyard.
- Play the hidden object scene by the trailer (B). Open the upper cabinet door to find the Scissors. Collect the rest of the objects. The SCRAP LEATHER is added to inventory.
- Enter the barn (C).
- Examine the ladder on the floor (A). Click the hook to attach it to the ladder rung.
- Look at the rear of the tractor (B). Click the hook to attach the other end of the chain to the tractor.
- Release the hand brake (C) to lift the ladder.
- Click the ladder to release the chain and lean it against the loft (A).
- Play the hidden object scene in the loft (B). Collect all of the items. The HACKSAW is added to inventory.
- Return to the street in front of the boarding house.
- Play the hidden object scene (A). Collect all of the items. Receive the SCREWDRIVER for inventory.
- Go to the landmark tree.
- Inspect the sign (B). Place the SCRAP LEATHER on the broken glass. Click to get a GLASS SHARD.
- Return to the church. Go downstairs to the crypt.
- Zoom in on the door lock on the left (C). Insert the two METAL FIGURINES and the HORNED CLAPPER in the slots.
- Enter the secret chamber.
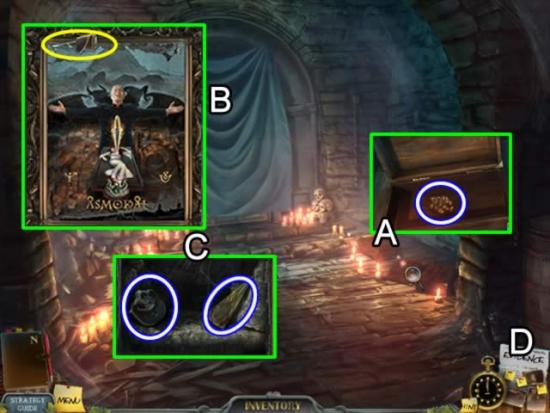
- Inspect the boxes on the right (A). Open the large box and take the RESIN.
- Take down the sheet covering the back wall (B).
- Inspect the painting. Use the GLASS SHARD to remove the painting from the frame. The painting is added to evidence.
- Take the BRASS WEDGE (2/6) and SKULL PLATE (2/3) from the recess behind the painting.
- Click the Evidence tab (D) to update the board.
- Drag the photo of the mysterious place and the ritual painting to the Crime Scene circle to complete the objective. A new objective, getting into the Ritual Hall is added.
- Return to the boathouse.
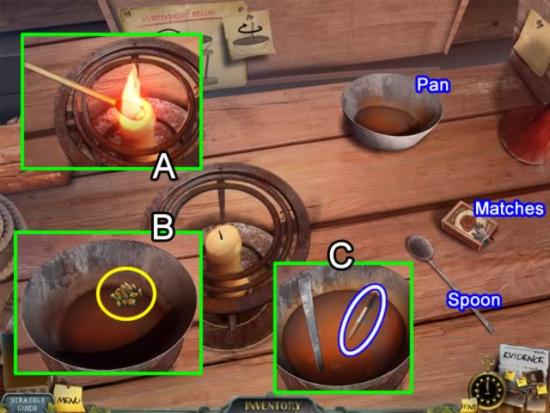
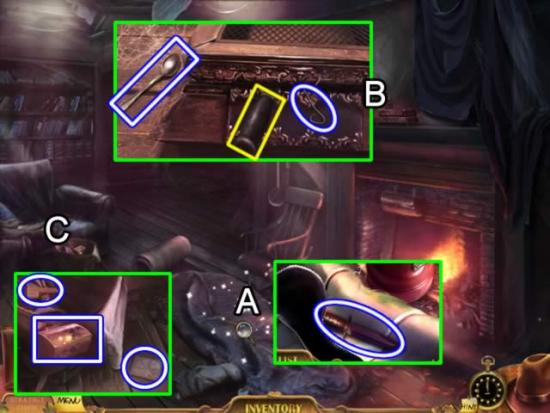
- Zoom in on the table on the back wall.
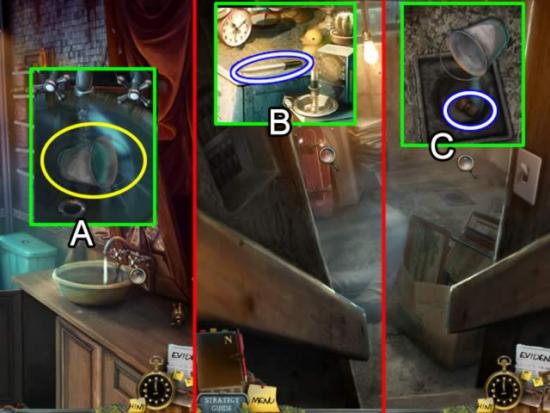
- Pick up the MATCHES. They are added to inventory. Use a match to light the candle (A).
- Put the pan on the burner and add the RESIN (B).
- Use the spoon to stir the resin (C). Get a DROPPER full of WATERPROOF RESIN.
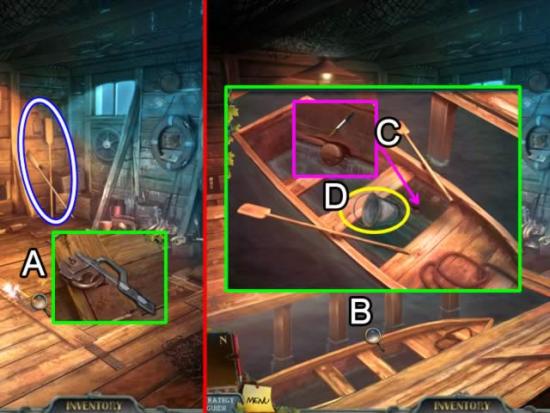
- Take the OARS from the back wall.
- Inspect the lock on the trapdoor (A). Use the HACKSAW to cut through the padlock.
- Look closer at the boat (B).
- Place the CORK in the hole (C) and seal it with the dropper of WATERPROOF RESIN.
- Use the BUCKET to scoop out the water (D).
- Add the OARS. Click to row away.

- Head up the trail toward the rocks.
- Examine the rock at the mysterious place (A). Take the SKULL PLATE (3/3).
- Return to the boathouse.
- Play the hidden object scene (B). Fined the listed objects. The SCRAPER is added to inventory.
- Return to the mausoleum in the graveyard.
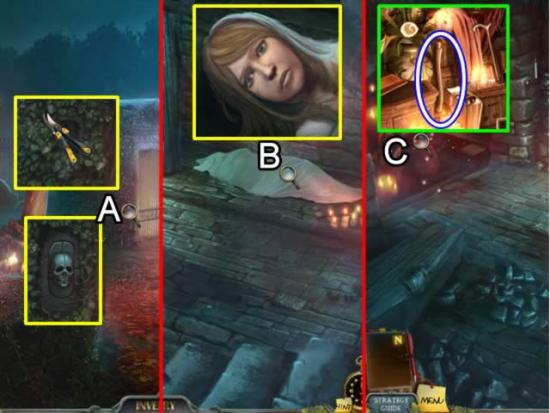
- Inspect the mausoleum (A). Use the GARDEN SHEARS to remove the ivy. Insert the 3 SKULL PLATES in the slot to open the door.
- Enter the tomb.
- Remove the sheet from the body (B). Discover Kate Burrows.
- Play the hidden object scene (C). Find all of the items. The AX HANDLE is retained in inventory.
- Return to the stranger’s cabin.
Chapter 7: The Cabin

- Grab the RAKE leaning against the side of the cabin.
- Zoom in on the leaf pile (A). Use the RAKE to uncover a broken ax. Attach the AX HANDLE to the ax head. Take the AX.
- Enter the cabin.
- Examine the box on the bed (B).
- Take the photo on the bed for evidence.
- Place the PENDANT in the lock to open the box.
- Take the picture for evidence. Add the TOY SOLDIER to inventory.
- Click the Evidence tab to update the board.
- Drag the two new photos to Detective Hamilton’s circle to complete this objective.
- Exit the board.
- Play the hidden object scene (A). The Handle is added to inventory as a TRAPDOOR HANDLE.
- Take the FISHING ROD leaning against the stove (B).
- Zoom in on the trapdoor (C). Attach the TRAPDOOR HANDLE. Click to open the doors.
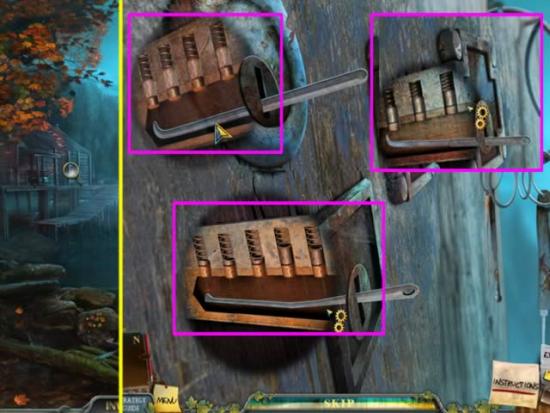
- Play the lock puzzle (D).
- The goal is to remove the top-most blades until all are removed. Click a blade and push it into its slot to remove it. The inset above shows the order in which the blades should be removed.
- Enter the basement.
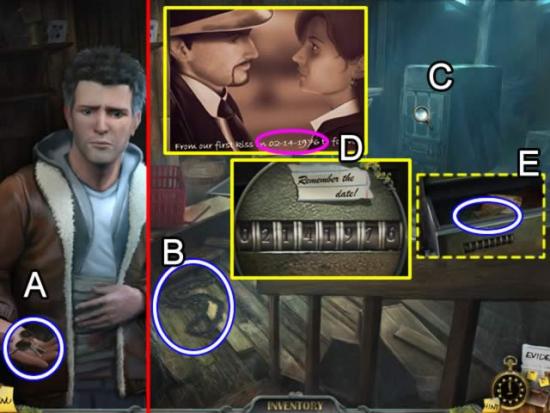
- Have a conversation with Kate’s boyfriend. Take the CAR KEYS from him (A).
- Pick up the CHAINSAW CHAIN (B).
- Examine the safe (C). Remove the cover. Use the SCREWDRIVER to remove the four screws. Look at the picture of Richard and Emily on the evidence board (D) to get the combination for the safe. Click the tumblers to read: 0-2-1-4-1-9-7-6.
- Take the BRASS WEDGE (3/6) from the safe (E).
- Exit the basement.
- Play the hidden object scene in the cabin (A). Find the items listed. The JACK HANDLE is added to inventory.
- Stop at the landmark tree.
- Use the FISHING ROD to retrieve the runes and numbers evidence piece from the branch (B).
- Go to the crypt.
- Play the hidden object scene on the desk (C). Collect the objects listed. The BRASS WEDGE (4/6) is added to inventory.
- Enter the secret chamber.
- Use the AX to open the two boxes (A). Take the BRASS WEDGE (5/6) and WALL CANDELABRUM.
- Go to the graveyard and enter the tomb.
- Play the hidden object scene (B). Get the BRASS WEDGE (6/6).
- Inspect the urn (C).
- Place the WALL CANDELABRUM in the slot. Click the candle to open the urn. Take the DEMONIC SYMBOL (1/5).
- Return to the crypt.
- Zoom in on the back wall (A).
- Place the BRASS WEDGES on the dial to start a puzzle.
- The goal is to use the numbered dials to move the hand to spell the password.
- The password is the word on the ritual painting: ASMODAI. There is only one way to solve this puzzle. Use the reset lever (yellow) if you make a mistake. Flip the toggles on the bottom of the numbers to change the arrow direction. Initially, all number directions are set for clockwise. Here is the solution:
- A – Click 2.
- S – Flip the toggle for 3 to go counter-clockwise. Click 3.
- M – Click 4.
- O – Flip the toggle for 2 to go counter-clockwise. Click 2.
- D – Flip the toggle for 7 to go counter-clockwise. Click 7.
- A – Flip the toggle for 4 to go counterclockwise. Click 4.
- I – Flip the toggle for 3 to go clockwise. Click 3.
- Click the lever to open the safe (B). Take the DEMONIC SYMBOL (2/5) and the rune and number evidence piece.
- Click the Evidence tab to update the board.
- Drag the two torn pieces of code to the “Runic Code” circle to complete this objective.
- Exit and return to the car.
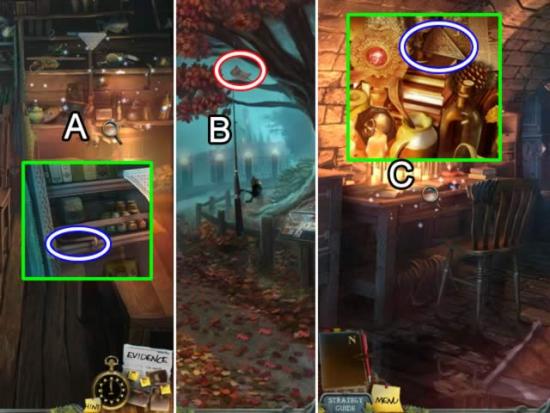
- Play the hidden object scene (A). Open the briefcase to find the Pen. Collect all of the items. The Oil Can is added to inventory as OIL.
- Return to the lonely house.
- Play the hidden object scene in the shed (B). Find all of the objects. The LUG WRENCH is retained for inventory.
- Go to the ruins.

- Inspect the area by the old chimney (A). Remove the burned logs. Place the TOY SOLDIER in the slot. Insert the WIND-UP KEY in the side. Click the key. Take the KNIFE.
- Go back up the road.
- Use the KNIFE to cut down the ROPE LADDER (B).
- Continue on to the farm.
Chapter 8: The Farm
- Play the hidden object scene in the trailer (A). Collect all of the items. The three LUG BOLTS are added to inventory.
- Enter the barn (B).
- Play the hidden object scene in the loft (A). Collect all of the items. The GAS CAN is retained in inventory.
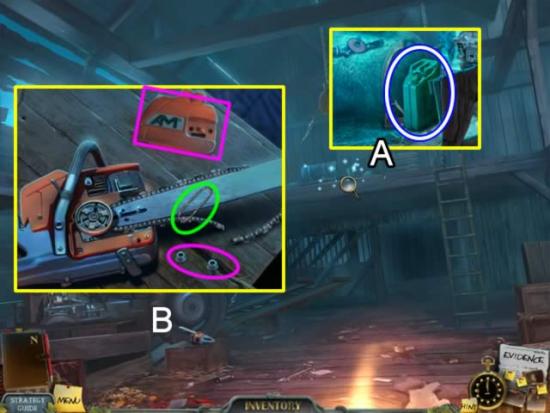
- Inspect the chainsaw (B). Remove the bolts and plate. Put the CHAINSAW CHAIN on the chain bar. Replace the cover and bolts. Take the CHAINSAW.
- Exit the barn.
- Look closer at the truck on the side of the barn.
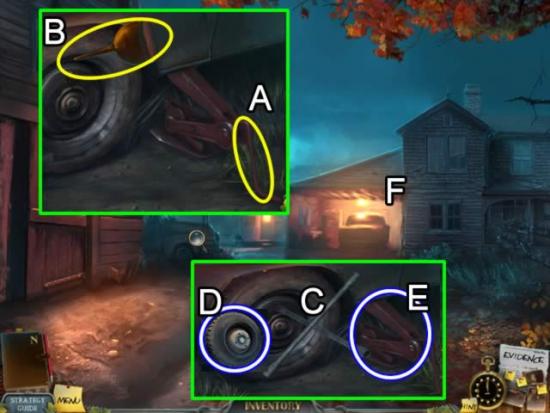
- Insert the JACK HANDLE in the jack (A). Click the handle to raise the truck. Pour the OIL on the rusty lug bolt (B).
- Use the LUG WRENCH to remove the bolt (C). Take the WHEEL (D). Click the jack handle to lower the truck. Take the JACK (E).
- Enter the garage (F).
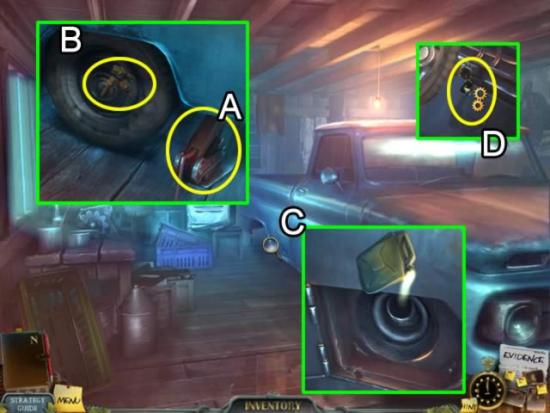
- Zoom in on the rear wheel well. Place the JACK under the truck. Click to raise it. Put the WHEEL on and secure it with the LUG BOLTS (B). Use the LUG WRENCH to tighten the bolts. Click the jack handle to lower the truck.
- Look closer at the gas cover (C). Open the cover, remove the cap and pour in the fuel from the GAS CAN. Close the cover.
- Open the interior (D). Put the CAR KEYS in the ignition. Click to start the truck. Click to drive to the gas station.
- Use the CHAINSAW to remove the tree in the road (A).
- Talk to the couple at the gas station. Take the DEMONIC SYMBOL (3/5).
- Return to the chapel.
Chapter 9: The Ritual Chambers
- Play the hidden object scene (A). Collect all of the items listed. The Horns are saved in inventory as DEMONIC SYMBOL (4/5). NOTE: This hidden object scene may not always be active when you return to the chapel. If it isn’t, return to the Tomb where we found Kate for an alternate HOG scene.
- Go to the crypt.
- Play the hidden object scene (B). The Skull is added to inventory as DEMONIC SYMBOL (5/5).
- Return to the boathouse and cross the lake to the rocks.

- Use the SCRAPER to remove the moss covering the rock (A).
- Insert the DEMONIC SYMBOL in the impression (B). The symbols light up. Click them in the order shown on the paper from the evidence board (C).
- A hole opens up in front of the rock. Put the ROPE LADDER in the hole. Descend the ladder into the ritual chambers.
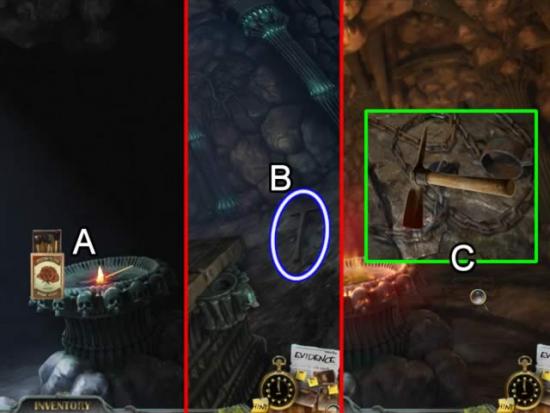
- Use the MATCHES to light a fire (A) and view the chamber.
- Go through the door to the ritual hall. Take the PICKAX (B) and return to the chamber.
- Use the PICKAX to break the chain attached to the floor (C). Take the RUSTY CHAIN and return to the ritual hall.
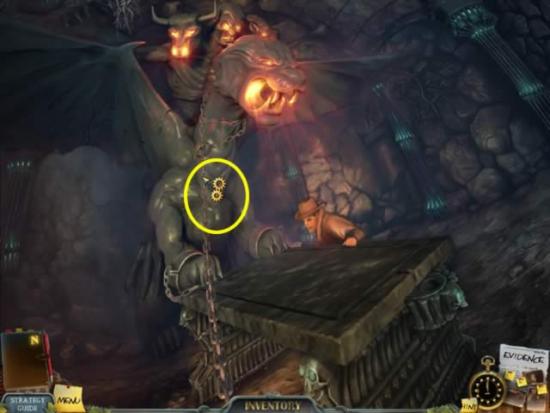
- Speak to the detective.
- Put the RUSTY CHAIN around the demon’s neck. Click to pull it tight.
- Watch the final cutscene.
Congratulations! You have finished playing Enigmantis: Ghosts of Maple Creek Collector’s Edition. A bonus chapter is now available. Select the Extras tab on the main menu. Click the Bonus Adventure to continue play.
Collector’s Edition Bonus Chapter
Watch the cutscene for an introduction to the chapter.
Zoom in on the backseat of the car with the flat tire. Click to play a puzzle.
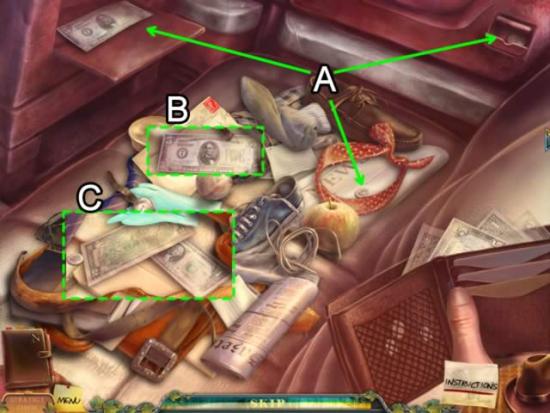
- The goal is to find four currency notes and three coins totaling $18.
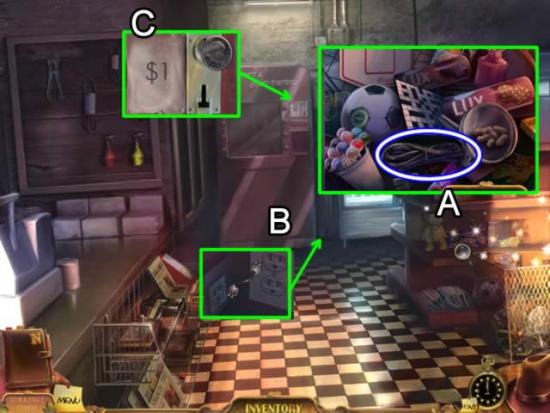
- Open the two compartments (A) and take a note and coin. Pick up the coin by the tie.
- Move the items in the seat around. The approximate location of a note (B) and two notes and a coin (C) are shown above.
- Take the road to the right toward the bridge. Continue to the gas station.
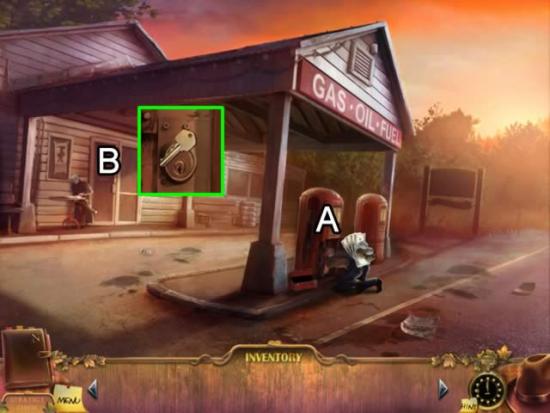
- Give the attendant the $18 for a $17 tire pump. Receive $1 in change and the STATION KEY.
- Use the STATION KEY to unlock the door (B).
- Play the hidden object scene (A). Collect all of the items. The CROWBAR is added to inventory.
- Take the TIRE PUMP (B).
- Return to the bridge.
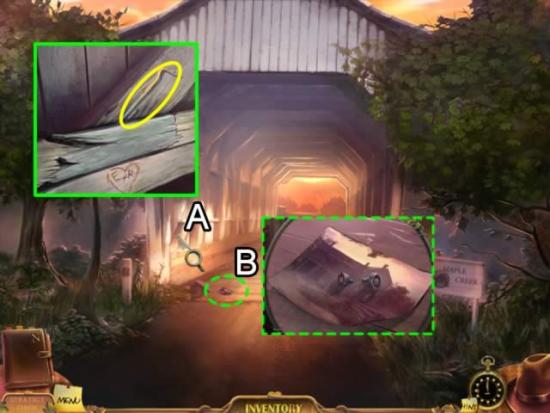
- Click the bird to shoo it away (A). Zoom in on the area. Use the CROWBAR to pry the boards loose.
- Look at the objects that fell from the boards (B). Take the R KEY, E KEY and PHOTO.
- Return to the gas station.
- Speak to the preacher sitting next to the door. Enter the station.
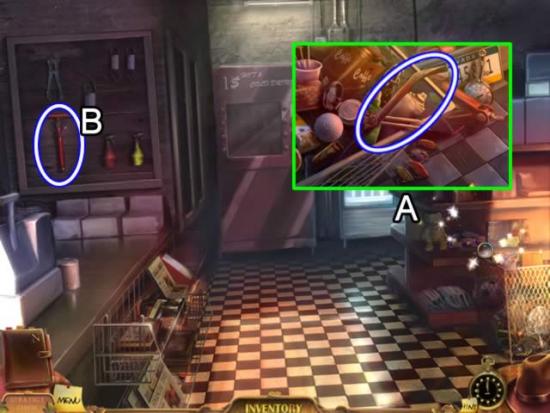
- Play the hidden object scene on the right (A). Collect all of the items. The POWER CORD is added to inventory.
- Zoom in on the power outlet by the drinks machine (B). Insert the POWER CORD.
- Access the drinks machine. Drop the DOLLAR COIN in the slot (C) to open a puzzle.
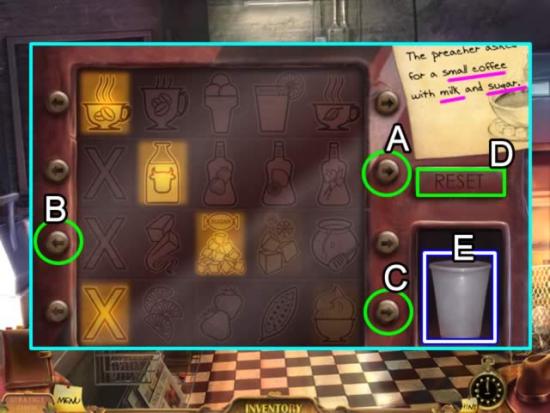
- The goal is to push the buttons in the correct order to obtain a small coffee with milk and sugar.
- Each button affects the selection in other rows. When seeing how each button works, the RESET button comes in handy (D). Finding the correct combination drops down the CUP OF COFFEE (E).
- SOLUTION: Press button (A) twice. Press button (B) twice. Press button (C).
- Exit the station. Give the CUP OF COFFEE to the preacher. A map is added to the Notes.
- Return to the car.
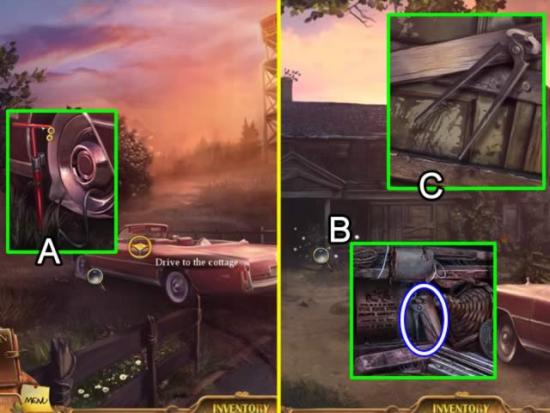
- Examine the front tire (A). Attach the TIRE PUMP to the flat tire. Click the handle to inflate the tire.
- Click the “Drive to cottage” icon.
- Play the hidden object scene in front of the cottage (B). Find all of the objects. The PLIERS are added to inventory.
- Inspect the door (C). Use the PLIERS to remove the nails holding the boards in place.
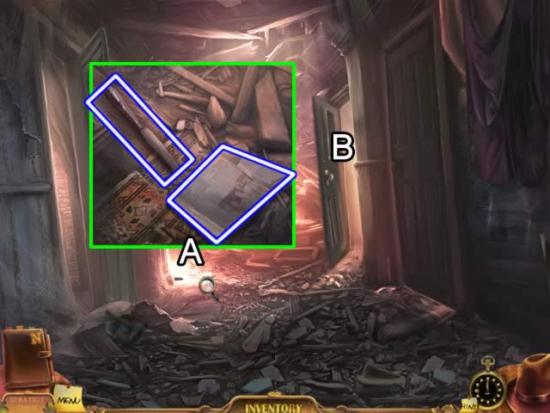
- Examine the clutter on the floor (A). Pick up a piece of CUTLERY (1/3) and the OLD NEWSPAPER.
- Enter the dining room (B).
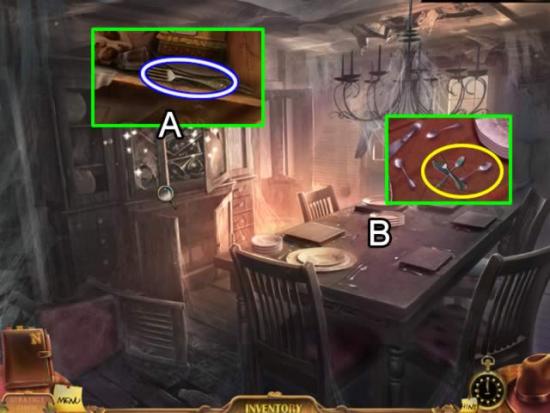
- Play the hidden object scene in the cupboard (A). Find any objects listed in white. Open both doors to see the objects listed in blue. The MATCHES are added to inventory.
- Look closer at the base of the cabinet (B). Take the POKER.
- Exit the cottage.
- Play the hidden object scene in front of the cottage (A). The two Logs are added to inventory as DRY WOOD.
- Inspect the top right window (B). Use the POKER to retrieve the SHIELD PIECE (1/4).
- Enter the cottage. Go through the door on the left to the living room.
- Examine the fireplace (A). Read the scrap of paper (yellow). It is added to the Notes section.
- Place the OLD NEWSPAPER and DRY WOOD in the grate. Strike a MATCH to light the fire.
- Play the hidden object scene on the sleeping bag (A). The KNIFE is added to inventory.
- Examine the box on the mantel (B). Wedge the KNIFE in the box to get the BENT WIRE. Take the spoon CUTLERY (2/3).
- Go through the backpack (C). Remove EMILY’S CASKET. Take the WOODCUT PIECE (1/3) that was under the casket. Pick up the SHIELD PIECE (2/4).
- Return to the dining room.
- Play the hidden object scene in the cupboard (A). The Fork is added to inventory as CUTLERY (3/3).
- Zoom in on the table (B). Put the CUTLERY pieces on the table to open a puzzle.
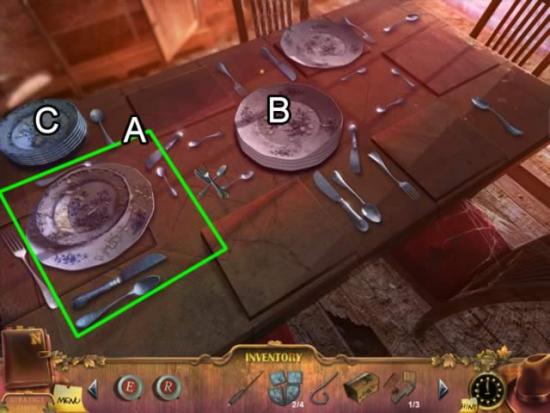
- The goal is to arrange the plates and cutlery so each setting matches the example (A).
- Distribute the plates (B) and then the bowls (C). Move the knives, forks, spoons and dessert spoons so each setting is complete. Click to rotate the pieces to the correct position. Note the knife blade faces inward and the direction the dessert spoon is facing in the correct setting.
- When a setting is correct, the board beneath it lowers and it is locked into place.
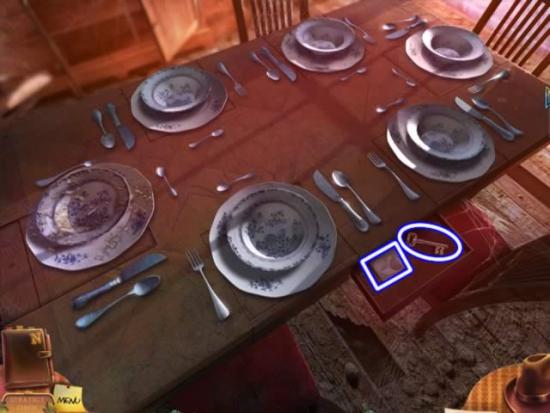
- See the next screenshot for the solution.
- When each setting is correct, the side drawer pops open. Take the OLD KEY and SHIELD PIECE (3/4).
- Return to the hallway.
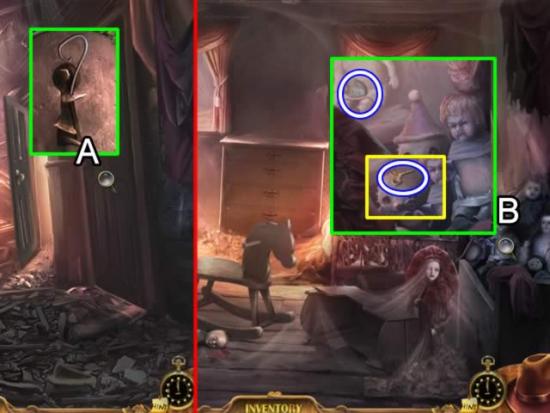
- Look closely at the lock on the door (A). Use the BENT WIRE to remove the obstruction in the keyhole. Insert the OLD KEY. Click to unlock the door. Click the knob to open the door.
- Examine the dolls (B). Take the SHIELD PIECE (4/4). Remove the pink hat and take the WIND-UP KEY (yellow).
- Return to the living room.
- Play the hidden object scene on the sleeping bag (A). The WOODCUT PIECE (2/3) is added to inventory.
- Examine the door at the back of the room (B). Place the four SHIELD PIECES in the center to start a puzzle.
- The goal is to rotate the rings and swap the center disks to create a pattern for the shield. Work from the outside in with the rings. See the next screenshot for the solution.
- Correctly solving the puzzle opens the door to the study.
- Look at the book on the desk (A). Read the old letter. It is added to the Notes section. Take the 3 KEY that is under the letter.
- Inspect the box (B). Insert the WIND-UP KEY. Click the key until the lid opens. Take the TIN-COVERED MEDALLION in the center.
- Return to the living room.
- Zoom in on the fireplace.
- Place the TIN-COVERED MEDALLION in the flames to melt away the tin (A). Use the POKER (B) to remove the MEDALLION.
- Return to the study.
- Open the top desk drawer and look at the safe.
- Place the 3 KEY, 4 KEY and E KEY on the open spaces in the letter and number rows.
- Place the MEDALLION in the slot on the top right that opens.
- The goal is to use the numbers to shift the letters above them the correct number of places in the alphabet to spell the password.
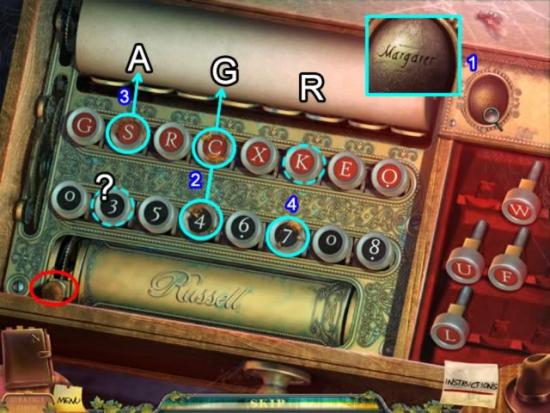
- Look closer at the medallion (1) to read the name: Margaret. This is the password.
- The number and letters with rust on them are fixed. The others can be swapped. The number indicates how many letters up the alphabet to go for the correct letter.
- Keys C and 4 are fixed (2). Four letters from “C” is “G”. These keys are correct for the password.
- The letter “S” is fixed. The letter “A” is the second letter in the password. Swap the number 3 with the number that when added to “S” will shift the alphabet to get the “A”. Swap the 3 and 8 numbers.
- Continue working with the letters and numbers to get the letter shifts for the password. Pull the lever (red) to check your answer. See the next screenshot for the solution.
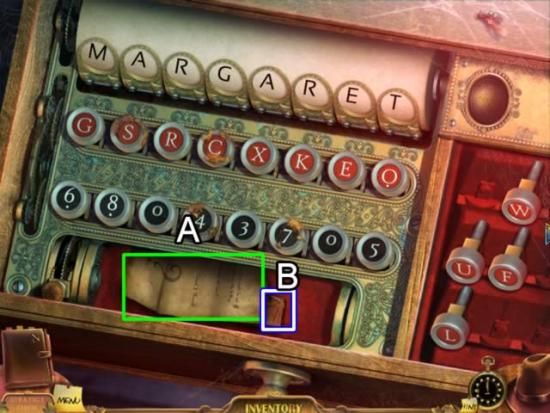
- The above screenshot shows one solution to the puzzle.
- Read the note in the drawer. Take the WOODCUT PIECE (3/3).
- Return to the nursery.
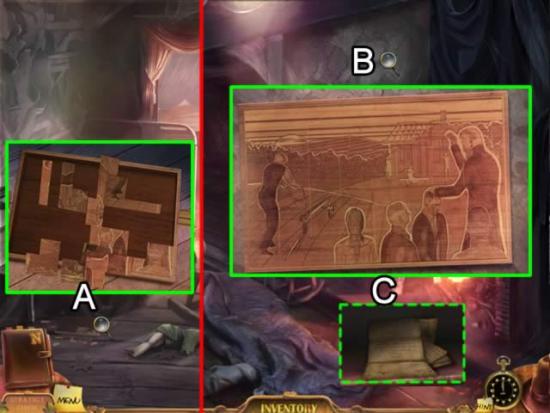
- Zoom in on the puzzle on the floor (A). Add the three WOODCUT PIECES to open a puzzle.
- Create a picture by selecting, rotating and placing the individual pieces. Correctly placed pieces lock into position.
- Take the completed PICTURE and return to the living room.
- Access the wall over the fireplace (B). Place the PICTURE on the wall. Click the picture to open the secret nook (C).
- Read the letters and watch the cutscene.
- Descend the rope into the chambers.
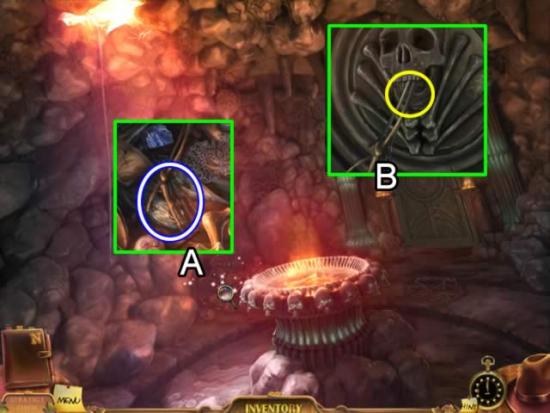
- Play the hidden object scene (A). The SKELETAL HAND is added to inventory.
- Inspect the door (B). Place the SKELETAL HAND in the open mouth.
- Go into the ritual hall and discover Emily.
- Return to the antechamber.
- Play the hidden object scene (A). Collect the PICKAX for inventory.
- Return to the ritual hall.
- Zoom in on Emily. Use the PICKAX on her chains (B).
- Use the PICKAX to widen the light (C) to make your escape.
Congratulations! You have finished playing the bonus adventure for Enigmantis: Ghosts of Maple Creek Collector’s Edition. All bonus materials are now available. Select the Extras tab on the main menu view the videos, concept art, wallpapers and play more hidden object scenes from the game.

More articles...
-
Grow A Garden 2 Base Price List
What's the most valuable crop? -
Evomon Best Starter [Leafbun, Blazpup, or Bubble?]
Grass-type, Fire-type, or Water-type? -
Evomon Tier List [META and BEST Evomon]
The Evomon dream team.